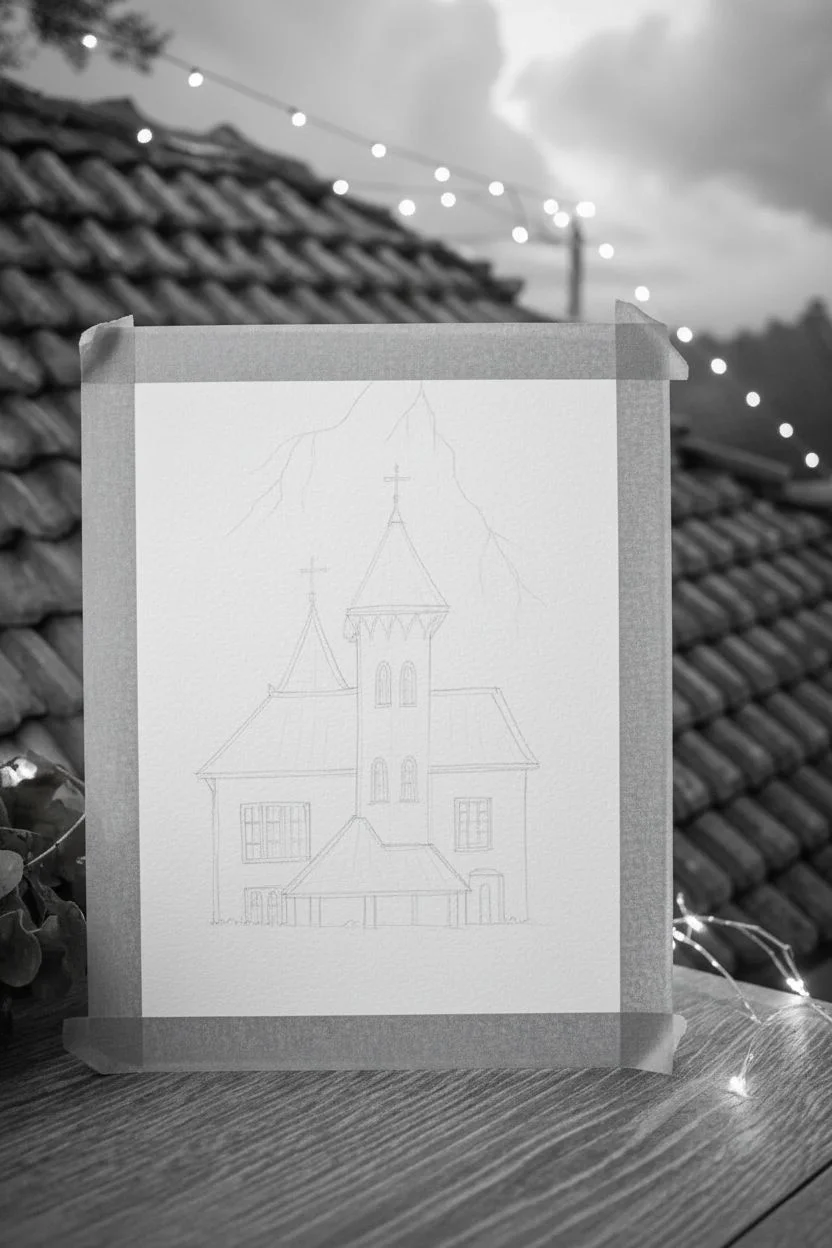
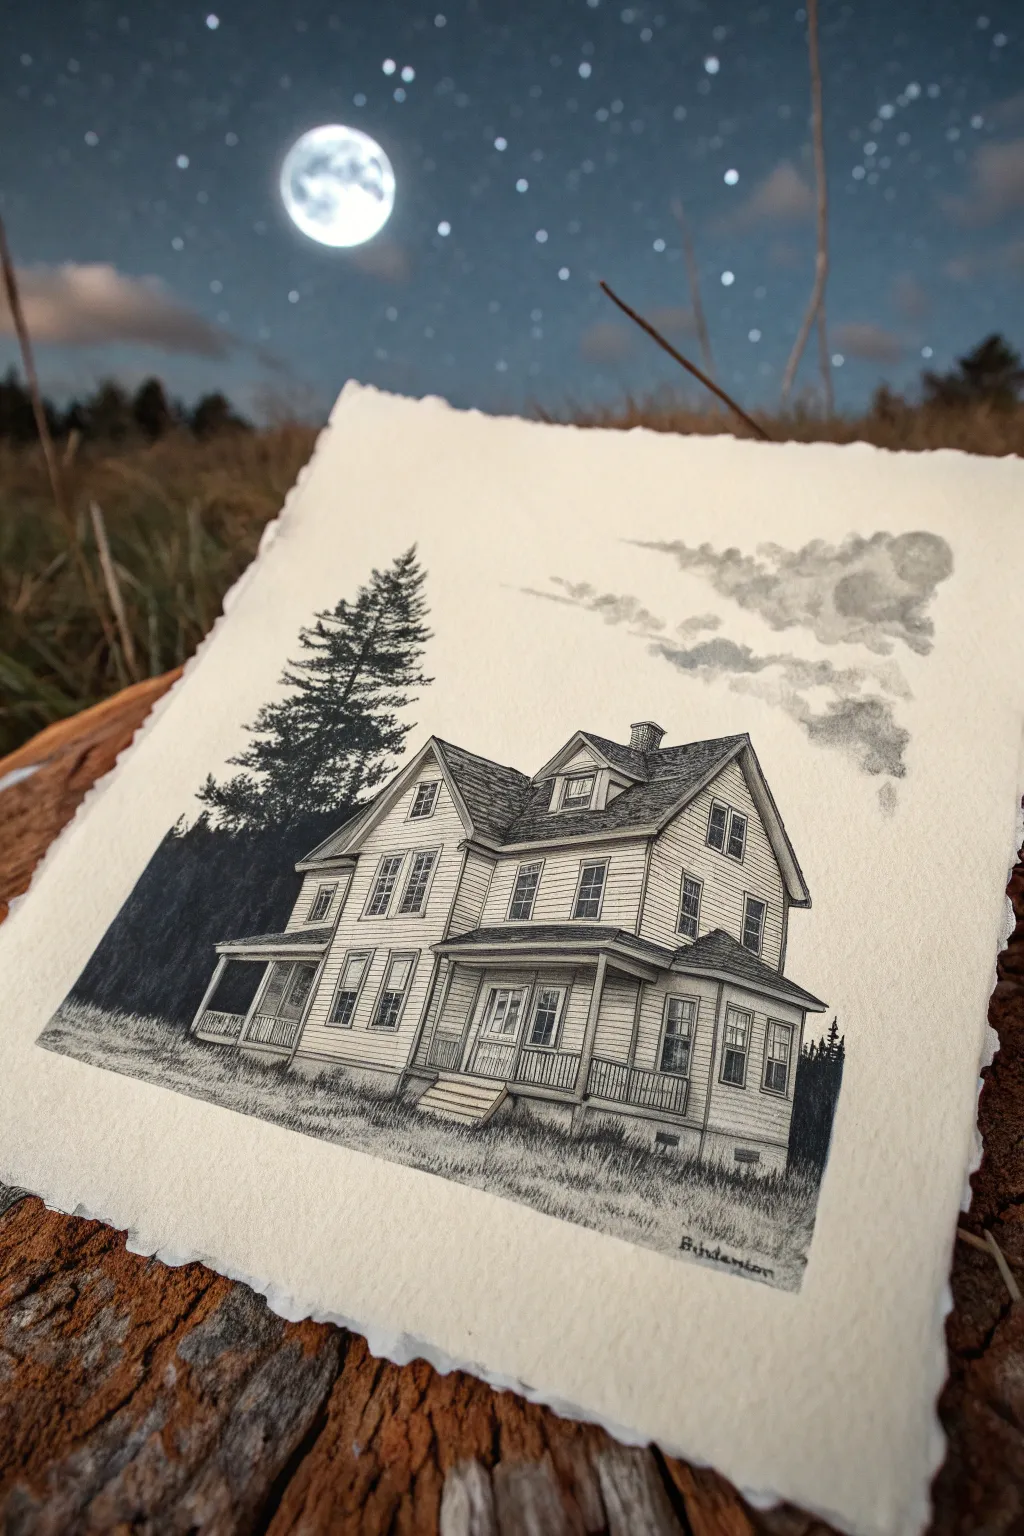
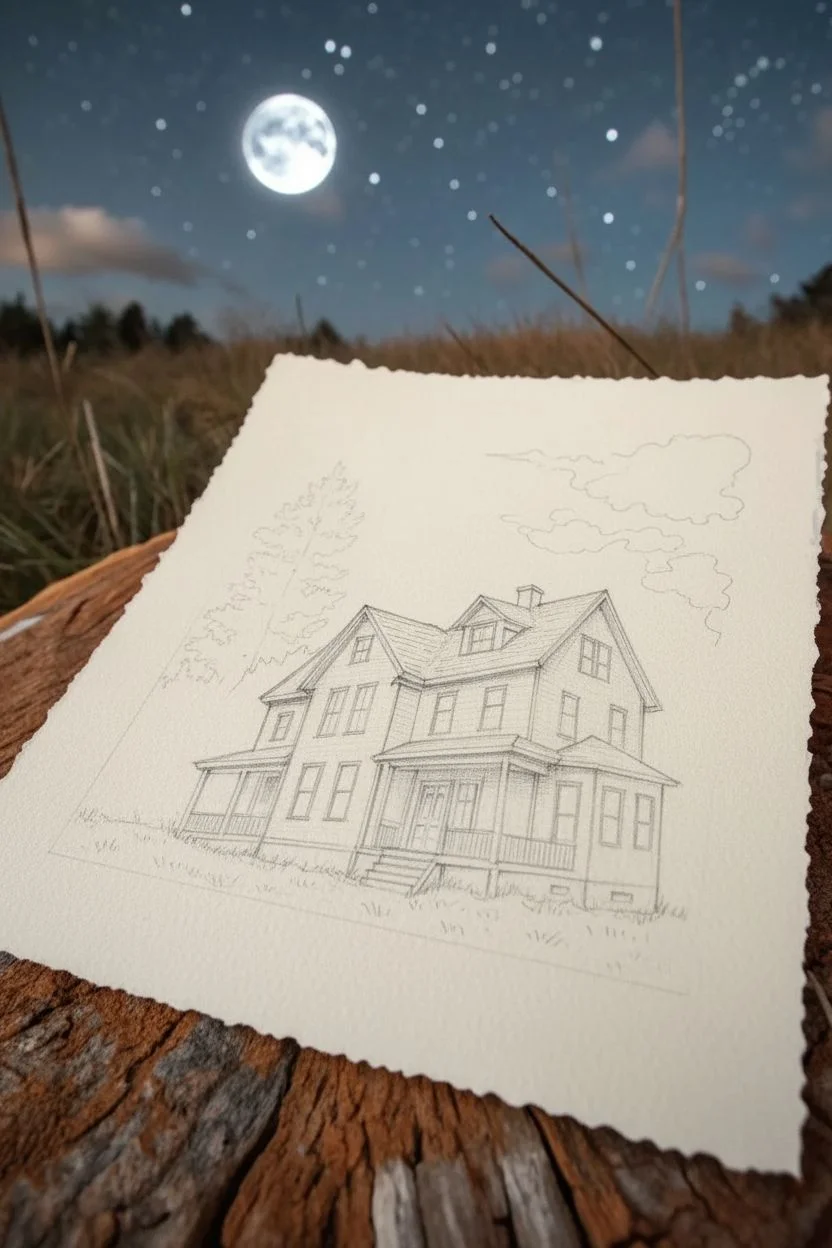
If you’re craving haunted house drawing ideas, spooky architecture is the perfect excuse to play with wonky perspective, dramatic shadows, and eerie little details. Here are my favorite ways to draw a haunted house that feels atmospheric—whether you want classic creepy or something weirdly imaginative.
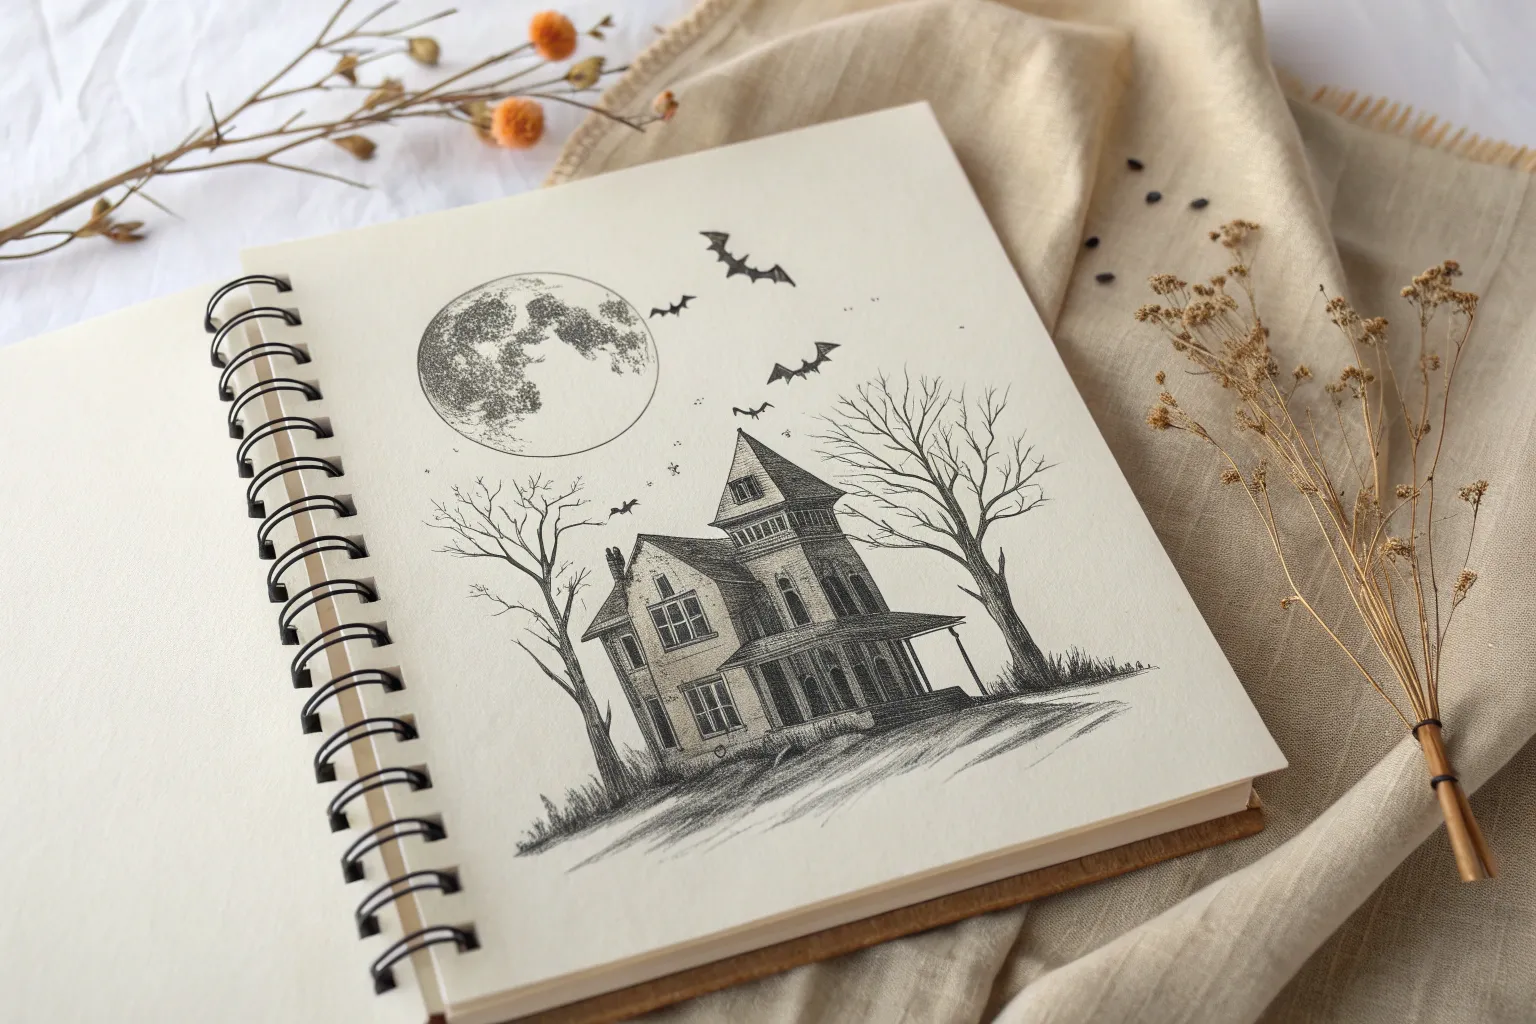
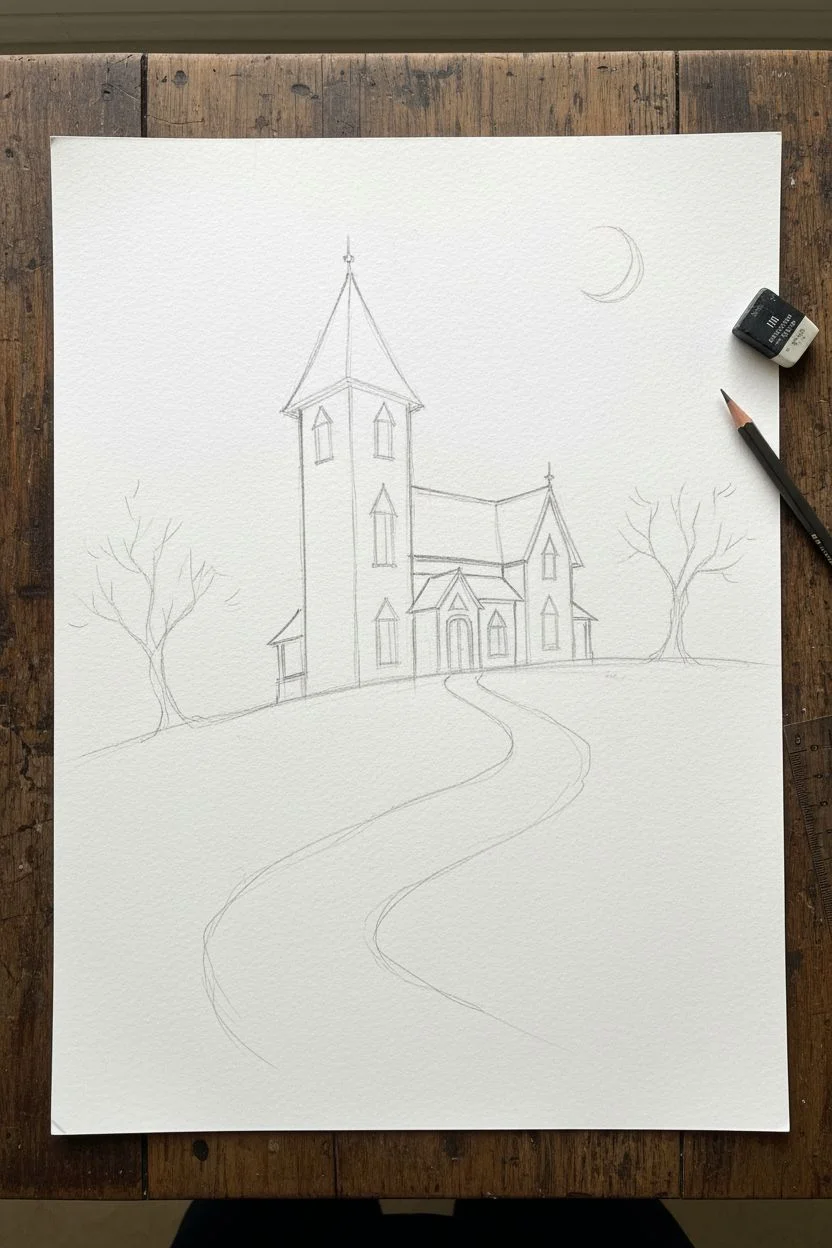
Moonlit Haunted House Silhouette
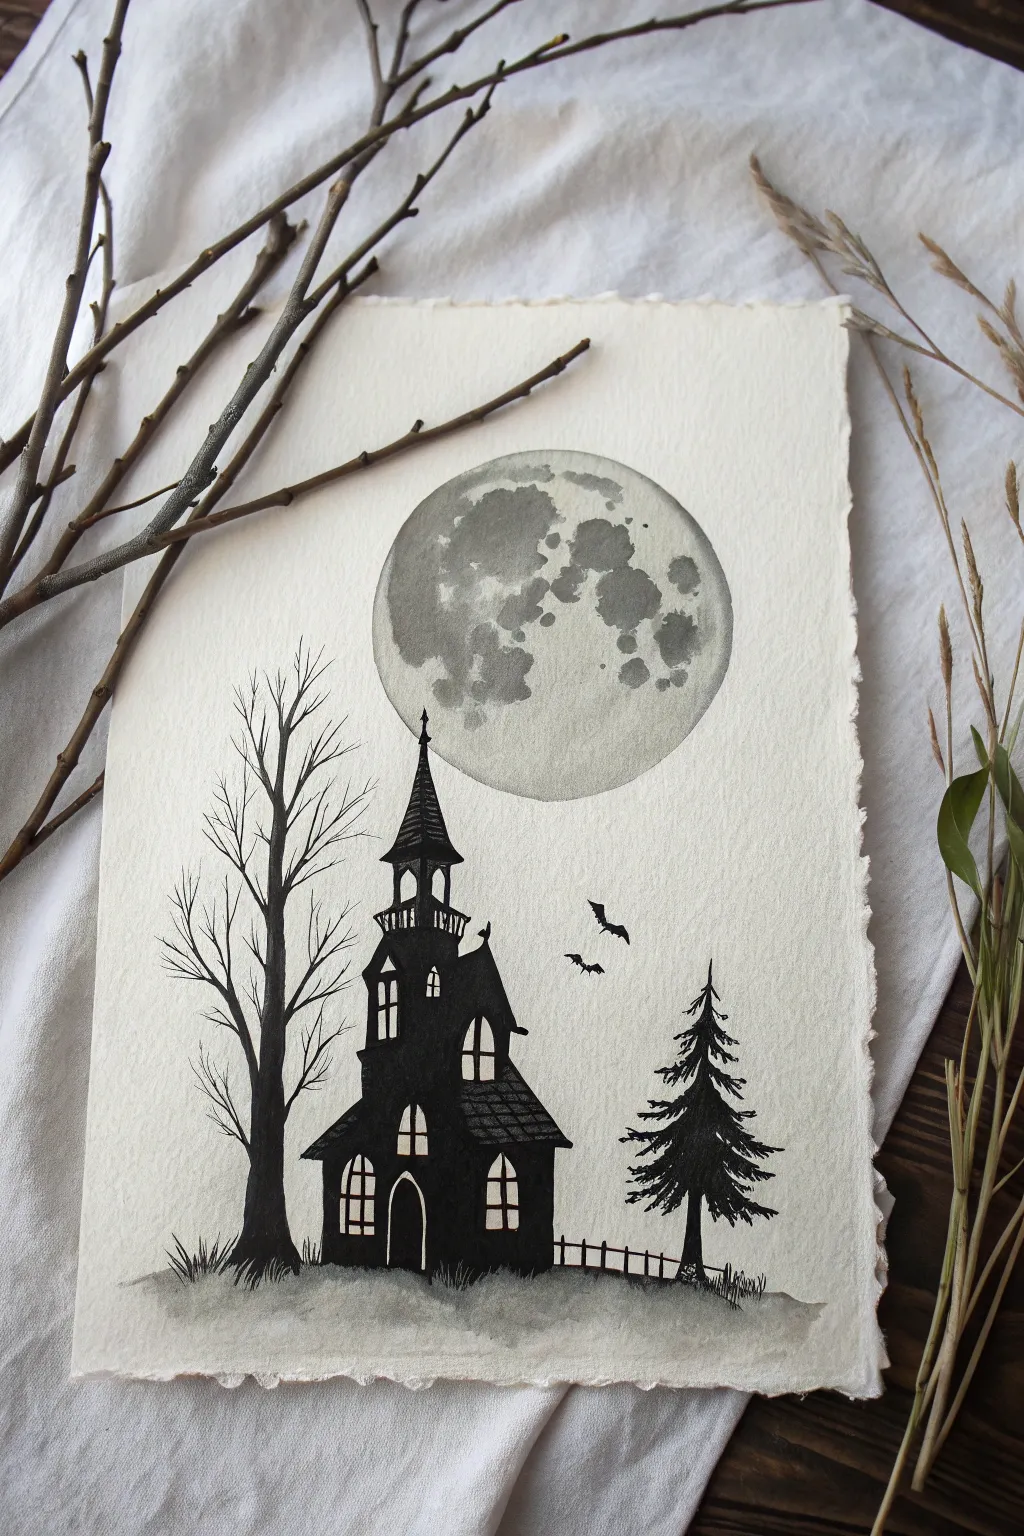
Capture the spooky serenity of a haunted landscape with this monochromatic ink and watercolor piece. By combining a detailed, textured moon with stark black silhouettes, you will create a high-contrast scene perfect for the Halloween season.
Step-by-Step Tutorial
Materials
- Cold press watercolor paper (deckled edge optional)
- Black waterproof ink or fine liner pens (various sizes)
- Black watercolor paint
- Small round brushes (sizes 2 and 4)
- Pencil and eraser for sketching
- Compass or circle template
- Cup of water and paper towels
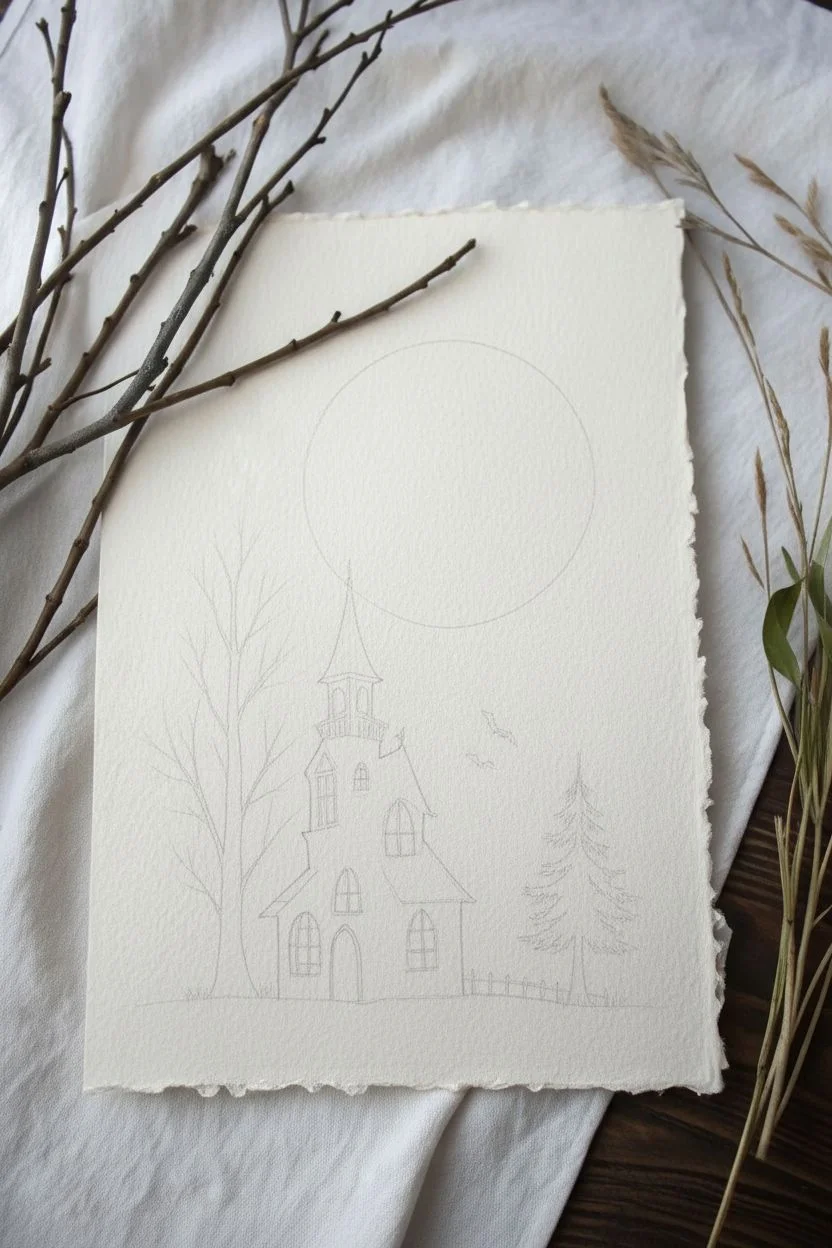
Step 1: Setting the Scene
-
Paper preparation:
Start with a sheet of high-quality watercolor paper. For an authentic, vintage look like the example, you can carefully tear the edges of your paper against a ruler to create a rough, deckled effect. -
Sketch the moon:
Using a compass or a circular object like a bowl, lightly trace a large circle in the upper center of the page. Keep your pencil pressure very light so the graphite won’t show through the paint later. -
Draft the composition:
Lightly sketch the outline of the house, the tall bare tree on the left, and the pine tree on the right. Focus only on the main shapes and height relationships; don’t worry about tiny details yet.
Bleeding edges?
If your black ink bleeds into the moon, your grey paint wasn’t fully dry. Blot immediately with a tissue and thicken the black outline slightly to hide the mistake.
Step 2: Painting the Moon
-
Create a wash:
Dilute a very small amount of black watercolor with plenty of water to create a pale grey wash. Brush this wash over the entire moon circle. -
Add craters while wet:
While the first layer is still damp, drop in slightly darker grey paint in random patches to simulate craters and lunar maria. The wet-on-wet technique will soften the edges naturally. -
Layering texture:
Once the moon is semi-dry, use a smaller brush with a darker grey mix to define specific craters. Use a stippling motion to add texture, keeping the edges of the moon circle crisp. -
Dry completely:
I prefer to let this dry completely before moving on to the black ink to prevent any unwanted bleeding. You can use a hairdryer on a low setting if you are impatient.
Step 3: Inking the Silhouette
-
Outline the house:
Using your waterproof black ink or a thick fineliner, outline the main structure of the haunted house, including the steep roof and the central tower. -
Fill the structure:
Fill in the entire house shape with solid black ink. Leave small rectangular or arched shapes unpainted to represent the glowing windows. -
Define the windows:
Carefully draw the window panes (mullions) inside the negative white spaces you left. This makes the house look like it has lights on inside. -
Draw the bare tree:
On the left side, draw the trunk of the large deciduous tree. Taper the branches as they reach upward, creating jagged, sharp angles for a spooky effect. -
Add the pine tree:
On the right, draw a straight vertical line for the pine tree trunk. Use quick, downward sketching strokes to create the jagged pine needle texture, getting wider as you move down the tree. -
Connect the scene:
Draw the uneven ground line across the bottom, slightly obscuring the base of the house and trees to ground them in the scene. -
Fence details:
Sketch a small, rickety picket fence connecting the house to the pine tree on the right side. Imperfection here adds character.
Glow Up
After the ink is fully dry, dilute a tiny drop of yellow watercolor and glaze it over the window ‘white’ spots to make the house look warm and inhabited.
Step 4: Atmosphere & Final Touches
-
Ground shading:
Dilute your black watercolor to a very light grey wash again. Gently paint the ground area at the bottom, fading it out into the white of the paper to create a misty floor effect. -
Adding bats:
Using your finest pen, draw two or three small bat silhouettes near the house and moon. Keep their wings sharp and angular. -
Roof details:
Add tiny details to the roof silhouette, like shingles or a small chimney pot, to break up any large flat black areas. -
Final assessment:
Step back and look at your contrast. If the black ink looks washed out in places, apply a second coat to ensure a deep, solid silhouette.
Frame your spooky masterpiece and enjoy the contrast of shadow and light


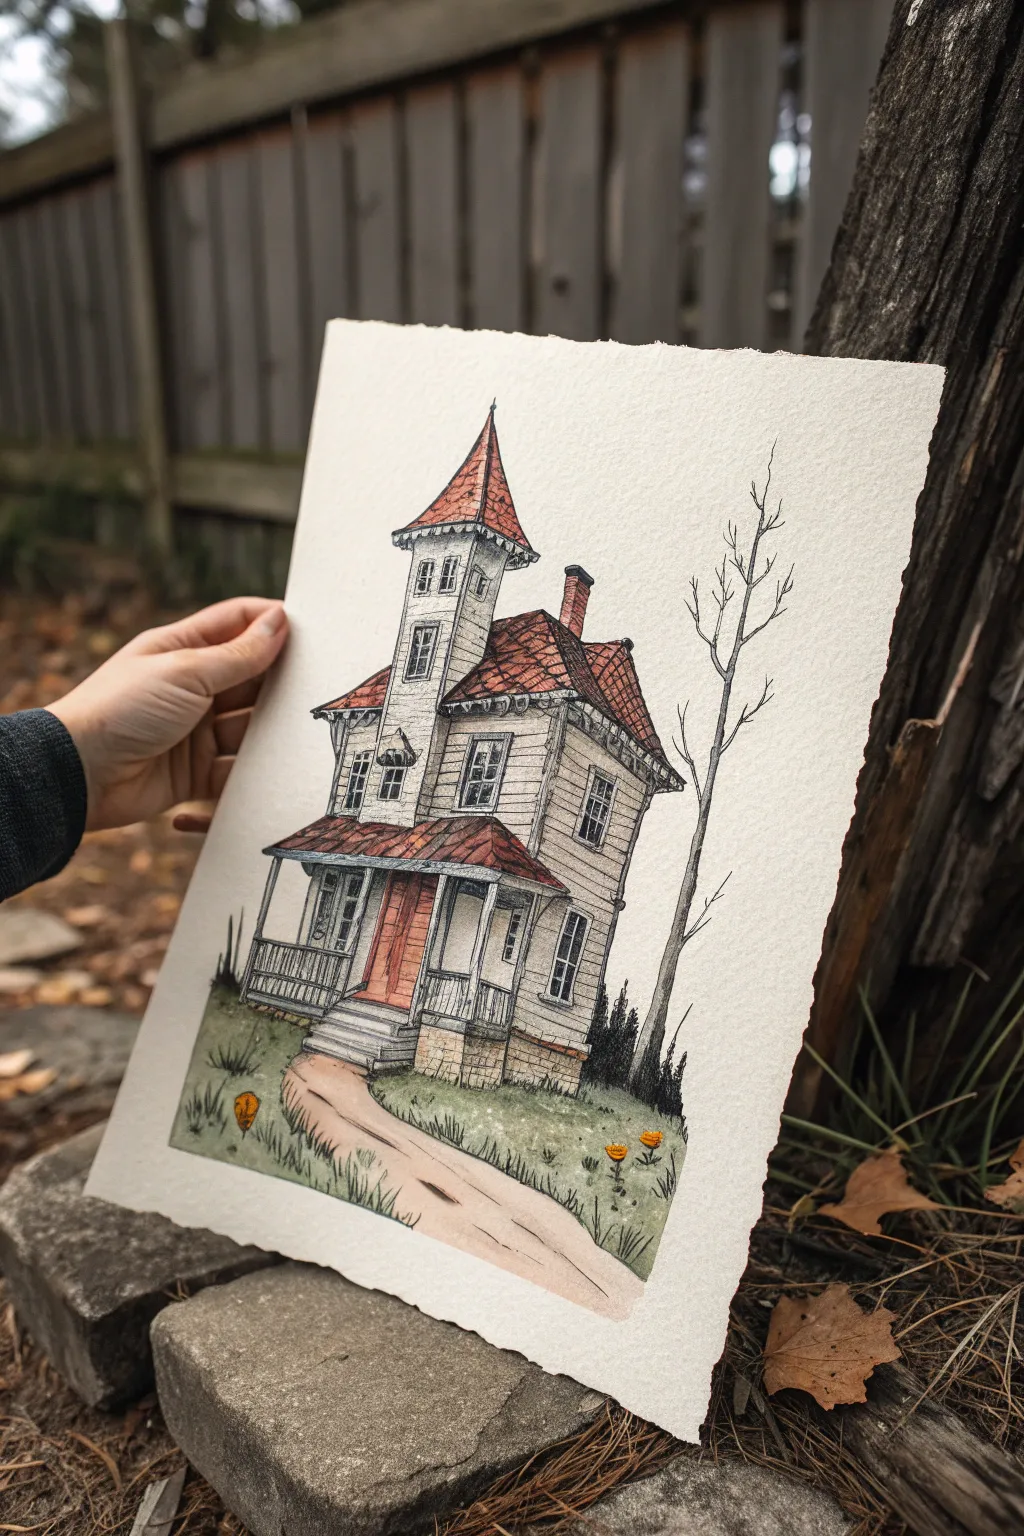
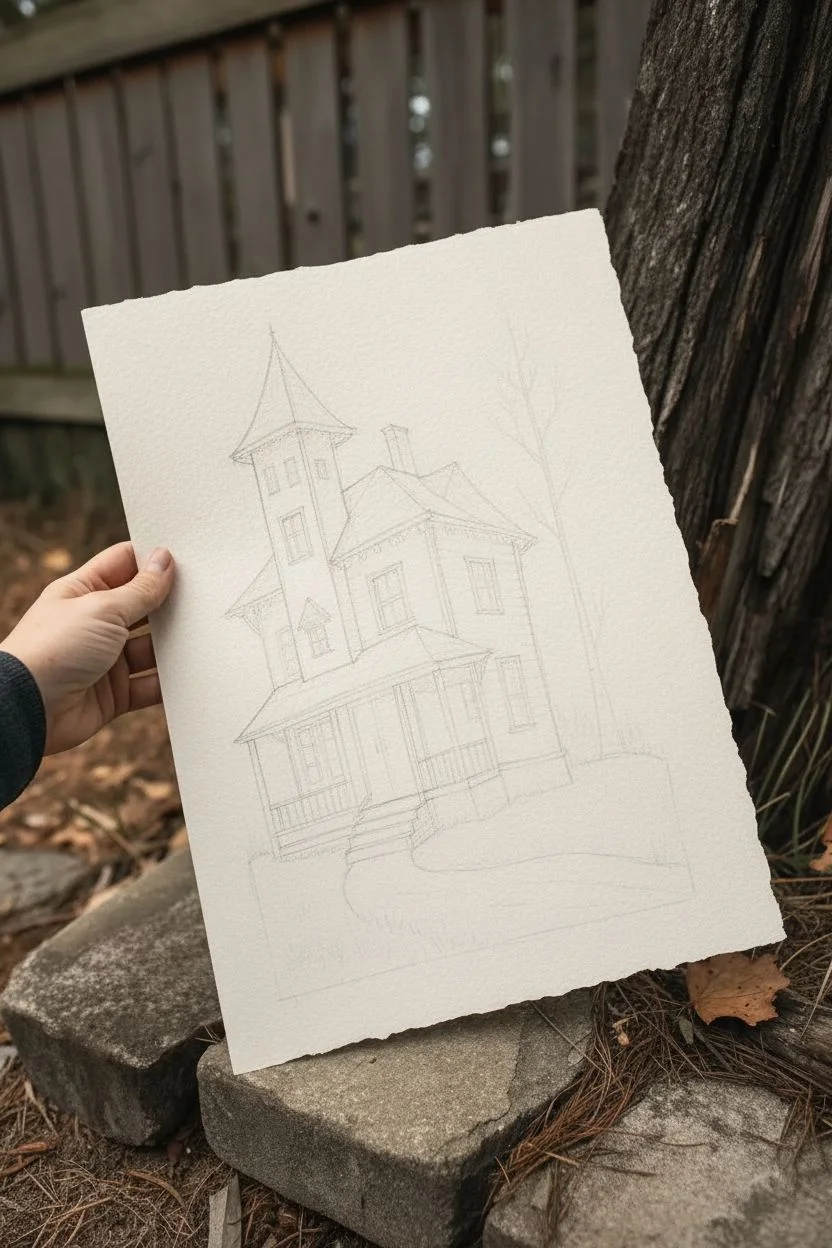
Gothic Mansion on a Desolate Hill
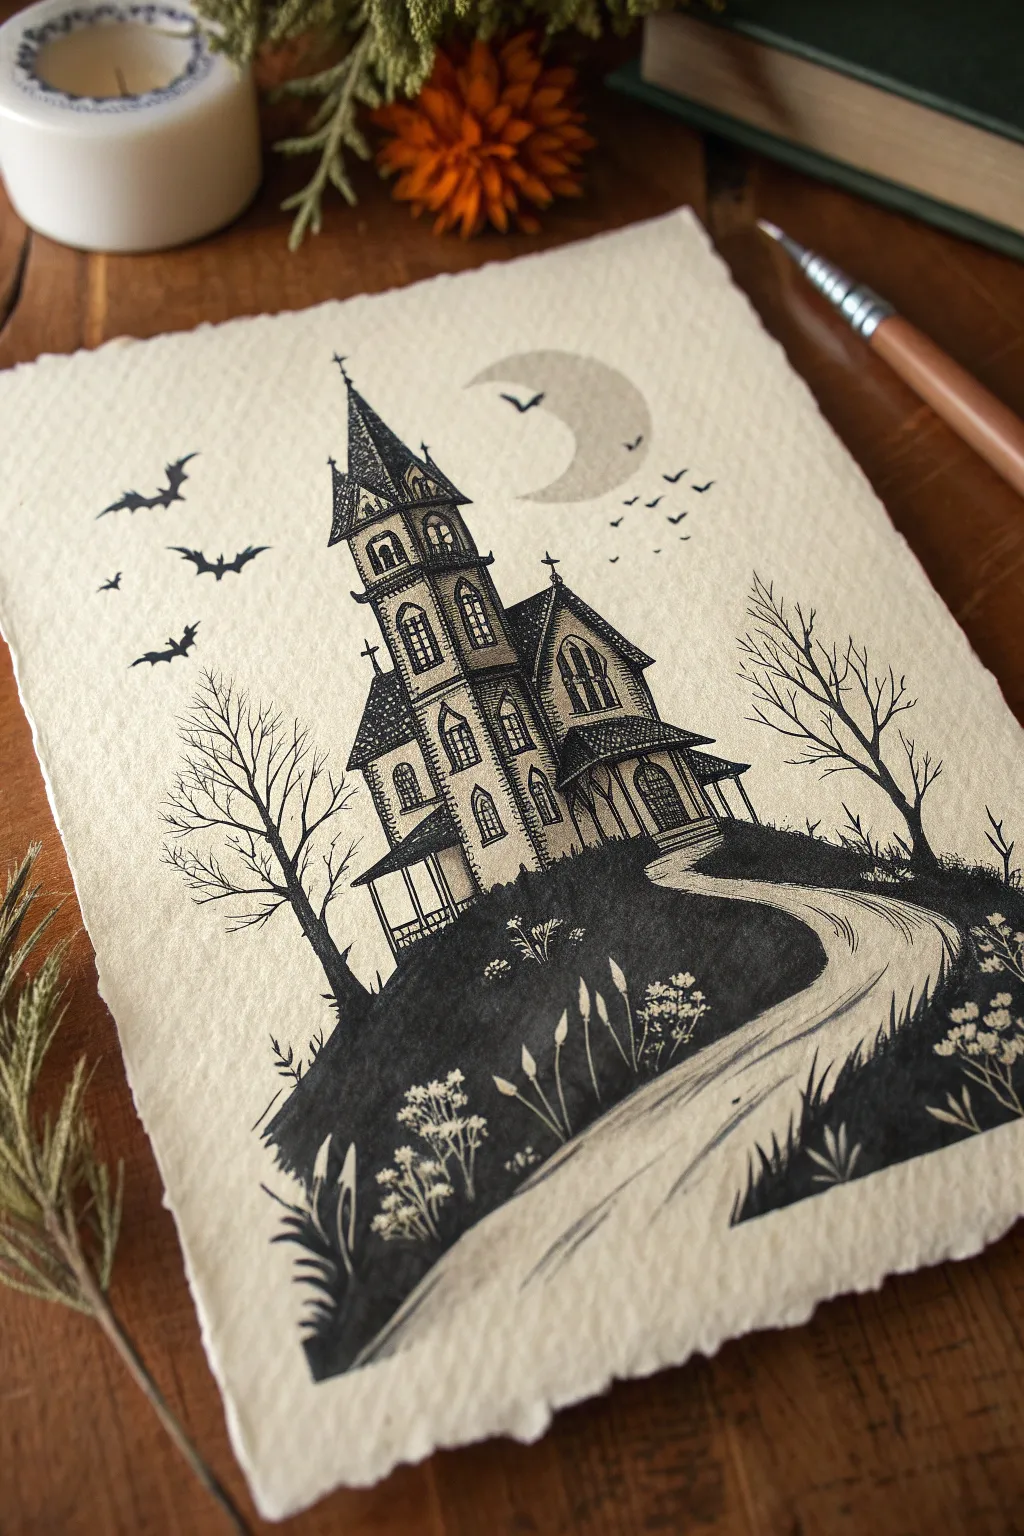
Capture the eerie romance of a hilltop manor with this striking black ink illustration. Using textured paper and simple fineliners, you’ll create a high-contrast piece featuring a towering Victorian house, barren trees, and a moody crescent moon.
How-To Guide
Materials
- Heavyweight textured paper (cold press watercolor paper or handmade cotton paper)
- Black waterproof fineliner pens (sizes 0.1, 0.3, and 0.5)
- Black brush pen or India ink with a small round brush
- Pencil (HB or 2H)
- Kneadable eraser
- Ruler (optional, for structure guidelines)
- Light grey marker or diluted ink wash (for the moon)
Step 1: Sketching the Composition
-
Draft the hill and path:
Start with a light pencil sketch. Draw a sloping hill that dominates the bottom third of the paper. Carve out a winding S-shaped path that starts wide at the bottom right and narrows as it leads up to the house foundation. -
Block in the house structure:
Place the house slightly off-center to the left. Sketch a tall, vertical rectangle for the main tower and a smaller attached section to the right. Add steep triangular roofs to both sections. -
Add architectural details:
Refine your sketch by adding the porch roof, the arched windows, and the spires on top of the roofs. Don’t worry about perfect lines; a little wobble adds to the aged, spooky character. -
Position nature elements:
Lightly mark the placement of two leafless trees—one on the left slope and one on the right. Sketch the crescent moon in the upper right sky.
Ink Smearing?
Textured paper dries slowly. Test your ink on a scrap piece first. If using a brush pen for the hill, wait at least 15 minutes before erasing pencil lines nearby.
Step 2: Inking the Mansion
-
Outline the main structure:
Switch to your 0.3 fineliner. Carefully trace the main vertical lines of the walls and the angles of the roofs. Use a ruler if you want precision, but freehand lines feel more organic. -
Detail the roof tiles:
For the steep roofs, draw small, scalloped lines or tiny overlapping triangles to mimic shingles or slate tiles. Leave some areas sparse to suggest light hitting the roof. -
Draw windows and doors:
Use the 0.1 pen for delicate details. Draw the arched frames of the windows and add grid lines for the panes. Darken the inside of the windows to make them look hollow and unlit. -
Add texture to the walls:
Use short, horizontal hatching strokes on the side of the house to simulate wood siding. Keep the strokes looser on the lighter side and denser on the shadowed side. -
Complete the porch:
Ink the porch columns and railing. Add small vertical lines under the porch roof to create a deep shadow.
Make it Antique
Before drawing, tea-stain your paper! Brief dipping in strong black tea adds a parchment-like yellow tone that makes the black ink pop and looks wonderfully aged.
Step 3: Creating the Landscape
-
Ink the hill’s silhouette:
Using a brush pen or a thicker 0.5 marker, outline the jagged, grassy top edge of the hill. I find it helpful to vary the pressure here to create the look of uneven turf. -
Fill the dark ground:
This is the boldest step. Use your brush pen or India ink to fill in the entire hill shape solid black, leaving the winding path completely white. This creates the dramatic high-contrast look. -
Draw the bare trees:
With the 0.1 pen, draw the skeletal trees. Start with a slightly thicker trunk and branch out into very fine, wildly twisting twigs. Ensure the roots blend seamlessly into the black hill. -
Detail the foreground flora:
Once the black ink is dry, use a white gel pen or simply negative space (if you planned ahead) to add ghostly white wildflowers and tall grasses growing out of the dark hill.
Step 4: Atmospheric Details
-
Ink the path texture:
Use your 0.1 pen to draw very wispy, broken lines following the curve of the path. These shouldn’t be solid outlines, just suggestions of dirt or gravel movement. -
Add the flight of bats:
Draw several silhouette bats in the sky using the 0.3 pen. Vary their sizes—larger ones closer to the left edge, smaller ones receding into the distance. -
Shade the moon:
Use a heavy stippling technique (lots of dots) or a very light grey marker to fill in the crescent moon. It needs just enough tone to stand out against the white paper. -
Final touches:
Add a few tiny birds in the distance and cross-hatching shadows under the eaves of the house. Once the ink is totally cured, gently erase any remaining pencil lines.
Frame your spooky masterpiece in a simple wood frame to emphasize the gothic aesthetic


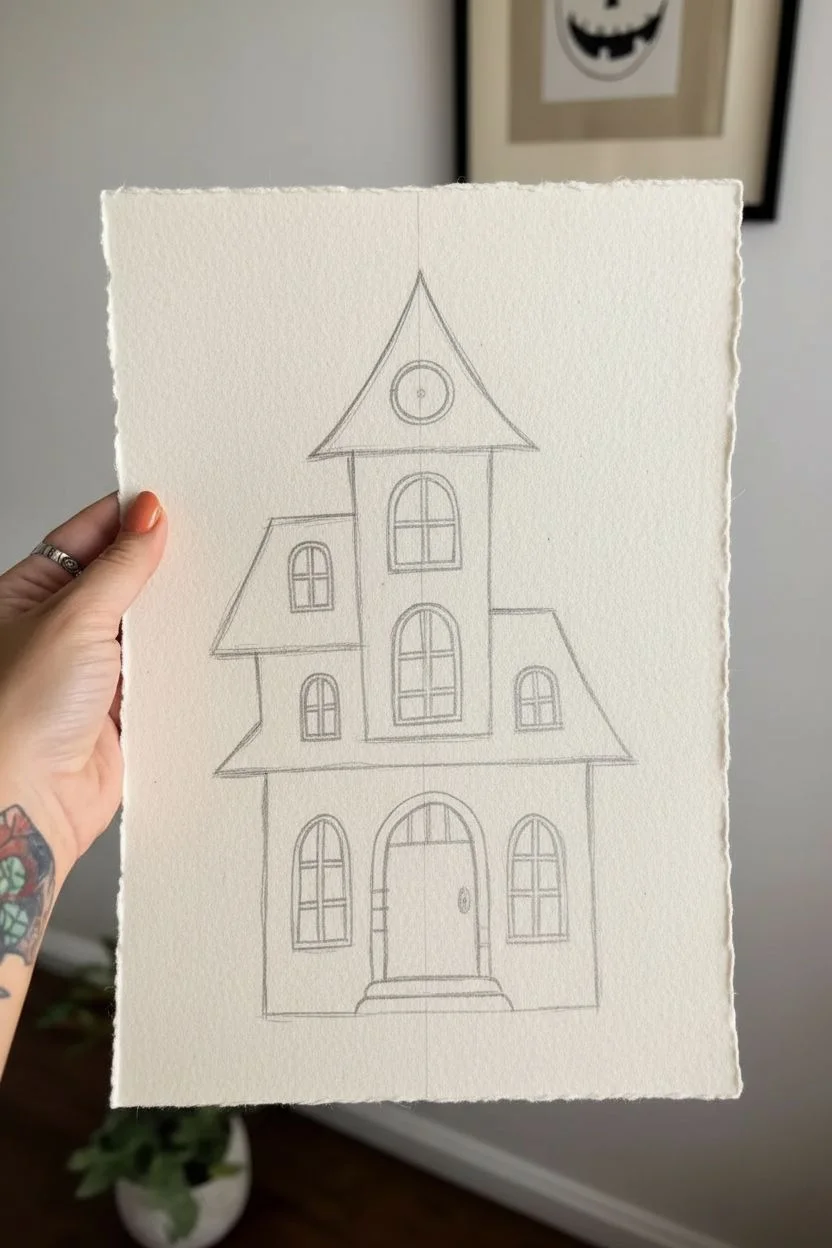
Crooked Architecture and Warped Perspective
Capture the eerie charm of a haunted home with this stylized watercolor and ink illustration. The beauty of this project lies in its intentional imperfections, where crooked lines and exaggerated angles create a delightfully spooky atmosphere.
Step-by-Step
Materials
- Cold press watercolor paper (approx. 140lb)
- Pencil and kneaded eraser
- Waterproof fine liner pens (0.1, 0.3, and 0.5mm)
- Watercolor paints (Burnt Sienna, Yellow Ochre, Paynes Gray, Sap Green, Sepia)
- Small round watercolor brushes (size 2 and 4)
- Ruler (optional, but freehand is preferred)
Step 1: Planning the Structure
-
Establish the horizon line:
Start by sketching a faint horizon line near the bottom third of your paper. This anchors your house and determines the angle of the ground. -
Sketch the main tower:
Draw a tall, narrow rectangle slightly off-center for the main tower. Let the vertical lines lean just slightly to the left or right to begin the ‘warped’ perspective effect immediately. -
Add the main house body:
Attach a wider, shorter block to the right of the tower. Slope the rooflines downward more steeply than a realistic house would; this exaggeration is key to the style. -
Defined the cone roof:
Top the tower with a sharp, tall triangular roof. Curve the bottom edge of the triangle upward to imply that we are looking up at the structure. -
Sketch the porch and path:
Draw the wrap-around porch base at the bottom. Start a winding path from the bottom steps, letting it curve organically toward the bottom corner of the page to lead the viewer’s eye.
Step 2: Inking the Details
-
Outline the silhouette:
Using a 0.5mm pen, go over your main structural lines. Don’t use a ruler here; a slightly shaky or wobbly hand adds character to the aged wood. -
Draw the roof shingles:
Switch to a 0.3mm pen. Draw rows of scalloped or rectangular shingles on the roof. You don’t need to draw every single one; suggesting them in clusters is often enough. -
Add siding and windows:
Use your 0.1mm pen to draw horizontal siding lines. Break the lines occasionally to simulate chipped paint. Draw distinct, tall windows with heavy frames. -
Detail the porch:
Ink the porch railings and columns. Add a few vertical lines on the door to suggest wood planks. -
Create the spooky tree:
On the right side, draw a tall, barren tree. Keep the branches jagged and reaching upwards like skeletal fingers, tapering them to fine points. -
Erase pencil marks:
Wait until the ink is completely dry to the touch, then gently erase all underlying pencil sketches to prepare for painting.
Wobbly Hand Technique
For that perfect ‘haunted’ look, hold your pen higher up the barrel, away from the tip. This reduces your control slightly, creating naturally jittery lines that look aged.
Step 3: Watercolor Wash
-
Paint the siding:
Mix a very watery wash of Yellow Ochre and a tiny touch of Paynes Gray to create a dirty cream color. Apply this loosely to the siding, leaving some white paper showing for highlights. -
Color the roof:
Use Burnt Sienna mixed with a little drop of Red for a rusty look. Paint the roof sections, letting the pigment pool slightly at the bottom edges for natural shading. -
Ground the house:
Paint the grass area with muted Sap Green. While the paint is wet, drop in hints of Paynes Gray near the bottom corners to create a vignette effect. -
Paint the path:
Use a light wash of watered-down Burnt Sienna or Sepia for the dirt path.
Level Up: Deckled Edges
Tear the edges of your watercolor paper against a ruler before you start painting. The rough, deckled edge makes the final piece feel like an antique artifact found in an attic.
Step 4: Final Touches and Shading
-
Deepen the shadows:
Once the first layer is dry, I like to mix a transparent gray using your blue and brown tones. Glaze this under the eaves, under the porch roof, and on the shadowed side of the tower to add dimension. -
Add texture with ink:
Return to your 0.1mm pen. Add cross-hatching to the darkest shadow areas, particularly under the roof overhangs and inside the empty windows. -
Enhance the landscaping:
Use the pen to draw tiny vertical strokes for grass blades in the foreground and messy scribbles near the foundation for overgrown bushes. -
Pop of color:
If desired, add tiny dots of bright orange or yellow in the grass to suggest mysterious wildflowers or pumpkins.
Now you have a delightfully creepy architectural portrait ready to frame or gift


Twisted Trees Framing the Haunted House
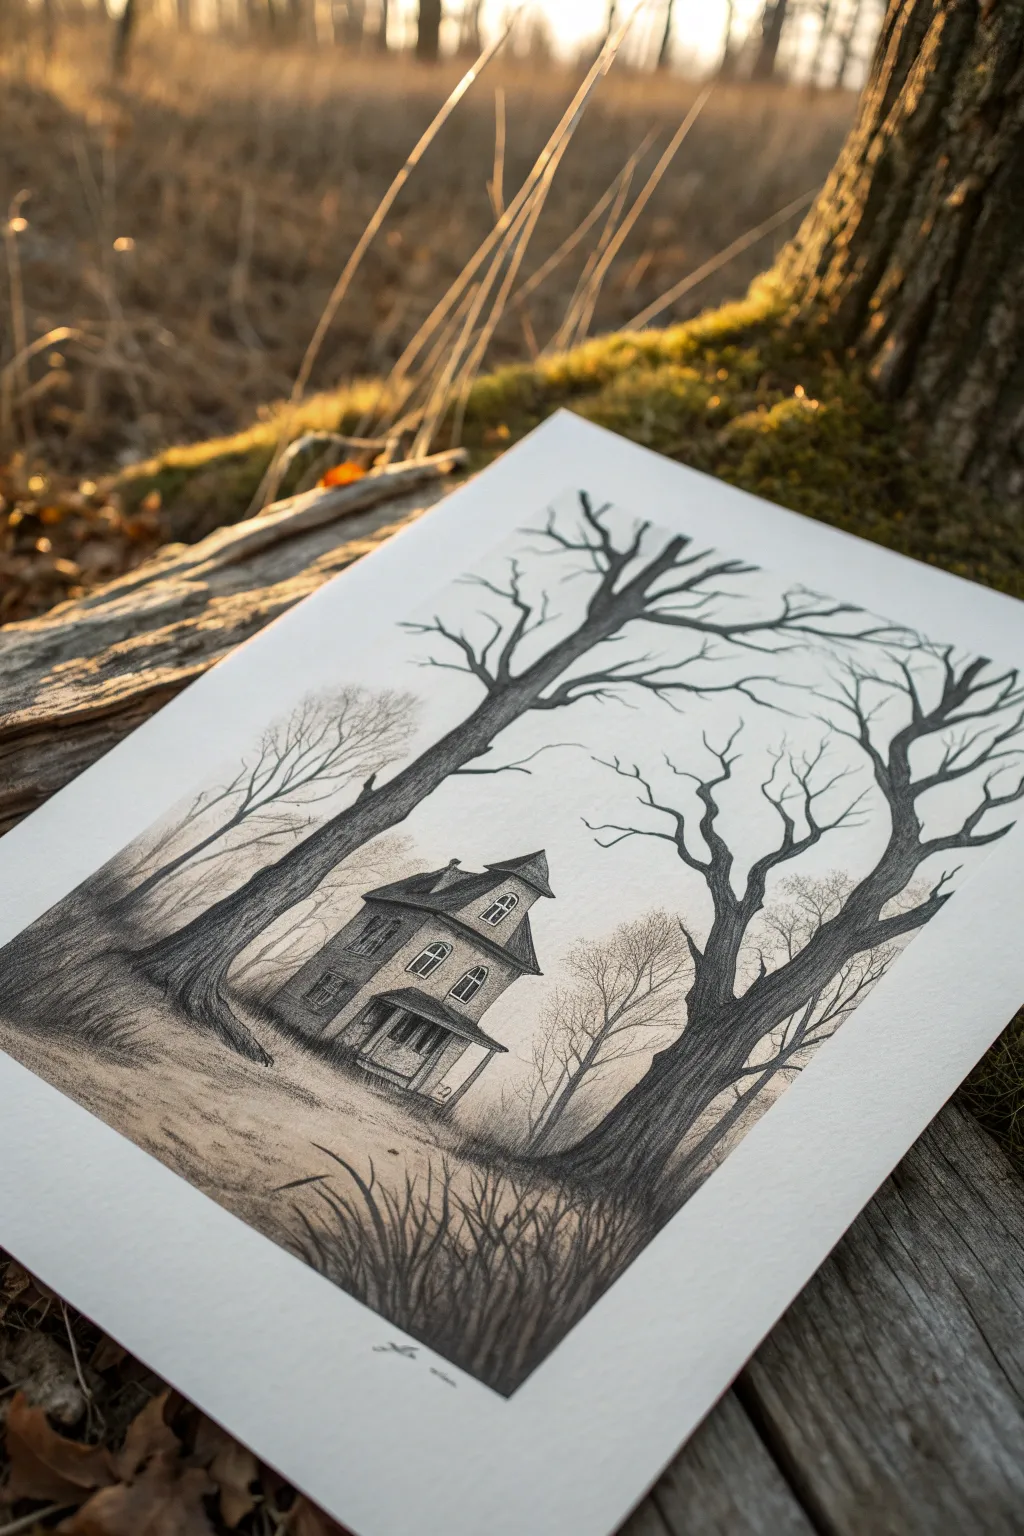
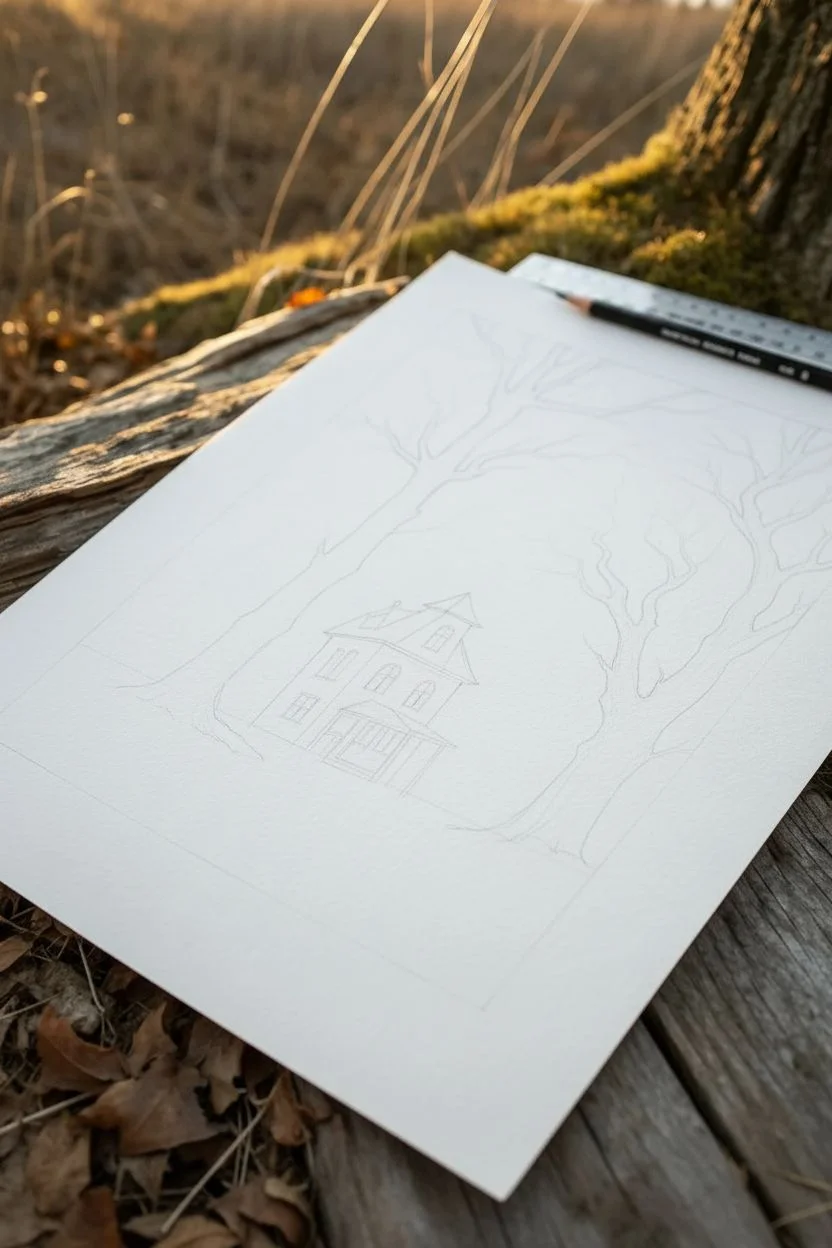
This atmospheric drawing uses the natural drama of bare, gnarled trees to frame a solitary Victorian house, creating a sense of isolation and mystery. By mastering simple graphite shading techniques and perspective, you’ll create a moody scene where the foreground trees draw the viewer’s eye straight into the haunted estate.
Step-by-Step Tutorial
Materials
- High-quality drawing paper (smooth or vellum finish, approx 11×14)
- Set of graphite pencils (HB, 2B, 4B, 6B)
- Charcoal pencil (optional, for deepest blacks)
- Kneaded eraser
- Blending stumps (tortillons)
- Ruler
- Fine-tip eraser pencil (for details)
Step 1: Setting the Scene
-
Establish the horizon:
Begin by lightly sketching a low horizon line about one-third up from the bottom of your paper using an HB pencil. This low angle will make the house and trees feel towering and imposing. -
Map the giant trees:
Sketch the primary shapes of the two large foreground trees. The left tree should lean inward aggressively, while the right tree mirrors it, creating a natural archway or ‘frame’ in the center of the page where the house will sit. -
Block in the house structure:
In the center clearing, lightly outline the basic geometric shapes of the house. Use two-point perspective, angling the rooflines slightly downward towards imaginary vanishing points to give the building depth and dimension. -
Refine the branches:
Extend the main branches from your tree trunks. Let them twist and zigzag unnaturally rather than curving smoothly; sharp, angular turns create that eerie, ‘reaching’ effect essential for a haunted atmosphere.
Muddy Shadows?
If your graphite becomes a gray smudge, you’ve over-blended. Use a kneaded eraser to lift out highlights on the bark and grass, restoring the crisp texture and contrast.
Step 2: Developing the Haunted House
-
Detail the architecture:
Switch to a sharpened 2B pencil to define the house details. Add the porch columns, the pointed gables, and the windows. Keep the lines slightly shaky or uneven to suggest age and decay. -
Darken the windows:
Fill in the window panes with a 4B pencil. Don’t make them solid black; leave tiny flecks of white paper showing to simulate the reflection of glass or broken panes. -
Add structural siding:
Draw faint horizontal lines for the wooden siding. I like to break these lines intermittently to show where boards might be missing or rotting away. -
Shade the house:
Apply light shading to the side of the house distinct from your light source. Use a blending stump to smooth this graphite, making the house look solid but slightly hazy, as if viewed through fog.
Pro Tip: Atmospheric Haze
To push the house further into the background, lightly tap a clean kneaded eraser over the finished house drawing. It softens the lines just enough to look foggy.
Step 3: Texturing the Twisted Trees
-
Bark texture foundation:
On the large foreground trunks, use a 4B pencil to draw vertical, flowing lines that follow the contour of the wood. Varing the pressure creates the ridges of rough bark. -
Deepen the shadows:
Use a 6B pencil (or charcoal) to darken the side of the trees facing away from the center light. The contrast between these dark trunks and the lighter background is crucial for depth. -
Create gnarled knots:
Add circular knots and darker patches where branches split off. These imperfections add character and make the trees feel ancient. -
Refine the twiggy ends:
With your sharpest HB pencil, draw fine, hair-like twigs at the very ends of the branches. Let them crisscross extensively to create a web-like canopy.
Step 4: Atmosphere and Foreground
-
Background foliage:
Behind the house and main trees, sketch very faint, misty tree outlines using a dull HB pencil. Keep these ghostly and undefined to push them into the distance. -
Ground cover foundation:
Sketch short, erratic vertical strokes at the base of the paper to represent overgrown grass. Ensure these strokes overlap the base of the tree trunks to ground them in the scene. -
Darken the foreground grass:
Using a 4B or 6B pencil, darken the grass closest to the bottom edge of the paper. This ‘vignette’ effect helps lead the viewer’s eye upward toward the house. -
Blend the path:
Lightly smudge the area leading up to the house with a dirty blending stump to create a worn, dusty dirt path. This provides a leading line for the eye. -
Final contrast check:
Step back and assess your values. Darken the deepest shadows in the tree bark one last time to ensure the house pops against the framing elements.
Frame your moody masterpiece in a simple black mat to emphasize the stark contrast of the composition

PENCIL GUIDE
Understanding Pencil Grades from H to B
From first sketch to finished drawing — learn pencil grades, line control, and shading techniques.
Explore the Full Guide
Foggy Path and Leaning Fence Leading In
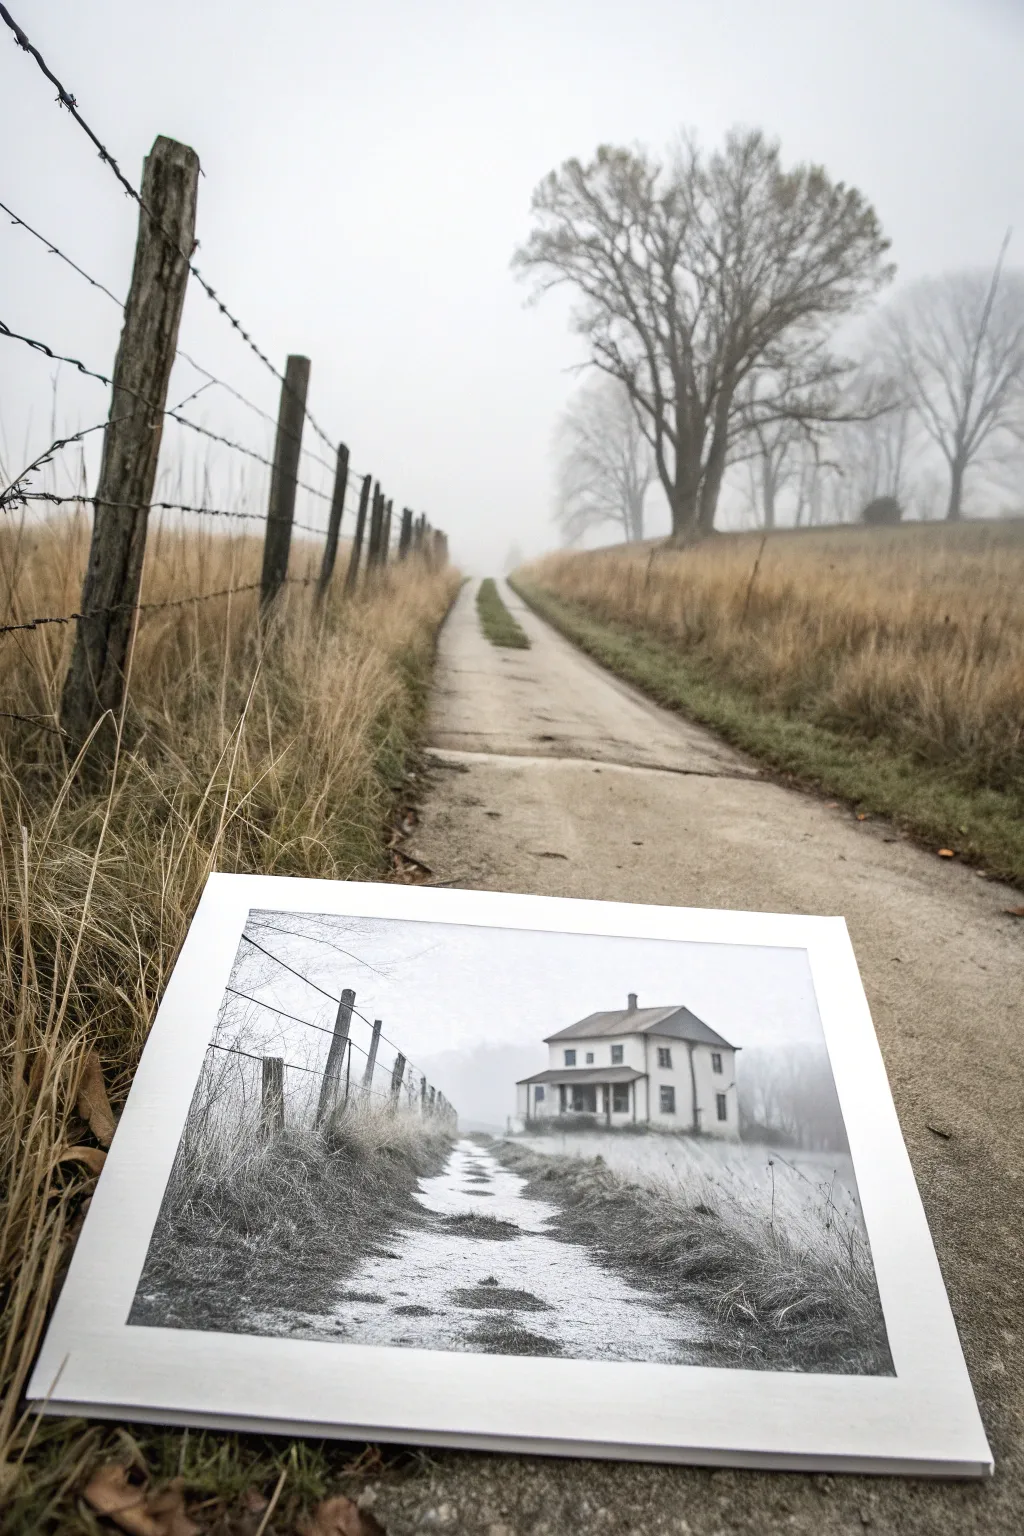

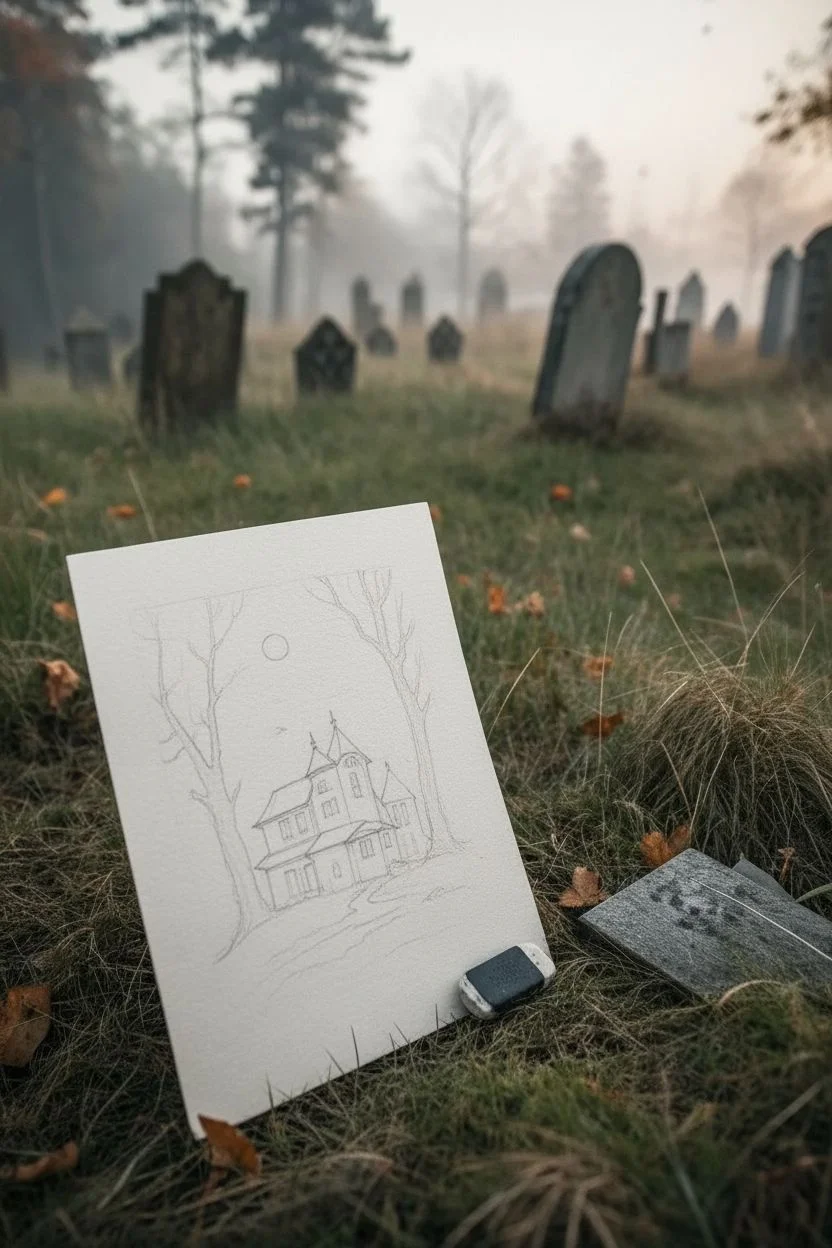
Blend reality with the supernatural by drawing a ghostly home onto a real landscape. This charcoal and graphite piece captures the eerie atmosphere of a foggy morning path leading to a house that perhaps was never really there.
How-To Guide
Materials
- Heavyweight drawing paper (Bristol vellum or mixed media)
- Graphite pencils (HB, 2B, 4B)
- Charcoal pencils (soft and medium)
- Willow charcoal stick
- Paper blending stumps (tortillons)
- Kneaded eraser
- Precision mono eraser (stick eraser)
- Workable fixative spray
- Ruler or straight edge
Step 1: Laying the Ghostly Foundation
-
Establish the horizon:
Begin by lightly sketching a horizontal line about one-third up from the bottom of your paper. This anchors your perspective. From the bottom center, draw two converging diagonal lines leading toward the horizon to define the dirt path. -
Draft the fence line:
On the left side, sketch a series of vertical posts that get smaller and closer together as they recede into the distance. This perspective trick is crucial for creating depth. -
Block in the house structure:
At the vanishing point of your path, lightly box in the shape of a two-story farmhouse. Keep the lines faint so they can be easily adjusted or blurred later. Give it a simple pitched roof and a porch structure. -
Wire the fence:
Connect your fence posts with three swooping, horizontal lines to represent the barbed wire. Let them sag slightly between posts to show age and lack of tension.
Mist Master
To get realistic fog, don’t draw the horizon line sharply. Instead, blend the sky tone down over the distant ground line so the earth and sky seem to merge together seamlessly.
Step 2: Building Atmosphere and Texture
-
Create the tonal sky:
Using a willow charcoal stick on its side, gently sweep across the sky area. Use a paper towel or chamois to blend this into a smooth, misty gray, leaving the area directly behind the house slightly lighter to make the structure pop. -
Detail the fence posts:
Switch to a 4B graphite pencil to darken the nearest fence posts. Add wood grain texture by varying your pressure and creating vertical, jagged strokes. I like to press harder on the shadow side (the right side) of each post. -
Develop the grassy foreground:
For the tall grass on the left, use quick, upward flicking motions with an HB pencil. Vary the length and direction of the strokes to make it look wild and untamed. -
Deepen the path shadows:
Use a 2B pencil to shade the ruts and tire tracks in the path. Keep the center of the path lighter to suggest wet, reflected light, while darkening the edges where the grass meets the dirt.
Step 3: The Haunted House and Finishing Touches
-
Define the house features:
Sharpen your charcoal pencil to add the windows. Don’t draw every pane perfectly; leave them dark and empty to suggest abandonment. Add a chimney and darken the area under the porch roof. -
Fade into the mist:
Use a clean blending stump to gently smudge the base of the house and the distant trees. This soft focus effect mimics thick fog and makes the house feel like a mirage. -
Enhance contrast:
Take a soft charcoal pencil and reinforce the darkest areas: the closest fence post, the deepest shadows in the grass, and the dark voids of the house windows. -
Add wire barbs:
Draw tiny ‘x’ shapes or small clusters of knots along your fence wires to look like barbs. Keep these sharp in the foreground but let them disappear as the fence moves away. -
Create atmospheric highlights:
Use your kneaded eraser to lift pigment from the page. Dab it to create light patches in the grass and horizontal streaks in the sky to simulate wisps of fog. -
Texture the road:
Lightly drag the side of a graphite pencil over the path area. The texture of the paper will pick up the graphite, creating a gritty, gravel-like appearance without drawing individual stones. -
Final assessment:
Step back and check your values. The foreground should be the sharpest and darkest, while the background (the house) should be softer and greyer. Use the eraser to knock back any lines that are too crisp near the horizon. -
Seal the drawing:
Once satisfied, spray the artwork with a workable fixative in a well-ventilated area to prevent the charcoal from smudging.
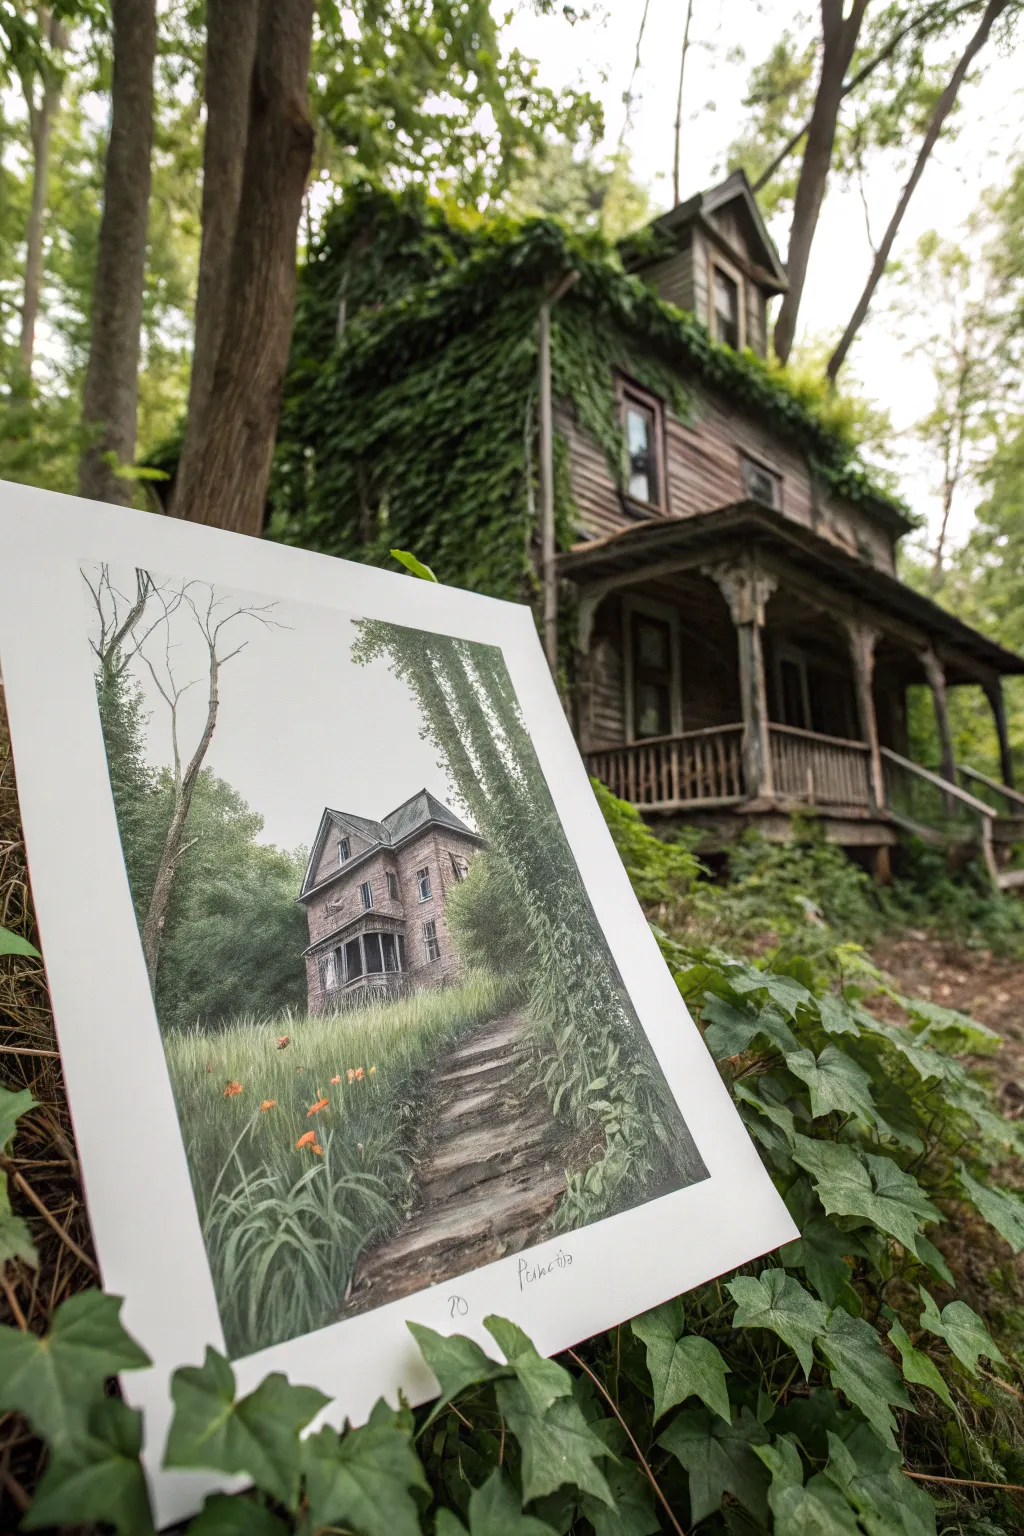
Level Up: Real World Blend
Take your finished drawing to a similar location outdoors. Photograph your drawing propped up against the real landscape to create an illusion where the artwork completes reality.
With your misty scene complete, you have a haunting piece of art that invites viewers to walk down a path toward the unknown
Storm Clouds and Lightning Behind the Roofline
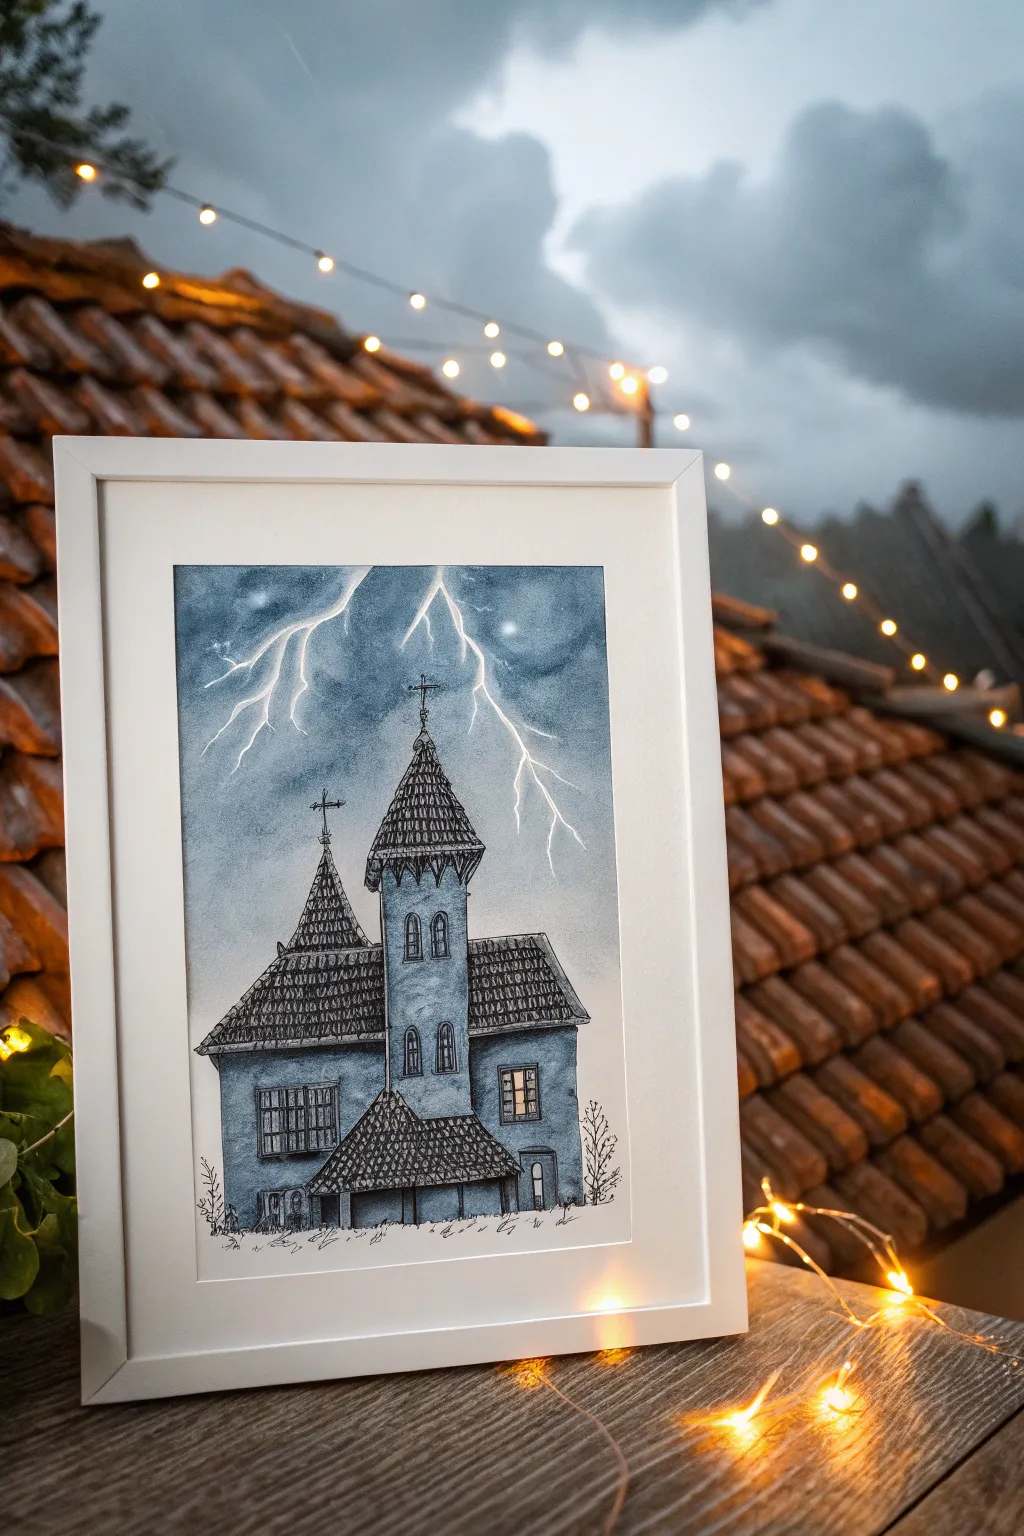
Capture the eerie beauty of a storm-swept haunted house with this moody ink and watercolor illustration. By combining loose watercolor washes for the atmosphere with precise ink detailing for architecture, you’ll create a striking piece that feels both whimsical and foreboding.
Step-by-Step Guide
Materials
- Cold press watercolor paper (A4 or 9×12 inch)
- Black waterproof fine liner pens (0.1, 0.3, and 0.5 sizes)
- Watercolor paints (Payne’s Grey, Indigo, Prussian Blue)
- White gouache or white gel pen
- Round watercolor brushes (Size 4 and 8)
- Pencil (HB) and eraser
- Masking fluid (optional, for lightning)
- Painter’s tape or washi tape
Step 1: Planning and Sketching
-
Tape down the paper:
Begin by securing your watercolor paper to a flat, hard surface using painter’s tape on all four sides. This prevents the paper from buckling when we add the wet washes later. -
Outline the basic shapes:
Lightly sketch the main structure of the house using an HB pencil. Start with a central tall rectangular tower, a wider main building block to the left, and a smaller annex to the right. -
Add the rooflines:
Sketch steep, triangular roofs on top of your shapes. The central tower needs a conical roof, while the main body gets a pitched roof. Don’t worry about perfect lines; a slight wobble adds character to an old building. -
Detail the features:
Draw in the windows, making some tall and narrow. Add the small entrance porch at the bottom. Sketch faint, jagged lines in the sky where you want your lightning bolts to strike.
Bleeding Lines?
If your ink lines bleed into the paint, your watercolor wasn’t dry enough. Use a hairdryer on the cool setting to ensure the paper is bone dry before uncapping your pens.
Step 2: Atmospheric Sky
-
preserve the lightning:
If you are using masking fluid, carefully paint thin lines over your lightning sketch and let it dry completely. If you don’t have masking fluid, you can skip this and add white gouache at the very end. -
Wet the sky area:
Using your larger size 8 brush and clean water, dampen the entire sky area above the house roofline. Be careful not to get water inside the house sketch yet. -
Drop in storm colors:
While the paper is wet, load your brush with a watery mix of Indigo and Payne’s Grey. Touch the brush to the wet paper and let the color bloom. -
Create cloud variation:
Add more concentrated pigment near the top corners and around the lightning bolts to create contrast. Leave some areas lighter to suggest illuminated clouds. Let this layer dry completely.
Stormy Glow
For a glowing lightning effect, gently lift a little blue paint from around your white lightning bolts using a damp, clean brush before the sky wash dries completely.
Step 3: Painting the Structure
-
Base wash for the house:
Mix a lighter wash of Payne’s Grey with a touch of Prussian Blue. Paint the entire body of the house, avoiding the window panes if you want them to glow yellow later. -
Shadows and depth:
While the house wash is still damp, drop slightly darker paint under the eaves of the roof and along the left side of the tower to suggest shadow. -
Roof texture base:
Paint the roof shapes with a darker, more concentrated mix of the same blue-grey tones. I find it helpful to let the brush skip slightly to create uneven texture. -
Lit window detail:
If you left window spaces white, paint one or two of them with a very diluted yellow or orange wash to hint at a light inside. Let the entire painting dry bone dry.
Step 4: Inking and Details
-
Outline the structure:
Using a 0.5 waterproof pen, trace over your pencil lines for the main walls and roof outlines. Make the lines slightly shaky or broken in places to emphasize the dilapidated look. -
Texture the roof tiles:
Switch to a 0.3 pen. Draw layers of small, messy U-shapes or vertical hatch marks across all the roof sections to create the look of old shingles. -
Window details:
Use the 0.1 pen to draw the grid lines (muntins) inside the windows. Add small cracks or darkened corners to make them look spooky. -
Add architectural texture:
Stipple small dots and scratchy lines on the walls using the 0.1 pen to mimic stone or stucco texture. Focus these marks near the bottom of the walls and under windows. -
Finishing the lightning:
If you used masking fluid, rub it off gently now to reveal the white paper. If not, use white gouache or a white gel pen to draw sharp, jagged lightning bolts over the dried sky paint. -
Final ground details:
Use the 0.3 pen to scribble some wild, dead grass and maybe a scraggly bush or two along the bottom edge of the house to ground the illustration.
Once framed, your moody manor will bring a perfect touch of mystery to any wall
BRUSH GUIDE
The Right Brush for Every Stroke
From clean lines to bold texture — master brush choice, stroke control, and essential techniques.
Explore the Full Guide
Haunted House With Bats and Night Sky Texture
Capture the unsettling silence of an abandoned home with this detailed pen and ink study. Using fine liners on textured deckle-edge paper creates a timeless, vintage architectural feel that pairs perfectly with the spooky subject matter.
Step-by-Step
Materials
- High-quality cotton rag paper with deckled edges (creamy or off-white)
- Set of fine liner pens (005, 01, 03, and 05 sizes, black ink)
- Graphite pencil (HB or 2H)
- Kneaded eraser
- Ruler or T-square
- Reference photo of a Victorian house
Step 1: Planning and Basic Structure
-
Establish the horizon:
Begin by lightly sketching a horizon line slightly below the middle of your paper using your 2H pencil. Determine where your vanishing points will sit for a subtle two-point perspective to give the house dimension. -
Block in major shapes:
Sketch the main cuboid forms of the house. Don’t worry about details yet; focus on the relationships between the main body of the house, the porch extension, and the pitched roof sections. -
Refine architectural details:
Add the specific Victorian elements: the gabled dormer windows on the roof, the wraparound porch structure, and the chimney. Use your ruler to keep vertical lines truly vertical, but allow horizontal lines to follow your perspective guides. -
Sketch the surroundings:
Lightly outline the placement of the large pine tree on the left and the cloudy sky above. Keep these organic shapes loose to contrast with the rigid lines of the architecture.
Ink Flow Secret
Work from left to right if you are right-handed (or vice versa) to prevent smudging wet ink with your hand. Place a scrap piece of paper under your drawing hand for extra protection.
Step 2: Inking the House Structure
-
Outline the main roof:
Switch to an 03 fine liner. Carefully trace the main rooflines and the chimney. I like to break the line slightly here and there to suggest age rather than a perfect, new construction. -
Detail the siding:
Using an 005 or 01 pen, draw the horizontal weatherboard siding. These lines should not be perfectly straight or continuous; broken lines help create texture and a weathered look. Follow the perspective angles carefully. -
Define the windows:
Use an 01 pen for the window frames. Darken the interior panes completely with an 05 pen or fill them with tight cross-hatching to make the house look empty and unlit. -
Construct the porch:
Ink the porch columns and railing with the 01 pen. Pay attention to the steps leading up to the door; ensure the rise and run of the stairs align with your perspective.
Vintage Vibe
Tea-stain your paper before drawing to enhance the aged, spooky aesthetic. Brew strong black tea, brush it over the paper, and let it dry completely flat before you start sketching.
Step 3: Texturing and Atmosphere
-
Shading the roof:
Create the texture of roof shingles using small, repetitive ‘U’ shapes or tight hatching with an 01 pen. Darken the areas under the eaves significantly to ground the roof onto the house. -
Rendering the dark pine:
For the large tree on the left, use an 05 pen to build up density. Use short, jagged scribbles to mimic pine needles. Make the core of the tree almost solid black, fading slightly at the edges. -
Grounding the house:
Use quick, upward flicks with an 005 pen along the base of the house to create tall, overgrown grass. This hides the straight bottom line of the foundation and makes the house feel settled in the landscape. -
Adding shadows:
Identify your light source (perhaps the moon from the top left). Add diagonal hatching under the porch roof and on the right side of the building to create deep shadows using an 01 pen.
Step 4: Sky and Final Touches
-
Stippling the clouds:
The clouds require a softer touch. Instead of outlining them, use stippling (lots of tiny distinct dots) with your 005 pen to build up their grey shapes. Concentrate dots in the center of the cloud mass and spread them out at the edges. -
Erase pencil guides:
Wait at least 15 minutes to ensure the ink is totally dry. Gently erase all your pencil sketches with the kneaded eraser to reveal the stark ink work. -
Final darkening:
Step back and assess contrast. If the house looks too flat, go back in with your 03 pen and thicken the shadow side of the roofline and the darkest recesses of the porch. -
Add signature:
Sign your name small and discreetly near the bottom right grass texture to complete the piece.
Now you have a hauntingly beautiful architectural portrait ready to be framed.
Front Yard Graveyard and Sunken Headstones
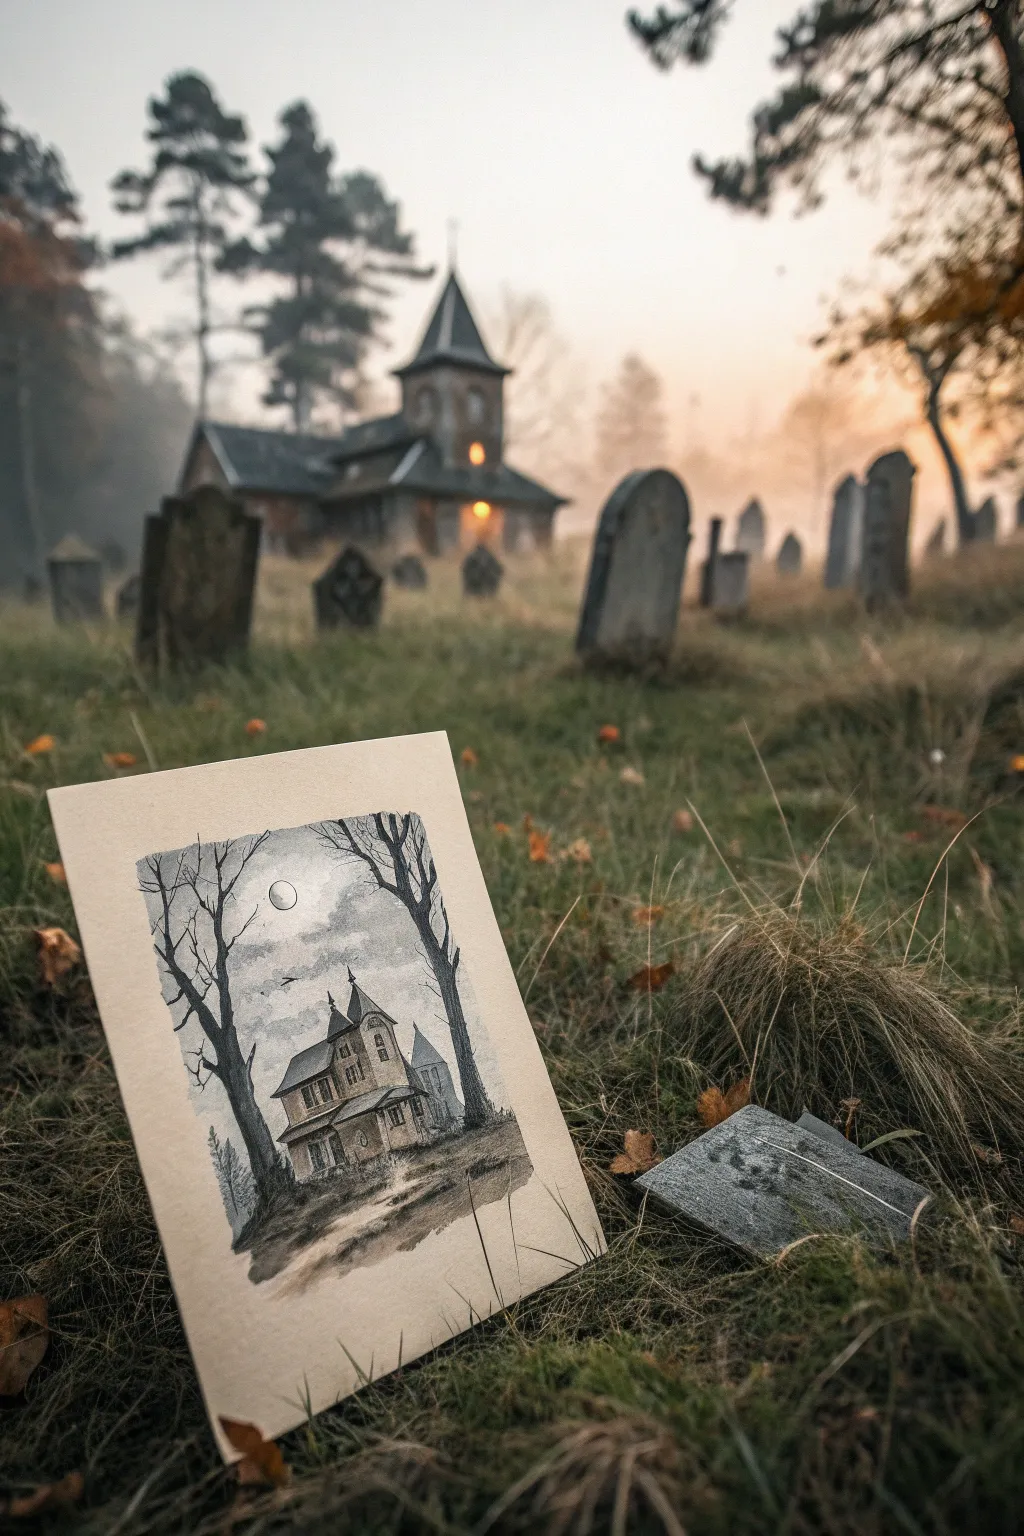
Capture the eerie stillness of an abandoned mansion with this atmospheric ink and wash illustration. Using stark contrast and misty textures, you’ll create a scene where silence speaks louder than words.
Step-by-Step Tutorial
Materials
- Heavyweight watercolor paper (smooth or cold press)
- Black waterproof fine liner pens (0.1, 0.3, 0.5)
- Black ink or liquid watercolor
- White gouache or white gel pen
- Soft round brushes (sizes 4 and 6)
- Pencil (HB) and kneaded eraser
- Palette for mixing washes
- Paper towels
- Masking tape
Step 1: Sketching the Bones
-
Build the Horizon:
Start by lightly sketching a sloping hill that rises from the bottom left to the center right. This uneven ground gives the house a precarious, unsettling foundation. -
Outline the Structure:
Draw the basic shapes of the house. Use tall, narrow rectangles for the main body and add steep, pointed triangles for the roof lines to emphasize the Victorian gothic style. -
Add Architectural Details:
Sketch in a turret on the left side and a small porch extension. Don’t worry about perfect straight lines; a little wobble makes the house look older and more decrepit. -
Position the Trees:
Flank the house with two large trees. Place one dominating the left foreground and another slightly further back on the right to frame the manor. -
Place the Moon:
Draw a small circle in the upper left sky, ensuring it sits clearly between the bare branches.
Pro Tip: Tea Staining
For an antique look, lightly wash the paper with brewed black tea before you start drawing. It gives the finished piece an aged, parchment-like quality.
Step 2: Inking the Scene
-
Refine the House:
Using a 0.3 fine liner, go over your pencil structure. Add vertical lines for siding and small rectangular windows, keeping some dark and others empty. -
Draw the Trees:
Switch to a 0.5 pen for the tree trunks. Create rough, jagged bark textures by using broken vertical strokes. Extend the branches out like skeletal fingers reaching for the moon. -
Texture the Ground:
Use short, scratchy strokes along the hill to suggest dead grass and uneven dirt paths leading up to the porch. -
Deepen the Shadows:
Use your thickest pen or a brush with pure black ink to fill in the deepest shadows under the eaves, the base of the trees, and the darkest windows.
Troubleshooting: Blotchy Sky
If your sky wash dries with hard water lines, re-wet the entire sky area gently and lift excess pigment with a clean, damp paper towel, then re-apply.
Step 3: Creating Atmosphere with Wash
-
Prepare Your Greys:
Dilute your black ink with water to create three distinct values: a very pale grey, a mid-tone grey, and a dark charcoal. -
Wash the Sky:
Wet the sky area lightly with clean water, avoiding the moon. Drop in the pale grey wash, letting it bloom naturally to create a cloudy, overcast effect. -
Shadow the House:
Apply the mid-tone grey to the side of the house facing away from the moon. This instantly creates dimension and form. -
Ground the Scene:
Use the dark charcoal wash on the bottom of the hill and around the base of the house to weigh the structure down. -
Soften the Edges:
While the ground wash is still damp, I like to pull a little pigment upward with a clean brush to simulate rising ground fog.
Step 4: Final Haunting Touches
-
Define the Moon:
If you lost the white of the moon, paint it back in with white gouache. Add a tiny halo of pale grey around it for a glowing effect. -
Add Flying Silhouettes:
With a 0.1 pen, draw tiny ‘m’ shapes in the distance to represent bats or crows circling the manor. -
Highlight the Decay:
Use a white gel pen or gouache to add highlights on the moonlit edges of the roof and the tops of the tree branches. -
Final Cleanup:
Once completely dry, gently erase any remaining pencil marks to leave the illustration stark and clean.
Step back and admire the chilling story your silent house now tells


Spooky Porch Scene With Pumpkins and Props
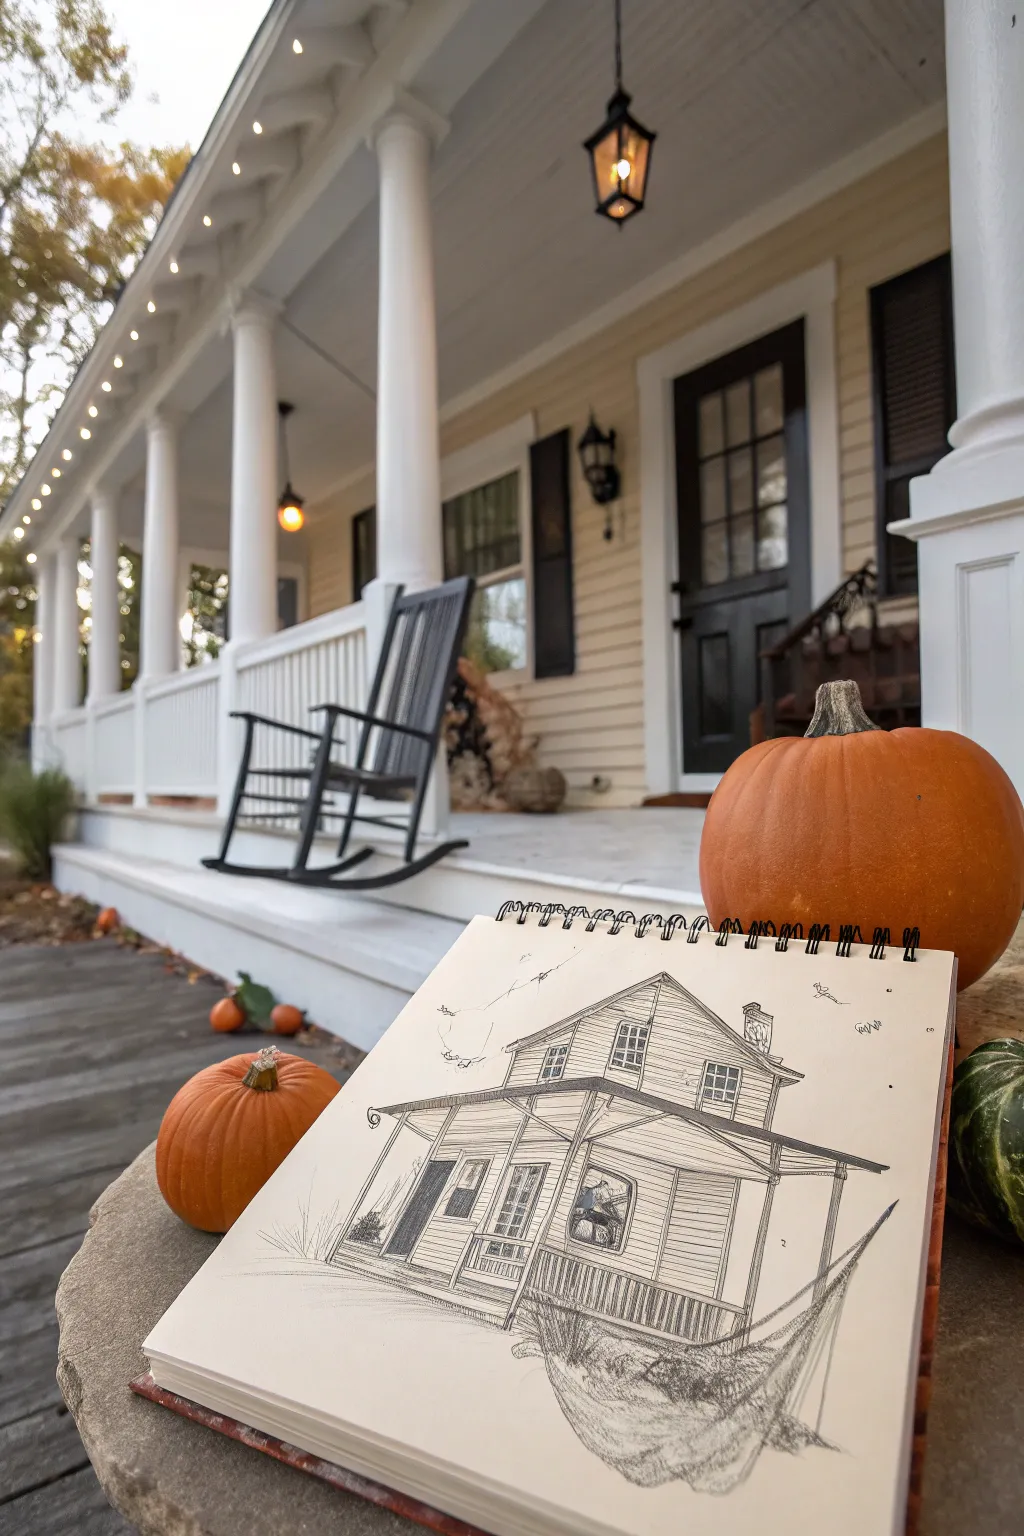
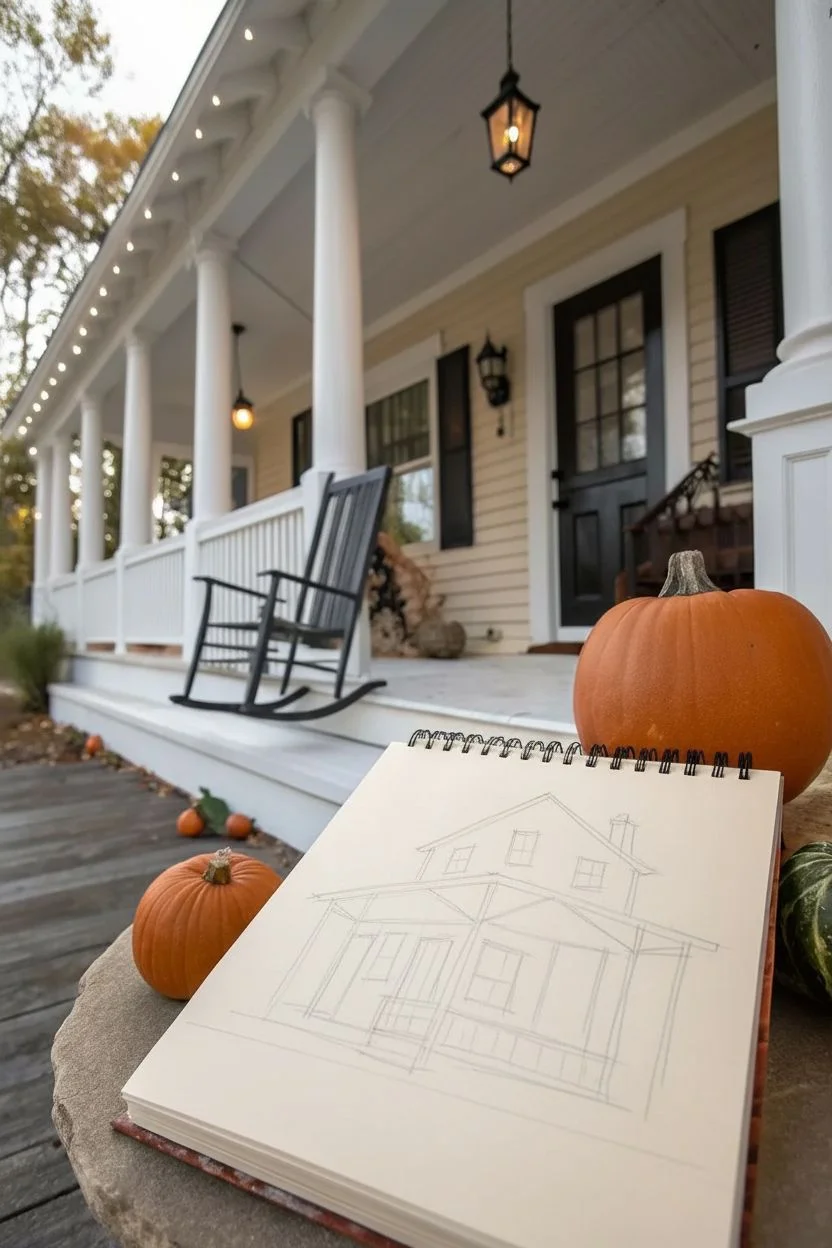
Capture the charm of an old, potentially spooky farmhouse with this detailed pen and ink sketch. The loose, illustrative style combined with precise architectural details creates a drawing that feels both nostalgic and slightly mysterious.
Step-by-Step
Materials
- Spiral-bound sketchbook with smooth, heavyweight paper
- Graphite pencil (HB or 2B)
- Kneaded eraser
- Fine liner pens (0.1mm, 0.3mm, 0.5mm)
- Ruler (optional, for guidelines)
Step 1: Laying the Foundation
-
Establish the horizon line:
Start by lightly drawing a horizon line across the lower third of your page with your pencil. This grounds your house and helps with perspective. -
Block in the main structure:
Sketch a large rectangle for the main body of the house. Above it, add a triangular shape for the gable roof. Don’t worry about perfect lines yet; keep your hand loose. -
Add the porch roof:
Draw a wide, sloping line extending from the middle of the house outward to form the porch roof. This should overhang the main rectangle significantly on both sides. -
Define the porch floor:
Sketch the porch floor line parallel to the roofline but lower down. Connect it to the ground with vertical lines indicating the foundation or crawl space underneath. -
Place the windows and door:
Roughly map out where the front door and windows will go. I like to center the door and place tall windows on either side, with smaller square windows on the upper floor.
Wobbly Lines?
If your straight lines are shaky, embrace it! For a haunted house theme, slightly crooked lines add character and make the structure look old and settled.
Step 2: Inking the Details
-
Outline the roof:
Switch to your 0.5mm pen. Go over the main roofline, making it distinct. Add a small chimney rectangle near the peak. -
Ink the structural beams:
Draw the vertical porch posts. Use straight, confident strokes. These hold up the porch roof, so make them look sturdy. -
Detail the siding:
With a finer 0.1mm pen, draw horizontal lines across the face of the house to represent clapboard siding. Break the lines occasionally to make the wood look aged and weathered. -
Draw the windows:
Carefully ink the window frames and mullions (the strips dividing the panes). Fill in the panes with diagonal hatching to suggest glass reflections or darkness inside. -
Sketch the porch railing:
Add the vertical slats of the porch railing. Draw them quickly and not perfectly parallel to enhance the ‘rickety’ haunted feel. -
Depict the hammock or netting:
In the foreground right, sketch a sagging, textured shape that resembles a hammock or perhaps old fishing nets. Use loose, scribbly strokes to create a woven texture.
Add Spooky Touches
Draw tiny cobwebs in the corners of the porch or frame, or add a silhouette of a cat in one of the windows to increase the Halloween vibe.
Step 3: Adding Atmosphere and Texture
-
Shade underneath the porch:
Use cross-hatching to deepen the shadows under the porch roof. This contrast makes the white porch posts pop forward. -
Texture the roof:
Add some vertical lines on the roof to suggest metal seaming or shingles. Keep them sparse so the drawing doesn’t get too busy. -
Add environmental details:
Draw some grassy tufts near the base of the house. Add small, scattered marks in the sky area to represent birds or bats flying in the distance. -
Refine the foreground:
Darken the area under the house and the hammock with heavier ink strokes to ground the composition. -
Final clean up:
Once the ink is completely dry, gently erase your pencil guidelines. Check for any lines that need reinforcing to balance the drawing.
Now you have a charmingly spooky architectural sketch ready to display in your home
Haunted House as a Face (Door and Window Monster)
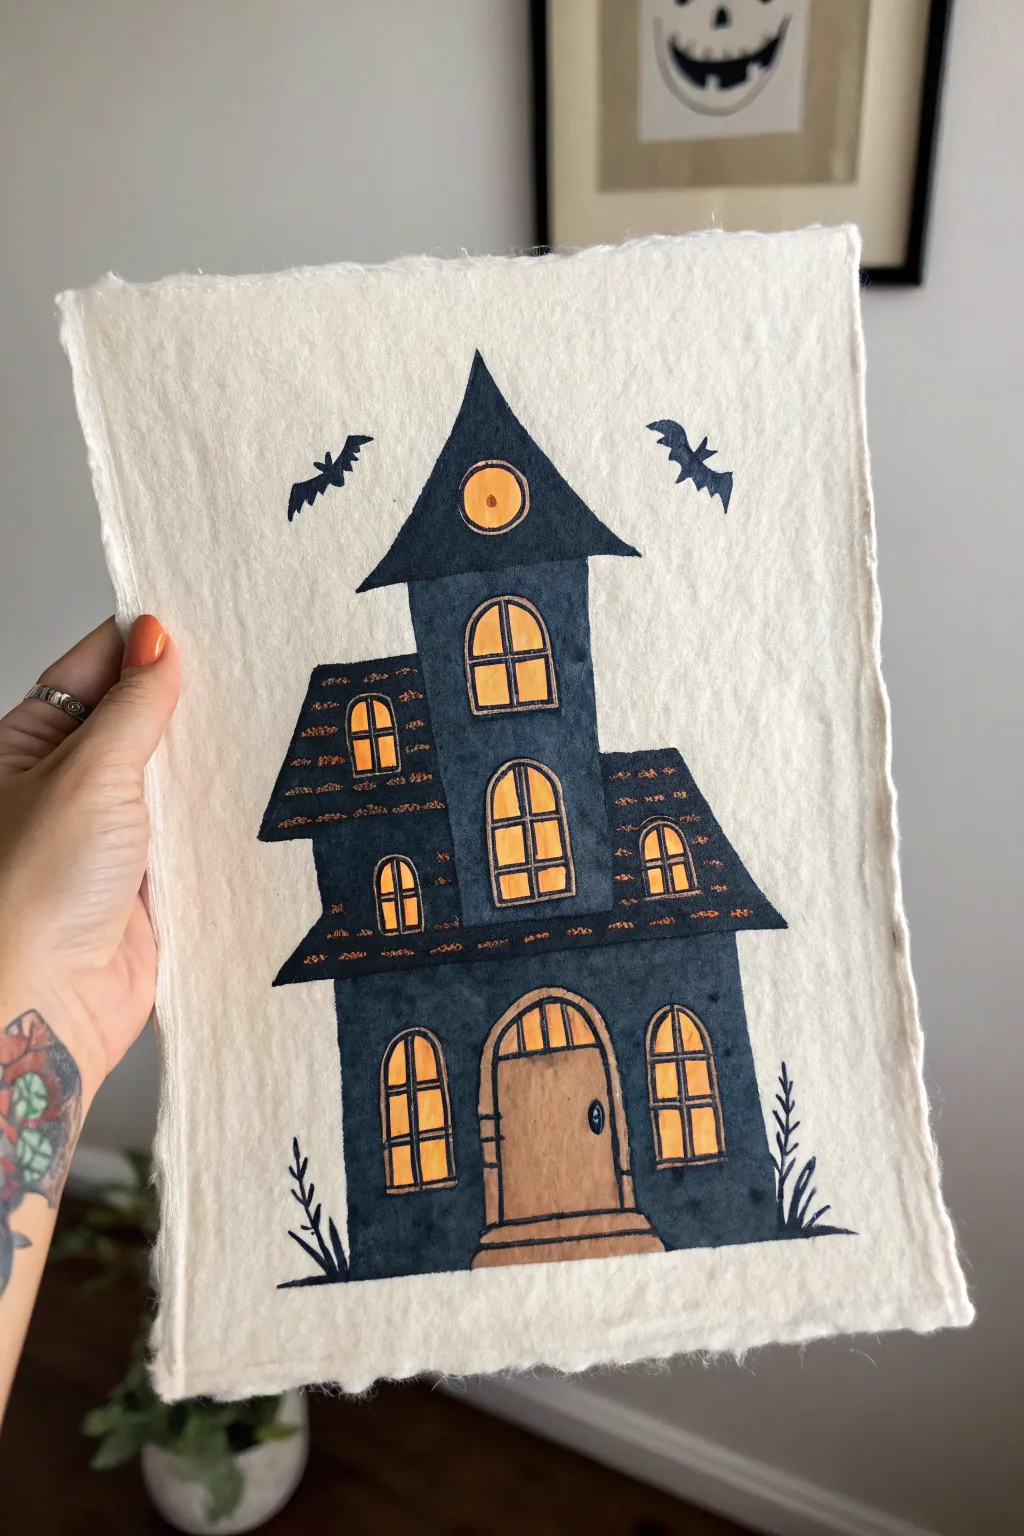
This charming illustration features a spooky yet sweet haunted house painted on lovely handmade paper with deckled edges. The dark, moody blues of the house contrast beautifully with the warm, glowing orange windows, creating a cozy Halloween atmosphere.
Detailed Instructions
Materials
- Handmade cotton rag paper (deckled edge)
- Watercolor paints (Indigo, Payne’s Grey, Burnt Sienna, Yellow Ochre)
- Fine liner pens (Black, 0.3mm and 0.5mm)
- Pencil (HB) and eraser
- Small round watercolor brushes (Size 2 and 4)
- Gold or metallic copper watercolor (optional for details)
- Ruler
Step 1: Drafting the Spooky Structure
-
Find the center:
Begin by lightly marking a vertical center line on your paper with a pencil. This will help you keep the tower straight, even though the overall quirky style doesn’t need to be perfectly symmetrical. -
Draw the main tower:
Sketch a tall, narrow rectangle in the middle for the central tower. Top it with a sharp triangular roof. The roof should overhang slightly on both sides. -
Add the wings:
Attached to the left and right sides of the tower, sketch two lower sections for the house. Give them slanted roofs that tuck under the main tower’s structure. Make the left wing slightly higher than the right for visual interest. -
Sketch the entrance:
At the very bottom center, draw a large arched doorway. This will serve as the ‘mouth’ of your house monster. Add a curved step leading up to it. -
Place the windows:
Draw arched windows throughout the house. Place a circular window near the tip of the tower’s roof. Add larger arched windows in the center of the tower sections, and smaller ones on the side wings. These act as the ‘eyes’ of the structure.
Working with Cotton Paper
Handmade cotton paper is very thirsty! I suggest mixing slightly more water into your paint than usual to help it flow across the textured surface.
Step 2: Inking the Details
-
Outline the structure:
Using a waterproof 0.5mm black fine liner, go over your main pencil lines. Don’t worry about using a ruler here; a slightly wobbly hand adds to the jagged, spooky character of the house. -
Define window panes:
Switch to a thinner 0.3mm pen to draw the grid lines inside the windows. A simple cross or T-shape works well for the arched windows to create panes. -
Add facial features:
Draw the door details, including a frame and a small handle. Add two bats flying in the sky—one on each side of the roof—using jagged chevron shapes. -
Plant some weeds:
At the base of the house, draw creeping, spikey grass blades on the left and right corners to ground the building. Once the ink is totally dry, gently erase your pencil marks.
Make it Shine
Paint the window panes with a metallic gold watercolor instead of yellow. When the light hits your drawing, the house will look like it’s truly glowing.
Step 3: Painting the Mood
-
Base wash for the house:
Mix a dark, watery wash of Indigo or Payne’s Grey. Paint the entire exterior of the house, carefully avoiding the windows and the door itself. The texture of handmade paper will naturally create uneven, mottled areas—embrace this as it looks like old siding. -
Deepen the shadows:
While the first layer is still slightly damp, drop more concentrated dark blue pigment into the edges of the rooflines and the bottom of the building to create dimension and shadows. -
Light up the windows:
Mix a warm Yellow Ochre with a touch of orange. Paint inside all the window shapes and the circular attic window. The color should look like glowing candlelight against the dark house. -
Paint the door:
Use a diluted Burnt Sienna or light brown to paint the wooden door and the step below it. Keep this wash fairly transparent so the ink details show through clearly.
Step 4: Finishing Touches
-
Roof textures:
Once the blue paint is completely dry, use a small brush or a copper/orange pen to add small dash marks across the roofs. These look like old, decaying shingles caught in the light. -
Enhance the glow:
If the windows look too flat, add a tiny wash of darker orange at the very bottom of each pane to suggest depth behind the glass. -
Final inking:
Check your black lines. If the watercolor has obscured any details, especially lightly around the door frame or the bats, re-trace them gently with your pen to make them pop again.
Now you have a delightfully spooky portrait ready to frame or display on a shelf for the season
Overgrown Haunted House With Vines and Mushrooms
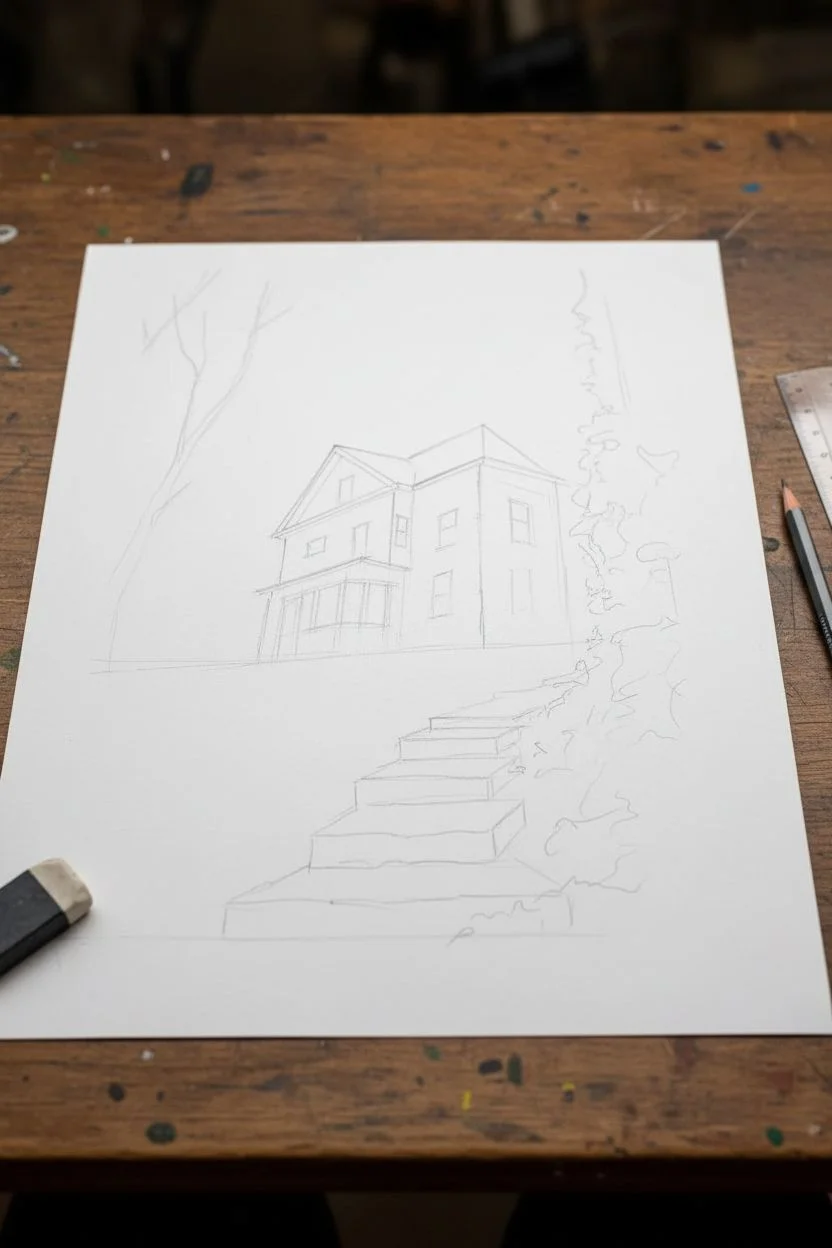
Capture the eerie beauty of a forgotten home with this detailed mixed-media illustration technique. You’ll create a moody, atmospheric scene featuring an old Victorian house perched atop overgrown stone steps, blending precision drawing with soft color washes.
Step-by-Step Tutorial
Materials
- Heavyweight mixed media paper (hot press for smoother details)
- H and HB graphite pencils
- Fine liner pens (0.1, 0.3, 0.5 mm in dark grey or sepia)
- Watercolor set (Payne’s Grey, Burnt Sienna, Sap Green, Yellow Ochre)
- Colored pencils (prismacolor or similar soft core)
- Small round brushes (size 2 and 4)
- Kneaded eraser
- Ruler
- White gel pen or gouache for highlights
Step 1: Planning and Sketching
-
Establish the horizon:
Begin by lightly penciling a low horizon line about one-third up the page. This low angle makes the house loom impressively above the viewer. -
Draft the perspective:
Using your ruler and H pencil, block out the basic geometric shapes of the house. Focus on the sharp angles of the roof peaks and the boxy main structure. Keep your lines incredibly faint so they disappear later. -
Sketch the path:
Draw the winding stone staircase leading from the bottom right corner up toward the house center. Make the steps wider at the bottom and narrower as they ascend to create depth. -
Add architectural details:
Flesh out the windows, porch railing, and siding. Don’t worry about perfect straightness; slightly sagging lines add character to an abandoned building. -
Outline organic elements:
Roughly sketch the placement of the tall, bare tree on the left and the dense ivy creeping up the right side of the structure.
Step 2: Inking and Base Layers
-
Apply initial ink work:
Use a 0.1mm sepia or grey pen to trace your structural lines. Use broken lines for things like grass or crumbling stone to keep the texture organic, rather than stiff. -
Wash the sky:
Mix a very dilute wash of Payne’s Grey and water. Apply this to the sky area, keeping it pale and overcast. Let this dry completely before moving on. -
Base coat the house:
Paint the house siding with a watery mix of Burnt Sienna and a touch of purple for a weathered wood look. Keep the wash uneven to simulate aging paint. -
Paint the foliage base:
Lay down a base of Sap Green mixed with Yellow Ochre for the grassy hill and the ivy. Keep it loose and undefined at this stage.
Muddy colors?
If your watercolors look muddy, ensure each layer is bone dry before adding more. Test color mixes on a scrap piece of the same paper first to check clarity.
Step 3: Detailing and Texture
-
Define the stone steps:
Using a size 2 brush, dab darker grey-brown shadows onto the risers of the stone steps. Leave the tops of the stones lighter to show where light hits them. -
Layer colored pencil shading:
Once the watercolor is bone dry, use colored pencils to deepen shadows under the eaves and porch. A dark indigo pencil works beautifully for deep, cool shadows that aren’t harsh black. -
Texturize the grass:
Use short, upward strokes with green and brown colored pencils to create individual blades of grass in the foreground. Vary the pressure to create depth and movement. -
Add the orange flowers:
With a bright orange pencil or a tiny dab of gouache, add small pops of color for the wildflowers dotting the long grass on the left side. -
Refine the trees:
I like to use a 0.3mm pen to carefully draw the intricate, skeleton-like branches of the dead tree on the left. Make the lines slightly shaky to mimick natural growth. -
Enhance the ivy:
Stipple dark green darker dots over the ivy areas to create the illusion of dense leaves shadows.
Level Up: Ghostly Vibe
Dilute a tiny drop of white gouache with water and glaze it over the bottom of the painting to create a subtle, rising mist effect around the stairs.
Step 4: Atmosphere and Finishing
-
Deepen windows:
Fill the window panes with a dark, almost black mixture. Leave teeny tiny slivers of white paper or add white gel pen later to suggest broken glass reflections. -
Integrate the path:
Lightly shade over the edges of the stone path with a green pencil to show grass encroaching on the walkway. -
Add final highlights:
Use a white gel pen to add subtle highlights to the tips of the tallest grass blades and the edges of the stone steps. -
Sign and seal:
Sign your name in pencil at the bottom border. A fixative spray is optional but recommended if you used heavy colored pencil layering.
Now you have a hauntingly beautiful piece of architectural art ready to display
Cute Cartoon Haunted Cottage With Friendly Ghosts
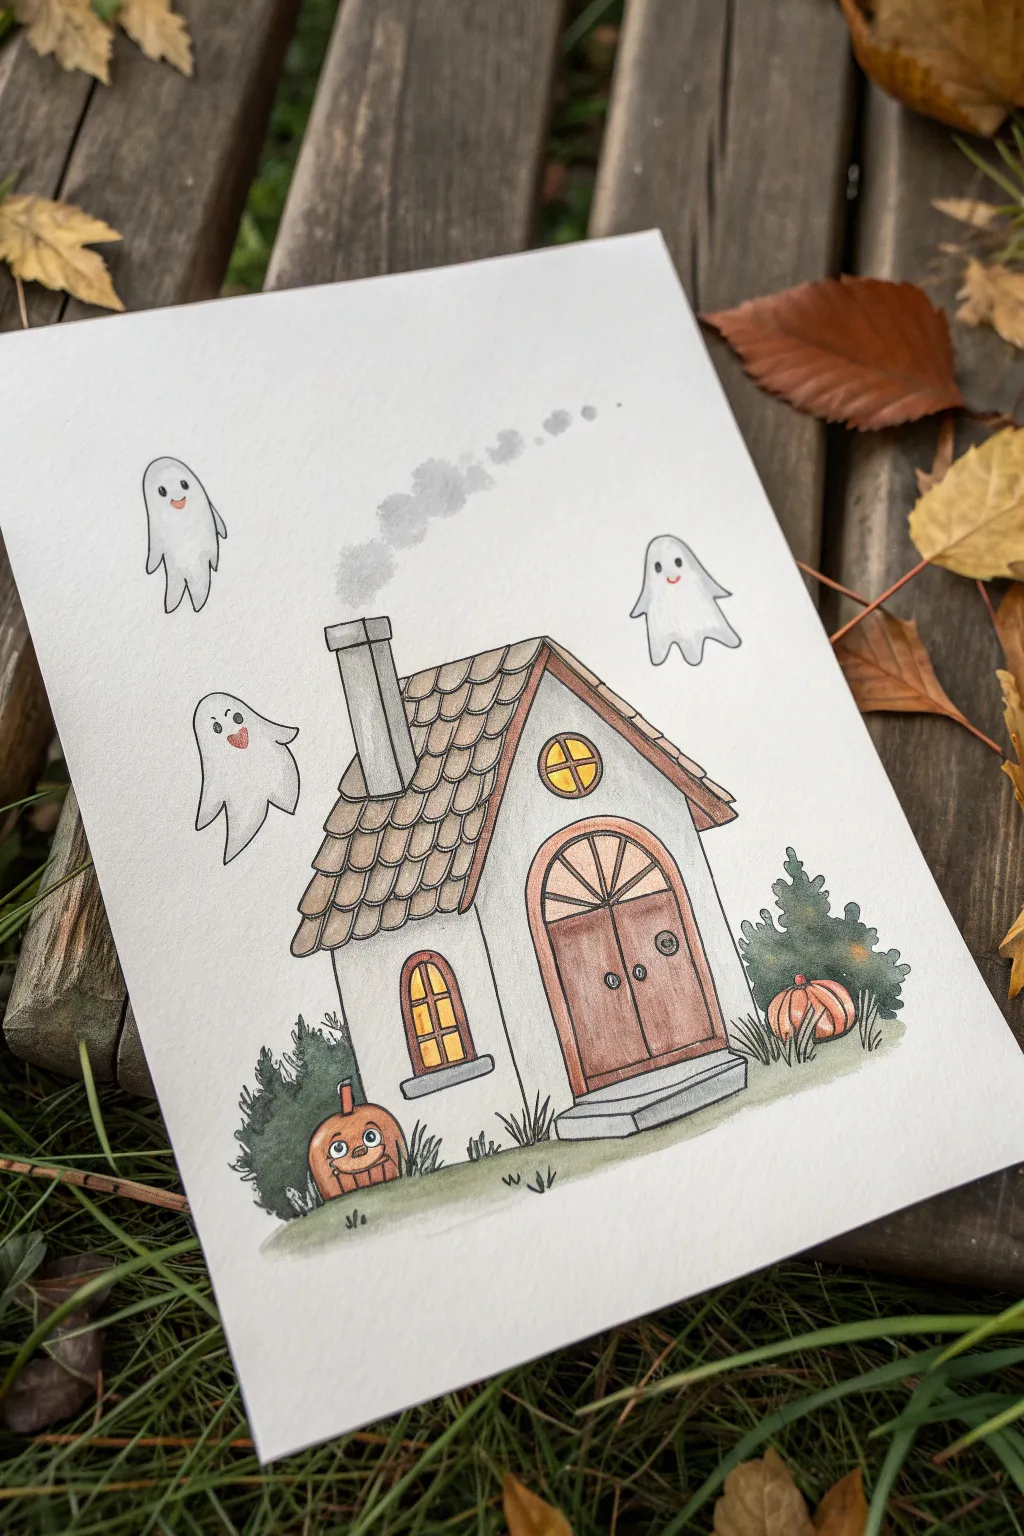
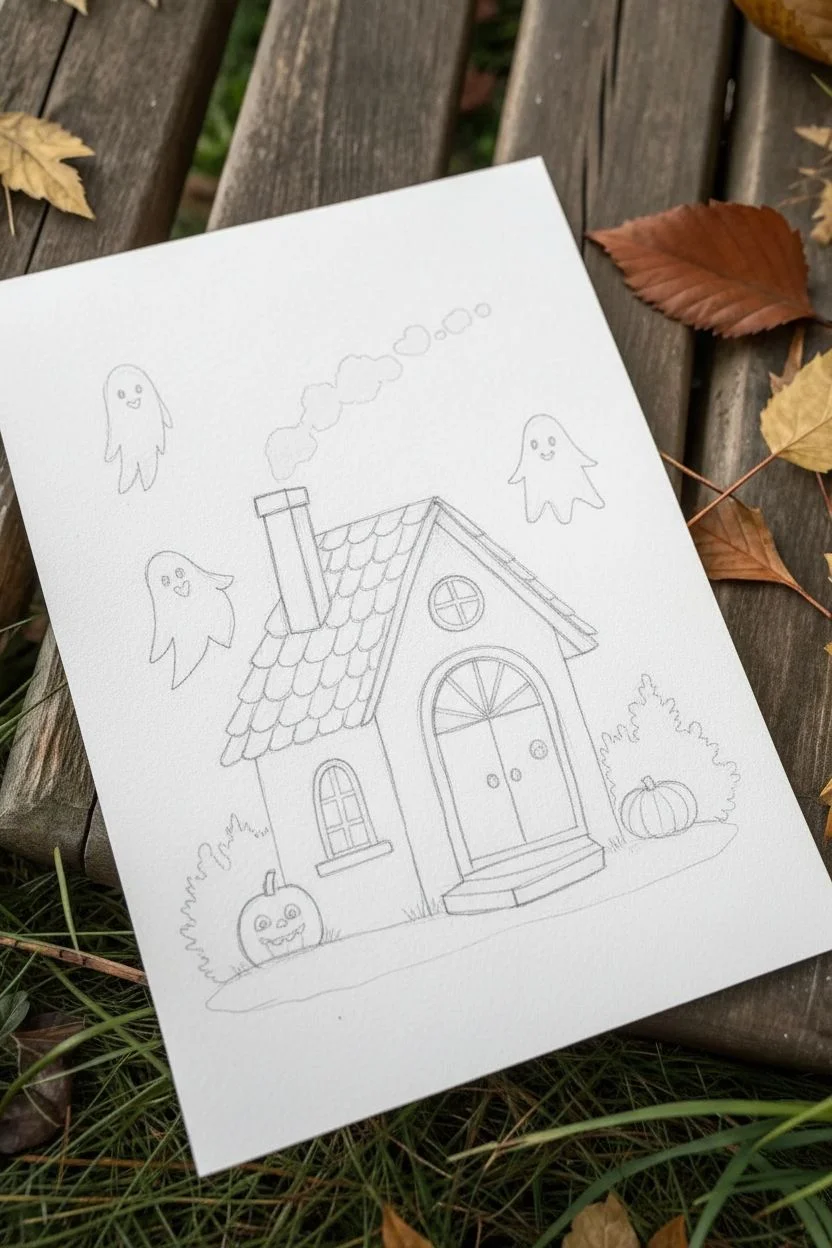
Create a cozy, spooky-sweet scene featuring a charming cottage surrounded by friendly spirits. This tutorial guides you through sketching a playful structure and bringing it to life with soft watercolor washes and crisp ink outlines.
Detailed Instructions
Materials
- Hot press watercolor paper (smooth texture is best for ink lines)
- Pencil (HB or H) and eraser
- Waterproof fine liner pens (black, sizes 01 and 05)
- Watercolor paints (warm browns, yellow ochre, muted greens, orange, grey)
- Small round brushes (size 2 and 4)
- Jar of water and paper towels
Step 1: Sketching the Cottage
-
Outline the main structure:
Start by drawing the basic shape of the house. Sketch a tall, slightly crooked rectangle for the front face and add a angled side wall to give it dimension. Top it with a steep, pitched roof shape. -
Add architectural details:
Draw a large arched doorway in the center of the front wall. Above it, place a small circular window. On the side wall, sketch a smaller arched window. Add a rectangular chimney sticking out of the left side of the roof. -
Refine the roof and ground:
Fill the roof area with rows of U-shaped scallops to represent shingles. Sketch a uneven, grassy line at the base of the house and add two small bushes on either side. Place a pumpkin near each bush—give the left one a silly face! -
Float the ghosts:
Above the house, lightly sketch three simple ghost shapes. Think of them as floating sheets with wiggly bottoms. Vary their sizes and heights for visual interest.
Ink Smearing?
Ensure your fine liner is labeled ‘waterproof’ or ‘archival.’ If unsure, test it on a scrap piece of paper, let it dry for 5 minutes, then wet it. If it bleeds, switch pens before starting.
Step 2: Inking the Design
-
Trace the main lines:
Using a 05 waterproof pen, carefully trace over your pencil lines for the house structure, roof, and ground. Keep your hand steady but allow for slight wobbles to maintain the whimsical, hand-drawn look. -
Ink the details:
Switch to a finer 01 pen for smaller details like the roof shingles, window panes, and the faces on the ghosts. For the ghost outlines, keep the line weight very light and delicate. -
Erase pencil marks:
Wait until the ink is completely dry—this is crucial to avoid smearing. Once safe, gently erase all underlying pencil sketch lines to leave a clean black-and-white drawing.
Step 3: Painting with Watercolors
-
Wash the walls and roof:
Mix a very watery beige or cream color and paint the walls of the house, leaving the paper white inside the windows. For the roof, use a diluted warm brown, blobbing in color so some shingles are darker than others. -
Paint the door and windows:
Use a richer, reddish-brown for the double doors. Paint the window panes a warm yellow to simulate glowing light inside. -
Color the greenery and pumpkins:
Paint the bushes with a muted, dark green. While that dries, paint the pumpkins with a bright orange, layering a slightly darker orange near the bottom for shadow. -
Add shadows:
Mix a pale grey wash. Add a shadow line under the roof overhang and along the right side of the house to ground the structure. Paint a light grey strip under the house for the ground shadow. -
Ghostly details:
The ghosts should remain mostly white. Use a very diluted grey to add tiny shadows to their folds or edges to give them volume. Add tiny red dots for their cheeks and hearts. -
Create the smoke:
Wet the paper slightly above the chimney. Drop in a very small amount of grey paint and let it bloom upward into a cloud shape, dabbing it with a paper towel if it gets too dark.
Roof Texture Trick
Don’t paint the roof a solid brown. Instead, paint individual shingles with varying amounts of water. This creates natural tonal variation and makes the tiling look much more interesting.
Now you have a charming little haunted scene perfect for greeting cards or seasonal decor


Have a question or want to share your own experience? I'd love to hear from you in the comments below!