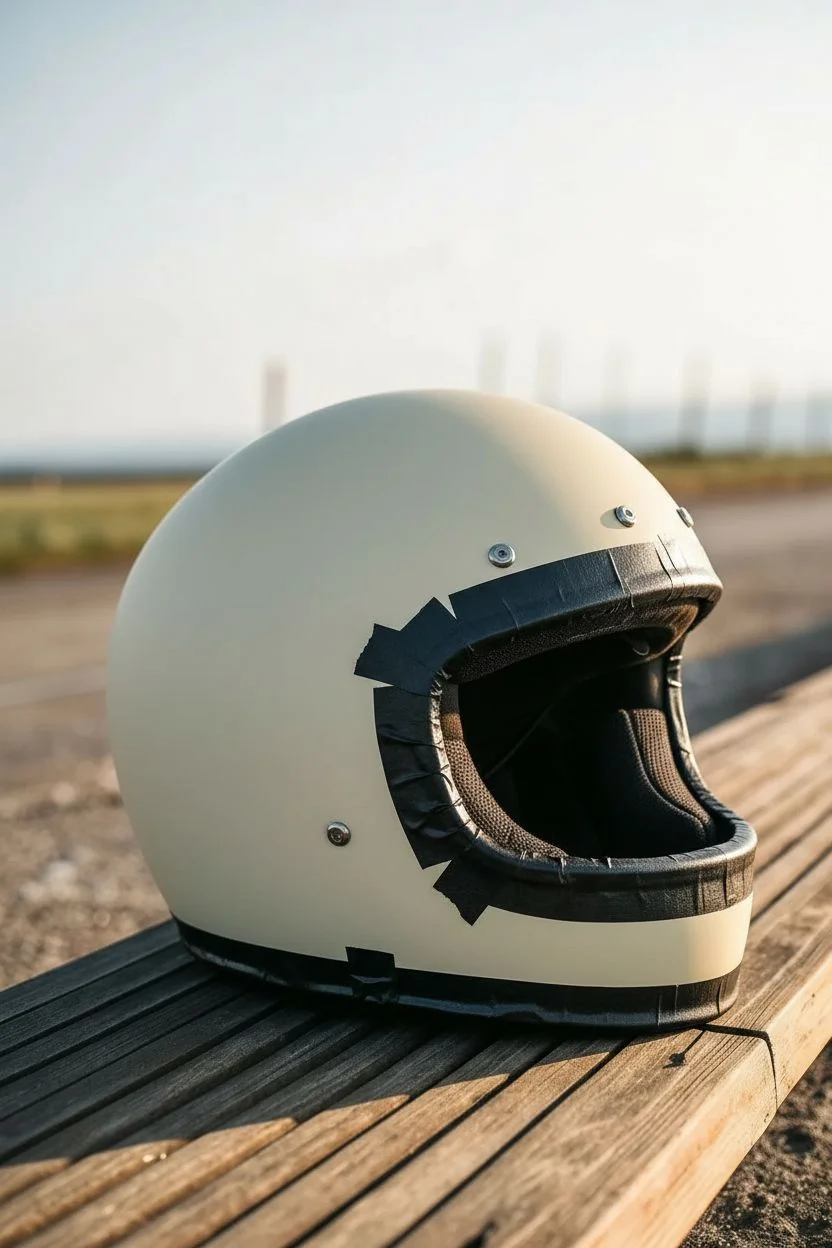
A helmet is basically a tiny curved canvas you get to wear, so even a simple concept can look wildly dynamic once it wraps around the shell. Here are some of my favorite helmet design directions—starting with classic crowd-pleasers and moving into more experimental, artsy territory.
Classic Racing Stripes
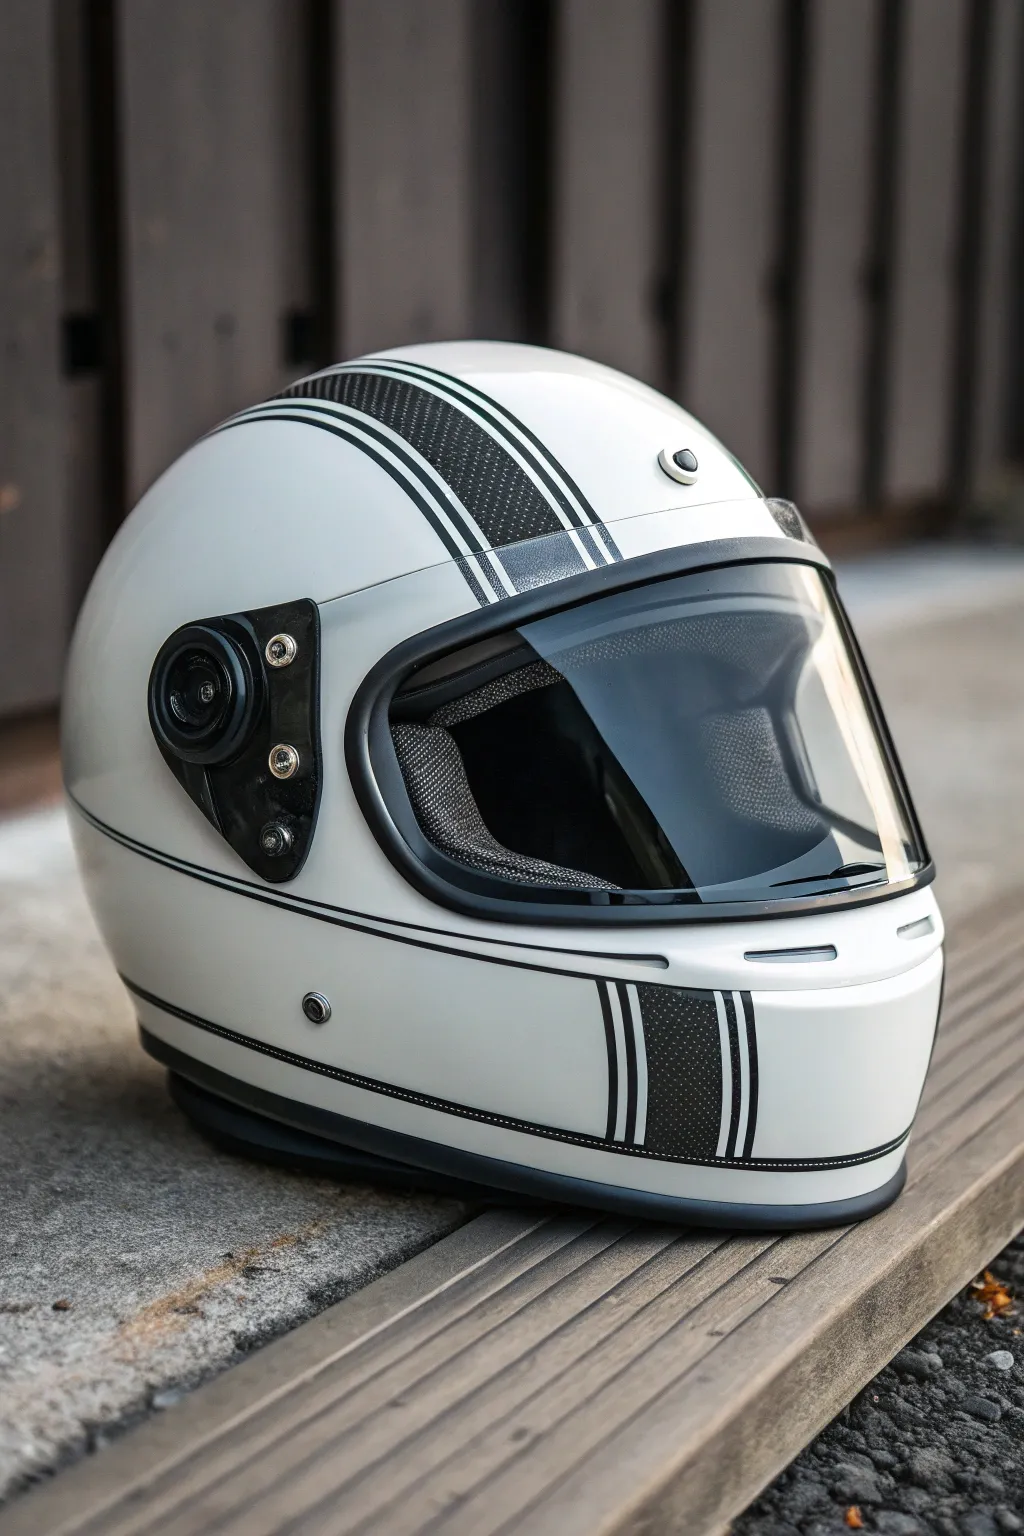
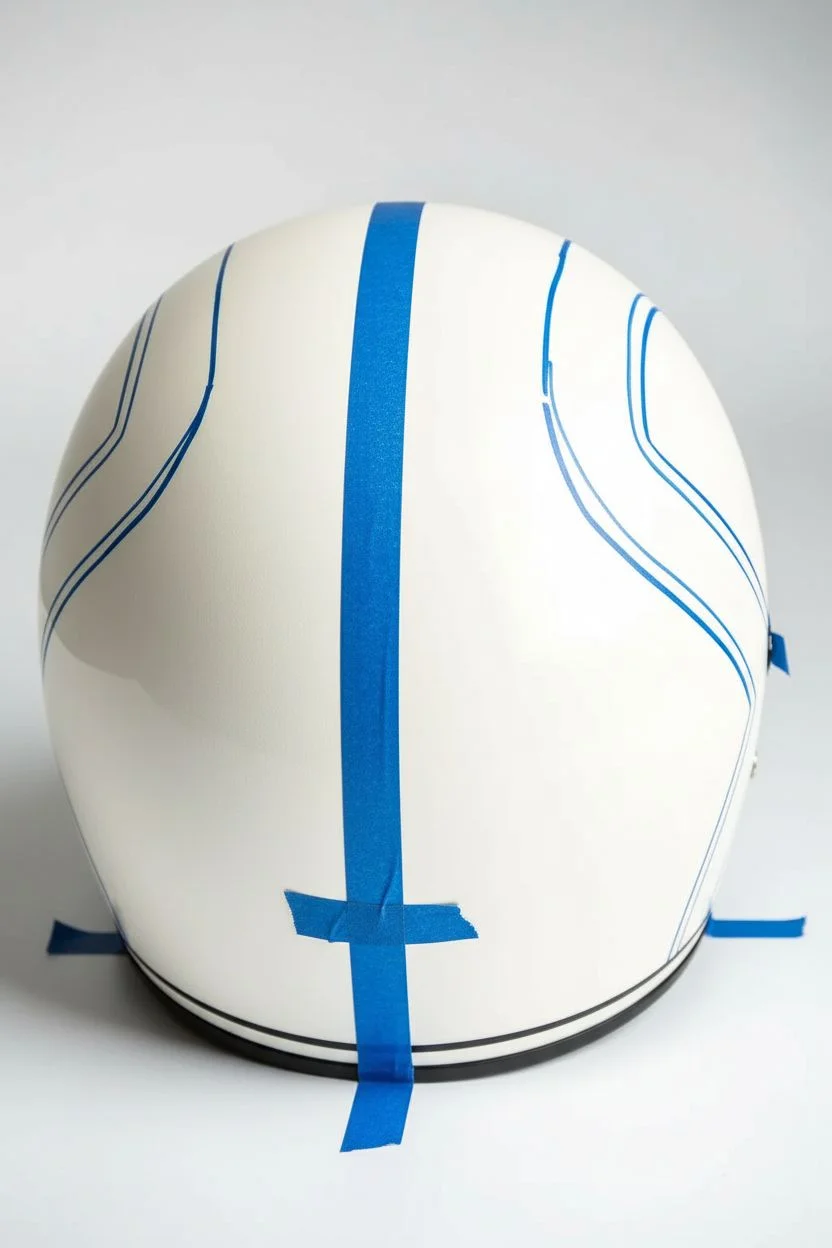
Transform a plain white helmet into a vintage masterpiece with this striking black racing stripe design. The combination of a broad textured center stripe flanked by crisp pinstripes evokes the golden era of motorsport in a clean, modern package.
How-To Guide
Materials
- White full-face motorcycle helmet (gloss finish)
- Black automotive vinyl wrap (matte or carbon fiber texture)
- Black pinstriping tape (3mm width)
- Knifeless tape (for precision cutting)
- Squeegee with felt edge
- Heat gun or hair dryer
- Isopropyl alcohol and lint-free cloths
- Measuring tape (flexible fabric style)
- Masking tape (low tack)
- Precision craft knife (Scalpel style)
- Scissors
Step 1: Preparation & Mapping
-
Clean surface:
Begin by thoroughly cleaning the helmet shell with isopropyl alcohol and a lint-free cloth. This removes any wax, grease, or road grime that would prevent the vinyl from adhering properly. -
Find the center:
Use your flexible measuring tape to find the absolute center of the helmet from the chin bar to the back of the neck. Mark this center line lightly with small pieces of masking tape at the front, top, and back. -
Define the main stripe:
Decide on the width of your main central stripe—about 2 inches is standard for this look. Measure 1 inch out from your center marks on both sides and mark these boundaries with masking tape guides.
Bubbles?
If you trap an air bubble that won’t squeegee out, prick it with the very tip of your craft knife and press the air out with your finger.
Step 2: Applying the Central Stripe
-
Lay knifeless tape:
Apply knifeless tape along the outer boundaries of your main stripe area. This amazing tool allows you to cut the vinyl perfectly without risking scratches to the helmet’s paint. -
Cut the vinyl:
Cut a strip of your textured black vinyl that is slightly widely and longer than the stripe path. You want plenty of excess to hold onto while stretching. -
Anchor and stretch:
Peel back a few inches of the liner and anchor the vinyl at the center top of the helmet. Working slowly, smooth it down toward the front, then repeat for the back. -
Apply heat:
Use a heat gun on a low setting to warm the vinyl slightly as you approach the curves of the chin and back. The heat makes the material pliable, letting you stretch it around the spherical shape without wrinkles. -
Squeegee smooth:
Use the felt-edged squeegee to press the vinyl firmly onto the surface, working from the center outward to push out air bubbles. -
Trim the edges:
Pull the filament of the knifeless tape to slice through the vinyl cleanly. Peel away the excess waste material and the tape carrier.
Step 3: Pin-Striping & Detailing
-
Measure the gap:
To create the ‘gap’ effect, measure about 3mm or 1/8th inch away from the main stripe’s edge on both sides. -
Apply inner pinstripe:
Carefully lay down your first line of black pinstriping tape. Keep your eye focused a few inches ahead of where you are sticking the tape to ensure a straight, fluid line. -
Create the secondary gap:
Leave another small gap of white space (matching the width of the pinstripe itself) next to the line you just placed. -
Apply outer pinstripe:
Lay down the second line of pinstriping tape. This double-line border adds that professional, detailed look seen in the photo. -
Horizontal accents:
Don’t forget the horizontal pinstriping that runs around the base of the helmet. Apply a single black pinstripe about an inch above the rubber trim along the jawline and sides to frame the vertical work. -
Trim ends:
Use your precision knife to carefully trim the ends of the pinstripes where they meet the helmet’s rubber gaskets or vents. I prefer tucking the ends slightly under the rubber trim if possible for a seamless finish.
Reflective Pop
Upgrade safety and style by using black reflective vinyl. It looks like standard black tape in daylight but glows bright white when hit by headlights.
Step 4: Final Touches
-
Post-heating:
Go over the entire design once more with the heat gun. This ‘post-heating’ process kills the memory of the vinyl, ensuring it stays stuck down in the deep curves and doesn’t lift over time. -
Clean and polish:
Wipe away any fingerprints or adhesive residue with a mild cleaner to reveal your new custom lid.
Now you have a bespoke helmet that looks fast even when it’s parked on the shelf


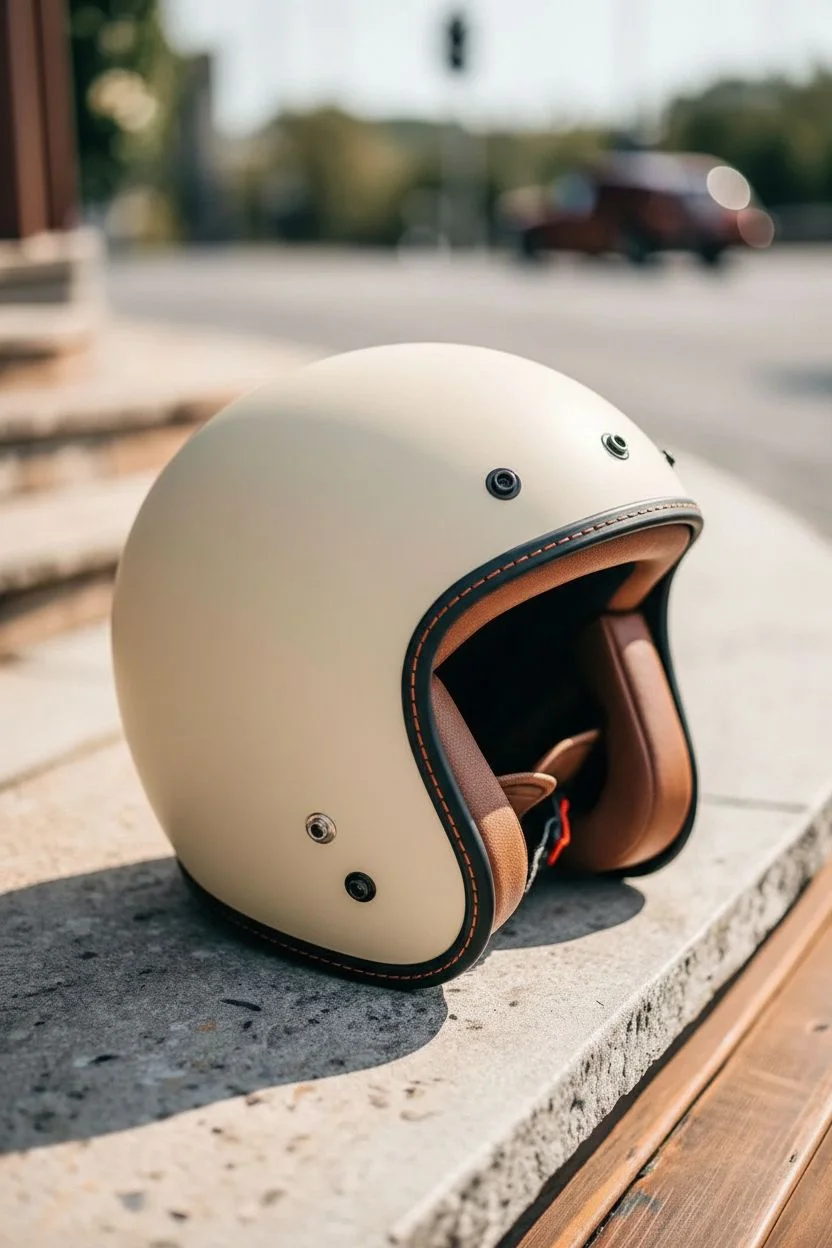
Two-Tone Color Split
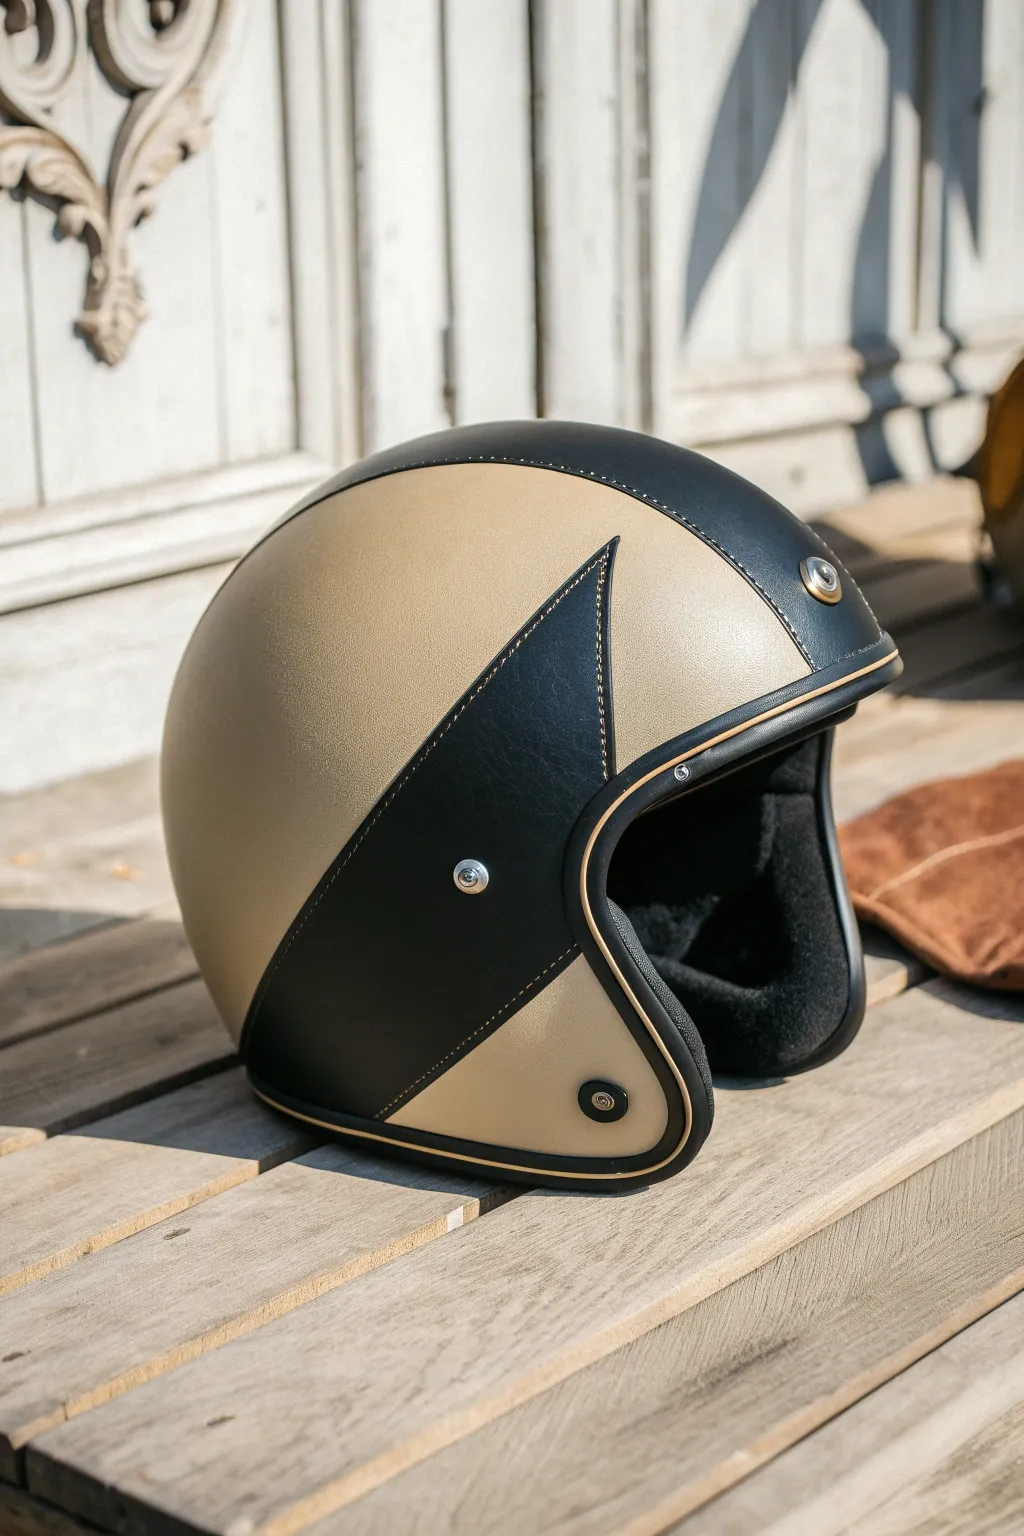
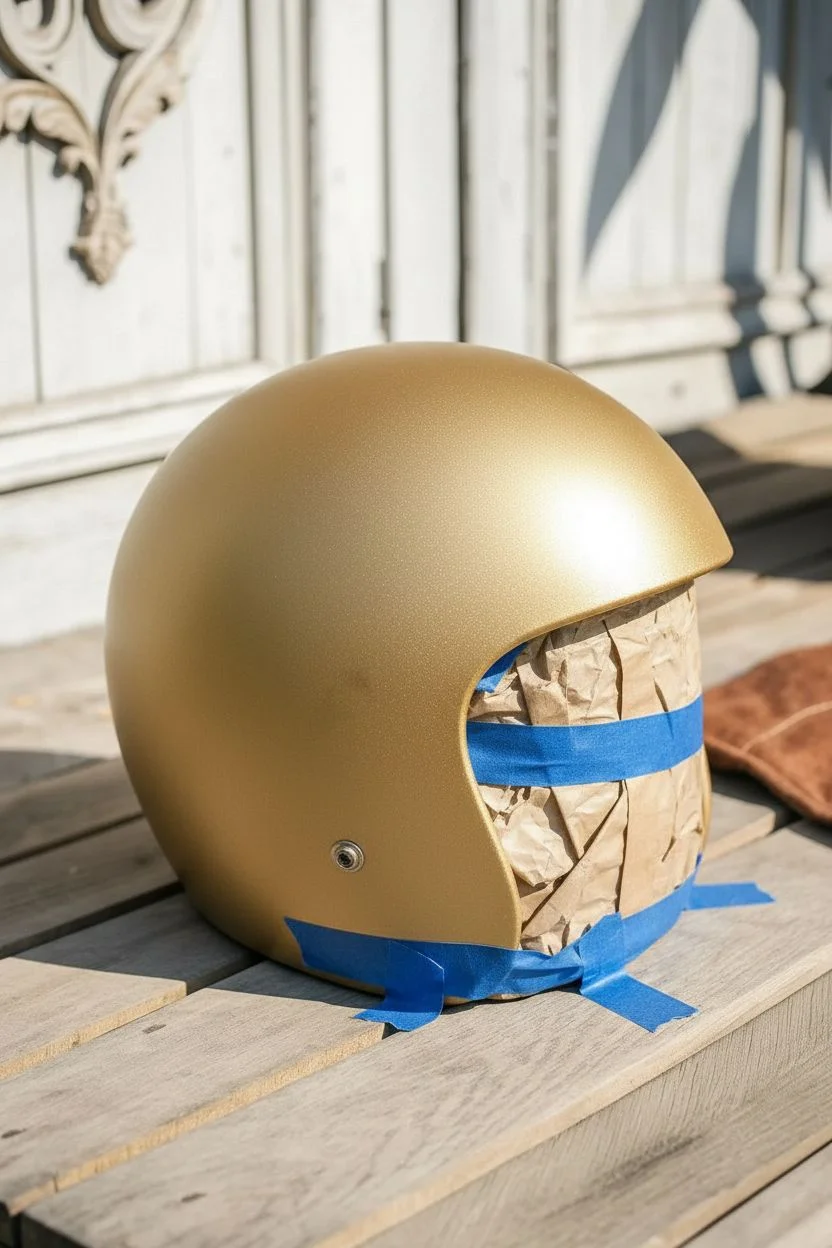
Transform a standard open-face helmet into a vintage-inspired masterpiece with this elegant two-tone design. The combination of metallic champagne gold and matte black leather-texture paint creates a sophisticated, custom-shop look without the heavy price tag.
Step-by-Step Tutorial
Materials
- Open-face motorcycle helmet (cleaned and prepped)
- Champagne gold metallic spray paint (flexible vinyl/plastic safe)
- Matte black spray paint or leather-texture paint
- Fine-line tape (3mm or 6mm)
- Painter’s masking tape (various widths)
- Masking paper or plastic sheeting
- Degreaser or isopropyl alcohol
- Fine-grit sandpaper (600 and 800 grit)
- Tack cloth
- Matte clear coat (UV resistant)
- Gold or bronze paint pen (fine tip) for faux stitching (optional)
- Black rubber edge trim (if replacing existing)
Step 1: Preparation & Base Coat
-
Disassemble the helmet:
Begin by removing any detachable parts like the visor, snaps, and internal padding if possible. If the rubber trim around the face opening is removable without damage, take it off to ensure clean paint lines underneath. -
Surface preparation:
Clean the entire helmet shell thoroughly with degreaser or isopropyl alcohol. This removes road grime, waxes, and oils that would prevent paint adhesion. -
Sanding:
Lightly scuff the original clear coat with 600-grit sandpaper. You don’t need to strip it to bare material, just create a dull, keyed surface for the new paint to grab. -
Masking internals:
Stuff the inside of the helmet with masking paper or newspaper and tape off the edges to protect the interior lining from overspray. -
Apply the gold base:
Apply the champagne gold metallic paint in light, even coats. I prefer to do 3-4 distinct thin layers rather than one heavy one to prevent runs. -
Drying time:
Allow the gold base to dry completely according to the manufacturer’s instructions, usually 24 hours, before attempting to mask over it.
Bleeding Lines?
If paint bleeds under the tape, wait for it to dry fully. Then, lightly scrape the excess with a toothpick or use a fine brush with the base color to touch up the edge.
Step 2: Designing the Split
-
Layout the curve:
Using fine-line tape, lay out the sweeping curve that separates the colors. Start from the bottom rear, curve upwards towards the top center, and then create the sharp ‘wing’ point that cuts back down towards the cheek area. -
Refining the shape:
Step back and look at the helmet from the side. Adjust the tape until the ‘wing’ shape flows naturally with the helmet’s rounded contour. -
Protecting the gold:
Once satisfied with the fine-line border, use wider painter’s tape and masking paper to cover all the gold areas you want to preserve. Press the tape edges down firmly to prevent bleed.
Step 3: The Black Accent & Finishing
-
Scuffing the black area:
Very lightly scuff the exposed gold paint in the area destined to remain black with 800-grit paper. This promotes adhesion between layers. -
Wipe down:
Use a tack cloth to gently remove any sanding dust from the masked area. -
Painting the black section:
Spray the matte black paint into the masked area. If you can find a ‘leather texture’ spray paint, this adds an incredible tactile finish that mimics the reference image. -
Unmasking:
Carefully remove the masking tape while the black paint is tacky but not fully wet—usually about 20-30 minutes after the final coat. Pull the tape away from the painted edge at a sharp angle. -
Detailing the edge:
The reference image features a faux-stitched look. Use a fine-tip gold or bronze paint pen to draw small, evenly spaced dashes along the black border, simulating thread. -
Clear coat:
Once all paint is cured, apply a matte clear coat over the entire shell. This unifies the sheen and protects your work from UV rays and road debris. -
Reassembly:
Reinstall the rubber trim, snaps, and any padding removed earlier to complete the restoration.
Leather Texture Hack
To get that leathery look without special paint, dab the wet black paint gently with a crumpled plastic bag or sea sponge before it dries to create surface texture.
Now you have a stylish helmet ready for your next café racer meetup


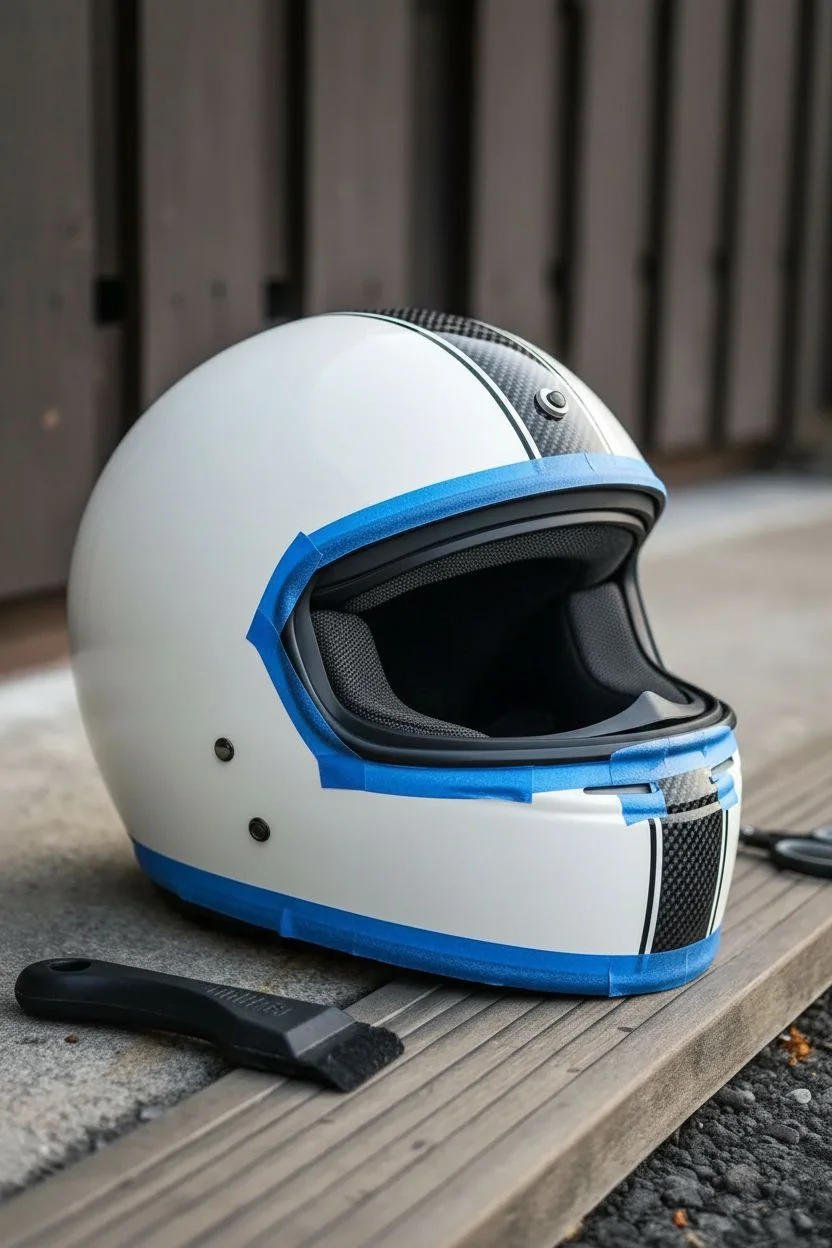
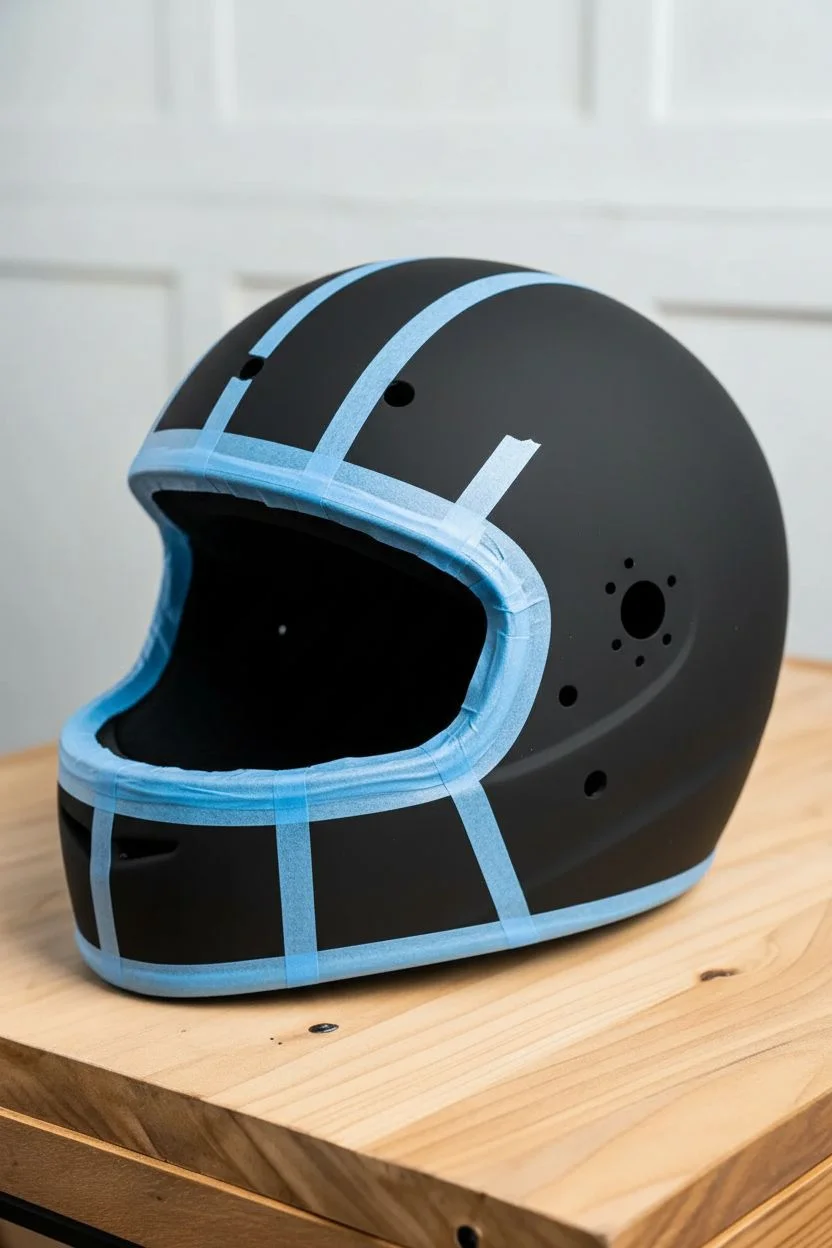
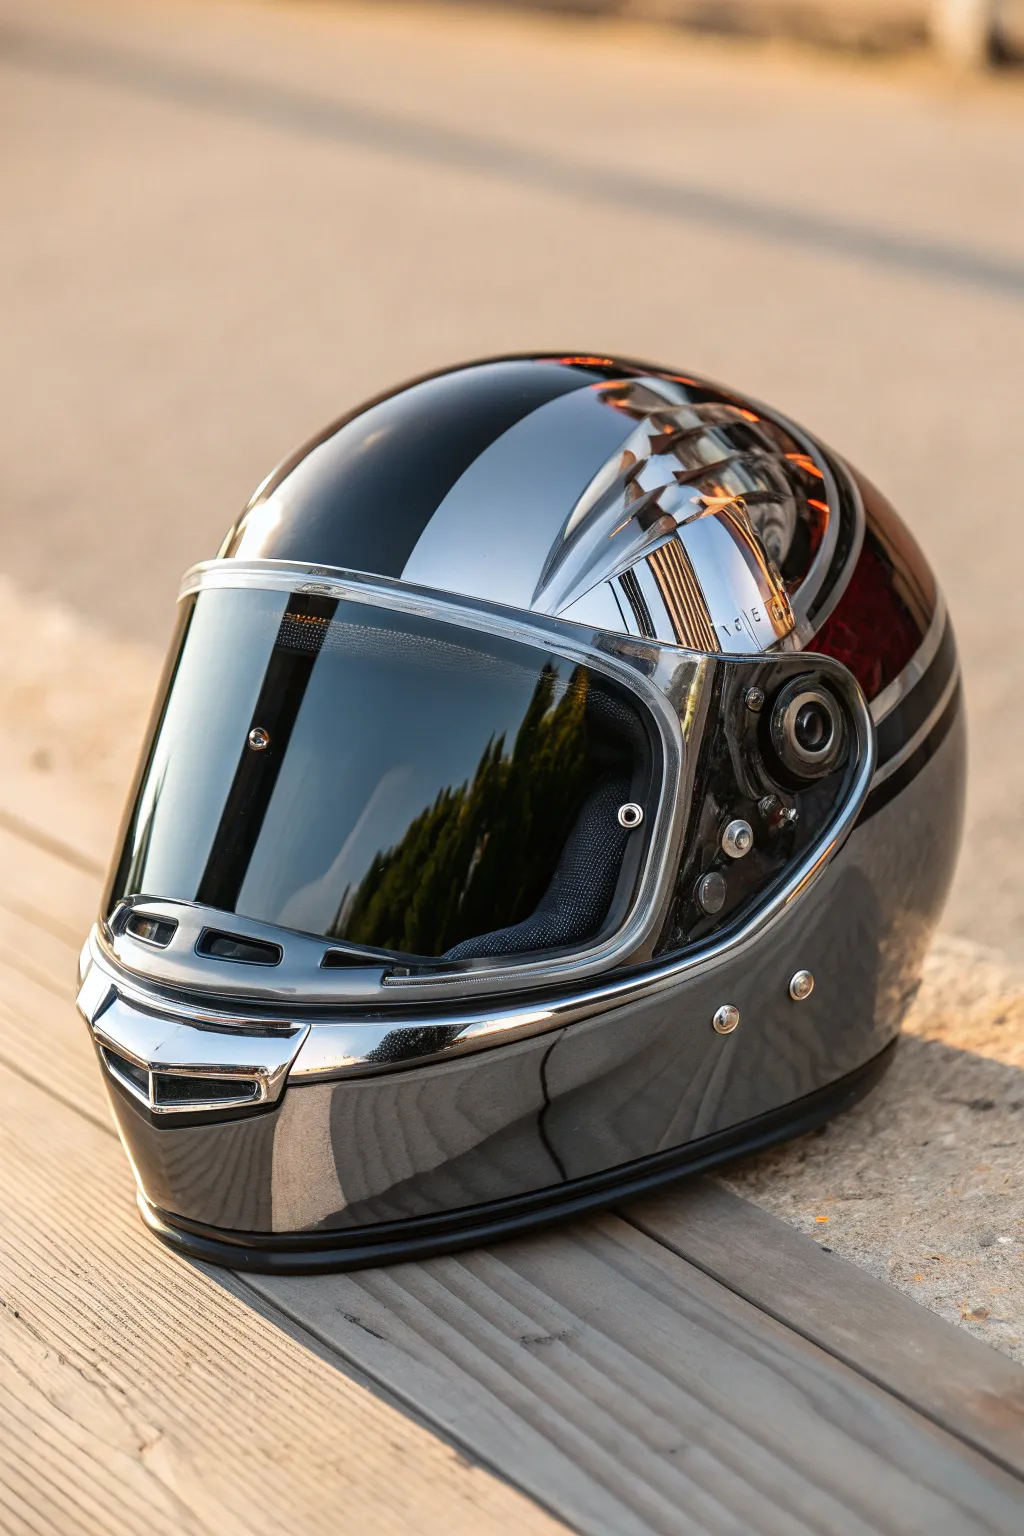
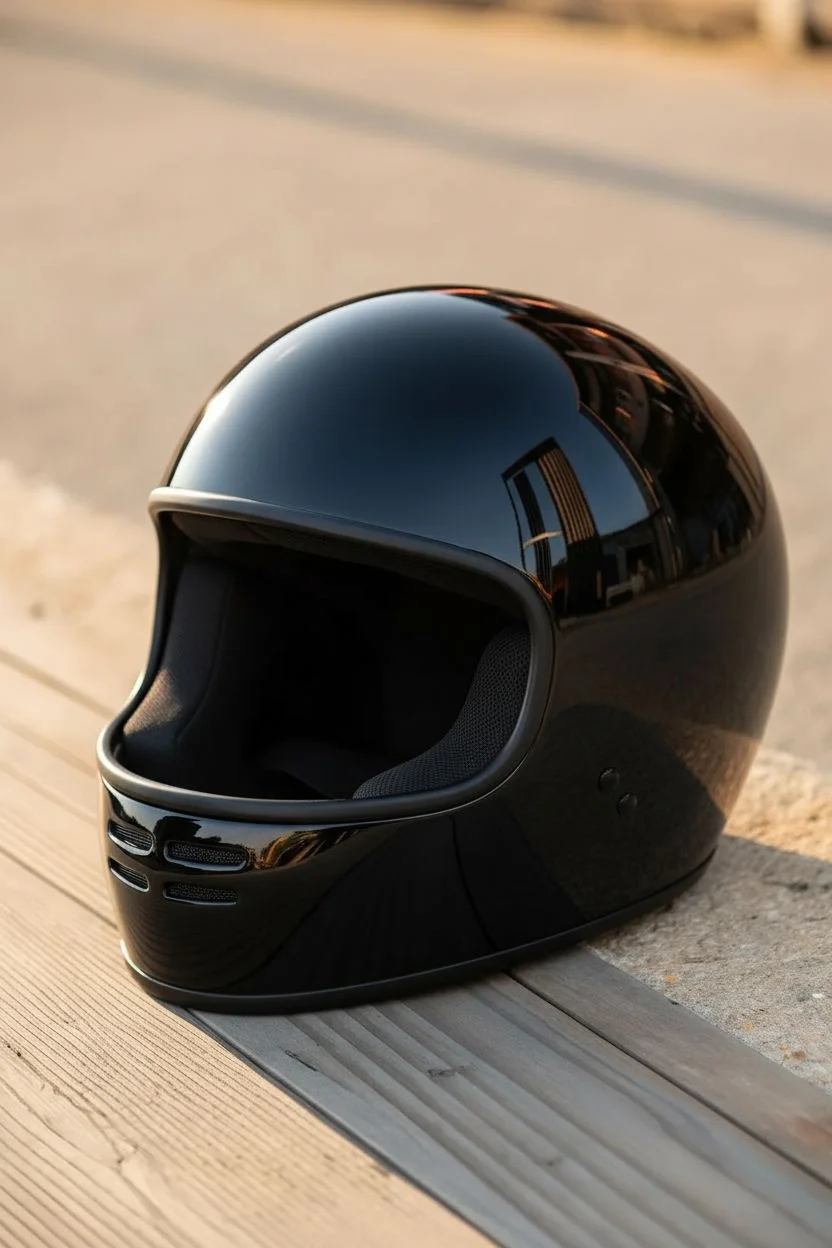
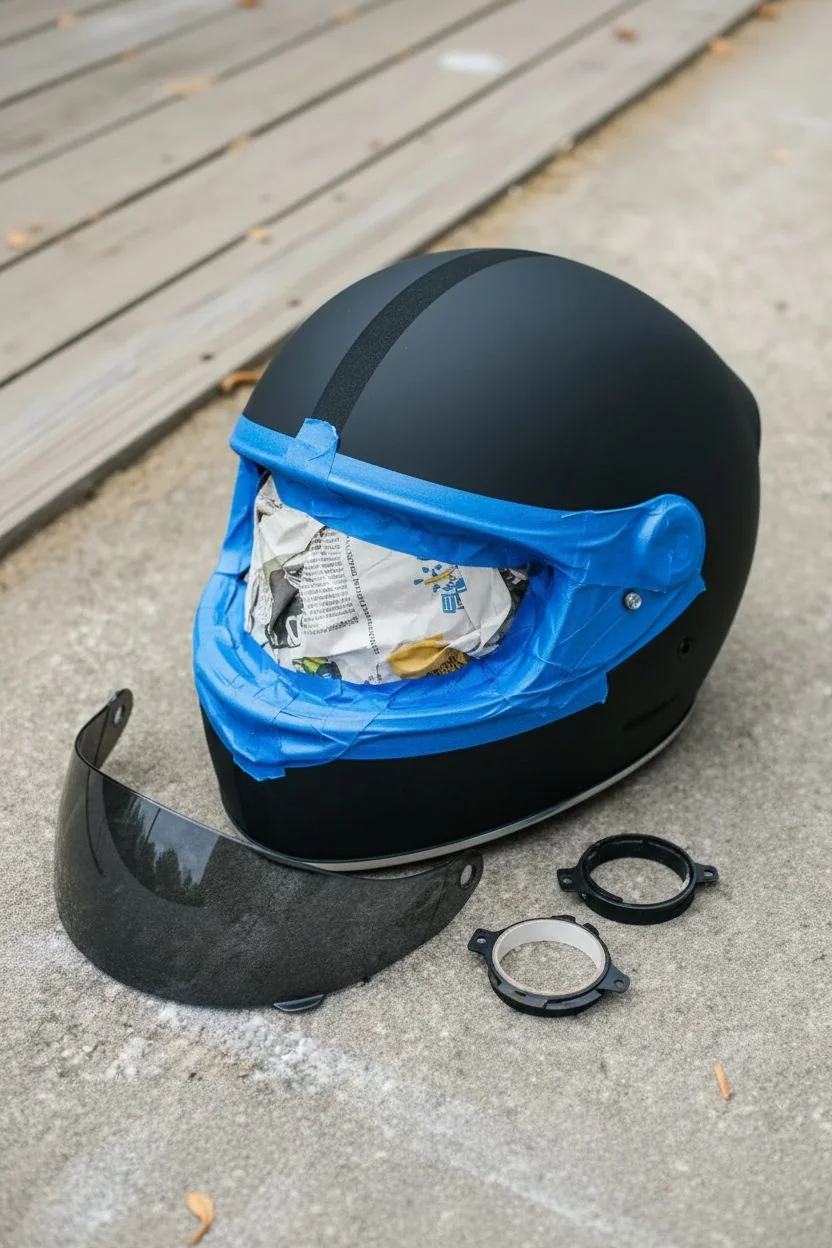
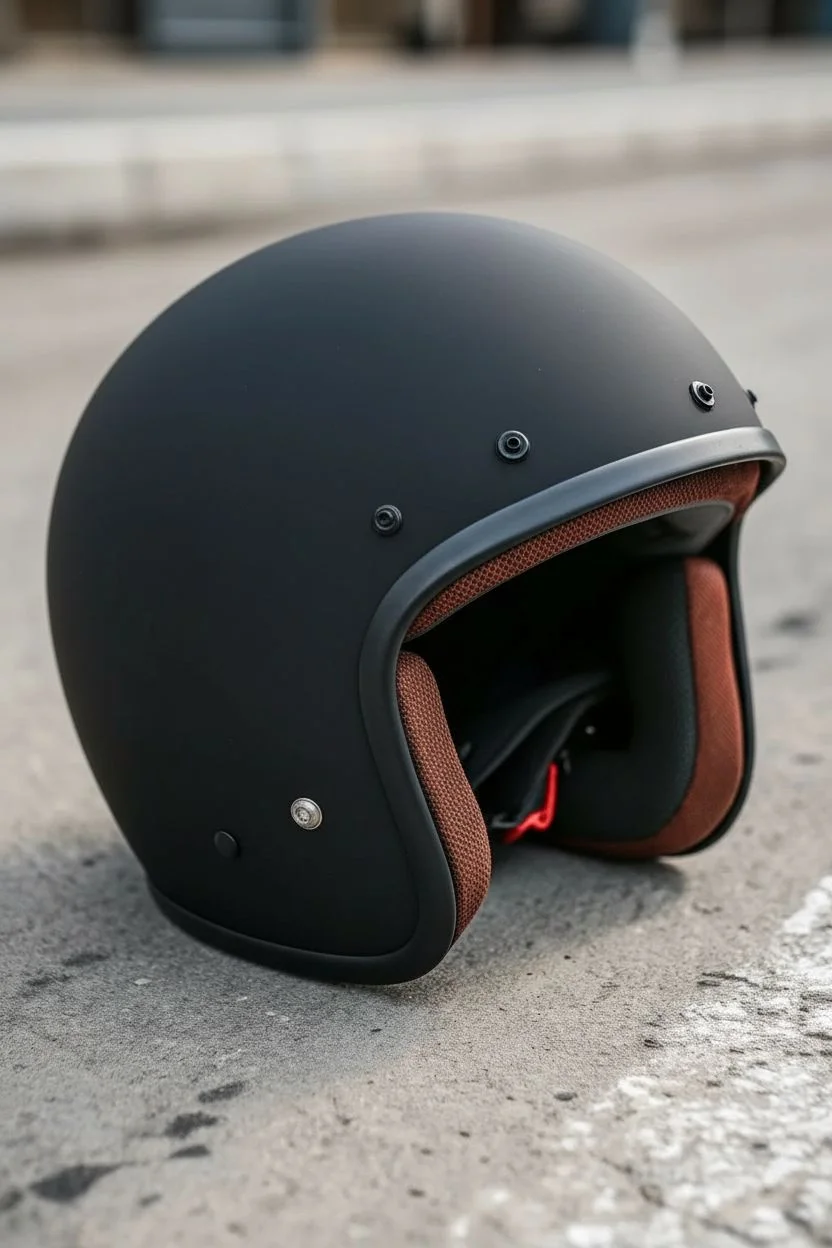
Matte Black With Micro Pinstripes

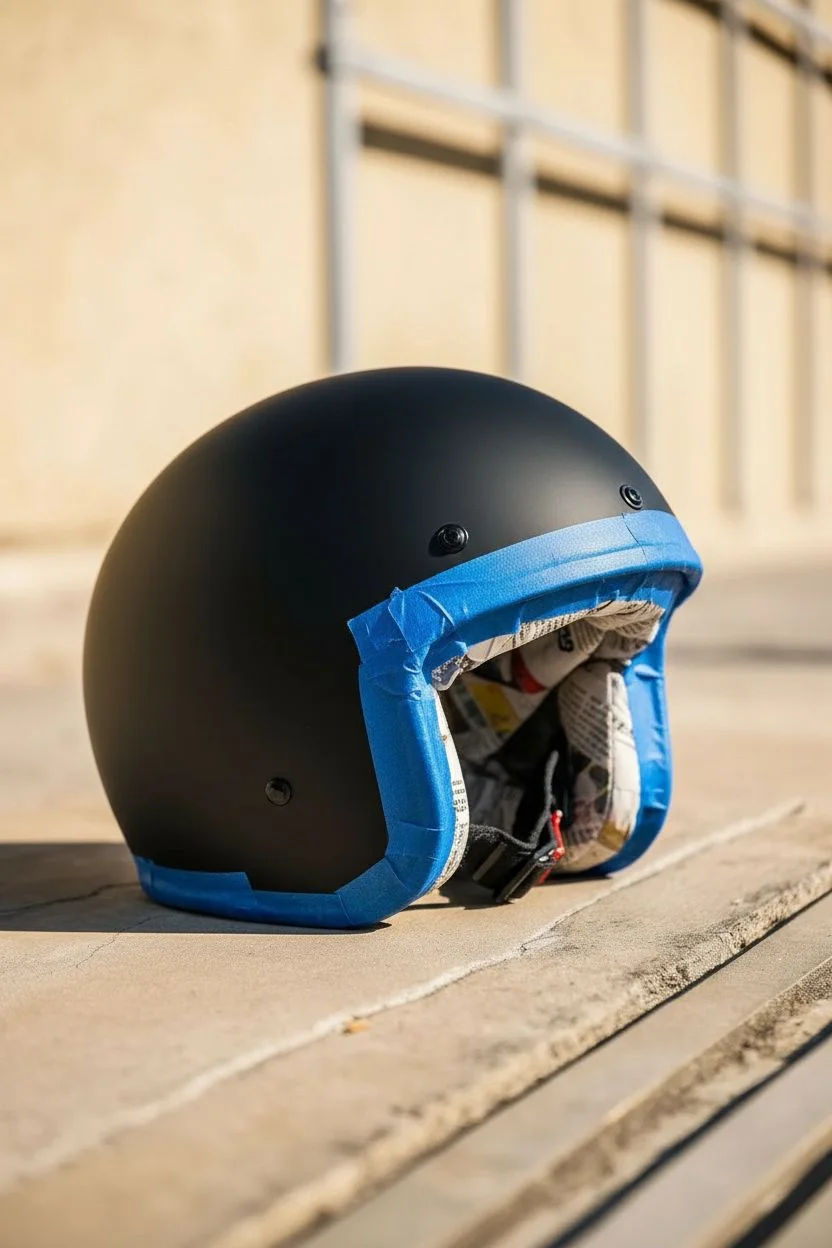
Transform a standard helmet into a sleek, retro-inspired masterpiece with a deep matte black finish and crisp silver pinstriping. This design relies on the contrast between the velvety base coat and the sharp metallic lines to create a look that is both understated and high-end.
Detailed Instructions
Materials
- Open-face motorcycle helmet (cleaned and prepped)
- 400-grit and 800-grit wet/dry sandpaper
- Degreaser or prep solvent
- Automotive grade masking tape (various widths)
- Fine line tape (1/8 inch or 3mm width)
- Matte black spray paint (automotive quality)
- Metallic silver pinstripe tape (vinyl) OR silver paint and striping brush
- Matte clear coat spray
- Microfiber cloths
- Tack cloth
- Painter’s contour tape (highly flexible)
Step 1: Preparation & Base Coat
-
Initial Sanding:
Begin by scuffing the entire surface of the helmet with 400-grit sandpaper. You aren’t trying to strip the old paint entirely, just creating a ‘key’ for the new paint to adhere to. Be thorough around the snaps and rim. -
Masking Off Interior:
Carefully mask off the rubber trim, the interior liner, and any metal snaps or rivets you want to keep unpainted. Use flexible painter’s tape for the curves and fill the helmet cavity with newspaper or rags to prevent overspray inside. -
Cleaning the Surface:
Wipe the helmet down thoroughly with a degreaser or prep solvent. Follow up with a tack cloth to pick up any microscopic dust particles that could ruin the smooth finish. -
First Coat of Black:
Shake your matte black automotive spray paint vigorously. Apply a light mist coat first—this is your tack coat. Let it sit for about 5-10 minutes until tacky. -
Building the Color:
Apply 2-3 wet coats of matte black, allowing proper flash time (usually 10-15 minutes) between coats. Keep your spray can moving to avoid drips. The goal is a uniform, deep black. -
Curing:
Allow the base coat to cure fully. Since we are applying stripes over it, I prefer to let this dry for at least 24 hours to ensure the tape doesn’t pull up the new paint.
Use Vinyl Knifeless Tape
For painted stripes, use knifeless tape instead of a blade. It contains a filament that cuts through paint films perfectly without scratching the base coat underneath.
Step 2: Laying the Lines
-
Planning the Center Line:
Find the absolute center of the helmet from the front brow to the back neck. Place a small piece of tape at the front and back center points as guides. -
Applying the Main Stripes:
Using your silver vinyl pinstripe tape (or fine line masking tape if you plan to paint the stripes), lay down the two parallel lines running front to back. Keep them evenly spaced, roughly 1-1.5 inches apart. -
Checking Symmetry:
Step back and look at the helmet from the front and top. The human eye is very good at spotting asymmetry. Adjust the lines now while the tape is repositionable. -
Option A: Vinyl Pinstripes:
If using vinyl striping tape (easiest method), simply press the silver tape down firmly along your guide path. Trim the ends cleanly at the rubber gasket using a sharp hobby knife. -
Option B: Painting Stripes:
If painting, you should have laid down two strips of masking tape with a gap in between. Scuff the gap lightly, cover the rest of the black helmet with paper, and spray your silver metallic paint into the gap. -
Removing Masking:
If you painted the stripes, remove the masking tape carefully while the silver paint is still slightly soft to keep a sharp edge. Let the silver dry completely.
Step 3: Finishing Touches
-
Adding Outer Accents:
To match the image, apply a second, thinner pinstripe just outside the main thick stripes. Leave a small gap (about 3-4mm) of black showing between the main stripe and this accent line. -
Final Tack:
Gently run a tack cloth over the entire helmet one last time to remove any dust that settled during the striping process. -
Matte Clear Coat:
Seal the design with a high-quality matte clear coat. This is crucial for protecting the vinyl stripes from peeling or the paint from chipping. Apply 2-3 thin, even coats. -
Unmasking:
Once the clear coat is dry to the touch (usually an hour or two), carefully remove all the masking tape from the rubber trim and interior. Pull the tape away from the paint edge at a 45-degree angle. -
Final Polish:
Let the helmet cure for a few days before use. Once fully hardened, you can use a matte-specific detailer spray to clean off fingerprints without adding unwanted shine.
Mix Finishes
Instead of silver, try a gloss black stripe over the matte black base. This ‘ghost’ effect creates a subtle, sophisticated texture difference visible only in certain light.
Enjoy the ride with your custom, factory-fresh looking lid


Flames That Follow the Chin Bar
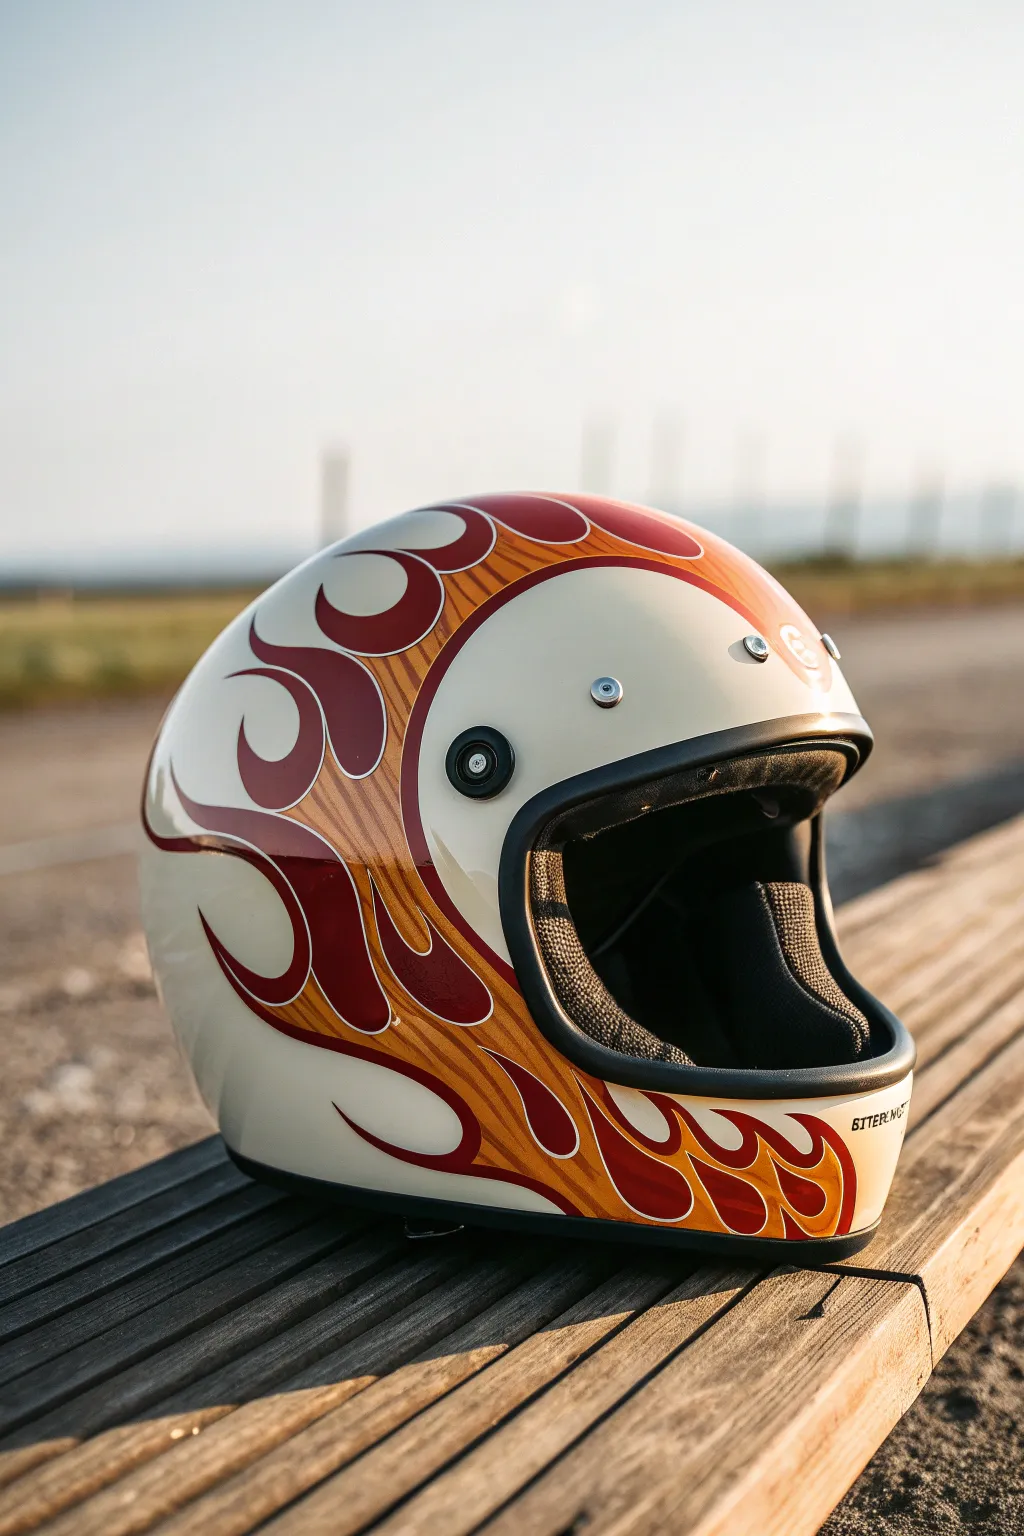
This custom helmet design channels classic hot rod culture with sweeping licks of fire that hug the chin bar and wrap around the sides. The vintage cream base coat combined with deep maroon and sunburst orange flames creates a timeless, retro look perfect for café racers.
Step-by-Step Tutorial
Materials
- Retro-style motorcycle helmet (white or cream base)
- Fine line tape (1/8 inch and 1/16 inch)
- Masking tape (various widths)
- Airbrush kit with compressor
- Automotive grade urethane paints (Maroon, Candy Orange, Pearl Yellow)
- High-gloss 2K clear coat
- Degreaser or wax and grease remover
- Grey scuff pad (Scotch-Brite)
- Tack cloth
- X-Acto knife with fresh blades
- Respirator mask and nitrile gloves
Step 1: Preparation and Base
-
Disassemble the helmet:
Begin by removing the visor, any removable trim, and the inner padding if possible. Mask off the eye port rubber seal and bottom rim completely with masking tape to protect them from overspray. -
Surface prep:
Clean the entire helmet surface with wax and grease remover. Using a grey scuff pad, gently scuff the existing clear coat until it has a dull, matte finish. This ensures the new paint adheres properly. -
Clean again:
Wipe down the helmet once more with degreaser and follow up with a tack cloth to remove every speck of dust before you start painting.
Bleeding Lines?
If paint bleeds under the tape, don’t panic. Once dry, lightly scrape the excess away with a sharp X-Acto blade or use a fine pinstriping brush to touch up the edge with the base color.
Step 2: Designing the Flames
-
Map the centerline:
Place a strip of fine line tape down the exact center of the helmet from front to back. This will act as your guide to ensure the flames are symmetrical on both sides. -
Lay out the main curves:
Using 1/8 inch fine line tape, start laying out your flame design. Begin at the chin bar, pulling a long, sweeping curve that wraps around the side toward the back. Focus on flow rather than perfect detail right now. -
Refine the lick shapes:
Switch to 1/16 inch tape for tighter curves. Create the ‘licks’ or flame tips, making sure they curl upwards and backwards, mimicking wind movement. The design should naturally frame the eye port. -
Mirror the design:
Once you are happy with one side, replicate the pattern on the other side. You can use tracing paper or simply measure key points from your centerline tape to ensure symmetry.
Smooth Tape Turns
When laying tape around tight curves, pull the tape taut but don’t stretch it. Pressing down firmly with your thumbnail as you turn prevents the tape from lifting or buckling.
Step 3: Painting the Design
-
Mask negative space:
Using masking tape and paper, cover all the areas that you want to remain the original cream color. Only the inside area of your flame shapes should be exposed. -
Apply the maroon base:
Load your airbrush with the deep maroon color. Spray light, even coats inside the masked flame areas. Build the color up gradually until you have solid, opaque coverage. -
Unmask for the border:
Carefully remove the masking tape covering the negative space, but leave the fine line tape defining the flame edges. We need to create the orange border next. -
Create the pinstripe gap:
Re-mask the cream area, but leave a small gap (about 1/4 inch) around your maroon flames. This gap will become the orange halo. -
Spray the gradient border:
Spray a candy orange color into this new gap, overlapping slightly onto the maroon to blend it. I prefer to fade this out towards the tips for a fiery effect. -
Add yellow highlights:
With the orange still fresh, add tiny hits of pearl yellow at the very tips of the flames and the highest curves to give the design depth and a glowing appearance.
Step 4: Finishing Touches
-
Remove all tape:
Very carefully peel away all masking and fine line tape. Pull the tape away from the painted edge at a sharp angle to cut a clean line. -
Clear coat application:
Mix your 2K clear coat according to instructions. Spray 3-4 wet coats over the entire helmet, allowing proper flash time between coats. This buries the paint edges so you don’t feel them. -
Wet sand and polish:
Once the clear is fully cured (usually 24 hours), wet sand with 1500 and then 2000 grit paper to smooth out any texture. finish by buffing with a polishing compound for a mirror-like shine. -
Reassembly:
Remove the protective tape from the rubber seals and re-install the visor and padding.
Ride out in style knowing your custom lid is a one-of-a-kind piece of art.
BRUSH GUIDE
The Right Brush for Every Stroke
From clean lines to bold texture — master brush choice, stroke control, and essential techniques.
Explore the Full Guide
Bold Geometric Speed Angles
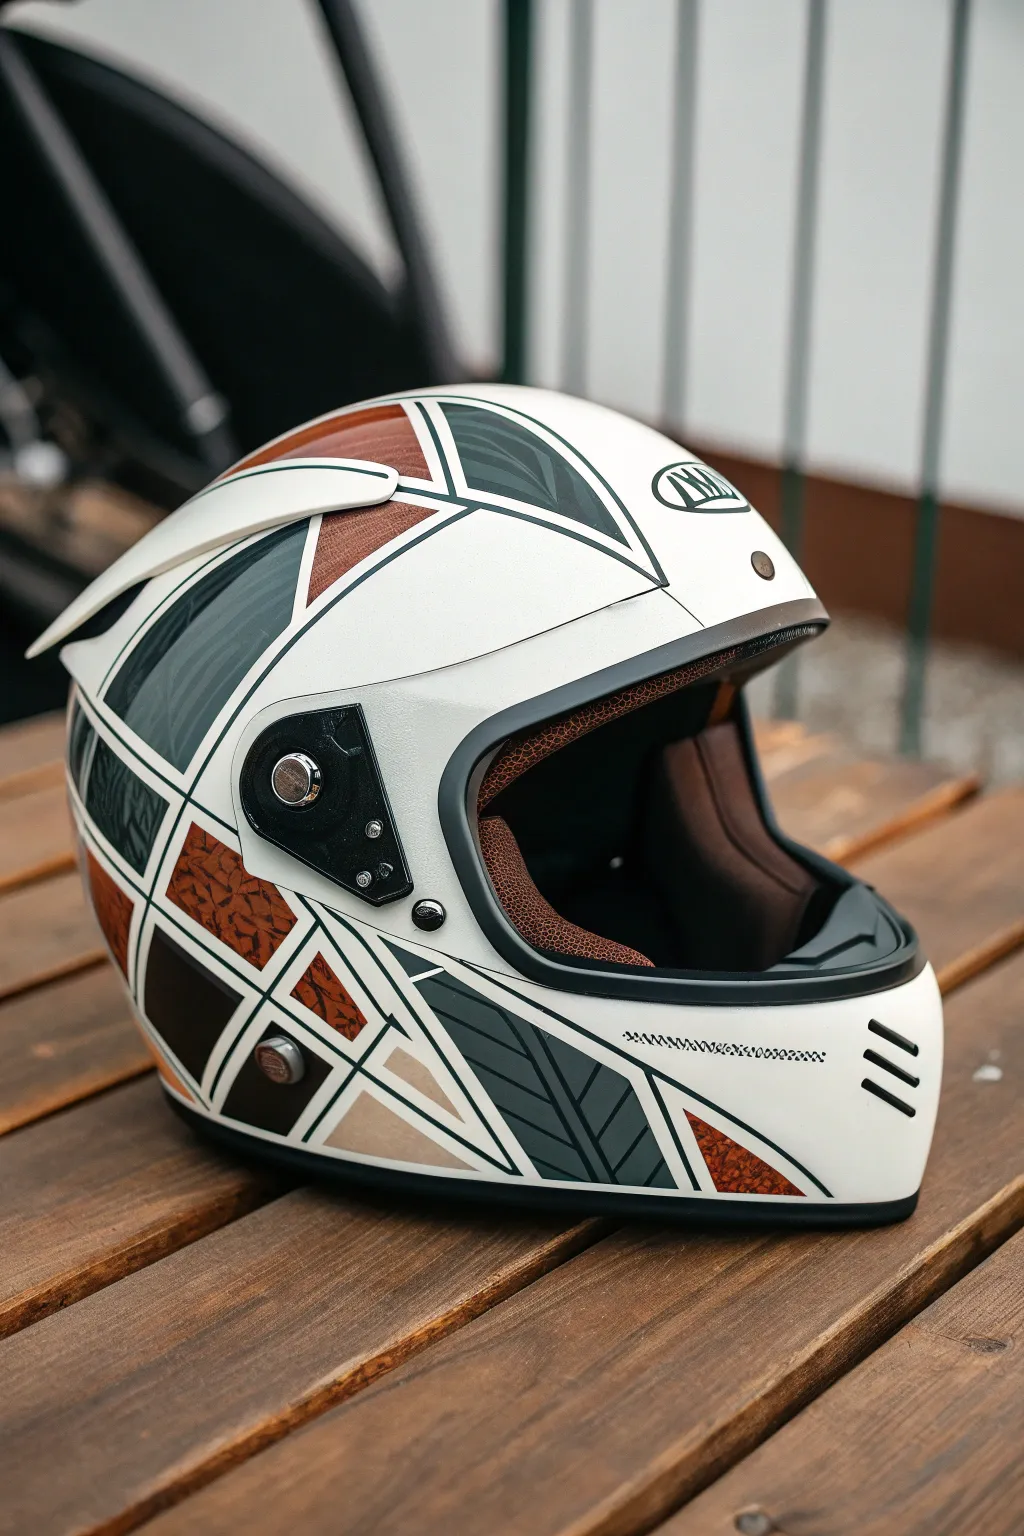
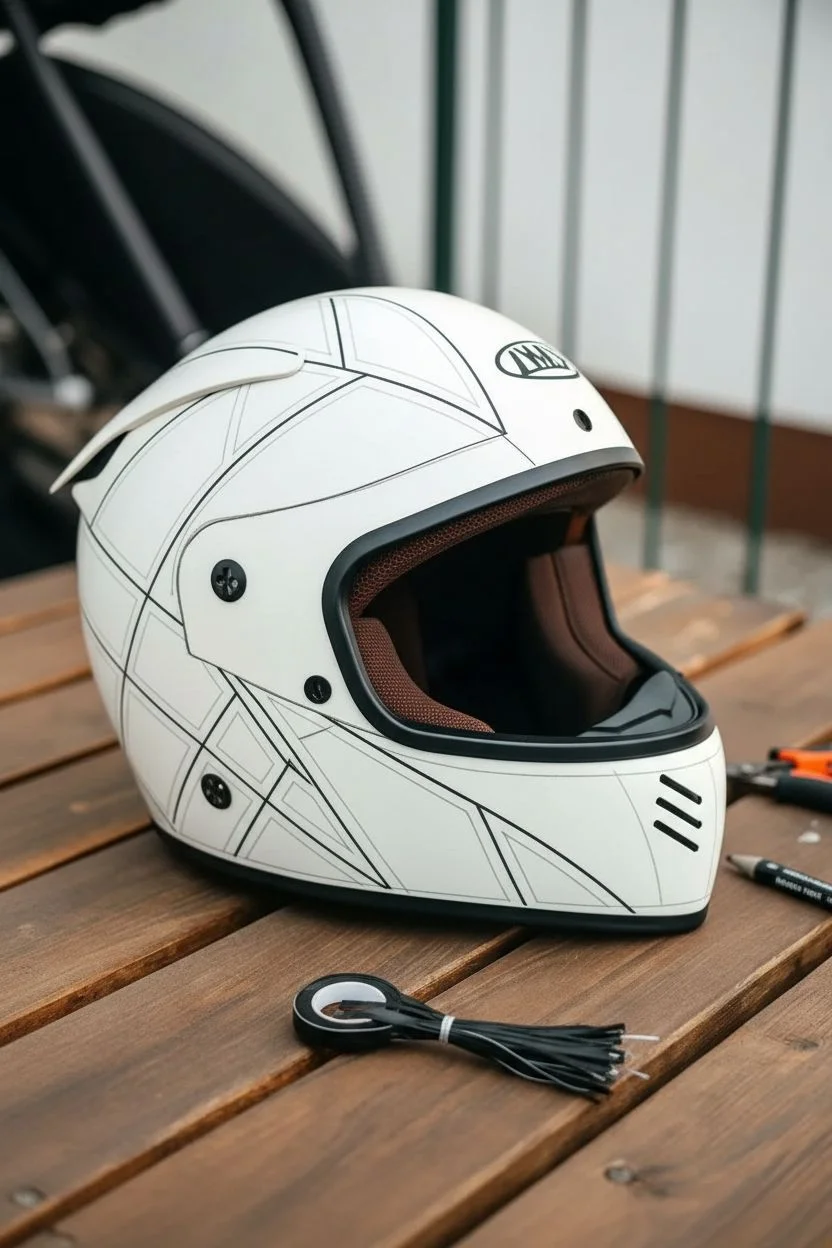
Transform a plain white helmet into a retro-futuristic masterpiece using sharp geometric forms and rich textures. This design combines the sleekness of modern speed blocks with the classic warmth of leather and carbon-inspired patterns for a truly unique look.
Step-by-Step
Materials
- White full-face helmet (matte or gloss base)
- Vinyl wrap sheets (matte grey, metallic bronze/copper, black)
- Textured vinyl (faux leather grain, subtle patterned grey)
- Knifeless tape (3.5mm)
- Precision craft knife (X-Acto)
- Squeegee with felt edge
- Heat gun or hair dryer
- Isopropyl alcohol and lint-free cloths
- Fine-line tape (3mm black or dark green for pinstriping)
- Measuring tape and grease pencil
Step 1: Preparation & Mapping
-
Clean surface:
Thoroughly clean the entire helmet with isopropyl alcohol and a lint-free cloth. Any oil, wax or fingerprints will prevent the vinyl from adhering properly, so take your time here. -
Remove hardware:
Carefully unscrew the visor mechanism, side pods, and any vents you can easily remove. This allows you to tuck the vinyl edges under the hardware for a seamless, professional finish. -
Plan the geometry:
Using a grease pencil, lightly sketch the large triangular zones directly onto the helmet. Aim for ‘speed angles’—shapes that sweep backward to simulate motion. Start with a large V-shape originating from the visor hinge area. -
Lay knifeless tape:
Apply knifeless tape along the lines you just sketched. This is crucial for getting those razor-sharp geometric edges without risking scratches on the helmet’s original paint.
Step 2: Applying the Base Shapes
-
First section: Dark Grey:
Cut a piece of the matte grey vinyl slightly larger than your first geometric triangle. Peel the backing and float it over the area. -
Squeegee and heat:
Start from the center of the shape and squeegee outwards. Use the heat gun lightly to soften the vinyl so it conforms to the spherical curve of the helmet without bunching. -
Cut the shape:
Pull the filament of the knifeless tape through the vinyl to cut your perfect line. Peel away the excess waste vinyl. -
Repeat for accents:
Repeat this process for the smaller geometric shards using the metallic bronze or copper vinyl. I prefer to space these out so no two colors of the same type touch directly.
Knifeless Tape is Key
Never cut directly on the helmet with a blade. Knifeless tape uses a filament to cut the vinyl from underneath, preventing damage to the helmet’s structural integrity.
Step 3: Adding Texture & Detail
-
Faux leather inserts:
For that unique vintage feel, apply the textured faux-leather vinyl in select triangular zones, particularly near the jawline or crown. -
Patterned grey sections:
Apply the subtle patterned grey vinyl (emulating the feather-like texture in the reference) to the curved side panels. Heat is very important here to ensure the pattern doesn’t distort too much. -
Create separation lines:
To define the shapes clearly, apply 3mm black fine-line tape (or pinstriping tape) over the gaps where your vinyl colors meet. This creates the bold outline effect that ties the design together. -
The pinstripe gap:
If you want the white base to show through like grout lines, simply leave a 3mm gap between your vinyl sections instead of overlapping them. -
Visor trim:
If your helmet has a rubber seal around the eye port, mask it off or carefully trim the vinyl right up to the edge using a very sharp blade, being careful not to cut the rubber.
Clear Coat Seal
For permanent durability, lightly sand the vinyl edges and spray the whole helmet with a customized 2K matte clear coat. This seals the stickers into one seamless surface.
Step 4: Finishing Touches
-
Post-heating:
Go over the entire helmet with your heat gun one last time. This ‘post-heating’ sets the vinyl’s memory and ensures the edges won’t lift over time. -
Reassembly:
Screw the visor mechanism and side pods back into place. The hardware should now sit nicely on top of your design, locking the edges down. -
Side vents:
If your helmet has indentations or vents on the chin bar, use black striping tape to accentuate these, mimicking the three black gills seen in the design. -
Final wipe down:
Give the helmet a final clean to remove any adhesive residue or hand oils from the installation process.
Strap on your newly customized helmet and enjoy the ride with style
Metallic Flake Fade

Channel the golden era of motorsport with this dazzling metallic flake helmet design. By combining deep bronze and bright silver flakes under a thick clear coat, you’ll achieve a finish that catches every ray of sunlight.
How-To Guide
Materials
- Full-face motorcycle helmet (sanded and primed)
- Black base coat paint (automotive grade urethane)
- Metal flake gun or dry flake buster attachment
- Silver holographic metal flake (.008 or .015 size)
- Deep gold or bronze metal flake (.008 or .015 size)
- Intercoat clear (binder for flakes)
- High-quality 2K urethane clear coat
- Fine line masking tape (1/8 inch or 1/4 inch)
- Masking paper and standard masking tape
- Tack Cloths
- Sandpaper (400, 600, 800, 1000, 2000 grit)
- buffing compound and polisher
Step 1: Preparation and Base
-
Prep the surface:
Begin by removing all hardware, vents, and the visor from your helmet. Thoroughly scuff the entire surface with 400-grit sandpaper to ensure mechanical adhesion, then wipe it down with a degreaser to remove any oils. -
Apply the black base:
Spray a solid black base coat over the entire helmet. Black provides the best depth and contrast for metal flakes, making them pop more intensely than a light background. -
Design your layout:
Once the black base is dry, use fine line tape to map out your design. For this look, create a stripe running from the chin bar, over the top, to the back, separating the gold section from the silver sides.
Step 2: Flaking the Silver
-
Mask for silver:
Carefully mask off the center stripe area (where the gold will go) using masking paper and tape. Ensure the edges are sealed tight so no silver flake wanders into the gold zone. -
Mix the silver flake:
Mix your silver holographic flakes into an intercoat clear or a dedicated flake carrier. A ratio of about 2 tablespoons of flake per cup of clear is standard, but adjust based on your gun’s nozzle size. -
Spray the silver:
Spray the silver flake mixture over the exposed sides of the helmet. Apply in multiple light passes rather than one heavy wet coat to prevent the flakes from sliding or clumping together. -
Check coverage:
Continue layering until you have roughly 80-90% coverage. You want a dense wall of sparkle, but leaving tiny gaps of black showing through actually enhances the depth. -
Lock it down:
Apply one coat of pure intercoat clear over the silver flake to seal it in place before you remove the masking.
Rough Texture?
If the surface feels like sandpaper after clearing, don’t keep sanding or you’ll hit the flake. Stop, spray more clear coat to build thickness, let cure, then resume sanding.
Step 3: Flaking the Gold
-
Switch masking:
Allow the silver side to flash off and dry to the touch. Carefully remove the masking from the center stripe. Now, mask off the silver areas you just painted to protect them from the gold flake. -
Apply gold flake:
Clean your gun thoroughly and mix your gold/bronze flake with the intercoat clear. Spray this into the center stripe area, using the same multiple-pass technique. -
Remove tape:
Once the gold flake is applied and tack-free, gently peel away all masking tape and paper. Do this while the paint is still slightly ‘green’ (soft) to avoid jagged edges. -
Bury in clear:
This is the crucial step for flake. Apply 3-4 heavy coats of high-solids 2K urethane clear coat. The flake creates a very rough texture, and you need enough clear to completely bury it.
Candy Coat It
Instead of colored flakes, use only silver flake for the whole helmet. Then, airbrush transparent ‘candy’ paints over specific sections to create the gold/bronze colors.
Step 4: Smoothing and Polishing
-
Initial sand:
Let the clear coat cure for at least 24 hours. Sand the entire helmet with 600 or 800-grit sandpaper to knock down the high points of the texture. Be careful not to sand through to the flake itself. -
Assess texture:
If I can still feel texture after sanding, I apply another 2-3 coats of clear. You need a surface that is perfectly flat like glass before the final polish. -
Final clear flow:
Once the surface is flat, spray one final ‘flow coat’ of clear for maximum gloss. -
Color sanding:
Wet sand the final clear coat starting with 1000 grit, moving to 1500, and finishing with 2000 until the surface is completely uniform and dull. -
Buff to shine:
Using a machine polisher and buffing compound, buff the helmet to a high mirror shine. Reassemble your visor and vents to finish.
Enjoy the ride with your stunning, personalized lid that commands attention on the road

PENCIL GUIDE
Understanding Pencil Grades from H to B
From first sketch to finished drawing — learn pencil grades, line control, and shading techniques.
Explore the Full Guide
Chrome-Look Highlights and Shine Illusions
Transform a standard full-face helmet into a retro-futuristic masterpiece featuring striking chrome-look panels against deep gloss black. This project relies on advanced chrome paints and careful masking to achieve that mirror-like liquid metal finish that turns heads on the street.
Step-by-Step Tutorial
Materials
- Full-face motorcycle helmet (sanded and prepped)
- High-gloss black base coat (automotive grade 2K urethane)
- Mirror chrome specialty paint (e.g., Alclad II or Spaz Stix)
- Automotive 2K clear coat
- Fine-line tape (1/8 inch or 3mm)
- Masking tape and masking paper
- Wet/dry sandpaper (600, 1000, 2000 grit)
- Polishing compound and microfiber cloths
- Airbrush or HVLP spray gun
- Tack cloth
- Respirator mask
Step 1: Preparation and Base Coat
-
Surface Prep:
Begin by removing the visor, rubber trim, and any removable vents from your helmet. Sand the entire original surface with 600-grit paper to scuff the clear coat, ensuring the new paint will adhere properly, then wipe down with a tack cloth. -
Apply Black Base:
Spray the entire helmet with a high-quality gloss black base coat. Chrome paint relies entirely on the smoothness of the undercoat, so this black layer must be flawless. -
Clear and Sand:
Apply a layer of 2K clear coat over the black to seal it. Once fully cured, wet sand this layer with 1000 and then 2000-grit paper. Buff it back to a glass-like finish using polishing compound; perfect smoothness is the secret to convincing chrome.
Step 2: Designing the Chrome Zones
-
Mapping the Lines:
Using fine-line tape, lay out the design curves. For this look, create a large swooping panel that starts at the chin bar, rises over the ear area, and curves toward the back. Add a secondary, thinner stripe underneath to echo the main shape. -
Symmetry Check:
Measure from the center line of the helmet to ensure your curves are symmetrical on the left and right sides. Step back often to view the flow of the lines. -
Masking Off:
Once satisfied with the fine-line tape boundaries, use wider masking tape and paper to completely cover the areas that will remain black. Press the tape edges down firm to prevent bleed-under.
Cloudy Chrome?
If your chrome looks gray or milky, you likely applied the layers too wet or too thick. Chrome paint must be misted on barely damp. You need to sand it back to black and retry with lighter coats.
Step 3: The Chrome Application
-
Dust Control:
Wipe the exposed areas (where the chrome will go) gently with a tack cloth one last time. Even a single speck of dust will show up in the final metallic finish. -
Mist Coating:
When spraying chrome paint, less is more. Apply the chrome in extremely light ‘dust’ coats using your airbrush or gun at low pressure. Do not try to wet the surface; you want the particles to sit on top of the black glass surface. -
Building Reflection:
Apply 3-5 very thin mist coats, waiting about 5-10 minutes between each. I usually stop just as the surface turns fully reflective; if you spray too much, it turns gray and dull instead of looking like metal. -
Buffing (Optional):
Some specific chrome paints actually benefit from a very gentle buffing with a soft cotton cloth once dry to orient the metallic flakes. Check your specific paint manufacturer’s instructions for this step.
Add a Color Tint
Mix a small amount of candy concentrate (like transparent blue or red) into your final clear coat. This will turn your silver chrome into stunning colored anodized metal.
Step 4: Detailed Accents
-
De-masking:
Carefully peel away the masking paper and the fine-line tape. Pull the tape back at a sharp angle away from the painted edge to ensure a crisp separating line between the chrome and black. -
Vent Details:
If your helmet vents are molded in, mask the surrounding area and spray the vent inlets with a matte black or gunmetal grey to add depth and mechanical definition. -
Side Mechanism Paint:
For the circular visor pivot point, you can hand-paint or airbrush a ring of darker gunmetal or titanium color to visually separate the mechanism from the main shell design.
Step 5: Final Finish and Assembly
-
Sealing the Chrome:
This is critical: chrome paint is fragile. Apply a water-based clear coat or a specific chrome sealer first. Solvent-based clears can ‘eat’ the chrome effect and turn it gray if applied directly. -
Final Clear Coat:
Once the sealer is dry, apply a final heavy automotive 2K clear coat over the entire helmet. This buries the tape lines so you can’t feel them and provides UV protection. -
Final Polish:
After the clear has cured for 24-48 hours, wet sand any dust nibs with 2000-grit paper and polish the whole helmet to a high gloss. -
Reassembly:
Reattach the rubber trim around the eye port and bottom edge. Reinstall the vents and snap the visor back into place.
Now tighten up that visor hardware and enjoy the envious stares your custom chrome finish will draw
Skull and Smoke Side Panels
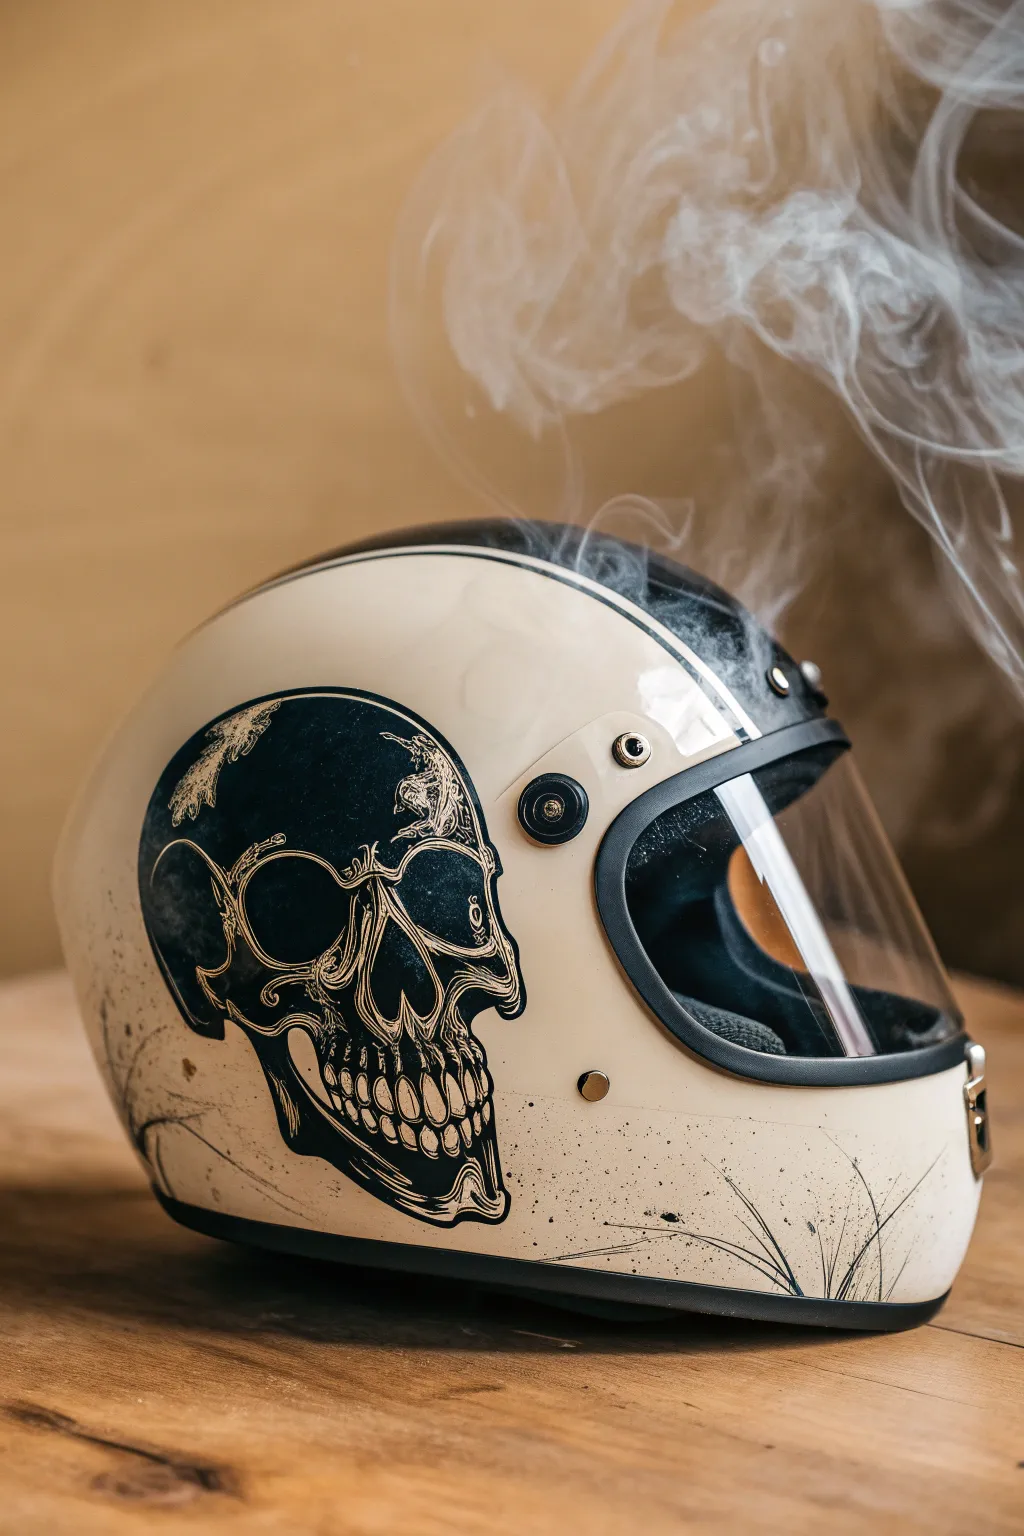
Transform a standard retro helmet into a ghostly masterpiece with this illustrative ink-style skull design. The distinctive look combines precise linework with gritty splatter effects on a cream base, evoking a vintage tattoo aesthetic that feels both raw and refined.
Step-by-Step Guide
Materials
- Retro full-face motorcycle helmet (matte or gloss cream/white)
- Sandpaper (400 and 800 grit)
- Masking tape and painter’s paper
- Surface cleaner / Degreaser
- Graphite transfer paper
- Pencil
- Black acrylic enamel paint or Posca markers (black, fine and medium tip)
- Fine liner brushes (sizes 0 and 00)
- Clear coat spray (2K recommended for durability)
- Old toothbrush (for splatter)
- Reference image of a skull profile
Step 1: Preparation & Base
-
Clean surface:
Begin by removing the visor and any detachable hardware to ensure they remain paint-free. Thoroughly clean the entire helmet shell with a degreaser to remove road grime, wax, or oils. -
Scuff the clear coat:
Lightly sand the area where the skull will be placed using 800 grit sandpaper. You don’t want to strip the original paint, just dull the shine so your new artwork adheres properly. -
Wipe down:
Clean the helmet again with a tack cloth or lint-free rag to remove every speck of sanding dust. -
Masking boundaries:
Use painter’s tape to mask off rubber seals, the eye port trim, and any vents you want to protect from accidental slips or splatter.
Step 2: Drafting the Design
-
Scale your reference:
Print your skull reference image to the appropriate size for the side of the helmet. Cut out the skull shape roughly to see how it fits against the curvature of the shell. -
Transfer the outline:
Place a sheet of graphite transfer paper between your printout and the helmet. Tape it securely in place so it doesn’t shift. -
Trace the key lines:
Using a pencil, trace the main contours of the skull—the cranium, eye socket, nose cavity, and jawline. Don’t worry about shading yet; just get the skeleton structure down. -
Refine the sketch:
Remove the paper and inspect your faint graphite lines. Use a pencil to hand-correct any areas where the transfer might have skipped due to the helmet’s curve.
Ink Flow Tip
On curved surfaces, paint markers can sometimes skip. Keep a piece of scrap cardboard nearby to pump the nib and ensure fresh ink flow before every few strokes.
Step 3: Inking & Detailing
-
Block out shadows:
Start with your medium-tip marker or a round brush with black enamel. Fill in the darkest voids first: the large eye socket, the nasal cavity, and the deep shadows under the cheekbone. -
Define the cracks:
Switch to your finest brush or a fine-tip Posca pen. I find it easiest to start drawing the jagged cranial sutures (the cracks in the skull) at the top and work downward. -
Add texture strokes:
Using very light, hatching strokes, create the texture of bone. Focus these hatching lines around the edges of the dark voids to create a gradient effect without using grey paint. -
Detail the teeth:
Carefully outline each tooth. To make them look aged rather than cartoonishly perfect, add small vertical cracks and ensure the gum line looks receded and uneven. -
Deepen the contrast:
Go back over your blackest areas. Ensuring the blacks are solid and opaque is crucial for that high-contrast, ink-illustration look. -
Add wispy elements:
Around the back of the skull, extend a few lines outward in a flowing, organic motion to suggest motion or smoke, letting the lines fade out as they move away from the bone.
Level Up: Smoke Effect
For a true phantom look, use a heavily diluted white or grey wash to paint faint, translucent smoke trails rising from the top of the skull before clear coating.
Step 4: Distressing & Finishing
-
Create the splatter:
Dip an old toothbrush into a small amount of black paint. Run your thumb across the bristles to flick tiny speckles onto the helmet. -
Control the chaos:
Concentrate the splatter near the jaw and the back of the skull, letting it fade out toward the front. This integrates the drawing into the helmet surface so it doesn’t look like a sticker. -
Dry time:
Allow the paint to cure fully. If you used acrylic markers, wait at least 24 hours just to be safe; enamel may require longer. -
Clear coat application:
Apply a spray clear coat (matte or satin works best for this vintage look) in light, even mists. Build up 2-3 layers to seal the artwork against wind and weather. -
Reassembly:
Once the clear coat has hardened completely—usually after 48 hours—remove your masking tape and reattach the visor.
Now you have a custom lid that looks as good on the shelf as it does on the road


Botanical Florals Around the Base Ring
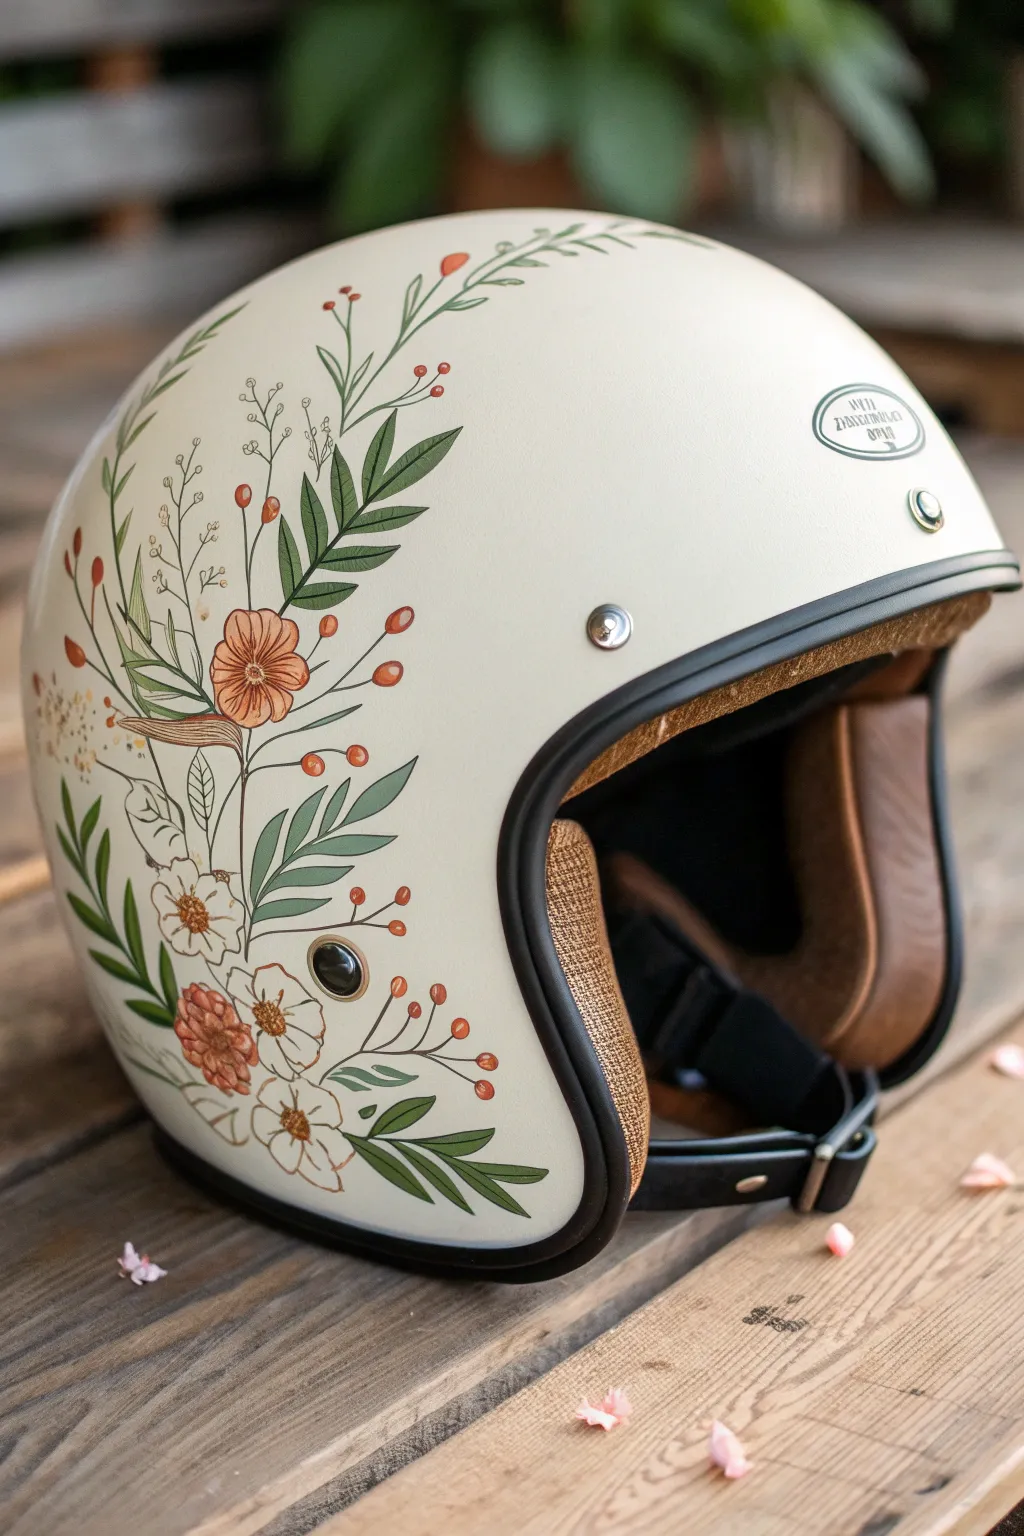
Transform a plain motorcycle helmet into a rolling piece of art with this delicate botanical design. Featuring muted earth tones and flowing organic lines, this project adds a soft, vintage touch to your riding gear without compromising style.
Step-by-Step
Materials
- Clean, solid-colored helmet (cream or matte white works best)
- Sandpaper (400 and 800 grit)
- Isopropyl alcohol and lint-free cloth
- Posca paint pens or high-quality acrylic paint markers (fine and extra-fine tips)
- Colors: Sage green, forest green, terra cotta, burnt orange, golden yellow, white, and black
- Pencil and eraser
- Clear coat spray sealant (matte or satin finish compatible with plastics)
- Painter’s tape
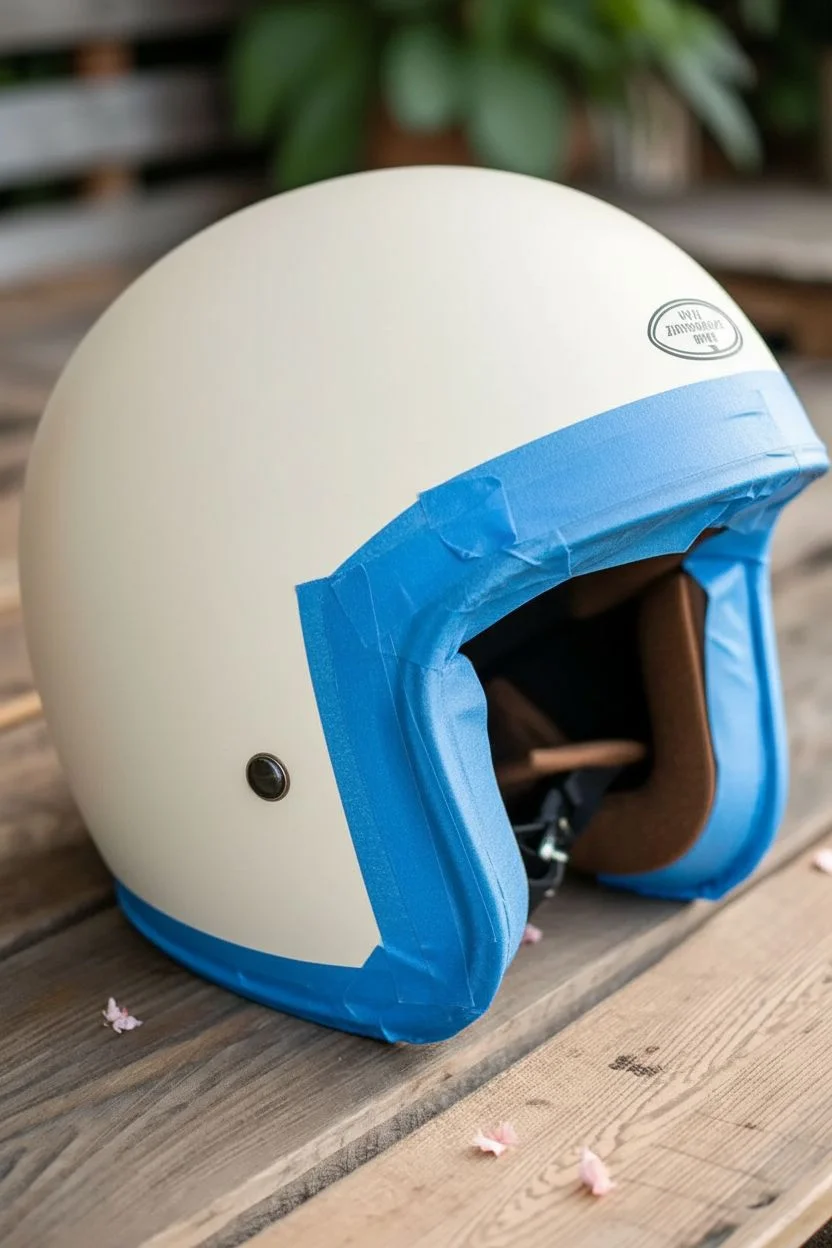
Step 1: Preparation
-
Prepare the workspace:
Set up a clean, well-lit area. Remove any detachable visors or peaks from your helmet to make handling easier. -
Masking off:
Use painter’s tape to carefully cover the black rubber trim, any vents, snaps, or logo badges you want to protect. Press the edges of the tape down firmly to prevent paint bleed. -
Scuffing the surface:
Lightly sand the area where you intend to paint using the 400 grit sandpaper. You don’t need to strip the paint, just de-gloss the clear coat to give the new paint something to grab onto. -
Smoothing and cleaning:
Follow up with a quick pass of 800 grit sandpaper for a smoother finish. Wipe the entire surface down thoroughly with isopropyl alcohol and a lint-free cloth to remove all dust and oils.
Fixing paint runs
If your paint pen floods or runs, don’t wipe it! Let it dry completely, then sand the drip down gently with high-grit sandpaper before painting over it.
Step 2: Planning and Sketching
-
Drafting the flow:
Using a pencil, lightly sketch the main ‘spine’ of your botanical arrangement. Start from the bottom base ring and curve upward along the side of the helmet, mimicking how a vine might grow. -
Adding main elements:
Sketch in the larger flowers and leaf clusters first. Position the largest terra cotta flower as a focal point near the curve, then stagger smaller blooms below and above it. -
Filling the gaps:
Draw faint guides for the sprigs of berries, fern-like leaves, and smaller filler flowers. Keep the composition loose and organic rather than perfectly symmetrical.
Step 3: Painting the Botanicals
-
Base layers for greenery:
Using your sage green marker, color in the larger leaves. For the darker, sharper leaves, switch to forest green. Apply thin, even layers; if the helmet color shows through, let it dry and apply a second coat. -
Painting the blooms:
Fill in the main flower petals with terra cotta and burnt orange tones. For the white flowers, use a white paint pen, possibly needing 2-3 coats to get a solid opaque look against the cream background. -
Adding stems and berries:
Use a fine-tip brown or dark green pen to connect your elements with thin, flowing stems. Dot in the small berries using burnt orange or red. -
Detailing the leaves:
Once the green base layers are fully dry, add veins to the leaves using a darker green or a very fine black liner. This adds depth and realism to the foliage. -
Flower centers and definition:
Add centers to your flowers using yellow or dark brown dots. Use a fine black pen to outline specific petals or add shading lines to the orange blooms for a vintage illustration style. -
Refining lines:
Go over any shaky outlines with your finest tip pen. Add tiny wispy strays or extra buds to soften the edges of the design so it doesn’t look like a sticker. -
Clean up:
Check for any pencil marks that are still visible and gently erase them. If you made a paint mistake, you can often gently scratch it off with a damp toothpick before it fully cures.
Add metallic flair
Use a gold leaf pen to add tiny accents to the flower centers or light highlights on the leaf tips for a design that catches the sunlight.
Step 4: Sealing and Finishing
-
Drying time:
Allow the paint to cure for at least 24 hours. This is crucial—if you seal wet paint, it will crack or bubble. -
First seal coat:
In a ventilated area, apply a very light ‘mist’ coat of the matte clear spray. Do not spray heavily yet, as the solvents can make the paint run. Let this tack up for 15 minutes. -
Final sealing:
Apply 2-3 fuller wet coats of the sealer, allowing proper drying time between each as per the can’s instructions. This protects your artwork from road debris and UV rays. -
Unmasking:
Once the final coat is dry to the touch, carefully peel away the painter’s tape to reveal the crisp edges against the rubber trim.
Enjoy riding with your custom gear knowing you have a truly one-of-a-kind design protecting you
Ocean Waves and Foam Flow
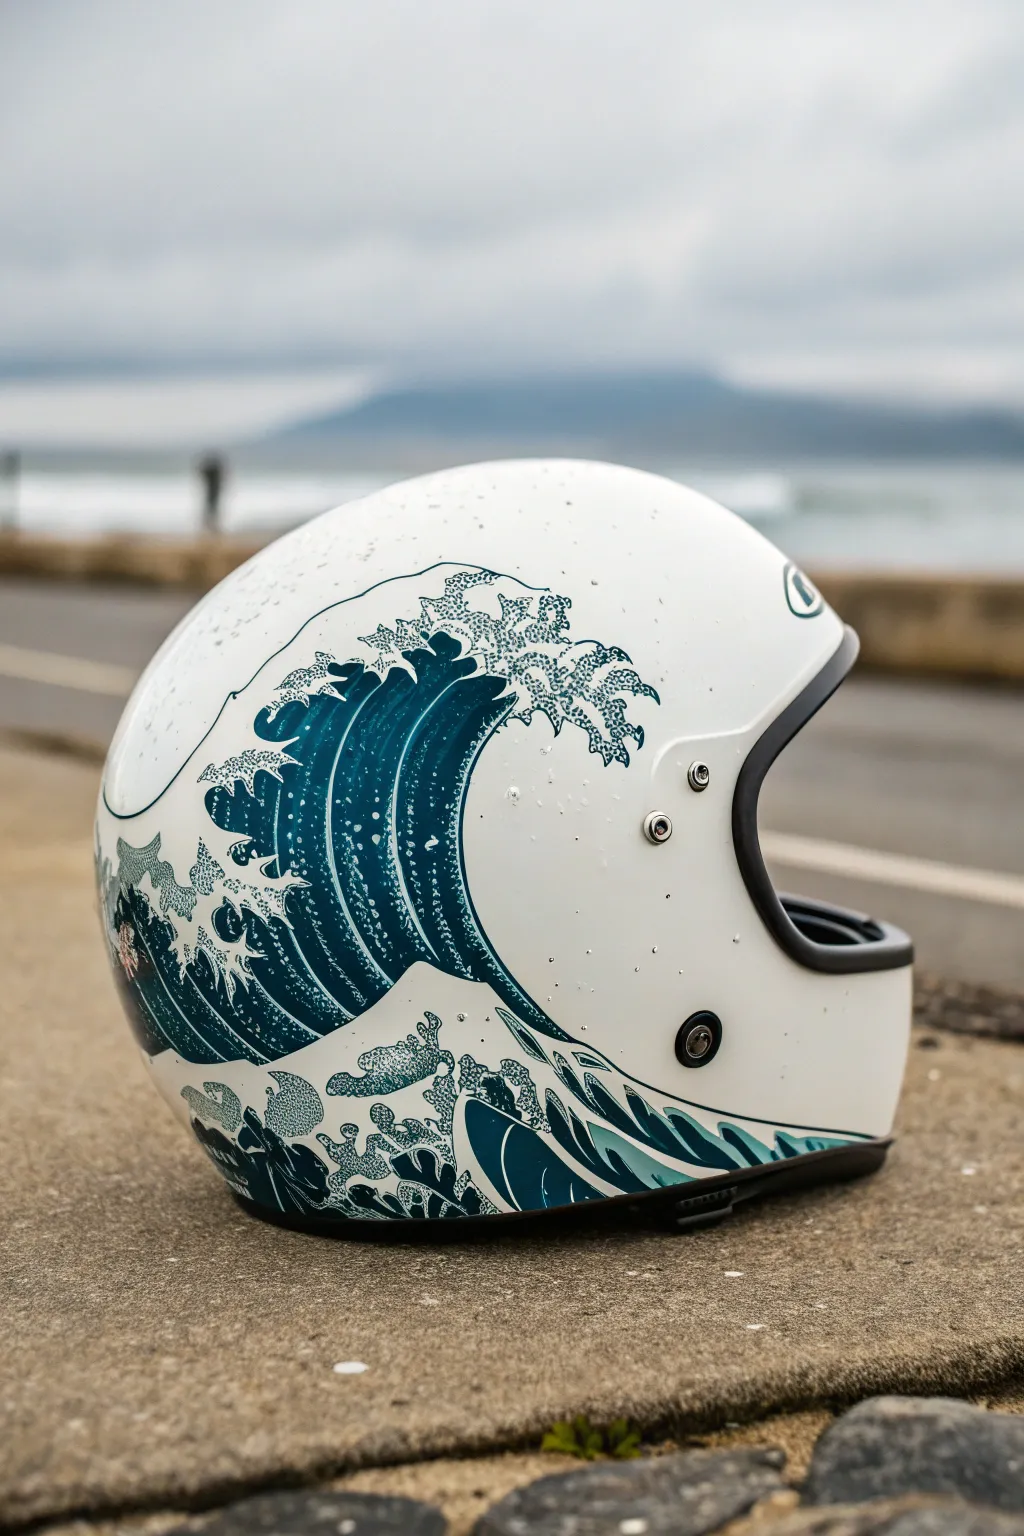
Transform a standard white motorcycle helmet into a moving masterpiece with this design inspired by Hokusai’s iconic woodblock print. This project uses high-quality vinyl decals or hand-painting techniques to wrap your gear in dynamic, crashing ocean waves.
Step-by-Step Tutorial
Materials
- Full-face white motorcycle helmet (clean surface)
- Hokusai ‘Great Wave’ vinyl decal set (large format) OR acrylic paint markers (teal, navy, white)
- Isopropyl alcohol (70% or higher)
- Microfiber cloths
- Heat gun or hair dryer
- Felt-edged squeegee
- Precision craft knife (X-Acto)
- Painter’s tape (low tack)
- Clear coat sealant (spray, UV resistant)
- Fine-grit sandpaper (1000-2000 grit, optional for prep)
Step 1: Preparation and Planning
-
Clean surface thoroughly:
Before applying anything, wipe the entire helmet down with isopropyl alcohol and a microfiber cloth. This removes road grime, grease, and wax that could prevent adhesion. -
Remove hardware:
Carefully unscrew and remove the visor and any external vents or snaps if possible. Store these small parts in a labeled bag so they don’t get lost. -
Mock up the placement:
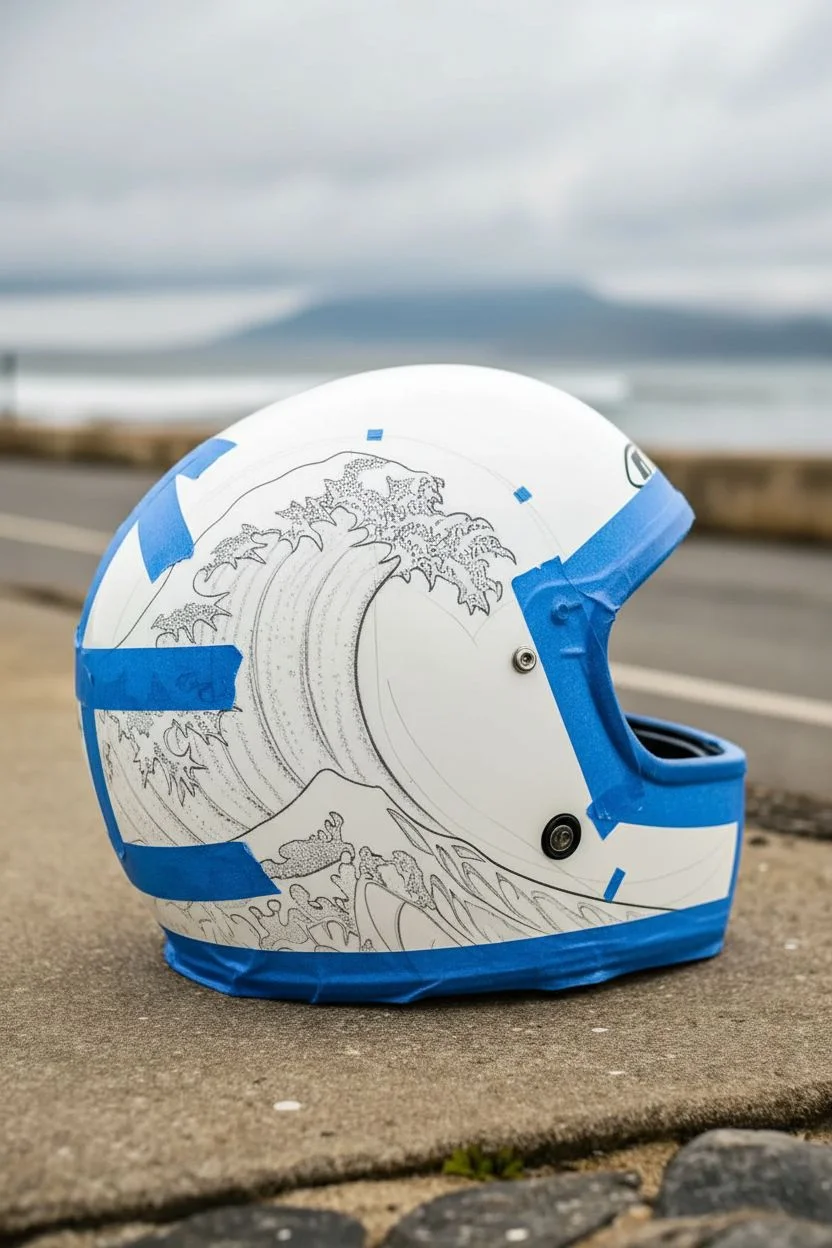
Cut your decal sheet roughly to shape or sketch your wave outlines lightly with a pencil. Use painter’s tape to hold the decal in place to verify the flow of the wave matches the curve of the helmet.
Smooth curves
Use a hairdryer instead of a heat gun if you are new to vinyl. It produces lower heat, giving you a wider margin for error so you don’t melt the decal.
Step 2: Application or Painting
-
Anchor the design:
If using a large decal, peel back a small 2-inch strip of the backing paper from the center or the flattest part of the wave design. Press this exposed adhesive section firmly onto the helmet. -
Work outward:
Slowly peel away the rest of the backing paper while simultaneously smoothing the decal down with your felt-edged squeegee. Work from the center outward to push air bubbles to the edges. -
Apply heat for curves:
As you reach the rounded curvature of the helmet, the vinyl will want to wrinkle. Gently warm the vinyl with a heat gun until it softens, then stretch it slightly around the curve. -
Smooth the edges:
Use your thumb or the squeegee to tuck the vinyl into any recesses or panel lines. The heat helps the material conform to complex shapes without bunching up. -
Trim excess material:
Once the main wave is applied, use a fresh blade in your craft knife to carefully trim any overhang around the visor opening and the helmet’s bottom rim. I find it helps to cut with very light pressure to avoid scoring the helmet underneath. -
Painting alternative – Outline:
If you chose to paint instead of using vinyl, use a navy blue acrylic marker to draw the bold outlines of the waves. Focus on the dynamic curve of the swell. -
Painting alternative – Fill:
Fill the body of the waves with deep teal and navy paints. Blend the colors while wet to create a gradient effect where the water deepens. -
Add the foam details:
Whether painting or adding smaller decal details, apply the white foam caps now. Use small, stippled dots to mimic the sea spray and crashing texture seen in the original artwork.
Step 3: Finishing Touches
-
Inspect for bubbles:
Look closely at the surface under a bright light. If you find tiny air bubbles under the decal, prick them with a fine needle and press the air out with your finger. -
Re-heat edges:
Go over all the cut edges and overlaps one last time with the heat gun to seal the vinyl bond permanently. -
Apply clear coat:
To protect your artwork from UV rays and scratches, apply 2-3 light coats of automotive-grade clear sealant. Allow proper drying time between coats as per the can’s instructions. -
Reassemble components:
Once the clear coat has cured completely (usually 24 hours), reattach the visor and any vents you removed earlier. -
Final polish:
Give the helmet a final wipe with a clean microfiber cloth to bring out the shine.
Add depth
Mix a tiny amount of metallic silver paint into your white acrylic for the wave crests. It adds a subtle shimmer that catches sunlight on the road.
Now you are ready to ride with the power of the ocean protecting you
Galaxy Nebula on the Crown
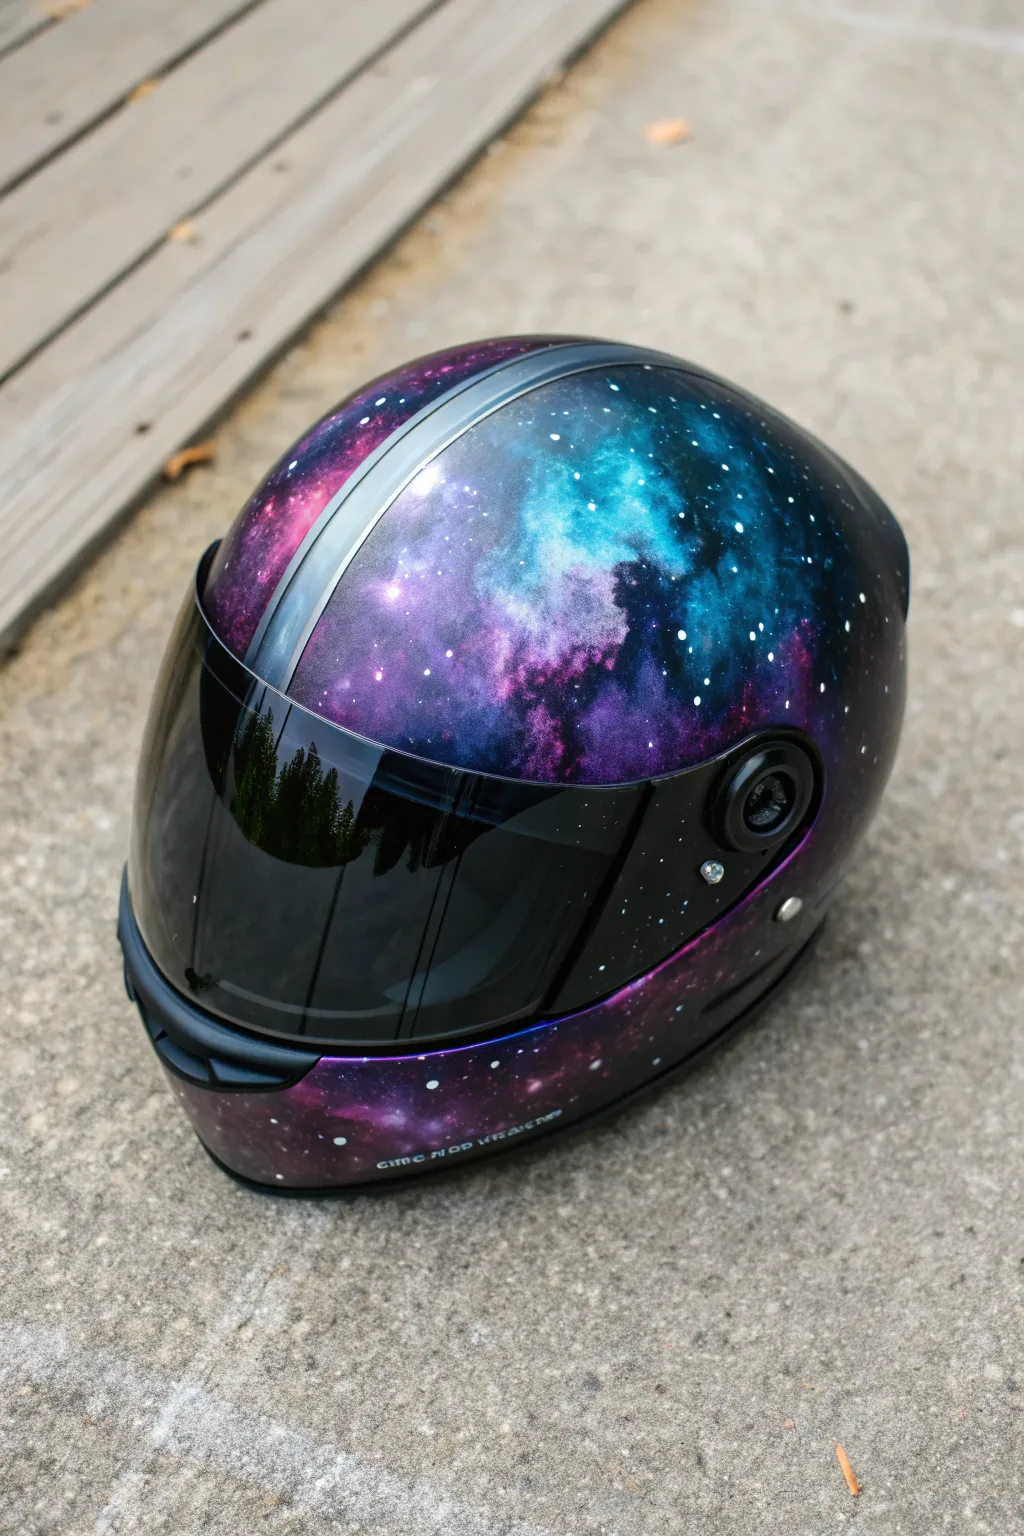
Transform a standard motorcycle helmet into a window to the universe with this stunning galaxy nebula design. The deep, swirling purples and teals, accented by bright star clusters, create a custom look that is truly out of this world.
How-To Guide
Materials
- Motorcycle helmet
- Sandpaper (400, 600, and 800 grit)
- Painter’s tape
- Masking paper or plastic
- Black primer spray paint
- Airbrush kit (or high-quality spray cans)
- Acrylic airbrush paints (Black, Deep Purple, Phthalo Blue, Teal, Magenta, White)
- Automotive clear coat (2K high gloss recommended)
- Tack cloth
- Toothbrush or stiff bristle brush
- Isopropyl alcohol
- Microfiber towels
Step 1: Preparation & Base Coat
-
Disassemble the helmet:
Begin by removing the visor, any vents that can be easily detached, and the inner padding if possible. This ensures you paint only the shell and keeps the functional parts clean. -
Clean surface thoroughly:
Wipe down the entire exterior shell with isopropyl alcohol and a microfiber towel to remove road grime, grease, or wax. -
Sand the shell:
Scuff the original finish using 400-grit sandpaper. You don’t need to remove all the old paint, just create a dull, rough surface for the new primer to bite into. -
Mask critical areas:
Use high-quality painter’s tape to cover rubber seals, the visor opening mechanism, and the bottom rim. Stuff the inside of the helmet with masking paper to prevent overspray from entering the interior. -
Clean again:
Wipe the helmet down with a tack cloth to remove every speck of dust generated by sanding. -
Apply black primer:
Spray a smooth, even coat of black primer over the entire shell. Apply a second coat if necessary to get full, opaque coverage. -
Create the center stripe:
Once the black base is fully dry (wait at least 4 hours), use painter’s tape to mask off a central stripe running from front to back if you want to keep a separation line like the original design.
Depth Perception
Layer your stars! Do one flicking pass before your final darker shading layer, and another heavy pass after. This puts some stars ‘behind’ the clouds.
Step 2: Painting the Galaxy
-
Start with deep colors:
Using your airbrush, lay down patches of Deep Purple and Magenta in random cloud-like formations. Keep the edges soft and diffused. -
Add cool tones:
Spray patches of Phthalo Blue and Teal, allowing them to overlap slightly with the purple areas. The goal is to create organic transitions, avoiding hard lines. -
Create depth with black:
Lightly mist black paint around the edges of your colored clouds to create ‘negative space’ in the nebula, making the colors pop more intensely. -
Highlight the nebula cores:
Mix a tiny amount of white with teal or pink and spray very concentrated bursts in the center of the largest color clouds. This simulates the bright gases near a star formation. -
Flick the stars:
Dip a toothbrush or stiff brush into white paint. Run your thumb across the bristles to flick tiny specks of paint onto the helmet. Vary your distance to create different sizes of stars. -
Add hero stars:
Hand-paint a few larger, brighter stars using a fine-point detail brush. You can add a subtle cross-flare to one or two for a dramatic effect. -
Remove masking:
Carefully peel away the tape used for the center stripe. If you want the stripe to blend in, you can lightly mist the edges with black before unmasking.
Step 3: Finishing
-
Wet sand imperfections:
If there is significant texture from the paint splatter, very gently wet sand with 800-grit paper to smooth it out without removing the stars. -
Apply clear coat:
Spray a 2K automotive high-gloss clear coat. This is crucial for UV protection and durability. Apply 2-3 coats, allowing proper flash time between layers as per the can’s instructions. I prefer to apply the first coat lightly as a tack coat. -
Polish (optional):
Once fully cured (usually 24-48 hours), you can wet sand and buff the clear coat for a mirror-like finish. -
Reassemble:
Remove all remaining masking tape and paper, then click your vents and visor back into place.
Sputtering Airbrush?
If your airbrush is spitting large blobs instead of mist, your paint is likely too thick. Thin it down to a milky consistency or increase PSI slightly.
Strap on your new helmet and enjoy the ride knowing you have a unique piece of art protecting you
Abstract Watercolor Splash Look

Transform a plain white motorcycle helmet into a work of art with this ethereal, watercolor-inspired floral design. Using alcohol inks or fluid acrylics, you’ll create soft washes of peach, magenta, and teal that seem to float across the surface.
Step-by-Step Guide
Materials
- Solid white motorcycle helmet
- Fine-grit sandpaper (400-600 grit)
- Isopropyl alcohol and lint-free cloths
- Alcohol inks (Salmon, Magenta, Teal, Emerald Green, Indigo)
- Alcohol blending solution
- Small round synthetic brushes (sizes 2, 4, and 6)
- Small spray bottle with rubbing alcohol
- Painter’s tape
- Plastic drop cloth
- Clear UV-resistant acrylic spray sealant (gloss finish)
- Automotive grade clear coat (2k spray recommended)
Step 1: Preparation
-
Clean and Mask:
Begin by thoroughly cleaning the helmet with soapy water to remove any grease or road grime. Once dry, use painter’s tape to carefully mask off the rubber trim, the visor mechanism, vents, and any branding logos you want to protect. Stuff the inside of the helmet with newspaper or cloth. -
Surface Scuffing:
Since most helmets have a glossy finish that repels paint, you need to scuff the surface lightly. Take your fine-grit sandpaper and gently rub the area where you plan to paint. You aren’t trying to remove the paint, just taking the shine off to create ‘tooth’ for the ink to grab. -
Final Wipe Down:
Wipe the sanded area down with isopropyl alcohol on a lint-free cloth. This removes sanding dust and ensures a perfectly clean canvas. Avoid touching this area with your bare fingers afterwards to prevent oil transfer.
Ink Running Too Fast?
If the ink runs down the curve too quickly, thicken your mixture slightly by letting the ink sit on a palette for a minute before applying, or work on smaller sections holding the helmet flat.
Step 2: Creating the Floral Wash
-
Initial Leaf Placement:
Start with the large foliage elements as your base. Mix a few drops of Teal ink with blending solution. Using the size 6 brush, lay down sweeping, curved shapes starting from the lower back of the helmet and curving upwards. -
Building Leaf Depth:
While the teal is still slightly wet, drop in a tiny bit of Emerald Green or Indigo into the shadow areas of the leaves. Let the colors bleed together naturally. I like to tilt the helmet slightly to encourage the natural flow of the liquid. -
Painting the Peach Bloom:
For the central flower, dilute the Salmon ink heavily with blending solution. Dab this onto the surface to create a round, loose flower shape. Keep the edges soft and irregular to mimic watercolor petals. -
Adding the Magenta Accent:
Near the base of your peach flower, add the Magenta ink to create a second, darker bloom. Draw petal shapes that overlap the leaves slightly. The transparency of the ink allows the teal outline to show through subtly, adding to the watercolor effect. -
Refining Petals:
Dip a smaller brush into pure alcohol and gently lift or push the ink around the edges of your flowers. This creates those hard, dried edges characteristic of watercolor paintings. Define the petals by adding concentrated ink in the center of the blooms. -
Creating the Feather Shape:
At the top of the design, paint a long, sweeping feather-like shape using a mix of diluted Magenta and Salmon. Use long, quick strokes to suggest texture without painting every individual barb. -
Adding Veins and Details:
Switch to your smallest brush (size 2). Dip it into undiluted Teal or Indigo ink. Carefully paint thin, delicate veins inside the large leaves and small accent sprigs extending from the main bouquet.
Step 3: Splatter and Finishing
-
The Splatter Technique:
To get those artistic specks, dip a stiff brush into your pink or orange ink. Hold the brush about 6 inches from the helmet and tap the handle against your finger to flick tiny droplets across the white negative space. -
Drying Time:
Allow the design to dry completely for at least 24 hours. Alcohol inks dry to the touch quickly but need time to fully set on non-porous surfaces. -
Initial Sealing:
Alcohol ink keeps reacting if you spray it too heavily. Do 3-4 ultra-light mist coats of the UV-resistant acrylic spray first. Let each coat dry for 20 minutes. Do not wet the surface; just a dusting. -
Final Clear Coat:
Once the acrylic seal is solid (after a few hours), apply your automotive 2K clear coat for durability. Apply 2-3 medium wet coats according to the can’s instructions to protect your artwork from UV rays and road debris. -
Reveal:
After the final clear coat has cured (usually 24-48 hours), carefully peel away all masking tape and remove the stuffing.
Add Metallic Glide
Mix a drop of gold alcohol ink or metallic mixative into your vein lines or splatter effects. It catches the sunlight beautifully when you’re out riding.
Strap on your helmet and enjoy the ride knowing you are wearing a completely unique piece of art
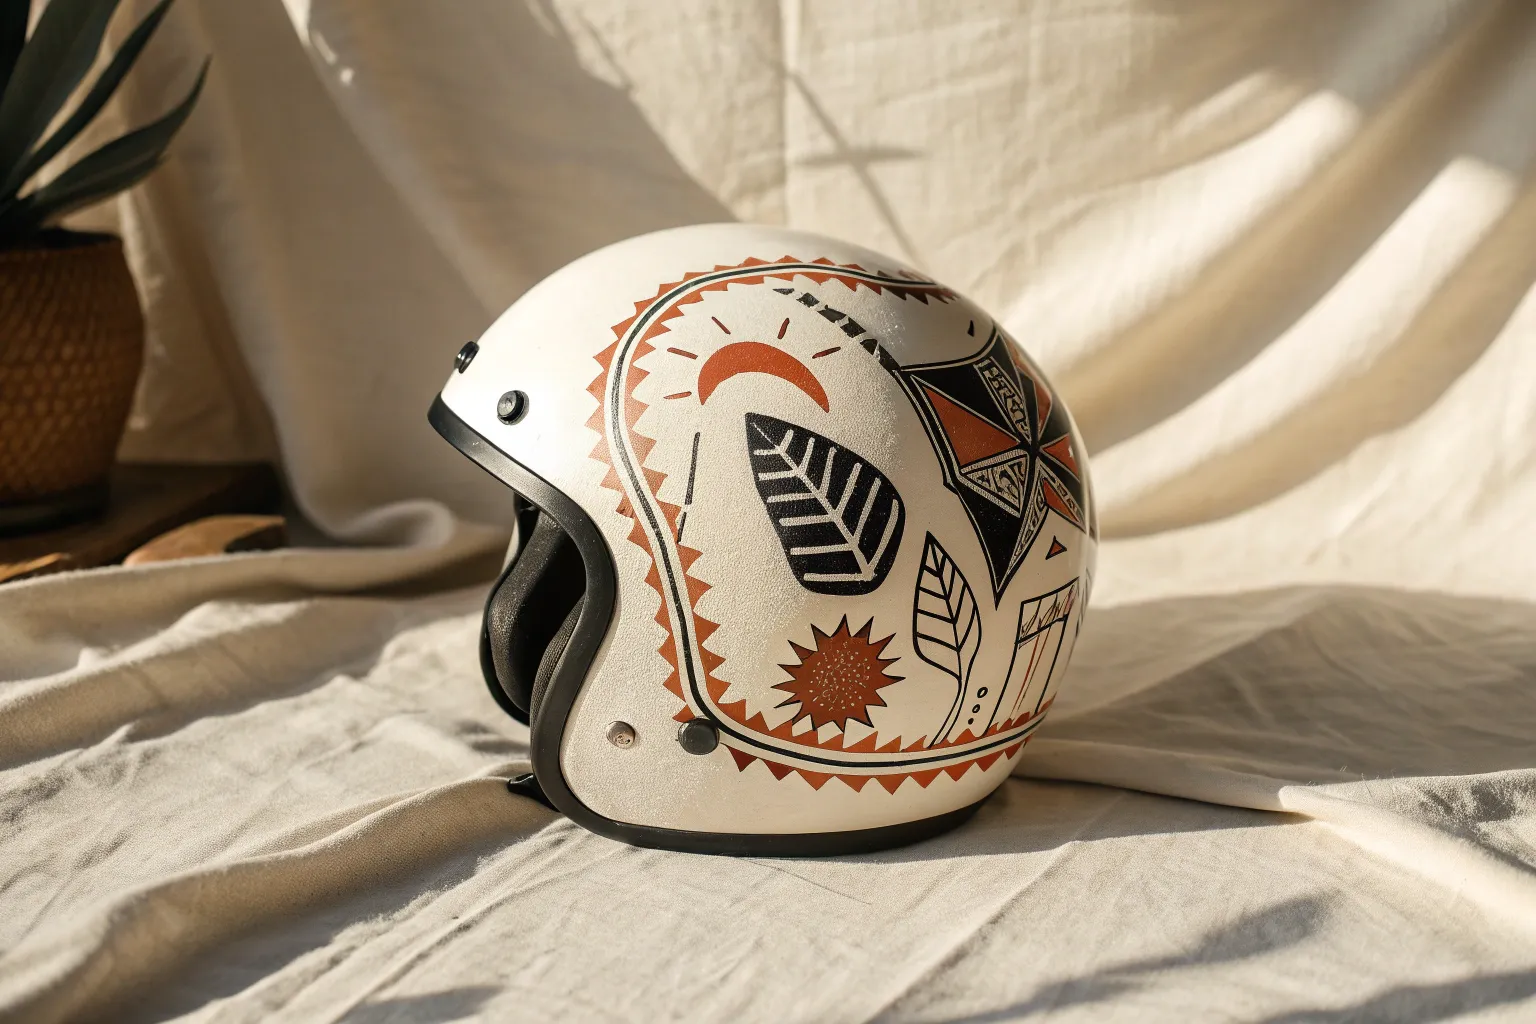
Mandala or Radial Symmetry Centered on Top
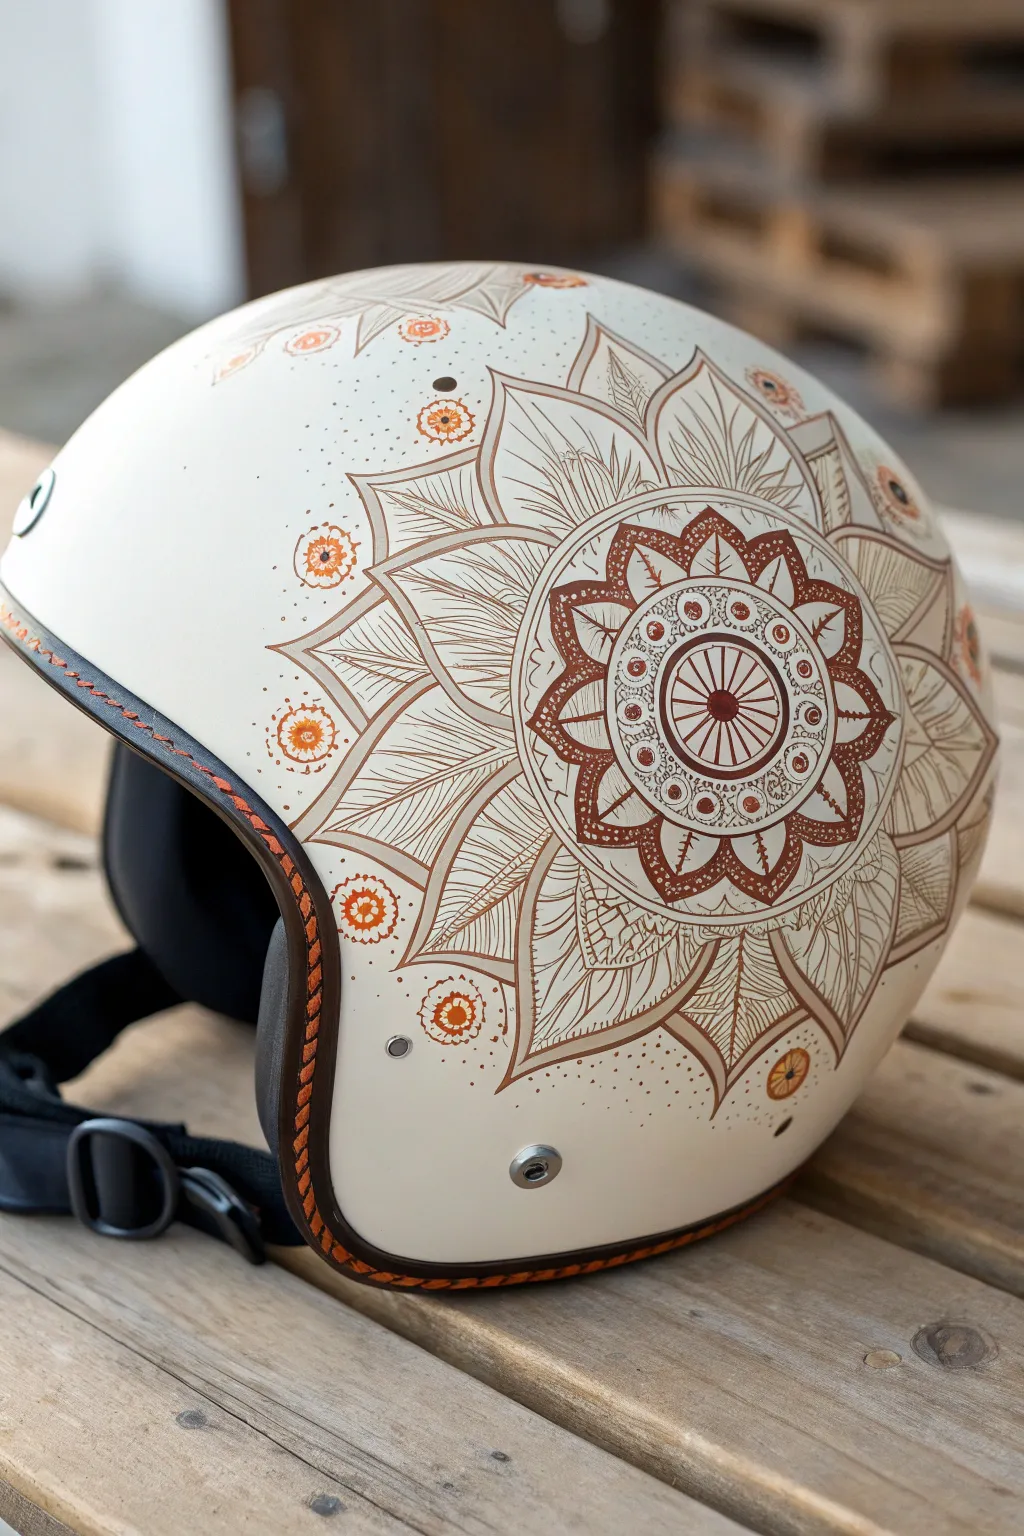

Transform a standard open-face helmet into a piece of wearable art with this intricate, radial mandala design. Featuring earthy browns, burnt oranges, and fine line work, this project mimics the delicate look of traditional henna body art on a durable surface.
Detailed Instructions
Materials
- White or cream open-face motorcycle helmet
- Posca paint pens (Brown, Burnt Orange/Terracotta, Beige/Cream) – fine and extra-fine tips
- Flexible sewing measuring tape
- Pencil (soft lead, easy to erase)
- Eraser
- Circular templates (cups, bowls, or compass with a soft tip)
- Clear acrylic sealant spray (matte or satin finish)
- Rubbing alcohol and lint-free cloth
- Cotton swabs
Step 1: Preparation & Mapping
-
Clean the Surface:
Before putting any ink down, thoroughly wipe the entire helmet shell with rubbing alcohol and a lint-free cloth to remove oils, wax, or road grime. This ensures your paint adheres properly. -
Find the Center:
Using your flexible measure tape, measure from the front snap to the back trim and side to side to locate the absolute center of the helmet’s crown. Mark this spot lightly with a pencil. -
Draft the Concentric Circles:
Using your circular templates or a compass, lightly sketch a series of concentric circles radiating from your center mark. Creating 3-4 distinct rings will help keep your mandala symmetrical as it expands down the sides. -
Divide the Sections:
Lightly draw dividing lines cutting through the center like a pizza. Start with 8 or 16 equal sections to guide where your petals will fall.
Pro Tip: Steady Hand
Rest your helmet on a beanbag or folded towel while drawing. This stops it from rolling away and gives you a stable surface to brace your hand against.
Step 2: Drawing the Core Mandala
-
The Center Wheel:
Start with your brown fine-tip pen. Draw a small ‘wheel’ at the very top using straight spokes within your smallest circle, outlining the rim firmly. -
First Layer of Petals:
Create the first ring of petals around the center wheel. Use a scalloped motion, filling the negative space between petals with small dots or cross-hatching for contrast. -
Adding Color Accents:
Switch to the burnt orange marker. Color inside the center wheel spokes and add small orange dots inside the first layer of scallops to bring warmth to the design. -
Secondary Flower Ring:
Draw larger, pointed petals extending to your next pencil guide. Outline them in brown, then draw a smaller internal petal shape inside each one. Fill the space between the inner and outer lines with brown ink.
Step 3: Expanding the Design
-
The Large Petals:
Sketch massive, sweeping petal shapes that curve down the side of the helmet. These should look like large lotus leaves. Keep the lines smooth and continuous. -
Intricate Fill Work:
Inside these large petals, draw fine parallel lines (striations) radiating from the base of the petal outward. This texture creates the ‘shading’ effect seen in the reference. -
Detailed Peaks:
At the tip of each large petal, draw a smaller, darker brown triangle or diamond shape. I find this creates a nice anchor point for the eye. -
Outer Embellishments:
Between the tips of the large petals, draw floating detailed circles or ‘suns.’ Use an orange center, surrounded by a ring of brown dots.
Troubleshooting: Smudges
If you accidentally smear wet paint, don’t wipe it! Let it dry completely, then gently scratch the mistake off with an X-Acto knife or paint over it with white.
Step 4: Finishing Touches
-
Stippling Texture:
Using the tip of your finest brown pen, add stippling (tiny dots) fading out from the mandala edges into the white space. This softens the transition. -
Clean Up:
Once you are absolutely sure the ink is dry, gently erase any visible pencil guidelines. Be careful not to smear the paint. -
Sealing the Work:
Move to a well-ventilated area. Apply thin, even coats of clear acrylic sealant. Do 2-3 light coats rather than one heavy one to prevent drips.
Now you have a custom helmet that combines safety with beautiful, personal flair
Bold Black Pattern Wrap (High Contrast)

Transform a plain white helmet into a striking piece of retro-inspired gear with this high-contrast black graphic design. The clean lines and dotted textures evoke classic 70s racing aesthetics, creating a look that is both timeless and aggressive.
Step-by-Step Tutorial
Materials
- Full-face retro-style white helmet (matte or gloss)
- High-performance black vinyl graphic tape (varying widths: 3mm, 6mm, 10mm)
- Perforated black vinyl sheet or carbon fiber effect vinyl
- Knifeless tape (for precision cutting on curves)
- Isopropyl alcohol and lint-free cloths
- Heat gun or hair dryer
- Felt-edged squeegee
- Precision craft knife (e.g., X-Acto)
- Fine-tip permanent marker
- Flexible sewing measuring tape
- Masking tape (low tack)
Step 1: Preparation and Mapping
-
Clean surface:
Begin by thoroughly cleaning the entire helmet shell with isopropyl alcohol and a lint-free cloth. This removes any factory wax or oils that could prevent the vinyl from adhering properly. -
Establish the centerline:
Use a strip of masking tape to mark the exact center of the helmet from front to back. This will be your crucial reference point to clarify symmetry. -
Outline the flowing X-shape:
Using thin masking tape or a china marker, sketch out the large, sweeping ‘X’ shape on the side. The lines should start thick near the center and taper or curve downwards toward the chin bar and rear. -
Check symmetry:
Mirror your design on the opposite side. Measure the distance from your centerline tape to your sketched lines at several key points to ensure both sides match perfectly.
Bubble Trouble?
If a bubble appears, prick it with the very tip of a fine needle, then heat slightly and press the air out with your finger.
Step 2: Drafting the Main Shapes
-
Apply Knifeless Tape:
Lay down Knifeless Tape directly over your sketched outline. This tape creates the boundaries for the large black sections without risking knife scratches on the helmet paint. -
Apply the main black vinyl:
Cut a piece of the textured or perforated black vinyl slightly larger than the main graphic area. Peel the backing and center it over the area bounded by the Knifeless Tape. -
Smooth the vinyl:
Working from the center outward, use your felt-edged squeegee to press the vinyl down. I find using a heat gun on a low setting helps the vinyl conform to the compound curves of the helmet without wrinkling. -
Cut the shape:
Pull the filament of the Knifeless Tape through the vinyl to cut your clean edge. Peel away the excess waste vinyl. -
Repeat for all sections:
Repeat this process for the secondary graphic zones, such as the curved section near the chin vent and the back panel.
Step 3: Detailing Lines & Accents
-
Create the border stripes:
Now, apply the 6mm black vinyl tape parallel to your main shapes. Leave a consistent gap of about 4-5mm between the main graphic block and this new stripe to let the white helmet show through. -
Add the pinstriping:
Use the thinner 3mm tape to create the intricate interior lines. Follow the curves of the larger shapes, maintaining steady spacing. -
Chin bar detailing:
Run a continuous stripe along the bottom rubber seal of the helmet, wrapping fully around the chin and neck area. -
Visor port outline:
Apply a medium-width stripe around the eye port gasket. This frames the face and connects the side graphics visually. -
Heat setting:
Once all graphics are placed, go over the entire design with the heat gun. This ‘post-heating’ relaxes the vinyl memory and ensures the adhesive bonds permanently.
Level Up: Reflective
Swap the standard white spaces for black reflective tape. By day it looks subtle, but at night headlights make it glow for safety.
Step 4: Finishing Touches
-
Trim excess:
Carefully trim any vinyl overhangs near the rubber gaskets or vents using a fresh blade in your craft knife. -
Inspect hardware:
If your helmet has snaps or metal vents, ensure the vinyl is trimmed cleanly around them rather than laid over top.
Put on your newly customized lid and enjoy the jealous looks at the next bike meet
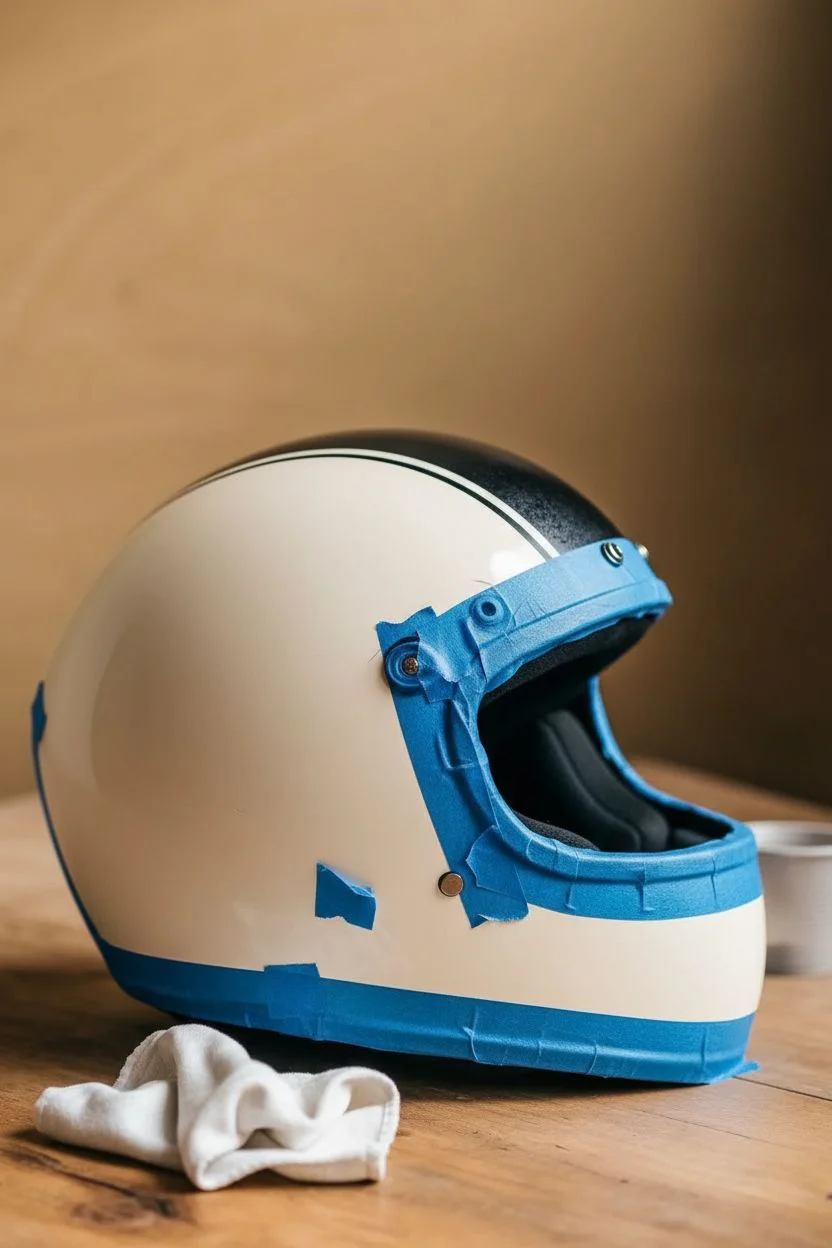
Typography and Number Blocks
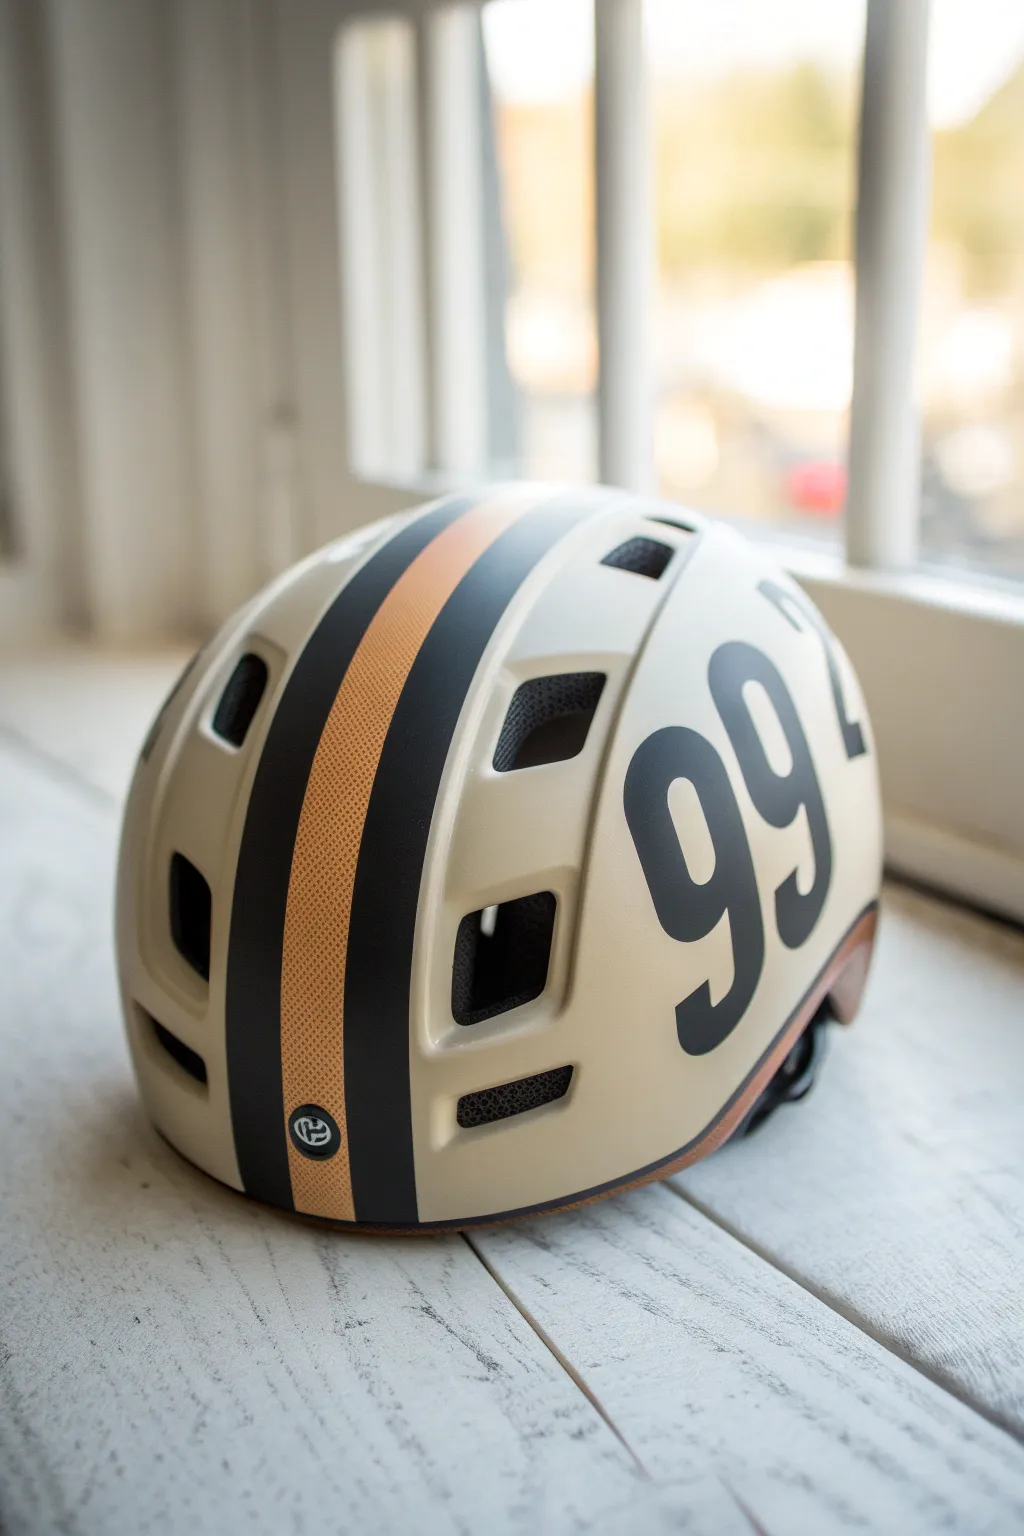
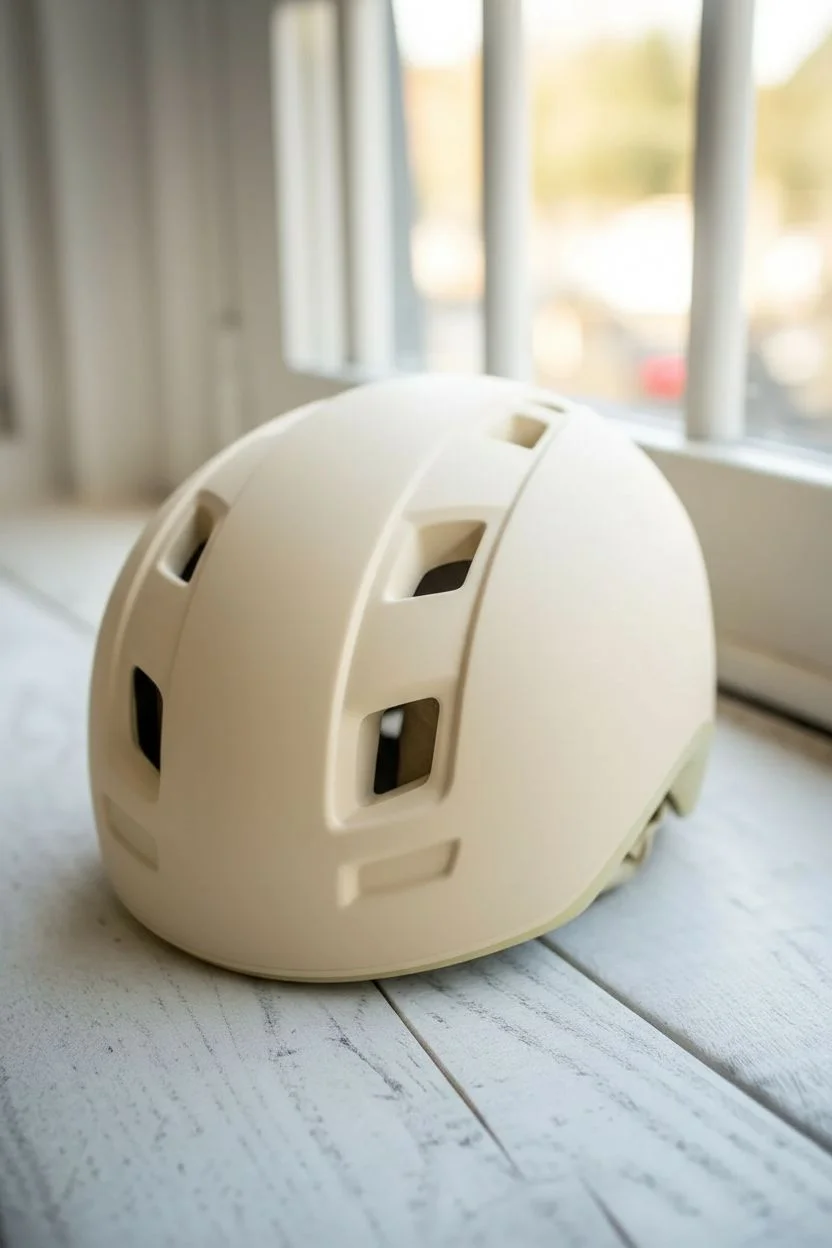
Transform a plain matte helmet into a vintage-inspired racing lid with this bold typography and stripe design. The combination of a creamy beige base, classic racing stripes, and oversized number blocks creates a stylish, cafe-racer aesthetic perfect for urban commuting.
Step-by-Step
Materials
- Matte cream or beige spray paint (automotive grade recommended)
- Matte black spray paint
- Metallic copper or dark gold adhesive vinyl strip (1 inch wide)
- Matte black adhesive vinyl sheet
- Helmet (hardshell urban style)
- Fine-grit sandpaper (400 and 800 grit)
- Painter’s tape (various widths)
- X-Acto knife or cutting plotter
- Degreaser or rubbing alcohol
- Lint-free cloth
- Matte clear coat sealer
- Design transfer tape
Step 1: Preparation and Base Coat
-
Prep the surface:
Start by cleaning the helmet thoroughly with degreaser to remove any factory waxes or oils. If the original surface is glossy, lightly sand it with 400-grit sandpaper to create a ‘key’ for the new paint to grip. Wipe away all dust with a damp cloth. -
Mask critical areas:
Carefully tape off the inner foam, straps, and any vents you don’t want painted. Use newspaper or plastic bags to stuff the inside of the helmet to protect the liner from overspray. -
Apply the base color:
Spray the helmet with the matte cream paint. Hold the can about 8-10 inches away and use smooth, sweeping motions. Apply 3-4 thin coats rather than one thick one to avoid drips, allowing 15 minutes of drying time between each layer. -
Let it cure:
Allow the base coat to cure, preferably overnight, to ensure the paint is hard enough to handle masking tape without peeling later.
Wrinkle-Free Curves
When applying vinyl to a round helmet, use a hairdryer! Warm vinyl stretches easily. Heat it for 5-10 seconds, then stretch it gently over the curve to eliminate wrinkles.
Step 2: Creating the Racing Stripes
-
Plan the center line:
Find the exact center of the helmet from front to back. Place a piece of painter’s tape lightly to mark this guide, ensuring your stripes will be perfectly symmetrical. -
Apply the gold center strip:
Take your metallic copper or gold vinyl strip. Start at the very front lip of the helmet and slowly lay it down along your center line, smoothing it with your thumb as you go to prevent air bubbles. I find stretching the vinyl slightly helps it curve around the dome shape. -
Add the black flanking stripes:
Cut two strips of matte black vinyl, approximately 0.5 to 0.75 inches wide. Apply these immediately next to the central gold strip, leaving no gap between them. The contrast creates that classic racing look. -
Trim the edges:
Use a sharp X-Acto knife to carefully trim the vinyl at the front and back edges of the helmet shell, tucking the ends under the rim if possible for a clean finish. -
Add logo detail:
If you have a small circular logo or emblem, apply it now at the bottom rear of the central stripe group for a professional branding touch.
Textured Effect
Instead of smooth gold vinyl, try a textured carbon fiber vinyl for the center stripe. It adds a modern, tactile element while keeping the retro color scheme.
Step 3: Typography and Numbering
-
Create the number stencil or decal:
Using a computer, choose a tall, condensed geometric font for your numbers (like ’99’). If you have a cutting plotter, cut the numbers out of matte black vinyl. If not, print them on paper to use as a template. -
Position the numbers:
Cut out your numbers. Place them on the side of the helmet to find the best placement. They should be large—almost touching the top curve and the bottom rim. Use masking tape to hold them temporarily while you step back and check the angle. -
Apply the vinyl numbers:
Once satisfied with the position, use transfer tape to apply the vinyl numbers to the helmet. Press down firmly, starting from the center of the number and working outward to push out air. -
Handling curved surfaces:
Since the helmet is spherical, large flat vinyl numbers might wrinkle. Use a hairdryer on low heat to warm the vinyl slightly; this makes it pliable so you can ease it over the curves without creases. -
Cut around vents:
If your large numbers cross over a ventilation hole, don’t panic. Apply the vinyl right over the hole, then use your X-Acto knife to carefully slice the vinyl inside the vent opening and wrap the edges inward.
Step 4: Finishing Touches
-
Check adhesion:
Go over every edge of your vinyl stripes and numbers with a squeegee or your fingernail to ensure everything is sealed tight against the painted surface. -
Clean strip:
Wipe the entire helmet gently with a microfiber cloth to remove finger oils, taking care not to lift the vinyl edges. -
Clear coat sealing:
To make the design permanent and weather-resistant, spray the entire helmet with a matte clear coat. Apply 2 light coats. This seals the vinyl edges so they won’t peel up over time. -
Remove masking:
Once the clear coat is dry to the touch but not fully cured (about 1 hour), carefully remove the masking tape from the liner and straps.
Now you have a custom piece of protective gear that looks as good as it performs.
Visor-Integrated Artwork Continuation
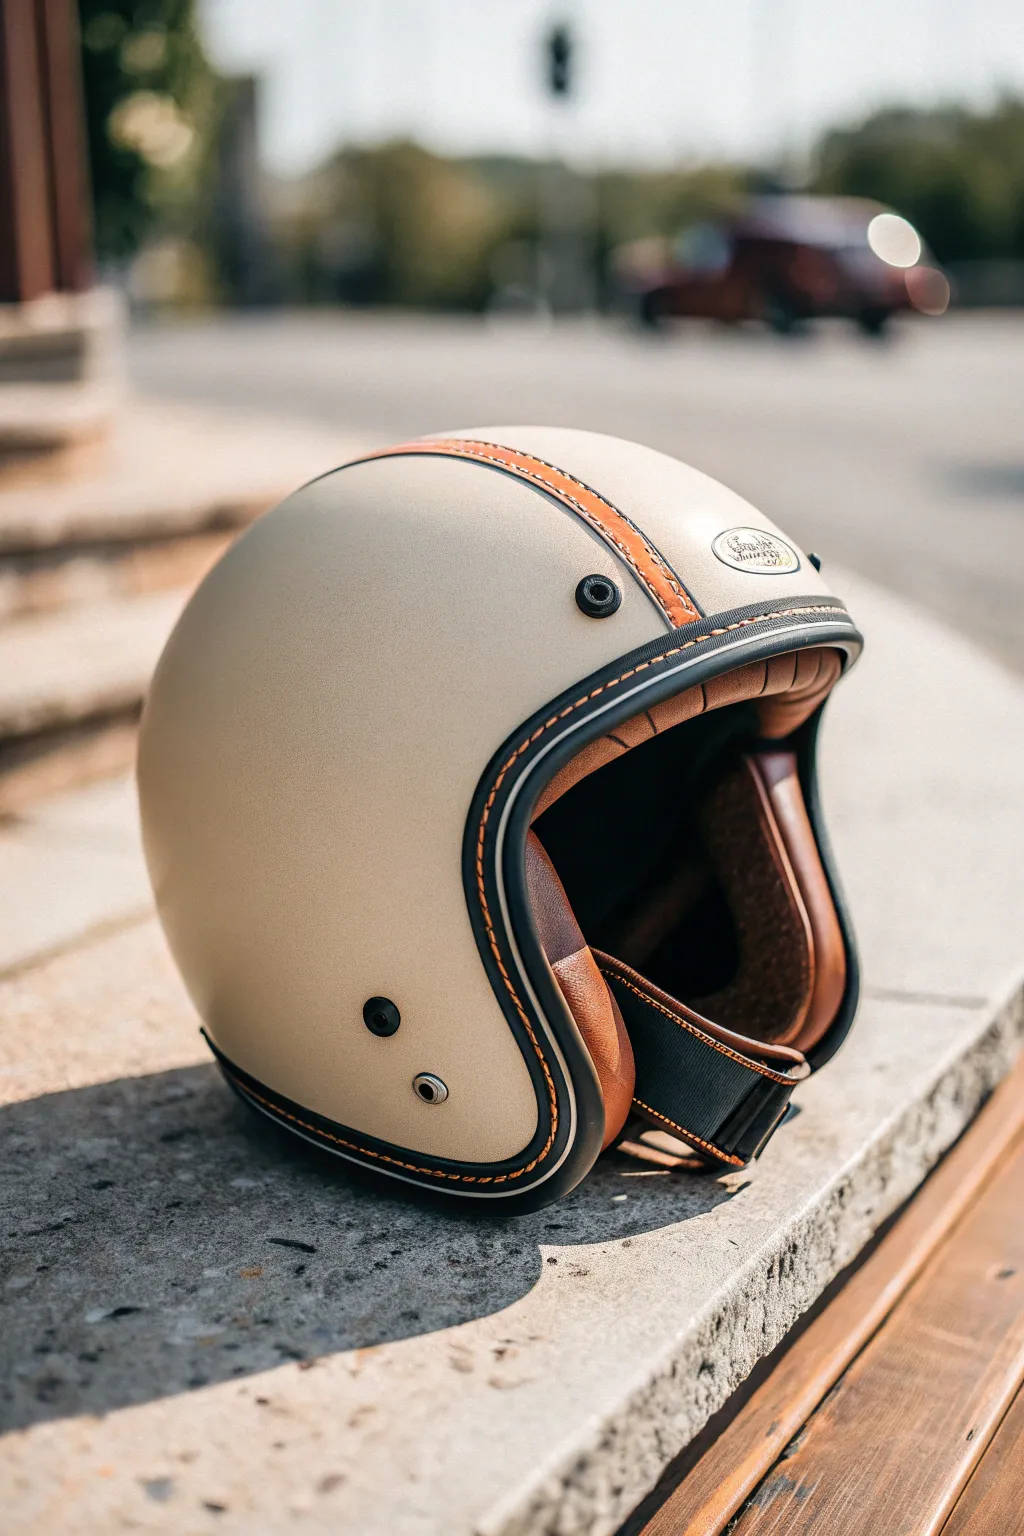
Transform a standard open-face helmet into a retro-inspired masterpiece featuring a textured cream finish, custom leather banding, and distinctive contrast stitching. This project bridges the gap between modern safety and classic cafe-racer aesthetics with a focus on tactile details.
Step-by-Step
Materials
- Open-face motorcycle helmet (DOT approved)
- Sandpaper (400, 800, and 1200 grit)
- Painter’s tape (various widths)
- Matte cream or beige spray paint (automotive grade)
- Matte clear coat sealant
- Faux or genuine leather strip (tan/brown, approx 1.5 inches wide)
- Heavy-duty waxed thread (bright orange)
- Leather stitching punch or awl
- Curved needle
- Contact cement or strong leather adhesive
- Black edge trim or rubber molding
- Black acrylic paint (for edging touch-ups)
- Helmet interior cleaning kit
Step 1: Preparation and Base Coat
-
Disassemble the helmet:
Begin by removing any detachable visors, peaks, or removable interior padding. Carefully tape off any non-removable rubber seals, snaps, or vents that you don’t want painted. -
Sand the surface:
Use 400-grit sandpaper to scuff the entire outer shell. You want to remove the glossy clear coat so the new paint adheres properly, but stay gentle to avoid damaging the integrity of the shell. -
Clean and degrease:
Wipe the helmet down thoroughly with an alcohol-based cleaner or degreaser to remove all sanding dust and oils. -
Apply the primer:
Spray a light, even coat of primer suitable for plastics or fiberglass. Let it dry completely according to the can’s instructions. -
Spray the cream base:
Apply your matte cream automotive paint in thin, steady sweeps. I like to keep the can moving constantly to avoid drips. Apply 3-4 light coats rather than one heavy one. -
Sand between coats:
Once dry, lightly wet-sand with 800-grit paper to smooth out any orange peel texture, then clean and apply the final color coat. -
Seal the finish:
Apply two coats of matte clear coat to protect the paint and give it that non-reflective, vintage look. Allow this to cure for at least 24 hours.
Clean Lines Only
When taping off rubber grommets, use a blunt plastic tool or fingernail to firmly press the tape into the crevices. This prevents paint bleed.
Step 2: Detailing the Leather Strip
-
Measure the arc:
Use a flexible measuring tape to determine the exact length needed for the leather stripe running from the front brow to the nape of the helmet. -
Pre-punch stitch holes:
On your leather strip, mark two parallel lines near the edges. Use a leather punch or awl to create evenly spaced holes along these lines for the decorative stitching. -
Add decorative stitching:
Using the orange waxed thread and a saddle stitch or running stitch, sew along the pre-punched holes. This is purely aesthetic, so focus on keeping tension even. -
Apply adhesive:
Apply a thin layer of contact cement to the underside of the leather strip and the corresponding center line on the helmet shell. Wait until tacky. -
Mount the strip:
Carefully press the leather strip onto the helmet, smoothing it from front to back to ensure no air bubbles are trapped underneath.
Step 3: Trim and Final Assembly
-
Prepare the edge trim:
If your helmet’s rubber edge trim is worn or was removed, prepare a new length of black U-channel rubber molding. -
Stitch the trim (optional):
To match the image perfectly, create a faux stitch effect on the black rubber trim using the same orange thread, or carefully glue a pre-stitched leather piping over the rubber edge. -
Install the trim:
Secure the black trim around the face opening and the bottom edge of the helmet using strong adhesive. Ensure the seam meets neatly at the back or underneath. -
Refine hardware:
Clean any metal snaps or rivets. If they got paint on them, carefully scrape it off or clean with a Q-tip dipped in solvent. -
Reassemble interior:
Snap the cheek pads and comfort liner back into place. If you removed leather ear pads, reattach them now. -
Final polish:
Wipe down the entire helmet with a microfiber cloth to remove fingerprints and ensure the matte finish looks uniform.
Weathered Effect
Before the clear coat dries, lightly dry-brush some darker brown paint on the leather edges to simulate a worn, road-trip patina.
Now you have a custom lid that looks perfectly tailored for a Sunday morning ride
Cracked Paint and Underlayer Reveal
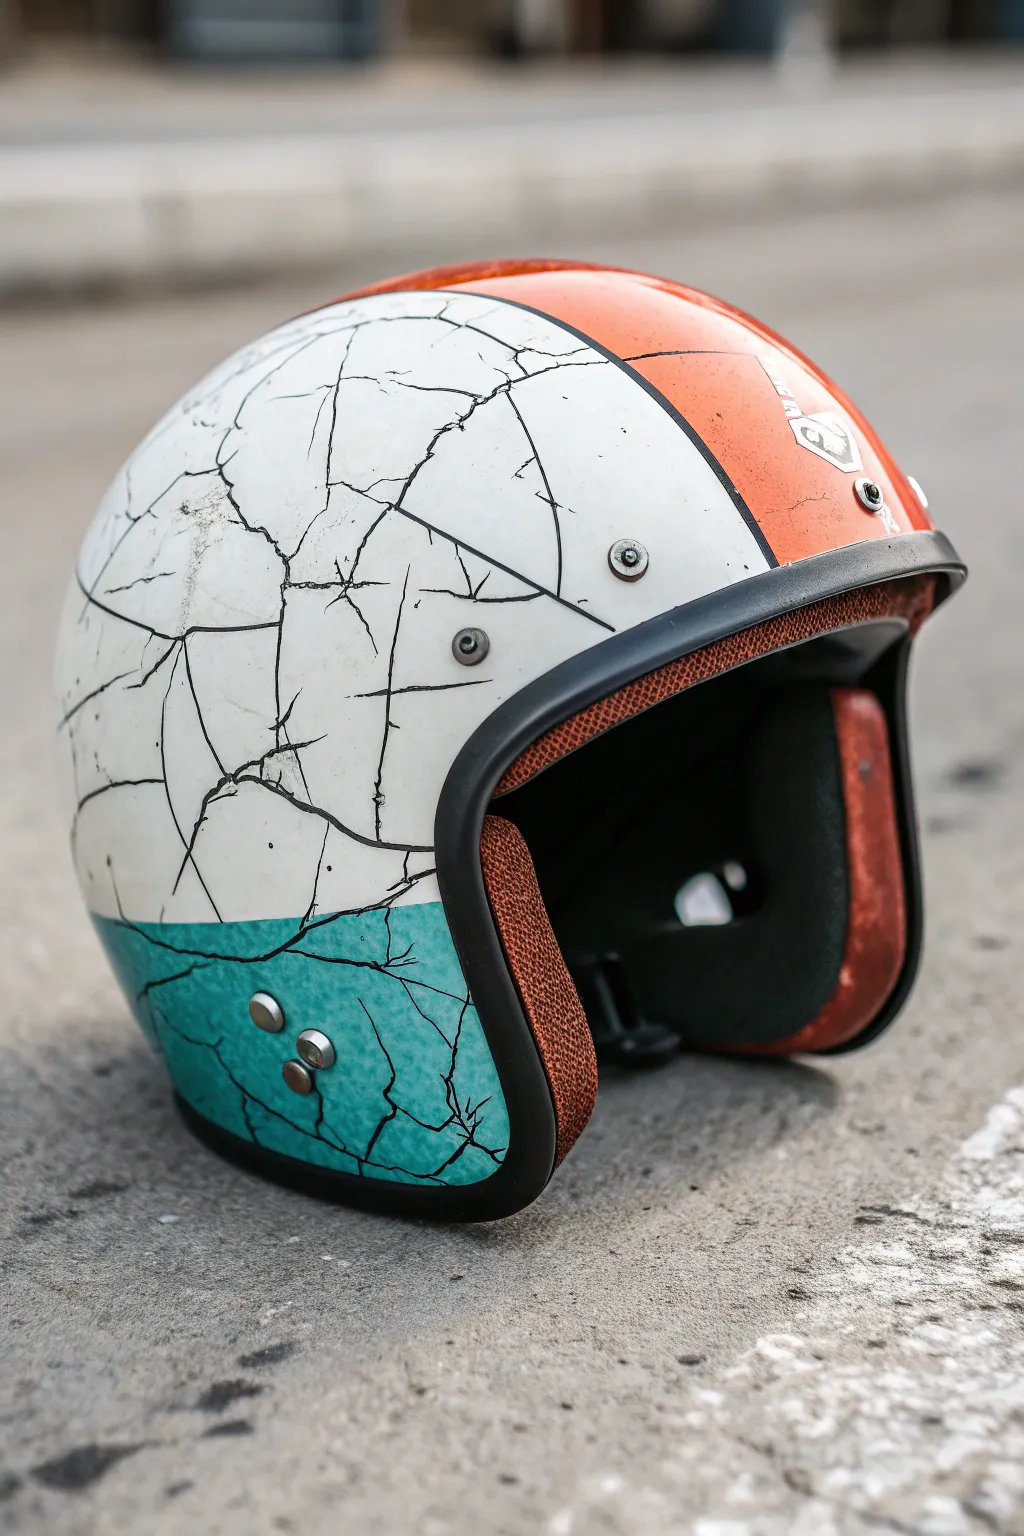
Transform a standard helmet into a road-worn relic with this stunning faux-cracked finish. The combination of retro racing stripes and realistic fracturing gives the piece a history that looks like it has survived decades of adventure.
Step-by-Step Guide
Materials
- Motorcycle helmet (clean, sanded)
- Black primer (or dark grey)
- Crackling medium (synthetic or glue-based)
- Acrylic paints: Cream White, Vintage Orange, Teal/Turquoise
- Painter’s tape (various widths)
- Fine-grit sandpaper (400-800 grit)
- Matte clear coat sealant
- Detail brush (size 0 or 00)
- Soft cloth
Step 1: Preparation and Base Layer
-
Surface Prep:
Begin by lightly sanding the entire helmet surface with 400-grit sandpaper to remove the factory sheen. This mechanical key is crucial for paint adhesion. -
Clean Up:
Wipe the helmet down thoroughly with a tack cloth or a rag dampened with isopropyl alcohol to remove all dust and oils. -
The Shadow Coat:
Spray or brush on two even coats of black primer. This dark layer will eventually become the ‘cracks’ visible through the top coat, so ensure solid coverage. -
Dry Time:
Allow the primer to cure completely according to the manufacturer’s instructions before moving on.
Crack Direction
Brush the top coat perpendicular to the crackle medium brushstrokes. This conflicting tension creates deeper, more jagged crack patterns.
Step 2: Applying the Design
-
Mapping the Stripes:
Use painter’s tape to mark off the central racing stripe area. Cover the sides where the white and teal will go, leaving only the center strip exposed. -
First Crackle Application:
Apply a generous layer of crackling medium to the exposed stripe area. The thickness of this medium determines the size of the cracks—thicker application yields wider cracks. -
Orange Layer:
Once the medium is tacky (but not dry), paint your Vintage Orange over the stripe. Work quickly with a flat brush, using single strokes; do not overwork the paint or you’ll disturb the crackling process. -
Reveal the Orange:
Let the orange section dry until cracks appear, then carefully peel away the masking tape. -
Masking the Lower Section:
Tape off the newly painted orange stripe and the upper ‘white’ section of the helmet to isolate the bottom curve for the teal color. -
Teal Crackle:
Apply crackling medium to this lower section. Wait for the tacky stage, then apply the Teal paint using the same single-stroke technique. -
Main White Section:
Once the teal is dry, mask it off. Apply crackling medium to the large remaining side panels. -
The White Coat:
Apply the Cream White paint over the medium. I find using a slightly loaded brush helps glide over the sticky medium without dragging.
Step 3: Refining and Sealing
-
Enhancing Cracks:
If some cracks aren’t dark enough, use a size 00 detail brush with watered-down black paint to carefully trace and deepen specific fissures. -
Adding Wear:
Take 800-grit sandpaper and very lightly scuff the edges where the color blockings meet. This softens the tape lines and simulates authentic rubbing wear. -
Dirt Wash:
Mix a very dilute wash of brown and black acrylic. Brush it over the white sections and immediately wipe it off with a rag. This leaves grime in the texture for an aged look. -
Hardware Polish:
Clean off any paint that accidentally got on the metal rivets or snaps using a cotton swab dipped in alcohol. -
Final Seal:
Finish with three protective coats of matte clear sealant. This locks in the fragile crackle paint and protects it from the elements.
Add Rust
Stipple burnt sienna paint into the widest black cracks and around metal rivets to mimic rust bleeding through the shell.
Strap on your helmet and enjoy the timeless character of your new masterpiece


Have a question or want to share your own experience? I'd love to hear from you in the comments below!