
If you’ve got a plain hoodie and a little paint, you’ve basically got a wearable canvas. Here are my favorite hoodie painting ideas—from classic center-chest graphics to big back-panel moments—so you can turn a basic sweatshirt into something that feels totally you.
Center-Chest Mini Icon
Capture the warmth of golden hour with this minimalist yet textured chest design. By mimicking the look of embroidery using puff paint or a heavy-body medium, you can create a sun-and-wave motif that feels as cozy as the hoodie itself.
Step-by-Step
Materials
- Cream or off-white cotton hoodie
- Fabric puff paint (gold, black, and white)
- Small round detail brush (size 0 or 1)
- Fabric medium (optional, for mixing)
- Pencil or disappearing fabric marker
- Cardboard insert
- Iron or hairdryer (for puff activation)
Step 1: Draft and Preparation
-
Pre-wash your garment:
Before you start, wash and dry your hoodie without fabric softener. This removes sizing chemicals and ensures the paint adheres permanently to the fibers. -
Insert a barrier:
Slide a piece of crisp cardboard inside the hoodie, placing it directly behind the chest area where you will be painting. This prevents paint from bleeding through to the back. -
Find the perfect placement:
Put the hoodie on or hold it up to a mirror to determine exactly where you want the icon. Mark the center point with a small dot using your pencil or fabric marker. -
Sketch the outline:
Lightly draw a semi-circle for the sun. Below it, sketch three wavy lines to represent the ocean ripples. Keep the design roughly 2-3 inches wide for that trendy ‘brand logo’ aesthetic.
Clean Lines Hack
If your hand is shaky, use masking tape to create the straight horizon line of the sun. Paint the gold, let it dry partially, then peel the tape for a razor-sharp edge.
Step 2: Painting the Sun
-
Mix your golden hue:
If your gold puff paint is too bright, mix a tiny dot of brown or orange into it on a palette. You want a warm, sunset amber tone. -
Fill the sun shape:
Using the puff paint bottle tip or a brush loaded heavily, fill in the top semi-circle. Apply it thickly; texture is good here. -
Create false embroidery texture:
While the gold paint is wet, take a toothpick or a dry brush and stipple small dots into the surface. This mimics the feeling of chenille loops or heavy thread. -
Let the sun set:
Allow this gold layer to dry for about an hour so you don’t smudge it while working on the lines below.
Add Sparkle
Mix fine glitter directly into the wet gold paint before it dries. When you puff it with heat later, the glitter will be embedded in the texture for a subtle shimmer.
Step 3: Creating the Waves
-
Draft the horizon line:
Using black puff paint with a fine precision tip, draw a steady line across the bottom of the sun to create the horizon. -
Draw the wave outlines:
Trace over your pencil sketches for the waves with the black paint. Keep the pressure consistent on the bottle to ensure the lines are uniform in thickness. -
Add the inner fill:
In the spaces between the black wave lines, gently add strokes of white or a very pale grey paint. This adds dimension without overwhelming the design. -
Refine the edges:
Go back with your fine brush to clean up any shaky edges on the black outline. I find holding my breath for a second helps steady my hand for these tiny corrections.
Step 4: Finishing Touches
-
Dry completely:
Let the design sit undisturbed for at least 24 hours. Puff paint takes longer to cure than standard acrylics. -
Activate the puff:
Use a hairdryer on a high heat setting, holding it a few inches from the design. Watch as the paint swells and puffs up to create that 3D relief effect. -
Seal (optional):
If you want extra durability, place a thin cloth over the design and press with a hot iron (no steam) for 15-20 seconds.
Now you have a custom, boutique-style hoodie ready for cozy days


Big Back Mural Scene
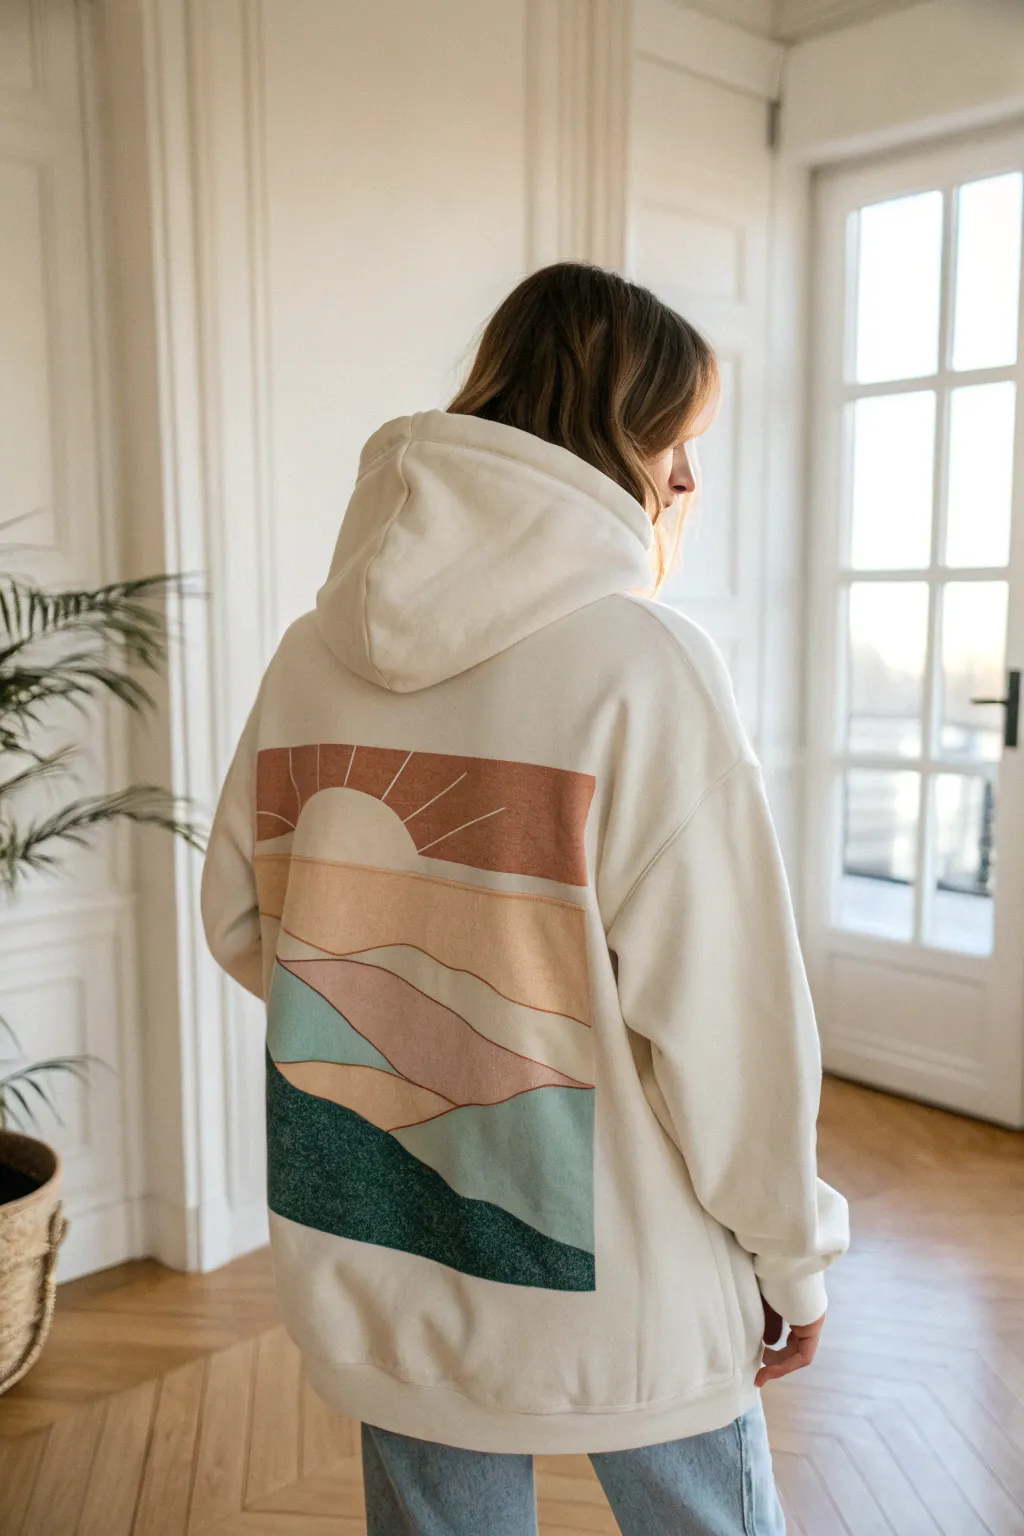
Transform a plain cream hoodie into a wearable piece of art with this structured, abstract landscape design. The large rectangular mural features soothing earth tones layered in stylized mountain shapes, creating a modern and calming aesthetic perfect for casual wear.
Step-by-Step Guide
Materials
- Cream or off-white cotton hoodie (pre-washed)
- Fabric medium
- Acrylic paints (Terracotta, Ochre, Dusty Pink, Sage Green, Forest Green, White)
- Masking tape or painter’s tape
- Flat shader brushes (medium and large)
- Fine liner brush
- Fabric marker or chalk
- Piece of cardboard (to fit inside hoodie)
- Iron and parchment paper
Step 1: Preparation & Mapping
-
Prepare the surface:
Start by sliding a large piece of cardboard inside the hoodie. This is crucial to prevent paint from bleeding through to the front. Smooth the fabric out on a flat table, ensuring the back area is taut and wrinkle-free. -
Tape the boundary:
Use painter’s tape to create a large vertical rectangle on the center back of the hoodie. Press the edges of the tape down firmly with your fingernail to ensure a crisp outer line. -
Sketch the layers:
With a piece of chalk or a faint fabric marker, lightly sketch your horizon lines inside the taped area. Draw a semi-circle for the sun near the top left, and wavy, organic lines below it to represent the rolling hills and mountains.
Fuzzy Edges?
If paint bled under the tape, use a stiff brush with a tiny bit of water to scrub it away while wet, or paint over the error with a mix matching the hoodie color.
Step 2: Painting the Sky & Sun
-
Mix the sky tone:
Mix your terracotta acrylic paint with fabric medium according to the bottle’s ratio (usually 1:1 or 2:1). The medium helps the paint move with the fabric rather than cracking. -
Paint the top block:
Fill in the top rectangular section, carefully painting around the semi-circle sun shape. Use a flat brush for the large areas and turn it on its side to get close to the sun’s edge. -
Fill the sun:
Mix a creamy, pale yellow or use the plain hoodie color if it matches well. Paint the semi-circle sun. If you want the sun rays, use a liner brush with the hoodie’s base color (or white) to paint thin lines radiating from the sun into the terracotta sky. -
Let it set:
Allow these top sections to dry to the touch before moving down, so you don’t accidentally smudge the wet paint with your hand.
Step 3: Layering the Landscape
-
Yellow ochre hill:
Mix yellow ochre with white and fabric medium to create a soft, warm sandy color. Paint the first wide layer immediately below the sky, following your sketched wavy line. -
Dusty rose layer:
Next, create a dusty pink shade. I like to add a tiny dot of the terracotta to my pink mix to make it cohesive. Paint the next hill shape, letting it slightly overlap the layer above if needed to cover pencil lines. -
Sage green accent:
Mix a light sage or mint green. Paint the smaller, nestled hill section on the left side, tucking it between the yellow and pink layers. -
Lower teal mountains:
Create a muted teal or grey-blue shade. Fill in the layer that sweeps across the bottom third of the design, ensuring the top edge has a nice organic curve.
Add Texture
Mix a little baking soda into the paint for the bottom forest green layer to give the ‘ground’ a slightly gritty, 3D texture compared to the smooth sky.
Step 4: The Final Details
-
Forest green base:
For the bottom-most section, use a deep forest green mixed with fabric medium. This anchors the image visually. Apply this liberally to the bottom area, ensuring solid coverage right up to the tape. -
Refine the edges:
Use your fine liner brush to tidy up the boundaries between the color blocks. You want clean, sharp separations between the hills. -
Remove the tape:
Carefully peel away the masking tape while the paint is still slightly tacky—this often helps prevent peeling dry paint chips. Pull the tape away at a 45-degree angle. -
Heat set:
Once the painting is completely dry (wait at least 24 hours), place parchment paper over the design and iron it on a medium, dry setting for several minutes to permanently set the pigment.
Enjoy wearing your calm, scenic landscape hoodie on your next cool morning walk


Classic Floral Spray
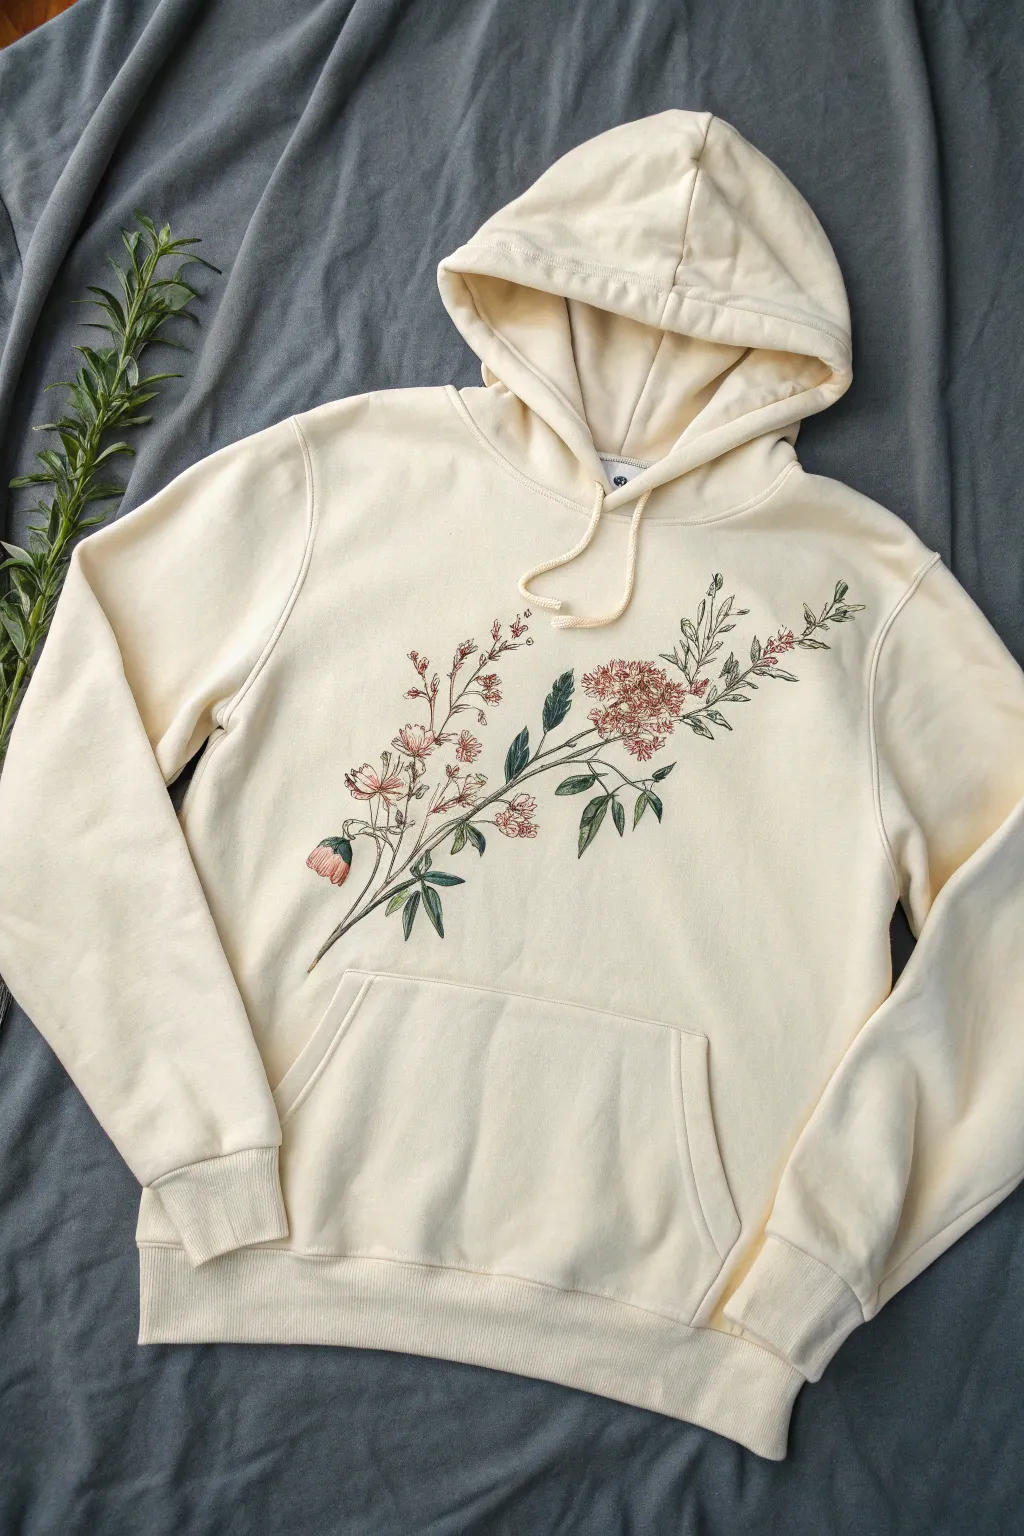
Transform a plain cream hoodie into a wearable piece of art with this delicate floral spray design. The vintage-inspired botanical illustration style adds a timeless and elegant touch to cozy loungewear.
Step-by-Step Tutorial
Materials
- Light cream or off-white cotton hoodie (pre-washed)
- Fabric medium
- Acrylic paints (muted pink, burnt sienna, olive green, sap green, white, yellow ochre)
- Fine liner brushes (sizes 00 and 000)
- Small flat shader brush (size 2)
- Fabric marker or chalk pencil (light grey or brown)
- Piece of cardboard (to fit inside hoodie)
- Palette for mixing
- Water cup and paper towels
- Iron and cloth for heat setting
Step 1: Preparation & Sketching
-
Prep the fabric:
Begin by washing and drying your hoodie without fabric softener to remove any sizing chemicals. This ensures the paint adheres properly to the fibers. -
Establish a barrier:
Slide a sturdy piece of cardboard inside the hoodie, placing it directly behind the chest area where you plan to paint. This prevents the paint from bleeding through to the back of the garment. -
Mix your base medium:
On your palette, mix your acrylic paints with fabric medium according to the bottle’s ratio (usually 1:1 or 2:1). This makes the paint flexible so it won’t crack when the fabric moves. -
Sketch the composition:
Lightly sketch the main diagonal line of the stem using a fabric marker or chalk pencil. Start from the lower left pocket area and curve gently upwards toward the right shoulder. -
Add branch details:
Sketch the smaller offshoot branches and roughly mark the positions of the flower clusters and leaves. Keep the lines very faint; you just need a general guide.
Step 2: Painting the Stems & Leaves
-
Paint the main stem:
Using the 00 liner brush and a mix of burnt sienna and a touch of olive green, carefully trace your main stem line. Keep the pressure light to create a thin, graceful line. -
Create offshoots:
Paint the smaller branches extending from the main stem. I usually make these slightly lighter in color by adding a tiny bit of white to the brown mix. -
Base coat the leaves:
Switch to your flat shader brush. Mix sap green with a little white for a muted tone and block in the leaf shapes. Paint them in the direction of growth, tapering to a point. -
Add leaf depth:
While the green is still slightly tacky, use a darker mix of olive green and brown to add shadows near the base of the leaves and along the center vein. -
Highlight the foliage:
With a clean small brush, add delicate highlights to the tips of the leaves using a mix of your lightest green and yellow ochre.
Stiff fabric fix
If your painted leaves feel too stiff or crunchy after drying, you likely used too much paint relative to medium. Gently sand the painted area with fine-grit sandpaper to soften it before heat setting.
Step 3: Floral Details & Finishing
-
Block in flower shapes:
Mix a muted dusty pink using red, white, and a drop of brown. Gently dab the general shapes of the flower clusters. For the large cluster on the right, use a stippling motion to suggest many small petals. -
Define the petals:
Once the pink base is dry, use your finest 000 brush with a darker brownish-red to outline individual petals and add details to the flower centers. -
Paint the hanging buds:
For the drooping bell-shaped flowers on the left, use a downward stroke. Add a darker color at the bottom of the bell and a lighter pink at the top to create a 3D volume effect. -
Connect the blooms:
Use your stem color to draw tiny, thread-like connections attaching each flower to the main branch. This is crucial for that detailed botanical look. -
Refine edges:
Step back and look at the design. Use your finest brush to sharpen any blurry edges on the leaves or add tiny thorns or texture to the stem if desired. -
Add final stamens:
For the open cluster flowers, paint tiny, hair-thin lines extending from the center using a dark brown, tipping them with tiny dots of yellow ochre for pollen. -
Heat set the design:
Allow the paint to dry for at least 24 hours. Once fully dry, place a thin cloth over the design and iron it on a med-high setting (no steam) for 3-5 minutes to permanently set the artwork.
Water it down
For a watercolor aesthetic like the example image, water down your fabric paint mixture slightly. It will soak into the fibers more, giving a softer, dyed appearance rather than sitting on top.
Now you have a cozy, custom hoodie that looks like it came straight from a vintage boutique


Stenciled Geometric Blocks
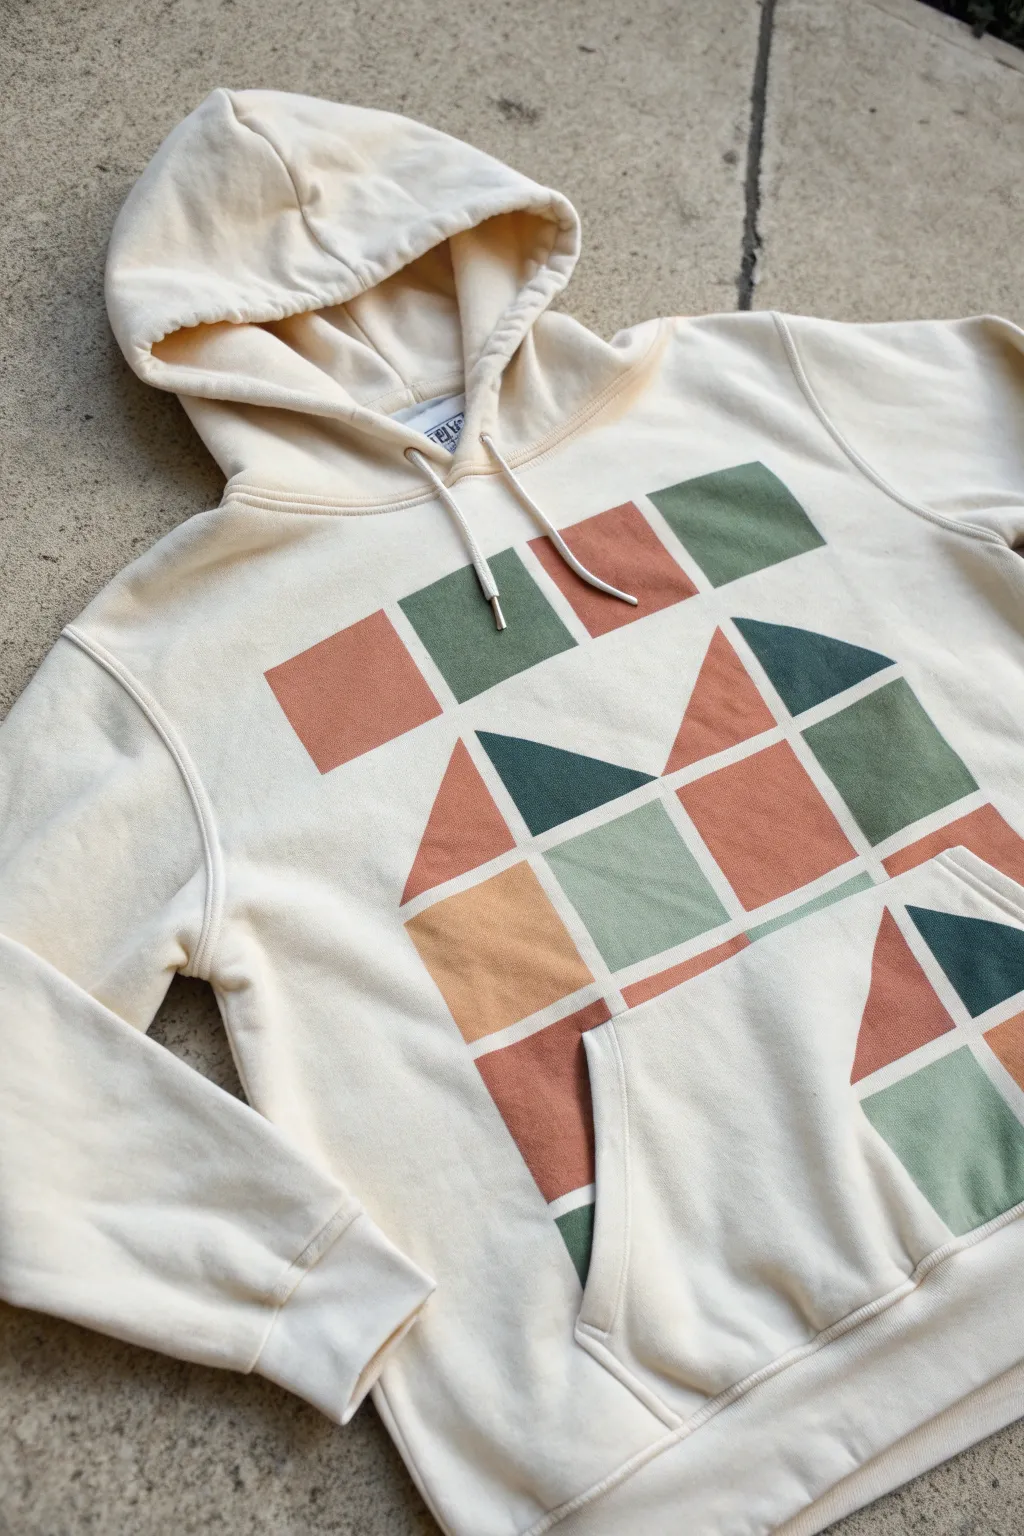
Transform a plain cream hoodie into a modern art piece with this structured, geometric block design. Using a warm palette of terracotta, sage green, and teal, this project balances clean lines with a soft, vintage aesthetic.
Step-by-Step
Materials
- Cream or off-white cotton hoodie (pre-washed)
- Fabric medium
- Acrylic craft paints (Terracotta/Rust, Sage Green, Teal, Mustard/Tan)
- Painter’s tape or stencil vinyl
- Stencil brushes (foam pouncers or flat stencil brushes)
- Ruler or straight edge
- Cardboard insert
- Iron (for heat setting)
- Parchment paper
Step 1: Preparation and Planning
-
Prep the fabric:
Begin by washing and drying your hoodie without fabric softener. This removes factory sizing and ensures the paint adheres properly to the cotton fibers. -
Insert protection:
Slide a sturdy piece of cardboard inside the hoodie body and another smaller piece into the front kangaroo pocket. This is crucial to prevent paint from bleeding through to the back or sticking the pocket shut. -
Map the grid:
Lay the hoodie flat on a smooth surface. Using a ruler and a light pencil or tailor’s chalk, lightly mark out a grid structure on the chest area. This doesn’t need to be perfect, but having guidelines helps align your shapes. -
Plan the pocket:
Don’t forget the kangaroo pocket. Extend your imaginary grid lines down over the pocket area so the design flows seamlessly from the chest onto the pouch.
Step 2: Creating the Stencils
-
Tape the boundaries:
Using painter’s tape, mask off the square and rectangular shapes. Press the edges of the tape down firmly with your fingernail or a credit card to prevent paint seepage. -
Create triangle accents:
For the triangular sections, overlap your tape strips at angles to block off the negative space. Look closely at the reference image to see how some squares are split diagonally into two colors. -
Mind the gap:
Leave thin, consistent gaps (about 1/4 inch) between your taped shapes. These unpainted spaces will create the grid lines that define the geometric look.
Fuzzy Lines?
If edges look fuzzy, the tape wasn’t sealed. Next time, paint a thin layer of the hoodie’s base color (cream) over the tape edges first to seal them before adding color.
Step 3: Painting the Design
-
Mix your medium:
Mix your acrylic paints with fabric medium according to the bottle instructions (usually 2:1 or 1:1 ratio). This makes the paint flexible so it won’t crack when you move. -
Start with sage:
Load a foam pouncer with the sage green mixture. Dab off excess paint onto a paper towel—you want a ‘dry brush’ effect to avoid bleeding under the tape. Fill in scattered blocks on the upper chest and pocket. -
Apply terracotta tones:
Switch to a fresh brush and apply the rust/terracotta color. Focus on balancing the composition by placing these warm blocks diagonally across from each other. -
Add deep teal accents:
Use the dark teal paint sparingly for high-contrast triangles. These darker shapes anchor the design and give it depth. -
Layering lighter tones:
Fill remaining spaces with the mustard or tan shade to execute the softer vintage look. I find that applying two thin coats looks much smoother than one thick glob. -
Pocket detail:
Carefully paint the design on the pocket. Be gentle near the thick seams where the pocket meets the body, as paint can pool in the stitching.
Level Up: Texture
Mix a pinch of baking powder into your paint for a puffed, suede-like texture. It adds a retro raised feel that matches the vintage aesthetic perfectly.
Step 4: Finishing Touches
-
Peel and reveal:
While the paint is still slightly tacky (not fully dry), slowly peel away the painter’s tape at a 45-degree angle. Pulling while wet helps ensure crisp, sharp lines. -
touch-ups:
Inspect your edges. If any paint bled under the tape, use a tiny detailed brush with a bit of white paint (or the hoodie color) to clean up the lines. -
Air dry:
Let the hoodie sit undisturbed for at least 24 hours to allow the paint to cure completely. -
Heat set the design:
Once dry, place a sheet of parchment paper over the painted area. Iron on a medium, dry heat setting for 3-5 minutes, moving the iron constantly. This seals the paint into the fibers for washability.
Enjoy wearing your custom geometric creation that looks stylish enough to be store-bought
BRUSH GUIDE
The Right Brush for Every Stroke
From clean lines to bold texture — master brush choice, stroke control, and essential techniques.
Explore the Full Guide
Pocket-Side Doodles
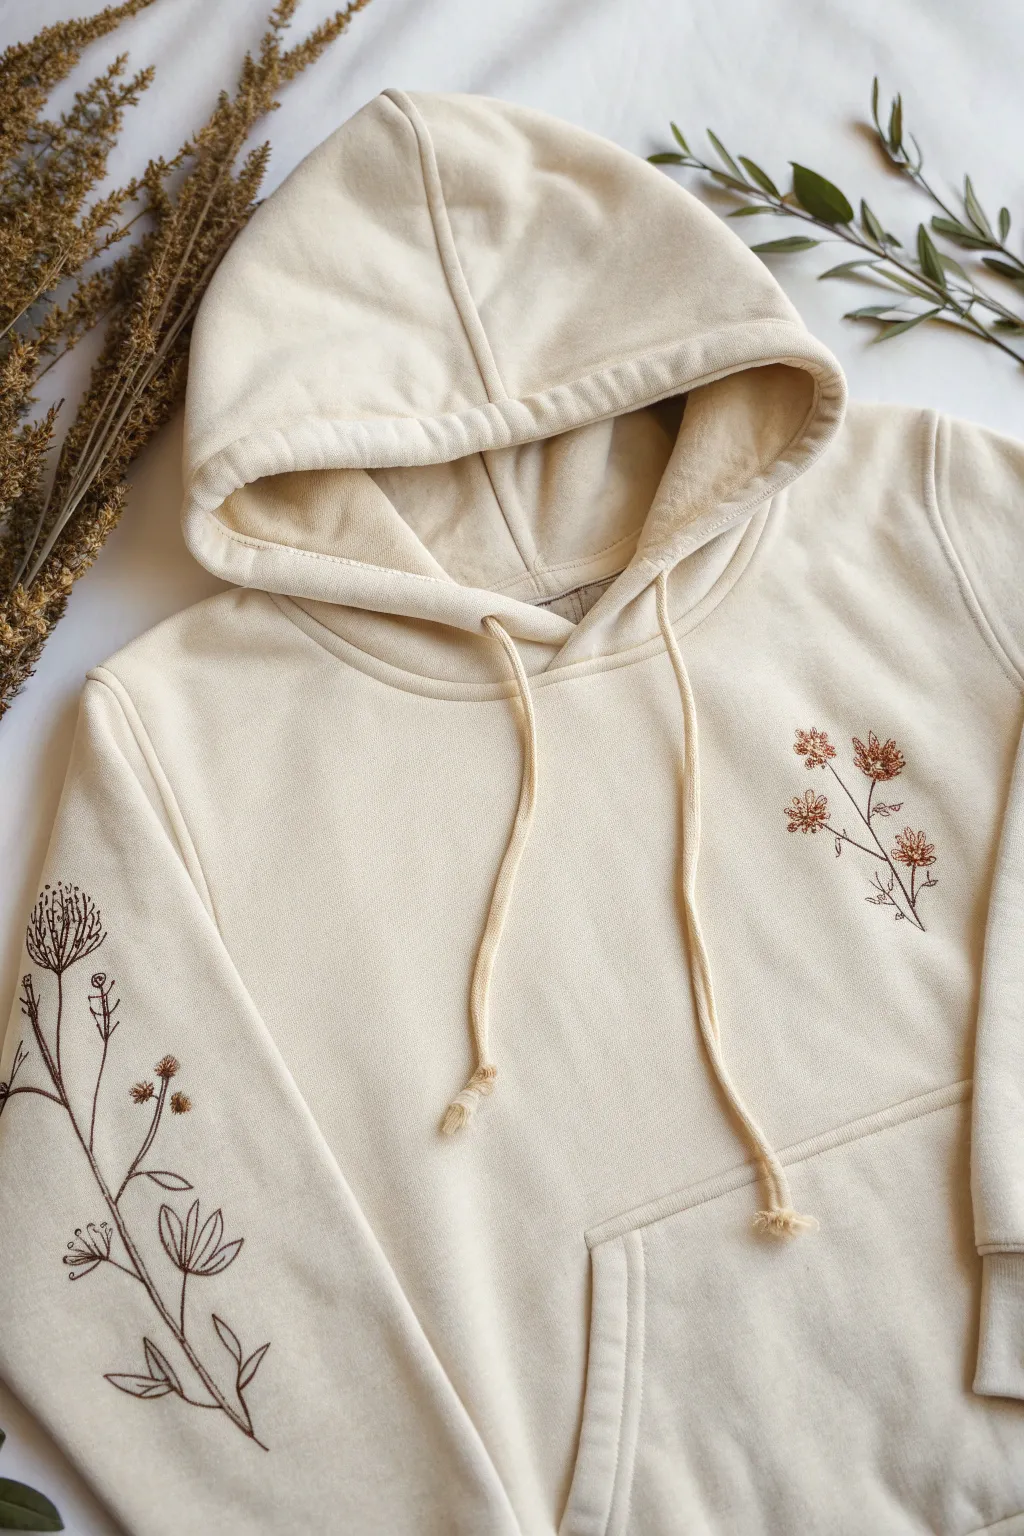
Transform a plain staple piece into boutique-worthy apparel with these delicate, earthy botanical illustrations. This project combines simple line work with a cozy, minimalist aesthetic perfect for fall layering.
Step-by-Step Tutorial
Materials
- Light beige or oatmeal-colored cotton hoodie
- Fabric paint (dark brown or sepia)
- Fabric medium (if using acrylic paint)
- Fine liner brush (size 0 or 00)
- Round brush (size 2)
- Water-soluble fabric marker or tailors chalk
- Cardboard or mat board
- Iron (for heat setting)
- Press cloth or parchment paper
- Paper plate or palette
- Masking tape
Step 1: Preparation
-
Wash the garment:
Begin by washing and drying your hoodie without fabric softener. This removes factory sizing chemicals that can prevent paint from adhering properly to the fibers. -
Insert barriers:
Slide a piece of crisp cardboard inside the body of the hoodie and another long strip inside the sleeve where you’ll be painting. This prevents paint from bleeding through to the back layers. -
Secure the fabric:
Use masking tape or clips to pull the fabric slightly taut against the cardboard. You want a smooth, wrinkle-free surface to draw on, especially for fine lines.
Uneven Lines?
If your lines look shaky, thicken them intentionally in select spots to mimic organic plant stems rather than trying to make them perfectly straight.
Step 2: Sketching the Design
-
Draft the chest motif:
Using your water-soluble marker, lightly sketch the chest design on the upper left side. Draw three main stems radiating outward: one moving straight up, and two angling slightly to the sides. -
Add floral details:
At the ends of these stems, sketch small, clustered flower heads. These don’t need to be hyper-realistic; think of them as impressionistic dandelions or dried wildflowers. -
Draft the sleeve vine:
Moving to the sleeve, draw a long, winding main stem that starts near the cuff and travels upward about 10-12 inches. Let the line curve naturally like a growing vine. -
Flesh out the sleeve:
Add secondary branches coming off the main vine. Sketch large, structured seed pods (which look like segmented ovals) and finer, feathery flower heads at the tips.
Step 3: Painting the Lines
-
Mix your paint:
Squeeze a dollop of dark brown fabric paint onto your palette. I usually add a tiny drop of water to improve the flow, making it ink-like for smoother lines. -
Trace the main stems:
Load your fine liner brush (size 0) with paint. With a steady hand, trace over your sketch lines for the main stems on both the chest and sleeve. Keep the pressure light for thin, elegant lines. -
Detail the chest flowers:
Switch to a stippling motion for the chest flowers. Use the tip of the brush to create small dots and short dashes that form the textured flower heads. -
paint the sleeve leaves:
For the sleeve, paint the segmented seed pods. Outline the oval shape first, then draw a center line and small V-shapes inside to mimic veins or segments. -
Add final textures:
Go back over the seed heads on the sleeve with very fine, wispy strokes to create the ‘feathery’ look at the top of the plants.
Add Depth
Mix a lighter tan shade and add subtle highlights to one side of the leaves or seed pods. This makes the drawing look less flat and more dimensional.
Step 4: Finishing Up
-
Let it cure:
Allow the paint to air dry completely. This usually takes at least 24 hours, but check your specific paint bottle instructions. -
Heat set the design:
Once dry, turn the hoodie inside out or place a press cloth over the painted areas. Iron on a medium-high setting (no steam) for 3-5 minutes to permanently set the pigment into the fabric. -
Remove guide lines:
If any marker lines are still visible, dab them gently with a damp cloth or give the hoodie a gentle rinse to dissolve the ink.
Now you have a custom, nature-inspired hoodie that blends artistic flair with everyday comfort
Paint Around the Drawstrings
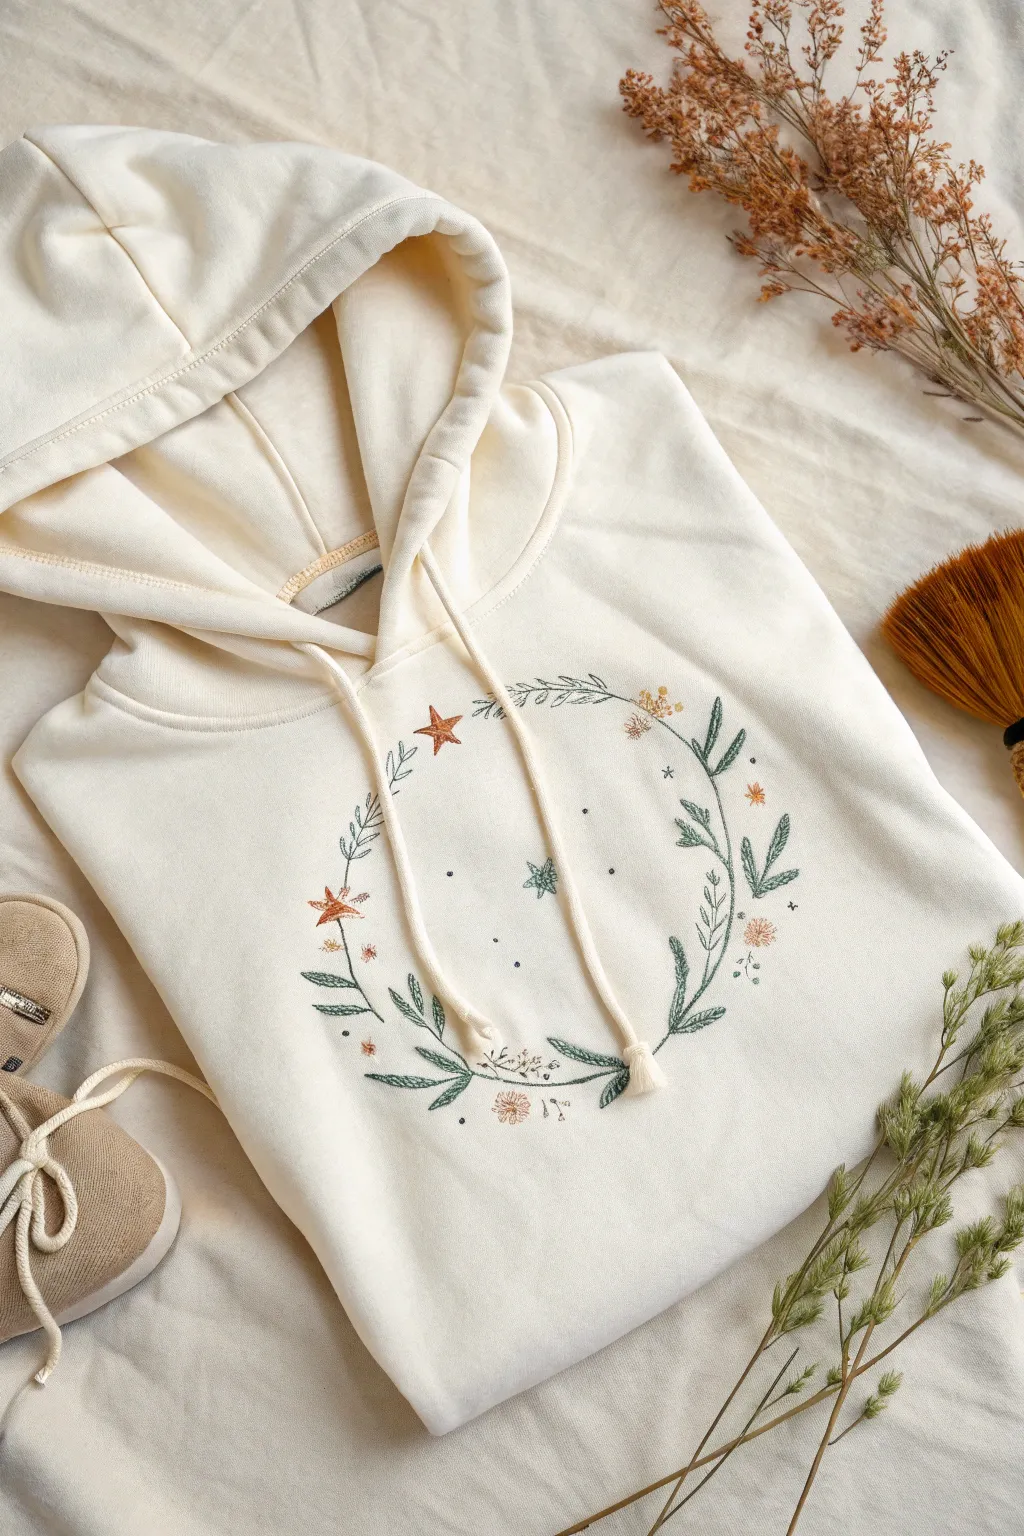
Transform a plain cream hoodie into a whimsical piece of wearable art with this delicate wreath design. Combining fine-line foliage with tiny celestial stars, this project mimics the look of modern embroidery using fabric paint.
Detailed Instructions
Materials
- Cream or off-white cotton hoodie
- Fabric medium (if using acrylics) or soft fabric paints
- Paints: Sage green, forest green, burnt orange/terracotta, soft yellow, white
- Fine liner brushes (sizes 00 and 000)
- Air-erasable fabric marker or tailor’s chalk
- Cardboard insert
- Iron (for heat setting)
- Compass or a circular object (approx. 8-10 inches diameter)
Step 1: Preparation & Sketching
-
Prepare the surface:
Wash and dry your hoodie without fabric softener to remove any sizing chemicals. This ensures the paint adheres properly to the fibers. -
Insert backing:
Place a smooth piece of cardboard inside the hoodie, directly behind the chest area. This prevents paint from bleeding through to the back and stretches the fabric slightly flat. -
Establish the shape:
Using your compass or a round plate as a guide, lightly trace a large circle in the center of the chest with your air-erasable marker. This will be the skeleton for your wreath. -
Sketch main stems:
Draw three to four curved lines that loosely follow your circle guide, overlapping them slightly at the bottom center. Leave the top somewhat open for an airy feel. -
Add foliage outlines:
Sketch small, sprig-like leaves coming off the main stems. Vary the direction—some pointing inward, some outward—to create a natural flow.
Brush Control
Add a drop of water to your acrylics to improve flow. The paint should be the consistency of heavy cream for sharp, fine lines.
Step 2: Painting the Foliage
-
Mix your greens:
Create a muted palette. Mix a little white and a touch of brown into your forest green to get that vintage, earthy look shown in the image. -
Paint main stems:
Using your 00 liner brush, carefully paint over the main stem lines with your darker green shade. Keep the pressure light to maintain thin, delicate lines. -
Fill the darker leaves:
Paint the leaves attached to the dark stems. Instead of filling them solidly, use short, feathery strokes to mimic the texture of thread or a sketched look. -
Layer lighter greens:
Switch to a sage or lighter olive green. Paint a few floating sprigs or fill in secondary leaves to add depth and variety to the wreath structure. -
Add detail veins:
Once the base green is dry to the touch, use your finest 000 brush with a slightly darker green to add a simple central vein line to the largest leaves.
Step 3: Celestial & Floral Details
-
Paint the stars:
Mix a warm terracotta or burnt orange color. Locate the open spaces within the wreath and paint small five-pointed stars. I like to make the top point slightly longer for a whimsical effect. -
Add tiny blossoms:
Using a soft yellow or pale peach, dab tiny clusters of dots near the ends of some stems. These represent purely decorative wildflower buds. -
Detail the stars:
If you want extra definition, outline your terracotta stars with a very fine line of darker rust or brown paint. -
Create ‘cosmic dust’:
Dip the very tip of your brush handle or a toothpick into gray or black paint. Add minute specks and dots randomly around the stars and inside the wreath area for texture. -
Erase markings:
Allow the paint to dry completely (at least 24 hours). If you used an air-erasable pen, the marks will fade; if water-erasable, dab gently with a damp Q-tip away from the paint. -
Heat set:
Turn the hoodie inside out or place a pressing cloth over the design. Iron on a medium setting (no steam) for 3-5 minutes to permanently fix the design.
Add Sparkle
Mix a tiny amount of gold fabric shimmer into your yellow or orange star paint for subtle glints that catch the light when you move.
Now you have a cozy, custom hoodie perfect for stargazing nights and cool mornings

PENCIL GUIDE
Understanding Pencil Grades from H to B
From first sketch to finished drawing — learn pencil grades, line control, and shading techniques.
Explore the Full Guide
Bold Animal Face Portrait
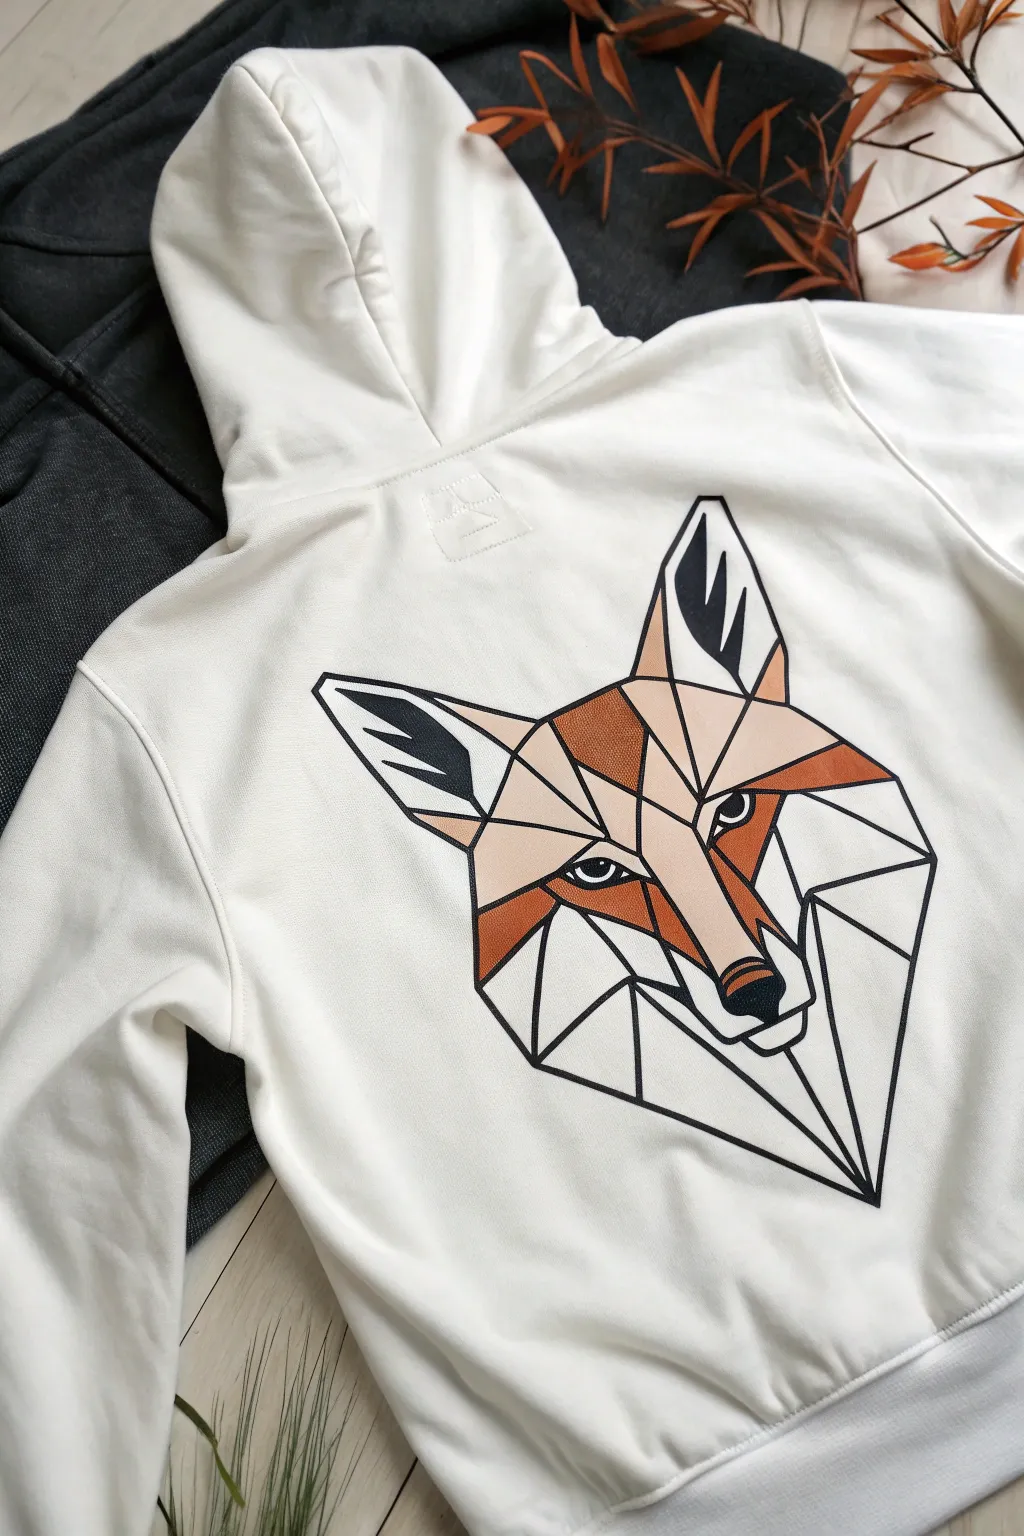
Transform a plain white hoodie into a piece of modern wearable art with this striking low-poly fox design. Using sharp lines and a warm color palette, you’ll create a sophisticated geometric portrait that looks professionally printed.
Step-by-Step
Materials
- White or light-colored cotton hoodie (pre-washed)
- Fabric paints (Black, Burnt Orange, Terracotta, Light Peach/Beige, White)
- Fine liner paintbrush (size 00 or 0)
- Small flat shader paintbrush (size 2 or 4)
- Fabric medium (optional, if using acrylics)
- Cardboard or cutting mat (to place inside the hoodie)
- Masking tape or painter’s tape
- Printed geometric fox reference image or stencil
- Tailor’s chalk or disappearing fabric marker
- Iron and parchment paper (for heat setting)
Step 1: Preparation & Outline
-
Prepare the fabric surface:
Before starting, ensure your hoodie has been washed to remove any factory sizing, which helps the paint adhere better. Once dry, slip a piece of cardboard inside the hoodie, directly under the back area where you’ll be painting. pull the fabric taut and secure it with clamps or tape so it doesn’t shift while you work. -
Sketch the geometric grid:
Using a printed reference of a low-poly fox, lightly sketch the main outline onto the fabric with tailor’s chalk. Focus on getting the outer triangle shape right first. I find it easiest to mark the center point and build the ears and snout outwards from there. -
Define the internal shapes:
Connect your points to create the internal triangular facets. Accuracy is key here, so use a ruler if your hand isn’t steady. These lines will be your guide for coloring, so make sure every triangle is clearly defined. -
Paint the black outlines:
Load your fine liner brush with black fabric paint. Carefully trace over your sketched lines. Keep the paint consistency fluid but not watery to avoid bleeding into the fabric threads. Create a crisp, continuous network of black lines that frame every polygon. -
Thicken the outer borders:
Go back over the main outline of the fox head to make it slightly bolder than the interior lines. This adds visual weight and separates the subject clearly from the white background.
Step 2: Color Blocking
-
Apply the darkest orange tones:
Identify the sections of the fox that represent shadow—usually under the ears, cheeks, and sides of the snout. Fill these specific polygons with your Terracotta or dark burnt orange paint using the small flat shader brush. -
Fill the mid-tones:
Mix a standard orange by combining your Burnt Orange with a tiny dot of white or yellow. Paint the main sections of the face and forehead. Be very careful to paint ‘inside the lines’ of your black grid, keeping the edges sharp. -
Add the highlights:
Use your Light Peach or Beige color for the lighter areas, such as the inner ears and the bridge of the nose. If the fabric is absorbing too much paint, you may need a second coat here to ensure the color looks solid and opaque. -
Detail the ears and nose:
Use pure black paint to fill in the dark geometric shapes inside the tips of the ears and the nose tip. Ensure these areas are solid black with no fabric showing through. -
Paint the eyes:
Using the fine liner brush again, paint the eyes carefully. Use black for the pupil and outline, and leave a tiny dot of unpainted fabric (or add a dot of white paint) for the catchlight to bring the fox to life.
Bleeding Lines?
If paint bleeds into the fabric grain, stop immediately. Let it dry, then paint over the bleed with white opaque fabric paint. Once dry, re-paint the correct color on top.
Step 3: Refining & Finishing
-
Clean up the lines:
Once your color blocks are dry to the touch, inspect your black outlines. If you accidentally painted over any lines, simply go back with your fine liner brush and black paint to re-establish those crisp boundaries. -
Let it cure:
Allow the painting to dry completely. Most fabric paints require at least 24 hours before they are ready for heat setting. Don’t rush this, or the paint might smudge. -
Heat set the design:
Place a sheet of parchment paper over the dry painted design. Set your iron to the cotton setting (no steam) and iron over the parchment paper for 3-5 minutes, moving constantly. This creates a permanent bond so your hoodie is machine washable.
Metallic Upgrade
Swap the beige or lightest peach tone for a metallic gold or copper fabric paint. The shimmer adds a trendy, high-end finish to the geometric facets.
This modern, structured design is sure to turn heads whenever you wear your custom creation
Mushroom Cluster Moment
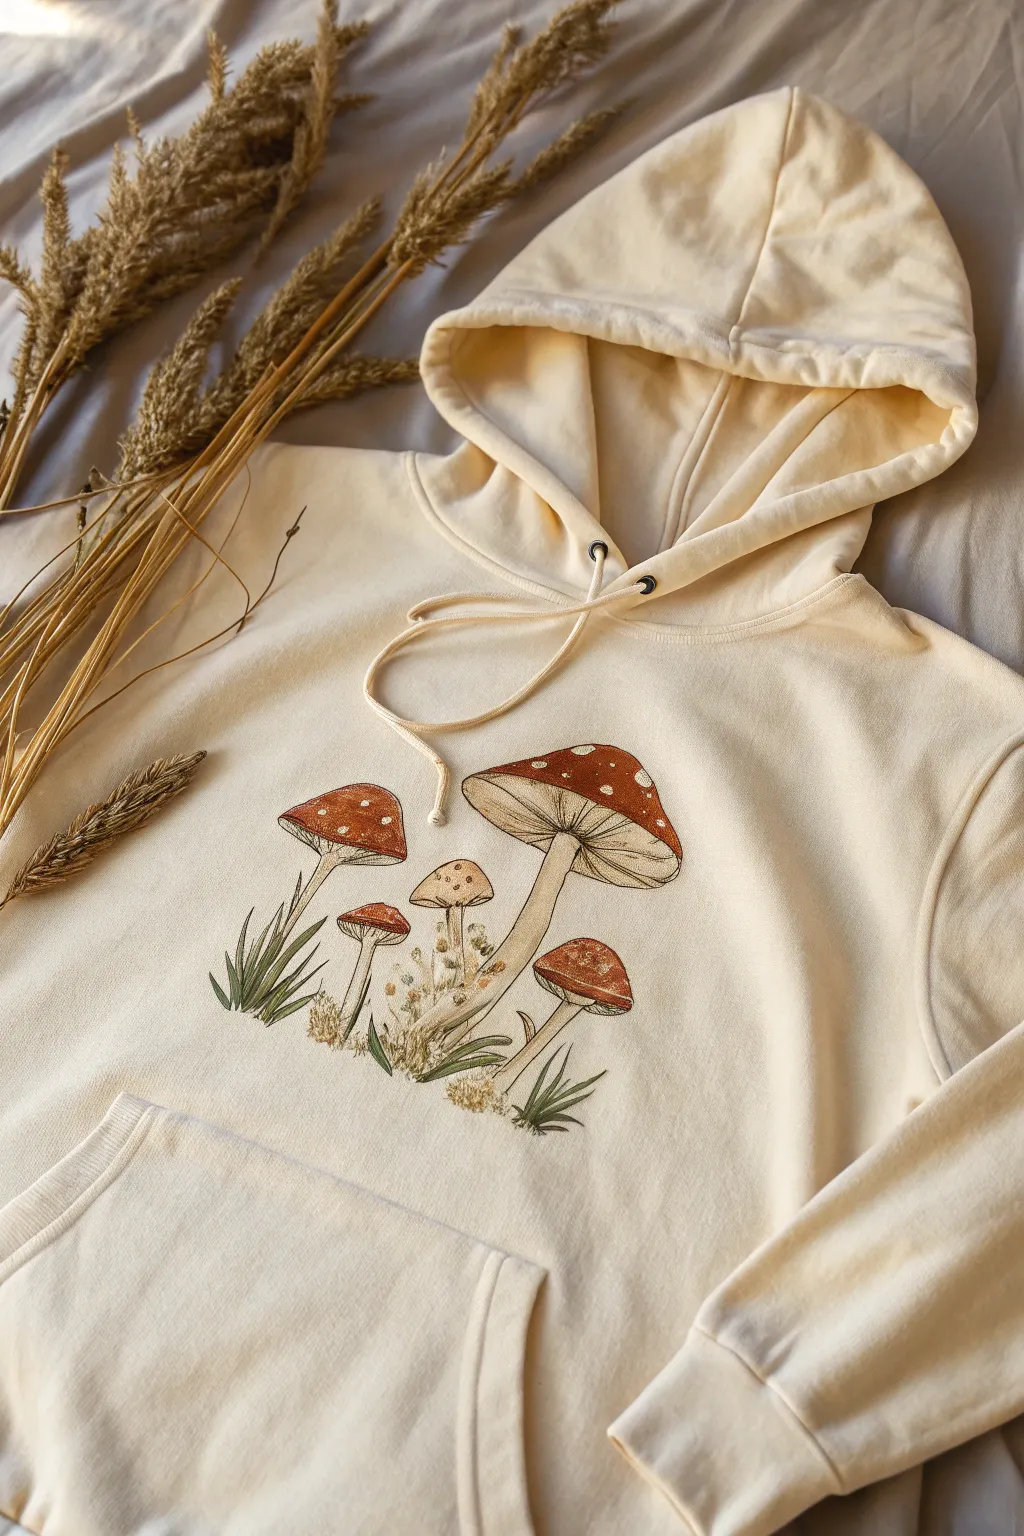
Bring a touch of cottagecore charm to your wardrobe with this detailed botanical illustration on a comfy cream hoodie. The design features a cluster of Amanita-style mushrooms in varied sizes, rendered in earthy reds and browns with delicate linear ink work.
Step-by-Step Tutorial
Materials
- Cream or beige cotton hoodie (pre-washed)
- Fabric medium
- Acrylic paints (burnt sienna, raw sienna, crimson red, titanium white, sap green, heavy cream)
- Fine liner fabric markers (brown or black, 0.5mm tip)
- Small flat shader brush (size 4 or 6)
- Fine detail brush (size 0 or 00)
- Cardboard insert
- Water jar & palette
- Pencil or disappearing fabric pen
Step 1: Preparation & Sketching
-
Prepare the surface:
Begin by sliding a piece of stiff cardboard inside the hoodie. This is crucial as it creates a stable surface for painting and prevents any paint from bleeding through to the back of the garment. -
Map out the composition:
Using a pencil or disappearing fabric pen, lightly sketch the main mushroom shapes. Start with the largest mushroom slightly off-center to the right, angling its cap. -
Add supporting elements:
Draw the medium-sized mushroom on the left, tucked slightly behind the main one. Then, fill in the smaller surrounding mushrooms and tiny sprouts near the base. -
Sketch the foliage:
Indicate where the grass clumps will go at the base of the stems, using quick, upward strokes to denote placement rather than detail.
Paint Consistency Tip
If your paint feels too thick to drag smoothly across the fabric, mist your palette slightly with water. You want a creamy consistency like melted ice cream.
Step 2: Base Colors
-
Mix your fabric paint:
Mix your acrylic paints with fabric medium according to the bottle instructions (usually 1:1 or 2 parts paint to 1 part medium). This ensures the design stays soft and flexible. -
Paint the stems:
Using a cream color mixed with a tiny drop of raw sienna, fill in all the mushroom stems. Keep the paint application smooth and flat. -
Base coat the caps:
Mix crimson red with burnt sienna to get a muted, rusty red tone. Apply this to the top caps of the mushrooms. For the unopened or smaller caps, you might want a slightly lighter tawny shade. -
Underbelly details:
For the gills underneath the large mushroom cap, paint a semi-circle of pale cream or off-white. Don’t worry about the lines yet; just get the solid color down.
Step 3: Adding Depth & Texture
-
Shadowing the stems:
Once the base is dry to the touch, mix a watery wash of raw sienna. Apply this gently along one side of the stems and right underneath the caps to create a cylindrical shadow effect. -
Detailing the caps:
Start adding the characteristic spots. Use titanium white for the spots on the red caps. Keep them irregular in size and placement for a natural look. -
Painting the grass:
Switch to your sap green paint mixed with a little brown to dull it down. With your fine brush, flick paint upwards from the base to create tufts of grass. -
Adding texture to the ground:
Dab a stippling of light brown and cream around the base of the stems to simulate moss or loose soil texture.
Fuzzy Lines?
If your fabric marker bleeds into the weave, your fabric might be too textured. Iron a piece of freezer paper to the back of the painting area to stabilize it while drawing.
Step 4: Line Work & Finishing
-
Outline the main shapes:
This is where the illustration comes to life. Using your fine liner fabric marker or a size 00 brush with thinned brown paint, carefully outline the outer edges of the mushroom caps and stems. -
Draw the gills:
On the large mushroom, draw fine, radiating lines from the stem to the edge of the cap underneath to represent the gills. Keep these lines very delicate. -
Define the stems:
Add vertical, slightly shaky lines up the length of the stems to mimic the fibrous texture of a mushroom stalk. -
Enhance the grass:
Go over your painted grass blades with the fine liner to give them sharp definition. Add a few extra purely ink blades for variety. -
Final highlights:
If the design feels too dark, add very subtle highlights of pure white on the top curve of the caps and the brightest part of the stems. -
Heat set the design:
Allow the hoodie to dry for at least 24 hours. Once fully dry, place a pressing cloth over the design and iron it on medium heat (no steam) for 3-5 minutes to permanently set the paint.
Wear your cozy new creation with pride, knowing you have a wearable piece of forest art


Ocean Creatures Along the Pocket
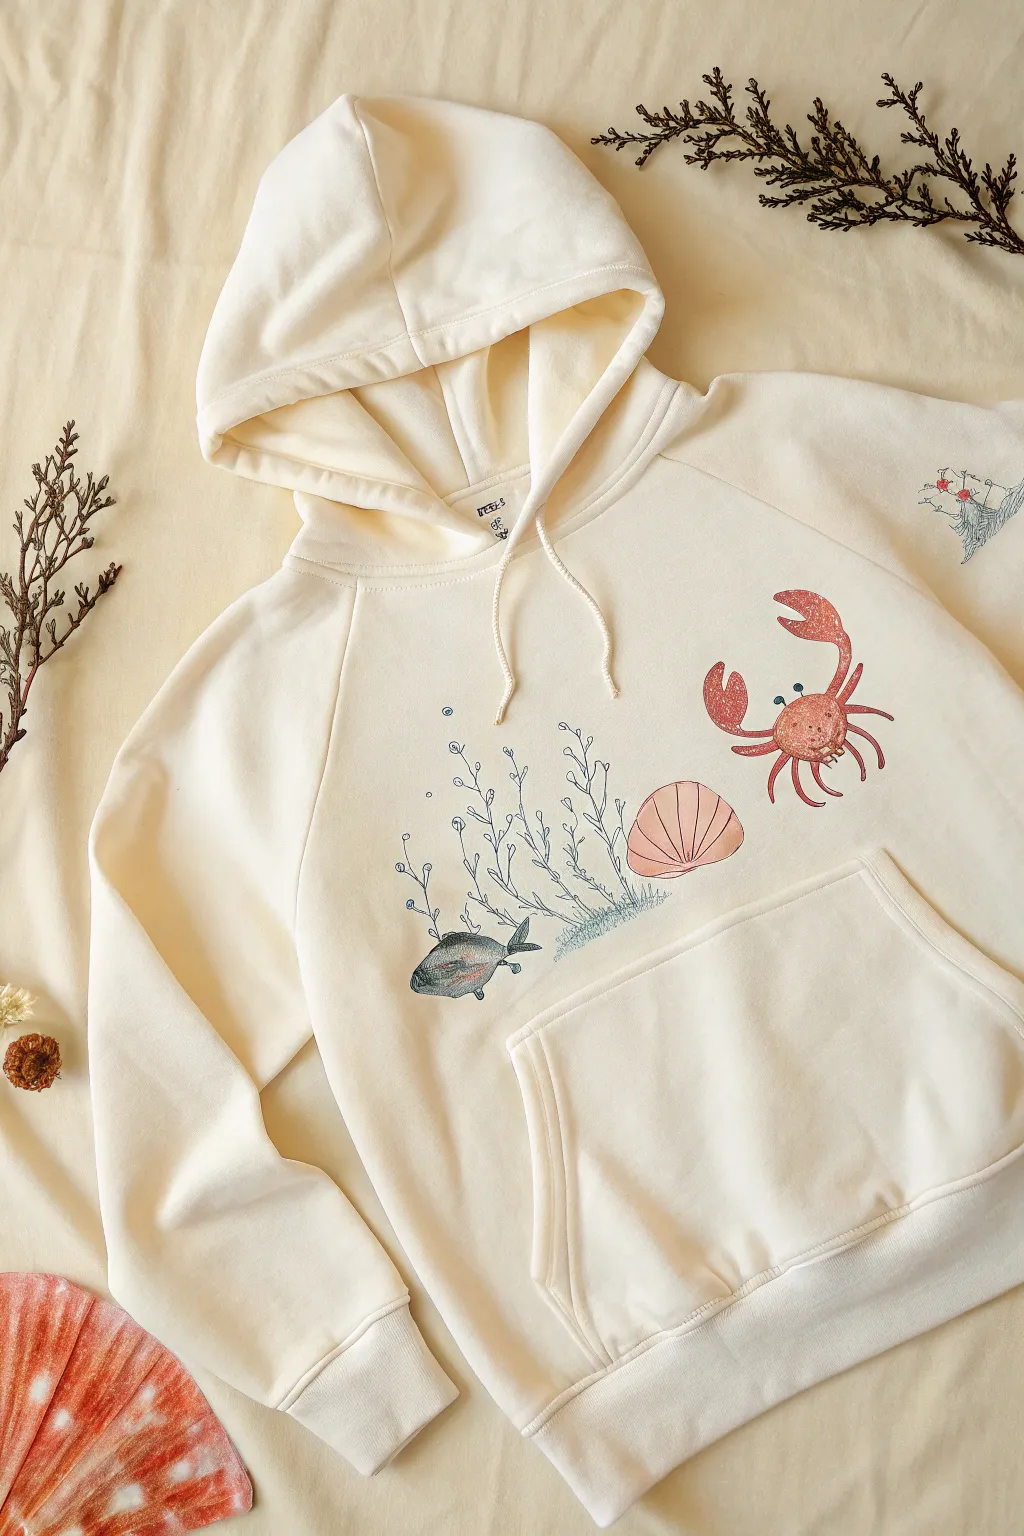
Transform a plain cream hoodie into a coastal keepsake with these delicate, hand-drawn ocean illustrations. The design features a whimsical crab, shell, and fish nestled among fine-lined seaweed, all painted just above the pocket for a playful, balanced composition.
Detailed Instructions
Materials
- Cream or off-white cotton hoodie (pre-washed)
- Fabric markers (fine tip: black, navy blue)
- Fabric paints (soft pink, coral red, slate grey, muted blue)
- Fine detail paintbrushes (size 0 and 00)
- Cardboard or cutting mat (to place inside hoodie)
- Iron (for heat setting)
- Pencil and eraser
- Palette or small dish for mixing
Step 1: Preparation and Sketching
-
Prepare the fabric:
Begin by sliding a piece of stiff cardboard inside the hoodie, positioning it directly behind the pocket area. This prevents paint from bleeding through to the back and provides a taut surface for sketching. -
Map the composition:
Using a pencil, lightly sketch the main elements in a row just above the pocket stitching. Place the fish on the left, the seaweed clusters in the center, the scallop shell next to them, and the crab on the right. -
Refine the fish:
Sketch the fish with a simple oval body and a fan-shaped tail. Add a small triangular fin on top and bottom. -
Draw the crab outline:
Outline the crab’s round body and two large front claws raised upward. Sketch four bent legs on the right side and four on the left to give it a scuttling appearance. -
Sketch the seaweed:
Draw thin, wavy vertical lines rising from the ‘ground’ area between the fish and shell. Add tiny circles or leaves branching off these stems for texture.
Bleeding Lines?
If your marker bleeds into the fabric grain, the ink is too fluid. Stop immediately and switch to a fine liner specifically labeled ‘pigment liner’ or use thicker fabric paint with a 00 brush.
Step 2: Painting the Creatures
-
Paint the scallop shell:
Mix a soft pink fabric paint. Fill in the semicircular shape of the shell. While the paint is still wet, add a tiny drop of white to the center to create a subtle highlight. -
Color the crab:
Using a coral red or rust-colored paint, carefully fill in the crab’s body, claws, and legs. Use your smallest brush here to stay inside the pencil lines. -
Fill in the fish:
Paint the body of the fish using a slate grey or muted blue. You can water down the fabric paint slightly to give it a watercolor-like transparency, which matches the artwork’s aesthetic. -
Add sleeve details:
If you want to match the original photo perfectly, sketch and paint a tiny matching motif, like a small boat or anchor, on the upper right sleeve using the same color palette. -
Let the base layers dry:
Allow all the painted areas to dry completely to the touch. This usually takes about an hour, depending on how thick your paint application was.
Pro Outline Tip
Don’t connect every single line when outlining the seaweed or bubbles. Leaving small gaps in the ink lines creates that breezy, hand-sketched illustration style seen in the photo.
Step 3: Detailing and Outlining
-
Outline the seaweed:
Switch to a fine-tip black or navy fabric marker. Trace over your pencil lines for the seaweed, keeping the lines shaky and organic rather than perfectly straight. -
Add bubbles:
Draw tiny circles floating up from the seaweed and the fish using a blue fine-tip marker or a very fine brush with diluted blue paint. -
Detail the shell:
Once the pink paint is dry, use a fine brush with a slightly darker pink or red to paint thin, radiating lines on the shell to show its ridges. -
Texture the crab:
Add small dots or stippling on the crab’s main shell using a darker red or brown paint. This gives it a textured, sandy look. -
Define the crab legs:
Use your dark fabric marker to outline the crab’s claws and legs to make them pop against the cream fabric. -
Finish the fish:
Add details to the fish using the fine black marker: draw the eye, the gill line, and texture on the fins and tail. Add cross-hatching or scales on the body if desired. -
Anchor the scene:
scribble a little bit of green or grey texture at the base of the seaweed and under the fish to ground the illustration so the creatures don’t look like they are floating in white space.
Step 4: Finishing Touches
-
Dry thoroughly:
Let the entire design dry for at least 24 hours. I prefer to leave it flat in a safe spot where it won’t be disturbed. -
Heat set the design:
Turn the hoodie inside out (or place a pressing cloth over the design). Iron on a medium-high setting without steam for 3-5 minutes to seal the paint into the fibers.
Now you have a unique, ocean-inspired hoodie ready for your next beach walk or cozy evening in
Anatomical Heart Statement
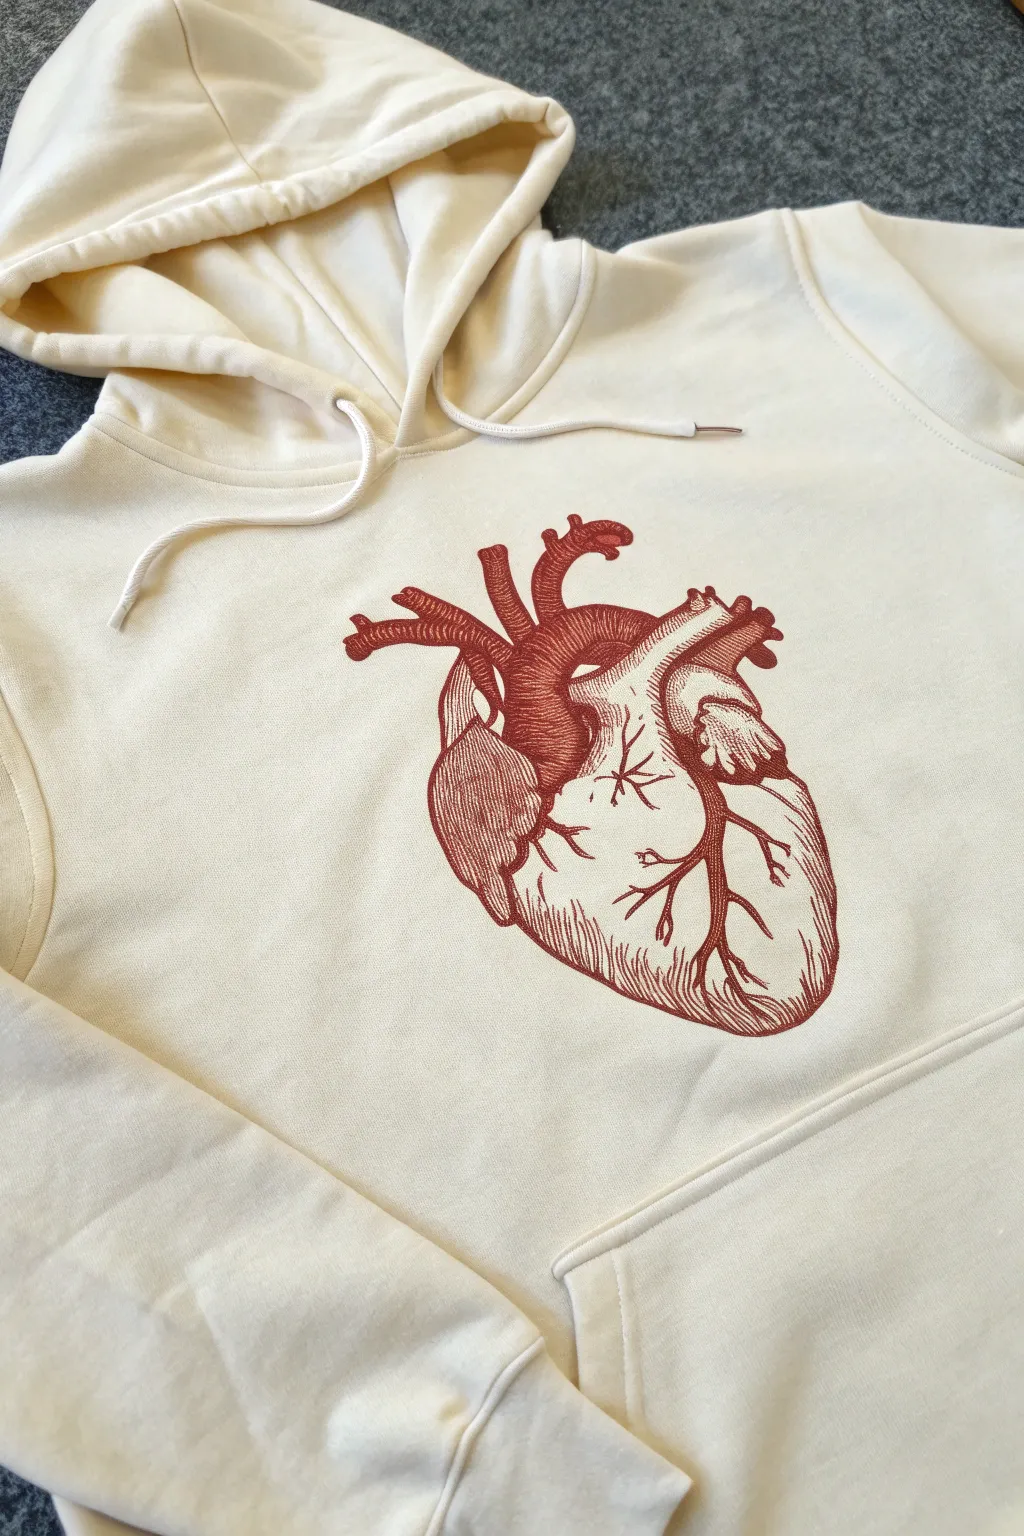
Bring a touch of medical illustration to your wardrobe with this striking anatomical heart hoodie. The clean lines and monochromatic rust-red palette create a sophisticated, vintage-textbook aesthetic that looks professionally printed.
Step-by-Step Tutorial
Materials
- Cream or off-white cotton hoodie
- Fabric paint (rust red or maroon)
- Fabric medium (if using standard acrylics)
- Fine liner detail brush (size 00 or 000)
- Small flat brush (size 2 or 4)
- Printed anatomical heart template
- Tailor’s chalk or transfer paper
- Cardboard insert
- Masking tape
- Iron for heat setting
Step 1: Preparation & Transfer
-
Pre-wash the hoodie:
Before you begin, wash and dry your hoodie without using fabric softener. This removes sizing chemicals and ensures the paint adheres permanently to the fibers. -
Insert backing board:
Slide a piece of sturdy cardboard inside the hoodie, placing it directly under the chest area. This prevents paint from bleeding through to the back and provides a firm surface. -
Secure the fabric:
Pull the fabric taut against the cardboard—not so tight that it distorts the weave, but smooth enough to avoid wrinkles. Use large binder clips or masking tape to hold it in place. -
Prepare your template:
Print out a high-contrast anatomical heart diagram at the desired size. If you aren’t confident freehanding, trace the main outlines onto transfer paper. -
Transfer the design:
Position your design on the center chest. Using a pencil or stylus, trace over the transfer paper to leave a faint guide on the fabric. If sketching freehand, use tailor’s chalk for easy corrections.
Clean Lines Hack
For the finest lines, dilute your fabric paint with just a drop of water. It should be the consistency of heavy cream to flow smoothly off the liner brush.
Step 2: Blocking the Shape
-
Mix your paint:
Prepare the rust-red color. If you are using heavy body acrylics, mix them 1:1 with fabric medium to prevent the finished design from cracking or feeling stiff. -
Outline the main arteries:
Start with the superior vena cava and aorta at the top. I find it easiest to paint the distinct tube-like exit points first to establish the scale. -
Define the ventricles:
Paint the outer boundary of the main heart chambers. Don’t worry about shading yet; just focus on getting a clean, solid silhouette for the major shapes. -
Fill solid areas:
Using your small flat brush, fill in the darker, shadowed sections of the aorta and pulmonary artery. The reference image uses solid blocks of color to suggest depth. -
Establish the veins:
Paint the primary branching veins across the surface of the heart, keeping the lines relatively thick at the base and tapering them slightly as they branch out.
Smudge Control
Accidentally dropped a speck of red where it doesn’t belong? Do not rub it! Wait for it to dry completely, then carefully scrape it off with a craft knife.
Step 3: Detailing & Line Work
-
Switch to the liner brush:
This is the most crucial phase for that ‘engraved’ look. Load your size 00 or 000 brush with slightly thinned paint for better flow. -
Hatch the shadows:
Instead of blending gradients, use ‘hatching’ marks—closely spaced parallel lines—to create shading on the curved sides of the heart. -
detail the texture:
Add short, directional strokes along the muscle fibers of the ventricles. These lines follow the contour of the form, helping the heart look round rather than flat. -
Refine the edges:
Go back over your perimeter lines. A crisp, confident edge is key to mimicking the style of a vintage medical print. -
Add final arteries:
Paint the tiniest branching capillaries that fade into the white space. Use the very tip of your brush and lift pressure as you end the stroke. -
Check for consistency:
Step back and look at the image as a whole. Thicken any lines that look too faint compared to the bold upper arteries.
Step 4: Finishing Touches
-
Let it cure:
Allow the paint to dry completely. Standard fabric paint takes about 24 hours to cure fully before heat setting. -
Heat set the design:
Turn the hoodie inside out (or place a clean cloth over the design). Iron on a cotton setting, no steam, for 3-5 minutes to lock the pigment into the fibers.
Rock your new anatomical art piece with pride knowing it is completely unique.
Metallic and Iridescent Highlights
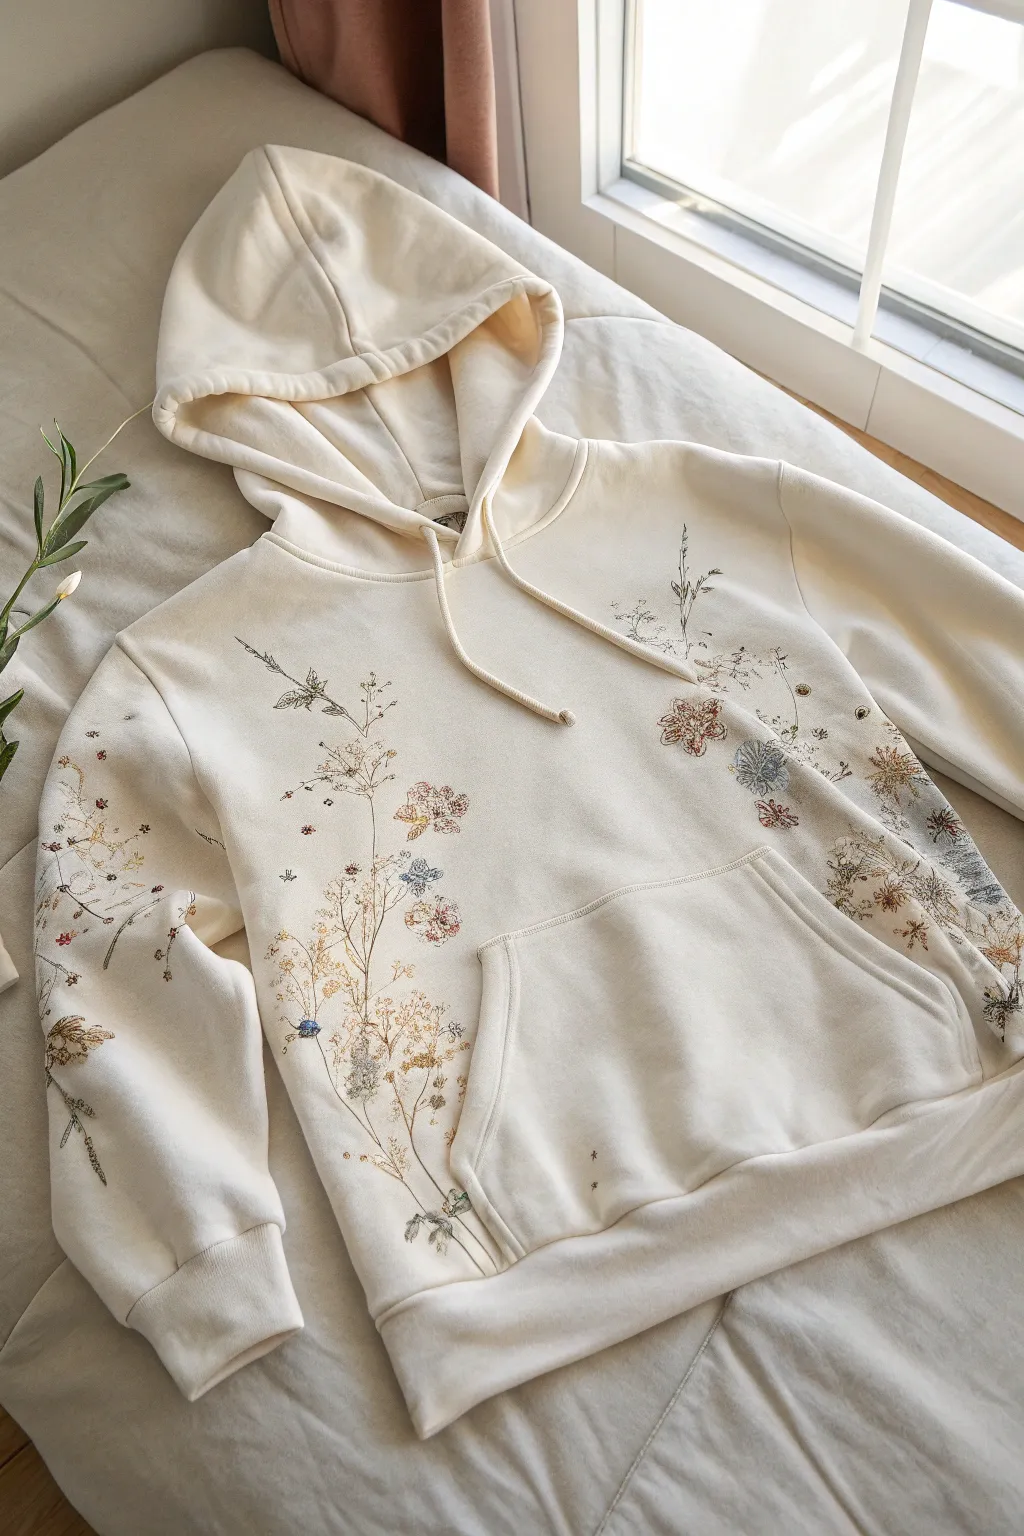
Transform a simple cream hoodie into a wearable botanical garden with this delicate hand-painted project. Featuring slender stems and soft, meadow-inspired blooms, this design uses fabric paints to create a vintage field guide aesthetic that feels both cozy and artistic.
How-To Guide
Materials
- Cream or beige cotton hoodie (pre-washed)
- Fabric medium
- Acrylic paints (muted tones: sage green, ochre, rust, periwinkle blue, dark brown, cream)
- Fine liner brushes (sizes 000 and 00)
- Small round brush (size 1 or 2)
- Fabric marker or chalk pencil (light color)
- Cardboard insert
- Palette or paper plate
- Iron and cloth for heat setting
Step 1: Preparation and Sketching
-
Prepare the fabric surface:
Begin by sliding a sturdy piece of cardboard inside the hoodie. This is crucial as it prevents paint from bleeding through to the back and provides a firm surface for your detailed line work. -
Plan the composition:
Visualize your layout. The design works best with asymmetry—focus on climbing vines starting from the bottom hem near the pocket and reaching upward, and a separate cluster draped over the shoulder or sleeve area. -
Sketch the main stems:
Using a light-colored chalk pencil or a fading fabric marker, very lightly draw the main curved lines for your stems. Keep these lines whimsical and flowing, rather than stick-straight. -
Add placement markers:
Mark small circles or dots where your major flower heads will go. This helps you balance the negative space before you commit with paint.
Smooth Lines Pro-Tip
If your brush drags on the fabric, add a drop of water to your paint/medium mix. It should flow like liquid ink for those super-thin stems.
Step 2: Painting the Stems and Greens
-
Mix your stem color:
Combine a dark brown with a touch of sage green and a generous amount of fabric medium. The consistency should be inky and smooth, allowing the brush to glide over the fabric weave. -
Paint the main stalks:
With your finest liner brush (000), trace over your chalk lines. Use light pressure to keep the stems as thin and delicate as possible. I like to lift the brush slightly at the ends of branches for a tapered look. -
Add varied foliage:
Along the stems, paint tiny, feathery leaves. Mix up your greens here—use a sage green for some and a more brownish-olive for others to mimic the variety found in a dried wildflower bouquet. -
Create wispy grasses:
interspersed among the main stems, perform quick, upward flicking motions with a pale ochre color to create the look of dried grasses or wheat stalks.
Step 3: Adding the Blooms
-
Paint base flower shapes:
Using a size 1 round brush, dab in the base colors for your flowers. Use muted ochre for small clusters, rust for larger blooms, and periwinkle for accent flowers. Keep the paint thin and watercolor-like by mixing with fabric medium. -
Detail the Queen Anne’s Lace:
For the umbrella-shaped flowers (umbels), use the very tip of your brush to dot tiny clusters of cream and pale brown at the ends of thin radiating stems. -
Add texture to larger blooms:
Once the base color is dry to the touch, use a contrasting darker shade to add centers and petal definitions. For example, add tiny dark brown specks to the center of the rust-colored flowers. -
Introduce metallic highlights:
Mix a tiny amount of metallic gold or bronze paint with fabric medium. Lightly graze this over the seed heads and the tips of the wheat-like grasses to catch the light.
Level Up: Bee Details
Add tiny painted bees or butterflies hovering near the flowers using gold metallic paint for wings to create a magical, iridescent effect.
Step 4: Finishing Touches
-
Review and refine:
Step back and look at the hoodie from a distance. Fill in any sparse areas with extra drifting petals or tiny flying seeds to create movement. -
Let it cure:
Allow the paint to limit dry completely for at least 24 hours. Don’t rush this step, as thick areas of paint need time to settle into the fibers. -
Heat set the design:
Place a thin cotton cloth over the painted areas and iron on a medium-high setting (no steam) for about 3-5 minutes per section to make the design permanent and washable.
Wear your new botanical masterpiece with pride, knowing you’ve captured a permanent piece of nature on your favorite cozy layer


Have a question or want to share your own experience? I'd love to hear from you in the comments below!