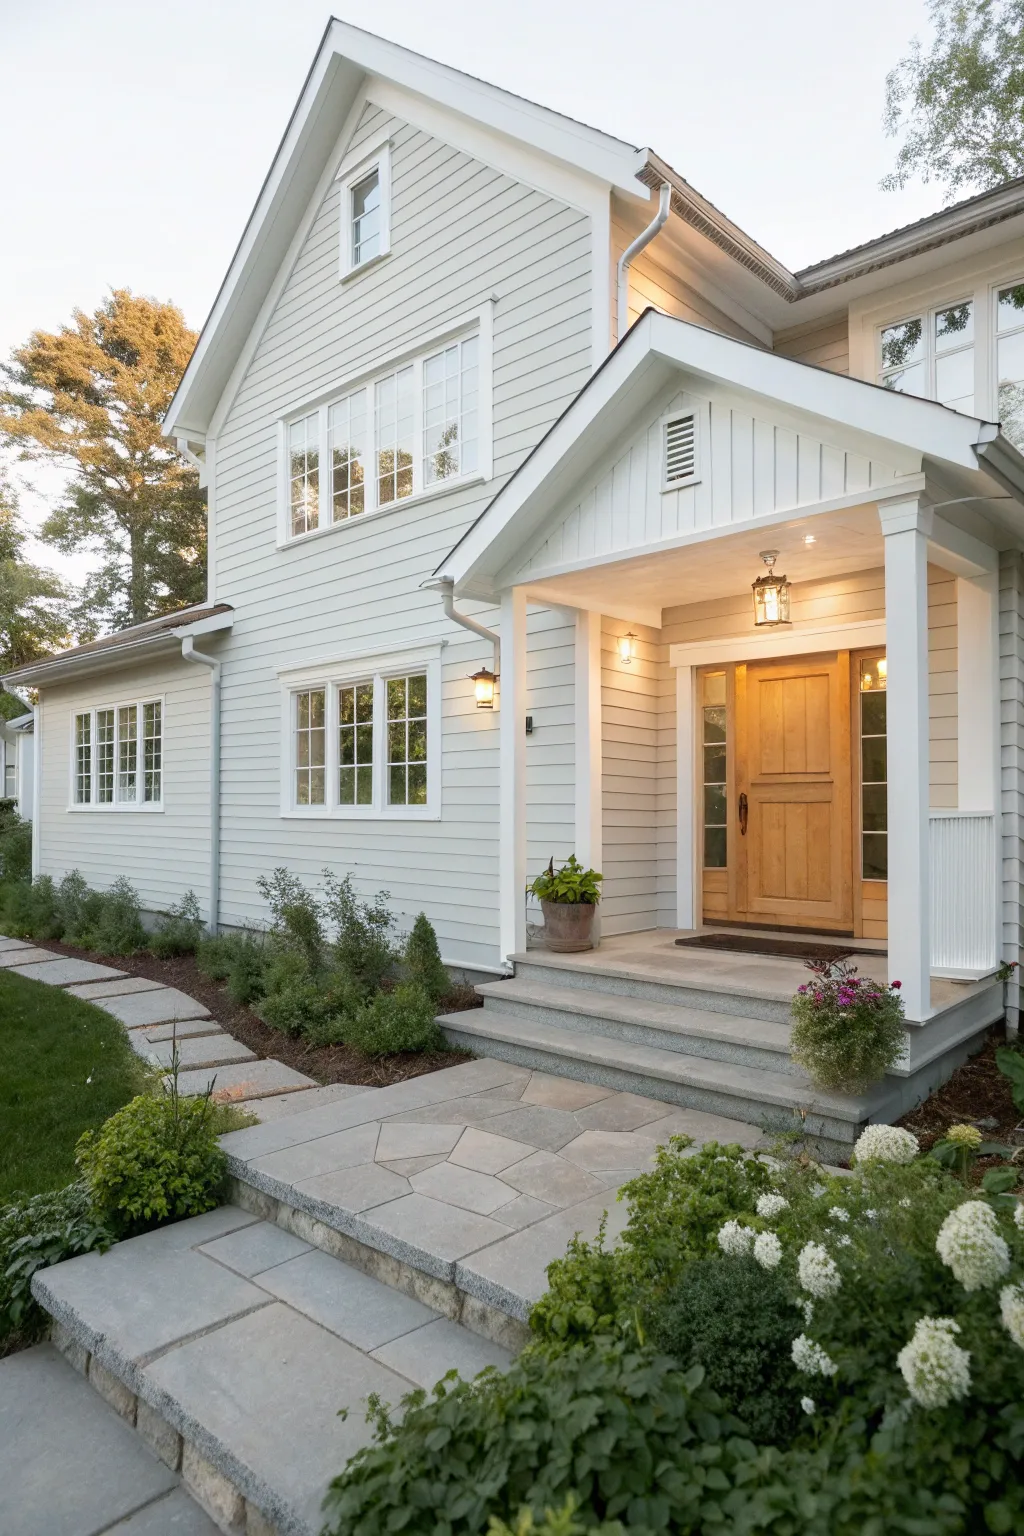
Choosing house color ideas is basically like composing a painting—big shapes first, then the crisp little details that make everything sing. Let’s play with body, trim, and accent combos that feel instantly curb-appealing in bright daylight and still look good next to real-life greenery.
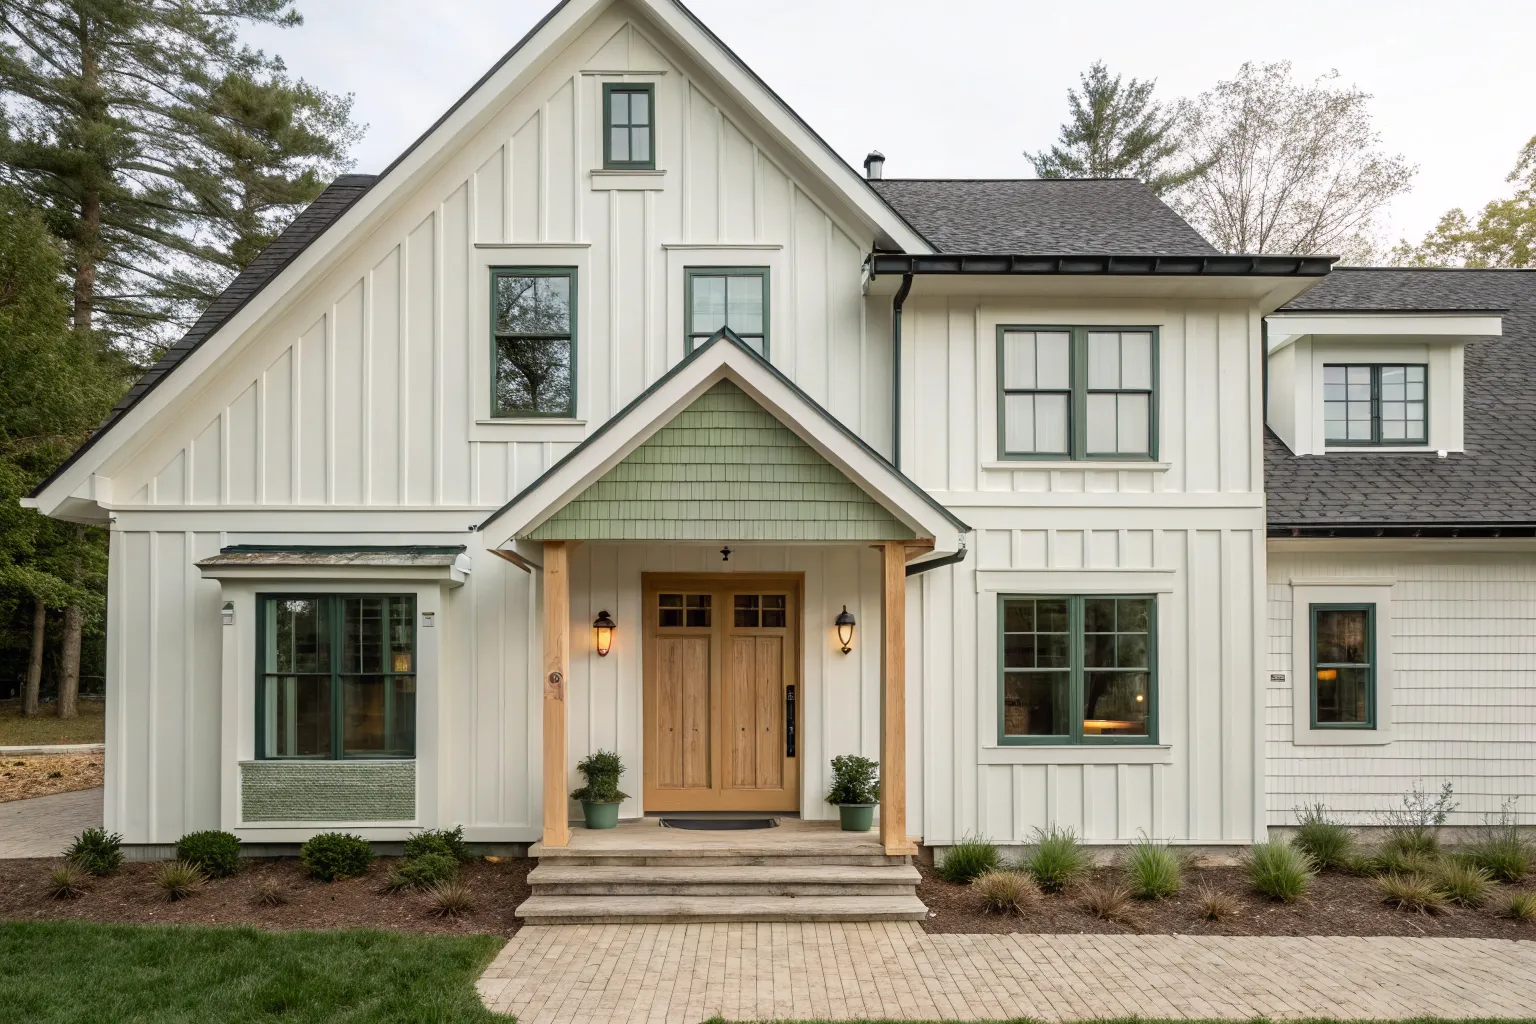
Classic White Body With Black Trim

Transforming your home’s exterior into this stunning modern farmhouse look relies on the sharp, clean contrast between crisp white siding and bold black accents. This project will guide you through painting your facade to achieve that classic, high-end curb appeal that feels both traditional and effortlessly contemporary.
How-To Guide
Materials
- High-quality exterior primer (masonry safe if painting brick)
- Pure White exterior latex paint (satin or low-lustre)
- Tricorn Black exterior paint (semi-gloss for trim/doors)
- Pressure washer
- Painter’s tape and masking paper
- Drop cloths
- Caulk and caulking gun
- Paint sprayer (airless recommended for large areas)
- Assorted paint brushes (angled sash brushes)
- Paint rollers and extension pole
- Ladder or scaffolding
- Sanding sponges
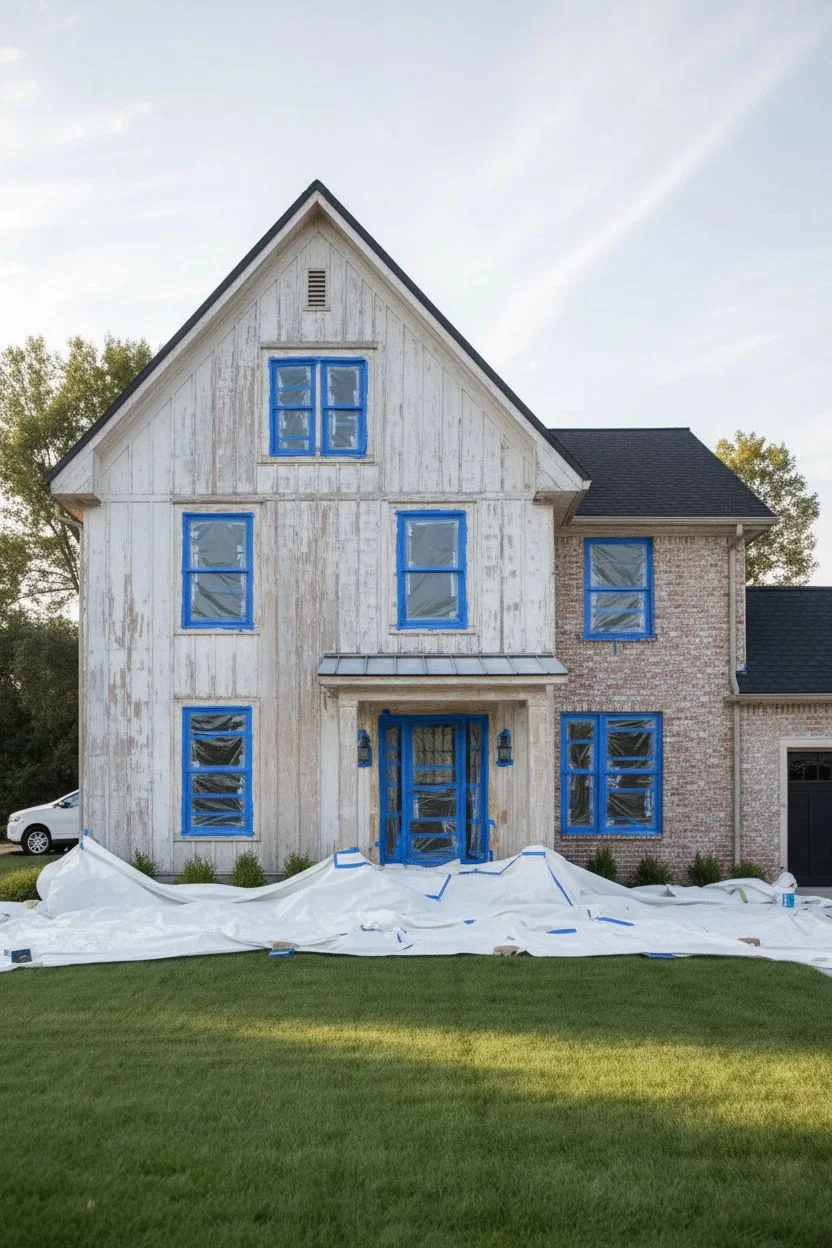
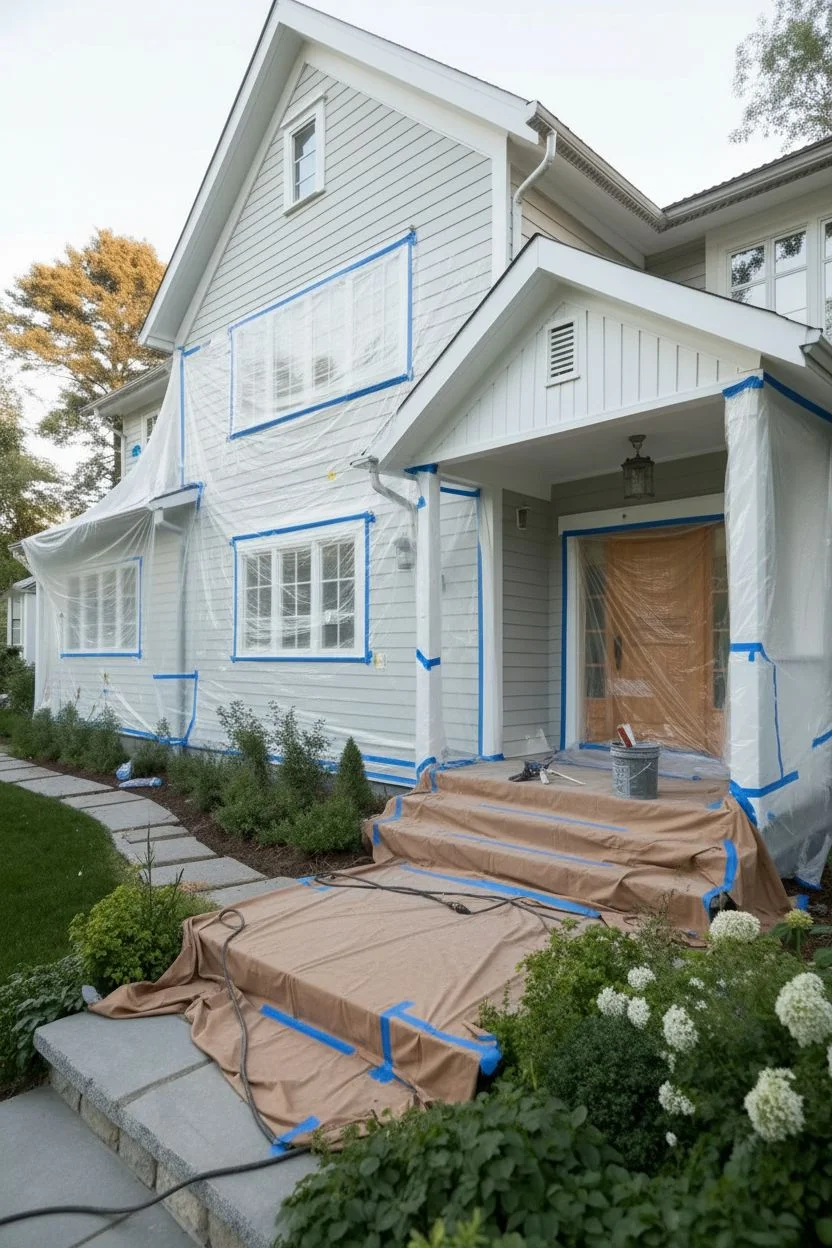
Step 1: Preparation and Cleaning
-
Wash the Exterior:
Begin by thoroughly pressure washing the entire exterior of the house. You need to remove all dirt, mold, mildew, and loose paint to ensure the new coat adheres perfectly. Pay special attention to the brick texture and under the eaves. -
Repair and Caulk:
Once the house is dry, inspect the siding and brick for cracks or gaps. Fill any gaps around windows, doors, and trim boards with a paintable exterior caulk. Replace any rotting wood if necessary. -
Protect Surroundings:
Cover all landscaping, light fixtures, walkways, and areas you don’t want painted with drop cloths and masking plastic. Tape off the window glass meticulously, as black trim paint is unforgiving on glass.
Step 2: Priming the Canvas
-
Prime the Brick:
If you are painting over raw brick, use a high-quality masonry primer. This seals the porous surface and ensures the topcoat looks uniform rather than soaking in patchily. -
Prime the Siding:
Apply a coat of exterior primer to the board and batten siding. Spot-prime any knots in the wood to prevent bleed-through later. -
Let it Cure:
Allow the primer to dry completely according to the manufacturer’s instructions. I usually like to give this a full day to ensure a rock-hard foundation for the color.
Master the Brick
When spraying brick, use a defined ‘cross-hatch’ pattern—spray horizontally then immediately vertically—to guarantee deep coverage in mortar joints.
Step 3: Applying the White Body
-
Setup the Sprayer:
Load your airless sprayer with the Pure White exterior paint. Using a sprayer is the most efficient way to get into the grooves of board and batten siding and the deep texture of brick. -
Spray the Siding:
Start at the top of the peaks and work your way down, spraying in even, overlapping horizontal strokes. Keep the sprayer tip about 12 inches from the surface to avoid runs. -
Back-Roll the Siding:
Have a helper follow immediately behind the sprayer with a roller to ‘back-roll’ the paint. This pushes the paint into the wood grain and evens out the texture. -
Spray the Brick:
Move to the brick section. Spray from multiple angles (left, right, up, down) to ensure paint gets into every crevice and mortar joint. -
Apply Second Coat:
After the first coat is dry, apply a second coat of white to the entire house for full opacity and durability.
Go Green
Amplify the contrast by planting structured boxwoods or dark green shrubbery along the foundation; the deep green pops beautifully against the white brick.
Step 4: Black Trim and Details
-
Paint the Windows First:
Using a high-quality angled sash brush, carefully hand-paint the window sashes and mullions in Tricorn Black. Steady hands are key here. -
Tackle the Fascia and Soffits:
Paint the roofline fascia boards and the gutters black. This creates that sharp outline that defines the house’s shape against the sky. -
Define the Front Door:
Paint the front door and its surrounding sidelights in black. Use smooth, long brush strokes or a mini foam roller to achieve a furniture-like finish without brush marks. -
Paint the Shutters:
If your shutters are removable, take them down and spray them black on a flat surface for the best finish. If not, mask the siding behind them carefully and brush them in place. -
Metal Accents:
Don’t forget the metal roof over the porch or any other metal awnings. Use a direct-to-metal paint in black to tie these features into the color scheme.
Step 5: Final Touches
-
Clean Up Lines:
Remove all painter’s tape while the trim paint is still slightly tacky to get crisp lines. If any black paint bled onto the white, touch it up with a small artist’s brush. -
Install Fixtures:
Reinstall or update your exterior lighting. Lantern-style black sconces, like the ones shown by the door, are the perfect jewelry for this look.
Step back and admire how the high-contrast palette has completely modernized the architectural character of your home


Warm White With Soft Greige Accents
Capture the classic beauty of this shingle-style colonial home with warm creamy whites and crisp charcoal accents. This acrylic painting project focuses on architectural precision, light play on siding, and lush landscaping textures to bring a stately residence to life on canvas.
Step-by-Step
Materials
- 16×20 inch stretched canvas
- Acrylic paints: Titanium White, Unbleached Titanium (Cream), Burnt Umber, Payne’s Grey, Yellow Ochre, Sap Green, Hookers Green
- Gesso (optional as a base coat)
- Pencil (HB) and ruler
- Flat shader brushes (sizes 8, 12)
- Round detail brushes (sizes 0, 2, 4)
- Fan brush (small)
- Palette knife for mixing
- Water cup and paper towels
Step 1: Sketching the Structure
-
Establish the horizon:
Begin by lightly drawing a horizon line about a third of the way up your canvas. This will separate the lush foreground lawn from the house itself. -
Block in main shapes:
Using your ruler and H pencil, draw the largest shapes first: the massive central gable and the smaller extension to the right. Focus on getting the pitch of the roof angles symmetrical and steep, characteristic of this architectural style. -
Define architectural details:
Sketch the specific features: the central portico with columns, the distinct windows with shutters, and the small dormer window near the roof peak. Ensure the windows align vertically and horizontally. -
Outline the landscaping:
Loosely sketch the curved shapes of the pebble driveway and the placement of the spherical shrubs and the small tree to the right. These organic shapes will soften the rigid lines of the house.
Step 2: Painting the House
-
Sky gradient base:
Mix Titanium White with a tiny touch of blue (or just use pure white if you prefer a bright overcast look as shown). Paint the sky area, fading it slightly as it nears the roofline. -
Base coat for siding:
Mix a large amount of ‘Warm White’ using Titanium White and a small dollop of Unbleached Titanium or Yellow Ochre. Apply a flat, even coat to the entire siding area of the house. -
Roof painting:
Mix Payne’s Grey with a bit of Burnt Umber for a soft charcoal tone. Paint the roof shapes. For the metal roof over the porch, use a slightly darker mix to distinguish materials. -
Adding shingle texture:
Once the siding base is dry, take a small flat brush with a slightly darker cream mix (add a touch more Ochre). Paint faint horizontal lines across the siding to mimic the shingle pattern. Don’t make them perfect lines; broken lines look more natural. -
Windows and shutters:
Paint the window panes with a dark grey (Payne’s Grey). Then, carefully paint the shutters using a solid grey-brown mix. Use your ruler as a guide if your hand feels shaky. -
Painting the portico:
Use pure Titanium White to paint the columns and trim of the front porch, making them pop against the cream siding. Paint the front door with Burnt Umber mixed with Ochre for a warm wood look.
Straighten Up!
If your lines look crooked, use painter’s tape to mask off the edges of the house and roof before painting. This ensures crisp, architectural lines effortlessly.
Step 3: Landscaping and Final Touches
-
Base for grass:
Mix Sap Green with a little Yellow Ochre. Paint the lawn areas on the bottom left and right. Keep strokes horizontal to suggest flat ground. -
Creating the driveway:
Mix white with a tiny dot of Burnt Umber for a pebble color. Stipple this mixture onto the driveway area using a scruffy old brush or a sponge to create a gravel texture. -
Painting the shrubs:
Using a round brush or fan brush, dab dark Hookers Green into the spherical shapes of the shrubs. Add highlights to the tops of the bushes with a lighter yellow-green mix to give them dimension. -
Detailing the tree:
Use a liner brush with thinned Burnt Umber to paint the delicate trunk and branches of the tree on the right. Stipple sparse green leaves on the branches so the house is still visible through them. -
Refining shadows:
Mix a transparent glaze of Payne’s Grey and water. Apply thin shadows under the roof eaves and beneath the window sills to give the house 3D depth. -
Final highlights:
Add tiny touches of pure white to the edges of window panes and the tops of the porch columns to simulate sunlight catching the edges.
Natural Greens
Avoid using tube green straight up. Mix in a little red or burnt umber to desaturate it for realistic, earthy foliage tones.
Step back and admire how the warm cream tones and structured landscaping create an inviting, classic home portrait


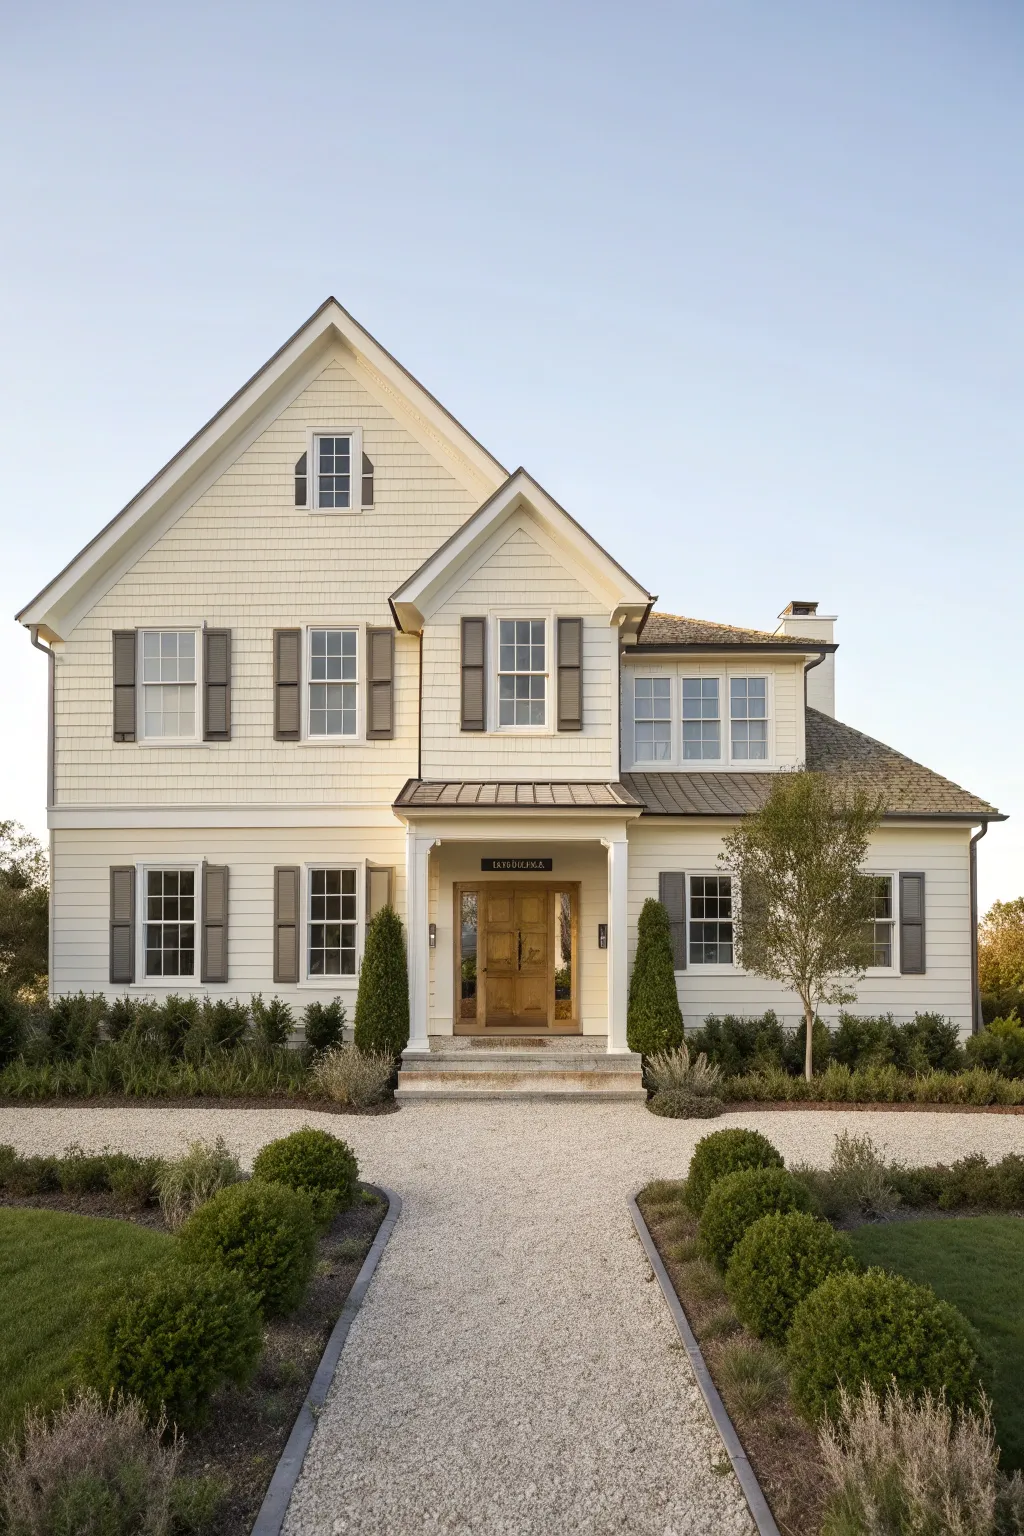
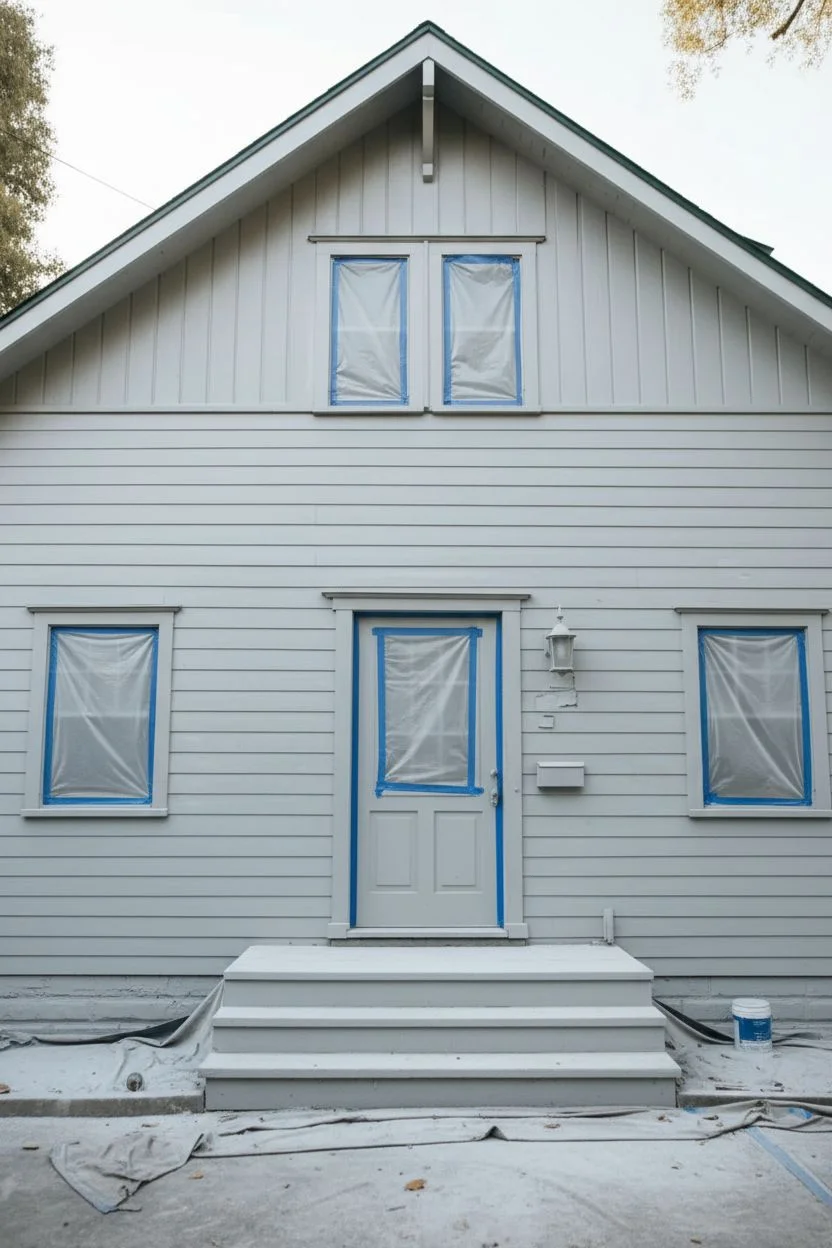
Light Gray Body With Bright White Trim
Achieve a timeless, airy aesthetic with this refined exterior makeover project that pairs a soft, misty gray siding with crisp, bright white trim. This clean color palette brightens the façade while highlighting architectural details like columns and window grids, creating a welcoming entrance that feels both modern and classic.
Step-by-Step Tutorial
Materials
- External primer (high-adhesion)
- Exterior latex paint (Satin sheen, light gray – e.g., ‘Repose Gray’ or similar)
- Exterior latex paint (Semi-gloss sheen, pure white – e.g., ‘Extra White’)
- Stain/Varnish (for wooden door, warm oak tone)
- Pressure washer
- Painter’s tape and plastic masking
- Caulk gun and exterior silicone caulk
- Paint sprayer (airless recommended for siding)
- Angled sash brushes (2.5 inch and 1.5 inch)
- Roller set with medium nap covers
- Drop cloths
- Scrapers and sanding blocks (120 grit)
Step 1: Preparation & Cleaning
-
Surface Assessment:
Begin by thoroughly inspecting the existing siding and trim for any loose boards, rot, or peeling paint. Replace damaged wood now to ensure your finish lasts. -
Deep Cleaning:
Use a pressure washer to remove dirt, mildew, and chalky residue from the siding and stone steps. Be careful not to spray water upwards under the lap siding. Let the house dry completely for at least 48 hours. -
Scraping and Sanding:
Scrape away any remaining loose paint chips. Lightly sand glossy areas and rough spots on the trim to create a ‘tooth’ for the new paint to adhere to. -
Caulking Gaps:
Inspect all seams around windows, doors, and corner boards. Apply a bead of exterior paintable caulk to seal gaps, preventing water intrusion and ensuring a seamless final look. -
Masking Off:
Cover the stone steps, porch floor, windows, and light fixtures with plastic sheeting and painter’s tape. Don’t forget to protect the natural wood front door if it’s already installed.
Uneven Coverage?
If the old color bleeds through the light gray, don’t over-apply thick layers. Instead, let it dry fully and apply a third thin coat. Thin layers cure harder and last longer.
Step 2: Painting the Body
-
Priming Bare Spots:
Spot prime any bare wood or repaired areas. If you are making a drastic color change, consider a full coat of tinted primer to help coverage. -
Spraying the Siding:
Load your airless sprayer with the light gray satin exterior paint. Work in sections from the top down, spraying horizontally with the clapboards to maintain a consistent wet edge. -
Back-Rolling:
Immediately after spraying a section, I find it crucial to have a helper back-roll the wet paint. This pushes the material into the wood grain and evens out the texture for a professional finish. -
Second Coat Application:
Once the first coat is fully dry (check can instructions, usually 4-6 hours), apply a second coat using the same spray and back-roll technique for maximum durability and color depth. -
Corner Board Cut-ins:
Carefully cut in the gray paint where the siding meets the corner boards and trim, but try to keep paint off the trim faces to save time later.
Pro Tip: Weather Watch
Never paint in direct, hot sunlight or if rain is expected within 24 hours. Overcast, dry days with temps between 60-80°F allow the paint to cure slowly and adhere best.
Step 3: Trim & Details
-
Painting Fascia and Soffits:
Switch to your bright white semi-gloss paint. Start high with the fascia boards and soffits under the eaves, using a roller for flat areas and a brush for edges. -
Window Casings:
Paint the window frames and grilles. Use a 1.5-inch angled sash brush for the delicate muntins (grids) to keep lines sharp and clean against the glass. -
Columns and Porch Trim:
Paint the porch columns and the header beam. Apply two coats here as these areas are high-visibility focal points. Watch for drips on vertical surfaces. -
Refining the Doorway:
If your door frame paint needs refreshing, carefully brush the white trim paint around the door casing. Keep a wet rag handy to immediately wipe any stray marks off the natural wood door. -
Door Restoration:
If the wooden door looks tired, lightly sand it and apply a fresh coat of marine-grade spar varnish or exterior stain to bring out the golden oak tones that contrast beautifully with the gray siding.
Step 4: Finishing Touches
-
Cleanup and Tape Removal:
Remove all masking tape and plastic while the final coat of trim paint is still slightly tacky to prevent peeling the edge. Carefully fold up drop cloths to trap debris. -
Hardware Reinstallation:
Reattach or clean your exterior light fixtures. Consider swapping dated fixtures for modern lantern-style sconces similar to the example for an updated look. -
Landscaping Touch-up:
Sweep the stone walkway and arrange potted plants like hydrangeas or boxwoods near the steps to soften the transition between the masonry and the fresh paint.
Step back and admire how this fresh, light palette transforms the home into a bright and inviting sanctuary


Navy Body With Crisp White Trim and a Bold Door
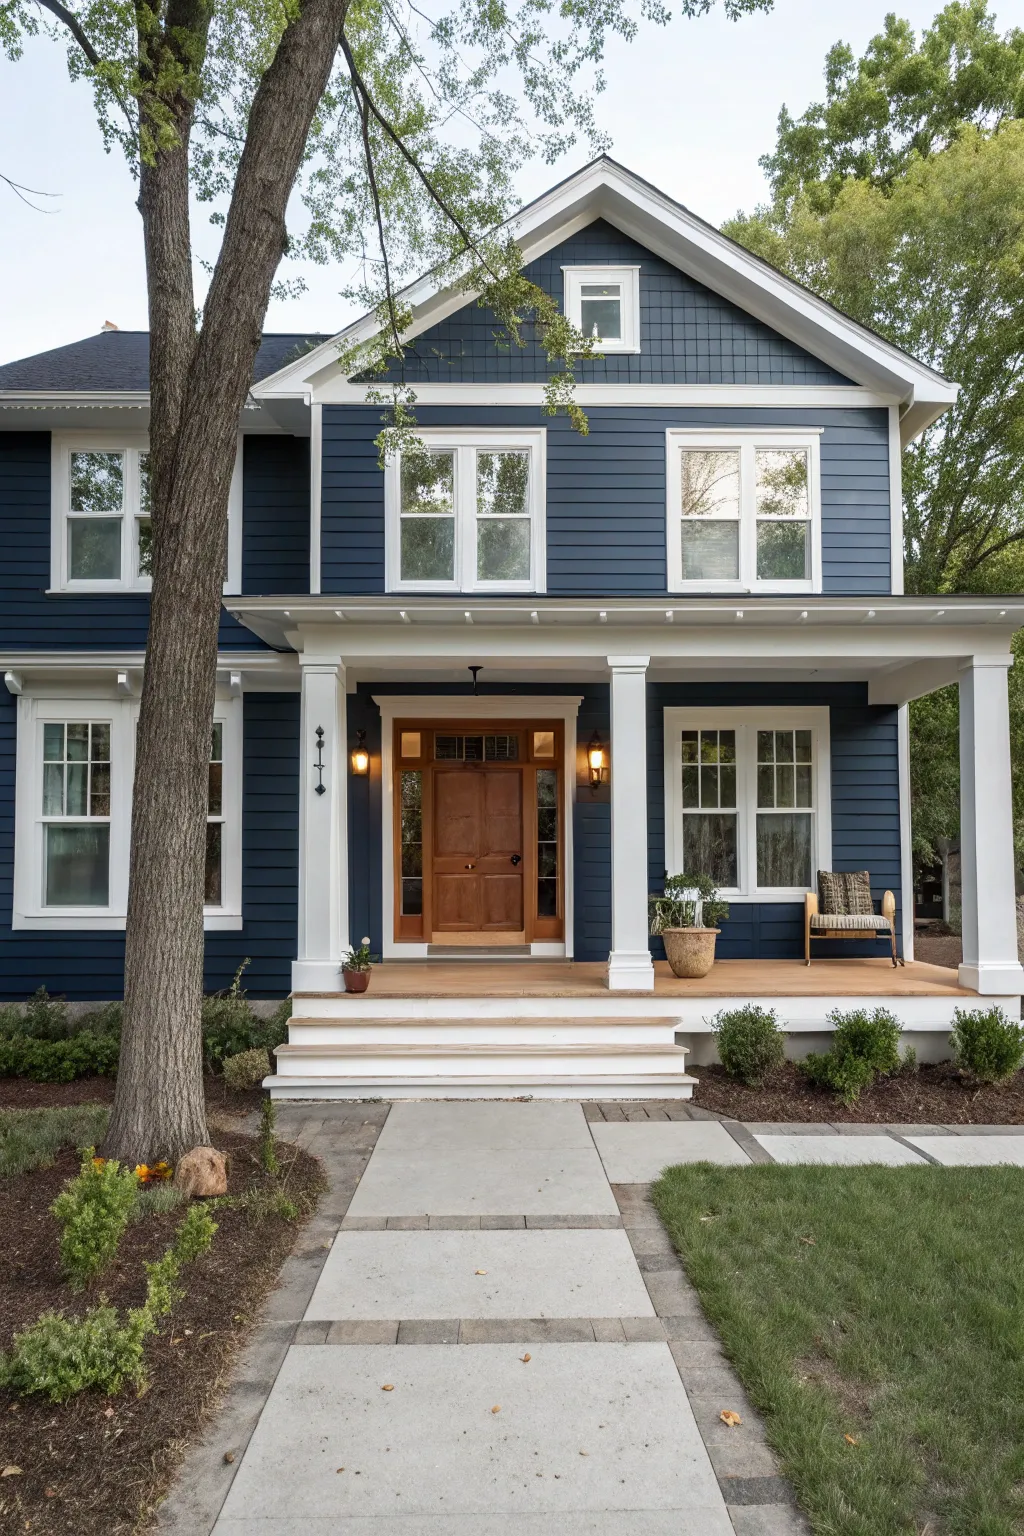
Capture the stately elegance of this navy-blue home with crisp white trim in a detailed architectural painting. This project focuses on straight lines, clean contrasts, and mastering the texture of siding and natural wood.
How-To Guide
Materials
- Hot press watercolor paper (140lb)
- Pencil (HB) and kneaded eraser
- Ruler or T-square
- Waterproof fine-liner pens (0.1mm, 0.3mm, 0.5mm)
- Watercolor paints (Indigo, Payne’s Gray, Burnt Sienna, Yellow Ochre, Sap Green, Sepia)
- White gouache
- Round brushes (sizes 2, 6, and 10)
- Flat brush (1/2 inch) for washes
- Masking tape
Step 1: Drafting the Architectural Bones
-
Lay out the main shapes:
Begin by taping down your paper to prevent buckling. Using your ruler and pencil, lightly sketch the large triangular gable of the roof first to center your composition. -
Add the siding guidelines:
Lightly draw horizontal lines across the front facade to represent the siding. Keep these evenly spaced, as they are crucial for the perspective. -
Define the porch and columns:
Sketch the rectangular porch base and vertical columns. Pay close attention to the spacing between the columns to ensure they look supportive and symmetrical. -
Sketch the windows and door:
Draw the window frames, ensuring the sashes are centered. Sketch the front door, including the glass side panels and transom window above it. -
Add nature elements:
Loosely sketch the large tree trunk on the left, letting branches reach up and over the house. Outline the shrubbery along the foundation and the paving stones leading to the porch.
Straight Line Secret
For long straight lines like siding, turn your paper sideways so you can draw the line pulling towards your body—it’s much steadier than drawing across.
Step 2: Inking the Structure
-
Ink the main outlines:
Use a 0.3mm pen to ink the roofline, corner boards, and porch columns. Use a ruler for the straight architectural lines to keep them crisp. -
Detail the siding:
Switch to a 0.1mm pen for the siding lines. Don’t draw every single line solid; break them occasionally to suggest light hitting the surface. -
Texture the tree:
Use the 0.3mm pen to add vertical, slightly wavy lines to the tree trunk to mimic bark texture. Stipple or scribble loosely for the shrubbery to differentiate organic shapes from the rigid house structure. -
Cleanup:
Once the ink is completely dry, gently erase all your pencil guides to leave a clean black and white drawing.
Step 3: Layering Watercolor Washes
-
Paint the siding base:
Mix a diluted wash of Indigo and Payne’s Gray. Using a flat brush, paint the siding areas, carefully cutting around the white window frames and columns. -
Deepen the navy shadows:
While the first layer is still damp, drop in more saturated Indigo under the eaves and roofline to create depth and shadow. -
Warm up the wood tones:
Mix Burnt Sienna with a touch of Yellow Ochre. Paint the front door and the porch floorboards. I find adding a tiny bit of red here makes the wood look richer. -
Paint the windows:
Use a very pale, watery gray (diluted Payne’s Gray) to fill the window panes. Leave tiny white spots unpainted for reflections. -
Add greenery:
Mix Sap Green with a little Sepia for a natural foliage color. Dab this onto the shrubs and the leaves in the upper right corner.
Boost the Contrast
Make the navy paint significantly darker right next to the white trim. This high contrast makes the white architectural details pop visually.
Step 4: Refining Details and Shadows
-
Enhance the trim contrast:
The trim should remain the white of the paper, but add thin shadows using a light violet-gray mix along the undersides of the window sills and porch beams to give them dimension. -
Darken the tree trunk:
Paint the tree trunk with a mix of Sepia and Payne’s Gray. Let the texture from your ink lines show through. -
Define the pavers:
Wash a light, warm gray over the walkway pavers. Once dry, deepen the gaps between them with a fine brush. -
Add the lawn:
Sweep a wash of Sap Green across the grass area in the foreground. Use vertical brush strokes near the edges to suggest individual grass blades. -
Final highlights:
Using white gouache, add crisp highlights to the lantern lights by the door and re-establish any lost whites on the porch railing or window muntins.
Step back and admire your precise architectural portrait, celebrating the classic beauty of navy and white design
BRUSH GUIDE
The Right Brush for Every Stroke
From clean lines to bold texture — master brush choice, stroke control, and essential techniques.
Explore the Full Guide
Beige Body Paired With Stone and White Trim
Capture the welcoming curb appeal of this suburban home by creating an architectural illustration using watercolors and ink. This project focuses on balancing rigid structural lines with organic landscaping textures for a balanced, realistic composition.
Step-by-Step
Materials
- Cold press watercolor paper (140 lb)
- Pencil (HB or 2H)
- Ruler or T-square
- Waterproof ink pens (0.1, 0.3, and 0.5 sizes)
- Watercolor paints (Yellow Ochre, Burnt Sienna, Payne’s Grey, Sap Green, Sepia)
- A mix of round brushes (size 2, 6, 12)
- Masking fluid (optional)
- White gouache or gel pen
Step 1: Planning the Structure
-
Establish the horizon line:
Start by drawing a light horizon line about one-third of the way up your paper. This will help ground your perspective, especially for the walkway leading to the front door. -
Block in the main masses:
Using your HB pencil and a ruler, lightly sketch the large triangular shapes of the gables first. The house has three main peaks; place the central highest peak first to anchor the composition. -
Define the facade grid:
Draw vertical lines to mark the corners of the house and the columns. Pay close attention to the spacing between the four white porch columns, ensuring the entry gap is centered. -
Detail the windows and siding:
Sketch the window frames, ensuring the mullions (the grid inside the window) are evenly spaced. Lightly draw horizontal guidelines for the siding, but don’t draw every single slat yet—just indicate the direction.
Straight Lines Secret
Don’t stress if your freehand lines aren’t perfect. A slight ‘wobble’ in your ink lines actually adds charm and warmth to architectural sketches.
Step 2: Inking the Lines
-
Outline the permanent structures:
Switch to a 0.5 waterproof pen to ink the main rooflines and the grounded stone sections. Use a ruler for the straightest edges, but allow the lines to break slightly for a hand-drawn feel. -
Refine the details:
Use a finer 0.1 pen for the delicate details like the window grids, the siding lines, and the decorative trim under the eaves. Keep the siding lines very light and possibly broken to avoid the drawing looking too busy. -
Texturing the stone:
With a 0.3 pen, draw irregular, interlocking shapes for the stone facade on the lower left and right. Vary the sizes of the stones and leave small gaps between them for grout. -
Sketch plant life:
Use a loose, scribbling motion with the 0.3 pen to outline the shrubs and the two conical bushes flanking the path. Do not close these shapes entirely; let the watercolor define their volume later.
Boost the Contrast
Deepen the shadows specifically under the porch overhang. High contrast here makes the white columns pop and pulls the viewer’s eye to the door.
Step 3: Applying Watercolor
-
Wash the siding:
Mix a very dilute wash of Yellow Ochre with a tiny touch of Burnt Sienna to get that warm beige. Apply this to the siding areas using a size 12 brush, carefully painting around the white trim. -
Paint the roof:
Combine Sepia and Payne’s Grey to create a dark, cool brown. Paint the roof sections, letting the color be slightly uneven to suggest texture and shingle variation. -
Color the stone facade:
I like to wet the stone area first with clean water. Then, drop in varying spots of dilute Brown, Grey, and Tan, letting the colors bleed together naturally to mimic the variation of natural stone. -
Define the shadows:
Mix a cool violet-grey using Payne’s Grey and a touch of purple. Glaze this transparent shadow color under the roof eaves, on the porch floor, and on the window glass to create depth. -
Greens for landscaping:
Use Sap Green mixed with a little Yellow for the sunny parts of the bushes. While still wet, drop in darker green (Sap Green + Sepia) at the bottom of the bushes to give them weight and volume.
Step 4: Final Touches
-
Paint the front door:
Use a rich Burnt Sienna to paint the wood door. Once dry, deepen the recessed panels with a second layer of the same color for dimension. -
Walkway texture:
Create a very watery grey wash for the concrete path. While it’s drying, spatter tiny droplets of darker grey paint from your brush to simulate the aggregate texture of concrete. -
Contrast the windows:
Fill the window panes with a dark, cool grey, leaving small white rectangles unpainted to represent the reflection of the sky. -
Highlight the trim:
Finally, use white gouache or a gel pen to clean up any edges on the white columns and add crisp highlights to the top edges of the shrubs.
Now you have a charming architectural portrait ready to frame or gift to a new homeowner
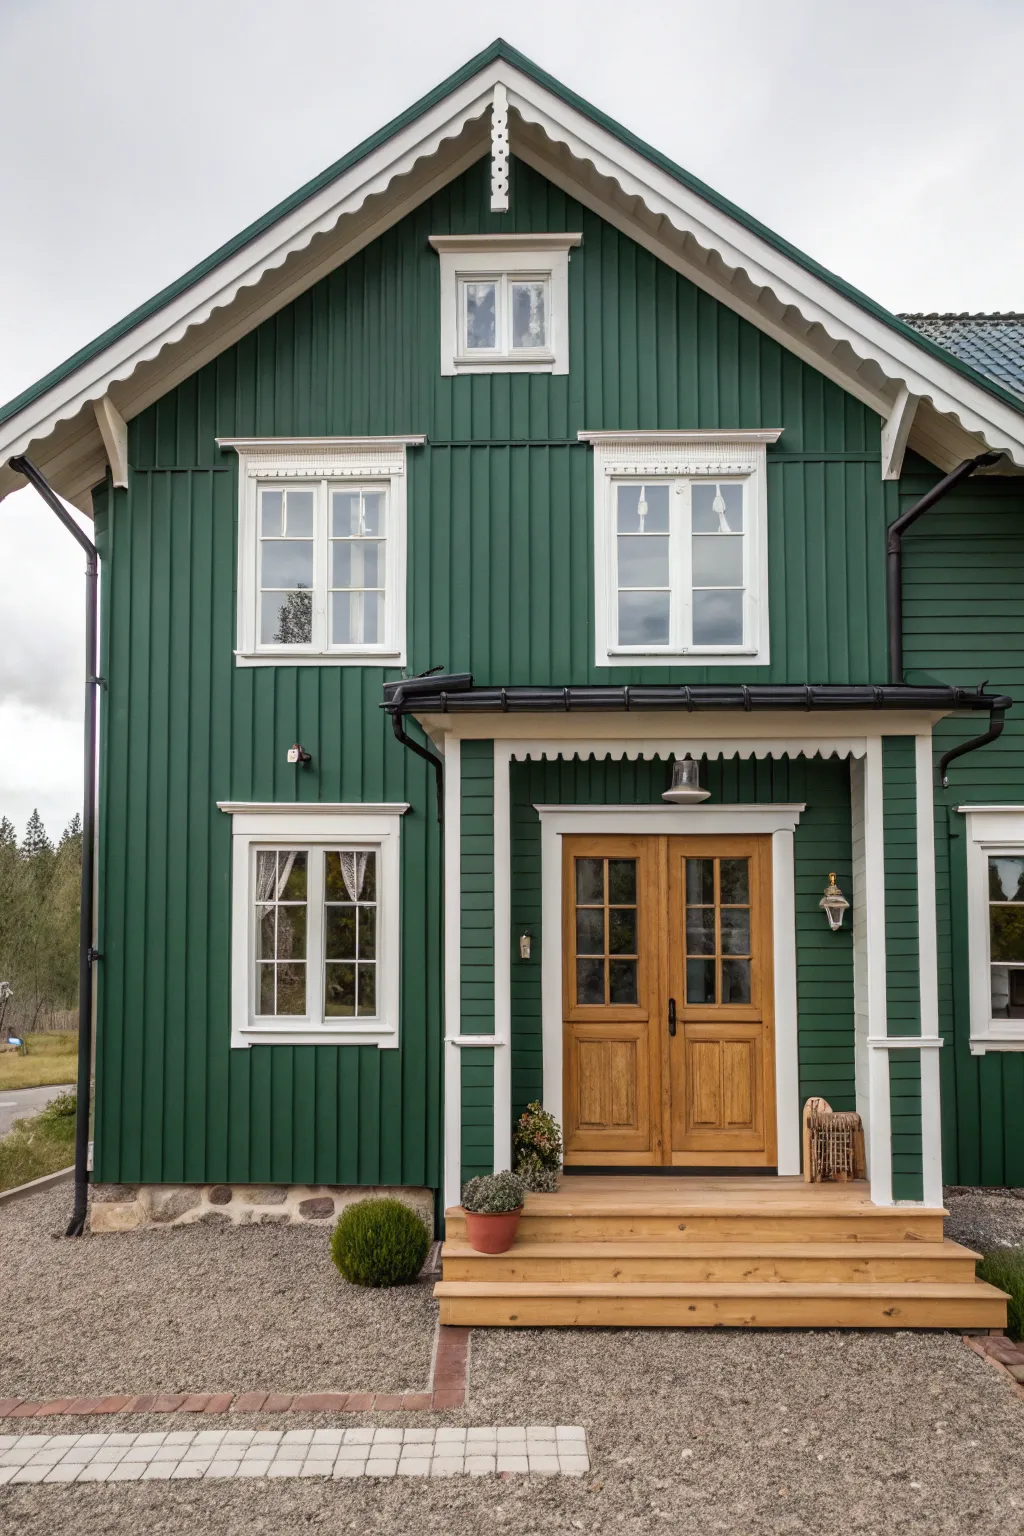
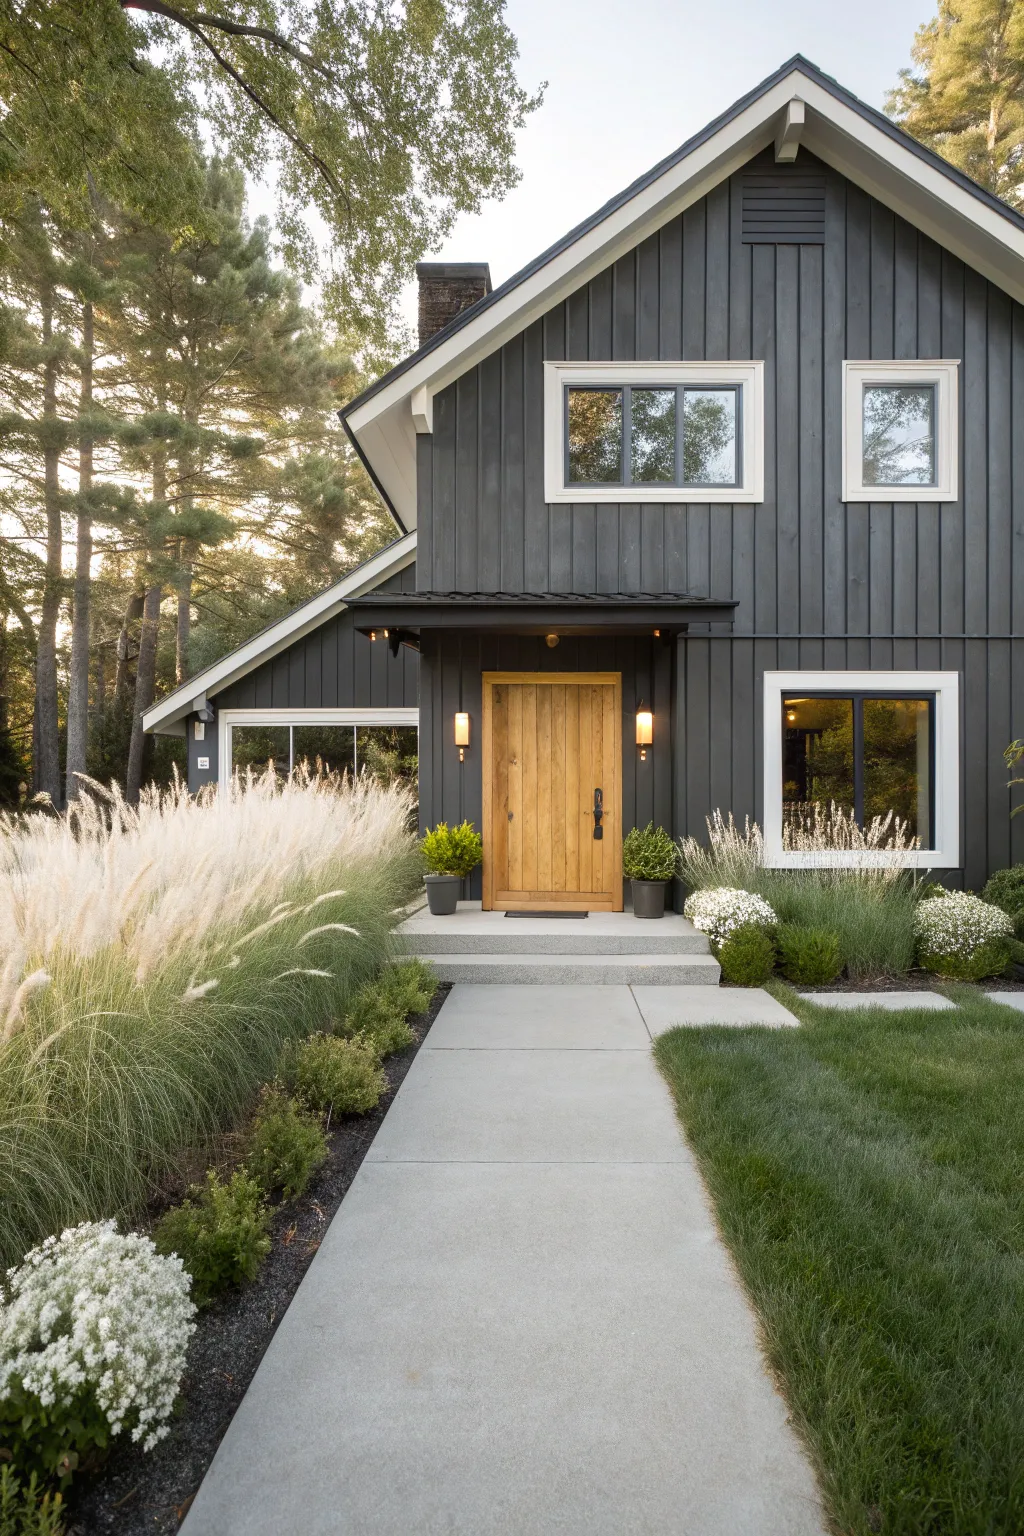
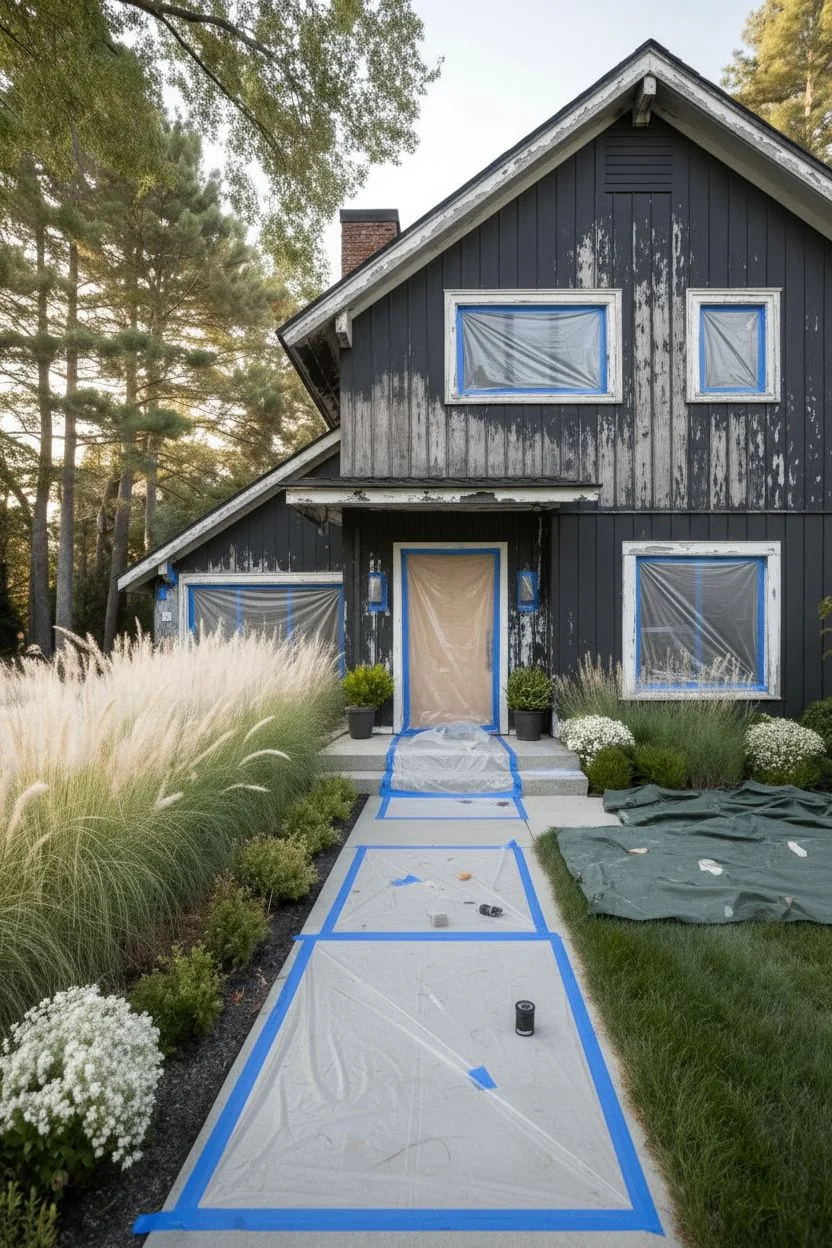
Greige Body With Charcoal Accents
Capture the cozy yet modern elegance of this greige farmhouse scene with acrylics, focusing on clean architectural lines and soft, natural textures. You’ll learn to balance warm neutral siding against striking charcoal accents to recreate this inviting home exterior.
Step-by-Step Tutorial
Materials
- Heavyweight cold press watercolor paper or canvas board (11×14 inches)
- Acrylic paints (Titanium White, Unbleached Titanium, Raw Umber, Burnt Sienna, Payne’s Gray, Carbon Black, Sap Green, Yellow Ochre)
- Flat shader brushes (sizes 4, 8, and 12)
- Round detail brushes (sizes 0 and 2)
- Rigger brush or liner brush
- Ruler and HB pencil
- Painter’s tape (low tack)
- Mixing palette and water cups
- Paper towels
Step 1: Drafting the Architecture
-
Establish the horizon:
Start by drawing a faint horizon line about one-third up from the bottom of your surface. This marks where the driveway meets the house foundation. -
Map the main volumes:
Using your ruler and HB pencil, sketch two large rectangles to represent the main house sections: a taller, narrower gable on the left for the garage, and a wider gable section on the right. -
Add rooflines:
Draw the steep triangular peaks (gables) atop your rectangles. Pay attention to the roof pitch; the garage section on the left should have a slightly steeper, more dramatic slope than the right section. -
Detail doors and windows:
Sketch the large double garage doors on the left. On the right, outline the front door, the small upper window, the double window set, and the lower living room window. Keep your lines light so they don’t show through the paint later. -
Mark siding direction:
Lightly indicate vertical lines on the left garage section for the ‘board and batten’ siding, and horizontal lines on the right section for the lap siding. You don’t need every single line, just enough to guide your brushstrokes.
Straight Lines Only
If your hands are shaky, use a piece of painter’s tape to mask off the edges of the house or rooflines. This ensures crisp, architectural edges without needing perfect brush control.
Step 2: Blocking in Base Colors
-
Mix the sky gradient:
Create a very pale blue-grey using Titanium White with a tiny dot of Payne’s Gray. Paint the sky area, fading it almost to pure white as you move down toward the roofline to suggest a bright, overcast day. -
Create the signature greige:
Mix a large batch of ‘greige’ using Unbleached Titanium, a touch of Raw Umber, and plenty of Titanium White. It should look like a warm, sandy beige with a hint of grey. Paint the entire body of the house, ignoring the windows and doors for now. -
Paint the driveway:
Mix Titanium White with a very small amount of Raw Umber and Black for a concrete color. Fill in the large driveway area in the foreground with smooth, horizontal strokes. -
Base the roof:
For the roof, mix Payne’s Gray with Carbon Black. Apply this dark charcoal color to the roof shapes, keeping the edges crisp.
Add Realistic Glass
Paint the window interiors dark grey, then swipe a diagonal dry-brush of white mixing with pale blue across them to mimic the reflection of the sky on the glass.
Step 3: Architectural Details
-
Define the trim:
Using a smaller flat brush, re-paint the fascia boards along the roofline and the vertical corner trim pieces with a slightly lighter version of your greige mix to add subtle dimension. -
Paint the garage doors:
Using the dark charcoal mix (Payne’s Gray + Black), carefully paint the garage doors. Leave the window panes at the top unpainted or paint them white for now. -
Add window frames and shutters:
Switch to a size 2 round brush. Use straight Black to paint the window frames, mullions (the grid lines), and the shutters on the right upper window. -
Render the front door:
Paint the front door area with the same charcoal mix as the garage. Add a tiny vertical highlight line in white later to suggest the glass sheen or door texture. -
Add siding texture:
This is a crucial step. Mix a slightly darker greige (add more Raw Umber). With a rigger brush and a ruler (if needed), paint thin vertical lines on the left for the batten strips, and thin horizontal lines on the right for lap siding shadows.
Step 4: Landscaping and Final Touches
-
Texture the gravel path:
Mix several shades of grey and warm beige. Use a stippling technique (dotting with the brush tip) to create the pebbled texture of the walkway next to the driveway and near the foundation. -
Paint base greenery:
Mix Sap Green with a little Black for deep shadows. Paint the small mounded plants along the gravel path in the foreground. -
Create ornamental grasses:
I like to use a fan brush or an old frayed flat brush here. Mix Yellow Ochre, Burnt Sienna, and White. Flick the brush upward quickly to create tall, feathery dry grasses in the bottom right corner. -
Add lighting warmth:
Mix a pale yellow-orange glaze (lots of water). Gently dab this inside the outdoor sconces by the garage and door to make them look illuminated. -
Refine shadows:
Use a transparent glaze of Payne’s Gray to deepen the shadows under the eaves, inside the garage door recessed panels, and under the window sills to verify the light source. -
Highlighting:
Finally, add crisp Titanium White highlights to the top edges of the gravel stones, the tips of the ornamental grass, and the brightest reflections on the window glass.
Now mount your finished architectural study in a simple black frame to echo the clean lines of your painting.

PENCIL GUIDE
Understanding Pencil Grades from H to B
From first sketch to finished drawing — learn pencil grades, line control, and shading techniques.
Explore the Full Guide
Cream Body With Sage Trim
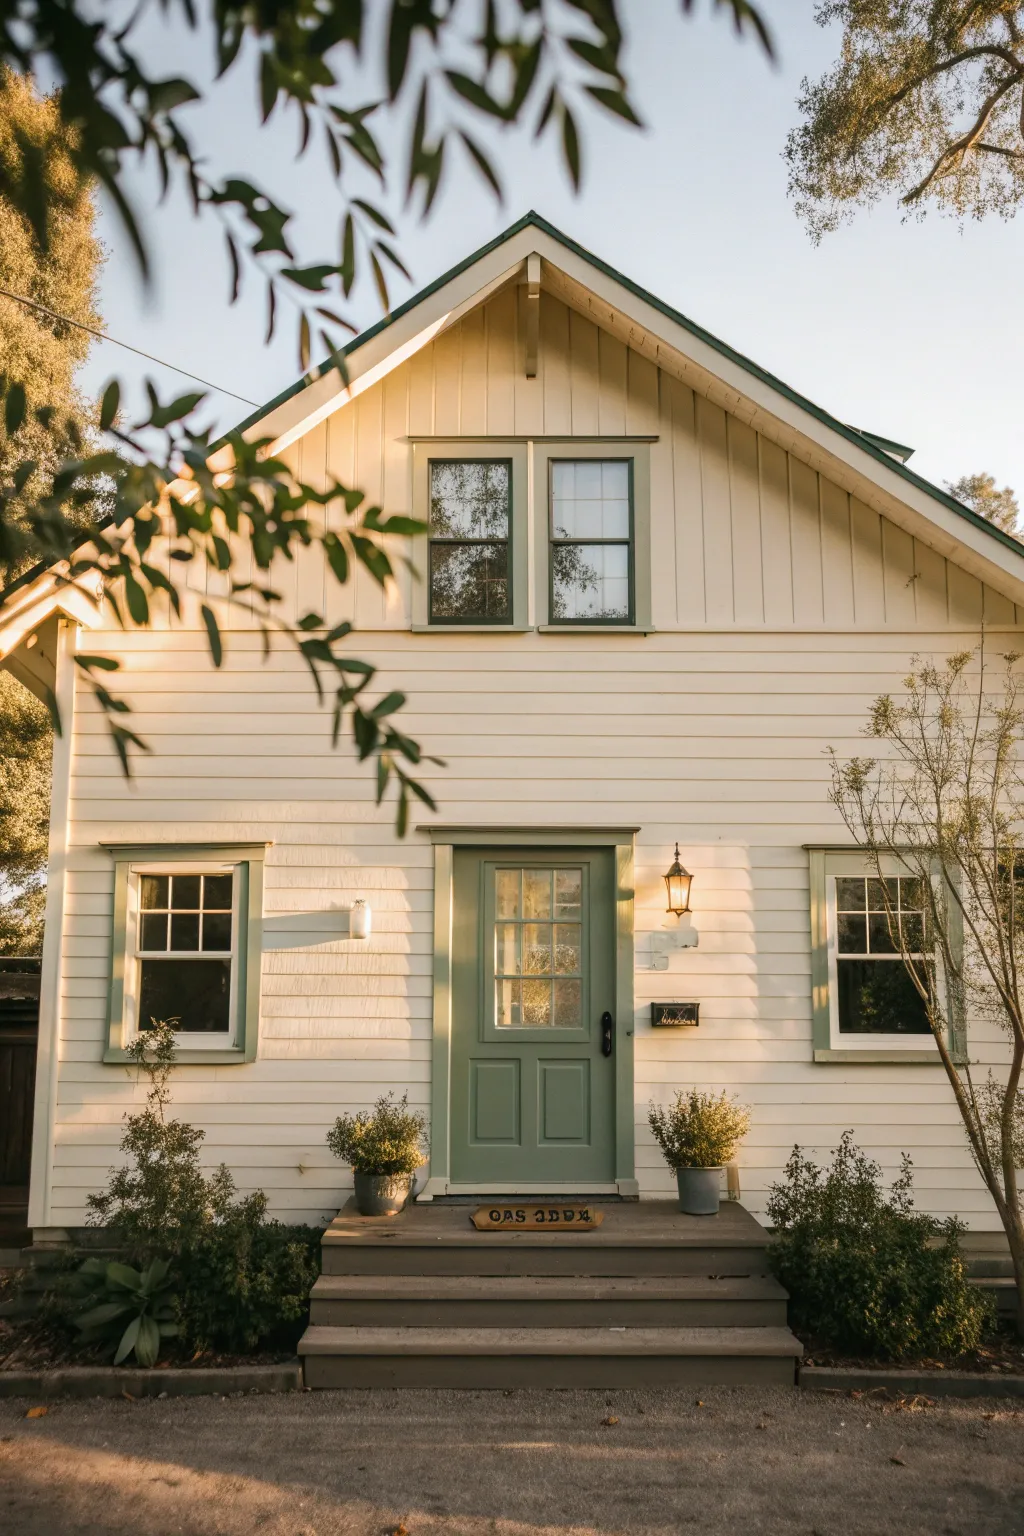
Transform a home’s exterior into a welcoming cottage retreat using a soft, buttery cream base accented by earthy sage green. This classic color combination highlights architectural details like window casings and fascia without overwhelming the landscape.
Step-by-Step Guide
Materials
- High-quality exterior latex paint (Cream/Off-white)
- High-quality exterior semi-gloss enamel (Sage Green)
- Exterior primer
- Pressure washer
- Scrapers and wire brushes
- Caulk gun and exterior paintable caulk
- Painter’s tape and plastic sheeting
- Drop cloths
- Extension ladder
- Paint sprayer (airless recommended)
- Selection of paintbrushes (angled sash brushes)
- Roller frames and extension poles
- Sandpaper (100-120 grit)
Step 1: Preparation
-
Clean surfaces:
Begin by thoroughly pressure washing the entire exterior to remove dirt, mildew, and chalky residue. Allow the wood siding to dry completely for at least 24-48 hours before proceeding. -
Scrape and sand:
Inspect the siding and trim for any peeling or flaking paint. Use a stiff scraper to remove loose material, then feather out the edges with sandpaper to ensure a smooth transition for the new coat. -
Repair imperfections:
Fill any cracks, nail holes, or gaps around windows and trim with a high-quality exterior caulk. Smooth the caulk immediately with a wet finger or rag for a professional finish. -
Protect surroundings:
Lay down drop cloths over porches, steps, and shrubs. Use plastic sheeting and painter’s tape to mask off windows, light fixtures, and the house number plaque to prevent overspray. -
Prime bare wood:
Spot-prime any areas where you scraped down to bare wood. If you are making a drastic color change, apply a full coat of tinted primer to the entire house to ensure even coverage.
Uneven Spray Pattern?
If your sprayer is spitting or leaving tails, the pressure is too low or the tip is clogged. Increase pressure gradually or clean the filter. Always strain paint before loading.
Step 2: Painting the Body
-
Set up the sprayer:
Load your airless sprayer with the cream exterior paint. Test the spray pattern on a piece of cardboard first to adjust pressure and ensure the fan width is correct. -
Spray the siding:
Working from the top down, spray the siding in long, even strokes, overlapping each pass by about 50%. Keep the gun perpendicular to the surface at all times. -
Back-roll the paint:
While the paint is still wet, have a helper follow behind with a roller to push the paint into the wood grain and texture. This I find crucial for adhesion and uniform finish. -
Apply second coat:
Once the first coat is fully dry according to manufacturer instructions, apply a second coat using the same spray-and-back-roll technique for maximum durability and color depth.
Add Dimension
Consider painting just the window sashes a dark charcoal or black while keeping the casing sage. This adds modern depth while maintaining the cottage charm.
Step 3: Trim and Accents
-
Mask for trim:
Once the body paint has cured for a day or two, mask off the siding around the windows, door frame, and fascia boards using high-quality painter’s tape. -
Paint the fascia:
Using an angled brush, carefully paint the fascia boards and eaves in the sage green tone. These high areas define the roofline, so take your time to get crisp lines. -
Detail the windows:
Paint the window frames and sills with the sage enamel. Use a smaller angled sash brush here to get deep into the corners without getting green on the glass. -
Paint the door casing:
Apply the sage green to the door frame and casing. Ensure the brush strokes follow the direction of the wood grain for a smooth look. -
Paint the door:
Paint the front door itself. Start with the recessed panels, then move to the vertical stiles and horizontal rails. The semi-gloss finish will make the door pop against the matte siding. -
Final touches:
Once the trim is dry to the touch, carefully peel away the painter’s tape at a 45-degree angle. Touch up any small bleeds with a small artist’s brush.
Step 4: Styling
-
Clean hardware:
Polish the exterior light fixtures and house numbers. If they look dated, a quick spray of matte black paint provides excellent contrast against the cream background. -
Add greenery:
Place simple potted plants, like boxwoods or small evergreens in galvanized buckets, on the porch steps to echo the sage trim color.
Step back and admire how this fresh palette completely revitalizes the character of your home
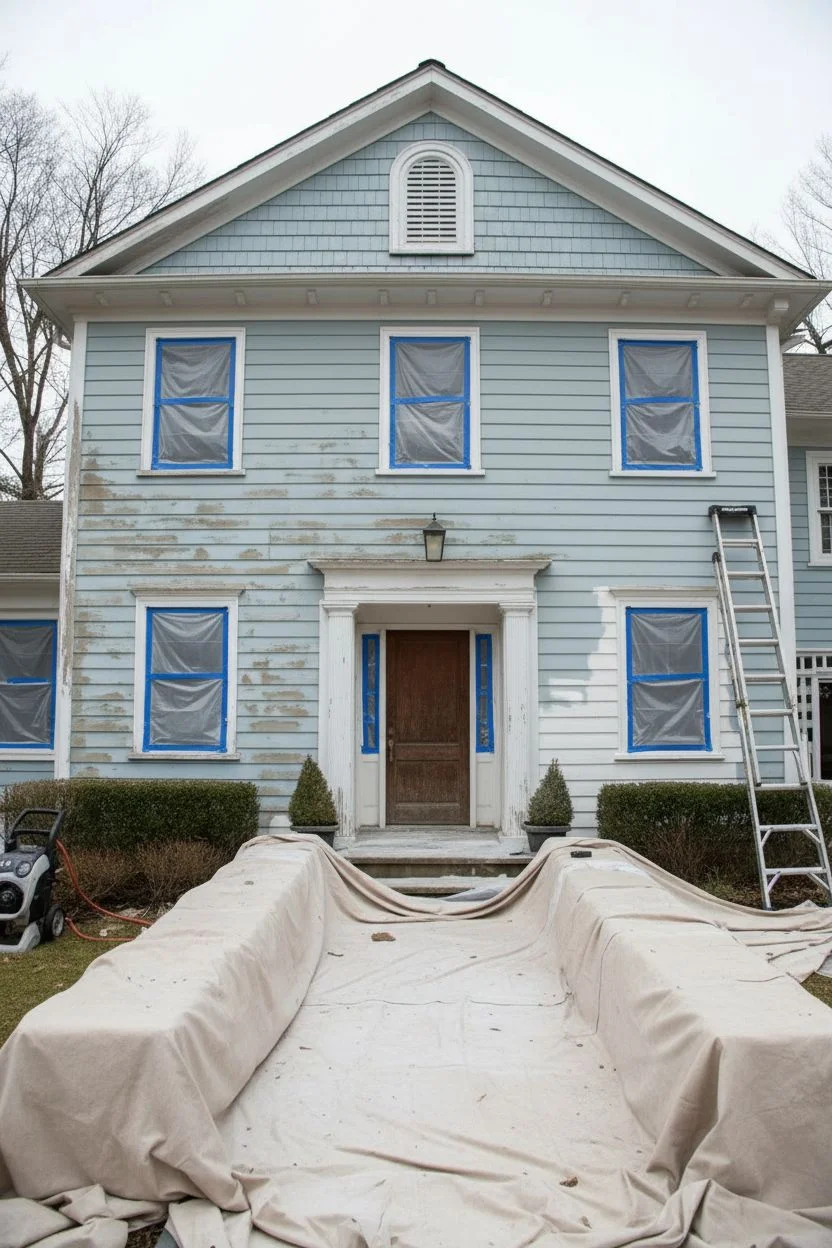
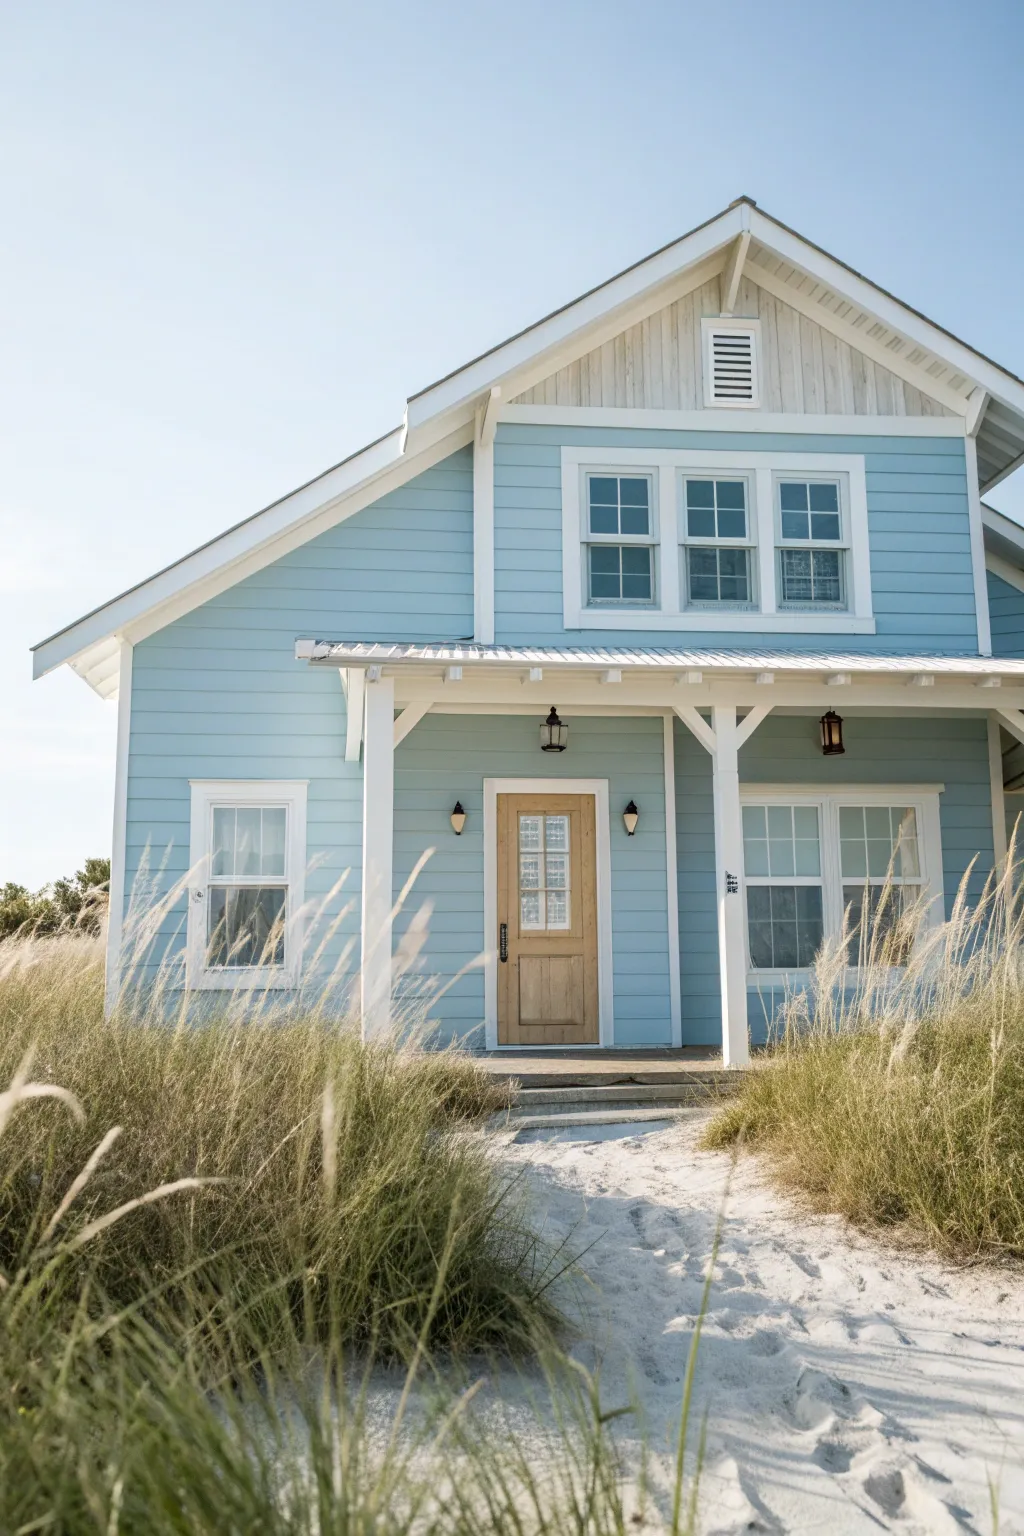
Soft Blue Body With White Trim for a Fresh Look
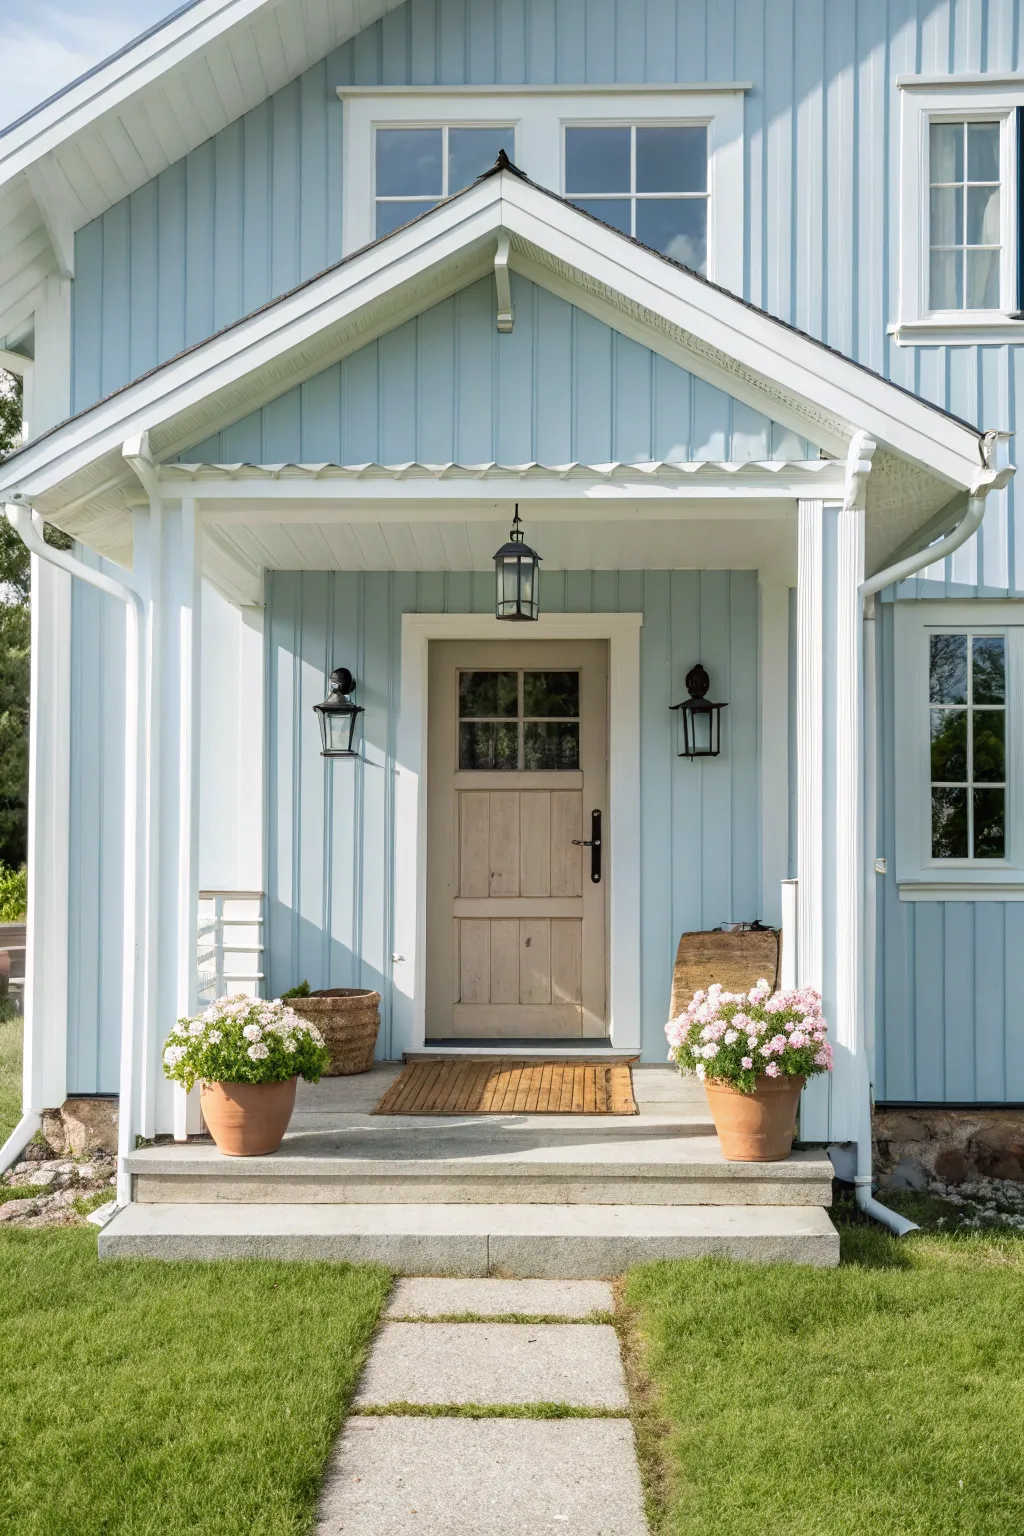
Transform your home’s exterior into a serene, welcoming retreat with this soft blue and crisp white color palette. This project focuses on achieving a professional-grade finish that highlights architectural details while creating a fresh, airy curb appeal.
Step-by-Step Tutorial
Materials
- High-quality exterior latex paint (Soft Sky Blue)
- High-quality exterior trim paint (Bright White, semi-gloss)
- Neutral greige exterior paint for door (satin finish)
- Pressure washer
- Exterior primer (tintable)
- Caulk gun and exterior grade paintable caulk
- Drop cloths and plastic sheeting
- Painter’s tape (exterior grade)
- Ladder (safe for exterior height)
- Various paint brushes (angled sash brush, 4-inch flat brush)
- Paint rollers and extension pole
- Paint scraper and sandpaper blocks
Step 1: Preparation and Cleaning
-
Inspect and Repair Siding:
Before even opening a paint can, walk around the exterior and inspect the wood siding for any rot or damage. Replace any compromised boards to ensure a solid foundation for your new color. -
Deep Clean surfaces:
Using a pressure washer, thoroughly clean the siding, trim, and porch ceiling. Start from the top and work your way down to remove dirt, mildew, and chalky residue that could prevent paint adhesion. -
Scrape and Sand:
Once the wood is completely dry, use a paint scraper to remove any peeling or flaking old paint. Follow this by sanding rough edges to create a smooth surface, feathering the edges where old paint meets bare wood. -
Caulk Gaps and Cracks:
Apply a high-quality exterior caulk to all seams, corners, and gaps around windows and door frames. This step is crucial for weatherproofing and achieving that seamless, professional look.
Weather Watch
Check the forecast before starting. You need a window of dry weather with temperatures between 50°F and 85°F. Avoid painting in direct, hot sunlight as it causes paint to dry too fast.
Step 2: Priming the Surface
-
Masking Off Areas:
Protect your windows, light fixtures (if not removing them), and the stone foundation with plastic sheeting and painter’s tape. Don’t forget to cover the porch floor and walkway with heavy drop cloths. -
Apply Primer:
Apply a full coat of high-quality exterior primer to all bare wood and painted surfaces. I find that tinting the primer slightly toward your final blue shade can help achieve better coverage with fewer topcoats. -
Spot Prime Knots:
If you are painting over raw wood with knots, hit them with a shellac-based primer specifically to prevent resin bleed-through later on.
Level Up: Hardware Upgrade
Replace standard brass fixtures with matte black lantern lights and matching door hardware. This high-contrast look anchors the soft blue and gives the home a modern farmhouse vibe.
Step 3: Painting the Body
-
Cut In Edges:
Start painting the main body by ‘cutting in’ around the trim, corners, and roofline with an angled sash brush. Work in manageable sections to maintain a wet edge. -
Roll the Siding:
Use a roller with a nap thickness appropriate for your siding’s texture (finely textured siding needs a shorter nap). Apply the soft blue paint in long, even strokes, working from top to bottom. -
Back-Brushing:
Immediately after rolling a section, lightly drag a wide brush over the wet paint. This pushes the paint into the wood grain and grooves, ensuring thorough coverage and a traditional hand-painted finish. -
Second Coat Application:
Allow the first coat to dry according to the manufacturer’s instructions. Apply a second coat using the same method for rich, true color and durability.
Step 4: Trim and Details
-
Painting the Trim:
Switch to your bright white semi-gloss paint for the trim. Carefully paint the window casings, corner boards, fascia, and porch columns. Use an angled brush for precision lines against either glass or the blue siding. -
Porch Ceiling Details:
Paint the porch ceiling white to reflect light and keep the entryway bright. If the ceiling has beadboard texture, ensure paint gets into the grooves without pooling. -
Refining the Door:
For the front door, use a neutral greige tone with a satin finish. Remove the hardware first for the cleanest look, then paint the recessed panels first, followed by the horizontal and vertical stiles. -
Reinstall Fixtures:
Once everything is fully cured (usually 24-48 hours), remove all masking tape and plastic. Reinstall your light fixtures, perhaps updating them to the lantern style shown for contrast. -
Final Styling:
Finish the look by placing terracotta pots with pink and white flowers on the steps and adding a natural fiber doormat to complement the neutral door.
Enjoy the fresh, coastal welcome your newly painted home offers every time you pull into the driveway


Deep Green Body With Warm White Trim
Capture the charm of traditional architecture with this acrylic painting tutorial, featuring a deep forest green facade contrasted against crisp white trim and warm wooden doors. You will learn how to render vertical siding textures and create realistic lighting on architectural details.
Detailed Instructions
Materials
- Heavyweight watercolor paper or canvas board (11×14 inches recommended)
- Pencil (HB) and ruler
- Acrylic paints: Phthalo Green, Burnt Umber, Yellow Ochre, Titanium White, Paynes Grey, Mars Black
- Flat shader brushes (sizes 4, 8, and 12)
- Small round detail brush (size 0 or 1)
- Rigger brush for fine lines
- Palette knife for mixing
- Painter’s tape or masking fluid (optional)
Step 1: Planning and Sketching
-
Map out the structure:
Begin by lightly sketching the main triangle of the gable roof and the rectangular body of the house. Use your ruler to ensure the vertical lines of the walls are perfectly straight. -
Add architectural features:
Position the central double doors first to anchor the composition. Then, sketch the two lower windows and the two upper windows, ensuring they align vertically. Don’t forget the small attic window near the peak. -
Detail the trim:
Outline the thick frames around the windows and the decorative scalloped trim (bargeboards) along the roofline. Add the porch columns and the steps leading up to the door. -
Draw the siding lines:
Lightly rule vertical lines across the green sections of the house to represent the wood paneling. Keep the spacing consistent, but don’t press too hard with your pencil as these will be painted over.
Straight Edge Secret
For crisp window frames, use low-tack painter’s tape or the edge of a piece of cardstock as a paint shield. This keeps your white lines perfectly straight against the green.
Step 2: Base Colors and The Green Facade
-
Mix the custom green:
Create a rich forest green by mixing Phthalo Green with a touch of Burnt Umber and a tiny speck of Mars Black to deepen it without making it dull. Make a large batch of this color. -
Paint the siding base:
Using a size 12 flat brush, block in the main green areas. Apply the paint smoothly, working around the window frames and door trim. It’s okay if the pencil lines for the siding disappear; we will redefine them later. -
Add the siding shadows:
Once the base green is dry, mix a slightly darker version of your green. Use a rigger brush or the edge of a flat brush to paint thin vertical lines where the siding boards meet. This creates the ‘board and batten’ effect. -
Enhance depth:
Add subtle highlights to the center of each vertical board using the base green mixed with a tiny bit of Yellow Ochre. This makes the wood look dimensional rather than flat.
Evening Glow
To change the mood, glaze the windows with a very pale, transparent yellow wash instead of grey-blue. This makes it look like the lights are on inside at dusk.
Step 3: Trim and Woodwork Details
-
Paint the white trim:
Use Titanium White with the smallest touch of Yellow Ochre to create a ‘warm white.’ Carefully paint the window frames, roof eaves, and porch columns. You may need two coats for solid coverage over any stray green paint. -
Define the scalloped roofline:
Use your smallest round brush to carefully paint the decorative white scallops along the gable edge. Paint the dark shadow underneath the eaves using a mix of Paynes Grey and Burnt Umber to make the white pop. -
Create the wooden doors:
Mix Yellow Ochre and Burnt Umber to get a warm honey-wood tone. Fill in the double doors. While wet, streak in a little pure Burnt Umber to simulate wood grain direction. -
Detail the door panels:
Once the door base is dry, use a dark brown wash to outline the recessed panels and frame of the door. Add the black handle hardware with a steady hand. -
Paint the windows:
Mix a soft grey-blue using Titanium White, Paynes Grey, and water. Paint the glass panes. I like to leave small random streaks of white to suggest reflections on the glass.
Step 4: Ground and Finishing Touches
-
Render the wooden steps:
Use the same honey-wood mix from the doors for the steps, but make the horizontal treads lighter than the vertical risers to show where the light hits. -
Paint the gravel path:
Stipple a mix of grey, beige, and white at the bottom of the canvas to create the texture of the gravel driveway. Keep the texture loose. -
Add the greenery:
Using a small stippling motion or an old brush, tap in the small green bush near the steps and the potted plant. Use various shades of green to give the foliage volume. -
Add final shadows:
Paint the cast shadows under the roof overhangs, under the window sills, and beneath the porch roof using a dark, transparent glaze of Paynes Grey. -
Highlight the metal:
Add the black rain gutters and downspouts. Use a white gel pen or fine brush to add a tiny highlight line along the metal pipe to make it look cylindrical and shiny.
Step back and admire your architectural portrait, noting how the warm wood tones complement that striking green.
Taupe Body With White Trim and Dark Shutters
Achieve a sophisticated, timeless look for your home’s exterior by pairing a warm taupe siding with crisp white trim and striking charcoal shutters. This tutorial guides you through the process of repainting your facade to mirror this classic suburban aesthetic.
Step-by-Step Tutorial
Materials
- High-quality exterior latex paint (Taupe/Beige)
- Exterior trim paint (White)
- Exterior paint (Charcoal/Black)
- Pressure washer
- Exterior primer
- Painter’s tape and plastic sheeting
- Caulk and caulking gun
- Extension ladder
- Drop cloths
- Paint rollers (thick nap for siding)
- Angled sash brushes
- Paint sprayer (optional for speed)
- Sandpaper or sanding block
- Scrapers for peeling paint
Step 1: Preparation & Cleaning
-
Wash the Exterior:
Begin by thoroughly cleaning the entire exterior surface using a pressure washer. Work from the top down to remove dirt, mildew, and chalky residue which can prevent new paint from adhering properly. -
Repair and Prep Surfaces:
Inspect the siding and trim for any damage. Scrape away loose or peeling paint, sand rough edges smooth, and fill gaps or cracks around windows and doors with a high-quality exterior caulk. -
Protect Surroundings:
Cover landscaping, walkways, and light fixtures with drop cloths or plastic sheeting to protect them from paint splatters. Tape off window glass meticulously to ensure clean lines later. -
Prime Bare Wood:
Spot-prime any areas where bare wood or siding is exposed. If you are making a drastic color change, consider a full coat of primer for better coverage and color fidelity.
Uneven Coverage?
If the dark shutter paint looks streaky, lightly sand uneven spots once dry and apply a third thin coat rather than one thick one.
Step 2: Painting the Body & Trim
-
Paint the Siding:
Start applying the taupe exterior paint to the main body of the house. If using a sprayer, follow up with back-rolling to work the paint into the texture of the siding. -
Work in Sections:
Paint from the top down to catch drips, working in manageable sections to maintain a wet edge and avoid lap marks. I find it helpful to follow the natural breaks in the siding boards. -
Apply Second Coat:
Once the first coat is completely dry—usually after 4-6 hours depending on humidity—apply a second coat for a rich, uniform taupe finish that stands up to the elements. -
Paint the Trim and Fascia:
Switch to your white trim paint and an angled brush. Carefully paint the eaves, window casings, door frames, and columns. Two coats are standard here to ensure the white pops against the taupe. -
Detail Work:
Pay special attention to the decorative dentil molding or complex trim pieces. Use a smaller brush to get into crevices without bridging the gaps with too much paint.
Step 3: Shutters & Entryway
-
Remove or Mask Shutters:
For the cleanest finish, remove the shutters to paint them on sawhorses. If removal isn’t possible, mask the surrounding siding very carefully. -
Paint Shutters Charcoal:
Apply the dark charcoal or soft black paint to the shutters. If they are louvered, spray painting is often the most efficient method to get between the slats; otherwise, use a brush to dab paint into the corners first. -
Refinish or Paint the Front Door:
Paint the front door in the same charcoal shade to anchor the entryway. Ensure you paint the edges that are visible when the door is open for a professional touch. -
Reinstall Fixtures:
Once all paint is cured, remove the masking tape. Rehang the shutters and reinstall any light fixtures or house numbers you removed. -
Final Touch-ups:
Walk around the perimeter with a small brush and your paint cans to touch up any accidental drips or missed spots on the siding or trim.
Add Curb Appeal
Place matching potted evergreens or boxwoods on either side of the entry to mirror the symmetry and color palette of the house.
Step back and admire how this elegant color trio transforms your home into a welcoming and stylish retreat
Charcoal Body With Soft White Trim
Transform a home’s exterior with this striking combination of deep charcoal siding and crisp, soft white trim. This modern farmhouse palette creates a sophisticated, high-contrast look that highlights architectural details while blending beautifully with natural landscaping.
How-To Guide
Materials
- High-quality exterior latex paint (Charcoal/Dark Gray)
- High-quality exterior latex paint (Soft White)
- Exterior wood stain (Warm Honey/Oak tone)
- Painter’s tape (exterior grade)
- Pressure washer
- Exterior primer (tinted gray recommended)
- Caulk and caulking gun
- Drop cloths and plastic sheeting
- Paint sprayer (airless recommended)
- Extension ladder
- Various paint brushes (angled sash & flat)
- Roller frames and covers (medium nap)
- Sanding block or power sander
Step 1: Preparation & Cleaning
-
Assess the Surface:
Begin by walking the perimeter of the house to inspect the siding and trim for any rot, loose boards, or damage. Replace or repair any compromised wood before you even think about opening a paint can. -
Deep Clean:
Pressure wash the entire exterior from top to bottom to remove dirt, mildew, and chalky residue. Allow the siding to dry completely for at least 24-48 hours ensures the new paint bonds properly. -
Caulk and Seal:
Apply exterior-grade caulk to gaps around windows, doors, and corner joints to watertight the home. Smooth the beads with a wet finger or rag for a professional finish. -
Masking Off:
Protect windows, light fixtures, and the concrete porch by covering them with plastic sheeting and securing the edges with exterior painter’s tape.
Step 2: Painting the Body
-
Prime the Surface:
If you are painting over bare wood or a drastic color change, apply a coat of tinted gray exterior primer. This helps the dark charcoal topcoat achieve full opacity with fewer layers. -
Cut In Edges:
Using an angled brush, carefully paint the charcoal color along the edges where the siding meets the roofline and foundation. This precision work makes the spraying process much faster later on. -
Spray the Siding:
Use an airless paint sprayer to apply the charcoal paint to the main body of the house. Work in vertical sections, overlapping each pass by 50% to ensure even coverage. -
Back-Roll:
Immediately after each sprayer pass, I like to have a helper back-roll the wet paint with a roller. This pushes the paint into the wood grain and evens out the texture. -
Dry and Recoat:
Allow the first coat to dry according to the manufacturer’s instructions, then apply a second coat for deep, rich color saturation.
Pro Tip: Tint It
Ask the paint store to tint your primer gray before you start. This simple step drastically improves coverage for dark charcoal colors, often saving you an entire coat of expensive topcoat paint.
Step 3: Trim & Accents
-
Prep the Trim:
Once the body is dry, carefully mask off the siding around the window frames and fascia boards to protect your fresh charcoal paint. -
Paint Fascia and Soffits:
Apply the soft white paint to the roofline fascia and soffits. Two coats are usually necessary here to get that bright, crisp contrast against the dark siding. -
Window Details:
Paint the window trim in soft white using a steady hand and a high-quality angled sash brush. Watch for drips in the corners and smooth them out immediately. -
Stain the Door:
Sand the wooden front door lightly to remove old finish, then apply a warm honey or oak-toned exterior stain. This natural wood element warms up the cool charcoal palette. -
Seal the Door:
Finish the door with a clear, exterior-grade spar urethane to protect it from UV rays and moisture.
Troubleshooting: Lap Marks
Seeing vertical stripes or ‘lap marks’? This happens when paint dries too fast. Avoid painting in direct, hot sunlight and maintain a ‘wet edge’ by working quickly across small sections.
Step 4: Final Touches
-
Install Hardware:
Attach modern black hardware to the door, such as a long handle set, to complement the dark siding. -
Lighting Fixtures:
Install warm-toned wall sconces on either side of the entry. The golden light will play beautifully against the dark charcoal backdrop at night. -
Clean Up:
Remove all plastic sheeting and tape carefully. Pull the tape away from the wet edge at a 45-degree angle to keep lines sharp. -
Landscaping Frame:
The project isn’t done until the scene is set; clean the concrete walkway and ensure adjacent landscaping, like ornamental grasses, is tidy to complete the look.
Step back and enjoy the bold, modern transformation your home has undergone with this sophisticated color scheme
Two-Tone Exterior: Light Upper, Dark Lower
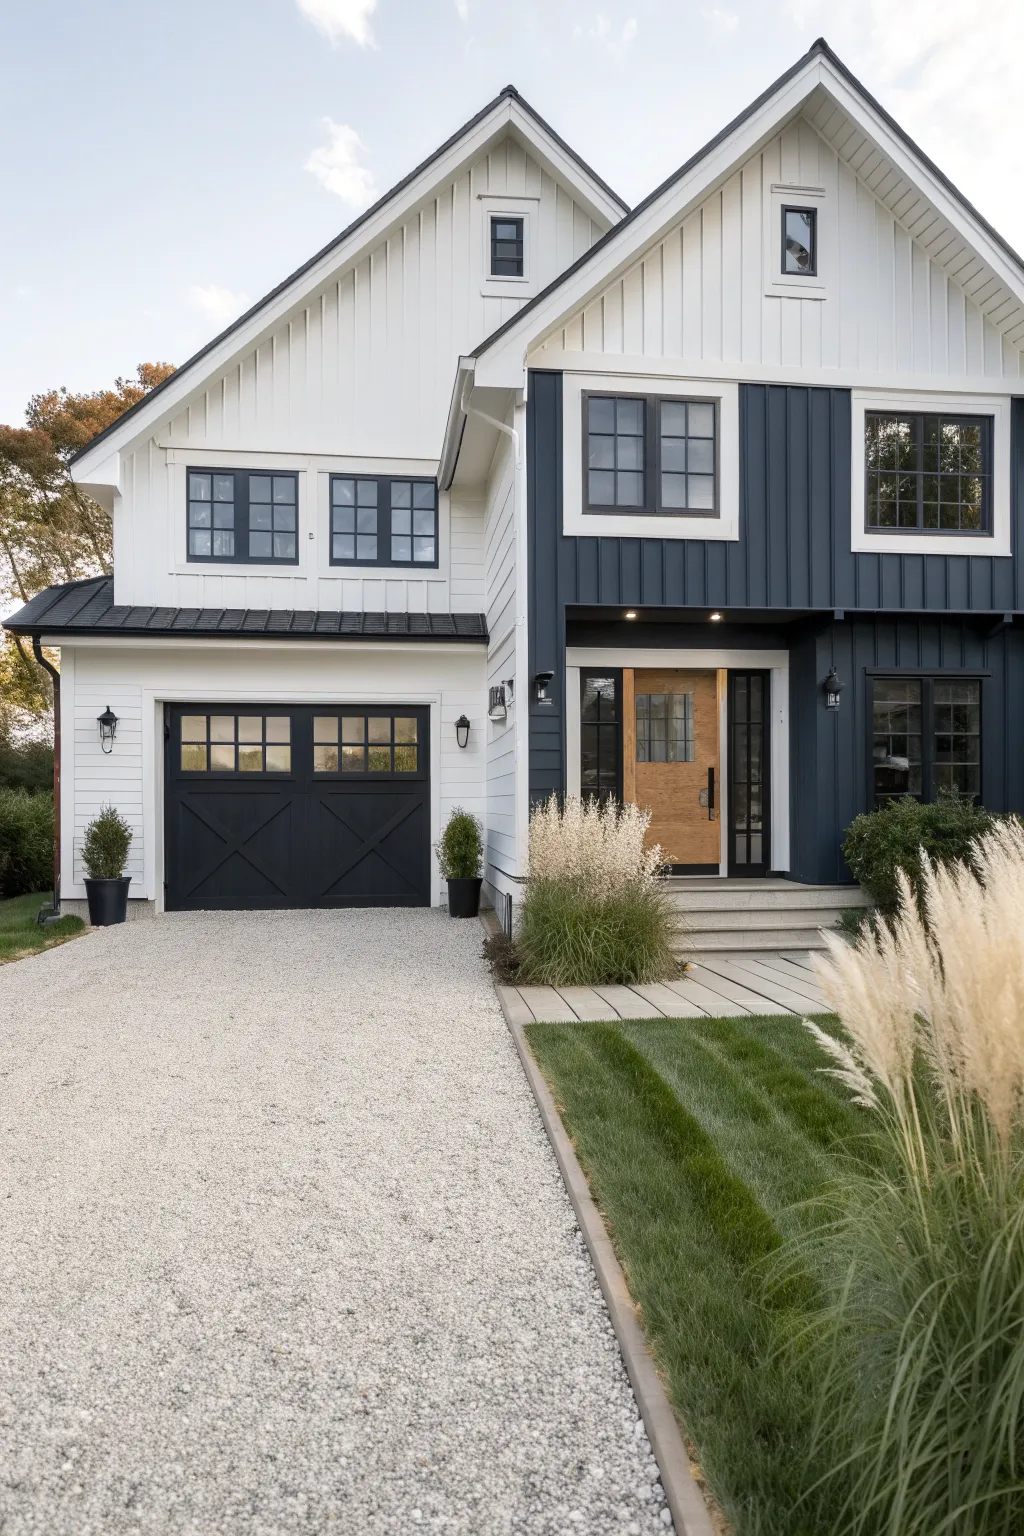

Transform a home’s exterior with this striking high-contrast design that balances classic farmhouse charm with modern sophistication. By pairing crisp white board-and-batten siding with a bold navy accent section, you create architectural interest and depth.
Step-by-Step Tutorial
Materials
- White exterior paint (e.g., Chantilly Lace)
- Navy blue exterior paint (e.g., Hale Navy)
- Black exterior trim paint
- Painter’s tape and plastic sheeting
- Airless paint sprayer
- Pressure washer
- Varied paint rollers (rough surface nap)
- Angled sash brushes
- Drop cloths
- Wood stain (for front door)
- Caulk and caulking gun
Step 1: Preparation & Cleaning
-
Wash the exterior:
Begin by thoroughly pressure washing the entire exterior surface to remove dirt, mildew, and chalkiness. Allow the siding to dry completely for at least 24 to 48 hours to ensure proper paint adhesion. -
Repair and caulk:
Inspect all board-and-batten siding for cracks or gaps. Fill nail holes and seal gaps between the vertical battens and boards with high-quality exterior caulk to weather-proof the surface. -
Protect surroundings:
Mask off windows, light fixtures, and the roofline with plastic sheeting and painter’s tape. Lay drop cloths heavily over the gravel driveway and concrete porch steps.
Bleed-Through Blues
If blue paint bleeds under the tape onto the white gable, let it dry fully. Then, re-tape precisely over the blue line and touch up the white with a small artist’s brush.
Step 2: Applying the Main White Field
-
Prime the surface:
If painting over bare wood or a radically different color, apply a high-quality exterior primer to the entire left side and the upper gable of the right side. -
Spray the white sections:
Using an airless sprayer, apply the white paint to the main garage section (left) and the upper gable peak on the right side. Keep the sprayer moving steadily to avoid drips on the vertical battens. -
Back-roll for texture:
Have a partner follow immediately behind the sprayer with a roller to push the paint into the wood grain and ensure even coverage. -
Apply second coat:
Once the first coat is dry, apply a second coat of white to achieve that crisp, opaque finish characteristic of modern farmhouses.
Step 3: Creating the Navy Contrast
-
Define the separation line:
Carefully tape off the transition line where the white upper gable meets the lower section on the right side. Use a high-adhesion tape designed for exterior surfaces to get a sharp line. -
Apply navy paint:
Paint the lower right section with the deep navy blue. If spraying, shield the surrounding white areas meticulously; otherwise, cut in edges by hand and roll the main surfaces. -
Detail the battens:
Use a brush to ensure the navy paint fully covers the sides of the vertical battens, as rollers often miss these 90-degree angles. -
Layering the dark color:
Dark colors can be tricky, so plan for two or even three coats to achieve a rich, uniform depth without streaking.
Tape Timing
Remove your exterior painter’s tape while the paint is still slightly tacky to prevent it from bonding to the film and pulling off chunks of your fresh paint.
Step 4: Trim & Accents
-
Paint window sashes:
Using a small angled sash brush, carefully paint the window mullions and frames in black. This contrast makes the windows pop against both the white and navy backgrounds. -
Garage door finish:
Paint the garage door matte black to match the windows. I find that spraying the garage door yields the smoothest, factory-like finish. -
Refinish the entry door:
Sand the wooden front door to raw wood if necessary, then apply a warm, medium-tone wood stain. Seal it with a marine-grade spar urethane to protect it from the elements. -
Install hardware:
Once the paint has cured, install the black farmhouse gooseneck lights flanking the garage and the modern sconces near the entry. -
Grounds cleanup:
Remove all masking tape and plastic. Rake the gravel driveway to ensure it looks neat and crisp against the newly painted foundation line.
Step back and admire how the bold color blocking instantly modernizes the traditional siding structure
Monochrome House Colors With Subtle Shade Shifts
Capture the serene geometry of modern architecture with this detailed mixed-media illustration tutorial. You’ll learn to render subtle tonal shifts and texture contrasts, from crisp siding to soft, wild grasses, creating a professional architectural visualization.
Step-by-Step Guide
Materials
- Hot press watercolor paper (A3 or similar)
- H and 2B graphite pencils
- Fine liner pens (0.05, 0.1, 0.3mm light grey and black)
- Alcohol-based markers (Cool Grey set: C1, C3, C5)
- Alcohol-based markers (Warm Grey set: W1, W3)
- Colored pencils (White, Burnt Sienna, Yellow Ochre, Dark Sepia)
- Ruler or T-square
- Kneaded eraser
- White gel pen
Step 1: Constructing the Framework
-
Establish the horizon:
Begin by drawing a faint horizon line about one-third up from the bottom of your paper. This will ground your perspective. -
Block in the main triangle:
Using your ruler and H pencil, draw a large, symmetrical isosceles triangle for the upper gable. Ensure the peak is vertically centered on your page. -
Define the lower volumes:
Sketch a rectangular box extending to the left for the garage/side wing, and verify the main entrance area sits directly under the gable’s center. -
Draft the architectural details:
Lightly mark out the three upper windows, ensuring equal spacing. Add the recessed entryway lines and the pathway leading towards the viewer.
Step 2: Inking the Structure
-
Outline the siding:
With a 0.05mm light grey pen, draw the vertical siding lines on the upper facade. Use a ruler to keep them perfectly parallel, but vary your pressure slightly so they don’t look robotic. -
Strengthen major edges:
Switch to a 0.1mm black pen to ink the rooflines, window frames, and the main silhouette of the house. -
Detail the entryway:
Use the 0.3mm pen to define the doorway and the supporting columns, emphasizing the depth of the recessed porch area. -
Erase guidelines:
Once the ink is fully dry, gently roll your kneaded eraser over the entire drawing to lift the graphite without smudging your crisp lines.
Uneven Marker Streaks?
If your grey siding looks blotchy, work faster while the ink is wet to blend it plain. Alternatively, go over it with a colored pencil to smooth out the texture.
Step 3: Layering Value & Color
-
Base tone for the siding:
Apply a wash of C1 (Cool Grey) marker over the upper vertical siding. Leave small, thin strips white occasionally to suggest light hitting the edges. -
Deepen the shadows:
Use C3 and C5 markers to fill the window panes. I like to leave a rough, diagonal shape uncolored in the glass to represent the reflection of the sky. -
Render the wood accents:
For the front door and surrounding wood paneling, layer Yellow Ochre pencil over a light W1 marker base. Add grain details with a sharp Burnt Sienna pencil. -
Texture the lower cladding:
On the right lower wall, use a W3 marker in vertical strokes. follow up with a grey colored pencil to add a rougher, concrete-like texture compared to the smooth upper siding.
Pro Tip: Atmospheric Depth
Make the lines of the tree branches in the top corner slightly thicker and darker than the house lines. This pushes the house into the background for instant depth.
Step 4: Softening with Nature
-
Sketch the foreground grass:
Switch to a Dark Sepia colored pencil. Use quick, upward flicking motions to create clumps of tall ornamental grasses in the foreground. -
Add depth to the landscaping:
Layer lighter ochre and even white pencil strokes over the sepia grass blades to simulate sunlight catching the dried stalks. -
Draw the bare branches:
Using a 0.1mm pen, draw the delicate, spindly tree branches encroaching from the top left corner. Keep the lines shaky and organic to contrast with the rigid house architecture. -
Final highlights:
Use a white gel pen to add tiny dots of reflection on the outdoor sconce lights and to clean up any edges on the white render of the left wing. -
Paver details:
Lightly pencil in the brick pattern on the walkway, shading the gaps slightly darker to show individual pavers without outlining every single one.
Step back and admire how your crisp lines and organic textures come together to form a balanced architectural portrait
Coastal Palette: Misty Blue, Sand, and White
Capture the breezy elegance of a coastal cottage with this architectural watercolor tutorial. You’ll layer soft misty blues and warm sandy neutrals to recreate the inviting atmosphere of a beachside retreat nestled among the dunes.
Step-by-Step
Materials
- Cold press watercolor paper (140lb/300gsm)
- HB graphite pencil
- Kneaded eraser
- Masking fluid (optional)
- Watercolor paints: Cerulean Blue, Cobalt Blue, Burnt Sienna, Yellow Ochre, Paynes Gray, Titanium White (gouache or watercolor)
- Round brushes (sizes 4, 8) and a flat wash brush (size 1/2 inch)
- Fan brush or rigger brush for grasses
- Two jars of water
- Paper towels
- Painter’s tape
Step 1: Sketching the Structure
-
Establish the horizon:
Begin by taping your paper to a board. Lightly draw a horizon line about one-third up from the bottom of the page, leaving plenty of room for the sandy path. -
Block in the house shape:
Draw the main gable shape of the house, focusing on the steep roof pitch typical of coastal architecture. Place the main volume slightly off-center to the right for a dynamic composition. -
Add architectural details:
Sketch the porch roof extending to the left, adding the vertical columns. Outline the placement of the windows—three on the upper floor, larger ones below—and the central front door. -
Define the trim and siding:
Lightly indicate the horizontal siding lines. Don’t press too hard; just give yourself a guide for painting later. Draw the window panes and the decorative vent near the roof peak. -
Sketch the foreground:
Loosely sketch the winding sandy path leading to the porch stairs. Indicate the masses of dune grass on either side with quick, upward strokes, but keep this area very rough.
Clean Edges Tip
Use masking fluid on the white porch columns and window grids before painting the blue siding. It keeps your whites pristine without careful negative painting.
Step 2: Painting the House
-
The sky wash:
Wet the sky area with clean water. Drop in a very dilute wash of Cerulean Blue, fading it out to white as you approach the horizon to mimic a bright, hazy coastal day. Let this dry completely. -
Base color for siding:
Mix a ‘Misty Blue’ using Cerulean Blue with a tiny touch of Paynes Gray to de-saturate it. Apply a flat wash over the siding areas, carefully painting around the white trim, windows, and columns. -
Deepening shadow areas:
While the first layer is dry, mix a slightly darker version of your blue. Apply this to the wall under the porch roof to create depth and shadow. -
Painting the door:
Mix Burnt Sienna with a little Yellow Ochre. Paint the door with vertical strokes to simulate wood grain. I like to lift a little pigment from the center wih a thirst brush to show light reflection. -
Adding the trim details:
The trim is white, but it needs definition. Use a very watery mix of Cobalt Blue and Paynes Gray to paint thin shadow lines under the eaves, window sills, and on the shaded side of the porch columns. -
Roof details:
For the roof, use a very pale gray wash. If you want the metallic look, keep it nearly white. Once dry, add thin lines for the seams. -
Window interiors:
Paint the glass panes with a dark mix of Paynes Gray and Blue. Leave tiny slivers of white paper for reflections, or add them back later with white gouache.
Go Multimedia
Use colored pencils over the dry watercolor to add crisp lines to the siding or to draw individual blades of grass for sharper foreground texture.
Step 3: The Sandy Landscape
-
Path foundation:
Wet the bottom third of the paper. Drop in distinct patches of Yellow Ochre and a touch of Burnt Sienna for the sand. Keep the path area closest to the house much lighter, almost white, to show bright sunlight. -
Creating texture:
While the sand wash is damp, sprinkle a tiny bit of salt or splatter clean water droplets to create a gritty, sandy texture. Allow this to dry fully. -
Base layer for grass:
Mix a dull green-brown using Yellow Ochre and a touch of Paynes Gray. Paint the solid masses at the base of the grassy areas, grounding the vegetation. -
Detailing the dune grass:
Using a rigger brush or fan brush, flick upward strokes of Burnt Sienna and dried Yellow Ochre to create the tall sea oats. Vary the pressure to make the tips taper naturally. -
Adding highlights:
Once the grass is dry, mix Titanium White gouache with a little yellow. Add opaque, sun-cautious highlights to the tips of the grasses in the foreground. -
Shadows on the sand:
Mix a cool violet-gray. Paint the cast shadows from the grasses onto the sand path. This helps integrate the vegetation with the ground. -
Final touches:
Add the lantern fixtures near the door with a fine point brush and dark paint. Reinforce the darkest shadows under the porch steps and eaves to make the white trim pop.
Step back and admire your sunny, coastal creation as you frame it for display
Desert-Inspired Stucco: Warm Sand and Terracotta Accents
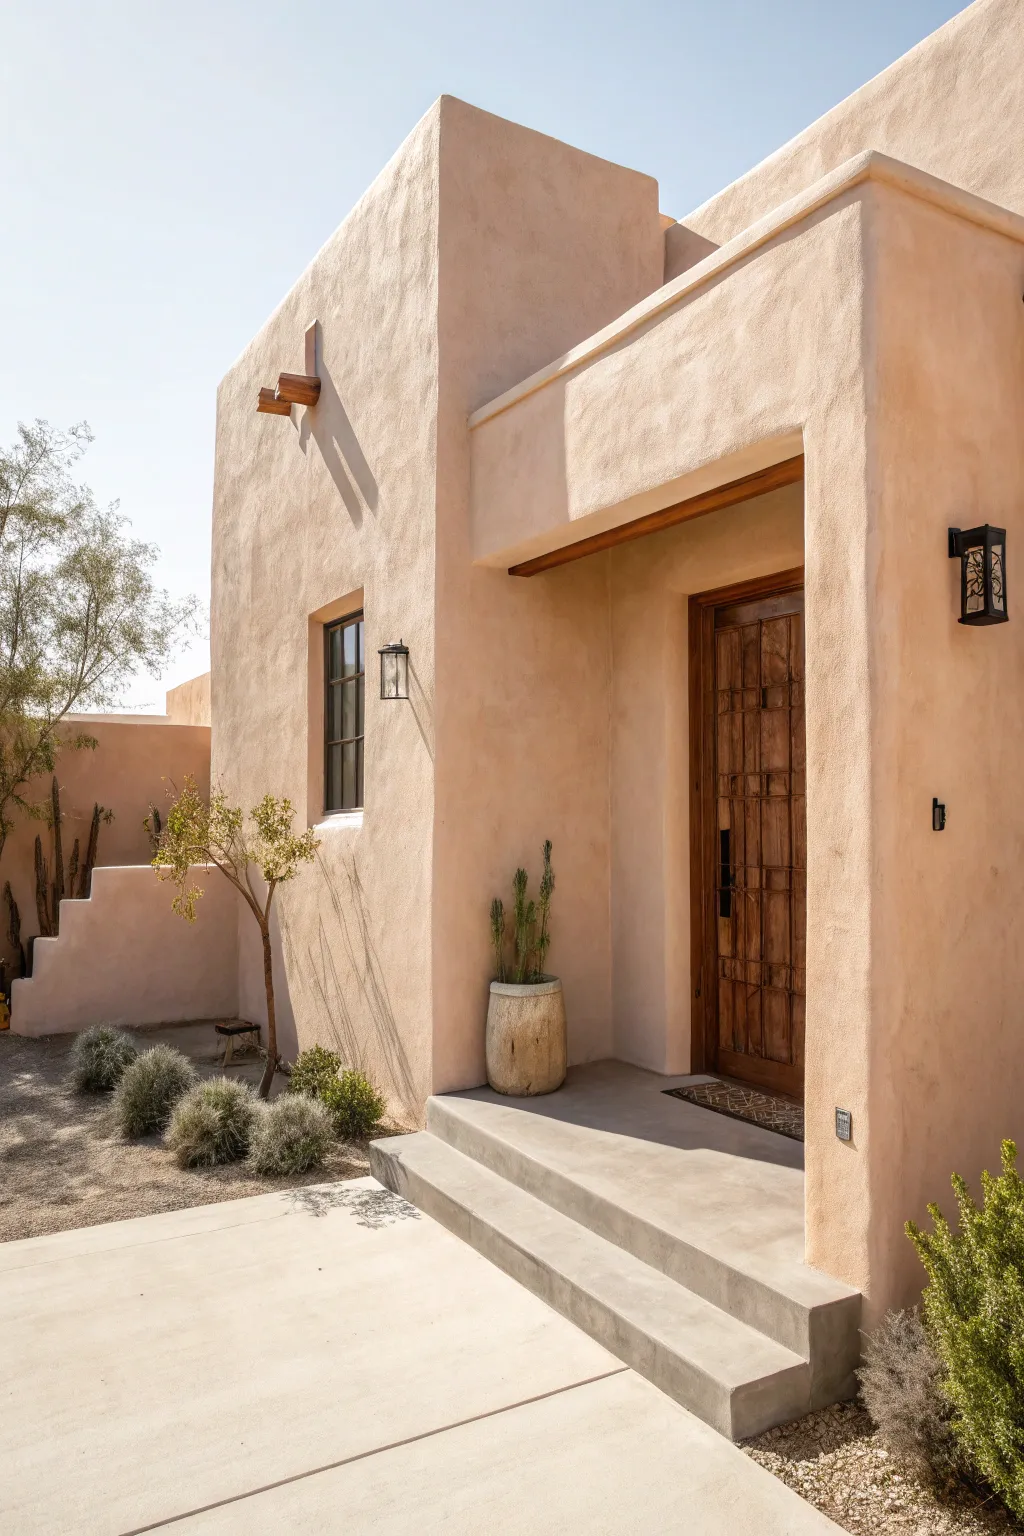
Capture the serene warmth of the southwest with this stucco application project that transforms a standard exterior into a desert oasis. The soft texture and peachy-sand tones create an inviting, sun-baked aesthetic that feels both modern and timeless.
How-To Guide
Materials
- Exterior masonry paint (Peach/Sand tone)
- Acrylic stucco or elastomeric coating
- Tintable texturing medium
- Large masonry brush
- Medium-nap paint roller
- Trowel or sponge float
- Painter’s tape
- Drop cloths
- Exterior wood stain (Walnut or Dark Oak)
- Medium grit sandpaper
- Outdoor sealer
Step 1: Preparation and Base Coat
-
Clean the surface:
Begin by thoroughly pressure washing your exterior walls to remove any dirt, loose paint, or debris. Let the surface dry completely, usually for about 24 hours. -
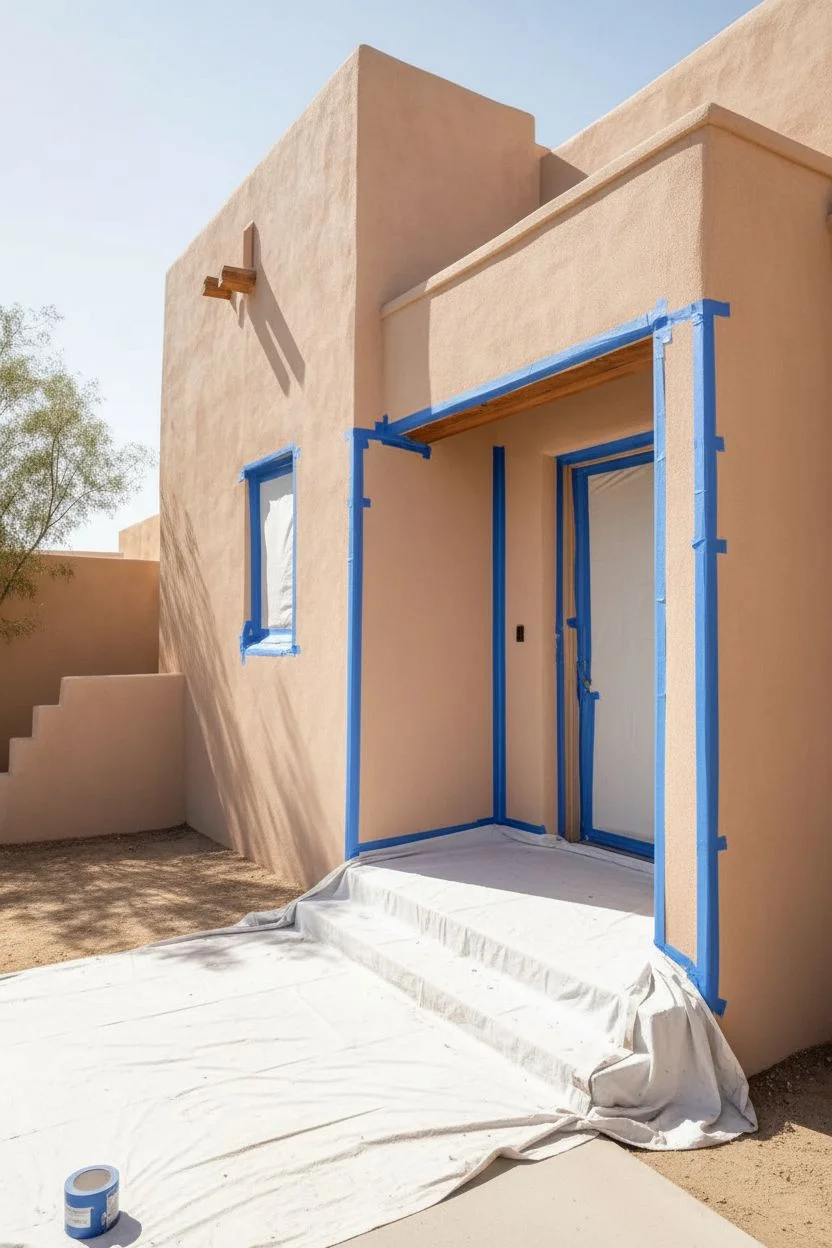
Protect surrounding areas:
Use painter’s tape to mask off windows, door frames, and light fixtures. Lay down drop cloths over any concrete steps or patio areas to catch accidental splatters. -
Inspect and repair:
Check the existing wall for cracks. Fill any noticeable fissures with an exterior-grade patching compound and sand them flush once dry. -
Mix the base color:
Prepare your exterior masonry paint. I prefer mixing a test batch first to ensure the ‘Warm Sand’ hue isn’t too pink or too yellow in direct sunlight. -
Apply the primer:
Roll on a high-quality masonry primer to ensure strong adhesion for the textured layers to come.
Sun Check
Test your paint color on a large board and view it at sunrise, noon, and sunset. Desert hues shift drastically throughout the day.
Step 2: Creating the Stucco Texture
-
Prepare the texturing medium:
Mix your acrylic stucco or elastomeric coating with the tint. Aim for a consistency distinct enough to hold ridges but loose enough to spread. -
Apply the first texture layer:
Using a trowel, apply the stucco mixture to the wall in sweeping, random arcs. Avoid perfect geometric patterns; the goal is an organic, hand-applied adobe look. -
Soften the edges:
While the compound is still wet, go back over the trowel marks with a damp sponge float. Gently swirl the float to knock down sharp ridges and blur specific tool marks. -
Layering for depth:
Once the first coat is tacky but not fully dry, dab additional material in sparse areas to build subtle variation in the surface depth. -
Let it cure:
Allow the textured walls to cure fully according to the manufacturer’s instructions, which often takes 24 to 48 hours depending on humidity.
Aged Patina
For an older look, mix a glazing liquid with a slightly darker paint shade and rag-roll it over the completely dry texture to highlight the crevices.
Step 3: Finishing Details
-
Staining the wood accents:
If you have exposed beams or vigas, sand them lightly. Apply a rich walnut or dark oak stain to create a high-contrast look against the light walls. -
Painting the details:
Using a small angular brush, carefully paint the window trim. A dark bronze or black adds a modern industrial touch to the rustic walls. -
Installing fixtures:
Mount wrought-iron style sconces. Ensure they are level and wired correctly for outdoor use to complete the authentic look. -
Sealing the steps:
Clean the concrete steps leading to the door. Apply a matte concrete sealer to protect them while keeping the raw, industrial gray finish. -
Adding greenery:
Place potted cacti or desert shrubs near the entrance. The green contrast is essential for popping against the warm terracotta tones.
Step back and admire how the warm tones transform the feeling of your entryway into a welcoming desert retreat
Pastel Cottage: Dusty Lavender With Cream Trim
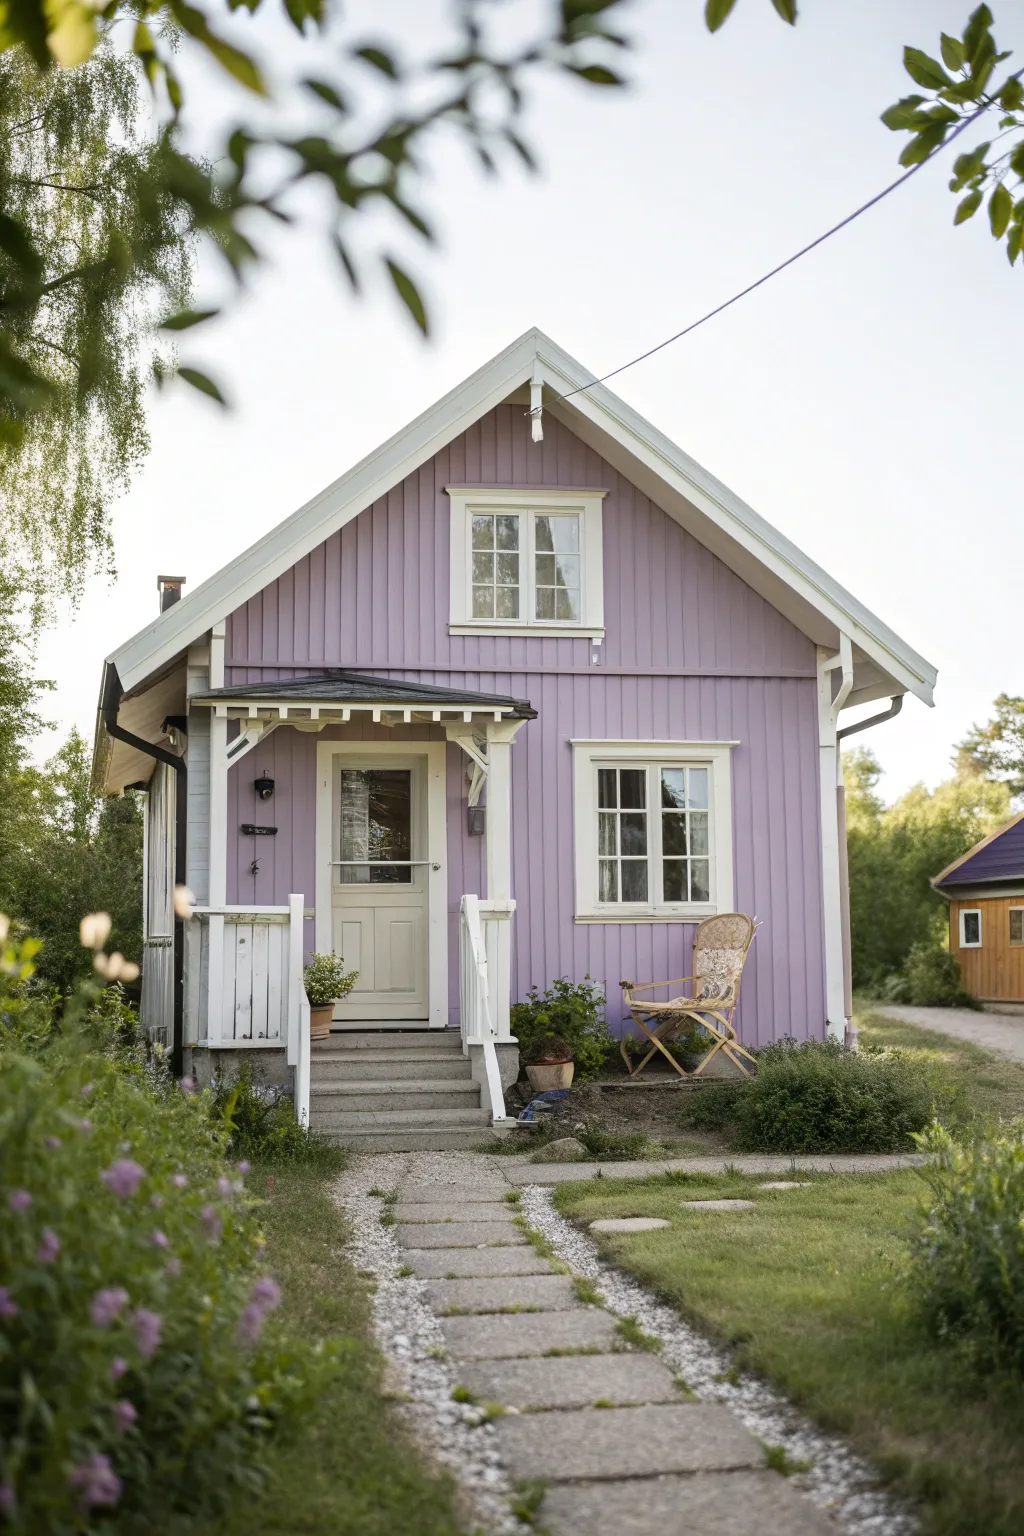
Transform your cottage into a storybook home with this soft, harmonious color palette. This tutorial guides you through achieving a smooth, professional dusty lavender finish paired with crisp cream accents for a timeless Scandinavian feel.
Step-by-Step
Materials
- High-quality exterior primer (oil or acrylic based)
- Exterior acrylic latex paint (Dusty Lavender/Lilac shade)
- Exterior acrylic latex paint (Warm Cream/Off-White shade)
- Pressure washer
- Wood filler or exterior caulk
- Sandpaper (80 and 120 grit) or power sander
- Scrapers and wire brushes
- Drop cloths and painter’s tape
- Angled sash brushes (2-3 inch)
- Paint rollers (medium nap) and extension pole
- Ladder
Step 1: Preparation & Repairs
-
Clean the Siding:
Begin by thoroughly cleaning the entire exterior. Use a pressure washer on a low setting to remove dirt, mildew, and loose paint, working from the top down to avoid streaking. -
Scrape and Sand:
Once dry, inspect the wood for peeling paint. Use a scraper to remove any loose flakes, then sand the edges of the remaining paint to create a smooth transition. I find spending extra time here makes the final coat look much more professional. -
Fill Imperfections:
Apply exterior wood filler to any holes or deep gouges in the siding. Use exterior caulk to seal gaps around windows and door frames to prevent moisture intrusion. -
Protect Surroundings:
Lay drop cloths over garden beds, walkways, and the porch floor. Use painter’s tape to mask off light fixtures, door hardware, and window glass. -
Prime Bare Wood:
Spot-prime any exposed raw wood or filled areas. If you are making a drastic color change, apply a full coat of primer to the entire house to ensure true color saturation.
Uneven Color Coverage?
If the lavender looks patchy after drying, your paint layer might have been too thin. Don’t overwork tacky paint; let it cure fully, then apply a third light coat.
Step 2: Painting the Siding
-
Cut In Edges:
Open your dusty lavender paint. Using an angled sash brush, cut in around the trim, under the eaves, and in corners where a roller won’t reach. -
Roll the Siding:
Use a medium-nap roller to apply the lavender paint to the main siding boards. Work in small sections (about 3-4 feet wide) from top to bottom. -
Back-Brush Technique:
Immediately after rolling, run a dry brush over the wet paint in the direction of the wood grain. This works the paint into the texture and removes roller stipple marks. -
Second Coat Application:
Allow the first coat to dry completely according to the manufacturer’s instructions (usually 4-6 hours). Apply a second coat using the same cut-in and rolling method for rich, opaque coverage.
Enhance the Entryway
Add warmth by staining the porch steps a natural wood tone instead of painting them gray. It grounds the pastel palette and adds a rustic, welcoming texture.
Step 3: Trim & Details
-
Prep the Trim:
Switch to your cream paint. Ensure the lavender siding is fully dry before starting the trim to avoid accidental smudges. -
Paint Window Frames:
Carefully paint the window sashes and frames with a 2-inch angled brush. Keep a wet edge to avoid brush marks on these smooth surfaces. -
Detail the Fascia and Soffits:
Paint the roofline fascia boards and the underside of the eaves (soffits) in cream. This brightens the roof outline and frames the house beautifully. -
Porch Posts and Railings:
Move to the porch area. Paint the vertical posts, detailed brackets, and railings. Use a smaller brush to get inside the intricate woodwork of the porch brackets. -
Door Refresh:
Paint the front door in the same cream shade to create a cohesive look, or choose a slightly deeper tone for subtle contrast. -
Final Touch-Ups:
Remove all painter’s tape carefully. Inspect the lines where trim meets siding and use a small artist’s brush to correct any bleeds or drips.
Enjoy the curb appeal of your freshly painted, whimsical cottage retreat
Statement Front Door: High-Impact Accent Color
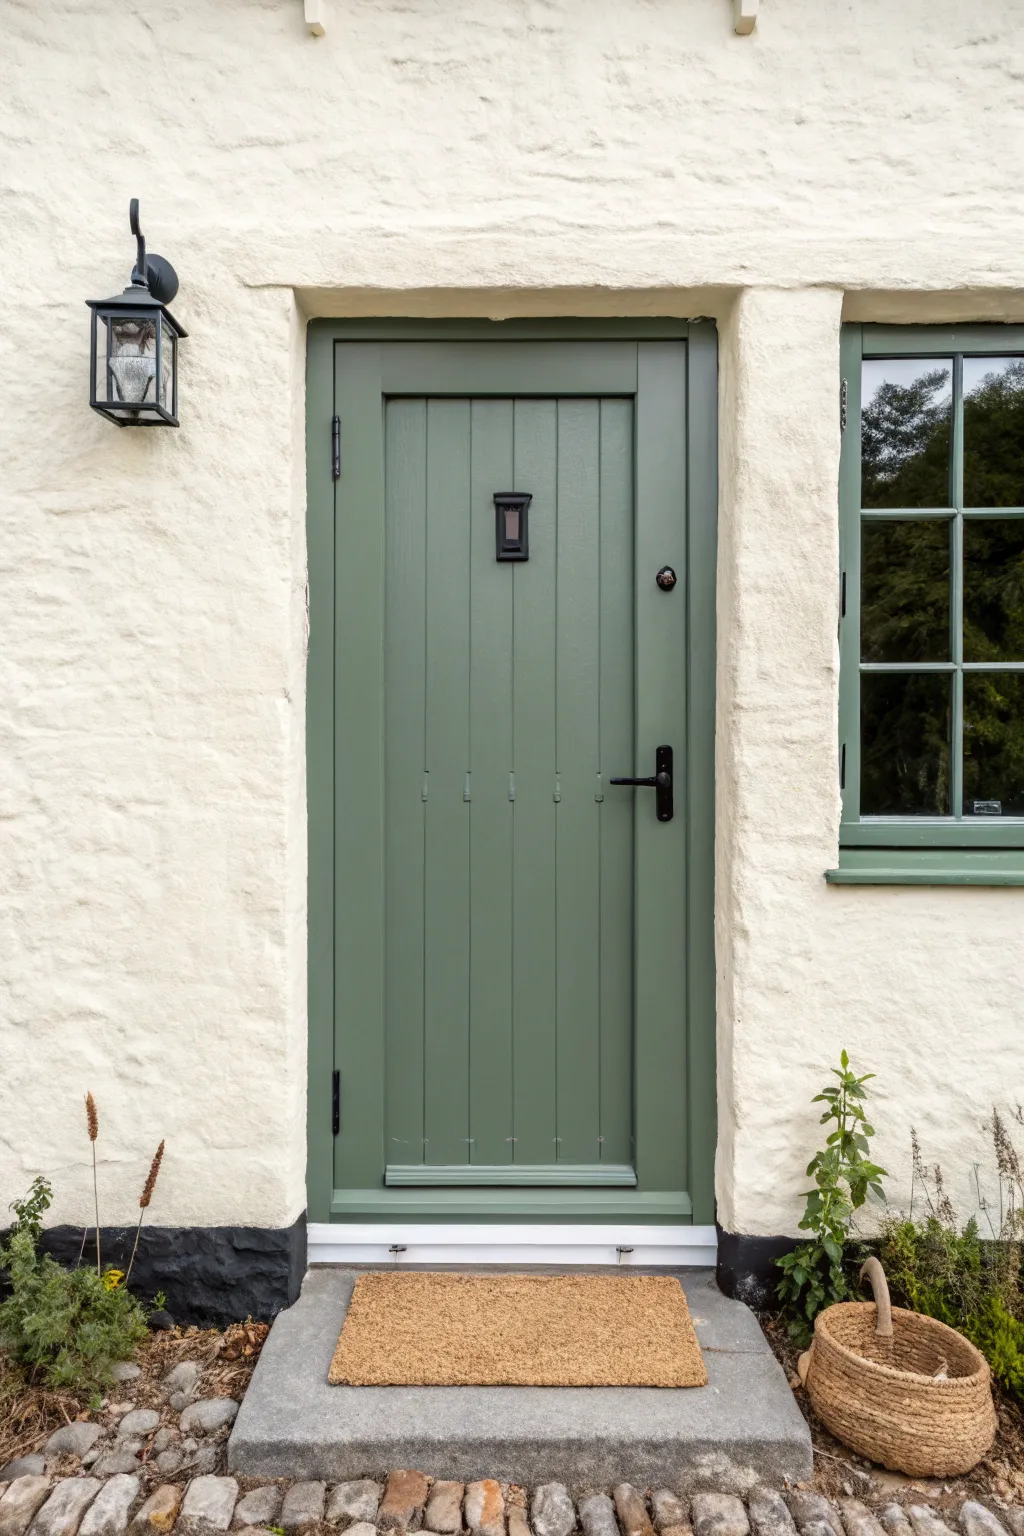
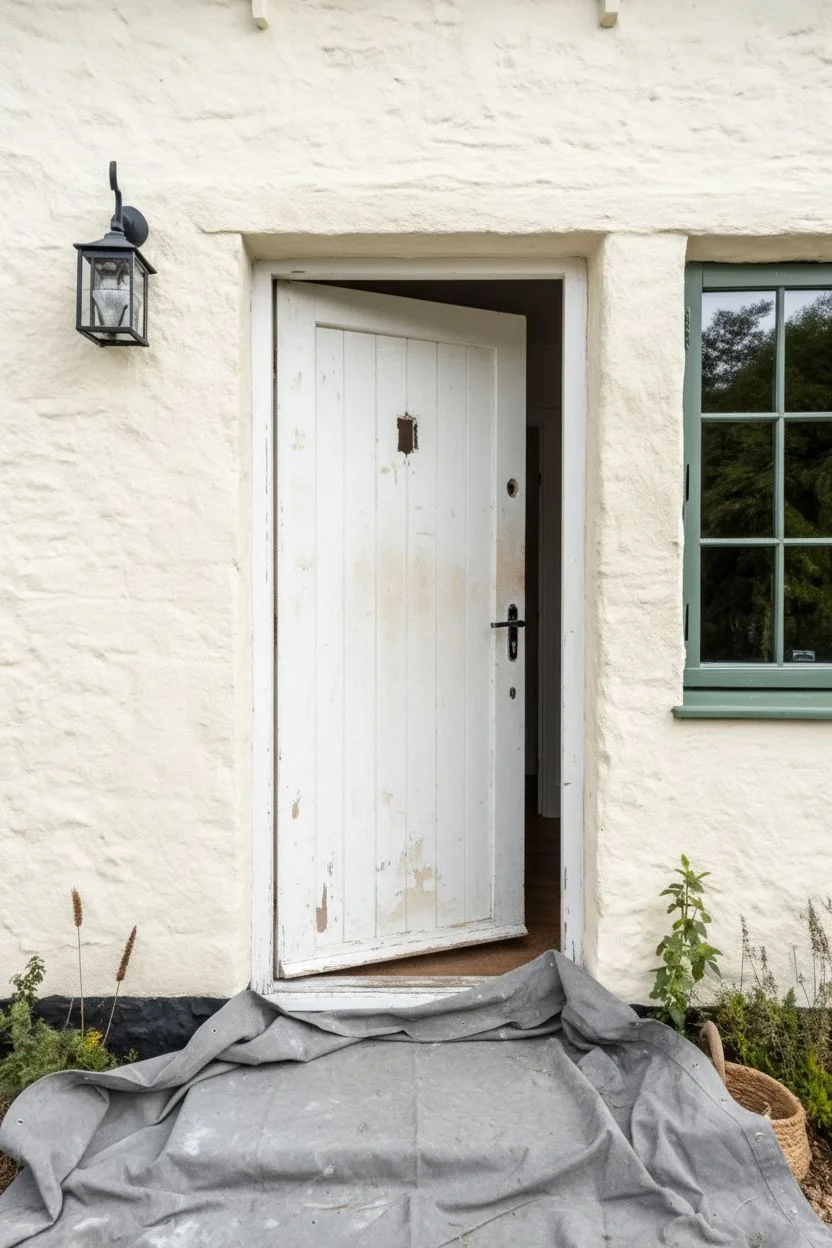
Transform your home’s curb appeal with this classic sage green door project, perfect for adding character to white or cream exteriors. This tutorial walks you through achieving that smooth, professional finish that mimics the look of a cozy countryside cottage.
Detailed Instructions
Materials
- Exterior wood door paint (Sage Green, satin finish)
- Primer suitable for exterior wood
- Sanding block (medium and fine grit)
- Painter’s tape
- Degreaser or sugar soap
- High-quality synthetic brush (2-inch angled)
- Mini foam roller and tray
- Drop cloth
- Screwdriver (for hardware removal)
- Wood filler (if repairs are needed)
- Clean rags
Step 1: Setting the Stage
-
Assess the weather:
Before starting, check your local forecast. You need a period of dry weather with temperatures between 50°F and 75°F for optimal paint curing. -
Clear the area:
Prop the door open so you can access all edges. Place a heavy drop cloth underneath to protect your porch or step from drips. -
Remove hardware:
Using a screwdriver, carefully remove the handle, letterbox, knocker, and spyhole. I always store screws in a labeled baggie so nothing gets lost. -
Clean thoroughly:
Scrub the entire door surface with a degreaser or sugar soap to remove grime, dirt, and oils. Rinse with clean water and let it dry completely.
Pro Tip: Better Brushwork
For the smoothest finish, load your brush gently and avoid ‘overworking’ the paint. Lay it on, smooth it once, and leave it alone to self-level.
Step 2: Surface Preparation
-
Fill imperfections:
Inspect the wood for cracks or deep dents. Apply exterior wood filler with a putty knife, smoothing it out, and allow it to dry according to package instructions. -
Sand the surface:
Using a medium-grit sanding block, sand the entire door to remove loose paint and create a ‘key’ for the new coat. Pay attention to the grooves in the paneling. -
Finish sanding:
Switch to a fine-grit sandpaper for a final pass to ensure a super smooth surface. Wipe away all dust with a damp rag or tack cloth. -
Mask edges:
Apply painter’s tape carefully along any glass panes, hinges that weren’t removed, and the door frame edges to ensure crisp lines.
Level Up: Hardware Update
Swap standard silver hardware for matte black iron handles and lanterns. This high contrast against the soft green creates a timeless, upscale look.
Step 3: Priming and Painting
-
Apply primer:
Brush a coat of exterior wood primer onto the door. Start with the recessed moldings and panels, then move to the vertical stiles and horizontal rails. Let this dry fully. -
Light sand:
Once the primer is dry, give it a very light scuff sand with fine-grit paper to remove any brush marks or raised grain, then wipe clean. -
Detail work first:
Dip your angled brush into the sage green paint. Carefully paint inside the recessed panels and any molding details first. -
Paint the panels:
Paint the flat center panels using smooth vertical strokes. Maintain a ‘wet edge’ to prevent lap marks. -
Paint the center vertical:
Paint the vertical strip that runs down the center of the door (the mullion) between the panels. -
Paint horizontal rails:
Paint the horizontal top, middle, and bottom rails. Feather the edges slightly where they meet the wet vertical paint to blend seamlessy. -
Paint vertical stiles:
Finish by painting the two long vertical sides (stiles) of the door, running from top to bottom. -
Paint edges:
Don’t forget the door edges. Paint the hinge edge only if the door is open; paint the latch edge so it matches the face.
Step 4: Finishing Touches
-
Apply second coat:
Allow the first coat to dry for the time recommended on your paint can (usually 4-24 hours). Apply a second coat following the same order: details, panels, verticals, horizontals, outer verticals. -
Remove tape:
While the second coat is still slightly tacky (not fully dry), carefully peel away the painter’s tape at a 45-degree angle to keep the lines sharp. -
Reinstall hardware:
Once the paint is fully cured—ideally wait 24 hours to avoid tackiness—reattach your handle, knocker, and letterbox. -
Style the entryway:
Complete the look by adding a natural fiber doormat and a woven basket with greenery nearby to echo the cottage aesthetic.
Enjoy the fresh, inviting look of your new cottage-style entryway
Color-Blocking Architectural Features With Painted Panels
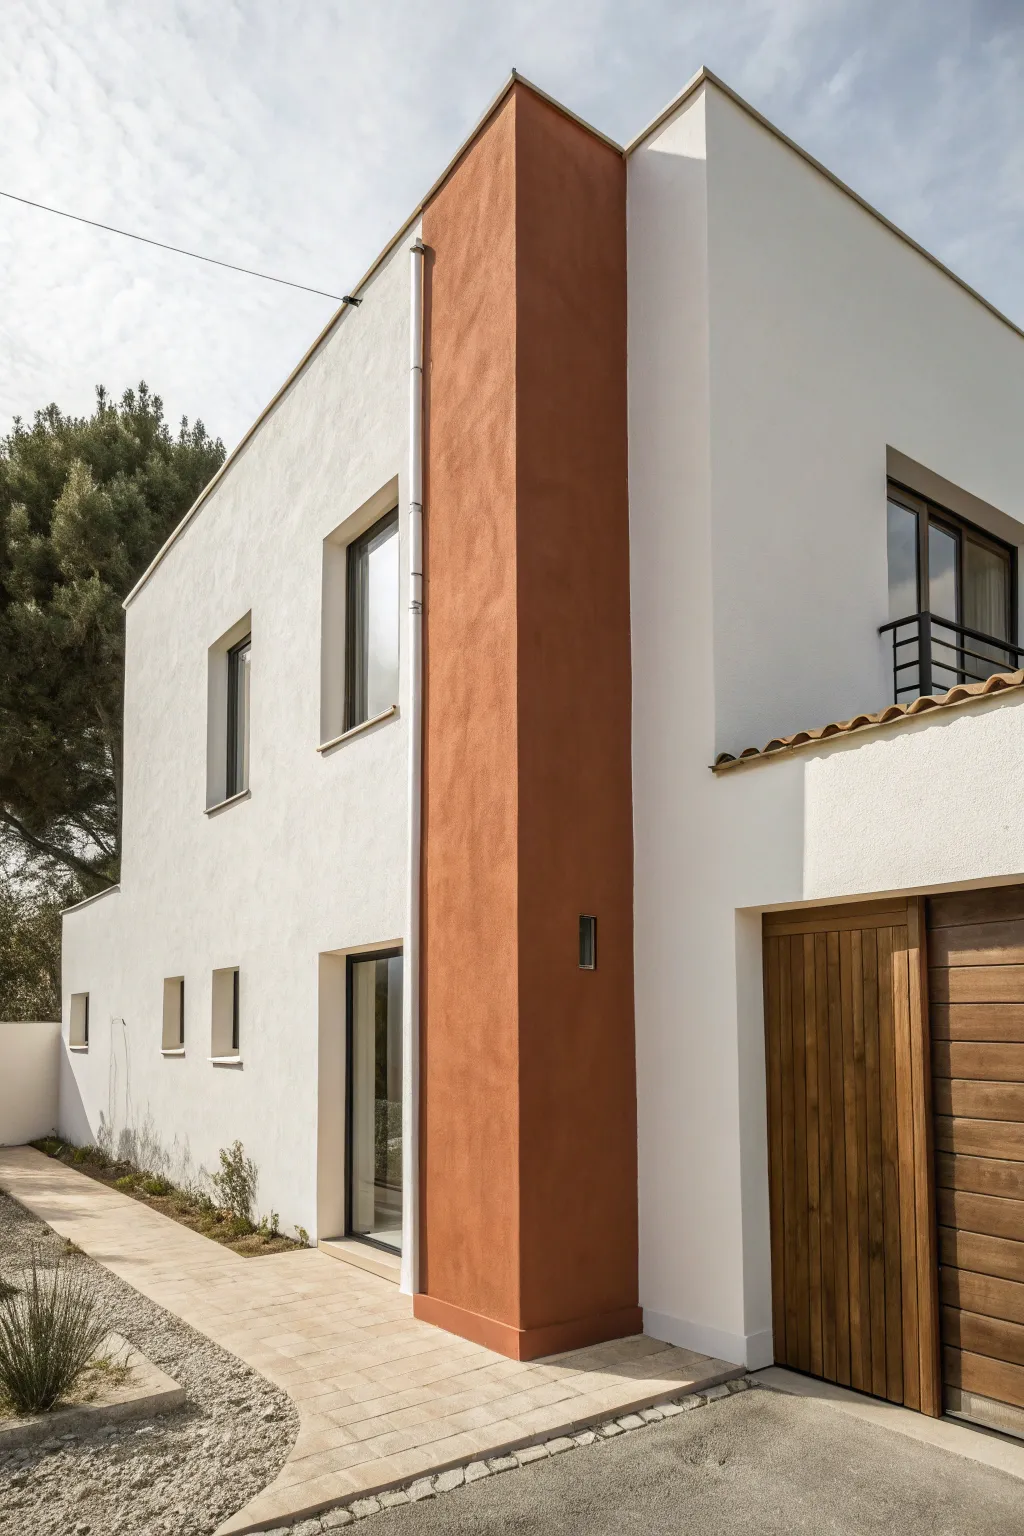
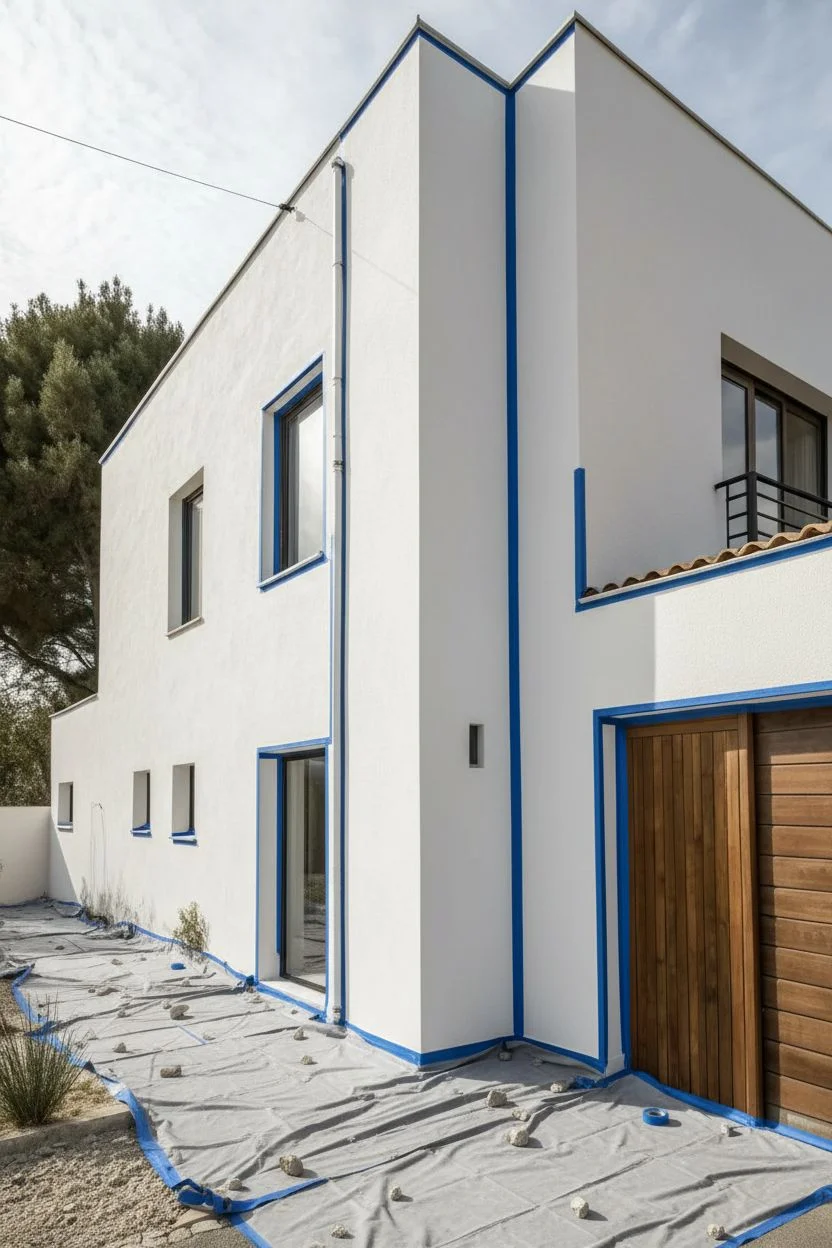
Transform a plain white exterior into a modern architectural statement by color-blocking a single structural feature. This project uses a rich, earthy terracotta hue to highlight a vertical column, creating depth and a striking visual anchor against the bright stucco.
Step-by-Step Guide
Materials
- High-quality exterior masonry paint (white for base, terracotta/burnt orange for accent)
- Pressure washer
- Exterior painter’s tape (UV resistant)
- Drop cloths
- Stiff bristle scrub brush
- Masonry filler and putty knife
- Paint roller frame with extension pole
- Medium to long nap roller covers (3/4 inch for stucco)
- Wide angled sash brush (synthetic bristles)
- Ladder
- Mild detergent or exterior house cleaner
- Small artist’s brush for touch-ups
Step 1: Preparation & Cleaning
-
Assess the surface:
Begin by closely inspecting the stucco surface for any cracks, loose debris, or existing peeling paint. The texture needs to be sound for the new color to adhere properly. -
Wash the walls:
Use a pressure washer on a low to medium setting to remove dust and dirt. For specific stained areas, I like to spot-clean with a stiff brush and mild detergent before rinsing. -
Repair imperfections:
Identify any hairline cracks in the stucco. Fill them with masonry filler using a putty knife, texturing the surface slightly to match the surrounding grain so the repair becomes invisible once painted. -
Protect the surroundings:
Lay down heavy-duty drop cloths over the patio pavers and garden beds to catch any drips. Secure them with rocks or tape if it’s a breezy day. -
Mask the edges:
For this project, precision is key. Apply high-quality exterior painter’s tape along the window frames, the drainpipe, and the roofline where the accent color will meet the fascia.
Tape Seal Trick
To get a razor-sharp line on bumpy stucco, paint a thin layer of the *base* color (white) over the tape edge first. This seals any gaps, so the accent color can’t bleed under.
Step 2: Painting the Base
-
Cut in the white:
Start by refreshing the main white walls. Use an angled sash brush to paint around the windows, doors, and corners where the roller won’t reach. -
Roll the main walls:
Using a 3/4 inch nap roller, apply the white masonry paint to the large wall sections. The thicker nap is essential for getting paint into the deep crevices of the stucco texture. -
Allow to dry:
Let the white base coat dry completely according to the manufacturer’s instructions—usually at least 4-6 hours—before attempting to tape off the accent area.
Step 3: Applying the Color Block
-
Define the accent zone:
Run a vertical line of painter’s tape to separate the white wall from the corner column you intend to highlight. Press the tape edge firmly into the stucco texture to prevent bleed-under. -
Protect the rain gutter:
Ensure the vertical drainpipe running alongside the column is either removed or meticulously taped off. Painting behind it requires patience, but accidental splashes on the metal will look messy. -
Cut in the terracotta:
Open your terracotta exterior paint. Use a clean angled brush to carefully paint along the taped vertical line, the ground edge, and the top roofline corner. -
Roll the first coat:
Load a fresh roller with the terracotta paint. Apply the first coat to the corner column, working from top to bottom to maintain a wet edge. -
Inspect coverage:
Stucco often absorbs the first coat quickly. Don’t worry if it looks slightly patchy initially; the second coat will unify the color. -
Apply the second coat:
After the directed drying time, roll on a second heavy coat of terracotta. Roll in different directions (w’s and m’s) to ensure every pit and peak of the stucco is covered. -
Check the reveals:
Look at the column from different angles. Stucco has deep texture, and it’s easy to miss ‘holidays’ (tiny unpainted spots) that are only visible from the side or below.
Texture Play
Use a specialized ‘elastomeric’ paint for the accent block. It’s thicker than standard paint, offering better waterproofing and a smoother, more rubberized finish that hides hairline cracks.
Step 4: Finishing Touches
-
Remove tape:
Carefully peel back the painter’s tape while the paint is still slightly tacky to ensure a crisp line. Pull the tape away from the painted edge at a 45-degree angle. -
Touch up lines:
If any paint seeped under the tape due to the rough texture, use a small artist’s brush and the original white paint to carefully correct the line. -
Clean up:
Remove all drop cloths and wash your brushes immediately. Reattach any hardware or fixtures you removed.
Step back and admire how this bold slice of color completely redefines the geometry of your home


Have a question or want to share your own experience? I'd love to hear from you in the comments below!