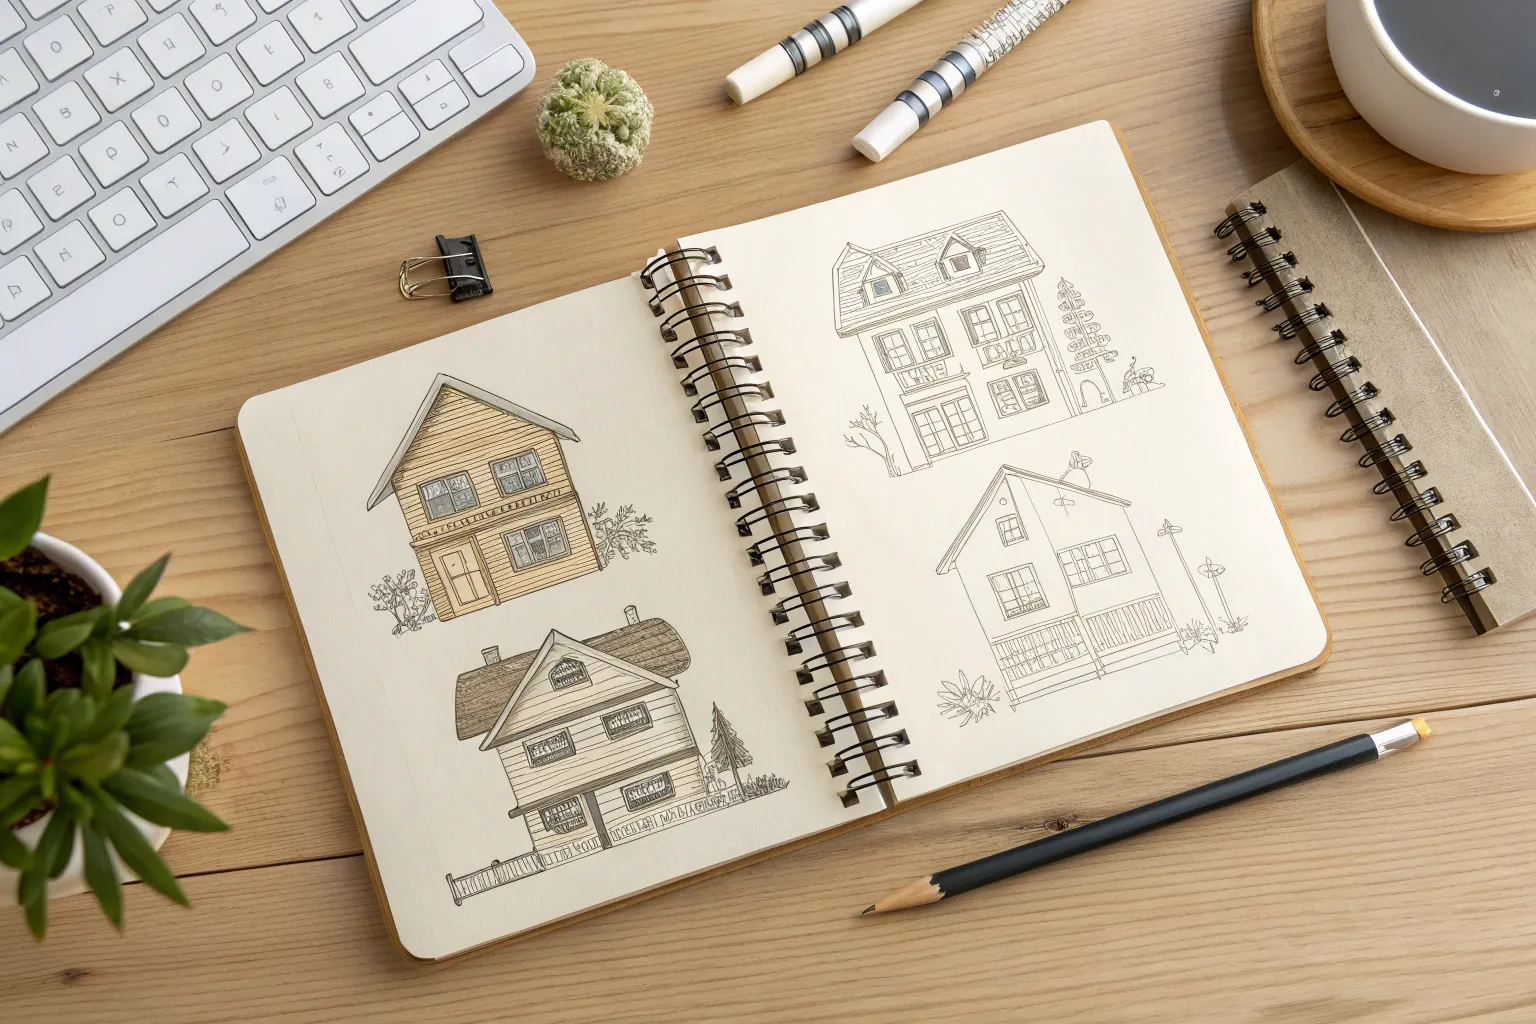
If you’ve ever wanted to draw a house but didn’t know where to start, you’re in the right mindset—houses are basically friendly stacks of shapes. I’m sharing my favorite house drawing ideas that range from classic and cozy to delightfully weird, so you can pick one that matches your mood today.
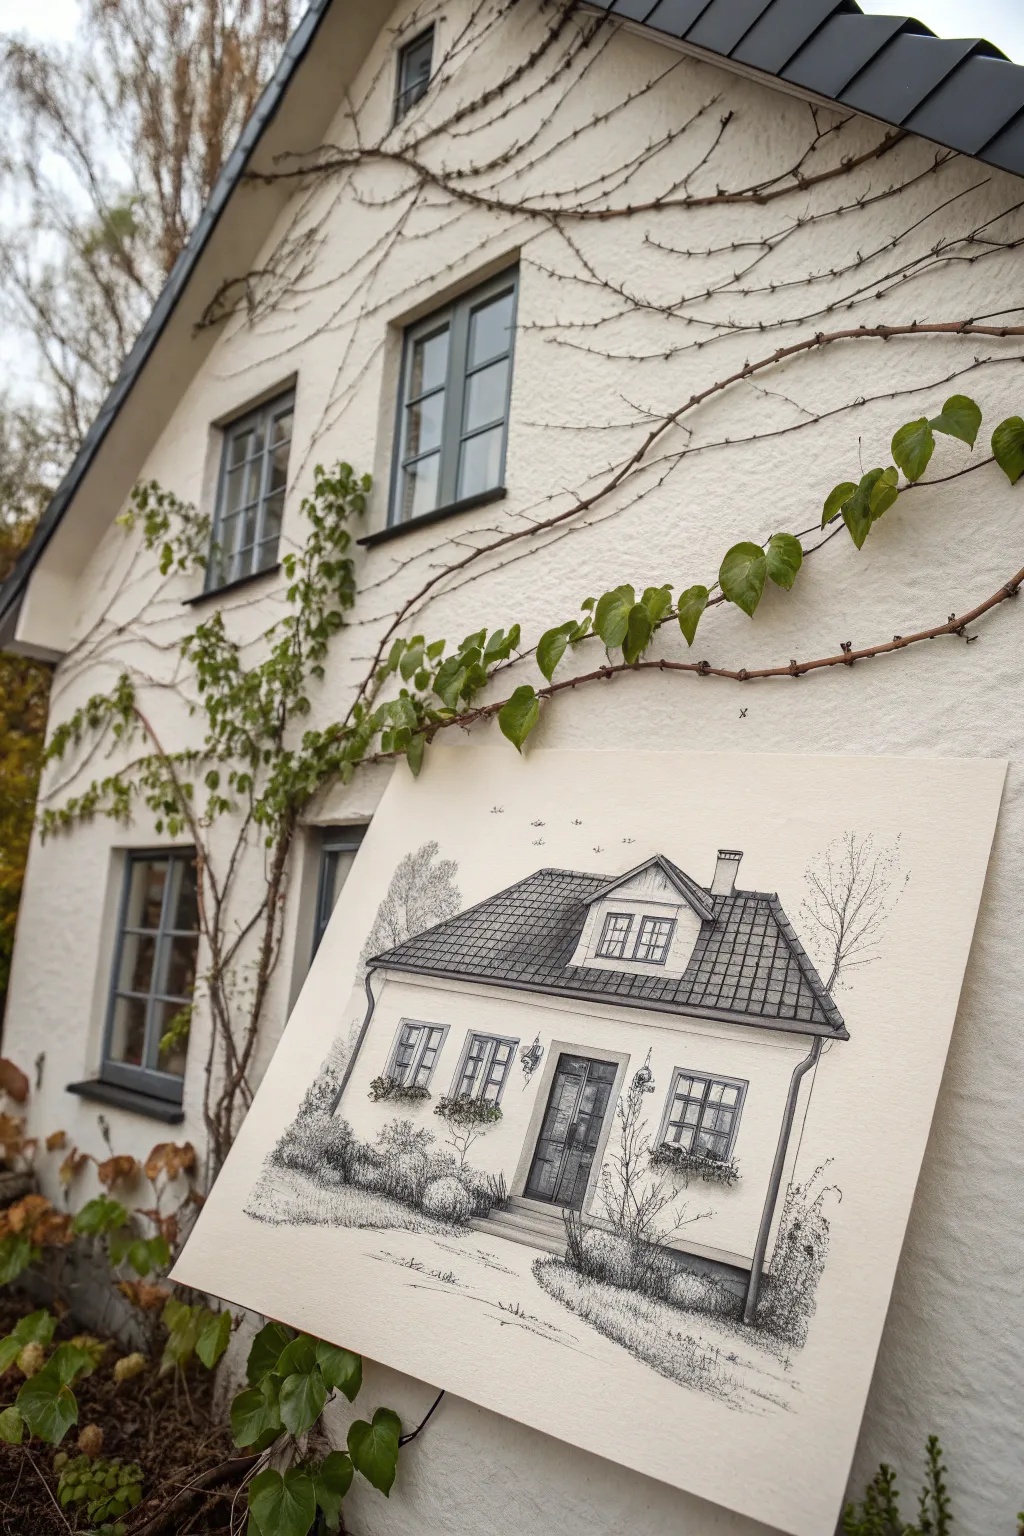
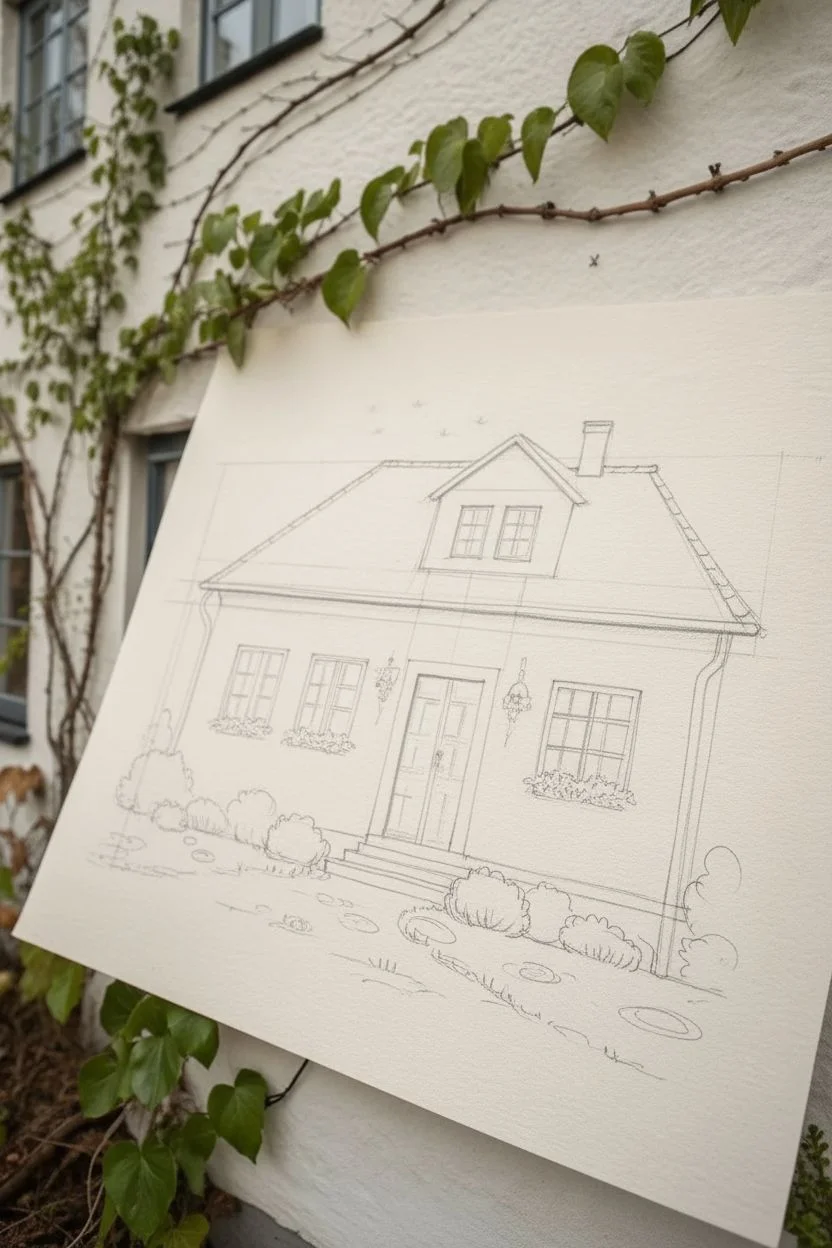
Classic Front-View House Sketch

Capture the charm of traditional architecture with this crisp, monochromatic sketch of a wooden cottage. Using precise line work and subtle textures, you’ll create a welcoming front-view illustration on heavy, textured paper.
Detailed Instructions
Materials
- Heavyweight textured paper (cold press or mixed media)
- Hard pencil (2H or H) for undersketching
- Fine liner pens (sizes 0.1, 0.3, and 0.5)
- Ruler or straightedge
- Kneaded eraser
Step 1: Drafting the Structure
-
Establish the horizon:
Begin by lightly drawing a horizontal line near the bottom third of your paper to serve as the ground level. This anchors the house. -
Block in the main shape:
Draw a large rectangle centered on your ground line for the main body of the house. Above this, add a triangle for the roof gable, ensuring the peak is perfectly centered. -
Outline the roof overhang:
Extend the roof lines slightly past the walls to create eaves. Keep these lines parallel to your initial triangle to show the thickness of the roof structure. -
Position openings:
Lightly sketch rectangles for the central double door and the two flanking windows. Add a smaller square window centered in the gable triangle above the door. -
Detail the entry steps:
Draw a set of three stairs leading up to the front door. Extend lines outward from the base of the stairs to denote a wooden deck or walkway.
Step 2: Inking the Foundation
-
Clean lines:
Switch to your 0.5 fine liner. Carefully go over the main outline of the house, the roof, and the door frame. Use a ruler for vertical walls but consider freehanding shorter lines for character. -
Window frames:
Ink the window outlines. Inside the main windows, draw a cross shape to create four panes per window. For the gable window, create a grid of four smaller panes. -
Door details:
Define the double doors with a center vertical line. Draw recessed panels on each door using the 0.3 pen for a slightly finer touch. -
Roof texture:
Under the eaves, draw small, repeating geometric brackets or exposed rafter tails. Add a simple chimney rectangle protruding from the roofline.
Natural Line Variation
Don’t stress about perfectly straight ruler lines. A slight wobble adds organic warmth, making the house feel like a home rather than a blueprint.
Step 3: Adding Texture and Siding
-
Vertical siding guidelines:
Using your pencil and ruler, lightly mark vertical intervals across the entire face of the house. These will guide your siding lines. -
Inking the planks:
With the 0.1 fine liner, draw the vertical siding lines. Don’t press too hard; these lines should be lighter than the structural outlines. I like to break the lines occasionally to suggest aged wood. -
Decking details:
Use the ruler to draw lines radiating solely from the stairs across the foreground deck, giving it a planked appearance. -
Foundation shading:
Create a gradient on the foundation strip at the bottom of the house using tiny stippling dots or very tight hatching to suggest concrete or stone.
Uneven Ink Flow?
Textured paper can sometimes snag fine nibs. Hold the pen more vertically and reduce pressure to let the ink glide over the paper’s tooth.
Step 4: Finishing Touches
-
Grounding foliage:
Sketch small, energetic tufts of grass and wild plants at the corners of the house foundation. Keep the strokes quick and upward-moving. -
Shadows and depth:
Use the 0.1 pen to add hatching shadows under the eaves and beneath the window sills. This gives the drawing dimensionality. -
Erase guidelines:
Once the ink is completely dry, gently roll a kneaded eraser over the entire drawing to lift the pencil sketch without damaging the paper texture.
Step back and admire the clean architectural lines of your finished cottage sketch


Two-Point Perspective Corner House
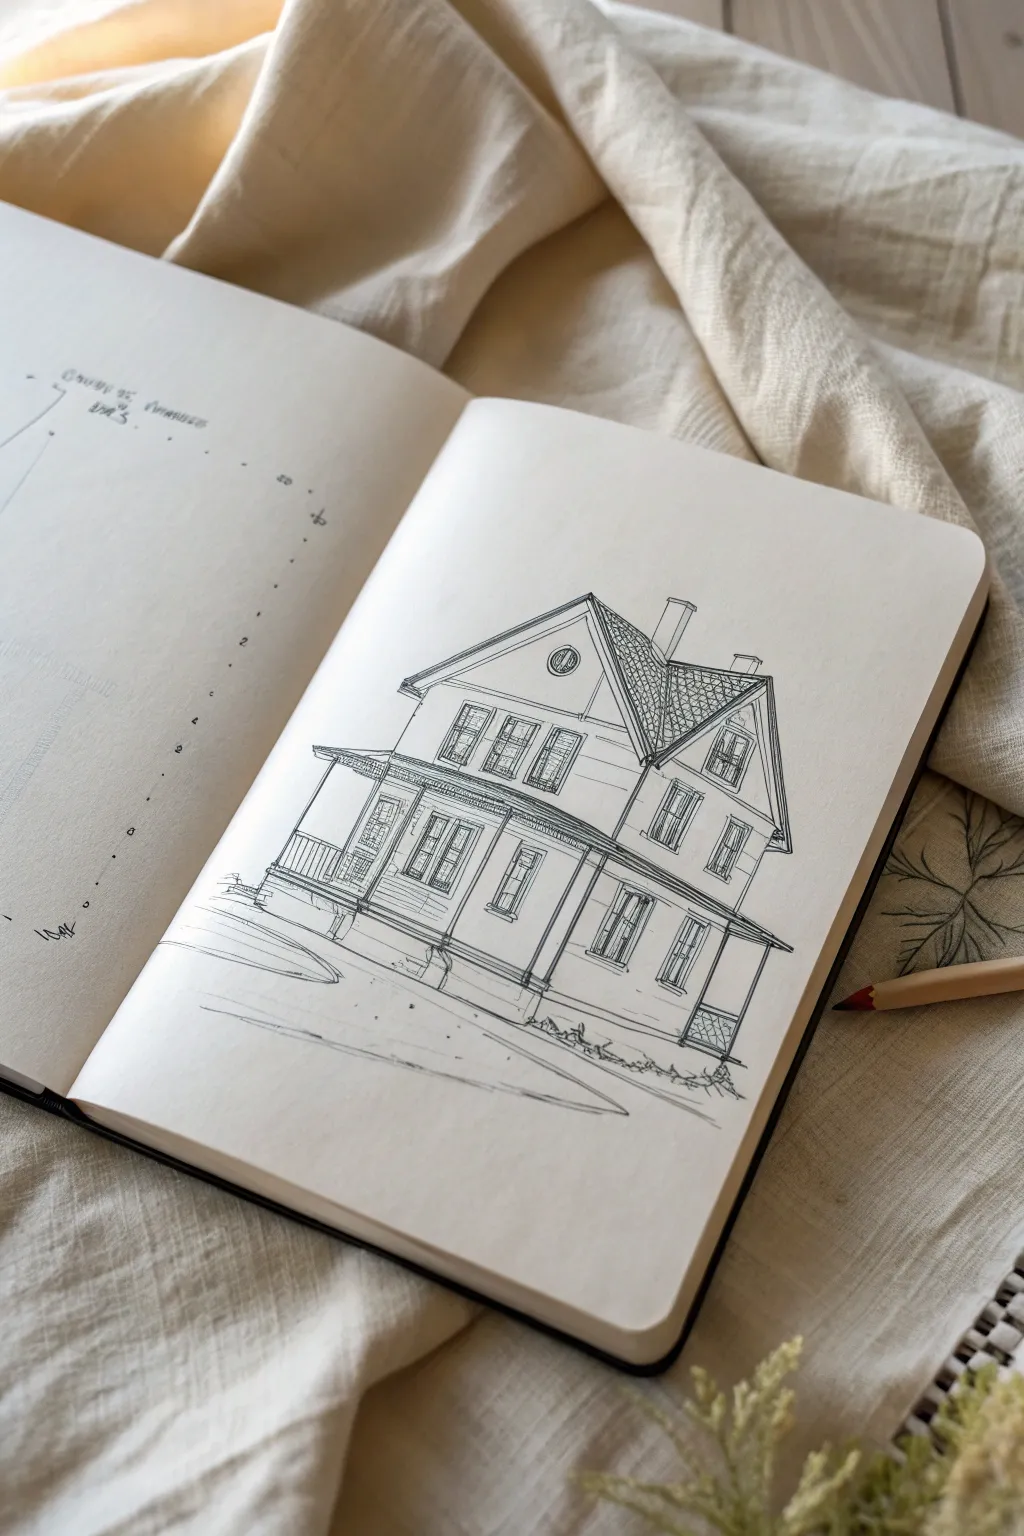
Capture the charm of classic architecture with this detailed pen-and-ink study of a two-story home. Using two-point perspective, you will learn to angle the structure dramatically to show depth, intricate siding textures, and a welcoming porch.
How-To Guide
Materials
- A5 Sketchbook (smooth ivory or white paper)
- HB or 2H graphite pencil
- Kneaded eraser
- Fine liner pens (sizes 0.1, 0.3, and 0.5)
- Ruler or straight edge
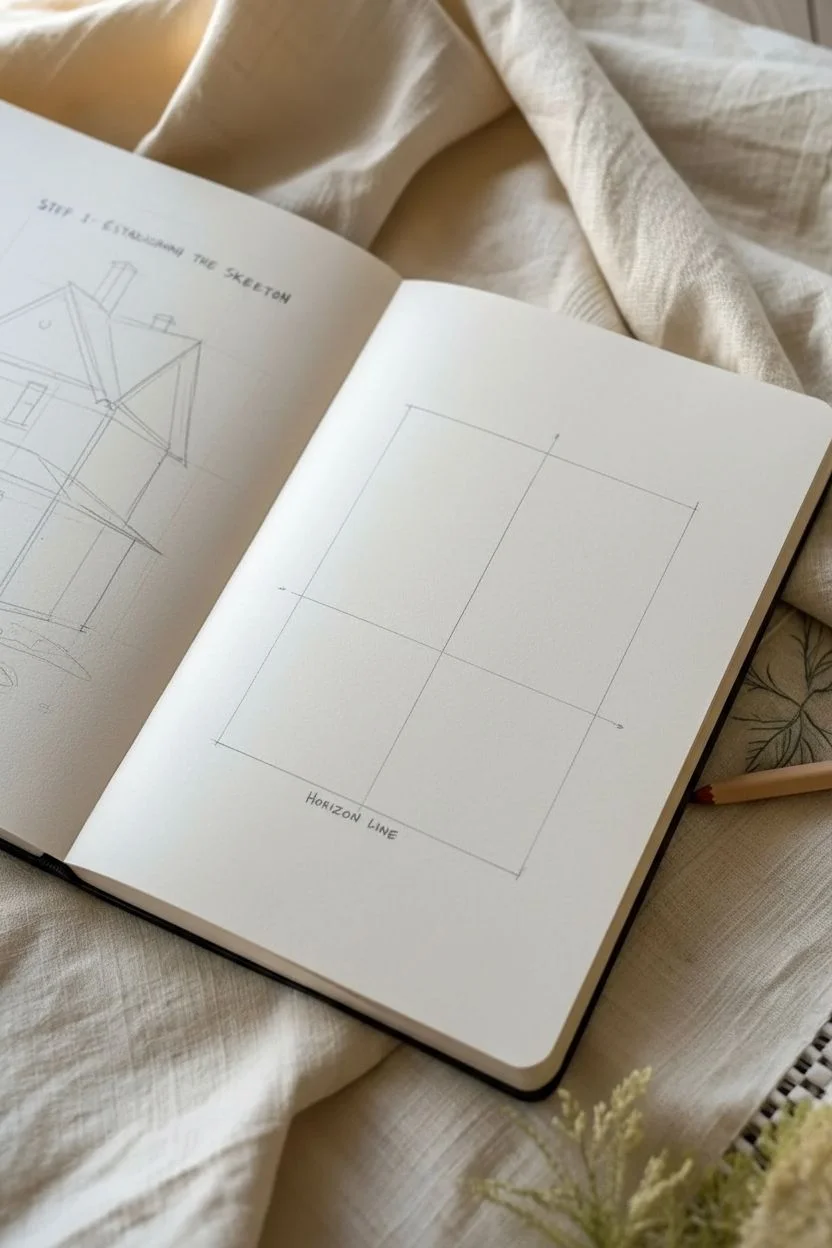
Step 1: Establishing the Skeleton
-
Define the Horizon Line:
Start by lightly drawing a horizontal line across your page, roughly one-third of the way up from the bottom. This is your eye level. -
Set the Vanishing Points:
Mark two vanishing points on your horizon line—one far off the left edge and one far off the right edge. Since this is a corner view, the house will sit between these points. -
Draw the Corner Edge:
Draw a vertical line near the center of your page to represent the closest corner of the house. Extend it above and below the horizon line to set the height of the two stories. -
Connect to Vanishing Points:
From the top and bottom of your central vertical line, draw light guidelines connecting back to your left and right vanishing points. These lines define the top of the roofline and the base of the foundation. -
Block in the Side Walls:
Decide how wide the house is. Draw two vertical lines on either side of the central corner to cut off the receding walls.
Drawing Pro Tip
Vary your line weight! Use thicker pens for the closest corner and outline, and thinner pens for distant details. This boosts the 3D effect instantly.
Step 2: Adding Architectural Features
-
Outline the Roof Peaks:
Find the center of the right-side wall and draw a vertical line straight up. Connect the top of this line to the corners of the wall to create the triangular gable. Repeat a smaller gable structure on the left side. -
Structure the Porch:
Draw a low, box-like shape wrapping around the base of the house. Use your vanishing points to ensure the porch roof and floor recede correctly. -
Place Window Guides:
Lightly sketch vertical rectangles for the windows. Remember that windows appear narrower the further away they get due to foreshortening. -
Detail the Chimneys:
Add two small rectangular boxes on the roof ridge for the chimneys, ensuring their sides follow the vertical alignment.
Step 3: Inking and Detailing
-
Ink the Main Outlines:
Switch to your 0.5 pen. Go over the main structural lines of the house—the corners, the roof edge, and the foundation—making them crisp and confident. -
Refine the Windows:
Using a 0.3 pen, draw the window frames and panes. Add double lines for the frames to give them thickness. -
Add Roofing Texture:
With the 0.1 pen, draw a crosshatch pattern on the roof to simulate shingles. Keep the lines slightly loose to maintain a sketch-like quality. -
Draw Siding Lines:
Using the 0.1 pen, draw horizontal lines across the exterior walls for clapboard siding. I prefer to break these lines occasionally rather than drawing them perfectly solid, which adds character. -
Detail the Porch Railings:
Carefully draw vertical vertical lines for the porch railing balusters. Keep them evenly spaced but sketch them quickly to avoid stiffness. -
Ground the Sketch:
Use loose, scribbly lines at the base of the house to suggest bushes or landscaping. Add a few sweeping lines in the foreground to create a walkway and lawn. -
Erase Pencil Marks:
Once the ink is completely dry, gently erase all graphite guidelines with your kneaded eraser to reveal the clean line work.
Level Up Your Art
Add a wash of diluted grey watercolor or marker ink to the shadowed side of the house (usually the side facing away from the light source) for dramatic depth.
Now you have a charming architectural sketch that perfectly captures the angles of a classic home


Cozy Cottage With a Chimney
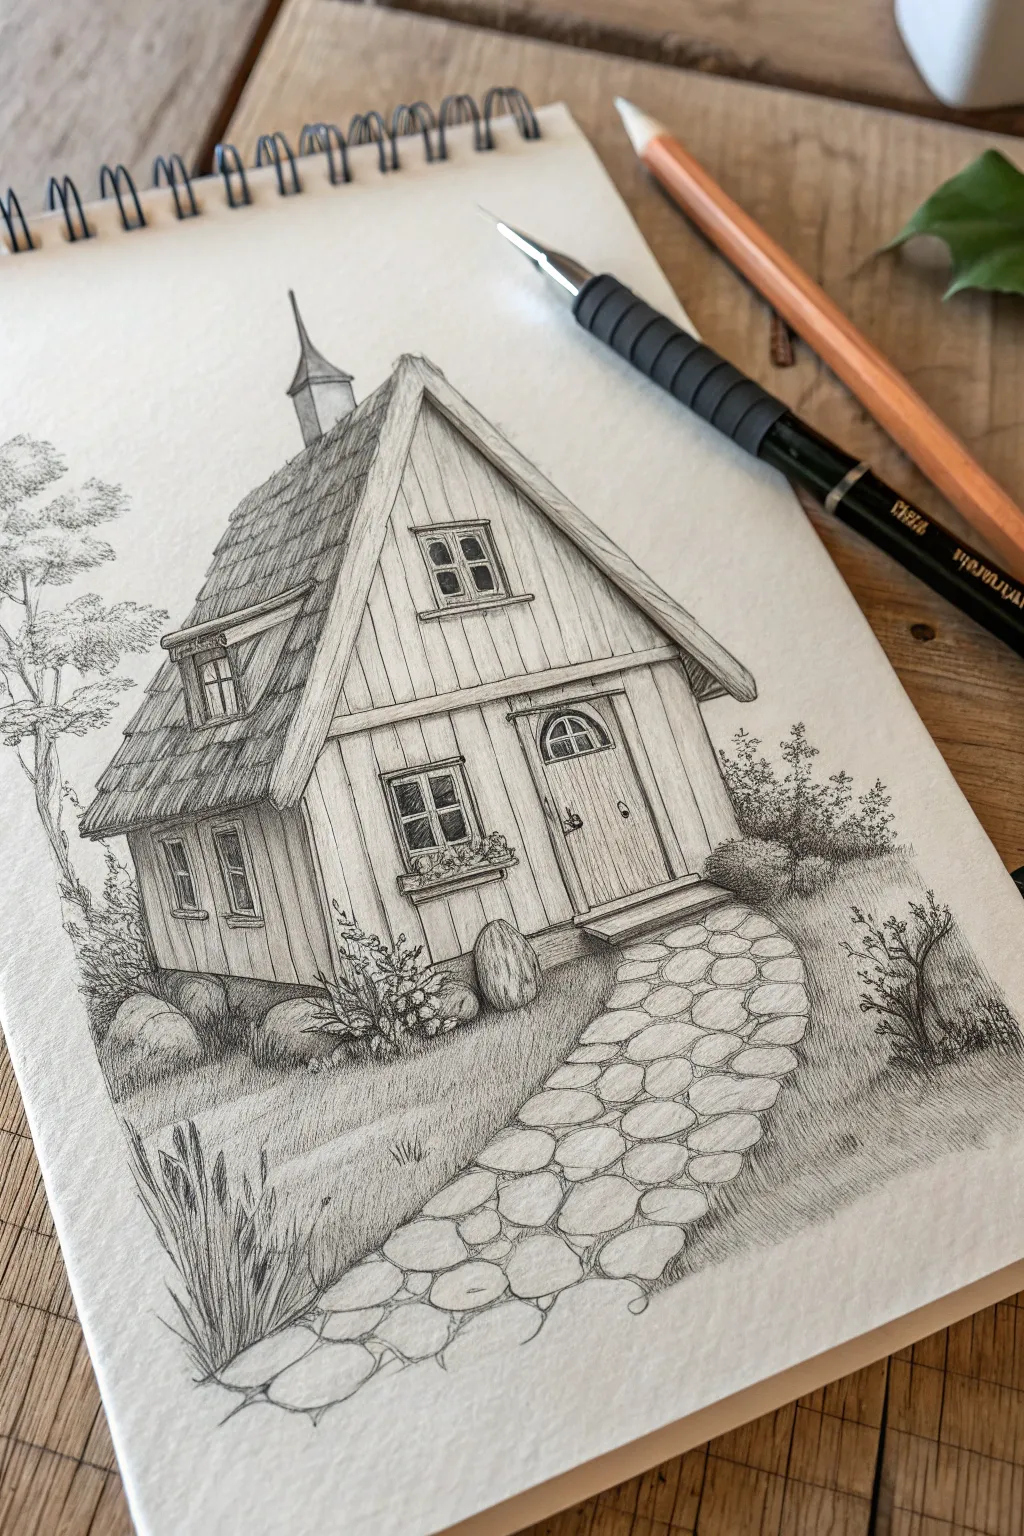
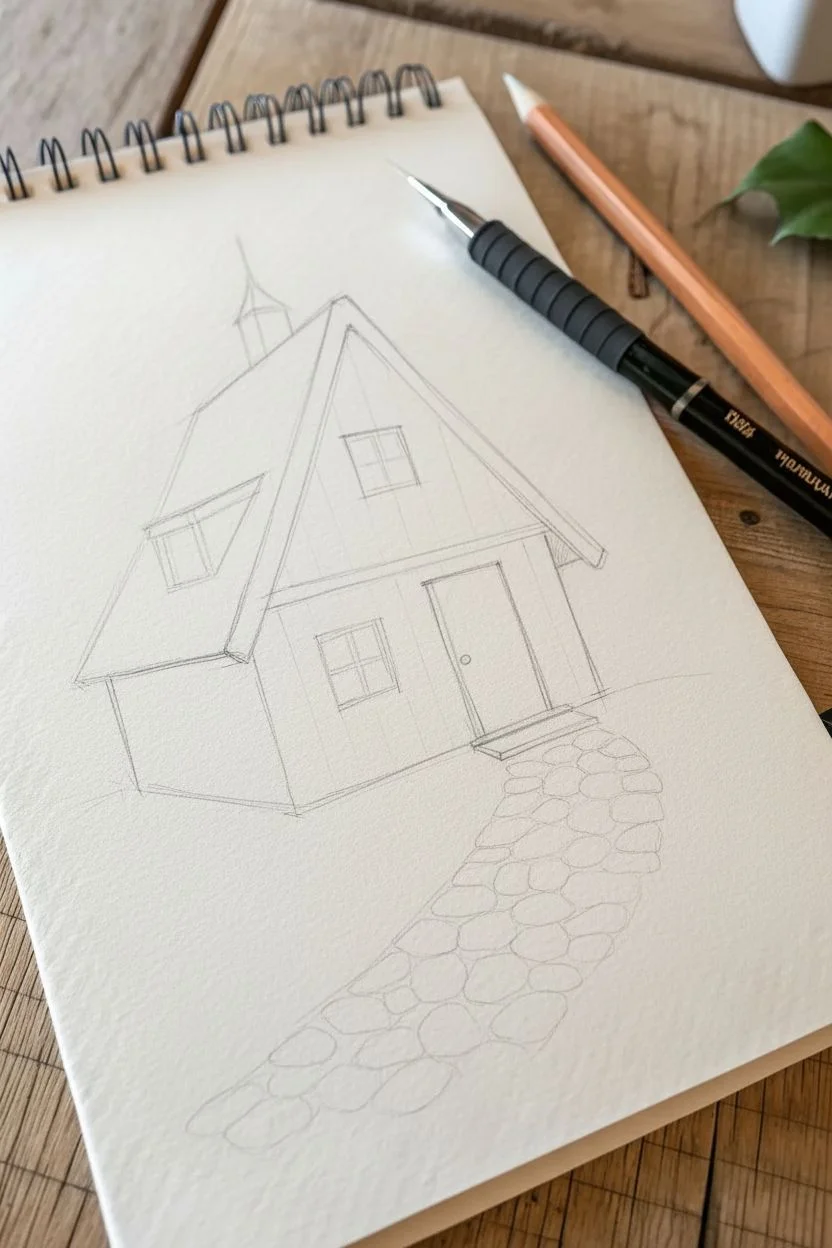
Capture the charm of a fairytale dwelling with this detailed pencil sketch of a rustic wooden cottage. Using classic hatching techniques and fine lines, you’ll create textured wood siding, a cozy stone path, and inviting architectural details.
Detailed Instructions
Materials
- Heavyweight sketchbook paper (smooth or vellum finish)
- Mechanical pencil (0.5mm HB or 2B lead)
- Standard graphite pencil (HB or B)
- Fine-point eraser or kneaded eraser
- Ruler (optional, for guidelines)
Step 1: Drafting the Perspective
-
Establish the main shape:
Start by lightly sketching a large vertical rectangle for the front facade and a slanted parallelogram for the visible side wall. This creates the basic 3D volume of the house. -
Add the roofline:
Draw a steep, A-frame triangle on top of your front rectangle. Extend the lines downward slightly past the walls to create the eaves. Mirror this slope for the back edge of the roof. -
Block in key features:
Lightly mark the placement of the front door with an arched top. Sketch squares for the upper attic window and the main lower window. Include a smaller dormer window jutting out from the left side of the roof. -
Draw the pathway:
From the front door, sketch sweeping curved lines widening toward the bottom of the page to define the winding stone path.
Step 2: Refining the Architecture
-
Detail the roof texture:
Instead of straight lines, use jagged, overlapping shapes to create the look of rough-hewn contrasting shingles or thatch. Add a small, pointed chimney at the very peak. -
Define the wood siding:
Vertical lines are essential here. Draw vertical planks across the entire front of the house. For the side wall, I find it helps to add a few horizontal breaks to suggest overlapping boards. -
Flesh out the windows and door:
Draw frames around your window squares, adding mullions (the cross bars) inside. Give the door vertical wood grain texture and a small circular window at the top. -
Add the porch:
Draw a simple rectangular step at the base of the door. Add a flower box under the main front window with loose, scribbly shapes for plants.
Fixing Wobbly Lines
If your straight architectural lines get too shaky, don’t erase! Go over them with a slightly heavier, deliberate stroke to mimic rough-hewn timber beams.
Step 3: Shading and Texturing
-
Shade the roof:
Using your mechanical pencil, add dense diagonal hatching to the shadowed side (the left side) of the roof. Leave the edges of the shingles slightly lighter to create depth. -
Texture the wood planks:
Go over your vertical siding lines with darker strokes. Add small knots, varying the line weight to make the wood look aged and rustic. -
Deepen the shadows:
Focus on the areas under the eaves and the dormer window. Press harder here to create strong contrast, which makes the roof look like it’s overhanging the walls. -
Render the path:
Draw individual irregular ovals for the stones in the path. Shade the spaces *between* the stones darkly to make the rocks pop out.
Add a Magical Glow
Make the cottage feel inhabited by lightly shading the window glass but leaving a bright white square in the center to represent a reflection or inner light.
Step 4: Landscape and Final Details
-
Sketch the foreground grass:
Use short, upward flicking strokes to create tufts of grass along the edges of the path and the base of the house. -
Add foreground rocks:
Draw large, rounded boulders near the corners of the house. Shade their undersides heavily to ground them in the scene. -
Draw the tree:
On the left side, sketch a thin, twisting tree trunk. Use loose, clustered scribbles for the leaves to keep the foliage looking airy and light. -
Balance the drawing:
Add a small bush on the right side to balance the composition. Use stippling (small dots) or tiny loops for a different texture than the tree. -
Final contrast check:
Step back and look at your drawing. Darken the darkest shadows—inside the windows, under the flower box, and beneath the roof—to give the piece a finished, professional look.
With these steps complete, you have a charming little retreat ready for any sketchbook


Modern Geometric House With Big Windows
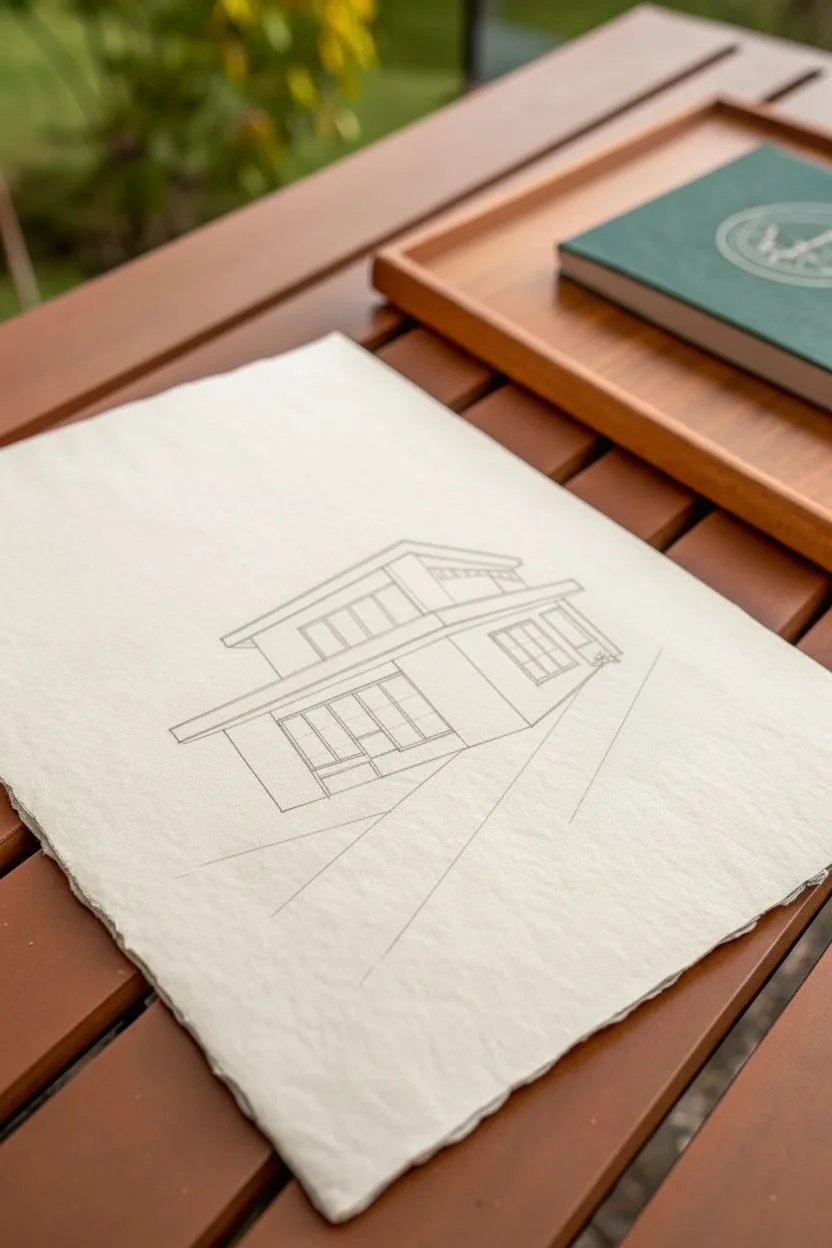
Capture the clean elegance of mid-century modern architecture with this precise ink drawing project. By combining rigorous geometric lines with the organic, soft feel of handmade deckle-edge paper, you’ll create a sophisticated piece of art that feels both architectural and inviting.
How-To Guide
Materials
- Heavyweight handmade paper with deckle edge (cotton rag preferred)
- Fine liner pens (sizes 0.1, 0.3, and 0.5)
- HB graphite pencil
- High-quality eraser
- Clear plastic ruler (12-inch or longer)
- Drafting triangle (optional but helpful)
- Blending stump or tortillon (optional)
Step 1: Drafting the Structure
-
Establish the horizon line:
Begin by lightly sketching a horizontal line across the lower third of your paper using your H pencil and ruler. This grounds the house and determines the perspective angle. -
Block in the main volumes:
Draw two distinct rectangular box shapes. Start with the lower ground floor as a wider rectangle, then stack a slightly narrower rectangle on top for the second story, offsetting it slightly to the left to create overhang interest. -
Define the rooflines:
Add the distinctive flat modern roofs. Draw thin, long rectangles atop each volume, extending them past the walls to create deep eaves which are characteristic of this architectural style. -
Map out the windows:
Using your ruler, lightly grid out large rectangular sections on the front facades. Modern houses rely on large glass panes, so keep these shapes expansive, leaving thin spaces for frames. -
Sketch the driveway perspective:
Draw two diagonal lines originating from the bottom corners of the house and flaring outward toward the bottom edge of the paper to suggest a paved driveway.
Step 2: Inking the Architecture
-
Outline the main structure:
Switch to your 0.5 pen. Carefully trace over your pencil lines for the main roof and wall outlines. Use your ruler to ensure these lines stay perfectly crisp and straight. -
Detail the window frames:
Use the 0.3 pen for the window frames. Draw inside your pencil guides to create the thickness of the frame, double-lining them to give them structural weight. -
Add brick texture:
This is a meditative step. With the 0.1 pen, draw horizontal rows of small bricks on the solid wall sections. Use faint, broken lines rather than a rigid grid to keep the texture looking natural and weathered. -
Create depth in the eaves:
Darken the underside of the roof overhangs. You can use closely spaced hatching lines with your 0.3 pen to simulate shadow, emphasizing the cantilevered design. -
Draw the walkway lines:
Ink the driveway lines with a single, confident stroke using the ruler and 0.3 pen. Add a second parallel line to the left side to suggest a curb or garden bed edge.
Paper Texture Tip
When drawing on textured rag paper, pull the pen slowly. Fast strokes can skip over the ‘valleys’ of the paper grain, leading to broken lines.
Step 3: Adding Landscape Elements
-
Sketch the trees:
Moving away from the ruler, use a loose hand to sketch tall trees flanking the house. Focus on the trunk structure and main branches rather than individual leaves. -
Ink the foliage:
With the 0.1 pen, trace the tree branches using shaky, organic lines to contrast with the rigid house. Add small scribble clusters at the ends of branches to suggest leaves without drawing them individually. -
Draw the bushes:
Add low-lying shrubbery along the foundation line using loop-like, scribbled textures to ground the building to the site. -
Add the clouds:
In the sky area, draw a continuous, wandering line to create stylized, billowy cloud shapes. Keep this line very thin and light (0.1 pen) so it doesn’t distract from the architecture. -
Include floor plan details:
For an architect’s sketch aesthetic, add a small, stylized compass rose or some loose ‘floor plan’ scribbles and arrows in the bottom right corner. -
Erase pencil marks:
Wait at least 15 minutes for the ink to fully cure. Gently erase all underlying graphite sketches, being careful not to snag the rough texture of the paper.
Add a Wash
Dilute a tiny drop of grey watercolor or ink and paint very light shadows under the roof eaves to make the building pop off the page.
Frame this drawing in a floating glass frame to show off those beautiful deckle edges
BRUSH GUIDE
The Right Brush for Every Stroke
From clean lines to bold texture — master brush choice, stroke control, and essential techniques.
Explore the Full Guide
Suburban Home With Porch and Garage

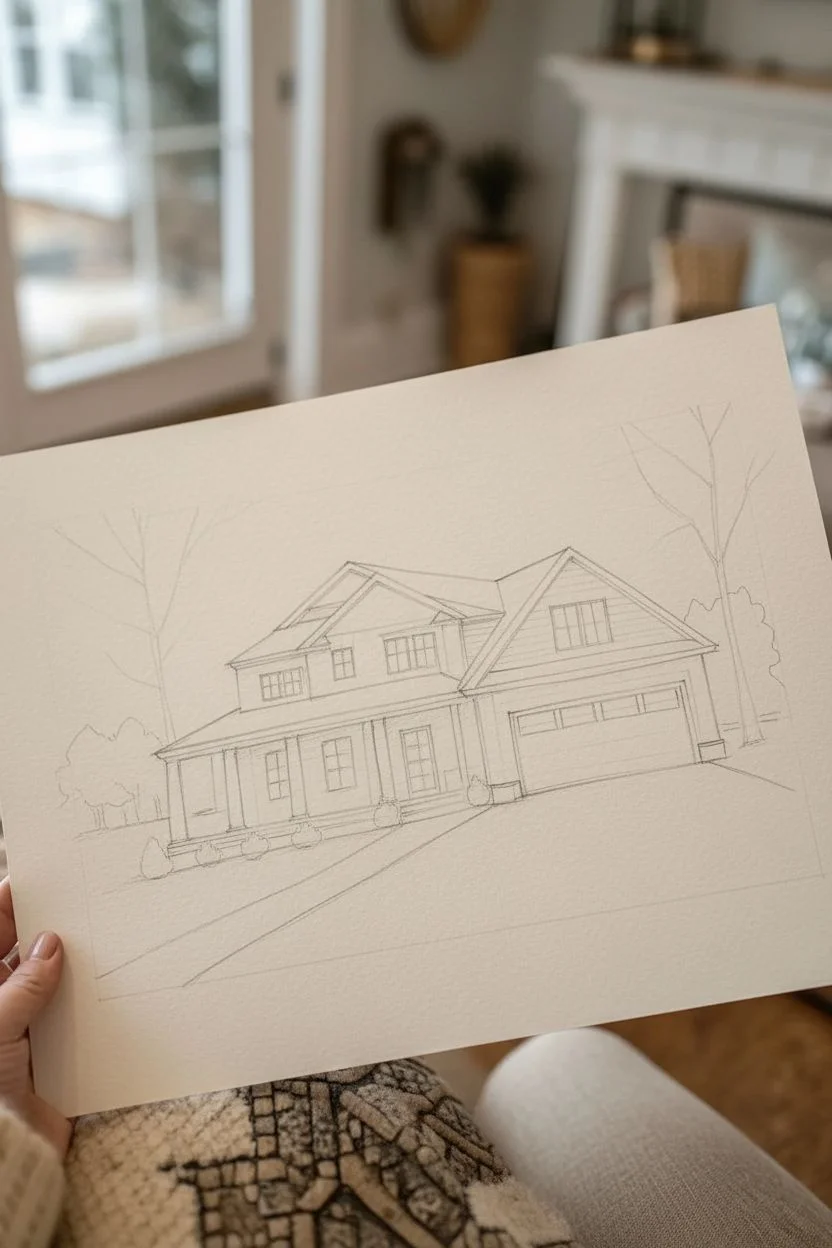
This project combines the clean precision of technical ink drawing with the soft, organic textures of watercolor to create a stunning architectural portrait. The resulting artwork captures the cozy charm of a suburban home, featuring a prominent garage, inviting porch, and autumnal landscaping.
Step-by-Step Tutorial
Materials
- Hot press watercolor paper (minimum 140lb)
- Fine liner pens (sizes 005, 01, and 03, waterproof pigment ink)
- Watercolor paints (Payne’s Gray, Burnt Umber, Yellow Ochre, Sap Green, Neutral Tint)
- Graphite pencil (HB or 2H)
- Kneaded eraser
- Ruler or T-square
- Round watercolor brushes (sizes 2, 6, and 8)
- White gel pen (optional)
- Masking tape
Step 1: Drafting the Structure
-
Establish the horizon line:
Begin by lightly tracing a horizontal line across the lower third of your paper. This anchors the house and determines your perspective. -
Block in the main volumes:
Using your ruler and HB pencil, sketch a large rectangle for the main body of the house and a protruding section for the garage on the right. Keep your pressure extremely light so lines can be erased later. -
Add the rooflines:
Draw the main gable roof over the house body and the secondary gable over the garage. Ensure the angles match; typical suburban roof pitches are often around 30 to 45 degrees. -
Detail the facade:
Mark out the vertical columns for the porch. Sketch the grid for the windows on the second floor and the large garage door panels. Use your ruler to keep vertical lines perfectly straight. -
Position the landscape:
Freely sketch the outline of the driveway sweeping toward the viewer. Lightly indicate the placement of the large tree on the right and the smaller shrubbery near the foundation.
Ink Smearing?
Patience is key! If your ink smears when you erase or paint, wait longer. Waterproof pigment liners need 15-20 mins to cure fully before wetting.
Step 2: Inking the Lines
-
Outline the main structure:
Switch to a 03 fine liner pen. Trace the main outlines of the roof, walls, and garage door. Be confident with your strokes—a slight wobble adds character, but try to maintain clean corners. -
Refine architectural details:
Use a finer 01 pen for the window frames, siding lines, and porch columns. For the siding, don’t draw every single horizontal line all the way across; broken lines suggest texture without overcrowding the drawing. -
Texture the roof:
With a 005 pen, draw tight horizontal lines or small ‘u’ shapes to suggest shingles. Focus this texture near the edges and peak of the roof, leaving the center slightly open to suggest light reflection. -
Ink the foliage:
Use the 01 pen to draw the tree trunk and branches with jagged, organic lines. Stipple (dot) small clusters of leaves rather than drawing outlines for the bushes to create a loose, leafy look. -
Clean up the sketch:
Once the ink is completely dry (give it at least 15 minutes), gently erase all underlying pencil marks with a kneaded eraser to leave a crisp black-and-white framework.
Step 3: Watercolor Application
-
Wash the driveway:
Mix a very watery grey using Neutral Tint and plenty of water. Apply a flat wash to the driveway area. While wet, drop a tiny bit of darker pigment near the garage door for a shadow gradient. -
Paint the roof:
Blend Payne’s Gray with a touch of blue. Paint the roof sections, leaving the detailed shingles darker and lifting out pigment from the center sections with a thirsty brush to create a highlight. -
Warm the siding:
Dilute Yellow Ochre until it is very faint creamy-beige. Apply a wash over the siding areas. It should serve as a subtle warmth rather than a strong color. -
Shadow the porch:
Mix a cool grey shadow color. Paint the interior shaded areas of the porch, behind the columns, to push that wall backward and create depth. -
Paint the foliage:
Use Sap Green mixed with Burnt Umber for a muted, realistic green. Paint the bushes loosely. For the trees, use a very dry brush to scumble textured faint yellow/brown foliage, suggesting autumn/winter leaves. -
Ground the house:
Add a wash of green and yellow ochre for the lawn. Let the paint bleed slightly into the driveway edges for a soft transition.
Level Up: Seasonal Vibes
Change the season by altering the foliage colors. Use bright pink transitions for spring blossoms or leave branches bare for winter.
Step 4: Final Touches
-
Deepen contrast:
Once dry, look for areas that need depth. I like to add a second layer of dark grey to the windows to make them look reflective. -
Add signature shadows:
Paint a sharp, dark cast shadow under the eaves of the roof and under the car garage overhang. This makes the drawing pop. -
Highlights:
Use a white gel pen to add tiny reflections to the window panes or to clean up any lines on the siding that got too dark. -
Sign and matte:
Add your signature in the corner with a fine pen. Consider mounting the piece on a mat board to frame your architectural portrait professionally.
Now you have a timeless architectural illustration ready to frame or gift to a homeowner
Townhouse Row for Repeating Shapes Practice
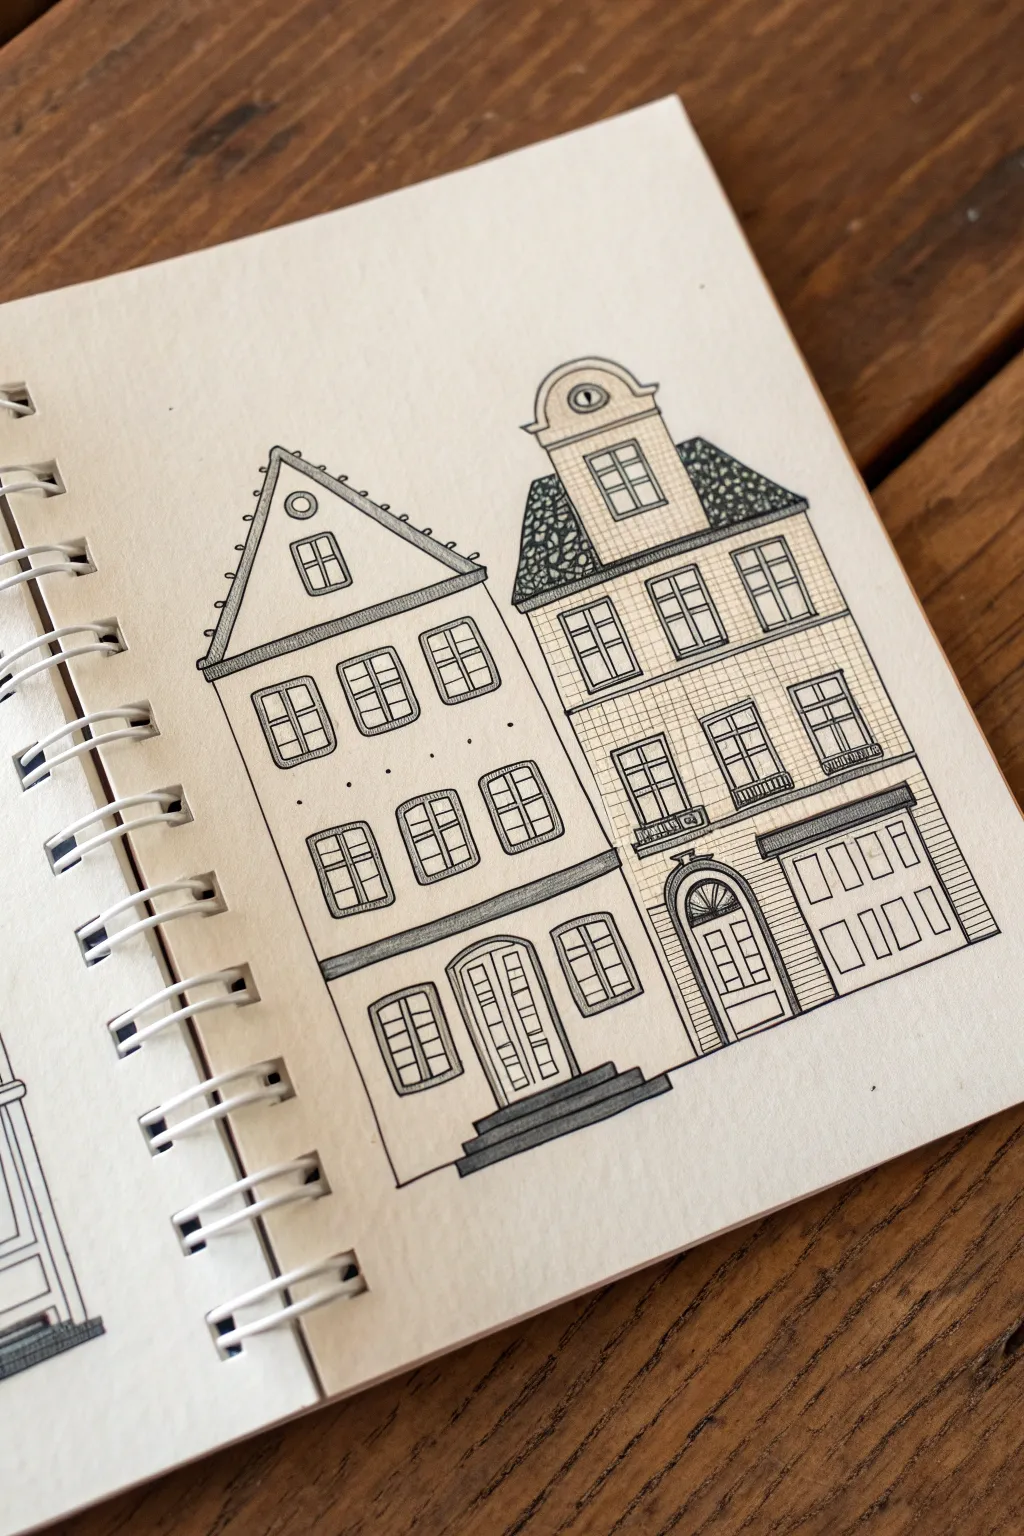
Capturing the charm of European architecture, this pen-and-ink study focuses on two distinct townhouses side-by-side. The project emphasizes clean linework, repeating window patterns, and subtle textures to distinguish building materials.
Step-by-Step
Materials
- Spiral-bound sketchbook (medium weight paper)
- Pencil (HB or H for light sketching)
- Eraser (kneaded preferred)
- Fine liner pen (01 or 03 size, black)
- Ruler (clear grid ruler works best)
Step 1: Planning the Structure
-
Define the baselines:
Start with a ruler and your pencil to draw a straight horizontal line near the bottom of the page for the ground level. -
Block in the facades:
Draw two tall, vertical rectangles side-by-side. Make sure they share a central vertical wall line but keep them distinct. The left house should be slightly wider than the right. -
Outline the roofs:
On the left rectangle, add a classic triangular roof shape. For the right rectangle, sketch a trapezoid shape topped with a small curved ornamental header. -
Mark floor levels:
Lightly rule horizontal lines across both buildings to establish where the floors divide. This ensures your windows will line up neatly.
Straight Line Secret
Don’t press hard against the ruler with your ink pen. Angle the tip slightly away from the ruler’s edge to prevent the ink from bleeding underneath and smudging.
Step 2: Inking the First House (Left)
-
Roof details:
Switch to your fine liner. Ink the triangle roof, doubling the outline on the left slope. Add small semi-circles along the outer edge to simulate decorative roof tiles. -
Small attic window:
Draw a small square window near the peak of the triangle. Add a cross for the pane and a small circle ornament above it. -
Main facade windows:
Ink the six main windows (two rows of three). Use a double line for the frames and divide each into four small panes. Keep your hand steady to maintain the rectangular shapes. -
Ground floor door and windows:
Draw the central double door with tall vertical glass panes. Flank it with two smaller, lower windows. -
Adding the stairs:
At the base of the door, draw three wide, shallow steps leading down. Use simple horizontal rectangles stacked on top of each other.
Step 3: Inking the Second House (Right)
-
The ornate roof:
Ink the curved header at the very top, adding a circular ‘eye’ window inside. Below this, draw the trapezoid roof section and fill the sides with a dense, leafy scribble texture to represent slate tiling. -
Grid pattern façade:
Before drawing windows, use your ruler to create a very faint grid of horizontal lines across the entire front of this house to simulate siding or brickwork. -
Window columns:
Draw three vertical columns of windows. The top two rows are standard square windows with four panes each. -
Balcony details:
On the middle row of windows, draw tiny rectangular planter boxes with vertical hatching at the base of each frame. -
Arched door entry:
Create an arched doorway on the ground left. Draw a semi-circle fanlight above a rectangular door. -
Garage or shop front:
To the right of the door, draw a wide rectangular opening. Fill it with four tall, vertical panels to resemble a garage door or shop window.
Level Up: Night Mode
Try filling in some of the window panes with solid black ink. This makes the house look lived-in and creates high contrast against the white walls.
Step 4: Finishing Touches
-
Darkening accents:
Use your pen to color in the steps of the left house completely black or dark grey with dense hatching. Do the same for the horizontal dividers between floors on both houses. -
Erase pencil lines:
Once the ink is completely dry—give it a full minute—gently erase all your visible pencil guides. -
Final texture check:
Scan the drawing for empty spots. I like to add a few tiny dots on the façade of the left house to give it a stucco texture.
Your charming architectural streetscape is now ready to serve as the start of a whole illustrated village

PENCIL GUIDE
Understanding Pencil Grades from H to B
From first sketch to finished drawing — learn pencil grades, line control, and shading techniques.
Explore the Full Guide
House on a Hill With a Curving Path
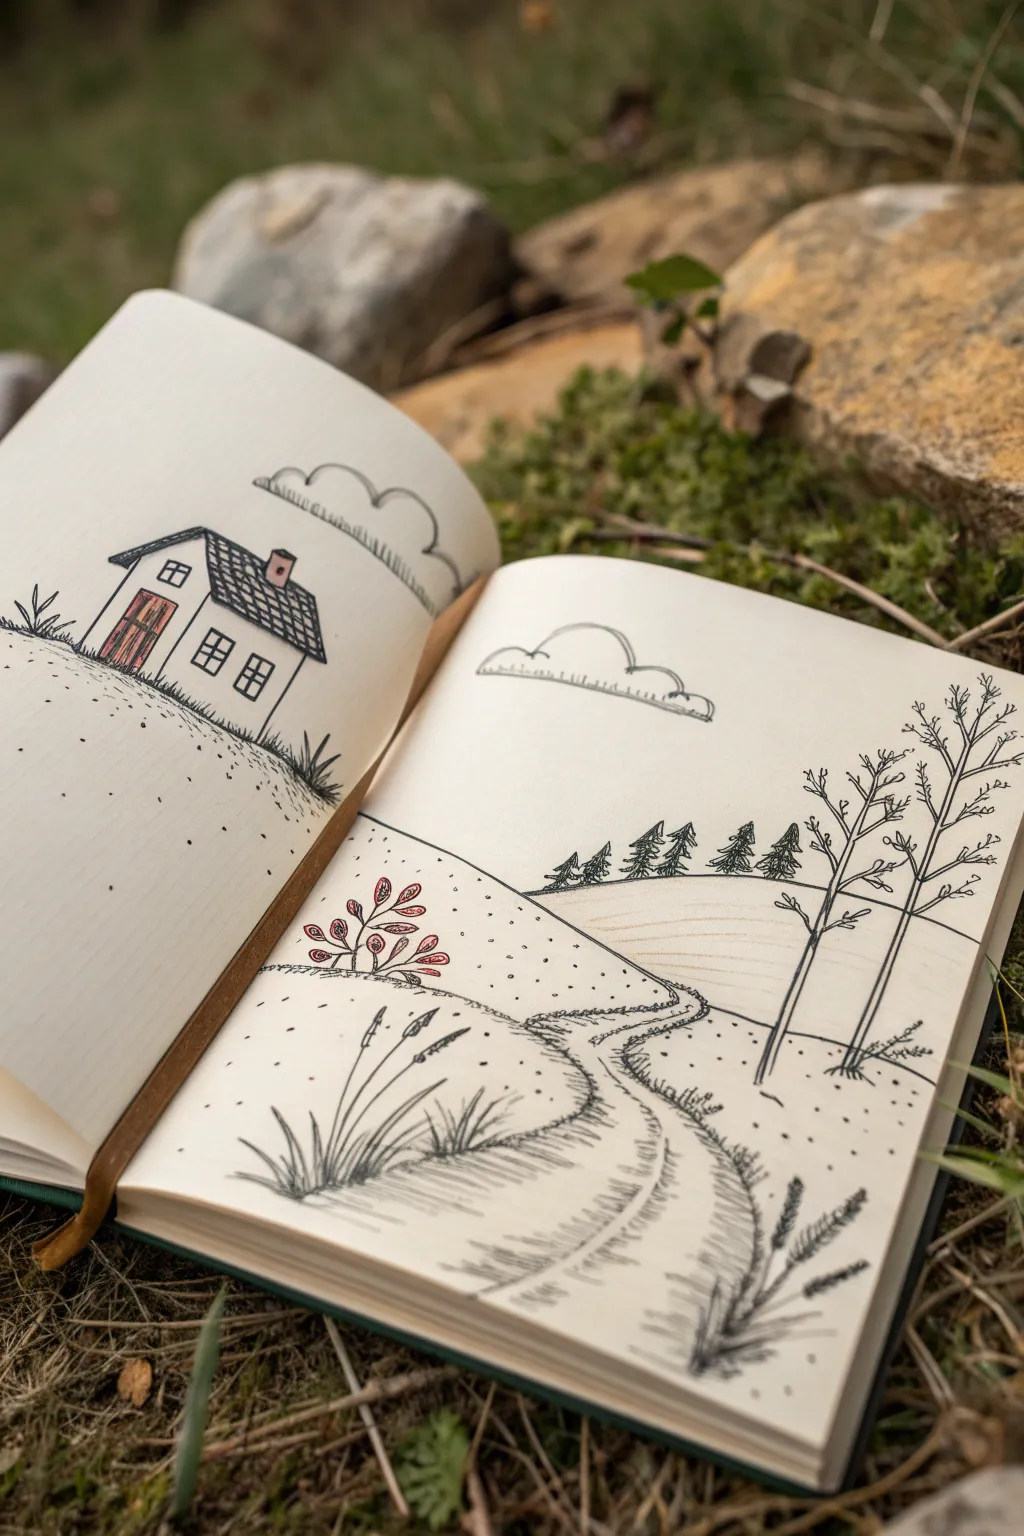
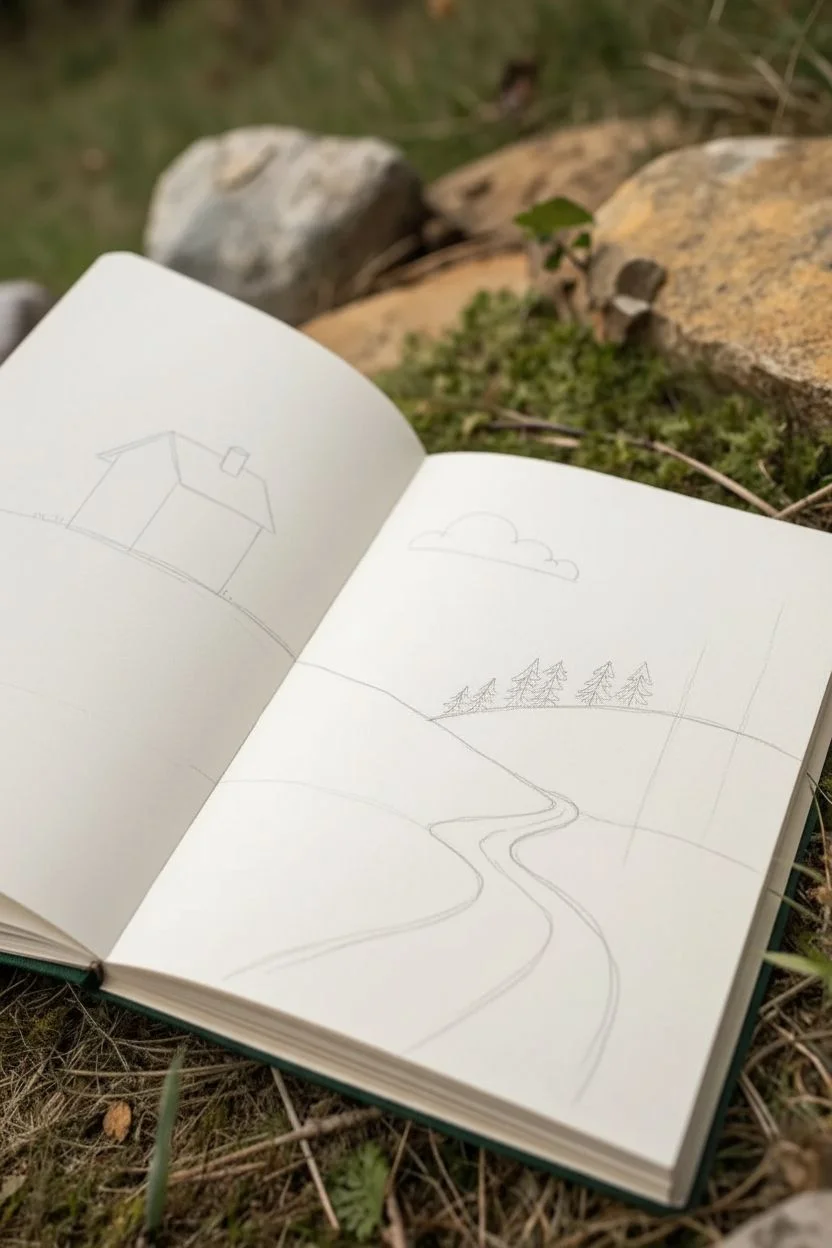
This charming double-page sketchbook spread captures a serene landscape with a cozy cottage on the left and a winding path inviting you into the scene on the right. Using simple ink lines and minimal color accents, it creates a whimsical, storybook atmosphere perfect for beginners.
Step-by-Step
Materials
- Sketchbook (cream or off-white paper preferred)
- Fine liner pen (black, 0.3mm or 0.5mm)
- Pencil (HB for preliminary sketching)
- Eraser
- Colored pencils or fine markers (brick red, light brown)
Step 1: Setting the Scene
-
Establish the horizon:
Open your sketchbook to a fresh double-page spread. lightly sketch a horizon line that starts low on the left page and rises gently, curving down onto the right page to create a sense of rolling hills. -
Draft the house placement:
On the upper left page, use your pencil to sketch a simple rectangular box for the house structure. Add a triangle on top for the roof and a smaller rectangle for a chimney. -
Sketch the path:
Drawing lightly, map out a winding road on the right page. Start it wide near the bottom center of the page and narrow it signficantly as it curves upward toward the middle fold, connecting visually to the hill on the left. -
Outline the foreground hill:
Define the slope of the hill in the foreground of the right page, creating a triangular section where you will later adding some detailed plant life.
Step 2: Inking the Structure
-
Ink the house outline:
Switch to your fine liner pen. Trace over your pencil lines for the house, giving the roof a slight overhang. Draw a grid pattern on the roof to represent shingles. -
Add windows and door:
Draw a double door on the front façade. Add two square windows on the side wall, dividing them into four panes each with a simple cross. -
Ink the clouds:
Draw stylistic, bumpy clouds. Place one above the house and another floating on the right page. Use a scalloped line for the top and a hatched, straight line for the bottom to give them a flat base. -
Draw the winding path:
Go over the path lines with your pen. Don’t make the lines perfectly continuous; use short, sketchy strokes to suggest a dirt track rather than a paved road. -
Detail the path texture:
Add small horizontal dashes across the path, concentrating them more on the curves to show the direction of travel and texture.
Ink Smudging?
If your eraser smears the ink, your pen might not be instant-dry. Wait at least 5 to 10 minutes before erasing pencil lines, or switch to a pigment liner which dries faster.
Step 3: Adding Nature Elements
-
Plant the distant trees:
On the horizon line of the right page, draw a row of tiny pine trees. Use simple zigzag scribbles to create their shape, making them small to suggest distance. -
Draw foreground trees:
On the far right edge, draw two taller, bare trees. I find that keeping the branches wiggly and Y-shaped looks most natural. Ensure the trunks are thin and delicate. -
Add grassy textures:
Throughout the empty spaces of the hills, especially near the house and path, add clusters of short vertical dashes to represent grass. -
Create the roadside details:
Along the bottom left of the right page, draw taller grasses and stylized cattails or wheat stalks leaning slightly over the path. -
Sketch the red flowers:
In the crook of the hill on the right page (near the spine), draw a small bush with oval-shaped leaves. -
Add stippling:
Dot your pen gently across the hillsides. This stippling effect adds texture to the ground without overwhelming the white space.
Make it Seasonal
Turn this into a winter scene by leaving the roof white but adding blue shadows, or make it autumn by coloring the bare trees on the right with orange and yellow dots.
Step 4: Finishing Touches
-
Erase pencil guides:
Once the ink is completely dry, gently erase all visible pencil marks to clean up the drawing. -
Color the house:
Use a brick-red colored pencil or marker to fill in the door and the chimney. Leave the rest of the house white for high contrast. -
Color the flowers:
Use the same red shade to carefully color the oval leaves of the bush you drew near the book’s spine. -
Shade the path:
Take a light brown pencil and very gently shade the inside of the path. Keep the pressure light to maintain the sketchy aesthetic.
Close your sketchbook knowing you’ve captured a peaceful moment in time
House With a Big Window Study Sheet
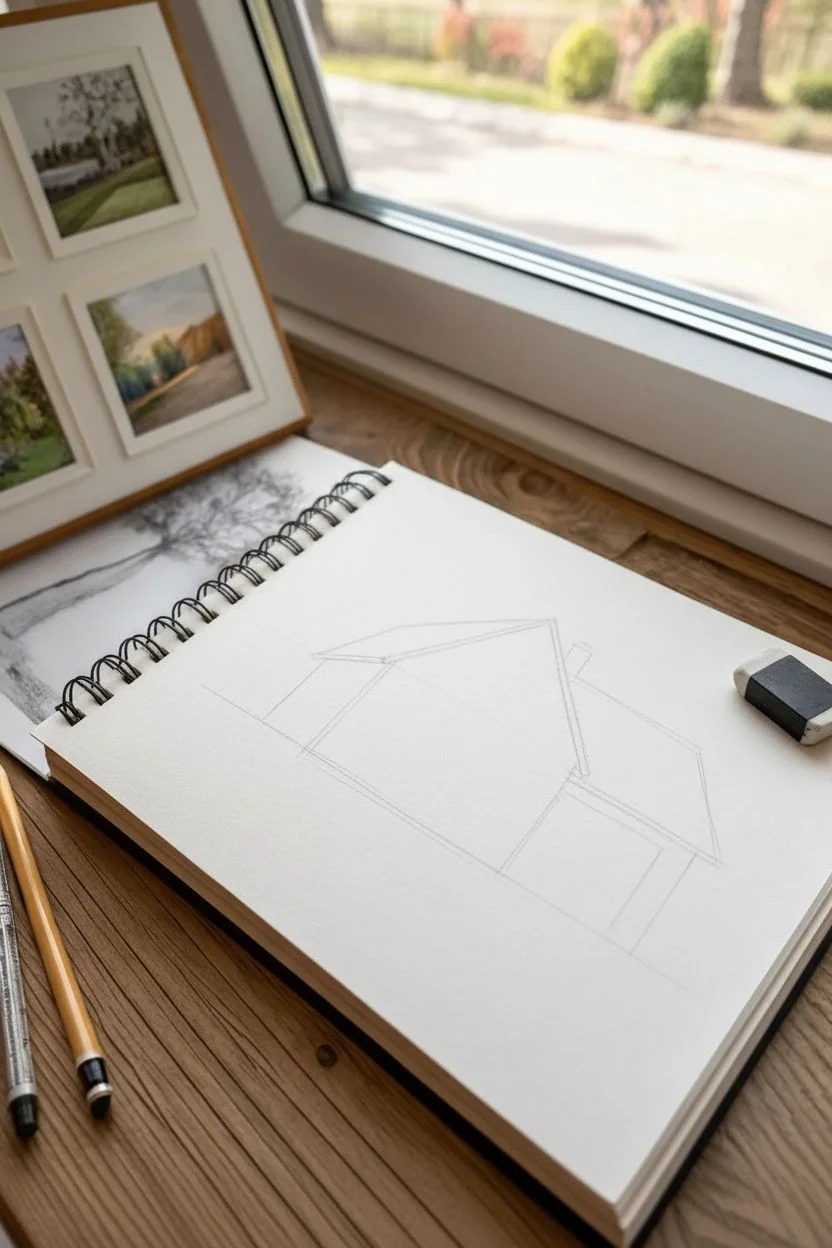
Capture the charm of suburban architecture with this detailed pencil study of a classic two-story home. This project focuses on straight lines, clean perspective, and subtle shading to bring a flat house drawing to life with depth and realism.
Detailed Instructions
Materials
- Sketchbook with heavy-weight paper (smooth or vellum finish)
- Set of graphite pencils (HB, 2B, 4B)
- Mechanical pencil (0.5mm, HB lead) for fine details
- Ruler or straight edge
- Kneaded eraser
- Precision eraser (stick or fine tip)
- Blending stump (tortillon)
Step 1: Laying the Foundation
-
Establish the Horizon Line:
Begin by lightly drawing a horizontal line across the lower third of your page using your HB pencil. This will serve as your ground level and anchor for the perspective. -
Block in the Main Shape:
Sketch a large rectangle for the main body of the house. Don’t worry about the roof yet; just establish the width and height of the front and side walls. -
Add the Roof Peaks:
Above your main rectangle, draw a large triangle for the primary roof gable facing the viewer. To the right, add a second, smaller triangle shape that will become the garage section. -
Connect the Rooflines:
Connect the peaks of your triangles back towards a vanishing point (or parallel if drawing an isometric style) to create the three-dimensional form of the roof. Keep these initial lines very light so they can be erased later.
Straight Edge Secret
Don’t press hard against your ruler. Instead, tilt your pencil away slightly so the graphite doesn’t smudge under the ruler’s edge when you lift it.
Step 2: Defining the Structure
-
Outline the Windows:
Switch to your ruler and mechanical pencil. Draw rectangular guides for the windows: two on the upper floor and two on the ground floor. Ensure the top and bottom lines of the windows align with the perspective of the house. -
Detail the Window Panes:
Divide each window rectangle into four panes using a cross shape. Add a double line around the perimeter of each window to create the frame thickness. -
Construct the Entrance:
On the left side of the house, sketch the front door area. Draw a recessed rectangle to show depth, indicating that the door is set back into the wall. -
Draft the Garage Door:
On the right-hand extension, draw a large square for the garage door. Divide this into a grid of 16 smaller squares (4×4) to create the paneling effect. -
Add the Steps:
At the base of the front door, draw two narrow, horizontal rectangles stacked on top of each other to represent the concrete steps leading up to the house.
Step 3: Adding Texture and Shading
-
Shade the Roof:
Using a 2B pencil, draw tightly spaced, horizontal lines across the entire roof surface. This linear shading mimics the look of shingles or metal roofing. -
Darken the Eaves:
Go back under the roof overhangs with a 4B pencil. Press firmly to create a dark shadow directly under the eaves; this contrast separates the roof from the walls. -
Render the Window Glass:
Lightly shade the window panes with diagonal strokes using an HB pencil. Leave small white shapes unshaded in the upper corners of the panes to represent reflections. -
Define the Garage Panels:
Darken the grid lines of the garage door. Add tiny L-shaped shadows in the top-left corner of each panel to make them look indented. -
Create Ground Shadows:
Use the side of your 4B pencil to add soft, broad shadows on the ground extending from the base of the house and the bushes. I find blending this slightly with a stump helps ground the building.
Smudgy Paper?
If your hand keeps smearing your pencil lines, place a clean scrap sheet of paper under your drawing hand. It acts as a shield while you work.
Step 4: Landscaping and Final Touches
-
Sketch the Bushes:
Using a scribbling, circular motion with a 2B pencil, create small, rounded bush shapes at the front corners of the house. Varies your pressure to create texture. -
Add the Winter Trees:
On the far right and left edges, draw bare tree trunks. Extend thin, branching lines outward and upward to create leafless branches that frame the composition. -
Clean Up Edges:
Use your precision eraser to clean up any stray construction lines that extend past the corners of the house. -
Final Outline Boost:
Take your mechanical pencil one last time and go over the main structural lines of the house—corners, roof peaks, and window frames—to make the drawing pop off the page.
Now you have a crisp architectural study to start your collection of house portraits


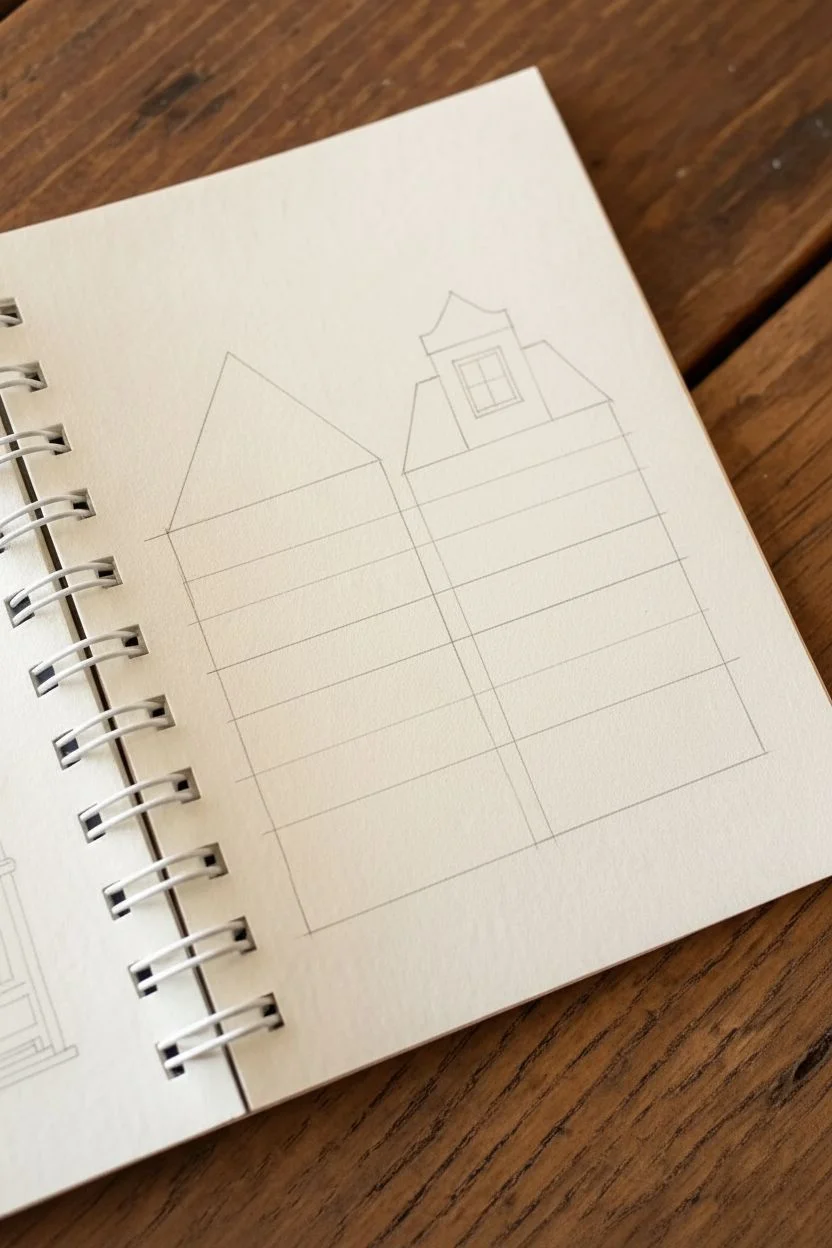
Roof Texture Sampler House
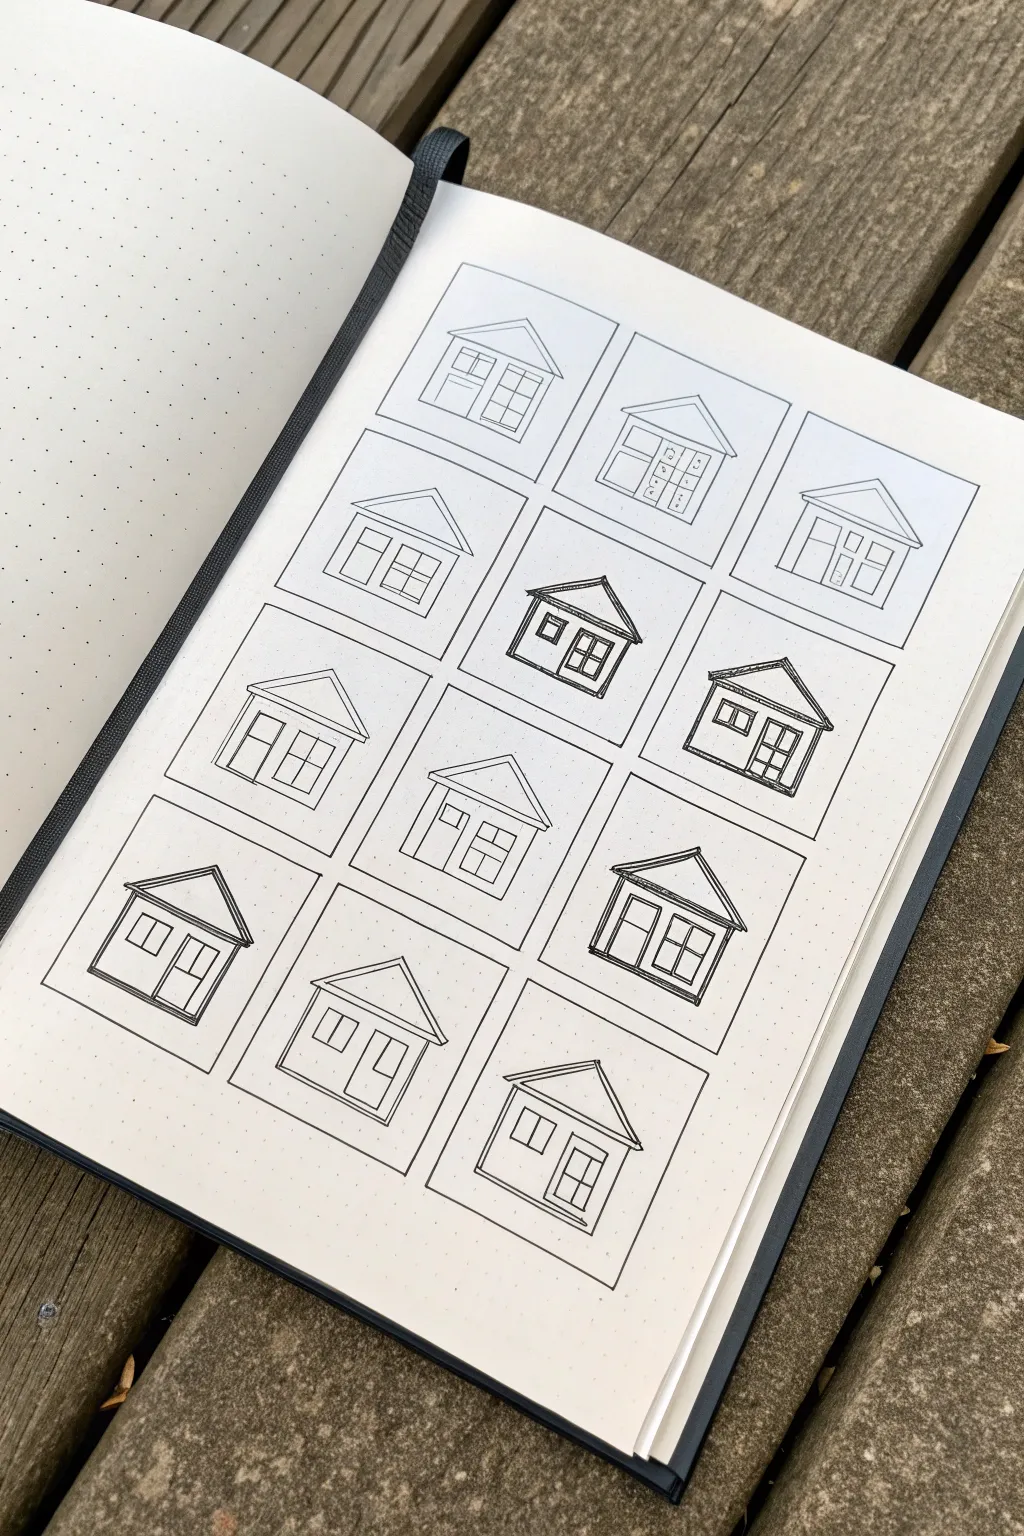
This bullet journal spread functions as both a practice sheet and a reference guide for your architectural doodles. By drawing a repeating grid of identical simple house shapes, you create the perfect canvas to experiment with twelve distinct roof and window styles without needing to redraw the layout every time.
Step-by-Step Guide
Materials
- A5 dotted bullet journal
- Ruler or straight edge
- Fine liner pen (01 or 03 size)
- Pencil (HB or lighter)
- Eraser
Step 1: Setting Up the Grid
-
Measure your page:
Begin by counting the total dot grid width and height of your page to determine the spacing. You will need to fit a 3×4 grid of squares. -
Mark the corners:
Using a pencil, mark the corners for twelve equal boxes. Leave a 1-2 dot margin between each box to keep the layout clean and organized. -
Draw the frames:
With your fineliner and ruler, ink the outlines of the twelve rectangular frames. These boxes will serve as the boundaries for each house drawing.
Step 2: Drafting the Basic House
-
Pencil the base shape First:
Inside the first top-left box, lightly sketch a simple house shape with your pencil. Start with a rectangle for the body and a triangle on top for the roof. -
Add basic features:
Sketch a large central window or door area within the house body. Keep this very simple for now, as the details will change per box. -
Repeat the process:
Replicate this exact same house outline in pencil across all remaining eleven boxes. I find it helpful to draw all the bottom rectangles first, then go back and add all the roof triangles to ensure consistency.
Uneven Grid?
If your math was slightly off and the boxes aren’t perfectly centered, add a thicker border or a decorative washi tape strip to the wider margin to balance the page visually.
Step 3: Inking the Variations
-
Define the first row:
Starting with the top row, use your fineliner to ink the pencil lines. For these top houses, keep the lines thin and crisp, focusing on standard window panes. -
Thicken the roof lines:
Move to the second row. Here, draw over your roof lines a second time or use a slightly thicker pen tip to give the roofs visual weight. This creates a ‘bold’ style. -
Vary the eave overhang:
On selected houses, extend the roof lines slightly past the walls to create deeper eaves. This adds a bit of dimension compared to the flush roofs. -
Experiment with windows:
In the middle row, change up the window designs. Try a four-pane window in one, a two-pane sliding style in another, and perhaps a large picture window in their neighbor. -
Create double outlines:
For the bottom row, try drawing a second line just inside the roof triangle. This mimics the look of trim or fascia boards. -
Add texture details:
If you wish to follow the ‘texture sampler’ theme, now is the time to add shingles, tiles, or vertical lines to specific roofs to differentiate them. -
Ink the structural lines:
Go over the vertical wall lines of the houses. You can make these slightly thinner than the roof lines to emphasize the shelter aspect of the drawing. -
Erase pencil guides:
Once the ink is completely dry—give it a full minute to avoid smudges—gently erase all the underlying pencil sketches.
Add Color
Use a single accent color (like a mild highlighter) to color just the front door or the roof of each house. It ties the whole spread together beautifully.
You now have a delightful reference chart ready for future doodle inspiration
Tiny House on Wheels
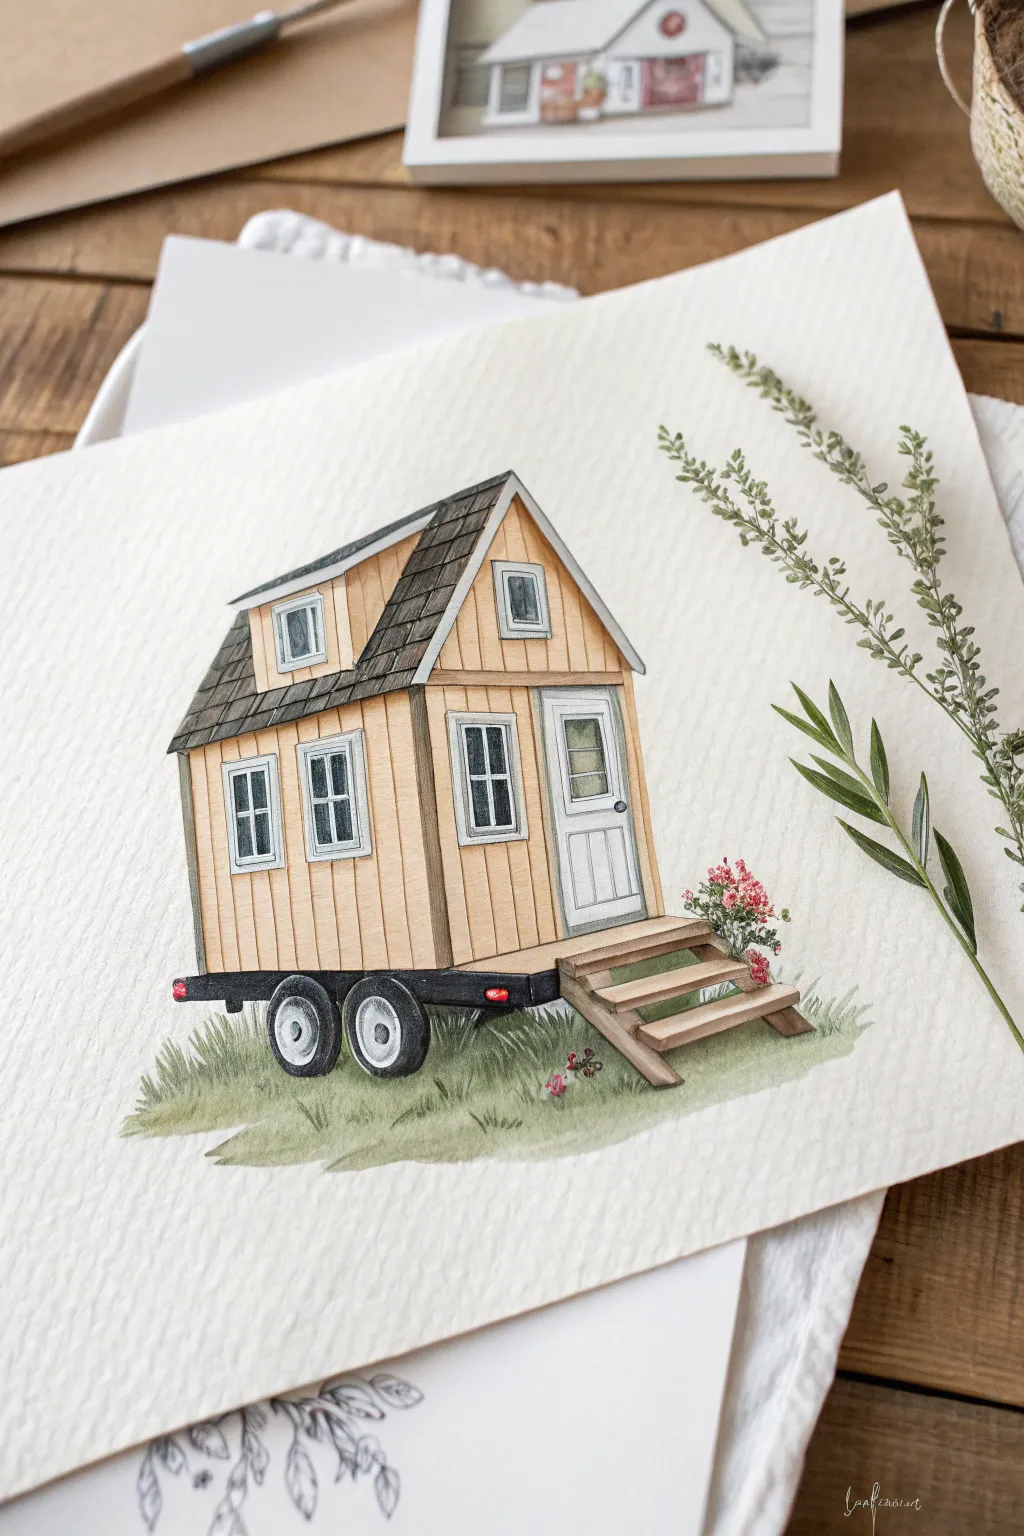
Capture the dream of mobile living with this charming illustration of a tiny house on wheels. Combining precise architectural lines with the soft warmth of watercolors/colored pencils, this project creates a cozy, inviting miniature world on paper.
Detailed Instructions
Materials
- Hot press watercolor paper (smooth texture)
- HB or 2H graphite pencil for sketching
- Fine liner pens (0.1mm, 0.3mm, 0.5mm, black and grey)
- Watercolor paints (Yellow Ochre, Burnt Sienna, Payne’s Grey, Sap Green)
- Colored pencils for texture (optional)
- Ruler
- Small round brushes (Size 0 and 2)
- White gel pen
Step 1: Planning and Sketching
-
Establish the horizon and base:
Start by lightly drawing the trailer chassis. Draw a long horizontal rectangle for the base and two circles for the wheels toward the left side. Don’t worry about perfect circles yet; just place them correctly. -
Draft the walls:
Draw the main vertical box of the house sitting on top of the trailer bed. Add a slight angled perspective so you can see both the long side and the front door side. -
Add the rooflines:
Sketch the main roof with a steep pitch. Add the distinct dormer window box popping out of the main roof slope on the long side. Use your ruler here to keep the angles consisting with your perspective. -
Detail the features:
Lightly pencil in the rectangular windows—two on the lower level, one in the dormer, one in the gable end. Add the door frame and the small wooden stairs leading up to it.
Keep it clean
When painting the vertical wood siding, leave microscopic gaps of white paper between some planks. This ‘negative space’ keeps the lines crisp and prevents colors from bleeding together.
Step 2: Inking the Lines
-
Outline the structure:
Using a 0.3mm fineliner, go over your main structural lines. Keep your hand steady but allow for slight imperfections to give it that organic, hand-drawn feel. -
Add wood siding texture:
Switch to a finer 0.1mm pen. Draw vertical lines down the siding of the house to mimic wooden planks. Break the lines occasionally so they don’t look like a barcode. -
Detail the roof shingles:
Draw horizontal rows across the roof, then add small vertical tick marks to suggest individual shingles. I find that offsetting these ticks creates a more realistic pattern. -
Finish ink details:
Ink the wheels, the window panes, and the staircase steps. Once the ink is completely dry, gently erase all your graphite guidelines.
Uneven perspective?
If your house looks lopsided, check your vertical lines. In 2-point perspective, all vertical lines (corners, door frames, windows) should be perfectly parallel to the sides of your paper.
Step 3: Adding Color
-
Paint the siding:
Mix a diluted wash of Yellow Ochre with a tiny touch of Burnt Sienna. Paint the siding panels, leaving the window trims white. Let the watercolor pool slightly at the bottom of the planks for natural shading. -
Color the roof:
Use a mix of Payne’s Grey and Burnt Umber for the roof. Apply it carefully, perhaps lifting a little color from the center of the shingles with a thirsty brush to show light reflection. -
Ground the structure:
Paint the trailer frame and wheels with a dark grey or black. While that dries, paint the wooden stairs with a darker brown than the siding to distinguish the different woods. -
Add the greenery:
Using a Sap Green mix, paint loose, upward-flicking strokes beneath the wheels to create grass. Don’t overwork this; let the white of the paper show through for texture.
Step 4: Final Touches
-
Deepen the shadows:
Once the first layers are dry, use a slightly darker mix of your siding color to paint thin shadow lines under the roof eaves and the dormer to add depth. -
Bloom the flowers:
Dab tiny dots of pink or red near the stairs to create the small flower bush. Add tiny green leaves around these dots. -
Highlight with white:
Take your white gel pen and add small glints to the window darker panes and the center of the wheels to make them look shiny. -
Final inspection:
Check for any areas that need more definition. You can use colored pencils now to enhance the wood grain texture over the dried watercolor if you want a grittier look.
Enjoy your charming little architectural study as it adds a touch of wanderlust to your sketchbook
Doodle House Icons Page
Fill a grid-style notebook page with this charming collection of miniature house portraits. Using simple geometric shapes and fine lines, you’ll create a varied neighborhood of tiny, whimsical dwellings that serve as perfect practice for architectural sketching.
How-To Guide
Materials
- Grid paper notebook or bullet journal
- Fine-liner pen (0.3mm or 0.5mm black ink)
- Pencil (optional for sketching)
- Eraser
Step 1: Setting the Foundations
-
Establish the spacing:
Visualize a grid of 4 columns and roughly 5 rows on your page. You don’t need to draw boundary lines, but use the paper’s graph lines to keep your little houses aligned vertically and horizontally. -
Draw the first roof:
Starting in the top left, sketch a simple triangular roof. Let the point of the triangle encompass about 2-3 grid squares in width. -
Add the structure:
Draw the boxy body of the house below the roof. For the first house, create an arched doorway and a small circular window. A tiny chimney on the left slope adds character. -
Create variation:
Move to the right for the second house. Make this one narrower with a steeper roof. Add grid lines inside the top triangle to mimic attic windows.
Wobbly Lines?
Don’t correct them! In doodle architecture, imperfect lines add charm. If a roof line is crooked, just thicken it slightly to make it look intentional.
Step 2: Building the Village
-
Drawing Tudor style:
For the third house in the top row, sketch a tall, narrow structure. Use crisscross hatching on the façade to imitate timber framing, typical of Tudor architecture. -
Simple A-frame:
Finish the first row with a tall A-frame cabin. Draw horizontal lines across the roof to represent shingles or siding, keeping the door simple and rounded. -
Row two: Texture focus:
Start the second row. For the house on the far right, draw a standard box house but fill the door or a large window area with a dense grid pattern to suggest a screen or window panes. -
Roof tiling:
Create a house in the middle of the page with a trapezoidal roof. Fill this roof area with small, repeating ‘U’ shapes or scallops to create a tiled texture.
Add Pop of Color
Use a single watered-down watercolor shade or a mild highlighter to fill in just the doors or just the roofs to unify the collection.
Step 3: Adding Details & Character
-
Window variety:
Experiment with window shapes as you move down the page. Try circular portholes, tall rectangular panes, or square windows divided into four smaller squares. -
Chimney types:
Vary your chimneys. Some can be simple rectangles, while others can be thin pipes or wider brick stacks. I find adding a little puff of smoke can sometimes look cute, though this spread keeps it static. -
Door detailing:
Draw double doors on wider houses. Use vertical lines to suggest wooden planks, or add small knobs and knockers for intricate detail. -
Complex roofs:
For the bottom rows, try asymmetrical roofs. Draw one slope longer than the other, like a ‘saltbox’ style house. This breaks up the monotony of symmetrical triangles. -
Stippled textures:
On one of the houses, perhaps in the fourth row, use stippling (little dots) on the roof instead of lines to suggest a textured material like slate or gravel.
Step 4: Final Touches
-
The nature element:
In the bottom right corner, instead of a house, sketch a simple climbing plant or vine going up the side of the unseen margin. Use small oval leaves attached to a main stem. -
Review and refine:
Look over your grid. If any lines look too faint, retrace them carefully to darken the ink. Ensure the visual weight of the black ink is balanced across the page. -
Erase guidelines:
If you used a pencil to plan your layout, wait until the ink is completely dry—give it a few minutes—and then gently erase any graphite marks.
You now have a delightful catalog of imaginary homes ready to decorate your next journal entry
House Covered in Vines and Climbing Plants
Capture the cozy elegance of a cottage with this detailed pen and ink drawing. The high-contrast black lines against cream paper evoke a classic architectural illustration style that feels both technical and artistic.
Step-by-Step Guide
Materials
- Cream or off-white textured drawing paper (heavyweight, hot press)
- Graphite pencil (HB or 2H)
- Kneaded eraser
- Fine liner pens (sizes 005, 01, 03, and 05)
- Ruler
- T-square or transparent grid ruler for alignment
Step 1: Drafting the Structure
-
Establish the horizon line:
Begin by lightly drawing a horizon line across the lower third of your paper using your HB pencil. -
Block in the main facade:
Draw the main rectangle for the front wall of the house. Ensure your vertical lines are perfectly straight using a ruler. -
Construct the roof angles:
add the triangular roofline and the dormer window section. The perspective should be slightly angled, showing just a sliver of the side wall. -
Position the openings:
Map out the door and window placements. Use guidelines to ensure the tops and bottoms of the windows align horizontally. -
Refine the details:
Lightly sketch in the window panes, the chimney, and the roof tiles. Add rough outlines for the bushes and ground cover.
Step 2: Main Inking
-
Outline the strong edges:
Switch to an 05 fine liner. Carefully go over the main structural lines—the corners of the house, the roof ridge, and the separation between the roof and wall. -
Define the windows:
Use an 03 pen for the window frames. Be steady; these geometric shapes need crisp corners. -
Add window panes:
Switch to an 01 pen for the delicate inner window panes (muntins). I find it helpful to pull the pen toward me for straighter lines. -
Detail the door:
Draw the door panels and handle with the 03 pen, adding a little extra thickness to the shadow side of the frame for depth. -
Ink the roof tiles:
With an 01 pen, draw the roof tiles. Don’t draw every single tile perfectly; suggesting rows with slightly broken lines looks more natural. -
Texture the chimney:
Add small, light vertical dashes on the chimney using the 005 pen to suggest brick texture without overcrowding it.
Wobbly Lines?
If your straight architectural lines are shaky, try moving your entire arm from the shoulder, rather than just your wrist. Draw faster for straighter results.
Step 3: Shading and Landscaping
-
Cross-hatch the roof:
Use diagonal hatching with your 01 pen on the darker side of the roof to create shadow and form. -
Darken the windows:
Fill in the glass areas with tight diagonal hatching using the 005 pen. Leave tiny white patches blank to represent reflections. -
Create the greenery:
Use a stippling or scribbling motion with the 01 pen to create the bushes at the foundation. Isolate some individual leaves at the edges for realism. -
Ground the building:
Add grass texture in the foreground using short, upward flicking strokes with the 005 pen. -
Add the tree silhouette:
Sketch the bare tree branches on the right side using shaky, organic lines that taper as they reach outward. -
Final erase:
Wait at least 15 minutes for the ink to fully cure, then gently roll a kneaded eraser over the entire drawing to lift the pencil guides.
Add Winter Vibes
To give the house a wintery feel, leave the tops of the roof tiles, chimney, and window sills completely white to suggest a dusting of snow.
Now you have a timeless piece of architectural art ready to be framed
Treehouse With Rope Ladder
Capture the magic of childhood with this charming illustration of a wooden treehouse nestled in an old oak. This project combines precise ink linework with soft, earthy watercolor washes to create a textured and inviting scene inside your sketchbook.
How-To Guide
Materials
- Sketchbook with mixed media or watercolor paper (approx. 160gsm+)
- HB Graphite pencil
- Kneaded eraser
- Waterproof fineliner pens (sizes 0.1 and 0.3)
- Watercolor paints (Earth tones: Burnt Sienna, Yellow Ochre, Sap Green, Payne’s Grey)
- Small round watercolor brush (size 4 or 6)
- Jar of water
- Paper towel
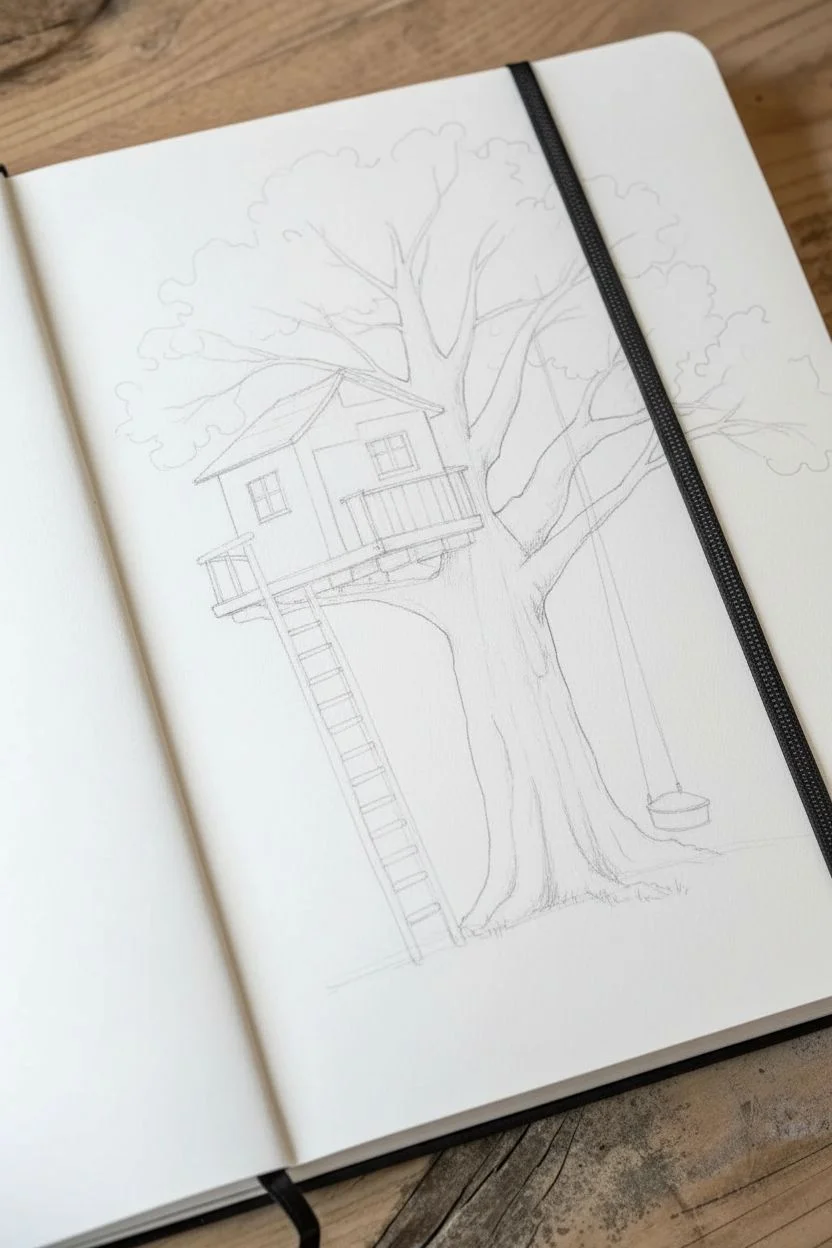
Step 1: Pencil Structure
-
Establish the trunk:
Begin by lightly sketching the main trunk of the tree. Draw it slightly off-center to the right, leaning leftwards. Give it a wide, sturdy base that tapers as it rises, splitting into two or three major branches. -
Place the platform:
Visualize where the treehouse sits in the fork of the branches. Sketch a rectangular box shape for the main cabin structure, angling it slightly so you can see the front and side walls. -
Add architectural details:
Refine the house shape by adding a pitched roof. Sketch a small balcony railing extending from the front and placing a small window on the side wall. -
Sketch the ladder and swing:
Draw long, parallel lines for the ladder extending from the balcony down to the ground. Near the base of the trunk on the right, sketch two long ropes hanging down for a simple tire or plank swing. -
Map the canopy:
Loosely outline cloud-like shapes around the upper branches to indicate where the leaves will go. Don’t draw individual leaves yet; just focus on the overall volume of the foliage.
Pro Tip: Texture Trick
When painting the bark, keep your brush fairly dry (dry-brush technique). Dragging it lightly creates natural rough streaks that look just like old wood.
Step 2: Inking the Scene
-
Outline the treehouse:
Using your 0.3 fineliner, trace the main lines of the house. Use a ruler if you want perfect straightness, but a freehand line adds more character to the rustic wood look. -
Detail the wood planks:
Switch to the finer 0.1 pen. Draw vertical lines on the house walls to create siding. Add small knots or grain lines occasionally to make the wood look weathered. -
Texture the bark:
Use the 0.3 pen to outline the trunk. For texture, use broken, wavy lines running vertically up the tree. Concentrate these lines near the edges of the trunk to create a sense of roundness and shadow. -
Define the ladder:
Ink the ladder rails and rungs. Make the rungs look like rough logs or planks rather than perfect metal bars. -
Inking the foliage:
Instead of a solid outline, use frantic, scribbly, or stippled motions with the 0.1 pen around your pencil guides to suggest the texture of leaves high up in the branches. -
Final pencil cleanup:
Once the ink is completely dry (give it a few minutes to be safe), gently erase all your graphite pencil marks using the kneaded eraser.
Step 3: Watercolor Washes
-
Paint the trunk base:
Mix a watery light brown using Burnt Sienna and a lot of water. Wash this over the entire trunk area. I like to drop in a tiny bit of grey or darker brown on the shadowed right side while it’s still wet. -
Color the cabin:
Use Yellow Ochre mixed with a touch of brown for the house siding to give it a fresh pine look. Paint the roof a cool grey or slate blue to differentiate it from the walls. -
Greenery base layer:
Mix a pale, watery Sap Green. Dab this color loosely over the foliage areas. Keep the edges soft and irregular, and leave plenty of white paper showing through for light. -
Deepening the shadows:
Once the first layer on the trunk is dry, mix a darker brown (Burnt Sienna + Payne’s Grey). Paint thin lines following the bark texture you drew earlier, focusing under the treehouse and on the right side of the trunk. -
Foliage depth:
Mix a darker, more saturated green. Dab this into the lower parts of the leaf clusters to suggest shadow and density, leaving the tops of the clusters lighter. -
Grounding the scene:
Add a very light wash of green at the base of the tree and ladder to suggest grass. Use flicking motions with your brush tip to create grass blades around the base of the trunk. -
Finishing touches:
Add a small touch of shadow color inside the cabin window and under the eaves of the roof to make the form pop.
Level Up: Hidden Life
Add tiny details to bring the story to life: a bird perched on the railing, a squirrel on the trunk, or a lantern hanging from a branch.
Now your sketchbook holds a peaceful retreat ready for imagination to climb
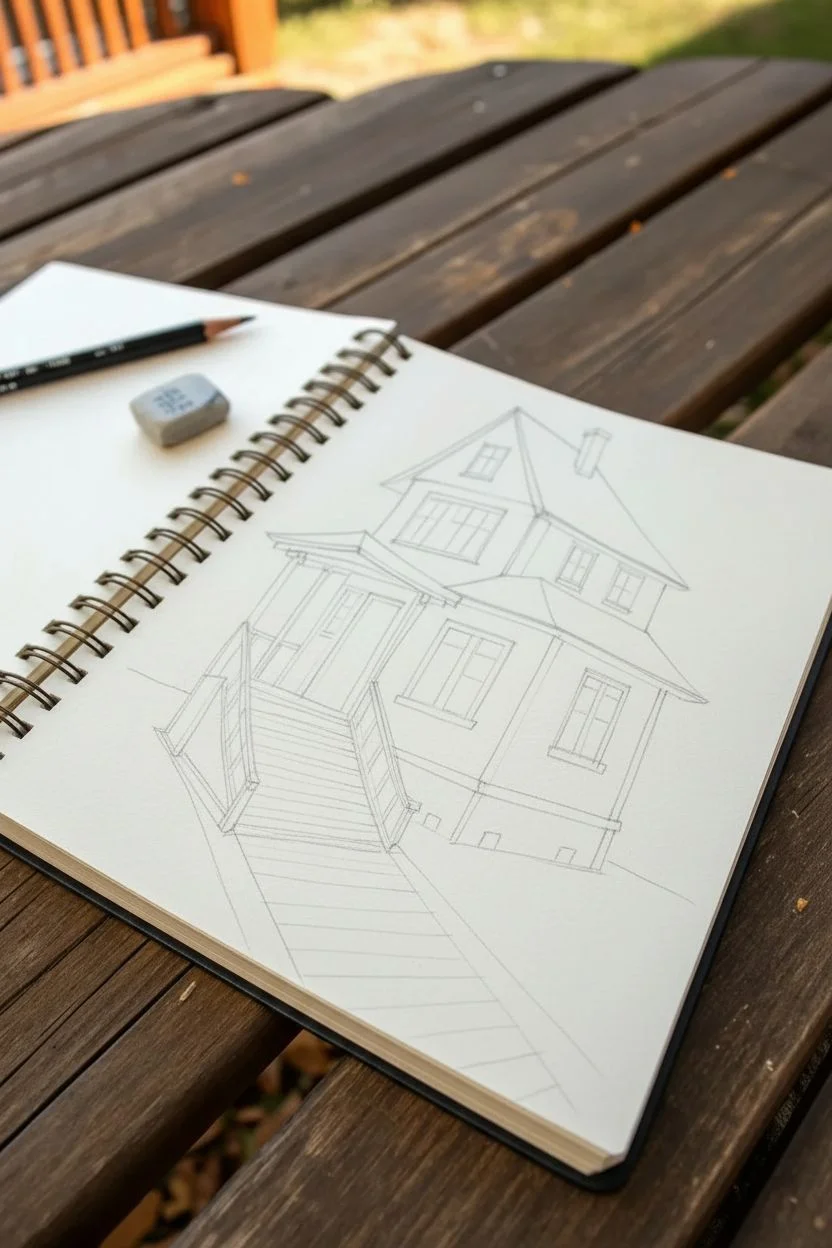
Surreal House With Impossible Perspective
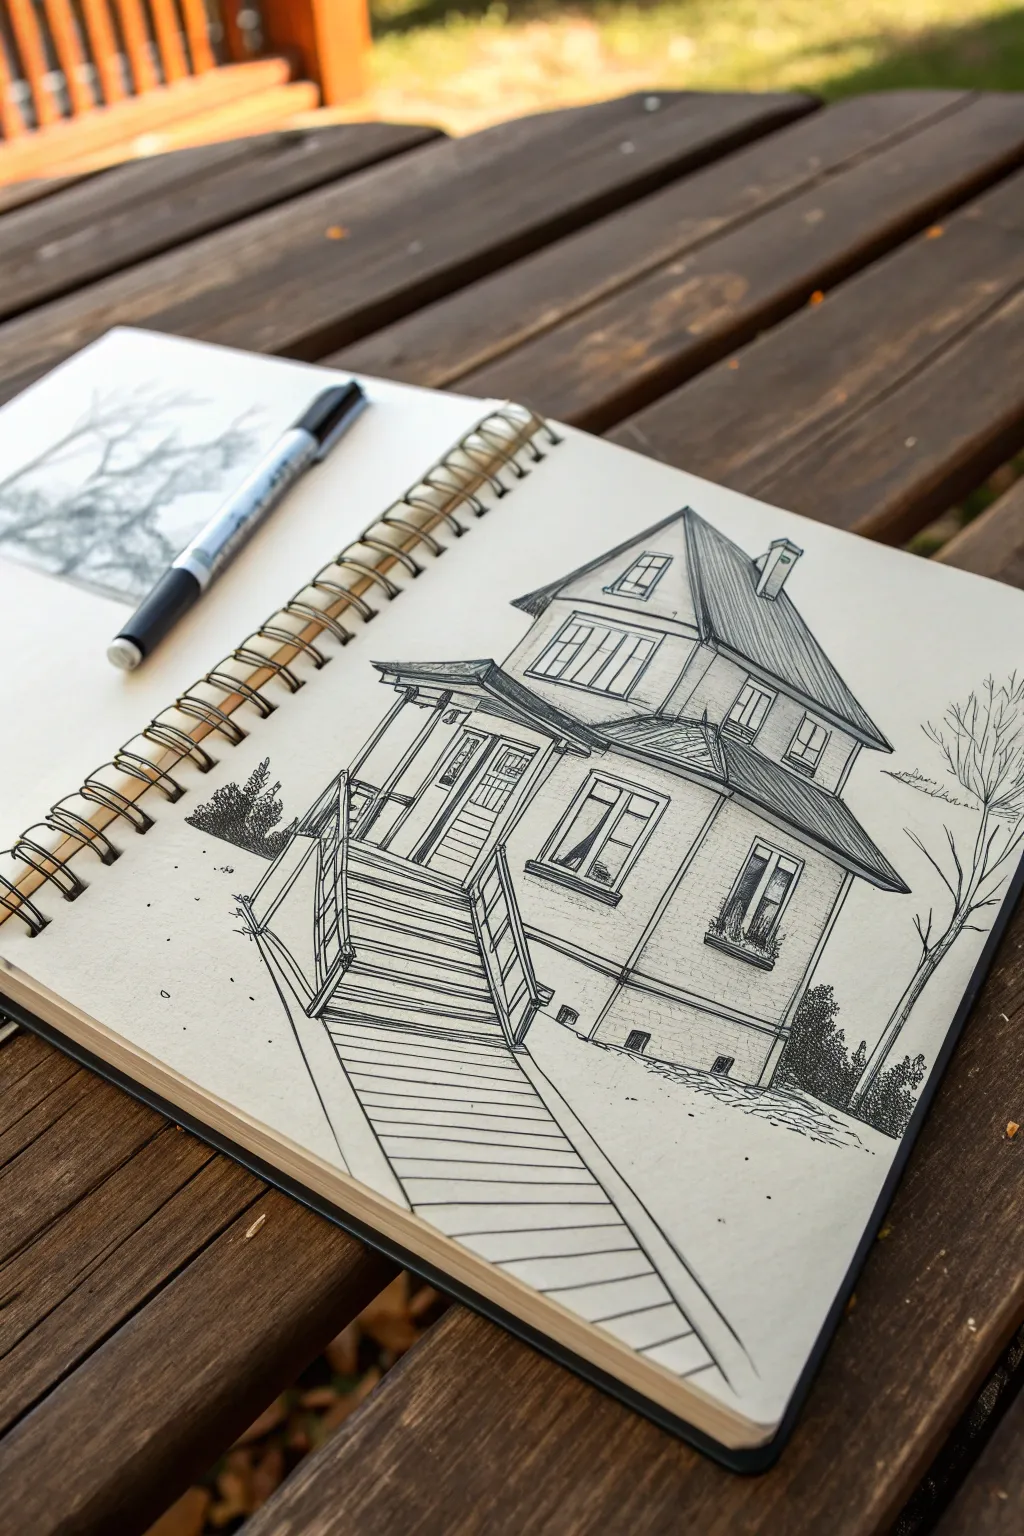
Capture the charm of this slightly surreal, two-story home with a detailed pen and ink sketch. The drawing features bold architectural lines, intricate wood textures, and a stairway that invites viewers upward into a scene of slightly twisted perspective.
Step-by-Step Tutorial
Materials
- Spiral-bound sketchbook (heavyweight smooth paper)
- Fine liner pens (sizes 0.1, 0.3, and 0.5)
- Pencil (HB or 2H)
- Kneaded eraser
- Ruler (optional, but helpful for long lines)
Step 1: Penciling the Framework
-
Establish the main volume:
Begin by lightly sketching a large vertical rectangle for the main body of the house. Divide this roughly in half horizontally to separate the ground floor from the upper story. -
Add the roof shapes:
Top the rectangle with a steep triangular roof for the main section. To the left, sketch a smaller, secondary gable shape that juts out, creating that complex, multi-faceted roofline. -
Draft the porch and stairs:
Extend a boxy shape from the lower left side of the house for the porch. Draw two long, converging lines extending from the porch bottom toward the bottom right corner of the page to create the dramatic walkway and stairs. -
Place windows and doors:
Sketch rectangles for the windows—two large ones on the upper floor front, a smaller attic window, and tall windows on the ground floor. Outline the front door area within the porch structure.
Wonky Lines?
If your straight lines curve unintentionally, don’t restart. Go over them again with a slightly wiggly, deliberate line. It adds to the ‘old house’ character.
Step 2: Inking Structural Lines
-
Outline the roof and eaves:
Switch to a 0.5 fine liner. Trace the main roof outlines, extending the eaves slightly beyond the walls for a realistic overhang. Keep these lines confident and straight. -
Define the walls and corners:
Ink the vertical corner lines of the house. I like to break the line slightly in places to give it a weathered, hand-drawn feel rather than a rigid blueprint look. -
Detail the windows:
Using a thinner 0.3 pen, ink the window frames. Add inner rectangles for the panes. For the ground floor window on the right, draw a small flower box underneath with jagged, grassy strokes for plants. -
construct the porch railing:
carefully ink the vertical posts of the porch. Draw the handrails parallel to the stair angle. Use short vertical strokes for the balusters (the small vertical pillars in the railing).
Add Weathering
To make the house look older, add tiny cracks in the window panes or small dots on the siding to look like peeling paint or knotholes in the wood.
Step 3: Texturing and Shading
-
Roof hatching:
With a 0.1 pen, draw tight, vertical hatching lines across the entire roof surface to simulate shingles or metal roofing. Vary the pressure to create shadows near the edges. -
Siding texture:
Add horizontal lines across the exterior walls to represent clapboard siding. Don’t draw every single line from end to end; suggestive, broken lines work best to keep the drawing open. -
The dramatic stairway:
Ink the horizontal planks of the walkway and stairs. Towards the bottom foreground, space the lines further apart to exaggerate the perspective. Towards the top stairs, pack lines closer together. -
Window depth:
Darken the glass panes with diagonal hatching. Leave small white shapes un-inked to represent reflections on the glass. -
Under-eave shadows:
Use the 0.5 pen to add heavy shadows under the roof eaves and the porch roof. This contrast pops the structure forward.
Step 4: Atmospheric Details
-
Adding foliage:
Sketch a bare, spindly tree on the right side using shaky, organic lines. Add a small bush on the left horizon line using dense scribbles to create texture. -
Grounding the house:
Draw a faint horizon line behind the house. Add stippling (small dots) and loose scratching marks around the base of the foundation to simulate dirt and grass. -
Stylized chimney:
Ink the small chimney on the rear roof slope. Add a tiny bit of hatching on one side to give it 3D form. -
Clean up:
Wait at least 5 minutes for the ink to fully dry. Gently erase all underlying pencil marks with your kneaded eraser to reveal the crisp black and white contrast.
Now you have a charming architectural study with a twist of perspective ready to show off


Have a question or want to share your own experience? I'd love to hear from you in the comments below!