
If you’ve ever wished your dessert dish could look as sweet as what you’re serving, ice cream bowl painting is exactly that kind of joy. I love how a few simple patterns—think waffle cone texture, melting drips, and sprinkles—can turn an ordinary bowl into a full-on treat.
Chocolate Drip Rim
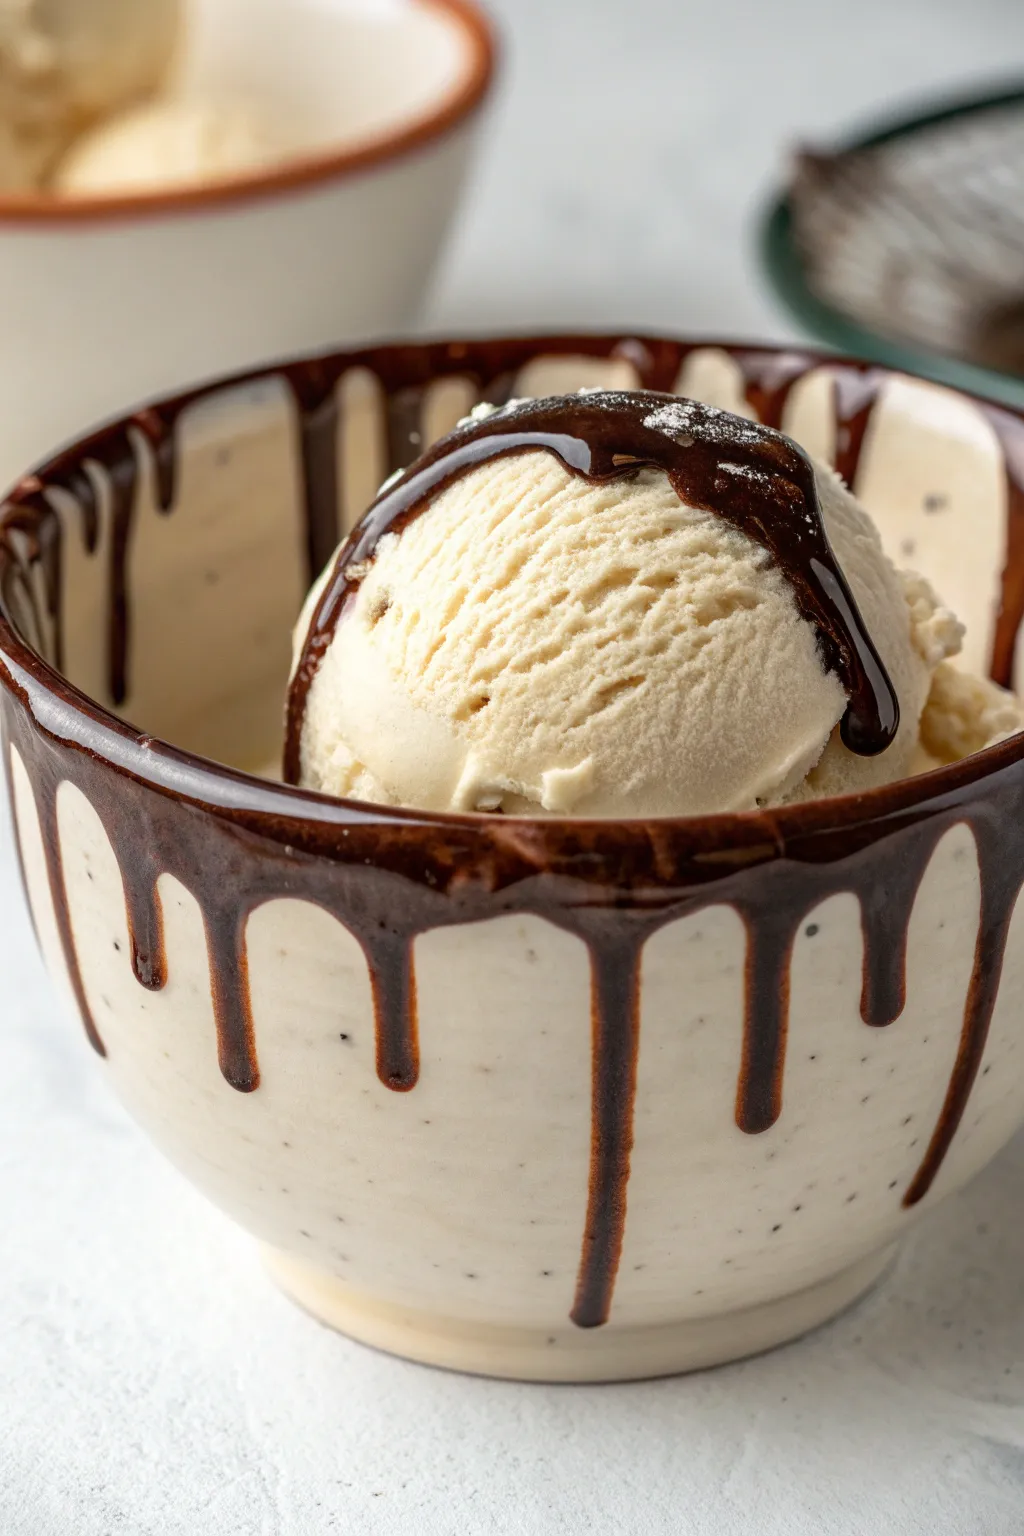
Transform a plain ceramic bowl into a dessert lover’s dream with this hyper-realistic chocolate sauce design. Using thick, dimensional paints, you’ll create a rich, glossy drip effect that looks delectable enough to eat.
Step-by-Step Guide
Materials
- Plain cream or off-white ceramic bowl
- Ceramic surface primer or clear sealer (optional)
- Pebeo Porcelaine 150 paint (Dark Brown or Chocolate)
- Pebeo Porcelaine 150 paint (Anthracite Black – for mixing)
- Gloss medium or glazing medium (for shine)
- Fine grit sandpaper
- Black acrylic paint (for speckles)
- Old toothbrush
- Small round tip paintbrush (size 2 or 4)
- Palette knife or mixing stick
- Oven (for curing paint, if required by brand)
Step 1: Preparation & Speckling
-
Clean the Surface:
Begin by washing your ceramic bowl thoroughly with warm soapy water to remove any grease or manufacturer oils. Wipe it down with rubbing alcohol for a perfectly clean painting surface and let it dry completely. -
Light Sanding:
If your bowl is very glossy, lightly scuff the exterior surface with fine-grit sandpaper. This helps the paint adhere better, though you should skip this if you want to retain the original glaze perfectly. -
Mix Speckle Paint:
Create a watered-down mixture of black acrylic paint. You want a consistency that is fluid but still opaque, similar to ink. -
Apply Vanilla Speckles:
Dip an old toothbrush into your black paint mixture. Hold it a few inches from the bowl and run your thumb across the bristles to flick tiny speckles onto the exterior. This mimics the look of vanilla bean flecks in ceramic. -
Refine the Texture:
If any speckles are too large, quickly dab them with a damp paper towel. Rotate the bowl to ensure even coverage, making the speckling denser near the bottom if desired. -
Seal the Base:
Allow the speckles to dry fully, which usually takes about 20-30 minutes. Apply a thin coat of clear ceramic sealer or gloss medium over the speckles to protect them while you work on the rim.
Step 2: Creating the Chocolate Drop
-
Mix the Chocolate Color:
On your palette, mix a large amount of Dark Brown ceramic paint with a tiny drop of Black. The goal is a rich, dark ganache color, not a milk chocolate tone. -
Add Gloss Medium:
Mix in a generous amount of gloss medium into your chocolate paint. I find this crucial because real chocolate sauce is shiny; this step ensures your dried paint retains that wet, appetizing look. -
Paint the Rim:
Using a size 4 round brush, paint a solid, thick band of the chocolate mixture directly onto the very top edge lip of the bowl. Make it uneven and wavy, as liquids don’t sit perfectly straight. -
Start the Drips:
Load your brush heavily with paint. Place the tip of the brush at the painted rim and drag it downwards slowly to create a drip line. Vary the lengths—some should stop high, others should reach halfway down the bowl. -
Create the Bead:
At the bottom of each drip line, deposit a small extra glob of paint. This rounded end mimics the surface tension of a real droplet pooling as it falls. -
Connect the Drips:
Between your main drip lines, gently curve the paint on the rim downwards slightly. This makes the sauce look like it is oozing continuously rather than just being striped lines. -
Inside Drips:
Don’t forget the inside! Paint shorter, matching drips flowing down the interior wall of the bowl. Real sauce would spill over both sides of the rim. -
Build Dimension:
Let the first layer dry to the touch (about an hour). Go back and re-apply paint over the existing drips, especially at the ‘bead’ on the bottom, to physically raise the paint surface for a 3D effect. -
Add Highlights:
Once the chocolate paint is tacky but not fully dry, take a tiny detail brush with a lighter brown or white mixture and add microscopic reflection dots on the curviest parts of the drips to enhance the glossy illusion.
Drips running too fast?
Keep your paint mixture thick! If it’s too runny, let it sit on the palette for 10 minutes to thicken slightly, or add less glazing medium.
Step 3: Curing
-
Drying Time:
Allow the bowl to air dry for at least 24 hours. The thick layers of ‘chocolate’ need significant time to harden completely. -
Bake to Set:
If using heat-set paints like Pebeo Porcelaine 150, place the bowl in a cold oven. Turn the oven to 300°F (150°C) and bake for 35 minutes once it reaches temperature. Let it cool completely inside the oven.
Go for sprinkles!
Before the chocolate rim paint dries, gently press real rainbow sprinkles into the wet paint or paint tiny colored dashes for a fun confetti look.
Now you have a charming, permanent dessert bowl that looks sweet even when empty


Neapolitan Flavor Bands
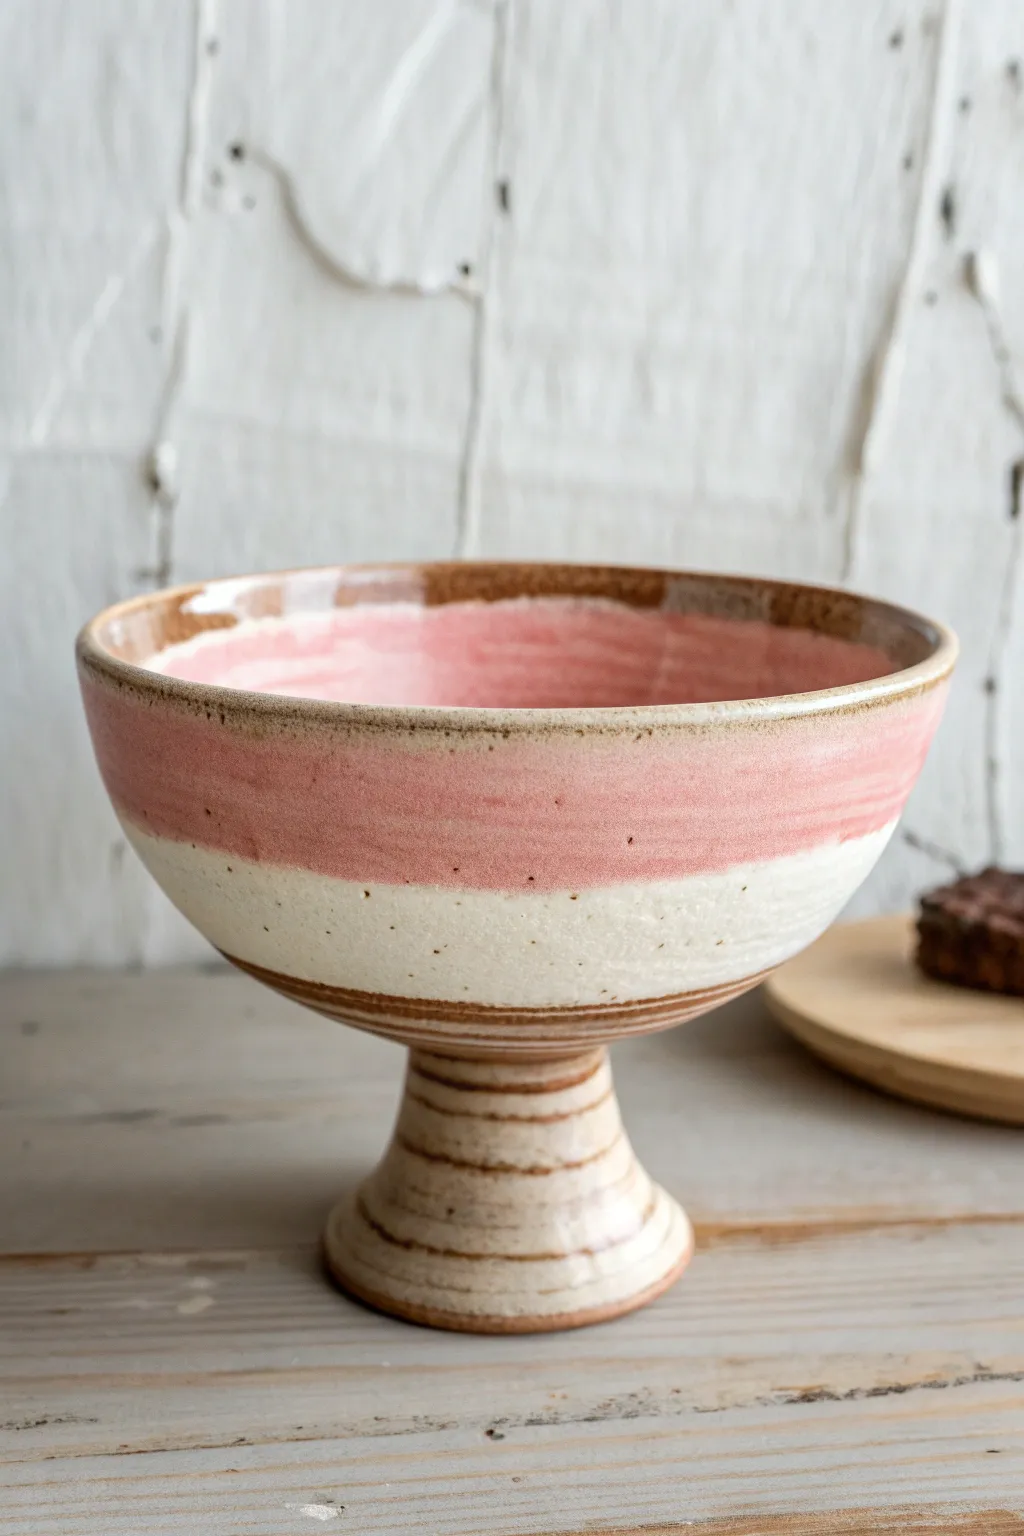
Capture the nostalgic charm of classic Neapolitan ice cream with this layered ceramic painting project. The design uses natural clay tones, creamy white, and soft strawberry pink to create a sophisticated yet playful vessel for your favorite desserts.
Step-by-Step Tutorial
Materials
- Bisque-fired ceramic chalice or footed bowl
- Underglaze in soft strawberry pink
- Underglaze in creamy white (opaque)
- Underglaze in dark toasted brown
- Fan brush (medium)
- Detail liner brush (fine)
- Flat shader brush (1/2 inch)
- Potter’s wheel or banding wheel
- Clear transparent glaze (food safe)
- Sponge and water bucket
Step 1: Preparation and Base
-
Clean surface:
Wipe down your bisque-fired bowl with a slightly damp sponge to remove any dust or kiln debris, ensuring a clean surface for the underglaze to adhere to. -
Center the piece:
Place your bowl on the center of your banding wheel or potter’s wheel. Spin it slowly to make sure it’s perfectly centered, which is crucial for getting straight bands. -
Mark banding lines:
While spinning the wheel slowly, lightly touch a pencil to the outside of the bowl to mark where your color divisions will be. Aim for the top half to be pink and the bottom half to be white.
Keep it Clean
If you make a mistake while banding lines, wait for the underglaze to dry completely, then gently scratch the unwanted paint off with a needle tool or stiff brush.
Step 2: Painting the Color Blocks
-
Apply the creamy white:
Load your flat shader brush with the creamy white underglaze. Spin the wheel and apply the white to the lower half of the bowl’s cup, starting just above the stem connection. -
Layer the white:
Let the first coat dry until it’s chalky and no longer shiny. Apply 2-3 additional coats to ensure the white is fully opaque. -
Apply the strawberry pink:
Using a clean flat brush, apply the pink underglaze to the top half of the bowl. Be sure to overlap the white section slightly to avoid any gaps of raw clay showing through. -
Refine the interior:
Repeat the banding process on the inside of the bowl. Spin the wheel and paint the top inner rim pink, fading into the white or leaving the bottom interior neutral depending on your preference. -
Build pink opacity:
Apply two more coats of pink, allowing drying time between each. Since this is a lighter color, building up layers is key for vibrant coverage.
Step 3: Adding the Details
-
Paint the rim:
Dip your fine liner brush into the dark toasted brown underglaze. Carefully paint the very top edge of the rim. I like to let the brush wobble just slightly to give it an organic feel. -
Stripe the stem:
Spin the wheel slowly again. Using the liner brush and brown underglaze, hold your hand steady against the stem to create thin horizontal rings. Vary the pressure to make some lines thicker than others. -
Define the transitions:
Add a thin brown line right at the junction where the bowl meets the stem to visually separate the two sections. -
Create the speckles:
Thicken a small amount of brown underglaze on a palette. Dip an old stiff brush or toothbrush into it, then run your thumb across the bristles to flick tiny speckles onto the creamy white section.
Rim Variation
Instead of a solid brown rim, try dipping just the sponge in brown underglaze and dabbing the rim for a rustic, toasted marshmallow effect.
Step 4: Finishing and Firing
-
Dry thoroughly:
Allow the underglaze layout to dry completely, preferably overnight, to prevent smudging during glazing. -
Apply clear glaze:
Dip the entire piece into a bucket of clear transparent glaze, or brush on three smooth flowing coats. Ensure the glaze is food-safe. -
Wipe the foot:
Use a sponge to wipe any glaze off the very bottom of the foot ring so it doesn’t fuse to the kiln shelf. -
Final fire:
Fire the piece in the kiln according to the specific temperature requirements of your chosen clay and glaze combination.
Enjoy serving your sweet treats in this perfectly coordinated custom bowl


Vanilla Inside, Chocolate Outside
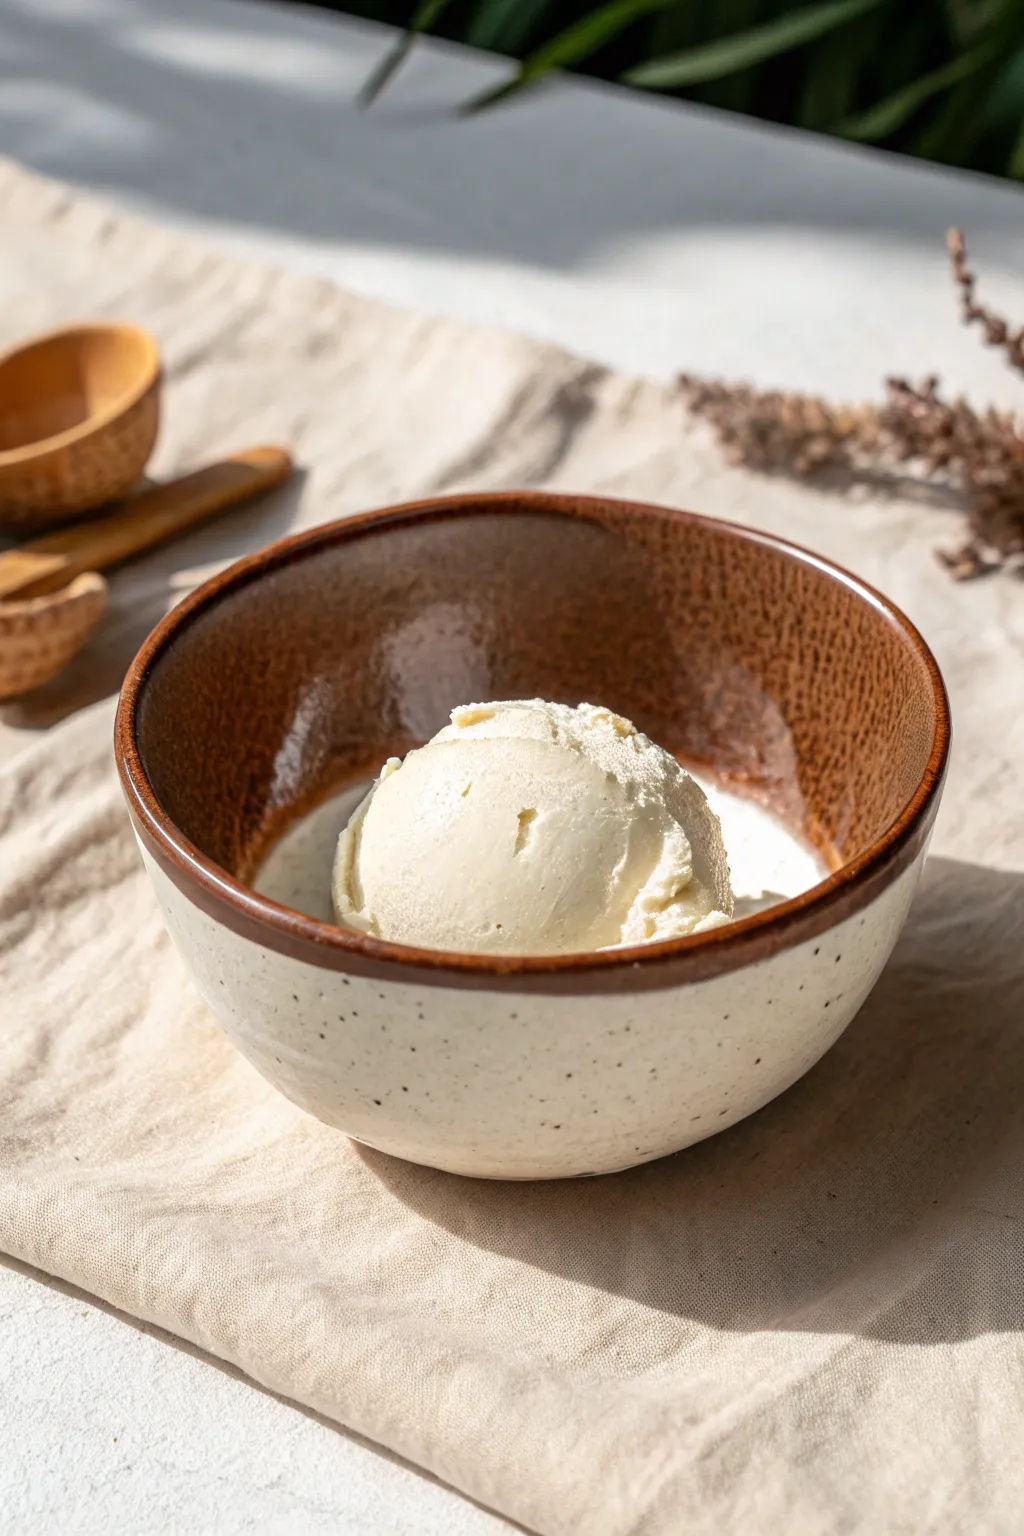
Recreate the charm of a rustic, hand-thrown pottery piece using simple painting techniques on a plain ceramic bowl. This project mimics the look of high-fire glazes with a clever use of speckled paint and contrasting rich brown tones.
Step-by-Step
Materials
- Plain white ceramic bowl (clean and dry)
- Ceramic or multi-surface acrylic paint (Cream/Off-White)
- Ceramic or multi-surface acrylic paint (Rich Caramel/Chocolate Brown)
- Gloss varnish or sealant (food safe if using on items for display, check labels)
- Small stiff-bristle brush (like a toothbrush) for speckling
- Soft synthetic flat brush (medium size)
- Small detail brush
- Painter’s tape
- Palette or small dish
- Water cup and paper towels
Step 1: Preparation and Base Coat
-
Clean surface:
Begin by thoroughly washing your bowl with soap and water to remove any grease or dust. Dry it completely with a lint-free towel. -
Prop the bowl:
Place the bowl upside down on a jar or sturdy cup. This elevates the work surface, making it easier to paint the exterior without smudging the bottom edge. -
Mix cream color:
Squeeze out your cream or off-white paint onto the palette. I like to add a tiny drop of brown to warm it up slightly so it doesn’t look like stark primer. -
Apply exterior base:
Using the flat synthetic brush, paint the entire outside of the bowl with the cream color. Don’t paint the rim yet—stop just below it. -
Let it dry:
Allow this first coat to dry completely. Depending on your paint thickness, this might take 20-30 minutes. -
Apply second coat:
Apply a second coat of the cream paint to ensure full coverage and opacity. Smooth out your brushstrokes as you go.
Don’t Over-Flick
For realistic pottery speckles, start with very little paint on your brush. It’s easy to add more speckles, but nearly impossible to remove a giant blob without repainting the base.
Step 2: Creating the Speckled Effect
-
Prepare speckle mix:
Dilute a small amount of dark brown or black paint with water until it has an ink-like consistency. -
Practice splattering:
Dip your stiff-bristle brush or old toothbrush into the watery mix. Practice splattering on a piece of scrap paper by running your thumb over the bristles. -
Apply speckles:
Gently flick the speckles onto the exterior of the bowl. Aim for a random, natural distribution rather than perfect spacing. -
Check density:
Step back and assess. You want enough speckles to mimic clay particles, but not so many that the bowl looks dirty. Add more sparingly if needed. -
Dry speckles:
Let the speckles dry completely before moving on to the rim, as wet speckles smudge easily.
Step 3: Painting the Interior and Rim
-
Flip the bowl:
Once the outside is dry to the touch, flip the bowl over carefully. -
Paint interior:
Using the chocolate brown paint, coat the entire inside of the bowl. Use long, sweeping strokes starting from the center and pulling upwards. -
Paint the rim:
This is the crucial step for the ‘dipped’ look. Paint the top rim of the bowl with the chocolate brown paint. -
Extend the rim:
Carefully bring the brown paint just over the edge onto the exterior, creating a band about 1/4 inch thick. It doesn’t need to be ruler-straight; a slight organic waver looks more like hand-dipped glaze. -
Blend the transition:
If the line looks too harsh, soften the transition between the brown rim and cream body with a slightly damp clean brush, though a solid line works well for this style. -
Interior second coat:
Apply a second coat to the interior and the rim once the first layer is dry, ensuring the color is rich and deep.
Texture Play
Mix a tiny amount of baking soda into the exterior cream paint before applying. This adds a gritty, stone-like texture that feels authentic to the touch.
Step 4: Finishing Touches
-
Inspect for gaps:
Look closely at the junction where the rim meets the speckled body. Touch up any cream spots that interrupt the brown band. -
Clear coat application:
Once fully cured (check your paint bottle instructions, usually 24 hours), apply a high-gloss varnish to the entire piece. -
Create the shine:
The gloss varnish simulates the look of fired ceramic glaze. Two thin coats are better than one thick gummy coat.
Display your new faux-ceramic masterpiece and enjoy the cozy, artisanal vibe it brings to your table


Sundae Bowl Diner Stripes
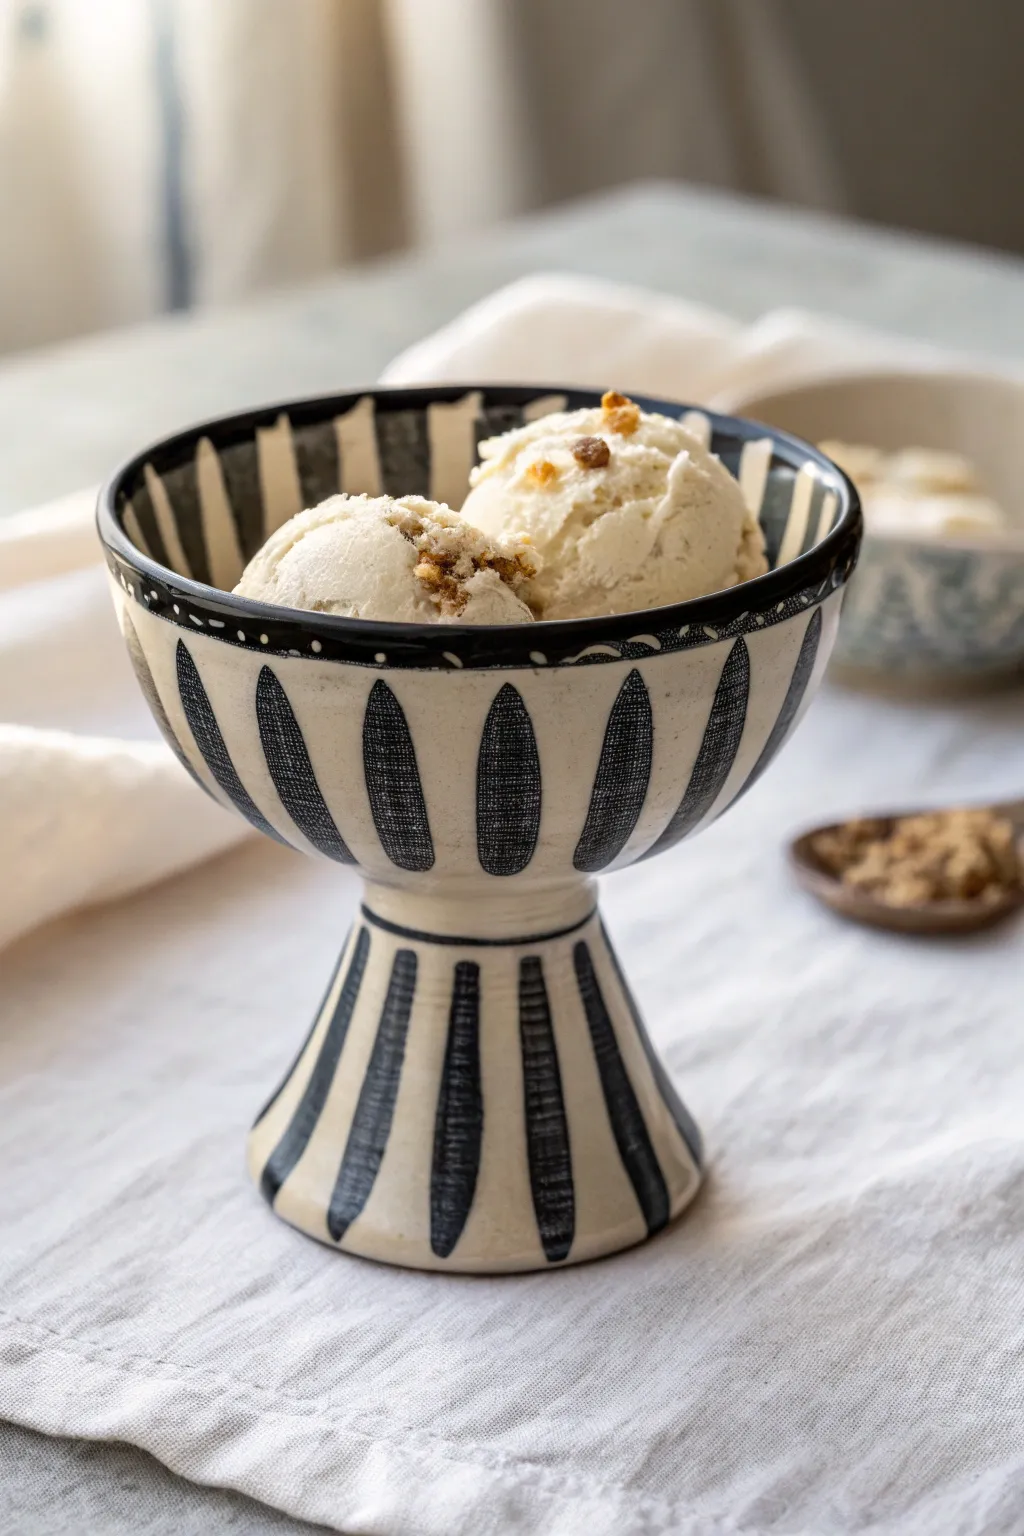
Recreate the charm of a retro diner with a sophisticated twist using this graphic black-and-cream design. The bold, uneven stripes evoke a hand-crafted pottery feel that makes every scoop of ice cream feel artisanal.
How-To Guide
Materials
- Bisque-fired ceramic footed bowl
- Underglaze pencil (black)
- Black geometric underglaze
- Cream or oatmeal-colored speckled matte glaze
- Small round brush (size 2 or 4)
- Detail liner brush (size 0)
- Damp sponge
- Clear dipping glaze (optional, depending on finish desired)
- Kiln access
Step 1: Preparation & Base Mapping
-
Clean the bisque:
Start by wiping down your bisque bowl with a slightly damp sponge. This removes any kiln dust or oils from your hands that might resist the glaze later on. -
Mark vertical guides:
Using a regular pencil (which will burn off in the kiln), lightly mark vertical lines around the widest part of the bowl. Aim for even spacing, about an inch apart, but don’t stress over perfect measurements; the charm is in the irregularity. -
Rough in the leaf shapes:
Sketch elongated oval or ‘surfboard’ shapes on the bowl’s exterior. These should start narrow at the bottom, widen in the middle, and taper to a point near the rim. -
Sketch the base stripes:
Repeat a similar process on the foot of the bowl. Draw vertical stripes that mirror the placement of the shapes on the main bowl, creating visual continuity from top to bottom.
Step 2: Painting the Pattern
-
Outline the shapes:
With your detail liner brush and black underglaze, carefully trace over your pencil outlines. I like to keep the pressure light here to avoid blobs. -
Fill the interiors:
Switch to your small round brush. Fill in the black ‘surfboard’ shapes completely. Apply two to three coats, letting each dry briefly in between, to ensure a solid, opaque black after firing. -
Add texture to the black:
Before the final coat of black is fully dry, you can use a dry brush or a scratching tool to gently create subtle vertical texture within the black areas, mimicking a woven look. -
Create the rim detail:
Using the liner brush again, paint a thin, slightly wavy horizontal line around the upper circumference of the bowl, just below the rim. -
Add the dots:
Paint tiny black dots periodically along that horizontal line. This adds a delicate, stitched effect that breaks up the solid geometry. -
Paint the inner rim stripes:
Turn your attention to the inside of the bowl. Paint short, vertical strokes descending from the glost rim, roughly lining up with the exterior black shapes. These shouldn’t go all the way down—just about an inch or so.
Uneven Lines?
Don’t panic if your stripes wobble. Use a rubber-tipped clean-up tool or a stiff, damp angle brush to nudge wet underglaze back into line before it dries.
Step 3: Glazing & Finishing
-
Wax resist application:
Once your black underglaze is bone dry, carefully apply wax resist over all the black painted areas. This protects your design from the background glaze. -
Clean up edges:
If any wax spills over, use a craft knife to scrape it back once it dries, keeping your edges crisp. -
Apply the background glaze:
Dip or brush the entire piece with your cream or oatmeal speckled glaze. The wax will resist the glaze, revealing the black design underneath. -
Wipe the resist:
Gently wipe any beads of cream glaze off the waxed black areas with a damp sponge or finger. This prevents stray spots of cream from firing onto your black stripes. -
Check the interior:
Ensure the inside is fully coated with the cream glaze (except where you want the black rim details to show through if you waxed them too). -
Final dry:
Let the piece dry completely overnight to ensure all moisture has evaporated from the clay body before firing. -
Fire:
Fire the piece according to the clay and glaze specifications (usually Cone 5 or 6 for stoneware durability).
Pro Tip: Texture Depth
For that true woven look shown in the darker stripes, gently drag a distinct tool through the last layer of wet black glaze to reveal a hint of white clay beneath.
Serve your favorite rocky road in this stylish bowl and enjoy the custom feel of your handiwork
BRUSH GUIDE
The Right Brush for Every Stroke
From clean lines to bold texture — master brush choice, stroke control, and essential techniques.
Explore the Full Guide
Painted Scoop Swirls
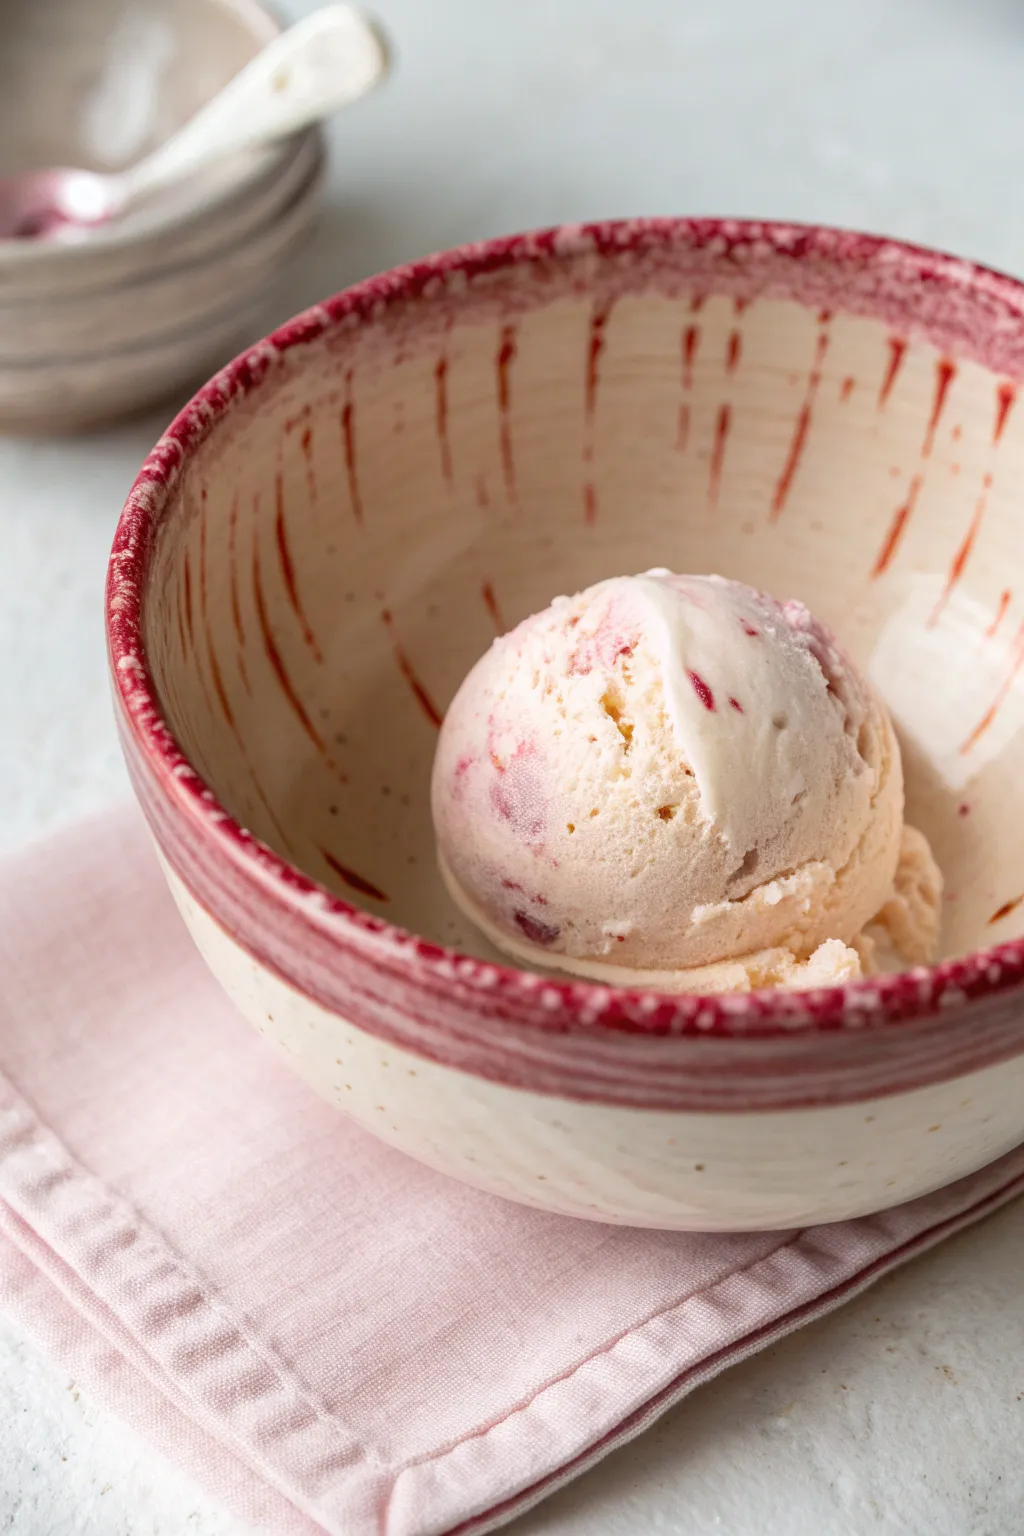
Transform a plain bisque bowl into a rustic masterpiece featuring vintage-style red drips that mimic the swirls of berry compote. This glazing project captures the charm of handmade pottery with a simple yet striking decorative rim technique.
Step-by-Step Guide
Materials
- Bisque-fired ceramic bowl
- Cream or off-white underglaze (food safe)
- Deep red or berry-colored glaze (food safe)
- Clear dipping or brushing glaze
- Fan brush
- Small fine-point brush
- Sponge
- Water container
- Lazy Susan or banding wheel (optional)
Step 1: Base Preparation
-
Wipe It Down:
Begin by gently wiping your bisque bowl with a slightly damp sponge to remove any dust or debris that might interfere with glaze adhesion. -
Apply Base Coat:
Using a fan brush, apply a smooth, even layer of the cream or off-white underglaze to the entire interior and exterior of the bowl. -
Layering Up:
Let the first coat dry until it’s chalky to the touch. Apply a second and third coat to ensure solid, opaque coverage, alternating the direction of your brushstrokes with each layer for a seamless finish. -
Smooth the Rim:
Check the rim for any clumps of glaze. Gently smooth them out with your finger or a dry brush, as this area will be the focal point of the next step.
Step 2: Creating the Drizzle Effect
-
Load the Brush:
Dip your fine-point brush into the deep red glaze. You want the brush fully loaded but not dripping uncontrollably just yet. -
Rim Definition:
Carefully paint the very top edge of the rim with the red glaze. Don’t worry about perfect neatness; a little unevenness adds to the rustic charm we are aiming for. -
Initiate the Drips:
Reload your brush with a heavier amount of red glaze. Touch the painted rim and press down slightly at irregular intervals to encourage the glaze to pool and start running down the interior walls. -
Controlled Gravity:
If I want longer drips, I like to gently tap the bowl on the table or tilt it slightly to help gravity pull the glaze down in streaks. -
Varying Lengths:
Ensure the streaks vary in length. Some should be short spots near the rim, while others should extend about a third of the way down the bowl’s interior. -
Clean the Exterior:
Check the outside of the bowl. If any red glaze dripped down the exterior wall where you don’t want it, wipe it away cleanly with a damp sponge. -
Inspect the Texture:
The red lines should look slightly raised or speckled. Allow this detail work to dry completely before moving to the final glazing step.
Drips running too fast?
If the glaze runs too quickly, it’s too thin. Let it sit open for a few minutes to thicken slightly, or test the viscosity on a piece of paper before applying it to the bowl rim.
Step 3: Finishing and Firing
-
Clear Glaze Application:
Once the red design is fully dry, apply a coat of clear glaze over the entire piece to seal it and make it food-safe. If dipping, do it in one quick, smooth motion. -
Brush Alternative:
If brushing on the clear glaze, use a large soft brush and float the glaze over the design to avoid smearing the red drips. -
Foot Cleaning:
Use a sponge to wipe all glaze off the very bottom (foot) of the bowl. This is crucial so it doesn’t fuse to the kiln shelf during firing. -
Final Check:
Inspect the surface one last time for pinholes or missed spots in the clear coat and touch up as needed. -
Fire the Piece:
Fire the bowl in a kiln according to the specific temperature (cone) instructions on your glaze bottles. -
Cool Down:
Allow the kiln to cool completely before opening. Thermal shock can crack your new creation.
Speckled Clay Hack
Use a speckled buff clay body instead of white clay. When fired, the natural iron specks will show through the cream glaze, adding extra dimension and an earthy, organic feel.
Now you have a stunning, food-safe bowl ready for your favorite frozen treat.
Sherbet Ombre Fade
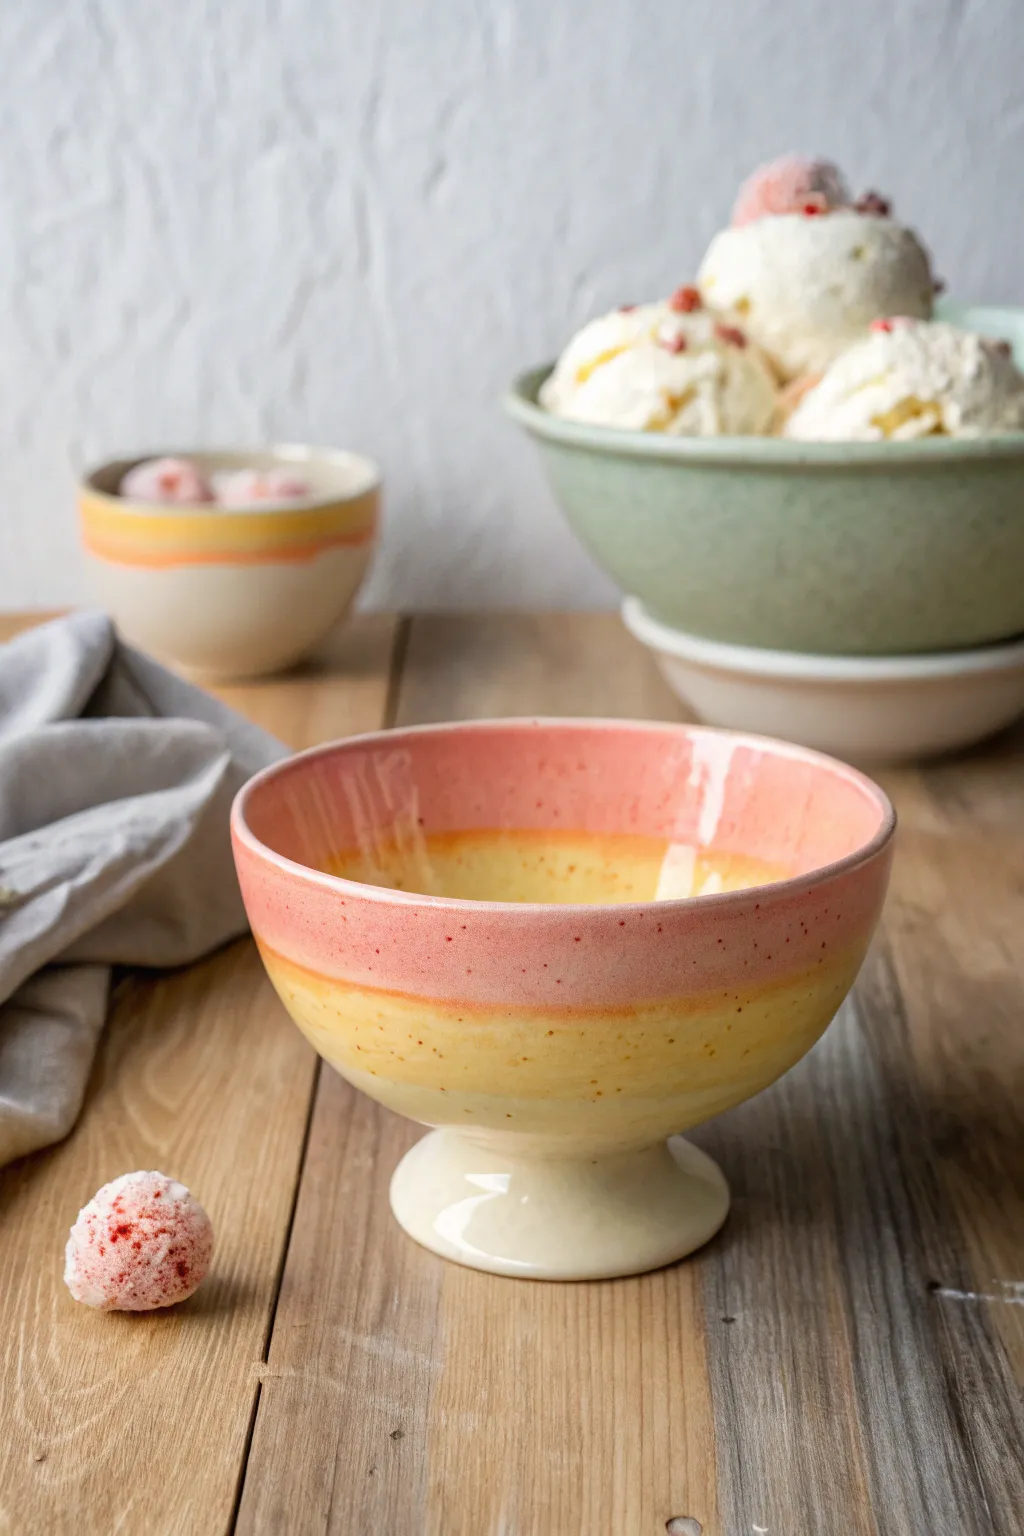
Capture the warmth of a summer evening with this delightful sherbet ombre bowl project. Using soft pinks and warm yellows on a cream base creates a gentle, gradient effect that looks good enough to eat.
Detailed Instructions
Materials
- Bisque-fired ceramic footed bowl
- Underglazes: Coral Pink, Golden Yellow, Cream/Off-White
- Clear dipping glaze (food safe)
- Wide, soft fan brush
- Small stiff bristle brush (e.g., toothbrush)
- Sponge
- Water container
- Paper towels
- Lazy Susan or banding wheel (optional but helpful)
Step 1: Preparation & Base Coat
-
Clean the bisque:
Start by wiping down your bisque bowl with a slightly damp sponge. This removes any ceramic dust that might prevent the glaze from adhering properly. -
Apply the base color:
Using your wide fan brush, apply two coats of the Cream/Off-White underglaze to the foot (the pedestal base) and the very bottom curve of the bowl. Let the first coat dry to the touch before adding the second. -
Painting the interior:
While you have the cream color out, paint the interior bottom of the bowl with two coats as well, ensuring full coverage.
Step 2: Creating the Ombre Bands
-
Start the yellow band:
Switch to your Golden Yellow underglaze. Paint a band around the middle section of the bowl’s exterior, slightly overlapping where it meets the cream base. -
Paint the interior yellow:
Mirror this on the inside of the bowl, painting a yellow band around the lower walls, just above the cream bottom. -
Apply the top pink band:
Load your brush with Coral Pink underglaze. Apply this to the top rim and the upper third of the bowl’s exterior. Make sure to paint the very top edge of the rim. -
Interior pink band:
Paint the upper interior walls with the Coral Pink, meeting the yellow section below.
Uneven Blending?
If the glaze dries too fast while blending, mist the surface lightly with water. This reactivates the underglaze, giving you more working time to smooth transitions.
Step 3: Blending the Fade
-
Prepare for blending:
Clean your fan brush thoroughly or grab a distinct soft blending brush. Keep a cup of clean water nearby. The goal is to soften the hard lines between colors. -
Blend yellow and cream:
Dampen your brush slightly—not dripping wet. Gently sweep back and forth horizontally where the yellow meets the cream base. Use a light touch to feather the yellow down into the cream. -
Blend pink and yellow:
Rinse your brush. Now, blend the transition line between the pink top and yellow middle. I find that pulling small strokes of yellow up into the pink and vice versa creates the most natural gradient. -
Repeat on the inside:
Use the same blending technique for the interior bands. It can be tricky to reach inside, so rotate the bowl slowly on your banding wheel to keep your strokes steady. -
Add a second coat:
Once the blended layers are dry, apply a second thin coat to the pink and yellow areas to deepen the color opacity, carefully re-blending the transitions while the glaze is wet.
Make it a Set
Paint matching spoons by dipping handles in the same pink and yellow glazes. Speckle the handles to tie the whole ice cream set together beautifully.
Step 4: Finishing Details
-
Create the speckles:
Dip a stiff bristle brush or an old toothbrush into a slightly watered-down mixture of a dark reddish-brown or deep coral underglaze. -
Splatter technique:
Run your thumb across the bristles to flick tiny specks of paint onto the bowl. Rotate the bowl to get even coverage on the exterior and interior. Practice on paper first to control the spray. -
Let it dry completely:
Allow the underglazes to dry completely, preferably overnight. The surface should be chalky and dry to the touch. -
Apply clear glaze:
Dip the entire bowl into a clear, food-safe dipping glaze. Hold it by the foot with tongs or your fingers (touching up the marks later) for an even coat. -
Final cleaning:
Wipe the very bottom of the foot with a sponge to remove any glaze so it doesn’t stick to the kiln shelf. -
Fire the piece:
Fire the bowl in the kiln according to the clay and glaze manufacturer’s instructions (typically Cone 06 or Cone 6 depending on your materials).
Once fired, fill your beautiful new bowl with a scoop of real sherbet and enjoy the sweet result of your hard work

PENCIL GUIDE
Understanding Pencil Grades from H to B
From first sketch to finished drawing — learn pencil grades, line control, and shading techniques.
Explore the Full Guide
Marbled Gelato Look
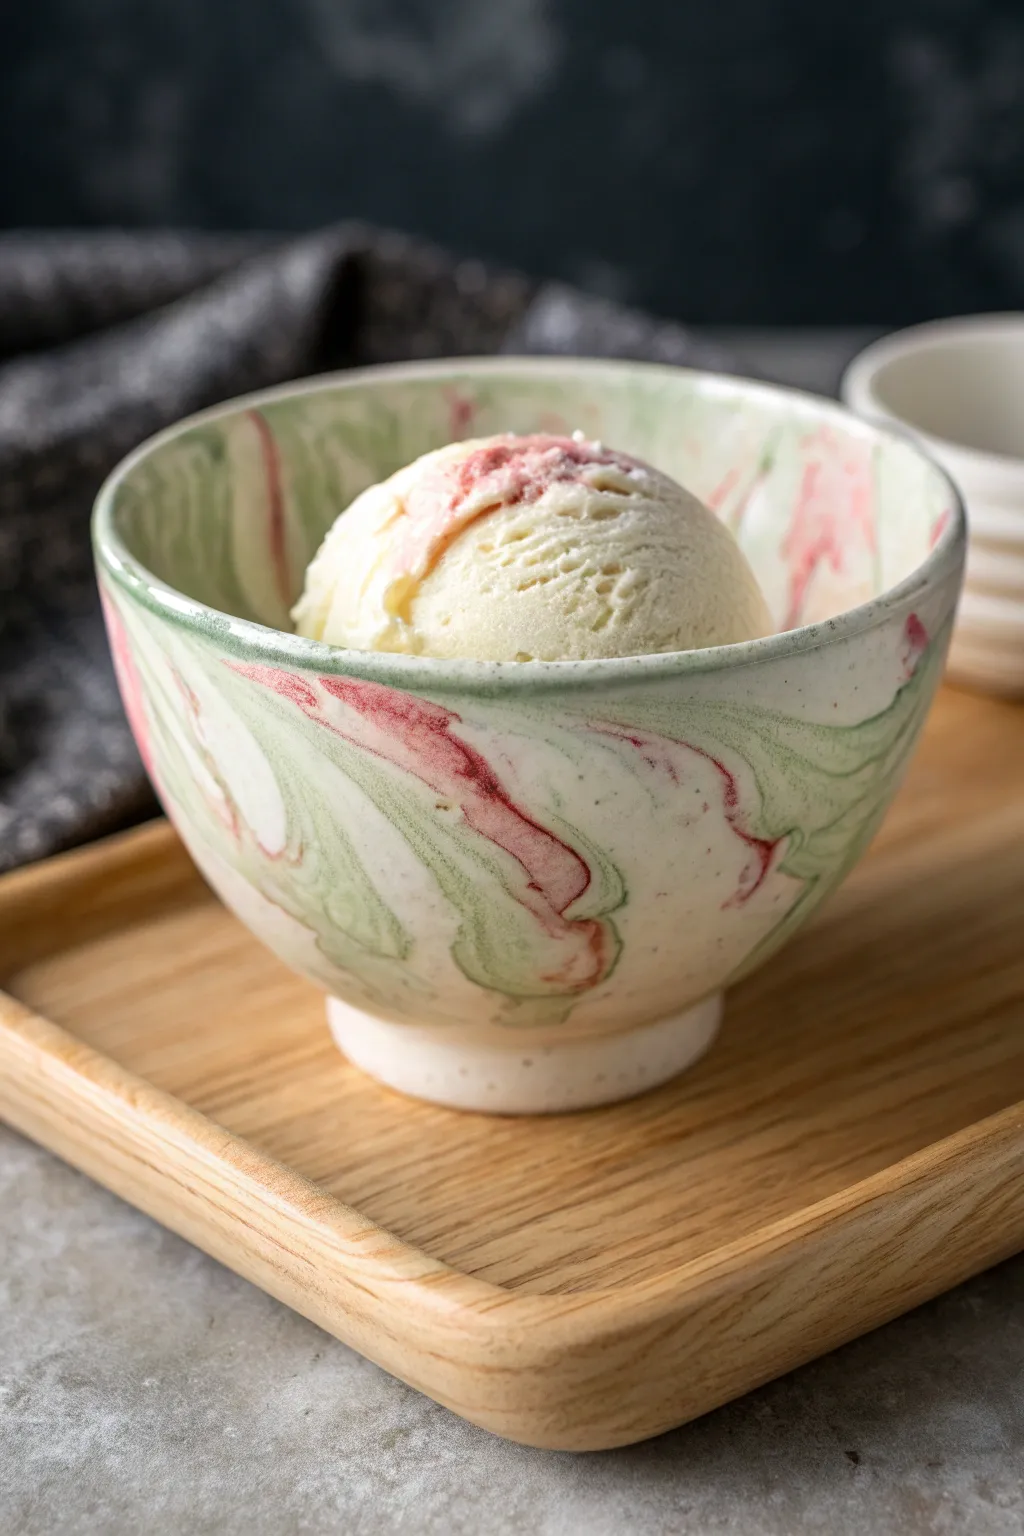
Recreate the creamy, rippled elegance of Italian gelato right on your dishware with this water marbling technique. The soft blend of sage green, milky white, and berry pink creates an organic, one-of-a-kind pattern that makes every scoop feel special.
Step-by-Step Guide
Materials
- White or cream ceramic bowl (glazed or bisque)
- Deep plastic container (larger than your bowl)
- Enamel paints or ceramic marbling paints (Sage Green, Berry Pink, Cream/White)
- Water (room temperature)
- Bamboo skewers or toothpicks
- Painter’s tape
- Paper towels
- Clear ceramic sealant/glaze (food-safe if painting inside)
- Disposable gloves
Step 1: Preparation
-
Clean the Surface:
Wash your ceramic bowl thoroughly with warm soapy water to remove any oils or dust. Let it dry completely. -
Wipe with Alcohol:
For extra adhesion, I usually wipe the exterior of the bowl with a cotton ball soaked in rubbing alcohol. This ensures the paint sticks perfectly to the ceramic surface. -
Mask the Interior:
Since most marbling paints aren’t food-safe, carefully apply painter’s tape to cover the entire inside of the bowl and the rim. Press the tape down firmly to create a tight seal so no water seeps in. -
Prepare the Water Bath:
Fill your deep plastic container with room temperature water. The temperature is crucial—water that is too cold can make the paint clump, while hot water sets it too fast.
Paint Sinking?
If drops sink to the bottom, your paint is too heavy. Try thinning it slightly with a drop of solvent, or switch to dedicated marbling inks.
Step 2: Creating the Marble Pattern
-
Drop the First Color:
Shake your sage green enamel paint well. Hold the bottle close to the water surface and drop 3-4 drops into the center. Watch it spread into a thin ring. -
Layer the Cream:
Promptly add 3-4 drops of the cream or white paint directly into the center of the green ring. You want to work relatively quickly so the paint stays fluid. -
Add the Berry Accent:
Add 1-2 drops of the berry pink paint into the center. Use this color sparingly compared to the green and white to mimic the delicate swirls in the reference image. -
Repeat the Rings:
Continue alternating drops of green and white, adding an occasional drop of pink, until the surface of the water is mostly covered with concentric rings of color. -
Swirl the Design:
Take a bamboo skewer and gently drag the tip through the surface of the water. Move from the outer edge toward the center, or swirl in figure-eights to disrupt the rings and create that organic, marble look. -
Check the Pattern:
Look at the water surface. If the pink lines look too thick, use the skewer to feather them out into the white sections.
Step 3: Dipping and Sealing
-
The Dip:
Put on your disposable gloves. Hold the bowl by the taped interior or use a strong grip on the bottom rim. -
Submerge the Bowl:
Slowly lower the bowl into the water at a slight angle. Keep pushing down until the water line reaches the taped rim. The paint on the surface will wrap around the ceramic. -
Clear the Surface:
While the bowl is still submerged, blow gently on the water’s surface to disperse the remaining paint skin to the edges of the container. This prevents a ‘double dip’ mess when you pull the bowl out. -
Remove and Drain:
Lift the bowl out of the water. Shake off excess water gently and place it upside down on paper towels to let the initial water drip off. -
Dry Completely:
Allow the bowl to air dry for at least 24 hours. The paint needs to fully cure before you handle it heavily. -
Remove the Tape:
Carefully peel away the painter’s tape from the rim and interior. If any paint bridged the gap between tape and bowl, lightly score the edge with a craft knife first. -
Seal the Work:
Apply a clear, food-safe ceramic sealer or high-gloss varnish over the painted exterior to protect the design from chipping during hand washing.
Clean Lines
Use liquid latex instead of tape for round shapes. Paint it on the rim, let it dry, dip your bowl, and then peel the latex off for a perfect edge.
Now you have a stunning, artisanal bowl that looks just as delicious as the dessert you’ll serve in it
Inside Illustration Sundae Surprise
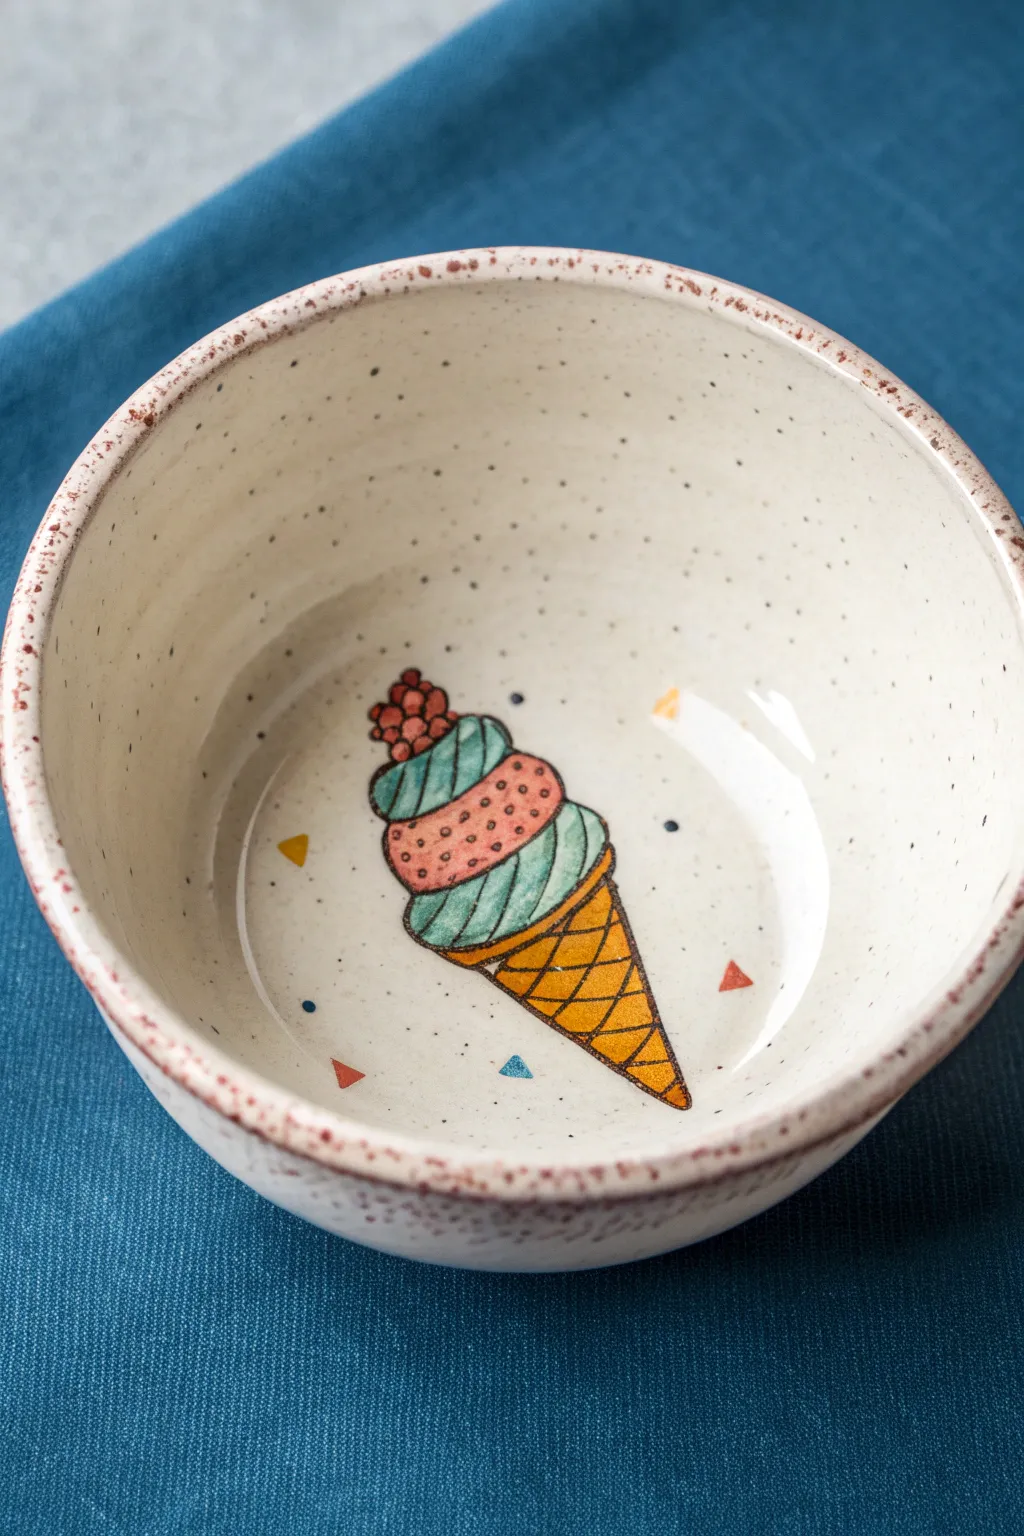
Transform a plain ceramic bowl into a sweet treat with this playful ice cream cone illustration. Nested at the very bottom, the design offers a charming surprise for anyone who finishes their dessert.
Step-by-Step Guide
Materials
- Bisque-fired ceramic bowl (speckled clay preferred)
- Underglaze pencil (black)
- Ceramic underglazes (mustard yellow, teal, coral pink, white)
- Small round detail brush (size 0 or 1)
- Fine liner brush (size 00)
- Clear food-safe ceramic glaze
- Clean water for rinsing
- Kiln (or access to a firing service)
Step 1: Sketching the Outline
-
Clean surface:
Begin by wiping the inside of your bisque bowl with a damp sponge to remove any dust, which can prevent glaze adhesion. -
Cone shape:
Using a black underglaze pencil, lightly sketch a narrow, inverted triangle near the center of the bowl’s bottom for the cone. -
First scoop:
Draw the bottom scoop sitting directly on the cone. This should look like a soft, rounded mound that slightly overhangs the cone edges. -
Middle scoop:
Stack a slightly flattened circular shape on top of the first mound. Keep the lines loose and organic. -
Top swirl:
Top off the stack with a swirled shape, creating a pointed peak like soft-serve or whipped cream. -
Cherry cluster:
Sketch a small cluster of circles at the very peak to represent a berry or cherry topping.
Fixing Smudges
If underglaze smears on the bisque, let it dry completely, then gently scrape it off with a craft knife or sandpaper instead of wiping, which spreads pigment.
Step 2: Blocking in Color
-
Painting the cone:
Dip your small round brush into mustard yellow underglaze. carefully fill in the triangle shape, leaving the pencil outline visible. -
Teal layers:
Using the teal underglaze, fill in the bottom scoop and the top swirled section. I usually apply two thin coats for opaque coverage. -
Pink middle:
Paint the middle scoop with the coral pink underglaze, being careful not to blend it into the teal sections. -
Berry details:
Use the very tip of your brush to dab the coral pink onto the cherry cluster at the top.
Step 3: Adding Line Work and Details
-
Outline the cone:
Once the yellow block is dry, use a fine liner brush and black underglaze to trace over your original pencil lines for the cone. -
Waffle pattern:
Paint diagonal grid lines across the yellow cone to create the classic waffle texture. -
Highlighting scoops:
Outline various sections of the ice cream scoops with thin black lines to define their separation. -
Adding texture:
Draw curved, vertical lines within the teal scoops to suggest the swirled texture of the ice cream. -
Dotted details:
Add small black dots to the pink scoop to simulate sprinkles or texture, and outline the individual berries at the top.
Make it Sparkle
Mix a tiny amount of clear glaze with the underglaze used for the ‘sprinkles’ on the pink scoop. This creates a slightly raised, textural effect after firing.
Step 4: Finishing Touches
-
Confetti background:
patter tiny triangles around the main illustration using the remaining yellow, teal, and pink underglazes to create a confetti effect. -
Blue dots:
Add a few tiny dark blue dots among the triangles for contrast. -
Glazing:
Once all underglaze is completely dry, apply a coat of clear, food-safe glaze over the entire interior of the bowl. -
Rim detail:
For a rustic finish, lightly sponge a reddish-brown iron oxide or underglaze along the very rim of the bowl. -
Final fire:
Fire the bowl in the kiln according to your clay and glaze specifications (usually Cone 5 or 6).
Now you have a delightful hidden gem waiting at the bottom of your next bowl of ice cream


Have a question or want to share your own experience? I'd love to hear from you in the comments below!