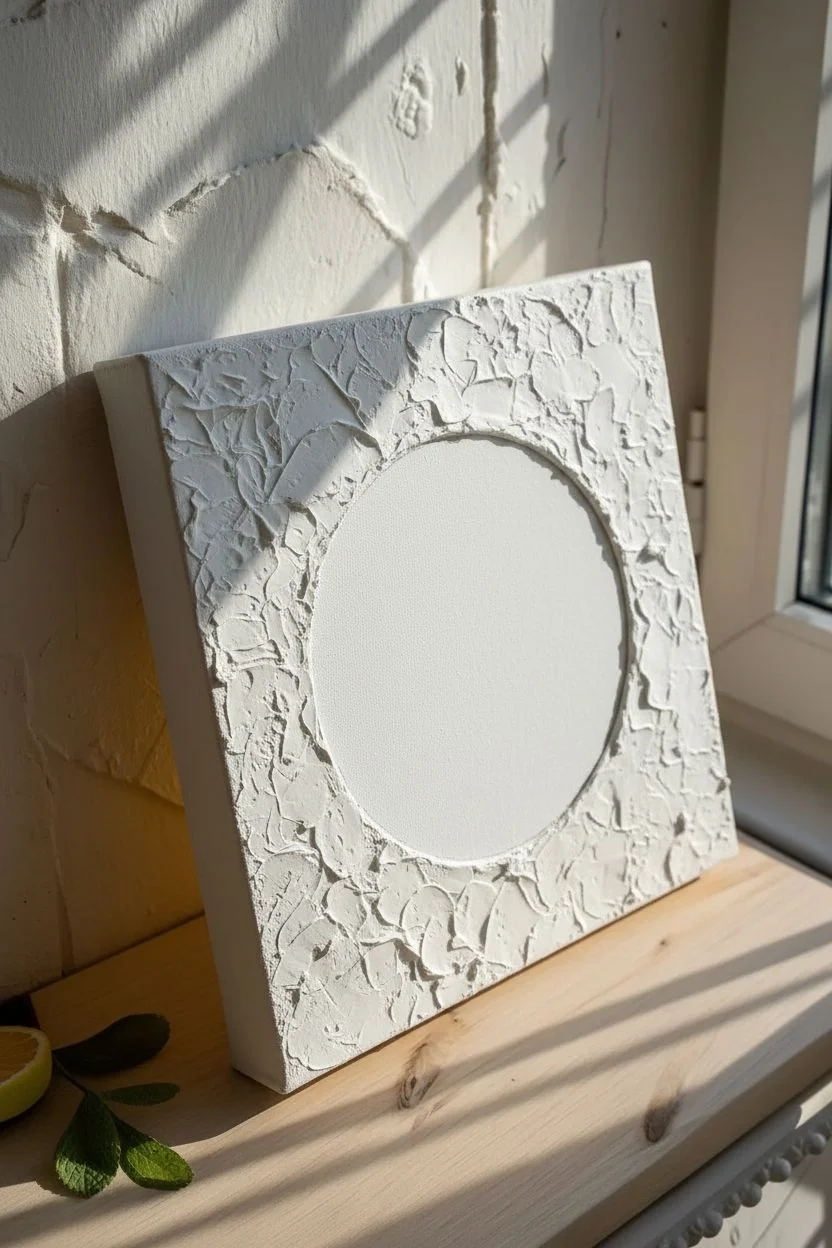
If you’ve been craving paintings that feel almost sculpted, impasto is where the magic happens—thick paint, bold marks, and that satisfying 3D texture. Here are my favorite impasto painting ideas that look impressive fast, especially when you lean into confident palette knife strokes.
Ocean Waves With Foamy Knife Peaks
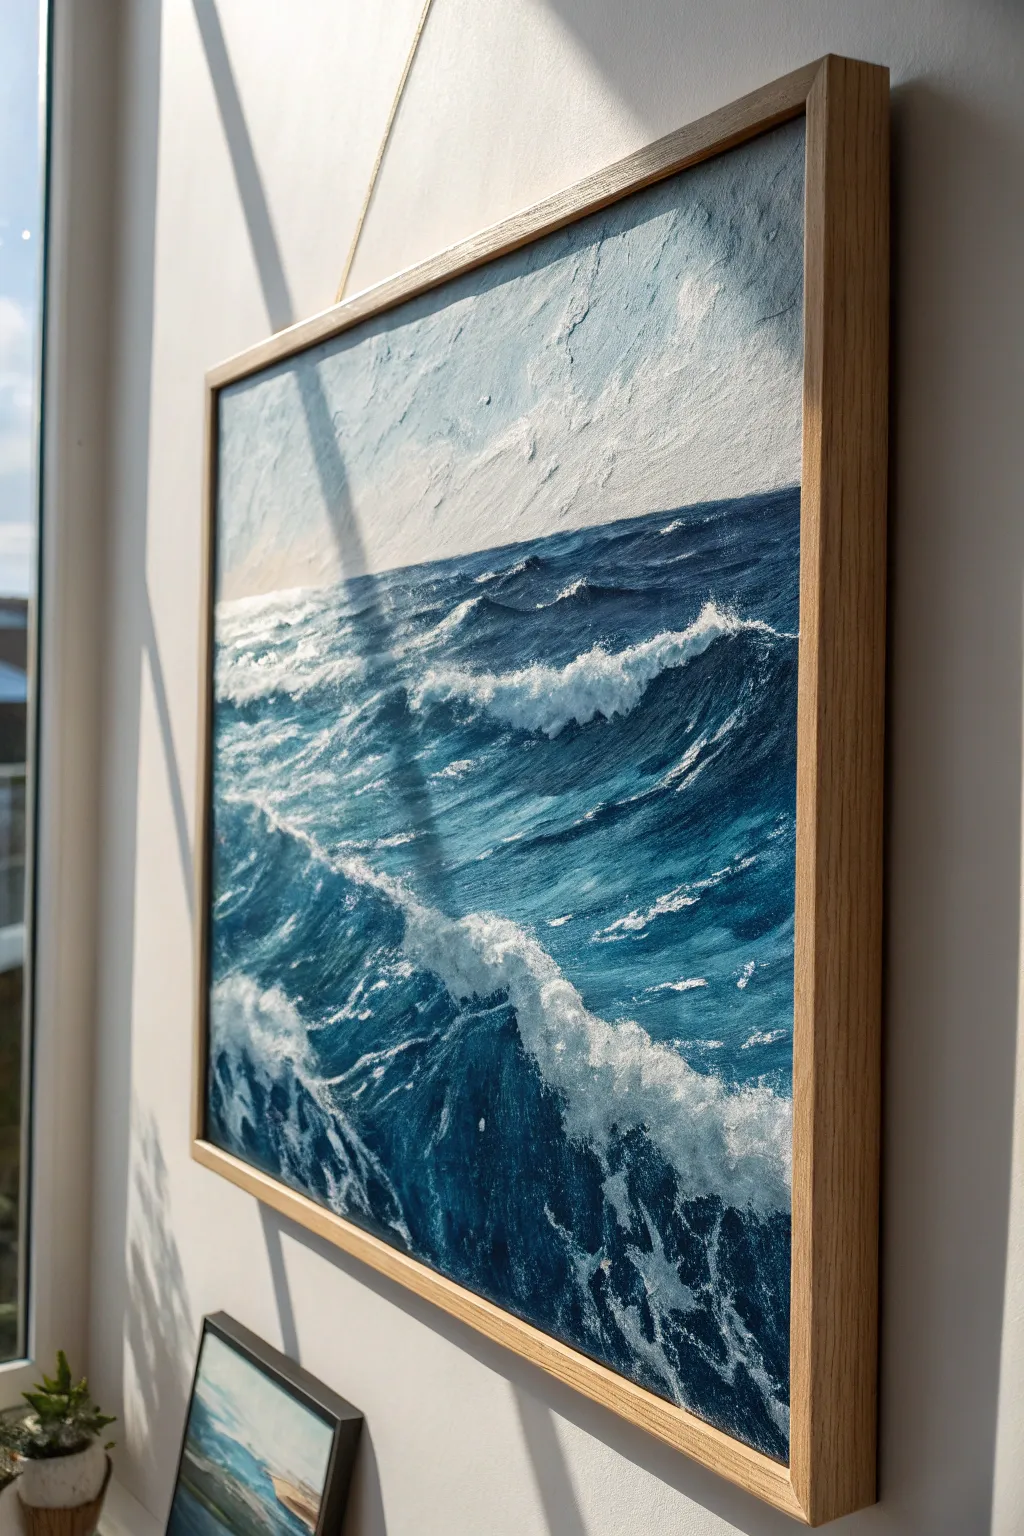
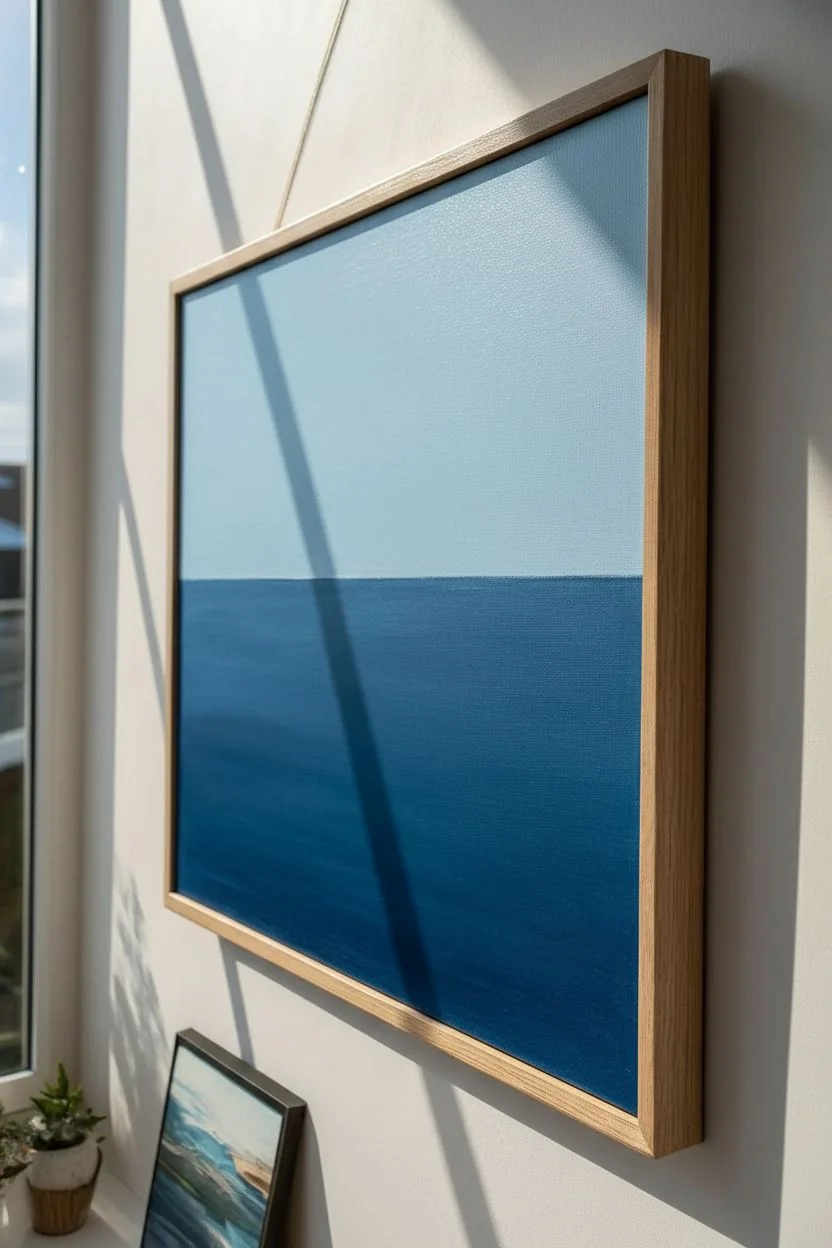
Capture the raw energy of the ocean with this dynamic impasto wave painting, featuring deep prussian blues and stark white caps. The heavy texture creates actual peaks and ridges, making the waves seem to leap right off the canvas.
Detailed Instructions
Materials
- Canvas board or stretched canvas (16×20″ recommended)
- Heavy body acrylic paints (Prussian Blue, Phthalo Blue, Titanium White, Paynes Grey, Turquoise)
- Thickening modeling paste or gel medium
- Palette knives (assorted sizes, including a large trowel and a thin diamond shape)
- Large flat paintbrush (2 inch)
- Wooden floating frame (light oak)
- Palette (disposable recommended)
Step 1: Setting the Horizon
-
Prepare the Colors:
Mix a large amount of Titanium White with just a speck of Phthalo Blue to create a very pale, icy sky blue. In a separate pile, mix your deep ocean base using Prussian Blue and a touch of Paynes Grey. -
Establish the Horizon:
Using your large flat brush, paint the top third of the canvas with your pale sky blue. Ensure the horizon line is relatively straight but don’t worry about perfection, as waves will overlap it. -
Underpainting the Sea:
With the same brush, apply a thin, flat layer of your dark blue mix to the bottom two-thirds of the canvas. This provides a solid color foundation so no white canvas shows through the texture later. -
Texture Preparation:
Let the underlayer dry completely. While waiting, mix your heavy body paints with modeling paste in a 1:1 ratio. You need three distinct texture piles: Deep Indigo, Mid-tone Turquoise, and Pure White.
Keep it Clean
Wipe your palette knife on a paper towel after every single stroke when applying the white foam. This ensures your whites stay crisp and don’t turn into light blue mush.
Step 2: Building the Waves
-
Deep Water Base:
Load a large palette knife with the Deep Indigo texture mix. Apply it thickly to the bottom section of the canvas, using sweeping, diagonal strokes that mimic the swell of water. -
Create the Swell:
Working upwards towards the horizon, switch to the Mid-tone Turquoise mix. Layer this over the dark blue in areas where you want the light to hit the translucent part of the wave. -
Blurring the Horizon:
Where the sea meets the sky, use a clean knife to gently drag the blue texture horizontally, creating a slightly distant, choppy water effect that isn’t too sharp. -
Carving the Motion:
Clean your knife. Use the edge of the blade to cut into the wet dark paint, creating channels and ridges that suggest the direction of the current. -
Mid-Layer Curing:
Allow these dark base layers to set for about an hour. They don’t need to be fully hard, but firm enough that the next layer of white won’t turn into a muddy gray mix.
Muddy Waves?
If the white paint is sinking into the blue and disappearing, the base layer is too wet. Stop immediately and let the painting sit for 2 hours before trying again.
Step 3: The Foamy Peaks
-
Loading the Knife:
Scoop a generous amount of plain Titanium White mixed with extra modeling paste onto the backside of your palette knife. You want it to hold its shape like frosting. -
Breaking Waves:
Apply the white to the tops of your dark ridges. Use a ‘buttering’ motion, letting the paint break naturally over the texture of the canvas to create the lacy sea foam look. -
The Crashing Front:
For the nearest large wave, apply the white quite thickly. Then, use the knife edge to pull the paint backward (away from the direction of the wave) to simulate wind spray. -
Adding Chaos:
Use a smaller diamond-shaped knife to dab small flecks of white into the deep blue troughs, representing foam left behind by previous crashing waves. -
Refining the Crests:
I find it helpful to go back with a tiny bit of pure Phthalo Blue on a small knife and tuck it just under the white foam crests to deepen the shadow and add volume. -
Final White Highlights:
Once the main foam is laid down, take pure Titanium White (no medium) and hit the very highest peaks of the texture for maximum brightness.
Step 4: Framing
-
Drying Time:
This step is crucial: allow the painting to dry for at least 48 to 72 hours. Impasto layers are thick and need time to cure all the way through. -
Varnishing:
Apply a gloss varnish to the water area to give it a wet look, but keep the sky matte or satin for contrast. -
Mounting:
Place the canvas into the light oak floating frame. Secure it from the back using offset clips so the painting appears to hover inside the wood border.
Hang your seascape where the natural light can catch those textured ridges and bring the water to life


Tulip Trio in One-Stroke Petals
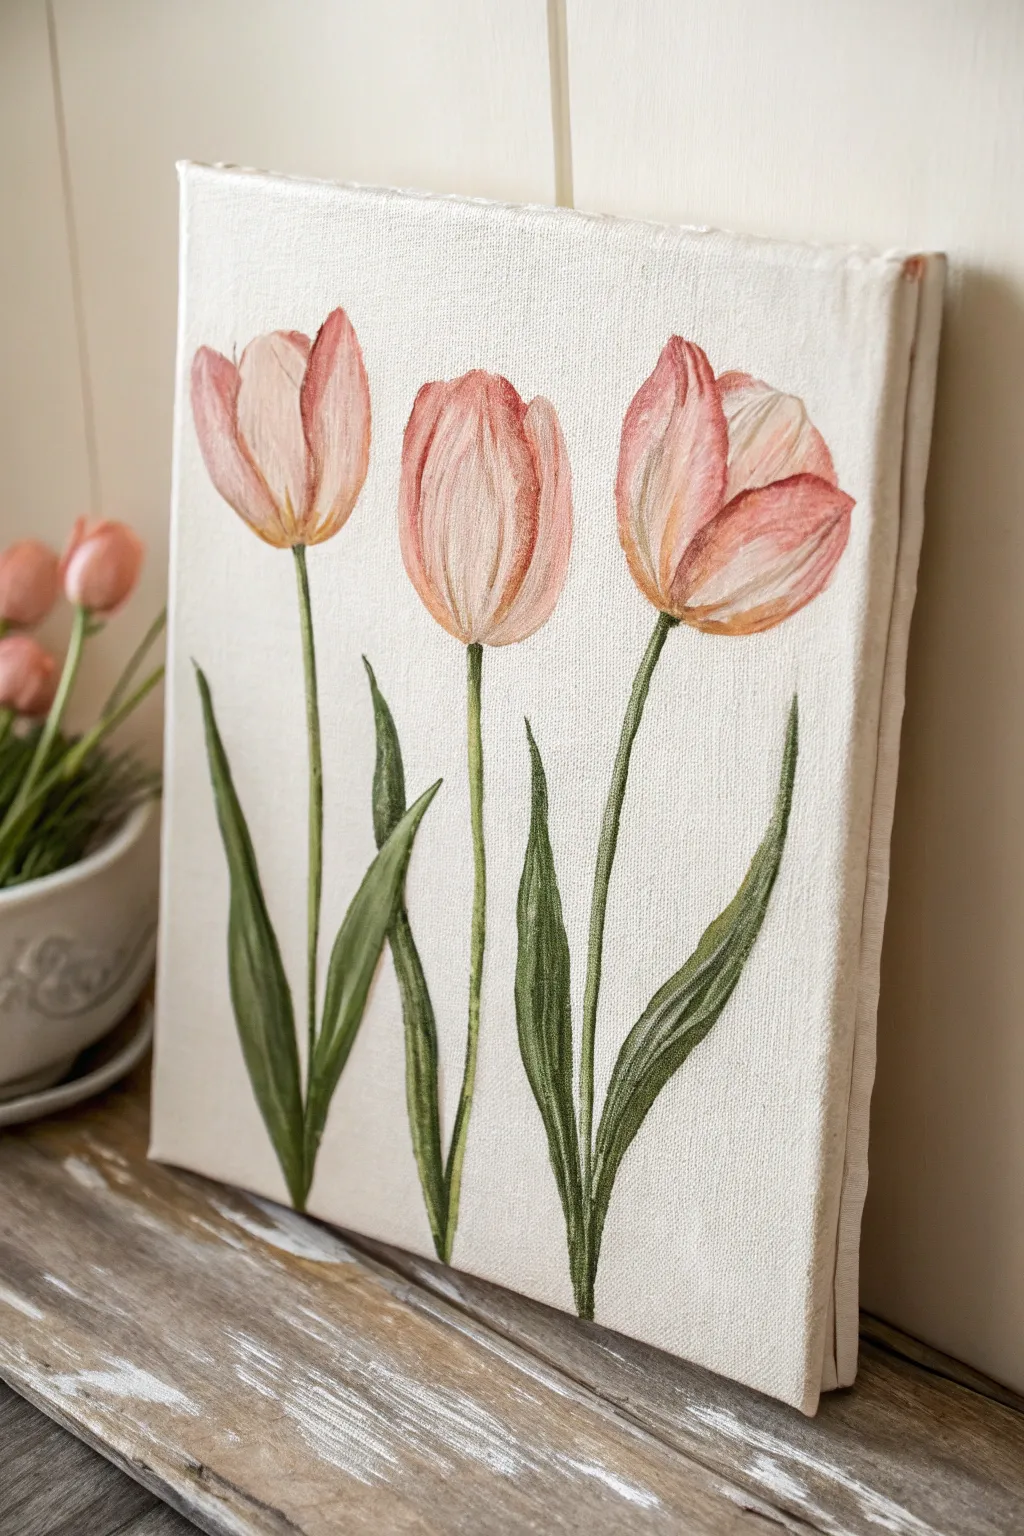
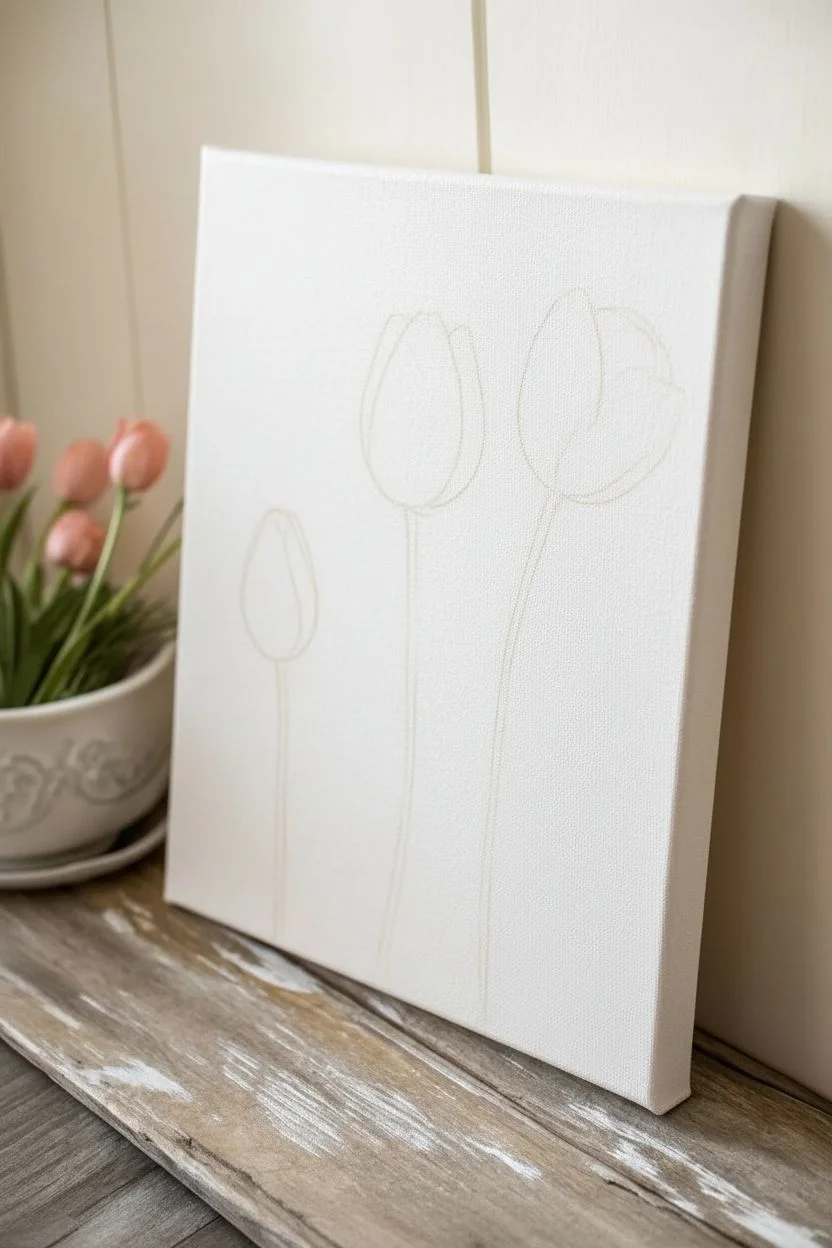
Capture the soft elegance of spring with this delicate study of three pink tulips. Using a one-stroke inspired technique on a textured canvas, you’ll create petals that feel organic and full of light.
How-To Guide
Materials
- Small stretched canvas (8×10″ or similar)
- Acrylic paints: Titanium White, Alizarin Crimson, Cadmium Yellow Medium, Sap Green, Burnt Umber
- Flat shader brush (size 10 or 12)
- Small round brush (size 2-4)
- Liner brush or rigger brush
- Palette and mixing knife
- Cup of water and paper towels
Step 1: Preparation & Base Outline
-
Prepare the canvas:
Begin with a plain white canvas. If your canvas provides too much friction, you can apply a thin coat of white gesso to smooth out the tooth slightly, though the natural texture works well for this organic look. -
Mix your base colors:
Create a soft peach-pink by mixing Titanium White with a small dot of Alizarin Crimson and a tiny hint of Cadmium Yellow. You want a gradient on your palette: pure white, pale pink, and a slightly deeper salmon pink. -
Sketch the composition:
Using a very diluted mix of Burnt Umber and water on your small round brush, lightly map out where the three tulip heads will sit. Place the left one slightly lower, the middle one highest, and the right one angled outward. Keep these lines incredibly faint.
Step 2: Painting the Petals
-
Load the brush:
Dip your flat shader brush into the white paint on one corner and the pink mix on the other corner. Blend them slightly on the palette so there is a soft transition in the middle. -
Create the center petal:
Focusing on the middle tulip first, place your brush at the bottom of the flower head. Press down and pull upward in a curve, lifting pressure at the top to create a tapered edge. This forms the main central petal. -
Add side petals:
Reload your brush with fresh bicolor paint. Starting from the bottom base again, sweep a curved stroke to the left, hugging the center petal. Repeat this motion on the right side. -
Build the left tulip:
For the leftmost flower, repeat the process but keep the form tighter, resembling a bud that is just beginning to open. Use slightly more white on the outer edges to show where light hits the curve. -
Paint the open right tulip:
The rightmost tulip is more open. Paint the back petal first, then layer the front petals with wider, looser strokes. Angle the flower head slightly to the right to create movement. -
Add definition:
Using the small round brush and a slightly darker mix of Alizarin Crimson and Yellow, add subtle streaks near the base of the petals. This creates depth and shadows where the petals overlap. -
Highlight the tips:
With a clean brush and pure Titanium White, gently glaze the very tops of the petals. I like to let the previous layer dry slightly so this highlight sits on top rather than blending in fully.
Muddy Petals?
If your pinks and whites are blending into a single flat color, wipe your brush clean more often. You need distinct piles of paint on the brush to keep that striated, one-stroke look.
Step 3: Stems & Foliage
-
Mix the greens:
Combine Sap Green with a touch of Burnt Umber to create a natural, earthy olive tone. Make a secondary lighter green by adding a little Yellow and White to the mix. -
Draw the stems:
Switch to your liner or rigger brush. Load it with the paint thinned slightly with water for better flow. Starting from the base of each flower head, pull a long, continuous line downward. Don’t make them perfectly straight; a slight wobble looks organic. -
Paint the first leaf:
Using the flat brush turned sideways (on its chisel edge), start at a low point on the stem. Press down to widen the stroke as you move up, then twist and lift to create a sharp point. Paint a large leaf for the left flower. -
Balance the foliage:
Add a second large leaf reaching up between the middle and right stems. Vary the height so it doesn’t look symmetrical. -
Add shading to leaves:
While the green paint is still wet, streak in some of your darker green-brown mix along one side of each leaf to suggest a shadow side. -
Connect the visual flow:
Ensure the stems connect naturally to the flowers. You might need a tiny dab of dark green right where the stem meets the pink petals to create a little cup or shadow. -
Final dry brushing:
Once fully dry, you can lightly dry-brush a tiny bit of white texture onto the pinkest parts of the petals to enhance the canvas texture look.
Level Up: Dewdrops
Add tiny transparent water droplets on a leaf using a dot of dark green for the shadow and a pinpoint of pure white for the reflection highlight.
Step back and admire how these simple strokes come together to create a blooming garden on your wall


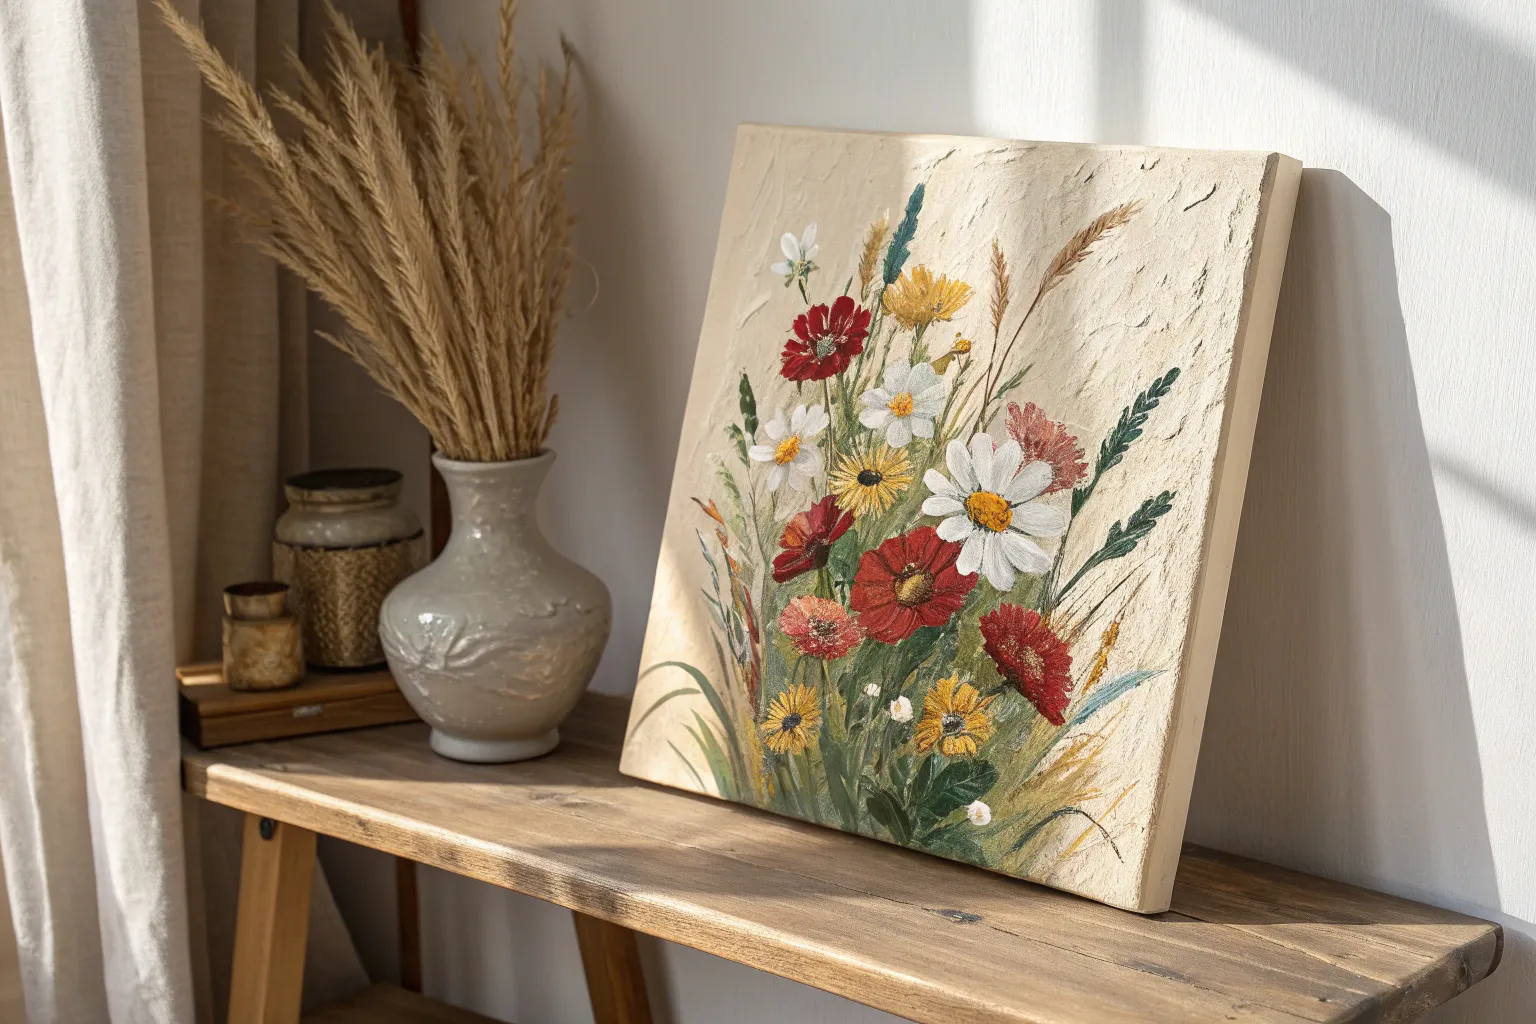
Wildflower Field of Dabs and Dashes
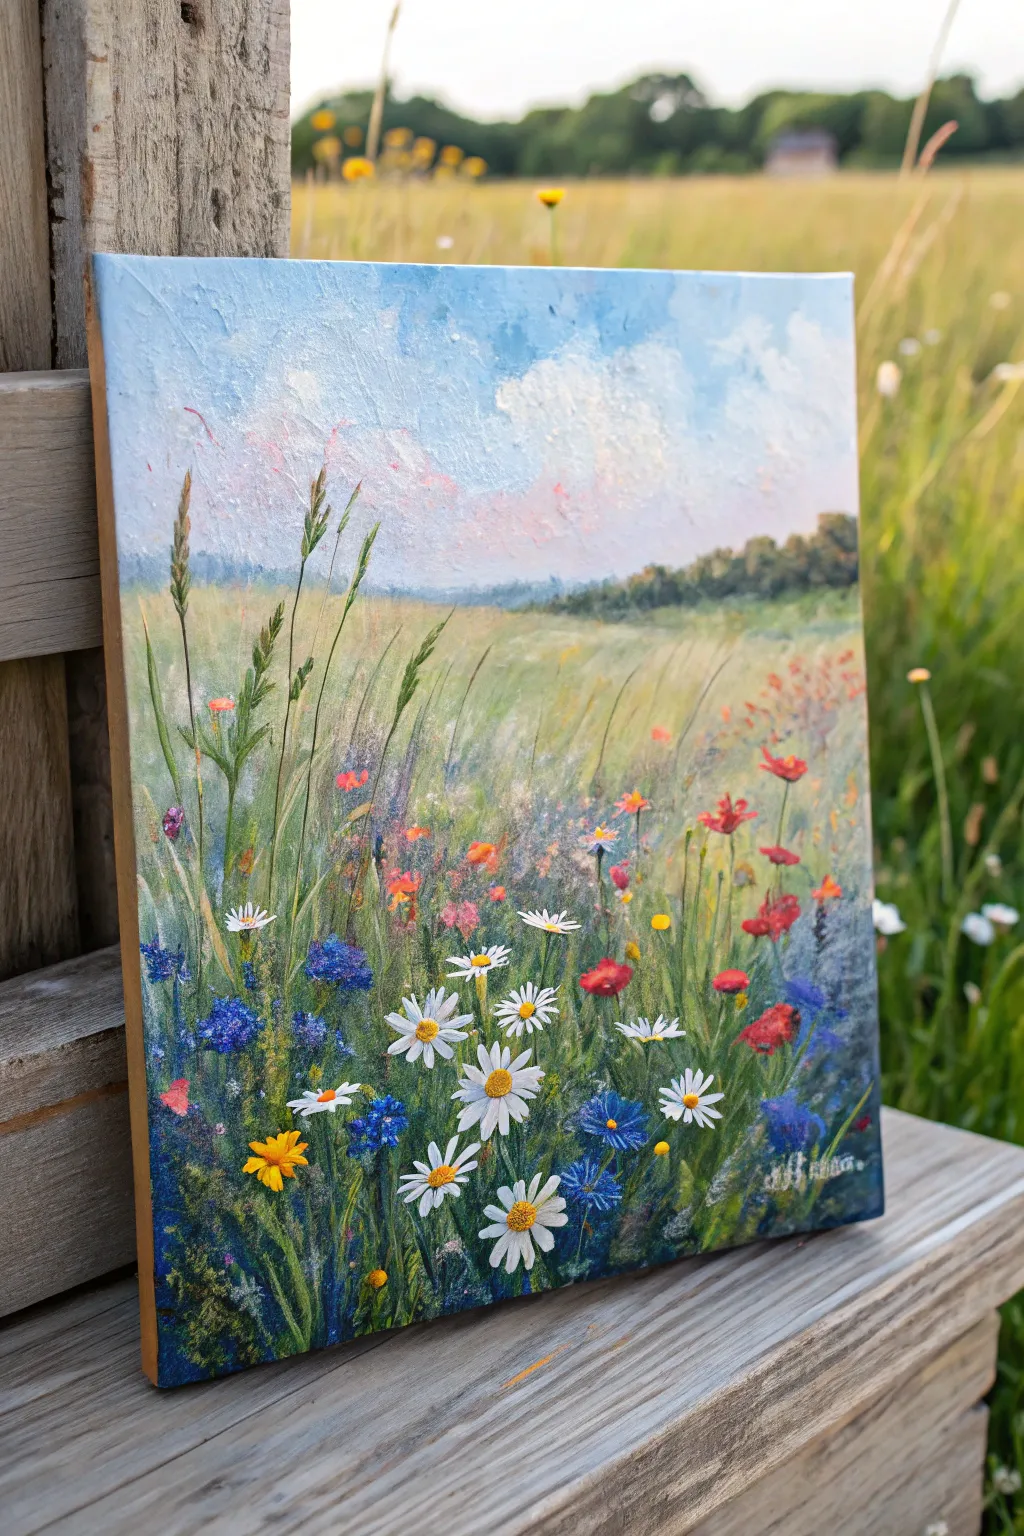
Capture the untamed beauty of a summer wildflower field using heavy body acrylics and bold texture techniques. This project focuses on building up layers of dabs and dashes to create a vibrant, three-dimensional meadow scene that feels alive with movement.
Step-by-Step
Materials
- Square canvas (approx. 12×12 inches)
- Heavy body acrylic paints (Titanium White, Ultramarine Blue, Phthalo Blue, Cadmium Yellow, Yellow Ochre, Cadmium Red, Sap Green, Burnt Umber)
- Modeling paste or gel medium (optional for extra texture)
- Palette knives (one medium trowel, one small diamond shape)
- Flat synthetic brushes (size 6 and 10)
- Small round detail brush (size 1 or 2)
- Palette for mixing
- Water cup and paper towels
Step 1: Sky and Background
-
Prime the sky:
Mix Titanium White with a tiny touch of Ultramarine Blue. Using a large palette knife, spread this mixture across the top third of the canvas. Don’t smooth it out perfectly; let the knife create ridges and peaks to mimic cloud textures. -
Add cloud shadows:
While the white is still wet, mix a faint lavender-gray using White, a speck of Blue, and a dot of Red. Dab this into the lower sections of your cloud shapes to give them volume and weight. -
Paint the distant trees:
Mix Sap Green, Ultramarine Blue, and a touch of Burnt Umber to create a deep, cool forest green. Using a size 10 flat brush, paint a jagged horizontal band across the horizon line where the sky ends. Keep the top edge uneven to suggest tree tops. -
Create the mid-ground field:
Below the tree line, blend Yellow Ochre with a lot of White and a touch of Sap Green. Apply this horizontally with a palette knife, scraping it thinly to create a smooth, distant grassy area that fades into the foreground.
Knife vs. Brush
Use a palette knife for ‘hard’ objects like thick stems or distant flat fields, and brushes for ‘soft’ organic shapes like petals. This contrast makes the texture exciting.
Step 2: Grassy Foundation
-
Block in the foreground green:
Mix a variety of greens for the bottom half of the canvas. Combine Sap Green with Yellow for warm areas and Phthalo Blue for cool shadows. Use a brush to cover the bottom canvas loosely, ensuring no white canvas shows through. -
Texture the tall grasses:
Load the edge of your palette knife with lighter green paint (Sap Green + White). Press the edge against the canvas and pull upward in quick, sweeping motions to create tall, vertical grass blades. -
Insert shadow depth:
Mix a dark blue-green shade. Use the small round brush to paint thin, dark lines between the lighter grass blades. This negative space makes the lighter grasses pop forward. -
Add tall stalks:
Using a liner brush or the edge of a small knife, paint thin, brownish-green vertical stalks that reach high up towards the sky area, specifically on the left side to balance the composition.
Level Up: Glossy Finish
Mix gloss gel medium into your acrylics before painting. It increases transparency and gives the thick impasto peaks a jewel-like shine that catches room light beautifully.
Step 3: Wildflower Explosion
-
Dab in blue cornflowers:
Mix Ultramarine Blue with a touch of White. Pick up a thick glob of paint with a small round brush and ‘stamp’ it onto the canvas in clusters. Don’t paint petals yet; just create textured blue textural centers. -
Add poppy accents:
Using pure Cadmium Red, place small, irregular dots scattered among the grasses. Keep these sparse to avoid overwhelming the scene—they are accents, not the main subject. -
Create the daisy centers:
Mix Cadmium Yellow with a tiny bit of Red to make an orange-yellow. Place raised dots of this thick paint where you want your main daisies to be. I like to group them in threes or fives for a natural look. -
Paint daisy petals:
Load a small filbert or round brush with pure Titanium White. Press the brush down near a yellow center and pull outward, lifting the brush at the end to create a tapered petal. Repeat around each center. -
Highlight the blue flowers:
Mix a lighter blue (White + Phthalo Blue). Add tiny dashes on top of your dried dark blue cornflower blobs to suggest light hitting individual petals. -
Detail the foreground:
Add a few distinct, small yellow flowers (like buttercups) near the very bottom edge using Cadmium Yellow. Use the tip of the palette knife to give them sharp, defined edges. -
Add white speckles:
Flick or dot tiny specks of white and light pink in the background grass area using a brush to suggest distant wildflowers that are out of focus.
Step 4: Final Touches
-
Refine grass overlap:
Mix a very pale, almost white-green. With a fine liner brush, paint a few sharp blades of grass that overlap *in front* of the flower stems. This pushes the flowers back into the foliage. -
Enhance texturing:
If any flower looks too flat, apply a second, thicker dab of paint right on top of the highlight areas. Impasto relies on this physical height of the paint to catch the light. -
Sign and seal:
Once the thick paint is fully dry (which may take a few days), sign your name in the corner with a contrasting color like white or light blue.
Step back and admire your lush, textured meadow that brings the outdoors right into your room


Cherry Blossom Branch With Thick Clusters
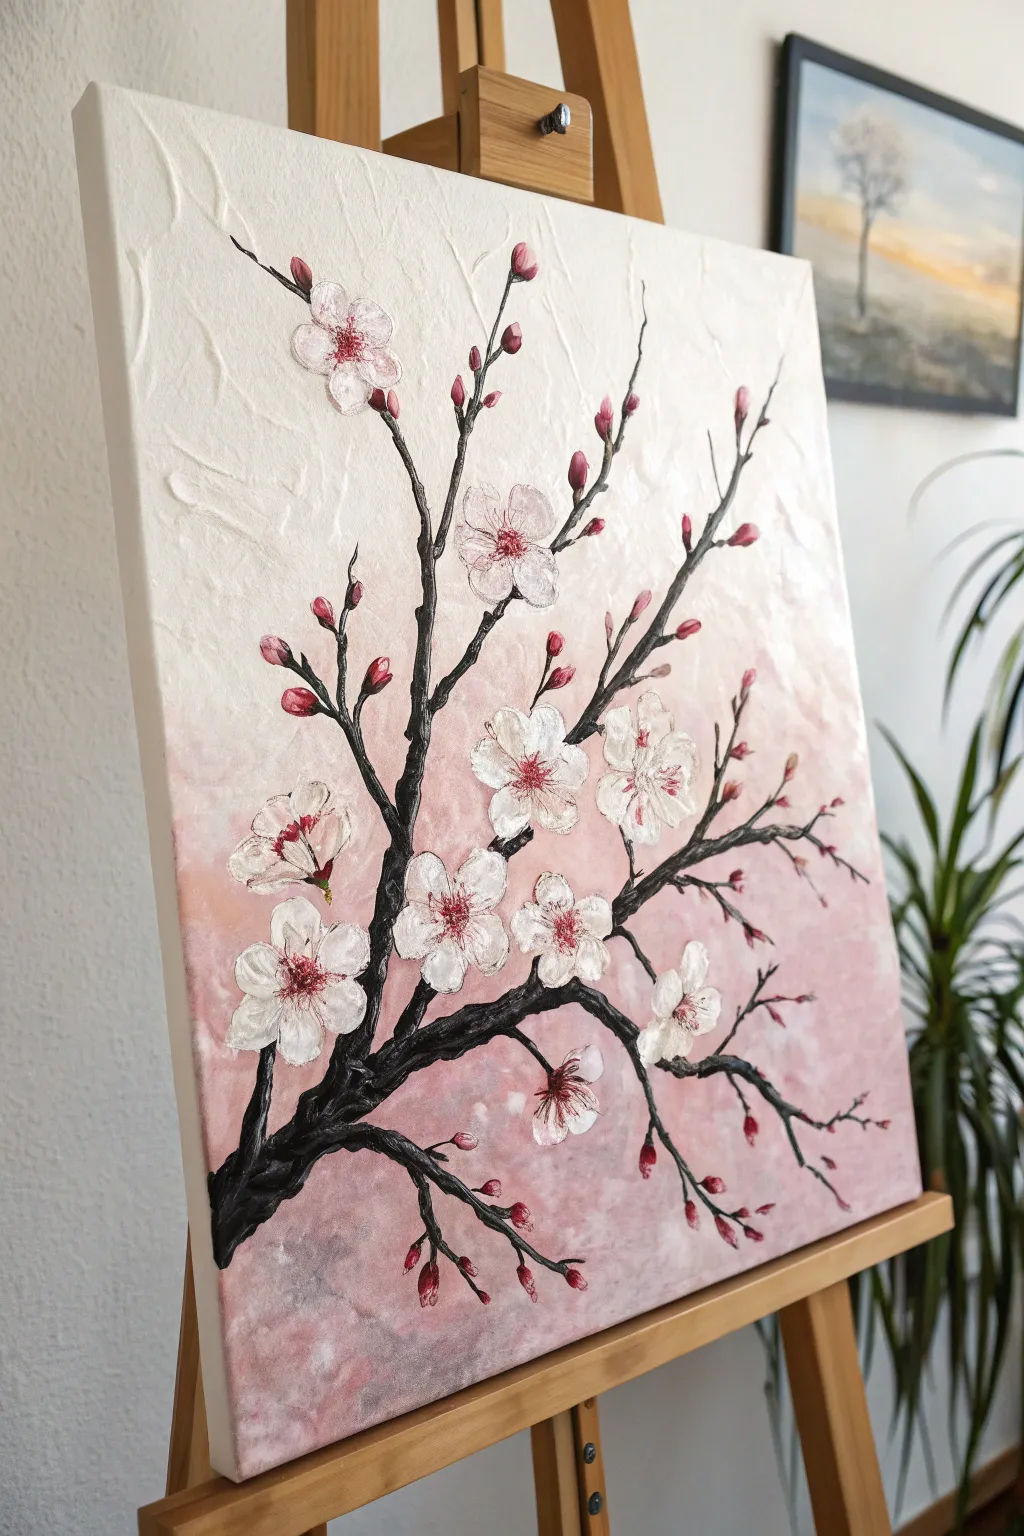
Capture the delicate beauty of spring with this highly textured acrylic painting that brings cherry blossoms to life. By using texture paste and a palette knife, you will create a stunning 3D effect where the flowers seem to bloom right off the canvas.
Step-by-Step Guide
Materials
- Stretched canvas (e.g., 16×20 inch)
- White texture paste or heavy molding paste
- Acrylic paints: White, Crimson Red, Burnt Umber, Black, Pink (or mix Red/White)
- Palette knifes (various sizes, pointed tips)
- Flat brush (large) for background
- Round detail brushes (small)
- Sponge or large soft brush for blending
- Pencil for sketching
- Paper plate or palette
Step 1: Preparing the Textured Background
-
Prime with paste:
Begin by applying a thin, uneven layer of texture paste all over the canvas using a large palette knife. Don’t smooth it out perfectly; keep random ridges and bumps to create a stucco-like foundation. -
Dry completely:
Allow this base layer of texture paste to dry fully. This can take several hours, so be patient, as painting over wet paste will muddy your colors. -
Mix the ombré:
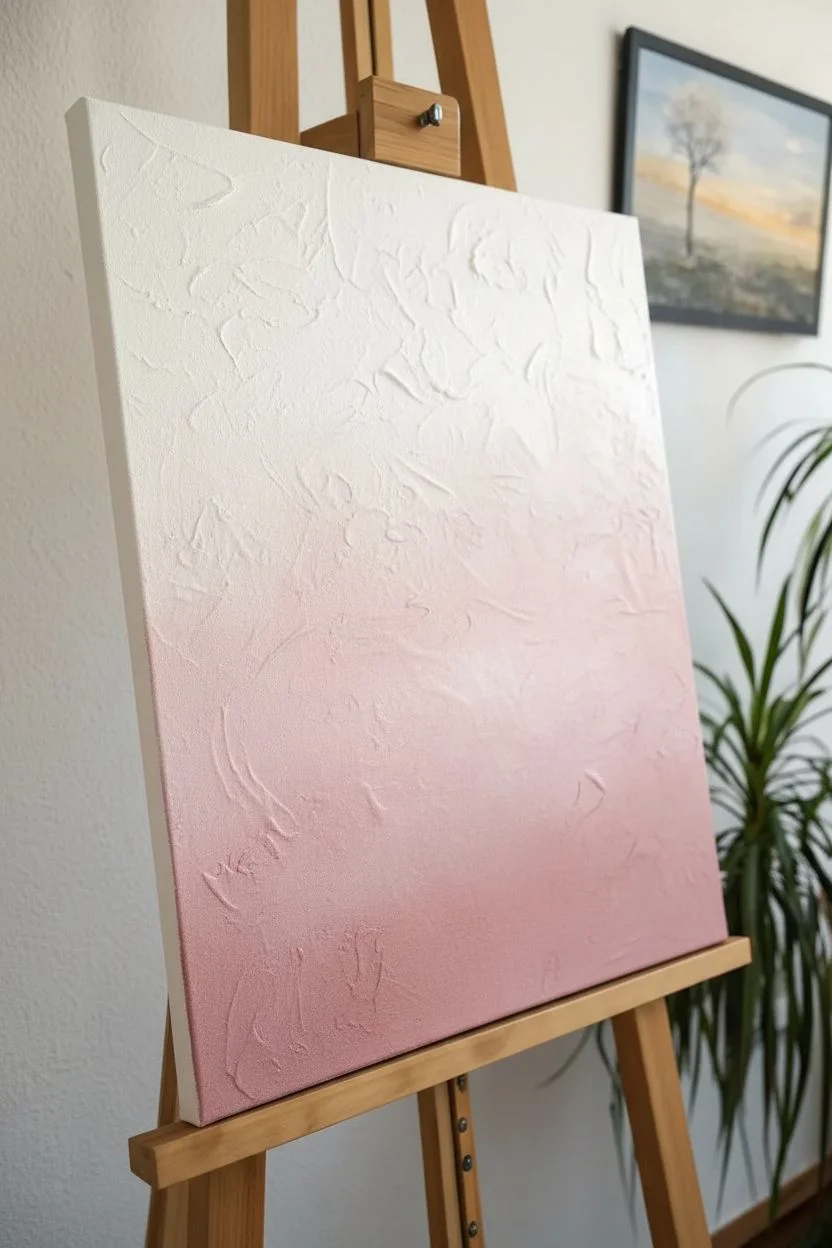
Prepare a gradient on your palette: pure white for the top, a very pale pink for the middle, and a dusty rose color for the bottom third. -
Apply the gradient:
Using a large flat brush or a damp sponge, paint the background. Start with white at the top, blending down into the pale pink, and finish with the darker pink at the bottom to create a soft, romantic haze.
Step 2: Sculpting the Branches
-
Sketch the layout:
Lightly trace the main branch structure with a pencil. Start from the bottom left corner and extend diagonal branches upwards toward the right side. -
Mix dark paste:
Mix a small amount of black and burnt umber acrylic paint directly into a dollop of texture paste. You want a thick, dark brown/black mixture that holds its shape. -
Pipe or sculpt branches:
Using the edge of a specific palette knife or a piping bag, lay down the thick dark paste along your pencil lines. The main trunk should be significantly thicker than the tips. -
Texturize the bark:
While the branch paste is wet, use a clean palette knife or a toothpick to scratch vertical grooves into the trunk. This mimics rough tree bark. -
Extend fine twigs:
Use a small liner brush with thinned dark paint to extend tiny, delicate twigs off the main textured branches. These will hold the smaller buds.
Fixing Flat Petals
If your petals flatten out as they dry, your paste was too runny. Mix more heavy molding paste or baking soda into your acrylics to stiffen the mixture instantly.
Step 3: Creating the 3D Blossoms
-
Prepare flower paste:
Mix a clean batch of texture paste with white acrylic paint. It needs to be stiff enough to hold a petal shape without sagging. -
Sculpt main petals:
Scoop a nickel-sized amount of white paste onto the back of a small palette knife. Press it gently onto the canvas near a branch specifically where you want a large open flower. -
Shape the petals:
Use the tip of the knife to manipulate the blob into five distinct petal shapes, pulling slightly outward from the center. I find wiping the knife clean between petals keeps the shapes crisp. -
Add variance:
Repeat this process for several large blooms, varying the angle of the flowers. Some should face forward, while others might tilt sideways. -
Create closed buds:
For the smaller buds at the tips of the branches, mix a drop of red into your paste to make pink. Dab small, teardrop-shaped amounts of this pink paste onto the twig ends. -
Layer the sepals:
Once the pink buds are placed, use your smallest brush with dark branch color to paint the tiny green/brown cups (sepals) at the very base of each pink bud.
Add Subtle Sparkle
While the white flower paste is still wet, sprinkle a tiny pinch of iridescent ultra-fine glitter onto the petals to simulate morning dew catching the sunlight.
Step 4: Details and Definition
-
Paint petal centers:
Allow the flower paste to form a skin (it doesn’t need to be rock hard yet). Dilute crimson red paint with a little water and dab it into the very center of the white flowers. -
Bleed the color:
Use a clean, damp brush to gently pull that red center color slightly outward into the white petals, creating a soft, blushing gradient. -
Add stamens:
Using a liner brush and dark red or brown paint, flick tiny lines radiating from the center of each open flower. -
Highlight the stamens:
Dot the ends of those tiny radiating lines with bright yellow or white paint to represent the pollen. -
Highlights and shadows:
Finally, inspect the branches. If they look too flat after drying, dry-brush a little light grey or white on the upper ridges of the bark to catch the light.
Hang your masterpiece once it is fully cured and enjoy the eternal spring vibe it brings to your room.
BRUSH GUIDE
The Right Brush for Every Stroke
From clean lines to bold texture — master brush choice, stroke control, and essential techniques.
Explore the Full Guide
Autumn Trees With Bark-Like Texture
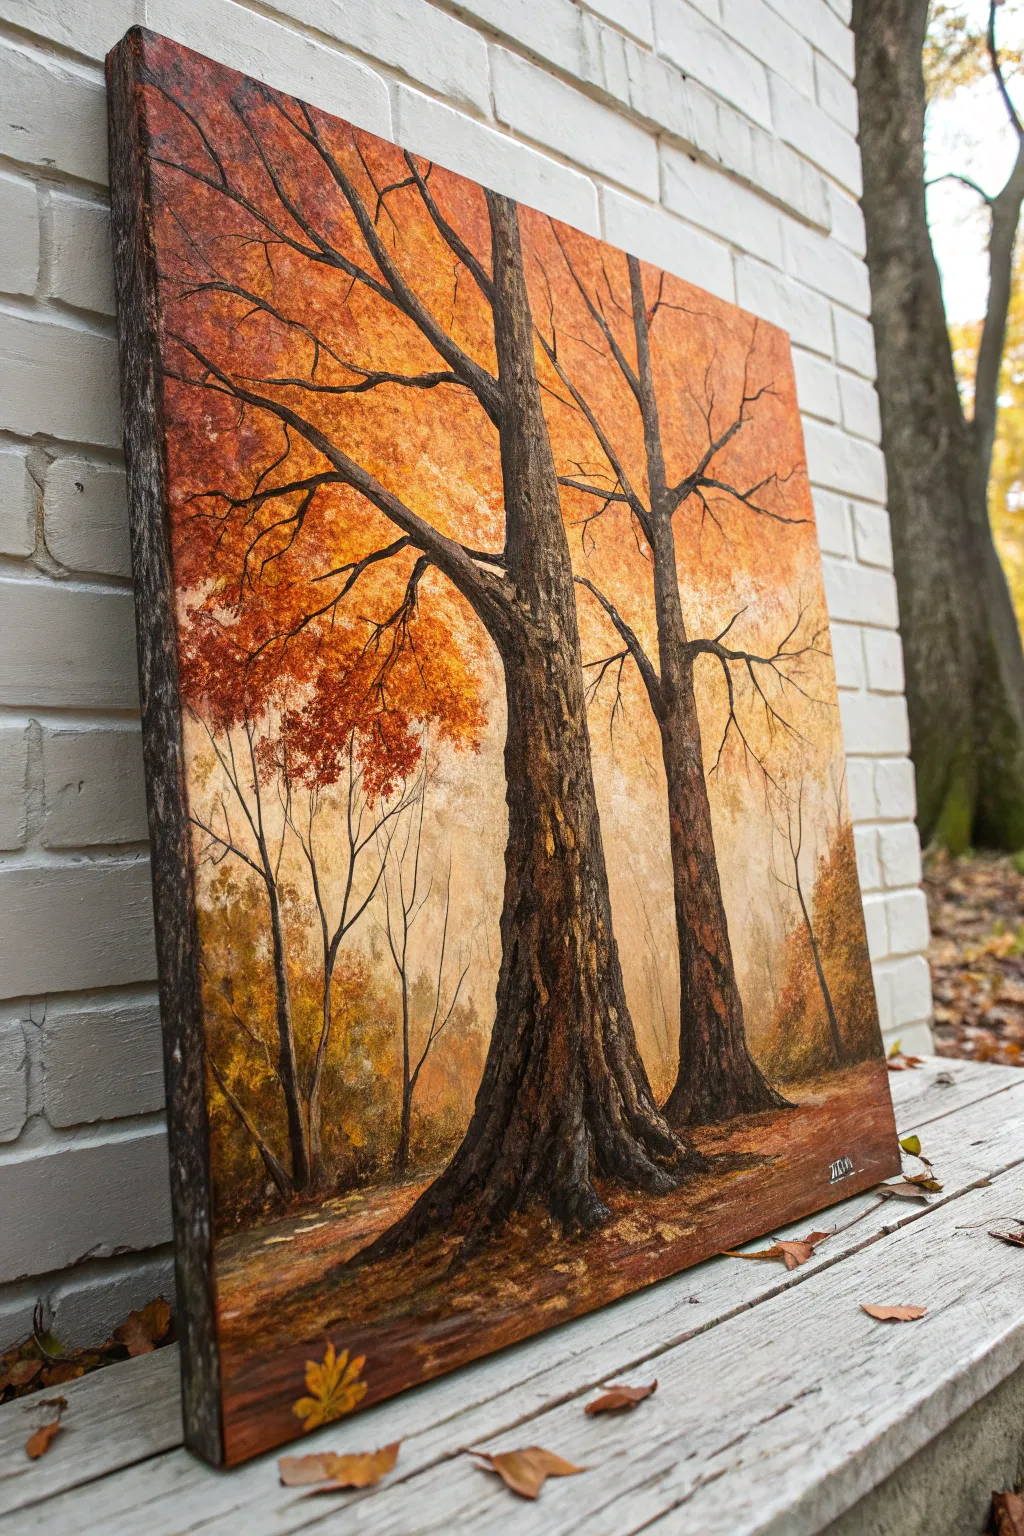
Capture the rugged beauty of aging trees with this project that focuses on building three-dimensional bark texture against a glowing autumnal backdrop. Using heavy body acrylics or modeling paste, you’ll sculpt the tree trunks right on the canvas before bringing them to life with layers of warm color.
How-To Guide
Materials
- Stretched canvas (16×20 or larger)
- Modeling paste or heavy structure gel
- Palette knives (assorted sizes, including a narrow trowel shape)
- Acrylic paints: Burnt Umber, Raw Sienna, Yellow Ochre, Cadmium Orange, Burnt Sienna, Titanium White, and Sap Green
- Large flat brush (1-inch or larger)
- Small round detail brush
- Fan brush
- Pencil
- Paper towels
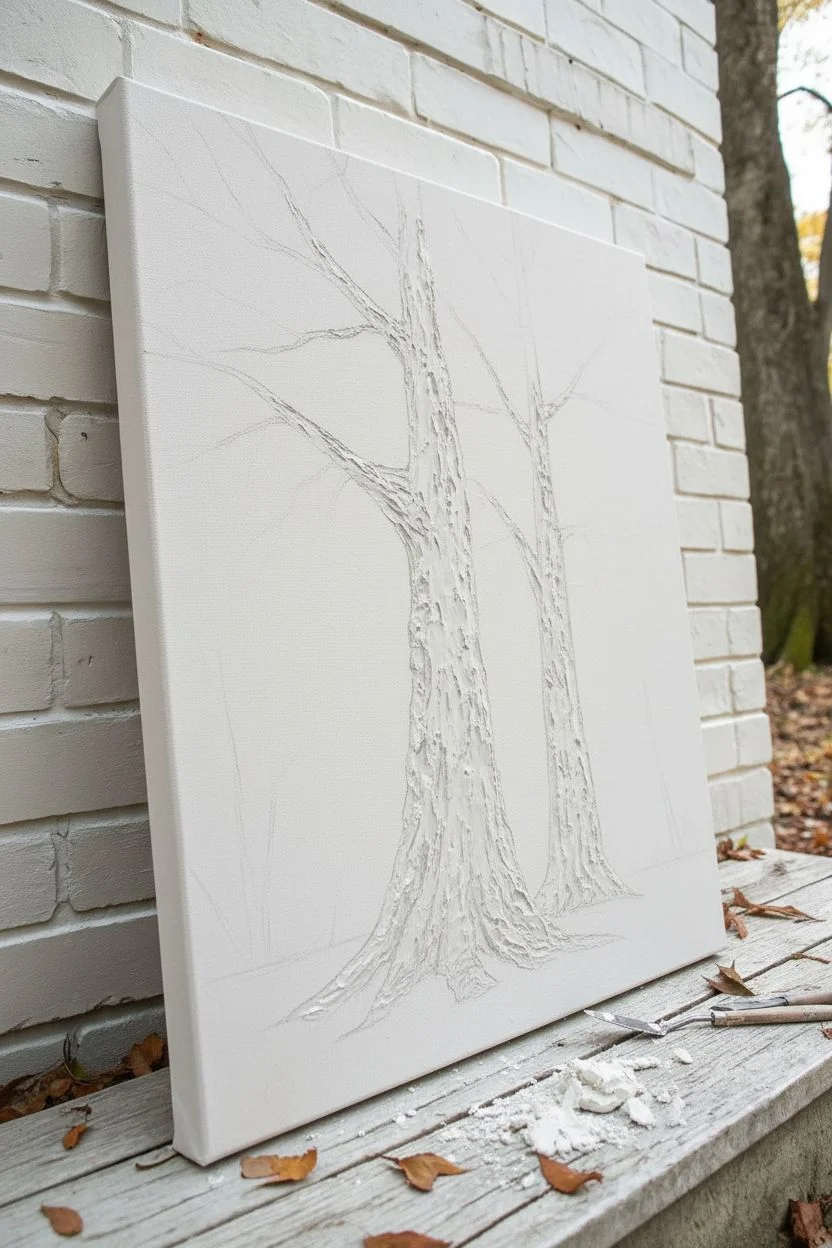
Step 1: Sculpting the Foundation
-
Sketch the composition:
Begin by lightly sketching the outline of your two main trees with a pencil. Place the largest tree slightly off-center to the left and the secondary tree to the right, ensuring their trunks flare out towards the bottom for a rooted look. -
Apply the paste:
Scoop out a generous amount of modeling paste with a palette knife. Apply it directly within your pencil outlines for the tree trunks. -
Build the bark texture:
Use the edge and flat side of your palette knife to manipulate the wet paste. Create vertical grooves, rough patches, and ridges to mimic the deep furrows of old tree bark. Don’t smooth it out; the rougher, the better. -
Extend the branches:
Use the tip of a smaller knife or a stiff brush to drag some of the paste upwards and outwards to form the main structural branches extending from the trunks. -
Allow to cure:
This is the most critical waiting period. Let the modeling paste dry completely, which may take 12-24 hours depending on thickness. Only proceed once it is hard to the touch.
Paste Cracking?
Thick modeling paste can crack if it dries too fast. Dry your canvas flat in a cool room away from direct heat or sun. If hairline cracks appear, simply fill them with extra paint during the base coat step.
Step 2: Creating the Atmosphere
-
Paint the background haze:
Mix Titanium White with a tiny touch of Yellow Ochre and Raw Sienna. Use a large flat brush to paint the background sky area, keeping the strokes vertical and loose to suggest a misty forest. -
Add background warmth:
While the background is still slightly damp, blend in soft patches of pale orange and muted browns near the horizon line to suggest distant foliage. -
Paint the forest floor:
Block in the ground area using horizontal strokes of Burnt Sienna mixed with Yellow Ochre. Allow the colors to streak naturally rather than over-blending them.
Pro Tip: Painted Edges
Don’t stop at the border! Wrap your background colors and ground texture around the sides of the canvas (gallery wrap style) so the finished piece looks polished without needing a frame.
Step 3: Painting the Textured Bark
-
Base coat the trunks:
Mix a dark wash of Burnt Umber with a little water. Paint over the dried modeling paste trunks, ensuring the dark paint gets into every deep crevice and groove you sculpted. -
Dry brush mid-tones:
Load a flat brush with pure Burnt Sienna, wipe most of it off on a paper towel, and lightly drag it over the raised ridges of the bark. This technique, called dry brushing, highlights the texture without filling the dark cracks. -
Add highlights:
Mix a light tan using White and Raw Sienna. Using the very edge of your palette knife or a dry brush, graze the highest points of the bark texture, particularly on the left side of the trees to indicate a light source. -
define characteristic markings:
Use a small detail brush with dark brown or black to emphasize deep pockets or knots in the wood where the branches meet the trunk.
Step 4: Foliage and Final Details
-
Stipple the leaves:
Use a fan brush or an old, splayed bristle brush. Dip it into Cadmium Orange and Burnt Sienna. Use a tapping or stippling motion to create clusters of leaves attached to the branches. -
Layer the canopy:
Add depth to the foliage by stippling darker reds and browns near the center of the leaf clusters, and lighter yellows and oranges on the outer edges. -
Add finer branches:
Switch to a liner script brush or a very fine round brush with thinned dark brown paint. Paint delicate, spindly twigs reaching out from the main branches into the leaf clusters. -
Create ground debris:
Use your fan brush to dab texture onto the forest floor, mimicking fallen leaves. I like to scatter a few distinct leaf shapes in the foreground using the sharp edge of a palette knife and bright orange paint. -
Final highlights:
Add final touches of pure yellow or white to the lightest parts of the sky peeking through the trees to enhance the contrast.
Step back and admire the rugged, tactile surface you’ve created.
Sunset Sky With Bold Knife Blocks
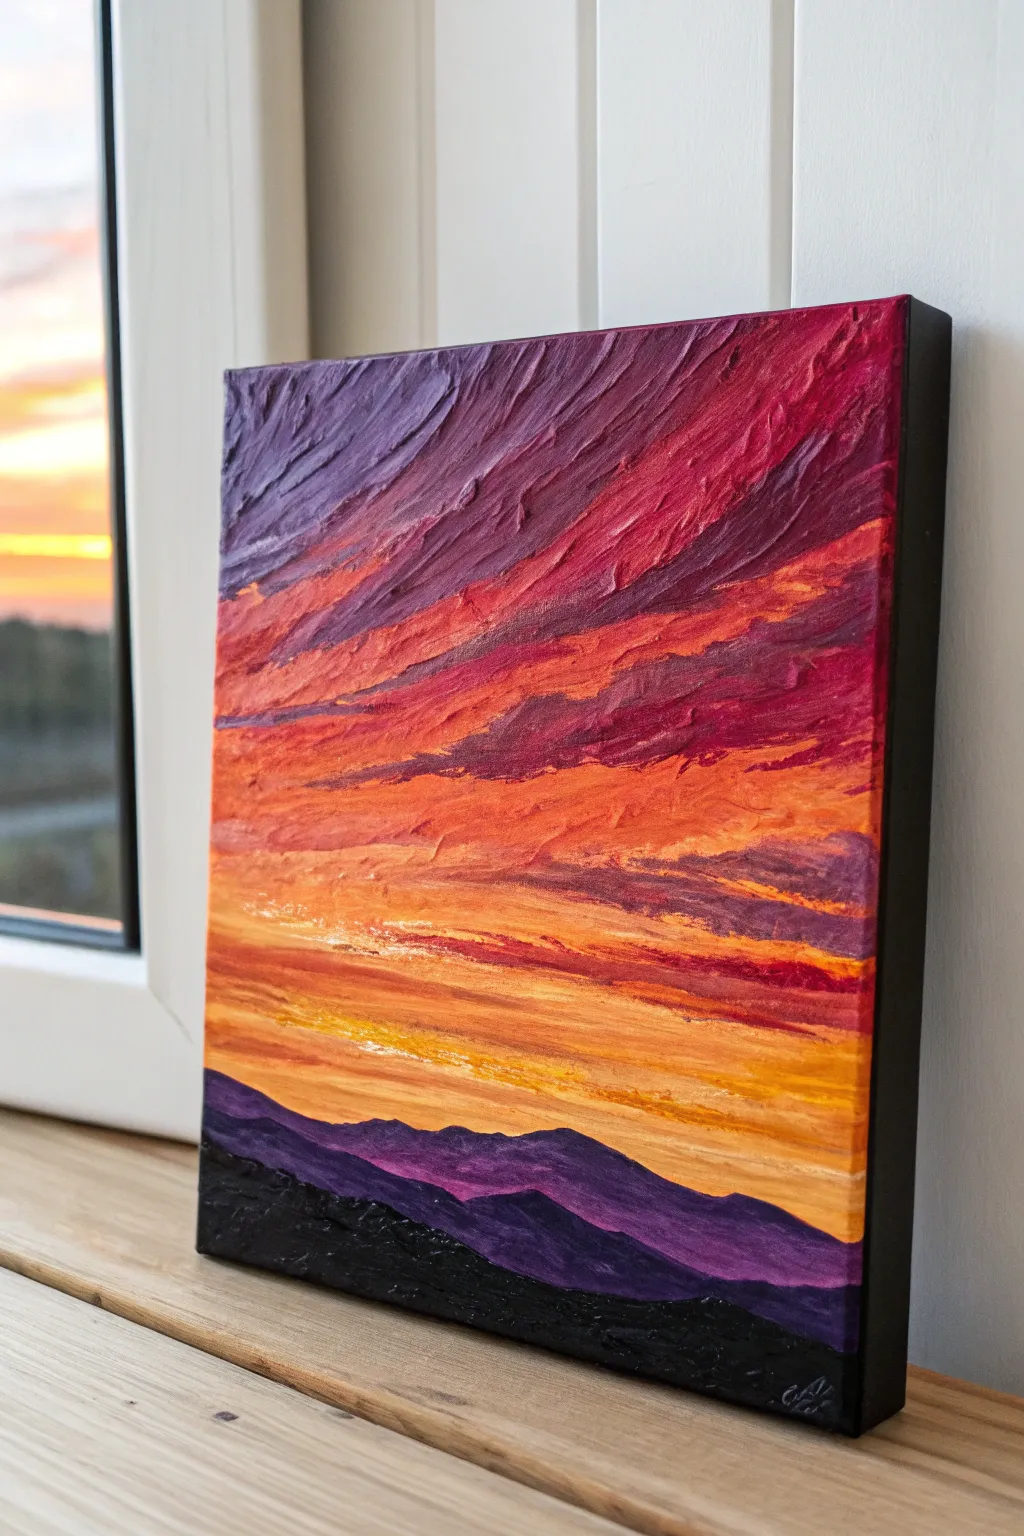

This project captures the fiery beauty of a dusk sky using the impasto technique to build incredible depth and movement. By layering heavy body acrylics with palette knives, you’ll create rippled clouds and silhouetted mountains that literally stand out from the canvas.
Step-by-Step Guide
Materials
- Square stretched canvas (e.g., 8×8 or 10×10 inches)
- Heavy body acrylic paints (Titanium White, Cadmium Yellow, Cadmium Orange, Alizarin Crimson, Dioxazine Purple, Mars Black)
- Set of palette knives (including a trowel shape and a long, thin blade)
- Texture medium or modeling paste (optional, for extra bulk)
- Paper palette or glass mixing surface
- Paper towels
Step 1: Setting the Sky’s Foundation
-
Prepare your palette:
Squeeze out generous amounts of your colors onto the mixing surface. For impasto, you need significantly more paint than usual. If your paint feels too thin, mix in a dollop of modeling paste to stiffen it up. -
Mix the deepest purples:
Start by mixing Dioxazine Purple with a touch of Alizarin Crimson to create a rich, dark plum shade for the uppermost sky. -
Apply the top layer:
Using a medium-sized trowel palette knife, scoop up a bead of the plum mixture. Apply it to the top left corner, dragging the knife diagonally downwards towards the right. Don’t smooth it out perfectly; let the ridges remain. -
Transition to magenta:
Clean your knife and mix Alizarin Crimson with a tiny bit of White to create a deep berry tone. Apply this right below the purple, following that same diagonal sweeping motion. -
Blend on canvas:
Allow the berry tone to slightly overlap the purple. Use the knife’s edge to gently marble them together where they meet, creating streaks rather than a smooth gradient.
Clean Swipes Only
Wipe your palette knife on a paper towel after almost every stroke. Keeping the blade clean prevents the vivid sunset colors from turning brown or muddy.
Step 2: Igniting the Colors
-
Introduce the orange:
Load your knife with pure Cadmium Orange. Apply this in the middle section of the sky, underneath the reds. Press slightly harder here to create flattened ‘shelves’ of cloud. -
Create the golden horizon:
Mix Cadmium Yellow with a little Orange and White. This glowing peach-gold will form the lowest part of the sky, just above where the mountains will sit. -
Layer the sunlight:
Apply the yellow mixture horizontally across the bottom third of the sky area. I like to use a longer, thinner knife here to create stretched-out, linear textures that mimic the horizon line. -
Add high-contrast highlights:
Wipe your knife completely clean. Pick up a small amount of pure White mixed with just a speck of Yellow. Skim this lightly over the orange and red sections to catch the tops of the texture ridges, simulating light hitting the clouds. -
Detail the streaks:
Go back with a clean knife edge and carve thin lines into the wet paint if needed to separate color bands and add definition to the cloud layers.
Gloss It Up
Once fully dry (wait a week!), apply a high-gloss varnish. This mimics the look of oil paints and makes those deep purples and bright oranges look even wetter and juicier.
Step 3: Sculpting the Mountains
-
Mix the distant range color:
Combine Dioxazine Purple with a little White and a tiny dot of Black to create a muted, hazy purple. -
Form the back peaks:
Apply this hazy purple along the bottom edge of your yellow sky. Use the tip of a small diamond-shaped palette knife to shape jagged peaks that slope gently. -
Mix the foreground shadow:
Create your darkest value by mixing Mars Black with Dioxazine Purple. Keep this mixture very thick. -
Create the foreground silhouette:
Apply this dark mixture at the very bottom of the canvas, overlapping the base of the purple mountains. Build the paint up thickly so this layer physically sits higher than the sky. -
Texture the land:
Tap the flat side of your knife against the black paint to create a rough, rocky texture, contrasting it against the sweeping lines of the sky.
Step 4: Finishing Touches
-
Paint the sides:
Impasto paintings look great on gallery-wrapped canvases. Take your excess black or dark purple paint and cover the side edges of the canvas for a clean, finished look. -
Refine the edges:
Check the transition between the mountains and sky. If the gap looks messy, carefully drag a little more yellow paint down to meet the mountain line. -
Let it cure:
Because the paint is so thick, this project will need significant drying time. Leave it flat in a dust-free area for at least 24-48 hours before hanging.
Now you have a dynamic, three-dimensional sunset that brings warmth to any room

PENCIL GUIDE
Understanding Pencil Grades from H to B
From first sketch to finished drawing — learn pencil grades, line control, and shading techniques.
Explore the Full Guide
Water Lily Pond With Floating Paint Pads
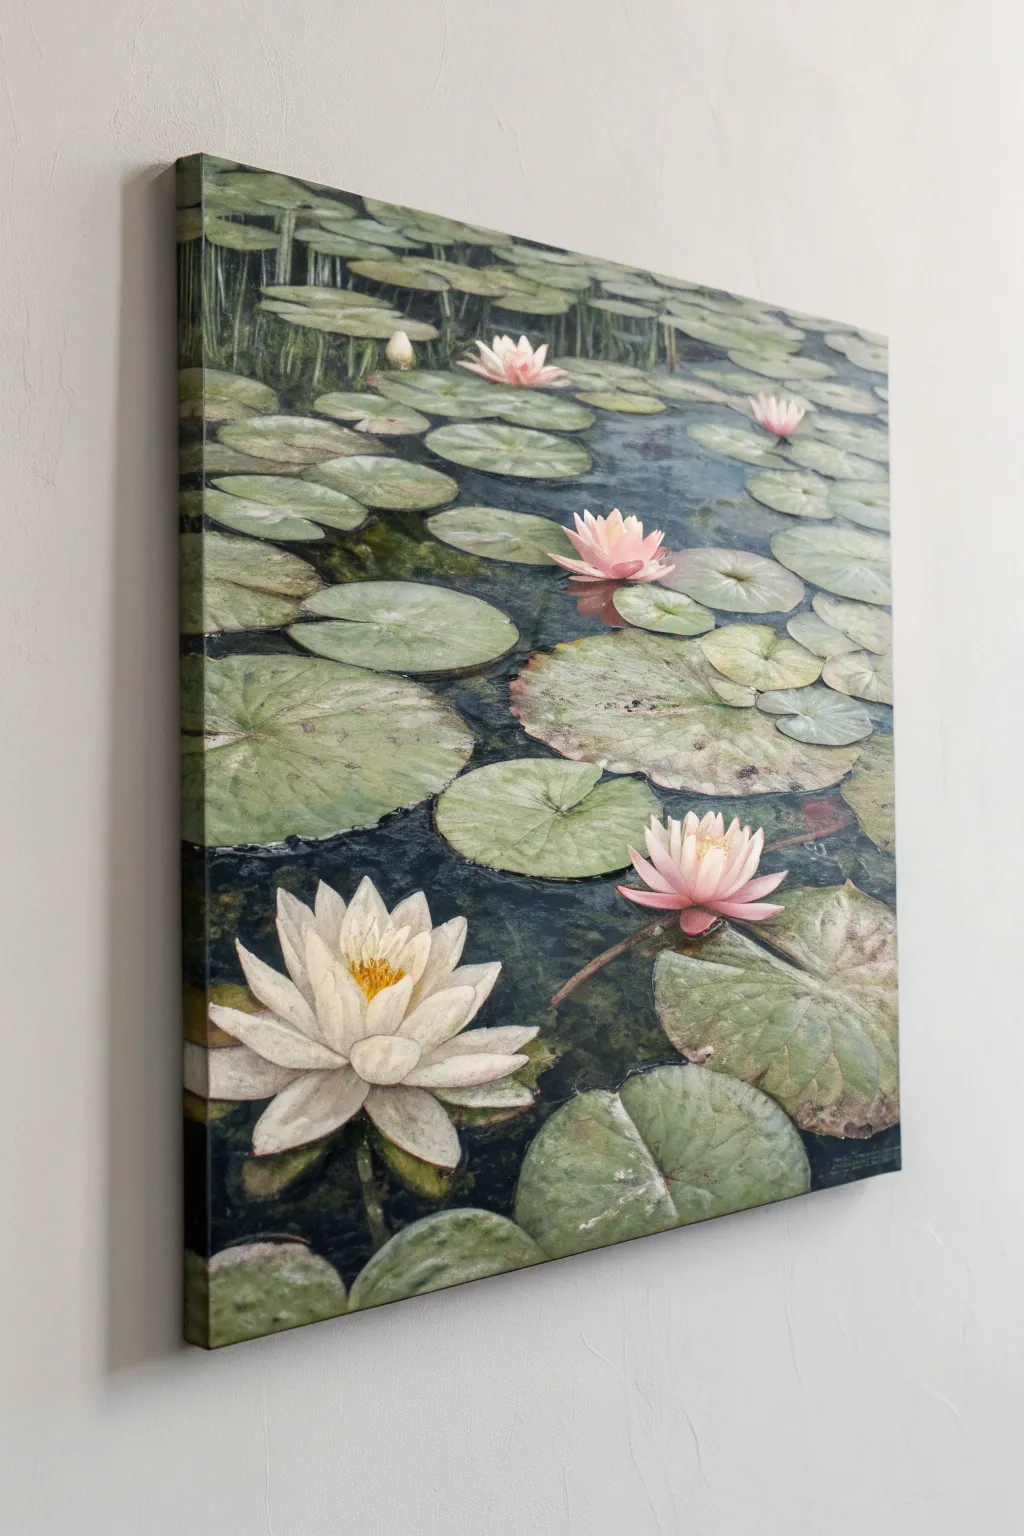
Capture the tranquil beauty of a water garden with this textured painting tutorial, focusing on the interplay of floating lily pads and delicate blooms. By building up layers of paint, you will create a sense of depth and tactile realism that makes the water lilies feel like they are truly resting on the dark, glassy surface.
How-To Guide
Materials
- Stretched canvas (square or rectangular format)
- Heavy body acrylic paints or oil paints (Phthalo Blue, Burnt Umber, Sap Green, Hookers Green, Titanium White, Cadmium Yellow, Alizarin Crimson)
- Palette knives (assorted sizes, including a small trowel and a diamond shape)
- Flat bristle brushes (large and medium)
- Round synthetic brushes (small for details)
- Modeling paste or thickener medium (optional for extra texture)
- Palette for mixing
- Water cup or solvent
- Rags or paper towels
Step 1: Setting the Scene
-
Prime the Surface:
Begin with a clean canvas. If you want a smoother starting point for your water, apply a coat of gesso, but for this textured look, the raw weave or pre-primed surface works fine. -
Establish the Water Base:
Mix Phthalo Blue with Burnt Umber and a touch of Hooker’s Green to create a deep, dark teal-black. This will be the shadow of the water. -
Apply the Background:
Using a large flat brush, cover the entire canvas with your dark water mixture. Keep your strokes horizontal and somewhat loose; we aren’t looking for perfection yet, just coverage. I like to keep this layer relatively thin so it dries faster. -
Sketch the Composition:
Once the background is dry to the touch, use a lighter green mix or a piece of chalk to rough out the oval shapes of your main lily pads. Place the larger ones in the foreground and smaller ones receding toward the top to create perspective.
Step 2: Layering the Pads
-
Base Green Mixes:
Prepare three piles of green: a dark shadow green (Sap Green + Blue), a mid-tone natural green (Sap Green + Yellow), and a light highlight green (Green + White + Yellow). -
Underpainting the Pads:
Use a medium brush to fill in your sketched ovals with the mid-tone green. Don’t worry about texture yet; just block in the shapes. -
Adding Impasto Texture:
Switch to your palette knife. Pick up the lighter green mixture and gently drag it across the top surface of the foreground pads. The paint should catch and sit on top, mimicking the waxy texture of the pad. -
Deepening Shadows:
With the edge of the knife or a stiff brush, apply the dark shadow green to the edges of the pads where they meet the water, and in the ‘V’ notch of each leaf. -
Receding Pads:
For the lily pads in the background, use less texture and slightly bluer, more muted greens. This atmospheric perspective helps push them into the distance.
Knife Control
Wipe your palette knife clean between every single color change. Muddy colors happen quickly in impasto, and clean knives keep your greens vibrant and distinct.
Step 3: Blooming Details
-
Positioning the Flowers:
Identify spots for your blooms. Place the largest, brightest white flower in the lower left foreground as a focal point, and smaller pink ones further back. -
Sculpting the White Lily:
Mix Titanium White with a tiny speck of Yellow for warmth. Using a small palette knife or a filbert brush loaded with heavy paint, press inward from the tip of the petal to the center. Build these petals up thickly. -
Painting Pink Blooms:
Mix White with Alizarin Crimson to get a soft pink. Create the cup-shaped flowers in the middle ground using upward strokes, keeping the centers slightly darker. -
The Center Glow:
For the open white lily, dab a mixture of Cadmium Yellow and a dot of orange into the very center using a small round brush to create the pollen-heavy stamens.
Impasto Boost
Mix clear modeling paste into your acrylics before painting the petals. This extends the paint body and lets you build 3D sculptural peaks that cast real shadows.
Step 4: Reflections and Refining
-
Water Reflections:
Mix a glaze of your dark water color with a little water or glazing medium. Use a clean brush to gently pull vertical strokes downward directly beneath the flowers and pads to suggest reflections. -
Surface Ripples:
Using a liner brush and a lighter blue-grey mix, paint thin, horizontal squiggles in the open water areas to suggest ripples and movement. -
Highlighting Edges:
Take pure Titanium White on a detail brush and add tiny highlights to the curling edges of the nearest lily pads and the tips of the flower petals. -
Submerged Stems:
If you have open water areas, paint very faint, vertical lines in a muted green to hint at stems disappearing into the depths. -
Final Contrast Check:
Step back and squint at your canvas. If the water looks too flat, glaze a bit more dark blue into the deepest corners to pop the bright green pads forward.
Allow the thick layers of paint to dry thoroughly, possibly taking several days, before displaying your peaceful garden scene.
Citrus Still Life With Pithy Texture
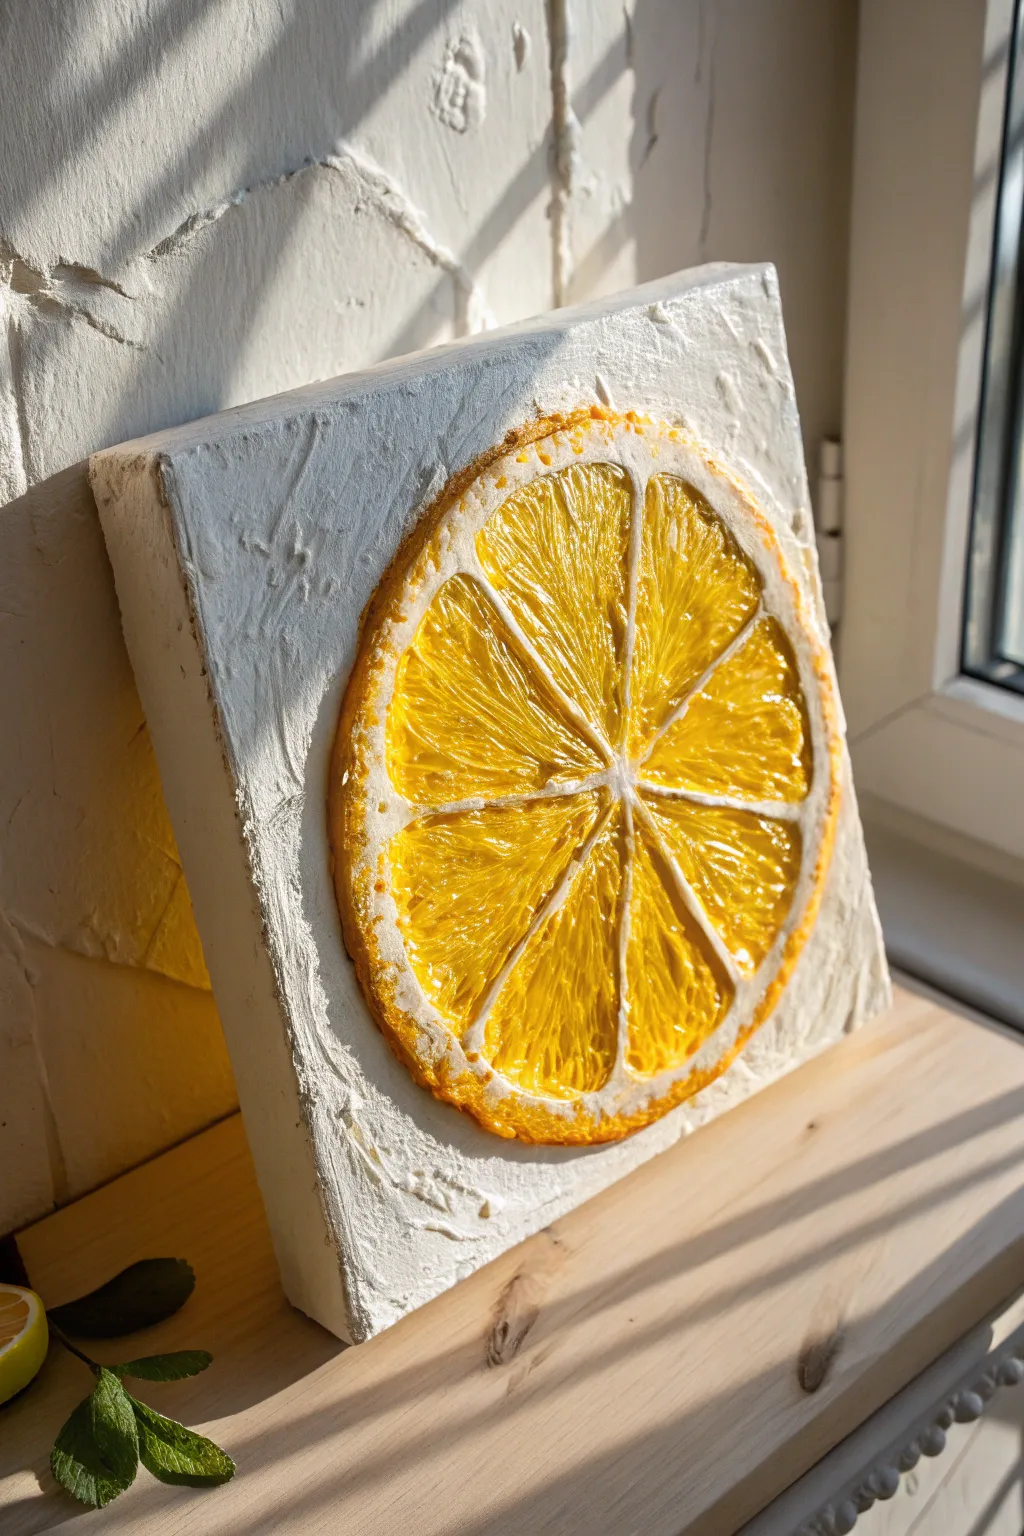
Capture the zesty freshness of citrus with this highly textured impasto painting that practically pops off the canvas. By combining rough, plaster-like backgrounds with glossy, translucent gels, you’ll create a lemon slice that looks juicy enough to squeeze.
Detailed Instructions
Materials
- Deep-edge square gallery wrapped canvas (approx. 8×8 or 10×10 inches)
- Modeling paste, heavy structure gel, or texture paste (white)
- Heavy body acrylic paints: Lemon Yellow, Cadmium Yellow Medium, White, Raw Sienna
- Gloss medium or glossy pouring medium
- Palette knives (large flat knife and small detail knife)
- Round synthetic brush (size 4 or 6)
- Compass or round object for tracing
- Pencil
Step 1: Texturing the Background
-
Prime the Surface:
Begin with your deep-edge canvas. Ensure it is clean and dust-free. If it is raw canvas, apply a coat of gesso first. -
Outline the Subject:
Use a compass or trace around a circular object (like a bowl) to lightly draw a large circle in the center of the canvas. This will be your lemon slice. -
Apply the Base Paste:
Scoop out a generous amount of plain white modeling paste with a large palette knife. Spread this thickly over the entire canvas, avoiding the interior of the circle you just drew. -
Create Rustic Texture:
Use the flat side of your knife to slap and pull the paste around the edges and corners, creating peaks and rough valleys. Don’t smooth it out; you want that rugged, stucco-wall appearance. -
Define the Rind Edge:
Carefully push some paste right up to the pencil line of your circle to build a slightly raised lip. This creates a physical boundary for the lemon slice. Let this white texture dry completely, preferably overnight.
Sticky Situation
If your yellow gel starts to flatten out as it dries, don’t worry. Wait for it to dry completely, then add a second layer of clear gloss gel on top and re-sculpt the texture.
Step 2: Sculpting the Lemon
-
Mix the Pith Color:
Mix a small amount of white heavy body acrylic with a tiny touch of raw sienna and some modeling paste to create a warm, creamy off-white color for the pith. -
Build the Pith and Segments:
Using a smaller palette knife, apply this creamy mixture in a ring around the inside edge of your circle (the pith). Then, draw lines of this paste intersecting in the middle to create the radial ‘spokes’ or membranes that separate the fruit segments. -
Prepare the Juicy Yellow:
For the fruit flesh, mix your Lemon Yellow and Cadmium Yellow with a high-gloss heavy gel medium. The ratio should be about 60% gel to 40% paint to ensure transparency and shine. -
Fill the Segments:
Load your palette knife or a stiff brush with the glossy yellow mixture. Dollop it thickly into the empty triangular segments between your white membranes. -
Sculpt the Pulp:
While the yellow gel is wet, use the tip of your knife to make small, directional scratching motions radiating from the center outward. This mimics the direction of natural juice vesicles.
Step 3: Details & Glazing
-
Enhance the Rind:
Mix Cadmium Yellow with a bit of Raw Sienna for a darker, orangey-yellow tone. carefully dab this onto the very outer edge of your lemon circle to create the skin texture. -
Add Depth with Glazing:
Once the initial yellow layer is touch-dry, mix a very watery glaze of Raw Sienna or a darker yellow. Lightly touch this into the corners of the fruit segments near the rind to imply shadow and roundness. -
Highlighting:
Mix a tiny amount of pure white with gloss medium. Apply tiny, sharp streaks of this highlight mixture on top of the wettest-looking parts of the yellow pulp to simulate light reflecting off juice. -
Final Gloss Coat:
I prefer to verify everything is fully dry (which may take 24 hours for thick impasto). Then, carefully paint a layer of pure gloss medium over just the lemon fruit parts to maximize that wet, sticky look.
Citrus Splash
Create a companion piece using orange or darker orange-red paints. A duo of lemon and blood orange slices looks stunning displayed together on a kitchen wall.
Hang your artwork near a window where natural light can catch the texture and make that lemon shine


Animal Fur With Directional Knife Strokes
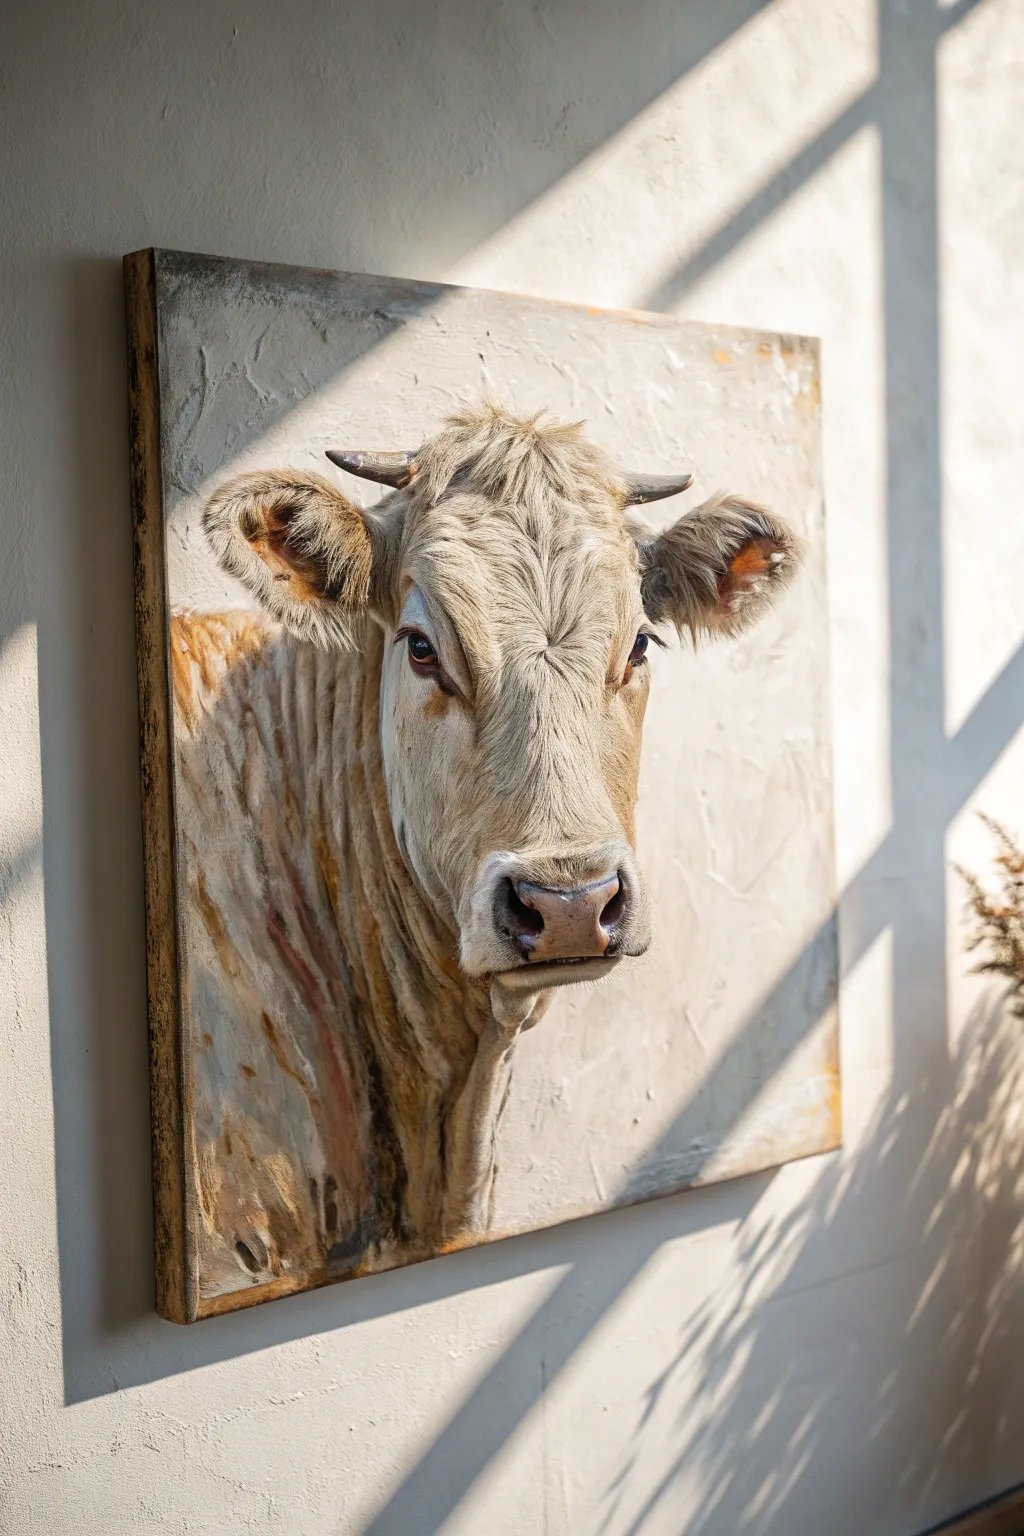
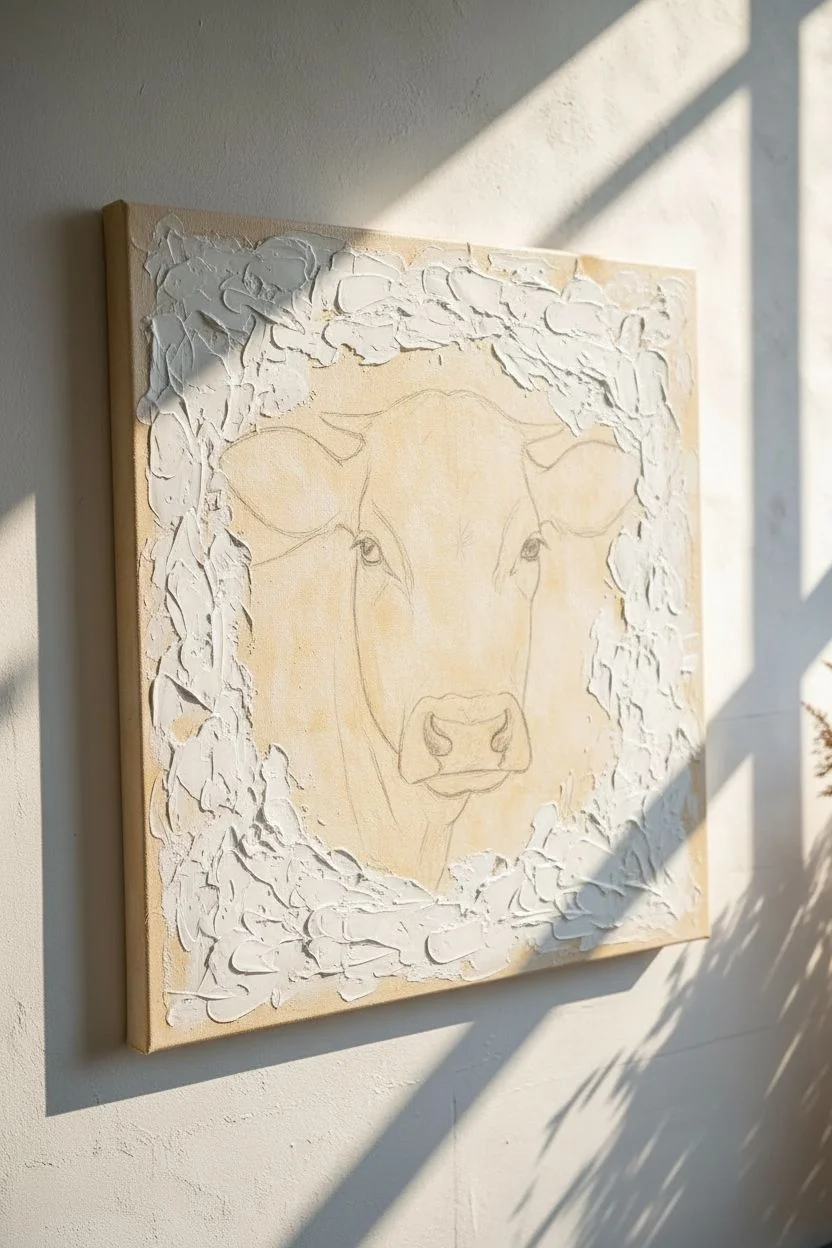
Capture the warmth and gentle gaze of farm life with this highly textured acrylic study. Using thick impasto medium and strategic palette knife strokes, you’ll sculpt the directional flow of fur right off the canvas for a strikingly realistic 3D effect.
Step-by-Step Tutorial
Materials
- Square gallery-wrapped canvas (approx. 20×20 inches)
- Heavy body acrylic paints (Titanium White, Unbleached Titanium, Raw Sienna, Burnt Umber, Yellow Ochre, Mars Black)
- Thick impasto gel medium or modeling paste
- Set of palette knives (including a trowel shape and a thin, elongated blade)
- Large flat bristle brush
- Pencil for sketching
- Reference photo of a cow
- Paper towels for wiping knives
Step 1: Preparation and Base Layer
-
Neutral background wash:
Begin by covering the entire canvas in a wash of Titanium White mixed with a tiny drop of Raw Sienna. This creates a warm, off-white base that complements the cow’s coloring. -
Sketch the outline:
Once the base is dry, lightly sketch the cow’s head using a pencil. Focus on the placement of the eyes, the snout, and the horn positioning. Don’t worry about tiny details; just get the proportions right. -
Establish the background texture:
Mix a large pile of Titanium White with impasto gel. Use a large palette knife to spread this around the negative space (outside the cow sketch). Apply it haphazardly, scraping it on and off to create a distressed, plastered wall effect.
Step 2: Color Blocking and Underpainting
-
Map the shadows:
Mix Raw Sienna and a touch of Burnt Umber with a flat brush. Paint in the darkest areas of the cow: the deep recesses of the ears, under the chin, the nostrils, and the shadow side of the neck. -
Define the mid-tones:
Use Unbleached Titanium and Yellow Ochre to block in the main fur areas. This doesn’t need texture yet; you are simply establishing the color map for where your heavy paint will go later. -
Paint the eyes:
The eyes need to be relatively smooth compared to the fur. Paint the iris with Burnt Umber and add a keen Mars Black pupil. Add a small, crisp white highlight to bring life to the gaze. -
Underpaint the nose:
Mix a soft pinkish-grey using White, a speck of Mars Black, and a tiny amount of Red (or Burnt Sienna). Apply this to the nose area flatly, serving as a base for later texturing.
Muddy Fur Fix
If your fur colors are blending into a single beige blob, stop immediately. Let the current layer dry completely before adding new strokes on top to keep colors distinct.
Step 3: Sculpting the Fur
-
Prepare the heavy mixture:
Mix your main fur color (Unbleached Titanium + White) with an equal part of heavy structure gel. The consistency should be like stiff frosting that holds a peak. -
Start at the crown:
Using a thin palette knife, load the tip with paint and press the ‘hair’ onto the top of the head. Flick the knife upward and outward, mimicking the cow’s tuft direction. -
Work down the forehead:
Moving down the face, apply the paint in downward, overlapping strokes. Keep the strokes short near the eyes and longer as you move down the nose bridge. -
Sculpt the ears:
For the ears, use the edge of the knife to create radiating lines from the ear canal outward. I like to add a bit more Burnt Umber here to show depth within the fluffy texture. -
Neck textures:
The neck fur is longer and hangs downwards. Switch to a larger trowel knife, applying long, sweeping distinct strokes of mixed White, Raw Sienna, and Umber to suggest folds of skin and heavy fur. -
Create directional contrast:
Pay attention to where the fur swirls, particularly on the forehead. Change your knife angle abruptly to create ridges where ‘hair’ meets from different directions.
Knife Direction Pro Tip
For the most realistic fur, always pull the knife in the direction the hair grows. On the neck, gravity pulls skin down, so drag your knife vertically.
Step 4: Detailing and Refining
-
The horns:
Mix Mars Black with White to make a dark charcoal grey. Apply this smoothly to the horns with a small knife, dragging a bit of lighter grey horizontally across them to suggest ridges in the keratin. -
Define the nostrils:
Using the pinkish-grey mix with extra gel, build up the rim of the nose. Use the knife tip to indent the nostril holes deeply, ensuring they look dark and wet. -
Enhance the shadows:
Take a small amount of Burnt Umber glaze (paint mixed with water or glazing liquid) and carefully run it into the deepest crevices of your dried impasto texture to exaggerate the depth. -
Warm highlights:
Mix Pure White with a tiny dot of Yellow Ochre. Add final high-relief touches to the tips of the ears, the brow bone, and the nose bridge where the light would naturally hit. -
Edge cleanup:
The charm of this piece is the rough edge. Ensure you have painted the sides of the canvas, perhaps dragging some of the background texture around the corner for continuity.
Let the painting dry in a dust-free area for at least 48 hours to ensure the thickest peaks typically harden fully
Palette-Knife Portrait With Faceted Planes
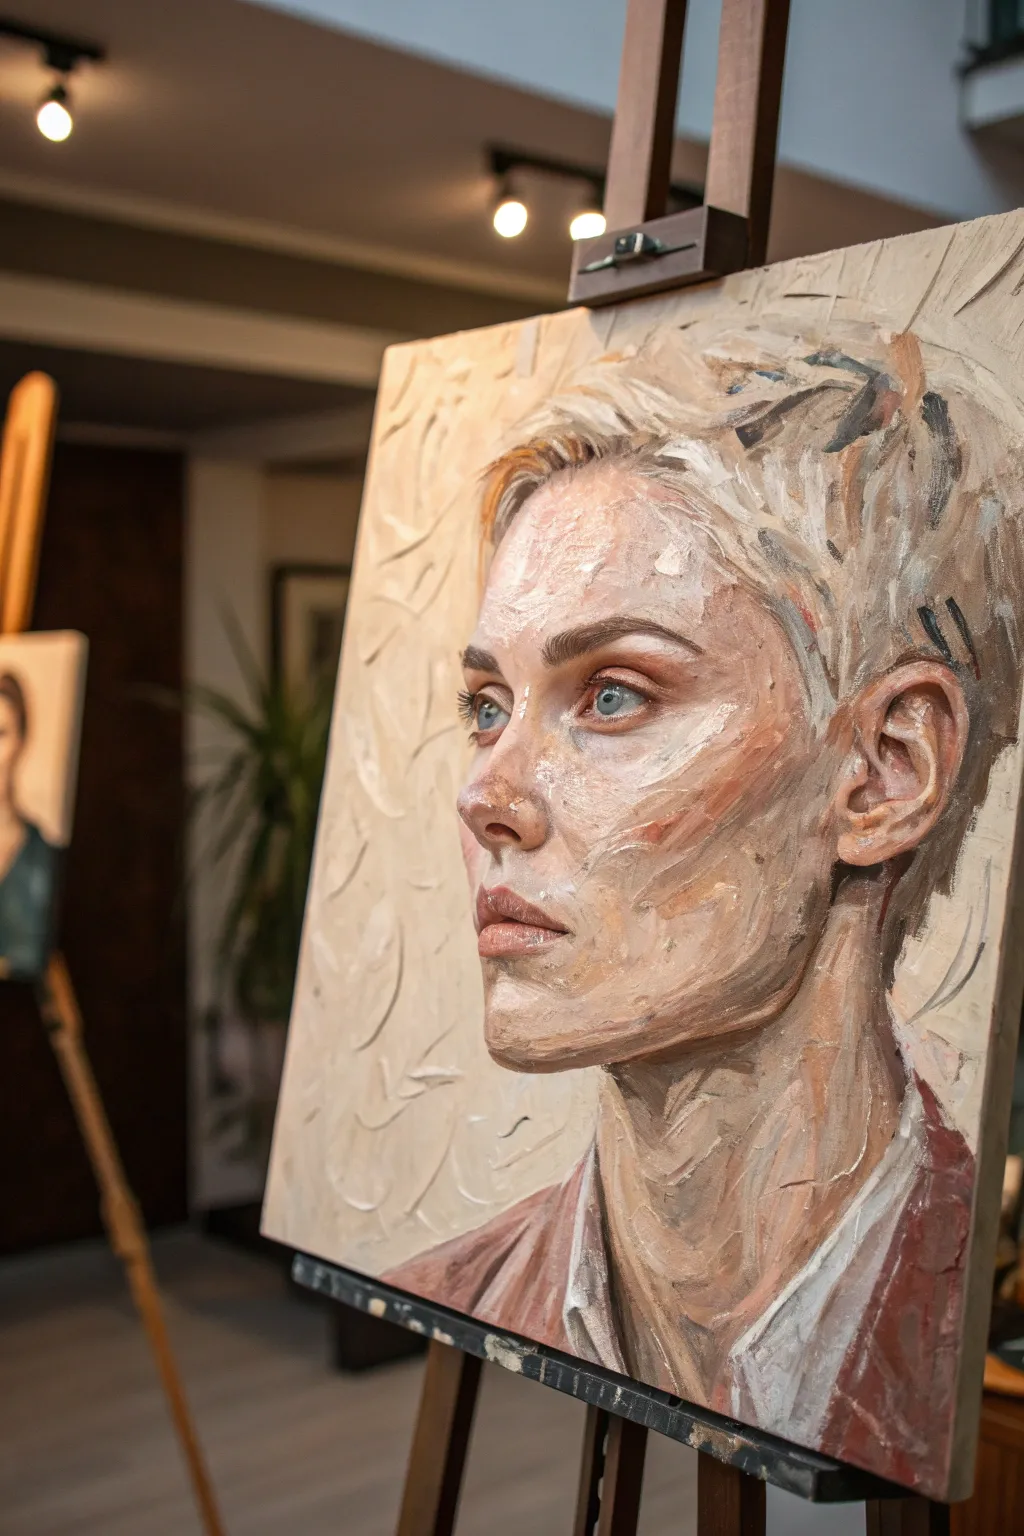
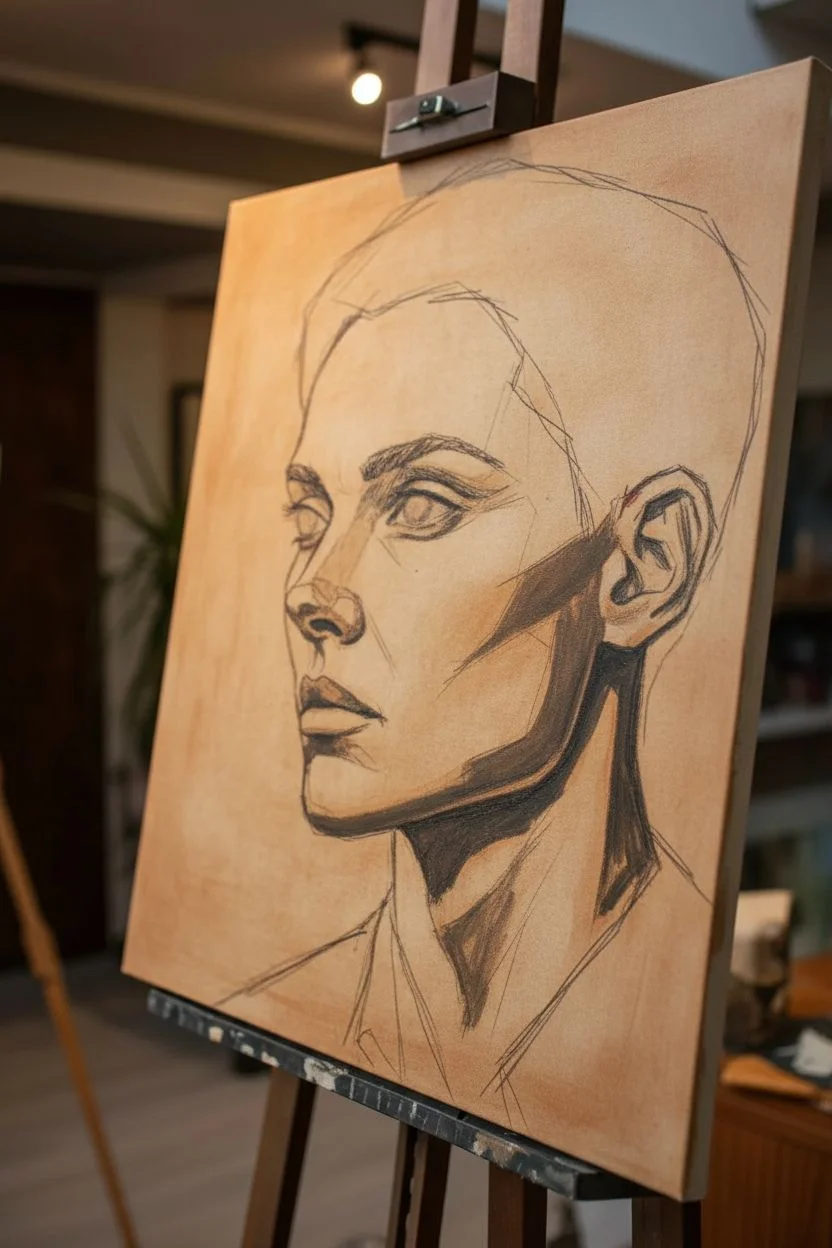
Capture the sculptural beauty of the human face using thick, expressive impasto strokes that build form through texture rather than blending. This project focuses on creating faceted planes of light and shadow, resulting in a portrait that feels carved as much as it is painted.
How-To Guide
Materials
- Heavy body acrylics or oil paints (Titanium White, Yellow Ochre, Burnt Sienna, Burnt Umber, Alizarin Crimson, Ultramarine Blue)
- Stretched canvas or canvas board (16×20 or similar)
- Assorted palette knives (diamond shape, trowel shape, and a long narrow blade)
- Thickening medium or modeling paste (essential for texture)
- Wide flat bristle brush (for background)
- Pencil or charcoal for sketching
- Large palette for mixing
Step 1: Preparation and Understructure
-
Prepare your canvas:
Begin by applying a thin, warm wash over the entire canvas using Burnt Sienna thinned with turpentine or water. This kills the harsh white and provides a mid-tone base. -
Sketch the contours:
Using a thin brush and dark paint (like Burnt Umber) or charcoal, sketch the basic head proportions. Focus on the angles of the jaw, the placement of the ear, and the triangular shape of the nose. -
Block in shadow shapes:
Identify the darkest areas of the face—under the chin, the eye sockets, and behind the ear. Paint these in flatly with a mix of Burnt Umber and Ultramarine Blue to establish your values early.
Clean Knife Policy
Wipe your palette knife clean after almost every stroke. Since you aren’t blending on the canvas, keeping the colors pure on the tool ensures your faceted planes stay crisp and bright.
Step 2: Building the Background Texture
-
Mix the background color:
Create a large pile of pale cream paint using Titanium White with a tiny touch of Yellow Ochre and Burnt Umber. -
Apply the background base:
Using a large palette knife, apply the cream mixture to the negative space around the head. Don’t smooth it out; let the ridges of the knife strokes remain visible. -
Add directional energy:
Create a swirling or hatching pattern in the wet background paint with the knife edge to give the space behind the head dynamic energy.
Step 3: Sculpting the Face
-
Mix skin tone variations:
Prepare three piles of flesh tones on your palette: a highlight (White + touch of Yellow Ochre), a mid-tone (White + Burnt Sienna + Ochre), and a shadow tone (Burnt Sienna + Alizarin Crimson + touch of Blue). -
Thicken the paint:
Mix a generous amount of thickening medium or cold wax into your paint piles. You want the consistency of soft butter that holds peak when lifted. -
Apply planar strokes on the cheek:
Start on the cheekbone. Load your diamond-shaped knife and lay down a slab of the highlight mix. Think of the face as a low-poly 3D model; do not blend the edges but let the shape sit on the canvas. -
Build the jawline:
Switch to your shadow tone. Use the flat edge of the knife to carve out the strong angle of the jaw, dragging the paint downward toward the neck. -
Construct the nose:
Use a smaller knife to place a vertical stroke for the bridge of the nose and a small, horizontal dab for the nostril shadow. Keep the strokes distinct to maintain that faceted look. -
Define the eye area:
Paint the eye socket with cooler, darker tones first. Then, place the white of the eye and the iris with clean, deliberate dabs. Avoid overworking this small area or it will become muddy. -
Carve the neck muscles:
Use long, vertical sweeps of the knife to suggest the sternocleidomastoid muscle in the neck. I find mixing a little green or grey into the neck shadow helps it recede properly. -
Refine the lips:
Use a mix of Alizarin Crimson and White. Apply the upper lip in two distinct planes and the lower lip as one fuller stroke.
Level Up: Color Temperature
Exaggerate temperature shifts to increase depth. Use cooler blues/greys for planes facing away from the light source and warmer oranges/pinks for planes facing toward it.
Step 4: Hair and Final Details
-
Create hair volume:
Mix a light blonde-grey using White, Ochre, and a tiny bit of Black. Apply this in thick, chunky strokes that follow the growth direction of the hair. -
Add lowlights:
While the hair paint is wet, slice in darker strokes of Burnt Umber near the roots and behind the ear to create depth and separation. -
Scrape back for effect:
Use the edge of a clean knife to scrape through a few areas of wet paint, revealing the underpainting. This adds complex texture, especially in the hair and clothing. -
Suggest clothing:
Block in the shoulders with a rusty red or brown tone. Use broad, loose knife strokes here to contrast with the tighter detail of the facial features. -
Final highlights:
Add the brightest highlights last—on the tip of the nose, the forehead, and the catchlight in the eye—using pure Titanium White.
Step back and admire how the thick, unblended strokes merge at a distance to form a striking and tangible portrait


Have a question or want to share your own experience? I'd love to hear from you in the comments below!