If you love dramatic contrast and those silky-smooth grays, India ink is about to become your new studio obsession. Here are my favorite India ink art ideas—from classic washes to delightfully weird experiments you’ll want to try immediately.
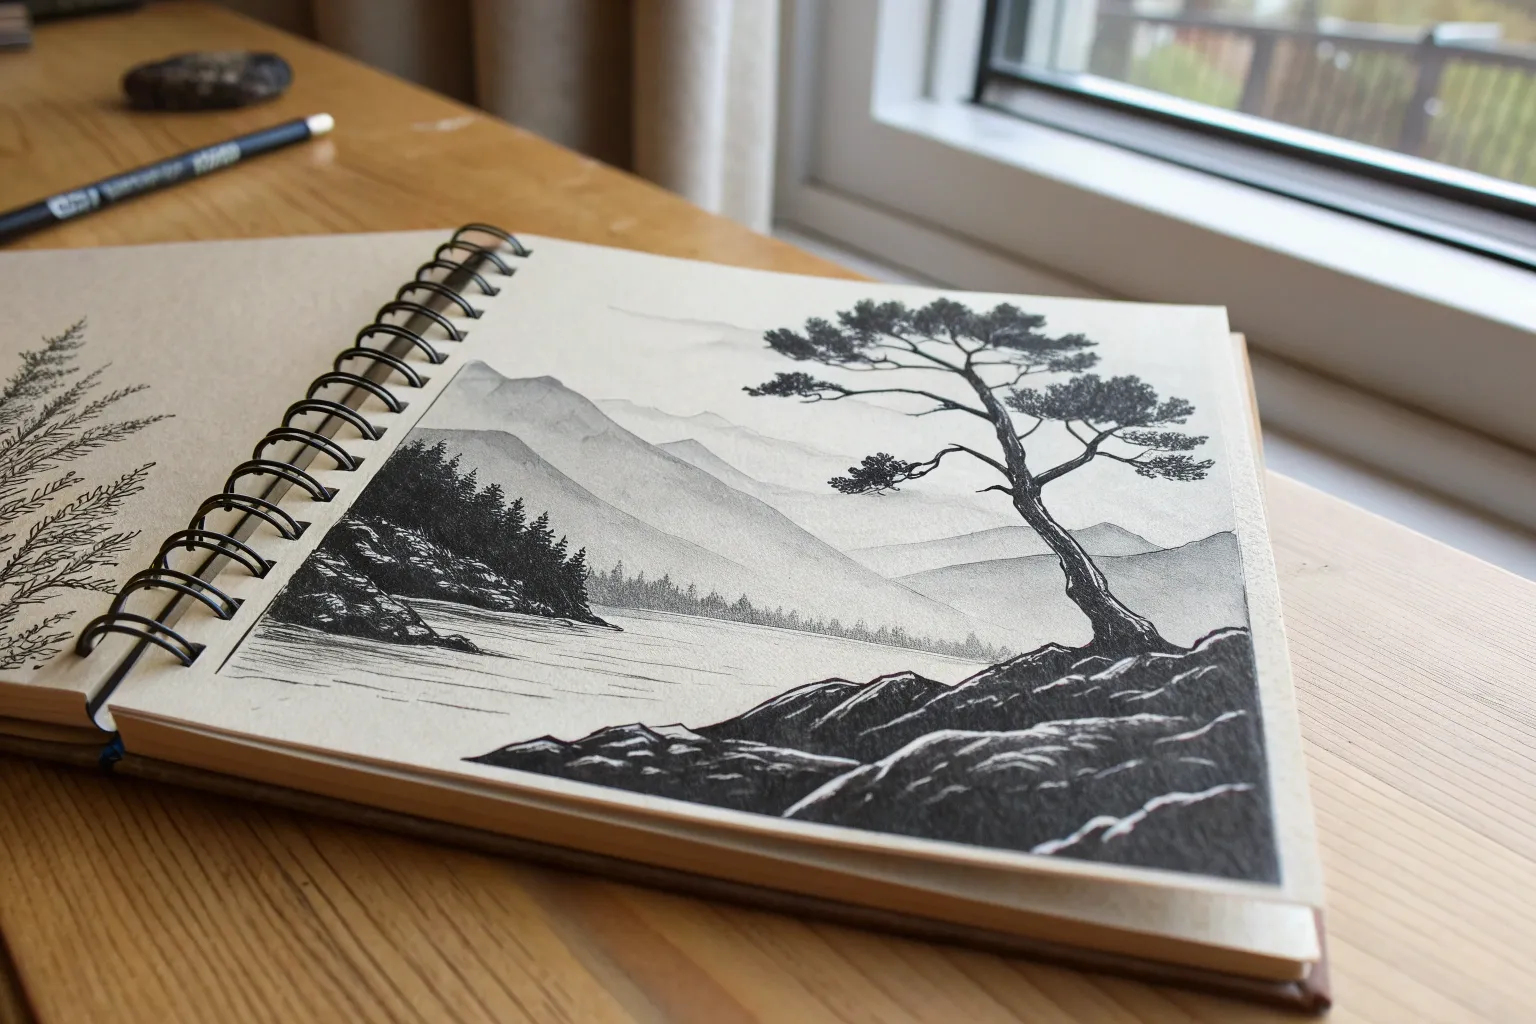
India Ink Mini Landscape Study
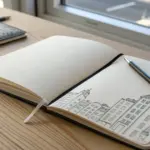
Capture the serenity of a lakeside evening using the stark contrast of India ink against soft, diluted washes. This mini landscape study focuses on atmospheric perspective and reflection techniques, perfect for framing or turning into a handmade card.
Step-by-Step Guide
Materials
- Cold press watercolor paper (cut to roughly 5×7 inches)
- Black India ink (waterproof)
- Small round brush (size 2 or 4)
- Fine liner brush or detail brush (size 0 or 00)
- Container of water for diluting
- Paper towel
- Pencil (optional for light sketching)
- Palette or small dish
Step 1: Setting the Atmosphere
-
Prepare your washes:
Before touching paper, create three distinct puddles of diluted ink on your palette: a very pale gray (mostly water), a medium gray, and a dark charcoal tone. Keep pure black ink reserved for later. -
Sketch the horizon:
Lightly visualize where your horizon line will sit. For a balanced composition like this one, place the horizon in the lower third of the paper rather than dead center. -
Paint the distant clouds:
Using your pale gray wash and the round brush, lay down a few horizontal strokes in the sky area. Keep the edges soft and uneven to mimic drifting clouds, leaving plenty of white space for the sky. -
Create distant mountains:
While the sky is still slightly damp (but not soaking), paint the distant mountain range using the medium gray wash. The dampness will help blur the edges, pushing these shapes into the background. -
Establish the water surface:
Using the same pale gray wash, add horizontal strokes below the horizon line to suggest the water’s surface, mirroring the placement of the clouds above. -
Let it dry completely:
This is crucial. Before adding any crisp black details, ensure your paper is bone dry to prevent the ink from bleeding into the soft background washes.
Control Your Saturation
Test your gray washes on a scrap piece of paper first. India ink is incredibly potent, and it is much easier to darken a wash layer by layer than to lighten one that is too dark.
Step 2: Adding the Foreground
-
Anchor the shoreline:
Switch to your darker charcoal wash or pure ink. Paint a jagged, narrow strip along the horizon line on the right side to create the distant heavy tree line base. -
Paint the main tree trunk:
On the left side, use the fine liner brush dipped in pure black India ink to draw a thin, vertical line for the main pine tree. It doesn’t need to be perfectly straight; natural wobbles look better. -
Add pine branches:
Starting from the top of the tree, use short, flicking motions to create branches. Keep the top branches short and sparse, gradually making them wider and denser as you move down the trunk. -
Texture the left shoreline:
At the base of your main tree, stipple pure black ink to simulate rocks and dense undergrowth, grounding the tree so it doesn’t look like it’s floating. -
Build the right-side cluster:
Paint the cluster of smaller trees on the right side. Start with their vertical trunks, then add the foliage, ensuring they are slightly shorter than your main left-side tree to create depth. -
Connect the land:
Use a mix of stippling and small horizontal strokes to connect the tree bases, creating a solid, dark shoreline silhouette.
Uneven Edges?
If your mountain wash dried with a hard edge you didn’t want, use a clean, damp brush (with just water) to gently scrub and soften that specific edge before adding the foreground trees.
Step 3: Reflections and Details
-
Start the reflections:
Clean your brush until it has very little pigment, or switch to your lightest gray wash. Drag the brush vertically downward directly beneath the tree clusters. -
Break the reflection lines:
To make the water look ripples, lift your brush intermittently as you drag down. I like to leave small horizontal white gaps in the reflection to show the water’s surface tension. -
Darken the near reflection:
Add a tiny amount of darker ink to the reflections closest to the shoreline, fading them out as they extend downward into the water. -
Paint the foreground grasses:
In the bottom right corner, use your finest brush or pen nib to flick quick, upward strokes. These represent tall grasses in the immediate foreground. -
Vary grass lengths:
Ensure the grass blades cross over each other slightly and vary in height for a natural, unkempt look. -
Final assessment:
Stand back and look at the contrast. If the main trees have dried lighter than expected, go over the darkest parts with a second coat of pure India ink for a silhouette effect.
Once the final ink touches are dry, your monochromatic landscape is ready to capture the quiet mood of twilight


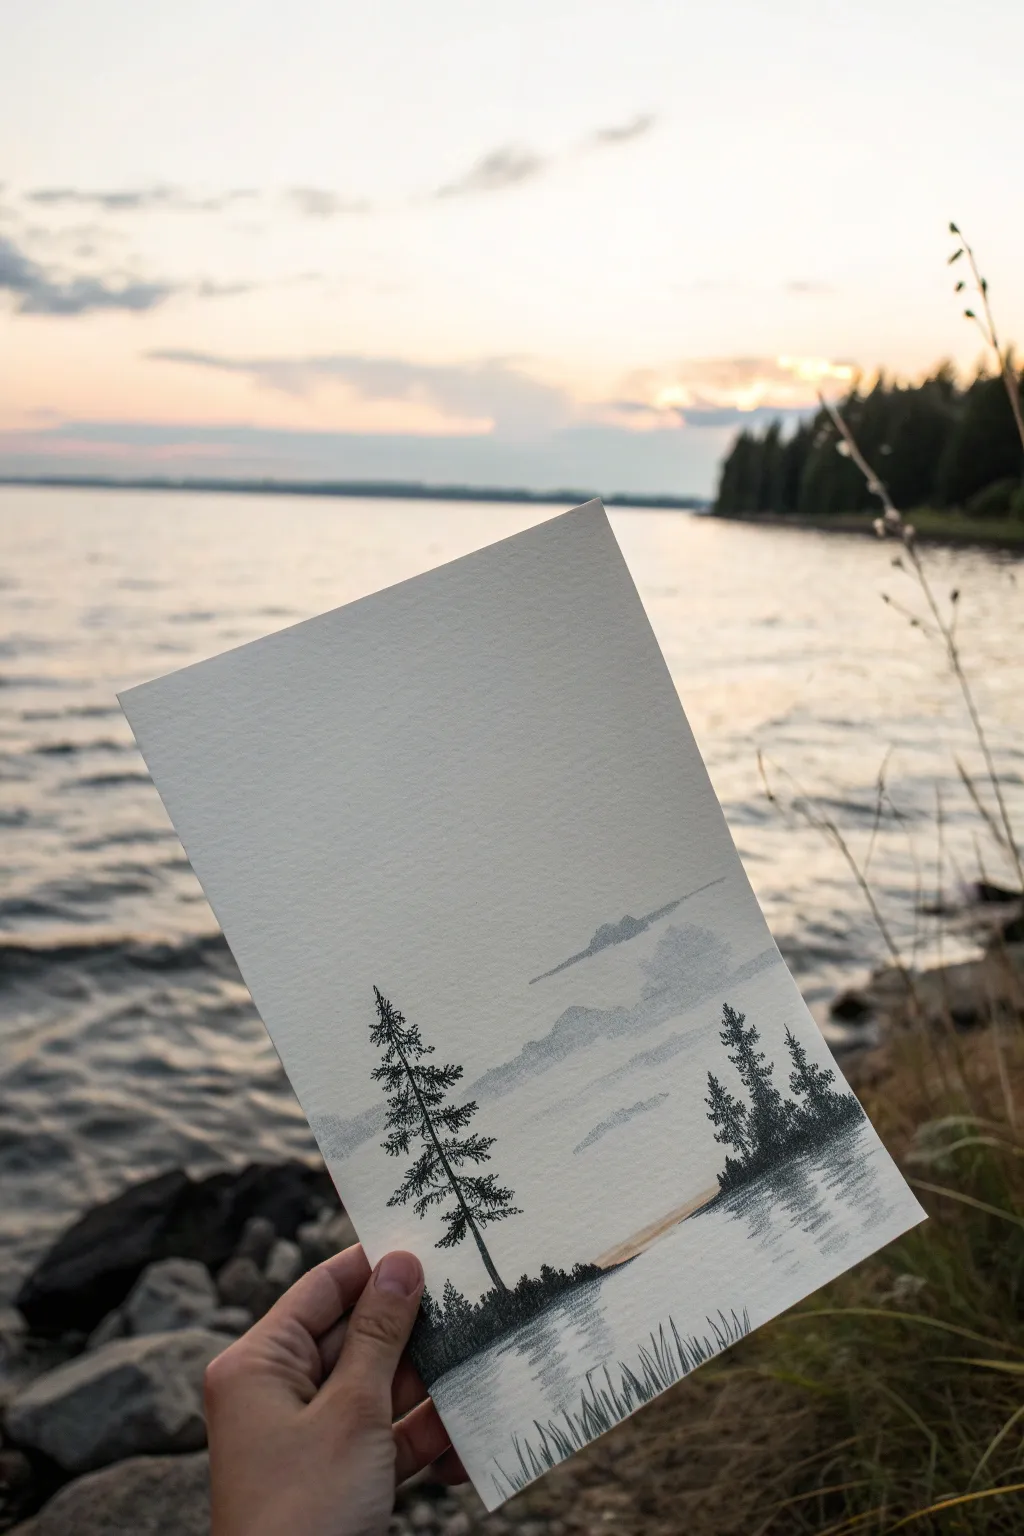
India Ink Pine Tree Silhouettes
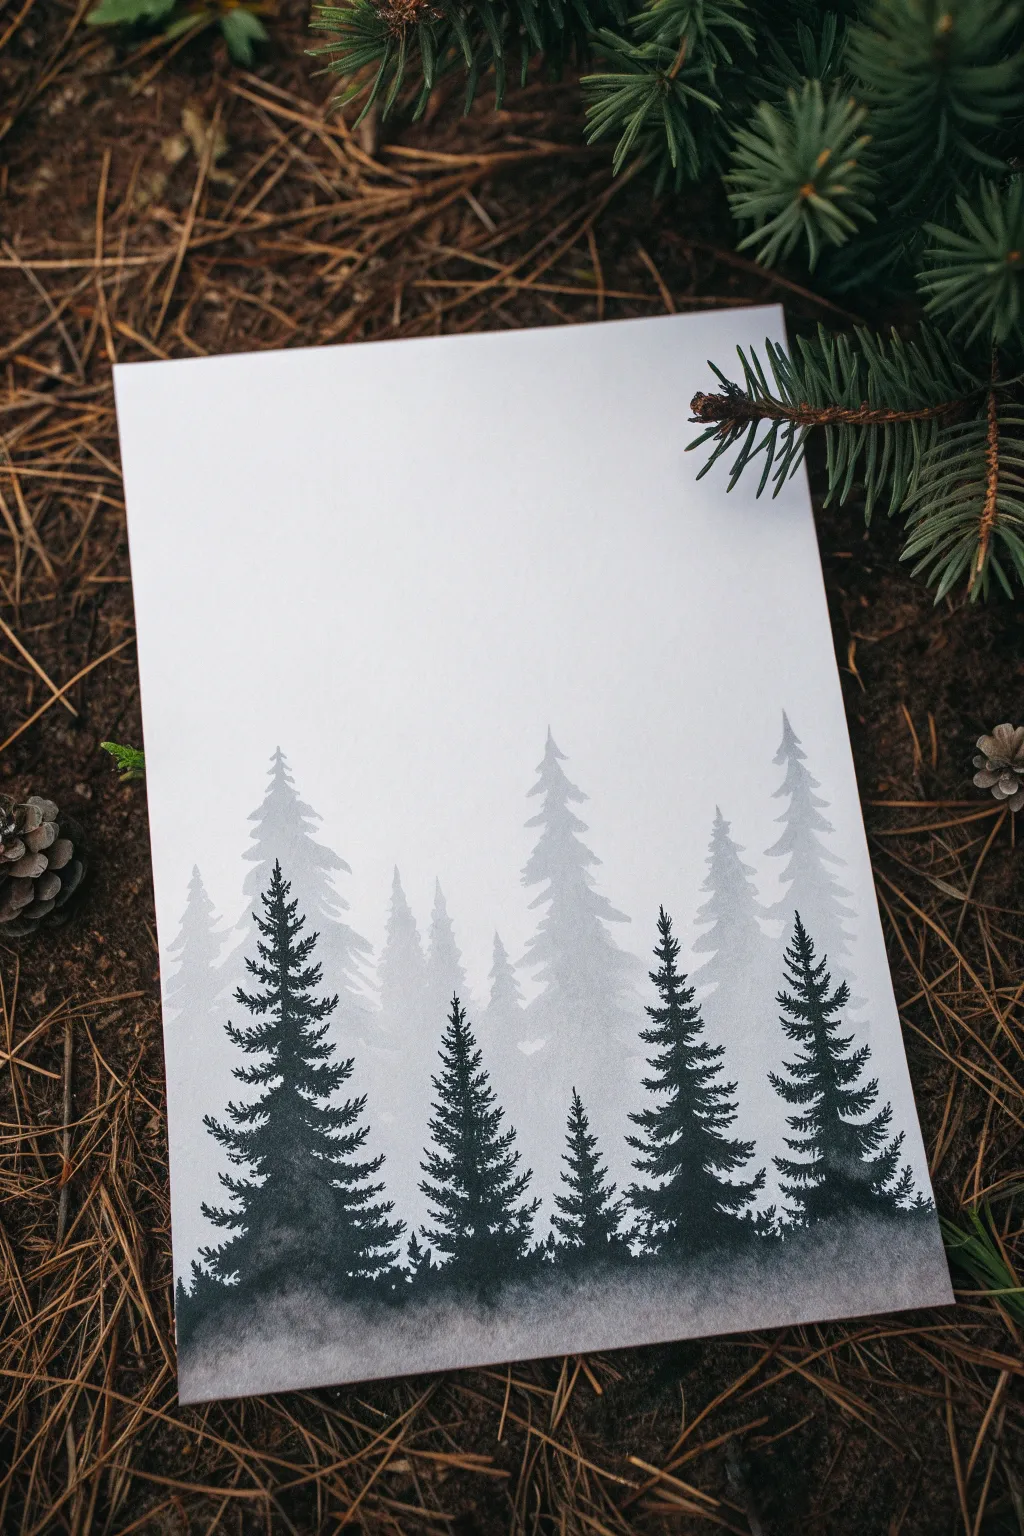
Create a serene, atmospheric landscape using just one color and the magic of dilution. This India ink project captures the depth of a foggy morning by layering pale, watery silhouettes behind sharp, ink-black foreground trees.
Step-by-Step Tutorial
Materials
- High-quality watercolor paper (cold press recommended for texture)
- Black India ink
- Water container (clean)
- Small mixing palette or ceramic dish
- Round watercolor brushes (sizes 2 and 6)
- Paper towels
- Masking tape (optional, to secure paper)
Step 1: Preparation and Planning
-
Set up your workspace:
Begin by taping down your watercolor paper to a flat surface if you want to prevent buckling, though for smaller pieces like this card size, you can work freely. Have your water, ink, and palette ready. -
Create your wash values:
Pour a few drops of India ink into your palette. In a separate well, mix a very small amount of ink with plenty of water to create a pale gray wash. You need at least three distinct values: a very pale gray, a medium gray, and pure black.
Fixing “Blooms”
If clear water backwashes into drying ink, it creates cauliflower-like blooms. To fix, wait until 100% dry, then gently glaze over the area with a slightly darker wash to hide the texture.
Step 2: The Background Layer
-
Paint the distant peaks:
Dip your larger brush into the palest gray wash. About halfway down the paper, paint the first row of tree shapes, keeping the edges soft and the forms simple. -
Wet-on-wet technique:
While the first shapes are still slightly damp, drop in a tiny bit more pigment at the base of the trees to create a subtle gradient, letting the ink bleed downwards. -
Establishing the mist:
Use clean water to fade the bottoms of these pale trees into nothingness. This creates the illusion of a thick fog separating the layers. -
Dry completely:
Wait for this first layer to be bone dry. If it’s damp, the next layer will bleed into it and ruin the depth effect.
Step 3: The Middle Ground
-
Mix a medium tone:
Load your brush with the medium gray wash. It should be noticeably darker than your first layer but still transparent. -
offset the trees:
Paint a second row of pine trees slightly lower on the page than the first. I like to stagger them so they sit in the gaps of the background trees. -
Add branch details:
Use the tip of the brush to flick small branches outward and slightly upward, mimicking the growth pattern of evergreens. -
Fade out the base:
Just like the first layer, rinse your brush and soften the bottom edge of this row with water so it disappears into the white of the paper. -
Second drying phase:
Allow this middle layer to dry fully. Test it by looking for any sheen on the paper surface; if it shines, it’s wet.
Starry Night Effect
Once the painting is completely dry, dip a toothbrush in white gouache or opaque white ink and flick it over the sky area to create a subtle falling snow or starry effect.
Step 4: The Foreground Silhouettes
-
Switch to pure ink:
Load your smaller, finer brush with undiluted black India ink. This will provide the crispest contrast. -
Start the main subjects:
Paint the central foreground trees, starting with a thin vertical line for the trunk. These should be the largest trees, starting lower on the page than the previous rows. -
Texture the foliage:
Using a stippling or dabbing motion, build the pine needles outward from the trunk. Keep the top of the tree sparse and pointy, getting wider and denser as you move down. -
Create smaller saplings:
Add a few smaller, pure black trees in between the large ones to create variety in height and interest. -
Ground the forest:
Instead of fading the bottom this time, use the black ink to create a solid, dark ground line. You can dilute it slightly at the very bottom edge to suggest ground mist, but keep the tree roots dark and anchored. -
Refine the edges:
Look over your silhouettes. If any branches look too smooth, add tiny, sharp flicks of ink to roughen them up and make them look more organic. -
Final dry:
India ink can dry brilliantly glossy or matte depending on the brand, but it takes a moment to set. Let the piece sit undisturbed until the blackest areas are dry to the touch.
Display your moody forest piece in a simple frame to let the stark contrast speak for itself


India Ink Moonlit Negative Space Scene
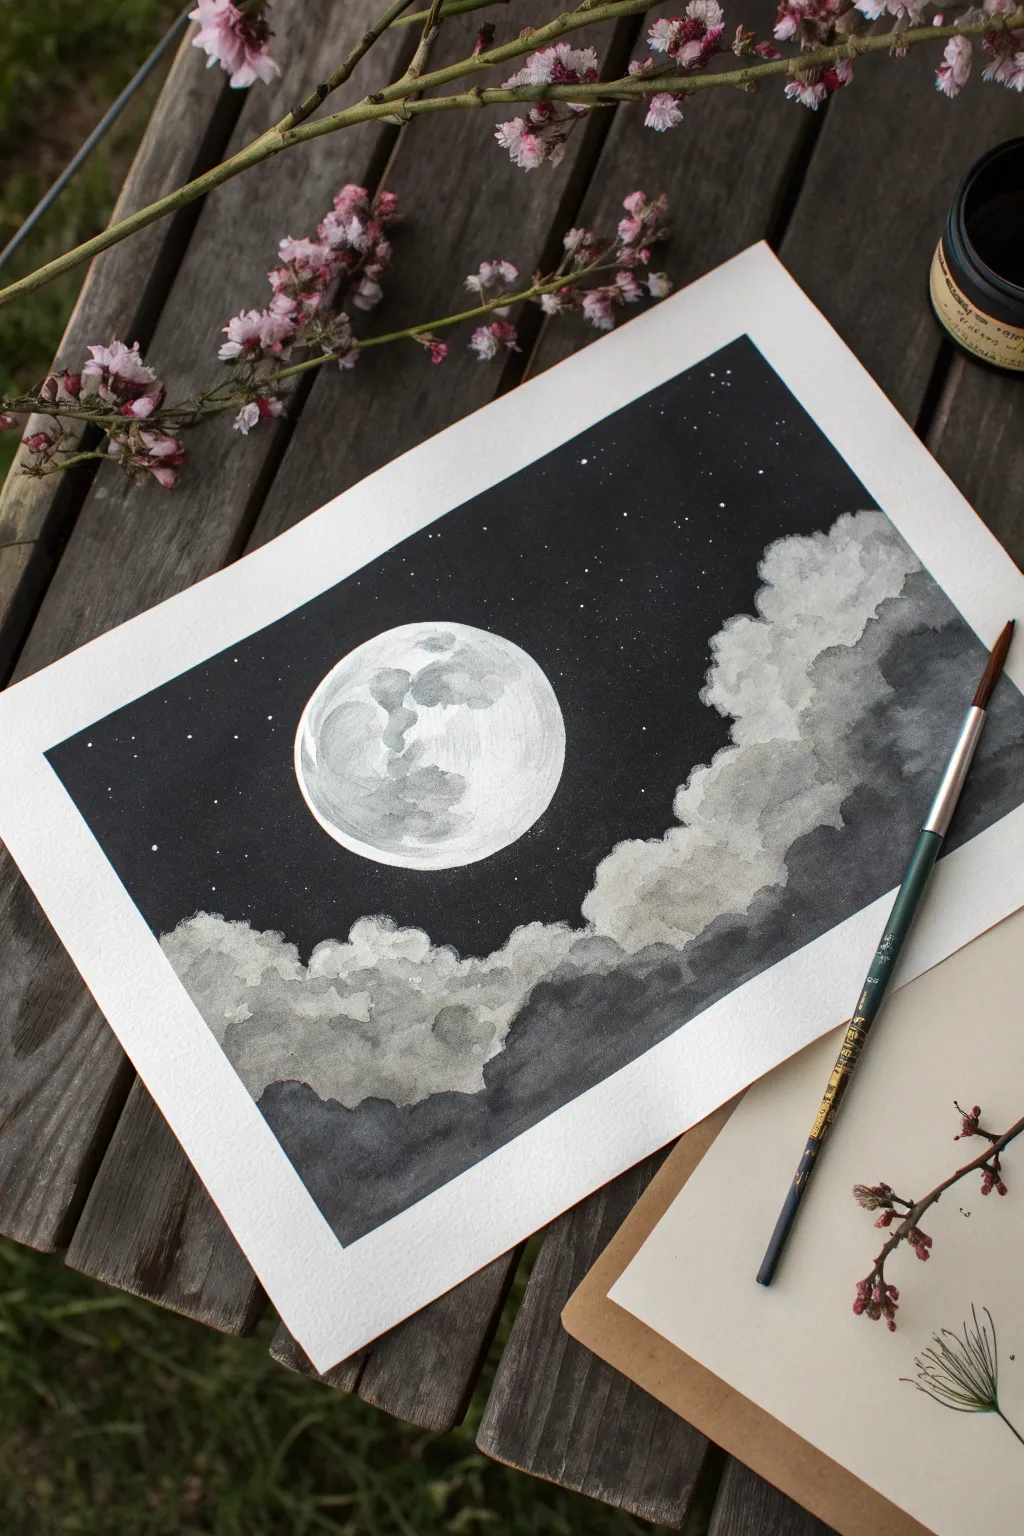
Capture the serene glow of a full moon surrounded by rolling clouds using just India ink and water. This project relies on beautiful monochromatic gradients and negative space to create a dramatic, high-contrast night sky.
Step-by-Step Tutorial
Materials
- High-quality watercolor paper (cold press recommended for texture)
- Black India ink
- Pencil and round object (or compass) for tracing
- Masking fluid
- Synthetic round brushes (sizes 2 and 6)
- Painter’s tape or washi tape
- Glass of water
- Palette or mixing tray
- Paper towels
Step 1: Preparation and Masking
-
Secure the paper:
Begin by taping down all four edges of your watercolor paper to a hard board or table. This creates a crisp white border around your final piece and prevents the paper from buckling when wet. -
Sketch the moon:
Use a compass or trace around a circular object like a jar lid to lightly draw the outline of the moon in the upper-left quadrant of the paper. Keep your pencil lines very faint so they don’t show through later. -
Protect the moon:
Apply a layer of masking fluid carefully inside the circle of the moon. This is crucial as it preserves the pristine white of the paper while you paint the dark sky around it. Allow the fluid to dry completely until it is tacky and firm. -
Sketch cloud shapes:
Lightly sketch the organic, fluffy shapes of the clouds accumulating in the bottom right corner and drifting toward the center. No need for perfection here; just guide lines.
Pro Tip: Bloom Control
For softer clouds, paint wet-on-wet. Wet the paper inside the cloud outline with clean water first, then touch the brush loaded with ink to the wet area and watch it spread naturally.
Step 2: Painting the Sky
-
Prepare the dark ink:
Pour pure India ink into your palette. For the deepest black of the night sky, you will use the ink undiluted. -
Paint the background:
Starting from the top left corner, use your larger brush to apply the black ink. Carefully cut in around the cloud shapes you sketched, but you can paint right over the masked moon. -
Create softness:
As you approach the edges of the clouds, dilute the ink slightly with water on your brush to create softer, less abrupt transitions where the sky meets the cloud tops. -
Add stars:
While the black sky is completely dry, you can use white gouache, a white gel pen, or simply leave tiny pinpricks of paper unpainted (though spattering white later is easier) to create the distant stars.
Troubleshooting: Blotchy Sky
If your black background looks streaky, apply a second coat of undiluted ink once the first is dry. Change your brush stroke direction to cross-hatch for a solid, velvety matte finish.
Step 3: Rendering Clouds
-
Mix value washes:
Create three puddles of ink on your palette: a very light grey (mostly water), a medium grey, and a dark grey. -
Base cloud layer:
Using the lightest grey wash, paint the tops of the cloud formations. Use a dabbing motion with the brush to mimic the fluffy texture of cumulus clouds. -
Add volume:
Before the first layer dries completely, drop in the medium grey wash near the bottom and middle of the cloud clumps. Let the wet ink bleed slightly upward to create natural shadows. -
Deepen shadows:
Use the darkest grey wash for the underside of the clouds and the areas furthest from the moonlight. This establishes the heavy, rolling weight of the lowest clouds. -
Refine edges:
If any cloud edges look too sharp, use a clean, damp brush to soften them, blending the ink outwards. I find this helps the clouds look more ethereal rather than solid.
Step 4: The Moon Detail
-
Remove masking:
Ensure the black background is totally dry. Gently rub away the masking fluid from the moon using your finger or a rubber cement pickup, revealing the growing white circle. -
Paint surface textures:
Using your smallest brush and extremely diluted light grey ink, paint the ‘seas’ or craters of the moon. Look at a reference photo of the moon to get the placement of the major dark spots right. -
Soften moon features:
Blot any areas that get too dark with a paper towel. The contrast inside the moon should be subtle compared to the stark difference between the moon and the black sky. -
The glow:
Leave the very edge of the moon on the top left completely white to represent the strongest light source.
Step 5: Final Touches
-
Star field:
If you didn’t leave negative space for stars, load a toothbrush or stiff brush with opaque white ink or gouache and flick a very fine mist of stars over the black sky area. -
Reveal the border:
Wait for the entire painting to dry completely. Slowly peel away the painter’s tape at a 45-degree angle to reveal your clean, crisp edges.
Now you have a moody, atmospheric night scene perfect for framing


India Ink Lighthouse in Storm Waves
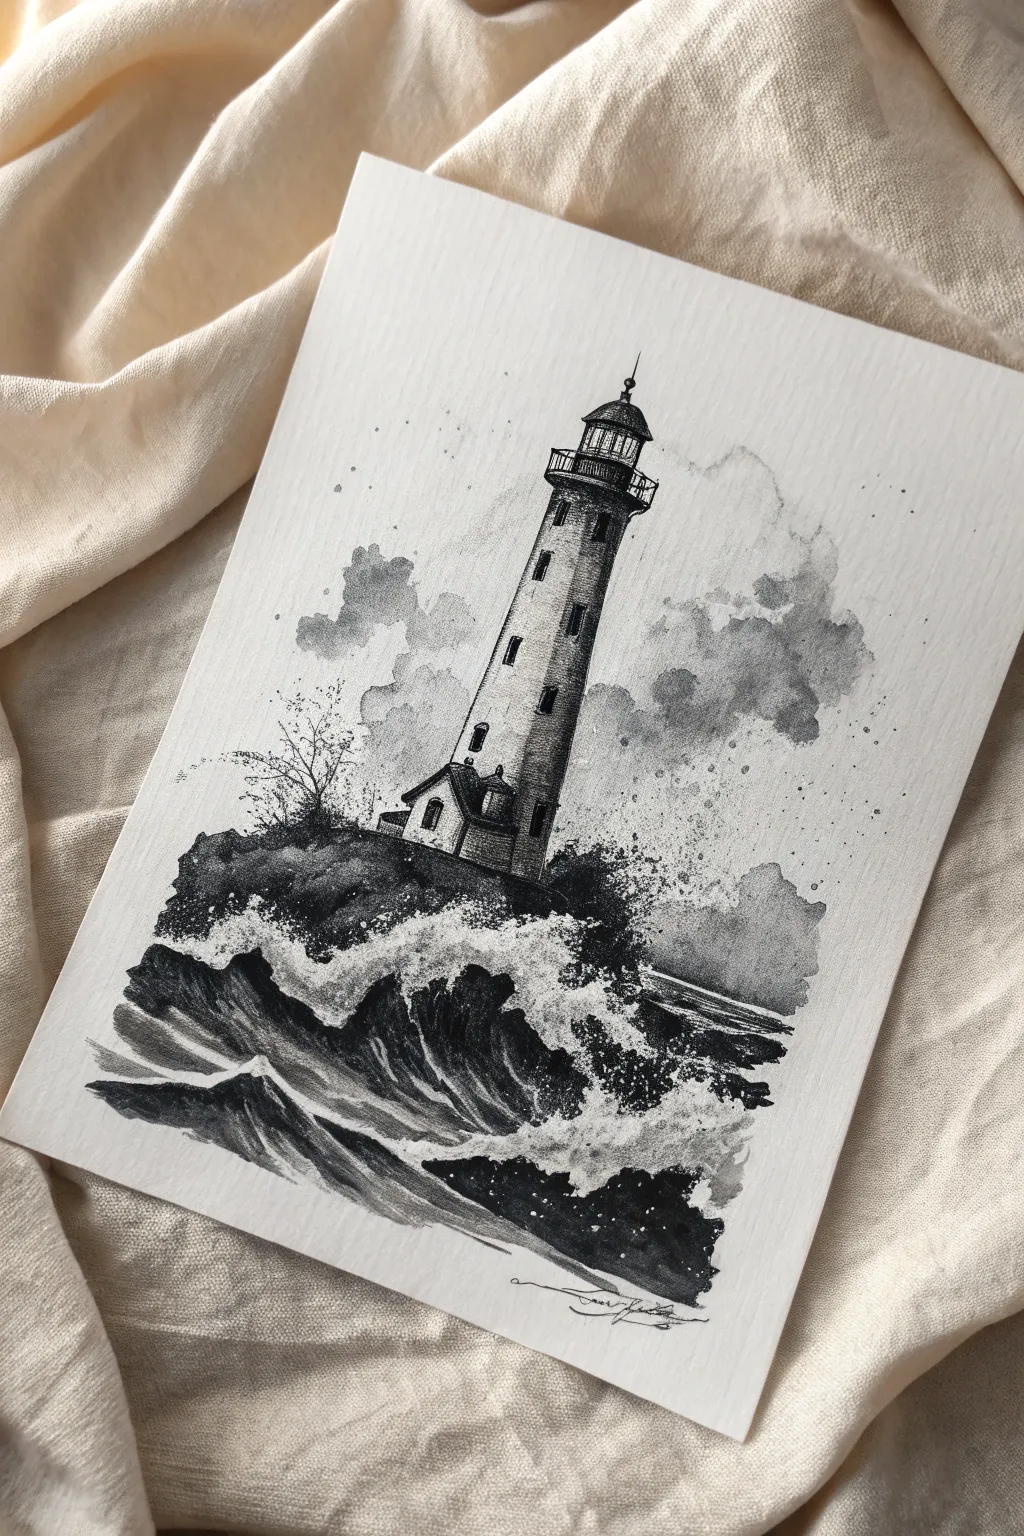
Capture the raw power of the ocean with this dramatic India ink illustration featuring a solitary lighthouse amidst crashing waves. By combining precise stippling techniques with loose, expressive ink washes, you’ll create a striking contrast between the enduring structure and the chaotic sea.
Detailed Instructions
Materials
- Heavyweight watercolor paper or mixed media paper (at least 140lb/300gsm)
- Black India ink (waterproof)
- Dip pen with fine nib or fine liner pens (sizes 005, 01, 03)
- Round watercolor brushes (size 4 and 8)
- Container of water for diluting ink
- Paper towels
- Pencil (HB or 2H) and eraser
- Old toothbrush (optional for splatter)
Step 1: Sketching the Foundation
-
Establish the horizon and rock:
Begin with a light pencil sketch. Draw a jagged, irregular shape in the lower third of the paper to represent the rocky island base, tilting it slightly to add dynamic movement. -
Draft the lighthouse structure:
Center the lighthouse on the rock. Sketch a tall, slightly tapered cylinder. Add the lantern room at the top with a small railing and a triangular roof cap. Don’t forget the small adjoining house at the base. -
Outline the waves:
Lightly indicate the flow of the water crashing against the rock. Draw sweeping curves to suggest the crests and troughs of the waves, leaving plenty of negative space for the sea spray.
Pro Tip: Masking Fluid
To keep your sea foam perfectly white, apply liquid masking fluid to the wave crests before painting. Rub it off after the ink dries for crisp, bright highlights
Step 2: Structuring with Pen & Ink
-
Ink the main outlines:
Using your dip pen or a 03 fine liner, carefully go over the lighthouse structure. Keep your lines steady but allow for some organic variation on the rocks to mimic natural texture. -
Add architectural details:
Switch to a finer nib or 005 pen. Draw the windows on the tower, spiraling upward. Detail the lantern room railing and the roof tiles on the small cottage. -
Begin shading the tower:
Use vertical hatching lines on the shadowed side of the lighthouse (the right side in this reference) to create volume. Keep the left side mostly white to indicate a light source. -
Texture the lighthouse walls:
Introduce stippling (tiny dots) along the transition between shadow and light on the tower. This gradient softens the shading and adds an aged, weathered look to the stone.
Level Up: Coffee Stain
For a vintage, nautical chart aesthetic, lightly wash the paper with diluted coffee or tea and let it dry completely before starting your pencil sketch
Step 3: Creating Atmosphere with Washes
-
Mix your grey values:
On a palette or in small cups, prepare three values of ink: a very pale grey (mostly water), a medium grey, and a near-black. -
Paint the rock formation:
Apply the dark ink directly to the base of the rock island. While it’s wet, touch a water-loaded brush to the edges to let the ink bleed outward slightly, creating a mossy, jagged texture. -
Establish the wave shapes:
Using the medium grey wash and a larger brush, paint the undulating bodies of the waves. Leave the tops of the waves completely white to represent foam. Use quick, sweeping strokes. -
Deepen the ocean contrast:
Once the first wave layer is dry, come back with darker ink in the troughs of the waves. This high contrast between the dark water and white paper is crucial for the stormy effect. -
Form the clouds:
Wet the sky area irregularly with clean water first. Drop in pale grey ink and let it bloom naturally to create soft, ominous storm clouds behind the lighthouse.
Step 4: Final Textures and Spray
-
Detail the crashing foam:
Using a dry brush technique or stippling with your pen, add texture to the white areas of the waves where they meet the dark water. This simulates the chaotic spray. -
Enhance the rock foliage:
Draw small, scraggly branches or weeds on the left side of the rock using your finest pen. I like to keep these lines jittery to suggest windblown vegetation. -
Add splatter effects:
Dip a stiff brush or toothbrush into medium-grey ink. Run your thumb over the bristles to flick tiny droplets across the sky and the base of the lighthouse, creating the illusion of airborne sea spray. -
Final dark accents:
Review your piece. Use pure black ink to reinforce the darkest shadows under the wave crests and on the shadowy side of the lighthouse lantern room.
Sign your name at the bottom and enjoy the moody atmosphere of your coastal creation
BRUSH GUIDE
The Right Brush for Every Stroke
From clean lines to bold texture — master brush choice, stroke control, and essential techniques.
Explore the Full Guide
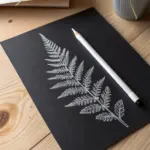
India Ink Line and Wash Botanicals
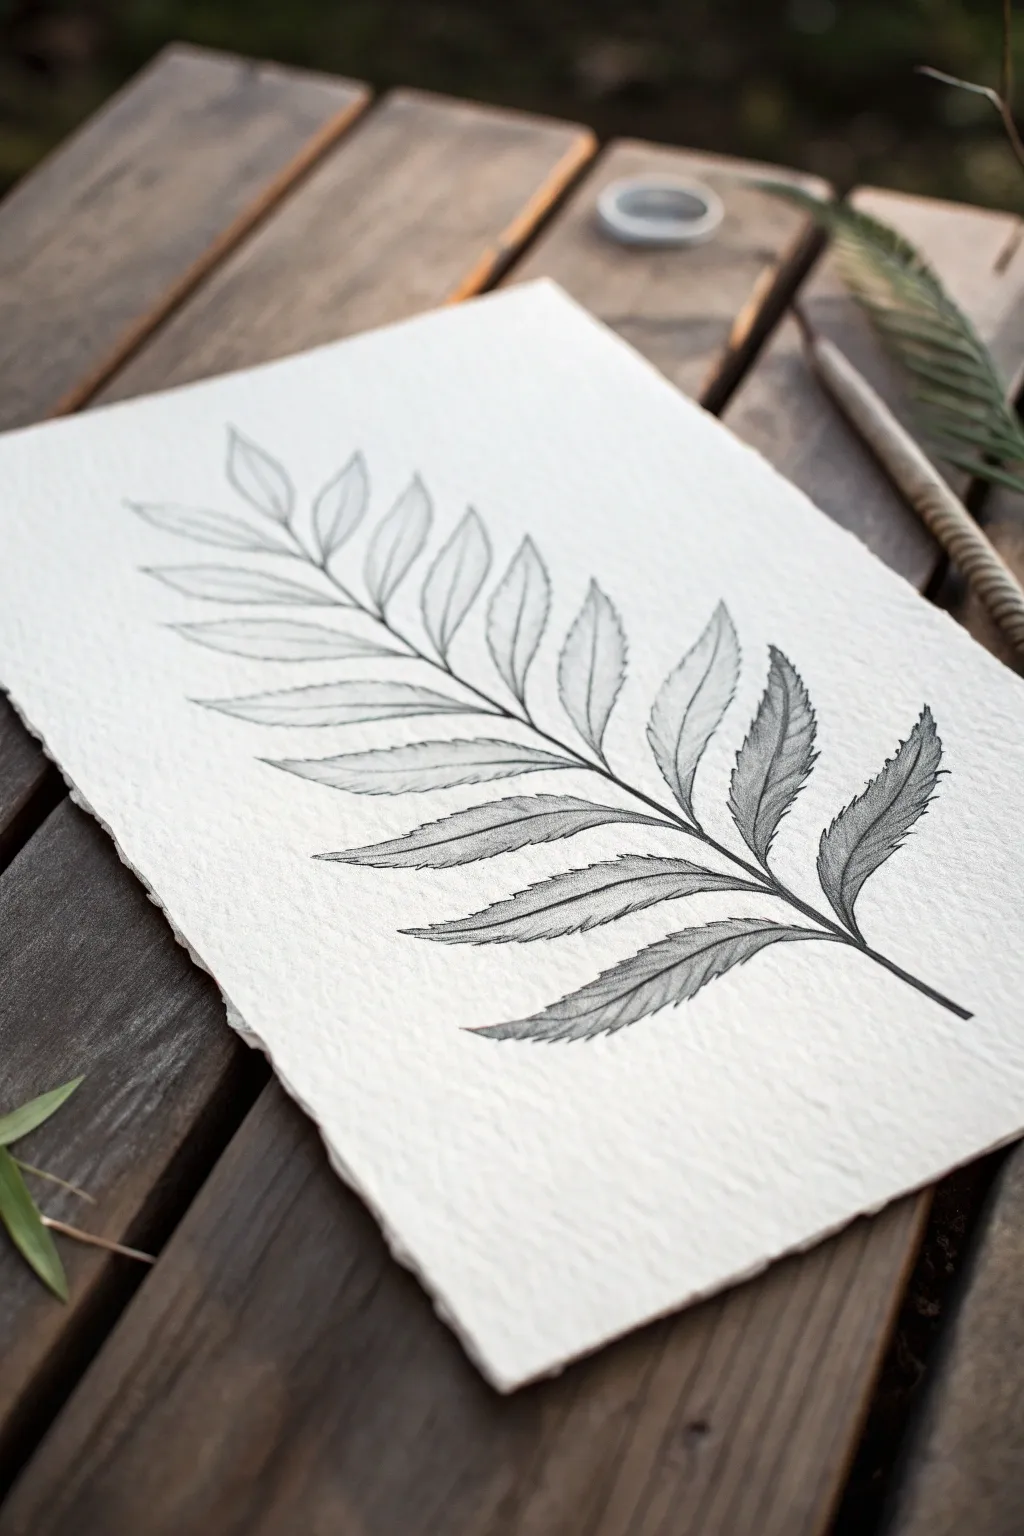
Capture the fragile elegance of a fern frond using fine liner pens and traditional India ink techniques. The result is a striking monochromatic botanical illustration that highlights texture and organic form on beautiful handmade paper.
Step-by-Step
Materials
- Heavyweight cold-press watercolor paper or handmade cotton rag paper
- HB or 2H graphite pencil
- Kneaded eraser
- India ink (black, waterproof)
- Dip pen with a fine nib (mapping nib works well)
- Small round watercolor brush (size 0 or 2)
- Clean water jar
- Paper towel
- Rough sketch paper for practice
Step 1: Conceptualizing and Sketching
-
Observe the anatomy:
Before putting pencil to paper, look closely at how a fern is constructed. Notice specifically how the leaflets (pinnae) attach to the central stem (rachis) and how they taper in size toward the tip of the frond. -
Plan the composition:
Visualize the diagonal limitation of your paper. A fern looks dynamic when placed at a slight angle, suggesting movement or natural growth. -
Establish the spine:
Using your graphite pencil with a very light hand, draw a long, slightly curved line to serve as the central stem. This curve dictates the ‘gesture’ of the entire leaf. -
Mark leaflet positions:
Along this central spine, lightly tick off spacing marks for the pairs of leaflets. Remember to make the gaps slightly smaller as you move toward the tip. -
Draft the leaflet shapes:
Lightly sketch the roughly lance-shaped outlines of each leaflet. Don’t worry about the serrated edges yet; just focus on getting the length and width proportions correct. -
Refine the edges:
Go back over your leaflet outlines and add the characteristic serrated or ‘toothed’ edges. Keep these irregular—nature is rarely perfectly symmetrical. -
Clean up the sketch:
Use your kneaded eraser to gently lift away the heaviest graphite lines, leaving only a faint ‘ghost’ image to guide your ink work. Heavy graphite can sometimes repel ink.
Nib Control Secret
If your dip pen nib is new, wipe it with rubbing alcohol or pass it quickly through a flame to remove the factory oil coating. This helps the ink flow smoothly.
Step 2: Inking and Shading
-
Outline the central stem:
Dip your pen into the India ink. Start by carefully tracing the central stem. Vary your pressure slightly: press harder at the base for a thicker line and lift gently as you reach the tip. -
Outline the leaflets:
Ink the outer edges of the leaflets. Use short, confident pulls of the pen to create the serrated teeth, ensuring the points feel sharp rather than rounded. -
Add central veins:
Draw the central vein down the middle of each individual leaflet. I find it helpful to break this line slightly near the tip to suggest light hitting the surface. -
Begin hatching shadows:
Start adding shading to the leaflets closest to the bottom of the stem. Use very fine, parallel lines (hatching) radiating from the center vein outwards. -
Deepen the contrast:
Concentrate your hatching marks near the central vein and base of each leaflet. This creates a concave visual effect, making the leaf look like it has volume. -
Layer with cross-hatching:
For the darker areas, add a second set of fine lines perpendicular to your first layer. This cross-hatching builds dense blacks without losing the texture of the paper. -
Create variation:
Leave the tips and edges of the leaflets largely unshaded or with very sparse white space. This high contrast mimics sunlight catching the edges of the frond. -
Add subtle wash (optional):
If you want softer gray tones, dilute a single drop of ink in a teaspoon of water. Use a damp brush to gently glaze over the shadowed areas, blending the hatched lines slightly. -
Erase guidelines:
Allow the ink to dry completely—give it at least 20 minutes to be safe. Gently erase any remaining pencil marks to leave a crisp, clean illustration.
Ink Blot Rescue
Dropped a blob of ink? Don’t smear it! Immediately touch the corner of a clean paper towel to the spill to wick it up, then let it dry and incorporate it into a shadow.
Frame your botanical study in a simple wooden frame to complement the organic subject matter
India Ink Architectural Sketch Study
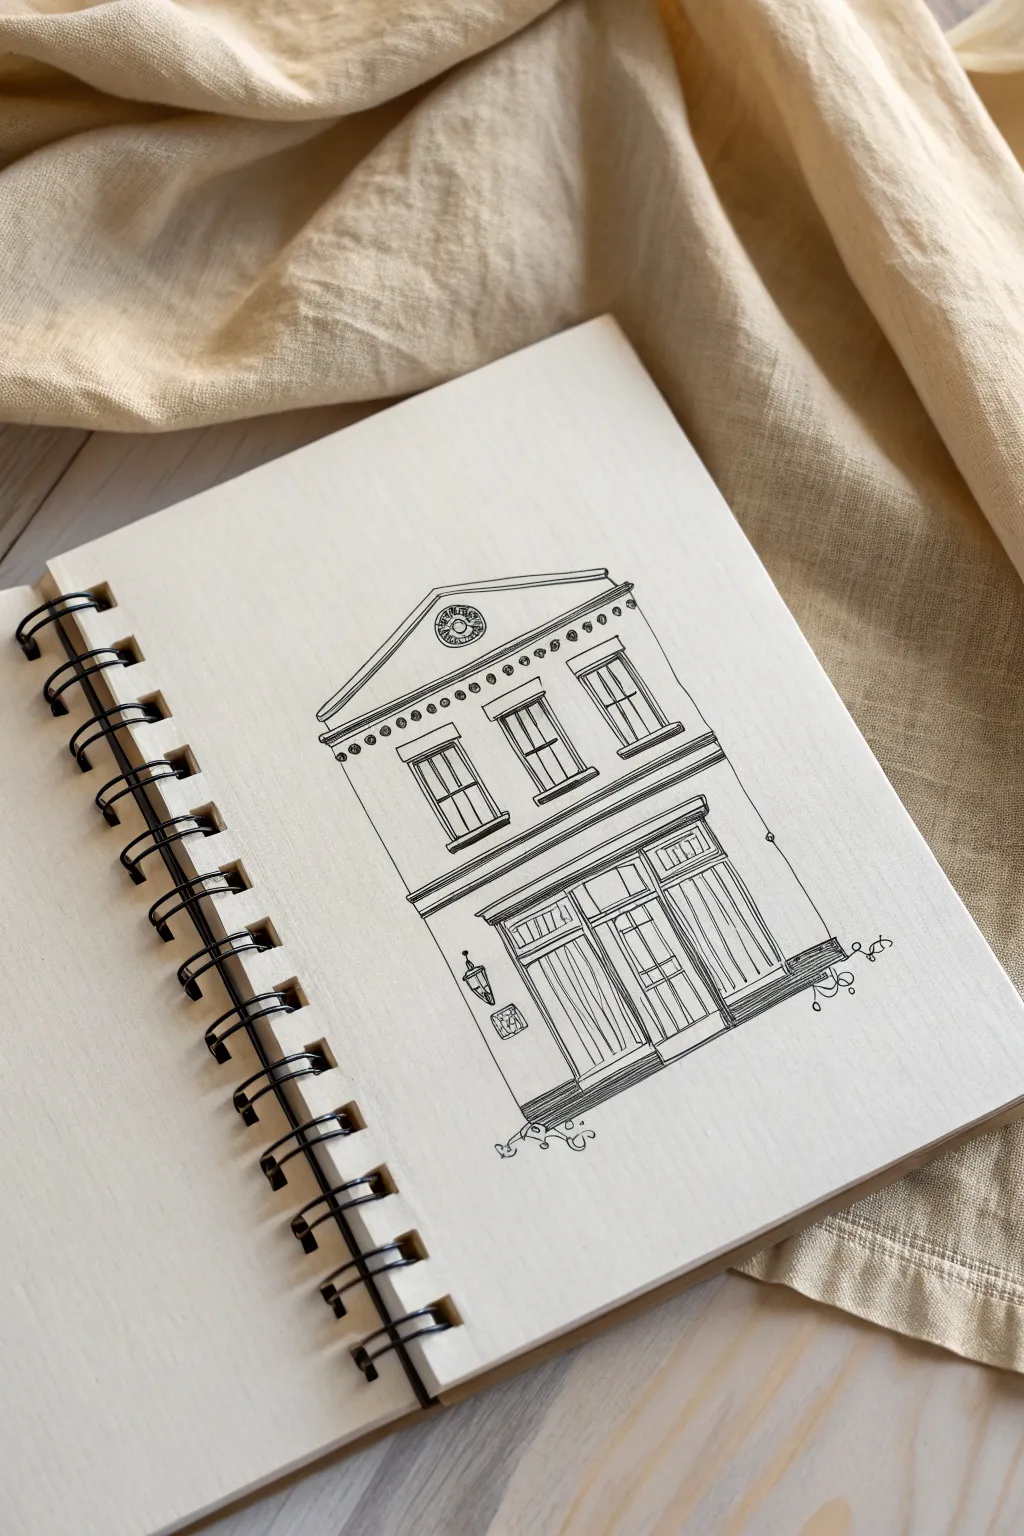
Capture the charm of traditional architecture with this clean, linear sketch of a townhouse facade. Using fine india ink pens, you’ll practice precision and detailing to create a balanced, illustrative piece on quality mixed-media paper.
How-To Guide
Materials
- Wire-bound sketchbook (heavyweight or mixed-media paper)
- HB Graphite pencil
- Kneaded eraser
- Ruler (clear acrylic works best)
- India ink fineliner pens (sizes 005, 01, and 03)
- Small circle template (optional)
Step 1: Planning the Structure
-
Establish the ground lines:
Begin by using your ruler and HB pencil to draw a faint horizontal line near the bottom third of your page. This will be the base of your building. Draw a second horizontal line about four inches above it to mark the separation between floors. -
Draft the outer walls:
Draw two vertical lines connecting your horizontals to define the width of the building. Keep your pressure extremely light so these guide lines are easy to erase later. -
Construct the roofline:
Above the top floor line, draw a shallow triangle to form the pediment (the triangular roof section). Add a narrow horizontal rectangle just below it to create the frieze area. -
Block in the windows:
On the second floor, lightly sketch three evenly spaced vertical rectangles for the windows. Ensure the central window is dead center, with the outer two equidistant from the edges. -
Outline the storefront:
For the ground floor, sketch a large rectangular opening for the shop front. Divide this space into a central door area flanked by two large window panels.
Clean Corners Pro-Tip
When using a ruler with ink, stick a small piece of masking tape or a penny on the underside of the ruler. This lifts the distinct edge off the paper, preventing ink from bleeding under the ruler.
Step 2: Inking the Outline
-
Inking the main structure:
Switch to your 03 size pen. Carefully trace the main vertical walls and the primary horizontal beam separating the floors. Use your ruler here to keep the architectural lines crisp and straight. -
Define the pediment:
Ink the triangular roofline with the 03 pen. Inside the triangle, use a 01 pen to draw a smaller triangle to create a border, and sketch a small circle in the center for the decorative medallion. -
Detail the cornice:
Below the roof triangle, draw a series of tiny circles or dots along the horizontal frieze using the 01 pen to suggest dentil molding or decorative carving. -
Window frames:
Use the 01 pen to ink the three upper windows. Draw a second rectangle inside each one to create the window frame depth, and add a simple cross-shape inside for the panes.
Level Up: Wash Effect
Use a water-soluble grey marker or diluted ink wash to add faint shadows under the roof eaves and inside the window frames for instant 3D depth.
Step 3: Adding Architectural Details
-
Ground floor structure:
Ink the large storefront frame with the 03 pen. Create a double line at the top to represent the molding above the door. -
Door and window panes:
Switch to the 005 pen for the delicate woodwork. Draw the vertical lines dividing the door and side windows. Instead of using a ruler for everything, I sometimes freehand these interior lines slightly to give the sketch a bit of warmth. -
Transom windows:
Above the main door and shop windows, draw a horizontal strip of smaller, square window panes (transom windows) using the 005 fine nib. -
Add the lantern:
On the left wall next to the door, sketch a small, vintage wall sconce or lantern. Use simple geometric shapes—a trapezoid for the light and a small bracket attaching it to the wall. -
Texture the glass:
Using the 005 pen, add very faint, broken diagonal lines across the glass surfaces of the door to suggest reflection and sheen. Keep these sparse to avoid dirtying the drawing.
Step 4: Final Touches
-
Detail baseboard:
Darken the very bottom edge of the building with the 03 pen to ground the structure. You can add a few short, horizontal hatch marks to suggest a stone foundation. -
Add whimsical elements:
Draw small, curly flourishes extending from the bottom corners of the building and near the right side. These decorative squiggles soften the rigid architecture and add an artistic flair. -
Erase pencil guides:
Wait at least 15 minutes for the ink to fully cure. This is crucial—if the ink is even slightly damp, it will smear. Once dry, gently scrub away all pencil marks with the kneaded eraser. -
Strengthen weights:
Review your drawing. If the main silhouette feels too light, go back over the outermost perimeter lines one last time with the 03 pen to make the building pop off the page.
Enjoy the satisfaction of seeing your crisp architectural lines stand out against the clean paper.

PENCIL GUIDE
Understanding Pencil Grades from H to B
From first sketch to finished drawing — learn pencil grades, line control, and shading techniques.
Explore the Full Guide
India Ink Crosshatching Texture Sampler
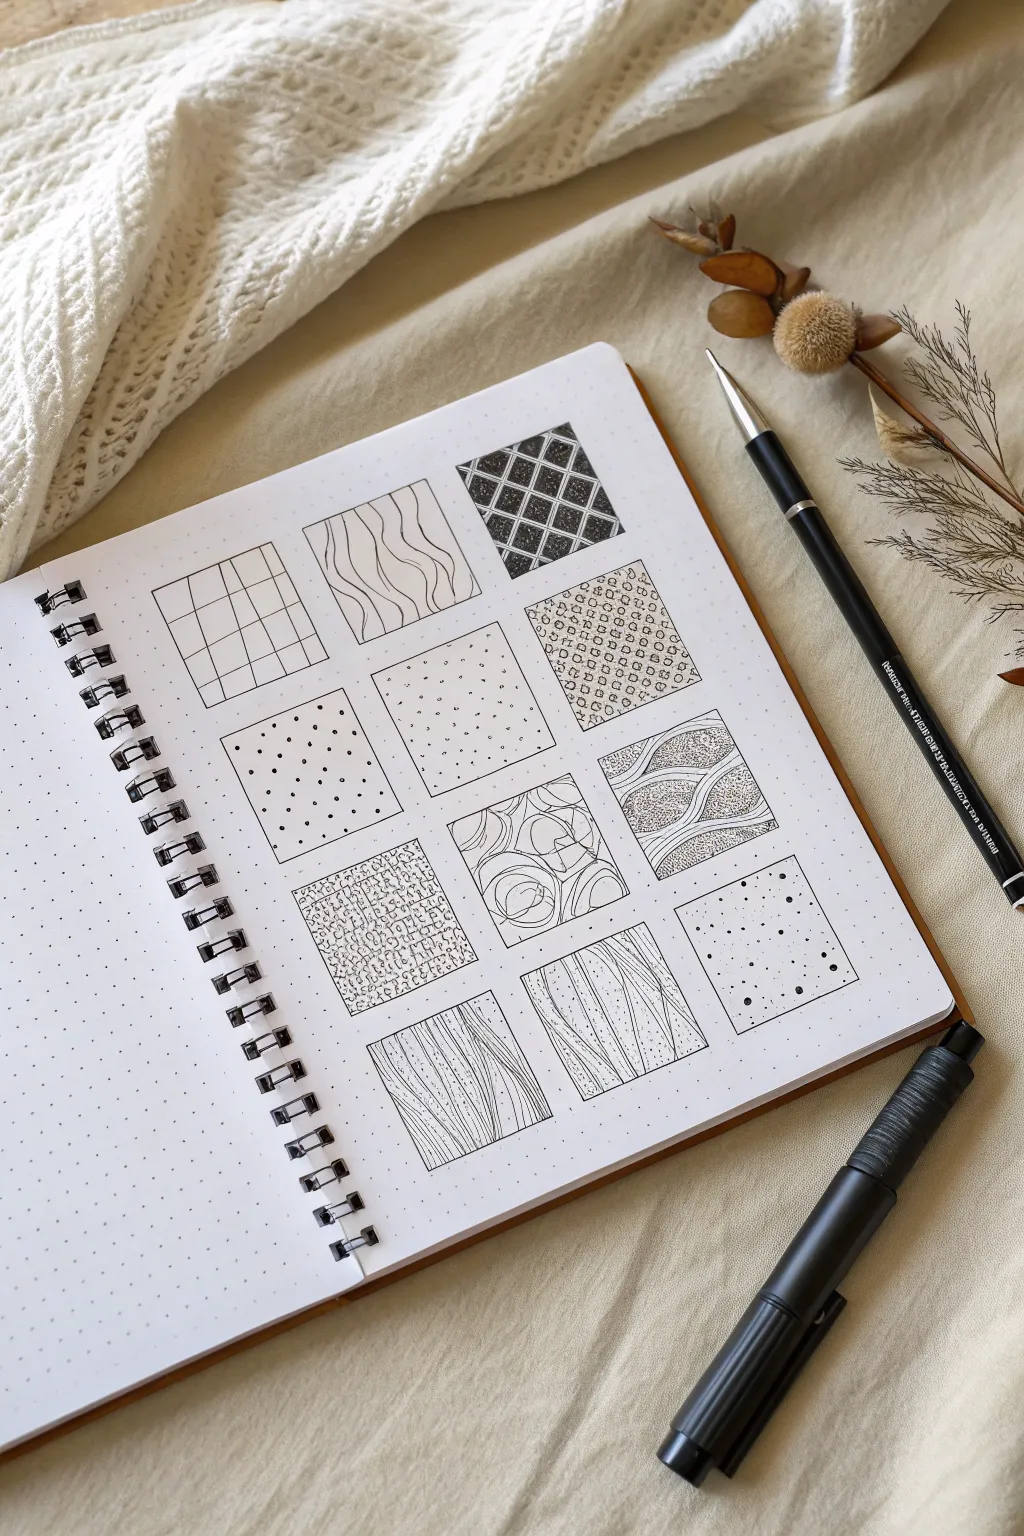
This practice page is a fantastic way to explore the versatility of India ink without the pressure of creating a full illustration. You’ll create a neat grid of twelve distinct pattern swatches, ranging from simple geometric lines to organic, stippled textures.
Detailed Instructions
Materials
- Dotted or grid notebook (or smooth Bristol paper)
- Fine liner pen (01 or 03 size) with India ink
- Brush pen or fude pen with India ink
- Ruler
- Pencil
- Eraser
Step 1: Setting the Grid
-
Map out the squares:
Using your pencil and ruler, lightly draw twelve equal squares in a 3×4 grid arrangement. If you are using a dot grid notebook, use the dots to ensure perfect 90-degree corners and consistent spacing between each box. -
Define the borders:
Go over your pencil squares with a fine liner pen to create crisp, permanent boundaries for your textures. Let the ink dry completely for a minute before erasing the pencil guidelines to avoid smearing.
Uneven borders?
If your hand shakes while drawing the square frames, try thick-lining the borders later with a brush pen. The bolder line weight hides wobbles and makes the delicate inner textures pop.
Step 2: Row 1: Geometric & Graphic
-
Simple grid:
In the first square, use your fine liner to draw vertical lines spaced evenly apart, then cross them with horizontal lines to create a basic windowpane check. -
Wavy lines:
For the second square, draw vertical lines again, but give them a gentle, consistent wave. Try to keep the distance between the waves relatively uniform. -
Negative space diamonds:
In the third square, switch to a brush pen or fill in heavily with your fine liner. Draw a diagonal grid, but instead of lines, fill in the diamond shapes with solid black ink, leaving thin white channels between them to create a striking lattice effect. -
Rough stippling:
For the last square in this row, fill the space with tiny, irregular circles or ‘bubbles’ packed closely together. This creates a pebbled, organic texture.
Step 3: Row 2: Dots & Flow
-
Uniform polkadots:
Create a pattern of evenly spacing medium-sized dots. I find it easiest to work in diagonal rows to keep the spacing consistent. -
Fine dust stippling:
In the next square, hold your pen vertically and gently tap to create very fine, sparse dots. Unlike the previous square, these should be tiny specks and spaced randomly like dust. -
Dense contouring:
For the third square, draw a few large, overlapping circular shapes. Fill the interiors with concentric curved lines that follow the shape of the outline, creating a topographical map look. -
Textured waves:
Divide the square with two or three thick, wavy ribbons. Fill the ribbons with dense stippling (lots of dots), leaving the background white, or fill the background with horizontal lines as a contrast.
Gradient Challenge
Try making each square a gradient. Start with heavy, dense marks at the bottom of the box and gradually space them out as you move upward for a fading effect.
Step 4: Row 3: Organic Patterns
-
Scribble texture:
Loosen your grip and fill this square with tight, continuous loops and scribbles. The goal is a chaotic, ‘carpet-like’ density that looks uniform from a distance. -
Flowing lines:
Draw flowing, hair-like lines that curve from the bottom to the top of the square. Vary the pressure slightly to give the lines some character. -
Woodgrain effect:
Similar to the flowing lines, draw vertical curves, but allow them to bunch together around ‘knots’ (small elongated ovals) to mimic the texture of wood. -
Scattered confetti:
Finish the final square with a mix of small dots and larger, solid circles. Varying the size of the dots adds depth and visual interest compared to the uniform dots in row two.
Now you have a library of textures to reference for your future ink drawings
India Ink Plastic-Wrap Crinkle Background
Using ordinary household plastic wrap, you can transform simple India ink into a complex, stormy seascape texture that looks like frothing ocean waves. The plastic traps the wet ink, forming unique organic veins and crinkles that reveal themselves magically once dry.
Step-by-Step Guide
Materials
- High-quality watercolor paper (cold press creates nice texture)
- Black India ink
- Soft synthetic watercolor brush (large flat or round)
- Plastic wrap (cling film)
- Small container for water
- Paper towels
- Masking tape or painter’s tape
Step 1: Preparation
-
Secure the paper:
Begin by taping down all four edges of your watercolor paper to a waterproof board or work surface. This prevents the paper from buckling when it gets wet and creates that crisp white border seen in the final piece. -
Prepare your ink wash:
Pour a small amount of India ink into a container. You can use it straight for deep black veins or dilute it slightly with water for a softer, charcoal-grey effect. I usually keep a jar of clean water nearby to adjust the intensity on the fly. -
Pre-cut the plastic:
Tear off a sheet of plastic wrap slightly larger than your paper. Have it ready to go immediately, as you’ll need to work quickly once the ink hits the paper so it doesn’t dry prematurely.
Step 2: Application
-
Wet the paper:
Lightly mist the paper with water or brush on a thin layer of clean water. This helps the ink flow and prevents it from soaking in too instantly, giving you more time to manipulate the texture. -
Apply the ink:
Load your large brush with India ink and apply it liberally across the paper. Don’t worry about being even; variation in puddling will create more interesting depth later. -
Layer the plastic wrap:
While the ink is still very wet and pooling, lay the sheet of plastic wrap directly onto the surface. Do not pull it taut—the magic happens in the slack. -
create the crinkles:
Use your fingers to push, pinch, and twist the plastic wrap against the wet paper. Scrunch it up to create ridges and valleys. The ink will naturally gather in the low points and pull away from the high points.
Muddy Patterns?
If your lines aren’t crisp, you likely removed the plastic too early. The ink must be 100% dry before peeling. Check for cold spots on the back of the paper to test dryness.
Step 3: Drying and Reveal
-
Let it rest:
This is the hardest part: patience. Leave the plastic wrap on the paper and let it sit undisturbed. Do not peek or lift the plastic. -
Wait for complete dryness:
Allow the piece to dry completely, which may take several hours or even overnight depending on humidity. If you remove the plastic while the ink is wet, the pattern will smear and disappear. -
Peel back the plastic:
Once you are certain the paper is bone dry, gently peel away the plastic wrap. You will see distinct, sharp lines where the ink pooled and dried in the plastic’s creases. -
Remove the tape:
Carefully peel away the masking tape from the edges, pulling away from the center of the artwork to avoid tearing the paper surface. -
Flatten the artwork:
The paper might be slightly wavy from the water. You can flatten it by placing it under a heavy book for a day to ensure it’s perfectly flat for framing.
Add Metallic Flair
Mix a few drops of gold or silver liquid ink into your black India ink wash before applying the plastic. The metallic pigments will settle into the cracks for a gilded vein effect.
Now you have a dynamic, organic texture that captures the wild movement of water frozen in time


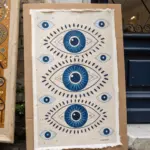
India Ink Resist “Stained Glass” Shapes
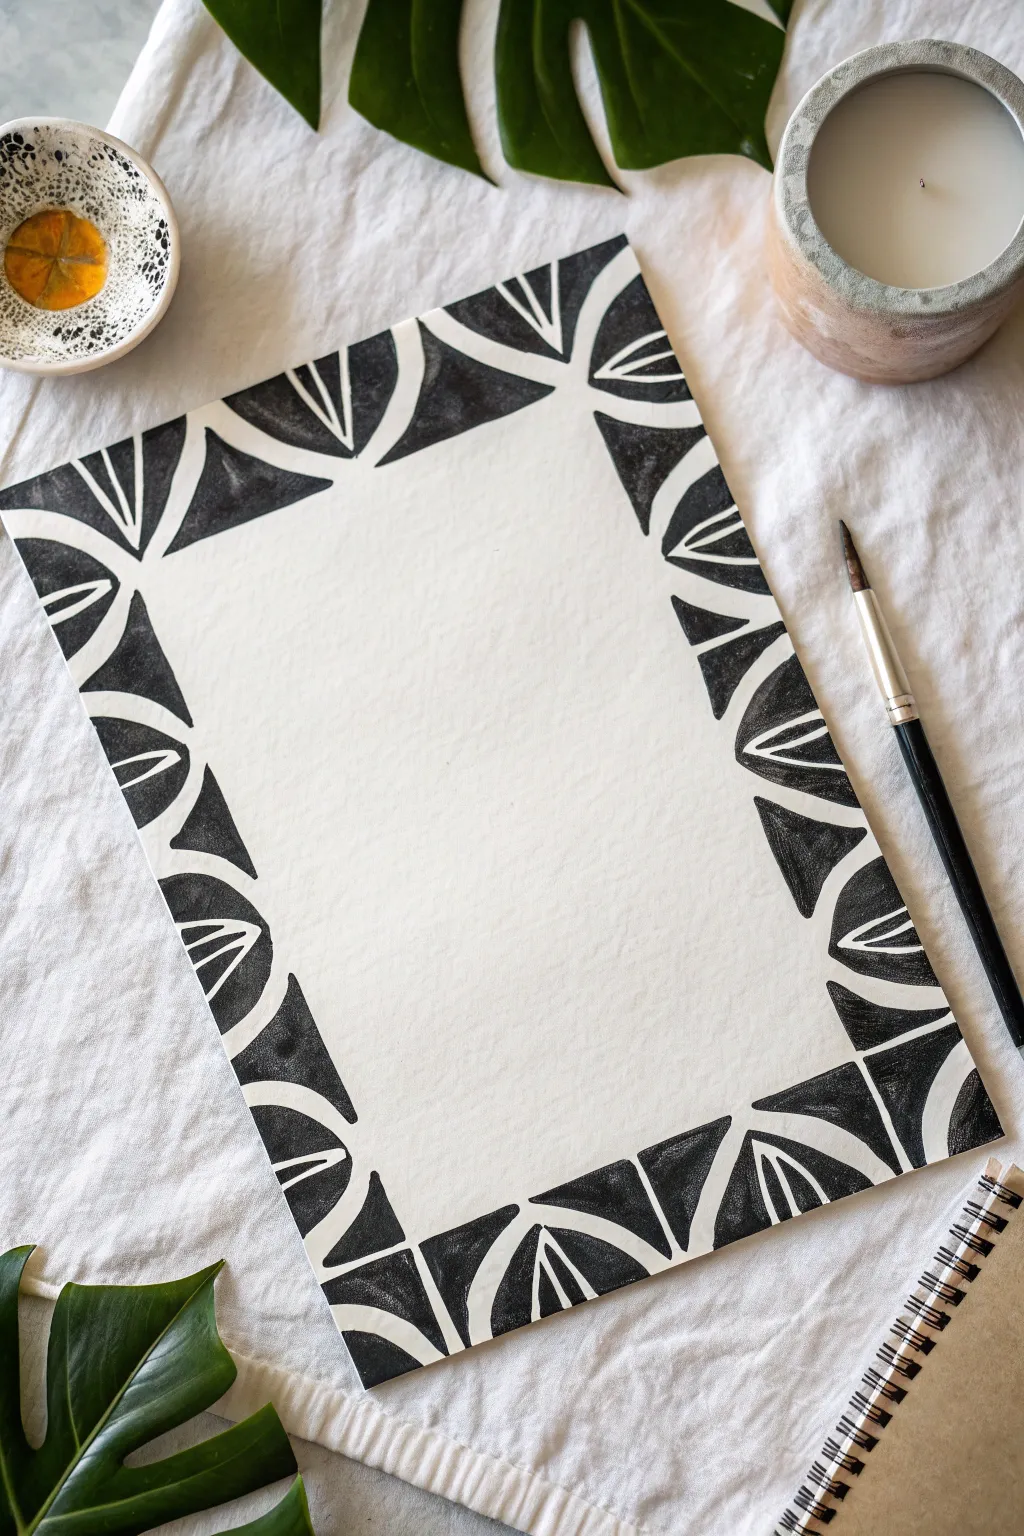
Transform a plain sheet of watercolor paper into a bold, decorative frame using high-contrast India ink. This project utilizes negative space to create a striking pattern that feels both modern and organic, perfect for framing poetry or calligraphy.
Step-by-Step
Materials
- Heavyweight watercolor paper or mixed media paper
- Waterproof India ink (black)
- Round pointed paintbrush (size 4 or 6)
- Pencil (HB or lighter)
- Ruler
- Eraser
- Jar of water for rinsing
- Painter’s tape or masking tape
Step 1: Planning and Sketching
-
Prepare the workspace:
Begin by taping down your paper to a work surface or drawing board. This prevents the paper from buckling when the wet ink is applied and keeps your edges clean. -
Mark the border width:
Using your ruler and pencil, lightly mark a border around the entire page. A width of about 1.5 to 2 inches works well for this scale, giving enough room for the pattern. -
Divide the border:
Divide the border area into equal rectangular or square blocks. Don’t press too hard with the pencil; you just need faint guide lines to keep the pattern consistent. -
Sketch the triangles:
Within each block, draw diagonal lines to create triangles. This ‘half-drop’ or zigzag structure forms the geometric base for the floral motifs. -
Draft the organic shapes:
Inside each triangular space, lightly sketch the petal or leaf shapes. The key is to draw the shapes that will remain *white*. The space around them will eventually be filled with black. -
Review the composition:
Step back and look at your sketch. Ensure the white shapes flow nicely into one another across the divides. It doesn’t have to be perfectly symmetrical; a little variation adds handmade charm.
Bleeding Lines?
If ink bleeds into the white shapes, your ink might be too watery or the paper too absorbent. Try using slightly thicker ink or switching to hot-press watercolor paper.
Step 2: Inking the Design
-
Outline the positive space:
Dip your round brush into the India ink. Carefully outline the pencil marks of your petal shapes first. This establishes the boundary between the white paper and the ink. -
Fill the negative space:
Once the delicate outlines are established, fill in the rest of the triangular block with solid black ink. -
Maintain consistent saturation:
India ink can sometimes dry streaky. To get that deep, opaque black, keep your brush well-loaded and try to work while the edge is still wet to avoid overlap marks. -
Define the corner details:
Pay special attention to the corners of the page. You may need to adapt the pattern slightly to turn the corner gracefully, perhaps by creating a larger, corner-anchoring petal shape. -
Work in sections:
I prefer to work around the paper in a clockwise direction to avoid smudging wet ink with my hand. Rotate the board or paper as needed so you are always pulling the brushstroke comfortably. -
Create the center separation:
Ensure there is a crisp, clean line separating the black border pattern from the central white blank space. You can use a ruler to guide your hand if you feel shaky, but a freehand line often looks softer and more artistic.
Step 3: Finishing Touches
-
Let it dry completely:
Allow the ink to dry fully. India ink dries relatively quickly, but thick areas might take up to 20 minutes. Don’t rush this, or you risk smearing. -
Erase pencil lines:
Gently gently run your eraser over the white areas to remove any visible pencil sketches. Be careful not to scrub too hard over the black ink, as some inks can smear slightly even when dry. -
Assess the blacks:
Check for any patchy areas in the black fill. If you see the paper grain showing through too much, apply a second coat of ink to those specific spots for a velvety finish. -
Remove tape:
Peel off the painter’s tape slowly, pulling it away from the paper at a 45-degree angle to reveal your crisp outer edge.
Add Gold Accents
Once the black ink is completely dry, paint a thin line of metallic gold watercolor or ink along the veins of the white petals for a luxurious, illuminated manuscript look.
You now have a beautifully framed space ready for your favorite quote or illustration
India Ink Surreal Whale and Patterns
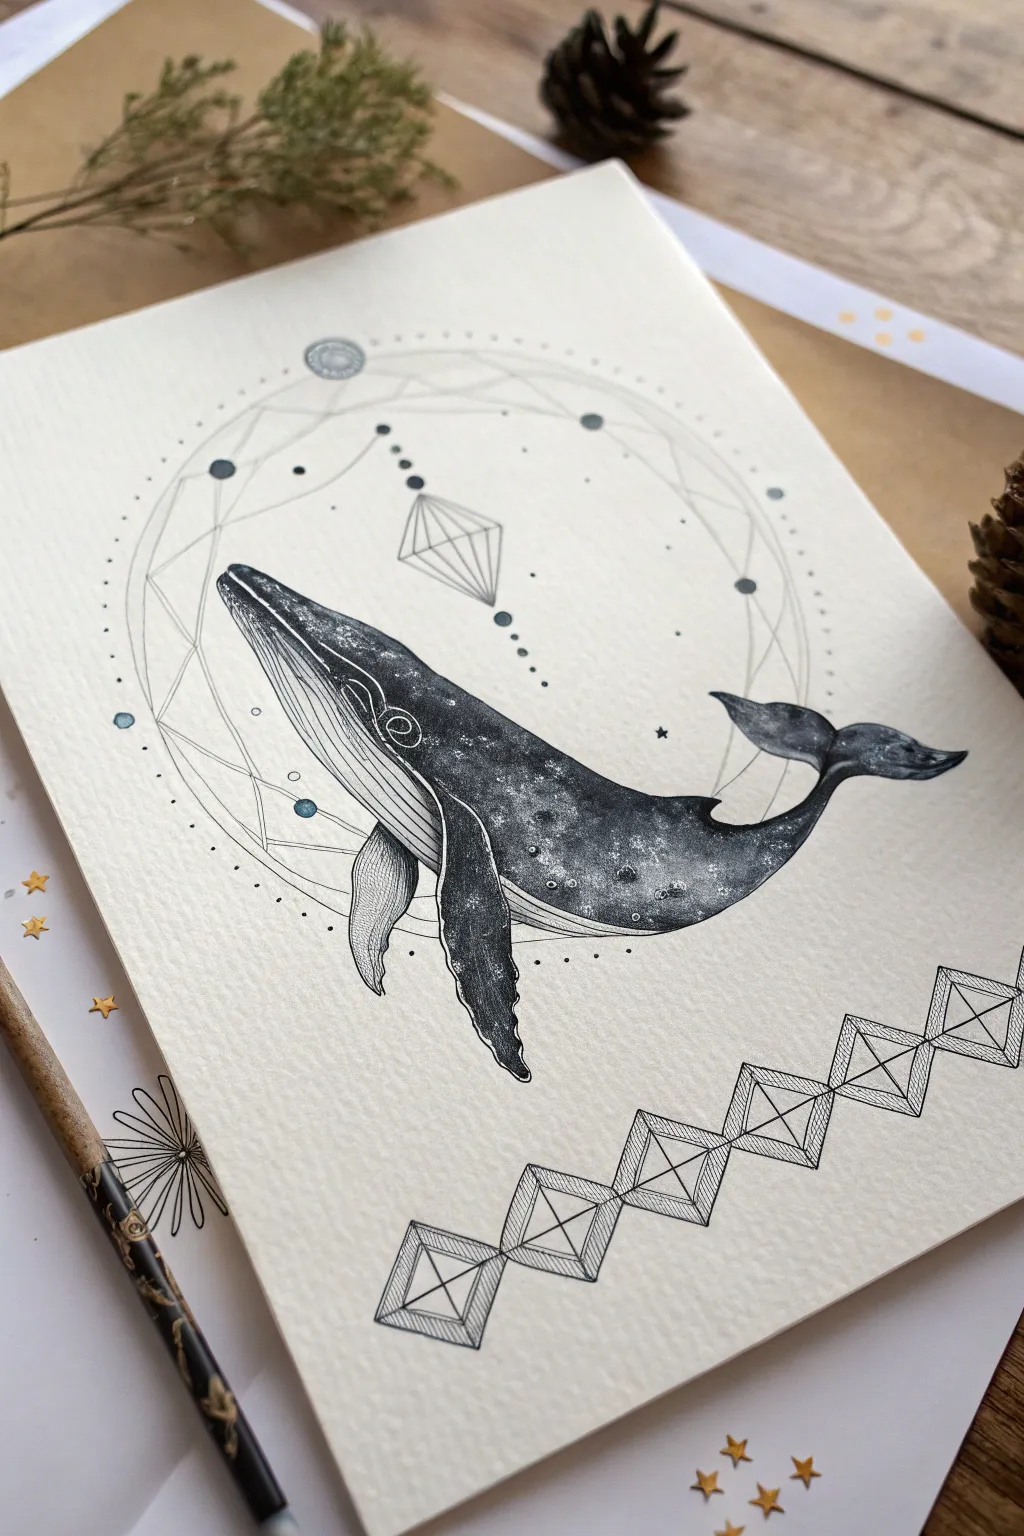
Dive into a mystical art project featuring a cosmic whale swimming through geometric constellations. This India ink illustration combines organic stippling textures with precise linework for a striking, surreal composition.
Step-by-Step Guide
Materials
- India ink (black)
- Dip pen holder and nibs (fine point and medium)
- Fine liner pens (0.05, 0.1, 0.5 sizes)
- Heavyweight cold-press watercolor paper or bristol board
- HB pencil
- Kneaded eraser
- Compass
- Ruler
- White gel pen or white gouache
- Small round paintbrush (size 0 or 00)
Step 1: Drafting the Cosmic Framework
-
Map the central circle:
Use your compass to draw a large, light circle in the upper-center of your paper. This will serve as the framing device for the whale. -
Add geometric layers:
Within the main circle, use the ruler to sketch intersecting lines creating a fragmented, crystalline look. Add a smaller, concentric circle inside the main one to create a border track. -
Sketch the whale:
Lightly draw the outline of a humpback whale swimming diagonally upward. Position the head near the left edge and the tail curving toward the right, ensuring the body overlaps the geometric background interesting ways. -
Detail the whale’s features:
Refine the sketch by adding the ventral pleats (the lines on the throat), the pectoral fin, and the curve of the fluke. Outline the decorative diamond border at the bottom right corner.
Stippling Success
Hold your pen vertically when stippling. Slanted angles create dashes instead of dots, ruining the texture. Take frequent breaks to rest your hand.
Step 2: Inking the Whale
-
Outline the body:
Using a 0.5 fine liner or a medium nib with India ink, carefully trace the main contour of the whale’s back, fins, and tail. Keep the lines smooth and confident. -
Define the underbelly:
Switch to a finer line (0.1) to draw the ventral pleats on the whale’s stomach. These lines should curve with the form of the body to suggest roundness. -
Begin the stippling:
This is the patience phase. Using a fine nib or 0.1 pen, start adding tiny dots to the darkest areas of the whale—the dorsal fin, the center of the back, and the edges of the tail. -
Build the gradient:
Create a gradient by spacing the dots further apart as you move toward the highlighted areas on the whale’s upper back. I like to keep the transition very gradual for a smooth look. -
Add texture to the fins:
Darken the pectoral fin significantly with dense stippling, but leave the leading edge lighter to show dimension. Add the barnacle-like textures inherent to humpbacks using irregular clusters of dots. -
Refine the darks:
Go back over the darkest shadows with India ink and a brush or a thicker pen to create solid black areas, blending them into the stippled sections.
Step 3: Background and Accents
-
Inking the geometry:
trace the circular background framework with a very fine (0.05) pen. The lines behind the whale should be extremely delicate to prevent them from overpowering the main subject. -
Create the hanging ornament:
Ink the diamond shape hanging from the circle above the whale. Use the ruler again to ensure these lines are razor-sharp. -
Draw the lower border:
Ink the sequence of diamond shapes in the bottom right corner. Use hatching lines inside these shapes to give them depth and shading. -
Add decorative dots:
Place solid black dots of varying sizes along the circular paths and hanging vertically like a mobile. Keep these perfectly round.
Cosmic Splash
Dilute a drop of blue watercolor or ink and flick it gently with a toothbrush over the background for a subtle, misty nebula effect behind the geometry.
Step 4: Final Celestial Touches
-
Erase pencil lines:
Wait until the ink is completely bone-dry. Gently run your kneaded eraser over the entire piece to lift the graphite sketches. -
Apply white highlights:
Use a white gel pen or opaque white gouache to add tiny stars or speckles directly onto the dark, inked portions of the whale’s body. This mimics a starry night sky on the skin. -
Add floating stars:
Draw tiny four-point stars or simple dots in the open space around the whale to emphasize the cosmic setting. -
Final assessment:
Step back and look for balance. If the whale looks too light against the stark white paper, add another layer of stippling to deepen the contrast.
Frame your celestial giant against a simple mat to let the intricate details shine
India Ink Giant Eye With a Tiny Silhouette
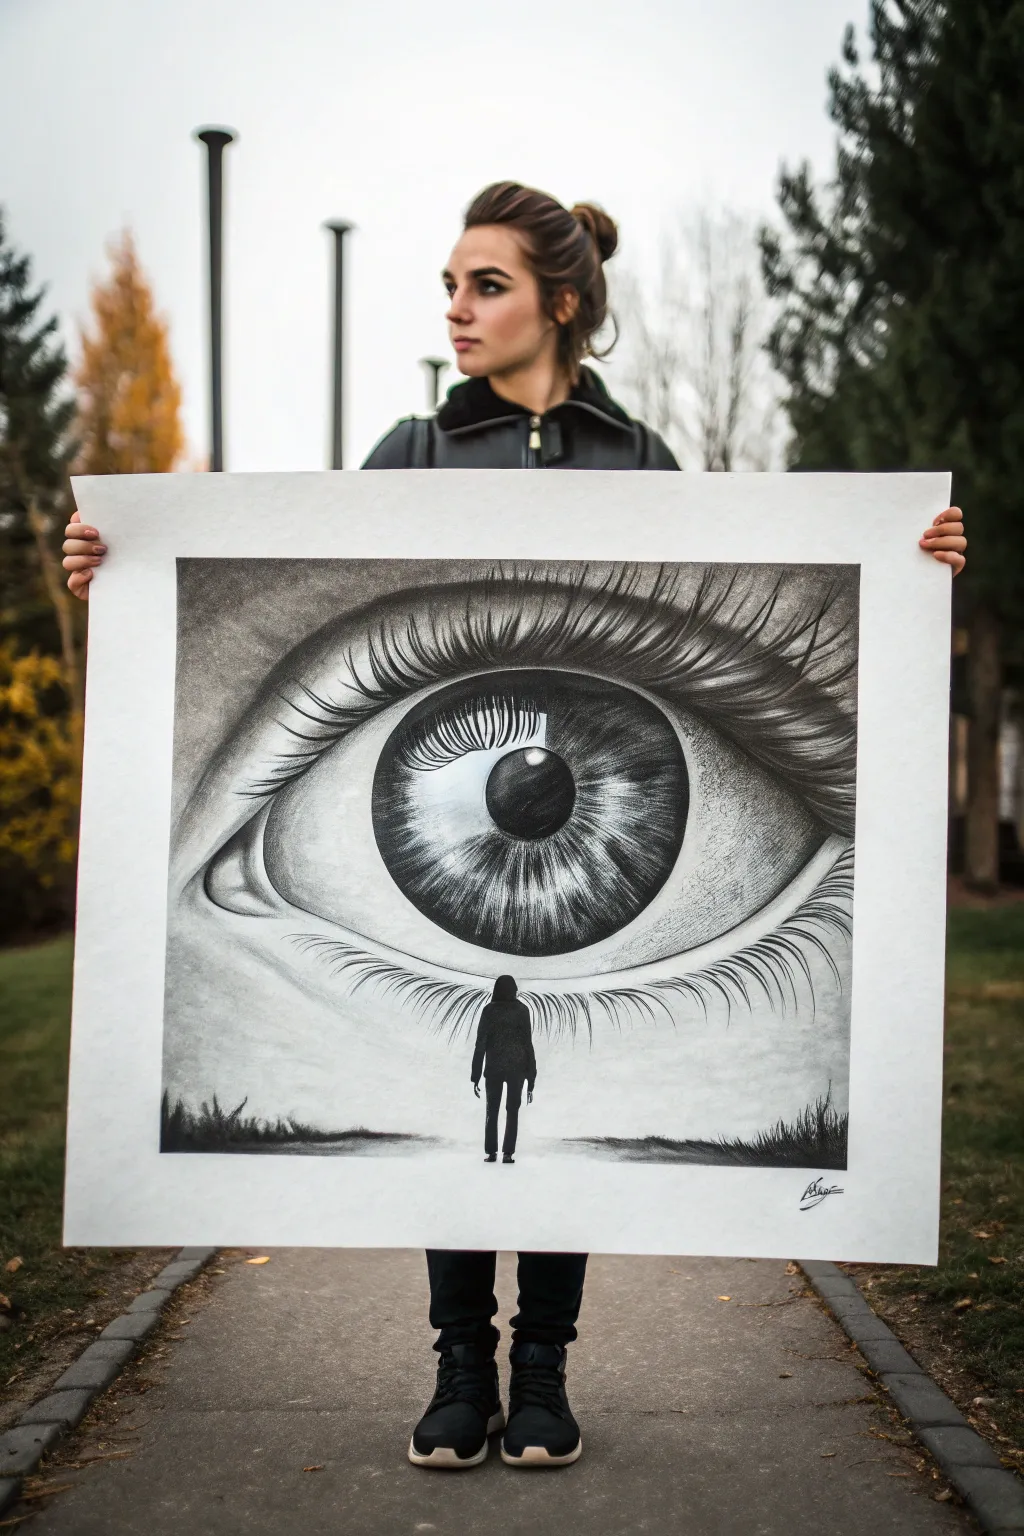
Capture a surreal and striking moment with this India ink project featuring a giant, hyper-realistic eye looming over a solitary figure. The stark contrast between the bright white paper and deep ink shadows creates a dramatic, dreamlike atmosphere perfect for a large-scale statement piece.
Step-by-Step Tutorial
Materials
- Large sheet of heavyweight watercolor paper or Bristol board (A2 or similar size)
- India ink (deep black)
- Graphite pencils (HB, 2B, 4B for sketching)
- Ink wash brushes (large round, medium flat)
- Fine liner pens or dip pen with nibs
- Water containers (one for clean water, one for rising)
- Paper towels
- Masking tape
- White gel pen or white gouache (for highlights)
Step 1: Conceptual Sketching
-
Prepare the canvas:
Tape down your large paper to a flat, sturdy board or table using masking tape along the edges. This prevents the paper from buckling when you apply wet ink washes later. -
Map the composition:
Using an HB pencil, lightly sketch the horizon line near the bottom third of the paper. Draw a vertical guideline down the center to help align the pupil later. -
Outline the eye shape:
Sketch the massive almond shape of the eye, ensuring it dominates the upper two-thirds of the sheet. The upper lid should arch high, while the lower lid curves gently downward. -
Define the iris and pupil:
Draw a large circle for the iris in the center, partially covered by the upper eyelid. Inside that, draw the pupil. Mark out the reflection spot (catchlight) now so you don’t accidentally color it in later. -
Sketch the silhouette:
At the bottom center, draw the outline of a small figure standing with their back to us. Keep the details minimal since this will be filled in with solid black.
Smooth Gradients
To get a smooth transition on the skin shading, wet the paper with clean water first before touching it with your grey ink wash. The ink will bleed naturally for a soft look.
Step 2: Layering Ink Washes
-
Create wash values:
Prepare three small connected containers or a palette with different ink-to-water ratios: a light grey wash, a medium grey, and pure black ink. -
Base shading for the skin:
Using a large soft brush and your lightest grey wash, paint the skin tones around the eye. Apply the wash wet-on-dry, focusing on the corners of the eye socket and the crease of the eyelid. -
Deepen the creases:
Switch to the medium grey wash. Add depth to the fold above the upper eyelid and the shadowy areas at the corners of the eye white (sclera). Keep the center of the sclera mostly white paper. -
Texture the iris:
With a smaller brush and medium wash, paint radiating lines outward from the pupil toward the edge of the iris using quick, flicking strokes. Leave some gaps for the underlying paper brightness to shine through. -
Darken the pupil:
Fill the pupil with pure, undiluted India ink. Be extremely careful to leave the pre-marked reflection highlight completely clean and white.
Double Exposure
Make it surreal by drawing a totally different landscape inside the pupil’s reflection, like a cityscape or a forest, instead of a standard light reflection.
Step 3: Detailing and Contrast
-
Draft the eyelashes:
Using a fine liner or a dip pen, draw the eyelashes. Start from the eyelid rim and flick outward with a confident curve. The upper lashes should be long, thick, and curve upward; lower lashes are shorter and sparser. -
Add iris details:
Go back into the iris with a fine brush and undiluted ink. Add darker radiating lines and intricate squiggles to mimic the muscle structure of the eye. -
Refining the skin texture:
Use a nearly dry brush with a tiny amount of grey ink to stipple or cross-hatch subtle texture onto the skin areas, suggesting pores or fine wrinkles. -
Creating the reflection:
Paint the reflection of the eyelashes into the highlight on the pupil. These should be curved, distorted lines that follow the shape of the glint.
Step 4: The Figure and Foreground
-
Fill the silhouette:
Using a medium round brush and pure black ink, carefully fill in the figure at the bottom. Ensure the edges are crisp against the background. -
Ground the figure:
Paint a faint shadow extending from the figure’s feet using a watered-down wash. Add rough, grassy textures to the left and right bottom corners using jagged upward strokes. -
Final highlights:
Once the ink is fully dry, use a white gel pen or a touch of white gouache to sharpen the catchlight in the eye or add tiny highlights to the wet edge of the lower eyelid. -
Clean up:
Wait for the artwork to differ completely (at least an hour for heavy pools of ink). Carefully erase any visible pencil guidelines.
Now step back and admire the intense, captivating drama you’ve created with just ink and water.

Have a question or want to share your own experience? I'd love to hear from you in the comments below!