If you’re craving that indie aesthetic—bright, a little weird, and totally unapologetic—these painting ideas are the kind of fun projects you can finish in a cozy afternoon. I’m keeping everything bold and trippy, with neon color pops, warped shapes, and dreamy retro vibes you can make your own.
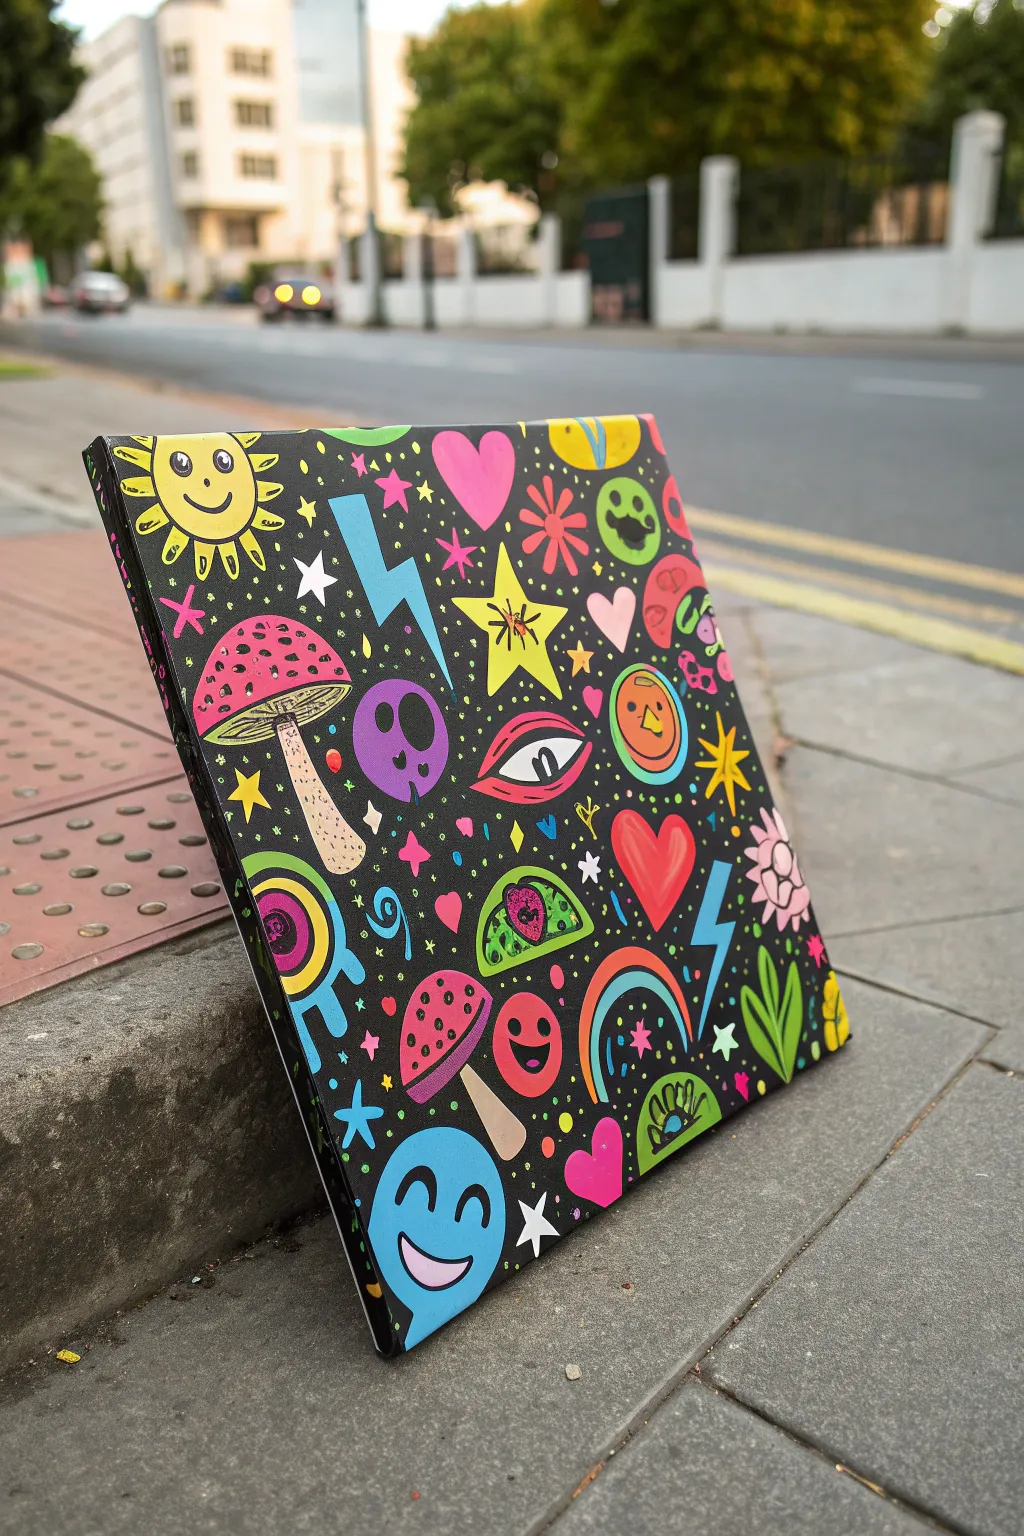
Warped Smiley Faces on Black Background
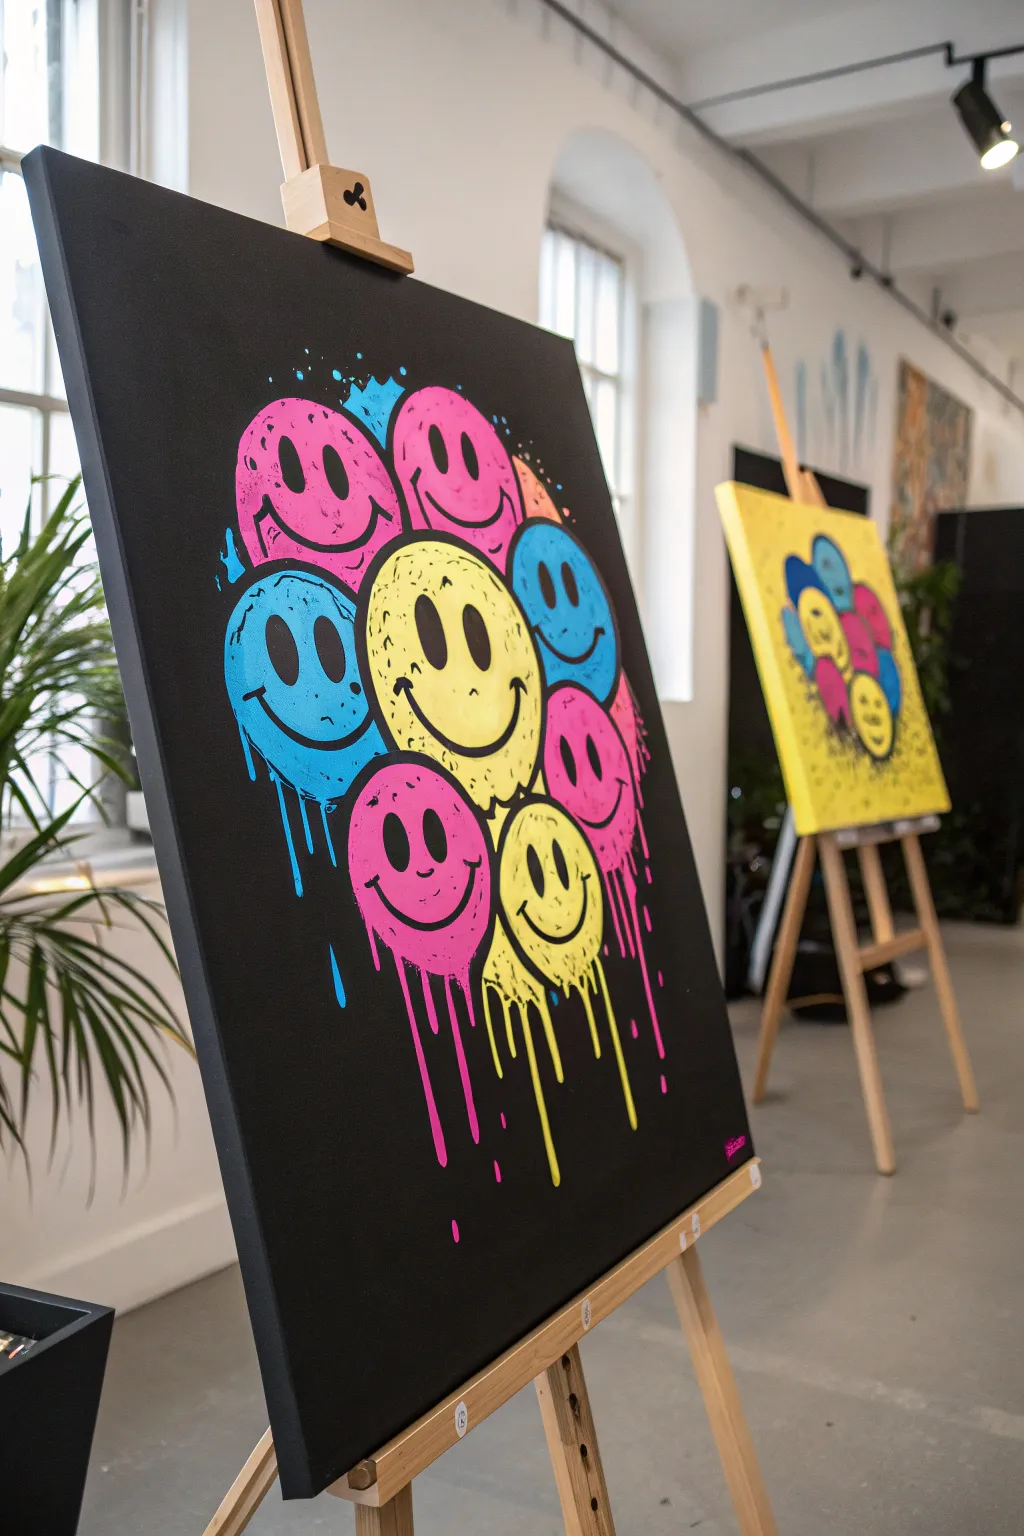
Capture a vibrant street-art vibe with this indie-style acrylic painting, featuring a cluster of dripping, warped smiley faces against a stark black background. The contrast between the matte black void and the electric neon colors creates a stunning, edgy centerpiece for any room.
How-To Guide
Materials
- Stretched canvas (16×20 inches or similar)
- Black acrylic paint (matte finish preferred)
- Neon pink acrylic paint
- Neon yellow acrylic paint
- Neon blue/cyan acrylic paint
- White acrylic paint (for priming neon areas)
- Wide flat brush
- Medium round brush
- Small liner brush or black paint marker
- Pencil or white charcoal pencil
- Palette
- Cup of water
- Paper towels
Step 1: Preparation & Background
-
Black out the canvas:
Start by covering your entire canvas with a solid coat of black acrylic paint. Use a wide flat brush to ensure smooth, even coverage. -
Check for opacity:
Let the first layer dry completely. If you can still see the white canvas texture through the black, apply a second coat for a deep, opaque void. -
Sketch the composition:
Once the background is bone-dry, use a white charcoal pencil or a regular pencil (pressed lightly) to sketch a cluster of circles in the center. Vary their sizes slightly and allow some to overlap. -
Block out the faces:
Inside your circular cluster, paint the base shapes with a layer of white acrylic paint. Since neon paints are often translucent, this white underpainting is crucial to make the colors pop against the black.
Neon Pop Secret
Mix a tiny dot of white into your neon paints for the first layer. It acts as a primer, making the subsequent pure neon layer significantly brighter.
Step 2: Adding the Neon Color
-
Apply the first color:
Start with your neon yellow. Paint the central, largest smiley face. Don’t worry about perfect edges just yet; indie art thrives on a slightly rougher aesthetic. -
Add secondary colors:
Fill in the surrounding circles with neon pink and neon blue. Try to distribute the colors so that no two identical colors are touching if possible, though clustering them is also a valid stylistic choice. -
Create the drip effect:
While the paint is wet or by adding a little water to your brush, drag the paint downwards from the bottom edge of the lower faces. Let gravity help you create natural-looking drips that bleed into the black background. -
Intensify the hues:
Neon paints can dry a bit darker than they appear wet. I like to let this dry briefly and add a second coat to ensure the colors are electric and opaque.
Step 3: Details & Linework
-
Outline the faces:
Using a small round brush and black paint, or a thick black paint marker, draw the outlines around each colored circle. Make the lines bold and uneven for a hand-drawn, graffiti feel. -
Paint the eyes:
Add two vertical oval shapes for eyes on each face. On some faces, tilt the eyes slightly to give them a warped or dizzy expression. -
Add the smiles:
Paint wide, U-shaped smiles. Extend the ends of the smiles up high, almost reaching the eyes, to exaggerate the happiness. -
Refine the drips:
Go back to your drips. If they look too faint, paint over them with the neon color. Add some standalone droplets floating below the main drips for extra detail. -
Add splatter details:
Load a wet brush with neon blue or pink. Tap the handle against another brush over the canvas to create small splatters around the top and sides of the cluster. -
Edge highlights:
Take a very small amount of white paint or a lighter shade of your neon colors and add tiny tick marks or highlights on the upper curves of the faces to suggest volume. -
Final black touch-ups:
Use your black paint to clean up any areas where the neon might have spilled too far out, sharpening the silhouette of the dripping cluster.
Glow in the Dark
Swap standard neon acrylics for UV-reactive or glow-in-the-dark paints. Under a blacklight, your melting smileys will actually glow.
Hang your dripping masterpiece on a well-lit wall to let those electric colors truly shine


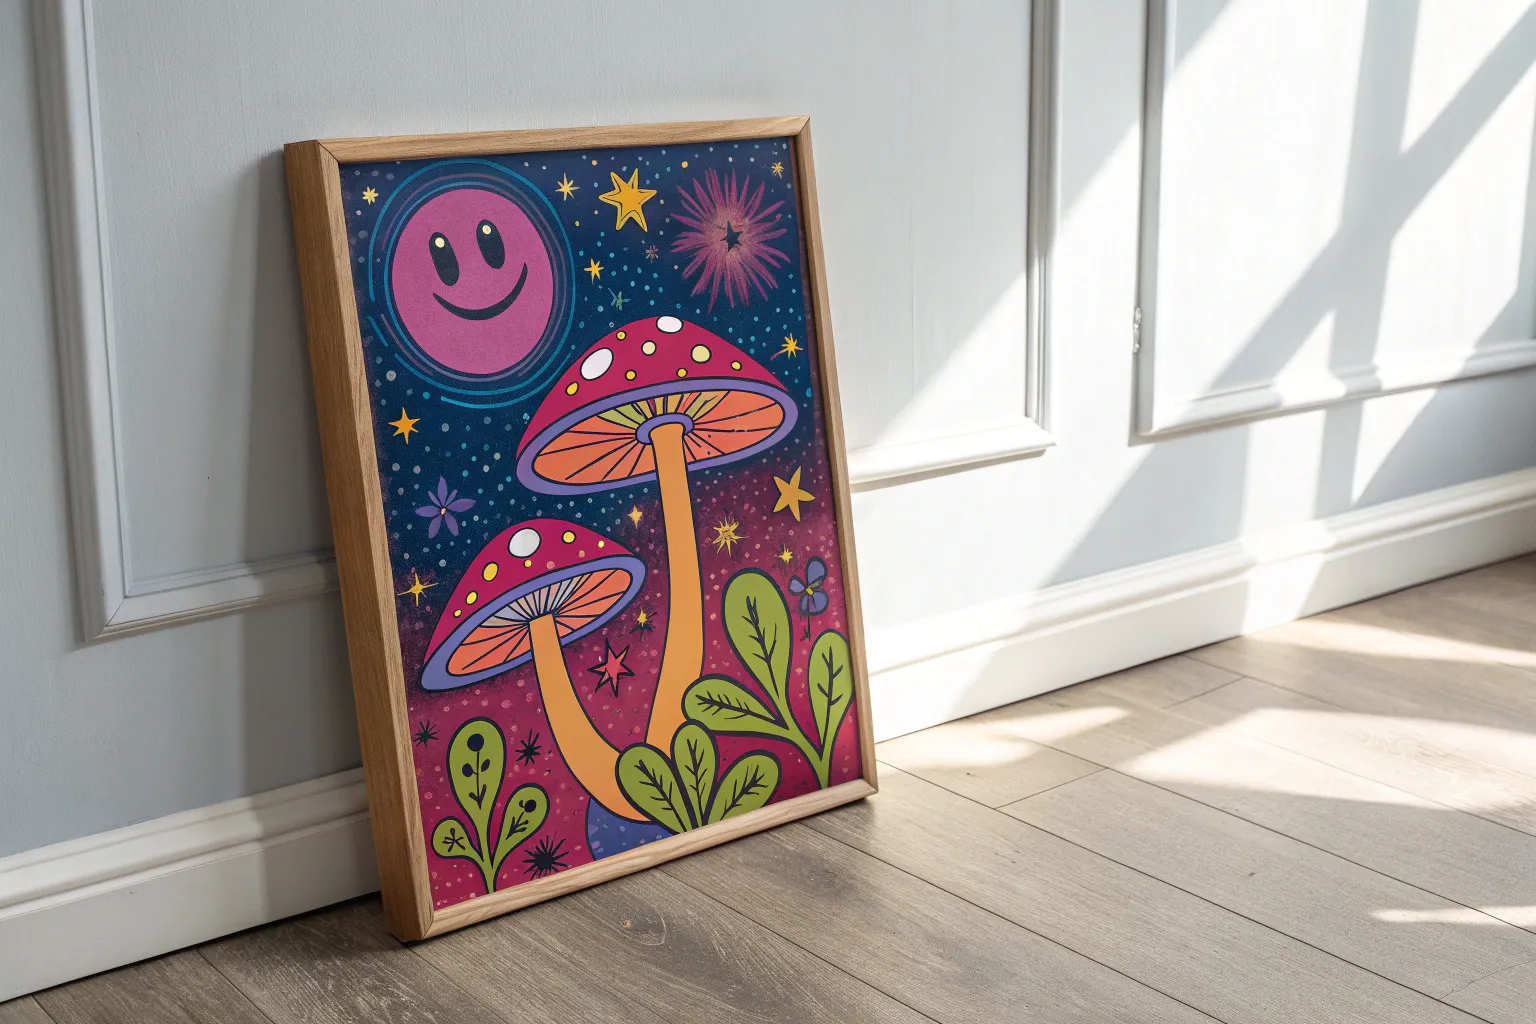
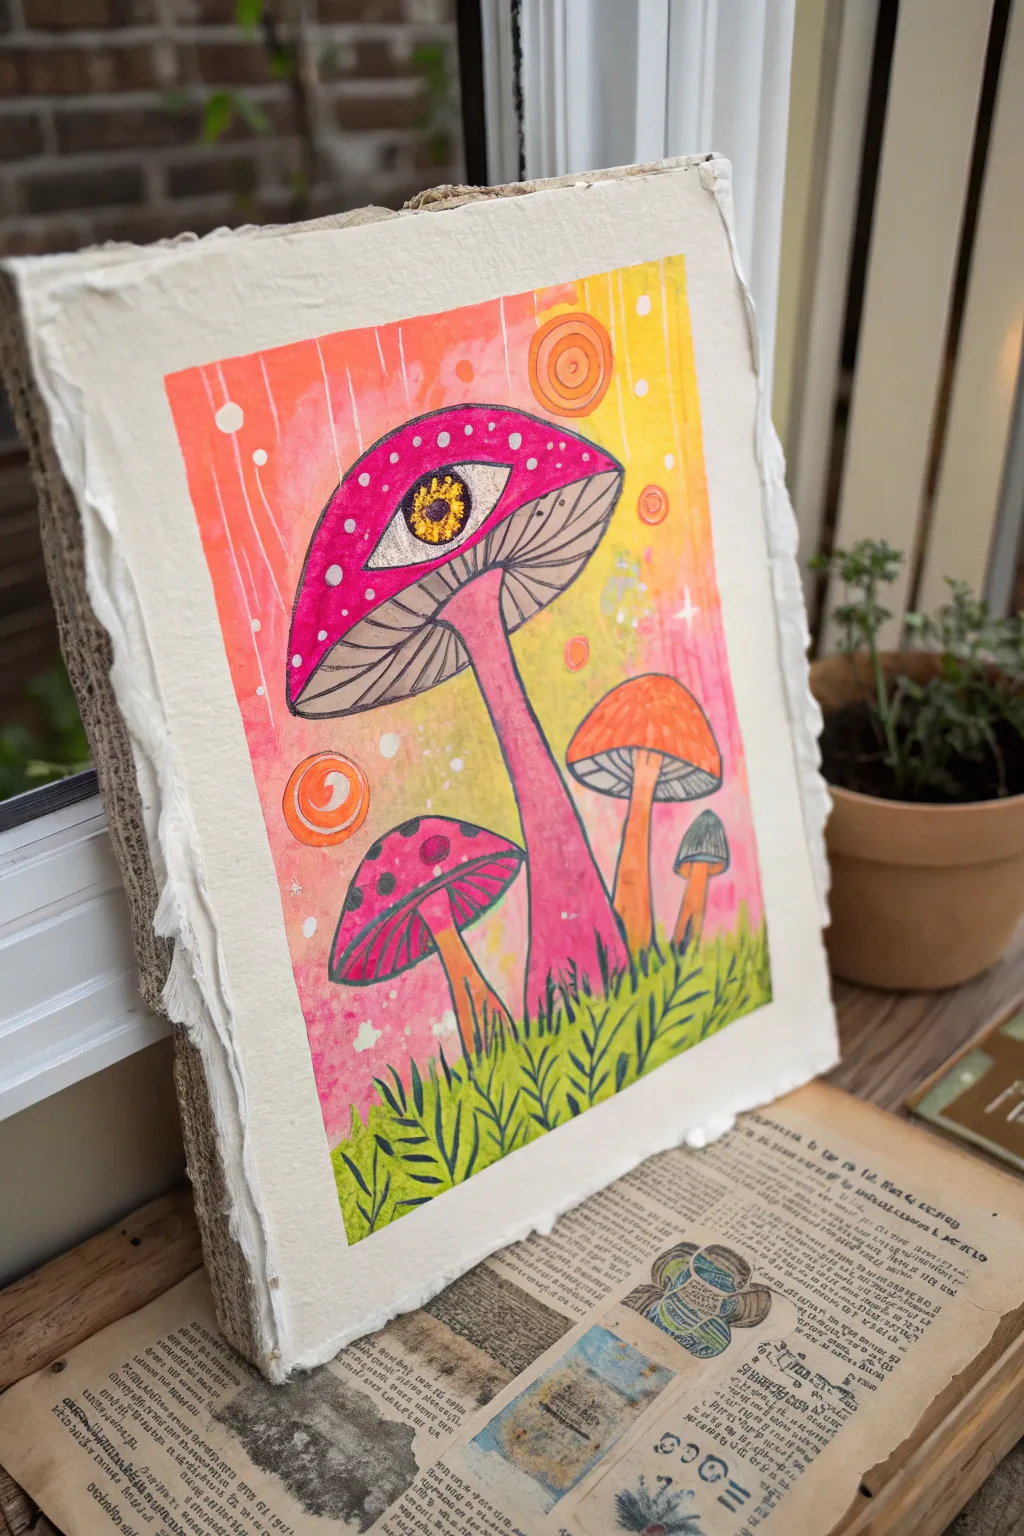
Trippy Mushrooms With Swirly Night Sky
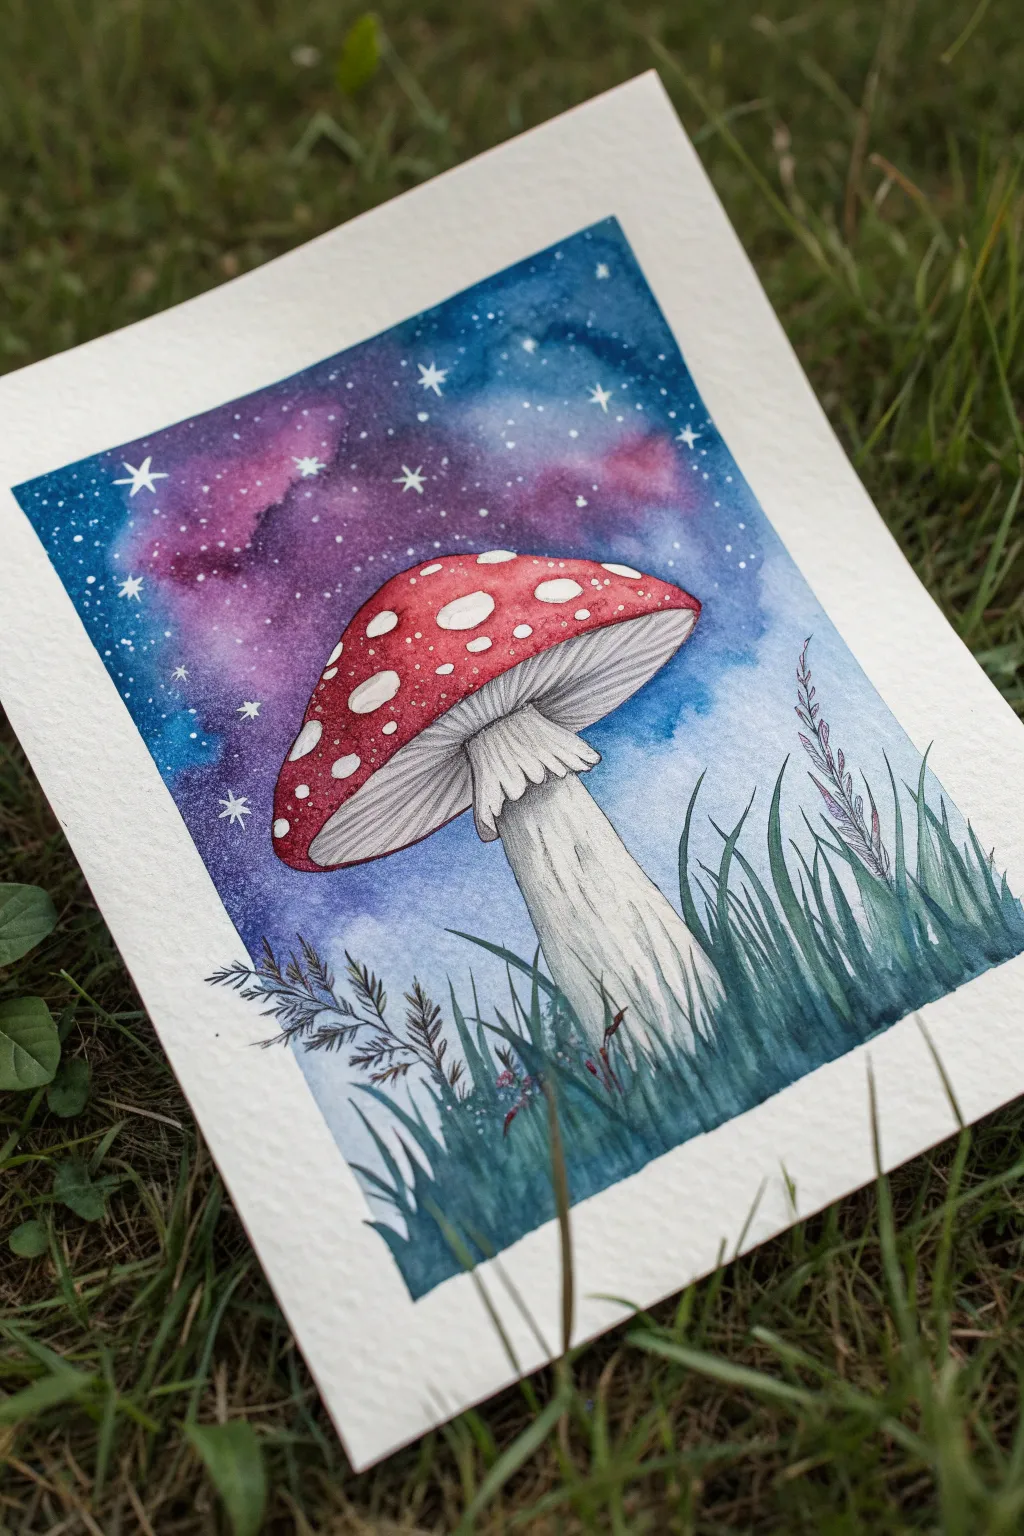
Merge terrestrial fungi with celestial wonder in this watercolor painting featuring a detailed amanita mushroom set against a vibrant galaxy sky. Deep blues and purples swirl around the subject, creating a magical atmosphere that makes the white-spotted cap pop.
Step-by-Step
Materials
- Cold press watercolor paper (300 gsm)
- Watercolor paints (Indigo, Prussian Blue, Purple/Violet, Alizarin Crimson, Sap Green)
- Pencil (HB or H)
- Kneaded eraser
- Fine liner pen (Black, waterproof, size 01 or 03)
- White gouache or white gel pen
- Round watercolor brushes (Size 2, 6, and 10)
- Jar of water
- Paper towels
- Masking tape
Step 1: Preparation and Sketching
-
Secure the paper:
Tape down all four edges of your watercolor paper to a board or table. This creates that crisp white border you see in the final piece and prevents the paper from buckling under heavy washes. -
Sketch the mushroom cap:
Lightly draw a large, curved dome shape in the center of the paper. Keep your pencil lines faint so they don’t show through later. -
Draw the stem and skirt:
Extend a thick, sturdy stem downwards from the cap. Just under the cap, sketch a ruffled ‘skirt’ or annulus that drapes slightly over the stem. -
Add detail to the gills:
Draw fine lines radiating from the stem outward toward the edge of the cap to represent the gills. I like to curve them slightly to show the mushroom’s volume. -
Sketch the grass:
At the bottom, sketch long, jagged blades of grass and a few leafy sprigs to ground the mushroom.
Muddy Galaxy Fix
If your blue and purple mix into a muddy brown, stop! Let the paper dry completely, then glaze a fresh layer of transparent blue over the top to unify the colors.
Step 2: Painting the Galaxy Sky
-
Wet-on-wet technique:
Using your largest brush, wet the sky area around the mushroom with clean water. Be careful not to get water inside the mushroom shape. -
Drop in color:
While the paper is wet, drop in concentrated Prussian Blue at the top corners and edges. Let it bleed naturally. -
Add purple hues:
Introduce purple or violet paint into the wet areas, letting it mix with the blue to create a nebula effect. -
Blend the horizon:
As you move closer to the grass line, dilute the paint slightly so the sky becomes a paler blue-purple, creating atmospheric depth. -
Create stars:
Once the sky is damp but not soaking, splatter tiny droplets of clean water or white paint to create texture. Let this layer dry completely.
Step 3: Painting the Mushroom
-
Base coat for the cap:
Paint the cap with a bright red like Alizarin Crimson. carefully paint around the white spots if you can, or lift the paint out later while wet with a clean, thirsty brush. -
Shadowing the cap:
Add a darker red or a touch of brown to the bottom edge of the cap to give it a rounded, 3D form. -
Painting the stem and gills:
Use a very watered-down grey or brown for the stem and gills. Keep it subtle—the paper white should do most of the work here. Add slightly darker grey lines in the shadows of the skirt. -
Detailing the white spots:
If you painted over the spots, use opaque white gouache to paint them back in now. Vary their sizes for a natural look.
Glow Up
Mix a tiny amount of iridescent medium into your white paint for the stars, or use metallic watercolor for the mushroom spots to make the piece shimmer in the light.
Step 4: Foreground and Details
-
Paint the grass:
Mix Sap Green with a bit of Indigo for a deep, night-time green. Paint the grass blades using quick, upward strokes with a thinner brush. Vary the pressure to taper the tips. -
Add the faint weeds:
Use a very dilute purple or grey mix to paint the delicate, fern-like weeds on the left and right sides. These should look softer than the main grass. -
Inking the outlines:
Once absolutely dry, use your fine liner to outline the mushroom stem, gills, and cap. Keep the line weight light on the light source side and slightly thicker in the shadows. -
Refining the gills:
Draw thin, precise lines for the gills using the fine liner. Don’t make them too uniform; some variation adds realism. -
Final star details:
Use a white gel pen or gouache on a small brush to add distinct, bright stars. Draw a few larger cross-shaped twinkles for extra magic. -
Reveal the border:
Carefully peel away the masking tape at a 45-degree angle to reveal your clean edges.
Frame this celestial fungus or gift it to a friend who loves gazing at the night sky

Wavy Checkerboard With Color Ripples
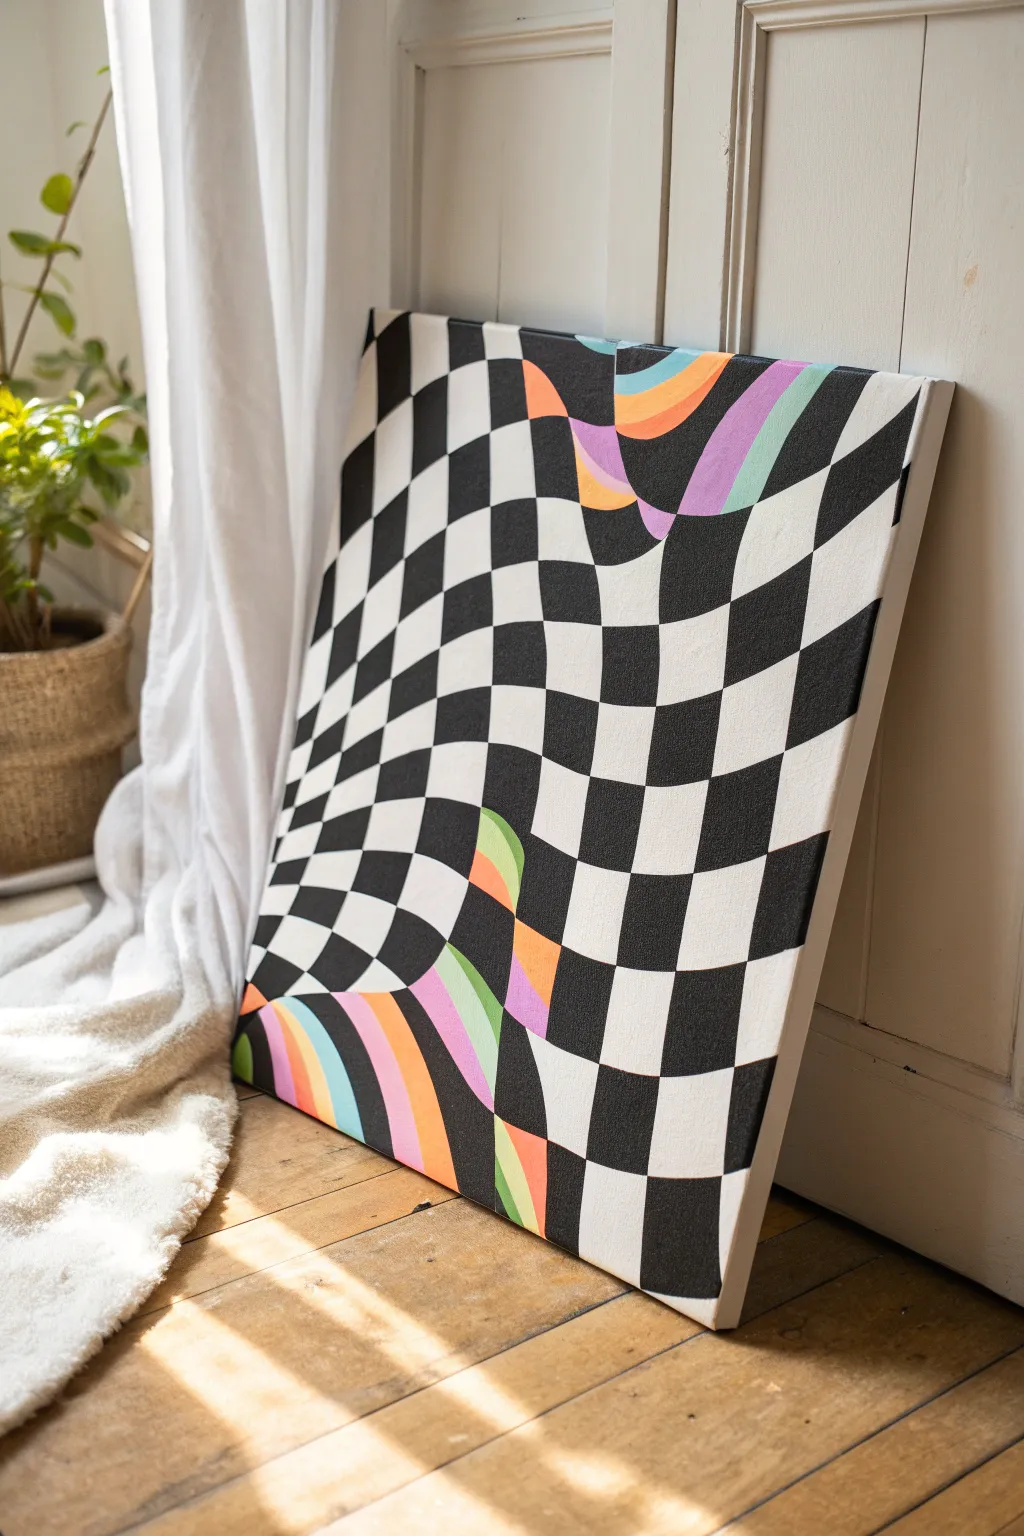
This trendy painting combines the optical illusion of a warped checkerboard with bursts of vibrant, psychedelic color. It’s a striking piece that looks complex but is built up through simple, methodical grid distortions.
Step-by-Step Guide
Materials
- Square stretched canvas (e.g., 16×16 inches)
- Acrylic paint (Black, Titanium White)
- Acrylic paint (Neon Orange, Light Pink, Mint/Teal, Lavender)
- Pencil and eraser
- Long ruler or straight edge
- Flat shader brushes (small and medium)
- Round detail brush (size 1 or 2)
- Artist tape or painter’s tape (optional)
Step 1: Planning the Distortion
-
Map the entry and exit points:
Before drawing any lines, mark faint ticks along the edges of your canvas where you want your checkerboard rows and columns to start and end. Aim for roughly 1.5 to 2-inch spacing. -
Sketch the vertical waves:
Connect your top and bottom marks with vertical lines. Instead of using a ruler, hand-draw them with a gentle S-curve. Let some lines bulge outward and others pinch inward to create that ‘warped’ effect. -
Sketch the horizontal waves:
Connect the side marks with horizontal wavy lines. Pay attention to where they intersect the vertical lines; these intersections define the corners of your checks. -
Define the melt zones:
Choose two distinct areas—perhaps opposing corners like in the photo—to add the color ripples. Draw a wavy contour line cutting through the existing grid in these spots. Inside this zone, drawing curved bands that defy the grid structure completely.
Step 2: Painting the Grid
-
Mark the black squares:
To avoid confusion later, lightly pencil an ‘X’ or a tiny dot inside every square that needs to be painted black. Remember, the pattern must alternate like a chessboard. -
Outline the black checks:
Using a small round detail brush and black paint, carefully outline the edges of your marked squares. Using the detail brush first gives you sharper corners than a flat brush would. -
Fill in the black:
Switch to a small flat shader brush to fill in the centers of the black squares. Apply the paint opaquely; you may need a second coat after the first one dries to get a solid, matte finish. -
Paint the white squares:
Once the black is fully dry, paint the remaining grid squares with Titanium White. Even if your canvas is already white, painting it creates a consistent texture and covers any stray pencil lines. -
Clean up edges:
Go back with your detail brush to sharpen the meeting points between black and white squares. Crisp lines are crucial for the optical illusion to work properly.
Uneven Lines?
If your hand is shaky, use a ‘mahl stick’ (or a clean ruler propped on a book) to rest your wrist above the wet canvas while painting detailed edges.
Step 3: Adding the Color Ripples
-
Paint the first color band:
Select your first color (e.g., orange) and fill in one of the curved bands in your designated ‘melt’ zone. I like to start with the brightest color to set the tone. -
Layer the adjacent colors:
Working outward from your first band, paint the next stripe (e.g., pink or lavender). Ensure the paint touches the edge of the checkerboard pattern cleanly without leaving gaps. -
Continue the sequence:
Fill in the remaining bands with teal and purple. Use smooth, long brushstrokes to make these sections look fluid, contrasting with the rigid (though warped) geometry of the checks. -
Refine the border:
Where the color ripples meet the black and white grid, use your smallest brush to ensure the separation line is incredibly sharp. This high contrast is what makes the grid look like it is physically melting away. -
Paint the canvas sides:
Don’t forget the edges of the canvas. Wrap the design around the sides—continue the black and white checks and the colored bands onto the depth of the canvas for a professional, finished look. -
Final retouches:
Inspect the canvas for any pencil marks showing through the white or transparent patches in the black. Apply final touch-ups and let the piece dry completely.
Opacity Hack
Mix a tiny drop of white into your neon paints. Neons are naturally translucent, and the white base makes them pop and cover the canvas much better.
Hang this wavy masterpiece in a spot where it can catch the light and serve as a funky conversation starter


Sun and Moon Faces in Bold Color Blocks

Create a stunning piece of modern decor with this four-panel celestial painting that balances warm earth tones with cool, deep blues and purples. Featuring stylized sun and moon faces with metallic accents, this project is perfect for adding a touch of mystical charm to any wall.
Detailed Instructions
Materials
- Square canvas or heavy watercolor paper (approx. 12×12 inches)
- Acrylic paints: Ochre yellow, deep purple, rust red, prussian blue, titanium white
- Metallic acrylic paint or paint pen (gold or bronze)
- Pencil and eraser
- Ruler
- Painter’s tape or masking tape
- Fine detail brush (size 0 or 1)
- Flat shader brush (size 6 or 8)
- Wooden frame (optional)
Step 1: Planning and Grid Layout
-
Measure the center:
Begin by finding the exact center of your square paper or canvas. Use a ruler to lightly mark the midpoint on all four sides. -
Draw the grid:
Connect your marks with a pencil to divide the surface into four equal quadrants. Press very lightly so the graphite doesn’t show through the lighter paint later. -
Define the borders:
Measure about 1/2 inch inward from the paper’s edge and mark off a border. Tape this off, along with the center cross-lines, using painter’s tape to ensure your color blocks will have crisp, straight edges.
Use a Compass
For perfectly round sun faces, trace around a small bowl or use a drawing compass. It makes the geometric elements look much sharper against the hand-painted rays.
Step 2: Blocking in the Colors
-
Paint the yellow quadrant:
Fill the top-left square with an opaque layer of ochre yellow paint. Depending on your paint’s thickness, create a second coat for solid coverage once the first is dry. -
Fill the purple quadrant:
Move to the top-right square and apply the deep purple acrylic. Ensure the paint extends fully to the tape lines. -
Paint the rust quadrant:
Paint the bottom-left square with the rust-red color. This warm tone works beautifully as a base for the wavy sun design. -
Complete the blue quadrant:
Fill the final bottom-right square with Prussian blue. Let all four quadrants dry completely before carefully peeling away the tape to reveal clean white gutters between the blocks.
Step 3: Sketching the Celestial Faces
-
Sketch the top-left sun:
Lightly sketch a circle in the center of the yellow block. Draw triangular rays extending outward and a serene sleeping face in the middle. -
Draft the top-right sun:
In the purple block, sketch a similar circle. Instead of simple triangles, sketch a border of small triangles inside the circle rim, and add wavy rays outside. -
Outline the bottom-left sun:
For the rust block, draw a central face surrounded by dynamic, wavy flame-like rays that swirl slightly, giving it a sense of motion. -
Draw the crescent moon:
In the blue block, sketch a large crescent moon facing right. Add three simple stars in the negative space to the right of the moon.
Add Gold Leaf
Instead of metallic paint, use gold leaf size and sheets for the moon and sun rays. The texture reflects light brilliantly and elevates the piece to gallery quality.
Step 4: Painting the Details
-
Paint the white sun:
Using a small flat brush and Titanium White, fill in the circle and rays of the top-left sun. You may need two coats to cover the yellow background. -
Detail the white face:
Once dry, use a very fine liner brush and a diluted brown or gold paint to carefully trace the sleeping eyes, nose, and lips onto the white circle. -
Outline the purple block’s sun:
Switch to your metallic gold paint or a gold paint pen. Outline the circle, the internal triangle border, and the facial features on the purple background. -
Fill the rust block’s sun:
Use a light beige or pale yellow paint to fill in the face and wavy rays on the rust background. Leave thin lines of the rust background showing between the rays for definition. -
Refine the wavy sun face:
Add facial details to the rust block’s sun using a fine brush with dark brown paint, giving it a peaceful expression. -
Paint the moon and stars:
Paint the crescent moon and the three stars in the blue block with gold or pale yellow. I like to add a tiny white highlight to the nose or lip of the moon for dimension. -
Add final gold accents:
Review the entire piece. Use the gold paint to add small highlights or crisp up lines on the rust and blue blocks to unify the metallic theme across the painting.
Once dry, place your artwork in a simple light wood frame to complement the warm tones of the design
BRUSH GUIDE
The Right Brush for Every Stroke
From clean lines to bold texture — master brush choice, stroke control, and essential techniques.
Explore the Full Guide
Indie Lips With a Rainbow Spill
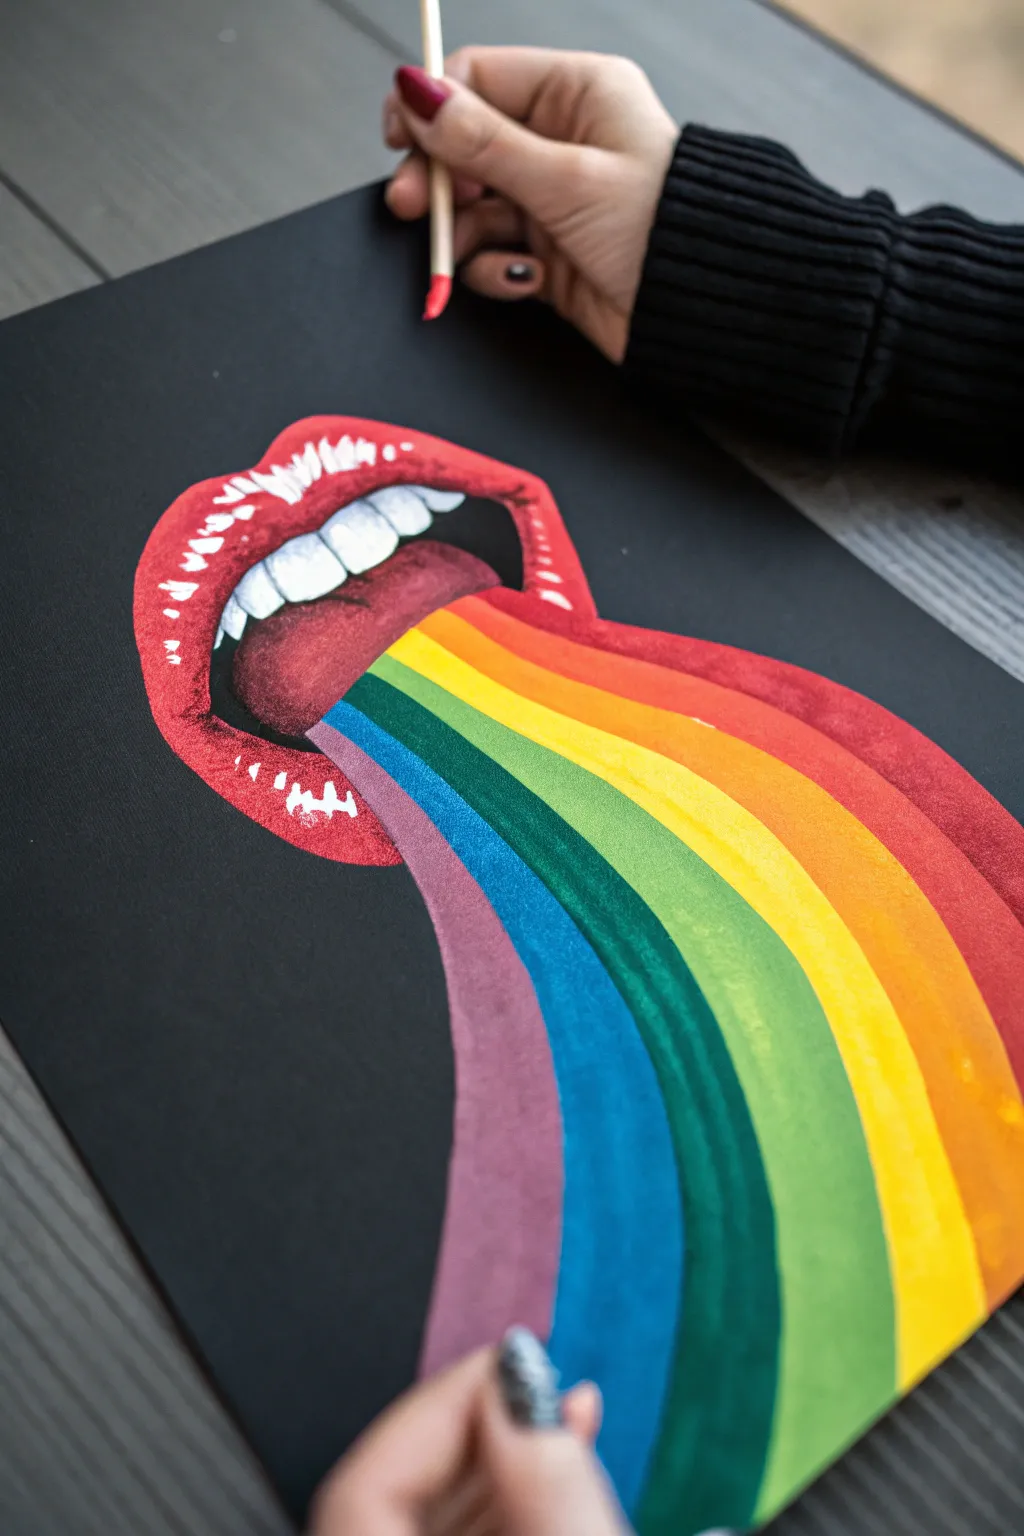
Capture the bold, indie aesthetic with this striking painting of glossy red lips spilling a vibrant rainbow. The high contrast of bright colors against a stark black background makes this piece pop off the canvas.
Detailed Instructions
Materials
- Black canvas or canvas panel (approx. 9×12 inches)
- White colored pencil or chalk (for sketching)
- Acrylic paints: Bright red, dark red/burgundy, white, purple, blue, teal, green, yellow, orange
- Flat shader brushes (medium and small)
- Fine liner brush for details
- Cup of water
- Paper towels
- Palette
Step 1: Sketching the Outline
-
Prepare the canvas:
Start with a pre-primed black canvas. If you only have white canvas, paint the entire surface with black acrylic paint and let it dry completely before beginning. -
Map the lips:
Using a white colored pencil or a piece of chalk, lightly sketch the outline of the open mouth on the upper left side of the canvas. Don’t press too hard; you just need a faint guide. -
Draw the spill:
From the open mouth, draw a cascading, curved path widening as it flows downward to the bottom right. Divide this path into six distinct bands for your rainbow colors. -
Detail the teeth:
Sketch the upper row of teeth inside the lips. Keep the shapes slightly rounded and rectangular.
Step 2: Painting the Lips and Mouth
-
Base coat the lips:
Fill in the lip shape with your bright red paint. You may need two thin coats to get solid coverage over the black background. -
Paint the teeth:
Fill the teeth with pure white paint. Be careful to stay inside your sketched lines for a crisp look. -
Create depth in the mouth:
For the inside of the mouth (the tongue area behind the rainbow), mix a dark red or burgundy. Paint the curved tongue shape appearing just below the teeth. -
Add shadows:
Use a small brush and your dark red/burgundy mix to paint the corners of the lips and the area just under the top lip to create dimension. -
Highlight the lips:
Using a fine liner brush and pure white paint, add vertical tick marks and small highlights along the ridges of the lips to give them a glossy, wet texture.
Paint Transparency?
Yellow and orange are notoriously transparent on black. Paint a layer of white primer under only those rainbow stripes first. Let it dry, then add color on top.
Step 3: Painting the Rainbow Spill
-
Start with purple:
Begin at the bottom edge of the ‘spill’ shape. Paint the lowest band with purple paint, ensuring a smooth curve from the mouth to the canvas edge. -
Add the blue band:
Paint the next stripe adjacent to the purple using a bright blue. Slightly overlap the wet edge if you want a subtle blend, or wait for it to dry for crisp lines. -
Paint teal/green:
Fill the third band with a teal or dark green shade. Using a flat brush helps keep the edges of the stripes clean. -
Apply the green:
Continue upward with a lighter, lime green color. I like to double-load my brush slightly with a bit of yellow here for extra vibrancy. -
Add yellow and orange:
Paint the next band bright yellow. Finish the top band of the rainbow spill with orange/red, blending it slightly into where the spill meets the bottom lip. -
Second coats:
Acrylics on black often need reinforcement. Once the first layer is dry, apply a second coat to any colors that look streaky or transparent, especially the yellow.
Clean Lines Pro-Tip
Use painter’s tape or masking tape to mark off the edges of the rainbow stripes as you paint them. This guarantees those sharp, graphic lines seen in the photo.
Step 4: Final Touches
-
Clean up edges:
If any paint went outside the lines, use a small brush with black paint to tidy up the edges and sharpen the silhouette. -
Enhance highlights:
Go back over the white highlights on the lips and teeth one last time to ensure they are bright and opaque. -
Varnish (Optional):
Once fully dry, you can apply a gloss varnish to the painted areas only, leaving the black canvas matte for a cool textural contrast.
Hang your new masterpiece on the wall and enjoy the splash of color
Sticker-Bomb Collage of Indie Doodles
Transform a simple black canvas into an explosion of personality with this sticker-bomb-inspired painting. Using bright acrylic markers and bold black outlines, you’ll create a cohesive tapestry of whimsical icons that captures the essence of doodling in a polished format.
Detailed Instructions
Materials
- Square stretched canvas (e.g., 12×12 inches)
- Black gesso or black acrylic paint
- Posca paint markers (various sizes: fine, bullet tip, broad)
- White colored pencil or chalk pencil
- Wide flat paintbrush
- Clear spray varnish (gloss or matte)
- Pencil and eraser
- Scrap paper for testing pens
Step 1: Base Preparation
-
Prime the Surface:
Begin by coating your entire canvas with black gesso or black acrylic paint. While you can buy black canvases, applying your own fresh coat ensures a deep, matte background that makes colors pop. -
Ensure Full Coverage:
Don’t forget to paint the sides of the canvas as well. This creates a finished, sculptural look since the doodles will eventually wrap around the edges. -
Dry Completely:
Let the base coat dry thoroughly. If it feels cool to the touch, it’s still wet inside paint layers, so give it extra time or use a hairdryer to speed things up.
Color Pop Trouble
If neon colors look dull on black, paint a layer of white primer in the shape of the doodle first. Let it dry, then apply the neon color on top for maximum brightness.
Step 2: Planning the Layout
-
Sketch the Anchors:
Using a white colored pencil or chalk pencil, lightly sketch your largest ‘hero’ icons first. Place items like the large mushroom, the bright sun, a lightning bolt, and the big heart spaced evenly across the canvas. -
Fill the Gaps:
Draw medium-sized elements in the empty spaces between your hero icons. Think about adding smiley faces, rainbows, open eyes, and flower bursts. -
Add Micro-Details:
Look for any remaining awkward black voids. Sketch in tiny filler elements like sparkles, dots, confetti, mini-hearts, and small stars to create that dense ‘sticker-bomb’ feel. -
Review Balance:
Step back and look at your sketch. You want an even distribution of shapes so no single area feels too heavy or too empty.
Step 3: Painting the Icons
-
Shake Markers Well:
Prime your acrylic paint markers by shaking them vigorously and pressing the nib on scrap paper until the ink flows opaque and smooth. -
Color Blocking:
Start filling in your spacing with solid colors. I usually tackle one color at a time—paint all yellow elements (sun, stars), then move to all pink elements (hearts, mushroom caps). This keeps the palette cohesive. -
Layering for Opacity:
Some colors, especially yellow and neon pink, might look transparent on the black background. Let the first layer dry and apply a second coat for true vibrancy. -
Painting the Edges:
Extend your designs over the side of the canvas where they naturally fall off the edge. This seamless continuation is key to the sticker-bomb aesthetic.
Pro Tip: Nib Hygiene
Painting on dry acrylic can clog marker nibs. Occasionally wipe your marker tip on a damp paper towel to keep ink flowing smoothly and prevent drying out.
Step 4: Detailing and Refining
-
Adding Personality:
Once the base colors are dry, use contrasting colors to add internal details. Draw the face on the sun, spots on the mushroom cap, pupils in the eyes, and segments in the rainbow. -
Black Outlines (Optional):
If any shapes look messy or bleed into each other, use a fine black paint pen to clean up edges or add definition back into the design. -
Sparkle Highlights:
Use a white paint pen to add tiny ‘glint’ highlights on the eyes, hearts, and mushroom caps. This simple step makes the doodle look like glossy stickers. -
Final Filler:
Take a look at the composition one last time. If you spot any unplanned black holes, add simple dots or stars directly with the paint markers.
Step 5: Finishing Up
-
Erase Guidelines:
Once the paint is 100% bone dry, gently erase any visible white pencil marks with a soft eraser. -
Seal the Work:
Take the canvas outside and apply a coat of clear spray varnish. A gloss finish mimics the look of vinyl stickers, while matte gives a more illustrative vibe.
Hang your busy masterpiece on the wall and enjoy the chaotic, colorful energy it brings to the room

PENCIL GUIDE
Understanding Pencil Grades from H to B
From first sketch to finished drawing — learn pencil grades, line control, and shading techniques.
Explore the Full Guide
Neon Fruit Still Life With Pattern Shadows

This vibrant acrylic painting combines the classic charm of a fruit still life with a bold, indie twist featuring a warped checkerboard pattern and saturated, almost neon colors. It’s a playful study in contrast between the organic shapes of citrus and the geometric, yet draped, fabric underneath.
How-To Guide
Materials
- Square canvas or canvas board (approx. 12×12 inches)
- Acrylic paints: Cadmium Orange, Cadmium Red Medium, Lemon Yellow, Titanium White, Ultramarine Blue, Phthalo Blue (for depth), Sap Green, and Alizarin Crimson
- Gesso (optional, for priming)
- Pencil (HB or lighter) for sketching
- Synthetic brushes: 1-inch flat (background), medium filbert (fruit), small round (details/checkerboard)
- Palette or mixing plate
- Water cup and paper towels
- Ruler (optional, for initial grid guidelines)
Step 1: Sketching the Composition
-
Create the warped grid:
Start by lightly sketching the checkerboard surface. Instead of perfect squares, let the lines curve and drape as if the fabric is bunching up. The lines should flow downward and towards the right, mimicking the drape of a tablecloth over an unseen edge. -
Place the oranges:
Draw three large circles for your oranges: one tucked in the back left, one sliced open in the middle ground, and a larger whole one in the foreground. For the sliced orange, draw a second inner circle to mark the rind thickness. -
Add the cherries and leaves:
Scatter small circles for cherries across the checkerboard—some alone, some in pairs. Finally, sketch large, pointed leaf shapes descending from the top of the canvas, overlapping the background space.
Pro Tip: Stippling Texture
Use an old, frayed brush to stipple the highlights on the orange skin. The rough bristles naturally create that bumpy, citrus-rind texture without needing to paint every dot.
Step 2: Blocking in the Base Layers
-
Paint the background:
Mix Ultramarine Blue with a touch of Phthalo Blue for a rich, deep ocean color. Apply this to the negative space behind the fruit and leaves, working carefully around your sketched outlines. -
Underpaint the fruit:
Fill in the orange shapes with a base coat of pure Cadmium Orange. For the cherries, use a dark Alizarin Crimson. Don’t worry about highlights yet; just get solid coverage. -
Start the checkerboard:
This step takes patience. Choose two colors for your pattern—here, we are using a dusty rose (Cadmium Red + White) and a dark navy (Ultramarine Blue + nice amount of black or Payne’s Grey). Paint the alternating squares, following your curved pencil lines. -
Base layer for leaves:
Mix Sap Green with a little Lemon Yellow for a fresh, leafy tone. Paint all the leaves flatly. Let the entire canvas dry completely before moving to details.
Level Up: Color shift
Swap the pink and blue checkerboard for clashing neon colors like lime green and electric purple to heighten the ‘indie’ aesthetic and make the fruit vibrate visually.
Step 3: Adding Form and Detail
-
Detail the sliced orange:
Using a small round brush and Lemon Yellow mixed with a tiny bit of White, paint the pith (the white part under the rind) and the segments of the fruit. Leave thin lines of the orange base showing between the segments to define them. -
Shade the whole oranges:
Mix Cadmium Red into your Orange to create a shadow tone. Apply this to the bottom and right sides of the spherical fruit to create volume. Blend the edge of the shadow into the main orange color while the paint is still slightly wet. -
Refine the checkerboard:
Go back over your checkerboard pattern with a second coat if needed for opacity. I find a small flat brush works best here to get crisp edges on the squares. -
Highlight the citrus skin:
Stipple (dab repeatedly) pure Lemon Yellow and White on the upper left portions of the oranges and the rind of the sliced fruit. This texture mimics the pitted skin of an orange. -
Paint the leaves:
Add veins to the leaves using a lighter green mix. Add shadows where leaves overlap each other using a mix of Sap Green and a touch of Blue.
Step 4: Final Touches and Highlights
-
Render the cherries:
Add a darker shadow (Crimson + Blue) to the bottom of each cherry. Then, add a small, sharp dot of Titanium White to the top of each cherry to make them look glossy and wet. -
Add stems:
Use a very fine liner brush and a mix of Green and White to paint the thin, graceful stems connecting the cherries. Don’t make them straight lines; give them a slight curve. -
Refine the shadows:
Using a transparent glaze of watered-down dark blue or purple, paint shadows cast by the fruit onto the checkerboard. This grounds the objects so they don’t look like they are floating. -
Final inspection:
Step back and check your contrast. If the background blue feels too flat, add subtle lighter blue strokes near the leaves to suggest movement. Ensure the pith of the orange is bright enough to pop.
Once dry, frame your masterpiece in a light wood floater frame to echo the natural tones of the canvas
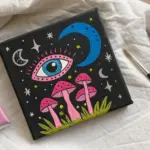
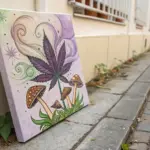
Neon Over Newsprint for Indie Texture
Create a surreal, vibrant masterpiece featuring a mystic eye-mushroom surrounded by neon hues and grassy textures. This tutorial brings together illustrative ink lines and bold washes of color on beautifully textured handmade paper.
Step-by-Step Tutorial
Materials
- Thick, handmade paper with deckled edges (cotton or rag paper)
- Watercolor paints or acrylic gouache (neon pink, bright orange, yellow, green, grey)
- Black archival ink fine liner pens (0.3mm and 0.5mm)
- White gel pen or acrylic paint marker
- Gold paint or metallic gel pen
- Paintbrushes (round #4 and #8)
- Rough cardboard or wood backing board
- Old book pages or newsprint (for collage/backing aesthetic)
- Glue stick or spray adhesive
- Pencil and eraser
Step 1: Preparation & Sketching
-
Prepare the substrate:
Begin by adhering a layer of vintage book pages or newsprint onto your rough cardboard backing. This creates the ‘Indie’ foundation. Mount your sheet of handmade, deckled-edge paper centrally on top of this, leaving the vintage text visible around the bottom edges. -
Draft the central form:
Lightly sketch the large central mushroom using a pencil. Draw a wide, slightly flattened cap and a tall, sturdy stem. In the center of the cap, sketch a large, almond-shaped eye opening. -
Add supporting elements:
Sketch a smaller, spotted mushroom to the left and a tall orange mushroom to the right. Add a tiny grey mushroom tucked in the background. Draw jagged, grass-like shapes at the bottom to ground the scene. -
Define the background:
Lightly mark out circular shapes in the sky area to represent abstract suns or planets, and draw vertical guide lines for the background rain/light effect.
Bleeding Lines?
If your ink bleeds into the paper fibers, ensure the paint is 100% dry first. You can also spray a light coat of matte fixative before inking to seal the surface.
Step 2: Applying Color
-
Paint the background wash:
Using your larger brush, apply a wet wash of neon pink and orange to the sky area. Let the colors bleed into each other, keeping the yellow tones near the top right for a glowing effect. -
Block in the main mushroom:
Fill the cap of the central mushroom with a vibrant magenta or hot pink. Leave small circles unpainted for the spots, or paint over them and add them later with opaque white. Paint the stem a lighter shade of pink. -
Color the secondary mushrooms:
Paint the left mushroom cap with a mix of red and purple. Use bright orange for the right mushroom cap, blending it slightly with yellow toward the edges for dimension. -
Paint the grass:
Use a lively lime green mixed with a touch of yellow for the grassy area. Apply the paint in upward, jagged strokes to mimic blades of grass. -
Detail the eye:
For the eye inside the main mushroom, leave the sclera (white part) unpainted or use white gouache. Paint the iris a dazzling gold or yellow. -
Add background elements:
Fill in the floating circular shapes with orange and yellow concentric rings. Let all paint layers dry completely before moving to ink.
Step 3: Inking & Details
-
Outline the main shapes:
Using a 0.5mm black archival pen, carefully trace the outlines of all mushrooms and the eye. Keep your hand steady but allow the natural texture of the paper to influence the line quality. -
Add texture to the stems:
Switch to a thinner 0.3mm pen. Draw vertical lines and delicate gills under the mushroom caps. I like to curve these lines slightly to emphasize the roundness of the 3D forms. -
Detail the grass:
Use the pen to outline the grass blades, adding quick, vertical flicks inside the green area to suggest density and texture. -
Define the pupil:
Draw the pupil in the center of the gold iris using solid black ink. Add radiating lines within the iris for realistic texture. -
Add white highlights:
Using a white gel pen or paint marker, add bright highlights to the mushroom caps, the grass tips, and a reflection dot in the eye to bring it to life. -
Create the rain effect:
Draw thin vertical white lines descending through the background sky. Add small white dots and stars scattered around the mushrooms for a magical atmosphere.
Add Surreal Dimension
Use metallic gold paint for the iris or background circles. When the light hits the texture of the rough paper, the metallic elements will shimmer mystically.
Display your finished piece against a window or bright wall to let the neon colors truly pop

Have a question or want to share your own experience? I'd love to hear from you in the comments below!