
If you’ve ever stared at a tiny infant handprint or baby footprint and thought, “How can something this small be this sweet?”—same. Here are my favorite ways to turn those little prints into art that feels playful now and still looks beautiful years from now.
Minimalist Handprint and Footprint Pair
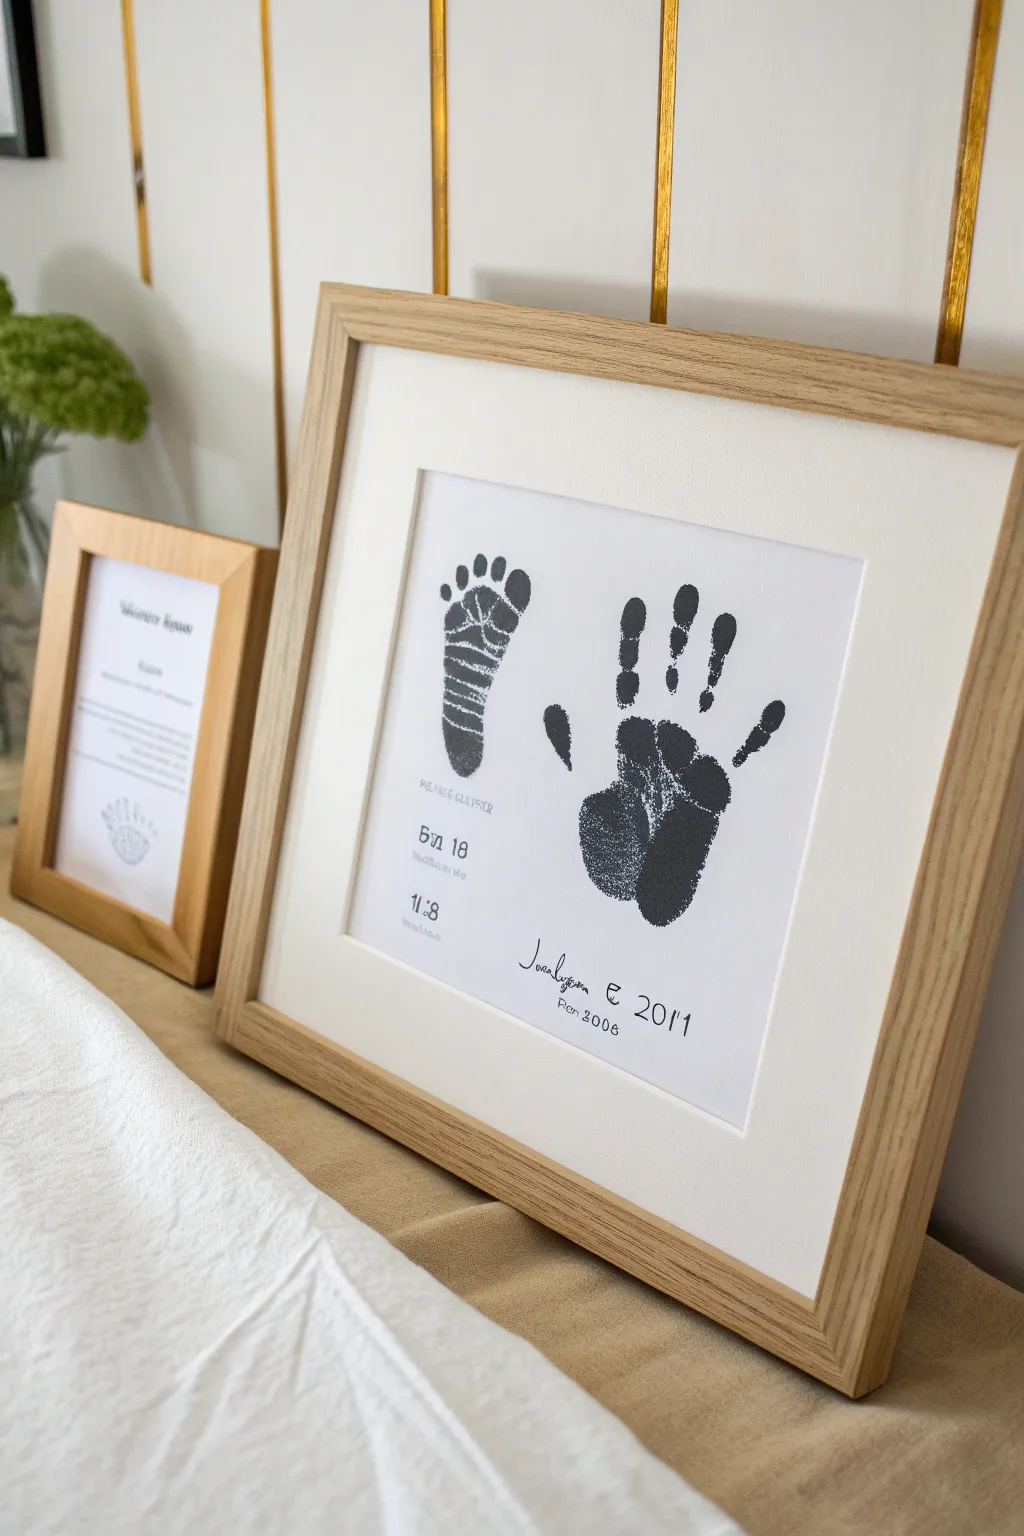
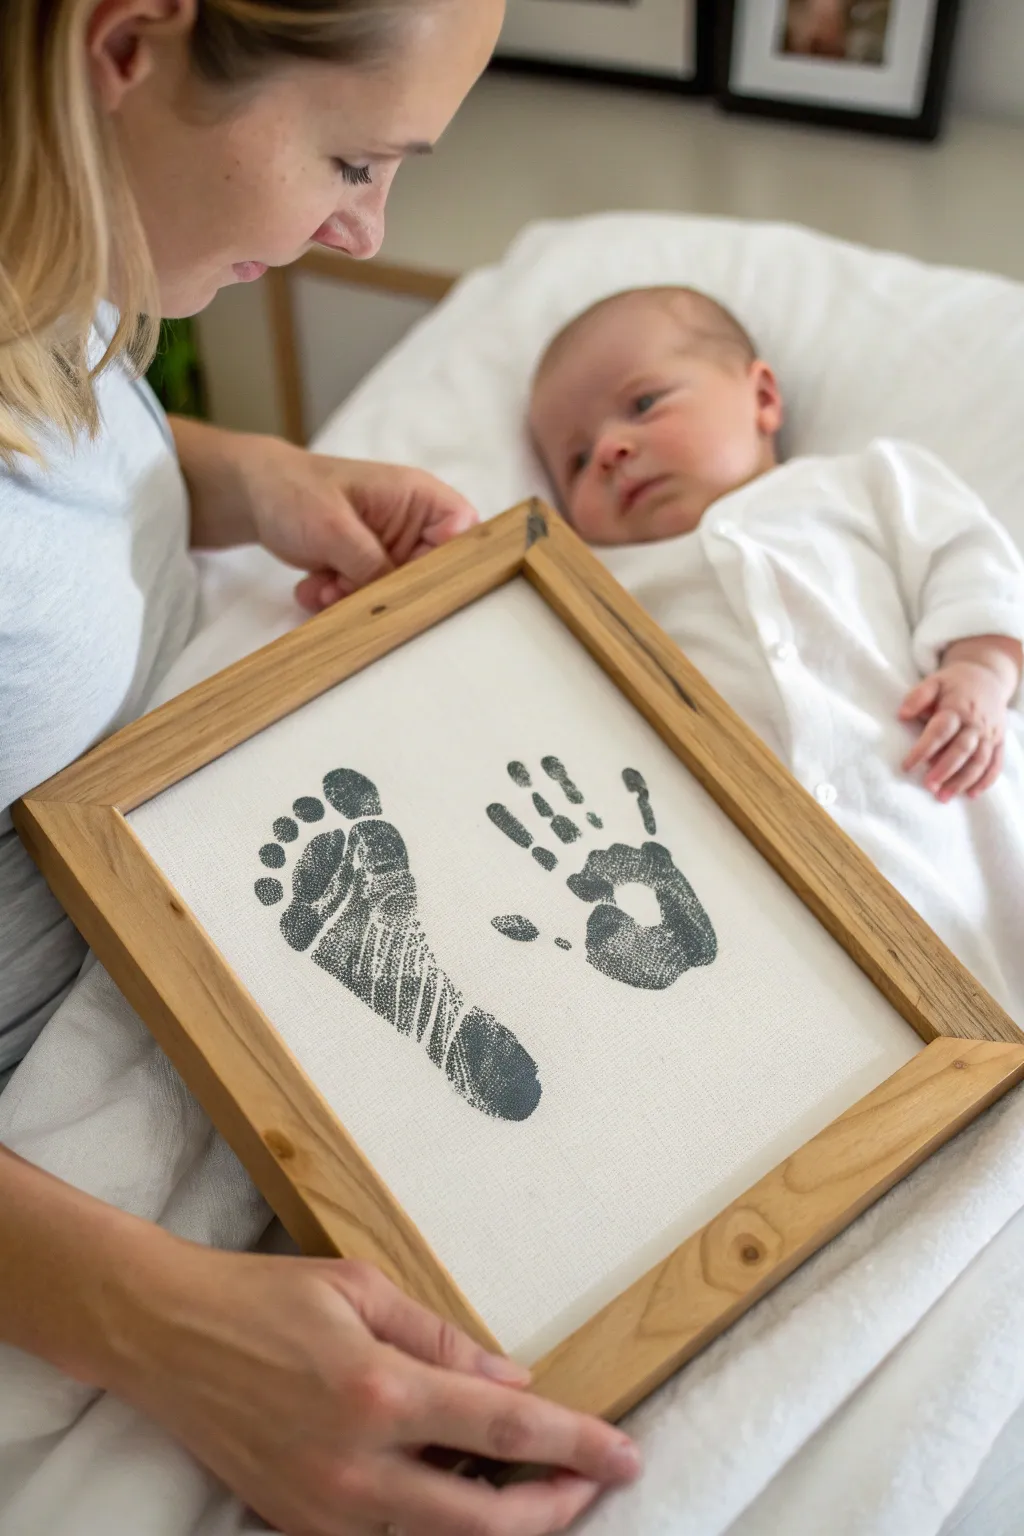
Create a sophisticated keepsake that celebrates your little one’s growth with this minimalist hand and footprint art. The clean lines of the black ink against white cardstock, paired with a natural wood frame, make for a modern gallery-worthy addition to any nursery.
Step-by-Step Guide
Materials
- Heavyweight white cardstock or archival art paper (A4 or 8×10)
- Black ink pad suitable for skin (baby-safe, non-toxic)
- Fine-tip black archival pen or waterproof marker
- Baby wipes or damp cloth
- Light wood box frame with white mat
- Ruler
- Pencil
- Eraser
- Scanner and printer (optional for digital editing)
Step 1: Capturing the Prints
-
Prepare the Station:
Set up a clean, flat surface with your cardstock taped down lightly at the corners so it doesn’t shift. Keep the ink pad open and baby wipes within immediate reach—speed is key here. -
Ink the Foot:
We’ll start with the foot as it’s usually easier than the hand. Gently press the baby’s foot onto the black ink pad. Ensure the heel, ball of the foot, and all five toes are evenly coated but not dripping with ink. -
Print the Foot:
Firmly but gently press the inked foot onto the left side of the paper. Roll the foot slighty from heel to toe to ensure a complete impression. Lift straight up to avoid smudges. -
Clean and Dry:
Immediately wipe the foot clean with baby wipes. Let the footprint dry completely for about 10-15 minutes before attempting the handprint to prevent accidental smearing. -
Ink the Hand:
Coating a baby’s hand can be tricky as they tend to make fists. I find it helpful to gently stroke the back of their hand to encourage them to open it, then quickly press it onto the ink pad. -
Print the Hand:
Position the hand to the right of the footprint. Press the palm down first, then gently unfurl and press each finger down. Hold for a second if possible, then lift the hand straight up. -
Clean Up:
Clean the baby’s hand thoroughly. Allow the paper to dry completely, ideally for at least an hour, to ensure the ink is set.
Smudgy Prints?
If you get smudges, scan the best print, clean up stray marks digitally in free software like Canva or GIMP, and reprint on textured paper for a flawless look.
Step 2: Adding Details and Framing
-
Plan the Text Layout:
Using a ruler and a very light pencil, draw faint guidelines below the prints where you want your text to go. This ensures your writing stays perfectly straight. -
Draft the Text:
Lightly sketch the birth stats—date, time, weight, or name—in pencil first. Mimic the style in the photo by keeping the font small, simple, and slightly spaced out. -
Ink the Text:
Trace over your pencil lines with the fine-tip archival pen. Use a steady hand and maintain consistent pressure for a clean, professional look. Let the ink dry fully. -
Erase Guidelines:
Once you are certain the pen ink is dry (give it extra time just to be safe), gently erase the pencil guidelines. -
Optional Digital Method:
If you are nervous about handwriting, you can scan the dried prints into a computer. Add the text using a simple sans-serif font in photo editing software, then print the final composition onto fresh high-quality cardstock. -
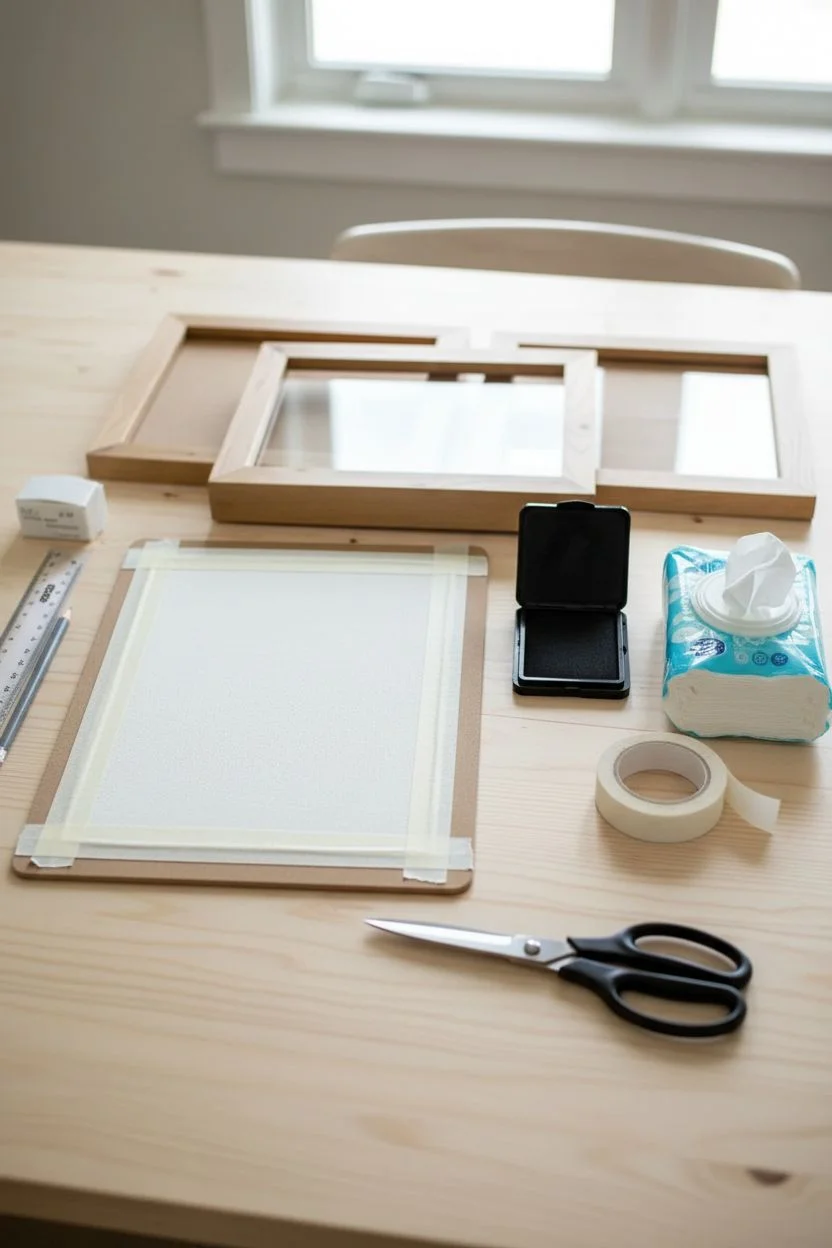
Prepare the Frame:
Clean the glass of your light wood frame on both sides to remove dust and fingerprints. Remove the backing board and place the white mat face down on the glass. -
Mount the Art:
Position your artwork face down against the mat. Use small pieces of masking tape or artist’s tape to secure the paper to the back of the mat, checking from the front to ensure it is centered. -
Final Assembly:
Place the backing board into the frame and secure the clips or tabs. Use a microfiber cloth to give the front glass one final wipe.
Make it Metallic
For a luxe twist, brush a thin layer of gold leaf adhesive over the dried black ink and apply gold foil. The prints will shine beautifully against the matte paper.
Now you have a beautifully preserved moment in time ready to hang or gift


Heart Made From Two Baby Footprints
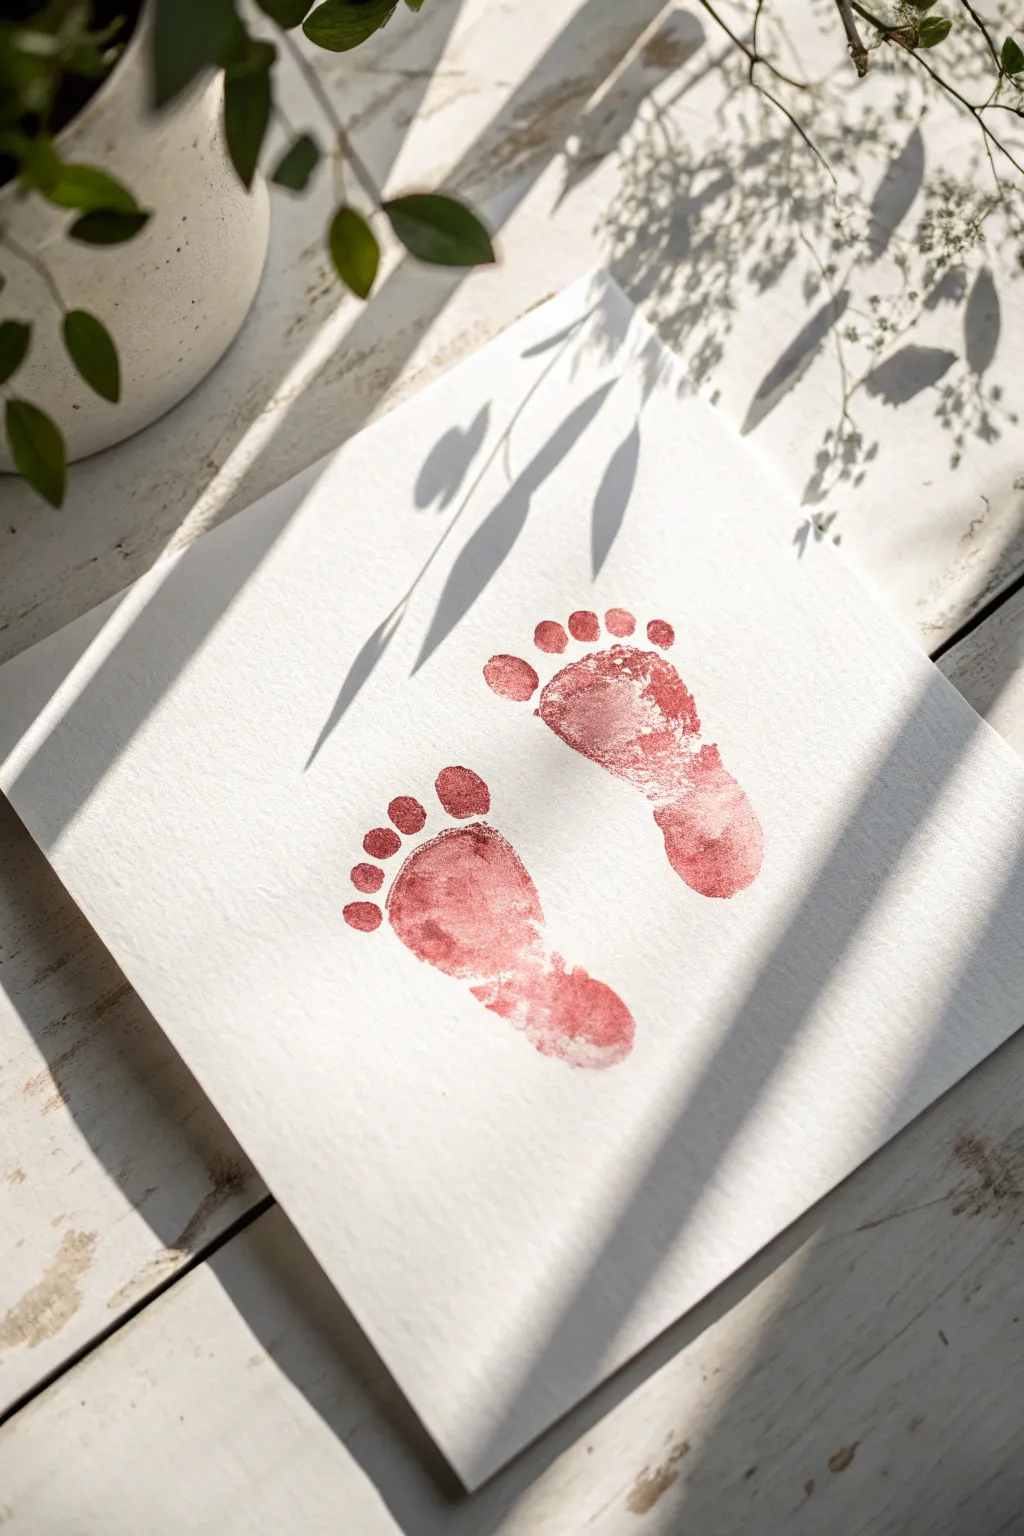
Capture the fleeting tininess of your little one’s feet with this simple yet beautiful footprint art. Using soft red tones on textured paper, this project creates a timeless memento that looks lovely framed in a nursery or given as a heartfelt gift.
Detailed Instructions
Materials
- High-quality textured art paper (watercolor or heavy cardstock)
- Non-toxic, baby-safe stamp pad or tempera paint (muted red/rose)
- Small sponge brush (if using paint)
- Baby wipes (essential for quick cleanup)
- Painter’s tape or masking tape
- Flat, hard surface or clipboard
- Helper (highly recommended)
Step 1: Preparation
-
Select your paper:
Choose a thick, high-quality paper with a bit of tooth or texture, like cold-press watercolor paper. This adds a professional, artistic feel to the final print compared to standard printer paper. -
Secure the workspace:
Tape your chosen paper down to a flat surface or clipboard using painter’s tape on the corners. This prevents the paper from shifting while you are wrangling a wiggly baby. -
Prepare the baby:
If possible, do this while the baby is relaxed or sleepy. Have a helper hold the baby while you manage the feet and the stamping. -
Ready the cleaning supplies:
Open your pack of baby wipes and have several pulled out and ready to grab immediately. You don’t want to be fumbling with a lid while holding a painted foot.
Step 2: Inking the Feet
-
Choose your medium:
Decide between a stamp pad or paint. A stamp pad often reveals more skin texture and detail, while paint provides a bolder, more solid color. -
Review the positioning:
Visualize the layout before you start. For this design, you want the heels closer together and the toes fanning out slightly to create a subtle ‘V’ shape. -
Apply color to the first foot:
Start with the left foot. If using a stamp pad, gently press the pad against the foot, ensuring coverage on all toes. If using paint, use the sponge brush to apply a thin, even layer. Too much paint will cause sliding. -
Check for evenness:
Look closely at the foot. You want the ink or paint to cover the ridges of the skin beautifully without dripping. Wipe off any excess from the edges.
Stamp Smart
Use a clipboard on your lap! It allows you to move the paper to meet the baby’s foot, which is much easier than trying to maneuver a baby’s leg onto a stationary table.
Step 3: Printing
-
Position the first foot:
Bring the paper to the foot rather than forcing the leg down awkwardly. Hover the inked foot over the left side of the paper. -
Press and roll:
Gently press the heel down first, then roll the foot forward towards the toes. Press each toe individually specifically to ensure they make contact. -
Lift cleanly:
Lift the foot straight up and away from the paper quickly to avoid smearing the print. Immediate cleaning with a wipe is a must here. -
Ink the second foot:
Repeat the application process for the right foot. I prefer to wait a moment to ensure the baby is calm again before proceeding. -
Align the second print:
Position the right foot next to the first print. Aim to have the heels closer together than the toes, angling the foot slightly outward. -
Execute the second print:
Press the heel down, roll to the toes, and ensure firm contact with the paper. Press gently on the top of the foot to get a good impression of the arch if the baby has chubby feet. -
Clean up:
Lift the foot cleanly and immediately clean the baby’s foot thoroughly with the prepared wipes.
Make it a Heart
To turn this into a clearer heart shape, overlap the heels slightly when printing. The natural curve of the footprints will form the top arches of a heart.
Step 4: Finishing Touches
-
Allow to dry:
Set the paper aside in a safe place to dry completely. If you used paint, this might take an hour or two; ink pads dry much faster. -
Evaluate the details:
Once dry, check if any details need touch-ups. Usually, the imperfections add to the charm, so resist the urge to ‘fix’ it too much. -
Optional labeling:
You can use a fine-tip archival pen to write the baby’s name and the date small at the bottom corner for a complete memory.
Your beautiful footprint art is now ready to be framed and cherished for years to come


Butterfly Wings From Footprints
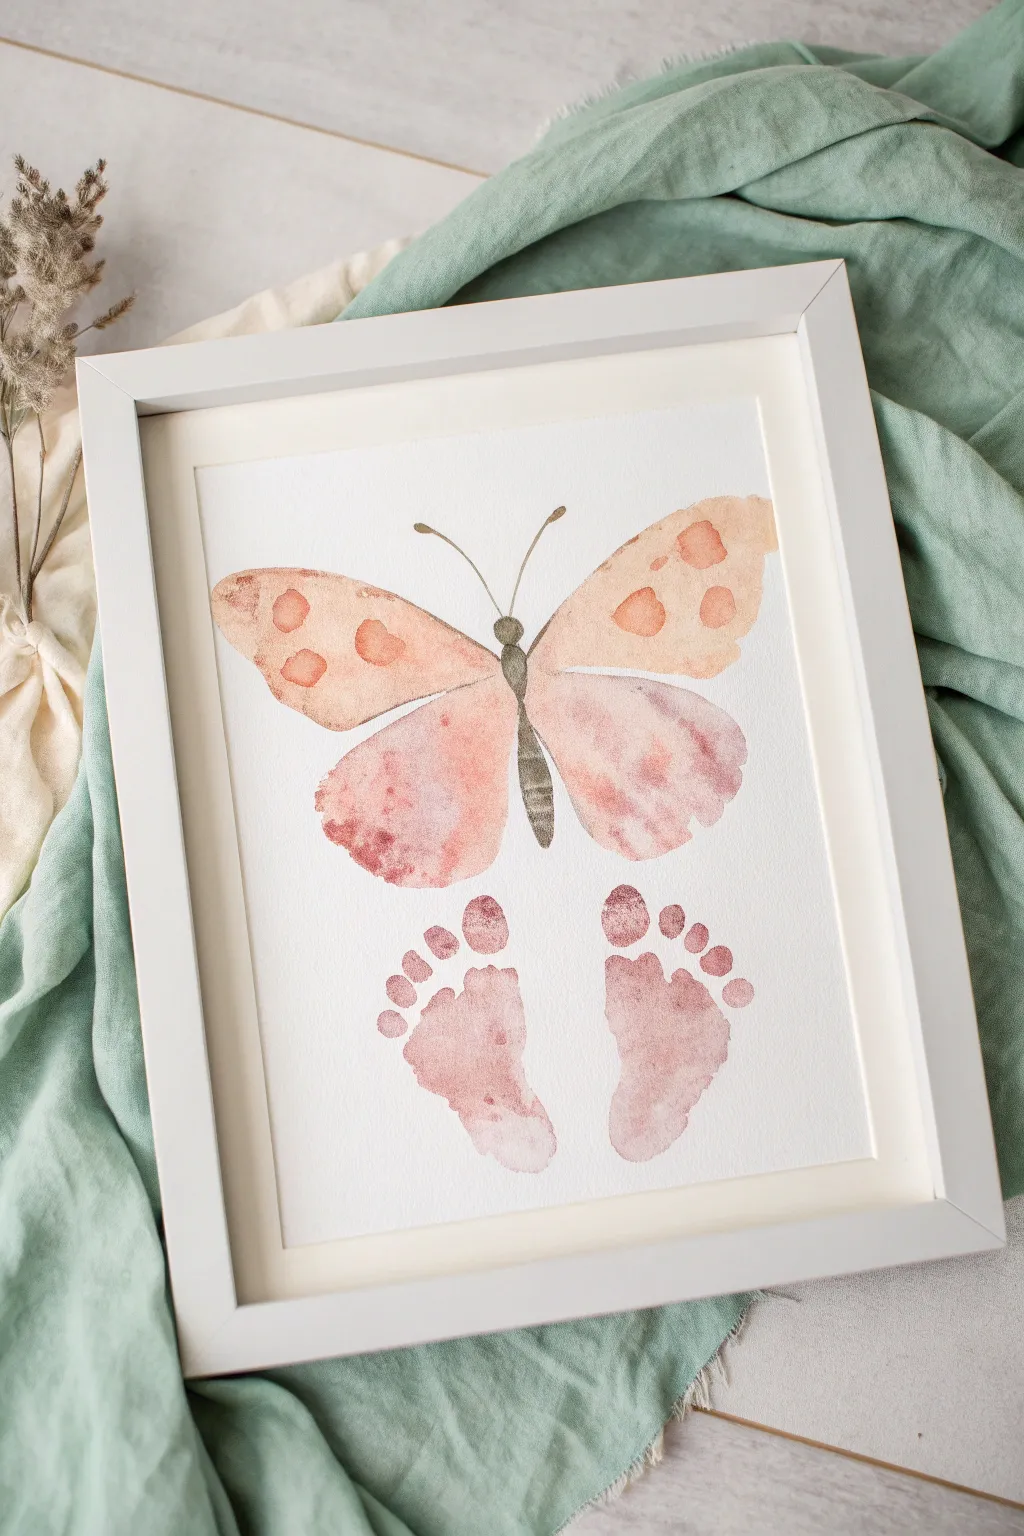
Transform tiny footprints into the lower wings of a beautiful, fluttering butterfly in this delicate keepsake project. The soft peach and rose tones create a warm, vintage feel that looks stunning framed in a Nursery.
How-To Guide
Materials
- High-quality watercolor paper (cold press, at least 140lb)
- Non-toxic, washable ink pad (rose or soft pink)
- Watercolor paints (shades of peach, soft orange, and brown)
- Fine round watercolor brush (size 2 or 4)
- Medium round watercolor brush (size 6 or 8)
- Pencil (HB or H)
- Eraser
- Water cup and paper towels
- Baby wipes (essential for clean-up)
- White or light wood frame (8×10 or similar)
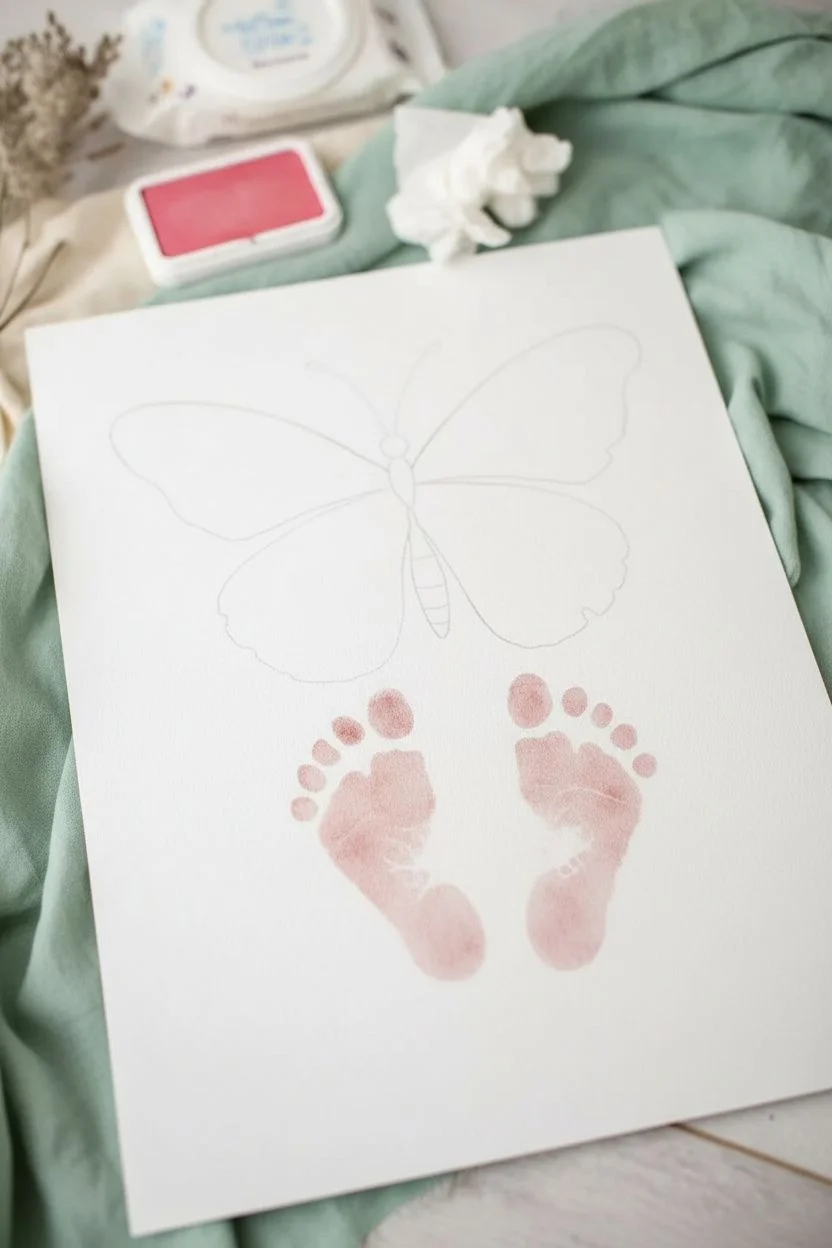
Step 1: Capturing the Footprints
-
Prepare your workspace:
Set up a clean, flat surface with your watercolor paper taped down if preferred. Have the ink pad open and baby wipes immediately accessible. -
Ink the first foot:
Gently press baby’s left foot onto the rose-colored ink pad. ensure the ink covers the entire sole and all five toes evenly, but isn’t dripping wet. -
Print the left wing:
Position the foot on the lower left quadrant of the paper (imagine where the butterfly’s bottom wing would go). Press firmly but gently, rocking slightly to catch the toes, then lift straight up. -
Clean and switch:
Immediately wipe the first foot clean. Repeat the inking process with the right foot. -
Print the right wing:
Place the right footprint next to the left one, leaving about an inch of space between the heels. The heels should angle slightly inward toward each other to mimic the shape of butterfly wings.
Smudged Footprint?
Don’t panic about smudges. Use a damp clean brush to gently lift excess ink off the paper, or turn a smudge into a ‘shadow’ or background element with water.
Step 2: Painting the Body and Top Wings
-
Let the prints dry:
Allow the footprint ink to dry completely before painting near it to avoid smudging. This usually takes about 10-15 minutes. -
Sketch the outline:
Using a pencil very lightly, sketch the thorax (body) between the footprints and draw the large upper wings extending out from the top of the body. Keep the lines faint so they don’t show through the paint. -
Mix your colors:
Prepare a watery mix of peach and soft orange watercolor. You want a translucent look, not opaque. -
Paint the upper wings base:
Using the medium brush, fill in the upper wing shapes with your peach mix. use plenty of water to get that classic watercolor texture. -
Add the spots:
While the wings are still slightly damp (but not soaking), create a more concentrated orange-brown mix. drop in circles of this pigment onto the wings to create soft, diffused spots. -
Paint the body:
Mix a dark grey-brown color. Using the fine brush, paint the segmented body between the wings. I like to make the segments slightly darker at the edges for dimension. -
Add the antennae:
With the very tip of your fine brush and the brown paint, sweep two delicate lines curving outward from the head. Add tiny oval tips to the ends. -
Connect the lower wings:
If the footprints didn’t perfectly touch the painted body, you can use a very watered-down rose paint to gently extend the heel area to meet the butterfly’s abdomen, blending the print into the artwork.
Pro Tip: Wing Symmetry
To get symmetrical upper wings without stressing, cut a paper template of one wing first and trace it lightly on both sides before you start painting.
Step 3: Finishing Touches
-
Review and refine:
Look over the piece. If the upper wings look too flat, add a subtle second layer of glaze near the body to show where the wings attach. -
Erase guidelines:
Once the painting is 100% bone dry (give it an hour or more), gently erase any visible pencil marks. -
Frame the piece:
Place the artwork into your chosen frame. A white mat adds a professional gallery look to the finished keepsake.
Now you have a timeless flutter of memories captured in watercolor art


Sunburst Footprints as Sun Rays
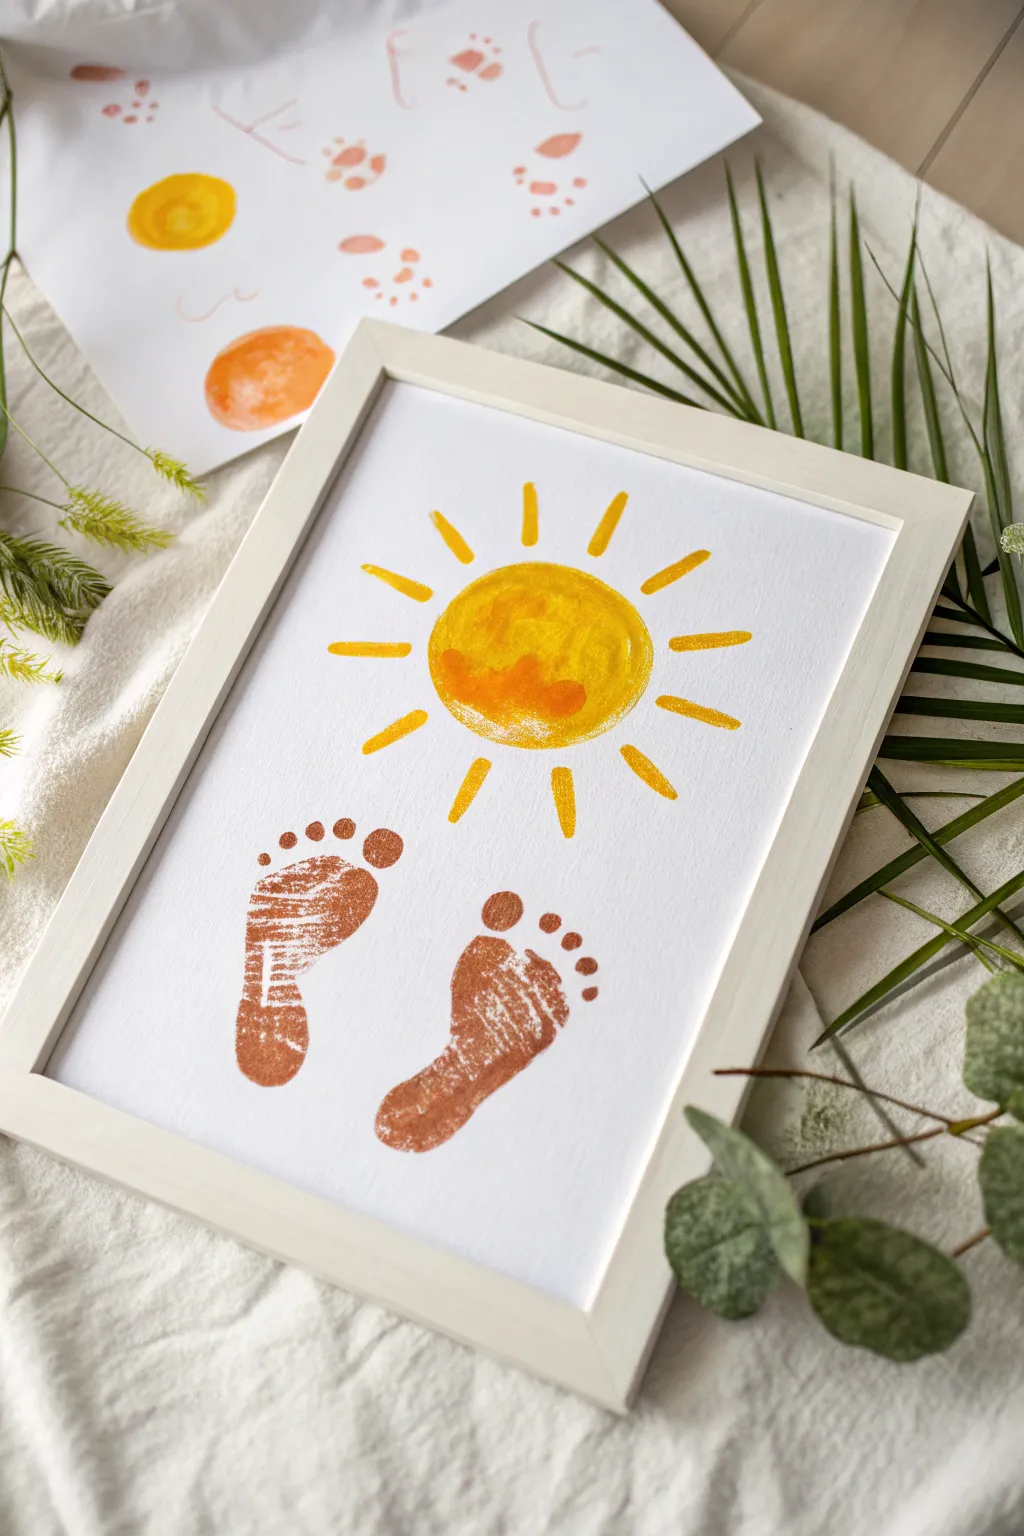
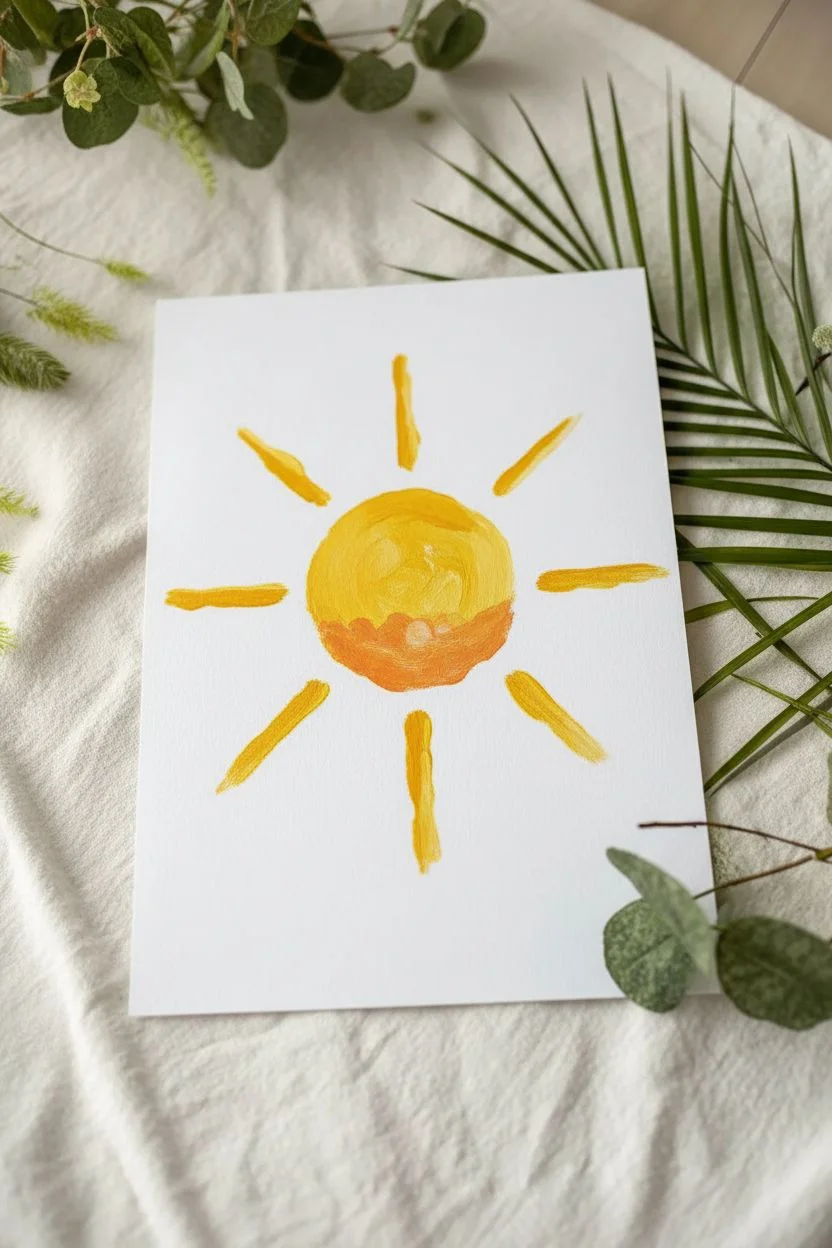
Brighten up any room with this radiant keepsake that captures painted footprints beneath a cheerful, hand-painted sun. The warm yellow and earthy brown tones create a cozy, summery feel perfect for preserving little steps in time.
Step-by-Step Guide
Materials
- White cardstock or heavy watercolor paper (A4 size)
- White or light wood frame
- Yellow acrylic or tempera paint
- Orange acrylic paint
- Brown acrylic paint
- Flat paintbrush (medium width)
- Small round paintbrush
- Paper plate or palette
- Baby wipes or damp cloth
- Flat surface or table covering
Step 1: Painting the Sun
-
Prepare the yellow base:
Squeeze a generous amount of yellow paint onto your palette. Add a very small dot of orange next to it, but don’t mix them fully yet. -
Paint the sun’s circle:
Using your medium flat brush, paint a solid circle near the top center of your paper. It doesn’t need to be perfectly round—a hand-painted look adds charm. -
Add dimension:
While the yellow circle is still wet, dip the corner of your brush into the orange paint. Gently blend this into the bottom half of the circle to create a warm, dimensional shadow effect. -
Paint the first rays:
Switch to your smaller round brush or use the edge of the flat brush. Paint four main rays extending from the sun at the top, bottom, left, and right positions. -
Fill in the rays:
Paint two shorter rays in between each of the main four rays. Try to keep them somewhat uniform in thickness, radiating outward like spokes on a wheel. -
Let the sun dry:
Set the paper aside for about 10–15 minutes until the sun is dry to the touch. This prevents smudging when you work on the footprints.
Step 2: Creating the Footprints
-
Prepare the brown paint:
Clean your flat brush thoroughly. Squeeze brown paint onto the palette; you want a workable consistency, not too runny. -
Paint the left foot:
Generously coat the bottom of the child’s left foot with brown paint. Ensure the toes and the arch are well-covered but not dripping. -
Stamp the left print:
Position the foot on the left side of the paper, below the sun. Press straight down firmly, gently pressing each toe to ensure a clear impression. -
Lift and clean:
Lift the foot straight up to avoid smearing. Immediately wipe the foot clean with baby wipes before moving to the next step. -
Paint the right foot:
Coat the right foot with the same brown paint. I find re-applying fresh paint ensures the second print matches the darkness of the first. -
Stamp the right print:
Place the right foot next to the left one, leaving a small gap between them. Angle the heel slightly inward if you want a natural ‘standing’ look. -
Check the toes:
If a toe didn’t print clearly, you can dip your finger in a tiny bit of brown paint and gently dab it to fill in the missing shape. -
Final drying time:
Allow the entire artwork to dry completely, preferably for at least an hour, so the thicker paint on the footprints hardens fully.
Smudge Rescue
If a footprint smears, turn it into a grassy patch with green paint or add a painted rock over the mistake.
Step 3: Framing the Masterpiece
-
Prepare the frame:
Remove the backing and glass (or acrylic front) from your white wooden frame. Clean the glass to remove any dust or fingerprints. -
Insert the art:
Once your painting is fully dry, place it face down against the glass inside the frame. Ensure it is centered. -
Secure the backing:
Place the backing board over the artwork and secure the clips or tabs to hold everything tight. -
Display:
Your sunny footprint art is now ready to be hung on a wall or placed on a shelf among some greenery for a natural vibe.
Add a Date
Use a fine-tip gold marker to write the child’s name and the date along the bottom edge or curving under the feet.
Hang this sunny creation in a nursery or play area to keep a little bit of summer around all year long
BRUSH GUIDE
The Right Brush for Every Stroke
From clean lines to bold texture — master brush choice, stroke control, and essential techniques.
Explore the Full Guide
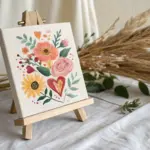
Handprint Flowers and Footprint Leaves
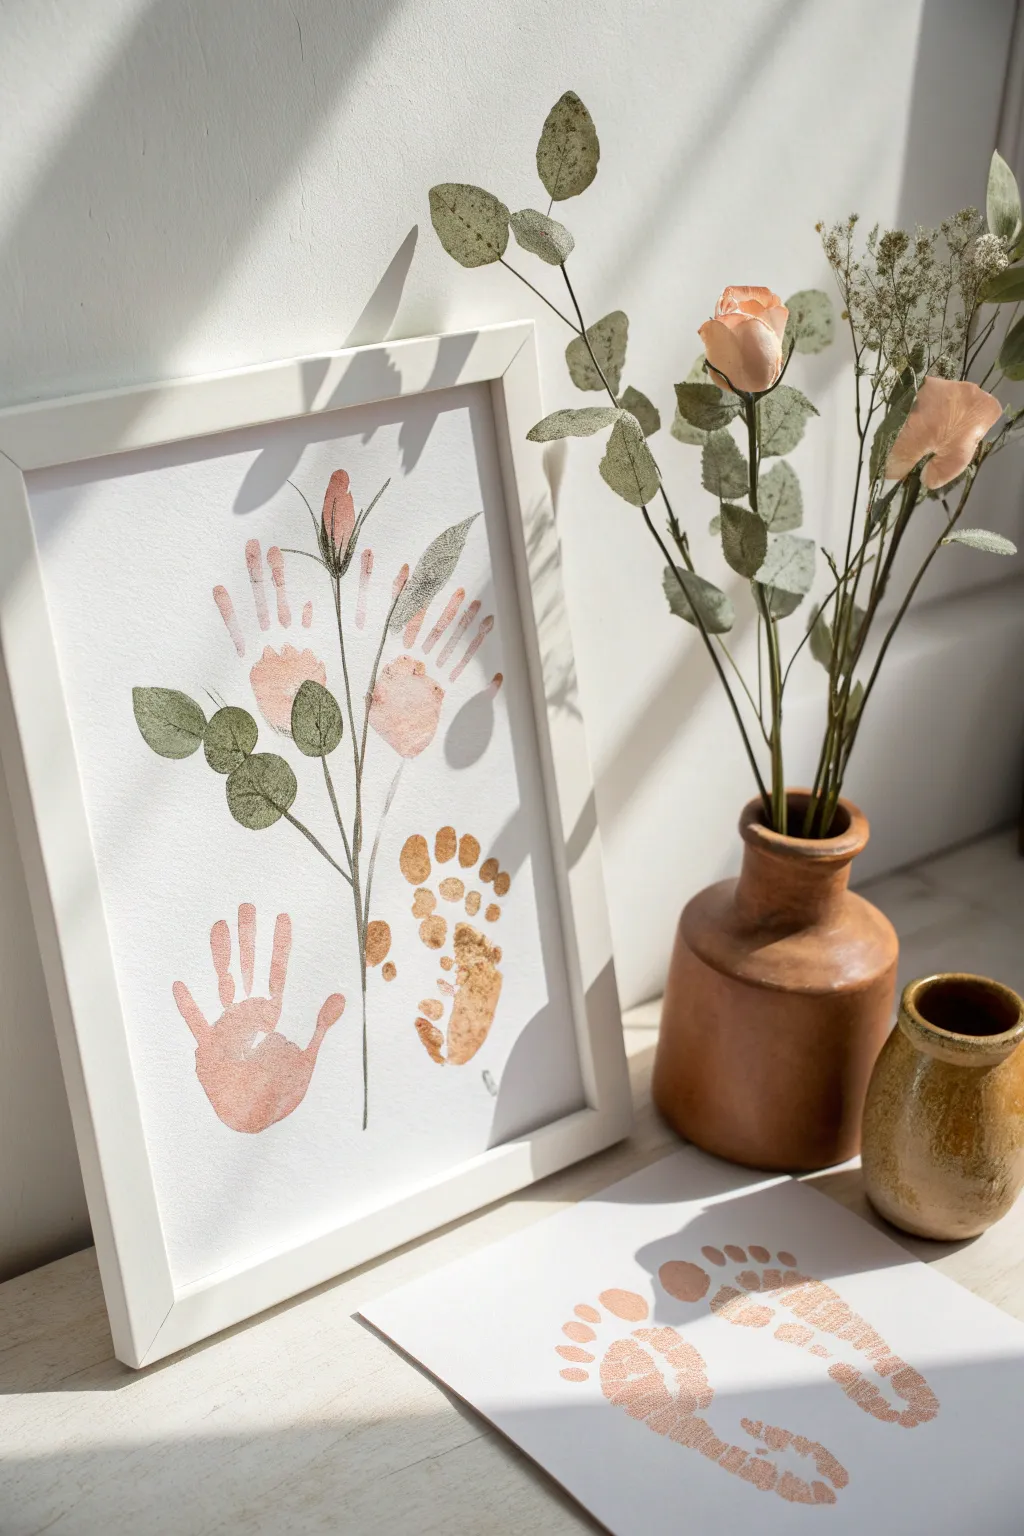

Transform tiny prints into an elegant botanical display with this soft, watercolor-inspired artwork. By combining handprints as blossoms and leaves with a single footprint detail, you creating a timeless piece that captures just how small they once were.
How-To Guide
Materials
- Heavyweight watercolor paper or textured cardstock (white)
- Non-toxic, washable paints (pale pink, peach/coral, muted sage green, brown)
- Fine liner brush or archived ink pen (black or dark grey)
- Flat paintbrush (medium size)
- Small round brush for details
- Paper plate or palette
- Baby wipes or damp cloth for quick cleanups
- White picture frame (optional)
Step 1: Planning and Preparation
-
Map your layout:
Before dipping any hands in paint, lightly sketch a vertical line down the center of your paper with a pencil. This will be the main stem and helps guide where the prints should land to keep the composition balanced. -
Mix your colors:
For that soft, vintage look shown in the image, mix a touch of white into your pink and peach paints to make them pastel. For the green, aim for a desaturated ‘eucalyptus’ tone rather than a bright primary green.
Smudged Print Rescue
If a hand wiggles, turn the smudge into a falling petal or an extra leaf by painting over it. Imperfections make it unique
Step 2: Creating the Blossoms
-
Paint the first hand:
Using the flat brush, apply a thin, even coat of the pale pink paint to your child’s hand. Make sure to cover the palm and fingers completely but avoid thick globs that might smudge. -
Print the top left blossom:
Guide the hand to the upper left section of your paper. Press firmly, fingers pointing upwards and slightly outwards, to create an open flower shape. Lift straight up to avoid smearing. -
Print the top right blossom:
Clean the hand or use the other hand. Apply a slightly peachier tone for variety. Press this handprint on the upper right side, mirroring the first one but slightly lower, with fingers fanning out to the right. -
Add a central bud (optional):
If you want the central rosebud detail seen in the example, you can either use a single finger press or paint a small oval shape between the two handprints using a darker pink shade.
Step 3: Adding the Foliage
-
Create the lower leaf:
For the large leaf on the bottom left, coat a hand in the sage green mixed with a little pink for warmth. Press this handprint lower down on the paper, pointing upwards and angled left. -
Stamp the footprint:
Using a brownish-gold or deep ochre paint, coat the child’s foot. Press this onto the bottom right area. This adds visual weight and texture, resembling fallen leaves or a seed pod element. -
Dry the prints completely:
This is crucial. Let the artwork sit for at least 30 minutes to an hour. If the paint is wet when you add stems, the ink will bleed and ruin the crisp lines.
Metallic Touch
Use gold leaf foil or metallic gold paint for the footprint to give the artwork a shimmering, high-end finish
Step 4: Detailing and Assembly
-
Draw the main stem:
Using your fine liner brush or pen, draw a long, slender central stem. Start from the bottom created by the low handprint and extend it up between the top two ‘flower’ handprints. -
Connect the blossoms:
Draw delicate, thinner lines branching off from the main stem to connect to the wrist-area of each handprint flower. It creates the illusion that the prints are growing from the plant. -
Paint eucalyptus leaves:
Using the small round brush and your sage green paint, add freehand circular leaves along the stems. Overlap the main stem slightly to create depth, painting flat, coin-shaped leaves similar to a silver dollar eucalyptus. -
Add veining details:
I like to take a very fine pen and add subtle veins to the painted eucalyptus leaves once they are dry. You can also add little sepals (green leaves) at the base of the pink handprints. -
Review and touch up:
Look for any gaps in the stems or areas that need a little definition. Since this is organic art, slight imperfections add to the charm, so don’t over-correct. -
Frame your masterpiece:
Once fully dry, place the artwork behind glass in a simple white frame. The white border helps the soft colors pop and gives it a gallery-ready appearance.
Hang this beautiful botanical record of your little one’s growth in a nursery or hallway for a daily smile
Classic Handprint Turkey Keepsake
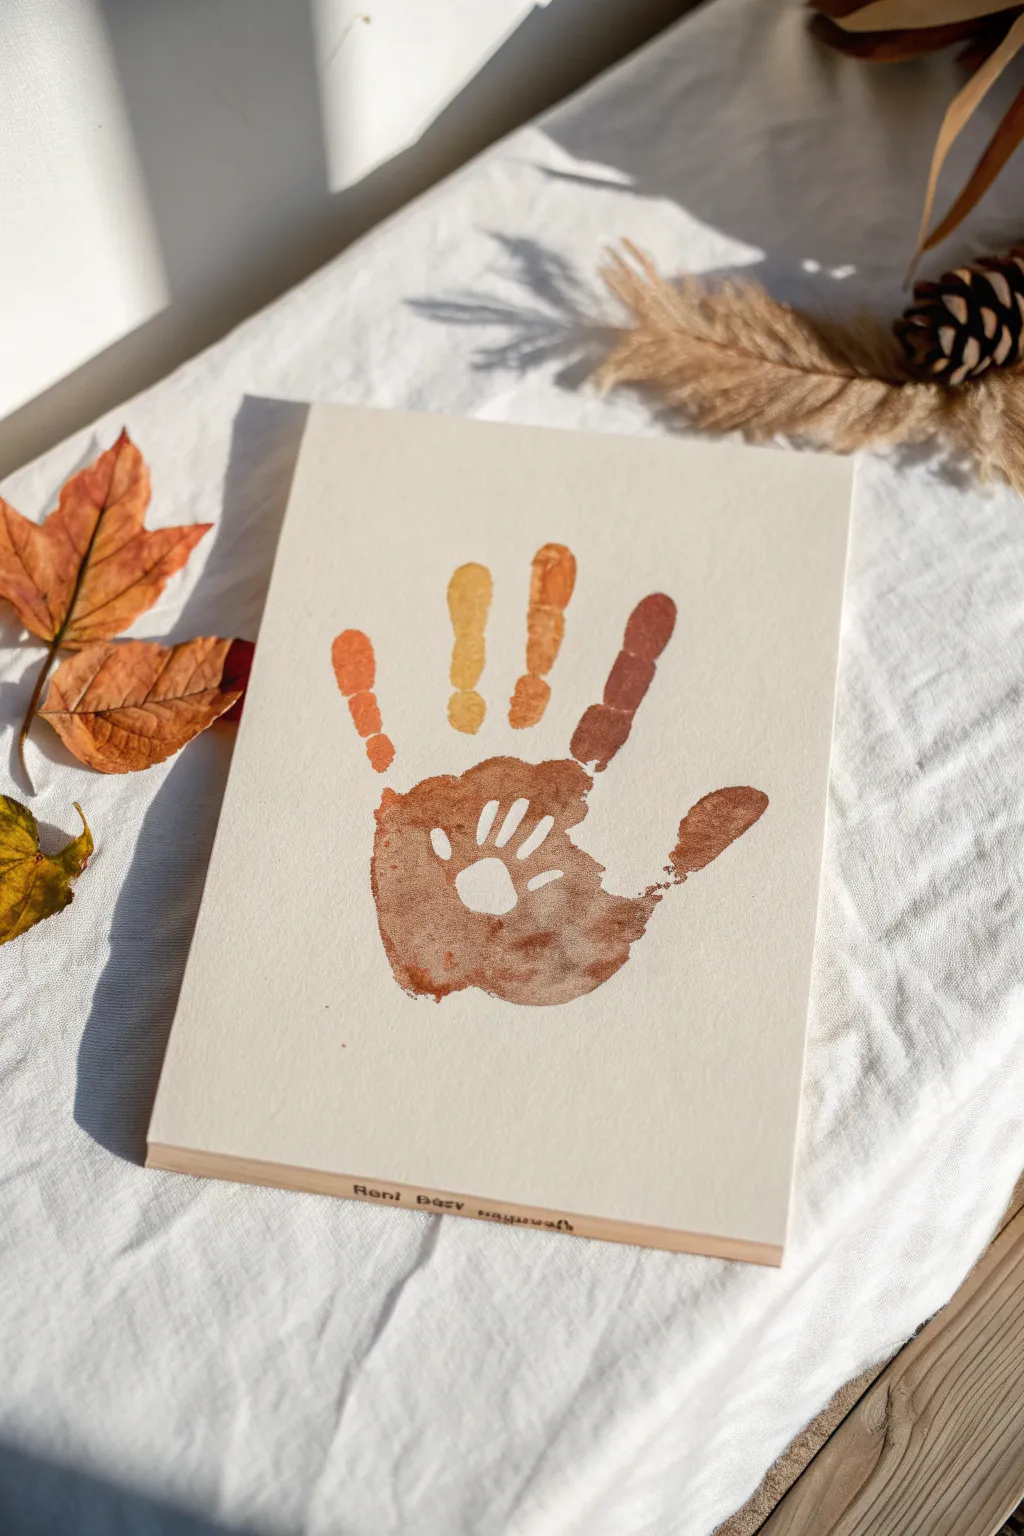

Capture the fleeting size of your little one’s hand nestled safe inside your own with this heartwarming layered print. The warm, earthy tones of the larger hand create a beautiful contrast against the crisp white silhouette of the baby’s palm, making a sophisticated keepsake for fall.
Detailed Instructions
Materials
- Thick watercolor paper or heavy cardstock (cream or off-white)
- Non-toxic acrylic craft paints (mocha brown, burnt orange, mustard yellow, reddish-brown)
- Removable adhesive vinyl or contact paper
- Scissors or a craft knife
- pencil
- Medium flat paintbrush
- Sponge dabbers (optional)
- Small wooden mounting block or frame
- Baby wipes (essential for quick cleanup)
Step 1: Creating the Negative Space Stencil
-
Trace the tiny hand:
Gently place your baby’s hand onto the backing of the adhesive vinyl or contact paper. Use a pencil to trace a rough outline around their fingers and palm. -
Refine the shape:
After moving the baby’s hand, clean up your pencil lines to create a smooth, clearly defined hand shape. It doesn’t need to be perfect, just recognizable. -
Cut the stencil:
Carefully cut out the hand shape using scissors or a craft knife. You want the actual hand cutout, shaped like a sticker, not the surrounding negative space. -
Position the sticker:
Peel the backing off your vinyl hand cutout. Place it firmly in the center of your watercolor paper where you want the main palm to be. Press down on all the edges to ensure paint won’t seep underneath.
Clean Lines Secret
Before painting your palm, wipe the vinyl sticker with a slightly damp cloth. This prevents the sticker from bonding too tightly to the paper, making removal much easier later.
Step 2: Painting the Parent Hand
-
Prepare your palette:
Squeeze out quarter-sized dollops of your mocha brown, burnt orange, mustard yellow, and reddish-brown paints onto a paper plate or palette. -
Paint the thumb area:
Apply the reddish-brown paint generously to your own thumb. Use the flat brush to get good coverage, ensuring the paint is wet but not dripping. -
Paint the index finger:
Move to your index finger and paint it with the mocha brown shade. I like to blend the color slightly at the base of the finger where it meets the palm for a seamless look. -
Add the middle finger color:
Coat your middle finger with the mustard yellow paint. This brighter tone adds a lovely pop of light to the earthy arrangement and mimics turning leaves. -
Finish the fingers:
Paint your ring finger with the burnt orange and your pinky with the original reddish-brown, creating a varied fall gradient across your hand. -
Coat the palm:
Cover your entire palm with the mocha brown paint. Make sure to apply a thick, wet layer, as this needs to transfer clearly over the vinyl sticker.
Add a Date
Use a fine-tip permanent marker or small letter stamps to add the child’s name and the year along the bottom edge of the wooden block for a timeless archival touch.
Step 3: The Transfer and Reveal
-
Position your hand:
Hover your painted hand over the paper, aiming so your palm lands directly on top of the vinyl sticker you placed earlier. -
Press down firmly:
Press your hand down onto the paper. Use your free hand to gently press on the back of your painted hand, ensuring the palm makes full contact with the paper around the sticker. -
Lift carefully:
Lift your hand straight up without sliding to avoid smearing the print. Immediately wash your hands with warm soapy water or baby wipes. -
Let it dry partially:
Allow the paint to dry until it is tacky but not fully hardened. This usually takes about 10 to 15 minutes depending on how thick your paint application was. -
Remove the stencil:
Use a pin or the tip of your craft knife to carefully lift the edge of the vinyl sticker from the center of the painted palm. -
Reveal the silhouette:
Peel the sticker away slowly. It should reveal a pristine white handprint surrounded by your painted palm print. -
Mount the artwork:
Once fully dry, trim the paper if necessary and adhere it to a wooden block or place it inside a frame to protect your collaborative masterpiece.
Now you have a touching visual reminder of just how small they once were within your grasp

PENCIL GUIDE
Understanding Pencil Grades from H to B
From first sketch to finished drawing — learn pencil grades, line control, and shading techniques.
Explore the Full Guide
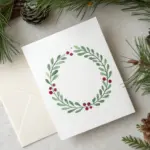
Mistletoe Footprints for Winter Decor
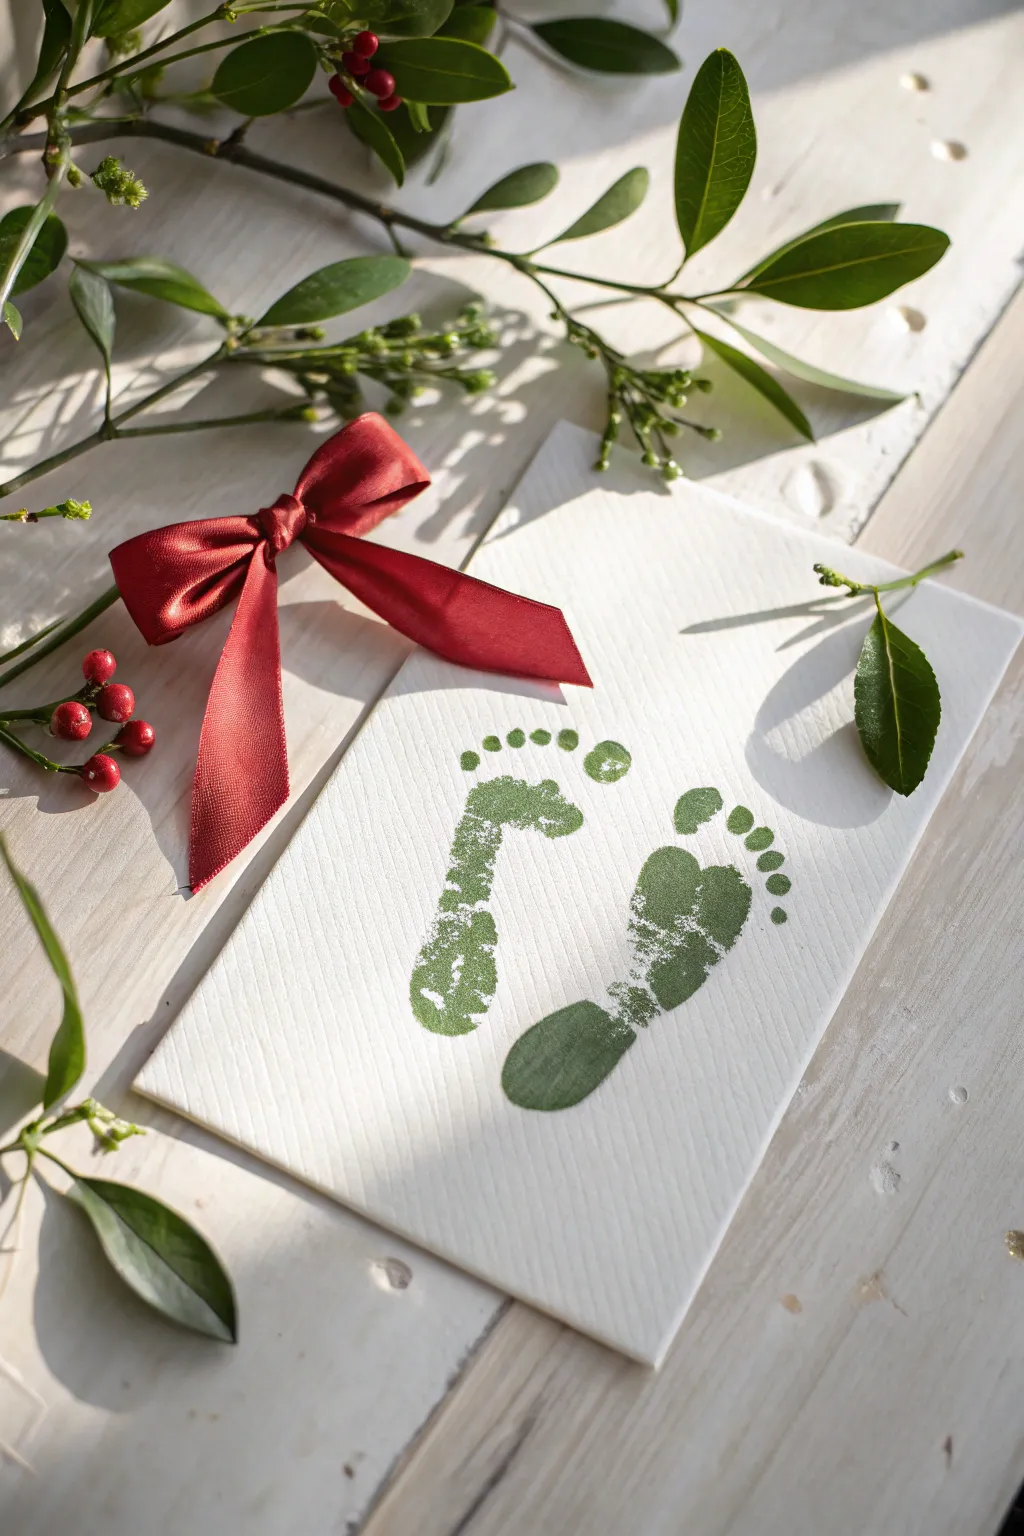
Transform tiny footprints into a festive botanical design with this elegant and minimalist winter art piece. The textured green prints create the perfect mistletoe leaf shape, making for a sophisticated holiday card or nursery decoration.
Step-by-Step
Materials
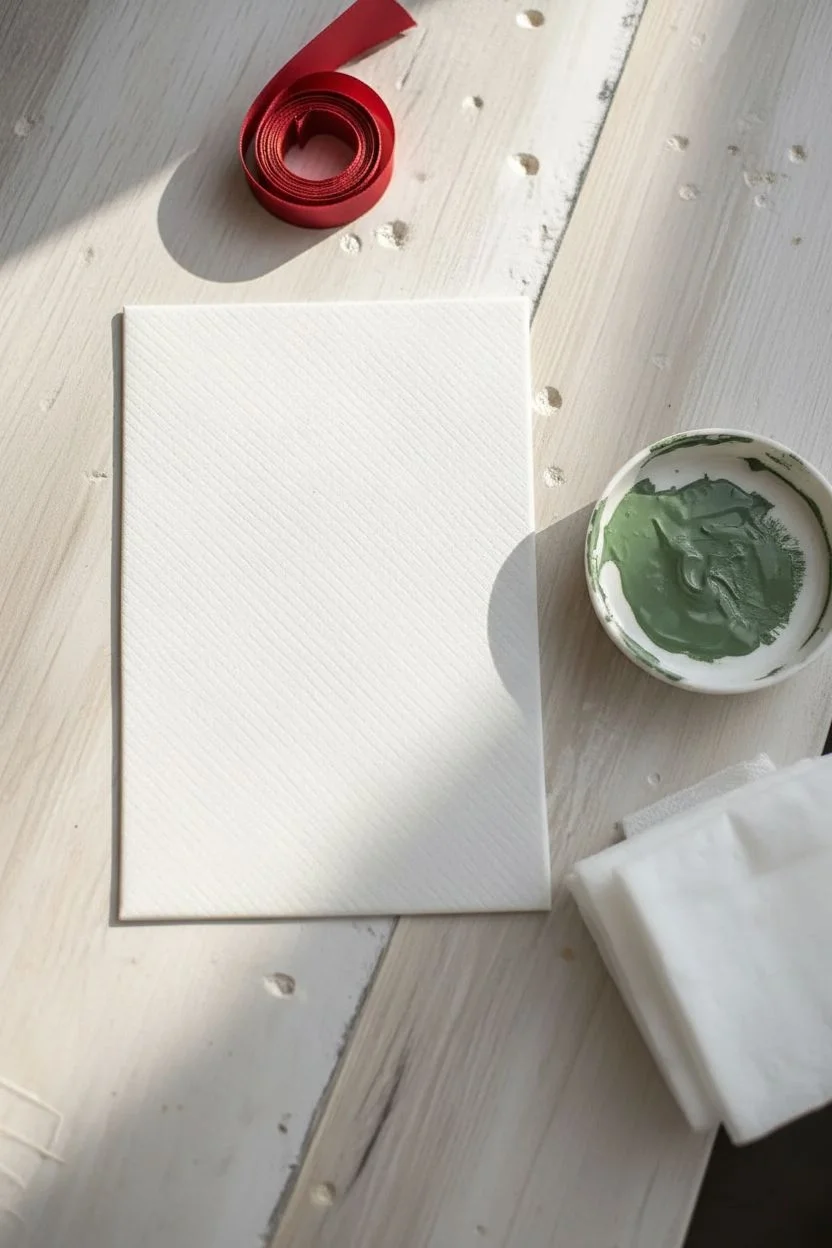
- Heavyweight textured cardstock or watercolor paper (white or cream)
- Non-toxic green washable paint or ink pad (sage or forest green)
- Small red satin ribbon (approx. 1/4 inch wide)
- Craft glue or hot glue gun (for the bow)
- Baby wipes or damp cloth
- Newspaper or messy mat for surface protection
- Optional: Real foliage for staging photos
Step 1: Preparation & Setup
-
Gather materials:
Lay out all your supplies within easy reach, especially the baby wipes, as you’ll want to clean up quickly after printing. -
Choose your paper:
Select a high-quality, textured paper. The visible weave shown in the example adds a lovely, rustic touch that flat printer paper can’t achieve. -
Prepare the baby:
If your little one is wiggly, this is best done when they are calm, perhaps right after a nap or while sitting in a high chair. -
Ink the foot:
Apply the green paint or ink generously to the bottom of the right foot. Ensure the toes and arch are well-covered but not dripping.
Clean Print Tip
For the crispest toes, do the printing on a hard surface like a table or floor, rather than carpet. A clipboard under the paper works wonders for stability.
Step 2: Creating the Prints
-
Position the first print:
Hold the paper steady. Guide the inked right foot to the paper, aiming to angle the heel inward slightly. -
Press firmly:
Press down gently but firmly on the heel, pad, and individual toes to ensure a clear impression of the texture. I find a slight rolling motion helps catch the toes. -
Lift and clean:
Lift the foot straight up to avoid smearing the paint. Immediately clean the painted foot with a baby wipe. -
Ink the left foot:
Apply the same green medium to the left foot, ensuring consistent coverage to match the opacity of the first print. -
Align the V-shape:
Position the left foot so the heels are close together (touching or nearly touching) and the toes angle outward to the left, creating a ‘V’ shape. -
Make the second impression:
Press down just as before. The goal is for the two footprints to mimic the diverging leaves of a mistletoe sprig. -
Lift and clean again:
Remove the foot carefully and perform a final cleanup of those tiny toes. -
Dry partially:
Let the prints sit undisturbed until the paint is visibly dry to the touch to prevent any accidental smudging.
Step 3: Finishing Touches
-
Tie the bow:
Take your red satin ribbon and tie a small, neat bow. Trim the tails at an angle so they look sharp and professional. -
Check placement:
Place the bow loosely at the point where the two heels meet to see how it sits. Adjust the bow size if it overwhelms the tiny feet. -
Adhere the bow:
Apply a small dot of craft glue or hot glue to the back of the bow’s knot. -
Secure the decoration:
Press the bow firmly onto the paper exactly where the heels converge. This acts as the stem binding the decorative ‘leaves’ together. -
Final drying:
Allow the glue to cure completely before displaying or framing your artwork. -
Optional embellishment:
If you want to add berries without using paint, you could glue small red buttons or pom-poms near the bow’s center.
Smudge Rescue
If a foot slides and smudges, don’t throw it away! Cut out the good prints closely and mount them onto a fresh piece of cardstock for a layered 3D effect.
This charming keepsake preserves a moment in time beautifully, creating a seasonal memory you will cherish for years to come
Name and Birth Stats Print With Tiny Prints
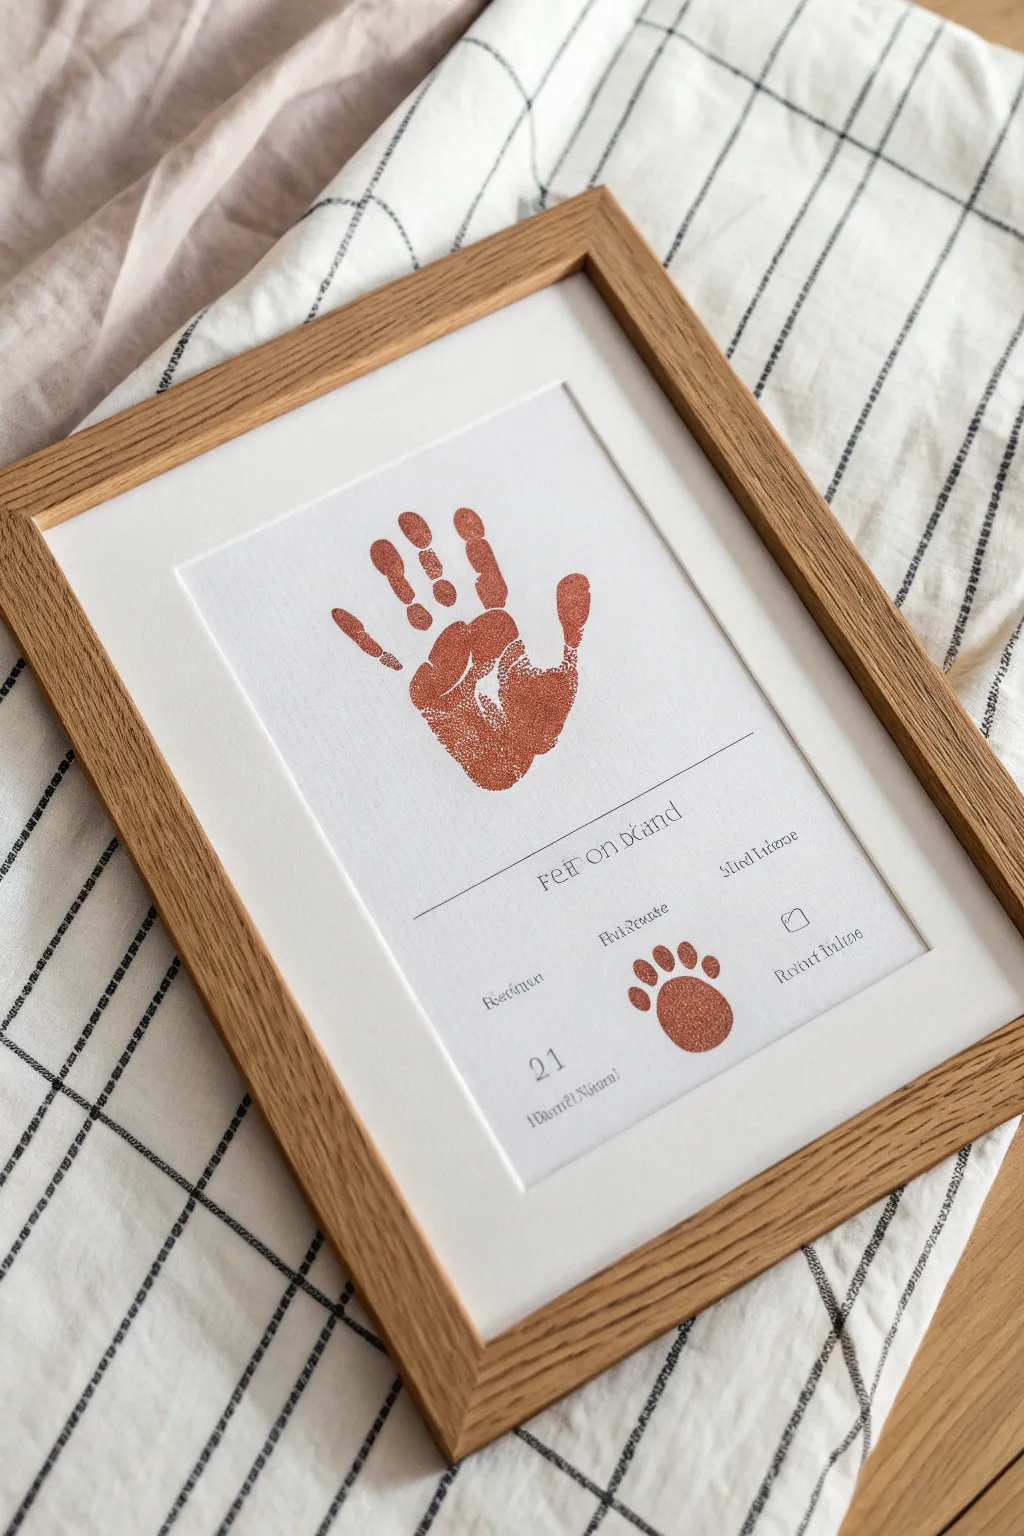
This elegant framed print combines a detailed rust-colored handprint with stylized birth statistics and a charming paw print graphic for a sophisticated nursery addition. The clean typography and textured print create a timeless memento that looks professionally designed but is entirely handmade.
Detailed Instructions
Materials
- Heavyweight white cardstock or watercolor paper (A4 or letter size)
- Rust or terracotta colored ink pad (baby-safe)
- Fine-tip black ink pen or calligraphy pen
- Computer and printer (optional for text)
- Ruler
- Pencil
- Eraser
- Natural wood frame (A4 or similar size)
- White mat board (to fit frame)
- Baby wipes
Step 1: Digital Layout & Text Preparation
-
Design the layout digitally:
If you are comfortable with design software, create a file measuring the size of your paper. Draw a horizontal line across the center to serve as a visual anchor between the handprint and the stats. -
Add the typography:
Choose a clean, serif font. Type the name just below the horizontal line. Below the name, arrange the birth weight, length, and date in three distinct columns. -
Print the base:
Load your heavyweight cardstock into the printer and print the text and line design. Ensure you leave ample empty space at the top for the handprint. -
Manual alternative:
If hand-lettering, lightly sketch a horizontal line with a pencil and ruler about two-thirds down the page. Use your fine-tip pen to ink over the line and carefully write the name and stats in your best script.
Smudge Rescue
If the hand slides and smears, scan the smudged print at high resolution. Use photo editing software to clean up the edges digitally, then print the clean version onto fresh textured paper.
Step 2: Capturing the Handprint
-
Prepare the baby-safe ink:
Open your rust or terracotta ink pad. Ensure the ink is evenly distributed on the pad surface; if it looks dry, add a few drops of re-inker. -
Ink the hand:
Gently press your baby’s palm onto the ink pad. Dab repeatedly to ensure the palm, fingers, and thumb are fully coated but not dripping with excess ink. -
Position the print:
Hover the hand over the empty space above your printed line. Aim to center it horizontally, keeping the fingers splayed slightly naturally. -
Press and lift:
Firmly press the hand onto the cardstock. Apply gentle pressure to each finger and the center of the palm. Lift the hand straight up to avoid smudging the fine details. -
Clean up immediately:
Use baby wipes to clean the ink off the baby’s hand right away before it dries or touches other surfaces.
Gilded Touch
For a luxe finish, use a glue pad instead of ink for the handprint. Once stamped, sprinkle gold embossing powder over the wet glue and heat set it for a raised, metallic golden print.
Step 3: Adding the Footprint Detail
-
Assess the footprint spot:
Locate the space between the middle birth stat column (often weight or length) and the date at the bottom. -
Ink the foot:
Using the same rust-colored ink, coat the baby’s foot. For this specific look, try to capture just the ball of the foot and toes to mimic the ‘paw print’ style seen in the inspiration, or do a full footprint if preferred. -
Stamp the foot:
Carefully press the inked foot into the designated spot among the text. Like the handprint, press firmly and lift straight up. -
Let it dry:
Allow the ink to dry completely for at least 30 minutes. Heavy cardstock absorbs ink well, but you don’t want to risk smearing it during framing.
Step 4: Framing the Artwork
-
Clean up sketch lines:
If you hand-drew the layout lines, use a quality eraser to remove any visible pencil marks once the ink is totally dry. -
Attach to mat:
Center your artwork behind the white mat opening. Use small pieces of artist tape on the back to secure the paper to the mat board. -
Clean the glass:
Wipe down the inside of the frame glass with a microfiber cloth to remove dust or fingerprints. -
Assemble the frame:
Place the glass, mat, and artwork into the wooden frame. Secure the backing clips tightly. -
Final inspection:
Check the front for any trapped dust specks before hanging.
This refined keepsake captures a moment in time with artistic flair, ready to be displayed on your nursery wall


Baby Holding the Framed Print Moment
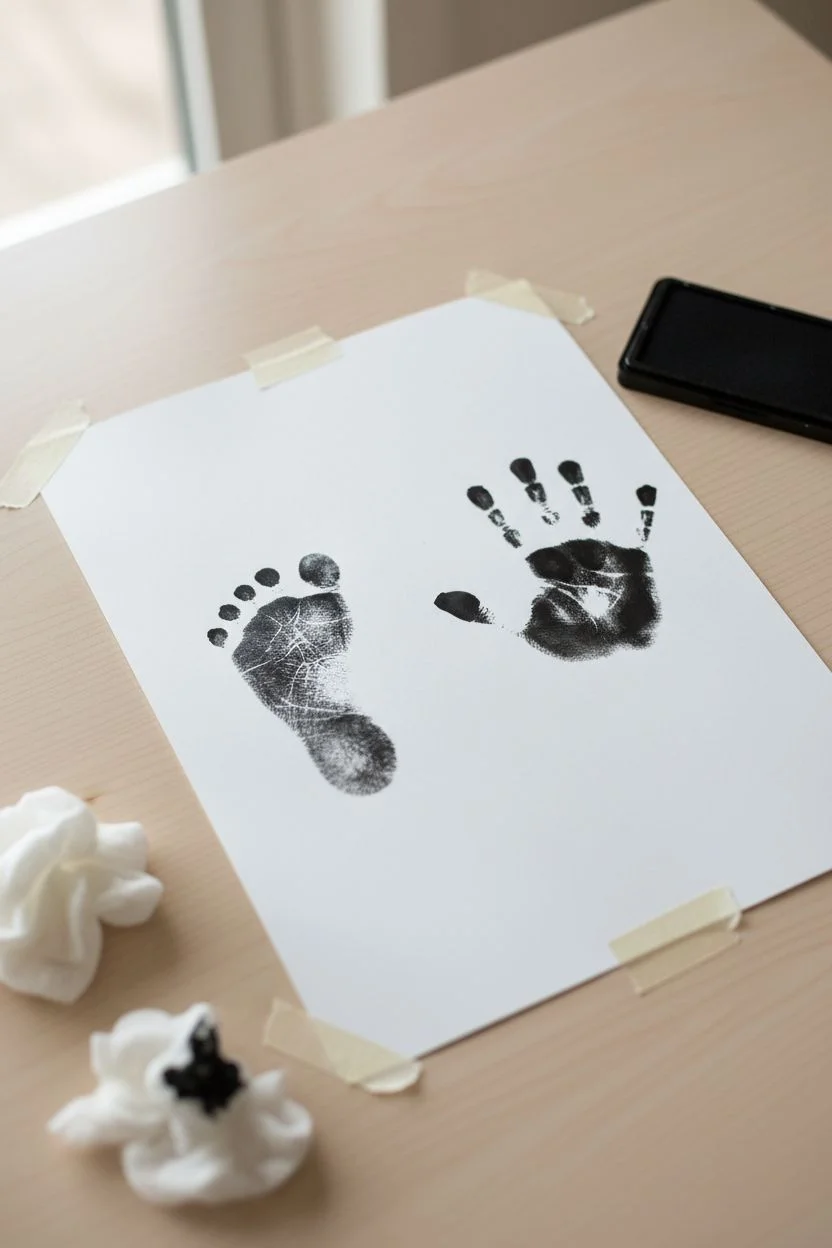
Capture the fleeting memory of tiny fingers and toes with this classic, minimalist keepsake. This project features high-contrast black ink prints on textured canvas or cardstock, encased in a simple wooden frame for a clean, modern aesthetic.
Step-by-Step
Materials
- Non-toxic, baby-safe black ink pad or black finger paint
- Heavyweight textured cardstock or unbleached canvas fabric
- Light wood box frame (8×10 or similar size)
- Scissors or fabric shears
- Baby wipes or damp cloth (for quick clean up)
- Flat, hard surface (clipboard or book)
- Mounting tape or acid-free adhesive
Step 1: Preparation
-
Gather your supplies:
Before involving the baby, ensure everything is within arm’s reach. Open your ink pad and have your cleaning wipes ready immediately next to your working area. -
Prepare the surface:
Cut your cardstock or fabric to a size slightly larger than your frame opening. If you are using loose fabric, tape it tautly onto a clipboard or hard book to prevent it from wrinkling during printing. -
Clean and dry:
Gently wipe the baby’s hand and foot to ensure they are free of lint or oils, then dry them completely. This helps the ink adhere evenly to the skin for a crisp print.
Pro Tip: Sleepy Baby
Try capturing the prints while the baby is asleep or very drowsy. A relaxed baby is less likely to clench their fists or kick, resulting in clearer prints and less mess.
Step 2: Taking the Footprint
-
Ink the foot:
Gently press the baby’s foot onto the black ink pad. Ensure full coverage from the heel to the tips of each toe. I like to inspect the foot visually to make sure no spots were missed. -
Position the print:
Bring the paper or board to the baby’s foot rather than pushing the foot onto the table. This gives you better control over placement. -
Press and roll:
Press the heel down firmly first, then roll the foot forward to press the toes down. Hold for just a second to transfer the ink. -
Lift carefully:
Peel the paper away from the foot quickly but smoothly to avoid smudging the ink. -
Immediate clean up:
Wipe the foot thoroughly with a baby wipe before moving on to the handprint phase.
Troubleshooting: Smudged Prints
If the print smears, don’t discard it immediately. Use a fine-tip black marker or pen to carefully fill in gaps or define edges once the ink is dry to salvage the artwork.
Step 3: Taking the Handprint
-
Ink the hand:
Ink the baby’s palm and fingers. This can be trickier as babies tend to clench their fists. Gently massage the palm to encourage it to open. -
The printing technique:
Guide the hand onto the paper next to the footprint. Press the palm down firmly and then gently press each finger individually to ensure they print clearly. -
The lift off:
Lift the hand straight up off the paper. Don’t worry if it’s not anatomically perfect; smudges add character. -
Dry thoroughly:
Set the print aside in a safe place to dry completely. If you used fabric ink or paint, this might take a few hours.
Step 4: Assembly & Framing
-
Trim to size:
Once the ink is fully dry, measure the opening of your wooden frame. Mark these dimensions lightly on the back of your print. -
Cut the print:
Using sharp scissors or a paper cutter, trim the print down to the exact size of the frame backing. -
Secure the print:
If using a fabric piece, you may need to secure it to the frame’s backing board using double-sided mounting tape or spray adhesive to keep it flat. -
Insert into frame:
Place the glass (if using) and the print into the light wood frame. Secure the back clips firmly. -
Final inspection:
Check the front for any dust or lint trapped under the glass and wipe the frame down for a polished finish.
Now you have a beautiful, tangible reminder of how small they once were to hang on your wall
Watercolor Wash Behind Crisp Ink Prints

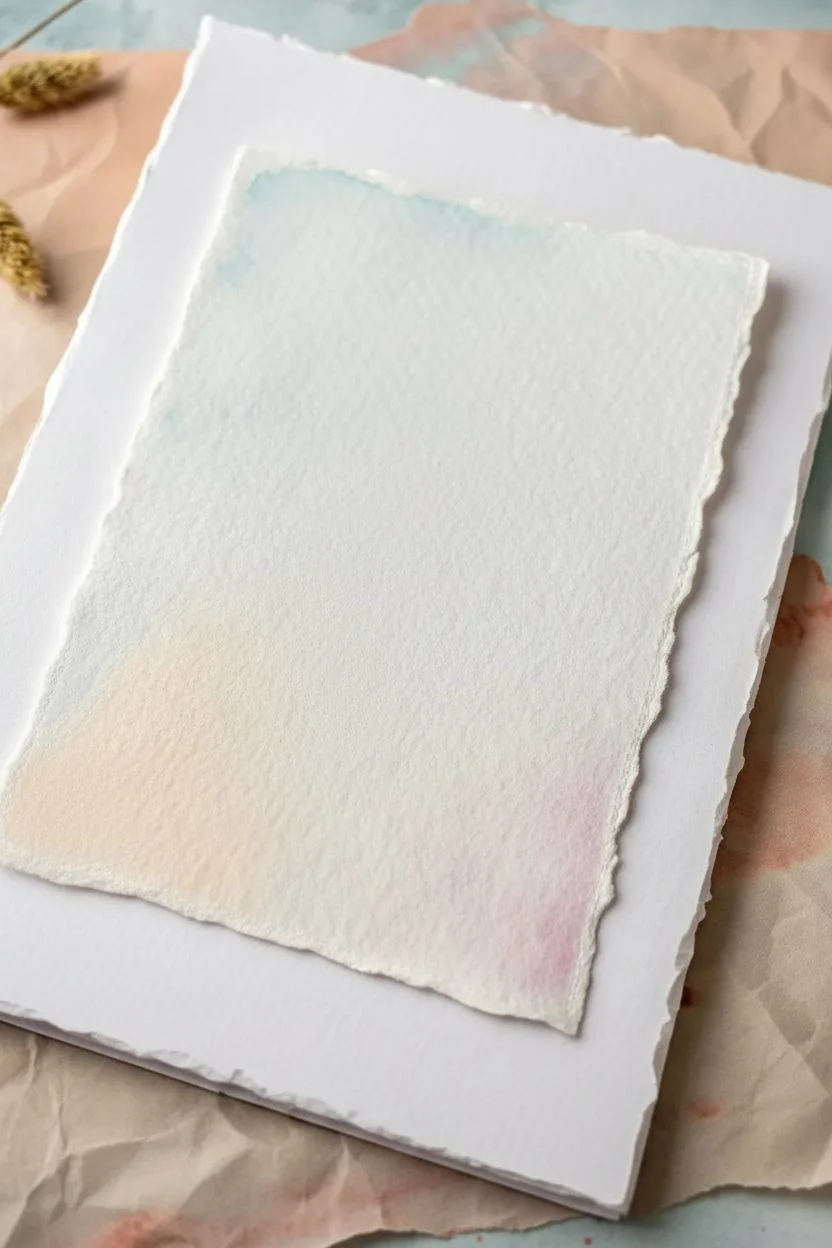
Pair the softness of pastel watercolors with the sharp, crisp detail of black ink to create a stunning keepsake. This technique uses high-quality paper and a gentle wash to let the tiny lines of your baby’s footprint take center stage.
Detailed Instructions
Materials
- High-grade cold press watercolor paper (deckled edge optional)
- Black ink pad (baby-safe and water-based)
- Watercolor paints (pastel blue, pink, and peach)
- Medium soft round watercolor brush
- Clean water cup
- Paper towels
- Piece of scrap paper for testing
- Painter’s tape or washi tape
- Spray bottle with water (optional)
Step 1: Preparing the Canvas
-
Select your paper:
Choose a thick, textured watercolor paper. The deckled (torn) edge shown in the image adds a beautiful, handmade vintage feel, so tear the edges gently against a ruler if your paper isn’t precut this way. -
Wet the background:
Dip your clean brush into water and lightly dampen the center area of the paper where you plan to paint. You want the paper to be glistening but not soaking wet to encourage soft blending. -
Mix the first hue:
On your palette, dilute a small amount of watercolor paint with plenty of water. I usually start with the lightest color, like a whisper-thin pastel blue, aiming for a very transparent wash. -
Apply the top wash:
Touch the brush to the upper section of your damp paper area. Let the blue pigment bloom slightly into the wet surface, creating an irregular, cloud-like shape rather than a hard rectangle. -
Blend the second tone:
Clean your brush thoroughly. Pick up a diluted peach or soft pink shade and apply it to the bottom section of your painted area, directly opposite the blue. -
Create the gradient:
With a damp, clean brush, gently nudge the edges of the pink and blue sections toward each other in the middle. Do not overmix; simply allow them to touch and bleed together naturally to avoid muddying the colors. -
Soften the edges:
Inspect the outer perimeter of your painted area. If any edges look too harsh, use a damp brush to fade them out into the white of the paper, keeping the overall shape organic. -
Let it dry completely:
This is crucial. The paper must be completely bone dry before stamping, or the ink will bleed into the fibers. You can speed this up with a hair dryer on a low, cool setting if needed.
Smudged Print?
If the print smears, don’t toss it! Use a fine black pen to turn the smudge into a shadow or add doodle elements to disguise it. Or, simply re-wet the paper and wash the ink away for an abstract look.
Step 2: Capturing the Print
-
Prepare the ink:
Open your black ink pad. For the best detail, use a firm ink pad rather than a spongy one, as it coats the skin more evenly without globs. -
Ink the foot:
Gently press the baby’s clean, dry foot onto the ink pad. Ensure coverage on every toe and the arch, but avoid pressing so hard that ink pools in the creases. -
Test the impression:
Make a quick test stamp on a scrap piece of paper. This removes excess ink and ensures you have the right amount of pressure before committing to the final artwork. -
Position the foot:
Hover the inked foot over the dried watercolor wash. Aim to center the footprint so the heel sits within the peach tone and the toes reach up into the blue area. -
Execute the stamp:
Press the foot straight down onto the paper. Use your free hand to gently press each individual toe down to ensure those tiny prints transfer clearly. -
Lift cleanly:
Lift the foot straight up and off the paper in one smooth motion. Do not wiggle or drag the foot, as this will smudge the crisp lines. -
Clean up immediately:
Use a baby wipe or warm soapy water to clean the baby’s foot right away, preventing incidental black footprints elsewhere in your workspace. -
Touch up if vital:
If a toe missed the paper entirely, you can use a fine-tip black pen to add a tiny suggestion of a print, but I prefer to leave imperfections as part of the handmade charm. -
Flatten the artwork:
Watercolor paper often buckles slightly after being wet. Once the ink is fully dry, place the artwork under a heavy book overnight to flatten it out perfectly for framing.
Metallic Accent
Once the black ink is totally dry, trace the very outer edge of the footprint with a gold gel pen or fine metallic paint. It adds a subtle, luxurious halo that catches the light beautifully.
Frame your delicate masterpiece in a simple floating frame to show off those lovely deckled edges
Pattern Repeat With Mini Handprints and Footprints
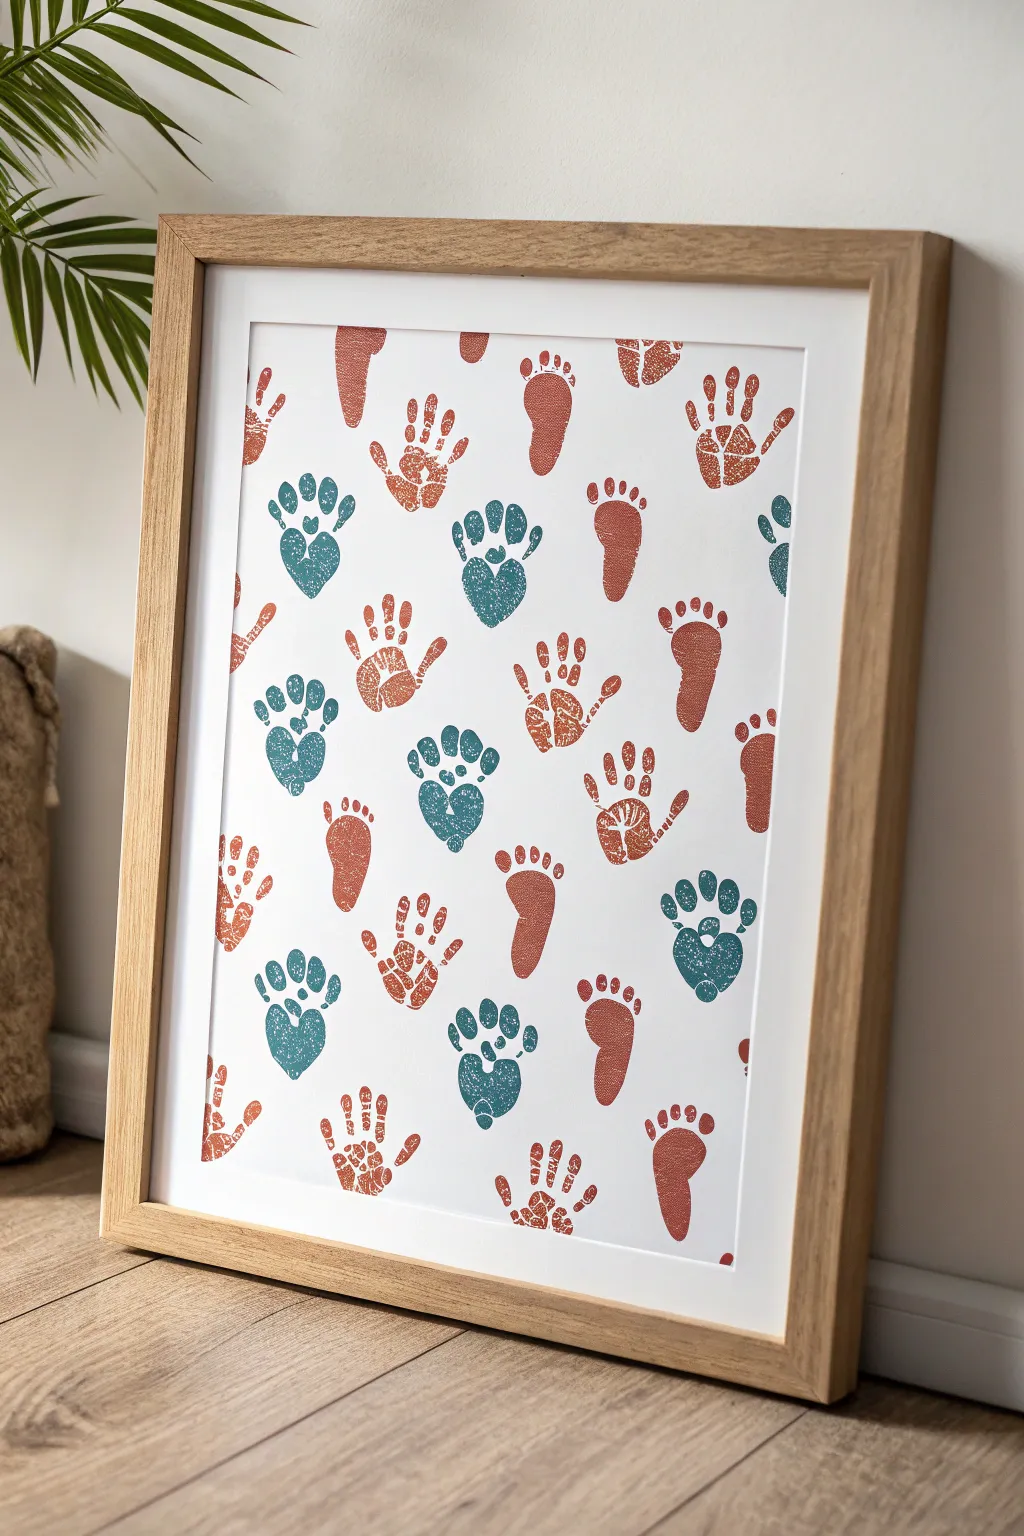
Transform precious little prints into a modern, repeating pattern that doubles as sophisticated wall art. By alternating handprints and footprints in a soothing palette of terracotta and slate blue, you can create a structured design that feels both playful and polished.
Step-by-Step Tutorial
Materials
- High-quality white cardstock or art paper (A3 or 11×17 recommended)
- Baby-safe ink pads or non-toxic acrylic paint
- Colors: Terracotta/Rust and Slate Blue/Teal
- Small foam roller or sponge wedge (if using paint)
- Pencil and ruler
- Eraser
- Scrap paper for testing
- Baby wipes (essential for quick cleanup)
- Wooden frame (light oak finish matches the example perfectly)
Step 1: Planning the Grid
-
Measure your paper:
Begin by laying out your large white cardstock on a flat surface. Measure the total width and height to determine your spacing. -
Mark a light grid:
Using a pencil and ruler, very lightly draw a grid to guide your placement. For the look in the photo, you will want staggered rows. Mark horizontal lines about 3-4 inches apart, depending on the size of your baby’s hands and feet. -
Mark center points:
On your horizontal lines, make small tick marks where each print should be centered. Stagger them so the print on the second line sits between the two prints on the first line.
Step 2: Color Strategy
-
Design your pattern:
Decide on your repeating sequence before opening any ink. The example follows a specific rhythm: a rust handprint, a blue heart-shaped paw print, a rust footprint, and so on. -
Prepare your palette:
Squeeze out your terracotta and slate blue paints onto a palette or open your ink pads. If mixing custom colors, ensure you mix enough to cover the whole sheet to maintain consistency. -
Practice first:
Do a few test prints on scrap paper. This helps you gauge how much pressure is needed and allows the baby to get used to the sensation of the cold ink or paint.
Stamp Smart
Work while baby is asleep or in a high chair for better control. If doing the ‘paw print’ shape, print the feet separately on paper, cut them out, and arrange them if live stamping is too hard.
Step 3: Printing the Pattern
-
Start with the Rust Hands:
Let’s work one color and limb at a time to minimize mess. Coat the baby’s hand in terracotta ink. -
Stamp the hands:
Press the hand firmly onto your designated pencil marks for the rust handprints. Hold for a second to ensure a clear transfer, then lift straight up. -
Clean and switch:
Thoroughly wipe the hand clean. Now, coat the baby’s foot in the terracotta color. -
Stamp the feet:
Stamp the footprints in their designated spots on the grid. Notice how some feet in the example are upright and perfectly vertical. -
Create the ‘paw’ prints:
For the teal elements that look like hearts or animal paws, you’ll use a special technique. Coat the foot in slate blue. -
Shape the heart:
Press the left foot down, and then overlap the heel slightly with the right foot at an angle to create the bottom of the heart shape. -
Add the toes:
The toes naturally form the top ‘crown’ of the paw-print shape. If the definition is lost, you can use a fingerprint to accentuate the toe pads. -
Fill the regular blue prints:
If your pattern includes standalone blue handprints or footprints, add those now to fill the remaining empty spots on your grid.
Digitize It
Capture one perfect handprint and one footprint, scan them at high resolution, and use software like Photoshop or Canva to arrange them into a perfect digital grid pattern for printing.
Step 4: Finishing Touches
-
Check for gaps:
Look over the composition. If a print is too light, you can carefully touch it up with a small brush, but I usually prefer leaving the natural texture of the skin visible. -
Erase guidelines:
Allow the artwork to dry completely—give it at least an hour. Once dry, gently erase any visible pencil marks from your initial grid. -
Framing:
Place the artwork inside a light wood or oak-finish frame. Using a white mount (mat board) can help elevate the look and keep the glass from pressing on the ink.
Now you have a stylish, modern piece of art that captures a fleeting moment in time without compromising your decor style
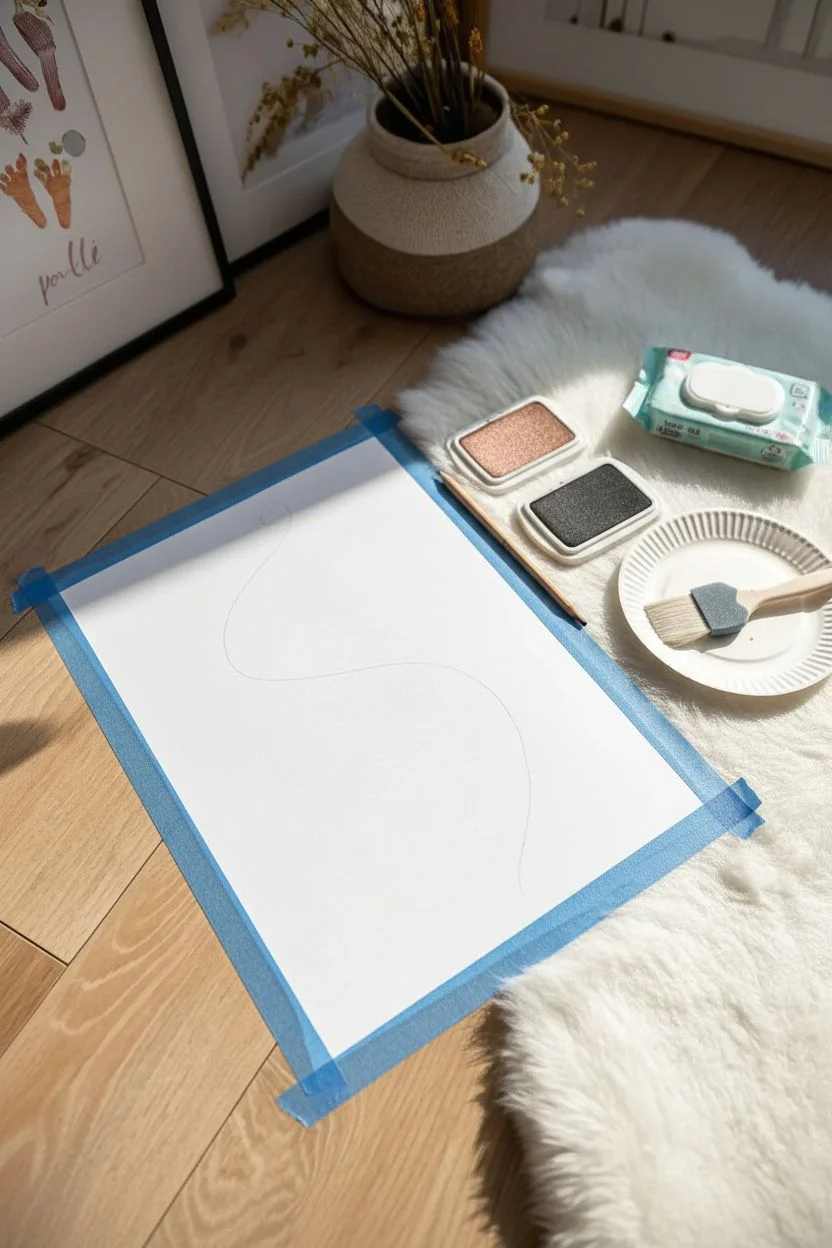
Ombré Footprint Trail as a Growth Story
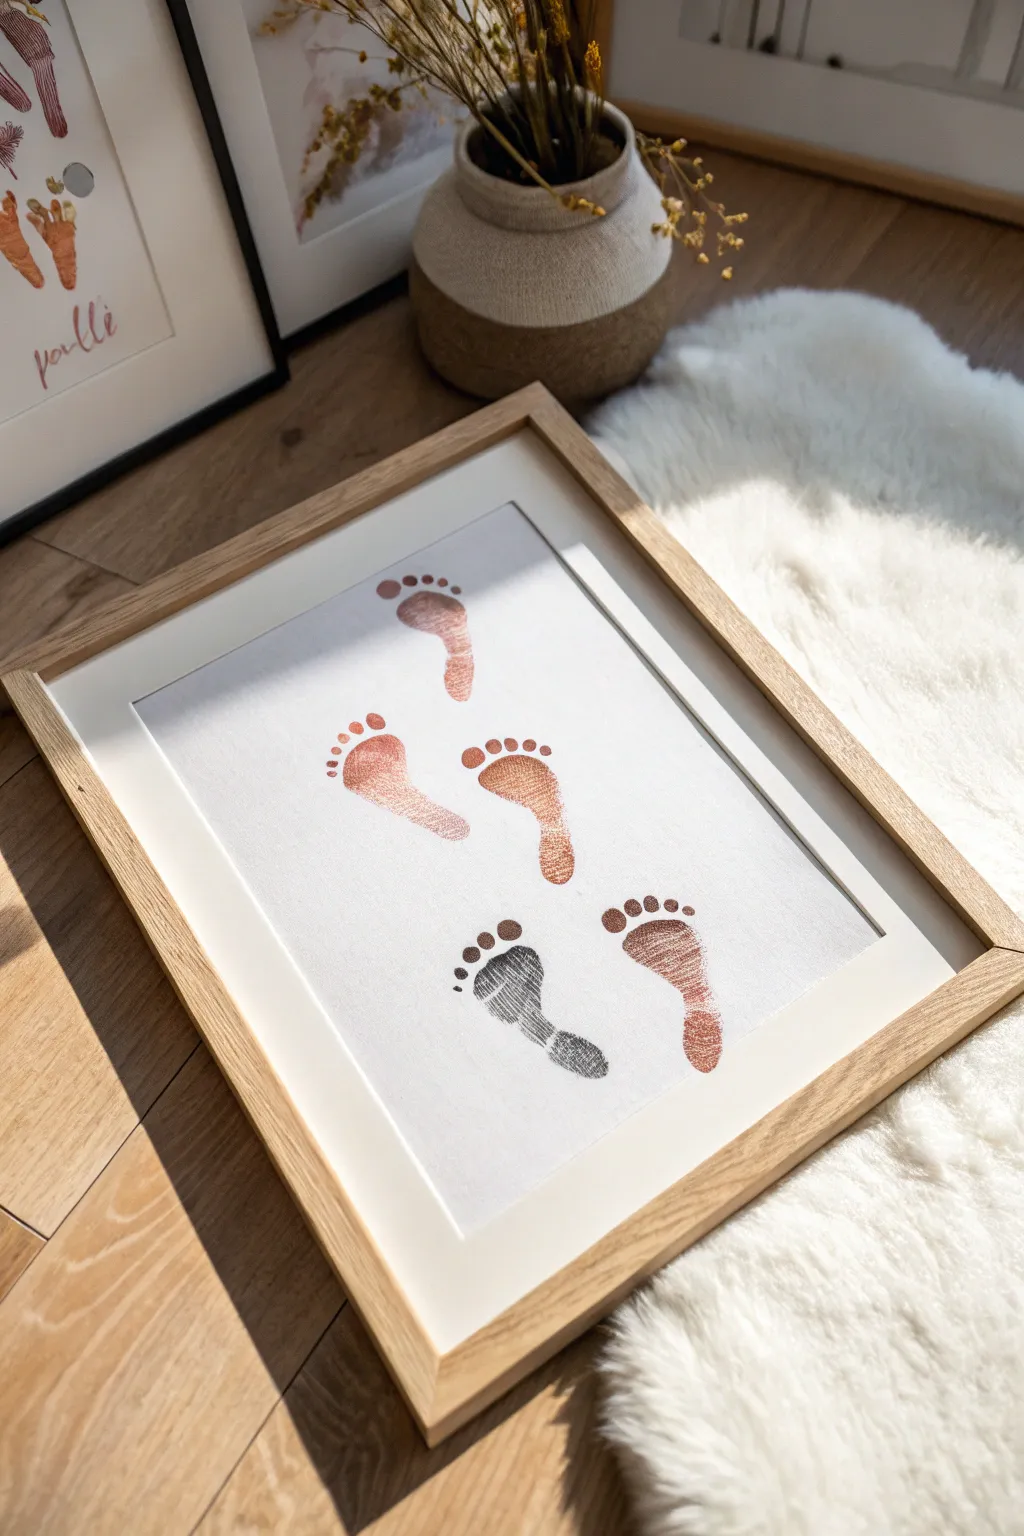
Capture the fleeting nature of your little one’s growth with this elegant footprint trail. By arranging prints in an ascending curve and using subtle color shifts, you create a piece that feels both organic and modern.
How-To Guide
Materials
- Heavyweight white cardstock or watercolor paper (A3 or A4 depending on frame size)
- Non-toxic ink pads or water-based acrylic paints
- Colors: Rose gold/copper, bronze, and charcoal grey
- Baby wipes (essential!)
- Light pencil
- Large wooden frame with matting
- Soft foam brush (if using paint)
- Paper plate or palette
Step 1: Preparation & Setup
-
Prepare the surface:
Lay your cardstock on a hard, flat surface. Tape the corners down with gentle painter’s tape if you’re worried about sliding, as a wiggly baby requires a stable canvas. -
Plan the arc:
Visualize a gentle ‘S’ curve or an ascending path. Lightly sketch this path with a pencil if you need a guide, but keep the line extremely faint so it can be erased later. -
Ink selection:
Arrange your ink pads or paints in order of intensity. The design in the photo transitions from a lighter rose gold at the top down to a dark charcoal at the bottom, creating a visual weight.
Step 2: Printing the Trail
-
Start at the top:
We will work from top to bottom to avoid smudging previous prints with your arm. Select the lightest color first (the rose gold/copper shade). -
Apply the ink:
Gently press the baby’s foot onto the ink pad. If using paint, apply a thin, even layer to the sole of the foot using a foam brush. Ensure the toes are well-covered but not dripping. -
The first print:
Position the foot for the highest print in your trail. Press the heel down first, then roll gently toward the toes. Lift straight up to avoid smearing. -
Clean and switch:
This is the most crucial step: thoroughly clean the foot with baby wipes and dry it completely before moving to the next color. -
Second print placement:
Using the same rose gold or a slightly darker copper tone, place the second print slightly lower and to the left of the first, angling it naturally as if walking. -
Transitioning color:
For the third print (middle), switch to a bronze tone. This bridges the gap between the light start and dark finish. -
Applying the middle print:
Stamp this middle footprint centrally, continuing the gentle curve of your imaginary path. -
Deepening the tone:
Mix a tiny dot of charcoal into your bronze paint, or switch to a dark metallic brown ink pad. Apply this to the foot for the fourth print. -
Fourth print alignment:
Place this print lower and slightly right, mimicking the natural stride of walking steps. -
The final anchor:
For the final, bottom-most footprint, use the charcoal grey ink. This dark anchor print provides visual stability to the composition. -
Stamping the final step:
Press firmly for this last step. I find holding the ankle steady with one hand while pressing the toes with the other yields the clearest detail here.
Smudge Rescue
If a toe smudges, don’t scrap it! Wait for it to dry, then use a white gel pen or small brush with white acrylic to carefully touch up the edges and redefine the shape.
Step 3: Finishing Touches
-
Drying time:
Allow the prints to dry completely. For metallic inks, this might take 1-2 hours to ensure they don’t smear against the glass later. -
Erase guides:
If you drew a pencil guide earlier, gently erase it now, being careful not to touch the ink itself. -
Framing:
Place the artwork behind a white mat. The mat adds a professional gallery feel and keeps the glass from pressing directly onto the textured prints. -
Assembly:
Secure the backing of your wooden frame. A light oak or natural wood frame complements the earthy tones of the footprints perfectly.
Date It
Use a fine-tip metallic pen to write the date or the child’s age in months very small beneath the bottom-most footprint for a subtle typographic detail.
Hang this growing path in a nursery or hallway to remind you of just how small those steps once were


Have a question or want to share your own experience? I'd love to hear from you in the comments below!