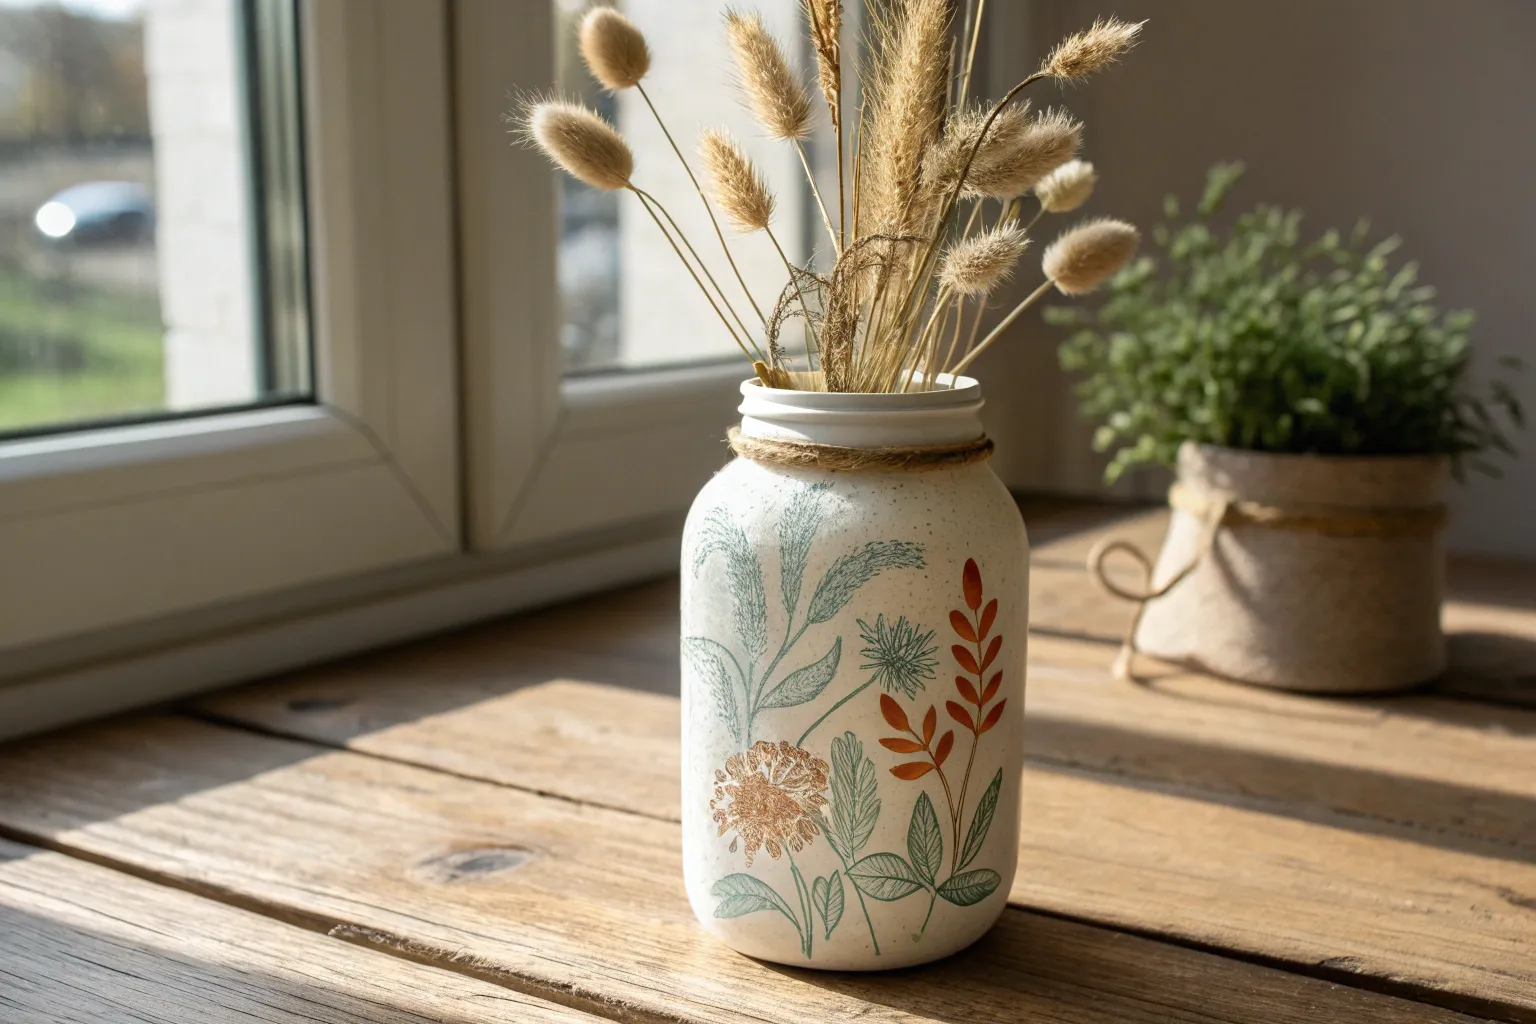
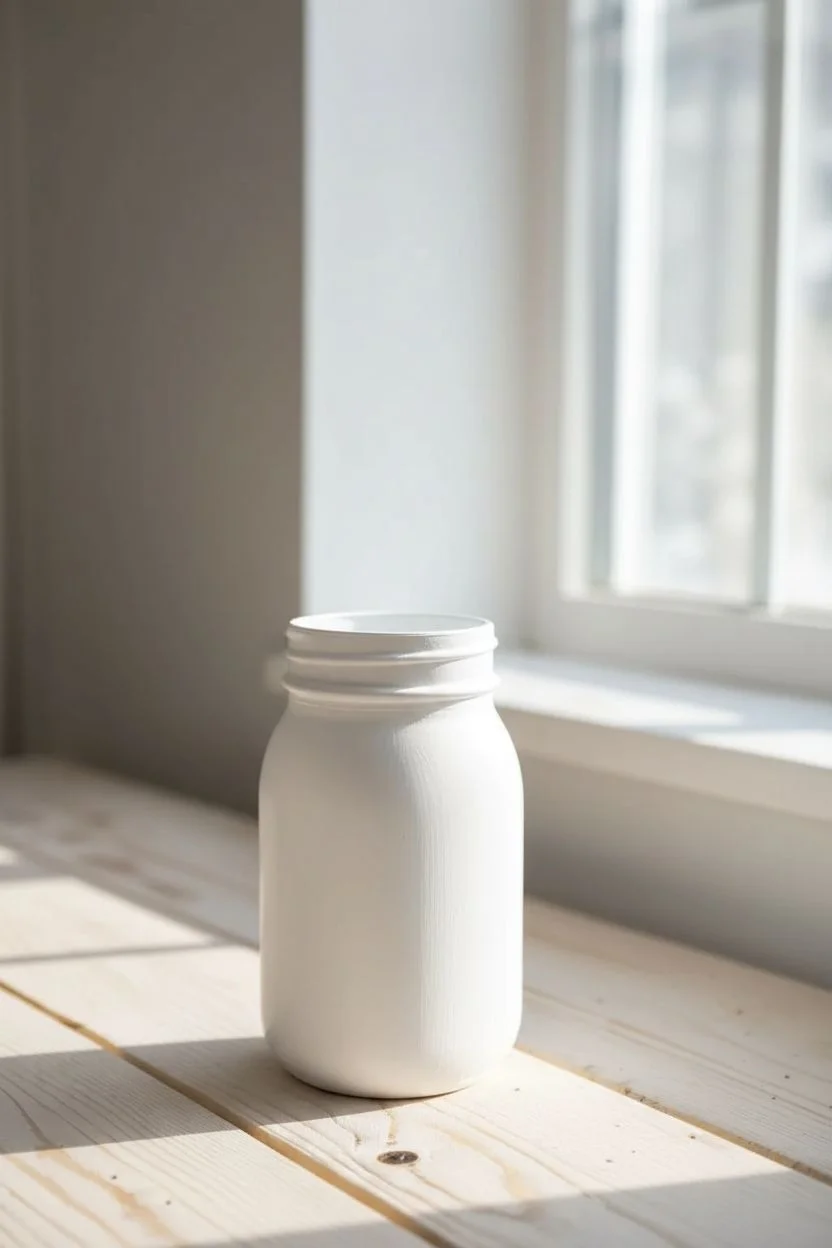
Transforming ordinary glass vessels into stunning home decor is one of the most satisfying ways to give your recycle bin a creative makeover. Whether you want to organize your desk or create a glowing centerpiece, these jar painting ideas will help you see standard containers in a whole new light.
The Classic Distressed Farmhouse Look
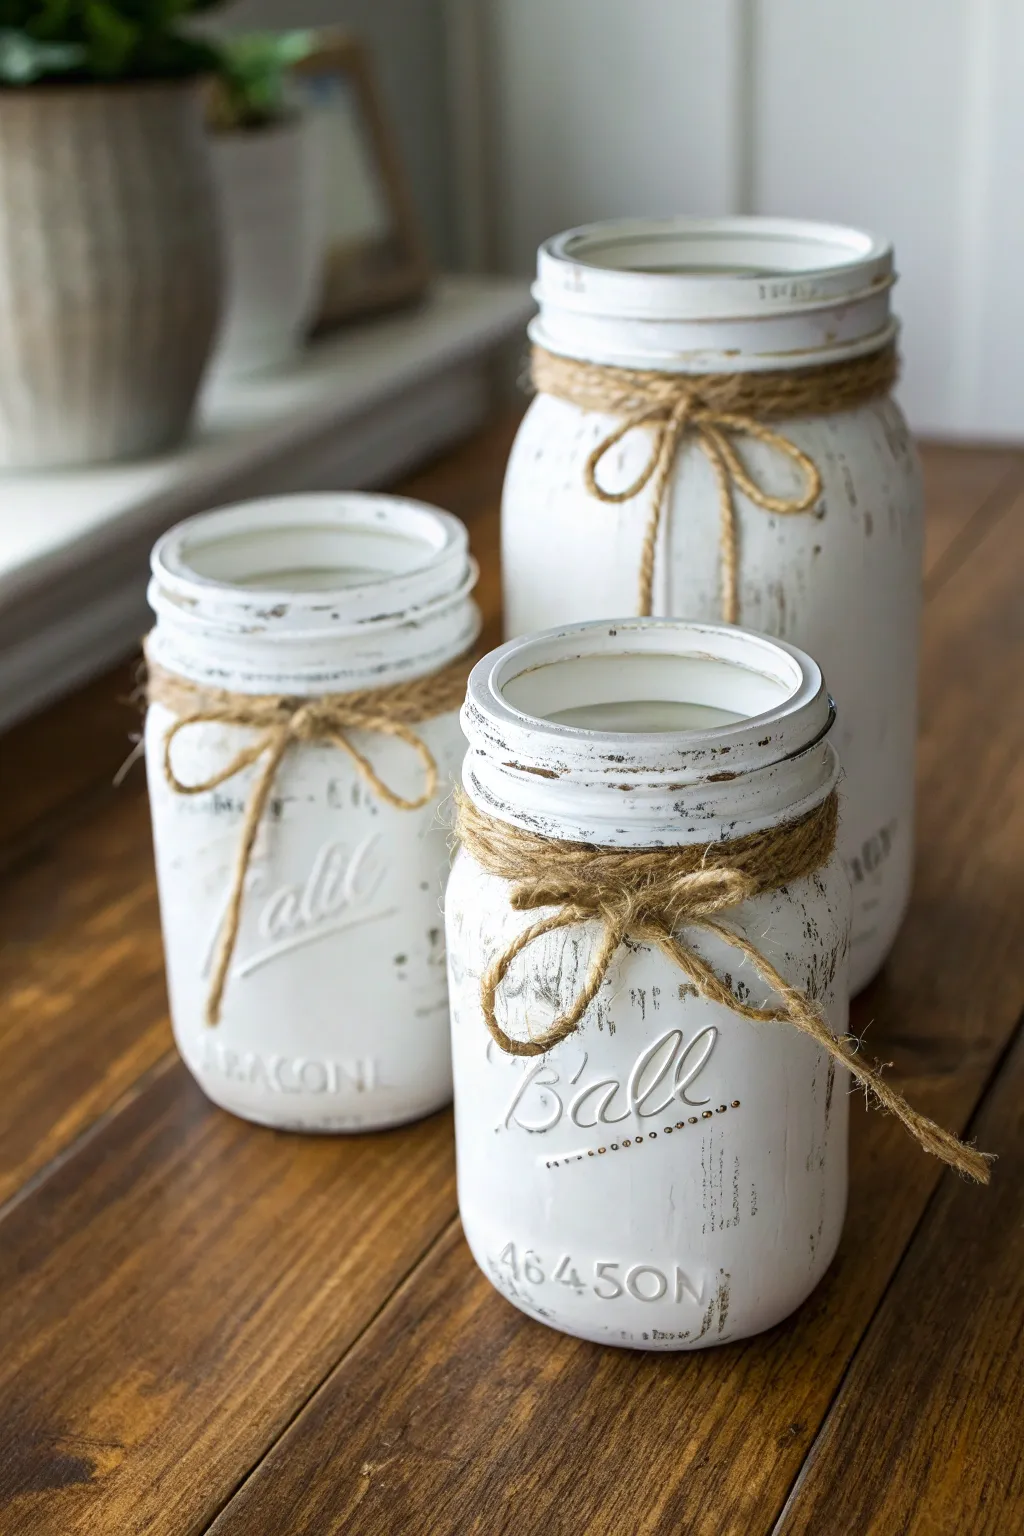
Capture the timeless charm of vintage farmhouse decor with these beautifully distressed mason jars. Using chalk paint and simple sanding techniques, you will highlight the iconic embossed lettering and create a weathered, matte finish that looks lovely on any mantle.
Step-by-Step Guide
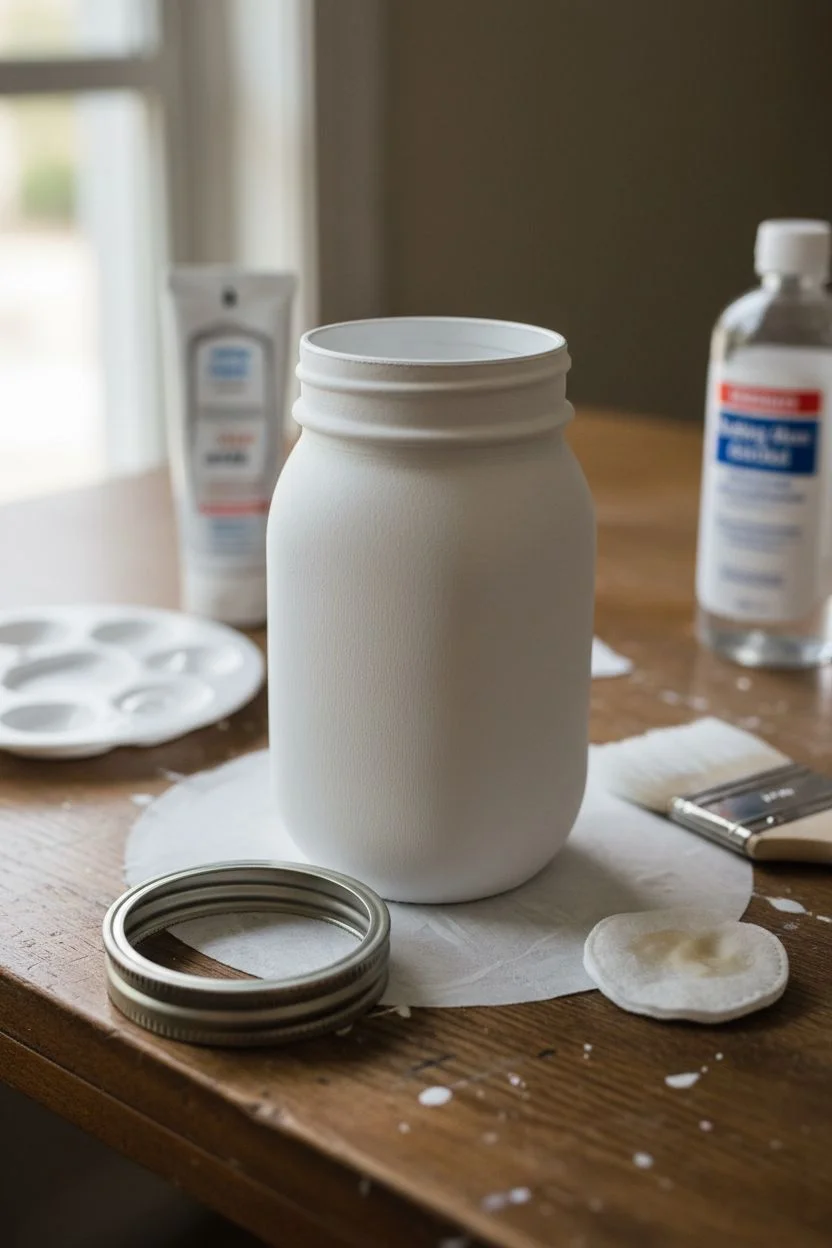
Materials
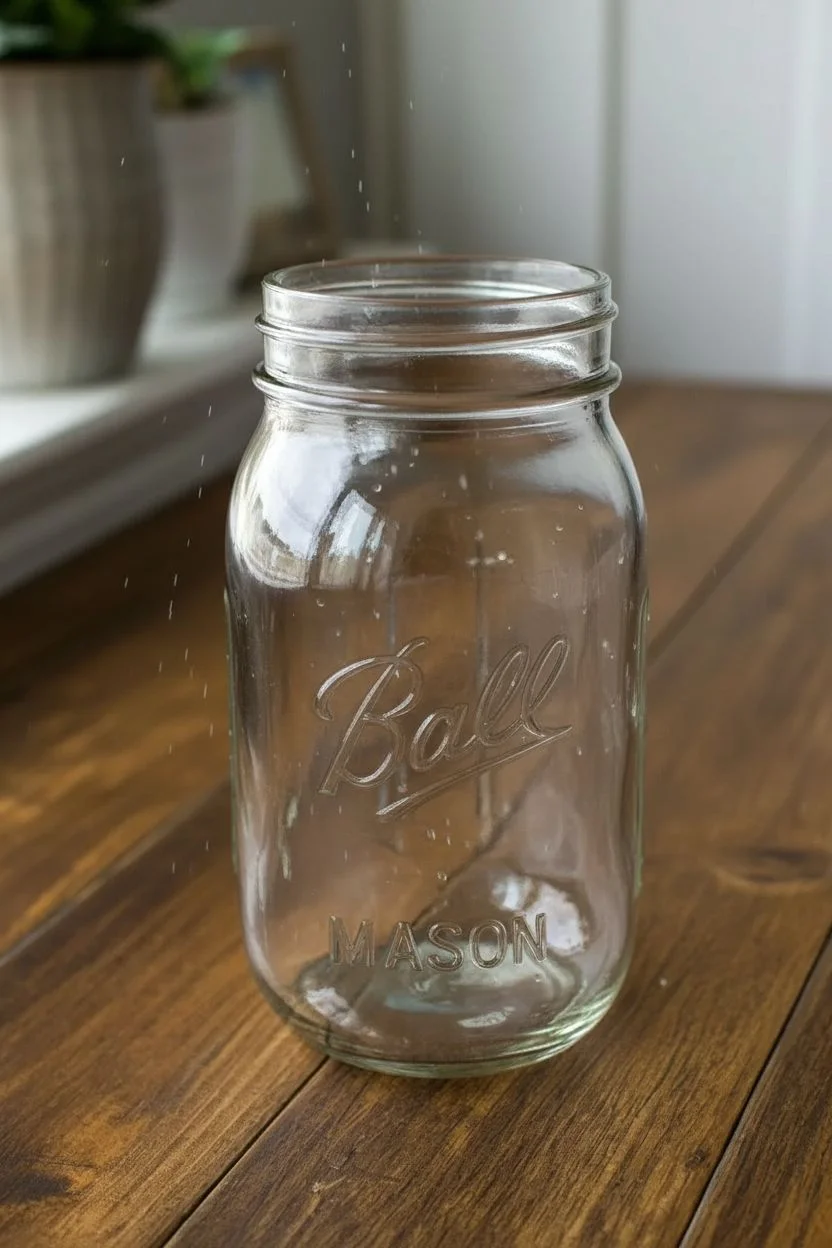
- Glass mason jars (clean and dry)
- Rubbing alcohol
- Cotton pads or paper towel
- White chalk paint (matte finish)
- Flat synthetic paintbrush (1-inch width)
- 100 to 120-grit sandpaper
- Jute twine
- Scissors
Step 1: Preparation
-
Deep clean the glass:
Wash your mason jars thoroughly with warm soapy water to remove any dust or sticker residue. -
Degrease the surface:
Pour a small amount of rubbing alcohol onto a cotton pad and wipe down the entire exterior of each jar. -
Air dry:
Allow the alcohol to evaporate completely, ensuring the glass is perfectly clean and free of oils, which guarantees the paint will stick.
Peeling Paint?
If the paint peels off in rubbery chunks instead of sanding into dust, it hasn’t cured long enough. Stop immediately to let it dry overnight, then try sanding again with a lighter touch.
Step 2: Painting
-
Load the brush:
Dip your flat synthetic brush into the white chalk paint; you want a moderate amount of paint, not dripping. -
Apply the first coat:
Paint the jar using vertical strokes from the rim down to the base to minimize brush marks. -
Cover the rim:
Don’t forget to paint the threaded rim area, but keep the layer thin here so the lid can still screw on if needed later. -
First drying phase:
Let this first coat dry for about an hour; it may look streaky or translucent, but that is normal. -
Apply the second coat:
Paint a second layer over the jar using the same vertical motion to build up full opacity. -
Touch up:
Inspect the jar for any transparent spots and dab a little extra paint there if needed. -
Full cure:
Let the jars dry completely for at least 24 hours; I find this waiting period crucial because if the paint is soft, it will peel rather than distress nicely.
Make it Functional
Turn this decor into a functional bathroom accessory by screwing a rust-proof soap pump dispenser lid onto the threaded top. It adds instant farmhouse utility to your sink area.
Step 3: Distressing and Finishing
-
Target the lettering:
Take a small piece of 100-grit sandpaper and gently sand over the raised ‘Ball’ or ‘Mason’ logo until the clear glass shows through. -
Distress the threads:
Run your sandpaper around the screw threads at the top of the jar to simulate wear from a lid. -
Add general wear:
Lightly scuff random areas on the smooth body of the jar to create a naturally aged appearance. -
Clean up dust:
Wipe the jar with a dry cloth or tack cloth to remove all chalk dust created by the sanding. -
Measure the twine:
Cut a piece of jute twine approximately 24 inches long. -
Wrap the neck:
Wrap the twine around the neck of the jar two or three times, keeping the strands relatively close together. -
Tie the knot:
Secure the twine with a simple double knot at the front center of the jar. -
Form the bow:
Tie a standard bow, pulling the loops tight so they sit perky and horizontal. -
Trim the tails:
Snip the ends of the twine bow at an angle so they hang down slightly but don’t obscure the wording.
Place your finished jars on a wooden surface or fill them with stems to enjoy your handmade slice of country charm.


Minimalist Daisy Patterns
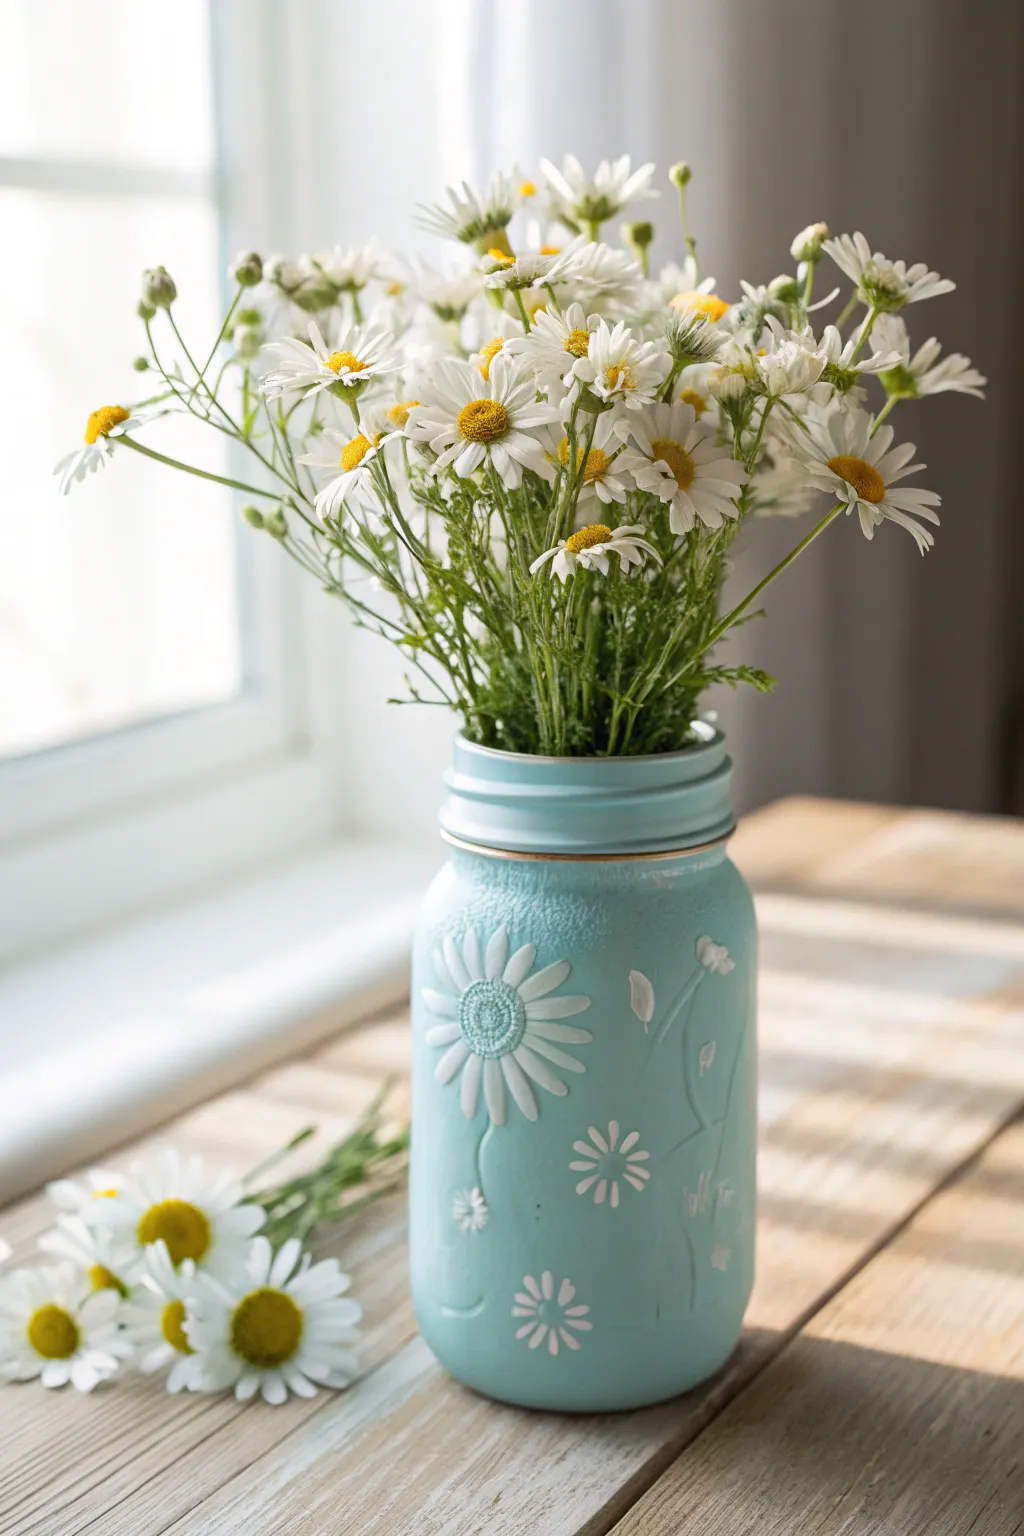
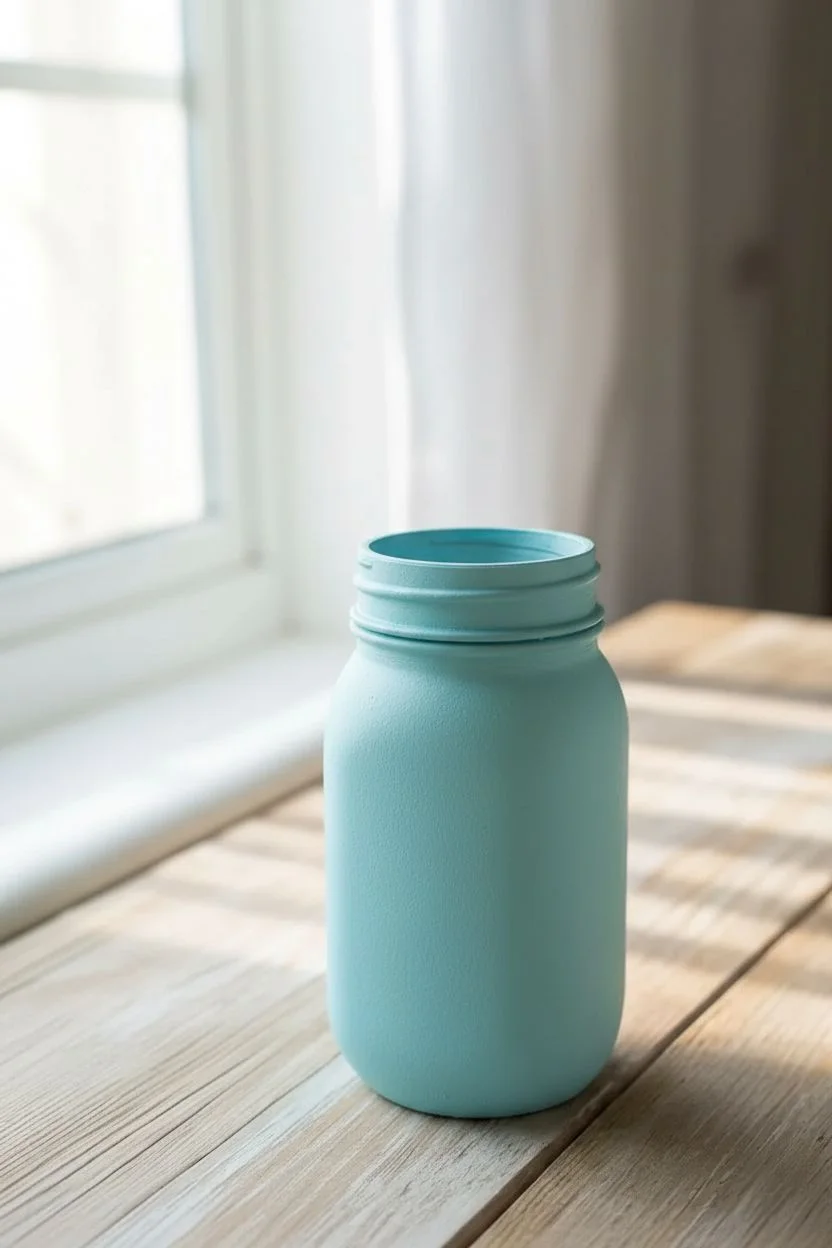
Transform a plain glass jar into a tactile piece of art featuring raised floral designs against a soothing matte blue background. This project uses texture paste and chalk paint to mimic the look of embossed ceramics for a stunning minimalist vase.
Detailed Instructions
Materials
- Quart-sized mason jar (standard mouth)
- Rubbing alcohol and cotton pad
- Chalk finish acrylic paint (Robin’s Egg Blue or Duck Egg Blue)
- White acrylic paint
- Modeling paste or texture paste
- Daisy stencil (mylar)
- Small palette knife
- Soft flat paintbrush (1-inch)
- Fine liner detail brush
- Stylus tool or toothpick
- Matte spray sealer
Step 1: Base Coat Application
-
Clean the glass:
Wipe the entire exterior of the mason jar with rubbing alcohol on a cotton pad to remove oils and fingerprints, ensuring the paint adheres properly. -
First layer of blue:
Using your soft flat brush, apply a thin, even coat of the Robin’s Egg Blue chalk paint. Don’t worry if it looks streaky; this is just the primer layer. -
Dry time:
Allow the first coat to dry for at least one hour feels dry to the touch. -
Opaque coverage:
Apply a second, slightly thicker coat of the blue paint. I like to use a dabbing or stippling motion with the brush tip for this layer to create an eggshell-like texture rather than smooth strokes. -
Paint the rim:
Carefully paint the threaded rim of the jar with the same blue shade so the metal doesn’t show through. -
Final base drying:
Let the jar sit overnight or for at least 4 hours to ensure the base is hard enough to support the texture paste.
Clean Lines Pro-Tip
Spray the back of your stencil with a temporary repositionable adhesive spray. This sticks the stencil tight to the glass curve and prevents the paste from bleeding underneath.
Step 2: Creating the 3D Daisy
-
Position the stencil:
Place your daisy stencil on the smooth front face of the jar. Secure it gently with painter’s tape, ensuring the stencil lies flat against the curve. -
Prepare the paste:
Scoop a small amount of modeling paste onto a palette. Mix in a drop of white acrylic paint to ensure the paste is bright white rather than translucent. -
Apply the relief:
Using the back of your palette knife, spread the white paste over the stencil openings like you are buttering toast. Aim for a thickness of about 1/8 inch. -
Reveal the flower:
Immediately lift the stencil straight up and away from the glass. Do not let the paste dry with the stencil on, or it will crack when removed. -
Refine the edges:
If any paste seeped under the stencil, use a damp fine brush or a toothpick to gently wipe away the excess while it is still wet. -
Texturing the center:
While the paste is wet, use a stylus or toothpick to gently poke a grid or dot pattern into the round center of the daisy to mimic the pollen texture shown in the photo. -
Paste drying time:
Set the jar aside in a safe place. Modeling paste is thick and will need 6 to 12 hours to cure completely hard.
Step 3: Details & Finish
-
Painting small blooms:
Dip a small round brush into plain white acrylic paint. Paint simple asterisk-shaped flowers scattered near the bottom of the jar to balance the large daisy. -
Adding stems:
Thin down your white paint slightly with water. Use a fine liner brush to paint delicate, wispy stems and leaves connecting the flowers. -
Create a translucent look:
For the faint background details seen in the artwork, wipe your brush so it is ‘dry’ and lightly sketch faint leaves that barely show up against the blue. -
Highlighting the center:
Once the textured flower is bone dry, dry-brush a tiny amount of pale blue or grey over the dotted center to accentuate the depth of the grid pattern. -
Sealing the work:
Take the jar outdoors and apply a clear matte spray sealer. This protects the chalk paint from chipping and keeps the texture paste firm. -
Final cure:
Let the sealer dry according to the can’s instructions before arranging your fresh daisies inside.
Troubleshooting Texture
If your modeling paste peaks too much when lifting the stencil, dip your finger in water and very gently tap the petals to smooth them down before the paste begins to set.
Fill your new textured masterpiece with fresh blooms and enjoy the charming cottage vibe it adds to your space


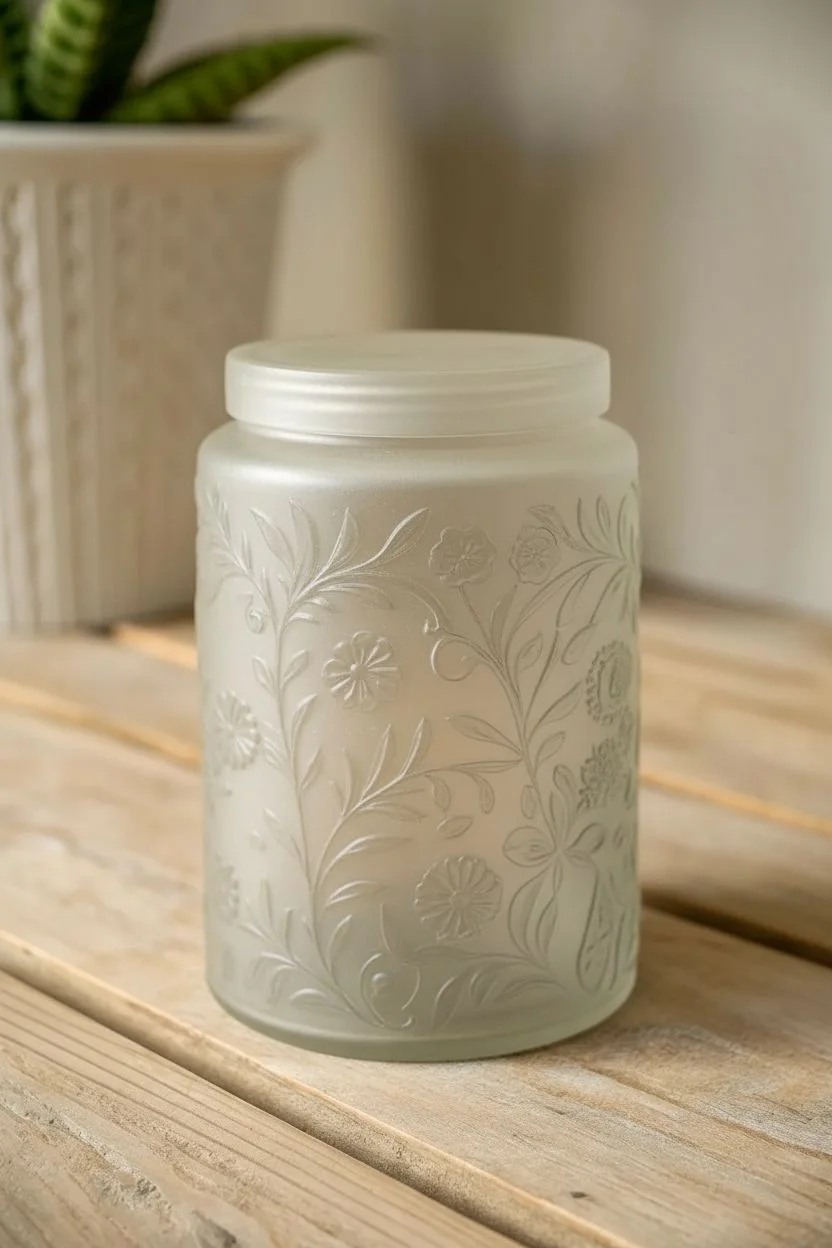
Translucent Sea Glass Simulation
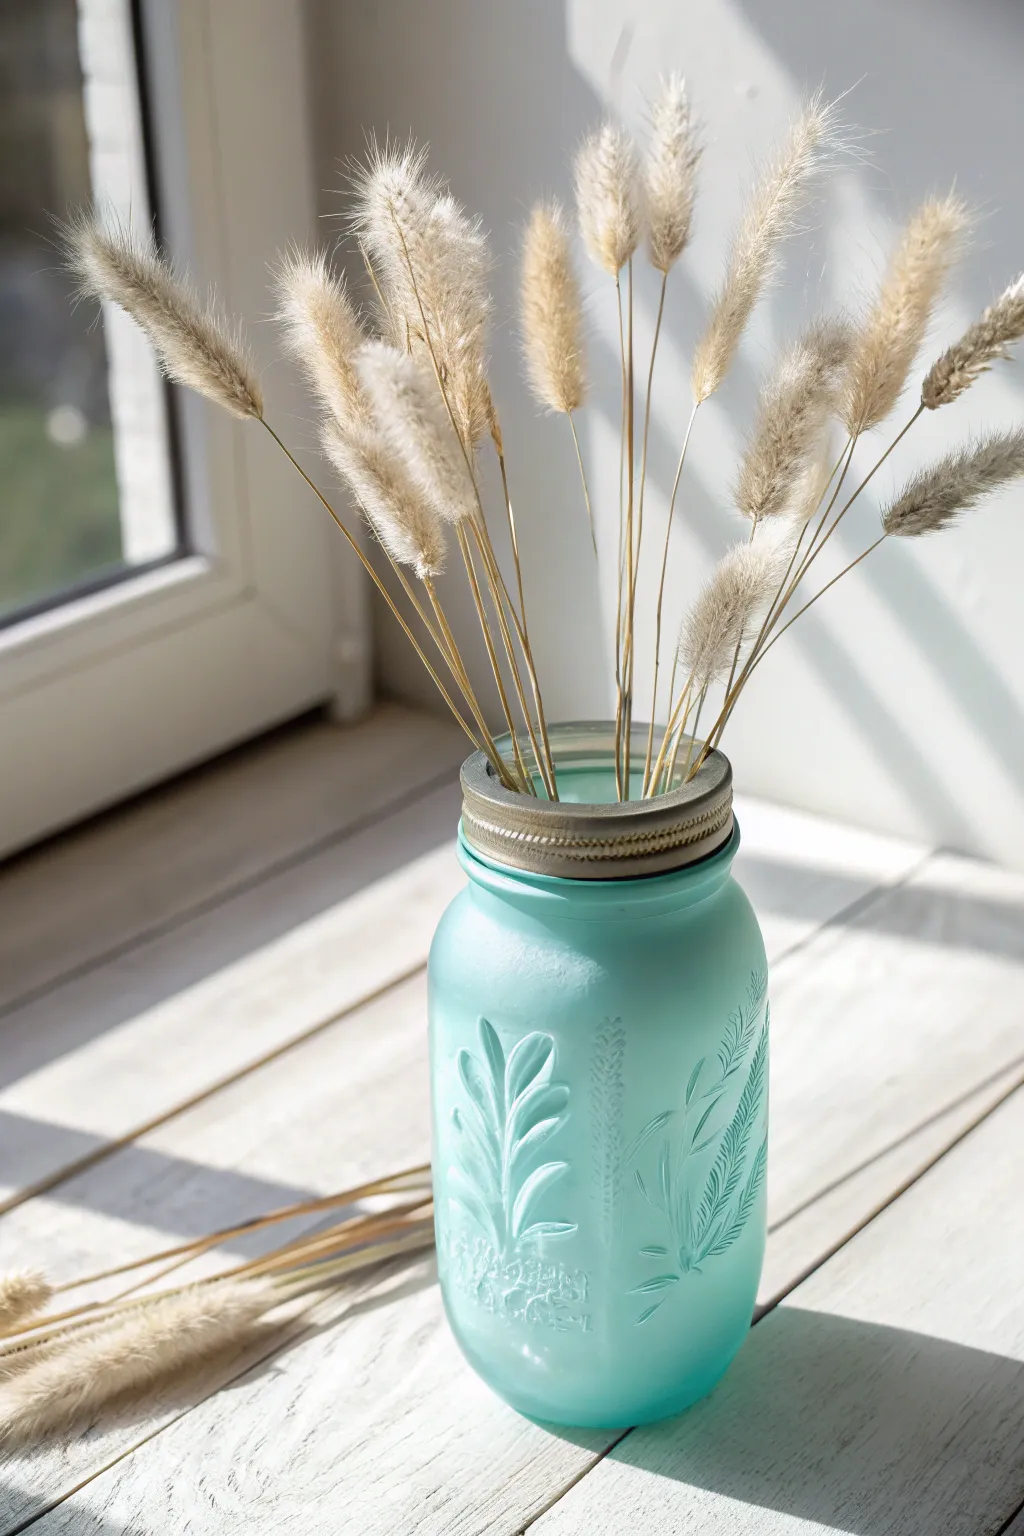
Transform a standard glass jar into a coastal treasure that captures the soft, light-filtering beauty of tumbled sea glass. This project uses a simple tinting technique to create a translucent, matte finish that perfectly highlights embossed glassware.
How-To Guide
Materials
- Glass mason jar (embossed design preferred)
- Matte Mod Podge
- Blue liquid food coloring or translucent gloss glaze
- Green liquid food coloring
- Rubbing alcohol
- Lint-free cloth
- Wide, soft-bristle paintbrush
- Disposable cup
- Stir stick
- Vintage zinc or galvanized lid ring
- Dried bunny tail grass (Lagurus)
Step 1: Preparation
-
Wash the glass:
Thoroughly wash your mason jar with warm soapy water to remove any dust or sticker residue. -
Degrease the surface:
Moisten a lint-free cloth with rubbing alcohol and wipe down the entire exterior of the jar. -
Dry completely:
Allow the alcohol to evaporate fully; this ensures your faux sea glass mixture adheres without peeling later.
Prevent Pooling
If the tint pools in the embossed letters or designs, gently dab the excess away with a dry Q-tip while wet. This keeps the glass pattern crisp rather than gloppy.
Step 2: Mixing the Tint
-
Pour the base:
Pour about two tablespoons of Matte Mod Podge into your disposable cup. -
Add first color:
Add three drops of blue liquid food coloring to the medium. -
Adjust the hue:
Add one small drop of green coloring to shift the blue toward that signature aqua-teal sea glass shade. -
Mix gently:
Stir the mixture with your stick until the color is uniform, trying to avoid creating too many air bubbles.
Level Up: Weathering
For an authentic beach-combed look, very lightly sand the raised embossing with fine-grit sandpaper after drying. This mimics the natural abrasion found on real sea glass.
Step 3: Painting
-
Position the jar:
Place your non-dominant hand inside the jar to hold it steady without touching the outside surface. -
Begin application:
Dip your wide brush into the tint and apply a thin layer starting from the neck of the jar, stopping just below the threads. -
Stroke direction:
Work your way down the jar using long, vertical strokes. -
Smooth the texture:
I prefer to lightly run the brush over completed sections once more to level out any thick ridges of glue. -
Minding the embossing:
Pay attention to the raised fruit or floral designs on the glass, ensuring the tint gets into the crevices but doesn’t pool thickly. -
Coat the bottom:
Finish by painting the bottom of the jar, smoothing strokes toward the center.
Step 4: Curing and Styling
-
Initial drying:
Place the jar upside down on a piece of wax paper or a raised can to dry for at least 30 minutes. -
Check opacity:
Once the white glue base turns clear and matte, assess the color intensity. -
Apply second coat:
If you want a deeper turquoise, repeat the painting process with a second thin layer. -
Full cure:
Let the jar cure upright overnight to harden the finish completely. -
Add hardware:
Screw on a vintage or galvanized metal ring; the dark metal contrasts beautifully with the bright aqua. -
Arrange flora:
Place a handful of dried bunny tail grass stems into the jar, letting them fan out naturally.
Place your finished jar on a sunny windowsill where the light can glow through the frosted aqua tint.


Geometric Tape Resist Design
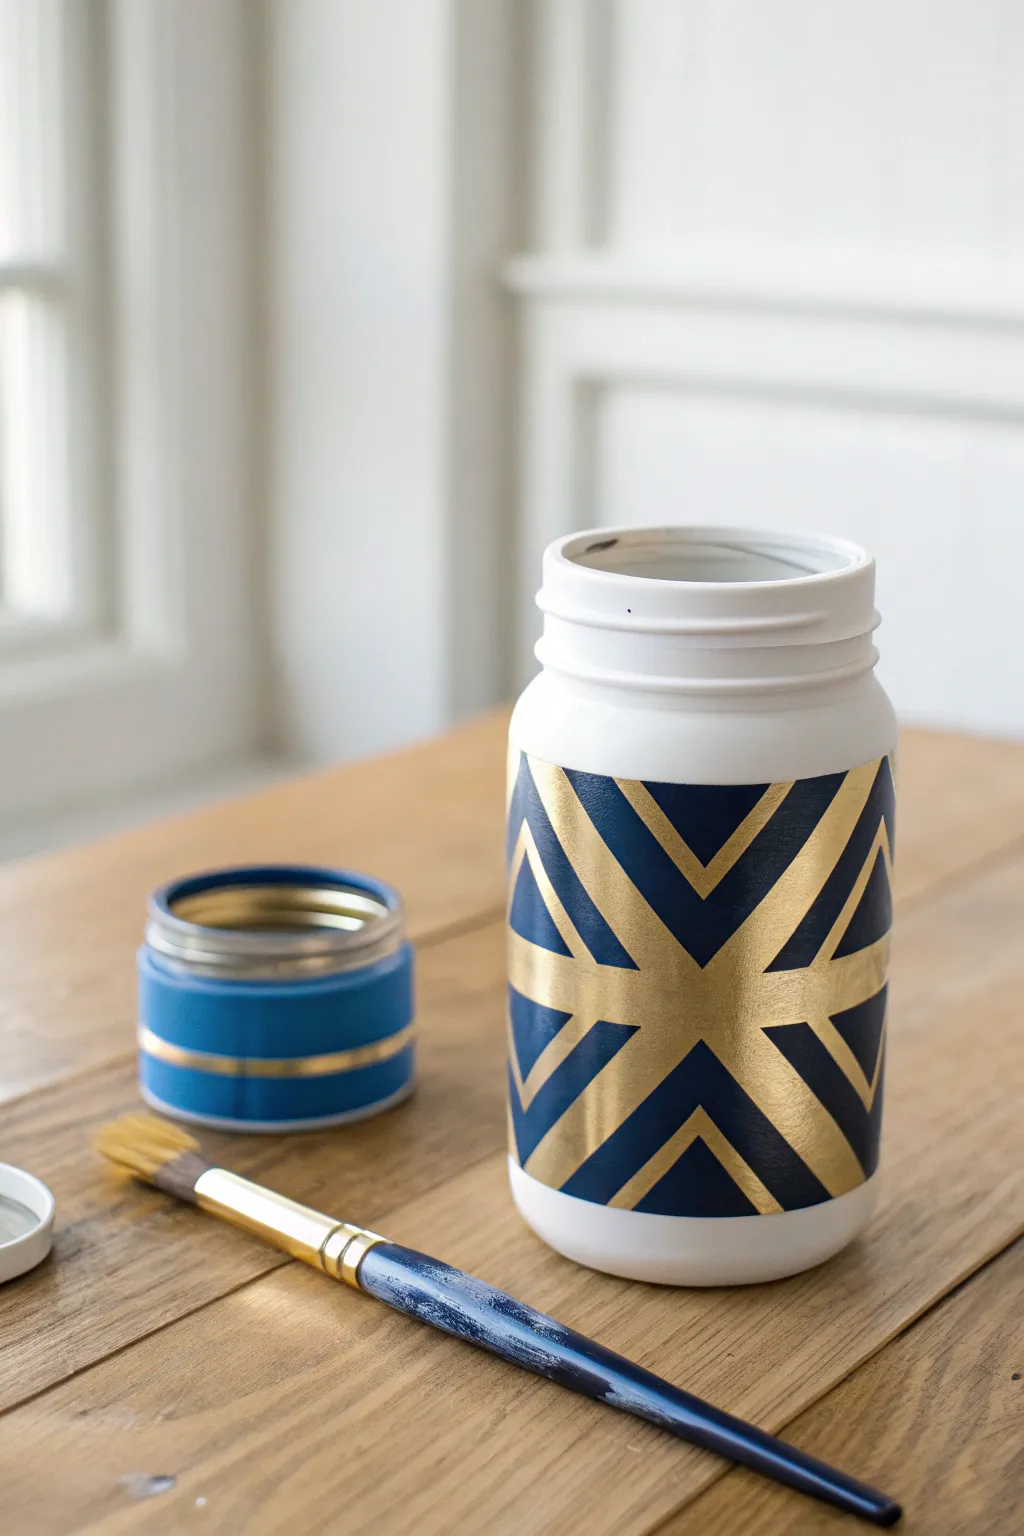
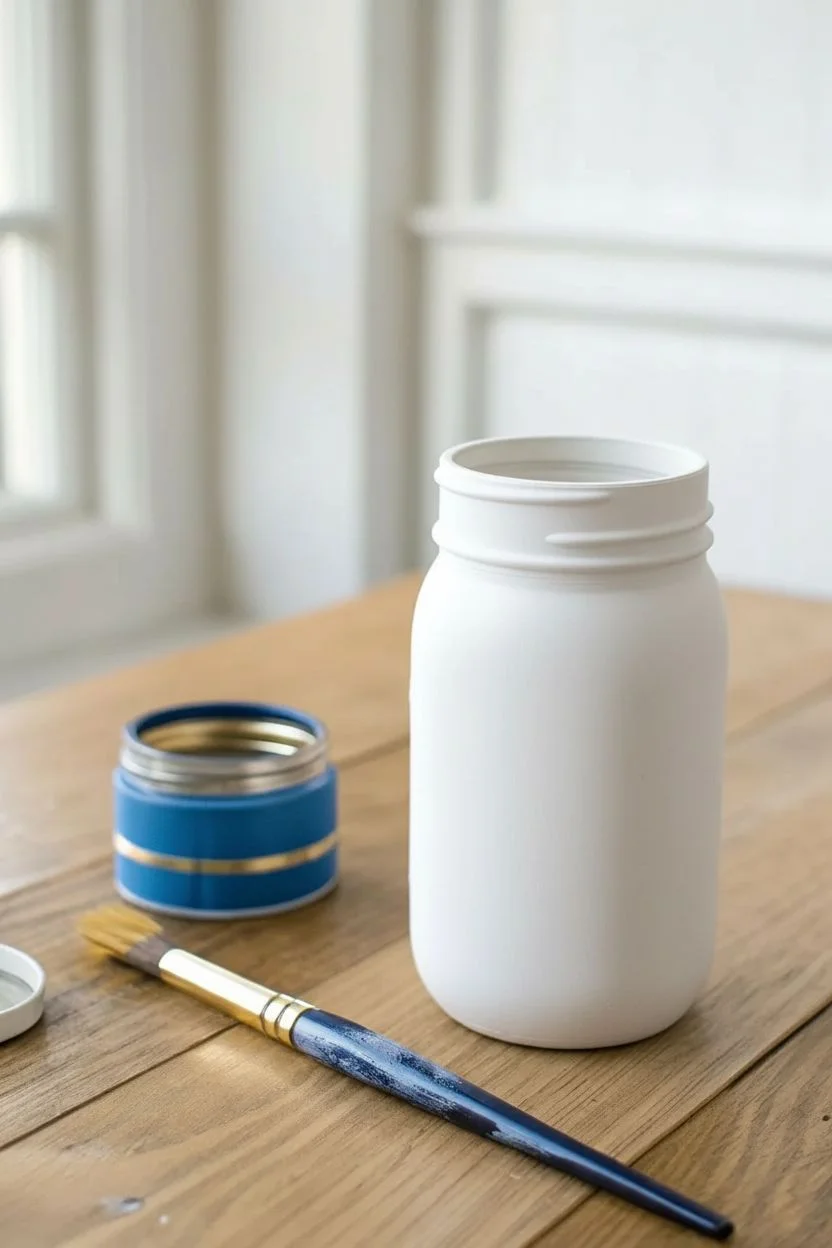
Transform a plain glass jar into a stunning piece of modern decor with this crisp tape-resist technique. The combination of deep navy blue and metallic gold creates a sophisticated, nautical-inspired look perfect for a desk organizer or flower vase. This project relies on layering and patience to achieve those razor-sharp geometric lines.
Step-by-Step
Materials
- Glass mason jar (smooth sided works best)
- Rubbing alcohol and cotton pad
- White chalk finish paint
- Metallic gold acrylic paint
- Navy blue acrylic paint
- Painter’s tape or Washi tape (1/4 inch width)
- Flat shader paintbrushes
- Clear matte sealer or varnish
- Scissors
Step 1: Preparation & Base Coating
-
Clean the glass:
Wipe down the entire exterior of your mason jar with rubbing alcohol on a cotton pad to remove any oils or fingerprints. -
Apply the white base:
Paint the entire jar, including the threaded rim, with white chalk paint. Chalk paint adheres beautifully to glass without needing a separate primer. -
Let it cure:
Allow the first coat to dry completely. Since we will be applying tape later, I like to let this dry a bit longer than usual to ensure a hard shell. -
Second coat:
Apply a second coat of white paint if the glass is still showing through, ensuring an opaque, matte finish. Let this dry fully.
Clean Line Secret
Before painting the navy blue, paint a very thin layer of the GOLD paint over the tape edges. This seals any gaps, so if any paint bleeds under, it matches the line color!
Step 2: The Golden Underlayer
-
Paint the gold section:
Paint a wide band of metallic gold around the body of the jar, starting below the neck threads and ending before the bottom curve. This will become your geometric lines later. -
Build opacity:
Metallic paints can be semi-transparent, so apply 2-3 thin coats of gold until you have a solid, shiny surface. -
Crucial drying time:
Let the gold paint cure for at least 2 hours. If the paint is tacky, the tape in the next step will ruin the finish.
Step 3: Taping the Design
-
Create the vertical line:
Cut a strip of painter’s tape and place it vertically down the center of the gold section. -
Create the horizontal line:
Place a second strip horizontally around the jar, crossing the vertical strip at a 90-degree angle. -
Add diagonals:
Apply two diagonal strips of tape to form a large ‘X’ across the jar, intersecting exactly where the vertical and horizontal lines meet. -
Burnish the edges:
Run your fingernail or a credit card firmly over the edges of all the tape strips. This prevents paint from seeping underneath.
Level Up
Try swapping the navy for black for an Art Deco look, or distress the white neck of the jar with sandpaper for a shabby-chic twist on a modern design.
Step 4: Applying the Navy
-
Paint the navy layer:
Using a flat brush, paint the navy blue color over the gold section and right over the tape. Focus on the negative triangle shapes created by the tape. -
Second blue coat:
Once the first layer is dry to the touch, apply a second coat of navy to ensure a deep, rich color. -
The reveal:
Here is the satisfying part: carefully peel off the tape while the final coat of blue paint is still slightly wet. Pull slowly at a 45-degree angle. -
Touch ups:
If any paint bled through, wait for it to dry, then use a tiny detail brush and the background color to tidy up the lines.
Step 5: Finishing the Lid
-
Paint the lid rim:
Take the jar lid ring and paint the exterior with your navy blue paint. -
Add gold accent:
Once the blue is dry, carefully hand-paint a thin gold stripe around the center of the lid ring, or use a piece of tape to mask it off for a straight line. -
Seal the project:
Protect your hard work by brushing a coat of clear matte sealer over the painted areas of the jar and lid.
Fill your new stylish vessel with pens or fresh blooms and enjoy the metallic shine.
BRUSH GUIDE
The Right Brush for Every Stroke
From clean lines to bold texture — master brush choice, stroke control, and essential techniques.
Explore the Full Guide
Charming Buffalo Plaid
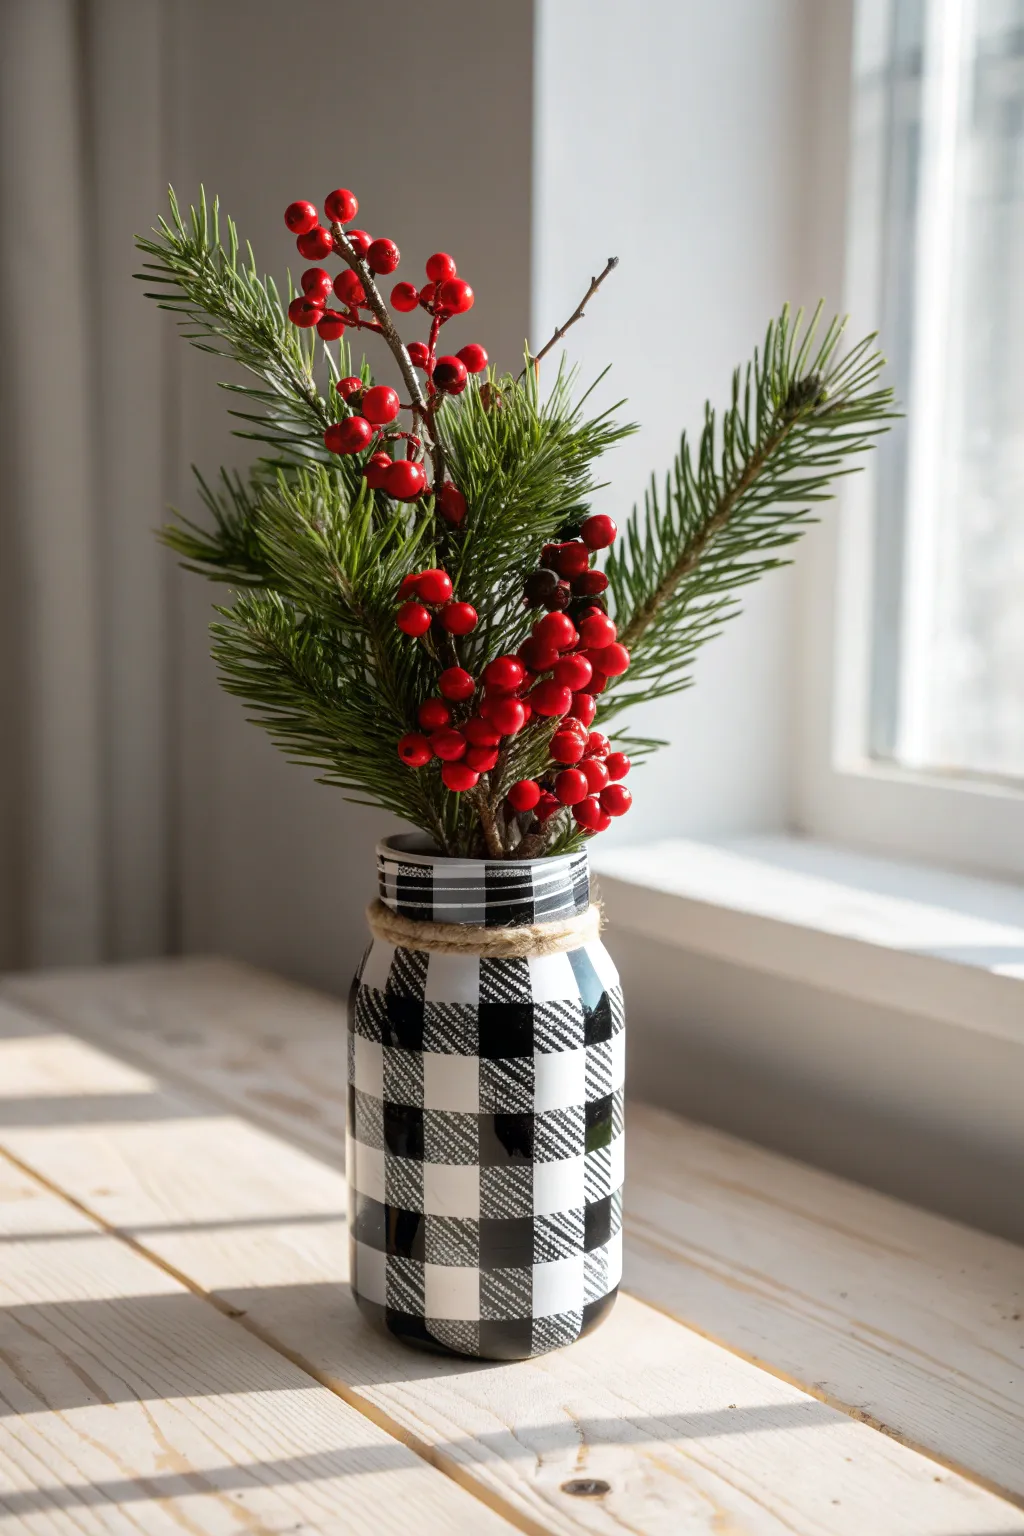
Transform a plain glass jar into a cozy farmhouse centerpiece with this high-contrast painting project. The classic black and white buffalo plaid pattern makes a striking statement especially when paired with winter greenery.
Step-by-Step Tutorial
Materials
- Glass mason jar (quart size)
- Rubbing alcohol and cotton pad
- White chalk paint (matte finish)
- Black acrylic paint
- Grey acrylic paint (or white/black mix)
- Painter’s tape (approx. 1 inch width)
- Flat paintbrush (medium size)
- Small detail paintbrush
- Jute twine
- Scissors
- Clear matte spray sealer (optional)
- Artificial pine and berry stems
Step 1: Preparation and Base Coat
-
Clean the glass:
Wipe the entire exterior of the mason jar with rubbing alcohol on a cotton pad to remove oils and ensure the paint adheres perfectly. -
Apply first coat:
Using your flat brush, apply a layer of white chalk paint to the outside of the jar, keeping your brushstrokes smooth and vertical. -
Let it dry:
Allow the first coat to dry completely; chalk paint usually dries quickly, but give it about 30 minutes to be safe. -
Apply second coat:
Paint a second layer of white to ensure full coverage so no glass shows through, then let this layer cure fully for at least an hour before taping.
Clean Lines Hack
If paint bleeds under the tape, wait for it to fully dry. Then, gently scrape the excess paint away with a craft knife or toothpick for a crisp edge.
Step 2: Creating the Grid
-
Tape vertical stripes:
Apply strips of painter’s tape vertically from the rim to the bottom. I try to space them so the gap between pieces of tape is roughly the same width as the tape itself. -
Seal the edges:
Press the edges of the tape down firmly with your thumbnail to prevent paint from bleeding underneath. -
Paint vertical grey lines:
Paint the exposed glass spaces between the tape with your grey acrylic paint. A dry-brush technique here adds a nice woven texture. -
Remove vertical tape:
Peel off the vertical tape strips while the paint is still slightly wet to get crisp lines, then let the grey stripes dry completely. -
Tape horizontal stripes:
Place strips of tape horizontally around the jar. Just like before, aim for spacing that matches the width of the tape. -
Touch up tape gaps:
Where the ends of the horizontal tape meet, ensure they align perfectly to keep the rings straight.
Step 3: Painting the Plaid
-
Paint horizontal grey lines:
Paint the exposed horizontal rings with the same grey paint you used for the vertical stripes. -
Identify check points:
Look for the squares where your new horizontal grey paint crosses over the dried vertical grey stripes you painted earlier. -
Add the black checks:
With the horizontal tape still on, use the detail brush to paint those specific intersection squares solid black. This contrast creates the buffalo plaid depth. -
Remove all tape:
Carefully peel away the horizontal tape to reveal your grid of white, grey, and black interlocking squares. -
Clean up lines:
Once dry, inspect your grid. I usually use a tiny brush with white paint to tidy up any smudges or uneven edges.
Level Up: Distressed Look
For a vintage vibe, lightly sand the painted jar with fine-grit sandpaper after it dries. Focus on the raised text or edges to reveal the glass.
Step 4: Finishing Touches
-
Seal the paint:
For durability, lightly mist the jar with a clear matte spray sealer and let it dry in a well-ventilated area. -
Wrap the rim:
The jar rim is tough to paint neatly, so wrap a length of jute twine around the threads 3 or 4 times to cover it. -
Secure the twine:
Tie the twine off in a simple knot or bow, trimming the ends for a neat finish. -
Style the jar:
Fill your new vase with artificial pine branches and bright red berry stems to complete the winter look.
Now you have a charming piece of handmade decor ready to brighten up your windowsill or mantel.
Playful Watermelon Organizers
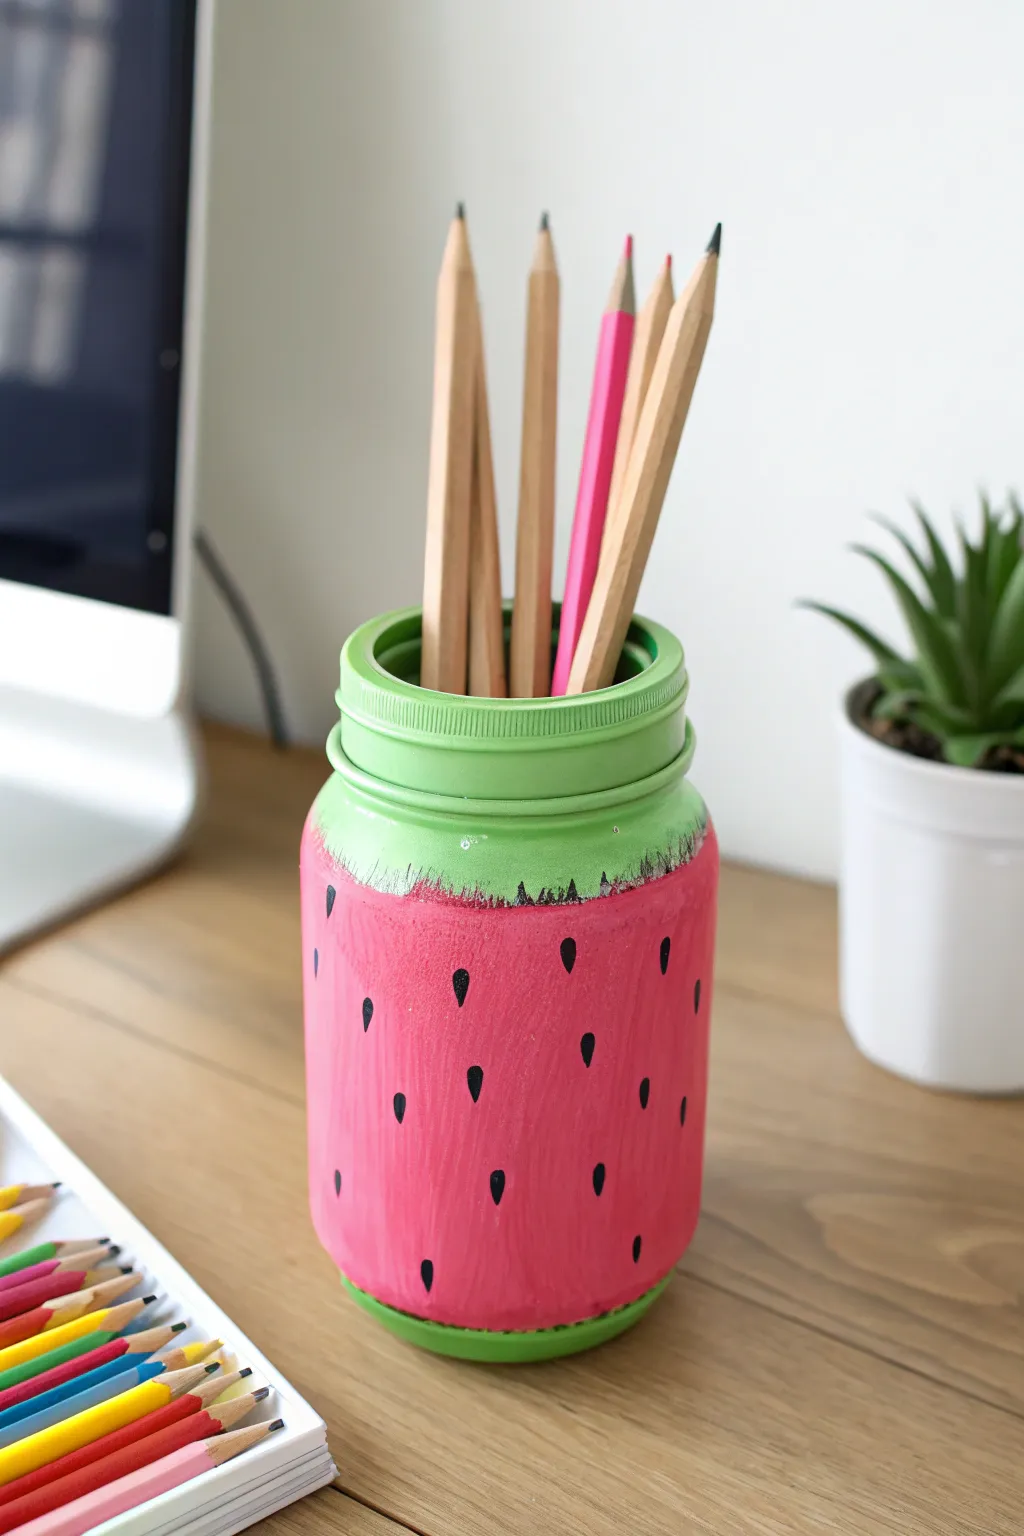
Brighten up your desk with this summery organizer that mimics the look of a fresh watermelon slice. By painting a standard mason jar with vibrant layers and adding a playful seed pattern, you create a sturdy vessel perfect for holding colored pencils or brushes.
Step-by-Step Guide
Materials
- Pint-sized mason jar with lid ring
- Rubbing alcohol and cotton pad
- White chalk paint or primer
- Acrylic paints: Bright Pink, Leaf Green, Black, White
- Wide flat paintbrush
- Fine detail or liner paintbrush
- Small painting palette or paper plate
- Spray sealer (Matte or Satin)
Step 1: Preparation & Base Coat
-
Clean the glass:
Wipe the entire exterior of the mason jar with rubbing alcohol on a cotton pad to remove oils and ensure the paint sticks. -
Separate the lid:
Unscrew the metal ring from the jar and discard or store the flat circular disc, as we only need the ring for this open-top organizer. -
Apply primer:
Paint the entire outside of the jar (including the threaded neck and bottom) with white chalk paint or primer. -
Let it cure:
Allow the white base layer to dry completely; this step is crucial for making the subsequent pink and green neon colors pop.
Smooth Operator
Use a foam pouncer or sponge brush instead of a bristle brush for the white base coat. This minimizes visible brushstrokes on the smooth glass surface.
Step 2: Adding the Rind & Flesh
-
Paint the bottom rind:
Using your flat brush, paint the bottom half-inch of the jar with the leaf green acrylic paint. -
Paint the lid ring:
Coat the separate metal lid ring with the same leaf green paint, ensuring you get inside the grooves. -
Paint the fruit flesh:
Cover the main body of the jar with the bright pink paint, stopping just short of the threaded neck at the top. -
Refine the opacity:
Once the first layer is dry to the touch, add a second coat of pink to ensure solid, opaque coverage without streaks. -
Mix a transition color:
On your palette, mix a small amount of white paint with a tiny drop of green to create a very pale, minty white-green. -
Create the upper rind:
Using a small brush, paint a rough, jagged line around the top of the pink section where it meets the neck, simulating the white inner rind. -
Color the neck:
Paint the threaded glass neck (above your new jagged line) with the leaf green paint so it blends well when the metal ring is attached later. -
Allow to set:
Let all color layers dry completely before moving on to the detail work to prevent smudging.
Make It Sparkle
Mix a small amount of fine iridescent glitter into your pink acrylic paint before applying. This gives the watermelon flesh the sugary, glistening texture of real fruit.
Step 3: Needs & Assembly
-
Paint the first seeds:
Dip your fine detail brush into black acrylic paint and create small teardrop shapes near the top of the pink section. -
Continue the pattern:
Work your way down the jar, staggering the seeds in loose rows so they look organic rather than perfectly gridded. -
Fix the direction:
I always double-check that the round part of the teardrop is at the bottom and the point is at the top for a classic watermelon seed look. -
Final dry:
Let the black seeds dry fully, which usually takes about 15-20 minutes depending on the thickness of the paint. -
Seal the project:
Spray the jar and the metal ring with a clear matte or satin sealer to protect the paint from chipping. -
Assemble:
Once the sealer is dry, screw the green metal ring back onto the jar threads to complete the look.
Now your desk has a pop of fruity color ready to organize your creative supplies.

PENCIL GUIDE
Understanding Pencil Grades from H to B
From first sketch to finished drawing — learn pencil grades, line control, and shading techniques.
Explore the Full Guide
Schoolroom Pencil Style

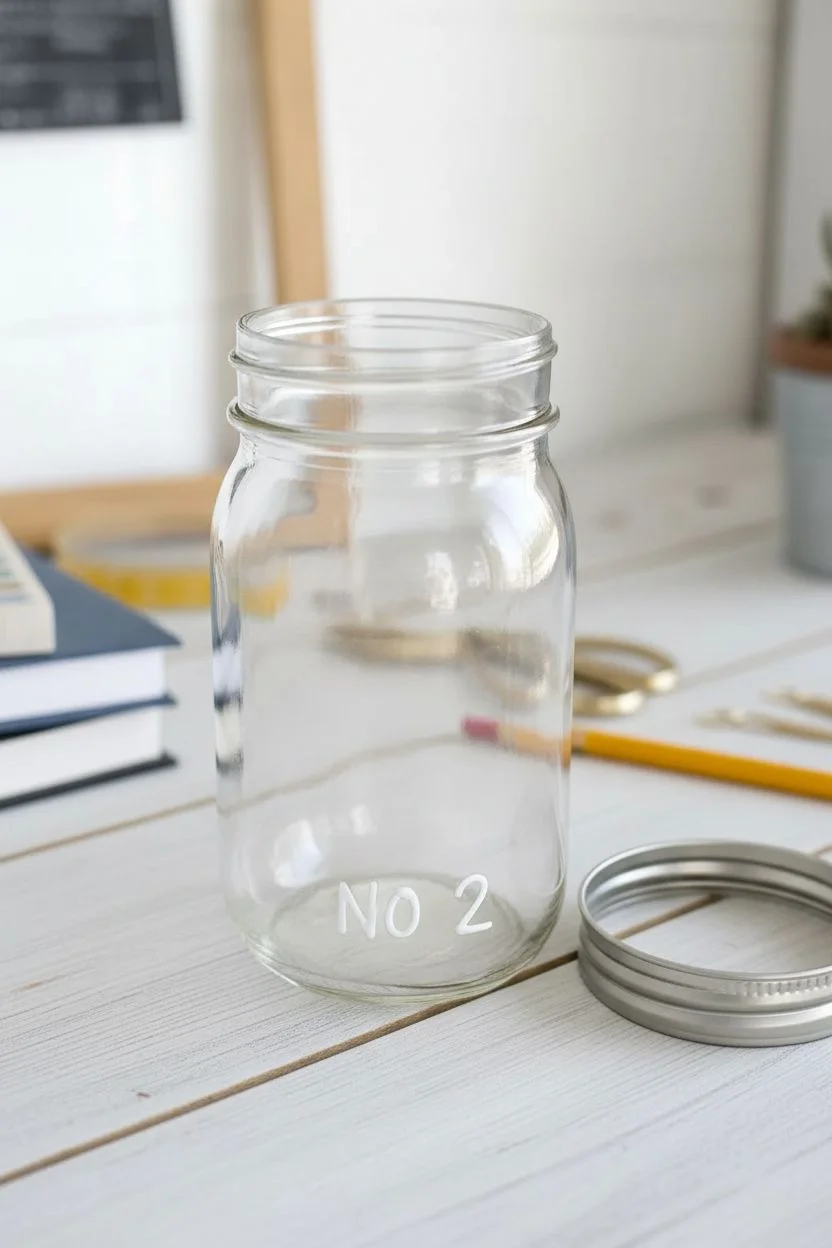
Bring a touch of nostalgic classroom charm to your desk with this clever mason jar makeover. By mimicking the classic yellow No. 2 pencil, you’ll create a playful and practical organizer perfect for holding tall supplies like scissors and rulers.
Step-by-Step
Materials
- Pint-sized Mason jar (smooth sides preferred)
- Rubbing alcohol and cotton ball
- Dimensional fabric paint (puff paint) in any color
- Yellow chalky finish paint (school bus yellow)
- Soft synthetic paintbrush or foam sponge brush
- Wide pink organza or grosgrain ribbon (approx 1.5 inch)
- Hot glue gun and glue sticks
- Standard silver Mason jar screw-top ring
- Matte spray sealer (optional)
Step 1: Preparation & Lettering
-
Clean the surface:
Begin by removing any existing labels or residue from your jar. -
Degrease with alcohol:
Wipe the entire exterior glass surface down with rubbing alcohol to remove oils; this ensures the paint sticks for the long haul. -
Draft the text:
Locate the smooth area near the bottom of the jar where you want your text to sit. -
Apply dimensional paint:
Using the dimensional puff paint nozzle like a pen, carefully write ‘NO 2’ on the glass. -
Allow for curing:
This step requires patience; let the puff paint dry completely until it is hard to the touch so it doesn’t smear during the main painting phase.
Step 2: Painting the Body
-
Load your brush:
Dip your paintbrush into the yellow chalk paint, ensuring you have a moderate amount on the bristles. -
Apply the first coat:
Paint the entire outside of the jar, brushing vertically from the neck threads down to the base. -
Cover the lettering:
Gently dab the paint over the raised ‘NO 2’ letters rather than dragging the brush, which ensures you coat all the nooks of the dried puff paint. -
Dry time:
I like to let this coat dry for at least an hour, or until it looks matte and feels dry to the touch. -
Apply the second coat:
Add a second layer of yellow paint to ensure full opacity, especially covering any streaks from the first pass. -
Seal the paint:
Once fully cured, apply a light coat of matte spray sealer to protect the finish from scratches.
Paint Slipping?
If the paint slides around on the glass during the first coat, don’t overwork it. Let that patchy layer dry fully; the second coat will grab onto the first layer perfectly.
Step 3: The Eraser & Assembly
-
Measure the ribbon:
Wrap your pink ribbon around the upper third of the jar to determine the correct length, adding a half-inch for overlap. -
Cut the material:
Cut the ribbon cleanly with sharp scissors to prevent fraying. -
Position the band:
Place the ribbon horizontally around the jar, sitting it just below the threads of the jar neck. -
Secure the ribbon:
Apply a thin bead of hot glue to the back of the ribbon and press it firmly onto the painted jar. -
Check the rim:
Ensure your metal screw-ring is a clean silver color; if you only have gold rings, give it a quick spray of metallic silver paint. -
Attach the ferrule:
Screw the silver metal ring onto the jar threads securely; this mimics the metal ferrule of a real pencil. -
Final touch:
Run your finger over the ribbon overlap to ensure it lies flat and the glue has set.
Level Up
Make a teacher’s gift set by creating a smaller jar painted pink for ‘erasers’ and a taller jar painted green for a ‘color pencil’ look.
Fill your new organizational masterpiece with pencils and tools to complete the iconic look.
Shimmering Galaxy and Constellations
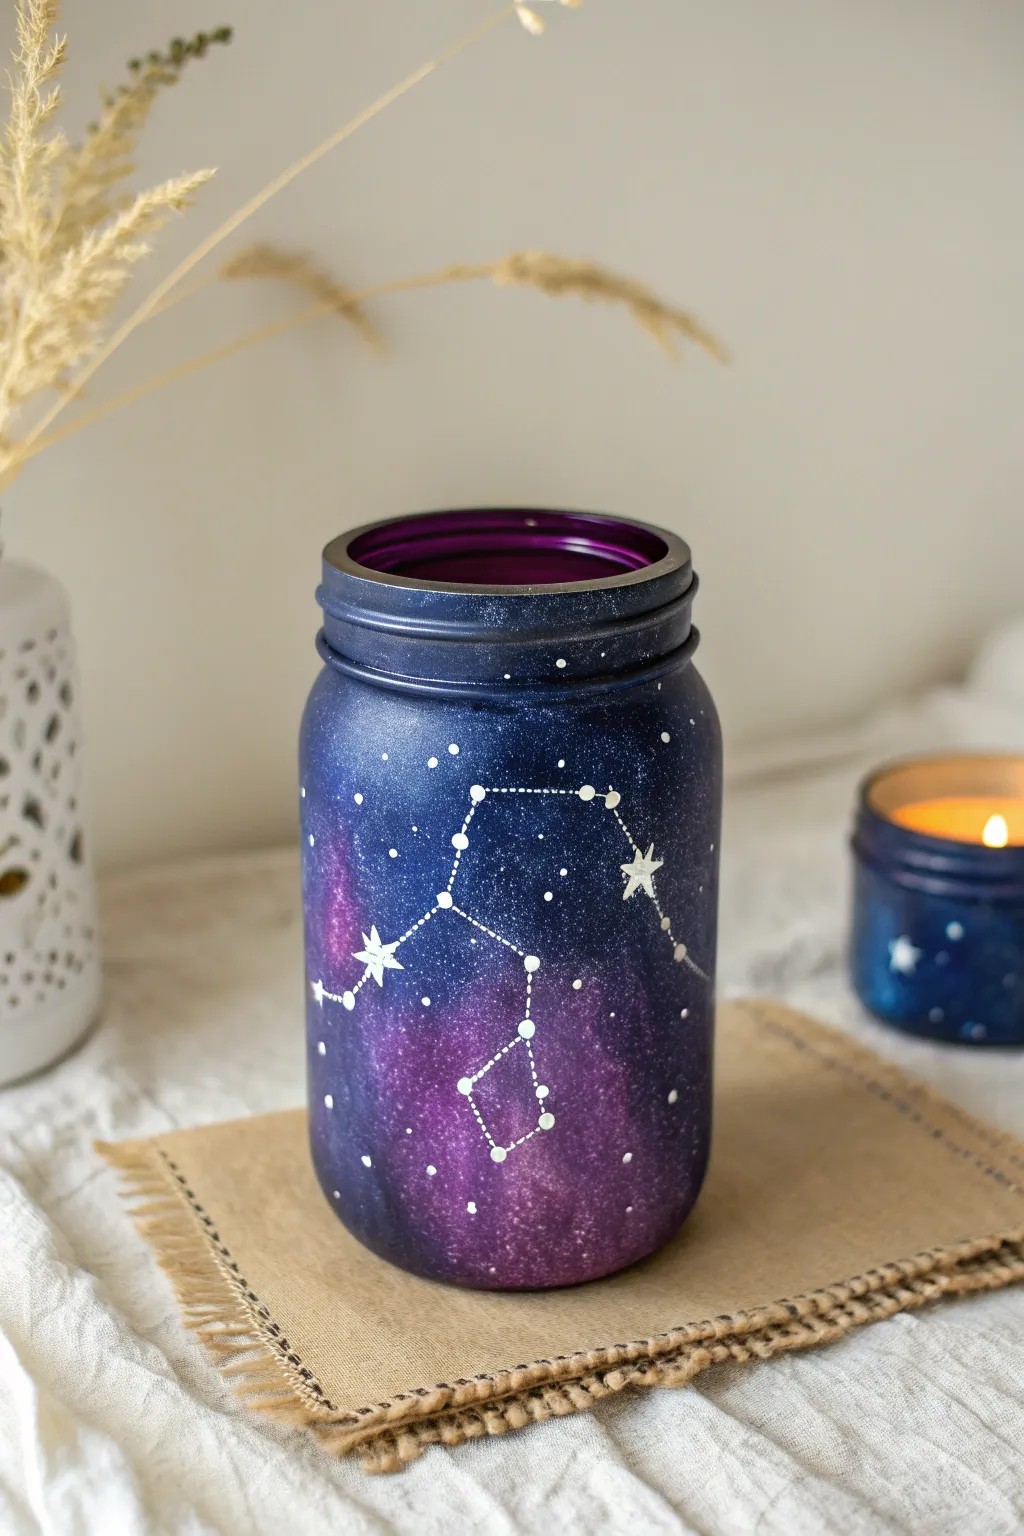
Transform a plain glass jar into a piece of the night sky with this mesmerizing galaxy painting project. Using simple sponging techniques, you will layer deep indigos and violets to create a cosmic backdrop for your favorite constellation.
Detailed Instructions
Materials
- Clean glass Mason jar (16oz or 32oz)
- Rubbing alcohol and cotton pads
- Acrylic craft paints: Navy Blue, Deep Violet, Magenta, Titanium White
- Wedge cosmetic sponges
- Old toothbrush or stiff bristle brush
- Fine liner detail brush (size 00 or 0)
- Paper plate or palette
- Clear spray sealant (matte or satin finish)
Step 1: Preparing the Canvas
-
Clean surface:
Wipe the entire exterior of the jar with rubbing alcohol and a cotton pad to remove oils and fingerprints, ensuring standard acrylic paint adheres properly to the smooth glass. -
Base coat application:
Squeeze a generous amount of Navy Blue paint onto your palette. Dip the flat side of a cosmetic sponge into the paint. -
Dabbing texture:
Apply the paint to the jar using an up-and-down dabbing motion rather than brushing strokes. This creates texture and prevents streaks. -
Covering the jar:
Coat the entire jar, including the rim, with this blue layer. Don’t worry if it looks slightly translucent; we will build opacity later. -
Drying time:
Allow this initial coat to dry completely for about 15 to 20 minutes. I usually touch it lightly to ensure it isn’t tacky before moving on. -
Second layer:
Repeat the sponge dabbing process with the Navy Blue to create an opaque, solid dark background.
Starry Pro Tip
When flicking the toothbrush for stars, test it on a piece of paper first. If the paint is too thick, you’ll get blobs; too thin, and it will run. Go for a cream-like texture.
Step 2: Creating the Nebula
-
Adding violet depth:
Dispense Deep Violet paint onto your palette. Using a fresh sponge, lightly dab random cloud-like patches over the dried blue base. -
Softening edges:
While the violet is still wet, gently dab the edges where it meets the blue to blend the colors seamlessly, creating a soft, hazy transition. -
Adding highlights:
Take a tiny amount of Magenta on a clean corner of a sponge. Dab this strictly into the centers of your violet patches to create glowing ‘hot spots’ in the nebula. -
Review and blend:
Continue layering small amounts of blue and purple until you are happy with the depth and variation of your galaxy clouds.
Troubleshooting Peeling
If the paint peels off the glass while sponging a new layer, you are likely overworking wet paint. Let the previous layer dry completely, or use a hair dryer to speed up the process.
Step 3: Stars and Constellations
-
Mixing splatter paint:
Mix a small amount of Titanium White paint with a few drops of water until it has an inky, fluid consistency. -
Creating background stars:
Dip the bristles of an old toothbrush into the watered-down white paint. Hold the brush near the jar and run your thumb across the bristles to flick a fine mist of stars over the purple and blue areas. -
Planning the constellation:
Choose a prominent side of the jar for your main constellation. Locate the position for the brightest stars (like the Gemini design shown here). -
Painting major stars:
Using the fine liner brush and undiluted Titanium White, paint varying sizes of dots for the primary stars. -
Adding starbursts:
For the largest stars in the formation, paint a small cross or four-pointed star shape over the dot to make them twinkle. -
Connecting the lines:
With the very tip of your detail brush, gently drag thin, broken or dotted lines to connect the stars, forming the constellation shape. -
Final drying:
Allow the white details to dry fully for at least an hour to prevent smearing during the sealing process.
Step 4: Finishing Touches
-
Sealing the work:
Take the jar to a well-ventilated area and apply a light coat of clear spray sealant to protect the paint from chipping. -
Adding light:
Once the sealant is dry, place a tealight or small battery-operated votive inside to illuminate your galaxy from within.
Light up your finished jar and enjoy the calming glow of your personal universe.


Swirled Marble Effect
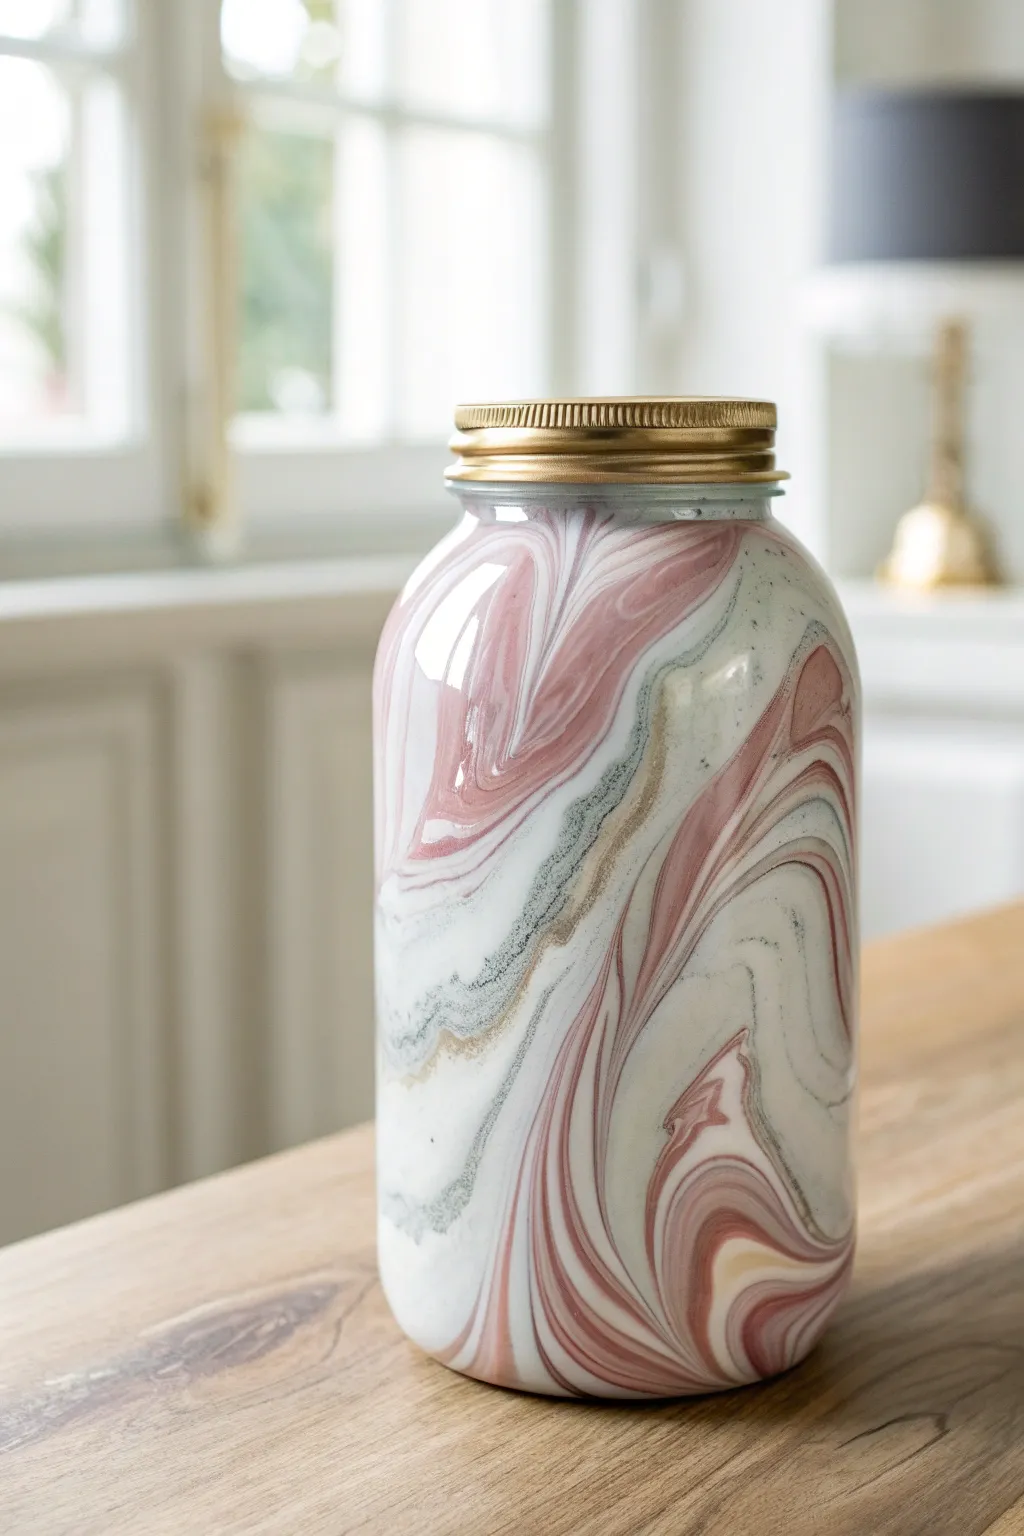
Transform a plain glass vessel into a sophisticated faux-stone masterpiece using the hydro-dipping technique. This project creates fluid, organic swirls of dusty pink, grey, and gold that mimic the elegance of real marble.
Step-by-Step
Materials
- Large glass mason jar
- Spray paint primer (white)
- Gloss spray paints (dusty pink, charcoal grey, white, metallic gold)
- Large plastic bin or bucket (deep enough to submerge the jar)
- Painter’s tape
- Rubbing alcohol and cotton pads
- Wooden skewer or stir stick
- Latex or nitrile gloves
- Clear gloss sealant spray
- Water
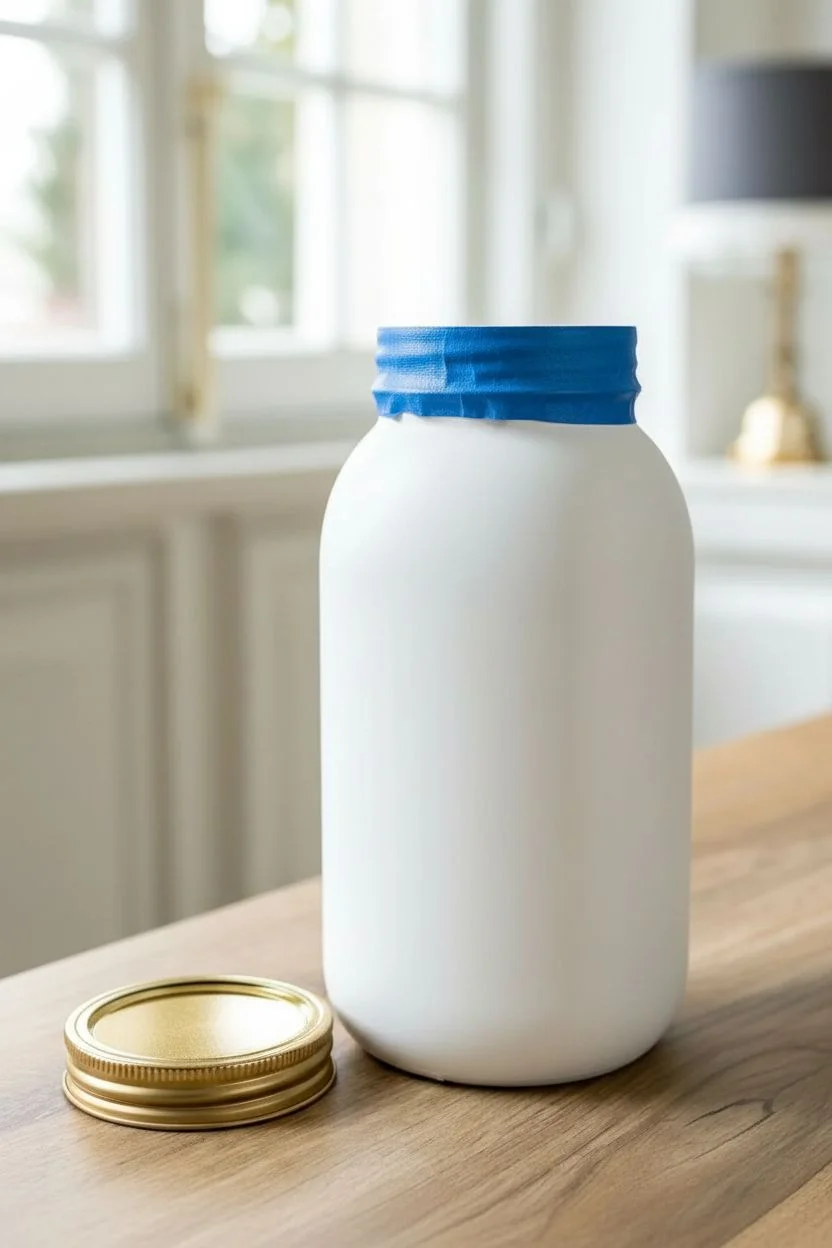
Step 1: Preparation
-
Clean surface:
Wipe down the entire outside of the jar with rubbing alcohol to remove any oils or fingerprints, ensuring the paint adheres perfectly. -
Protect the rim:
Wrap a strip of painter’s tape around the threaded rim of the jar. This keeps the screw-top area clean so the lid still fits properly later. -
Prime the glass:
In a well-ventilated area, spray the entire jar with white primer. Apply light, even coats to avoid drips. -
Dry the base:
Allow the white base coat to dry completely according to the can’s instructions. A solid white background is essential for the marble colors to show up true. -
Paint the lid:
While the jar dries, remove the lid and spray paint it with the metallic gold to match the accents in your marble pattern.
Water Temp Pro Tip
Ensure your water is lukewarm/room temperature. Cold water causes the paint to seize up and clump instantly, while hot water makes it separate too fast.
Step 2: Creating the Marble Bath
-
Prepare the water:
Fill your plastic bin with room-temperature water. Start approximately 3/4 full so the water doesn’t overflow when you dip the jar. -
Spray the first color:
Put on your gloves. Shake your spray cans well, then spray your main color (white) directly onto the center of the water surface for about 2 seconds. -
Layer the colors:
Immediately spray the dusty pink into the center of the white ring, followed by the charcoal grey, and finally a quick burst of metallic gold. -
Repeat for density:
Repeat the spraying process quickly if you want more intense color saturation, creating a bullseye effect on the water. -
Create the swirling pattern:
Take your wooden skewer and gently drag it through the floating paint. I like to move from the outside edge toward the center to create those realistic marble veins.
Step 3: The Dip
-
Submerge the jar:
Hold the jar from the inside (put your hand inside the opening to grip it). Slowly dip the jar into the water at a 45-degree angle. -
Roll and twist:
As you push the jar down, slowly rotate your wrist to wrap the floating paint around the glass surface. -
Clear the surface:
Once the jar is fully submerged, keep it underwater. Use your other hand (or blow on the water) to push the remaining floating paint aside with the skewer. -
Remove the jar:
Only pull the jar out of the water once the surface is clear. This prevents a second layer of paint from ruining the pattern you just applied.
Level Up: Luminosity
Place battery-operated fairy lights inside the finished jar. The marble pattern will glow beautifully through the semi-opaque sections.
Step 4: Finishing
-
Dry properly:
Set the jar upside down on a piece of cardboard or a drying rack to let the water drip off and the paint cure. -
Remove tape:
Once the paint is dry to the touch, carefully peel off the painter’s tape from the rim. -
Seal the artwork:
Spray a coat of clear gloss sealant over the jar to protect the design and give it that polished, ceramic look.
Enjoy displaying your elegant, custom-made marble vase on your vanity or desk
Magical Silhouette Lanterns
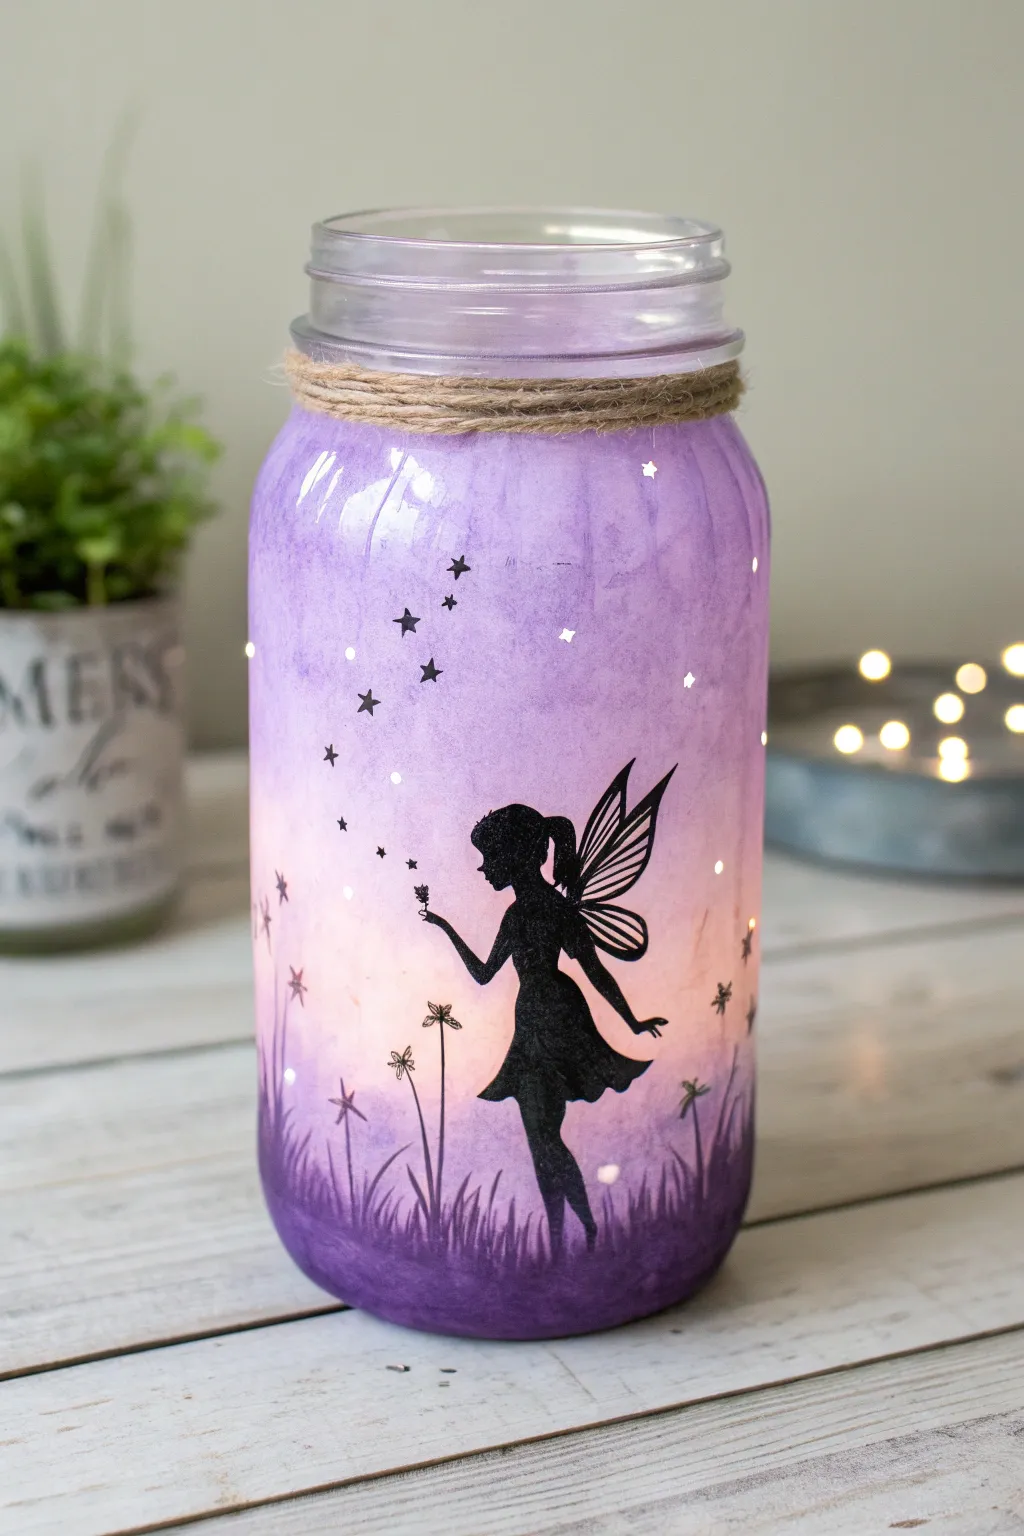
Capture a whimsical twilight moment in a jar with this enchanting silhouette lantern. By blending soft acrylics and adding a striking black silhouette, you’ll create a magical nightlight that looks like a captured fairy tale.
Step-by-Step Guide
Materials
- Clean glass mason jar (quart size)
- Rubbing alcohol and cotton pad
- Acrylic craft paints (White, Lavender, Deep Purple, Black)
- Cosmetic sponge wedges
- Fairy silhouette (printed on paper or black vinyl)
- Decoupage glue (like Mod Podge)
- Fine detail paintbrush
- Small scissors or craft knife
- Jute twine
- Battery-operated fairy lights
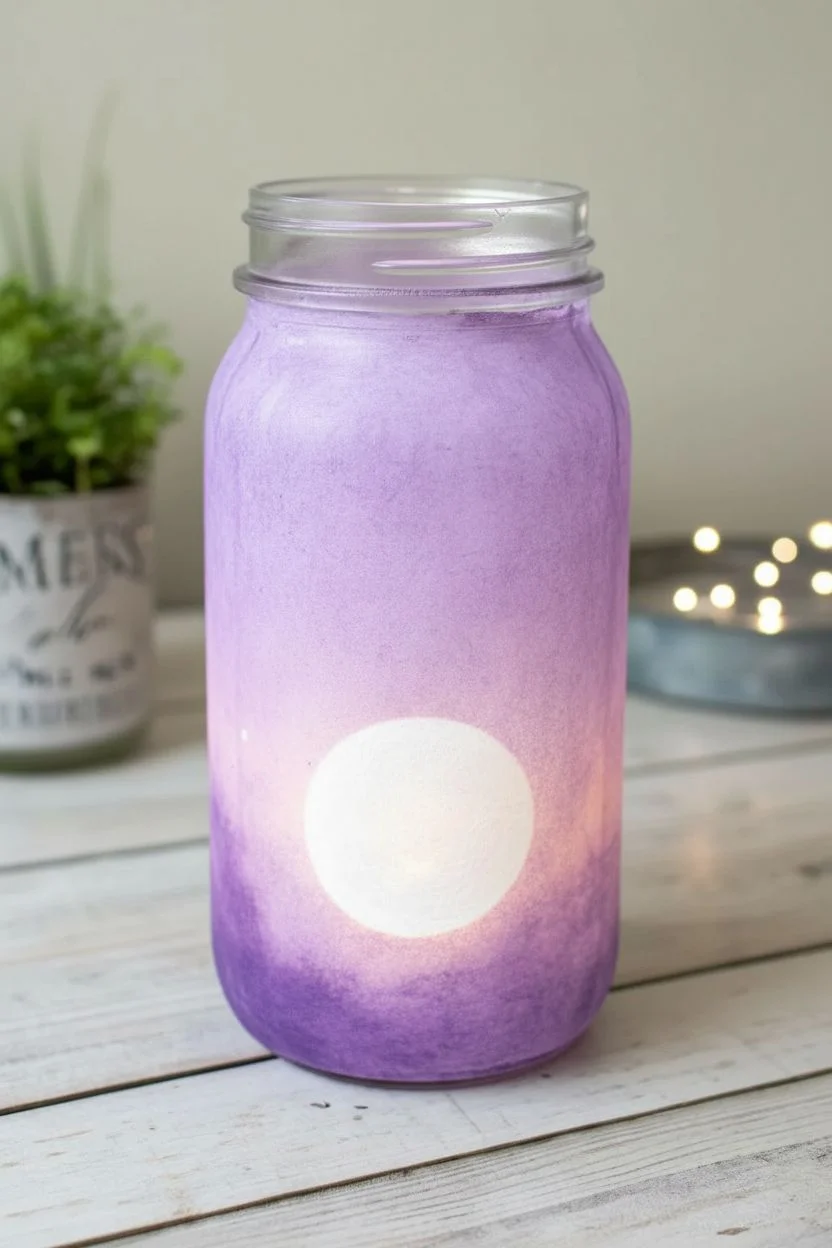
Step 1: Setting the Background
-
Clean the surface:
Wipe down the entire outside of your mason jar with rubbing alcohol and a cotton pad to remove any oils or fingerprints, ensuring the paint adheres perfectly. -
Load the sponge:
Squeeze a small amount of white and lavender paint onto a palette. Dab a cosmetic sponge wedge into the white paint first. -
Create the light source:
Gently dab the white paint onto the lower-middle section of the jar to create a glowing ‘moon’ or light center. Don’t make it opaque; a mottled, cloudy texture is perfect. -
Blend the lavender:
Without cleaning the sponge, pick up a little lavender paint. Dab this around the edges of your white circle, blending the colors wet-on-wet to create a soft transition. -
Add deep purple:
Move to the deep purple paint for the top of the jar and the very bottom rim. Sponge this color in, blending it downward into the lavender creates a natural ombre effect. -
Check transparency:
Hold the jar up to a window. You want the paint to be translucent enough for light to shine through, so avoid thick, heavy layers. -
Let it dry:
Allow the paint to dry completely. I like to let this sit for about 20 minutes, or you can use a hair dryer on a low cool setting to speed things up.
Step 2: Adding the Silhouette
-
Prepare the fairy:
While the jar dries, cut out your fairy silhouette. If you printed it on regular paper, cut as close to the black ink as possible, especially around the wings. -
Glue placement:
Apply a thin layer of decoupage glue to the back of your cutout. Position the fairy so her feet are near the bottom curve of the jar, partially over the purple grass area. -
Smooth it out:
Gently press the cutout onto the jar, smoothing from the center outward to push out any air bubbles without tearing the paper. -
Seal the image:
Brush a thin layer of decoupage glue over the entire top of the fairy cutout to seal it against the glass and prevent edges from peeling.
Pro Tip
If you don’t have a steady hand for painting stars, use a fine-tip permanent marker or a paint pen to draw the tiny details on the dried background paint.
Step 3: Painting Details
-
Paint the grass:
Using black acrylic paint and a fine detail brush, paint vertical, wispy blades of grass along the very bottom of the jar. -
Blend the scene:
Ensure the painted grass overlaps the bottom of the paper cutout slightly. This grounds the fairy and hides the straight edge of the paper. -
Add the stars:
Dip the very tip of your smallest brush (or a toothpick) into black paint. Dot a trail of tiny stars or ‘dust’ swirling up from the fairy’s open hand. -
Create background stars:
Add a few scattered stars around the upper purple section of the jar. You can make simple dots or tiny four-point star shapes. -
Optional highlights:
Once the black stars are dry, you can add microscopic dots of white inside some of them to make them twinkle.
Level Up
Sprinkle a tiny pinch of ultra-fine clear glitter into the wet Mod Podge when sealing the fairy to give the jar a magical shimmering finish when unlit.
Step 4: Final Assembly
-
Wrap the rim:
Take a length of jute twine and wrap it snugly around the threaded neck of the jar three or four times. -
Secure the twine:
Tie the twine in a small, tight knot or bow. You can use a dab of hot glue to keep it from slipping if necessary. -
Light it up:
Insert a string of battery-operated fairy lights or a bright LED tea light into the jar to reveal the glowing sunset effect.
Place your new lantern on a shelf or nightstand and enjoy the soft, dreamy glow of your handcrafted fairy world.
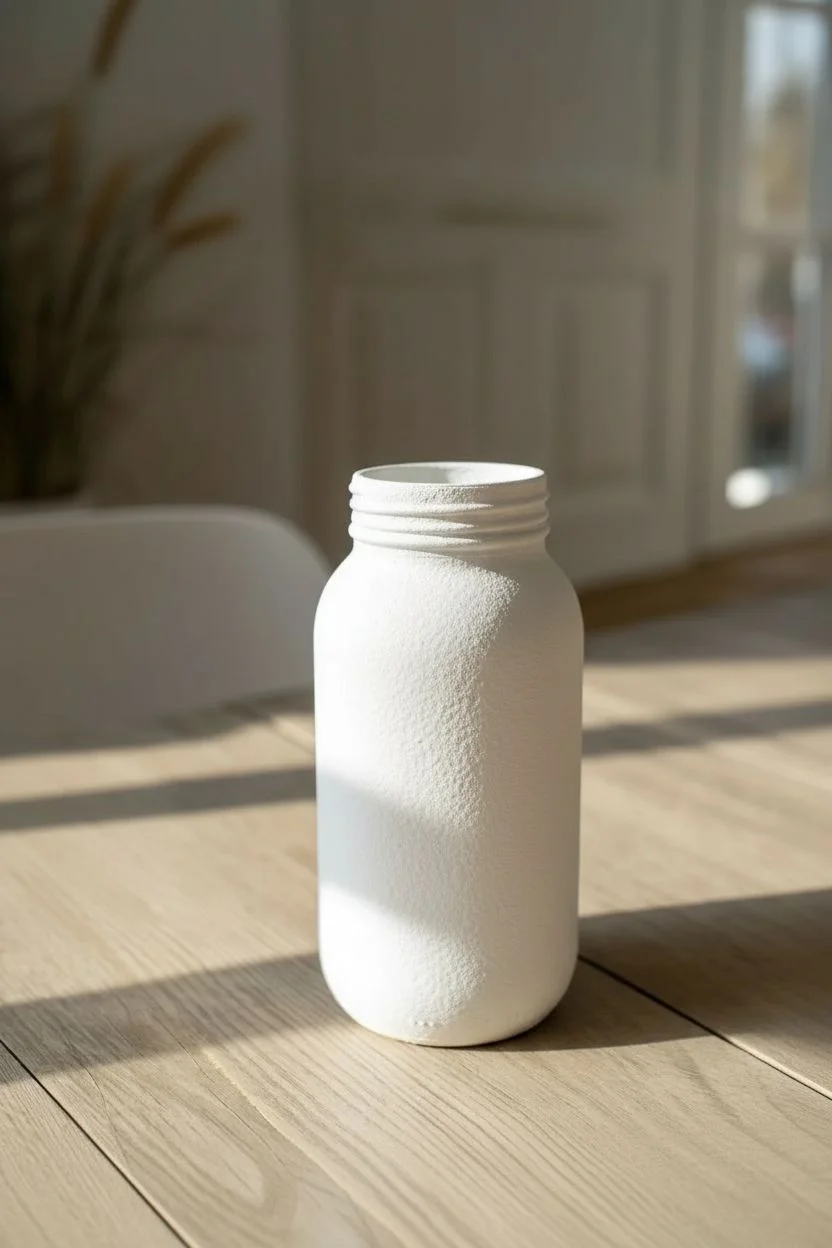
Thumbprint Heart Art
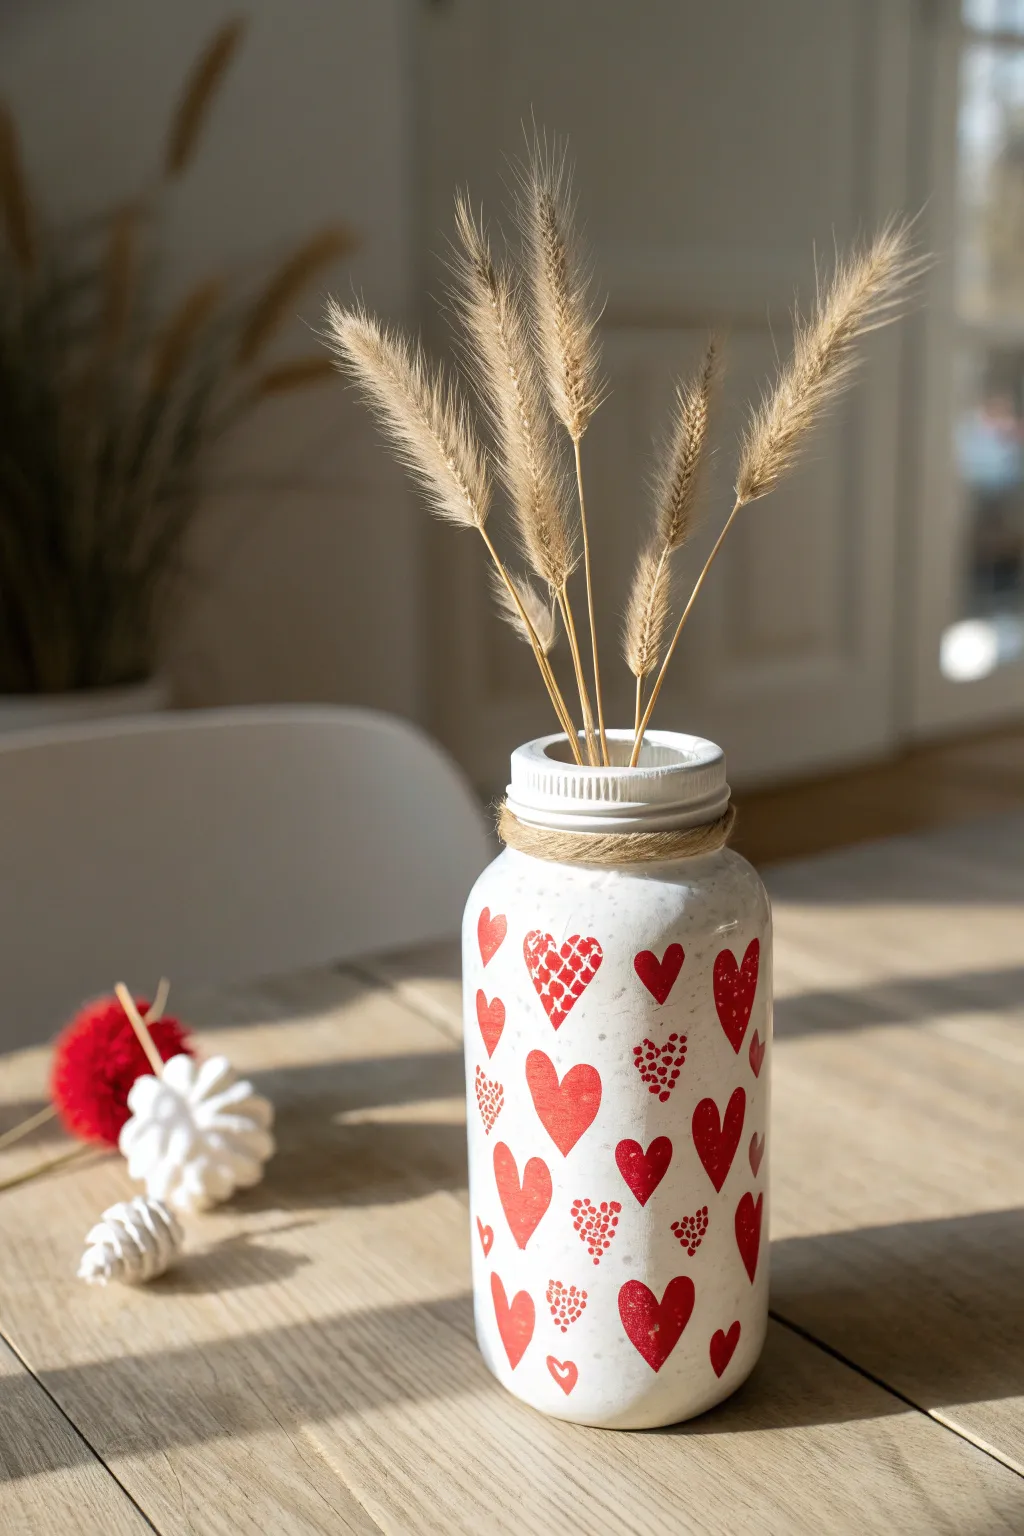
Transform a recycled glass jar into a charming centerpiece using a simple thumbprint technique mixed with hand-painted details. This project pairs a matte white finish with playful red hearts to create a lovely farmhouse-style accent.
Detailed Instructions
Materials
- Clean glass jar (mason or sauce jar)
- Rubbing alcohol and cotton pad
- White chalk paint
- Red acrylic paint
- Foam pouncer or cosmetic wedge sponge
- Fine detail paintbrush
- Paper plate or palette
- Jute twine
- Scissors
- Hot glue gun (optional)
Step 1: Preparing the Base
-
Clean the glass:
Wash your jar thoroughly with soap and water to remove any labels or glue residue, then dry it completely with a lint-free cloth. -
Degrease the surface:
Wipe the entire exterior of the jar with rubbing alcohol on a cotton pad. This removes invisible oils and ensures the paint sticks perfectly. -
Apply first coat:
Pour a small amount of white chalk paint onto your palette. Using a foam pouncer or cosmetic sponge, dab the paint onto the glass using an up-and-down stippling motion. -
Create texture:
Note that stippling creates a slight texture resembling ceramic, which is what we want. Avoid brushing side-to-side to prevent streaks. -
Dry and repeat:
Allow the first coat to dry for about 30 minutes. Apply a second coat using the same dabbing motion until the glass is completely opaque. -
Final cure:
Let the white base finish drying completely. I prefer to leave it for an hour just to be safe before starting the heart details.
Step 2: Painting the Hearts
-
Prep the red paint:
Squeeze a dime-sized amount of bright red acrylic paint onto your paper plate. -
Create solid hearts:
Dip the pad of your thumb into the red paint, blotting excess on a clean spot of the plate so it isn’t gloopy. -
Form the shape:
Press your thumb onto the jar at a 45-degree angle to the left, then overlap it at a 45-degree angle to the right to form a ‘V’ or heart shape. -
Refine the edges:
Use a fine detail brush to sharpen the bottom point of the heart or round out the top arches if the print looks too irregular. -
Add stippled hearts:
To mimic the dotted hearts seen in the image, dip the non-brush handle end of your paintbrush into the red paint. -
Dot the pattern:
Gently stamp dots onto the white surface, clustering them to form a heart shape directly. Start with the outline and fill the center with random dots. -
Create grid hearts:
For the patterned hearts, first paint a solid red heart (using the thumbprint or brush method) and let it dry completely. -
Detail the grid:
Once the red heart is dry, dip your finest detail brush into the white chalk paint and carefully draw thin diagonal lines across the heart to create a cross-hatch pattern. -
Randomize placement:
Continue adding these three styles of hearts around the jar, rotating it as you go to ensure even spacing.
Pro Tip: Vary the Scale
Use your pinky finger instead of your thumb to create smaller hearts interspersed among the larger ones. This size variety makes the pattern look more dynamic and professional.
Step 3: Finishing Touches
-
Dry the artwork:
Allow all the painted details to dry fully. If you want extra protection, you can apply a clear matte sealer spray at this stage. -
Prep the twine:
Cut a long piece of jute twine, roughly 24 inches long depending on the size of your jar neck. -
Wrap the neck:
Apply a tiny dot of hot glue to the back of the jar rim to secure the starting point of the twine. -
Secure the wrapping:
Wrap the twine tightly around the threads of the jar neck 3 to 4 times to create a rustic band. -
Tie it off:
Secure the end with another small dot of glue or tie a small, neat knot on the backside and trim the excess. -
Style the jar:
Fill your new vase with dried bunny tails or wheat grass to complete the look shown in the photo.
Troubleshooting: Slippery Paint
If the paint slides around or peels off the glass, the surface likely wasn’t clean enough. Ensure you wipe heavily with rubbing alcohol before painting to remove all oils.
Enjoy displaying your adorable custom vase and filling it with your favorite seasonal dried flowers.
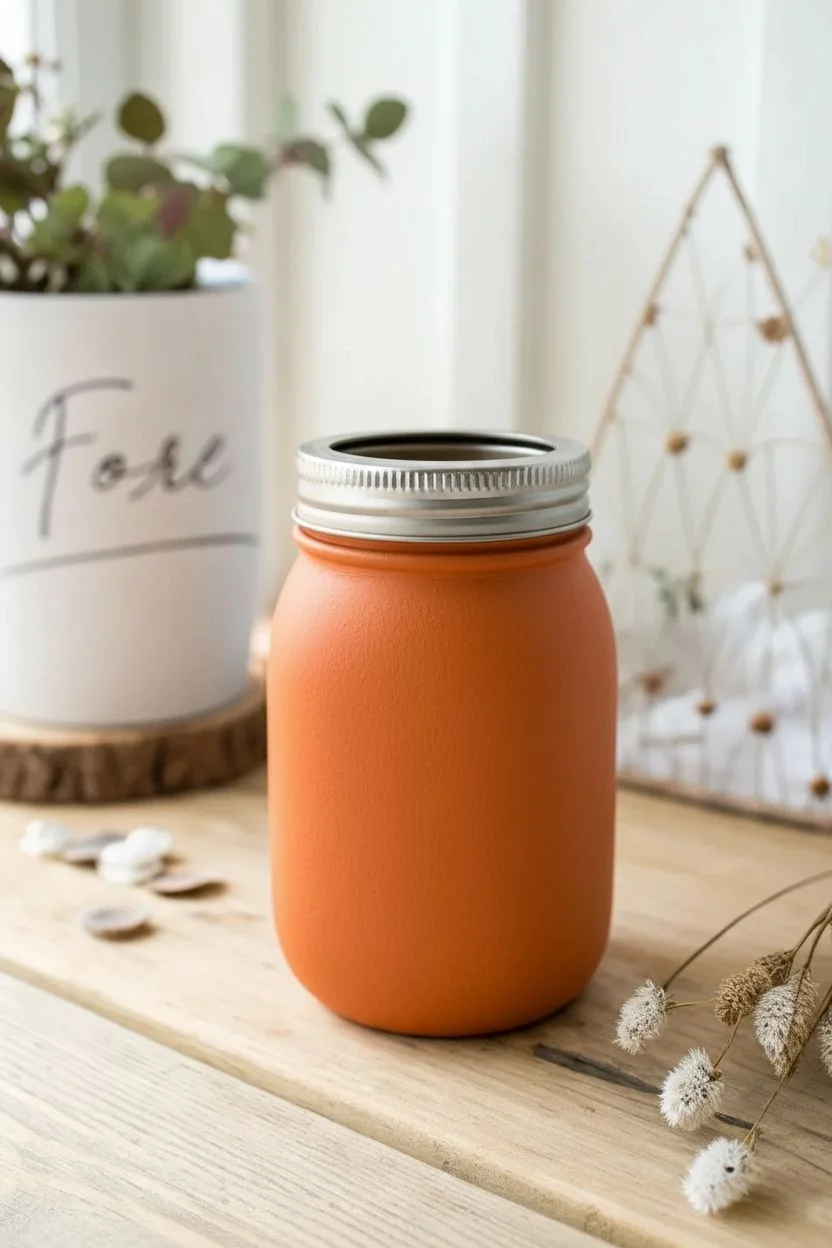
Cute Animal Faces
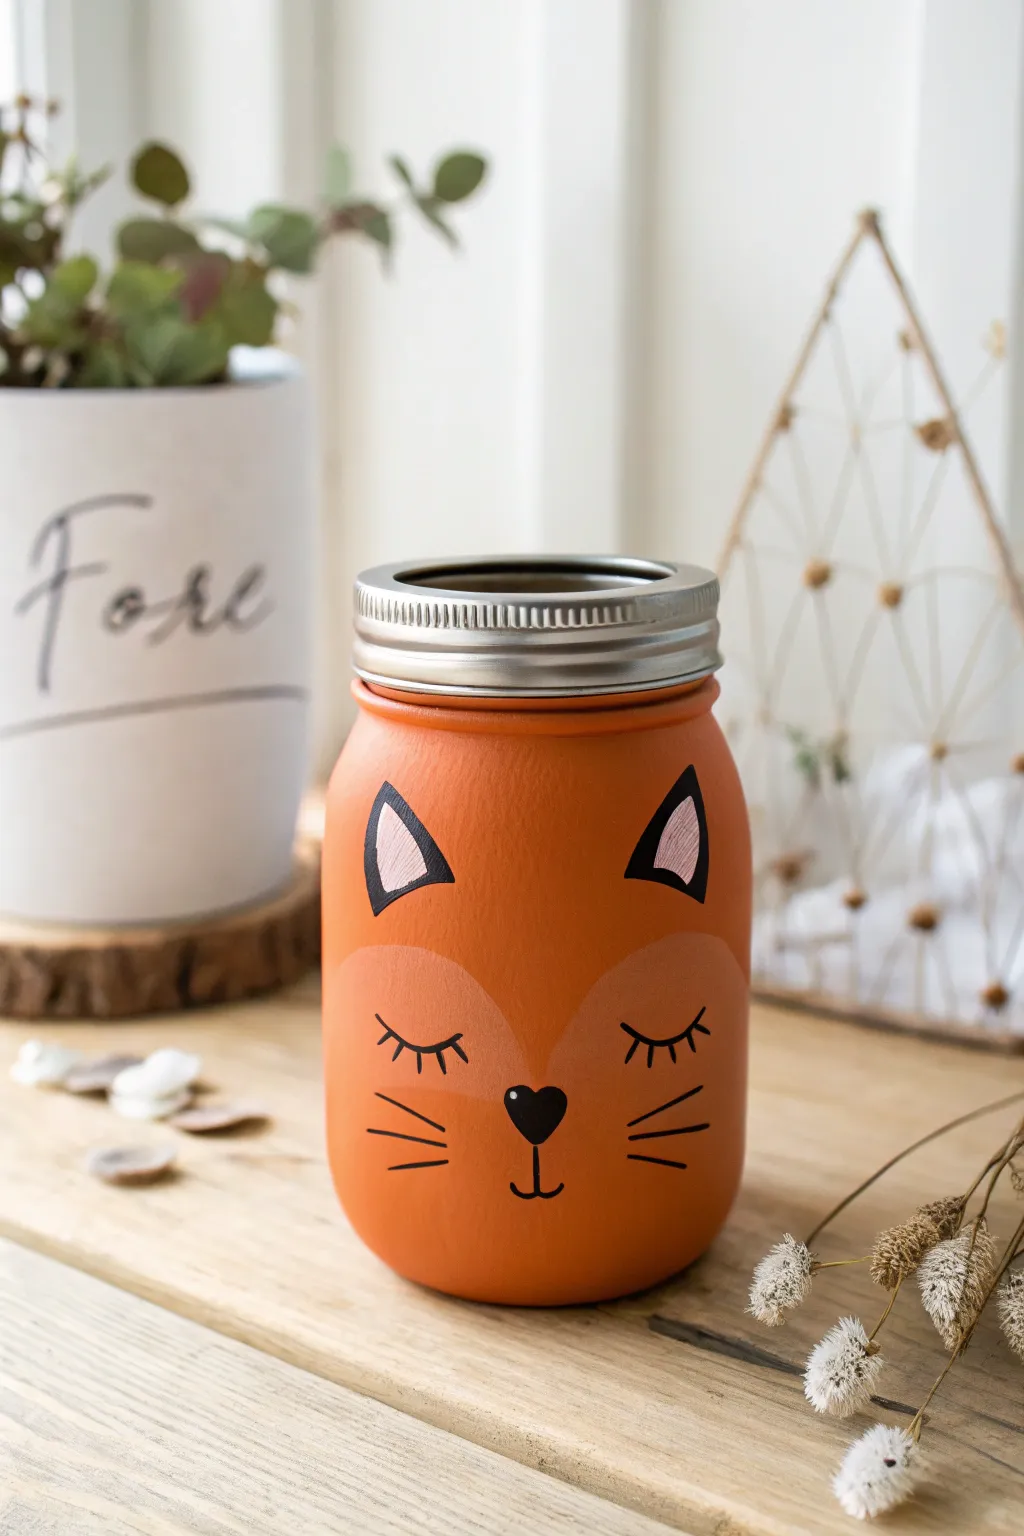
Transform a plain glass vessel into a charming woodland creature with this matte-finish project. With its warm pumpkin tones and sweet sleeping expression, this fox jar makes for adorable autumn decor or a cozy desk organizer.
How-To Guide
Materials
- 1 Pint-sized mason jar with lid ring
- Rubbing alcohol and cotton pads
- Matte acrylic craft paint (Pumpkin Orange, Soft Pink, Cream/Light Peach)
- Black acrylic paint marker (fine tip)
- Wide flat synthetic paintbrush
- Small round detail brush
- Cosmetic wedge sponges
- Matte clear spray sealer
Step 1: Base Coating
-
Clean the glass:
Wash your mason jar thoroughly with soap and water to remove any grease or sticker residue. -
Degrease surface:
Wipe the entire exterior of the jar with rubbing alcohol on a cotton pad to ensure the paint adheres perfectly. -
First orange layer:
Using your wide flat brush, apply a thin, even coat of Pumpkin Orange paint to the exterior of the jar, stopping just below the screw threads at the top. -
Dry time:
Allow this base coat to dry for at least 20 minutes; it will look streaky at this stage, which is normal. -
Build opacity:
Apply a second coat of orange paint. I find that dabbing this layer on with a cosmetic sponge eliminates brush strokes and creates that nice matte texture. -
Final coverage check:
Hold the jar up to the light to see if any spots are transparent; add a third light sponge coat if necessary and let it dry completely.
Sponge It On
For a flawless finish without streaks, use a cosmetic wedge sponge for the final coat. Use an up-and-down dabbing motion rather than dragging to mimic a ceramic texture.
Step 2: Adding Features
-
The muzzle area:
Mix a tiny drop of Cream paint with your Pumpkin Orange to create a lighter shade. -
Paint cheek patches:
Paint two subtle, rounded arches near the bottom center of the face area to create the lighter fur of the muzzle. -
Ear placement:
Using the Soft Pink paint and a small detail brush, paint two triangles near the top shoulder of the jar where the glass curves inward. -
Let features set:
It is crucial to let these colored shapes dry fully before outlining, or the black marker might snag the wet paint.
Wobbly Lines?
If you make a mistake with the black pen, don’t wipe it while wet! Let it dry completely, paint over the error with a dab of orange, and try again.
Step 3: Defining the Face
-
Ear outlines:
Take your black acrylic paint marker and carefully trace around the pink triangles to define the fox’s ears. -
Draw the nose:
Draw a small, solid black heart in the center of the jar, slightly overlapping the top of the lighter muzzle area. -
Mouth detail:
Draw a short vertical line down from the nose, connecting to a small upward-curving ‘smile’ line. -
Sleeping eyes:
About an inch above the nose, draw two downward-curving crescents for the closed eyes. -
Lashes:
Add three or four tiny, flicked lines to the bottom of each eye curve to create eyelashes. -
Whiskers:
Draw three straight floating lines on each cheek, extending outward from the muzzle area. -
Seal the work:
Once the ink is bone dry, spray the jar with a matte clear sealer to protect the paint from scratching. -
Finishing touch:
Screw the metal lid ring back onto the top of the jar to complete the look.
Pop some dried flowers or pens into your new fox jar and enjoy your handiwork.
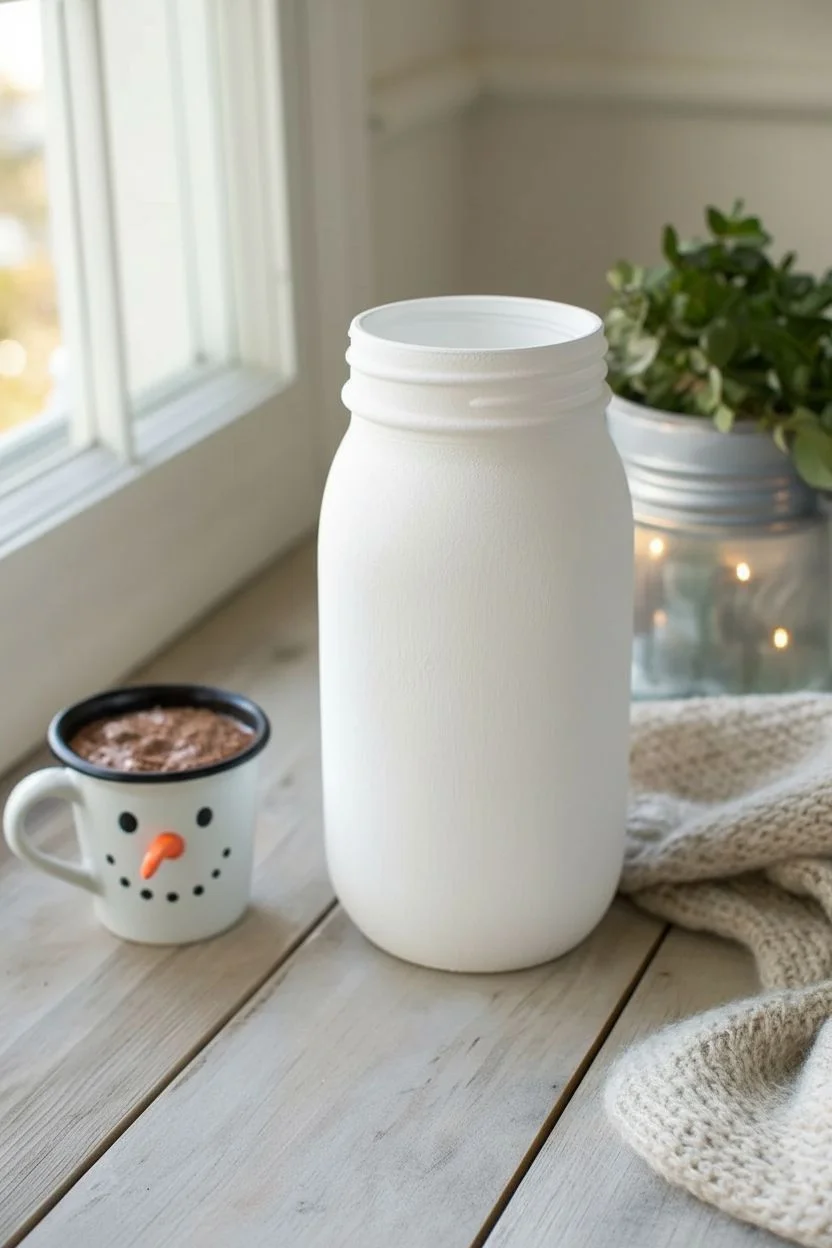
Winter Snowman Friends
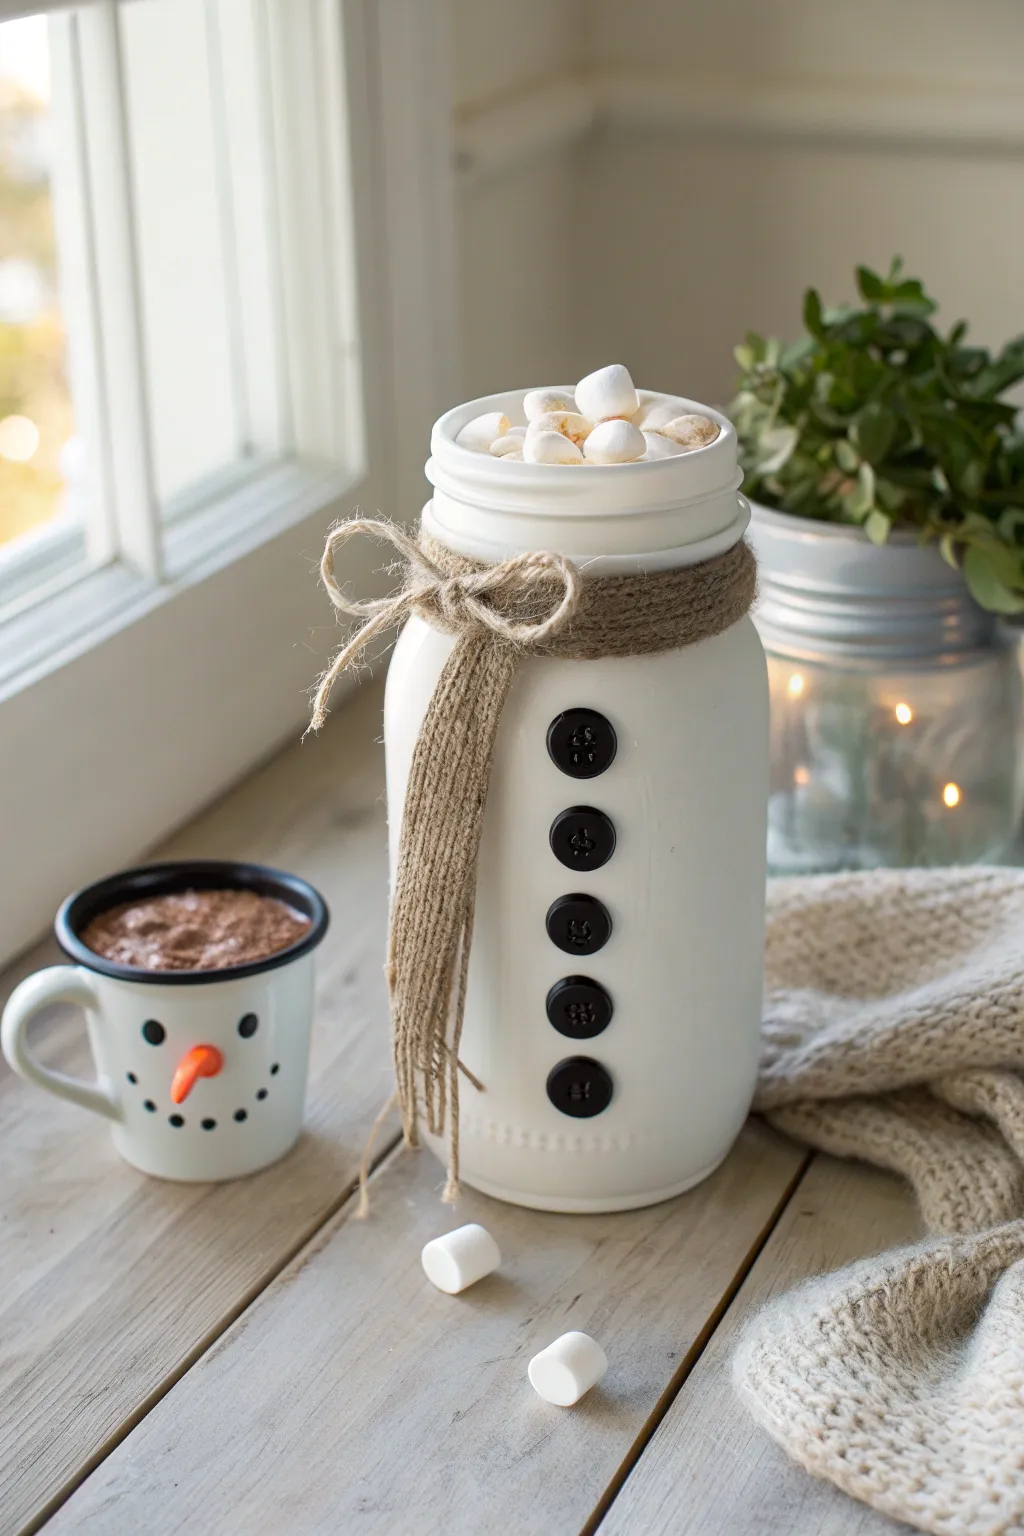
Transform a simple glass jar into an adorable winter character perfect for holding hot cocoa supplies or sweet treats. The matte white finish and rustic jute scarf give this snowman a charming farmhouse feel that warms up any kitchen counter.
Detailed Instructions
Materials
- Quart-sized masonry jar (smooth or branded)
- White chalk paint (matte finish)
- Foam sponge brush
- Rubbing alcohol and cotton pad
- Thick jute twine or burlap yarn
- Four large black buttons (4-hole style)
- Hot glue gun and glue sticks
- Scissors
Step 1: Prepping and Painting
-
Clean the glass:
Wash your mason jar thoroughly with warm soapy water to remove any dust or grease residue, then dry it completely. -
Degrease the surface:
Wipe down the entire exterior of the jar with rubbing alcohol on a cotton pad. This step is vital to ensure the paint adheres to the slippery glass surface without peeling later. -
Apply the first coat:
Dip your foam sponge brush into the white chalk paint. Apply a thin, even layer using vertical strokes from the rim down to the base. It will look streaky and semi-transparent initially, but don’t worry. -
Let it dry:
Allow the first coat to dry for at least one hour. I prefer to wait until the glass feels room temperature rather than cool to the touch. -
Apply the second coat:
Apply a second layer of paint, this time using a pouncing or dabbing motion with the sponge brush rather than stroking. This builds texture and provides opaque coverage. -
Check for gaps:
Hold the jar up to a light source to spot any thin areas. If needed, dab a little extra paint on those spots to ensure a solid, snowy white finish. -
Full cure time:
Let the jar sit undisturbed for several hours, or ideally overnight, to let the paint fully cure and harden before you start handling it for decoration.
Paint Troubleshooting
If the paint scratches off easily while gluing buttons, it likely hasn’t cured long enough. A spray sealer or clear matte fixative over the white paint can protect the finish.
Step 2: Creating the Scarf
-
Cut the twine:
Cut a very long piece of jute twine or burlap yarn, approximately 4 feet long depending on the thickness of your material. -
Start the wrap:
Find the center of your twine and place it against the back of the jar’s neck, right where the lid threads would be. -
Layer the material:
Wrap the twine around the neck multiple times, crossing over loosely to create a bundled, cozy scarf look that covers the glass threads. -
Secure the base knot:
Once you have built up a nice thickness, bring the ends to the front, slightly off-center to the left, and tie a standard knot to secure the wrap. -
Tie the bow:
Tie a generous bow, pulling the loops out slightly so they look fluffy rather than tight. -
Trim the tails:
Trim the hanging ends of the twine so they extend about halfway down the jar. -
Fray the ends:
Use your fingers to separate and fray the fibers at the very tips of the twine tails for a rustic, woven appearance.
Make a Friend
Create a matching mug like the one in the photo by using enamel-safe acrylic paints to draw a simple dotted smile and an orange carrot nose on a small white camping cup.
Step 3: Finishing Touches
-
Plan button placement:
Lay the jar gently on its back (using a towel to prevent rolling) and place your four black buttons down the center to space them evenly. -
Glue the top button:
Apply a small dot of hot glue to the back of the top button and press it firmly onto the jar, about an inch below the scarf line. -
Glue the bottom button:
Attach the bottom button next. Placing the top and bottom ones first helps you space the middle ones perfectly without running out of room. -
Attach remaining buttons:
Glue the remaining two buttons in the space between the top and bottom ones, keeping them aligned in a straight vertical column. -
Clean up:
Once the glue is cool, gently pull away any wispy hot glue strings that might be draping across the paint. -
Fill the jar:
Fill your new snowman container with mini marshmallows, white hot cocoa powder, or peppermint candies to complete the snowy effect.
Enjoy displaying your festive winter jar on a coffee station or gifting it to a friend
Raised Texture Relief
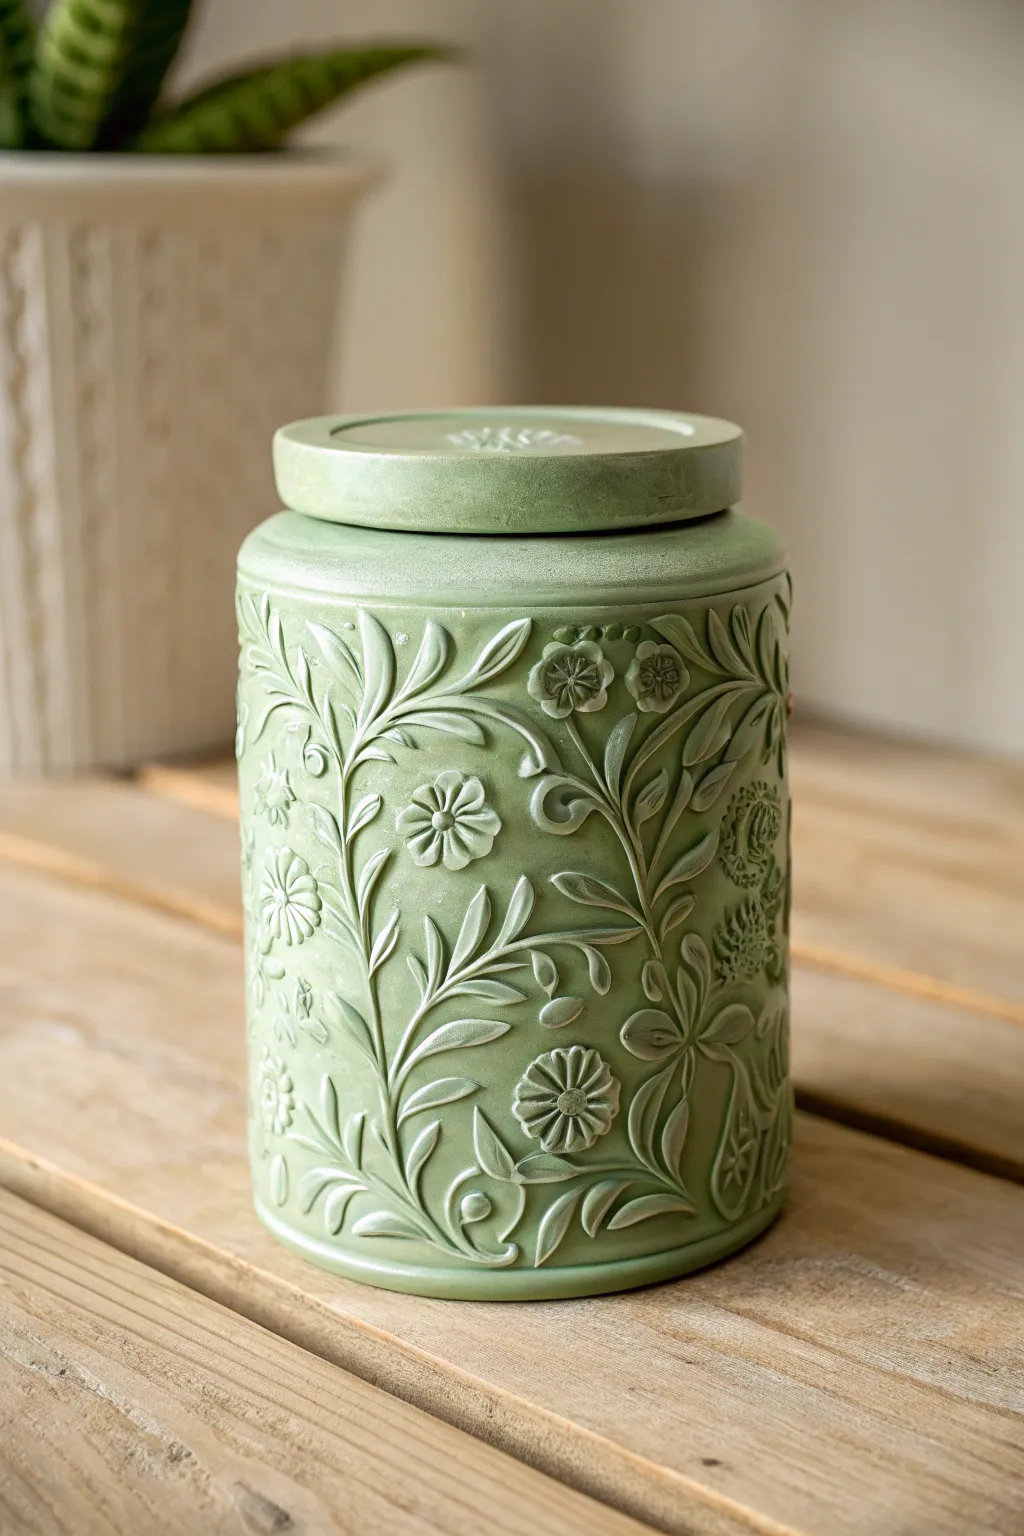
Transform a plain glass or ceramic container into a high-end, faux-ceramic masterpiece using relief piping techniques. This project relies on thick texture paste and a monochromatic palette to create an elegant, tactile surface that begs to be touched.
Step-by-Step Tutorial
Materials
- Cylindrical jar with lid (glass or smooth ceramic)
- Rubbing alcohol and cotton pads
- Bonding primer (for glass/tile)
- Modeling paste or heavy structure gel
- Precision applicator bottle or piping bag with fine round tip
- Sage green chalk paint
- Soft synthetic flat brush
- High-grit sandpaper (400 grit)
- Matte spray varnish
- Pencil (optional)
Step 1: Surface Preparation
-
Clean the surface:
Wipe the entire exterior of the jar and lid thoroughly with rubbing alcohol to remove any oils or residue. -
Apply primer:
Brush on a thin, even coat of bonding primer to ensure your texture paste adheres to the smooth surface. -
Allow to cure:
Let the primer dry completely according to the manufacturer’s instructions before moving on. -
Plan the design:
Lightly sketch a flowing vine pattern onto the jar using a pencil, or simply plan the path mentally for a free-flowing look.
Step 2: Piping the Relief
-
Prepare the paste:
Fill your precision applicator bottle with modeling paste; tap the bottle on the table to release trapped air bubbles. -
Test the flow:
Squeeze a practice line onto a scrap piece of paper to ensure the consistency is smooth and the line width is consistent. -
Pipe the main vines:
Starting from the bottom, gently squeeze the bottle to trace the main stems of your vines, allowing them to curve organically up the jar. -
Add leaves:
Pipe leaf shapes branching off the stems; press harder at the base of the leaf and release pressure as you pull away to create a tapered tip. -
Create flower centers:
Squeeze small, raised dots in the open spaces where you want your blooms to sit. -
Form the petals:
Pipe teardrop shapes radiating outward from the flower centers, keeping them close together for a lush look. -
Detail the lid:
Repeat a small floral motif or simple vine circle on the center of the jar lid to match the body. -
Dry the texture:
Let the jar sit undisturbed for at least 24 hours; the paste is thick and needs to harden completely to the core.
Fixing Mistakes
If you pipe a leaf or line you aren’t happy with, don’t panic. Simply use a damp Q-tip or a palette knife to immediately wipe the wet paste away and try again.
Step 3: Painting and Finishing
-
Smooth the peaks:
Once fully hard, gently run fine-grit sandpaper over the design to knock down any sharp, unwanted peaks from the piping. -
Remove dust:
Wipe the jar with a dry, soft cloth or brush to remove any sanding dust from the crevices. -
Apply base coat:
Paint the entire jar and lid with sage green chalk paint, using a stippling (poking) motion to get paint into the tight corners of the relief. -
Check for gaps:
I like to rotate the jar under a bright light here to make sure I haven’t missed any white spots of paste hidden under the leaves. -
Apply second coat:
Brush on a second coat of paint to effectuate a completely opaque, seamless ceramic finish. -
Dry thoroughly:
Allow the paint to dry completely; chalk paint usually dries quickly but give it an hour to be safe. -
Seal the work:
Spray the jar with a matte varnish to protect the paint without adding unwanted shine, preserving the powdery ceramic look.
Antique Shadowing
To add more depth, mix a drop of dark grey paint with water to create a glaze. Brush it over the texture and wipe it back immediately, leaving shadows in the recesses.
Place your newly textured jar on a shelf or desk to enjoy that sophisticated, handcrafted charm.
Trendy Faux Terracotta

Transform a plain glass vessel into a trendy, high-end piece of pottery without using a kiln. This project uses a clever textural mixture to replicate the gritty, matte surface of aged sun-baked clay.
Detailed Instructions
Materials
- Large glass jar (recycled)
- Acrylic paint (Burnt Sienna/Terracotta)
- Acrylic paint (Warm White/Cream)
- Baking soda
- Rubbing alcohol
- Cotton pad
- Flat paintbrush
- Palette or paper plate
- Matte clear sealant spray
Step 1: Preparation
-
Clean everything:
Remove any labels and sticky residue from your glass jar using warm soapy water. -
Degrease surface:
Wipe the entire exterior of the jar with rubbing alcohol on a cotton pad to ensure the paint adheres perfectly to the slick glass.
Too clumpy?
baking soda paints can thicken rapidly on the palette. If your mix becomes unspreadable halfway through, mix in a tiny splash of water to revive the creamy consistency without losing the grit.
Step 2: Mixing the Texture
-
Pour base color:
Squeeze a generous amount of Burnt Sienna acrylic paint onto your palette. If the color feels too dark, mix in a touch of Cream to soften it. -
Add the secret ingredient:
Sprinkle baking soda into the paint. Start with a ratio of 1 part baking soda to 2 parts paint. -
Mix consistency:
Stir the mixture with your brush handle. You are looking for a thick, fluffy consistency that resembles mousse or gritty frosting. -
Adjust thickness:
If the mix is too runny, add more soda; if it’s too stiff to spread, add a drop of water or more paint.
Ancient Dust Hack
For an even more authentic ‘fresh from the ruins’ look, lightly rub actual flour or cornstarch onto the fully dried paint before sealing. It settles into the crevices like real dust.
Step 3: Painting
-
First layer application:
Apply the mixture to the jar using horizontal brush strokes to cover the surface quickly. -
Create grit:
While the paint is wet, go back over it using a dabbing or stippling motion with the tip of the brush to create a rough, pitted texture. -
Cover the rim:
Paint the top rim and just inside the neck of the jar so the glass remains hidden when looking from above. -
First dry time:
Let this coat dry completely. I like to wait about 30 to 45 minutes until it is cool to the touch. -
Second coat:
Mix a fresh batch of textured paint and apply a second layer to ensure total opacity and build up the tactile surface. -
Refine visible texture:
Focus your stippling on areas that look too smooth, building up ridges that will mimic natural clay perfections. -
Full cure:
Allow the jar to dry for several hours or overnight to ensure the baking soda mixture hardens fully.
Step 4: Aging & Finishing
-
Prepare dusting paint:
Put a small amount of lighter cream or off-white paint on a clean section of your palette; do not mix baking soda into this one. -
Check brush moisture:
Dip a dry brush into the paint and offload almost all of it onto a paper towel until the brush leaves remarkably faint marks. -
Dry brush technique:
Lightly sweep the dry brush over the raised textures of the jar to catch the ‘peaks’ of the grit, mimicking the calcium bloom seen on old pots. -
Create scuffs:
Dab a little extra light paint in random spots to simulate weathered abrasions or sun-bleached areas. -
Seal the work:
Once you are happy with the weathered look, spray the jar with a clear matte sealant to stop the texture from flaking off over time. -
Add botanicals:
Fill your new vessel with dried pampas grass or wheat stems to complete the rustic vibration.
Now you have a stunning, stone-like vessel ready to warm up any corner of your home


Have a question or want to share your own experience? I'd love to hear from you in the comments below!