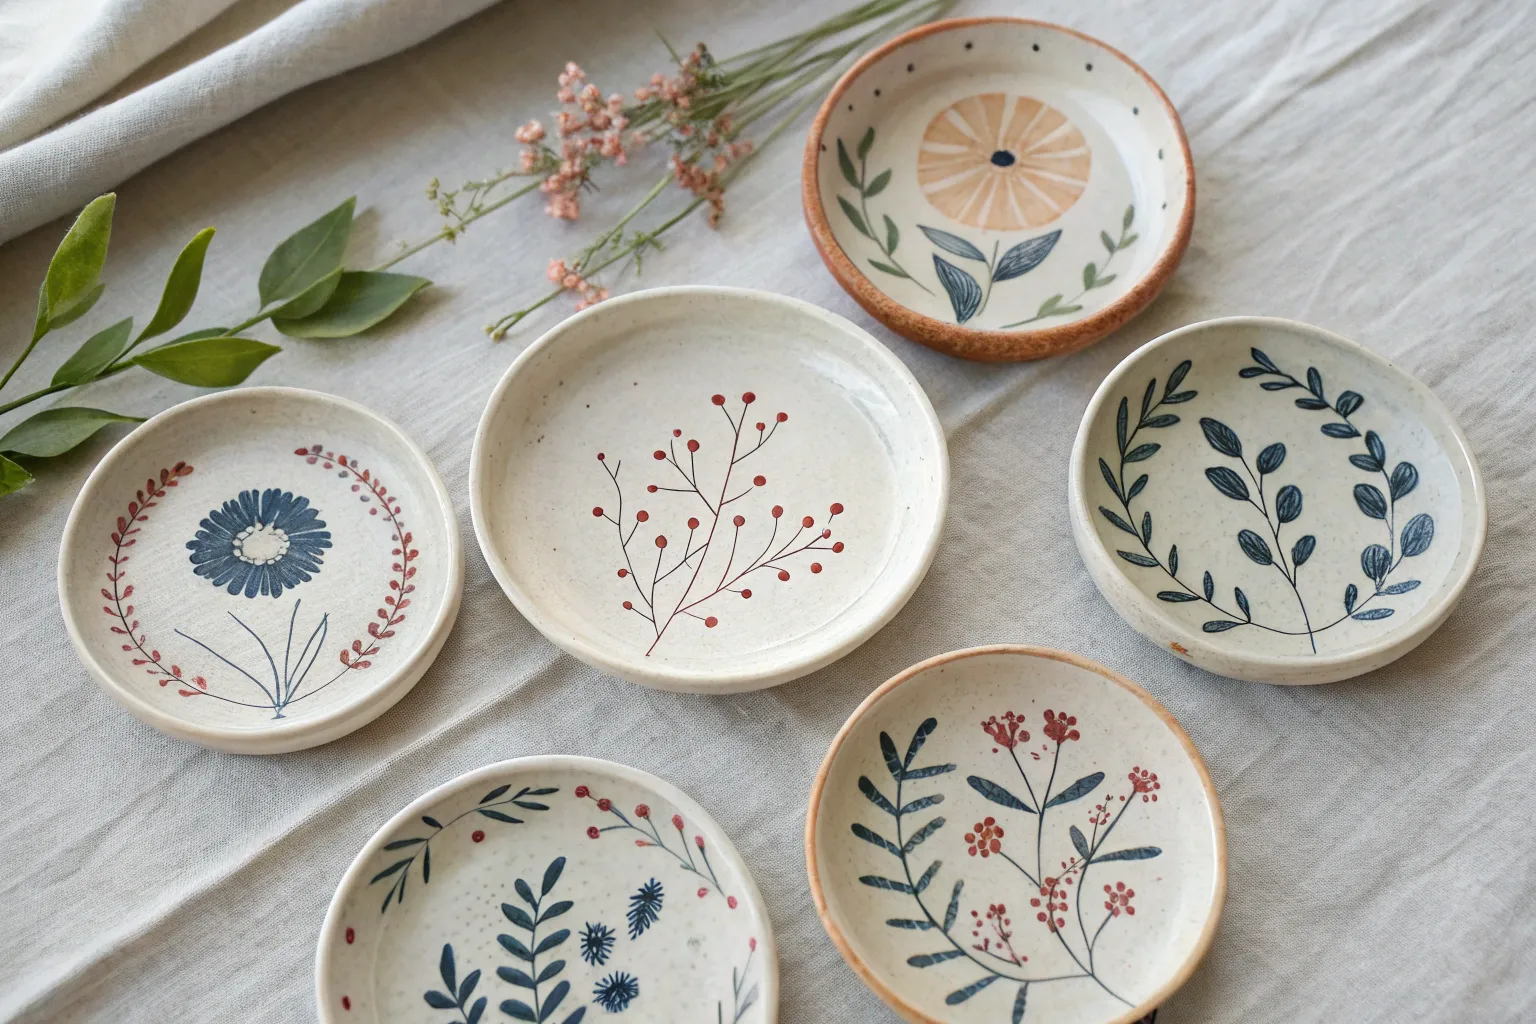
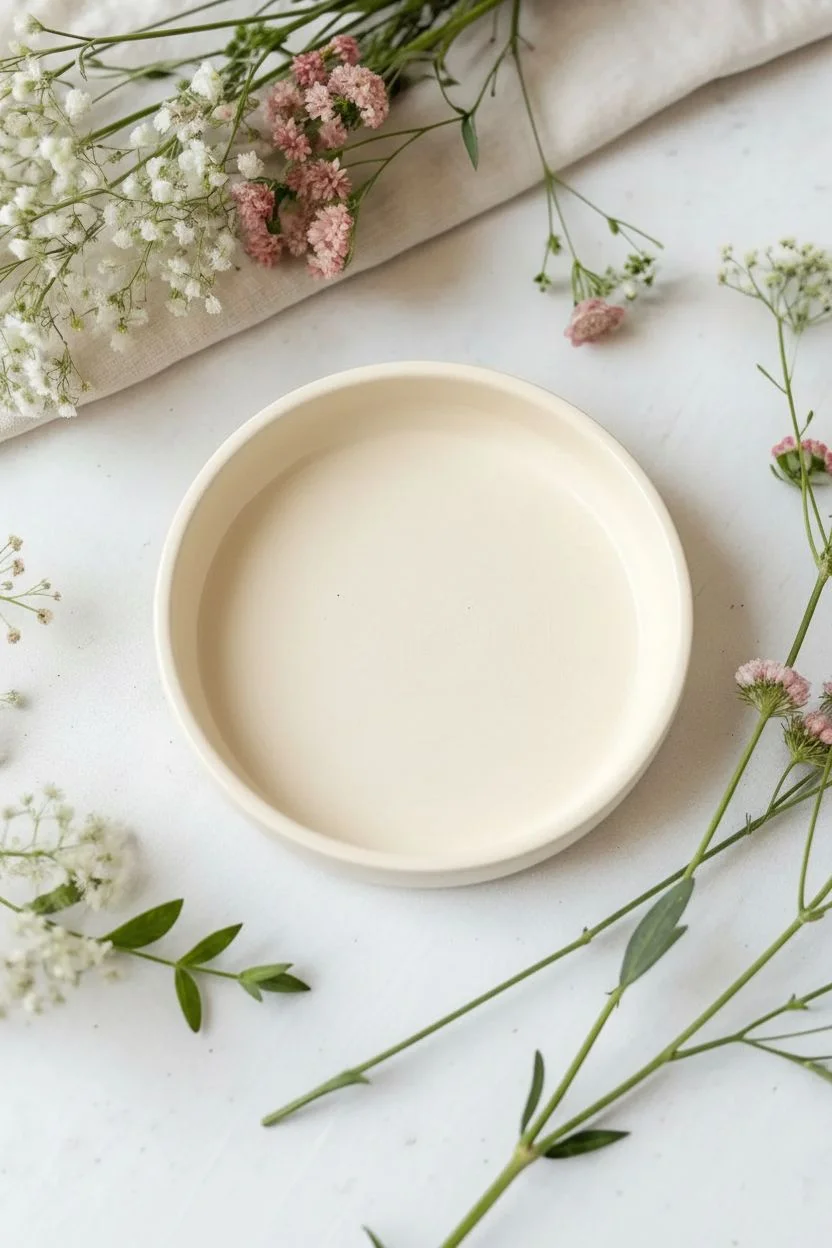
A little jewelry dish is basically a tiny canvas you can finish in one cozy sitting, and it instantly makes your nightstand feel more intentional. Here are my favorite jewelry dish painting ideas—starting with the classics everyone loves and building into those extra-fun, artsy twists.
Delicate Floral Wreath Border
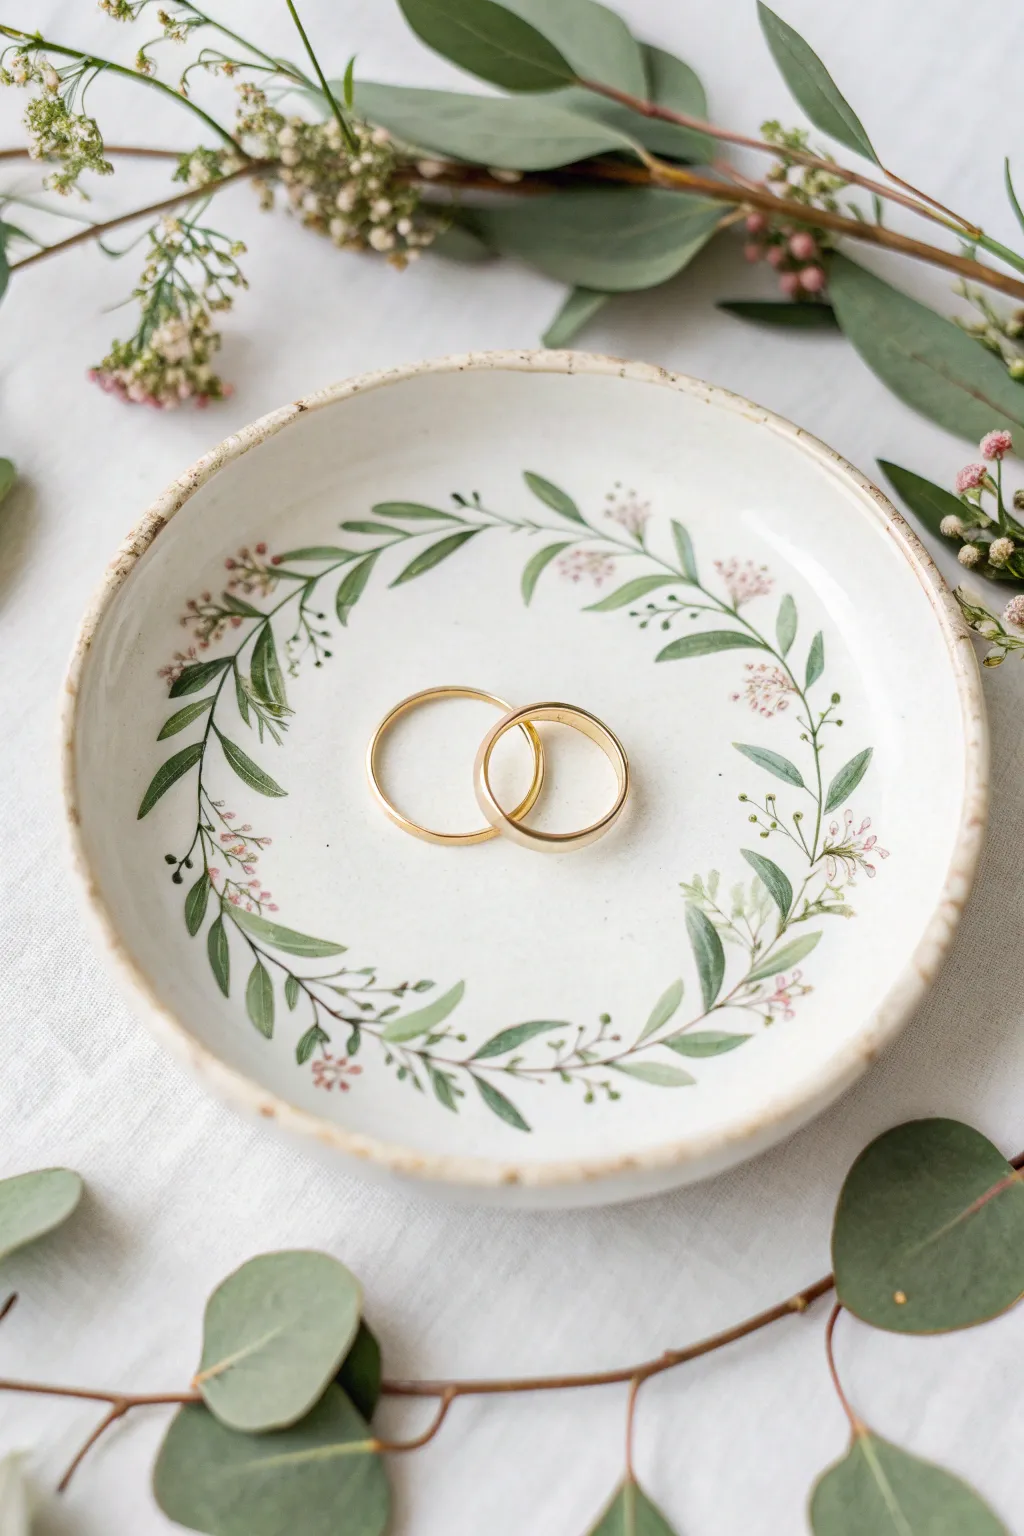
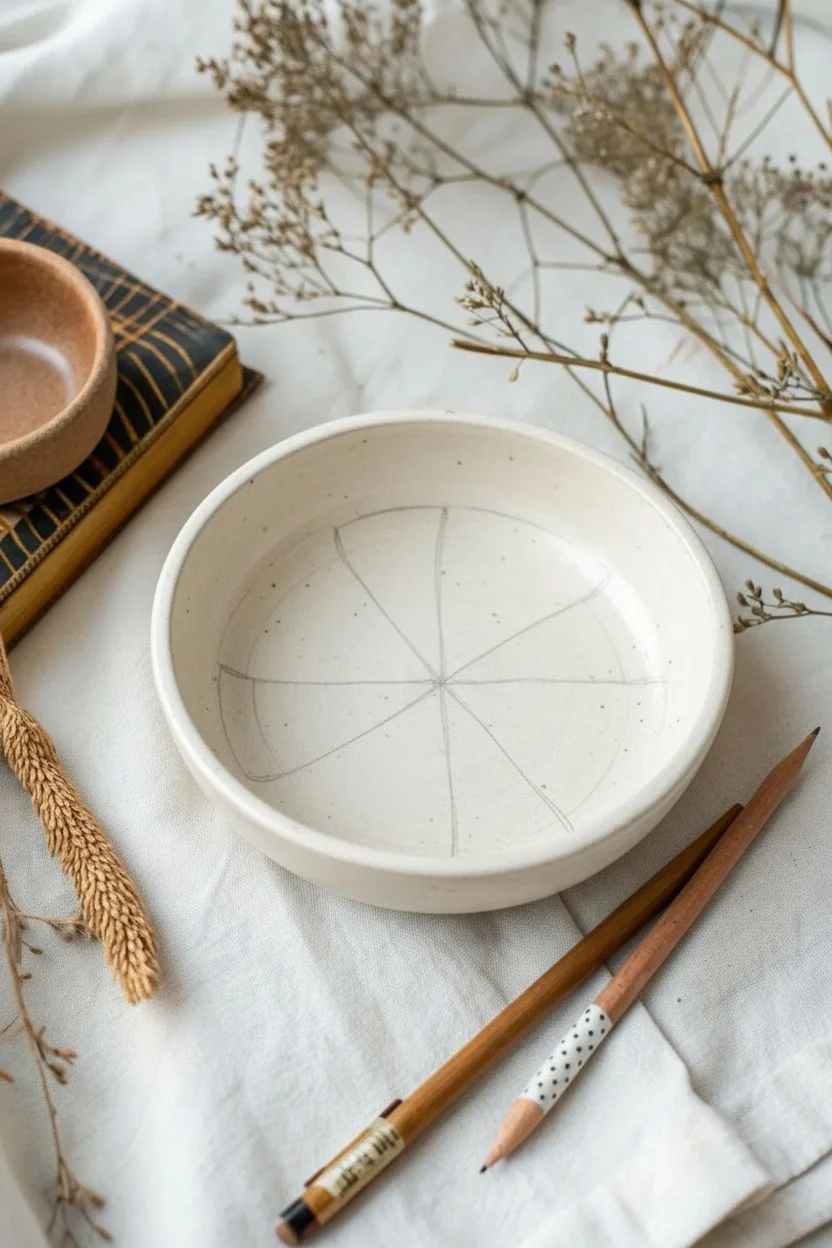
Capture the elegance of nature with this delicate floral wreath design, perfectly framing your most precious rings. Using fine brushwork and soft natural tones, you’ll transform a simple clay dish into a keepsake that feels like a vintage botanical illustration.
Step-by-Step
Materials
- White air-dry clay or pre-made ceramic ring dish
- Acrylic paints (Olive Green, Sage Green, Forest Green, Pastel Pink, Cream, Brown)
- Glazing medium or water for thinning paint
- Fine liner brush (size 00 or 000)
- Small round brush (size 2)
- Gloss varnish or sealant
- Palette for mixing
- Pencil
- Sandpaper (fine grit)
Step 1: Base Preparation
-
Surface smoothing:
If you are starting with a handmade clay dish, ensure it is completely dry. Take your fine-grit sandpaper and gently gently buff the interior surface until it feels smooth to the touch. -
Dust removal:
Wipe the dish down with a slightly damp cloth to remove all clay dust. A clean surface is crucial for delicate line work to adhere properly. -
Base coat application:
Using the round brush, apply a layer of creamy off-white paint to the interior of the dish. This mimics the look of glazed stoneware and provides a warm background for the leaves.
Brush Control Trick
To get razor-thin vine lines, roll your liner brush tip in the paint on your palette to form a sharp point before touching the dish.
Step 2: Painting the Wreath Structure
-
Sketch the circle:
Lightly trace a circle inside the bowl with a pencil, keeping it about half an inch away from the rim. I like to keep my pencil lines extremely faint so they disappear under the paint later. -
Create the main stems:
Mix a small amount of brown paint with olive green and thin it slightly with water. Using your fine liner brush, paint thin, winding vines along your pencil guide. Let the line break occasionally for a natural look; it shouldn’t be a perfect heavy circle. -
Add secondary branches:
While the main stems are still tacky, pull small, short offshoot stems extending outward and inward from the main circle. Vary the length and direction to create organic movement. -
Initial drying:
Allow the skeleton of your wreath to dry for at least 15 minutes before adding foliage to prevent muddying the colors.
Step 3: Layering the Foliage
-
Paint base leaves:
Load your liner brush with sage green. Press the belly of the brush down gently and lift up quickly to create tapered, almond-shaped leaves along the stems. -
Varying size:
Make some leaves slightly larger near the bottom curve of the wreath and smaller, more delicate ones near the top. -
Adding depth with darks:
Switch to forest green. Paint a few darker leaves tucked behind the sage ones or overlapping slightly. This variation gives the wreath visual volume. -
Introducing movement:
Paint a few leaves that aren’t perfectly attached to the stems, floating nearby. This creates a whimsical, airy effect.
Make it Personal
Hide tiny initials of the couple or a significant date within the leaves using a brown micron pen before sealing the dish.
Step 4: Floral Details & Finishing
-
Dotting the buds:
Mix a very pale pink with a dot of cream. Using the absolute tip of your smallest brush, dab clusters of tiny dots at the tips of the smaller branches to resemble baby’s breath or budding flowers. -
Adding definition:
Once the pink dots dry, add microscopic specks of reddish-brown near the base of the flower clusters to anchor them to the stems. -
Rim accents:
Dip a dry brush (or even a small sponge) into light brown paint. Gently dab the very edge of the dish rim to create a rustic, distressed pottery look. -
Final cure:
Allow the paint to cure for 24 hours to ensure everything is completely set. -
Sealing:
Apply two coats of gloss varnish, letting the first coat dry completely before adding the second. This protects the painted design from ring scratches and gives it a ceramic shine.
Now you have a charming, nature-inspired resting place for your favorite jewelry pieces


Tiny Wildflower Scatter
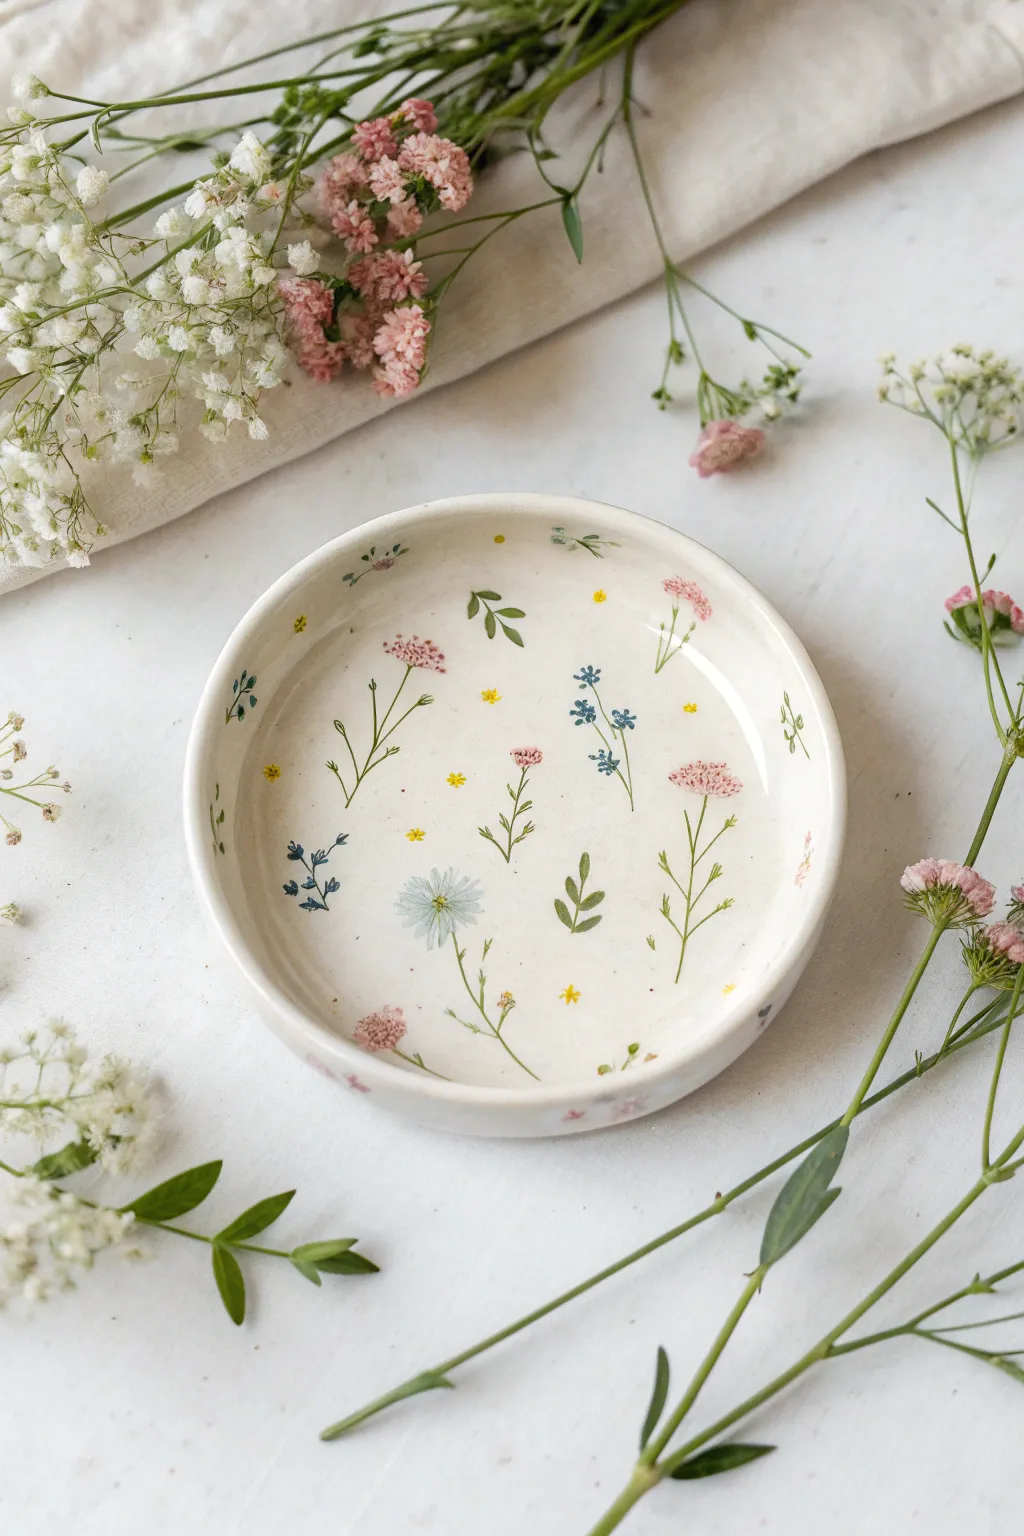
Transform a plain ceramic dish into a botanical keepsake with this delicate wildflower scatter pattern. The airy, minimal design mimics pressing flowers into clay, creating a sweet and functional piece for your jewelry.
Step-by-Step Tutorial
Materials
- Small white ceramic jewelry dish (glazed or unglazed bisque)
- Ceramic paints or high-quality acrylics (light pink, deep pink, cornflower blue, sunny yellow, sage green, olive green, cream)
- Fine detail brushes (sizes 0, 00, and 000)
- Rubbing alcohol and cotton pad
- Ceramic sealant or gloss varnish
- Palette for mixing
Step 1: Preparation
-
Clean surface:
Before painting, wipe down your ceramic dish thoroughly with rubbing alcohol on a cotton pad. This removes any invisible oils or dust that might prevent the paint from adhering properly. -
Base coat (optional):
If your dish is a stark white and you prefer the creamy, warm tone shown in the photo, mix a tiny drop of yellow and brown into white paint. Apply a thin, even wash over the entire interior and let it dry completely.
Shaky Hands?
If your lines feel too thick or shaky, try resting your pinky finger on the dish surface to stabilize your hand while painting the fine stems.
Step 2: Painting the Stems
-
Mix green shades:
On your palette, prepare two shades of green: a lighter sage for young stems and a deeper olive for leaves. I usually thin these slightly with a drop of water to help the paint flow smoothly from a liner brush. -
Draft the stems:
Using your thinnest brush (size 000), paint extremely thin, curving lines scattered randomly across the bottom and sides of the dish. Vary the lengths and directions so they don’t look uniform. -
Add leaves:
Along some stems, press the belly of your brush down gently and lift up to create small, tapered leaves. Leave some stems bare for now—variety is key to the wild look. -
Create floating foliage:
Paint a few standalone sprigs of leaves without flowers. Use the olive green for these small clusters to add depth to the composition.
Gold Accents
For a luxe finish, paint the very rim of the dish with liquid styling gold leaf, or add tiny metallic dots to the flower centers.
Step 3: Adding the Blooms
-
Pink clustered flowers:
Dip a size 00 brush into light pink paint. Create the flat-topped flower clusters (like yarrow) by dabbing tiny dots close together at the top of a few stems. -
Detailing the pinks:
Once the light pink base is tacky but not fully dry, add tinier dots of deep pink on top to create shadow and texture within the blooms. -
Blue sprigs:
Using the cornflower blue, paint small five-petaled flowers along the finer stems. These should look like forget-me-nots. Keep them loose; they don’t need to be botanically perfect. -
The single daisy:
Choose a focal point for the large pale blue daisy. Paint very thin, long petals radiating from a center point using a diluted blue-grey mix so it looks translucent. -
Yellow accents:
Use a toothpick or the very tip of your smallest brush to place tiny yellow dots. Put them in the centers of the blue flowers and scatter solitary yellow dots in the empty white spaces to fill gaps.
Step 4: Finishing Touches
-
Rim details:
Don’t forget the sides of the dish. Paint a few stems ‘growing’ up the vertical rim to create continuity. -
Review spacing:
Step back and look at the scatter pattern. If there is an awkward empty spot, add a tiny extra leaf or a single floating yellow dot to balance it out. -
Cure time:
Let the paint dry for at least 24 hours. If using specific ceramic paints that require baking, follow the manufacturer’s instructions for oven curing. -
Sealing:
Apply two thin coats of a clear glossy varnish or ceramic sealant. This protects your delicate brushwork from scratching when you toss your keys or rings into the dish.
Enjoy using your new floral dish to hold your favorite treasures


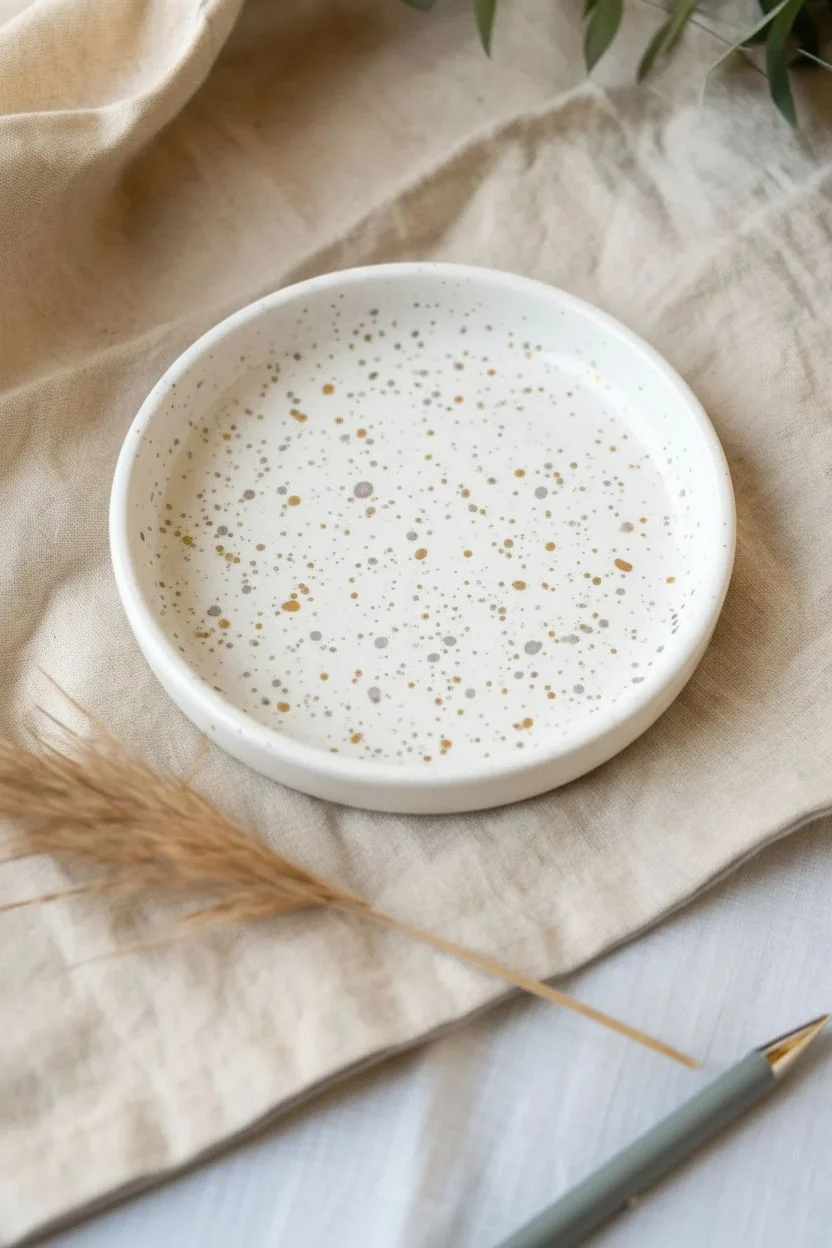
Classic Polka Dots and Dashes
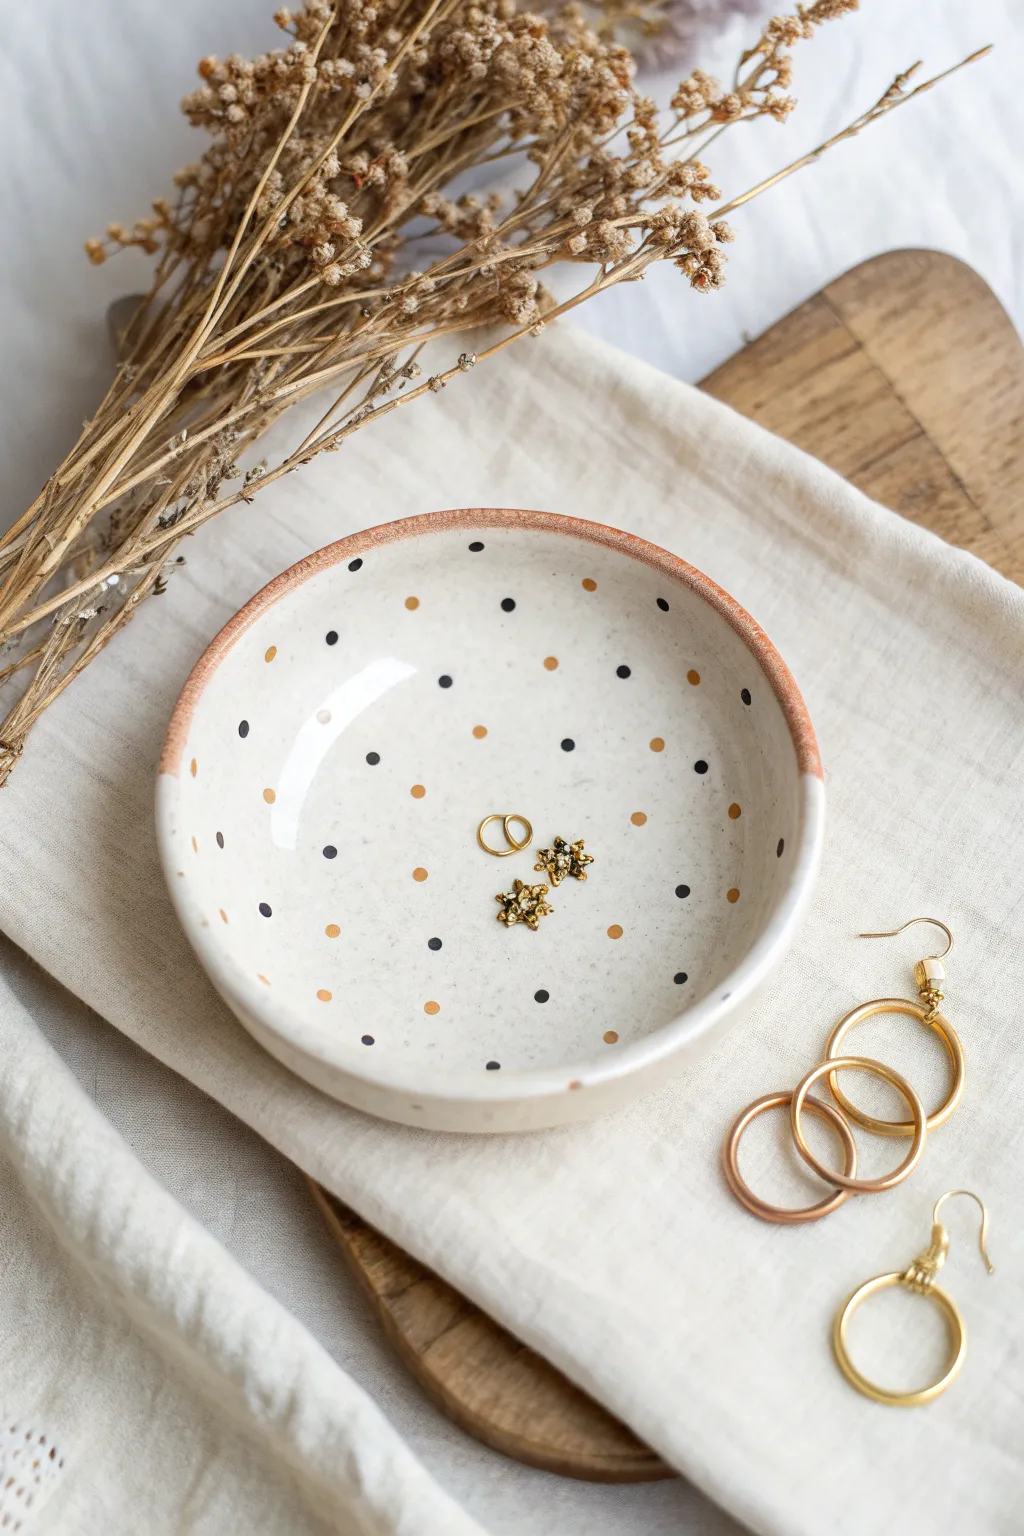
This charming speckled jewelry dish combines rustic exposed clay with a classic, minimalist pattern. The interplay of mustard yellow and charcoal black dots creates a timeless look that is perfect for holding your favorite studs and rings.
Step-by-Step
Materials
- Small ceramic or polymer clay dish (bisque or oven-bake)
- Ceramic paint or acrylic paint (black/charcoal)
- Ceramic paint or acrylic paint (mustard/gold)
- Clear gloss glaze or varnish
- Paintbrush (small round or detail)
- Cotton swabs or a dedicated dotting tool
- Painter’s tape or wash tape
- Paper plate or palette
- Paper towels
- Sandpaper (fine grit, optional)
Step 1: Preparation and Base
-
Prepare the surface:
Begin by ensuring your dish is clean, dry, and free of any dust or oils. If you are using a bisque ceramic piece or baked polymer clay, wipe it down with a slightly damp paper towel. -
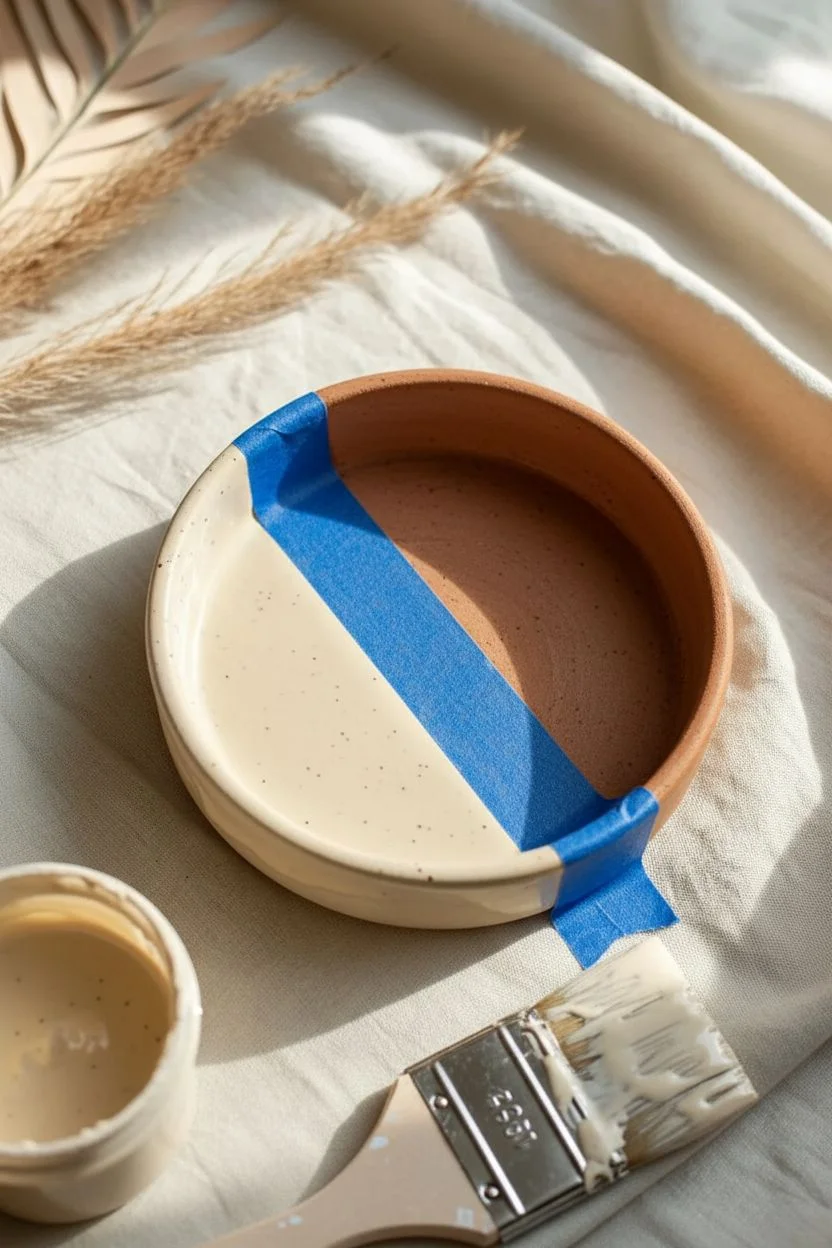
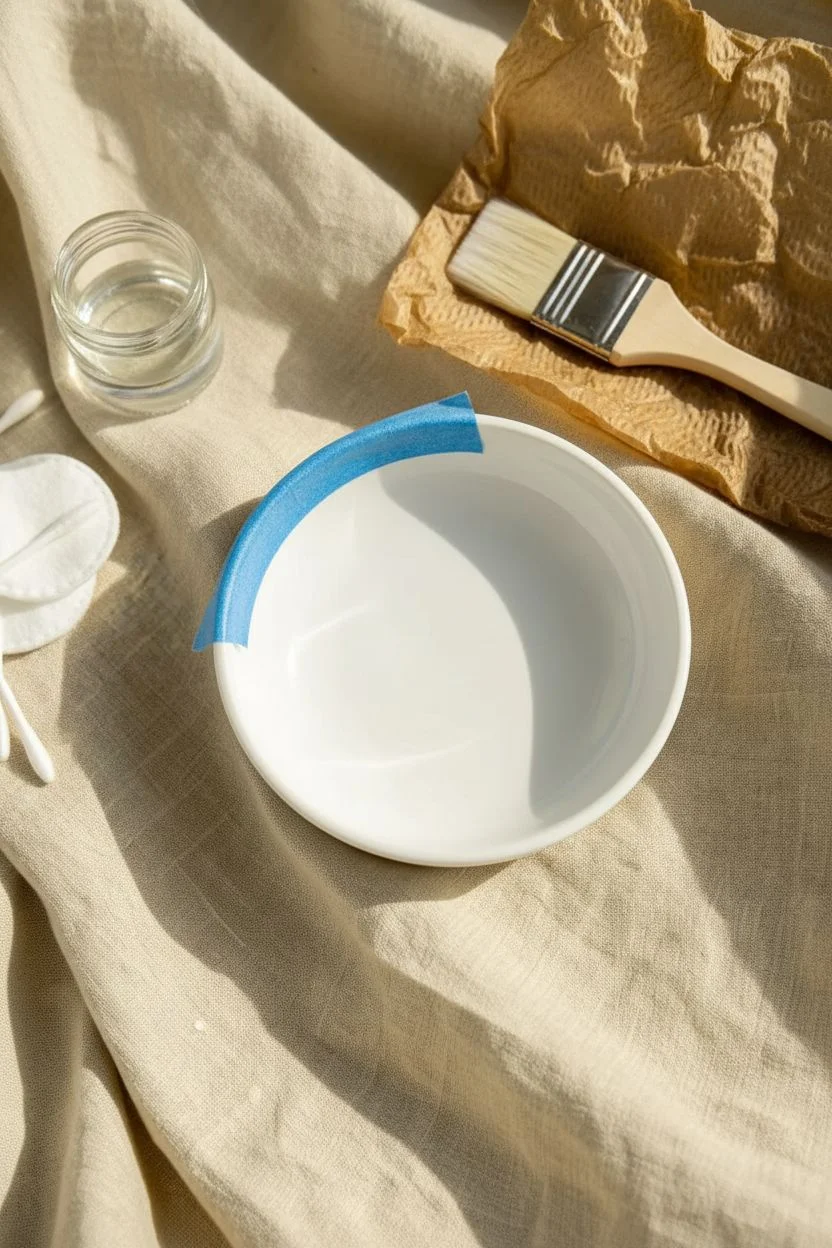
Mask the rim:
The rim of this dish features a lovely exposed clay look. To keep this area neat, carefully apply a strip of painter’s tape around the outer edge where you want the raw color to remain visible. -
Apply the base coat:
Using a creamy white or off-white paint, cover the interior of the dish entirely. You want a smooth, solid background for your dots. -
Let it dry completely:
Allow the base coat to dry fully to the touch. If the first coat looks streaky, apply a second thin layer for better opacity and wait for it to cure.
Step 2: Creating the Polka Dot Pattern
-
Set up your palette:
Dispense a small dime-sized amount of your charcoal black and mustard yellow paints onto your paper plate. -
Select your dotting tool:
For irregular, organic dots like in the photo, the back end of a paintbrush handle works wonderfully. Dip the handle directly into the charcoal paint. -
Start with the black dots:
Distribute the black dots randomly across the surface of the dish. I prefer starting near the center and working outward to ensure even spacing. -
Vary the pressure:
Press gently for smaller dots and slightly harder for larger ones to create natural variation, keeping the spacing loose and airy. -
Clean your tool:
Wipe off the charcoal paint from your tool completely using a paper towel, or switch to a fresh cotton swab. -
Add the mustard accents:
Dip your tool into the mustard yellow paint. Look for the empty spaces between your black dots and fill them in with yellow dots. -
Balance the design:
Step back and look at the dish from a distance. If any areas look too sparse, add a tiny dot of either color to balance the composition. -
Dry the pattern:
Let the polka dots dry completely. This step is crucial so you don’t smudge your hard work during the glazing phase.
Don’t Aim for Perfection
For this organic look, use the wooden end of different sized paintbrushes to stamp dots. Hand-painted variations make it look more authentically ceramic.
Step 3: Finishing Touches and Sealing
-
Create the rim detail:
Remove the painter’s tape carefully. Use a very small brush to paint a thin, uneven line of terra cotta or rust-colored paint along the very top edge of the rim to mimic the raw clay look shown in the image. -
Soften the rim edge:
While the rim paint is still slightly wet, you can dab it gently with a dry paper towel to soften the line, making it look more like organic earthenware. -
Prepare the glaze:
Once all paint is bone dry, stir your clear gloss glaze gently to avoid creating bubbles. -
Apply the glaze:
Using a soft, wide brush, apply a coat of gloss glaze over the entire interior of the dish. This protects the paint and gives it that professional ceramic shine. -
Check for drips:
Immediately inspect the sides of the dish for any dripping glaze and smooth them out with your brush before they set. -
Final cure:
Allow the dish to cure according to your sealant’s instructions. If using ceramic paint that requires baking, place the dish in a cold oven and heat it as directed.
Add Metallic Flair
Swap the mustard yellow paint for a liquid gold leaf or metallic gold acrylic. The shimmer adds a luxurious touch that catches the light beautifully.
Now you have a stylish spot to keep your everyday jewelry safe and organized


Simple Black-and-White Linework
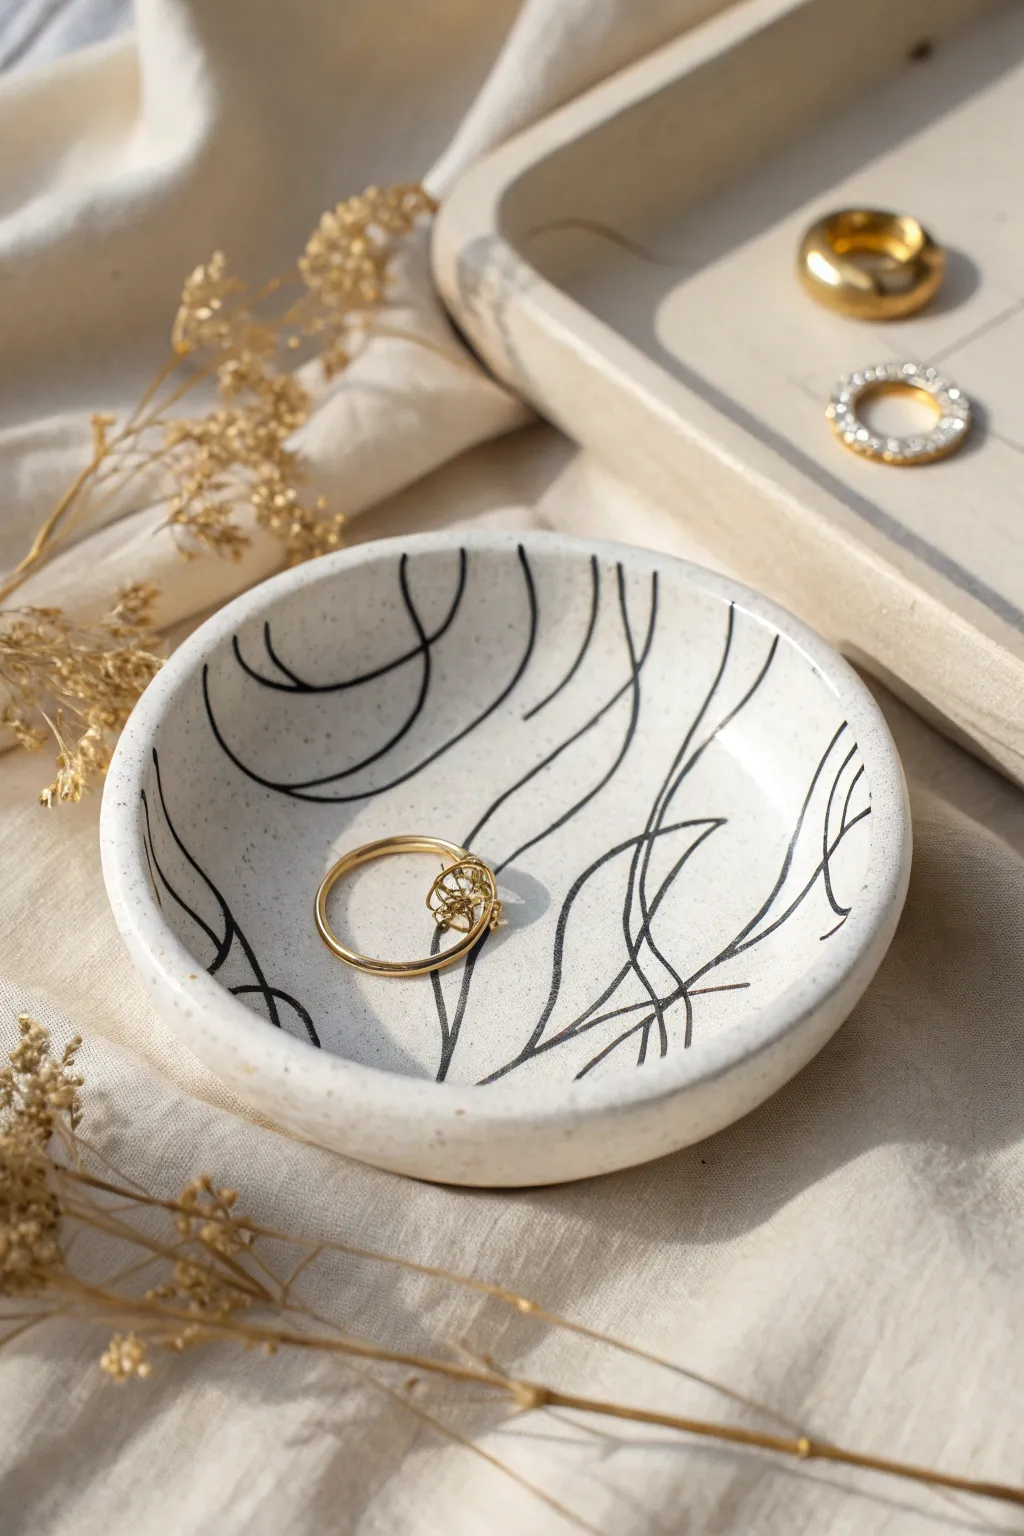
Embrace the elegance of simplicity with this modern jewelry dish featuring fluid, abstract black lines on a speckled cream base. The organic linework creates a sense of movement that perfectly complements delicate gold rings and accessories.
Step-by-Step Tutorial
Materials
- Small ceramic pinch pot or unglazed bisque dish
- Cream or off-white acrylic paint (matte finish)
- Flecked texture medium or fine sand (optional for speckled effect)
- Fine-tip black paint pen (oil-based works best on ceramic)
- Glossy varnish or sealant (Mod Podge or spray finish)
- Small flat paintbrush
- Old toothbrush (optional for speckling)
- Light brown acrylic paint (optional for speckling)
Step 1: Base Preparation
-
Clean surface:
Begin with a clean, dry ceramic dish. If you are using an upcycled thrift store find, wash it thoroughly with soap and water and wipe it down with rubbing alcohol to remove any oils. -
Mix base color:
Pour out a dollop of cream or warm off-white acrylic paint. If you want that stone-like texture shown in the image, mix in a tiny pinch of fine sand or texture medium. -
Apply first coat:
Using a soft, flat paintbrush, cover the entire inside and rim of the dish. Use long, smooth strokes to minimize brush marks. -
Dry and repeat:
Let the first coat dry completely to the touch. Apply a second coat to ensure opaque, even coverage where no original clay shows through. -
Create speckles (Optional):
If you want the speckled effect without texture medium, dip an old toothbrush into diluted light brown paint. Run your thumb over the bristles to flick tiny droplets onto the dried cream base. Keep it subtle.
Ink Smearing?
If your black lines smear when applying varnish, switch to a spray sealant. Mist the first coat very lightly from a distance to ‘set’ the ink before applying a heavier second coat.
Step 2: Designing the Linework
-
Practice lines:
Before touching the bowl, grab a piece of scrap paper. Practice drawing long, fluid curves that intersect and flow like ribbons. The goal is confident, unbroken motion. -
Plan direction:
Visualize the flow inside your bowl. In the example, the lines tend to sweep from one side to the other, following the curvature of the dish. -
Start the primary curves:
Take your fine-tip black paint pen. Starting near the rim, draw your first long, sweeping curve down into the basin and back up the other side. Don’t overthink it; hesitation causes shaky lines. -
Add intersecting lines:
Draw a few more major curves that run roughly parallel to the first but occasionally intersect or diverge. Think of strands of hair or waving grass. -
Vary the weight:
For a more organic look, I like to re-trace parts of the lines to make them slightly thicker in the curves, tapering off to thin points at the ends. -
Fill the gaps:
Look for large empty spaces. fill them with smaller, separate curved segments that echo the main flow. Allow some lines to travel all the way up and over the rim. -
Refine edges:
Check the points where lines cross. If the ink skipped or looks translucent, carefully touch it up for a solid, bold black.
Step 3: Sealing and Finishing
-
Full cure time:
Let the paint pen ink dry completely. Depending on the brand, this might take an hour or two. If you rush this, the sealant might smear your beautiful lines. -
Select finish:
Choose a sealant. A matte spray keeps the raw ceramic look, but a glossy varnish (as seen in the photo) makes it look like glazed pottery and is easier to dust. -
Apply sealant:
Apply a thin, even layer of varnish over the inside of the dish. If brushing it on, use a very soft brush and minimal pressure to avoid dragging the black ink. -
Check for bubbles:
Immediately inspect the wet surface for bubbles. Gently blow on them or pop them with a dry brush tip before the sealant sets. -
Final cure:
Allow the dish to cure for at least 24 hours before placing any jewelry inside to ensure the surface is hard and non-tacky.
Line Variance Pro-Tip
Don’t just use one wrist motion. Rotate the actual dish in your hand as you draw. This helps you maintain a natural curve without awkwardly contorting your wrist.
Place your favorite rings in your new dish and enjoy the chic, artisan look you created yourself
BRUSH GUIDE
The Right Brush for Every Stroke
From clean lines to bold texture — master brush choice, stroke control, and essential techniques.
Explore the Full Guide
Soft Pastel Checkerboard
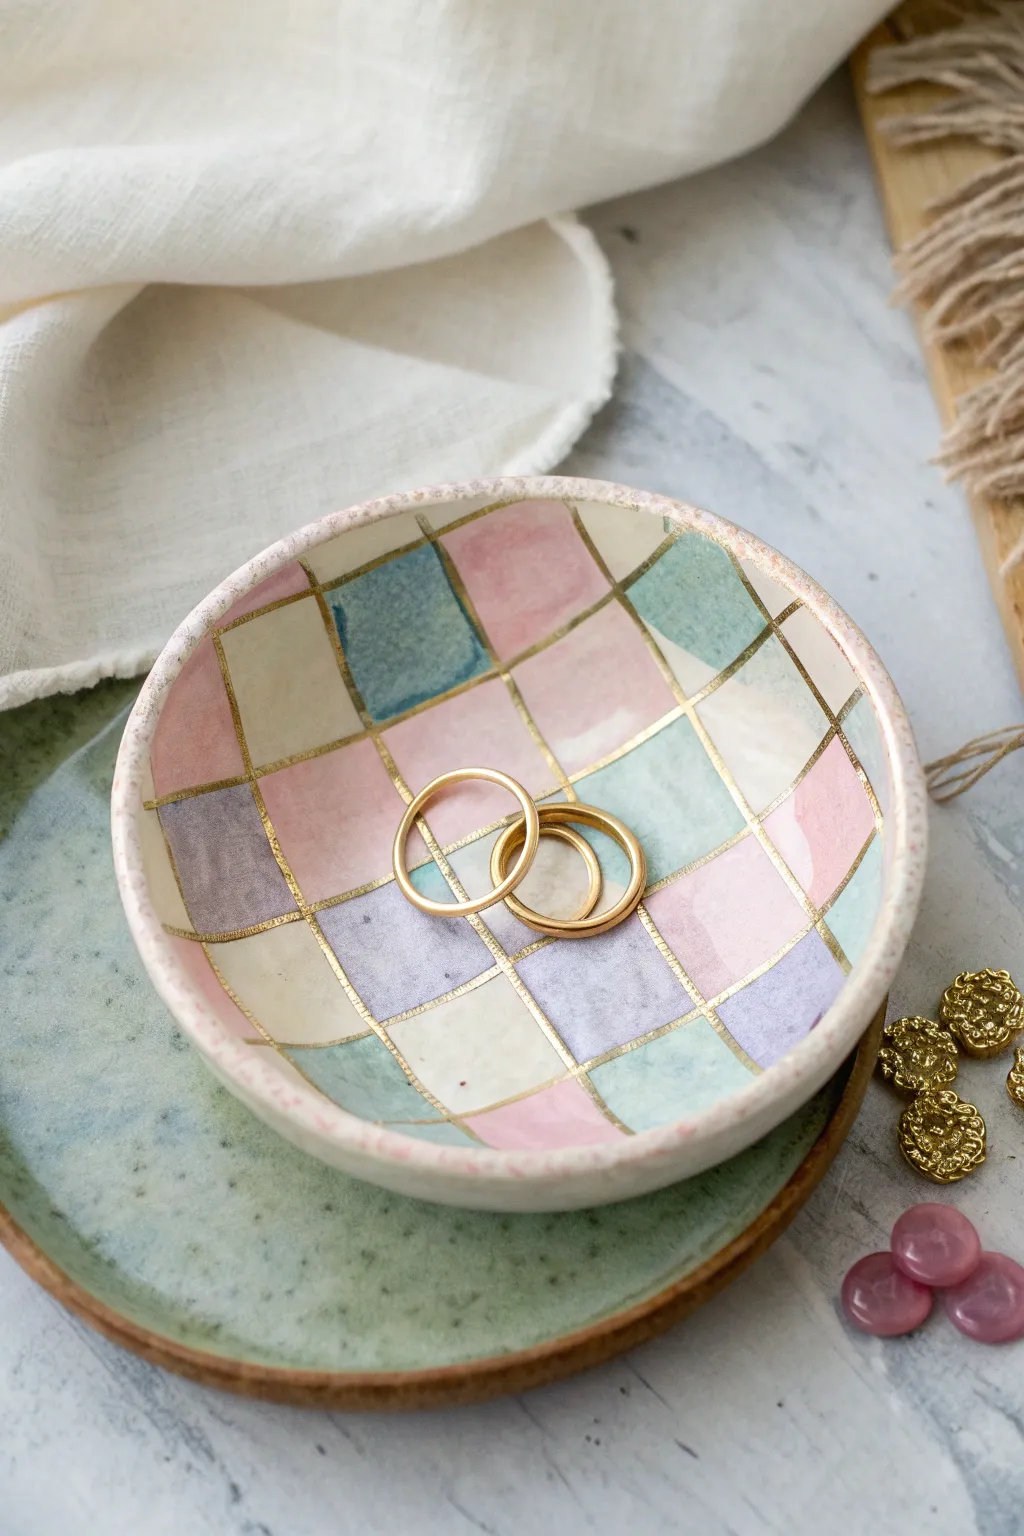
Transform a plain ceramic dish into a dreamy, heirloom-quality piece with this soft pastel checkerboard design. The delicate watercolor-style squares are beautifully grounded by elegant gold grid lines, creating the perfect resting place for your favorite rings.
Step-by-Step Guide
Materials
- Small white ceramic trinket dish (unglazed bisque or glazed)
- Ceramic paints or high-quality acrylics (Soft Pink, Mint Green, Lavender, Cream, Muted Blue)
- Pebeo Porcelaine 150 Outliner (Gold) or a fine-tip gold oil-based paint pen
- Flat shader brush (size 4 or 6)
- Fine liner brush (size 0 or 00)
- Glazing medium (if using acrylics to get transparency)
- Pencil
- Flexible ruler or measuring tape
- Gloss varnish or sealant (specifically for ceramics)
- Water cup and palette
- Paper towels
Step 1: Preparation & Mapping
-
Clean surface:
Begin by thoroughly cleaning your ceramic dish with rubbing alcohol or warm soapy water. Let it dry completely to ensure no oils or dust interfere with the paint adhesion. -
Mark the center:
Find the approximate center of your dish. Lightly mark a small dot with a pencil. This will serve as the anchor point for your grid wrapping around the curved surface. -
Draw vertical guides:
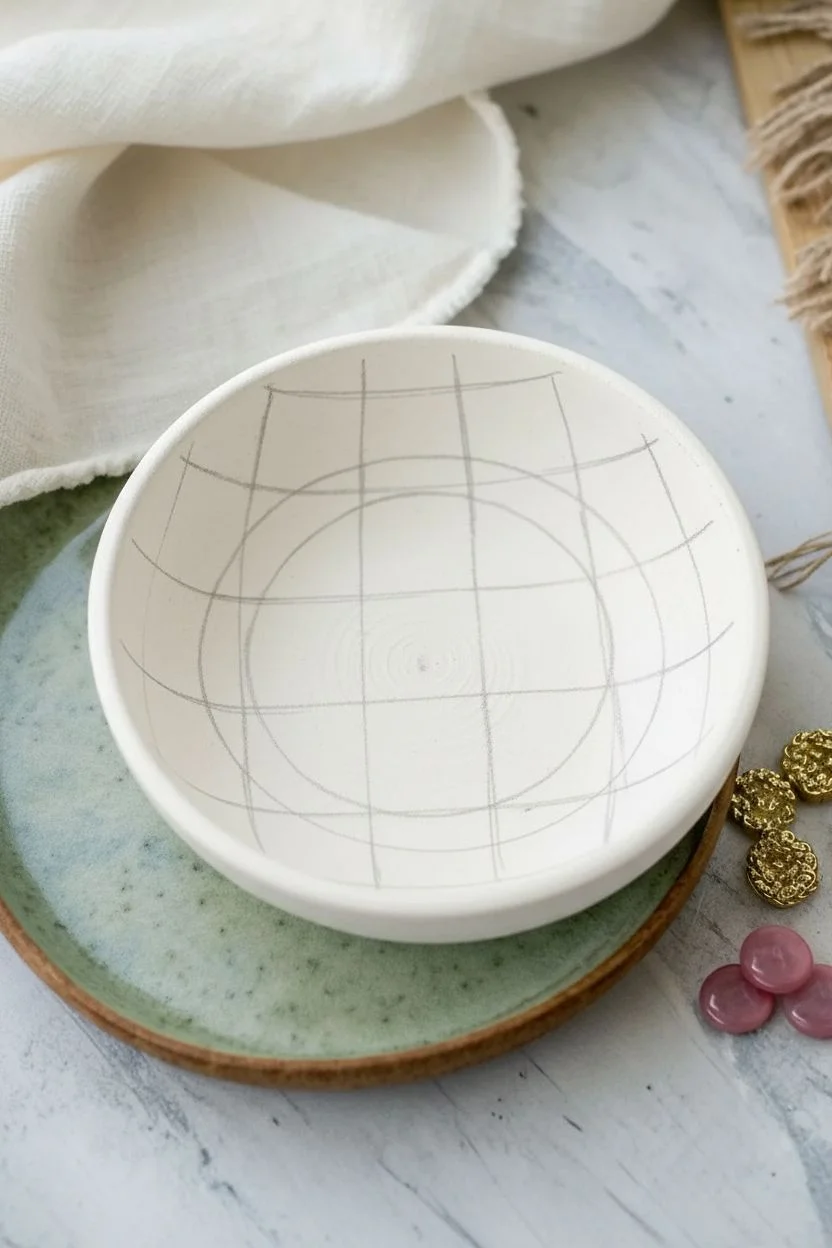
Using a flexible ruler or measuring tape, lightly sketch curved vertical lines radiating from the center out to the rim. Space them somewhat evenly, but don’t worry about mathematical perfection; a hand-drawn look adds charm. -
Draw horizontal guides:
Sketch concentric circles (or curved horizontal lines) crossing your vertical lines to create a grid. The squares near the rim will naturally be larger than those near the center due to the dish’s shape.
Pro Tip: Faux Watercolor
To get that cloudy watercolor look with acrylics, dip your brush in water *before* picking up paint. Don’t overwork the square; let the puddle dry naturally for darker edges.
Step 2: Painting the Pastels
-
Prepare the palette:
Squeeze out small amounts of your pastel colors: pink, mint, lavender, blue, and cream. Use a separate well to mix each color with a drop of water or glazing medium. You want a semi-transparent, watercolor-like consistency rather than opaque coverage. -
Paint the first color:
Start with the soft pink. Choose random squares on your grid to fill in. I like to keep them spaced out so no two pink squares touch directly. -
Apply the washes:
Use your flat shader brush to apply the wash. Let the paint pool slightly in some corners of the squares to mimic that watercolor texture seen in the photo. Don’t worry about perfect edges; the gold lines will cover them later. -
Add the mint tones:
Rinse your brush and switch to the mint green. Fill in adjacent squares, again keeping the application loose and gently translucent. -
Fill with remaining colors:
Continue the process with your lavender and muted blue shades. The variation in opacity is key here—some squares can be darker, while others are barely tinted. -
Fill the gaps:
Use the cream or a very pale yellow to fill in any remaining white squares. This warms up the design and ensures the white ceramic doesn’t look stark against the pastels. -
Detail the rim:
Take a slightly drier brush with a mix of pink and cream and dab it along the very edge of the rim to create a textured, speckled border. -
Let it cure:
Allow the paint to dry completely. If you used heavy washes, give it at least an hour to ensure the moisture has evaporated before adding the metallic layer.
Step 3: Gilding & Finishing
-
Test the gold:
If using a gold relief outliner tube, squeeze a little onto a paper towel first to ensure there are no air bubbles. If using a paint pen, pump the nib until flow is smooth. -
Trace vertical lines:
Carefully trace over your pencil grid lines. Start with the vertical lines radiating from the center. Work slowly to maintain a steady line width. -
Trace horizontal lines:
Connect the verticals with the horizontal grid lines. If your line breaks or looks shaky, embrace it—this style relies on organic imperfections rather than rigid geometry. -
Rim accent:
Run a thin line of gold along the very inner lip of the bowl, just below the textured rim paint, to frame the checkerboard pattern. -
Clean up smudges:
If you accidentally smear a gold line while it’s wet, quickly use a damp cotton swab or a toothpick to correcting the mistake before it sets. -
Final cure:
Allow the gold to dry according to the manufacturer’s instructions. Some ceramic paints require baking in a home oven (usually 300°F/150°C for 30 minutes) to become permanent and dishwasher safe. -
Seal (Optional):
If you didn’t use bake-on paints, apply a glossy varnish over the entire painted area to protect the surface from scratches from your jewelry.
Fixing Wobbly Grids
If your gold lines go astray, wait for them to dry completely. You can often scratch off the mistakes gently with a craft knife without damaging the base layer.
Place this lovely dish on your vanity to enjoy a touch of pastel elegance every time you reach for your jewelry
Modern Arch Rainbow
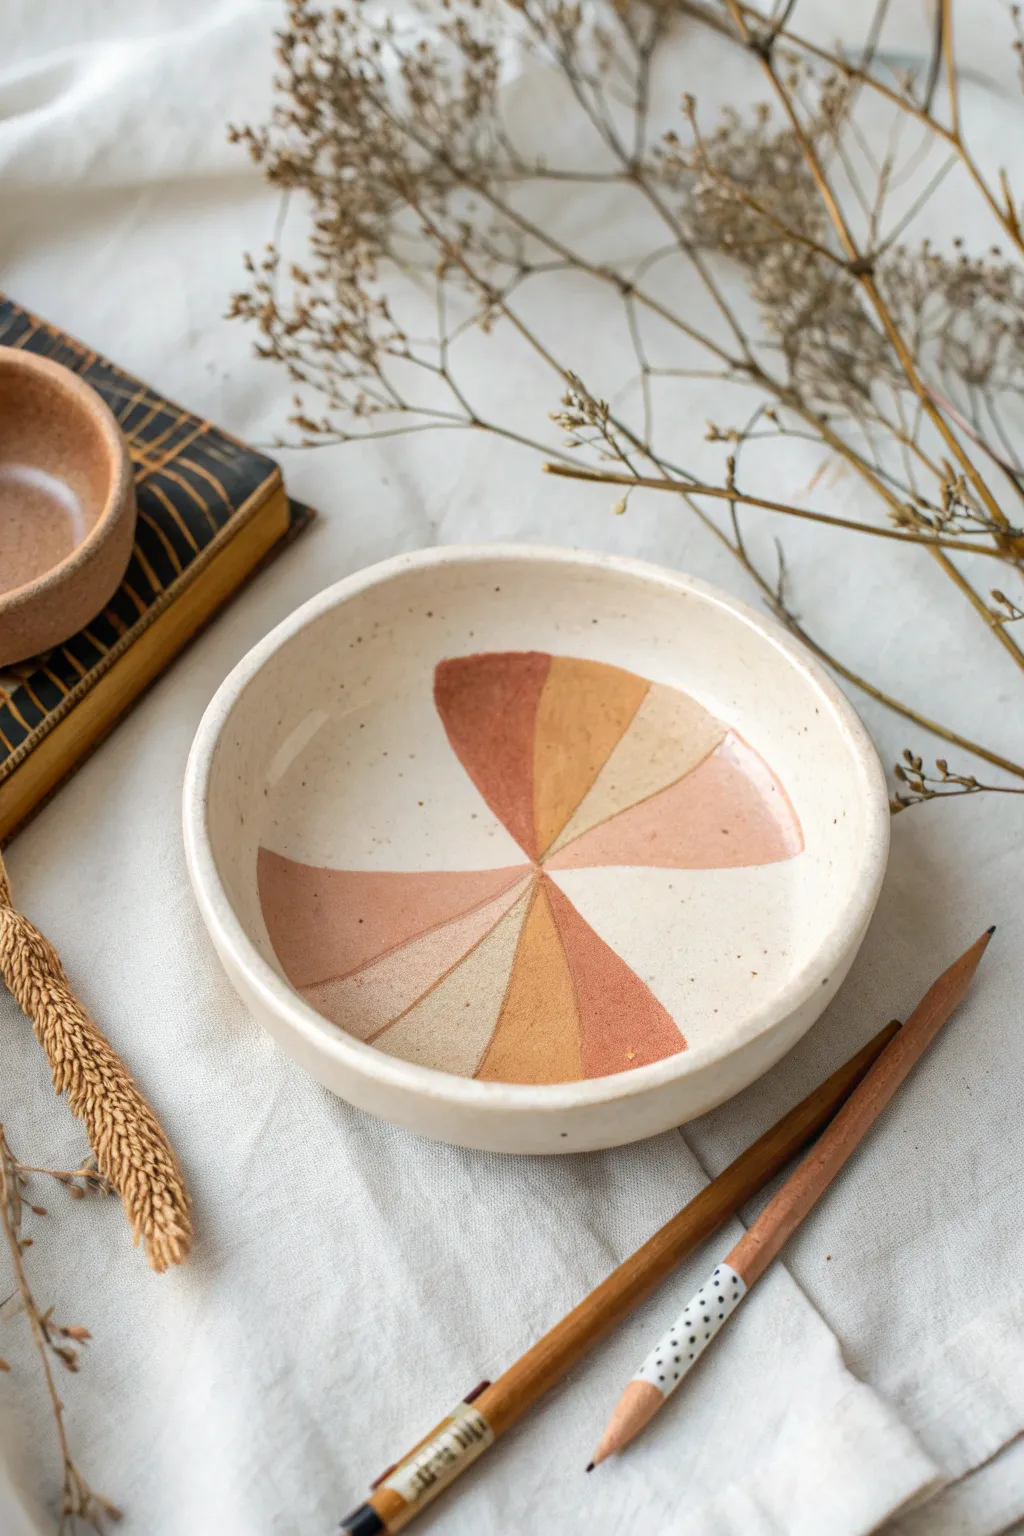
Embrace the warmth of nature with this symmetrical, modern arch design painted onto a simple ceramic dish. The muted terracotta, mustard, and blush tones create a calming palette that turns a functional item into a piece of minimalist art.
Detailed Instructions
Materials
- Small white or cream ceramic dish (unglazed bisque or glazed)
- Acrylic paints (terracotta/burnt sienna, mustard yellow, beige/sand, blush pink)
- Fine tip paint brushes (size 0 and 2)
- Pencil for sketching
- Palette or small plate for mixing
- Cup of water and paper towels
- Gloss or matte varnish (optional, for sealing)
Step 1: Planning and Sketching
-
Clean surface:
Begin by wiping down your ceramic dish with a damp cloth to remove any dust or oils. Let it dry completely. -
Find the center:
Visually locate the very center of the dish. This is where the points of your two fan shapes will meet. -
Sketch the first arch:
Using a pencil very lightly, draw a triangular wedge shape starting from the center and fanning out towards the rim. Think of it like a slice of pie with a rounded crust. -
Mirror the shape:
Draw an identical wedge shape exactly opposite the first one. The points should touch in the middle, creating a bowtie-like effect. -
Divide into sections:
Inside each large wedge, sketch three curved lines radiating from the center point to the outer edge. This divides each main shape into four smaller, pie-slice segments.
Clean Lines Hack
Work from the center outward. It helps keep your hand from smudging wet paint near the middle point as you rotate the dish.
Step 2: Painting the Palette
-
Prepare the terracotta:
Squeeze out a small amount of terracotta or burnt sienna paint. If it’s too thick, add a drop of water to improve flow. -
Paint the first segment:
Starting with the top-left section of your upper arch, fill it in carefully with the terracotta paint. Use the fine tip brush to get crisp edges. -
Mirror the color:
Find the corresponding segment on the bottom arch (bottom-right) and paint it with the same terracotta shade to maintain symmetry. -
Mix the mustard tone:
Clean your brush thoroughly. Prepare your mustard yellow paint. Paint the segment directly next to the terracotta one on the top arch. -
Repeat the pattern:
Paint the matching segment on the bottom arch with the mustard yellow. Step back occasionally to ensure the colors balance. -
Apply the beige:
Next, use the beige or sand color for the third segment in the rotation. Apply two coats if the paint looks streaky, letting the first coat dry briefly in between. -
Finish with blush:
Fill the final remaining segment of each arch with the soft blush pink. This completes the full spectrum of the fan.
Step 3: Finishing Touches
-
Refine the edges:
Once the main colors are dry, look closely at the lines between the colors. If any look messy, use your finest brush to touch them up. -
Add speckles (optional):
If your dish wasn’t already speckled, you can flick a toothbrush dipped in watered-down brown paint over the dish for a textured, pottery look. -
Check center point:
Ensure the very center point where all colors meet is neat. You can add a tiny dot of one color there to hide any gaps if needed. -
Let it cure:
Allow the paint to dry fully for at least 24 hours. -
Seal the work:
Apply a coat of clear varnish over the painted areas (or the whole dish) to protect your artwork from scratches and wear.
Add Texture
Mix baking soda into your acrylic paint before applying (ratio 1:1). This creates a rough, terracotta-like texture that feels amazing.
Now you have a stunning, modern catch-all dish perfect for your rings or keys

PENCIL GUIDE
Understanding Pencil Grades from H to B
From first sketch to finished drawing — learn pencil grades, line control, and shading techniques.
Explore the Full Guide
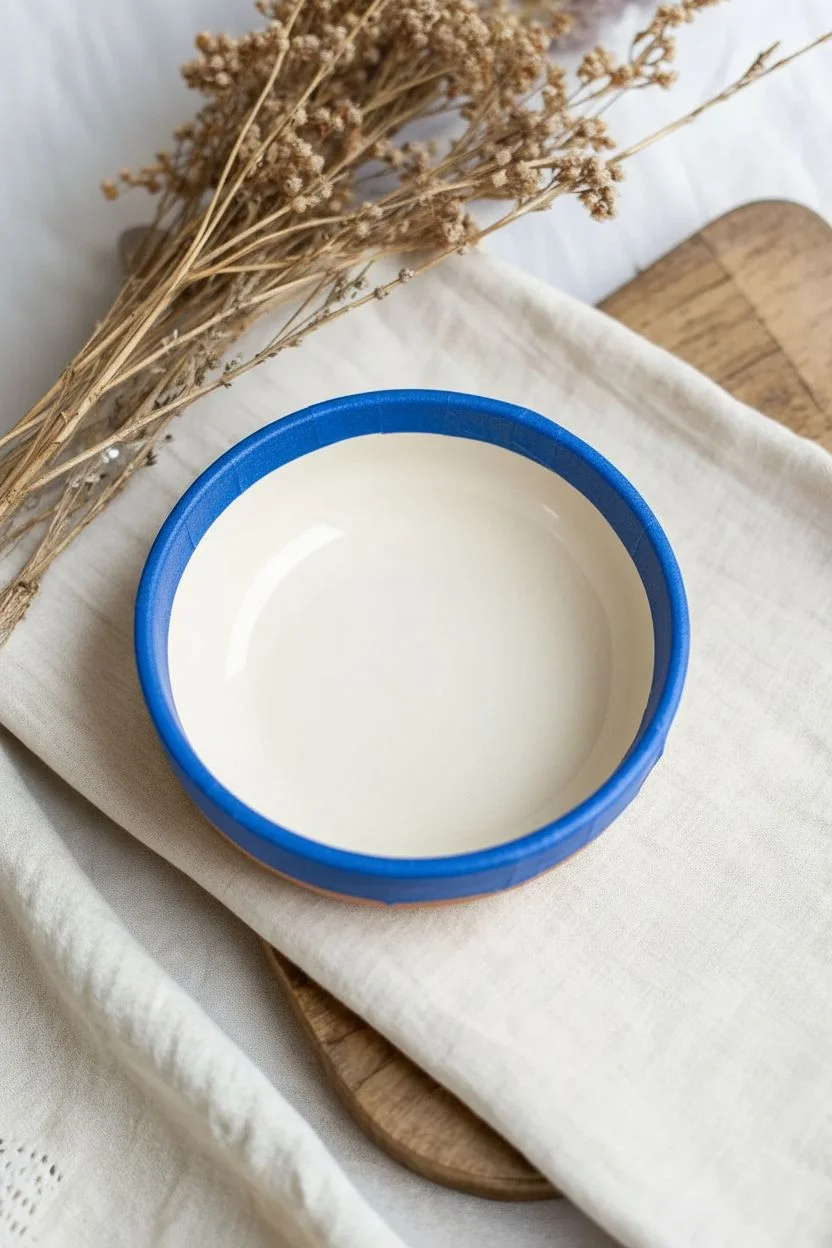
Minimal Half-Dipped Color
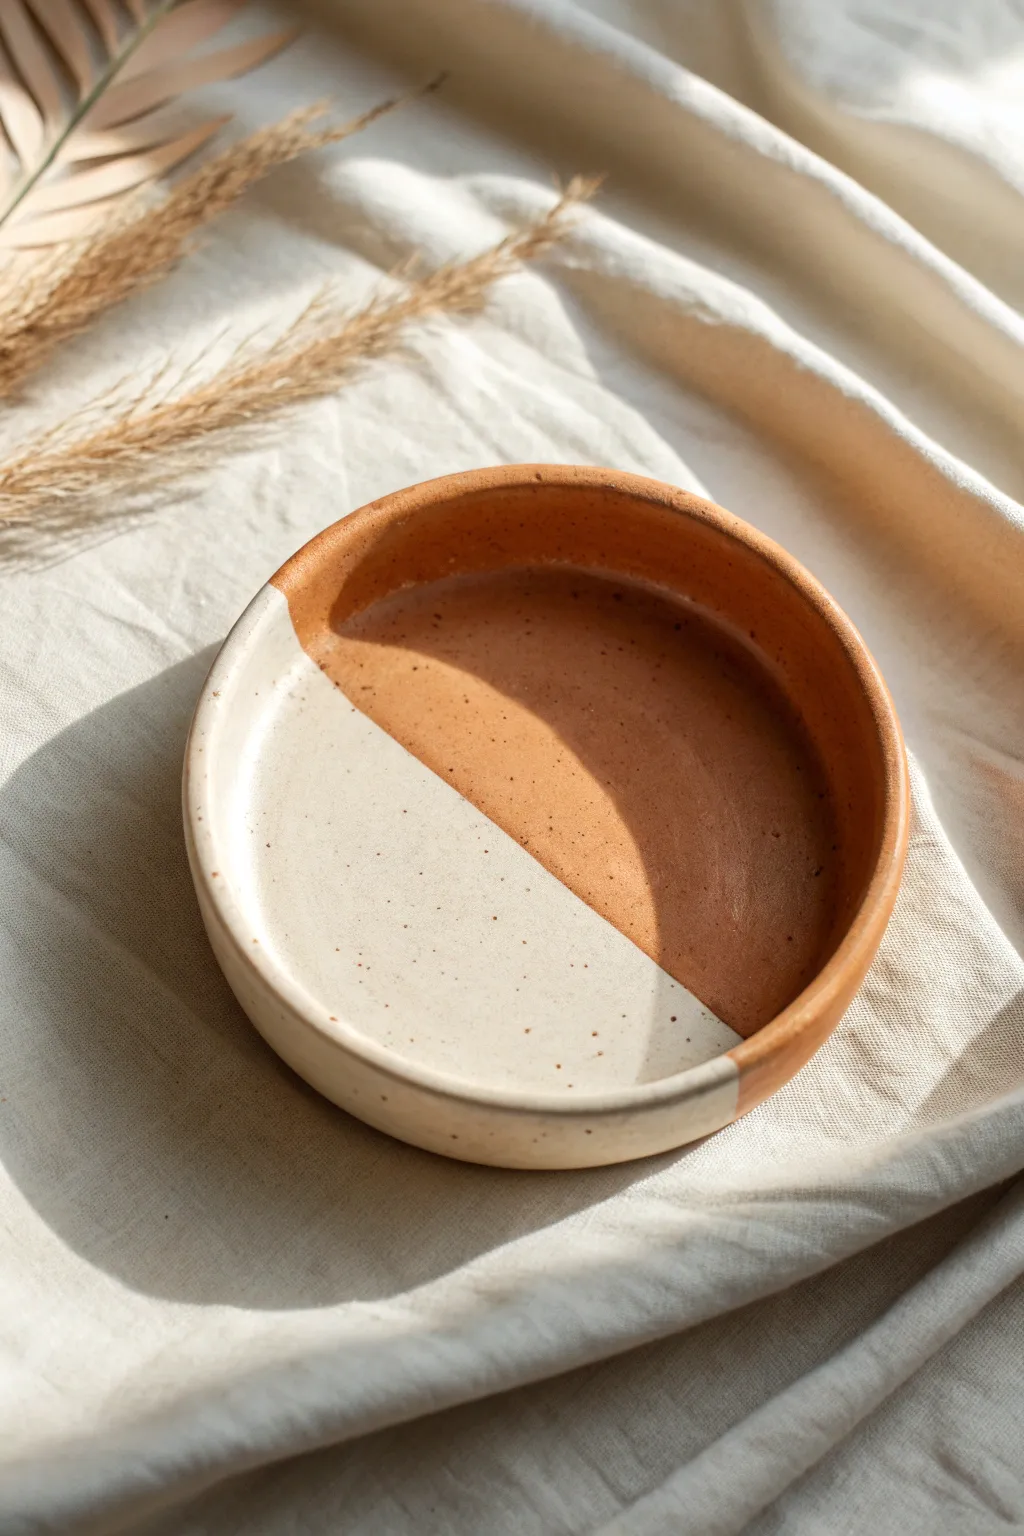
Embrace the beauty of raw simplicity with this minimalist jewelry dish design. Featuring a sharp diagonal split between creamy speckled white and warm terracotta, this project uses a half-dip technique to achieve a clean, modern aesthetic perfect for holding your favorite rings.
Step-by-Step Guide
Materials
- Bisque-fired ceramic jewelry dish (round and shallow)
- Painter’s tape or fine-line masking tape (optional, for crisp lines)
- Cream or off-white speckled ceramic glaze
- Terracotta or warm amber ceramic glaze
- Wide, flat synthetic brush (approx. 1 inch)
- Small container for glaze pouring (optional)
- Damp sponge
- Clear matte or satin sealant (if using non-fired paints)
Step 1: Preparation and Planning
-
Clean surface:
Begin by wiping down your bisque dish with a slightly damp sponge. This removes any dust or oils that might prevent the glaze or paint from adhering properly. -
Define the line:
Decide on the angle for your diagonal split. You want a line that cuts roughly through the center but slightly offset to create visual interest. I prefer holding the dish at the angle I plan to dip it to visualize the final look. -
Masking (Method A):
For the absolute crispest line, run a strip of painter’s tape across the inside and outside of the bowl at your chosen angle. Press the edges down firmly with your fingernail to prevent any bleed-under. -
Freehand preparation (Method B):
If you are brave and want a more organic feel, skip the tape. You will rely on a steady hand or a dipping motion later on.
Faux Ceramic Look
No kiln? Mix baking soda into acrylic paint for a textured, matte finish that mimics unglazed ceramic, then seal with a matte spray.
Step 2: Applying the Base Tone
-
Stir the glaze:
Make sure your cream speckled glaze is thoroughly mixed. The speckles often settle at the bottom, so give it a vigorous stir. -
First coat application:
Using your wide flat brush, apply the cream glaze to one half of the dish. If you used tape, paint right over the edge of the tape. If freehanding, paint carefully up to your imaginary line. -
Smooth the strokes:
Use long, sweeping strokes from the center outward to minimize brush marks. Ceramic glazes often level out in the kiln, but smoother application is always better. -
Let it dry:
Allow this first layer to dry until it’s chalky and cool to the touch. This usually takes about 15-20 minutes depending on humidity. -
Second coat:
Apply a second coat of the cream glaze to ensure full opacity. The speckled effect relies on a good density of glaze. -
Clean up edges:
If you got any cream glaze on the side meant for the terracotta color, wipe it away immediately with a clean, damp cloth or Q-tip.
Step 3: Adding the Warmth
-
Tape removal (if applicable):
If you used tape for the first half, gently peel it away now. You should have a sharp line where the cream glaze ends and the bare bisque begins. -
Re-taping (Optional):
To protect your cream side, you can apply fresh tape directly over the dry cream glaze line. Be very gentle so you don’t flake the dry glaze. -
Apply terracotta color:
Load your brush with the terracotta or amber glaze. Paint the remaining half of the dish. I find starting from the center line and pulling away towards the rim gives the cleanest edge control. -
Watch the intersection:
Pay distinct attention to where the two colors meet. Ideally, they should touch perfectly without overlapping too much, which can create a raised ridge. -
Layering up:
Just like the first side, let the terracotta layer dry and apply a second coat for rich, deep color saturation. -
Dipping alternative:
If you have a large bucket of glaze, you can physically dip the bare side of the dish into the terracotta glaze for a few seconds. This creates a perfectly smooth finish but requires more material.
Bleeding Lines?
If paint bleeds under tape, let it dry fully, then gently scrape the excess away with a craft knife or toothpick for a sharp edge.
Step 4: Finishing Touches
-
Inspect the rim:
Check the rim of the dish. Ensure the transition line wraps over the edge cleanly to the outside of the bowl for a continuous look. -
Remove tape:
If you re-taped the second side, remove it now while the glaze is still slightly damp to avoid chipping crisp edges. -
Clean bottom:
Wipe the bottom ‘foot’ of the dish perfectly clean of any glaze. Glaze on the bottom will fuse your dish to the kiln shelf during firing. -
Final dry:
Let the piece dry completely for 24 hours before firing. If using acrylic paints instead of glaze, let it cure for 48 hours before sealing. -
Firing:
Fire the piece according to your glaze manufacturer’s instructions (usually Cone 06 or Cone 6). This final step melts the glass particles, revealing the true glossy or satin finish and the speckles.
Once fired or sealed, place your rings in their chic new home and admire the perfect balance of color.
Citrus Slice Motif
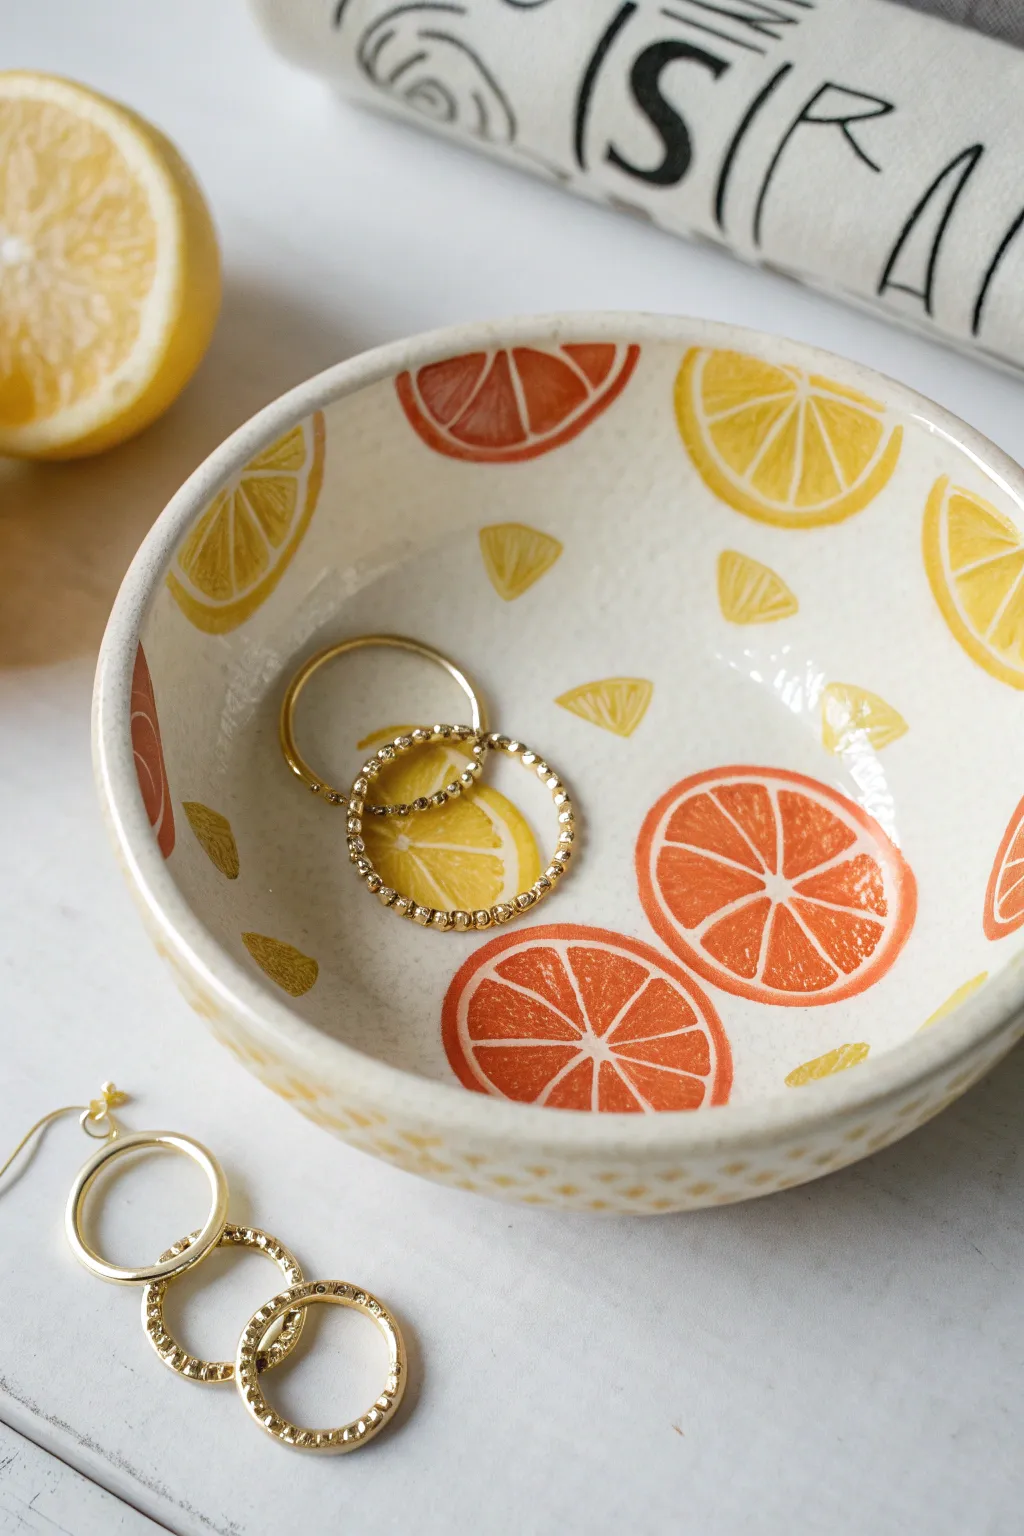
Bring a fresh squeeze of summer to your vanity with this vibrant hand-painted jewelry bowl. Featuring juicy orange and lemon slices scattered across a white ceramic base, this playful design is perfect for holding your favorite rings and studs.
Step-by-Step
Materials
- Small white ceramic bowl (bisque or glazed)
- Ceramic or multi-surface acrylic paints (bright orange, yellow, white)
- Small round brushes (sizes 2 and 4)
- Fine liner brush (size 00 or 0)
- Palette or small plate
- Water cup and paper towels
- Clear gloss sealant (brush-on or spray)
Step 1: Planning and Base Shapes
-
Clean surface:
Begin by wiping down your ceramic bowl with rubbing alcohol or soapy water to remove any oils or dust. Let it dry completely. -
Practice Sketch:
Before touching paint to the bowl, practice drawing your citrus shapes on scrap paper. You are aiming for semi-circles and small pie-wedge triangles. -
Map placement:
Visualize where your larger fruit slices will go. Aim for a random, scattered pattern, placing some near the rim and others deep in the bowl. -
paint the orange rinds:
Load a round size 4 brush with bright orange paint. Paint several ‘smile’ shapes or semi-circles around the inside of the bowl to serve as the rinds. -
Paint the lemon rinds:
Switch to yellow paint and repeat the previous step, filling in the empty spaces with yellow semi-circle rinds. Vary the sizes slightly for interest. -
Add floating wedges:
To fill smaller gaps, paint tiny individual yellow triangles floating freely, like little loose bits of pulp.
Oops! Smudged Lines?
If your white segment lines look too thick, wait for them to dry, then use a tiny brush with the original fruit color to trim them back down.
Step 2: Adding the Pulp Details
-
Fill the oranges:
Inside the orange rinds, paint a solid semi-circle shape, leaving a very thin hairline gap of white between the fruit flesh and the rind. -
Fill the lemons:
Do the same for the yellow lemon slices, painting a solid yellow semi-circle inside the rind, again preserving that tiny white gap. -
Let it dry:
Wait about 10–15 minutes for these base layers to dry to the touch so your white details don’t blend and turn muddy. -
Create segments:
Using your fine liner brush and white paint (or by scratching away wet paint if you prefer), paint thin radiating lines over the colored flesh to create segments. Start from the center of the straight edge and fan outward. -
Texture the pulp:
I like to use a nearly dry brush to dab a little extra white texture inside the segments, giving them that realistic, juicy citrus look. -
Clean up edges:
If any lines look messy, use a clean damp brush to gently wipe away mistakes or reshape the curve of a fruit slice.
Make it Pop
Mix a tiny drop of red into your orange paint for a few slices to create ‘blood orange’ varieties for extra visual depth.
Step 3: Finishing Touches
-
Outside pattern:
If desired, extend the pattern to the outside of the bowl. Simple yellow dashes or dots near the bottom rim add a nice continuity. -
Full cure:
Allow the paint to dry completely according to the manufacturer’s instructions—usually at least 24 hours. -
Bake or seal:
If using bake-on ceramic paint, place the dish in a cold oven, heat to the specified temperature (often 350°F), bake for 30 minutes, and let cool in the oven. Otherwise, apply a glossy clear coat.
Now you have a cheerful spot to keep your treasures safe


Cherries With Tiny Leaves
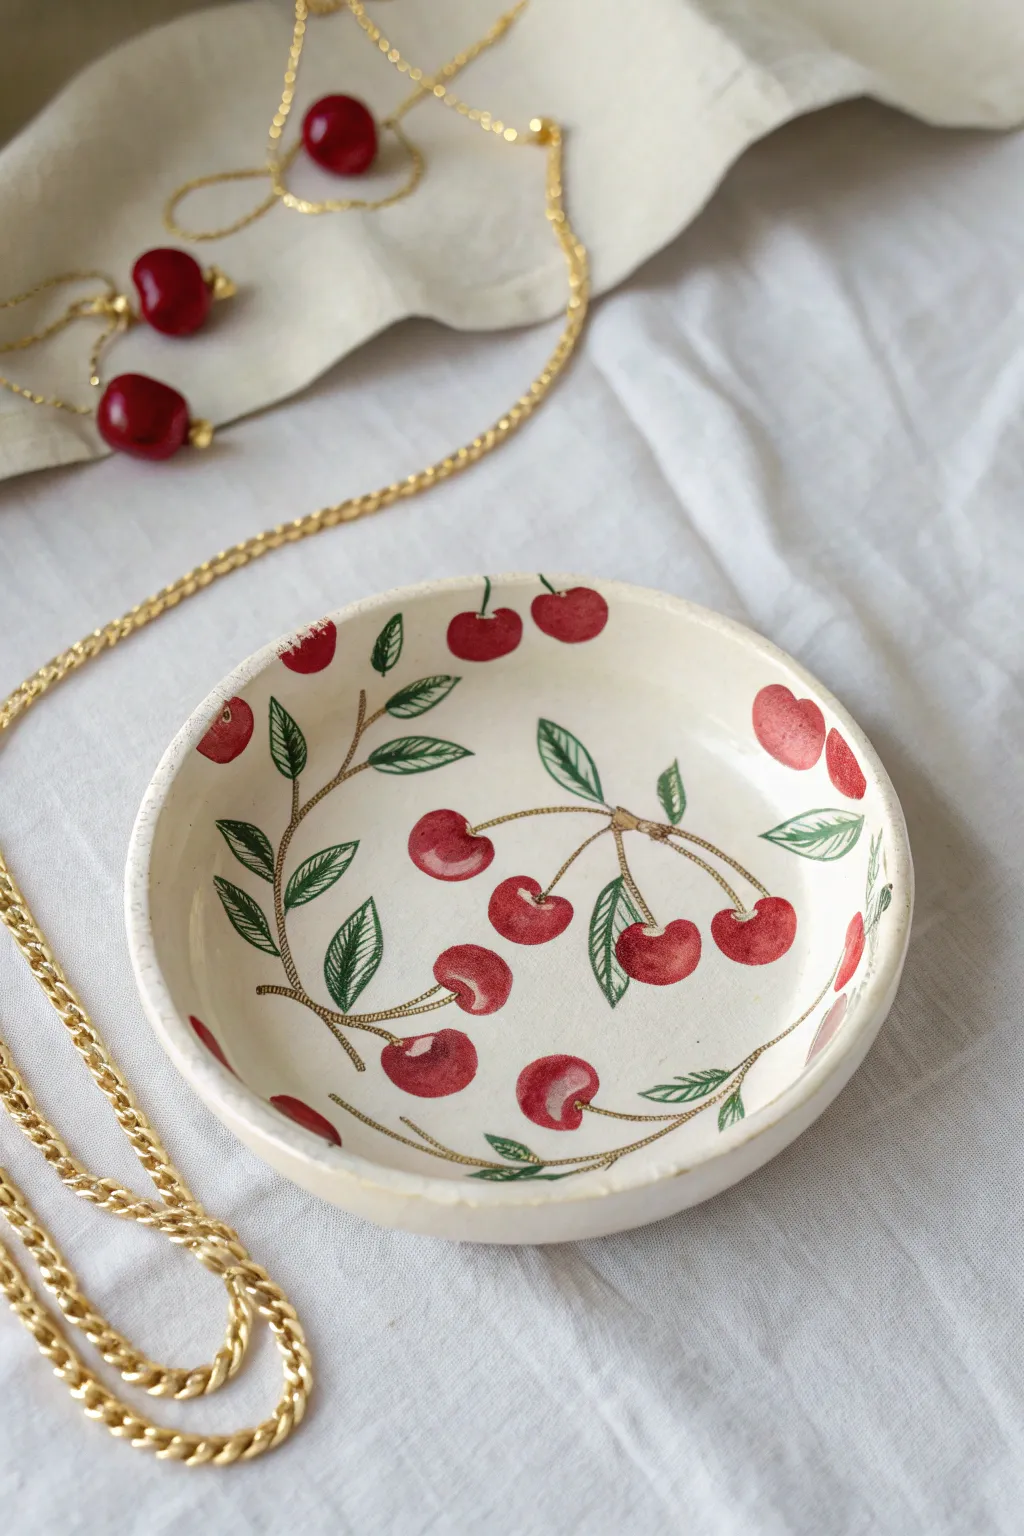
Capture the sweetness of summer with this charming jewelry dish featuring bright red cherries and delicate greenery. The design has a lovely vintage illustration feel, perfect for holding your favorite rings and necklaces on a bedside table.
Step-by-Step Guide
Materials
- Small ceramic trinket dish (bisque or glazed)
- Acrylic paints (bright red, deep crimson, forest green, light olive, brown, white)
- Fine detail paintbrushes (sizes 0 and 00)
- Small round brush (size 2)
- Palette or small plate
- Water cup and paper towels
- Clear acrylic sealer or glossy varnish
- Pencil for sketching (optional)
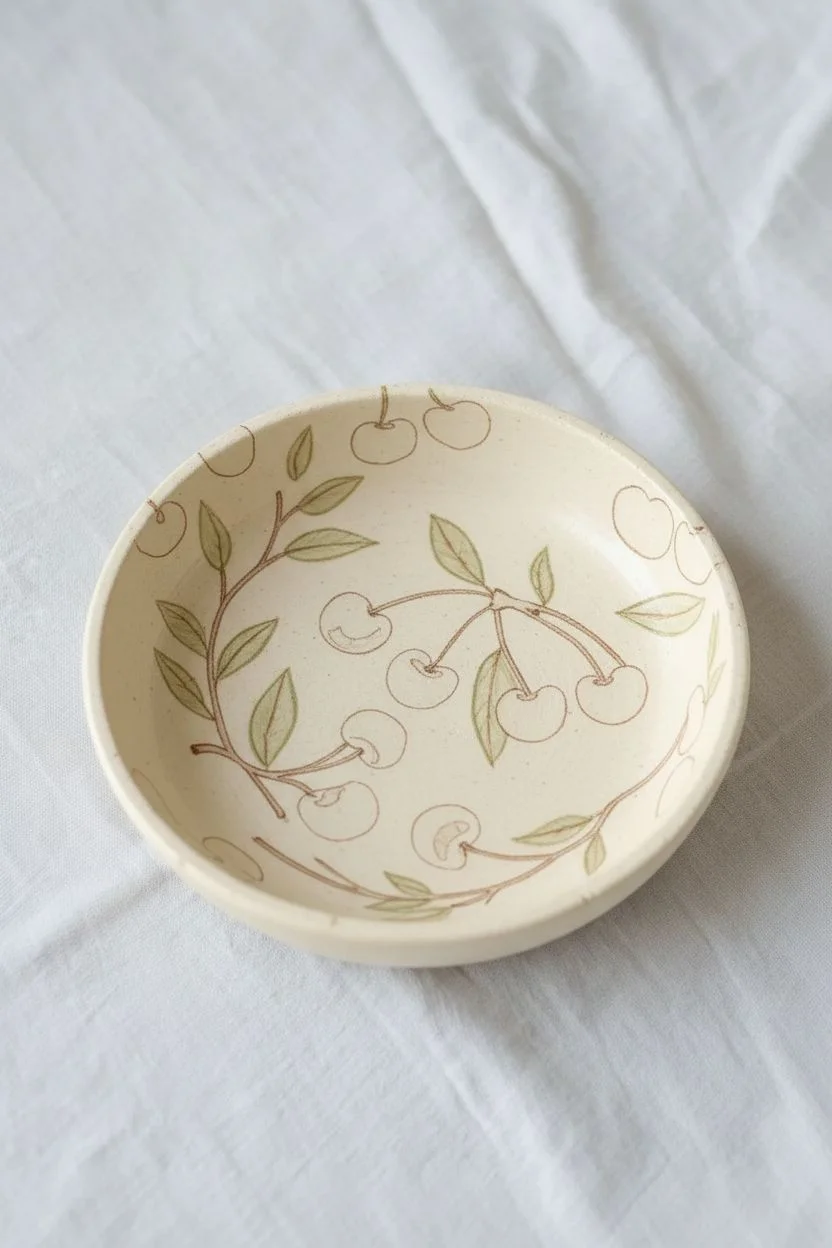
Step 1: Preparation & Base Composition
-
Clean surface:
Begin by ensuring your ceramic dish is completely clean and dry. Any dust or oils can prevent the acrylics from adhering properly, so give it a quick wipe with a damp cloth if needed. -
Mix the stem color:
On your palette, mix a small amount of brown paint with a tiny touch of olive green to create a natural, woody stem color. It should be thin enough to flow easily from your brush. -
Map out the stems:
Using your size 0 liner brush, lightly paint the main branch structure. Start from the left side and sweep a few thin, curving lines towards the center and right. Keep the touch light; these are just the anchors for your fruit. -
Add secondary stems:
Branch off from your main lines with smaller stems where you plan to hang the cherries. The composition works best if the cherries are scattered randomly—some near the center, and some hugging the rim.
Brush Control Secret
To get super thin stem lines without shakiness, dilute your acrylic paint with a few drops of water until it has an ink-like consistency, then pull the brush quickly.
Step 2: Painting the Cherries
-
Base red layer:
Load your round brush with bright red paint. Paint round, slightly heart-shaped forms at the ends of your stems. Don’t worry about making perfect circles; organic shapes look more illustrative. -
Include rim cherries:
Paint a few cherries floating near the upper rim of the bowl without stems attached perfectly yet. This creates a playful, falling pattern effect. -
Let it dry:
Allow this first layer of red to dry for about 10 minutes. If the paint looks streaky, I like to apply a second thin coat here for opacity. -
Add shadows:
Mix a tiny bit of brown or deep crimson into your red. Paint a small crescent shape along the bottom curve of each cherry to give them weight and dimension. -
Create highlights:
Mix a drop of white into your bright red to make a soft pink. Paint a curved highlight near the top left of each cherry. For extra shine, add a tiny dot of pure white right in the center of the highlight. -
Detail the pits:
For an artistic touch, paint a small, darker indentation at the top of the cherry where the stem connects. This helps the fruit look like it’s actually hanging rather than just floating.
Step 3: Adding Greenery
-
Leaf outlines:
Switch to your smallest liner brush (size 00) and load it with forest green. Carefully outline the shape of the leaves attached to the stems. They should be pointed ovals with slightly serrated edges. -
Fill the leaves:
Lightly fill in the leaves using the green paint. You don’t need solid coverage; allowing some of the dish’s background color to show through mimics a watercolor style. -
Draw leaf veins:
Once the green is dry, take a darker green or thin black paint on your finest brush. Draw a central line down each leaf and add tiny diagonal veins branching out. -
Connect stems:
Go back over your brown stems to ensure they connect cleanly to both the leaves and the tops of the cherries. Thickening the junction point slightly adds realism.
Clay Texture Idea
Before painting, you can use actual cherry stems to press texture into the clay if you are sculpting the dish yourself, creating a relief effect.
Step 4: Finishing Touches
-
Review and refine:
Look over the dish for any stray marks. You can scrape off tiny mistakes with a toothpick if the paint isn’t fully cured, or paint over them with a color matching your dish. -
Rim detailing:
Use a dry brush technique to lightly distress the very edge of the rim with a soft beige or brown, giving the dish a slightly aged, vintage appearance. -
Sealing the art:
Once the paint is completely bone dry (wait at least an hour), apply a coat of glossy varnish or clear sealer. This protects the design from jewelry scratches and gives the cherries a juicy shine.
Place your favorite gold chains inside and enjoy the pop of color on your dresser
Daisy Chain Around the Rim
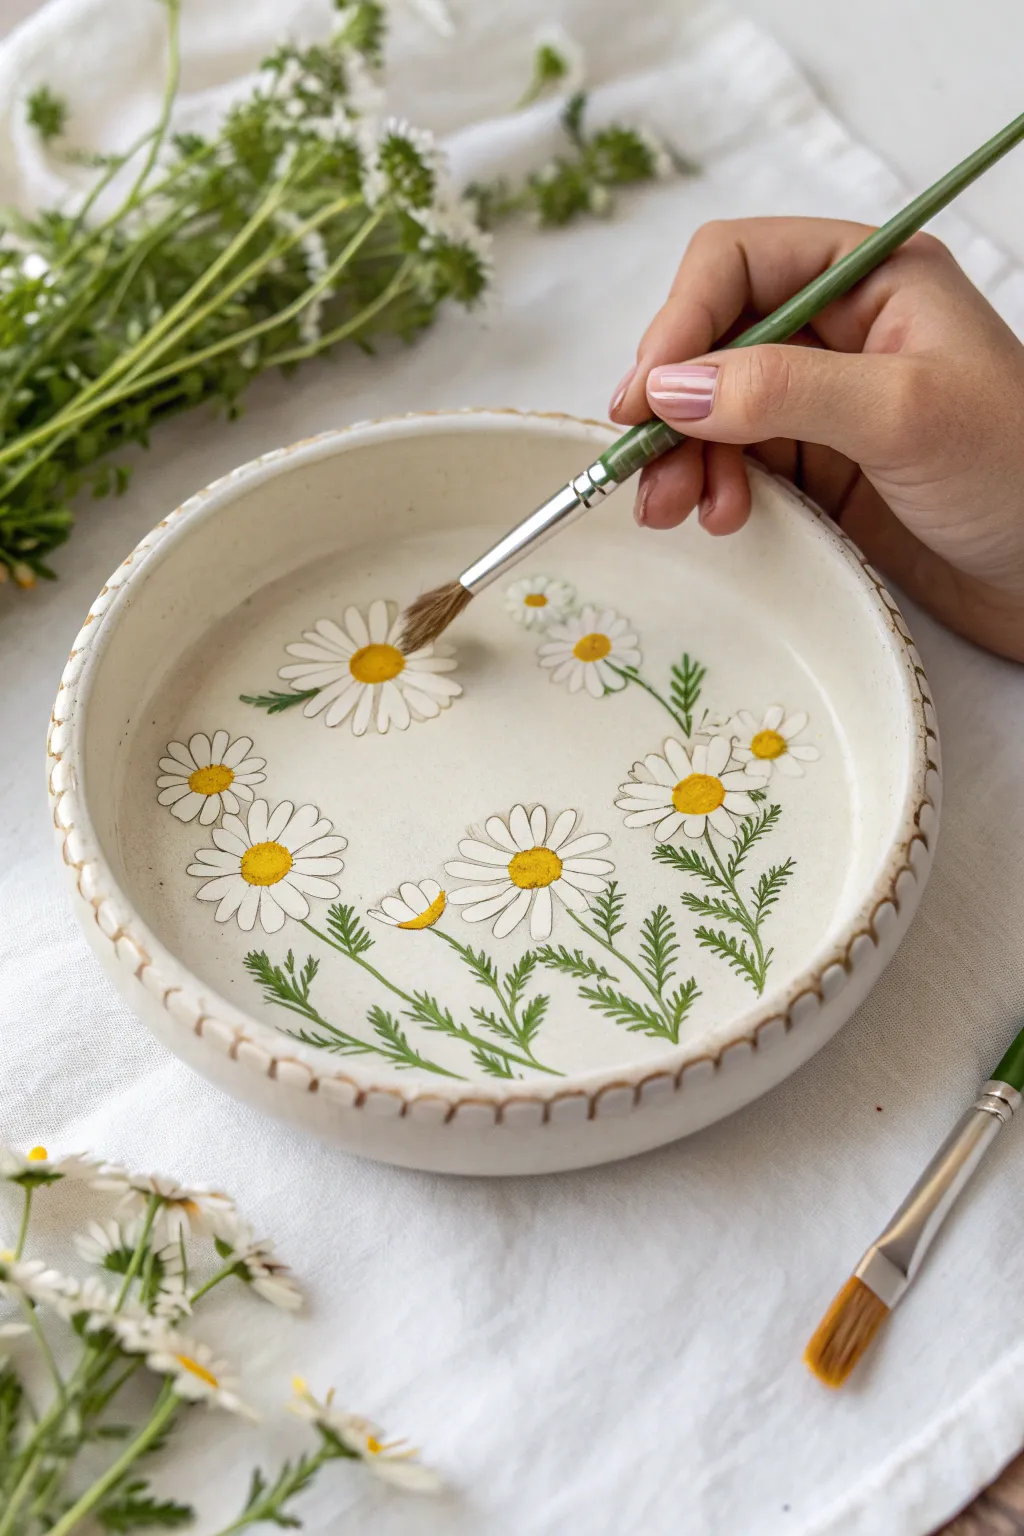
Transform a simple ceramic bowl into a blooming meadow with this charming botanical design. Using fine brushwork and cheerful colors, you’ll paint a wreath of daisies and feathery greenery that circles the base, perfect for holding your favorite rings.
How-To Guide
Materials
- Small white ceramic dish (with fluted rim preferable)
- Ceramic or acrylic enamel paints (White, Yellow, Green)
- Fine detail paintbrush (size 0 or 00)
- Small round paintbrush (size 1)
- Palette or small dish for mixing
- Paper towels
- Water cup
- Rubbing alcohol
- Clear ceramic varnish or sealant (glossy)
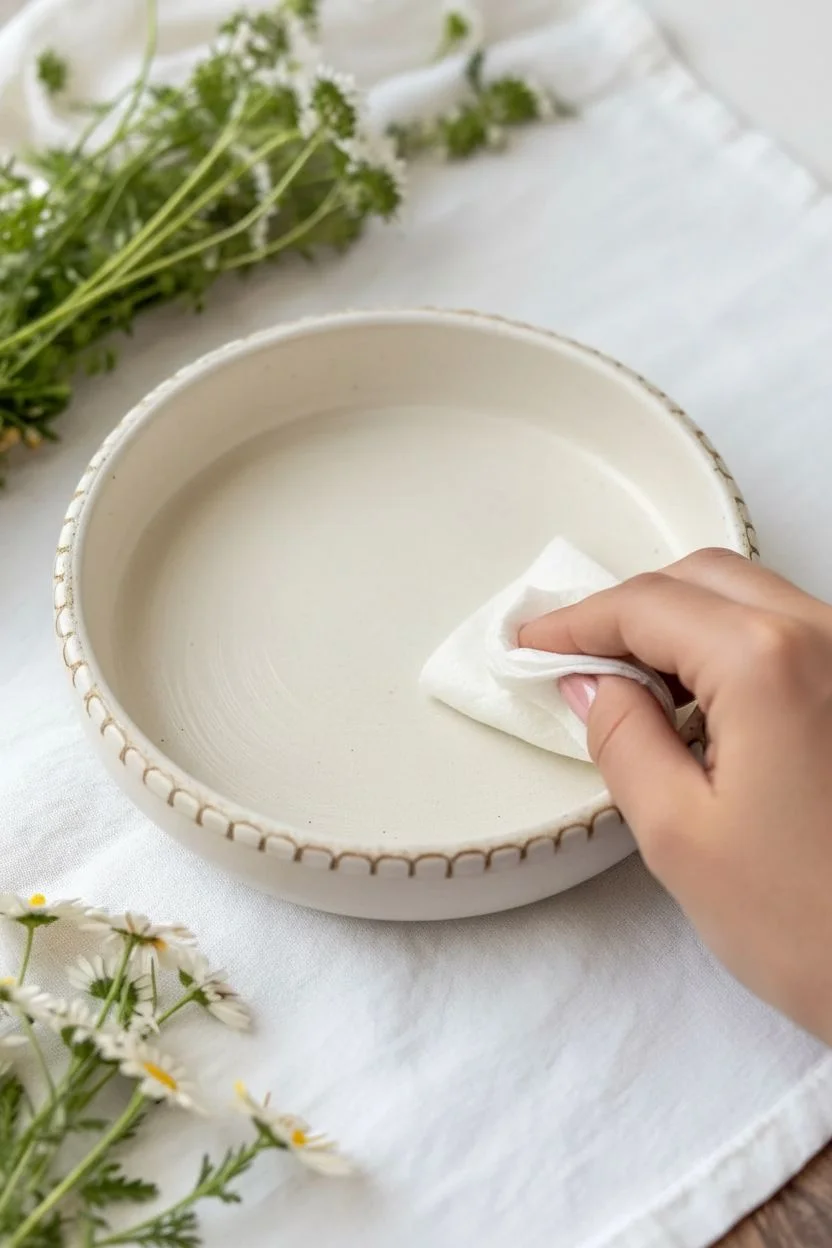
Step 1: Preparation & Planning
-
Clean surface:
Begin by wiping the entire interior surface of your ceramic dish with rubbing alcohol on a paper towel. This removes oils and residue, ensuring the paint adheres perfectly. -
Visual mapping:
Mentally map out a circle inside the dish where your wreath will sit. You want the flowers to flow naturally around the curve, leaving the very center somewhat open.
Step 2: Painting the Daisies
-
Start with centers:
Load your small round brush with yellow paint. Dab small, slightly oval shapes at uneven intervals around your imaginary circle to act as the daisy centers. -
Vary the angles:
Don’t make them all face perfectly upward. Tilt some centers slightly sideways to suggest flowers facing different directions. -
Petal base coat:
Switch to your white paint and the fine detail brush. For the main open flowers, paint long, slender teardrop shapes radiance out from the yellow centers. -
Layering petals:
I find it helpful to paint the top, bottom, left, and right petals first like a compass, then fill in the gaps. This keeps the spacing even. -
Add side-view flowers:
For the flowers that are turned away or budding (like the one near the bottom center), paint shorter white petals only on the top half of the yellow oval. -
Refining opacity:
Ceramic paint can be translucent. Once the first layer of white is dry to the touch, add a second coat to the petals to make them pop against the cream background. -
Detailing centers:
Mix a tiny speck of brown or darker orange into your yellow. Dab this onto the bottom edge of your yellow centers to give them a 3D, textured appearance. -
Small filler buds:
Paint a few tiny white circles without detailed petals in the background areas to represent unopened buds.
Fixing Smudges
Make a mistake? Since ceramic surfaces are sleek, you can quickly wipe away wet paint with a damp Q-tip. If dried, gently scratch it off with a toothpick.
Step 3: Adding Greenery
-
Stem structure:
Using thin green paint and your finest brush, draw delicate, curved lines connecting your flower heads downward toward the base of the wreath. -
Feathery leaves:
The leaves in this design are fern-like. Start at the base of a stem and use quick, short flicks of the brush moving outward to create a jagged, feathery texture. -
Building density:
Continue adding these fronds between the flowers. Vary the height of the greenery so some leaves poke up behind the daisy petals. -
Connecting the wreath:
Ensure the stems at the bottom crisscross slightly or originate from a similar direction to maintain the flow of the circular composition.
Brush Control
For the sharpest petal tips, slightly dampen your brush before loading the paint and twirl the bristles on your palette to form a needle-sharp point.
Step 4: Finishing Touches
-
Clean outlines:
If you want a clearer definition, you can mix a very faint grey wash and outline just the tips of a few petals, but keeping it natural is usually best. -
Rim detail:
If your dish has a fluted rim like the one shown, dry brush a little brown or beige paint lightly over the raised edges to accentuate the vintage feel. -
Final cure:
Let the paint dry for at least 24 hours. If using oven-bake enamels, follow the manufacturer’s instructions to bake the dish; otherwise, apply a glossy sealant to protect your work.
Once sealed and cured, this lovely little dish is ready to hold your treasures or be gifted to a friend.
Tiny Heart Sprinkles
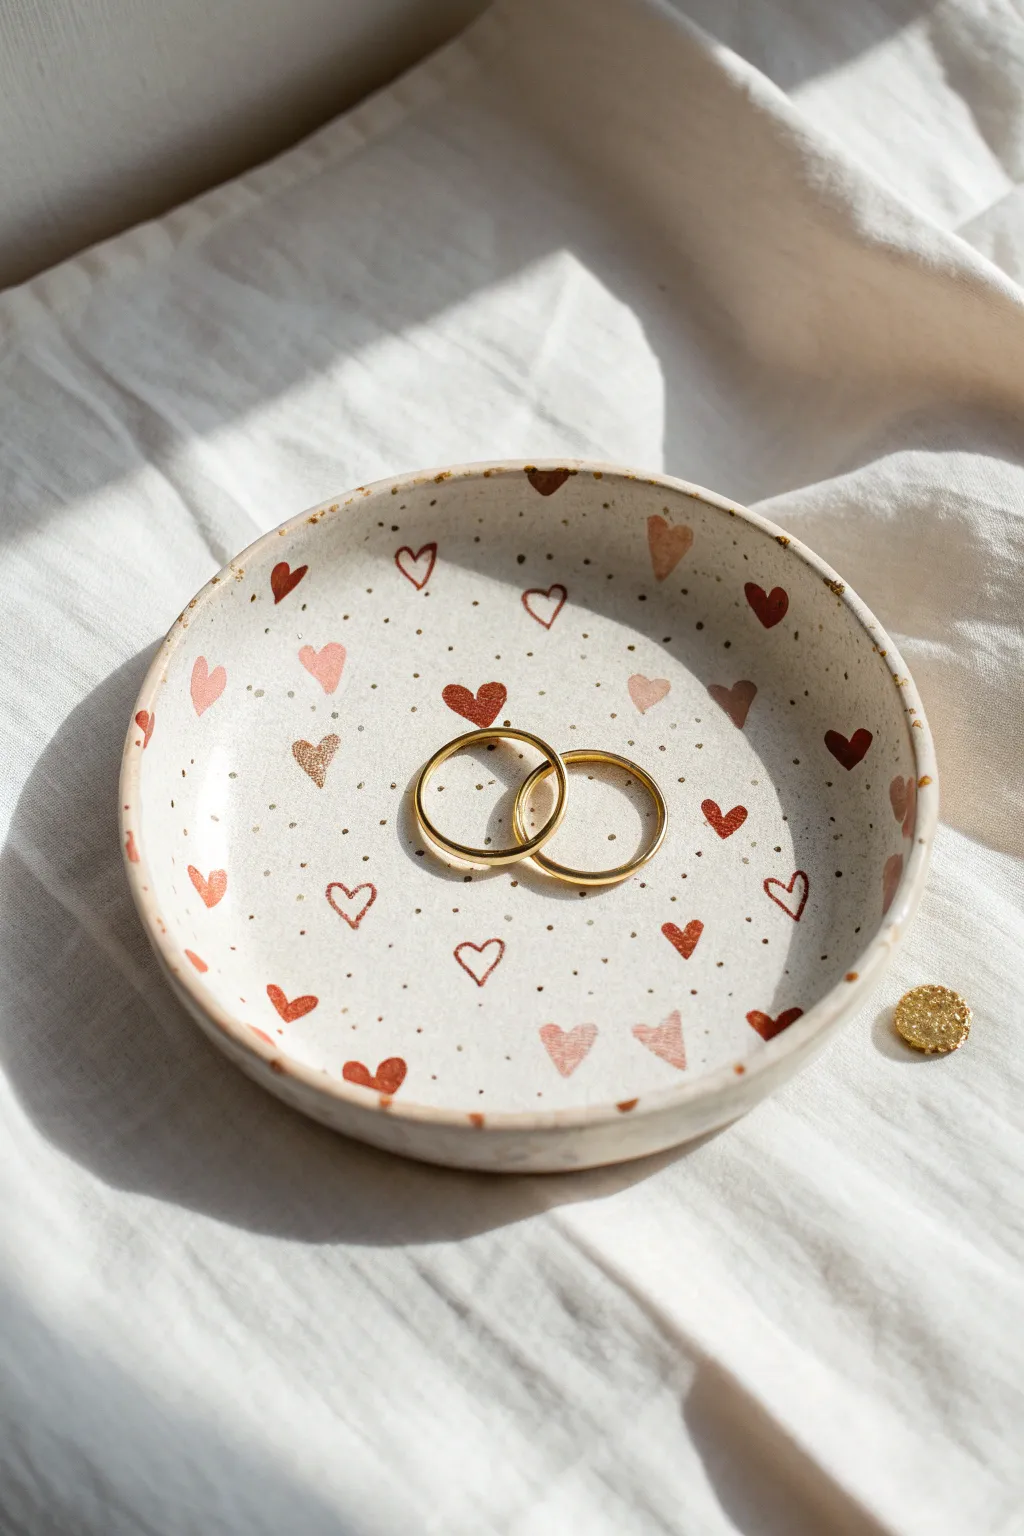
Transform a plain ceramic dish into a romantic keepsake holder with this delicate pattern of scattered hearts and speckles. The mix of solid shapes, outlines, and varying shades of terracotta and pink creates a sweet, hand-drawn aesthetic that feels modern yet personal.
Step-by-Step Tutorial
Materials
- White or cream ceramic jewelry dish (bisque or glazed)
- Ceramic paints or enamel paints (terracotta, blush pink, deep red)
- Fine detail paintbrush (size 0 or 00)
- Small dotting tool or toothpick
- Paper palette or scrap ceramic tile
- Clear gloss glaze or sealant (appropriate for your paint type)
- Water cup and paper towels
- Rubbing alcohol (for cleaning the dish first)
Step 1: Preparation & Planning
-
Clean the Surface:
Before painting, wipe your ceramic dish down thoroughly with rubbing alcohol and a lint-free cloth. This removes any oils or dust that might prevent the paint from adhering properly. -
Review Your Palette:
Squeeze out small amounts of your red, terracotta, and blush pink paints onto your palette. If the colors are too thick, I like to thin them slightly with a drop of water or medium so they flow smoothly from a fine brush.
Uneven Hearts?
Don’t panic if hearts look wonky! The charm of this design is its hand-drawn imperfection. If you really dislike one, wipe it quickly with a wet Q-tip before it dries.
Step 2: Painting the Heart Motifs
-
Start with Solid Terracotta Hearts:
Dip your fine brush into the terracotta or rust-colored paint. Paint tiny solid hearts randomly around the inner surface of the bowl. Keep them small—about the size of a grain of rice or slightly larger. -
Add Blush Pink Hearts:
Rinse your brush well. Switch to the blush pink shade and add more solid hearts in the empty spaces. Try to rotate the dish as you work so the hearts face different directions for a tumbled, confetti look. -
Incorporate Deep Red Accents:
Using the deep red paint, add a few scattered solid hearts. Use this color sparingly compared to the lighter shades to keep the design feeling airy and light. -
Create Outline Hearts:
Now for the delicate details. Reload your brush with the terracotta or deep red paint. Instead of filling them in, carefully paint just the outline of small hearts. This variety adds visual interest and lightness to the pattern. -
Paint the Rim Details:
Don’t forget the edges. Paint a few partial hearts or small marks right on the rim of the dish, as if the pattern is wrapping over the edge.
Pro Tip: Practice Placement
Before touching the dish, practice painting your tiny hearts on a piece of paper to get comfortable with the brush pressure needed for the thin outlines.
Step 3: Adding Texture & Finishing
-
Add Tiny Speckles:
Using the very tip of your brush or a toothpick, dot tiny specks of the darkest color between the hearts. These shouldn’t be perfect circles; irregular specks mimic the look of speckled stoneware. -
Check for Balance:
Take a step back and look at the dish. Are there any large empty gaps? Fill them with a tiny dot or a very small heart outline to balance the composition. -
Dry Completely:
Let the paint dry fully according to the manufacturer’s instructions. For most acrylic enamels, this is at least 24 hours; for fired glazes, wait until it’s bone dry. -
Rim Emphasis (Optional):
If you want a rustic touch, lightly sponge or dry-brush a tiny bit of brown or terracotta paint along the very top edge of the rim to define the shape. -
Apply Sealant:
If you used air-dry acrylics or enamels, brush on a clear gloss sealant to protect your work from scratches. If using ceramic glazes, fire the piece in the kiln as directed. -
Final Cure:
Allow the sealant or glaze to fully cure before placing any jewelry inside. This ensures your rings won’t stick to or scratch the beautiful new surface.
This charming little dish is now ready to hold your most precious treasures safely on your bedside table
Monogram Initial Centerpiece
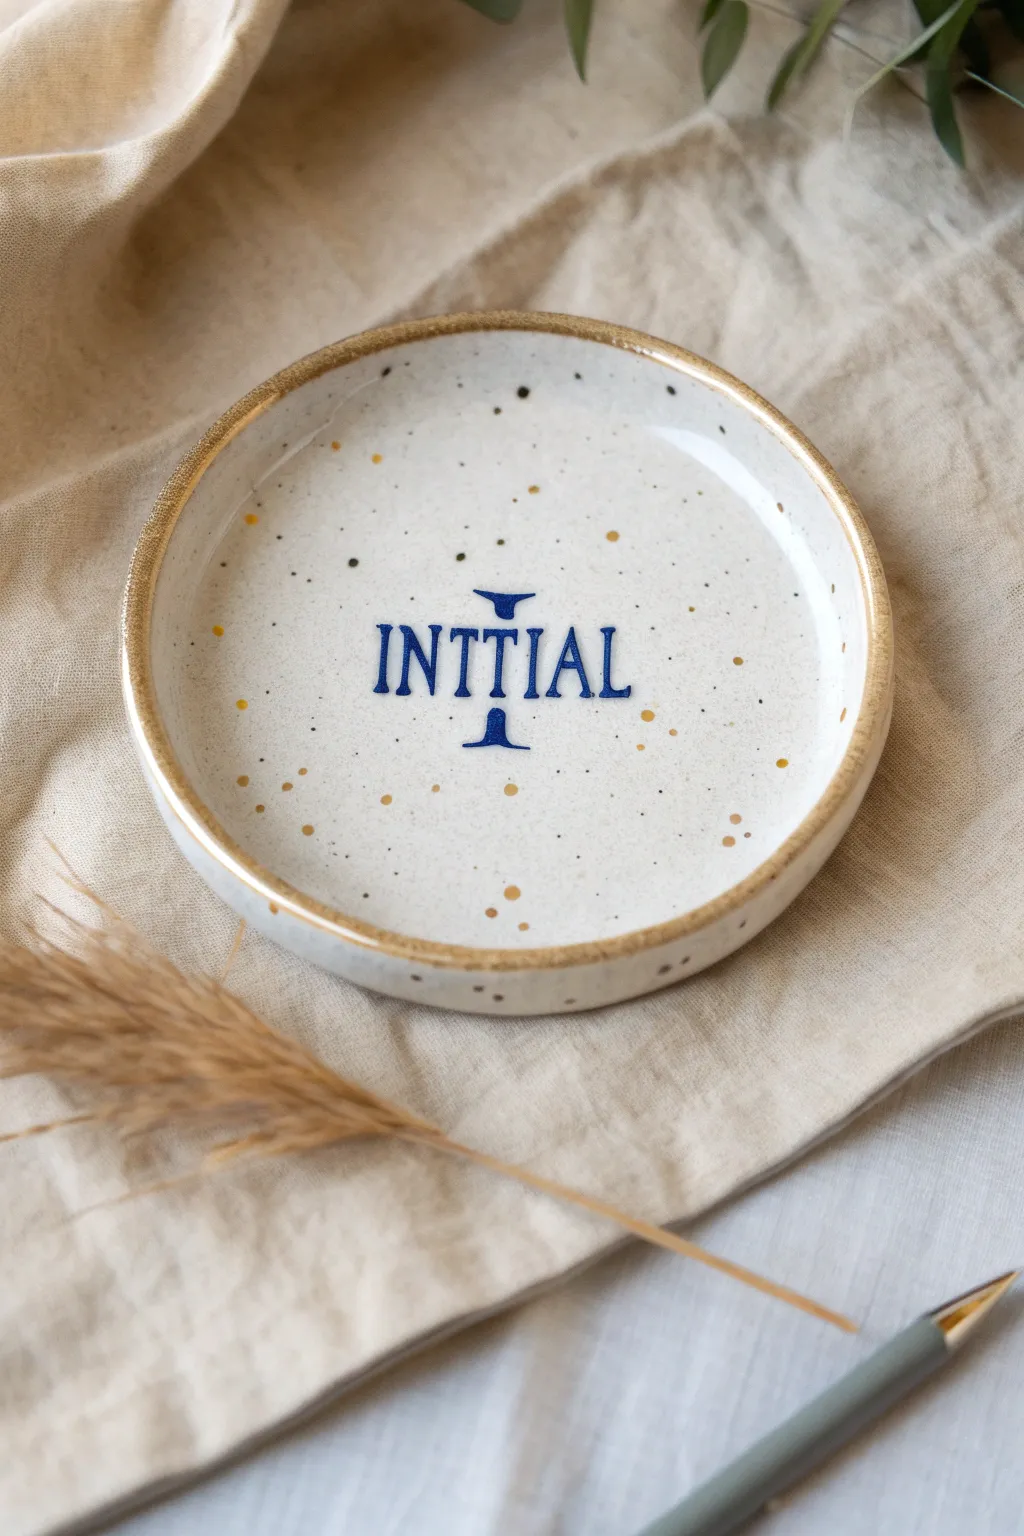
Transform a plain ceramic dish into a personalized keepsake with this elegant monogram project. Featuring a speckled finish and a classic serif typeface, this jewelry holder mimics the look of high-end pottery with simple painting techniques.
Step-by-Step
Materials
- Small round ceramic dish (white or cream)
- Ceramic or multi-surface paint (Navy Blue)
- Ceramic or multi-surface paint (Metallic Gold)
- Ceramic or multi-surface paint (Warm Grey or Taupe)
- Fine detail paintbrush (size 0 or 00)
- Old toothbrush or stiff bristle brush
- Pencil
- Printed letter template (optional)
- Carbon paper (optional)
- Rubbing alcohol
- Cotton pads
- Glaze or sealant (if paint requires it)
Step 1: Preparation & Base Effect
-
Clean the surface:
Begin by wiping down your ceramic dish thoroughly with rubbing alcohol and a cotton pad. This removes any oils or fingerprints that might prevent the paint from adhering properly. -
Prepare the speckling mix:
To mimic the look of speckled stoneware, mix a very small amount of water with your warm grey or taupe paint. You want a fluid consistency that isn’t too runny. -
Apply the speckles:
Dip an old toothbrush or stiff brush into the diluted paint. Hold it over the dish and run your thumb across the bristles to flick tiny droplets onto the surface. Aim for random distribution. -
Add gold accents:
Repeat the previous splatter technique using the metallic gold paint. I find that adding just a few gold specks gives the piece a subtle shimmer without overpowering the design. -
Dry the base:
Allow the splatter effect to dry completely before touching the dish again. This usually takes about 20-30 minutes depending on how heavy your droplets were.
Fixing Smudges
Did a splatter land right where your text goes? Use a Q-tip dipped in rubbing alcohol to create a clean ‘window’ in the speckles before painting your letters.
Step 2: Painting the Monogram
-
Design the layout:
Choose a serif font for your monogram or text. You can either freehand this with a pencil directly on the dish or print out your desired letter and transfer it using carbon paper. -
Outline the text:
Load your fine detail brush with navy blue paint. Carefully trace the outline of your letters. Keep your hand steady and use only the very tip of the brush. -
Create the serifs:
Pay special attention to the serifs—the small lines attached to the end of the strokes. Make these sharp and distinct to match the classic style shown in the example. -
Fill the letters:
Once the outline is established, gently fill in the body of the letters with the navy paint. If the paint looks streaky, let the first coat dry and apply a second thin coat. -
Add the central motif (optional):
The example features a stylized ‘I’ shape above and below the text. To recreate this, paint a small horizontal bar centered above your text, flaring the ends slightly. -
Balance the design:
Mirror that motif below the text to frame your word perfectly. Ensure these decorative elements align vertically with the center of your lettering.
Custom Colors
Swap the navy blue for a deep forest green or charcoal grey for a moody look, or try rose gold for the rim to match specific jewelry tones.
Step 3: Finishing Touches
-
Paint the rim:
Dip your brush into the metallic gold paint. Carefully run the brush along the very top edge of the dish’s rim to create a gilded border. -
Refine the rim:
If the rim line feels too uniform, you can intentionally make it slightly organic or uneven to enhance the handmade pottery aesthetic. -
Clean up mistakes:
If you have any stray paint marks or wobbly lines, use a damp cotton swab or a toothpick to gently scrape away unwanted paint while it’s still tacky. -
Cure the paint:
Most ceramic paints require curing to become durable. Follow the manufacturer’s instructions on your paint bottle, which often involves baking the dish in a home oven for 30 minutes. -
Cool down:
If baking, turn the oven off and let the dish cool down completely inside the oven before removing it. This prevents the ceramic from cracking due to temperature shock.
Your personalized jewelry dish is now ready to hold your favorite rings and trinkets
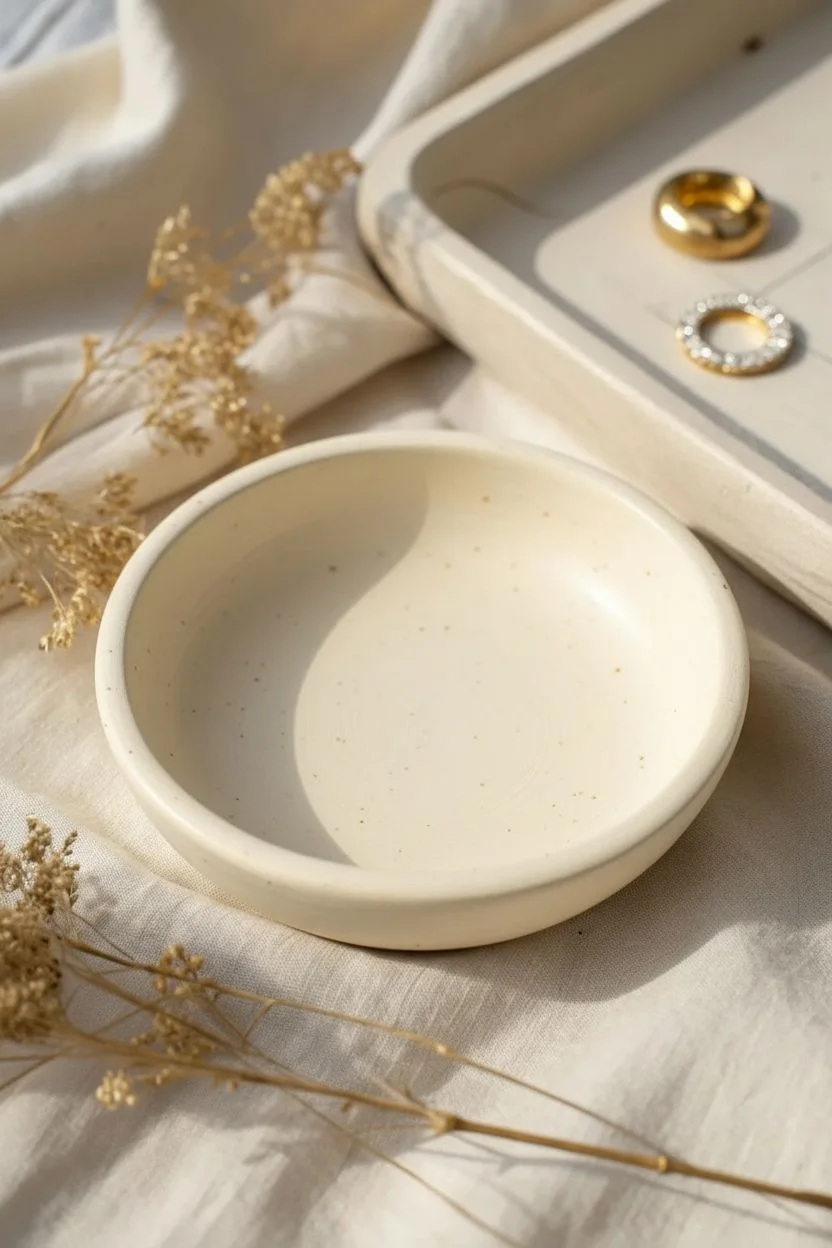
Metallic Gold Rim Accent
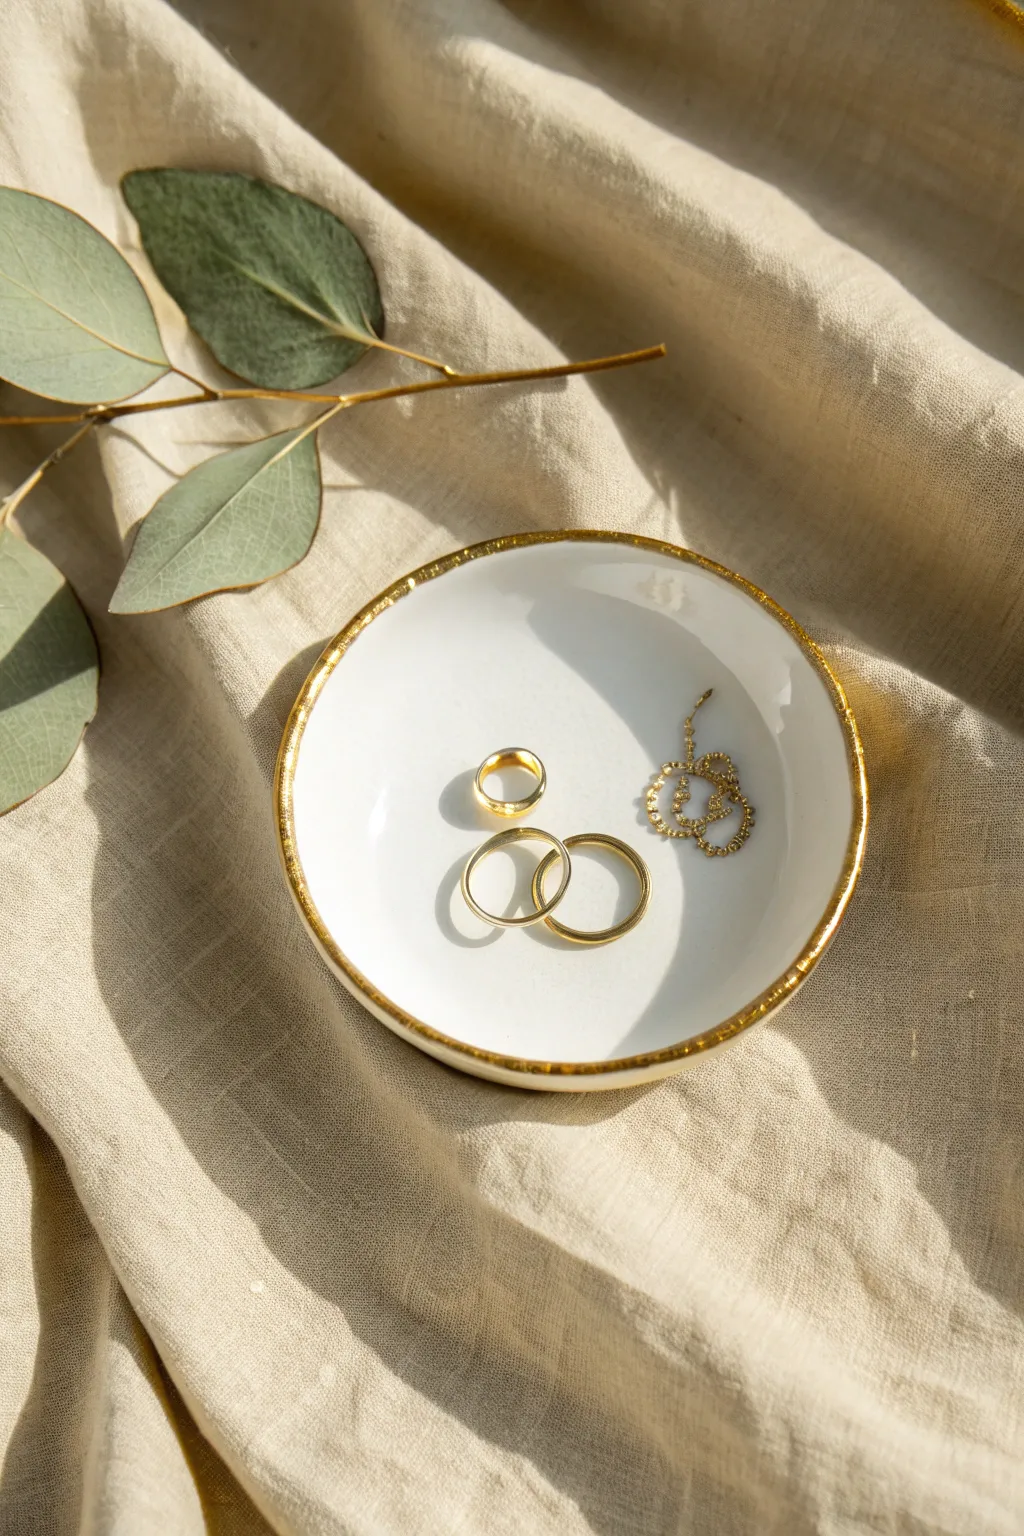
Transform a plain white ceramic saucer into a luxury trinket dish with nothing more than a steady hand and a touch of liquid leaf. The result is a stunningly minimalist piece that looks like high-end boutique decor, perfect for holding your everyday rings and earrings.
Step-by-Step Guide
Materials
- Small white ceramic trinket dish or sauce bowl
- Liquid gold leaf paint (solvent-based for best shine)
- Small, flat synthetic paintbrush (size 2 or 4)
- Rubbing alcohol
- Cotton pads
- Painter’s tape or washi tape (optional)
- Small glass jar or disposable cup
- Paper towels
- Cotton swabs
Step 1: Preparation and Cleaning
-
Surface check:
Begin by inspecting your ceramic dish for any cracks, chips, or existing glaze imperfections. A smooth, flawless rim will yield the most professional-looking metallic edge. -
Degrease with alcohol:
Soak a cotton pad with rubbing alcohol and thoroughly wipe down the entire dish, paying special attention to the rim. Oils from your fingers can prevent the gold leaf from adhering properly. -
Air dry completely:
Set the dish aside for several minutes to ensure all the alcohol has evaporated. The surface must be bone dry before you introduce any paint. -
Prepare your workspace:
Liquid gold leaf is potent and can be messy. Lay down paper towels to protect your table and ensure good ventilation in the room, as the fumes can be strong. -
Shake the liquid leaf:
Vigorously shake your bottle of liquid gold leaf. The metallic pigments are heavy and settle at the bottom; you need them fully suspended for that rich, opaque shine.
Step 2: Painting the Gold Rim
-
Load the brush:
Dip just the tip of your flat synthetic brush into the liquid gold. You want enough product to flow smoothly but not so much that it drips down the side of the bowl. -
Establish the anchor point:
Start at one point on the rim. Instead of painting with the tip, lay the bristles flat against the top edge of the ceramic dish. -
The glide technique:
Slowly drag the brush along the rim, using the edge of the ceramic itself as a guide to keep your line straight. I find rotating the dish with my other hand works better than moving the brush hand around the circumference. -
Widen the inner band:
Once the top edge is covered, slightly angle your brush inward to paint a deeper band on the interior slope of the rim. This creates that ‘dipped’ look visible in the photo. -
Check the exterior edge:
Inspect the outside of the rim. If the gold line looks too thin, gently run your brush along the outer lip to ensure the gold is visible from the side profile as well. -
Define the irregularity:
The charm of this piece is the slight organic imperfection. Don’t stress about a geometrically perfect circle; allow the brush to create a natural, hand-painted texture. -
Correcting mistakes:
If you accidentally smudge gold where you don’t want it, quickly dip a cotton swab in rubbing alcohol (or the specific solvent recommended on your gold leaf bottle) and wipe it away while wet. -
Second coat evaluation:
Let the first layer dry for about 10-15 minutes. If the white ceramic is peeking through, apply a second thin coat using the same gliding motion.
Choosing the Right Gold
Avoid standard acrylic gold paint; it dries dull. For the mirror-like finish in the photo, you must use ‘Liquid Leaf’ or an oil-based gilding paint.
Step 3: Finishing Touches
-
Initial drying phase:
Place the dish in a dust-free area. Allow it to sit undisturbed for at least one hour until the gold is dry to the touch. -
Full cure time:
Although it feels dry quickly, liquid leaf needs about 24 hours to fully cure and harder. Do not place jewelry in it during this time. -
Clean your tools:
While the dish cures, clean your brush immediately using turpentine or mineral spirits (water won’t work on liquid leaf). Wash with soap afterward to keep the bristles soft. -
Final inspection:
Once fully cured, inspect the rim one last time. The finish should be highly reflective and smooth. -
Styling the dish:
Your piece is ready. Arrange delicate gold rings or a simple chain necklace inside to complement the warm metallic tones of the rim.
Fixing Uneven Lines
If your hand is shaky, rest your pinky finger on the table or the center of the bowl to stabilize your brush hand while you paint the rim.
This simple upgrade proves that sometimes the smallest details make the biggest impact on your vanity display
Marbled Swirl Look
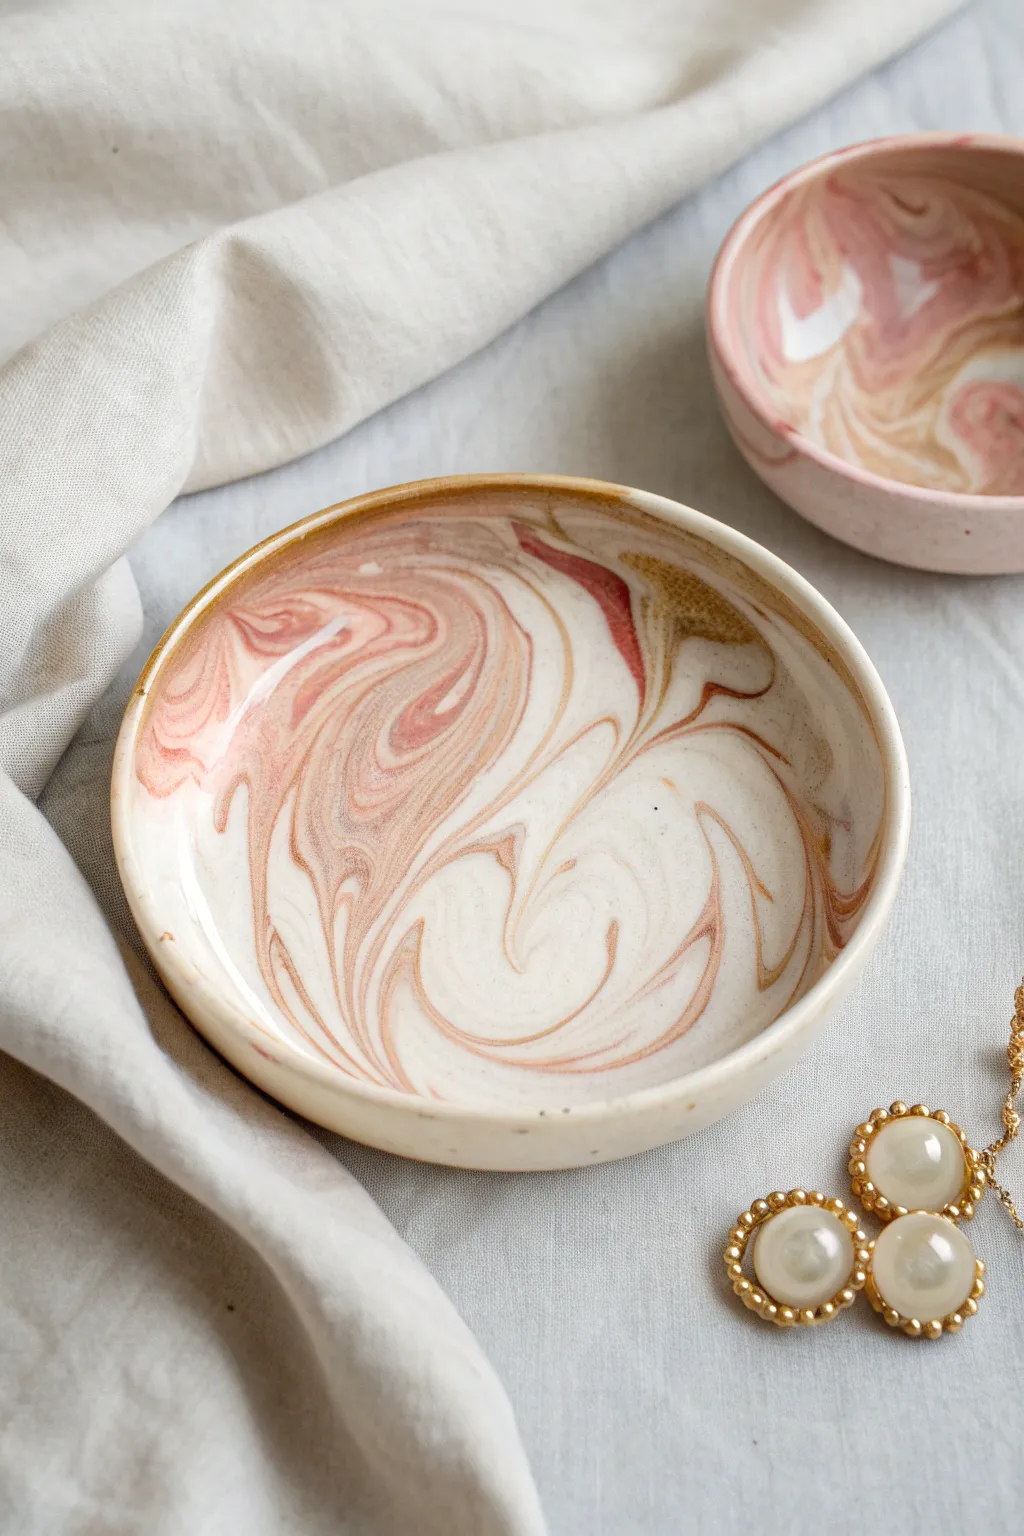
Capture the organic beauty of swirling stone with this chic marbled jewelry dish project. Using polymer clay allows you to effortlessly blend cream, rose, and terracotta tones into a sophisticated, high-end looking piece for your nightstand.
Step-by-Step
Materials
- White or cream polymer clay
- Terra cotta or warm brown polymer clay
- Rose pink polymer clay
- Acrylic rolling pin or glass jar
- Oven-safe small bowl (to use as a mold)
- Craft knife or clay blade
- Sandpaper (fine grit)
- Gloss glaze or polyurethane varnish
- Soft paintbrush
Step 1: Preparing the Clay
-
Condition the white clay:
Start by taking a large block of your white or cream clay. Knead it thoroughly in your hands until it becomes soft, pliable, and easy to work with. Form it into a thick log about 4 inches long. -
Prepare accent colors:
Condition smaller amounts of the rose pink and terra cotta clays. Roll these into thin ropes, significantly thinner than your white log. -
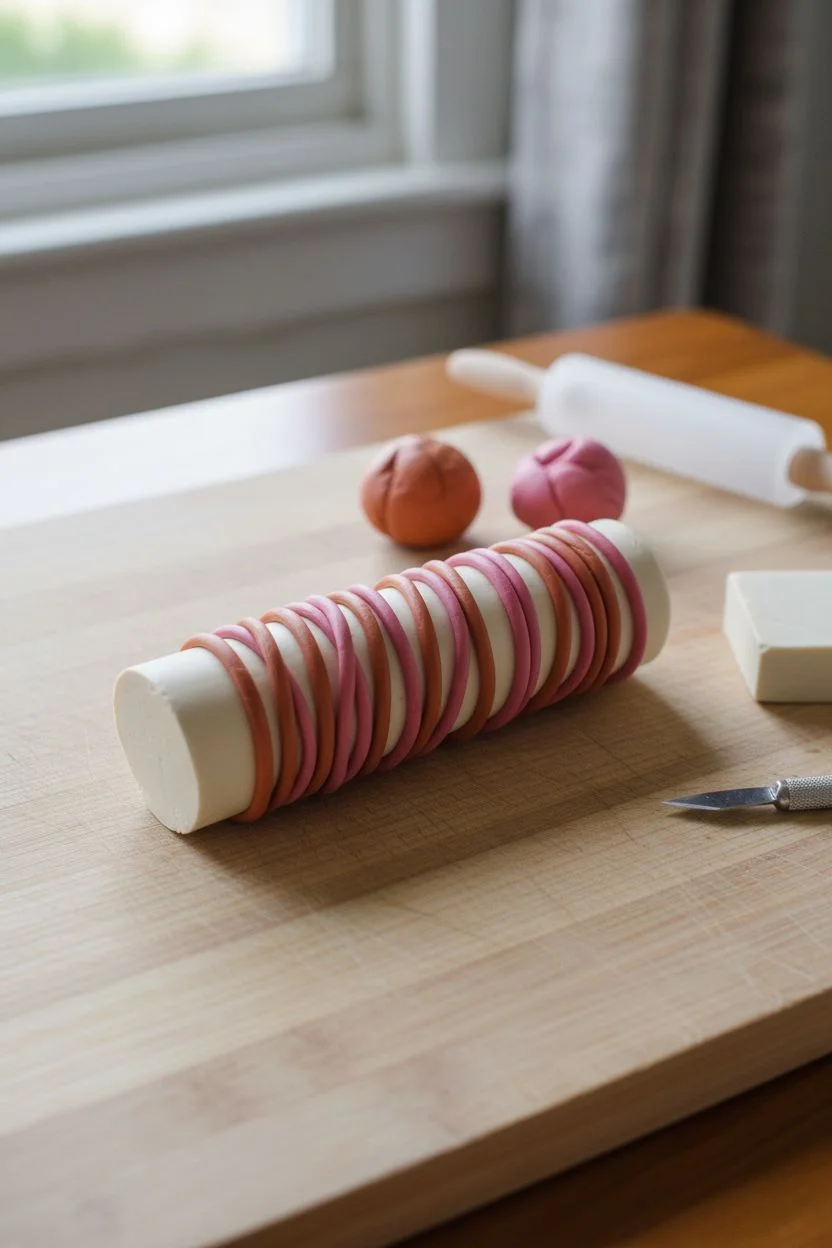
Combine the ropes:
Lay the thin colored ropes lengthwise along the thick white log. You can twist them slightly or place them straight, depending on how wild you want the pattern to be. -
Twist the log:
Grip both ends of the combined log and twist in opposite directions. Keep twisting until the colors look like candy cane stripes spiraling around the white core.
Muddy Colors?
If your colors look brown instead of distinct swirls, you over-mixed the clay. Next time, twist and fold fewer times to keep the color separation crisp.
Step 2: creating the Marbled Pattern
-
Fold and roll:
Fold the twisted log in half onto itself and roll it out into a smooth log again. This step begins to merge the distinct stripes into softer swirls. -
Repeat the process:
Twist the log again, fold it, and roll it out. I usually repeat this process 2 or 3 times—stop when you see intricate veins of color but before the colors mix completely into a single muddy shade. -
Form a ball:
Once you are happy with the marbling potential, roll the log into a tight, smooth ball. Ensure there are no air bubbles trapped inside.
Step 3: Shaping the Dish
-
Flatten the clay:
Place the ball on a clean, flat surface. Use your acrylic roller to flatten it into a disc about 1/4 inch thick. Rotate the clay frequently to keep the shape circular. -
Inspect the pattern:
Check both sides of your disc. The marbling will look different on each side, so choose the one with the most pleasing swirls to be the face of your dish. -
Refine the edges:
Your circle might be uneven. Use a round cookie cutter or trace around a bowl with your craft knife to cut a perfect circle. -
Shape the rim:
Gently smooth the cut edge with your finger to round it off, removing any sharp cuts or jagged bits from the knife.
Smooth Operator
Wipe your clay with a little rubbing alcohol before baking. It removes fingerprints and lint, leaving a flawlessly smooth surface.
Step 4: Baking and Finishing
-
Mold the dish:
Take your oven-safe bowl and place the clay disc inside it. Gently press it down so it takes the curved shape of the bowl’s bottom. -
Bake the clay:
Place the bowl with the clay on a baking sheet. Bake according to the manufacturer’s instructions on your specific package of clay (usually around 275°F for 15-30 minutes). -
Cool down:
Remove from the oven and let the clay cool completely inside the mold. Removing it while hot can warp the shape. -
Sand the edges:
Once cool, pop the clay dish out. Use fine-grit sandpaper to gently buff the rim and any rough spots on the surface for a professional, stone-like feel. -
Apply the glaze:
Clean off any sanding dust with a damp cloth. Using a soft brush, apply a thin coat of gloss glaze to the inside of the dish to give it that ceramic shine and protect the pattern. -
Paint the rim (optional):
For an extra touch of elegance, you can carefully paint the very rim with liquid gold leaf or metallic paint.
Place your favorite rings or earrings inside and enjoy the custom pop of color it adds to your dresser
Terrazzo Confetti Speckles
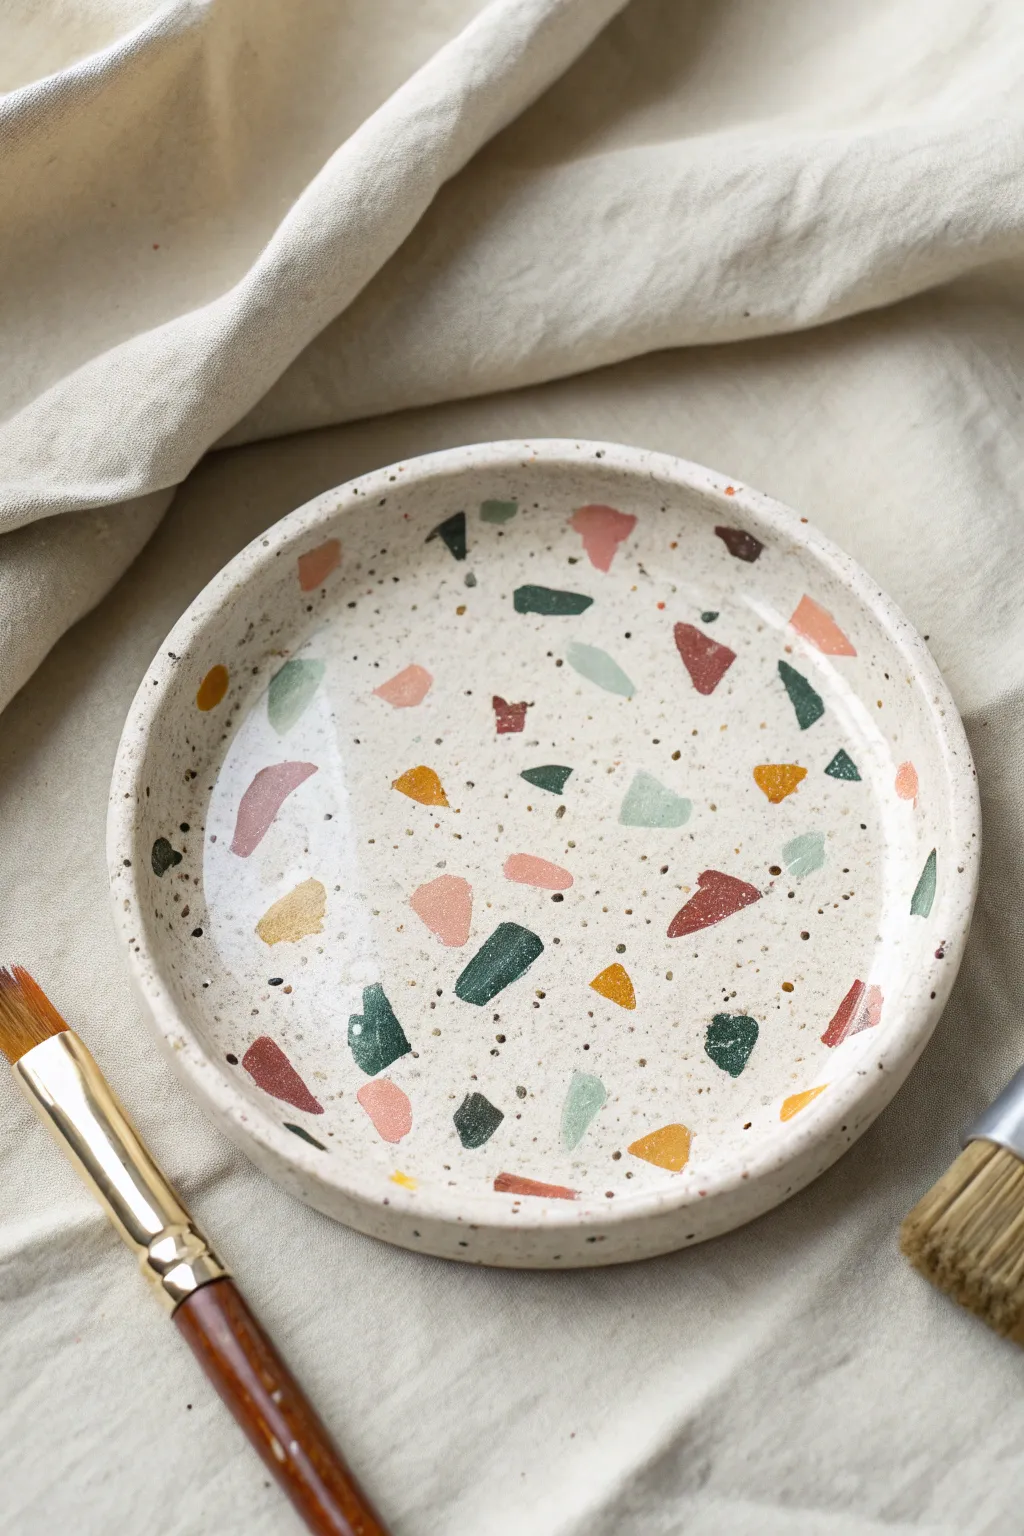
Create a high-end, faux-stone look on a simple jewelry dish using nothing but paint. This terrazzo effect combines scattered, irregular shapes with tiny speckles to mimic the texture of polished composite material.
Step-by-Step Tutorial
Materials
- Small ceramic or clay jewelry dish
- Acrylic paints (Cream/Beige base, plus Rust Red, Forest Green, Blush Pink, Mustard Yellow)
- Black acrylic paint (thinned) or black ink
- Flat shader brush (size 6 or 8)
- Small angled brush or detailing brush
- Old toothbrush or stiff bristle brush
- Glossy clear sealant (Mod Podge or spray varnish)
- Palette or paper plate
- Paper towels
- Cardboard box (for splatter containment)
Step 1: Base Preparation
-
Clean the surface:
Before painting, wipe down your ceramic dish with a damp cloth or a little rubbing alcohol to remove any dust or oils. This ensures the paint adheres perfectly. -
Mix the base color:
Create a warm, stony neutral by mixing a generous amount of white acrylic with a tiny drop of beige or raw sienna. You want a creamy, oatmeal shade rather than a stark white. -
Apply the first coat:
Using your flat shader brush, apply a smooth, even layer of the cream base color all over the inside and rim of the dish. -
Let it dry completely:
Allow this first layer to dry for about 15-20 minutes. If the underlying ceramic color is still showing through, apply a second coat for full opacity.
Splotchy Splatters?
If your toothbrush releases large blobs instead of mist, the paint is too thick. Add water, test on paper, then try again.
Step 2: Painting the Terrazzo Chips
-
Plan your palette:
Squeeze out small amounts of your accent colors: rust red, forest green, blush pink, and mustard yellow. I like to keep these colors slightly muted or earthy to mimic real stone. -
Paint the first shapes:
Start with the forest green. Using a small angled brush, paint random, irregular geometric shapes. Think trapezoids, uneven triangles, and jagged rectangles. -
Vary the size:
Make some green shapes larger (about the size of a fingernail clipping) and others quite small, scattering them sparsely across the dish surface. -
Add the rust accents:
Rinse your brush and switch to the rust red. Paint similar jagged shapes, placing them in the empty spaces. Try to avoid letting shapes touch each other. -
Layer in the blush pink:
Introduce the blush pink for a softer contrast. These shapes can be slightly more rounded but still keep edges distinct rather than perfectly circular. -
Finish with mustard:
Fill in remaining gaps with the mustard yellow. Step back occasionally to look at the overall balance; you want an even distribution of color without distinct patterns. -
Refine the edges:
If any heavy paint strokes created ridges, carefully smooth them out with a slightly damp brush before the paint sets fully.
Level Up: Metallic Pop
Add a fifth color of metallic gold or copper for a luxe finish. Paint these chips last so they sit on top and catch the light.
Step 3: Final Speckling & Sealing
-
Prepare the splatter paint:
Mix a small amount of black acrylic paint with a drop of water. The consistency should be fluid, like ink, but not watery enough to drip uncontrollably. -
Set up a splatter station:
Place your dish inside a cardboard box or on a wide area of newspaper to protect your surroundings from flying paint droplets. -
Load the tool:
Dip an old toothbrush or a stiff hog-bristle brush into the thinned black paint. Tap off the excess on a paper towel first. -
Flick the paint:
Hold the brush about 6 inches above the dish. Use your thumb to flick the bristles, sending a fine mist of tiny black dots over the entire surface. -
Check density:
Aim for a light dusting of specks. These tiny dots are what visually tie the disparate colors together into a cohesive stone look. -
Dry thoroughly:
Let the dish sit undisturbed for at least an hour. The splatter needs to be completely dry before sealing to avoid smearing. -
Apply varnish:
Apply a coat of glossy clear sealant. Poured resin or a thick layer of high-gloss Mod Podge works best to simulate the polished shine of real terrazzo.
Once sealed and cured, this trendy dish is ready to hold your favorite rings and studs
Celestial Moon and Stars
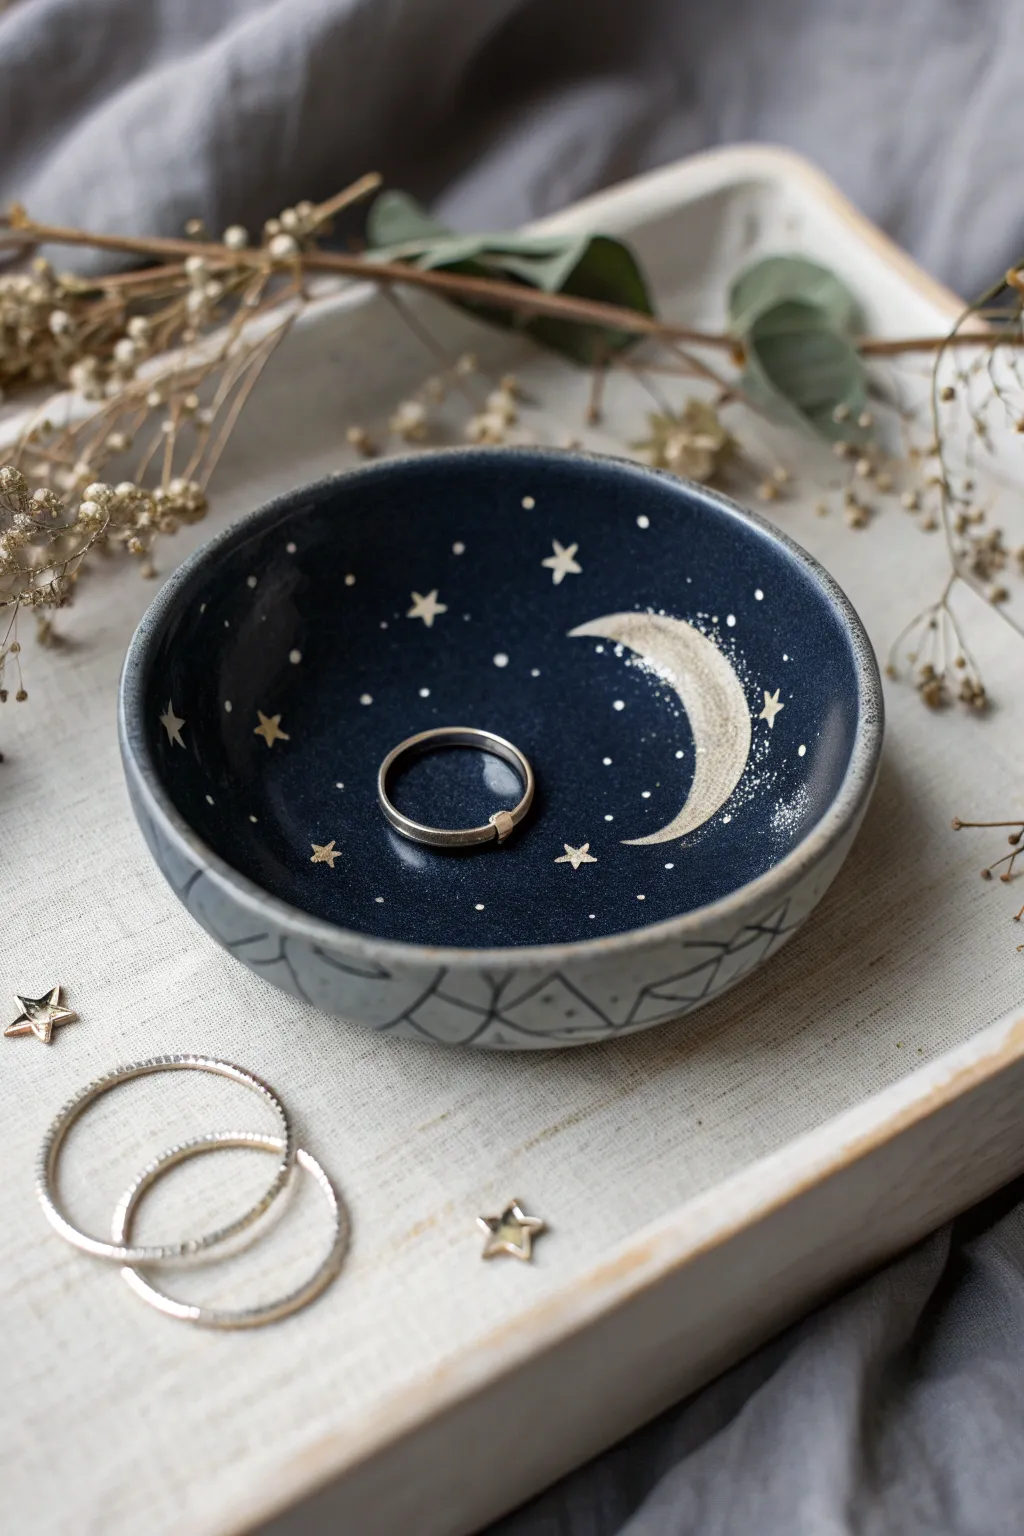
Transform a simple clay bowl into a dreamy night sky with this elegant celestial design. The deep indigo interior contrasts beautifully with delicate gold stars and a textured crescent moon, creating the perfect resting place for your favorite rings.
How-To Guide
Materials
- Small ceramic trinket dish (bisque or air-dry clay)
- Deep indigo or midnight blue acrylic paint
- Metallic gold paint (fluid acrylic or paint pen)
- Metallic silver or pearl white paint
- Fine detail paintbrush (size 0 or 00)
- Small flat shader brush
- Pencil
- Gloss varnish or sealant
- Palette for mixing
- Paper towel
Step 1: Preparation & Base Coat
-
Clean the surface:
Before you begin, wipe down your ceramic dish with a slightly damp cloth to remove any dust or oils. Let it dry completely to ensure the paint adheres smoothly. -
Outline the exterior pattern:
Turn the bowl over or hold it sideways. Using a light pencil touch, sketch a repeating geometric pattern of intersecting curves or scallops along the lower outer rim. This creates the subtle textured look seen on the outside. -
Define the exterior lines:
Go over your pencil lines on the exterior with a fine-tip black marker or a very thin brush with dark grey paint. Keep the lines thin and deliberate. -
Paint the interior base:
Using your flat shader brush, apply a coat of deep indigo or midnight blue paint to the entire inside of the bowl. Apply smoothly to avoid brush streaks. -
Apply a second coat:
Once the first layer is dry to the touch, apply a second coat of the dark blue. This ensures a rich, opaque background that looks like the depth of space. Let this dry fully before adding details.
Uneven Stars?
If your hand shakes while painting tiny stars, try using the tip of a toothpick or a dotting tool instead of a brush. It gives much more control for creating perfect, round distant stars.
Step 2: Painting the Moon
-
Sketch the crescent:
Looking at the right side of the bowl’s interior, lightly pencil in a large crescent moon shape. If you’re nervous about freehanding, trace a circular object and then shift it slightly to trace the inner curve. -
Base layer for the moon:
Mix a small amount of silver or pearl white with a drop of gold to get a pale champagne color. Fill in the crescent shape using your detail brush. -
Add texture:
While the moon paint is still slightly tacky, stipple (dab repeatedly) a bit of pure gold or darker metallic bronze towards the inner curve of the moon. This creates a cratered, dimensional texture. -
Create the moon glow:
Dry brush a tiny amount of white or silver paint just outside the curve of the moon. I find this creates a subtle “halo” effect that makes the moon pop against the dark blue.
Pro Tip: Depth trick
Mix a tiny drop of gloss medium into your dark blue base coat. It gives the background a slight sheen before varnishing, making the ‘sky’ look deeper and more like ceramic glaze.
Step 3: Stars & Constellations
-
Paint the major stars:
Dip your fine detail brush into the metallic gold paint. Paint small five-pointed stars scattered randomly across the blue sky. Varry their sizes; place slightly larger ones near the center and rim. -
Add simpler stars:
Between the five-pointed stars, add simple four-pointed stars or cross shapes. Rotate them slightly so they aren’t all uniform. -
Create the starfield:
Using the very tip of your brush or a toothpick dipped in gold, dot tiny specks throughout the empty blue spaces. These represent distant stars and add depth to the galaxy. -
Add star clusters:
Group a few tiny dots closer together in 2-3 spots to simulate star clusters or nebulae. Keep these delicate so they don’t look like accidental spills. -
Highlight the moon dust:
Add a sprinkling of very fine white or silver dots concentrated near the ends of the crescent moon, as if it’s trailing stardust. -
Rim detail:
Carefully run the side of your brush along the very top edge of the dish with a grey or slate blue paint to create a defined rim that separates the dark interior from the lighter exterior. -
Seal the artwork:
Allow the paint to cure for at least 24 hours. Once fully dry, apply two thin coats of gloss varnish to the interior. This protects the paint from scratches when you place your jewelry inside.
Now your jewelry has a magical place to rest under the stars every night
Crystal-Inspired Faceted Shapes
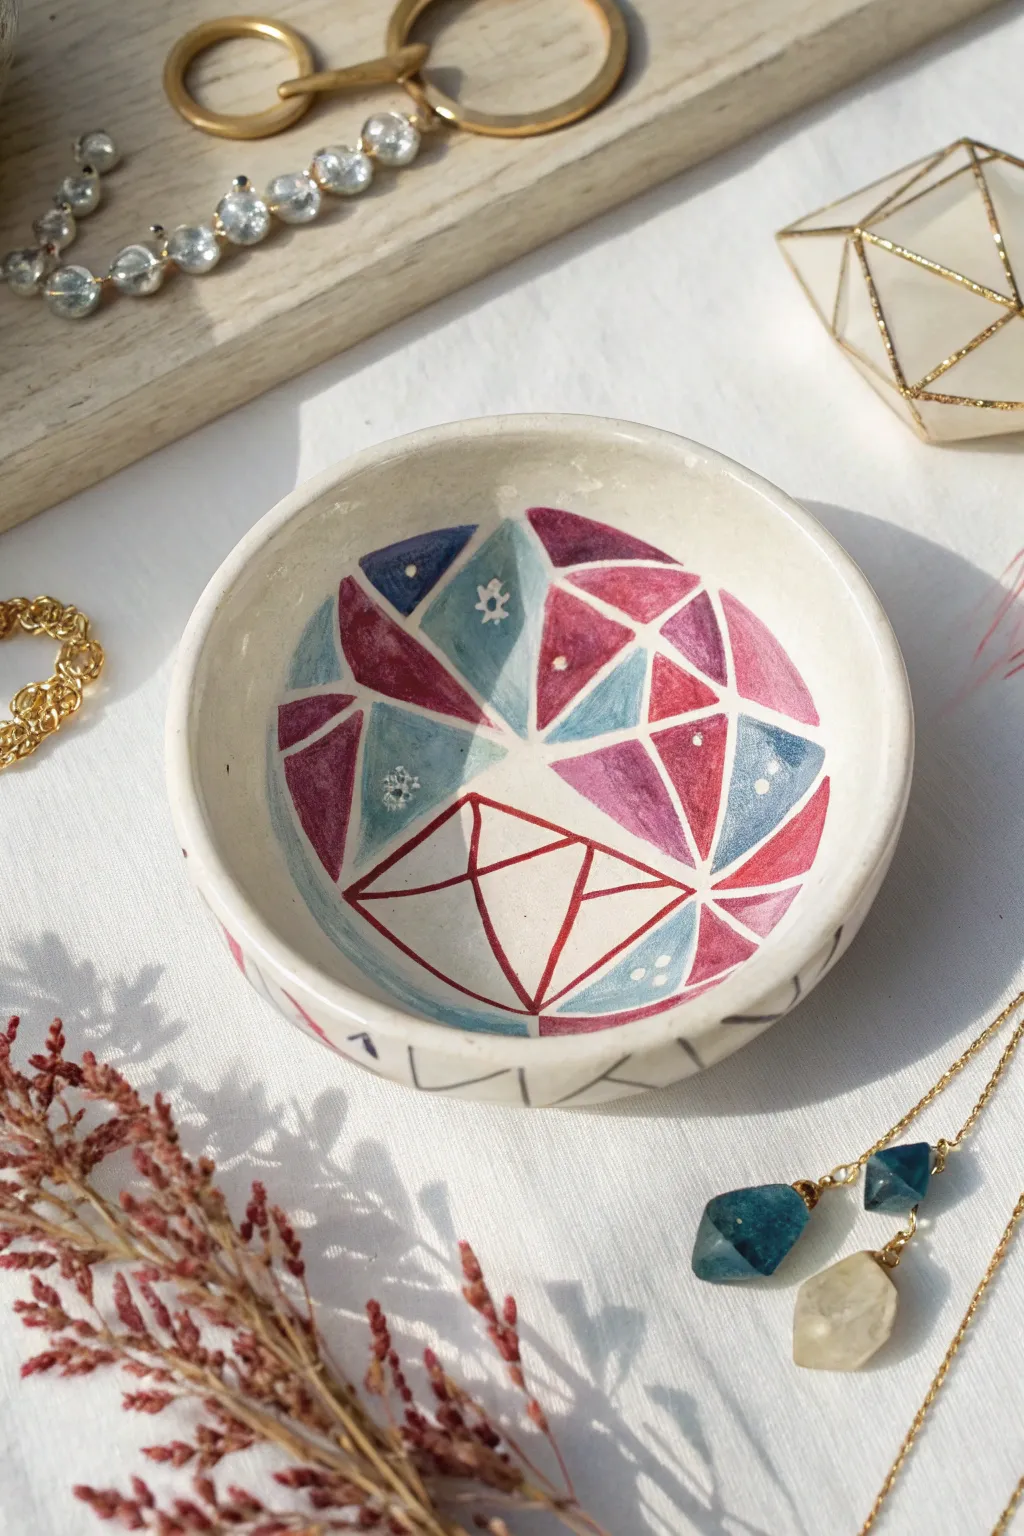
Transform a plain ceramic dish into a sparkling crystal cavern with this geometric painting project. Using jagged lines and luscious jewel tones, this design mimics the faceted beauty of cut gemstones for a sophisticated catch-all dish.
Step-by-Step Tutorial
Materials
- Small white ceramic dish (bisque or glazed)
- Pencil (HB or lighter)
- Fine liner paintbrush (size 0 or 00)
- Small round paintbrush (size 2)
- Acrylic paints: Berry red, magenta, deep teal, light blue, and white
- Gold or metallic paint pen (optional)
- Palette or small dish for mixing
- Gloss varnish or sealant
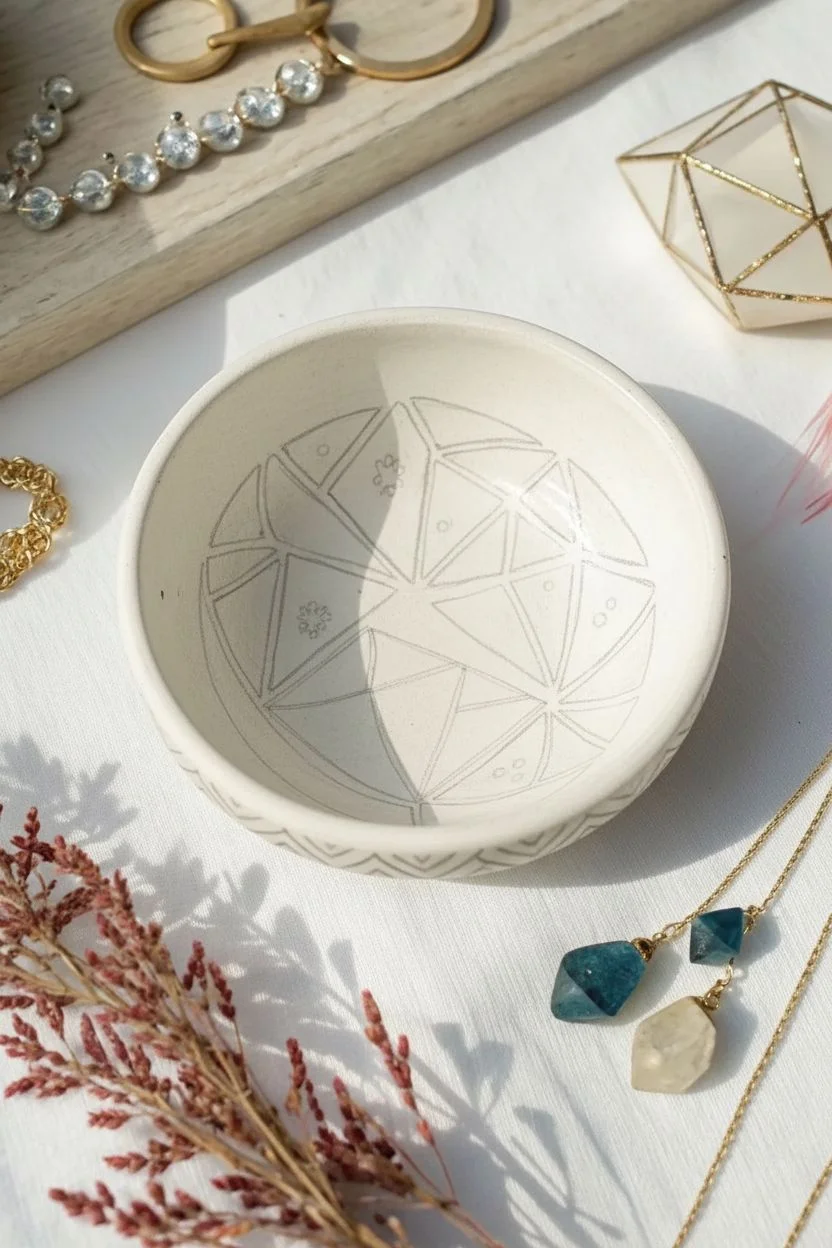
Step 1: Drafting the Facets
-
Find the center:
Start by lightly marking the center point of your bowl with a pencil. This doesn’t need to be mathematically perfect, but it acts as the anchor for your radiating lines. -
Draw the primary star:
From that center point, draw 5 to 7 straight lines radiating outward toward the rim, like the spokes of a wheel. Vary the distance between them slightly to keep it looking organic. -
Connect the spokes:
Connect the ends of your radiating lines with straight lines to form triangles. Then, add smaller intersecting lines within these shapes to create a network of varied triangles and diamonds. -
Outline the rim:
If you want the pattern to extend to the outside, draw a simple zigzag or chevron pattern along the outer rim of the bowl.
Clean Lines Hack
If your hand feels shaky painting the white channels, paint the whole section a solid color first. Once dry, use a white paint pen to draw the geometric grid over top.
Step 2: Applying Color
-
Mix your palette:
Prepare your acrylic paints. You’ll want two distinct color families: a warm pink/berry gradient and a cool blue/teal gradient. Mixing a tiny bit of water into the paint can help it flow smoother on ceramic surfaces. -
Paint the warm facets:
Using your size 2 brush, fill in scattered triangles with your deepest berry red. I like to keep these shapes non-adjacent so the colors are distributed evenly. -
Add the lighter pinks:
Mix a little white into your magenta to create a lighter shade. Fill in the sections next to or near your dark red triangles to create a sense of depth and reflection. -
Paint the cool facets:
Switch to your blues. Fill the remaining alternating shapes with deep teal and light blue. The contrast between the warm pinks and cool blues is what gives this piece its vibrant energy. -
Leave negative space:
Crucially, leave a thin gap of unpainted white ceramic between every single colored shape. These white channels act as the ‘grout’ lines that define the geometric structure. -
Create the white gem:
Leave one larger cluster of shapes at the bottom completely unpainted (white). Outline these specific shapes with a thin red line using your fine liner brush to define the facets without filling them in.
Step 3: Detailing & Finishing
-
Add stardust details:
Dip the very tip of your fine liner brush (or a toothpick) into white paint. Add tiny clusters of three dots or small starbursts inside a few of the darker blue triangles to mimic light reflecting off crystal. -
Clean up lines:
If any paint has strayed into your white channels, you can carefully scratch it away with a toothpick once it’s half-dry, or touch it up with white paint later. -
Detail the rim:
Use a dark grey or black paint very sparingly to trace the chevron pattern you sketched on the outer rim earlier. -
Let it cure:
Allow the paint to dry completely for at least 24 hours to ensure adhesion. -
Seal the surface:
Apply two thin coats of gloss varnish. This protects the paint from scratching and gives the dish that essential glossy, gem-like finish.
Gilded Edges
For a luxe touch, trace over the white ‘grout’ lines with liquid gold leaf or a metallic gold paint pen instead of leaving them plain white.
Now you have a stunning geometric vessel ready to hold your favorite rings and studs
Ocean Wave Gradient

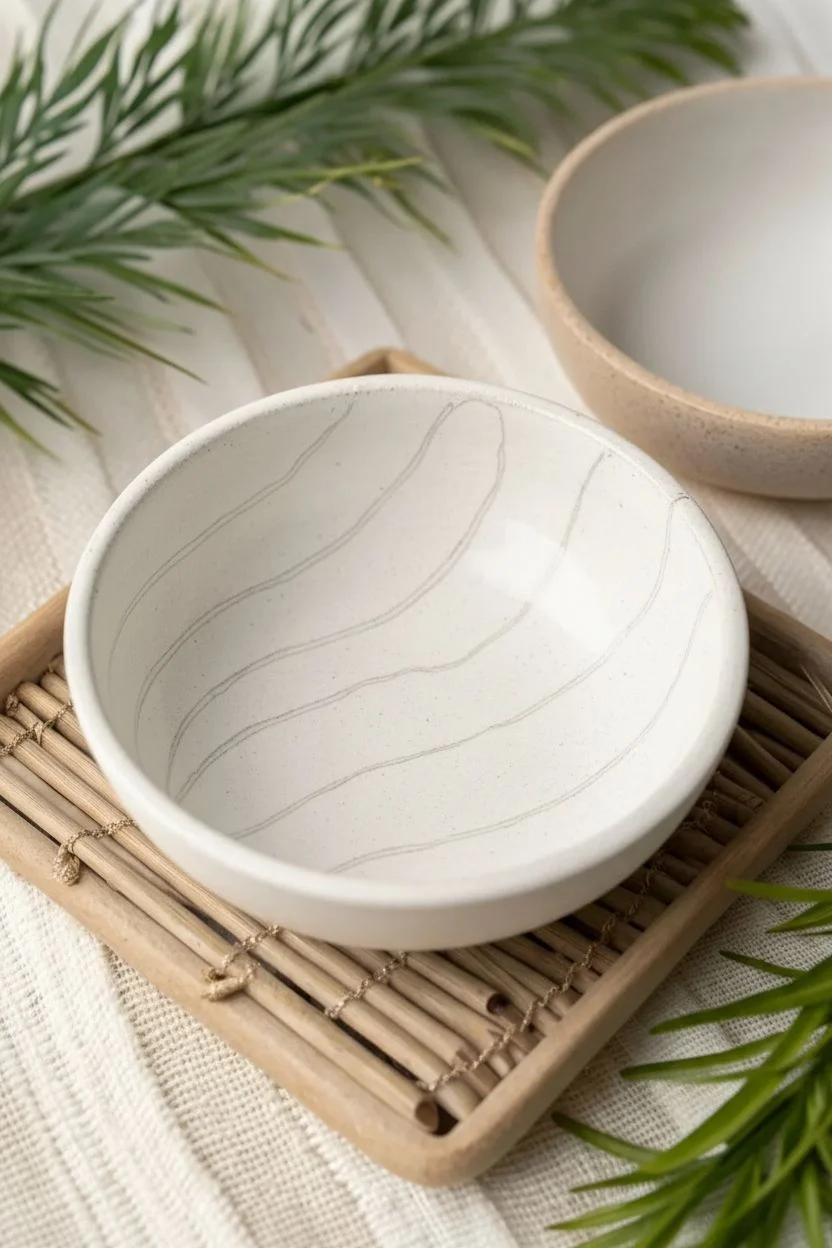
Capture the serene beauty of the seaside with a jewelry dish that mimics rolling ocean waves. This project combines flowing watercolor glazes in tranquil hues of teal and turquoise, accented by elegant gold veining for a sophisticated finish.
Step-by-Step Guide
Materials
- Small white ceramic bowl (unglazed bisque or matte finish)
- Ceramic paints or fluid acrylics (dark teal, turquoise, cobalt blue, white)
- Glazing medium (if using acrylics)
- Gold paint pen (fine tip) or liquid gold leaf with liner brush
- Soft synthetic watercolor brushes (round size 4 and 6)
- Palette for mixing
- Water cups
- Gloss varnish or resin sealant (optional but recommended)
Step 1: Preparation and Planning
-
Clean surface:
Begin by ensuring your ceramic bowl is completely free of dust and oils. Wipe it down with a damp cloth or a little rubbing alcohol, then let it dry fully. -
Map the waves:
Lightly sketch organic, wavy lines across the inside of the bowl using a very faint pencil touch. These curves will define where your different ocean colors meet.
Step 2: Painting the Ocean Layers
-
Mix the deepest hue:
On your palette, create your darkest ocean shade by mixing dark teal with a touch of cobalt blue. You want a rich, saturated color for the deepest part of the wave. -
Paint the first section:
Apply this dark teal mixture to one of the wave sections. I like to keep the paint fairly wet and fluid to encourage a watercolor-like transparency, but ensure it remains within your pencil lines. -
Create a mid-tone turquoise:
Mix a bright turquoise shade. Add a small amount of glazing medium or water to thin it slightly, creating a semi-transparent wash. -
Apply the mid-tone:
Paint the section adjacent to your dark wave. Don’t worry if the edges touch slightly; a bit of bleed adds to the organic look, though we will cover boundaries later. -
Mix a pale aqua:
Add white paint to your turquoise mix to create a very pale, soft aqua color. This represents the shallow, sunlit water. -
Fill remaining sections:
Apply the pale aqua to the remaining wave bands. Leave some areas very sheer so the white of the ceramic glows through, adding depth. -
Add texture and variation:
While the paint is still damp, dab a slightly wet, clean brush into the center of the color bands to lift a tiny bit of pigment. This creates a subtle cloudiness that mimics moving water. -
Dry completely:
Allow the paint to dry thoroughly. Since we are layering materials, the base coat needs to be bone dry before the next step to prevent smudging.
Wet Edge Technique
Work quickly when painting the blue sections. Keeping the edges of your paint slightly wet allows for softer transitions before you add the hard gold lines.
Step 3: The Golden Details
-
Prepare the gold:
Shake your gold paint pen vigorously or mix your liquid gold leaf. The metallic pigment needs to be well-suspended for a solid, shiny line. -
Trace the boundaries:
carefully trace over the lines where your different paint colors meet. Use a steady hand to create thin, organic gold veins that separate the ocean hues. -
Add floating accents:
Draw small, broken gold lines or tiny flecks within the larger color blocks. These mimic sunlight catching ripples on the water’s surface. -
Rim the edge:
Run your gold pen or brush along the very rim of the bowl to create a finished, professional border that frames the artwork. -
Define the outer edge:
If desired, create a very thin gold line just inside the lip of the bowl to add an extra layer of dimension.
Pearl Enamel Accent
Add a dot of iridescent pearl medium or white pearl paint on top of the lightest blue section to mimic sea foam bubbles.
Step 4: Sealing and Finishing
-
Cure the metallics:
Let the gold leaf or paint pen cure for at least an hour. Metallics can smear easily if sealed too quickly. -
Apply varnish:
Brush on a coat of high-gloss varnish or pour a thin layer of clear resin over the inside of the bowl. This gives the ‘water’ a wet, glass-like finish and protects your jewelry from scratching the paint.
Place your favorite earrings inside to see how the gold lines make your jewelry sparkle against the blue tones
Painted Shell Interior Illusion
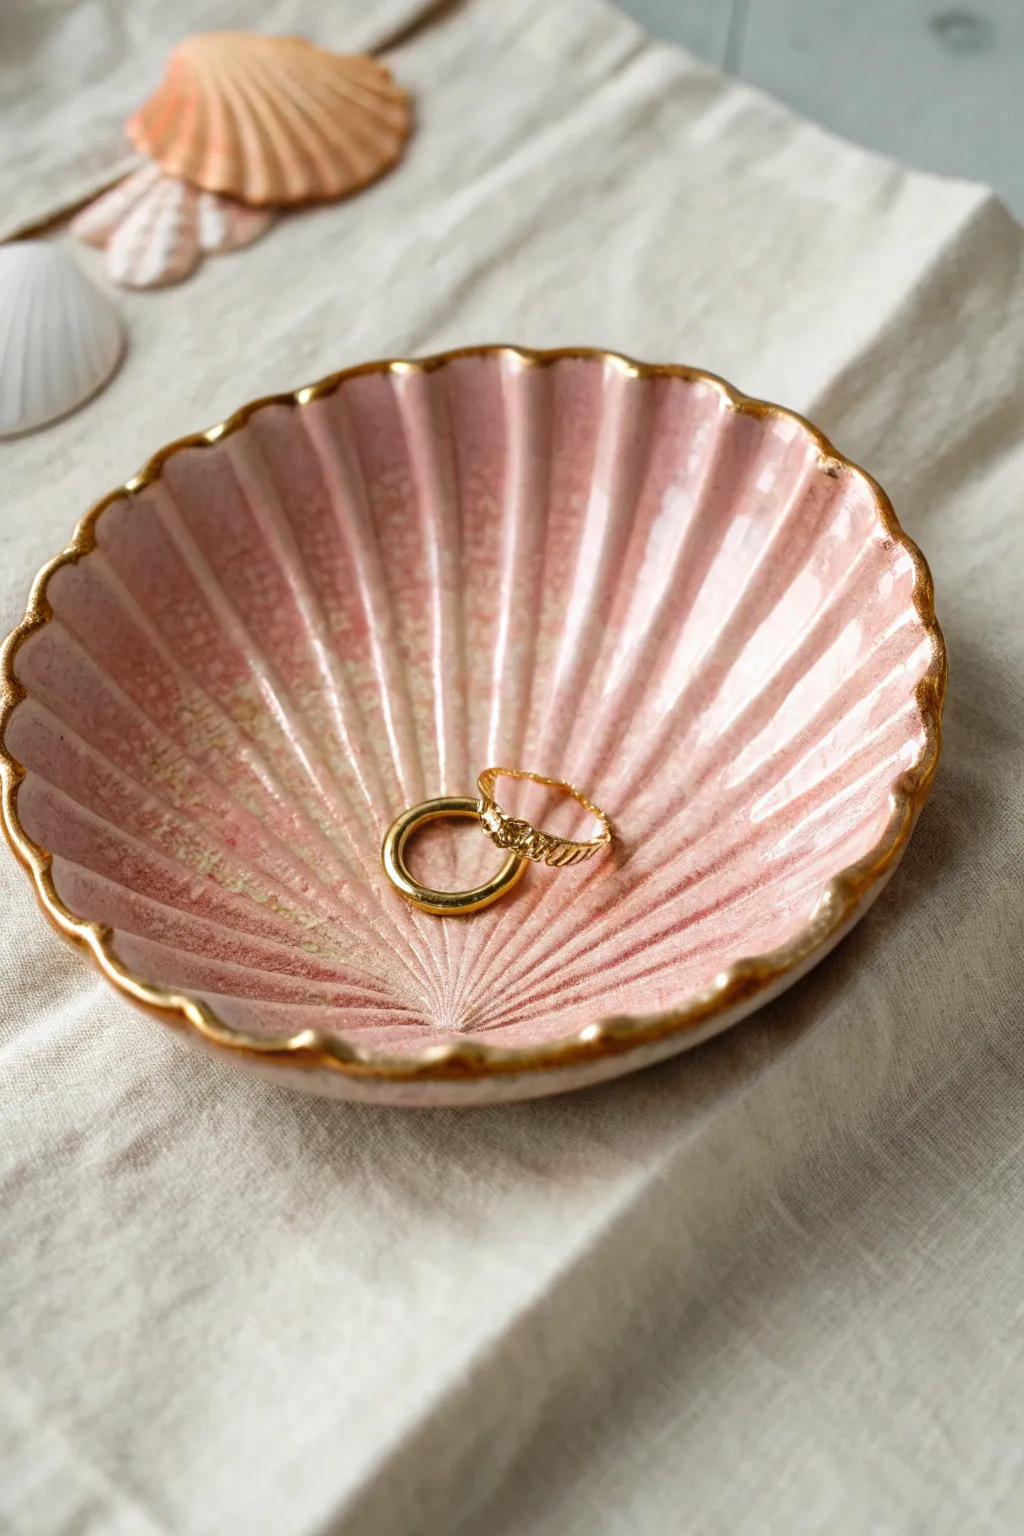
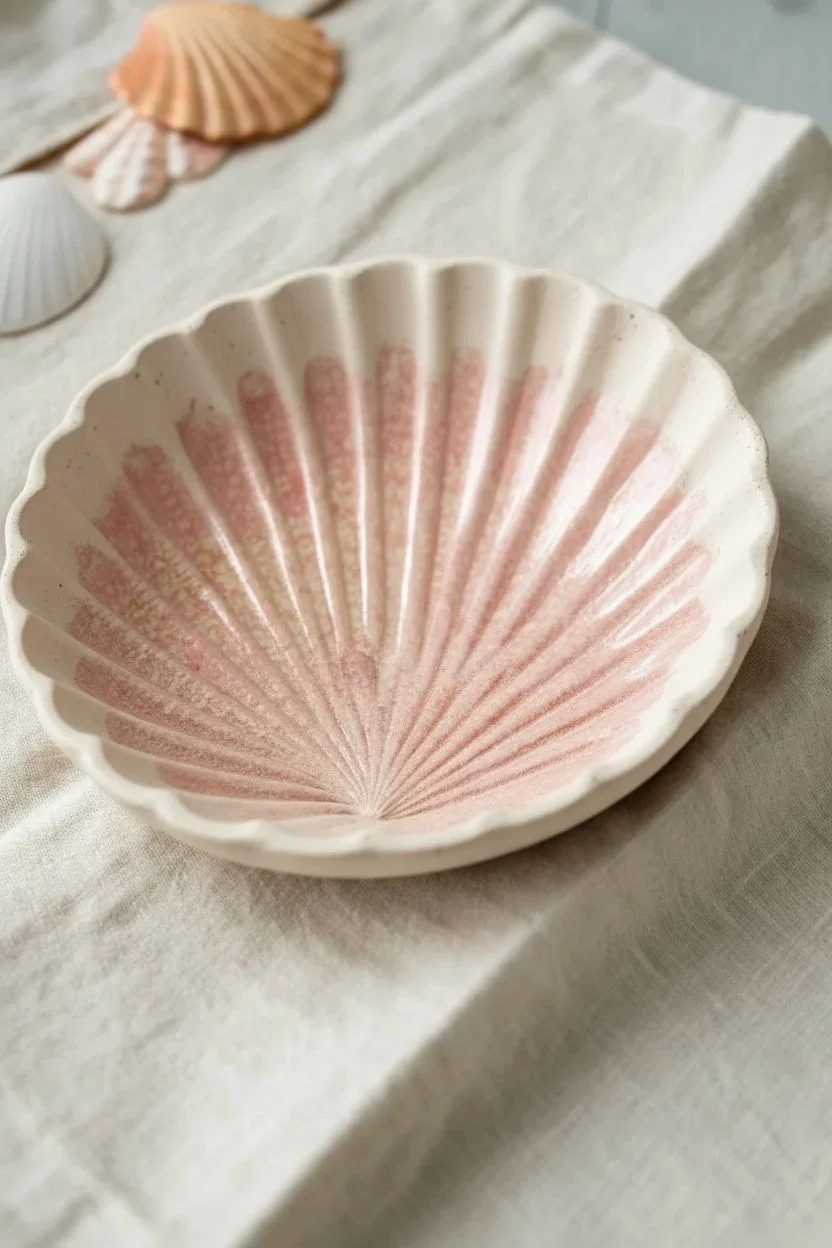
Transform a simple scalloped clay dish into a high-end vanity accessory with this blended paint technique. The result features a pearlescent pink interior that mimics the natural iridescence of a seashell, perfectly framed by a luxe gold rim.
How-To Guide
Materials
- Scalloped shell-shaped ceramic or air-dry clay dish (pre-made or handmade)
- Acrylic paint: soft pastel pink, white, and metallic pearl
- Liquid gold leaf or high-gloss metallic gold acrylic paint
- Glazing medium or water (for thinning)
- Soft synthetic flat brush (size 6 or 8)
- Fine detail brush (size 0 or 1)
- Sea sponge or coarse texture sponge
- Gloss varnish or resin (optional)
Step 1: Base Coat & Texture
-
Prime the surface:
Ensure your shell dish is clean, dry, and free of dust. If you are using raw air-dry clay, give it a quick coat of white gesso to seal the pores and create a smooth starting point. -
Mix the blush tone:
On your palette, mix a small amount of pastel pink with white acrylic paint. You want a very pale, milky pink as your base color. -
Apply the first wash:
Thin your pink mixture with a little water or glazing medium so it’s semi-transparent. Brush this wash over the entire interior of the shell, letting it pool slightly in the grooves to create depth. -
Add pearlescent highlights:
While the base is still slightly tacky, load your brush with metallic pearl paint. lightly sweep this over the raised ridges of the shell shape, leaving the darker pink recesses untouched. -
Create the mottled texture:
Dampen a small piece of sea sponge. Dip it lightly into a mix of pink and a tiny drop of gold paint. Dab off most of the paint on a paper towel until almost dry. -
Stipple the interior:
Gently stipple the sponge continuously across the inner surface of the dish. This creates that natural, organic speckling found in real seashells. Focus the texture slightly more toward the center whorl.
Step 2: Golden Details & Sealing
-
Add gold flecks:
Using an old toothbrush or a stiff bristle brush, pick up a tiny amount of liquid gold leaf or metallic paint. Use your thumb to flick very fine speckles onto the pink surface. Less is more here; you want a hint of shimmer, not large blobs. -
Dry completely:
Allow the interior paint layers to dry fully. This is crucial before moving to the rim to prevent smudging. I like to let this sit for at least an hour to be safe. -
Paint the gilded rim:
Shake your liquid gold leaf well. Using the fine detail brush, carefully paint the very edge of the scalloped rim. -
Create the wavy edge:
Don’t just paint the top flat edge; allow the brush to wiggle slightly onto the inner lip of the bowl. Following the natural curves of the scallops gives it that organic, dipped-in-gold look. -
Refine the gold line:
Go back over the rim to ensure the gold is opaque. If the line looks too uniform, deliberately thicken it in the ‘valleys’ of the scallops to enhance the shape. -
Seal the piece:
Once the gold is fully dry (check the manufacturer’s instructions, as oil-based gold leaf takes longer), apply a coat of gloss varnish over the entire interior. This protects the paint from scratching when you place jewelry inside.
Natural Variation
Real shells aren’t perfect. Don’t smooth out your brushstrokes too much; the slight ridges in the paint mimic the calcified texture of a real shell.
Resin Finish
For a glass-like professionally glazed look, pour a thin layer of clear UV resin into the dish as your final step instead of using standard varnish.
Now you have a stunning faux-ceramic piece ready to hold your favorite rings
Raised Dot Mandala Texture
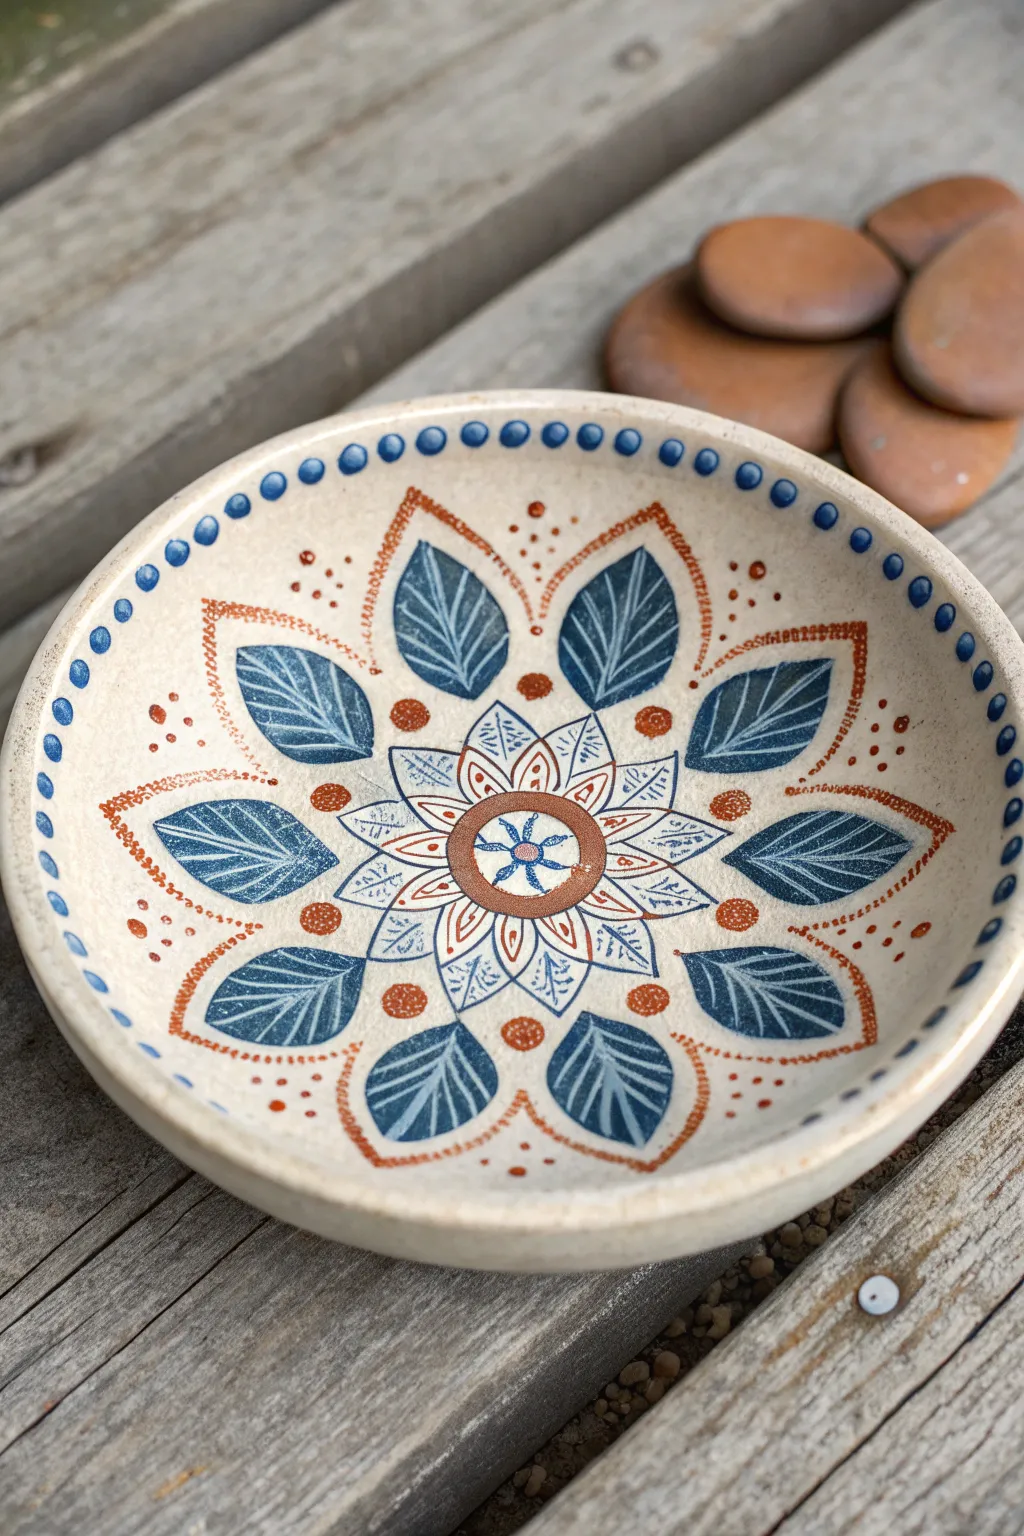
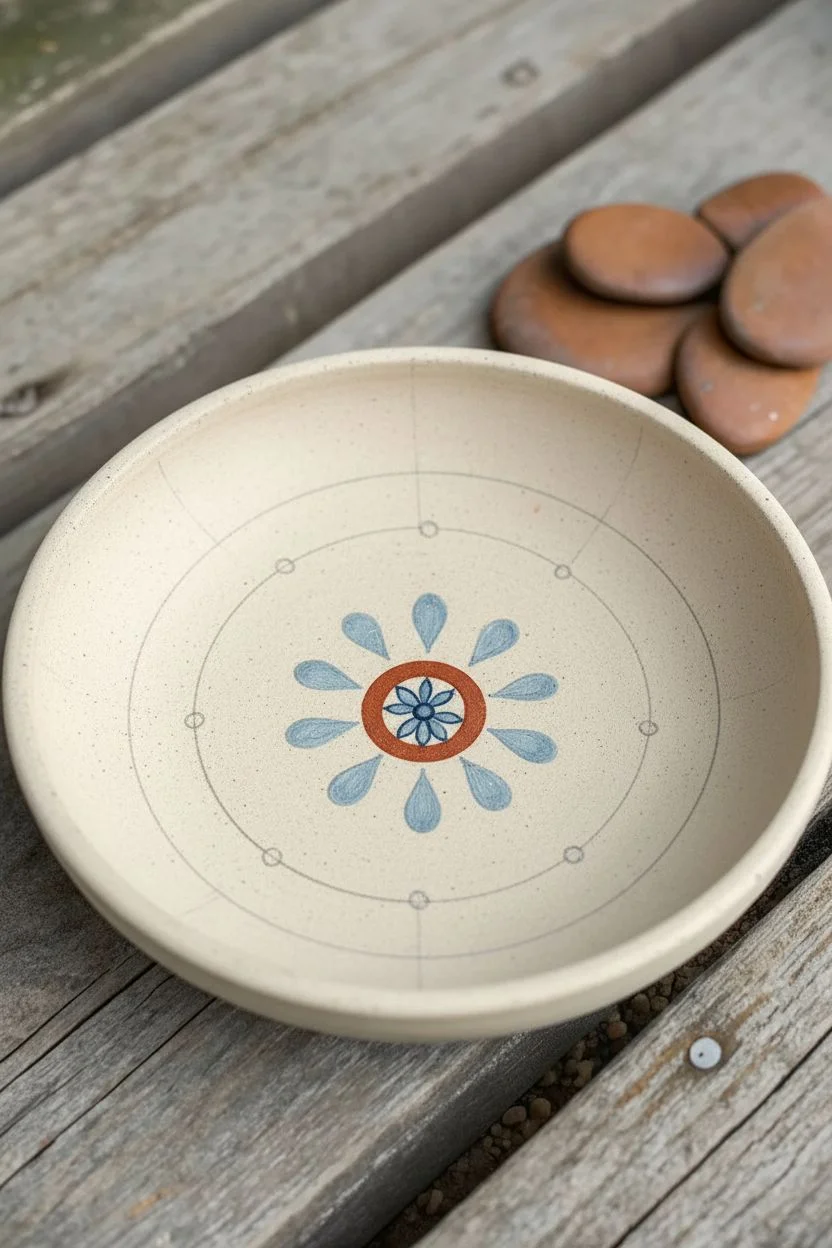
Transform a plain ceramic dish into a stunning piece of functional art with this earthy, nature-inspired mandala design. By combining navy blue leaves with rustic terracotta dotted outlines, you’ll create a beautifully textured surface perfect for holding your favorite rings and trinkets.
Step-by-Step Guide
Materials
- Small bisque or glazed ceramic dish (beige/cream base)
- Navy blue acrylic paint or ceramic paint
- Terracotta/rust orange acrylic paint
- Fine detail paintbrush (size 0 or 00)
- Small round paintbrush (size 2)
- Dotting tools (or toothpicks/paintbrush ends)
- Pencil for sketching
- Gloss sealant or decoupage medium (if not firing)
Step 1: Base Structure & Center
-
Prep the surface:
Ensure your dish is clean, dry, and dust-free. If working on raw bisque, wipe it down with a damp sponge first. -
Mark the center:
Using a very light pencil touch, mark the absolute center of the bowl. Draw a faint small circle around it, about the size of a dime. -
Draft the layout:
Lightly sketch two concentric circles radiating from the center. The first should be about an inch out, and the next about two inches out. Then, lightly mark 8 evenly spaced points around each circle to guide your leaf placement. -
Paint the central ring:
Load your round brush with terracotta paint and fill in the central dime-sized circle. While that dries, paint a small navy blue starburst or flower shape directly in the middle of the terracotta circle. -
Add the first petal layer:
Using a fine liner brush and navy blue paint mixed with a tiny bit of white (or just use a lighter blue), paint eight small, tear-drop shaped petals radiating outward from the central rust circle.
Step 2: Leaves & Primary Patterns
-
Create the inner leaf ring:
Switch to the navy blue paint. Between each of the small light-blue petals, paint a medium-sized leaf shape pointing outward. These should be outlined first, then filled in, leaving a very thin line down the center for the vein. -
Detail the inner leaves:
Once the blue leaves are dry, use your finest brush or a white gel pen to draw delicate veins inside each blue leaf. -
Paint the large outer leaves:
Moving to the outer sketched ring, paint eight large, bold leaf shapes in navy blue. Position them so they nest between the smaller triangular sections of the previous layer. -
Add vein details:
Just like the inner layer, add fine white or light blue vein details to these larger leaves. I find that resting my pinky finger on the table helps steady my hand for these fine lines. -
Outline the leaves:
Load a dotting tool or the very tip of a brush with terracotta paint. Carefully place tiny dots along the contour of each large navy leaf, creating a dotted frame that doesn’t quite touch the blue paint.
Clean Lines Pro Tip
Can’t get steady lines? Use a paint marker for the veins and outlines instead of a brush. It offers much more control for fine details on curved surfaces.
Step 3: Dot work & Finishing Touches
-
Create the connector points:
Between the tips of the large blue leaves, paint a solid terracotta circle (about the size of a peppercorn). -
Add floating dots:
Using a smaller dotting tool, add a cluster of three tiny terracotta dots tapering outward from the top of each large leaf tip. -
Fill the negative space:
Look for empty triangular spaces between the inner and outer patterns. Add small clusters of tiny terracotta dots here to make the design feel cohesive and full. -
Paint the rim border:
Dip a medium-sized dotting tool into the navy blue paint. Create a consistent ring of dots along the very top rim of the dish, spacing them about 1/4 inch apart. -
Clean up:
Check your design for any smudges. If using acrylics, you can scrape away errors gently with a toothpick once dry. -
Seal the piece:
Allow the paint to cure for at least 24 hours. Apply two coats of a high-gloss varnish to protect the paint and give it that ceramic-glaze shine.
Level Up: Texture
Mix a small amount of baking soda into your terracotta paint before dotting. This creates a raised, 3D texture that feels like real ceramic slip trailing.
Place your finished dish on a bedside table to catch your daily jewelry and admire the rhythmic pattern you created
Glow-in-the-Dark Constellation Dish
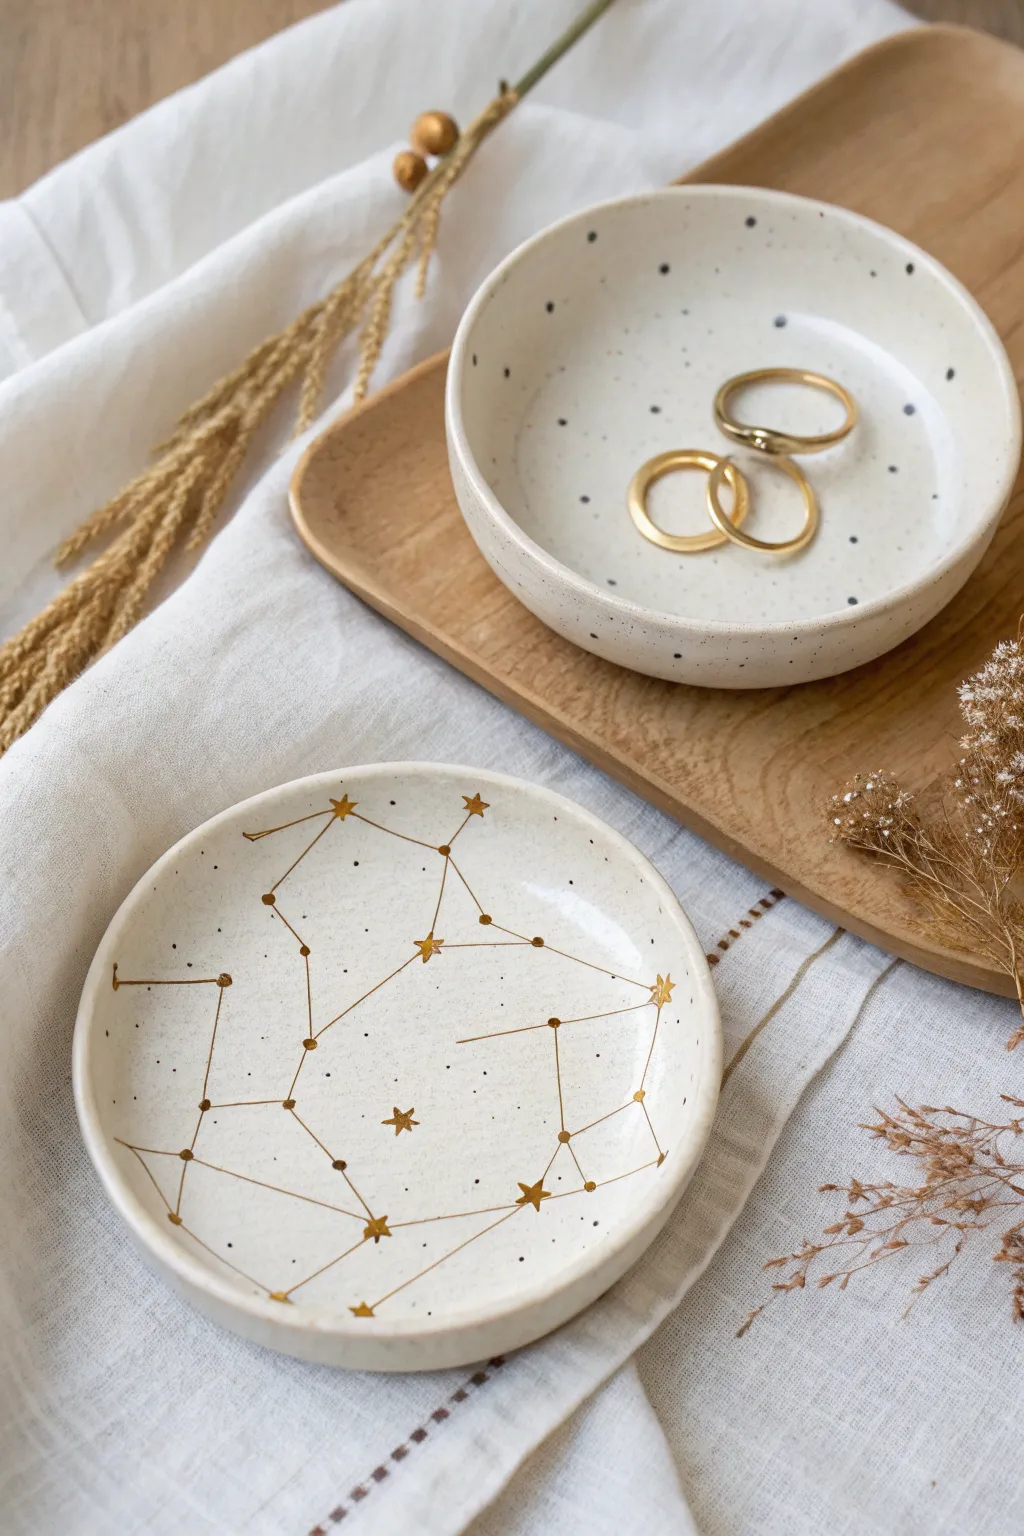
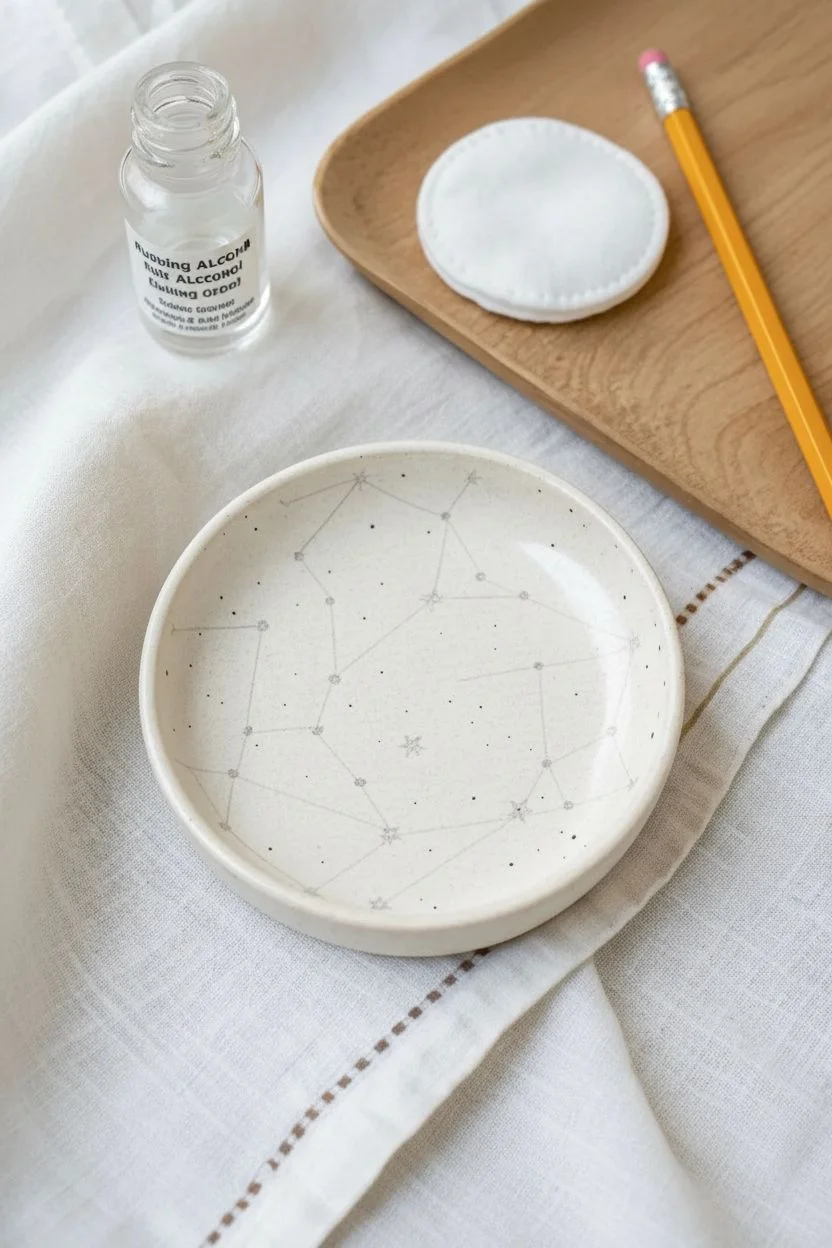
Transform a simple ceramic dish into a starry night sky using delicate gold line work and hidden glowing accents. This elegant project combines modern minimalist design with a subtle magical touch that reveals itself when the lights go out.
Detailed Instructions
Materials
- Small white ceramic trinket dish (round)
- Fine-tip gold paint pen or gold leafing pen
- Glow-in-the-dark acrylic paint (neutral/white drying)
- Very fine detail paintbrush (size 00 or 000)
- Pencil
- Eraser
- Rubbing alcohol
- Cotton pad
- Clear sealant or glaze (optional)
- Reference image of constellations
Step 1: Preparation & Planning
-
Clean the Surface:
Before starting any design work, wipe down the entire ceramic dish with rubbing alcohol and a cotton pad. This removes oils and dust, ensuring your paint adheres perfectly for a lasting finish. -
Choose Your Pattern:
Select a constellation pattern to feature. You can choose your zodiac sign, the Big Dipper, or create a whimsical, made-up star map that fits the curve of your specific dish. -
Draft the Stars:
Using a pencil, very lightly mark where your main stars will sit. Think about composition; arrange the main constellation slightly off-center for a natural look, or create a border of stars around the rim.
Step 2: Designing the Constellation
-
Draw Star Points:
Take your gold paint pen and create small five-pointed stars over your pencil marks. I like to vary their sizes slightly—some larger ‘alpha’ stars and some tiny twinkling points. -
Add Polka Dots:
In the negative space around your main constellation, add random tiny gold dots. These represent distant stars and add texture to the white ceramic without overcrowding the design. -
Connect the Lines:
Once the stars are touch-dry, carefully use the gold pen to draw straight lines connecting your constellation points. Use a quick, confident stroke to keep lines straight rather than wobbly. -
Let Gold Set:
Allow the gold paint pen to dry completely according to the manufacturer’s instructions, typically about 15-20 minutes, to avoid smudging during the next intricate steps.
Pro Tip: Steady Hands
Rest your pinky finger on the table or the edge of the dish while painting. This anchors your hand, giving you much better control for drawing those thin, straight constellation lines.
Step 3: Adding the Magic
-
Prepare Glowing Paint:
Squeeze a tiny amount of glow-in-the-dark acrylic paint onto a palette or scrap paper. You want a high-quality pigment that dries relatively clear or milky white so it disappears in daylight. -
Layering the Light:
Dip your fine detail brush into the glow paint. Carefully dab a small bead of paint directly over the center of your gold stars. The gold will still shine through the edges. -
Highlighting Lines:
For extra luminosity, trace a very thin, almost invisible layer of glow paint over the connecting gold lines. This makes the connections appear to float in the dark. -
Create Invisible Stars:
Add extra dots of glow paint in the empty white spaces of the dish where there is no gold. In the daytime, these will be invisible, but at night, the ‘sky’ will be fuller. -
Check Density:
Turn off the lights briefly (cup your hands over the dish if it’s bright) to check your glow application. Add a second coat to the stars if the glow feels too faint.
Level Up: Galaxy Wash
Before adding gold, sponge on a very watery wash of navy and purple watercolor. Let it dry, then add your gold stars on top for a deep, moody galaxy background effect.
Step 4: Finishing Touches
-
Clean Up Draft Marks:
Once all paint is completely bone-dry, gently erase any visible pencil marks that weren’t covered by the gold paint. Be extremely gentle to avoid scraping the gold. -
Speckle Effect (Optional):
To mimic the speckled stoneware look in the photo, you can flick a toothbrush with diluted brown or grey paint lightly over the dish, avoiding your main gold stars. -
Seal the Design:
If you plan to use this dish for heavy items like keys, apply a clear, glossy sealant spray or Mod Podge. Apply in thin coats to prevent clouding the crisp gold lines. -
Final Cure:
Let the dish sit undisturbed for at last 24 hours to ensure the paint and sealant have fully hardened before placing any jewelry inside.
Place your favorite rings on your new celestial dish and watch the secret stars emerge when the lights go down


Have a question or want to share your own experience? I'd love to hear from you in the comments below!