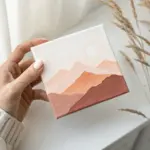
I love how a kitchen canvas painting can make even the busiest cooking corner feel personal and cozy. Here are my favorite kitchen canvas painting ideas—from classic food paintings to bolder, more unexpected kitchen-themed styles you can totally make your own.
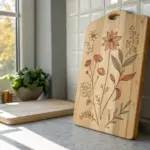
Lemon and Olive Branch Study
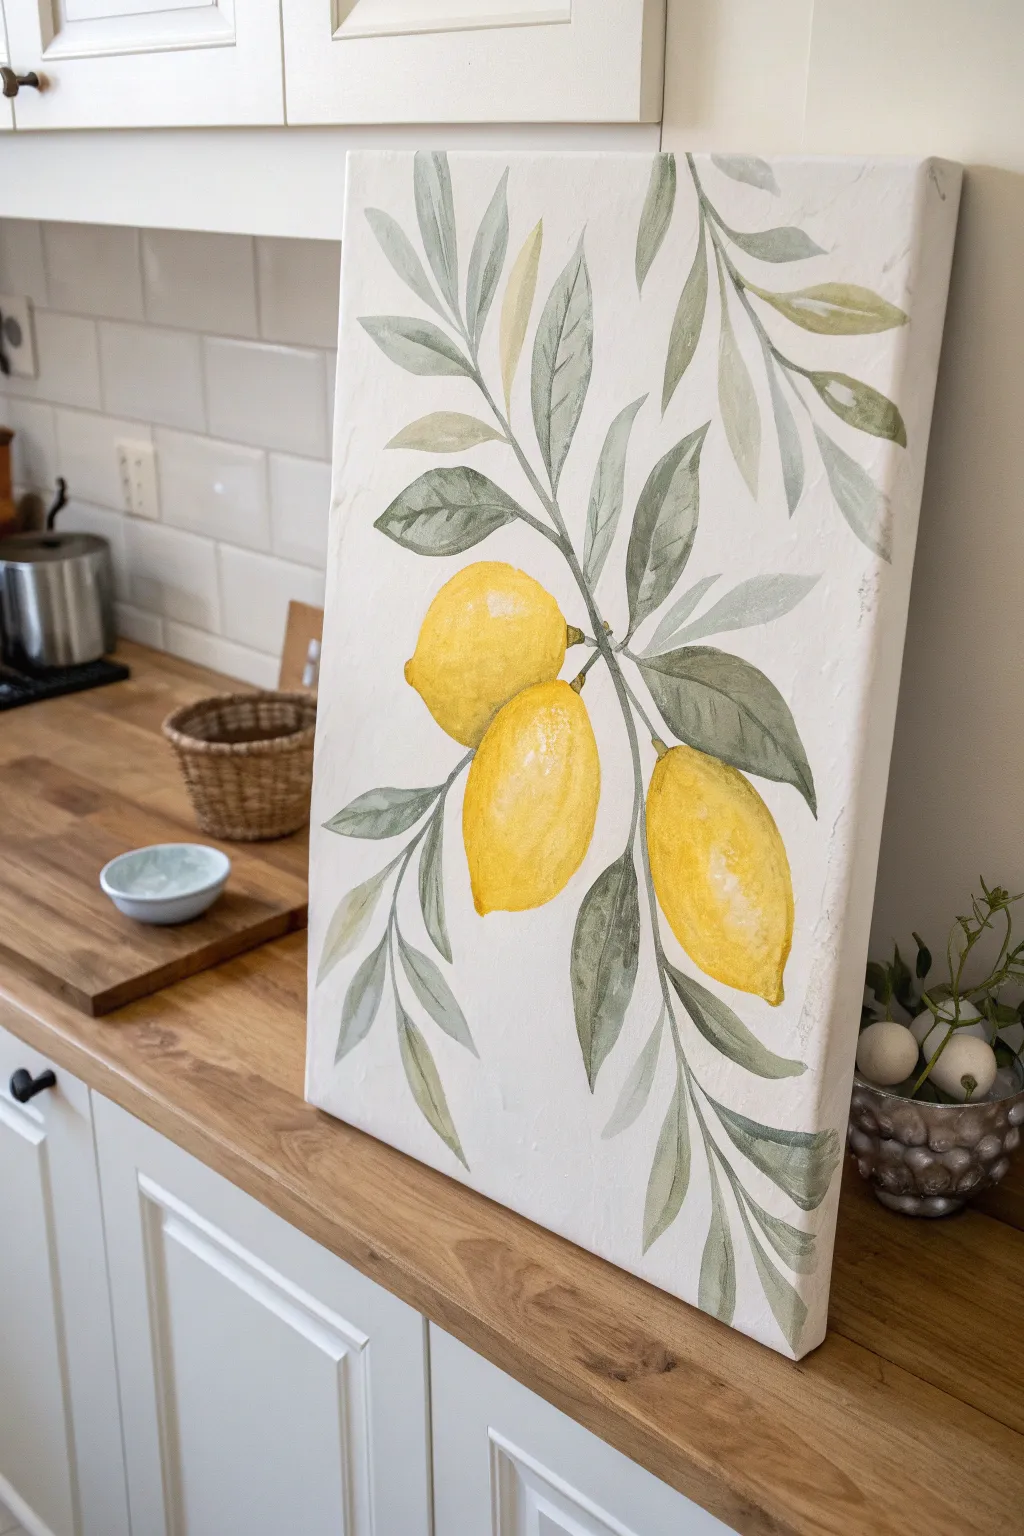
Bring a fresh Mediterranean feel to your kitchen with this elegant study of lemons and olive-style foliage. The painting features soft, muted greens and textured yellows against a crisp white background, mimicking the look of vintage botanical illustrations.
Detailed Instructions
Materials
- Stretched canvas (rectangular, approx. 12×24 inches)
- Acrylic paints: Titanium White, Cadmium Yellow, Yellow Ochre, Sap Green, Burnt Umber, Neutral Grey
- Gesso (optional, for smoother surface)
- Flat brushes (1-inch and 1/2-inch)
- Round brushes (sizes 4 and 8)
- Palette and water cup
- HB Pencil
- Paper towels
Step 1: Preparation & Sketching
-
Prime the surface:
If your canvas feels too rough, apply a thin coat of white Gesso to create a smoother working surface. Let it dry completely before proceeding. -
Draft the central stem:
Using an HB pencil, lightly sketch a main central stem curving gently from the top center down towards the bottom right. Keep the line faint so it doesn’t show through the final paint. -
Position the lemons:
Draw three oval shapes for the lemons. Place one high on the left, one slightly below it in the center, and the third lower down on the right. Give them slightly pointed ends to mimic the natural shape of lemons. -
Map the foliage:
Sketch long, lance-shaped leaves extending from the main stem. Group them in pairs or small clusters, ensuring some point upward and others droop downward for a natural, gravity-affected look. -
Refine the connections:
Connect the lemons to the main branch with short, sturdy stems. Double-check your composition to ensure there is enough negative white space to keep the artwork feeling airy.
Fixing Flat Fruit
If your lemons look like flat circles, deepen the shadow on the bottom curve with a glaze of Burnt Umber mixed with yellow, then brighten the top highlight with pure white.
Step 2: Painting the Foliage
-
Mix leaf greens:
Create a muted olive green by mixing Sap Green, a touch of Burnt Umber, and plenty of Titanium White. You want a soft, desaturated tone rather than a bright grassy green. -
Block in the leaves:
Using a size 8 round brush, fill in the leaf shapes. Don’t worry about perfect coverage; a little streakiness adds texture. -
Add tonal variation:
While the green is still slightly wet, mix a darker version of your green (more Sap Green and Grey). Apply this to one side of selected leaves to suggest shadow and depth. -
Paint the stems:
Switch to a size 4 round brush. Use a mix of Burnt Umber and your green mix to paint the thin, woody stems connecting the leaves and fruit. -
Highlight the tips:
Mix a very pale grey-green using mostly White and a dot of your base green. Add quick, light strokes to the tips of the leaves where the light would naturally hit.
Framing Idea
To enhance the vintage botanical vibe, mount the canvas in a simple light oak floating frame. This complements the yellows without overpowering the delicate leaves.
Step 3: Painting the Fruit
-
Base coat the lemons:
Mix Cadmium Yellow with a tiny amount of White. Paint the full shape of each lemon, ensuring opaque coverage to hide the canvas texture. -
Establish shadows:
I like to mix a small amount of Yellow Ochre into the base yellow to create a warm shadow tone. Apply this to the bottom and left distinct curves of the lemons to give them volume. -
Create texture:
Using a slightly dry brush, dab concentrated Cadmium Yellow onto the center of the fruit. The stippling motion mimics the pitted texture of citrus rind. -
Add bright highlights:
Mix Titanium White with a speck of yellow. Paint a crescent-shaped highlight on the upper right side of each lemon to show where the light source is reflecting. -
Final leaf details:
Go back to your leaves with the small brush. Use a watery mix of grey-green to paint subtle central veins on the largest leaves. -
Clean up edges:
If any paint went outside the lines, use pure Titanium White to paint over the mistake and crisp up the background edges.
Hang your new artwork in a sunny spot to enjoy those vibrant citrus hues all year round


Herb Botanical Canvas Set
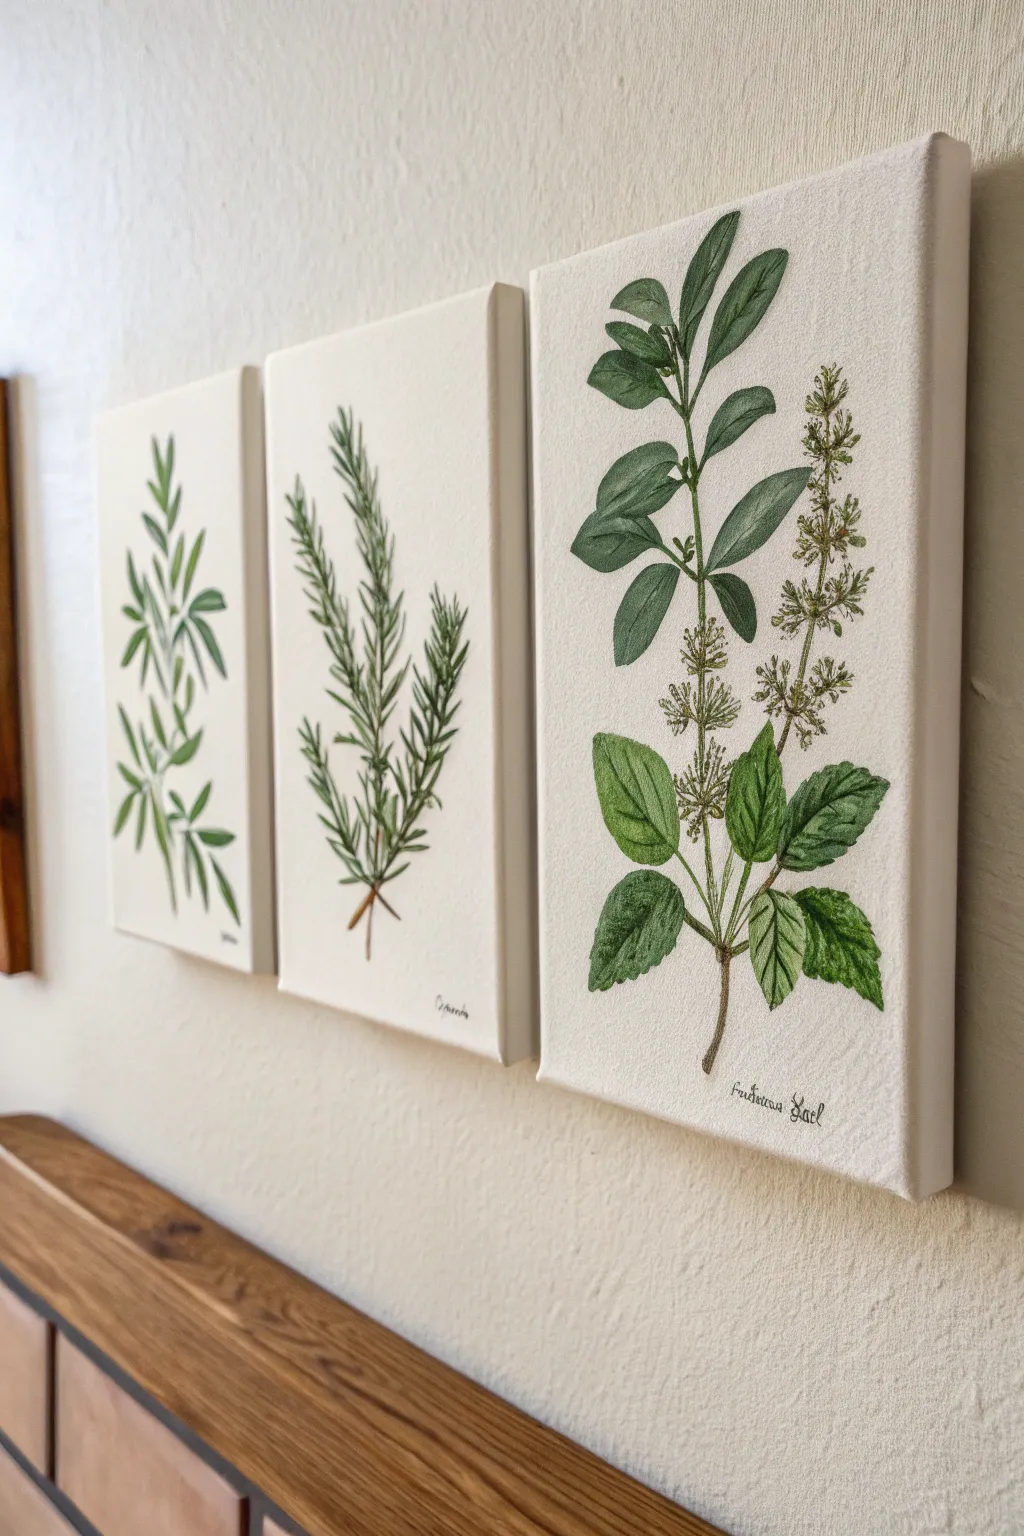
Bring the timeless elegance of a Victorian greenhouse into your kitchen with this trio of painted herb canvases. This project mimics the delicate look of antique botanical plates using acrylics on stretched canvas for a fresh, organic display.
Step-by-Step Tutorial
Materials
- 3 Small stretched canvases (e.g., 5″x7″ or 8″x10″)
- Gesso (white)
- Acrylic paints (Sap Green, Hooker’s Green, Burnt Umber, Yellow Ochre, Titanium White, and a tiny bit of Black)
- Fine liner brushes (sizes 00 and 1)
- Small flat brush (for background)
- Pencil (HB or 2H)
- Tracing paper (optional)
- Mixing palette
- Water cup and paper towels
- Matte varnish (optional)
Step 1: Canvas Preparation
-
Prime the Surface:
Even though most canvases come primed, applying an extra layer of white gesso creates a smoother surface that mimics paper. Apply a thin coat with your flat brush and let it dry completely. -
Sand for Smoothness:
Once the gesso is bone dry, lightly sand the surface with very fine-grit sandpaper. This reduces the canvas texture, making it easier to paint delicate stems. -
Mix an Off-White Base:
To get that vintage paper look, mix a large amount of Titanium White with the tiniest dot of Yellow Ochre. Paint the entire face and sides of the canvases with this warm cream color.
Wobbly Lines?
Improve fine lines by adding a drop of water to your paint for an ink-like flow. Brace your pinky finger against the dry part of the canvas for stability.
Step 2: Sketching the Composition
-
Plan the Layout:
Decide on your three herbs. The example shows sage, rosemary, and possibly basil or mint. Aim for variety in leaf shapes: one needle-like, one broad-leafed, and one with small clustered leaves. -
Sketch the Central Stems:
Using a light hand and an HB pencil, draw a single vertical line slightly off-center for the main stem of each plant to establish flow. -
Draft the Leaves:
Lightly sketch the leaves branching out. For the rosemary, draw short, upward-curving lines. For the basil/mint, sketch larger ovals near the bottom, getting smaller as you move up. -
Add Floral Details:
On the third canvas (the flowering herb), sketch small clusters or spikes at the top of the stem where the tiny flowers will eventually sit.
Level Up: Aged Look
Create an antique feel by lightly glazing the corners of the canvas with a wash of watered-down Burnt Umber paint. This creates a subtle ‘tea-stained’ vignette.
Step 3: Painting the Greenery
-
Base Coat the Stems:
Mix Sap Green with a touch of Burnt Umber to create a brownish-green. Use your size 1 brush to paint the main stems, keeping the lines thin but confident. -
Block in Leaf Shapes:
Starting with the broad-leafed herb, mix Hooker’s Green with a little White. Fill in the leaf shapes with a flat, even layer of color. Don’t worry about veins yet. -
Paint Needle Leaves:
For the rosemary-style herb, use the liner brush and a darker green mix. Use quick, flicking motions to create the sharp, needle-like foliage. -
Vary the Greens:
To make the set look natural, I like to slightly alter the green mixture for each plant. Add more Yellow Ochre to one for a warmer tone, and a touch of blue to another for a cool, sage-like color. -
Add Shadow and Depth:
Once the base green is dry, mix a darker version of your green. Paint one side of the stem or the underside of the leaves to suggest a light source coming from the left. -
Highlighting:
Mix a pale green (mostly White with a touch of your base green). lightly brush this onto the tips of the rosemary needles and the top curves of the broad leaves.
Step 4: Adding Details & text
-
Painting Veins:
Switch to your size 00 brush. Mix a dark green ink-like consistency with water. Carefully paint the central vein and branching veins on the larger leaves. -
Creating Texture:
For the flowering herb, use a stippling technique (tiny dots) with a mix of creamy white and pale green to simulate the fluffy texture of the flower spikes. -
Refining Edges:
If any paint went outside the lines, use your background cream color to tidy up the edges of the leaves for a crisp botanical illustration look. -
Inking the Script:
At the bottom right of each canvas, use a very sharp pencil to write the Latin or common name of the herb. Use your 00 brush and thinned black-brown paint to trace over this script delicately. -
Sealing the Work:
Allow the paintings to cure for 24 hours. Brush on a coat of matte varnish to protect the surface without adding unwanted glossy glare.
Now you have a charming set of custom botanical art that looks professionally curated


Coffee Mug Still Life
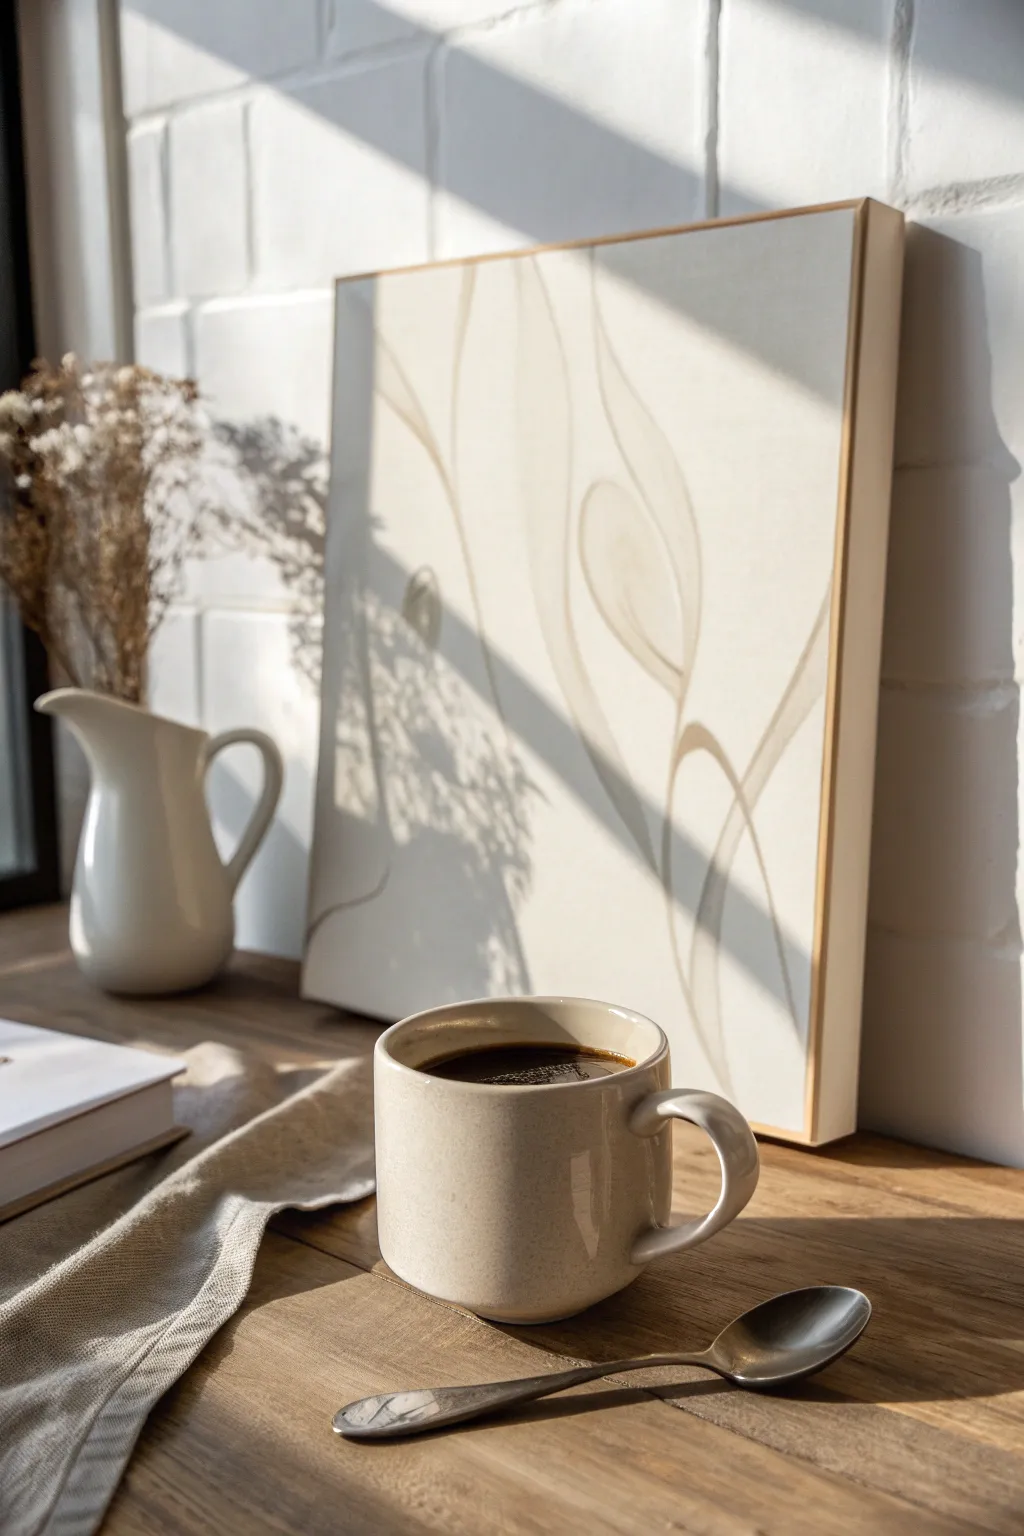
Embrace the serenity of your morning ritual with this minimalist, abstract canvas painting. Using soft, neutral tones and fluid lines, this piece captures the organic elegance of smoke or steam rising, perfect for a peaceful kitchen corner.
Step-by-Step Guide
Materials
- Deep-edge gallery wrapped canvas (11×14 or similar)
- Acrylic paints: Titanium White, Unbleached Titanium, Raw Umber
- Gesso (if canvas isn’t primed)
- Medium flat brush (approx. 1 inch)
- Long bristled liner brush or rigger brush
- Round synthetic brush (size 6)
- Palette or mixing plate
- Jar of water
- Paper towels
- Pencil (light H grade)
Step 1: Preparing the Base
-
Prime the Surface:
Even if your canvas is pre-primed, adding a fresh coat of Gesso creates a smoother texture. Apply a thin, even layer and let it dry completely. -
Mix the Background Tone:
Create a warm, off-white base color. Mix a large amount of Titanium White with just a tiny drop of Unbleached Titanium. You want a creamy, milk-like shade, not a dark beige. -
Apply Base Coat:
Using your medium flat brush, paint the entire front surface of the canvas. Use horizontal strokes for a uniform look. -
Paint the Sides:
Don’t forget the deep edges. Painting the sides the same base color gives the artwork a polished, professional gallery feel. -
Apply a Second Coat:
Once the first layer is dry to the touch, apply a second coat to ensure full opacity. I find this depth makes the top lines stand out better later.
Step 2: Drafting the Design
-
Plan the Flow:
Visualize three to four main vertical lines that sway gently like rising steam. They should start near the bottom and reach toward the top and sides. -
Light Sketching:
With a light H pencil, very faintly sketch these main flowing lines. Keep your hand loose and move from your shoulder, not your wrist, to get smooth curves. -
Add Secondary Curves:
Sketch a few intersecting loops or ‘leaves’ that branch off the main lines. These abstract shapes add visual interest without needing to be realistic.
Shaky Hands?
If you struggle with long, smooth strokes, rest your pinky finger on a dry part of the canvas for stability, or support your painting wrist with your other hand while moving.
Step 3: Painting the Lines
-
Mix the Line Color:
Combine Unbleached Titanium with a very small touch of Raw Umber. You are aiming for a soft taupe or ‘latte’ color that is only a few shades darker than your background. -
Test the Consistency:
Add a drop or two of water to your paint mix. Inky consistency is key for long, smooth lines that don’t break. -
Start the Main Lines:
Using the long-bristled liner brush, trace your main vertical pencil marks. Apply gentle pressure; vary the thickness slightly by pressing harder or lighter as you go. -
Detail the Loops:
Switch to the size 6 round brush if you need more control for the wider loop sections. Fill in the curves with confident strokes. -
Feather the Edges:
If any lines look too harsh, use a damp, clean brush to slightly soften or ‘feather’ one side of the line, creating a subtle shadow effect. -
Check for Balance:
Step back and look at the composition. If a space feels too empty, add a very thin, distinct ghost line in the background using a watered-down version of your mix.
Texture Play
Mix a tiny amount of baking soda into your line paint. It creates a gritty, sandstone-like texture that adds beautiful dimension to an otherwise flat minimalist piece.
Step 4: Finishing Touches
-
Clean Up:
If you made any mistakes or stray marks, use your original background color on a small brush to paint over them once the lines are dry. -
Frame the Edge:
For a refined look like the reference creates, mix a slightly darker raw wood tone and carefully paint just the thin front-facing rim of the canvas edge, acting as a faux frame. -
Final Drying:
Allow the painting to rest flat for at least 24 hours to ensure the thicker parts of the acrylic are fully cured. -
Optional Varnish:
Since this will live in a kitchen, a coat of matte varnish is a smart idea to protect against humidity and splashes.
Place your new artwork near a window to catch the morning light and enjoy the peaceful vibe it brings to your kitchen


Garlic, Onion, and Pepper Trio
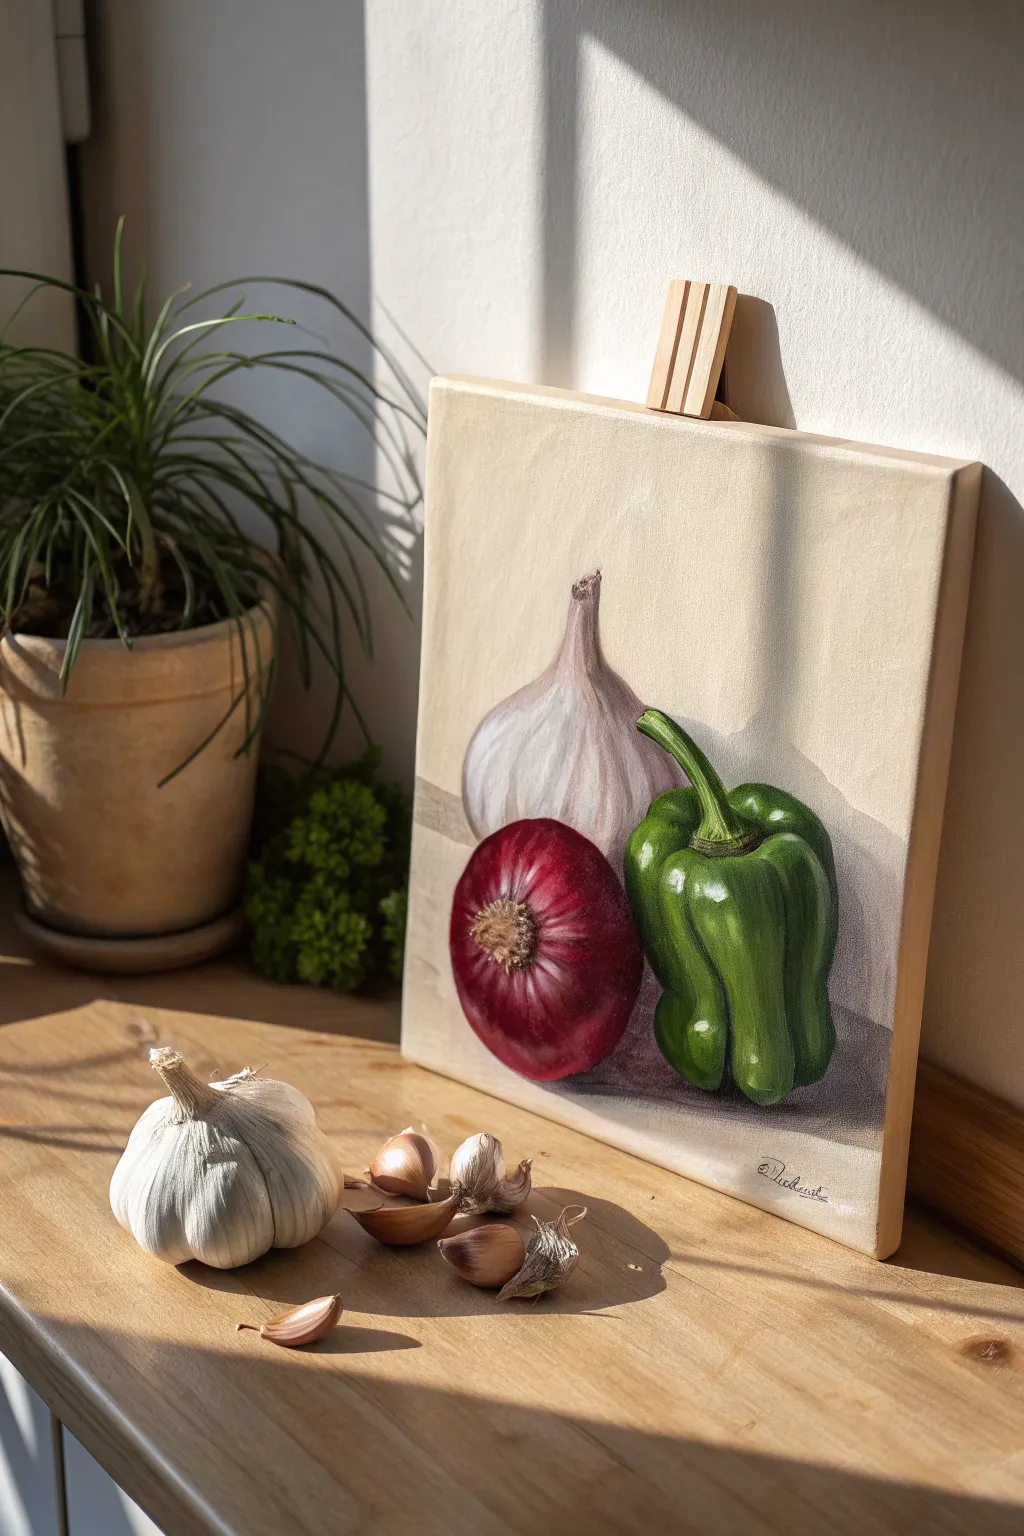
Capture the essence of fresh ingredients with this vibrant still life featuring a garlic bulb, red onion, and green bell pepper on a small square canvas. The clean, neutral background highlights the rich colors and glossy textures of the vegetables, making it a perfect addition to any kitchen decor.
Detailed Instructions
Materials
- Square primed canvas (approx. 8×8 or 10×10 inches)
- Acrylic paints (Titanium White, Burnt Umber, Alizarin Crimson, Cadmium Red, Sap Green, Phthalo Green, Yellow Ochre, Ultramarine Blue, Ivory Black)
- Set of synthetic brushes (flat shader, round #4, fine liner)
- Palette for mixing
- Cup of water and paper towels
- Graphite pencil (HB) for sketching
- Slow-drying medium (optional for easier blending)
Step 1: Sketching and Background
-
Outline the Composition:
Begin by lightly sketching the outlines of the three vegetables on your canvas. Place the garlic tall in the back center, the red onion sitting predominantly in the front left, and the green pepper leaning slightly against them on the right. Sketch the horizon line lightly across the bottom third to ground the objects. -
Block in Basic Shapes:
Don’t worry about details yet, just focus on getting the rounded volumes correct. The onion should be a flattened sphere, the pepper more irregular and lobed, and the garlic a teardrop shape with a papery top. -
Paint the Background:
Mix a large amount of a creamy, neutral beige using Titanium White with a tiny touch of Yellow Ochre and Burnt Umber. Paint the entire background space around your sketch, keeping the strokes smooth. -
Add Subtle Shadows:
While the background is still slightly damp (or by mixing a slightly darker shade), add very faint shadows on the wall behind the garlic and pepper to create depth. This separates the objects from the background immediately.
Step 2: The Garlic Bulb
-
Base Coat:
Fill the garlic shape with a mixture of Titanium White and a tiny dot of Burnt Umber to create an off-white, papery base color. -
Adding Form:
Mix a heavily diluted wash of purple (Alizarin Crimson and Ultramarine Blue). Gently glaze this over the shadowed side of the garlic and up the neck to suggest volume and those characteristic purple streaks. -
Defining Layers:
Use a liner brush with a slightly darker grey-brown to sketch fine, wavy lines vertically up the garlic neck, mimicking the papery skin layers.
Muddy Colors?
If your shadows look muddy rather than deep, stop mixing black into everything. Instead, use complementary colors (green’s opposite is red) to darken tones naturally.
Step 3: The Red Onion
-
Deep Red Base:
Mix Alizarin Crimson with a touch of Burnt Umber for a deep, rich burgundy. Paint the entire body of the onion, establishing a dark foundation. -
Building Highlights:
Mix Cadmium Red with a little White. Using a round brush, paint curved strokes following the contour of the onion to show its spherical shape. Leave the edges darker to enhance roundness. -
Texture and Root:
For the papery center root, use a small brush with Yellow Ochre and Burnt Umber. Use a stippling motion to create a fuzzy, dry texture in the center. -
Final Onion Shine:
Add a few sharp, curved lines of Titanium White mixed with a drop of pink on the upper left side to represent the glossy skin reflecting light.
Kitchen Window Light
Paint a subtle windowpane reflection on the pepper’s glossiest point. A small square of white light bends around the curve and instantly adds realism.
Step 4: The Green Pepper
-
Vibrant Green Base:
Combine Sap Green with a little Phthalo Green for intensity. Cover the entire pepper surface, except for the stem. -
Sculpting Lobes:
Mix your green with a touch of black or blue to create a shadow tone. Paint vertical valleys down the pepper to separate it into distinct lobes. -
Highlighting:
Mix Yellow Ochre into your base green for a lighter tone. Paint the tops of the lobes where the light hits. I find adding a tiny bit of white for the strongest specualar highlight really makes it look waxy and crisp. -
The Stem:
Paint the stem using a lighter yellow-green. Add a dark rim where the stem joins the fruit to show it sitting in a small depression.
Step 5: Grounding and Finishing
-
Cast Shadows:
Mix a dark, cool greyish-purple. Paint the cast shadows underneath the vegetables on the table surface. Soften the edges of these shadows as they move away from the objects. -
Refining Edges:
Go back with your background color and neaten up any edges where the vegetables might have messy outlines. This cleans up the silhouette. -
Final Glaze:
If any colors look dull, you can apply a very thin glaze of gloss medium mixed with the local color to boost saturation. -
Signature:
Sign your name small in the bottom right corner using a fine liner brush and thinned dark paint.
Hang this delightful trio in your kitchen to inspire your next culinary creation
BRUSH GUIDE
The Right Brush for Every Stroke
From clean lines to bold texture — master brush choice, stroke control, and essential techniques.
Explore the Full Guide
Fresh Bread and Butter Still Life
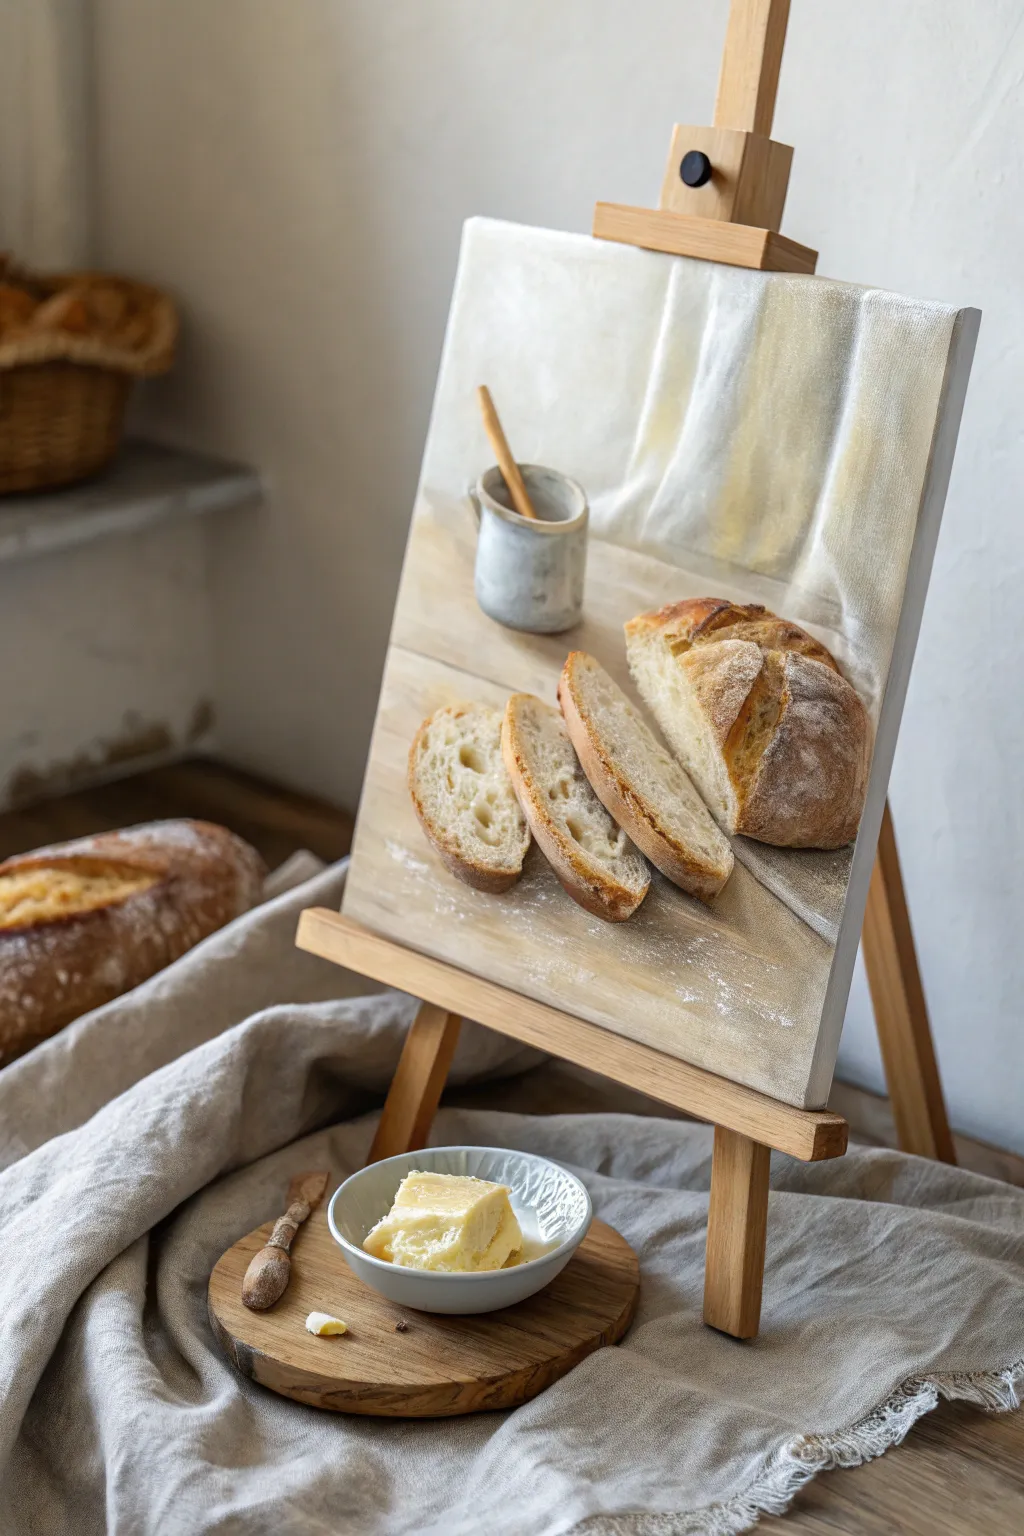
Capture the warmth and comfort of a countryside kitchen with this hyper-realistic acrylic still life. By layering translucent glazes over a textured background, you’ll create a piece that looks almost good enough to eat.
Step-by-Step Tutorial
Materials
- Stretched canvas (12×16 inches or similar)
- Heavy body acrylic paints (Titanium White, Burnt Umber, Yellow Ochre, Raw Sienna, Burnt Sienna, Mars Black)
- Glazing medium
- Gesso
- Flat synthetic brushes (various sizes)
- Small round detail brush (size 1 or 2)
- Palette knife
- Clean water and rags
Step 1: Setting the Scene
-
Prime the Surface:
Begin by applying a coat of gesso to your canvas. Use horizontal strokes to create a slight texture that mimics a wooden grain, which will help with the background table effect later. -
Sketch the Composition:
Dilute a small amount of Raw Sienna with water to create a wash. Use a small round brush to lightly sketch the outline of the bread loaf, the three slices, and the small ceramic pitcher. Keep the perspective slightly angled from above. -
Block in Background Tones:
Mix Titanium White with a touch of Yellow Ochre and a tiny bit of Burnt Umber. Paint the entire background area behind the bread, using vertical strokes to suggest a draped cloth or wall behind the table surface. -
Establish the Table Surface:
For the wooden board beneath the bread, mix Raw Sienna and Titanium White. Paint horizontal strokes, adding slightly darker streaks of Burnt Umber while the paint is wet to simulate wood grain.
Muddy Colors?
If your bread crumb looks dirty rather than baked, clean your water and brushes. Use separate water jars for your dark browns and your creamy whites to keep the highlights crisp.
Step 2: Building the Bread
-
Base Color for Crust:
Mix Yellow Ochre and Burnt Sienna to create a golden-brown crust color. Apply this to the outer edges of the main loaf and the crust edges of the slices. -
Base Color for Crumb:
Mix a large amount of Titanium White with a very small dot of Yellow Ochre. Fill in the interior ‘soft’ parts of the bread slices and the cut face of the loaf. -
Adding Bread Texture:
Using a small, scruffy brush or a sponge, dab slightly darker off-white tones onto the bread crumb area. This stippling technique mimics the air pockets and texture of sourdough. -
Painting the Pitcher:
Paint the small pitcher with a mix of Titanium White and a touch of Mars Black for a soft grey. Add a darker grey shadow on the left side to give it cylindrical volume.
Step 3: Refining Details and Lighting
-
Deepening the Crust:
I like to glaze here. Mix Burnt Umber with glazing medium to make it transparent. Lightly brush this over the darkest parts of the crust to create a rich, baked look without losing the color underneath. -
Defining the Slices:
Use a small round brush and a mix of Burnt Umber and Black to paint the thin shadow lines where the slices touch the board. This grounds the objects so they don’t look like they are floating. -
Highlighting the Crumb:
Take pure Titanium White on your smallest brush. Add tiny dots and highlights inside the air pockets of the bread crumb to make it look moist and fresh. -
Flour Dusting Effect:
Dry brush a tiny amount of Titanium White over the top of the crust and lightly onto the wooden board area. This creates the illusion of dusted flour. -
Pitcher Details:
Add a small wooden spoon handle sticking out of the pitcher using Yellow Ochre and Burnt Sienna. Add a crisp white highlight to the pitcher’s rim to show it is ceramic.
Add Texture Paste
Mix modeling paste into your acrylics for the crust areas. Use a palette knife to apply it thickly, physically recreating the rough texture of the bread crust on the canvas.
Step 4: Final Touches
-
Cast Shadows:
Mix a transparent grey wash using glaze. Paint soft shadows extending to the left of the pitcher and the bread slices to match the light source coming from the right. -
Color Correction:
Step back and look at your painting. If the background feels too flat, add very subtle vertical washes of white and grey to enhance the ‘draped fabric’ look. -
Varnishing:
Once the painting is completely dry (wait at least 24 hours), apply a satin varnish to seal the work and unify the sheen of the different paint layers.
Now step back and enjoy this cozy addition to your kitchen décor, ready to hang or display on a small easel
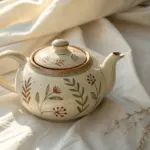
Teacups and Teapot Stack
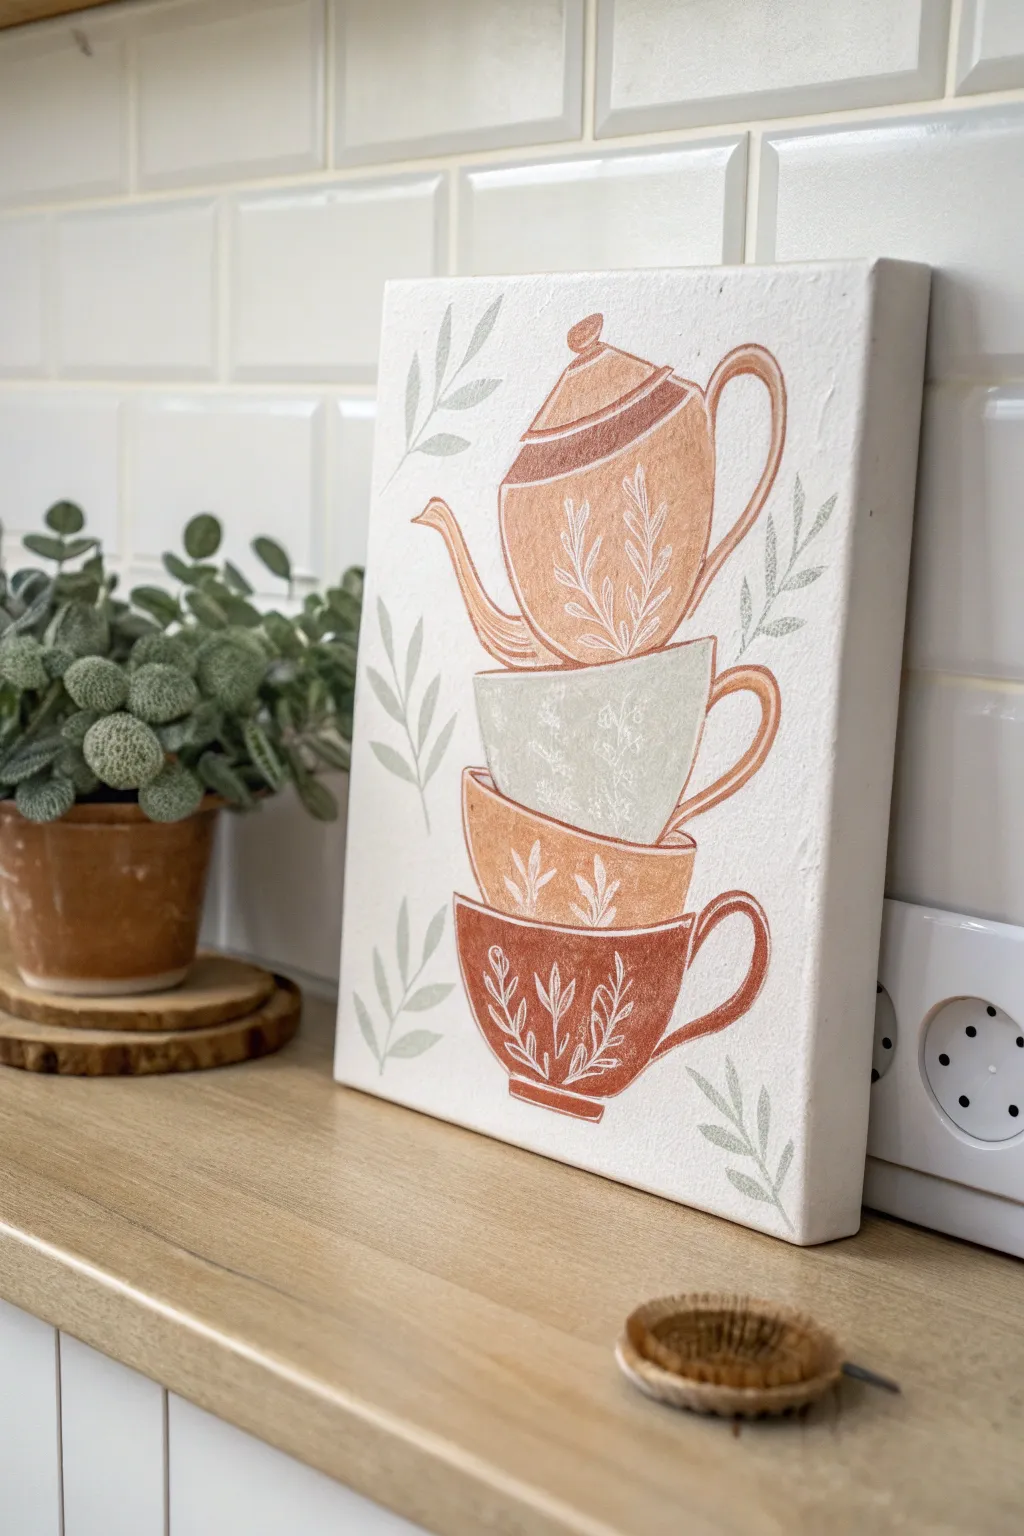
Capture the cozy charm of a rustic kitchen with this illustrative canvas painting featuring a whimsical stack of teacups topped with a classic teapot. Using earthy terracotta tones and delicate white line work, you’ll create a piece that feels both vintage and modern.
Step-by-Step Tutorial
Materials
- Small rectangular stretched canvas (approx. 8×10 or A4 size)
- Acrylic paints: Burnt Sienna, Raw Sienna, Titanium White, Sage Green, Unbleached Titanium (Beige)
- Pencil and eraser for sketching
- Flat brushes (various sizes for blocking in color)
- Fine liner brush (size 0 or 00) for details
- Paint palette or plate
- Cup of water and paper towels
- White paint pen (optional, for crisp details)
Step 1: Sketching the Stack
-
Establish the centerline:
Begin by lightly drawing a vertical line down the center of your canvas. This guide will help ensure your teacups and teapot don’t lean too heavily to one side. -
Draft the bottom cup:
Starting near the bottom quarter of the canvas, sketch the lowest teacup. Draw a wide warmth bowl shape that tapers slightly at the foot, adding a curved handle on the right side. -
Layer the second cup:
Draw the middle teacup slightly overlapping or resting directly inside the rim of the bottom one. Make this bowl shape slightly shallower and wider than the first. -
Add the third cup:
Sketch the top teacup. This one should look slightly differently shaped, perhaps a bit more delicate, to add visual interest to the stack. -
Top with the teapot:
Crown your stack with a teapot. Draw a satisfyingly round body, a triangular lid, a curved spout on the left, and a large handle on the right. Keep your pencil lines light so they are easy to cover.
Clean Lines Tip
If you struggle with brush control for the white floral details, swap the brush for a fine-tip white acrylic paint marker. It offers pen-like precision on canvas.
Step 2: Blocking in Color
-
Paint the background:
Mix a large amount of Titanium White with a tiny touch of Unbleached Titanium to create a warm, creamy off-white. Paint the entire background around your sketch, getting close to the pencil lines but not covering them completely. -
Base coat the bottom cup:
Mix Burnt Sienna with a little red or brown to get a deep rust color. Fill in the bottom teacup body and handle, applying two thin coats if necessary for opacity. -
Paint the middle cup:
Use a lighter terracotta shade for the middle cup. You can achieve this by mixing your Burnt Sienna with some Unbleached Titanium or a touch of yellow ochre. -
Color the top cup:
For the third cup, switch to a soft sage green. Mix Sage Green with white to keep it pastel and airy, creating a nice break in the warm tones. -
Fill in the teapot:
Paint the teapot using a warm beige or light peach tone. I like to paint the lid band and the very bottom of the pot with the darker rust color from the first cup to tie the color palette together.
Texture Boost
Mix a pinch of baking soda into your acrylic paint for the teacups. This creates a gritty, matte texture that mimics unglazed terracotta pottery perfectly.
Step 3: Detailing and Embellishing
-
Let it dry completely:
Ensure all your base bloats are completely dry to the touch before starting the line work. Wet paint will cause your fine lines to blur. -
Add leaf motifs to the cups:
Using your fine liner brush and pure Titanium White (or a white paint pen), carefully paint delicate botanical sprigs on each cup. Vary the designs—some leaves can be solid white, while others are just outlines. -
Decorate the teapot:
Add white leaf patterns to the belly of the teapot. Use thin, sweeping strokes to mimic the curve of the pot, which helps give it a 3D appearance. -
Highlight the rims and handles:
Add thin white highlight lines along the top rims of the cups, the curve of the handles, and the spout to suggest light hitting the ceramic. -
Paint background leaves:
Mix a very pale, watered-down Sage Green. Paint floating leaf sprigs in the background space around the stack to frame the composition. -
Final touches:
Step back and assess your spacing. Add small dots or extra leaves where the composition feels empty, and erase any visible pencil marks from the background.
Hang your charming new artwork in the kitchen or above a coffee station to enjoy a warm, welcoming vibe every morning

PENCIL GUIDE
Understanding Pencil Grades from H to B
From first sketch to finished drawing — learn pencil grades, line control, and shading techniques.
Explore the Full Guide
Wine Glass and Grape Still Life
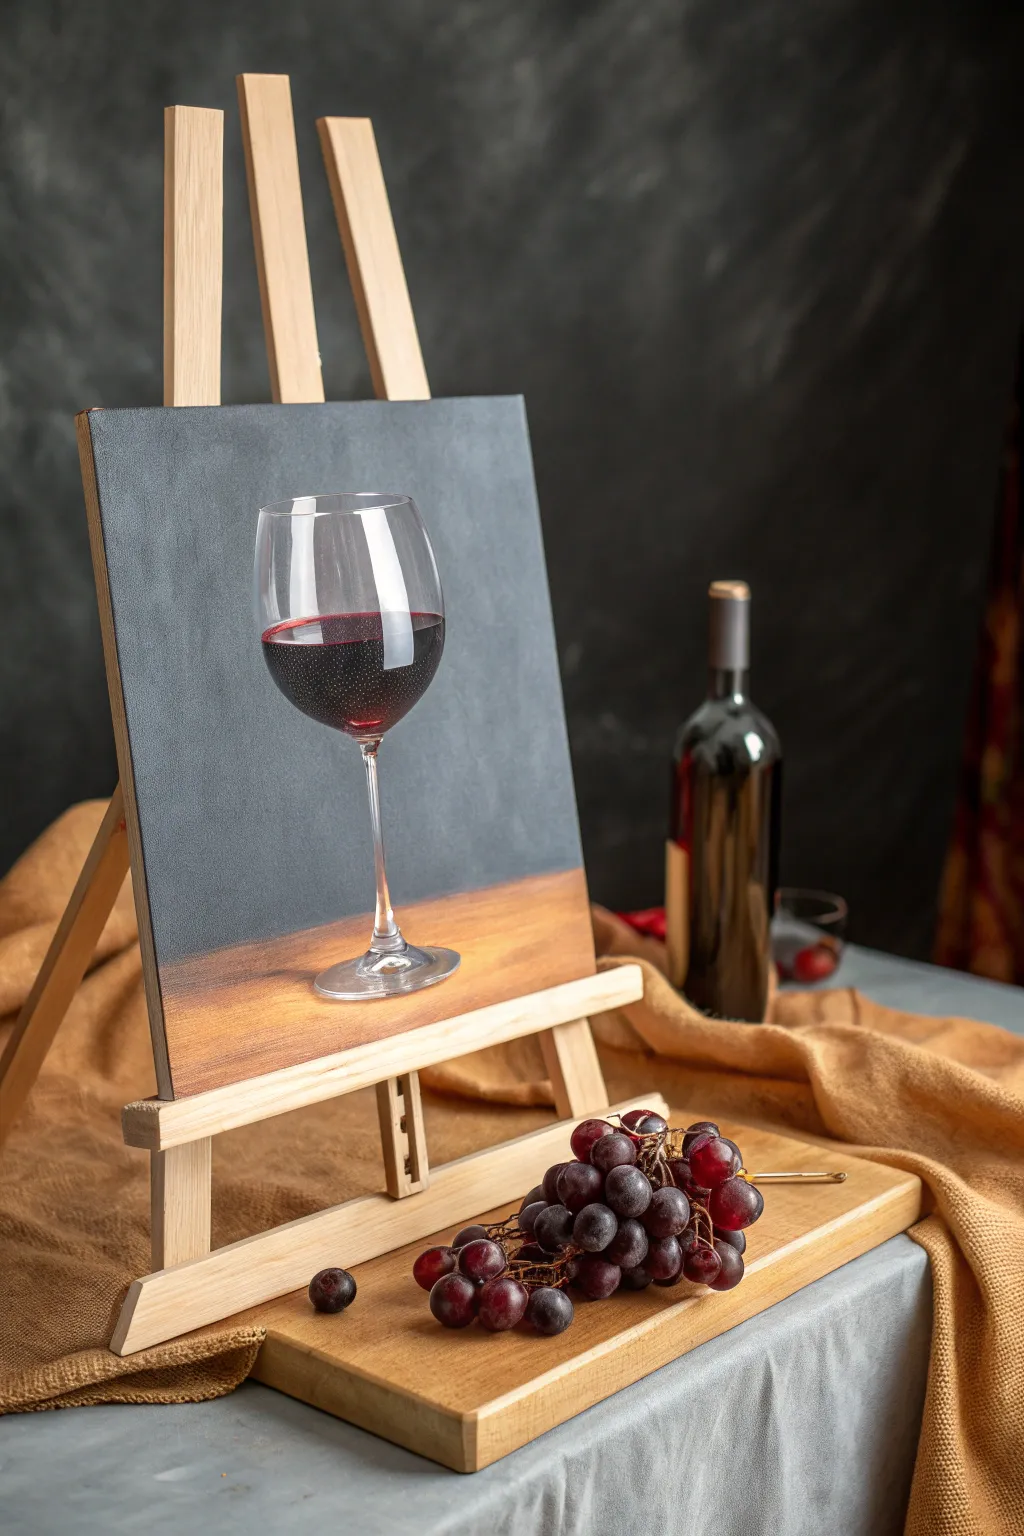
Capture the elegance of a classic red wine glass with this striking acrylic study that plays with light and transparency. The finished piece features a dramatic dark background contrasting with a warm wooden surface, making the glass pop with realism.
Detailed Instructions
Materials
- Small square canvas (e.g., 10×10 or 12×12 inches)
- Acrylic paints: Mars Black, Titanium White, Burnt Umber, Yellow Ochre, Cadmium Red, Alizarin Crimson
- Flat shader brushes (medium and large)
- Small round detail brush (size 0 or 1)
- Palette for mixing
- Cup of water and paper towels
- Chalk or pastel pencil for sketching
Step 1: Setting the Stage
-
Establish the horizon line:
Begin by deciding where your table surface ends and the wall begins. Use a ruler to lightly draw a horizontal line about one-third of the way up from the bottom of the canvas. -
Block in the background wall:
Mix Mars Black with a tiny touch of Titanium White to create a soft, charcoal grey. Using a large flat brush, paint the entire area above your horizon line. Use crisscross strokes to give the wall a slight texture rather than a flat, solid fill. -
Paint the wooden surface:
For the table area below the line, mix Burnt Umber with Yellow Ochre and a hint of White. Apply this horizontally with smooth, long strokes to mimic wood grain. -
Create a gradient glow:
While the table paint is still slightly wet, blend a bit more Yellow Ochre and White into the center area where the glass will sit. This creates a subtle warm spotlight effect. -
Sketch the glass shape:
Once the background is completely dry, use a piece of white chalk to lightly outline your wine glass. Start with an oval for the rim, draw the bowl shape, a long slender stem, and an oval for the base.
Mastering Transparency
To make glass look real, don’t paint the whole thing. Paint only the reflections and the distortions. Let the background color verify the transparency.
Step 2: Painting the Glass
-
Define the liquid level:
Decide how full your glass is and draw a very faint horizontal ellipse inside the bowl to mark the surface of the wine. -
Fill the wine body:
Mix Alizarin Crimson with a touch of Black to create a deep, dark red. Fill in the lower part of the wine liquid, keeping the edges crisp. -
Add translucent highlights:
Toward the top of the liquid line, mix pure Alizarin Crimson with a tiny bit of Cadmium Red. Paint this near the surface line to show light passing through the wine. -
Paint the glass rim:
Using your smallest detail brush and watered-down Titanium White or very light grey, trace the rim of the glass. Keep the lines incredibly thin. The line should be broken in places, not a solid circle. -
Detail the stem:
Paint the stem using a mix of white and grey. Add a stark white vertical line on one side of the stem to represent the reflection of light. -
Create the glass base:
Outline the base oval with thin white/grey lines. Add small distortions or squiggles of white to mimic the complex refractions found in thick glass bottoms.
Wobbly Lines?
Painting straight stems is hard. If your hand is shaky, use a clean ruler as a guide for your brush, or rotate the canvas sideways to pull the stroke toward you.
Step 3: Reflections and Finishing Touches
-
Add the main reflections:
This is the most crucial step for realism. Identify where your light source is coming from (usually top left or right). Paint bold, rectangular(ish) blocks of pure White on the bowl of the glass to act as window reflections. -
Soften the reflections:
If the white reflections look too harsh, you can glaze over the edges slightly with a very watered-down grey to curve them around the glass form. -
Enhance the wine bubbles:
Dip a toothpick or the very tip of your smallest brush into pure White paint. Dot tiny specks inside the wine and right at the surface line to create bubbles. -
Cast the shadow:
Mix a glaze of Black and water (or glazing medium). Paint a soft shadow on the table surface extending from the base of the glass, opposite your light source. -
Refine the glass edges:
Go back with your background wall color (that charcoal grey) and tidy up the outer edges of the glass bowl if your white outline got too thick. -
Final highlights:
Add one last tiny sparkle of pure white on the rim and the base where the light hits strongest.
Now step back and admire how a few simple highlights can transform canvas into crystal
Utensil Pattern in Soft Neutrals

Bring the heart of the home onto your walls with this charming, pattern-based canvas featuring an array of illustrated kitchen tools. The soft earth tones and playful line work create a sophisticated yet cozy vibe perfect for modern kitchen decor.
Detailed Instructions
Materials
- Large stretched canvas (e.g., 24×30 inches)
- Acrylic paints (Titanium White, Burnt Sienna, Raw Umber, Yellow Ochre, Mars Black)
- Matte acrylic medium
- Gesso (if canvas is unprimed)
- Pencil (HB or H)
- Ruler or tape measure
- Assorted flat brushes (1/2 inch and 1/4 inch)
- Fine liner brush (size 0 or 1)
- Palette or paper plate
- Reference images of vintage whisks and spatulas
Step 1: Preparation & Base Coat
-
Prime the Surface:
Ensure your canvas is clean and taut. Even if it came pre-primed, I like to add a fresh coat of white gesso to ensure a smooth, professional painting surface. Let this dry completely. -
Mix the Background Color:
Create a warm, creamy off-white shade by mixing a large amount of Titanium White with just a tiny drop of Yellow Ochre and a speck of Raw Umber. You want a color that looks like unbleached cotton or linen. -
Paint the Background:
Apply the background color evenly across the entire face and sides of the canvas using a large flat brush. Use long, horizontal strokes to minimize texture. Let it dry for at least an hour. -
Plan the Layout:
Lightly sketch a grid or random placement plan on scratch paper first to balance the shapes. The goal is a tossed pattern look, where items are scattered but evenly spaced.
Steady Hand Trick
When painting long thin lines for the whisk wires, rest your pinky finger on a dry part of the canvas to stabilize your hand.
Step 2: Blocking in Shapes
-
Sketch the Outlines:
Using your pencil very lightly, draw the basic silhouettes of various kitchen tools directly onto the canvas. Focus on whisks (balloon, flat, coil) and spatulas. Vary their orientation so some point up and some point down. -
Mix the Palette:
Prepare your main colors: a rust orange (Burnt Sienna + Red), a soft tan (White + Raw Umber), a deep charcoal (Black + White), and a muted mauve-brown. Keep the tones earthy and subdued. -
Paint Solid Silhouettes:
Select a few shapes to trigger as solid blocks of color. Use a medium flat brush to fill in spatula heads or solid spoon shapes with the rust and tan tones. Leave the wire whisk shapes empty for now. -
Add Handle Details:
For the whisks, paint just the handles first. Use different colors for variety—wooden handles in tan or brown, and darker composite handles in charcoal or rust.
Kitchen Customization
Trace your actual favorite kitchen utensils onto the canvas before painting for a truly personalized and accurate silhouette shape.
Step 3: Line Work & Details
-
Thin the Paint:
For the crisp lines needed for the wire loops, mix a small amount of water or flow improver into your charcoal and dark brown paints. The consistency should be inky, allowing the brush to glide. -
Outline the Whisks:
Using your fine liner brush, carefully paint the wire loops of the whisks. Start from the handle and sweep outward in a tear-drop motion. Don’t worry about perfect symmetry; a hand-drawn look adds character. -
Create Variety in Line Weight:
Paint some wire loops thick and bold with the charcoal, and others thin and delicate with the lighter grey or tan. This creates visual depth. -
Add Internal Patterns:
On the solid spatula shapes you painted earlier, use a contrasting light color (like the background cream) to paint small details like slots, holes, or wood grain lines once the base color is fully dry. -
Refine Edges:
Go back with your background color and a small clean brush to tidy up any wobbly edges on the handles or solid shapes.
Step 4: Finishing Touches
-
Erase Pencil Marks:
Once you are absolutely certain the paint is 100% dry (give it a few hours), gently erase any visible pencil sketch lines. -
Assess the Balance:
Step back and look at the composition. If a spot looks too empty, paint a small detail like a spatula handle tip or a single wire loop peeking in from the edge to imply the pattern continues off-canvas. -
Seal the Artwork:
Apply a coat of matte acrylic medium or varnish over the entire piece. This protects the paint from kitchen grease or dust and unifies the sheen of the different colors.
Hang your new culinary masterpiece on an empty kitchen wall and enjoy the artisanal touch it adds to your cooking space


Whimsical Character Veggie Portrait
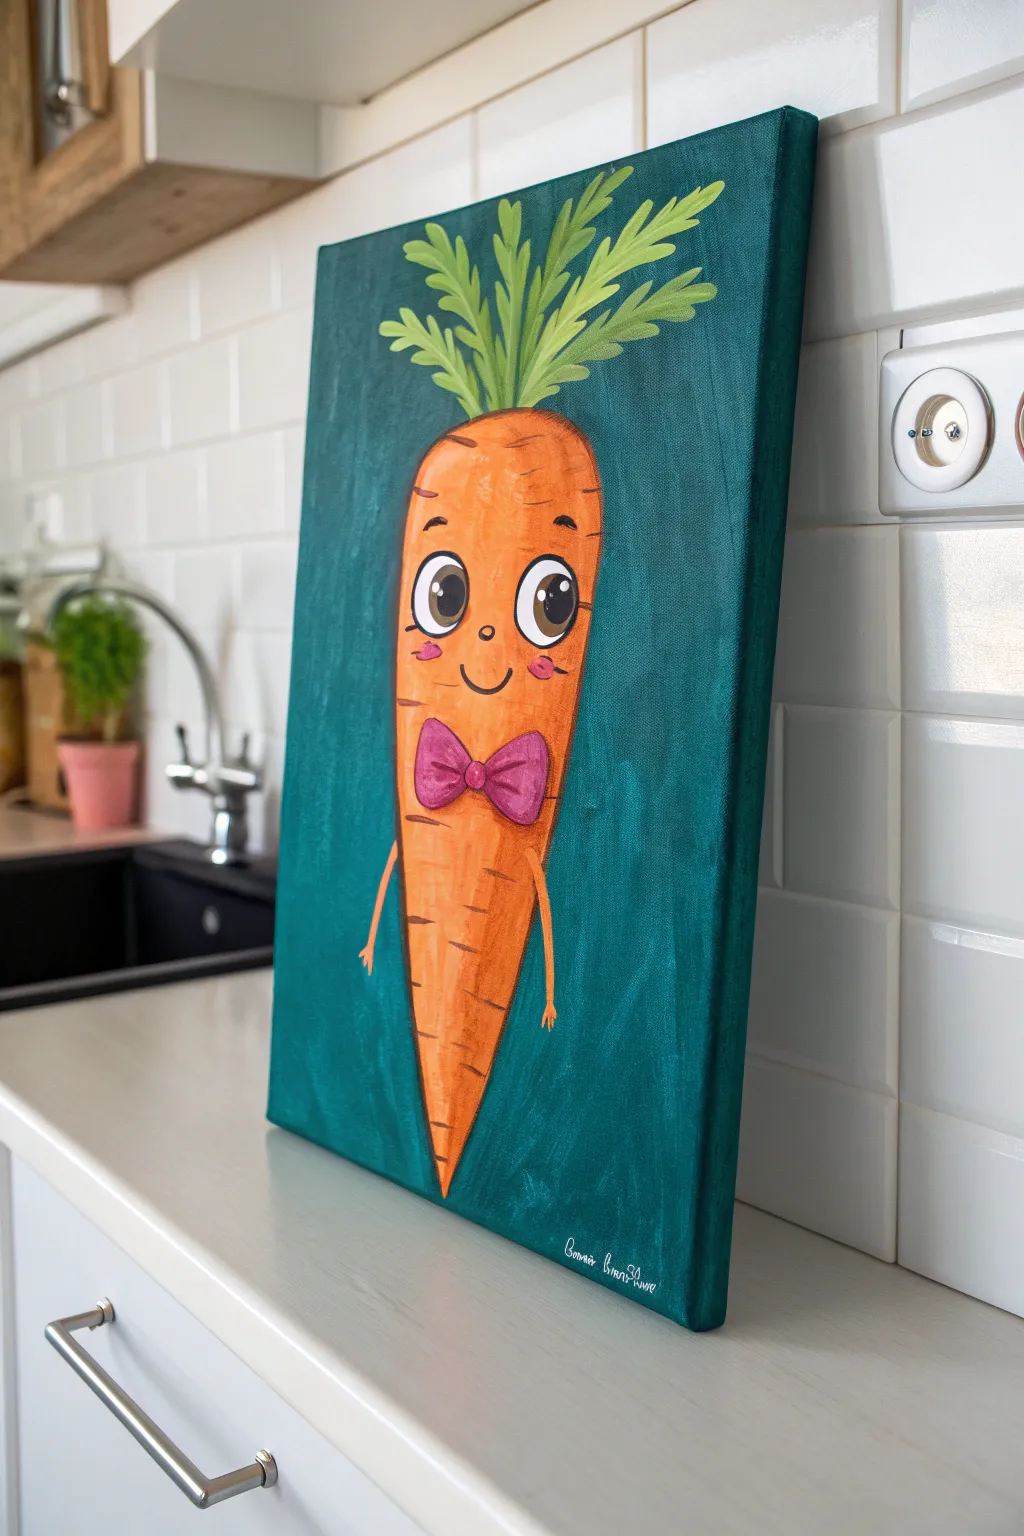
Brighten up your culinary space with this adorable portrait of a dapper carrot, featuring expressive eyes and a charming bow tie. The deep teal background makes the vibrant orange pop, adding a splash of whimsical character to modern white kitchens.
Step-by-Step
Materials
- Stretched canvas (rectangular, roughly 12×18 or similar ratio)
- Acrylic paints: Orange, White, Black, Deep Teal/Turquoise, Pink/Magenta, Light Green, Dark Green
- Flat brush (large) for background
- Filbert brush (medium) for the carrot body
- Round detail brush (small) for features
- Pencil and eraser
- Palette for mixing
- Cup of water and paper towels
Step 1: Planning and Background
-
Sketch the outline:
Start by lightly sketching a large, inverted elongated triangle shape for the carrot body in the center of your canvas. Round off the top heavily and slightly blunt the bottom tip. -
Add the details:
Pencil in the leafy greens sprouting from the top center. Draw two large ovals for eyes about one-third of the way down, a small U-shaped smile, and a bow tie shape in the lower mid-chest area. -
Mix the background color:
On your palette, mix a Deep Teal with a tiny touch of black or dark green to get a rich, moody turquoise shade. You want it to contest strongly with the orange later. -
Paint the background:
Using your large flat brush, carefully paint the entire negative space around the carrot sketch. Use vertical strokes to create a subtle texture that mimics wood grain or linen. -
Refine the edges:
Switch to a smaller brush to get clean lines right up to the pencil marks of the carrot and the leaves. Let this background layer dry completely before moving on.
Step 2: The Main Character
-
Base coat the carrot:
Mix a bright orange acrylic. Paint the entire body of the carrot, avoiding the eyes and bow tie if you can, though painting over them is fine since acrylic is opaque. -
Add dimension:
While the orange is still slightly wet, mix a lighter peach tone (orange + white) and streak it down the center for a highlight. Use a darker rusty orange on the sides to create a rounded, 3D effect. -
Paint the greenery:
Use a light green for the base of the leaves at the top. Let it dry, then add definition with darker green strokes to separate the individual leafy stems. -
Texture lines:
Using a fine liner brush and thinned dark orange or light brown paint, add small horizontal scratches across the body to mimic the natural texture of a carrot. -
Paint the bow tie:
Fill in the bow tie shape with a bright magenta or pink. Once dry, add a darker purple outlining and center knot detail to make it pop.
Uneven Coverage?
If the orange paint looks streaky over the white canvas, don’t overload the brush. Apply thin layers, letting each dry fully, rather than one thick gloppy coat.
Step 3: Bringing it to Life
-
Paint the eye whites:
Fill the large eye ovals with pure white paint. You may need two coats to ensure the teal or orange underneath doesn’t show through. -
Add the irises:
Paint large dark brown or black circles inside the white ovals, leaving a small crescent of white at the bottom or sides if you want a specific gaze direction. -
Create the sparkle:
This satisfies the character’s look immediately: dip the handle end of a brush in white paint and dot a large reflection in the upper right of each pupil, plus a smaller dot nearby. -
Draw the facial features:
Use a very fine brush with black or dark brown paint to outline the eyes, draw thin eyebrows, and trace the smiling mouth. -
Rosy cheeks:
Dilute a little pink paint with water to make a glaze, or use a dry brush technique, to dab soft pink circles just below the eyes. -
Add limbs:
Paint two very thin, stick-figure arms extending from the sides of the carrot using the orange body color. Add three tiny fingers at the ends. -
Final outlines:
I find that adding a very thin, broken outline around the whole carrot in dark brown helps separate it from the background and gives it an illustrative style. -
Sign your work:
Add your signature in white or light grey at the bottom right corner using your finest brush.
Pro Tip: Eye Expressions
Where you place the black pupils changes the personality. Pupils closer together look cute and innocent; pupils looking sideways look mischievous.
Hang your veggie friend in the kitchen to oversee your cooking adventures with a smile
Abstract Sauce Swirls and Drips
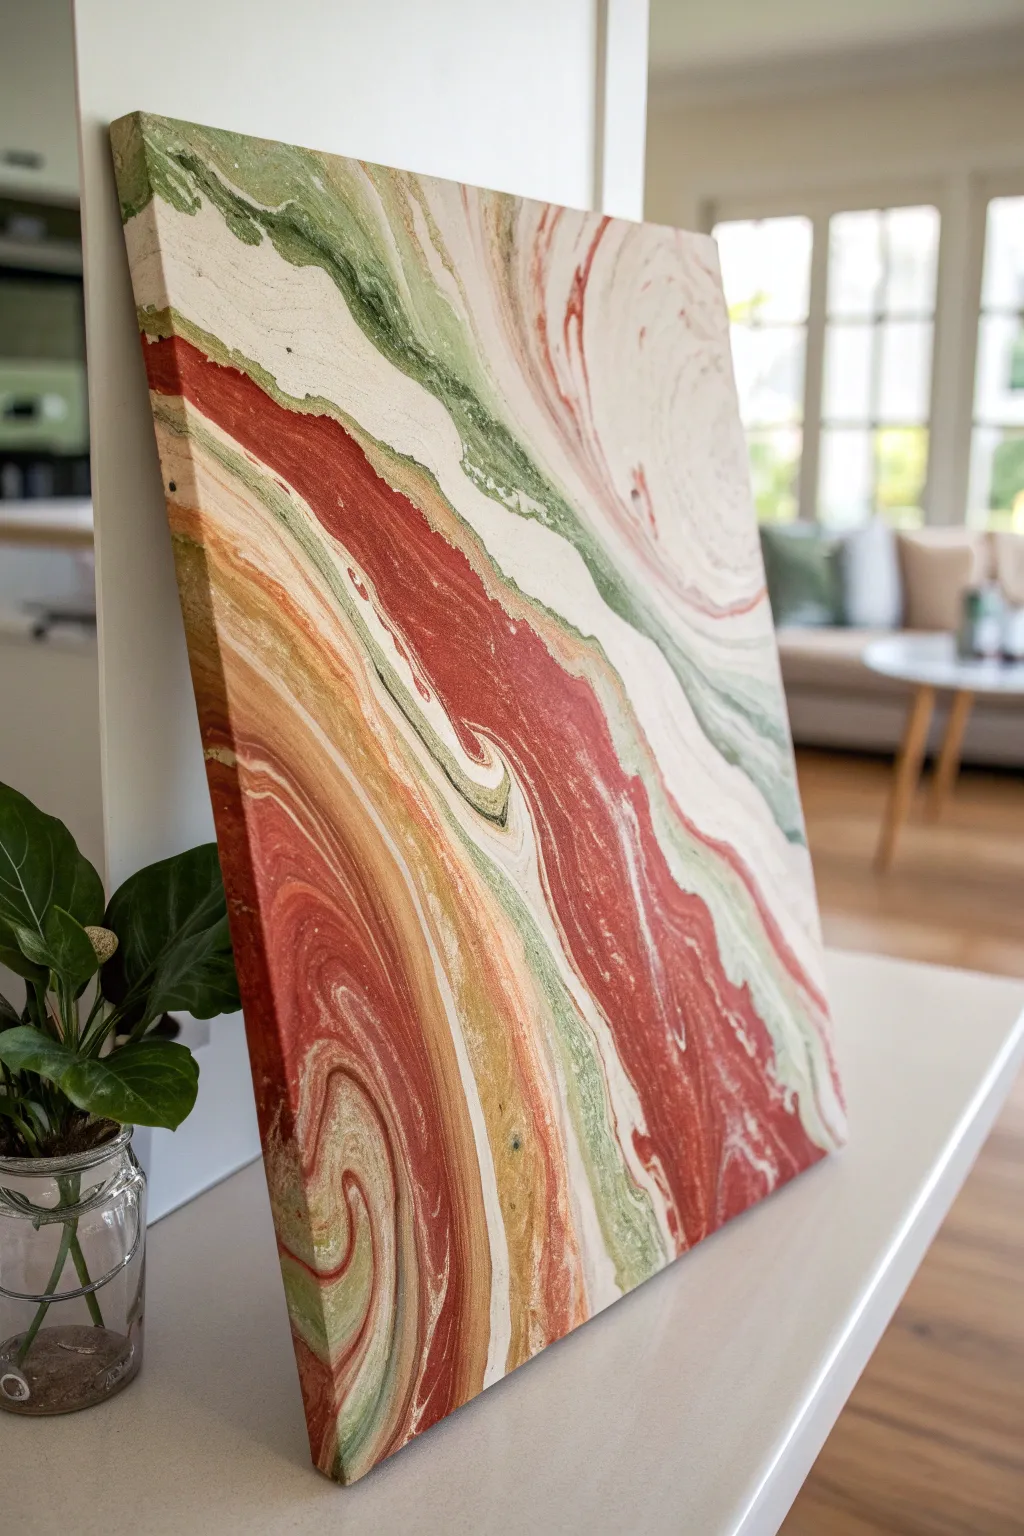
Capture the organic flow of a busy kitchen with this fluid art piece featuring rich tomato reds, creamy whites, and fresh herb greens. This abstract swirl design mimics the beautiful chaos of sauces and ingredients mixing together, creating a modern yet appetizing focal point for your culinary space.
Step-by-Step Guide
Materials
- Square stretched canvas (12×12 or similar)
- Acrylic paints: Terra cotta red, sage green, light mustard yellow, titanium white, cream/off-white
- Pouring medium (Liquitex or similar)
- Plastic cups (one per color + one large cup)
- Wooden stir sticks
- Drop cloth or large garbage bag
- Gloves
- Disposable aluminum roasting pan (optional, for catching drips)
- Silicone oil (optional, for creating ‘cells’)
Step 1: Preparation & Mixing
-
Ideally prepare your workspace:
Fluid art is messy, so cover your entire work surface with a heavy drop cloth or plastic bags. If you have a large aluminum roasting pan, place your canvas inside it on top of four overturned cups to elevate it. -
Mix the paint ratios:
In separate cups, mix one part acrylic paint with approximately one part pouring medium. The consistency should be like warm honey—fluid enough to run off the stick, but not as thin as water. -
Adjust the texture:
Stir slowly to avoid creating too many air bubbles. If the mixture feels too thick, add a few drops of water at a time until the paint flows smoothly. -
Create your color palette:
Mix a generous amount of your cream/off-white, as this will be the base that helps the other colors move. Ensure your terracotta red and sage green are well-mixed, as clumps will ruin the smooth swirl effect. -
Optional cell creation:
If you want those tiny, bubbling ‘cells’ within the paint layers, add 1-2 drops of silicone oil to the red and green cups only and stir just once.
Clean Edges Trick
Apply painter’s tape to the *back* edges of the canvas before painting. Once the painting is dry, peel the tape off for a perfectly clean back free of dried paint drips.
Step 2: The Pouring Process
-
Layer the dirty cup:
Take a clean, large cup. Start by pouring a small amount of white into the bottom. Then, gently pour layers of red, green, mustard, and more white on top of each other. Do not stir this cup. -
Repeat the layering:
Continue layering the colors until the cup is about three-quarters full. I like to vary the amount of each color—sometimes a splash of yellow, sometimes a heavy pour of red—to keep the pattern unpredictable. -
Prime the canvas:
Pour some of your plain white/cream mixture onto the center of the canvas and spread it thinly over the entire surface, including the edges. This ‘wet’ surface helps the colored paint glide effortlessly. -
Perform the flip cup (or ring pour):
You can either place the canvas face down on the cup and flip them together, or simply pour the contents of the cup slowly onto the center of the canvas in a tight circular motion (a ‘ring pour’). The ring pour yields the striations seen in the reference image. -
Release the paint:
If you did a flip cup, lift the cup straight up to release the puddle of paint. If you did a ring pour, simply stop pouring when the cup is empty.
Step 3: Tilting & Finishing
-
Begin the tilt:
Gently lift the canvas and tilt it slowly in a circular motion. Watch how the paint stretches and moves. The goal is to cover the corners without losing the beautiful bands of color in the center. -
Guide the composition:
Tilt the canvas toward one corner until the paint just starts to go over the edge, then bring it back to the center. Repeat this for all four corners. -
Create the diagonal flow:
To match the reference image’s diagonal movement, tilt the canvas more aggressively from the top left to the bottom right, encouraging the red and green veins to elongate across the surface. -
Check the edges:
Ensure the sides of the canvas are fully covered. You can use your finger to dab dripping paint onto any bare spots along the edges. -
Pop surface bubbles:
If you see tiny air bubbles trapped in the paint, you can lightly pass a kitchen torch or a heat gun over the surface (keep it moving constantly) to pop them. This also helps bring up cells if silicone was used. -
Allow for drying:
Place the painting on a level surface in a dust-free area. It needs to dry undisturbed for at least 24-48 hours. The paint will self-level as it dries. -
Seal the artwork:
Once fully cured (after a few weeks), apply a coat of gloss varnish to protect the surface from kitchen grease and make the colors pop.
Texture Pop
Mix a small amount of fine gold glitter or metallic gold paint into your cream color for a subtle shimmer that catches the kitchen light.
Hang your new masterpiece near the spice rack or pantry to echo the delicious colors of your cooking ingredients


Have a question or want to share your own experience? I'd love to hear from you in the comments below!