I’ve painted and redesigned enough kitchens to know a kitchen soffit can feel like that stubborn “blank corner” in a sketch—annoying until you give it a plan. These ideas help you either hush it into the background or turn it into a bold, intentional design moment right above your upper cabinets.
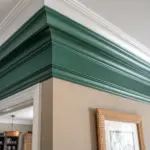
Paint It to Match the Ceiling
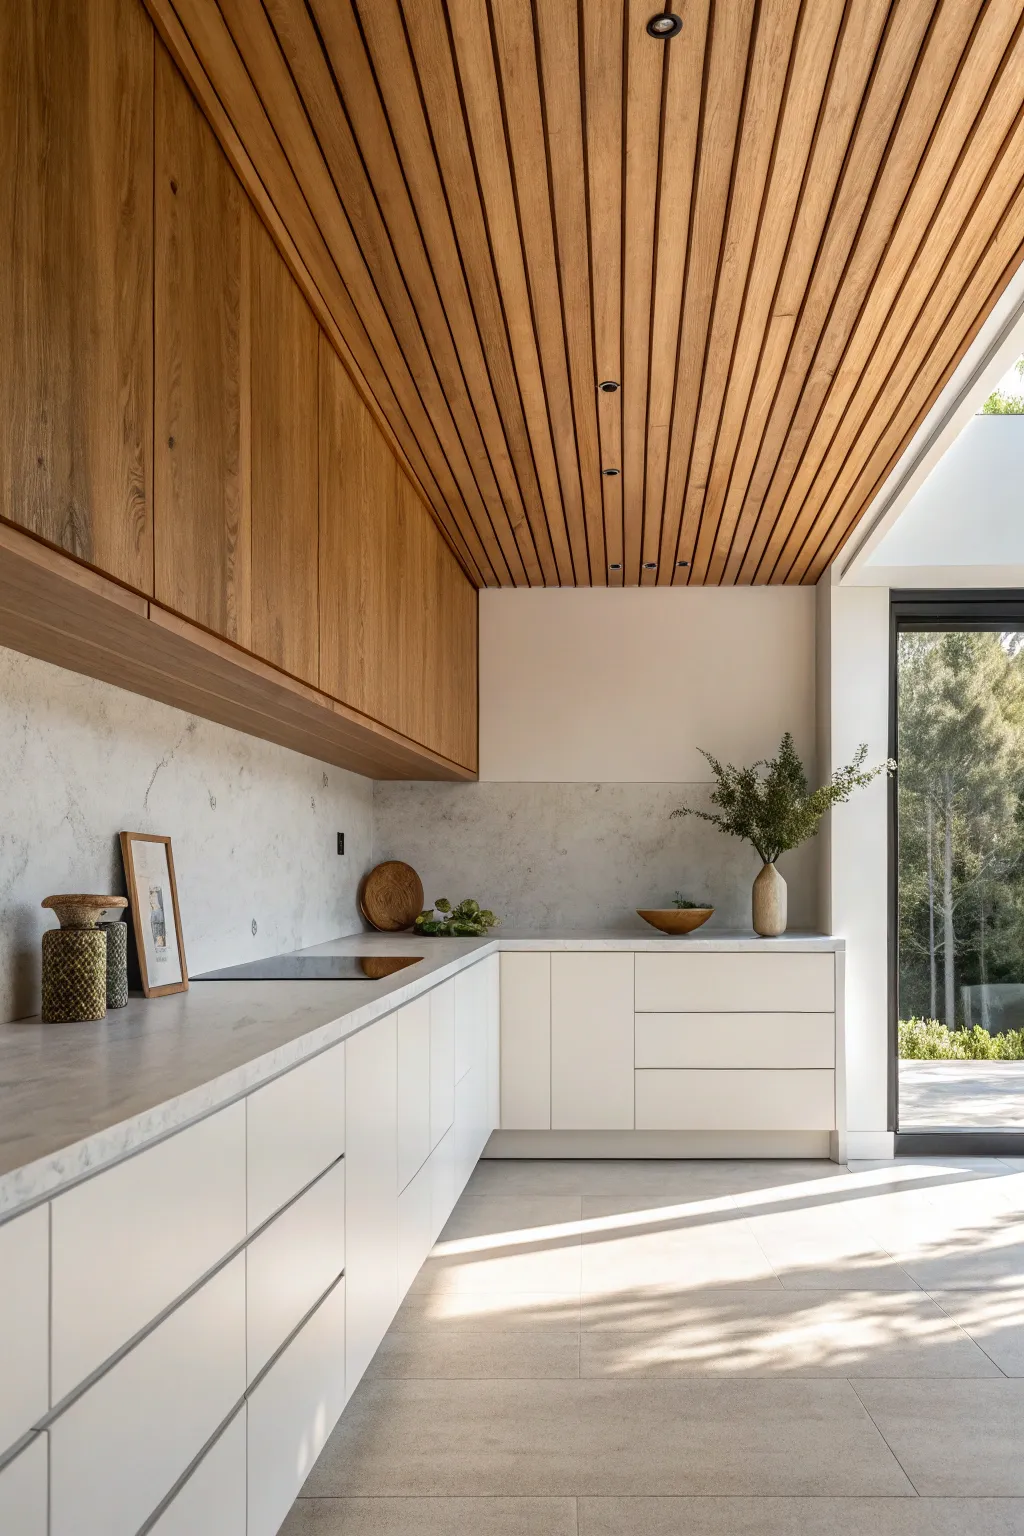
This project transforms a potentially awkward kitchen soffit into a seamless extension of your ceiling, creating height and airiness through strategic paint and trim work. By matching the soffit color and finish directly to the planked ceiling, the transition disappears, letting your beautiful cabinetry take center stage.
Detailed Instructions
Materials
- Interior latex paint (color-matched to ceiling)
- Small roller (4-inch width)
- Angled sash brush (2-inch)
- Painter’s tape
- Crown molding (matching ceiling trim)
- Miter saw
- Pin nailer or finishing nails
- Paintable caulk and caulk gun
- Wood filler
- Fine-grit sandpaper (220-grit)
- Drop cloths
- Ladder
Step 1: Preparation & Surface Work
-
Protect the Area:
Begin by thoroughly covering your countertops and lower cabinets with drop cloths. Since you’ll be working overhead, spatters are inevitable, so taking time here saves cleanup later. -
Clean the Surface:
Wipe down the soffit area with a mild degreaser or soapy water to remove any kitchen grime or dust. Paint adheres best to a perfectly clean surface. -
Sand for Adhesion:
Lightly scuff the soffit surface using 220-grit sandpaper. You don’t need to remove old paint entirely, just dull any gloss so the new coat grips well. -
Tape Off Boundaries:
Apply painter’s tape precisely along the top edge of your upper cabinets where they meet the soffit. Run a fingernail or putty knife along the tape edge to seal it tight against bleed-through.
Paint Formula Tip
Use the exact same paint can for both ceiling and soffit, not just a color match. Differences in sheen (flat vs eggshell) will ruin the seamless illusion.
Step 2: Painting the Soffit
-
Cut In Edges:
Using your angled sash brush, carefully paint the corners and edges of the soffit where a roller can’t reach. Feather the edges outward to prevent harsh lines. -
Roll the Main Area:
Load your 4-inch roller with the ceiling-matched paint. Roll the soffit in smooth, overlapping strokes. I find that working in small sections while the ‘cut in’ paint is still wet helps blend everything seamlessly. -
Check Coverage:
Allow the first coat to dry completely according to the can’s instructions. If the old color or drywall texture shows through, apply a second coat for a solid, consistent finish. -
Remove Tape:
Carefully peel away the painter’s tape while the final coat is still slightly tacky. Pulling at a 45-degree angle away from the painted edge usually gives the crispest line.
Step 3: Installing the Crown Molding
-
Measure the Span:
Measure the length of the soffit where it meets the ceiling. Double-check your measurements, as accuracy is key for tight corners. -
Cut the Molding:
Set your miter saw to cut the crown molding. If you have corners, you’ll need to cut 45-degree angles (or cope the joints if preferred) to act as a bridge between the vertical soffit and the horizontal ceiling. -
Dry Fit:
Hold the molding pieces in place to ensure corners meet tightly and the run is level. A helper is invaluable here to hold the other end while you check the fit. -
Secure the Molding:
Nail the molding into place using a pin nailer, driving nails into the ceiling joists or soffit framing. Ensure the bottom edge of the molding sits flush against the newly painted soffit.
Level Up: Plank It!
For total invisibility, install thin shiplap planks horizontally over the soffit before painting, matching the ceiling’s plank direction and texture exactly.
Step 4: Finishing Touches
-
Fill Nail Holes:
Dab a tiny amount of wood filler into each nail hole on the molding. Let it dry, then sand it flush with a fine-grit paper. -
Caulk the Gaps:
Run a thin bead of paintable caulk along the top edge where the molding meets the ceiling and the bottom edge meeting the soffit. Smooth perfectly with a wet finger. -
Paint the Molding:
Once the caulk and filler are dry, paint the crown molding with the same color used on the soffit and ceiling. This unifies the entire upper zone. -
Final Inspection:
Step down from the ladder and view the work from across the room. Touch up any missed spots or shadows to ensure the soffit now looks like a deliberate architectural feature rather than a boxed-in pipe chase.
Enjoy the brighter, taller feel of your kitchen now that the visual clutter of the soffit has disappeared


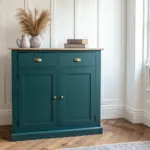
Paint It to Match the Cabinets
Transform an awkward kitchen soffit into an elegant architectural feature by painting it to match your cabinetry. This monochromatic approach creates a sense of height and cohesion, making standard cabinets feel like custom built-ins while softening the visual break between wall and ceiling.
Step-by-Step Guide
Materials
- High-quality interior paint (color-matched to cabinets)
- Stain-blocking primer
- Sanding sponge (220-grit)
- Painter’s tape (delicate surface)
- Drop cloths
- Degreaser or TSP substitute
- Microfiber cloths
- Angled sash brush (2-inch)
- Paint roller frame and microfiber covers (3/8 inch nap)
- Extension pole
- Paint tray and liners
- Screwdriver (if removing vent covers)
Step 1: Preparation & Cleaning
-
Clear the area:
Remove any items from the countertops below the soffit and cover the counters and floor with drop cloths to catch accidental splatters. -
Clean the surface:
Kitchen soffits often collect grease and dust that settles high up. Scrub the entire soffit area thoroughly with a degreaser or TSP substitute using a microfiber cloth. -
Rinse and dry:
Wipe the surface down with clean water to remove any cleaning residue, then dry it completely with a clean towel. -
Remove hardware:
If there are vent covers or light fixtures on the soffit, remove them making use of your screwdriver. It’s much cleaner than painting around them. -
Address imperfections:
Inspect the drywall for any dings or nail pops. Fill these with spackle, let dry, and sand flush before proceeding.
Step 2: Sanding & taping
-
Light scuff sand:
Use a 220-grit sanding sponge to lightly scuff the soffit surface. You aren’t trying to remove old paint, just giving the new paint something to grip onto. -
Dust off:
Wipe away all sanding dust with a damp cloth or a tack cloth. Dust is the enemy of a smooth finish. -
Tape the ceiling:
Apply painter’s tape along the ceiling line where it meets the soffit. Press the edge firmly with a putty knife or credit card to prevent bleed-through. -
Protect the cabinets:
Tape off the top of the cabinet crown molding or the cabinet tops themselves. This step is critical since you are using the same color, but different sheen or material differences might show if you get sloppy.
Paint Peeling?
If paint peels when removing tape, score the edge gently with a utility knife first. This severs the dried paint film, ensuring a crisp line without lifting your new work.
Step 3: Priming & Painting
-
Apply primer:
Roll on a coat of stain-blocking primer. This is especially important in kitchens where hidden grease might bleed through, or if you are covering a darker wall color. -
Cut in the edges:
Once the primer is dry, open your color-matched paint. Use your angled sash brush to ‘cut in’ a 2-3 inch border along the ceiling, corners, and cabinet top. -
Feather the edges:
While the cut-in paint is still wet, feather the edges slightly toward the center to avoid leaving hard ridge lines that the roller won’t cover later. -
Roll the first coat:
Use your roller with a 3/8 inch nap cover to apply the first coat of paint. Work in small sections, always keeping a ‘wet edge’ to ensure a uniform texture. -
Dry and assess:
Allow the first coat to dry according to the manufacturer’s instructions. I usually wait a bit longer in humid kitchens to ensure it cures properly. -
Apply second coat:
Repeat the cutting and rolling process for a second coat. This ensures true color depth and durability, which mimics the finish of the cabinets below.
Add Crown Molding
Install chunky crown molding at the very top of the soffit (meeting the ceiling) painted in the same color. It creates a truly built-in, high-end furniture look.
Step 4: Finishing Touches
-
Remove tape:
Carefully peel off the painter’s tape while the second coat is still slightly tacky. Pull at a 45-degree angle away from the painted edge for the sharpest line. -
Reinstall hardware:
Once the paint is fully cured (give it at least 24 hours), reinstall any vent covers or light fixtures you removed earlier. -
Final clean up:
Remove drop cloths and wipe down any stray dust from the counters. Step back and admire how the soffit now visually extends your cabinets to the ceiling.
Enjoy the sleek, vertical continuity this simple painting trick brings to your kitchen space


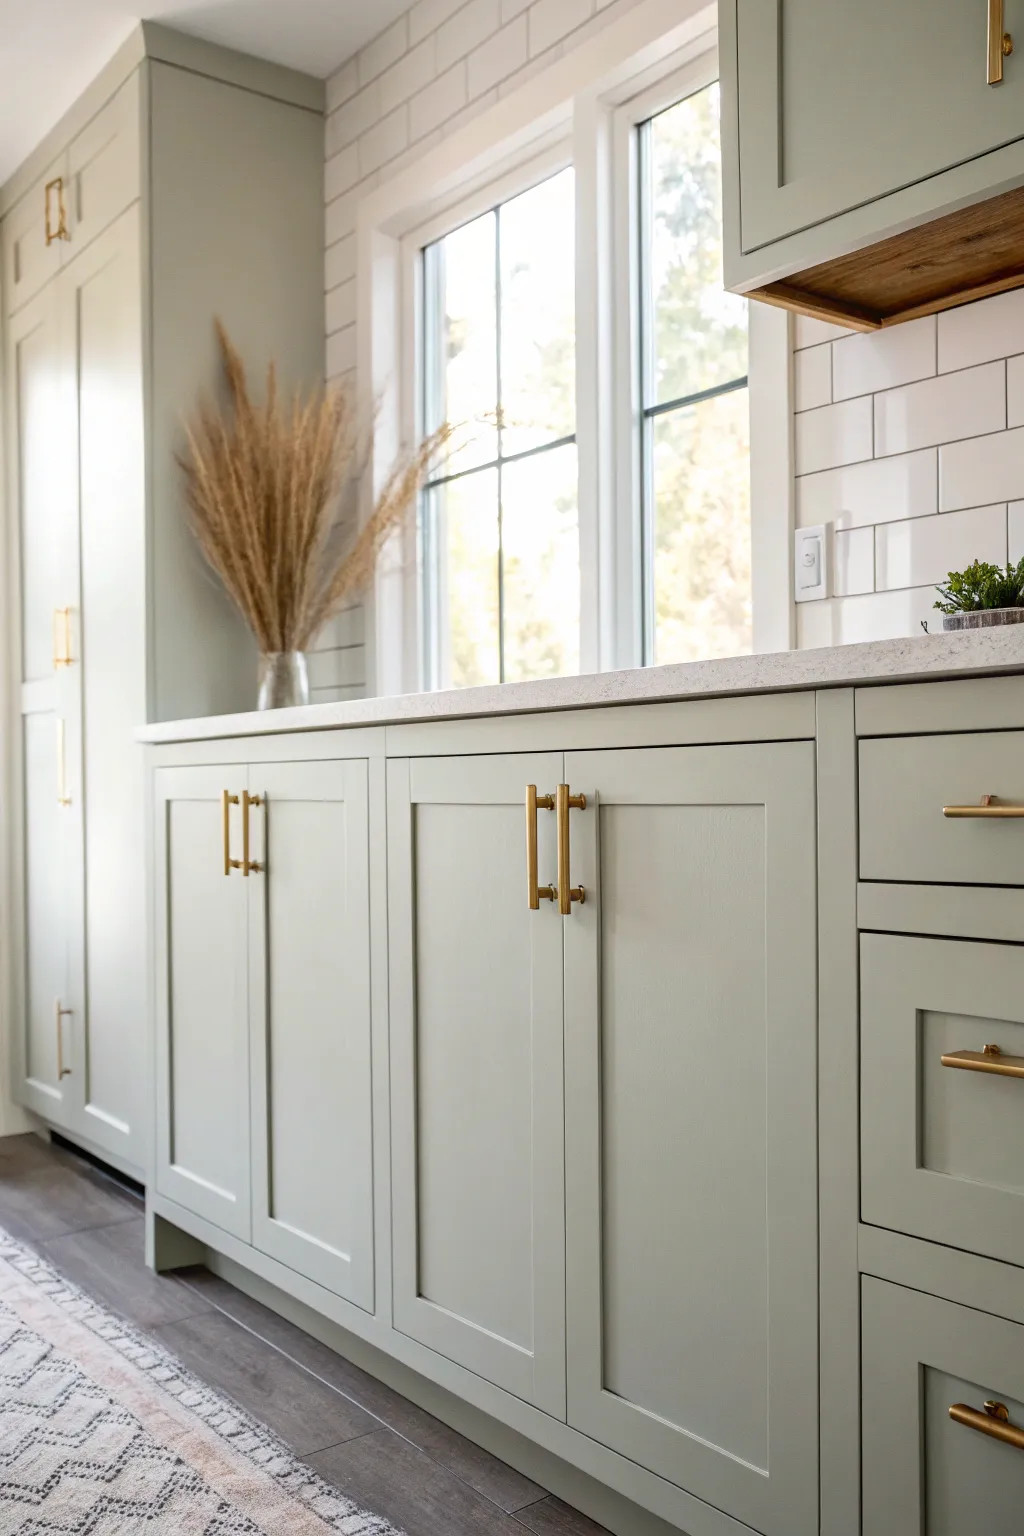
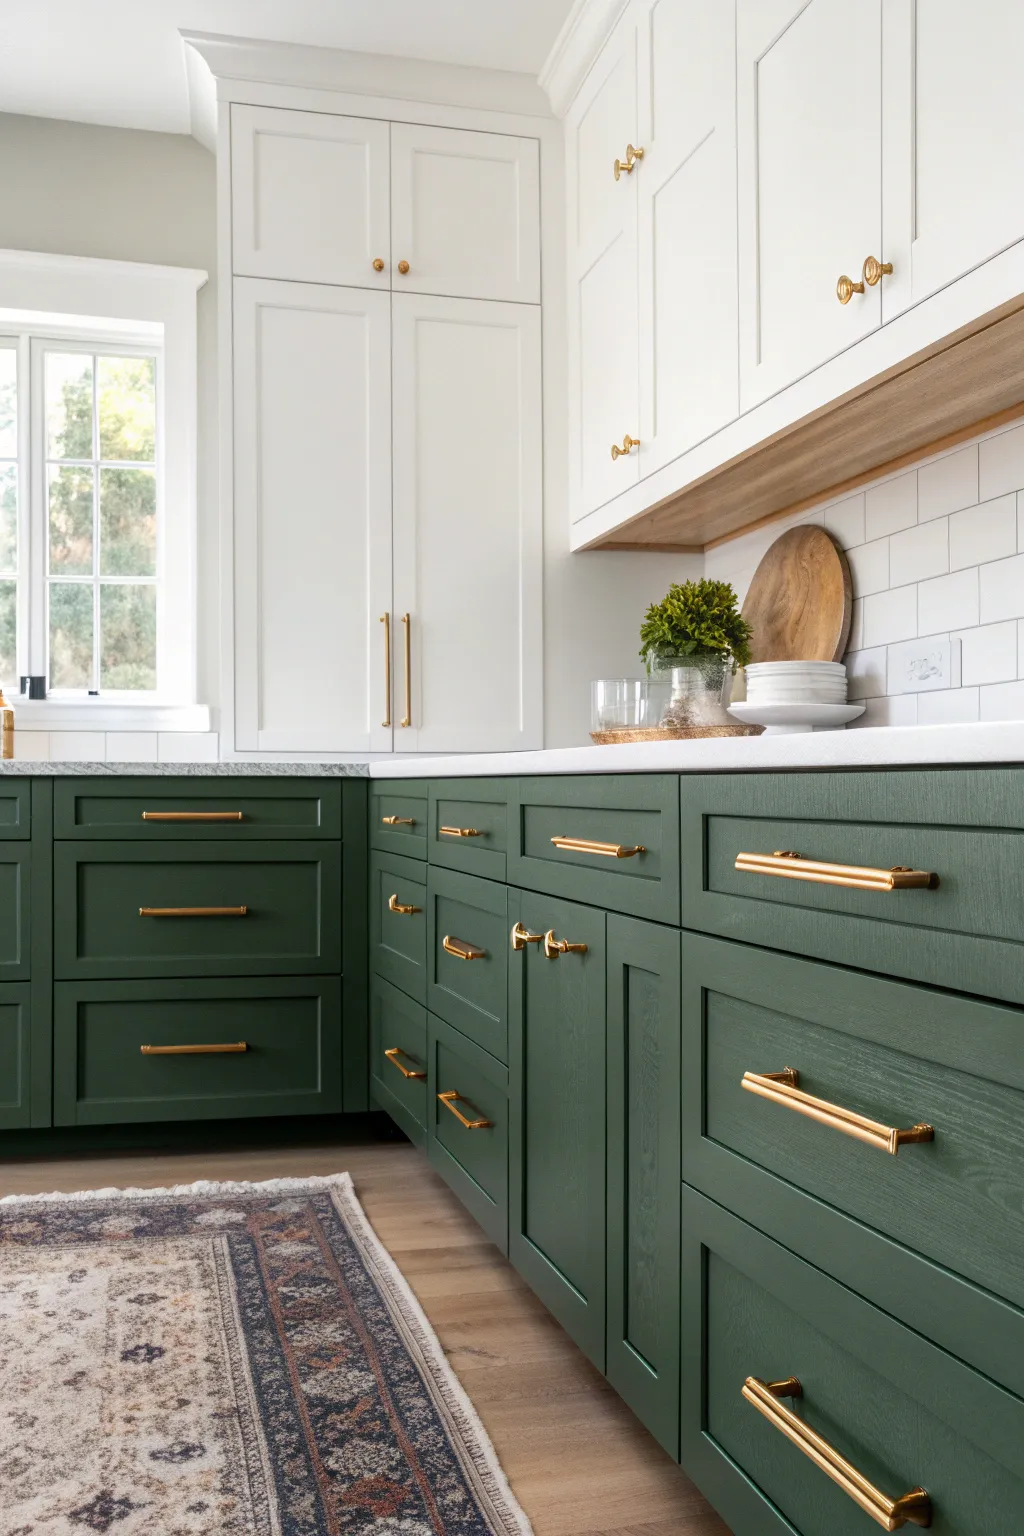
Use a Contrasting Color Band
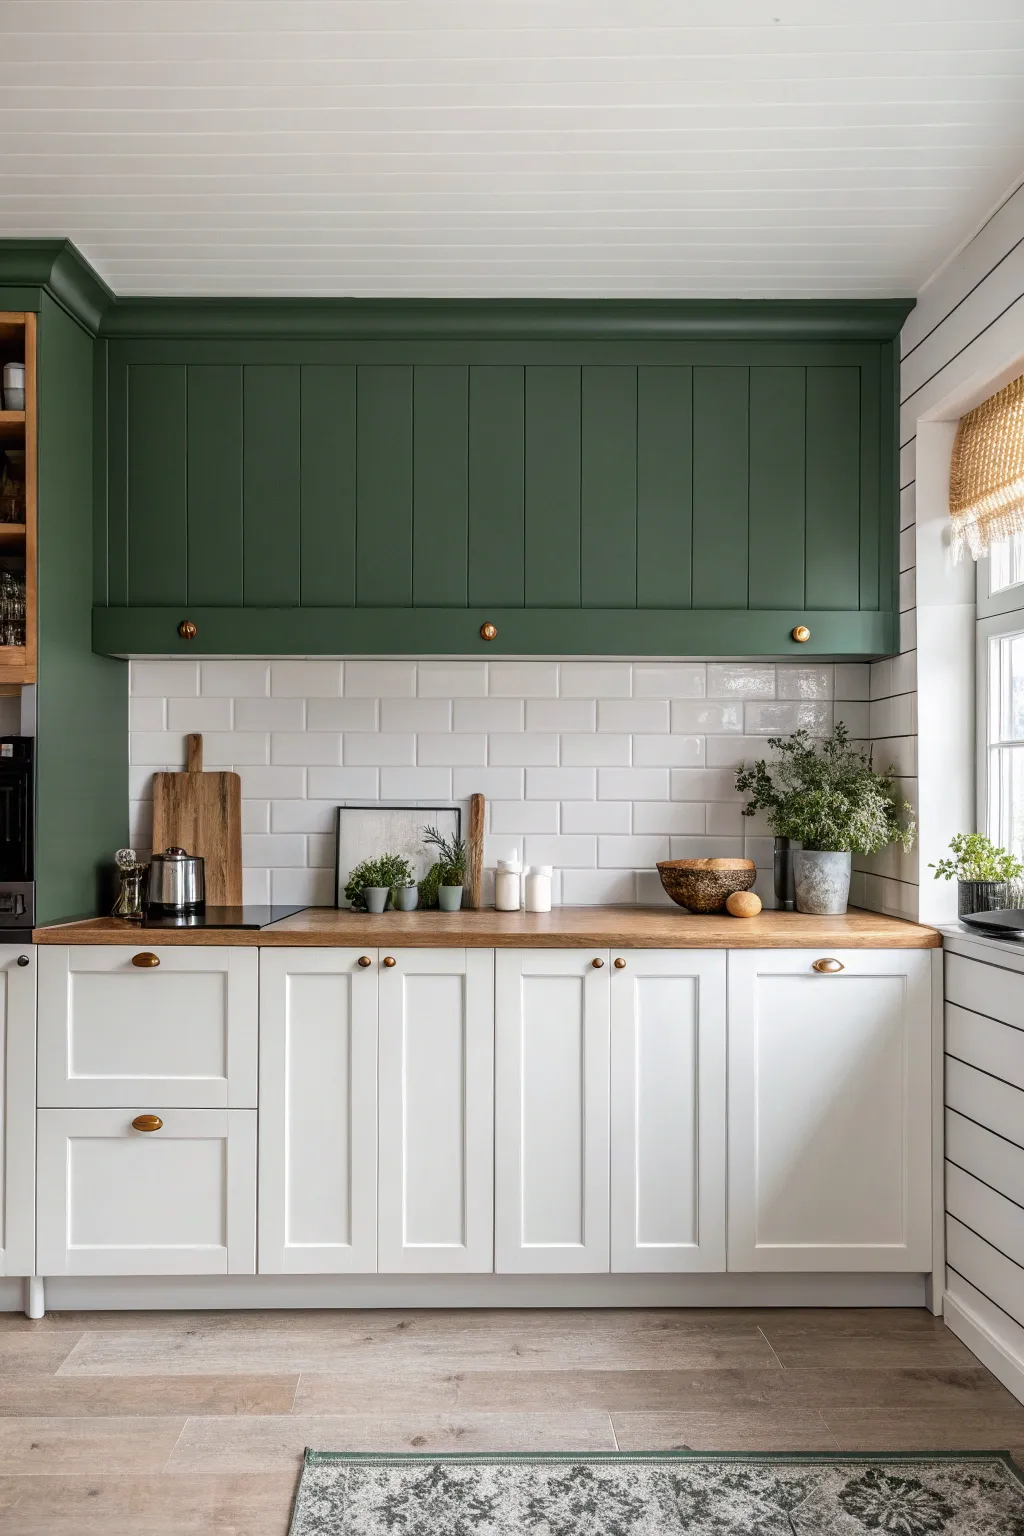
Transform a standard kitchen by creating a striking visual contrast using deep green upper cabinetry and crisp white lowers, bridged by clever trim work. This project focuses on building out a soffit-integrated upper cabinet facade to achieve that seamless, built-in English cottage aesthetic.
Step-by-Step
Materials
- White base cabinets (shaker style)
- Deep green upper cabinet paint (satin finish)
- Plywood or MDF panels for soffit facing
- Vertical shiplap or beadboard paneling
- Crown molding
- Solid wood butcher block countertop
- Brass cabinet knobs and cup pulls
- White subway tiles
- White grout
- Polyurethane sealer
- Wood glue and construction adhesive
- Brad nailer
- Circular saw or table saw
- Painter’s tape
Step 1: Base Cabinet & Countertop Installation
-
Install base cabinets:
Begin by leveling and installing your white shaker-style base cabinets. Ensure they are perfectly plumb, as this foundation dictates the rest of the build. Secure them to the wall studs and to each other. -
Prepare the butcher block:
Measure your total counter length. Cut the solid wood butcher block to size, allowing for a slight overhang on the front edge. Sand the surface smooth, starting with 120-grit and moving up to 220-grit sandpaper. -
Seal the wood:
Apply a coat of oil-based polyurethane or food-safe wood oil to the countertop. I like to let this soak in and dry completely before adding a second and third coat for maximum durability against kitchen moisture. -
Attach the counter:
Once dry, secure the countertop to the base cabinets using L-brackets from underneath or by screwing through the cabinet corner braces.
Uneven Paint Coverage
If the dark green looks patchy, lightly sand between coats with 320-grit paper. This knocks down texture and helps the next layer adhere more pigment for a solid finish.
Step 2: Upper Cabinetry & Soffit Build
-
Construct the upper framework:
Instead of standard upper cabinets, build or install a framework that extends all the way to the ceiling. If using existing cabinets, you will be facing them to create a unified look. -
Apply vertical paneling:
Cut vertical shiplap or beadboard panels to cover the entire upper section. The lines should run vertically to draw the eye upward. Use construction adhesive and brad nails to secure these panels to your cabinet frames or furring strips. -
Create the bottom apron:
Install a horizontal trim piece along the bottom edge of the upper cabinets. This acts as a visual rail and a mounting point for the small brass knobs later. -
Install the soffit crown:
Measure and cut crown molding to fit the top junction where the cabinetry meets the ceiling. Miter the corners carefully for a seamless wrap-around effect, filling any gaps with wood filler. -
Prime the upper structure:
Apply a high-quality primer to the entire upper wood structure—panels, apron, and crown molding. This is crucial for the dark paint to cover evenly. -
Paint the deep green:
Apply your deep forest green paint in satin finish. Use a brush for the grooves of the paneling and a foam roller for the flat surfaces to avoid brush marks. Two to three coats will likely be needed for full opacity.
Step 3: Backsplash & Finishing Touches
-
Set the subway tile:
Apply tile adhesive to the wall space between the countertop and the upper cabinet apron. Lay out white subway tiles in a classic running bond (brick) pattern. -
Grout the tiles:
Once the adhesive has set, apply white grout. Wipe away excess haze with a damp sponge, ensuring the lines are crisp and clean to match the bright lower cabinets. -
Install hardware:
Drill holes for your hardware. Install brass cup pulls on the lower white drawers and small brass knobs on the green upper apron rail. -
Add side paneling:
If you have an exposed wall side, install horizontal shiplap painted in white to continue the texture without darkening the space. -
Final styling:
Place wooden cutting boards and potted herbs on the counter to warm up the green and white palette.
Add Under-Cabinet Lighting
Route a channel behind the bottom apron rail to hide an LED strip. This adds functional task lighting that creates a cozy glow on the subway tiles.
Step back and admire how this two-tone design completely changes the architectural feel of the room


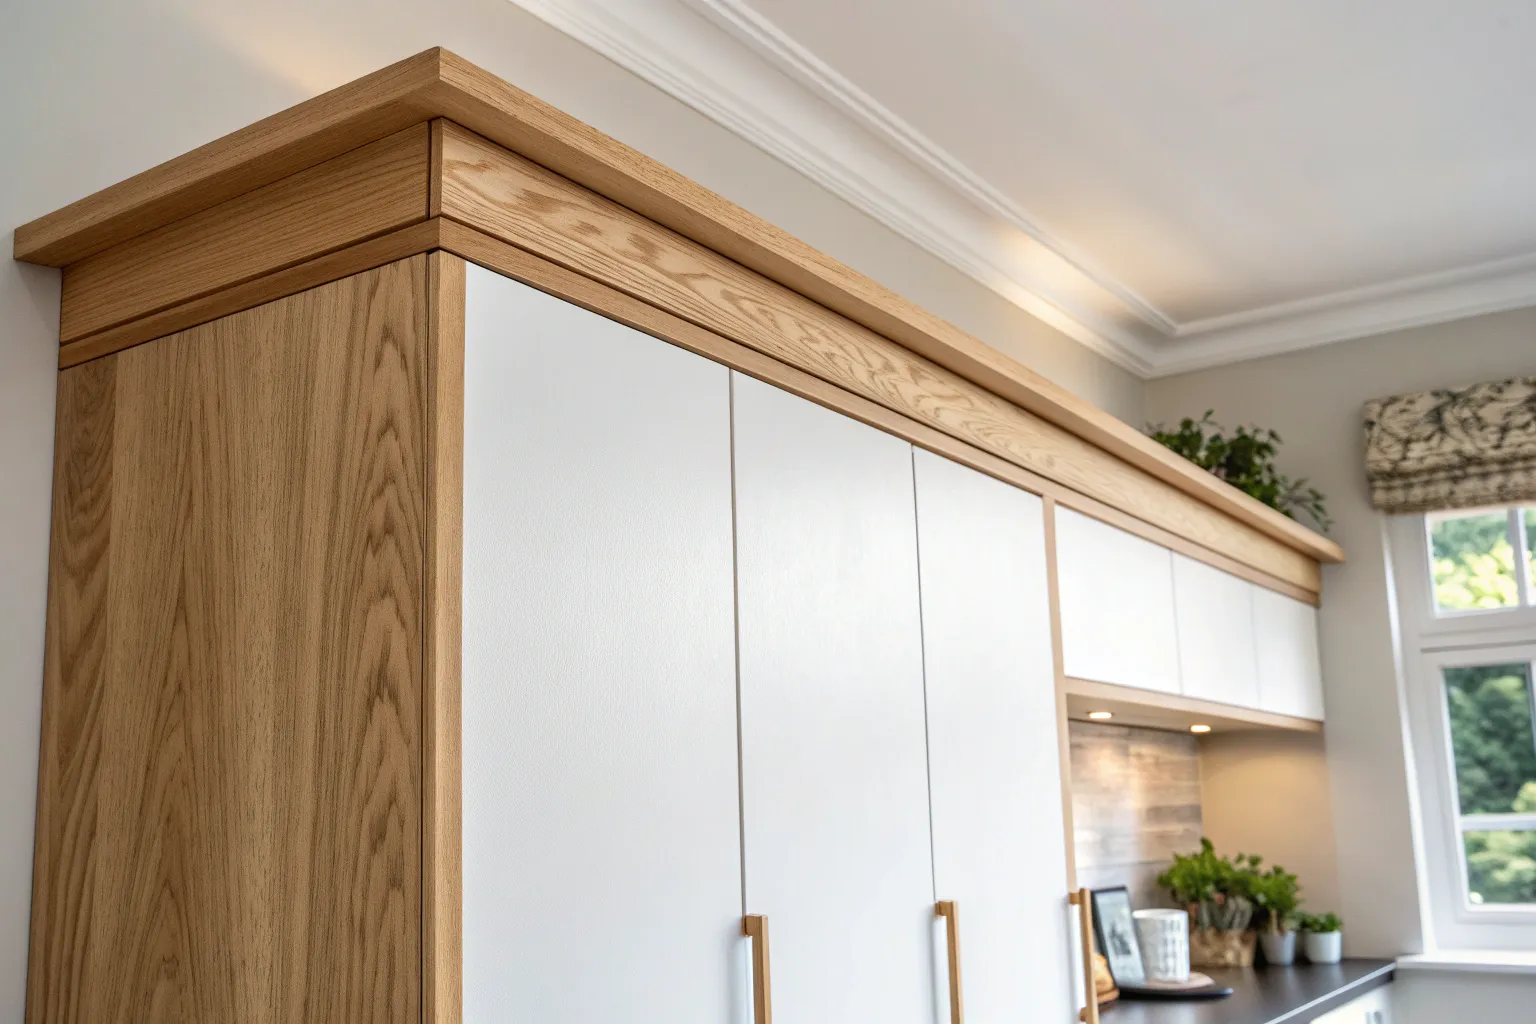
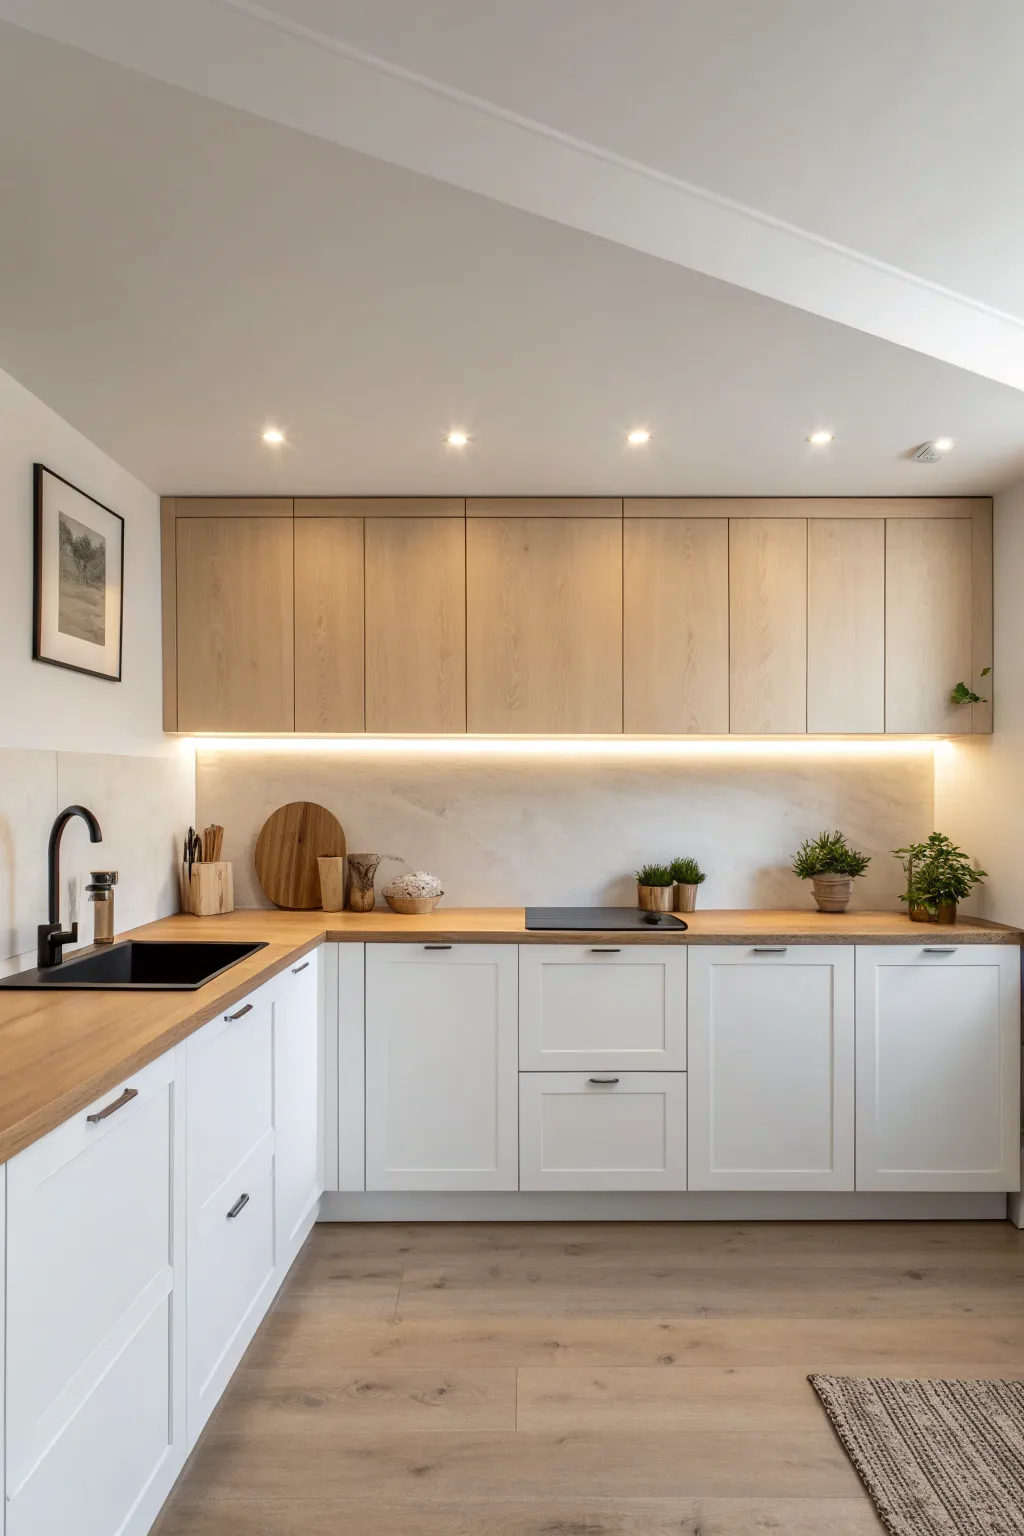
Extend Uppers Up to the Soffit Line
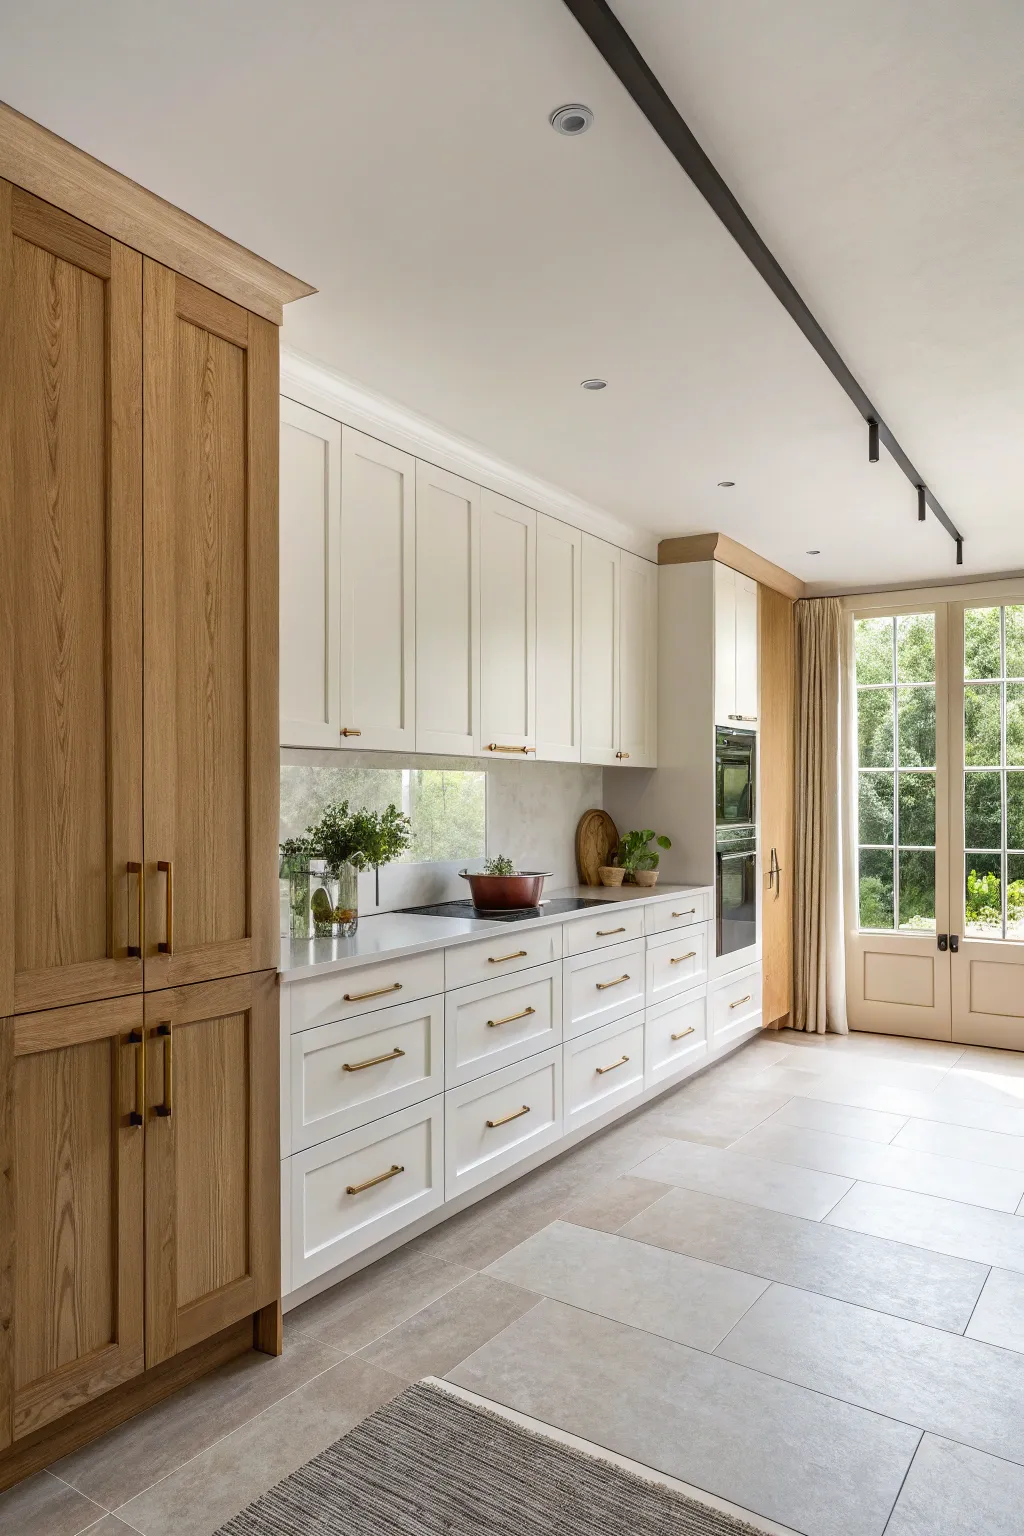
Achieve a high-end, custom look by extending your kitchen upper cabinets directly to a soffit line. This project blends warm oak textures with crisp white cabinetry for a clean, architectural finish that maximizes vertical storage.
Step-by-Step
Materials
- Cabinet boxes (base and upper)
- White shaker cabinet doors
- Oak veneer cabinet doors and panels
- Soffit framing lumber (2x4s)
- Drywall and joint compound
- Crown molding (matching oak)
- Cabinet screws and shims
- Laser level
- drill/driver set
- Stud finder
- Table saw or circular saw
- Wood glue and pin nails
- Brass cabinet hardware (pulls and knobs)
Step 1: Planning and Soffit Construction
-
Establish the ceiling line:
Before ordering cabinets, determine your exact ceiling height and desired cabinet run height. Use a laser level to mark the top line where your cabinets will end, ensuring it is perfectly level across the entire wall. -
Calculate the soffit drop:
Measure the distance from your ceiling down to the top of your cabinet line. This gap will define the height of the soffit you need to frame out. -
Frame the soffit structure:
Build a ladder frame using 2×4 lumber. Attach it securely to the ceiling joists, making sure the front face aligns perfectly with the future depth of your upper cabinets plus the door thickness. -
Drywall and finish:
Cover the frame with drywall. Apply joint tape and compound, then sand smooth. I like to prime and paint the soffit now—matching the ceiling color—before any cabinets are installed to avoid splatter risks later.
Uneven Ceilings?
If your ceiling bows, scribe the top of the soffit drywall or the crown molding to match the curve rather than forcing the wood straight, which creates gaps.
Step 2: Cabinet Installation and Integration
-
Set the tall pantry units:
Begin by installing the tall oak pantry tower on the left. Shim the base until it is plumb and level, ensuring the top edge meets the underside of your new soffit or leaves exactly enough room for your crown molding. -
Install base cabinets:
Position the white base cabinets along the wall. Level them front-to-back and side-to-side, screwing them into the wall studs and to each other. -
Mount upper cabinets:
Hang the white upper cabinets. Their tops should butt right up against the bottom of your completed soffit. Use clamps to hold face frames flush while you screw them together. -
Add side filler panels:
Cut an oak veneer panel to cover the exposed side of the refrigerator or oven housing on the right. This creates a bookend effect that mirrors the pantry tower on the left. -
Apply crown molding:
Install the flat oak crown molding along the top of the pantry tower. If your design calls for it, you can also run a small trim piece where the white uppers meet the soffit to hide any minor gaps.
Level Up: Hidden Venting
Use the hollow space inside your new soffit to route HVAC ducting or hide the exhaust vent for your range hood, keeping the kitchen lines unbelievably clean.
Step 3: Finishing Details
-
Install the backsplash:
If you are incorporating a window or stone splash, measure and install it now. For a seamless look like the photo, ensure the material runs fully between the countertop and the bottom of the uppers. -
Attach hardware:
Mark drilling templates on your doors and drawers. Install the sleek brass pulls horizontally on drawers and vertically on doors for a consistent, modern aesthetic. -
Adjust hinges:
Open and close every door. Use the adjustment screws on the hinges to ensure all gaps are even and the door faces are flush with the frames. -
Install track lighting:
Mount a black track lighting system parallel to the cabinet run. Position the heads to wash light onto the cabinet fronts, highlighting the texture of the wood and the clean white finish.
Step back and admire how extending your cabinetry to the soffit transforms the kitchen into a tailored, architectural space
BRUSH GUIDE
The Right Brush for Every Stroke
From clean lines to bold texture — master brush choice, stroke control, and essential techniques.
Explore the Full Guide
Stack a Second Row of Small Cabinets
Recreate the sophisticated look of stacked cabinetry reaching the ceiling with this precise tutorial. By adding a second row of smaller upper cabinets, you can eliminate empty soffit space and achieve a seamless, custom-built appearance that feels both modern and timeless.
Detailed Instructions
Materials
- Pre-assembled small upper cabinets (sized to fill gap to ceiling)
- Upper cabinet units (standard height)
- Forest green paint (satin or semi-gloss finish)
- Clean white paint (satin or semi-gloss finish)
- Gold bar cabinet pulls and knobs
- Crown molding trim
- Drill and driver set
- Cabinet screws and shims
- Clamps
- Stud finder
- Laser level
- Wood filler and sandpaper
- Caulk and caulk gun
Step 1: Preparation and Base Installation
-
Measure vertical space:
Begin by measuring the exact distance from the top of your existing or planned standard upper cabinets to the ceiling. This crucial measurement determines the height of the second row of ‘stacker’ cabinets needed to fill the former soffit space. -
Locate and mark studs:
Use a stud finder to map out the wall studs across the entire installation area. I find it helpful to mark these lines clearly with painter’s tape or a pencil so they remain visible as you lift cabinets into place. -
Install the main upper row:
Hang the standard-height upper cabinets first. Use a laser level to ensure they are perfectly horizontal, securing them into the studs with cabinetry screws. Do not tighten fully until you’ve checked for plumb and square. -
Level and shim:
Check the cabinets for plumb (vertical alignment). Insert shims behind the cabinets where necessary to make sure the face frames are perfectly flat and aligned with one another before tightening the mounting screws.
Step 2: Stacking the Second Row
-
Prepare the stacker cabinets:
Remove the doors from your smaller, second-row cabinets to make them lighter and easier to maneuver. Pre-drill holes through the bottom of these small cabinets where they will attach to the tops of the main row. -
Hoist and position:
Lift the first small cabinet onto the corresponding main cabinet below. Align the face frames perfectly so they are flush. Use clamps to hold the two units tightly together while you work. -
Secure vertically:
Drive screws down through the bottom of the stacker cabinet into the top frame of the lower cabinet. This connects the two units into what looks like a single, tall structure. -
Anchor to the wall:
Once connected to the cabinet below, secure the stacker cabinet to the wall studs using cabinet screws. Repeat this process for the entire run of upper cabinets. -
Connect face frames:
Drill pilot holes through the side stiles of neighboring face frames and screw them together. This pulls the cabinets tight against each other, minimizing gaps and creating a unified facade.
Use Glass for Light
Swap solid doors on the top ‘stacker’ row for glass-front doors. Interior puck lights inside these cabinets create an airy, glowing effect that draws the eye upward.
Step 3: Finishing Details
-
Install crown molding:
Measure and cut crown molding to fit the top edge where the stacker cabinets meet the ceiling. This acts as the final visual bridge, hiding any slight unevenness in ceiling height. -
Fill and sand:
Use wood filler to cover all screw holes and visible seams between the stacked units. Once dry, sand these areas smooth so the transition between the upper and lower blocks becomes invisible. -
Caulk the edges:
Run a thin bead of caulk along the crown molding at the ceiling line and any gaps between the cabinet sides and the walls for a professional, airtight seal. -
Paint the uppers white:
Apply a clean white paint to the entire upper assembly—both heavy and light cabinets—as well as the crown molding. This unifies the separate boxes into one seamless white column. -
Paint lower cabinets green:
For the base cabinets, apply a rich forest green paint. This grounding color adds contrast and prevents the room from feeling too sterile, anchoring the design. -
Add hardware:
Drill templates for your hardware. Install long gold bar pulls on the larger doors and smaller matching gold knobs or pulls on the small upper doors to emphasize the vertical scale.
Seamless Joinery
For a truly custom look, fill the horizontal seam between the two stacked cabinets with Bondo before painting. It hides the join better than wood filler.
Step back and admire how this stacked approach instantly elevates the grandeur of your kitchen space
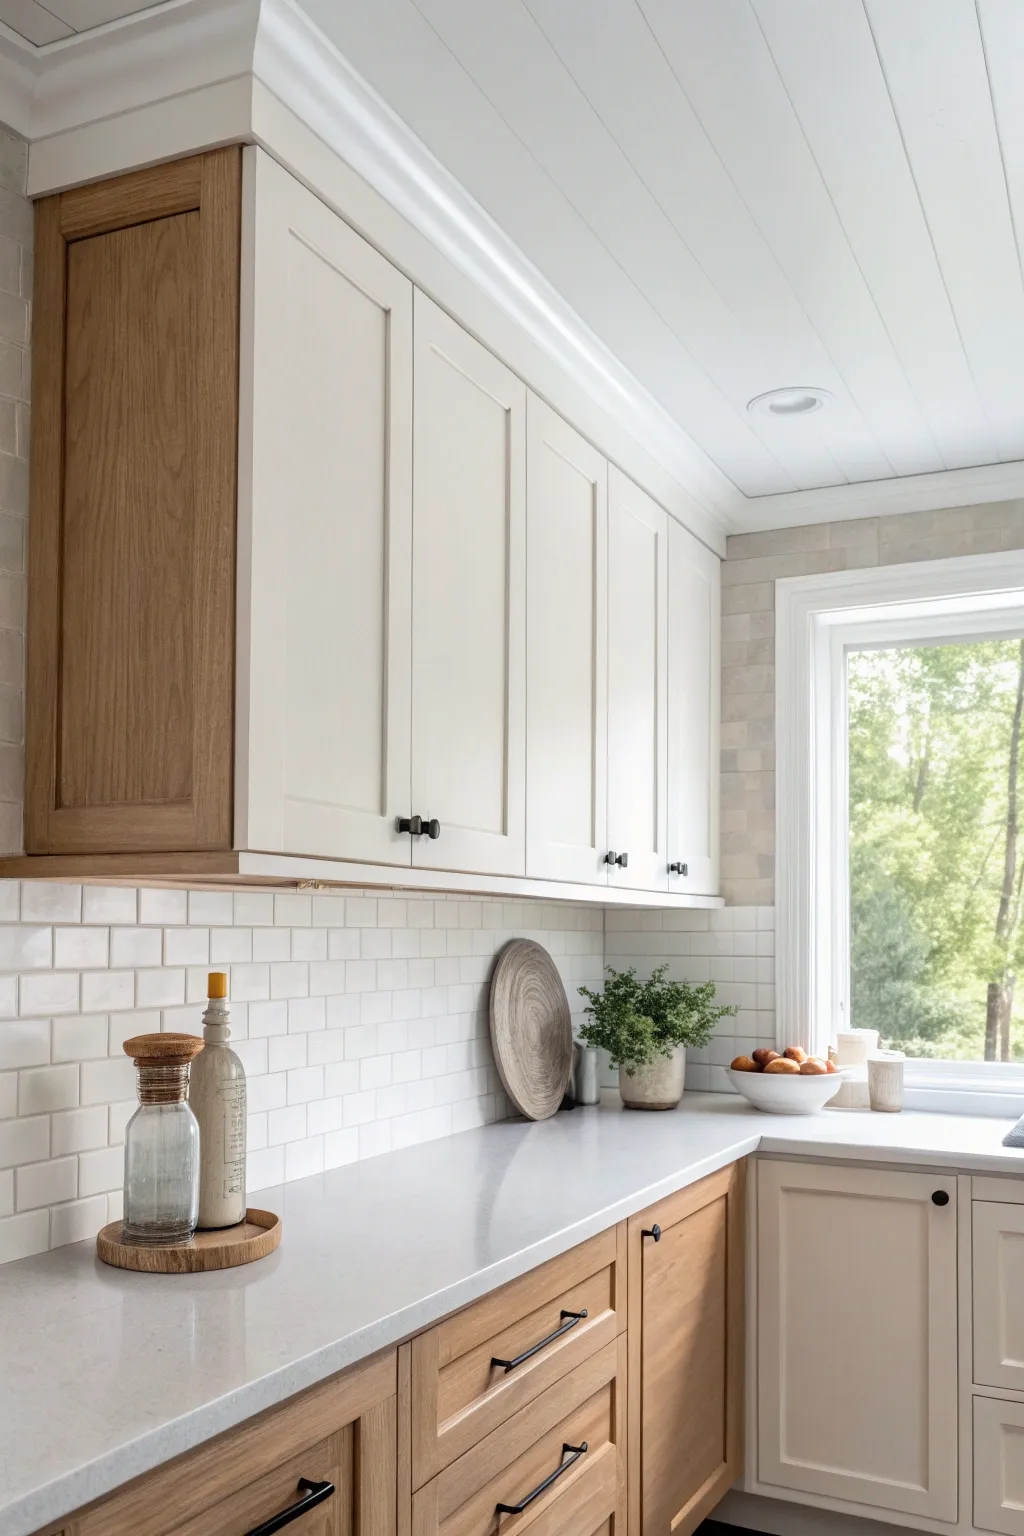
Try Glass-Front Uppers Under the Soffit
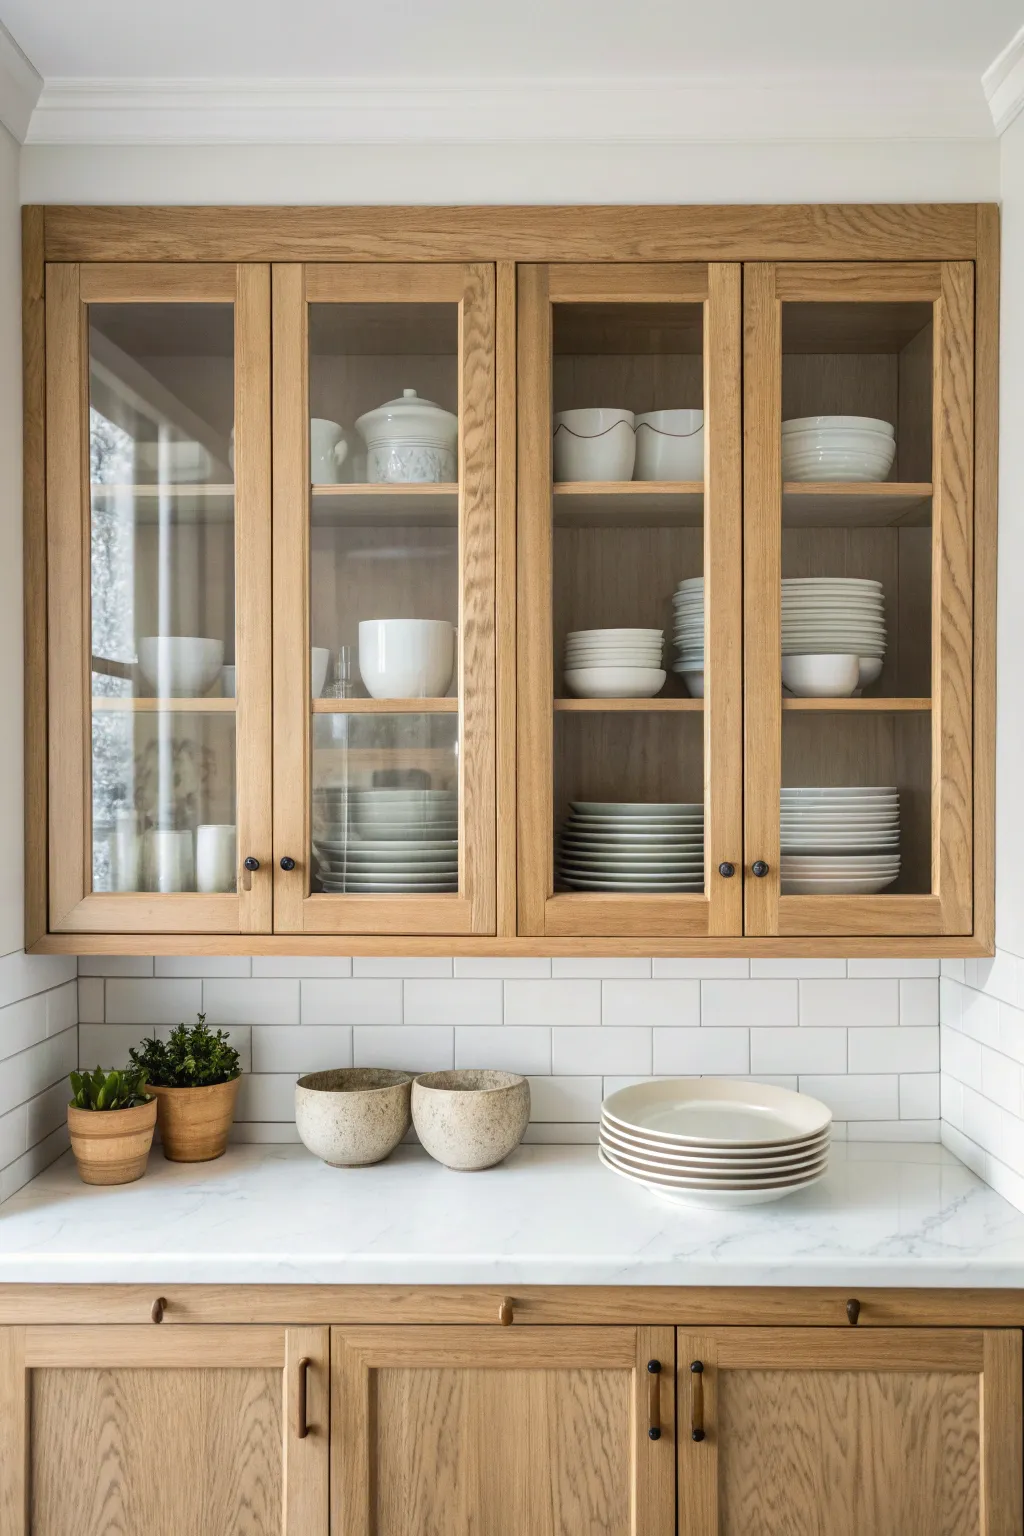
Recreate this timeless kitchen vignette by building and installing custom glass-front upper cabinets beneath a soffit, paired with warm wood tones and organized ceramics. This project focuses on precise cabinetry installation and thoughtful styling to achieve a seamless, built-in look.
Step-by-Step
Materials
- Pre-assembled oak upper cabinets (glass-front)
- Oak base cabinets
- Cabinet filler strips
- Screws (cabinet mounting)
- Power drill and driver bits
- Level (4-foot and torpedo)
- Shims
- Clamps
- White marble or quartz countertop slab
- White subway tiles
- Tile adhesive and grout
- Cabinet hardware (knobs/pulls)
- Stud finder
Step 1: Base Cabinet Installation
-
Prep the layout:
Begin by marking the stud locations on the wall where your base cabinets will sit. Use a stud finder and a pencil to draw vertical lines to guide your screw placement later. -
Level the floor:
Find the highest point on your floor using a long level. This high point will dictate where the cabinets sit; you will shim up from the lower points to match this level. -
Set the first cabinet:
Place your first oak base cabinet in position. Check for level both front-to-back and side-to-side. Insert shims underneath the base until the bubble is perfectly centered. -
Secure to wall:
Once level, drive heavy-duty cabinet screws through the back hanging rail of the cabinet into the wall studs you marked earlier. Do not fully tighten until adjacent cabinets are aligned. -
Connect cabinets:
Position the next base unit. Clamp the face frames of the two cabinets together tightly so they are flush. Drill pilot holes through the side of the face frame and screw them together.
Uneven Walls?
If your walls bow, shimming behind the cabinet is essential. Don’t force the cabinet back to the wall or you’ll rack the frame, causing doors to misalign.
Step 2: Installing the Countertop & Backsplash
-
Install the countertop:
Apply a bead of silicone adhesive to the top edges of your base cabinets. Carefully lower your marble or quartz slab onto the cabinets. Verify it is level and overhangs evenly. -
Tiling prep:
Protect your new countertop with cardboard or a drop cloth. Draw a level reference line on the wall just above the countertop to ensure your first row of tiles is straight. -
Apply subway tile:
Spread tile adhesive on the wall using a notched trowel. Press your white subway tiles into place, using spacers to maintain consistent gap lines. Work your way up to where the bottom of the upper cabinets will be. -
Grout lines:
After the adhesive has set (usually 24 hours), apply white grout into the gaps using a rubber float. Wipe away excess haze with a damp sponge as you go.
Step 3: Hanging the Glass Uppers
-
Mark hanging height:
To get that snug ‘under the soffit’ look, measure down from the ceiling or soffit to determine exactly where the top of your cabinet should land. Install a temporary ledger board on the wall to support the heavy cabinets during installation. -
Lift and secure:
With a helper, lift the oak glass-front upper cabinet onto the ledger board. Check for plumb and level. Drive screws through the back rail into the wall studs. -
Install filler strips:
If there are gaps between the cabinet and the wall or soffit, measure and cut oak filler strips. I typically scribe these to match any irregularities in the wall for a perfect fit. -
Refine the doors:
Adjust the cabinet door hinges so the gaps between doors are even and the lines are straight. This is crucial for glass-front cabinets where alignment is very visible. -
Add hardware:
Mark the drill locations for your knobs. Use a jig to ensure consistent placement on every door. Drill holes and attach the dark bronze knobs for contrast.
Scribing Tip
Use a compass to transfer the wall’s unique profile onto your filler strip. Cut along this traced line for a customized fit that eliminates unsightly gaps.
Step 4: Final Styling
-
Clean glass:
Thoroughly clean the glass panes inside and out to remove dust and fingerprints from installation. -
Arrange ceramics:
Stack white plates and bowls inside the cabinets. Group items by height and size to create a balanced, curated appearance visible through the glass. -
Countertop decor:
Place a few textured stone bowls and small potted greenery on the countertop to add warmth and life to the composition.
Enjoy the organized beauty of your new custom cabinetry setup

PENCIL GUIDE
Understanding Pencil Grades from H to B
From first sketch to finished drawing — learn pencil grades, line control, and shading techniques.
Explore the Full Guide
Turn the Soffit Into a Lighting Bulkhead
Transform an awkward ceiling soffit into a sleek, modern architectural feature by integrating recessed lighting directly into the structure. This project creates a clean, minimalist look that washes your upper cabinets with warm, purposeful light while hiding essential wiring.
How-To Guide
Materials
- 2×4 framing lumber
- 1/2-inch drywall sheets
- Drywall screws
- Joint compound
- Drywall tape
- Recessed lighting cans (IC-rated if near insulation)
- LED trim kits (warm white, 2700K-3000K)
- 14/2 Romex electrical wire
- Drill with hole saw attachment
- Stud finder
- Level
- Wire strippers
- Sanding block
- Primer and ceiling paint
Step 1: Planning and Framing
-
Map out light placement:
Before minimal demolition, determine exactly where your lights need to sit. Measure the width of your upper cabinets and aim to center each light above a cabinet door section for balanced illumination. -
Assess existing soffit:
Check the existing soffit structure with a stud finder to locate framing members. Ensure there is enough vertical clearance inside the soffit to house the recessed lighting cans. -
Build the bulkhead frame:
If building from scratch or extending an existing soffit, construct a ladder frame using 2×4 lumber. Secure the top plate to the ceiling joists and the back plate to the wall studs, ensuring everything is perfectly level. -
Run electrical wiring:
With the power off at the breaker, run your 14/2 Romex cable from the switch box to the first light location, leaving a generous loop of wire at each subsequent light position.
Dimmer Switch Tip
Install a dimmer switch for your new bulkhead lights. Being able to lower the intensity creates varying moods, from bright cooking prep to soft evening ambiance.
Step 2: Drywall and Installation
-
Install drywall sheets:
Cut pieces of 1/2-inch drywall to fit the face and underside of your bulkhead frame. Screw them into place, sinking the screw heads slightly below the surface without breaking the paper. -
Mark light centers:
Once the drywall is up, transfer your previously measured light locations onto the new drywall surface. Double-check these measurements to ensure they form a straight line parallel to the cabinets. -
Drill lighting holes:
Use a hole saw attachment sized specifically for your recessed cans (usually 4 or 6 inches). Carefully drill through the drywall at your marked center points. -
Tape and mud joints:
Apply mesh or paper tape to all seams and corners. Spread a layer of joint compound over the tape and screw indentations, feathering the edges to blend with the surrounding wall. -
Sand and smooth:
Allow the compound to dry completely, then sand it smooth. I like to run my hand over the joints to feel for imperfections that my eyes might miss, reapplying a thin skim coat if necessary.
Level Up: Smart Control
Use smart Wi-Fi enabled bulbs or a smart switch. You can then group the bulkhead lights with the under-cabinet LEDs to control the entire kitchen scene with one voice command.
Step 3: Finishing Touches
-
Prime the surface:
Apply a high-quality drywall primer to the entire bulkhead. This seals the fresh compound and ensures your topcoat will have an even sheen. -
Paint to match:
Roll on two coats of ceiling paint. Using a matte white finish helps the bulkhead blend seamlessly into the ceiling, making the lighting the star rather than the structure. -
Wire the housings:
Pull the electrical wire through the cut holes. Strip the ends and connect them to the recessed housing terminals—black to black, white to white, and ground to ground. -
Insert housings:
Push the housing cans up into the holes. specialized clips inside the housing will snap down onto the drywall to hold the unit firmly in place. -
Install LED trims:
Attach your LED trim kits to the housings. Most modern kits use torsion springs that squeeze together and slot into brackets inside the can, pulling the trim tight against the finished ceiling. -
Adding under-cabinet strip:
For the layered light effect seen in the photo, install a separate LED strip channel along the bottom of the upper cabinets to complement the overhead bulkhead lights.
Enjoy the sleek, integrated look of your new lighting feature as it brightens your workspace.
Hang Pendants From the Soffit Edge
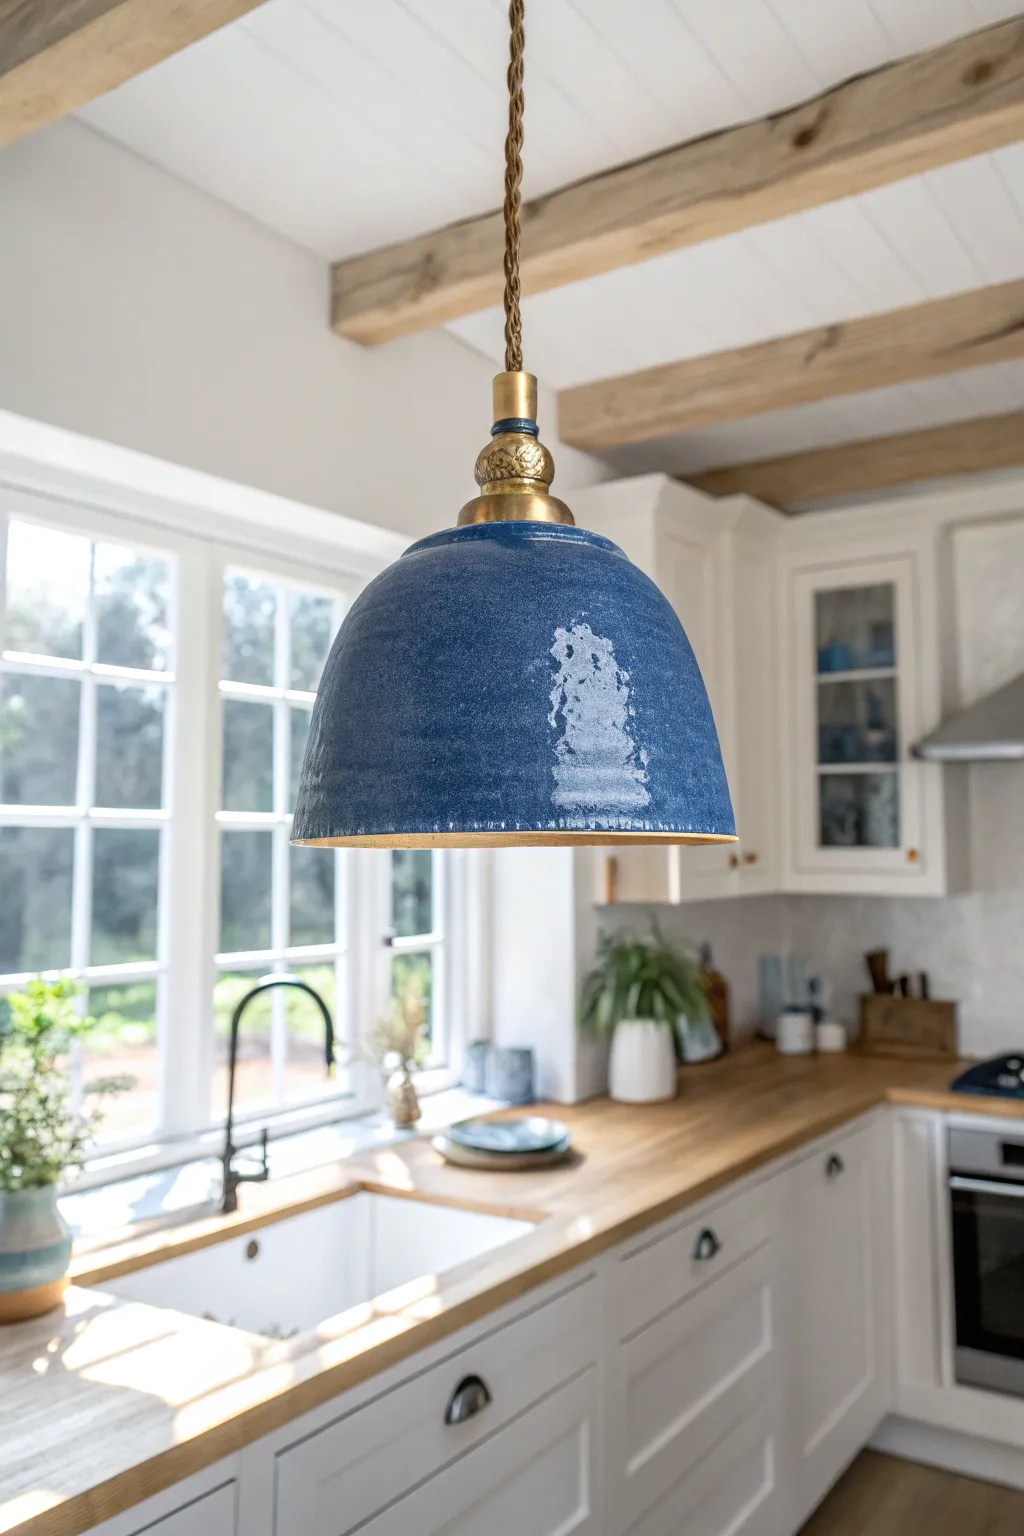
Transform a plain, inexpensive dome light into a stunning, hand-thrown pottery look-alike with this clever painting technique. The rich indigo hue combined with a textured, distressed finish creates a high-end artisanal focal point for your kitchen.
Step-by-Step Guide
Materials
- Smooth metal or plastic dome pendant shade
- Sanding block (medium grit)
- Primer spray paint (suitable for metal/plastic)
- Texture spray paint (stone or terracotta effect)
- Deep indigo/navy blue acrylic craft paint
- White or light grey chalk paint
- Gold leaf Rub ‘n Buff or metallic gold paint
- Clear matte sealer spray
- Sea sponge
- Fine-grit sandpaper
- Painters tape
- Clean rags
Step 1: Preparation & Base Texture
-
Disassemble the fixture:
Before starting, carefully remove the shade from the electrical cord and socket. If the hardware at the top (the cap) is attached, remove it or tape it off meticulously with painter’s tape to protect the brass finish. -
Scuff the surface:
Take your sanding block and thoroughly scuff the exterior of the shade. This is crucial for adhesion, especially if your starting shade has a glossy factory finish. Wipe away all dust with a damp rag. -
Prime the shade:
Apply a coat of primer spray paint to the exterior. Use even, sweeping motions to avoid drips. Let this dry completely according to the can’s instructions. -
Add the texture layer:
To mimic the feel of clay, spray the shade with a stone or terracotta texture spray. You don’t need a heavy coat—just enough to break up the smooth manufactured surface. Allow this to cure fully, usually overnight.
Paint Peeling?
If the paint scratches off easily, the surface wasn’t prepped enough. Lightly sand the peeling area, wipe clean with rubbing alcohol, re-prime, and then repaint that section.
Step 2: Creating the Glazed Look
-
Apply the base color:
Mix your indigo acrylic paint with a tiny drop of water to improve flow. Paint the entire exterior of the shade. The texture underneath will start to grab the paint in interesting ways. -
Add a second coat:
Once the first coat is dry to the touch, apply a second coat of blue to ensure rich, opaque coverage. I find cross-hatching your brushstrokes helps create a more organic, hand-painted vibe. -
Create the distressed patch:
Dip a dampened sea sponge into a small amount of white or light grey chalk paint. Blot most of it off onto a paper towel until the sponge is almost dry. -
Stipple the detail:
Gently dab the sponge onto one side of the shade to create that concentrated, speckled ‘worn’ area seen in the photo. Keep the edges of this patch soft and irregular. -
Soften the transition:
While the white paint is still slightly tacky, use a clean, dry brush to feather out the edges of the white patch, blending it slightly into the blue backdrop so it looks like a natural glaze imperfection rather than a stamp. -
Overall distressing:
Using extremely fine sandpaper, very lightly pass over the entire blue surface. This will reveal tiny peaks of the texture underneath, enhancing the ceramic illusion.
Pro Tip: Depth of Color
Mix a tiny bit of plaster of Paris or baking soda into your blue acrylic paint. It thickens the paint for a true ceramic glaze texture without needing the spray base.
Step 3: Finishing Touches
-
Seal the paint:
Protect your hard work with two light coats of clear matte sealer spray. This locks in the chalky finish and protects the paint from kitchen grease. -
Enhance the rim:
For that exposed clay edge look, use your finger or a small brush to apply gold Rub ‘n Buff or metallic paint along the very bottom rim of the shade. -
Detail the hardware:
If your original hardware (the cap connecting the cord) isn’t already brass, paint it gold now to match the rim. Let everything cure for at least 24 hours. -
Reassemble:
Remove any painter’s tape and reattach the shade to your light kit. Ensure the bulb is appropriate for the shade’s material before switching it on.
Hang your new pendant light and enjoy the warmth of custom pottery without the heavy price tag


Wrap the Soffit in Wood for Warmth
Transform a plain kitchen soffit into a striking architectural statement by extending warm oak paneling from the upper cabinets across the ceiling. This project creates a seamless canopy effect that draws the eye upward and adds sophisticated warmth to modern, minimalist spaces.
How-To Guide
Materials
- White oak veneer plywood (3/4 inch)
- White oak solid wood slats (1×2 inch)
- Construction adhesive (Liquid Nails or simliar)
- Finish nails (18 gauge) and brad nailer
- Table saw or circular saw with edge guide
- Miter saw
- Laser level
- Stud finder
- Wood stain (natural/matte)
- Polyurethane sealer (matte)
- Jigsaw (for light cutouts)
- Fine grit sandpaper (220 grit)
- Tape measure
- Pencil
Step 1: Preparation & Soffit Cladding
-
Measure twice:
Before buying materials, calculate the exact square footage of your soffit face, underside, and the ceiling area you plan to cover. I like to add about 15% extra for cuts and waste. -
Prep the surface:
Ensure the existing drywall on the soffit and ceiling is clean and flat. Remove any existing molding or trim. Use a stud finder to locate and mark all ceiling joists and wall studs with a pencil; these marks are crucial for securing the heavier elements later. -
Cut soffit panels:
Rip your 3/4-inch white oak veneer plywood into strips that match the height of your soffit face. Measure the underside depth and rip strips for that as well. If your soffit is wider than 8 feet, plan your seams to align with where the vertical cabinet lines will visually fall. -
Attach the face panels:
Apply construction adhesive to the back of the face panel. Press it firm against the soffit drywall and secure it with finish nails into the studs you marked earlier. Keep the bottom edge perfectly flush with the bottom of the soffit structure. -
Clad the underside:
Install the plywood strip to the underside of the soffit using the same adhesive and nail method. Ensure a tight butt joint where it meets the face panel; sand this corner slightly to ensure it feels smooth to the touch. -
Install the dropped edge:
To create the illusion of a thicker, solid canopy like in the photo, rip a 4- to 6-inch strip of oak plywood. Attach this vertically to the bottom front edge of the soffit, extending downward. This acts as a valance that hides under-cabinet lighting and visually connects the soffit to the cabinetry.
Pro Tip: Hidden Fastening
To hide nail holes in the ceiling slats, shoot your brad nails sideways through the slat tongue or side (blind nailing) where possible, or use adhesive heavily so fewer nails are needed.
Step 2: Ceiling Slat Installation
-
Establish the centerline:
Use a laser level to project a straight line across your ceiling perpendicular to the soffit. This ensures your wood slats will run perfectly straight, even if the walls aren’t perfectly square. -
Prepare the slats:
Cut your 1×2 solid white oak slats to length. If your ceiling span is longer than your lumber, cut them at 45-degree angles (scarf joints) for near-invisible seams. -
Cut light openings:
Measure exactly where your recessed can lights are located. Transfer these measurements to the corresponding slats. Use a jigsaw to carefully cut semi-circles or notches out of the slats so they fit snugly around the light fixtures. -
Install the first slat:
Apply adhesive to the back of your first slat and press it against the ceiling, aligning it strictly with your laser line. Shoot brad nails through the slat into the ceiling joists. This first piece sets the trajectory for the whole ceiling, so take your time getting it straight. -
Spacing the slats:
Use a scrap piece of wood cut to your desired gap width (about 1/2 to 3/4 inch) as a spacer block. Place the spacer against the installed slat, press the next slat against the spacer, and nail it into place. Repeat this process across the ceiling. -
Navigate the transition:
When you reach the soffit, continue the slats right up to the plywood cladding. For a seamless look, you can run shorter slat pieces onto the underside of the soffit if you want the texture to continue, though the inspiration image keeps the soffit smooth for contrast.
Level Up: Integrated LEDs
Route a channel into the back of a few slats before installation to embed LED strip lighting. This creates a soft, ambient glow between the wood beams without visible fixtures.
Step 3: Finishing Touches
-
Fill and sand:
Use a wood filler that matches your oak species to fill all nail holes. Once dry, sand the filler and any rough edges with 220-grit sandpaper. Vacuum all dust from the gaps between slats—compressed air works wonders here. -
Apply the finish:
Stir your matte polyurethane sealer gently to avoid bubbles. Apply a thin coat using a high-quality brush or foam applicator, working in the direction of the grain. I find that a matte finish preserves the natural, raw look of the wood best. -
Sand between coats:
Once the first coat is completely dry, lightly scuff sand the surface with fine sandpaper to knock down any raised grain. Wipe clean with a tack cloth. -
Final coat:
Apply a second and final coat of polyurethane. Allow this to cure fully according to the manufacturer’s instructions before reinstalling any light trims or turning on heat sources near the ceiling.
This architectural feature will completely redefine the vertical space of your kitchen, bringing warmth and clean lines to your daily view
Treat the Soffit Face Like a Mini Mural
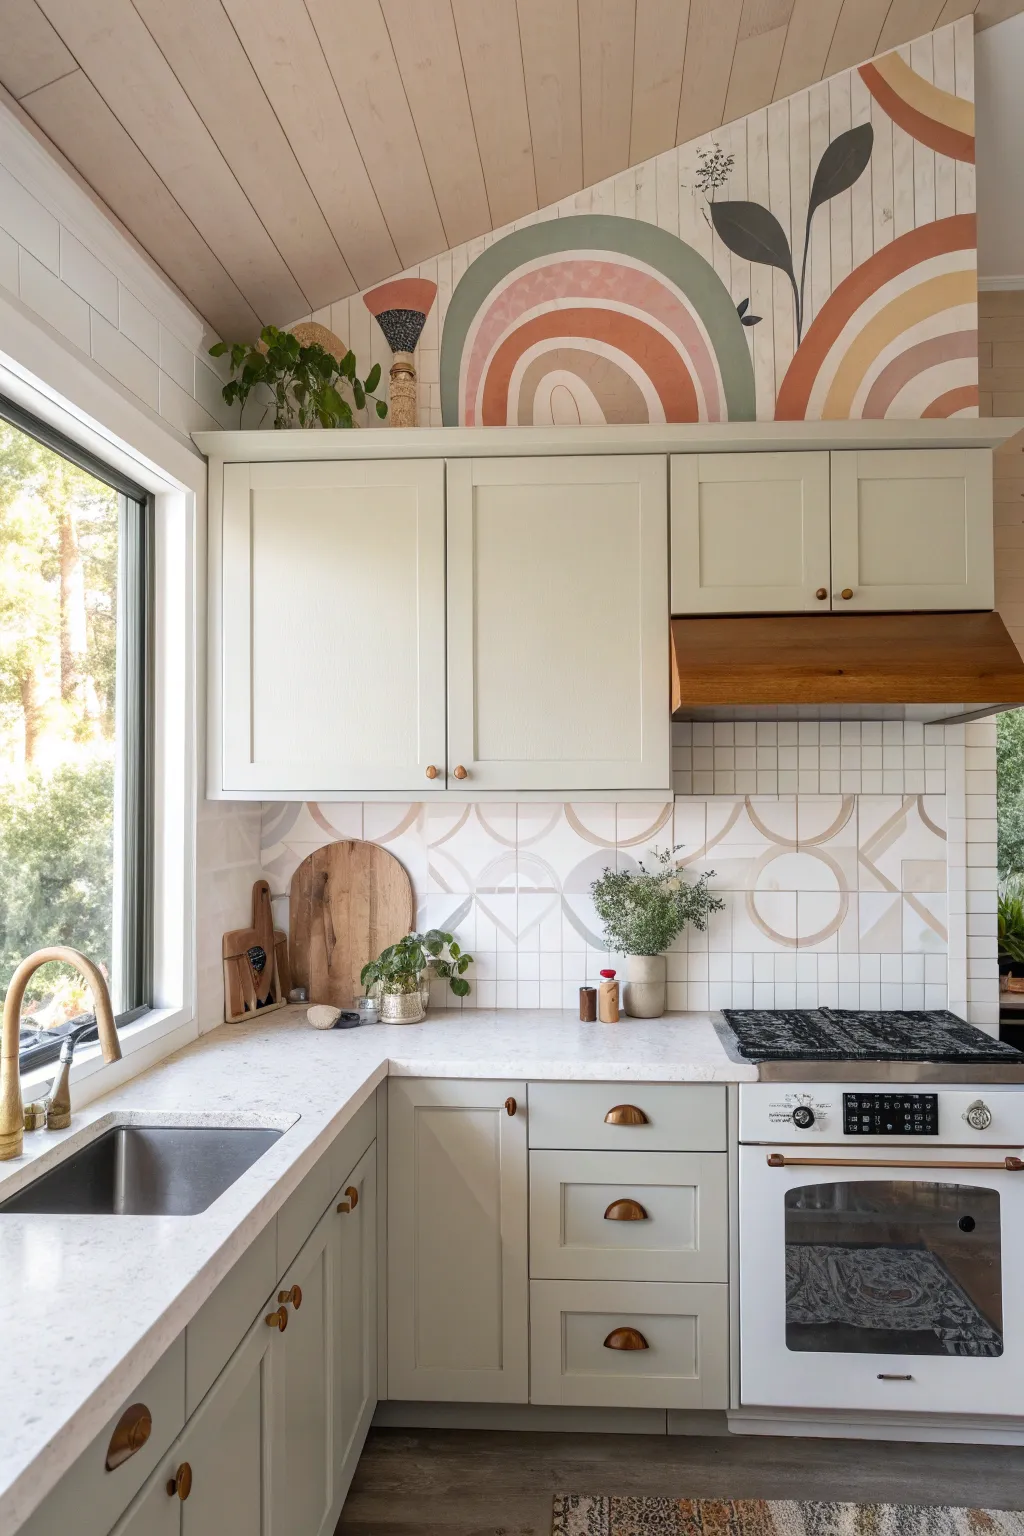
Transform the often-overlooked space above your kitchen cabinets into a stunning focal point with this earthy, bohemian-inspired mural. The design features soft, muted arches and botanical silhouettes painted directly onto a shiplap-style backdrop for texture and charm.
How-To Guide
Materials
- Interior latex paint (Eggshell finish: Cream/White base)
- Acrylic craft paints or sample pots (Terracotta, Sage Green, Mustard Yellow, Dusty Rose, Charcoal/Black)
- Painter’s tape (1-inch and delicate surface)
- Pencil and eraser
- String and thumb tack (for creating compass)
- Angled sash brush (2-inch)
- Small round artist brushes (sizes 4 and 8)
- Flat artist brush (1-inch)
- Drop cloth
- Ladder or step stool
- Damp rag
Step 1: Prep and Base Coat
-
Clear the area:
Remove any decor from the top of the cabinets and cover your countertops and cabinet fronts with a drop cloth to protect them from drips. -
Clean the surface:
Wipe down the soffit area thoroughly with a damp rag and mild degreaser to remove kitchen grease and dust, ensuring proper paint adhesion. -
Tap off boundaries:
Apply painter’s tape along the ceiling line and the top edge of the cabinet crown molding to create crisp, professional edges. -
Apply the background:
Paint the entire soffit area with your cream or white base color. Since the surface in the image has vertical grooves (shiplap style), use the sash brush to get into the crevices first, then smooth out the flats. -
Let it cure:
Allow the base coat to dry completely, preferably overnight, before attempting to draw or paint the design over it.
Uneven Arches?
If your hand is shaky, don’t worry about perfect lines. The boho aesthetic embraces organic imperfections. You can also use a ‘dry brush’ technique on edges to make them look intentionally soft and distressed.
Step 2: Drafting the Design
-
Plan the layout:
Visualize where your main arches will go. In the inspiration image, a large sage green arch sits centrally, flanked by a smaller terracotta arch on the left and a large mustard one on the right. -
Mark anchor points:
Mark the center point for the base of each rainbow arch lightly with a pencil just above the cabinet molding. -
Create a string compass:
Tie a piece of string to a pencil. Measure the string to the desired radius of your largest specific arch band. -
Draw the curves:
Hold or tape the string end at your center point and swing the pencil to draw perfect semi-circles. Shorten the string incrementally to create the inner bands for each rainbow. -
Sketch botanical elements:
Freehand the organic shapes. Sketch a large stem rising between the central and right arches, and add a smaller abstract floral shape on the far left.
Level Up: Texture
Mix a small amount of baking soda into your acrylic craft paints before applying. This creates a chalky, plaster-like texture that adds incredible depth and an authentic vintage feel.
Step 3: painting the Mural
-
Paint the first arch:
Starting with the large central rainbow, use the 1-inch flat artist brush to fill in the outer band with sage green paint. Keep a steady hand to follow your pencil line. -
Add inner details:
Paint the inner bands of the central arch. Mix the dusty rose with a bit of white for a lighter tone to create the speckled pattern band, dabbing the brush to create texture. -
Paint the side arches:
Move to the right arch, filling the thick bands with mustard yellow and terracotta. Then paint the smaller left arch with similar warm tones to balance the composition. -
Refine the edges:
I like to go back with a small round brush to neaten up any wobbly edges on the curved bands once the main color is down. -
Paint the botanical black:
Using charcoal or black paint and a size 8 round brush, fill in the large stem and leaf silhouette. The contrast here is key, so ensure the paint is opaque. -
Add fine botanical details:
Switch to your smallest brush (size 4) to paint the delicate lines of the flower heads and the thin stems of the smaller plant on the left. -
Touch up the background:
Once the mural is dry, use your base cream color and a small brush to cover any visible pencil marks or clean up areas where the colors may have strayed. -
Remove tape:
Slowly peel off the painter’s tape at a 45-degree angle while the touch-ups are still slightly tacky to prevent peeling the film.
Step back and admire how this playful splash of color completely changes the personality of your kitchen space

Have a question or want to share your own experience? I'd love to hear from you in the comments below!