When I’m hunting for landscape picture ideas, I usually start close to home—because yards, patios, and garden paths are packed with shapes, textures, and light. Here are my favorite scene ideas to paint or draw when you want that satisfying mix of pretty and practical outdoor design.
Backyard Patio With Cozy Seating
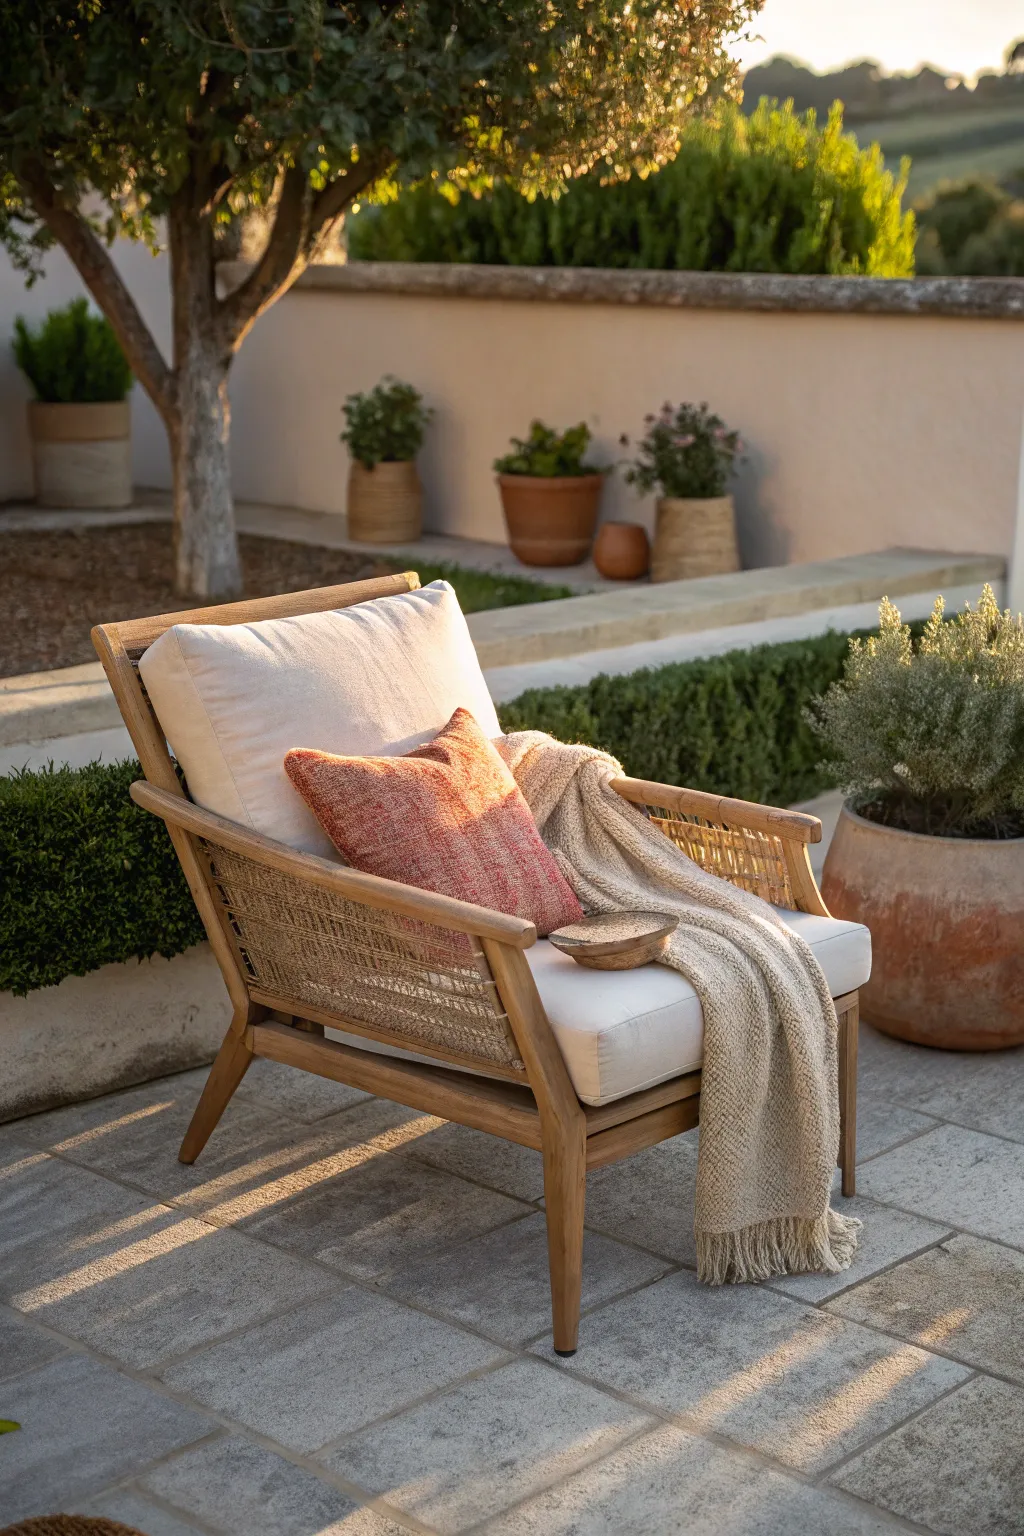
Capture the serene warmth of a backyard oasis with this photography tutorial, focusing on natural light and texture. You’ll learn how to compose a cozy outdoor vignette that balances golden hour illumination with inviting decor elements.
How-To Guide
Materials
- DSLR or Mirrorless Camera
- Prime lens (35mm or 50mm recommended)
- Tripod
- Reflector (gold/silver)
- Outdoor lounge chair (teak or wood)
- Cream linen cushions
- Textured throw blanket
- Accent pillow (terracotta/rust color)
- Potted plants (terracotta pots)
- Small wooden bowl
- Stone patio setting
Step 1: Staging the Scene
-
Location Scout:
Find a spot on a stone patio that receives dappled sunlight, ideally near a tree or low wall to add depth to the background. -
Furniture Placement:
Position your main subject, the wooden lounge chair, at a slight 45-degree angle to the camera. This creates a more dynamic composition than shooting it straight-on. -
Layering Textiles:
Place a large cream cushion on the seat and back. Drape a chunky knit throw blanket casually over the right armrest, letting it puddle slightly on the seat and hang down towards the patio stones. -
Adding the Pop of Color:
Nestle a rust-colored textured pillow against the cream back cushion. Angle it slightly so it looks lived-in rather than stiffly posed. -
Accessorizing:
Place a small wooden bowl atop the blanket on the seat for a touch of organic detail that invites the viewer into the scene. -
Background Elements:
Arrange potted plants in the background along the wall. Use terracotta pots to echo the color of the accent pillow, creating visual harmony.
Sunlight Tip
Use a white card or foam board to block direct beams hitting the white cushion if they are blowing out details.
Step 2: Managing Light
-
Timing is Everything:
Plan your shoot for ‘golden hour’—the hour just before sunset. You want the light to be warm, directional, and skimming across surfaces to highlight textures. -
Observer the Shadows:
Watch how the shadows from the tree or nearby foliage fall across the stone floor. Position the chair so distinct, long shadows cast by the legs lead the eye into the frame. -
Refining Contrast:
If the shadows on the front of the chair are too deep, I like to use a reflector on the shadow side to bounce a little light back onto the wood and wicker details.
Style Shift
Swap the rust pillow for navy blue and use a cool-toned filter for a fresh morning vibe instead of sunset.
Step 3: Composition & Capture
-
Camera Settings:
Set your aperture to around f/2.8 or f/4 to keep the chair sharp while softening the background plants and wall. -
Finding the Angle:
Shooting from a slightly low angle, about waist height, often makes furniture look more inviting and grand. Align your camera so the horizon line is straight. -
Checking the Frame:
Look through the viewfinder. Ensure the background plants aren’t ‘growing’ out of the chair directly; adjust your position slightly left or right to separate the elements. -
Focus Point:
Set your focus point on the texture of the rust pillow or the arm of the chair. These are the tactile elements you want the viewer to feel. -
Capture Variations:
Take several shots, adjusting the exposure slightly. Expose for the highlights on the white cushion so they don’t blow out and lose detail. -
Review and Adjust:
Check your images. If the blanket looks too messy, re-drape it. Small adjustments to the folds can make a huge difference creating that effortless look.
Step 4: Post-Processing
-
Warm Up:
In editing, slightly increase the white balance temperature to enhance the golden hour feel giving the stone warmth. -
Texture Boost:
Add a touch of clarity or structure to the area with the wicker and blanket to really make those weaves pop against the smoother stone.
With the right light and arrangement, you have preserved a perfect moment of backyard tranquility


Stone Steppers Set in Grass
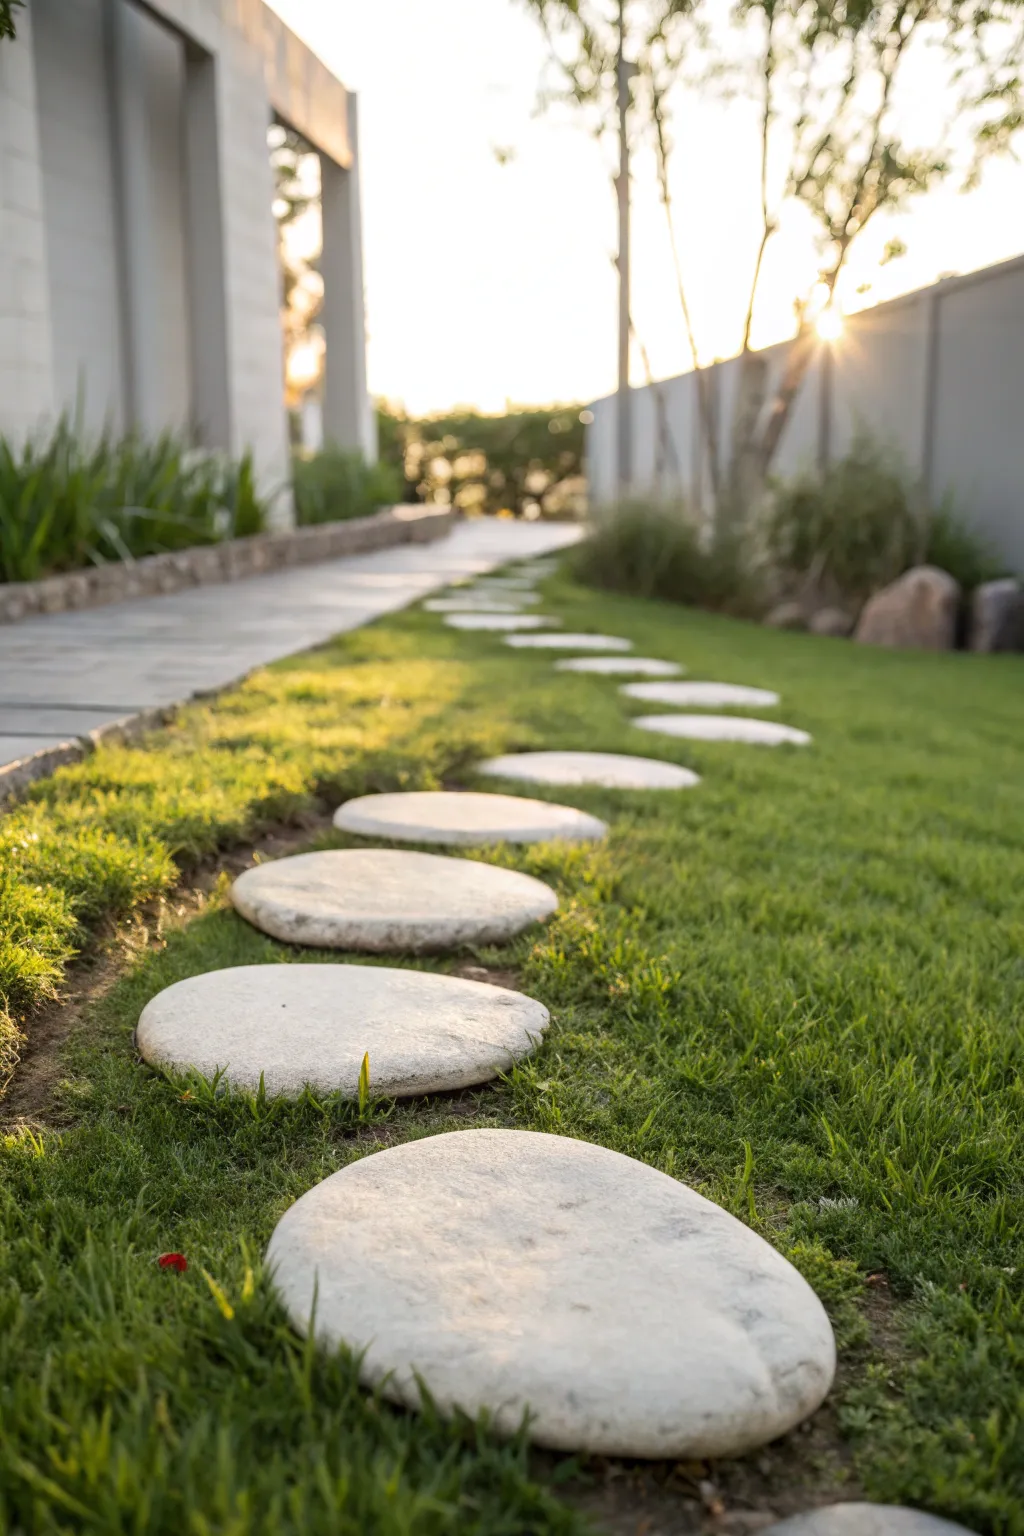
Bring structure and tranquility to your garden with this minimalist pathway project. By carefully setting smooth, oversized river stones directly into the turf, you create an inviting journey that blends seamlessly with the surrounding greenery.
Step-by-Step Guide
Materials
- Large, flat white river stones (approx. 18-24 inches diameter)
- Marking paint or flour
- Spade or edging shovel
- Hand trowel
- Sand (builders sand or paver sand)
- Rubber mallet
- Bubble level
- Grass seed (matching your lawn type)
- Topsoil
- Garden hose with spray nozzle
Step 1: Planning and Layout
-
Define the path:
Walk the intended route naturally to determine where your feet land comfortably. A gentle curve adds mystery and softness compared to a straight line. -
Space the stones:
Place your large river stones directly on top of the grass in a trial layout. Aim for a spacing of about 4 to 6 inches between each stone—close enough for easy stepping but wide enough for grass to grow between them. -
Check the stride:
Test the walkway yourself, adjusting stones slightly until the stride feels natural and ergonomic. I like to walk it back and forth a few times to ensure it works for different walking paces. -
Mark the outlines:
Once satisfied with the placement, use marking paint or a sprinkle of flour to trace the exact outline of each stone onto the grass. -
Remove the stones:
Set the stones aside, keeping them in order if they vary significantly in shape or size, so you know exactly which hole belongs to which stone.
Step 2: Excavation
-
Cut the sod:
Using a sharp spade or edging shovel, cut along the marked outlines. Try to keep your cuts clean and vertical to preserve the surrounding grass roots. -
Remove the turf:
Lift out the patch of sod. Dig down just deep enough so the hole is about 1 to 1.5 inches deeper than the thickness of your stone. -
Level the base:
Use a hand trowel to flatten the bottom of the hole. Remove any large rocks or roots that might cause the stone to wobble later. -
Add the sand bed:
Pour a layer of builder’s sand into the hole, approximately 1 inch thick. This sand bed provides stability and makes leveling much easier than working with just soil.
Mowing Strategy
Set stones slightly below the cut height of your lawnmower blades. This allows you to mow directly over them without stopping to trim edges.
Step 3: Setting the Stones
-
Place the stone:
Carefully lower the corresponding stone into its prepared hole. It should sit slightly above the soil line but flush with or just below the tips of the grass blades. -
Seat the stone:
Strike the stone firmly in the center and around the edges with a rubber mallet. This seats it into the sand bed and eliminates air pockets underneath. -
Check for wobble:
Step on the stone and rock your weight. If it moves, lift it up and adjust the sand underneath until it is completely stable. -
Level it out:
Place a bubble level across the surface. Ensure the stone is relatively flat, though a very slight slope away from the house or path center helps with water runoff. -
Backfill edges:
Mix a small amount of topsoil with grass seed. Pack this mixture tightly into the gap between the stone edge and the existing lawn. -
Repeat the process:
Continue down the line, excavating and setting one stone at a time to maintain your spacing accuracy. -
Water and settle:
Water the entire area gently with a spray nozzle. This helps settle the dirt around the stones and encourages the surrounding grass to recover from the stress of installation.
Glow Up
Install small solar spotlights near chosen stones or plant creeping thyme between steps for a fragrant, magical evening pathway.
Enjoy strolling down your new garden path as the grass grows thick and lush around the stones


Crushed Gravel Path With Borders
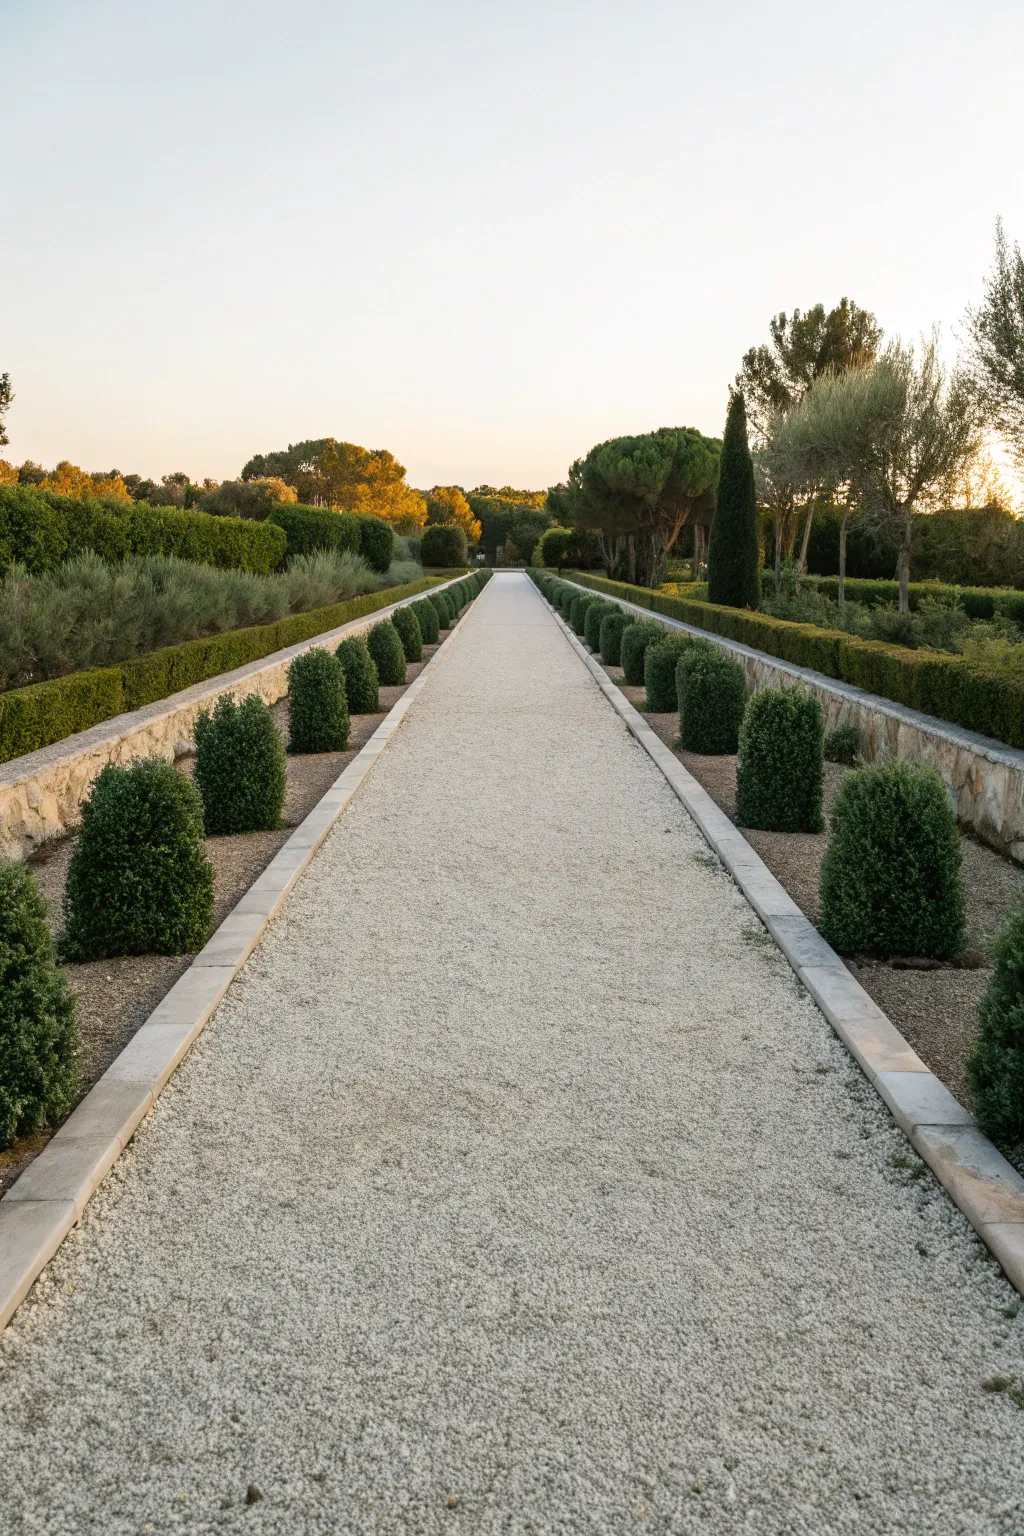
Create a sense of grandeur and perspective with this classic formal garden path design. This project focuses on clean lines, symmetrical planting, and the satisfying crunch of white gravel to transform a long stretch of yard into an elegant promenade.
Step-by-Step
Materials
- Crushed white gravel (approx. 3/8 inch or 10mm)
- Compacted road base or crushed stone for foundation
- Concrete curb stones or cut limestone edging
- Weed barrier landscape fabric
- Boxwood shrubs (Buxus) or similar compact evergreen
- Yew or Privet hedging plants for outer border
- Natural fieldstone or block for low retaining walls
- Masonry sand
- Shovel and spade
- String line and stakes
- Plate compactor
- Rubber mallet
- Trowel and gardening gloves
Step 1: Layout and Excavation
-
Define the Centerline:
Begin by establishing the exact center of your walkway. Run a long, taut string line from the starting point to the destination to ensure your path is perfectly straight, as symmetry is key to this look. -
Mark the Edges:
Measure outward from your center string to determine the path width—around 4 to 5 feet is comfortable for walking. Mark these outer edges with spray paint or additional string lines. -
Excavate the Path:
Dig out the soil between your markings to a depth of about 4-6 inches. Keep the bottom relatively flat but consider a very slight slope to the sides for drainage. -
Prepare the Base:
Fill the trench with 3-4 inches of road base material. Spread it evenly with a rake to create a solid foundation. -
Compact the Foundation:
Use a plate compactor to tamp down the road base firmly. This step prevents the finished path from becoming rutted or uneven over time.
Step 2: Edging and Walls
-
Install Curbing:
Place your concrete or limestone curb stones along the excavated edge. These should sit slightly proud of the ground level to contain the gravel. -
Set the Stones:
Use a rubber mallet to tap each curb stone into place, ensuring they are level with one another. I find it helpful to use a long level across multiple stones to check for dips. -
Backfill the Curbs:
Pack soil or sand tightly behind the curb stones on the planting bed side to lock them securely in place. -
Build Retaining Walls (Optional):
If your garden surrounds are higher than the path, construct low dry-stack walls using natural fieldstone parallel to your curbing, leaving a planting strip about 2-3 feet wide.
Weeds Breaking Through?
If stubborn weeds appear despite the fabric, spot treat immediately with a natural vinegar solution or pull them by hand after rain when the ground is soft.
Step 3: Planting the Borders
-
Space the Evergreens:
In the planting strip between the curb and the outer wall (or lawn), set out your rounded boxwood shrubs. Space them evenly—about 18-24 inches apart—to create a rhythmic pattern. -
Plant the Shrubs:
Dig individual holes for each shrub, incorporating some compost. Plant them at the same depth they were in their nursery pots and water them in well. -
Mulch the Beds:
Apply a layer of fine gravel or organic mulch around the base of the shrubs. This suppresses weeds and adds to the clean, manicured aesthetic. -
Outer Hedging:
Beyond the low wall or planting strip, plant a continuous row of taller hedging plants like Yew or Privet to frame the entire vista and create enclosure.
Add Lighting Drama
Install low-voltage uplights at the base of every third shrub. It creates a stunning rhythmic shadow effect down the path at night.
Step 4: Surfacing
-
Lay Landscape Fabric:
Roll out high-quality weed barrier fabric over your compacted base inside the path area. Overlap any seams by at least 6 inches. -
Spread the Gravel:
Pour the crushed white gravel onto the fabric. Aim for a depth of about 1.5 to 2 inches; any deeper and it becomes difficult to walk through. -
Rake Smooth:
Use a wide garden rake to spread the gravel evenly, bringing it flush with or just slightly below the top of your curb edging. -
Final Wash:
Gently spray the gravel with a hose to wash away stone dust and reveal the bright, crisp color of the stone.
Enjoy the peaceful symmetry of your new garden promenade as you take your evening stroll


Fire Pit Circle as a Focal Point
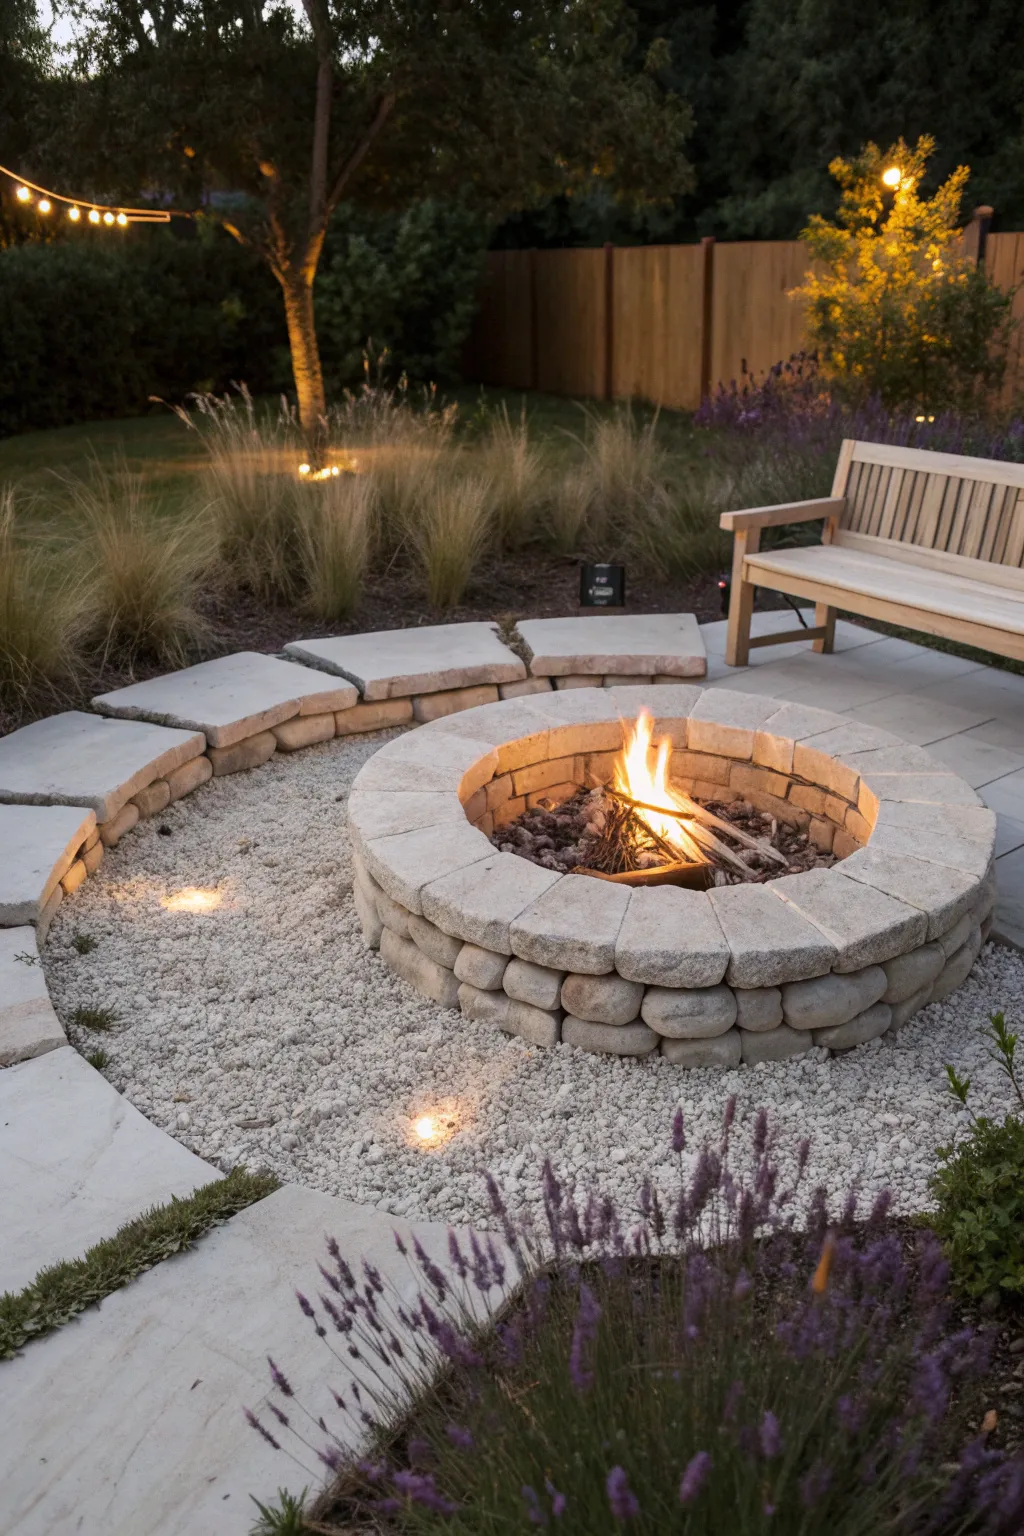
Transform your backyard into a cozy evening retreat with this circular stone fire pit design featuring integrated seating and ambient lighting. The layout uses natural textures like crushed stone and ornamental grasses to create a relaxing, organic focal point perfect for gathering.
Step-by-Step Guide
Materials
- Landscape marking paint or flour
- Shovel and spade
- Tamper tool
- Landscape fabric
- Compactable gravel base (crushed limestone)
- Sand (for leveling)
- Tumbled stone wall blocks (travertine or similar)
- Large flat capstones (for seating wall and fire pit)
- Crushed white granite or decorative gravel
- Fire ring insert (steel)
- Masonry adhesive
- Heat-resistant mortar (optional)
- Low-voltage landscape lighting kit (well lights)
- Lavender and ornamental grass plugs
Step 1: Site Prep and Layout
-
Mark the center:
Choose a level spot in your yard safe for fire. Drive a stake into the exact center of where you want your fire pit. -
Paint your circles:
Tie a string to the center stake. Create two circles: a smaller inner circle for the fire pit itself (usually 3-4 feet diameter) and a large outer circle for the gravel patio and retaining seating wall (roughly 12-14 feet diameter). Mark these lines with landscape paint. -
Excavate the area:
Remove the sod and soil within the large outer circle to a depth of about 4-6 inches. You want a flat, recessed area to build your foundation. -
Lay the base:
Widen the trench specifically under where the heavy stone walls will sit by another 2 inches deep. Pour in compactable gravel base, wet it slightly, and tamp it down firmly until it is rock hard and level.
Step 2: Building the Fire Pit
-
Position the first course:
Lay your first ring of tumbled stone blocks on the leveled base in the center. verify level front-to-back and side-to-side on every single stone. -
Install the fire ring:
Place your steel fire ring insert inside the stones to ensure the fit is correct before gluing anything down. -
Stack and secure:
Apply masonry adhesive to the tops of the first row. Stagger the second row of blocks so the vertical seams don’t line up, creating a stronger bond and better look. -
Cap the pit:
Place the wide, flat capstones on the final rim of the fire pit. Use heat-resistant mortar or adhesive here for extra safety. Let the overhang extend slightly inward over the fire ring.
Stone Selection Tip
Use tumbled pavers rather than cut stone for the pit walls. The rougher, rounded edges create that aged, organic look that blends better with gravel.
Step 3: The Perimeter and Patio
-
Construct the seating wall:
Following your outer circle guide, build the low retaining wall using larger rectangular stone blocks or slabs. This only needs to be 12-18 inches high to serve as casual seating. -
Install lighting wiring:
Before filling the patio floor, run your low-voltage wires. Position the well lights so they will sit flush with the final gravel level, aiming them to wash light over the gravel texture. -
Add landscape fabric:
Cover the exposed dirt floor of the patio circle with heavy-duty landscape fabric to prevent weeds from popping up through your stones later. -
Fill with decorative gravel:
Pour the crushed white granite or pea gravel into the patio ring. Spread it evenly with a rake until it meets the base of the fire pit and the seating wall, about 2-3 inches deep.
Enhance the Ambience
Bury the up-lights slightly deep in the gravel so the light source is hidden, and only the glow reflects off the white stones for a ‘moonlight’ effect.
Step 4: Planting and Finishing
-
Softening edges:
Dig holes immediately behind the low seating wall and plant ornamental grasses like Mexican Feather Grass. Their wispy texture contrasts beautifully with the heavy stone. -
Add color and scent:
Plant lavender groupings near the entrance of the circle or in foreground beds. The heat from the stones will help release their fragrance in the evening. -
Install string lights:
Hang bistro lights overhead, connecting from nearby trees or installed posts, to mirror the circular gathering space below. -
Final touches:
Place a teak or wooden bench on the outer edge for additional structured seating. Add logs to the pit ready for your first fire.
Now you have a stunning, permanent landscape feature ready for roasting marshmallows and late-night conversations
BRUSH GUIDE
The Right Brush for Every Stroke
From clean lines to bold texture — master brush choice, stroke control, and essential techniques.
Explore the Full Guide
Narrow Side Yard With Linear Rhythm
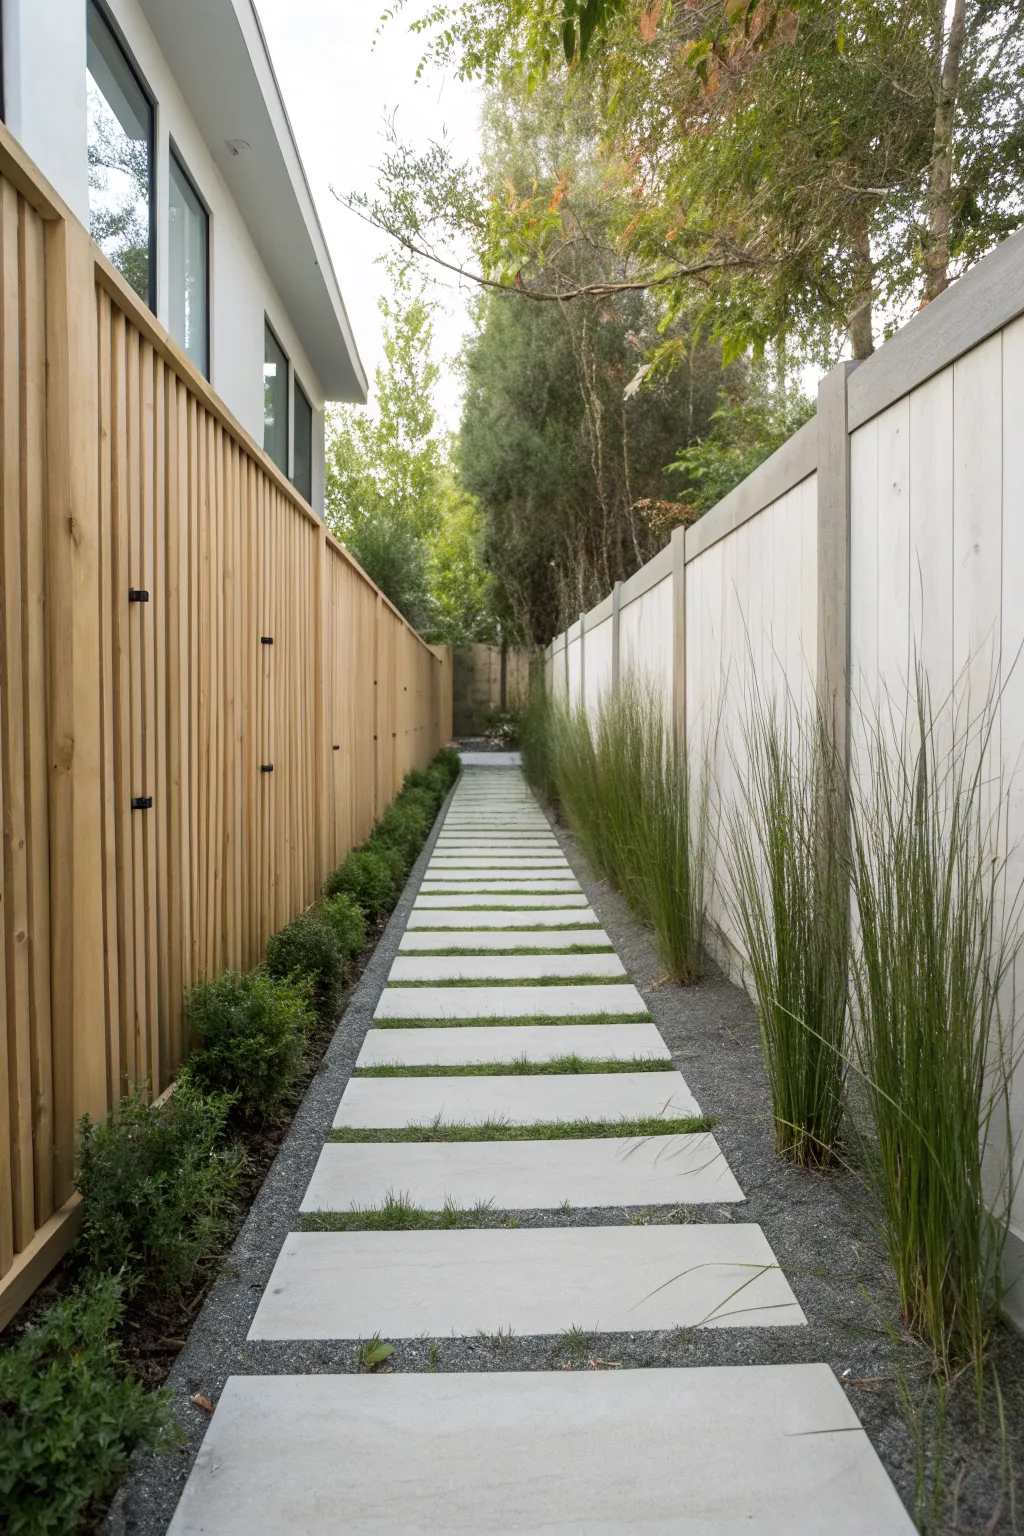
Transform a narrow, overlooked side yard into a striking architectural feature with this rhythmic pathway design. This landscape project balances warm wood tones and cool concrete pavers to create a functional corridor that feels spacious and modern.
How-To Guide
Materials
- Large rectangular concrete pavers (approx. 24×48 inches)
- Crushed gray gravel or decomposed granite (3/8 minus)
- Landscape fabric
- Metal edging or bender board
- Cedar or redwood fencing slats (vertical installation)
- White exterior fence paint or stain
- Ornamental grasses (like Feather Reed Grass)
- Low-growing boxwood shrubs or similar evergreens
- Sod or grass seed (optional for between pavers)
- Shovel and rake
- Tamper or plate compactor
- Level and string line
Step 1: Site Prep & Hardscaping
-
Clear and level the corridor:
Begin by removing existing vegetation, old rocks, or debris from the side yard. Excavate the soil down about 4-6 inches across the entire pathway area to accommodate the base layers. -
Install weed barrier:
Roll out high-quality landscape fabric over the exposed soil. This is crucial for preventing weeds from poking through your gravel and keeps your pavers from sinking into mud over time. -
Lay the base layer:
Spread a 2-3 inch layer of crushed gravel or road base. Use a tamper or rent a plate compactor to create a rock-solid, level surface; a firm foundation prevents wobbly pavers later. -
Set the string lines:
Run a mason’s line down the center of the path to ensure your pavers stay perfectly aligned. Symmetry is key to this look, so take your time measuring from the side fences. -
Position the pavers:
Place your large rectangular pavers along the string line. Space them evenly, leaving about 4-6 inches of gaps between them. I find using a scrap piece of 4×4 lumber as a spacer helps keep the gaps consistent. -
Level individual stones:
Check each paver with a spirit level both horizontally and vertically. Add or remove small amounts of sand or stone dust underneath to adjust until they sit flat and stable.
Step 2: Vertical Elements & Fencing
-
Install the warm wood fence:
On the left side, install vertical cedar or redwood slats. Secure them to horizontal rails, keeping the spacing tight for privacy but allowing for subtle shadow play. -
Stain or seal the wood:
Apply a clear sealant or a light semi-transparent stain to the wood fence to preserve its natural golden color and protect it from weathering. -
Update the opposing fence:
On the right side, paint the existing fence or install new panels in a clean, creamy white. This contrast between the warm wood and cool white opens up the narrow space visually. -
Add dark accents:
Install black matte hardware or brackets on the wood fence if visible, or paint any fence posts a dark grey/taupe to create a structural rhythm that separates the white panels.
Paver Wobble?
If a paver rocks when you step on it, lift it up and add a handful of sand to the low corner. Re-position and tap it down with a rubber mallet until solid.
Step 3: Softscaping & Finishing
-
Fill the paver gaps:
Fill the spaces between the pavers with soil if you plan to grow grass, or fill them halfway with gravel for a lower-maintenance look. In the photo, grass sits between pavers, so pack soil tightly there. -
Create the gravel beds:
Fill the areas on the far left and right of the paver path with dark grey crushed gravel. This creates a clean drainage channel and defines the planting beds. -
Plant linear shrubs:
Along the wooden fence, dig small holes and plant low-growing boxwoods or compact evergreens. Space them closely to eventually form a continuous low hedge. -
Add vertical greenery:
Along the white fence, plant upright ornamental grasses like ‘Karl Foerster’. These add verticality without taking up much horizontal width, perfect for tight side yards. -
Seed or sod the gaps:
Cut strips of sod to fit strictly between the pavers, or sprinkle grass seed mixed with topsoil into the cracks. Water gently to avoid washing the soil onto your clean stones. -
Final clean up:
Sweep any loose soil or gravel off the pavers. Gently spray down the plants and stones to remove dust and reveal the sharp contrast between the concrete and the greenery.
Night Mode Elevation
Install solar or low-voltage uplights at the base of the tall grasses. The light grazing up the white fence creates incredible drama and depth at night.
Now you have a structured, serene walkway that turns a simple passage into a destination
Terraced Slope With Retaining Walls
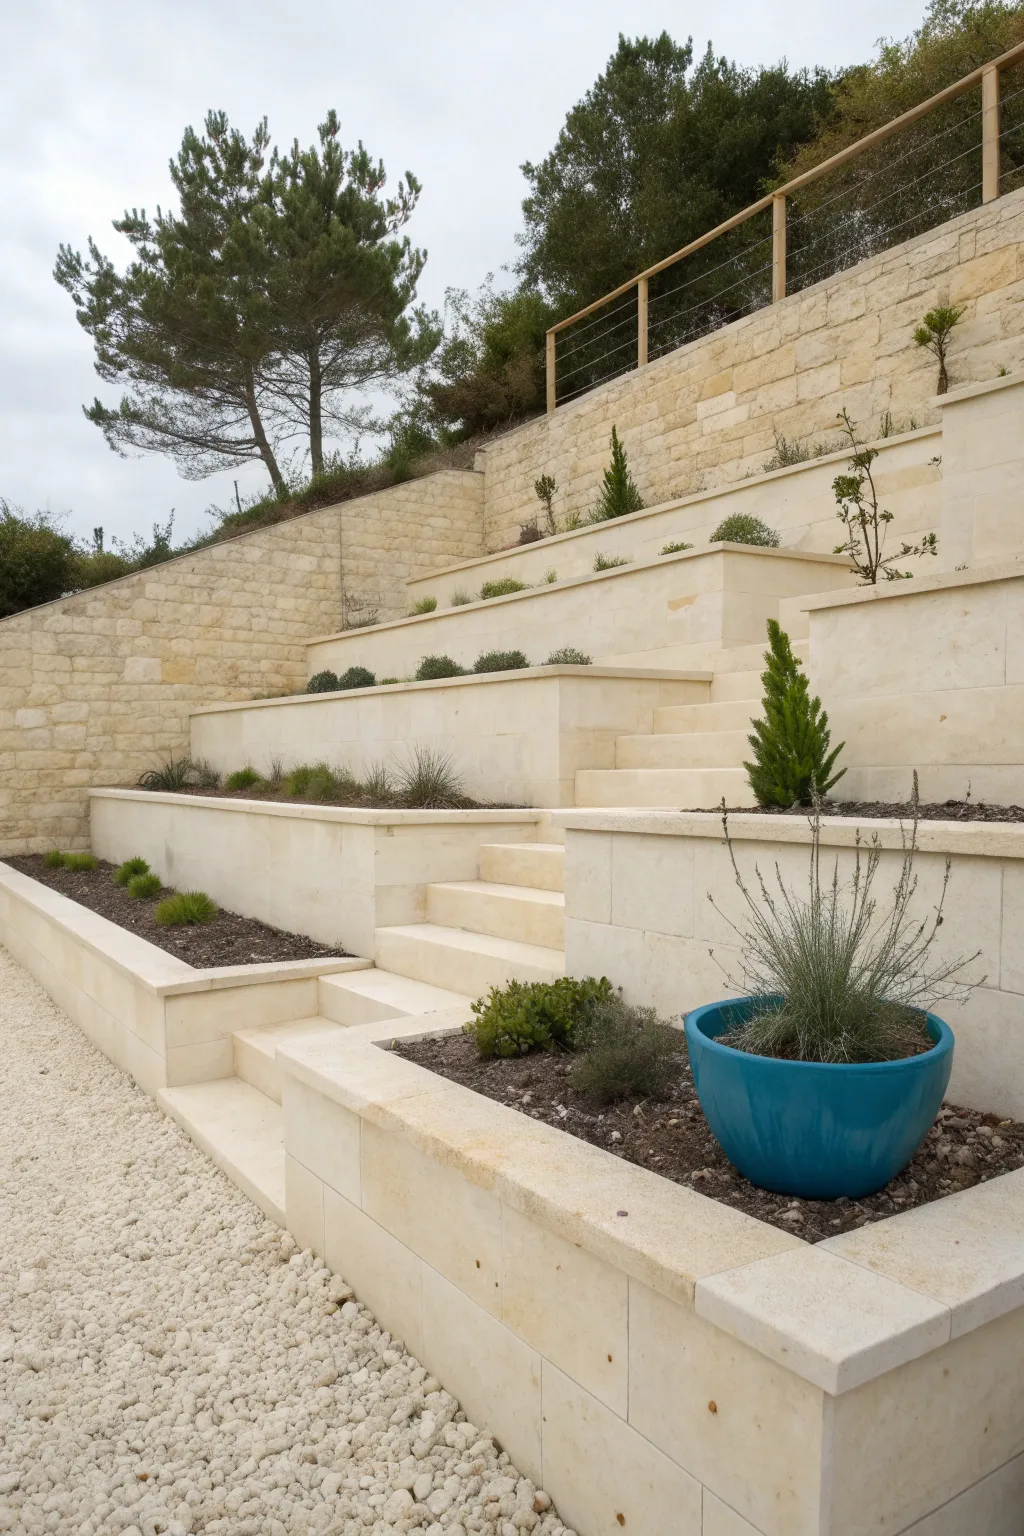
This project tackles the construction of a modern structural landscape featuring elegant limestone retaining walls that tame a steep slope into usable terraces. The clean lines of the stone blocks contrast beautifully with the organic textures of the gravel path and sparse plantings.
Step-by-Step Guide
Materials
- Limestone blocks (cut stone)
- Compacted gravel (for base)
- Concrete mix
- Small white pebbles/gravel
- Drainage pipe
- Filter fabric
- Mortar mix
- Topsoil
- Various plants (conifers, shrubs)
Step 1: Site Prep & Foundation
-
Assess the slope:
Begin by carefully surveying your slope to determine the rise and run. Mark out the desired terrace levels with stakes and string lines, ensuring you plan for adequate flat space on each tier for planting. -
Excavate the base:
Dig trenches for the first (lowest) retaining wall foundation. Your trench should be wider than your stone blocks and deep enough to sit below the frost line in your area. -
Lay the sub-base:
Fill the bottom of your trench with about 6 inches of crushed gravel. Compact this layer thoroughly with a plate compactor to ensure a stable, non-shifting base for the heavy stone.
Clean Lines Tip
Use a string line for every single course of stone. Even a 1/8 inch variation can look wavy on a long, modern wall like this.
Step 2: Building the Lower Walls
-
Set the first course:
Mix a batch of concrete for your footing or lay the first course of limestone blocks directly onto the compacted base if using a dry-stack method. Ideally, embed the first row slightly below grade for stability. Use a level on every single block. -
Install drainage:
Behind the first course of stones, lay a perforated drainage pipe wrapped in a filter sock. This is crucial to prevent water pressure from building up behind the wall and pushing the stones out over time. -
Backfill with gravel:
Cover the drainage pipe with clear gravel (drainage stone). This promotes water flow away from the soil behind the wall. -
Build upward:
Continue laying courses of limestone blocks. For this clean, modern look, use minimal visible mortar or a high-strength landscape adhesive if the blocks are precision-cut. Stagger the vertical joints (running bond pattern) for structural integrity.
Step 3: Constructing Stairs & Upper Tiers
-
Integrate the stairs:
As you build the lower wall, mark the location for the traverse steps. You’ll need to excavate into the slope for each stair tread. The side walls of the planting beds will act as the cheek walls for these stairs. -
Set stair treads:
Install the limestone step treads one by one, working from the bottom up. Ensure each tread overlaps the one below it slightly and has a very slight forward pitch (1/8 inch) to shed rainwater. -
Form the upper terraces:
Repeat the excavation and wall-building process for the second and third tiers. Step the walls back into the slope. I find it helpful to constantly check my setback distance to keep the planting beds uniform in width. -
Cap the walls:
Install coping stones on top of the retaining walls. These should slightly overhang the wall face to create a shadow line and protect the wall beneath from water runoff.
Level Up: Lighting
Install low-voltage hardscape lights under the coping stones of the walls and steps. It creates a stunning nighttime atmosphere.
Step 4: Finishing Touches
-
Fill planting beds:
Line the inside of the planting beds with landscape fabric to keep soil from migrating into the gravel backfill. Fill the terraces with high-quality topsoil suitable for your chosen plants. -
Hardscape the path:
Level the ground area at the very bottom of the structure. Lay down a weed barrier fabric and spread a thick layer of white decorative pebbles to create the walking path shown in the foreground. -
Clean the stone:
Brush off any loose debris or mortar dust from the limestone blocks. A gentle wash with water can help remove construction dust, revealing the stone’s natural cream color. -
Planting:
Place your selected plants—small conifers, grasses, and shrubs—into the topsoil. Mulch with a dark organic mulch to contrast with the light stone, making the greenery pop. -
Add feature pot:
Place a bold, colorful ceramic pot (like the teal one shown) on the lower tier or near the stairs as a focal point. Plant a textural grass or lavender inside to soften the hard lines.
Step back and admire how the structured stone turns a difficult slope into an architectural feature.

PENCIL GUIDE
Understanding Pencil Grades from H to B
From first sketch to finished drawing — learn pencil grades, line control, and shading techniques.
Explore the Full Guide
Rock Garden With Water-Wise Planting
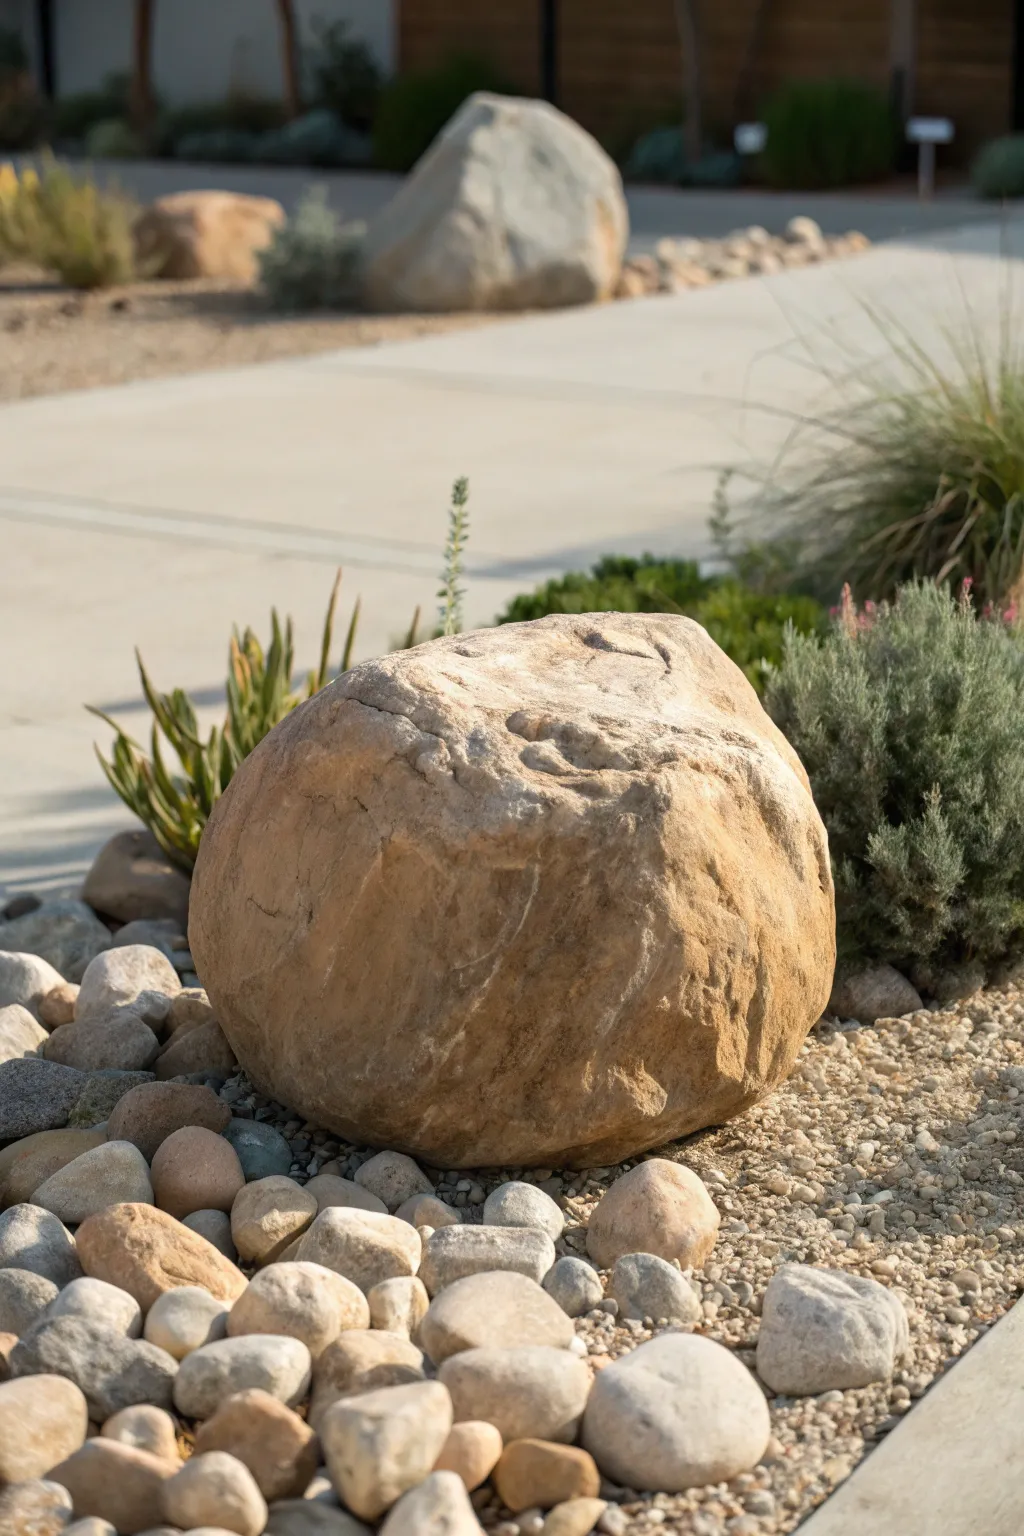
This project centers on creating a serene, water-wise garden vignette featuring a statement boulder surrounded by textural river stones. The natural tan and beige palette evokes a calming, arid landscape perfect for modern yards or entryways.
Step-by-Step Tutorial
Materials
- One large landscape boulder (approx. 2-3 ft diameter, tan/sandstone color)
- Assorted river rocks (1-3 inch size, rounded, mixed earth tones)
- Decomposed granite or fine gravel (beige/gold color)
- Landscape fabric (weed barrier)
- Shovel and rake
- Broom
- Drought-tolerant plants (e.g., Kangaroo Paw, small shrubs)
- Work gloves
- Wheelbarrow (optional but helpful)
Step 1: Site Preparation
-
Select the location:
Choose a spot next to a walkway or patio where the feature will be clearly visible. Ensure the ground is relatively level and drains well. -
Clear and dig:
Remove any existing grass or weeds from the area. Dig down about 2-3 inches to accommodate the base layer of gravel and prevent it from spilling over onto the pavement. -
Lay landscape fabric:
Roll out landscape fabric over the cleared soil. This critical step prevents weeds from growing up through your beautiful rock arrangement. -
Cut holes for planting:
If you plan to include plants like the ones visible behind the boulder, use scissors to cut X-shaped slits in the fabric where you intend to dig.
Uneven Settling?
If the large boulder starts to lean after a heavy rain, pack sharp-edged gravel (not round river rock) under the low side. It locks together better to provide firm support.
Step 2: Setting the Anchor
-
Position the main boulder:
Place your large statement boulder. Orient it so the most interesting face—perhaps one with natural crevices or color striations—is facing the main viewing angle. -
Dig a depression:
Instead of just sitting it on top, I like to dig a slight depression underneath the boulder so it settles in. This makes it look like a natural outcrop rather than a rock that was just dropped there. -
Verify stability:
Wiggle the boulder firmly to ensure it doesn’t rock back and forth. Pack soil or gravel under any gaps at the base to stabilize it completely.
Step 3: Planting and Base Layer
-
Install plants:
Dig holes for your chosen drought-tolerant plants through the fabric slits. Place them behind and slightly to the side of the boulder to frame it without obscuring it. -
Backfill plants:
Fill around the root balls with soil and firm it down gently. Water them immediately to help settle the soil. -
Spread the fine base:
Pour the decomposed granite or fine gravel around the boulder and plants. This acts as your base layer. Use a rake to spread it evenly to a depth of about 1-2 inches.
Nightscaping
Add a small solar uplight aimed at the textured face of the large boulder. This creates dramatic shadows at night and makes your garden feature a 24-hour focal point.
Step 4: Detailing with River Rock
-
Create a transition zone:
Begin placing the medium-sized river rocks around the absolute base of the large boulder. This hides the gap where the boulder meets the ground. -
Scatter for naturalism:
Don’t create a perfect ring. Scatter the river rocks outward, grouping them more densely near the boulder and letting them thin out as they move away. -
Mix sizes:
Ensure you are mixing smaller pebbles with the 3-inch stones. Uniformity looks artificial; variety mimics a dry riverbed. -
Nestle the stones:
Press the river rocks slightly into the underlying decomposed granite so they don’t roll away easily. -
Clean edges:
Use a broom to sweep any stray gravel or dust off the concrete path to keep the edge crisp and clean. -
Rinse the stones:
Give the entire arrangement a gentle spray with a hose. This washes off quarry dust and brings out the true colors of the river rock and boulder.
Enjoy the peaceful, maintenance-free beauty of your new rock garden feature
Symmetry at the Steps and Door
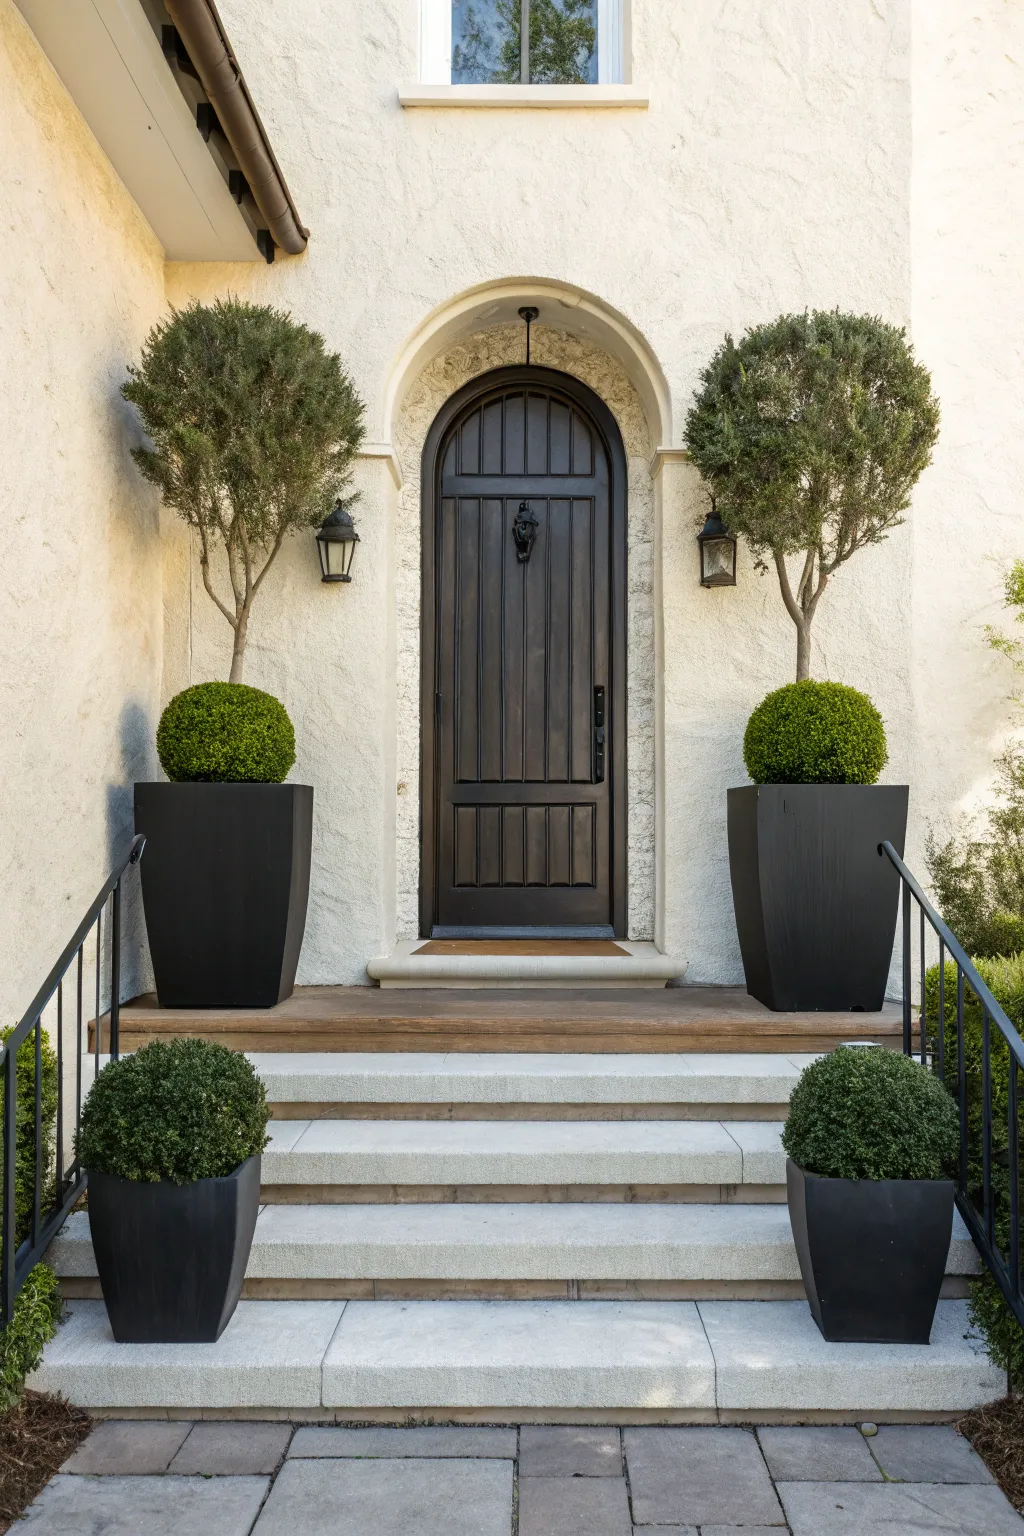
This project transforms a standard entryway into a grand, balanced statement using classic topiary and sleek modern planters. With a focus on symmetry and tiered heights, the result is an elegant, welcoming threshold that boosts curb appeal instantly.
Detailed Instructions
Materials
- 2 Large tall tapered planters (black or dark bronze, min. 30 inches tall)
- 2 Smaller tapered planters (matching finish, min. 18 inches tall)
- 2 Standard rosemary or olive topiaries (lollipop style, approx. 4-5 feet tall)
- 2 Dwarf boxwood spheres (approx. 12-15 inches diameter)
- 2 Medium boxwood spheres (approx. 18 inches diameter)
- Potting soil (high-quality exterior mix)
- Drainage gravel or pea stone
- Bubble wrap or Styrofoam blocks (optional void filler)
- Landscape fabric
- Slow-release fertilizer granules
- Watering can or hose
Step 1: Preparing the Large Upper Planters
-
Position the containers:
Place your two large, tall planters on the porch landing. Ensure they are perfectly symmetrical, flanking the door frame with equal distance from the wall and the door trim. -
Create drainage layers:
Fill the bottom 3-4 inches of each planter with drainage gravel. If your pots are very deep, you can fill the bottom third with lightweight void fillers like Styrofoam blocks to save on soil weight. -
Add separation fabric:
Cut a piece of landscape fabric to fit over the drainage or filler layer. This prevents the soil from washing down and clogging the drainage holes while keeping everything tidy. -
Fill with soil:
Pour your potting mix into the planters, filling them until the soil level is about 10 inches from the rim. Press down gently to remove large air pockets.
Pro Tip
To ensure your topiaries grow straight, rotate the pots a quarter turn every week. This prevents the plants from leaning toward the sun source.
Step 2: Planting the Topiaries
-
Prepare the feature trees:
Take your standard topiary trees out of their nursery pots. Gently massage the root balls to loosen any circular roots, which helps them establish faster in their new home. -
Position the trees:
Place one tree into the center of each large planter. Step back to check vertical alignment; the trunk should look perfectly straight relative to the door’s vertical lines. -
Secure the trees:
Fill the remaining space around the root ball with soil, packing it firmly to keep the tree stable. Leave about 2 inches of space at the top for watering. -
Add the underplanting base:
At the base of the tall tree, you need to add the medium boxwood sphere. You may need to mound the soil slightly around the tree trunk to get the sphere to sit at the right height. -
Install the middle tier:
Plant the medium boxwood spheres directly into the soil at the base of the lollipop tree. They should look like a green ‘cushion’ protecting the trunk.
Level Up
Add uplighting inside the planters or small landscape spotlights directed at the trees to cast dramatic shadows against the stucco at night.
Step 3: Styling the Lower Steps
-
Position the lower pots:
Place the two smaller matching planters on a lower step. Aim for alignment with the outer edge of the upper planters to maintain visual weight. -
Fill and prep:
Repeat the drainage and soil filling process for these smaller pots, ensuring you leave enough room for the root ball of the final plants. -
Plant the lower spheres:
Place the dwarf boxwood spheres into these lower pots. I like to rotate the plants before final packing to find their ‘best side’ where the foliage looks densest. -
Final adjustment:
Pack soil firmly around the base. Check that the top of the plant sits slightly above the rim of the pot for a full, overflowing look.
Step 4: Finishing Touches
-
Clean up surfaces:
Sweep away any spilled soil from the limestone steps and porch decking immediately to prevent staining. -
Water thoroughly:
Water all four planters slowly until you see water starting to trickle from the drainage holes. This settles the soil and removes air pockets. -
Prune for perfection:
Using sharp shears, lightly trim the boxwood spheres and the topiary heads to ensure they are perfectly round and uniform. Symmetry is key here.
Enjoy the commanding presence of your new, perfectly symmetrical entryway.


Curved Shrub Arc Around a Feature Tree

Transform a modest tree into a stunning focal point with this elegant, geometric landscaping design. By creating concentric rings of neatly trimmed boxwood hedges, you’ll add structure and classical beauty to any flat garden terrace or gravel courtyard.
Step-by-Step Guide
Materials
- Young boxwood (Buxus) shrubs (quantity depends on circle size)
- Measuring tape
- String and stake (for marking circles)
- Spray paint (landscaping marker)
- Garden spade
- Compost or soil improver
- Hand shears or electric hedge trimmer
- Gravel or crushed stone
- Stone pavers or edging bricks (optional but recommended)
Step 1: Planning and Marking
-
Assess the site:
Begin with a flat, cleared area around your central feature tree. Ensure the ground is level and the soil is suitable for planting. The tree should already be established or planted first. -
Set the center point:
Identify the exact base of the tree trunk as your center point. Tie a string to the trunk loosely or use a stake driven into the ground right next to it. -
Mark the inner circle:
Determine the radius for your inner hedge ring. Walk around the tree with the string pulled taut to that length, spraying a continuous line on the ground with landscaping paint to mark the planting trench. -
Mark the outer circle:
Lengthen your string to mark the planting line for the larger, outer hedge. Leave enough space between the two rings for a gravel path—typically 2 to 3 feet feels comfortable for walking or maintenance. -
Define the perimeter:
If you plan to add a stone border like in the reference image, mark a third circle slightly outside the outer hedge line to guide your edging installation.
Uneven Growth?
If one side of your circle gets more shade, those plants may grow slower. Rotate fertilizer application or trim the sunny side more aggressively to keep huge symmetrical balance.
Step 2: Soil Preparation and Edging
-
Excavate the trenches:
Dig a trench along your spray-painted lines for the hedges. The trench should be about twice as wide as the root balls of your boxwood plants and just as deep. -
Install stone edging:
If you are using stone pavers or bricks to define the outermost boundary, dig a shallow trench along that outer mark. Lay your stones flush with the ground level for a seamless transition into the surrounding gravel. -
Amend the soil:
Mix the excavated soil with compost or organic matter. Boxwoods love well-draining soil, so I like to ensure the mix isn’t too heavy with clay at this stage.
Sharp Shears Required
For that ultra-crisp, architectural look seen here, use manual shears rather than electric trimmers for the final shaping. It gives you far more control over the curve.
Step 3: Planting the Hedges
-
Space the plants:
Place your boxwood shrubs into the trenches while still in their pots to check spacing. For a dense hedge that fills in quickly, place them so their leaves are just barely touching. -
Plant the inner ring:
Remove the plants from pots and set them into the inner trench. Backfill with your soil mix, firming the ground gently with your hands or foot to remove air pockets. -
Plant the outer ring:
Repeat the planting process for the outer circle. Ensure the plants stand upright and align perfectly with the curve of your trench. -
Water thoroughly:
Give all the new plants a deep watering immediately after planting to help settle the soil around the roots.
Step 4: Finishing Touches
-
Lay the gravel:
Fill the space between the two hedge rings and the area outside the edging with gravel or crushed stone. Rake it smooth so it is level. -
Initial shaping:
Once the plants are established (wait a few weeks if possible), use shears to trim the tops level. Create a uniform height for the inner ring, perhaps slightly lower than the outer one for visual depth. -
Refine the sides:
Trim the sides of the hedges to create sharp, vertical walls. This crisp geometry contrasts beautifully with the organic shape of the tree branches. -
Final clean up:
Brush away any clippings from the gravel and give the area a final rake to leave pristine, concentric patterns.
With consistent trimming and care, your living sculpture will mature into a sophisticated garden centerpiece
Minimal Lawn With One Statement Plant

This project guides you through creating a serene landscape photograph that emphasizes clean lines and natural beauty. You will focus on balancing the organic form of a statement tree against stark architectural elements to achieve a peaceful, minimalist composition.
How-To Guide
Materials
- DSLR or Mirrorless Camera
- Wide-angle lens (approx. 24mm or 35mm)
- Tripod with a ball head
- Circular Polarizer (CPL) filter
- Gravel or crushed stone (for landscaping prep)
- Mature olive tree (or similar statement tree)
- Freshly mowed lawn
- White exterior wall
Step 1: Planning and Preparation
-
Scout the Location:
Find a location that features a strong, single architectural element, like a long white wall, adjacent to an open green space. The key is finding a spot where the horizon is visible in the background. -
Select the Subject:
Identify a single tree with an interesting, sculptural branch structure. An olive tree works best due to its gnarly trunk and airy canopy, but any tree with character will do. -
Time Your Shoot:
Plan to shoot during the ‘Golden Hour,’ specifically just as the sun is dipping below or rising above the horizon. This ensures soft, warm backlighting without harsh shadows on the grass. -
Prepare the Grounds:
Ensure the lawn is impeccably mowed. The stripes in the grass act as leading lines, so mow in straight lines toward the horizon to enhance depth. -
Check the Architecture:
Clean the white wall if necessary. The beauty of this shot relies on the pristine, stark contrast of the white wall against the organic tree.
Uneven Lighting?
If the sky is too bright and the tree too dark, use a Graduated Neutral Density filter or bracket your shots and merge them later in HDR software.
Step 2: Composition and Setup
-
Position the Tripod:
Set up your tripod at a low-to-medium height. You want the camera angle to be roughly chest-height to capture the texture of the grass while keeping the tree centered against the sky. -
Frame the White Wall:
Compose the shot so the white wall enters from the left edge, occupying about a third of the frame. It should lead the eye toward the center but not dominate the tree. -
Center the Tree:
Adjust your position until the tree is the clear focal point. Ensure the trunk is clearly silhouetted against the lighter background and the branches don’t visually merge with the wall too much. -
Include the Horizon:
Align the horizon line so it sits in the lower third or middle of the frame, distinct from the wall’s top edge. This separation adds depth. -
Include Foreground Detail:
Frame the bottom of the shot to include the stone border or gravel edge on the left. This provides a textural transition from the wall to the grass.
Pro Tip: Leading Lines
Use the mower stripes! Mow the lawn perpendicular to the camera angle to create horizontal lines that widen the scene, or vertically to draw the eye in.
Step 3: Shooting and Execution
-
Attach the Polarizer:
Screw on your Circular Polarizer. Rotate it slowly until you see the glare reduce on the grass blades and the colors of the sky deepen slightly. -
Set Aperture:
Set your aperture to f/8 or f/11. I generally prefer f/11 here to ensure everything from the foreground grass to the distant horizon remains sharp. -
Focusing:
Set your focus point directly on the trunk of the tree. This anchors the sharpness where the viewer’s eye will naturally land. -
Manage Dynamic Range:
Check your histogram. Because you are shooting into the light (backlit), watch out for blown-out highlights in the sky. If needed, underexpose slightly to save sky detail. -
Capture the Shadows:
Wait for the light to cast the tree’s shadow toward the camera or slightly to the side. The wall on the left should also cast a long, dramatic shadow across itself. -
Take the Shot:
Use a remote shutter release or a 2-second timer to eliminate camera shake. Take several bracketed exposures (one normal, one darker, one brighter) to ensure you capture the full range of light.
Step 4: Post-Processing
-
Adjust White Balance:
In your editing software, warm up the white balance slightly to reflect the golden hour tones, but keep the wall looking crisp white, not yellow. -
Lift Shadows:
Gently lift the shadows on the tree trunk to reveal the texture of the bark, ensuring it doesn’t become a solid black silhouette. -
enhance Greens:
Selectively target the green channel. Increase luminance and slightly desaturate to achieve that soft, manicured look seen in the reference image.
You now have a stunning, peaceful landscape image ready to anchor your portfolio
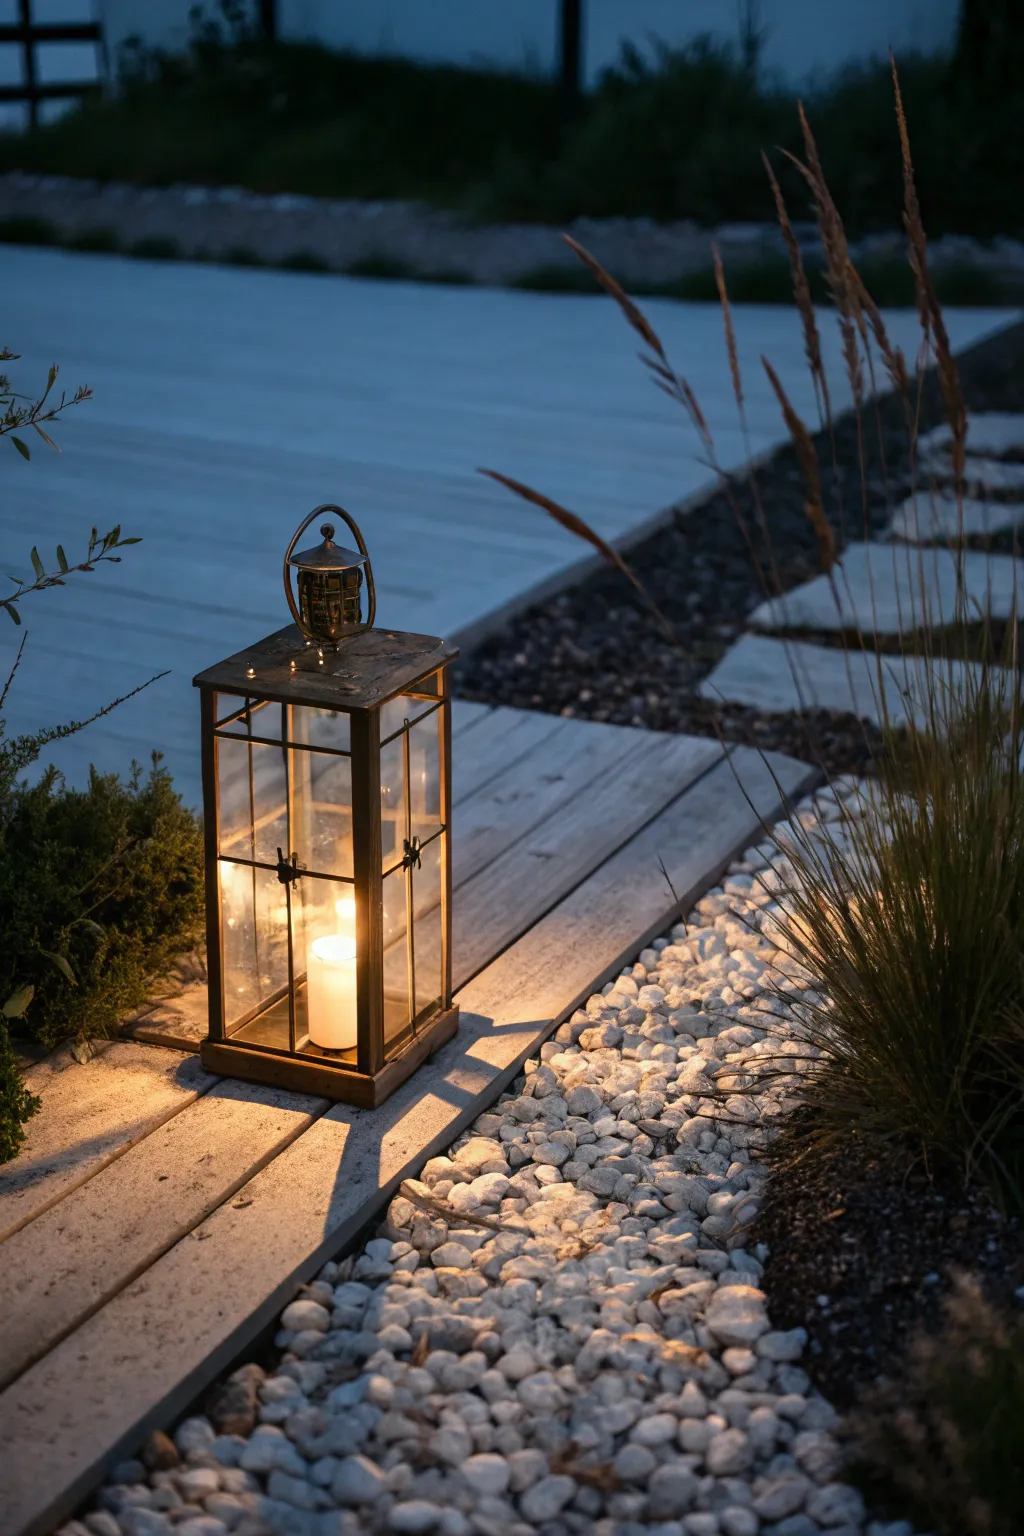
Night Yard With Path Lighting

Capture the serene ambiance of a summer evening with this atmospheric photograph. This project focuses on balancing the warm glow of candlelight with the cool, blue tones of twilight to create a cozy and inviting garden scene.
How-To Guide
Materials
- DSLR or Mirrorless Camera
- Tripod (Essential for low light)
- Wide aperture lens (f/1.8 – f/2.8 recommended)
- Small metal lantern with glass panes
- Pillar candle (real or high-quality LED)
- Lighter or matches
- Outdoor setting with decking and stones
- Remote shutter release or self-timer setup
Step 1: Setting the Scene
-
Scout the location:
Find a spot in your garden where different textures meet. Look for a junction between smooth wooden decking, rough gravel or river stones, and soft organic foliage like tall grasses. -
Clean the surfaces:
Briefly sweep the decking to remove unwanted debris, but leave a few natural elements like stray leaves if they add character. Ensure the glass on your lantern is streak-free for a clear glow. -
Position the subject:
Place the lantern on the edge of the decking so it acts as an anchor point. Angle it slightly so the corner faces the camera, adding dimension rather than shooting it straight-on. -
Arrange the background:
Check behind the lantern. You want the path or garden beds to lead the eye into the distance. If you have tall grasses nearby, ensure they frame the right side of the shot without blocking the lantern.
Flame Blowout?
If the candle flame is overexposed and losing detail, underexpose the shot slightly in-camera and recover the shadow details later in post-processing softwares.
Step 2: Lighting and Atmosphere
-
Wait for the blue hour:
The magic of this shot relies on timing. Set up about 20 minutes after sunset, during ‘blue hour,’ when the ambient light turns a cool, deep blue but isn’t pitch black yet. -
Light the candle:
Carefully light the pillar candle inside the lantern. Ensure the wick is trimmed to prevent a large, flickering flame that might cause motion blur, favoring a steady, warm glow instead. -
Evaluate adjacent lighting:
Turn off any harsh overhead porch lights. You want the candle to be the primary light source for the immediate foreground, with only faint ambient light illuminating the background path.
Step 3: Camera Settings and Composition
-
Descent to eye level:
Lower your tripod so the camera is just slightly above the ground level. Shooting from this low angle emphasizes the texture of the stones and the decking. -
Set the aperture:
Open your aperture wide, around f/2.8 or f/4. This will keep the lantern crisp while gently blurring the background path and grasses, creating a dreamy depth of field. -
Adjust ISO:
Keep your ISO relatively low, between 200 and 400, to maintain image quality and reduce graininess in the dark areas. -
Determine shutter speed:
Since you are on a tripod, use a slower shutter speed (1/15th to 1/30th of a second). This allows enough ambient blue light to register on the sensor without blowing out the candle flame.
Add Magic
Use a spray bottle to lightly mist the glass panes of the lantern or the surrounding stones. The water droplets will catch the candlelight and add extra sparkle.
Step 4: Shooting and Refining
-
Focus manually:
Switch to manual focus and zoom in on your camera’s LCD screen. Pinpoint the focus on the metal frame of the lantern or the texture of the wick to ensure absolute sharpness. -
Use a timer:
Set a 2-second timer or use a remote release. Even the tiny movement of pressing the shutter button can cause shake in a low-light exposure. -
Take a test shot:
Review the image. If the flame is just a white blob, increase your shutter speed slightly. If the background is too black, slow the shutter speed down. -
Adjust white balance:
I prefer to set the white balance to ‘Tungsten’ or around 3200K manually. This enhances the cool blues of the evening light while keeping the candlelight looking golden and warm. -
Capture variations:
Take several shots as the light fades. The balance between the artificial candlelight and natural twilight changes rapidly, and your best shot might happen in a 5-minute window.
Enjoy the peaceful process of capturing your garden in a new light


Have a question or want to share your own experience? I'd love to hear from you in the comments below!