Lanterns are basically the blank canvas of home decor—simple on their own, but wildly expressive once you start styling what goes inside (and what goes around) the frame. Here are my favorite lantern ideas that you can mix, match, and tweak like you’re building a little light-filled still life in the studio.
Classic Pillar Candle Glow
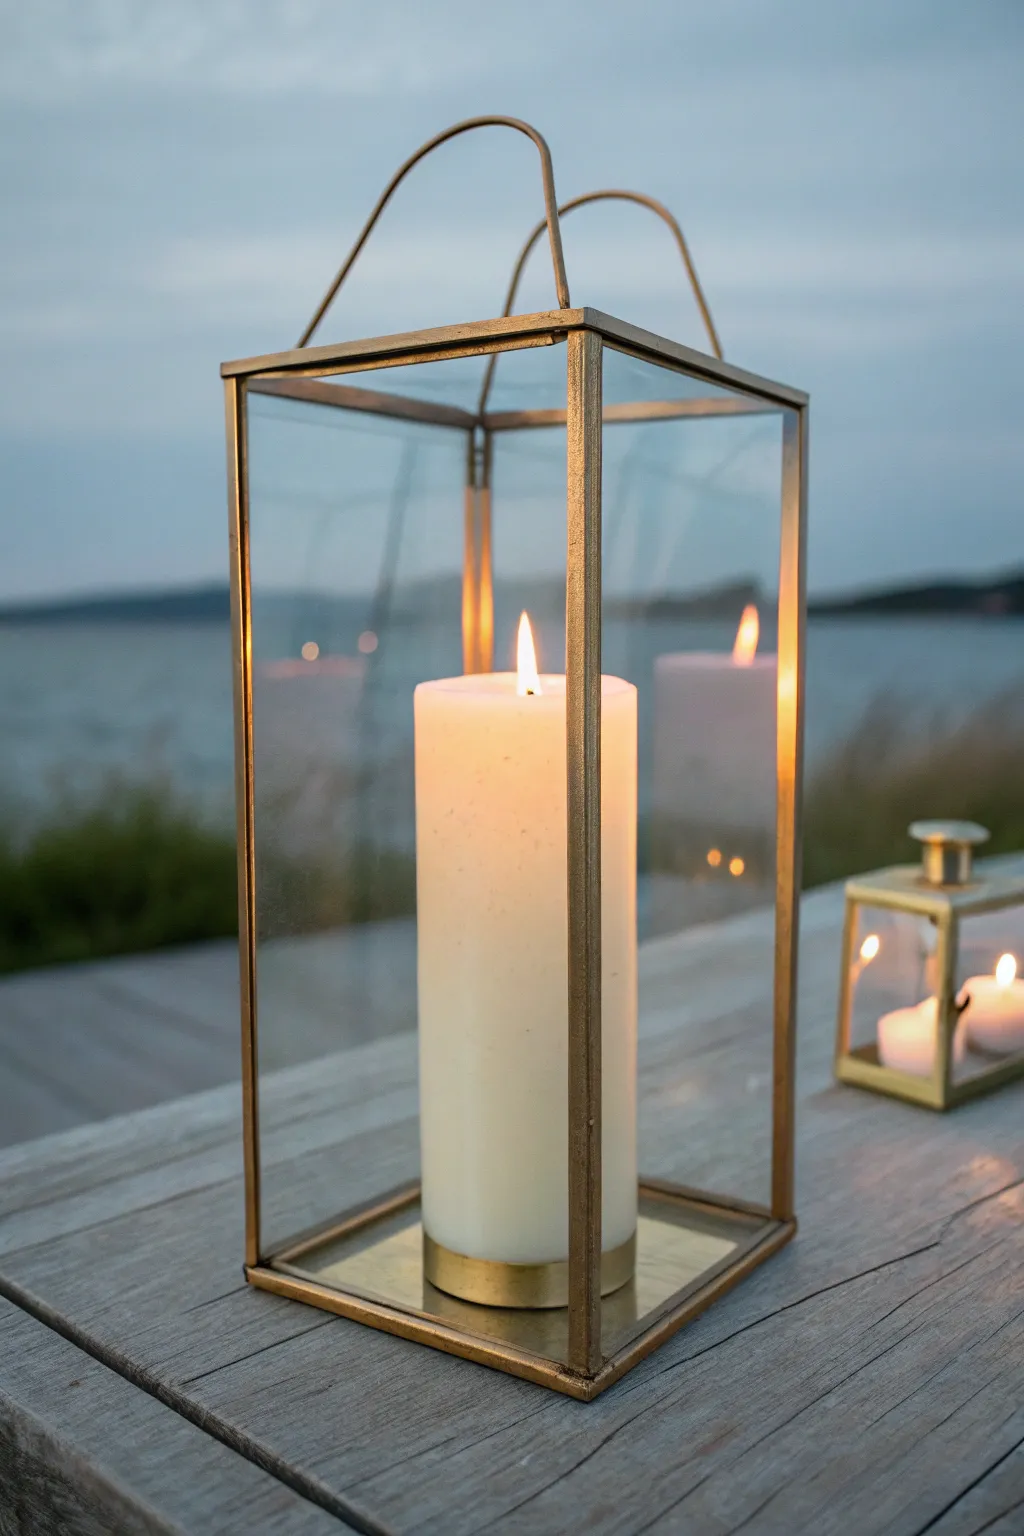
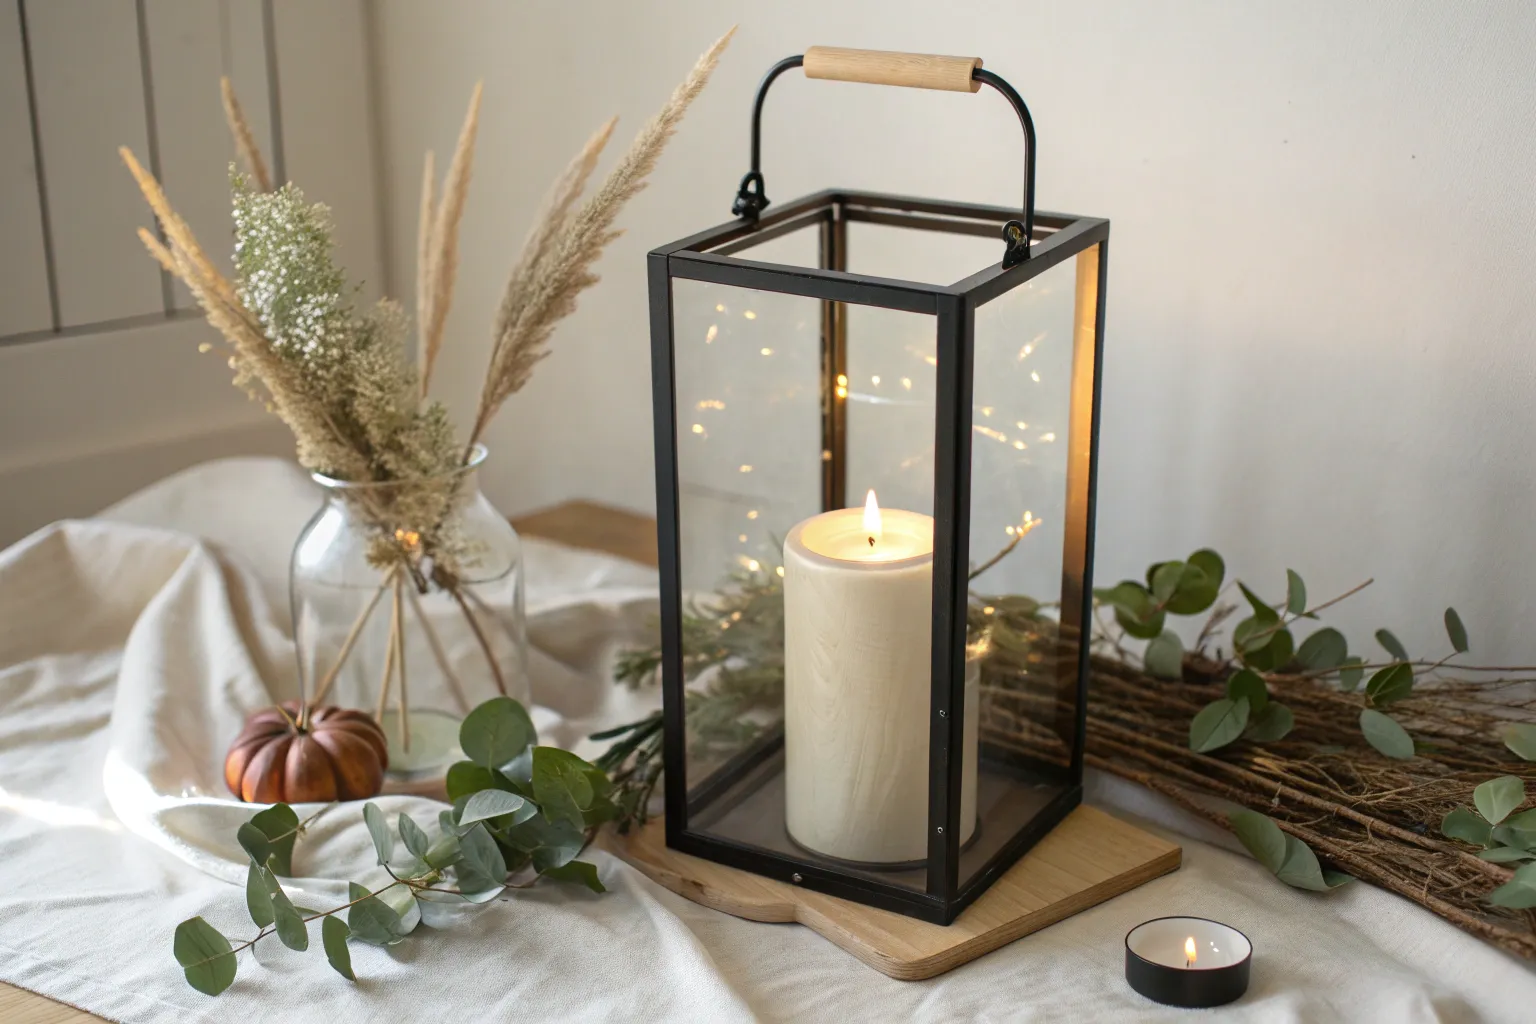
Capture the serene essence of dusk with this elegant brass and glass lantern project. Its clean lines and warm, flickering glow make it a perfect centerpiece for outdoor dining or a cozy indoor accent.
Step-by-Step Tutorial
Materials
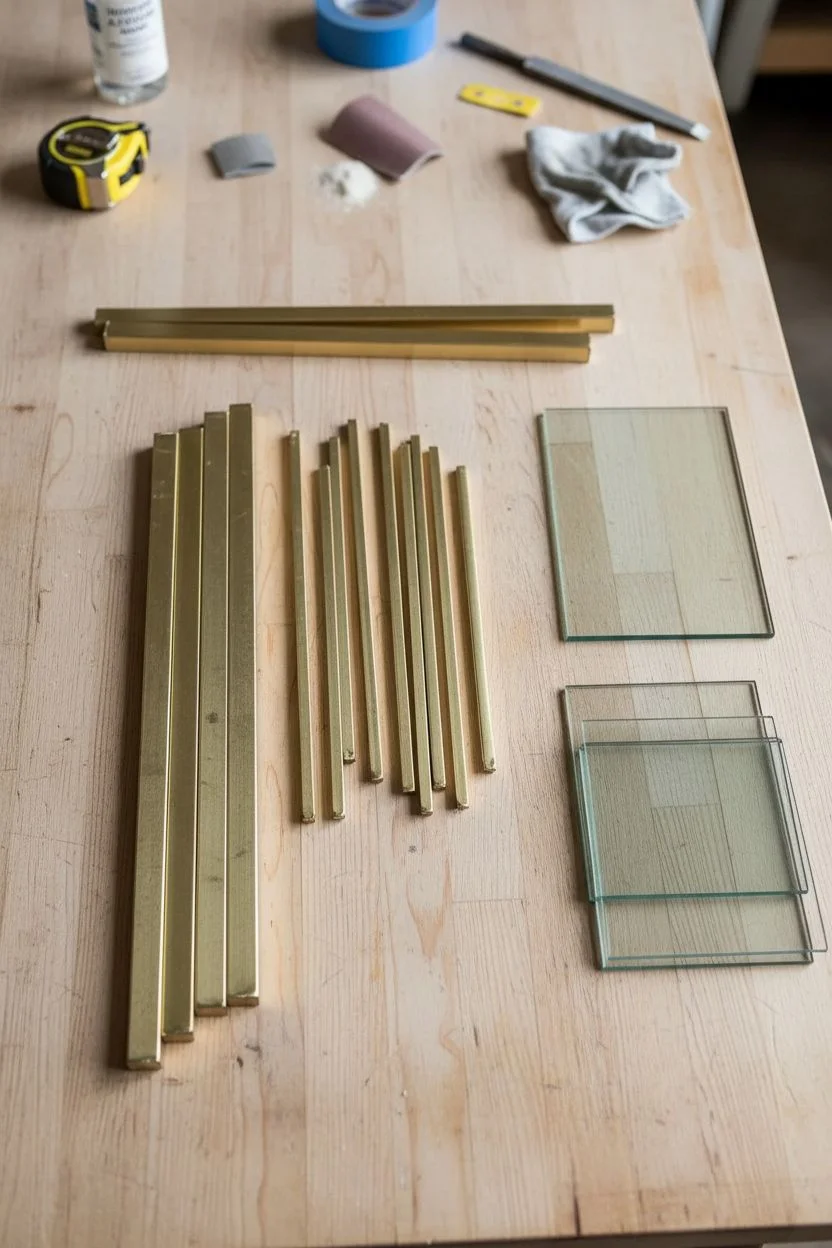
- 4 panels of 3mm clear glass (cut to 6″ x 10″)
- 1 panel of 3mm clear glass (cut to 6″ x 6″ for the base)
- Brass angle trim (1/2″ wide)
- Brass flat bar (1/8″ thick, 1/2″ wide)
- Strong epoxy adhesive (clear, metal-to-glass formulation)
- Soldering iron and lead-free solder (optional, for decorative joints)
- Fine-grit sandpaper (400 grit)
- Metal file
- Painter’s tape
- Large white pillar candle
- Brass polish and soft cloth
- Protective gloves and eyewear
Step 1: Preparing the Frame
-
Measure and cut angles:
Begin by measuring your brass angle trim. You will need four lengths of 10 inches for the vertical corners and eight lengths of 6 inches for the top and bottom horizontal frames. -
Miter the corners:
Carefully cut the ends of your horizontal pieces at a 45-degree angle so they fit together perfectly to form square frames. Keep the vertical pieces straight-cut if you want them to sit inside the frames, or miter everything for a seamless cube look. -
Smooth the edges:
Use a metal file to remove any burrs from your cuts. Follow up with fine-grit sandpaper to ensure all brass edges are smooth to the touch. -
Clean surfaces:
Wipe down all glass panels and brass pieces with isopropyl alcohol to remove oils or dust, ensuring a strong bond later.
Burnished Look
For an antiqued finish, skip the polish and instead rub the brass with a little diluted black paint or a darkening solution, then wipe away the excess.
Step 2: Assembling the Lantern Body
-
Create the base frame:
Lay out four 6-inch angle pieces to form a square on a flat surface. Apply a thin bead of epoxy to the mitered corners and press them together. -
Secure the base:
Use painter’s tape to hold the corners of the base frame tight while the epoxy cures. Check for squareness with a carpenter’s square. -
Repeat for the top:
Construct the top frame exactly like the base, adhering the corners and taping them securely. -
Attach vertical supports:
Once the base frame is dry, stand a vertical brass angle piece in each corner. Apply epoxy to the contact points deeply within the corner groove. -
Insert glass panels:
Before adding the top frame, I find it easiest to slide the glass panels into place now. Apply a small amount of epoxy along the inside of the vertical brass angles and press the 6″ x 10″ glass panels firmly against the metal. -
Cap it off:
Place the top square frame over the vertical supports and glass. Ensure everything aligns perfectly before the adhesive sets. -
Add the floor:
Carefully lower the 6″ x 6″ glass square into the bottom frame to create the floor of the lantern. Secure with a few dots of epoxy.
Step 3: Adding the Handle Detail
-
Bend the handle:
Take a length of flat brass bar approx 12-14 inches long. Gently bend it into an arch shape. You can use a paint can or similar cylindrical object to get a smooth curve. -
Form the attachment hooks:
Using pliers, bend the very ends of the flat bar outward to create small feet or tabs that will sit on the top frame. -
Position the handle:
Center the handle diagonally across the top of the lantern frame. This diagonal placement adds visual interest and stability. -
Secure the handle:
Epoxy the tabs of the handle to the top rim of the brass frame. Hold it in place with clamps or tape until fully cured.
Double Handle
Create a second handle arch and attach it perpendicular to the first one on the top frame for a more complex, intersecting architectural look.
Step 4: Finishing Touches
-
Clean excess glue:
Once all epoxy is fully hardened (check package time), use a razor blade to carefully scrape away any excess adhesive that squeezed out onto the glass. -
Polish the brass:
Apply a small amount of brass polish to a soft cloth and buff the metal frame to a high shine, removing fingerprints and oxidation. -
Place the candle:
Insert a large white pillar candle into the center of the lantern. Ensure it sits flat on the glass base. -
Final inspection:
Wipe the glass inside and out one last time for crystal clarity before displaying your new creation.
Light your candle and enjoy the sophisticated atmosphere this custom lantern brings to your table


Trio of Lanterns in Mixed Heights
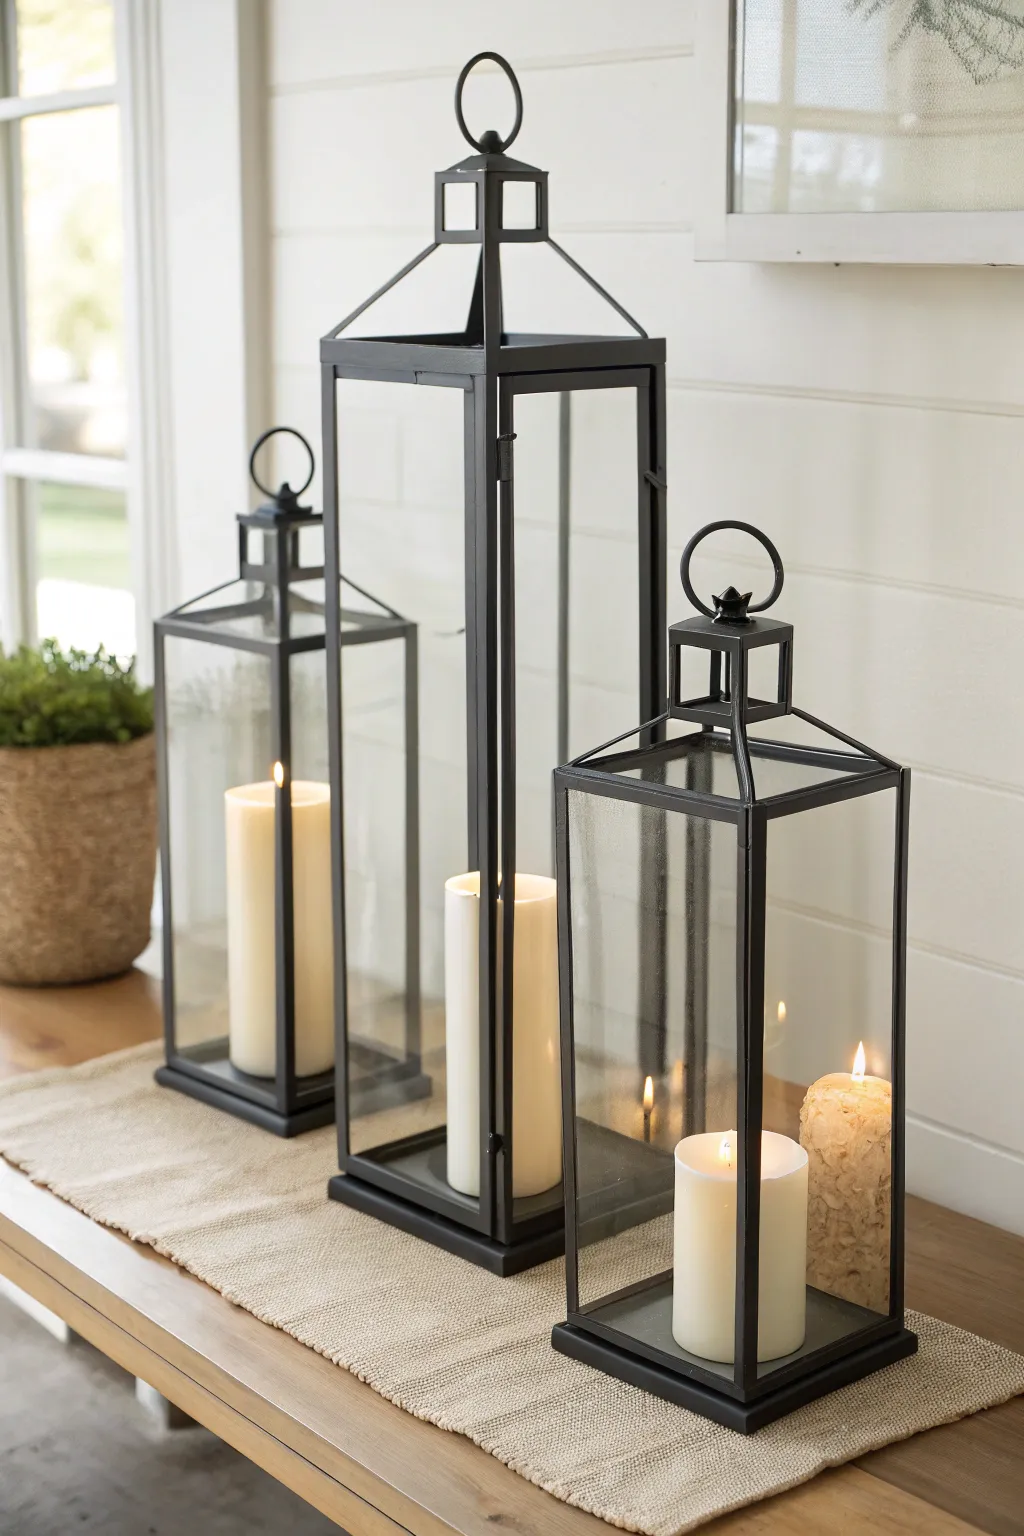
Create a sophisticated focal point for your entryway or dining table with this trio of sleek, metal-framed lanterns. The varying heights add visual interest while the clean lines and candlelight provide a warm, inviting atmosphere perfect for modern farmhouse decor.
Step-by-Step Guide
Materials
- 3 black metal lanterns (small, medium, large)
- Neutral woven table runner (burlap or linen blend)
- 3 cream pillar candles (LED or wax)
- 1 textured/patterned pillar candle (optional)
- Glass cleaner
- Microfiber cloth
- Lighter or matches (if using real wax)
- Scissors (for trimming wicks)
- Small potted greenery (optional styling prop)
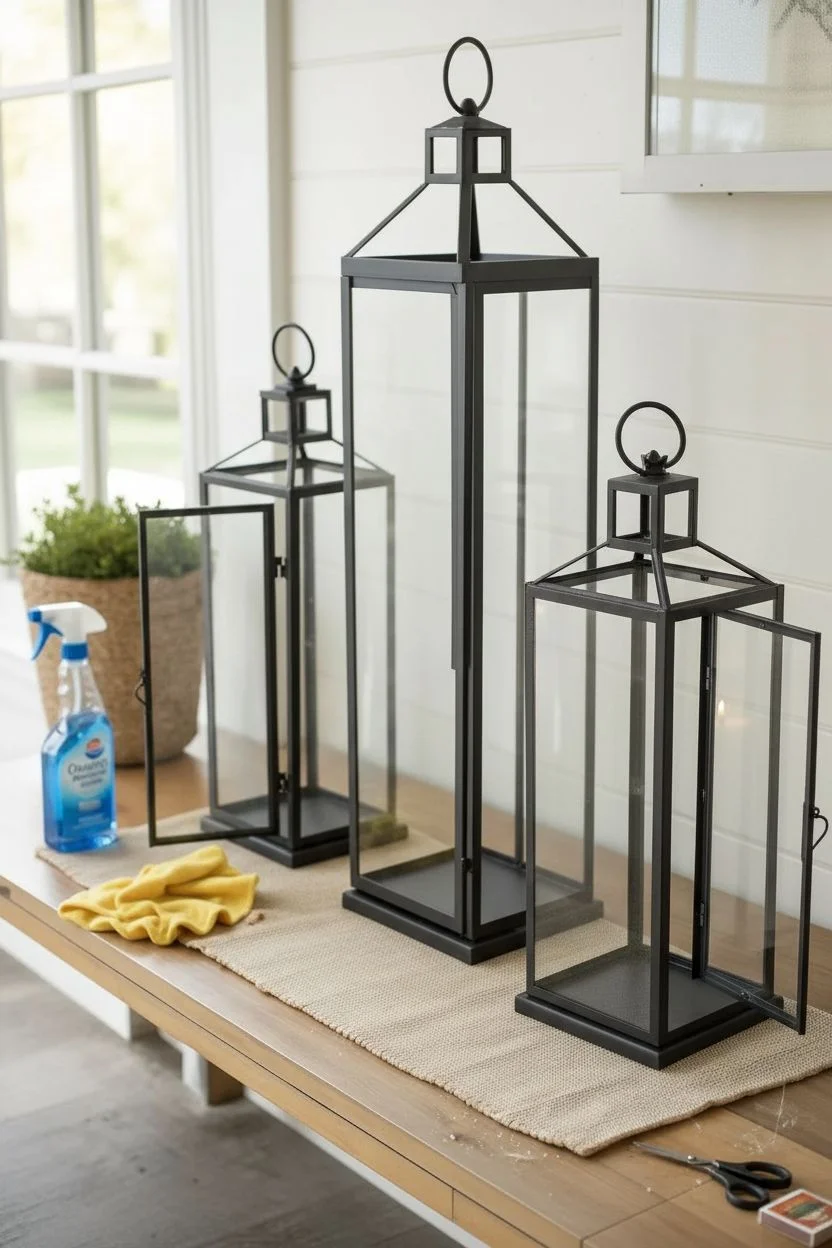
Step 1: Preparation & Cleaning
-
Select your surface:
Choose a long, flat surface like a console table, dining buffet, or mantel. Ensure it is stable enough to support the weight of three metal lanterns. -
Lay the foundation:
Unroll your woven table runner across the center of the surface. Smooth out any creases to ensure the lanterns will sit perfectly flat. -
Clean the glass panels:
Before assembling, spray a small amount of glass cleaner onto your microfiber cloth. -
Wipe down interiors:
Carefully wipe the inside glass panels of each lantern first to remove any dust or fingerprints that will be hard to reach later. I always find it easier to do this before placing the candles inside. -
Polish the exterior:
Give the outside glass and the black metal frames a final polish to ensure a streak-free shine.
Wobbly Wax?
If a candle sits unevenly inside the lantern, adhere a small ball of museum wax or a loop of painter’s tape to the bottom of the candle to secure it perfectly upright.
Step 2: Arrangement & Assembly
-
Place the anchor piece:
Start by positioning the tallest lantern. Place it slightly off-center on the runner to create an asymmetrical, modern look. -
Add the medium lantern:
Position the medium-sized lantern next to the large one. Place it slightly forward or backward relative to the large one to create depth, rather than lining them up like soldiers. -
Place the smallest lantern:
Set the smallest lantern on the opposite side of the tall one, or nestle it in front to complete a triangular visual composition. -
Check spacing:
Adjust the distance between the lanterns. They should be close enough to feel like a cohesive unit—about 2 to 3 inches apart—but not touching.
Seasonal Swap
Change the look seasonally by filling the bottom of the lanterns with thematic items like pinecones, sea glass, or faux autumn leaves around the base of the candles.
Step 3: Candle Styling
-
Select your candles:
Choose pillar candles appropriate for the height of each lantern. The candle should fill about one-third to one-half of the lantern’s vertical space. -
Insert the main candles:
Open the door of the largest lantern and carefully place a smooth, cream-colored pillar candle in the center. -
Repeat for the medium lantern:
Place a matching smooth cream candle into the medium lantern. -
Add texture:
For the smallest lantern, consider swapping the smooth candle for a textured or rustic pillar candle to add a subtle visual surprise. -
Trim wicks:
If using real wax candles, trim the wicks to 1/4 inch to ensure a clean burn and prevent soot from clouding your freshly cleaned glass. -
Lighting:
Light the candles carefully using a long lighter to reach inside the frames, or switch on your LED timers. -
Final touches:
Close the lantern latches securely. If utilizing a side prop like the woven basket with greenery shown in the photo, place it to the left of the smallest lantern to balance the visual weight.
Now you have a timeless, elegant display that adds instant warmth to your home


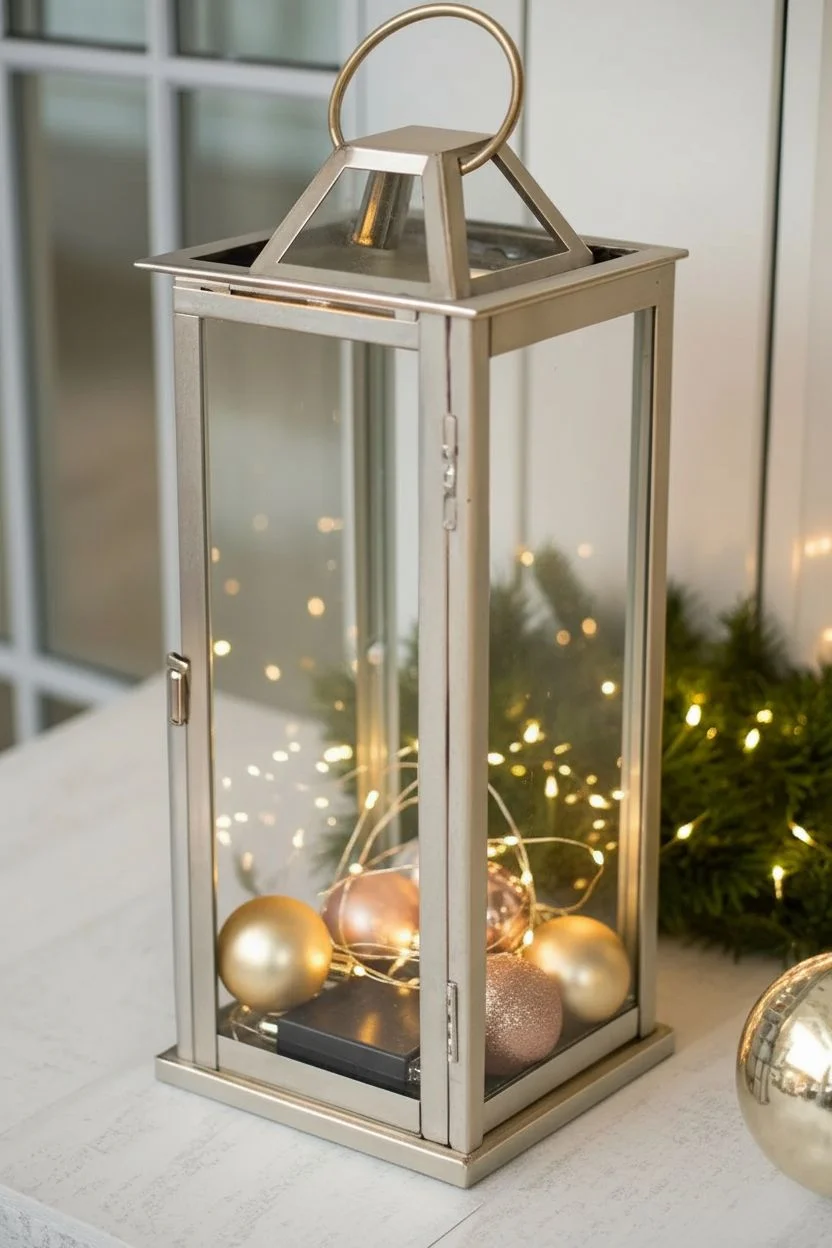
Tangled Fairy Light Nest
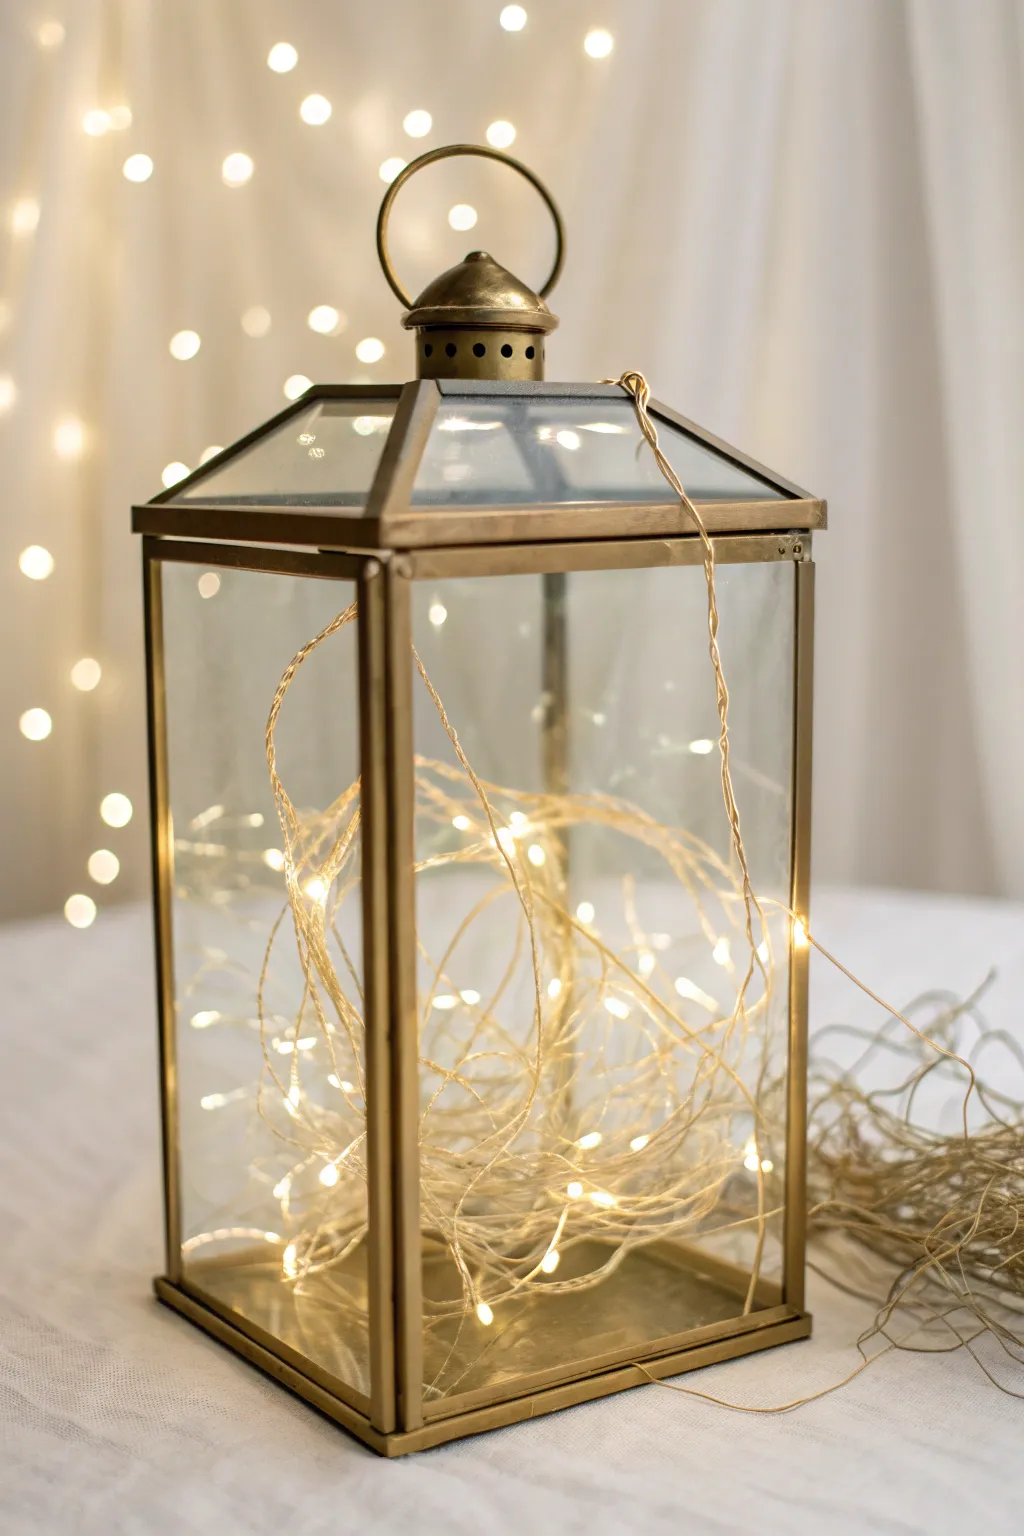
Transform a simple brass lantern into a mesmerizing beacon of warmth by creating a seemingly effortless nest of glowing fairy lights. This project creates a stunning centerpiece where the delicate wire tendrils act as sculpture even when the lights are dimmed.
Step-by-Step
Materials
- Glass paneled lantern (brass or gold finish)
- Battery-operated LED fairy lights (copper or gold wire, warm white)
- Soft microfiber cloth
- Glass cleaner
- Small piece of clear tape (optional)
- Batteries for lights
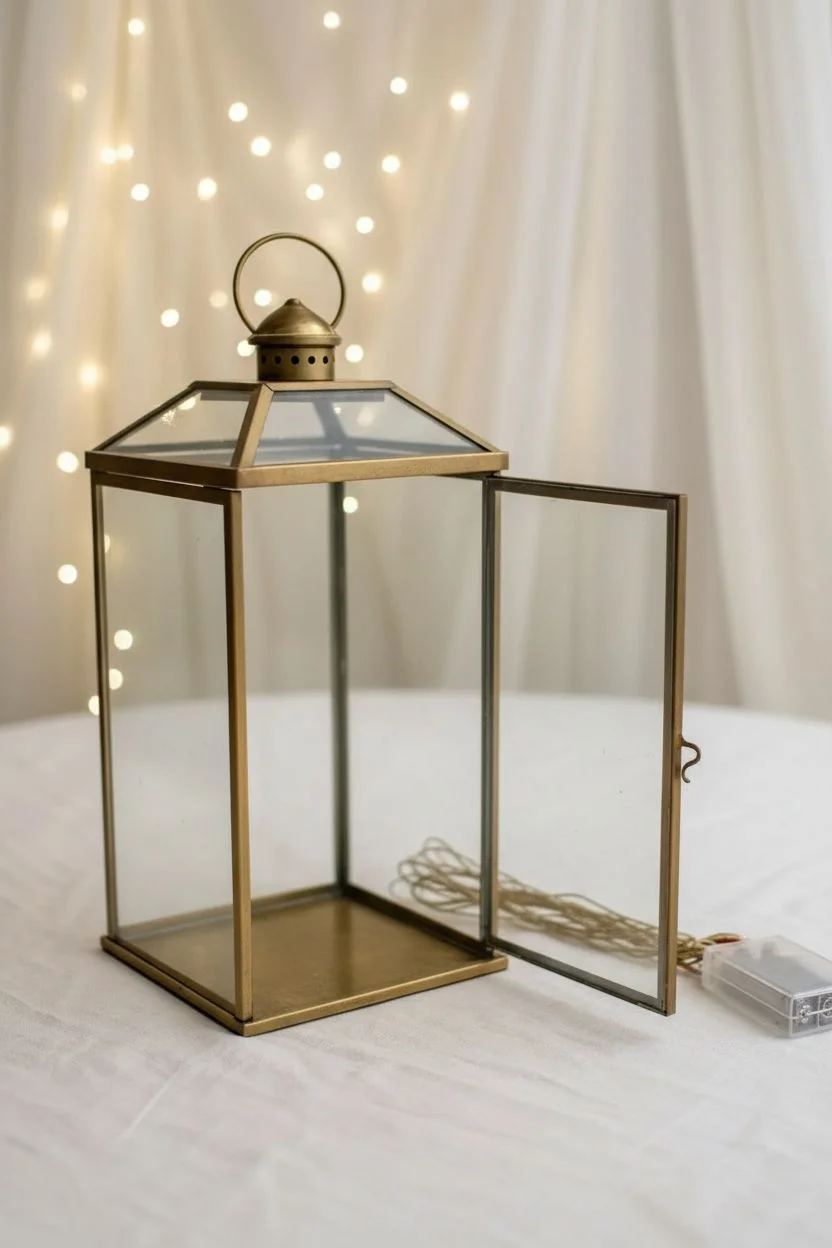
Step 1: Preparation and Cleaning
-
Open the lantern:
Locate the latch on your lantern door and swing it open fully to access the interior. -
Clean the glass:
Spray a small amount of glass cleaner onto your microfiber cloth. -
Wipe interior surfaces:
Carefully wipe down the inside of each glass panel to remove dust and fingerprints, as these will be highlighted by the lights from within. -
Clean the exterior:
Repeat the cleaning process on the outside of the glass and polish the metal frame to a shine. -
Prepare the lights:
Install fresh batteries into your fairy light pack and switch them on to ensure all bulbs are working correctly. -
Unspool the wire:
COMPLETELY unspool the fairy lights so you have one long, straight strand of wire to work with.
Wire Wisdom
Use ‘warm white’ LEDs on copper wire specifically. Silver wire can look too cool and icy against a brass lantern frame.
Step 2: Creating the Light Nest
-
Hide the battery pack:
Place the battery pack flat on the bottom of the lantern. I prefer to push it toward the back corner so it is less visible. -
Begin the coil:
Take the end of the wire closest to the battery pack and create a loose loop in your hand. -
Insert first layer:
Place this initial loop over the battery pack to help camouflage it. -
Build volume:
Gently feed the rest of the wire into the lantern, allowing it to coil naturally. -
Avoid tight knots:
Don’t force the wire into perfect circles; let it twist and turn randomly to create that organic, tangled look. -
Fill the vertical space:
Lift some loops higher so they reach up toward the top of the glass panels, preventing the lights from looking like a flat pile on the floor. -
Check density:
Step back and look at the arrangement. If one side looks dark, gently prod the wire cluster with your finger to redistribute the lights. -
Manage the tail:
If you have excess wire, decide if you want to keep it all inside or let a strand escape. -
Create the trailing effect:
For the look in the photo, drape the final 12-18 inches of wire out of the top opening or loosely through the door gap. -
Close the lantern:
Carefully close the lantern door. If you are trailing wire out the door, ensure the latch doesn’t pinch or sever the delicate copper wire. -
Secure the wire:
If the trailing wire slips, use a tiny piece of clear tape on the back of the lantern rim to hold the exit point in place. -
Final arrangement:
Gently fluff the external wire tail so it looks like it’s spilling out naturally rather than hanging straight down.
Placement Issues
If lights keep sliding down to the bottom, use tiny clear adhesive dots on the glass walls to hook a few loops higher up.
Now dim the room lights and enjoy the cozy atmosphere of your captured fireflies


Mini Pumpkin and Gourd Fill

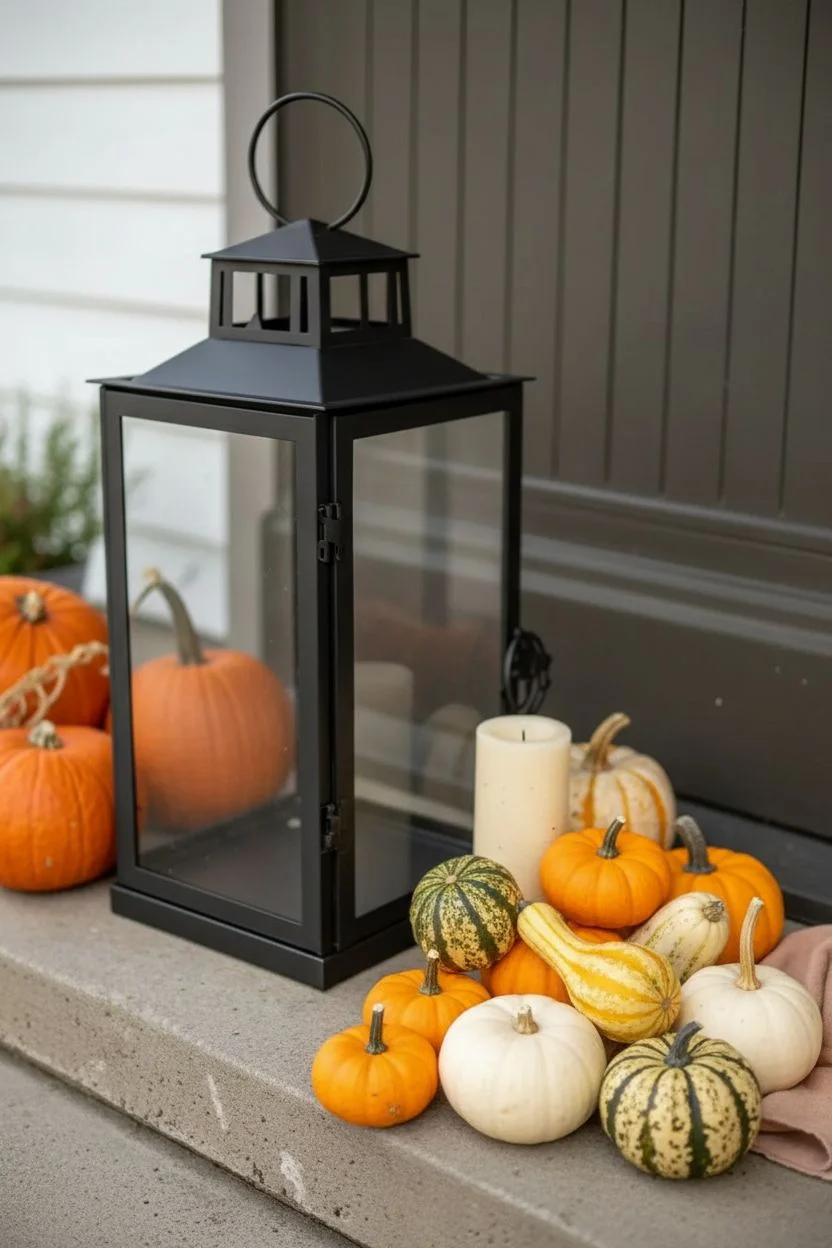
Transform a simple black lantern into a festive autumnal display by filling it with a bountiful mix of mini pumpkins and gourds. This project combines the natural textures of the harvest season with the warm, inviting flicker of candlelight for a perfect porch or entryway accent.
Step-by-Step Tutorial
Materials
- Large black metal lantern (approx. 18-24 inches tall) with glass panels
- Assorted mini pumpkins (orange, white)
- Assorted ornamental gourds (striped, speckled)
- Tall white pillar candle (flameless LED recommended for safety)
- Soft cloth or glass cleaner
- Small brush or dry cloth for dusting pumpkins
Step 1: Preparation
-
Clean the Lantern:
Begin by thoroughly cleaning the glass panels of your lantern inside and out using glass cleaner and a soft cloth. -
Check the Chimney:
Wipe down the metal frame and the vented chimney area at the top to ensure no dust or debris will fall onto your arrangement later. -
Prep the Produce:
Inspect your mini pumpkins and gourds. Wipe them down with a dry cloth to remove any dirt or loose stems. -
Select the Stars:
Group your pumpkins by size and color so you can easily grab what you need while styling.
Rot Prevention
If using real produce, check weekly for soft spots. Place a small piece of parchment paper under bottom pumpkins to protect the metal base from moisture.
Step 2: Arrangement
-
Place the Candle:
Open the lantern door and position your pillar candle. Instead of centering it perfectly, place it slightly off-center toward the front right to leave room for stacking behind it. -
Create a Base Layer:
Place two or three sturdy, flatter pumpkins at the bottom of the lantern. These will act as a foundation for the others. -
Vary the Colors:
I like to mix an orange mini pumpkin next to a green-striped gourd on the bottom layer to establish immediate visual contrast. -
Build the Back:
Begin stacking pumpkins in the back corner behind the candle. Use the lantern walls for support if needed. -
Add Height:
Place a larger, striped gourd or pumpkin on top of your base layer in the back to draw the eye upward. -
Fill the Gaps:
Tuck smaller gourds into the spaces between the larger pumpkins and the candle. -
Mind the Flame:
Ensure no pumpkins are leaning directly against the candle itself or hovering over the flame area. -
Check the Front View:
Close the door briefly to check your composition. Make sure the prettiest sides of the pumpkins are facing out through the glass. -
Adjust for Balance:
If the arrangement looks heavy on one side, shift a bright orange pumpkin to the opposite side to balance the color weight. -
Careful Stacking:
When stacking a second layer, ensure the bottom pumpkins are stable so the pile doesn’t shift when you move the lantern. -
Feature a Speckled Gourd:
Find a spot near the front or side glass to showcase a uniquely textured or speckled gourd for added interest.
Faux Glow
Weave a string of battery-operated copper wire fairy lights in and around the pumpkin stack for a magical sparkle that outshines a single candle.
Step 3: Styling & Finishing
-
External Accents:
Place a few extra pumpkins outside the lantern, near the base, to extend the scene and ground the lantern in its setting. -
Add a Large Companion:
Position a larger orange pumpkin next to the lantern for a classic autumnal pairing. -
Final Polish:
Give the glass one last check for fingerprints you might have left while arranging the interior. -
Light the Candle:
Turn on your LED candle or carefully light the wick if using a real flame, ensuring plenty of clearance above. -
Close and Secure:
Latch the lantern door securely. Your harvest display is now ready to warm up your porch.
Enjoy the cozy ambiance this seasonal lantern brings to your home’s entrance
BRUSH GUIDE
The Right Brush for Every Stroke
From clean lines to bold texture — master brush choice, stroke control, and essential techniques.
Explore the Full Guide
Metallic Ornament Bowl-Effect Fill
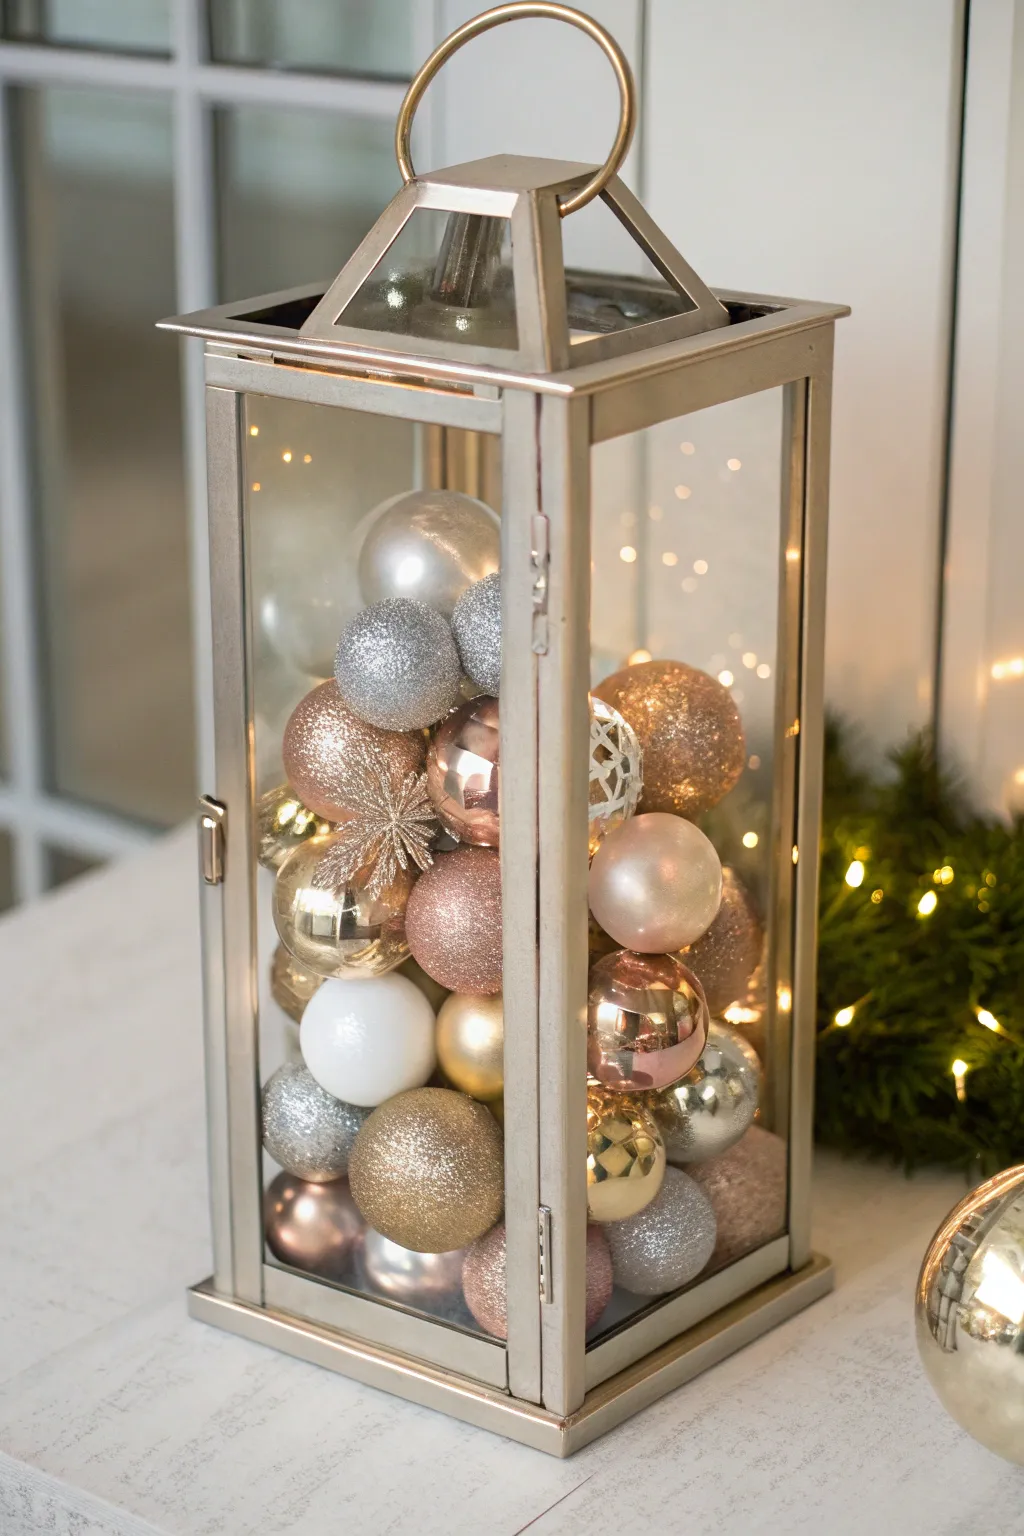
Transform a simple glass lantern into a dazzling holiday centerpiece by creating a ‘bowl’ effect with varied metallic ornaments. This elegant arrangement combines textures of glitter, matte, and mirrored finishes to catch the light beautifully.
Step-by-Step Guide
Materials
- Tall metal lantern (silver or nickel finish)
- Assorted metallic ornaments (gold, silver, rose gold, champagne)
- Variety of ornament sizes (mini, small, medium)
- Variety of finishes (glitter, matte, shiny, pearlescent)
- Battery-operated LED fairy lights (warm white)
- Microfiber cloth (for cleaning glass)
- Optional: decorative picks or patterned ornaments
Step 1: Preparation & Foundation
-
Clean the glass:
Before filling, thoroughly clean the inside and outside of the lantern glass panes with a microfiber cloth to ensure no fingerprints or dust tarnish the final gleam. -
Check the lights:
Unwind your fairy lights and insert fresh batteries. Turn them on to double-check that all bulbs are working correctly before you bury the battery pack. -
Hide the battery pack:
Place the battery pack flat on the bottom of the lantern. While I usually tape it down, focusing on burying it under the first layer of ornaments works best here so you can easily access the switch later. -
Create the base layer:
Select your largest, heaviest ornaments for the bottom. Gently place 3-4 medium-sized baubles around the battery pack to conceal it from view.
Cap Concealment
Remove the hanging strings or hooks from the ornaments before filling. This creates a cleaner, more fluid ‘ball pit’ look without messy tangles.
Step 2: Layering the Ornaments
-
Begin the light weaving:
Drape a small section of the fairy wire loosely over the base layer of ornaments, ensuring the lights are evenly distributed rather than clumped in one corner. -
Add mixed textures:
Add the next layer of ornaments. Mix textures deliberately here—place a glittery ball next to a shiny one to maximize visual contrast. -
Incorporate color variation:
Vary your metallic tones as you build upward. If you just placed a gold ornament, try adding a silver or rose gold one next to it to break up solid blocks of color. -
Nestle the lights:
Continue winding the fairy light wire upward as you stack. The wire should weave in and out of the ornaments invisibly, casting a glow from within the pile. -
Fill the gaps:
Examine the corners of the lantern. Use smaller, mini-sized baubles to fill in the awkward gaps between the larger spheres and the glass walls.
Step 3: Finishing Touches
-
Raise the level:
Continue stacking ornaments until you reach about two-thirds to three-quarters of the way up the lantern. Leave some ‘headroom’ at the top to keep the look airy. -
Highlight specific pieces:
If you have a special feature ornament, like the starburst-patterned gold one seen here, position it prominently near the front glass for maximum visibility. -
Secure the wire end:
Tuck the very end of the fairy light strand behind a top-layer ornament so the wire tip isn’t sticking out awkwardly. -
Adjust facing:
Carefully rotate any ornaments that have visible hanging caps. Try to turn the caps inward or downward so the smooth, decorative sides face the glass. -
Close and polish:
Latch the lantern door securely. Do a final wipe-down of the exterior glass to remove any smudges created during the filling process.
Add a Scent
Tuck a scent stick or a cinnamon-scented pinecone deep into the center of the ornament pile for a hidden source of holiday fragrance.
Place your glowing lantern near some greenery to watch the warm lights reflect off the metallic surfaces
Greenery Wreath Base Anchor
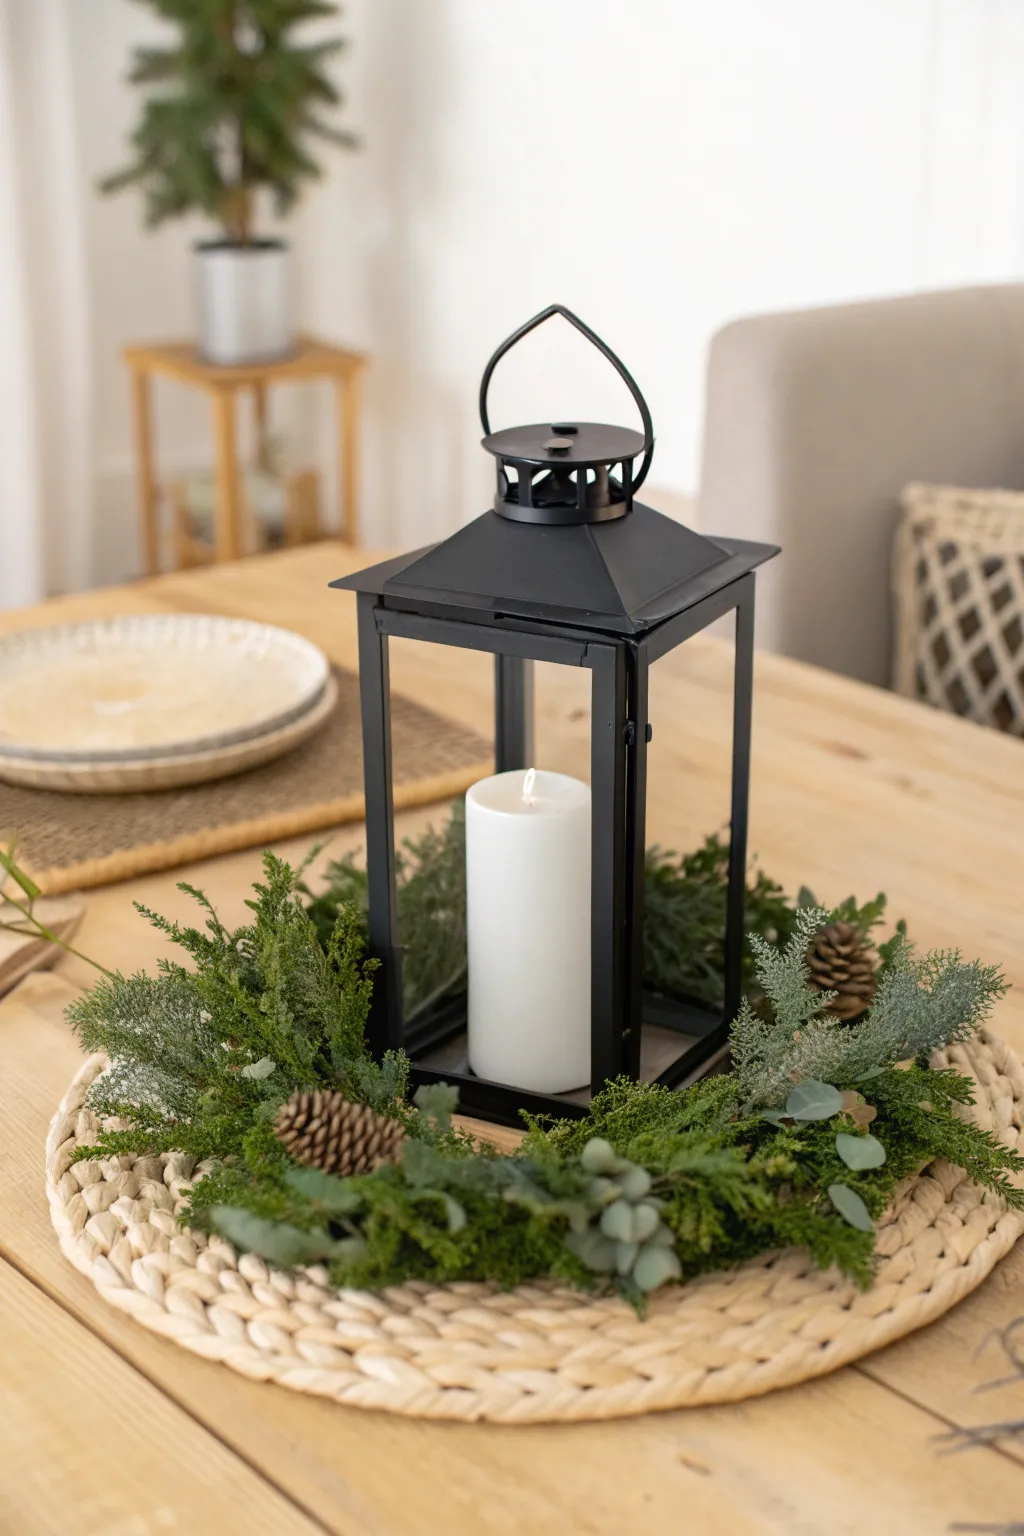
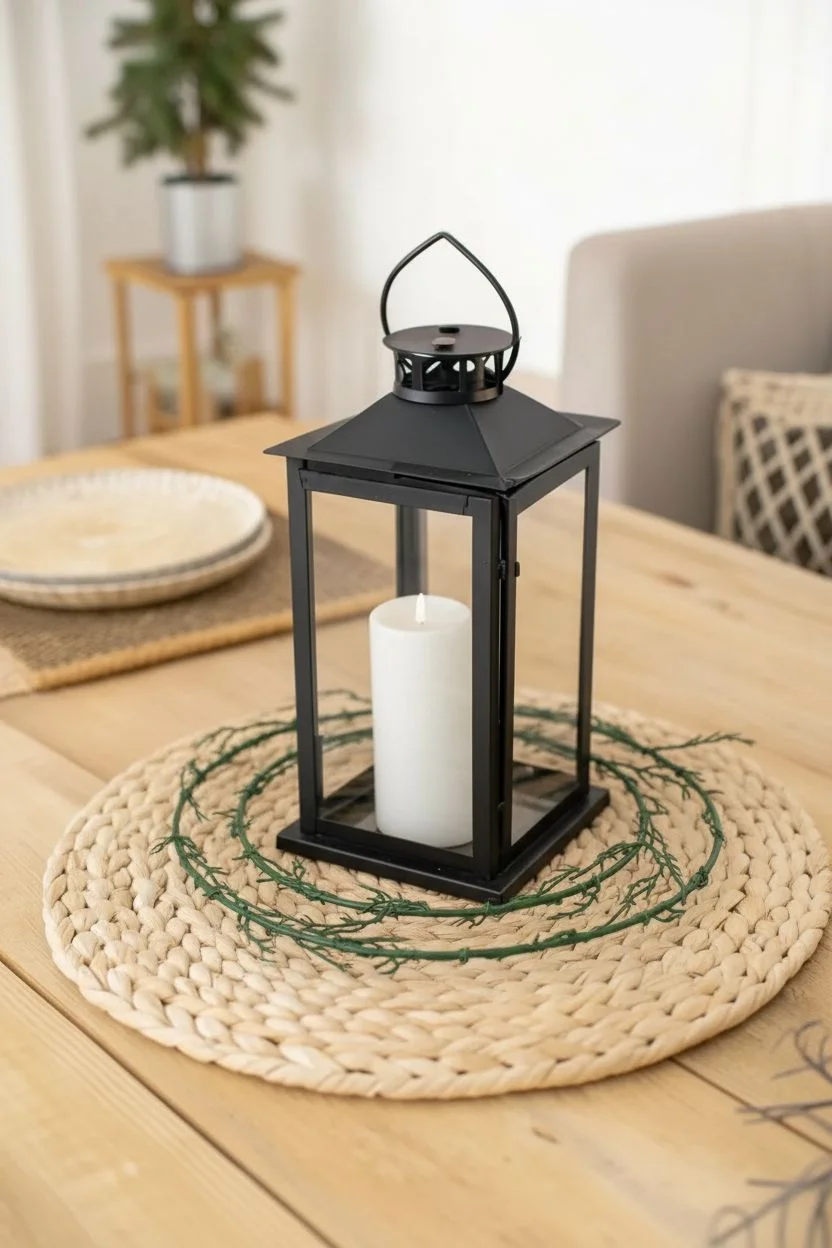
Create a sophisticated table centerpiece by layering natural textures and simple components. This arrangement combines the warmth of a woven base with a classic black lantern nestled in a lush, mixed-greenery wreath for a timeless seasonal look.
How-To Guide
Materials
- Black metal lantern (square, with handle)
- White pillar candle (approximately 3×6 inches)
- Round woven placemat (water hyacinth or seagrass)
- Artificial greenery wreath base (vine or wire)
- Faux cedar sprigs
- Faux eucalyptus stems (frosted or dusty green)
- Small pinecones (3-5 count)
- Floral wire or green twist ties
- Wire cutters
- Hot glue gun and glue sticks
Step 1: Setting the Foundation
-
Choose your base:
Begin by placing your woven placemat in the center of your table. This natural fiber mat not only protects the table surface but adds a crucial layer of texture that grounds the entire arrangement. -
Position the lantern:
Place the black metal lantern directly in the center of the placemat. Ensure it is stable and flat. Open the lantern door and insert your white pillar candle now, so you don’t have to disturb the greenery later. -
Prepare the wreath form:
Take your basic greenery wreath or wire form. Test the fit by sliding it over the lantern. It should sit comfortably on the placemat, hugging the base of the lantern without being too tight.
Step 2: Building the Greenery
-
Establish the primary green layer:
If using loose sprigs rather than a pre-made wreath, start by attaching longer branches of faux cedar to your wire form using floral wire. Arrange them so they flow in the same clockwise direction. -
Fluff and Shape:
Once your base layer is attached, spend a moment fluffing the branches outward. You want them to look full and slightly wild, rather than perfectly manicured. -
Add texture with eucalyptus:
Cut small stems of frosted eucalyptus. I like to tuck these in at irregular intervals around the wreath to break up the darker green of the cedar and add a softer, cooler tone. -
Create volume:
Look for any gaps where the wire base or the placemat underneath shows through too much. Fill these spots with smaller snippets of cedar, securing them with a dab of hot glue if the wire is hard to reach. -
Check the profile:
Step back and view the wreath at eye level. Ensure the greenery isn’t so high that it obscures the glass panes of the lantern; it should just graze the bottom metal rim.
Natural Scent Hack
Tuck a few real cinnamon sticks or dried orange slices deep into the greenery. The heat from the nearby lantern will gently warm them, releasing a subtle, cozy aroma.
Step 3: Adding Natural Accents
-
Select your pinecones:
Choose 3 to 5 small pinecones. Odd numbers generally look more natural and pleasing to the eye in arrangements like this. -
Position the pinecones:
Nestle the pinecones into the greenery. Don’t just place them on top; tuck them slightly under a cedar branch so they look like they grew there. -
Secure the accents:
Use a small dot of hot glue on the bottom of each pinecone to secure it to the greenery or the wreath base. Hold in place for a few seconds until set. -
Final adjustment:
Do a final check of the arrangement. If any greenery is sticking straight up or looking awkward, gently bend the wire stems to integrate them better with the flow of the wreath. -
Clean up:
Remove any visible strings of hot glue or stray bits of floral wire. Close the lantern door securely if it was left ajar. -
Light the candle:
When ready to display, light the pillar candle inside to cast a warm glow through the glass panes.
Wobbly Lantern?
If the lantern rocks on the woven mat due to the uneven weave, place a small, flat coaster or a cut circle of cardboard underneath the lantern to stabilize it invisibly.
Enjoy the cozy ambiance this simple yet elegant centerpiece brings to your dining space

PENCIL GUIDE
Understanding Pencil Grades from H to B
From first sketch to finished drawing — learn pencil grades, line control, and shading techniques.
Explore the Full Guide
Ribbon and Foliage Handle Topper
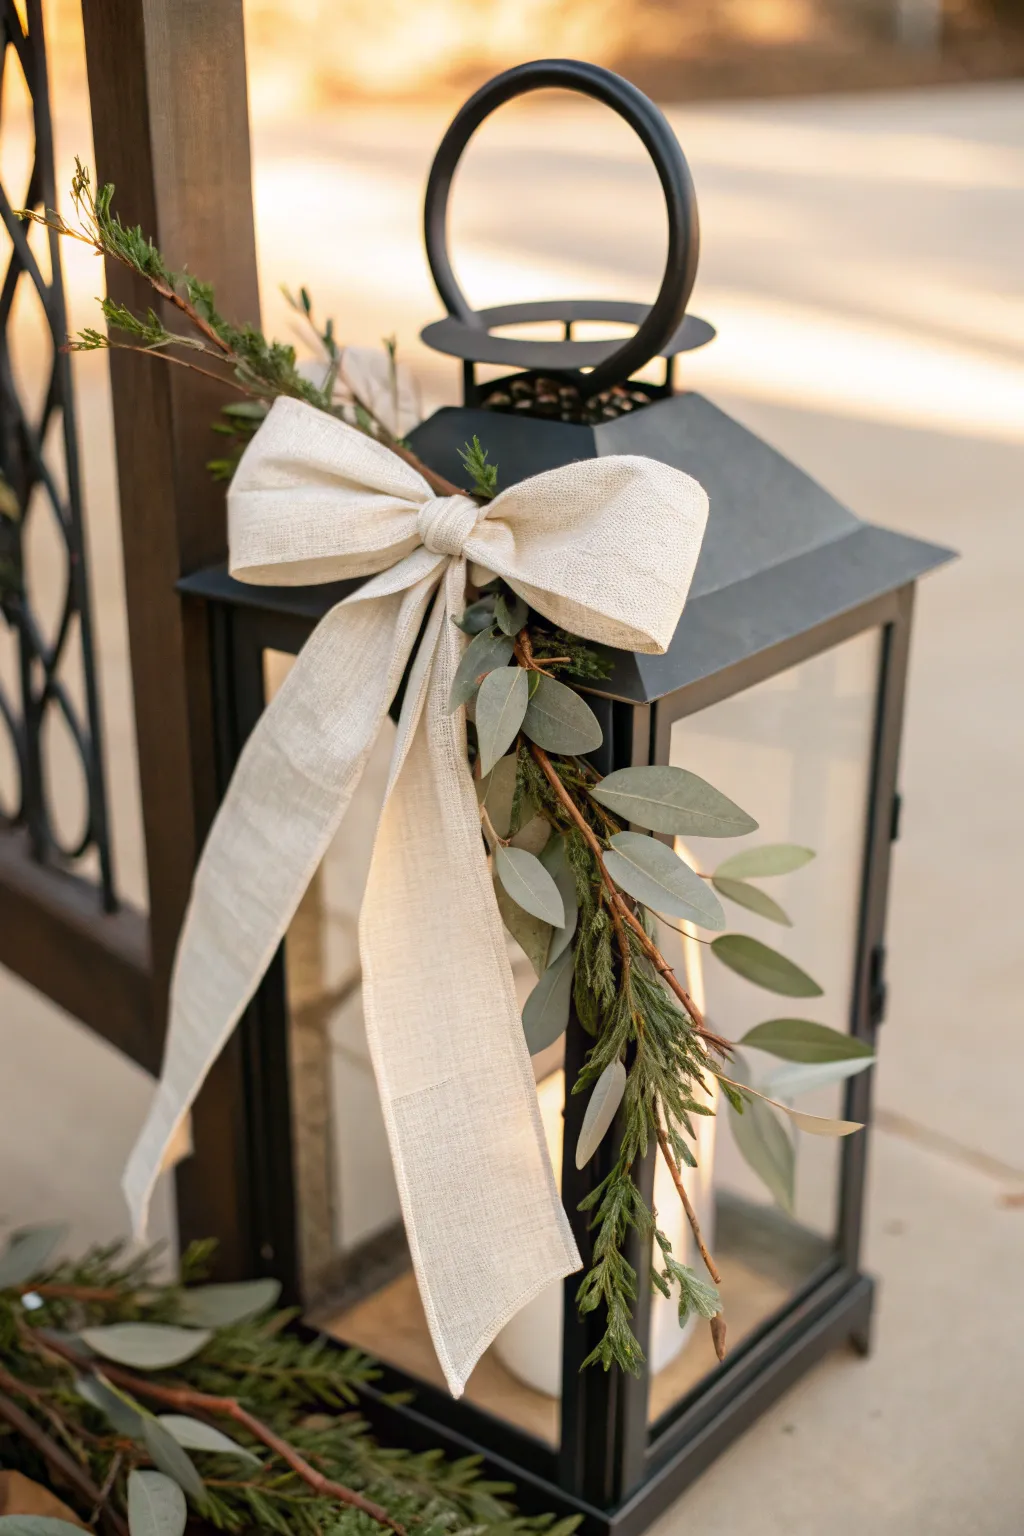

Transform a simple black lantern into an elegant decor piece by dressing up the handle with organic textures and a structured bow. This lantern topper combines wispy eucalyptus and hardy evergreen sprigs with a linen-style ribbon for a look that works beautifully for weddings, holidays, or everyday farmhouse styling.
Detailed Instructions
Materials
- Black metal lantern (medium to large size)
- Cream or beige varying-width linen ribbon (wired is best)
- Floral wire (green or brown)
- Fresh or high-quality faux eucalyptus stems (silver dollar or seeded)
- Fresh or faux evergreen cypress sprigs
- Thin decorative twig branches
- Wire cutters
- sharp scissors
- Hot glue gun and glue sticks (optional, for securing wayward leaves)
Step 1: Creating the Greenery Base
-
Select your stems:
Begin by selecting two main sprigs of evergreen cypress and two stems of eucalyptus. You want them to be roughly 8-10 inches long, depending on the height of your lantern. Trim off any excess leaves from the bottom 2 inches of each stem to create a clean ‘handle’ for binding. -
Layer the foliage:
Lay one evergreen sprig down first, then place a eucalyptus stem completely on top of it. Repeat this for the second set of stems. The goal is to mix the textures so the dark green cypress peeks through the softer gray-green eucalyptus leaves. -
Add twig accents:
Tuck a thin, bare twig branch behind each bundle. These should extend slightly beyond the greenery, adding a rustic, woodland height to the arrangement. -
Bind the bundles:
Take a length of floral wire and wrap the bottom, stripped stems of your first bundle tightly together. Repeat for the second bundle. You now have two distinct swags of greenery. -
Join the sides:
Position the two bundles horizontally so their stem ends overlap in the middle. The leafy ends should point in opposite directions—one going left, one going right. Secure them firmly together in the center with more floral wire, creating a single, long swag.
Drooping Bow?
If your linen ribbon is too floppy and won’t hold the loop shape, spray the ribbon with heavy starch or hairspray and let it dry before tying. This stiffens the fabric without adding visible wires.
Step 2: Tying the Perfect Bow
-
Measure the ribbon:
Cut a long length of your linen ribbon. You’ll need enough to create two generous loops and two very long tails that cascade down the side of the lantern. A 2-yard length is usually a safe bet for a medium lantern. -
Form the first loop:
Find the center of your ribbon, but then slide your hand about 12 inches to one side to leave a long tail. Make a loop that is roughly 3-4 inches wide. -
Create the second loop:
Bring the long end of the ribbon back to the center to form the second loop of the same size. Pinch the center tightly between your thumb and forefinger. -
Secure the center:
Use a small piece of floral wire to wrap tightly around the pinched center of the bow. Twist it at the back to lock the shape in place. -
Add a center knot:
Cut a small, separate strip of ribbon (about 3 inches long). Fold it lengthwise to make it narrower, then wrap it around the wired center of your bow to hide the mechanics. Glue or wire this small strip at the back. -
Trim the tails:
Cut the tails of the ribbon at an angle or in a fishtail v-shape. I find that leaving one tail slightly longer than the other adds a nice, casual elegance to the final look.
Natural Scents
Tuck a small bundle of cinnamon sticks or dried orange slices behind the bow’s center knot. The heat from a real candle inside the lantern will gently warm them, releasing a subtle, cozy fragrance.
Step 3: Assembly and Styling
-
Attach greenery to lantern:
Place your long greenery swag diagonally across the lantern handle or just below the handle mount. Use floral wire to secure the center of the swag directly to the metal lantern frame. Ensure it feels stable and doesn’t slide. -
Shape the foliage:
Gently bend the wired stems so the greenery curves naturally downward along the side of the lantern rather than sticking straight out. This ‘draping’ effect mimics gravity. -
Attach the bow:
Using the wire tails on the back of your bow (or the tails of the center knot wire), twist the bow onto the exact center of the greenery swag, covering the point where the two greenery bundles joined. -
Arrange the tails:
Smooth the ribbon tails so they flow downwards. Position one tail to drape slightly forward and the other slightly back to integrate with the greenery. -
Final adjustments:
Step back and assess the silhouette. If a eucalyptus leaf is facing the wrong way or hiding the ribbon, gently twist it or use a tiny dot of hot glue to tack it in place against another leaf.
Light your candle and enjoy the warm, welcoming atmosphere created by your beautifully adorned lantern
Console Table Framing Pair
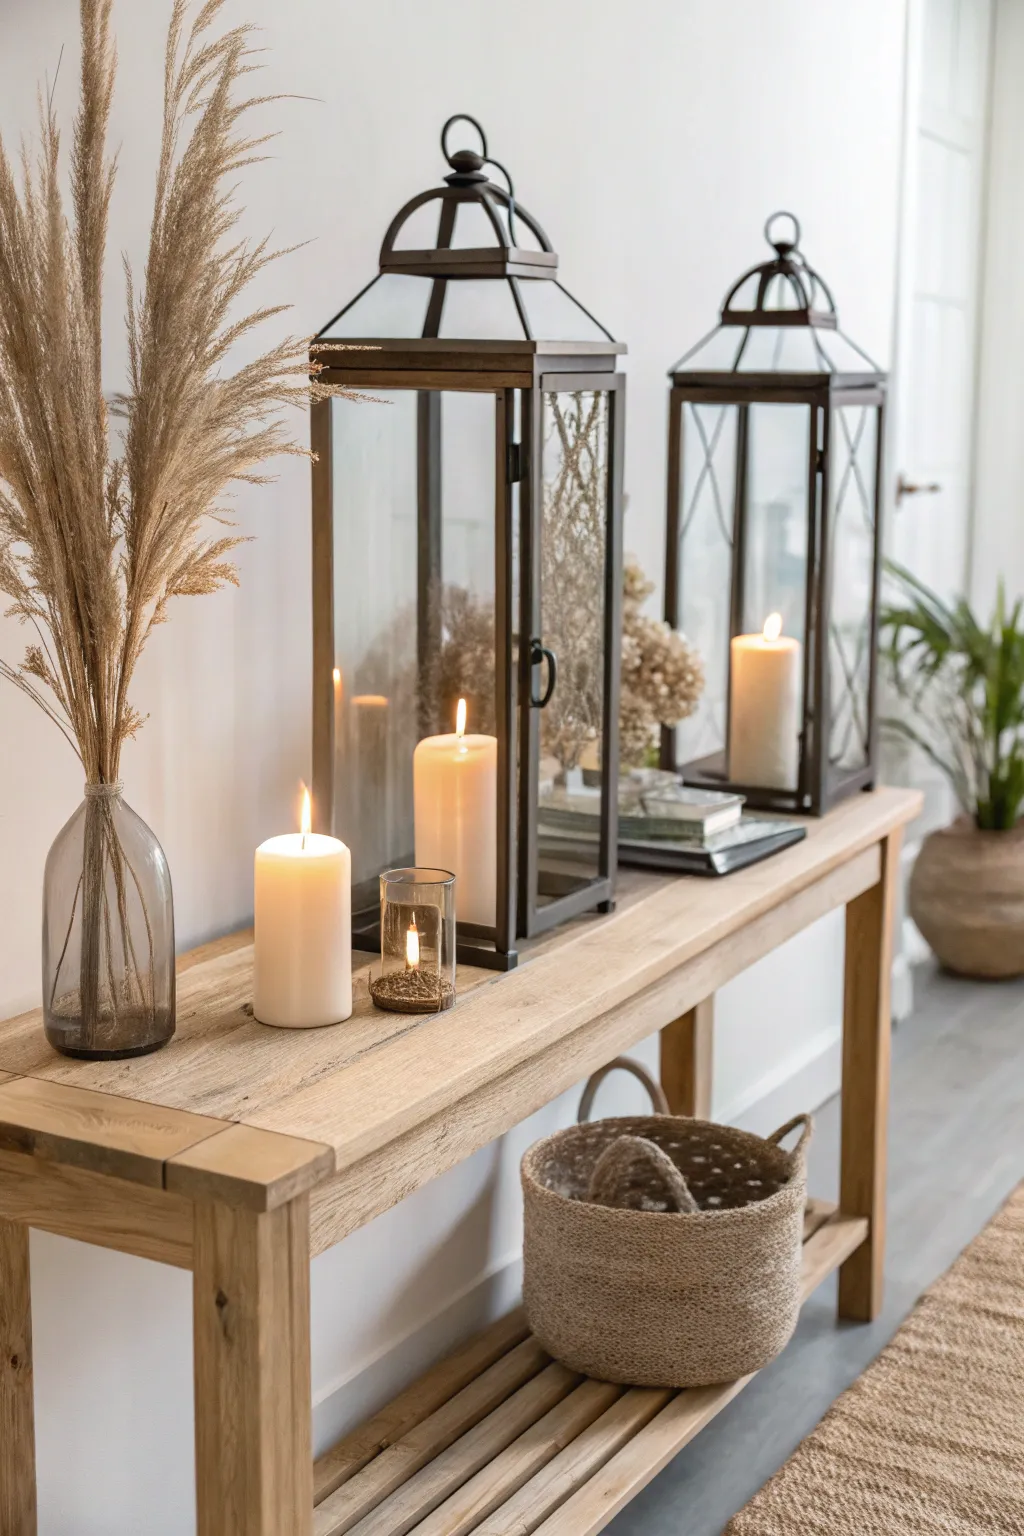
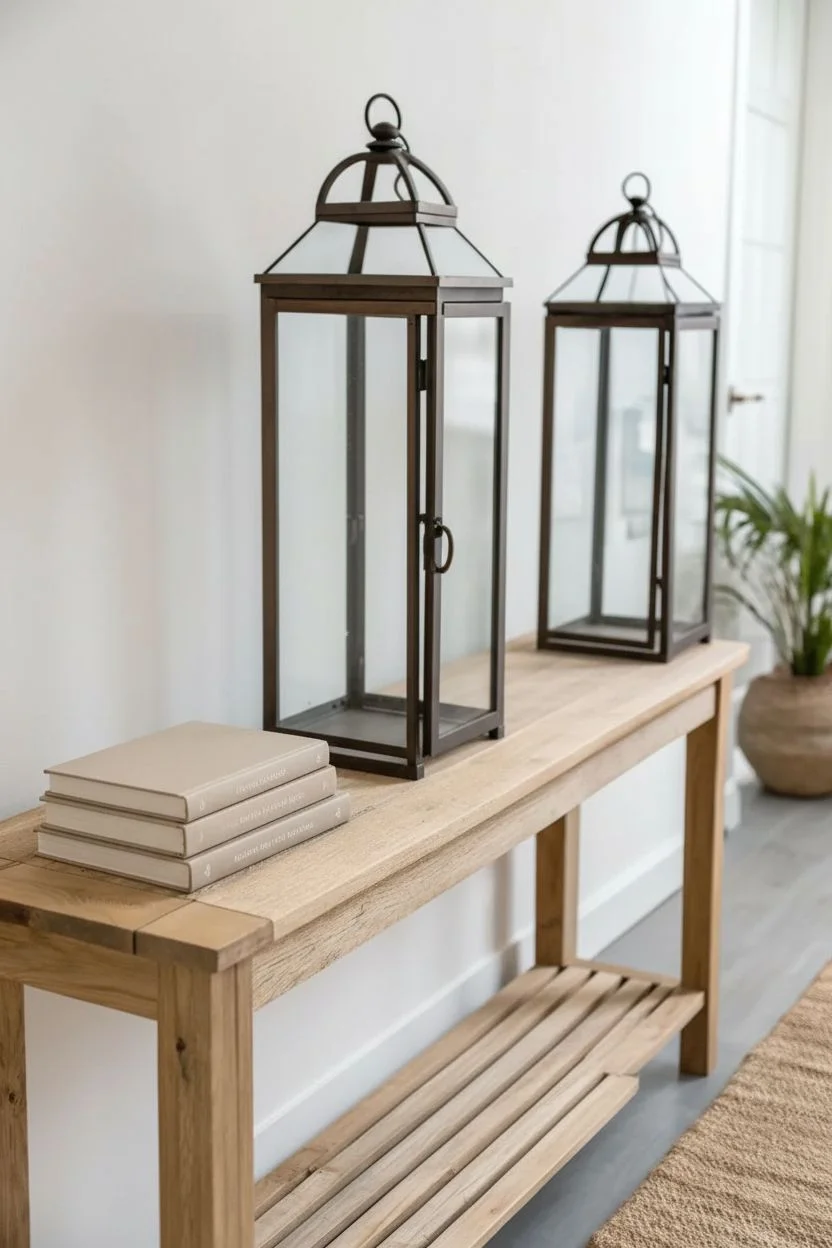
Bring warmth and vertical interest to your entryway with this balanced lantern arrangement. By pairing oversized lanterns with softer natural textures like pampas grass and woven seagrass, you create a console display that feels both curated and invitingly cozy.
How-To Guide
Materials
- Two large metal and glass lanterns (approx. 20-24 inches tall)
- Wooden console table (rustic finish preferred)
- Three white pillar candles (varying heights)
- Small glass votive candle holder
- One glass jug vase (narrow neck)
- Dried pampas grass stems
- Dried filler florals (optional, for inside lantern)
- Woven seagrass basket
- Decorative coffee table books
- Lighter or matches
Step 1: Setting the Foundation
-
Clear and Clean:
Begin by completely clearing off your console table. Wipe down the surface to remove any dust so your arrangement sits on a clean slate. -
Position the Primary Lantern:
Place the taller or primary lantern on the table surface. Position it slightly off-center to the right, leaving enough space behind it for the wall to breathe. -
Place the Secondary Lantern:
Set the second matching lantern further to the right of the first one. Spacing them apart allows each piece to stand out rather than blending into a single block. -
Adding Height Variation:
To create visual interest, place a small stack of 2-3 neutral-colored coffee table books under or next to the lanterns. This breaks up the horizontal line of the table.
Step 2: Internal Styling
-
Insert Main Candles:
Open the lantern doors and place a large white pillar candle inside the primary lantern. Ensure it sits flat and stable. -
Add Texture Inside:
I like to tuck a small sprig of dried florals or tiny branches inside the back corner of the larger lantern, behind the candle. This adds depth so the glass box doesn’t feel empty. -
Secure the Second Candle:
Place the second pillar candle into the other lantern. If this lantern feels too stark, you can elevate the candle slightly on a small internal riser or block.
Wobbly Candles?
If a pillar candle feels unstable inside the lantern, melt a small pool of wax onto the lantern floor and press the candle base into it firmly.
Step 3: Balancing with Soft Textures
-
Prepare the Pampas:
Taking your dried pampas grass, gently shake the stems outside to remove loose seeds. Arrange them in your hand, varying the heights slightly. -
Arranging the Vase:
Place the pampas bouquet into the narrow-neck glass vase. The fluffiness of the grass provides a crucial softness to counteract the hard metal lines of the lanterns. -
Positioning the Vase:
Set the vase on the far left side of the console table. This creates an asymmetrical balance with the two lanterns on the right. -
The Bridge Element:
Place a standalone pillar candle directly on the table surface, just to the right of the vase. This bridges the gap between the tall grass and the heavy lanterns. -
Adding the Sparkle:
Nestle a small glass votive holder with a tea light or small candle next to the standalone pillar candle. This tiny point of light adds intimacy.
Seasonal Swap
Replace the pampas grass with eucalyptus branches for spring or evergreen sprigs for winter to completely change the vibe without buying new decor.
Step 4: Grounding the Look
-
Lower Shelf Styling:
Turn your attention to the space beneath the table. Place a large woven seagrass basket on the lower shelf or floor. -
Basket Placement:
Position the basket so it sits roughly beneath the lanterns. This visual weight at the bottom anchors the heavy items on top. -
Final Check:
Step back and check the balance. Adjust the spacing of the lanterns or the spread of the pampas grass until the composition feels relaxed yet ordered. -
Light It Up:
Carefully light the wicks of all candles—inside the lanterns and on the table. Enjoy the warm glow bouncing off the glass panes.
Enjoy the peaceful ambiance your new lantern display brings to the room


Coffee Table Still-Life Stack
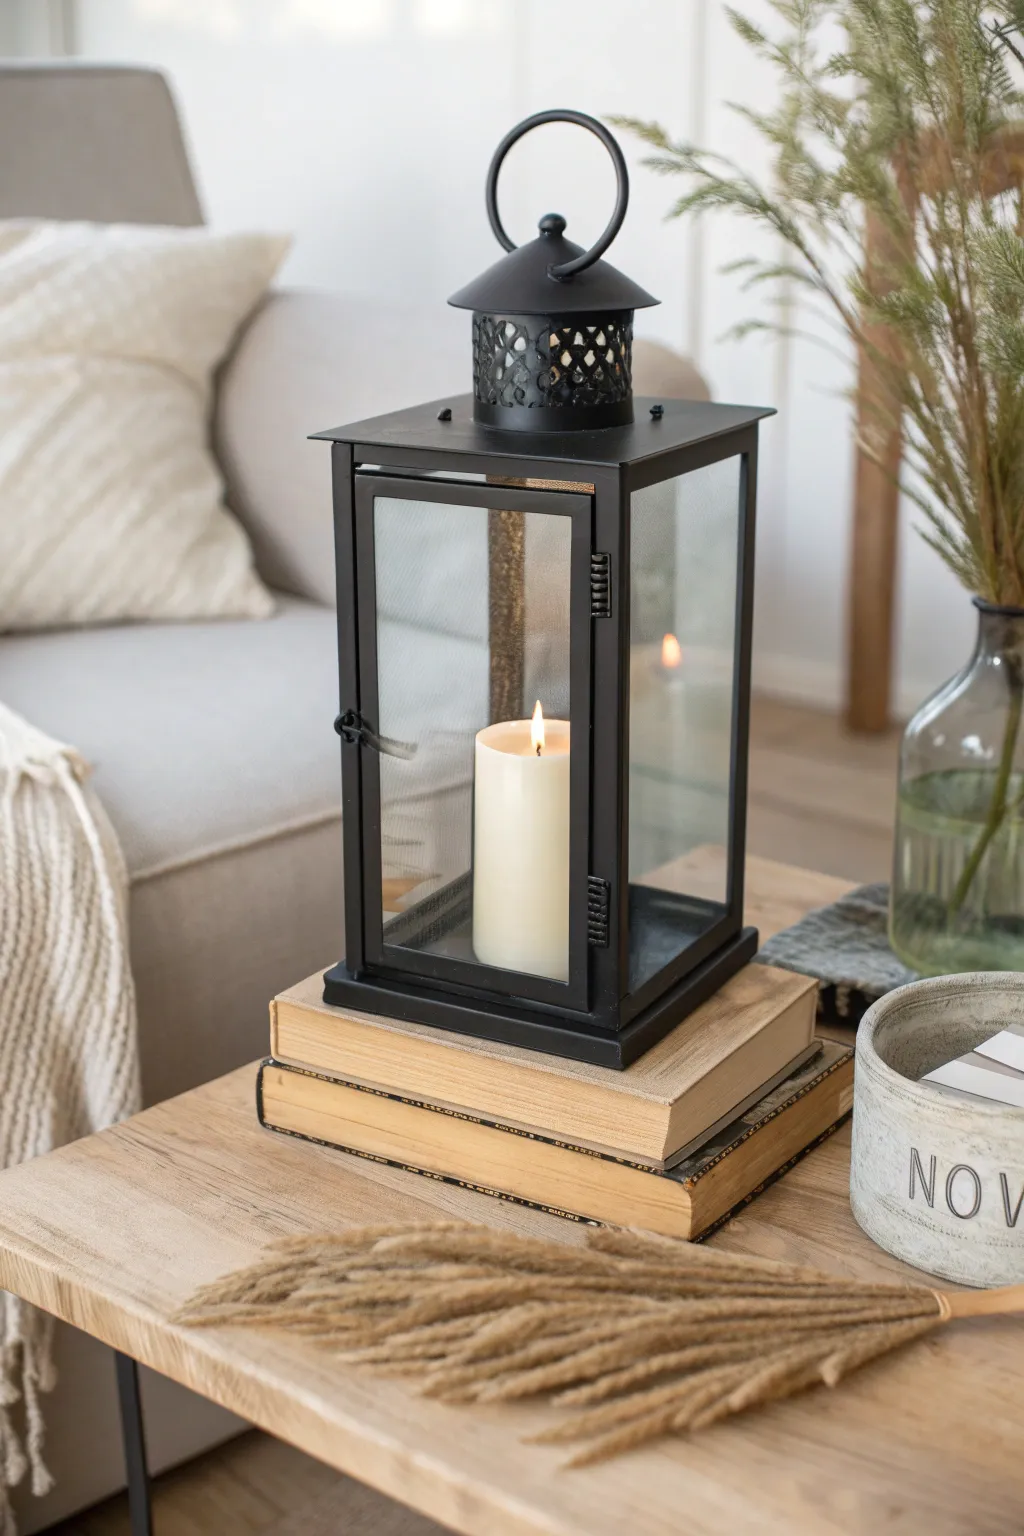
Bring warmth and height to your coffee table with this sophisticated still-life arrangement. By stacking vintage books as a plinth for a modern lantern, you create a cozy focal point that blends rustic textures with contemporary lines.
Step-by-Step
Materials
- Black metal lantern (rectangular with glass panels)
- White pillar candle (unscented)
- Two hardcover books (preferably with neutral or aged spines)
- Dried pampas grass or wheat stems (loose)
- Wooden coffee table or tray surface
- Microfiber cloth
- Glass cleaner
- Long matches or lighter
Step 1: Preparing the Foundation
-
Select the books:
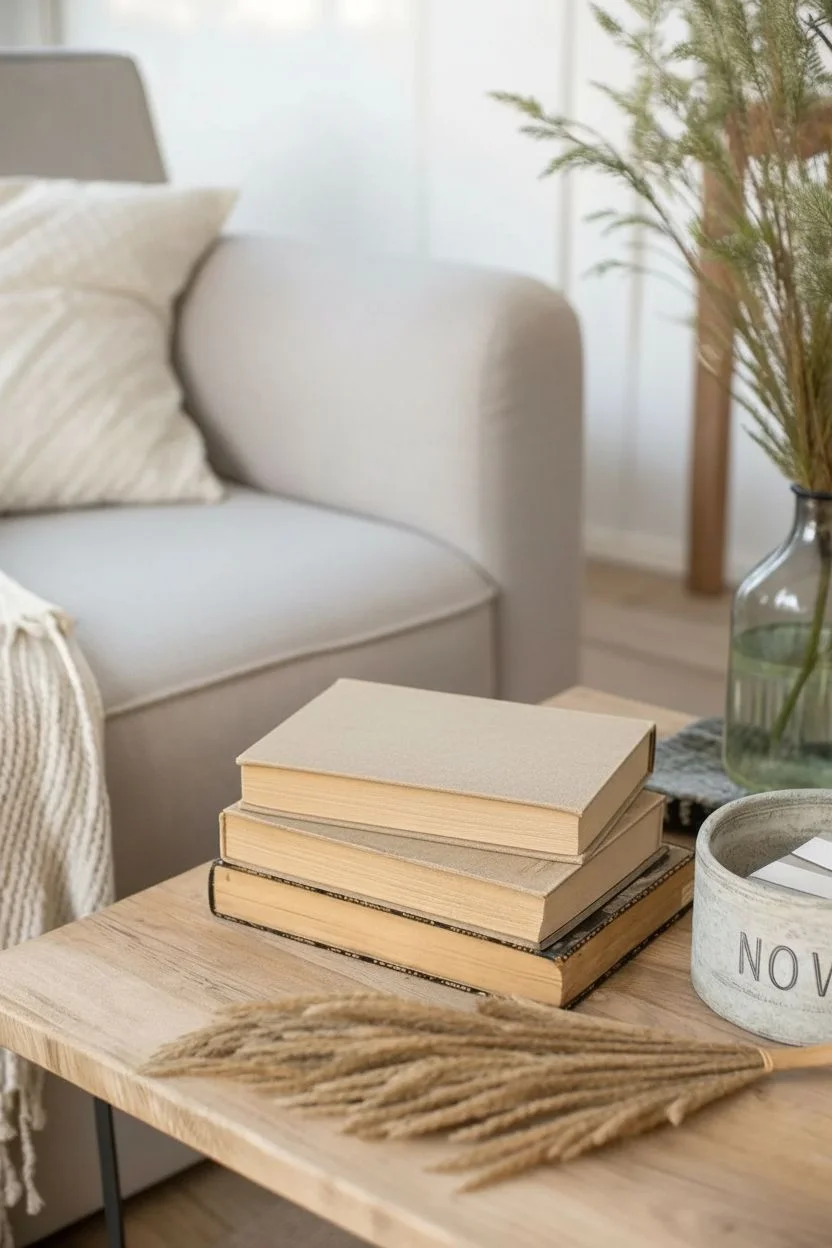
Choose two hardcover books that are slightly larger than the base of your lantern. Look for volumes with beige, tan, or brown spines to match the neutral aesthetic. If they have colorful dust jackets, remove them to reveal the cloth covers underneath. -
Clean the surfaces:
Wipe down the coffee table area where you plan to place the arrangement. Dust the books thoroughly, paying attention to the edges. -
Stack the books:
Place the larger of the two books on the table first. Center the slightly smaller book on top of it. I find that aligning their spines facing the same direction gives the stack a deliberate, curated look rather than a messy pile. -
Check stability:
Press down gently on the stack to ensure it is level and stable. The books will act as a pedestal, so they need to be flat enough to support the lantern safely.
Aged Book Hack
If your books look too new, you can age the pages by lightly brushing the edges with strong brewed tea or coffee and letting them air dry.
Step 2: Preparing the Lantern
-
Clean the glass:
Using glass cleaner and a microfiber cloth, clean both the inside and outside of the lantern’s glass panels. Remove any fingerprints or smudges, as the candlelight will highlight imperfection. -
Prepare the candle:
Check the wick of your pillar candle. Trim it to about 1/4 inch to ensure a clean, steady burn without excess smoke. -
Insert the candle:
Open the lantern door. Place the pillar candle inside, ensuring it is perfectly centered on the lantern’s floor. Press it down slightly if the wax is soft to help it grip the metal base. -
Secure the door:
Close the lantern door and ensure the latch is fully engaged. It shouldn’t rattle or swing open on its own.
Step 3: Assembling the Scene
-
Position the lantern:
Lift the prepared lantern and place it squarely in the center of the top book. Check it from a few angles to ensure it isn’t leaning or off-center. -
Add texture:
Take a small handful of dried pampas grass or wheat stems. Arrange these loosely on the table surface in front of or slightly to the side of the book stack. -
Fan the stems:
Gently spread the dried stems so they fan out slightly, creating a soft, organic texture that contrasts with the hard lines of the books and metal. -
Final check:
Step back and assess the composition. The lantern should feel balanced on the books, and the dried grass should act as a subtle accent without decluttering the space. -
Light the candle:
Open the lantern door carefully. Light the candle using a long match or lighter, then close the door immediately to protect the flame from drafts.
Seasonal Switch-Up
Wrap a sheer chiffon ribbon around the book stack or place a small seasonal wreath around the base of the candle inside the lantern.
Now sit back and enjoy the flickering glow of your newly styled coffee table centerpiece
Mantel End-Cap Lantern Styling
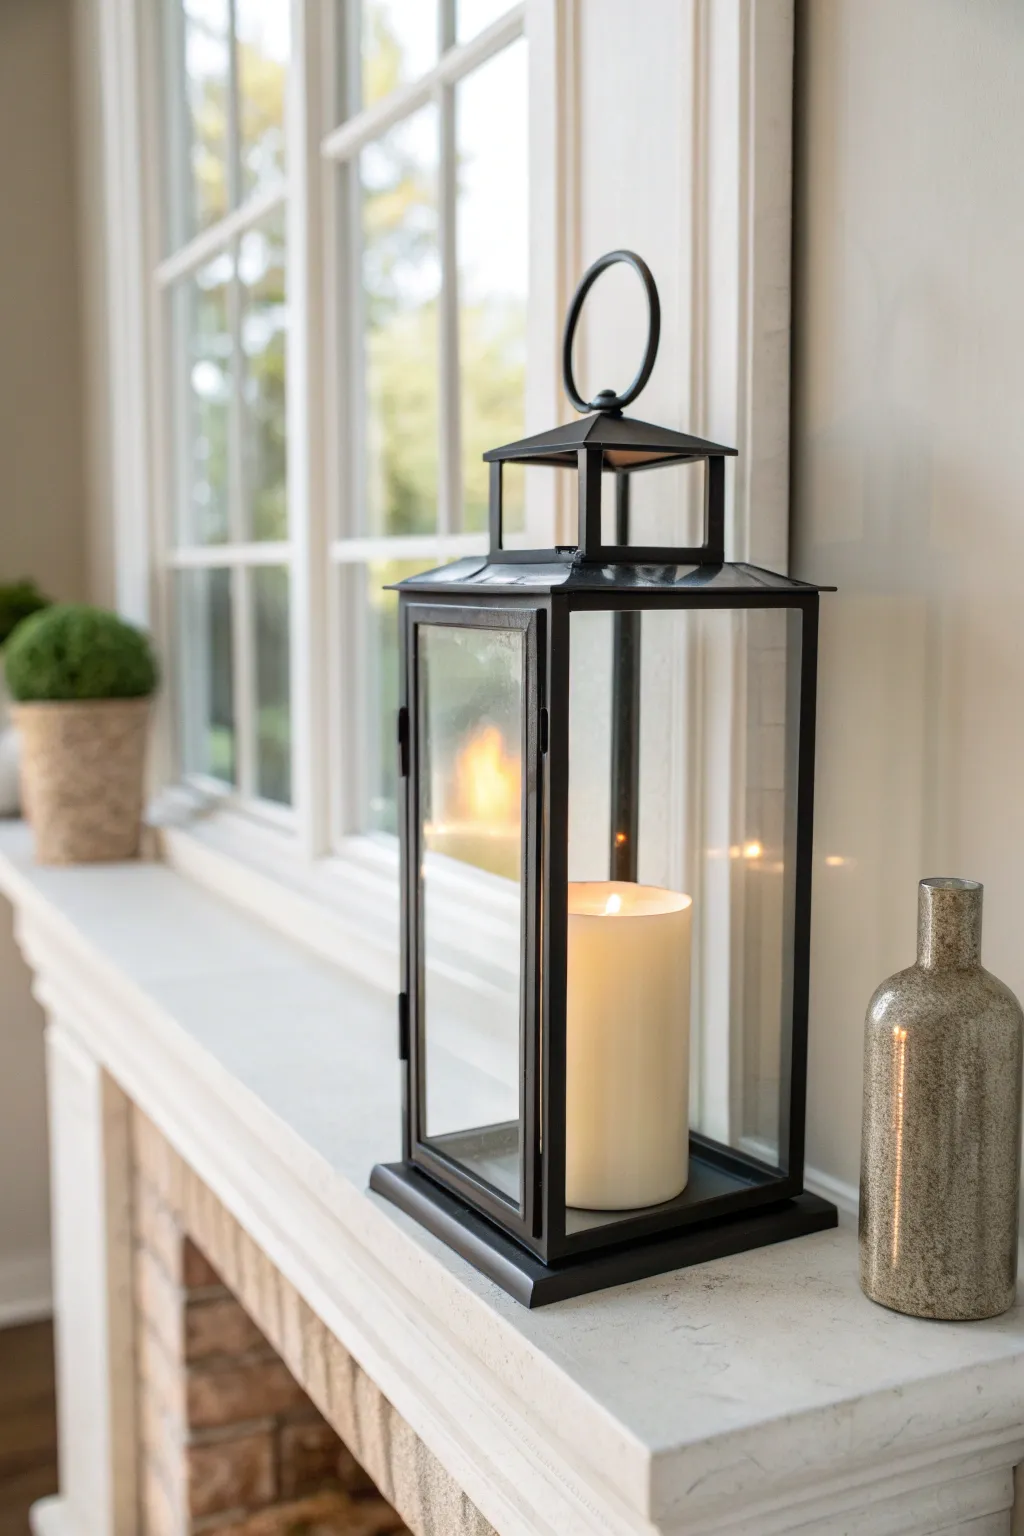
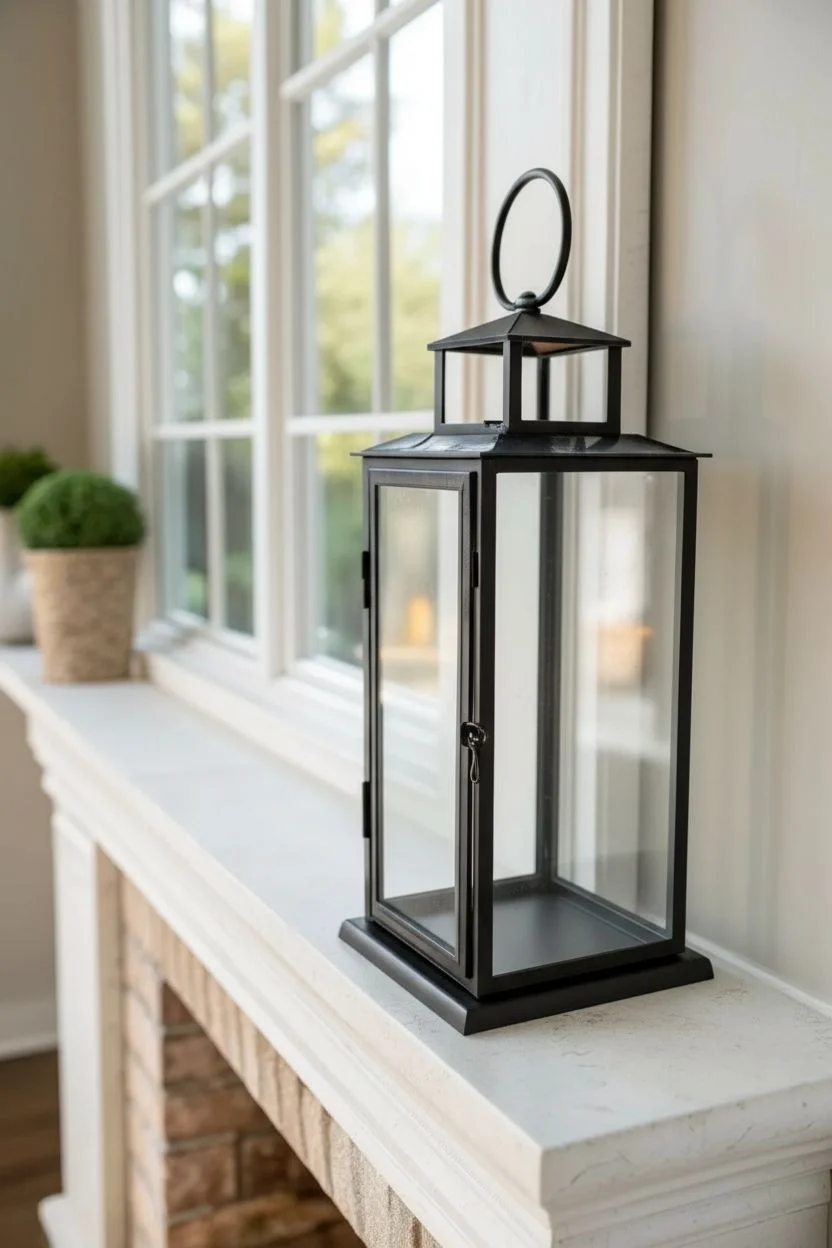
Transform a simple mantel into a cozy focal point with this minimalist lantern styling project. By focusing on clean lines, classic black metal, and the soft glow of candlelight, you create an inviting atmosphere that feels both modern and timeless.
How-To Guide
Materials
- Tall black metal lantern (approx. 18-20 inches tall) with glass panels
- Large ivory pillar candle (3-4 inches diameter)
- Microfiber cleaning cloth
- Glass cleaner
- Long-reach lighter or matches
- Decorative textured glass bottle (gray/stone finish)
- Small potted topiary or green plant (optional, for balance)
- Felt pads or clear rubber bumpers
Step 1: Preparation and Cleaning
-
Prepare the surface:
Before placing any decor, ensure your mantelpiece is free of dust and debris. A quick wipe with a damp cloth provides a clean slate for your styling arrangement. -
Inspect the lantern:
Check your metal lantern for any existing dust or fingerprints. This style relies on clarity, so smudge-free glass is essential. -
Clean the glass panels:
Spray a small amount of glass cleaner onto your microfiber cloth—never directly onto the lantern to avoid pooling in the metal frame seams. -
Wipe interior and exterior:
Gently wipe down both the inside and outside of each glass pane. I like to hold the lantern up to the window light to check for any missed streaks. -
Polish the metal frame:
Use a dry section of your cloth to buff the black metal frame, ensuring the finish looks matte and consistent.
Step 2: Assembly and Styling
-
Add protective feet:
Flip the lantern over and attach small felt pads or clear rubber bumpers to the corners of the base. This protects your mantel finish from scratches when moving the piece. -
Open the lantern door:
Release the latch on the front panel of the lantern. Ensure the hinge moves smoothly; apply a tiny drop of lubricant if it squeaks. -
Prepare the candle:
Take your ivory pillar candle and ensure the wick is trimmed to about 1/4 inch. This prevents smoking and keeps the glass clean longer. -
Insert the candle:
Carefully place the candle inside, centering it perfectly on the metal floor of the lantern. Visual balance is key here. -
Position the lantern:
Place the lantern on the far right end of your mantel. Align it so the sharp corners run parallel to the mantel edge, creating crisp lines against the window frame. -
Check spacing:
Leave a few inches of breathing room between the lantern and the wall or window trim to let the light circulate.
Clearer Views
Use a coffee filter instead of paper towels when cleaning glass. It leaves zero lint behind, ensuring the lantern panes remain crystal clear and streak-free against the sunlight.
Step 3: Finishing Touches
-
Add the companion piece:
Place the decorative textured bottle to the right of the lantern. Position it slightly back so it doesn’t compete for attention but complements the height difference. -
Balance the scene:
If you are styling the full mantel, place a small green topiary on the opposite end to visually weigh down the other side without mirroring perfectly. -
Re-check glass clarity:
Placing the candle might have caused accidental fingerprints. Do one final quick spot check on the glass. -
Light the wick:
Using a long-reach lighter, carefully light the candle. Allow the flame to settle and stabilize. -
Close the latch:
Securely close the lantern door and fasten the latch. The glass will now protect the flame from drafts, creating a steady, calming glow.
Soot Prevention
If the glass starts getting black soot marks, your wick is too long. extinguish the flame, let it cool, and trim the wick to 1/8th inch before relighting.
Step back and enjoy the simple, sophisticated warmth your new lantern arrangement brings to the room
Table Runner Centerpiece Lantern
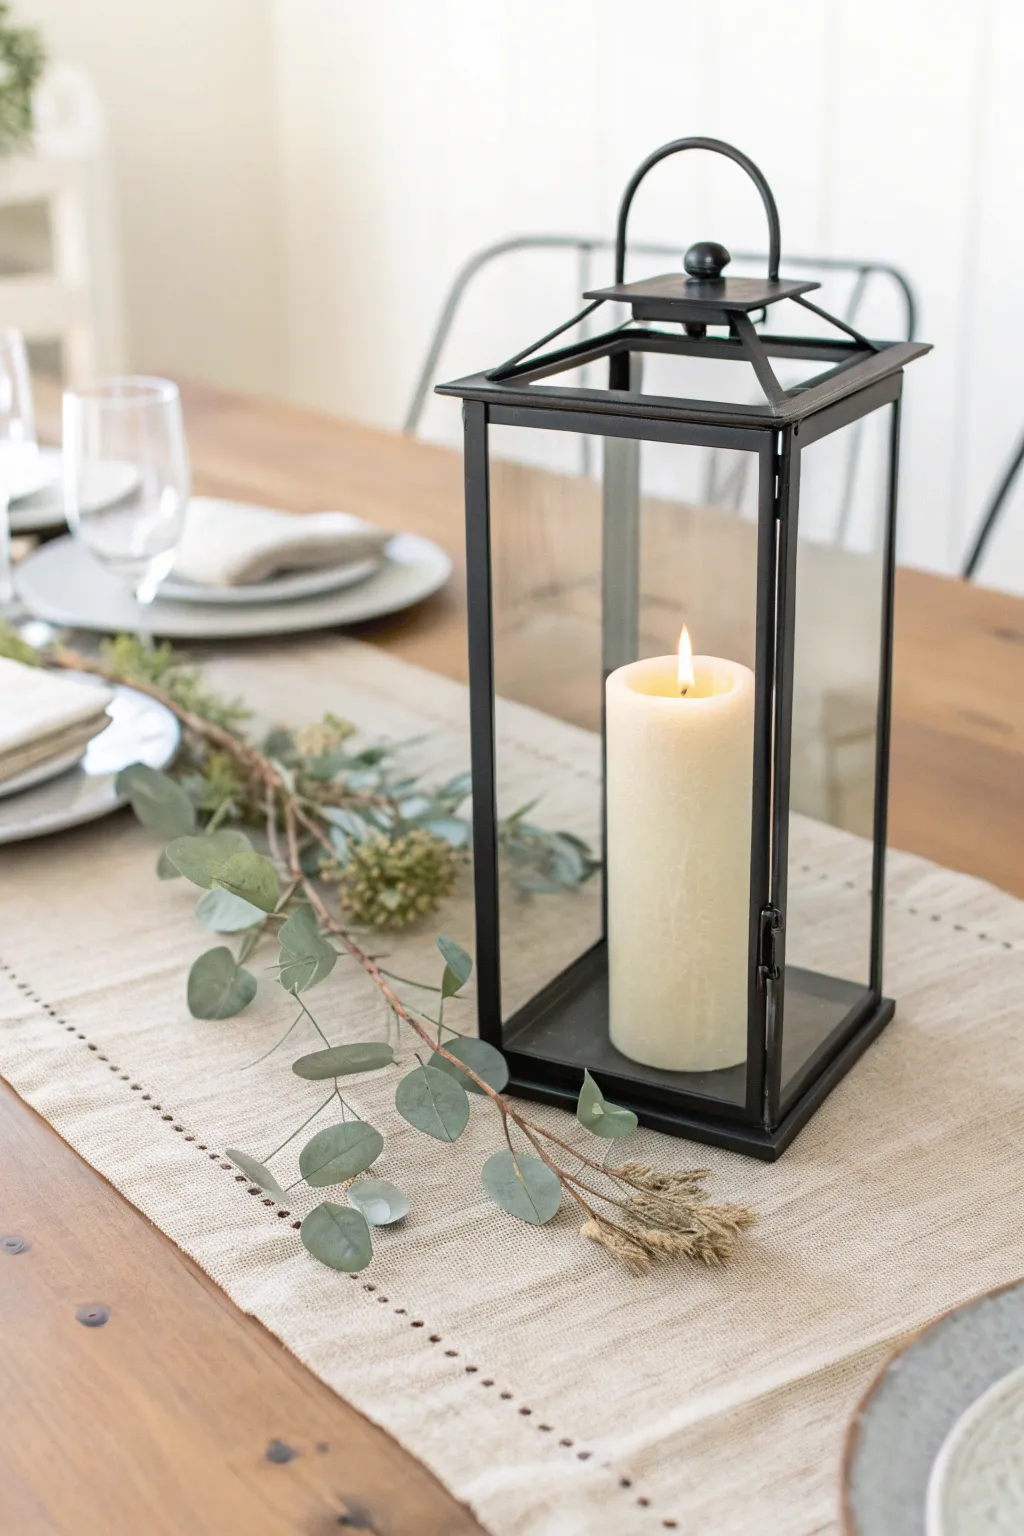
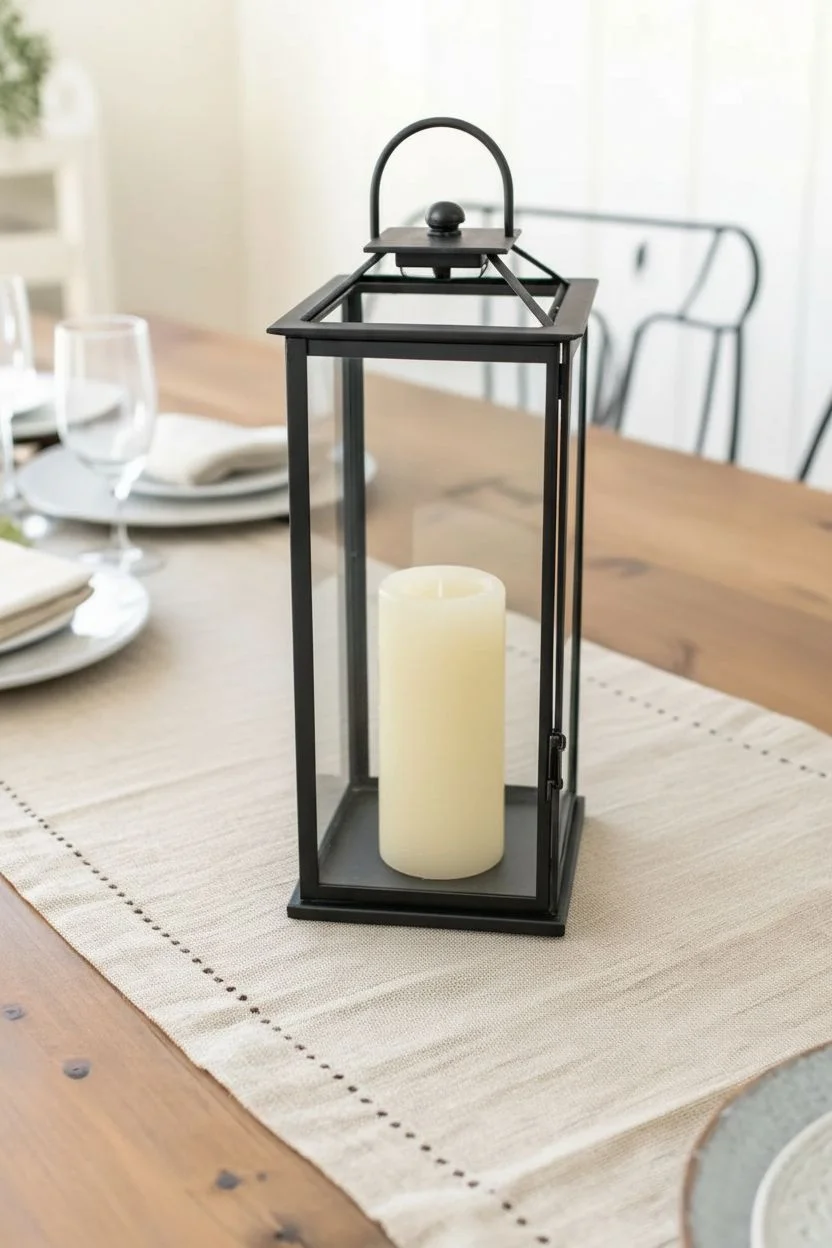
Bring a touch of organic elegance to your dining table with this clean, modern centerpiece arrangement. Combining the stark lines of a black metal lantern with the soft, flowing textures of eucalyptus and linen, this project creates an inviting atmosphere perfect for everyday dining or special gatherings.
Step-by-Step Tutorial
Materials
- Large black metal lantern (approximately 16-18 inches tall)
- Wide cream pillar candle (3-4 inches diameter)
- Natural linen table runner with hemstitch detail
- Fresh or high-quality artificial Silver Dollar Eucalyptus stems
- Dried wild grass bundles or wheat stalks (neutral tones)
- Scissors or floral shears
- Long grill lighter or matches
Step 1: Setting the Foundation
-
Prepare the surface:
Begin by clearing your wooden dining table completely. Wipe down the surface to ensure no dust or crumbs interfere with your runner placement. -
Lay the runner:
Unroll your natural linen runner down the center of the table. Smooth it out with your hands to remove any major creases, though a slightly relaxed look fits the aesthetic. -
Position the lantern:
Place your black metal lantern directly in the center of the runner. Ensure it sits flat and stable, with the door latch facing a convenient direction for access. -
Prepare the lantern interior:
Open the lantern door. If your lantern has a glass bottom, wipe it quickly with a microfiber cloth to remove fingerprints. -
Add the candle:
Place the cream pillar candle inside the lantern. I like to twist the candle slightly as I set it down to ensure it feels grounded and perfectly centered within the frame.
Freshness Factor
If using fresh eucalyptus, mist the leaves lightly with water an hour before guests arrive. This keeps the classic grey-green color vibrant and prevents curling.
Step 2: Arranging the Greenery
-
Select your main branch:
Choose a long, arching stem of silver dollar eucalyptus. Look for one that has a natural curve to it. -
Clean lower leaves:
Strip away the bottom 2-3 inches of leaves from the thick end of the stem. This reduces bulk where the stem will sit near the lantern base. -
Establish the curve:
Lay the main stem on the runner so that the cut end is tucked just slightly behind or next to the back corner of the lantern. -
Direct the flow:
Allow the leafy part of the branch to snake diagonally outward across the runner, moving away from the lantern. -
Add secondary stems:
Take a second, slightly shorter stem of eucalyptus. Place it facing the opposite direction on the other side of the lantern to create asymmetrical balance. -
Overlay for fullness:
If your first stem looks a bit sparse, layer a smaller sprig of eucalyptus on top of the main stem, tucking its cut end underneath existing leaves to hide the mechanics.
Unruly Stems?
If a branch refuses to lay flat or twists firmly the wrong way, use a small, clear glue dot or double-sided tape under a leaf to anchor it to the runner.
Step 3: Adding Texture and Detail
-
Prepare dried accents:
Take a small bundle of the dried grass or wheat. Trim the stems so they are about 6-8 inches long. -
Weave in texture:
Gently tuck these dried elements among the eucalyptus leaves. Focus on the area where the green stems meet the lantern to create a transition point. -
Refine the placement:
Adjust the leaves so they look natural. Some should lay flat against the linen, while others can twist upward slightly for dimension. -
Check the view:
Sit in one of the dining chairs to check the height. Ensure the arrangement doesn’t block the line of sight across the table. -
Clean glass panels:
Do a final check of the lantern glass panels from the outside, buffing away any smudges created during the greenery placement. -
Light the candle:
Use a long grill lighter to carefully light the pillar candle inside. This keeps your hand away from the soot and preserves the clean look of the wax. -
Close the latch:
gently close the lantern door and secure the latch. The reflection of the flame against the glass adds immediate warmth.
Enjoy the calm, sophisticated ambiance this simple centerpiece brings to your dining area
Front Steps or Walkway Lantern Line
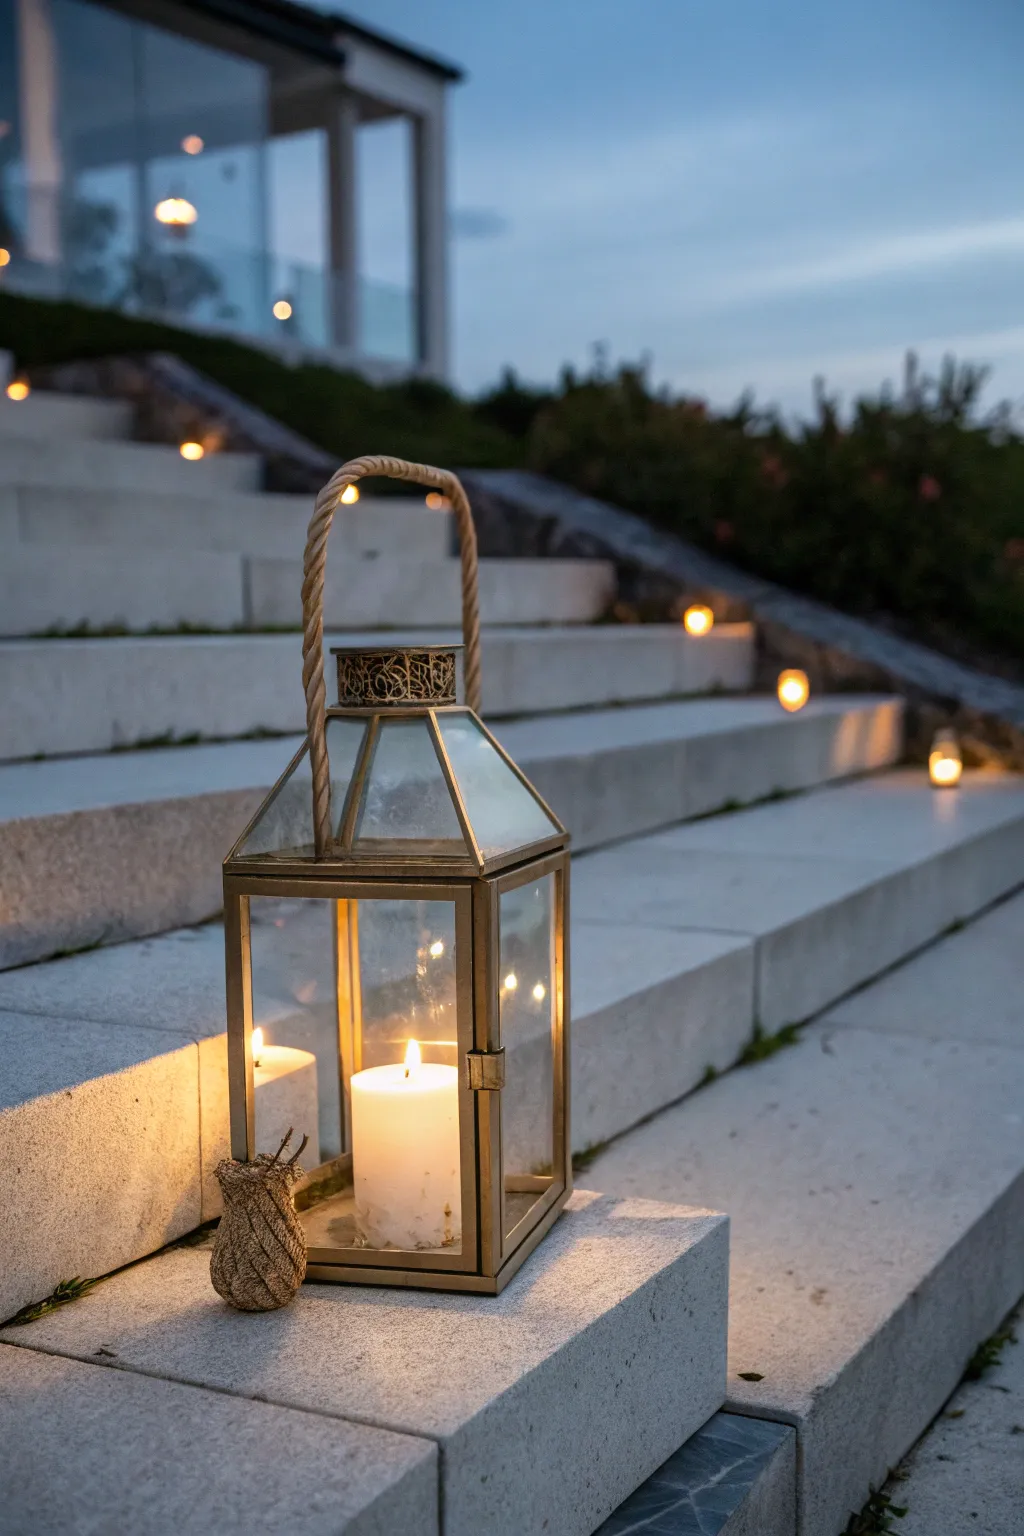
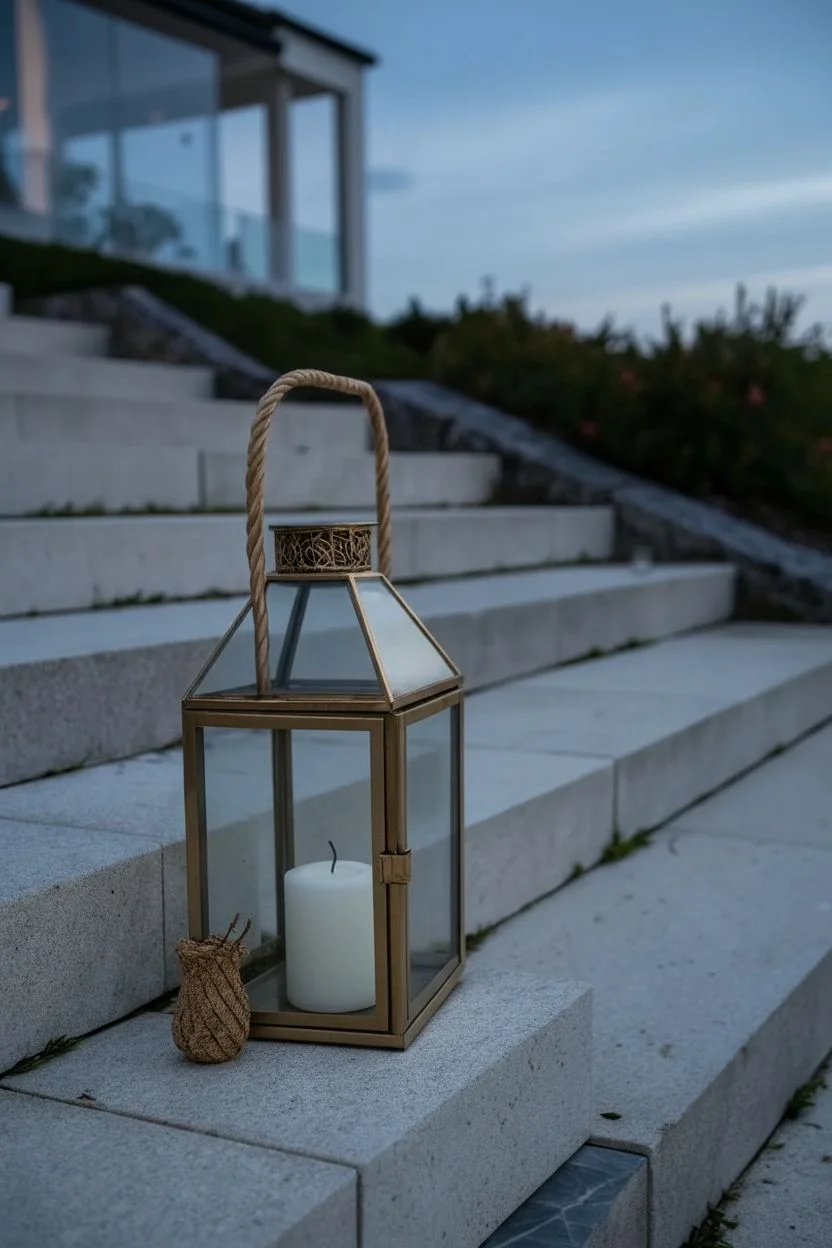
Transform a simple stone stairway into an inviting pathway by curating a mood-lit lantern display. This project focuses on styling a large focal lantern with a glowing pillar candle, complemented by a trail of smaller votives leading up the steps.
Detailed Instructions
Materials
- Large metal and glass lantern (brass or bronze finish)
- Thick rope for handle accent (if lantern lacks one)
- Large white pillar candle (3-4 inch diameter)
- Small glass votive holders (4-6)
- Tea light candles (real or LED)
- Stick lighter or long matches
- Coarse twine or jute string
- Scissors
- Hot glue gun (optional)
- Glass cleaner
- Microfiber cloth
Step 1: Preparing the Focal Lantern
-
Clean the glass:
Before assembling, thoroughly clean the glass panels of your main lantern using glass cleaner and a microfiber cloth to ensure the candlelight shines clearly without smudges. -
Handle inspection:
Check the handle of your lantern. If it is a plain metal wire, you can wrap it with thick rope to mimic the rustic look in the photo, securing the ends with a dab of hot glue underneath the wrapping. -
Prepare the pillar candle:
Select a large white pillar candle. Trim the wick to about 1/4 inch to ensure a clean, steady burn without excessive smoking. -
Insert the candle:
Open the lantern door and center the pillar candle on the base. If the candle wobbles, melt a few drops of wax onto the base first and press the candle into it to secure it upright. -
Create a decorative accent:
Using a small length of coarse twine or jute, create a small, purely decorative knot or tassel. Tie this loosely around the base of the lantern handle or rest it near the bottom corner for a textural touch.
Step 2: Arranging the Step Display
-
Select the location:
identify the bottom-most step or the landing area where your main lantern will sit. It needs a flat, stable surface where it won’t be a tripping hazard. -
Position the main lantern:
Place the large lantern on the chosen spot, turning it slightly so a corner faces outward rather than a flat side; this adds visual depth to the arrangement. -
Prepare the trail:
Gather your small glass votive holders and tea lights. I like to use clear glass holders so the flame is visible from all angles. -
Stagger the placement:
Place the first votive on the step immediately behind the main lantern, slightly off-center to the right or left. -
Continue the line:
Move up to the next step and place another votive. Alternate the placement side-to-side (zig-zag pattern) as you ascend the stairs to lead the eye upward. -
Address distant steps:
For steps further up in the background, place votives sporadically. You don’t need one on every single step; skipping a step here and there creates a more casual, organic look.
Pro Tip: Stick the Wick
If using real tea lights on windy evenings, put a tiny pea-sized ball of mounting putty or museum wax under the metal tin to keep them from sliding off the stone.
Step 3: Lighting and Safety
-
Light the trail first:
Start lighting your candles from the top step downwards. This prevents you from having to reach over hot flames or potentially knocking over the lower lanterns as you work. -
Light the main lantern:
Finally, use a stick lighter to ignite the large pillar candle inside the main lantern. Close the latch securely to protect the flame from wind. -
Check surroundings:
Ensure no foliage, dry leaves, or long grass overhangs the steps where the open flame votives are placed. -
Final adjustment:
Step back to the bottom of the walkway and check the alignment. Nudge the lantern or votives slightly to ensure the line of light looks balanced and inviting.
Level Up: Seasonal Fillers
For added flair, place seasonal items inside the main lantern around the base of the candle, such as sea glass in summer or pinecones in winter.
Now stepping out your front door feels like a magical entrance every evening
Patio Edge Glow with Repeat Lanterns
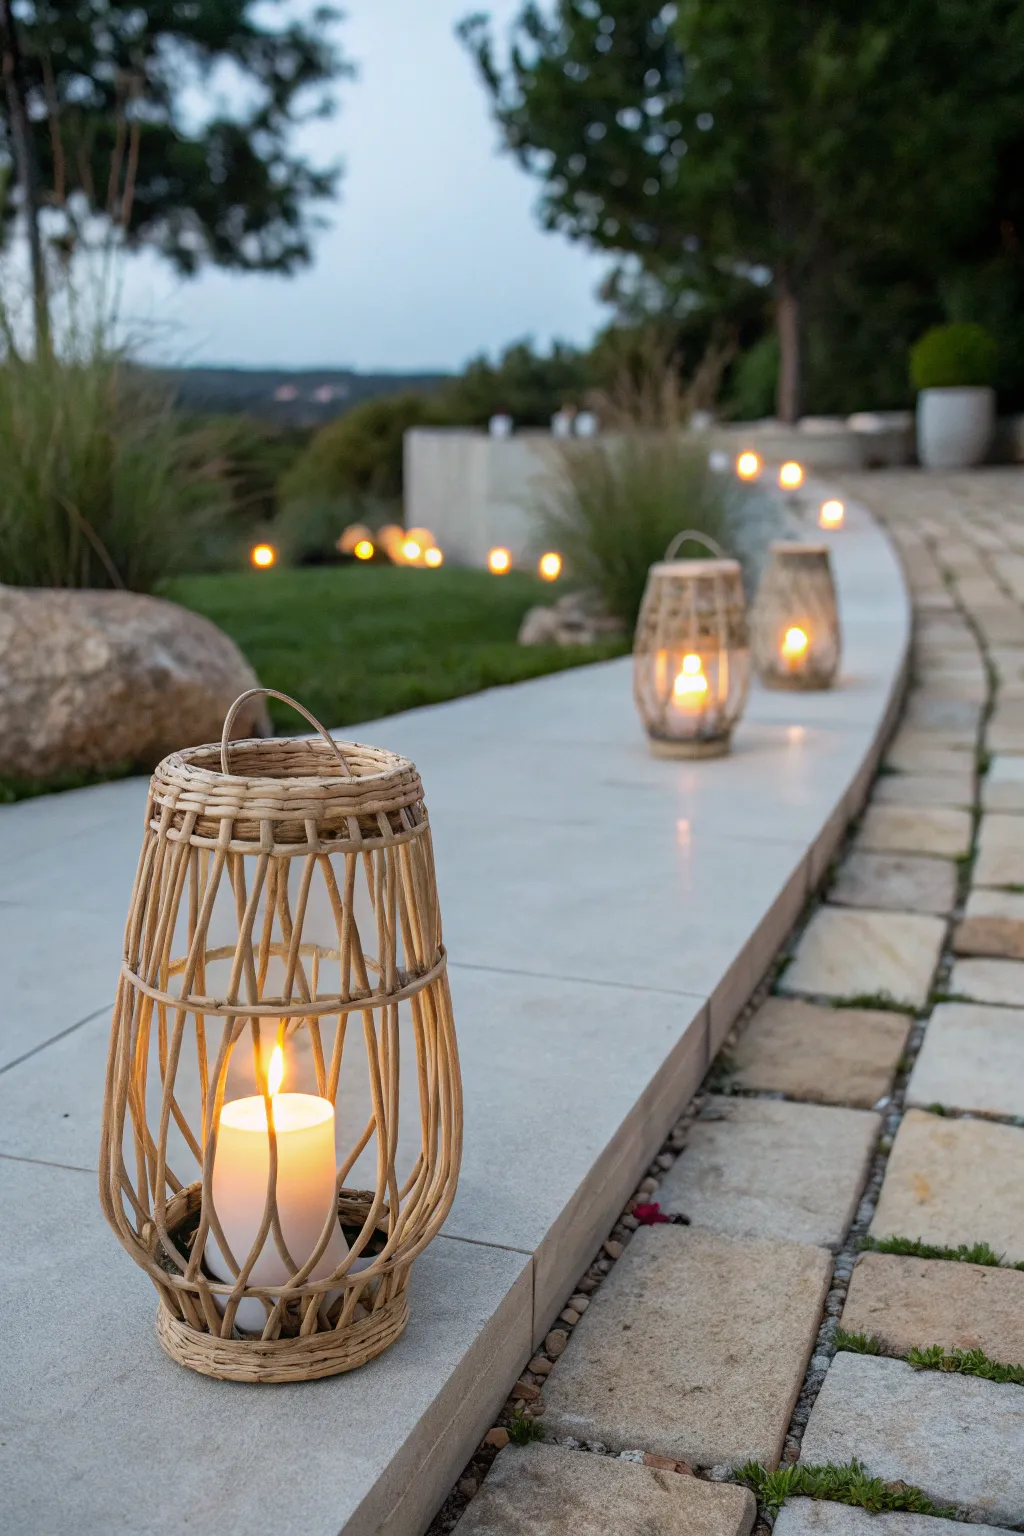
Transform your garden walkway into an enchanting evening escape with these handmade wicker-style lanterns. Their open weave casts beautiful shadows while safely sheltering candles, creating a warm, inviting glow perfect for patio edges.
Step-by-Step Tutorial
Materials
- Balloon (large, round shape)
- Natural rattan reed or paper twist cord (approx. 5mm thickness)
- Strong craft glue or wood glue
- Water
- Small bowl for mixing
- Clothespins or binder clips
- Scissors
- Cardboard or sturdy base (circular)
- Clear matte spray sealer
- LED pillar candles (outdoor rated)
- Twine or thin wire (for binding)
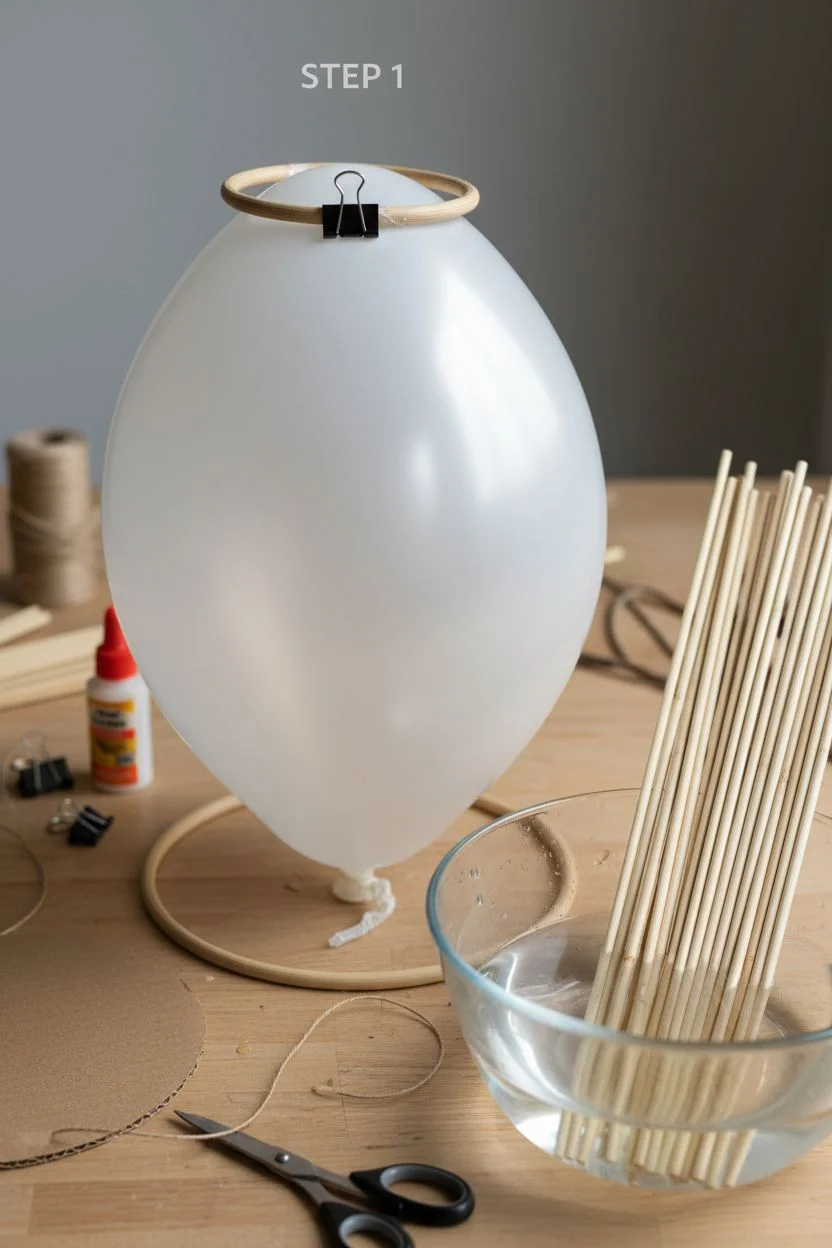
Step 1: Creating the Frame
-
Prepare the base form:
Inflate your balloon to the desired size of your lantern. It should be slightly pear-shaped or oval to match the look in the photo. Secure the knot tightly so no air escapes. -
Make the structural rings:
Cut your rattan reed or paper cord to create two distinct rings: a smaller one for the top opening and a slightly larger one for the sturdy bottom base. Glue the ends of each ring together and secure with a clothespin until dry. -
Measure vertical struts:
Cut approximately 12 to 16 lengths of reed that will serve as the vertical ribs of the lantern. These need to be long enough to curve around the inflated balloon from the top ring to the bottom ring, with about an inch of excess. -
Soak the reeds:
If using natural rattan, soak the cut pieces in warm water for about 15-20 minutes. I find this makes them much more pliable and less likely to snap as you curve them around the balloon form.
Uneven Shape?
If the vertical ribs are warping as they dry, keep the balloon inflated tightly inside. You can also use painter’s tape to hold specific ribs flatter against the balloon form.
Step 2: Weaving the Shape
-
Position the rings:
Place the bottom ring on your work surface. Balance the balloon inside it, knot side up. Place the top ring around the knot of the balloon. -
Attach vertical ribs:
Take a wet vertical rib and tuck it into the bottom ring and the top ring. Use binder clips or clothespins to hold it temporarily in place against the balloon’s curve. -
Create the spacing:
Repeat this process with four ribs first, placing them at 12, 3, 6, and 9 o’clock positions to ensure the structure is balanced. Then, fill in the remaining gaps evenly with the rest of your vertical ribs. -
Secure the joints:
Once all vertical ribs are clipped in place, use thin wire or twine to lash them securely to the top and bottom rings. Add a dab of strong glue at each contact point for extra durability. -
Add horizontal weavers:
To mimic the specific look in the photo, weave two or three horizontal bands of reed near the top and bottom. Weave these in an over-under pattern through the vertical ribs to lock everything together.
Step 3: Handle and Finishing
-
Construct the handle:
Cut a longer piece of reed for the handle. Soak it well, then curve it over the top opening. Tuck the ends securely into the top weaving structure on opposite sides. -
Reinforce the handle:
Wire the handle ends firmly to the top rim. I like to wrap a bit of extra reed around the attachment points to hide the wire and give it a polished, finished look. -
Let it dry completely:
Allow the entire structure to dry thoroughly around the balloon. This usually takes 24 hours. The reeds will shrink slightly as they dry, tightening the structure. -
Remove the form:
Once bone dry and rigid, pop the balloon and carefully peel away any rubber remnants involved in the glue joints. -
Create a solid floor:
Glue a circular piece of sturdy cardboard or thin wood to the bottom ring. This ensures your candle sits flat and stable inside the lantern. -
Seal the lantern:
Take the lantern outside and spray it with a clear matte sealer. This protects the reed from moisture and helps the lantern withstand outdoor evenings. -
Add the light:
Place a cream-colored LED pillar candle inside. Since these are flammable materials, stick to battery-operated lights rather than real flames for safety.
Natural Texture
For that aged, weathered look seen in the photo, lightly brush a diluted gray or brown wood stain over the dry reed before sealing. It adds instant depth.
Arranging several of these handmade lanterns along a path creates a magical rhythm of light for your outdoor space
Lantern Inside a Lantern Color Pop
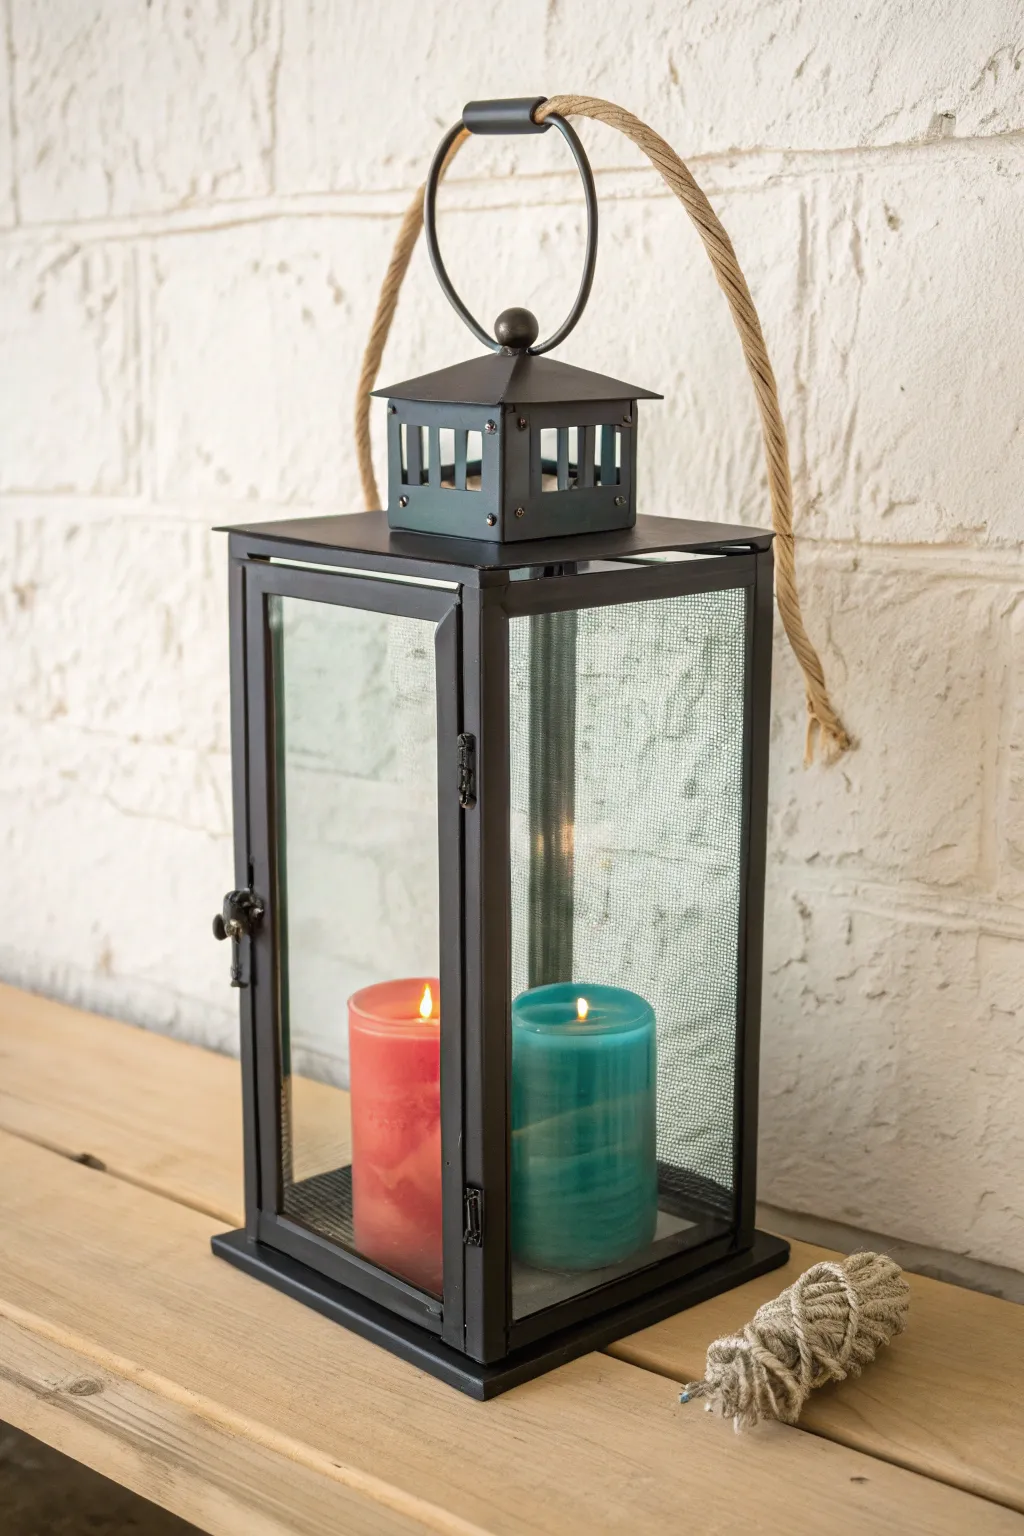

Create a striking centerpiece by combining bold color blocking with rustic textures in this simple lantern arrangement. The contrast between the sleek black metal, natural rope, and vibrant candles offers a modern farmhouse aesthetic that instantly warms up any corner.
Step-by-Step Guide
Materials
- Tall black metal lantern (approx. 18-24 inches)
- Thick natural jute or sisal rope (approx. 3/4 inch thickness)
- Coral pink LED pillar candle (3-inch diameter)
- Teal blue LED pillar candle (3-inch diameter)
- Scissors
- Hot glue gun and glue sticks
- Clean microfiber cloth
- Glass cleaner
- Optional: Thin craft wire
Step 1: Preparing the Lantern
-
Clean the surfaces:
Before adding any decorative elements, ensure your lantern is pristine. Take a microfiber cloth and a small amount of glass cleaner to wipe down both the inside and outside of the glass panes. -
Check the hardware:
Inspect the door latch and the top ventilation chimney to make sure they are secure. If the lantern has been sitting for a while, dust out the interior base with a dry cloth. -
Prepare the handle loop:
Locate the metal ring at the very top of the lantern. Ensure it moves freely, as you will be attaching the rope handle here.
Stay Upright
To keep candles from sliding if the lantern is moved, place a small dab of museum wax or a loop of masking tape on the bottom of each candle.
Step 2: Creating the Rope Handle
-
Measure the rope:
Cut a length of your thick jute rope measuring approximately 36 inches. This length will allow for a generous arch and secure attachment points. -
Prevent fraying:
Immediately after cutting, apply a small dab of hot glue to the raw ends of the rope or wrap them tightly with a bit of tape to keep the strands from unravelling while you work. -
Thread the rope:
Feed one end of the rope through the metal ring at the top of the lantern. Pull it through until you have equal lengths on both sides if you plan to knot it at the top, or prepare to attach it to the sides if your lantern has side loops. -
Secure the attachment:
For the style shown in the image, the rope is actually a separate decorative loop. If mimicking this exactly, simply loop the rope through the top metal ring. -
Bind the loop:
Bring the two ends of the rope together to form a large loop. You can use a smaller piece of twine or thin craft wire to bind these ends together securely near the metal ring, hiding the join behind the metal hardware if possible. -
Create the hanging arch:
Ideally, the rope should stand up slightly on its own. If the rope is too floppy, you can thread a piece of heavy-gauge craft wire through the center of the rope strands to give it shape and structure. -
Trim excess rope:
Once the loop is formed and secured, trim any jagged ends for a neat appearance. Only trim after you are certain the knot or binding is tight.
Step 3: Arranging the Interior
-
Select your candles:
Choose two LED pillar candles of the same height but different bold colors—specifically a coral red and a teal blue for this look creating a vibrant contrast. -
Position the first candle:
Open the lantern door. Place the coral candle on the left side of the lantern floor. Ensure it sits flat and isn’t wobbling on any internal ridges. -
Add the second candle:
I like to place the teal candle immediately to the right of the coral one. Position them close together, leaving just a small gap of about half an inch between them. -
Check visibility:
Close the lantern door gently. Step back and look through the glass to ensure the connection between the colors is centered and pleasing to the eye. -
Adjust angles:
If your candles have a “wick” that is slanted or directional, rotate them so the “flame” part is facing slightly forward for the best view. -
Activate the glow:
Turn on the LED candles. Many come with timers, so set them now if desired to have your lantern light up automatically in the evening.
Seasonal Swap
Create different moods by swapping the candle colors—try orange and black for Halloween, or red and green for Christmas, keeping the base lantern the same.
Step 4: Final Stylizing
-
Add a rustic accent:
For an extra touch seen in the project, take a leftover scrap of the jute rope (about 5-6 inches). -
Knot the accent:
Tie a simple overhand knot in this small piece of rope to create a “monkey fist” or decorative knot. -
Place the accent:
Set this knotted rope piece on the surface next to the lantern base, as shown in the photo, to tie the textural elements together visually. -
Final polish:
Give the glass one last check for fingerprints you might have left while arranging the candles.
Now you have a charming, color-blocked accent piece ready to brighten up your shelf or entryway
Layered Sand and Shell Coastal Fill
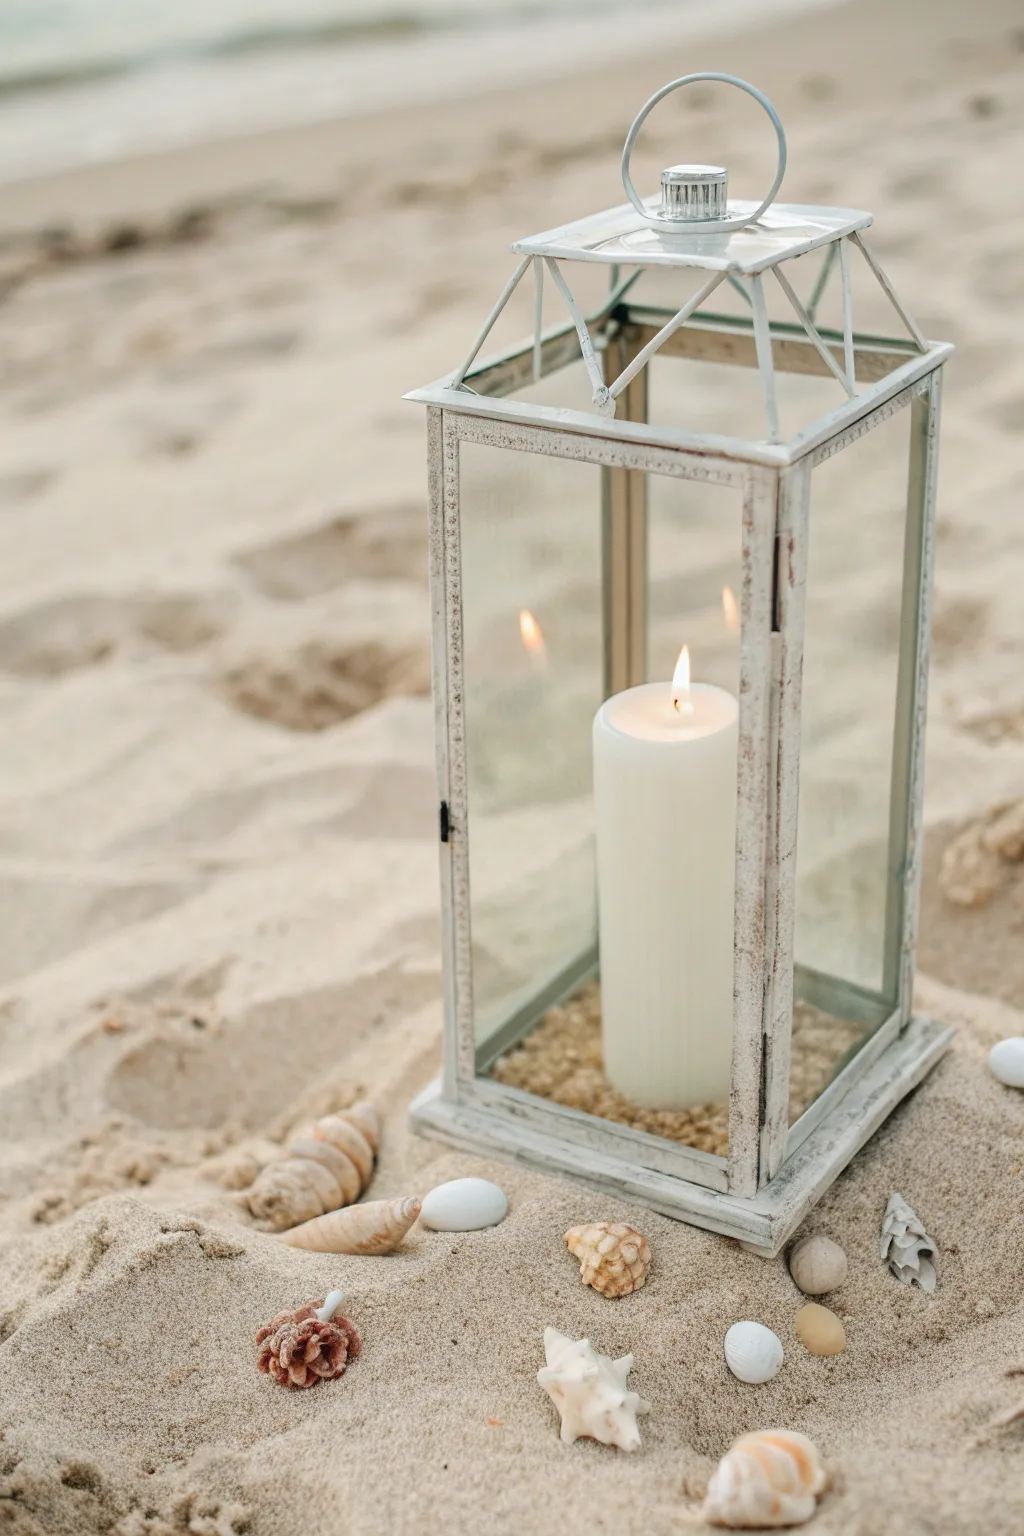
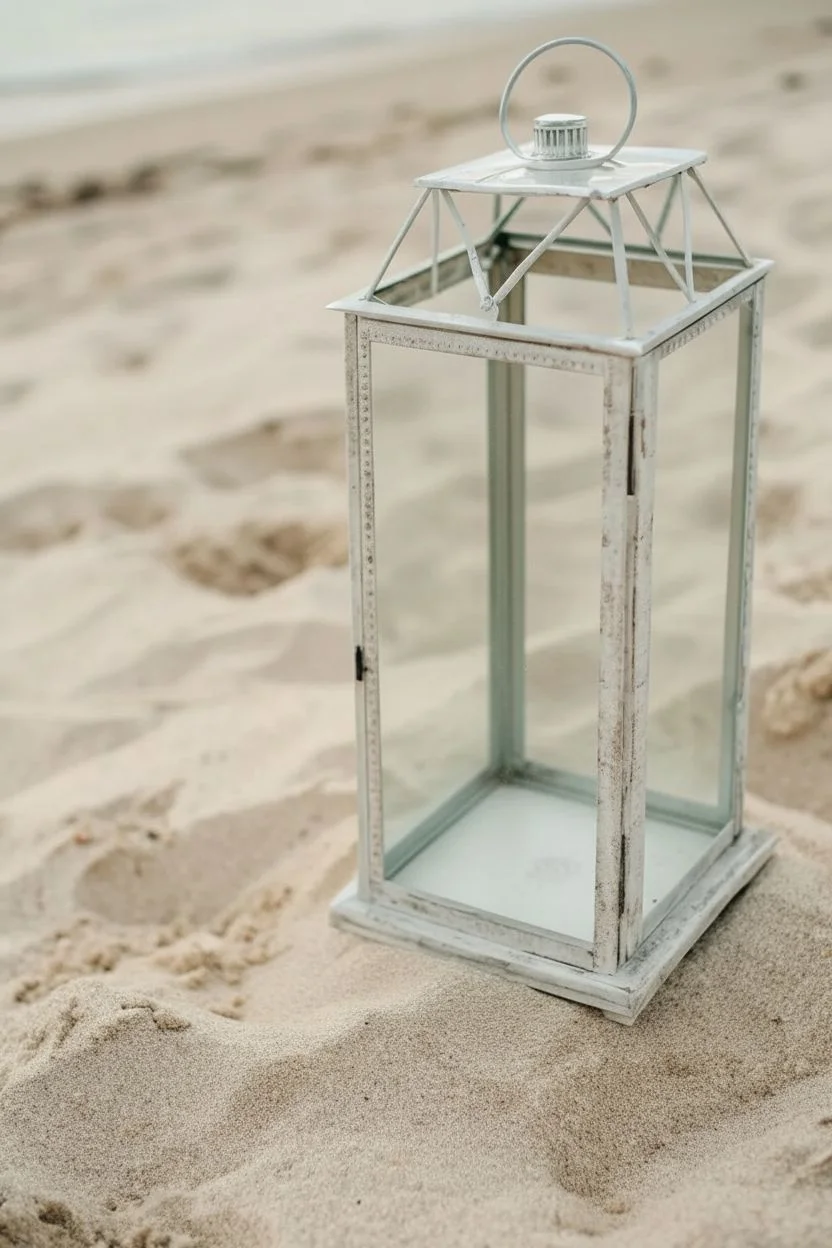
Capture the peaceful essence of a beach walk with this coastal-inspired lantern arrangement. By combining soft white candlelight with natural textures like coarse sand and seashells, you can bring a breath of fresh ocean air to any setting.
Step-by-Step Guide
Materials
- Tall vintage-style lantern (white, weathered metal finish)
- Wide white pillar candle
- Coarse beach sand or small gravel (beige/tan)
- Assorted seashells (conch, scallop, spiral)
- Smooth white stones or sea glass pebbles
- Small paintbrush (for dusting)
- Microfiber cloth
- Long-reach lighter
Step 1: Preparation
-
Clean the Glass:
Before adding any materials, thoroughly clean the glass panes of your lantern inside and out using a microfiber cloth to ensure they are free of smudges and dust. -
Check Stability:
Ensure the lantern sits flat on your working surface. If you are placing this directly on sand outside, you’ll level it later, update for now, just make sure the door latch works smoothly.
Use Sticky Wax
For extra stability, especially if moving the lantern, place a small dab of floral sticky clay or melted wax on the bottom of the candle before pressing it into the sand.
Step 2: Internal Arrangement
-
Pour the Base Layer:
Open the lantern door and gently pour in the coarse sand or small gravel. You want enough to cover the bottom metal plate completely, creating a bed about 0.5 to 1 inch deep. -
Level the Surface:
Give the lantern a gentle shake or use your hand to smooth out the sand layer so it is relatively flat, providing a stable foundation for the candle. -
Place the Candle:
Position your white pillar candle in the precise center of the lantern. Press it down firmly into the sand layer with a slight twisting motion to nestle it securely so it won’t tip over. -
Inspect the Level:
Step back and look at the candle from different angles to ensure it is standing perfectly straight up within the glass enclosure. -
Dust Off Debris:
If any sand or dust clung to the side of the candle during placement, use a small, dry paintbrush to gently sweep it off so the wax remains pristine white.
Add Hidden Scents
Mix a few drops of sea-salt or coconut fragrance oil into the sand base inside the lantern. As the candle warms the enclosure, it will release a subtle beach aroma.
Step 3: External Styling
-
Position the Lantern:
Place the finished lantern in its final display spot, whether that’s on a sandy beach for an event or a tabletop. -
Embed in Sand:
If displaying on actual sand, wiggle the lantern base down slightly into the ground so it looks settled and integrated with the environment rather than just floating on top. -
Select Anchor Shells:
Choose 2-3 larger shells, like conical spirals or whelks. Place these first near the corners of the lantern base to establish visual weight. -
Add Texture Variety:
Scatter smaller, differently shaped shells—like scallops or textured murex shells—between the larger ones to create a natural, unforced look. -
Incorporate Stones:
Tuck a few smooth white stones or ‘sea beans’ among the shells. I find this creates a nice color bridge between the beige sand and the white lantern frame. -
Create a Drift Line:
Arrange the loose items so they trail off slightly away from the lantern, mimicking how the tide deposits treasures on the shore, rather than creating a perfect circle. -
Final Check:
Look for any large gaps near the base of the lantern and fill them with a small shell or pebble to ground the object visually. -
Light the Candle:
Use a long-reach lighter to carefully ignite the pillar candle inside, being careful not to smudge the glass with soot.
Enjoy the warm glow and coastal charm of your beautiful seaside centerpiece
Hand-Painted Lantern Panels in Simple Patterns
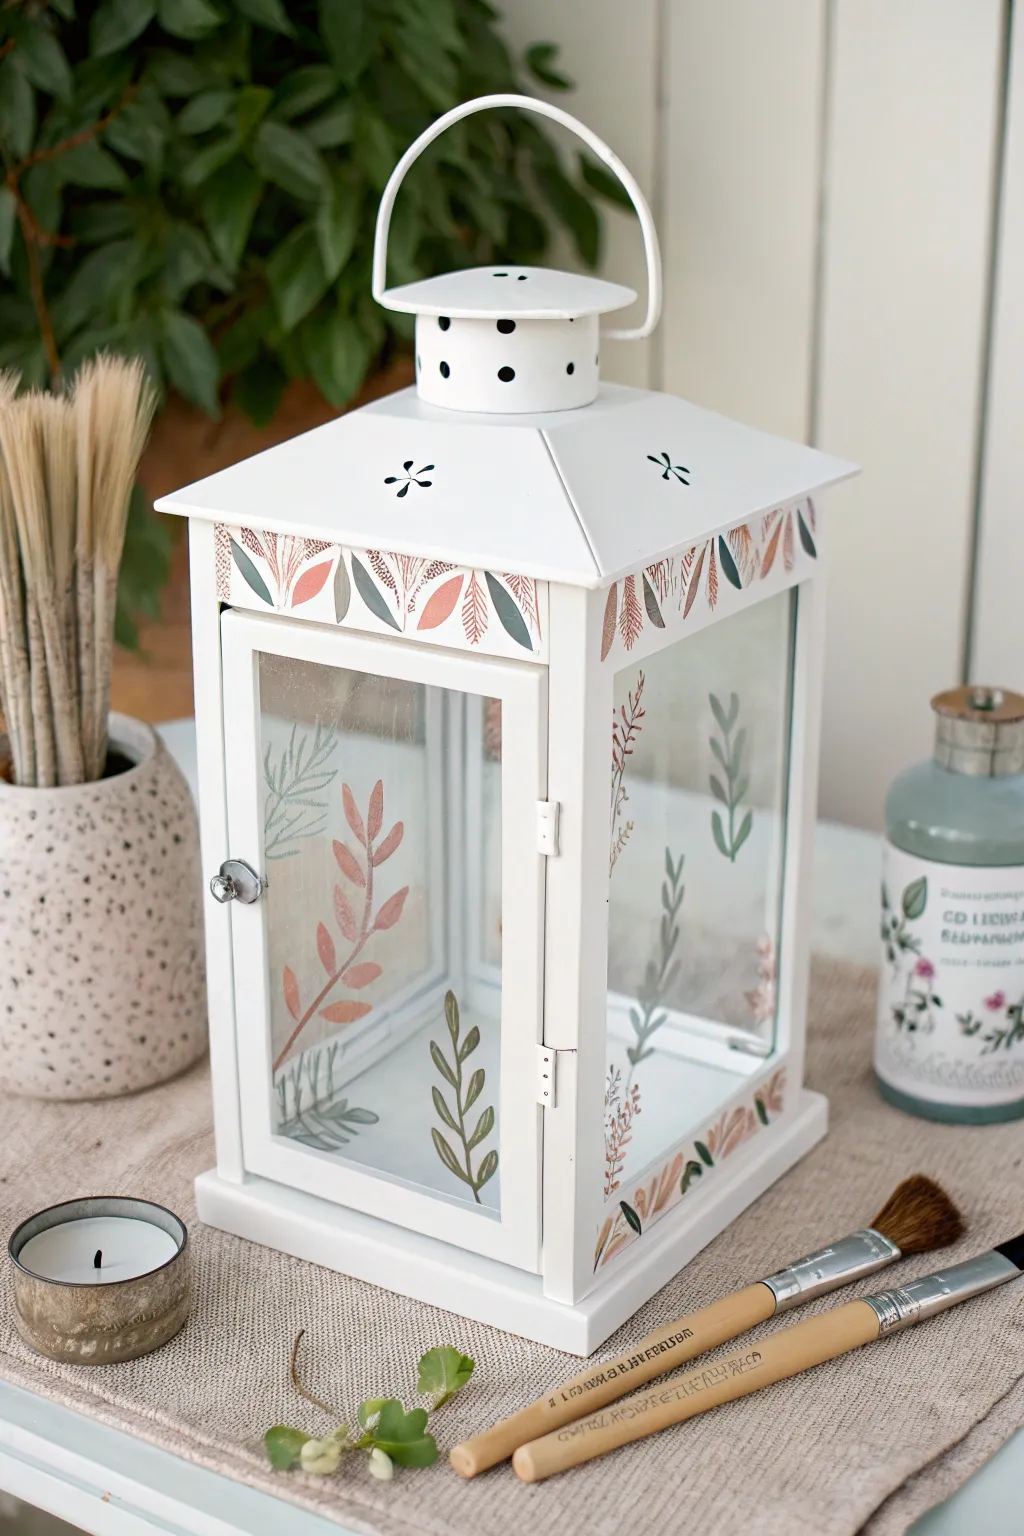
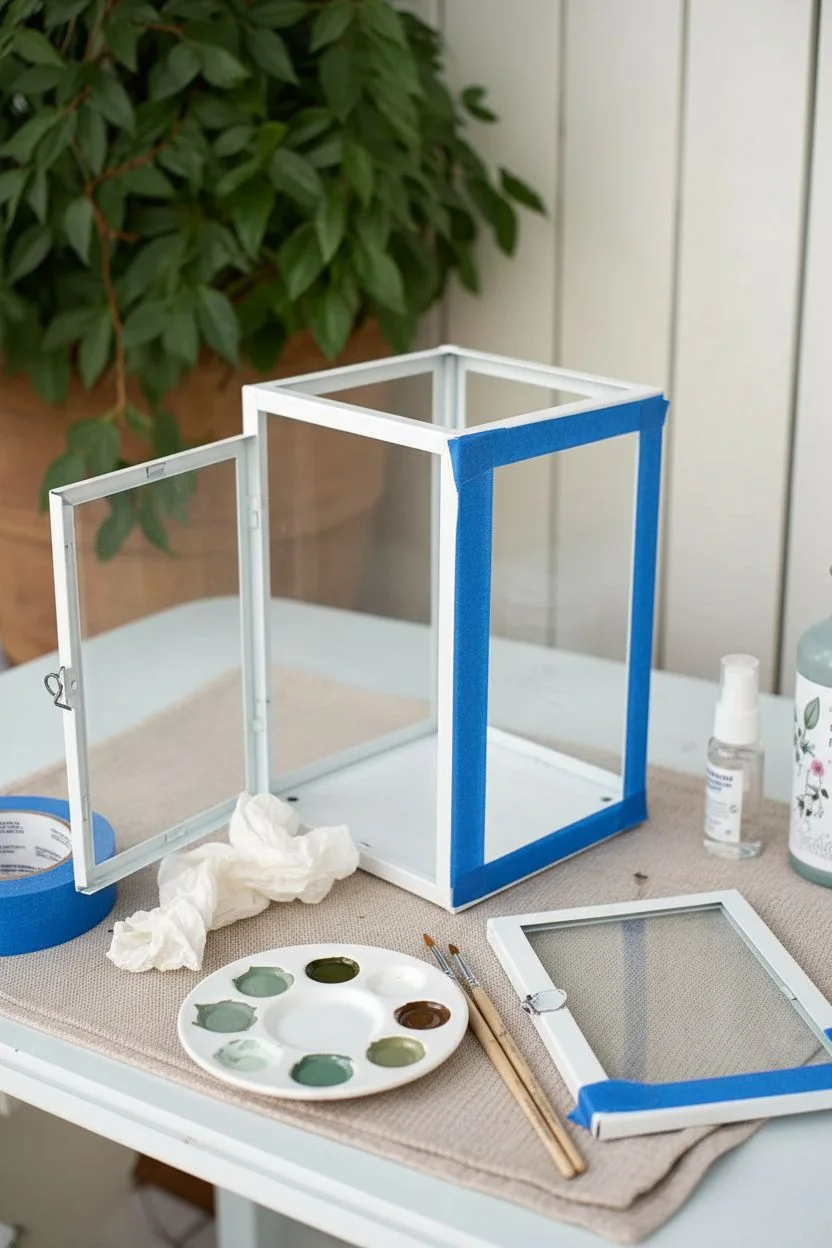
Transform a plain white lantern into a charming garden accent with delicate, freehand botanical patterns. This project uses translucent glass paints to create a soft, stained-glass effect featuring simple leaf motifs in earthy tones like sage, rust, and olive.
Step-by-Step
Materials
- White metal lantern with glass panels
- Glass paints or multi-surface acrylics (Sage Green, Rust/Terracotta, Deep Olive)
- Rubbing alcohol
- Lint-free cloth
- Fine liner brush (size 0 or 1)
- Small round brush (size 2 or 4)
- Painter’s tape
- Paper towels
- Palette or small dish
- Clear spray sealer (optional, for durability)
Step 1: Preparation
-
Dissassemble the lantern:
Carefully remove the glass panels from the lantern frame if possible. This makes painting much easier as you can work on a flat surface. If they are fixed, tape off the metal edges securely with painter’s tape. -
Clean the surfaces:
Wipe down all glass surfaces thoroughly with rubbing alcohol and a lint-free cloth. This removes fingerprints and oils that could prevent the paint from adhering properly. -
Plan your palette:
Squeeze a small amount of your sage green, rust, and olive paints onto your palette. I like to keep a paper towel handy to blot excess paint from my brushes before touching the glass.
Glass Paint Consistency
If your paint feels too opaque, mix it with a drop of glass medium or clear gloss glaze. This increases transparency, letting the candlelight glow through the leaves beautifully.
Step 2: Painting the Glass Panels
-
Start the main stalks:
Using the fine liner brush dipped in a neutral or diluted olive green, paint thin, curving lines starting from the bottom corners of the glass panel. These will be the main stems for your foliage. -
Add rust-colored leaves:
Switch to your small round brush and load it with the rust or terracotta paint. Create simple leaf shapes by pressing the brush down and lifting up as you pull away to form a point. -
Paint sage foliage:
Clean your brush and switch to sage green. Add a second variety of leaves, perhaps fern-like fronds or rounded eucalyptus shapes, interspersed among the rust leaves for visual interest. -
Include subtle details:
Use the very tip of your liner brush with a darker green to add tiny veins inside the larger leaves or small dots near the tips of the stems. -
Keep the center clear:
Focus your painting primarily around the bottom and sides of the glass, leaving the center relatively clear so the candlelight can shine through obstructed. -
Repeat for all panels:
Move to the next glass panel. You don’t need to make them identical; slight variations in the plant arrangement look more organic and natural. -
Let the glass dry:
Allow the paint on the glass to dry completely according to the manufacturer’s instructions. Glass paint often requires longer curing times than standard acrylics.
Frosted Effect
Before painting the leaves, spray the outside of the glass with a frosted glass spray for a softer, diffused look that hides the candle bulb while glowing warmly.
Step 3: Painting the Metal Frame
-
Clean the top rim:
Ensure the white metal band around the top of the lantern (just under the roof) is clean and dry. -
Establish a border pattern:
dip a small round brush into your rust color and paint small, slanted leaf strokes along the top metal border. Aim for a repeating pattern. -
Fill the gaps:
Using a dark olive or grey-blue shade, paint contrasting leaf shapes in the gaps between your rust leaves. -
Add linear details:
Use your fine liner brush to add thin stems connecting these border leaves, creating a continuous vine effect wrapping around the lantern. -
Bottom border:
Repeat this same vine process on the bottom metal rim of the lantern to frame the glass panels. -
Allow to cure:
Let the painted metal sections dry fully. If using standard acrylics on metal, handle carefully until cured.
Step 4: Finishing Touches
-
Reassemble the lantern:
Once all paint is completely dry and cured, carefully place the glass panels back into the lantern frame if you removed them. -
Secure the clips:
Bend the metal tabs back into place to secure the glass, being careful not to scratch your fresh paint. -
Sealing (Optional):
If this lantern will be used outdoors, lightly mist the painted areas with a clear, weather-resistant sealer to protect your work from the elements. -
Add light:
Place a pillar candle or a battery-operated LED candle inside to see how the light illuminates your botanical designs.
Place your finished lantern on a patio table or mantel to enjoy the warm, custom glow of your handiwork
Faux Stained-Glass Effect with Painted Washes
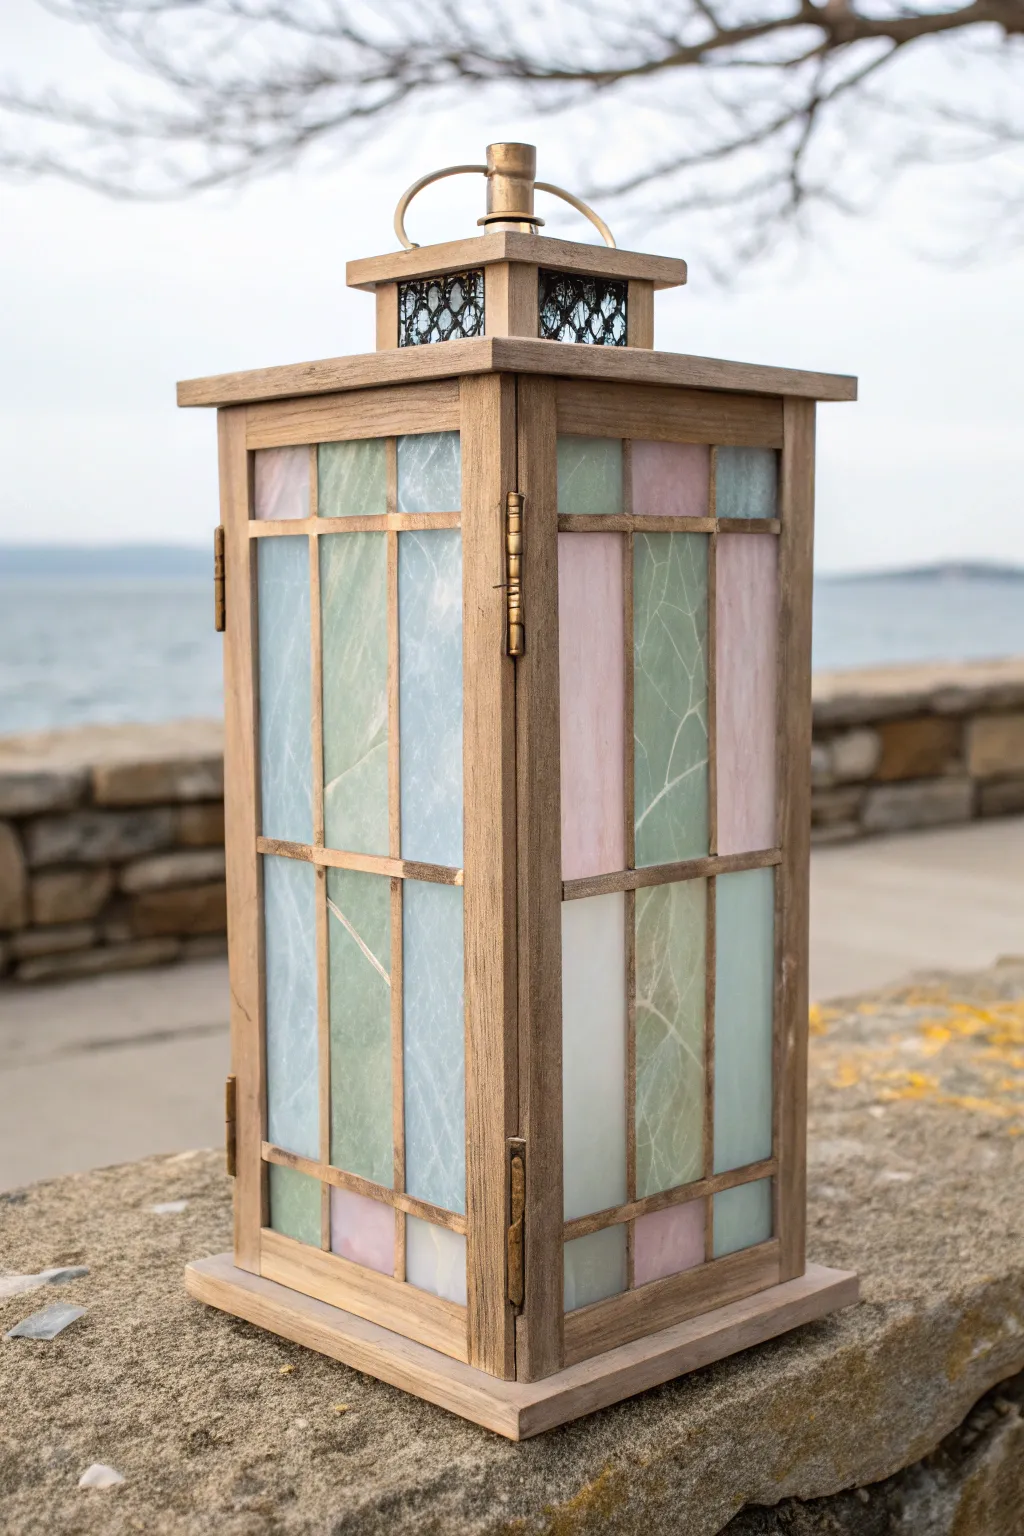
Transform a plain wooden lantern into a glowing faux-stained glass masterpiece using nothing but paint and translucent styling. This project mimics the delicate, veined look of agate slices with soft pastel washes that catch the light beautifully.
Step-by-Step Tutorial
Materials
- Unfinished wooden lantern with glass panels
- Frosted glass spray paint
- Acrylic paints (pastel blue, sage green, soft pink, white)
- Glazing medium or water (for thinning)
- Fine liner brush
- Flat shader brush (medium size)
- Painter’s tape
- Paper towels
- Clear sealant spray (optional)
Step 1: Preparation & Frosting
-
Disassemble the lantern:
Begin by removing any removable glass panels if possible. If the glass is fixed, carefully tape off all the wooden trim on both the inside and outside to protect it from stray paint marks in the next steps. -
Clean the glass:
Wipe down all glass surfaces with glass cleaner or rubbing alcohol to remove dust, fingerprints, or oils. A clean surface is crucial for the frosted spray to adhere evenly. -
Apply the frosted base:
In a well-ventilated area, spray a thin, even coat of frosted glass spray paint onto the *inside* face of the glass panels. This provides `tooth` for the acrylics and creates that initial semi-opaque look. -
Let it cure:
Allow the frosted spray to dry completely according to the manufacturer’s instructions—usually about 15-20 minutes—before moving on to wet paints.
Fixing “blobs”
If your veining lines get too thick or blobby, quickly wipe them away with a damp Q-tip before they dry. You can re-draw the line instantly.
Step 2: Creating the Faux Agate Wash
-
Mix your washes:
Prepare your palette by mixing your pastel acrylics with glazing medium (or a little water) in a 1:1 ratio. You want the consistency to be fluid and translucent, not thick and opaque. -
Paint the first section:
Working on the inside of the glass (over the frosted layer), apply a pale blue wash to specific vertical sections. Use long, smooth strokes with your flat shader brush to minimize visible brush marks. -
Add color variety:
Switch to your sage green and soft pink mixtures. Paint alternating rectangular sections, leaving the wooden grid lines as natural boundaries. It helps to alternate colors randomly for an organic, stained-glass feel. -
Blend edges slightly:
While the paint is still wet, you can very gently feather the edges where colors might meet in a single pane, though the wooden dividers usually separate them nicely. -
Blot for texture:
Take a crumpled paper towel and lightly dab the wet paint in random spots. This lifts a tiny bit of pigment, creating a clouded, stone-like texture rather than a flat sheet of color. -
Dry the base layer:
Let this color layer dry fully. Depending on how much water you used, this might take 30 minutes to an hour. Using a hairdryer on a low, cool setting can speed this up.
Step 3: The Veining Detail
-
Prepare the veining paint:
Mix a small amount of white acrylic paint with water until it has an inky consistency. It needs to flow easily off a fine liner brush without dragging. -
Paint main veins:
Using your fine liner brush, paint thin, trembling lines diagonally across the colored panels. I like to imagine how lightning forks or how a leaf has veins—keep the lines irregular and branching. -
Add subtlety:
Immediately after painting a vein, you can gently pat it with a clean, dry brush or your finger to soften the line so it looks embedded in the glass rather than sitting on top. -
Layer darker veins:
For extra depth, mix a tiny drop of the base color (blue, green, or pink) into your white mixture to create a slightly darker vein tone and add a few secondary, fainter lines. -
Dry and remove tape:
Once you are happy with the agate effect, let everything dry overnight. Carefully peel away the painter’s tape to reveal crisp wooden edges against your new faux glass.
Add a darker grid
For a leaded glass look, outline the inner edges of each pane with a thin line of metallic gold or liquid lead paint after the colors dry.
Place a battery-operated candle inside and watch your new faux-stone panels glow with coastal charm
Shadow-Casting Cutout Inserts for Dramatic Light
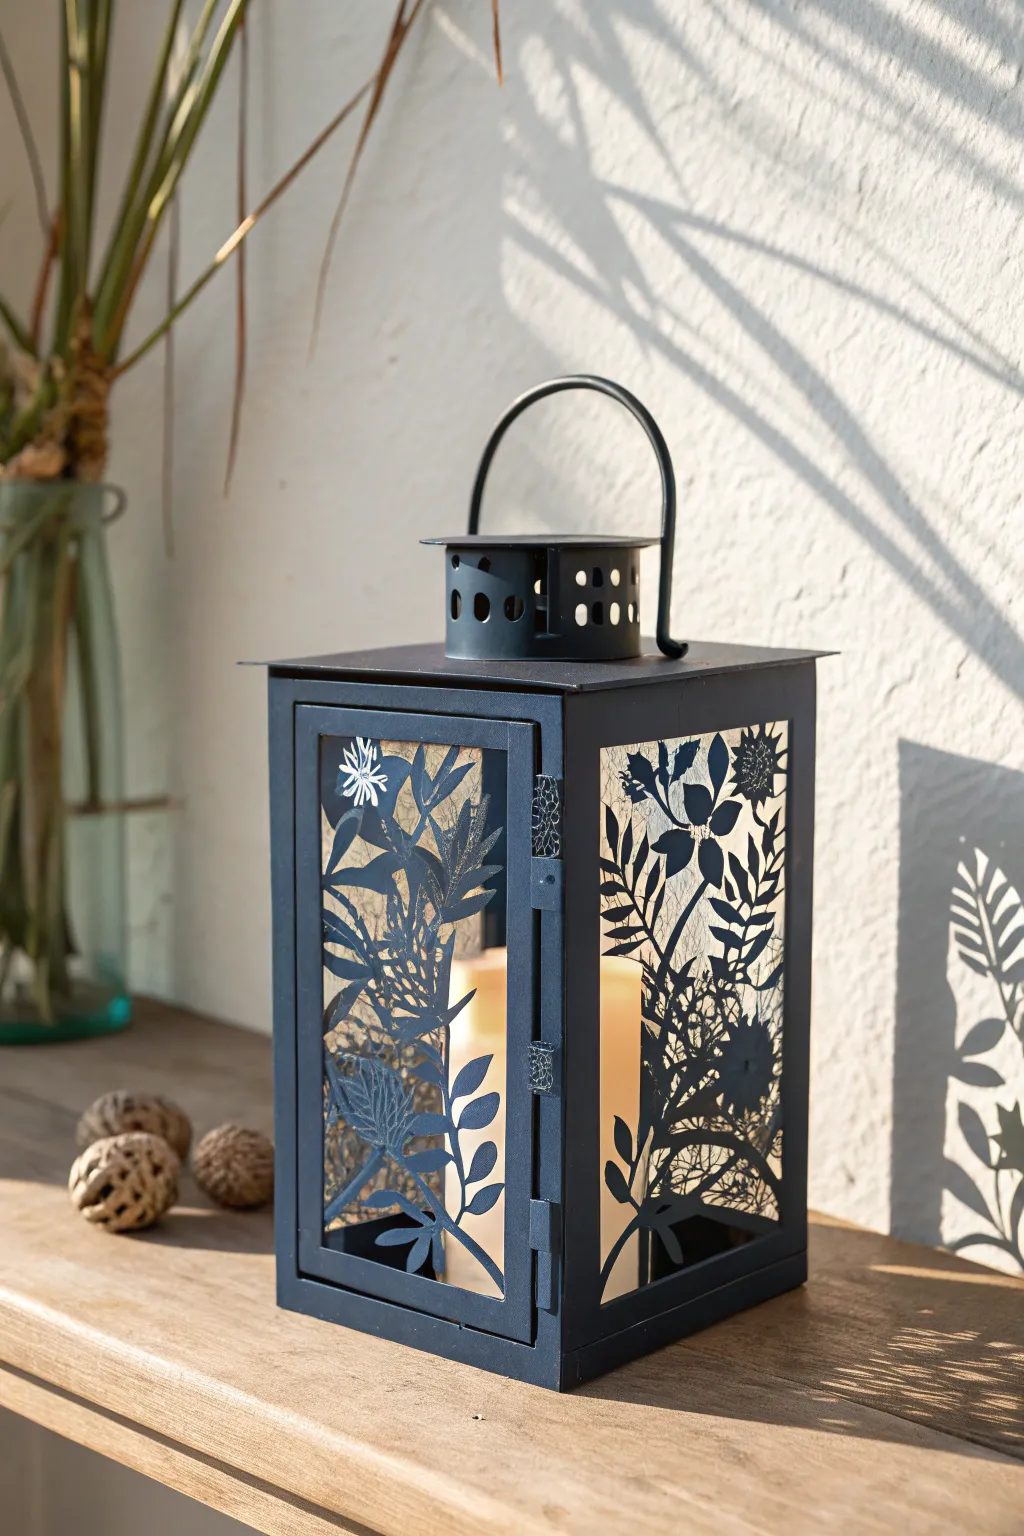
Transform a simple glass-paneled lantern into a mesmerizing light feature using intricate paper or vinyl cutouts. When lit from within, the delicate botanical silhouettes cast dramatic, leafy shadows that add an enchanting atmosphere to any room.
Step-by-Step Guide
Materials
- Metal lantern with glass panels (dark finish)
- Black cardstock (65lb) or removable black adhesive vinyl
- Precision craft knife (like an X-Acto)
- Self-healing cutting mat
- Measuring tape or ruler
- Pencil and eraser
- Botanical silhouette templates (printed)
- Spray adhesive (if using cardstock)
- Double-sided tape (optional)
- Glass cleaner and microfiber cloth
- LED pillar candle or real candle
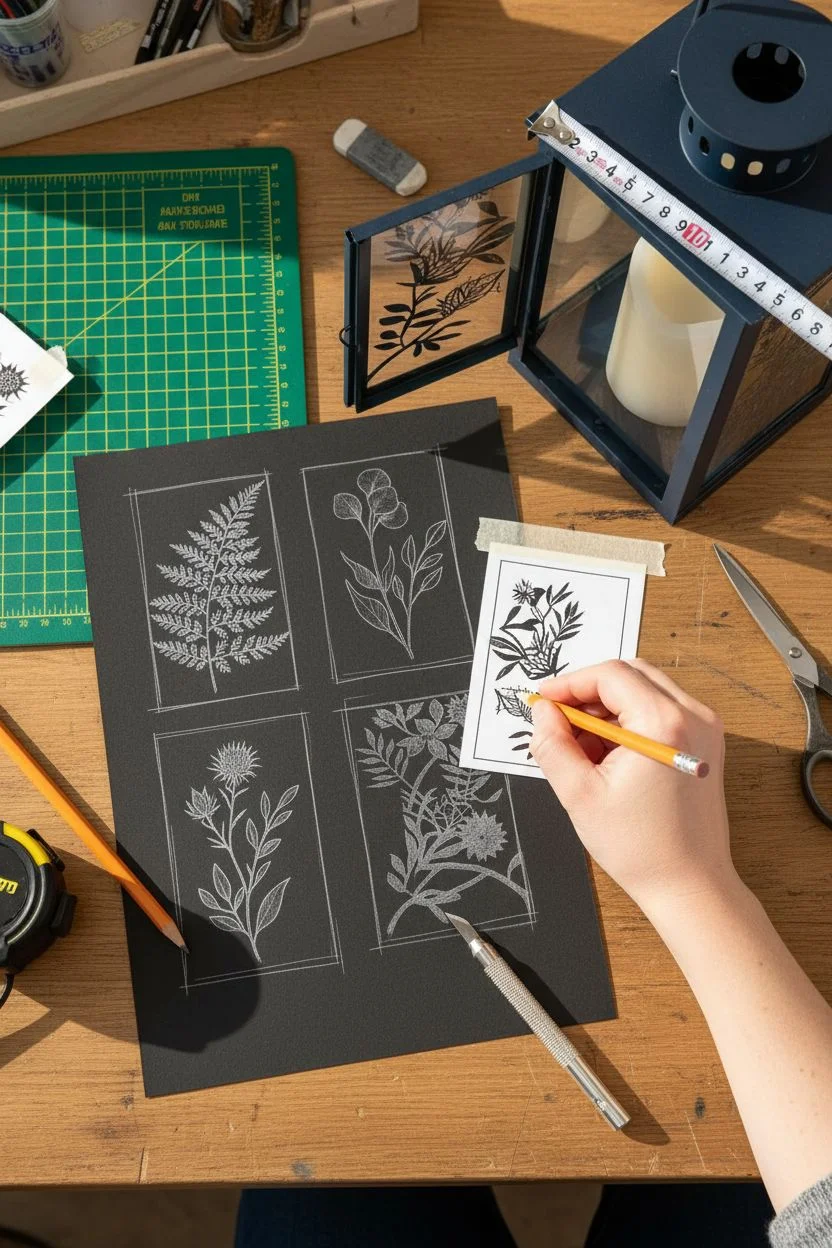
Step 1: Preparation and Design
-
Measure the panels:
Begin by carefully measuring the dimensions of the glass panels on your chosen lantern. You will need the exact height and width of the visible glass area to ensure your inserts fit perfectly without buckling. -
Select your motifs:
Choose botanical designs that feature strong silhouettes, such as fern fronds, eucalyptus leaves, or thistle flowers. You can draw these freehand or find printable silhouette templates online. -
Scale and trace:
Resize your chosen designs to fit the measurements you took earlier. If you are drawing freehand, sketch the design lightly onto the back of your black cardstock or vinyl backing paper. If using a template, tape it securely over your material.
Step 2: Cutting the Silhouettes
-
Set up your workspace:
Place your cutting mat on a stable, well-lit surface. Ensure you have a fresh, sharp blade in your craft knife—this is crucial for clean lines on intricate details. -
Start with inner cuts:
Begin cutting out the smallest interior sections of your design first. This preserves the structural integrity of the larger piece while you work on the delicate bits. -
Work outward:
Once the fine inner details are removed, proceed to cut the larger shapes and finally the exterior outline of the silhouette. Take your time around curves, turning the paper rather than your hand for smoother lines. -
Refine the edges:
Inspect your cutout for any hanging chads or rough spots. Gently trim these away so the silhouette looks crisp and professional when backlit. -
Repeat the process:
Create a cutout panel for each side of the lantern. I like to vary the designs slightly on each panel to create a more organic, natural garden feel.
Sharp Blades Only
Change your blade frequently! Paper dulls blades surprisingly fast. A fresh blade prevents tearing and creates crisp shadow lines.
Step 3: Installation
-
Clean the glass:
Remove the glass panels from the lantern if possible, or leave them in place. Clean each pane thoroughly with glass cleaner and a microfiber cloth to remove dust and fingerprints. -
Apply adhesive (Vinyl method):
If you used adhesive vinyl, carefully peel back the transfer paper. Align the vinyl with the top corner of the glass pane and slowly smooth it down to avoid air bubbles. -
Apply adhesive (Cardstock method):
If using cardstock, lightly mist the front face of your cutout with spray adhesive. Let it get tacky for a few seconds before handling. -
Position the inserts:
Press the cardstock cutout against the inside of the glass panel. Using the inside protects the paper from the elements and potential heat. Smooth it gently from the center outwards. -
Secure the corners:
For extra security, especially with cardstock, apply tiny pieces of double-sided tape to the very corners of the design where they meet the frame, ensuring they lay perfectly flat.
Uneven Shadows?
If shadows look blurry, move the lantern closer to the wall. The closer the light source is to the cutout, the sharper the projection will be.
Step 4: Final Touches
-
Reassemble:
If you removed the glass panels, carefully slide them back into the lantern frame and bend the tabs back to secure them. -
Clean up:
Wipe away any smudges or adhesive residue from the exterior of the glass to ensure the cleanest possible shadow projection. -
Light it up:
Place an LED pillar candle inside. LED is preferred here to eliminate fire risk with the paper inserts, but a real candle can be used if the inserts are on the outside or well-shielded. -
Test the shadows:
Turn on your light source and place the lantern near a wall. Adjust the distance to get the sharpest shadow definition and enjoy your handmade ambiance.
Enjoy the cozy, dramatic atmosphere your new custom lantern brings to your evening space


Have a question or want to share your own experience? I'd love to hear from you in the comments below!