If your laundry room feels like it’s all function and zero feeling, paint is the quickest way to flip that script. I love how the right paint color can make the space look cleaner, brighter, and honestly a lot more you.
Classic Soft White Walls
Capture the calm, organized beauty of a classic laundry room with this detailed acrylic painting tutorial. You’ll master the textures of woven hyacinth baskets, smooth white wainscoting, and the warm grain of a wooden shelf.
Detailed Instructions
Materials
- 11×14 inch canvas or canvas panel
- Acrylic paints: Titanium White, Burnt Umber, Yellow Ochre, Raw Sienna, Paynes Grey, Sap Green, Chromium Oxide Green
- Synthetic brushes: 1 inch flat (for backgrounds), #6 Filbert, #4 Round, #00 Detail Liner
- Palette knife (optional for mixing)
- Water container and paper towels
- Pencil for sketching
- Ruler
Step 1: Sketching the Layout
-
Establish the Foundation:
Begin by drawing a horizon line about one-third up from the bottom of your canvas; this will be the top edge of your wooden shelf. -
Map Out the Wainscoting:
Using a ruler, lightly sketch vertical lines above the shelf to represent the beadboard paneling. Ensure they are evenly spaced to create that clean architectural rhythm. -
Position the Main Subject:
Sketch the large oval shape of the main laundry basket sitting prominently on the shelf. Don’t worry about the weave yet, just get the main volume and the two handle loops at the top. -
Background Elements:
Lightly outline the washing machine in the far left background and the shelf decor above the wainscoting, including the smaller basket and plant.
Weave Woes?
If your basket looks too messy, step back. Woven texture relies on the suggestion of pattern, not every strand. Simplify your strokes.
Step 2: Blocking in Base Colors
-
Painting the Walls:
Mix a large amount of Titanium White with a tiny dot of Paynes Grey to create a soft, cool white. Use your flat brush to fill in the wainscoting and upper wall areas, painting around your sketches. -
The Wooden Shelf:
Mix Burnt Umber with a touch of Yellow Ochre for a warm, medium wood tone. Paint the shelf surface, using long horizontal strokes to imply wood grain. -
Basket Underpainting:
Fill in the basket shapes with a flat wash of Yellow Ochre mixed with a little Raw Sienna. This creates a solid, warm undertone that will shine through the weave detail. -
Greenery and Details:
Block in the plant leaves with a mix of Sap Green and White, and fill the washing machine shape with a very pale grey.
Sunlight Effect
Glaze the left side of the painting with a very transparent wash of Zinc White to create a soft, hazy ‘window light’ bloom effect.
Step 3: Developing Texture and Depth
-
Shadowing the Wainscoting:
Using a small round brush and a slightly darker grey-white mix, paint thin vertical lines along the sketched groove marks of the paneling to create depth. -
Highlighting the Paneling:
Add a thin line of pure Titanium White right next to your shadow lines on the side where the light hits to make the beadboard pop. -
Starting the Weave Texture:
Switch to your #4 Round brush. I find mixing Burnt Umber with a little water helps the paint flow better here. Paint short, curved horizontal strokes across the basket to simulate the horizontal bands of the weave. -
Adding Vertical Supports:
Intersperse small, darker vertical dashes between your horizontal strokes to mimic the vertical stitching that holds the basket material together. -
Highlighting the Basket:
Mix White with Yellow Ochre to create a pale straw color. Carefully dab this onto the top center of each woven ‘loop’ to show where the light catches the texture.
Step 4: Refining Details
-
Refining the Wood Shelf:
Use a dry brush technique with Burnt Umber to drag faint wood grain lines across the shelf surface. Add a darker shadow directly under the basket to ground it. -
Painting the Handles:
Use the #00 Liner brush to paint the wrapped texture on the basket handles. Alternate small strokes of dark brown and light ochre to show the twisted material. -
Plant Life:
Add definition to the plant leaves by painting the stems with darker green and adding bright yellow-green highlights to the tips of the leaves. -
Final White Highlights:
Add crisp, pure white highlights to the washing machine door and the very brightest spots on the wainscoting ledge to simulate a bright, airy room.
Step back and admire the clean lines and cozy textures of your finished laundry room scene


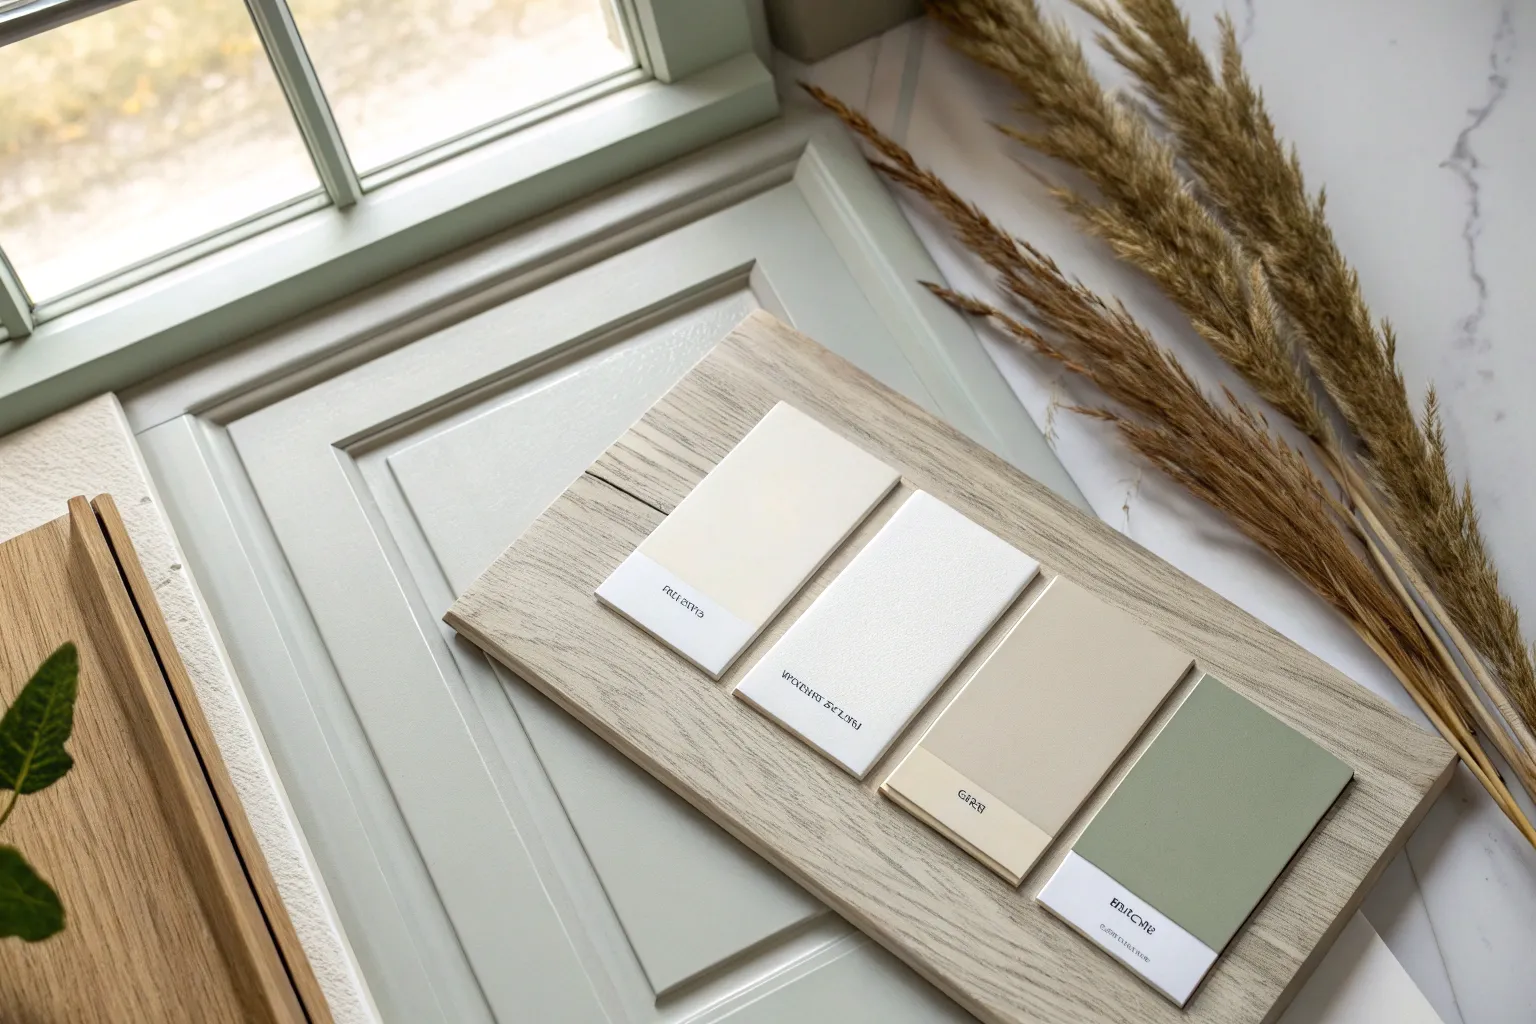
Warm Greige for an Easy Neutral
Transform your laundry space into a serene retreat with a warm greige update that feels clean, inviting, and effortlessly neutral. This project focuses on painting your cabinetry and styling the space to achieve that high-end, spa-like atmosphere.
Step-by-Step
Materials
- High-quality cabinet paint (satin or semi-gloss finish)
- Warm greige paint color (e.g., Revere Pewter or similar)
- Medium-grit sandpaper (120-150 grit)
- Fine-grit sandpaper (220 grit)
- Degreaser or TSP substitute
- High-bonding primer
- Synthetic bristle paintbrushes (1.5” and 2.5” angled)
- Small foam rollers and tray
- Painter’s tape
- Drop cloths
- Polished nickel or brushed silver cabinet hardware
- Wicker laundry basket
- Fresh white towels
Step 1: Preparation & Cleaning
-
Remove hardware:
Begin by removing all cabinet doors and drawers from the laundry room vanity. Unscrew all knobs, pulls, and hinges, placing them in labeled bags so you don’t lose any pieces. -
Clean surfaces thoroughly:
Scrub all surfaces with a degreaser or TSP substitute. Laundry rooms often collect lint and detergent residue, so I like to be extra thorough here to ensure the best paint adhesion. -
Sand the finish:
Using medium-grit sandpaper, lightly sand all the wood surfaces to de-gloss the old finish. You don’t need to strip it bare, just create enough tooth for the primer to stick. -
Wipe away dust:
Vacuum up the sanding dust and follow with a tack cloth or a damp rag to ensure the surface is perfectly clean before priming. -
Tape and protect:
Apply painter’s tape to the walls adjacent to the cabinets and cover the countertop and floors with drop cloths to protect them from drips.
Step 2: Priming & Painting
-
Apply primer:
Roll on a coat of high-bonding primer using a small foam roller for flat areas and a brush for corners. Let this dry completely, usually overnight. -
Sand the primer:
Once dry, gently scuff the primer with fine-grit sandpaper to smooth out any brush strokes or bumps. Wipe clean again. -
First coat of paint:
Open your warm greige paint and give it a good stir. Apply the first coat using the angled brush for detailed areas and molding, following the grain of the wood. -
Roll the flat surfaces:
Switch to your foam roller to cover the larger flat panels of the doors and cabinet frames. Keep a wet edge to avoid lap marks. -
Dry and assess:
Allow the first coat to dry for at least 4-6 hours. Check for any thin spots, but resist the urge to touch up significantly while it’s still tacky. -
Second coat application:
Apply a second coat in the same manner. This second layer will deepen the color and provide that rich, durable finish essential for high-traffic areas. -
Cure time:
Let the cabinets cure for at least 24-48 hours before reattaching hardware. This patience prevents the paint from chipping or sticking.
Sticky Situation
If drawers stick after painting, run a bit of candle wax along the wooden glides or edges. This reduces friction without messy sprays.
Step 3: Styling & Finishing Touches
-
Reassemble cabinetry:
Reattach the hinges and hang the doors back onto the frames. Slide the drawers back into place. -
Install hardware:
Install your chosen knobs or pulls. Polished nickel works beautifully with warm greige, adding a subtle shine that complements the paint tone. -
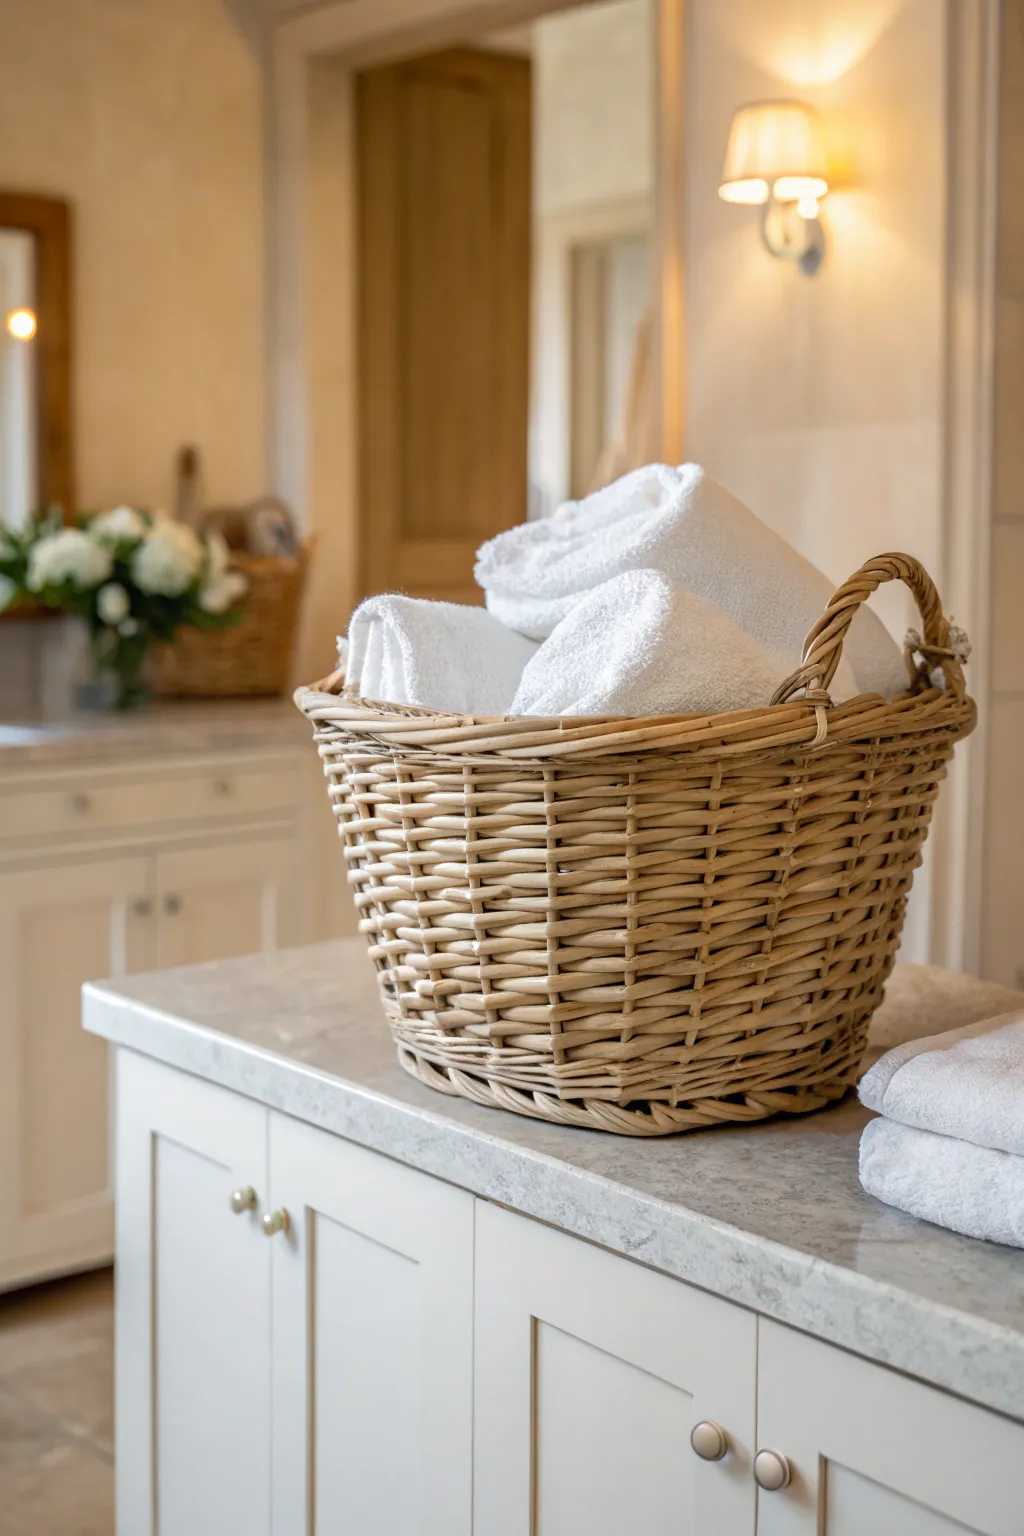
Style with texture:
Place a large wicker basket on the countertop. The natural texture of the wicker adds warmth and breaks up the solid color of the cabinetry. -
Fold towels elegantly:
Fill the basket with fluffy white towels. I prefer to roll some and stack others loosely to create a casual, inviting look rather than rigid, military-style folds. -
Add background elements:
If you have open shelving or counter space in the background, add a vase of white flowers or greenery to bring a fresh, organic element to the room.
Luxe Look
Line the drawers with a scented, patterned paper before refilling them. It adds a hidden pop of joy every time you open them.
Enjoy the calm and composed feel of your newly refreshed laundry space


Soothing Blue-Gray for a Fresh Look
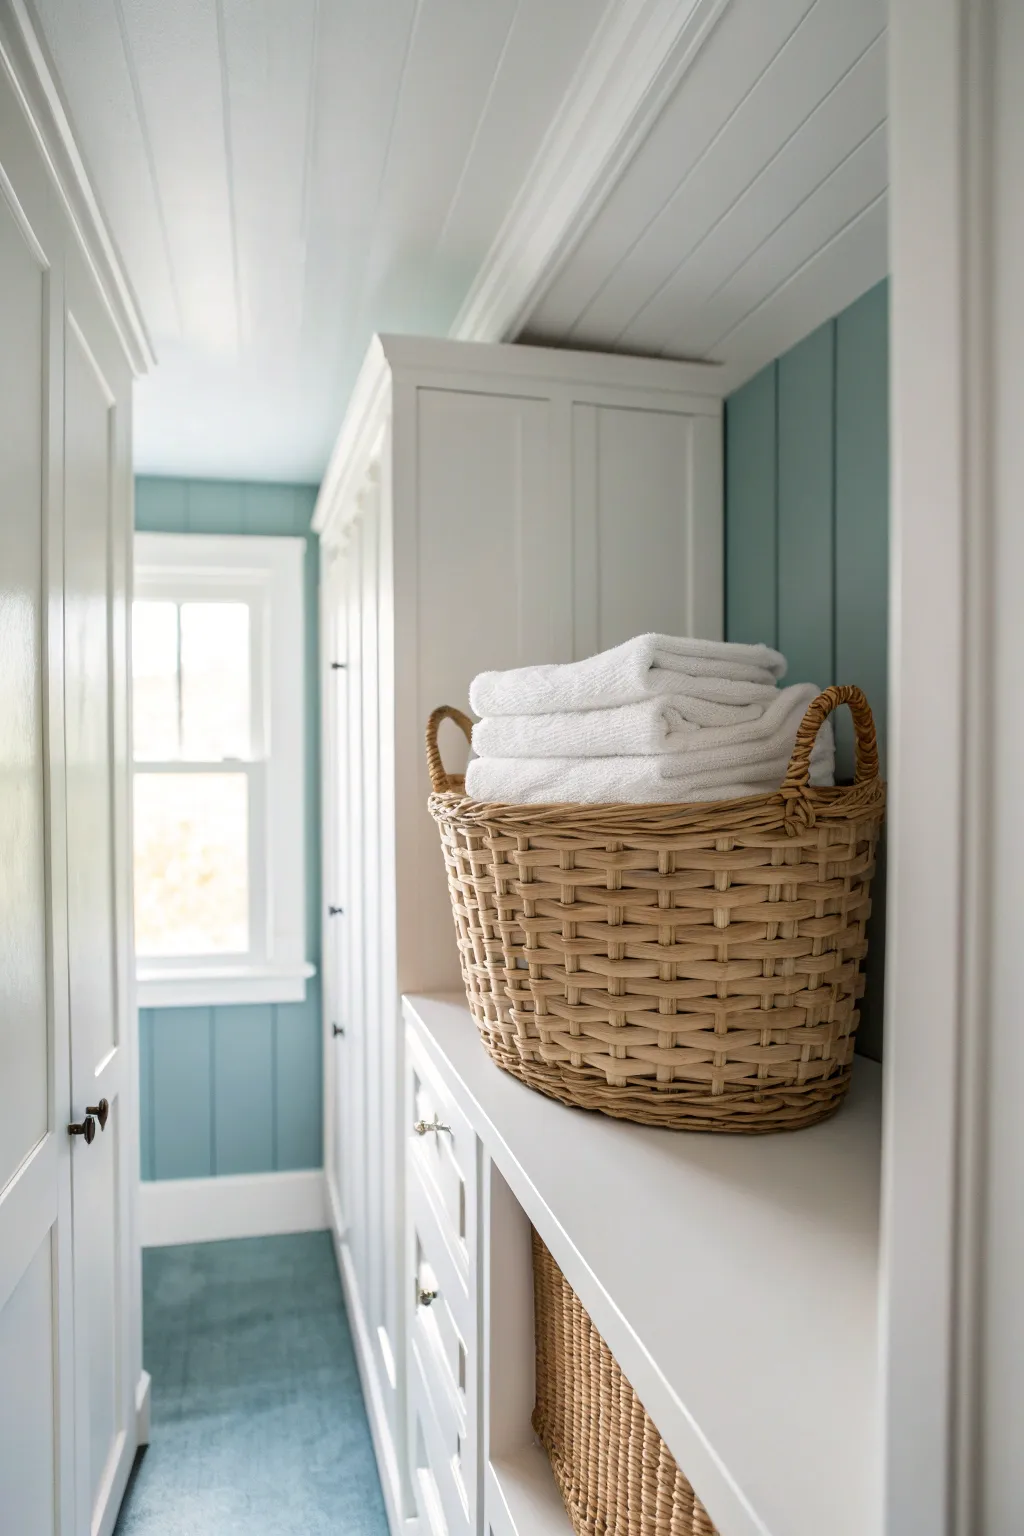
Transform a utilitarian laundry space into a calming coastal retreat with this blue-gray paint makeover featuring crisp white cabinetry. This project balances soothing wall tones with bright woodwork to create a clean, airy atmosphere that makes chores feel a little lighter.
Detailed Instructions
Materials
- Satin or semi-gloss interior paint (White)
- Eggshell or satin interior paint (Blue-Gray)
- Painter’s tape (multi-surface)
- Drop cloths
- Sanding sponges (medium and fine grit)
- Angled sash brush (2-inch)
- Paint roller frame and microfiber covers (3/8 inch nap)
- Paint tray and liners
- Screwdriver (for hardware removal)
- TSP or degreaser cleaner
- Primer (stain-blocking)
Step 1: Preparation & Cleaning
-
Clear and clean:
Remove all baskets, towels, and decorative items from the room. Wipe down all walls, baseboards, and cabinet surfaces with TSP or a degreaser to remove dust and residue. -
Remove hardware:
Use your screwdriver to take off all cabinet knobs, pulls, and switch plates. Store them in a labeled bag so nothing gets lost. -
Protect the space:
Lay down heavy-duty drop cloths over the flooring, specifically covering that lovely blue carpet or tile to prevent spills. -
Tape the edges:
Apply painter’s tape carefully along the ceiling line, around window trim, and along the floor edges where the baseboards meet the carpet.
Smooth Paneling
For grooved wall paneling, paint the vertical grooves with a brush first, then immediately roll over the flat face. This prevents paint from pooling in the cracks.
Step 2: Painting the Cabinetry & Trim
-
Light sanding:
Scuff sand the existing cabinet surfaces and trim with a medium-grit sponge. This helps the new paint adhere properly. -
Prime the wood:
Apply a coat of stain-blocking primer to the cabinets, shelves, and window trim. Let it dry completely according to the can’s instructions. -
Cut in the white:
Using the angled sash brush, paint the corners and edges of the cabinetry, shelves, and window sash with your white semi-gloss paint. -
Roll the flat surfaces:
Use a small roller to apply the white paint to larger cabinet panels and shelf tops for a smooth, brush-mark-free finish. -
Second coat:
Once dry, apply a second coat of white to ensure a crisp, opaque finish that stands out against the upcoming wall color.
Step 3: Applying the Blue-Gray Walls
-
Trim the walls:
With a clean angled brush, cut in the blue-gray paint along the ceiling line, corners, and right up against your freshly painted white trim. -
Roll the main walls:
Load your roller with the soothing blue-gray paint. Apply it to the wall panels or drywall using a ‘W’ motion to distribute the paint evenly. -
Check for coverage:
Let the first coat dry for at least 4 hours. Inspect for patchiness and apply a second coat to deepen the color and ensure durability. -
Paneling detail:
If you have vertical paneling or beadboard, ensure paint gets into the grooves by running the brush vertically down the seams before rolling over them.
Texture Contrast
Add warmth to the cool blue-gray palette by choosing natural woven baskets made of seagrass or wicker instead of plastic bins.
Step 4: Finishing Touches
-
Remove tape:
Carefully peel away the painter’s tape while the paint is still slightly tacky to achieve sharp, clean lines without peeling. -
Reinstall hardware:
Once the cabinets are fully cured (ideally 24 hours), screw the knobs and pulls back into place. -
Style the shelves:
Place your woven baskets back onto the shelves. I like to fold plush white towels neatly inside to echo the clean white trim.
Enjoy the calming atmosphere of your freshly painted laundry room, where the soothing colors make daily tasks feel a bit more peaceful


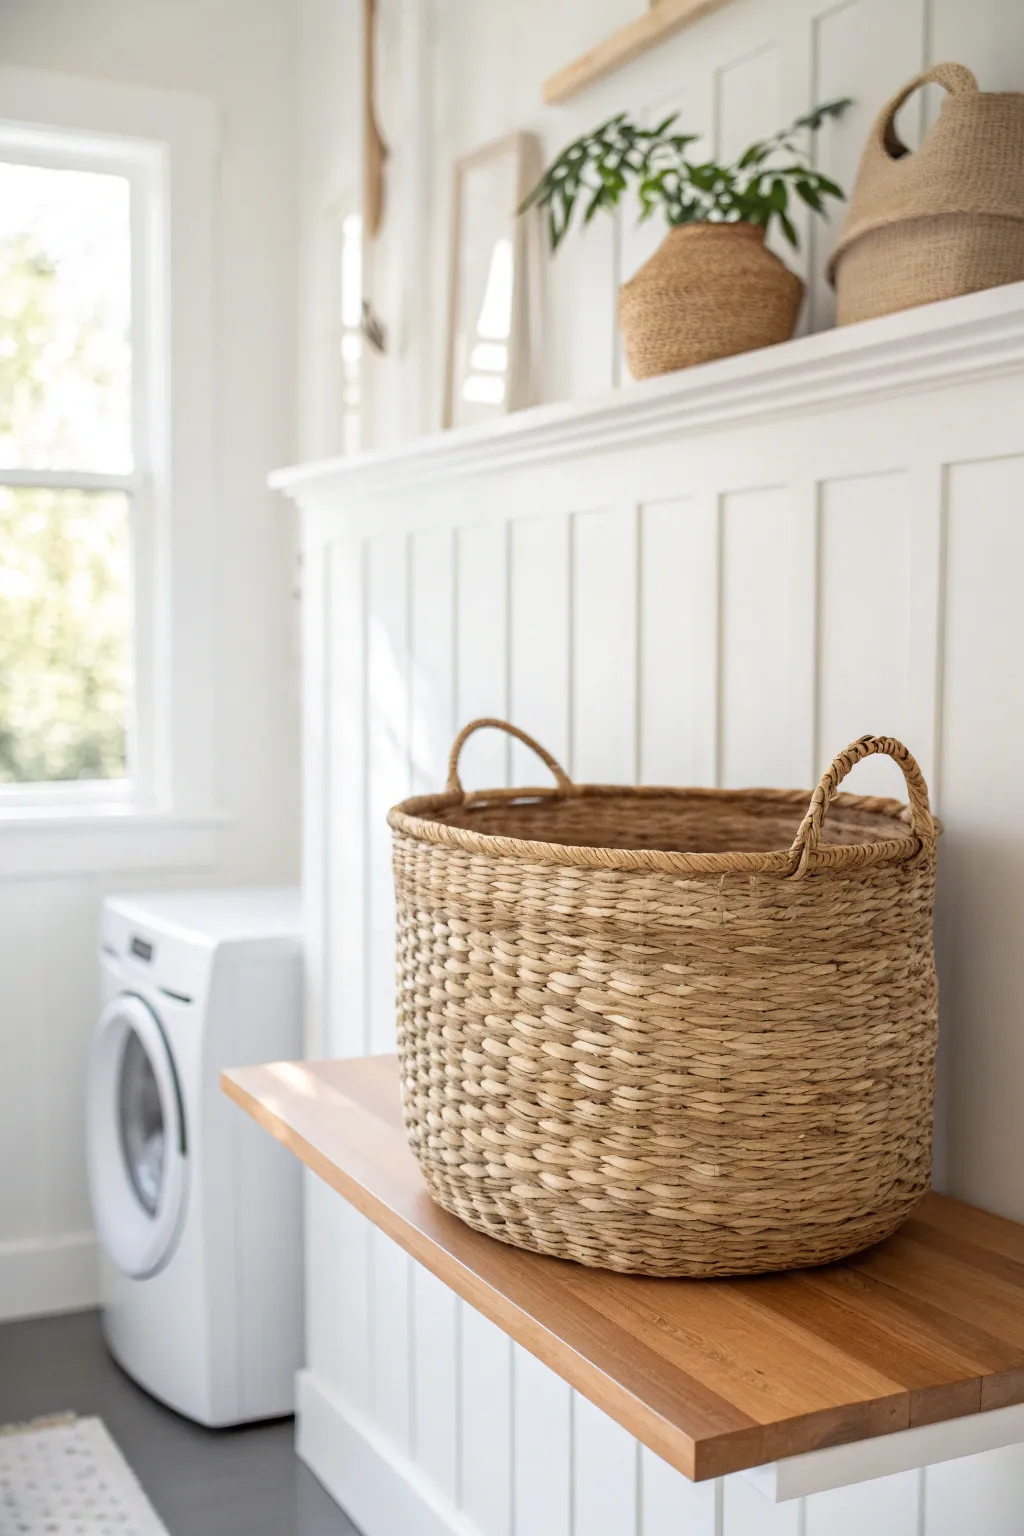
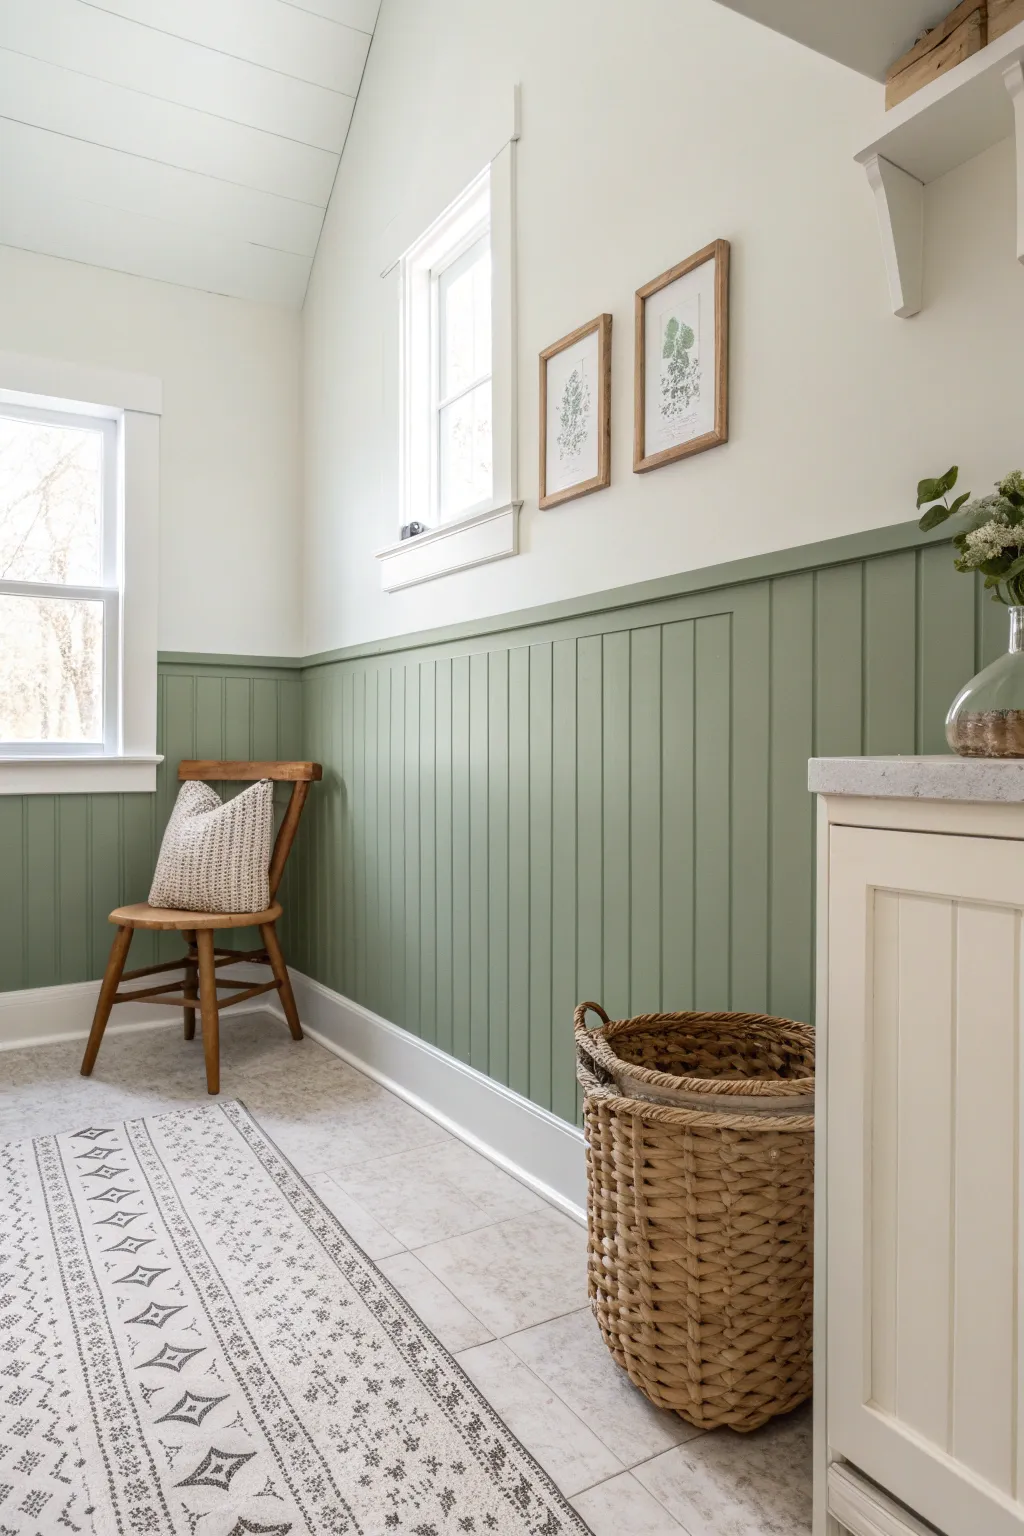
Soft Sage Green for a Natural Mood
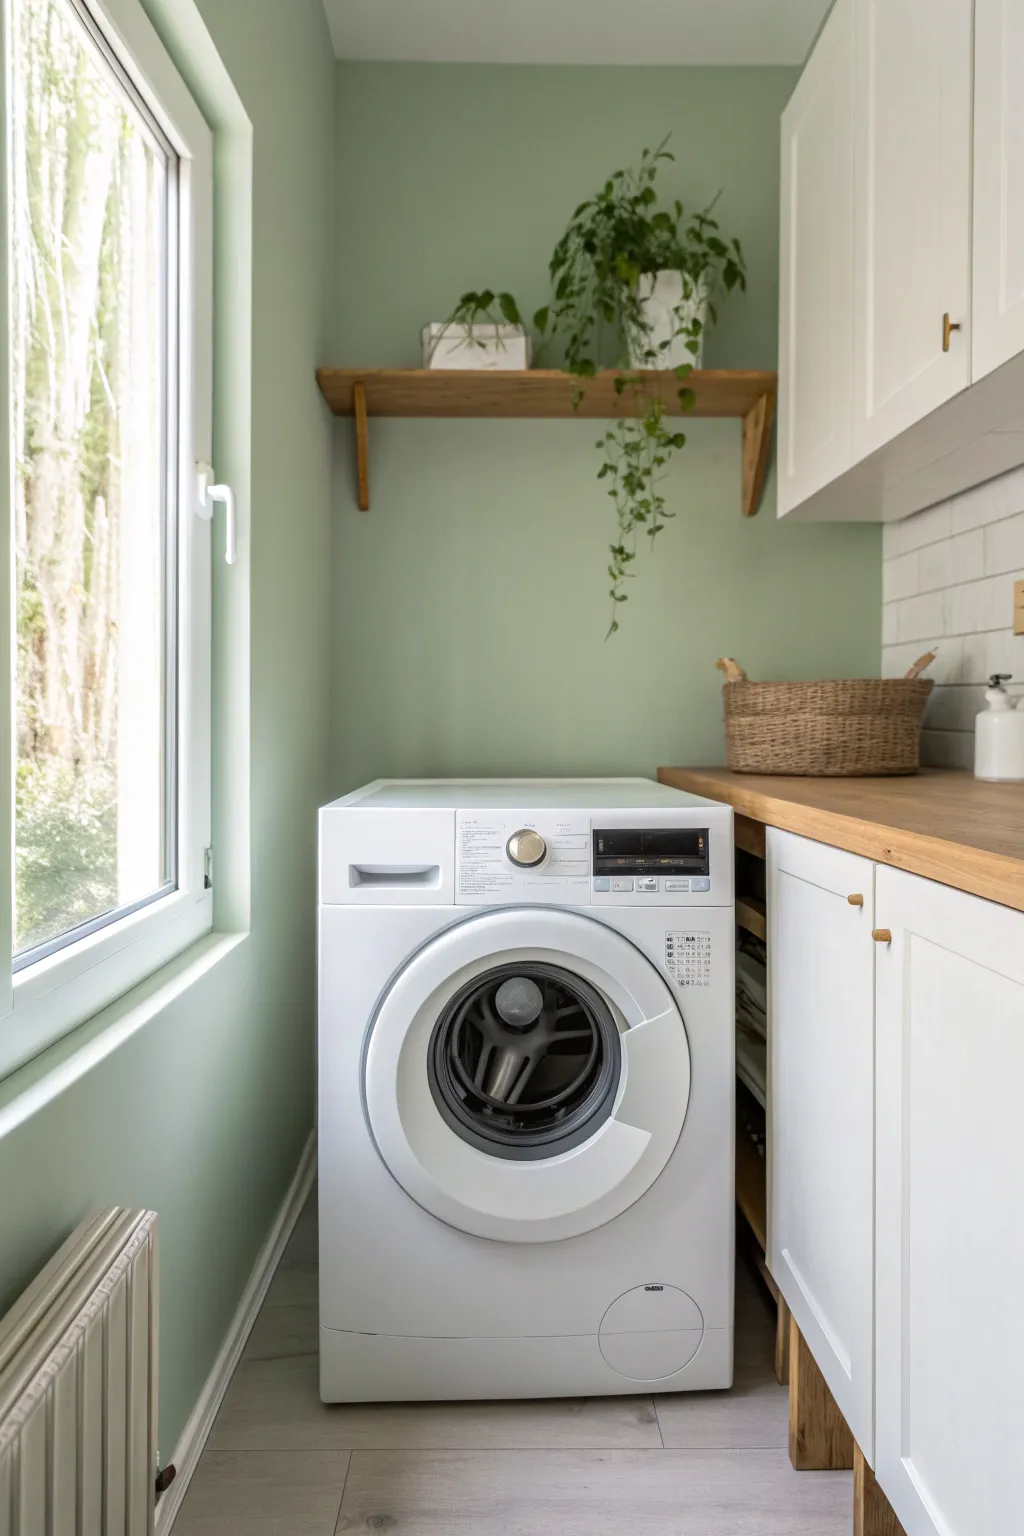
Transform your laundry space into a calming retreat with this soft sage green makeover, perfectly balancing natural wood tones and crisp white accents. This project brings the outdoors in, creating a fresh, organic atmosphere that makes laundry day feel less like a chore.
Step-by-Step Guide
Materials
- Soft sage green interior paint (satin or eggshell finish)
- White trim paint (semi-gloss)
- Painter’s tape
- Drop cloths
- Sanding block (medium grit)
- TSP or degreaser
- Paint rollers (microfiber)
- Angled sash brush
- Natural wood floating shelf (oak or pine)
- Shelf brackets (wooden)
- Wall anchors and screws
- Drill and level
- Light wood stain (optional for counter/shelf match)
Step 1: Prep Work
-
Clear and Clean:
Remove everything from the room, including the washing machine if possible, or pull it strictly into the center. Wipe down all walls with TSP or a mild degreaser to remove lint dust and residue. -
Sanding Surfaces:
Lightly sand the walls to knock down any bumps or previous gloss. This helps the new sage paint adhere better. -
Protect Trim:
Apply painter’s tape carefully along the window trim, baseboards, and ceiling line. Press the edges down firmly with a putty knife to prevent bleed-through. -
Floor Protection:
Lay down drop cloths to cover the flooring completely. Tape the edges of the cloth to the floor so they don’t shift while you work.
Step 2: Painting the Walls
-
Cut In First:
Using your angled sash brush, ‘cut in’ a 2-3 inch border of sage green paint around all edges—corners, ceiling line, and around the window frame. -
Rolling the Walls:
Pour your sage paint into a tray. Load your roller evenly and apply the paint in W-shaped motions, starting from one side of the room and working across. -
Check Coverage:
Once the first coat is dry (usually 2-4 hours), inspect for patchy areas. Sage greens can sometimes be translucent, so a second coat is almost always necessary for depth. -
Apply Second Coat:
Roll on the second coat just like the first. I find rolling in the same direction for the final pass helps uniform the texture. -
Remove Tape:
While the paint is still slightly tacky, carefully peel off the painter’s tape at a 45-degree angle to ensure crisp lines.
Swatch Watch
Paint large swatches on different walls and observe them throughout the day. Sage changes drastically from morning sun to evening artificial light.
Step 3: Installing the Shelf
-
Locate Studs:
Use a stud finder to locate the wall studs above the washing machine area. Mark these points lightly with a pencil. -
Plan Height:
Determine the height for your shelf. It needs to be high enough to clear any top-loading lids or supplies, but low enough to reach easily. -
Mount Brackets:
Hold your brackets up to your stud marks. Use a level to ensure they are perfectly vertical, then mark the screw holes. -
Drill and Secure:
Drill pilot holes into the marks. Screw the brackets firmly into the wall studs. -
Attach Shelf:
Place your wood board onto the brackets. Check level again, then secure the board to the brackets from underneath using short wood screws.
Texture Twist
Add beadboard paneling to the lower half of the wall painted in semi-gloss white for a classic cottage feel that complements the sage upper walls.
Step 4: Styling the Space
-
Countertop Consistency:
If you have a countertop over your machines, ensure its tone matches your new shelf. If not, a light sanding and matching stain can tie the wood tones together. -
Add Greenery:
Place a trailing plant, like a Pothos or Ivy, on the high shelf. The cascading vines emphasize the green wall color beautifully. -
Functional Decor:
Use woven baskets for texture to store loose items. White ceramic containers for detergent keep the look clean and minimalist.
Enjoy the peaceful energy of your new laundry room every time you walk in to start a load
BRUSH GUIDE
The Right Brush for Every Stroke
From clean lines to bold texture — master brush choice, stroke control, and essential techniques.
Explore the Full Guide
Navy Accent Wall to Add Depth
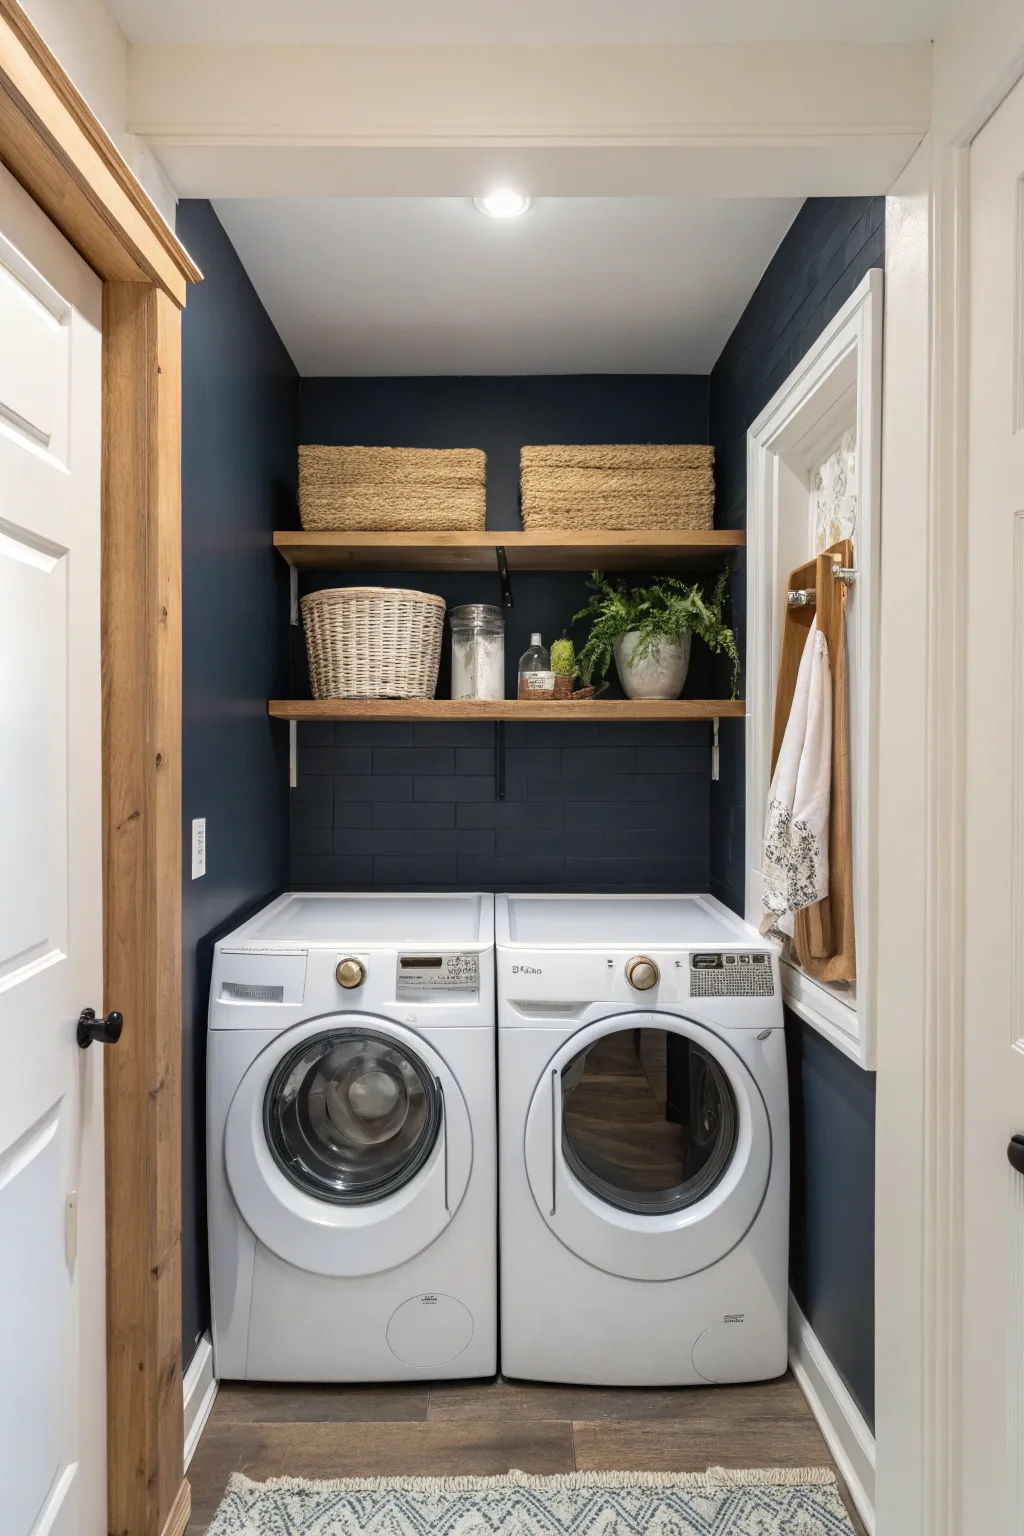
Transform a standard laundry alcove into a sophisticated space by wrapping the walls in a deep, moody navy blue. This project blends functional storage with striking color contrast, using rich wood tones to warm up the cool dark paint.
How-To Guide
Materials
- Navy blue semi-gloss or satin interior paint (e.g., Hale Navy or similar)
- White semi-gloss trim paint
- Painter’s tape
- Drop cloths
- Sanding block (medium grit)
- Paint rollers (microfiber) and tray
- Angled sash brush (2-inch)
- Measuring tape
- Stud finder
- 2×10 lumber (cut to alcove width, for shelving)
- Wood stain (Early American or similar medium tone)
- Polyurethane sealer (matte or satin)
- Heavy-duty black shelf brackets (L-brackets)
- Wall anchors and long wood screws
- Level
- Drill with driver bits
Step 1: Preparation & Painting
-
Clear the space:
Remove the washer and dryer from the alcove completely to give yourself ample working room. I like to vacuum the corners and baseboards immediately to ensure no dust gets into the paint later. -
Protect surfaces:
Lay down drop cloths to cover the flooring. Use painter’s tape to mask off the ceiling line, baseboards, and the door trim on the right side where the white meets the intended navy wall. -
Prep the walls:
Fill any existing nail holes with spackle and sand smooth once dry. Give the entire wall surface a light scuff sand to help the dark pigment adhere better. -
Cut in the edges:
Using your angled sash brush, carefully cut in the navy paint along the ceiling clean, corners, and baseboards. Take your time here; dark paint shows mistakes against white trim easily. -
Roll the first coat:
Apply the first coat of navy paint using a microfiber roller for a smooth finish. Don’t worry if it looks patchy; deep blues often need multiple layers for full opacity. -
Apply the second coat:
Allow the first coat to dry completely (usually 4 hours). Roll on a second coat, moving in consistent vertical strokes to minimize roller marks. Check for any thin spots with a bright work light. -
Remove tape:
While the final coat is still slightly tacky, carefully peel away the painter’s tape at a 45-degree angle to ensure a crisp line.
Secret Paint Tip
For deep navy walls, use a grey-tinted primer rather than white. It helps the dark topcoat achieve true depth and coverage in fewer coats.
Step 2: Creating the Floating Shelves
-
Measure and cut lumber:
Measure the width of your alcove wall exactly. Cut your 2×10 lumber boards about 1/4 inch shorter than this measurement to allow for an easy fit without scraping your fresh paint. -
Sand the wood:
Sand the boards thoroughly, starting with coarse grit and finishing with fine grit until the surface is buttery smooth. -
Stain application:
Apply your chosen wood stain with a rag or brush. Wipe off excess stain after a few minutes, depending on how deep you want the color. Let it dry according to the can’s instructions. -
Seal the shelves:
Apply a coat of polyurethane sealer to protect the wood from humidity and detergent drips. Lightly sand between coats if you apply more than one.
Step 3: Installation & Styling
-
Locate studs:
Use a stud finder to mark the stud locations on your navy back wall. This is crucial for shelves that will hold heavy laundry supplies. -
Mark bracket height:
Decide on your shelf heights. A good rule of thumb is at least 18-20 inches above the machines for the first shelf, and 12-15 inches between shelves. Mark these lines using a level. -
Install brackets:
Drill pilot holes into the studs and secure your black L-brackets with heavy-duty screws. Ensure the brackets are perfectly level before tightening fully. -
Secure the shelves:
Place your stained wood boards onto the brackets. screw them in from underneath to secure them in place so they won’t tip forward. -
Reinstall appliances:
Carefully slide your washer and dryer back into place. Double-check that all hoses and cords are connected properly. -
Style the shelves:
Add woven baskets for texture to hide ugly supplies. Place glass jars for detergent pods and add a potted plant like a fern to bring life against the dark background.
Add Hidden Function
Mount a slim hanging rod or fold-out drying rack on the side wall or underneath the bottom shelf for air-drying delicates without taking up floor space.
Enjoy the dramatic and organized upgrade to your laundry routine.
Two-Tone Paneling for Structure
Transform a plain laundry room into a structured, calming retreat with this two-tone paneling project. By combining crisp vertical beadboard wainscoting with a soothing sage green, you create architectural interest that feels both historic and fresh.
Step-by-Step
Materials
- 4×8 Beadboard or V-groove paneling sheets
- General Purpose Primer
- Semi-gloss paint (Sage Green shade)
- Satin or Eggshell paint (Warm White shade)
- Top cap moulding (dado rail)
- Baseboard moulding
- Construction adhesive
- Finishing nails (1.5 inch and 2 inch)
- Wood filler
- Paintable caulk
- Circular saw
- Jigsaw (for outlet cutouts)
- Stud finder
- Level
- Caulk gun
- Hammer or nail gun
- Sandpaper (220 grit)
- Roller set and sash brush
Step 1: Preparation & Wall Prep
-
Assess the space:
Begin by removing any existing baseboards and outlet covers from the walls. Use a utility knife to score the top of the old baseboards to prevent peeling the drywall paper when you pry them off. -
Determine paneling height:
Decide how high you want your wainscoting. A standard height is often around 32-36 inches, or simply divide the wall into thirds visually. Mark a level horizontal line across the room at your chosen height to guide your installation later. -
Locate studs:
Use a stud finder to mark the location of all vertical studs along the walls. Mark these locations above your horizontal line so you can see them clearly once the paneling is in place.
Step 2: Installing the Paneling
-
Cut panels to size:
Measure and cut your beadboard sheets to match your determined height. A circular saw works best for long straight cuts. Remember to measure twice to ensure they fit snugly under your level line. -
Address outlets:
Measure the exact location of any electrical outlets. Transfer these measurements to your paneling sheets and carefully cut out the openings using a jigsaw. -
Apply adhesive:
Apply a zigzag pattern of construction adhesive to the back of your first panel. Position it on the wall, starting from an inside corner. Ensure the top edge aligns perfectly with your level line. -
Secure the panels:
Nail the panel into the studs you marked earlier. I find using a brad nailer makes this go much faster, but a hammer and finishing nails work just fine. Repeat for all remaining panels, butting them tightly against each other.
Seamless Corners
When beadboard meets a corner, the pattern often breaks. I prefer to cope the corner joints or overlap the sheets intentionally to keep the vertical groove spacing consistent visually.
Step 3: Trim & Finishing Details
-
Install the top cap:
Measure and cut your top cap moulding (sometimes called a dado rail) to sit directly on top of the beadboard edge. This piece hides the rough cut of the paneling and creates a finished shelf-like look. -
Add new baseboards:
Install your new baseboard moulding along the bottom edge of the paneling. This anchors the look and hides any gaps between the paneling and the floor. -
Fill the holes:
Go over every nail hole with a small amount of wood filler. Once dry, sand the filler flush with the surface using 220-grit sandpaper. -
Caulk the seams:
Apply a thin bead of paintable caulk along all seams—where the moulding meets the wall, where the baseboard meets the paneling, and in the corners. Smooth it with a wet finger for a seamless transition.
Functional Ledge
Use a slightly deeper moulding (1.5 – 2 inches) for the top cap. This creates a functional narrow shelf perfect for leaning small framed art or resting tiny succulent pots.
Step 4: Painting the Two-Tone Look
-
Prime the surface:
Even if your materials appear pre-primed, apply a coat of quality primer to the paneling and wood trim to ensure the best possible paint adhesion and color truth. -
Paint the upper wall:
Paint the drywall above the chair rail with your chosen warm white paint. Don’t worry about being too perfect at the bottom edge; the rail will separate the colors. -
Cut in the green:
Once the top is dry, use a sash brush to carefully paint the trim portions (baseboard and top rail) with your sage green paint. Take your time near the floor and the upper wall. -
Roll the texture:
Use a roller with a nap appropriate for smooth surfaces to paint the main beadboard sections sage green. Roll vertically to follow the grooves of the paneling, ensuring paint gets into the crevices without pooling. -
Apply second coat:
Let the first coat dry completely according to the can’s instructions. Apply a second coat to the green section to achieve that rich, fully saturated finish shown in the photo.
Enjoy the refreshing structure and color this classic update brings to your utility space

PENCIL GUIDE
Understanding Pencil Grades from H to B
From first sketch to finished drawing — learn pencil grades, line control, and shading techniques.
Explore the Full Guide
Painted Cabinets as the Main Color Move
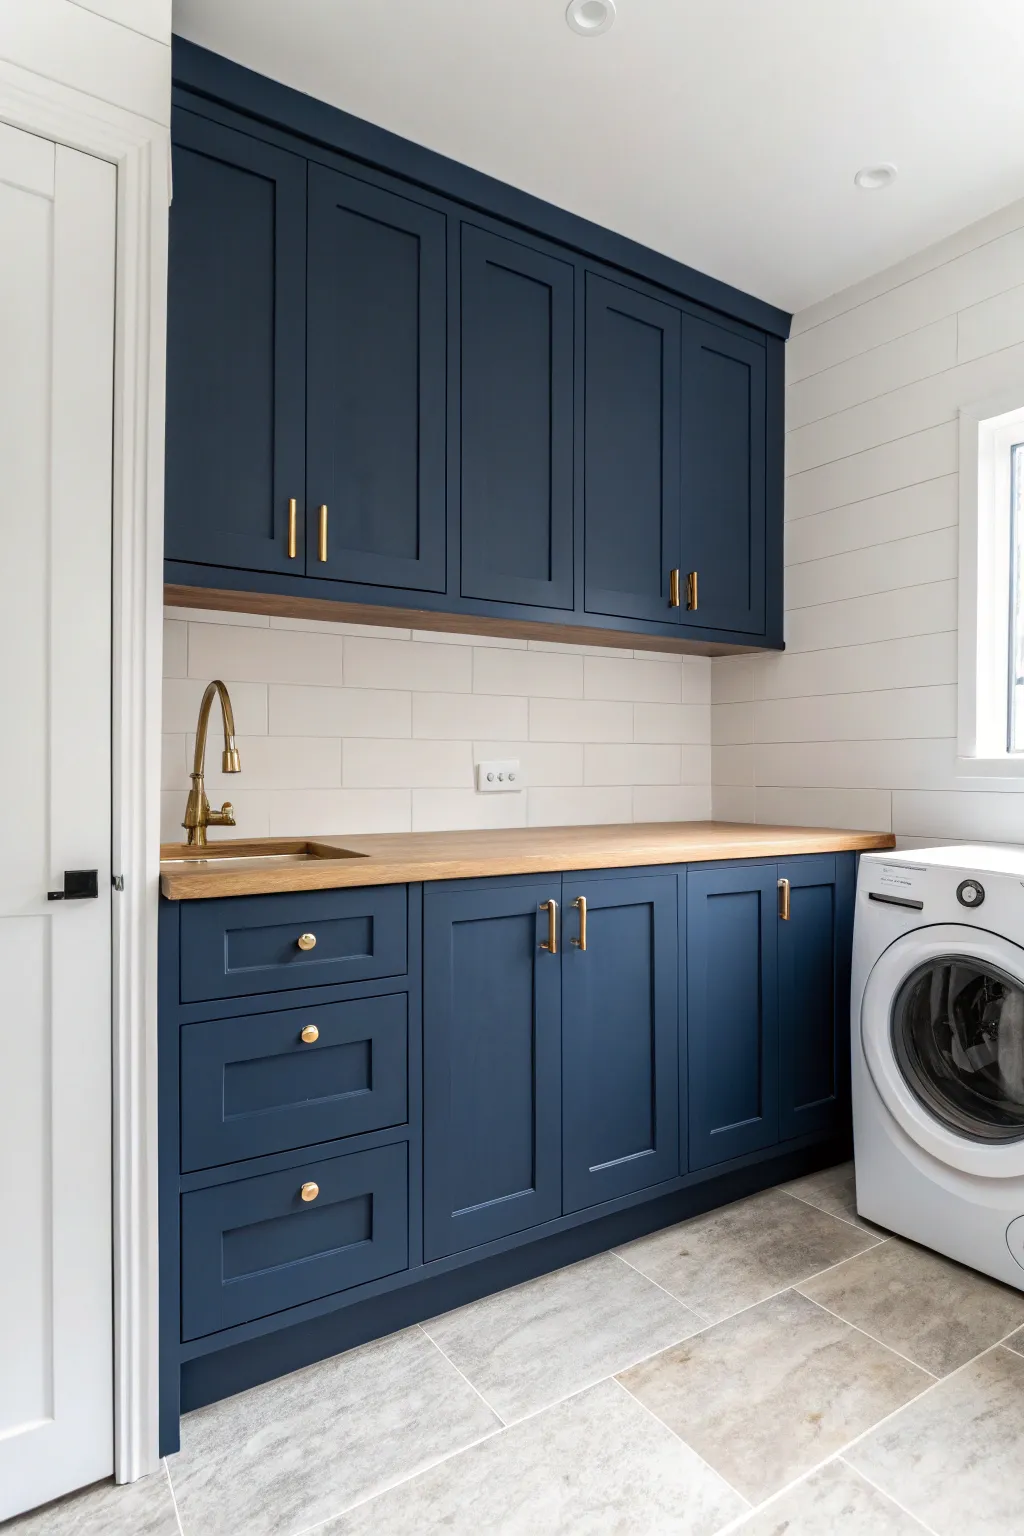
Transform a plain utility space into a sophisticated laundry room featuring deep navy cabinets, warm butcher block counters, and crisp shiplap accents. This project balances bold color with classic textures to create a room that makes chores feel a little more luxurious.
Step-by-Step Guide
Materials
- Navy blue cabinet paint (satin or semi-gloss finish)
- Primer suitable for cabinetry
- Butcher block countertop slab
- Pre-primed shiplap boards
- White subway tiles
- Tile adhesive and white grout
- Gold cabinet hardware (pulls and knobs)
- Gold high-arc faucet
- Drop cloth and painter’s tape
- Sandpaper (120 and 220 grit)
- Paint rollers (foam and microfiber)
- Brad nailer and nails
- Caulk and caulking gun
- Power drill and bits
- Circular saw or jigsaw
Step 1: Cabinet Preparation & Painting
-
Clear and clean:
Remove all cabinet doors, drawers, and existing hardware. Label each door and its corresponding opening with tape to ensure they go back in the right spot later. Clean all surfaces thoroughly with a degreaser to remove finish oils or dirt. -
Sand for adhesion:
Lightly sand all cabinet boxes, doors, and drawer fronts using 120-grit sandpaper. You aren’t trying to remove all the old finish, just scuffing it up enough so the primer grips well. -
Prime the surfaces:
Apply a high-quality bonding primer to all surfaces. Use a brush for corners and detailed moldings, and a foam roller for flat areas to keep the texture smooth. Let this dry completely according to the can’s instructions. -
Smooth it out:
Once the primer is dry, give everything a quick, light sanding with 220-grit sandpaper. Wipe away the dust with a tack cloth or damp rag. -
Apply the navy color:
Paint the first coat of navy blue using a high-density foam roller or a sprayer if available. I find that thin, even coats are crucial here to avoid drips. Allow the first coat to dry fully. -
Second coat and finish:
Apply a second coat of navy paint for full, rich coverage. Check against a light source to ensure no streaks remain. Let the cabinets cure for at least 24-48 hours before reattaching hardware.
Step 2: Countertop & Plumbing
-
Measure and cut countertop:
Measure the length of your cabinet run accurately. Transfer these measurements to your butcher block slab and cut it to size using a circular saw. Sand the cut edge smooth. -
Cut the sink hole:
Place the template provided with your new sink onto the butcher block. Mark the cut line and carefully cut out the opening using a jigsaw. Test the fit before securing anything. -
Seal the wood:
Apply a waterproof sealer or oil to the butcher block, paying extra attention to the cut edges around the sink hole to prevent water damage. -
Install counter and faucet:
Secure the butcher block to the cabinets from underneath using screws. Install the gold faucet and the sink according to manufacturer instructions, connecting the plumbing lines below.
Hardware Placement
For a custom look, place pulls horizontally on drawers and vertically on doors. Use a plastic template jig to prevent drilling errors.
Step 3: Wall Treatments
-
Plan the backsplash:
Determine the height for your tile backsplash. It should run from the countertop up to the bottom of the upper cabinets. -
Install subway tile:
Spread tile adhesive on the wall and place your white subway tiles in a classic brick pattern. Use spacers to keep lines straight. Let the adhesive set overnight. -
Grout the tile:
Apply white grout over the tiles, pressing it firmly into the gaps. Wipe away excess haze with a damp sponge. -
Install shiplap siding:
On the adjacent wall, measure and cut your shiplap boards. Start from the ceiling and work your way down, nailing them into the studs with a brad nailer. Check level frequently. -
Paint wall details:
Paint the shiplap bright white to contrast with the dark cabinets. While you have the white paint out, touch up any trim or baseboards.
Under-Cabinet Lighting
Add battery-operated LED puck lights or an LED strip under the upper cabinets to highlight the subway tile and warm wood tones.
Step 4: Final Assembly
-
Reassemble cabinetry:
Reattach your cabinet doors and slide the drawers back in. Adjust the hinges so all gaps are even and level. -
Drill for hardware:
Use a hardware template to mark exactly where your knobs and pulls will go. This ensures uniformity across all doors and drawers. -
Attach the gold accents:
Screw in the gold pulls and knobs. This is the moment the look really comes together. -
Caulk and clean:
Run a bead of caulk where the countertop meets the backsplash for a watertight seal. Do a final clean of the floor and surfaces.
Enjoy the fresh, modern utility of your newly renovated laundry space
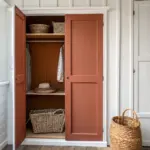
Match Trim and Ceiling for a Seamless Feel
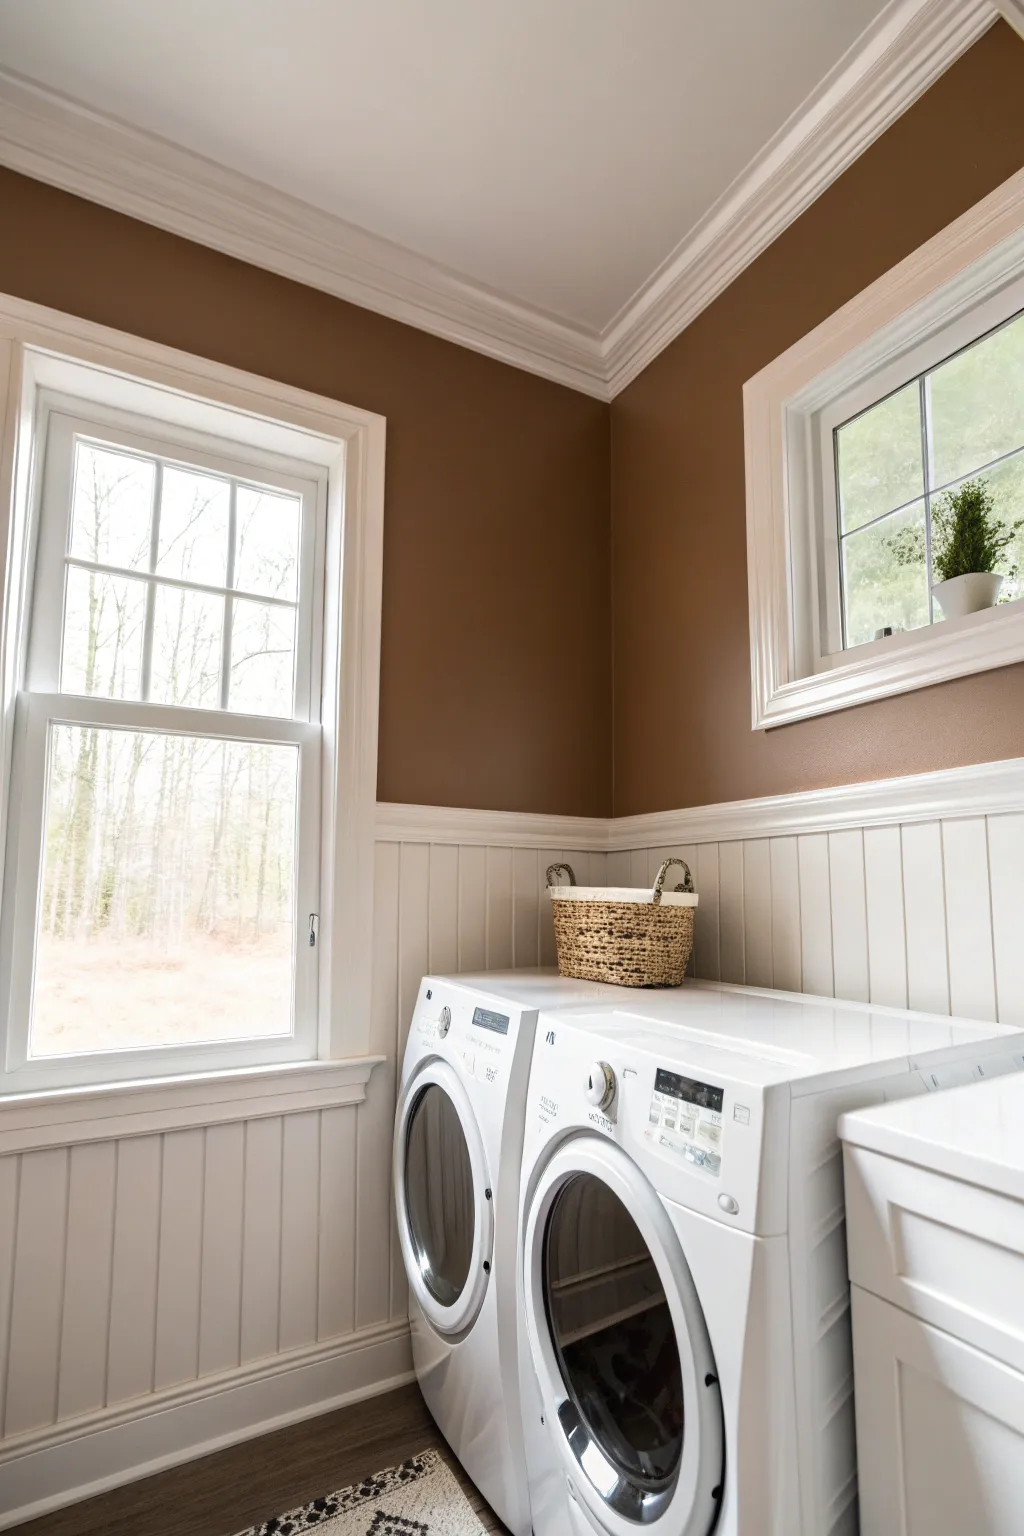
This classic renovation combines rich cocoa walls with crisp white beadboard wainscoting to create a laundry space that feels grand yet grounded. By matching the ceiling tone to the ceiling molding and window trim, you achieve a seamless, high-end look that expands the visual height of the room.
Step-by-Step
Materials
- Semi-gloss white latex paint (trim & wainscoting)
- Eggshell or Satin medium brown latex paint (walls)
- Flat white ceiling paint
- Beadboard paneling sheets or individual planks
- Baseboard molding (3-4 inch height)
- Chair rail molding
- Crown molding
- Window casing trim
- Construction adhesive (Liquid Nails)
- Finishing nails
- Wood filler
- Caulk and caulk gun
- Sandpaper (120 and 220 grit)
- Painter’s tape
- Brad nailer or hammer
- Miter saw
- Level
- Stud finder
- Paint rollers (foam for trim, medium nap for walls)
- Angled sash brush
Step 1: Preparation and Wainscoting Installation
-
Clear and clean:
Remove all appliances, including the washer and dryer, to ensure you have wall-to-wall access. Clean the walls thoroughly to remove dust or lint that laundry rooms tend to accumulate. -
Establish the height:
Determine the height for your wainscoting. In this design, the chair rail sits just above the washing machine height, roughly 36 to 42 inches from the floor. Use a level to mark a continuous horizontal line around the room at this height. -
Cut the beadboard:
Measure the distance from the floor to your level line. Cut your beadboard sheets or planks to this length using a circular saw, ensuring the grooves run vertically. -
Install the panels:
Apply construction adhesive to the back of the beadboard panels. Press them firmly against the wall, starting from a corner. Secure them by nailing into the studs with a brad nailer. -
Add baseboards:
Measure and cut your baseboard molding to fit the perimeter of the floor. Install it directly over the bottom edge of the beadboard to hide any uneven cuts or gaps near the flooring. -
Install chair rail:
Cut the chair rail molding to fit the top edge of the beadboard. This cap piece is crucial for the finished look. Nail it securely into the studs, ensuring it creates a distinct separation between lower and upper wall sections.
Step 2: Trim and Molding Details
-
Frame the windows:
If your windows are currently bare, cut 1×4 trim boards or specific window casing to frame them. Install the sill piece first, followed by the side casings, and finally the header piece. I find that pre-assembling the casing on the floor can sometimes make the angles tighter before nailing to the wall. -
Install crown molding:
Measure the top perimeter of the room. Cut your crown molding at 45-degree compound angles for the corners. Install it where the wall meets the ceiling to draw the eye upward. -
Fill and sand:
Use wood filler to cover all nail holes in the wainscoting, baseboards, chair rail, window trim, and crown molding. Once dry, sand the filler flus with 220-grit sandpaper. -
Caulk the seams:
Run a thin bead of caulk along every seam where wood meets wood or wood meets wall. Focus on the corners of the wainscoting, the top of the chair rail, and gaps in the crown molding. Smooth with a wet finger.
Sticky Situation?
If the brown paint bleeds under the tape onto your white chair rail, don’t wipe it while wet. Let it dry completely, then gently scrape the bleed with a razor blade or touch it up with white paint.
Step 3: Painting
-
Tape and protect:
Apply painter’s tape to the floor and the glass panes of the windows. Tape off the wall area right above the chair rail to protect it while painting the white lower section. -
Paint the ceiling:
Start at the top. Paint the ceiling with a flat white paint. Bring the paint slightly down the wall if you haven’t installed crown molding yet, but since the molding is up, carefully cut in against the bottom edge of the crown molding. -
Paint the trim and wainscoting:
Paint the crown molding, window trim, wainscoting, baseboards, and chair rail with semi-gloss white paint. The sheen difference helps reflect light and makes the surfaces easier to clean. Apply two coats for solid coverage. -
Cut in the wall color:
Once the white trim is completely dry (wait at least 4 hours), tape off the top of the chair rail and the bottom of the crown molding. Use an angled sash brush to ‘cut in’ the brown paint around the edges. -
Roll the walls:
Use a medium nap roller to apply the rich brown latex paint to the upper wall sections. Work in ‘W’ shapes to blend the paint evenly. The contrast against the white trim will start to pop immediately. -
Second coat:
Allow the first coat of brown to dry for 2-4 hours. Apply a second coat to ensure the color is deep and opaque, fully covering the drywall. -
Remove tape and touch up:
Ideally, peel off the painter’s tape while the final coat is still slightly tacky to prevent peeling the dried film. Use a small artist brush to fix any little bleeds or errors.
Pro Tip
To get perfectly invisible seams on beadboard sheets, apply a small amount of wood glue to the overlapping edges before nailing them up, then sand the joint thoroughly after the glue dries.
Step back and admire how the dark walls make the white woodwork gleam, giving your laundry room a sophisticated, custom-built appearance.


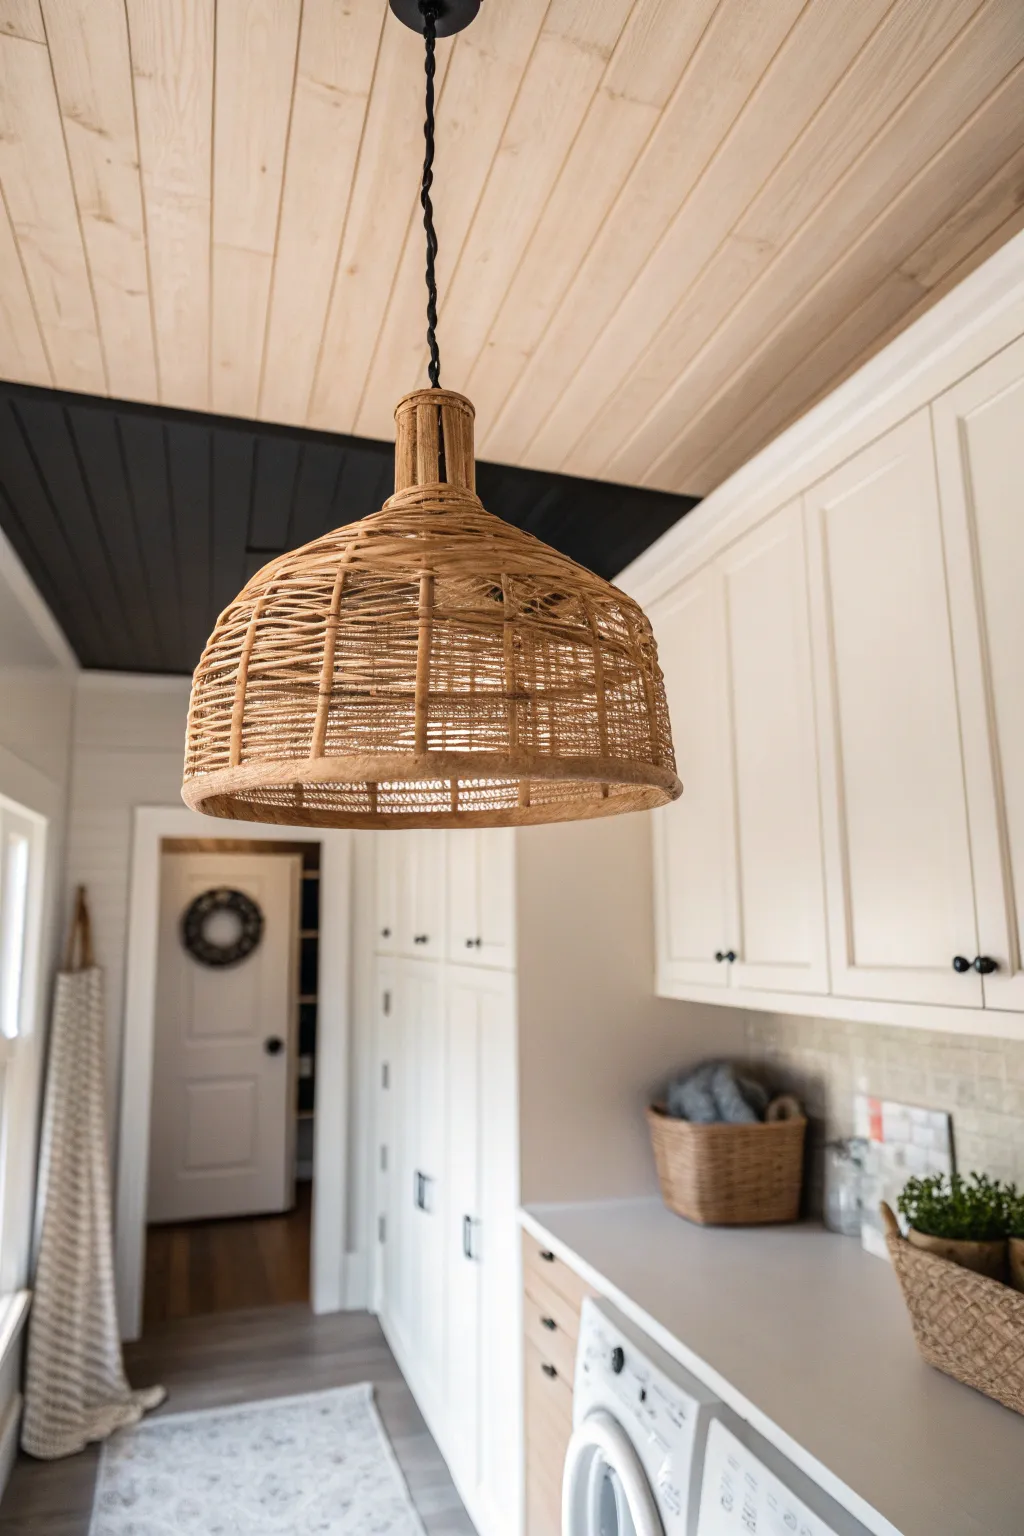
Sunny Yellow to Warm Up a Windowless Room
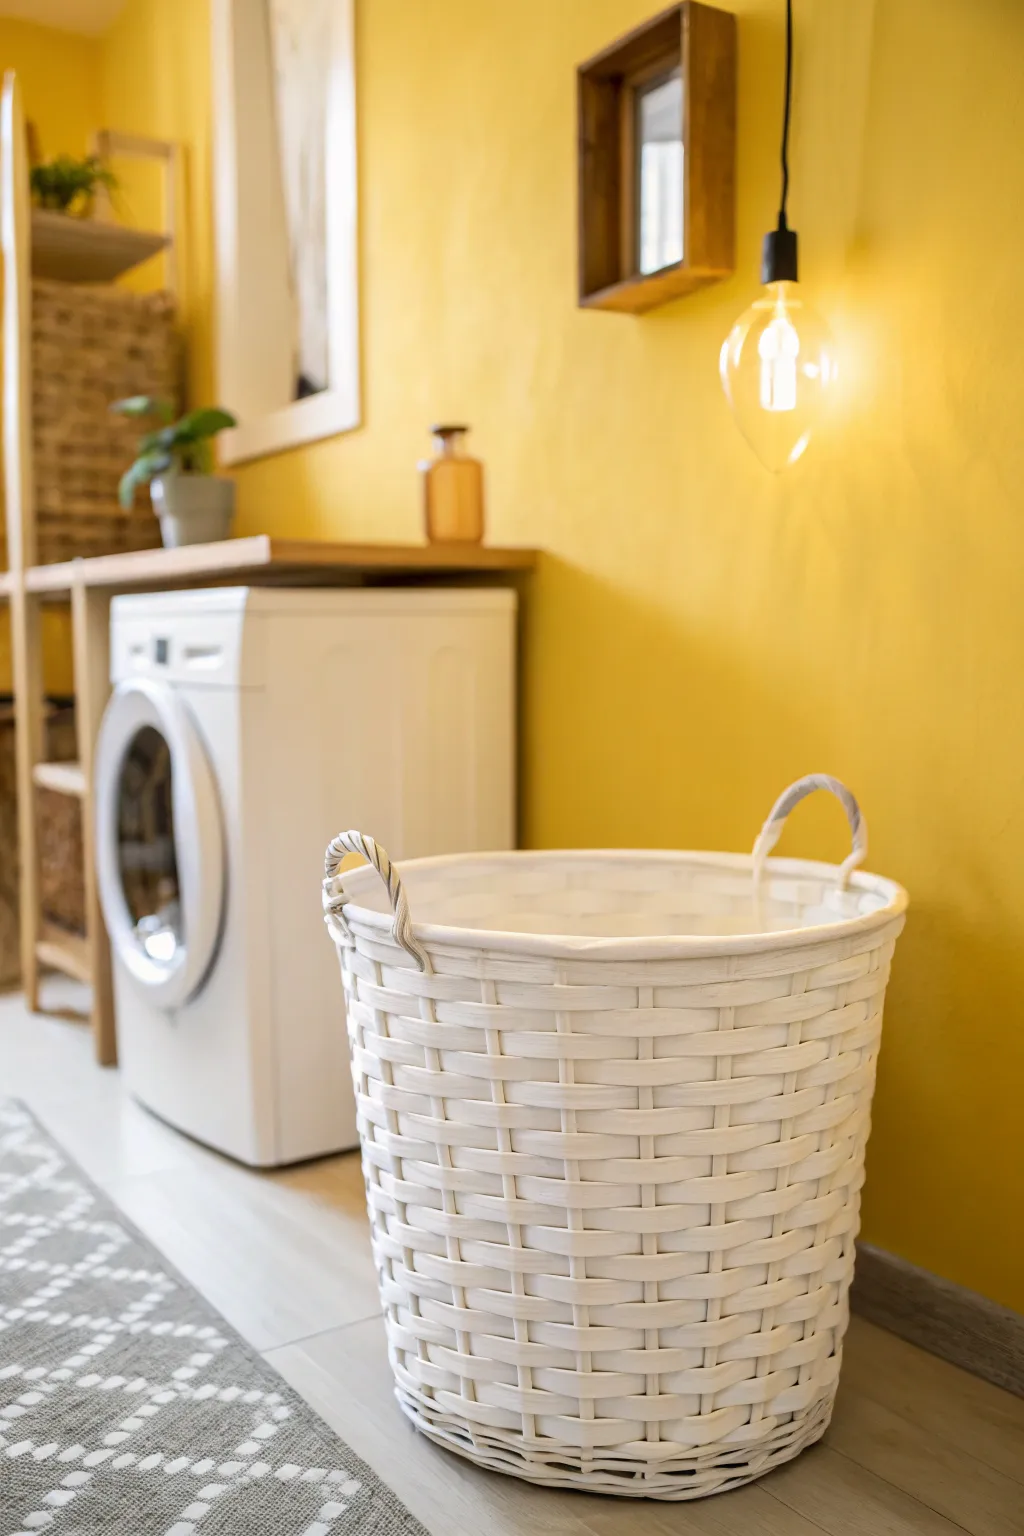
Transform a dim laundry space into a cheerful oasis with this vibrant yellow wall makeover. The project centers on creating a warm, inviting backdrop that instantly brightens the room, complemented by warm wood accents and crisp white fixtures.
Step-by-Step Tutorial
Materials
- Interior latex paint (Sunny Yellow/Golden Rod shade)
- Painter’s tape (1.5-inch width)
- Drop cloths or plastic sheeting
- Spackle and putty knife
- Sandpaper (220-grit)
- Microfiber cloth
- Primer (stain-blocking)
- Paint roller (3/8-inch nap)
- Paint tray and liner
- Angled sash brush (2-inch)
- Ladder or step stool
- Wood stain (Golden Oak or similar)
- Small wall-mounted wooden box shelf
- Black pendant light kit with exposed bulb
- Warm LED Edison bulb
- Drill and wall anchors
Step 1: Preparation & Wall Prep
-
Clear and Clean:
Begin by removing everything from the designated wall area, including the washing machine if possible, or pull it forward significantly. Wipe the wall down with a damp cloth to remove dust and lint. -
Patch Imperfections:
Inspect the wall for nail holes or dents. Apply a small amount of spackle with a putty knife, let it dry, and sand it flush with the wall surface using 220-grit sandpaper. -
Protect Surfaces:
Lay down drop cloths to protect your flooring. Apply painter’s tape along the baseboards, ceiling line, and adjoining walls to ensure crisp, clean edges.
Sunshine State of Mind
Yellow paint reflects light differently. Test a swatch on the wall and observe it at different times of day before committing to the whole gallon.
Step 2: Painting the Sunny Drop
-
Prime the Surface:
If painting over a dark color or bare drywall, roll on a coat of stain-blocking primer. Allow this to dry completely according to the manufacturer’s instructions. -
Cut In Edges:
Using the 2-inch angled sash brush, carefully paint a border of the sunny yellow paint along the taped edges, corners, and around any outlets. -
Roll the First Coat:
Pour your yellow paint into the tray. Load your roller and apply the paint in ‘W’ or ‘M’ patterns to distribute it evenly, working in 3-foot sections. Blend the rolled areas into the wet ‘cut-in’ edges. -
Dry and Assess:
Let the first coat dry for at least 4 hours. Yellow can be tricky with coverage, so don’t worry if it looks slightly patchy at this stage. -
Apply Second Coat:
Repeat the rolling process for the second coat. This layer will deepen the color and provide the solid, opaque finish seen in the photo. Remove the tape while the paint is still slightly tacky to prevent peeling.
Texture Play
Paint the woven basket in a matte white if you can’t find one pre-made. Use spray paint for even coverage inside the weave effortlessly.
Step 3: Installing Accents
-
Install the Wall Shelf:
Identify a spot on the upper wall for the small wooden box shelf. Mark your drill holes, insert wall anchors if not hitting a stud, and screw the shelf securely into place. -
Hang the Pendant Light:
Install a ceiling hook or bracket near the wall. Hang the black pendant cord so the bulb hangs at a visually pleasing height, roughly parallel to the middle of the box shelf. -
Screw in the Bulb:
Insert a warm-toned LED Edison bulb. This specific bulb style is crucial for recreating the warm glow shown in the inspiration image.
Step 4: Styling the Space
-
Position the Washer:
Move the washing machine back into place. If you are adding a counter shelf above it, ensure it sits just an inch or two above the appliance top. -
Add Greenery:
Place a small potted plant, like a pothos or fern, on the counter shelf. The green contrasts beautifully with the yellow wall. -
Decorative Elements:
Place an amber glass bottle on the shelf to catch the light. I find that grouping items in odd numbers usually looks best. -
The Final Touch:
Place a large white woven laundry basket in the foreground. This adds texture and breaks up the solid color of the wall and appliances.
Enjoy the warmth and energy of your newly brightened laundry space every time you wash a load
Blush or Peach Pastels for Soft Clean Energy
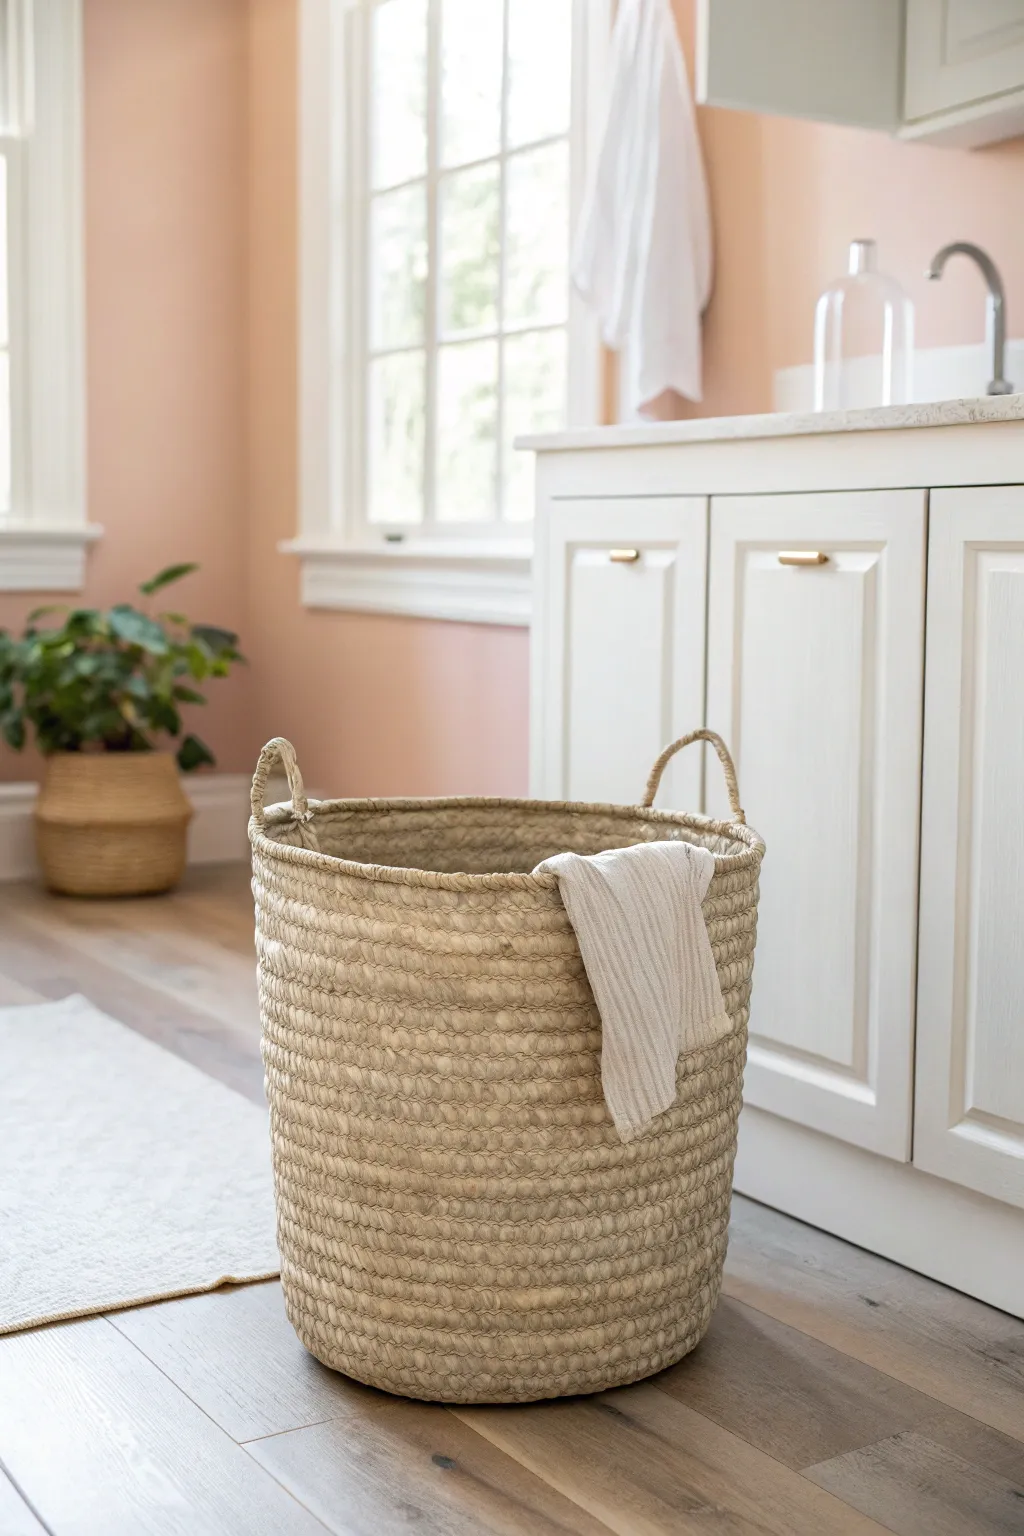
Bring texture and warmth to your laundry room or bathroom with this large, handmade braided basket. Crafted from thick jute or sisal rope using a simple coiling technique, its sturdy design and charming looped handles make it as functional as it is beautiful.
Step-by-Step Guide
Materials
- 200-300 feet of 10mm or 12mm jute or sisal rope
- Heavy-duty hot glue gun
- Large supply of hot glue sticks (clear or amber)
- Heavy-duty sewing needle and strong upholstery thread (optional for reinforcement)
- Large bucket or wastebasket (to use as a mold/form)
- Painter’s tape
- Scissors
Step 1: Creating the Base
-
Prepare the center coil:
Begin by taking one end of your thick jute rope. Fold the raw end over tightly about half an inch and secure it with a generous dab of hot glue to prevent fraying. This will be the very center of your basket’s bottom. -
Start the spiral:
Apply a line of hot glue along the side of that folded end and wrap the rope around it tightly. Hold it firmly for 30 seconds until the glue sets completely. This initial spiral needs to be very tight to ensure a solid foundation. -
Expand the flat disc:
Continue wrapping the rope around the center coil, applying glue to the side of the rope (not the top) as you go. Keep pressing the new coil firmly against the previous one on a flat surface like a table or floor to ensure the bottom stays perfectly flat. -
Check the diameter:
Keep coiling until the flat circle reaches the same diameter as the bottom of the bucket or wastebasket you are using as your form. This usually takes about 12-14 inches for a standard laundry basket size.
Step 2: Building the Walls
-
Transition to vertical:
Once your base is the desired size, place your bucket mold directly on top of the rope disc. Instead of gluing the rope to the side of the previous coil, begin gluing slightly upward onto the previous row to start building the walls. -
Secure the form:
I find it helpful to use a few pieces of painter’s tape to loosely hold the rope base to the bottom of the bucket so it doesn’t slide around while you work on the first few vertical rows. -
Coil up the sides:
Continue wrapping the rope around the bucket, applying a steady bead of glue between the bottom of the new rope strand and the top of the previous row. Press firmly as you go to eliminate gaps. -
Maintain tension:
Pull the rope snug against the bucket mold as you work. This ensures your basket will have straight, even sides rather than bulging outward. Keep checking that your coils are level. -
Hide the glue:
Be careful not to use excessive glue that might seep out onto the visible exterior. If glue does squish out, wipe it away immediately with a scrap piece of fabric or cardboard before it hardens. -
Reinforce periodically (optional):
For extra durability, especially if this will hold heavy laundry, take a moment every 4-5 inches of height to add a few vertical stitches with upholstery thread, linking the coils together from the inside. -
Remove the mold:
Once you have reached about 80% of your desired height, carefully slide the bucket or wastebasket out. The structure should now be stiff enough to support itself as you finish the top portion.
Sticky Situation?
If you struggle with hot glue strings, wait until the project is totally cool, then blast it quickly with a hot hair dryer. The webbing will melt away instantly.
Step 3: Adding Handles and Finishing
-
Mark handle placement:
Identify two points on the rim directly opposite each other where you want your handles to be. Mark these spots lightly with chalk or a piece of tape. -
Form the first handle loop:
When you reach the first mark with your rope, stop gluing the rope to the basket rim. Instead, measure out about 6-8 inches of loose rope to form an arch, then begin gluing again at the other side of the handle mark. -
Create the second handle:
Continue coiling and gluing around the rim until you reach the opposite side. Repeat the arching process to create the second handle loop, mirroring the size of the first one. -
Reinforce the handles:
Do one final full pass of rope around the entire top rim. When you reach the handle loops, wrap the new rope directly around the arched rope of the previous layer, gluing them together to make a double-thick, sturdy handle. -
Cinch the end:
To finish, cut the rope at an angle so it tapers off. Glue this tapered end securely to the inside rim of the basket, blending it into the coil below so the stopping point isn’t obvious from the outside. -
Clean up:
Inspect the entire basket for any wisps of dried hot glue or stray jute fibers. Use scissors to trim any fuzzy bits for a cleaner, more professional look. -
Final shaping:
If the basket looks slightly misshapen after handling, dampen the rope slightly with a spray bottle and press it back into a perfect circle, then let it dry completely to set the shape.
Pro Tip: Seamless Joins
When starting a new spool of rope, cut both ends at a 45-degree angle. Overlap the angled cuts and glue them tightly together to keep the coil thickness consistent.
Place your newly crafted basket in your laundry room to add immediate warmth and organic texture to the space
Mix Finishes for Subtle Dimension
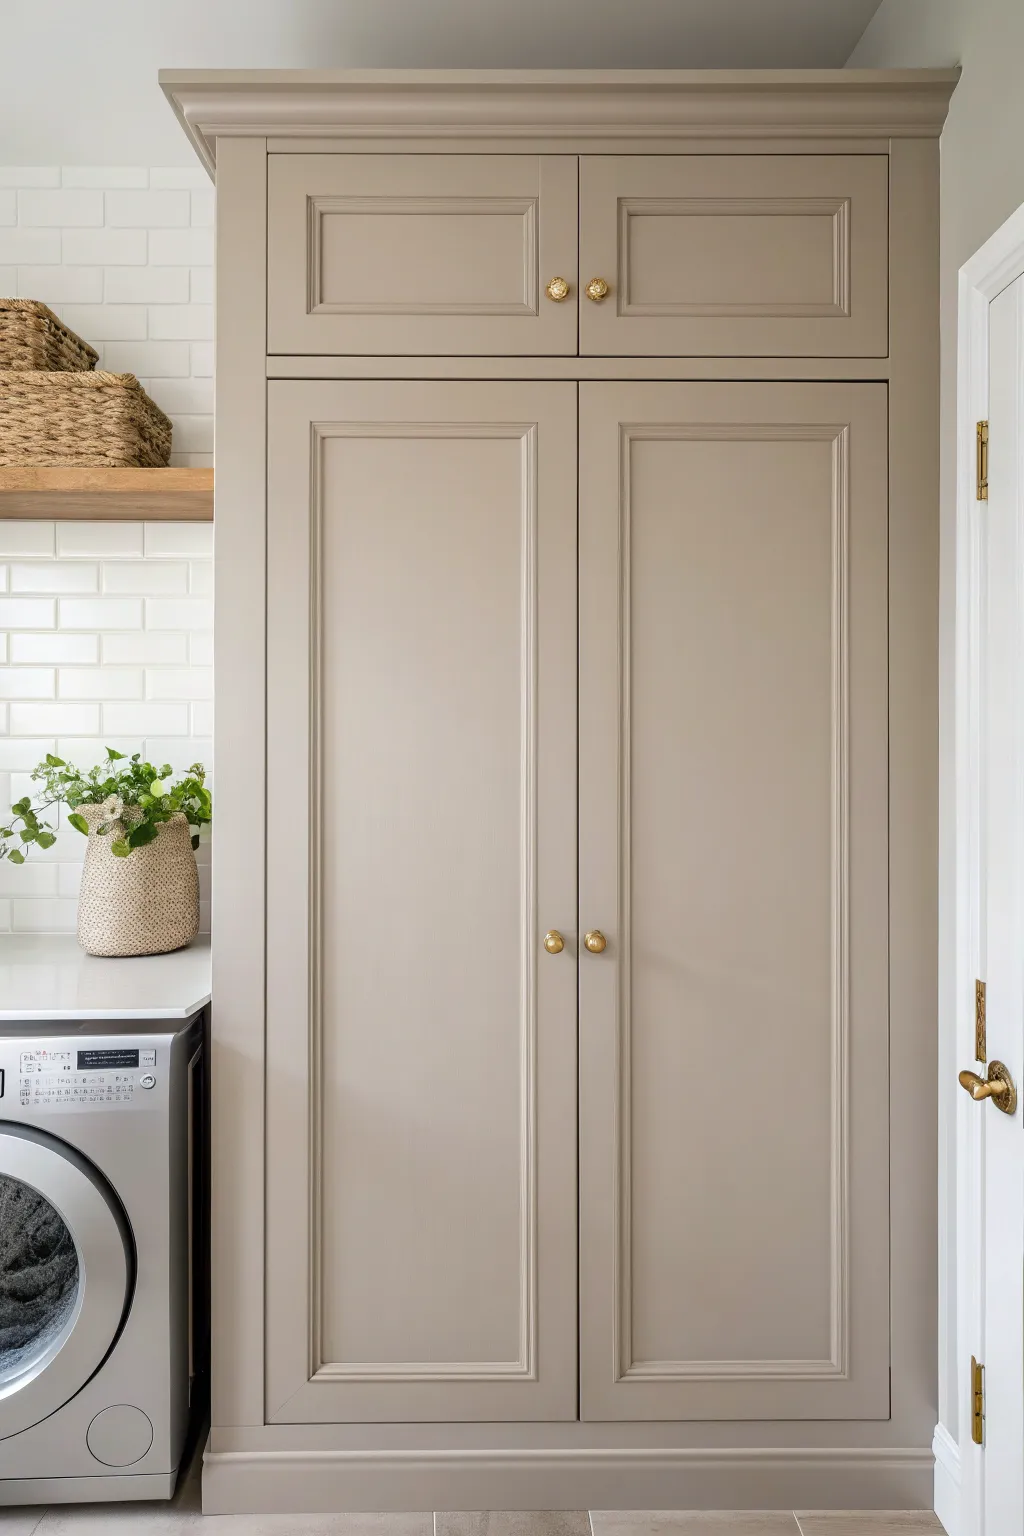
Transform a plain, builder-grade utility cabinet into a stunning, custom-look piece with subtle dimension and warmth. This project focuses on adding crown molding and achieving that flawless, warm-taupe ‘greige’ finish that instantly elevates a laundry room.
Step-by-Step Tutorial
Materials
- Large utility cabinet (pre-existing or new flat-pack)
- Wide crown molding (wood or MDF)
- Small cove molding (optional, for filler)
- Pneumatic brad nailer and 1.5-inch nails
- Miter saw
- Wood glue
- Wood filler
- Fine-grit sandpaper (220-grit)
- Tack cloth
- High-quality bonding primer
- Cabinet paint in a warm taupe/greige (Satin or Semi-Gloss finish)
- High-density foam roller and handle
- Angled sash brush (2-inch)
- Painter’s tape
- Gold or brass cabinet knobs
Step 1: Preparation & Crown Build
-
Assess the cabinet:
Begin by removing all doors, hinges, and hardware from your cabinet carcass. Lay the doors flat on a work surface or sawhorses. Mask off the surrounding walls, ceiling, and adjacent backsplash tiles with painter’s tape to protect them from splatters. -
Measure for molding:
Measure the top width and depth of your cabinet box precisely. If your cabinet doesn’t go all the way to the ceiling, you’ll need to build a simple wooden ‘cleat’ or frame on top of the cabinet to nail the crown molding into. -
Cut the crown molding:
Using your miter saw, cut the front piece of molding with 45-degree angles on both ends (assuming a standard rectangular cabinet). Cut the side return pieces with a 45-degree angle on the front end and a 90-degree straight cut where it touches the wall. -
Dry fit and adjust:
Hold the molding pieces up to the cabinet to check the fit. The corners should meet crisply. If your walls aren’t perfectly square (they rarely are), you may need to adjust your miter angle slightly for a tight seam. -
Install the molding:
Apply a bead of wood glue to the mitered joints. Nail the molding into place using a pneumatic brad nailer, shooting nails into the top structural rail of the cabinet or the cleat you installed. Wipe away excess glue immediately. -
Fill and seamless finish:
Fill all nail holes and the corner seams with wood filler. Once dry, sand these areas smooth with 220-grit sandpaper so the joint becomes invisible. Run a thin bead of caulk along the top edge where the molding meets the ceiling and smooth it with a damp finger.
Sticky Situation?
If your doors are sticking after painting, you likely re-hung them too soon. Add small felt or silicone bumper pads to the inside corners of the doors to prevent paint-on-paint can tact while it fully cures.
Step 2: The Professional Paint Job
-
Scuff sand surfaces:
Lightly sand all cabinet surfaces—doors and the frame—with 220-grit sandpaper. You aren’t trying to remove old finishes, just roughening the surface or ‘de-glossing’ it so the new primer adheres properly. -
Clean thoroughly:
Vacuum up the sanding dust, then wipe every inch down with a tack cloth or a rag dampened with mineral spirits. Any leftover dust will ruin your smooth finish. -
Apply bonding primer:
Roll on a coat of high-quality bonding primer using a foam roller. Use a brush for the recessed panels and corners. Let this dry completely according to the manufacturer’s instructions. -
First coat of color:
Stir your greige paint thoroughly. I like to start by brushing the recessed groove details of the door panels first. Work quickly to smooth out brush marks before the paint starts to set. -
Roll the flat surfaces:
Immediately switch to your foam roller for the large, flat center panels and the outer stiles and rails. Maintain a wet edge to avoid lap marks. -
Sand between coats:
Once the first coat is fully dry (usually 4-6 hours minimum for cabinet paint), very lightly hand-sand the surface with fine sandpaper to knock down any bumps. Wipe away the dust with a tack cloth. -
Final coat application:
Apply the second coat using the same method: brush the details, then roll the flats. This second coat provides the true depth of color and the durable finish needed for a laundry room. -
Paint the frame:
While the doors dry, paint the cabinet frame and the new crown molding attached to the unit. Use the brush for the crown molding profiles to get deep into the curves.
Level Up: Hidden Storage
Add a slide-out drying rack or ironing board inside the tall vertical cabinet section. It utilizes the narrow depth efficiently and keeps utility items completely hidden but accessible.
Step 3: Reassembly & Hardware
-
Cure time is key:
Allow the paint to cure for at least 24-48 hours before handling the doors. Cabinet paint takes longer to harden than wall paint, and rushing this step can lead to fingerprints or dings. -
Reattach doors:
Carefully screw the hinges back onto the frame and hang the doors. Adjust the hinge screws as needed to ensure the reveal (the gap between doors) is even and straight. -
Install the knobs:
If you are changing hardware styles, you may need to fill old holes and drill new ones. For this look, center small brass knobs on the stiles of the lower doors, and place them near the bottom corners of the upper cabinet doors.
Step back and appreciate how a simple color change and some molding can make a functional space feel like a designer room.
Painted Stripes for Instant Graphic Style
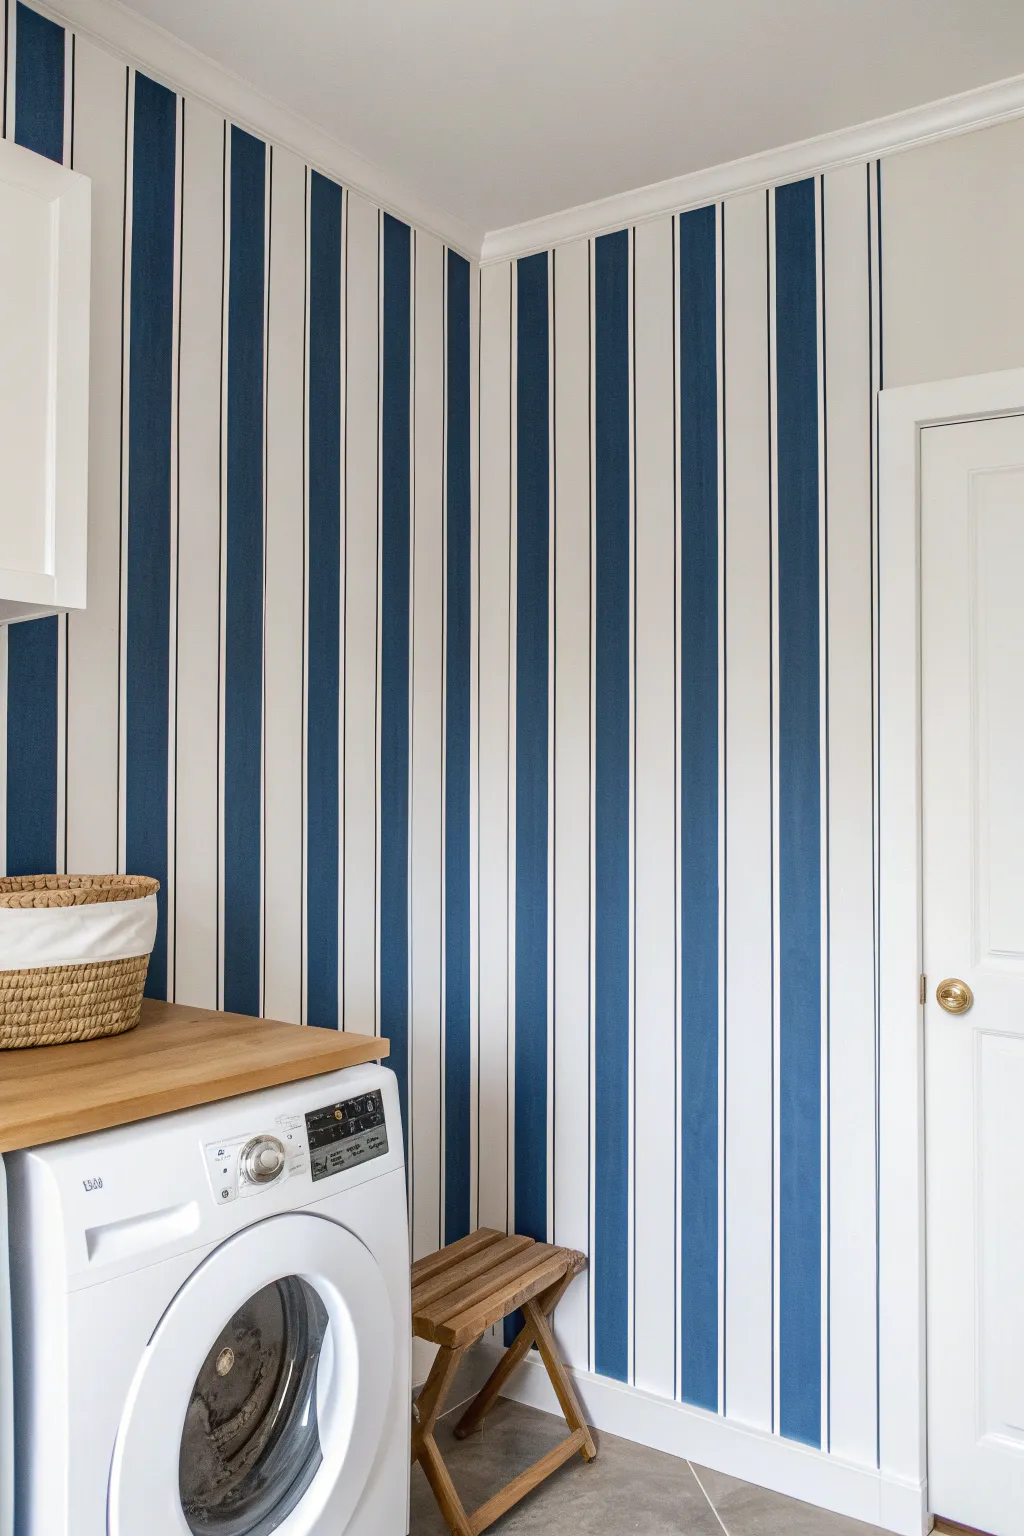
Transform a plain laundry room corner into a crisp, coastal retreat with these bold vertical stripes. This project uses high-contrast navy blue paint against a bright white background to create a graphic look that makes small spaces feel taller and more dynamic.
Step-by-Step
Materials
- Bright white interior latex paint (satin or semi-gloss)
- Navy blue interior latex paint (matching the stripe color)
- Microfiber paint roller (3/8″ nap)
- Painter’s tape (specifically for delicate surfaces or sharp lines)
- Laser level (highly recommended) or a long carpenter’s level
- Pencil
- Tape measure
- Angled sash brush (2 inch)
- Drop cloths
- Credit card or putty knife
- White paint (for sealing tape edges)
Step 1: Preparation and Base Coat
-
Clear the area:
Remove any shelving, artwork, or easily movable appliances from the corner you intend to paint. If you can’t move the washer completely, pull it out enough to reach the wall comfortably. -
Clean the walls:
Wipe down the walls with a damp cloth and mild detergent to remove dust or laundry lint, ensuring the tape will stick properly later. -
Apply the base color:
Paint the entire wall area with your chosen bright white base color using a roller. Doing two coats creates the best foundation. -
Allow ample drying time:
Wait at least 24 to 48 hours for the base coat to cure. This is crucial—if the paint is fresh, the tape might peel it off.
Tape Sealing Trick
Always ‘seal’ your tape edge with the BASE wall color first. This fills any microscopic gaps with the white paint, ensuring your subsequent blue layer has a razor-sharp, professional line.
Step 2: Mapping Out the Stripes
-
Determine stripe width:
Measure the total width of your wall. For the look in the image, aim for stripes that are approximately 4 to 6 inches wide. Divide your wall width by your desired stripe width to see how they fit. -
Adjust for corners:
I prefer to start my measurements from the most visible corner to ensure a full stripe lands there, rather than an awkward sliver. -
Mark the lines:
Using your tape measure, make small pencil ticks along the top of the wall at your determined intervals (e.g., every 5 inches). -
Draw vertical guides:
Set up your laser level to hit your pencil marks. If you don’t have a laser, use a carpenter’s level and draw a very light pencil line from floor to ceiling at each interval. -
Mark the ‘paint’ zones:
Place a small piece of painter’s tape inside every other column. This simple visual cue reminds you exactly which stripes stay white and which ones get painted blue.
Step 3: Taping and Painting
-
Apply the tape:
Run long strips of painter’s tape along the *outside* of the pencil lines for the stripes you intend to paint. The tape should cover the area that will remain white. -
Burnish the edges:
Run a credit card or a plastic putty knife firmly along the edge of the tape to press it down tight. This prevents paint from seeping underneath. -
Seal the tape (The Secret Step):
Lightly brush a thin layer of your *base white paint* over the edge of the tape where the blue stripe will go. This seals the gap with white; if any paint bleeds, it matches the base coat perfectly. -
Let the seal dry:
Wait about 30 minutes for that white sealing layer to dry completely. -
Cut in the edges:
Using your angled sash brush and the navy blue paint, carefully cut in at the ceiling line and baseboards within the stripe zones. -
Roll the blue stripes:
Use a small roller to fill in the blue stripes. Apply a light, even coat to avoid heavy texture buildup. -
Apply a second coat:
Once the first blue coat is dry to the touch, roll on a second coat for full, rich opacity.
Bleeding Lines?
If paint bled under the tape, don’t panic. Let it dry completely, then place a fresh piece of tape over the blue stripe (leaving a hair-width gap) and touch up the white with a small brush.
Step 4: The Reveal
-
Remove tape immediately:
Don’t wait for the blue paint to dry completely. While it is still slightly tacky, slowly pull the tape off at a 45-degree angle away from the painted edge. -
Check for imperfections:
Inspect your lines. If a tiny bit of blue bled through, wait for it to dry, then use a tiny artist’s brush and white paint to touch it up. -
Reinstall fixtures:
Once fully cured, push your washer back into place and hang any shelves or baskets to complete your laundry room renovation.
Enjoy the crisp, tailored look your new nautical stripes bring to the space
Geometric Blocks to Define a Folding Zone
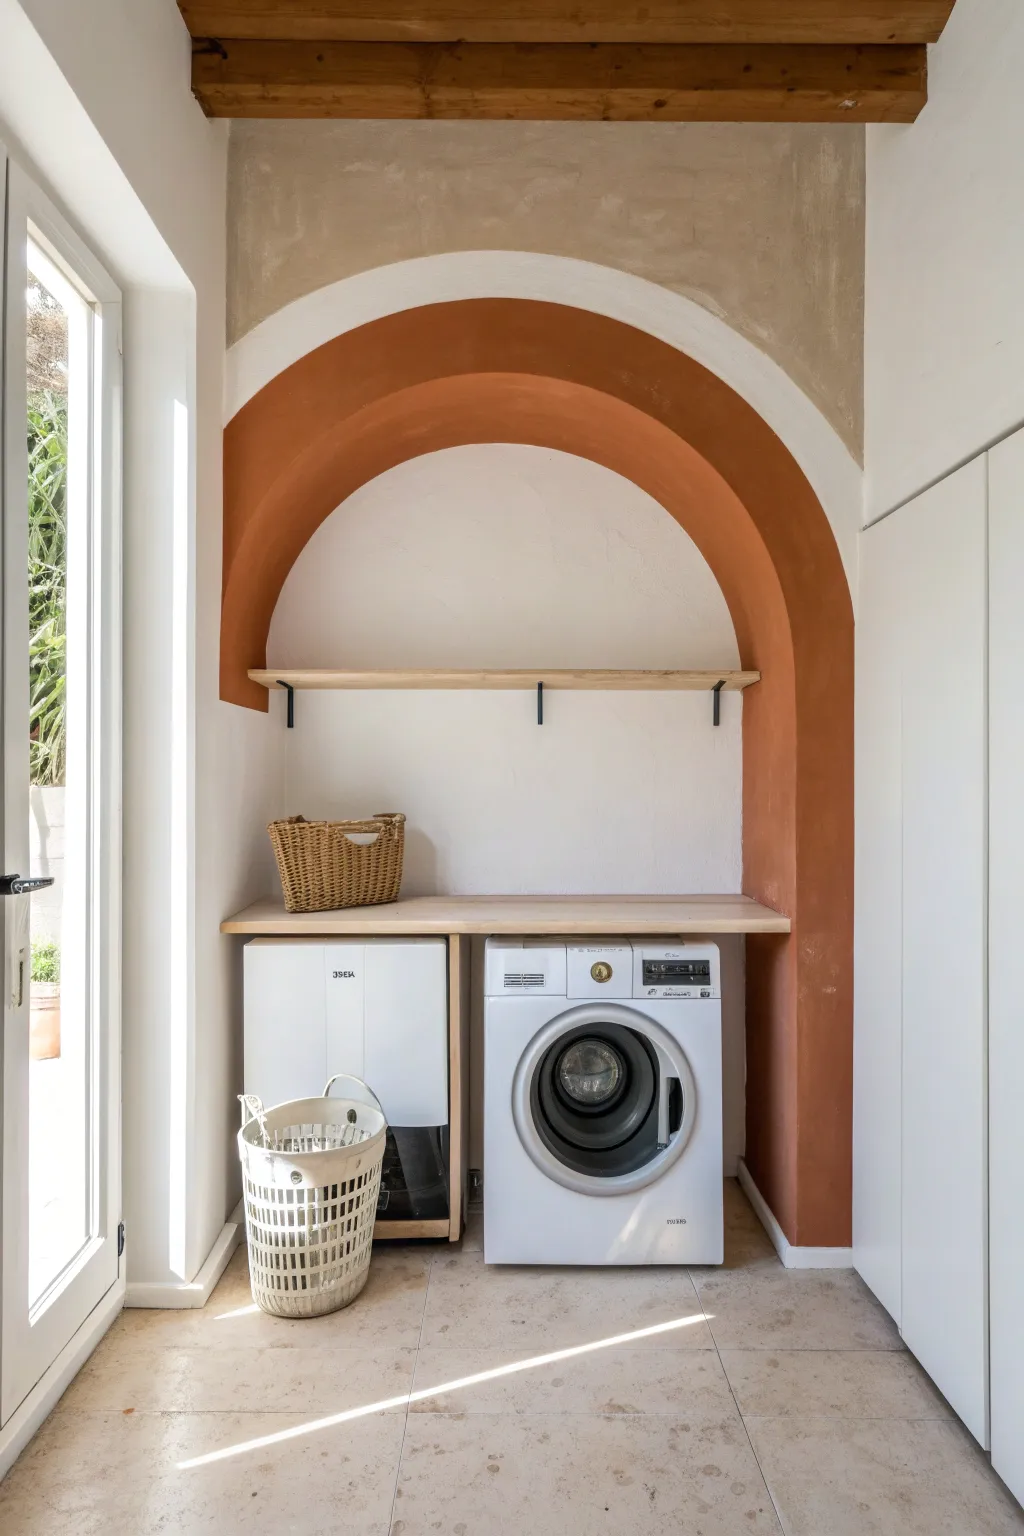
Transform a plain utility corner into a warm, focal point by painting a bold geometric arch. This project uses earthy tones to create architectural interest without actually building anything, perfectly framing your laundry or folding station.
How-To Guide
Materials
- Interior latex paint (terracotta/burnt orange color)
- Interior latex paint (white or off-white for touch-ups)
- Pencil
- String or twine
- Measuring tape
- Thumbtack or small nail
- Painter’s tape
- Angled sash brush (2-2.5 inch)
- Small foam roller and tray
- Drop cloth
- Fine-grit sandpaper (optional)
- Damp cloth
Step 1: Measurement and Layout
-
Measure the workspace:
Begin by measuring the total width of the area where your appliances will sit. You want the arch to comfortably encase the washer and any adjacent units, usually leaving a few inches of breathing room on either side. -
Determine the center point:
Find the exact horizontal center of your desired arch width on the wall. Mark this center point with a pencil at the height where you want the curved part of the arch to begin—typically just above where your floating shelf will sit. -
Create a compass:
Cut a piece of non-stretchy string slightly longer than the radius of your desired arch. Tie one end securely around a pencil. -
Attach the pivot point:
Tie the loose end of the string to a thumbtack or small nail. Press this tack into the center point mark you made on the wall earlier. Adjust the string length so the pencil tip hits exactly where you want the outer edge of the arch to be. -
Draw the outer curve:
Keeping the string taut, carefully swing the pencil in a semi-circle motion to draw the top curve of your arch. Ensure your motion is smooth to avoid jerky lines. -
Draw the vertical lines:
Use a level and a straight edge (or a long ruler) to draw straight vertical lines down from the ends of your semi-circle to the floor. These will form the legs of the arch. -
Create the inner curve:
Decide on the thickness of your arch band (the photo shows a thick band, likely 8-12 inches). Shorten your string by that exact amount, anchor it to the same center tack, and draw a second, smaller semi-circle inside the first. -
Complete the outline:
Draw vertical lines down from the ends of the inner semi-circle to the floor or counter height, completing the outline of the hollow arch shape.
Uneven Curves?
Does your drawn curve look shaky? Don’t stress. Before painting, re-trace the line using a different colored pencil until you get a smooth arc, then only paint the “good” line.
Step 2: Painting the Design
-
Prepare the surface:
Wipe down the wall area with a damp cloth to remove dust or detergent residue. If the wall represents a high-gloss finish, briefly scuff it with fine-grit sandpaper for better adhesion. -
Tape the edges:
Apply painter’s tape along the straight vertical lines of the arch legs. Press the edges of the tape down firmly to prevent bleed-through. -
Cut in the curves:
This is the most critical step. Using your angled sash brush, carefully paint closely along the pencil lines of the curved sections. I find holding the brush like a pen gives more control for these sweeping motions. -
Fill the center:
Once the tedious edging is done, use a small foam roller to fill in the body of the arch. The small roller helps you navigate the curve without accidentally rolling over the lines. -
Allow to dry:
Let the first coat dry completely according to the paint can’s instructions. This usually takes 2-4 hours. -
Apply second coat:
Repeat the cutting-in and rolling process for a second coat. This ensures the terracotta color is rich, opaque, and vibrant. -
Remove tape:
While the second coat is still slightly tacky (not fully dry), gently peel off the painter’s tape at a 45-degree angle. This prevents existing paint from peeling up with the tape. -
Touch up:
Inspect your edges. If you notice any wobbles in the curve or bleed-through on the straight lines, use a small artist’s brush and your original wall color to clean up the perimeter.
Pro Tip: Pencil Eraser Hack
If you are prone to shaky hands, rest your pinky finger against the wall as you paint the curve. It acts as a stabilizer, allowing your brush to glide much smoother than hovering your hand.
Step back and admire how a simple shape and a splash of color have completely redefined the character of the room
Paint the Ceiling for a Cozy Surprise
Elevate your laundry room from utilitarian to stunning by adding a bold, dark contrast to a planked ceiling. This project creates a striking visual separation that highlights architectural details like wood grain while adding moody sophistication.
Step-by-Step
Materials
- Matte black or charcoal interior latex paint
- High-quality 2-inch angled sash brush
- Small foam roller (4-inch) with smooth nap
- Painter’s tape (delicate surface)
- Drop cloths or plastic sheeting
- Ladder or step stool
- Spackle or wood filler (if needed)
- Fine-grit sandpaper (220-grit)
- Tack cloth
- Screwdriver (for fixture removal)
Step 1: Preparation & Masking
-
Clear the room:
Begin by removing as much as possible from the laundry area to give yourself ample working space. Take down any hanging baskets, hampers, or decorative items. -
Remove light fixtures:
Turn off the power at the breaker box, then carefully unscrew and lower the canopy of your pendant light. Disconnect the wires and fully remove the fixture so you have a clear ceiling surface to paint. -
Protect surfaces below:
Lay down heavy canvas drop cloths over your washing machines, countertops, and floors. Unlike plastic, canvas absorbs drips so you don’t track paint around the house. -
Tape off edges:
Apply painter’s tape along the top edge of the crown molding or wall where the ceiling meets the vertical surface. Press the edge of the tape firmly with a putty knife to prevent bleed-through. -
Mask adjoining ceiling sections:
If you are only painting a specific section of the ceiling, like in the photo, create a sharp line using painter’s tape to separate the dark painted area from the natural wood section.
Uneven Coverage?
If wood grain is still showing through after two coats, don’t press harder. Instead, apply a third, very thin coat. Multiple thin layers are always smoother than one thick, gloopy one.
Step 2: Painting the Ceiling
-
Inspect the planks:
Look over the wood planks for any large holes or cracks. Fill them with a small amount of wood filler, let it dry, and lightly sand smooth with 220-grit sandpaper. -
Clean the surface:
Wipe down the entire ceiling area you intend to paint with a tack cloth to remove dust from sanding or everyday accumulation. Paint adheres best to a perfectly clean surface. -
Cut in the edges:
Using your 2-inch angled sash brush, carefully paint the perimeter of the ceiling section. I find it helpful to wiggle the brush bristles into the grooves between the planks to ensure full coverage in the seams. -
Paint the grooves:
Before rolling, use the brush to run a line of paint deep into the V-grooves or gaps between the wood planks. A roller often misses these deep recesses, leaving unpainted wood showing through. -
Roll the first coat:
Pour your matte black paint into a small tray. Load your 4-inch foam roller and apply the paint perpendicular to the planks first to push paint into the grain, then finish with long strokes parallel to the boards. -
Let it dry completely:
Allow the first coat to dry for at least 2-4 hours, or according to the manufacturer’s instructions. Dark colors often look patchy while wet, so don’t panic yet. -
Apply second coat:
Repeat the cutting-in process if necessary, then roll on a second coat. Move systematically across the ceiling to maintain a ‘wet edge,’ which helps prevent lap marks from appearing in the final finish. -
Check for holidays:
Shine a bright work light across the ceiling surface to spot any ‘holidays’ (missed spots), especially in the texture of the wood grain. Dab these with your brush and blend while the paint is still workable.
Clean Lines Pro Tip
Before applying your black paint, seal the edge of your painter’s tape with a quick swipe of clear matte medium or the existing ceiling color. This blocks leaks for a razor-sharp line.
Step 3: Finishing Touches
-
Remove tape:
While the paint is still slightly tacky (not fully cured), carefully peel away the painter’s tape at a 45-degree angle. This prevents the dried paint film from ripping. -
Reinstall lighting:
Once the ceiling is dry to the touch (ideally wait 24 hours for full cure), reinstall your pendant light fixture. The black cord will disappear beautifully against the new dark background. -
Clean up:
Fold your drop cloths inward to trap any dust or paint flecks, shake them out outside, and return your laundry essentials to their places.
Step back and admire how the dark ceiling instantly adds depth and modern flair to your functional space
Painted Floor Pattern for Big Personality
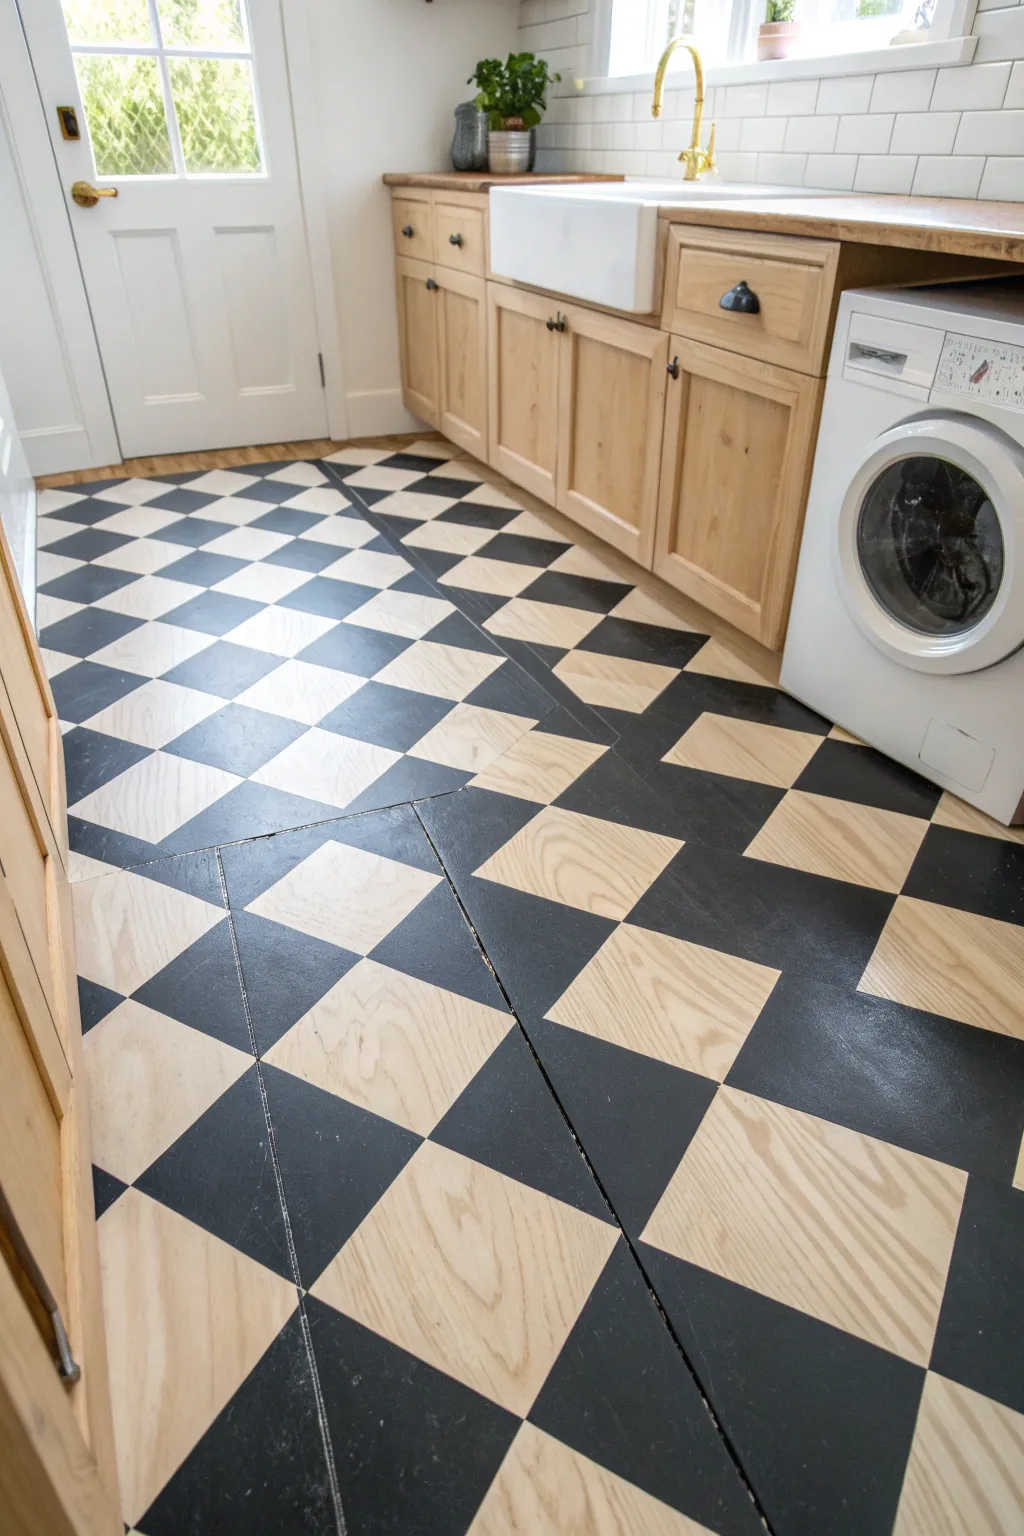
Transform a plain plywood subfloor into a stunning design feature with this striking checkerboard pattern. By leaving half the squares as exposed wood grain and painting the others a rich charcoal, you create a sense of depth and warmth that feels both classic and modern.
Detailed Instructions
Materials
- Sanded plywood subfloor (ready for finish)
- Porch and floor paint (Charcoal or Black)
- High-quality adhesion primer
- Water-based polyurethane (matte or satin finish)
- Painter’s tape (1.5 or 2 inch width)
- Measuring tape
- Chalk line tool
- Pencil
- Speed square
- 4-inch foam roller and handle
- Small angled sash brush
- Utility knife
- Orbital sander with 220-grit sandpaper
Step 1: Prep and Prime
-
Assess the Surface:
Ensure your plywood floor is completely clean, dry, and filled. If there are screw holes, fill them with wood filler that matches the plywood tone, then sand everything smooth with an orbital sander. -
Clean Thoroughly:
Vacuum every inch of the floor to remove sanding dust. Follow up with a tack cloth or a slightly damp rag to ensure no debris remains, as dust will ruin your crisp lines.
Seal Tape Like a Pro
For razor-sharp lines on textured wood, paint the base color (or clear sealer) over the tape edge first. This fills voids before the dark paint touches it.
Step 2: Layout and Taping
-
Establish the Center:
Find the center point of the room. It often looks best to center your pattern on the main doorway or the primary line of sight rather than the geometric center of the room. -
Mark the First Lines:
Using your chalk line, snap a line diagonally across the room through your center point. For a diamond pattern like this, your grid needs to be at a 45-degree angle to the walls. -
Determine Square Size:
Decide on the size of your diamonds (12-inch or 18-inch squares work well). Mark these intervals along your initial chalk line. -
Snap the Grid:
Snap parallel chalk lines at your marked intervals. Then, snap the perpendicular lines to create the grid. Use a speed square to double-check that your intersections are perfect 90-degree angles. -
Tape the Pattern:
Apply painter’s tape along the *outside* edges of the squares destined to be painted black. This is the crucial step: trace your ‘to-be-painted’ squares carefully. You will tape specifically to preserve the wood squares. -
Seal the Tape:
Run a credit card or huge putty knife firmly over all tape edges to ensure a tight seal. This prevents paint bleed. -
The Sealing Trick:
I like to brush a very thin layer of clear matte polyurethane over the tape edges first. This seals the tape line so if anything bleeds under, it’s clear finish, not black paint.
Step 3: Painting and Sealing
-
Edge the Squares:
Using your small angled brush and the charcoal floor paint, carefully paint the edges of the designated squares, brushing inward away from the tape. -
Roll the Color:
Use the foam roller to fill in the rest of the painted squares. Apply a thin, even coat. Don’t overload the roller. -
Second Coat:
Allow the first coat to dry according to the can’s instructions, then apply a second coat for full opacity. -
Remove Tape:
Pull the tape up while the second coat of paint is still slightly tacky. Pull at a 45-degree angle away from the painted edge for the crispest line. -
Touch Ups:
Once the tape is gone, inspect your work. Use a tiny artist’s brush to fix any small bleeds or imperfections on the wood squares. -
Cure Time:
Let the paint cure fully for at least 24 to 48 hours before applying the topcoat. The paint needs to be hard enough to withstand the sealer application. -
First Coat of Sealer:
Apply a coat of water-based polyurethane over the entire floor—both the painted squares and the raw wood ones. Use a high-quality synthetic brush or a lambswool applicator. -
Light Sanding:
Once the first coat of poly is dry, lightly hand-sand with 220-grit paper to knock down any raised wood grain. Verify the surface is smooth to the touch. -
Final Protection:
Apply 2 to 3 additional coats of polyurethane, allowing proper drying time between each. This protects the raw wood from water damage, especially in a laundry area.
Level Up: Distress It
Before the final sealer, lightly sand the painted black squares in high-traffic areas. This creates a vintage, lived-in farmhouse look instantly.
Now you have a durable, custom floor that adds incredible character for a fraction of the cost of tile
Color-Drench the Whole Room for Maximum Drama
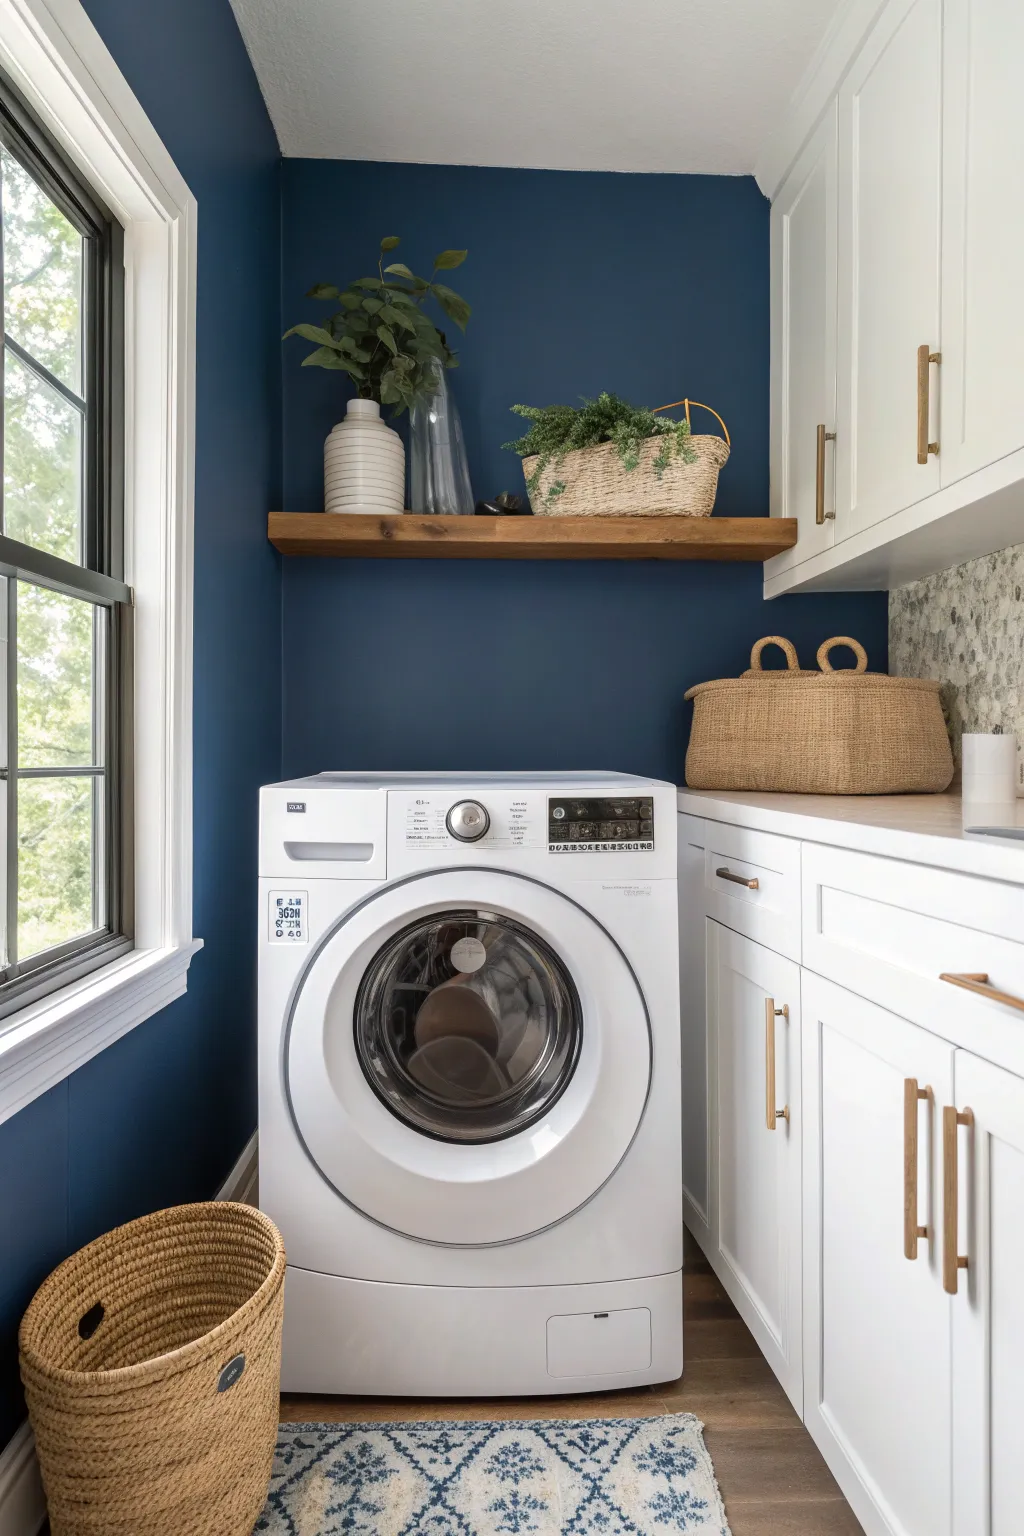
Transform a utilitarian space into a dramatic sanctuary by embracing the color-drenching trend with a rich navy blue. This project creates a bold, immersive backdrop that makes crisp white cabinetry and warm wood accents pop beautifully.
Step-by-Step Guide
Materials
- Deep navy blue interior paint (eggshell or satin finish)
- Painter’s tape (high quality)
- Drop cloths
- Spackle and putty knife
- Sandpaper (medium and fine grit)
- Angled sash brush (2.5 inch)
- Paint roller frame and extension pole
- Microfiber roller covers (3/8 inch nap)
- Paint tray and liner
- Step ladder
- Screwdriver (for outlet covers)
- Mild detergent and sponge
Step 1: Preparation and Cleaning
-
Clear and clean:
Remove everything from the room, including the washer and dryer if possible, or pull them to the center and cover completely. Wash the walls with a sponge and mild detergent to remove lint, dust, and residues. -
Remove hardware:
Use a screwdriver to take off all electrical outlet covers and switch plates. Keep the screws taped to the plates so they don’t get lost. -
Patch imperfections:
Inspect the walls for nail holes or dings. Fill them with spackle using a putty knife, let dry completely, and sand smooth until flush with the wall. -
Protect trim and floors:
Apply painter’s tape carefully along the edges of the white window trim, baseboards, and the ceiling line. Press the tape edges down firmly to prevent bleed-through.
Patchy Coverage?
Dark walls often look streaky after one coat. Don’t panic or over-roll wet paint. The second coat will even out the sheen and deepen the color significantly.
Step 2: Cutting In the Color
-
Stir the paint:
Open your navy blue paint can and mix it thoroughly to ensure the pigments are evenly distributed, which is crucial for dark colors. -
Edge the ceiling:
Dip your angled sash brush into the paint and carefully cut in a line where the wall meets the ceiling. -
Paint corners and trim:
Continue using the brush to paint the corners of the room and along the taped edges of the window trim and baseboards. -
Feather the edges:
I like to feather out the brush strokes slightly toward the center of the wall so the roller can blend seamlessly later.
Step 3: Rolling the Walls
-
Load the roller:
Pour paint into the tray and load your roller cover until it is fully saturated but not dripping. -
Apply the first coat:
Start rolling the walls in a ‘W’ pattern, working in sections about 3-4 feet wide. -
Smooth it out:
Fill in the ‘W’ with vertical strokes, overlapping slightly with the wet edge of the previous section for a uniform finish. -
Check for gaps:
Dark paint can reveal missed spots easily; inspect the coverage as you go, but don’t overwork half-dried paint. -
Let it dry:
Allow the first coat to dry completely according to the manufacturer’s instructions, usually 4 hours.
Add Warmth
To soften the intense blue, swap standard cabinet hardware for brushed gold or brass pulls. The metallic warmth contrasts beautifully against navy walls.
Step 4: Finishing Layer
-
Second coat application:
Apply a second coat using the same rolling technique. This step is non-negotiable for navy blue to achieve that deep, true saturation shown in the photo. -
Remove tape:
While the paint is still slightly tacky—usually about an hour after painting—carefully peel off the painter’s tape at a 45-degree angle. -
Inspect margins:
Check your edges. If any blue bled onto the white trim, wipe it while wet or touch it up with white trim paint later. -
Replace fixtures:
Once fully cured, reinstall the outlet covers and move the appliances back into place. -
Style and accessorize:
Install a floating wood shelf above the machines and add texture with woven baskets and greenery to complete the look.
Enjoy the sophisticated atmosphere of your newly transformed laundry room every time you tackle a load of wash


Have a question or want to share your own experience? I'd love to hear from you in the comments below!