
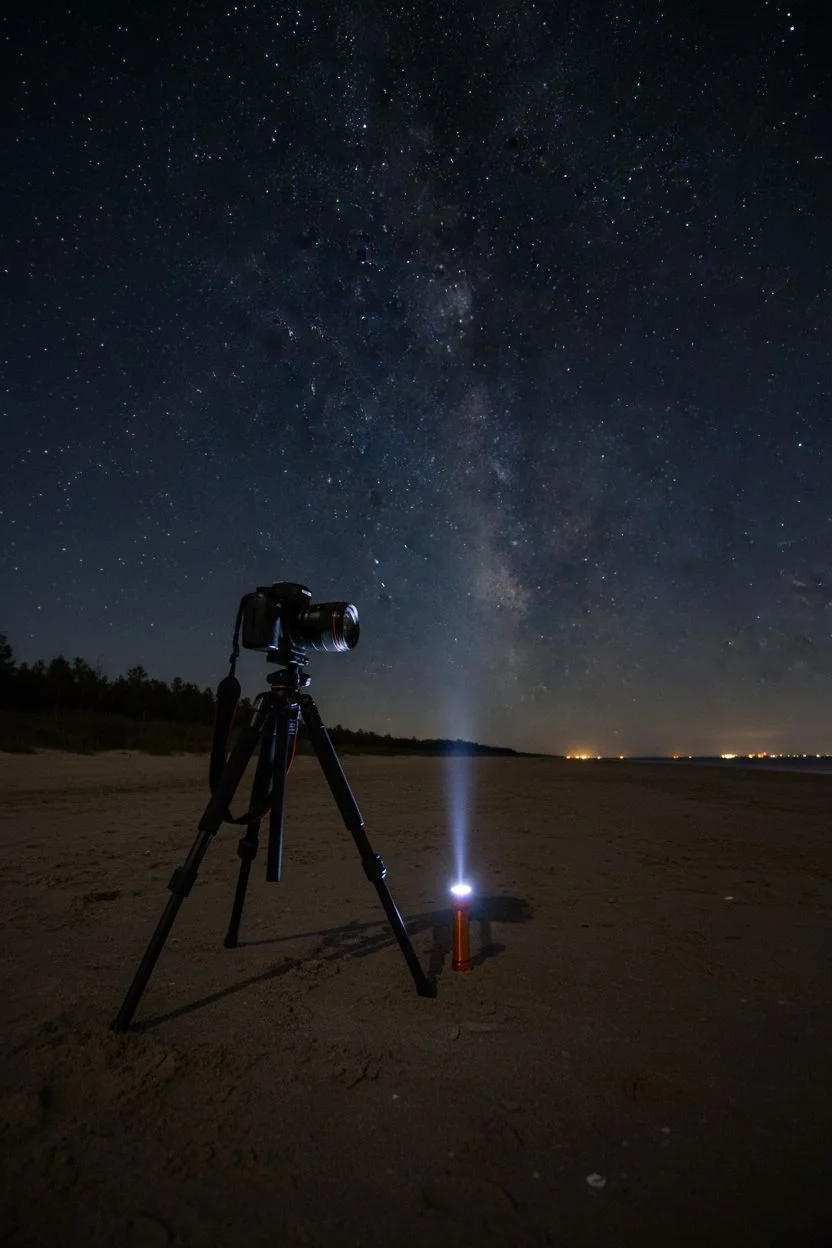
There is something truly magical about trading your paintbrush for a flashlight and using the darkness as your canvas to create glowing masterpieces. I am so excited to share these techniques that will turn a simple long exposure into a work of art using nothing but movement and illumination.
Handwriting names and messages in the air

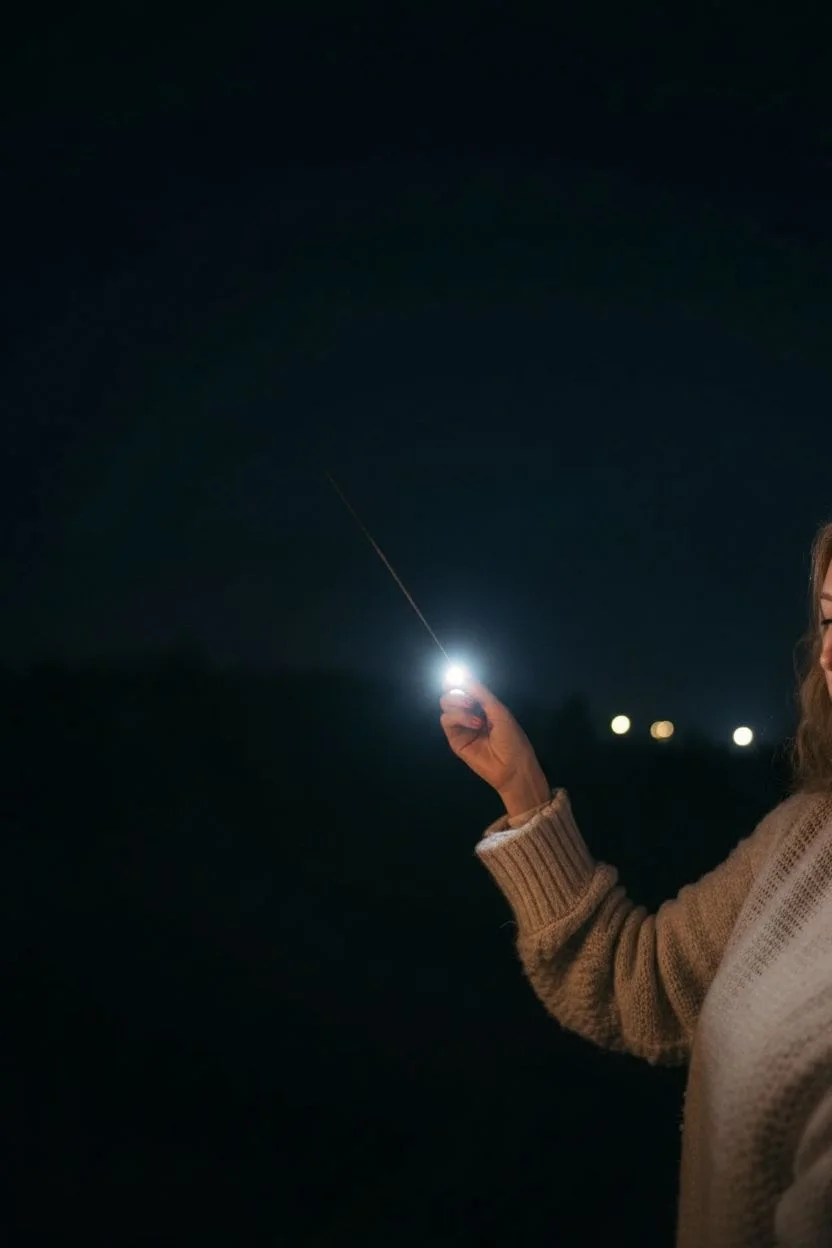
Capture the magic of a warm evening by creating a glowing neon message using nothing but a camera and a sparkler. This long-exposure technique turns a fleeting moment into a permanent artwork, perfect for creating romantic visuals or creative wall art.
Step-by-Step
Materials
- DSLR or Mirrorless camera with Manual Mode
- Sturdy tripod
- Long-burning sparklers (10-inch or longer recommended)
- Lighter or matches
- Flashlight (for aiming)
Step 1: Setting the Scene
-
Secure the camera:
Mount your camera on a sturdy tripod to keep it perfectly motionless; any movement during the exposure will blur the background and ruin the effect. -
Select Manual Mode:
Switch your camera dial to ‘M’ (Manual) so you can independently control the shutter speed and aperture settings. -
Lower the ISO:
Set your ISO to 100 or 200 to ensure the dark areas of the image remain clean and free from grainy digital noise. -
Adjust Aperture:
Dial in an aperture of around f/8. This middle-range setting keeps the sparkler trail sharp without letting in too much ambient background light. -
Set Shutter Speed:
Choose a shutter speed between 8 to 15 seconds, giving yourself ample time to complete the cursive word without rushing.
The Mirror Hack
Struggling to write backwards? Write normally from left to right, then simply flip the image horizontally in your editing software later.
Step 2: Focusing and Framing
-
Position the writer:
Have your subject stand in the frame exactly where they intend to write the word ‘love’. -
Illuminate the target:
Shine a brightness flashlight directly on the subject’s hand so the camera sensor can detect it in the dark. -
Lock the focus:
Switch your lens to Manual Focus and rotate the focus ring until the illuminated hand is tack sharp, then leave it there. -
Dry run:
I always encourage a practice round where the subject traces the word in the air (without the sparkler) to ensure it stays within the frame. -
Test exposure:
Take a quick test shot without the sparkler to check the ambient light; the background should be dark but not completely pitch black.
Step 3: Painting with Fire
-
Prepare the sparkler:
Hold a long-stemmed sparkler at the very end of the handle to keep your hand safe from sparks. -
Ignite safely:
Light the sparkler and let it burn for a second or two until the sparks establish a consistent, bright flow. -
Trigger the shutter:
Press the shutter button using a 2-second timer or a remote release to prevent shaking the camera setup. -
Begin the motion:
As soon as the shutter opens, begin writing the word in the air using bold, fluid arm movements. -
The mirror technique:
To make the text readable to the camera, imagine writing on the inside of a window for someone outside to see: you must write backwards from right to left. -
Maintain fluidity:
Keep the sparkler moving seamlessly; pausing at any point will create an overexposed ‘blob’ of light in your script. -
Loop the letters:
Use large, exaggerated cursive loops to keep the letters connected, ensuring the light stream never breaks. -
Exiting the frame:
Once you finish the ‘e’, continue the motion slightly outward or hold steady until you hear the shutter click closed. -
Review results:
Check the image on your screen; if the word is incomplete, increase your shutter speed by a few seconds for the next take.
Level Up: Blue Hour
Instead of pitch black night, shoot during ‘blue hour’ (20 mins after sunset) to get a rich, deep blue sky behind the golden sparks.
Keep experimenting with different words and motion speeds until you capture that perfect, glowing script.


Drawing floating neon hearts and simple symbols


Capture the magic of love in the wild with this stunning light painting project. By combining the serene backdrop of a twilight forest with the vibrant energy of a pink light source, you’ll create a floating neon heart that looks like a portal to another world.
Step-by-Step Guide
Materials
- DSLR or Mirrorless Camera
- Wide-angle lens (e.g., 16mm-24mm)
- Sturdy Tripod
- Bright pink LED light wand or flashlight with pink gel
- Remote shutter release (optional)
- Flashlight (for focusing)
- Dark clothing (black hoodie and pants)
Step 1: Setting the Scene
-
Scout the location:
Find a forest path lined with tall, straight pine trees. The vertical lines of the trunks will contrast beautifully with the curves of the heart. -
Wait for the blue hour:
Plan to shoot about 20 to 40 minutes after sunset. You want the sky to be a deep royal blue, not completely pitch black. -
Position the camera:
Set up your tripod low to the ground to emphasize the height of the trees and provide a dramatic perspective. -
Frame the shot:
Mount your camera in portrait orientation and tilt it slightly upward to capture the tree canopy against the sky.
Step 2: Camera Configuration
-
Establish focus:
Place a lit flashlight on the ground where you intend to stand. Focus your camera on that light, then switch your lens to Manual Focus (MF) to lock it in place. -
Dial in exposure:
Switch to Manual Mode (M). Set your ISO to 100 or 200 to keep the image clean and free of grain. -
Set aperture:
Choose an aperture around f/8. This ensures both your light drawing and the surrounding trees remain reasonably sharp. -
Shutter speed:
Select ‘Bulb’ mode for complete control over the exposure duration, or set a long exposure time like 30 seconds.
Fluid Movement
Keep your elbow slightly bent and rotate from your waist rather than just your shoulder. This core movement helps create more symmetrical and organic-looking curves.
Step 3: Painting the Heart
-
Dress for invisibility:
Put on your dark clothing. This ensures you disappear into the shadows while the camera records only the light. -
Prepare the tool:
Hold your pink LED wand or gelled flashlight. Make sure it has fresh batteries for a consistently bright stroke. -
Start the timer:
Trigger the shutter using a remote or a 10-second self-timer, giving yourself just enough time to get into position. -
Begin the exposure:
Once the shutter opens, turn on your pink light, aiming it directly toward the camera lens. -
Draw the first curve:
Starting at the bottom point of the heart, move your arm smoothly upward and outward to form the left rounded lobe. -
Create the dip:
Bring the light down toward the center ‘V’ of the heart, keeping your movement steady. -
Loop the other side:
I like to pivot my whole upper body here to keep the motion fluid as I sweep up to create the right lobe. -
Close the shape:
Bring the light back down to meet your starting point at the bottom, completing the heart outline. -
Finish cleanly:
Immediately switch off the light to avoid creating stray streaks, then stand still or walk out of frame until the shutter closes.
Ghostly Figures?
If you are visible in the photo, you’re either moving too slowly or catching ambient light. distinct silhouettes. Wear darker clothes and keep moving constantly to stay invisible.
Check your camera screen to admire the glowing symbol of love floating in the twilight forest.


Creating geometric light orbs on a string
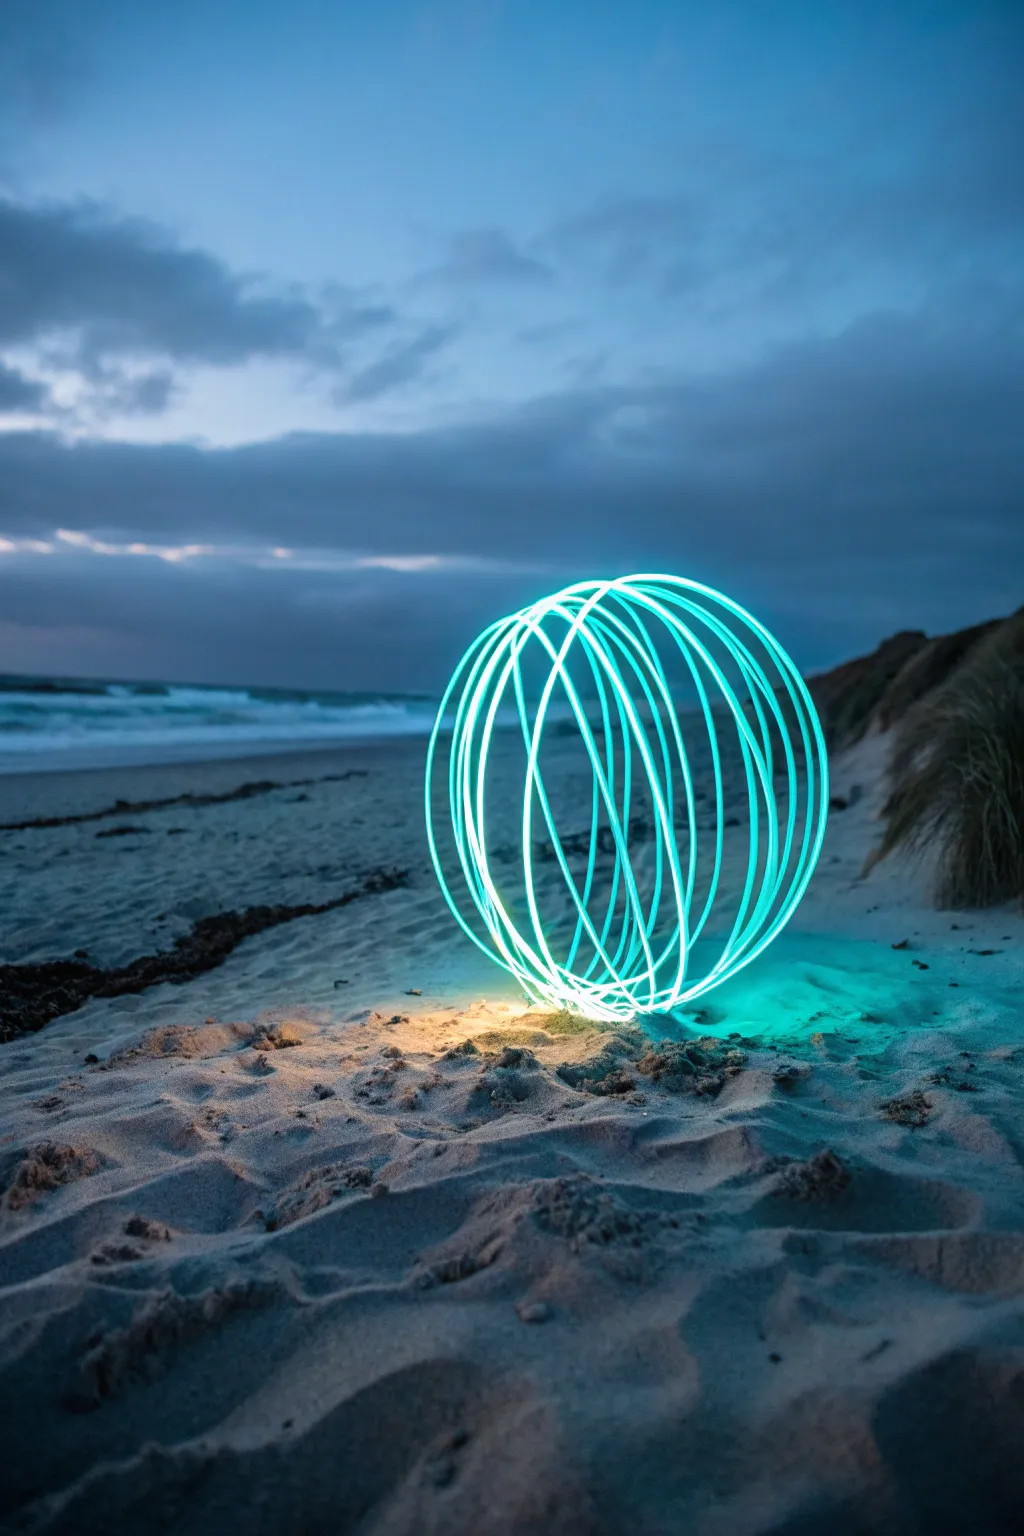
Capture a futuristic sphere of energy on a serene beach using long-exposure photography. This technique creates a perfect, glowing geometric cage that seems to hover mysteriously over the sand.
Step-by-Step Guide
Materials
- DSLR or Mirrorless camera with Manual Mode
- Wide-angle lens
- Sturdy tripod
- Bright LED flashlight
- Cyan or teal color gel
- Strong, non-elastic string (approx. 1 meter)
- Electrical tape
- Dark clothing
- Remote shutter release
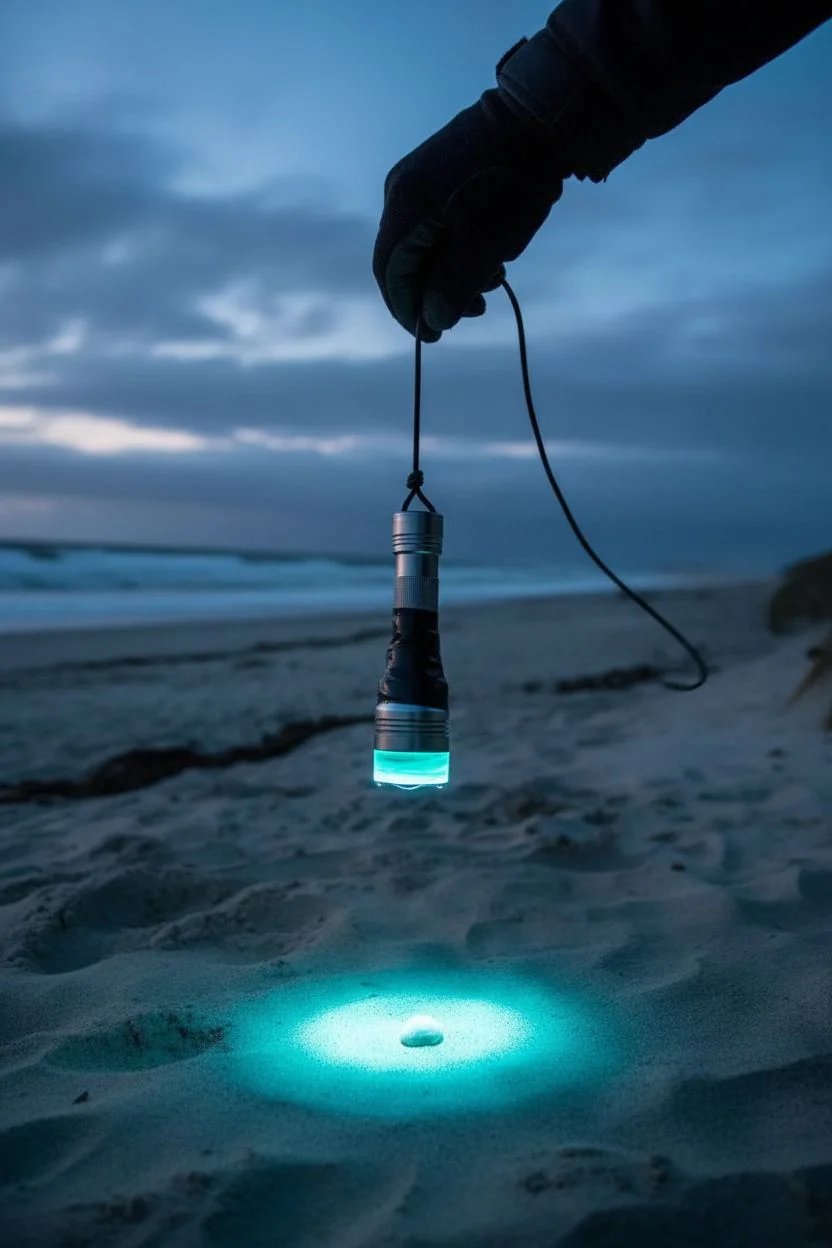
Step 1: Rigging the Light Tool
-
Color the light:
Place a cyan or teal gel over the lens of your flashlight to match the cool tones of the sample image, securing it with a small piece of tape. -
Attach the string:
Tie one end of your string securely around the handle of the flashlight. -
Secure the bond:
I find that wrapping electrical tape tightly over the knot and the base of the light is essential to prevent it from flying off during the spin. -
Test the balance:
Hold the free end of the string and give the light a gentle swing to ensure it moves smoothly like a pendulum without irregular wobbling.
Step 2: Setting the Scene
-
Location timing:
Arrive at a beach location during ‘blue hour’ (just after sunset) to capture the deep blue ambient sky and visible cloud details. -
Tripod placement:
Set up your tripod low to the ground, sinking the legs slightly into the sand for maximum stability against coastal breezes. -
Mark the center:
Place a small stone or shell on the sand where you want the center of your orb to ‘sit’. -
Focus settings:
Switch your lens to Manual Focus and adjust it until the marker on the sand is perfectly sharp. -
Exposure settings:
Set your camera to Manual mode with ISO 100 to reduce noise and an aperture of f/8 for sharp light streaks. -
Shutter speed:
Select ‘Bulb’ mode so you can control the exposure duration, or set a long exposure time (30-60 seconds). -
Invisible operator:
Put on dark, non-reflective clothing (including gloves if possible) to ensure you don’t appear as a ghostly figure in the final shot.
Wobbly Orb Shape?
To keep the sphere perfect, anchor your spinning hand against your body or a fixed point. Do not move your arm; only move your feet to rotate around the center.
Step 3: Painting the Orb
-
Positioning:
Stand directly over your ground marker, holding the end of the string at your chest level. -
Check the radius:
Adjust the string length so the flashlight hangs just a few inches above the sand. -
Start the swing:
Turn on the flashlight and begin spinning it in a specialized vertical circle along your side. -
Trigger the camera:
Use your remote shutter to begin the exposure once you have a steady rhythm. -
Rotate your body:
While keeping the light spinning vertically, shuffle your feet slowly in a small circle around your ground marker. -
Maintain the axis:
Keep your hand holding the string in the exact same position in space—imagine it being pinned to the air—while your body moves around it. -
Finish the shape:
Once you have completed a full 360-degree rotation, turn the flashlight off immediately before stopping the spin or moving away.
Dual-Tone Magic
Tape a second light of a different color to the string, facing the opposite direction. This will create a complex, multi-colored weave pattern in your final orb.
Mastering this technique allows you to place these ethereal geometric sculptures in any landscape you choose.


Wrapping subjects in string light trails
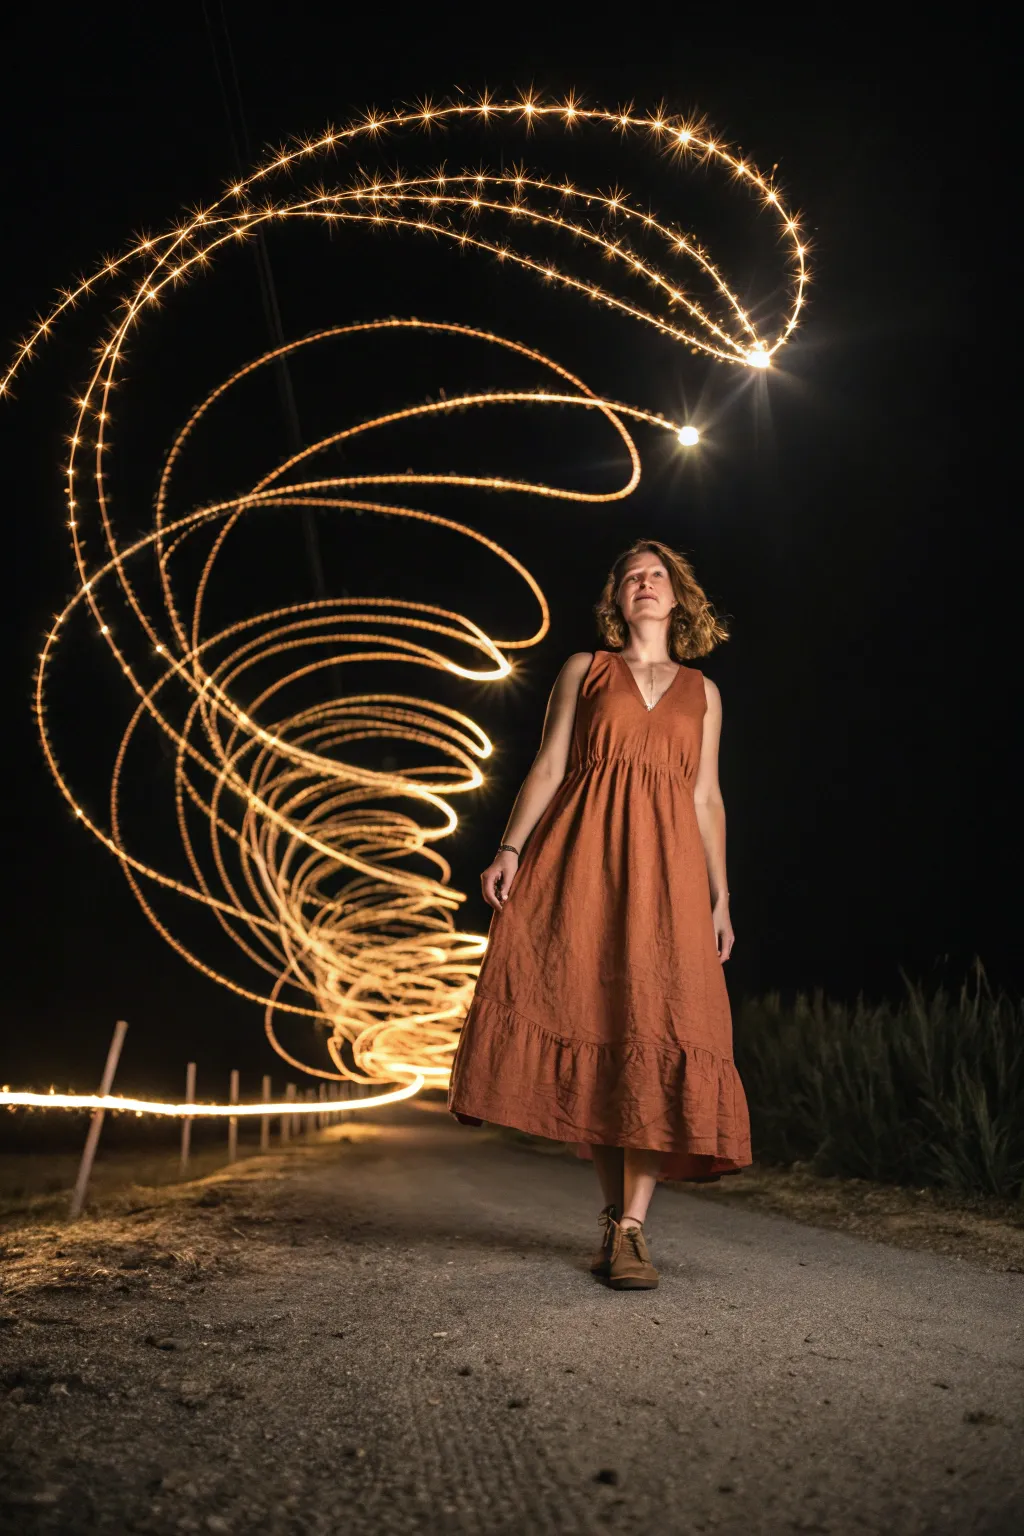
Capture the magic of motion by wrapping your subject in a spiraling tunnel of golden light. This long-exposure photography technique combines a steady portrait with dynamic light painting to create a whimsical, energy-filled composition.
How-To Guide
Materials
- DSLR or Mirrorless camera with manual mode
- sturdy tripod
- warm white LED string lights (battery operated)
- dark tape or velcro strap
- external flash (speedlight) or flashlight
- dark clothing (for the light painter)
Step 1: Setting the Stage
-
Find the spot:
Locate a dark path or open area with minimal streetlights to ensure the light trails stand out clearly against the black background. -
Position the gear:
Set your camera on the tripod at waist height or lower to give the light tunnel a grander perspective. -
Prepare the light tool:
Bunch up the battery pack end of your string lights and tape it securely. Leave about 1 meter of lights dragging loose to swing; bundle the excess so it doesn’t tangle. -
Dress the part:
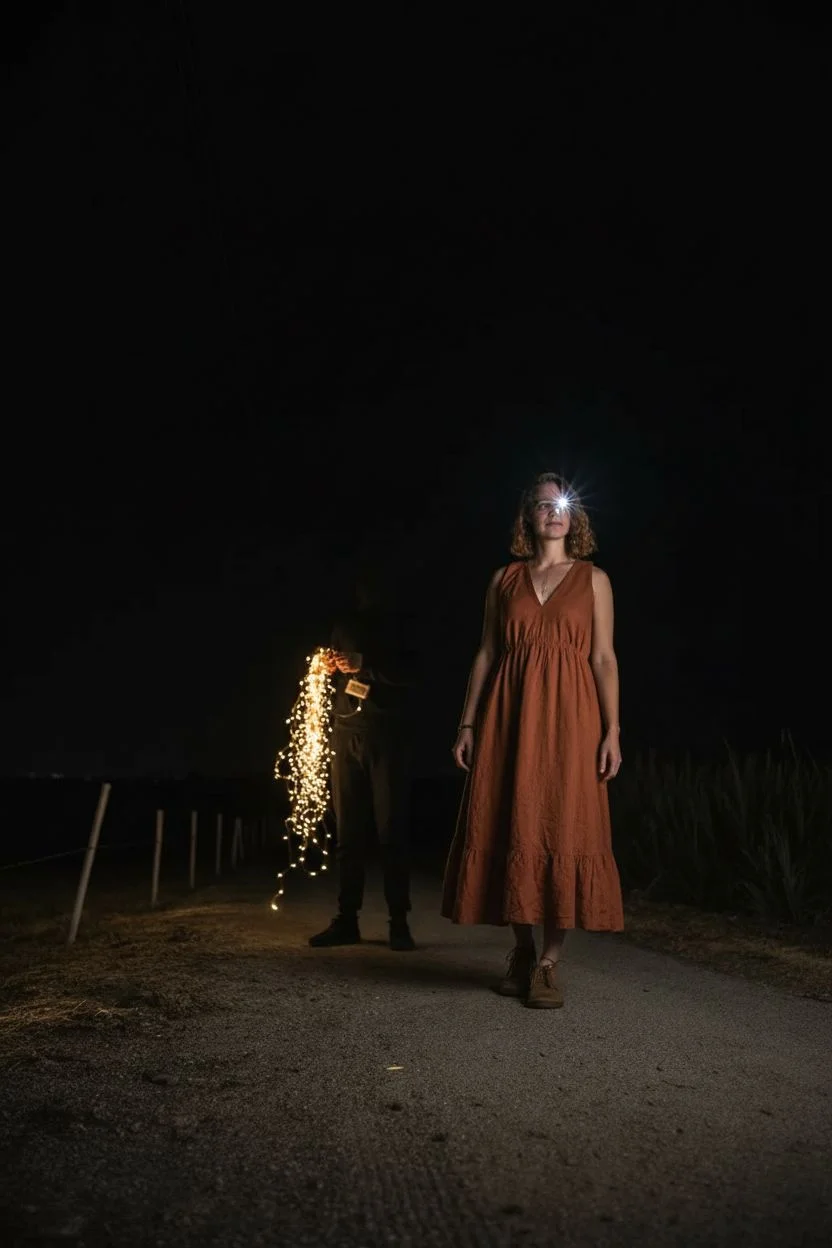
The person spinning the lights (the painter) must wear head-to-toe black clothing to remain invisible in the final image. -
Compose the frame:
Place your subject in the foreground. Use a flashlight to help you frame the shot, ensuring there is dead space behind them for the light spiral. -
Lock focus:
focus on your subject’s eyes using a flashlight to assist the autofocus. Once sharp, switch your lens to ‘Manual Focus’ so it doesn’t hunt in the dark.
Ghostly Subject?
If your model looks transparent, they moved or were lit by ambient light during the spiral phase. Keep them in total darkness until the flash pops.
Step 2: Camera Configuration
-
Switch to Manual Mode:
Turn your mode dial to ‘M’ or ‘Bulb’ allows you to control the exact duration of the exposure. -
Set the Aperture:
Dial in an aperture between f/8 and f/11. I usually aim for f/11 because smaller apertures turn the individual LEDs into tiny starbursts. -
Adjust ISO:
Keep your ISO low, around 100 or 200, to maintain the highest image quality and ensure the background remains pitch black. -
Prepare the shutter:
Set the shutter speed to ‘Bulb’ mode if you have a remote release, or set a timed exposure of roughly 15-20 seconds.
Pro Tip: Starry Spikes
To get those crisp star-points on the light trails, use a smaller aperture (higher f-number like f/13). This creates natural diffraction spikes.
Step 3: Painting the Light
-
Get in position:
Have the light painter stand directly behind the subject, hidden from the camera’s view. -
Ignite the lights:
Turn on the string lights. The painter should start swinging them in a steady, vertical circle. -
Open the shutter:
Press the shutter button to begin the exposure. Shout ‘Go!’ so the painter knows to start moving. -
Create the vortex:
The painter should walk backwards slowly away from the camera while maintaining the circular spinning motion to create the spiral tunnel effect. -
Freeze the subject:
Just before ending the exposure, fire a handheld flash manually at the subject from the side or front to ‘freeze’ them sharply. -
Close and review:
Release the shutter to finish the shot. Check the LCD; if the trails are too dim, walk slower or open the aperture slightly.
Experiment with different swing speeds and angles to create unique light signatures for every portrait you take.
BRUSH GUIDE
The Right Brush for Every Stroke
From clean lines to bold texture — master brush choice, stroke control, and essential techniques.
Explore the Full Guide
Utilizing water reflections to double the drawing
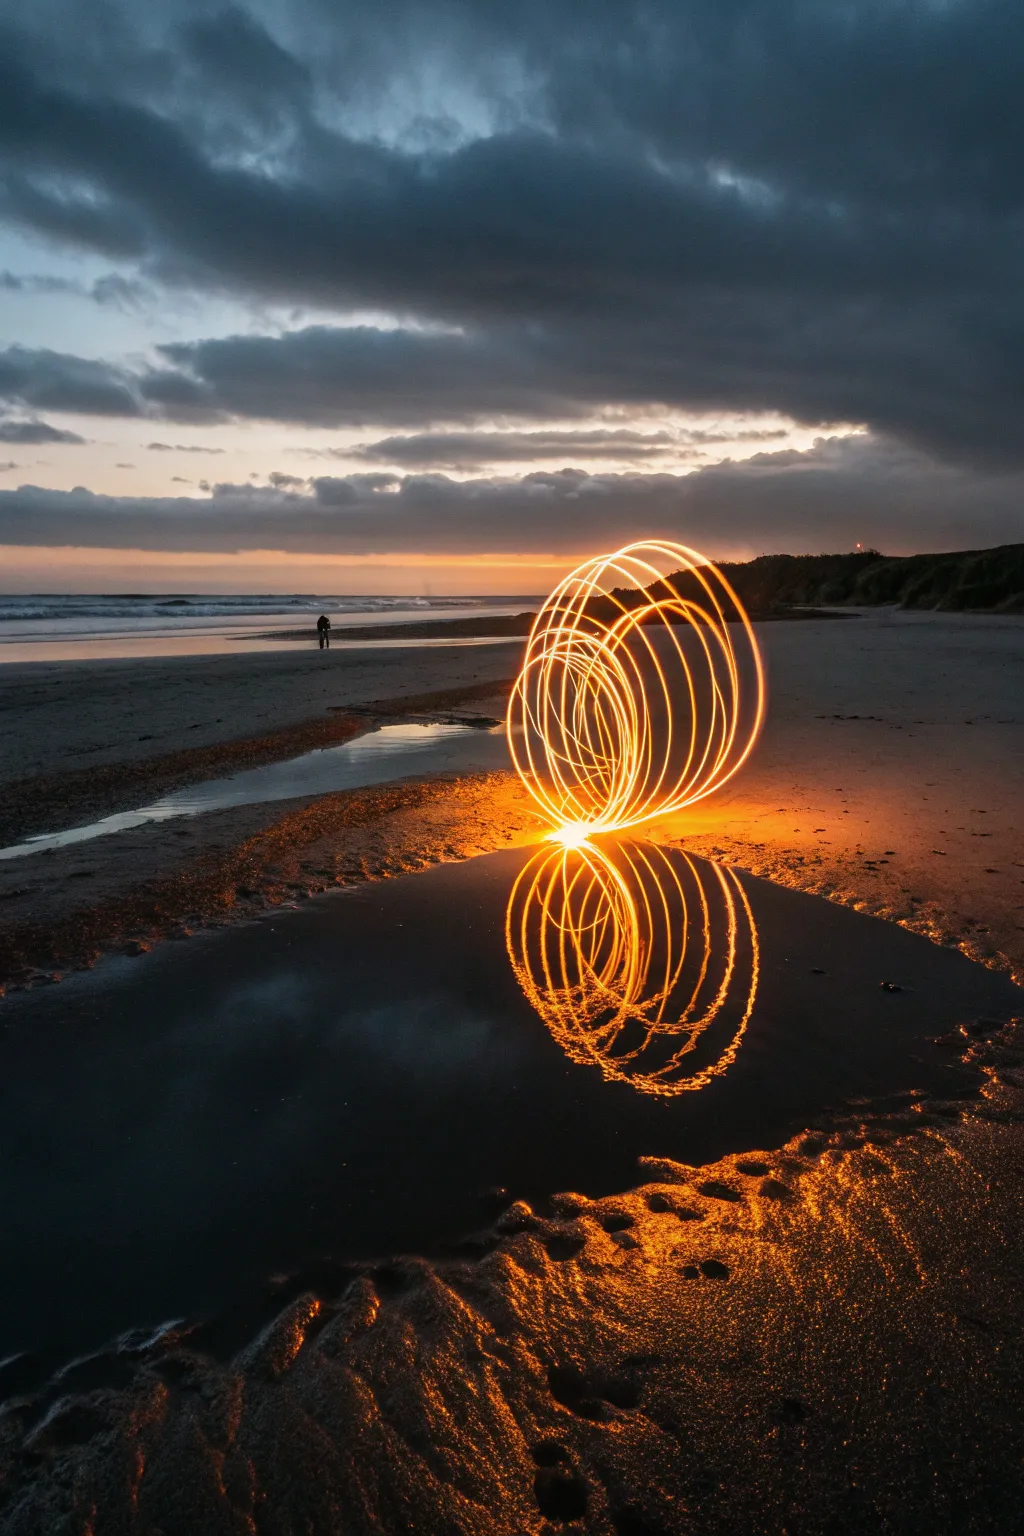
Transform a calm beach evening into a sci-fi landscape by painting a fiery sphere of light over a tide pool. Utilizing a long exposure technique, you will capture the motion of a spinning light source that reflects perfectly in the water, creating a mesmerizing geometric twin.
Step-by-Step
Materials
- DSLR or Mirrorless Camera with Manual Mode
- Sturdy Tripod
- Wide-angle lens (e.g., 18mm-24mm)
- Bright LED flashlight or light painting wand
- Orange color gel or orange cap (for the light)
- String (approx. 2 feet) or spinning tool handle
- Dark, non-reflective clothing
- Remote shutter release or intervalometer
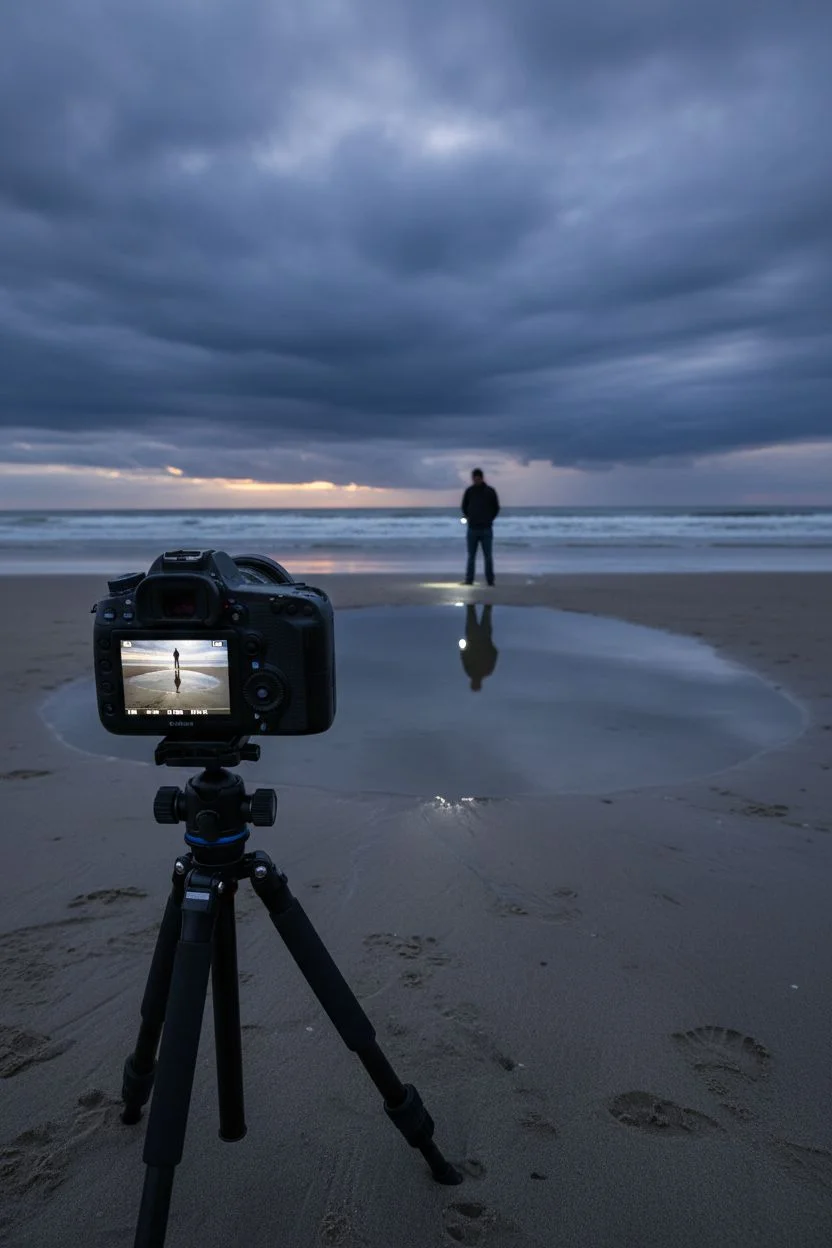
Step 1: location scouting & setup
-
Timing the tide:
Arrive at the beach during low tide and just after sunset (blue hour) to balance the ambient sky light with the brightness of your LED. -
Finding the mirror:
Scout for a shallow tide pool or a patch of saturated sand that is perfectly still to ensure a glass-like reflection. -
Low angle setup:
Mount your camera on the tripod and lower the legs as far as they go, positioning the lens just inches above the sand. -
Composing the frame:
Compose your shot so the horizon line is in the upper third, leaving plenty of room in the foreground for the reflection pool. -
Establishing focus:
Switch your lens to Manual Focus. Have a helper stand where you intend to spin the orb and shine a light on their shoes. -
Locking sharpness:
Zoom in on your camera’s Live View screen to the lit shoes, adjust the focus ring until crisp, and then do not touch the ring again.
Ghost Protocol
Keep moving constantly while spinning the light. If you stand still for too long, your silhouette will block the background. Constant motion combined with dark clothes makes you disappear.
Step 2: configuring the camera
-
Mode selection:
Turn your camera mode dial to Manual (M) to take full control over the exposure triangle. -
Setting ISO:
Set your ISO to 100 or 200 to maximize image quality and minimize digital grain in the dark areas. -
Aperture adjustment:
Dial your aperture to f/8 or f/11. This narrower aperture helps keep both the foreground ripples and the horizon sharp. -
Shutter speed:
Set your shutter speed to ‘Bulb’ mode so you can control the exact duration of the exposure, or select 30 seconds if Bulb isn’t an option.
Step 3: painting the light
-
Gear preparation:
Dress in head-to-toe black clothing to remain invisible to the sensor. Attach your orange light to the string or wand securely. -
Positioning:
Stand directly behind the chosen puddle, maximizing the distance between your feet and the water’s edge to avoid splashing. -
Starting the exposure:
Trigger the shutter using a remote or a 10-second timer to give you time to get into position and steady the camera. -
Spinning the circle:
Begin spinning the light on the string in a consistent vertical circle at your side, keeping a steady rhythm. -
Forming the sphere:
While spinning the light, slowly rotate your body or shuffle your feet in a tight circle to create the 3D spherical volume. -
Creating the contact point:
I like to ensure the bottom of the light’s arc almost touches the ground; this visually connects the orb to its reflection in the photo. -
Closing the shape:
Complete a full 360-degree rotation of your body, ensuring you end up back where you started to close the sphere. -
Ending the shot:
Immediately switch off the flashlight to avoid unwanted trails, then step out of the frame and release the shutter button. -
Review and refine:
Check the image on the LCD. If the orb is too dim, open the aperture to f/5.6; if the background is too bright, increase the f-number. -
Adjusting position:
If the reflection is cut off, tilt the camera slightly down or move the spinning location closer to the water’s edge.
Level Up: Color Swap
Pause your spin halfway through the rotation, swap the color cap on your flashlight to blue or pink, and continue the rotation to create a two-toned hybrid sphere.
Head out to the coast and enjoy watching your fiery creations come to life on the calm waters.
Building a receding light tunnel in a forest path
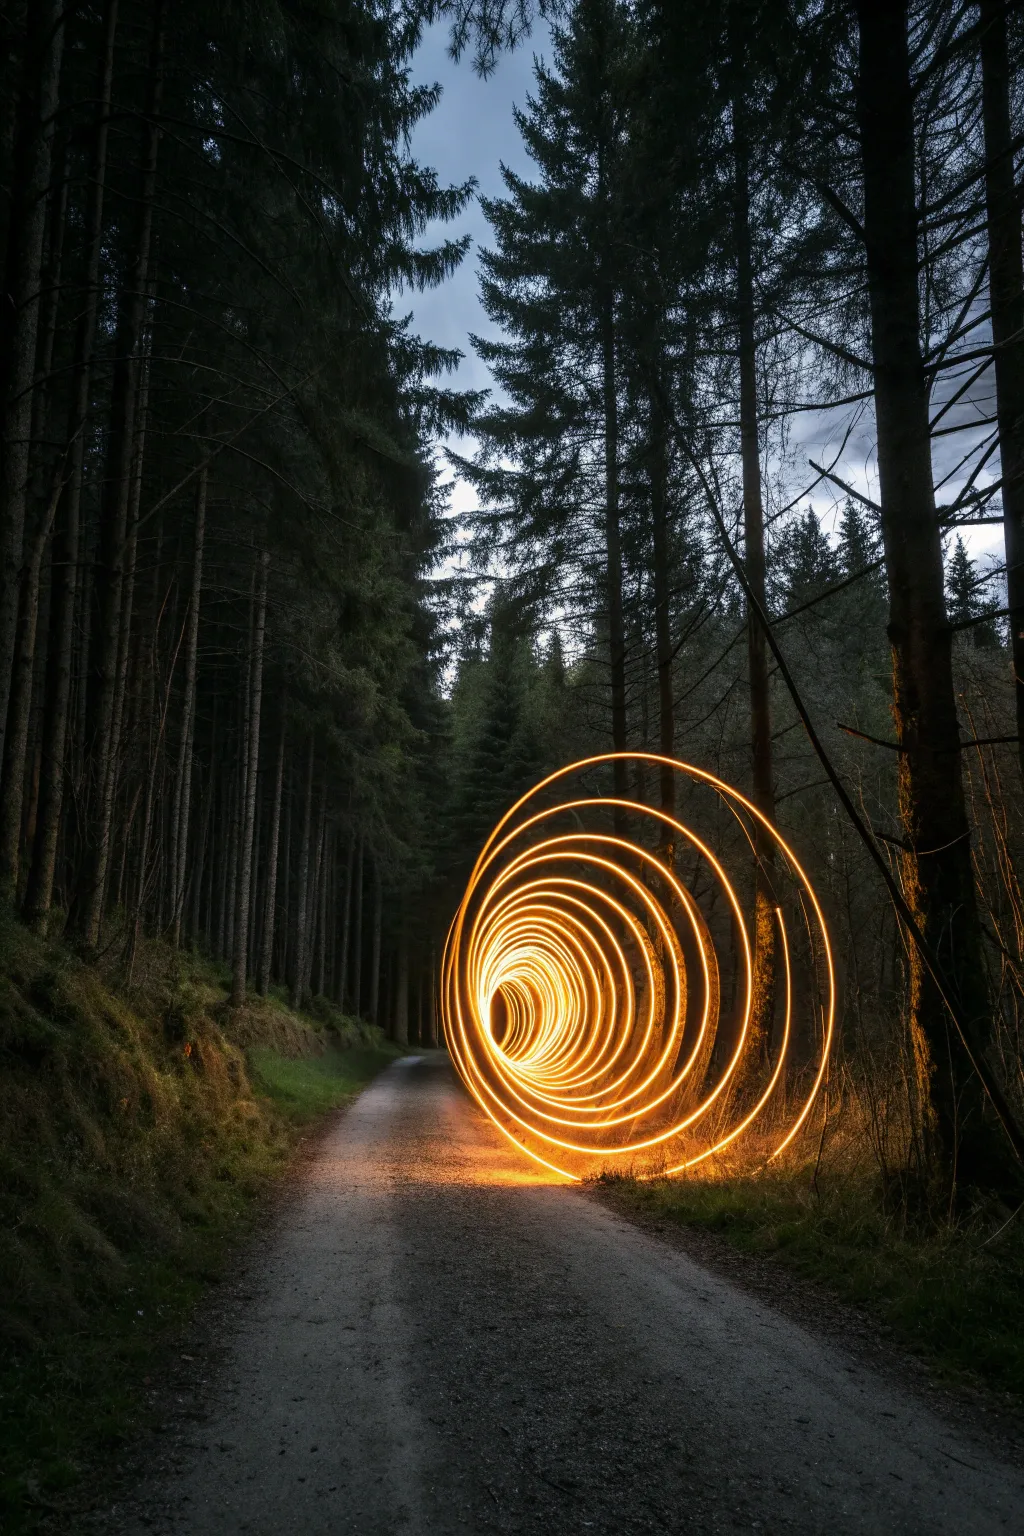
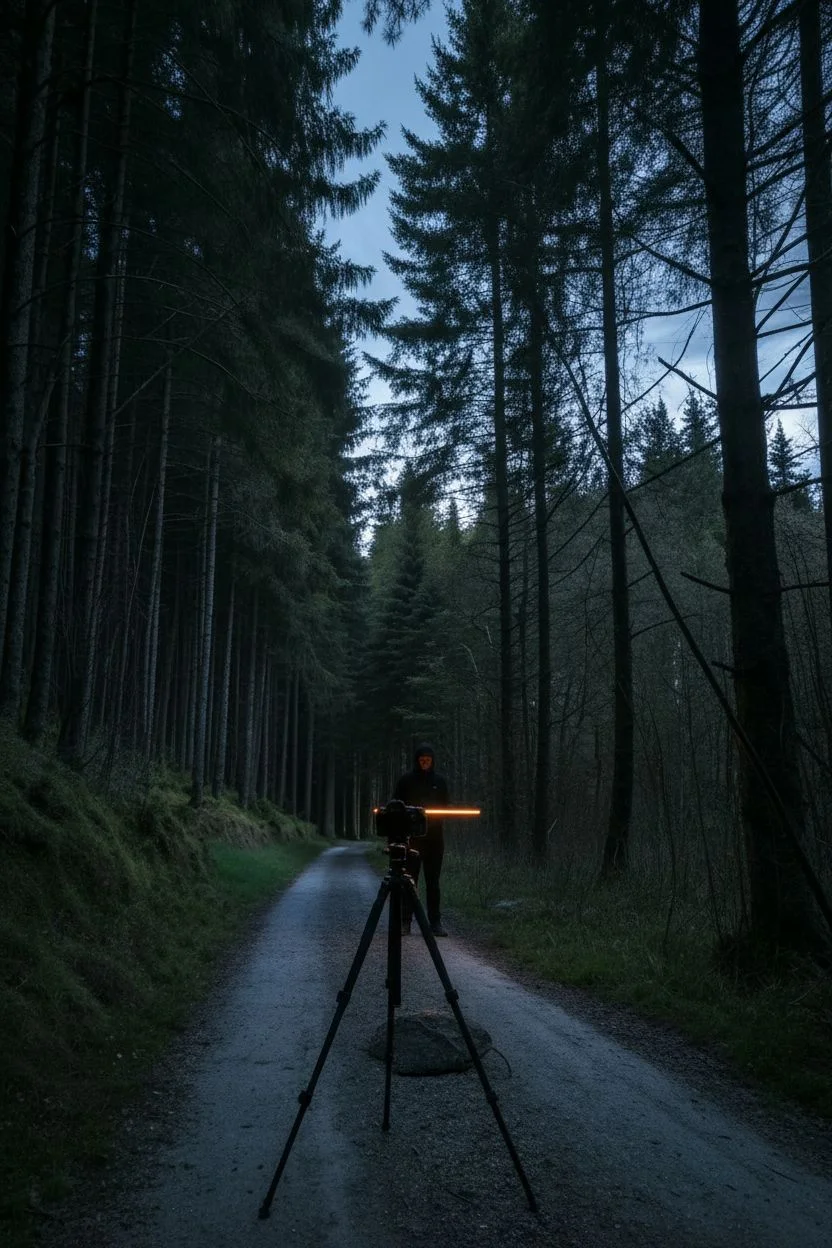
Transform a quiet woodland trail into a portal to another dimension using long-exposure photography and a single light source. This project creates a mesmerizing, warm tunnel effect that contrasts beautifully against the cool blue tones of a twilight forest.
Detailed Instructions
Materials
- DSLR or Mirrorless Camera
- Wide-angle lens (16-35mm recommended)
- Sturdy tripod
- Orange LED light wand, tube, or saber
- Remote shutter release (optional but helpful)
- Black clothing (hoodie, pants, gloves)
- Flashlight (for focusing)
Step 1: Scene & Camera Setup
-
Scouting the path:
Find a straight section of a forest trail lined with tall, vertical trees to provide natural framing for your tunnel. -
Timing the light:
Plan to shoot during ‘blue hour,’ roughly 20 to 40 minutes after sunset, to capture the deep indigo sky color rather than pitch black. -
Positioning:
Set your tripod low to the ground to emphasize the texture of the gravel or dirt path and make the trees look taller. -
Lens selection:
Attach a wide-angle lens to capture the full environment; somewhere between 16mm and 24mm is usually ideal. -
Finding focus:
I prefer to shine a bright flashlight on a tree or rock about 15 feet away, lock my focus manually on that spot, and then turn the flashlight off. -
Aperture settings:
Set your aperture to f/8 or f/11 to ensure a deep depth of field, keeping both the nearby light rings and the distant trees sharp. -
ISO setup:
Keep your ISO low, around 100 or 200, to maintain distinct crisp lines in the light trails and minimize digital noise. -
Shutter speed:
Switch your camera to ‘Bulb’ mode so you can keep the shutter open for as long as it takes to walk the path.
Step 2: Painting the Tunnel
-
Dress for invisibility:
Put on your dark clothing, including a hood and gloves, which prevents your body from reflecting light and appearing as a ‘ghost’ in the image. -
Light prep:
Turn on your orange LED wand or light tube to its brightest setting. -
Starting position:
Stand in the middle of the frame, roughly 10 feet away from the camera lens, holding the light tool. -
Open shutter:
Trigger the remote shutter to begin the exposure (or have a friend press the button if you don’t have a remote). -
Begin the spin:
immediately start spinning the light wand in a full circle perpendicular to the ground, keeping your arm straight. -
The backward walk:
While maintaining a consistent spinning rhythm, walk slowly and steadily backward away from the camera. -
Spacing the rings:
Try to sync your steps with your arm rotation—one step per spin usually creates nice, tight spacing between the light rings. -
Consistent size:
Keep your arm extension consistent so the outer diameter of the tunnel feels uniform as it recedes into the distance. -
Finishing the spiral:
Once you have walked sufficiently far down the path, turn off the light wand immediately before you stop moving. -
Closing the shutter:
Release the remote shutter button (or run back behind the camera if using a timer) to end the exposure. -
Review and adjust:
Check the photo on your LCD screen; if the rings are too far apart, walk slower next time, or spin the light faster.
Stealth Mode
Keep your body directly behind the light source as you walk backward. The bright light blinds the sensor to what is behind it, effectively masking your silhouette entirely.
Color Gradient
Tape a gel filter over half of your light tube, or use an RGB wand that shifts colors. As you spin, the tunnel will transition from orange to teal or purple for a sci-fi wormhole effect!
Now you have a stunning, glowing pathway that leads right into the imagination.

PENCIL GUIDE
Understanding Pencil Grades from H to B
From first sketch to finished drawing — learn pencil grades, line control, and shading techniques.
Explore the Full Guide
Using an umbrella for light rain effects
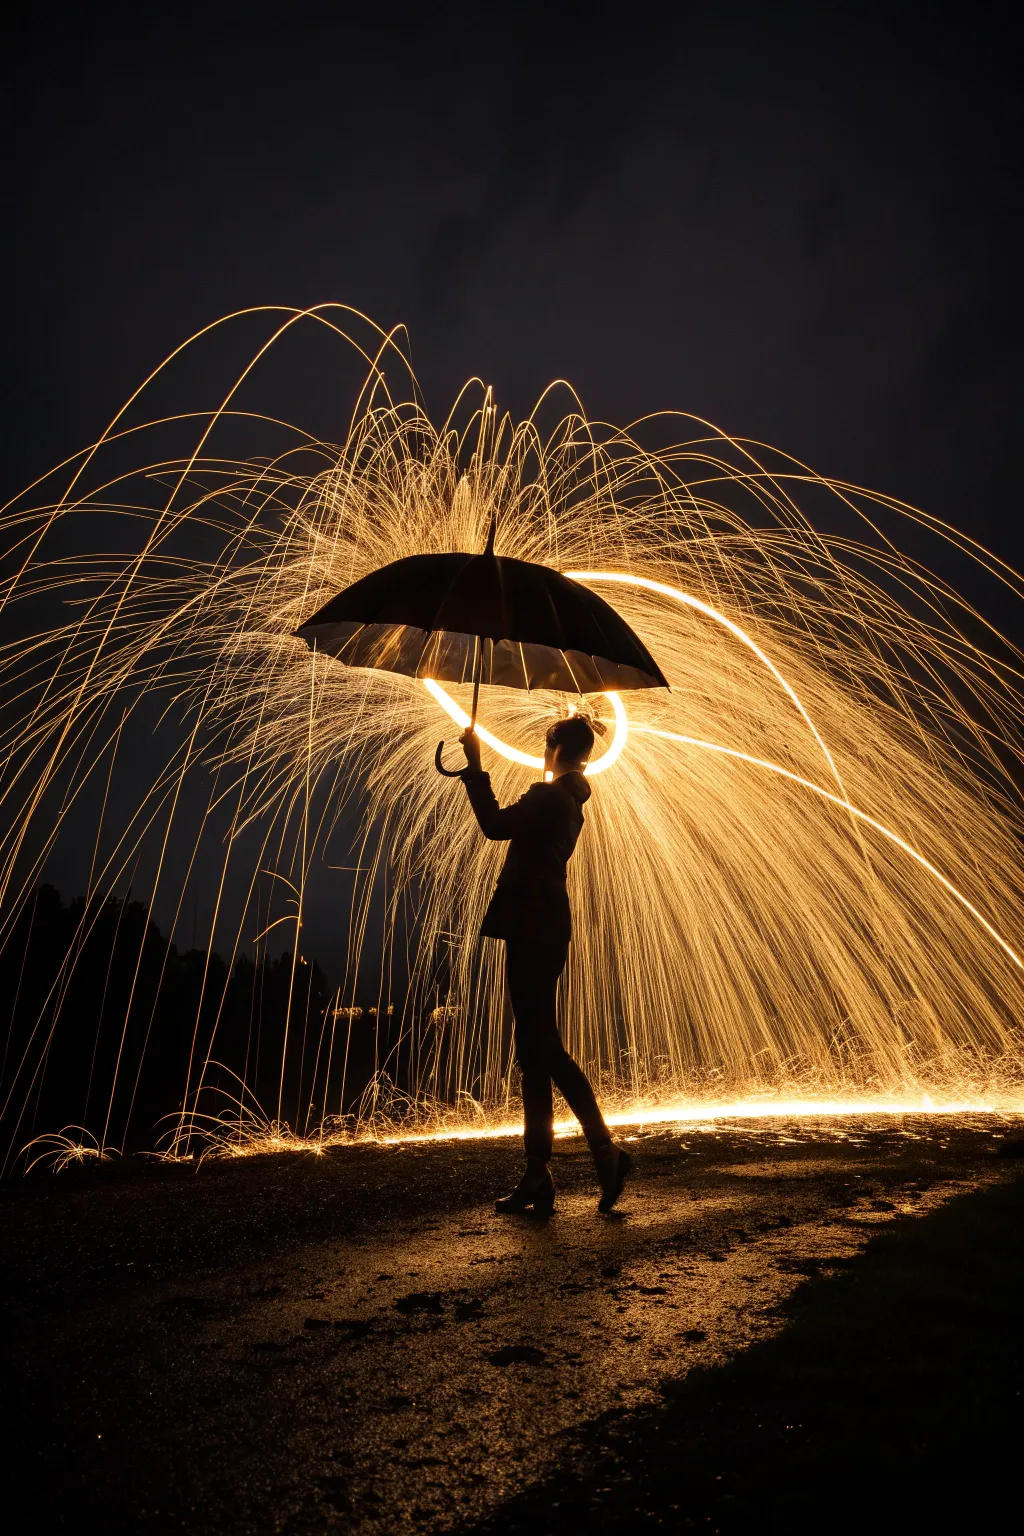
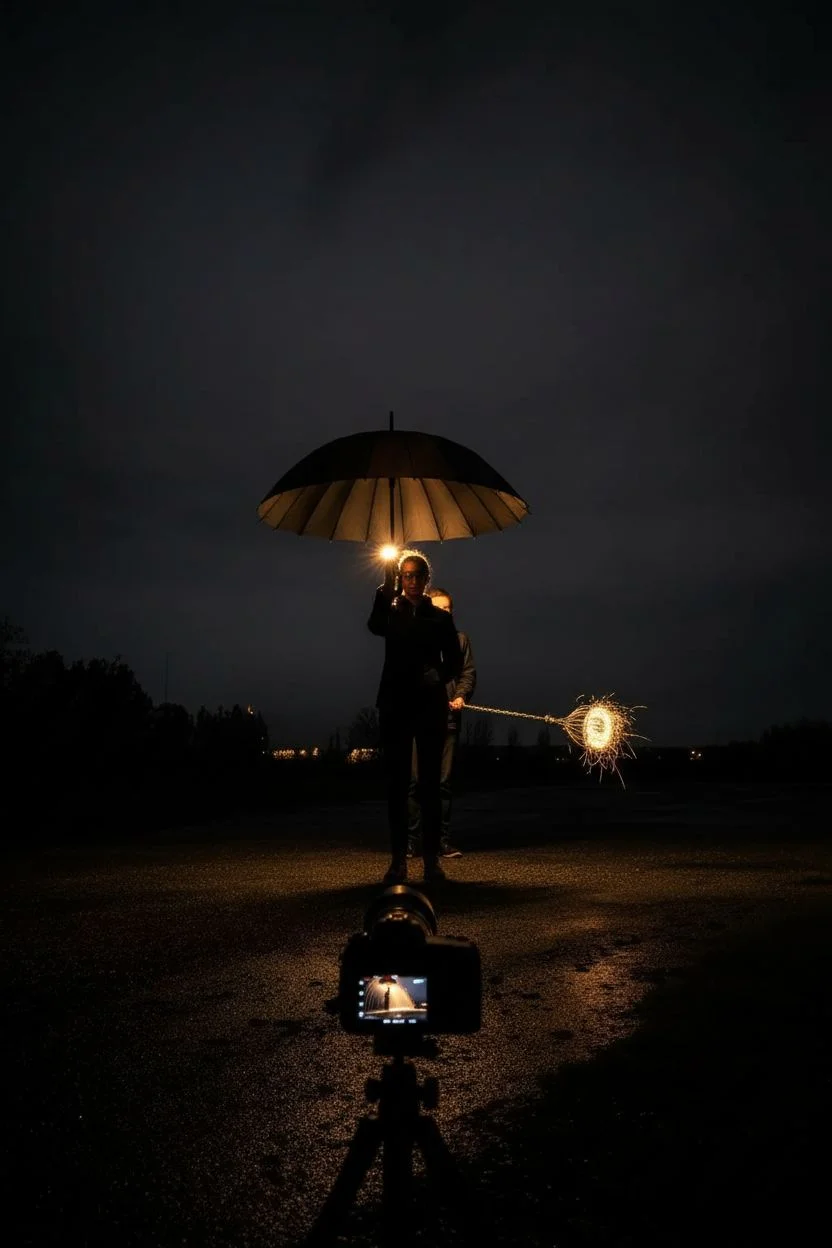
Capture a breathtaking silhouette shielded against a cascade of fire using the dynamic art of steel wool photography. This technique utilizes long exposure to turn flying sparks into glowing golden trails that bounce dramatically off a simple umbrella.
Detailed Instructions
Materials
- DSLR or Mirrorless camera with manual mode
- Tripod (essential)
- Wide-angle lens (e.g., 18mm-24mm)
- Grade #0000 or #000 fine steel wool
- Metal whisk with a loop handle
- Strong string, chain, or dog leash (approx. 1 meter)
- Lighter or 9V battery
- Large, dark umbrella
- Safety glasses and non-flammable clothing/hoodie
- Fire extinguisher (safety first!)
Step 1: Location & Safety Prep
-
Find the perfect spot:
Scout a location that is pitch dark and far away from flammable materials like dry grass, wooden structures, or vehicles. Concrete or wet pavement works best. -
Dress for safety:
Ensure both the model and the person spinning the wool wear safety glasses and non-synthetic clothing like cotton or denim jackets to prevent burns. -
Prepare the spinner tool:
Tease apart a pad of steel wool to fluff it up, increasing airflow for a better burn. -
Load the whisk:
Stuff the fluffed steel wool loosely inside the wire cage of the metal whisk. -
Secure the rig:
Clip or tie your chain or leash securely to the handle of the whisk.
Step 2: Camera Setup
-
Stabilize the camera:
Mount your camera on the tripod. Position it low to the ground if you want to emphasize the floor reflections shown in the image. -
Dial in exposure settings:
Set your camera to Manual Mode. Start with an ISO of 100 or 200 to keep the image clean and noise-free. -
Adjust aperture:
Set the aperture between f/8 and f/11. This ensures deep depth of field and keeps the bright sparks sharp. -
Set shutter speed:
Input a shutter speed of 15 to 20 seconds. This is usually enough time to capture the full spin duration. -
Lock the focus:
Shine a flashlight on your model. Use auto-focus to lock onto them, then immediately switch the lens to Manual Focus so it doesn’t hunt in the dark.
Pro Tip: Mirror Effect
To get the stunning ground reflections seen in the photo, pour a bucket of water on the concrete in front of the model just before shooting.
Step 3: creating the Shot
-
Position the team:
Have the model stand firm holding the umbrella properly over their head. -
Hide the spinner:
The person spinning the wool should stand directly behind the model, hidden completely from the camera’s view. -
Ignite the wool:
When ready, the spinner lights the steel wool using a lighter or by touching it to a 9V battery. -
Trigger the shutter:
Press the shutter button immediately to begin the long exposure. -
Spin the wool:
The spinner rotates the whisk in a vertical circle behind the model. I find spinning at a moderate pace sends the sparks flying further outward. -
Deflect the sparks:
Ensure the sparks hit the top of the umbrella and bounce off, creating that protective dome effect. -
Hold perfectly still:
The model must remain statue-still for the entire 15-20 seconds to prevent the silhouette from blurring. -
Finish the exposure:
Once the shutter closes, check the image on the LCD screen. -
Adjust and repeat:
If the sparks are too bright (blown out), lower the ISO or close the aperture to f/13 for the next attempt.
Troubleshooting: Blurry Model
If the silhouette edges look soft or ghostly, the model moved. Have them brace the umbrella handle against their shoulder for extra stability during the exposure.
Review your fiery masterpiece and enjoy the magic of painting with light
Blending urban backdrops with light streaks
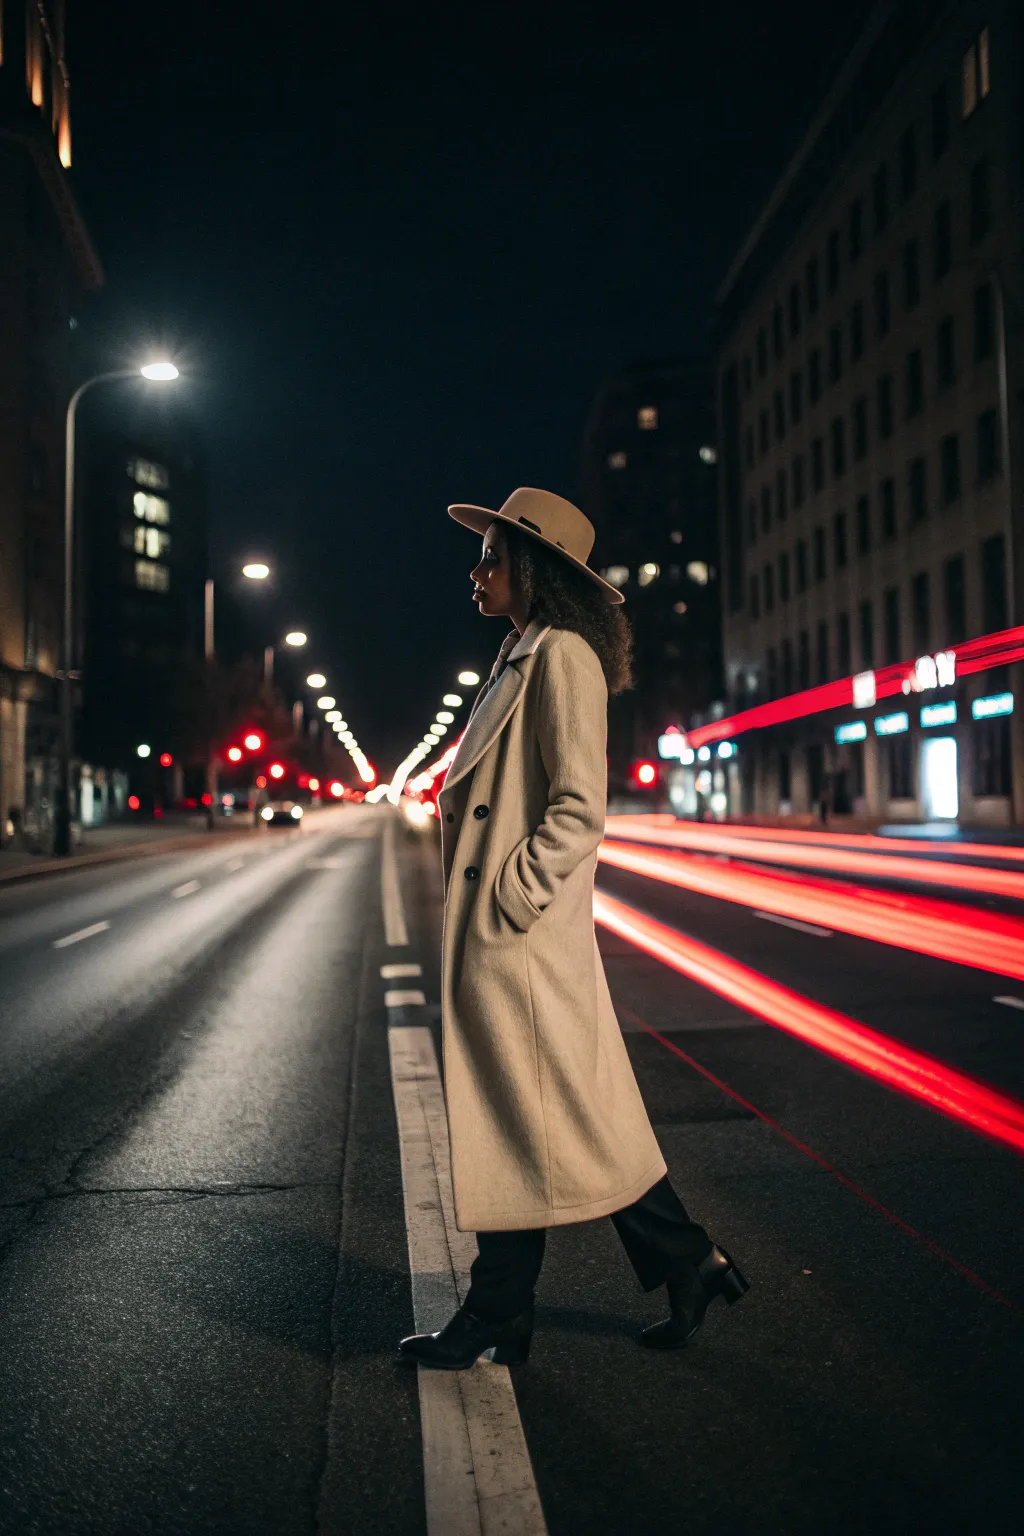
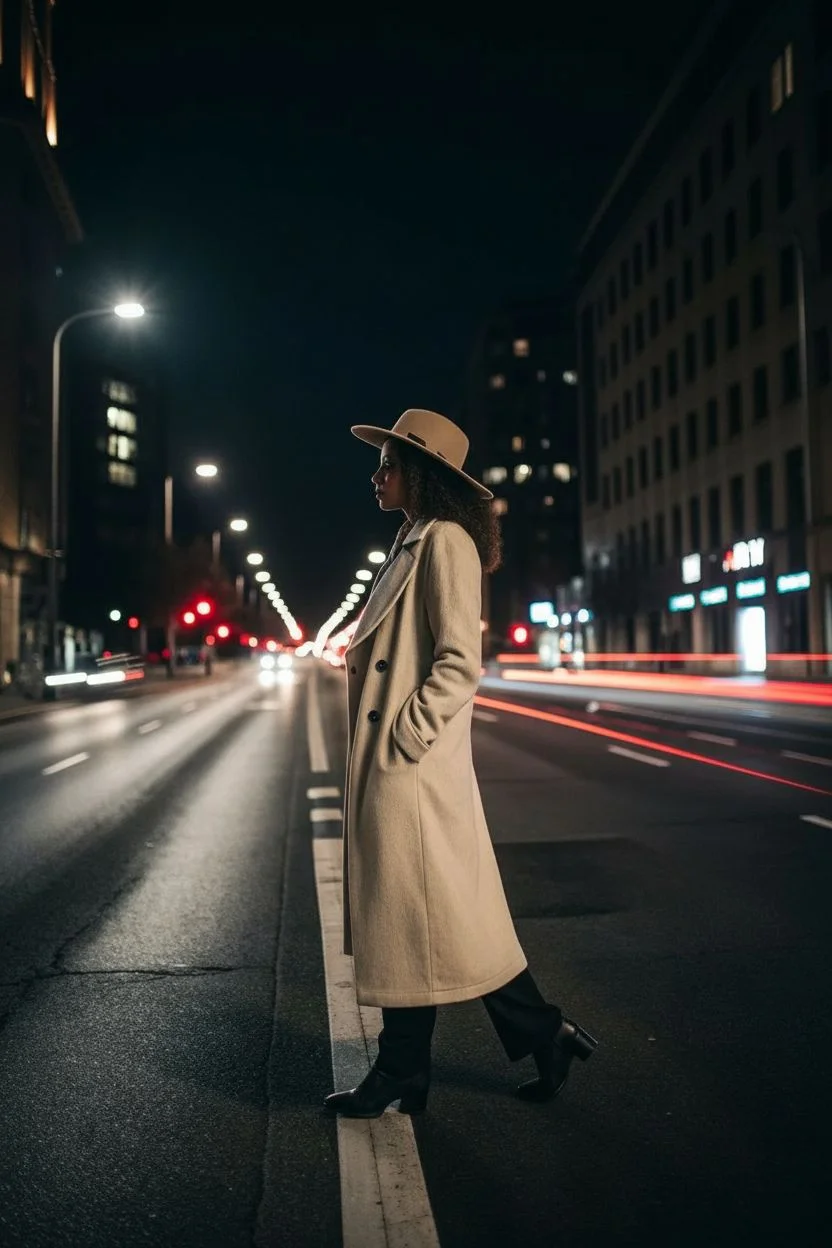
This project combines long-exposure photography with flash techniques to create a striking contrast between a frozen subject and dynamic city energy. By manipulating shutter speed, you will turn ordinary traffic into vibrant rivers of light while keeping your model perfectly sharp.
How-To Guide
Materials
- DSLR or Mirrorless Camera
- Wide-angle lens (24mm or 35mm)
- Sturdy Tripod
- External Speedlight (Flash)
- Model with hat and trench coat
- Urban location with traffic flow
Step 1: Location and Composition
-
Find the flow:
Scout a city street with steady one-way traffic; shooting taillights (cars moving away) provides the iconic red streaks shown in the example. -
Prioritize safety:
Position your model on a wide sidewalk or a safe median strip where they are clearly visible but not in danger. -
Low angle setup:
Set up your tripod low to the ground, roughly at knee height; this exaggerates the perspective of the road lines and creates a more majestic silhouette. -
Center point:
Frame the shot symmetrically, placing the model in the center with the city’s vanishing point directly behind them to lead the eye.
Ghosting Issues?
If the model looks semi-transparent, the ambient street light is too bright. Move to a darker spot or increase your flash power so the flash becomes the dominant light source that ‘locks’ them in.
Step 2: Camera Settings
-
Manual mode:
Switch your camera dial to Manual Mode (M) to gain full independent control over aperture and shutter speed. -
Base ISO:
Set your ISO to 100 or 200, which keeps the dark areas of the night sky clean and free of digital noise. -
Aperture choice:
Dial in an aperture between f/8 and f/11; this deeper depth of field ensures both the model and the background buildings remain crisp. -
Shutter speed drag:
Set your shutter speed to approximately 2 to 4 seconds, adjusting based on how fast the traffic is moving.
Composite Hack
If staying still is too hard, take two photos: one fast flash shot of the model and one long exposure of the car trails. Layer them in Photoshop using the ‘Lighten’ blend mode for a perfect result.
Step 3: Freezing the Subject
-
Flash setup:
Mount your speedlight or hold it off-camera to the side to create more dramatic shadows on the coat. -
Rear curtain sync:
Go into your camera’s flash menu and enable “Rear Curtain Sync” (or Second Curtain Sync); this fires the flash at the *end* of the exposure. -
Why this matters:
This setting ensures that any movement creates a trail behind the subject rather than in front of them, though for a static pose, it simply helps freeze sharpness. -
Posing stability:
Ask your model to adopt a comfortable stance, perhaps placing hands in pockets, as they must remain as still as possible.
Step 4: Shooting the Exposure
-
Watch the lights:
Wait for a cluster of vehicles to enter your frame; you want a dense pack of cars to create thick, unbroken light lines. -
Trigger the shot:
Press the shutter button gently, or use a remote release to prevent any camera vibration. -
The hold:
I like to count out loud during the exposure so the model knows exactly how long to hold their breath and stay frozen. -
Variable testing:
Take several shots, adjusting the shutter speed longer (up to 6 seconds) if the light trails don’t stretch all the way across the frame.
Step 5: Post-Processing
-
Cool tones:
In your photo editor, adjust the White Balance towards the blue side to enhance the moody, urban night aesthetic. -
Boost the streaks:
Selectively increase the saturation and luminance of the Red and Orange color channels to make the taillights pop. -
Final sharpen:
Apply masking to sharpen only the model and the road texture, leaving the light trails silky and smooth.
Now you have a dynamic night portrait that perfectly captures the motion of the city


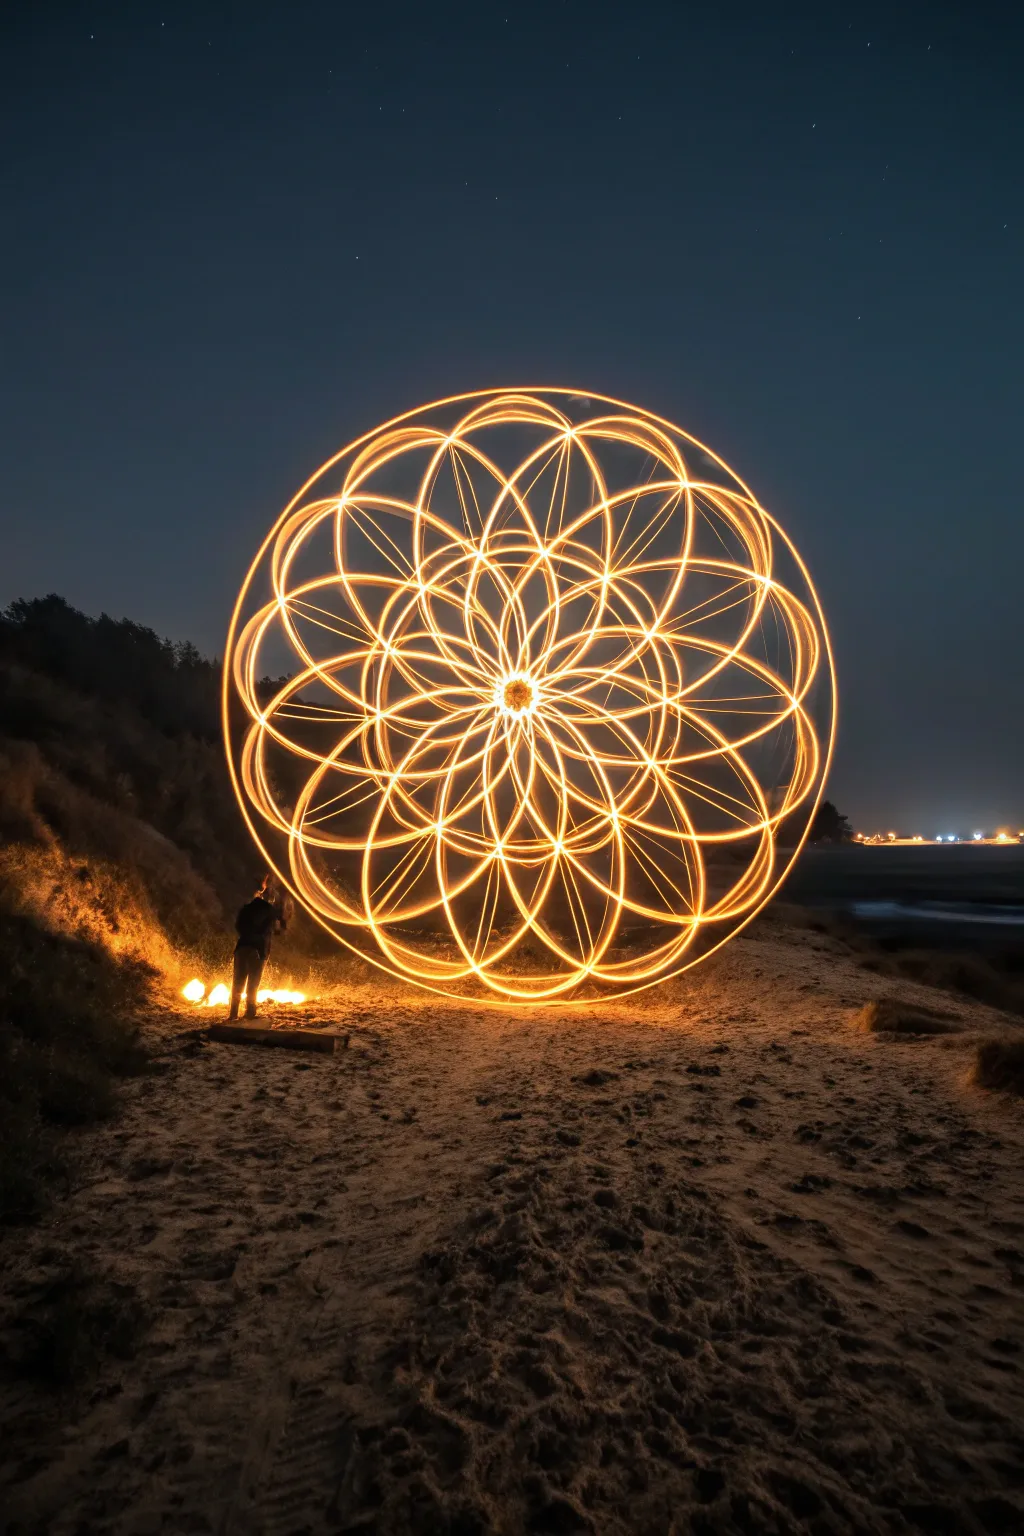
Capturing spirograph patterns with a swinging light
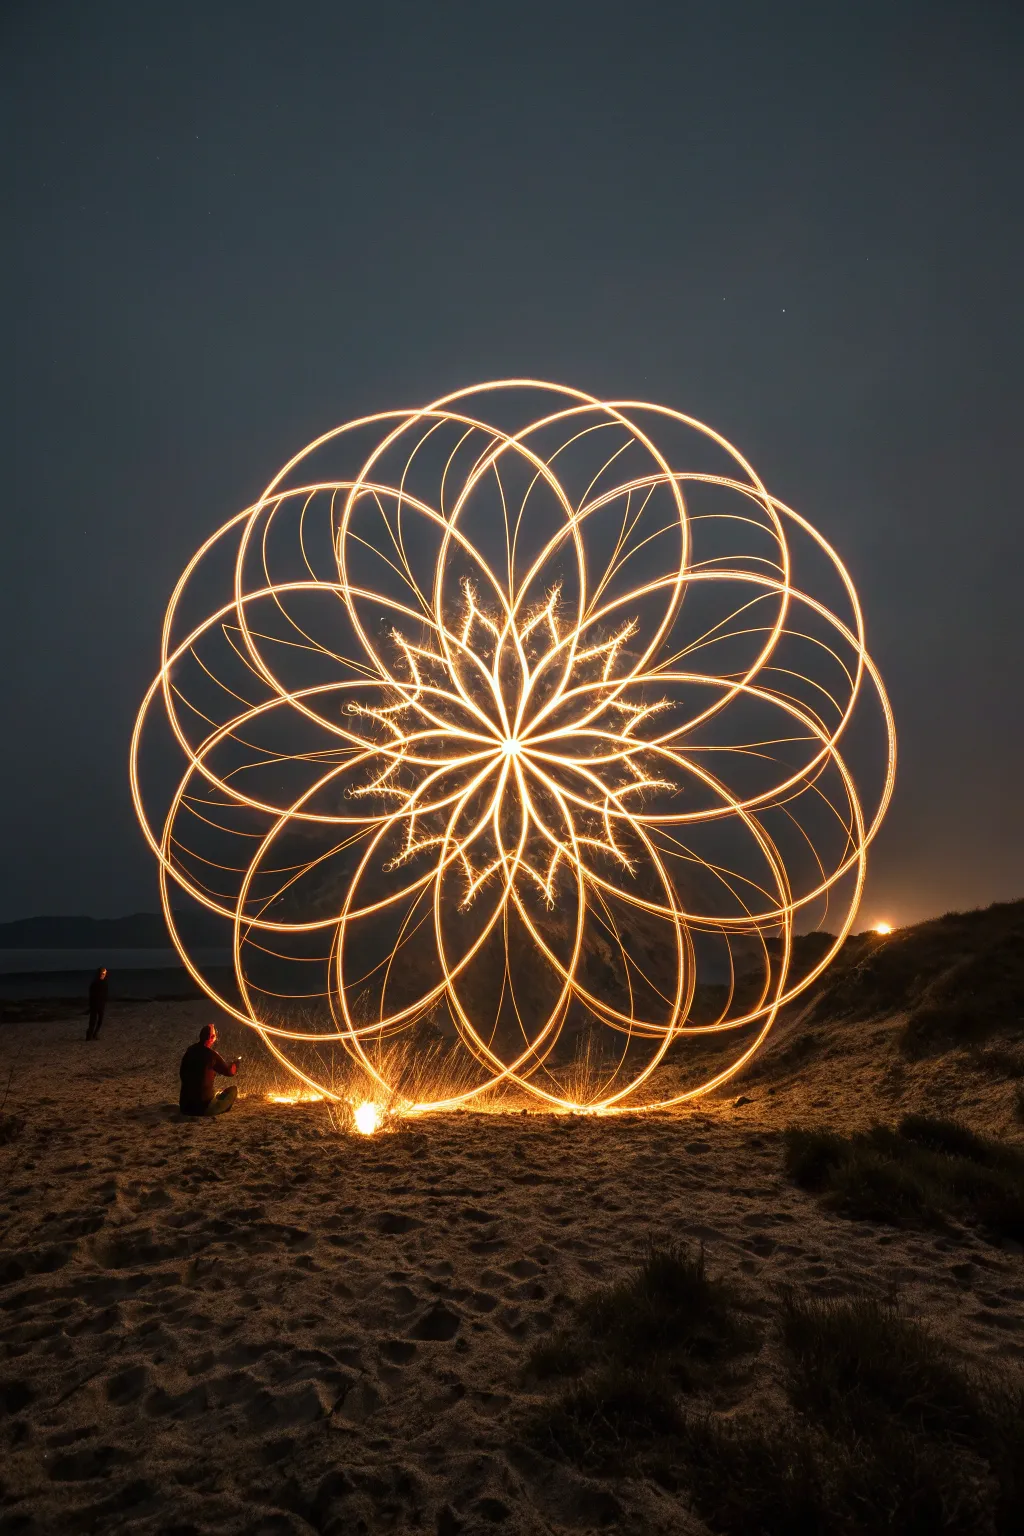
Transform a simple swinging flashlight into a mesmerizing geometric mandala that glows against the night sky. By harnessing the physics of a pendulum, you can capture intricate, symmetrical patterns that look like complex computer graphics but are created entirely in-camera.
Step-by-Step
Materials
- DSLR or Mirrorless camera with Bulb mode
- Tripod (or sturdy ground placement)
- Bright LED flashlight (warm white or gold)
- Paracord or non-stretch string (approx. 1 meter)
- Black electrical tape or gaffer tape
- Remote shutter release
- C-stand, boom arm, or a sturdy tree branch
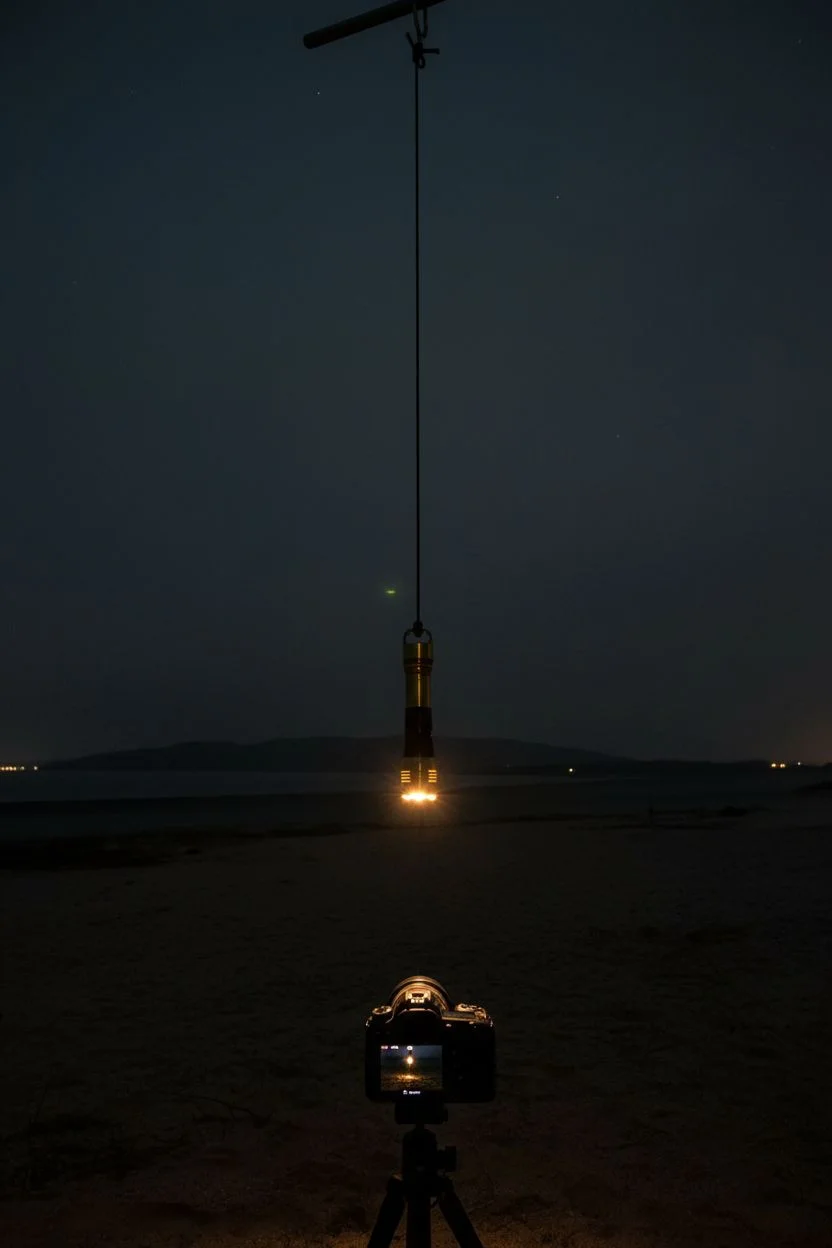
Step 1: Rigging the Pendulum
-
Prepare the light source:
Take your flashlight and wrap black tape around the head, leaving only the very front glass exposed. This ‘snoot’ prevents light from spilling sideways and keeps your lines razor-sharp. -
Attach the suspension cord:
Tie your string securely to the tail of the flashlight. Ensure the light hangs perfectly straight down when suspended; if it tilts, your spirograph lines will look uneven. -
Set up the suspension point:
Find a pivot point overhead, such as a boom arm on a stand, a distinct tree branch, or even a hook in a ceiling if practically outdoors. The higher the suspension point, the wider and smoother your arc will be. -
Hang the light:
Secure the free end of the string to your suspension point. I generally prefer the light to hang about 3 to 4 feet off the ground to leave room for the camera underneath.
Step 2: Camera Configuration
-
Position the camera:
Place your camera directly underneath the hanging light, facing straight up. If you don’t have a tripod that goes distinctively low, you can carefully nestle the camera on a beanbag or jacket on the ground. -
Align the center:
Look through the viewfinder and adjust the camera position until the quiescent hanging light is exactly in the center of your frame. -
Dial in focus:
Turn on the flashlight. Switch your lens to Manual Focus and adjust until the bulb’s emitter is pin-sharp. Once focused, be careful not to bump the focus ring. -
Base exposure settings:
Set your camera to Manual or Bulb mode. Set ISO to 100 or 200 to reduce noise, and close your aperture to around f/11 or f/16. This narrow aperture creates nice definition and prevents the center from overexposing.
Wobbly Lines?
If your curves look jittery rather than smooth, your string is likely twisting or stretching. Use non-stretch paracord and ensure the flashlight isn’t spinning on its own axis.
Step 3: The Light Performance
-
Darken the environment:
Turn off all other light sources. The darker the location, the more the golden light trails will pop against the background. -
Initiate the swing:
Gently pull the flashlight to one side. Instead of releasing it in a straight line, give it a slight diagonal push to create an elliptical orbit. This oval shape is what generates the flower-petal pattern. -
Open the shutter:
Using your remote release, open the glowing shutter immediately after you release the light. Keep the shutter open. -
Watch the decay:
Allow the physics to do the work. Watch as the orbit naturally gets smaller and smaller (decaying) towards the center. This usually takes 30 to 60 seconds. -
End the exposure:
Before the light comes to a complete dead stop in the middle, place a black card or hat over the lens (or turn off the light remotely if possible) and then close the shutter. This prevents a big blown-out blob of white in the center. -
Review and adjust:
Check your image. If the lines are too faint, open the aperture slightly (e.g., to f/8). If the center is too bright, stop down (e.g., f/22) or end the exposure sooner.
Color Swap Trick
Carefully cover the lens with a black hat mid-swing (don’t bump the camera!), swap a colored gel over your flashlight, and uncover the lens to create multi-colored rings in one shot.
Enjoy experimenting with different swing angles to create your own collection of glowing mathematical flowers
Abstract art through camera rotation techniques
Create a stunning geometric light orb that seemingly floats above the sand against a starry night sky. This tutorial guides you through the process of ‘kinetic light painting,’ where a stationary camera captures the complex trail of a hand-spun light tool.
How-To Guide
Materials
- DSLR or Mirrorless Camera with Manual Mode
- Wide-Angle Lens (14mm-24mm ideal)
- Sturdy Tripod
- Remote Shutter Release (or intervalometer)
- High-Lumen Flashlight (500+ lumens)
- Plexiglass Light Blade or Tube attachment
- Orange Color Gel (or warm white flashlight)
- Dark clothing (black hoodie/pants)
- Small marker light (optional)
Step 1: Setting the Scene
-
Scout the location:
Find a dark beach area with minimal light pollution. The darker the environment, the more vivid your light trails will appear against the night sky. -
Secure the tripod:
Plant your tripod legs firmly into the sand to prevent sinking. I sometimes push them down an extra inch to ensure absolute stability against wind or waves. -
Compose the frame:
Angle your camera low to capture the texture of the sand in the foreground and a vast expanse of sky in the background. -
Establish focus:
Place a lit flashlight on the ground exactly where you plan to stand. Use auto-focus to lock onto this light, then switch your lens immediately to ‘Manual Focus’ to lock it in.
Pro Tip: The Wrist Snap
To add the complex inner petal details seen in the image, try slightly rotating your wrist at the top and bottom of each vertical swing. This twists the flat blade, varying the width of the light trail.
Step 2: Camera Configuration
-
Switch to Manual Mode:
Turn your camera dial to ‘M’ or ‘B’ (Bulb) mode to allow for total control over exposure time. -
Set the aperture:
Dial in an aperture of f/8 or f/11. This narrower aperture keeps the light trails sharp and increases depth of field, ensuring both the orb and stars are relatively focused. -
Adjust ISO:
Set your ISO to 100 or 200. Keeping this low minimizes noise in the dark areas of the image. -
Prepare shutter speed:
Set your shutter speed to ‘Bulb’. This allows the shutter to stay open for as long as you are painting—likely 30 to 60 seconds for this project.
Step 3: Tool Preparation
-
Assemble the light tool:
Attach your plexiglass blade or tube to the flashlight. If your light is cool white, tape a small piece of orange gel over the lens to achieve the golden fire look seen in the photo. -
Check intensity:
Turn on the light briefly to ensure the beam travels through the entire length of the blade, creating a solid bar of light. -
Dress for invisibility:
Put on your dark clothing. This ensures you remain a silhouette or disappear completely, leaving only the light trails visible.
Level Up: Fire & Ice
Create contrast by doing the main sphere in orange, then swapping to a blue light to paint the sand around the base. This creates a stunning warm/cool color separation in the final shot.
Step 4: The Performance
-
Position yourself:
Stand at your focused spot. Mark the center point in the sand between your feet; this is your ‘hub’ that you must pivot around. -
Begin exposure:
Trigger the remote shutter to open the camera’s eye. -
Ignite the light:
Turn on your light tool holding it downwards. -
Start the vertical spin:
Begin spinning the light tool in a large vertical circle at your side, keeping your arm straight like a propeller. -
Rotate your body:
While maintaining the vertical spin speed, slowly shuffle your feet to rotate your entire body. Aim to pivot around that center mark in the sand. -
Maintain consistency:
Complete a full 360-degree rotation of your body. Try to keep your hand at the same height relative to the ground throughout the turn to create a perfect sphere. -
Finish the shape:
Once you return to your starting angle, turn off the light immediately to avoid ‘burning out’ the final overlap. -
End exposure:
Release the shutter remote to close the exposure and process the image.
Review your shot on the LCD screen and get ready to adjust your speed for an even more perfect sphere next time.
The pixel-stick effect for floating graphics
Capture a surreal, glowing geometric pattern hovering mysteriously over a twilight field using the magic of light painting. This project combines digital design with long-exposure photography to create a stunning ‘pixel stick’ effect that looks like CGI in real life.
Detailed Instructions
Materials
- Programmable LED Light Wand (e.g., Pixelstick, Magilight)
- DSLR or Mirrorless Camera with Manual Settiings
- Sturdy Tripod
- SD Card (formatted for your wand)
- Computer with basic image editing software
- Remote Shutter Release
- Dark clothing (black hoodie/pants)
- Flashlight (for focusing)
Step 1: Digital Preparation
-
Select your design:
Choose a high-contrast mandala or geometric pattern with vibrant colors on a pure black background. -
Check pixel height:
Consult your LED wand’s manual to find its specific vertical resolution (often 144px or 200px). -
Resize the image:
Open your editing software and resize the image so its height matches the wand’s pixel count exactly. -
Rotate the canvas:
Rotate the entire image 90 degrees counter-clockwise; I always double-check this step, as the wand prints vertical strips horizontally as you walk. -
Save the file:
Export the image as a 24-bit BMP (Bitmap) file, which is the standard format for most light painting tools. -
Transfer to device:
Load the file onto your SD card and insert it into the light wand controller.
Invisible Walker
Wear non-reflective black clothing from head to toe. This prevents you from appearing as a ghostly blur in the image, ensuring the glowing graphic looks like it is floating magically in mid-air.
Step 2: Camera & Scene Setup
-
Scout the location:
Find an open field with a clear horizon line; arrive just before sunset to get set up. -
Wait for blue hour:
Wait until the sky turns a deep indigo but isn’t pitch black yet to capture the nice background detail. -
Secure the camera:
Mount your camera firmly on the tripod to prevent any shake during the upcoming long exposure. -
Set manual focus:
Place a marker or have a friend stand where you plan to walk, illuminate them with a flashlight, and lock your focus on that spot. -
Dial in exposure settings:
Set your ISO to 100 or 200 to ensure a clean, grain-free image. -
Adjust aperture:
Close the aperture to f/8 or f/11; this depth of field keeps both the landscape and the light art sharp. -
Set shutter mode:
Switch the shutter speed to ‘Bulb’ mode so you can control the exact duration of the exposure.
Water Mirror
Take this project to the next level by performing the walk behind a calm puddle or lake. The reflection will double the graphic’s impact and create a stunning symmetrical portal effect.
Step 3: The Light Performance
-
Get into position:
Stand just outside the camera frame holding the LED wand vertically, ready to walk across the field of view. -
Open the shutter:
Use your remote release to open the camera shutter and begin the exposure. -
Trigger the wand:
Press the start button on your light wand to begin the image sequence immediately. -
Walk the path:
Walk sideways at a steady, consistent pace across the frame, keeping the wand perfectly upright. -
Maintain stability:
Keep your arm steady and avoid bobbing up and down; I find holding the stick with two hands helps keep the circular shape from distorting. -
End the exposure:
Once the image sequence finishes or you leave the frame, close the camera shutter. -
Review and adjust:
Check the photo: if the mandala looks ‘squashed,’ walk slower next time; if it looks stretched out, pick up your pace.
Enjoy the magical process of painting with light and seeing your digital art come to life in the real world
Capturing the fiery chaos of steel wool sparks
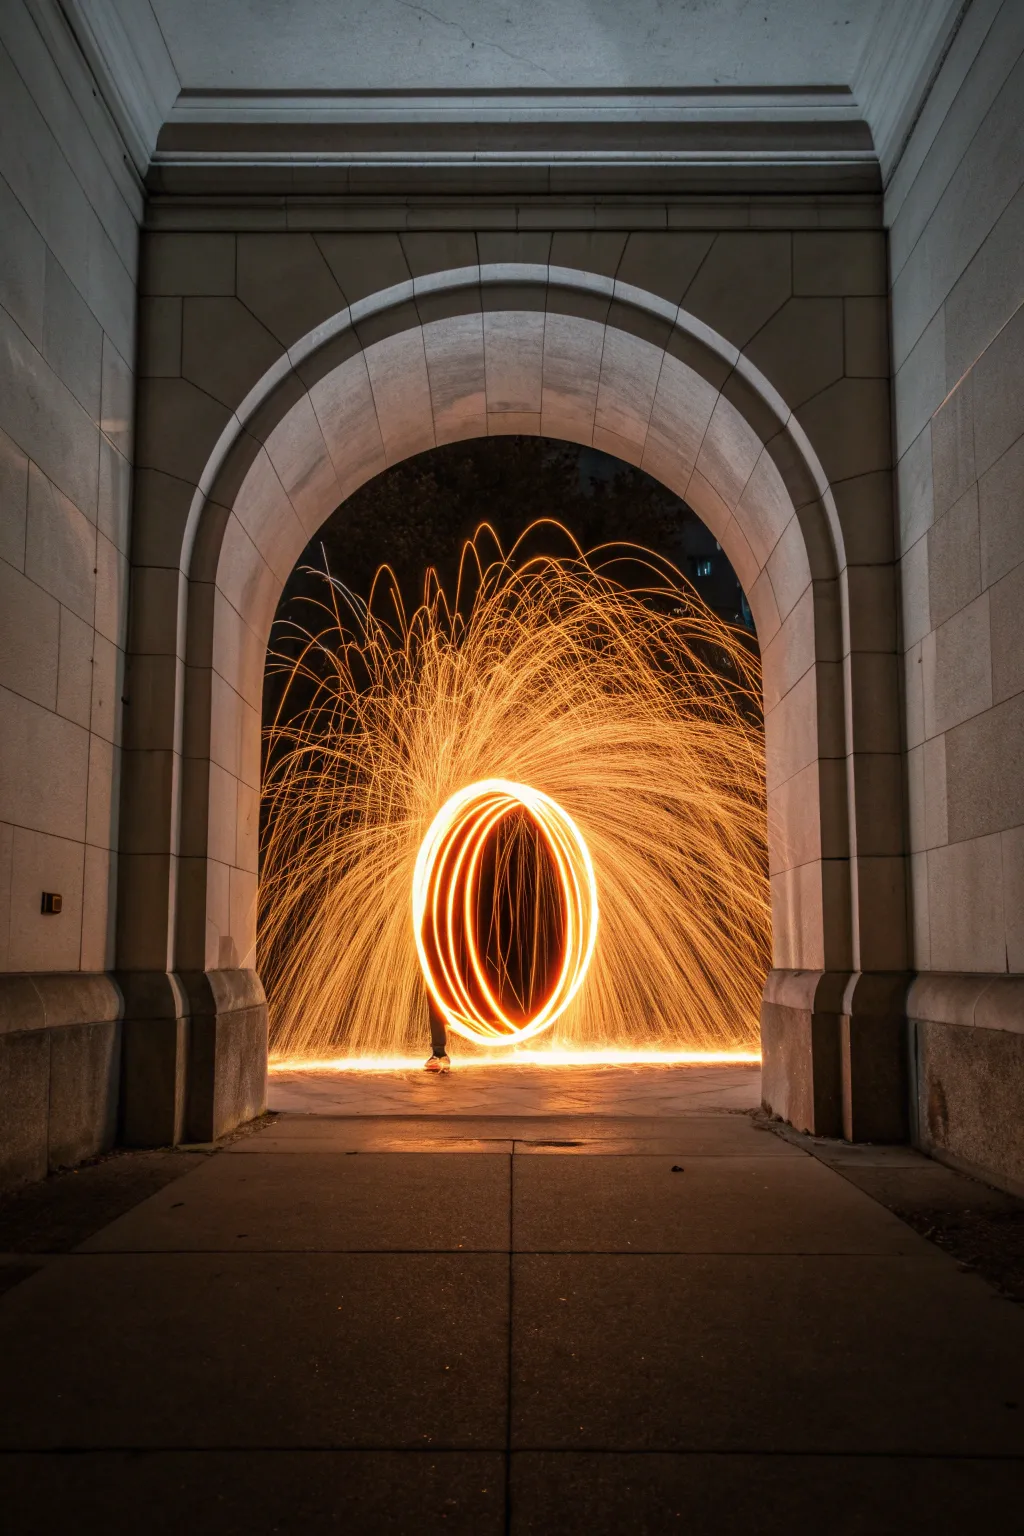
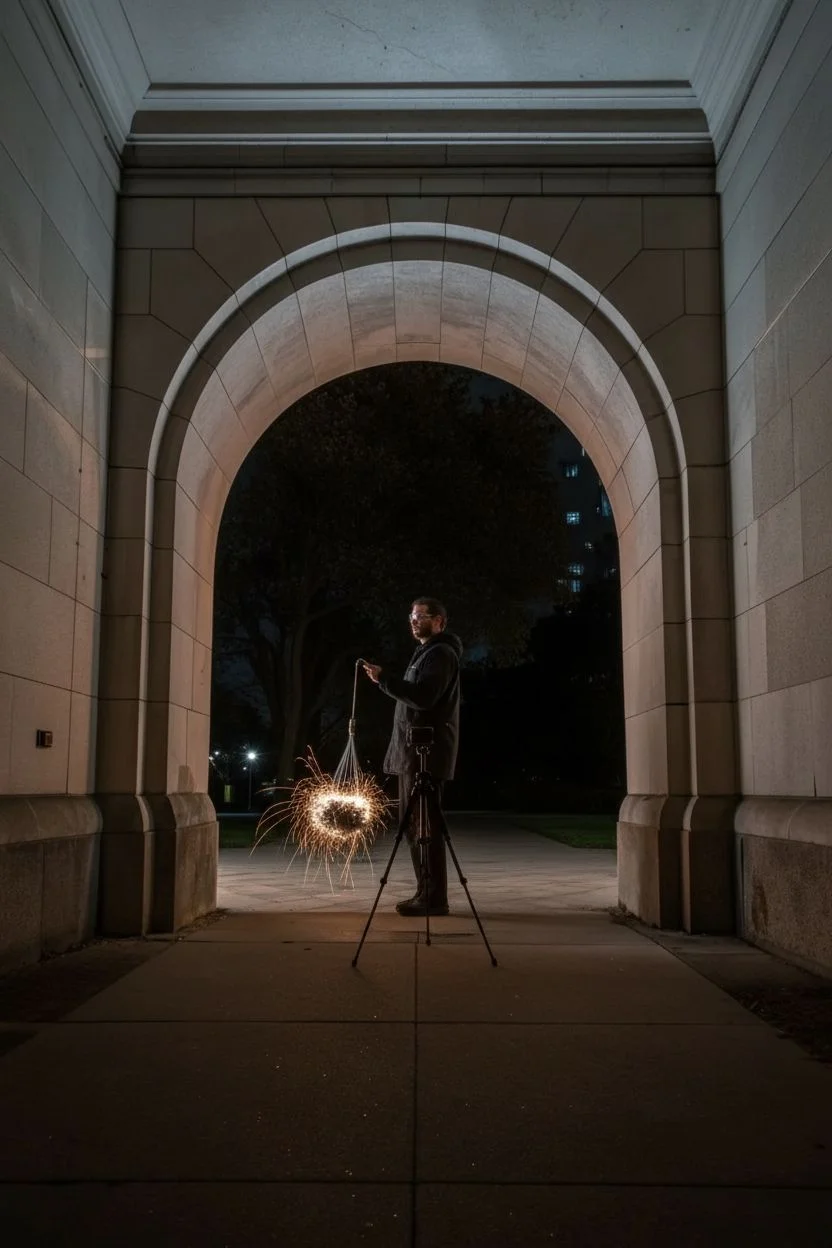
This project combines the historic stillness of stone architecture with the kinetic energy of combusting steel wool to create a stunning, fiery vortex. By spinning burning metal inside a whisk during a long exposure, you can paint vibrant light trails that illuminate the surrounding archway.
Step-by-Step Tutorial
Materials
- DSLR or Mirrorless Camera
- Sturdy Tripod
- Wide-angle lens (e.g., 16-35mm)
- Grade #0000 fine steel wool
- Stainless steel whisk with loop handle
- Strong cord, dog leash, or metal chain (approx. 4ft)
- Lighter or 9V battery
- Protective gear (gloves, safety glasses, hood)
- Fire extinguisher or water bucket
Step 1: Rig Assembly and Safety Prep
-
Choose the location:
Scout a location with a stone or concrete archway similar to the photo. Avoid any areas with dry grass, wood, or flammable materials—concrete is your safest canvas. -
Prepare the spark tool:
Tie your cord or chain securely to the handle loop of the stainless steel whisk. Give it a few sharp tugs to ensure the knot will not slip under centrifugal force. -
Load the fuel:
Take a pad of Grade #0000 steel wool and gently tease it apart to fluff it up. This increases airflow, which is vital for a consistent burn. -
Fill the whisk:
Stuff the fluffed steel wool loosely inside the whisk cage. Do not pack it too tightly, or it won’t burn all the way through. -
Safety check:
Put on your safety glasses and cover your skin with heavy cotton or denim clothing. Ensure your fire extinguisher is placed nearby.
Troubleshooting: Dull Trails
If the sparks look weak or die out instantly, you likely packed the wool too tight. Tease it apart more next time to let oxygen feed the fire.
Step 2: Camera Configuration
-
Compose the frame:
Set up your tripod low to the ground, centered perfectly in front of the archway to emphasize symmetry. -
Lock it down:
Secure the camera on the tripod and turn off any Image Stabilization (IS/VR) on your lens, as this can actually cause blur during long exposures. -
Focus manually:
Have a friend stand where the spinning will happen and shine a flashlight on their chest. Switch your lens to Manual Focus and adjust until the light is perfectly sharp. -
Set the aperture:
Dial your aperture to f/8 or f/11. This ensures a deep depth of field so both the spark trails and the stone archway remain in focus. -
Adjust ISO:
Keep your ISO low, around 100 or 200, to maintain high image quality and prevent the bright sparks from blowing out the highlights. -
Set shutter speed:
Set your shutter speed to roughly 15 to 20 seconds. This should be enough time to capture several full rotations of the spin.
Pro Tip: White Balance
Set your White Balance to ‘Tungsten’ or ‘Incandescent’ (approx 3200K). This turns the background sky a deep, cool blue, making the orange sparks pop intensely.
Step 3: The Ignite and Spin
-
Final positioning:
Have the spinner stand in the center of the arch, sideways to the camera, holding the cord so the whisk hangs near their knees. -
Communication setup:
Establish a clear countdown system with the spinner so you can synchronize the shutter release with the ignition. -
Ignition:
Light the bottom of the steel wool with a lighter until it begins to glow red. It won’t flare up massively until air hits it. -
Start the spin:
The spinner should immediately begin rotating the cord in a steady vertical circle. I find a moderate pace works best to throw sparks outward. -
Capture the shot:
Press the shutter button immediately once the sparks start flying. Use a remote or a 2-second timer to avoid shaking the camera. -
Maintain movement:
Keep spinning until the shutter closes or the wool burns out. The spinner should try to keep their body as still as possible to remain a silhouette. -
Review and adjust:
Check the image histogram on your screen. If the sparks are too bright, close the aperture to f/13; if the arch is too dark, bump the ISO slightly.
Once you have captured your perfect ring of fire, carefully sweep the area to ensure no hot embers remain before leaving the location


Have a question or want to share your own experience? I'd love to hear from you in the comments below!