I love turning a plain lighter into a tiny mini canvas—it’s the quickest little art fix, and it fits right in your pocket. Below are my favorite lighter painting ideas that actually work on that tall, curved shape (and look even better once you add a clear sealant).
Simple Color-Block Panels
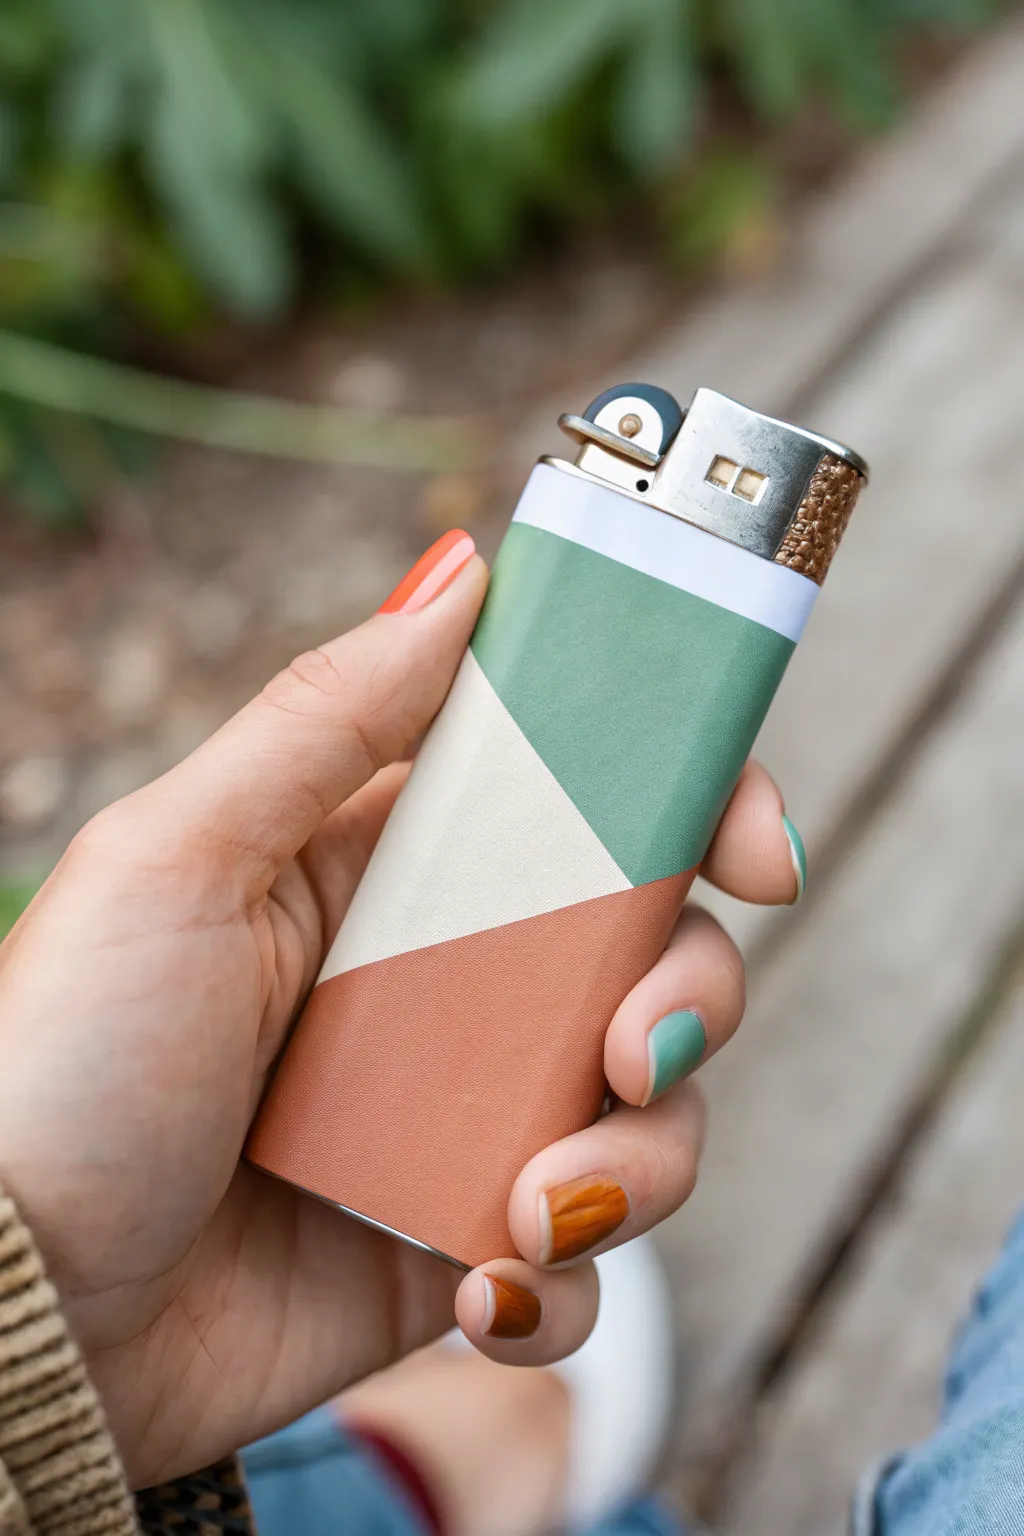
Transform a plain white lighter into a modern accessory with this simple yet striking color-block design. Using masking tape and acrylics, you’ll create crisp intersections of sage green, terra cotta, and creamy white for a clean, minimalist aesthetic.
Detailed Instructions
Materials
- Standard white lighter (BIC style)
- Masking tape or painter’s tape (low tack)
- Acrylic paints (sage green, terra cotta/rust, cream/off-white)
- Small flat synthetic paintbrush
- Fine-grit sandpaper (400-600 grit)
- Matte clear coat sealer (spray or brush-on)
- Rubbing alcohol
- Cotton pads or paper towel
- X-acto knife or craft blade (optional)
Step 1: Preparation
-
Clean the surface:
Before doing anything else, wipe the entire plastic body of the lighter with rubbing alcohol on a cotton pad to remove oils, fingerprints, and sticker residue. -
Light scuffing:
Gently sand the plastic surface with fine-grit sandpaper. You don’t want deep scratches, just enough texture or ‘tooth’ for the paint to grip effectively. -
Final wipe down:
Clean the surface one more time with alcohol to remove the sanding dust, ensuring a perfectly clean canvas.
Fuzzy Lines?
If paint bleeds under the tape, it’s often because the paint was too watery. Next time, use thicker ‘heavy body’ acrylics or seal tape edges with a clear medium first.
Step 2: Creating the Design
-
Tape the top border:
Apply a strip of masking tape strictly horizontally around the top of the lighter, just below the metal guard. This preserves a clean white band at the top. -
Mask the first diagonal:
Cut a piece of tape and place it diagonally across the front face of the lighter. This line will separate the green section from the cream section. -
Mask the second diagonal:
Place a second diagonal piece of tape that intersects the first one, creating the triangular boundary between the cream section and the rust-colored bottom section. -
Seal the edges:
Run your fingernail or a burnishing tool firmly along every edge of the tape to prevent paint from bleeding underneath.
Step 3: Painting
-
Base coat the cream:
Using your flat brush, apply the cream or off-white paint to the triangular section defined by your tape lines. Apply thin layers. -
Layering:
Allow the first coat to dry, then apply a second coat of cream to ensure full opacity so the white plastic doesn’t show through. -
Painting the sage green:
Apply the sage green paint to the upper diagonal section. Be careful not to paint over the top horizontal tape line. -
Painting the rust bottom:
Paint the bottom section of the lighter in terra cotta or rust. You might need to hold the lighter by the metal top to reach the very bottom edge easily. -
Opacity check:
I usually hold the lighter up to a light source to check for patchy spots; apply third coats to the green and rust sections if needed for a solid, matte look.
Make it Metallic
For a luxe twist, swap one of the matte colors for gold leaf or metallic gold paint. A single gold geometric panel adds instant elegance to the design.
Step 4: Finishing
-
Drying time:
Let the paint dry completely. It should be dry to the touch, but not tacky. -
The reveal:
Very slowly peel back the tape. Pull the tape away from the painted edge at a 45-degree angle to get the sharpest line possible. -
Clean up edges:
If any paint bled through, use the tip of a craft knife or a toothpick to gently scrape away the excess paint while it’s still relatively fresh. -
Apply sealer:
To protect your design from chipping in your pocket, apply a layer of matte clear coat over the entire painted surface. -
Final cure:
Let the clear coat cure according to the manufacturer’s instructions (usually 24 hours) before putting the lighter into heavy use.
Enjoy using your custom piece of functional pocket art

Tiny Floral Vine Wrap
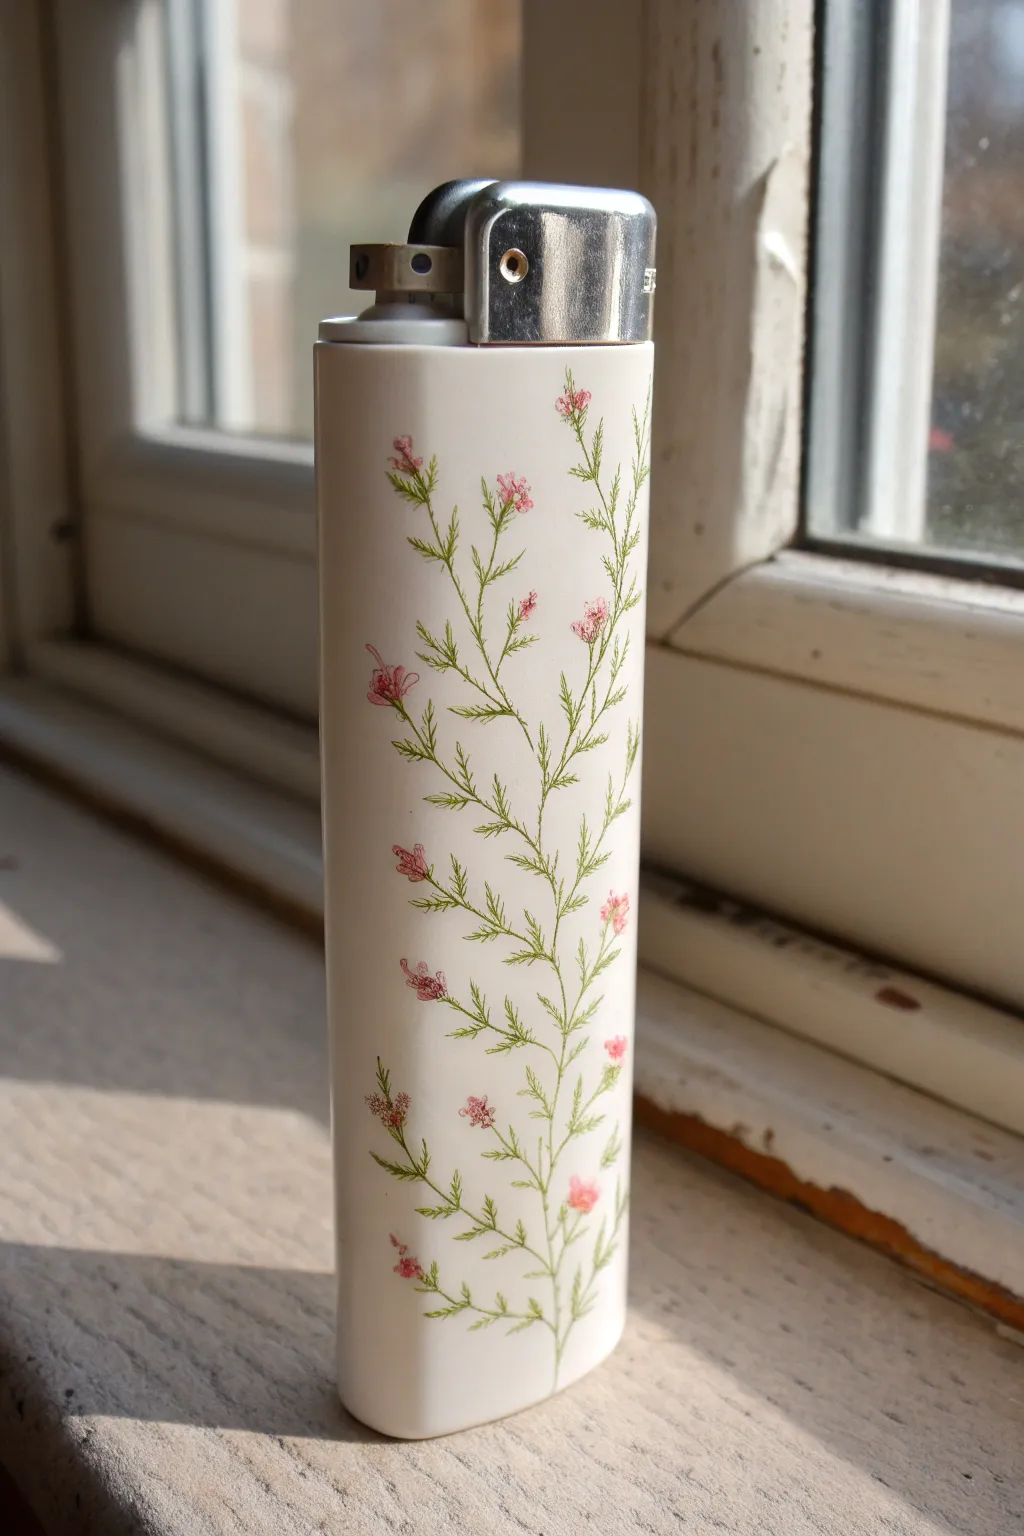
Transform an ordinary white lighter into a botanical keepsake with this delicate climbing vine design. The airy stems and tiny pink blooms create a subtle, elegant look that feels like a pressed flower preserving a moment of spring.
Step-by-Step Tutorial
Materials
- White lighter (standard size)
- Fine-grit sandpaper (400-600 grit)
- Acrylic paints (Forest Green, Sage Green, Olive, pale Pink, Magenta)
- Detail brush (size 000 or 0000)
- Liner brush (size 00 or 0)
- Satin or Matte spray varnish/sealant
- Rubbing alcohol
- Cotton pads or paper towel
- Palette or small dish
- Water cup
Step 1: Preparation & Base
-
Prep the surface:
Even though the lighter is plastic, paint adheres best to a slightly textured surface. Very lightly scuff the white plastic casing with your fine-grit sandpaper. You don’t want deep scratches, just to remove the factory sheen. -
Clean thoroughly:
Wipe the entire lighter down with rubbing alcohol on a cotton pad to remove any oils from your hands and dust from sanding. Let it dry completely for a minute. -
Mix your stem color:
On your palette, mix a touch of Forest Green with a bit of Olive. You want a natural, herbal green that isn’t too bright or synthetic looking. Add a drop of water to thin the paint to an ink-like consistency for smooth lines.
Step 2: Painting the Structure
-
Draft the main vine:
Using your liner brush, start at the bottom of the lighter and paint a very thin, wavy line extending upwards. Let the line curve naturally, perhaps meandering slightly to the left or right, but generally moving toward the top metal guard. -
Add secondary branches:
From your main center line, paint shorter, thinner branches extending outward in alternating directions. Keep these lines extremely faint and delicate; I like to lift the brush as I reach the tip of the branch so it tapers off naturally. -
Create leaf clusters:
Switch to your detail brush (size 000). Along the branches, paint tiny, fern-like fronds. These should be short, rapid strokes pulling away from the stem, mimicking the look of dill or asparagus fern foliage. -
Vary the greens:
Dip barely the tip of your brush into the Sage Green without rinsing off the previous dark green. Add a few lighter fronds overlapping the darker ones to create depth and dimension within the foliage. -
Dry the greenery:
Allow the green layer to dry completely before adding flowers. Since the lines are thin, this should only take about 5-10 minutes.
Steady Hand Trick
Rest your pinky finger on the unpainted side of the lighter while working. This anchors your hand, allowing you to paint the ultra-fine vine lines without shaking.
Step 3: Adding Blooms & Finishing
-
Place the buds:
Mix a soft pale Pink. Using the very tip of your detail brush, dot small clusters of color at the ends of some of the branches. These don’t need to be perfect circles; irregular shapes look more like wild buds. -
Add floral definition:
While the pink is still slightly tacky, pick up a tiny amount of Magenta. Dab this darker color near the base of the pink buds to give them a shadow and make them pop against the white background. -
Connect the blooms:
Use your green mixture again to paint tiny, hair-thin lines connecting the base of the pink flowers to the main stems if any gaps remain. -
Check for balance:
Rotate the lighter and look at the composition. If a spot looks too empty, add a small floating leaf or a tiny detached bud to fill the space without cluttering it. -
Final drying time:
Let the painting cure for at least an hour. Acrylics dry fast to the touch, but you want them hardened before sealing. -
Apply sealant:
In a well-ventilated area, hold the lighter by the metal top (masking it with tape if you prefer). Spray a light, even coat of matte or satin varnish over the painted area. -
Second coat:
After the first coat is dry (check your can’s instructions), apply a second light coat to ensure durability against daily handling in pockets or bags.
Level Up: 3D Texture
Once the paint is dry, use a toothpick to apply tiny drops of clear UV resin or dimensional glaze over just the pink flower buds for a raised, glossy, jewel-like effect.
Now you have a functional piece of pocket art that brings a touch of nature wherever you go


Clean Geometric Stripes
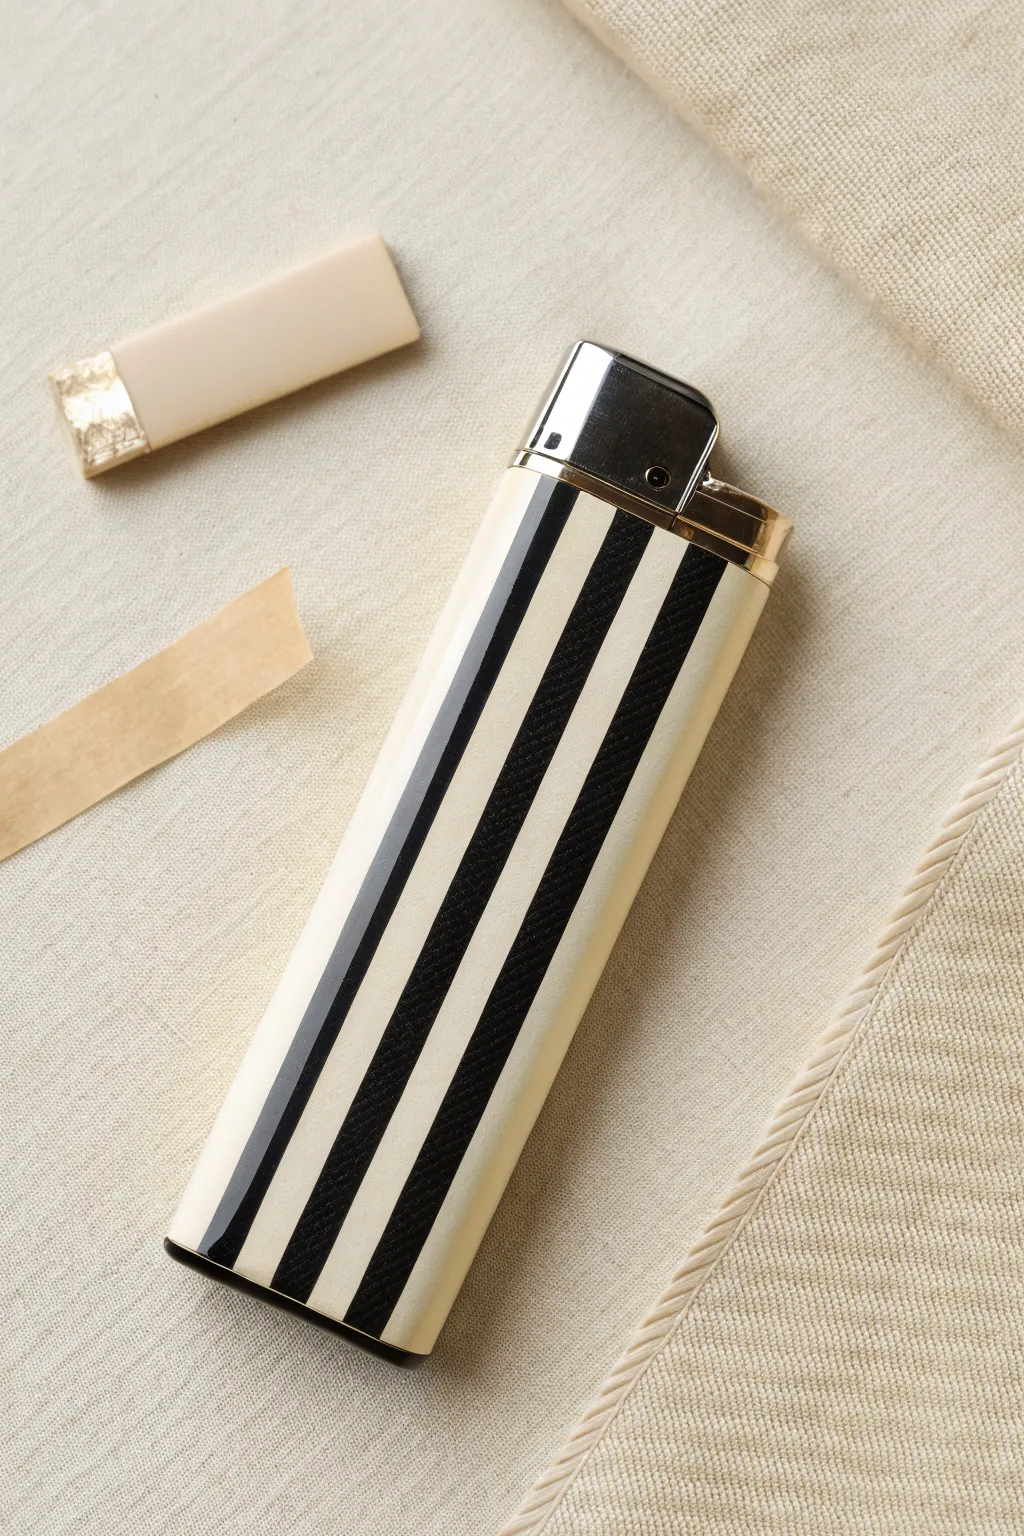
Turn an ordinary lighter into a chic accessory with this bold, high-contrast design. The alternating cream and black stripes create a timeless geometric look that feels both retro and modern.
Detailed Instructions
Materials
- Standard lighter (Bic style)
- Sandpaper (400-600 grit)
- Rubbing alcohol
- Cotton rounds
- Painter’s tape or graphic art tape (low tack)
- Cream or off-white acrylic paint (or spray paint)
- Black acrylic paint (high pigment)
- Small flat brush
- Clear spray sealant (gloss or matte)
- Utility knife or X-Acto blade
- Drop cloth or scrap paper
Step 1: Preparation and Base Coat
-
Prepare the surface:
Begin by lightly sanding the entire plastic casing of the lighter. This scuffs up the factory finish and gives the new paint something to grip onto. -
Clean thoroughly:
Wipe the lighter down with rubbing alcohol on a cotton round to remove any sanding dust and oils from your hands or the factory. -
Mask the hardware:
Carefully wrap painter’s tape around the metal hood mechanism at the top. Ensure the edge of the tape is pressed firmly against the plastic line so no paint creeps onto the metal. -
Protect the bottom:
Place a small piece of tape over the bottom valve area if you are using a refillable lighter, or just to keep the base neat. -
Apply the first base coat:
Paint the entire plastic body with your cream or off-white color. If using a brush, use long, vertical strokes to minimize texture. Let this layer dry completely. -
Add a second coat:
Apply a second layer of cream paint to ensure full opacity. The original color of the lighter shouldn’t show through at all. Allow this to cure fully, perhaps overnight, as soft paint will peel when we tape it.
Clean Lines Secret
Use graphic art tape instead of standard painter’s tape. It comes in very thin fixed widths, making it much easier to get perfectly consistent stripe sizes.
Step 2: Creating the Stripes
-
Plan your spacing:
Decide on the width of your stripes. For the look in the image, you want three black stripes and four cream stripes visible on the main face. -
Apply the tape strips:
Cut vertical strips of painter’s tape. Place them vertically along the lighter body where you want the *cream* color to remain. Press the edges down firmly with your fingernail to prevent bleed-under. -
Check alignment:
Look at the lighter from straight on. The tape strips should run perfectly parallel to the sides of the lighter. Adjust if they look crooked. -
Seal the tape edges:
This is a trick I love: brush a very thin layer of the *cream* base color over the edges of the tape. This fills any tiny gaps with the base color, so the black line will be razor-sharp. -
Apply the black paint:
Once the sealing layer is dry, paint the exposed vertical sections with black acrylic. Use a small flat brush and paint carefully between the tape lines. -
Second pass for depth:
The black needs to be opaque. Apply a second coat of black paint once the first is dry to the touch, ensuring a rich, deep color. -
Remove tape while damp:
Don’t let the final black coat dry completely hard before removing tape, or it might chip. Carefully peel the tape strips away at a 45-degree angle while the paint is slightly tacky.
Step 3: Finishing Touches
-
Clean up edges:
If any paint bled under, use a damp toothpick or a very fine brush with a bit of cream paint to tidy up the lines. -
Dry completely:
Let the lighter sit untouched for several hours to ensure all layers are fully hardened. -
Seal the work:
Spray the entire painted surface with a clear acrylic sealant. This is crucial for a handheld item to prevent the paint from rubbing off in your pocket. -
Remove masking:
Once the sealant is dry, peel off the protective tape from the metal hood and the bottom.
Gold Leaf Upgrade
For a luxe twist, swap the cream paint for gold leaf on the base layer, then paint the black stripes over it. The metallic shine popping through looks incredible.
Enjoy using your sleek new lighter or gift it as a handmade treasure

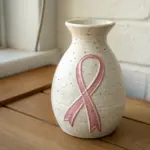
Classic Polka Dots With Contrast
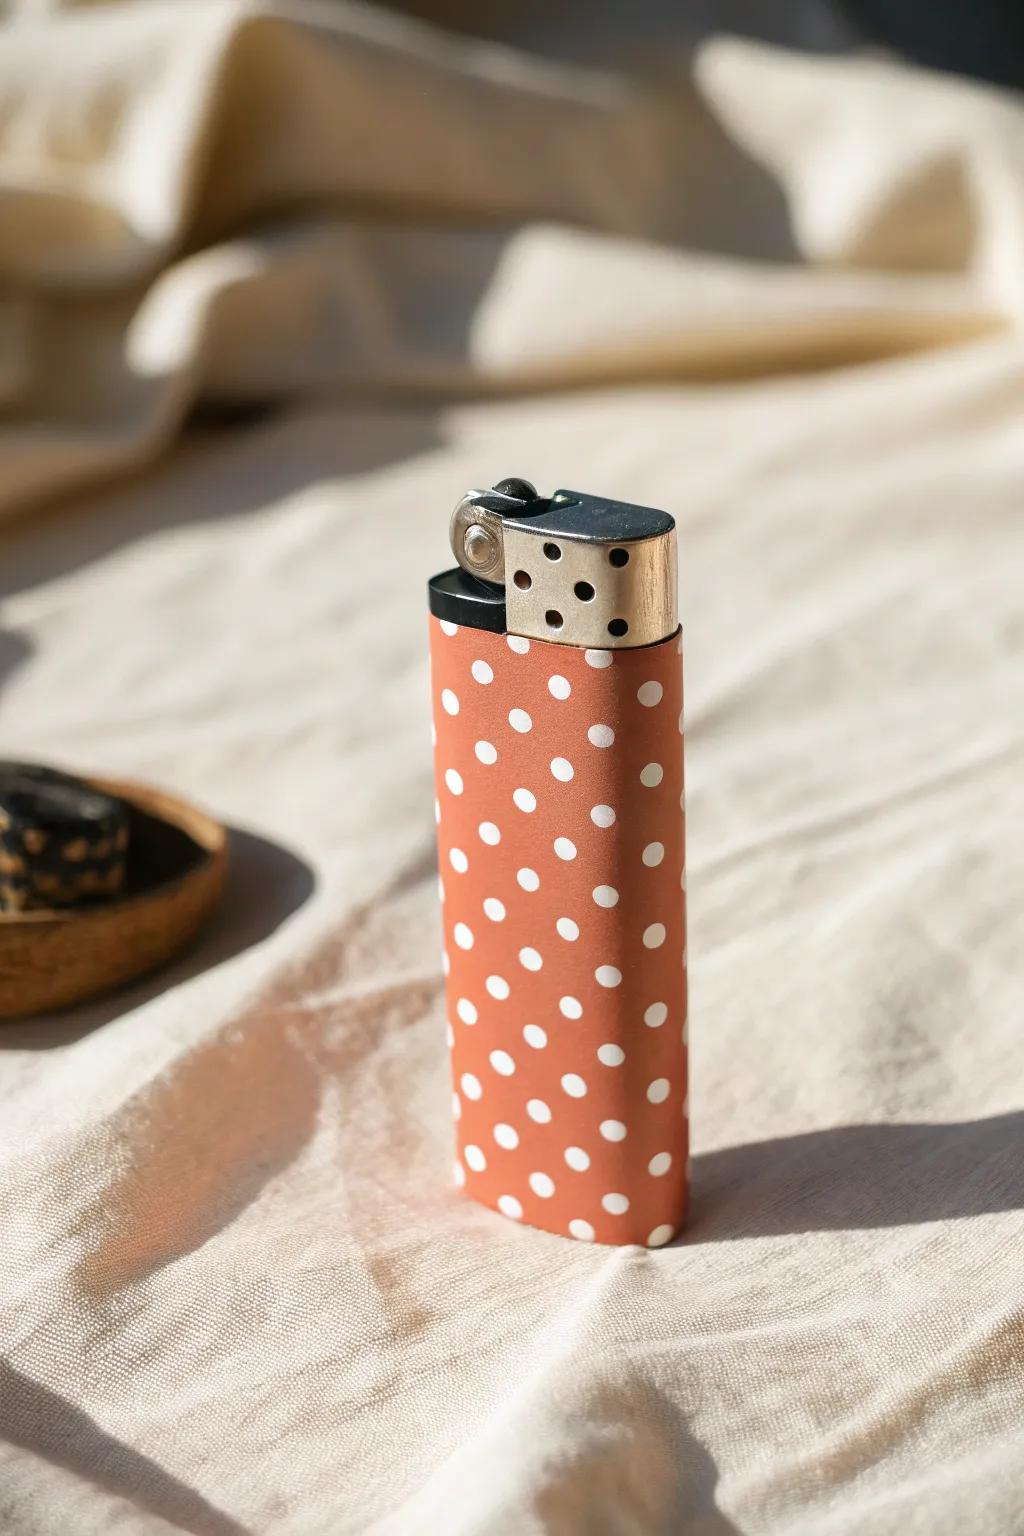
Transform an ordinary pocket lighter into a chic statement accessory with this warm, retro-inspired design. The combination of a matte burnt orange or terracotta background with crisp white dots creates a timeless look that feels both modern and vintage.
How-To Guide
Materials
- Standard disposable lighter (BIC J5/J6 size works best)
- High-grit sandpaper (400-600 grit)
- Isopropyl alcohol or rubbing alcohol
- Cotton pads or lint-free cloth
- Painter’s tape or masking tape
- White primer spray paint (plastic-adhesive)
- Terracotta or burnt orange acrylic paint
- White acrylic paint
- Dotting tool (or the flat end of a drill bit/skewer)
- Flat synthetic paintbrush (medium size)
- Matte or satin clear sealant spray
Step 1: Preparation
-
Clean the Surface:
Before you do anything else, thoroughly wipe down the lighter with isopropyl alcohol and a cotton pad. This removes oils from your hands that prevent paint adhesion. -
Light Sanding:
Gently scuff the plastic body of the lighter using 400-600 grit sandpaper. You don’t need to remove the original color, just create a slightly rough texture for the primer to grip. -
Wipe Again:
Clean off all the sanding dust with another alcohol wipe to ensure a pristine surface. -
Tape Off Mechanics:
Carefully apply painter’s tape around the metal hood and the black gas button. Ensure the tape edge is perfectly straight where it meets the plastic body to guarantee a clean paint line later.
Paint Consistency Tip
If your white paint creates sharp peaks when you lift the tool, mix in a tiny drop of flow improver or water to help the dots settle flat and smooth.
Step 2: Base Coat Application
-
Apply Primer:
Spray a thin, even coat of white plastic-adhesive primer over the taped lighter. Allow this to dry completely according to the can’s instructions, usually about 30 minutes. -
Mix Your Color:
While the primer dries, prepare your terracotta acrylic paint. If you can’t find the perfect shade, mix a standard orange with a touch of brown and a tiny drop of white to get that earthy tone. -
First Terracotta Layer:
Using your flat synthetic brush, apply the first coat of terracotta paint. Keep your strokes long and vertical to minimize texture. -
Let it Dry:
Allow the first coat to dry until it is no longer tacky to the touch. I usually wait about 20-30 minutes for acrylics. -
Second Terracotta Layer:
Apply a second coat of the terracotta paint to ensure full opacity. If the original lighter color was dark, you might even need a thin third coat. -
Full Cure:
Let the base color dry completely for at least an hour before moving on to the detail work. The paint needs to be hard enough to withstand the pressure of the dotting tool.
Make It Glossy
Swap the matte sealant for a high-gloss Mod Podge or resin topcoat. This creates an enamel-like finish that makes the colors pop even more.
Step 3: Detailing and Sealing
-
Prepare White Paint:
Pour a small puddle of white acrylic paint onto your palette. It should be fluid but not watery; if it’s too thick, the dots will have peaks. -
Test Your Dot Size:
Dip your dotting tool into the paint and test a few dots on a piece of scrap paper to ensure the size matches the scale shown in the image. -
Start the Center Row:
Begin by placing a vertical row of dots down the center of the lighter’s face. Space them evenly, leaving about a dot’s width of space between each one. -
Offset Rows:
Create the next row to the left and right of the center line. Place these dots in the gaps between the center dots (brick layout) rather than directly next to them. -
Fill the Sides:
Continue the pattern around the curvature of the lighter. Don’t worry if the dots cut off at the edges; painting partial dots creates a seamless, wrapped look. -
Dry the Dots:
Allow the white dots to dry completely. Since the paint is thicker here, give it extra time—perhaps an hour or two—to prevent smearing. -
Remove Tape:
Very gently peel off the painter’s tape from the metal hood. Pull the tape away from the painted area at a 45-degree angle to keep the edge crisp. -
Seal the Work:
Finish by spraying the entire painted area with a matte or satin clear sealant. Apply two thin coats to protect against chipping in your pocket.
Slip this customized lighter into your pocket or bag to add a touch of handmade warmth to your everyday carry items
BRUSH GUIDE
The Right Brush for Every Stroke
From clean lines to bold texture — master brush choice, stroke control, and essential techniques.
Explore the Full Guide
Ombre Sunset Gradient
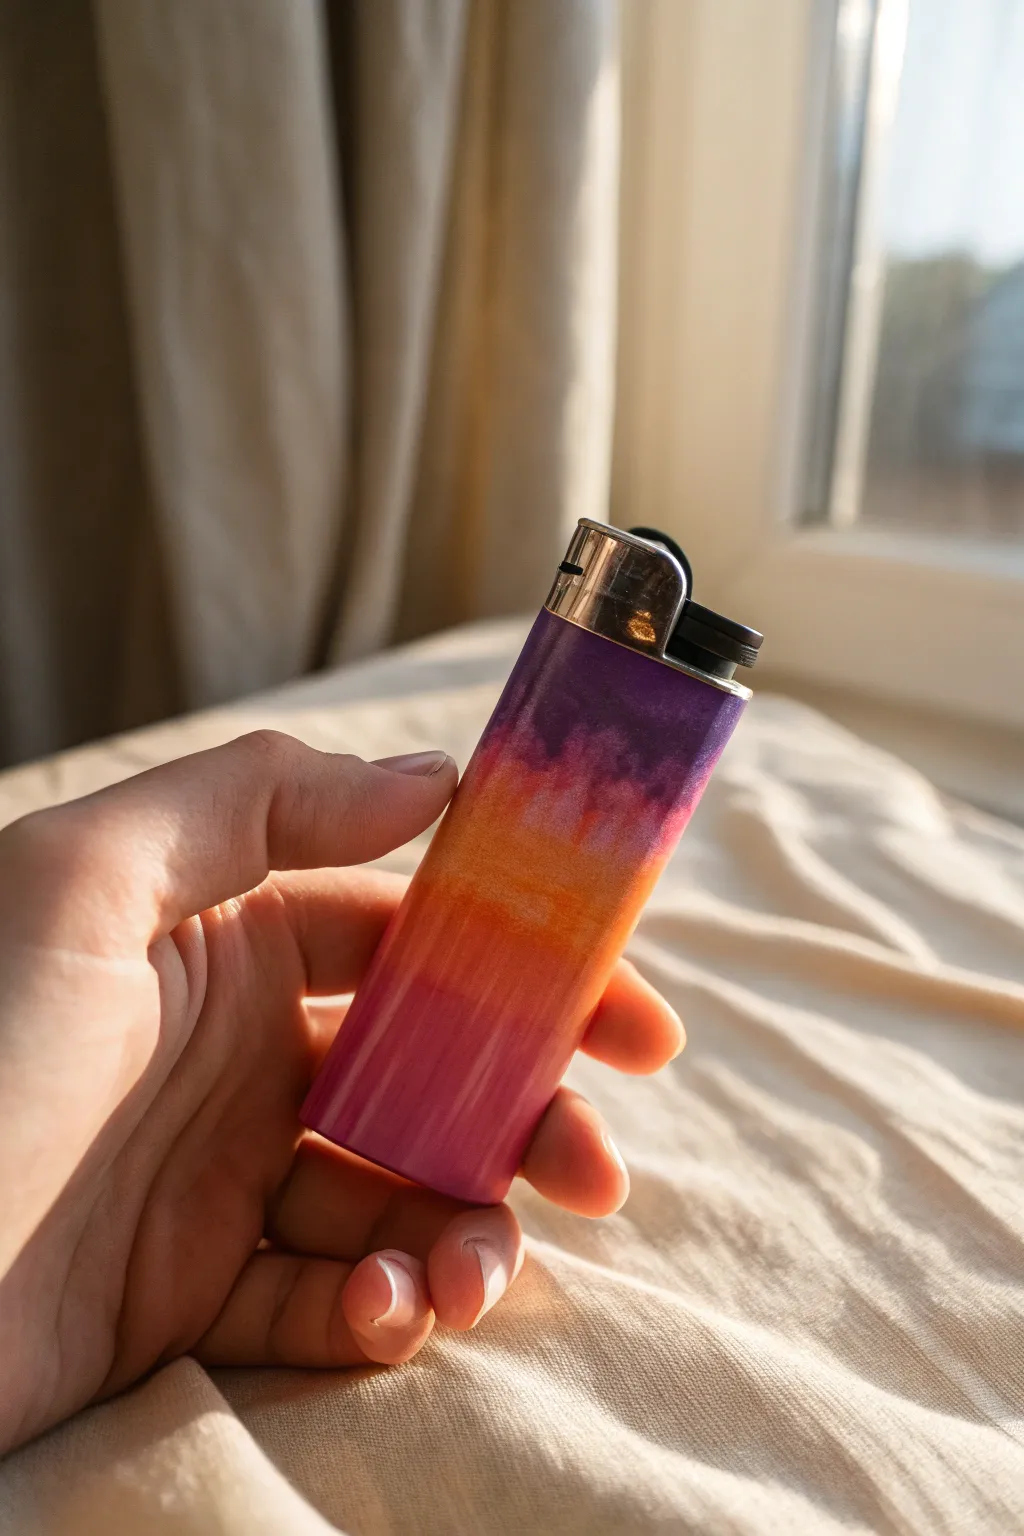
Capture the magic of twilight in the palm of your hand with this striking ombre lighter design. This project blends deep violet, vibrant orange, and soft pink into a seamless gradient that mimics a perfect summer sunset.
Detailed Instructions
Materials
- Standard lighter (white or light colored base works best)
- Painter’s tape or masking tape
- Rubbing alcohol
- Cotton pads
- Acrylic paints (Dark violet, bright orange, hot pink)
- Small makeup sponges or texture sponges
- Small flat paintbrush
- Clear spray sealant or Mod Podge
- Paper plate or palette
- Fine-grit sandpaper (optional)
Step 1: Preparation
-
Clean the surface:
Start by wiping down the plastic body of the lighter with a cotton pad soaked in rubbing alcohol. This removes oils and residue that could repel the paint. -
Slight scuffing:
If your lighter has a very glossy finish, gently scuff the plastic surface with fine-grit sandpaper. This creates a bit of ‘tooth’ for the acrylic paint to grip onto. -
Mask the metal:
Carefully wrap painter’s tape around the metal hood and the ignition mechanism at the top. Ensure the tape edge is perfectly straight right where the plastic meets the metal so you get a crisp line later. -
Base coat:
Apply a thin layer of white acrylic paint if your lighter isn’t already white. This ensures your sunset colors will pop and look true to tone. Let this base dry completely before moving on.
Stubborn Streaks?
If the blending lines look too harsh, wait for the paint to dry fully. Then, mix a transitional color (like a peach for the pink/orange border) and sponge it lightly over the harsh line.
Step 2: Creating the Gradient
-
Prepare the palette:
Squeeze out dime-sized amounts of your violet, orange, and pink paints onto a paper plate. Leave a little space between them for mixing. -
Start at the bottom:
Load a small makeup sponge with the hot pink paint. Dab it onto the bottom third of the lighter using a stippling motion. Don’t aim for a hard line at the top of this section; keep it feathered. -
Apply the middle tone:
Using a fresh side of the sponge or a new wedge, pick up the bright orange paint. Stipple this into the middle section of the lighter. -
Initial blending:
While the paint is still wet, lightly tap the sponge over the boundary where the orange meets the pink. This helps the colors merge softly rather than sitting as stripes. -
The twilight top:
Use a clean sponge section to apply the dark violet paint to the top third of the lighter, right up against your tape line. -
The violet-orange transition:
Gently tap the violet sponge downward into the orange area slightly. If the transition looks muddy, I like to mix a tiny bit of the two colors on the palette and dab that specific mix right on the border. -
Layering for opacity:
Let the first uneven coat dry for about 10-15 minutes. It will look streaky at first, which is normal. Repeat the sponging process with a second layer to build up solid, opaque color. -
Refining the blend:
On this second pass, focus heavily on the transition zones. Use a very light touch—almost like you are tickling the surface with the sponge—to achieve that distinctive misty, cloud-like fade seen in the photo. -
Check the edges:
Rotate the lighter and ensure the gradient connects smoothly on all sides. Touch up any bald spots with the appropriate color.
Step 3: Finishing Touches
-
Remove tape:
Carefully peel away the painter’s tape while the final coat is tacky but not fully wet. Pulling it away at a 45-degree angle helps prevent peeling up the paint skin. -
Clean up:
If any paint seeped onto the metal hood, scrape it away gently with a fingernail or a toothpick before it hardens completely. -
Dry time:
Allow the lighter to sit undisturbed for at least an hour. Acrylics dry fast to the touch but need time to harden. -
Seal the deal:
To protect your art from being scratched off in your pocket, apply a clear top coat. A spray sealer works best for a smooth finish without brush strokes. Do two light coats rather than one heavy, dripping one.
Add some sparkle
Before sealing, flick a stiff toothbrush dipped in white paint over the violet section to create tiny stars, turning your sunset into a starry night sky.
Once sealed and dried, your lighter will be a pocket-sized masterpiece ready to brighten your day
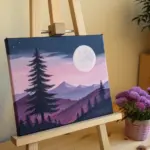
Mini Mountain Landscape Strip
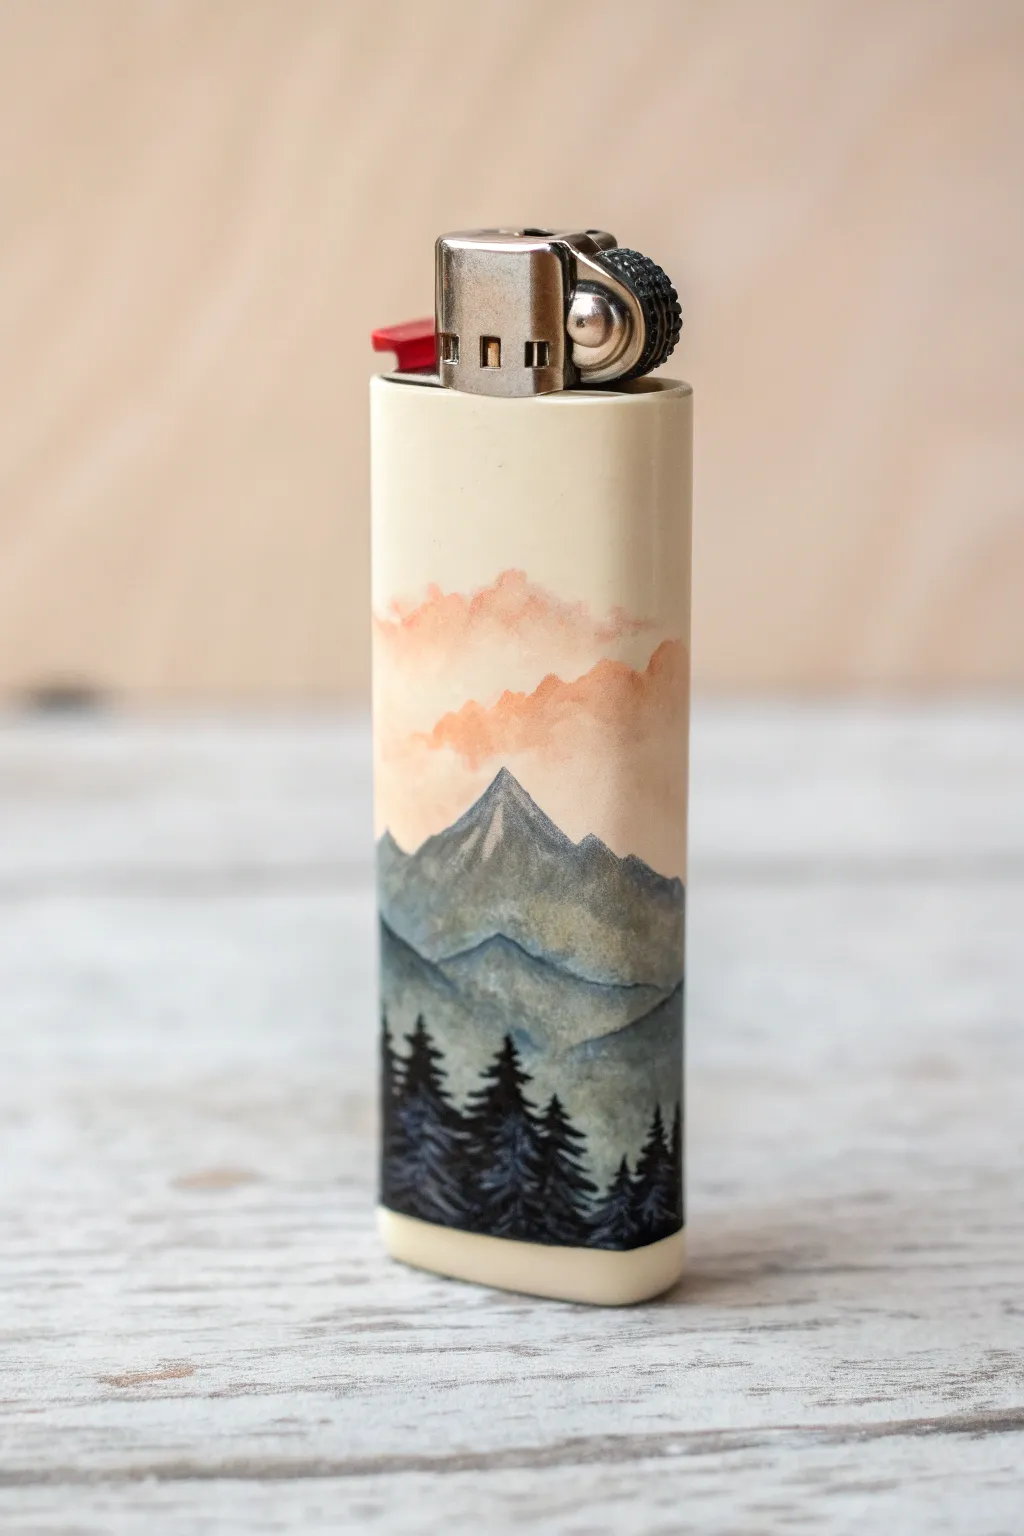
Transform an ordinary white lighter into a tiny canvas featuring a serene mountain range. This project layers misty mountains, bold evergreen trees, and soft sunset clouds for a calming, hand-painted aesthetic that fits right in your pocket.
Step-by-Step Tutorial
Materials
- White lighter (removed label and residue)
- Acrylic paints (Titanium White, Payne’s Grey, Burnt Sienna, Mars Black, Phthalo Blue)
- Small round paintbrush (size 0 or 00)
- Fine liner brush (size 10/0 for details)
- Matte medium or flow improver
- Spray sealant (matte or satin finish)
- Fine-grit sandpaper (optional)
- Palette for mixing
Step 1: Preparation and Sky
-
Prepare the surface:
Before painting, ensure your lighter is completely clean. Remove any stickers and use rubbing alcohol or Goo Gone to get rid of sticky residue. If the surface is very slick, lightly scuff it with fine-grit sandpaper to help the paint adhere. -
Mix the cloud color:
Create a soft, peachy sunset hue by mixing a tiny dot of Burnt Sienna with plenty of Titanium White. You want a color that suggests a warm, fading light. -
Paint the clouds:
Using your small round brush, dab the peach mixture onto the upper third of the lighter. Use a fairly dry brush technique here—blot off excess paint on a paper towel first—to create soft, fluffy edges that mimic drifting clouds. -
Soften the edges:
While the paint is still slightly tacky, use a clean, slightly damp brush to gently feather out the bottom edges of the clouds, letting the white of the lighter show through for a misty effect.
Paint Slipping?
If acrylic paint beads up on the plastic surface, don’t panic. Mix a little bit of PVA glue or gesso into your base layer colors to give them extra grip.
Step 2: Layering the Mountains
-
Mix the distant mountain color:
Combine Titanium White with a small amount of Payne’s Grey and a tiny touch of Phthalo Blue. This should be a very pale, cool blue-grey tone to represent atmospheric perspective. -
Paint the furthest peak:
Paint a simple triangular peak just below your cloud line. Keep the shape somewhat irregular so it looks organic, not geometric. Fill in the shape downward, fading it out as you go lower. -
Mix the mid-range color:
Add a bit more Payne’s Grey and a touch of Burnt Sienna to your previous mix. The Sienna will desaturate the blue, creating a rockier, earthier grey tone. -
Add the middle mountains:
Paint a second, slightly lower range of mountains overlapping the first one. Ensure -
Adjust transparency:
I like to water this layer down ever so slightly with matte medium; this translucency helps the layers recede visually. -
Mix the foreground mountain color:
Create a darker, moodier grey using mostly Payne’s Grey and a little less white. This layer needs to be bold enough to stand out against the misty background. -
Paint the lowest peaks:
Apply this darker grey as the final layer of rock, encompassing the bottom third of the lighter. Let the paint coverage be more solid here.
Step 3: Adding the Forest and Finish
-
Prepare the black paint:
Squeeze out some Mars Black. For fine lines, mix in a drop of flow improver or water so the paint glides smoothly off your liner brush without clumping. -
Create the tree spines:
Using your finest liner brush, paint thin vertical lines starting from the very bottom of the lighter, reaching up into the grey mountains based on how tall you want your trees. -
Stipple the foliage:
Starting at the top of a vertical line, use the very tip of your brush to tap tiny horizontal dashes, getting wider as you move down the tree trunk to form a conical pine shape. -
Fill the forest floor:
Continue painting trees of varying heights across the bottom. Overlap them densely closer to the base to create a solid silhouette of a deep forest. -
Let it cure:
Allow the lighter to dry completely for at least an hour. Acrylics dry fast to the touch but need time to harden on plastic. -
Seal the artwork:
In valid a well-ventilated area, apply a thin coat of spray sealant. A matte finish looks best for this natural scene, but satin works if you want a slight sheen. -
Final cure:
Let the sealant dry according to the can’s instructions (usually 24 hours) before putting the lighter in your pocket or using it.
Pro Tip: Depth Check
Add tiny hints of white to the very tips of your black trees. It mimics moonlight or snow and separates the trees from the dark background.
Enjoy carrying a tiny piece of the wilderness with you wherever you go

PENCIL GUIDE
Understanding Pencil Grades from H to B
From first sketch to finished drawing — learn pencil grades, line control, and shading techniques.
Explore the Full Guide
Cute Cactus Column
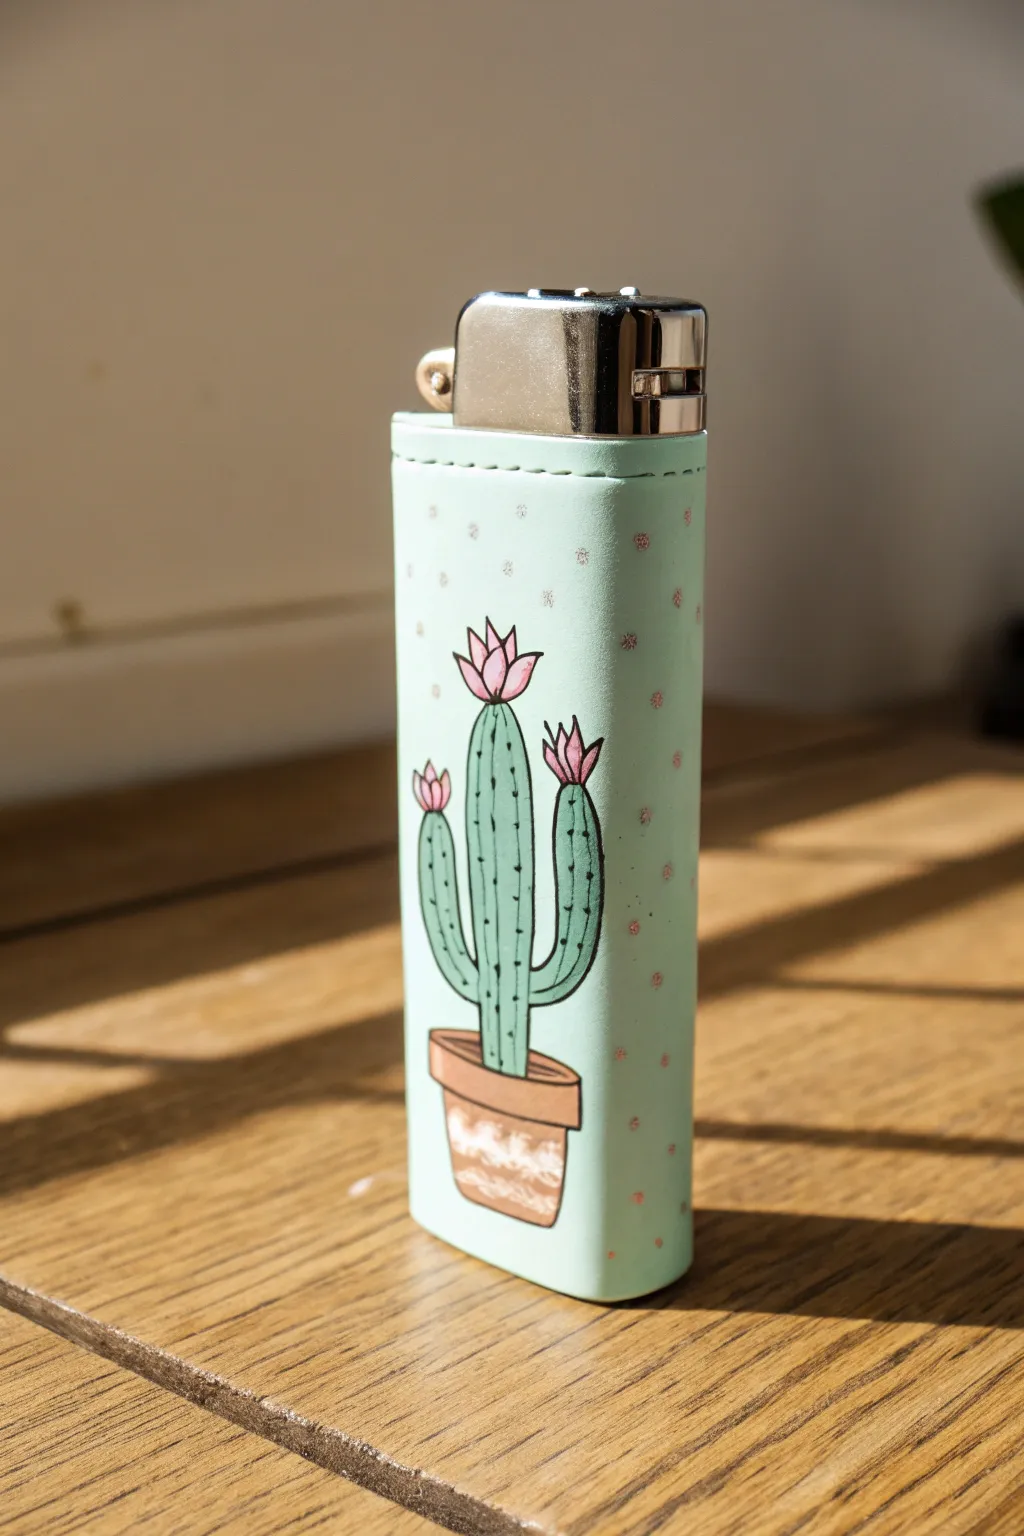
Transform a plain lighter into a prickly pocket accessory with this adorable cactus design. The soft mint background pairs perfectly with the hand-painted saguaro, making for a charming and durable mini-canvas.
Detailed Instructions
Materials
- Refillable metal lighter case (silver or plain)
- White gesso primer
- Mint green acrylic paint
- Sage green acrylic paint
- Terracotta/warm brown acrylic paint
- Pale pink acrylic paint
- Fine point waterproof black marker (0.1mm or 0.3mm)
- Small flat brush
- Fine liner brush
- Matte spray varnish or sealant
- Sandpaper (fine grit)
Step 1: Preparing the Base
-
Surface Prep:
Begin by removing the lighter insert from the metal case to work safely. Lightly scuff the entire exterior surface of the case with fine-grit sandpaper to give the metal some ‘tooth’ for the paint to grip. -
Priming:
Apply a thin, even coat of white gesso primer over the entire case. This is crucial for metal surfaces, as acrylics will peel right off without it. Let this dry completely before moving forward. -
Second Coat:
If I can still see the metal showing through after the first coat dries, I add a second thin layer of gesso to ensure a solid white base. -
Base Color:
Using a small flat brush, paint the entire case with the mint green acrylic paint. Use long, vertical strokes to minimize brush marks. -
Base Coverage:
Allow the first mint coat to dry, then apply a second coat for full opacity. Ensure the top rim is neatly painted, but avoid getting paint inside the case where the lighter slides in.
Paint Consistency
Thin your acrylics slightly with a drop of water. Thick paint creates ridges that chip easily on items that get handled often like lighters.
Step 2: Painting the Cactus
-
Sketching the Outline:
Once the mint base is 100% dry, lightly sketch the cactus pot near the bottom and the three-armed cactus shape using a pencil. Keep the lines incredibly faint so they aren’t visible later. -
The Pot Base:
Mix your terracotta paint. Use the fine liner brush to fill in the flower pot shape. Don’t worry about the rim or details yet; just get the main block of brown color down. -
The Cactus Body:
Switch to your sage green paint. Carefully fill in the cactus shape, starting with the central column and then painting the two curved arms on either side. -
Adding Blooms:
Using the pale pink paint, add three small flower shapes at the very tips of the cactus arms. These should look like small, spiky tulips blooming upward. -
Pot Rim:
Go back to the terracotta paint and add a slightly darker strip across the top of the pot to create the rim, slightly overhanging the base of the pot. -
Pot Texture:
Dilute a tiny bit of white or light cream paint. Add wavy, horizontal dry-brush strokes across the pot base to simulate a weathered clay texture.
Step 3: Detailing and Sealing
-
Outlining the Pot:
Make sure all paint is bone dry. Take your fine point black marker and carefully trace the outline of the flower pot, giving it a crisp, defined edge. -
Outlining the Cactus:
Outline the green cactus body. Instead of a perfectly smooth line, allow the pen to wiggle slightly to mimic the organic texture of a plant. -
Defining the Ribs:
Draw vertical lines running down the length of the central cactus column and the curved arms. These represent the ribs of the succulent. -
Needles and Spines:
Along the vertical rib lines you just drew, add tiny black dots or very short dashes to represent the prickly spines. -
Flower Details:
Outline the pink flowers with the black marker. Add a few internal lines to separate the petals and give them dimension. -
Background Accents:
Using a toothpick or a very fine dotting tool, dip into the pale pink paint and add tiny, scattered dots around the background to fill the empty mint space. -
Protective Seal:
Wait 24 hours for the paint and ink to cure fully. In a well-ventilated area, spray the case with a clear matte varnish to protect your art from chipping in your pocket.
Add Some Shine
Mix a small amount of fine gold glitter into your clear sealant topcoat for a subtle desert shimmer that catches the sunlight.
Slide your lighter insert back in and enjoy your custom hand-painted accessory.
Stylized Eye Pattern
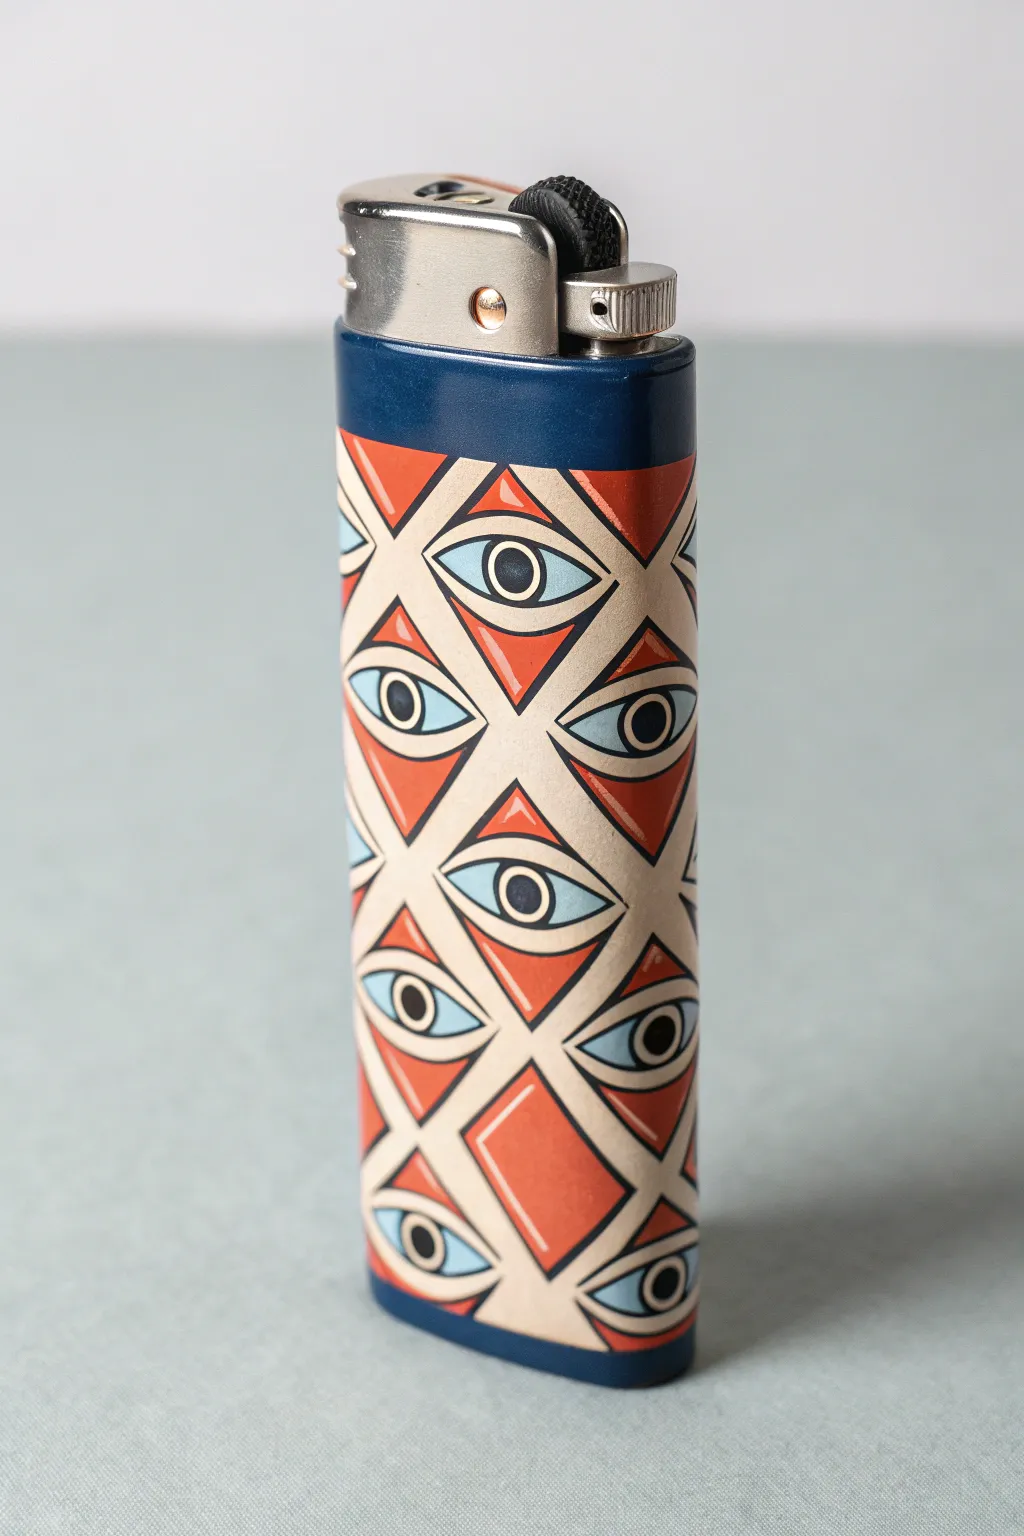
Transform an ordinary lighter into a mystic talisman with this bold, graphic eye pattern. Using a repeating diamond grid and a striking palette of terracotta, cream, and teal, intricate linework brings this surreal design to life.
Step-by-Step Tutorial
Materials
- Standard bic-style lighter (dark blue base recommended)
- Sandpaper (fine grit, 400-600)
- Self-adhesive vinyl paper or sticker paper (matte)
- Acrylic paints (cream/beige, terracotta red, light teal blue, black)
- Fine liner brushes (00 and 000 sizes)
- Black fine-tip permanent marker or micron pen (waterproof)
- Clear spray sealant or Mod Podge hard coat
- Pencil and ruler
- X-acto knife or precision scissors
Step 1: Preparation and Base Layout
-
Prepare the surface:
Since painting directly on smooth plastic is difficult, we will create a ‘skin’ for the lighter. Cut a piece of self-adhesive vinyl or sticker paper that wraps perfectly around the lighter’s body. -
Prime the paper:
Paint the entire surface of your sticker paper with a layer of cream or beige acrylic paint. This serves as your background color and ensures the pencil marks will show up clearly. -
Grid the design:
Using a ruler and pencil, lightly draw a diamond grid pattern across the cream surface. The lines should crisscross to create elongated diamond shapes, roughly 1.5cm tall each. -
Sketch the eyes:
Inside every other diamond, lightly sketch an almond-shaped eye opening. In the alternating diamonds (the ones without eyes), sketch a smaller internal diamond shape to create the geometric filler. -
Detail the iris:
Draw circles for the irises within the eye shapes. Since the eyes are stylized, make sure the circles are perfectly round and centered within the almond shapes.
Clean Lines Hack
Work from the center of the paper outwards. Painting the central eyes first prevents your hand from smudging wet paint on the edges while you work.
Step 2: Painting the Pattern
-
Fill the geometric shapes:
Mix a terracotta red shade. Carefully paint the triangular spaces surrounding the eye shapes and fill in the interior diamond shapes you sketched earlier. -
Paint the eye whites:
Using a very light teal or pale blue, paint the ‘whites’ of the eyes. This unexpected color choice gives the design its surreal, vintage tarot card aesthetic. -
Add the pupils:
With black acrylic paint and your smallest brush, fill in the center pupil of each eye. A steady hand is key here to keep them looking focused. -
Refine the background:
If your original cream background got messy during the red and blue stages, touch up the grid lines between the shapes with fresh cream paint to keep the separation clean.
Step 3: Outlining and Assembly
-
Outline main shapes:
Once the paint is completely dry, use a black fine-tip waterproof marker to outline the diamond grid. The line should be consistent in thickness to separate the red zones from the cream grid. -
Define the eyes:
Outline the almond shape of the eyes and the circular irises. Add a second, thinner line around the pupil to create depth. -
Add curved details:
Draw the curvature lines above and below the almond shapes (the eyelids). These black arc lines help integrate the organic eye shape into the rigid diamond grid. -
Seal the artwork:
Before attaching it to the lighter, spray the paper with a thin coat of clear sealant. This prevents the ink from smudging during application. -
Apply the skin:
Peel the backing off your painted sticker paper. align it carefully with the bottom edge of the lighter, and wrap it slowly around the body to avoid air bubbles. -
Final heavy coat:
Apply a thicker layer of gloss varnish or Mod Podge over the wrapped lighter to protect the design from pocket wear and tear.
Ink Bleeding?
If your marker bleeds into the paint, the acrylics aren’t fully dry. Use a hair dryer on a cool setting for a few minutes before attempting the linework again.
Now you have a functional piece of pocket art that is sure to spark conversation


Animal Print Remix
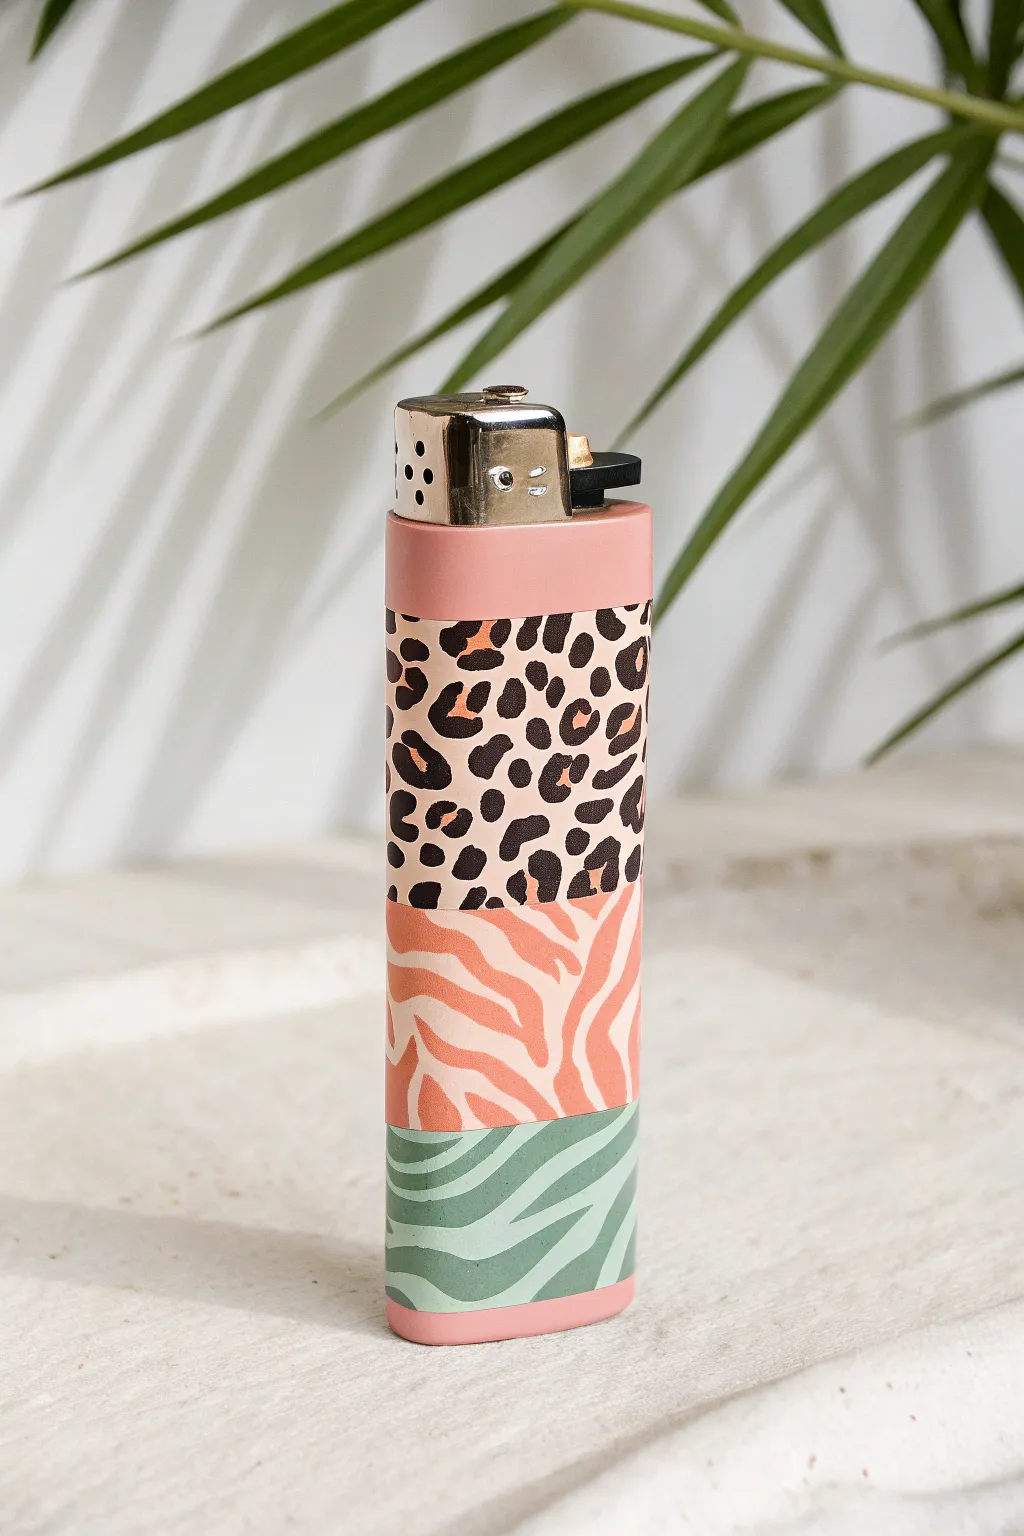
Give a standard lighter a fierce new look with this tiered animal print design. By layering bands of leopard spots and zebra stripes in soft pastel hues, you create a funky, mixed-media accessory that stands out.
Detailed Instructions
Materials
- Standard rectangular lighter (white or pink base is ideal)
- Painter’s tape or masking tape
- Acrylic paints (pastel pink, black, peach/orange, sage green, cream)
- Fine detail paintbrushes (sizes 00 and 1)
- Small flat brush
- Mod Podge or clear sealant varnish
- Sandpaper (fine grit)
- Pencil (optional)
Step 1: Preparation and Base Layer
-
Prep the surface:
Before painting, lightly sand the surface of the lighter to remove the glossy finish. This helps the paint adhere much better. Wipe away any dust with a damp cloth. -
Apply the background color:
Since the top band and the spaces between the leopard spots are pink, paint the entire lighter with a base coat of pastel pink acrylic paint. You might need two coats for full opacity. Let this dry completely. -
Mark your sections:
Using a pencil, very lightly mark four horizontal sections on the lighter. The top section is solid pink, the second is for leopard print, the third for orange zebra, and the bottom for green zebra. I find measuring them creates a cleaner look, but eyeballing works for a more organic feel.
Sticky Situation?
To prevent paint from peeling when removing tape, press the tape edges down firmly with a fingernail or credit card before painting.
Step 2: Painting the Leopard Band
-
Mask off the section:
Apply painter’s tape above and below the second section (the leopard area) to ensure crisp lines. Ensure the pink base coat is 100% dry before applying tape so it doesn’t peel. -
Create the spots base:
Using peach or light brown paint, dab uneven, organic blobs onto the pink background within this section. Keep them spaced out randomly. -
Outline the rosettes:
With your finest brush and black paint, draw broken, C-shaped outlines around the peach blobs. Vary the thickness of the lines for a natural look. -
Fill the gaps:
Add small black dots or irregular shapes in the empty pink spaces between the main rosettes to balance the pattern. -
Remove tape:
Carefully peel away the painter’s tape while the paint is still slightly tacky to avoid pulling up dried chunks.
Uneven Stripes?
Don’t sweat perfectly straight stripes. Animal prints are naturally organic and irregular, so wobbly lines actually make it look more realistic.
Step 3: Painting the Zebra Bands
-
Tape the third section:
Once the leopard section is dry, tape off the top and bottom of the third band. This will be the orange zebra print section. -
Paint the background:
Fill this entire taped section with a cream or very pale beige color. Let it dry fully. -
Add orange stripes:
Using a peach/orange mixed paint and a fine brush, paint wavy, tapering stripes coming from the sides toward the center. Think of them as squiggly triangles. -
Tape the bottom section:
After the orange section dries and you’ve removed that tape, tape off the final bottom section. -
Green background:
Paint this bottom band with a sage green color. Apply a second coat if necessary for rich coverage. -
Add lighter stripes:
Using a very light mint or pale green (mix white with your sage green), paint similar wavy zebra stripes over the dark green base. This inversion creates a cool contrast.
Step 4: Finishing Touches
-
Clean up lines:
Once all tape is removed, use a steady hand and a tiny brush with the appropriate background color to fix any paint bleed that might have occurred between the sections. -
Seal the deal:
Apply a coat of clear varnish or Mod Podge over the entire painted area. This protects your artwork from scratching off in your pocket or bag.
Now you have a totally unique, safari-chic accessory ready to coordinate with your outfit
Monogram and Micro Icons
Transform a plain plastic lighter into a bespoke accessory with this delicate vine and lettering design. Using fine-tipped brushes and steady hand-lettering, you’ll create a charming piece that combines black ink-style details with warm metallic accents.
Step-by-Step Tutorial
Materials
- Standard lighter (cream or white surface)
- Fine-grit sandpaper (400-600 grit)
- Rubbing alcohol and cotton pad
- Fine black micro-pen or ultra-fine liner brush with black acrylic paint
- Copper or metallic orange acrylic paint
- Small round detail brush (size 0 or 00)
- Clear matte or satin varnish spray
- Paper towel
Step 1: Surface Preparation
-
Degloss the Surface:
Begin by lightly sanding the entire body of the lighter with your fine-grit sandpaper. You don’t want deep scratches, just enough scuffing to remove the factory shine so the paint adheres properly. -
Clean Thoroughly:
Wipe the lighter down firmly with a cotton pad soaked in rubbing alcohol to remove all sanding dust and oils from your fingers. Let it air dry completely.
Step 2: Lettering the Centerpiece
-
Draft the Text:
Using your fine black liner brush or micro-pen, carefully write the word ‘LIGHTER’ in the vertical center of the lighter face. -
Refine the Font Style:
Use a playful, slightly varied serif style for the letters. Notice how the ‘L’ and ‘R’ curl slightly at the ends. -
Add Line Weight:
Go back over the downstrokes of your letters to thicken them slightly, giving the text a hand-lettered calligraphy feel.
Keep it clean
Rest your painting hand on a clean dry sponge or folded paper towel while working. This prevents your palm from smudging wet ink on the slick rounded surface.
Step 3: Adding Metallic Accents
-
Paint the Upper Swirl:
Load your small detail brush with copper or metallic orange paint. Paint a small, unconnected loop or ‘s’ shape floating just above the text, slightly to the right. -
Paint the Lower Swirl:
Create a mirrored decorative shape below the text. Paint two outward-curving scrolls that resemble a stylized mustache or bracket shape. -
Add Central Detail:
Place a small vertical dash of copper paint directly above the ‘I’ in ‘LIGHTER’ to act as a whimsical accent feature.
Go monochromatic
Try painting the lighter entirely black first, then use white or metallic gold pens for the design to create a striking ‘negative’ version of this look.
Step 4: Creating the Botanical Frame
-
Draw the Top Vine Stems:
Using your black ultra-fine liner again, draw two curved lines arching upward and outward from the top of your copper swirl, forming a loose ‘V’ shape. -
Add Upper Leaves:
Paint small, pointed oval leaves along these stems. Keep the leaves open (outline only) near the center, and fill some leaves solid black towards the tips for visual weight. -
Draw the Bottom Vine Stems:
Mirror the top design below the text. Draw curved stems extending downward from the bottom copper swirls, wrapping around the base area. -
Add Lower Leaves:
Add leaves to these lower stems, maintaining the same mix of outlined and filled-in leaves to create a balanced, organic look.
Step 5: Finishing Details
-
Scatter the Stars:
In the negative space above the top vines, draw tiny five-pointed stars and asterisks using your finest black tip. -
Add Falling Stars:
Repeat this process below the bottom vines, scattering a few stars and asterisks downward toward the base of the lighter. -
Stipple the Background:
Add very small dots in clusters around the vines and stars to fill any empty voids and add texture to the illustration. -
Dry Completely:
Allow the paint and ink to cure for at least 24 hours to ensure everything is hard set before sealing. -
Seal the Work:
Hold the lighter by the metal hood and spray a thin, even coat of clear matte varnish over the body to protect your art from daily wear.
Carefully slide your new custom lighter into your pocket or gift it to a friend who appreciates tiny art
Tattoo-Style Flash Minis
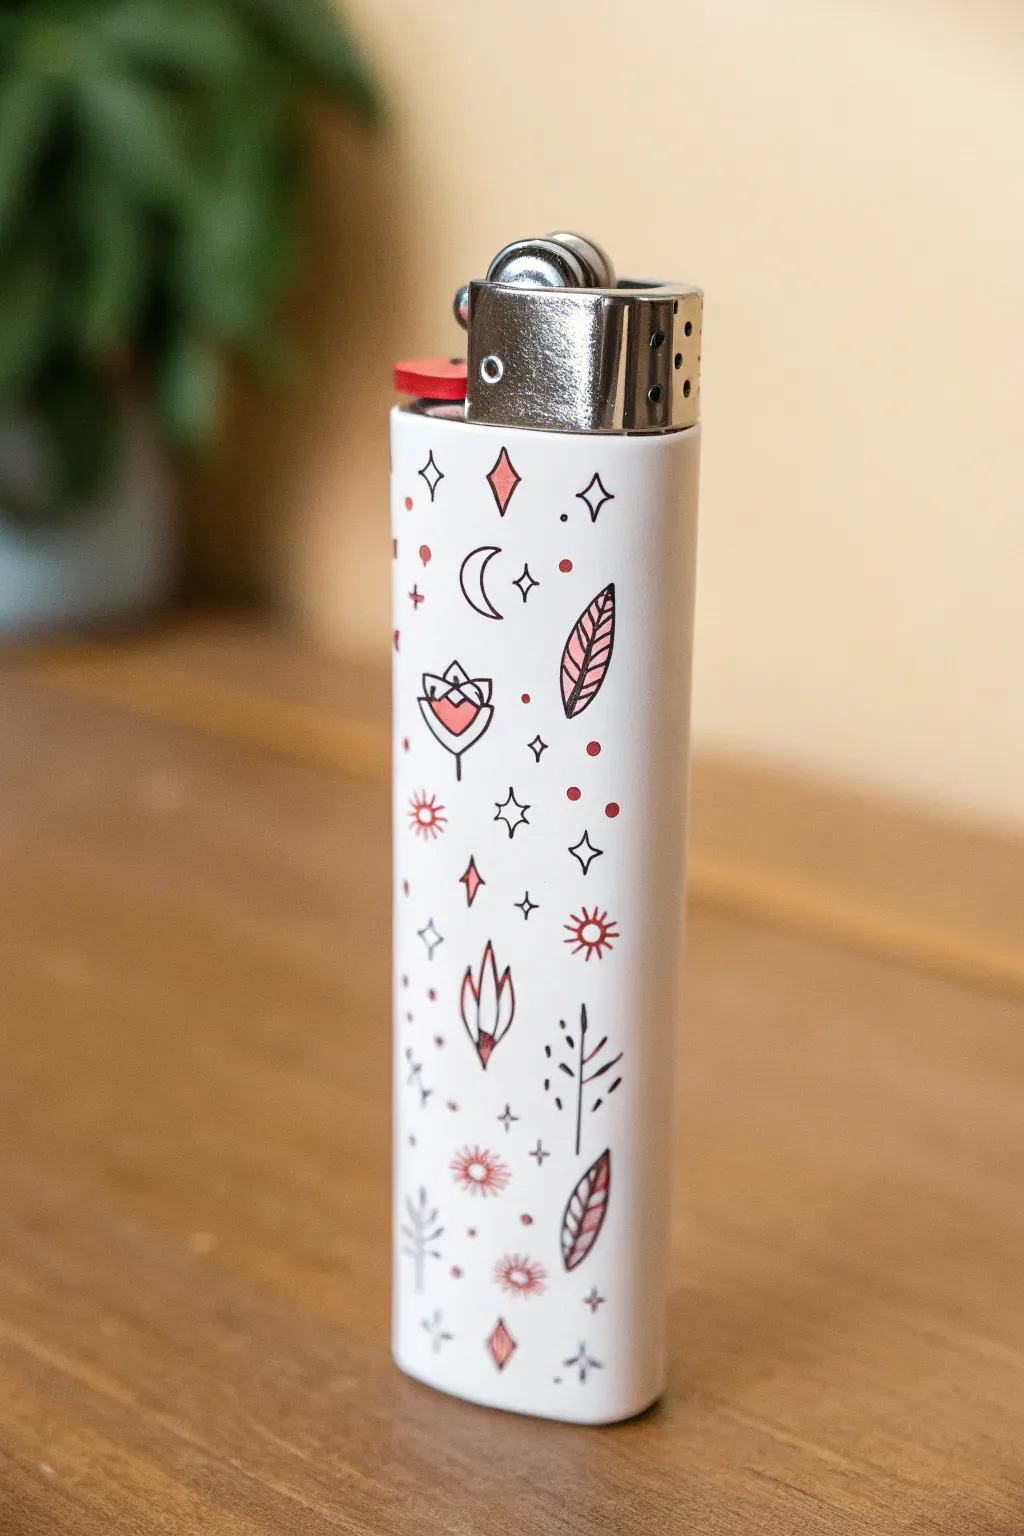
Transform a plain white lighter into a pocket-sized piece of art using simple line work and tattoo-inspired motifs. This project combines delicate celestial doodles with bold red accents for a clean, minimalist aesthetic that feels both modern and mystic.
Step-by-Step
Materials
- Standard white lighter (Clipper or Bic style)
- Fine grit sandpaper (400-600 grit)
- Rubbing alcohol and cotton pads
- Fine tip permanent marker (Black, 0.3mm or 0.5mm)
- Medium tip permanent marker or acrylic paint pen (Red/Coral)
- Clear matte sealant spray
- Pencil and eraser (optional)
Step 1: Surface Preparation
-
Clean the surface:
Before you begin, wipe down the entire plastic body of the lighter with rubbing alcohol to remove any oils, fingerprints, or adhesive residue from stickers. -
Light scuffing:
Gently rub the plastic surface with fine-grit sandpaper. You are not trying to remove material, just create a microscopic ‘tooth’ for the ink to grab onto so it doesn’t bead up. -
Final wipe:
Clean the lighter one last time with alcohol to remove the plastic dust created by sanding. Let it air dry completely for a minute.
Ink Choosing Tip
Use oil-based paint markers (like fine-point Posca or Sharpie Oil-Based) rather than standard alcohol markers. Alcohol ink rubs off plastic easily, while oil-based paint bonds permanently.
Step 2: Drafting the Design
-
Visualizing the layout:
Think of the lighter as a canvas for ‘flash sheet’ art—lots of small, independent icons spaced evenly apart rather than one big picture. I personally find it helpful to sketch a few ideas on paper first to check the scale. -
Pencil guidelines:
Using a very light touch, you can sketch the basic placement of your largest icons directly onto the lighter. Keep the graphite faint so it doesn’t smear into your final ink. -
Placing main icons:
Start by positioning the ‘hero’ elements. Draw a crescent moon near the top third and a stylized flower or diamond near the bottom. Leave plenty of white space between them.
Step 3: Inking the Black Outlines
-
Drawing the moon:
Using your black fine-tip marker, carefully ink the crescent moon. Keep your hand steady and brace your pinky against the lighter for stability. -
Adding organic shapes:
Draw the leaf or feather motifs. Use a quick, confident stroke for the central stem, then add the veins or barbs with smaller, tapered flicks. -
Geometric elements:
Add the diamonds and four-pointed stars. For the stars, draw a skinny cross first, then curve the lines inward toward the center point to create that concave sparkle shape. -
Stylized flora:
Ink the small tulip or bud shapes. These are simple U-shapes with a jagged top or a central petal rising up. -
Sun bursts:
Draw small circles and surround them with tiny rays to create mini suns. Vary the placement so they don’t line up perfectly. -
Filler details:
Look for large empty gaps and fill them with very simple elements: tiny dots, small plus signs (+), or single lines to act as ‘confetti’ balancing the composition. -
Drying time:
Let the black ink sit for at least 15 minutes before moving to color. If you rush this, the red ink might bleed into the wet black lines.
Level Up: Cosmic Glow
Swap the red accent marker for glow-in-the-dark paint. Apply it to the stars and moon so your lighter reveals a hidden galaxy when the lights go down.
Step 4: Adding Color Accents
-
Selective coloring:
Take your red or coral marker. The goal is not to color everything in, but to highlight specific parts. Choose the center of the diamond or one side of a feather. -
Dot accents:
Add small red dots amidst the black stars and sparkles. This brings warmth to the design and connects the disparate elements. -
Filling shapes:
Color in selected geometric shapes, like the center of the geometric flower or the interior of a diamond, ensuring you stay neatly within your black lines.
Step 5: Sealing and Finishing
-
Removing sketches:
If you used pencil earlier and it’s still visible, gently erase it now, being extremely careful not to rub off your fresh ink. -
First seal coat:
Take your clear matte sealant outside. Hold the can about 10-12 inches away and apply a very light mist coat. Do not spray heavily or the ink will run. -
Drying the seal:
Let this mist coat dry for 20 minutes. It acts as a barrier for the heavier coat. -
Final coat:
Apply a second, slightly heavier coat of sealant to protect the art from hand wear and tear. Let it cure for 24 hours before putting it in your pocket.
Now you have a custom accessory that brings a bit of starry magic to your everyday carry
Galaxy Sky With Splatter Stars
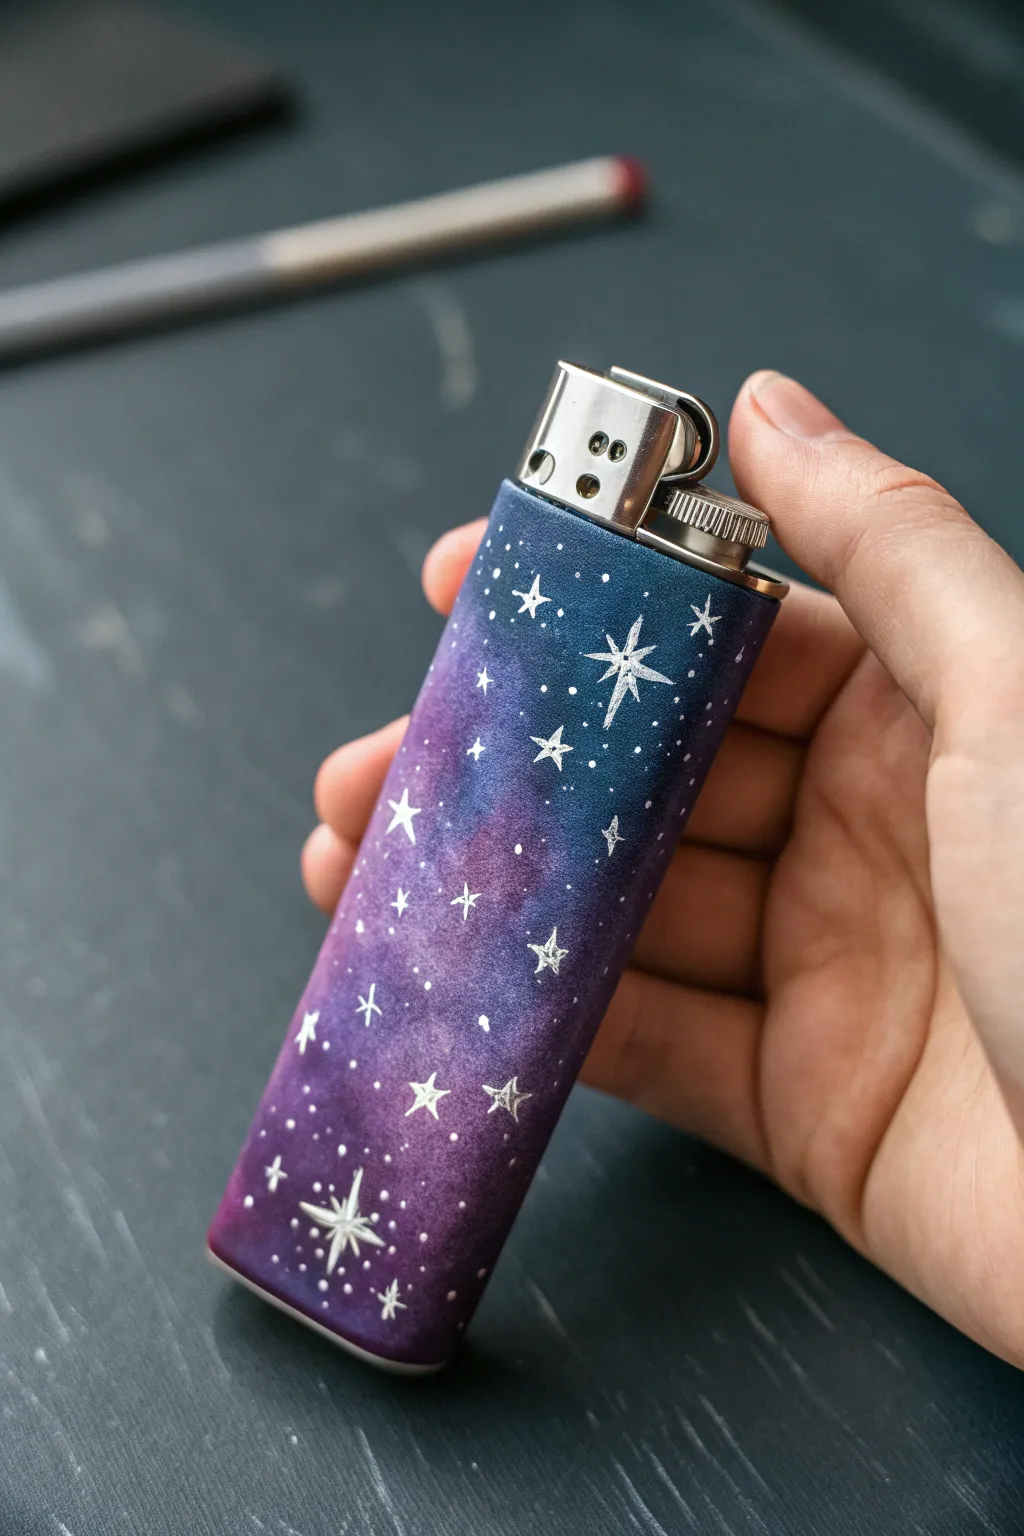
Transform a plain leather lighter sleeve into a stunning piece of pocket art featuring a dreamy galaxy gradient. This project uses blending techniques to create a seamless transition from deep indigo to violet, topped with delicate hand-painted stars.
How-To Guide
Materials
- Leather or faux leather lighter sleeve (blank)
- Angelus leather paints (or high-quality acrylics): Navy Blue, Violet, White, Black
- Leather preparer and deglazer (or rubbing alcohol)
- Cotton pads or balls
- Small painting sponges or makeup sponge wedges
- Detail paintbrush (size 00 or 000)
- Acrylic finisher or leather sealer (matte or satin)
- Palette for mixing
- Artist tape (optional)
Step 1: Preparation and Base
-
Clean the Surface:
Before painting, use a cotton pad dampened with leather preparer or rubbing alcohol to wipe down the sleeve. This removes factory finishes and oils, ensuring the paint adheres properly. -
Masking Off:
If you want to keep the inside or the edges pristine, carefully apply artist tape to those areas. This step is optional but helpful if you have a shaky hand. -
Base Coast:
Apply a thin, even layer of Navy Blue mixed with a tiny drop of Black to the entire sleeve using a sponge. This dark base will make the galaxy colors pop later. -
Let it Dry:
Allow this base coat to dry completely. Leather paint dries fast, usually within 15-20 minutes, but don’t rush it.
Step 2: Creating the Galaxy Gradient
-
Sponge the Top:
Take a clean sponge and dab pure Navy Blue onto the top third of the sleeve. Use a stippling motion (dabbing up and down) to create texture rather than streaks. -
Apply the Middle Tone:
While the blue is still slightly wet, mix a bit of Violet with the Navy Blue. Sponge this blend into the middle section, overlapping slightly with the top blue area to soften the transition. -
Add the Purple Bottom:
Load a fresh sponge edge with pure Violet paint. Dab this onto the bottom third of the sleeve, working it upwards into the middle mixture. -
Blend the Seams:
Going back with a slightly damp sponge (with very little paint), gently tap over the distinct lines where colors meet. The goal is a soft, smoky fade from blue to purple. -
Second Pass:
Once the first gradient layer is dry, repeat the sponging process. Leather paint is often semi-transparent, so a second layer adds richness and depth to the galaxy effect.
Fixing Heavy Splatters
If a splatter blob is too big, don’t wipe it! Let it dry, then paint over it with a tiny dab of your background blue or purple color to ‘erase’ it.
Step 3: Stars and Details
-
Prepare the Stars:
Pour a small amount of White paint onto your palette. I find adding a tiny drop of water helps the paint flow better from a fine brush for crisp lines. -
Paint Major Stars:
Using your smallest detail brush, paint a few four-pointed ‘cross’ stars. Place them randomly—one near the top, one near the bottom—to anchor the design. -
Add Five-Pointed Stars:
In the open spaces, carefully draw a few classic five-pointed stars. Keep these slightly smaller than your main cross stars for variety. -
Create Distant Stars:
Dip the very tip of your brush or a toothpick into the white paint. Dot the surface gently to create tiny pinprick stars. Cluster some together to mimic distant galaxies. -
The Splatter Technique:
For a natural starry dust effect, load an old toothbrush with thinned white paint and flick the bristles with your thumb over the sleeve. Practice on paper first to control the spray.
Glow Up
Mix glow-in-the-dark medium into your white paint for the stars. During the day it looks normal, but at night your galaxy will actually shine.
Step 4: Finishing Touches
-
Dry Thoroughly:
Let all the paint work dry completely for at least an hour. The white stars need to be solid before sealing to prevent smearing. -
Seal the Deal:
Apply a thin layer of matte or satin acrylic finisher over the entire painted surface. This protects the art from scratches and daily wear in your pocket. -
Final Cure:
Allow the finisher to cure for 24 hours before inserting your lighter to ensure the finish doesn’t tackle or stick.
Now you have a personalized piece of the universe right in your pocket
Stencil Layering for Crisp Shapes
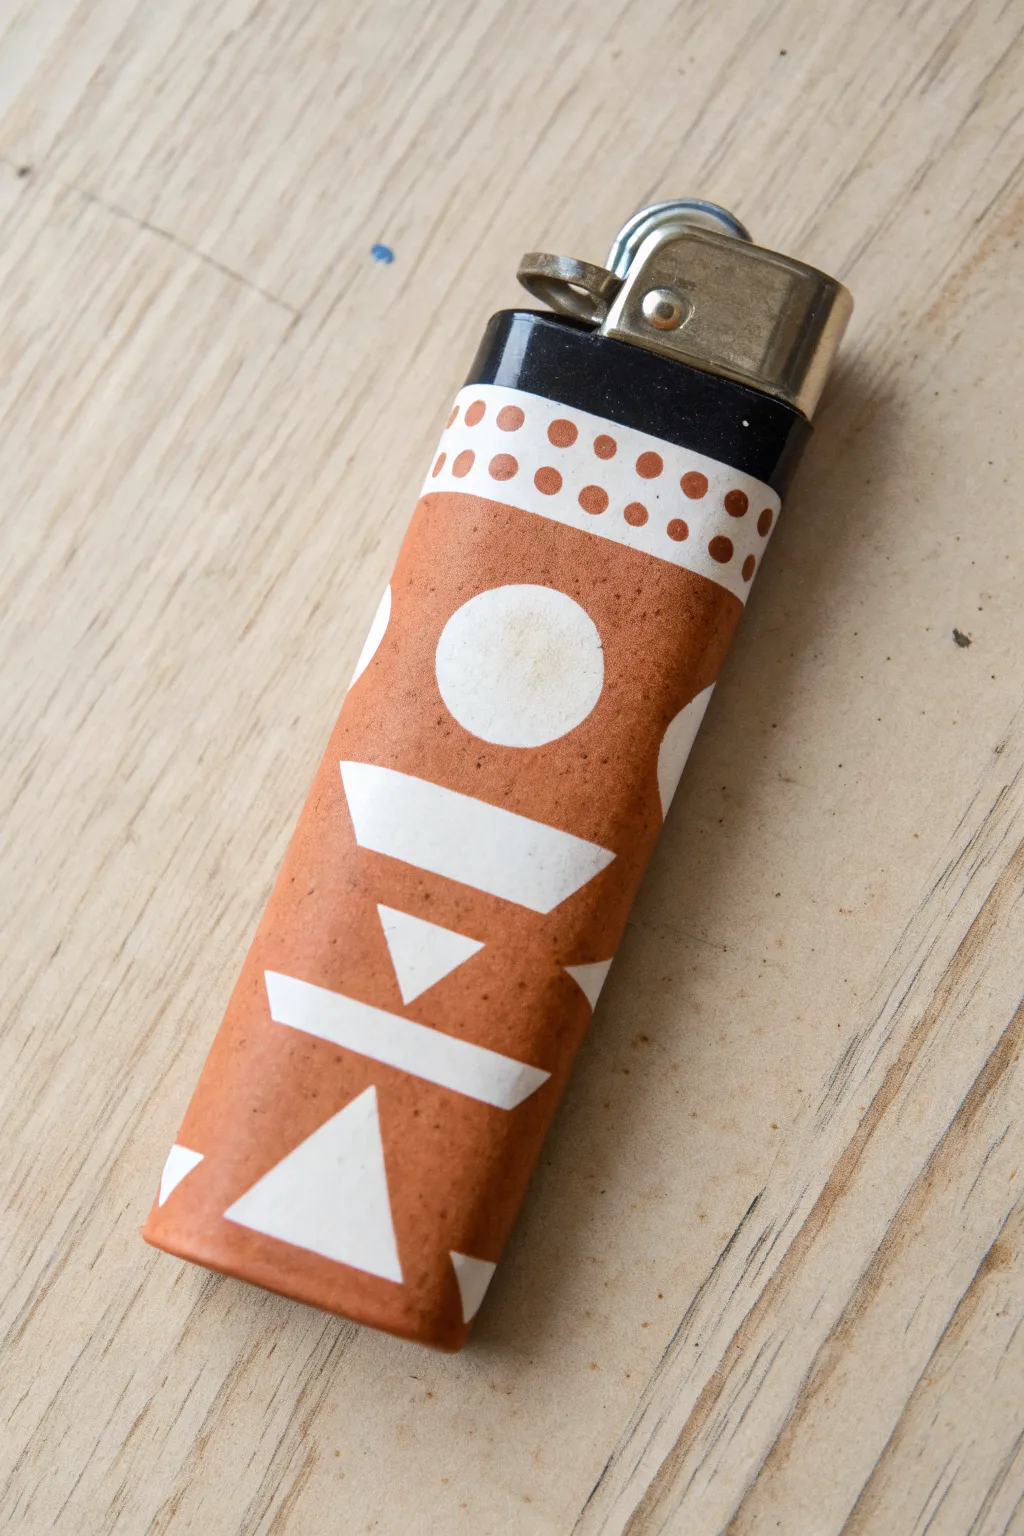
Transform a standard lighter into a piece of modern pocket art with this geometric design. The warm, terracotta-hued paint contrasts beautifully with crisp white shapes, creating a look that feels both earthy and graphic.
How-To Guide
Materials
- Standard lighter (black or dark color preferred)
- Sandpaper (fine grit, 400-600)
- Terracotta or rust-colored acrylic paint
- White acrylic paint or primer
- High-quality painter’s tape or masking tape
- Detail brush (size 0 or 00)
- Circular dotting tool or toothpick
- Hole punch (standard office style)
- Small craft knife (X-Acto)
- Clear matte varnish or sealant spray
- Isopropyl alcohol
Step 1: Preparation and Base
-
Prepare the surface:
Begin by lightly sanding the plastic body of the lighter. This scuffs up the glossy finish and helps the paint adhere much better. Wipe it down thoroughly with isopropyl alcohol to remove any dust and oils. -
Mask the hardware:
Use painter’s tape to carefully cover the metal top part of the lighter. Press the tape down firmly at the edges to prevent any paint from seeping underneath onto the chrome. -
Apply the white base:
Paint the entire body of the lighter with white acrylic paint. This will serve as the color for your geometric shapes later. You may need two to three thin coats for full opacity, letting each dry completely in between.
Step 2: Creating the Stencils
-
Cut the tape strips:
While the base coat dries, place a strip of painter’s tape on a cutting mat. -
Create triangles and trapezoids:
Use your craft knife to cut small triangles and elongated trapezoid shapes from the tape. These will form the ‘negative space’ white shapes on the finished lighter. -
Punch the circles:
Take a piece of painter’s tape and stick it onto parchment paper or wax paper. Use a standard hole punch to punch through the tape/paper combo. Peel the tape circle off the backing to get a perfect round sticker. -
Design the layout:
Plan your pattern. In this design, a large circle sits near the top, followed by a wide trapezoid, an inverted triangle, a bar, and finally a triangle at the base.
Bleeding Edges?
If paint bleeds under your tape, seal the tape edges with a tiny bit of the *base* (white) color first. Let that dry, then apply the rust color. This blocks leaks.
Step 3: Applying the Design
-
Place the main shapes:
Carefully adhere your tape shapes onto the white lighter. Press the edges down firmly with your fingernail or a burnishing tool to ensure a crisp line. -
Create the top band:
Place a horizontal strip of tape around the top of the lighter, leaving about a half-inch of white exposed near the metal hardware. This area will eventually have dots. -
Apply the terracotta coat:
Paint the entire body of the lighter—covering your tape stickers and the exposed white areas—with the terracotta or rust-colored paint. Don’t paint the very top white band you just masked off. -
Let it cure:
Allow the rust color to dry completely. I like to give this step a bit of extra time to ensure the paint doesn’t peel up when removing the tape. -
The reveal:
Gently peel away the tape shapes and the horizontal strip using the tip of your craft knife or tweezers. You should now see sharp white shapes against the rust background.
Texture Match
To mimic the earthy texture in the photo, mix a tiny pinch of baking soda into your rust-colored acrylic paint before applying the final coat.
Step 4: Finishing Details
-
Dot the top band:
Dip a dotting tool or the back of a toothpick into the rust paint. Carefully add two rows of small dots onto the white band near the top. -
Clean up edges:
If any paint bled under the tape, use your detail brush with a tiny amount of white paint to touch up the edges and make them sharp again. -
Seal the work:
Once the paint is fully cured (preferably overnight), apply 1-2 coats of clear matte varnish. This is crucial for a lighter that will be handled frequently. -
Final unmasking:
Remove the heavy masking tape from the metal hardware to reveal your finished custom lighter.
Enjoy using your unique, handcrafted accessory that turns a simple utility item into a conversation piece
Paint Plus Mini Decoupage Collage
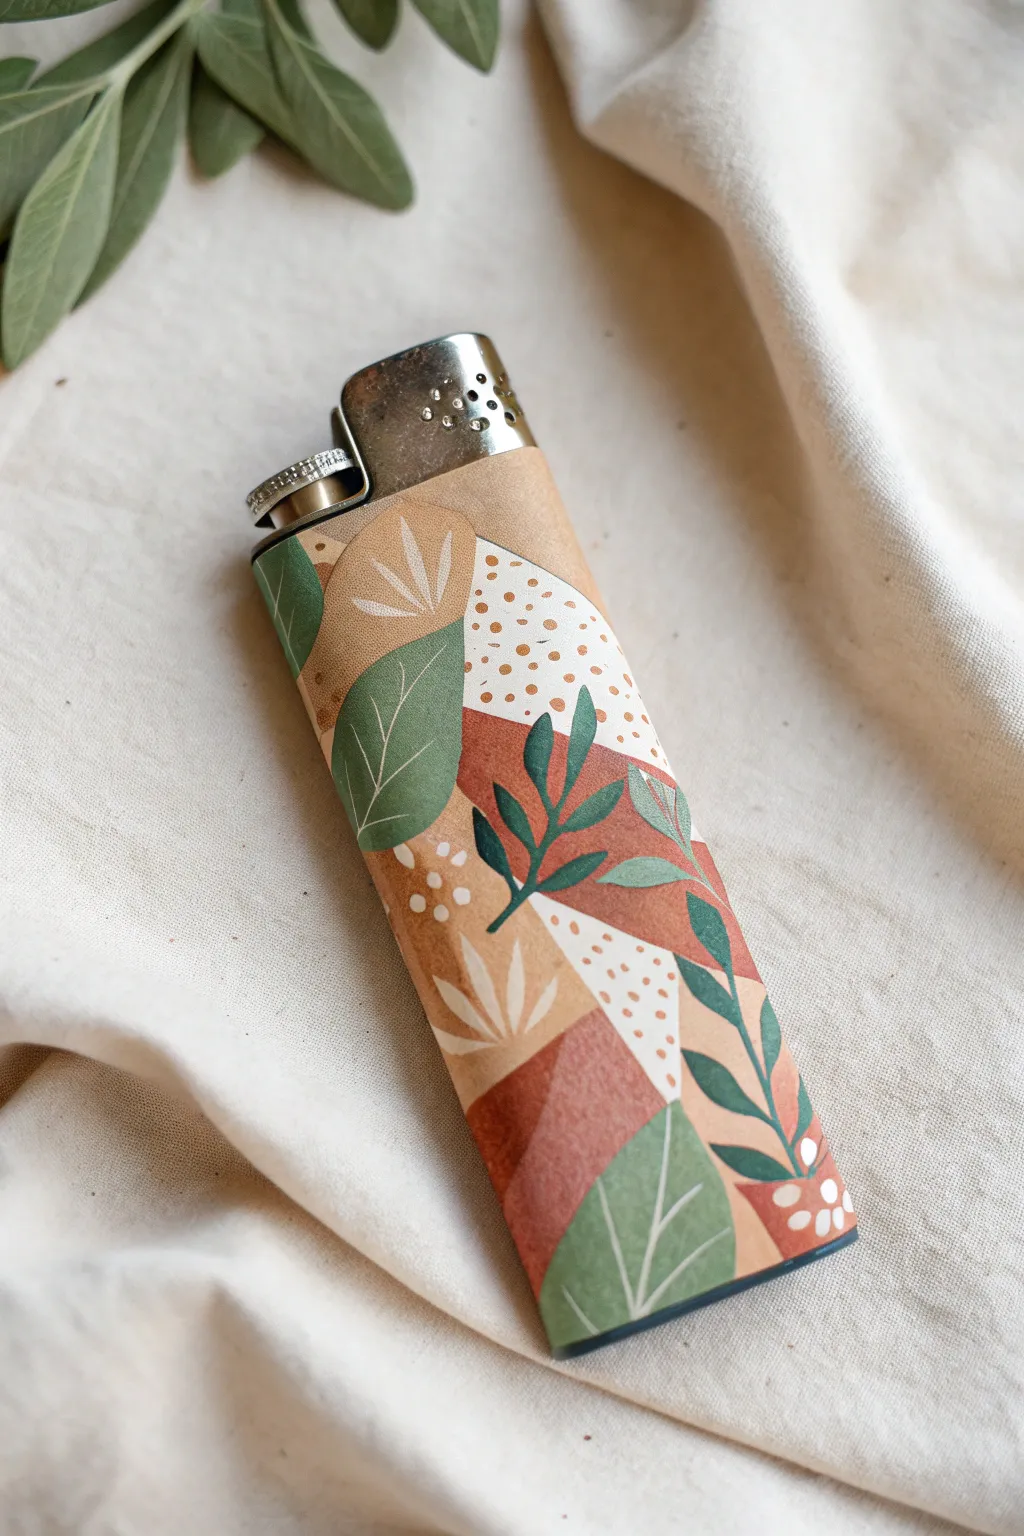
Transform a plain lighter into a miniature piece of earth-toned art using a mix of decoupage and delicate hand-painted details. This project combines geometric color blocking with organic leaf motifs for a warm, bohemian aesthetic.
Step-by-Step Guide
Materials
- Standard lighter (white or light-colored base)
- Decorative paper scraps (kraft paper, terracotta, sage green)
- Mod Podge or decoupage glue
- Small flat paintbrush
- Fine liner paintbrush (size 0 or 00)
- Acrylic paints (dark green, white, cream)
- Scissors or craft knife
- Sandpaper (fine grit)
- Clear matte sealant or varnish
Step 1: Preparation & Base Layer
-
Clean surface:
Begin by removing any stickers or labels from your lighter. Wipe the surface down with a bit of rubbing alcohol to remove oils and dirt, ensuring a clean bond for your materials. -
Sand lightly:
Scuff the plastic surface very gently with fine-grit sandpaper. This creates a subtle texture or ‘tooth’ that helps the glue adhere better than on smooth plastic. -
Select paper palette:
Gather paper scraps in your chosen color palette. For this look, focus on earthy tones: kraft brown, muted terracotta, sage green, and cream. -
Cut geometric shapes:
Cut your papers into small, varied geometric shapes. Aim for triangles, irregular polygons, and curved semi-circles that will fit comfortably on the small surface of the lighter.
Step 2: Decoupage Application
-
Apply base glue:
Brush a thin, even layer of Mod Podge onto a small section of the lighter where you want to place your first piece of paper. -
Place first shape:
Press a paper shape onto the glued area. Smooth it out with your finger or the brush handle to eliminate air bubbles. -
Build the mosaic:
Continue gluing paper shapes, overlapping them slightly to create a cohesive collage effect. Vary the colors so identical shades don’t touch. -
Wrap around edges:
Ensure the paper wraps cleanly around the curves. If the paper overlaps the metal top or the bottom rim, trim the excess carefully with a craft knife once dry. -
Seal the paper:
Once the entire surface is covered and dry, apply a coat of Mod Podge over the top of the papers to seal them and create a uniform surface for painting. -
Let it cure:
Allow this sealing layer to dry completely. It should feel smooth and non-tacky before you begin the next phase.
Wrinkle Rescue
If your paper bubbles while gluing, prick the bubble with a pin and press it flat with a damp finger. Do this immediately before the glue sets hard.
Step 3: Painted Details
-
Mix leaf colors:
Prepare your acrylic paints. You’ll need a dark forest green for the stems and leaves, and a creamy white for highlights and dots. -
Paint large leaves:
Using your fine liner brush and dark green paint, add stylized leafy branches. Paint a central stem first, then add almond-shaped leaves branching off. -
Paint vein details:
On the lighter-colored paper sections (like the green shapes), use a very fine brush and cream or white paint to draw thin lines for leaf veins. -
Add geometric plants:
Paint simple, abstract plant shapes using white or cream paint. Try a central point with three or five lines radiating outward like a fan. -
Dot patterns:
I like to fill empty spaces with clusters of tiny dots. Use the tip of a toothpick or the end of your brush handle dipped in paint to create uniform speckles. -
Layering details:
Add small clusters of white dots near the tips of your painted leaves or along the edges of the color blocks for extra visual interest.
Go Botanical
Instead of painting leaves, try pressing tiny real dried flowers or fern tips onto the paper layer before the final seal for an authentic nature vibe.
Step 4: Finishing Touches
-
Dry paint:
Ensure all painted details are fully dry to the touch so they don’t smear during the final sealing process. -
Final clear coat:
Apply a final durable topcoat. A mismatched matte finish looks best with the kraft paper aesthetic, but gloss works too if you prefer shine. -
Check the mechanism:
Make sure no glue or varnish has seeped into the spark wheel or gas release mechanism at the top.
Enjoy the tactile feel of your custom art piece every time you use it
Faux Engraved Linework Look
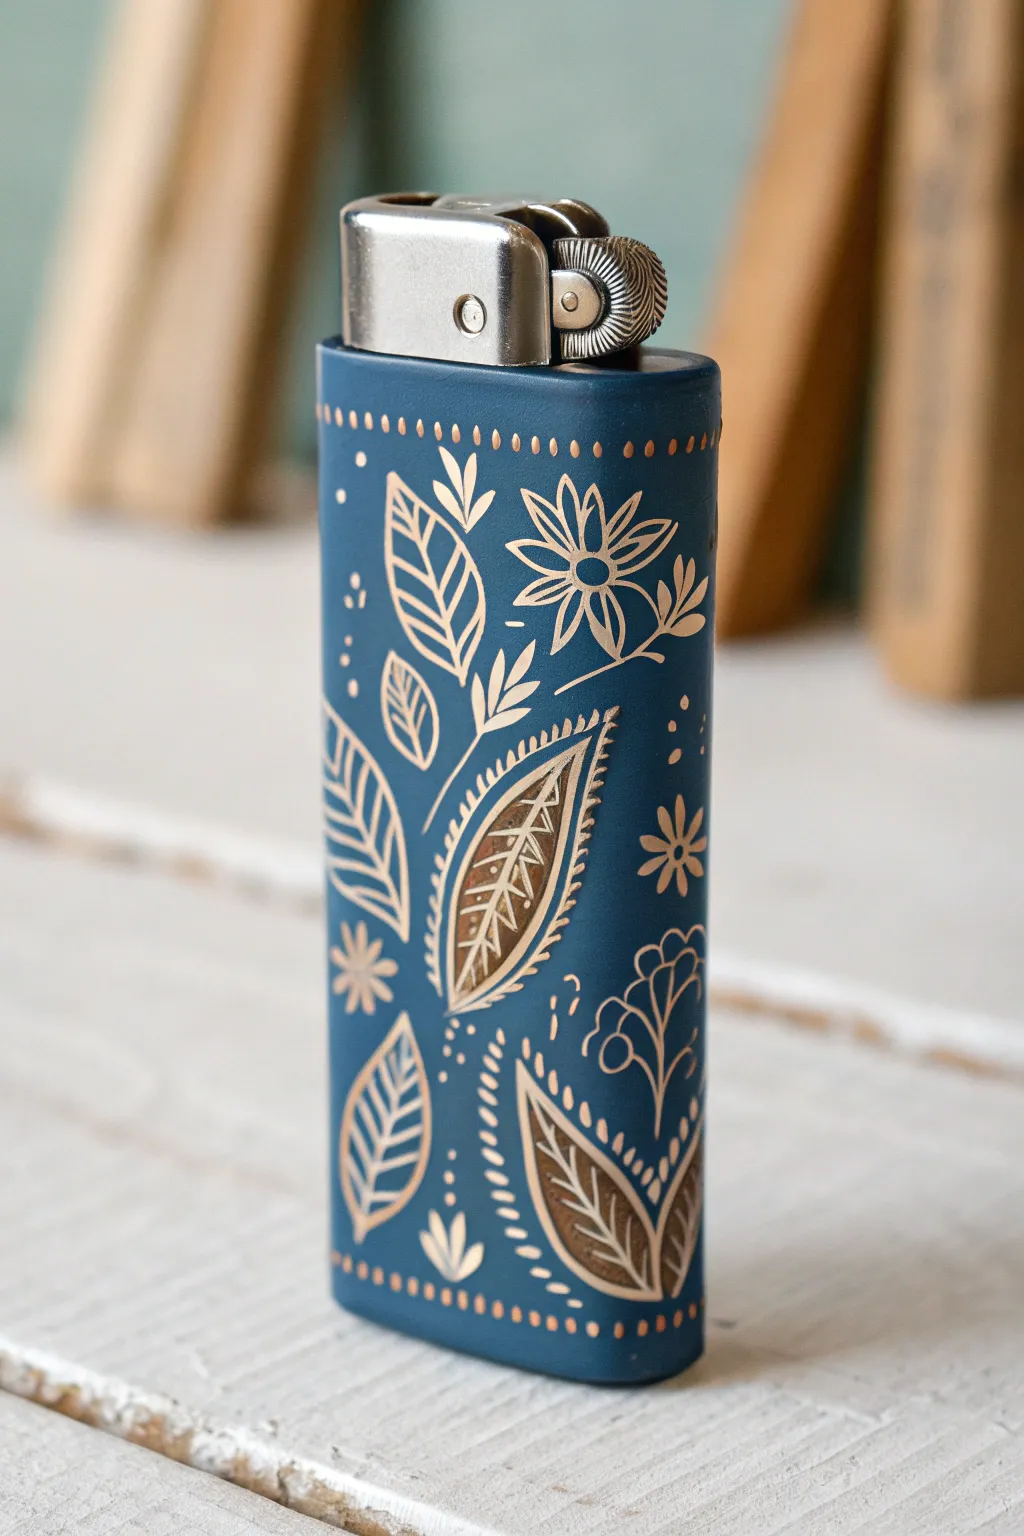
Transform a standard lighter into an elegant accessory with this deceptively simple faux-engraving technique. By combining a matte base with metallic paint pens, you’ll achieve a sophisticated, etched look that mimics expensive metalwork.
Step-by-Step
Materials
- Standard lighter (Bic or similar)
- Fine-grit sandpaper (400-600 grit)
- Matte spray paint (specifically a deep teal or petroleum blue)
- Painter’s tape
- Gold or bronze fine-tip paint pen (oil-based works best)
- Bronze or copper metallic marker (thicker tip for filling)
- Fine detail paintbrush (optional)
- Clear matte sealer spray
- Pencil
- Tracing paper (optional)
Step 1: Preparation & Base Coat
-
Prepare the surface:
Begin by removing any stickers or labels from your lighter. Use a bit of adhesive remover or rubbing alcohol to get rid of any sticky residue, ensuring the plastic is completely clean and dry. -
Scuff the shine:
Lightly sand the entire plastic body of the lighter with fine-grit sandpaper. You aren’t trying to grind it down, just creating enough ‘tooth’ so the spray paint will adhere permanently without chipping. -
Mask the hardware:
Using painter’s tape, carefully wrap the metal head of the lighter. Press the tape firmly into the crease where the metal meets the plastic to ensure a crisp line and protect the functional parts from paint. -
Prime and paint:
In a well-ventilated area, apply the matte teal spray paint. Hold the can about 8-10 inches away and apply thin, even coats. I prefer doing two or three light coats rather than one heavy one to avoid drips. -
Let it cure:
Allow the base coat to dry completely. While it might feel dry to the touch in an hour, letting it cure overnight is best to ensure the surface is hard enough to draw on without indenting the paint.
Step 2: Designing the Pattern
-
Plan the layout:
Lightly sketch your design onto the painted surface with a soft pencil. Focus on a central floral motif—a daisy-like flower near the top right works well as an anchor point. -
Draw the main stems:
Sketch a sweeping, curved line diagonally across the lighter body to serve as the main stem. Add a second, smaller stem curvature near the bottom to balance the composition. -
Outline the leaves:
along the stems, pencil in large, teardrop-shaped leaves. Vary their sizes, placing larger leaves at the bottom and medium ones near the middle.
Steady Hands Pro-Tip
Rest your wrist on a dense sponge or a small stack of books while drawing. This elevates your hand to the level of the lighter, giving you much better control over fine lines.
Step 3: Applying the Faux Engraving
-
Start the gold linework:
Take your fine-tip gold paint pen and trace over your pencil lines. Start with the flower petals and the central stem. Keep your hand steady and apply even pressure to create a consistent line width. -
Fill the large leaves:
For the larger, prominent leaves, create a solid outline first. Then, draw a central vein down the middle. Instead of coloring the whole leaf solid, draw diagonal veins leaving the background color showing, or fill specific sections with a darker bronze marker to create depth. -
Add secondary flora:
Draw the smaller, fern-like sprigs and tiny leaves branching off the main stem. These should be delicate, simple outlines without complex filling. -
Incorporate decorative dots:
Scatter groups of three small dots in the empty negative spaces around the leaves. This stippling effect mimics traditional metal tooling and fills awkward gaps. -
Create the borders:
Carefully draw a horizontal line of small dots or dashes across the very top and very bottom of the lighter face. This ‘framing’ gives the piece a finished, intentional look. -
Refine the details:
Look closely at your large leaves. Use the fine tip pen to add tiny serrated edges or ‘teeth’ to the outside of the leaf shapes for extra texture.
Level Up: Two-Tone Metal
Use a silver pen for the veins inside the leaves and gold for the outlines. The mixed-metal effect increases the 3D ‘engraved’ illusion significantly.
Step 4: Finishing Touches
-
Dry the ink:
Let the paint pen work dry for at least 30 minutes. Metallic markers can smudge easily if handled too soon. -
Erase guidelines:
If any pencil lines are still visible, very gently erase them with a kneaded eraser, being careful not to rub off the gold pigment. -
Seal the work:
Apply a coat of clear matte sealer over the entire painted body. This is crucial for a lighter, which gets handled constantly in pockets and bags. -
Remove the mask:
Once the sealer is tacky-dry, carefully peel off the painter’s tape from the metal head to reveal your crisp, clean edge.
Now you have a custom piece of pocket art that combines practical utility with artistic flair
Drip Paint Illusion With Gloss Finish
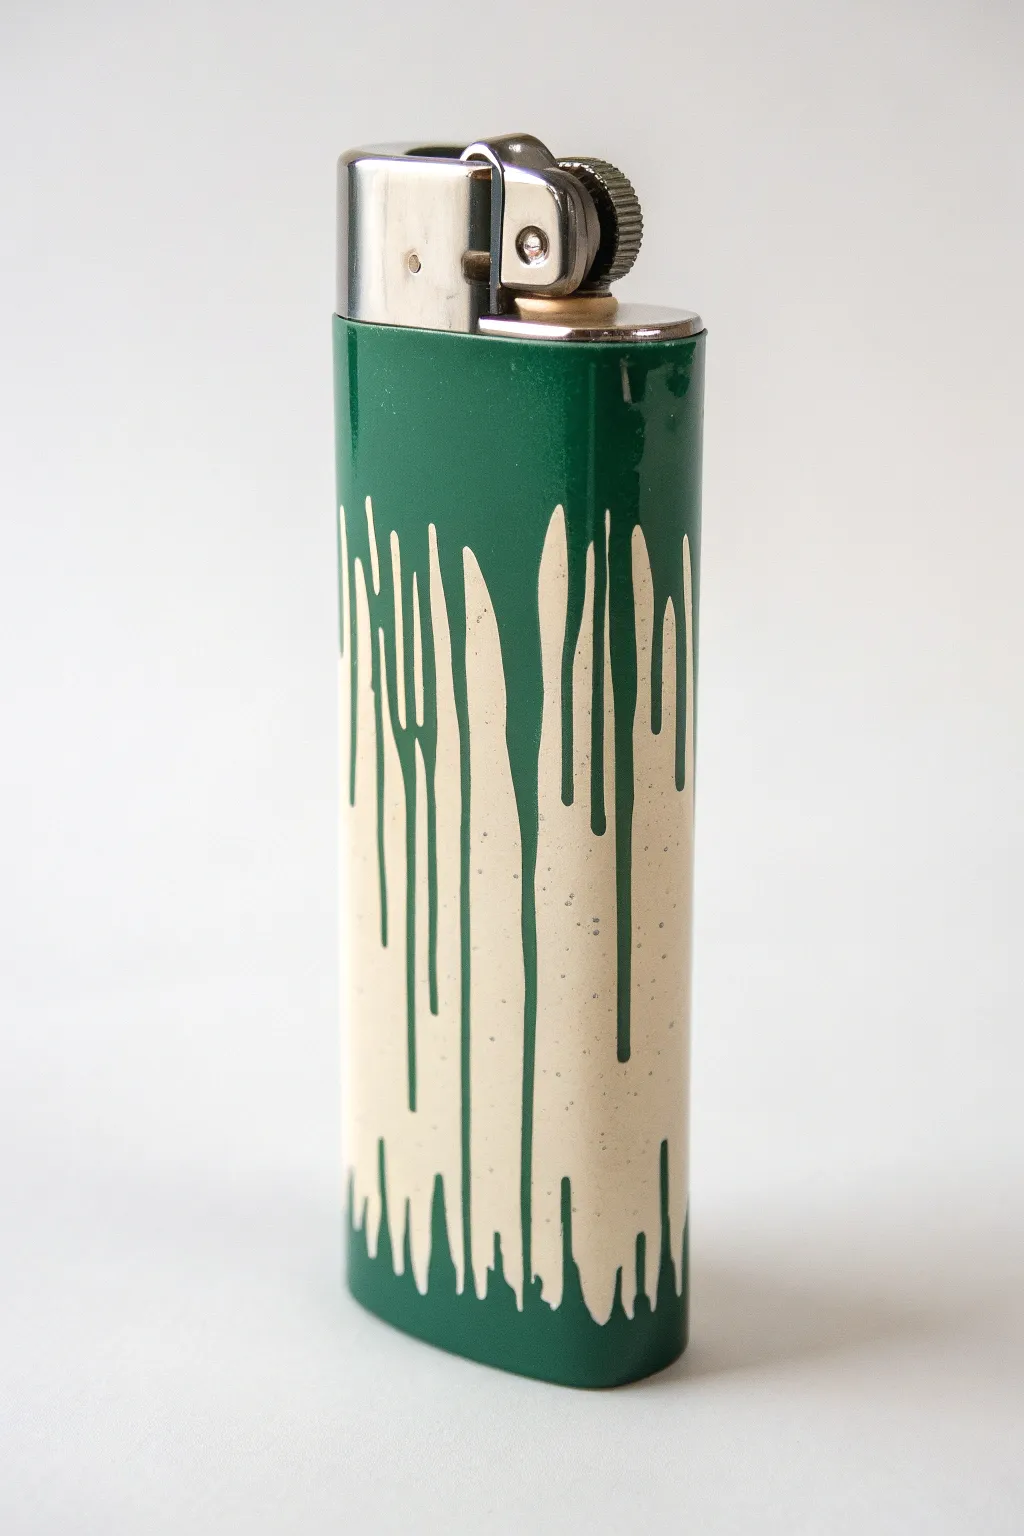
Transform an ordinary lighter into a sleek piece of pocket art with this eye-catching drip illusion. The contrast between the deep forest green and the creamy beige creates a striking, modern aesthetic that looks professionally manufactured but is entirely DIY.
Step-by-Step Guide
Materials
- Reusable lighter (such as a Clipper)
- Sandpaper (400-600 grit)
- Painter’s tape or masking tape
- Forest green spray paint (enamel preferred)
- Cream/beige acrylic paint
- Fine detail paintbrush (size 0 or 00)
- High-gloss clear coat spray (varnish)
- Isopropyl alcohol
Step 1: Preparation & Base Coat
-
Prep the surface:
Begin by removing any existing stickers or labels from your lighter. Scuff the entire plastic body gently with 400-600 grit sandpaper. You aren’t trying to remove material, just taking off the factory shine to help the paint adhere. -
Clean thoroughly:
Wipe the sanded surface down with a cloth dampened in isopropyl alcohol to remove dust and oils. -
Mask the metal:
Carefully wrap painter’s tape around the metal top mechanism. Ensure the tape edge is perfectly straight and tight against the rim so no paint sneaks onto the functional parts. -
Apply the green base:
Working in a ventilated area, apply your forest green spray paint. Hold the can about 8-10 inches away and use light, sweeping coats. -
Dry and inspect:
Let the first coat dry for about 15 minutes. Create a second coat to ensure complete, opaque coverage. Allow this base layer to cure fully—I usually give it at least 24 hours to ensure it’s hard enough to paint over without lifting.
Step 2: Painting the Drip Design
-
Plan the flow:
Visualize where your drips will fall. The design relies on vertical lines comprising a main ‘sheet’ of dripping paint that breaks apart as it moves down. -
Outline the top drips:
Using your fine detail brush and cream acrylic paint, carefully draw the outlines of the drip shapes. Start from the top (near the metal rim) and pull lines downward. -
Vary the lengths:
Make sure your vertical lines are of varying lengths. Some should stop short, while others extend almost to the bottom to create a natural, organic look. -
Add floating droplets:
To enhance the illusion, paint a few disconnected drop shapes near the tips of your longest drips. -
Fill the shapes:
Fill in the outlines with your cream paint. You may need two thin layers of acrylic to get a solid, non-streaky color against the dark green background. -
Create the bottom ‘splatter’:
At the very bottom edge of the lighter, paint an upward-facing jagged pattern, as if the lighter has been dipped in a puddle of cream paint. This balances the composition. -
Refine the edges:
Go back over your lines with a steady hand to sharpen any fuzzy edges. The cleaner the line, the more convincing the graphic effect. -
Add subtle speckles:
For extra texture, you can flick a tiny amount of cream paint off a stiff brush to create micro-splatters on the green sections, though keep this minimal.
Sticky Situation?
If acrylic paint feels tacky after drying, dust it lightly with cornstarch before varnishing. This absorbs moisture and preps it for the clear coat without smudging.
Step 3: Finishing Touches
-
Remove masking:
Carefully peel away the painter’s tape from the metal top before clear coating. This prevents the varnish from sealing the tape to the lighter. -
Clear coat application:
Apply a high-gloss clear coat spray over the entire painted body. This seals the acrylic work and gives it that shiny, manufactured look shown in the photo. -
Final cure:
Let the lighter dry upright in a dust-free environment for the time recommended on your varnish can before handling.
Flow Control
Thin your cream acrylic slightly with a heavy body medium or just a drop of water. Better flow creates smoother lines and prevents brushstroke ridges.
Now you have a custom accessory that combines street art style with everyday utility
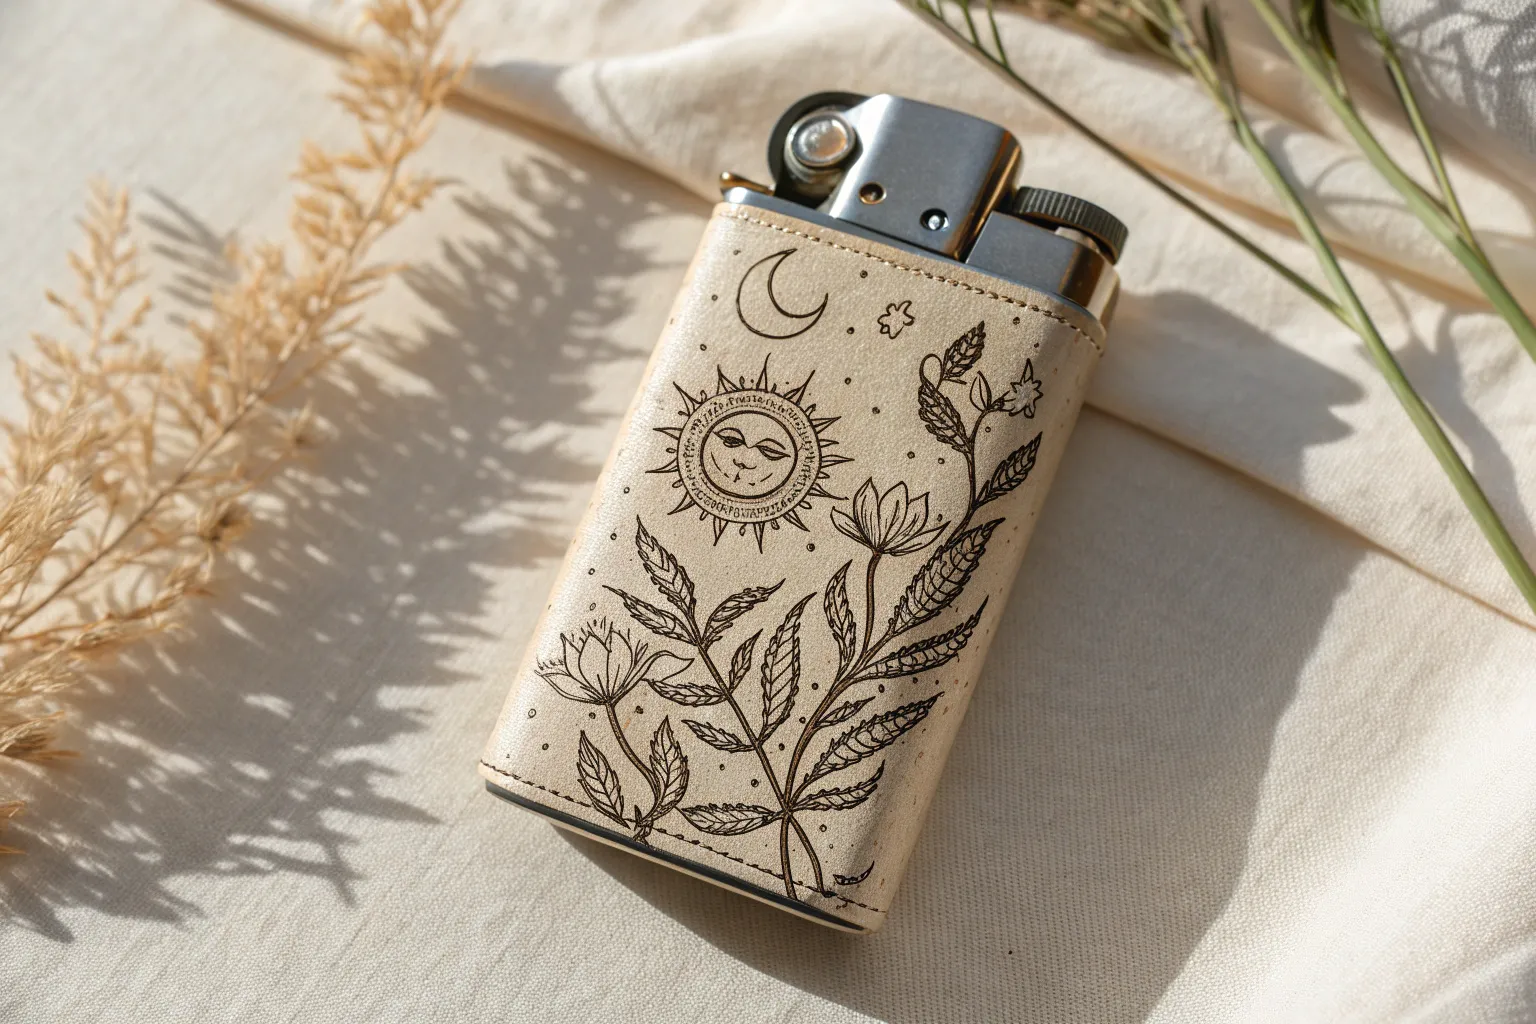
Glow-Layer Accents for Night Pop
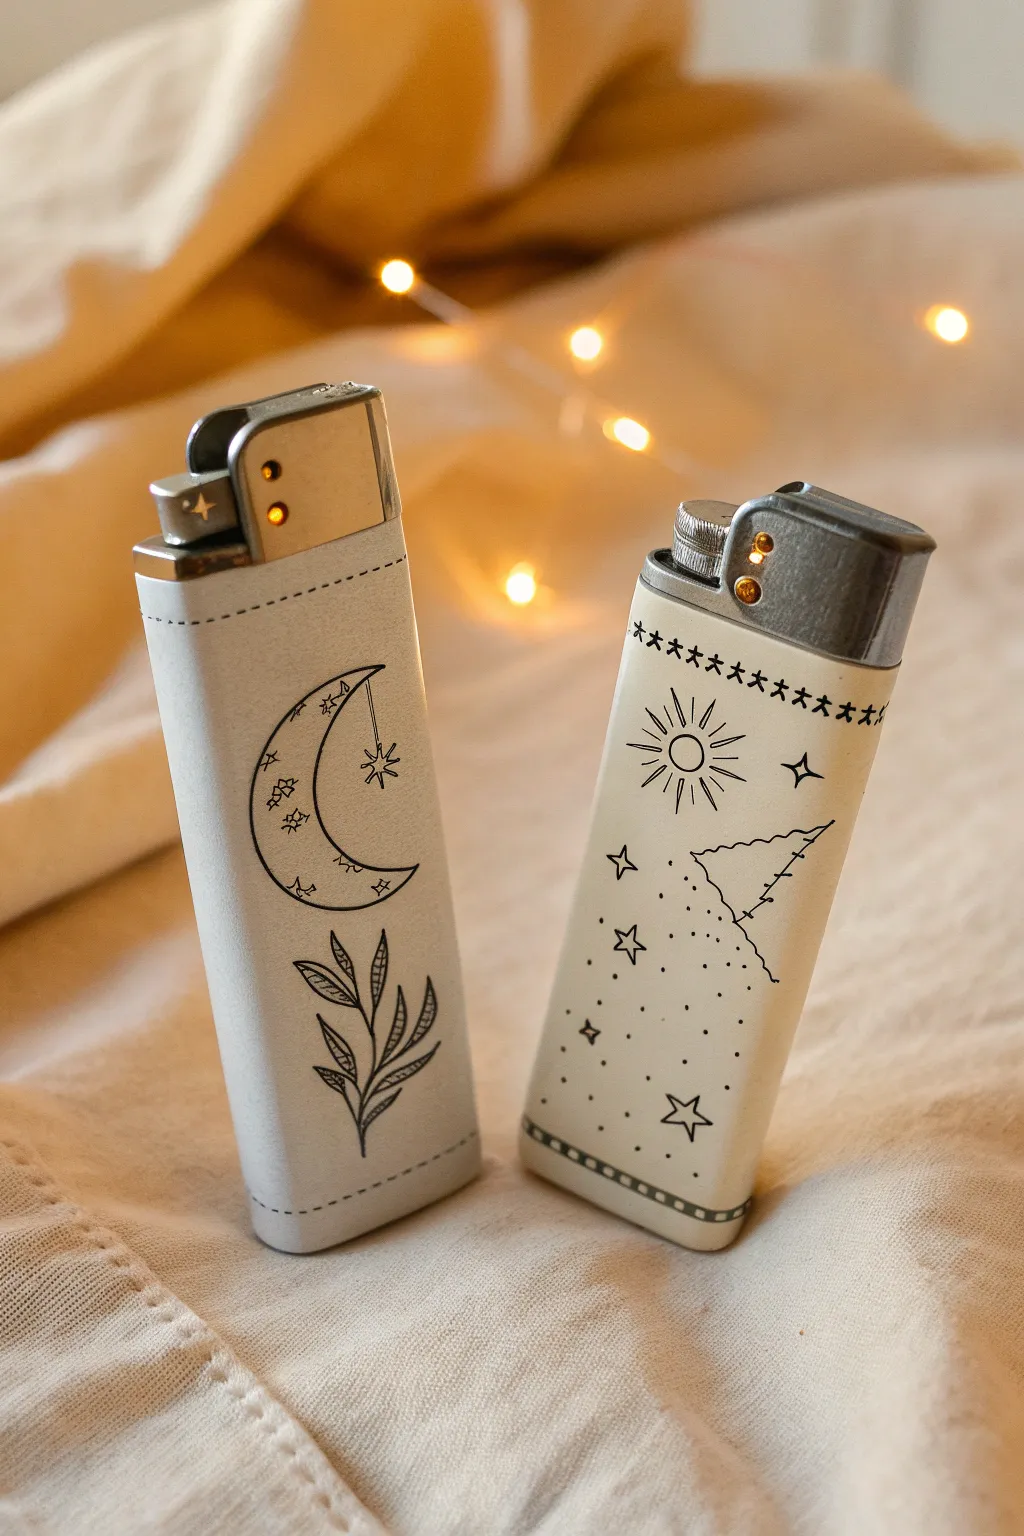
Transform ordinary lighters into mystical pocket art with these delicate celestial designs featuring moons, suns, and starry details. The off-white matte base provides the perfect canvas for crisp black line work that feels both modern and magical.
Step-by-Step Tutorial
Materials
- Refillable lighters (white or cream)
- Sandpaper (fine grit, 400-600)
- Matte spray primer (white or cream)
- Ultra-fine tip permanent marker or acrylic paint pen (black, 0.5mm or smaller)
- Clear matte sealer spray
- Pencil (optional for sketching)
- Eraser
Step 1: Preparation
-
Clean surface:
Begin by thoroughly cleaning the surface of your lighters with rubbing alcohol to remove any oils or factory residue. -
Light sanding:
Gently scuff the plastic surface with fine-grit sandpaper. This creates a ‘tooth’ for the primer to grip onto without leaving deep scratches. -
Priming:
Apply a thin, even coat of matte spray primer. I like to do two very light coats rather than one heavy one to avoid drips. Let this dry completely according to the can’s instructions, usually at least an hour.
Step 2: Drafting the Design
-
Pencil sketch:
With a very light hand, sketch your main elements using a pencil. For the moon design on the first lighter, draw a large crescent shape in the center. -
Adding details:
Inside the crescent moon, lightly mark positions for tiny stars. Below the moon, sketch a simple stem with leaves curving upward. -
Sun layout:
For the second lighter, sketch a sun circle near the top. Add a horizon line or abstract mountain shape below it. -
Pattern guides:
Lightly mark a row of small crosses or stars near the very top rim of the sun lighter to create a decorative band.
Ink Smearing?
If your marker smears when you apply the clear coat, switch to a water-based sealer fir the first coat, or mist the first spray layer from very far away to ‘set’ the ink gently.
Step 3: Inking the Moon Lighter
-
Outline the moon:
Using your ultra-fine black marker, trace the crescent moon outline. Keep your hand steady and rotate the lighter, not your hand, to get a smooth curve. -
Moon interior:
Draw the tiny stars inside the moon. Add a string hanging from the top tip of the moon with a larger starburst at the end. -
Botanical base:
Trace the leafy branch at the bottom. Use slightly varying pressure to give the leaves a natural, tapered look. -
Stitching detail:
Add a dashed line around the top and bottom edge of the lighter to mimic a stitched leather look.
Pro Tip: Steady Hands
Rest your drawing hand on a heavy book or table surface while holding the lighter. This stabilization helps create those crisp, unwavering lines on the curved surface.
Step 4: Inking the Sun Lighter
-
Sun rays:
Ink the central circle for the sun, then draw the rays. Alternate between simple lines and triangular rays for visual interest. -
Top border:
Carefully ink the row of small crosses or star shapes around the top rim, keeping the spacing consistent. -
Star field:
Fill the lower section with a mix of small stars and stippling dots. Vary the density of the dots to create a fading effect. -
Abstract lines:
Ink the triangular or mountain-like shape that cuts across the middle, adding small hatching lines on one side for texture.
Step 5: Finishing Touches
-
Clean up:
Once the ink is 100% dry (give it at least 20 minutes), gently erase any visible pencil marks. -
Sealing:
Place the lighters in a well-ventilated area. Apply a light coat of clear matte sealer spray to protect your artwork from rubbing off during use. -
Final cure:
Allow the sealer to cure fully, preferably overnight, before handling the lighters extensively.
Now you have a set of personalized accessories that bring a bit of starlight to your day


Have a question or want to share your own experience? I'd love to hear from you in the comments below!