If you’re itching to draw a lion, you’re in the perfect place—there’s so much personality packed into that face, mane, and stare. Here are my favorite lion drawing ideas to help you go from simple sketching to seriously striking results.
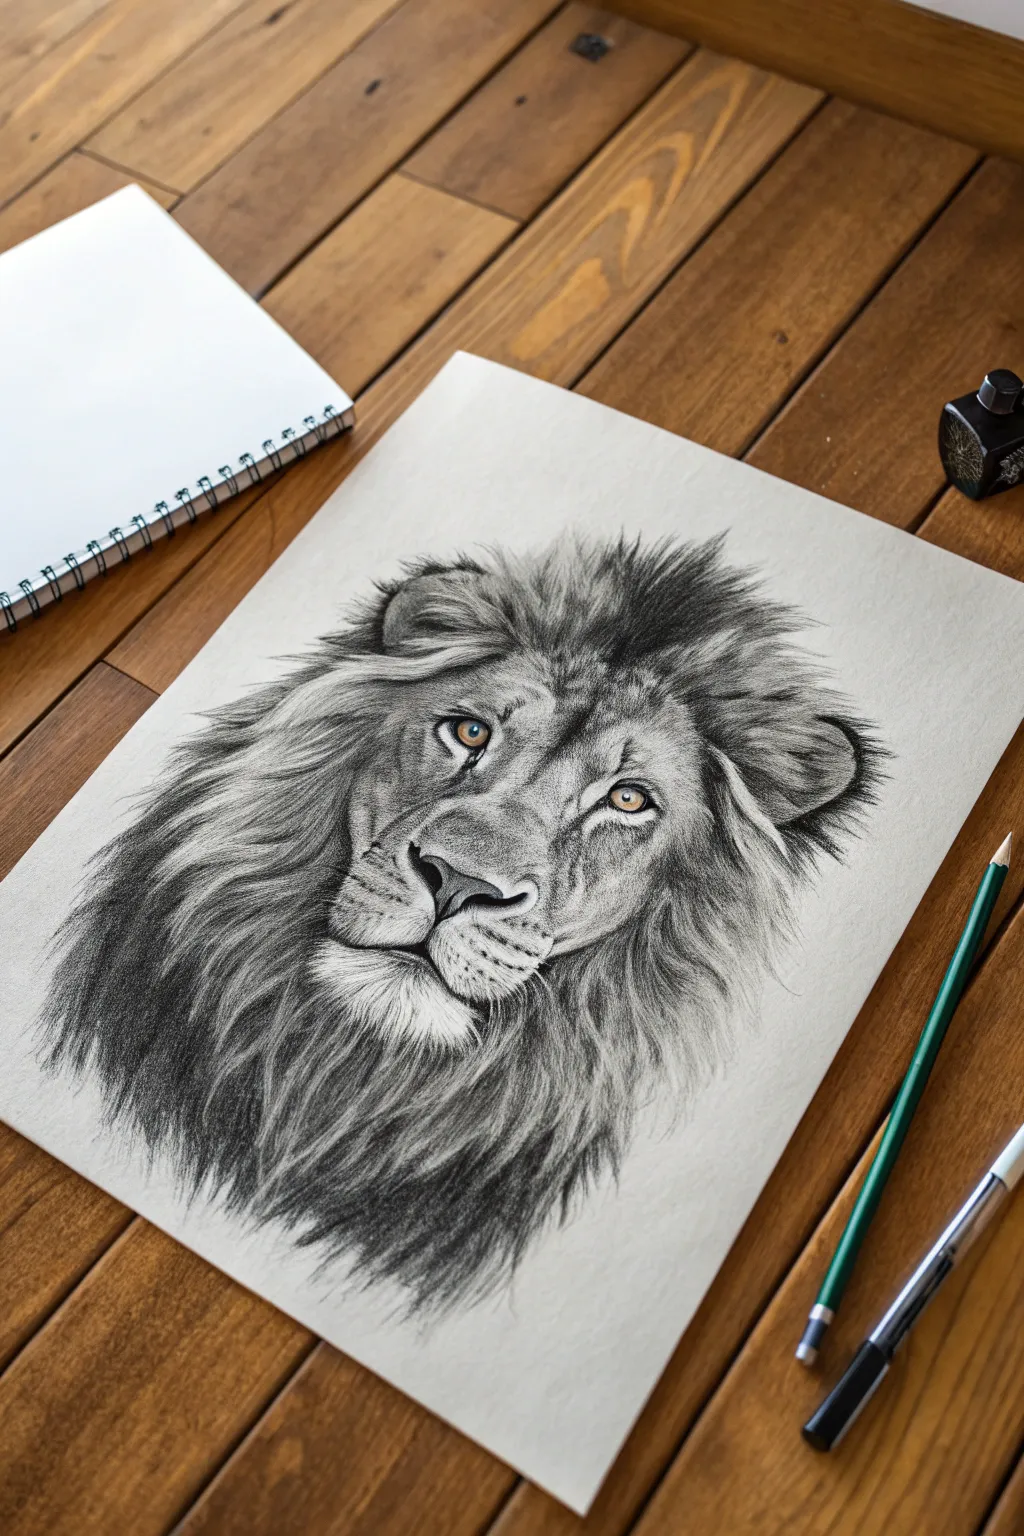
Classic Front-Facing Lion Portrait
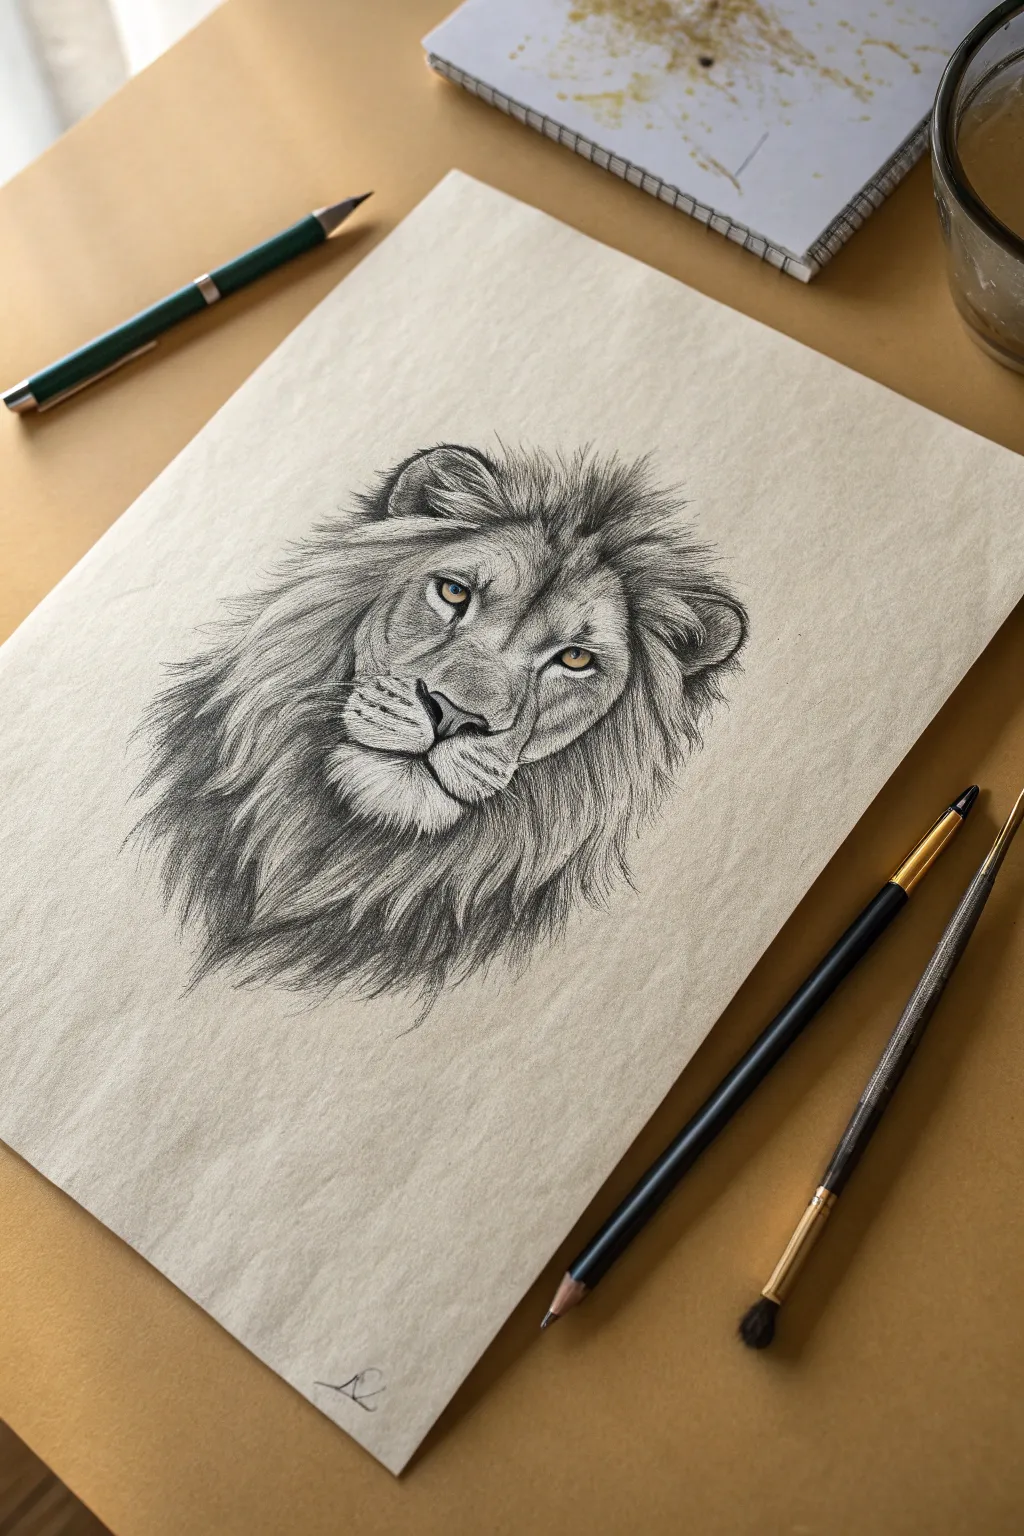
Capture the solemn dignity of the king of beasts with this classic front-facing portrait. By working on toned tan paper, you’ll be able to create striking highlights and deep shadows that bring the lion’s fur texture to life with incredible realism.
Step-by-Step
Materials
- Toned tan or grey drawing paper (smooth or vellum finish)
- Graphite pencils (HB, 2B, 4B, 6B)
- Black charcoal pencil or compressed charcoal stick
- White charcoal pencil or white pastel pencil
- Yellow/Gold colored pencil (polychromos or wax-based)
- Fine-point mechanical pencil (0.5mm)
- Kneaded eraser
- Blurring stump or soft paintbrush
- Pencil sharpener
Step 1: Laying the Foundations
-
Establish the symmetry line:
Begin by lightly drawing a vertical line down the center of your paper. This guide is crucial for a front-facing portrait to ensure the eyes and muzzle remain symmetrical. -
Map the key shapes:
Sketch a sturdy, inverted triangle shape for the nose nose about a third of the way up the page. From the top corners of the nose, draw light diagonals upwards to mark the inner corners of the eyes. Use simple circles to indicate the eye placement. -
Outline the mane:
Focus on the overall silhouette of the mane rather than individual hairs. Draw a large, rough oval shape that frames the face, slightly wider at the distinct ‘cheek’ fluffs. -
Refine the facial features:
Develop the drawing of the muzzle, adding the split in the upper lip and the chin. Carefully shape the eyes, making them almond-shaped with a slight downward slant towards the nose.
Keep it Sharp
For realistic fur, a sharp point is non-negotiable. Rotate your pencil every few strokes to maintain a fine edge, or keep sandpaper handy to constantly hone the lead tip.
Step 2: Eyes and Face Details
-
Detail the eyes:
Outline the eyes firmly with a dark 4B pencil or black charcoal. Fill in the pupils solid black, leaving a tiny speck of paper visible for the catchlight. -
Add the golden hue:
Take your yellow or gold colored pencil and gently shade the irises. Keeping the color subtle creates a haunting realism against the monochrome greys. -
Darken the nose and mouth:
Use your 6B graphite or black charcoal to fill in the dark nostrils and the separation line of the mouth. Shade the nose leather, keeping the top edge slightly lighter to show dimension. -
Establish facial structure:
Using an HB pencil, shade the structure of the snout and brow bone. Use shading to carve out the depth of the eye sockets, keeping your strokes light and smooth.
Muddy Fur Fix
If your fur looks like a solid grey blob, you’ve over-blended. Use a specialized ‘tombow mono zero’ eraser or the sharp edge of a kneaded eraser to lift out thin highlights.
Step 3: Mastering the Fur Texture
-
Start the short fur:
On the nose bridge and cheeks, use your mechanical pencil or a sharp HB to create very short, directional strokes that radiate outward from the center. -
Build the mid-length fur:
Move to the forehead and sides of the face. Switch to a 2B pencil and lengthen your strokes. Ensure the strokes follow the natural growth pattern: moving up the forehead and sweeping back around the ears. -
Create the deep mane shadows:
Identify where the mane is thickest and darkest, usually under the chin and behind the ears. Use your darkest charcoal or 6B pencil to lay down heavy, broad strokes here. -
Layer the mane strands:
Transition to the lighter areas of the mane. Use long, flowing S-curve strokes with a 4B pencil. Drawing fur is about layering; allow some strokes to cross over others to create a tangled, natural look. -
Soften the texture:
Take a clean, dry paintbrush or a blending stump and gently flick it in the direction of hair growth. This softens the pencil lines just enough to make them look like soft fur rather than wire.
Step 4: Highlights and Final Touches
-
Add white charcoal highlights:
Use your white charcoal pencil to strike in the whiskers on the muzzle. Make these strokes quick and confident so they tape naturally at the end. -
Highlight the mane:
Look for tufts of hair in the mane that catch the light. Add strokes of white charcoal intermingled with the grey graphite to create depth and sheen. -
Brighten the eyes:
Reinforce the catchlight in the eyes with white charcoal or a white gel pen if the paper white isn’t bright enough. Add a tiny touch of white to the lower eyelid rim. -
Clean up borders:
Erase any stray construction lines or smudges around the outer drawing. Adding a small signature at the bottom gives it a professional finish.
Step back and admire the intense, soulful gaze you have created on the page


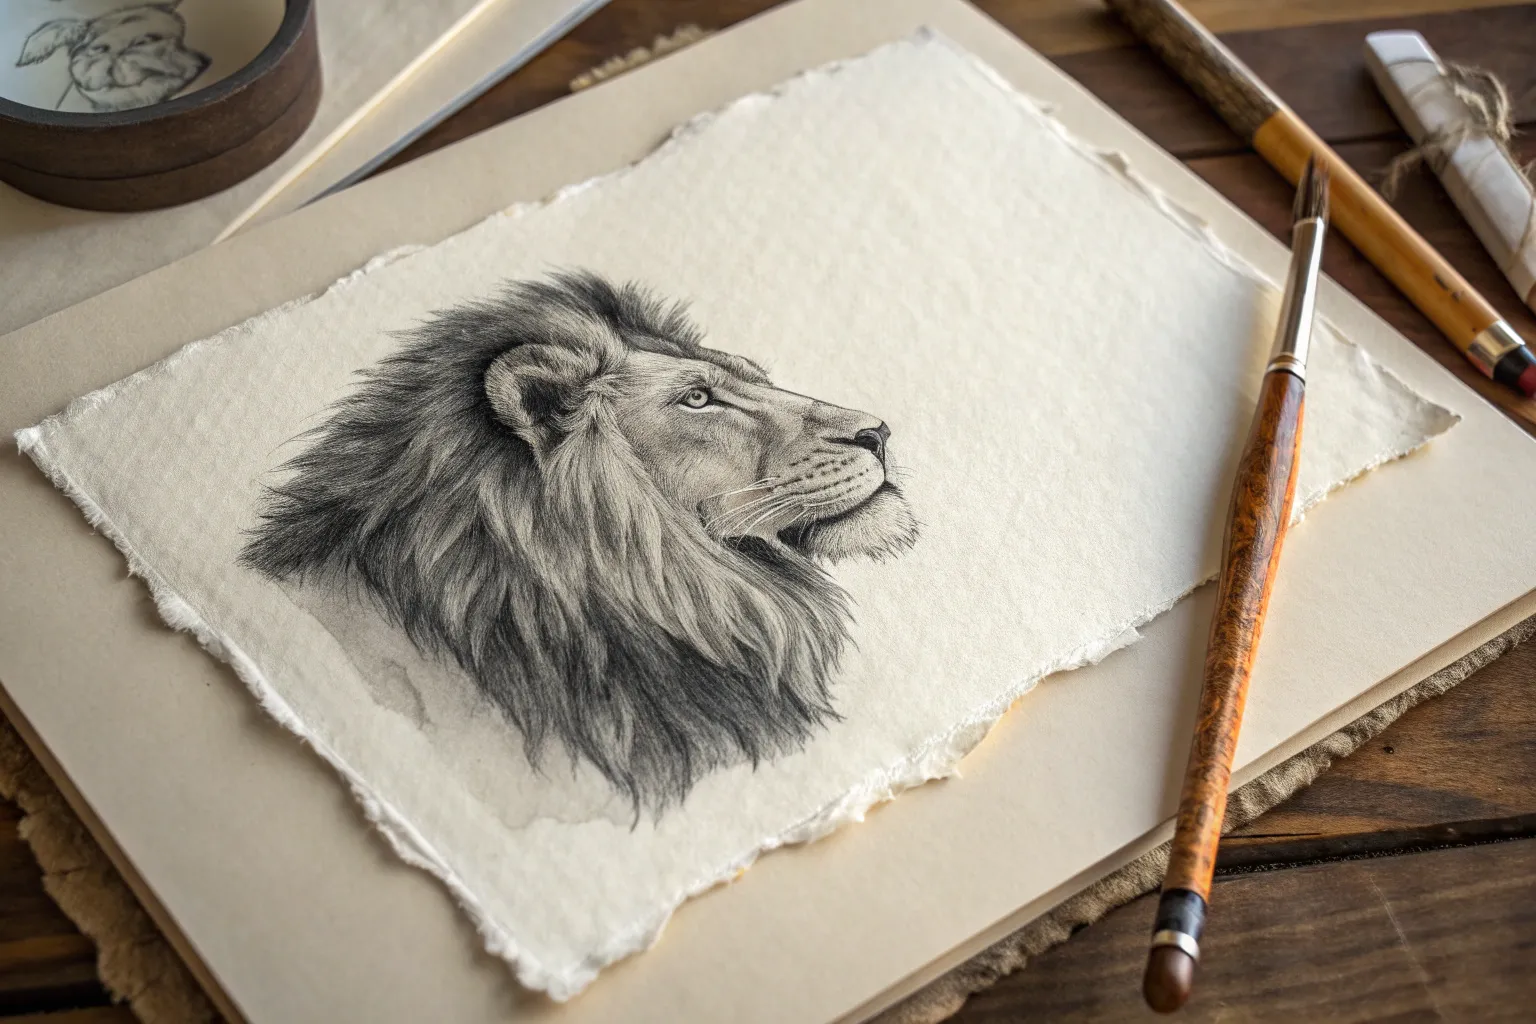
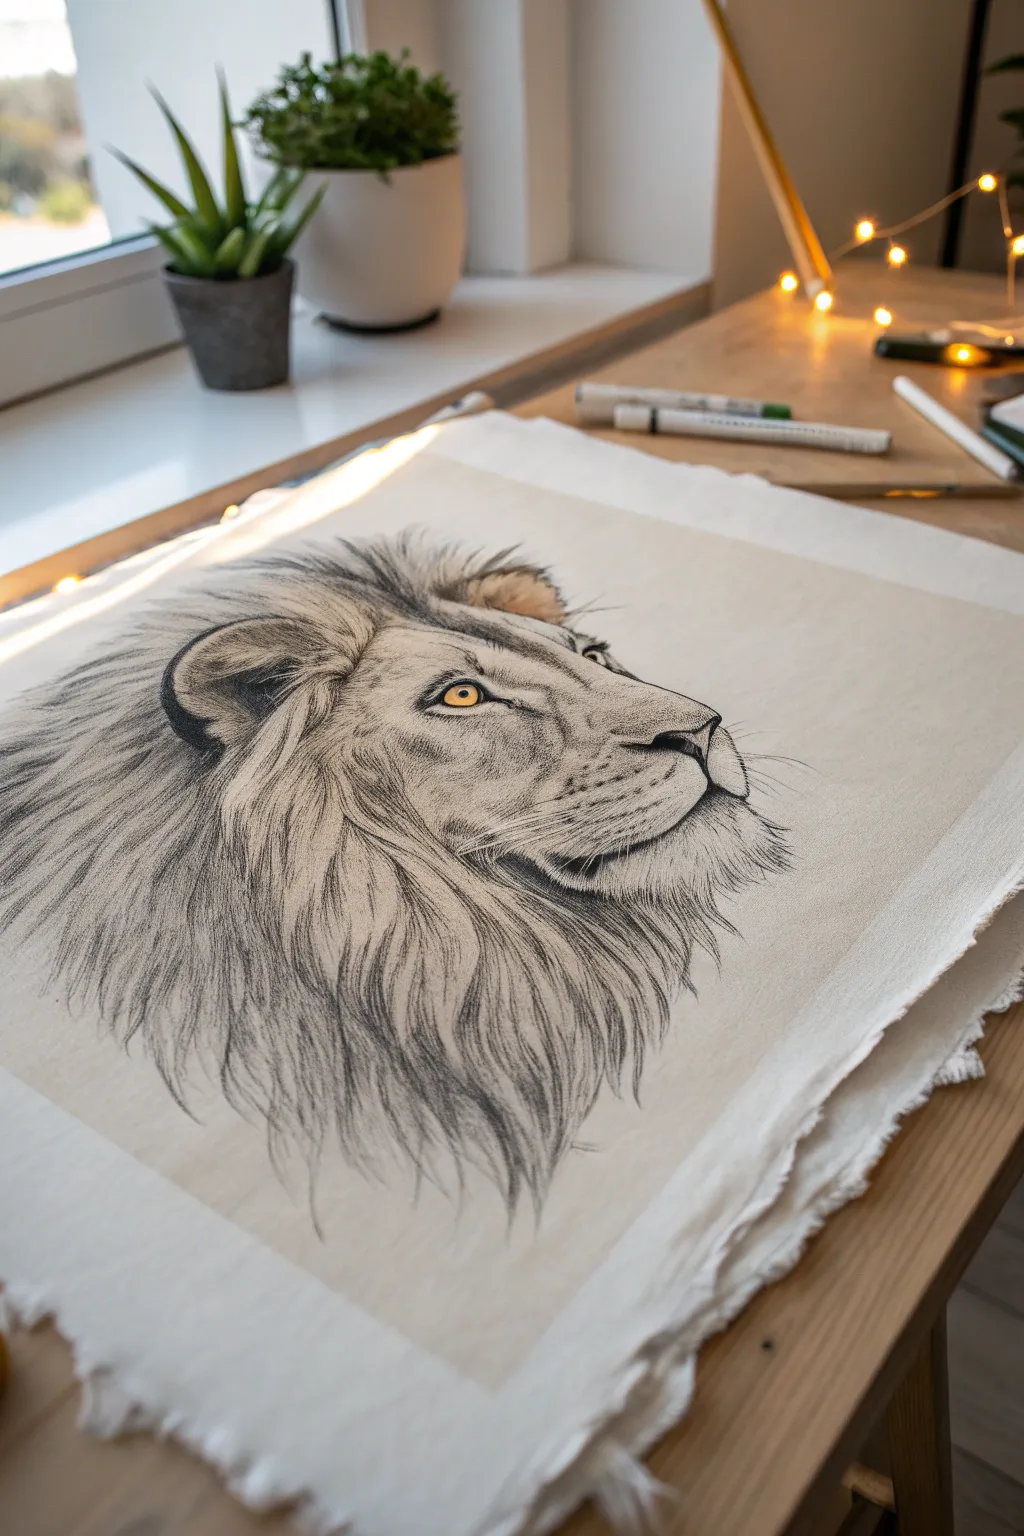
Regal Lion Profile With Calm Expression
Capture the quiet dignity of the savannah’s king with this highly detailed profile study. Using a combination of graphite and charcoal pencils, you will learn to render intricate fur textures and a piercing, lifelike eye that serves as the drawing’s focal point.
Step-by-Step Tutorial
Materials
- High-quality textured drawing paper (deckle edge optional)
- Graphite pencils (HB, 2B, 4B, 6B)
- Charcoal pencils (soft and medium)
- Kneaded eraser
- Precision eraser (mono zero or similar)
- Blending stumps (tortillons)
- White gel pen or white gouache for highlights
- Soft brush (for sweeping away eraser crumbs)
Step 1: Laying the Foundation
-
Establish the proportions:
Begin with a very light HB pencil sketch. Draw a circle for the main skull shape and a smaller, slightly squared shape protruding to the right for the muzzle. Connect these with a sloping line for the forehead and nose bridge. -
Refine the profile:
Carefully outline the distinct Roman nose shape of the lion. Mark the position of the eye, which sits relatively high, and the ear, which should be tucked back into the mane. Keep your lines faint so they disappear later. -
Map the fur direction:
Before adding detail, draw light directional arrows or flow lines across the mane and face. The fur on the nose is short and velvet-like, while the mane flows downwards and backwards in thick distinct clumps.
Keep It Clean
Place a scrap piece of paper under your drawing hand. This prevents your palm from smudging your careful shading and keeps skin oils off the paper.
Step 2: The Soul of the Lion: The Eye
-
Outline the eye shape:
Draw the almond shape of the eye, paying close attention to the dark tear duct area at the front. The upper lid should be heavy and dark. -
Shade the iris:
Using a 2B pencil, shade the iris, leaving a small, sharp circle of white paper for the catchlight. The iris should be darker at the top (under the lid’s shadow) and lighter at the bottom. -
Deepen the pupil:
Fill in the pupil with your darkest charcoal pencil for maximum contrast. This intense black will make the amber tones of the graphite iris pop.
Step 3: Developing the Facial Features
-
Render the muzzle:
Using short, tight strokes with an HB pencil, create the velvet texture on the nose bridge. Shade around the whisker pads, using small dots to indicate where the whiskers will emerge later. -
Add the nose and mouth:
Darken the nostril and the line of the mouth with a 4B pencil. The mouth line often turns slightly downward at the corner, adding to that ‘calm’ regal expression. -
Shade the cheek:
Apply a base layer of shading to the cheek area under the eye. Use a blending stump to smooth this out, as the facial fur is much shorter and softer than the mane.
Mane Looks Flat?
Don’t just draw parallel lines. Ensure hairs cross over each other and group them into ‘clumps’ with distinct shadow shapes between them for volume.
Step 4: The Mane Event
-
Start the main fur clumps:
Switch to your 4B and 6B pencils. Instead of drawing individual hairs immediately, shade the dark ‘valleys’ or shadows between the large locks of hair first. This negative drawing technique defines the shapes. -
Texture the light areas:
Inside the lighter shapes you just defined, use a sharp 2B pencil to draw long, flowing strands. Follow the directional guide you made earlier. I find it helpful to rotate the paper to keep my hand stroke natural. -
Add charcoal depth:
For the deepest shadows behind the ear and under the jaw, use the charcoal pencil. This matte black creates a rich depth that graphite alone cannot achieve. -
Work on the ear:
Render the ear with a mix of dark internal shadows and fluffy light hairs on the rim. Use the precision eraser to ‘draw’ white hairs back into the dark charcoal background of the ear interior. -
Create the chin beard:
The fur on the chin is often lighter and wispy. Use lighter strokes here and leave more of the paper white showing through to suggest this lighter coloration.
Step 5: Final Details
-
Draw the whiskers:
Sharpen your pencil to a needle point or use a mechanical pencil. With quick, confident flicks, draw the long whiskers exploding from the muzzle pads. Press firmly at the start of the stroke and lift off at the end. -
Add highlights:
Use your white gel pen or gouache to add tiny, sharp highlights to the wettest part of the eye and the tip of the nose. -
Review contrast:
Step back and squint at your drawing. Darken any areas in the mane that look too washed out to ensure the profile stands out boldly against the plain paper.
Now step back and admire the powerful spirit you’ve captured on the page


Roaring Lion Profile With Open Jaw
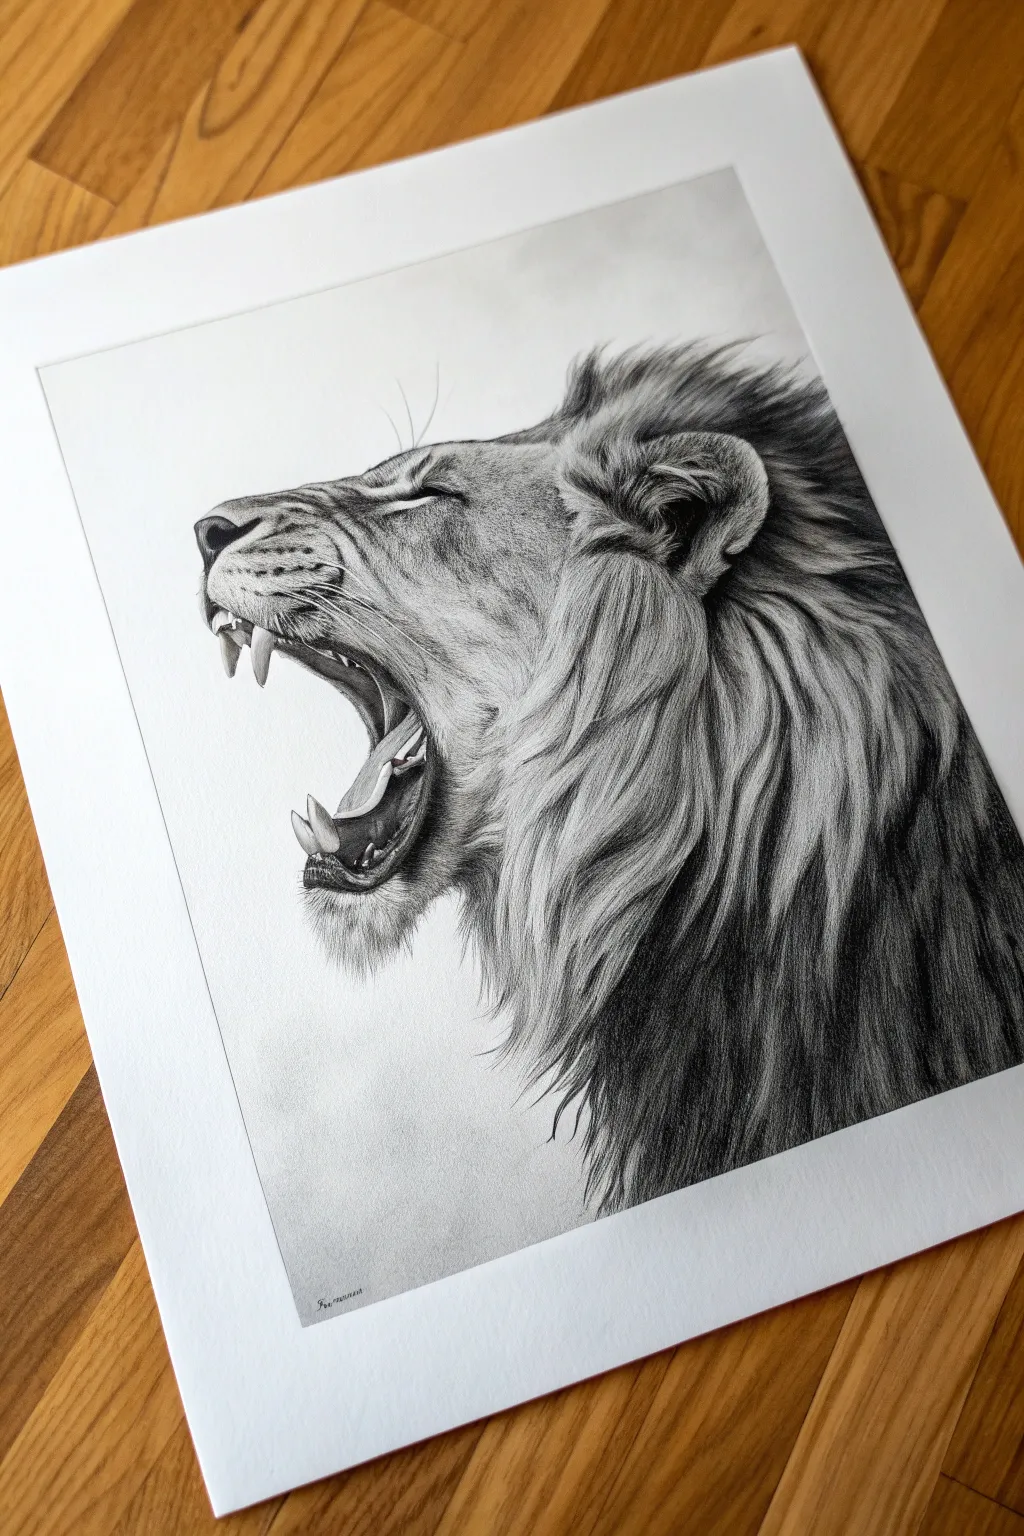
Capture the raw power and detailed majesty of the king of the jungle with this striking graphite pencil drawing. This project focuses on realistic fur textures and dramatic contrast to bring a roaring lion to life on paper
Step-by-Step Guide
Materials
- High-quality drawing paper (smooth or vellum finish, at least 90lb)
- Graphite pencils (range from 2H to 8B)
- Mechanical pencil (0.5mm, HB or 2B)
- Kneaded eraser
- Precision eraser (stick or mono zero)
- Blending stumps (tortillons)
- Soft tissue or chamois cloth
- Reference photo of a lion profile
Step 1: Laying the Framework
-
Establish the Head Shape:
Begin with a 2H pencil to sketch a large, gentle oval for the main mass of the head. Add a smaller, slightly rectangular shape extending to the left for the muzzle area. -
Define the Jawline:
Draw the open jaw by creating two angled lines extending from the muzzle. The top line usually angles up slightly, while the bottom jaw drops significantly to create that wide, roaring gap. -
Map Facial Features:
Lightly mark the placement of the eye—it should sit fairly high on the head, roughly aligned with the bridge of the nose. Sketch the triangular shape of the nose tip and the curve of the ear set back on the skull. -
Outline the Teeth and Tongue:
Carefully draw the curved, sharp canine teeth on the upper and lower jaws. Sketch the tongue’s shape, noting how it lifts in the middle and curves downward near the throat. -
Refine the Contour:
Go over your initial guides to solidify the lion’s profile. Add slight bumps for the brow ridge and the wrinkled skin on the nose bridge that appears when the animal snarls.
Step 2: Developing Texture and Depth
-
Shade the Mouth Cavity:
Use a 4B or 6B pencil to fill in the darkest recesses of the mouth. This deep black background will make the white teeth and lighter tongue pop significantly. -
Detail the Eye:
Switch to a mechanical pencil for precision. Draw the pupil and iris, leaving a tiny white spot for the catchlight. Darken the rim around the eye and add short, directional strokes for the eyelashes. -
Render the Nose and Muzzle:
Use an HB pencil to shade the nose leather, keeping it textured but not too dark yet. Add the small dots (follicles) for whiskers on the upper lip. -
Start the Short Fur:
On the face, use short, quick strokes with an HB or B pencil to mimic short fur. Follow the bone structure—strokes should curve around the cheekbones and snout. -
Create Skin Folds:
Around the nose and eye, draw the wrinkles created by the roar. Use a blending stump to soften these lines so they look like flexible skin rather than hard cuts. -
Detail the Teeth and Gums:
Lightly shade the gums with an H pencil. For the teeth, keep them mostly paper-white but add faint shading near the gumline to show curvature.
Hair Flow Pro Tip
Rotate your paper constantly while drawing the mane. Pulling pencil strokes toward your body is much easier and creates smoother, more natural-looking hair tapers than pushing away.
Step 3: The Mane Event
-
Map Flowing Hair Directions:
Before committing to dark marks, lightly sketch large arrows or lines indicating which way the long mane hair flows. It usually sweeps backward from the face and down the neck. -
Layer Light Mane Hairs:
Using a 2B pencil, start drawing long, flowing strokes for the mane. Don’t try to draw every hair; instead, group them into clumps or locks. -
Deepen the Shadows:
Switch to a 6B or 8B pencil to add deep shadows between the locks of hair. This negative space defines the shape of the lighter hairs on top. -
Refining the Ear Fur:
The fur around the ear is complex. Use short strokes inside the ear and longer, tufted strokes around the edges to make it look soft and fluffy. -
Blend for Softness:
I like to use a soft tissue to gently rub over the mane area. This pushes the graphite into the paper grain, creating a smooth mid-tone base. -
Add Crisp Highlights:
Take your precision eraser (or the sharp edge of a cut eraser) and erase thin lines back out of the mane and facial fur. These bright white strokes act as illuminated hairs hitting the light. -
Final Whiskers:
Using your sharpest pencil or even an indentation tool, add the long whiskers exploding from the muzzle. Make these strokes confident and quick to keep them looking natural. -
Contrast Check:
Step back and assess your drawing. Darken the deepest blacks in the mane and mouth one last time to ensure maximum dramatic contrast.
Level Up: Indentation
Before shading the muzzle, use a stylus or empty ballpoint pen to press whisker lines into the paper. When you shade over them, the lines stay bright white for ultra-realistic whiskers.
Sign your masterpiece in the corner and admire the ferocious energy you’ve captured on the page


Full-Body Lion Walking Toward You

Capture the raw power and regal presence of a male lion with this realistic graphite drawing tutorial. You will learn to render intricate fur textures and create depth as the subject strides confidently toward the viewer on off-white paper.
Step-by-Step
Materials
- High-quality smooth bristol or hot-press watercolor paper (off-white/cream tone recommended)
- Graphite pencil set (spanning 4H to 6B)
- Mechanical pencil (0.5mm HB or 2B) for fine details
- Kneaded eraser
- Precision mono zero eraser
- Blending stumps (tortillons)
- Tissue paper or cotton swab for soft shading
- Workable fixative spray
Step 1: Structural blocking
-
Establish the gesture:
Begin with a very light 4H pencil to draw a gesture line indicating the lion’s movement. Mark the top of the head and the bottom of the paws to ensure the full body fits on your page. -
Construct the main forms:
Sketch a large oval for the chest and ribcage, and a slightly smaller circle for the head. Connect these with loose lines to form the thick neck. Add cylinder shapes for the front legs, paying close attention to the perspective; the leg stepping forward should appear slightly larger. -
Refine the facial features:
Map out the construction lines on the face. Draw a horizontal line for the eyes and a vertical line for the nose bridge. Sketch the basic shapes of the muzzle, nose triangular tip, and the ears.
Fixing “Flat” Fur
If the mane looks flat, you’ve likely over-blended. Re-establish texture by adding sharp, dark pencil strokes for shadows and erasing thin lines for highlights.
Step 2: Detailing the Face & Mane based
-
Draw the eyes:
Switch to a sharp HB or 2B pencil. Define the almond shape of the eyes. Outline the pupils and iris, leaving a tiny white speck for the catchlight to bring the lion to life. -
Define the nose and mouth:
Darken the nostrils and the line of the mouth. Use short, curved strokes to indicate the whisker spots on the muzzle without drawing the whiskers just yet. -
Begin the mane texture:
Using a 2B pencil, start laying down the foundation of the mane. Follow the growth direction—hair flows outward from the face. Don’t draw individual hairs yet; draw clumps or locks of hair instead. -
Deepen facial shadows:
Use a 4B pencil to add depth around the eyes and under the chin. I find that deepening these shadows early helps anchor the focus of the drawing before moving to the body.
Warm it Up
To mimic the savannah heat, gently rub a small amount of charcoal powder or sepia pastel dust into the background for a subtle, warm atmospheric tint.
Step 3: Body & Fur Texture
-
Shade the torso:
Lightly shade the body using an H pencil to establish the mid-tones. Use a blending stump to smooth this base layer so it looks like soft, short fur. -
Develop the leg muscles:
Observe where the light hits the muscles. Keep the tops of the paws and the front of the legs lighter. Use a B pencil to shade the recesses between muscles to show the anatomy beneath the skin. -
Layer the mane:
Return to the mane with a 6B pencil for the darkest shadows between the locks of hair. This high contrast is what makes the mane look thick and voluminous. -
Refine the paws:
Detail the large paws. Outline the separate toes and use curved shading lines to show their rounded volume. Ensure the claws are retracted but visible as dark hints in the fur.
Step 4: Final Atmosphere
-
Add ground details:
Sketch loose, patchy grass around the paws using quick, upward flicks of a 2B pencil. Vary the length and direction of the grass blades for realism. -
Create a cast shadow:
Use a soft 4B or 6B pencil to draw the shadow directly underneath the lion. This grounds the figure so it doesn’t look like it’s floating. -
Final highlights:
Take your mono zero eraser (or a sliced regular eraser) and lift out thin highlights in the mane and on the whiskers. This technique, subtractive drawing, creates convincing white hairs. -
Seal the drawing:
Once satisfied with the contrast balance, lightly spray the drawing with a workable fixative to prevent the graphite from smudging.
Now step back and admire the intense gaze of your finished graphite masterpiece
BRUSH GUIDE
The Right Brush for Every Stroke
From clean lines to bold texture — master brush choice, stroke control, and essential techniques.
Explore the Full Guide
Lion Head Construction Lines Practice
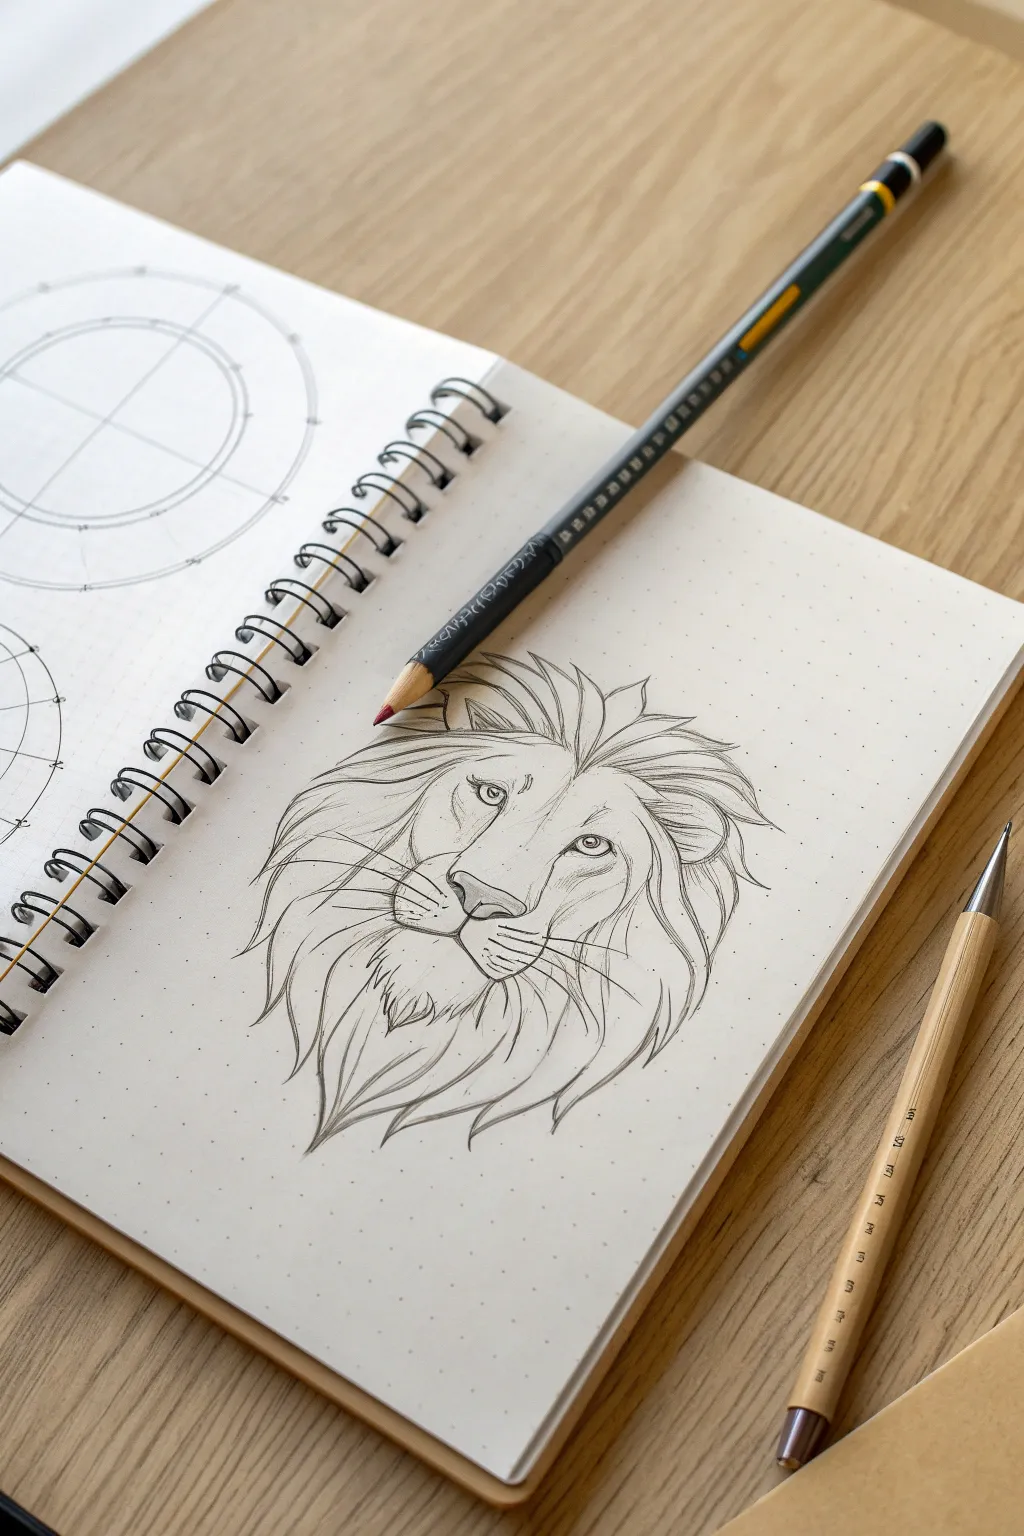
Master the art of combining engineered precision with organic flow in this sketchbook study. This project bridges the gap between rigid construction lines and the soft fur textures of a noble lion’s mane, perfectly suited for dot-grid journaling.
Detailed Instructions
Materials
- Dot grid sketchbook or paper
- Compass (optional but recommended for the prep page)
- H or 2H graphite pencil (for construction lines)
- HB or 2B graphite pencil (for the main sketch)
- Fine liner or darker pencil (optional, for final accents)
- Eraser (kneaded eraser preferred)
Step 1: Setting the Foundation
-
Create the symmetry line:
Begin on your blank page by lightly drawing a vertical centerline. Use the dots on your grid paper to ensure this line is perfectly straight, as it will anchor the entire face. -
Establish the cranial circle:
Draw a circle for the main part of the skull. This shouldn’t be too large; leave plenty of room around it for the majestic mane. -
Define the muzzle box:
Attached to the bottom of your circle, sketch a slightly tapered rectangle or ‘U’ shape for the muzzle area. I find that keeping this shape slightly angular at first helps structure the jaw better than a simple curve. -
Mark eye placement:
Draw a horizontal line across the center of the circle. This is your eye line. Mark two small points equidistant from the centerline for the pupils.
Hair Flow Secret
Don’t draw every single hair. Draw ‘clumps’ or ribbons of hair by outlining V-shapes, then fill them with just a few internal lines for volume.
Step 2: Drafting Facial Features
-
Form the nose bridge:
Draw two diagonal lines coming down from the inner corners of the eye markers toward the nose area. This creates the bridge of the muzzle. -
Sketch the nose pad:
At the bottom of the muzzle shape, draw the nose pad. It looks like a wide, soft triangle pointing down. Add the nostrils as small curves on the sides. -
Outline the eyes:
Sketch the almond shapes of the eyes. Make the outer corners tilt slightly upward and emphasize the dark rim around them, typical of feline anatomy. -
Draw the mouth and chin:
From the bottom of the nose pad, draw a vertical line connecting to the mouth slit. Curve the mouth outwards on both sides. Add a small, furry chin shape underneath.
Wonky Eyes?
If the eyes look crossed or uneven, flip your sketchbook upside down. This fresh perspective usually highlights asymmetry immediately so you can fix it.
Step 3: Adding the Mane and Details
-
Rough in the mane volume:
Before drawing individual hairs, lightly sketch the outer contour of the mane. Think of it as a cloud or flame shape surrounding the head, rather than individual strands. -
Detail the ears:
Tuck the rounded ears into the mane line, positioned roughly at the same height as the eyes or slightly higher. Their base should be hidden by tufts of fur. -
Refine the face contour:
Switch to your softer pencil (HB or 2B). Darken the lines of the face, adding unevenness to the cheeks to suggest fur rather than smooth skin. -
Draw cheek fur:
Sketch long, sweeping strokes coming from the cheeks, flowing backward. These should look like distinct clumps of hair. -
Build the upper mane layers:
Start adding the mane hair from the forehead, sweeping the lines upward and backward. Use quick, confident flicks of the wrist to taper the ends of the lines. -
Flow the side mane:
Continue these sweeping strokes down the sides of the face. Varry the direction slightly so the hair looks natural and windswept, not perfectly combed. -
Add the bottom beard:
Create the beard area by drawing hair that flows downward from the chin. Group these lines into V-shaped points to simulate wet or matted fur texture. -
Add whiskers:
Place small dots on the muzzle pad first. Then, use very quick, light strokes to flick long whiskers outward. Don’t press too hard here. -
Final shading touches:
Add subtle shading under the chin, inside the ears, and around the eyes to give depth. Gently erase any visible construction lines that distract from the flow.
Now you have a regal lion portrait that perfectly balances structure and wild grace
Nose, Muzzle, and Whisker Pad Focus
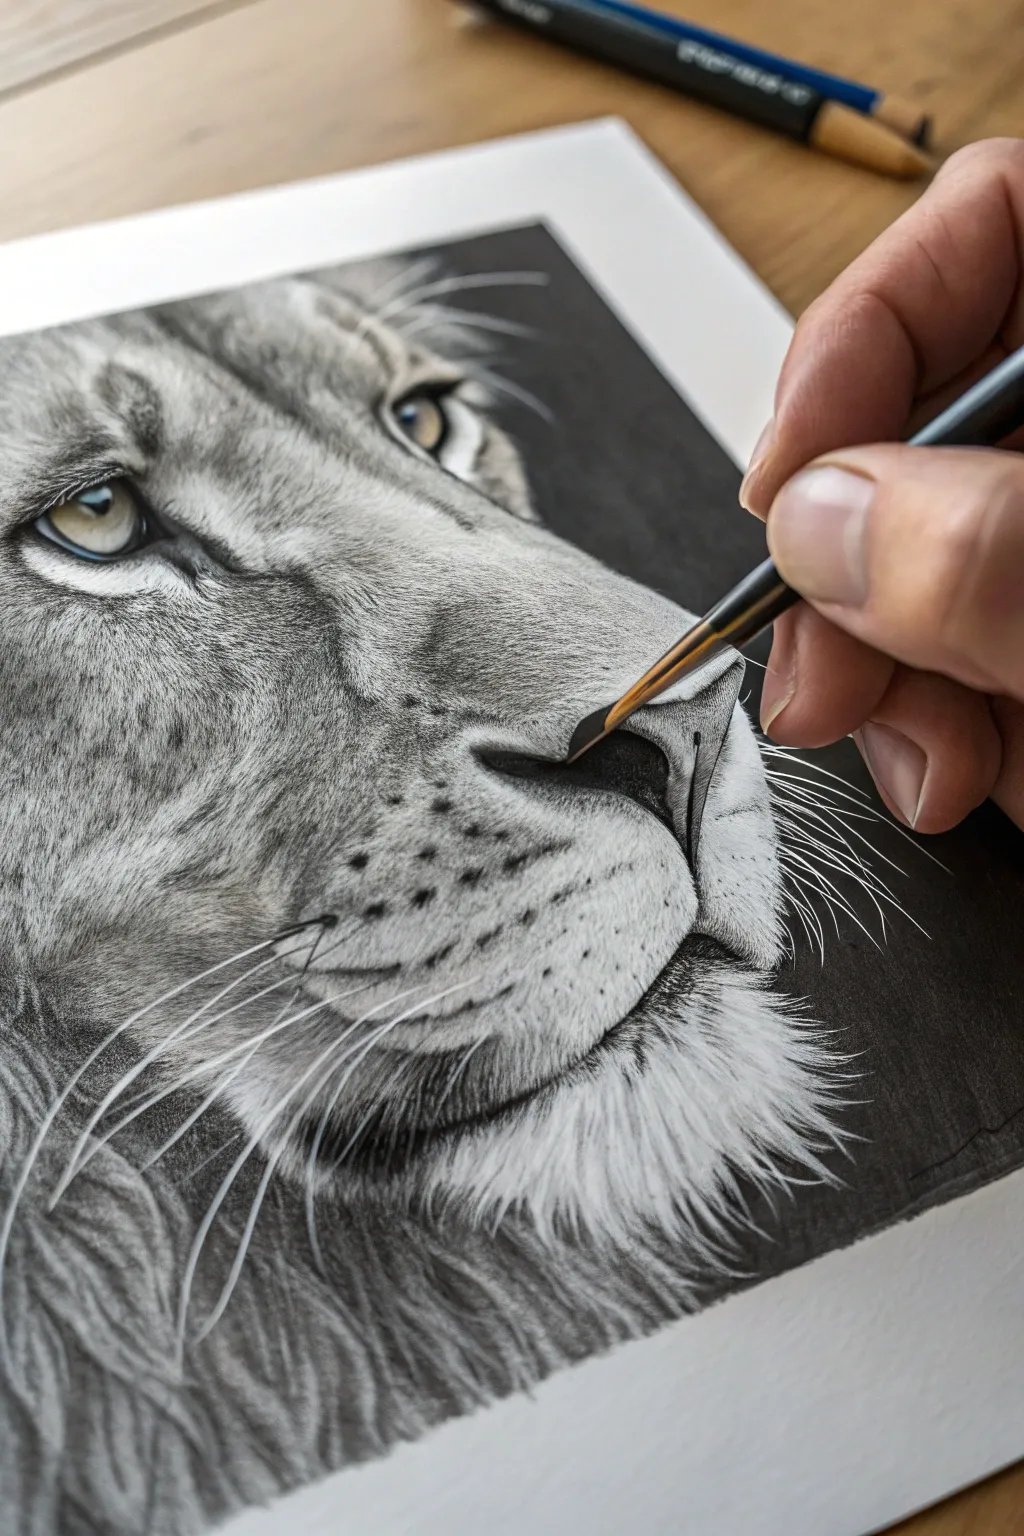
Capture the intense beauty of a big cat with this focused study on the nose and muzzle area using high-contrast shading. You will learn to render velvety fur textures and piercing eyes that seem to look right off the paper.
How-To Guide
Materials
- High-quality smooth bristol board or hot-press watercolor paper
- Set of graphite pencils (2H to 8B)
- Black charcoal pencil or carbon pencil for deepest blacks
- Fine-point mechanical pencil (0.5mm, 4B lead)
- Small round synthetic brush (size 0 or 1)
- Graphite powder or charcoal powder
- Kneaded eraser
- Mono Zero eraser (precision eraser)
- White gel pen or gouache for highlights
Step 1: Laying the Foundations
-
Basic Sketch:
Begin with a very light outline using a 2H pencil. Focus on the triangular shape of the nose, the curve of the whisker pads, and the alignment of the left eye. Keep lines faint so they don’t show later. -
Mapping Shadows:
Lightly shade the darkest areas first to establish a value map. This includes the nostril interior, the crease where the lips meet, and the pupil. This helps anchor your drawing before adding texture. -
The Eye:
Render the eye early to bring life to the piece. Use a sharp 4B pencil for the pupil and the dark rim around the eyelids. Leave a crisp white circle for the catchlight reflection. -
Iris Detail:
Shade the iris using a mid-tone grey, radiating lines outward from the pupil. Darken the top under the eyelid to show depth and roundness.
Step 2: Fur Texture and Volume
-
Base Tone Application:
Using graphite powder and a soft brush, gently wash a light grey tone over the entire face area, avoiding the whiskers and highlights. This gets rid of the stark white paper look. -
Bridge of the Nose:
Start adding short, dense fur strokes on the nose bridge. Use a mechanical pencil for precision. The hairs here are very short and should flow downward and outward. -
Darkening the Creases:
Switch to a 6B or charcoal pencil to deepen the shadow between the nose and the cheek. This creates the three-dimensional form of the muzzle popping forward. -
Muzzle Texture:
On the muzzle pad, instead of drawing individual hairs immediately, stipple tiny dots and short horizontal dashes. This mimics the rough, pore-like texture of the skin beneath the whiskers. -
Nose Leather:
For the nose tip itself, smooth out the graphite with a blending stump, then use the Mono Zero eraser to lift out tiny highlights that suggest a wet, leather-like texture. Use the carbon pencil for the pitch-black nostrils.
Keep it Clean
Place a sheet of clear acetate or scrap paper under your drawing hand. This prevents your skin oils and friction from smudging previous pencil work.
Step 3: Final Details
-
Whisker Spots:
Identify the rows where whiskers emerge. Draw small, dark, irregular ovals for the follicle spots. Use your darkest pencil here to ensure they stand out against the grey muzzle. -
Adding Whiskers:
I prefer to use a fine brush with white gouache or a sharp white gel pen for whiskers. Commit to the stroke—make it fast and tapered so the whisker looks natural and springy. -
Negative Space Whiskers:
Alternatively, if not using white ink, you must carefully draw the dark fur *around* the white paper to leave thin white lines for the whiskers. This takes patience but looks incredibly realistic. -
Chin Fur:
Draw the longer fur on the chin. These strokes should be longer, wavier, and clumped together slightly. Leave significant white space between clumps to show highlight. -
Deepening Values:
Go back over your darkest darks with the carbon pencil or black ink wash. The contrast between the almost-black shadows and bright white highlights is what makes the image look photographic. -
Final Cleanup:
Use your kneaded eraser to lift any smudges from the background, keeping the surrounding area pristine either stark white or filled with a solid, flat black for drama.
Sharpen Up
Use fine sandpaper to sharpen your pencil lead to a needle point. This is crucial for getting those microscopic fur details without them looking blurry.
Take a step back to admire the lifelike intensity of the gaze you have created.

PENCIL GUIDE
Understanding Pencil Grades from H to B
From first sketch to finished drawing — learn pencil grades, line control, and shading techniques.
Explore the Full Guide
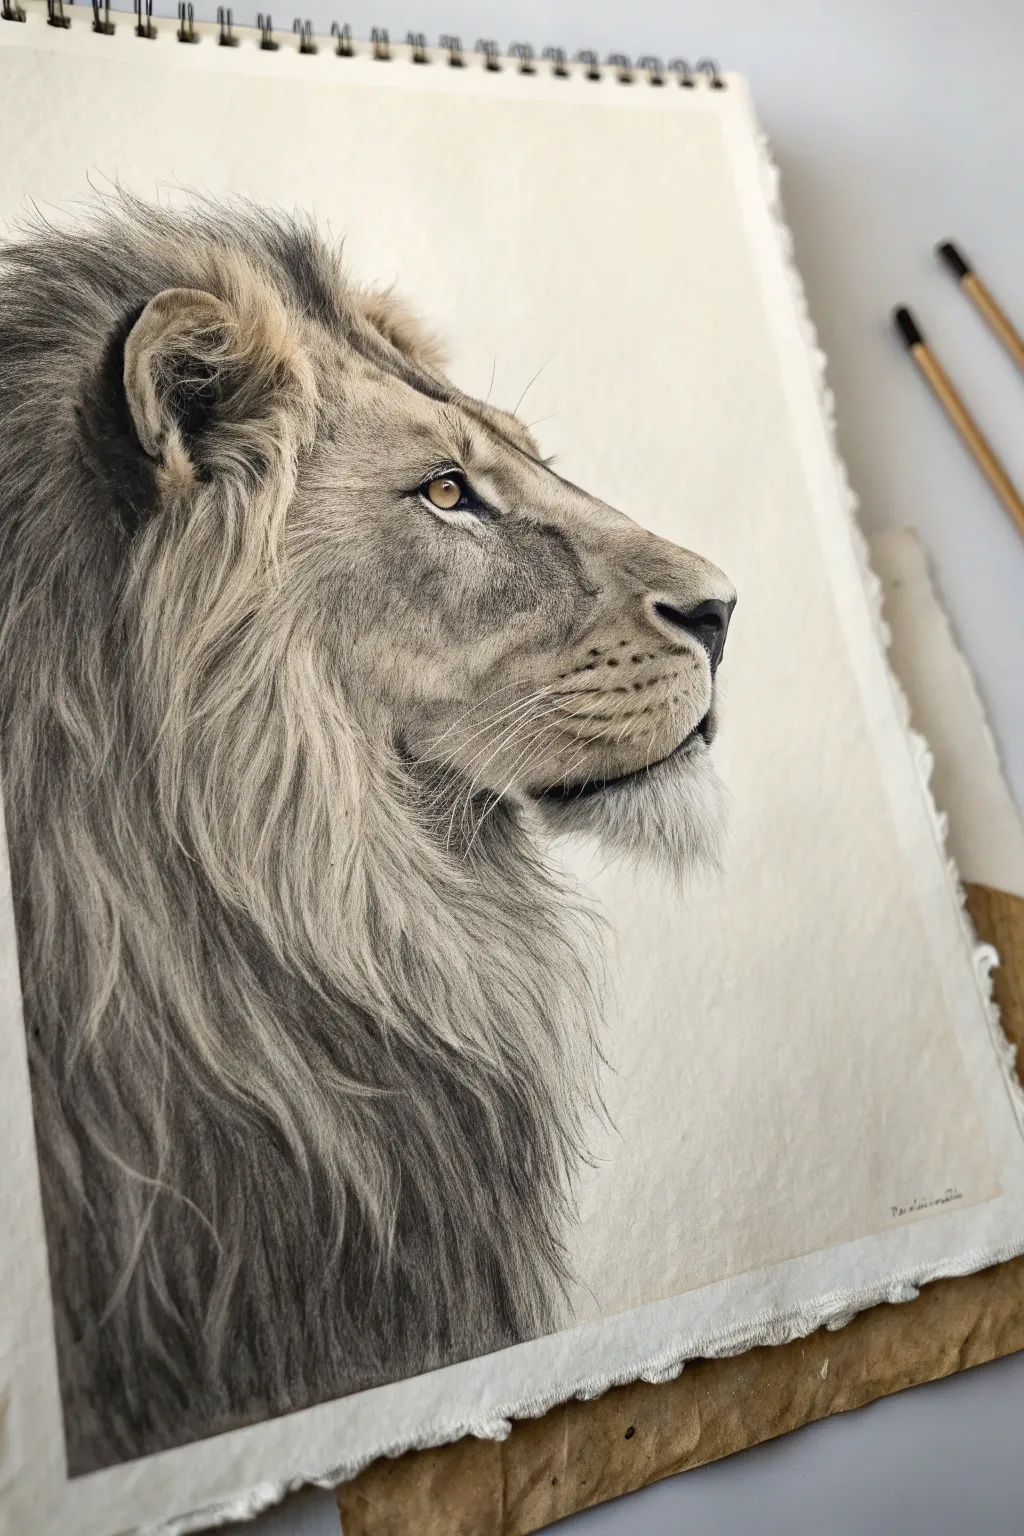
Mane Texture In Big Clumps First
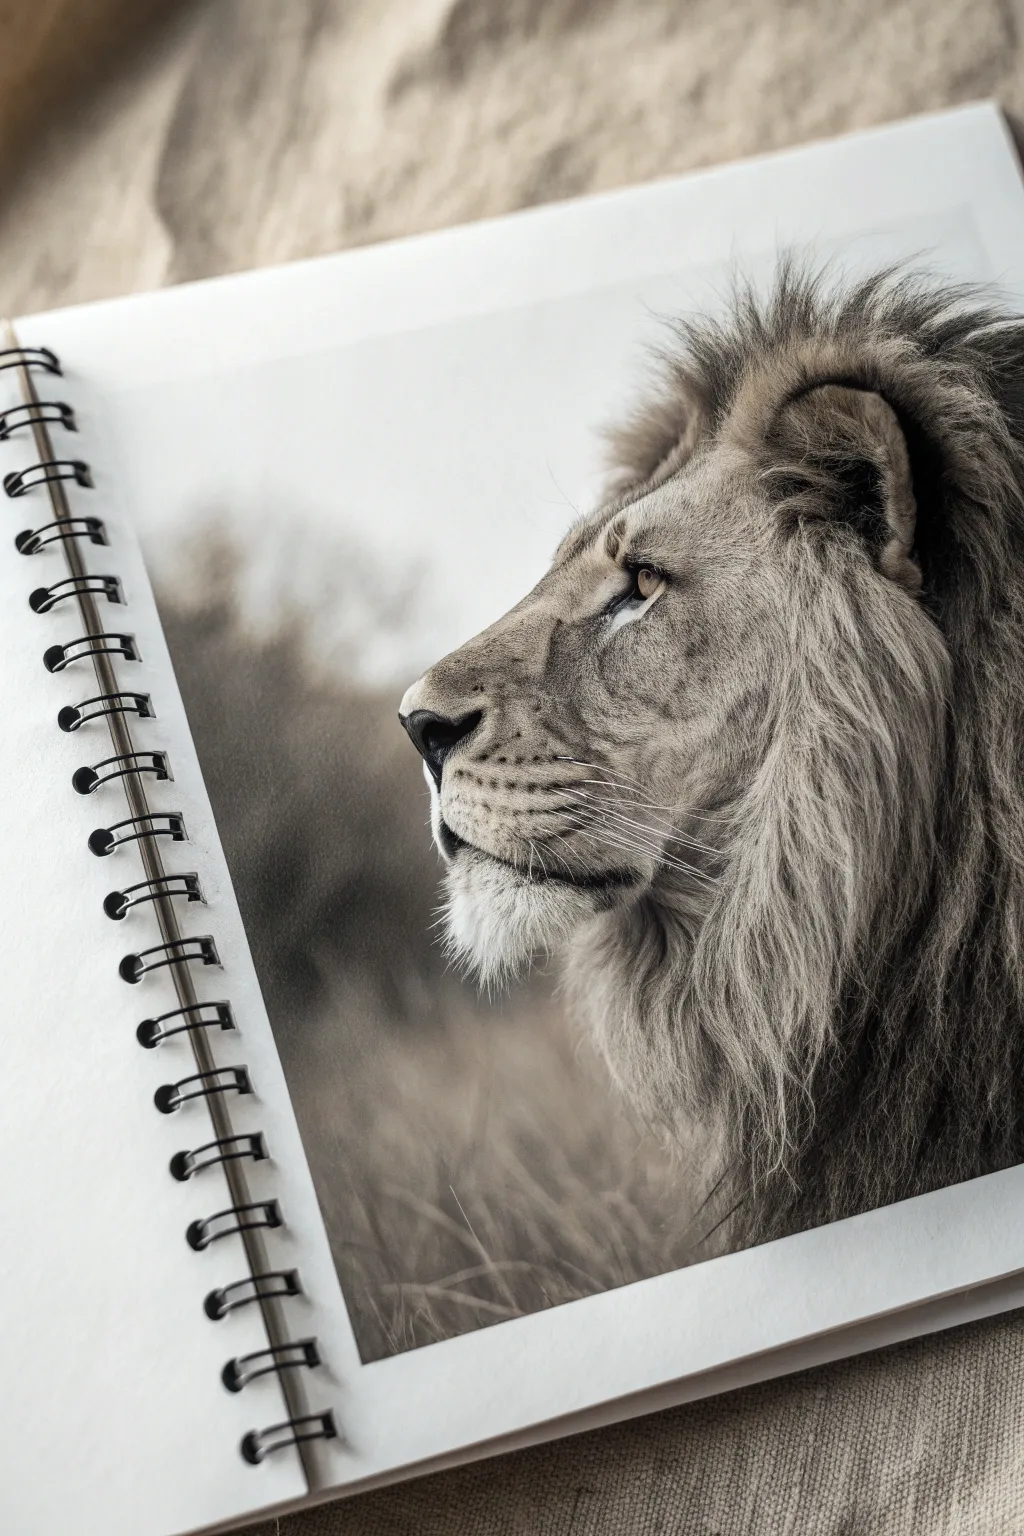
This tutorial guides you through creating a stunningly photorealistic lion profile, focusing heavily on capturing the complex texture of the mane and fur. By working in specific layers, you’ll achieve the depth and softness that makes this regal subject come to life on the sketchbook page.
Step-by-Step
Materials
- Spiral-bound sketchbook (heavyweight paper, smooth or vellum surface)
- Graphite pencils (ranging from 4H to 8B)
- Mechanical pencil (0.5mm HB and 2B)
- Kneaded eraser
- Precision mono zero eraser
- Blending stumps (tortillons) of various sizes
- Tissue or chamois cloth for broad blending
- Reference photo of a lion profile
Step 1: Initial Sketch and Mapping
-
Establish the proportions:
Begin with a loose, light sketch using an HB pencil. Focus on the main shapes: the slope of the forehead, the boxy shape of the muzzle, and the large curve of the mane area. -
Refine the profile:
Sharpen your outline slightly. Pay close attention to the eye placement—it sits deep under the brow ridge. Mark the ear location high on the head, nestled into the future mane. -
Map the fur direction:
Before adding detail, draw light directional arrows or flow lines. The fur flows back from the nose, sweeps down the cheek, and erupts outward in the mane. This map is crucial for realism later.
Step 2: The Face and Features
-
Render the eye:
Start with the eye using a 4B pencil for the pupil and upper lid shadow to create depth. Leave a tiny, crisp white highlight to give it life. Shade the iris with a blending stump for a glassy look. -
Sculpt the nose:
Use a 6B pencil for the dark nostril shape, fading out into the nose leather. The nose texture should look leathery, so use small stippling motions rather than smooth shading here. -
Short fur around the muzzle:
Using a sharp H or HB pencil, draw very short, tight strokes radiating from the nose bridge. Keep these strokes distinct but close together. -
Add the whiskers:
Indent the paper slightly with a dried-out ballpoint pen or a stylus where the whiskers will go. Then, shade over the muzzle with graphite; the indented lines will stay white, creating perfect whiskers later. -
Shade the cheek structure:
Build up the facial structure using a 2B pencil and a blending stump. The cheekbone needs a highlight, while the area under it should be shadowed to show the heavy bone structure.
Mane looks flat?
If the hair looks flat, you likely don’t have enough contrast. Be brave with your 8B pencil—darker shadows between the hair clumps will immediately push the lighter hairs forward.
Step 3: Building the Mane
-
Block in major clumps:
Don’t try to draw every hair at once. Outline the large, distinct clumps of hair that form the mane, referring to the ‘Big Clumps First’ concept. Think of them as overlapping ribbons. -
Base layer shading:
Use a tissue to rub a mid-tone grey layer over the entire mane area. This gets rid of the stark white paper and provides a base for the darker hairs. -
Deep shadows first:
Take a 6B or 8B pencil and darken the deep crevices between the clumps. This negative space defines the volume of the hair more than the hair itself does. -
Mid-tone texture:
Switch to a 2B or 4B pencil. Fill in the individual clumps with long, flowing strokes that follow your initial directional map. Keep your wrist loose. -
Varying line weight:
I find it helps to rotate the pencil frequently to keep a sharp edge. Mix thick and thin strokes within the mane to prevent it from looking like wire. -
Refine the ear fur:
The fur on the ear edge is soft and fuzzy. Use a blending stump to smudge the graphite gently outward, creating a soft-focus effect against the background.
Level Up: Texture
For ultra-realism, use an indentation tool or empty pen to press ‘invisible’ lines into the paper in the mane area before shading. When you pencil over it, realistic white hairs appear magically.
Step 4: Final Details and Atmosphere
-
Create the background:
To make the lion pop, add a blurred background. lay down graphite dust or heavy 6B shading around the face, then blend it vigorously with a tissue until it’s a smooth, out-of-focus grey cloud. -
Lift out highlights:
Use your mono zero eraser or the sharp edge of a kneaded eraser to lift out flyaway hairs in the mane and bright spots on the bridge of the nose. -
Chin and beard details:
The chin hair is often white or very light. Define this area by shading remarkably dark around it (negative drawing) rather than drawing the hairs themselves. -
Final contrast check:
Step back. Deepen your darkest blacks (eyes, nostrils, deep mane shadows) one last time with an 8B to ensure the drawing has a full range of values.
Take a moment to clean up any smudges on the white edges of your paper to give your artwork a professional finish
High-Contrast Shading for a Dramatic Lion
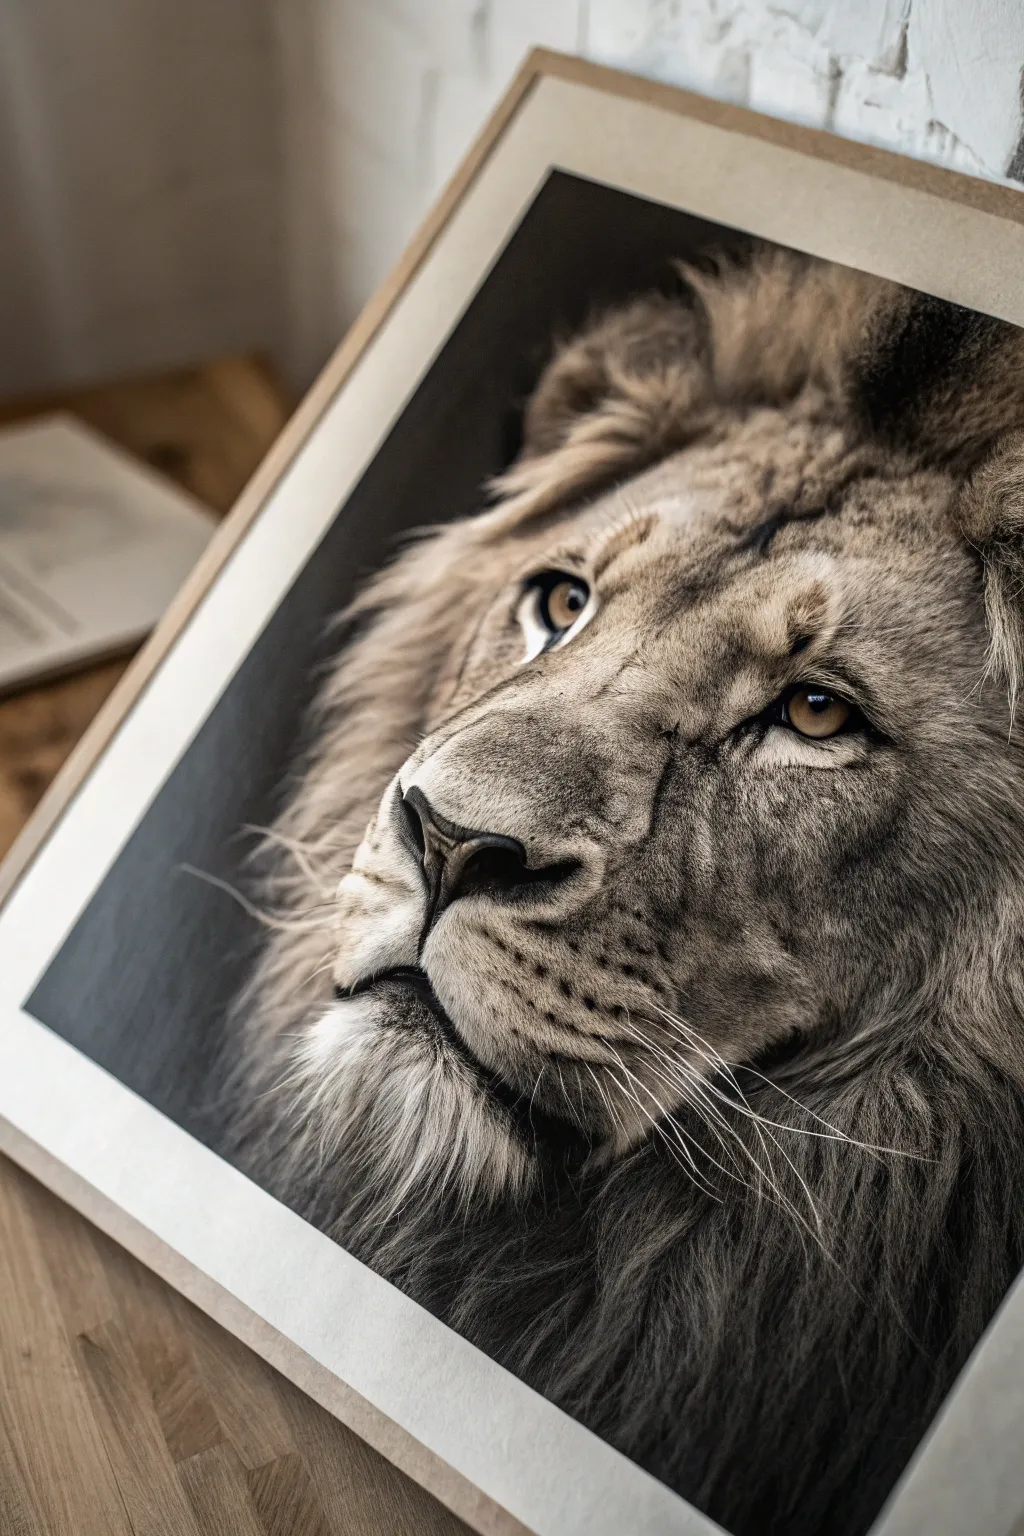
Capture the raw intensity and serene power of the king of beasts with this high-contrast monochromatic drawing project. By focusing on dramatic lighting and intricate fur textures, you will create a piece that feels almost three-dimensional in its depth.
Step-by-Step Tutorial
Materials
- High-quality heavyweight drawing paper (smooth or vellum finish)
- Range of graphite pencils (2H, HB, 2B, 4B, 6B, 8B)
- Charcoal pencil (optional, for deepest blacks)
- Kneaded eraser
- Precision mechanical eraser
- Blending stumps (tortillons)
- Soft tissue or chamois cloth
- Fixative spray
Step 1: Laying the Framework
-
Map the proportions:
Begin with a 2H pencil to very lightly sketch the basic shapes. Focus on the triangular alignment of the eyes and nose. This lion is looking diagonally upward, so angle your centerline accordingly from the bottom left to the top right. -
Define the features:
Sketch the outline of the almond-shaped eyes, the broad bridge of the nose, and the heavy brow ridges. Keep these lines faint; they are guideposts, not permanent borders. -
Outline the mane:
Loosely indicate the flow of the mane. Don’t draw individual hairs yet; instead, draw the ‘chunks’ or masses of hair to see how they frame the face, ensuring the head sits naturally within the fur.
Pro Tip: Paper Barrier
Place a clean sheet of scrap paper under your drawing hand. This prevents the oils in your skin from ruining the paper and keeps you from smudging your work as you move across the drawing.
Step 2: The Soul of the Lion: Eyes and Nose
-
Establish the pupils:
Switch to a 4B pencil to fill in the pupils. These should be the darkest points early on to serve as an anchor for your value range. Leave a tiny, crisp circle of white paper for the catchlight. -
Render the iris:
Use an HB pencil to draw radial lines in the iris, moving from the pupil outward. Keep the area under the upper eyelid slightly darker to suggest a shadow from the brow. -
Sculpt the nose:
Define the nostrils with a 6B pencil. The nostrils are deep caves, so make them pitch black. Fade this darkness gently upward into the gray texture of the nose leather using a 2B pencil. -
Texture the nose leather:
Stipple tiny dots and small, irregular shapes on the nose bridge. I like to tap the area with a kneaded eraser afterward to soften these marks so they look like skin texture rather than distinct dots.
Troubleshooting: Flat Fur
If the mane looks flat, you likely have too many mid-tones. Use an eraser to pull out bright highlights and an 8B pencil to deepen the shadows between locks. Contrast creates depth.
Step 3: Building Form and Fur
-
Map the facial shadows:
Identify the darkest planes of the face—typically under the cheekbones, the side of the muzzle, and beneath the chin. Lightly shade these areas with a 2B pencil to establish volume. -
Start the short fur:
On the bridge of the nose and cheeks, the fur is very short. Use a sharp HB pencil to make short, flicking strokes. Always follow the direction of growth, which flows away from the center of the face. -
Darken the muzzle spots:
Draw the whisker spots on the muzzle using a 4B pencil. These aren’t perfect circles; make them slightly irregular ovals. Ensure the fur texture flows cleanly around them. -
Layer the mane base:
For the thick mane, lay down a base tone of graphite using the side of a 4B pencil. Use a tissue to smudge this into a smooth, mid-tone gray cloud. -
Detail the mane strands:
Over your smooth grey base, use a 6B and 8B pencil to draw long, flowing distinct locks of hair. Vary your pressure to create depth—press harder for clumps in shadow, lighter for surface strands. -
Add deep contrast:
Look for the deepest crevices in the mane and the area where the mane meets the face. Use your darkest pencil (or charcoal) here to create high contrast, which pushes the lighter face forward.
Step 4: Refining and Highlighting
-
Lift out highlights:
Take your mechanical eraser or the sharp edge of a kneaded eraser and ‘draw’ white hairs back into the grey areas of the mane. This subtractive drawing technique adds incredible realism. -
Refine the whiskers:
Use a sharp mechanical eraser to pull out long, sweeping white whiskers from the muzzle spots. If needed, outline them very faintly on the shadow side to make them pop. -
Enhance the eye contrast:
Return to the eyes. Darken the rim around the eye (the eyeliner) and ensure the whites of the eyes aren’t stark white—shade them slightly in the corners to show the eyeball’s curve. -
Final check:
Step back from your drawing. If the drawing looks flat, darken your darkest shadow areas just a bit more. The drama of this piece relies on the difference between the bright highlights and deep shadows. -
Seal the work:
Once fully satisfied, spray a fixative over the drawing in a well-ventilated area to prevent your intricate graphite work from smudging over time.
Now you have a stunning, gaze-arresting piece of wildlife art ready to frame and display


Eraser Highlights for Fur and Whiskers
Capture the majestic spirit of the king of the jungle with this detailed pencil study. This project focuses on building layers of graphite to create deep, textural fur and piercing, soulful eyes.
Step-by-Step
Materials
- Heavyweight drawing paper (smooth or vellum finish)
- Graphite pencils (HB, 2B, 4B, 6B)
- Black colored pencil or charcoal pencil (for deepest values)
- Fine liner pen (black, 0.3mm or 0.5mm)
- White gel pen or gouache (for highlights)
- Kneaded eraser
- Precision eraser (mono zero or similar)
- Blending stump or tissue
- Pencil sharpener
Step 1: Blocking the Foundation
-
Establish the outline:
Begin with a light HB pencil sketch. Draw a vertical centerline to ensure symmetry, then map out the almond shapes of the eyes, the triangular nose, and the muzzle structure. Keep your lines faint so they can be erased or drawn over later. -
Map the fur direction:
Using light, sweeping strokes, indicate the direction the fur grows. The mane flows outward from the face like a sunburst, while the fur on the nose bridge is short and travels upward. This ‘map’ prevents confusion later. -
Define the eyes:
The eyes are the soul of the drawing. Outline the pupil and iris carefully. Reserve a tiny white circle in each eye now for the catch-light—it’s cleaner to save the white of the paper than to add it back later.
Subtractive Drawing
Don’t just draw dark lines; draw with your eraser! Cutting through a patch of graphite with a sharp eraser edge creates the most realistic bright flyaway hairs.
Step 2: Building Value and Texture
-
Start with the eyes:
Fill in the pupils with your darkest 6B pencil or black colored pencil. Shade the iris with a 2B, radiating lines outward from the pupil. Add a touch of yellow or brown colored pencil to the iris if you want that subtle golden glow shown in the reference. -
Shade the nose and muzzle:
Use a 4B pencil to darken the nostrils and the split in the upper lip. Shade the nose pad with a speckled texture, leaving the top edge lighter to show dimension. Use a blending stump to smooth the graphite on the short fur of the muzzle. -
Layering the mane – base layer:
Switch to a 2B pencil. Apply long, flowing strokes following your directional map. Don’t press hard yet; this layer establishes the mid-tones of the magnificent mane. -
Deepening the shadows:
Using a 4B or 6B pencil, go into the deepest crevices of the mane, especially under the chin and around the ears. These dark valleys make the lighter tufts of fur pop forward. -
Create distinct textural zones:
Notice how the fur separates into chunky locks. Draw the shadows *between* these locks rather than outlining the locks themselves. This negative drawing technique creates much fluffier, more realistic volume.
Make it Roar
Try drawing this on tan or grey toned paper. Use white charcoal for the highlights and the lion will pop off the page with 3D intensity.
Step 3: Refining Details and Contrast
-
Intensify the blacks:
To get that dramatic, almost charcoal-like contrast, take your black colored pencil or charcoal and restate the darkest shadows in the mane and the dark lining around the eyes. This eliminates the ‘graphite shine’ common in heavy drawings. -
Short fur detailing:
Across the cheeks and forehead, use short, ticking strokes with a sharp 2B pencil. I like to continuously rotate my pencil to keep the point sharp for these delicate little hairs. -
Developing the ear:
Shade the inner ear deep dark, leaving coarse, long white hairs sticking out from the rim. The contrast between the dark inner ear and the white tufts creates immediate depth. -
Lifting out highlights:
Take your precision eraser or mold your kneaded eraser into a fine point. firmly ‘draw’ white hairs back into the grey areas of the mane. This subtractive technique is crucial for that windswept look. -
Adding whiskers:
Whiskers need confidence. Use your precision eraser to swipe quick, curved lines from the muzzle spots. If the eraser doesn’t lift enough, use a white gel pen, but soften the line immediately with your finger so it doesn’t look like plastic. -
Final eye highlights:
Enhance the catch-light in the eyes with a strong dot of white gel pen or gouache. This single step brings the lion to life instantly. -
Clean up and anchor:
Check the bottom edge of the drawing. Let the mane fade out naturally rather than ending in a hard line. Use an eraser to clean up any smudges on the surrounding paper to keep the presentation professional.
Step back and admire the intense gaze of your finished graphite lion portrait
Backlit Lion With Rim Lighting
This striking project captures the quiet dignity of a lion in profile, balancing detailed graphite work with a singular, piercing pop of color in the eye. Using textured paper adds an organic, timeless feel to the sketch, making the fur look even more lifelike against the rough grain.
Detailed Instructions
Materials
- High-quality textured paper (heavyweight mixed media or watercolor paper with deckled edges)
- Graphite pencils (HB, 2B, 4B, 6B)
- Black charcoal pencil or very soft graphite (8B) for deepest blacks
- Yellow and orange colored pencils (or pastel pencils)
- White gel pen or gouache for highlights
- Kneaded eraser
- Blending stump or tortillon
- Drafting tape (optional, to secure paper)
Step 1: Laying the Foundations
-
Map the silhouette:
Begin with an HB pencil, using very light, loose strokes to establish the overall shape of the lion’s head in profile. Draw a sloping line for the forehead that transitions into the snout, and mark the position of the chin. -
Place the features:
Lightly sketch the almond shape of the eye, positioning it roughly midway between the top of the skull and the mouth line. Add the triangular shape of the nose tip and the curve of the mouth. -
Outline the mane:
Sketch the flowing boundaries of the mane. Let these lines be organic and wavy, extending far back from the face to create volume to the neck and chest area. -
Refine the facial structure:
Go back over your initial facial lines with a slightly firmer pressure. Define the curves around the nostril, the heavy brow ridge above the eye, and the separate tufts of fur on the chin.
Muddy Fur?
If the mane looks like a solid grey blob, you’ve over-blended. Use a kneaded eraser to lift out ‘light’ strands, then re-draw dark separating lines between clumps.
Step 2: Developing the Mane and Fur
-
Start the directional flow:
Switch to a 2B pencil. Starting from the face and moving outward, draw long, sweeping lines to indicate the direction the fur grows. The fur near the face is shorter, while the mane flows in long, cascading locks. -
Layering the mane:
Use a 4B pencil to add darker strands within the mane. Don’t try to draw every single hair; instead, group the fur into thick clumps or locks, shading the spaces *between* the clumps to create depth. -
Shading the face:
Lightly shade the face using the side of your 2B pencil. Focus on the shadow under the jawline, roughly around the cheekbone, and the snout area. Leave the area immediately around the eye and the top of the muzzle lighter. -
Texturing short fur:
For the short fur on the face (nose bridge and cheeks), use short, ticking strokes. I find that following the contour of the bone structure here is crucial for realism. -
Deepening contrast:
Take your 6B pencil or charcoal and darken the deepest shadow areas: the inside of the ear, the corner of the mouth, the nostril, and the deepest recesses of the mane.
Step 3: The Focal Point: That Golden Eye
-
Outline the eye shape:
Use a sharp 4B pencil to heavily outline the eye, creating a thick, dark rim (like eyeliner) and the pupil. -
Adding base color:
Gently fill the iris with a yellow colored pencil. Keep the pressure light to allow the paper texture to show through slightly, adding dimension. -
Creating depth:
Layer an orange colored pencil near the top of the iris (under the eyelid shadow) and fading downward. This gradient makes the eye look round rather than flat. -
Ear details:
While you have the colored pencils out, add a faint touch of orange or brown to the inner fluff of the ear for subtle warmth, blending it immediately with your graphite grays.
Pro Tip: Paper Grain
Let the paper texture work for you. Using the side of the pencil drags graphite across the ‘peaks’ of the paper, naturally creating a fur-like texture without individual strokes.
Step 4: Refining and Finishing
-
Blend the mid-tones:
Use a stump or a tissue to gently smudge the graphite on the lion’s cheek and neck. This softens the pencil marks and makes the underlying skin look smoother compared to the rough mane. -
Re-establish crisp lines:
Blending often dulls your details. Go back in with a sharp HB or 2B pencil to re-draw key whiskers and specific hairs that got lost in the smudge. -
Whisker placement:
Draw the muzzle spots (whisker pads) with small dots. Then, use quick, confident flicks to add the long whiskers extending from the muzzle. -
The highlight:
Apply a tiny dot of white gel pen or white gouache to the upper part of the pupil/iris. This catchlight brings the lion to life instantly. -
Rim lighting effect:
Erase cleanly along the very top edge of the head and mane to suggest light hitting from above. You can emphasize this by darkening the background slightly right next to that bright edge. -
Final texture check:
Review the mane one last time. Add a few stray, wild hairs with a sharp pencil to break up any shapes that look too uniform or ‘perfect’.
Step back and admire the commanding presence of your finished lion portrait
Minimal Line-Art Lion Face
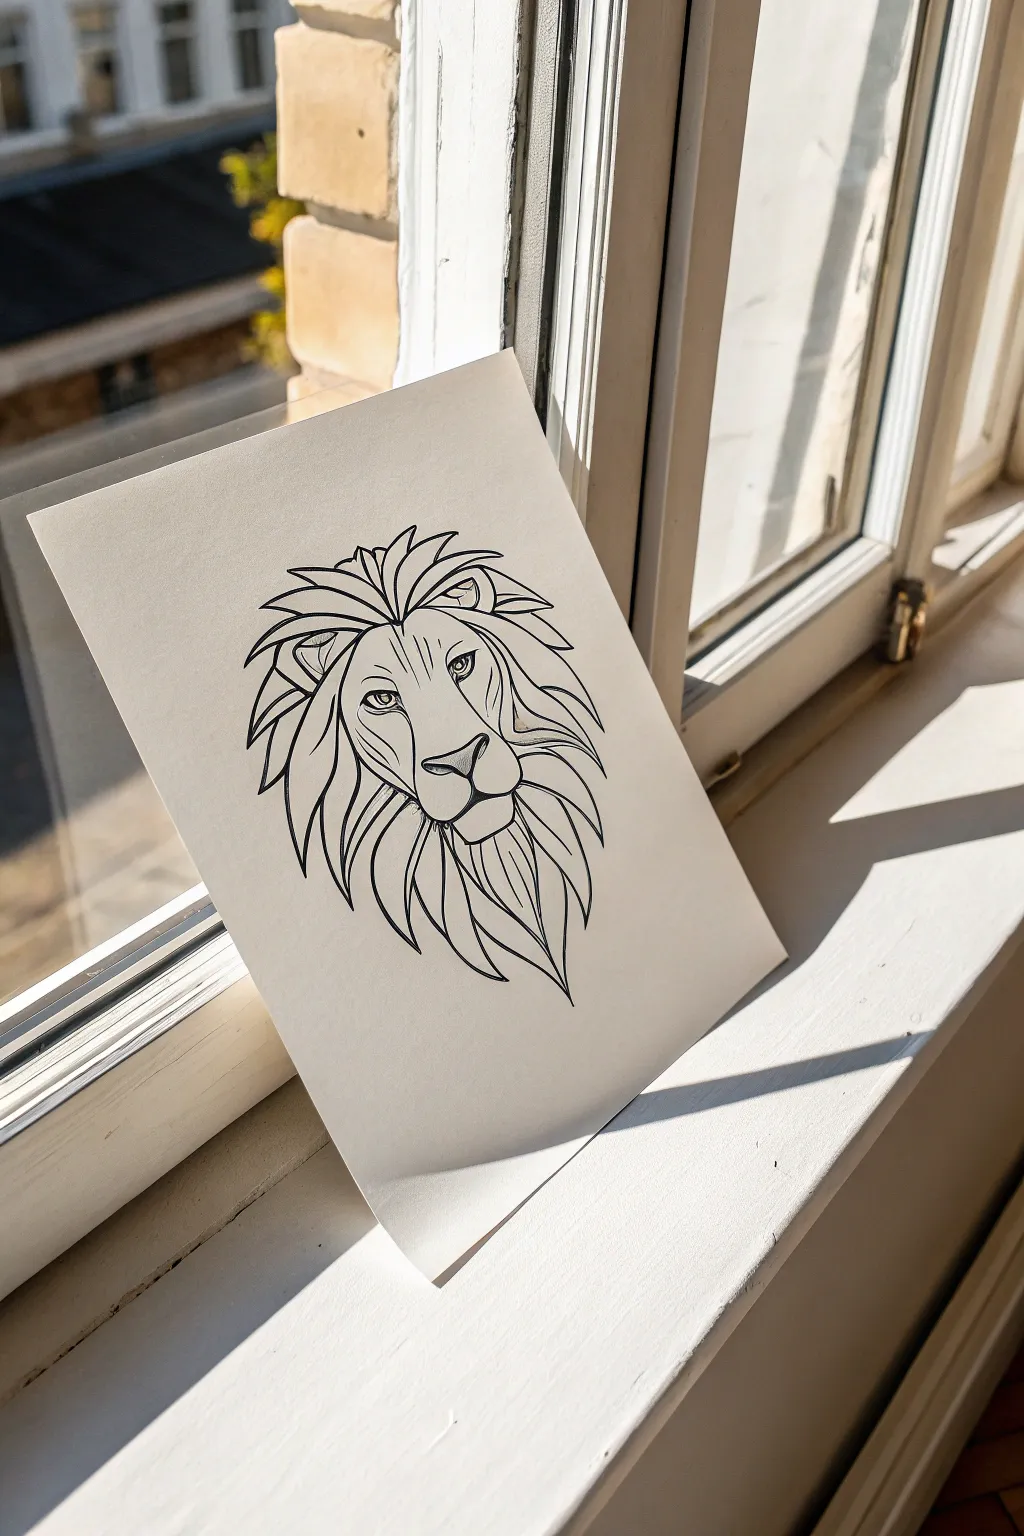
This project focuses on the elegance of clean lines and negative space, capturing the strength of a lion with minimal shading. The stark contrast between the crisp black ink and white paper creates a modern, sophisticated look perfect for framing.
How-To Guide
Materials
- High-quality white heavyweight drawing paper or bristol board (A4 size)
- HB or 2B pencil for sketching
- Kneaded eraser
- Fine liner pens (sizes 0.3mm and 0.5mm)
- Thicker black marker or brush pen (optional for varied line weight)
- Ruler (helpful for checking symmetry)
Step 1: Conceptual Sketching
-
Reference Points:
Start by lightly drawing a vertical centerline down the middle of your paper to ensure symmetry. Mark a horizontal line about one-third of the way down for the eyes, and another mark lower down for the nose placement. -
Nose and Muzzle Shape:
Begin the features by sketching the nose. Draw a soft, inverted triangle shape with rounded corners. Extend two curved lines downward from the bottom corners to form the upper lip/muzzle area. -
Eye Placement:
Position the eyes on your horizontal guide. Sketch two almond shapes, slanting slightly downwards toward the nose. Keep the inner corners sharp and the outer corners slightly lifted. -
Defining the Face Structure:
Lightly sketch the bridge of the nose connecting up to the forehead. Then, outline the cheekbones that sweep back from the eye area, creating the central ‘shield’ shape of the lion’s face. -
Planning the Mane:
Instead of drawing individual hairs, sketch large, flame-like shapes radiating from the face. Think of these as jagged leaves or stylized wave crests that frame the head. Keep the bottom section pointed, like a beard.
Master the Taper
For the sharp tips of the mane, start your pen stroke inside the shape and flick outward quickly. This natural wrist motion creates a sharp, perfectly tapered point every time.
Step 2: Refining the Lines
-
Detailing the Eyes:
Inside the almond shapes, draw circular irises. Add a small ‘V’ shape or heavy line at the top of the eye to represent the hooded brow, giving the lion a calm, intense gaze. -
Sculpting the Snout:
Refine the lines around the nose. Add a small curve under the nose pad to create the philtrum, and define the chin with a squared-off curve below the mouth. -
Mane Flow:
Solidify the mane sketch. Ensure the ‘locks’ overlap naturally. I find it helpful to draw the locks closest to the face first, then add the outer layers behind them. -
Ears:
Tuck two rounded triangle shapes into the upper mane. They should look like they are emerging from the hair, so don’t draw the full bottom edge of the ear.
Shaky Lines?
If your long lines aren’t smooth, try drawing from your shoulder rather than your wrist. It helps create fluid, continuous strokes instead of jittery ones.
Step 3: Inking the Artwork
-
Outline the Eyes:
Using your 0.3mm fine liner, carefully trace the eyes. Fill in the pupils completely black, leaving a tiny white dot for a highlight if you wish. -
Nose and Mouth:
Ink the nose pad. You can fill the nostrils with solid black for depth. Trace the muzzle lines with steady, smooth strokes. -
Face Contours:
Switch to a 0.5mm pen for the main face outlines to give them more weight. Use long, confident strokes rather than short, scratchy ones. -
Inking the Mane:
Trace the sharp points of the mane. Vary your pressure: press harder at the base of a hair clump and lift off as you reach the sharp tip to create a tapered line. -
Adding Line Weight:
Go back over key areas where shadows would fall—like under the chin or where mane sections overlap—and thicken those lines slightly. This adds dimension without shading.
Step 4: Final Touches
-
Erase Sketches:
Wait at least 15 minutes for the ink to fully cure. Gently erase all pencil marks with your kneaded eraser to reveal the crisp black lines. -
Clean Up:
Check for any gaps in your line art. If a line looks too thin or shaky, carefully smooth it out with your fine liner.
Now you have a striking, minimalist piece of art ready to display, capturing the lion’s spirit with just a few bold lines
Geometric Faceted Lion Head
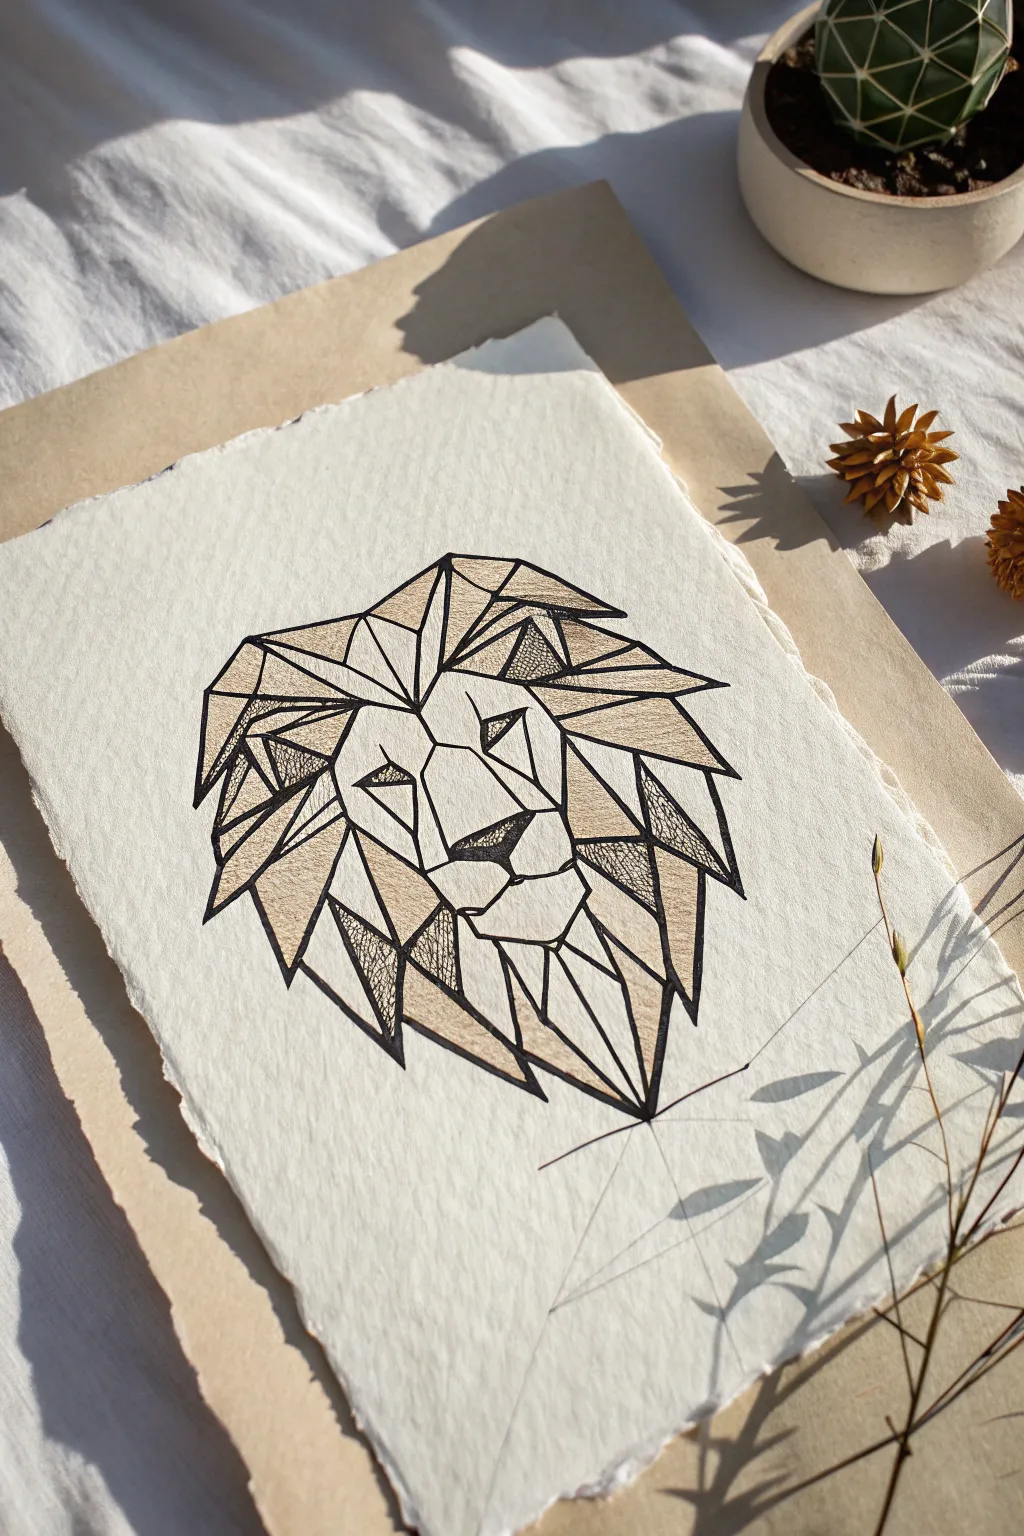
This striking project combines modern geometric aesthetics with the classic majesty of a lion. By breaking the form down into angular facets and using simple ink techniques like stippling, you’ll create a sophisticated piece of art that looks far more complex than it actually is.
Step-by-Step Guide
Materials
- High-quality textured art paper (deckled edge optional)
- Beige or tan backing paper
- Fine liner pens (0.1mm, 0.3mm, and 0.5mm)
- Graphite pencil (HB or 2H)
- Eraser (kneaded preferred)
- Ruler or straight edge
- Tracing paper (optional but helpful)
Step 1: Drafting the Framework
-
Map out the centerline:
Begin by lightly drawing a vertical line down the center of your paper using your pencil and ruler. This will act as the anchor for the lion’s symmetry. -
Sketch the primary shapes:
Around the centerline, sketch a large, inverted shield shape for the face and mane. Draw a rough hexagon in the middle for the nose and muzzle area to establish proportions. -
Define the eyes and nose:
Using straight lines, block out triangular shapes for the eyes and a geometric polygon for the nose nose. Keep these lines very light so they can be erased later. -
Construct the mane:
Extend lines outwards from the face to create the mane. Instead of curves, use sharp, angular triangles that radiate outward like shards of glass. Vary the sizes—some large and jagged, others small and filler-like. -
Fragment the face:
Go back into the face area and break up the larger planes. Draw connecting lines from the nose to the cheekbones and forehead, turning the rounded forms of a lion’s face into flat, polygonal facets.
Step 2: Inking the Outline
-
Trace the main lines:
Switch to your 0.5mm fineliner. Carefully go over your pencil lines, using a ruler if you want machine-perfect precision, or freehanding for a slightly more organic feel. -
Thicken the perimeter:
Go over the outermost boundary lines of the mane and the main facial features (eyes and nose tip) a second time to create a bolder, heavier line weight that anchors the drawing. -
Refine internal lines:
Use a thinner 0.3mm pen for the internal facets of the mane and face. This subtle difference in line weight adds depth and prevents the drawing from looking too cluttered. -
Let the ink set:
Allow the ink to dry completely for at least 15 minutes. This is crucial before erasing to prevent smudging crisp lines. -
Clean up the draft:
Gently erase all the underlying graphite sketch lines using a kneaded eraser. Dab rather than rub if your paper is particularly soft or textured.
Straight Edge Secret
Use a clear acrylic ruler when inking. It allows you to see the line you’re connecting to underneath, ensuring your geometric corners meet perfectly without overshooting.
Step 3: Adding Texture and Detail
-
Select facets for shading:
Choose specific triangles within the mane and face to darken. Don’t shade everything; pick about 20-30% of the shapes to create contrast. Focus on areas that would naturally be in shadow, like under the chin or deep in the mane. -
Apply stippling:
For the darkest facets, use your 0.1mm pen to fill the shape with tiny dots (stippling). Cluster the dots tightly near the corners of the triangle and spread them out toward the center for a gradient effect. -
Add linear hatching:
On other facets, use parallel straight lines (hatching) to create a medium tone. I find that varying the direction of the lines in adjacent shapes helps distinguish the different planes of the face. -
Detail the eyes:
Fill in the pupil area with solid black, leaving a tiny sliver of white paper for a highlight. This brings the lion to life immediately. -
Enhance the nose:
Stipple the nose densely to give it a darker value and a textured look, distinguishing it from the surrounding fur facets. -
Final assessment:
Step back and look at the overall balance. If an area feels too light, add a few more stippled dots or hatching lines to balance the composition.
Golden Hour Glow
Dilute a tiny drop of gold watercolor or metallic ink and wash it over just a few specific facets. This adds a subtle, regal shimmer that catches the light beautifully.
Mount your finished drawing on the beige backing paper to complete the warm, gallery-ready aesthetic
Lion Silhouette With Scene Inside
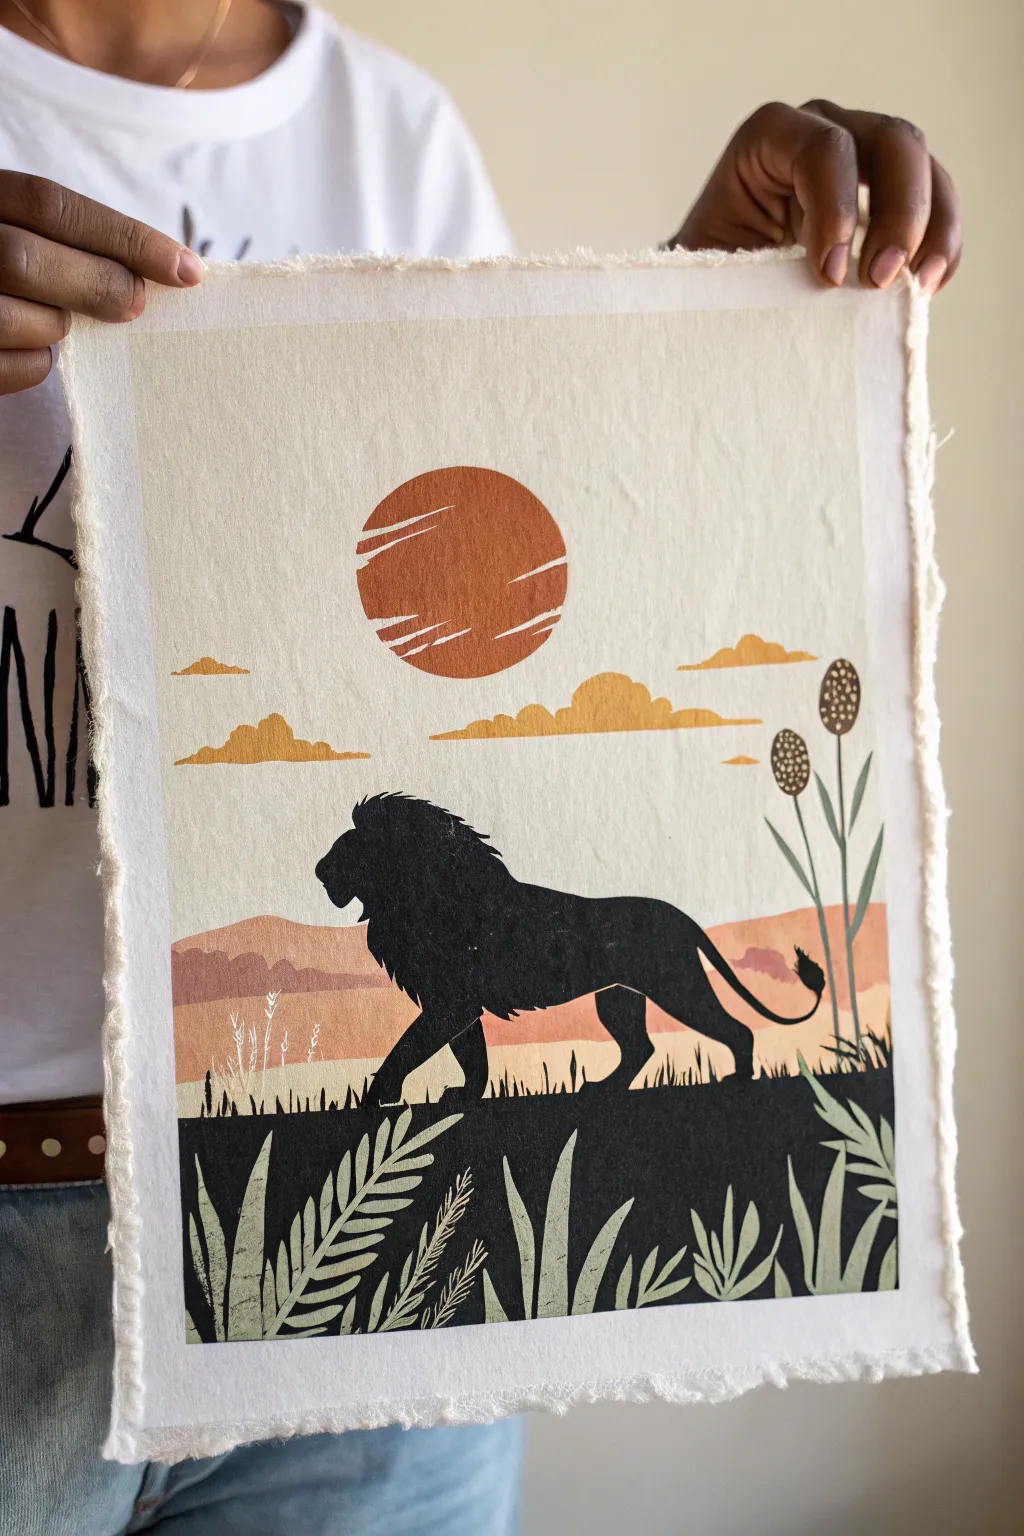
Capture the majesty of the savanna with this bold lion silhouette set against a warm, stylized landscape. The design mimics the clean lines and layered look of traditional block printing, using opaque paints on textured paper for a high-quality finish.
How-To Guide
Materials
- Heavyweight watercolor paper or printmaking paper (with deckle edge)
- Black acrylic paint or gouache
- Burnt sienna or rust acrylic paint
- Yellow ochre or mustard acrylic paint
- Sage green acrylic paint
- Cream or off-white acrylic paint
- Assorted flat brushes (small and medium)
- Fine liner brush
- Pencil and eraser
- Ruler
- Masking tape
Step 1: Setting the Scene
-
Prepare the paper:
Start with a piece of high-quality paper, ideally roughly 8×10 or 9×12 inches. If your paper doesn’t have a deckle edge, you can create a faux one by carefully tearing the edges against a ruler rather than cutting them with scissors. -
Mask the borders:
Use masking tape to create a clean rectangular border about 1 to 1.5 inches directly inside the paper’s edge. This creates the negative space frame seen in the original image. -
Sketch the layout:
Lightly sketch the horizon lines. Draw a line about one-third up from the bottom for the ground. Draw the circular sun in the upper center and mark out the rolling hills in the background. -
Outline the lion:
Sketch the silhouette of the walking lion. Focus on the shape of the mane and the stride of the legs. Don’t worry about internal details like eyes or fur texture; this will be a solid silhouette.
Step 2: Painting the Background
-
Paint the sky:
Mix a large amount of cream or off-white paint. Apply this to the entire sky area, working around your pencil sketch of the sun and clouds. Use horizontal strokes for a smooth, sky-like texture. -
Add the sun:
Fill in the sun circle with a deep rust or burnt sienna color. While the paint is wet, you can lift out thin horizontal lines with a clean, dry brush to create the ‘cutout’ texture effect, or wait until it’s dry and paint cream stripes over it. -
Create the distant clouds:
Using yellow ochre, paint the stylized clouds floating just below the sun. Keep the bottom edges flat and the tops rounded and fluffy. -
Paint the distant hills:
Use a slightly watered-down version of your rust color to paint the rolling hills behind the lion. I like to keep this layer slightly transparent or uneven to mimic the texture of a block print. -
Add the middle ground:
Below the rust hills, paint a strip of sandy beige or light ochre to represent the flat plains. -
Let it dry completely:
Allow all background layers to dry fully. Acrylics dry fast, but give it at least 20 minutes so you don’t smudge colors when painting the foreground.
Uneven Paint Coverage?
If acrylics look streaky, don’t overwork wet paint. Let the first coat dry completely, then apply a second thin layer. Matte medium can also help flow.
Step 3: The Lion and Foreground
-
Fill the lion silhouette:
Using deep black paint and a medium brush, carefully fill in the lion’s shape. Use a smaller brush for the tips of the mane and the tail tuft to keep the edges crisp. -
Paint the foreground shadow:
Extend that black paint all the way to the bottom tape line to create the solid ground the lion is walking on. The top edge of this black area should look like grass blades. -
Add grass texture:
Use a fine liner brush to flick small, upward strokes along the top edge of the black ground. This creates the look of grass silhouetted against the sunset. -
Paint the tall plants:
On the right side, painting over the background sky, add two or three tall, thin stems with oval seed pods at the top. Use a dark grey or black for this. -
Detail the seed pods:
Once the seed head shapes are dry, use a tiny dot of cream paint to add stippling texture inside them.
Pro Tip: Faux Print Texture
To mimic the ‘salty’ look of a real block print, lightly dab a dry sponge with cream paint over the solid color areas to create subtle noise and texture.
Step 4: Final Botanical Details
-
Paint the foreground foliage:
Mix a muted sage green color. Paint large, leafy shapes rising from the bottom black section. These should overlap the black ground, creating depth. -
Add leafy variety:
Paint different leaf shapes—some broad and curved, others fern-like with small leaflets. Alternating these shapes makes the foreground look lush. -
Highlight the grass:
Use a very thin brush and white or cream paint to add a few delicate grass stalks in the background, just behind the lion’s back legs, for extra contrast. -
Remove tape:
Once the painting is 100% dry, slowly peel away the masking tape at a 45-degree angle to reveal your crisp, clean borders.
Frame your finished piece in a floating frame to show off those beautiful deckle edges
Abstract Lion Mane Made of Patterns
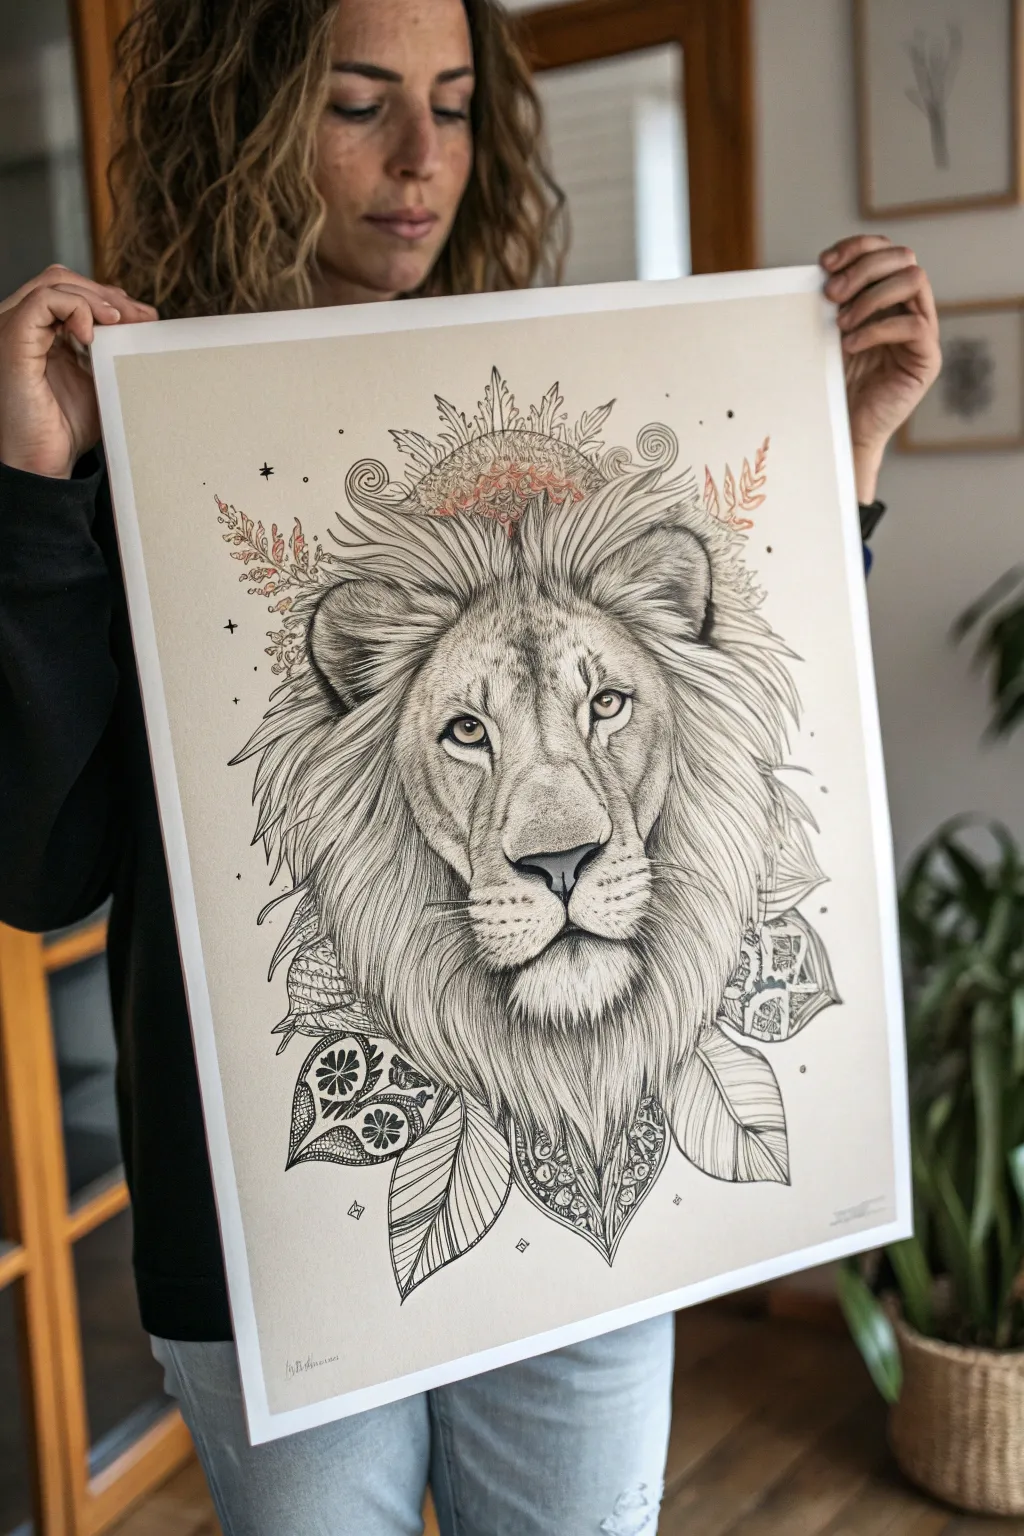
This striking portrait merges the regal power of a realistic lion with the delicate whimsy of botanical illustration and zentangle patterns. By blending precise graphite shading with stylized line work, you create a piece that feels both grounded and magically surreal.
Step-by-Step
Materials
- Large format smooth Bristol board or hot-press watercolor paper (A2 or 18×24 inches)
- Graphite pencils (HB, 2B, 4B, 6B)
- Mechanical pencil (0.5mm HB) for fine details
- Fine liner pens (0.1mm, 0.3mm, 0.5mm, black)
- Colored pencils (terracotta, burnt orange, pale yellow)
- Kneaded eraser
- Blending stumps (tortillons)
- Drafting tape
- Workable fixative spray
Step 1: Laying the Foundation
-
Establish the proportions:
Begin with a light HB pencil sketch to map out the lion’s face. Draw a central vertical line for symmetry and horizontal guides for the eyes, nose, and mouth. The eyes should be spaced roughly one eye-width apart. -
Outline the features:
Refine the shapes of the eyes, the broad nose bridge, and the muzzle. Keep these lines faint, as you don’t want hard outlines in the final realistic sections. Sketch the general flow of the mane, extending it outward to fill the page. -
Map the decorative elements:
Lightly sketch the crown area above the head and the abstract ‘bib’ at the bottom. Instead of fur, draw large leaf shapes, feathers, and paisley teardrops where the mane would naturally end at the chest.
Step 2: Realistic Fur & Features
-
Render the eyes:
Start with the eyes to bring the lion to life. Use a 4B pencil for the pupil and upper lash line. Leave a tiny white highlight in each eye unshaded. Use a 2B for the iris, drawing radial lines outward from the pupil. -
Build the nose structure:
Shade the nose pad with a 6B pencil, getting very dark in the nostrils. Fade upward into the bridge of the nose using a blending stump to create soft, velvet-like texture. -
Short fur texture:
Using a sharp mechanical pencil, draw short, directional strokes for the fur on the face. Pay close attention to the direction of hair growth—outward from the nose and up the forehead. Keep strokes light and layered. -
Deepen the shadows:
Switch to a 4B pencil to add depth under the chin, around the eyes, and beside the muzzle. I like to blend these darker areas slightly to make the fur look dense before adding a final layer of sharp hairs on top. -
Flowing mane strands:
As you move away from the face, elongate your pencil strokes. Draw long, sweeping locks of hair that curve around the ears and frame the face. Leave the bottom neck area empty for the pattern work.
Smudge Control
Place a clean sheet of scrap paper under your drawing hand. This prevents oils from your skin transferring to the paper and stops you from dragging graphite across your clean background.
Step 3: Abstract Pattern Work
-
Inking the organic shapes:
Switch to your 0.3mm or 0.5mm fine liner. Trace the leaf and feather shapes you sketched at the bottom of the mane. Make these lines confident and smooth. -
Fill with intricate patterns:
Inside the larger leaf shapes, use the 0.1mm pen to draw detailed zentangle patterns. Good options include tight circles (pebbles), closely spaced hatching, or small floral mandalas. Treat each section as a mini-drawing. -
Connect mane to pattern:
To blend the realistic fur into the ink drawings, use your pencil to draw hair strands that overlap the inked leaves slightly. This integration makes the transition look intentional rather than cut-and-paste. -
Add floating elements:
Draw small geometric diamonds, stars, and dots floating around the mane and pattern work. This adds a mystical, celestial vibe to the composition.
Go For Gold
For a truly regal finish, use gold leaf or metallic gold paint for the floating stars and specific details in the bottom zentangle patterns.
Step 4: The Crown & Color Accents
-
Sketch the crown flora:
At the top of the head, refine the sun-like or floral crown. Use wispy, organic lines to suggest fern leaves and soft petals emerging from the fur. -
Apply touches of color:
Using the terracotta and pale yellow colored pencils, very lightly shade specific parts of the crown and small details in the bottom patterns. Keep the color subtle—just a hint of warmth against the grey graphite. -
Final contrast check:
Step back and look at the whole piece. Use your darkest 6B pencil to reinforce the deepest shadows in the mane and facial features to ensure the lion pops off the page. -
Seal the drawing:
Once you are happy with the balance of realism and abstraction, spray the piece with a workable fixative to prevent the thick graphite layers from smudging.
Hang your finished masterpiece in a simple frame to let the intricate details speak for themselves


Have a question or want to share your own experience? I'd love to hear from you in the comments below!