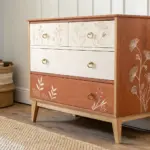
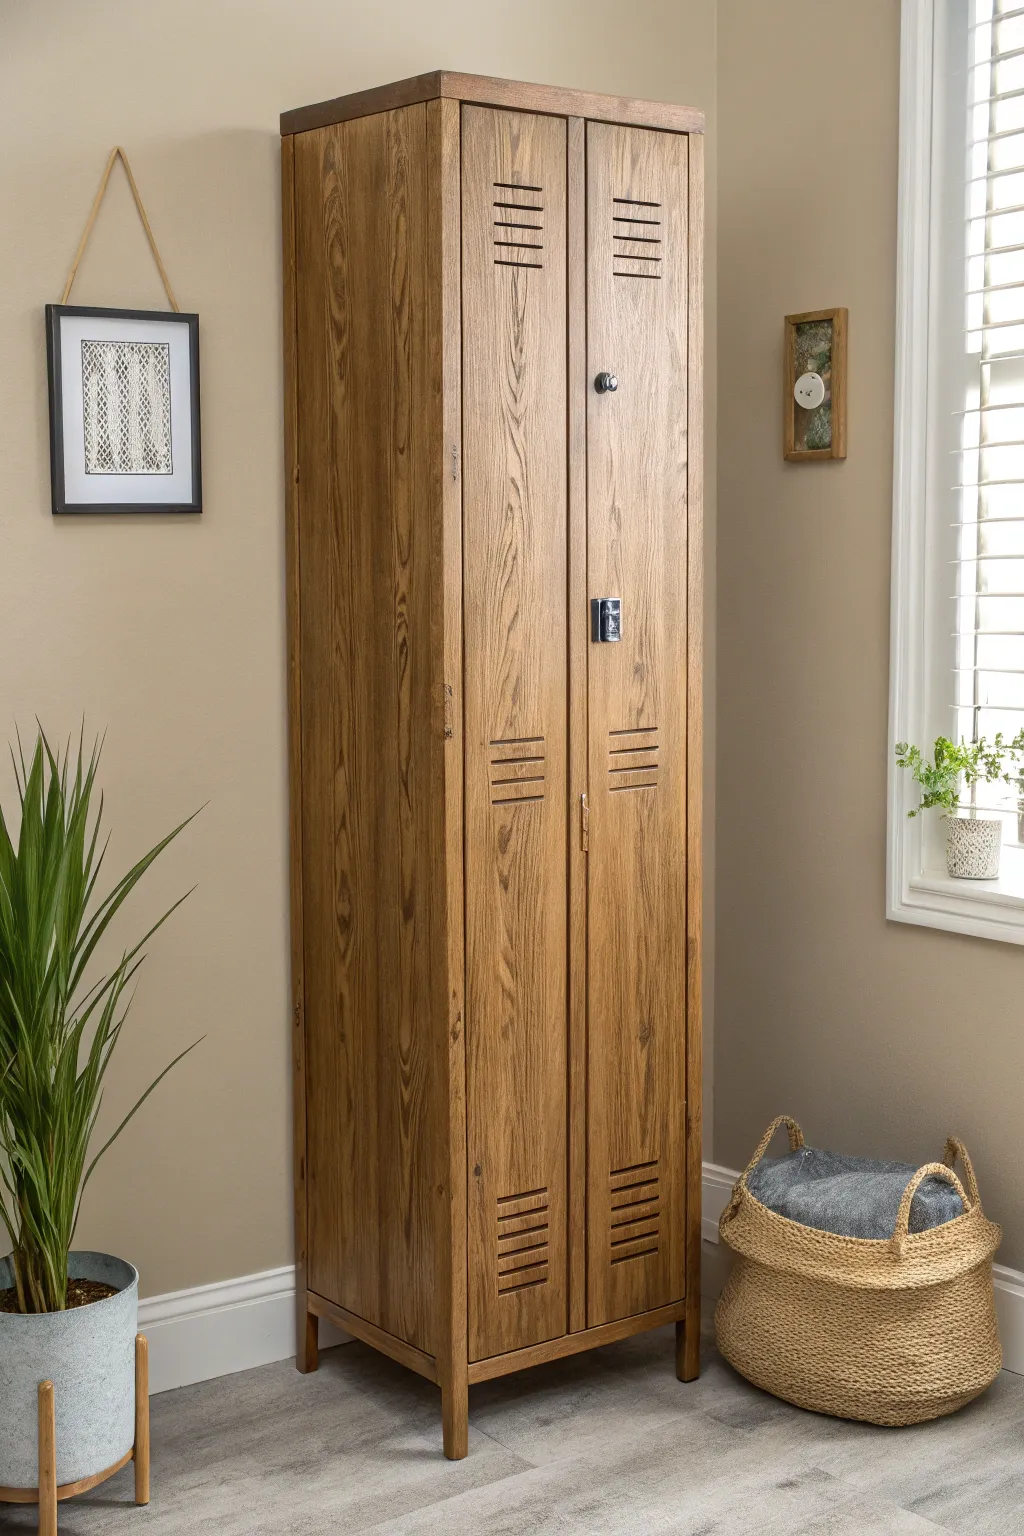
A basic metal locker is basically a blank canvas—once you add fresh paint, it instantly feels like a real piece of home decor instead of industrial storage. Here are my favorite locker painting ideas to help you get that clean, personal look (from classic to total wow).
Solid Color Locker Refresh
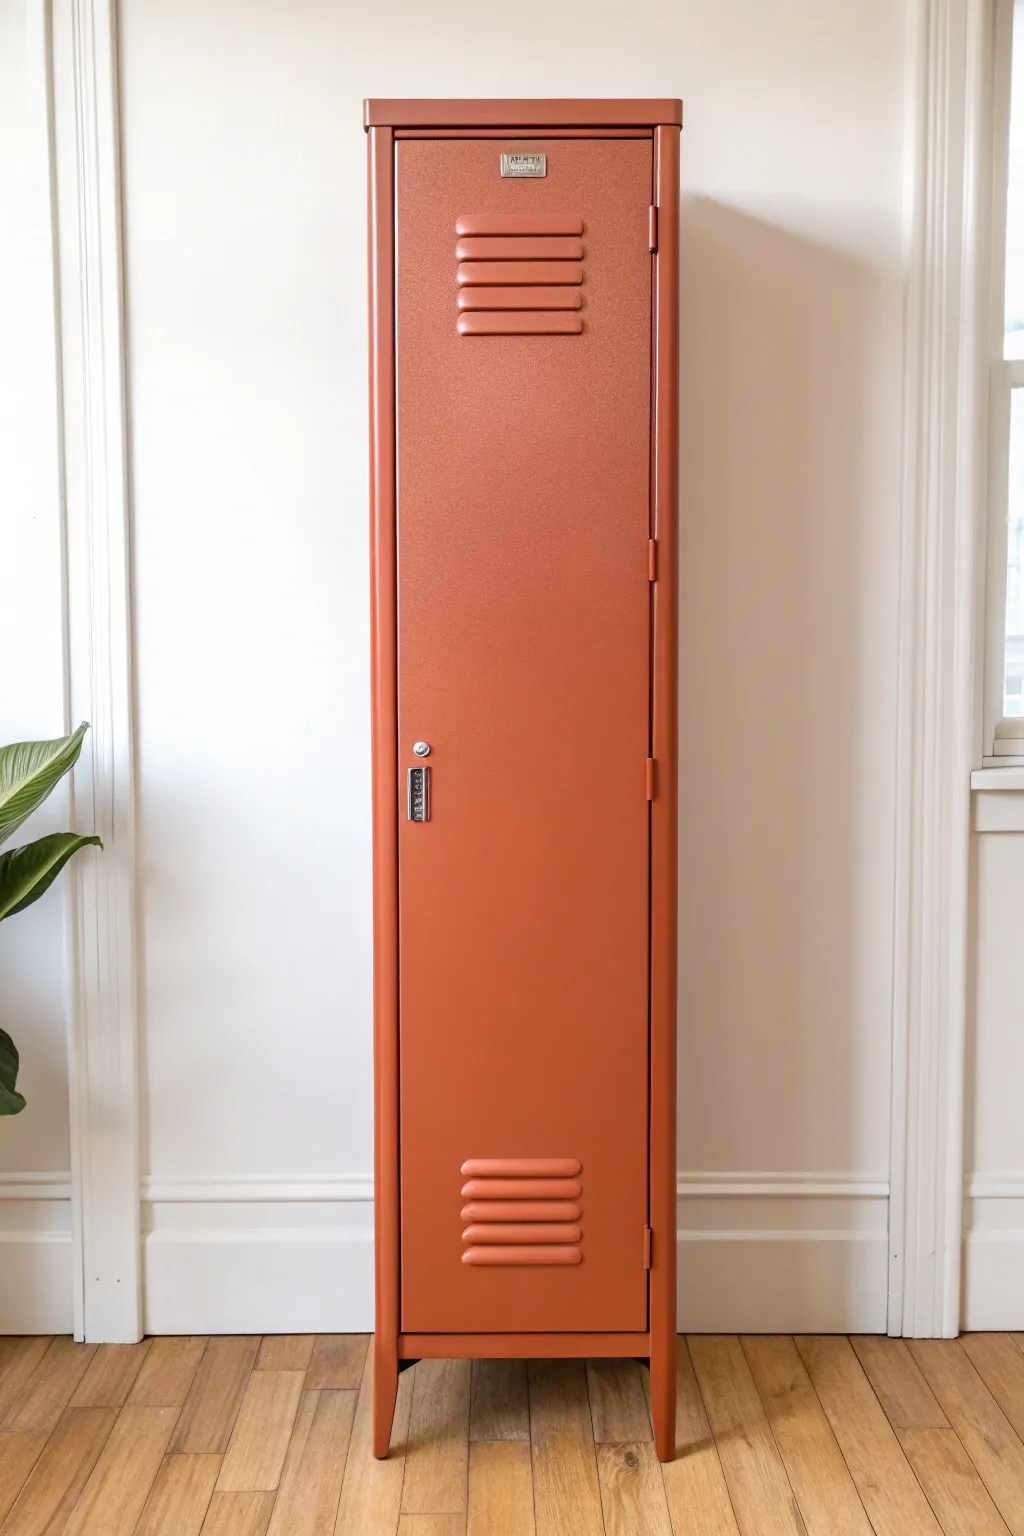
Give a simple metal locker a sophisticated new lease on life with this warm, solid-color update. By applying a rich terracotta hue, you can turn utilitarian storage into a stylish statement piece that adds an earthy pop to any room.
Step-by-Step Tutorial
Materials
- Metal locker
- Degreaser or TSP substitute
- Fine-grit sandpaper (220-grit)
- Clean rags or tack cloth
- Painter’s tape
- Metal primer (spray or liquid)
- High-quality spray paint or enamel in terracotta/burnt orange
- Screwdriver (for hardware removal)
- Drop cloth or cardboard
- Respirator mask
Step 1: Preparation
-
Strip the hardware:
Begin by removing any removable parts. Use your screwdriver to take off the handle, lock mechanism, and any metal logo plates or label holders. Store these screws in a small bag so they don’t get lost. -
Clean thoroughly:
Scrub the entire locker down with a degreaser or a TSP substitute. Metal lockers often accumulate oils and grime that will prevent paint from sticking, so be diligent here. -
Scuff sand:
Once dry, lightly sand the entire exterior surface with 220-grit sandpaper. You aren’t trying to remove all the old paint, just scuffing it up to give the new primer something to grab onto. -
Remove dust:
Wipe away all the sanding dust using a slightly damp rag or a tack cloth. Any leftover dust bunnies will ruin your smooth finish. -
Tape and protect:
If there are hinges or internal mechanisms you couldn’t remove but don’t want painted, cover them carefully with painter’s tape.
Trigger Comfort
Using a spray can trigger handle attachment saves your finger from cramping and provides much smoother control for those long vertical passes.
Step 2: Priming
-
Set up your workspace:
Move the locker to a well-ventilated area, preferably outdoors or in a garage with the door open. Place it on a large drop cloth. -
Apply primer:
Spray a thin, even coat of metal primer over the entire locker. I find that a grey primer works best if you are transitioning to a darker color like terracotta. -
Check for drips:
Inspect the surface immediately after priming. If you see any drips forming, lightly smooth them out with a gloved finger or brush before they set. -
Let it cure:
Allow the primer to dry completely according to the can’s instructions. This usually takes about an hour, but humidity can affect the timing.
Step 3: Painting
-
First color coat:
Shake your terracotta spray paint can vigorously for at least a minute. Apply the first coat using long, sweeping motions, starting and stopping the spray off the edge of the locker to avoid spurts. -
Focus on the vents:
Pay special attention to the louvered vents at the top and bottom. Spray from a few different angles—up, down, and sideways—to ensure the paint covers inside the slats without pooling. -
Wait and re-coat:
Let the first coat dry until it is tacky but not wet (usually 15-20 minutes). Apply a second thin coat to build up the color opacity. -
Final coat for depth:
Apply a third and final coat if necessary to achieve that deep, solid finish. Multiple thin coats are always better than one thick one which leads to runs. -
Dry time:
Let the locker dry undisturbed for at least 24 hours. The paint needs to fully harden before you start handling it.
Orange Peel Texture?
If the finish looks bumpy like an orange peel, you likely sprayed too far away or it was too hot. Sand lightly with ultra-fine grit and respray closer.
Step 4: Assembly
-
Clean hardware:
While the locker dries, clean up your old hardware. If the metal plate looks tarnished, a quick polish gives it a nice shine. -
Reattach components:
Once the paint is fully cured, carefully screw the handle, lock, and label plate back into place. -
Final inspection:
Remove any remaining painter’s tape and place the locker in its new spot, ready for styling.
Now you have a stunning, modernized storage piece that brings warmth and character to your space


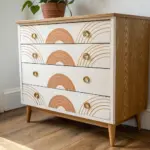
Soft Neutral Matte Finish
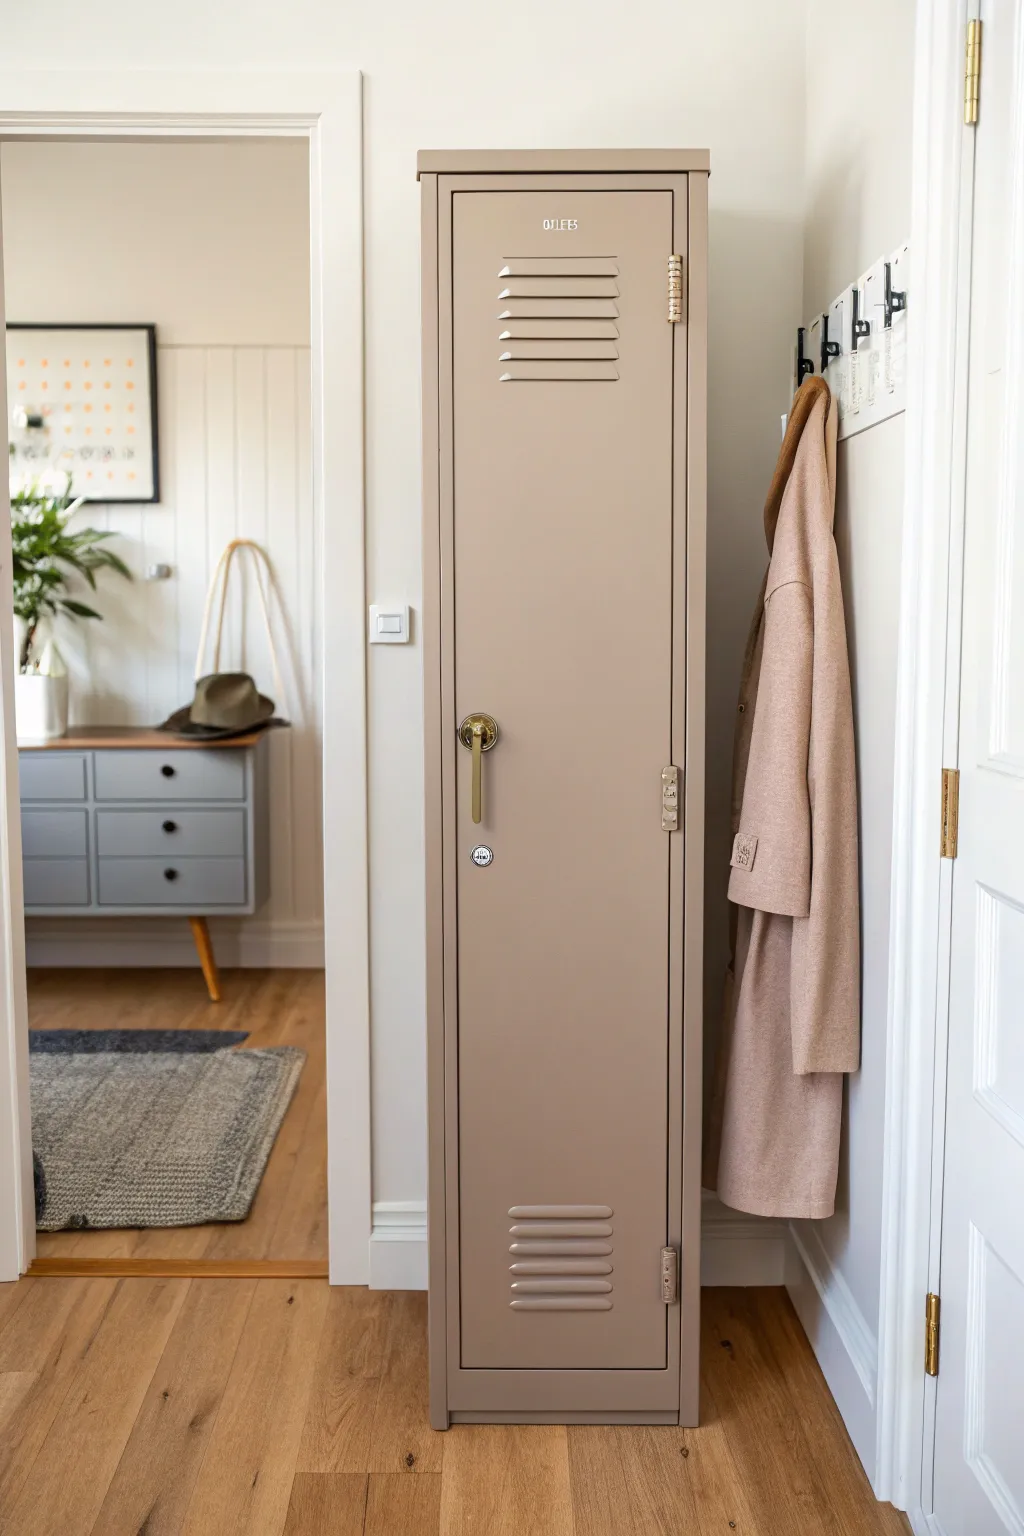
Elevate a standard metal storage locker into a piece of sophisticated entryway furniture with this soft neutral makeover. The monochromatic taupe finish and brass accents create a modern, minimalist look that blends seamlessly with warm wood floors.
How-To Guide
Materials
- Metal locker (vintage or new)
- Sandpaper (120 and 220 grit)
- TSP substitute or degreaser
- Painter’s tape
- Damp cloth or tack cloth
- Metal primer (spray or brush-on)
- Matte chalkboard or mineral paint in soft taupe
- High-density foam roller
- Small angled paintbrush
- Gold or brass spray paint
- Screwdriver
- Drop cloth
Step 1: Preparation & Disassembly
-
Remove Hardware:
Begin by removing all detachable hardware from the locker using a screwdriver. This includes the handle, lock mechanism, vents (if removable), and any hooks. Place these small parts in a labeled bag so nothing gets lost. -
Clean Thoroughly:
Wipe down the entire locker with a TSP substitute or a strong degreaser. Metal furniture often has invisible oils or manufacturing residues that repel paint, so this step is crucial for adhesion. -
Sand the surface:
Scuff sand the entire exterior using 120-grit sandpaper. You don’t need to strip the original paint down to bare metal; the goal is simply to scratch up the glossy surface so the new primer has something to grip. -
Clean dust:
Wipe away all sanding dust with a damp cloth followed by a tack cloth to ensure a perfectly smooth base. -
Protect the area:
Lay down a drop cloth in a well-ventilated area. If there are parts of the locker interior you don’t want painted, mask them off carefully with painter’s tape.
Step 2: Priming & Painting
-
Apply primer:
Apply a coat of high-quality metal primer. Spray primer often yields the smoothest finish, but a roller works too. Ensure you cover the louvers (vent slots) thoroughly without letting paint drip. -
Let primer cure:
Allow the primer to dry completely according to the manufacturer’s instructions. If it feels rough after drying, give it a very light pass with 220-grit sandpaper and wipe clean. -
Edge work:
Using your small angled brush, paint the difficult areas first: inside the recessed handle area, around the hinges, and into the slat vents. -
Roll the first coat:
Pour your matte taupe paint into a tray. I like to use a high-density foam roller here, as it minimizes texture. Apply the first coat in long, smooth vertical strokes. -
Dry and assess:
Let this first coat dry fully. Don’t worry if it looks streaky; coverage will improve with the next layer. -
Apply second coat:
Apply a second coat using the same technique. Watch carefully for drips around the vents or door edges and smooth them out immediately. -
Inspect finish:
Check the coverage once dry. If the original color is still showing through or the finish isn’t perfectly opaque, apply a third thin coat.
Smooth Operator
Add a conditioner like Floetrol to your latex paint. It slows drying time, allowing brush and roller marks to level out and disappear for a factory-like finish.
Step 3: Details & Assembly
-
Prep hardware:
While the locker cures, take your removed handle and hardware. Clean them and place them on a scrap piece of cardboard. -
Paint hardware:
Spray the hardware with gold or brass spray paint. Use short, light bursts to avoid drips, applying 2-3 coats for full coverage. -
Cure time:
Allow the painted locker to cure for at least 24 hours before reassembly. Paint may feel dry to the touch sooner, but it needs time to harden against scratches. -
Reassemble:
Carefully screw the gold hardware back onto the door. Be gentle with the screwdriver to avoid slipping and scratching your fresh paint job. -
Final placement:
Move the locker into position. If you have uneven floors, adjust the feet or add felt pads underneath to ensure the door swings smoothly.
Sticky Door?
If the door sticks after painting, rub a clear candle or a bit of beeswax along the metal-on-metal contact points inside the door frame to lubricate the closure.
Enjoy the sleek organization and understated elegance your renewed locker brings to the space


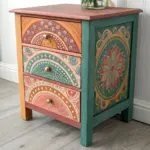
Pastel Rainbow Door Colors
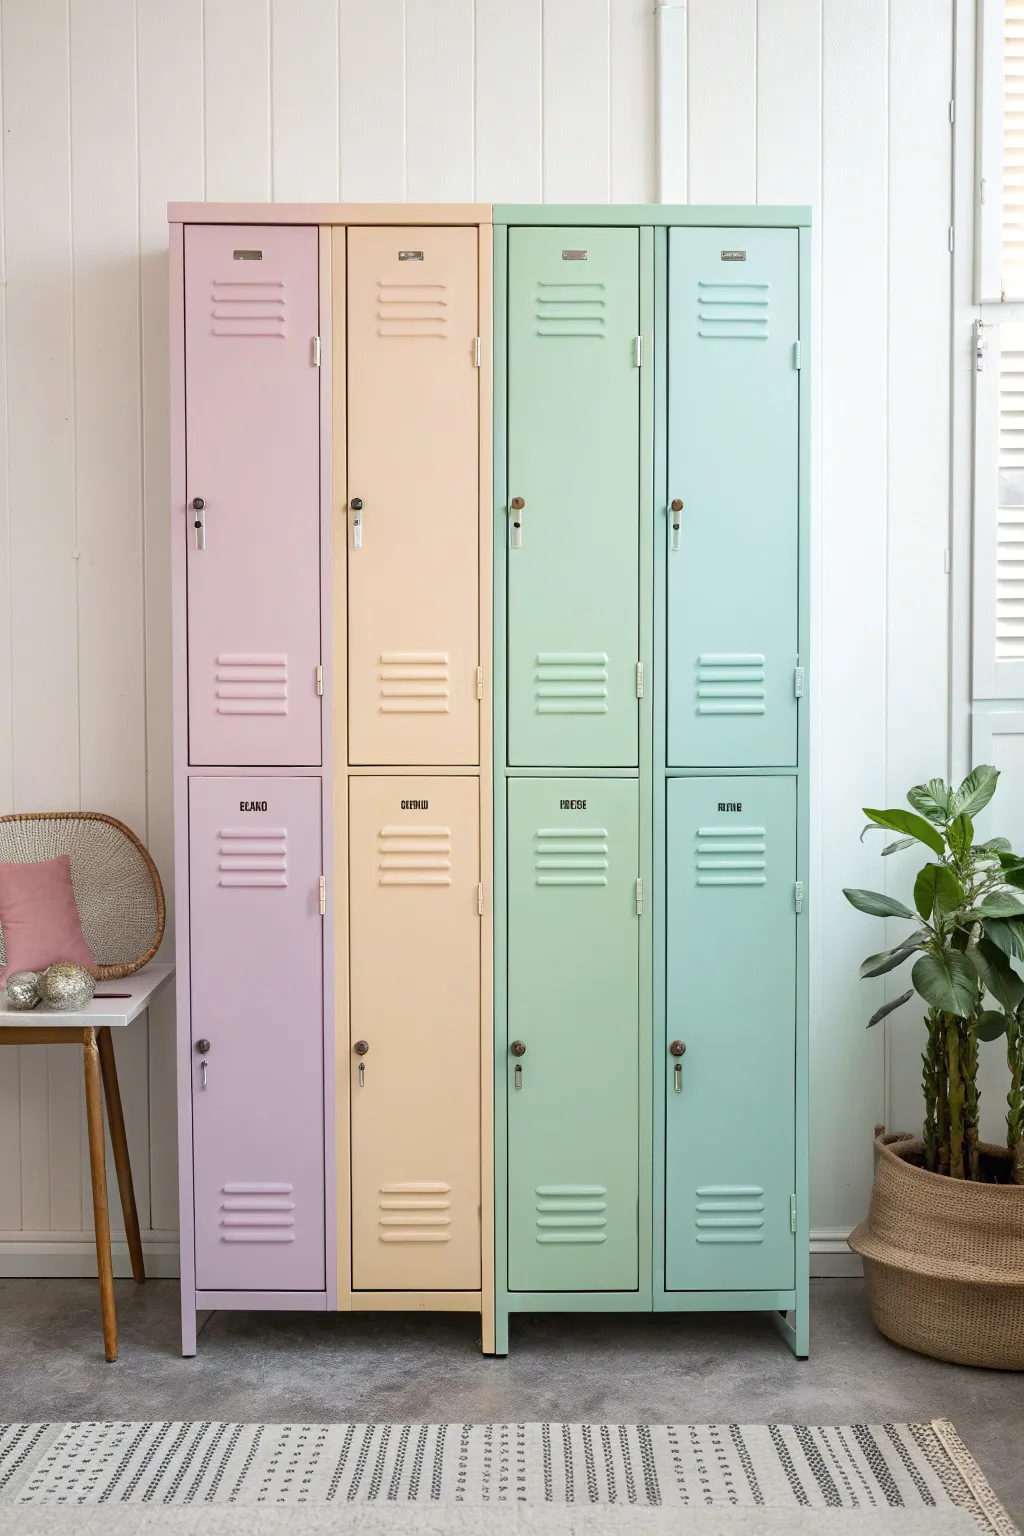
Transform utilitarian metal storage into a soft, organized statement piece with this pastel gradient project. By using a palette of sherbet-inspired shades, you can turn standard lockers into a charming focal point perfect for a playroom or entryway.
Step-by-Step
Materials
- Set of metal lockers (4-door or similar configuration)
- Sandpaper (220-grit and 400-grit)
- Degreaser or TSP substitute
- Metal primer (spray preferred for smooth finish)
- Four pastel spray paint colors: Pastel Pink, Peach/Apricot, Mint Green, Soft Turquoise
- Painter’s tape
- Drop cloths
- Screwdriver (for hardware removal)
- Letter stencils (small, sans-serif font)
- Black acrylic paint or stencil paint
- Small stencil brush or sponge dauber
- Clear matte or satin sealant spray
Step 1: Preparation & Disassembly
-
Remove hardware:
Begin by removing all handles, locks, and any internal hooks using a screwdriver. Place these small pieces in labeled bags so you don’t lose them during the process. -
Separate the doors:
If your locker construction allows, carefully unhinge or unscrew the doors from the frame. Painting doors horizontally prevents drips and makes the job much easier. -
Clean thoroughly:
Wipe down every surface with a heavy-duty degreaser or TSP substitute. Metal furniture often has invisible oils that will repel paint, so don’t skip this step. -
Scuff sand:
Lightly sand all surfaces with 220-grit sandpaper to give the metal ‘tooth’ for the primer to stick to. You aren’t trying to remove the old finish entirely, just dulling the shine. -
Wipe away dust:
Use a tack cloth or a damp lint-free rag to remove every speck of sanding dust. A clean surface is crucial for a smooth spray finish.
Drip Disaster?
If you get a paint run on the metal, don’t wipe it while wet! Let it dry completely, sand the drip flat with fine sandpaper, and then mist a light coat over the area to blend it.
Step 2: Priming & Painting
-
Prime the metal:
Apply a coat of high-quality metal primer. I prefer using a spray primer here because it gets into the louvers (the vents) much better than a brush would. -
Sand the primer:
Once dry, verify the surface is smooth. If the primer feels rough, give it a very quick, gentle pass with 400-grit sandpaper. -
Sort your colors:
Arrange your spray paint cans in the gradient order shown: Pink, Peach, Mint, Turquoise. This helps you visualize which door gets which color before you start spraying. -
Spray the first coats:
Apply your first coat of color to each door and the corresponding section of the frame. Use long, sweeping motions starting off the object and ending off the object to avoid thick spots. -
Build up coverage:
Allow the first coat to dry according to the can’s instructions, then apply a second and possibly third light coat. Multiple thin layers prevent the dreaded drips that ruin a smooth metal finish. -
Respect the cure time:
Let the paint cure for at least 24 hours. Metal paint needs to harden significantly before you handle it for reassembly or stenciling.
Step 3: Stenciling & Assembly
-
Position the stencils:
On the lower doors, measure to find the center point just above the louver vents. Tape your letter stencils in place, ensuring they are perfectly level. -
Apply stencil paint:
Dip your stencil brush into black paint and offload most of it onto a paper towel until the brush is almost dry. Lightly dab vertically over the stencil. -
Remove stencils:
Carefully peel away the stencil tape while the paint is still slightly wet to keep the edges crisp. If any paint bled underneath, touch it up carefully with a small brush and the background color. -
Seal the finish:
Once the stencils are fully dry, spray the entire locker unit with a clear matte or satin sealant. This protects the pastel finish from scratches and scuffs. -
Reattach hardware:
Reinstall the handles, locks, and hinges. If the original hardware was rusty, you might considered having spray painted them metallic gold or silver while they were off. -
Final assembly:
Rehang the doors onto the frames, double-checking that the gradient order (Pink to Turquoise) is correct.
Magnetic Personality
Since typical magnets might scratch your new paint job over time, buy adhesive magnetic sheets. Cut them to the size of the inner door panels to create a hidden magnetic board inside.
Now you have a beautifully organized storage solution that brings a soft, colorful energy to the room


Color-Blocked Locker Grid
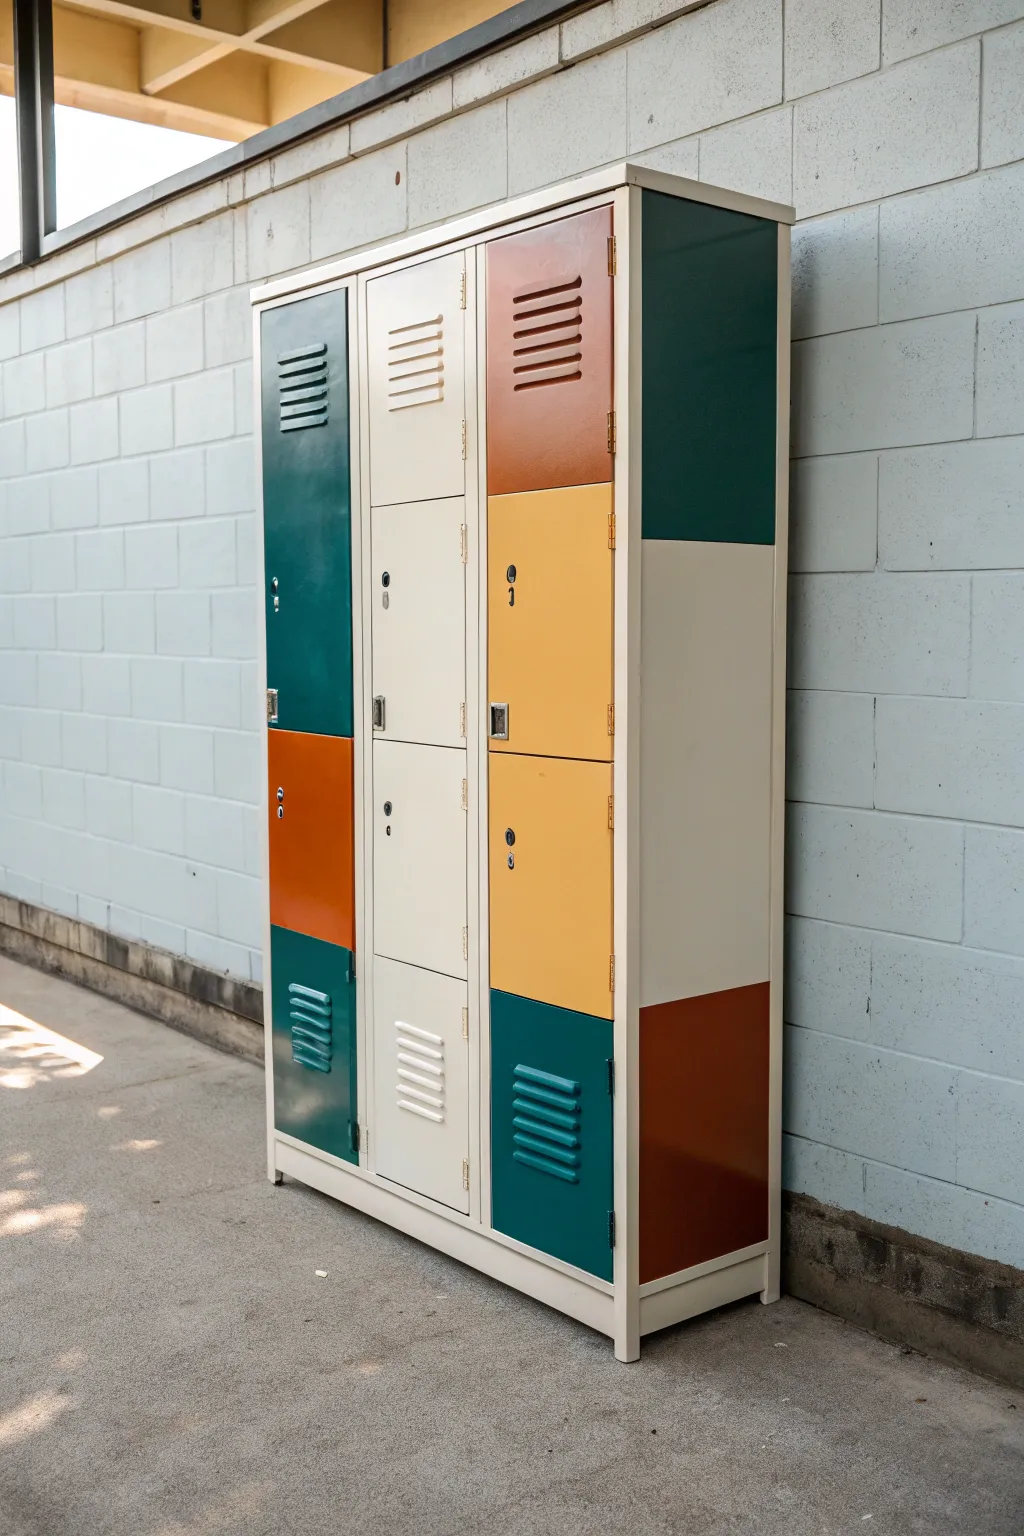
Transform a standard metal locker unit into a statement piece with this bold, Mondrian-inspired color blocking technique. The alternating grid of teal, mustard, rust, and cream creates a retro-modern vibe perfect for entryways or mudrooms.
Step-by-Step Tutorial
Materials
- Metal locker unit (3-column style)
- Sandpaper (220-grit)
- Metal primer (spray or roll-on)
- Painter’s tape (high quality)
- Enamel paint in Teal/Dark Green
- Enamel paint in Mustard Yellow
- Enamel paint in Rust/Terracotta
- Enamel paint in Cream/Off-White
- Small foam rollers (4-inch)
- Angled sash brush (1.5-inch)
- Drop cloth
- Screwdriver (for hardware removal)
- Degreaser cleaner
Step 1: Preparation & Priming
-
Remove hardware:
Begin by removing any number plates, handles, or locks if possible. If they are permanently attached, cover them completely with painter’s tape. -
Clean surfaces:
Scrub the entire locker unit down with a degreaser cleaner to remove oils and dirt. This step is crucial for paint adhesion on metal surfaces. -
Sand the metal:
Lightly scuff the original finish with 220-grit sandpaper. You aren’t trying to strip the paint, just creating a ‘tooth’ for the new primer to grab onto. -
Wipe away dust:
Use a tack cloth or a damp rag to remove every speck of sanding dust. Let the surface dry completely before moving on. -
Apply primer:
Apply a coat of high-quality metal primer. I prefer using a spray primer for the smoothest finish, but a foam roller works well too. Ensure you get into the louvers (the vents).
Drip Disaster?
If paint drips accumulate in the louvers, quickly smooth them with a dry brush before they set. If dried, carefully slice the drip off with a razor blade and touch up.
Step 2: Planning the Grid
-
Map your pattern:
Looking at the reference, sketch out your color plan. The design relies on asymmetry. Assign colors so no two identical colors touch side-by-side. -
Plan the side panel:
Don’t forget the side of the cabinet. In the example, large blocks of color extend from the front face around to the side, creating a continuous geometric look. -
Tape off sections:
Use painter’s tape to mask off areas you aren’t painting first. You will likely need to paint in stages—doing all the cream sections first, then letting them dry before taping over them to paint adjacent colors.
Step 3: Painting the Colors
-
Paint the louvers first:
Start with the louvers (vents) on the doors using a small brush. Dab the paint into the crevices gently to avoid drips running down the front. -
Roll the flat surfaces:
Use a 4-inch foam roller to apply paint to the flat door panels. The foam roller eliminates brush strokes and gives that factory-dipped finish. -
Apply the Cream color:
Start with your lightest color (Cream). Paint the designated central column doors and the large middle section on the side panel. -
Apply the Mustard Yellow:
Move on to the Mustard sections. In the reference, this covers the middle locker doors and a section beneath the rust color. Apply 2-3 thin coats rather than one thick one. -
Apply the Rust/Terracotta:
Paint the top right door and the lower-left door in Rust. This warm tone anchors the palette. Be careful with edges where colors meet. -
Apply the Teal/Dark Green:
Finish with the Teal sections on the remaining doors and the top/bottom blocks on the side panel. This deep color might require an extra coat for full opacity. -
Detail the frame:
Decide on a frame color. The example uses the Cream color for the thin metal frame between the doors, which separates the colored blocks cleanly.
Crisp Lines Pro Tip
After taping, seal the tape edge with a tiny bit of the *base* color (or primer) first. This prevents the new color from bleeding under the tape.
Step 4: Finishing Touches
-
Remove tape carefully:
Peel off the painter’s tape while the final coat is still slightly tacky. Pulling it at a 45-degree angle helps ensure a crisp line without peeling up paint. -
Cure time:
Let the paint cure for at least 48 hours before handling heavily. Enamel takes time to harden completely against scratches. -
Reattach hardware:
Screw the handles, locks, or number plates back into place. If you painted over the locks, ensure they still turn freely.
Step back and admire how a simple coat of paint turned industrial storage into a functional work of art
BRUSH GUIDE
The Right Brush for Every Stroke
From clean lines to bold texture — master brush choice, stroke control, and essential techniques.
Explore the Full Guide
Classic Stripes on Locker Doors
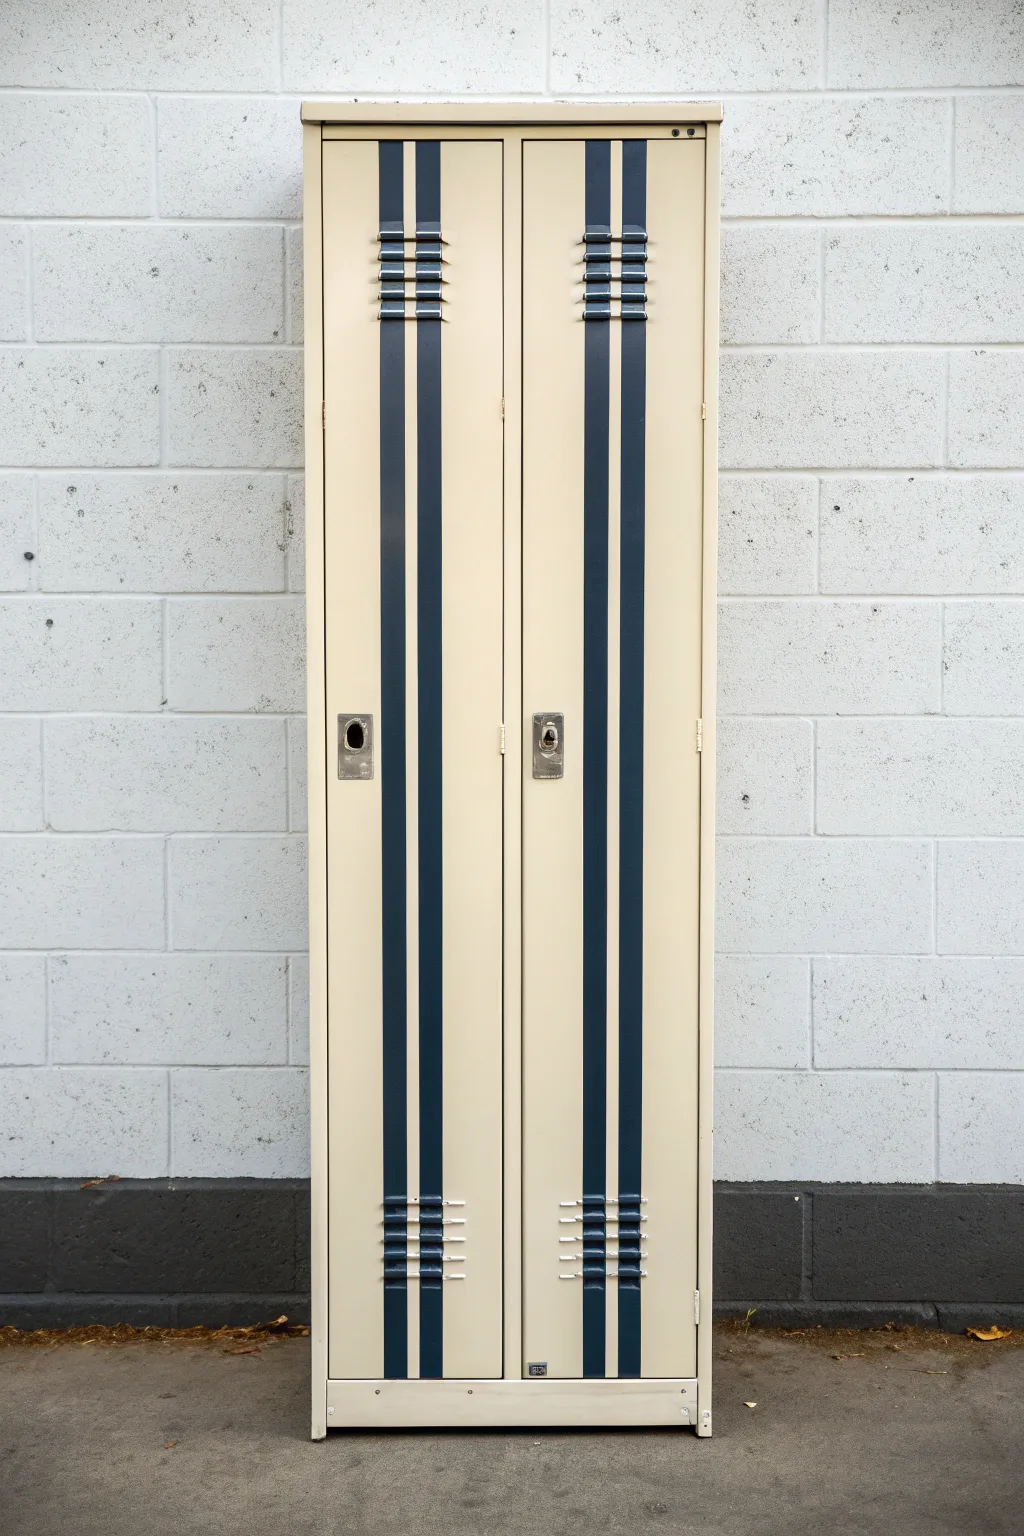
Give a standard metal locker a timeless, athletic upgrade with this classic stripe design. The cream base paired with bold navy lines creates a vintage gym aesthetic that fits perfectly in mudrooms, entryways, or teen bedrooms.
Step-by-Step Guide
Materials
- Metal locker (double or single door)
- Sandpaper (120 and 220 grit)
- Painter’s tape (1-inch and 2-inch widths)
- High-quality spray paint primer (metal formula)
- Cream or off-white spray paint (satin finish)
- Navy blue spray paint (satin finish)
- Drop cloth or cardboard
- Cleaning degreaser (like TSP or a mild detergent)
- Microfiber cloths
- Measuring tape
- Exacto knife or razor blade
Step 1: Preparation & Base Coat
-
Clean the surface:
Begin by thoroughly cleaning the entire locker with a degreaser or TSP solution. Metal lockers often have oily residues or years of grime that will prevent paint from sticking, so scrub well and let it dry completely. -
Sand for adhesion:
Scuff the original finish using 120-grit sandpaper. You don’t need to strip it to bare metal, but you do need to remove any sheen so the new paint has something to grip. Wipe away the dust with a damp microfiber cloth. -
Apply metal primer:
Spray a thin, even coat of metal primer over the entire exterior. Keep the can moving to avoid drips. Let the primer dry according to the manufacturer’s instructions, usually about an hour. -
Spray the base color:
Apply your cream or off-white base color. Hold the can 8-10 inches away and use sweeping motions. Several light coats are always better than one heavy one to prevent runs. -
Ensure full coverage:
Check difficult angles, especially around the handle mechanism and inside the ventilation slats. Apply a second or third coat as needed until the color is solid and opaque. -
Allow extensive drying time:
This is crucial: let the base coat cure for at least 24 to 48 hours. If the paint is even slightly soft, the painter’s tape used in the next phase will peel it right off.
Bleed-Through Blues?
If paint bled under the tape, wait for it to fully dry. Then, spray some base cream paint into a cup and use a small artist’s brush to carefully touch up the line.
Step 2: Creating the Stripes
-
Measure the center:
Find the vertical center of each door using your measuring tape. Mark this spot lightly with a pencil at the very top and very bottom of the door. -
Create the stripe guide:
To achieve the look in the photo, you want two thick stripes with a gap in the middle. Place a strip of 1-inch painter’s tape vertically down the exact center of the door. This will act as the spacer between your navy stripes. -
Define the outer edges:
Place a strip of tape on both the left and right sides of your center spacer tape. The width of this gap determines how wide your navy stripes will be. I like to use the width of the tape itself as a guide for spacing. -
Mask off the rest:
Once your stripe channels are defined, use paper or plastic sheeting and tape to cover the rest of the beige door completely. You want only the areas intended for navy paint to be exposed. -
Detail the vents:
This is the tricky part. Use an Exacto knife or razor blade to carefully press the tape into the recesses of the ventilation slats. Trim away excess tape so the stripe continues cleanly over the bumps without gaps where spray could sneak under. -
Seal the tape edges:
Run your fingernail or a credit card firmly along every edge of the tape to ensure a tight seal. For extra insurance, you can spray a very light mist of the *cream* base paint over the tape edges first; this seals any tiny gaps with the base color.
Step 3: Finish & Reveal
-
Apply the accent color:
Spray the navy blue paint into the masked-off stripe area. Use short, controlled bursts, especially over the ventilation slats, to avoid pooling paint in the louvers. -
Add a second coat:
After about 15 minutes (or as directed by your can), apply a second coat of navy to ensure a rich, deep color contrast against the light background. -
Remove tape promptly:
Don’t let the navy paint fully cure before removing the tape. Peel the tape away slowly at a 45-degree angle while the paint is still slightly tacky to get the crispest lines. -
Handle the vent tape:
Use tweezers to carefully pull the small pieces of tape out from the deep grooves of the ventilation slats without nicking the fresh paint. -
Final cure:
Let the locker sit undisturbed for a few days to fully harden before reattaching any hardware or moving it into high-traffic areas.
Go Custom
Swap the navy stripes for your favorite sports team’s colors, or use metallic gold paint for a glam Art Deco interpretation of this industrial classic.
Now you have a stunning, factory-style storage piece that looks like a vintage find.
Ombre Fade From Top to Bottom
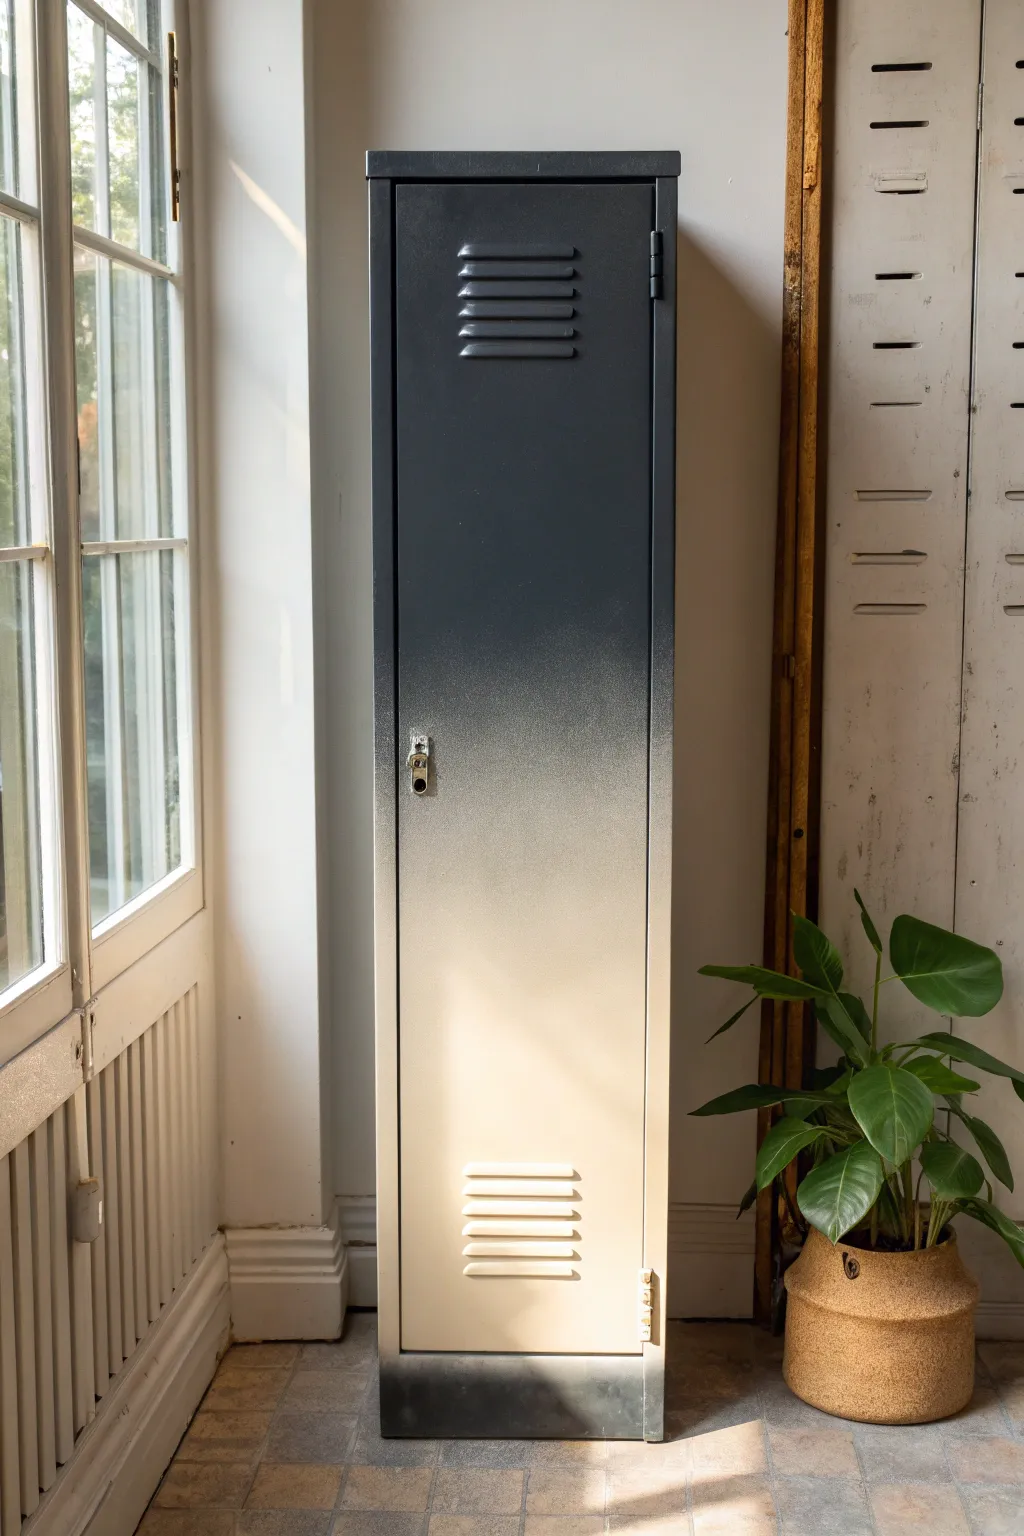
Transform a utilitarian metal locker into a stunning statement piece with this dramatic gradient effect. By blending deep charcoal navy into a soft cream, you create a sophisticated ombre fade that adds modern industrial charm to any entryway or studio space.
Step-by-Step Tutorial
Materials
- Vintage or new metal locker
- Sandpaper (220-grit and 400-grit)
- Clean rags and mild degreaser (like TSP substitute)
- Painter’s tape
- Spray primer suitable for metal
- Matte spray paint (Dark Charcoal or Midnight Navy)
- Matte spray paint (Cream or Off-White)
- Matte clear topcoat spray
- Drop cloths or cardboard
- Respirator mask
Step 1: Preparation & Priming
-
Clean surface:
Begin by thoroughly cleaning the entire locker with a mild degreaser and a clean rag. Metal lockers often have oily residues or years of grime that will repel paint. -
Sand for adhesion:
Scuff the entire surface with 220-grit sandpaper. You don’t need to strip the old paint completely, just create a rough surface for the new paint to grip. -
Remove dust:
Wipe down the locker again with a damp, lint-free cloth to remove all sanding dust. -
Mask hardware:
Use painter’s tape to carefully cover the handle, lock mechanism, and any hinges you don’t want painted. If the vents are open to the inside, tape cardboard behind them to prevent overspray inside. -
Apply primer:
Spray a thin, even coat of metal primer over the entire exterior. I prefer two light coats rather than one heavy one to avoid drips. -
Dry time:
Allow the primer to dry completely according to the can’s instructions, usually about an hour.
Step 2: Creating the Ombre Base
-
Paint the bottom section:
Start with your lighter color (Cream). Spray the bottom half of the locker, ensuring full coverage on the lowest section and fading the spray out as you reach the middle. -
Extend the light tone:
Bring the cream color up slightly higher than you think the transition point should be. This gives you a ‘safe zone’ for blending later. -
Paint the top section:
Switch to your dark color (Charcoal/Navy). Spray the top third of the locker solid, ensuring the top cap and vents are fully covered. -
Begin the downward fade:
Bring the dark paint down toward the middle, lightening your pressure on the nozzle as you approach the cream section.
Pro Tip: The Speckle Effect
To get that artistic speckled transition seen in the photo, don’t press the nozzle fully down in the middle zone. A half-press often spits larger droplets.
Step 3: Blending the Gradient
-
Mist the transition zone:
This is the crucial step. Hold the dark can about 12-15 inches away from the middle section and utilize quick, horizontal dusting motions. -
Feather the edge:
Allow the overspray of the dark paint to gently speckle onto the cream base. You want a ‘mist’ landing on the surface, not a wet coat. -
Correct with light paint:
If the dark section came down too low or looks too harsh, grab the cream spray paint again. Mist it upward into the dark transition area to soften the line. -
Check from a distance:
Step back about five feet to evaluate the fade not as a painter, but as a viewer. The transition should look seamless from afar. -
Repeat misting:
Go back and forth between the two colors, lightly misting the middle area until the gradient feels smooth and natural.
Fixing Drips
If you sprayed too heavily in the middle and get a run, don’t wipe it! Let it dry, sand it smooth with 400-grit paper, and then re-mist the area.
Step 4: Finishing Touches
-
Dry completely:
Let the paint cure for at least 24 hours. Because we layered paints in the middle, this area needs extra time to harden. -
Apply clear coat:
Seal your work with a matte clear coat. Apply in long, vertical strokes from top to bottom to unify the sheen of the two different colored paints. -
Remove tape:
Carefully peel away the painter’s tape from the hardware. If the paint bridged over the tape, score the edge gently with a craft knife first. -
Clean hardware:
If any paint seeped onto the chrome handle, use a little nail polish remover on a Q-tip to clean it up immediately.
Enjoy the sleek, custom look of your new standout storage piece

PENCIL GUIDE
Understanding Pencil Grades from H to B
From first sketch to finished drawing — learn pencil grades, line control, and shading techniques.
Explore the Full Guide
Two-Tone Inside and Out
Transform a standard metal locker into a sophisticated storage piece with this subtle two-tone technique. By using a slightly darker shade for the interior, you create depth and an elevated, custom look that feels at home in a living space rather than a hallway.
Step-by-Step
Materials
- Metal locker (vintage or reproduction)
- Sandpaper (120 and 220 grit)
- Painter’s tape
- Metal primer (spray or rolled)
- High-quality enamel or chalk paint (Light Sage for exterior)
- High-quality enamel or chalk paint (Dark Olive for interior)
- Small foam roller
- Synthetic bristle brush (2-inch)
- Small artist brush for tight corners
- Screwdriver (for hardware removal)
- Drop cloth
- Degreasing cleaner (like TSP substitute)
- Clear matte or satin topcoat (polyurethane)
Step 1: Preparation & Dismantling
-
Clear the area:
Begin by setting up your workspace in a well-ventilated area, laying down a drop cloth to protect your floors. -
Remove hardware:
Using your screwdriver, carefully remove any handles, locks, number plates, or hinges if possible. Bag these up so you don’t lose the screws. -
Deep clean:
Wipe down the entire locker, inside and out, with a degreasing cleaner. Vintage lockers often possess a film of oil or grime that will repel paint. -
Scuff sand:
Once dry, use 120-grit sandpaper to scuff the metal surfaces. You aren’t trying to remove all previous paint, just scratching the surface to give the new primer something to grip. -
Wipe dust:
Remove all sanding dust with a tack cloth or a damp rag, ensuring the surface is perfectly clean before priming.
Step 2: Inner Depth
-
Prime the interior:
Apply a coat of metal primer to the inside of the locker. A spray primer works best for getting into the back corners and shelf supports without drips. -
Paint the corners first:
Start applying your darker ‘Shadow Tone’ color (the Dark Olive). Use a brush to cut in along the back seams, corners, and around shelf brackets. -
Roll the interior walls:
Switch to a small foam roller to cover the large flat surfaces of the interior walls and the back panel. This ensures a smooth finish without brush marks. -
Paint the shelves:
Don’t forget the undersides of any shelves; paint the top and bottom of the shelves in the darker tone for a cohesive look when the door is open. -
Second coat:
Allow the first coat to dry completely according to the can’s instructions, then apply a second coat for full opacity.
Sticky Door Fix
If layers of paint make the door rub, sand the contact edge down to bare metal and apply only a thin layer of spray paint instead of rolled layers.
Step 3: Exterior Elegance
-
Tape the transition:
Once the interior is fully dry, apply painter’s tape along the inner rim of the door frame where the inside color meets the outside edge. -
Prime the exterior:
Apply your metal primer to the exterior surfaces, paying special attention to the louvered vents on the door. -
Brush the details:
Using your ‘Light Sage’ exterior color, start closely with a brush around the vents, hinge areas, and the feet of the locker. -
Roll the exterior:
Use a fresh foam roller to apply the Light Sage paint to the door front and side panels. Rolling gives that factory-smooth finish desirable on metal furniture. -
Address the louvers:
I usually go back with a very small dry brush to catch any drips that might have gathered in the corners of the vented louvers while the paint is still wet. -
Apply second exterior coat:
Let the first layer cure, then apply a second coat. A third thin coat might be necessary depending on the quality of your paint.
Pro Tip: Spray Polish
Use a can of high-gloss gold spray paint on the hinges and lock mechanism before reinstalling them to get that trendy mixed-metal aesthetic.
Step 4: Finishing Touches
-
Seal the surface:
Once the paint has cured for at least 24 hours, apply two coats of a clear matte or satin topcoat to protect against scratches. -
Reinstall hardware:
Clean up your original hardware (or spray paint it gold/brass like in the example) and screw it back into place. -
Remove tape:
Carefully peel away any remaining painter’s tape to reveal your crisp lines.
Enjoy the organized calm your new statement storage piece brings to the room
Contrasting Hardware Accents
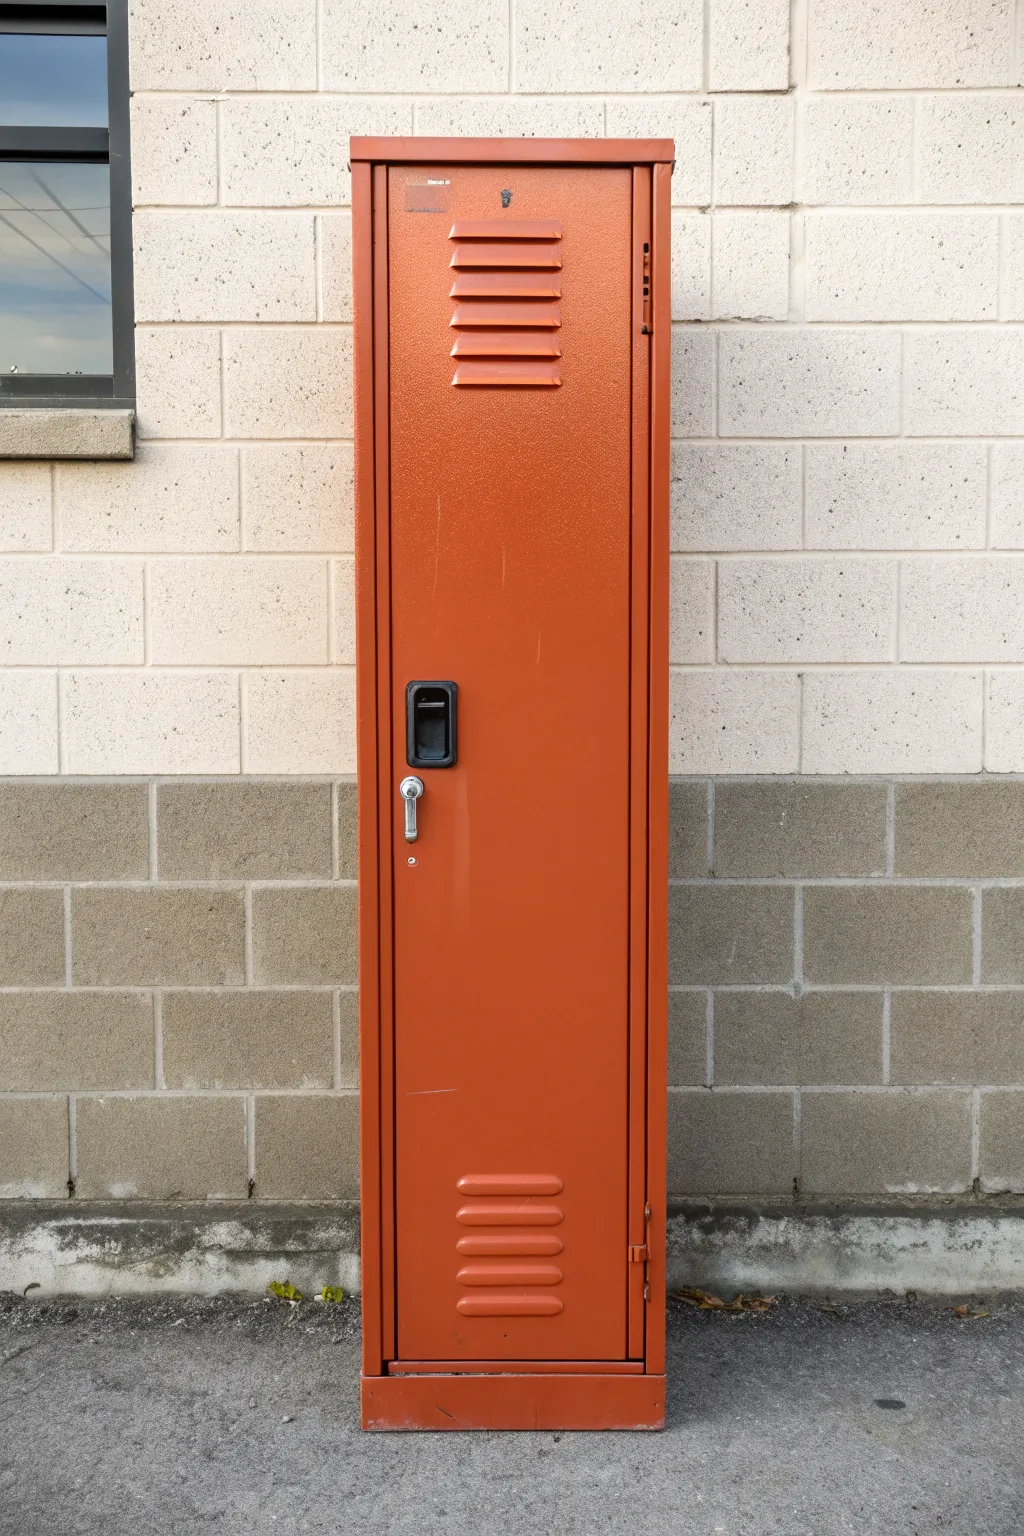
Transform a standard metal locker into a statement piece with this vibrant rusty-orange finish that makes the original hardware pop. This project focuses on achieving a smooth, factory-like coat while highlighting the industrial contrast between the warm paint and the cool black and silver handle mechanism.
Step-by-Step Guide
Materials
- Metal locker (vintage or new)
- Rust-oleum protective enamel spray paint (gloss, Rusty Orange or similar)
- Masking tape (high quality)
- Sandpaper (220-grit and 400-grit)
- Metal primer spray (grey)
- Degreaser or TSP substitute
- Clean lint-free rags
- Drop cloth or cardboard
- Screwdriver or wrench set (for hardware removal)
- Respirator mask
Step 1: Preparation & Hardware Removal
-
Remove the hardware:
Before you even touch a can of paint, carefully remove the black plastic handle housing and the silver latch mechanism using your screwdriver. Store these pieces and their screws in a labeled bag so nothing gets lost. -
Clean the surface thoroughly:
Scrub the entire locker down with a degreaser or TSP substitute and a rag. Old lockers often have years of oily residue or grime that will ruin your paint adhesion, so be thorough. -
Sand for adhesion:
Scuff sand the entire exterior surface using 220-grit sandpaper. You don’t need to strip it to bare metal, but you do need to remove the glossy sheen so the new primer has something to grip. -
Wipe away dust:
Use a tack cloth or a damp lint-free rag to remove every speck of sanding dust. Any dust left behind will create a bumpy texture in your final finish. -
Mask internal areas:
If you aren’t painting the interior, tape off the door jambs and any openings like the vents from the inside to prevent overspray from drifting in.
Step 2: Priming & Painting
-
Apply metal primer:
Spray a thin, even coat of grey metal primer over the entire locker. Keep the can moving to avoid drips, especially around the louvers (vents) where paint tends to pool. -
Sand the primer:
Once the primer is fully dry, give it a very light pass with 400-grit sandpaper to smooth out any texture. Wipe it clean again. -
First coat of color:
Shake your Rusty Orange enamel spray paint vigorously for at least one minute. Apply your first coat in light, sweeping horizontal motions, starting the spray off the object and ending off the object. -
Wait between coats:
I like to let this dry briefly—about 15-20 minutes—before the next coat, just until it’s tacky but not wet. -
Second coat for opacity:
Apply a second coat, moving in a vertical pattern this time to ensure full coverage. Pay special attention to the angles of the vents to ensure no grey primer is peeking through. -
Check for thin spots:
Inspect the finish under good light. If you see any unevenness, apply a third, very light dusting coat to even out the color. -
Let it cure:
Allow the paint to cure for at least 24-48 hours. Enamel takes time to harden, and rushing this step can lead to fingerprints or dents in the finish.
Drips While Spraying?
Don’t wipe wet paint! Wait for the drip to dry completely, sand it smooth with 400-grit paper, and then apply a light touch-up coat over the area.
Step 3: Reassembly & Detailing
-
Clean the hardware:
While the locker cures, clean the black handle housing and chrome latch with soapy water. If the black plastic looks faded, you can refresh it with a plastic restorer product. -
Reinstall the mechanism:
Carefully screw the black background plate and handle assembly back into the door. Tighten screws by hand to avoid cracking the fresh paint around the holes. -
Attach the latch:
Reattach the silver latch lever. The contrast between the fresh orange paint, the matte black housing, and the shiny chrome latch is the key design element here. -
Final wipe down:
Give the entire piece a final wipe with a soft microfiber cloth to remove any handling marks and polish the chrome accent.
Pro Tip: Vent Painting
Spray the vents from multiple angles (up, down, left, right) lightly. It covers hidden spots without flooding the area and causing runs.
Now you have a striking industrial storage piece that looks brand new and ready for use


Stenciled Numbers and Names
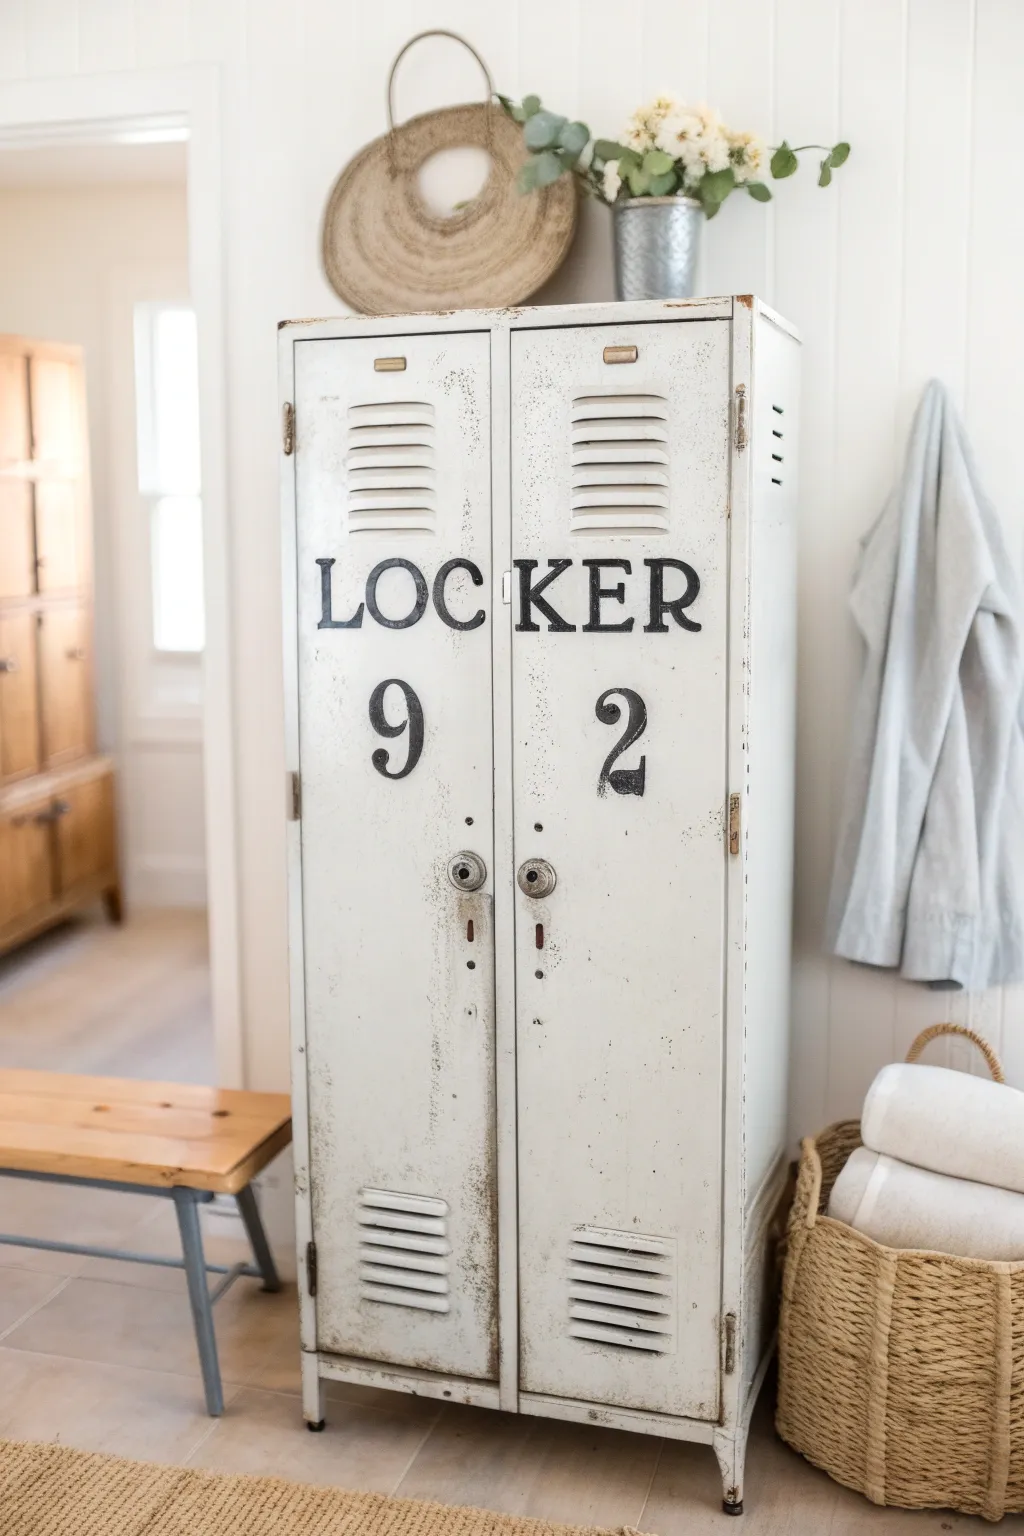
Transform a plain metal locker into a piece of nostalgic decor with this masterful stenciling project. By combining crisp typography with intentional weathering techniques, you’ll achieve an authentic industrial look that feels like a flea market find.
Step-by-Step Tutorial
Materials
- Metal locker (vintage or reproduction)
- Sandpaper (120 and 220 grit)
- Primer designed for metal
- Off-white spray paint or chalk paint
- Large custom stencils (‘LOCKER’, ‘9’, ‘2’)
- Painter’s tape
- Black acrylic craft paint or stencil paint
- Dark grey acrylic craft paint
- Stencil brushes (various sizes)
- Small detail brush
- Dark brown antiquing wax or glazing medium
- Lint-free rags
- Matte clear coat sealer
Step 1: Preparation & Base Coat
-
Clean the surface:
Begin by thoroughly cleaning the metal locker with a degreaser or soapy water to remove any oils, dirt, or old sticker residue. Allow it to dry completely. -
Scuff sand:
Lightly sand the entire exterior using 120-grit sandpaper. You aren’t trying to remove all the old paint, just roughing up the surface so the new primer adheres properly. -
Prime the metal:
Apply a coat of metal primer. If your locker is already a light color, you might skip this, but primer ensures longevity and prevents rust from bleeding through later. -
Apply the base color:
Spray or brush on your off-white base color. Two or three thin coats are better than one thick one to avoid drips. Let this cure fully—ideally overnight—before moving to stencils.
Clean Lines Across Gaps
When stenciling across the door gap, place a piece of cardstock inside the door edge. This catches overspray and keeps the stencil crisp without painting the interior frame.
Step 2: Stenciling the Typography
-
Position the text:
Measure the width of the doors to center your ‘LOCKER’ text. If the word spans across the gap between doors, cut your stencil in half or tape it carefully so the gap is accounted for. -
Secure the stencils:
Use painter’s tape generously to hold the stencils in place. Double-check your levels; vintage industrial style looks best when the alignment is precise. -
Load the brush:
Dip your stencil brush into black paint, then offload almost all of it onto a paper towel. The brush should feel nearly dry to the touch to prevent paint from bleeding under the stencil edges. -
Apply the black paint:
Using a vertical dabbing or pouncing motion, fill in the letters and numbers. Don’t swipe the brush side-to-side. Build up the opacity gradually with multiple light passes. -
Remove stencils:
Carefully peel away the painter’s tape and lift the stencils while the paint is still slightly tacky to ensure crisp edges.
Step 3: Distressing & Aging
-
Sand for wear:
Once the stencil paint is bone dry, take your 220-grit sandpaper and lightly sand over the letters and numbers. Focus on the edges to make them look worn down by time. -
Create faux rust:
Dip a small detail brush or a sponge into dark brown antiquing wax or a mix of brown and orange paint. Dab this casually along the seams, near the handles, and the bottom vents. -
add grime details:
I like to smudge a little dark grey paint near the handle mechanisms and hinges to simulate years of greasy finger marks. -
Weather the typography:
Take a nearly dry brush with the brown glazing medium and lightly drag it downward from the stenciled letters, creating faint, vertical streaks that mimic water runoff and rust trails. -
Buff the wax:
If you used wax, let it sit for about 15 minutes, then buff it gently with a lint-free rag. This pushes the ‘dirt’ into the texture of the paint and gives it a natural sheen. -
Seal the finish:
Protect your hard work with a clear matte sealer spray. This locks in the distressed finish and makes the locker durable enough for daily use.
Bleeding Paint?
If paint bleeds under the stencil, don’t panic. Wait for it to dry, then use a small artist’s brush and your off-white base color to touch up the edges and ‘erase’ the mistake.
Enjoy the organized charm this personalized vintage-style locker brings to your entryway or mudroom
Chalkboard Label Panels
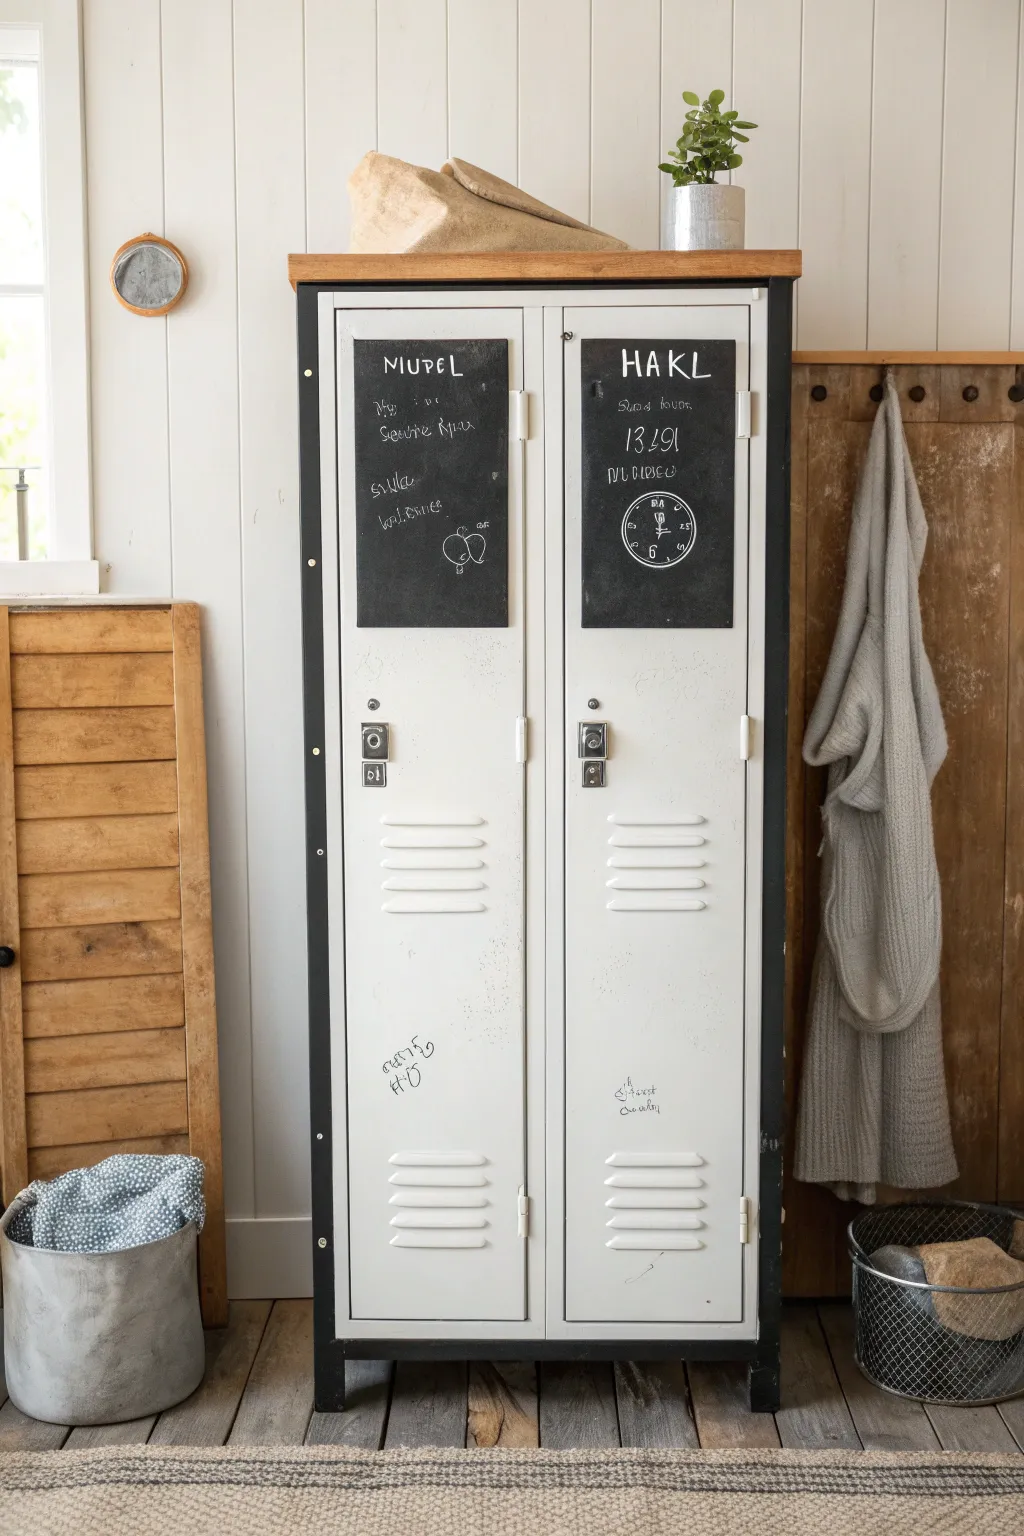
Transform ordinary metal lockers into functional organizational centers with these bold, hand-painted chalkboard labels. The high-contrast black panels against the creamy white metal create a vintage industrial look that is perfect for jotting down reminders, names, or playful doodles.
Step-by-Step
Materials
- White or light grey mental lockers (pre-cleaned)
- Black chalkboard paint (tin or spray)
- Fine grit sandpaper (220-grit)
- Painter’s tape (high quality)
- Small foam roller or high-density foam brush
- Measuring tape
- Pencil
- Level
- Rubbing alcohol
- Lint-free cloth
- White chalk or chalk marker
Step 1: Preparation & Masking
-
Clean the Surface:
Begin by thoroughly cleaning the upper section of the locker doors where the panels will go. Use rubbing alcohol and a lint-free cloth to remove any oils, grease, or dust that could prevent the paint from adhering properly. -
Determine Panel Size:
Decide on the dimensions for your chalkboard rectangles. For this specific look, aim for a rectangle that fits comfortably within the upper third of the door, leaving about a 2-inch border from the top and sides of the door edges. -
Measure and Mark:
Use your measuring tape and pencil to lightly mark the corners of your rectangles on the locker surface. I like to use a small level here to ensure the top and bottom lines are perfectly horizontal. -
Tape the Borders:
Apply painter’s tape along the outside of your pencil marks. Press the edges of the tape down firmly with your fingernail or a credit card to create a tight seal; this prevents the black paint from bleeding underneath. -
Light Scuffing:
Using the 220-grit sandpaper, very gently scuff the metal surface *inside* the taped area. You aren’t trying to remove the existing paint, just giving it a little ‘tooth’ so the chalkboard paint grips better. -
Wipe Clean:
Wipe away the sanding dust completely with a damp cloth and let the area dry for a few minutes.
Seal the Edge
Before painting black, paint a thin line of the locker’s base color along the tape edge. This seals the tape so any bleed is the invisible base color, ensuring a razor-sharp black line.
Step 2: Painting the Panels
-
First Coat Application:
Dip your small foam roller or foam brush into the black chalkboard paint. Apply a thin, even coat inside the taped area. Avoid overloading the roller to prevent drips. -
Dry Time:
Allow the first coat to dry according to the manufacturer’s instructions, usually at least one hour. -
Second Coat:
Apply a second coat of chalkboard paint moving in the opposite direction of the first coat (e.g., if you went vertical first, go horizontal now). This cross-hatching technique ensures solid coverage without streaks. -
Third Coat (Optional):
If the metal underneath is still slightly visible, apply a third thin coat. Most chalkboard paints require 2-3 coats for full durability. -
Remove Tape:
Here is the crucial moment: carefully peel off the painter’s tape while the final coat is still slightly wet (tacky, but not dry). Pull the tape away from the painted area at a 45-degree angle to get the crispest line. -
Full Cure:
Let the paint cure completely. While it might feel dry in an hour, chalkboard paint often needs 24 hours to 3 days to fully harden before you can write on it.
Uneven Texture?
If the brush strokes look too prominent, light sanding with very fine grit sandpaper between dry coats helps smooth the finish for better writing.
Step 3: Conditioning & Styling
-
Condition the Surface:
Once fully cured, take a piece of white chalk and rub the side of it over the entire painted surface. This ‘seasons’ the chalkboard so your first written words don’t burn a permanent ghost image into the paint. -
Wipe Down:
Erase the chalk conditioning layer with a dry cloth or felt eraser. You should be left with a dusty, vintage black slate look. -
Lettering:
Use a sharpened stick of chalk for a classic look or a fine-tip chalk marker for precision. Recreate the specific look from the image by writing a Name or category in all caps at the top (like ‘MUPEL’ or ‘HAKL’). -
Add Details:
Below the main title, scribble smaller notes, numbers, or sketches. In the image, there are faint circled numbers and a small clock drawing—add these whimsical elements to mimic the authentic school-locker vibe.
Now you have a personalized, functional piece of storage that adds character to any mudroom or entryway
Geometric Tape Line Pattern
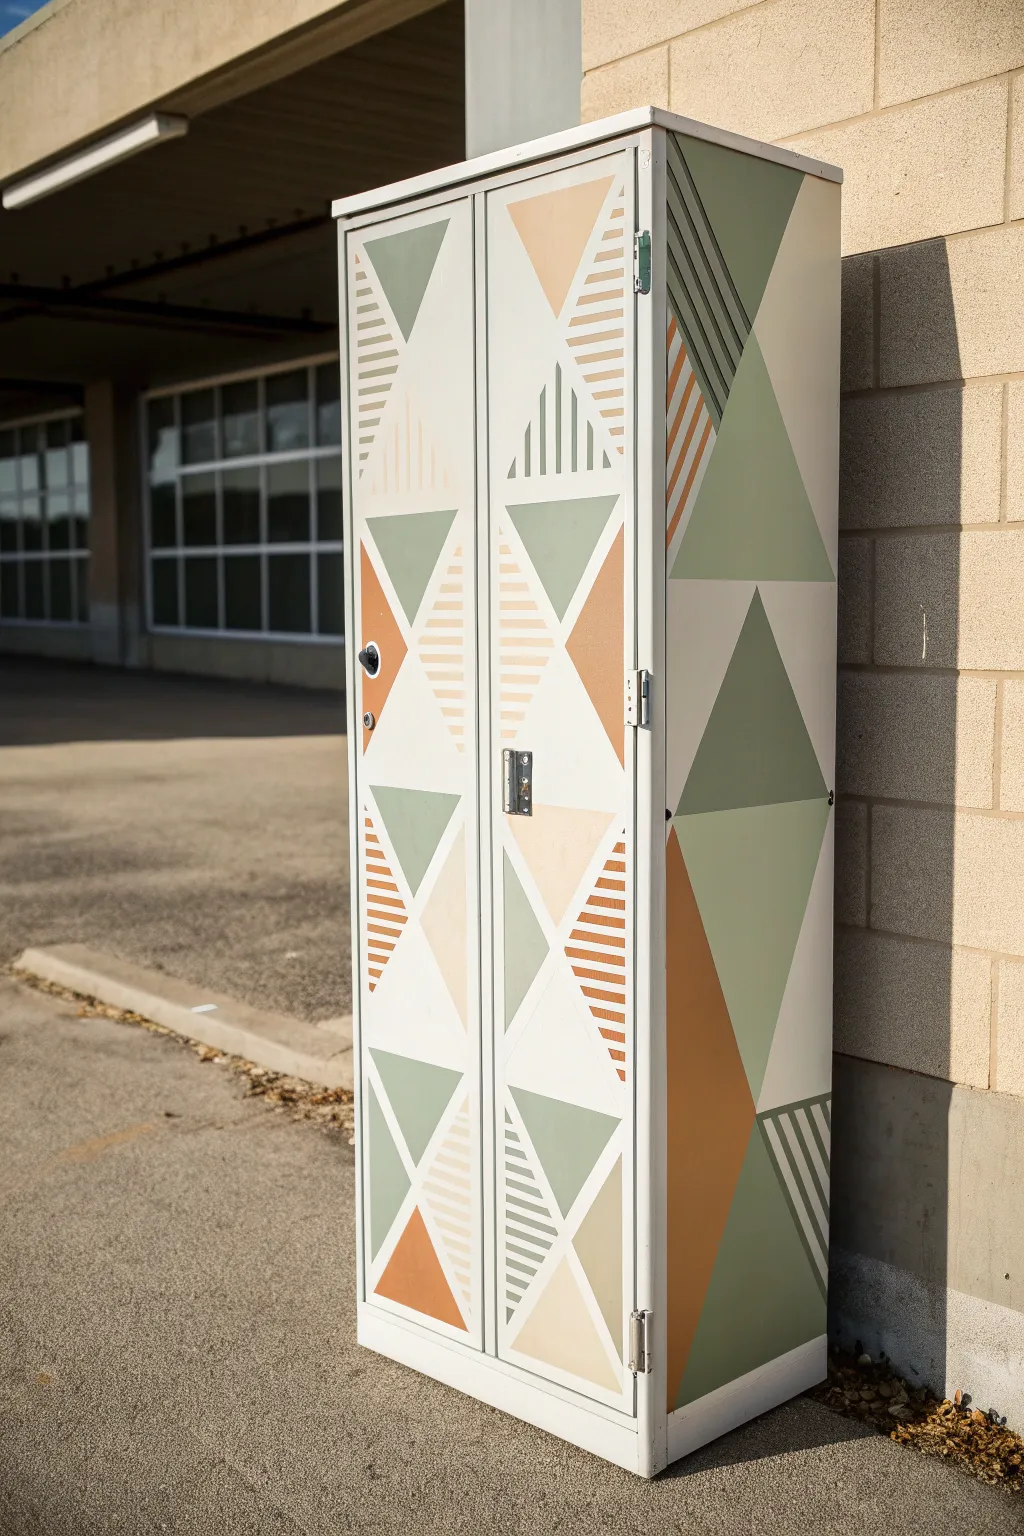
Transform a standard metal locker into a statement piece with this retro-inspired geometric design. Using painter’s tape and a muted palette of sage, terracotta, and cream, you’ll create a striking visual rhythm of triangles and stripes.
Step-by-Step Tutorial
Materials
- Metal locker (clean and prepped)
- Sandpaper (220-grit)
- Primer suitable for metal
- Chalk paint or acrylic enamel (White/Cream base)
- Chalk paint or acrylic enamel (Sage Green)
- Chalk paint or acrylic enamel (Dark Forest Green)
- Chalk paint or acrylic enamel (Terracotta/Rust)
- Chalk paint or acrylic enamel (Pale Peach)
- Painter’s tape (various widths relative to scale, 0.25 inch and 1 inch)
- Exacto knife or craft blade
- Small foam rollers
- Assorted small paintbrushes (flat and angled)
- Ruler or straight edge
- Sealer (polycrylic or clear wax)
Step 1: Preparation & Base Coat
-
Surface Prep:
Clean the entire locker thoroughly with a degreaser to remove oils and dirt. Once dry, lightly scuff the metal surface with 220-grit sandpaper to give the paint something to grip. -
Hardware Removal:
Tape off the main handle and keyhole mechanism immediately, or remove handles if possible. This ensures crisp edges around the functional parts later. -
Prime the Metal:
Apply a coat of high-quality metal primer using a foam roller for the smoothest finish. Let this cure according to the manufacturer’s instructions before moving on. -
Apply Base Color:
Roll on your base color—a warm creamy white works perfectly as the background for this design. You will likely need two coats to achieve full opacity. Allow complete drying time (usually 24 hours) to prevent the painter’s tape from peeling this layer up later.
Step 2: Designing the Grid
-
Visualize the X Pattern:
Look at the doors as rectangles. The primary structure relies on large ‘X’ shapes that divide the space into triangles. Use long strips of medium-width painter’s tape to mark out these large diagonal bisecting lines across the front doors and side panels. -
Subdivide Shapes:
Within the large triangles formed by your main X lines, create smaller triangles. Use your tape to span from the center points of the X to the edges of the door. Don’t worry about perfection; an asymmetrical balance looks more organic. -
Seal the Tape Edges:
I always run a credit card or brayer firmly over every piece of tape. Then, lightly brush a tiny amount of your base cream paint over the tape edges. This locks the tape and prevents colored paint from bleeding under.
Clean Lines Guarantee
Use a ‘frog tape’ specifically designed for delicate surfaces if you’re painting over a fresh base coat. It minimizes the chance of pulling up your background paint.
Step 3: Painting Solids
-
Plan Your Palette:
Before dipping your brush, stick small sticky notes on the different masked sections to designate colors (e.g., ‘Sage’, ‘Rust’, ‘Stripes’). This helps you balance the color distribution evenly. -
Paint the Sage Triangles:
Using a small flat brush, fill in the designated sage green sections. Keep your brush strokes parallel to the longest side of the triangle for a neat finish. -
Add Depth with Forest Green:
Select a few larger triangles, particularly on the side panel or lower sections, to paint in dark forest green. This anchors the design. -
Pop with Terracotta:
Fill in the accent triangles with the rust/terracotta color. These warm tones contrast beautifully against the cool greens. -
Soft Accents:
Paint the remaining solid triangles with your pale peach shade. Two thin coats are usually better than one thick coat to avoid ridges.
Level Up: Metallic Pop
Replace one of the solid triangle colors (like the peach or rust) with a metallic gold or copper paint. It adds a touch of glamour that catches the light.
Step 4: Creating the Striped Detail
-
Masking the Stripes:
Identify the triangles reserved for stripe patterns. Using your thinnest painter’s tape (or cutting standard tape into thin strips), lay down parallel lines within these triangle shapes. -
Spacing Check:
Try to eyeball the spacing so the gaps (which will be painted) are roughly equal to the width of the tape (which will remain cream). Vary the direction of the stripes—horizontal, vertical, and diagonal—between different triangles for visual interest. -
Tape Trimming:
Use an Exacto knife to carefully trim the ends of your stripe tape so they fit perfectly inside their triangular borders without overlapping onto the already painted solid colors. -
Paint the Stripes:
Lightly dab or brush your chosen color (sage, peach, or rust) over the striped masked areas. Ensure you don’t overload the brush to minimize bleed.
Step 5: The Reveal & Finish
-
Remove Tape:
While the final coat of paint is still slightly tacky (not fully dry), slowly peel back all the tape at a 45-degree angle. This is the magic moment. -
Touch Ups:
Use a tiny artist’s brush to fix any small bleeds or jagged lines with the appropriate color. -
Protect Your Work:
Once fully cured (wait at least 48 hours), apply a clear polycrylic topcoat or furniture wax. This protects the finish from locker room wear and tear.
Enjoy the satisfaction of seeing your custom, geometric art piece every time you reach for your gear
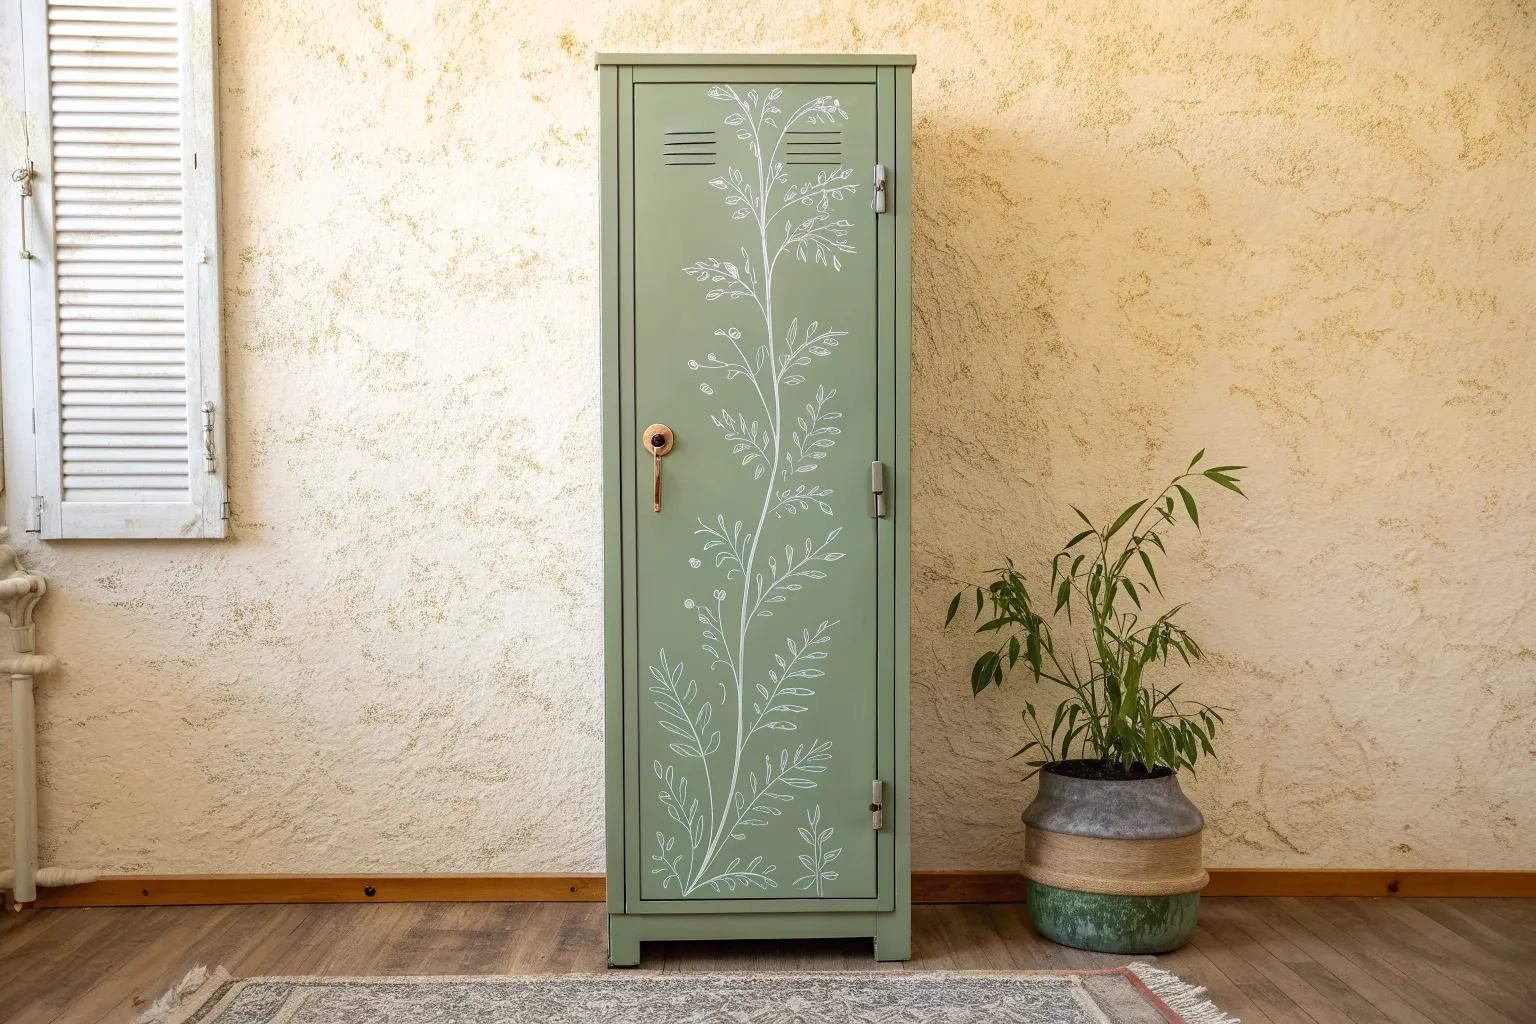
Hand-Painted Botanicals on Lockers
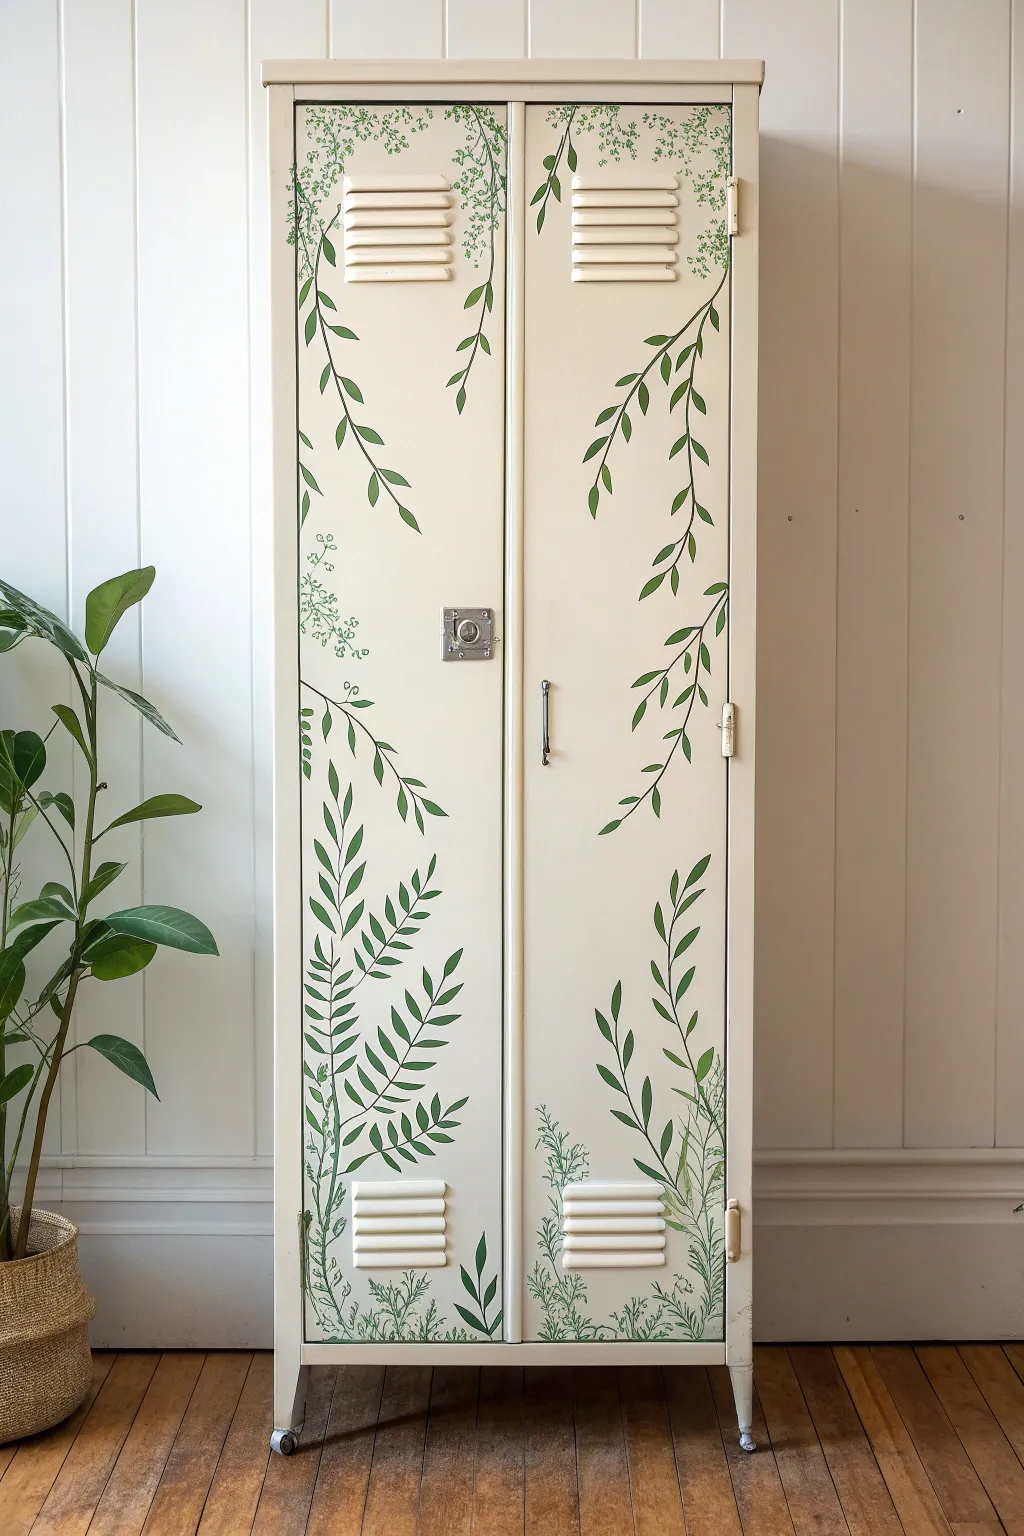
Transform a standard metal locker into a delicate garden feature with this hand-painted botanical design. Using a simple palette of greens against a warm cream background creates a fresh, organic look that softens the industrial edges perfectly.
How-To Guide
Materials
- Metal locker (vintage or reproduction)
- Sandpaper (fine grit, 220)
- Metal primer spray
- Cream or off-white chalk paint or satin finish paint
- Acrylic paints (Dark hunter green, sage green, olive green)
- Round artist brushes (Sizes 2, 4, and 6)
- Fine liner brush (Size 0 or 00)
- Pencil for light sketching
- Clear matte or satin topcoat sealer
- Small foam roller
- Drop cloth
- Painter’s tape
Step 1: Preparation & Base Coat
-
Clean surface:
Begin by thoroughly cleaning the locker with a degreasing cleaner to remove any oils, dirt, or old sticker residue. -
Scuff sand:
Lightly sand the entire exterior surface with fine-grit sandpaper. You aren’t trying to strip it bare, just creating a ‘tooth’ for the new paint to adhere to. -
Mask hardware:
Use painter’s tape to carefully cover the metal handles, number plates, locking mechanisms, and hinges if you aren’t removing them. -
Apply primer:
Spray the locker with a high-quality metal primer. Use steady, sweeping motions to avoid drips and let it fully cure according to the can’s instructions. -
Roll base color:
Using a small foam roller, apply your cream or off-white base color. I find thin coats work best here to avoid texture buildup. -
Second coat:
Once dry, apply a second coat of the base color to ensure solid, opaque coverage, then let it cure for at least 24 hours before starting the artwork.
Step 2: Painting the Greenery
-
Sketch the flow:
Take a pencil and very lightly sketch the main ‘spine’ lines of your vines. Start from the top corners and curve them downward, and bring others up from the bottom corners to frame the doors. -
Paint main stems:
Mix a dark hunter green with a touch of olive. Using a size 4 round brush, paint over your pencil lines to create the long, thin stems that trail down the locker face. -
Add primary leaves:
Switch to a size 6 brush. Load it with the dark green mixture and press-and-lift to create almond-shaped leaves attached to the upper vines. Vary the spacing so it feels natural. -
Create lower ferns:
For the bottom section, paint more upright, fern-like structures. Use long, sweeping strokes that curve slightly outward as they rise. -
Layer lighter greens:
Mix a sage green tone. Go back to the top corners and top vents to add smaller, more delicate clusters of leaves intertwined with the darker vines. -
Detail fine foliage:
Use your fine liner brush (size 0) with a watered-down olive green to sketch very delicate, airy sprigs and tiny wildflower silhouettes near the bottom edge and around the vents. -
Overlap elements:
Don’t be afraid to let some leaves paint over the gap between the two doors or slightly over the vent louvers; this visual continuity makes the piece look cohesive. -
Add depth:
Go back to your largest leaves and add a tiny line of the lighter sage green down the center of a few dark leaves to suggest veins and dimension. -
Clean up edges:
If you made any mistakes or drips, use a small brush with your original cream base color to ‘erase’ them once the green paint is dry.
Brush Technique Tip
Practice the ‘press and lift’ leaf stroke on paper first. Start with light pressure for the stem, press down for the leaf belly, and lift while dragging to make a sharp tip.
Step 3: Protection
-
Seal the art:
Once the botanical design is completely dry (give it a few hours), apply a clear matte or satin topcoat. A spray sealer is often easier to apply evenly without smearing the hand-painted details. -
Remove tape:
Carefully peel away the painter’s tape from the hardware while the sealer is still tacky to prevent it from pulling up any dried finish.
Level Up: Hardware
For a truly vintage schoolhouse vibe, gently dry-brush a metallic gold or bronze onto the locking mechanisms and hinges to highlight their industrial texture.
Now you have a functional storage piece that doubles as a beautiful, garden-inspired work of art for your home
Terrazzo Speckles for Texture
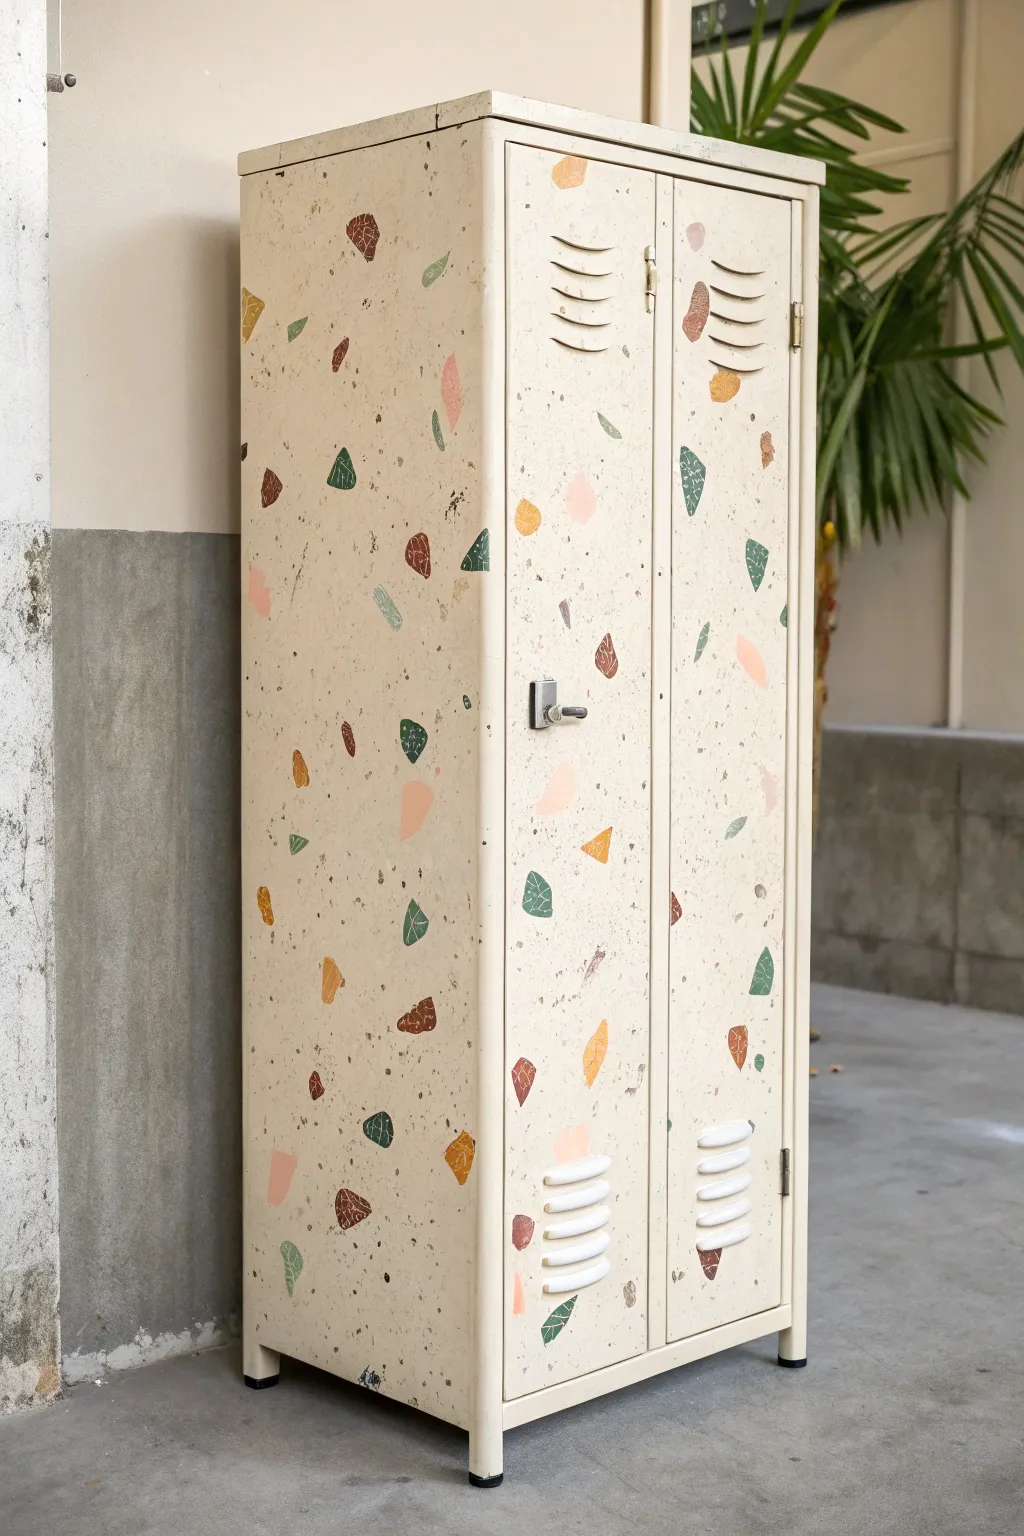
Transform a plain, industrial metal locker into a trendy statement piece with this faux terrazzo technique. By layering irregular geometric shapes over fine splatters, you create convincing depth and texture that mimics the classic composite material perfectly.
Step-by-Step Tutorial
Materials
- Metal locker (clean and dry)
- Sandpaper (220-grit)
- Metal primer (spray preferred)
- Beige or cream base paint (semi-gloss or satin)
- Acrylic paints (terracotta, forest green, leafy green, mustard yellow, blush pink, dark brown)
- Small flat brushes and angled detail brushes
- Old toothbrush or stiff bristle brush
- Clear matte or satin topcoat sealer
- Painter’s tape
- Drop cloth
- Mixing palette
Step 1: Prep and Base Coat
-
Prepare the surface:
Remove any removable hardware like handles or locks if possible, or cover them thoroughly with painter’s tape. Lightly sand the entire exterior of the locker with 220-grit sandpaper to rough up the existing finish, which helps the new paint adhere better. -
Clean thoroughly:
Wipe down the metal with a damp cloth or a degreaser to remove all sanding dust and oils. Let it dry completely. -
Apply primer:
Spray a coat of metal primer over the entire locker, using smooth, sweeping motions to avoid drips. Allow the primer to cure according to the can’s instructions. -
Paint the background:
Apply your beige or cream base coat. You will likely need two or three thin coats for solid opacity. I like to let this dry overnight to ensure a rock-hard foundation for the details.
Fixing Heavy Splatters
If a splatter blob lands too large or runny, don’t wipe it! Let it dry completely, then dab a tiny bit of your beige base color over it to minimize it before sealing.
Step 2: Creating the Fine Speckles
-
Mix the splatter paint:
Dilute a small amount of dark brown and dark grey acrylic paint with water until it has an inky consistency. -
Test your technique:
Dip an old toothbrush into the thinned paint and run your thumb across the bristles over a piece of cardboard to test the spray pattern. -
First splatter layer:
Flick the paint onto the locker to create very fine, random dots. Focus on even distribution but allow for some natural variation. -
Add dimension:
Repeat the splatter process with a slightly lighter grey or taupe color. This layering of different tiny dots is crucial for that authentic stone look.
Level Up: Metallic Chips
Mix in a few shapes painted with gold leaf or copper metallic paint. These shiny accents catch the light and make the faux stone look incredibly high-end.
Step 3: Painting the Terrazzo Stones
-
Plan your palette:
Pour out small amounts of your colorful acrylics: terracotta, multiple greens, mustard, and blush pink. Keep them undiluted for good coverage. -
Paint large shards:
Using a small flat brush, paint medium-sized irregular shapes. Think of triangles with softened corners or jagged shards. Space them out generously. -
Add variety with distinct colors:
Switch colors and paint more shapes. Try to make some shapes elongated and others more blocky. Avoid placing two shapes of the same color right next to each other. -
Incorporate small chips:
Use a smaller detail brush to add tiny “chips” of color in the empty spaces between the larger shapes. These should look like broken fragments. -
Detail the vents:
Pay attention to the louvered vents. Paint the slats carefully, allowing the pattern to flow over them rather than stopping abruptly. -
Add dark accents:
Paint a few dark brown or black shapes. These high-contrast pieces anchor the design and make the lighter colors pop. -
Re-splatter (Optional):
Once the shapes are dry, you can do one very light pass of the toothbrush splatter over some of the painted “stones” to make them look embedded in the surface.
Step 4: Sealing and Finishing
-
Let it cure:
Allow all the acrylic paint work to dry for at least 24 hours. The paint needs to be fully set before sealing. -
Apply clear coat:
Spray or brush on a clear matte or satin topcoat. This protects the water-based acrylics from scratching and moisture. -
Reassemble:
Remove the painter’s tape and reattach any hardware you removed in the first step.
Now you have a durable, custom storage piece that looks like it was carved from designer stone
Galaxy Blend With Stars
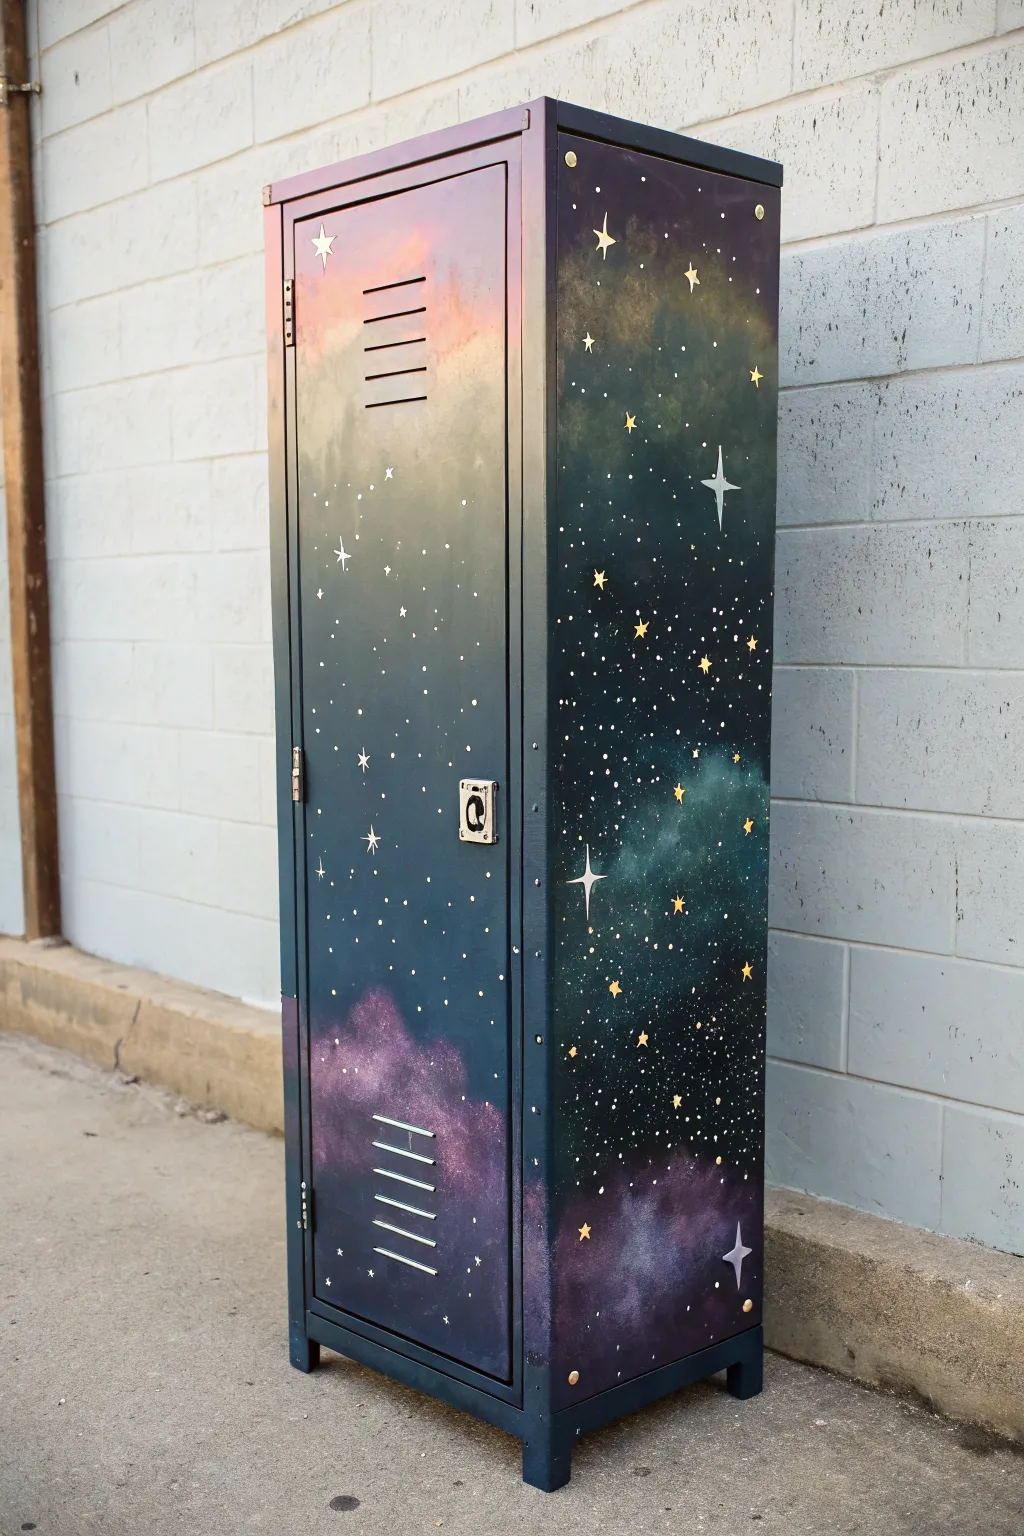
Transform a standard metal locker into a portal to deep space with this dreamy galaxy blend technique. This project relies on soft, sponged gradients and crisp star accents to create a cosmic scene that looks professional but is surprisingly beginner-friendly.
Detailed Instructions
Materials
- Metal locker (clean and dry)
- Fine-grit sandpaper (220 grit)
- Painter’s tape
- Primer spray paint (grey or black)
- Acrylic craft paints (navy blue, black, purple, teal, magenta, white, metallic gold)
- Assorted sponge brushes
- Natural sea sponge
- Small detail paintbrushes
- Toothbrush (for misting stars)
- Clear sealant spray (matte or satin finish)
- Star stencils (optional)
Step 1: Preparation & Base Coat
-
Surface Prep:
Begin by removing any hardware or taping over the lock mechanism carefully. If the locker surface is glossy, lightly scuff it with 220-grit sandpaper to help the paint adhere. -
Clean Up:
Wipe down the entire locker with a damp cloth to remove sanding dust and oils. Let it dry completely. -
Apply Primer:
Spray a thin, even coat of grey or black primer over the exterior. This ensures your dark galaxy colors will show up true and opaque. Allow the primer to cure according to the can’s instructions. -
Dark Foundation:
Using a large sponge brush or roller, apply a base coat of deep navy blue mixed with a little black. You want a very dark night-sky canvas, but not pure flat black.
Step 2: Creating the Nebulas
-
Sponge Technique:
Dampen a natural sea sponge and wring it out thoroughly. Pour small puddles of teal, purple, and magenta onto a palette. -
First Nebula Layer:
Dip the sponge into your first color (e.g., teal) and dab off the excess on a paper towel. Lightly pounce the sponge onto the locker in diagonal, cloud-like clusters. -
Blending Edges:
While the paint is still tacky, use a clean part of the sponge or a dry brush to soften the edges of your color patches, fading them into the dark background. -
Adding Depth:
Layer a second color, like purple, near the teal clouds but not fully covering them. Overlap slightly to create new blended hues. -
Sunrise Gradient:
For the top section shown in the photo, create a ‘sunrise’ effect by sponging magenta, then blending into a soft orange or pink near the very top edge. -
Intensifying shadows:
Go back in with your dark navy/black mix on a sponge to cut back into the bright clouds. This creates the negative space that defines the nebula shapes.
Muddy Colors?
If your nebula colors turn grey or muddy, you’re blending wet paint too much. Let the first color layer dry fully before sponging a contrasting color on top.
Step 3: Adding the Stars
-
Star Mist splatter:
Dilute a small value of white paint with water until it’s the consistency of ink. Dip an old toothbrush into it. -
Flicking Technique:
Hold the toothbrush near the locker surface and run your thumb across the bristles to flick a fine mist of white specks. I find doing a test spray on cardboard first creates the most consistent splatter. -
Major Stars:
Using a fine detail brush and metallic gold or bright white paint, hand-paint specific larger stars. Paint a cross shape, then curve the inner corners inward to create a four-pointed glimmer. -
Stencil Accents:
If you aren’t confident hand-painting the larger stars, use a small stencil. Secure it flat against the surface and dab paint vertically to prevent bleeding. -
Constellation Details:
Look for empty dark patches and add tiny clusters of dots or specific constellation patterns for visual interest.
Glow In The Dark
Mix glow-in-the-dark medium into your white star paint. The locker will look standard during the day but reveal a hidden glowing galaxy when the lights go out.
Step 4: Finishing
-
Drying Time:
Allow the entire painted surface to dry for at least 24 hours to ensure the acrylics are fully set. -
Sealant Application:
Finish with two light coats of clear matte or satin spray sealant. This protects your artwork from scratches and daily wear and tear in hallway traffic. -
Reassembly:
Once the sealant is no longer tacky, remove the painter’s tape from the lock and reattach any hardware.
Step back and admire your personal slice of the universe tailored right into your room decor
Faux Woodgrain Painted on Metal
Transform a standard metal locker into a stunning, rustic-inspired storage piece that mimics the warmth of natural oak. By layering glazes and using a wood graining tool, standard cold steel becomes indistinguishable from high-end wooden furniture.
Step-by-Step Guide
Materials
- Metal locker (cleaned and prepped)
- Fine-grit sandpaper (220-grit)
- Primer designed for metal
- Base coat paint (warm beige or tan acrylic latex)
- Glaze medium
- Dark brown acrylic paint (burnt umber or espresso)
- Wood graining rocker tool
- Wide bristle chip brush (3-4 inch)
- Fine detail brush
- Clear polyurethane topcoat (satin finish)
- Painter’s tape
- Mild degreaser
- lint-free cloths
Step 1: Preparation & Base Coat
-
Clean the surface:
Begin by thoroughly cleaning the metal locker with a mild degreaser to remove any oils, stickers, or factory residue. Wipe it down with a damp cloth and let it dry completely. -
Scuff sand:
Lightly sand the entire exterior surface with 220-grit sandpaper. You don’t need to strip the original paint, just create a “tooth” for the new primer to grip. -
Prime the metal:
Apply a high-quality metal primer. Use a roller for the large flat sides and a brush for the vents and corners to ensure full coverage. Allow the primer to cure according to the can’s instructions. -
Apply base color:
Paint the entire locker with your warm beige or tan base coat. This light color will serve as the background “wood” tone. Apply two thin coats rather than one thick one for a smooth finish. -
Dry thoroughly:
Let the base coat dry for at least 24 hours. The paint must be fully cured before you start dragging tools through the wet glaze in the next phase.
Don’t Overwork It
Work efficiently with glaze. If you drag the tool over the same spot too many times, the paint will get muddy. If you mess up a section, wipe it off instantly and restart.
Step 2: Creating the Grain
-
Mix the glaze:
In a container, mix one part dark brown paint with four parts clear glaze medium. The mixture should be translucent, allowing the tan base coat to peek through. -
Work in sections:
Tape off one vertical section of the locker at a time (like a single door panel). You need to work quickly while the glaze is wet, so don’t try to cover the whole piece at once. -
Apply the glaze:
Brush the dark glaze mixture onto the section using a wide chip brush. Paint in long, vertical strokes from top to bottom. -
Rock the graining tool:
Immediately place the wood graining tool at the top edge of the wet glaze. Slowly drag it down while gently rocking the tool forward and backward to create knots and cathedral grain patterns. -
Vary the pattern:
For the next vertical pass right beside the first, vary your rocking speed or spacing so the ‘knots’ don’t line up perfectly. This random variation is key to a realistic look. -
Use a dry brush for softness:
If the grain lines look too harsh or contrasty, I like to lightly drag a clean, dry chip brush vertically over the wet glaze to soften the edges and create smaller ‘tick marks’ typical of wood texture. -
Detail the vents:
Use a smaller brush to push the dark glaze into the vent slats. Wood graining tools often skip these indentations, so you’ll need to hand-paint linear grain lines here to maintain the illusion.
Vintage Character
Before the final sealer, lightly distress the edges with sandpaper to reveal the base coat, simulating years of wear on the ‘wood’ corners.
Step 3: Finishing Touches
-
Add plank lines (optional):
If you want the sides to look like joined planks, use a straight edge and a fine detail brush with darker paint to draw vertical lines where boards would naturally meet. -
Dry the glaze:
Allow the faux grain layer to dry completely. Glaze takes longer than standard paint, so give it at least 24 to 48 hours to be safe. -
Seal the work:
Apply a clear satin polyurethane topcoat. A satin finish mimics the natural sheen of waxed wood, whereas gloss looks too artificial. Apply 2-3 coats for durability. -
Update hardware:
Reattach the locker handle and lock mechanism. If the original chrome looks too industrial, mist them with oil-rubbed bronze spray paint before reassembling. -
Final cure:
Let the final topcoat cure for a few days before placing heavy items inside or on top of the locker to prevent tackiness.
Step back and admire your new high-end faux furniture piece that adds character to any room without the heavy price tag
Continuous Mural Across Multiple Lockers
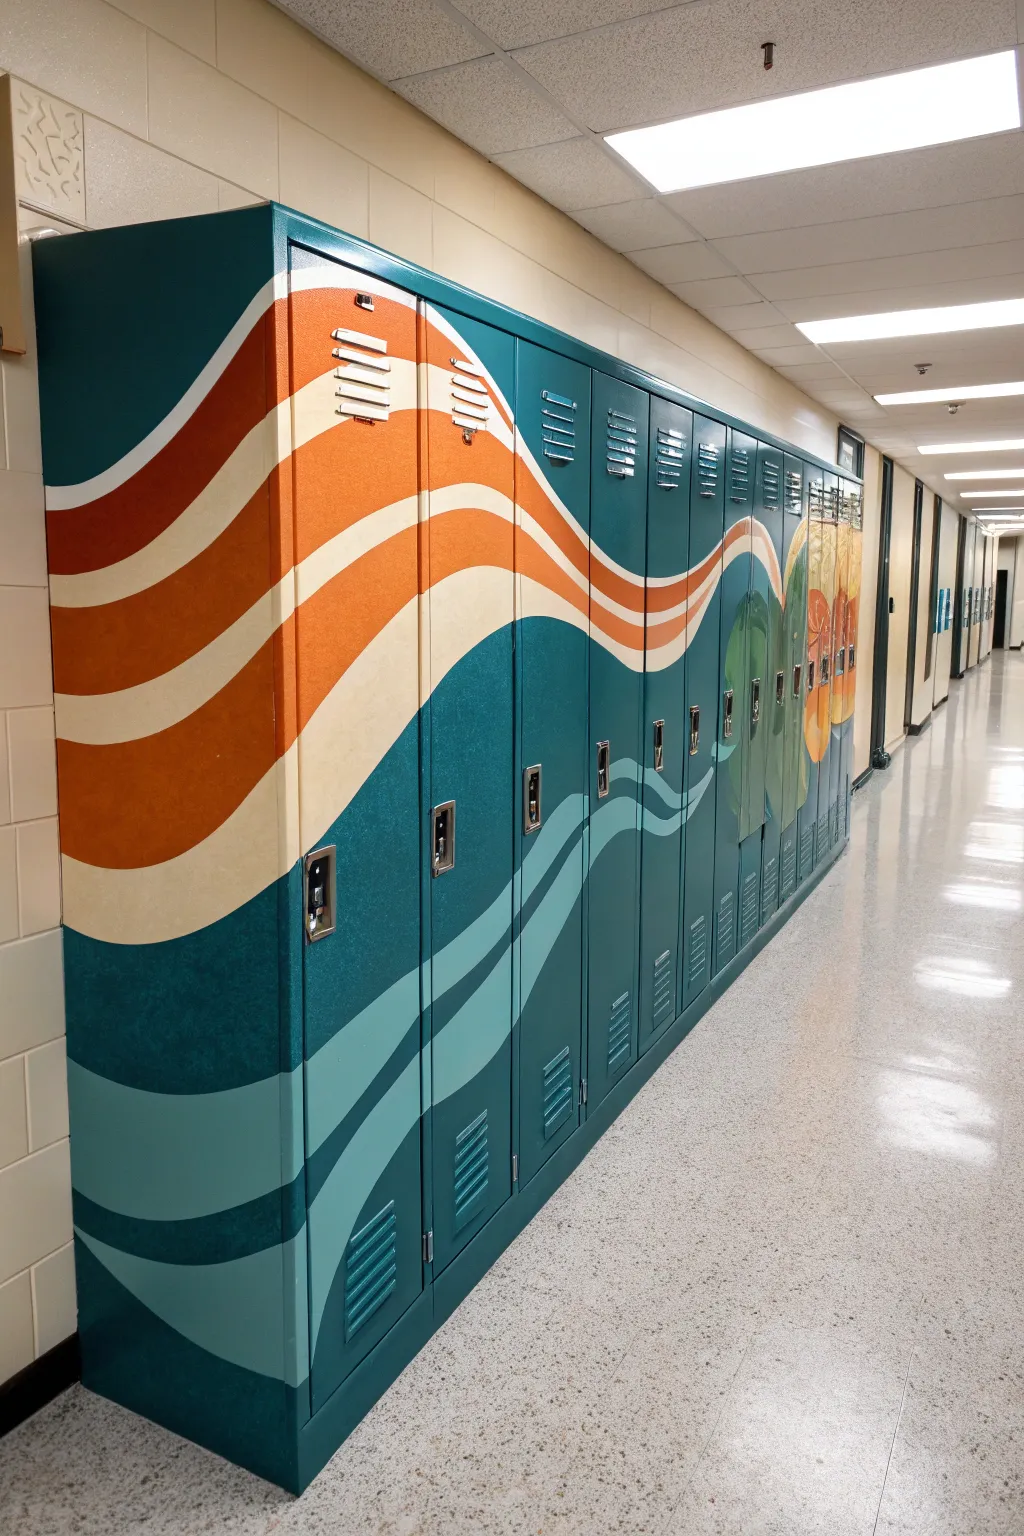
Transform a hallway of standard lockers into a cohesive, flowing art piece with this rolling wave design. By treating the entire bank of lockers as a single canvas, you create a dynamic sense of movement using retro-inspired shades of teal, rust, and orange.
Detailed Instructions
Materials
- High-quality adhesion primer (specifically for metal)
- Acrylic enamel paints (Teal, Dark Teal, Cream, Orange, Rust Red)
- Paint rollers (foam or short nap)
- Assorted synthetic paintbrushes (1-inch angle brush, liner brush)
- Painter’s tape (blue or green)
- Chalk or pastel pencil (light color)
- Fine-grit sandpaper (220-grit)
- Cleaning supplies (degreaser/TSP substitute)
- Clear acrylic topcoat (gloss or satin)
Step 1: Preparation
-
Clean the surface:
Begin by thoroughly cleaning the locker doors with a degreaser or TSP substitute. School lockers often have years of oil, residue, and tape buildup that will prevent paint adhesion. -
Sand for adhesion:
Lightly scuff all the surfaces you intend to paint with 220-grit sandpaper. You don’t need to strip the original paint entirely, just dull the sheen to give the new primer something to grip. -
Wipe down:
Use a damp cloth to remove all sanding dust, then let the metal dry completely before moving forward. -
Tape and Prime:
Tape off the handles, vents, number plates, and hinges carefully. Apply a coat of high-quality metal primer to the entire surface area of the mural. I prefer using a foam roller here for the smoothest finish, avoiding brush marks.
Paint Peeling off Metal?
If paint peels when removing tape, you likely pulled too fast or the primer didn’t bond. Score the tape edge lightly with a craft knife before pulling to sever the paint film cleanly.
Step 2: Drafting the Design
-
Sketch the flow:
Once the primer is fully cured, use a piece of light-colored chalk to sketch your wave lines across the entire bank of lockers continuously. Treat the gaps between lockers as if they aren’t there—the line should ‘jump’ across the gap. -
Define the zones:
Map out your color bands. The design features a large teal base section, followed by a lighter blue wave, a thick cream stripe, an orange band, and finally a rust-red crest. -
Adjust curves:
Step back about ten feet to look at the flow. Adjust the chalk lines so the curves move gracefully up and down the length of the hallway without abrupt angles.
Step 3: Painting the Base Layers
-
Paint the background:
Start with the largest color block, which is the deep teal/blue at the bottom and top sections. Use a small roller to fill in these large areas, cutting in carefully around your chalk lines with an angled brush. -
Apply the next band:
Moving upward or downward from your base, paint the secondary lighter blue wave. Apply two thin coats rather than one thick one to prevent drips, especially on vertical metal surfaces. -
Add the contrast stripes:
Paint the cream-colored stripe next. This high-contrast band really defines the movement of the piece. Use a steady hand and a flat brush to get crisp edges against the teal. -
Fill the warm tones:
Fill in the orange and rust-red sections. These warm tones will likely need 2-3 coats to achieve full opacity over the white primer.
Clean Lines Pro-Tip
For super crisp straight lines on curves, use flexible vinyl tape (often used for auto detailing) rather than standard masking tape to guide your brush along the wave.
Step 4: Detailing and Sealing
-
Clean up edges:
Inspect the lines where colors meet. If the edges are shaky, use a liner brush with the appropriate color to sharpen the transition. -
Manage the gaps:
Open the locker doors slightly to paint the edges of the door (the thickness of the metal). Wrapping the color around this edge ensures the image looks continuous even when viewed from an angle. -
Detail the vents:
Use a small, stiff brush to ensure paint gets into the recessed louvers of the vents without clogging them. Avoid putting too much paint here; dry-brushing works best. -
Remove tape:
Carefully peel off the painter’s tape while the final coat is still slightly tacky to prevent peeling up dried paint chips. -
Apply topcoat:
Once the mural is cured (allow at least 24 hours), apply two coats of clear acrylic sealer. This is crucial for high-traffic school hallways to protect against scratches and cleaning chemicals.
Step back and admire how the individual lockers disappear into one stunning, unified wave of color


Have a question or want to share your own experience? I'd love to hear from you in the comments below!