When I’m painting stones with a love theme, I always start with designs that feel instantly readable—big hearts, sweet words, and simple color combos. Then I sprinkle in a few playful twists so your love rocks feel personal, giftable, and totally you.
Classic Heart With Bold Outline
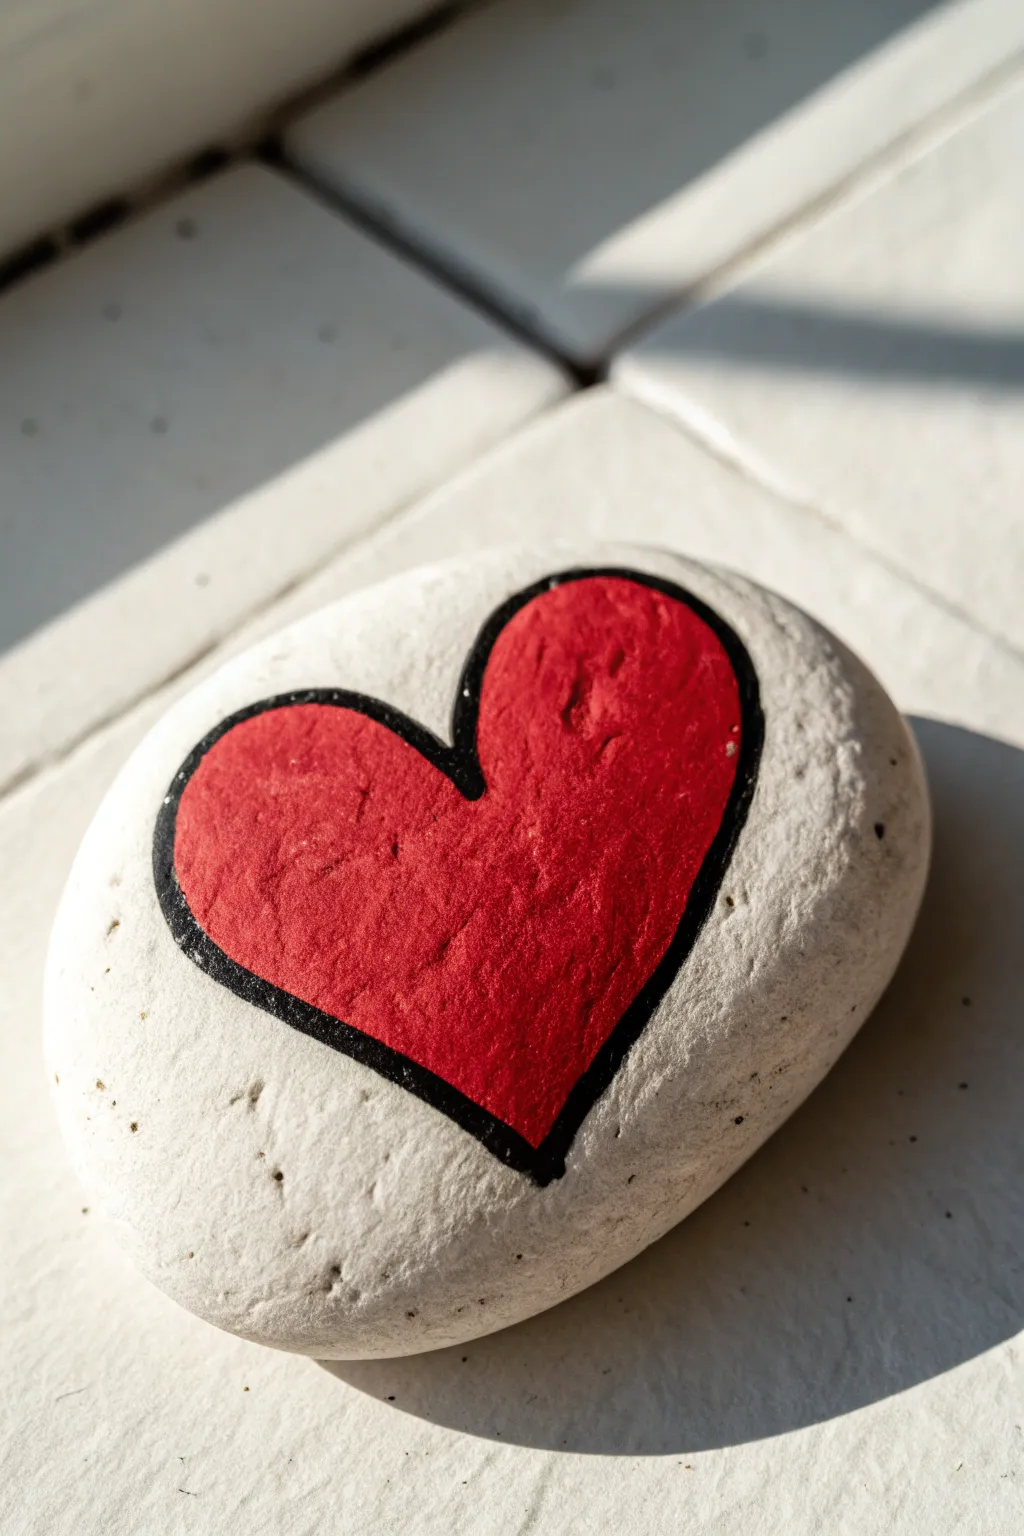
Sometimes simplicity speaks volumes, and this striking design features a vibrant red heart contrasting beautifully against smooth white stone. By using a confident black outline, you create a graphic, sticker-like effect that instantly draws the eye.
Detailed Instructions
Materials
- Smooth, rounded river stone (approx. palm-sized)
- White acrylic paint (matte finish)
- Red acrylic paint (bright scarlet or primary red)
- Black acrylic paint or a broad Posca paint pen
- Flat paintbrush (medium size)
- Fine liner brush for detailing
- Matte spray sealer or varnish
- Pencil for sketching
- Palette or paper plate
Step 1: Preparing the Canvas
-
Clean the stone:
Begin by scrubbing your chosen rock with warm, soapy water to remove any dirt or oils that might repel the paint. Let it dry completely in the sun or use a hairdryer to speed things up. -
Base coat application:
Using your medium flat brush, apply a coat of white acrylic paint. Since rocks can be porous, you want a creamy, consistent layer. -
Adding coverage:
Allow the first layer to dry until it’s no longer tacky. Apply a second coat of white to ensure the natural stone color is fully hidden and you have a bright, opaque canvas. Two to three thin coats are better than one thick, gloopy one. -
Inspect the surface:
Hold the rock up to the light to check for any uneven patches. I like to smooth out any brushstrokes gently with a slightly damp brush before the final white layer sets.
Clean Lines Hack
To steady your hand for the outline, rest your pinky finger on the dry part of the rock while you paint. It acts as an anchor for smooth curves.
Step 2: Designing the Heart
-
Sketch the outline:
Once your white base is bone dry, lightly sketch a large heart shape with a pencil. Make it tilt slightly to the side for a whimsical, playful look rather than centering it perfectly. -
First red fill:
Load a clean brush with your bright red acrylic paint. Carefully fill in the heart shape, staying just inside your pencil lines. Don’t worry about perfect edges yet; the outline will cover them. -
Building color intensity:
Red pigment is often translucent, so you will likely see streaks after the first pass. Let it dry completely. -
Second red layer:
Apply a second layer of red paint. This deepens the color and makes it pop against the white background. If you want a really saturated look, a third coat might be necessary. -
Clean up edges:
If you accidentally went too far outside the lines, use a tiny bit of white paint to touch up the background once the red is dry.
Level Up: 3D Effect
Add a tiny, curved white ‘comma’ shape inside the upper right lobe of the heart to create a shiny reflection highlight for a dimensional look.
Step 3: The Defining Outline
-
Prepare black paint:
For the bold outline, use a fine liner brush loaded with slightly thinned black acrylic paint, or shake a black paint pen thoroughly until the ink flows smoothly. -
Start the lower point:
Begin your outline at the bottom point of the heart. This anchors your shape and gives you a starting reference. -
Trace the curves:
Slowly trace upwards along the curve of the heart. Keep your hand steady and apply consistent pressure to maintain a uniform line thickness. -
Thicken the line:
The charm of this specific design is the thick border. Go over your initial line again to widen it. Aim for a thickness of about 2-3 millimeters for that cartoon-style impact. -
Check the connections:
Ensure the ‘V’ shape at the top center of the heart is crisp and sharp. A dull point here can make the heart look like a kidney bean. -
Final drying time:
Let the black paint dry fully. Since the outline is thicker, it might take a few extra minutes to set completely.
Step 4: Sealing and Finishing
-
Choose your finish:
To match the reference image, choose a matte sealer rather than a high gloss one. This keeps the stone looking natural and soft. -
Apply the sealer:
Spray the sealer in light, even mists from about 12 inches away. Avoid soaking the rock, which can cause the black ink to run. -
Back it up:
Don’t forget to sign the bottom or add the date once the front is sealed and dry.
Now you have a charming, durable token of affection ready to be hidden in a park for a stranger or gifted to someone special


Simple “Love” Hand Lettering

This elegant yet playful stone painting project transforms a simple grey rock into a heartfelt token using classic hand lettering. The smooth finish and bold black script create a striking contrast that is perfect for a Valentine’s gift or inspirational pocket rock.
Step-by-Step Tutorial
Materials
- Smooth, light-colored river rock (flat surface preferred)
- Black paint pen (fine tip/0.7mm)
- Black paint pen (medium or brush tip)
- Pencil (HB or lighter)
- White block eraser
- Matte spray sealer or varnish
- Soap and water (for cleaning the rock)
Step 1: Preparation and Sketching
-
Surface Prep:
Begin by thoroughly washing your rock with warm, soapy water to remove any dirt or oils that could prevent the ink from sticking. Let it dry completely in the sun or use a hairdryer to speed things up. -
Pencil Guide:
Lightly sketch the word ‘love’ across the widest part of your stone using a pencil. Aim for a flowing script style where the letters connect seamlessly. -
Refining the Curves:
Adjust your pencil sketch to ensure the loops of the ‘l’ and ‘e’ are generous and open. This open spacing prevents the ink from bleeding together later. -
Drafting Embellishments:
Sketches a few tiny hearts scattered around the main text. I find it looks best when they are placed somewhat randomly—above the ‘l’, below the ‘v’, and near the tail of the ‘e’.
Step 2: Lettering the Main Text
-
Initial Outline:
Take your fine-tip black paint pen and carefully trace over your pencil lines for the word ‘love’. Keep your hand steady and don’t worry about thickness yet; just establish the skeleton of the letters. -
Thickening Downstrokes:
To create that calligraphy look, identify every part of the letter where your pen moved *downward* while writing. Draw a second line parallel to these downstrokes to thicken them. -
Filling the Weight:
Use your medium-tip pen (or carefully color with the fine tip) to fill in the space between your parallel lines. This creates the ‘faux calligraphy’ effect with thick downstrokes and thin upstrokes. -
Extending the Tail:
Pay special attention to the tail of the ‘e’. Extend it slightly and curve it upwards to cradle the word, giving it a balanced finish. -
Smooth Connections:
Go back to where the thick and thin lines meet. Small bumps can happen here, so carefully smooth out these transition points with the fine tip so the letters look fluid.
Ink Control
Test your paint pen on a scrap of paper before touching the rock. If the ink is flowing too fast, it will bleed into the textures of the stone.
Step 3: Adding Details and Finishing
-
Outlining Hearts:
Using the fine-tip pen again, trace your pencil sketches for the scattered hearts. Keep these lines delicate and crisp. -
Filling Accents:
Choose two or three of the larger hearts to fill in completely black. This adds visual weight and variety compared to the outline-only hearts. -
Adding Tiny Details:
Draw tiny, simple hearts (almost like V shapes) in any large empty spaces to balance the composition, but be careful not to overcrowd the rock. -
Drying Time:
Allow the ink to dry completely. Paint pens can smear easily on non-porous rocks, so give it at least 15 to 20 minutes. -
Erasing Guidelines:
Once you are absolutely certain the ink is dry, gently run your white block eraser over the design to remove any visible pencil marks. -
First Seal Coat:
Take your rock to a well-ventilated area. Apply a very light mist of matte spray sealer. Do not soak it, as heavy spray can re-wet the ink and cause it to run. -
Final Protection:
After the first light mist is dry (about 30 minutes), apply a second, heavier coat of sealer to ensure the stone is weather-resistant and scuff-proof.
Pop of Color
Make the design pop by filling in the outline hearts with gold or bright red paint pen, leaving the main text stark black for contrast.
You now have a beautifully lettered stone that captures a simple sentiment in a timeless style


Arrow Through a Heart
This charming art piece captures the classic symbol of romance with a clean, modern aesthetic. The design features a bold pink heart pierced by an arrow, framed by a delicate dotted outline on a smooth white background.
Step-by-Step
Materials
- Smooth river rock (flat and oval)
- White acrylic paint (matte finish)
- Soft pink acrylic paint
- Black acrylic paint or fine-point paint pen
- Gold metallic paint or paint pen
- Flat paintbrush (medium)
- Small round paintbrush (fine detail)
- Ball stylus tool or toothpick
- Pencil for sketching
- Clear sealant (matte or gloss)
Step 1: Preparing the Canvas
-
Clean the surface:
Begin by washing your stone with warm soapy water to remove any dirt or grease. Dry it thoroughly with a lint-free cloth or let it sun-dry. -
Apply base coat:
Paint the entire top surface of the rock with white acrylic paint. You want a solid, opaque background, so don’t be afraid to apply a second coat once the first is dry. -
Sketch the heart:
Using a pencil lightly, draw a medium-sized heart in the center of the rock. Tilt the heart slightly to the left for a dynamic look.
Dotting Tool Hack
If you don’t have a stylus, a bobby pin entered into a pencil eraser makes a perfect dotting tool.
Step 2: Painting the Heart
-
Fill the heart:
Load your medium brush with soft pink paint. Carefully fill in the heart shape you sketched, keeping the edges as smooth as possible. -
Add a second layer:
Acrylic pinks can sometimes be translucent. Apply a second layer of pink once the first is dry to ensure the color is vibrant and consistent. -
Sketch the arrow path:
Visualize where the arrow enters and exits. Lightly sketch a line entering the top right of the heart and exiting the bottom left, ensuring the angles align.
Add Dimension
Add a tiny white highlight curve on the upper right of the pink heart to make it look puffy and 3D.
Step 3: Adding the Arrow Details
-
Draw the shaft:
Using a fine-point black paint pen (or a very thin brush), draw the line of the arrow shaft. Do not draw over the pink heart; skip over it so the arrow appears to go *behind* or *through* it. -
Create the fletching:
On the upper end of the line (top right), draw the fletching (feathers). Make small, angled dashes branching off the main shaft, tapering them slightly toward the end. -
Draw the arrowhead:
On the bottom left end of the line, draw a simple triangle for the arrowhead. Add a small line down the center of the triangle and two backward-angled barbs at the back of the head.
Step 4: Decorative Accents
-
Plan the outer dots:
Imagine a larger heart shape surrounding your pink heart. You can lightly pencil this guide line if needed. -
Dot the outline:
Dip a ball stylus tool or the non-brush end of a paintbrush into black paint. Stamp small dots along your imaginary outer heart line, keeping the spacing consistent. -
Break for the arrow:
Be mindful where the arrow intersects the dotted line. I prefer to stop the dots just before they hit the arrow graphic to keep the design clean. -
Add gold flair:
Using a gold paint pen or thin brush, add tiny accents. Place a few small gold dots or tiny starbursts randomly in the white space around the heart. -
Final dry:
Allow the entire rock to dry completely for at least an hour to prevent any smearing during the sealing process.
Step 5: Finishing Touches
-
Seal the artwork:
Apply a clear acrylic sealant over the rock. A spray sealant is often easier for not smudging paint pens, but a brush-on varnish works if applied gently.
Now you have a sweet, hand-painted keepsake perfect for gifting or hiding in the garden


Polka-Dot Heart Fill
This charming design combines soft pastels with a classic polka-dot pattern for a sweet, retro-inspired look. The contrast between the darker heart and lighter background makes the central motif pop, while the white dots tie the whole piece together.
Detailed Instructions
Materials
- Smooth, round river rock
- Light pink acrylic paint (base)
- Medium mauve or dark pink acrylic paint (heart)
- White acrylic paint
- Flat paintbrush
- Fine detail paintbrush or pencil
- Dotting tool or toothpick
- Clear sealant (spray or brush-on)
Step 1: Preparing the Base
-
Clean the surface:
Begin by washing your stone with warm water and soap to remove any dirt or oils that might prevent the paint from sticking. -
Base coat application:
Using a flat paintbrush, cover the entire top surface of the rock with your light pink acrylic paint. -
Opacity check:
Let the first layer dry completely. If the natural color of the rock is showing through, apply a second coat for a solid, opaque finish. -
Dry time:
Allow the base coat to dry fully before moving on. It needs to be dry to the touch so the next colors don’t blend.
Dotting Perfection
For perfectly uniform dots without a specialized tool, dip the flat end of a drill bit or a small nail head into the paint. Test on paper first!
Step 2: Painting the Heart
-
Outline the heart:
Lightly sketch a large heart shape in the center of the rock using a pencil. Alternatively, use a very fine brush with your darker pink/mauve paint to draw the outline. -
Adjust the shape:
Step back and look at your outline. This is the moment to correct any asymmetry before filling it in. -
Fill the heart:
Using the medium mauve or dark pink paint, carefully fill in the heart shape. Use smooth strokes to keep the surface even. -
Refine the edges:
Go back around the perimeter of the heart with a small detail brush to ensure the lines are crisp and sharp against the light pink background. -
Wait for drying:
Let this heart layer dry completely. I prefer to give it an extra ten minutes just to be safe, as wet paint will ruin the dotting step.
Add Dimension
Make the heart look 3D by adding a tiny crescent of lighter pink paint along the top left curve of the heart before you add the dots.
Step 3: Adding the Dots
-
Select your tool:
Dip a dotting tool, the handle end of a paintbrush, or even a toothpick into your white acrylic paint. -
Dot the heart:
Start applying dots inside the dark pink heart. Try to space them evenly in a loose grid pattern or scatter them randomly if you prefer a more organic look. -
Dot the background:
Now, add white dots to the light pink background area surrounding the heart. -
Mind the gap:
Be careful near the edge of the heart. You want dots close to the line, but try not to let them overlap the color boundary for a cleaner finish. -
Consistency check:
Reload your tool with paint frequently to ensure your dots stay relatively the same size and roundness. -
Final drying:
Allow the white dots to dry completely. Since dots are thicker blobs of paint, they will take longer to dry than the flat layers.
Step 4: Finishing Touches
-
Inspect the work:
Look over the rock for any smudges or areas that need a tiny touch-up. -
Seal the deal:
Apply a coat of clear sealant or varnish. This protects the paint from chipping and gives the rock a professional, finished sheen.
Now you have a sweet, handmade token of affection ready to brighten someone’s day
BRUSH GUIDE
The Right Brush for Every Stroke
From clean lines to bold texture — master brush choice, stroke control, and essential techniques.
Explore the Full Guide
Striped Heart Pattern
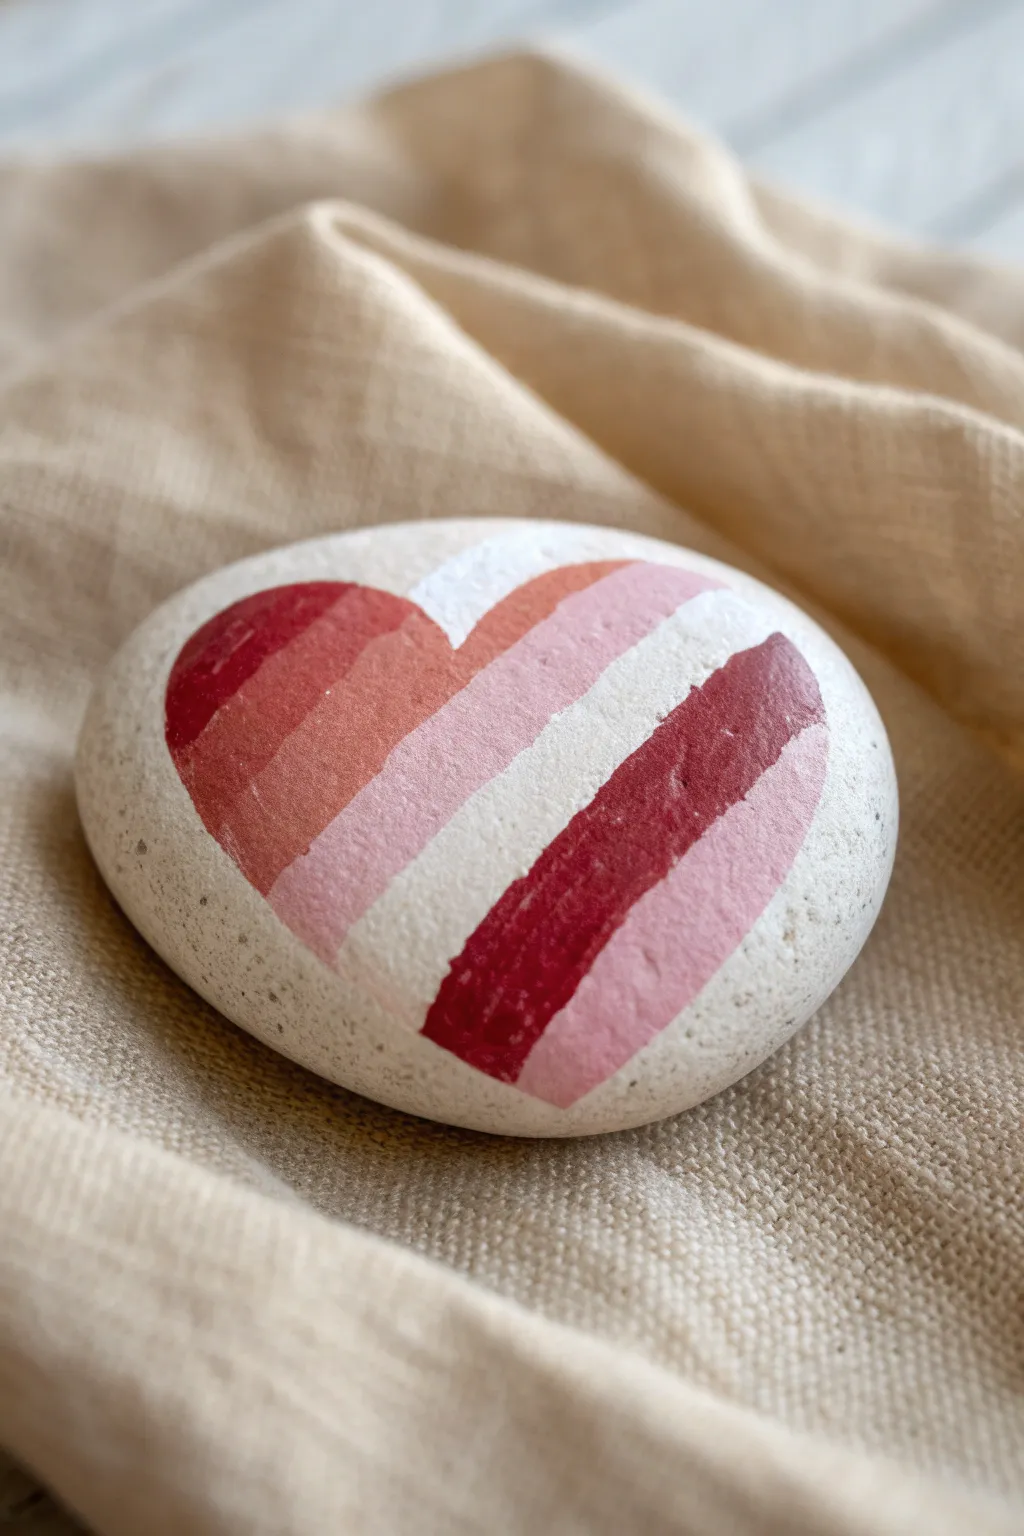
This charming project takes a simple stone and transforms it into a symbol of affection using bold, diagonal stripes. The clean lines and monochromatic red-to-pink palette give it a modern, graphic look that feels like a sweet valentine.
How-To Guide
Materials
- Smooth, white river rock (flat surface preferred)
- Pencil for sketching
- Eraser
- Acrylic paints: Deep red, coral/terra cotta, bubblegum pink, pale blush pink, white
- Small flat brush (size 2 or 4)
- Fine liner brush (optional, for edges)
- Palette or small plate for mixing
- Water cup and paper towel
- Clear spray sealant or varnish (matte or gloss)
Step 1: Preparation & Sketching
-
Clean the surface:
Begin by washing your stone with warm soapy water to remove any dirt or oils. Let it dry completely in the sun or with a towel. -
Inspect the canvas:
Turn the rock over in your hands to find the smoothest, flattest side. This will be your painting surface to ensure your stripes stay crisp. -
Draw the heart outline:
Using a pencil, lightly sketch a large heart shape in the center of the rock. Don’t press too hard; you just need a faint guide. -
Mark the stripes:
Lightly sketch diagonal lines across the heart to create your striped sections. Aim for roughly equal widths, but they don’t need to be mathematically perfect.
Clean Lines Hack
For ultra-crisp edges between colors, place very thin strips of washi tape or painter’s tape over your pencil lines before painting. Peel them off while the paint is still slightly wet.
Step 2: Painting the Stripes
-
Prepare your palette:
Squeeze out small amounts of your deep red, coral, bubblegum pink, pale blush, and white paints onto your palette. -
Start with the darkest shade:
Dip your flat brush into the deep red paint. Fill in the bottom-left diagonal section of the heart, carefully following the curve of your pencil outline. -
Apply the next tone:
Clean your brush thoroughly. Move to the adjacent stripe and paint it with the coral or terra cotta shade. Ensure the paint meets the red stripe without overlapping too much. -
Paint the middle stripe:
For the center band, I like to use the pale blush pink. This lighter color in the middle helps break up the saturation. -
Add the white stripe:
Paint the next diagonal section pure white. Since white acrylic can be translucent, apply a thin coat, let it dry for a minute, and add a second coat for opacity. -
Finish the top section:
Fill the final top-right section with the deep red again to balance the composition. Use the edge of your flat brush to get a sharp line along the top bumps of the heart. -
Paint the remaining stripe:
If you have a remaining empty stripe (depending on your spacing), fill it with the bubblegum pink or repeat a color to balance the pattern.
Step 3: Refining & Finishing
-
Clean up edges:
Once the base coats are dry, inspect the outer edges of the heart. If the curve looks jagged, use a fine liner brush and the corresponding color to smooth out the perimeter. -
Sharpen the lines:
If any colors bled into each other, carefully re-paint the edge of the stripe with the correct color to make the separation distinct. -
Let it cure:
Allow the rock to dry completely for at least an hour. The paint should feel dry to the touch and not tacky. -
Seal the artwork:
Take the rock to a well-ventilated area and apply a clearer sealer. A matte spray keeps the natural look of the stone, while gloss will make the colors pop like candy.
Level Up: Ombré Effect
Instead of hard stripes, blend the wet paint slightly where the stripes meet to create a smooth gradient fade from dark red to white across the heart.
Place this lovely creation on your desk as a paperweight or leave it in a park for a stranger to find
Plaid Heart Block
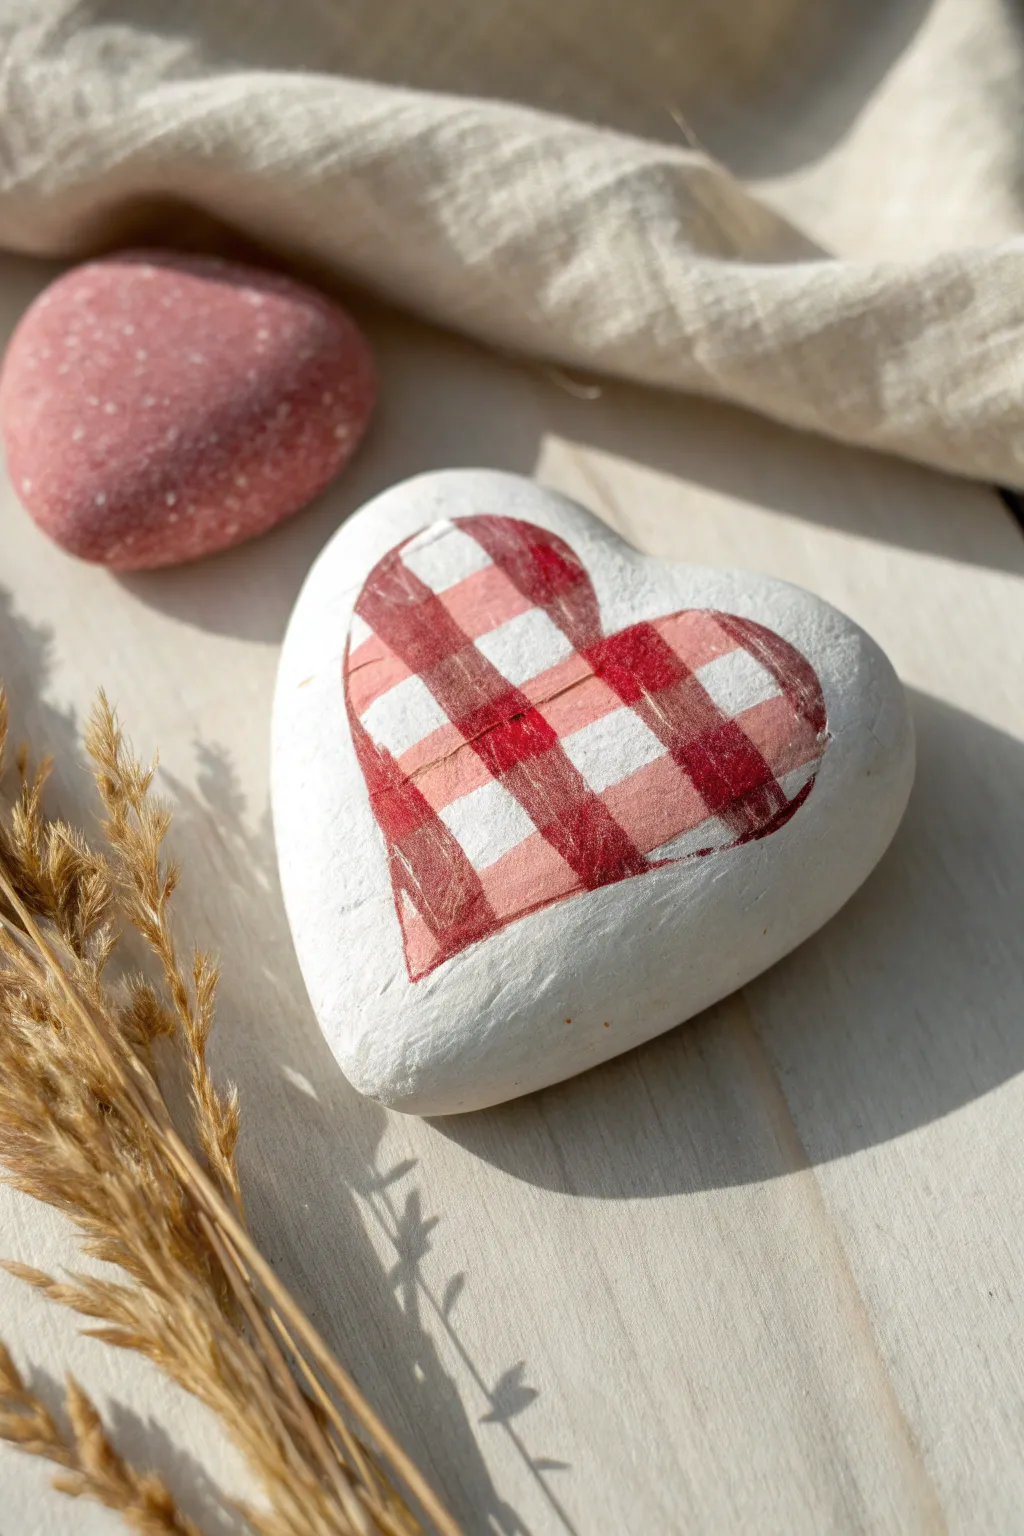
Transform a simple heart-shaped stone into a rustic Valentine’s treasure with a classic red and white plaid pattern. This project uses decoupage techniques to apply a neat, intricate design that looks hand-painted but comes together with surprising ease.
Step-by-Step Tutorial
Materials
- Heart-shaped stone (smooth surface)
- White acrylic paint
- Plaid or gingham patterned paper napkin or tissue paper
- Mod Podge (Matte or Satin finish)
- Small flat paintbrush
- Soft bristle brush for decoupage
- Scissors
- Water container
- Paper towels
Step 1: Base Preparation
-
Clean the stone:
Begin by washing your heart-shaped stone with mild soap and water to remove any dirt or oils. Let it dry completely before painting. -
Apply base coat:
Using a flat paintbrush, cover the entire top surface of the stone with white acrylic paint. You want a clean, opaque background so the pattern will show through clearly. -
Second coat:
Once the first layer is dry to the touch, apply a second coat of white paint. I like to let this dry briefly, usually about 15-20 minutes, to ensure full coverage without streaks.
Wet Brush Trick
To tear the napkin shape instead of cutting for a softer edge, paint a water outline on the napkin first. The paper will tear easily along the wet line.
Step 2: Preparing the Pattern
-
Separate napkin layers:
If you are using a printed paper napkin, carefully peel away the white backing plies. You only want the single, thin top layer with the printed plaid design. -
Determine heart size:
Place your napkin over the painted stone to visualize the size of the heart you need. It should be slightly smaller than the stone’s face, leaving a nice white border. -
Cut the heart shape:
Using sharp scissors, cut a heart shape out of the single ply of napkin. Don’t worry if the edges aren’t mechanically perfect; a slightly organic shape adds charm.
Add Dimensions
Outline the plaid heart with a very fine black paint pen or puff paint to make the design pop off the white background.
Step 3: Decoupage Application
-
Apply adhesive:
Brush a thin, even layer of Mod Podge directly onto the center of the painted white stone where your plaid heart will sit. -
Position the paper:
Gently place your cut-out paper heart onto the wet adhesive. Start from the center and lightly tap it down towards the edges. -
Smooth wrinkles:
Using your finger wrapped in a bit of plastic wrap or a dry brush, very gently smooth out the paper. The napkin is fragile when wet, so use a light touch to avoid tearing. -
Seal the design:
Dip your soft brush into the Mod Podge again and apply a top coat over the paper heart. Extend the sealer slightly past the edges of the paper onto the white paint to secure the perimeter. -
Blend the edges:
As you seal, brush outward from the center of the heart. This helps feather the edges so the paper looks like it is painted onto the stone rather than just sitting on top.
Step 4: Finishing Touches
-
Dry completely:
Allow the rock to dry undisturbed for at least an hour. The adhesive will turn from milky white to clear as it cures. -
Distress (Optional):
If you want a more weathered look, lightly sand the edges of the heart paper with very fine-grit sandpaper once it is fully dry. -
Final seal:
Apply one last full coat of Mod Podge or a spray sealer over the entire face of the rock to foster durability and give it a unified sheen.
Now you have a charming piece of rustic decor perfect for gifting or keeping

PENCIL GUIDE
Understanding Pencil Grades from H to B
From first sketch to finished drawing — learn pencil grades, line control, and shading techniques.
Explore the Full Guide
Dotted Mandala Heart
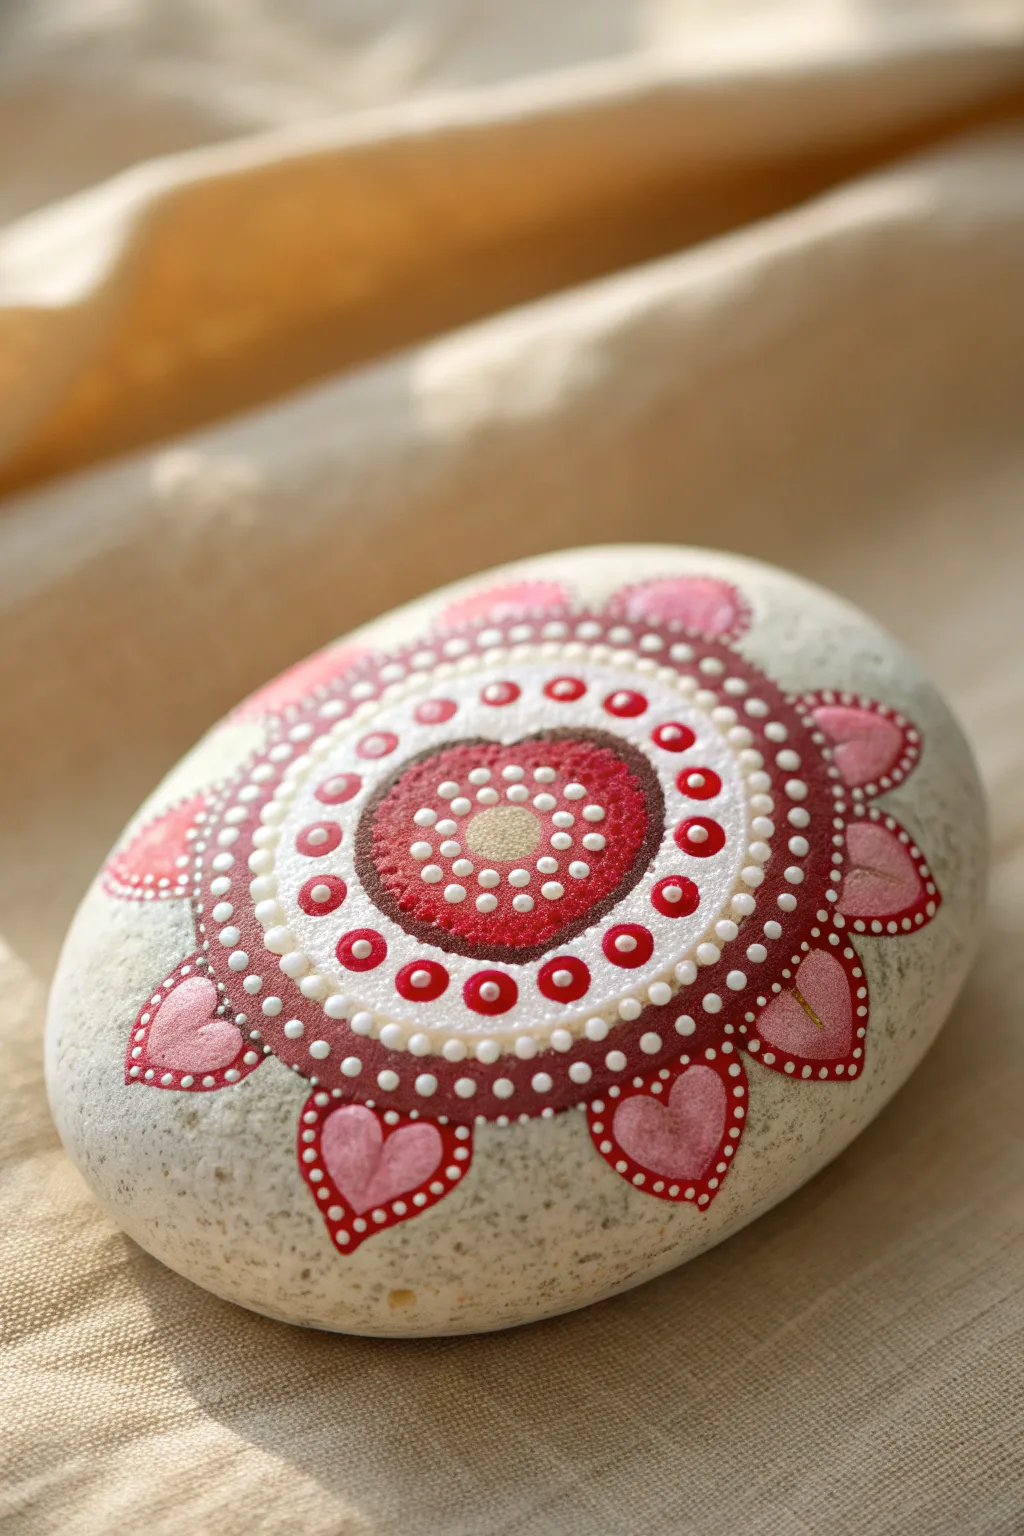
This elegant stone project radiates warmth with concentric rings of dots and a charming border of hearts. The design blends soft pinks, deep reds, and crisp whites into a soothing mandala that feels just as lovely to touch as it is to admire.
How-To Guide
Materials
- Smooth, oval river rock (light beige or white)
- Acrylic paints: Bright Red, Burgundy/Maroon, Light Pink, Titanium White, and Gold (optional)
- Dotting tools (various sizes, from fine needle to large ball)
- Small flat paintbrush
- Gloss varnish or sealer
- Palette or small tray for paints
- Damp paper towel for cleaning tools
Step 1: Base and Center
-
Prep the Stone:
Begin with a clean, dry stone. If your rock isn’t naturally light-colored, paint a base coat of light beige or cream acrylic over the entire surface and let it dry completely. -
Central Dot:
Using your largest dotting tool, place a single gold or light beige dot in the absolute center of the stone. -
The Red Circle:
Around the central dot, paint a solid circle of bright red paint. This isn’t dotted; use a small brush to paint a flat, smooth circle about an inch in diameter. -
Inner Dot Layers:
Once the red circle is dry, take a medium dotting tool and white paint. Create a ring of white dots directly on top of the red paint, circling the gold center. -
expanding the Center:
Still working inside the red circle, add a second ring of slightly smaller white dots just outside the previous ring.
Perfect Paint Texture
For perfectly round, peaked dots, your paint should be like heavy cream. If it’s too thick, add a drop of pouring medium; too thin, and the dots will flatten.
Step 2: Mandala Rings
-
Burgundy Border:
Outline the red painted circle with a ring of burgundy dots. Place them closely together so they almost touch the red edge. -
Creamy Contrast:
Switch to white or cream paint. Create a ring of medium-sized dots immediately outside the burgundy ring. -
Red Ring Feature:
Now for a bold accent. Use a larger dotting tool to place a ring of larger bright red dots around the white layer. -
Walking the Dots:
This is a key mandala technique: take a tiny dotting tool with white paint. Place a small dot in the center of each large red dot you just painted, creating a ‘bullseye’ effect. -
Outer White Ring:
Create the final circular boundary with a ring of small white dots surrounding the red bullseyes. -
Burgundy Separation:
Paint a thin, solid line or very tightly spaced tiny dots of burgundy around the entire mandala so far to define the border before the hearts begin.
Gradient Effect
Make the heart designs ombré! Mix a little white into your pink for the hearts at the top, and gradually use darker pinks as you move down the sides.
Step 3: Heart Border and Finish
-
Painting the Hearts:
Around the perimeter, paint distinct heart shapes using pink paint. Aim for about 8-10 hearts, pointing outward like flower petals. I find it easiest to paint a ‘V’ shape first and then fill in the curves. -
Dotted Heart Outlines:
Using your smallest tool or a toothpick, dip into dark red or burgundy paint. Carefully dot the outline of every pink heart. -
Connecting the Hearts:
Between the bottom of each heart (where the points meet the central circle), place a medium-sized burgundy dot to bridge the gap. -
Tiny Details:
For extra texture, add tiny white micro-dots along the inner edge of the burgundy circle, filling any negative space. -
Gilded Touch:
Optional: paint a very thin gold line down the center of each pink heart for a touch of elegance. -
Final Seal:
Allow the stone to dry for at least 24 hours to ensure the thick dots are solid. Coat with a glossy varnish to make the colors pop and protect your work.
Place this lovely stone on your desk or give it to a friend as a permanent reminder of kindness
Lovebirds on a Branch Rock
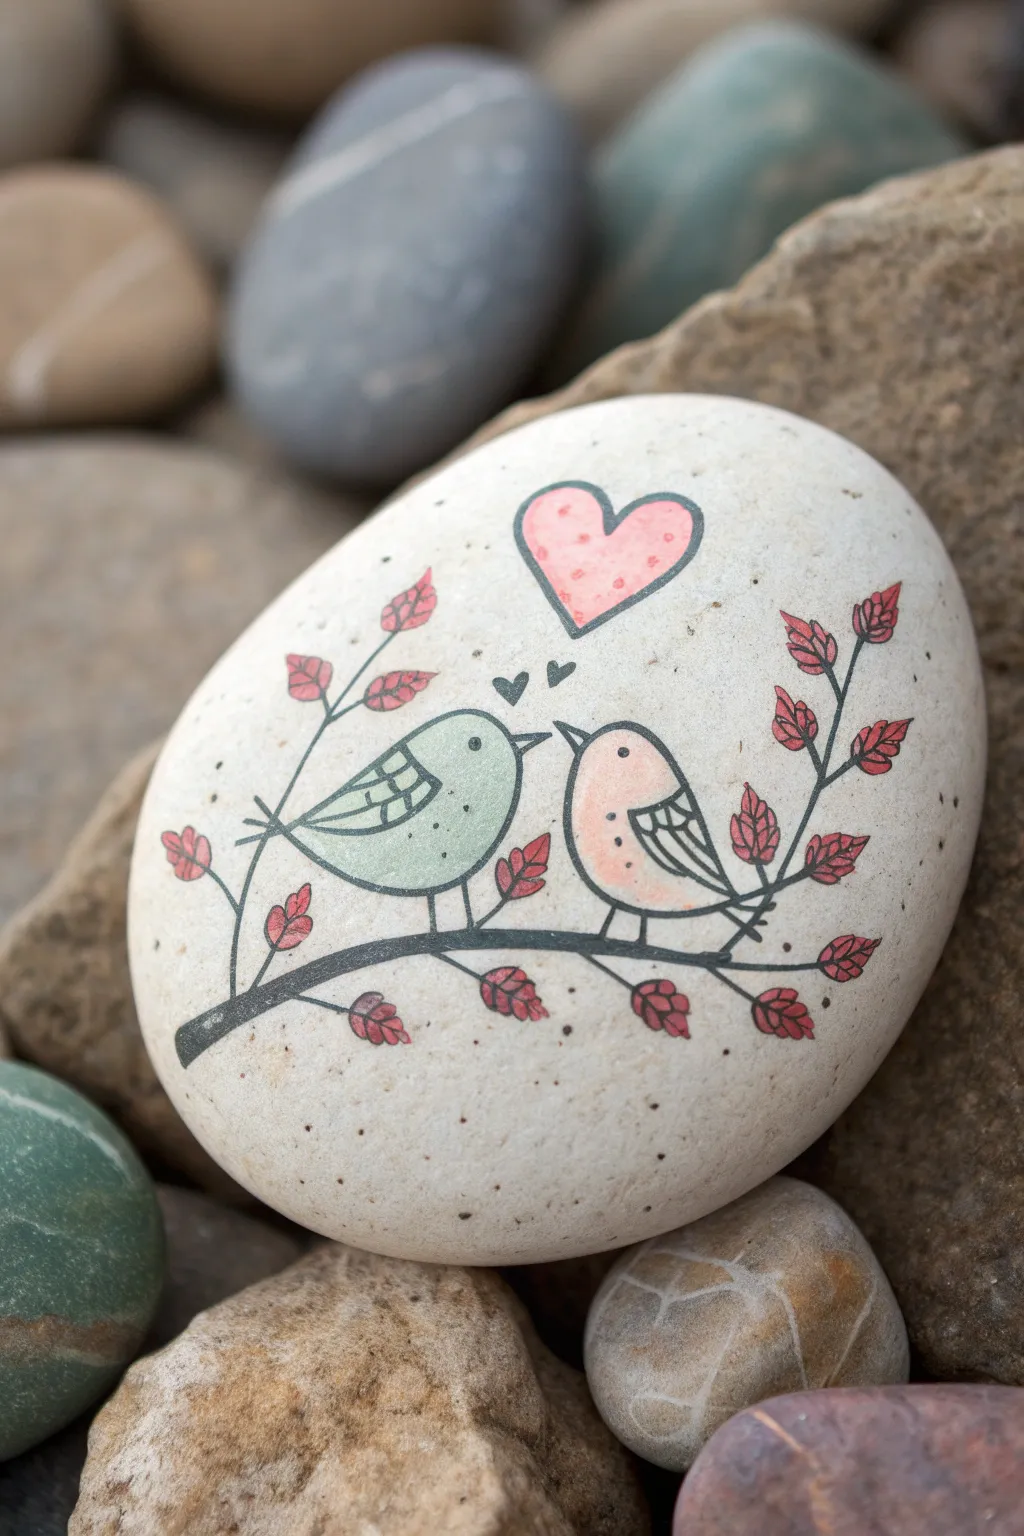
This charming project features two sweet birds perched together on a branch, sharing a moment under a floating heart. The smooth, light surface of the stone highlights the delicate line work and soft pastel colors, creating a keepsake perfect for gifting or garden decor.
Step-by-Step Guide
Materials
- Smooth, oval-shaped river rock (white or very light grey)
- Pencil and eraser
- Fine-point black permanent marker or paint pen (0.5mm or 0.7mm)
- Acrylic paints: sage green, soft peach/coral, dark grey/black, pink
- Small round paintbrush (size 0 or 1)
- Matte spray sealer or varnish
Step 1: Preparation & Sketching
-
Prepare the rough surface:
Begin by washing your stone with warm soapy water to remove any dirt or oils. Let it dry completely before starting; a slightly damp stone can cause ink to bleed. -
Sketch the main branch:
Using a pencil, lightly draw a curved line sweeping across the lower half of the rock. This will be the main branch. Add smaller offshoot twigs extending upwards and downwards from the main line. -
Outline the birds:
Draw two teardrop shapes sitting on the branch, facing each other. The left bird should be slightly plumper, and the right bird slightly more upright. Leave a small gap between their beaks. -
Add the details:
Sketch a simple beak for each bird and a round eye. Draw a large heart floating centered above the birds, and two tiny hearts hovering right between their beaks. -
The leaves:
Draw small, leaf-like shapes at the ends of your twig lines. Keep them simple and somewhat uniform to maintain the illustrative style.
Ink Control
If your marker tip gathers paint dust, scribble quickly on a scrap piece of paper to clear the flow before returning to the rock.
Step 2: Adding Color
-
Paint the left bird:
Load your small brush with sage green paint. Carefully fill in the body of the left bird, avoiding the wing area if you sketched it, though it’s easier to paint the whole shape and add details later. -
Paint the right bird:
Rinse your brush thoroughly and switch to the soft peach or coral paint. Fill in the body of the right bird smoothly. If the paint looks streaky, let the first coat dry and apply a second. -
Color the hearts and leaves:
Use a soft pink mix (white mixed with a touch of red or pink) to fill in the large heart above. For the leaves, use a slightly darker or reddish-pink tone to create contrast against the green bird. -
Let it dry:
Allow the paint to dry completely. This step is crucial because painting wet-on-wet will smudge your crisp lines later.
Step 3: Inking & Detailing
-
Outline the branch:
Take your fine-point black marker or paint pen. Trace over the pencil line for the branch, making it slightly thicker than the other lines to ground the image. -
Ink the left bird:
Outline the green bird’s body. Draw a wing shape inside the body and add a grid pattern or simple stripes to give it texture. Add stick legs attaching it to the branch. -
Ink the right bird:
Outline the peach bird. Draw its wing, perhaps with simple scalloped lines for feathers, and add its legs. -
Facial features:
carefully dot the eye on each bird and draw the triangular beaks. If you have a very steady hand, you can leave a tiny unpainted speck in the eye for a highlight, or add it later with white paint. -
Outline leaves and hearts:
Trace the leaves. Add a center vein line to each leaf for detail. Outline the large pink heart and the two tiny floating hearts. -
Add decorative dots:
Using the very tip of your marker or a toothpick dipped in paint, add tiny dots inside the large heart and on the bird’s breast for texture. I find this really brings the illustration to life.
Glittery Love
Once the sealer is dry, use a clear glitter pen or a tiny bit of metallic gold paint to accent the hearts or the birds’ wings for extra sparkle.
Step 4: Finishing Touches
-
Erase pencil marks:
Once you are absolutely sure the ink is dry, gently erase any visible pencil sketch lines. -
Seal the artwork:
finish by applying a layer of matte spray sealer. This protects the stone from weather if placed outside and prevents the paint from chipping.
Your adorable lovebird stone is now ready to brighten a corner of your home or bring a smile to someone special


Hand-Holding Otter Couple
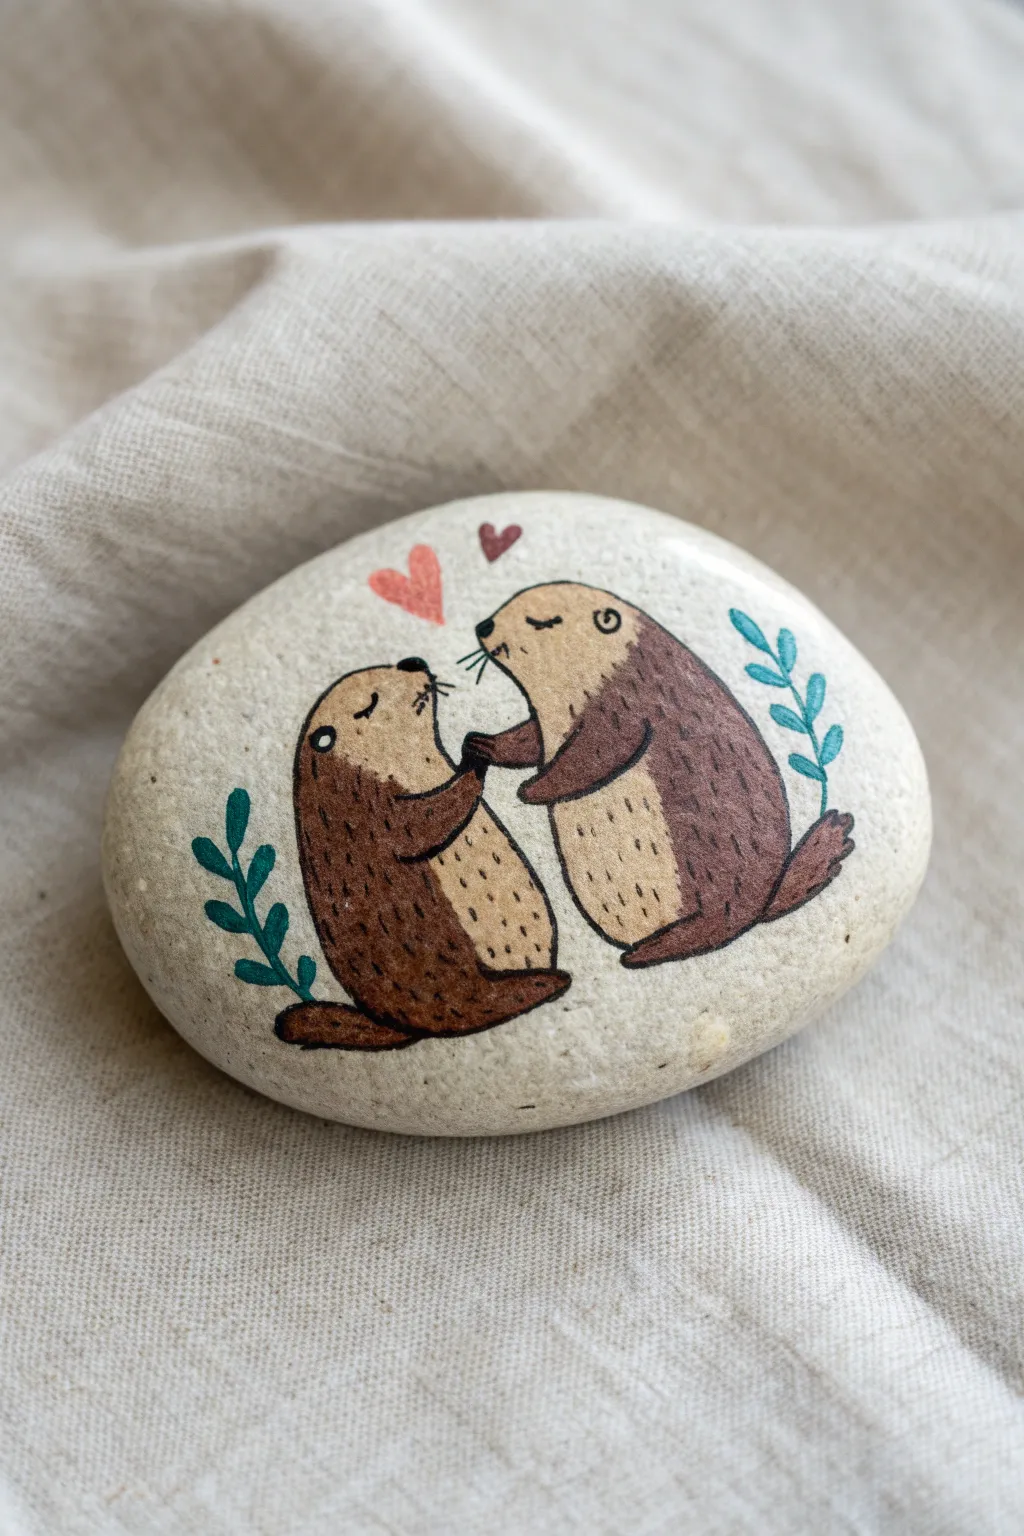
This adorable rock painting features a pair of sweet otters holding paws, perfect for a paperweight or a thoughtful gift. The natural stone background complements the earthy brown tones of the otters, with small hearts adding a touch of romance.
Step-by-Step
Materials
- Smooth river rock (light beige or grey)
- Acrylic paints (dark brown, tan/beige, forest green, pink, dark red/maroon)
- Fine point paint brushes (liner brush and size 0 round)
- Black ultra-fine paint pen or permanent marker (0.5mm)
- Pencil and eraser
- Palette or small plate for mixing
- Matte or satin varnish sealer
Step 1: Preparation & Sketching
-
Clean the surface:
Begin with a clean, dry rock. Wash it with mild soap and water to remove any dirt or oils, then let it dry completely before starting. -
Outline the otters:
Using a pencil, lightly sketch two overlapping oval shapes that lean toward each other. These will form the main bodies of the otters. -
Add details:
Sketch the heads at the top of the ovals, ensuring the snouts point inward. Draw little arms reaching out to meet in the center, and add rounded feet at the bottom. -
Sketch the decorative elements:
Draw simple leafy sprigs curving alongside each otter and two small hearts floating between their heads.
Stabilize Your Hand
For the tiny fur dashes and whiskers, rest your pinky finger on a bare part of the rock to keep your hand steady while painting details.
Step 2: Painting the Base Layers
-
Paint the belly fur:
Mix a warm beige or tan color. Paint the stomach area of both otters, creating a slightly curved oval shape on their fronts. Let this dry. -
Fill the darker fur:
Use a chocolate brown acrylic to fill in the rest of the otter bodies, carefully painting around the beige tummies. Don’t worry about perfect edges yet; the outline will help later. -
Paint the arms and tails:
Extend the brown paint to fill in the tails at the bottom and the arms reaching toward the center. Ensure the hands overlap slightly. -
Second coat:
Once the brown paint is dry to the touch, apply a second thin coat if the rock surface is showing through.
Step 3: Adding Details & Environment
-
Leafy sprigs:
Dip a fine liner brush into forest green paint. Trace the curved stems of the side plants first, then add small, simple almond-shaped leaves. -
Floating hearts:
Paint the larger heart in a soft pink and the smaller, higher heart in a deep red or maroon shade. -
Texture the fur:
Using your finest brush and a very small amount of dark brown paint (or a fine tip brown pen), add tiny vertical dashes onto the beige belly area to simulate fur texture. -
Define the connection:
Ensure the area where their paws meet is clearly painted; I like to use the dark brown to round off the paw shapes so they look like they are clasping.
Paint Pen Clogging?
If your black outline pen stops flowing over the acrylic paint, wipe the tip gently on a damp paper towel to remove dried paint buildup.
Step 4: Outlining & Sealing
-
Trace the outlines:
Once all paint is completely dry, use an ultra-fine black paint pen to outline the entire body of both otters. -
Draw the faces:
Use the pen to add small curved lines for closed, happy eyes, tiny triangular noses, and thin whiskers sprouting from their snouts. -
Add final definition:
Draw a separating line between the brown fur and the beige belly. Add tiny definition lines to the paws and feet. -
Erase pencil marks:
Check for any visible pencil lines from your initial sketch and gently erase them, being careful not to rub off any paint. -
Apply varnish:
Finish by applying a coat of matte or satin varnish to protect the artwork from chipping and to deepen the colors.
Now you have a charming little keepsake that perfectly captures friendship and affection
Heart Balloon Bunch
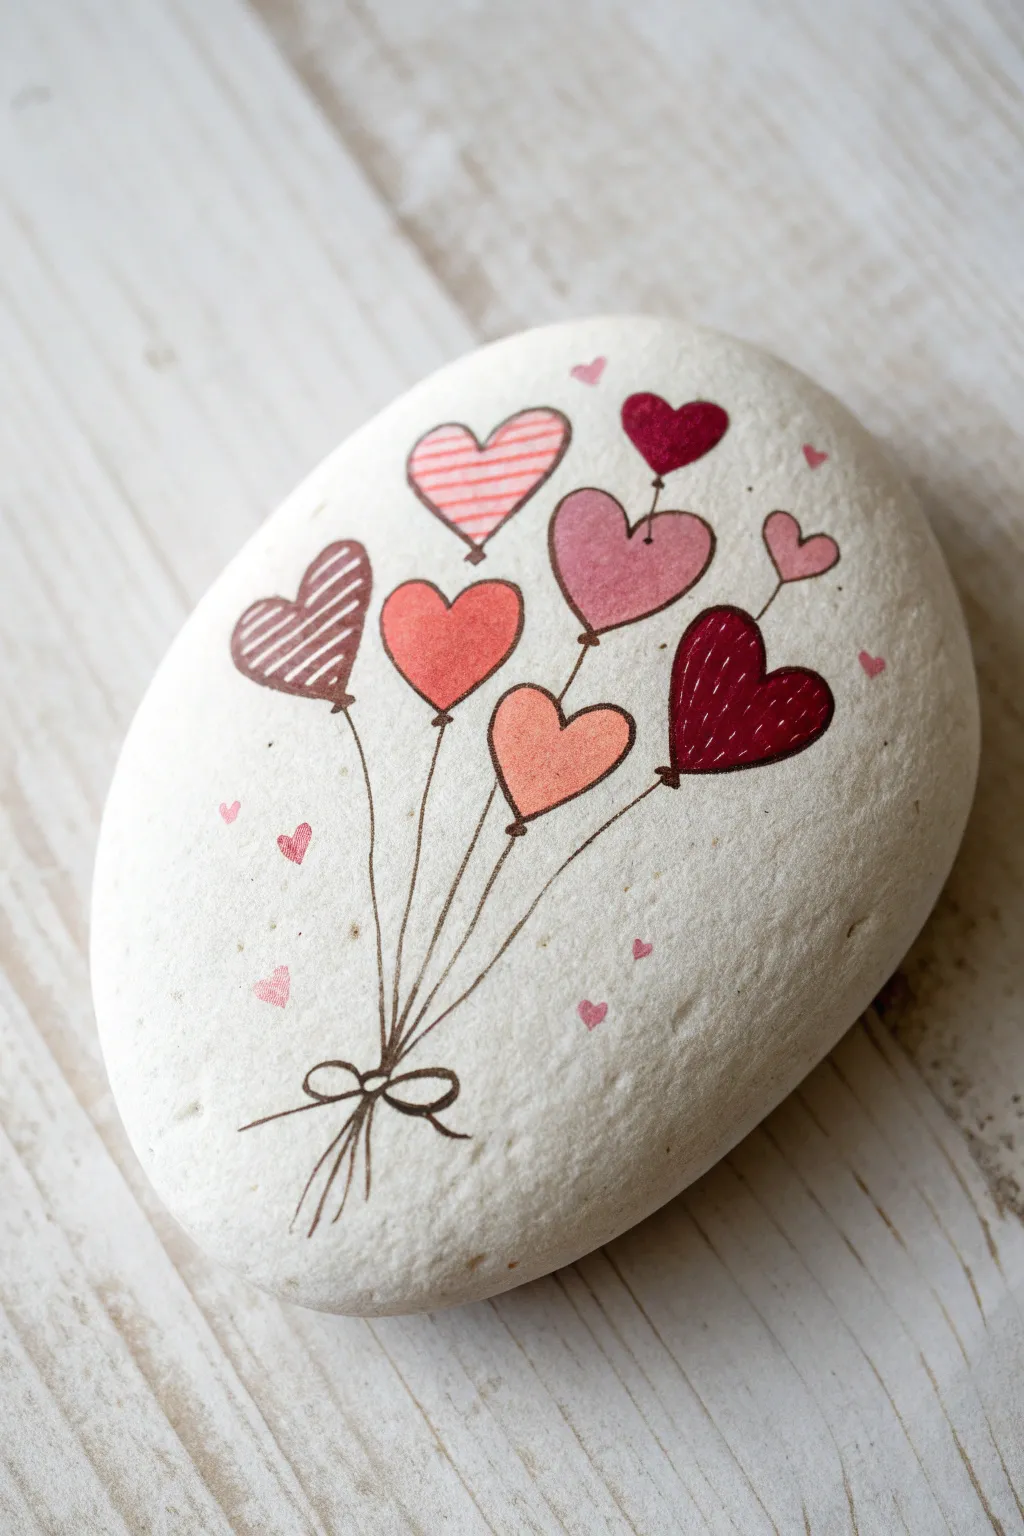
This sweet design transforms a simple stone into a joyful bundle of heart-shaped balloons. The delicate lines and varied patterns give it a lovely, hand-drawn illustration style that feels both whimsical and heartfelt.
Step-by-Step Guide
Materials
- Smooth, light-colored river rock (preferably white or beige)
- Fine grit sandpaper (optional)
- Pencil and eraser
- Paint pens (extra fine and fine tips) in shades of red, pink, burgundy, and brown
- Acrylic paint (optional alternate to pens)
- Fine liner brush (if using paints)
- Clear matte or satin sealant spray
Step 1: Preparation & Sketching
-
Prepare your surface:
Clean your rock thoroughly with soap and water to remove any dirt or oils. Let it dry completely. If the surface feels rough, give it a quick rub with fine-grit sandpaper to create a smooth canvas for your pens. -
Sketch the layout:
Using a pencil, lightly sketch the outlines of seven heart shapes in a cluster near the top center of the rock. Vary the sizes and angles slightly so they look like balloons jostling for space. -
Add the strings:
Draw faint lines extending from the bottom point of each heart, converging at a single point near the bottom of the rock. Keep these lines slightly curved to suggest movement. -
Sketch the bow:
Where the lines meet, sketch a simple bow with two loops and two tails hanging down.
Ink Bleeding?
If your contour lines are bleeding into the colored hearts, the base paint isn’t dry enough yet. Give it another 10-15 minutes, or use a hair dryer on low heat to speed it up.
Step 2: Coloring the Hearts
-
Paint the solid hearts:
Choose three hearts to fill in completely. I like to use a deep burgundy for the large right-hand heart, a soft coral-pink for the center heart, and a dusty rose for the top-center heart. Apply two thin coats for opacity. -
Create the striped heart:
For the top-left heart, carefully draw horizontal stripes using a pink paint pen. Leave the spaces between the stripes unpainted so the white rock shows through. -
Create the diagonal stripe heart:
On the far left heart, draw diagonal stripes using a brownish-burgundy pen. This adds a nice contrast in texture to the bunch. -
Add the tiny hearts:
Fill in the smallest filler hearts on the right side with a soft pink. These little gap-fillers make the bouquet look full.
Step 3: Detailing & Outlining
-
Outline the shapes:
Once the paint is fully dry, use an extra-fine brown or dark grey paint pen to outline every heart. Keep your hand steady but don’t worry about perfection; a slightly sketchy line adds character. -
Add texture to the dark heart:
On the large burgundy heart, add tiny, scratched-looking white or light pink hash marks. This gives it a stitched or textured fabric appearance. -
Draw the strings:
Trace over your pencil lines for the strings using the fine brown pen. Make sure each string connects clearly to the bottom tip of a heart balloon. -
Add little knots:
Draw a tiny triangle or dot at the very bottom tip of each heart where it meets the string to represent the tied knot of the balloon. -
Inking the bow:
Outline your bow sketch with the brown pen. Fill the tails with simple lines to imply the fabric folds.
Make it Shine
Add a tiny dot of white paint or a white gel pen accent to the upper right curve of each balloon. This creates a ‘highlight’ reflection that makes them look round and shiny.
Step 4: Final Touches
-
Scatter background hearts:
Around the main bouquet, draw tiny, confetti-like hearts floating in the background using pink and red pens. Keep them small and sparse. -
Clean up:
Wait until all ink is absolutely dry, then gently erase any visible pencil marks that weren’t covered by paint. -
Seal the artwork:
Finish by spraying the rock with a clear matte or satin sealant. This protects the paint from chipping and keeps the colors vibrant.
Now you have a permanent bouquet that will never wilt or float away
Rainbow Gradient Heart

Brighten someone’s day with this charming painted rock featuring a heart made of vibrant, stacked rainbow layers. The design follows the natural curves of the stone for a harmonious, organic look.
Detailed Instructions
Materials
- Smooth, rounded river rock (cleaned and dried)
- Pencil
- Acrylic paints (Red, Orange, Yellow, Green, Teal, Blue, Purple, White – optional)
- Small round paintbrush (size 0 or 1)
- Medium flat paintbrush
- Palette or small plate
- Clear sealant (spray or brush-on)
- Cup of water and paper towels
Step 1: Preparation & Sketching
-
Clean Your Canvas:
Begin by scrubbing your rock with warm soapy water to remove any dirt or oils, then let it dry completely. A clean surface ensures your paint adheres properly and lasts longer. -
Sketch the Outer Heart:
Using a pencil, lightly draw a large heart shape on the face of the stone. Try to center it, leaving an even border of bare stone around the edges. -
Define the Layers:
Inside your pencil heart, lightly sketch curved lines that mimic the top curves of the heart. You will need to divide the heart into seven distinct sections for the rainbow colors, starting from the top and working down to the point.
Step 2: Painting the Rainbow
-
Start with Red:
Load your small round brush with bright red acrylic paint. Carefully fill in the very top section of the heart, following the curved arches. -
Paint the Orange Band:
Rinse your brush and switch to orange paint. Fill in the second section directly underneath the red. If you want a sharper line between colors, let the red dry for a few minutes first. -
Add Yellow Sunshine:
Paint the third band with a vibrant yellow. Yellow can sometimes be translucent, so I often apply a thin layer of white first, let it dry, and then paint the yellow over it for extra pop. -
Apply the Green Layer:
Move on to a bright grassy green for the fourth section. Keep your hand steady to maintain the curved shape of the band. -
Paint the Aqua Band:
The fifth band uses a teal or aqua shade. This cool tone bridges the gap between the green and the deeper blues coming next. -
Deepen with Blue:
For the sixth section, apply a classic royal or navy blue. By now, the heart shape is narrowing, so be careful not to paint outside your pencil lines. -
Finish with Purple:
Fill the final, smallest tip of the heart with a deep purple. This anchors the design at the bottom point. -
Review and Touch Up:
Look over your rainbow. If any colors look streaky or transparent, apply a second coat once the first layer is dry to ensure solid, opaque coverage.
Fixing Wobbly Lines
If your bands touch or bleed, let both colors dry completely. Then, repaint the edge of one color right over the mistake for a crisp line.
Step 3: Refining & Sealing
-
Clean Up Edges:
If you painted outside the lines, use a clean, damp brush or a toothpick to gently scrape away mistakes before the paint fully cures. -
Optional Outlining:
If you enjoy a bolder look, you can use a very fine brush or a black paint pen to outline the heart or the individual color bands, though the original look relies on the colors touching directly. -
Dry Time:
Allow the stone to sit undisturbed for at least an hour steps. The paint needs to be completely dry before sealing to prevent smearing. -
Seal for Protection:
Apply a coat of clear acrylic sealer or varnish. This will protect your rock from weather if you plan to hide it outside and gives the colors a lovely sheen.
Add Some Sparkle
Mix a tiny pinch of fine glitter into your clear sealant or use a glitter topcoat to make your rainbow heart shimmer in the sunlight.
Place your finished rock in a garden or park to spread a little colorful love to a stranger
Cross-Stitch Heart Illusion
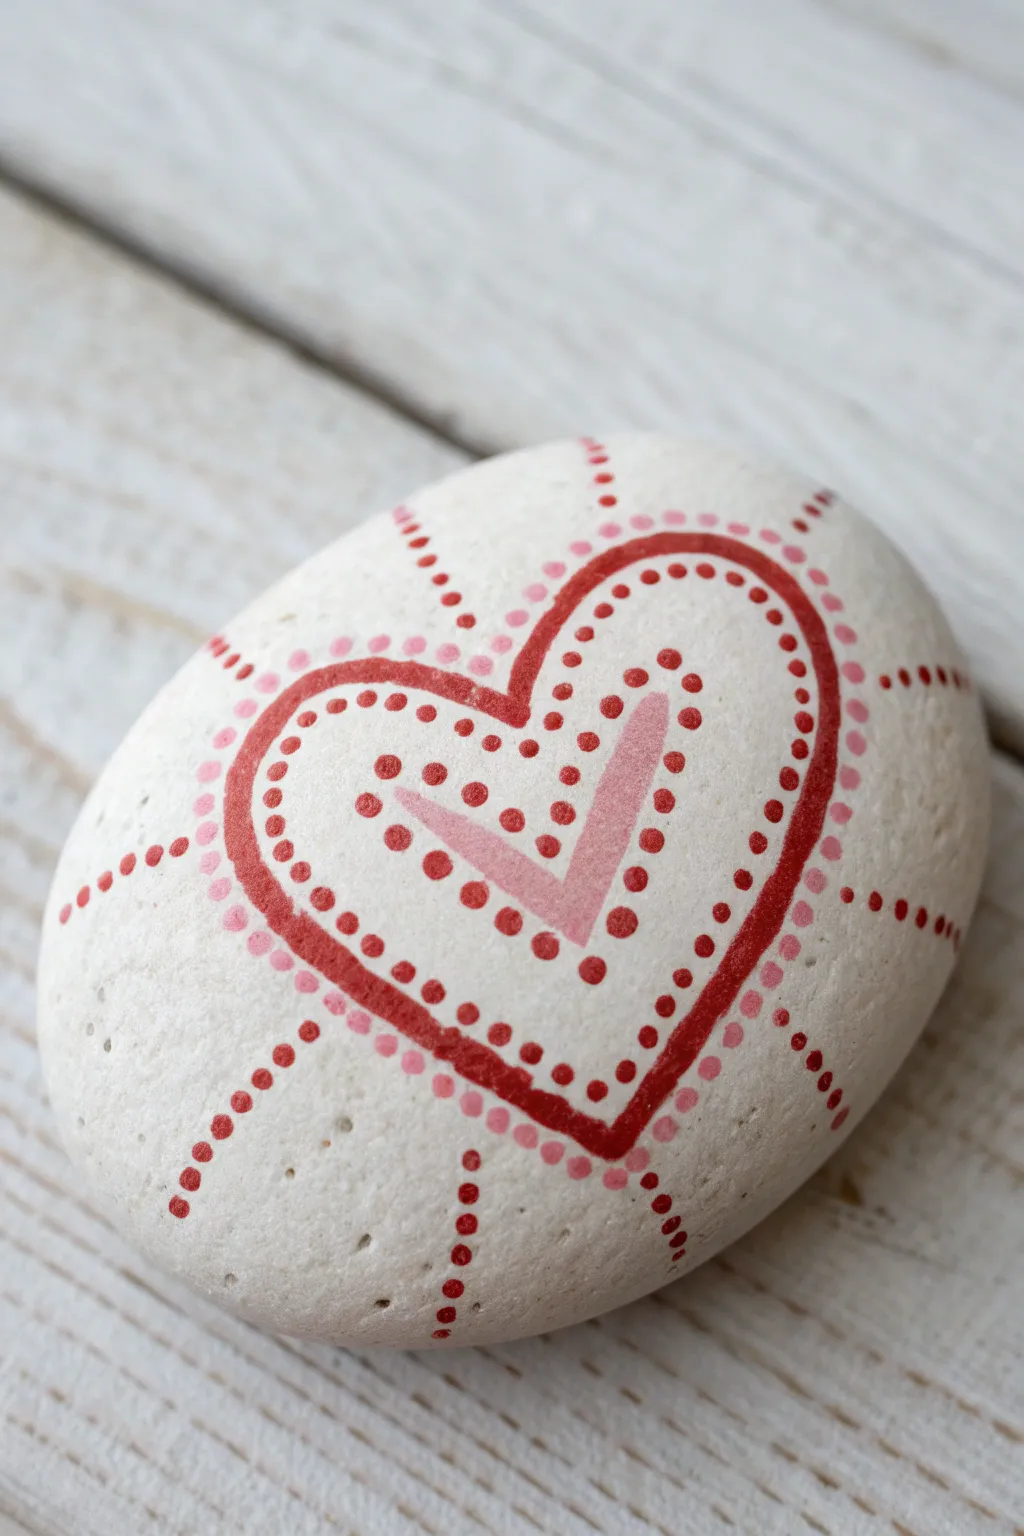
This charming project mimics the delicate look of folk art embroidery or cross-stitch using simple dots and dashes. The radiating red lines and dotted heart motifs create a warm, loving energy perfect for a handmade gift.
Detailed Instructions
Materials
- Smooth river stone (white or light beige)
- Fine grit sandpaper
- Acrylic paints (bright red, soft pink)
- Fine liner brush (size 0 or 00)
- Dotting tools (various sizes, or toothpicks/brush ends)
- Pencil and eraser
- Gloss varnish or sealant
Step 1: Preparation & Base
-
Clean Your Canvas:
Begin by washing your stone thoroughly with soap and water to remove any dirt or oils. Let it dry completely in the sun or with a hairdryer. -
Smooth the Surface:
If your stone has rough patches, lightly sand it with fine-grit sandpaper to create an even surface for your brushwork. Wipe away the dust with a damp cloth. -
Sketch the Heart:
With a pencil, lightly sketch a simple heart shape in the center of the rock. Keep your lines faint so they won’t show through the paint later. -
Add Radiating Lines:
Lightly mark guide points extending outward from the heart, like sun rays. You don’t need to draw the full lines, just enough to guide where your radiating dots will go.
Wobbly Lines?
If your hand shakes while painting lines, rest your wrist on the table and exhale slowly as you pull the brush. You can also clean up edges with a damp Q-tip immediately.
Step 2: Painting the Heart
-
Outline in Red:
Using your fine liner brush and bright red paint, carefully paint over your pencil heart outline. Keep the line thickness consistent. -
Inner Cheek Accents:
Mix a soft pink shade or use straight pink acrylic. Paint a ‘V’ shape inside the heart, near the bottom point, but make the arms of the V thick and slightly rounded, almost like rosy cheeks inside the heart. -
Inner Dotted Border:
Dip a small dotting tool into bright red paint. Place a row of dots following the curve inside your painted red outline. Space them evenly for a clean look. -
Outer Dotted Border:
Switch to soft pink paint. Create a dotted halo just outside the main red heart outline. These dots should be slightly smaller and spaced a bit further apart than the inner red ones.
Step 3: Radiating Details
-
Start the Rays:
Using red paint and your fine liner brush, paint short dashes extending outward from the pink dotted border. Think of these like the start of sunbeams. -
Extend with Dots:
Continue these lines outward using red dots. Start with a medium-sized dot near the dash, and gradually decrease the dot size as you move toward the edge of the stone. -
Center Fill Dots:
Inside the heart, between the red outline and the pink ‘V’ shape, add a scattered pattern of red dots. Keep them organized in rows that follow the heart’s curvature. -
Refining the V:
I like to take a very fine brush and clean up the edges of the pink V shape if the paint has feathered at all. A crisp edge makes the design pop.
Paint Consistency
For perfect dots that don’t finish with peaks, mix a tiny drop of water into your acrylics. You want a creamy, flowing consistency like heavy cream.
Step 4: Finishing Touches
-
Erase Guidelines:
Once the paint is absolutely bone dry (give it at least an hour), gently erase any visible pencil marks. Be careful not to scrub the paint off. -
Check for Gaps:
Look over your design. If any dots look too thin or transparent, carefully dab a second layer of paint on top of them. -
Seal the Artwork:
Finish by applying a coat of gloss varnish. This protects your design from chipping and gives the stone a beautiful, polished ceramic look.
Now you have a beautifully patterned stone that feels both traditional and uniquely yours
Two Rocks That Make One Heart
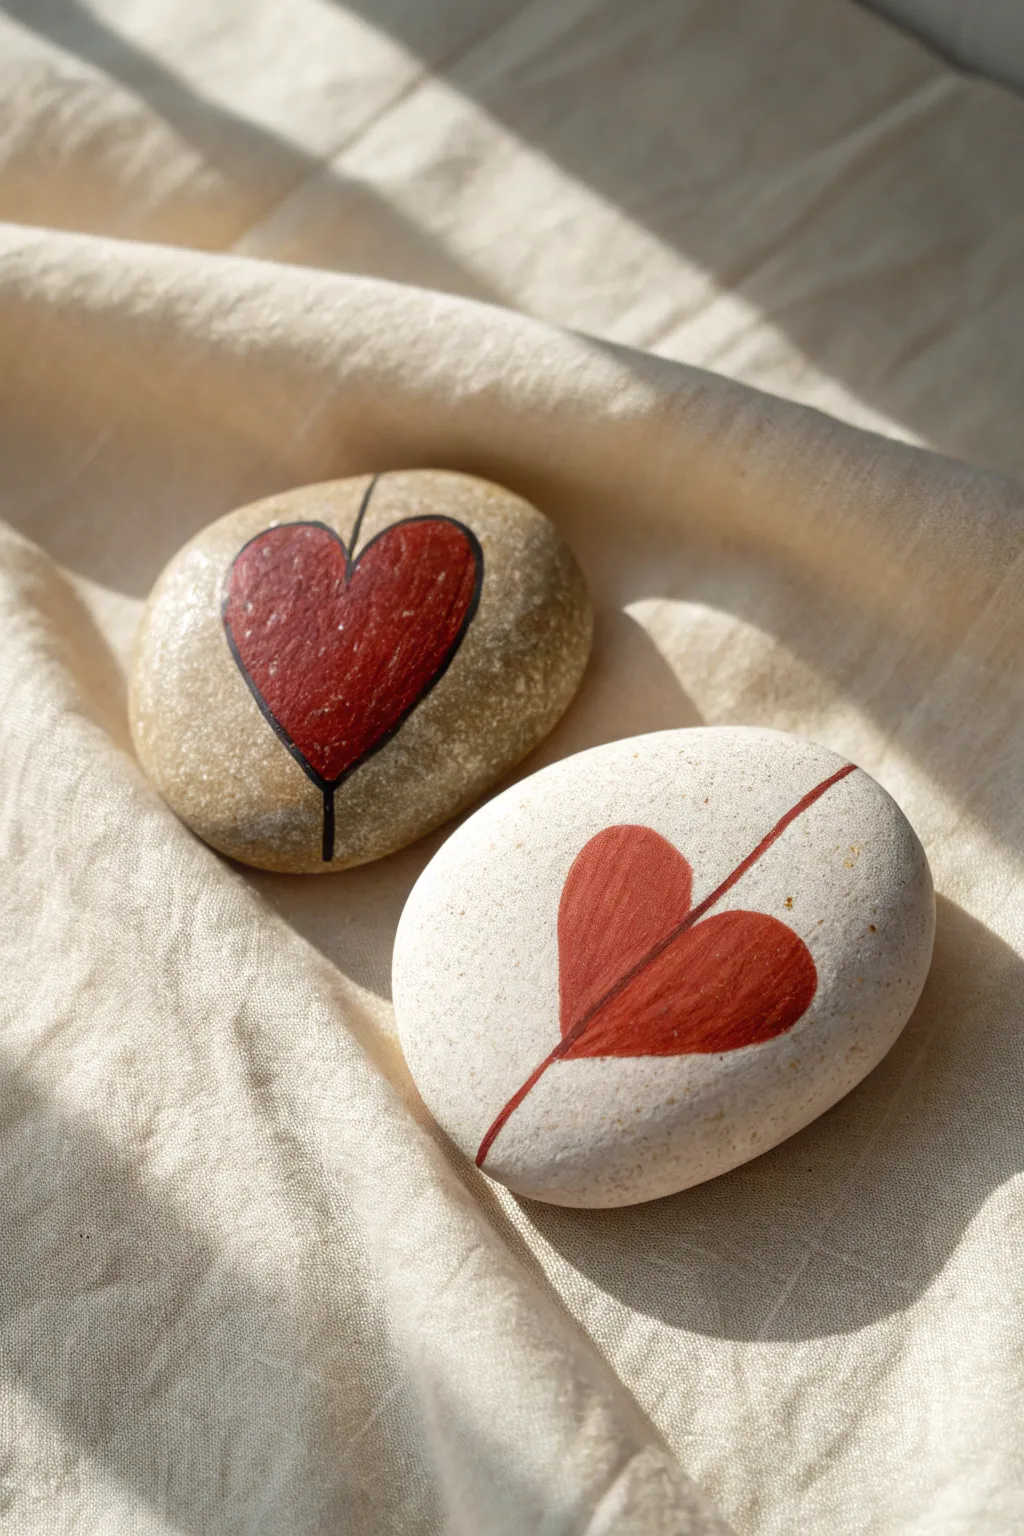
Create a unique symbol of connection with this pair of painted stones that features two distinct heart designs intersected by a single, continuous line. The organic texture of the rocks combined with the crisp red hearts offers a beautiful contrast perfect for a shared keepsake or modern decor accent.
Step-by-Step Guide
Materials
- Two smooth stones (one light/white, one darker/tan)
- Red acrylic paint (deep crimson or berry red)
- Black acrylic paint or thin black paint marker
- Small flat paintbrush (size 2 or 4)
- Fine liner brush (size 0 or 00)
- Pencil for sketching
- Ruler or straight edge
- Matte finish sealant spray or varnish
- Palette or small dish for mixing
- Cup of water and paper towels
Step 1: Preparation & Planning
-
Select your canvas:
Choose two stones that are roughly the same size but have contrasting natural colors. Look for smooth surfaces, especially in the center where the painting will go, to ensure crisp lines. -
Clean the surface:
Wash your chosen rocks with soap and warm water to remove any dirt or oils. Let them dry completely, ideally in the sun, as moisture trapped inside can ruin the paint later. -
Position the stones:
Lay the rocks side-by-side on your work surface exactly how you want them displayed. Find an arrangement where the shapes naturally complement each other.
Step 2: Sketching the Design
-
Draw the center line:
On the darker stone, use a ruler to lightly sketch a straight vertical line down the center with a pencil. This will serve as the anchor for your first heart. -
Sketch the diagonal line:
On the white stone, sketch a similar line, but angle it diagonally across the face of the rock to create visual interest and variation between the two pieces. -
Outline the hearts:
Lightly draw a heart shape over each line. Center the heart on the line so the line acts as a ‘spine’ running through the middle of the shape. -
Check the proportions:
Step back and look at both rocks together. Ensure the hearts are similar in size for visual balance, even though their angles are different.
Jittery Hands?
If painting straight lines on a curved rock is difficult, use thin masking tape or washi tape as a guide. Press it down firmly to prevent paint bleed.
Step 3: Painting the Hearts
-
Base coat the red:
Using your small flat brush, fill in the heart shapes with red acrylic paint. Be careful to stay inside your pencil lines. -
Smooth the edges:
While the paint is wet, gently refine the curved edges of the heart to make them smooth and rounded. If the rock is very porous, your first layer might look streaky. -
First drying time:
Allow the first coat to dry completely to the touch. This usually takes about 15 minutes, depending on how thick the paint was applied. -
Apply a second coat:
Paint a second layer of red over the hearts to make the color opaque and rich. I find this second pass is crucial for covering the darker stone’s natural color. -
Wait for curing:
Let the red paint dry fully. It needs to be perfectly dry before adding the fine line work on top to prevent smudging.
Puzzle Piece Match
Paint the line so it stops at the exact edge where the two rocks touch. When placed together, the line will look like it connects across the gap.
Step 4: Adding the Line Detail
-
Prepare the liner brush:
Load your fine liner brush with black paint (for the dark stone) or red paint (for the white stone). Alternatively, a paint pen works perfectly here for steadier control. -
Paint the spine on the dark rock:
Carefully trace the vertical pencil line on the darker stone using black paint. Extend the line slightly above and below the heart, stopping before the rock’s edge. -
Paint the spine on the white rock:
On the white stone, use the red paint to trace the diagonal line. Instead of painting on top of the heart, focus on the segments of the line extending *out* from the heart shape. -
Add the center detail:
For the white rock specifically, paint a thin line through the center of the red heart in a slightly darker shade of red or brown to mimic a leaf vein or fold, if desired. -
Outline the dark rock’s heart:
Using the fine liner brush and black paint, carefully outline the entire red heart on the darker stone to make it pop against the background.
Step 5: Finishing Touches
-
Clean up sketch lines:
Once all paint is 100% dry, gently erase any visible pencil marks that weren’t covered by paint. -
Seal the artwork:
Spray the rocks with a matte sealant. This protects the paint from chipping and gives the stones a uniform, professional finish without making them too shiny. -
Final cure:
Let the sealant dry according to the manufacturer’s instructions before stacking or handling.
Place your finished stones on a favorite shelf or wrap them up as a thoughtful gift for someone special
Anatomical Heart With Kind Words
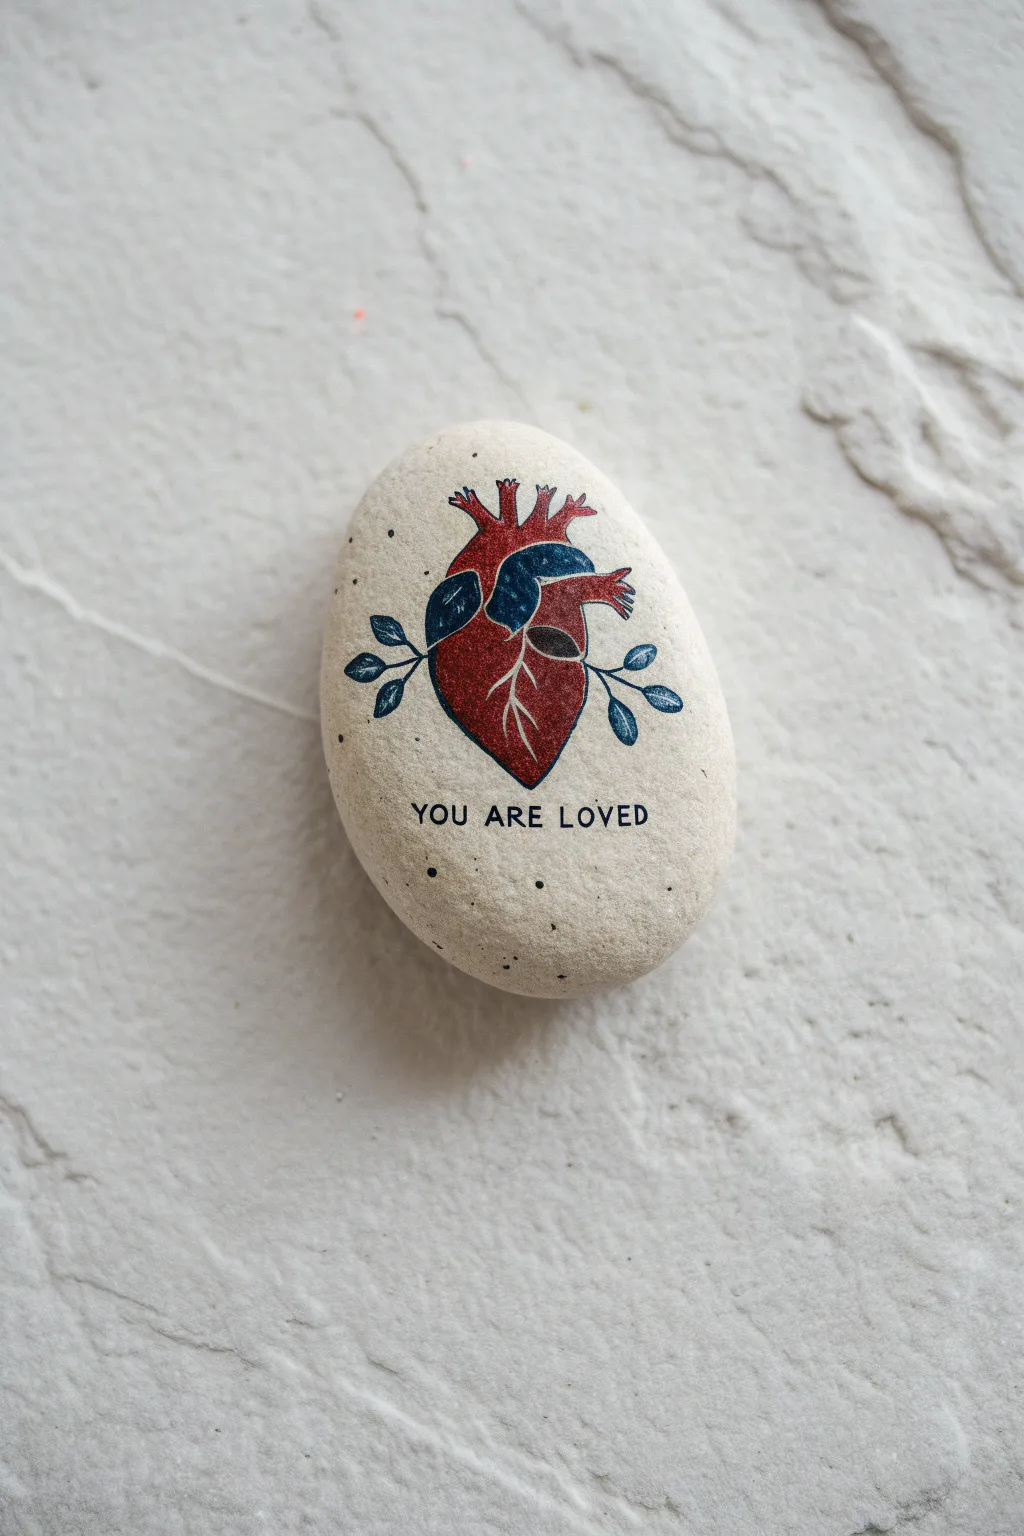
This project melds biological realism with whimsical affirmation, treating a smooth stone as a canvas for a stylized anatomical heart sprouting gentle leaves. The result is a sophisticated yet encouraging token that feels like a vintage textbook illustration brought to life.
Step-by-Step
Materials
- Smooth, light-colored river rock (approximately palm-sized)
- Pencil (HB or 2B)
- Fine-point permanent marker or liner pen (black)
- Acrylic paints (deep red, crimson, dark blue, white)
- Fine detail paintbrushes (sizes 00 and 1)
- Toothbrush or stiff bristle brush (for splattering)
- Letter stamps and black ink pad (optional but recommended)
- Matte spray varnish or sealer
Step 1: Preparation and Sketching
-
Select and Clean the Stone:
Choose a stone with a very flat, smooth surface to ensure your fine lines don’t skip. Wash it thoroughly with soap and water, then let it dry completely before starting. -
Lightly Sketch the Heart:
Using a pencil, draw the basic outline of an anatomical heart in the center of the rock. Don’t worry about perfect medical accuracy; focus on the main ventricles and the top arteries (aorta and vena cava). -
Add Botanical Elements:
Sketch two small branches extending outward from behind the heart shape. Add simple, oval-shaped leaves to these stems to soften the biological look.
Step 2: Painting the Heart
-
Base Coat the Heart:
Mix a deep red acrylic paint and fill in the main body of the heart. You may need two thin coats to get solid coverage without brushstrokes showing. -
Paint the Upper Chambers:
For the upper atria and vessels, mix a dark blue with a tiny touch of black. Carefully paint these sections, ensuring a clean separation from the red areas. -
Add Highlights:
Once dry, use your finest brush and white paint to add very subtle highlights to the curves of the heart and the blue vessels to suggest volume. -
Paint the Leaves:
Using the same dark blue mix (to keep the color palette cohesive), paint the leaves and stems you sketched earlier. This limited palette gives the piece a stunning graphic quality.
Ink Smudging?
If your pen smears when sealing, switch to an oil-based marker or apply a layer of Mod Podge very gently before the final spray varnish.
Step 3: Detailing and Text
-
Outline the Heart:
Using a very fine black liner pen or a 00 brush with thinned black paint, outline the entire heart structure. Keep your hand steady to create crisp edges. -
Add Texture Lines:
Draw thin, branching lines across the red section of the heart to represent veins and muscle texture. I like to keep these lines delicate so they don’t overpower the red base. -
Outline the Leaves:
Add a thin outline to your blue leaves and draw a single vein down the center of each one for definition. -
Stamp the Message:
Below the heart, add the phrase ‘YOU ARE LOVED.’ Small rubber letter stamps work best for this uniform, typewriter-style look. Test your stamp on paper first to check ink levels. -
Hand-Lettering Alternative:
If you don’t have stamps, carefully hand-letter the phrase using a fine-point marker in simple, uppercase block letters.
Pro Tip: Vintage Look
Mix a tiny drop of brown into your red paint. This ‘dulls’ the brightness slightly, making the heart look more like an old textbook illustration.
Step 4: Finishing Touches
-
Create the Splatter Effect:
Dilute a tiny amount of black paint with water. Dip an old toothbrush or stiff brush into it, and flick the bristles with your thumb to create tiny speckles around the heart. -
Refine the Edges:
If any paint went outside the lines, use a clean, damp brush or a white gel pen to tidy up the edges against the stone background. -
Dry Thoroughly:
Allow the paint and ink to dry for several hours. Ink, in particular, can smear easily if not 100% set. -
Seal the Artwork:
Spray the rock with a matte varnish. Use light layers to prevent the ink or marker from running; a matte finish preserves the natural stone look better than gloss.
Place this stone where someone needs a reminder of their worth or gift it as a unique token of affection


Have a question or want to share your own experience? I'd love to hear from you in the comments below!