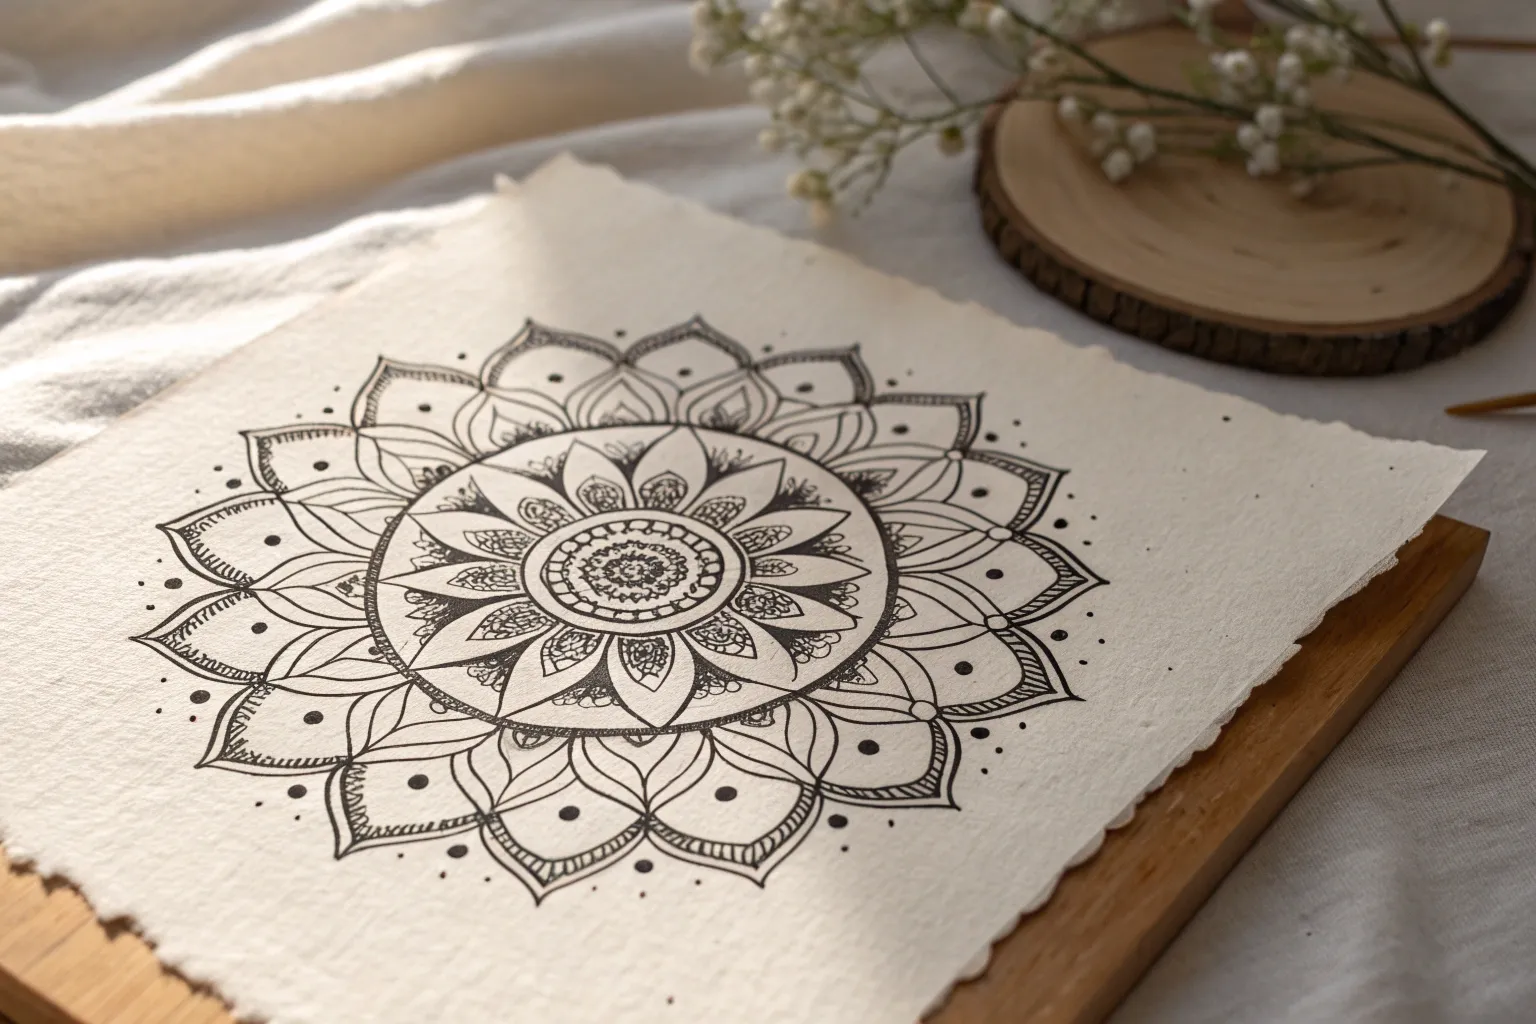
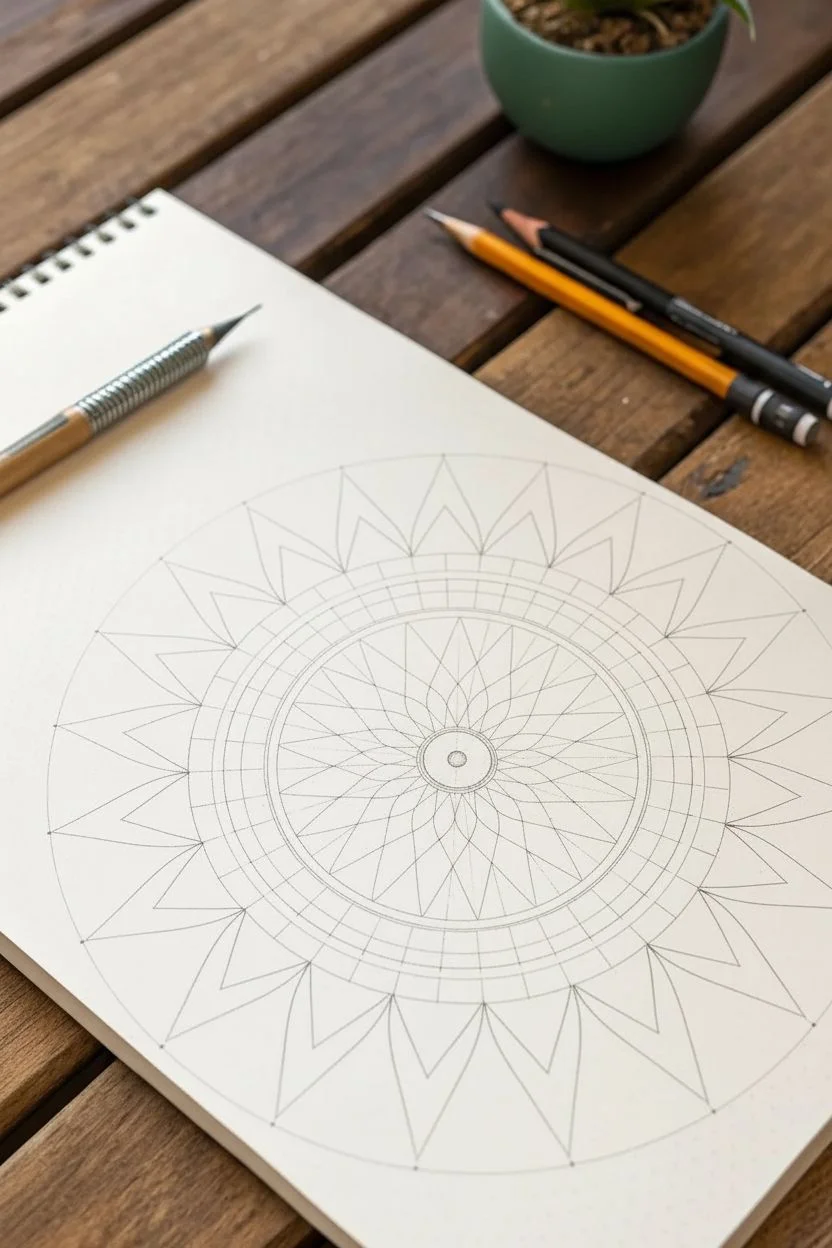
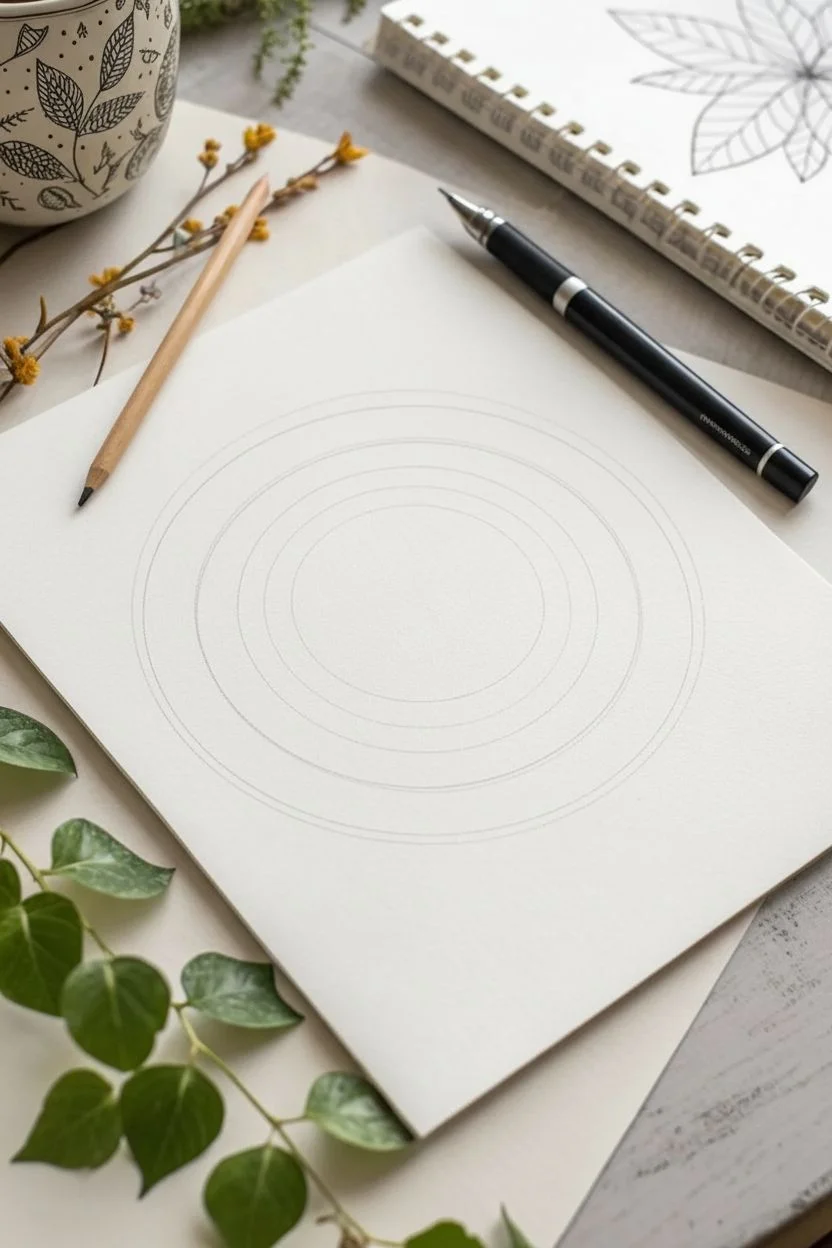
If you’ve ever stared at a blank circle and thought, “Okay… now what?” you’re not alone—I lean on a little library of mandala pattern building blocks every time. Here are my go-to repeatable motifs and ring ideas you can mix, match, and stack into gorgeous concentric rings.
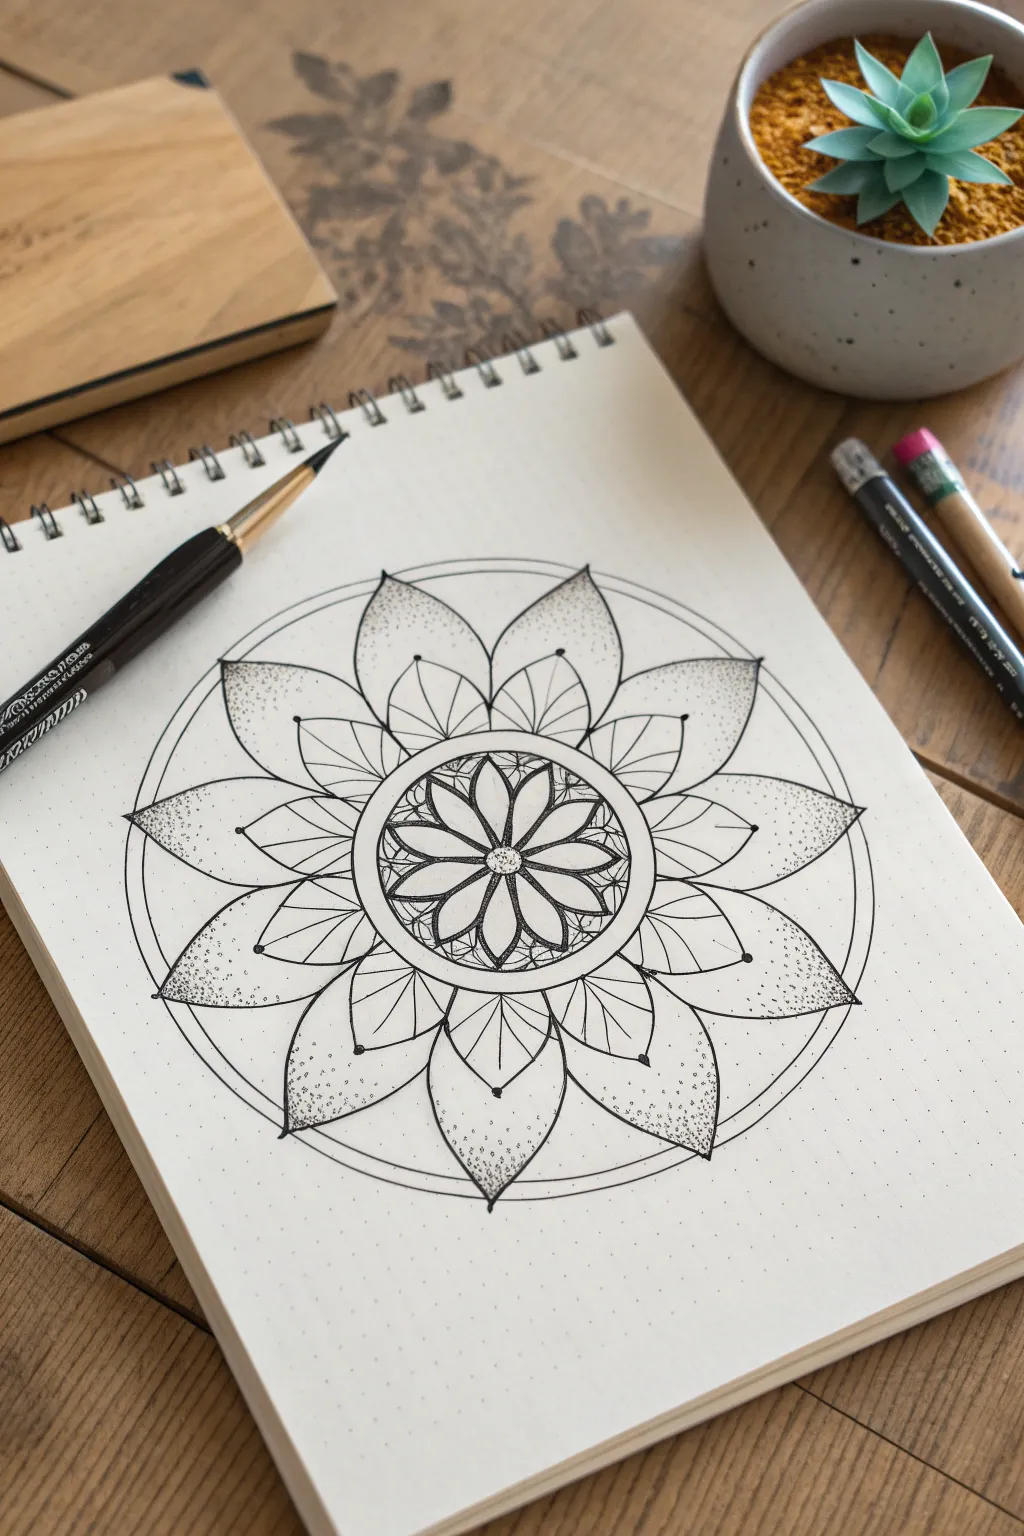
Classic Floral Center Seed

This elegant mandala design focuses on the beauty of symmetry and organic shapes, starting from a simple seed and blooming outward. With its clean lines and delicate shading, this project is a perfect meditation in ink for both beginners and seasoned artists.
Step-by-Step
Materials
- Cream-colored sketchbook or drawing paper
- Fine liner pen (black, size 0.3 or 0.5)
- Pencil (HB or 2H for light lines)
- Compass
- Protractor (optional)
- Eraser
- Ruler
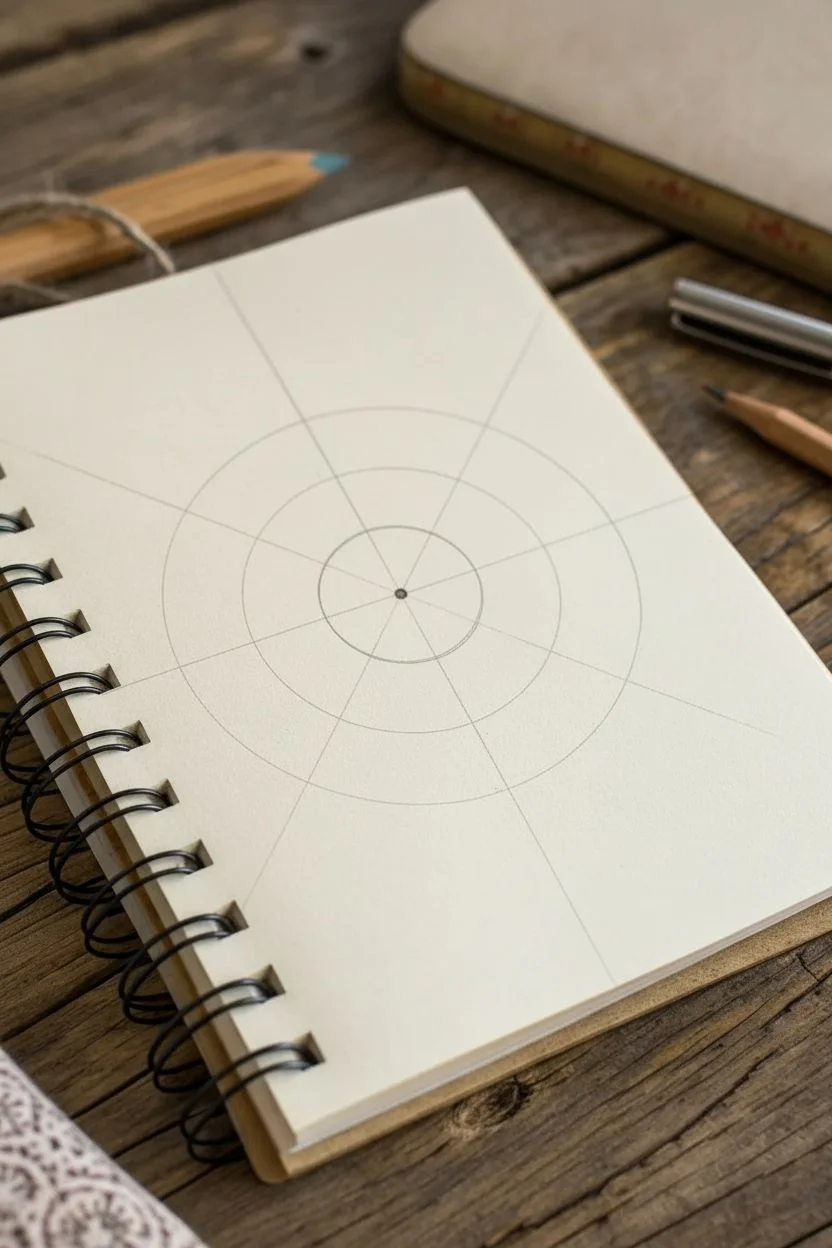
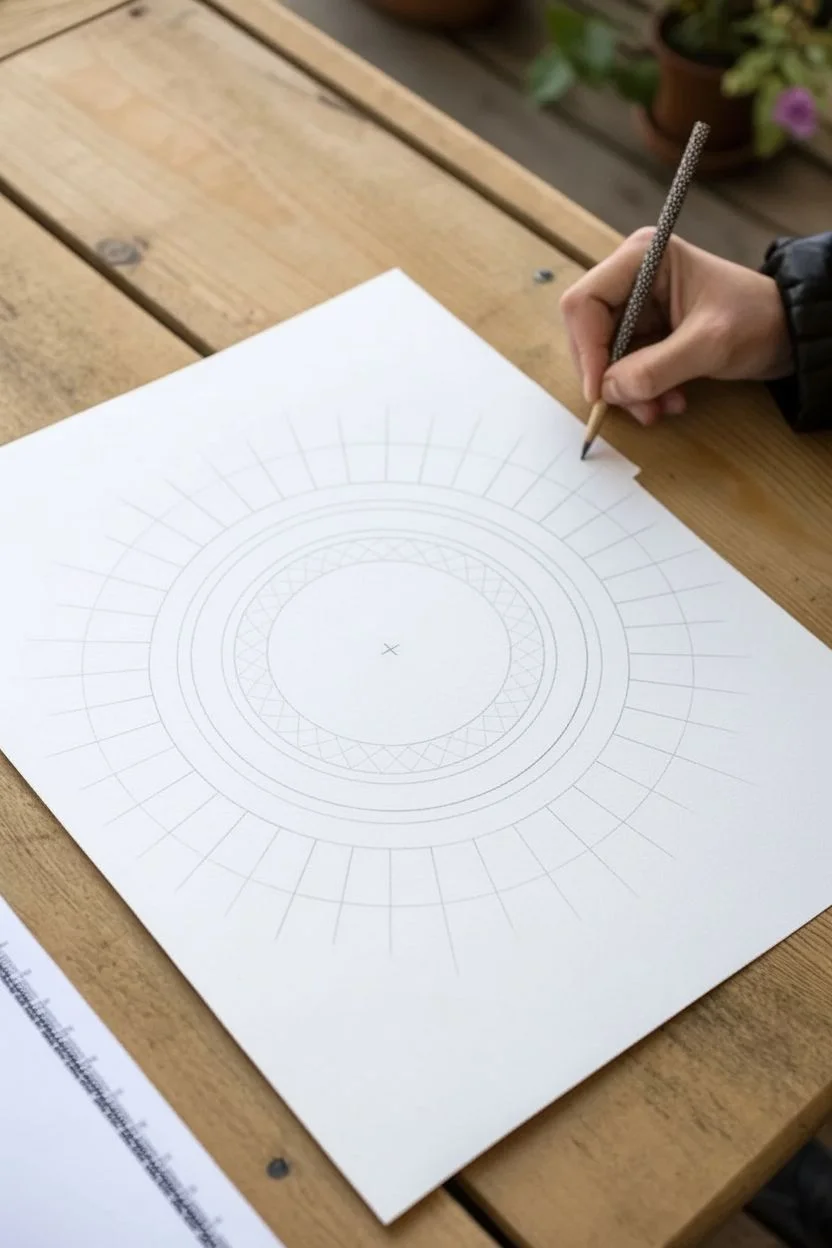
Step 1: Setting the Foundation
-
Find your center:
Begin by marking a small dot in the exact center of your page. This will anchor the entire design. -
Grid lines:
Using a ruler and pencil, draw a light vertical line and a horizontal line through the center dot to create a cross. If you want more precision, add diagonal lines to divide the space into eight equal pie slices. -
Concentric circles:
Place your compass point on the center dot. Draw four light pencil circles: a very small inner circle (about 1 inch diameter), a second slightly larger circle for the seed border, a third for the first petals, and a large outer circle for the final layer.
Ink Flow Tip
Keep a scrap paper nearby. If your pen skips over the pencil lead, scribble quickly on the scrap to get the ink flowing smoothly again instantly.
Step 2: Drawing the Seed Center
-
The eight-point star:
Switch to your fine liner pen. I find it helpful to start directly in the center; draw an eight-petal flower shape inside the smallest circle. Each petal should align with one of your eight grid lines. -
Inner details:
Inside each of those eight initial petals, draw a simple straight line down the middle to add definition. -
Stippling texture:
Fill the negative space between the petals with tiny stippled dots. Keep the dots dense near the center and slightly looser as they move outward to create depth. -
The double border:
Trace the second pencil circle with ink to create a defined ring around your center flower. Draw a second ring just outside it, creating a narrow channel. -
Channel details:
Fill the narrow channel you just created with small, evenly spaced dots or tiny ticks to give the border some texture.
Add Depth
Thicken the outer boundary lines of the main petals slightly more than the interior detail lines. This line weight variation helps the layers pop visually.
Step 3: Blooming Outward
-
First petal layer:
Draw the first ring of large petals. Each new petal should sit between the tips of the center flower petals. Use the third pencil circle as a guide for height, keeping them rounded and uniform. -
Mid-rib lines:
Draw a central line up the middle of each new petal, stopping just short of the tip. -
Hatching the base:
Add shading by drawing fine, short hatching lines radiating from the base of each petal. This makes the petals look like they are curving upward. -
Adding separators:
Between each of these main petals, draw a small, pointed ‘sepal’ or triangle shape peeking out from behind.
Step 4: The Final Layer
-
Outer petal outline:
Draw the largest ring of petals. These should be wider and slightly pointed at the top. Center each one directly behind the petals of the previous layer. -
Double lining:
Carefully draw an inner outline inside each large outer petal. This ‘double line’ effect adds instant sophistication to the design. -
Central veins:
Draw a straight line down the center of each large petal. At the top of this line, add two small branches forming a subtle V-shape. -
Base flourishing:
At the bottom of the large petals, add fanned hatching lines similar to the previous layer, but slightly longer to account for the larger size. -
Clean up:
Once the ink is completely dry—give it a few minutes to be safe—gently erase all your pencil grid lines and circles.
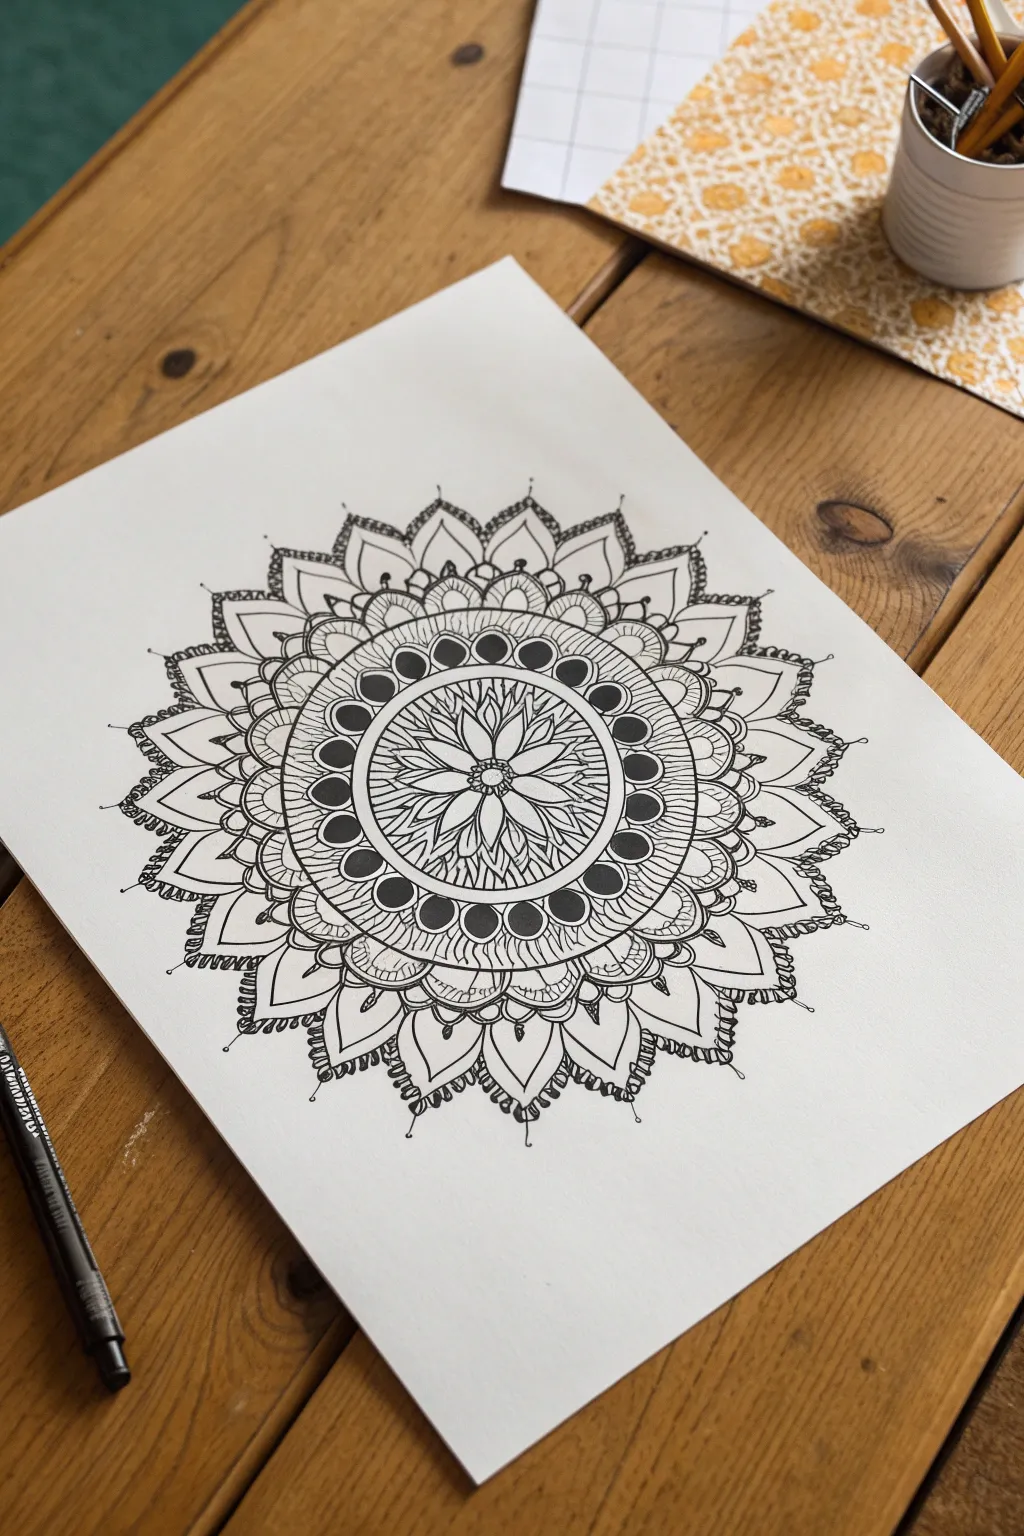
Now you have a timeless floral mandala that looks beautiful on its own or ready for color


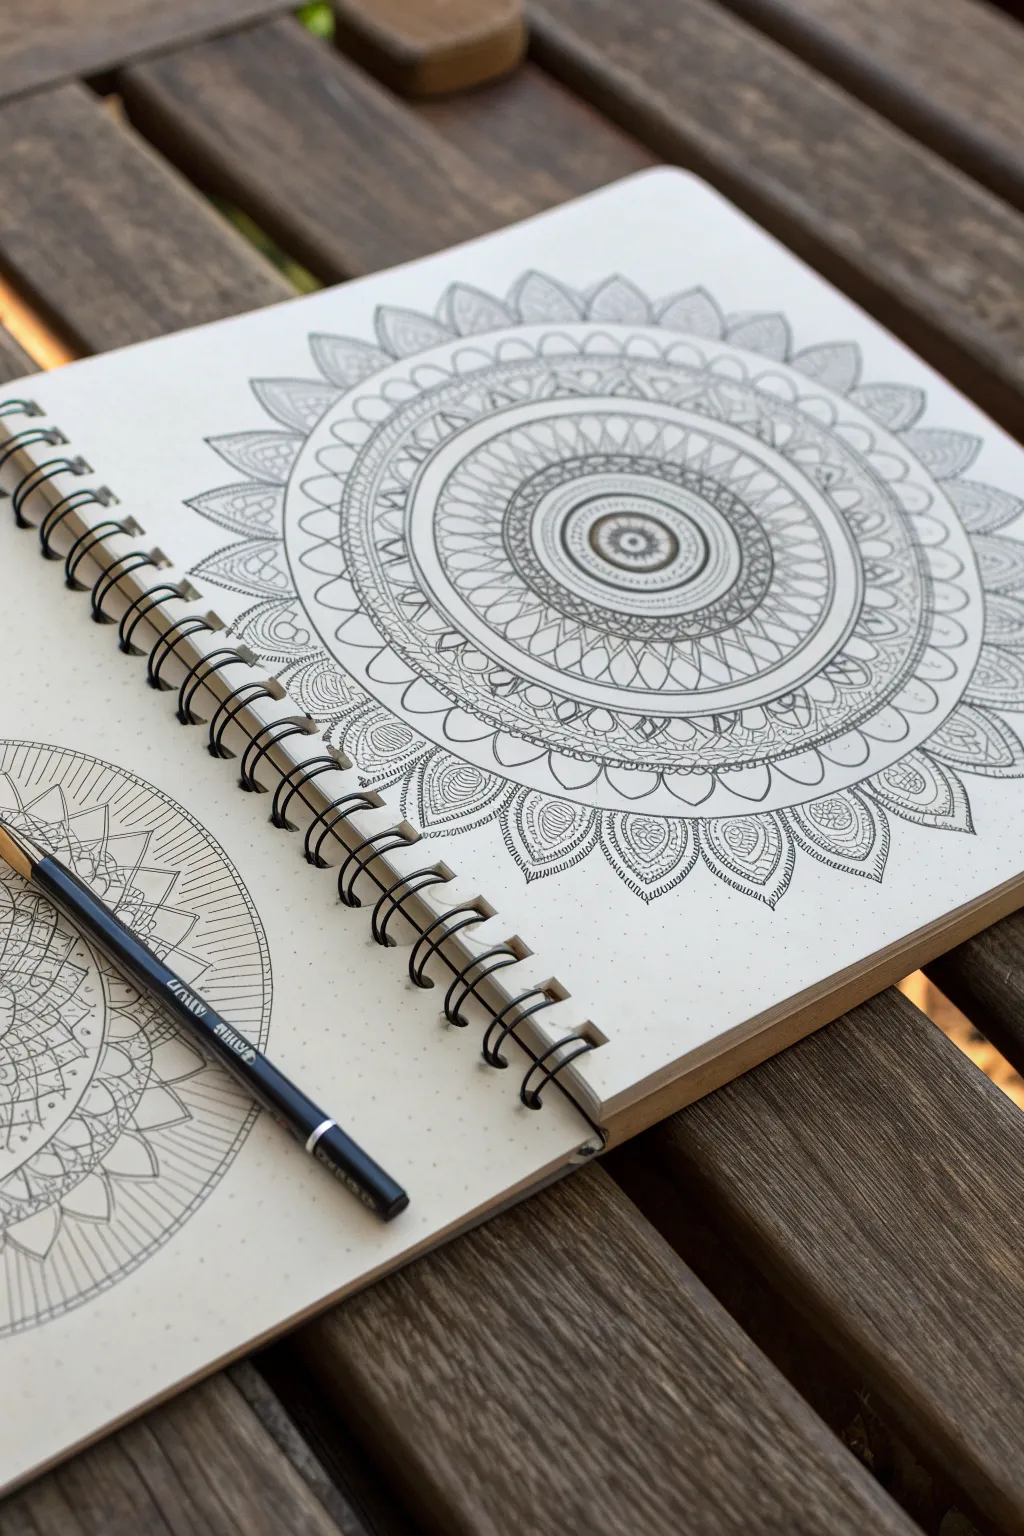
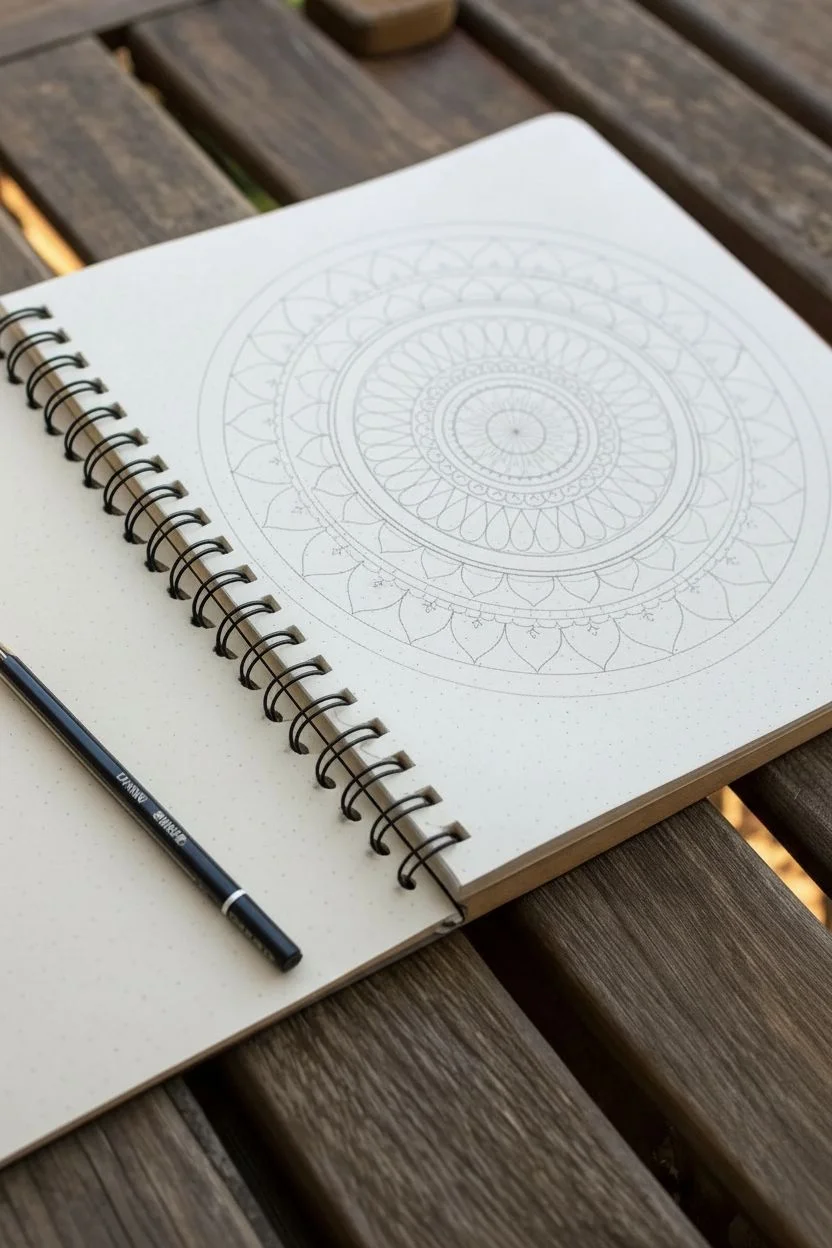
Lotus Petal Rings in Layers

This serene mandala design builds outward from a detailed center, utilizing layers of lotus-inspired petals to create depth and balance. The striking contrast comes from simple stippling techniques, turning basic fine-liner strokes into textured artwork on dot grid paper.
Step-by-Step Guide
Materials
- Dot grid notebook or sketchbook paper
- Compass or circle template
- Ruler or straight edge
- Pencil (HB or similar)
- Eraser
- Black fine-liner pen (0.3mm or 0.5mm)
- Black ultra-fine liner pen (0.05mm or 0.1mm) for stippling
Step 1: Setting the Structure
-
Establish the center:
Begin by marking the center point of your page. Using your compass, draw a small circle about 1 inch in diameter. Draw a second, slightly smaller circle inside it to create a thick rim. -
Draw outer guidelines:
From the same center point, draw two much larger circles. One should act as the boundary for the second layer of petals, and the largest will define the tips of the outermost petals. -
Divide the circle:
Use your ruler to lightly draw vertical and horizontal lines through the center, dividing the circle into four quadrants. Then, draw diagonal lines to divide those quadrants, creating eight equal pie slices. This grid is crucial for symmetry.
Step 2: Drawing the Central Flower
-
Sketch the inner petals:
Inside your smallest central circle, sketch eight small, thin petals radiating from the very center dot. They should look like a simple daisy. -
Add detail to the rim:
In the gap between your two inner circles, draw small triangles or zig-zags that connect the petal tips to the outer rim of this central ring. -
Create the first main layer:
Sketch eight larger, leaf-shaped petals extending from the central ring. Use your grid lines to ensure each petal point aligns perfectly with a line. -
Draw the secondary layer:
Between each of the main petals you just drew, sketch the tips of eight petals peeking out from behind. These should only show the top triangle portion.
Uneven Petals?
If petals look lopsided, don’t erase the whole ring. Just adjust the neighboring petal to overlap slightly differently. Organic variations often look better tailored than perfect digital symmetry.
Step 3: The Outer Lotus Ring
-
Outline the largest petals:
Using your largest guide circle, sketch twelve large, wide lotus petals. These should be evenly spaced. If eight petals don’t fit the width you want, you can adjust the spacing to fit twelve, or stick to eight for simpler symmetry. -
Refine the shapes:
Ensure the tips of these large petals touch the outermost circle guide. Curve the sides gently so they overlap slightly or touch at the base. -
Add interior veins:
Draw a straight line down the center of each large petal, stopping about halfway down. Then, draw two curved lines branching out from the base of that center line to create a geometric vein pattern.
Stippling Patience
Keep your pen vertical when stippling. Slanted dots turn into tiny dashes, which ruins the texture. Take breaks to prevent hand cramping and maintain dot consistency.
Step 4: Inking and Stippling
-
Trace the main lines:
Switch to your thicker fine-liner (0.3mm or 0.5mm). Carefully trace over all your pencil petal outlines and the distinct circles. Do not trace the grid lines. -
Ink the central details:
Carefully ink the tiny daisy petals in the center. I find it helpful to rotate the sketchbook as I work to keep my hand steady. -
Begin stippling shading:
Switch to your ultra-fine pen (0.05mm). Start adding tiny dots at the tips of the largest outer petals. Cluster the dots densely near the tip. -
Fade the gradient:
As you move down the petal, space the dots further apart. This creates a gradient effect that makes the tips look darker and textured. -
Shade the inner layers:
Apply the same stippling technique to the middle layer of petals, but focus the density at the base of the petals (closest to the center) to create depth. -
Cross-hatch the center:
For the very center ring background (behind the daisy petals), use tiny cross-hatching or dense stippling to make it dark, making the white petals pop. -
Final clean up:
Wait at least 15 minutes for the ink to fully dry. Then, gently erase all pencil guidelines and grid marks to reveal the crisp black and white design.
Enjoy the rhythmic process of dotting your design and watching the textures come to life on the page


Scalloped Arch Border Bands

This intricate design combines a central floral mandala with a striking scalloped border, creating a balanced and harmonious layout on your dot grid page. The precise line work and repetitive patterns make for a calming, meditative drawing experience that looks impressively complex when finished.
How-To Guide
Materials
- Spiral-bound dot grid notebook
- Fine liner pen (0.3mm or 0.5mm, black)
- Ultra-fine liner pen (0.1mm, black for details)
- Pencil (HB or 2H for sketching)
- Clean eraser
- Compass (optional, but helpful for the center)
- Ruler
Step 1: Setting the Structure
-
Locate the center:
Begin by finding the approximate center of your dot grid page. If you are using a compass, place the point here. If freehanding, make a small, faint pencil mark. -
Draft the central circles:
Lightly sketch three concentric circles to define the mandala’s core. The innermost circle should be about 1 inch in diameter, followed by a middle ring about 0.5 inches wider, and an outer ring encompassing the main medallion shape. -
Outline the border bands:
At the top and bottom of the page, use your ruler to pencil in two parallel horizontal lines. These guidelines will contain your scalloped borders. Leave enough space between the lines for the arch patterns, roughly 1.5 inches high.
Grid Guide Trick
Count your grid squares before starting! Mark the exact middle of your border strip first, draw the center arch there, and work outward to ensure symmetry.
Step 2: Drawing the Central Mandala
-
Ink the floral center:
Using your 0.3mm pen, draw a small flower in the very center with eight rounded petals. Inside each petal, add a tiny line for texture. -
Build the first ring:
Around the central flower, draw a double-circle border. Fill the space between these two thin circles with small, densely packed vertical hatch lines to create a darkened band. -
Create the petal layers:
Draw a ring of small, rounded petals radiating outward from that dark band. Enclose this layer with another thin circle line. -
Add the main petals:
Sketch a larger ring of U-shaped petals. Inside this ring, draw a slightly smaller circle to create a ‘track’. Fill this track with small circles or dots. -
Draw the outer points:
For the final layer of the mandala, draw large, pointed leaf shapes extending outward. Ensure the tips touch your faint outer pencil guide. Add a smaller, inner tear-drop shape inside each leaf for added dimension.
Uneven Petals?
If your mandala petals start looking uneven, stop and make faint pencil ticks at 12, 3, 6, and 9 o’clock. Use these anchor points to realign your spacing.
Step 3: Crafting the Scalloped Borders
-
Define the zig-zag base:
along your bottom pencil guidelines, draw a continuous zig-zag line. The points of the zig-zag should align with the grid dots to keep them even. -
Add the scalloped arches:
Above each ‘valley’ of the zig-zag, draw a rounded arch. Inside each arch, draw a slightly smaller arch to create a double-line effect. -
Fill the arch details:
At the peak of every zig-zag triangle (between the arches), draw a small flower or starburst shape. I like to use an 8-pointed asterisk design here. -
Texture the triangles:
Inside the downward-pointing triangles of your zig-zag, add vertical hatching lines similar to the mandala center. This ties the border design back to the main focal point. -
Mirror the design:
Repeat this entire process for the top border band, flipping the orientation so the arches hang downward if desired, or keep them identical to the bottom. -
Incorporate the dot grid:
Use the visible dots of the paper as part of the design. Add tiny ink dots between the petals of the mandala or along the border edges to integrate the background.
Step 4: Final Touches
-
Let the ink settle:
Wait at least 5-10 minutes for the ink to dry completely. Smudging happens easily if you rush this step. -
Erase guidelines:
Gently erase all your pencil sketches and compass marks. Hold the paper taut to prevent wrinkling. -
Refine the contrast:
Go back in with your 0.1mm ultra-fine pen. Add extra hatching to the dark bands if they look patchy, and sharpen the points of the outer mandala leaves.
Enjoy the rhythmic process of filling in these structured patterns and watch your page transform into a work of art.


Pointed Triangle and Chevron Repeats
This project combines intricate pointed geometry with a soothing, earthy palette of rusts and teals on textured paper. It’s a perfect exercise in radial symmetry, creating a vibrant centerpiece that feels both organic and structured.
Step-by-Step
Materials
- Heavyweight, cold-press watercolor paper or handmade cotton paper
- Compass with pencil attachment
- Protractor
- HB or 2H pencil for drafting
- Fine liner pens (Black, waterproof, sizes 0.1 and 0.5)
- Watercolor paints or gouache (Rust/Burnt Siena, Turquoise/Teal, Deep Blue, Ochre)
- Small round brushes (Size 0 and Size 2)
- Eraser (kneaded preferred)
Step 1: Drafting the Skeleton
-
Find the center:
Begin by marking the precise center of your paper. Using your compass, draw a small central circle about 1 inch in diameter. -
Establish the rings:
Continuing from the center point, draw five concentric circles moving outward. Space them irregularly for interest: a narrow gap for detailed bands and wider gaps about 1-1.5 inches for the petal sections. -
Divide the circle:
Use your protractor to mark every 15 or 20 degrees around the outer circle. Use a ruler to connect these marks through the center, creating a pie-chart grid that will guide your petal sizes.
Consistent Spacing
If your hand shakes, rotate the paper rather than your hand. Always pull the pen stroke toward your body for smoother, straighter lines.
Step 2: Drawing the Details
-
Create the central flower:
In the smallest circle, sketch a multi-petaled flower shape. Surrounding this, in the first ring, draw radiating lines to create a sunburst effect. -
Draft the inner bands:
For the next band outward, sketch narrow, elongated ovals that touch top and bottom. This creates the ‘seed’ look visible near the center. -
Add the chevron layer:
In the middle ring, use your grid lines to draw a zigzag or chevron pattern. Inside each V-shape, sketch a pointed triangle or petal fitting snugly within the guide. -
Sketch the primary petals:
Moving to the largest open section, draw large, pointed leaf shapes. They should be wide at the base and taper sharply. Add a smaller, internal diamond shape at the base of each leaf. -
Finish with the outer rim:
For the final exterior border, draft a saw-tooth edge of interconnected, curved triangles that mimics a crown of leaves. -
Refine with dots:
Lightly sketch circles and dots between the petals of the middle and outer rings to fill negative space.
Gold Leaf Accents
Add tiny dots of metallic gold paint or gold leaf to the center of the rust petals or the very central flower for a luxurious finish.
Step 3: Inking and Coloring
-
Outline the design:
Using a 0.5 fine liner, go over all your pencil lines. Use a steady hand. For the delicate inner details near the center, switch to the 0.1 pen for finer control. -
Erase guidelines:
Wait until the ink is completely dry—I usually give it at least 15 minutes—then gently erase all pencil grid lines and circles. -
Paint the center:
Mix a watery Ochre and Burnt Siena. Paint the very center flower and the thin radiating lines, keeping the wash transparent. -
Fill the primary petals:
Load your Size 2 brush with Rust or Burnt Siena. Paint the large, pointed petals in the main ring, leaving the internal diamond shapes unpainted for now. -
Add teal accents:
Using the Turquoise/Teal paint, fill in the outer saw-tooth border leaf tips. Also, paint the small diamond shapes at the base of the rust petals. -
Contrast with deep blue:
Mix a small amount of Deep Blue with Teal. Use this darker shade to fill the background areas behind the main rust petals and in the narrowest detailed bands for contrast. -
Highlight the dots:
Carefully dab color into the small floating circles using the tip of your smallest brush. Alternate between rust and pale ochre. -
Final touches:
Once the paint is dry, if any lines look faded against the dark paint, re-trace them with the fine liner to make the geometry pop.
Display your finished mandala on a wall or desk to enjoy the calming balance of your newly created geometry

PENCIL GUIDE
Understanding Pencil Grades from H to B
From first sketch to finished drawing — learn pencil grades, line control, and shading techniques.
Explore the Full Guide
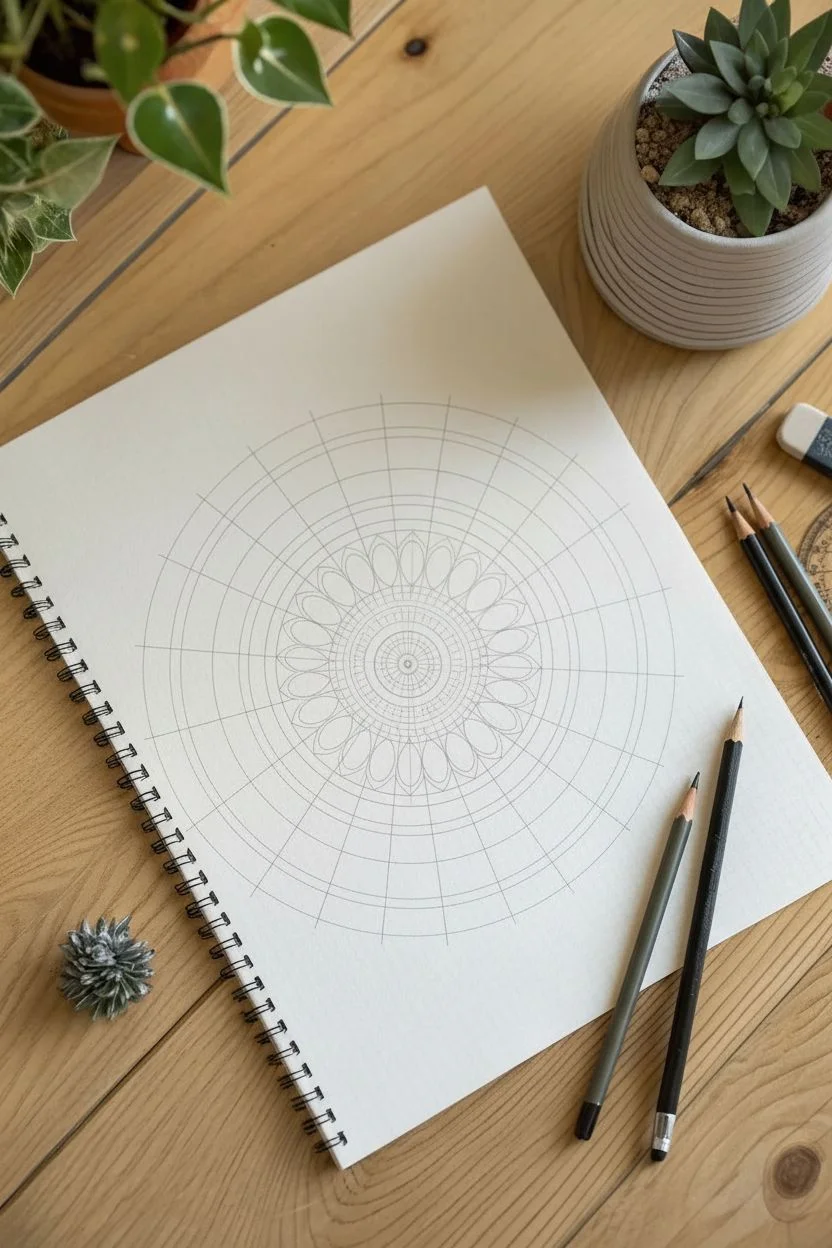
Radiating Line Spokes and Sunbursts
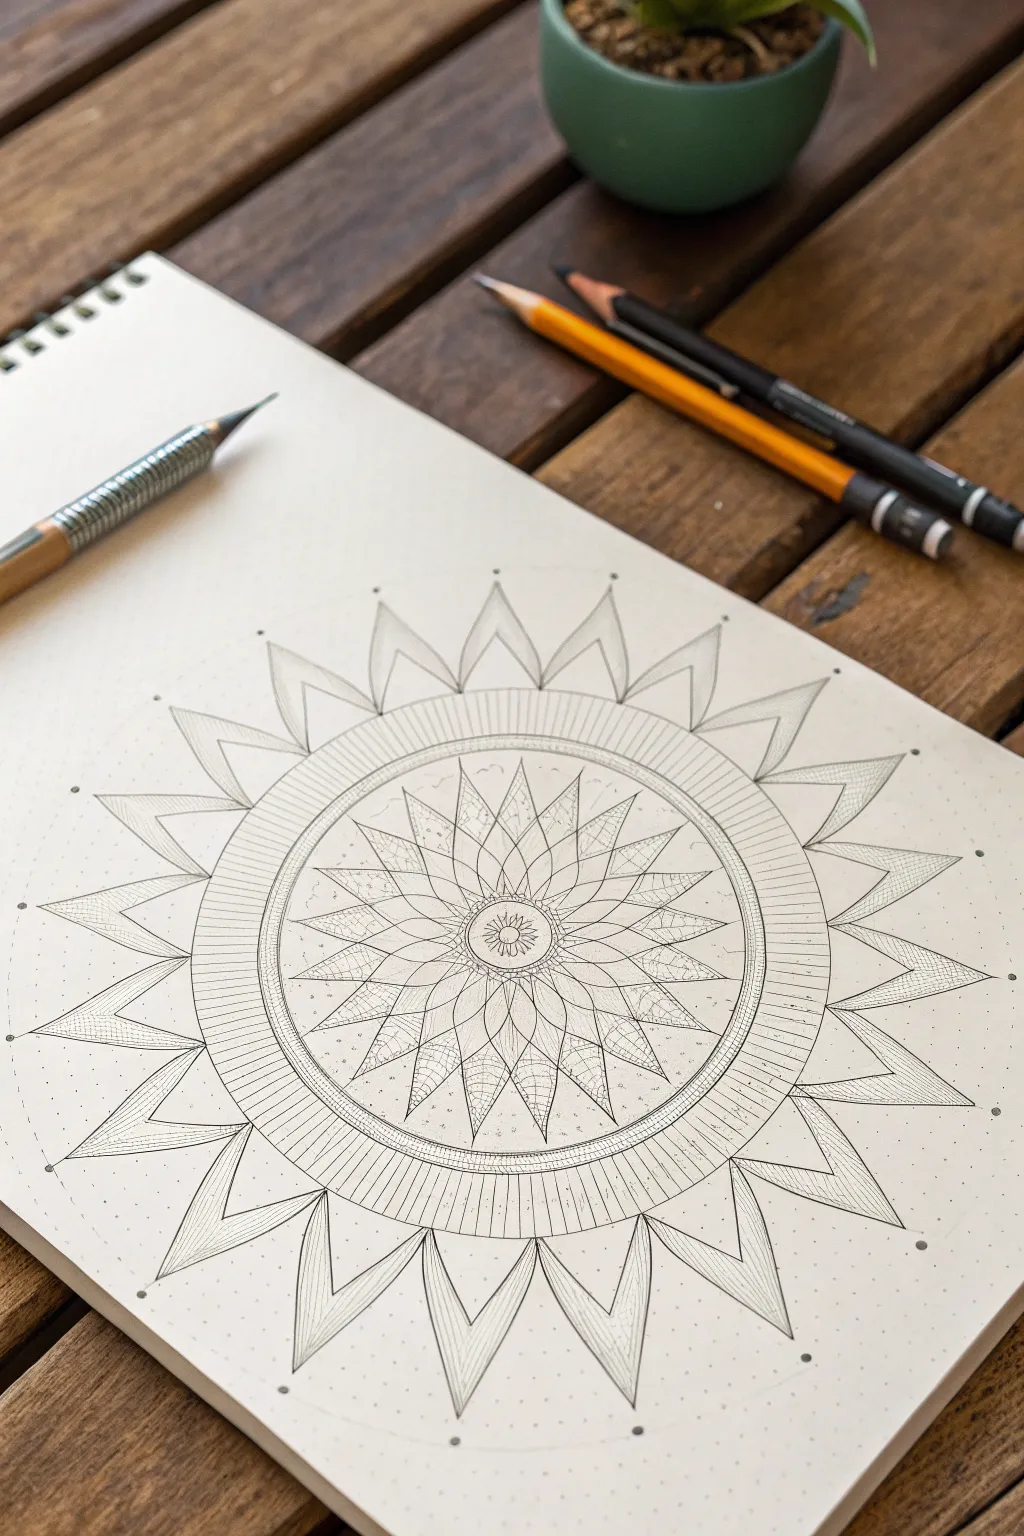
This intricate mandala combines precise geometric spokework with organic, petal-like shapes to create a design that feels both mechanical and botanical. The structured radiating lines draw the eye inward to a delicate central flower, making it a perfect exercise in symmetry and detail.
Step-by-Step Guide
Materials
- Sketchbook or drawing paper (medium weight)
- Mechanical pencil (HB or 2B)
- Compass
- Protractor
- Ruler or straight edge
- Fine-liner pens (optional for inking)
- Eraser
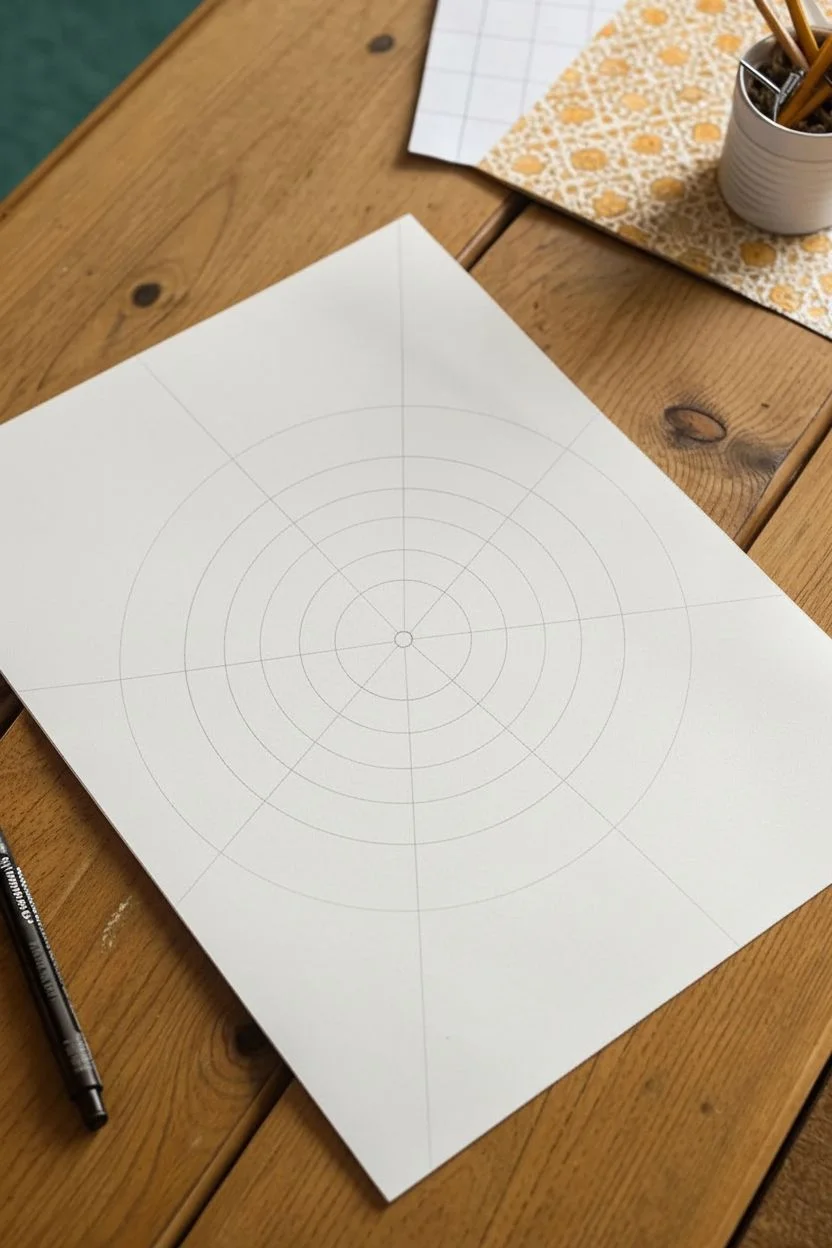
Step 1: Setting the Foundation
-
Establish the center:
Begin by marking a precise center dot on your page. This single point will be the anchor for every subsequent circle and line. -
Draw the concentric circles:
Using your compass, draw a series of light concentric circles. You will need a small inner circle (for the flower center), a medium circle (for the inner petals), a larger band (for the wheel spokes), and a final large outer circle (for the sunburst points). -
Mark degrees for symmetry:
Place your protractor on the center line. Mark every 20 or 30 degrees around the outer circle depending on how many spokes you want. Lightly draw straight lines from the center through these marks to the edge to create your radial grid.
Step 2: The Central Flora
-
Detail the very center:
In the smallest circle, draw a tiny flower head with small, rounded petals. This acts as the ‘seed’ of your mandala. -
Draft the inner petal layer:
Working within the next ring outward, sketch pointed leaf shapes that radiate from the center. Each leaf tip should align with one of your guide lines. -
Refine the inner petals:
Give these inner petals a double line or a slight fold down the center for dimension. I find that curve lines slightly inward near the base makes them look more organic. -
Add texture:
Lightly shade or stipple inside these petals to distinguish them from the rest of the design.
Uneven Spacing?
If your final petals don’t fit perfectly, don’t erase everything. Adjust the width of the last few petals slightly; the eye naturally forgives small variances in a complex radial pattern.
Step 3: The Radiating Wheel
-
Define the wheel rim:
Focus on the band surrounding your inner petals. Darken the two circles that define this ring to create a clear border. -
Draw the spokes:
Using your ruler, draw tight, distinct lines connecting the inner border of this ring to the outer border. These shouldn’t be your main guide lines, but rather many small, evenly spaced lines creating a ‘hatching’ effect. -
Ensure even spacing:
Take your time here. The beauty of this section relies on the rhythm of the lines being consistent all the way around.
Clean Edges
Rotate your paper constantly as you draw the radiating lines. Pulling your pencil stroke towards your body usually results in straighter, more controlled lines than pushing away.
Step 4: Outer Sunburst Spikes
-
Plot the outer points:
Look at the outermost circle guide you drew earlier. Mark distinct dots where your main radial guide lines intersect this circle. -
Connect the peaks:
Draw straight lines from these outer dots back down to the edge of the ‘wheel’ section, forming large triangular spikes. -
Create the inner V-shapes:
Inside each large triangle, draw a smaller, inverted V-shape. This creates a ‘hollow’ look and adds complexity to the negative space. -
Double the lines:
Add a second, parallel line inside each of the main triangle sides. This creates a border effect, making the spikes look constructed rather than just drawn. -
Add midline details:
Draw a faint center line down the middle of each large spike to emphasize the symmetry and sharpness.
Step 5: Final Definition
-
Darken key lines:
Go back over your main shapes with a slightly heavier hand or a sharper pencil lead to make the design pop. -
Add guide dots:
For a decorative touch, place small dots just outside the tip of each sunburst spike. -
Clean up:
Gently erase any stray construction lines that run through the petals or spikes, leaving only your finished geometry.
Now you have a structured, harmonious design ready for ink or shading
Teardrops and Paisley Swirl Motifs
This detailed mandala design combines classic geometric circles with organic teardrop and petal motifs for a stunning, lacy effect. Created with fine lines and repetitive patterns, it offers a meditative drawing experience that results in a complex, harmonious artwork.
Step-by-Step Tutorial
Materials
- Spiral-bound sketchbook with smooth, dotted or blank paper
- Fine-liner pen (black, 0.3mm or 0.5mm tip)
- Pencil (HB or 2H for guidelines)
- Compass
- Protractor (optional, for spacing)
- Eraser
Step 1: Setting the Foundation
-
Initial centering:
Begin by finding the center of your page. Mark this spot lightly with your pencil. If you are using a dotted journal, simply select a central dot to work from. -
Drafting concentric circles:
Using your compass, draw a series of lightly penciled concentric circles spreading outward from the center point. Space them varyingly—some close together for detailed bands, and others wider apart for larger petal shapes. -
dividing the sections:
Lightly draw straight lines intersecting through the center point to divide your circle into equal pie slices like a wheel. Start with 8 sections, then divide again to get 16 or 32 guide lines depending on how detailed you want your symmetry to be.
Steady Hands Pro Tip
Rotate your sketchbook constantly as you draw. Pulling the pen toward your body is easier and more stable than pushing it away or drawing sideways.
Step 2: Drawing the Core
-
Central eye:
Switch to your black ink pen. Draw a small, bold circle in the very center, leaving a tiny white dot in the middle for a highlight. -
First ring patterns:
Outline the first few small pencil circles with ink. In the smallest gap, draw tiny U-shapes or scallops to create a ruffled texture around the pupil. -
Adding texture:
In the next ring outward, draw tightly packed radiating lines (hatching) that go all the way around the circle. This creates a darker, textured band that separates the center from the petals. -
Small petal row:
On the next available guideline circle, draw a row of small, simple flower petals. Each petal point should align with one of your radial guide lines.
Step 3: Expanding with Motifs
-
Geometric zig-zags:
Move outward to a wider band. Draw a continuous zig-zag line confined within two concentric circles to create a ring of triangles. -
Double outlining:
Trace the zig-zag line again on the inside to create a double-lined effect. This adds visual weight to the geometric section without needing solid fill. -
Criss-cross hatching:
In the next narrow band, draw simple diagonal hatching lines. I find that cross-hatching here adds a lovely ‘woven’ look that contrasts with the floral shapes. -
Large teardrops:
This is a key layer. In a wide outer band, draw large, sweeping teardrop shapes. The base of each teardrop should rest on the inner circle, and the point should touch the outer circle guide.
Level Up: Gold Accents
Use a metallic gold gel pen to fill in specific small elements, like the center distinct dots or the inner teardrops, for a luxurious pop of shine.
Step 4: Detailing the Outer Layers
-
Filling the teardrops:
Inside each large teardrop, draw a smaller, matching teardrop shape. Fill the space between the inner and outer teardrop with small circles or stippling. -
Scalloped borders:
Draw widely spaced, large scallops (half-circles) along the next guideline. These serve as the base for the final, most intricate layer. -
Paisley swirls:
Inside each large scallop, draw a paisley swirled shape or a leafy ornate detail. Use your finest pen tip here to keep the lines crisp and separated. -
Outer petal points:
Finish the perimeter with large, pointed petals. Give them a double outline for definition. Inside each point, draw a central vein line and tiny perpendicular veins, mimicking a real leaf. -
Final shading:
Go back through the design and thicken specific lines to add depth. Darken the negative space between the outer petals and add tiny dots near the base of the teardrops for shading. -
Erase guidelines:
Wait at least 15 minutes to ensure the ink is bone dry. Gently erase all your pencil circles and radial lines to reveal the crisp black and white design.
With every layer completed, your mandala grows into a mesmerizing piece of rhythmic art you can be proud of
BRUSH GUIDE
The Right Brush for Every Stroke
From clean lines to bold texture — master brush choice, stroke control, and essential techniques.
Explore the Full Guide
Leaf-and-Vine Botanical Fillers
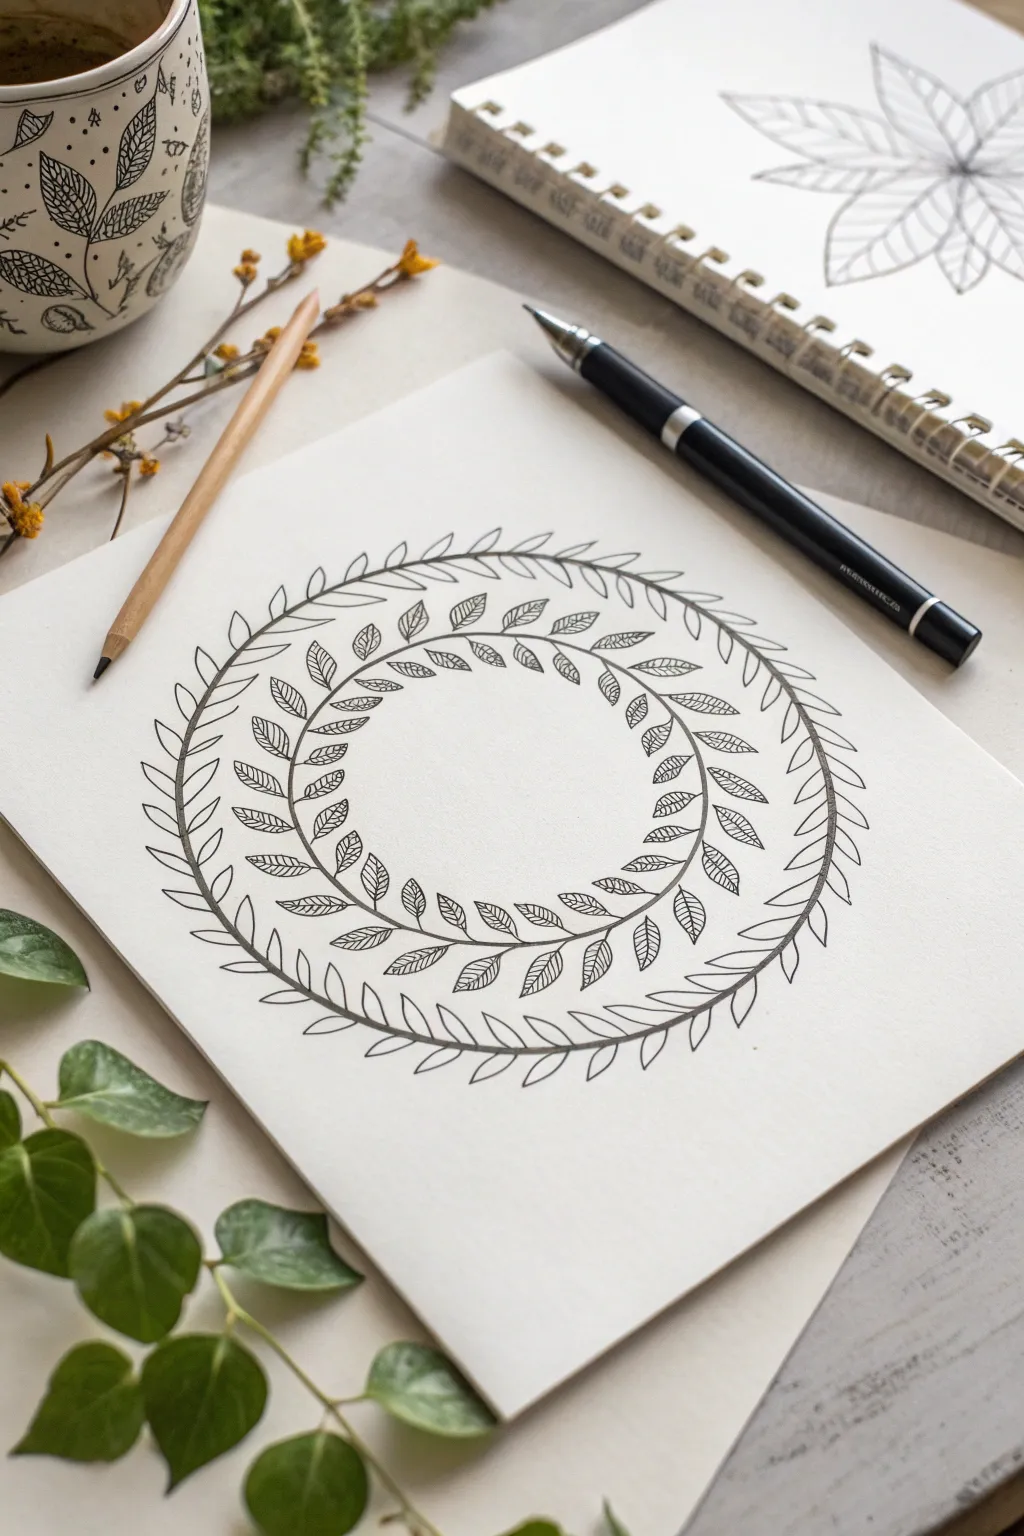
This elegant leaf-and-vine design offers a refreshing, nature-inspired take on traditional geometric mandalas. By layering simple organic shapes in concentric circles, you’ll build a soothing, balanced composition that celebrates the beauty of botanical repetition.
How-To Guide
Materials
- High-quality white drawing paper (heavyweight sketch or mixed media paper)
- Compass or circular objects for tracing
- HB or 2H graphite pencil
- Fine liner pen (black, 0.3mm or 0.5mm)
- Fine liner pen (black, 0.1mm for details)
- Eraser (kneaded or high-quality vinyl)
- Ruler
Step 1: Setting the Structure
-
Find your center:
Begin by marking the precise center of your paper. This single point will be crucial for keeping your concentric rings balanced. -
Draw the guide circles:
Using a compass, draw three concentric circles lightly in pencil. The innermost circle defines the empty center space; the middle circle guides the inner leaf ring; and the outermost circle will hold the simpler vine border. -
Add boundary lines:
Draw faint boundary lines for each ring. The inner leaf pattern needs an inner and outer boundary to keep the leaves uniform in height. Similarly, define the width for the outer vine ring.
Wobbly Circles?
If your freehand circles for the stems look uneven, don’t worry. Use a compass for the final ink line too, or trace a household object like a bowl or mug rim for stability.
Step 2: The Inner Leaf Ring
-
Sketch the central stem:
Lightly sketch a circle precisely in the middle of your inner band. This will act as the ‘stem’ that all the small leaves attach to. -
Draft the leaf shapes:
Using your pencil, sketch small, almond-shaped leaves along this stem line. Alternate their direction: one pointing inward, the next pointing outward. Keep the spacing consistent so they form a continuous chain. -
Ink the leaf outlines:
Take your 0.3mm fine liner and carefully trace over your pencil leaf shapes. Focus on creating smooth, continuous curves for the leaf edges. -
Add the central vein:
Draw a single, crucial line down the center of each leaf. This line should connect directly to the main stem circle, grounding each leaf. -
Detail with veins:
Switch to your finer 0.1mm pen. Inside each small leaf, draw delicate diagonal veins extending from the center line to the edges. I find that keeping these lines very light adds a lovely texture without overpowering the shape.
Step 3: The Outer Vine Border
-
Draft the outer stem:
Move to the outermost ring. Draw a continuous circle in pencil that sits roughly in the middle of this band. This matches the structure of the inner ring but on a larger scale. -
Mark leaf placement:
Lightly tick marks along this outer circle where each large leaf will go. These leaves are longer and more slender than the inner ones, resembling willow or olive leaves. -
Sketch the slender leaves:
Draw the elongated leaf shapes in pencil. Arrange them in opposing pairs or an alternating pattern that flows in a single direction (clockwise or counter-clockwise) to create a sense of movement. -
Ink the outer stem:
With your 0.5mm pen, ink the main circular stem line first. A slightly thicker line here gives the border visual weight. -
Ink the outer leaves:
Trace the long leaf shapes with the 0.3mm pen. Unlike the inner ring, leave these leaves without detailed veining for now to create a visual contrast, or add just a simple center line.
Rhythm & Flow
Rotate your paper constantly as you draw. Keeping your hand in a comfortable position ensures the angle of your leaves remains consistent all the way around the intricate circle.
Step 4: Refining and Finishing
-
Check for gaps:
Look at the spacing between your two main rings. If it feels too empty, you can add very small dots or tiny circles in ink to bridge the negative space. -
Erase pencil guides:
Wait until the ink is completely dry—give it a few extra minutes to be safe. Then, gently erase all graphite lines, moving your eraser in circular motions to avoid crumpling the paper. -
Strengthen lines:
Review your line work. If the outer border feels too light compared to the dense inner ring, go over the main stem lines once more or thicken the base of the leaves slightly.
Step back and admire the calm symmetry of your botanical creation
Beadwork Dot Chains and Halo Dots
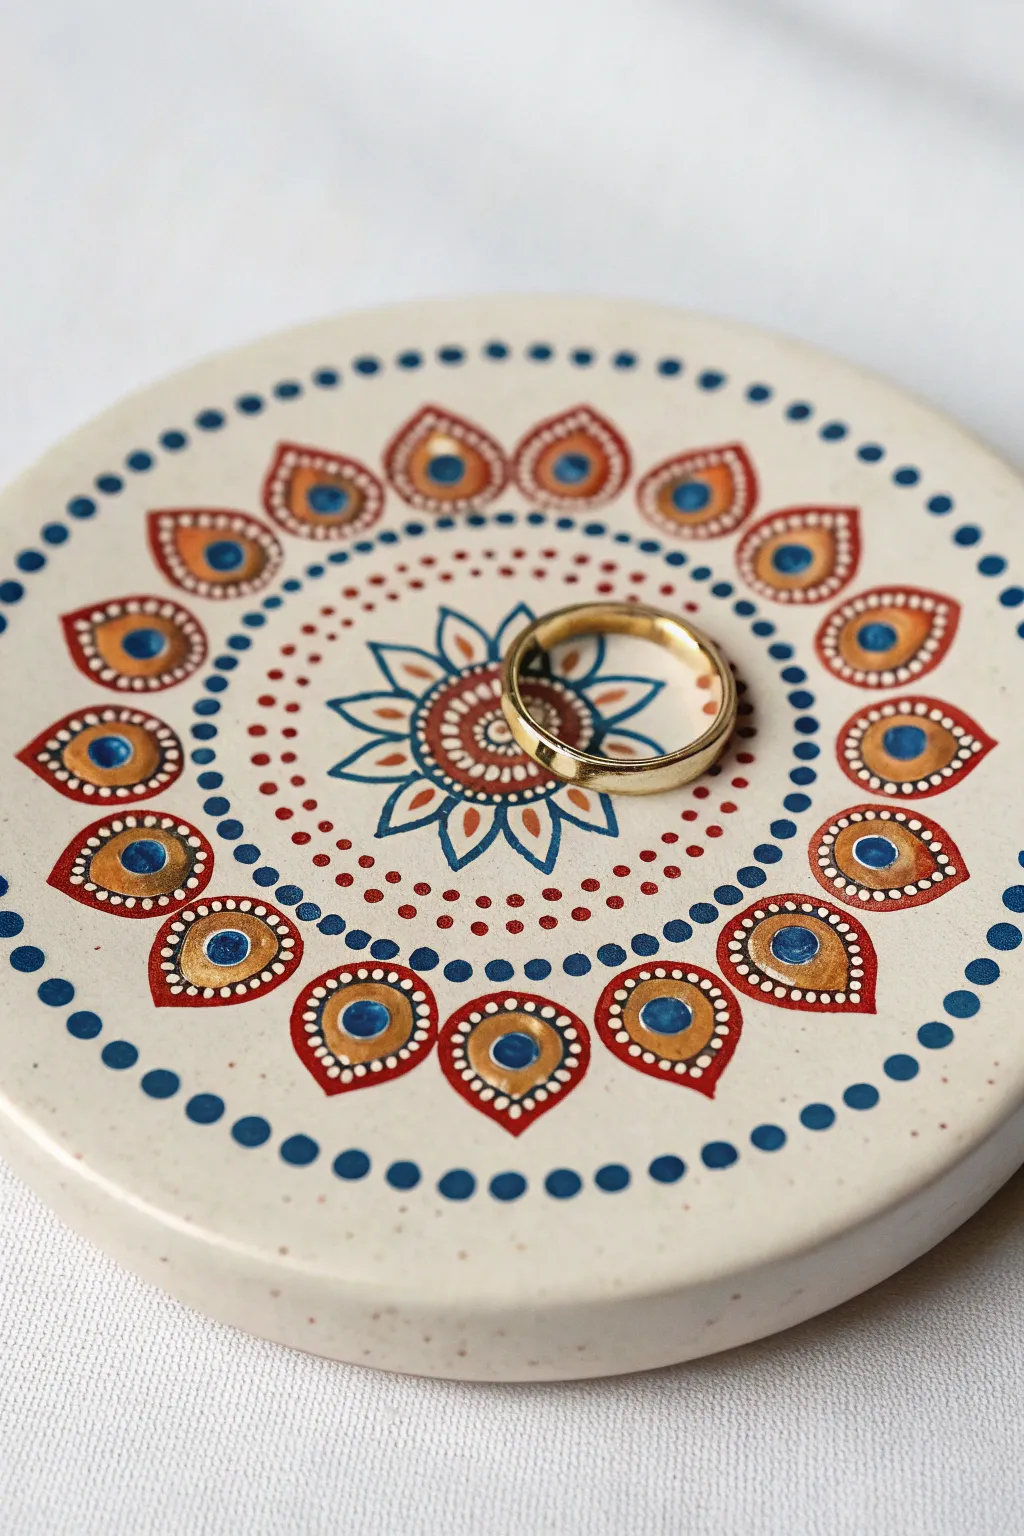
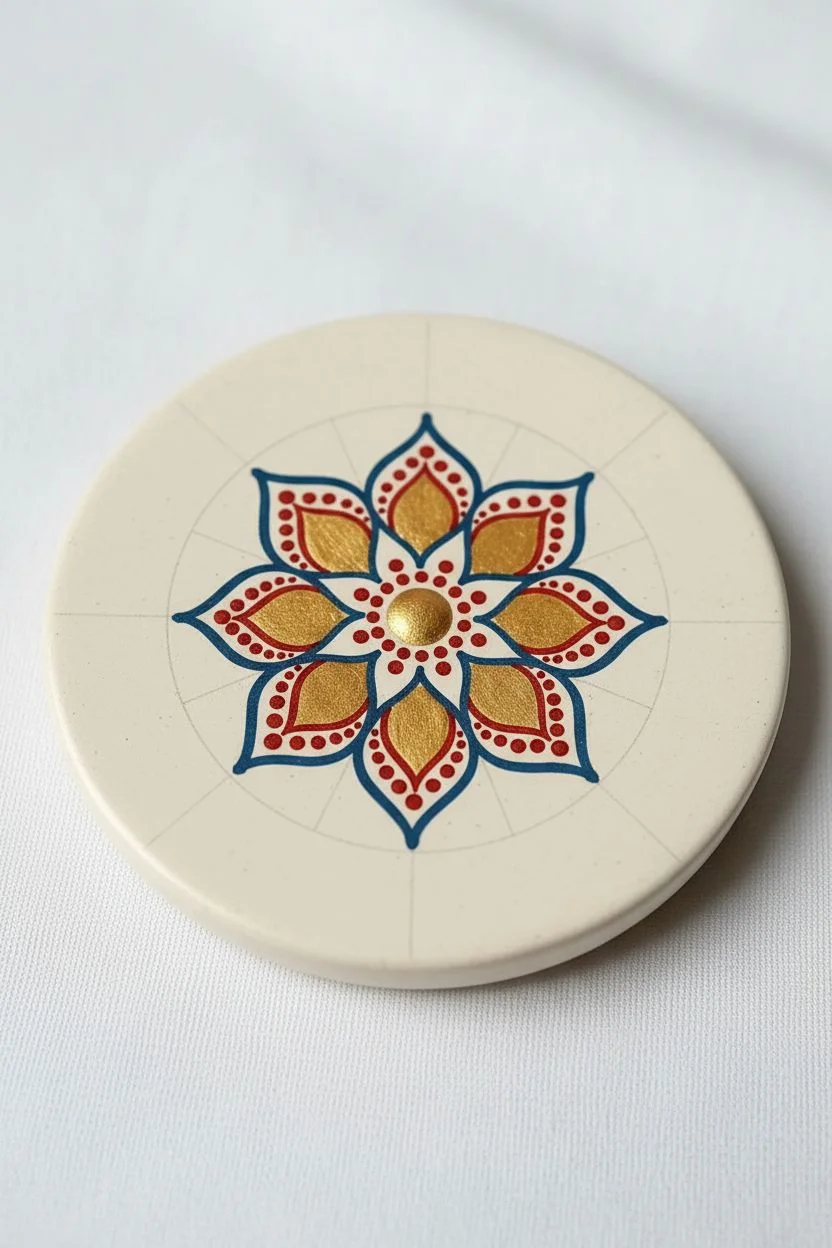
Transform a simple circular clay blank into a stunning jewelry tray featuring a mandala design inspired by the vibrant eyes of peacock feathers. This project combines precise dotting techniques with teardrop shapes in a rich palette of deep red, navy blue, and metallic gold.
Step-by-Step
Materials
- Round ceramic or polymer clay coaster blank (approx. 4-5 inches)
- Acrylic paints: Navy Blue, Deep Red/Maroon, Metallic Gold, White
- Set of dotting tools (various sizes)
- Fine tip liner brush (00 or 000 size)
- compass and pencil (optional for guidelines)
- Gloss varnish or resin for sealing
- Palette for mixing heavy body paints
Step 1: Setting the Center Stage
-
Prep the surface:
Ensure your ceramic or clay base is clean and dry. If the surface is rough, give it a very light sanding with fine-grit sandpaper. I find that wiping it down with a damp cloth afterward helps the paint adhere much better. -
Establish the center:
Find the exact center of your coaster. You can eyeball this or use a ruler to make a faint pencil mark. Place a medium-sized metallic gold dot right in the middle. -
Create the first ring:
Using a small dotting tool and Deep Red paint, place a ring of small dots tightly around the central gold dot. -
Add the petal outlines:
Switch to your fine eyeliner brush and Navy Blue paint. Draw an eight-pointed flower shape around the center red ring. The petals should be pointed, resembling a simplified starburst. -
Trace inner petals:
Inside each navy blue petal, carefully paint a slightly smaller outline in Deep Red using the liner brush. -
Fill the petals:
Using the metallic gold paint, fill in the remaining space inside each petal to give the flower a glowing core.
Step 2: Building the Middle Layers
-
Dot the halo:
Take a small dotting tool and Deep Red paint. Create a wide circle of dots that sits just outside the tips of your starburst flower. Keep the spacing consistent. -
Add the inner dot chain:
Imitate the beadwork look by placing a second ring of red dots further out, leaving about a half-inch of negative space between this ring and the previous one. -
Connect with micro-dots:
Between these two red rings, use your smallest tool or a toothpick to add tiny red dots in a radial pattern, creating the illusion of delicate bead strings connecting the circles. -
Encircle with blue:
Using a medium tool and Navy Blue paint, place a ring of dots just outside your last red ring. These serve as the base for the main teardrop border.
Uneven Dots?
Work with a ‘puddle’ consistency. If your paint is too thick, dots will peak; too thin, they’ll flatten. Test on paper first to ensure roundness.
Step 3: The Peacock Teardrop Border
-
Paint the teardrop outlines:
Using the Deep Red paint and your liner brush, paint a series of teardrop shapes around the perimeter. The pointed top of each teardrop should face inward toward the center. -
Fill with gold background:
Fill the bottom, rounded part of each teardrop with Metallic Gold paint. Let this layer dry completely before moving to the next step. -
Add the pupil:
Once the gold is dry, place a substantial Navy Blue dot in the center of the gold area. This creates the classic ‘peacock eye’ effect. -
Highlight the eye:
Place a smaller light blue or turquoise dot (mix White and Navy if needed) inside the Navy Blue dot for depth. -
Create the beadwork rim:
Use your smallest dotting tool and White paint to create a chain of tiny ‘pearls’ lining the outer edge of the red teardrop outline. This ‘halo’ effect makes the shapes pop.
Go 3D
Use ‘relief outliner’ paint or dimensional fabric paint for the teardrop outlines. This adds physical texture you can feel alongside the visual pattern.
Step 4: Final Touches
-
Outer rim border:
Finish the design with a bold ring of large Navy Blue dots around the very edge of the coaster. -
Clean up guidelines:
If you used any pencil marks for spacing, gently erase them once you are absolutely certain the paint is bone dry. -
Seal the artwork:
Apply a clear gloss varnish or a thin layer of resin over the entire top surface. This protects the delicate dot work and gives the ceramic a professional, glazed appearance.
Place your favorite ring in the center to test out your beautiful new jewelry holder


Diamond Lattice and Crosshatch Grids
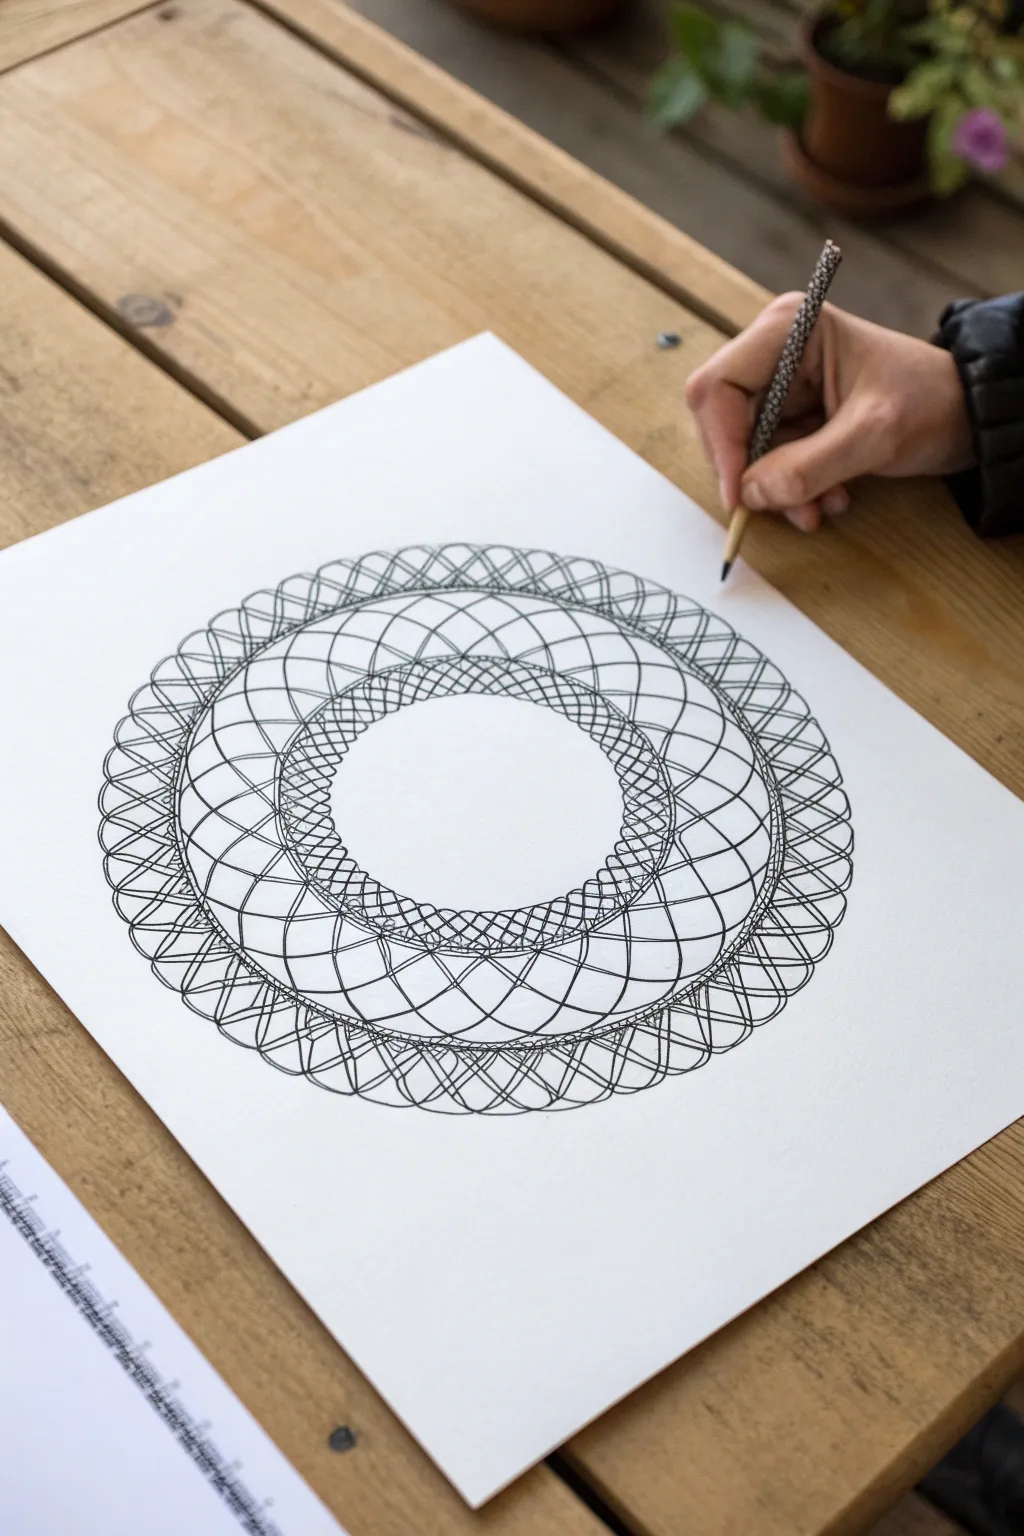
This mesmerizing design relies on the rhythmic overlapping of continuous curves to create a sense of depth and movement. By layering distinctive lattice patterns in concentric rings, you’ll achieve an intricate, woven look that feels both structured and organic.
Step-by-Step Tutorial
Materials
- High-quality white drawing paper (A4 or square format)
- Compass with extension bar (optional but helpful)
- Protractor
- Fine-liner pen (0.3mm or 0.5mm, black)
- Pencil (HB or 2H for light guidelines)
- Eraser
- Flexible curve ruler or French curves (optional)
Step 1: Setting the Framework
-
Establish the concentric rings:
Begin by finding the exact center of your paper. Using your compass, draw three main concentric circles lightly in pencil. The innermost circle will define the central void, the middle circle separates the dense inner band, and the largest circle defines the outer edge of the design. -
Define the band widths:
Add boundary lines for your bands. You need a narrow inner ring (for the dense crosshatching) and a wider outer ring (for the larger lattice loops). Lightly mark these boundaries so you know exactly where your ink lines should start and stop. -
Divide the circle:
Use a protractor to divide your circle into equal segments. For this specific dense pattern, 36 sections (every 10 degrees) or 72 sections (every 5 degrees) works best. Mark these lightly on the perimeter guidelines to help space your curves evenly.
Step 2: Drawing the Inner Lattice
-
Curve directions:
Switch to your fine-liner pen. On the inner band (the one closest to the center), start drawing small, uniform arcs connecting your segment marks. You want these arcs to curve clockwise from the inner edge of the band to the outer edge. -
Completing the first mesh:
Now, draw the counter-curves. Draw identical arcs going counter-clockwise over the same band. This creates a dense diamond mesh pattern. Keep your hand steady and try to maintain consistent curvature for each stroke. -
Reinforcing the structure:
Once the crosshatch mesh is done, carefully re-ink the boundary circles of this inner band to give the chaotic mesh a clean, defined container.
Steady Hands
Pivot from your elbow or shoulder, not your wrist, when drawing the long sweeping curves. This biomechanical trick produces much smoother, more confident arcs.
Step 3: Creating the Outer Loops
-
The sweeping curves:
The outer ring features much larger, elongated loops. Start from a point on the middle circle boundary and draw a smooth, long arc that sweeps out toward the edge and lands several segment marks away. I find it helps to look at the destination point while drawing the line, rather than watching the pen tip. -
Establishing the rhythm:
Continue this pattern all the way around the circle. Each loop should overlap the previous ones significantly. If you are skipping 4 segment marks for the width of a loop, consistency is key to getting that spirograph look. -
The reverse layer:
Just like the inner band, you now need to create the counter-motion. Draw the same long, sweeping loops in the opposite direction. Where these large curves intersect, they will create the distinct kite-shaped openings seen in the reference.
Add Dimension
Use a thinner pen (0.1mm) for the cross-hatching and a thicker pen (0.5mm) for the main structural loops to create instant visual depth and hierarchy.
Step 4: Outer Border and Refinement
-
The final rim:
On the very outer edge, add a final layer of smaller, tighter loops that encircle the main lattice. These should connect the peaks of your large loops, creating a scalloped border effect. -
Connect the outer scallops:
Draw intersecting arcs on this outer rim to mirror the diamond mesh of the center, though slightly looser. This ties the design together visually. -
Weighting the lines:
Review your ink work. If any primary structural lines look too thin, go over them a second time to add line weight. Thickening the intersections where lines cross can add a subtle 3D shadow effect. -
Clean up:
Wait at least 15 minutes for the ink to cure completely. Once dry, gently erase all your pencil guidelines and segment marks to reveal the crisp, floating geometry.
Enjoy the relaxing rhythm of repetitive line work as your intricate lattice emerges from the paper.
Checkerboard Blocks With Alternating Fills
This intricate black-and-white mandala features concentric layers of petals, circles, and fine line work that radiate from a central blossom. The design balances bold, dark accents with delicate hatching, creating a hypnotic and relaxing piece of art perfect for a quiet afternoon.
Step-by-Step
Materials
- White drawing paper or smooth cardstock (A4 or similar size)
- Fine liner pens (sizes 0.1, 0.3, and 0.5mm ideally)
- Black brush pen or broad marker for filling darker areas
- Pencil (HB or similar)
- Eraser
- Compass
- Ruler
Step 1: Setting the Foundation
-
Find the Center:
Begin by marking the precise center of your paper. Use your ruler to measure the width and height, placing a small dot where they intersect. -
Draw Guide Circles:
Using your compass, draw a series of concentric circles radiating from the center dot. Start with a small circle (approx 2cm diameter) and continue outward, spacing subsequent circles about 1.5–2cm apart until you have about 6-7 rings. Keep these pencil lines very light as they will be erased later. -
Create Section Lines:
Use your ruler to draw straight lines through the center, dividing your circle into wedges like a pizza. Start with vertical and horizontal lines, then bisect those angles until you have 16 equal sections. These will guide your petal symmetrical placement.
Step 2: Drawing the Core
-
Central Flower:
With your 0.3mm pen, draw a small eight-petaled flower in the innermost circle. Add a second layer of slightly larger petals peeking out from behind the first set. -
Inner Border:
Outline the next compass circle heavily. Fill this narrow band with tiny, closely spaced vertical lines (hatching) to create texture around the central flower. -
Bold Dot Ring:
In the next available band, draw a series of large, distinct circles. Use your thicker marker or brush pen to fill the negative space around these circles with solid black, making the white dots pop.
Keep it Clean
Place a clean sheet of scrap paper under your drawing hand. This prevents oils from your skin transferring to the paper and stops the ink from smudging while you work.
Step 3: Expanding the Pattern
-
First Petal Layer:
Draw a ring of rounded petals extending outward from the dot ring. Each petal should align with your pencil grid lines to keep them even. Inside each petal, draw a smaller, similar shape. -
Hatched Details:
Fill the space between the inner and outer petal lines with fine, horizontal hatching lines. This shading adds depth and distinguishes this layer from the others. -
The Arch Layer:
Surround the petal layer with a band of simple arches (semicircles). Double the line for this arch to give it weight, and add a tiny circle inside the peak of each arch. -
Large Outer Petals:
Draw the largest layer of petals now, using the outer guide circles. These should be pointed at the tips, resembling lotus petals. Make them broad and sweeping.
Uneven Petals?
If your petals start looking uneven, don’t erase ink. Instead, thicken the outline of the smaller petals to match the larger ones, effectively hiding the size difference.
Step 4: Final Details and Touches
-
Inner Petal Decoration:
Inside these large outer petals, draw a teardrop shape that floats in the center. I like to add thin lines radiating from the base of the petal up toward this teardrop for a textured look. -
Scalloped Edges:
Along the outer edge of the large petals, add a decorative border. Draw tiny, repetitive loops or scallops along the perimeter of each point. -
Final Dark Accents:
Review your design and look for areas to add contrast. Color in small details like the tiny circles between the scalloped edges or the tips of the inner petals with your black marker. -
Erase Guides:
Allow the ink to dry completely—wait at least 15 minutes to prevent smudging. Gently erase all your pencil guide circles and section lines.
Step back and admire the complex symmetry you’ve built from simple repetitive shapes.
Honeycomb Hexagon Cells as a Ring
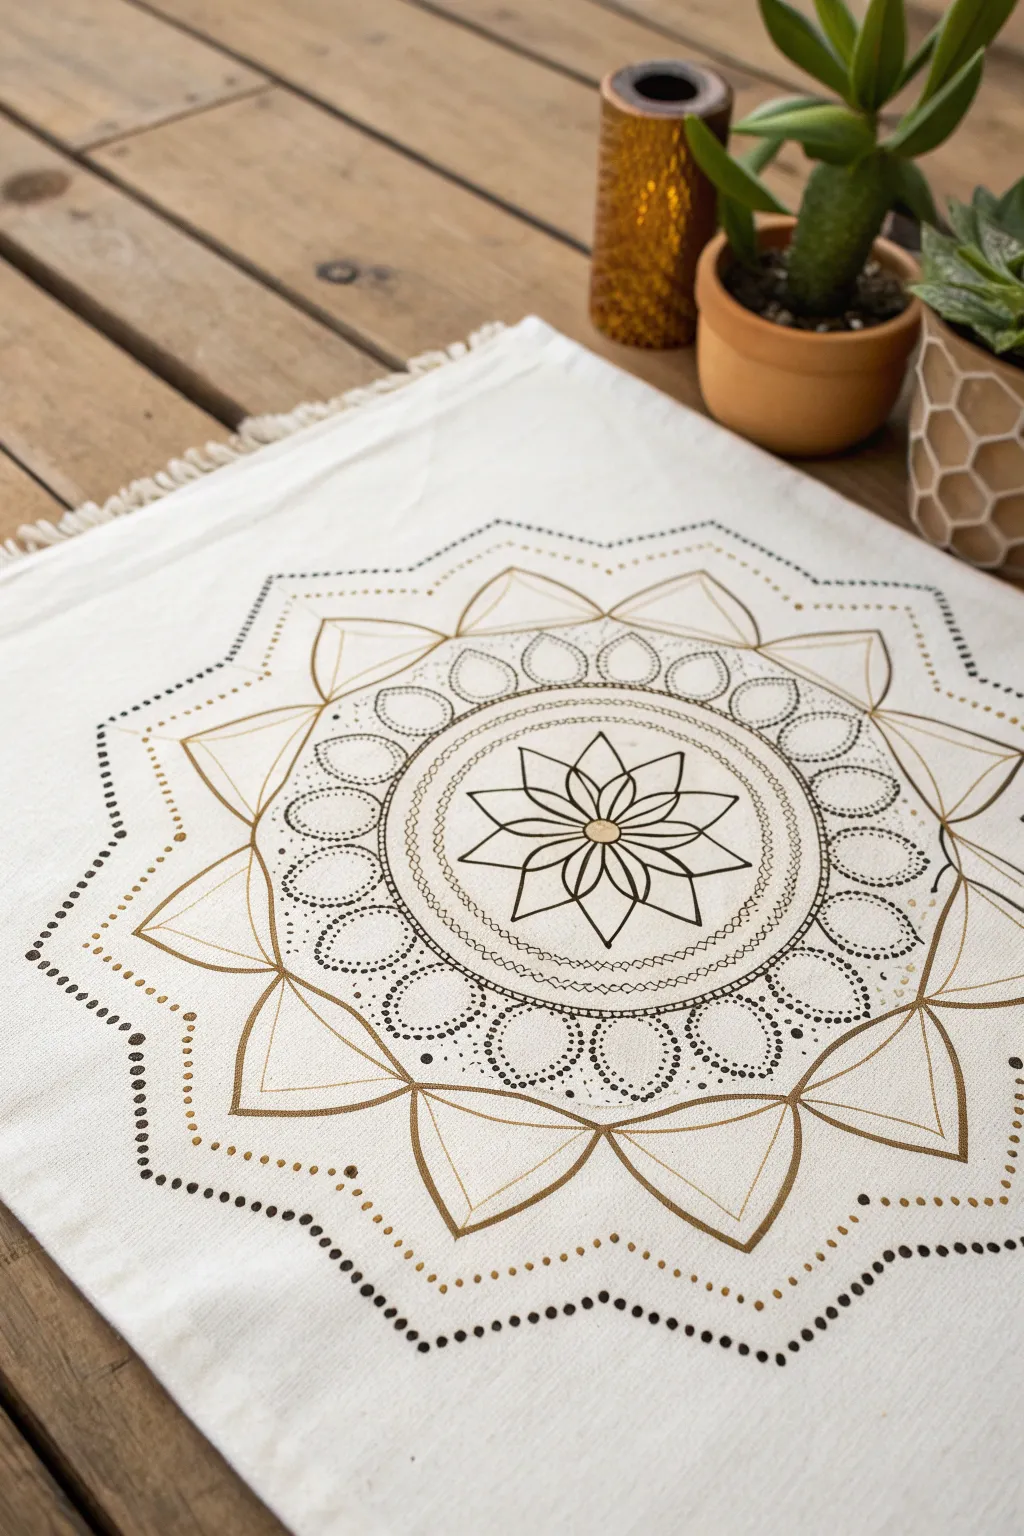
Transform a plain piece of fabric into a stunning bohemian centerpiece with this mandala design featuring gold accents and precise linework. The combination of metallic sheen and sharp black ink creates a sophisticated yet hand-drawn aesthetic perfect for table runners or wall hangings.
Step-by-Step Guide
Materials
- Cotton or linen fabric (white or cream)
- Black fabric marker or permanent fine-tip pen
- Gold metallic fabric paint or paint pen
- Compass or circular objects for tracing
- Ruler
- Pencil and eraser
- Iron and ironing board
Step 1: Preparation & Base Grid
-
Prepare the fabric:
Begin by washing, drying, and thoroughly ironing your fabric to remove any sizing or wrinkles. A smooth surface is crucial for crisp lines. -
Mark the center:
Find the exact center of your fabric piece and mark it lightly with a pencil. This will be the anchor for your entire mandala. -
Draw guide circles:
Using a compass or tracing circular household objects, lightly sketch four concentric circles expanding outward from the center point to guide your pattern layers.
Uneven Ink Flow?
If your gold pen skips or creates blobs, store it tip-down for 10 minutes before use and test it on a scrap cloth first.
Step 2: Central Floral Motif
-
Sketch the center flower:
Start sketching an eight-petaled flower in the smallest circle. Draw pointed, elliptical petals that radiate from the center dot. -
Add inner details:
Inside each of the eight main petals, draw a smaller, similar petal shape. Connect these with a small central circle. -
Ink the flower:
Using your black fabric marker, trace over your pencil lines for the central flower. I prefer to keep my hand steady by resting my wrist on a scrap piece of paper. -
Create the honeycomb ring:
Around the flower, draw a band of small, tight circles or repeating hexagon shapes using the gold metallic pen. This creates a textured ‘honeycomb’ effect that separates the center from the outer layers.
Step 3: Expanding Layers
-
Draw the petal ring:
In the next available ring, sketch a series of rounded, U-shaped petals. Fill these with small black dots to create a stippled texture. -
Layer the geometric points:
Sketch a layer of larger, triangular points extending outward. Bisect each triangle with a line down the middle to give them a faceted, gem-like appearance. -
Apply gold accents:
Trace these triangular shapes with your gold paint pen. Go over the lines twice if needed to ensure the gold really catches the light. -
Add dotted details:
Using the black marker, add rows of decorative dots following the curves of your gold triangles. Vary the dot spacing to create visual rhythm.
Level Up: Fringe Benefits
Add texture by fraying the edges of your fabric to create a soft fringe, then sew a simple stay-stitch to stop it from unraveling further.
Step 4: Outer Border & Finish
-
Outline the starburst:
Create the final, largest layer by drawing a jagged, star-like perimeter. Use a ruler to ensure these lines are straight and sharp. -
Alternate dot colors:
Along this outer starburst line, alternate between black and gold dots. This integrates the color palette across the entire design. -
Erase pencil guides:
Once the ink is completely dry (wait at least an hour), gently erase any visible pencil guidelines. -
Heat set the design:
To make your design permanent and washable, iron the back of the fabric on a high setting (no steam) for several minutes.
Now you have a custom piece of geometric art ready to display on your table
Stippling, Hatching, and Texture Fills
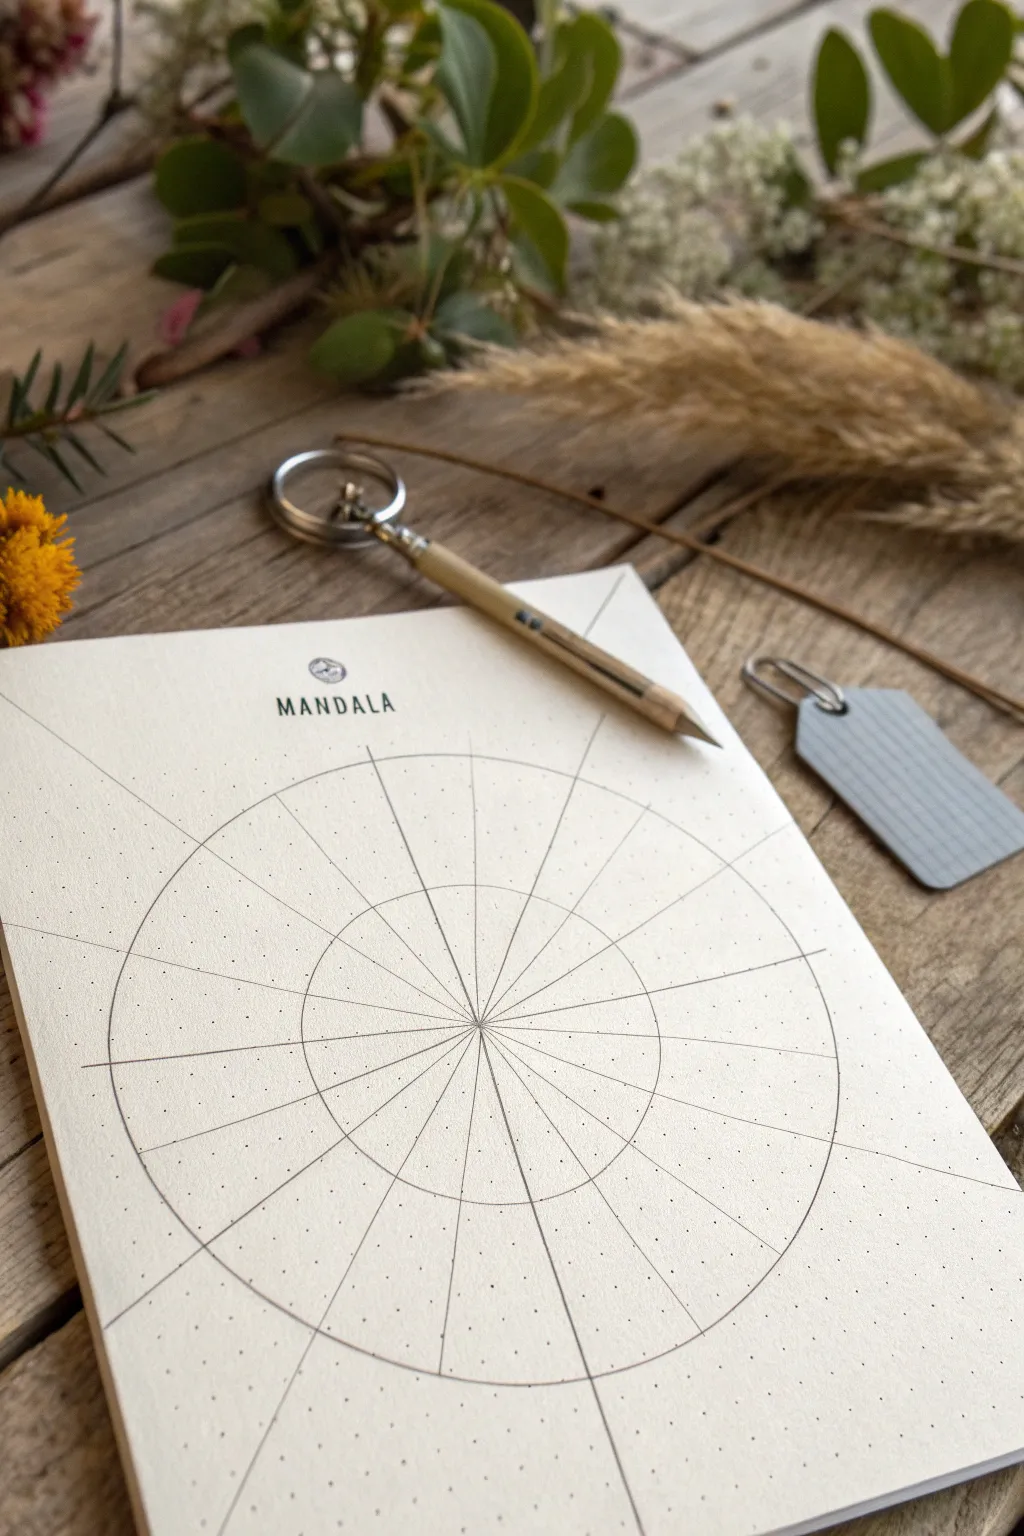
Before diving into intricate patterns, every great mandala starts with a solid foundation. This project focuses on drawing a precise polar grid on dot-grid paper, creating the perfect framework for detailed stippling and texture exploration.
How-To Guide
Materials
- High-quality cream or off-white dot grid notebook (A5 size recommended)
- Compass with a sharp lead or extension arm
- Fine liner pen (0.1mm or 0.2mm, black)
- Ruler (preferably clear plastic)
- Pencil (HB or 2H for light guidelines)
- Eraser
- Protractor (360-degree preferred)
Step 1: Establishing the Center
-
Find the page center:
Begin by locating the exact center of your page. Count the dots horizontally and vertically to find the midpoint. Mark this central dot lightly with your pencil; this will be the anchor for your entire design. -
Add the title:
If you wish to replicate the header, use a stencil or careful hand-lettering to write ‘MANDALA’ in all caps about an inch from the top edge, centered horizontally. Use your fine liner for this. -
Draw the logo:
Just above the text, draw a tiny circle (approx. 1cm diameter) using a circle template or freehand. Add a small abstract wave or mountain motif inside to match the branding style shown.
Smudge Prevention
Ink smearing is the enemy of precision grids. Tape a small piece of tissue on the underside of your ruler to lift it slightly off the paper while dragging.
Step 2: Constructing the Circular Guides
-
Set up your compass:
Insert your fine liner directly into your compass if you have a universal holder attachment. If not, use a hard pencil lead (2H) to draw these initial lines, and you can trace them with ink later. I prefer inking directly to keep the lines crisp. -
Draw the inner circle:
Place the compass needle on your center dot. Adjust the radius to about 2cm (roughly 4 grid dots out) and draw your first small circle. -
Draw the middle circle:
Expand your compass radius to approximately 5cm. Draw a second concentric circle around the first. -
Draw the outer circle:
Extend the compass further to roughly 8cm radius. Draw the largest circle, ensuring it fits comfortably on the page with breathing room at the sides.
Creative Extension
Instead of solid lines for the grid, try using dotted or dashed lines for the concentric circles. This makes the grid fade into the background once you start drawing.
Step 3: Adding Radial Segments
-
Mark degrees:
Place your protractor on the center point. You need to divide the circle into 16 equal sections. Mark a small dot every 22.5 degrees around the outside of your largest circle. -
Draw main axes:
Using your ruler and fine liner, draw a vertical line straight through the center, extending past the outer circle slightly. Do the same horizontally. -
Draw diagonal axes:
Draw two long diagonal lines crossing through the center, splitting your four quadrants in half. You now have 8 pie slices. -
Complete the segmentation:
Align your ruler with the remaining degree marks and the center point. Draw lines bisecting the existing segments to create a total of 16 equal ‘slices’. -
Extend the lines:
Let some of these radial lines extend slightly beyond the outermost circle, as seen in the reference, to give the grid an architectural, blueprint feel.
Step 4: Refining the Template
-
Review line weight:
Check your inked lines. They should be consistent and fine. If you used pencil first, carefully trace over your grid with the 0.1mm fine liner now, keeping a steady hand. -
Clean up:
Once you are certain the ink is completely dry, gently erase any pencil guidelines or stray graphite marks. Be careful not to smudge the fresh ink. -
Inspect the dots:
Notice how the pre-printed dots of the paper interact with your grid. They provide additional anchor points for future drawing inside the segments.
You now have a flawless geometric framework ready for your creative patterns to unfold
Mini-Mandalas as Pattern Stickers
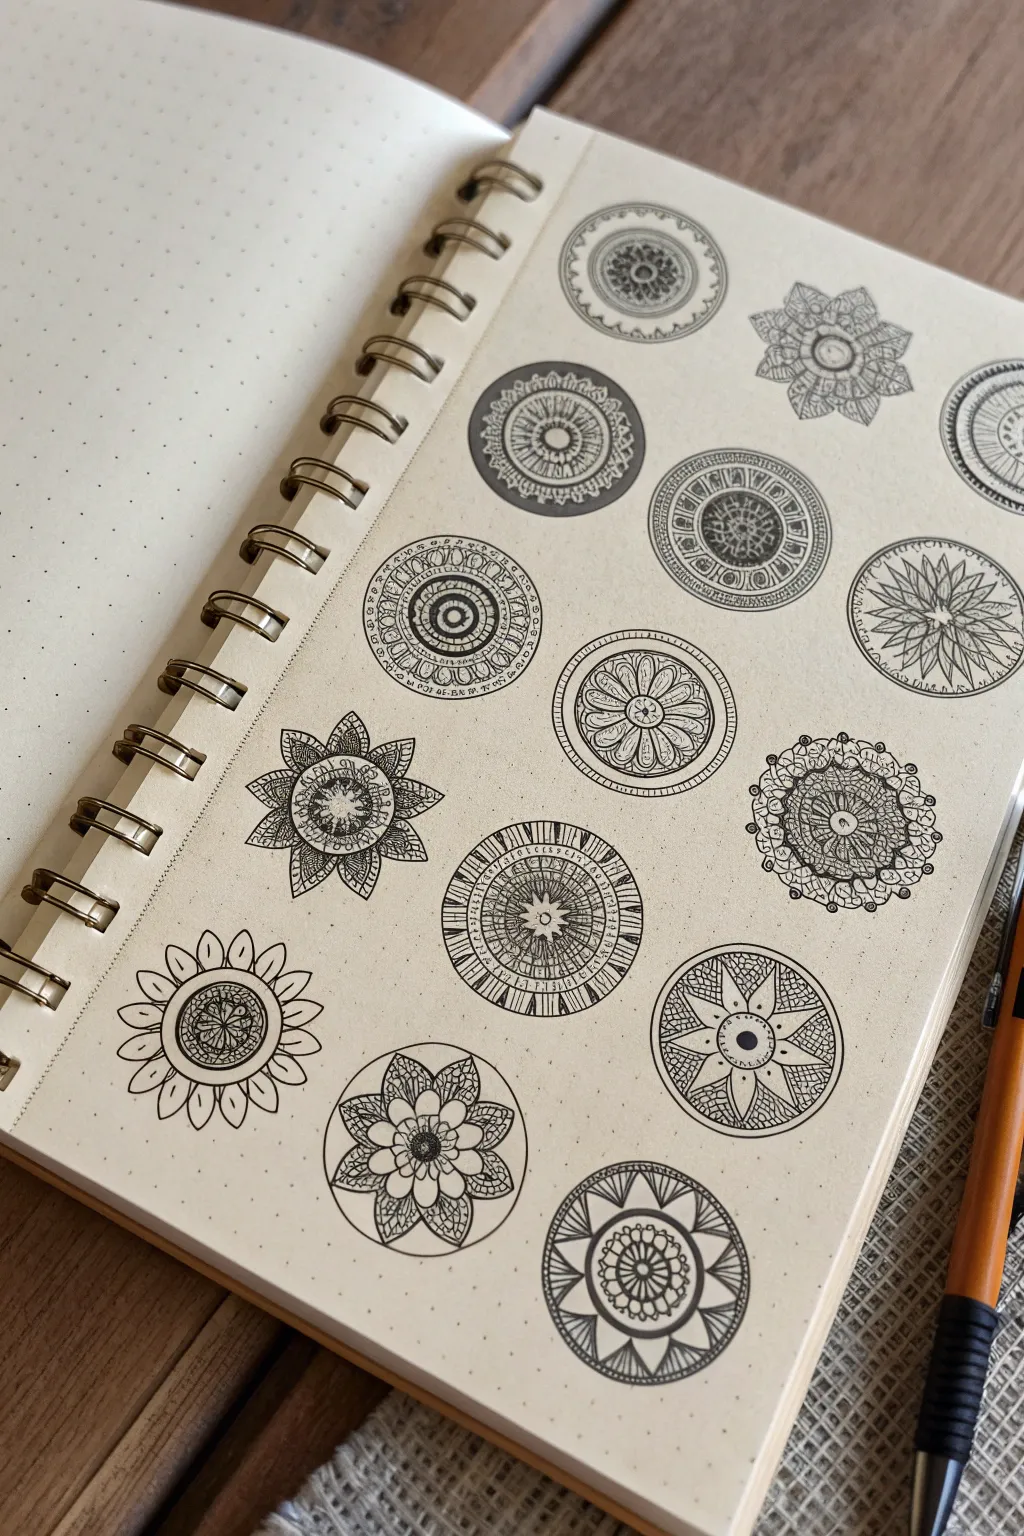
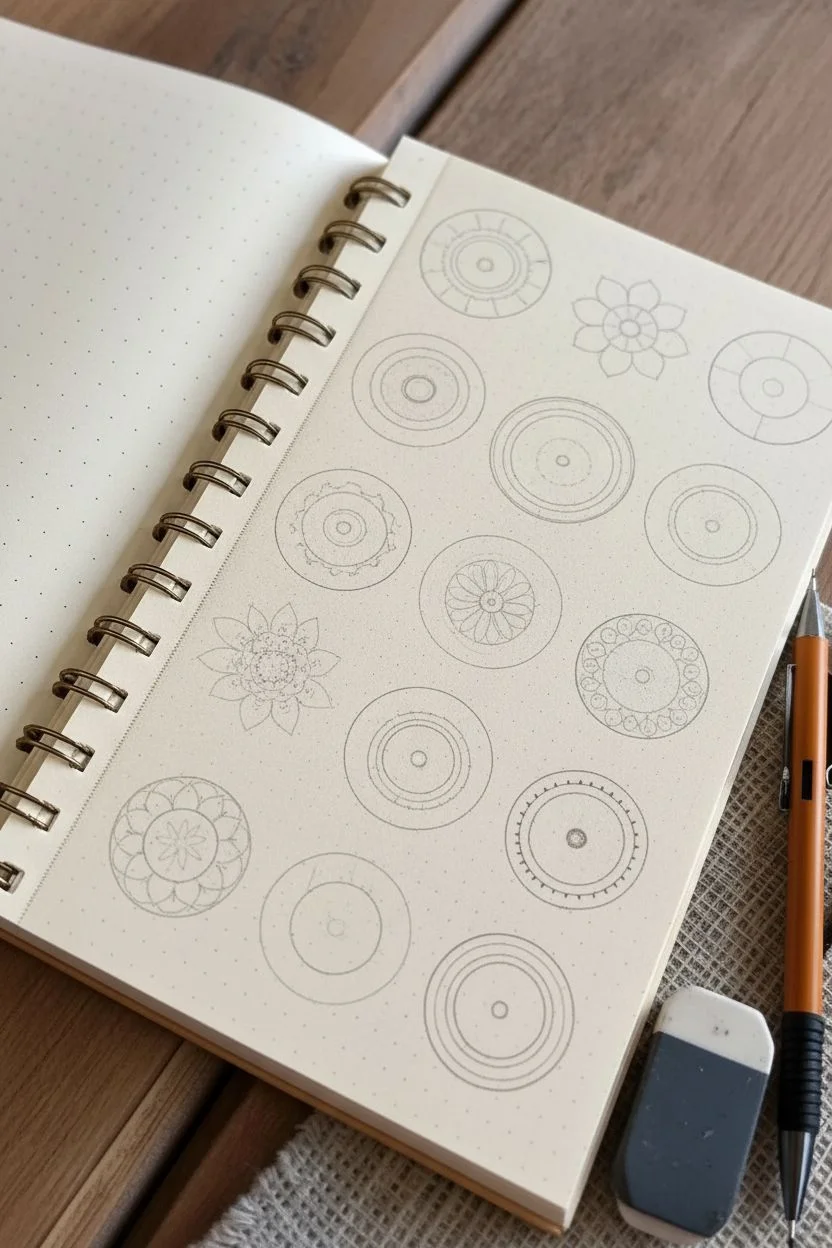
Fill a journal page with a stunning collection of miniature mandalas, varying in complexity and line weight for a cohesive yet diverse look. This project is perfect for practicing precision and exploring different geometric motifs on a small, manageable scale.
Step-by-Step Tutorial
Materials
- Dotted grid journal or sketchbook (A5 size recommended)
- Fine liner pens (sizes 0.1, 0.3, and 0.5)
- Circle stencil or drawing compass
- Pencil (HB or lighter)
- Eraser
- Ruler (optional)
Step 1: Planning and Layout
-
Grid Preparation:
Begin by deciding on a layout for your mini-mandalas. A 3×5 or 4×5 grid structure works beautifully on standard A5 paper. -
Drafting Circles:
Using a pencil and your circle stencil (or compass), lightly draw uniform circles across the page. Aim for a diameter of about 1.5 to 2 inches (3-5 cm) per mandala to keep them ‘mini’. -
Spacing:
Ensure there is enough breathing room between each circle so the designs don’t look cluttered. Use the dot grid of your notebook to help align them perfectly. -
Internal Guides:
Lightly sketch a center point and concentric guide rings within each circle. These don’t need to be perfect, but they will help you build symmetrical layers later.
Step 2: Designing Varied Motifs
-
flower Power:
For floral-style mandalas (like those in the bottom left), start with a small central circle using your 0.3 pen. Draw petal shapes radiating outward, adding a second layer of larger petals behind the first. -
Geometric Precision:
For the crisp, wheel-like designs, use a ruler to draw straight lines radiating from the center like wheel spokes. Connect these spokes with scalloped edges or straight lines near the outer rim. -
Intricate Weaves:
Create density by filling specific rings with repetitive patterns. Try tiny triangles, dots, or close-together hatch marks using your finest 0.1 pen for delicate detailing. -
Sunburst Styles:
Draw a star or sunburst shape in the center. Extend long, sharp triangles toward the outer edge, filling the negative space with contrasting lines or stippling.
Uneven Spacing?
If your internal petals end up uneven, don’t erase. Just fill the negative spaces with solid black ink or stippling to hide the asymmetry.
Step 3: Inking and Refining
-
Primary Outlines:
Go over your main structural pencil lines with the 0.5 pen. A slightly thicker outline gives the mini-mandala a ‘sticker’ appearance. -
Detail Work:
Switch to the 0.1 pen to add texture. I find that adding tiny dots (stippling) inside petals or geometric shapes adds incredible depth without making the drawing look heavy. -
Double Lines:
Create visual separation between sections by drawing double borders around your concentric rings. This negative space makes the design pop. -
Solid Fills:
Selectively fill small areas with solid black ink. Use the 0.5 pen for this to ensure rich, dark coverage in the center eyes or specific geometric segments. -
Outer Rims:
Finish each mandala by solidifying the outermost circle. You can leave it as a simple line or add a final scalloped edge or tiny external dots for flair.
Create Real Stickers
Draw these directly onto white adhesive label paper sheets. Once inked, cut them out with scissors for instant, custom planner stickers.
Step 4: Finishing Touches
-
Drying Time:
Allow the ink to dry completely. Fine liners dry quickly, but since we used solid fills, give it an extra 5-10 minutes to prevent smudging. -
Erasing Guides:
Gently erase all visible pencil marks. Hold the paper taut with one hand while erasing to avoid crinkling the page. -
Final Inspection:
Look for any broken lines or areas that need a touch more contrast and fix them with your 0.1 pen.
Your page is now a gallery of intricate inspiration ready to be admired or scanned for future projects
Spiral Mandala Bands for a Twisty Layout

This intricate mandala moves beyond simple concentric circles, incorporating woven spiral bands and varied petal shapes to create a dynamic, radiating design. With its delicate linework and mesmerizing layers, this pen-and-ink drawing offers a relaxing way to practice precision and pattern-building.
Step-by-Step
Materials
- Sketchbook with smooth, heavy paper
- Compass or circular stencils
- Protractor (optional, for even spacing)
- Pencil (HB or 2H for guidelines)
- Fine-liner pens (0.1mm, 0.3mm, and 0.5mm)
- Eraser
- Ruler
Step 1: Setting the Foundation
-
Mark the center:
Begin by finding the exact center of your page. Mark this spot lightly with your pencil; this anchor point is crucial for keeping your symmetry tight as the design expands. -
Draft the concentric rings:
Using your compass, draw a series of light concentric circles radiating from the center. Create about 8-10 rings of varying spacing—some narrow for detailed borders, others wider for larger petals or the spiral band. -
Divide the circle:
Use a protractor or a ruler to lightly divide your circle into equal segments like a pie. I find 16 or 32 segments work best for this level of detail, providing clear guidelines for petal placement.
Step 2: Drawing the Core
-
Start the center rosette:
Switch to a 0.3mm fine-liner. Draw a small flower or star shape in the very center, followed by a tight ring of tiny semicircles or U-shapes around it to build texture immediately. -
Add first petal layer:
In the next ring outwards, draw small, simple petals. Keep them uniform, using your pencil guidelines to ensure they all peak at the same distance from the center. -
Create the heavy contrast ring:
Draw three concentric circles close together. Fill the space between the inner two with closely packed vertical lines or heavy shading to create a dark, defining band that separates the core from the middle layers.
Keep it Steady
Rotate your sketchbook as you work around the circle. Drawing strokes away from your body is often steadier than drawing sideways or towards yourself.
Step 3: Building the Complexity
-
Draw the main petal ring:
In a wider band, draw large, ovular petals. Inside each petal, draw a slightly smaller oval, leaving a small gap. This double-line effect adds elegance and volume. -
Fill the negative space:
Between the tips of these large petals, draw small inverted triangles or diamond shapes. Fill these shapes with tiny stippling (dots) or cross-hatching to add depth. -
Draft the spiral band:
This is the ‘twisty’ feature. In the next wide ring, instead of straight dividers, draw slightly curved diagonal lines connecting the inner circle to the outer circle of this band. -
Detail the spiral textual:
Inside each diagonal segment created in the previous step, add small recurring motifs—like tiny circles, squiggles, or repeated text-like distinct marks—generating a sense of motion.
Color Pop
Leave the design black and white for elegance, or use watercolor pencils to shade just the petals in a single gradient hue for a dramatic effect.
Step 4: The Outer Expansion
-
Construct the jagged frame:
Draw two thin rings outside the spiral band. Between them, draw a zigzag line that goes all the way around, creating a series of triangles. -
Add the spike layer:
Extend long, straight lines outward from the points of your zigzags. Connect these lines with curved arches to form a layer of open, pointed ‘spikes’ or elongated petals. -
Detail the spikes:
Use a 0.1mm pen to add delicate internal details to these spikes, such as a single straight line down the middle or a small dot at the very tip. -
Final outer perimeter:
For the largest, final layer, draw very thin, long lines radiating outward. Connect their tips with straight lines to create a vast, geometric web-like finish. -
Add terminating dots:
At the very tip of every outer point and intersection, place a small, solid black dot. This adds a polished, jewelry-like finish to difference vertices.
Step 5: Refining and Cleaning
-
Thicken lines:
Review your work. Use a 0.5mm pen to re-trace the major structural circles to make them pop against the finer details. -
Erase guidelines:
Wait at least 15-20 minutes to ensure the ink is completely dry. Gently erase all visible pencil marks, revealing the crisp black-and-white design.
Step back and admire the rhythmic motion captured in your static drawing
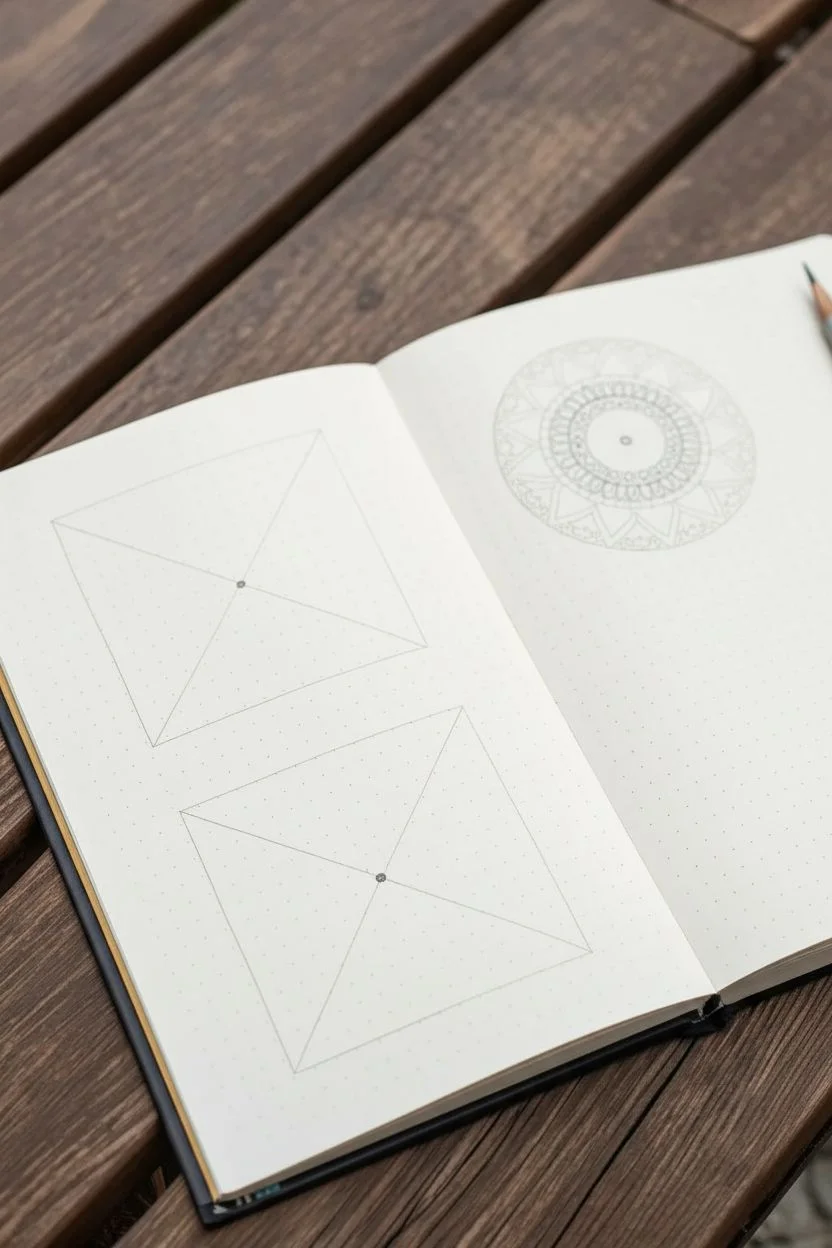
Non-Circular Mandala Frames (Square, Heart, Fan)
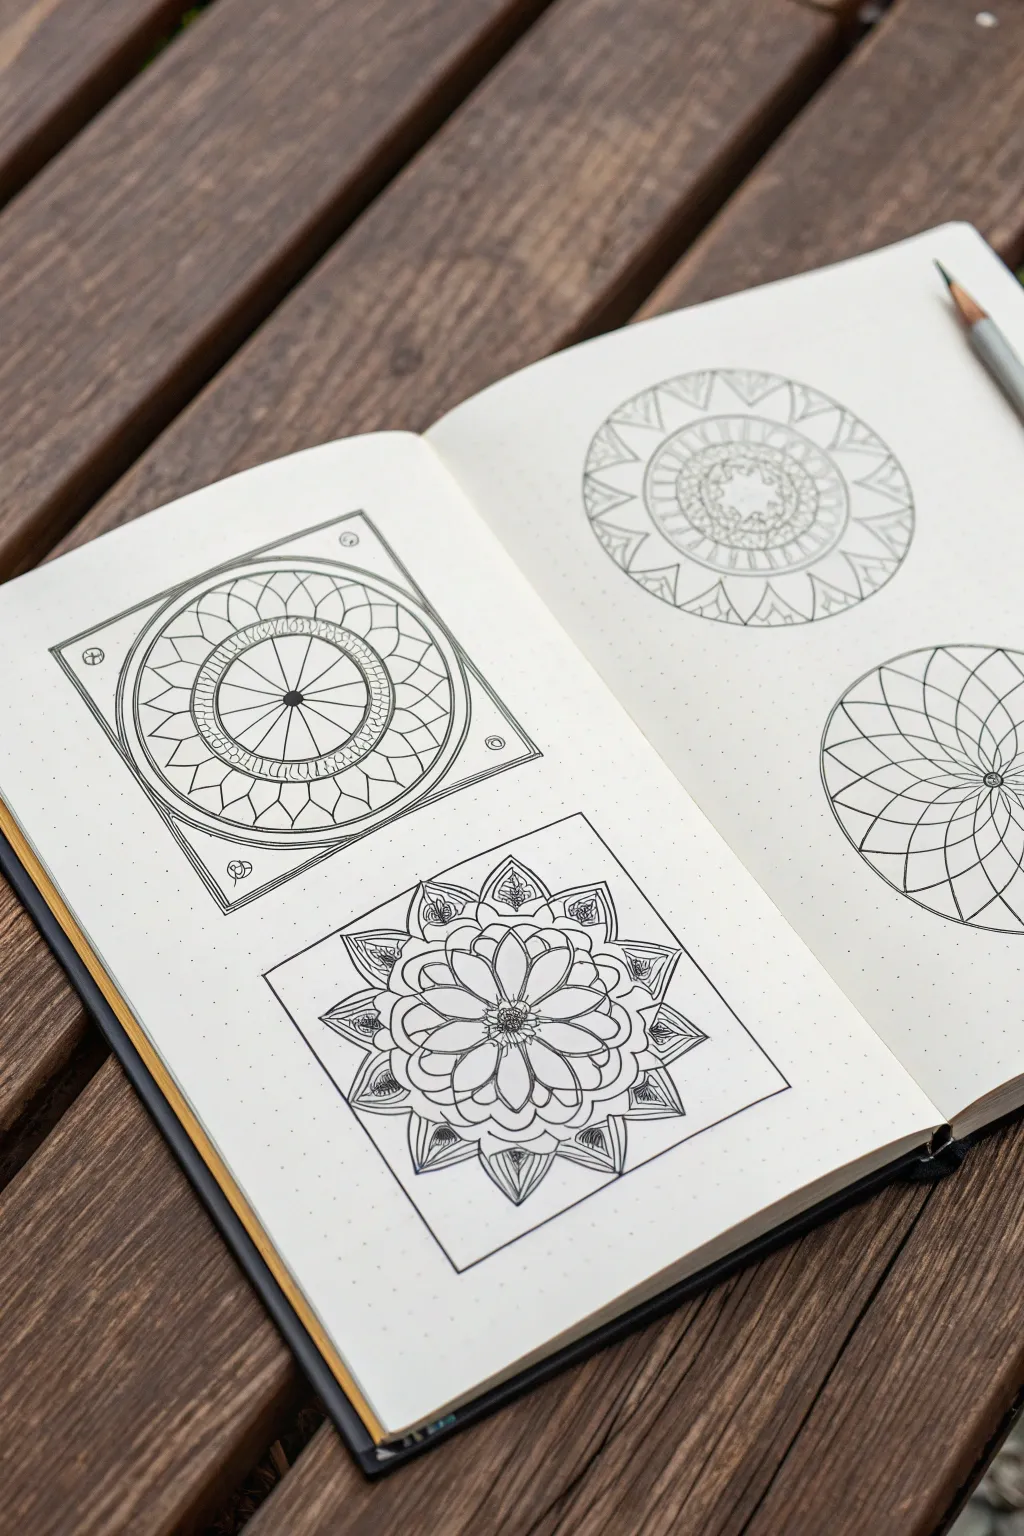
This project explores the intriguing intersection of circular mandala symmetry contained within rigid square frames. You will create two distinct designs: a structured geometric pattern and a softer flora-inspired variation, both showcased on a crisp dotted grid page.
Step-by-Step Tutorial
Materials
- Dotted grid sketchbook or journal (A5 or A4 size)
- Fine liner pens (0.3mm and 0.5mm, black)
- Pencil (HB or 2B)
- Compass
- Ruler
- Eraser
Step 1: Preparation and Grid Layout
-
Define the boundaries:
Focus on the left-hand page of your dot grid journal. Using your ruler and pencil, lightly draw two substantial squares, one above the other. Aim for roughly 8x8cm or 10x10cm depending on your paper size, leaving enough white space around them. -
Mark the centers:
Find the precise center of each square by drawing light diagonal lines from corner to corner. Where they intersect is your anchor point for the compass.
Grid Master Tip
Use the dot grid to guide your symmetry without measuring. Count the dots from the center to ensure every petal is exactly the same length.
Step 2: Top Design: The Geometric Square
-
Draft the inner circles:
For the top square, place your compass on the center point. Draw three concentric circles. The smallest should act as a central hub, the next as a mid-ground, and the largest should almost touch the sides of the square. -
Create radial segments:
Using a ruler, draw straight lines dividing the circles into 16 even ‘slices’ like a pie chart. Use the center point to ensure accuracy. -
Ink the central hub:
Switch to your 0.3mm fine liner. Ink the smallest circle and the radial spokes inside it. Add a solid dot right in the center. -
Add texture to the middle ring:
In the ring surrounding the hub, draw small, tight semi-circles or scallops along the outer edge of that band to create a textured border. -
Draw the petal arcs:
In the largest outer ring, connect the radial lines with curved arcs to create a petal-like effect that points outward. I find it helps to rotate the book as you draw each curve to keep your hand angle consistent. -
Frame the design:
Ink the outer square border with a slightly thicker 0.5mm pen for emphasis. In the four corners outside the circle but inside the square, add small decorative circles or tiny flourishes to fill the negative space.
Uneven Ink Lines?
If a line wobbles, don’t restart. Thicken the line slightly to hide the bump, or add a second parallel line to turn the mistake into a design feature.
Step 3: Bottom Design: The Floral Square
-
Establish the floral guide:
Move to the bottom square. Lightly pencil two concentric circles again, but keep them looser. These are just guides for petal lengths. -
Draft the central petals:
Draw a central flower with eight petals radiating from the center point. Make them pointed at the tips, like a lotus. -
Add the second layer:
Draw a second row of petals peeking out from behind the first layer. These should be wider and align with the gaps of the first layer. -
Ink the center:
Using the 0.3mm pen, draw a small, stippled texture (tiny dots) for the flower’s center pistil area. -
Outline the petals:
Carefully ink over your petal pencil lines. Inside each petal, draw a slightly smaller, thinner line to mimic the veins or inner shape of the leaf. -
Create the corner flourishes:
Instead of a perfect circle, let the outer petals extend toward the corners. Draw detailed, leaf-like triangular shapes that point directly into the four corners of the square box. -
Darken the details:
Add small hatch marks or shading at the base of the petals to give the flower depth and dimension. -
Finalize the frame:
Ink the square border around the flower. Ensure the tips of the ‘corner leaves’ touch or slightly overlap this border for a contained look. -
Cleanup:
Wait at least 5-10 minutes for the ink to dry completely. Gently erase all pencil guidelines from both sketches.
Now you have a pair of structured, framed mandalas that are ready for color or look perfect in black and white


Have a question or want to share your own experience? I'd love to hear from you in the comments below!