A martini glass is basically a tiny canvas with built-in drama: that crisp V-shape and elegant stem do so much of the design work for you. Here are my favorite martini glass painting ideas that play up the bowl, the rim, and the stem in ways that feel festive, giftable, and totally doable.
Citrus Wedge Rim Border
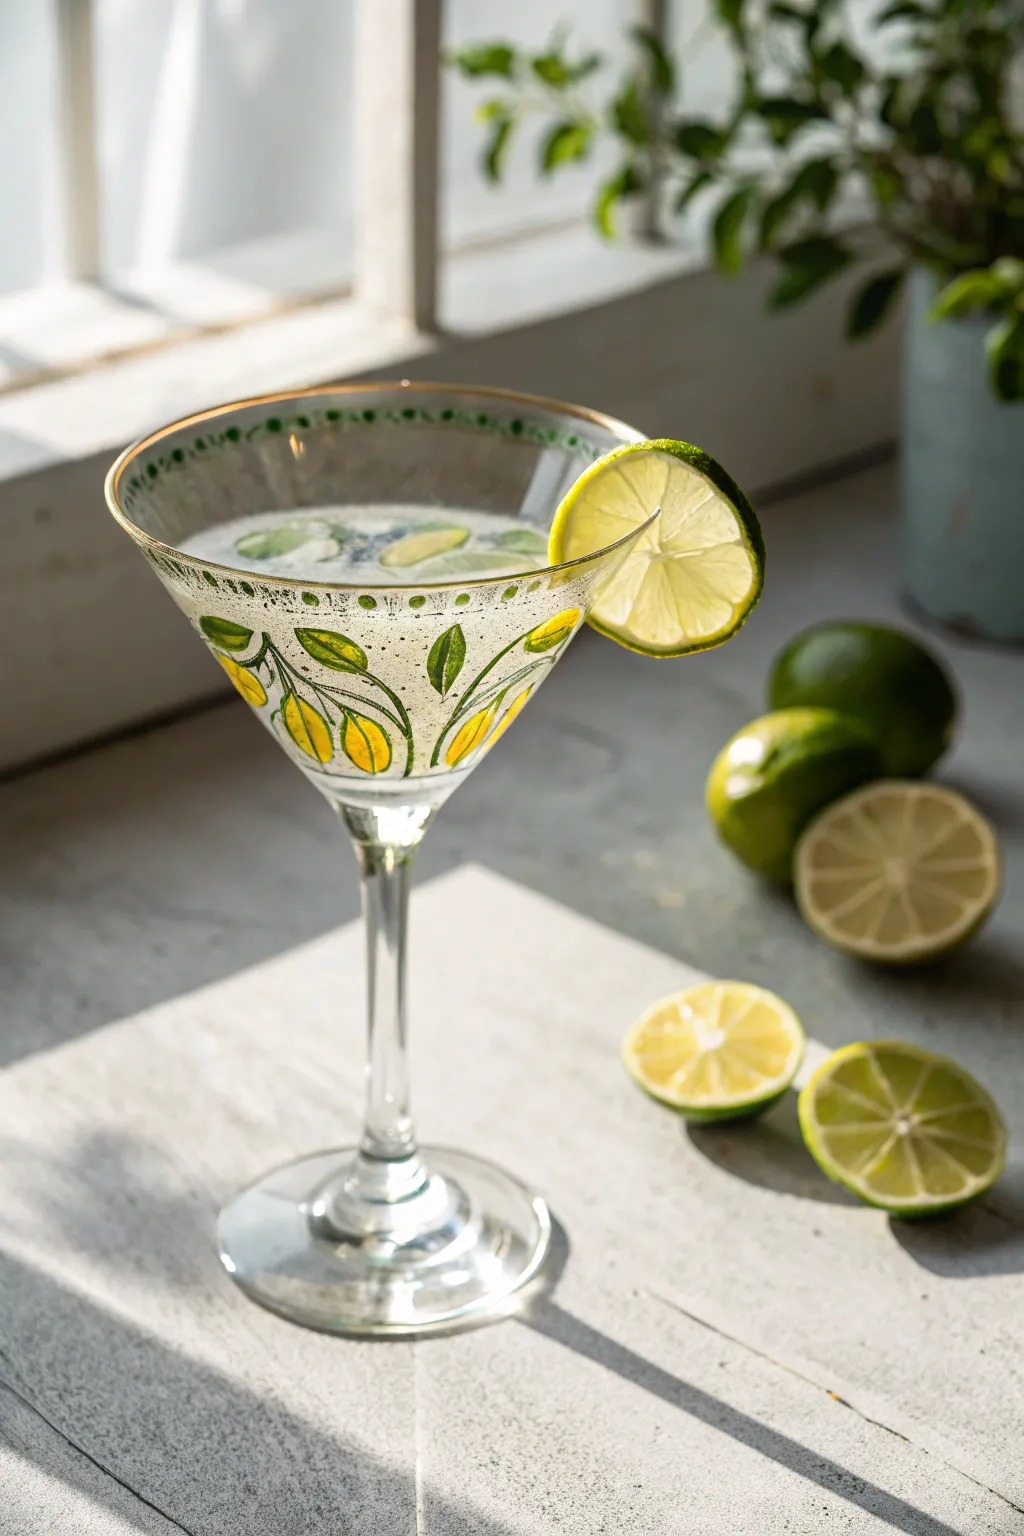
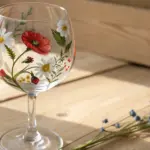
Bring a fresh squeeze of citrus to your bar cart with this elegant hand-painted martini glass. Featuring a delicate dotted rim and sweeping lemon branches, this design combines sunny yellows and garden greens for a sophisticated summer look.
How-To Guide
Materials
- Martini glass (washed and cleaned with rubbing alcohol)
- Enamel glass paint (opaque yellow, opaque white, leaf green, olive green)
- Gold glass outliner or metallic gold enamel paint
- Fine liner brush (size 0 or 00)
- Small round brush (size 1 or 2)
- Dotting tool or toothpick
- Rubbing alcohol
- Paper towels
- Palette or paper plate
- Oven (for curing, unless using air-dry paints)
Step 1: Preparation & Rim Detail
-
Clean the Surface:
Before painting anything, wipe down the entire outer surface of the glass with rubbing alcohol and a paper towel. This removes oils and fingerprints that prevent paint from adhering properly. -
Mix the Rim Green:
On your palette, mix a touch of olive green with a tiny bit of leaf green to get a rich, herbal shade. You want a color that is dark but still vibrant. -
Paint the Top Dots:
Dip your fine liner brush or a small dotting tool into the green mix. Carefully place small, evenly spaced dots along the very top edge of the glass rim. Keep them tiny and delicate. -
Add Decorative Swags:
Using the same green and your fine liner brush, paint tiny, shallow U-shaped swags connecting the dots. Think of it like a delicate garland draped around the top edge. -
Create the Gold Band:
Load your liner brush with metallic gold paint. About a quarter-inch below the green rim decoration, paint a thin, continuous horizontal line around the circumference of the glass. Steady your hand by resting your pinky on the glass stem. -
Add the Dotted Border:
Just below your gold line, use your dotting tool (or a clean toothpick) and the green paint to create another horizontal row of evenly spaced dots around the glass.
Steady Hand Trick
Place the glass upside down on a turntable or lazy susan. Spin the table while holding your brush steady to get perfectly straight horizontal lines.
Step 2: Painting the Lemons
-
Outline the Lemon Shapes:
For the main design, use the fine liner brush and the olive green paint to outline elongated oval shapes for the lemons. Vary their angles slightly so they look like they are hanging naturally. -
Outline the Leaves:
Connected to your lemon outlines, draw simple, pointed leaf shapes. Create clusters where two leaves meet a lemon for a balanced composition. -
Connect with Stems:
Draw thin, curved lines connecting your lemon and leaf clusters. These stems should flow upwards, creating a U-shape that mimics the curve of the glass bowl. -
Fill the Lemons:
Switch to your small round brush. Mix opaque yellow with a tiny drop of white to increase opacity. Fill in the lemon outlines carefully. I like to do a thin coat first, let it dry for 10 minutes, and add a second coat for brightness. -
Fill the Leaves:
Clean your brush and pick up the leaf green paint. Gently fill in the leaf outlines. You don’t need to be perfectly opaque here; a little translucency looks lovely on glass. -
Add Highlights:
Once the yellow paint is tacky but not fully dry, take a tiny bit of white paint on your liner brush and add a small curved highlight to the top curve of each lemon to give it dimension. -
Final Green Details:
Go back with your dark olive green and re-define any stems that got covered. You can also add a central vein line down the middle of each leaf for extra realism.
Step 3: Curing & Finishing
-
Check for Mistakes:
Before the paint sets, look for any smudges or uneven lines. Use a damp cotton swab or a toothpick to gently scrape away errors. -
Let it Dry:
Allow the glass to air dry for at least 1 hour (or up to 24 hours depending on your specific paint brand) before handling it too much. -
Bake to Cure:
Place the glass in a cool oven. Turn the heat to 350°F (175°C) and bake for 30 minutes. Turn the oven off and let the glass cool completely inside the oven to prevent cracking.
Paint Slipping?
If paint is sliding off the glass, your surface might be oily or the paint is too thin. Reclean with alcohol or let the paint sit on the palette for 5 mins to thicken.
Once baked and cooled, your custom glassware is ready to be filled with your favorite icy cocktail and enjoyed


Elegant Botanical Vines Up the Stem
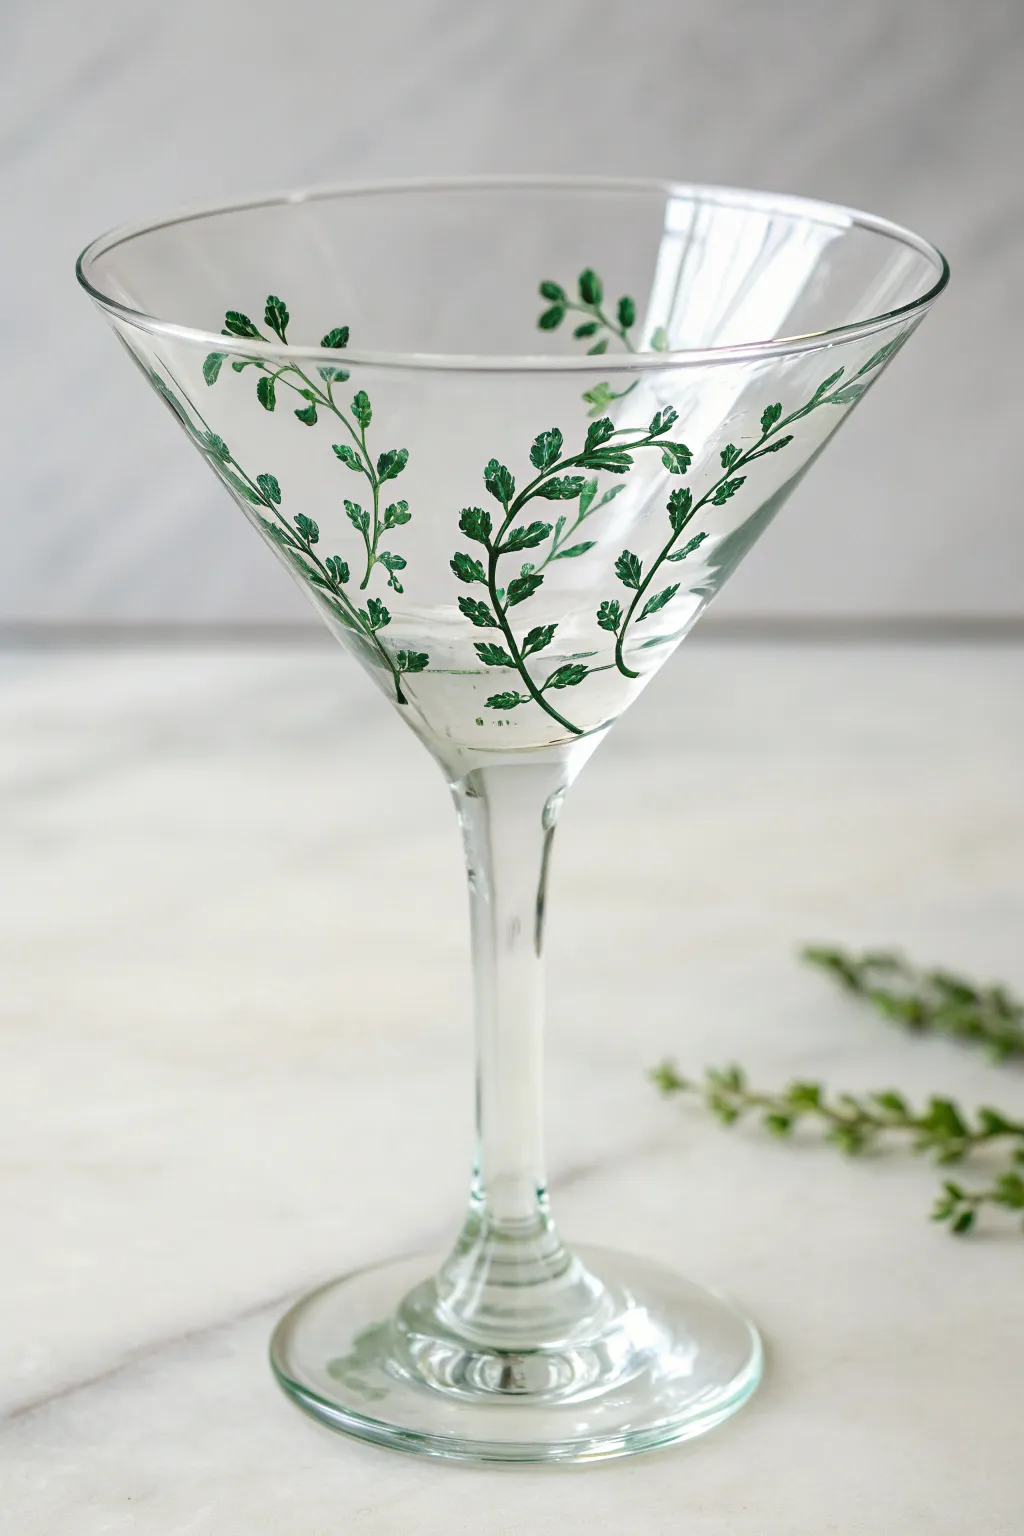
Transform a plain martini glass into a botanical masterpiece with delicate, hand-painted fern fronds climbing up the bowl. The twisting green vines create a fresh, organic aesthetic perfect for garden parties or elegant spring gatherings.
How-To Guide
Materials
- Martini glass (clean and grease-free)
- Enamel glass paint (Forest Green)
- Enamel glass paint (Leaf Green or Sage)
- Fine liner brush (size 00 or 000)
- Small round brush (size 1)
- Rubbing alcohol
- Cotton pads
- Palette or small plate
- Paper towels
- Oven (for curing)
Step 1: Preparation and Planning
-
Clean the Surface:
Before painting, the glass must be pristine. Wipe the entire exterior surface of the martini glass with rubbing alcohol on a cotton pad to remove any fingerprints, oils, or dust. -
Let it Dry:
Allow the alcohol to evaporate completely for a few moments so you have a perfectly dry, clean canvas. -
Mix Your Greens:
Squeeze small amounts of Forest Green and Leaf Green onto your palette. I like to blend a tiny bit of the two shades in the middle to create a third, transitional color.
Natural Texture
Don’t overmix your greens on the palette. Keep the colors partially separated so each brushstroke carries a slightly different variegated mix of light and dark for a natural look.
Step 2: Painting the Vines
-
Start the Main Stems:
Using your fine liner brush loaded with thinning Forest Green paint, begin at the very bottom of the glass bowl where it meets the stem. -
The First Swoop:
Paint a thin, confident line curving upward and outward toward the rim. Let the line be slightly wavy rather than perfectly straight to mimic organic growth. -
Add Secondary Vines:
Paint three to four more main stems starting from the base, spacing them out around the glass so the design feels balanced. Vary their heights slightly. -
Branching Out:
Along each main vine, add tiny offshoot branches with the tip of your liner brush. Keep these very short and delicate.
Shaky Hands?
If you struggle with painting thin lines on a curved surface, rest your pinky finger on the glass stem or base to anchor your hand while you work on the bowl.
Step 3: Adding the Foliage
-
Technique Practice:
For the leaves, you’ll use a tiny dab-and-pull motion. Practice on a piece of paper first: touch the brush down to make the round base of the leaf, then lift as you pull away to create a tapered tip. -
Cluster the Leaves:
Using the size 1 round brush and the darker green, begin adding leaves to the lower sections of your vines. Paint them in small clusters or pairs along the stems. -
Vary the Sizes:
Make the leaves slightly larger near the bottom of the stem and gradually tinier as you reach the delicate tips of the vines near the rim. -
Introduce Light Green:
Switch to your lighter Sage or Leaf Green paint. Add leaves interspersed among the dark ones to create depth and the illusion of light hitting the foliage. -
Overlap for Realism:
Don’t be afraid to let a light green leaf slightly overlap a dark green vine. This layering adds dimension to the artwork. -
Detail the Tips:
Switch back to your ultra-fine liner brush for the very ends of the ferns. Add tiny dots or flecks of green to suggest budding leaves. -
Check Consistency:
Rotate the glass carefully. Ensure that the density of leaves is relatively even around the bowl, filling in any obvious large gaps with a new small branch.
Step 4: Finishing Touches
-
Clean Up Edges:
If you strayed too close to the drinking rim or made a smudge, use a damp cotton swab or toothpick to wipe away the wet paint immediately. -
Air Dry First:
Allow the painted glass to sit undisturbed for at least 1 hour (or per your paint manufacturer’s instructions) until it is dry to the touch. -
Cure the Paint:
To make the glass top-rack dishwasher safe, place the glass in a cold oven. Turn the heat to 350°F (175°C) and bake for 30 minutes. Turn the oven off and let the glass cool down completely inside before removing.
Once baked and cooled, your elegant fern glass is ready to serve your favorite cocktails with a touch of botanical charm


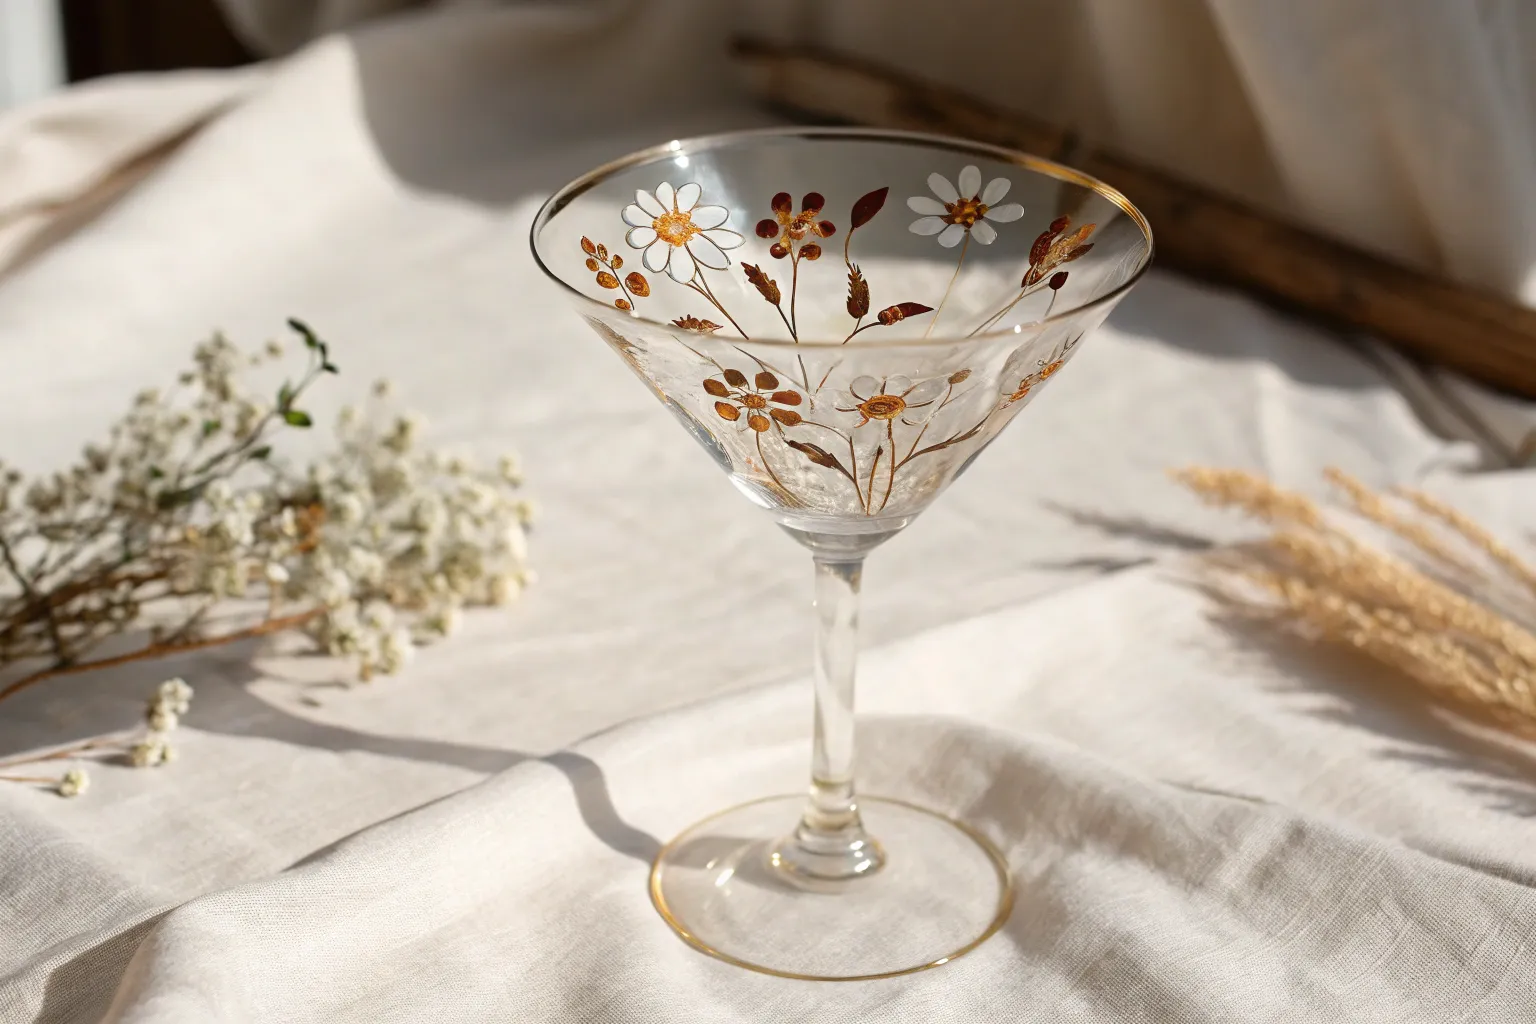
Single Statement Flower on the Bowl
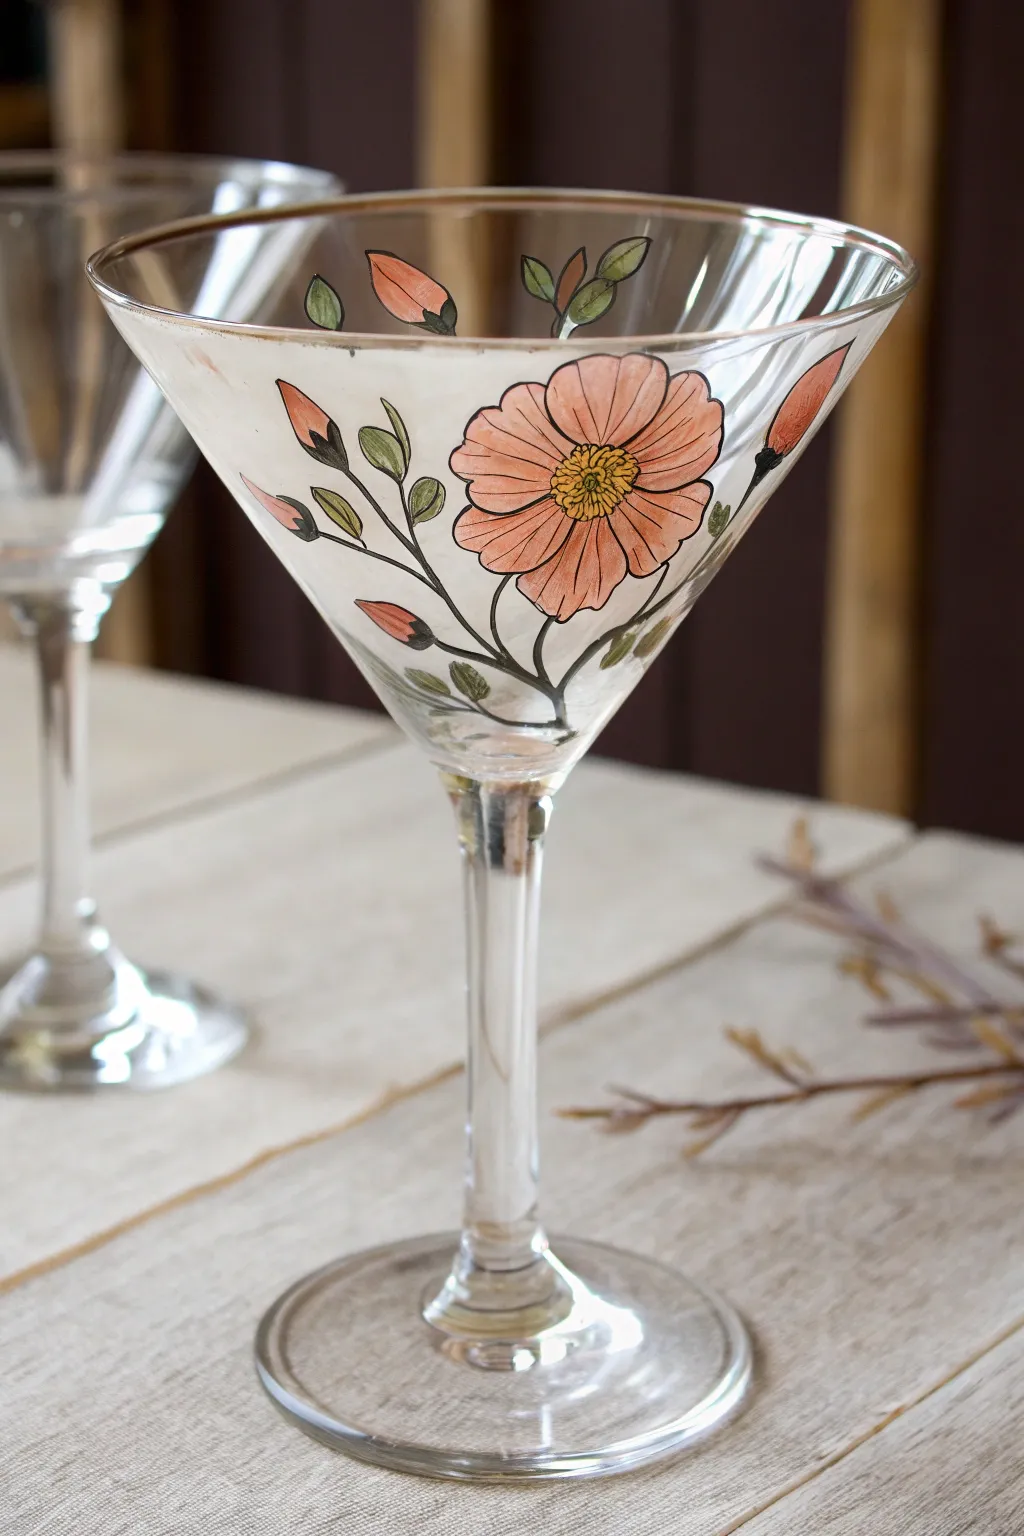
Capture the elegance of a vintage botanical illustration right on your stemware with this single statement flower design. The peach-toned bloom takes center stage against the clear glass, framed by wandering vines and delicate budding flowers for a sophisticated, hand-painted look.
Step-by-Step Guide
Materials
- Clear martini glass
- Rubbing alcohol and paper towel
- Enamel glass paints (opaque peach, deep yellow, sage green, olive green, white)
- Fine liner brush (size 00 or 000)
- Small round brush (size 1 or 2)
- Black glass liner or outlining paint
- Palette or small dish
- Cotton swabs (for corrections)
- Oven (for curing)
Step 1: Preparation & Mapping
-
Clean surface:
Before dipping your brush, thoroughly wipe the entire bowl of the martini glass with rubbing alcohol. This removes unseen oils and ensures your paint adheres for the long haul. -
Plan placement:
Decide where your main flower will live. Position it slightly off-center on the bowl so the petals can wrap naturally around the curve rather than sitting flat on the front.
Step 2: The Main Bloom
-
Outline the center:
Using your fine liner brush and black outlining paint, draw a small, slightly irregular circle for the flower’s center. -
Draw petals:
Extend 6 to 8 petal shapes outward from the center circle. Keep the lines thin and slightly wobbly to mimic organic movement rather than perfect geometric shapes. -
Fill the petals:
Mix a touch of white into your peach enamel paint to create a soft, opaque base. Use the small round brush to fill in each petal, carefully avoiding the black outlines. -
Add dimension:
While the peach is still slightly tacky, I like to take a tiny bit of the original unmixed peach color and drag it from the center of the flower outward to create gentle shading. -
Detail the center:
Fill the central circle with deep yellow paint. Once dry, add tiny black stippling dots over the yellow to create texture and depth.
Wobbly Lines?
If your black outlines are shaky, use a cotton swab dipped in alcohol to erase mistakes instantly. You can also clean up edges with a toothpick once the paint is semi-dry.
Step 3: Vines & Foliage
-
Draft the stems:
With the black liner, draw a main wavy stem extending from underneath the flower down toward the stem of the glass. -
Branch out:
Add smaller off-shoot lines stems branching away from the main flower. let them curl naturally around the sides of the glass. -
Add leaves and buds:
Draw small, teardrop leaf shapes along the vines. Add uniform oval shapes at the tips of some branches to represent closed flower buds. -
Paint the leaves:
Using the sage green, fill in the leaf outlines. For a more botanical feel, mix in a tiny streak of olive green on one side of each leaf for variation. -
Color the buds:
Fill the oval bud shapes with your peach color. Add a tiny green cap (calyx) at the bottom of each bud where it connects to the stem.
Layered Petals
Wait for the peach base coat to dry fully, then paint a second layer of slightly lighter peach on just the tips of the petals to catch the light and add volume.
Step 4: Finishing Details
-
Refine outlines:
Once the filled colors are dry to the touch, go back over any black lines that may have been obscured by the fill paint to crisp up the edges. -
Add veins:
Use your thinnest liner brush and a diluted black or dark green to paint extremely fine central veins on the larger leaves. -
Rim the glass:
For a glamorous finish, carefully paint a thin line of gold or silver (optional) or stick with a simple black line along the very rim of the glass. -
Air dry:
Allow the painted glass to sit undisturbed for at least 24 hours (or up to 21 days for air-curing paints) before handling heavily. -
Bake to cure:
To make the glass top-rack dishwasher safe, place it in a cool oven. Set the temperature to 350°F (175°C), bake for 30 minutes, and leave it inside to cool down completely with the oven.
Your sophisticated new glassware is now ready to serve up drinks with an artistic twist


Polka Dots That Fade Upward
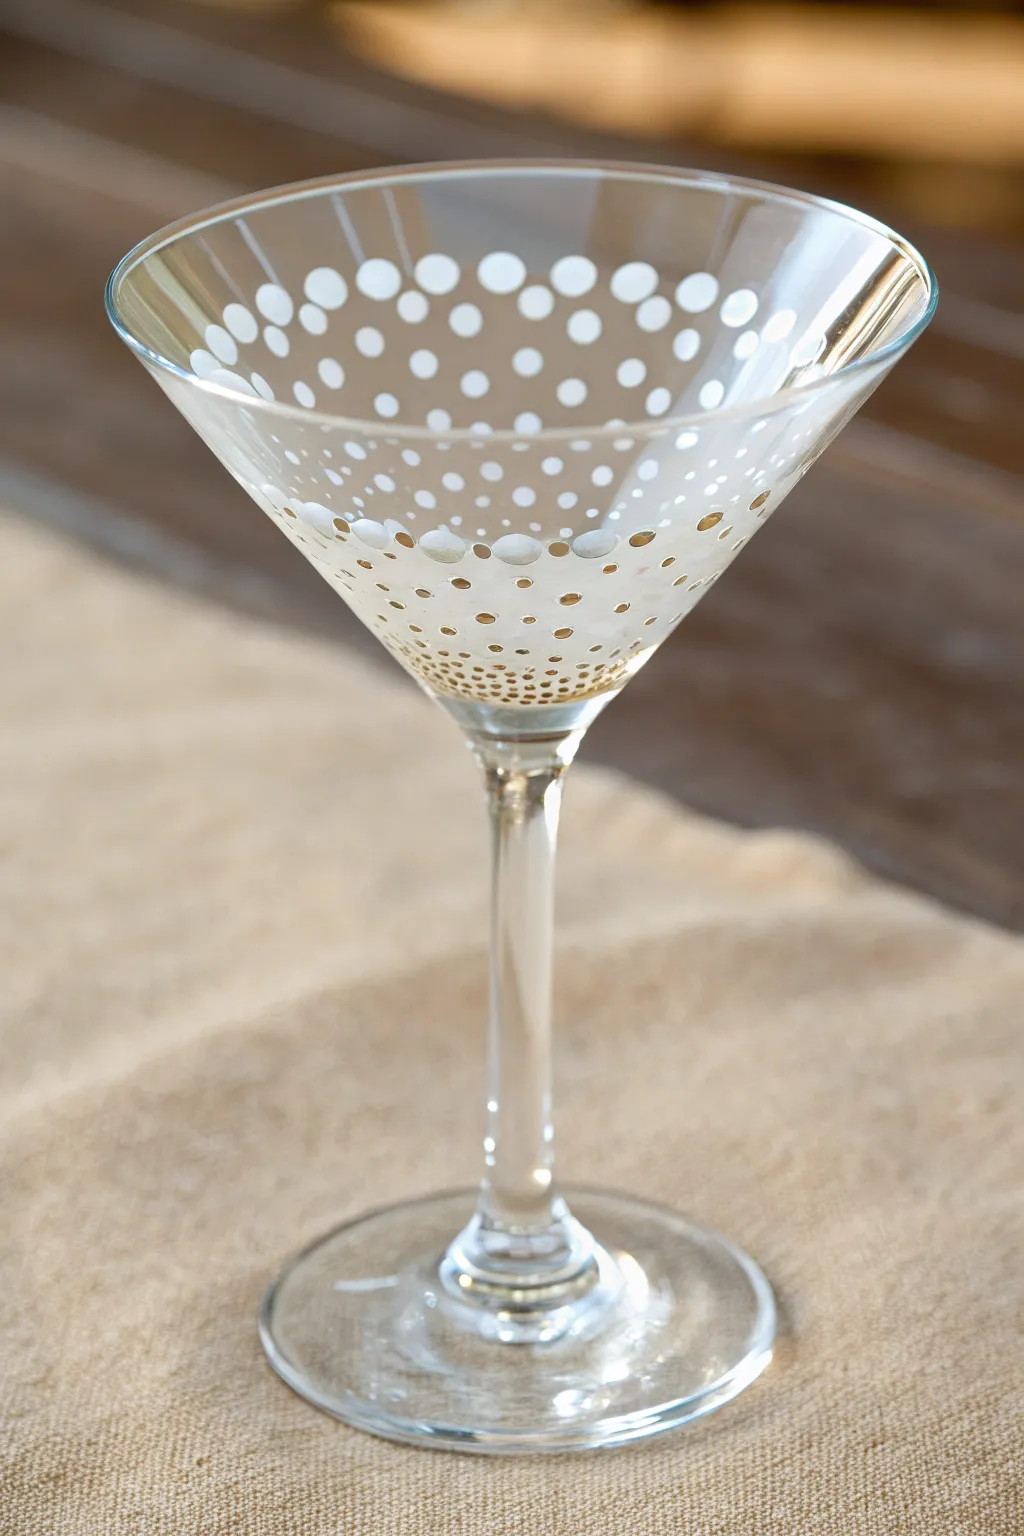
Capture the bubbly spirit of a classic cocktail with this elegant, festive design. By varying dot sizes and density, you’ll create a stunning visual effect that looks like champagne bubbles floating to the surface.
How-To Guide
Materials
- Standard glass martini glass
- Rubbing alcohol
- Cotton pads or paper towels
- White enamel craft paint for glass
- Gold metallic enamel craft paint for glass
- Set of foam pouncers or daubers (assorted small sizes)
- Toothpicks or a fine-point dotting tool
- Paper plate or palette
- Oven (for curing)
Step 1: Preparation & Planning
-
Clean surface:
Before applying any paint, thoroughly wipe down the entire outer surface of the martini glass bowl with rubbing alcohol and a cotton pad. This removes oils and fingerprints that could prevent the paint from adhering properly. -
Dry completely:
Allow the alcohol to air dry completely for a few moments to ensure a pristine canvas. -
Prepare palette:
Dispense a dime-sized amount of the gold metallic paint and the white enamel paint onto your paper plate, keeping them separate for now.
Uneven Circles?
If your pouncer is sliding and making ovals, try sticking the foam straight down and lifting straight up without dragging. Practicing on paper first helps get the motion right.
Step 2: The Base Layer
-
Start small:
Begin at the very bottom of the glass bowl, right where it meets the stem. Dip a toothpick or fine-point dotting tool into the gold paint. -
Create density:
Apply tiny gold dots in a concentrated ring around the base of the bowl. These should be very close together, almost touching, to create a solid foundation of color. -
Expand upward:
Continue adding tiny gold dots, moving slightly up the glass. As you move up about half an inch, start spacing them out just a tiny bit more to begin the fading effect. -
Switch tools:
Once you have a solid band of tiny gold dots at the base, switch to the smallest foam pouncer or the handle end of a paintbrush. -
Add medium gold dots:
Add a scattered layer of slightly larger gold dots just above your dense base layer. I find it helpful to rotate the glass constantly to ensure even coverage.
Step 3: The Gradient Fade
-
Transition to white:
Now, switch to your white paint. Using your smallest pouncer or brush end, place white dots intermingled with the upper edge of the gold section. -
Increase size:
Select a slightly larger foam pouncer. Dip it in white paint and dab off the excess on your palette so it doesn’t gloop or drip. -
Mid-glass placement:
Apply these medium-sized white dots around the middle of the glass bowl. Space them further apart than the dots below to enhance the airy, floating look. -
Go larger:
Switch to your largest foam pouncer for the top section of the glass. -
Top tier:
bPress large white dots near the rim of the glass. These should be the most sparse, with plenty of clear glass showing between them. -
Check overlap:
Inspect the transition zones. If the jump between gold and white feels too abrupt, add a few tiny gold dots up into the white section or small white dots down into the gold to blend them.
Level Up: Pearl Essence
For extra dimension, mix a little pearl medium into your white paint. It gives the upper bubbles a translucent, frosty quality that looks incredible when filled with liquid.
Step 4: Finishing Touches
-
Clean drips:
Check for any smudges or drips. While the paint is wet, you can easily wipe them away with a damp cotton swab or toothpick. -
Rim check:
Ensure no paint is actually touching the rim where lips would touch; keep the highest dots at least half an inch from the top edge. -
Air dry:
Let the glass sit undisturbed for at least one hour until the paint is dry to the touch, or follow the specific manufacturer’s instructions for air drying times. -
Cure:
Place the glass in a cool oven. Turn the heat to 350°F (175°C) and bake for 30 minutes. Turn the oven off and let the glass cool down completely inside the oven to prevent cracking.
Once cured, your bubbly new glassware is ready for its first pour and fully dishwasher safe on the top rack
BRUSH GUIDE
The Right Brush for Every Stroke
From clean lines to bold texture — master brush choice, stroke control, and essential techniques.
Explore the Full Guide
Glittery Confetti Party Sprinkle
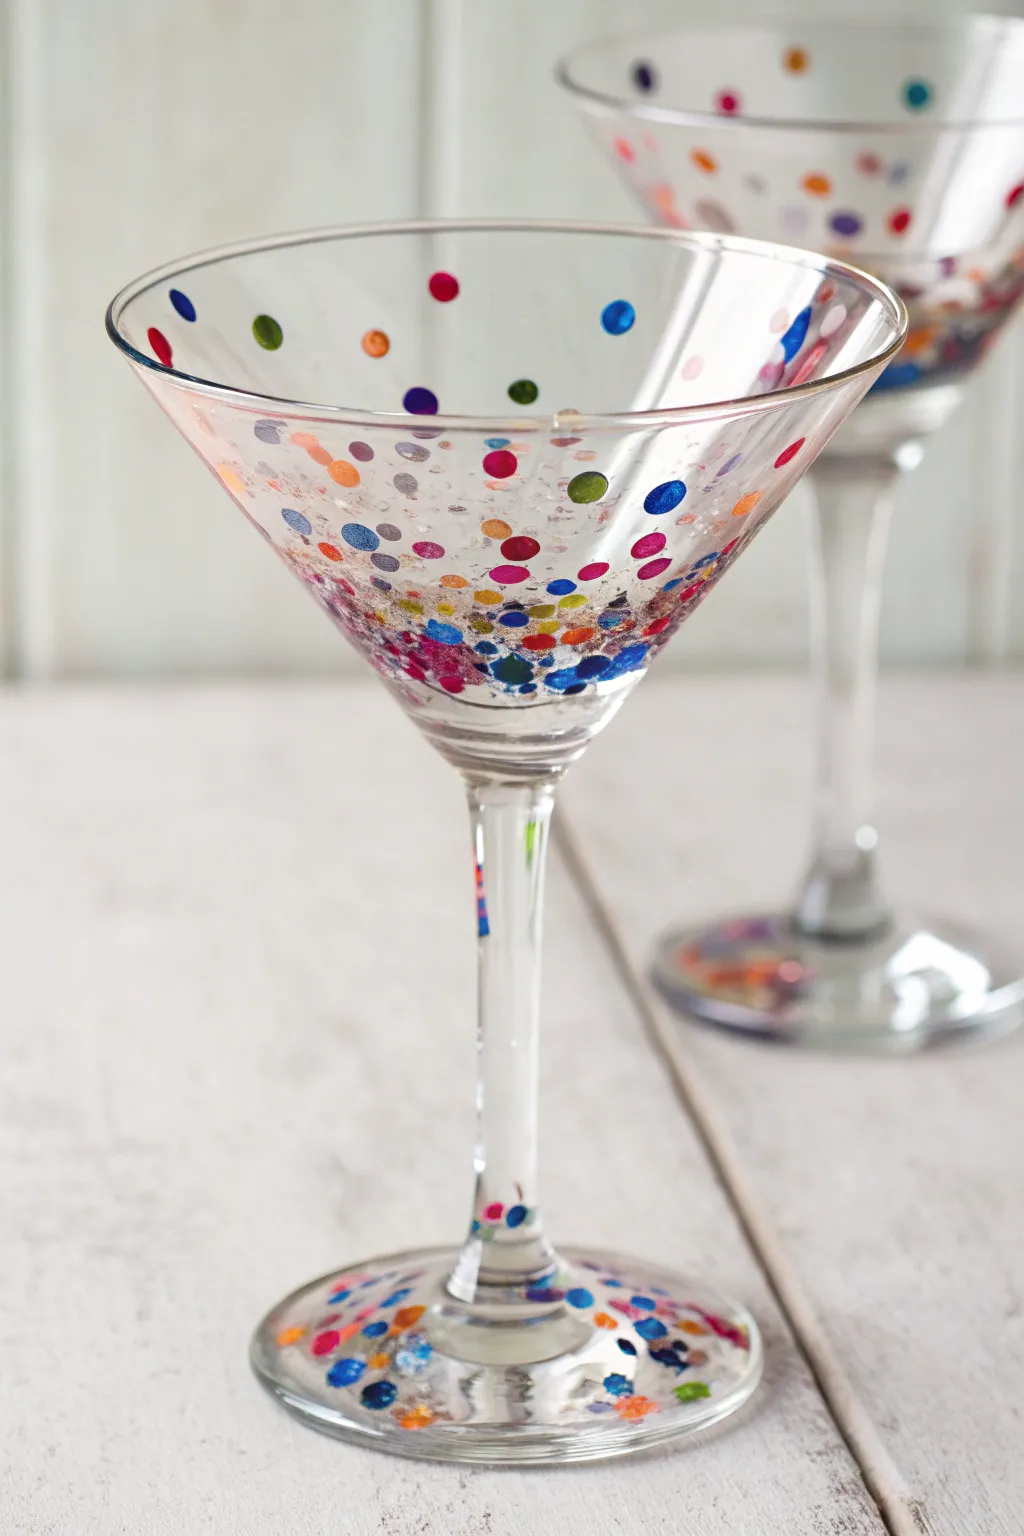
Bring the party to your glassware with these festive, confetti-inspired martini glasses that feature a cascading ombre of colorful dots. The design starts densely at the base of the bowl and foot, scattering lightly upwards for a playful, bubbly effect.
Step-by-Step Guide
Materials
- Martini glasses (washed and dried)
- Rubbing alcohol
- Cotton pads or paper towels
- Multi-surface acrylic craft paint or enamel glass paint (blue, light blue, pink, red, green, orange, purple, silver/glitter)
- Foam pouncers (small size)
- Cotton swabs (Q-tips)
- Toothpicks
- Paper plate or palette
- Oven (for curing)
Step 1: Preparation
-
Clean the Surface:
Before you begin painting, wipe down the entire outer surface of the martini glass with rubbing alcohol using a cotton pad. This removes any oils or fingerprints that could prevent the paint from adhering properly. -
Set Up Palette:
Squeeze a dime-sized amount of each paint color onto your paper plate. Space them out enough so they don’t accidentally mix.
Uneven Dots?
If your dots look lumpy or have peaks, lightly tap the bottom of the glass on the table while the paint is wet to settle them flat.
Step 2: Creating the Confetti Base
-
Start at the Bottom:
Begin painting at the very bottom of the glass bowl, right where it meets the stem. Dip a cotton swab or the handle end of a paintbrush into your first color (e.g., dark blue). -
Apply Dense Dots:
Dot the paint onto the glass, clustering the dots tightly together at the base. You want this area to look very full, almost solid with color, but composed of individual circles. -
Rotate and Repeat:
Rotate the glass carefully and continue adding dots of different colors—red, green, orange—keeping them concentrated in that bottom half-inch area. -
Layer with Glitter:
I like to mix in a silver glitter paint among the solid colors at this stage to add that extra sparkle. Dab these glitter dots in the gaps between the colored dots.
Add Dimension
Once the first layer is dry, add smaller white or metallic dots on top of the larger colored dots to create a ‘highlight’ reflection effect.
Step 3: The Scattering Effect
-
Move Upwards:
As you move up the side of the glass bowl, begin spacing the dots further apart. This creates the ‘floating confetti’ look. -
Vary Dot Sizes:
Switch tools to create variety. Use the end of a toothpick for tiny specks and a small foam pouncer or a larger brush handle for bigger statement dots. -
Create the Fade:
Stop adding dots about halfway to two-thirds up the glass. The rim should remain clear for comfortable drinking. -
Paint the Stem Base:
Don’t forget the foot of the glass! Replicate the pattern by densely dotting the center of the base plate and scattering outward toward the edge. -
Check for Drips:
Inspect your work for any paint that might be running. If a dot is too heavy, quickly dab it with a clean tissue or fix it with a toothpick.
Step 4: Finishing Touches
-
Let it Dry:
Allow the paint to dry completely according to the manufacturer’s instructions. This usually takes at least 1 hour for touch-dry and 24 hours for a full cure. -
Cure the Paint:
To make the glasses dishwasher safe (top rack), place the cold glasses into a cold oven. Turn the heat to 350°F (175°C) and bake for 30 minutes. -
Cool Down:
Turn the oven off and let the glasses cool down completely inside the oven before removing them. This gradual temperature change prevents cracking.
Your dazzling new glassware is now ready to serve up drinks at your next celebration
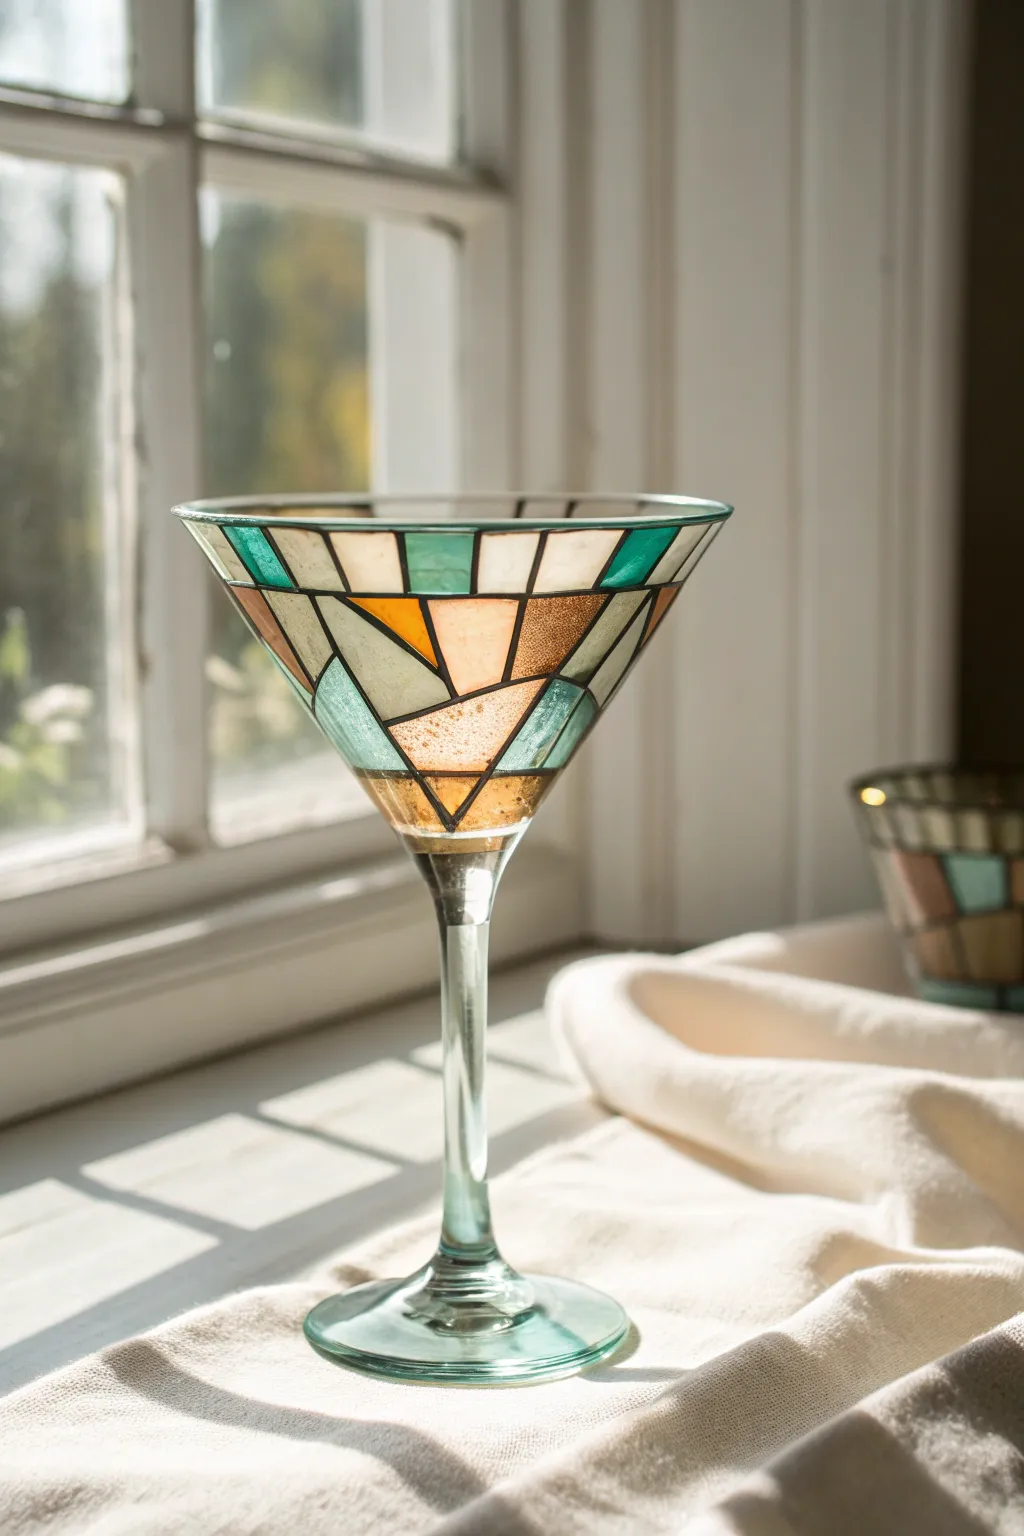
Bold Color-Block Triangle Panels
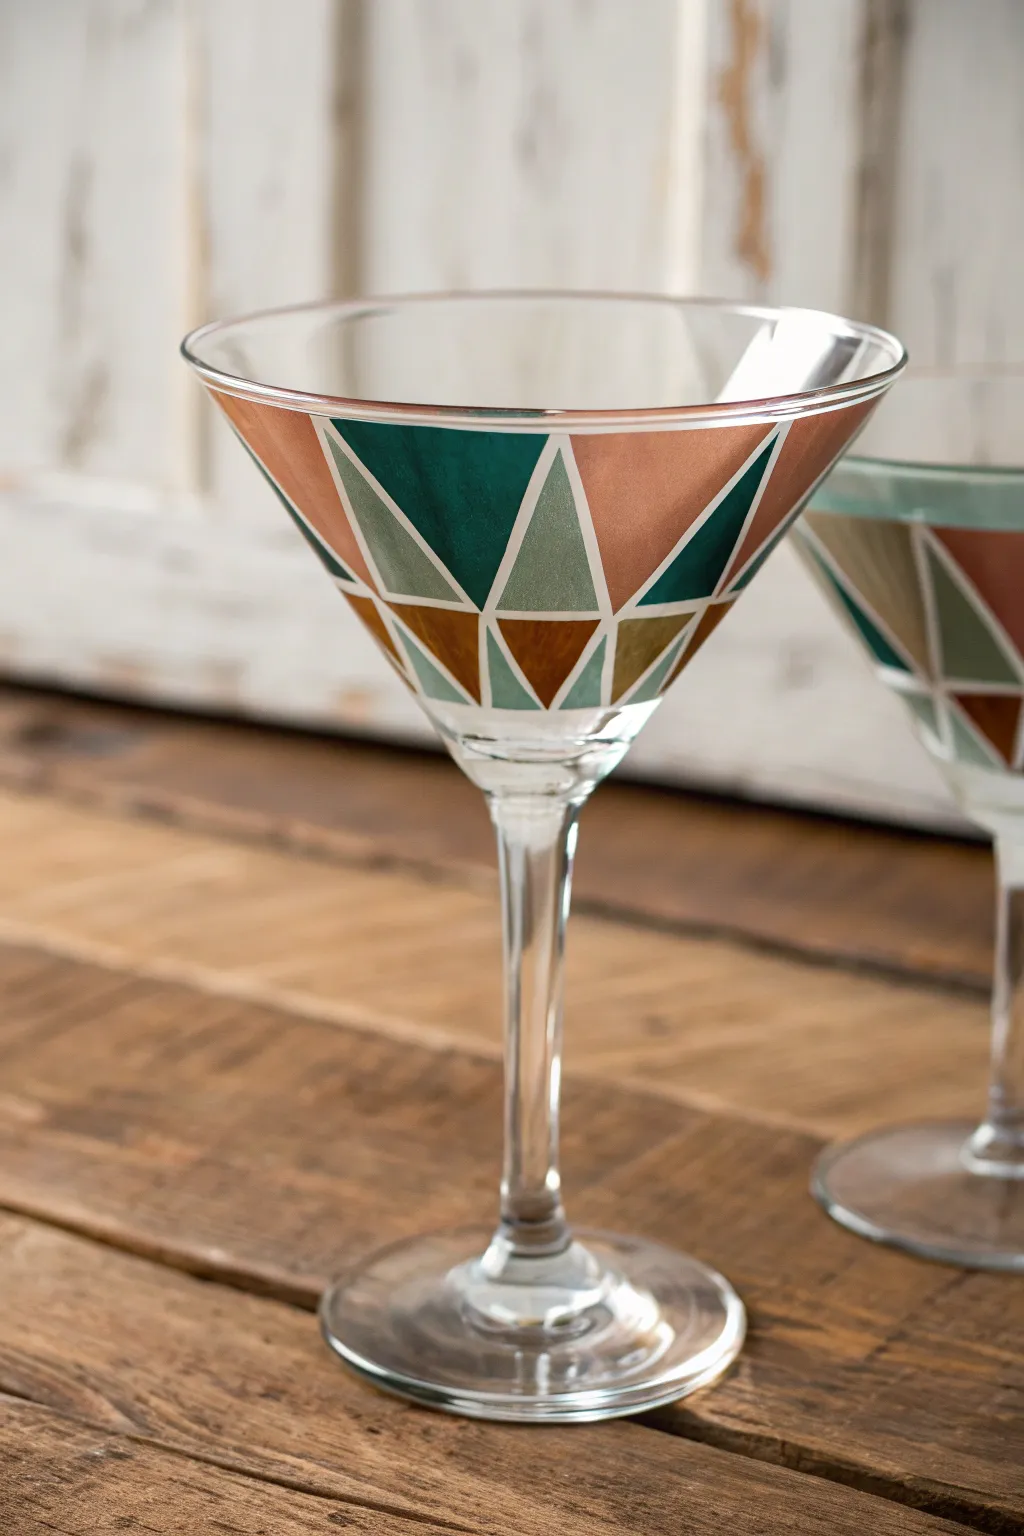
Bring a mid-century modern flair to your barware with this sophisticated color-block design. Featuring intersecting triangles in warm terracotta, deep teal, and earthy browns, these glasses look like a high-end mosaic without the heavy price tag.
Detailed Instructions
Materials
- Martini glasses (clear glass)
- Rubbing alcohol and cotton pads
- Enamel glass paints (Opaque gloss finish)
- Colors: Teal/Deep Emerald, Terracotta/Copper, Sage Green, Chocolate Brown
- Flat shader brush (size 4 or 6)
- Detail liner brush (size 0 or 00)
- White or light gray liquid glass outliner (optional but helpful)
- Painter’s tape or 1/8 inch masking tape
- Craft knife
- Palette or small plate
- Cotton swabs (for cleanup)
- Oven (for curing)
Step 1: Preparation & Mapping
-
Clean the Surface:
Before laying down a single drop of paint, thoroughly wipe down the outside of your martini glass with rubbing alcohol on a cotton pad. This removes invisible oils and fingerprints that could prevent the paint from adhering properly. -
Establish the Top Rim:
Apply a strip of painter’s tape horizontally around the glass, about 1/4 to 1/2 inch below the actual rim. This ensures you leave a clear ‘lip-safe’ zone where no paint will touch the drinker’s mouth. -
Create the Grid:
For this geometric design, precision matters. Use thin 1/8-inch masking tape to create a series of large V-shapes starting from your top tape line and pointing down toward the stem. -
Subdivide the Shapes:
Cross those initial V-shapes with horizontal tape lines or intersecting diagonals to create smaller triangles within the larger ones. Press the tape down firmly with your fingernail to prevent paint bleed. -
Trim Excess Tape:
Use a sharp craft knife to carefully trim away any overlapping tape tails that might interfere with your painting zones. You want clean, distinct triangular sections of exposed glass.
Step 2: Painting the Panels
-
Start with Teal:
Load your flat shader brush with the deep teal or emerald paint. Identify the largest central triangles in your pattern and fill them in with smooth, confident strokes. I find it best to brush away from the tape edges toward the center of the shape to minimize seeping. -
Apply the Terracotta:
Rinse your brush thoroughly and dry it. Move to the terracotta or copper shade, painting the inverted triangles adjacent to the teal ones. These warm tones provide a striking contrast. -
Add Sage Green Accents:
Using the sage green, fill in the smaller, narrower triangles that act as connectors between the larger shapes. This lighter color helps balance the darker tones. -
Anchor with Brown:
To give the design weight, use the chocolate brown paint for the smallest triangles located near the bottom of the bowl, right where it meets the stem. -
Check for Opacity:
After the first coat feels tacky (usually 15-20 minutes), hold the glass up to the light. If the colors look streaky or translucent, gently apply a second thin coat to solidify the color blocks.
Clean Lines Secret
Burnish down the edges of your masking tape with a spoon or credit card before painting. This creates a tighter seal against the glass and stops jagged edges.
Step 3: Finishing Touches
-
Remove Tape Carefully:
This is crucial: remove the tape while the paint is still slightly wet or at least tacky—do not wait for it to fully harden, or you might peel the paint off with it. Pull slowly at a 45-degree angle. -
Clean Up Lines:
If any paint seeped under the tape, use a slightly damp cotton swab or the tip of your craft knife to gently scrape away the excess while it’s fresh, sharpening those crisp geometric edges. -
Add Detail Lines (Optional):
To mimic the look in the photo perfectly, use a liner brush or liquid glass outliner to paint very thin white or light gray lines in the negative space between the colored triangles. This creates a cohesive separate-panel effect. -
Dry Time:
Allow the glass to air dry for at least 1 hour before handling excessively, and let it cure for a full 24 hours before baking. -
Bake to Set:
Place the cold glass into a cold oven. Set the temperature to 350°F (175°C) and bake for 30 minutes. Turn the oven off and let the glass cool down completely inside the oven to prevent cracking.
Metallic Upgrade
Swap the terracotta paint for a true metallic copper glass paint. It catches the candlelight beautifully during evening cocktails.
Once cooled, your custom barware is ready to impress at your next dinner party

PENCIL GUIDE
Understanding Pencil Grades from H to B
From first sketch to finished drawing — learn pencil grades, line control, and shading techniques.
Explore the Full Guide
Stained-Glass Style Translucent Blocks
Capture the timeless elegance of Tiffany lamps on a sleek martini glass with this faux stained-glass project. Translucent blocks of teal, amber, and cream creates a warm, vintage aesthetic that glows beautifully when held to the light.
How-To Guide
Materials
- Martini glass (clean and dry)
- Rubbing alcohol and cotton pads
- Liquid leading or relief paste (black or pewter)
- Pebeo Vitrail glass paints (or similar transparent glass paint) in Teal, Amber/Orange, and Cream/White
- Small round synthetic paintbrush (size 0 or 1)
- Toothpicks
- Paper plate or palette
- Painter’s tape (optional)
- Cotton swabs for cleanup
Step 1: Preparation & Planning
-
Clean the surface:
Thoroughly wipe down the entire bowl of the martini glass with rubbing alcohol. This removes any oils or fingerprints that could prevent the paint and lead lines from adhering properly. -
Mask the rim:
If you plan to drink from this glass, apply a strip of painter’s tape around the top 1/2 inch of the rim. It is safer to keep paints away from where your mouth will touch. -
Plan your pattern:
Sketch a rough geometric design on paper first. The style shown uses a mix of triangles and trapezoids, radiating somewhat loosely from the stem upwards.
Pro Tip: Gravity is Tricky
Paint one side of the glass at a time and let it dry to a tack before rotating. This prevents the fluid paint from running down the curved surface.
Step 2: Creating the Lead Lines
-
Start the leading:
Using the liquid leading bottle directly, begin drawing your lines on the glass. Start near the top (below your tape line) and work your way down so you don’t smudge your work. -
Draw the horiztonal anchor:
Create a horizontal line around the upper portion of the glass to frame the design. You can keep this line steady by resting your pinky finger against the glass while you rotate it. -
Add vertical dividers:
Draw vertical or slightly slanted lines down from your horizontal band. Varied angles create that authentic ‘fractured’ stained glass look. -
Create the mosaic shapes:
Connect your vertical lines with random diagonal cross-sections. Aim for variety in size and shape—some small triangles, some larger quadrilaterals. -
Close the shapes:
Ensure every shape is fully enclosed by the leading lines. Gaps will cause the liquid glass paint to leak into neighboring sections later. -
Correct mistakes:
If a line goes rogue, wait for it to dry slightly and peel it off with a toothpick, or wipe it away immediately with a wet cotton swab. -
Let the lead cure:
Allow the relief paste to dry completely. This usually takes at least 2 hours, but check your specific product instructions. The lines must be hard before you paint.
Step 3: Painting the Glass
-
Prepare the paints:
squeeze a small amount of your Teal, Amber, and Cream glass paints onto your palette. Do not shake the bottles vigorously, as this creates bubbles; stir gently instead. -
Fill the Teal sections:
Dip your brush generously into the Teal paint. ‘Drop’ the paint into a chosen section rather than brushing it. Let the paint flow to the edges of the lead distinct lines. -
Add the Amber tones:
Clean your brush thoroughly and switch to the Amber/Orange paint. Select scattered sections to paint, ensuring you don’t put two of the same color right next to each other. -
Apply the Cream accents:
Fill remaining sections with the Cream or White translucent paint. This lighter color provides essential contrast and helps the darker colors pop. -
Leave some clear:
For a true light-catching effect, you can leave a few small sections unpainted, or paint them with a clear medium to match the glossy texture of the other shapes. -
Pop air bubbles:
Inspect your wet paint closely. If you see tiny bubbles, gently pop them with the tip of a toothpick before the paint starts to skin over. -
Dry horizontally:
Glass paint is fluid. To prevent drips, you may need to prop the glass carefully or turn it occasionally as it sets initially, though painting thin layers helps avoid this.
Troubleshooting: Leaky Lines
If paint bleeds underneath your lead lines, the lines weren’t fully connected to the glass. Wait for it to dry, slice the bleed with a craft knife, and scrape it off.
Step 4: Curing
-
Initial drying:
Let the glass sit undisturbed in a dust-free area for 24 hours. The paint will be dry to the touch but not fully cured. -
Baking (Optional):
Check your paint brand’s instructions. Many glass paints require baking in a home oven (often around 325°F for 40 minutes) to become dishwasher resistant.
Now you have a stunning, light-catching vessel ready for your next sophisticated gathering
Frosted Snowflakes on the V Shape
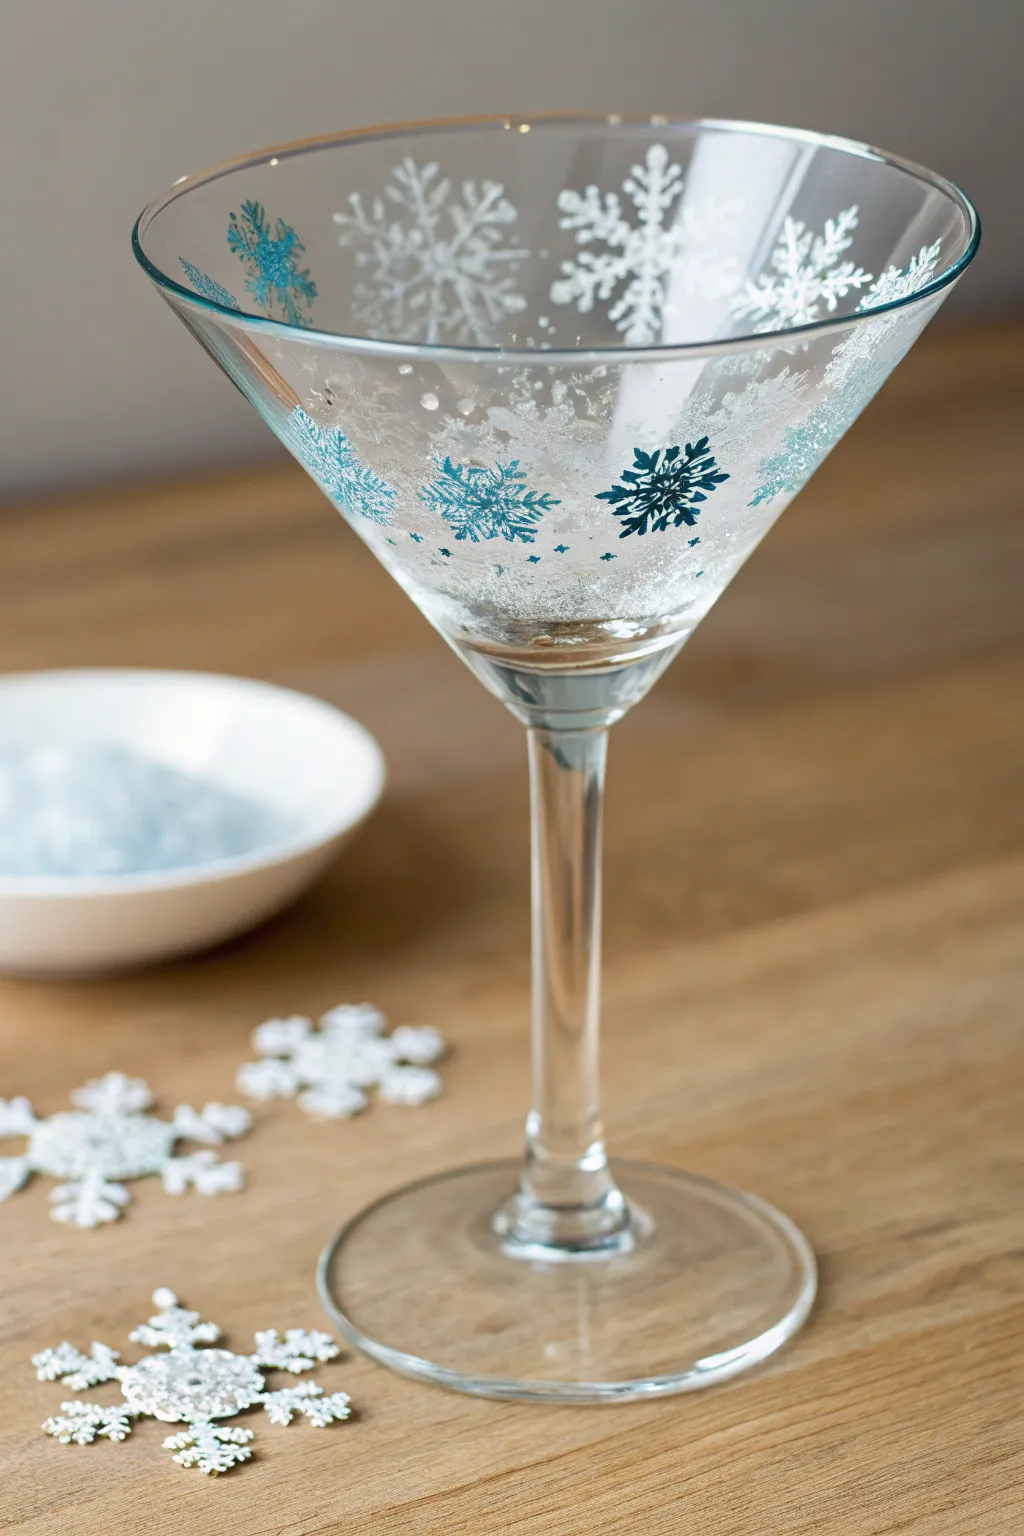
Transform a plain martini glass into a frosty masterpiece perfect for holiday entertaining with this delicate snowflake design. By combining translucent frosting mediums with crisp painted details, you’ll achieve an elegant, icy look that seems to have frozen right onto the glass.
Step-by-Step Tutorial
Materials
- Glass martini glass
- Rubbing alcohol
- Cotton pads or paper towel
- Frosting medium (glass frosting spray or paint-on medium)
- White enamel glass paint
- Metallic blue or teal enamel glass paint
- Pale blue enamel glass paint
- Fine detail paintbrushes (size 0 or 00)
- Small cosmetic sponge or dauber
- Palette or small plate
- Oven (for curing, if paint requires)
Step 1: Preparation & Base Frosting
-
Clean surface:
Begin by thoroughly wiping down the entire surface of the martini glass with rubbing alcohol and a paper towel. This removes any oils or fingerprints that could prevent the paint from adhering properly. -
Plan frost zone:
Decide where you want the heaviest frost. In this design, the ‘ice’ looks thickest at the bottom of the V-shape. You can mark this mental line or use a tiny piece of painter’s tape as a guide on the stem to keep it clean. -
Apply initial frost:
Using a cosmetic sponge, dab a small amount of glass frosting medium onto the glass. Start at the very bottom of the bowl where it meets the stem. -
Fade the effect:
Work your way upward with the sponge, using less pressure and less product as you go higher. You want a gradient effect—opaque white at the bottom, fading to sheer glass near the rim. -
Add texture:
While the medium is still wet, you can tap the sponge repeatedly over the heavier areas to create a stippled, icy texture rather than a smooth finish. Let this base layer dry completely according to the manufacturer’s instructions.
Step 2: Building the Snowflakes
-
Load your palette:
Dispense small amounts of your white, metallic blue, and pale blue enamel paints onto your palette. I like to keep them separate to ensure crisp colors. -
Start with large white flakes:
Using your fine detail brush and white paint, paint the largest snowflakes first near the rim. Start with a simple cross (+), then add an X over it to create an 8-point star. -
Add detail to white flakes:
Add tiny ‘V’ shapes or dots at the end of each arm of the white snowflakes to give them that classic crystalline look. -
Paint blue flakes:
Switch to your metallic blue or teal paint. Paint medium-sized snowflakes interspersed between the white ones, primarily around the middle section of the glass bowl. -
Create pale blue accents:
Using the pale blue paint, add a few smaller, simpler star-shaped flakes lower down on the glass, overlapping slightly with the frosted base layer. -
Vary the designs:
Don’t make every snowflake identical. Some can be simple 6-point stars, others can be elaborate crystalline shapes. This variety mimics nature. -
Micro-dot detailing:
Dip the non-brush end (the handle tip) of your paintbrush into white paint. Gently dot tiny specks of ‘snow’ around the empty spaces between the larger flakes.
Sponge Stippling Secret
Use a natural sea sponge instead of a synthetic makeup sponge for irregular, organic ice patterns that look more realistic.
Step 3: Finishing Touches
-
Deepen the frost:
Once your painted snowflakes are touch-dry, evaluate the bottom frost. If it needs more depth, lightly sponge a tiny bit of white enamel paint over the frosting medium at the very base of the bowl. -
Clean the stem:
Check the stem for any accidental smudges. Use a cotton swab dipped in rubbing alcohol to clean up any stray paint marks below the bowl. -
Review rim area:
Ensure no paint is directly on the lip where someone would drink. It’s best to leave the top half-inch fairly clear or very lightly detailed. -
Curing process:
Let the glass sit for at least 24 hours to air dry. For dishwasher durability (if your specific paints allow), place the glass in a cool oven, heat to 350°F (175°C), bake for 30 minutes, and let it cool down inside the oven.
Sparkle Upgrade
While the paint is wet, lightly dust ultra-fine iridesecent glitter over the wet snowflakes for a magical shimmer.
Enjoy your beautiful winter creation at your next holiday gathering or gift it to a friend who loves the snow


Holly and Ribbon Holiday Wrap
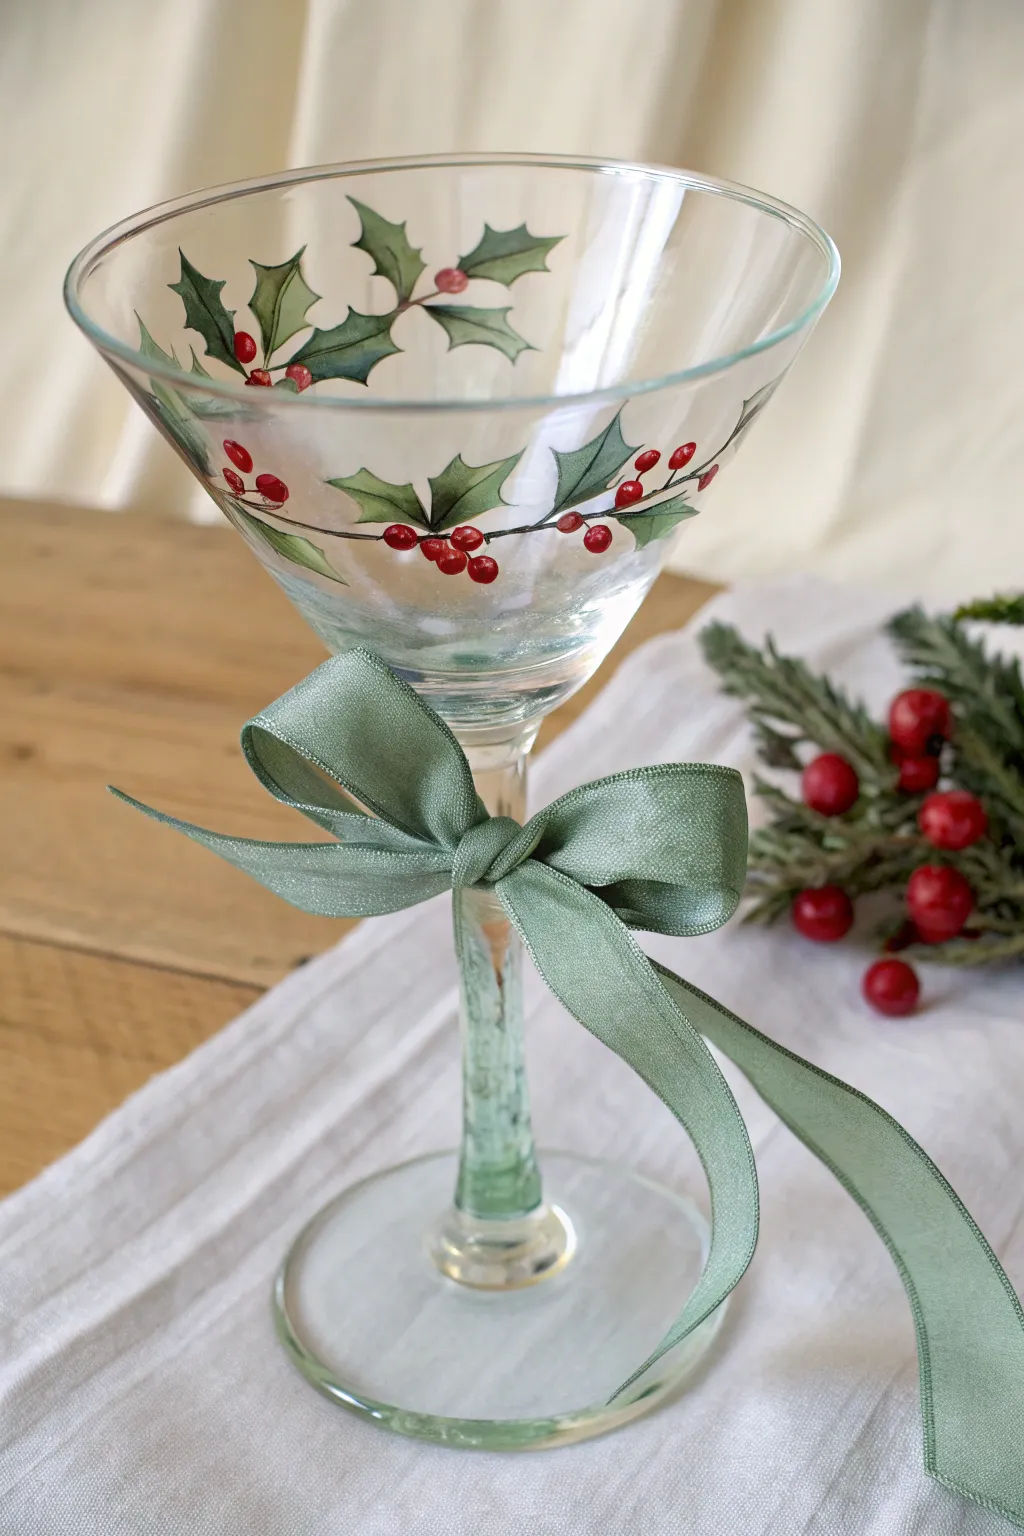
Transform a simple martini glass into elegant stemware for your holiday table with this delicate holly design. The classic combination of festive greenery and bright red berries, tied off with a soft sage ribbon, makes every sip feel like a celebration.
Detailed Instructions
Materials
- Clear glass martini glass
- Rubbing alcohol and cotton pads
- Enamel glass craft paint (Dark Green, Light Green, Red, Brown)
- Small round detail brush (size 0 or 1)
- Fine liner brush
- Sage green satin ribbon (approx. 1/2 inch wide)
- Paper plate or palette
- Water cup and paper towels
- Oven (for baking/curing, optional)
Step 1: Preparation and Vine Structure
-
Clean the Glass:
Before painting, it is crucial to remove any oils or fingerprints from the glass surface. Wipe the entire bowl of the martini glass thoroughly with rubbing alcohol on a cotton pad and let it air dry completely. -
Mix the Vine Color:
On your palette, mix a tiny amount of brown paint with a dot of water to improve flow, or use it straight if it’s thin enough. You want a very fine consistency. -
Paint the Vine Guide:
Using your fine liner brush, paint a very thin, delicate vine line that swoops around the circumference of the glass bowl. It doesn’t need to be a perfect circle; gentle curves look more organic.
Paint Slipping?
If paint streaks or won’t stick, the glass likely still has oil residue. Wipe again with alcohol and avoid touching the painting area with bare fingers.
Step 2: Painting the Holly Leaves
-
Outline the Leaves:
Switch to your small round brush. Dip it into the dark green enamel paint. Along the vine you just created, paint the outline of classic holly leaves with their signature spiky edges. -
Fill the Leaves:
Fill in the leaf outlines with the dark green paint. Don’t worry about complete opacity yet; sometimes slightly sheer glass paint adds a lovely stained-glass effect. -
Add Highlights:
While the dark green is still slightly wet (or dry if you prefer sharp lines), take a very small amount of light green paint. Blend this into the center or one side of each leaf to create dimension and light reflection. -
Create Veins:
Once the green base is tacky or dry, use your finest liner brush and a darker green (or mix green with a tiny touch of black/brown) to draw a thin central vein down the middle of each leaf. -
Repeat Around the Bowl:
Continue painting clusters of two or three leaves at intervals around the glass. I usually leave small gaps between clusters for the berries.
Step 3: Adding Berries and Details
-
Dot the Berries:
Dip the handle end of a small brush (or use a dotting tool) into bright red enamel paint. Press gently onto the glass near the leaf clusters to create perfectly round berries. -
Cluster the Berries:
Group the berries in clusters of three or scattered pairs along the vine line. Varying the sizes slightly makes them look more natural. -
Add Berry Highlights:
Wait for the red paint to dry significantly. Then, add a tiny speck of white paint to the top right curve of each berry to simulate a shiny reflection. -
Clean Up Edges:
If any paint has gone astray, use a damp cotton swab or a toothpick to gently scrape away errors before hardening the paint.
Pro Tip: Translucency
Mix a clear glazing medium with your green paint. This makes the leaves semi-transparent, allowing the liquid inside the glass to shimmer through the design.
Step 4: Finishing Touches
-
Cure the Paint:
Follow the instructions on your specific bottle of enamel paint. Most require air drying for 21 days or baking in a cool oven that heats up to 350°F for 30 minutes to make the design dishwasher safe. -
Prepare the Ribbon:
Cut a length of sage green ribbon, about 12-14 inches long. Angle-cut the ends to prevent fraying and give it a polished look. -
Tie the Bow:
Wrap the ribbon around the narrowest part of the stem, just under the bowl. Tie a simple shoelace bow. -
Adjust the Bow:
Gently tug the loops to make them full and symmetrical, ensuring the ‘tails’ of the ribbon drape naturally down the stem. -
Secure the Knot:
If you are concerned about the ribbon slipping during use, place a barely visible dot of clear craft glue (or a glue dot) on the glass stem before tying the knot.
Now you have a stunning piece of custom glassware ready to toast the season
Candy Stripe Stem With Tiny Stars
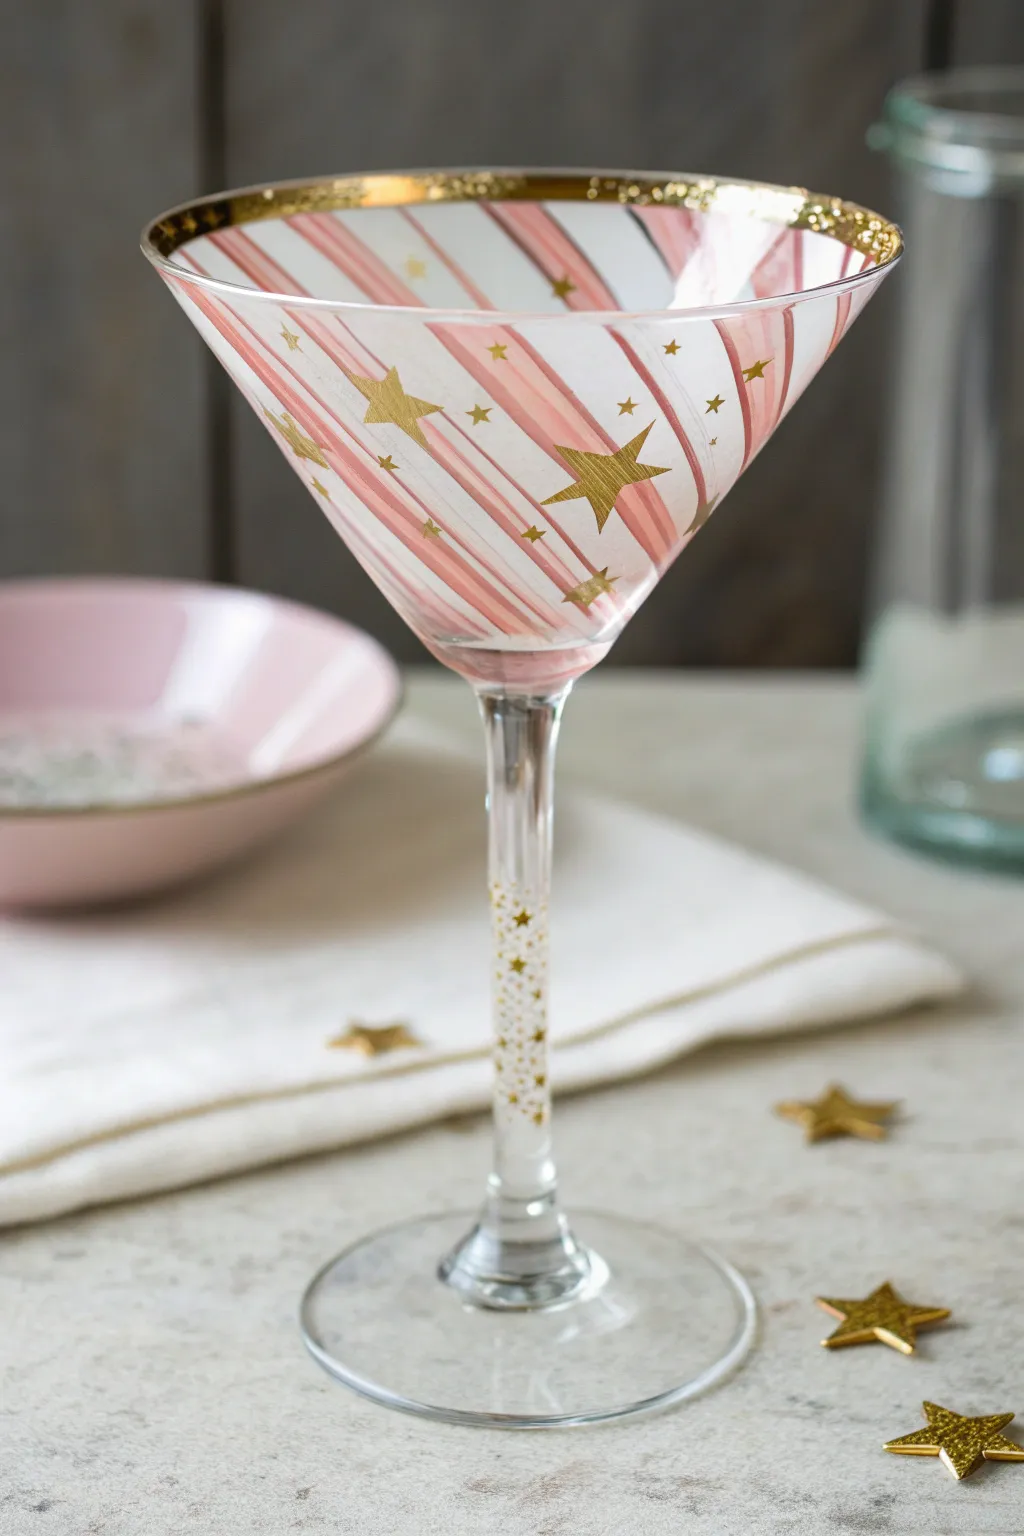
Transform a plain martini glass into a festive masterpiece featuring elegant candy cane stripes and scattered gold stars. This design balances sweet pink tones with glamorous metallic accents for a drinkware set that truly sparkles.
Step-by-Step Guide
Materials
- Clear glass martini glass
- Rubbing alcohol and cotton pads
- Glass paint: Soft pink (opaque or semi-transparent), Gold metallic
- Glossy glass medium (optional, for thinning paint)
- Painter’s tape or thin masking tape (1/4 inch width)
- Flat shader brush (small)
- Fine detail liner brush
- Small dotting tool or toothpick
- Paper plate or palette
- Oven (for curing, if required by your paint brand)
Step 1: Preparation & Masking
-
Clean the surface:
Before laying down any color, wipe the entire glass surface with rubbing alcohol on a cotton pad. This removes oils and fingerprints that could prevent the paint from adhering properly. -
Plan your stripes:
Visualize the swirl pattern for the bowl. We want the stripes to spiral gently from the base of the bowl up to the rim. -
Tape the glass:
Using thin painter’s tape, create a spiral mask on the outside of the glass bowl. Adhere the tape starting near the stem connection and wind it upwards. Press the edges down firmly to prevent paint bleed. -
Double-check spacing:
Ensure the spacing between the tape lines—where the pink paint will go—is roughly even, though a little handmade variance adds charm.
Fixing Smudges
Smudged a star? Don’t panic. Use a Q-tip slightly dampened with rubbing alcohol to erase the mistake instantly before it dries.
Step 2: Painting the Pink Stripes
-
Load the brush:
Dip your flat shader brush into the soft pink glass paint. If the paint feels too thick, mix in a tiny drop of glass medium to help it glide smoothly. -
Paint the open areas:
Fill in the glass spaces between the tape lines with the pink paint. Apply the paint in long, sweeping strokes following the curve of the tape to minimize brush marks. -
Check opacity:
If the first coat looks too streaky, let it dry for about 20 minutes and apply a second thin coat for a richer pastel color. -
Remove the tape:
While the paint is still slightly tacky (but not wet), carefully peel off the tape. Pull it away at an angle to keep crisp edges. -
Clean up edges:
If any pink paint seeped under the tape, use a toothpick or a damp cotton swab to gently scrape or wipe it away while it’s fresh.
Step 3: Adding the Gold Accents
-
Paint the rim:
Using your flat brush or the side of a liner brush, carefully paint the very rim of the glass with gold metallic paint. Create a thin, possibly uneven ‘foil’ effect for a vintage look. -
Practice your stars:
On a scrap piece of paper, practice painting five-point stars with your fine liner brush to get the shape right before touching the glass. -
Paint large stars:
Scatter a few large gold stars across the bowl of the glass. Place some over the pink stripes and some on the clear glass sections for depth. I like to angle them differently so they look like they are tumbling. -
Fill small stars:
Using the tip of your liner brush, add smaller, simpler stars in the gaps between the larger ones. -
Add micro-stars:
Use a dotting tool or toothpick dipped in gold to add tiny specks or micro-stars near the larger ones for a magical dust effect.
Add Dimension
Mix a tiny bit of clear glitter medium into the pink paint for stripes that have a subtle, sugary shimmer under the lights.
Step 4: Detailing the Stem
-
Transition to the stem:
The stem needs a lighter touch. Instead of stripes, we will create a gradient of ‘stardust’. -
Dot the stem:
Using the smallest dotting tool or the very tip of your brush, tap tiny gold dots and miniature stars along the stem. -
Create a gradient:
Concentrate more dots near the top of the stem where it connects to the bowl, and space them out as you move down towards the foot of the glass. -
Curing the paint:
Allow the glass to dry for at least 24 hours. Follow the manufacturer’s instructions on your paint bottle to cure the piece, usually by baking it in a non-preheated oven to make it washable.
Now pour your favorite cosmopolitan into your new custom creation and enjoy the sparkle.
Galaxy Night Sky Martini Glass
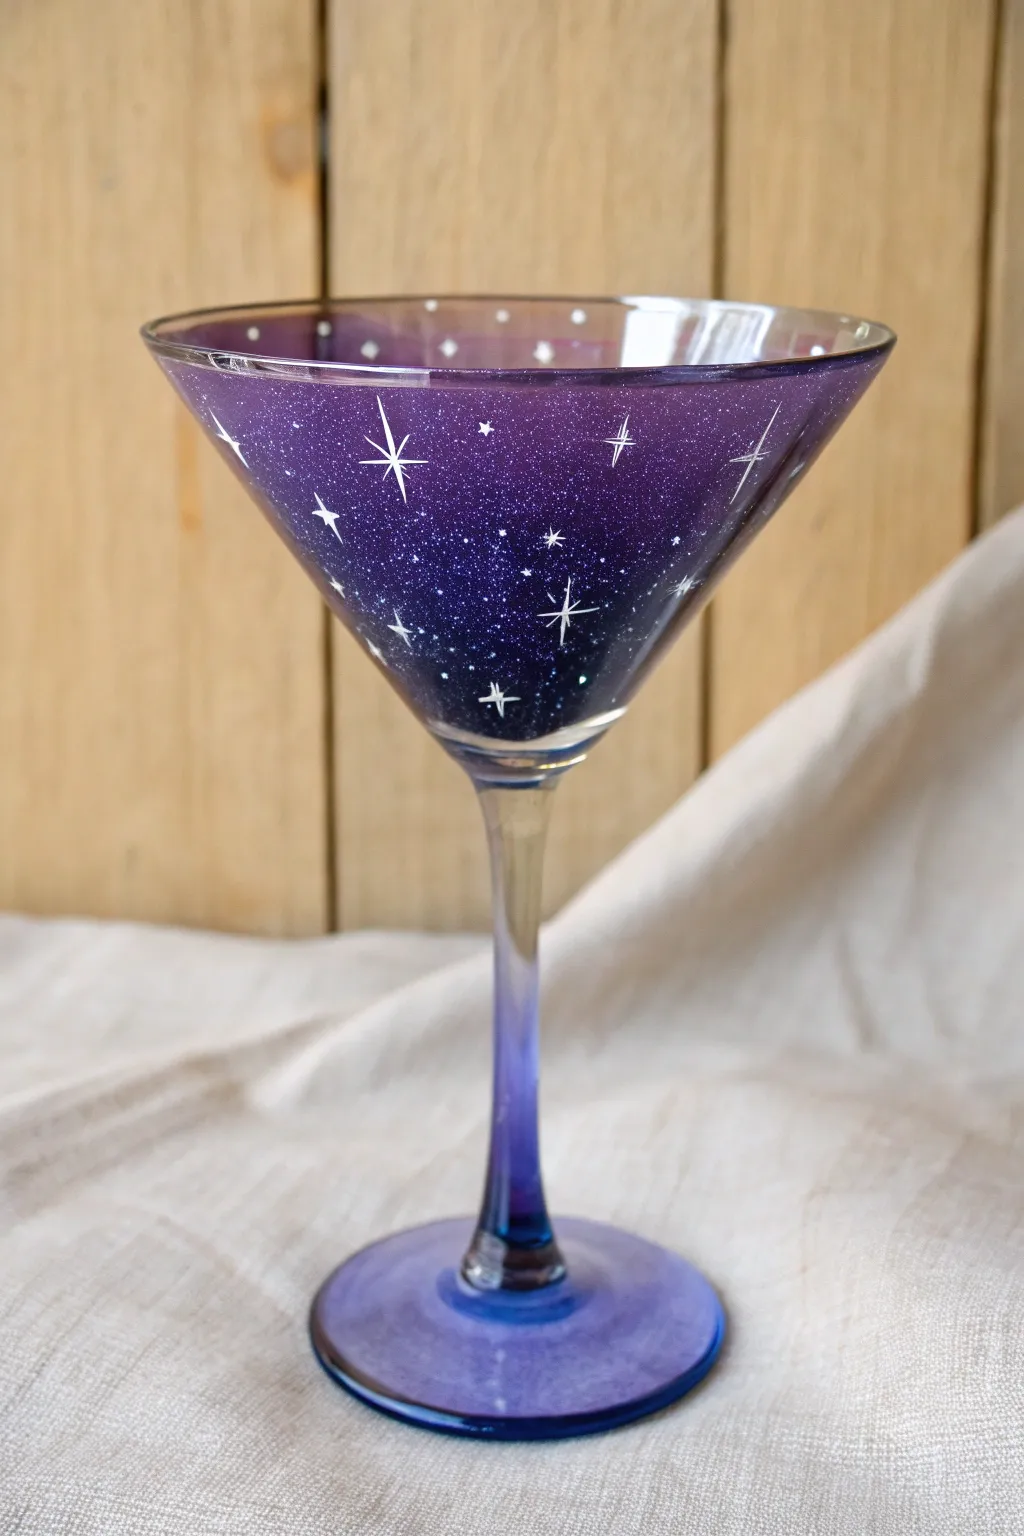
Transform a plain martini glass into a piece of celestial art with this stunning galaxy design. Featuring a deep, glittering purple gradient and delicate white stars, this project brings the magic of the night sky right to your table setting.
How-To Guide
Materials
- Clear glass martini glass
- Rubbing alcohol
- Cotton pads
- Multi-surface acrylic enamel paint (Deep Violet)
- Multi-surface acrylic enamel paint (Midnight Blue or Navy)
- Multi-surface acrylic enamel paint (White)
- Fine silver glitter dust or glitter paint medium
- Cosmetic sponge wedges
- Fine detail liner brush (size 0 or 00)
- Small round brush
- Sealant or gloss varnish (optional, for glass)
- Oven (for curing)
Step 1: Preparation and Base Coat
-
Clean surface:
Begin by thoroughly cleaning the martini glass with rubbing alcohol and a cotton pad. This removes any oils or fingerprints that could prevent the paint from adhering properly. -
Load the sponge:
Squeeze a small amount of Deep Violet and Midnight Blue paint onto a palette. Take a cosmetic sponge wedge and dab it into the Deep Violet, tapping off any excess paint on a paper towel. -
Apply the first layer:
Starting at the top rim of the glass bowl, gently dab the sponge against the exterior glass. Work your way down towards the stem, moving in a circular pattern around the glass. -
Build the gradient:
As you move lower on the bowl towards the stem, pick up a tiny bit of Midnight Blue on the same sponge to darken the color. Blend this into the violet to create a subtle transition into the deeper abyss of space. -
Paint the stem:
Continue sponging down the stem and onto the base of the glass. Use lighter pressure here to keep the layer thin and even, ensuring the transition flows seamlessly from bowl to foot. -
Initial dry time:
Let this first coat dry for about 20-30 minutes. It may look sheer or streaky at this stage, but don’t worry—that’s normal. -
Second coat:
Repeat the sponge dabbing process with a second layer to build opacity. The color should now look rich and vibrant against the light.
Sponge Technique Tip
Don’t drag the sponge! Use a rapid up-and-down dabbing motion (stippling). This creates a wonderful texture that eliminates brush strokes and helps the glitter catch the light.
Step 2: Adding the Stars
-
Sparkle effect:
While the second coat is still slightly tacky, lightly dust fine silver glitter over the painted area, focusing on the darker sections to mimic distant galaxies. Alternatively, mix a clear glitter medium with a tiny drop of violet paint and sponge a thin layer over the top. -
Dry completely:
Allow the base coats to dry completely, preferably for an hour, before attempting the fine details. Wet paint will cause your stars to bleed. -
Paint major stars:
Using your finest liner brush and opaque white enamel paint, create the large stars. Start by painting a small vertical line, then cross it with a horizontal line. -
Detail the starbursts:
Add smaller diagonal lines between the main cross of your starburst. I like to make the vertical line slightly longer than the others to give it a twinkling appearance. -
Scatter small stars:
Dip the tip of a toothpick or the handle end of a small brush into the white paint. Dot various sizes of stars around the larger starbursts to fill the empty space. -
Add dimension:
For added depth, place a few tiny white dots near the rim on the *inside* of the glass if you only painted the exterior, or simply cluster some tiny dots together to look like distant star clusters.
Constellation Mapping
Instead of random stars, look up a real constellation like Cassiopeia or the Big Dipper and map it out on the glass using your white dots for a hidden astronomical detail.
Step 3: Curing and Finishing
-
Check coverage:
Hold the glass up to a light source to check for any unintentional bald spots in the purple base. Touch up lightly with your sponge if needed. -
Air cure:
Follow the instructions on your specific paint bottle for curing times. Most enamels require 21 days of air drying to become dishwasher safe, or an oven-bake method. -
Bake to cure:
To speed up the process, place the glass in a cool oven. Set the temperature to 350°F (175°C) and bake for 30 minutes. Turn the oven off and let the glass cool down completely inside the oven before removing it to prevent cracking.
Once cured, your glass is ready to hold your favorite cosmic cocktail and sparkle under the evening lights
Under-the-Sea Tentacles Wrapping the Bowl
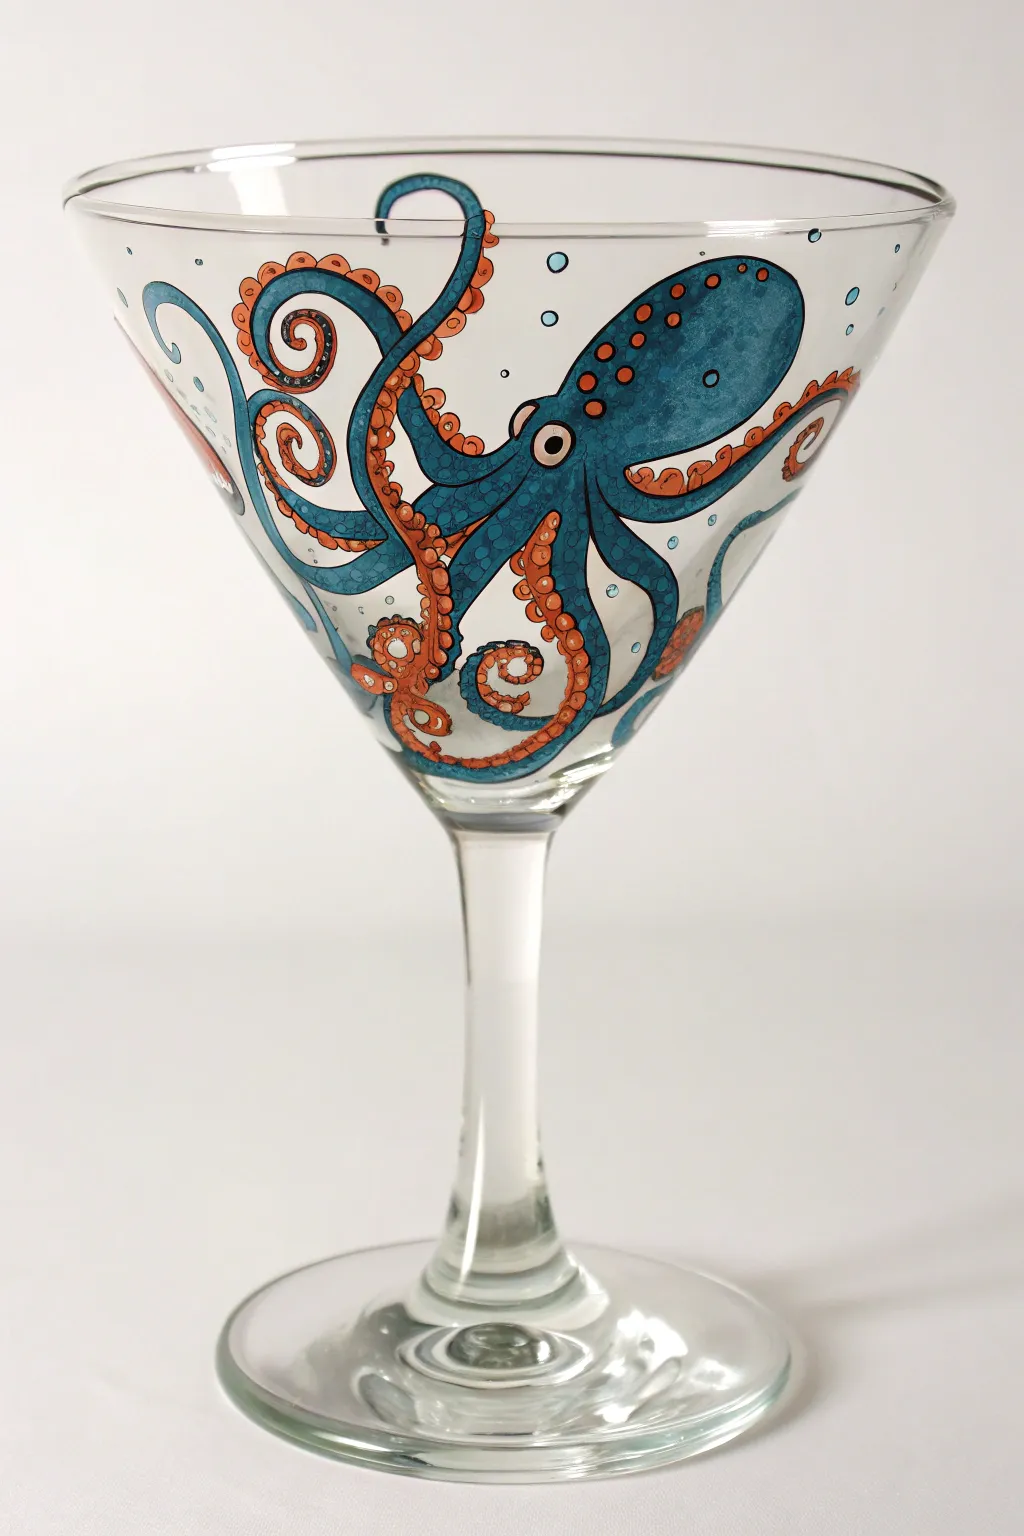
Transform a plain martini glass into a stunning underwater scene featuring a majestic teal octopus wrapping its tentacles around the bowl. This detailed hand-painted design combines deep sea blues with vibrant orange accents for a piece of drinkware that truly makes a splash.
Step-by-Step
Materials
- Clear martini glass (cleaned with rubbing alcohol)
- Enamel glass paints (Teal/Deep Blue, Orange/Rust, White, Black)
- Fine liner brush (size 00 or 000)
- Small round brush (size 1 or 2)
- Black glass liner or outlining medium (in a squeeze bottle or for brush application)
- Paper towels
- Rubbing alcohol
- Palette or small dish
- Small jar of water
- Cotton swabs (for mistakes)
Step 1: Preparation & Outline
-
Clean surface:
Before you start, wipe down the entire bowl of the glass with rubbing alcohol on a paper towel to remove any oils or fingerprints, ensuring the paint adheres perfectly. -
Sketch the body shape:
Using a fine brush and a very light wash of teal paint (or a washable marker if you prefer a guide), sketching the main bulbous head of the octopus near the upper rim is a great starting point. -
Map the tentacles:
Draw guiding lines for the eight tentacles. Make them curvy and dynamic, having some reach up towards the rim and others curl down towards the stem, intertwining them for a natural look. -
Apply the black outline:
Using your black glass liner or a fine liner brush loaded with black enamel, carefully trace the outline of the head and each tentacle. Keep your hand steady and rest your pinky on the glass for balance. -
Define the eye:
Draw a small circle for the eye on the head shape, adding a smaller pupil inside. Outline this clearly in black so the creature has a focal point. -
Add suction cup details:
Along the underside of each tentacle curve, draw rows of small circles or U-shapes to represent the suction cups. Vary their size, making them larger near the base of the tentacle and tiny at the tips.
Paint Consistency Pro-Tip
Glass paint is slick! If it’s too transparent, don’t glob it on. Apply one thin layer, let it dry for an hour, then apply a second thin layer for solid vibrancy.
Step 2: Filling with Color
-
Base coat the body:
Load your small round brush with teal enamel paint. Carefully fill in the main body and the top side of the tentacles, being careful to stay within your black outlines. -
Paint the suction cups:
Clean your brush thoroughly, then pick up the orange or rust-colored paint. Fill in the suction cup areas carefully. I find dabbing the paint in creates a nice, raised texture. -
Let the first layer dry:
Allow the paint to dry for about 15-20 minutes. Glass paint can be slippery, so letting it set slightly prevents colors from muddying if you need a second coat. -
Add depth to the body:
Mix a tiny drop of black into your teal paint to create a darker shade. Apply this shadow color to the bottom edges of the tentacles and the underside of the head to give the octopus volume. -
Highlight the form:
Mix a little white into your original teal. Paint subtle highlights on the top curve of the head and the upper ridges of the tentacles to make them look wet and shiny. -
Paint the eye:
Fill the outer ring of the eye with white paint. Once dry, fill the pupil with solid black, adding a tiny white dot as a reflection highlight to bring it to life.
Wobbly Lines?
If your outlines are shaky, use a cotton swab dipped in rubbing alcohol to quickly erase the mistake while wet. Or, gently scrape off dry mistakes with a craft knife.
Step 3: Finishing Touches
-
Detail the texture:
Using your finest brush and black paint, add small clusters of dots or tiny circles on the teal skin of the octopus to resemble bumpy skin texture. -
Add bubbles:
Dip the handle end of a paintbrush into light blue or white paint and dot random circles around the octopus to create floating bubbles. -
Outline bubbles:
Once the bubble dots are dry, use your fine liner brush to circle them with a very thin black line to match the illustrative style. -
Refine lines:
Go back over any main black outlines that might have been covered by paint to make the design crisp and bold again. -
Curing:
Follow the manufacturer’s instructions for your specific glass paint to cure the piece. This usually involves either air drying for 21 days or baking it in a cool oven that heats up to 350°F for 30 minutes.
Once fully cured, your hand-painted masterpiece is ready to serve up drinks with a touch of aquatic elegance


Have a question or want to share your own experience? I'd love to hear from you in the comments below!