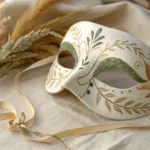
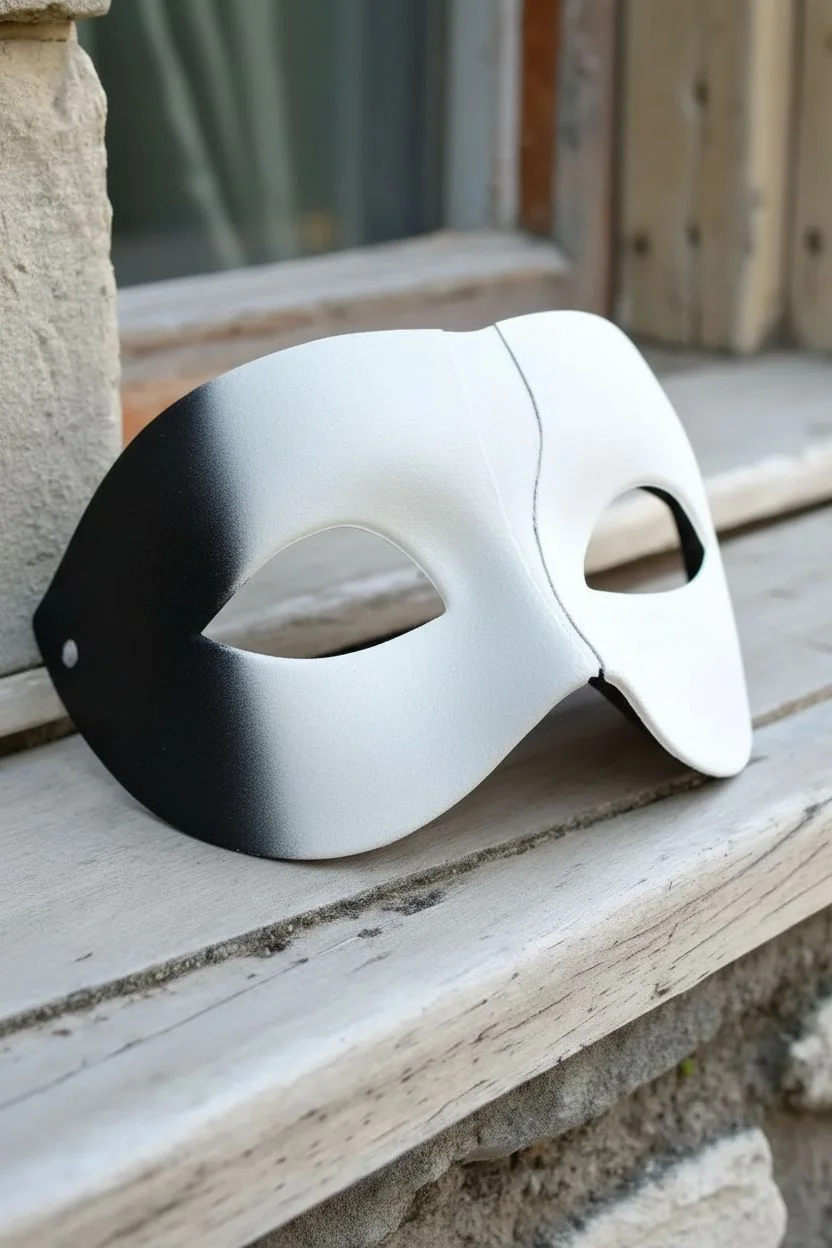
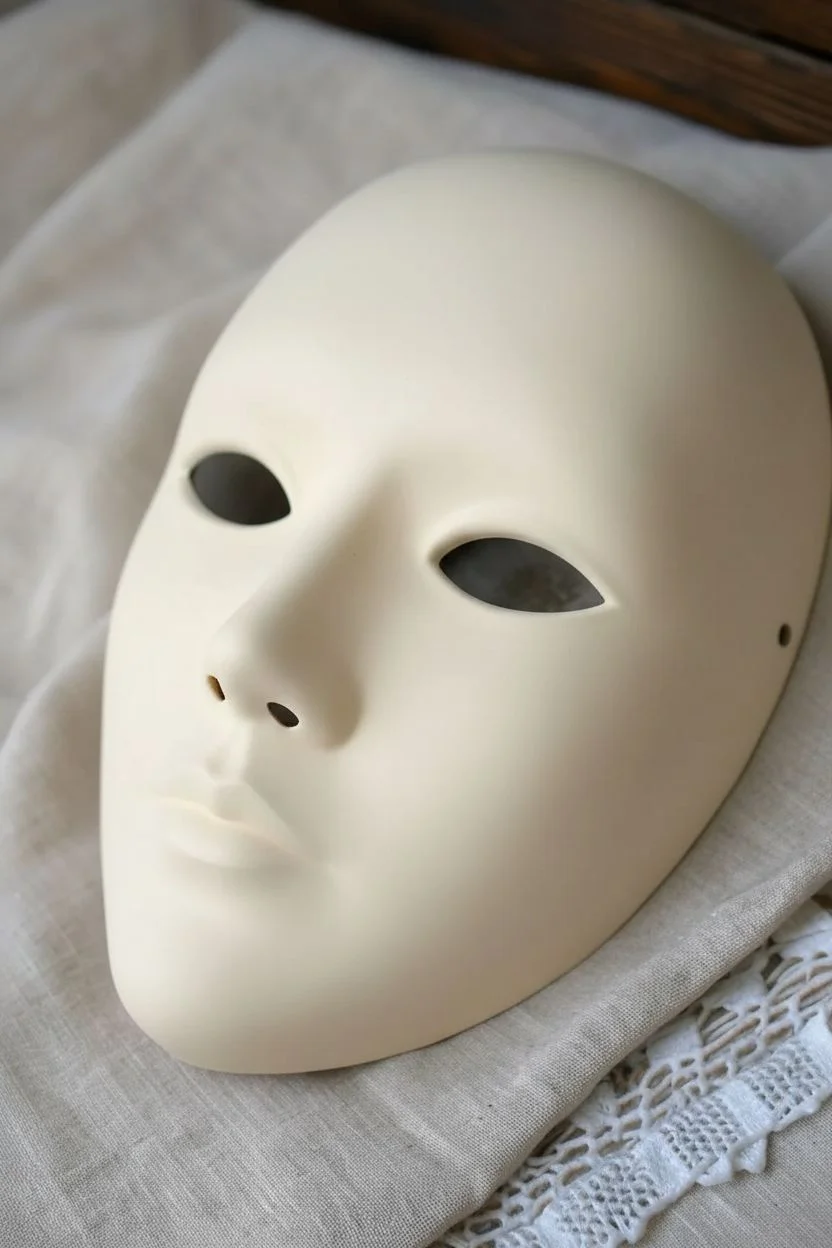
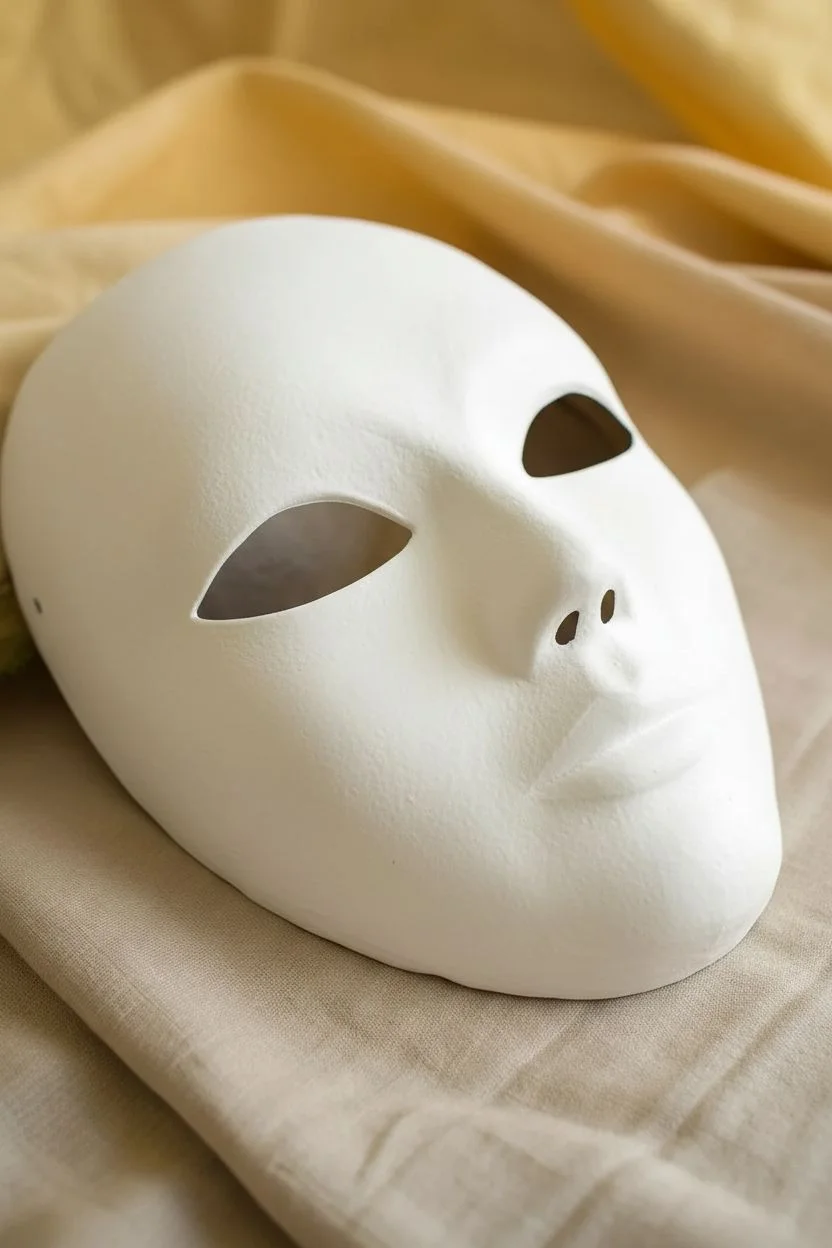
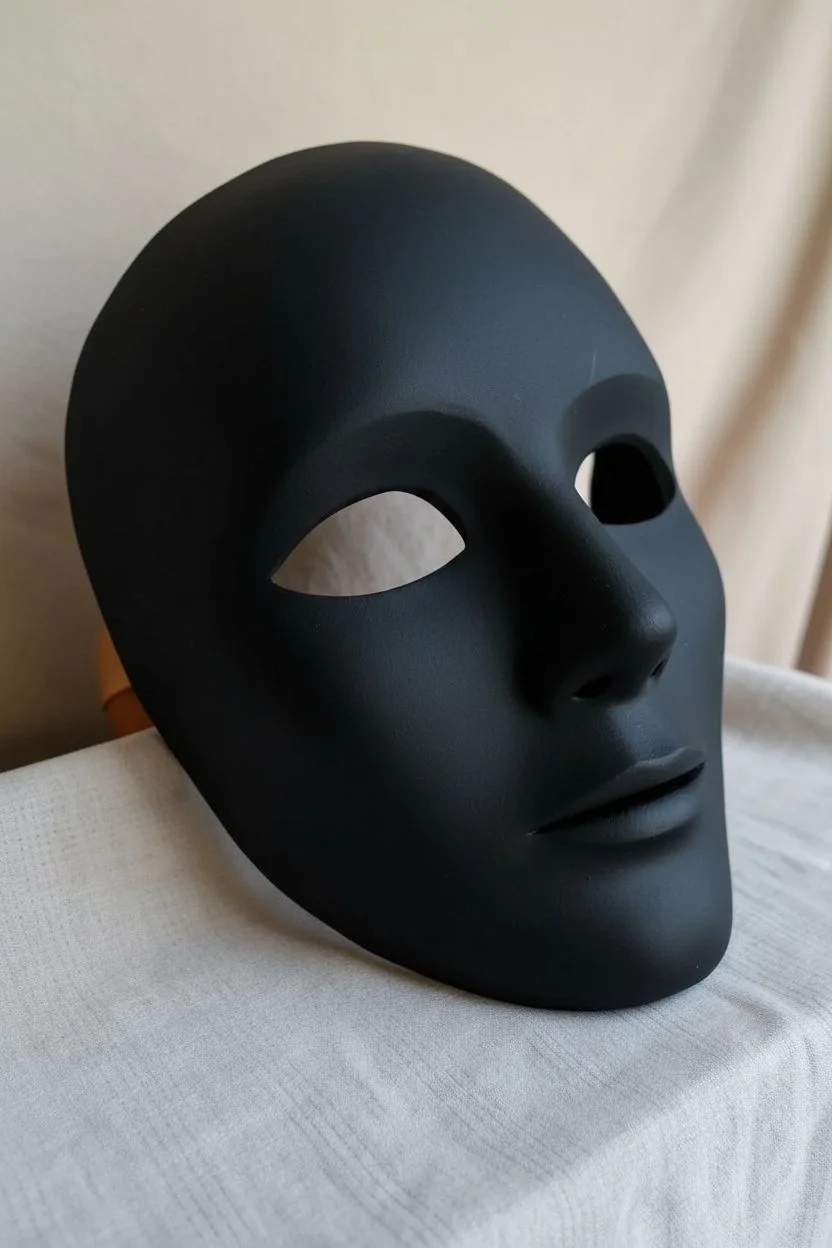
A blank mask is basically the most satisfying little 3D canvas—instant drama, instant personality. These mask painting ideas are meant to spark your imagination fast, whether you’re going elegant masquerade mask vibes or something delightfully weird.
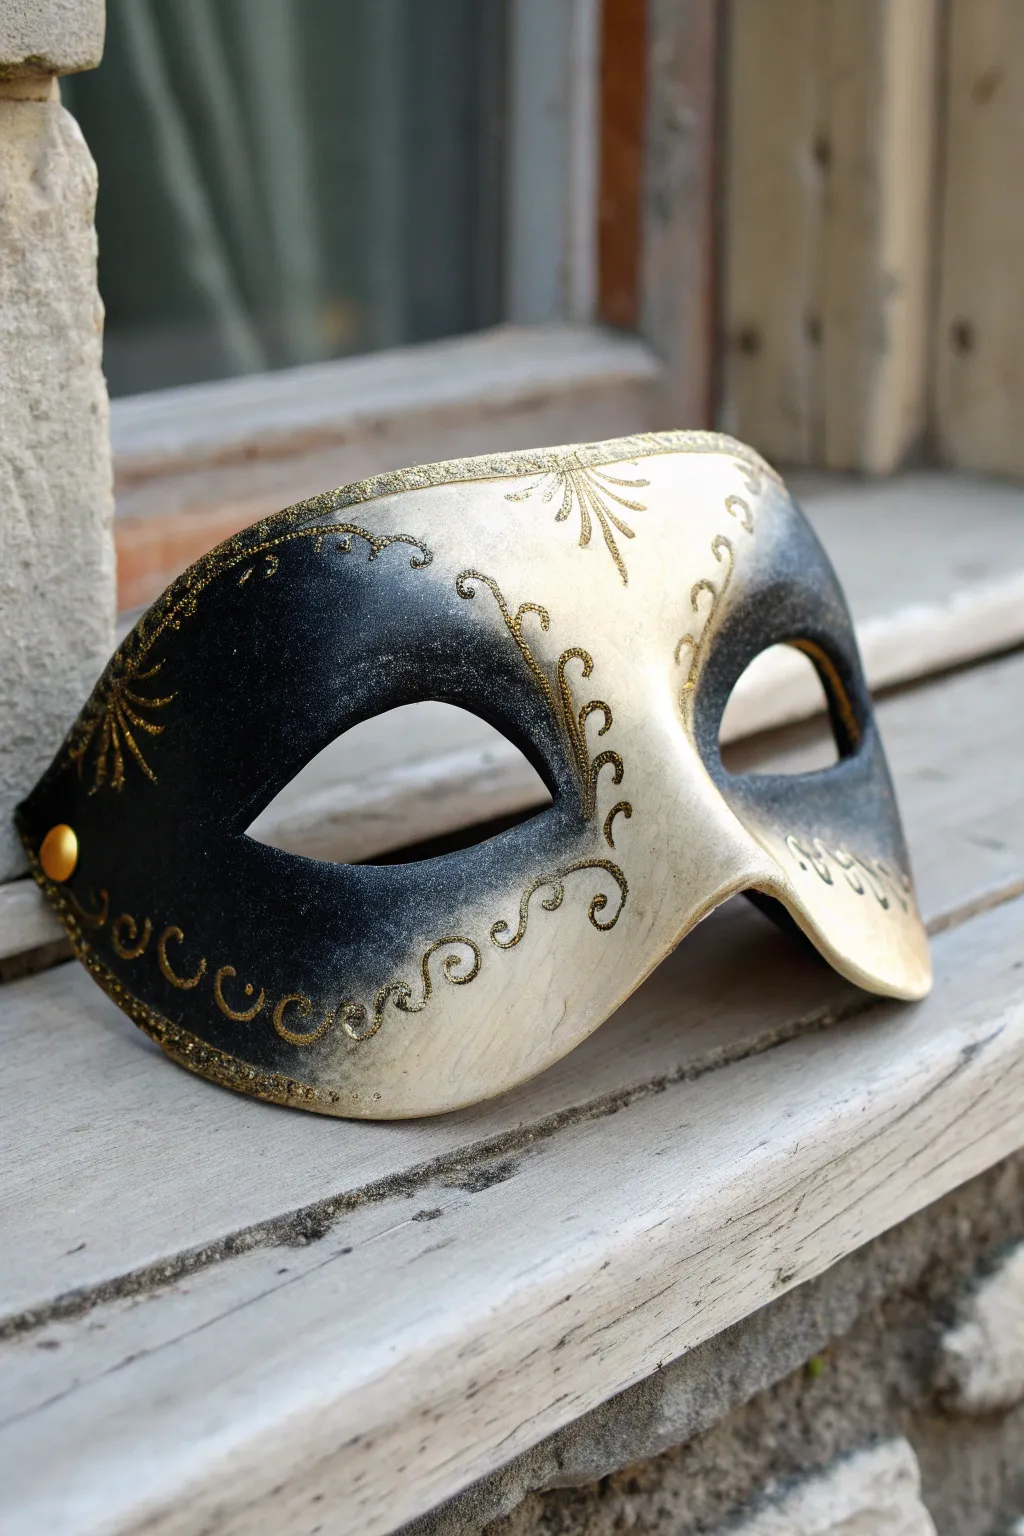
Venetian Filigree and Gold Accents
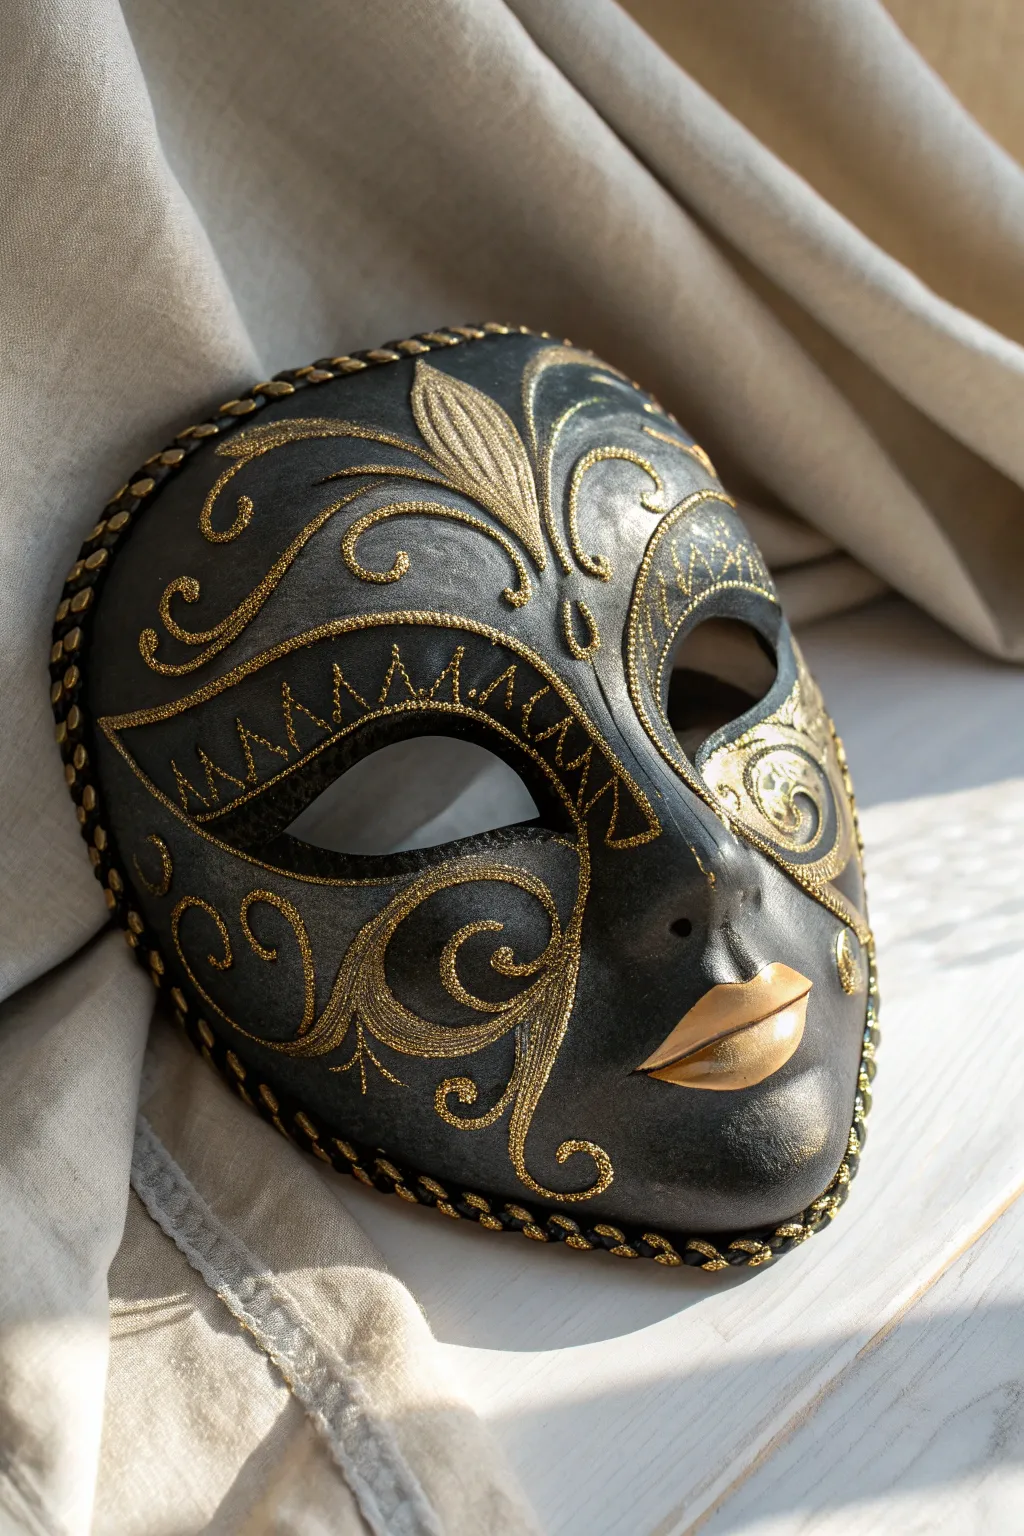
Capture the enigmatic allure of Venice with this stunning masquerade mask, featuring a matte black base adorned with intricate gold glitter scrollwork. The contrast between the dark, moody background and the shimmering raised details creates a sophisticated piece wearable for events or beautiful as wall art.
Detailed Instructions
Materials
- Blank papier-mâché or resin full-face mask
- Matte black acrylic paint
- Gold acrylic paint (metallic finish)
- Gold glitter glue (fine tip squeeze bottle)
- Black and gold braided decorative cord/trim
- Hot glue gun and glue sticks
- Soft synthetic flat brush (medium)
- Small round detail brush
- Pencil or white chalk pencil
- Matte or satin clear sealant spray
Step 1: Base Preparation
-
Prime the Surface:
Ensure your mask blank is clean and dry. If using a glossy plastic mask, lightly sand it first to help the paint adhere. -
Apply the Base Coat:
Using a soft flat brush, cover the entire front of the mask with matte black acrylic paint. I like to use long, smooth strokes to minimize brush marks. -
Build Opacity:
Let the first coat dry completely. Apply a second or third coat until you have a solid, velvety black finish with no underlying color showing through. -
Create a Subtle Sheen:
For that slightly dusty, aged look seen in the photo, dry brush a tiny amount of metallic pewter or dark grey paint over the high points (cheeks, nose bridge, forehead). Keep this extremely faint.
Glitter Glue Flow
If the nozzle clogs or air bubbles sputter out, test the flow on a scrap paper first. Keep a pin handy to clear the tip immediately if it blocks up.
Step 2: The Features
-
Paint the Lips:
Switch to your metallic gold acrylic paint and a small round brush. Carefully paint the lips, defining the cupid’s bow clearly. -
Refine the Edges:
You may need two coats of gold for brilliance. If you wobble outside the lip line, tidy it up with a touch of black once the gold is dry. -
Sketch the Design:
Using a white chalk pencil or a regular pencil (if you have good lighting), very lightly sketch the main filigree swirls. Focus on a central fleur-de-lis shape on the forehead and large scrolls on the cheeks. -
Map the Eye Area:
Draw an outline around the eye holes, extending outward slightly to create a winged shape guideline for the glitter application.
Sharper Lines
For crisper filigree than a bottle allows, squeeze paint onto a palette and apply it using a fine liner brush or a toothpick for dots.
Step 3: Filigree Detailing
-
Start the Centerpiece:
Take your gold glitter glue with a fine-tip nozzle. Begin at the forehead, tracing your sketched fleur-de-lis pattern. Squeeze gently to maintain a consistent line thickness. -
Fill the Petals:
Inside the larger petal shapes of the forehead design, fill the space with strokes of glitter glue to create a solid shimmering block rather than just an outline. -
Execute the Scrolls:
Work your way down to the cheeks. Create the large ‘C’ and ‘S’ scrolls. The key is to move your hand steadily and confidently to keep the curves smooth. -
Detail the Eyes:
Outline the eye shape with the glitter glue. Then, add the zigzag or ‘sawtooth’ pattern inside the winged outline you drew earlier, connecting the zigzags with small dots at the points. -
Add Flourishes:
Fill in any empty negative spaces with smaller swirls, dots, or teardrop shapes to balance the composition. Don’t overcrowd it; let the black background breathe.
Step 4: Finishing Touches
-
Dry Completely:
Allow the glitter glue to dry flat for several hours, preferably overnight. The glue will shrink slightly as it dries, leaving just the sparkle. -
Prepare the Trim:
Measure the circumference of your mask’s outer edge and cut a length of the black and gold braided cord. -
Attach the Border:
Working in small 2-inch sections, apply hot glue to the very edge of the mask and press the braided cord into place. Hold it until it sets to prevent lifting. -
Seal (Optional):
If you plan to wear the mask often, a light mist of spray sealant can help fix the glitter in place, though it may dull the sparkle slightly.
Once the trim is set, your Venetian masterpiece is ready to bring an air of mystery to your next masquerade event


Classic Mardi Gras Color Pop
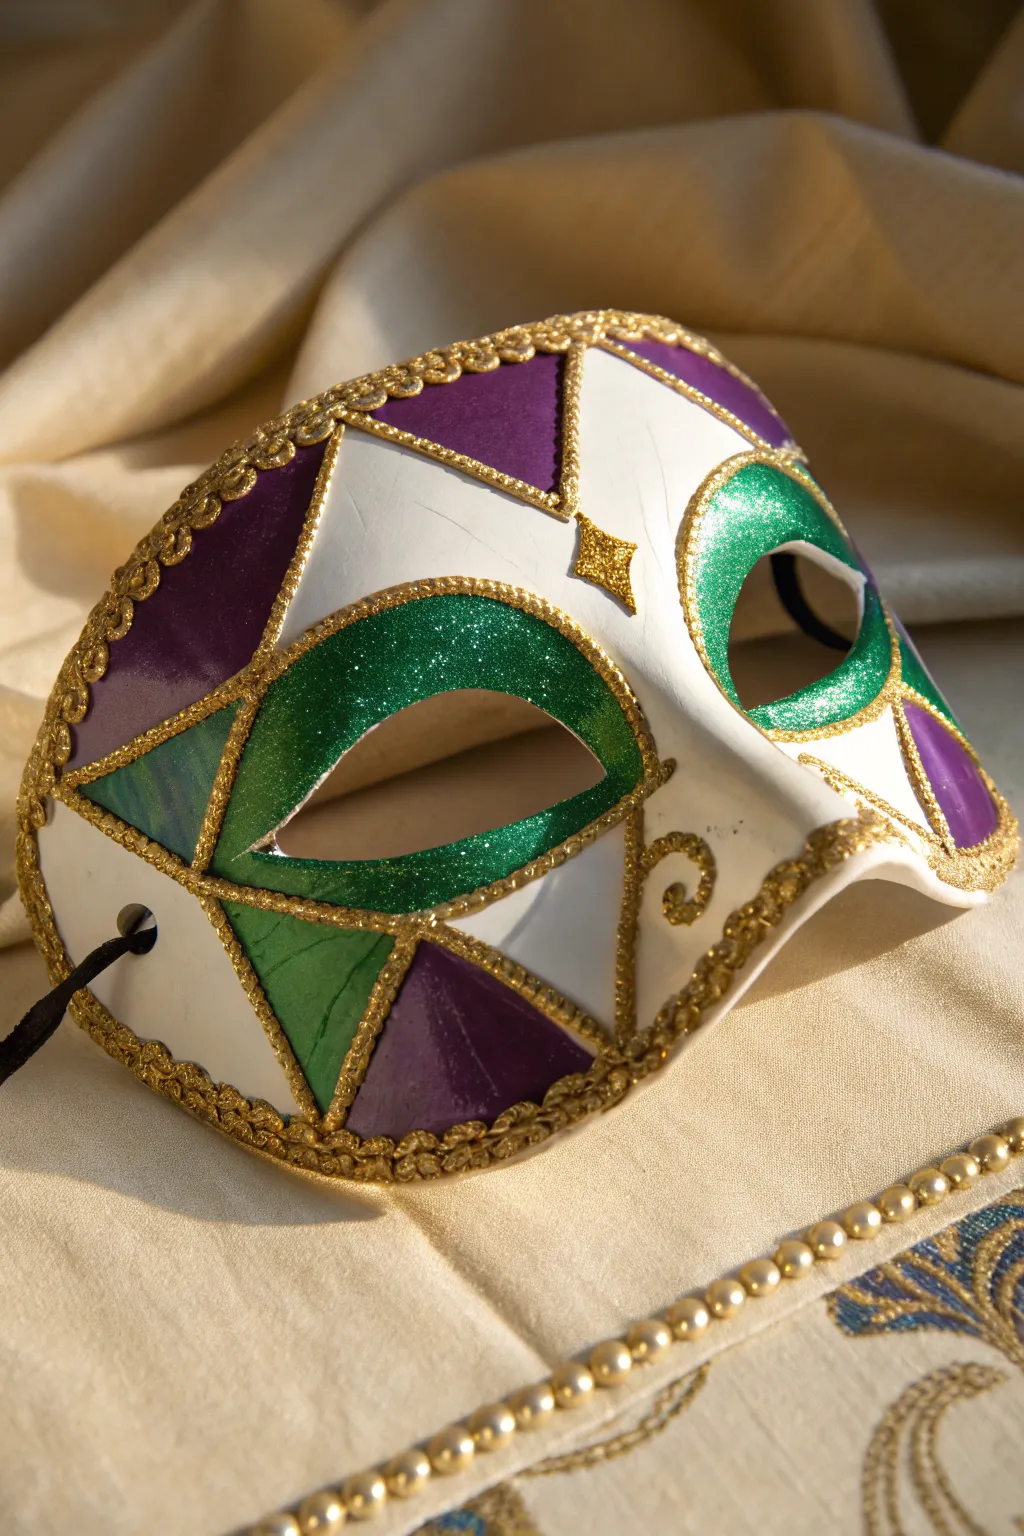
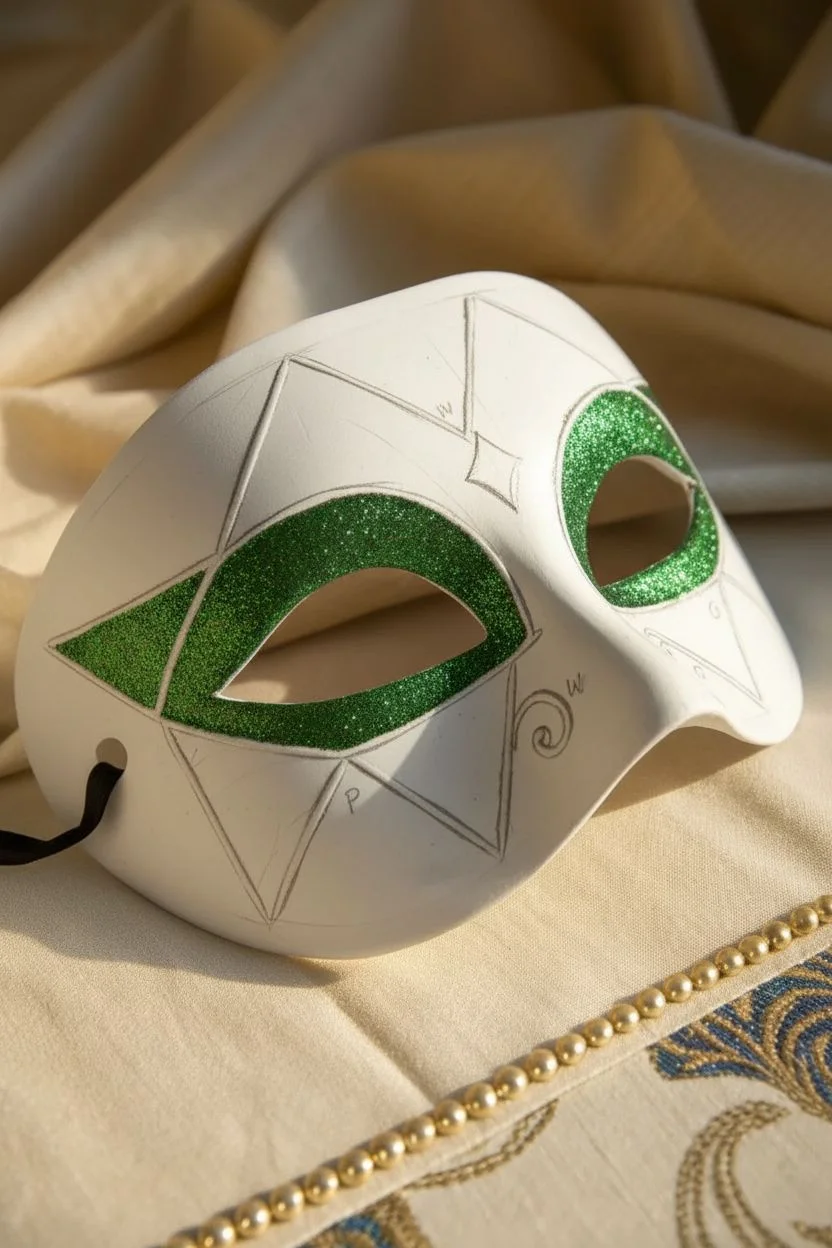
Capture the spirit of Mardi Gras with this elegant half-mask featuring a classic harlequin diamond pattern. By combining matte acrylics with dazzling glitter and raised gold detailing, you’ll create a sophisticated accessory perfect for a masquerade ball or festive decor.
Step-by-Step Guide
Materials
- Plain white half-mask base (papier-mâché or plastic)
- Acrylic paints: Purple, White, Emerald Green
- Gold dimensional fabric paint (puffy paint) or relief liner
- Fine glitter: Emerald Green
- Gloss varnish or decoupage glue (Mod Podge)
- Pencil and eraser
- Small flat brush (size 4 or 6)
- Fine round detail brush (size 0 or 1)
- Black elastic cord or satin ribbon
- Clear craft glue
Step 1: Preparation & Sketching
-
Clean the base:
Start with a clean, dry mask base. If using a plastic mask, give it a quick wipe with rubbing alcohol to ensure the paint adheres well. If using papier-mâché, gently sand any rough edges. -
Mark the eye outlines:
Using a pencil, draw a wide, almond-shaped outline around the eye holes. This area will eventually be glittered green, so make the shape generous and sweeping. -
Draft the diamond pattern:
Sketch a diamond (harlequin) pattern across the forehead and cheeks. Start with a central vertical line to keep things symmetrical, then draw diagonal intersecting lines to create the diamond shapes. -
Plan your colors:
Before painting, lightly mark each diamond section with a small ‘P’ for purple, ‘W’ for white, or ‘G’ for green to avoid confusion later. The reference shows alternating purple and white on top, with green accents below.
Fixing Smudged Lines
If you accidentally smear the gold dimensional paint, don’t wipe it! Let it dry completely, then peel it off like a sticker or gently scrape it away with a craft knife.
Step 2: Painting the Base Design
-
Apply the white sections:
Using your flat brush, paint the designated white diamonds. Even if the mask is already white, a coat of paint gives it a consistent, professional finish. Let this layer dry completely. -
Block in the purple:
Carefully fill in the purple diamonds. Use the edge of your flat brush to get crisp lines against the white sections. Depending on the opacity of your paint, you may need a second coat for a deep, rich royal purple. -
Paint green underlayers:
Paint the eye areas and the lower diamond sections with emerald green acrylic paint. This acts as a base color so that if the glitter has any gaps, green will show through instead of white. -
Add detail swirls:
If your design includes cheek swirls not covered by diamonds, sketch those lightly now or prepare to freehand them with the gold liner later.
Durable Glitter
To prevent shedding, mix your loose glitter directly into a clear gloss medium or Mod Podge before painting it on. This locks the sparkles in place without dulling the shine.
Step 3: Glitter & Texture
-
Apply adhesive for glitter:
Working one eye at a time, brush a layer of decoupage glue or craft glue over the green painted eye area. Be careful not to go outside your penciled boundary. -
Dust the glitter:
Generously pour fine emerald green glitter over the wet glue. I find it helpful to do this over a sheet of paper so you can funnel the excess back into the jar. Tap the mask gently to remove loose particles. -
Seal the paint:
Once the base paint is fully dry (and avoiding the fresh glitter), apply a coat of gloss varnish to the purple and white sections. This gives the mask a ceramic-like sheen.
Step 4: Gold Relief Detailing
-
Test the gold liner:
Squeeze a small amount of your gold dimensional paint onto a scrap piece of paper to ensure the flow is smooth and to get a feel for the pressure needed. -
Outline the eyes:
Carefully trace the outer edge of the green glittered eye areas with the gold liner. Keep your hand steady and apply even pressure to create a raised, bead-like line. -
Define the diamonds:
Go over all your pencil lines for the harlequin pattern with the gold liner. The raised gold hides the transition between paint colors, making your edges look perfect. -
Pipeline effect:
For a textured look like the original, move the tip slightly back and forth or dot it as you move to create a ‘braided’ or dotted texture rather than a straight smooth line. -
Add flourishes:
Draw decorative swirls on the cheeks and a four-point star or diamond shape in the center of the forehead using the gold liner. -
Adding the border:
Run a continuous line of gold relief paint along the entire outer edge of the mask to frame the artwork. -
Attach the cord:
Once the gold paint is fully hardened (this can take several hours), thread your black elastic cord through the side holes and secure with a knot on the inside.
Now your mask is ready to dazzle the crowd with its bold colors and brilliant sparkle


Elegant Half-Mask Ombre Fade
This sophisticated half-mask design balances the drama of deep black with the elegance of creamy white, merged together in a soft, dreamy gradient. Intricate gold glitter scrollwork adds a touch of baroque luxury, making it perfect for a masquerade ball or Mardi Gras celebration.
Detailed Instructions
Materials
- Plain papier-mâché or plastic half-mask base
- Gesso or white primer
- Black acrylic paint
- Cream or pearl white acrylic paint
- Gold glitter glue or 3D gold outliner
- Fine glitter (gold)
- Medium flat synthetic brush
- Small round detail brush
- Sponge dabber or makeup sponge
- Gloss varnish or sealant spray
- Gold snap fastener or rivet (optional)
Step 1: Base Preparation & Solid Colors
-
Prime the Surface:
Start by applying a thin, even coat of gesso or white primer over the entire mask. This ensures your colors will pop and adhere smoothly to the surface. Let it dry completely before moving on. -
Apply the Cream Base:
Using your flat brush, paint the right side of the mask with your cream or pearl white cylinder. Extend this color slightly past the center line of the nose to prepare for blending later. -
Apply the Black Base:
Paint the left side of the mask with black acrylic paint. Stop just before you reach the center, leaving a small gap between the wet black paint and the dry cream section.
Step 2: Creating the Ombre Fade
-
Prepare for Blending:
While the black paint is still wet, dampen a sponge dabber or makeup sponge slightly. You want it moist but not dripping. -
Initial Blend:
Gently dab the sponge at the border where the black meets the cream. Use a stippling motion to pull small amounts of black paint over into the cream area. -
Softening the Transition:
Wipe your sponge or flip it to a clean side. Dab the area again to soften the harsh specks, creating a misty, grey transition zone right down the center of the nose and forehead. -
Refining the Gradient:
If the transition looks too grey, you can dry-brush a tiny amount of pure cream paint back over the blended area from the right side to brighten the fade. Let the entire base coat dry for at least 30 minutes.
Sponge Tactics
For the smoothest ombre, use a ripped piece of kitchen sponge rather than a cut one. The uneven, torn texture blends paint without leaving hard geometric edges.
Step 3: Gilded Scrollwork Details
-
Planning the Design:
Lightly sketch your scroll patterns with a pencil if you aren’t confident freehanding. Notice how the swirls curve around the eye holes and along the cheekbones. -
Applying Glitter Glue:
Using a gold glitter glue bottle with a fine tip or a 3D gold outliner, carefully trace your scroll designs. Squeeze with consistent pressure to keep the line thickness uniform. -
Adding Center Motifs:
Draw a starburst or fan shape at the top center of the forehead and a matching one at the outer corner of the black side. These serve as focal points for the design. -
Border Detailing:
Run a line of your gold medium along the very top edge of the mask and the bottom rim to frame the face. I find steadying my pinky finger against the table helps keep this line straight. -
Intensifying the Sparkle:
While the glue is still wet, gently sprinkle loose fine gold glitter over the lines. This creates a richer, more raised texture than glitter glue alone. -
Clean Up:
Tap the mask vertically on your work surface to shake off excess loose glitter. Use a clean, dry brush to sweep away any stray sparkles from the painted areas.
Level Up: Texture
Before painting, glue pieces of lace onto the mask surface. Paint over them to create a subtle, raised fabric texture beneath your ombre design.
Step 4: Finishing Touches
-
Seal the Work:
Once the glitter glue is bone dry—usually after several hours—spray the mask with a gloss varnish. This protects the paint and creates a porcelain-like finish. -
Hardware Accent:
If your mask has holes for ribbons, you can glue a small gold snap cap or rivet over the hole on the black side for an industrial-chic detail, or simulate one with a dot of thick gold paint.
Allow your beautiful new mask to cure fully overnight before attaching ribbons and wearing it to your event


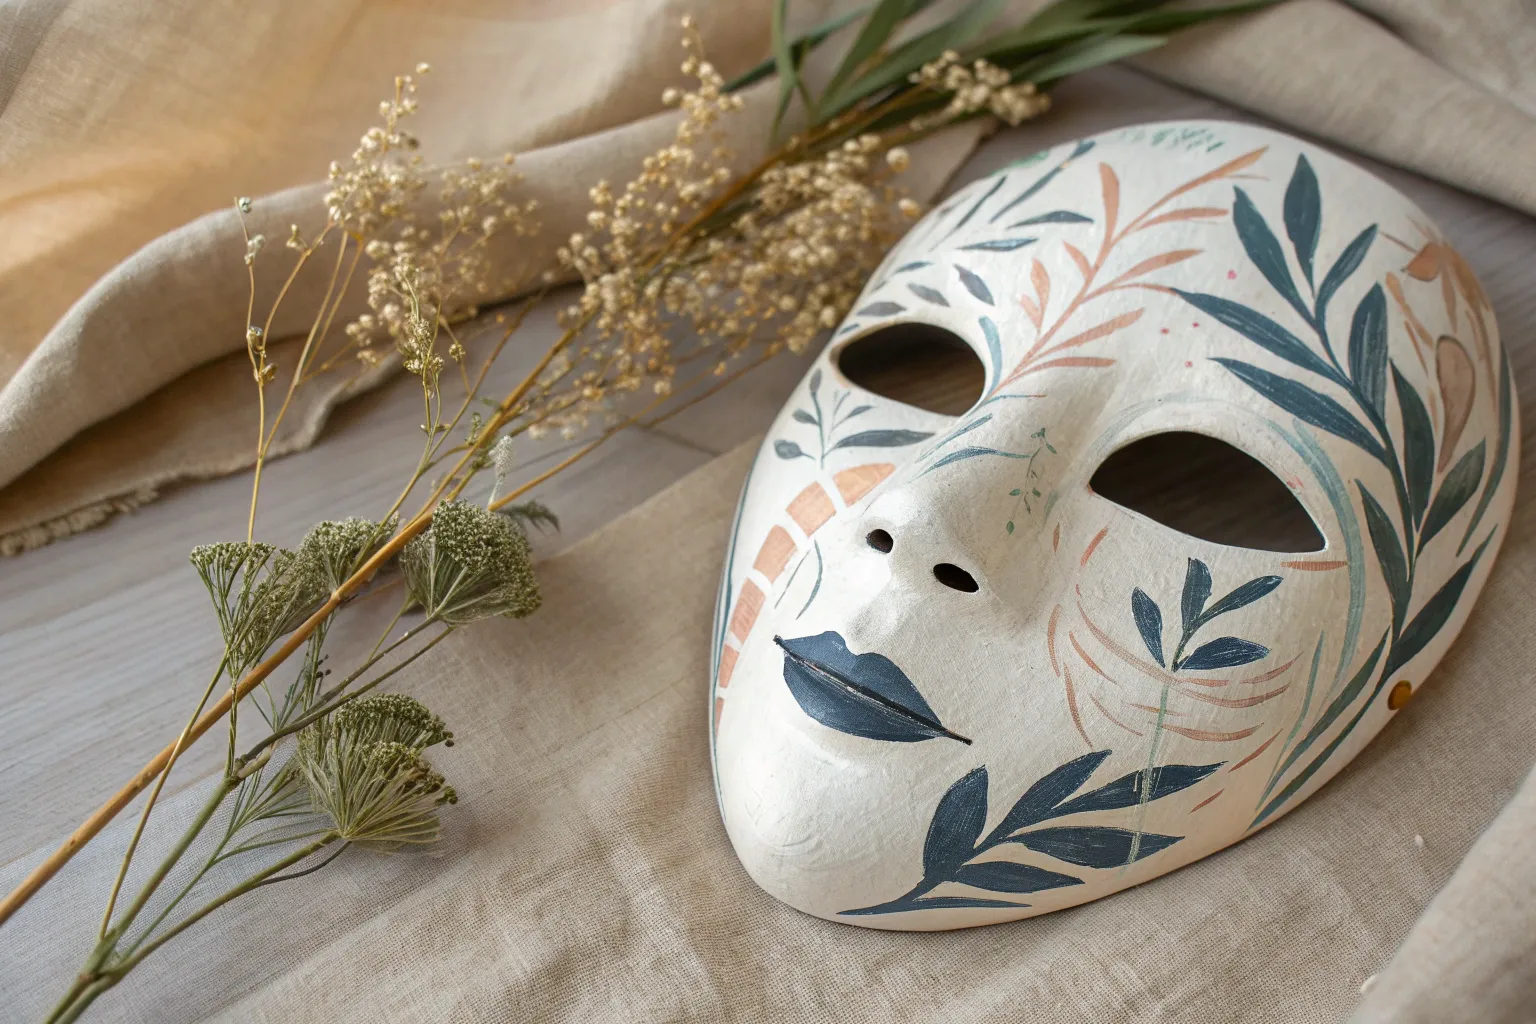
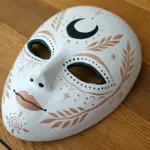
Symmetrical Sugar Skull Florals

Embrace the vibrant spirit of Dia de los Muertos with this striking sugar skull mask, featuring ornate symmetry and rich floral motifs. The design balances a stark white base with intricate teal, orange, and dusky pink petals for a look that is both haunting and beautiful.
Step-by-Step Guide
Materials
- Full-face white mask (papier-mâché or plastic)
- White matte spray primer
- Acrylic paints (black, white, teal, burnt orange, dusky pink, gold/mustard yellow)
- Assorted brushes (fine liner, round detail sizes 0-2, small flat brush)
- Pencil and eraser
- Matte or satin clear sealant spray
- Water cup and palette
Step 1: Preparation & Base Coat
-
Prime the Surface:
Begin by cleaning your mask blank to ensure it’s free of dust or oils. Spray a thorough coat of white matte primer over the entire surface. This gives the acrylics something to grip onto and ensures the white background looks solid and bone-like. -
Establish the White Base:
Once the primer is dry, paint two thin layers of white acrylic over the entire mask. Let the first coat dry completely before applying the second to avoid streaks. -
Map Out the Symmetry:
Using a pencil very lightly, draw a vertical line down the center of the forehead, nose, and chin. This guideline is crucial for keeping your floral patterns and eye sockets perfectly symmetrical.
Wobbly Lines?
If your hands shake while painting fine black outlines, rest your pinky finger on a dry part of the mask to stabilize your hand. Use a long-bristled liner brush for smoother strokes.
Step 2: Core Features
-
Defining the Eyes:
Sketch large, slightly downturned circles around the eye holes. Paint the interior of these circles solid black, extending right to the rim of the eye holes to create that hollow skull effect. -
Nose Cavity:
Draw an upside-down heart shape on the nose tip. Fill this in with solid black paint, keeping the edges crisp. -
Cheekbone Contours:
Lightly sketch the hollow of the cheeks. Paint a soft, curved black shape that tapers near the jawline to simulate the gap between the upper and lower jaw. -
Teeth and Jaw:
Draw a horizontal line across the mouth area, extending far out onto the cheeks. Paint vertical lines across this main line to represent teeth. Detail the roots of these teeth by slightly curving the lines outward at the top and bottom.
Add Depth
Mix a tiny drop of glaze medium into your teal and pink paints. Paint a second sheer layer over the petal edges to create a subtle 3D shaded effect.
Step 3: Floral Details & Ornamentation
-
Forehead Flower Center:
Place a large flower at the top center of the forehead. Start with a yellow center, outlined in black, and paint large, pointed petals radiating outward in dusky pink with dark gray shading at the tips. -
Side Temples:
On the left temple, sketch a large flower with teal and pink petals. Paint the petals carefully, using the fine liner brush to outline each one in black for a graphic, illustrative look. -
Orbital Dots:
Use a burnt orange or mustard yellow paint to create a ring of small dots or scallops around the outer edge of the black eye sockets. Outline each dot in black to make them pop. -
Chin Floral:
Mirror the forehead design on a smaller scale at the chin. Paint a half-flower shape with orange and red petals rising up towards the mouth. -
Cheek Swirls:
Above the jaw hollows, paint decorative swirls using gold or mustard paint. I find that thinning the paint slightly helps these swirling lines flow more smoothly.
Step 4: Final Touches
-
Leaf Accents:
Fill empty white spaces on the cheeks and forehead with stylized green leaves. Use teal for the base and add veins with a darker green or black fine liner. -
Detailing the Brows:
Instead of hair eyebrows, paint decorative flourishes or teardrop shapes above the orbital sockets using black and gold paint. -
Refining Lines:
Go over all your black outlines one last time with your finest brush to ensure sharpness. Clean up any smudges with a touch of white paint. -
Sealing the Work:
Allow the mask to dry for at least 24 hours. Finish with a spray of matte or satin sealant to protect the paint from chipping and give it a professional finish.
Now wearing your masterpiece, you are ready to celebrate with tradition and style
BRUSH GUIDE
The Right Brush for Every Stroke
From clean lines to bold texture — master brush choice, stroke control, and essential techniques.
Explore the Full Guide
Harlequin Diamonds and Checkerboards
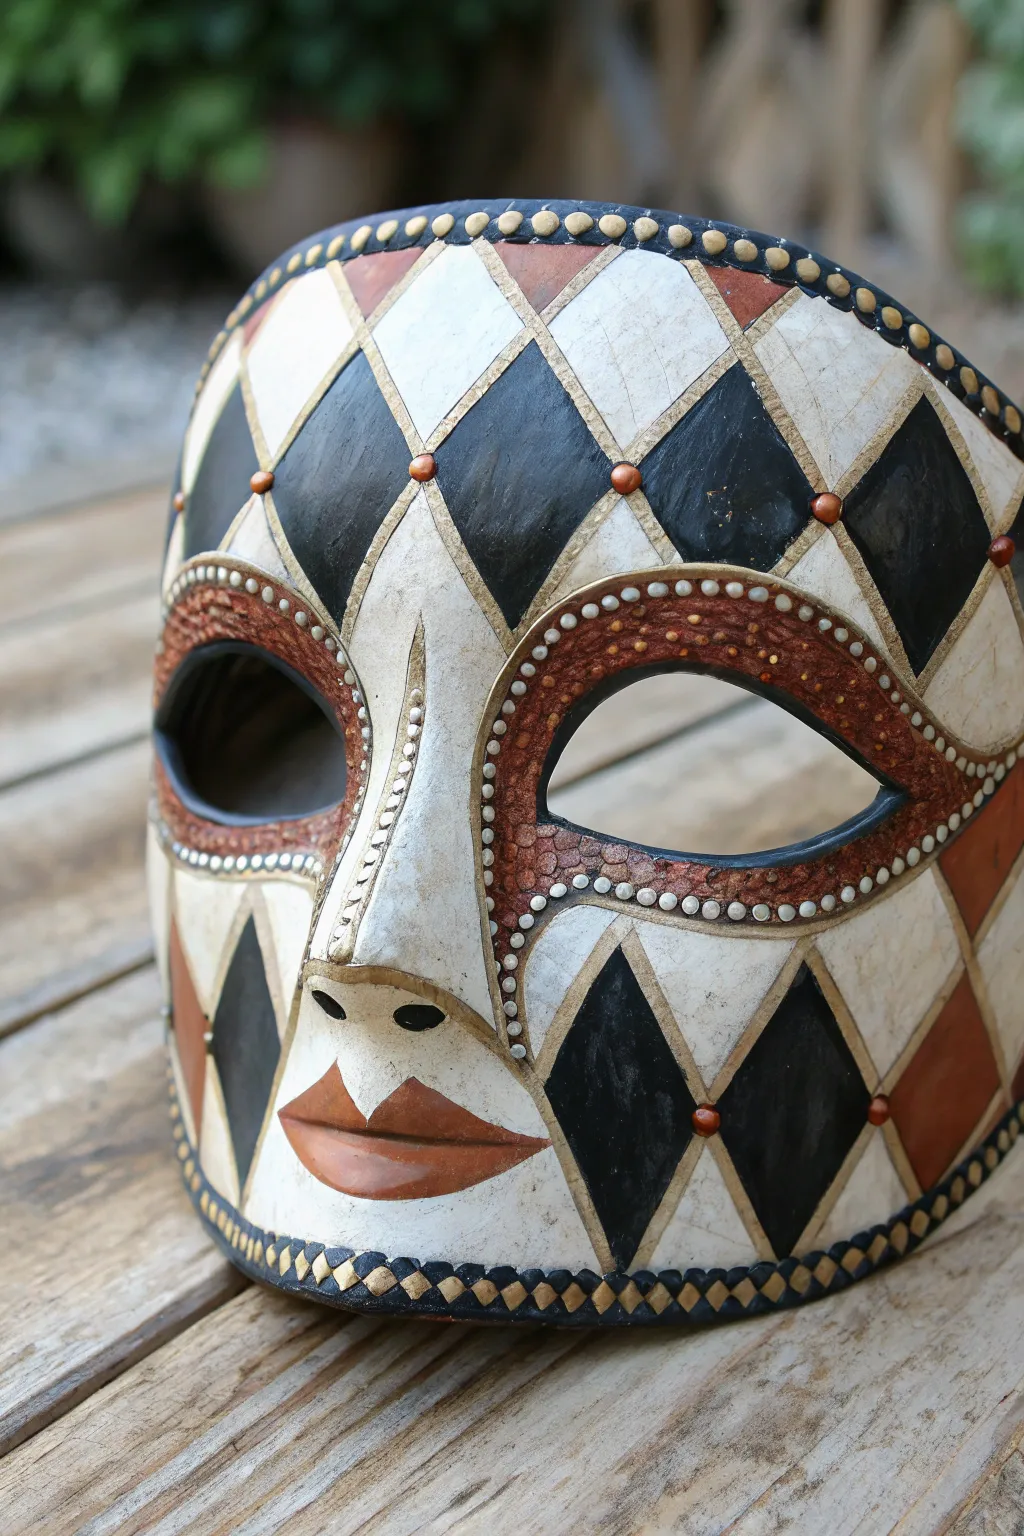
Embrace the classic allure of the commedia dell’arte with this stunning harlequin mask project. Featuring a timeless diamond pattern in earthy tones of cream, black, and burnt sienna, adorned with raised dot detailing, this piece feels like a discovered antique treasure.
Detailed Instructions
Materials
- Blank full-face mask (solid paper mache or resin)
- Acrylic paints: Cream/Off-white, Mars Black, Burnt Sienna, Metallic Gold
- Gesso primer
- Pencil and flexible ruler or measuring tape
- Fine detail brushes (round sizes 0 and 2)
- Flat shader brushes (sizes 4 and 6)
- Dimensional fabric paint or puffy paint (Gold or Pearl)
- Matte varnish or sealant
- Small gold beads or sticker gems (optional)
- Strong craft glue (if using beads)
Step 1: Preparation and Base Coat
-
Prime the surface:
Begin by applying a smooth coat of white gesso to your blank mask. This creates a uniform texture and ensures your paint colors will be opaque and vibrant. Let this dry completely before moving on. -
Establish the base color:
Paint the entire mask with your cream or off-white acrylic paint. You may need two thin coats to achieve full coverage without brushstrokes showing. Allow rigorous drying time here, as you’ll be drawing over this layer. -
Map the eye contours:
Using a pencil, lightly outline a teardrop or almond shape surrounding each eye hole. Extend the outer corner slightly towards the temples to create that dramatic harlequin look. These areas will be painted differently than the main diamond pattern.
Step 2: Drafting the Diamond Pattern
-
Establish the center line:
Draw a very faint vertical line down the exact center of the mask, from the forehead, down the nose, to the chin. This is your anchor for symmetry. -
Create the grid:
Using a flexible ruler, draw diagonal lines crisscrossing across the face to form a diamond grid. Start from the center line and work outwards. The diamonds don’t need to be mathematically perfect—a little variation adds to the hand-crafted charm. -
Mark your colors:
To avoid confusion while painting, lightly mark inside each diamond with a ‘B’ for black, ‘E’ for earth/sienna, or leave it blank for cream. Follow the alternating pattern shown in the reference image: black diamonds often touch cream ones, with sienna accents interspersed.
Grid Master
Use masking tape (low tack) to mark out your grid lines before painting. This ensures perfectly straight edges for your diamonds without needing a steady hand.
Step 3: Painting the Design
-
Fill the black diamonds:
Using a flat shader brush, carefully fill in the diamonds marked for black. Use the edge of the brush to get crisp, straight lines along your pencil marks. I find it helpful to rotate the mask constantly to get the best angle for each edge. -
Add the sienna accents:
Paint the selected diamonds and the eye contour areas with Burnt Sienna. This warm, reddish-brown hue bridges the gap between the stark black and cream. For the eye areas, dab the paint slightly to create a textured finish rather than a smooth wash. -
Paint the lips:
Outline the lips carefully. Paint the upper and lower lip in Burnt Sienna, keeping the shape distinct and somewhat stylized. -
Refine the edges:
Once the main colors are dry, use a very fine liner brush and your cream paint (or gold, if you prefer a richer look) to outline the diamonds. This ‘grouting’ line separates the colors and cleans up any messy intersections.
Vintage Crackle
Apply a crackle medium over the cream diamonds before adding the antiquing wash. The wash will settle into the cracks, making the mask look centuries old.
Step 4: Detailing and Embellishment
-
Create the eye border:
Using your dimensional paint or puff paint, carefully squeeze out a line of tiny dots around the outer edge of the Burnt Sienna eye patch. Keep your pressure consistent to ensure the dots are all similar in size. -
Inner eye detailing:
Add a second row of dots closer to the actual eye opening, creating a double border effect. This adds significant depth and tactile texture to the piece. -
Nose and lip accents:
Run a line of small raised dots down the bridge of the nose and along the top edge of the upper lip. These small details frame the face’s central features beautifully. -
Apply diamond points:
Place a small dot of gold dimensional paint or glue a small gold bead at the intersecting points of the diamonds. Focus these especially on the forehead and upper cheek areas. -
Rim the mask:
Finish the painting phase by adding a border along the outer edge of the mask. A simple pattern of alternating small diamonds or triangles in black and gold creates a finished ‘frame’ for the face.
Step 5: Finishing Touches
-
Antique the surface:
Mix a tiny drop of Burnt Sienna with a lot of water to create a wash. Lightly brush this over the cream areas and immediately wipe it back with a paper towel. This stains the paint slightly for an aged, vintage look. -
Seal the work:
Once absolutely everything is dry (give the dimensional paint at least 24 hours), apply a coat of matte varnish. This protects your work and unifies the sheen of the different paints.
Display your finished harlequin masterpiece on a wall or stand to add a touch of dramatic history to your decor
Peacock-Inspired Eye Frames
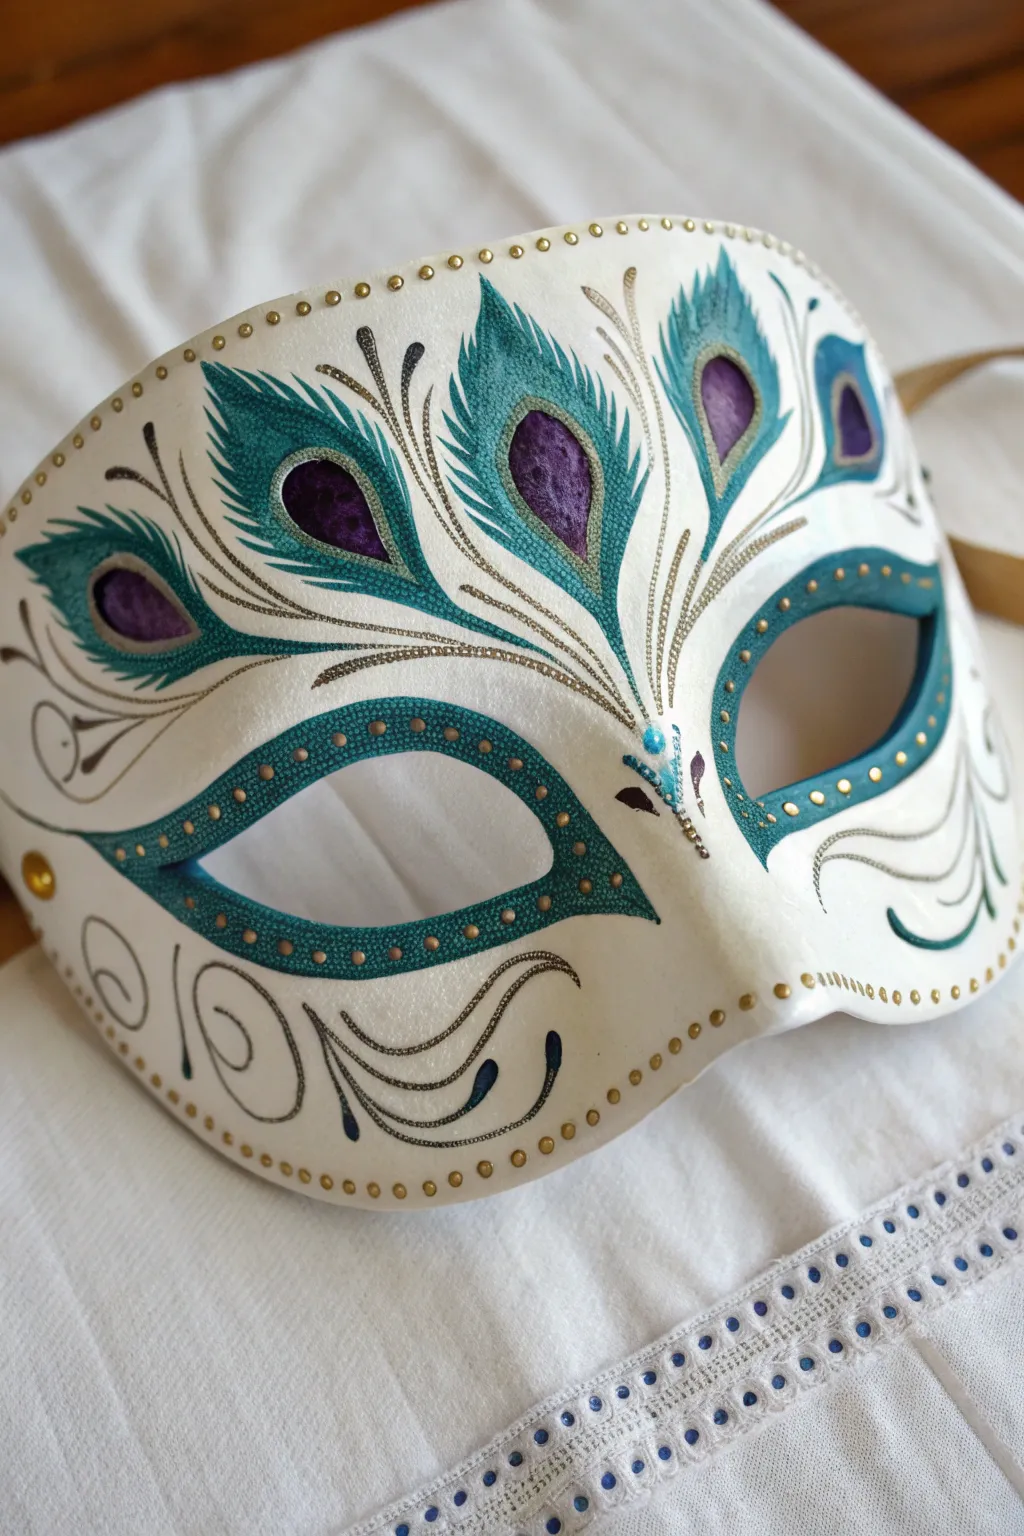
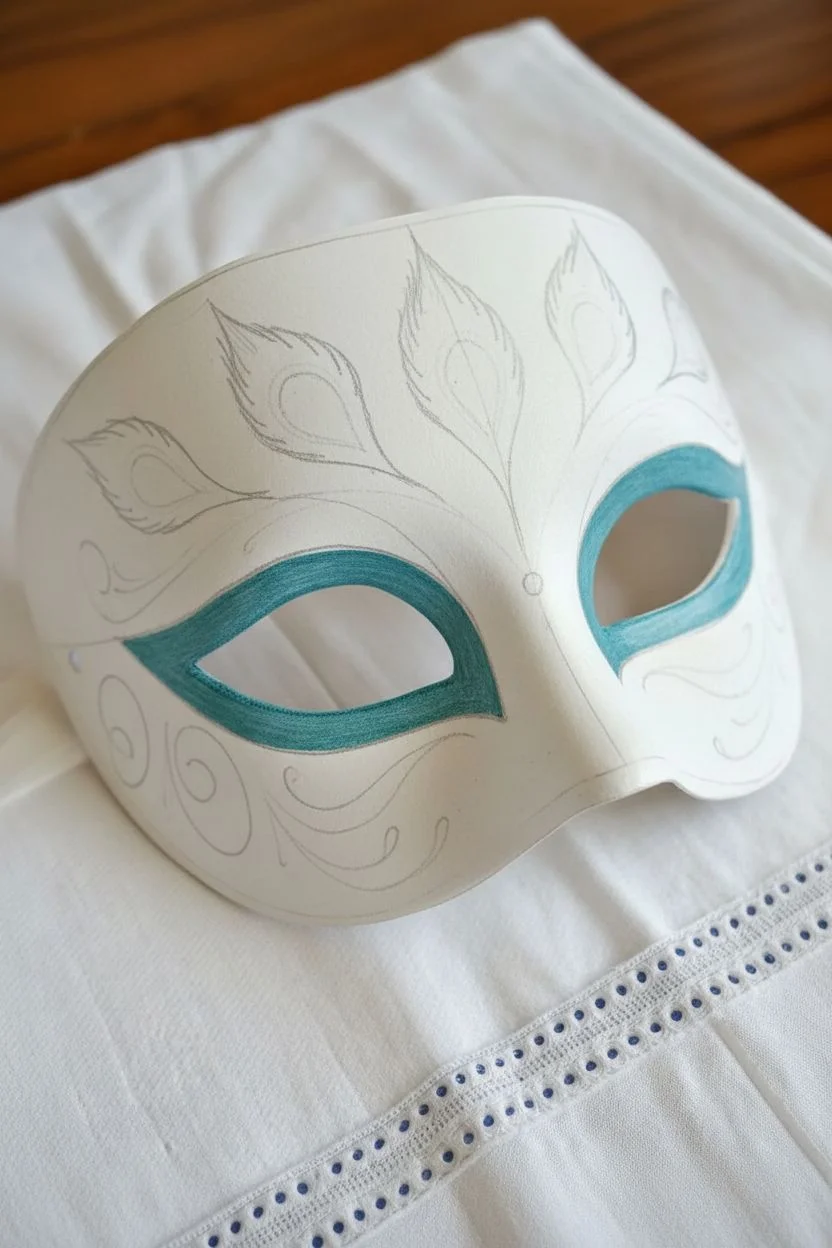
Transform a plain white mask into an elegant accessory featuring sweeping peacock feather motifs and delicate gold filigree. The combination of teal and deep purple creates a rich, classic aesthetic perfect for any masquerade ball.
How-To Guide
Materials
- Plain white Venetian half-mask (paper maché or plastic equivalent)
- Acrylic paints: Teal/Turquoise, Deep Purple
- Gold dimensional fabric paint or relief paste (fine tip)
- Gold acrylic paint (for base details)
- Fine round detail brushes (sizes 0 and 2)
- Flat shader brush (size 4 or 6)
- Pencil for sketching
- Eraser
- Matte or satin varnish (optional spray)
Step 1: Preparation & Sketching
-
Clean surface:
Ensure your mask base is clean and free of dust. If the surface is too glossy, lightly sand it with fine-grit sandpaper to help the paint adhere better. -
Map the feathers:
Lightly sketch the peacock feather shapes using a pencil. Start from the bridge of the nose and fan them out upwards towards the forehead. These shapes should look like elongated teardrops. -
Outline the eyes:
Sketch a border around the eye holes. This band should be about a quarter-inch thick and follow the natural curve of the eye cutout. -
Add flourish guides:
Draw faint guidelines for the decorative swirls on the cheeks and the sides of the mask. Don’t worry about perfect details yet; just mark the flow of the curves.
Steady Hand Trick
Rest your pinky finger on a dry part of the mask while painting fine lines. This anchors your hand and prevents shaking for smoother swirls.
Step 2: Painting the Eye Frames
-
Base coat the eyes:
Using your flat shader brush, fill in the sketched borders around the eyes with teal acrylic paint. You may need two coats to get a solid, opaque color. -
Add detail dots:
Once the teal border is dry, dip the handle end of a paintbrush into gold paint. Gently dot a row of gold spots along the center of the teal band. Keep the spacing consistent. -
Create the inner rim:
Use a fine liner brush and the same teal paint to carefully paint the inside edge of the eye cutout so no white shows from the side.
Add Sparkle
While the dimensional paint is still wet, sprinkle ultra-fine iridescent glitter on the feather tips for a subtle shimmer that catches the light.
Step 3: Creating the Feathers
-
Paint the feather centers:
Fill the inner teardrop shape of each feather with deep purple acrylic paint. This represents the ‘eye’ of the peacock feather. -
Feather techniques:
While the purple is drying, load a round brush with teal paint. Create the feathery texture around the purple centers by using quick, flicking strokes outward. I find it helps to rotate the mask as you work to keep the angle natural. -
Layering texture:
Continue adding teal strokes until the feather shape feels full, tapering off at the top. Ensure the strokes all originate from the central spine direction of the feather. -
Connecting the stems:
Use your dimensional gold paint or a very fine brush with gold acrylic to draw the thin spines of the feathers, converging them at the bridge of the nose.
Step 4: Gold Detailing & Finishing
-
Outline the feathers:
Using the dimensional gold paint with a fine tip, carefully outline the purple centers and add delicate gold wisps between the teal feather strokes. -
Cheek swirls:
Trace over your pencil sketches on the cheeks with black or dark grey fine lines first to anchor the design, creating elegant spirals and curls. -
Gold accents:
Enhance the cheek swirls by painting a parallel line of gold relief paint right next to the dark lines. This creates a shadowed, 3D effect. -
Applying the border:
Starting at the top edge of the mask, apply small dots of gold dimensional paint along the entire perimeter. Keep the pressure steady for uniform sized dots. -
Nose bridge detail:
Add a small cluster of dots or a tiny gemstone at the bridge of the nose where the feather stems meet to hide the gathering point. -
Final touches:
Let the dimensional paint dry completely (this often takes longer than standard acrylic). Once fully cured, spray with a light varnish to seal your work.
Your sophisticated mask is now ready to turn heads at your next event

PENCIL GUIDE
Understanding Pencil Grades from H to B
From first sketch to finished drawing — learn pencil grades, line control, and shading techniques.
Explore the Full Guide
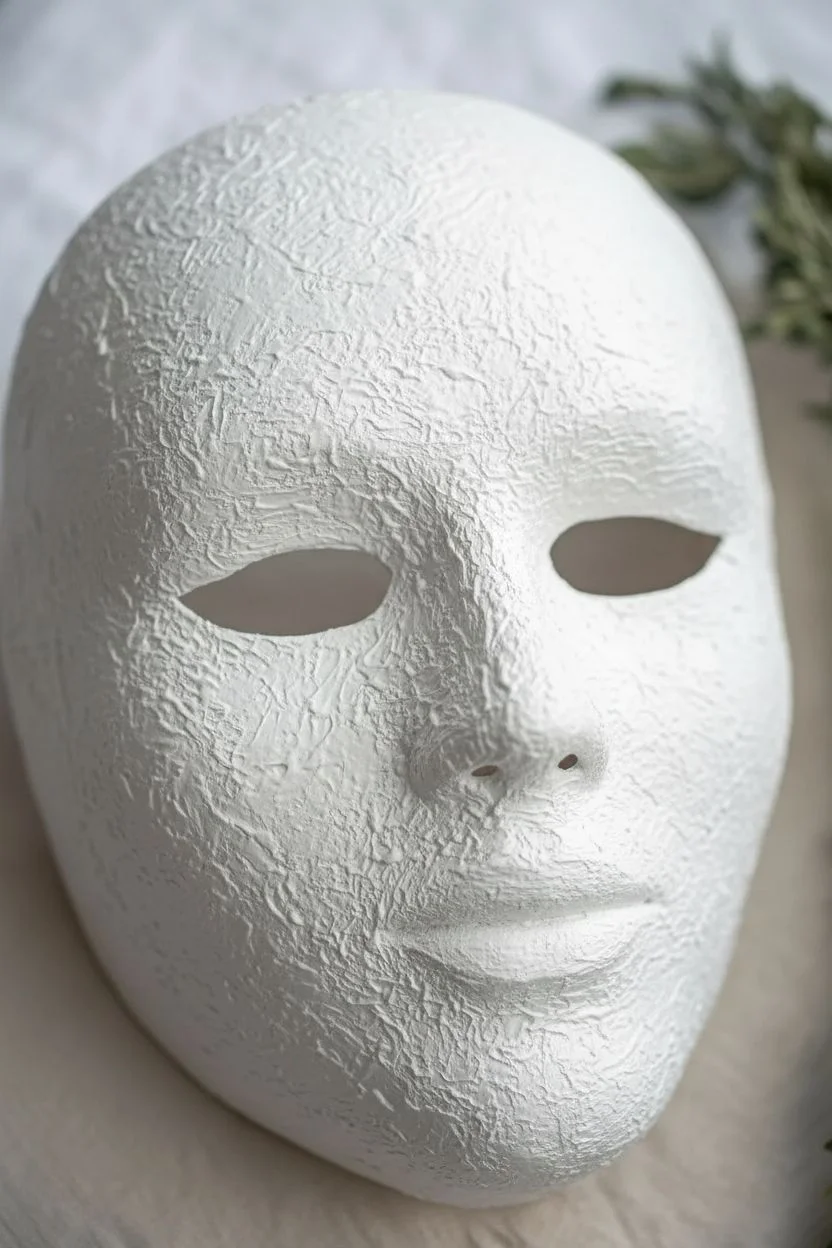
Floral Vines Wrapping the Cheeks
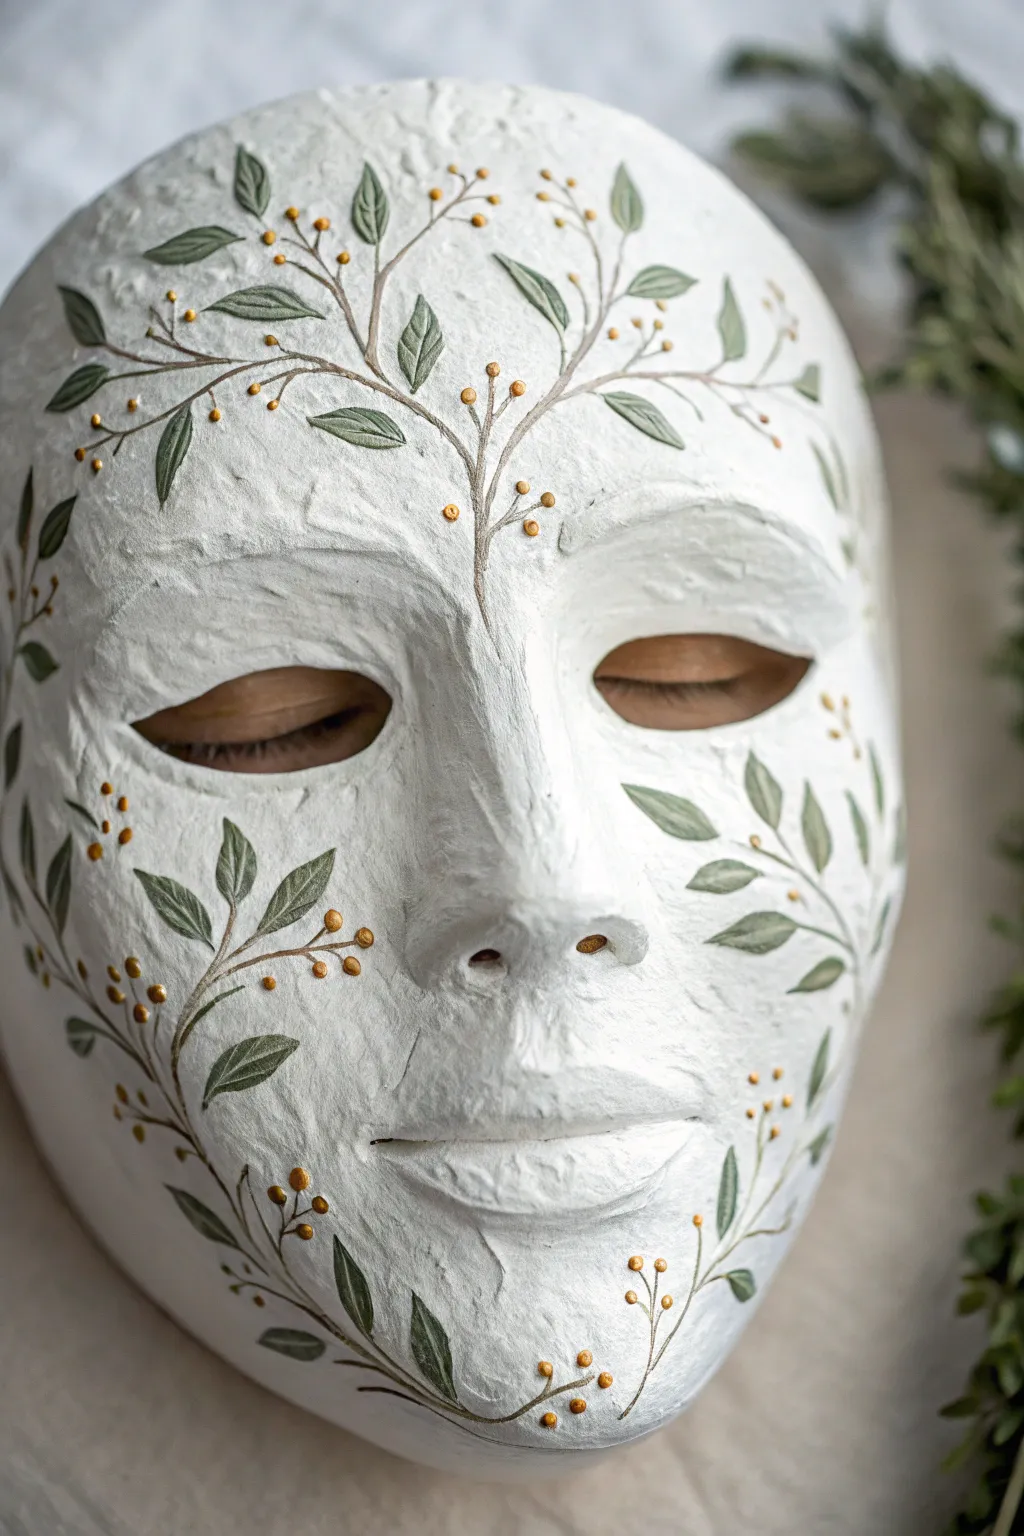
Transform a simple paper mache or plaster mask into an enchanted forest creaure with this delicate vine design. The textured white base provides the perfect rustic canvas for meandering green leaves and golden berry accents that frame the face beautifully.
Step-by-Step Tutorial
Materials
- Full-face paper mache or plaster craft mask
- Gesso primer
- White acrylic paint (matte finish)
- Titanium white texture paste or modeling paste
- Palette knife
- Acrylic paints: Olive Green, Sap Green, Burnt Umber, Gold Metallic
- Fine liner brush (size 0 or 00)
- Small round brush (size 2)
- Pencil
- Matte varnish spray
Step 1: Preparing the Textured Base
-
Prime the Surface:
Begin by applying a coat of gesso to your mask to seal the paper or plaster material. This prevents your paints from soaking in too quickly later on. -
Create Texture:
Using a palette knife, apply a layer of texture paste over the entire front surface of the mask. Don’t try to make it smooth; use dabbing motions to create small peaks and valleys for a stone-like, organic finish. -
Dry Completely:
Allow the texture paste to dry fully. This can take several hours or overnight depending on the thickness. It must be rock hard before painting. -
Base Coat Painting:
Paint over the dried texture paste with matte white acrylic paint. Dab the brush into the crevices to ensure no raw paste or primer shows through. Let this dry.
Uneven Texture?
If painting fine lines over the bumps is difficult, slightly dilute your paint with a flow medium. This helps the brush glide over the textured peaks without skipping.
Step 2: Planning the Vind Design
-
Sketch Layout:
Lightly sketch the main flow of your vines with a pencil. Start a central vine climbing up from the bridge of the nose, fanning out across the forehead. Add curving vines sweeping up from the jawline along the cheeks. -
Branch Placement:
Mark small ticks along your main vine lines where you want leaves or smaller offshoot branches to go. Aim for asymmetry to keep it looking natural.
Step 3: Painting the Foliage
-
Mix Stem Color:
Mix Burnt Umber with a tiny touch of white to create a soft, woody brown. Thin it slightly with water so it flows smoothly. -
Paint Main Stems:
Using a fine liner brush and your brown mix, carefully paint the main stems following your pencil guides. Keep the pressure light so the lines remain thin and delicate. -
Leaf Green Mix:
Prepare your leaf colors by mixing Sap Green with a little Olive Green. I like to have a lighter and darker version on my palette to add depth to individual leaves. -
Painting Leaves:
With the liner brush or a small round brush, paint small, almond-shaped leaves attached to your stems. Press down slightly at the base of the leaf and lift up as you pull away to create a sharp point. -
Adding Veins:
Once the green leaves are dry, mix a slightly darker green or use your brown stem color to paint a minuscule central vein line down larger leaves for added realism.
Leaf Variation
Mix a tiny bit of the gold paint into your green for a few select leaves. It ties the color palette together and gives the greenery a magical, sun-kissed glow.
Step 4: The Golden Details
-
Painting Berries:
Dip the very tip of your round brush handle or a dotting tool into Metallic Gold paint. Gently dot small clusters of berries at the ends of thin branches or scattered along the stems. -
Highlighting:
If your vines look too flat against the textured background, add extremely subtle highlights to the upper curves of the brown stems using a watered-down light tan color. -
Cleanup:
Check for any pencil marks that are still visible. If the paint is dry, you can gently erase them, or touch them up with a speck of white paint. -
Sealing:
Finish the project by spraying the mask with a matte varnish. This protects your delicate vine work without making the mask shiny, preserving that stone-like aesthetic.
Now you have a stunning, nature-inspired mask ready for display or a masquerade
Stylized Animal Spirit Mask
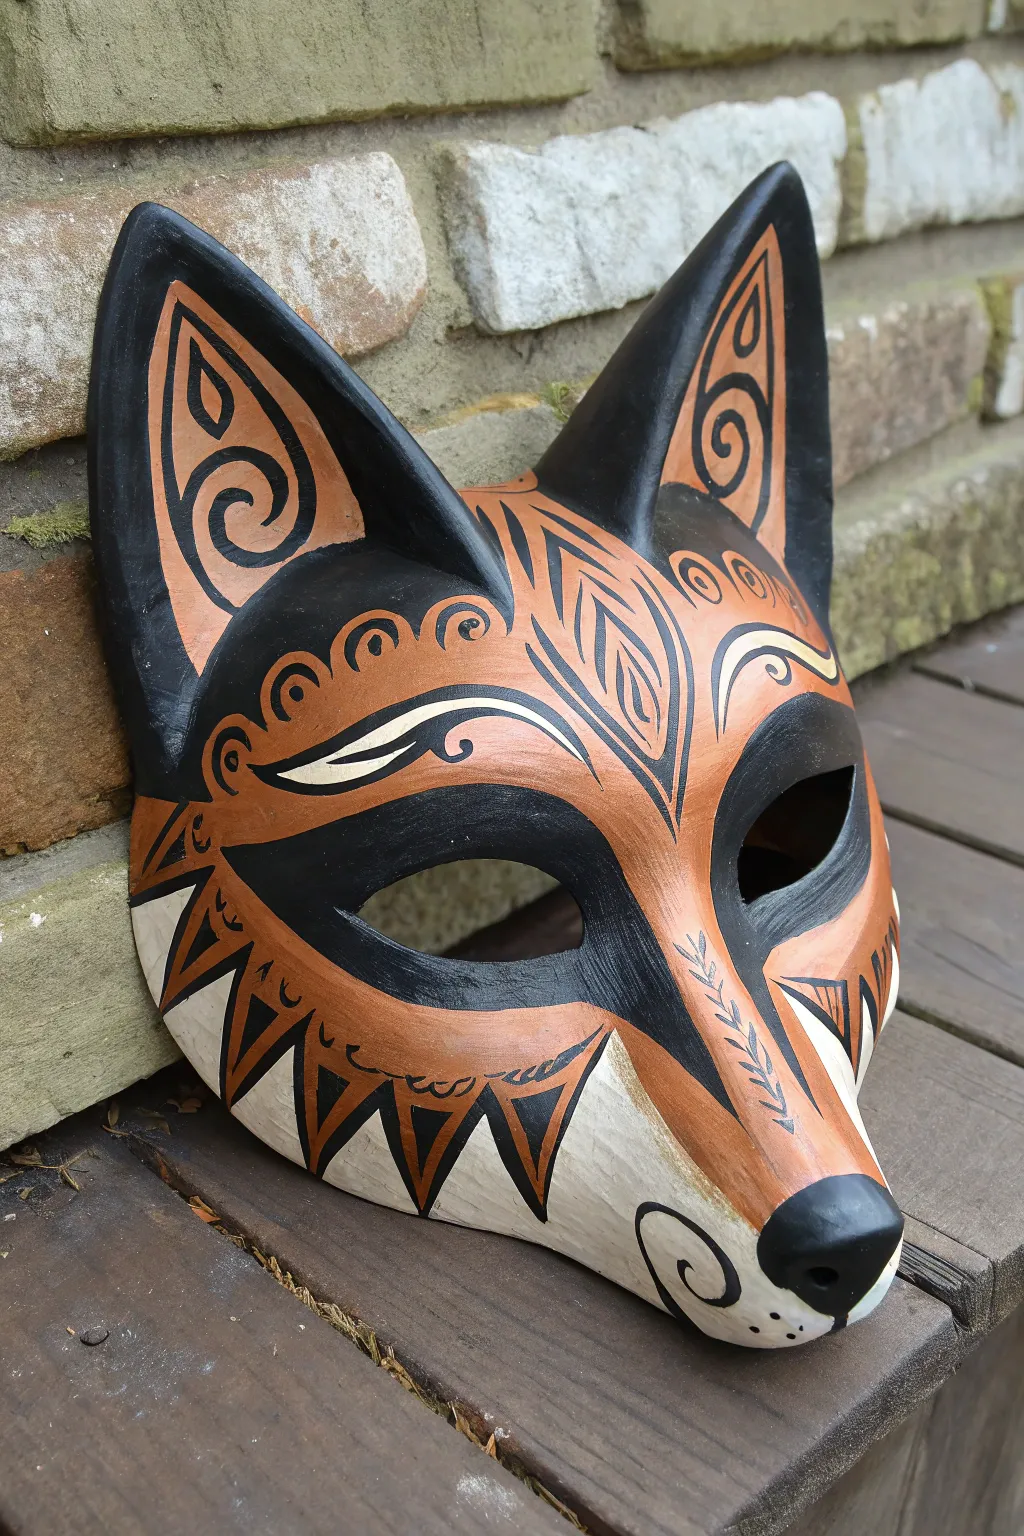
Transform a plain mask base into a mystical forest guardian with this striking fox design. Combining bold black linework with earthy copper and cream tones, this stylized piece uses tribal-inspired patterns to create a look that feels both ancient and modern.
How-To Guide
Materials
- Paper mache or resin fox mask blank
- Acrylic paints: Carbon Black, Metallic Copper or Burnt Sienna, Cream/Off-White
- Pencil and eraser
- Detail brushes (liner size 00 or 0)
- Flat shader brushes (medium and small)
- Gloss or satin varnish (spray or brush-on)
- Water cup and palette
Step 1: Base Preparation & Sketching
-
Prime the Surface:
Ensure your mask blank is clean and smooth. If it’s raw paper mache, apply a coat of gesso or a flat white primer to seal the surface and let it dry completely. -
Map Out the Zones:
Using a pencil, lightly draw the main color zones. Mark the large black shapes around the eyes that sweep back toward the ears. Outline the cream section on the lower snout and jawline. -
Define the Ears:
Sketch the inner triangular shape of the ears, deciding where the black border will separate the inner copper design from the outer edge. -
Draft the Patterns:
Lightly sketch the tribal motifs. Focus on the swirl patterns on the forehead, the leaf-like shape between the eyes, and the jagged triangles along the jawline. Don’t press too hard, as you want to be able to erase or paint over these lines easily.
Flow & Steady Hands
Thin your black acrylic slightly with a drop of water. This improves flow for long, continuous swirl lines without the brush dragging or skipping.
Step 2: color Blocking
-
Apply the Base Cream:
Start with the lightest color. Paint the lower snout, the jawline area, and the small accent swooshes above the eyes with your cream or off-white acrylic. You may need two coats for opaque coverage. -
Fill the Copper Areas:
Using a flat brush, fill in all the mid-tone areas with metallic copper or burnt sienna. This includes the forehead, the bridge of the nose, and the inner ear panels. This warm tone provides the crucial contrast for the black details later. -
Paint the Deep Black:
Carefully fill in the large black areas around the eye holes, the nose, the outer edges of the ears, and the very back of the head. Use a smaller flat brush near the edges to keep your lines crisp. -
Dry and Assess:
Allow the base colors to dry completely. If the copper or black looks patchy, I usually add a second thin layer at this stage to ensure richness.
Step 3: Detailed Linework
-
Outline the Jaw:
Switch to your finest liner brush and black paint. Create the sharp, jagged triangular ‘teeth’ pattern along the jawline where the copper meets the cream section. Fill the triangles in with copper if you haven’t already, then outline them boldly in black. -
Forehead Swirls:
Paint the decorative swirls above the eyes. These look like curled waves or fern fronds. Use a steady hand to vary the line thickness—thick at the base of the curve, tapering to a point. -
Central Leaf Motel:
On the center of the forehead, paint the stylized leaf or diamond shape. Outline it in black and add the internal vein lines for detail. -
Ear Details:
Add the spiral motifs inside the copper triangles of the ears. These should mirror the style of the forehead swirls but fit within the upright triangular space. -
Eye Swooshes:
Outline the cream ‘eyebrow’ swooshes with a thin black line to verify their shape and separate them clearly from the surrounding copper. -
Nose and Whiskers:
Ensure the nose tip is solid black. Underneath, on the cream snout, add a small black spiral curl or whisker dots to give the snout personality. -
Bridge Texture:
Paint the delicate, vine-like arrow pattern running down the center bridge of the nose toward the tip. These act like small directional arrows pointing downward.
Gold Leaf Accent
Replace the copper paint with real gold or copper leaf for the forehead patterns. The metallic shine will catch the light beautifully for a high-end look.
Step 4: Final Touches
-
Clean Up Edges:
Look over the mask for any shaky lines. Use your cream or copper paint to tidy up any black smudges, or use black to sharpen the boundaries of the colored zones. -
Seal the Work:
Once the paint is fully cured (give it at least an hour), apply a satin or gloss varnish. This will deepen the black contrast and make the metallic copper shimmer.
This striking mask makes for a beautiful wall display or a sophisticated addition to a costume


Geometric Color Blocking on Mask Planes
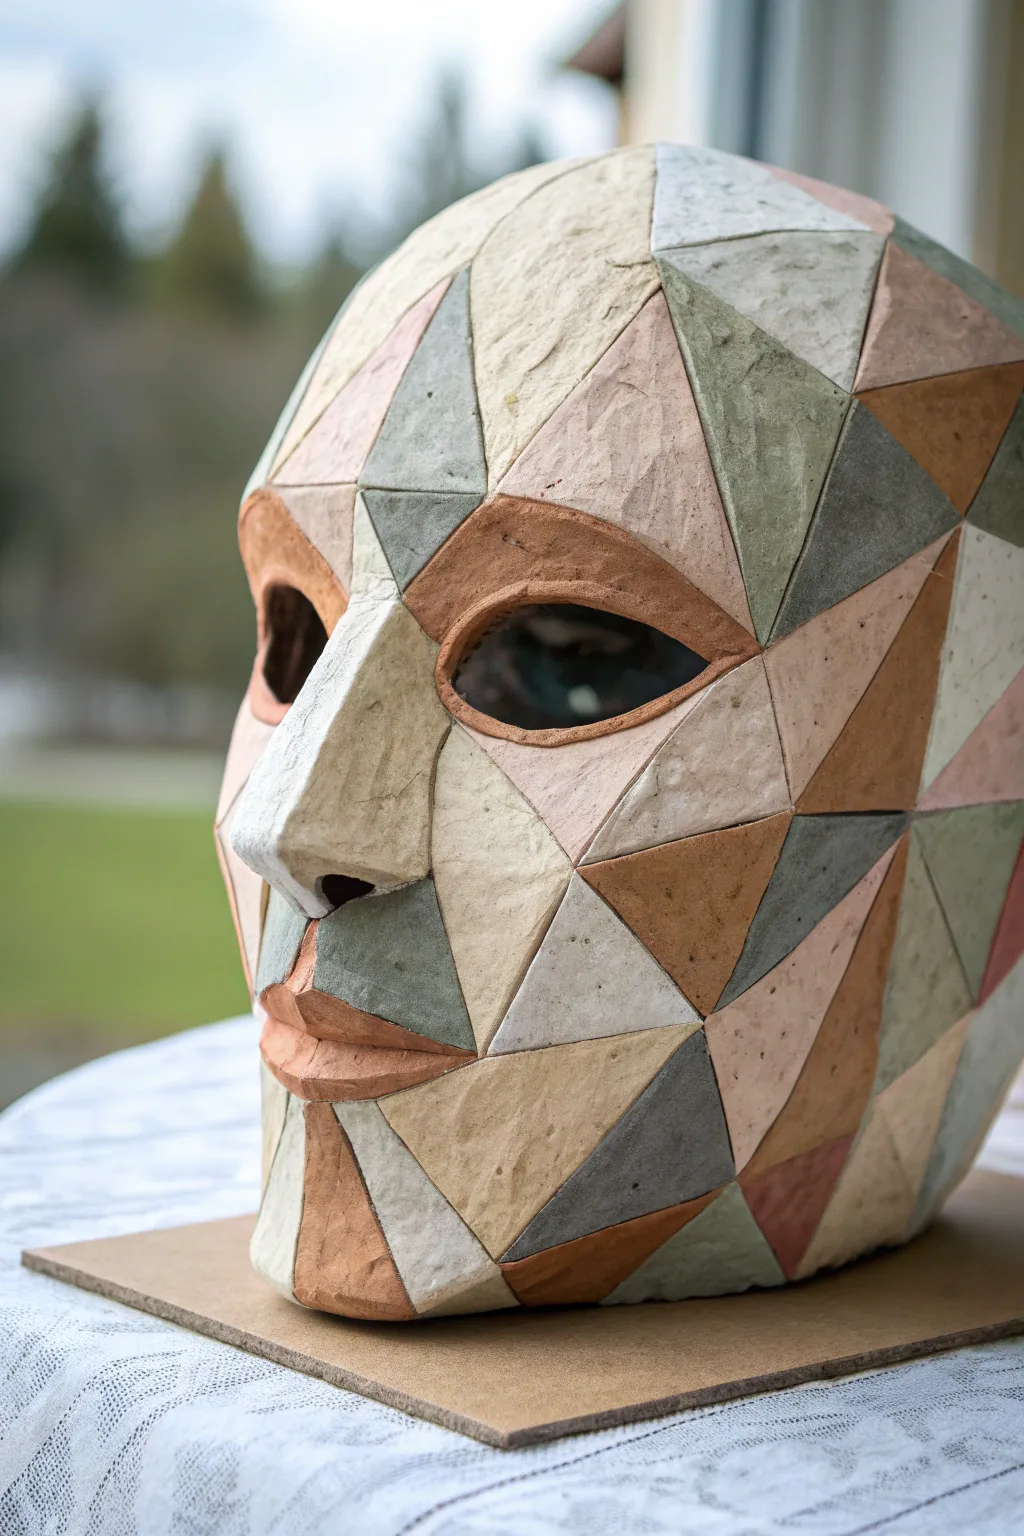
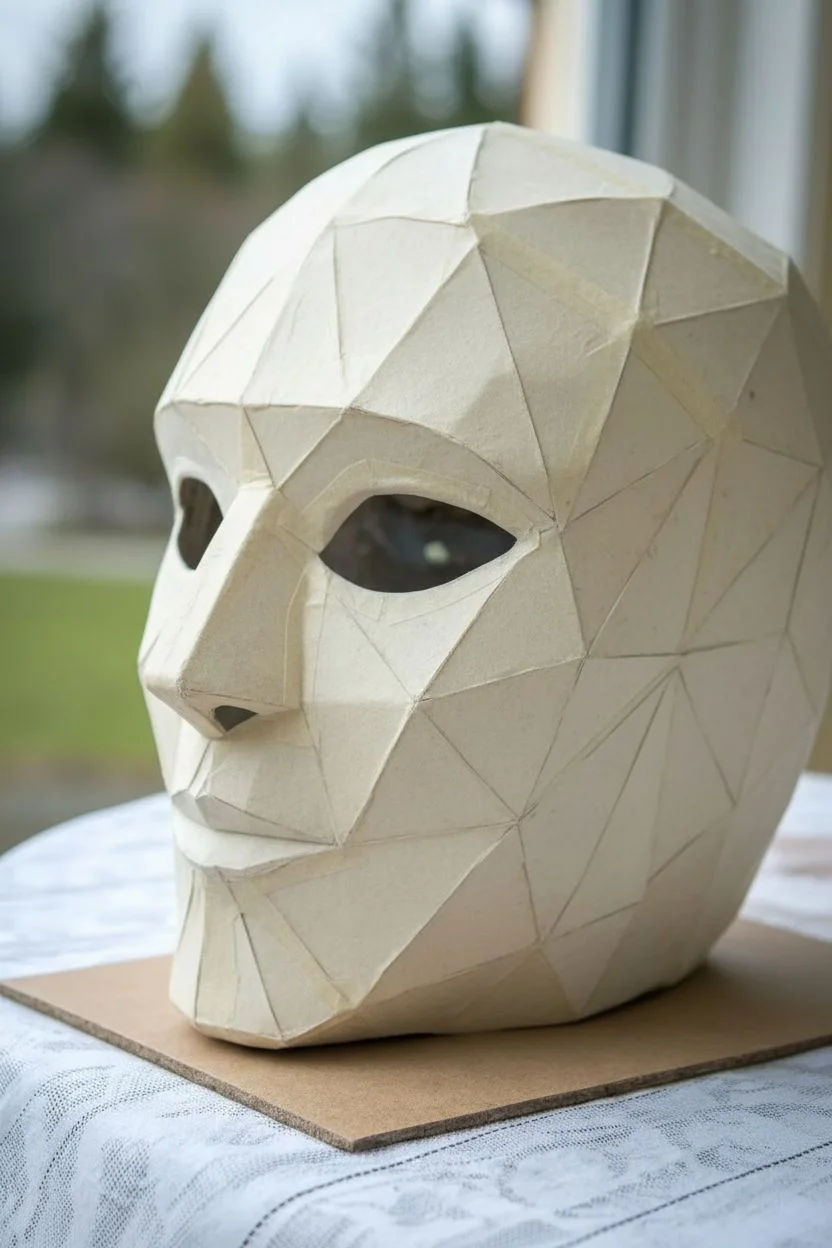
This striking mask project combines the modern aesthetic of low-poly 3D modeling with a tactile, earthen finish. By building up geometric planes rather than smooth curves, you’ll create a sophisticated sculpture that plays beautifully with light and shadow.
Detailed Instructions
Materials
- Cardstock or heavy paper (for the template)
- Rigid foam head form or balloon (as a base)
- Paper mache clay or air-dry clay (grey and terracotta tones)
- PVA glue or Mod Podge
- Craft knife and scissors
- Masking tape
- Acrylic paints (terracotta, slate grey, cream, beige)
- Fine grit sandpaper
- Matte geometric template (downloadable or hand-drawn)
- Palette knife and small flat brushes
Step 1: Constructing the Geometric Base
-
Prepare the template:
Begin by sourcing a low-poly mask template online, or sketch your own network of connecting triangles on paper. You want a map of polygons that form the contours of a face. -
Transfer to cardstock:
Transfer your triangle shapes onto heavy cardstock. Cut these out precisely, as sharp edges are crucial for the faceted look. -
Assemble the structure:
Tape the cardstock triangles together edge-to-edge using masking tape. If you are working over a foam head or balloon for support, ensure you don’t glue the cardstock directly to it so it can be removed later if desired. -
Define the features:
Pay special attention to the nose and eye sockets. The nose should be a pyramid-like structure, while the eyes need sunken, recessed planes to create depth. -
Reinforce the seams:
Go over every internal seam with a second layer of tape or a thin strip of paper dipped in glue to ensure the structure is rigid.
Sharp Edges Secret
Use a metal ruler or a straight edge of a credit card to press into the clay at the seams. This packs the clay down and ensures your geometric lines stay perfectly straight while drying.
Step 2: Applying Texture and Color
-
Mix your clay colors:
Prepare small batches of paper mache clay or air-dry clay. Tint them before application using acrylic paint—create a slate grey, a warm terracotta, a light cream, and a beige. -
Select your palette strategy:
Plan your color blocking. I find it helpful to place darker tones (like the reddish-brown) near the eyes and lips to draw focus, using lighter creams for the forehead and cheeks. -
Fill the first triangle:
Take a small pinch of tinted clay and press it onto a single cardstock triangle. Use a palette knife to spread it exactly to the edges, keeping the surface flat but retaining a slight stone-like texture. -
Create clean borders:
When moving to an adjacent triangle, switch clay colors. Use the edge of your palette knife to press the clays against each other without blending them, maintaining a sharp line. -
Sculpt the eye rims:
For the eyes, roll a very thin snake of terracotta clay. Press this around the eye opening to create a distinct, organic rim that frames the dark interior. -
Detail the lips:
Apply the rusty orange clay to the lip area. Keep the geometry simple—two or three planes for the top lip and two for the bottom are usually sufficient. -
Continue color blocking:
Work your way around the rest of the head, alternating colors so that no two adjacent triangles share the same shade. This emphasizes the faceted effect. -
Smooth the nose bridge:
On the nose bridge, I like to use a lighter stone color to catch the light, ensuring the side planes of the nose are darker to enhance the 3D form.
Stone Effect
Mix a small amount of fine sand or coffee grounds into your paper mache clay before applying. This adds a grainy, realistic stone texture that catches the light beautifully.
Step 3: Finishing Touches
-
Let it cure completely:
Allow the mask to dry for at least 24 to 48 hours. The clay must be fully hard before you do any final work. -
Sand edges lightly:
If any clay has spilled over the sharp geometric ridges, use fine-grit sandpaper to gently re-define those lines. You want the transitions to look crisp. -
Paint touch-ups:
If the clay colors dried duller than expected, use a dry-brush technique with your acrylics to highlight the center of each triangle, leaving the edges slightly darker. -
Seal the work:
Apply a matte sealant over the entire piece. Avoid gloss, as a matte finish mimics the look of raw stone or dry earth seen in the example.
Once the sealant is dry, your geometric masterpiece is ready to be displayed as a sophisticated piece of modern art
Galaxy Nebula and Star Splatter
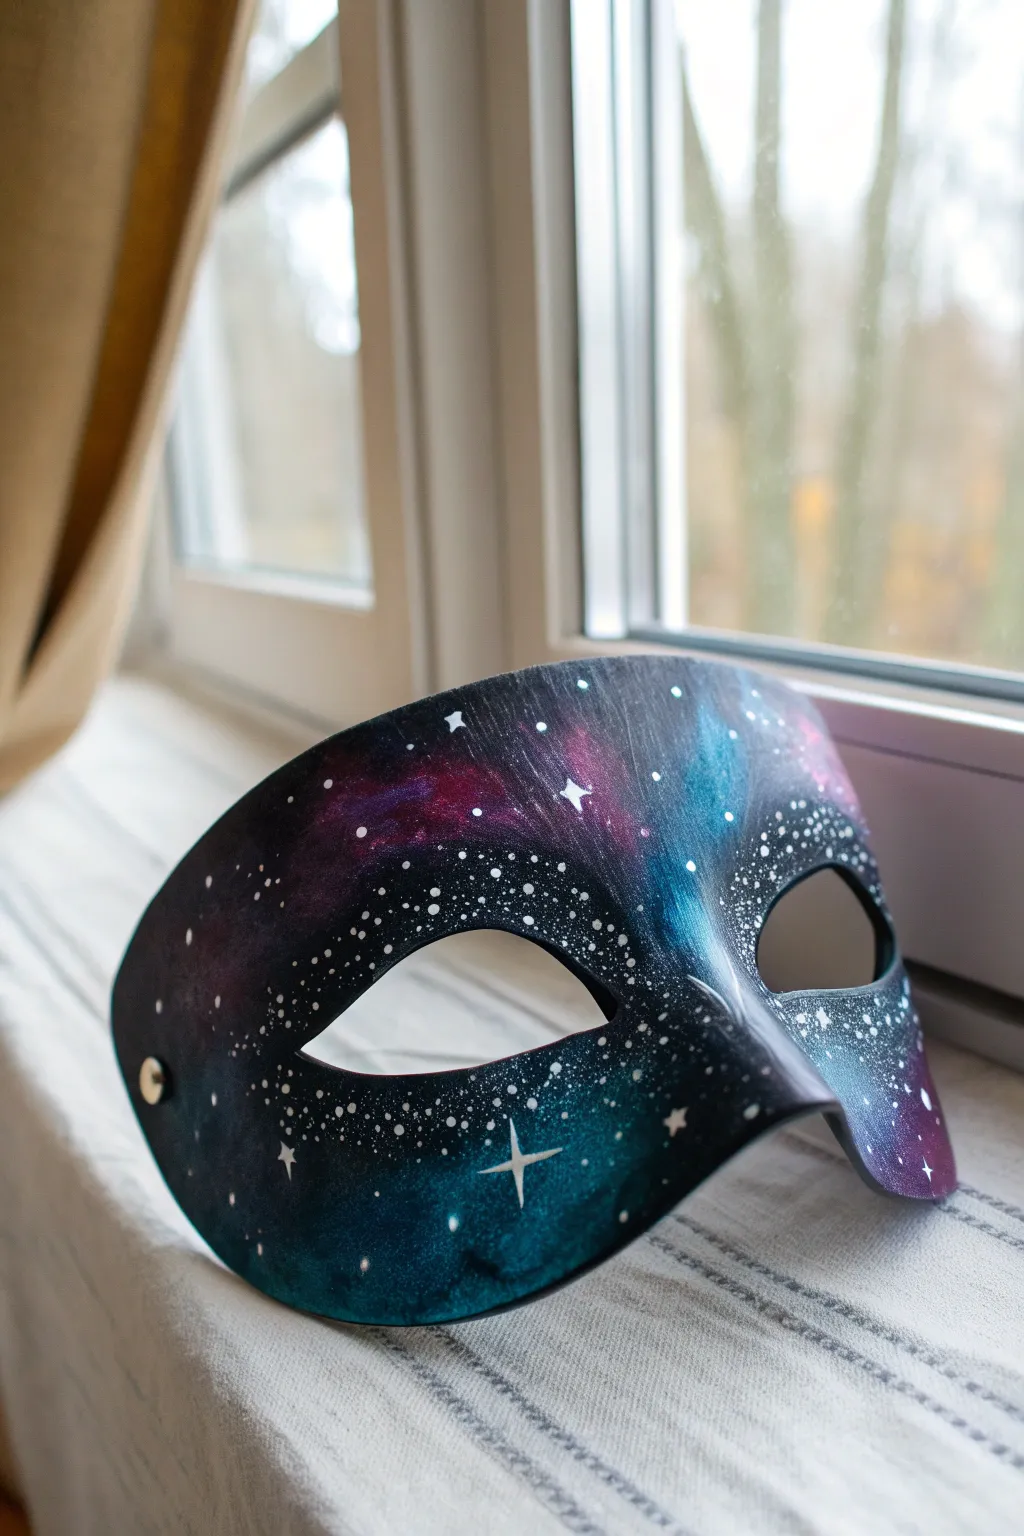

Transform a plain base into a breathtaking piece of the cosmos with this galaxy-themed mask. Featuring deep nebulas in purple and teal, scattered stardust, and bright guiding stars, this project captures the mystery of deep space.
How-To Guide
Materials
- Blank masquerade mask (smooth leather or paper mache)
- Acrylic paints (black, dark blue, teal, magenta/purple, white)
- Paints brushes (flat shader, small round, fine liner)
- Makeup sponge or small crafting sponge
- Old toothbrush (for spattering)
- Water cup and palette
- Matte or satin varnish spray
Step 1: Setting the Dark Canvas
-
Prepare the Surface:
Ensure your mask is clean and dry. If the surface is very glossy, give it a light sanding so the paint adheres better. -
Base Coat Application:
Using a flat brush, apply a solid coat of black acrylic paint over the entire front of the mask. -
Edges and Details:
Don’t forget to paint the inner rims of the eye holes and the outer edges of the mask to ensure raw material doesn’t show through. -
Dry Completely:
Let this black base layer dry fully before moving on. This provides the necessary depth for the galaxy effect.
Too Much Splatter?
If you accidentally flick a giant blob of white paint, don’t panic. Let it dry, then paint over it with black and re-sponge a bit of nebula color on top.
Step 2: Creating the Nebulas
-
Sponge Preparation:
Dampen a small piece of makeup sponge slightly, then dip it into dark blue paint. Dab off excess paint onto a paper towel until the texture looks soft and airy. -
First Nebula Layer:
Gently sponge cloud-like patches diagonally across the mask. Focus on the forehead area and the bridge of the nose, keeping the edges soft and fading into the black. -
Adding Teal Highlights:
While the blue is still slightly tacky, load a clean part of your sponge with teal paint. Dab this into the center of your blue clouds to create a glowing core effect. -
Introducing Purple:
Using a fresh sponge section, apply magenta or purple paint in separate areas, perhaps sweeping over one eye or across the temple. Overlap slightly with the blue for interesting color mixing. -
Blending Softly:
If the transitions look too harsh, I like to use a clean, barely damp sponge to gently pat the edges where the color meets the black background. -
Intensifying Colors:
Once the first layer of color is dry, go back and add brighter touches of teal and magenta in the very centers of the nebulas to make them pop against the dark background.
Starry Depth Pro-Tip
Create depth by splattering once before your nebula colors represent distant stars, and again after the colors for foreground stars.
Step 3: Stardust and Constellations
-
Mixing Fluid White:
Mix a small amount of white acrylic paint with a few drops of water until it reaches an ink-like consistency. -
Spattering Stars:
Dip an old toothbrush into the thinned white paint. Test on a scrap paper first, then run your thumb across the bristles to flick tiny specks of ‘distant stars’ across the mask. Concentrate more splatter near the colored nebulas. -
Hand-Painting Medium Stars:
Use a small round brush or the tip of a toothpick to dot slightly larger stars intentionally around the eyes and nose bridge. -
Drawing the Cross-Stars:
With your finest liner brush, paint a few highlight stars. Draw a simple cross shape with long, thin tails—one vertical line and one horizontal line intersecting. -
Refining the Big Stars:
To make these cross-stars shine, add a tiny dot of pure white in the very center where the lines cross. -
Adding the Hardware:
If your mask needs a strap, install a gold stud or rivet on the sides as seen in the reference, or simply glue ribbon to the back. -
Sealing the Universe:
Once absolutely dry, spray the mask with a matte or satin varnish to protect the paint from scratches and moisture.
Now you have a piece of the infinite universe to wear to your next masquerade event
Matte Monochrome With Glossy Details
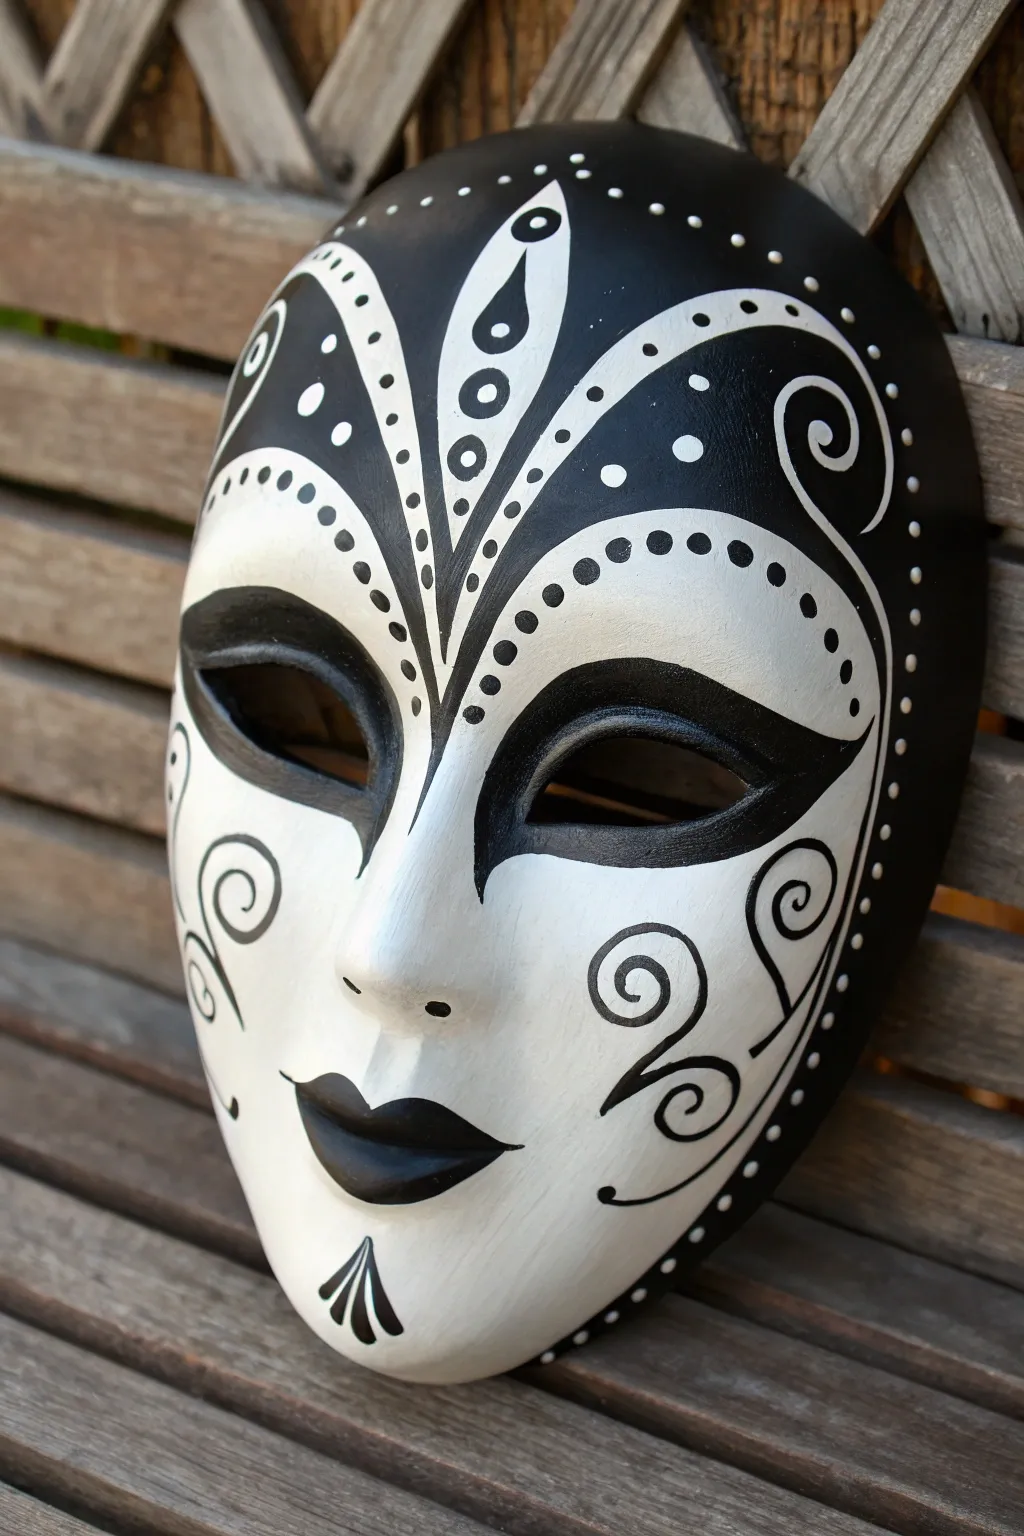
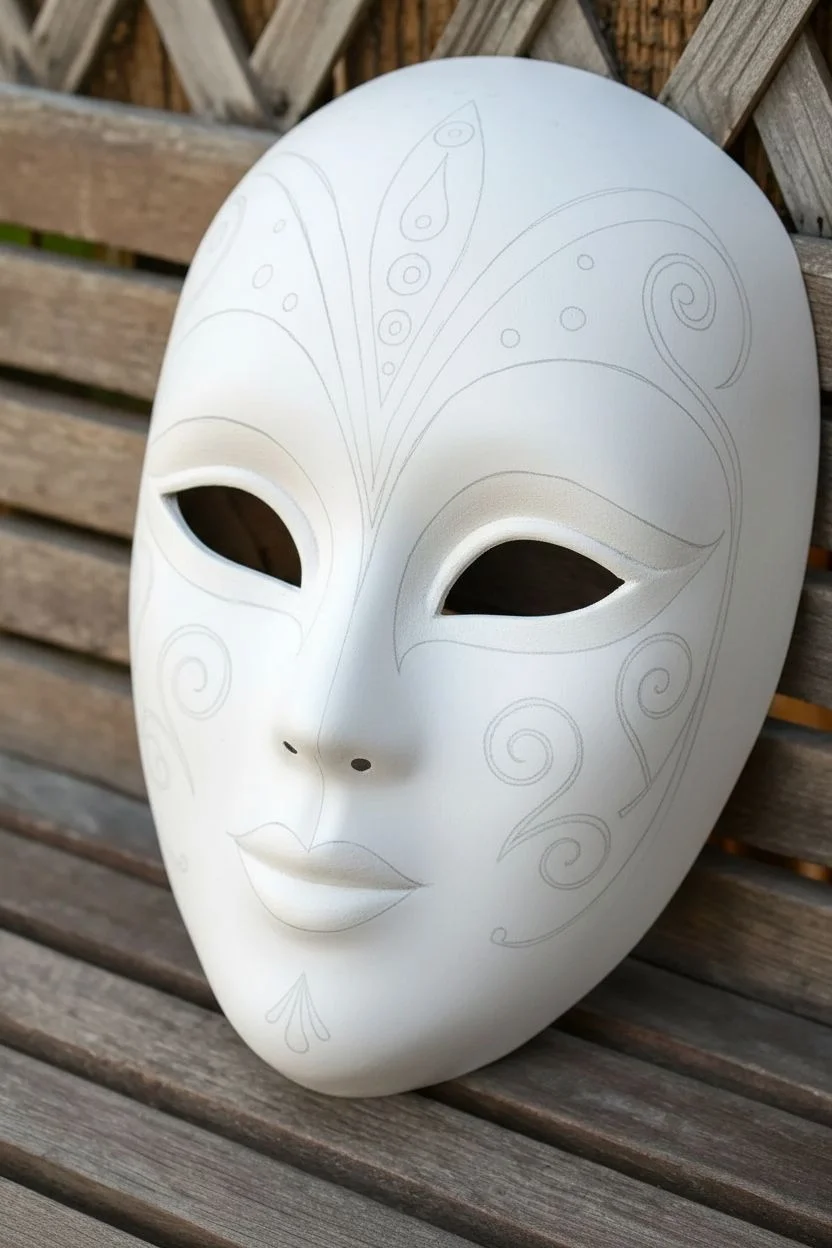
Transform a plain papier-mâché mask into a sophisticated piece of art using only black and white paint. This design relies on bold contrasts, intricate swirling linework, and careful dotting to create a classic Venetian-inspired look.
Step-by-Step Guide
Materials
- Full-face white papier-mâché mask
- Gesso primer
- Matte white acrylic paint
- Matte black acrylic paint
- Pencil and white eraser
- Flat shader brush (size 6 or 8)
- Round detail brushes (sizes 0 and 2)
- Dotting tool or toothpick
- Matte spray varnish
Step 1: Preparation & Base Coat
-
Prime the surface:
Begin by applying a thin, even coat of gesso to the entire mask. This seals the papier-mâché and ensures your acrylics will lay down smoothly. -
Apply the white base:
Once the primer is dry, paint the entire mask with matte white acrylic. You may need two to three coats to get a solid, opaque finish, letting each layer dry completely in between. -
Sand for smoothness (Optional):
If you notice brushstrokes or bumps, lightly sand the white base with very fine-grit sandpaper before moving on to the detailed work.
Step 2: Drafting the Design
-
Mark the center line:
Lightly sketch a very faint vertical line down the center of the nose and forehead with a pencil. Symmetry is crucial for this design, and this guide will help keep your patterns balanced. -
Sketch the forehead crest:
Draw the main central shape on the forehead: a large, leaf-like tear-drop shape extending up from the bridge of the nose. Add two mirrored, curved sections flanking it that sweep outward toward the temples. -
Outline the eye accents:
Sketch broad, sweeping almond shapes around the eye holes. Extend the outer corners into a sharp point like a dramatic winged eyeliner. -
Plan the swirls:
Lightly draw the large spiral designs on the cheeks and the smaller decorative flourishes near the chin and temples. Keep your pencil pressure light so it’s easy to erase later.
Clean Lines
If you make a mistake with the black paint, don’t panic. Let it dry completely, then paint over the error with white. It’s much easier than wiping wet paint.
Step 3: Painting the Black Elements
-
Fill the eye sections:
Using your size 2 round brush, carefully paint the area around the eyes black, following your sketched almond shapes. I find steadying my pinky finger on a dry part of the mask helps with these curves. -
Paint the lips:
Fill in the lips with black paint. Keep the edges crisp and defined, emphasizing the cupid’s bow and the corners. -
Block in the forehead design:
Paint the background of the forehead crest black. Be very careful around the internal white shapes—the teardrops and circles within the crest are negative space, revealing the white base underneath. -
Execute the cheek swirls:
Switch to your smallest liner brush (size 0). Paint the thin, swirling lines on the cheeks with fluid, confident strokes. Adding a drop of water to your black paint can help the brush glide better for these long lines. -
Add the chin detail:
Paint the small, stylized fan or fleur-de-lis shape at the very center of the chin. -
Outline the perimeter:
Carefully paint a thin black border around the outer edge of the entire mask to frame the face.
Add Drama
For a ‘Matte with Glossy Details’ effect, use clear gloss varnish or dimensional glaze on just the black painted areas after the matte seal dries.
Step 4: Detailing & Dots
-
Add the large dots:
Dip the large end of a dotting tool (or the back of a paintbrush handle) into white paint. Place large, uniform dots onto the black forehead sections. -
Create the dot borders:
Using black paint and a smaller dotting tool, create a row of dots following the curve above the eye designs. Spacing is key here; try to keep the distance between dots consistent. -
Add perimeter dots:
Apply tiny white dots along the black outer rim of the mask for a delicate, lace-like finish. -
Refine the forehead details:
Go back into the white ‘negative space’ shapes on the forehead. Add small black dots or centers to the white circles to create ‘eyes’ in the pattern. -
Cleanup:
Allow the black paint to dry completely. If any pencil lines are still visible, gently erase them now. -
Seal the work:
Finish by spraying the mask with a matte varnish. This protects the paint from scratching and gives the entire piece a unified, professional texture.
Display your striking monochrome creation on a shelf or wear it to your next costume event with pride
Cracked Porcelain Doll Effect
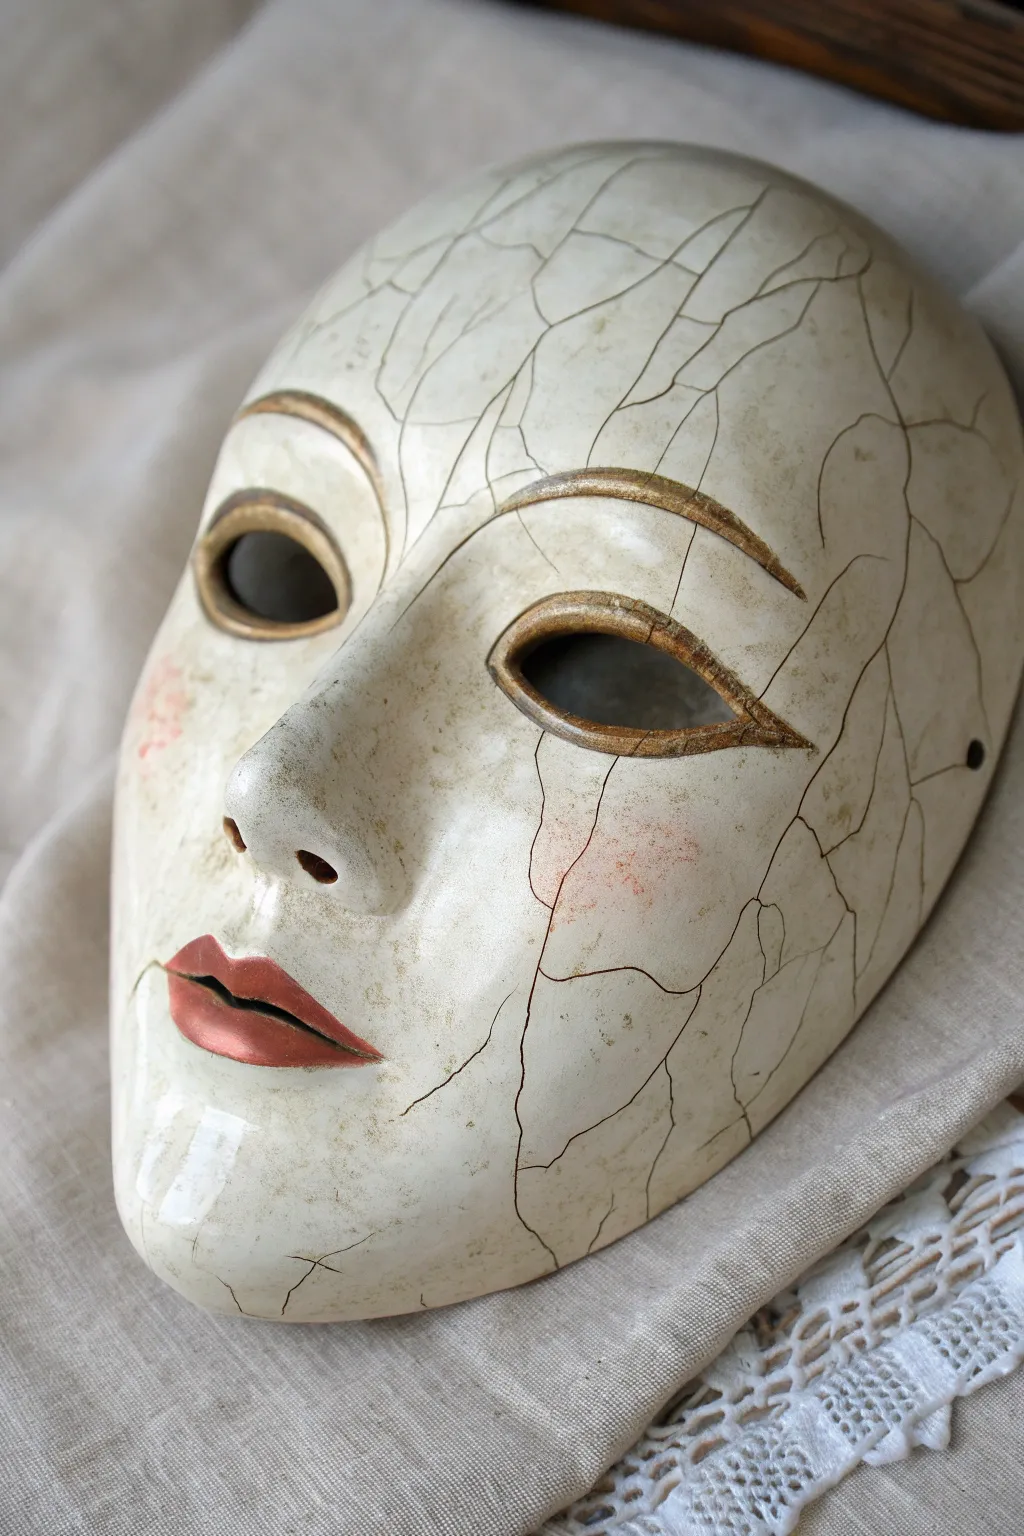
Transform a simple base into a hauntingly beautiful artifact that looks like centuries-old ceramic. This technique uses craquelure medium and careful antiquing to mimic the delicate fractures of aged porcelain without compromising the mask’s structure.
Detailed Instructions
Materials
- Smooth face mask form (plastic, paper maché, or plaster)
- White gesso primer
- Cream or off-white acrylic paint
- Clear craquelure medium (2-step system recommended)
- Gold or bronze acrylic paint
- Burnt umber oil paint or dark antiquing wax
- Soft pink pastel or blush
- Red acrylic paint (muted, not bright fire engine)
- High-gloss varnish
- Fine liner brushes
- Soft rags or paper towels
- Sanding sponge (fine grit)
Step 1: Preparation and Base Coat
-
Prep the Surface:
Begin by sanding your mask form lightly if it has any rough seams or bumps. Developing a perfectly smooth surface is crucial for the porcelain illusion. -
Prime and Paint:
Apply two coats of white gesso to prime the surface. Once dry, paint the entire mask with a cream or warm off-white acrylic. Avoid stark white, as real aged porcelain has a warmer, buttery tone.
Step 2: Painting Features
-
Outline the Eyes:
Using a liner brush and metallic gold or bronze paint, carefully outline the eye openings. Create a defined, almond-shaped rim that mimics painted ceramic glaze. -
Add the Eyebrows:
Paint thin, arched eyebrows above the eye sockets using the same gold or bronze tone. Keep the line consistent and smooth. -
Create the Lips:
Paint the lips with a muted red acrylic. Real porcelain dolls often have a cupid’s bow shape; focus color on the center of the lips, fading slightly toward the corners. -
Rosy Cheeks:
Take a soft pink pastel, crush a tiny bit into powder, and gently buff it onto the cheek area with a soft, dry brush or cotton pad. This creates a soft, airbrushed blush effect.
Cracks too faint?
If the cracks aren’t holding the dark pigment, the top coat of medium may have been too thin. Apply another layer of Step 2, let dry, and re-antique.
Step 3: The Crackle Effect
-
Applying Step 1 Medium:
Apply the first step of your 2-part craquelure medium. Brush it on generously and evenly. Let this layer dry until it is tacky but clear, usually about 30-45 minutes depending on brand instructions. -
Applying Step 2 Medium:
Apply the second step of the medium. The thickness of this layer often dictates crack size—I find a medium-thick layer works best for visible but realistic fractures. Let this dry completely (often overnight). -
Wait for Cracks:
As the top layer dries, clear cracks will appear. They will be practically invisible at this stage, but don’t worry, the next phase will reveal them.
Level Up: Broken Pieces
For a truly damaged look, physically break a small piece off the mask’s edge before painting, then paint the exposed edge dark grey to simulate clay.
Step 4: Antiquing and Finishing
-
Reveal the Cracks:
Rub Burnt Umber oil paint or dark antiquing wax over the entire surface. Work it deeply into the cracks using a circular motion with a soft cloth. -
Wipe Back Excess:
Immediately wipe away the excess oil or wax from the smooth surfaces using a clean rag. The dark pigment will remain trapped in the fissures, revealing the spiderweb pattern. -
Clean the Highlights:
If the surface looks too muddy, dampen a cloth very slightly with mineral spirits (for oil) or water (for wax) to clean the high points of the nose and forehead, restoring the porcelain glow. -
Add Manual Cracks:
If the chemical crackle didn’t reach certain edges or features, use your finest liner brush and water-thinned brown paint to manually paint a few connecting lines for continuity. -
Seal the Work:
Once the antiquing medium is fully dry (oil paint can take days to cure fully), apply a final coat of high-gloss varnish. This mimics the fired glaze of real ceramics.
Display your finished piece against dark velvet to really make that aged surface pop
Weathered Horror Hockey-Style Mask
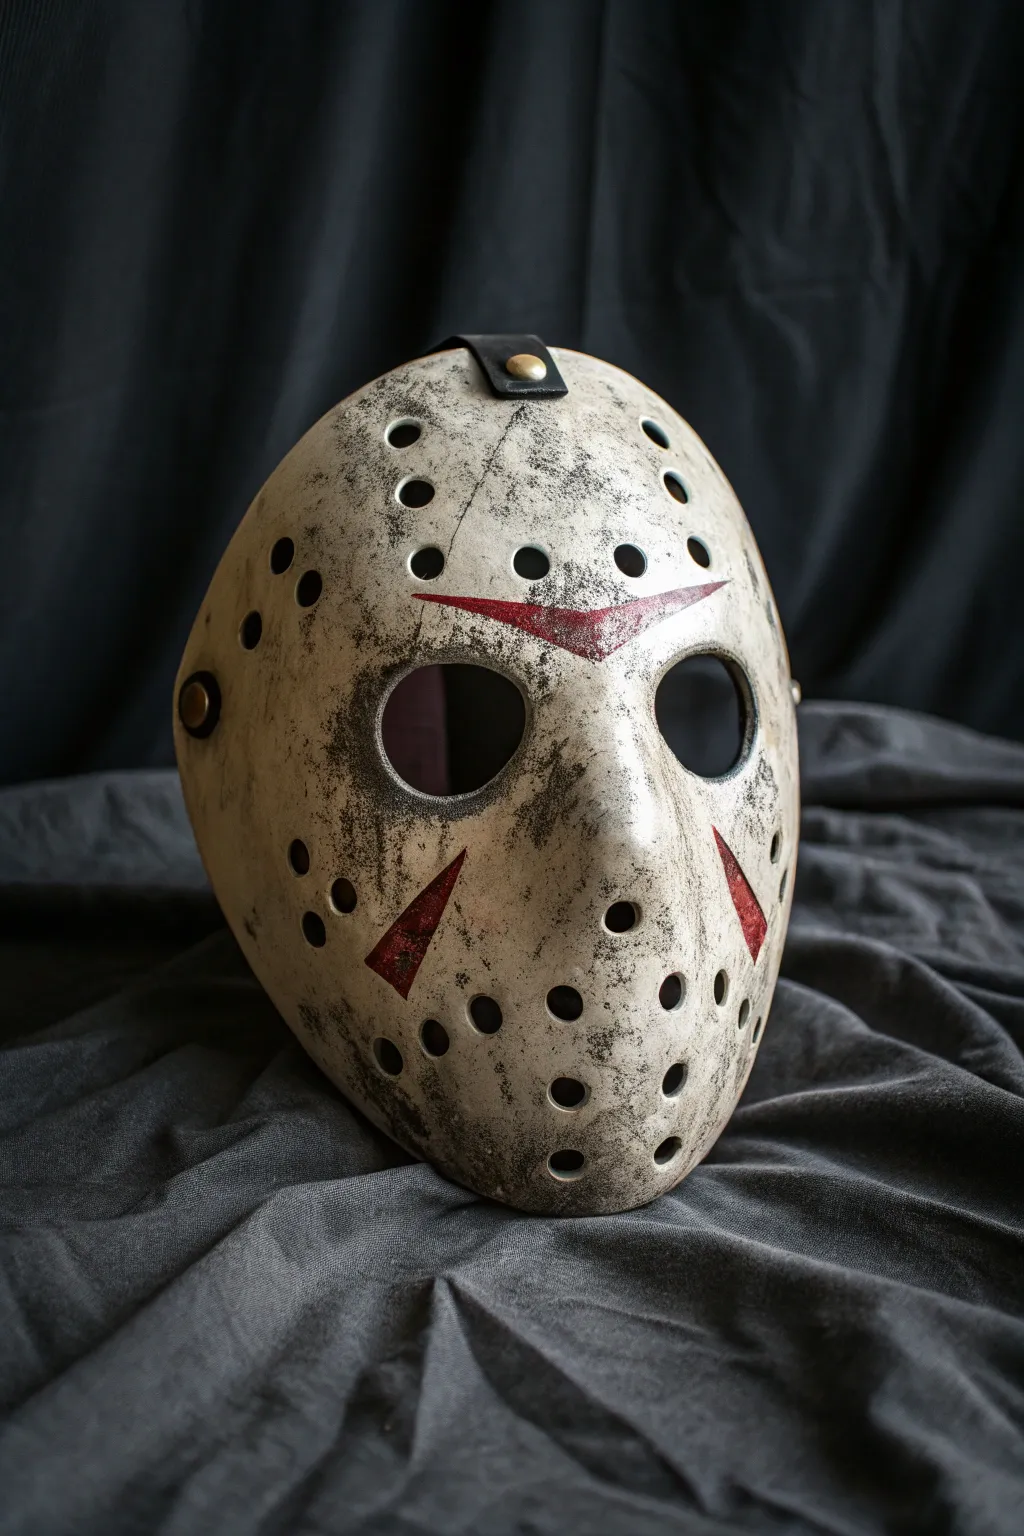
Transform a pristine hockey mask into a terrifying relic straight out of a horror movie. This project focuses on realistic aging techniques to create a gritty, battle-worn finish complete with iconic markings.
Step-by-Step Guide
Materials
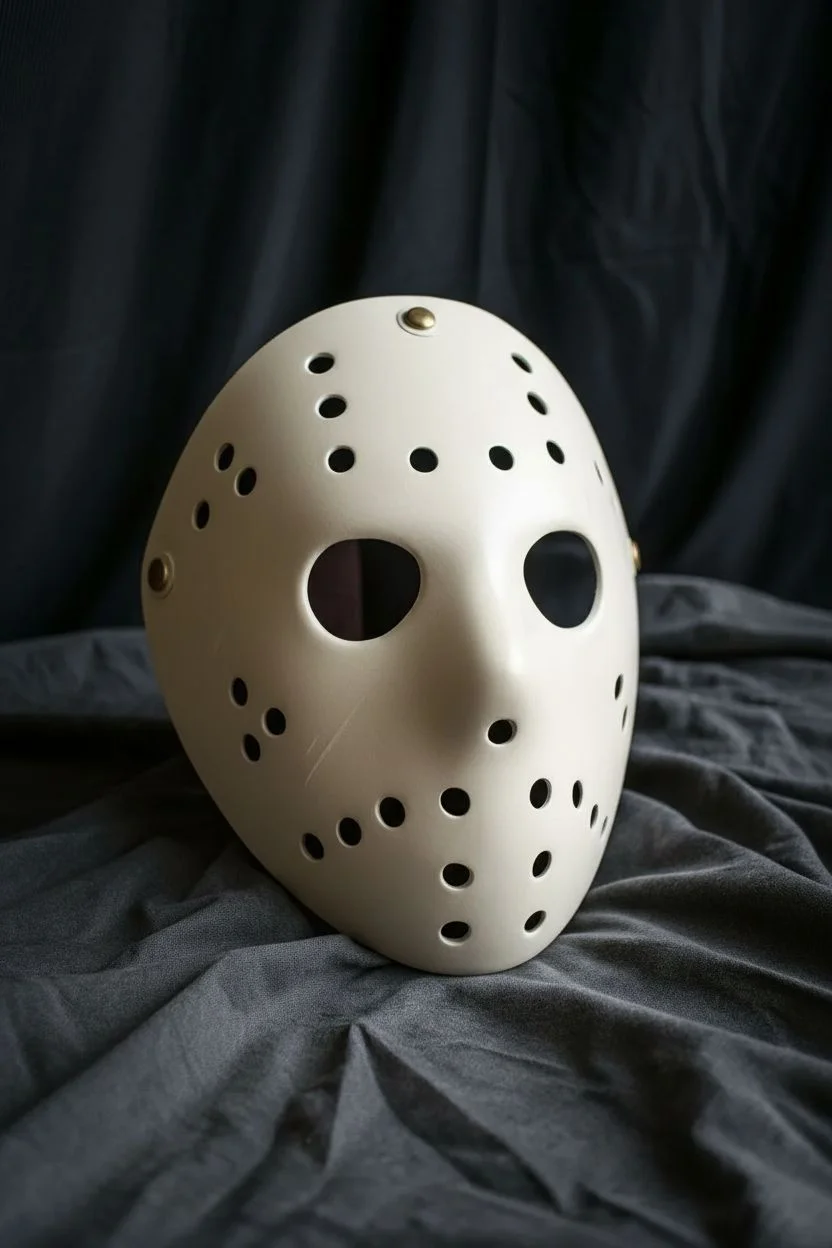
- Blank white plastic hockey mask
- Sandpaper (medium and fine grit)
- Matte spray paint (bone or off-white)
- Acrylic paints (black, burnt umber, crimson red)
- Gloss clear coat spray
- Satin or matte clear coat spray
- Masking tape
- X-acto knife
- Kitchen sponge or sea sponge
- Small detail brushes
- Paper towels
- Brass fasteners or upholstery tacks (optional for added realism)
Step 1: Preparation & Base Coat
-
Sand the shiny surface:
Begin by thoroughly sanding the entire surface of the plastic mask. We need to remove the factory shine so the paint adheres properly; focus on the edges and eye holes where wear would naturally occur. -
Clean the surface:
Wipe down the mask with a damp cloth or a little rubbing alcohol to remove all plastic dust and oils. Let it dry completely. -
Damage the mask (optional):
To add authentic battle damage, use your X-acto knife to carve small scratches, nicks, or even a crack near the edges. Be careful not to cut all the way through unless intended. -
Apply the base color:
Spray the mask with your bone or off-white matte spray paint. Use light, even sweeping motions to avoid drips. Apply 2-3 coats, letting them dry for about 15 minutes between applications.
Step 2: Adding the Iconic Markings
-
Tape off the chevrons:
Once the base coat is fully cured (give it at least an hour), use masking tape to block out the chevron shapes. You’ll need one distinct triangle on the forehead pointing down, and two cheek chevrons pointing toward the chin. -
Paint the red details:
Using a stiff brush and crimson red acrylic paint, dab the color into the taped areas. Don’t make it too perfect; a stippling motion helps it look like painted wood or weathered plastic. -
Remove tape carefully:
Peel away the masking tape while the red paint is still slightly tacky to get clean lines, then let the red markings dry completely. -
Distress the red paint:
Take a fine-grit sandpaper and very gently scuff over the dry red markings. This simulates years of wear where the paint has chipped away.
Don’t Rush the Wipe
When wiping off your black wash, don’t aim for totally clean. Leave smears and streaks in the direction of gravity to simulate rain and grime running down the mask over time.
Step 3: Weathering & Grime
-
Create a black wash:
Mix black acrylic paint with a generous amount of water until it has the consistency of ink or coffee. -
Apply the first wash:
Brush the black wash over the entire mask, ensuring it gets into the vent holes, scratches, and crevices. -
Wipe it back:
Immediately use a paper towel to wipe the wash off the raised surfaces. The dark paint will remain in the recesses, highlighting the texture. -
Sponge on grime:
Dip a torn piece of sponge into undiluted black paint, then dab most of it off onto a paper towel. Lightly stipple this ‘dry sponge’ around the edges, eye sockets, and nose area to create a random dirt effect. -
Add deep scratches:
Take a very small detail brush with black or dark brown paint and paint thin lines inside the physical scratches you carved earlier to add depth. -
Splatter texture:
Load an old toothbrush with thinned brown paint and flick the bristles at the mask to create tiny speckles of mud and dirt.
Add Subtle Color Depth
Mix a tiny drop of green or yellow into your wash for the bottom half of the mask. This mimics algae or grass stains, making it look like the mask has been lying on the ground.
Step 4: Hardware & Sealing
-
Paint the snaps:
If your mask has molded snaps, paint them gold or brass. For a more realistic look, I prefer to glue actual brass upholstery tacks over the molded spots. -
Weather the hardware:
Dab a tiny bit of black paint onto the brass snaps and wipe it off quickly, leaving grime around the edges to kill the shine. -
Final matte seal:
Protect your paint job with a coat of matte or satin clear spray. This locks in the acrylics and unifies the sheen so the dirty spots don’t look glossy.
Now you have a chilling, movie-quality prop ready for display or your next costume event
Negative Space Lace Stencil Look
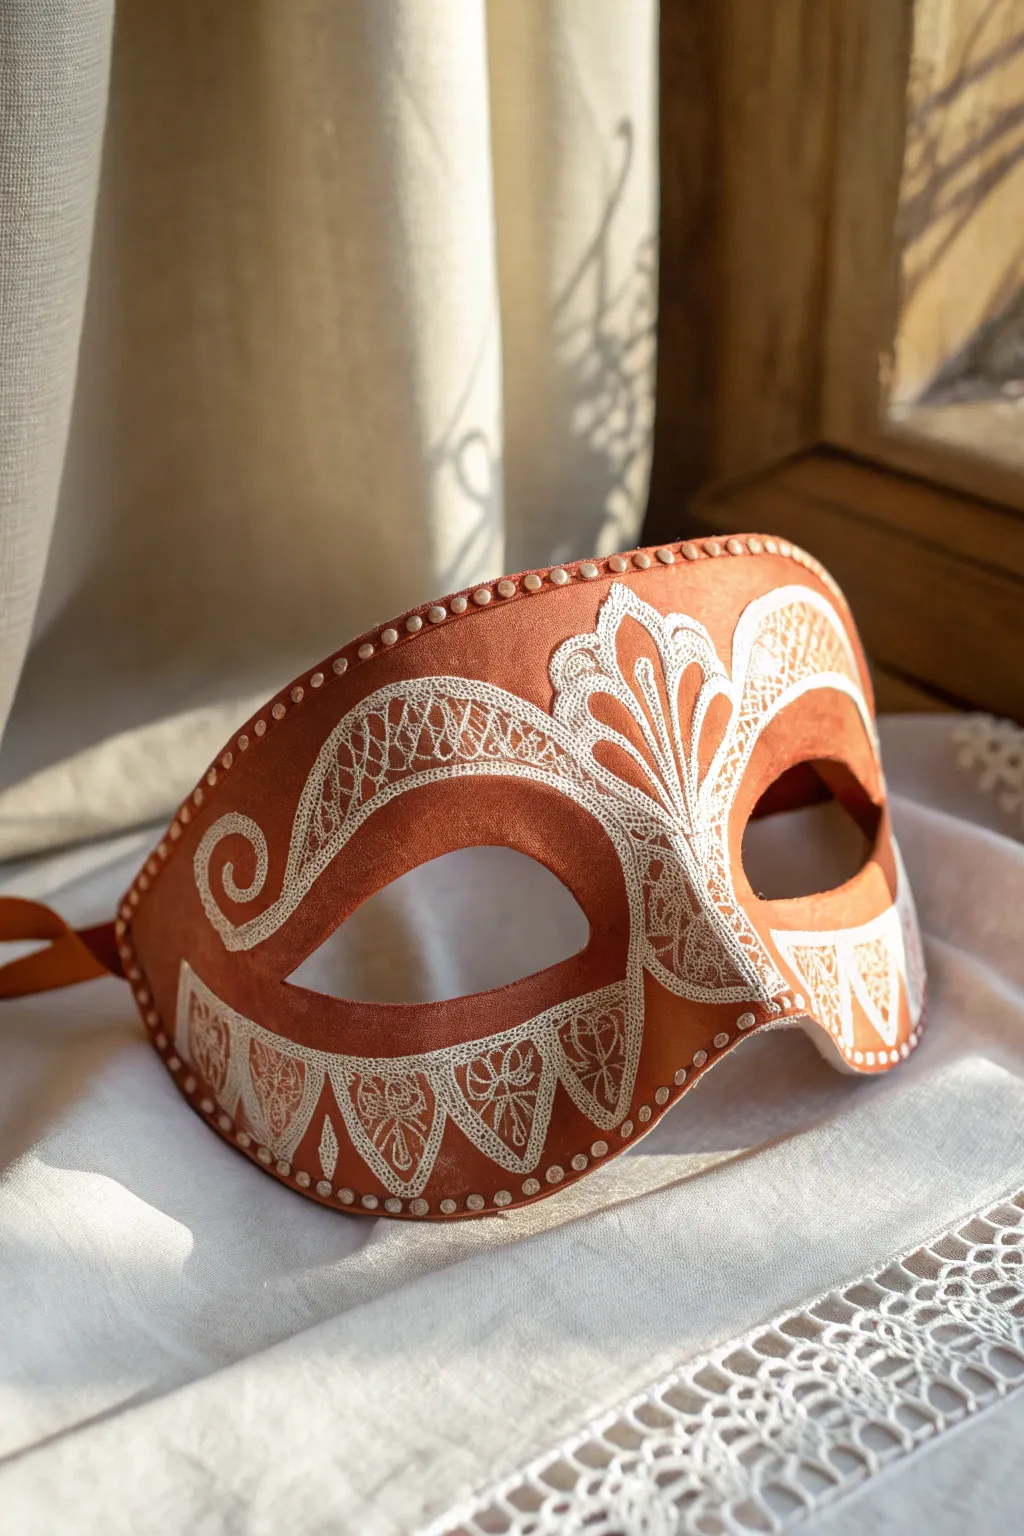
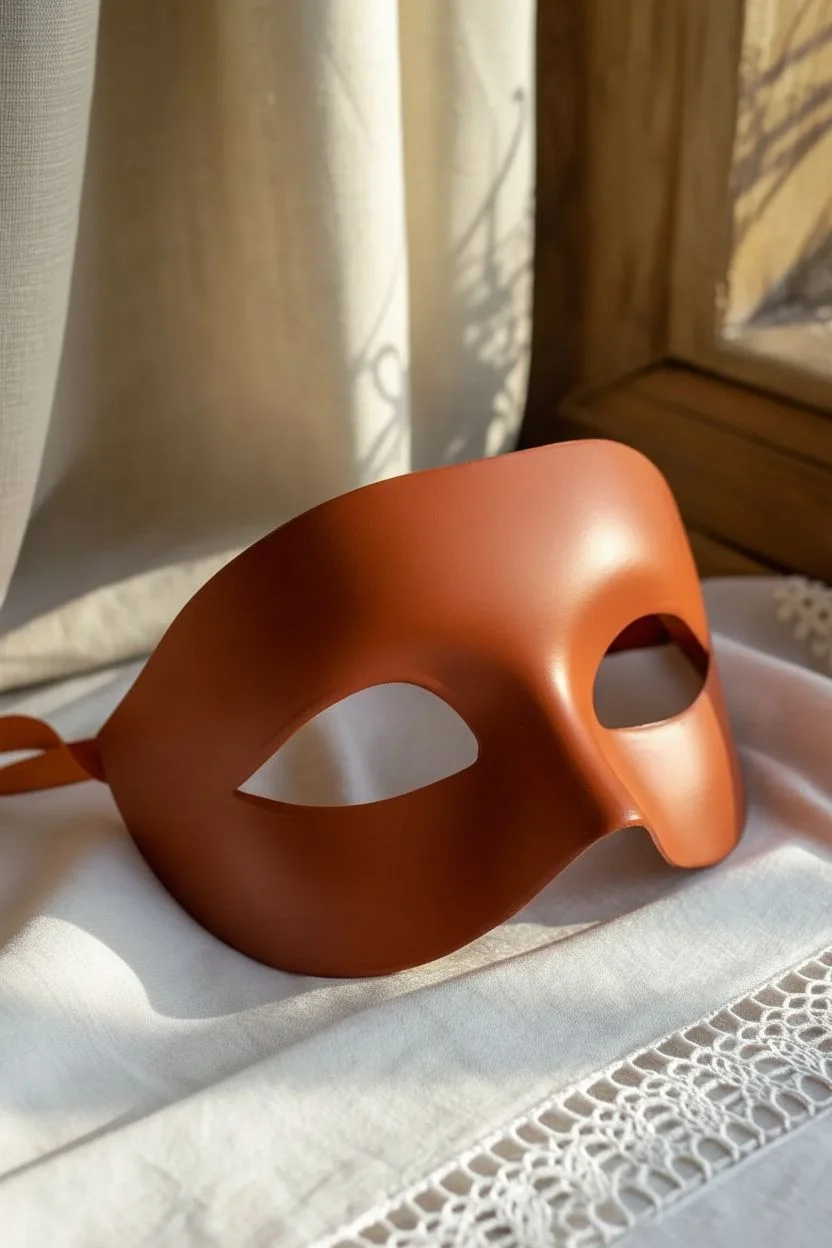
Achieve the delicate elegance of lace without gluing on a single thread by using the negative space technique. This project combines a warm, earthy terracotta base with intricate, hand-painted white filigree to create a sophisticated masquerade piece.
Detailed Instructions
Materials
- Blank masquerade mask (papier-mâché or hard plastic base)
- Terracotta or burnt orange acrylic paint
- White acrylic paint (high opacity) or a white gel pen
- Fine liner brush (size 00 or 000)
- Small flat shader brush
- Pencil (HB or H)
- Eraser
- Matte or satin varnish spray
- Matching ribbon for ties
- Palette
- Water cup and paper towels
Step 1: Base Preparation
-
Prime the Surface:
Ensure your blank mask is clean and dry. If the surface is very slick, give it a light sanding with fine-grit sandpaper to help the paint adhere. -
Apply the Base Coat:
Using your flat shader brush, coat the entire front of the mask with the terracotta acrylic paint. Use long, smooth strokes to minimize brush marks. -
Add a Second Layer:
Let the first coat dry completely (about 15-20 minutes). Apply a second coat to ensure rich, opaque coverage with no streaks showing through. -
Dry Thoroughly:
Allow the base color to cure fully for at least an hour. The paint must be hard and dry before you start the delicate detailed work.
Fixing Wobbly Lines
If a line gets too thick or messy, don’t wipe it! Let it dry, then paint over the mistake with your base terracotta color. It acts like an eraser.
Step 2: Mapping the Design
-
Sketch Key Shapes:
Very lightly sketch your main lace shapes with a pencil. Start with the central fan motif directly above the nose bridge. -
Outline Eye Borders:
Draw the swooping curves that frame the tops of the eyes, mirroring the left and right sides as closely as possible. -
Plan the Lower Triangles:
Sketch a series of triangular points or scallops along the bottom edge of the mask, creating a lace border effect. -
Refine the Swirls:
Add the swirling guide lines inside your main shapes. You don’t need to draw every tiny mesh line, just the main structural curves of the lace.
Step 3: Painting the Lace
-
Outline in White:
Load your fine liner brush with white paint thinned to an ink-like consistency, or use a high-quality white gel pen. Carefully trace over your main pencil outlines. -
Create the Top Center:
Fill the central fan shape. Instead of solid white, draw vertical lines radiating outward, resembling the veins of a leaf or fan, leaving the terracotta showing between them. -
Cross-Hatch the Mesh:
Inside the large swooping shapes above the eyes, paint a diagonal grid pattern. Keep your lines extremely thin to mimic delicate netting. -
Add Scalloped Edges:
Paint small semi-circles along the outer edges of your white outlines to create a ‘picot’ lace edge look. -
Detail the Lower Border:
Fill the triangular shapes on the bottom edge with stylized floral motifs or simple cross-hatching, alternating patterns for visual interest. -
Thicken Main Lines:
Go back over the primary structural lines (the borders of your shapes) with a second pass of white to make them stand out against the fine mesh work.
Add Dimension
Mix a tiny drop of brown into the terracotta and paint faint shadows under the white lace lines. This creates a realistic 3D raised embroidery effect.
Step 4: Finishing Touches
-
Dot the Perimeter:
Using the handle end of a paintbrush or a dotting tool, apply a row of evenly spaced white dots along the very outer rim of the mask. -
Clean Up:
Once the white paint is fully dry, gently erase any visible pencil marks with a soft eraser. -
Seal the Work:
Spray the mask with a matte or satin varnish to protect the paint from chipping and give it a professional finish. -
Attach Ribbons:
Secure the matching ribbon ties to the sides of the mask using hot glue or by threading them through pre-punched holes.
Your sophisticated lace-effect mask is now ready to add a touch of mystery to your next event or wall display
Typography Across the Brow and Cheeks
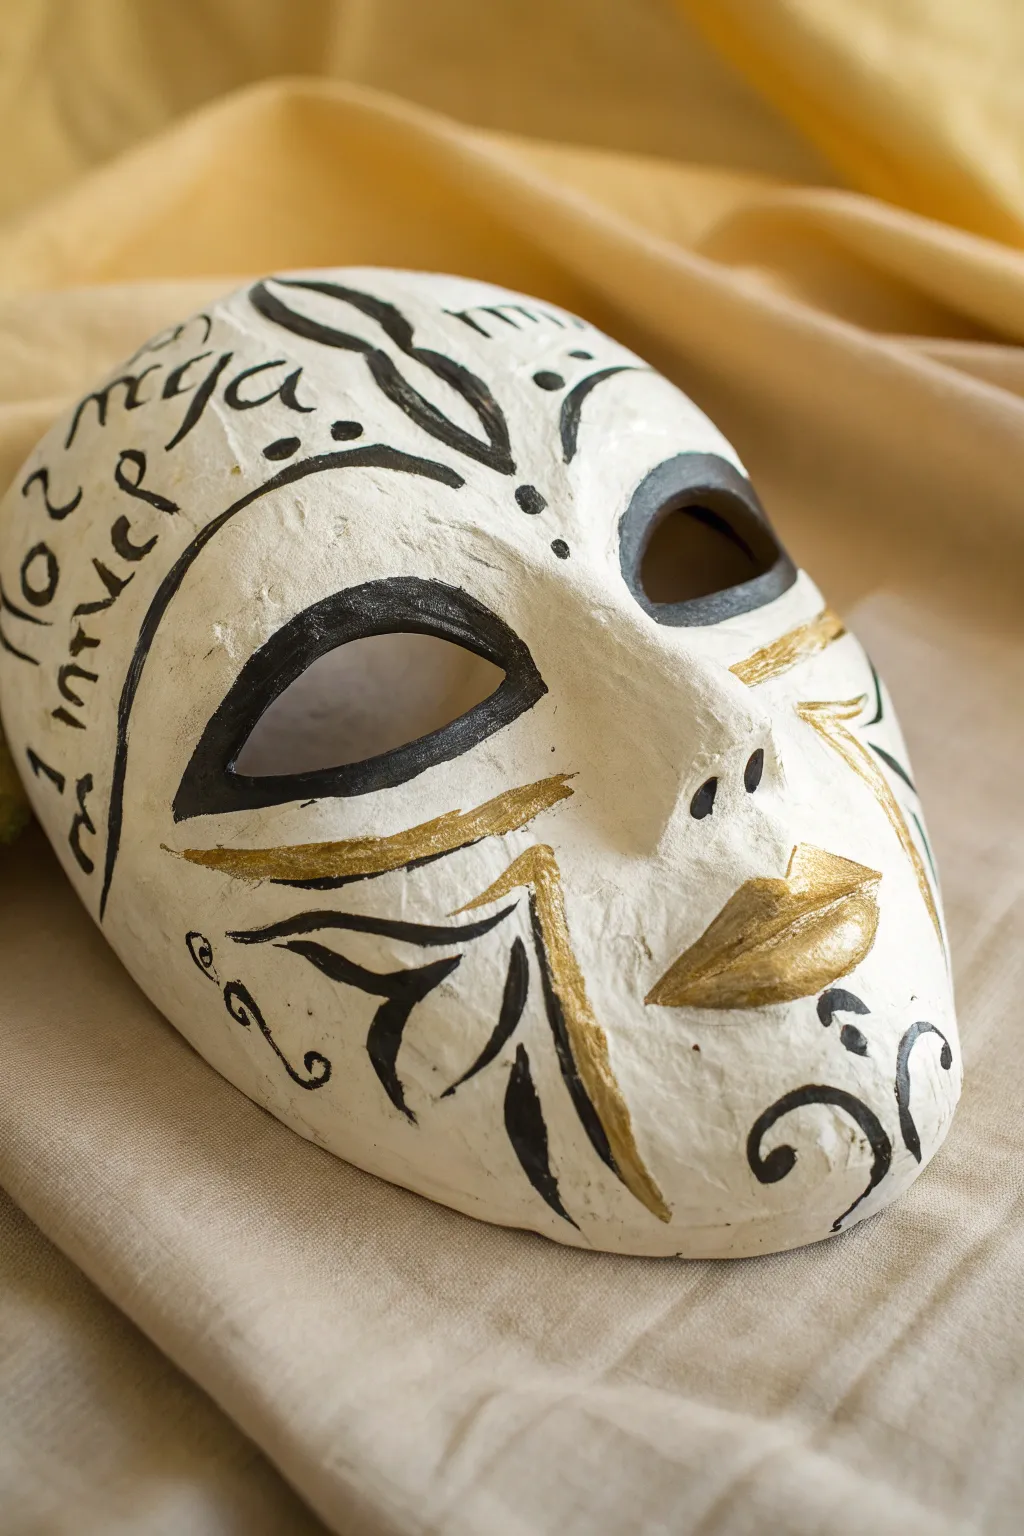
This project transforms a plain white mask into a sophisticated piece of art using bold calligraphy and striking contrast. The combination of flowing script, stark black swirling motifs, and touches of metallic gold creates a mysterious, Venetian-inspired look ideal for decor or display.
Step-by-Step
Materials
- Blank white paper maché or plaster full-face mask
- White acrylic paint (matte)
- Black acrylic paint
- Gold metallic acrylic paint
- Fine liner paintbrush (size 0 or 00)
- Small flat shader paintbrush (size 2 or 4)
- Pencil for sketching
- Eraser
- Matte or satin varnish (optional spray)
Step 1: Base Preparation
-
Prime the Surface:
Begin by applying a smooth, even coat of white matte acrylic paint over the entire mask. Even if the mask is already white, this creates a uniform texture that accepts detail work much better. -
Smooth the Canvas:
Inspect the mask for any rough bumps or paper maché ridges. If necessary, lightly sand them down and apply a second coat of white paint for a flawless finish. -
Let it Set:
Allow the base coat to dry completely. It should be dry to the touch so your pencil sketch doesn’t dig into soft paint.
Fixing Shaky Lines
If your script edges look jagged, wait for the black to dry fully. Use white paint and a tiny brush to carefully ‘cut in’ and reshape the letters from the outside.
Step 2: Sketching the Design
-
Map the Bold Areas:
Use a light pencil to outline the heavy black areas around the eyes. Draw an almond shape that encompasses the eye holes, extending slightly upward at the outer corners. -
Draft the Florals and Swirls:
Sketch the organic, leaf-like shapes on the forehead and cheeks. Notice the symmetry: a central motif on the forehead and swooping curves on the jawline. -
Draft the Script:
On the left temple and cheek, lightly pencil in your chosen text. Allow the letters to curve naturally with the contours of the mask face rather than trying to write in straight lines. -
Outline the Gold Accents:
Mark the areas for gold application: the full lips, a swooping accent under the left eye, and the highlights within the cheek designs.
Step 3: Painting the Details
-
Define the Eyes:
Using a small flat brush and black acrylic, carefully fill in the outlined eye areas. I find it easiest to outline the shape first with a liner brush before filling the center. -
Paint the Script:
Switch to your finest liner brush. Load it with thinned black paint (ink consistency helps flow) and carefully trace your penciled letters. Vary the pressure to create thick and thin line weights. -
Create the Forehead Motif:
Paint the decorative shapes on the forehead. Use confident, single strokes for the black lines and dot accents to keep them looking crisp. -
Detail the Cheeks:
Paint the distinct black swirls on the chin and jawline. Add the leaf-like shapes on the cheeks, leaving specific negative spaces where the gold will go later. -
Add Decorative Dots:
Using the very tip of your brush or a dotting tool, place small black dots around the forehead design and script to balance the composition.
Antique Effect
Mix a tiny drop of brown paint with water to create a wash. Lightly brush it over the dried white areas and wipe away immediately for an aged parchment look.
Step 4: The Golden Touch
-
Paint the Lips:
Load a clean flat brush with metallic gold paint. Fill in the lips completely, ensuring crisp edges especially at the cupid’s bow and corners. -
Highlight the Cheeks:
Apply gold paint to the specific sketched areas on the cheeks, integrating it alongside the black designs. The gold acts as a shadow or highlight to the black forms. -
The Under-Eye Swoop:
Paint a single, confident gold stroke beneath the left eye, mirroring the curve of the black eye makeup you painted earlier. -
Clean Up:
Once the paint is dry, gently erase any visible pencil marks. Be extremely careful near the gold paint, as some metallic pigments can smudge. -
Seal (Optional):
For longevity, spray the mask with a light coat of matte or satin varnish to protect your intricate brushwork from dust and fading.
Now you have a stunning, hand-lettered mask ready to hang on your wall or wear to your next masquerade
Neon UV-Reactive Rave Mask Designs
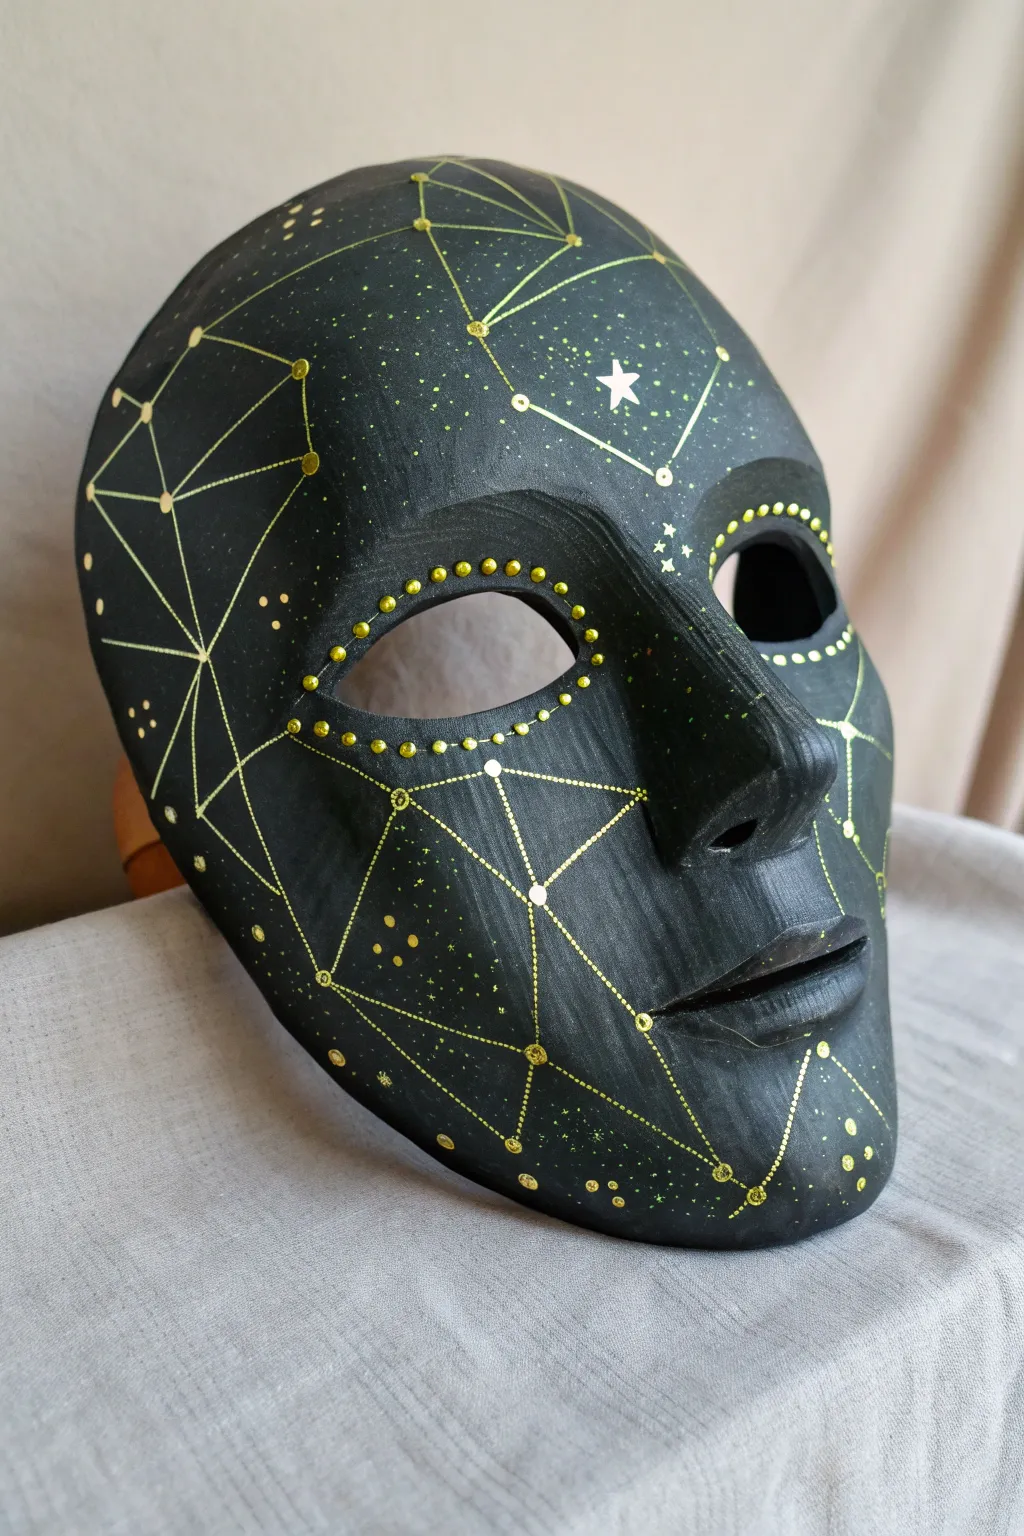
Transform a plain base into a celestial masterpiece with this striking black and gold design. Featuring delicate geometric constellations and bright dotted accents, this mask glows with an ethereal quality perfect for raves or starry nights.
Detailed Instructions
Materials
- Blank full-face mask (plastic or paper mache)
- Matte black acrylic paint
- Gesso or primer (optional but recommended)
- UV-reactive neon yellow or gold paint
- Fine liner brush (size 0 or 00)
- Small dotting tool or toothpick
- White pencil or chalk for sketching
- Ruler
- Medium flat brush
- Satin or matte varnish spray
Step 1: Base Preparation
-
Prime the surface:
Before laying down your dark base, apply a coat of gesso to your blank mask. This helps smooth out any manufacturing textures and gives the paint something to grip onto. -
Apply the darkness:
Using your medium flat brush, paint the entire mask with matte black acrylic. Paint in smooth, horizontal strokes to minimize texture. -
Layer for opacity:
Let the first coat dry completely, usually about 20 minutes. Apply a second coat to ensure a deep, opaque void-like finish without any streaks showing through.
Step 2: Drafting the Constellations
-
Map your stars:
With a white pencil or chalk, lightly mark where your major connection points—the ‘stars’—will live. Focus on key areas like the cheekbones, forehead, and jawline to balance the composition. -
Connect the dots:
Using a ruler and your white pencil, lightly draw straight lines connecting your marked points to form triangular and geometric shapes. Don’t worry about perfection; this is just a guide. -
Outline the eyes:
Sketch a guide circle around the eye holes where you want the decorative dot border to sit. Keeping this symmetrical really helps the final look.
Steady Hands
Rest your pinky finger on a dry part of the mask while painting lines. This anchors your hand and gives you much more control for creating straight, crisp geometric lines.
Step 3: The Geometric Web
-
Load your liner:
Dip your fine liner brush into the neon yellow or gold paint. Thin the paint slightly with a drop of water if it feels too thick to flow smoothly. -
Trace the main lines:
Carefully paint over your chalk lines. Start from the center of the mask and work outward to avoid smudging your work with your hand. -
Emphasize vertices:
At every point where lines intersect, paint a small, solid circle. These act as the ‘stars’ in your constellations and cover up messy intersections. -
Add detail dots:
Along some of the longer lines, use the very tip of your brush to tap tiny dashes or dots, creating variety in the line weight and texture.
Glow Up
Use actual glow-in-the-dark acrylics mixed with your neon paint. Charge the mask under a bright light before your event, and the constellations will shine even when usage of UV lights is low.
Step 4: Celestial Details
-
Frame the eyes:
Take your dotting tool or the back of a brush. Dip it into the paint and stamp a row of evenly spaced dots around the rim of the eye sockets. -
Create varying sizes:
Switch to a smaller tool (like a toothpick) and add smaller dots in open black spaces to simulate distant stars or space dust. -
Paint a focal star:
On the forehead or a cheek, freehand a small five-pointed star or a diamond bursts to serve as a focal point among the geometric web. -
Stipple the void:
I like to take an almost dry brush with a tiny bit of paint and lightly stipple random areas. This creates a subtle ‘nebula’ effect of faint speckles in the background.
Step 5: Final Touches
-
Clean the guides:
Once the paint is 100% bone dry, use a slightly damp Q-tip or a soft eraser to gently remove any visible white pencil marks. -
Touch up black:
If you accidentally smudged any neon paint where it shouldn’t be, use a small brush and your black base paint to tidy up the edges. -
Seal the universe:
Finish by spraying the mask with a matte or satin varnish. This protects your fine line work and keeps the black paint looking deep and velvety.
Your cosmic creation is now ready to light up the night with its mesmerizing geometry


Have a question or want to share your own experience? I'd love to hear from you in the comments below!