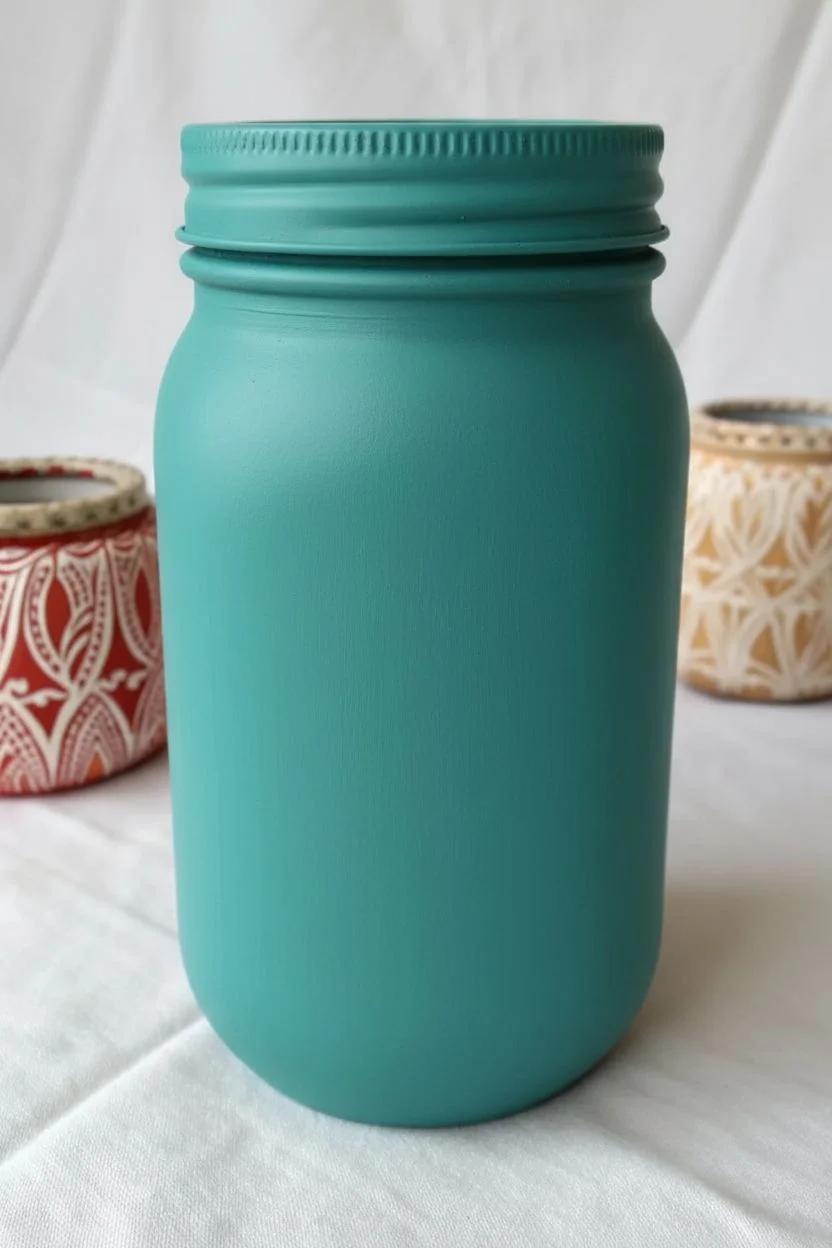
Painting mason jars is one of my favorite quick wins because glass turns into decor so fast with just a little color and imagination. If you’ve got a few empty jars and the itch to make something cute for your home (or a gift), these mason jar painting ideas will keep you busy in the best way.
Classic Matte Painted Mason Jars With Distressed Edges
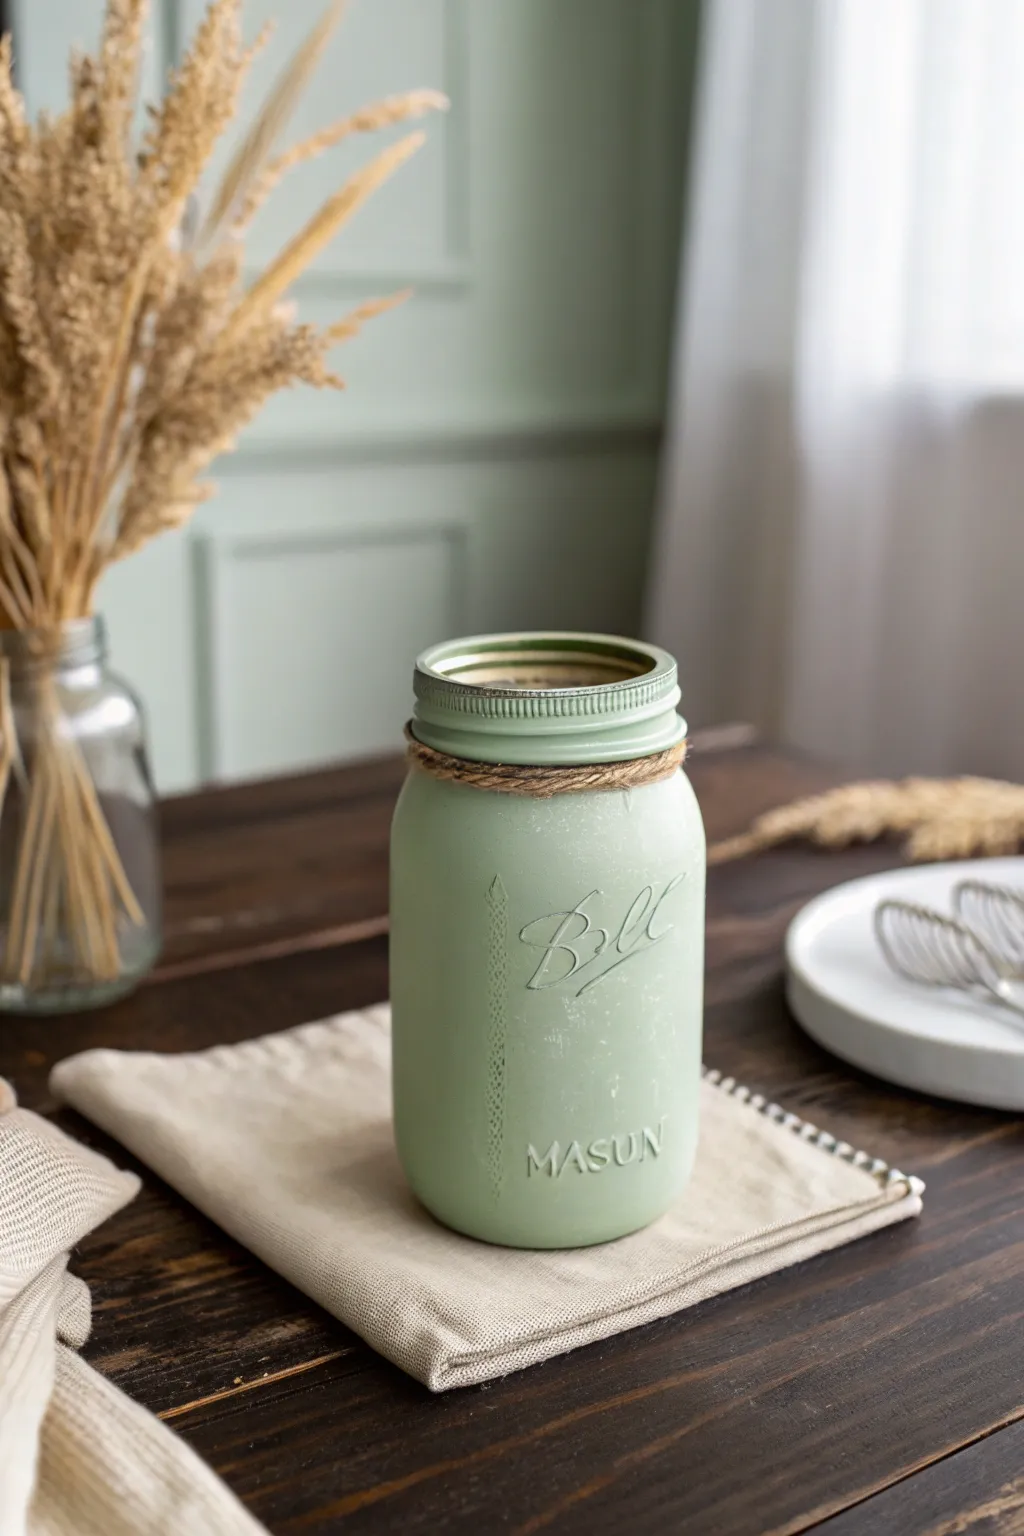
Transform a plain glass jar into a rustic farmhouse masterpiece with a soft sage green finish and charming distressed details. The worn edges and matte texture give this piece a timeless, vintage appeal that fits perfectly into cottage-style decor.
Step-by-Step Tutorial
Materials
- Standard glass Mason jar (quart size)
- Rubbing alcohol and cotton pad
- Chalk finish paint (Sage Green or similar muted pastel)
- Medium flat paintbrush (1-inch width)
- Sandpaper (100 or 120 grit)
- Clear matte sealer spray or wax
- Jute twine
- Scissors
Step 1: Preparation and Base Coat
-
Clean surface:
Begin by thoroughly cleaning the exterior of your glass jar. Wipe it down with rubbing alcohol on a cotton pad to remove any oils or fingerprints, which ensures the paint adheres properly. -
First coat application:
Dip your flat brush into the sage green chalk paint. Apply a thin, even coat over the entire outside of the jar, starting from the neck and working your way down to the base. -
Watch the direction:
Keep your brush strokes vertical for a clean look, but don’t worry too much about perfection yet—chalk paint is forgiving. -
Let it dry:
Allow this first layer to dry completely. This usually takes about one to two hours, depending on the humidity. The paint should look matte and feel dry to the touch. -
Second coat:
Once dry, apply a second coat of the same sage green paint. This layer provides full opacity and covers any streaks from the first pass. -
Rim details:
Ensure you paint carefully around the threaded rim at the top, but avoid painting the very top lip if you plan to use it for drinking, though usually these are for decor. -
Final dry time:
Let the jar sit overnight or for at least 4-6 hours to ensure the paint cures slightly before we start the distressing process.
Step 2: Distressing and Sealing
-
Prepare sandpaper:
Cut a small square of your 100 or 120-grit sandpaper. Fold it to make it easier to grip and control against the glass curves. -
Target raised areas:
Gently sand over the raised “Ball” logo script and the “MASON” lettering. Apply light pressure until the paint wears away and the glass peeks through. -
Thread distressing:
Run the sandpaper horizontally around the threaded neck of the jar. This highlights the ridges and adds to the rustic feel. -
Random distressing:
I like to add a few random scuffs on the smooth parts of the jar and the bottom edge to simulate natural wear and tear over time. -
Clean up dust:
Use a dry, soft cloth or a tack cloth to wipe away all the fine paint dust created by the sanding process. -
Seal the finish:
To protect the paint from chipping further, spray the jar with a clear matte sealer. Alternatively, you can buff on a clear wax for a soft sheen. -
Drying the sealer:
Allow the sealer to dry according to the manufacturer’s instructions, usually about 24 hours for a full cure, though it will be touch-dry sooner.
Fixing Paint Slip
If the paint slides off the glass excessively while applying the first coat, your brush might be too wet. Let the first coat dry patchy; the second coat will cover it solid.
Step 3: Finishing Touches
-
Measure twine:
Cut a length of jute twine roughly 24 inches long. -
Wrap the neck:
Wrap the twine around the neck of the jar, sitting comfortably in the threaded groove area. -
Secure the twine:
Loop it around 2-3 times to create a textured band, then tie it off securely. You can tuck the ends in or trim them short for a neat appearance as seen in the photo.
Use it as a Vase
Since the paint is on the outside, you can safely fill the inside with water for fresh flowers. Just be careful not to submerge the painted exterior when washing.
Place your finished jar on a wooden table or shelf to instantly warm up your room


Simple Daisy Dot Mason Jars
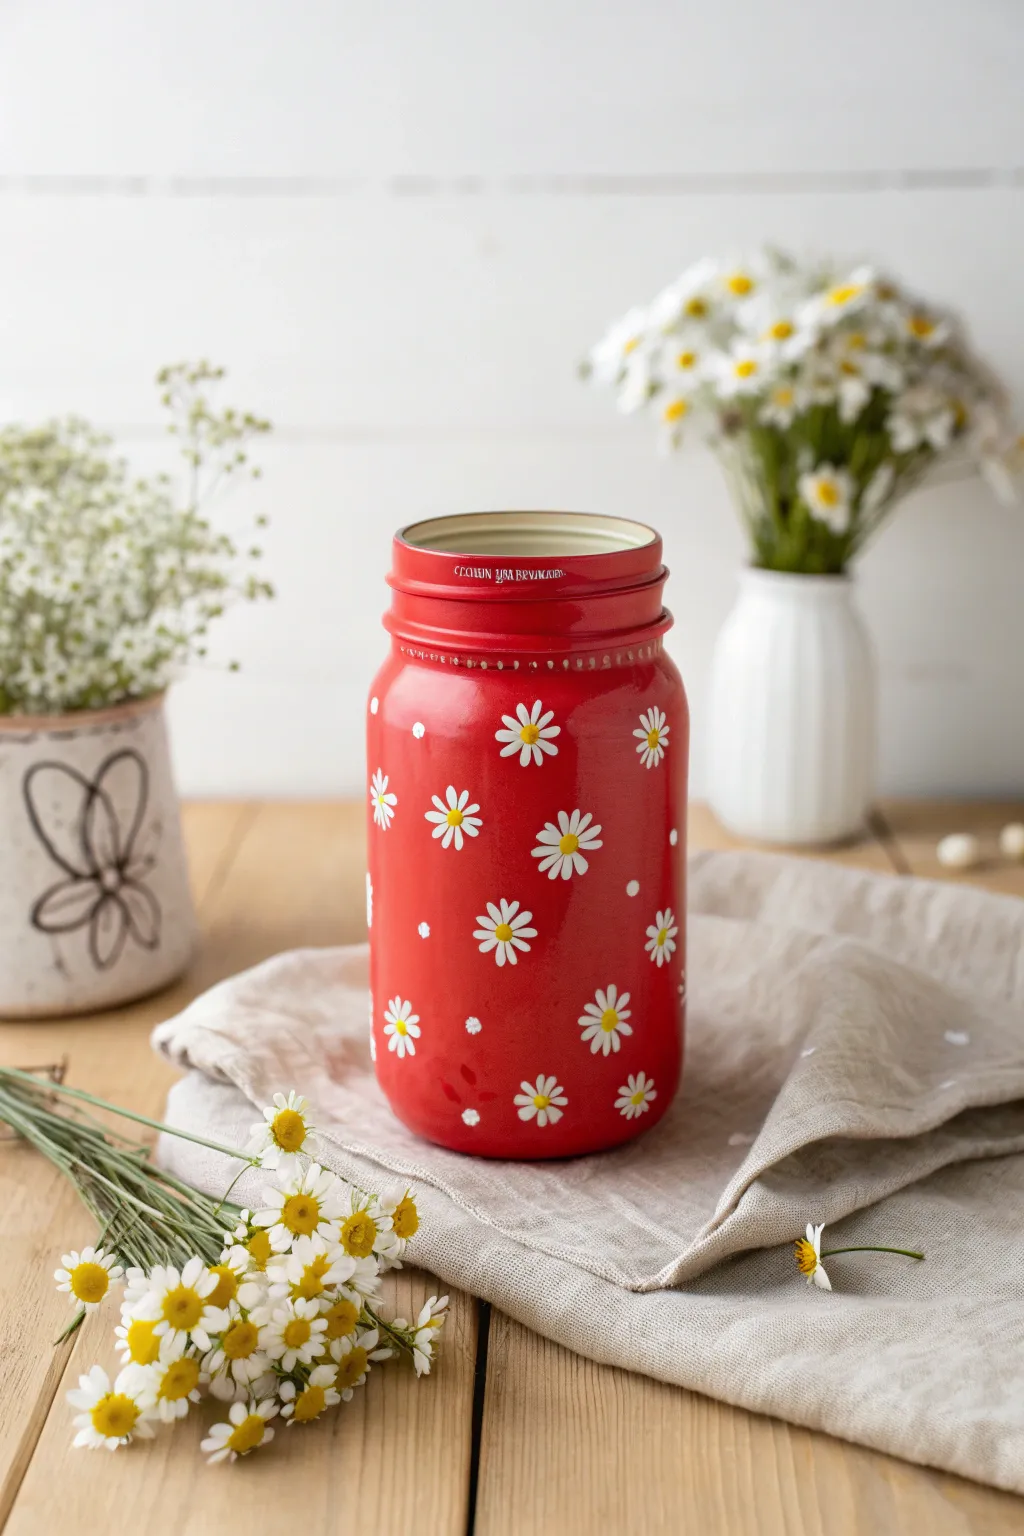
Transform a plain glass jar into a vibrant pop of color with this cheerful red and white daisy design. This project combines bold background painting with delicate floral detailing for a charming, rustic piece of decor.
Step-by-Step
Materials
- Clean glass mason jar (quart size)
- Rubbing alcohol
- Cotton pads
- Red multi-surface acrylic paint or chalk paint
- White multi-surface acrylic paint
- Yellow ochre acrylic paint
- Flat paintbrush (approx. 1 inch)
- Small round detail brush (size 1 or 2)
- Dotting tool or handle end of a paintbrush
- Matte spray sealer or clear varnish
Step 1: Preparation & Base Coat
-
Clean surface:
Begin by thoroughly cleaning the outside of your mason jar with rubbing alcohol and a cotton pad. This removes oily fingerprints and ensures the paint adheres properly. -
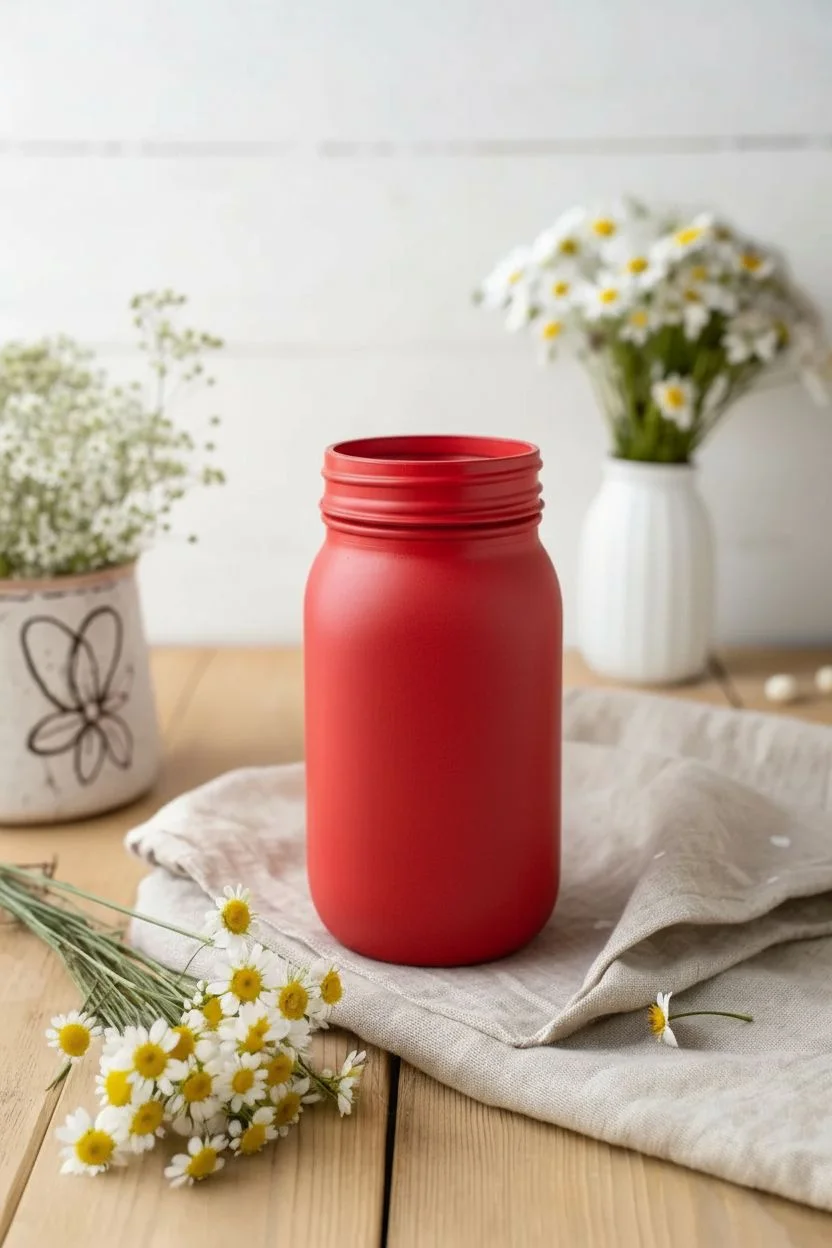
Apply first red coat:
Using a flat 1-inch brush, apply a generous coat involving red paint to the entire exterior of the jar right up to the rim. -
Smooth strokes:
Work in long, vertical strokes from top to bottom to minimize texture marks as the paint settles. -
Dry thoroughly:
Allow this first layer to dry completely. This usually takes about an hour, depending on the humidity and paint thickness. -
Second coat coverage:
Apply a second coat of red paint to ensure full opacity. The glass should not show through at all. I find that turning the jar upside down on a tall bottle helps me paint the rim without smudging. -
Final cure:
Let the base coats cure for at least 2-4 hours before starting the detailed flower work so the red doesn’t lift.
Clean Edges Pro Tip
Keep a damp Q-tip nearby while painting petals. If you make a mistake or a petal gets too wonky, you can quickly wipe it away without ruining the dry red base layer.
Step 2: Painting the Daisy Centers
-
Plan placement:
Visualize where your flowers will go. A random, scattered pattern looks best, with some flowers closer together and others further apart. -
Create yellow centers:
Dip a dotting tool or the back end of a paintbrush into yellow ochre paint. -
Apply dots:
Press the tool gently onto the red surface to create small yellow circles. These will be the centers of your daisies. -
Add accent dots:
In the empty spaces between where the flowers will be, add tiny single white dots using a smaller dotting tool to create a whimsical ‘pollen’ or ‘snow’ effect.
Distressed Upgrade
Once the red paint is fully dry but before painting the flowers, use fine-grit sandpaper to gently scuff the raised lettering and rim for a rustic, farmhouse vibe.
Step 3: Adding Petals & Finishing
-
Prepare white paint:
Load a small round detail brush with white acrylic paint. You want the consistency to be creamy but not drippy. -
Paint first petals:
Starting near a yellow center, press the brush down and pull outward slightly to release pressure, creating a teardrop petal shape. -
Complete the circle:
Continue painting 5-8 petals around each yellow center. Don’t worry if they aren’t identical; natural irregularity adds charm. -
Layering tips:
If the red shows through the white petals, let the first layer of white dry for ten minutes and carefully go over the petals again for brighter coverage. -
Refine the rim:
Check the screw-top rim of the jar. If paint pooled in the grooves, use the tip of a dry brush to smooth it out or add a fresh thin line of red for a clean finish. -
Dry completely:
Allow the jar to sit undisturbed overnight to ensure the design is fully hard. -
Seal the work:
Spray the entire jar with a matte clear sealer in a well-ventilated area to protect your artwork from scratches and dust.
Now your jar is ready to be filled with fresh wildflowers or used as a colorful utensil holder on your counter


Hand-Painted Wildflower Bouquet Mason Jar Vase
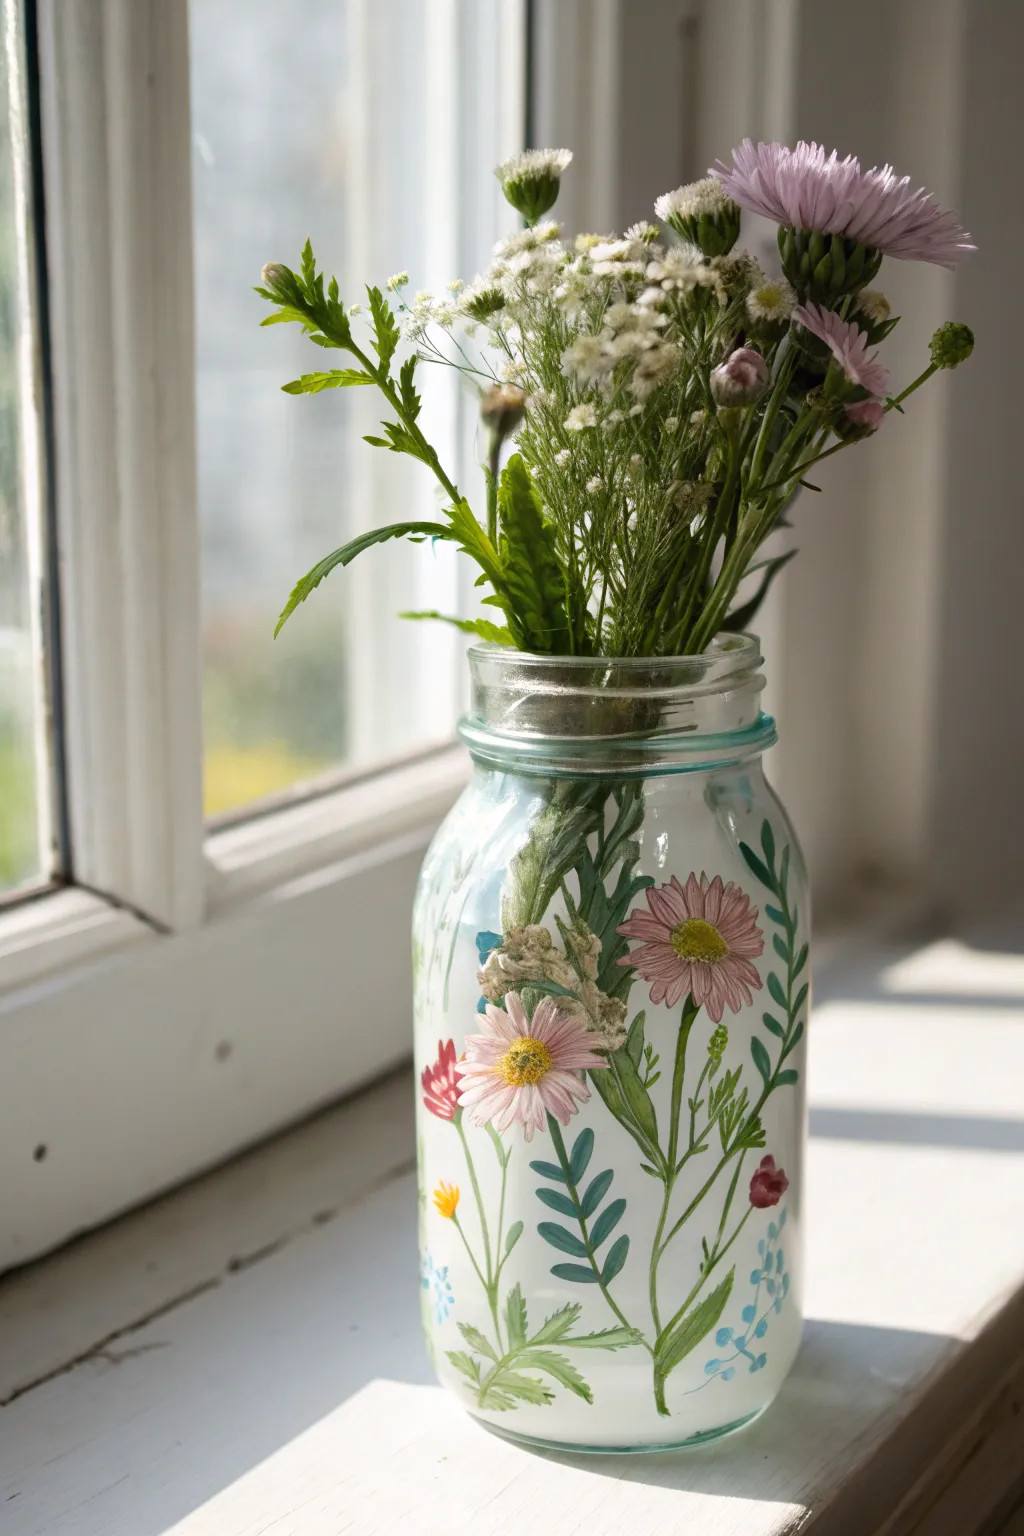

Transform a simple glass jar into a charming, rustic vase with this delicate wildflower design. By painting a crisp white base coat and layering botanical elements over it, you’ll create a bright, airy piece that looks lovely on any windowsill.
Detailed Instructions
Materials
- Clean glass mason jar (quart size)
- Rubbing alcohol and cotton pads
- White acrylic craft paint or chalk paint
- Acrylic paints: sage green, forest green, soft pink, lilac, bright yellow, crimson red, sky blue
- Flat paintbrush (1-inch width)
- Small round detail brushes (sizes 0 and 2)
- Fine liner brush
- Clear acrylic sealer spray (matte or satin finish)
- Palette or paper plate
- Water cup and paper towels
Step 1: Preparing the Canvas
-
Clean the surface:
Before painting, wipe the exterior of the mason jar thoroughly with rubbing alcohol and a cotton pad. This removes oils and fingerprints, ensuring your paint adheres perfectly. -
Apply the base coat:
Using your flat paintbrush, apply a layer of white acrylic or chalk paint to the outside of the jar. Use smooth, vertical strokes from the neck down to the base. -
Build opacity:
Let the first coat dry completely (about 20-30 minutes). I find that two or three thin coats serve better than one thick, goopy layer. Apply additional coats until the glass is fully opaque and white.
Brush Control Tip
For the finest stems and vines, thin your green acrylic paint with a tiny drop of water. Ink-like consistency flows smoother than thick paint.
Step 2: Painting the Greenery
-
Draft the main stems:
Mix a sage green with a tiny drop of brown to get a natural stem color. Using a size 2 round brush, paint three to four long, curved lines starting from the bottom of the jar and reaching toward the neck. Keep them loose and organic. -
Add fern-like leaves:
Switch to your darker forest green. Along one of the stems, paint small, alternating teardrop shapes to mimic fern fronds or feathery foliage. -
Paint broad leaves:
Near the base of another stem, paint larger, elongated oval leaves using the sage green. Press the brush down and lift as you pull away to create a tapered tip. -
Create climbing vines:
With a fine liner brush and forest green paint, add a trailing vine with tiny, simple leaves climbing up one of the empty spaces on the jar.
Step 3: Adding the Blooms
-
Paint the pink daisies:
Mix soft pink with a touch of lilac. Choose two spots on your stems—one higher, one lower—and paint a circle of thin, elongated petals radiating from a center point. -
Detail the flower centers:
Once the pink petals are dry, dip the tip of a small round brush into bright yellow. Dab a textured center into the middle of each daisy. I like to add a tiny dot of brown on one side of the yellow for shadow. -
Add red buds:
Using crimson red, paint small, teardrop-shaped buds near the ends of the climbing vines or on short offshoot stems. Keep these small and subtle. -
Incorporate blue accents:
With sky blue paint and your smallest brush or a dotting tool, dab clusters of tiny dots near the bottom foliage to represent forget-me-nots or baby’s breath. -
Highlight the leaves:
Mix a little white into your sage green. Use the liner brush to add a thin highlight line down the center of the larger leaves for dimension.
Distressed Charm
After the white base coat dries completely, lightly sand the raised lettering or rim of the jar with fine-grit sandpaper before painting the flowers.
Step 4: Finishing Touches
-
Refine the details:
Look over your design. Use your fine liner brush to connect any floating flowers to stems with thin green lines. -
Clean the rim:
If any white base paint got onto the threads of the jar rim where the lid screws on, wipe it away with a damp cloth or carefully scrape it off for a neater look. -
Allow to cure:
Let the jar sit undisturbed for at least 24 hours to allow the paint layers to fully cure and harden. -
Seal the artwork:
Take the jar to a well-ventilated area and spray it lightly with a clear acrylic sealer. This protects the flowers from scratches and moisture.
Fill your new vase with fresh asters or dried herbs to complete the rustic look


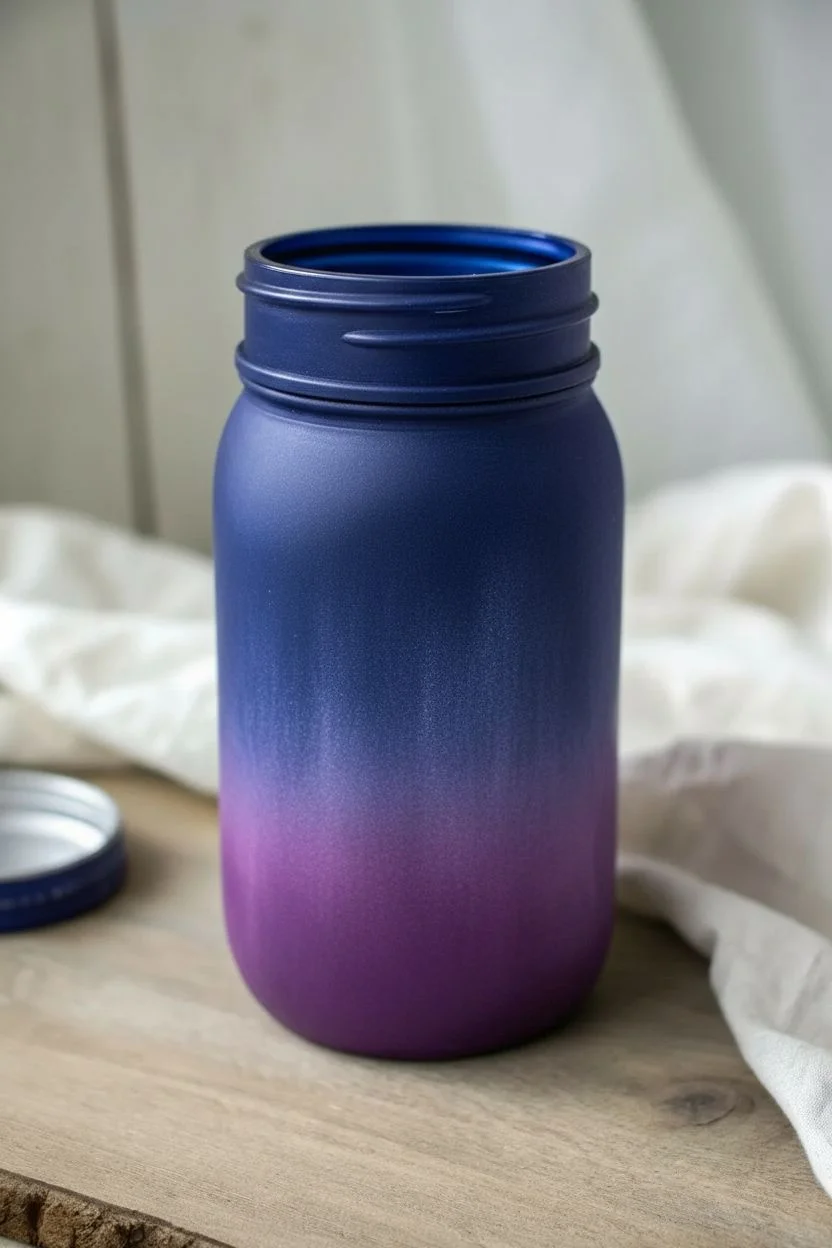
Soft Ombre Fade Mason Jars
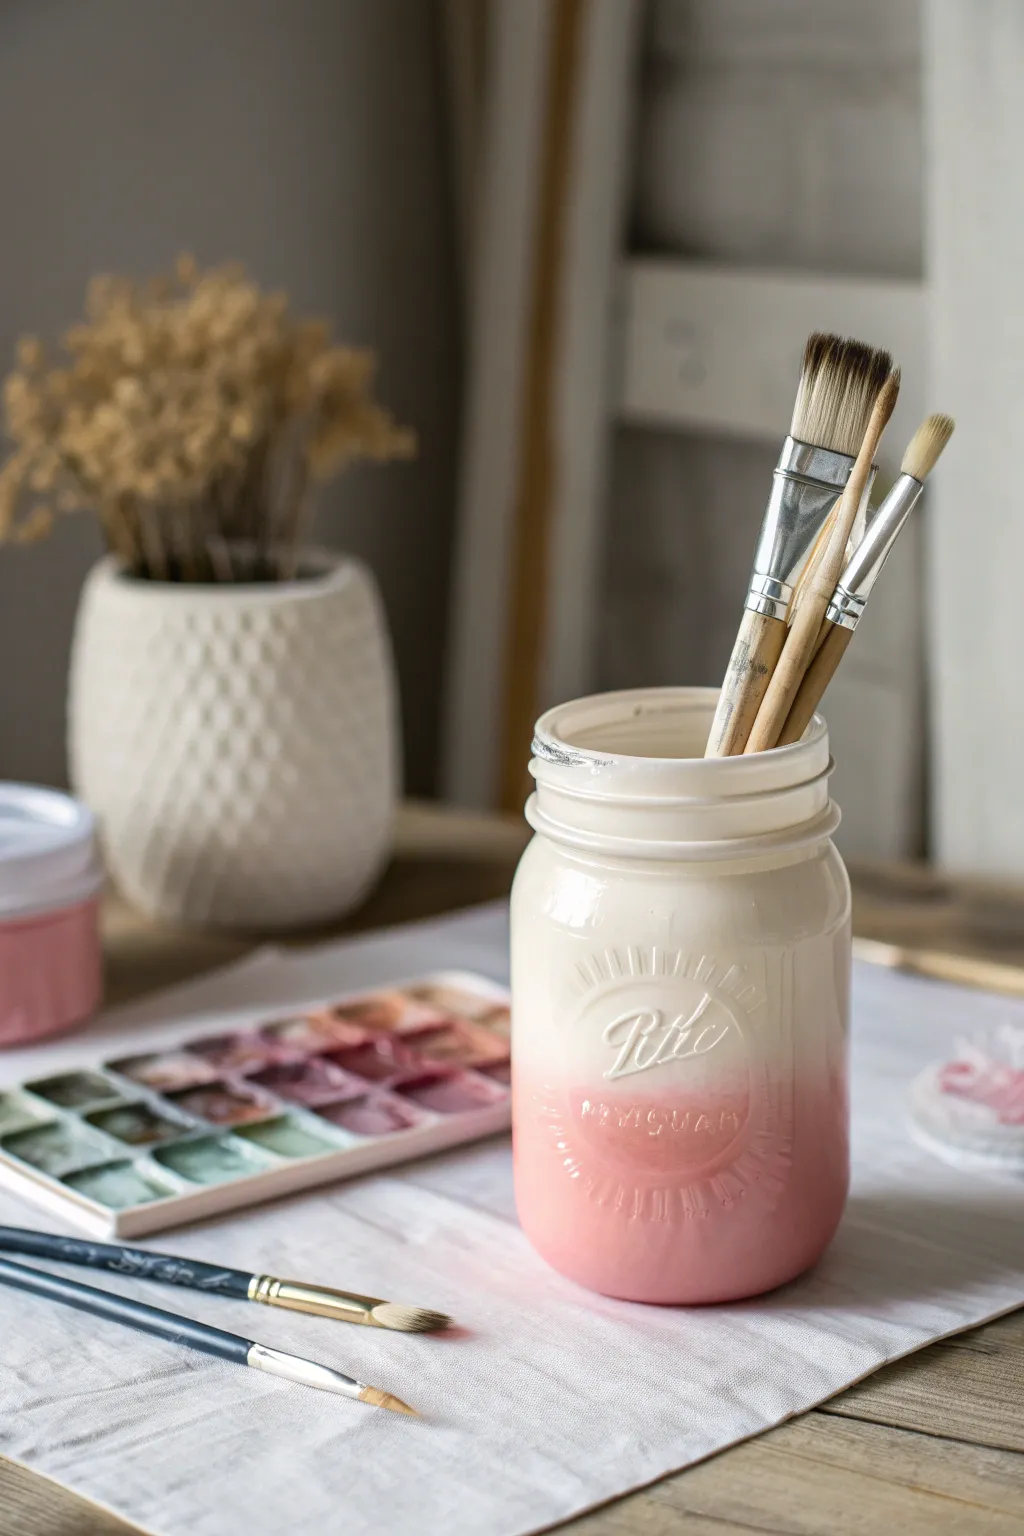
Bring a touch of soft, romantic elegance to your workspace with this matte-finish mason jar, featuring a seamless fade from cream to blush pink. The gentle gradient and chalky texture make it the perfect vessel for holding your favorite art brushes or a bouquet of dried flowers.
Step-by-Step Guide
Materials
- Standard glass mason jar (pint size recommended)
- Rubbing alcohol and cotton pads
- Chalk finish paint (Cream/Antique White)
- Chalk finish paint (Soft Pink/Blush)
- Small makeup sponge wedges
- Flat paintbrush (1-inch width)
- Paper plate or palette
- Matte clear sealant spray (optional)
- Sandpaper (fine grit, optional for distressing)
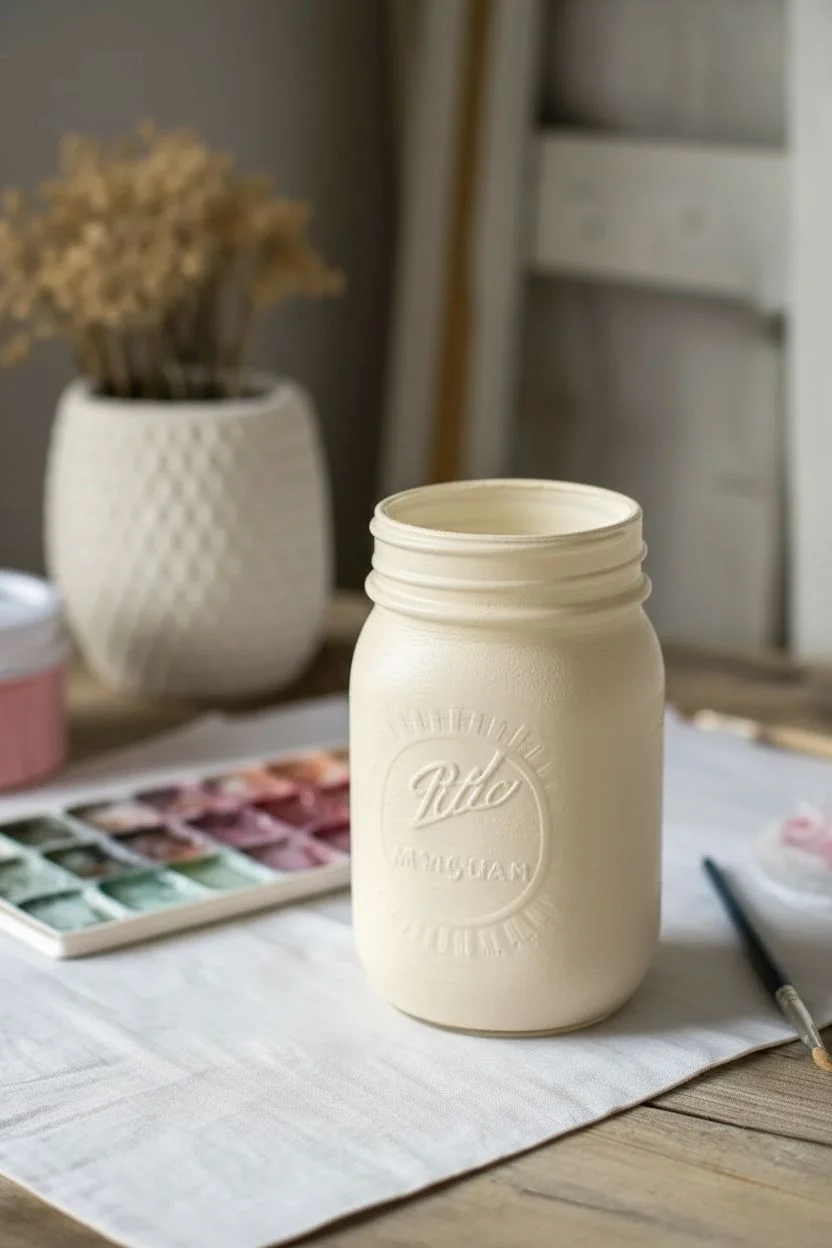
Step 1: Prep and Base Coat
-
Clean the glass:
Before putting any paint down, wipe the entire exterior of your mason jar with rubbing alcohol and a cotton pad. This removes oily fingerprints and ensures the paint adheres perfectly to the slick glass surface. -
Apply the first white layer:
Using your flat paintbrush, apply a coat of the Cream chalk paint to the entire jar, stopping just before the very bottom rim. Don’t worry if it looks streaky at this stage; chalk paint covers well with multiple layers. -
Let it dry completely:
Allow this initial base coat to dry fully, which usually takes about 20 to 30 minutes depending on your paint brand. It should feel dry and chalky to the touch. -
Add a second white coat:
Apply a second layer of the Cream paint to ensure solid opacity. The glass should no longer be visible through the paint. Let this layer dry completely as well.
Step 2: Creating the Ombre Fade
-
Prepare your palette:
Pour a small pool of the Soft Pink paint and a separate pool of the Cream paint onto your paper plate. -
Mix a transitional shade:
In the middle of the plate, mix a little bit of pink into the cream to create a very pale, transition shade. This will bridge the gap between your two main colors. -
Start the pink bottom:
Dip the flat bottom of a makeup sponge wedge into the full-strength pink paint. Dab it firmly around the bottom third of the jar, ensuring solid coverage right at the base. -
Begin the transition:
Grab a fresh makeup sponge. Dip it into your mixed transition shade. Dab this color right above your pink line, slightly overlapping the wet pink paint. -
Blend the line:
While the paints are still wet, lightly tap the sponge over the line where the pink and transition shade meet. The texture of the sponge helps blur the hard line. -
Apply the top white section:
Dip a clean sponge (or a clean side of a wedge) into the Cream paint. Sponge this onto the upper third of the jar, overlapping slightly with the transition area. -
Master the blend:
Here I prefer to use a nearly dry sponge to tap repeatedly up and down the gradient area. Keep tapping gently until the colors seem to melt into each other without a visible stripe. -
Check the embossing:
Pay special attention to the raised ‘Ball’ or ‘Mason’ logo. Use the corner of your sponge to ensure paint gets into the crevices without filling them in completely, keeping the text crisp. -
Dry and repeat if needed:
Let the ombre layer dry. If the fade looks too subtle or the glass shows through, you can repeat the sponging process one more time to intensify the blush color.
Paint Peeling Off?
If paint peels while sponging, you’re likely overworking wet layers. Let everything dry comprehensively between coats, or switch to a dabbing motion rather than dragging the sponge.
Step 3: Finishing Touches
-
Clean up the rim:
For a professional look, ensure no paint has glopped onto the screw-top threads at the very top. Wipe them clean with a damp cloth if necessary, or paint them neatly if you prefer a fully covered look. -
Seal the work:
To protect that velvety chalk finish from scratches, take the jar outside and spray it with a light coat of matte clear sealant. This is crucial if you plan to use it for holding brushes.
Pro Tip: Highlight the Logo
Once fully dry, lightly run a piece of fine-grit sandpaper over the raised lettering. This gently distresses the high points, making the logo pop in white against the ombre background.
Now you have a serene, custom-painted jar ready to organize your creative tools with style
BRUSH GUIDE
The Right Brush for Every Stroke
From clean lines to bold texture — master brush choice, stroke control, and essential techniques.
Explore the Full Guide
Painted Mason Jar Lanterns With Cutout Silhouettes
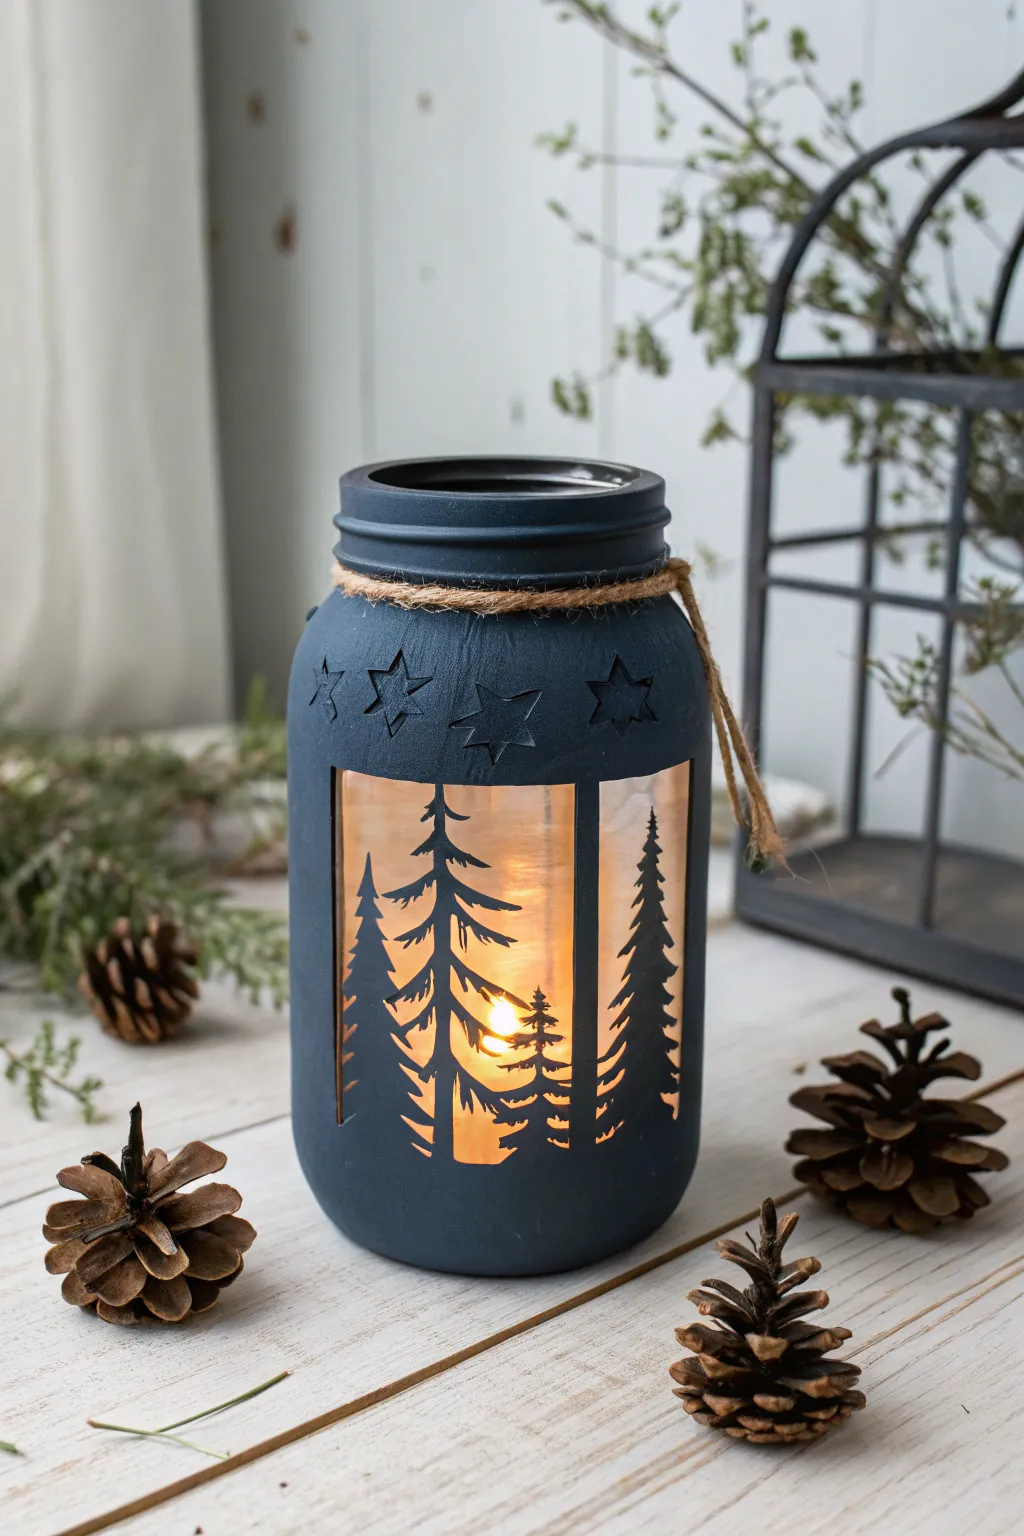
Transform a simple glass jar into a mystical winter scene with this stunning matte-finish lantern. The deep midnight blue paint contrasts beautifully with the warm candlelight glowing through tree and star cutouts, creating a cozy atmosphere perfect for chilly evenings.
Step-by-Step
Materials
- Large smooth-sided mason jar
- Adhesive vinyl or contact paper
- Craft knife (e.g., X-Acto) with fresh blades
- Cutting mat
- Matte chalk paint (Midnight Blue or Charcoal)
- Foam pouncer or soft sponge applicator
- Jute twine
- Scissors
- Rubbing alcohol
- Lint-free cloth
- Tea light candle (battery-operated recommended)
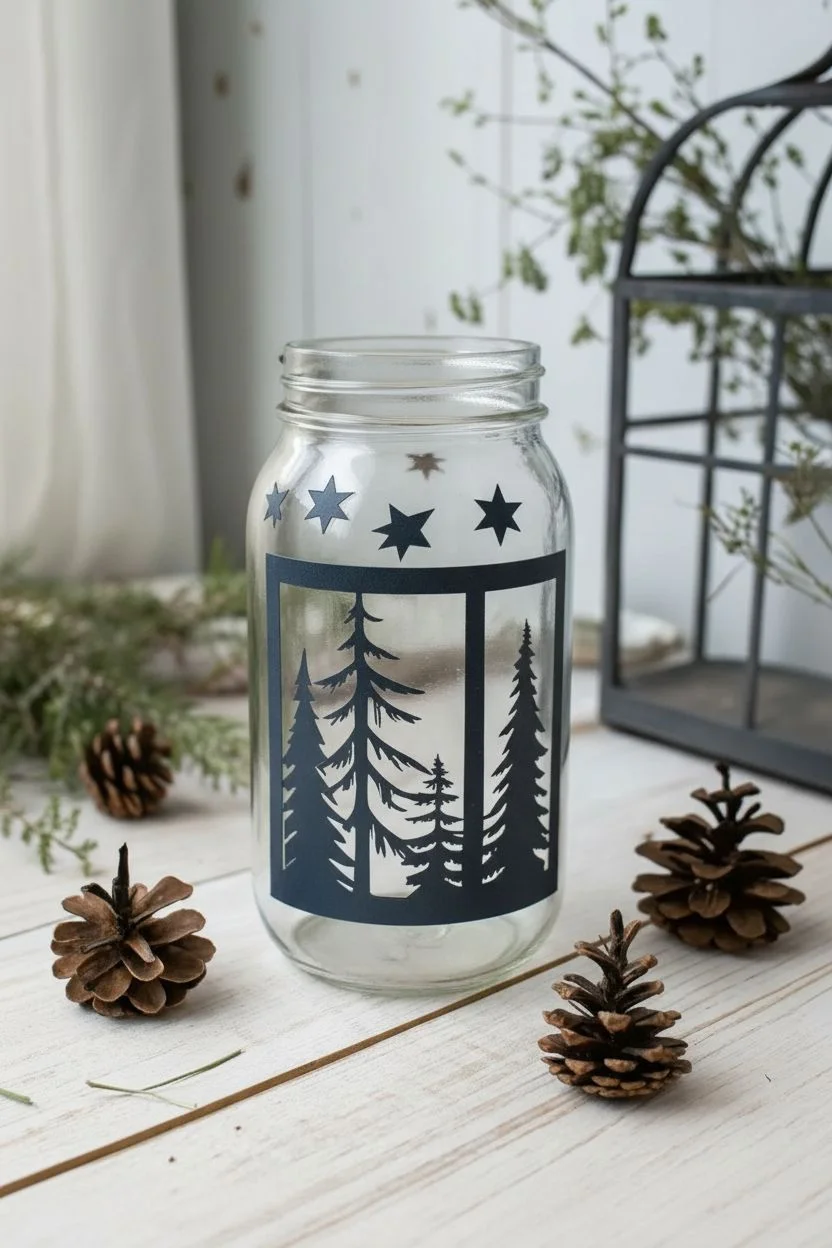
Step 1: Preparation & Masking
-
Clean the surface:
Begin by thoroughly wiping down the exterior of your mason jar with rubbing alcohol and a lint-free cloth. This removes any oils or fingerprints that could prevent the vinyl and paint from adhering properly. -
Create the tree stencils:
On a sheet of adhesive vinyl or contact paper, sketch out a dense forest scene. Draw various pine trees of different heights, making sure to connect their bases with a strip of ‘ground’ at the bottom. The trees should be stylized with jagged branches. -
Cut the shapes:
Carefully cut out your tree shapes using a craft knife on a cutting mat. For this reverse-stencil technique, you need the actual tree shapes (positive space), not the outline around them. -
Design the stars:
Draw several five-pointed stars on the remaining vinyl. Keep them relatively small, about half an inch to an inch in width, to fit the neck of the jar. -
Cut the stars:
Cut out the star shapes precisely. Sharp points look best, so change your blade if it starts to drag on the vinyl.
Clean Lines Pro Tip
Remove the vinyl stencils while the final coat of paint is still slightly tacky. If the paint is bone dry, it may chip or peel up along with the sticker.
Step 2: Applying Design & Painting
-
Apply the tree mask:
Peel the backing off your vinyl tree silhouette. Carefully place it inside a rectangular ‘window’ area on the front of the jar. Smooth it down firmly, paying special attention to the edges of the branches to prevent paint bleed. -
Mask the window borders:
To create the crisp rectangular frame seen in the image, use strips of painter’s tape or extra vinyl to mask off the vertical sides and top/bottom edges around your tree scene. This defines the ‘window’ through which the light will shine. -
Place the stars:
Stick your star cutouts along the upper curve of the jar, just below the threading. Arrange them in a random or evenly spaced pattern, smoothing edges down tightly. -
First coat of paint:
Pour a small amount of matte chalk paint onto a palette. Using a foam pouncer, dab the paint onto the jar with an up-and-down motion. Do not drag the sponge, as this can lift the edges of your vinyl stencils. -
Let it dry:
Allow the first coat to dry completely. Chalk paint usually dries quickly, but give it at least 20-30 minutes to be safe. -
Second coat:
Apply a second layer of paint using the same dabbing technique. This ensures opacity so the light only shines through your intended designs. I find two coats is usually perfect for that solid, matte decorative look. -
Paint the rim:
Don’t forget to paint the threaded rim of the jar so no clear glass shows at the top.
Level Up: Frosty Effect
Before painting, spray the *inside* of the jar with frosted glass spray. This diffuses the candlelight and makes the unpainted glass look like frozen ice.
Step 3: Finishing Touches
-
Peel the vinyl:
Once the paint is dry to the touch but not fully cured (usually about an hour), carefully peel away the vinyl stencils. Use the tip of your craft knife or a pin to lift the corners of the stars and trees. -
Tidy up:
If any paint bled under the vinyl, gently scrape it away with a damp toothpick or the very tip of your craft knife to sharpen the lines. -
Wrap the twine:
Cut a length of jute twine. Wrap it tightly around the neck of the jar, covering the painted threads. Wrap it 3-4 times to create a rustic texture. -
Secure the knot:
Tie the twine off in a simple knot or bow at the side. You can add a dab of hot glue under the knot to keep it securely in place. -
Add nature accents (Optional):
For an extra touch, you can tuck a small sprig of faux pine or holly berries into the twine knot. -
Light it up:
Place a battery-operated tea light or small pillar candle inside the jar to reveal the silhouette forest.
Enjoy the peaceful ambiance of your handcrafted winter forest lantern on your next cozy night in
Speckled Egg-Inspired Mason Jars
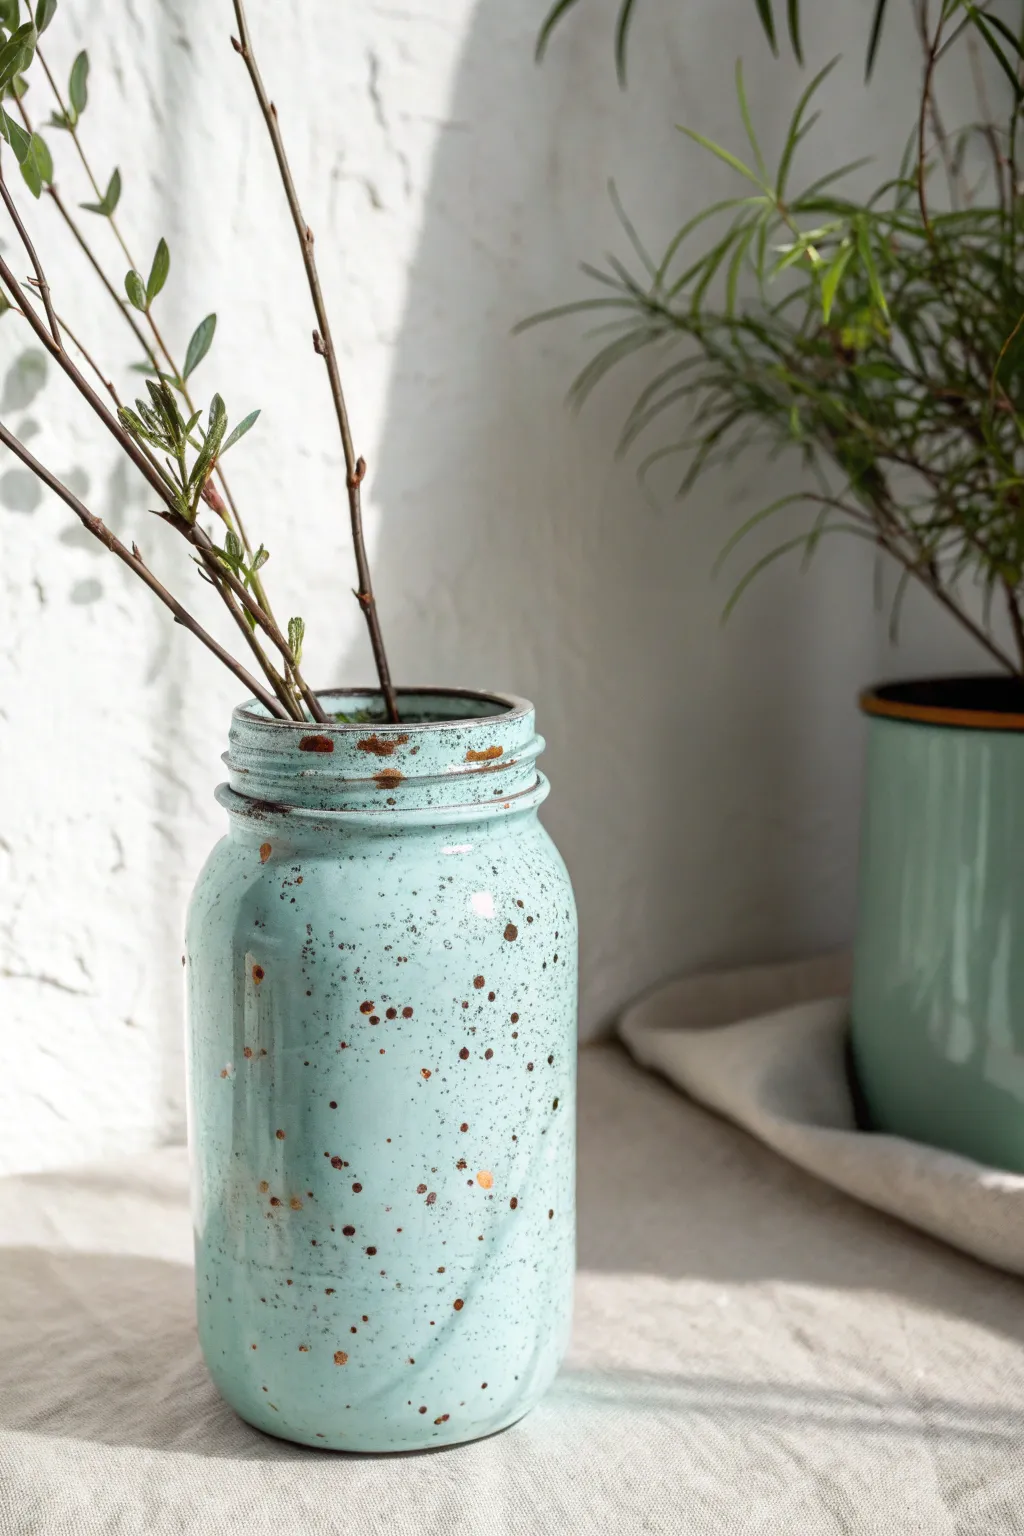
Transform a standard glass jar into a piece of farmhouse decor with this speckled egg technique. The resulting finish features a soothing pale turquoise base accented by organic, chocolate-brown splatters that mimic nature’s effortless beauty.
Detailed Instructions
Materials
- Standard glass mason jar (quart size)
- Rubbing alcohol and cotton pads
- Chalky finish paint (pale turquoise/robin’s egg blue)
- Acrylic paint (dark brown or burnt umber)
- Medium flat paintbrush
- Old toothbrush or stiff bristle brush
- Water formatting spray bottle (optional) and cup
- Paper plate or palette
- Cardboard box or drop cloth (for splatter protection)
- Sandpaper (220 grit) or nail file
- Matte clear sealer spray
Step 1: Base Coat Application
-
Prep the surface:
Begin by thoroughly cleaning the exterior of your mason jar with rubbing alcohol and a cotton pad. This removes oils and fingerprints, ensuring the paint adheres properly to the smooth glass. -
Apply the first coat:
Using a medium flat brush, apply a layer of pale turquoise chalky finish paint to the outside of the jar. Chalk paint is ideal here because of its matte, eggshell-like texture. -
Dry completely:
Allow this first coat to dry fully. Chalk paint dries relatively fast, usually within 20-30 minutes, but follow the manufacturer’s instructions. -
Add a second coat:
Apply a second coat of the turquoise paint to ensure full coverage. Glass can be tricky, so this layer helps hide any brush strokes or transparent spots. -
Dry again:
Let the jar sit until completely dry to the touch. I prefer to leave it for an hour to ensure the base is hard enough for the next steps. -
Distress the rim:
Take a small piece of 220-grit sandpaper or a nail file and gently scuff the raised threads at the top of the jar. This reveals a bit of clear glass, adding to the rustic, worn-in look. -
Smooth imperfections:
Lightly run your sandpaper over the body of the jar if there are any thick drips or clumps, creating a smooth canvas for the speckles.
Use Metallic Paint
Swap the dark brown acrylic for a metallic bronze or antique gold paint for the speckles. This adds a subtle shimmer that catches the sunlight beautifully.
Step 2: Creating the Speckles
-
Prepare the workspace:
Place your painted jar inside a cardboard box or on a wide drop cloth. The next step is messy, and you want to contain the splatter. -
Mix the splatter paint:
Squeeze a dime-sized amount of dark brown acrylic paint onto a paper plate. Add a few drops of water to thin it down until it reaches an inky consistency. -
Load the tool:
Dip an old toothbrush or a stiff-bristle brush into the watered-down brown paint. Shake off any large excess drips back onto the plate. -
Test the splatter:
Before hitting the jar, practice on a piece of scrap paper. Run your thumb across the bristles to flick the paint forward, adjusting pressure to change the dot size. -
Splatter the jar:
Hold the brush near the jar and flick the bristles to create a spray of fine dots. Move around the jar to ensure even coverage. -
Add variance:
Create a few larger, irregular spots by tapping the handle of the toothbrush against your finger directly over specific areas. This variety makes the finish look more natural. -
Focus on the rim:
Add a little extra splatter concentration near the rim and the neck of the jar, as dirt and age naturally accumulate in these crevices. -
Dry the speckles:
Let the brown speckles dry completely. Since they are thin, this usually takes about 15 minutes.
Wrap It Up
Tie a piece of jute twine or rough hemp rope around the neck of the jar several times and knot it securely to enhance the rustic farmhouse vibe.
Step 3: Sealing and Finishing
-
Apply sealer:
Take your matte clear sealer spray and apply a light, even coat over the entire jar. This protects the paint from scratching off and makes the jar easier to dust later. -
Let it cure:
Allow the sealer to cure according to the can’s directions, usually 24 hours for full hardness. -
Style with nature:
Once fully cured, fill the jar with twiggy branches, dried lavender, or pussy willows to complement the natural aesthetic.
Your new speckled jar is ready to bring a touch of the outdoors into your favored cozy corner

PENCIL GUIDE
Understanding Pencil Grades from H to B
From first sketch to finished drawing — learn pencil grades, line control, and shading techniques.
Explore the Full Guide
Marble-Swirl Mason Jars for a Fancy Vase Moment
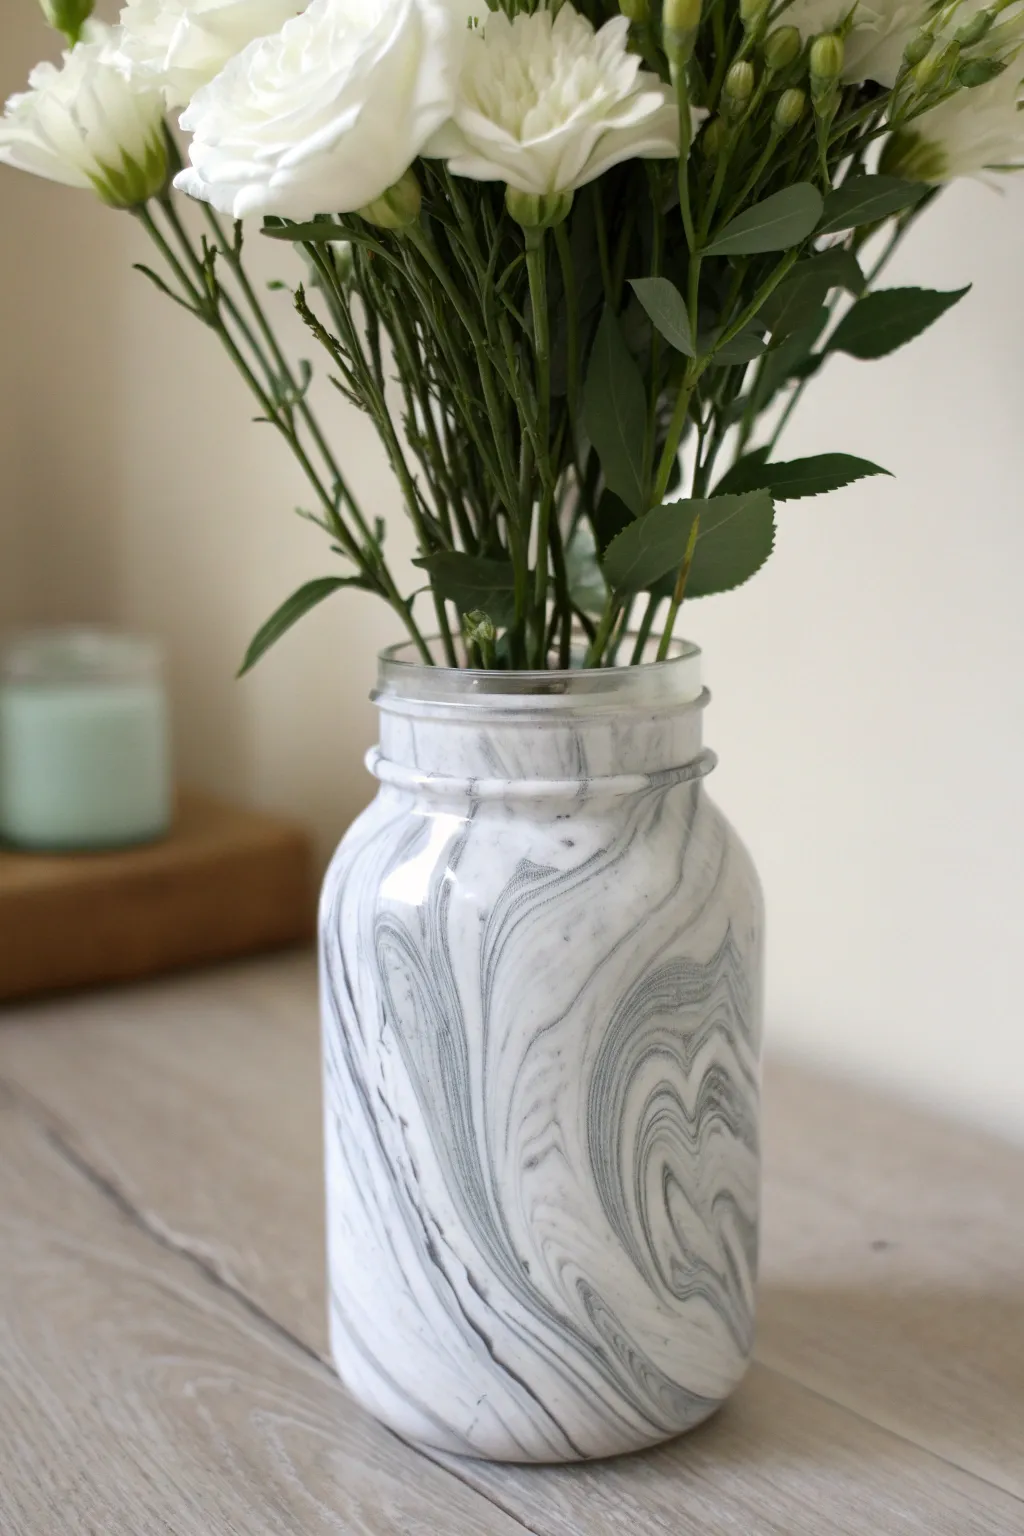
Transform a plain glass jar into a high-end decor piece with this surprisingly simple marbling technique. The finished vase mimics expensive white carrara marble with delicate charcoal veining, making it a perfect vessel for fresh bouquets.
How-To Guide
Materials
- Clean glass mason jar (quart size works well)
- Rubbing alcohol and paper towel
- White spray paint (satin or matte finish)
- Grey acrylic craft paint (charcoal or slate)
- Black acrylic craft paint (optional, for depth)
- Clear acrylic sealant spray (matte or satin)
- Medium flat paintbrush
- Fine liner paintbrush
- Feather or fan brush (optional)
- Small artist sponge or sea sponge
- Paper plate or palette
- Cup of water
Step 1: Base Preparation
-
Clean the surface:
Thoroughly wipe down the outside of your mason jar with rubbing alcohol and a paper towel to remove any oils or fingerprints. -
Apply the base coat:
In a well-ventilated area, spray the entire exterior of the jar with white spray paint. -
Check for coverage:
Apply two to three thin coats rather than one thick one to prevent drips, allowing about 15 minutes of drying time between each layer. -
Let it cure:
Allow the white base coat to dry completely, preferably overnight, so the acrylics won’t lift the paint later.
Natural Stone Look
Real marble is never perfect. Intentionally shake your hand while painting veins to avoid straight lines.
Step 2: Creating the Marble Veins
-
Prepare your palette:
Mix a small amount of grey acrylic paint with a tiny drop of water on your palette to improve its flow. -
Draw primary veins:
Using a fine liner brush, paint thin, trembling lines diagonally across the jar. I like to twist the brush slightly as I drag it to create natural, organic variations. -
Follow a pattern:
Ensure all your major veins flow in roughly the same direction (e.g., bottom left to top right) to mimic real stone strata. -
Soften the lines:
While the grey paint is still wet, take a damp (not soaking) sponge or feather brush and gently dab along the edges of your lines to blur them into the white background. -
Add secondary veins:
Create smaller, fainter offshoot veins branching from the main lines using a lighter wash of grey paint.
Add Some Glamour
Once the grey veins are dry, trace a few thin lines with metallic gold liquid leaf for a ‘kintsugi’ vibe.
Step 3: Layering and Detailing
-
Create smoky areas:
Dip a sea sponge into a very watery grey mixture, dab most of it off on a paper towel, and lightly mist a few patch areas on the jar for a ‘smoky’ stone effect. -
Intensify contrast:
Mix a tiny bit of black into your grey paint to create a darker charcoal shade. -
Add definition:
Use your finest brush to add very thin, sharp lines inside the blurred grey areas to represent the deepest cracks in the marble. -
Review and refine:
Step back and look at the jar from a distance. If an area looks too stark, use a clean, damp brush to feather the edges further. -
Dry the details:
Let all your acrylic marbling work dry for at least one hour.
Step 4: Sealing and Finishing
-
Apply sealant:
Spray the entire jar with a clear acrylic sealant to protect your paint job from scratching or water damage. -
Clean the rim:
If you plan to drink from it (though these are best for flowers), ensure the very top rim is clean of paint, or sand it gently for a distressed glass rim look. -
Final cure time:
Let the sealant cure for 24 hours before filling the jar with water and flowers.
Fill your new faux-stone vessel with greenery and enjoy the elegant upgrade to your space
Paint-Drip Mason Jars for a Messy-Fun Finish
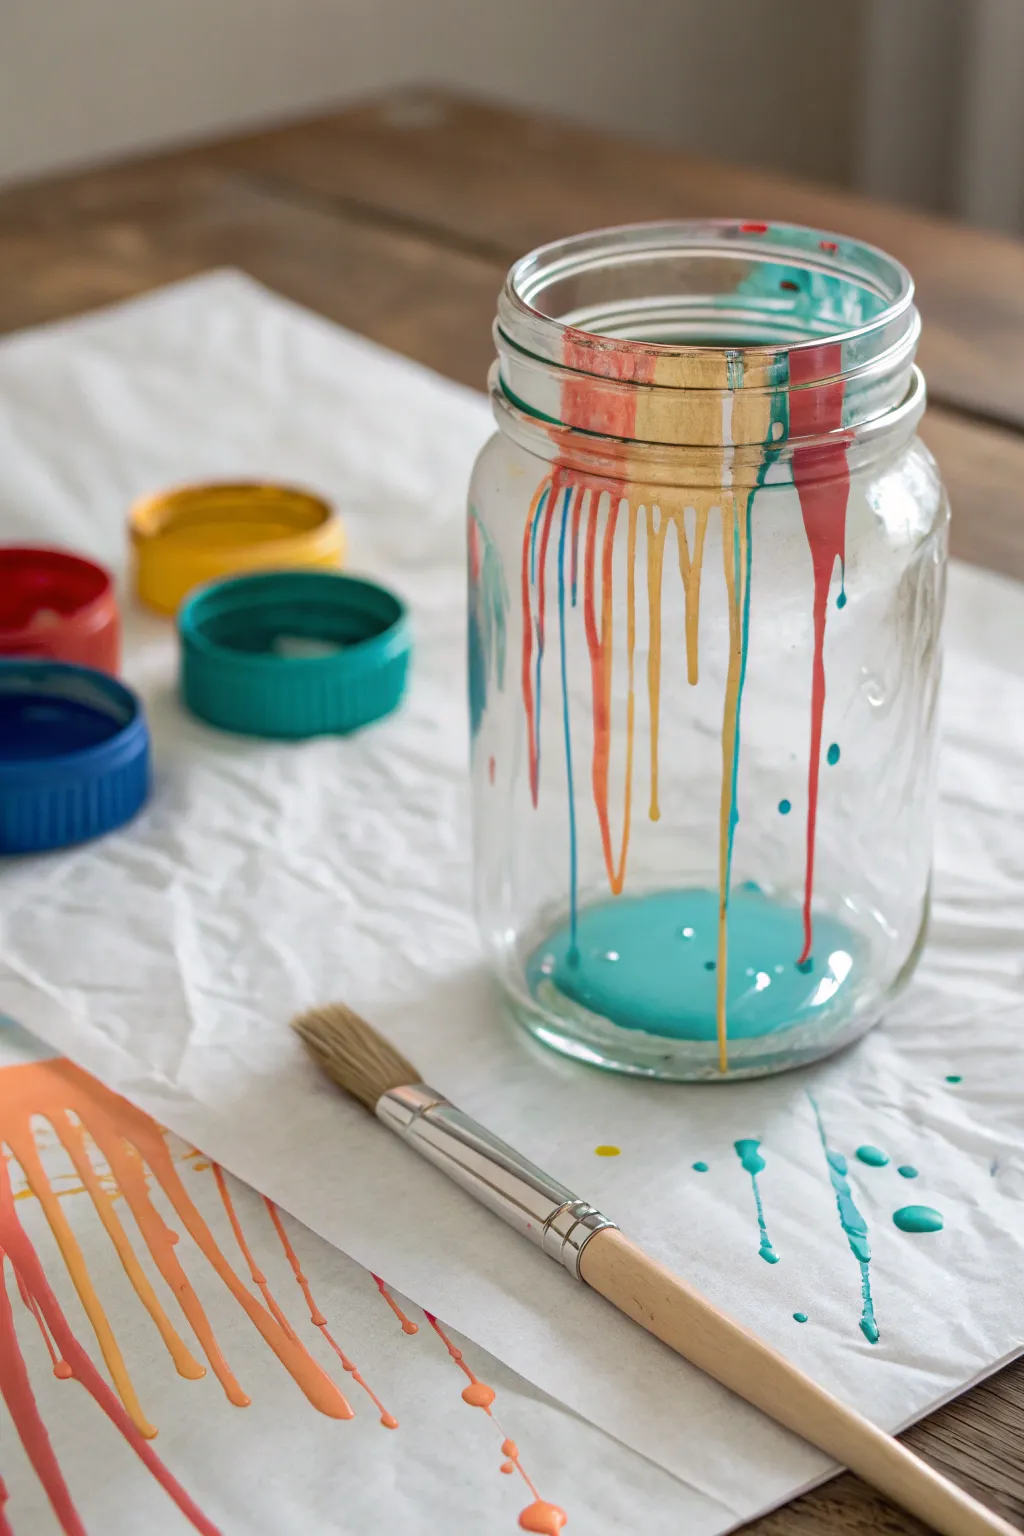

Capturing the playful chaos of dripping paint suspended in glass, this project turns a simple mason jar into a piece of modern art. The vibrant streaks of teal, gold, orange, and red slide down the clear walls, creating organic patterns that look great from every angle.
Step-by-Step Guide
Materials
- Clean, quart-sized mason jar
- Acrylic craft paints (teal, metallic gold, bright orange, coral/red)
- Small cups or lids for paint mixing
- Water (to thin the paint)
- Wide, flat paintbrush
- Protective paper or drop cloth (butcher paper works well)
- Wooden stir sticks or toothpicks
Step 1: Preparation
-
Clean the glass:
Ensure your mason jar is thoroughly washed and dried. Any oily residue or dust will prevent the paint from adhering smoothly, so give it a quick wipe with rubbing alcohol if needed. -
Protect your workspace:
Spread out a large sheet of white butcher paper or newsprint. This project gets messy by design, so having a designated drip zone is crucial for an easy cleanup later. -
Prepare your palette:
Squeeze a generous amount of each paint color—teal, metallic gold, orange, and red—into separate small containers or jar lids. You want the colors easily accessible.
Clean Drip Tip
If a drip is going rogue or merging too much with a neighbor, use a cotton swab to guide it or wipe away the excess while it’s still wet.
Step 2: Thinning the Paint
-
Assess paint viscosity:
Check the thickness of your acrylics. Standard craft paint is often too thick to drip naturally. You want a consistency similar to heavy cream or melted ice cream. -
Add water gradually:
Add a few drops of water to each paint color. Stir well with a toothpick or small stick. -
Test the drip:
Lift your stir stick out of the paint. If it flows off in a steady stream rather than globs, it’s ready. If it breaks too quickly, add just a tiny bit more water.
Step 3: Creating the Drips
-
Load the brush:
Generously load your flat paintbrush with the first color, perhaps the metallic gold, ensuring the bristles are saturated. -
Apply to the rim:
Place the brush just inside the rim of the jar. Press the bristles against the glass and flood the area with paint. -
Encourage the flow:
Depending on the look you want, you can gently tap the jar on the table or tilt it slightly to encourage a long, dramatic drip to start traveling down the glass wall. -
Switch colors:
Clean your brush thoroughly (or grab a fresh one) and load it with the next color, like the teal or bright orange. -
Overlap slightly:
Apply this new color right next to or slightly overlapping the previous one on the inner rim. I find that letting the colors touch at the top creates a nice blending effect before they separate into drips. -
Vary drip lengths:
Use more paint for some sections and less for others. This variation creates visual interest, with some drips reaching the bottom quickly and others stopping midway. -
Rotate the jar:
Continue working your way around the entire circumference of the jar rim, rotating the glass as you add stripes of alternating colors. -
Add accidental splatters:
For that artistic, messy studio look, dip a stiff brush in paint and flick the bristles to create tiny droplets on the outside of the jar or on the paper beneath it.
Make It Glow
Once fully dry, place a battery-operated tea light inside. The light will shine through the thinner streaks and reflect beautifully off the metallic gold paint.
Step 4: Finishing
-
Create a bottom pool:
Allow the longest drips to pool at the bottom of the jar. If you want a more solid base of color, you can pour a tiny amount of teal directly into the bottom and swirl it to meet the descending drips. -
Let gravity work:
Let the jar sit upright undisturbed for at least 30 minutes. Gravity will continue to pull the paint down, thinning the streaks and settling the bottom pool. -
Dry completely:
Because the paint is applied thickly, the drying time is longer than usual. Leave the jar in a dry, warm spot for 24 hours to ensure the bottom pool hardens fully.
Now you have a vibrant, custom glass piece ready to hold pencils, flowers, or just catch the light on your windowsill


Polka Dot Mason Jars in Coordinated Color Palettes
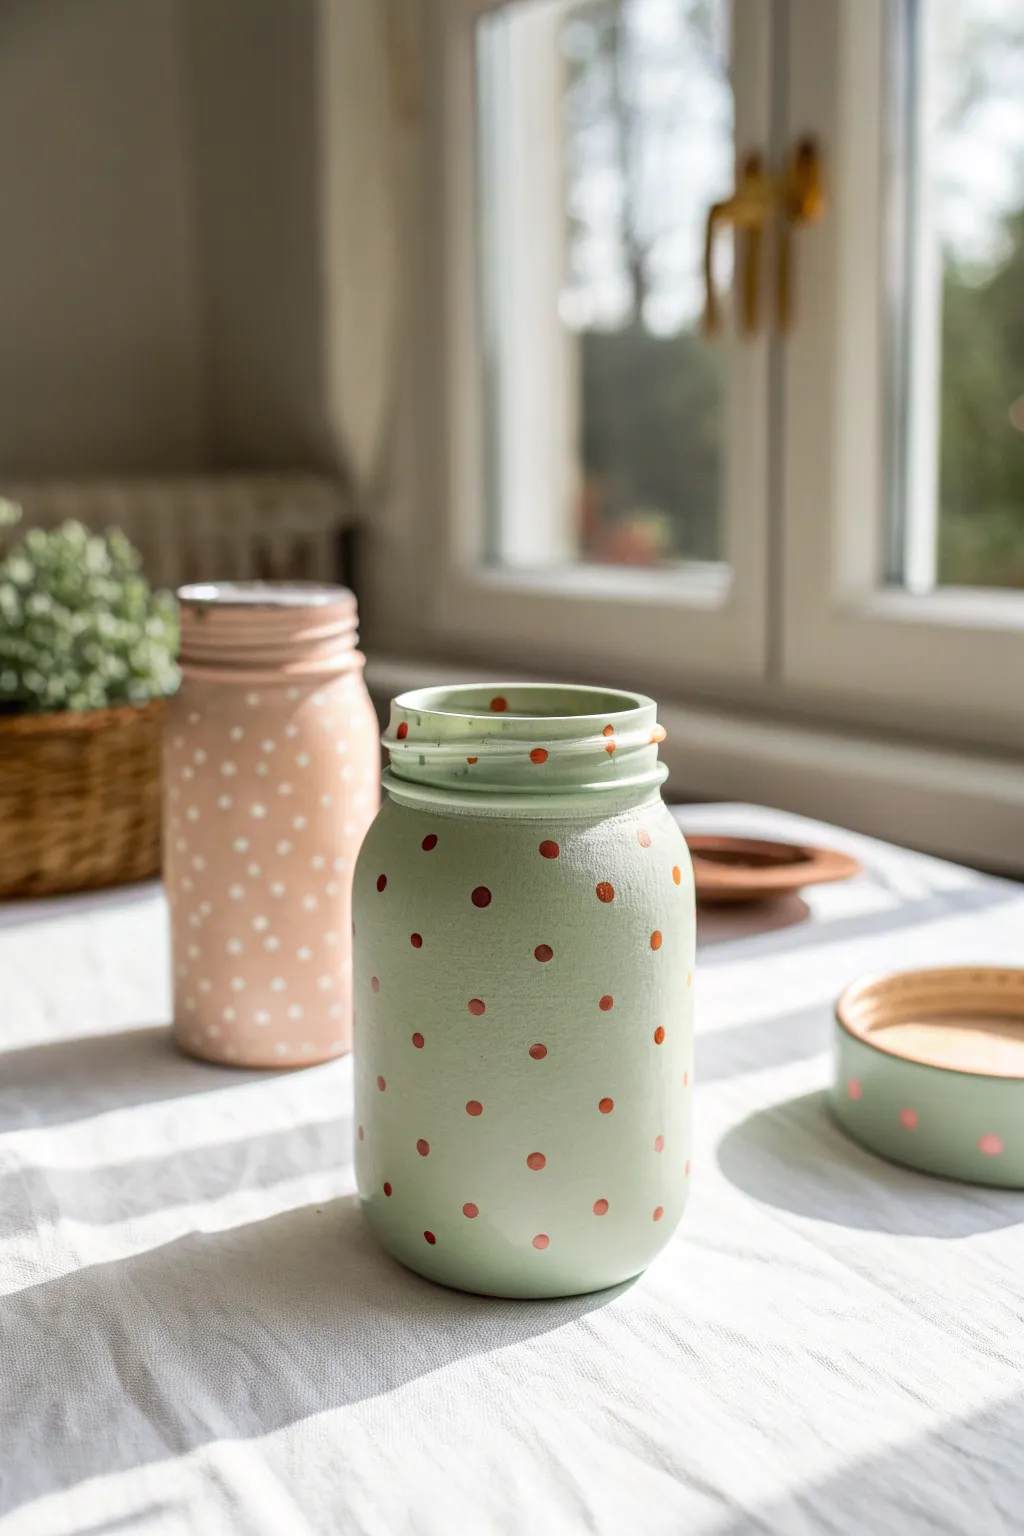
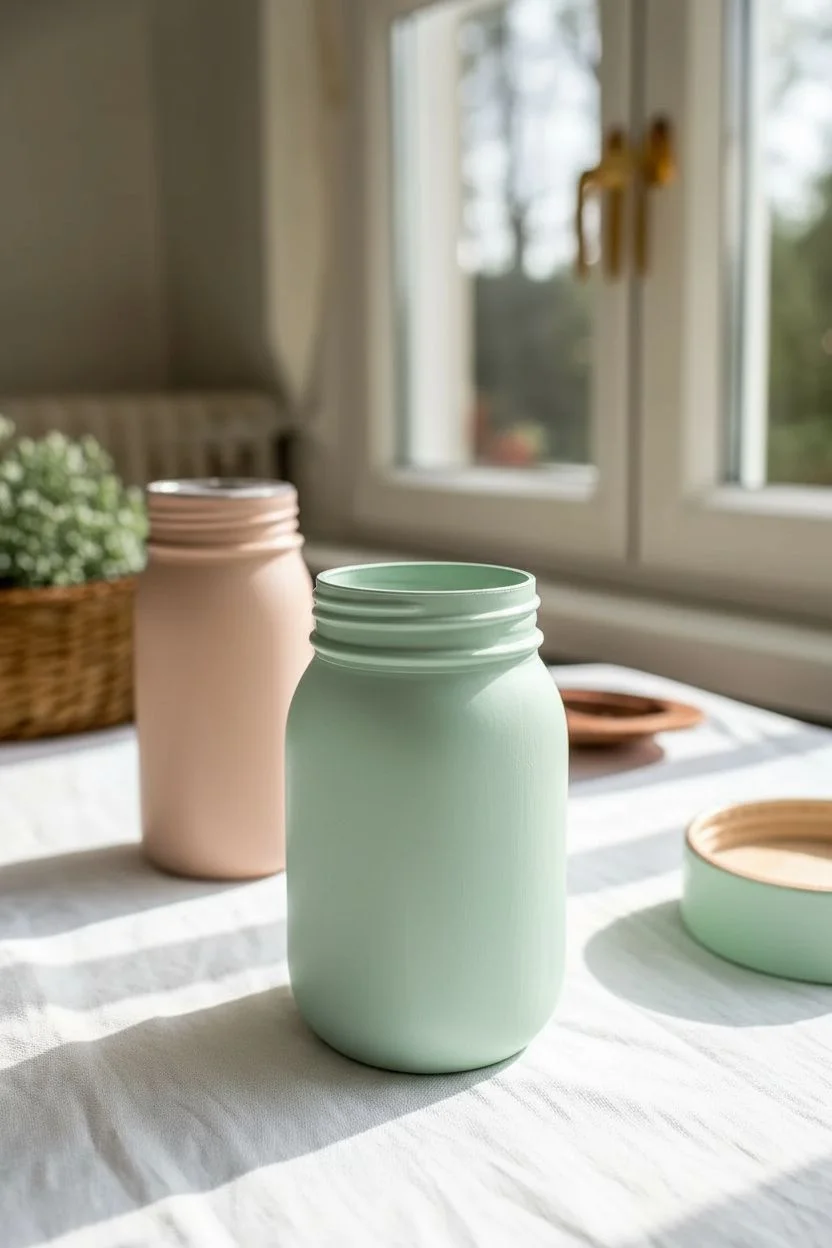
Transform plain glass jars into charming, vintage-inspired decor with soft pastel hues and playful dots. This project achieves a lovely matte finish that contrasts beautifully with coordinated polka dots, perfect for brightening up a windowsill or desk.
Step-by-Step Tutorial
Materials
- Clean mason jars with lids
- Rubbing alcohol
- Cotton pads
- Chalk finish paint (Mint/Sage Green, Blush Pink)
- Acrylic paint (Terracotta/Burnt Orange, White/Cream)
- Flat paintbrush (medium width)
- Small round paintbrush or dotting tool
- Small foam pouncer (optional)
- Matte clear sealant spray
- Paper plate or palette
- Wax paper or newspaper
Step 1: Preparation & Base Coat
-
Clean the surfaces:
Begin by removing any labels or residue from your mason jars. Wipe the entire exterior glass surface and the lids with rubbing alcohol on a cotton pad to remove oils and fingerprints, ensuring the paint adheres properly. -
Set up your workspace:
Lay down wax paper or newspaper to protect your table. Remove the lids from the jars and set them aside to be painted separately. -
Apply the first base coat:
Dip your flat paintbrush into the mint green chalk paint. Apply a smooth, even layer over the entire exterior of the first jar, working from the rim down to the base. Don’t worry if it looks streaky; coverage will improve with the next coat. -
Paint the second jar:
Repeat the process with the second jar using the blush pink chalk paint. Ensure you get into the crevices of the screw-top rim, but avoid painting the very top lip if you plan to use these for drinking. -
Don’t forget the lids:
Paint the exterior of the lids (and screw bands if separate) with their respective matching base colors. Prop them up on a small object like a bottle cap so the edges don’t stick to your paper. -
Allow to dry:
Let the first coat dry completely, which typically takes about an hour depending on humidity. Chalk paint dries relatively fast, but patience here prevents peeling later. -
Apply the second coat:
Once dry, apply a second coat of chalk paint to both jars and lids. Use long, vertical strokes to minimize brush marks and create that solid, opaque matte finish visible in the photo. -
Check for coverage:
Hold the jars up to the light to check for any translucent spots. I usually find two coats are enough, but a third thin coat might be necessary for very light colors.
Oops! Uneven Dots?
If your dots look uneven or raised, lightly sand them with fine-grit sandpaper after they dry to flatten them out, then touch up the paint if needed.
Step 2: Adding the Polka Dots
-
Prepare your dot colors:
Pour a small amount of terracotta acrylic paint onto your palette for the green jar, and white or cream paint for the pink jar. -
Choose your tool:
Select a small round paintbrush, the handle end of a brush, or a specialized dotting tool. The size of the tool tip will determine the size of your dots. -
Test your technique:
Practice making dots on a piece of scrap paper first. Dip your tool into the paint and press straight down, then lift straight up to create a perfect circle. -
Start dotting the green jar:
Begin applying terracotta dots to the mint green jar. Start near the top rim and work your way down in a random, scattered pattern rather than a strict grid for a more organic look. -
Vary the spacing:
Space the dots roughly 1 to 1.5 inches apart. Try to avoid clustering them too closely; allow the background color to breathe. -
Dot the pink jar:
Switch to your white paint and apply dots to the pink jar. Aim for a slightly different density or size if you want to create variety between the two jars. -
Decorate the lids:
Add a few coordinating dots to the sides or top of the painted lids to tie the look together. On the green jar’s lid, place a few terracotta dots along the vertical rim band. -
Clean up drips:
If a dot smudges or drips, quickly wipe it away with a damp cotton swab or wait for it to dry and touch it up with the base color.
Style It Up
Wrap a piece of jute twine or a thin satin ribbon around the neck of the jar before screwing on the lid to add a rustic or elegant texture.
Step 3: Finishing Touches
-
Let the dots cure:
Allow the polka dots to dry fully. Acrylic paint can form a skin quickly but needs time to harden underneath, so give it at least 2-3 hours. -
Seal the project:
To protect the finish from chipping, especially if the jars will be handled often, take them to a well-ventilated area and apply a light coat of matte clear sealant spray. -
Final assembly:
Once the sealant is dry and no longer taky, screw the lids back onto the jars or place them alongside for a styled vignette.
Now you have a set of delightfully dotted jars ready to hold flowers, pens, or just brighten your day on their own
Fruit-Themed Mason Jars That Look Like Summer Treats
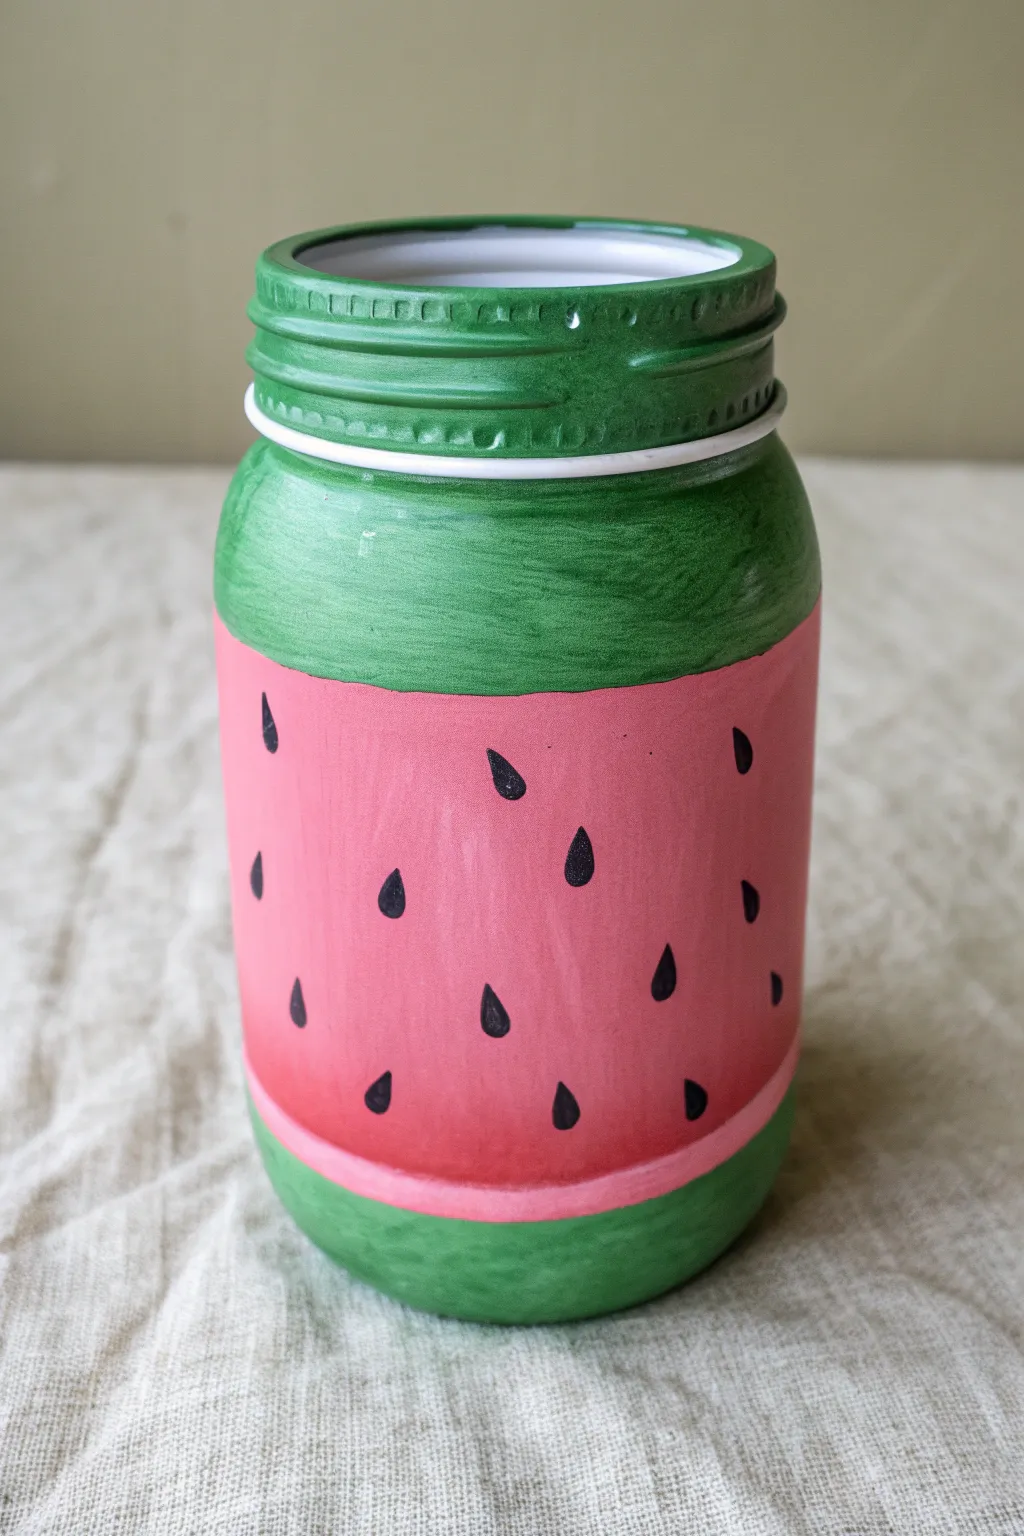
Transform a plain glass jar into a refreshing slice of summer with this vibrant watermelon-themed project. This cheerful design combines bright pinks and greens with simple seeds, making it a perfect centerpiece for a kitchen counter or picnic table.
Step-by-Step
Materials
- Clean mason jar (standard size)
- White or primer spray paint (optional base)
- Acrylic craft paint: Bright Pink (Watermelon)
- Acrylic craft paint: Kelly Green (Rind)
- Acrylic craft paint: Black (Seeds)
- Washi tape or painter’s tape
- Wide flat paintbrush
- Small fine-tip paintbrush
- Matte sealer or finishing spray
Step 1: Prepping and Priming
-
Clean the surface:
Before you break out the paint, give your clean mason jar a quick wipe down with rubbing alcohol or white vinegar to remove any oils or fingerprints that might resist the paint. -
Base coat the lid:
Unscrew the lid ring and remove the flat circular seal. Set the seal aside, as you won’t need to paint the food-safe underside. Paint the exterior of the lid ring and the top of the seal with a solid coat of Kelly Green paint. -
Create a base layer:
For the brightest colors, apply a coat of white acrylic paint or primer to the entire exterior of the jar. Let this dry completely before moving on.
Seed Stamping Hack
Struggling to paint seeds? Dip the tip of a Q-tip or a small foam pouncer into black paint, press it onto the jar, and use a toothpick to drag the paint upward into a point.
Step 2: Painting the Rind and Flesh
-
Tape the top border:
Apply a strip of painter’s tape or washi tape around the jar, positioning the bottom edge of the tape right at the shoulder line where the jar begins to curve inward. -
Tape the bottom border:
Place another strip of tape around the bottom of the jar, leaving about an inch of glass exposed at the very base for the bottom rind. -
Paint the pink center:
Using a wide flat brush, paint the large middle section between your tape lines with Bright Pink. You may need two or three coats to get distinct, opaque coverage, letting each layer dry for about 15 minutes. -
Remove the tape:
Once the pink paint is tacky but not fully dry, gently peel away both strips of tape to reveal crisp edges. -
Paint the top green section:
Carefully paint the area above the pink section—the neck and shoulders of the jar—with Kelly Green. Use a smaller brush to cut in close to the pink line without touching it. -
Paint the bottom green section:
Fill in the bottom inch of the jar with the same Kelly Green. I find resting my pinky finger on the table helps stabilize my hand for a steady line near the bottom. -
Create the white pith line:
The gap between the pink and green sections naturally looks like the white pith of a watermelon rind. If your white base coat isn’t showing through cleanly, use a very fine brush to paint a thin white line separating the colors.
Step 3: Adding the Details
-
Start the seeds:
Dip a fine-tip paintbrush into black acrylic paint. You want a teardrop shape for the seeds. -
Paint the teardrops:
Press the brush down gently to create the round bottom of the seed, then lift up quickly as you drag the brush upward to create the pointed top. -
Scatter the pattern:
Randomly distribute seeds around the entire pink section of the jar. Don’t make them too uniform; a random scatter looks more natural. -
Touch up the threading:
If any paint got onto the actual screw threads at the very top of the jar rim, wipe it away so the lid screws on smoothly later. -
Wait for full cure:
Allow the jar to sit undisturbed for at least 24 hours to ensure all layers of paint are fully hardened. -
Seal the jar:
Spray the entire jar with a clear matte sealant. This protects the acrylic paint from scratching and moisture. -
Reassemble:
Once the sealer is dry, screw the green-painted lid ring back onto the jar to complete the look.
Level Up: Texture
Before the green paint dries, dab it gently with a dry paper towel or sponge. This creates a mottled texture that mimics the look of a real watermelon rind.
Now your jar is ready to hold utensils, straws, or fresh summer blooms
Cute Face Mason Jars for Gifts and Kids’ Rooms
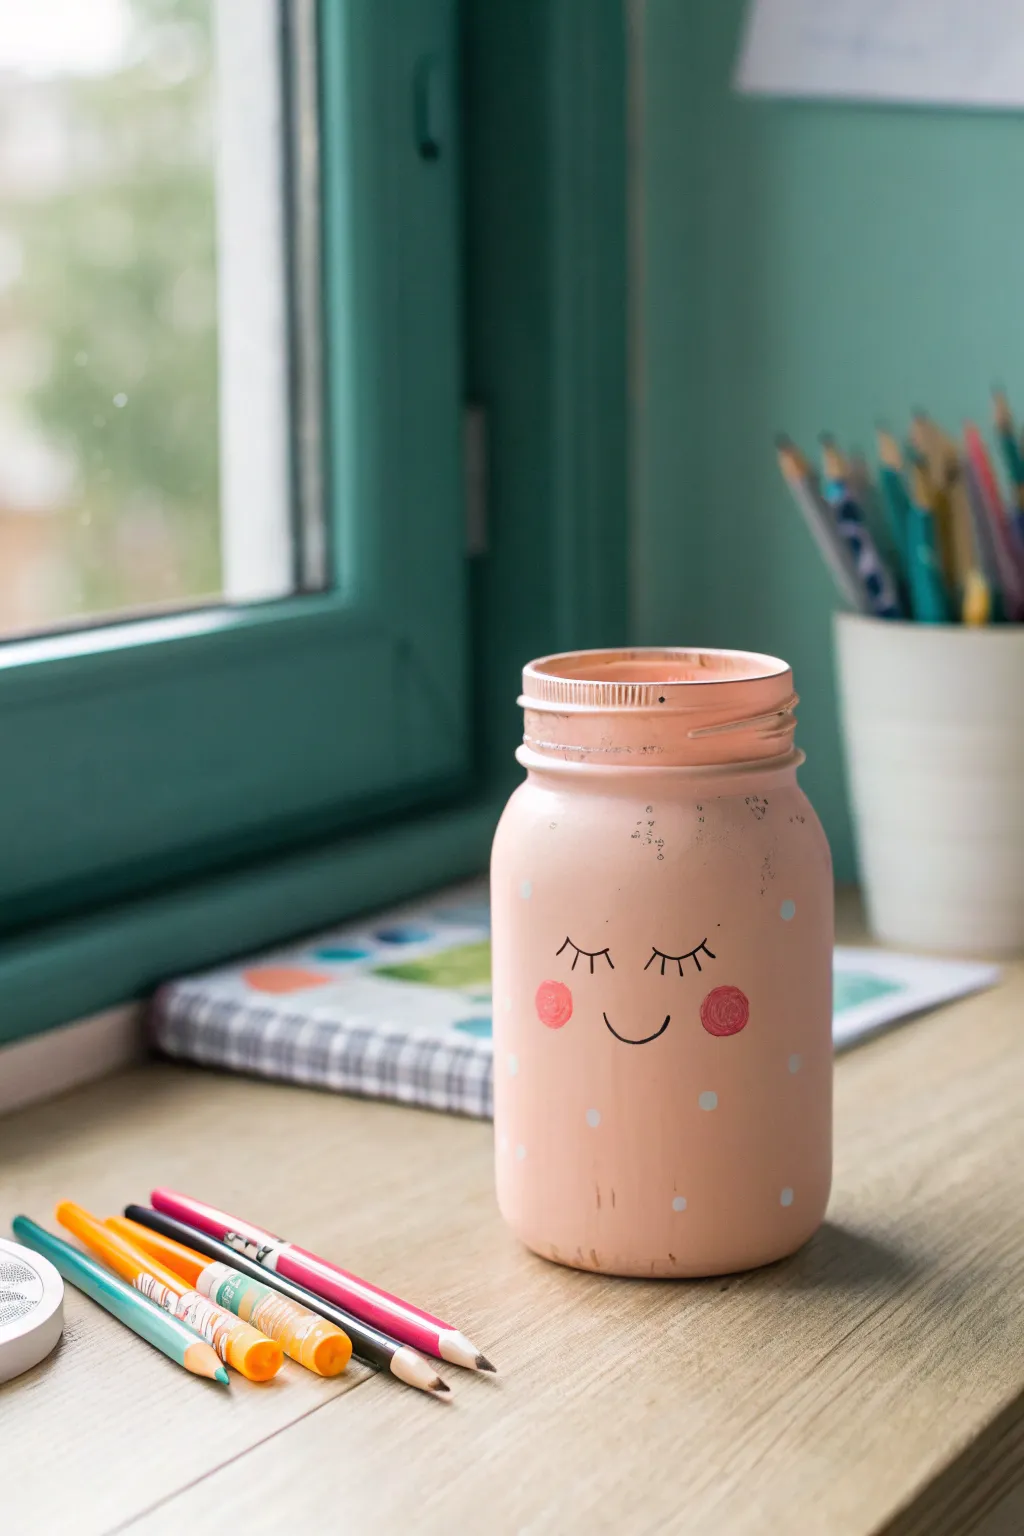
Transform a plain glass jar into an adorable storage container with a soft, blushing personality. This project features a gentle peachy-pink matte finish adorned with playful polka dots and a sweet, sleepy face that’s perfect for brightening up a desk or shelf.
How-To Guide
Materials
- Clean glass mason jar (lid removed)
- Rubbing alcohol and cotton pad
- Peachy-pink acrylic craft paint (matte finish)
- White acrylic paint
- Dark pink or coral acrylic paint
- Black permanent marker or fine-tip paint pen
- Medium flat paintbrush
- Small round paintbrush
- Toothpick or dotting tool
- Clear matte sealer spray (optional)
Step 1: Base Coat Application
-
Prep the surface:
Begin by thoroughly cleaning the outside of your mason jar with rubbing alcohol on a cotton pad. This removes oily fingerprints and ensures the paint adheres properly to the smooth glass. -
First coat of pink:
Using a medium flat paintbrush, apply a layer of peachy-pink acrylic paint to the entire exterior of the jar, including the threads at the top. Use long, vertical strokes to minimize brush marks. -
Let it dry:
Allow the first coat to dry completely. Glass is a slippery surface, so rushing this step can cause the paint to lift. It usually takes about 20-30 minutes. -
Add coverage:
Apply a second coat of the pink paint, brushing in the same direction as the first. If the glass is still showing through, a third coat may be necessary for a solid, opaque look. -
Rim details:
Don’t forget to paint the very top rim of the jar so no clear glass shows from above. I find dabbing the brush tip here works better than swiping. -
Full cure:
Let the final base coat dry fully, preferably for an hour, so the surface is hard enough to draw on without scratching the paint.
Step 2: Adding the Face Features
-
Drafting the face:
Visualize where you want the face to sit—usually centered on the smoothest side of the jar. You can lightly sketch the placement with a pencil if you’re nervous about freehanding. -
Drawing the eyes:
Using a black permanent marker or a fine-tip paint pen, draw two curved arches for the sleepy closed eyes. Keep them symmetrical and centered. -
Adding eyelashes:
Carefully draw three small lashes extending downwards from each eye arch. Make the middle lash slightly longer for a cute, fluttery effect. -
Drawing the smile:
Draw a small, simple U-shape curve between and slightly below the eyes to create a content little smile. -
Painting the cheeks:
Dip a small round brush (or even your pinky finger) into the dark pink or coral paint. Dab a round circle on each side of the smile to create rosy cheeks. -
Feathering the edges:
If the cheek circles look too perfect, gently tap the edges while the paint is wet to give them a softer, blush-like appearance.
Paint Slipping?
If acrylic paint slides off the glass, mix a tiny bit of baking soda into your base color. This adds ‘tooth’ and texture, helping the paint grip the slick surface instantly.
Step 3: Decorative Details
-
Creating polka dots:
Dip the flat end of a toothpick, the back of a paintbrush handle, or a dotting tool into white acrylic paint. -
Placing the dots:
Press dots randomly around the rest of the jar, avoiding the immediate face area. Try to space them out unevenly for a whimsical, organic look. -
Adding variety:
Vary the pressure slightly as you stamp to create tiny differences in dot size, which adds to the hand-painted charm. -
Distressing (optional):
If you want the rustic look shown in the photo, wait for everything to dry, then use a tiny piece of fine-grit sandpaper to scuff the raised text or threads of the jar. -
Sealing the work:
To protect your artwork from chipping, spray the finished jar with a clear matte sealer in a well-ventilated area.
Make it a Set
Paint two more jars in coordinating pastel blue and mint green. Draw different expressions on each one—like winking or surprised—to create a trio of characters for organizing markers.
Pop your favorite pens or a small succulent into your new cheerful jar and enjoy the pop of personality it adds to the room
Galaxy Night-Sky Mason Jars With Star Splatter
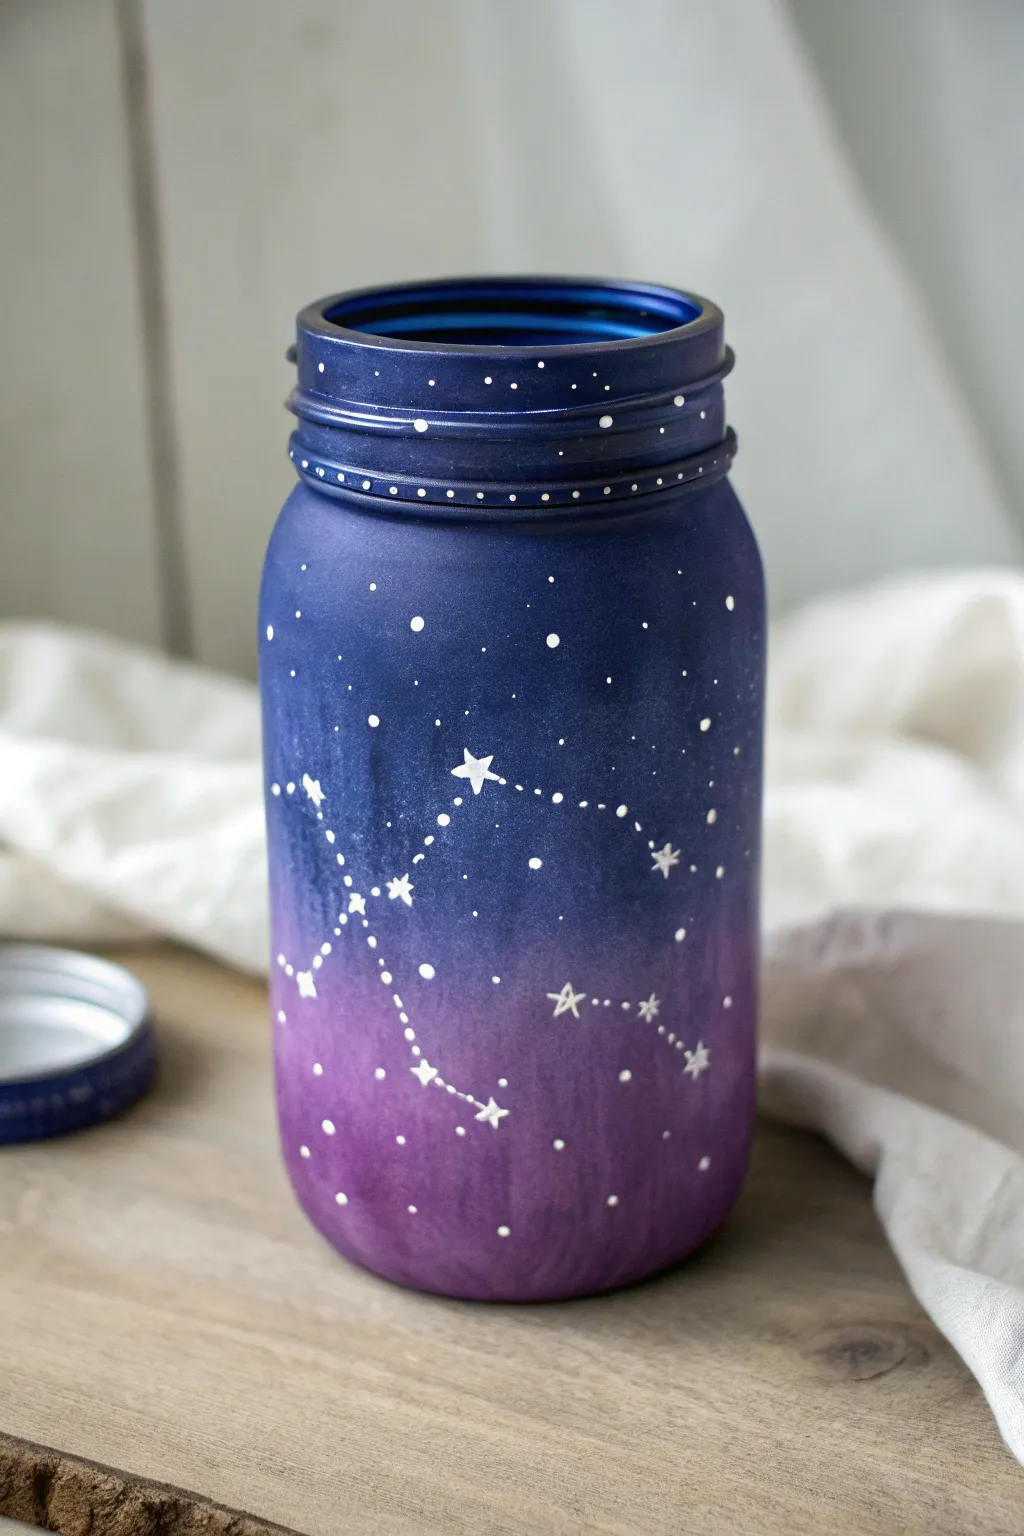
Transform a plain glass jar into a stunning piece of the night sky with this gradient galaxy project. This design features a seamless blend of deep blues and purples, accented by delicate hand-painted constellations that glow against the dark background.
Step-by-Step Tutorial
Materials
- Clean mason jar (without embossed logos works best)
- Rubbing alcohol and cotton pad
- Makeup sponge wedges
- Acrylic paint: Navy Blue, Deep Purple, White
- Fine detail paintbrush (size 0 or 00)
- Small dotting tool or toothpick
- Paper plate or palette
- Matte spray sealer (optional)
Step 1: Preparing the Base
-
Clean the surface:
Wipe down the entire exterior of the mason jar with rubbing alcohol and a cotton pad. This removes oils and fingerprints, ensuring the paint adheres perfectly without peeling later. -
Load the sponge:
Squeeze a generous amount of navy blue and deep purple acrylic paint onto your palette. Take a makeup sponge wedge and dab it into the navy blue paint, tapping off the excess on a clean part of the plate. -
Apply the first color:
Starting at the rim of the jar, sponge the navy blue paint around the top specifically. Use an up-and-down dabbing motion rather than wiping to create texture. Bring this color down about two-thirds of the way. -
Add the gradient:
While the blue is still slightly wet, load a fresh sponge with deep purple paint. Start dabbing at the bottom of the jar and work your way upward. -
Blend the transition:
Where the purple meets the blue, lighten your touch. Allow the colors to overlap slightly, dabbing repeatedly over the seam to create a soft, blurred gradient transition between the night sky colors. -
Dry and repeat:
Let this first layer dry completely—this usually takes about 15-20 minutes. Apply a second coat using the same sponge technique to ensure the glass is fully opaque and the colors are vibrant. -
Paint the rim:
Don’t forget the screw-top rim threads. Dab navy blue paint carefully over them so the entire jar looks cohesive, even when the lid is off.
Sponge Technique
Don’t drag the sponge! Consistent up-and-down dabbing creates that misty, airbrushed texture essential for a realistic galaxy look.
Step 2: Designing the Cosmos
-
Plan your constellation:
Choose a constellation shape you love (like the Big Dipper or Cassiopeia). Visualize where the main stars will sit on the front of the jar to ensure it fits nicely within the blue-to-purple transition zone. -
Paint the major stars:
Using a fine detail brush and white acrylic paint, create small five-pointed stars at the main anchor points of your chosen constellation. I find it easiest to paint a simple cross first, then add the diagonal lines. -
Connect the dots:
Load your fine brush with watery white paint (mix a tiny drop of water in). Paint very thin, dashed lines connecting your major stars to form the constellation’s shape. -
Add medium stars:
Scatter a few medium-sized dots around the constellation using the back of your brush handle or a large dotting tool. Place these randomly in the empty blue spaces. -
Create distant stars:
Dip a toothpick into the white paint and gently touch the jar surface to create tiny, pin-prick stars. Group some closer together to mimic distant star clusters. -
Detail the rim:
Add a row of tiny white dots along the lowest ridge of the jar’s neck. Spacing them evenly adds a delightful geometric finish that frames the galaxy below. -
Let it cure:
Allow the white paint to dry fully. If you want to protect your artwork from scratches, finish by spraying the jar with a clear matte sealer in a well-ventilated area.
Paint Peeling?
If paint lifts while blending layers, the bottom coat wasn’t dry enough. Let it sit for another 10 minutes or use a hair dryer on cool.
Place a battery-operated tea light inside your finished jar to watch your personal galaxy glow softly in the dark
Stenciled Pattern Mason Jars for Crisp, Clean Designs
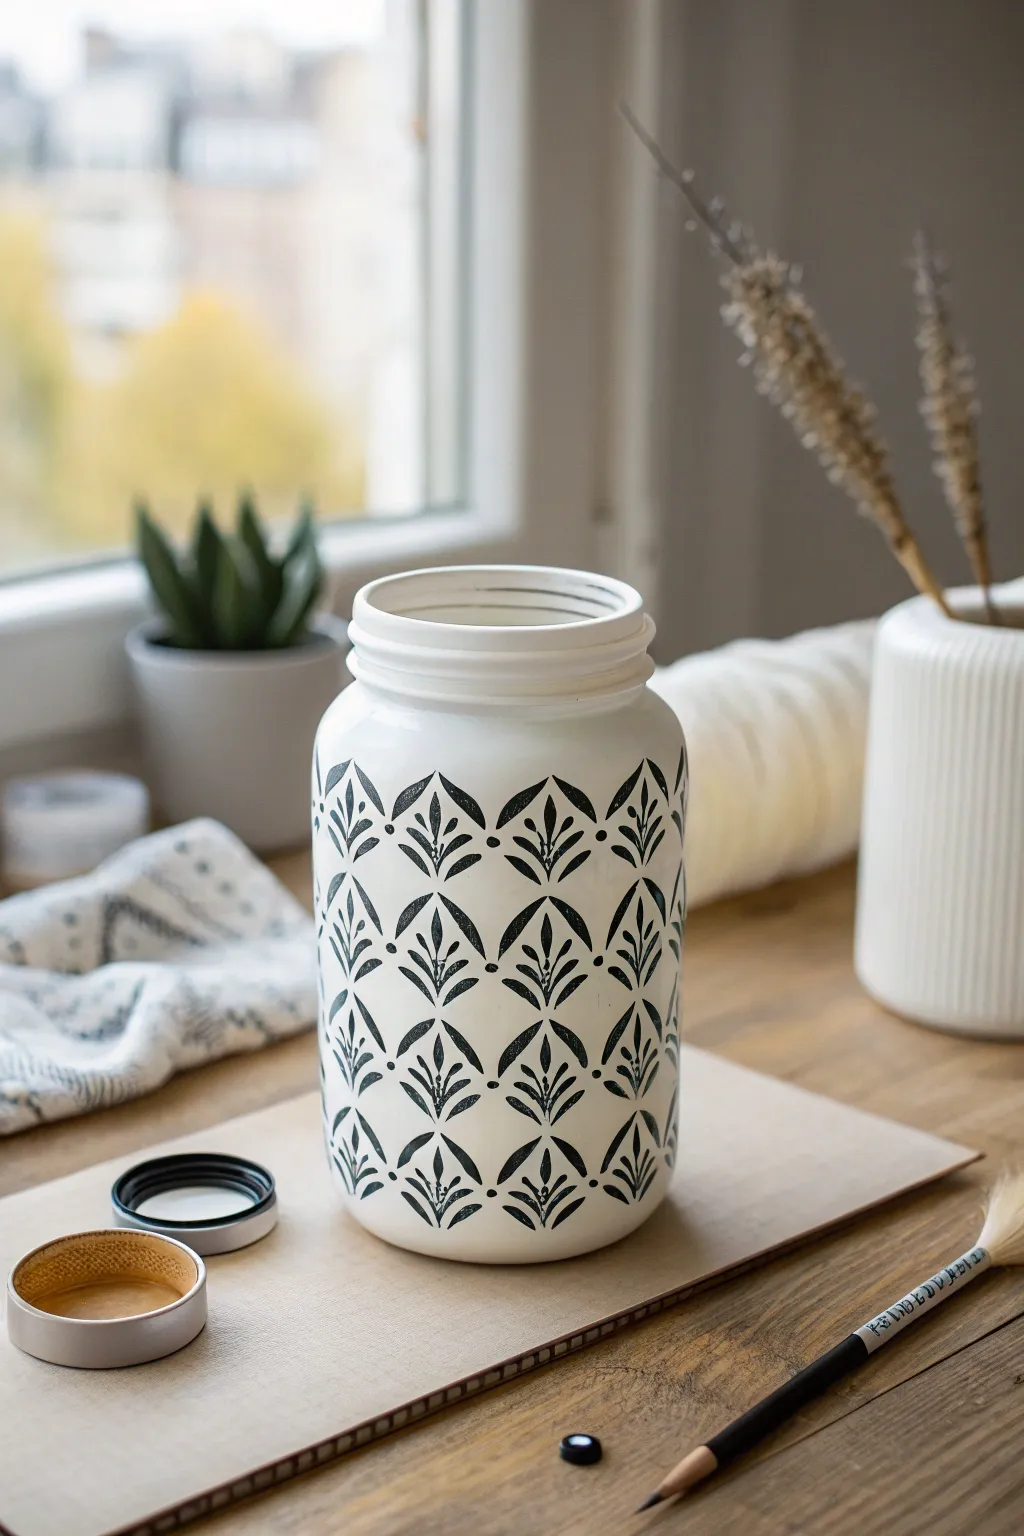
Transform a simple glass jar into a stunning piece of home decor with this high-contrast stenciling project. The crisp black leaf motif against a matte white background creates a sophisticated, modern look perfect for holding utensils or dried flowers.
Step-by-Step Guide
Materials
- Large smooth-sided mason jar (32 oz or similar)
- Matte white chalk paint or acrylic craft paint
- Carbon black acrylic paint
- Adhesive stencil (leaf or geometric floral pattern)
- Wide flat synthetic paintbrush
- Small round stencil brush or foam pouncer
- Painter’s tape
- Rubbing alcohol
- Cotton pad
- Paper plate or palette
- Matte spray sealer (optional)
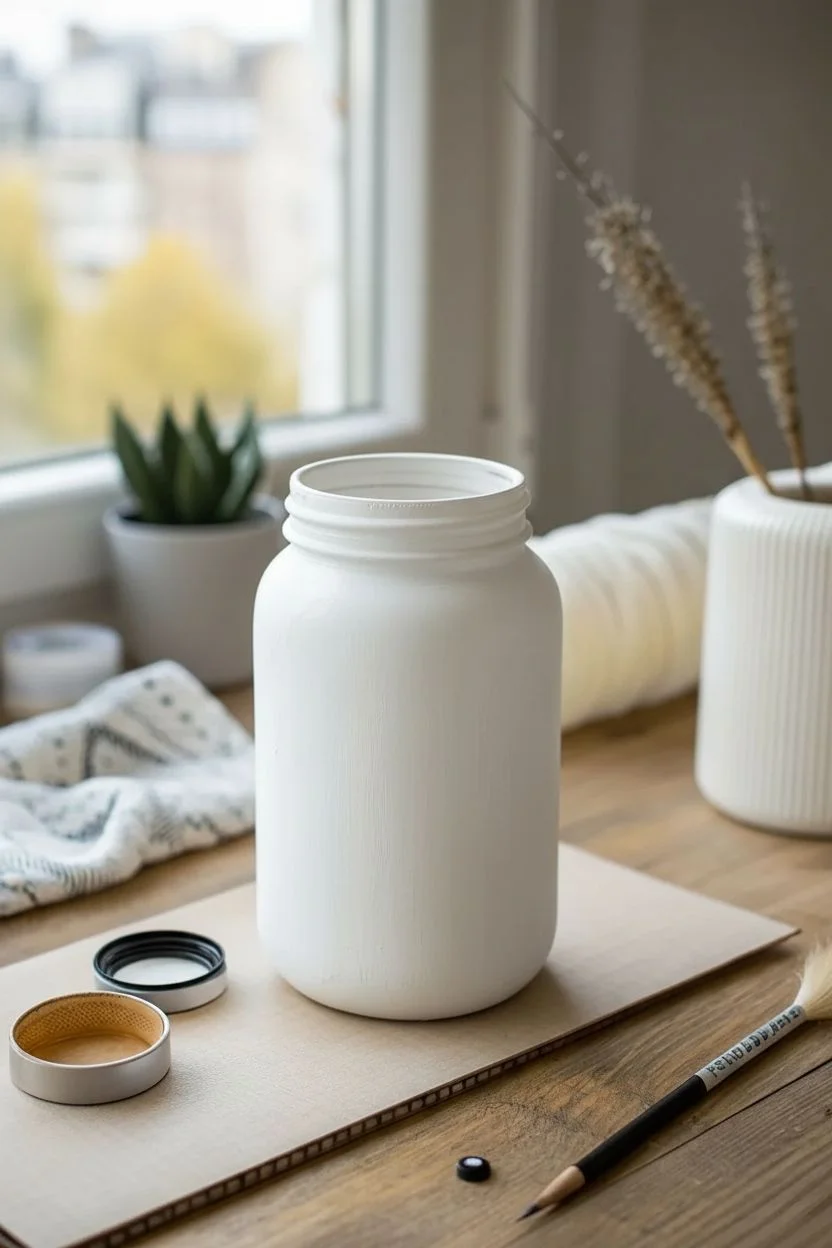
Step 1: Preparation and Base Coat
-
Clean the surface:
Before painting, wipe down the entire exterior of your mason jar with rubbing alcohol on a cotton pad. This removes oils and fingerprints, ensuring the paint adheres perfectly to the glass. -
Apply the first coat:
Using a wide flat synthetic brush, apply a generous layer of matte white chalk paint. Chalk paint is ideal here because it sticks well to glass without needing a separate primer. -
Smooth the stroke:
Work in long, vertical strokes from the rim to the base to minimize brush marks. Don’t worry if it looks slightly streaky on the first pass; coverage will build up. -
Let it dry completely:
Allow the first coat to dry for at least one hour. If the jar feels cool to the touch, it still holds moisture and needs more time. -
Add a second coat:
Apply a second layer of white paint. If you want an ultra-smooth finish, use a slightly lighter hand this time. Let this layer cure fully, preferably overnight, to prevent the paint from peeling when you apply the stencil adhesive later. -
Paint the rim:
Don’t forget the threaded rim of the jar. Carefully paint the threads white so the finish looks cohesive even without a lid.
Step 2: Stenciling the Pattern
-
Position the stencil:
Take your flexible adhesive stencil featuring a leaf or geometric design. Wrap it around the jar, ensuring it sits flat against the curve. Use painter’s tape at the edges if the adhesive isn’t strong enough. -
Load the stencil brush:
Pour a small amount of carbon black acrylic paint onto your paper plate. Dip your stencil brush tip in, then dab most of the paint off onto a clean spot on the plate. Your brush should be almost dry. -
Apply the black paint:
Using a vertical up-and-down dabbing motion (stippling), apply the black paint through the stencil openings. Avoid sweeping side-to-side, as this pushes paint under the stencil edges. -
Check density:
I usually do a light pass first, then go back over the design to darken the black. This build-up method prevents bleeding and keeps the lines crisp. -
Lift the stencil:
While the black paint is still slightly tacky but not wet, carefully peel back the stencil. Pull it straight away from the jar rather than sliding it. -
Align the next section:
Once the first section is dry to the touch (about 10-15 minutes), wipe the back of your stencil clean if needed. Realign it next to your previous work to continue the pattern around the jar. -
Complete the circumference:
Continue the stenciling process around the entire jar. If the pattern doesn’t meet perfectly at the back, focus on keeping the spacing consistent so the gap looks intentional.
Bleeding Lines?
If paint is seeping under your stencil, your brush is too wet. Off-load more paint onto a paper towel before touching the jar until the brush feels dry to the touch.
Step 3: Finishing Touches
-
Touch up edges:
Inspect your work. If any black paint bled under the stencil, use a tiny detail brush with a bit of white paint to clean up the edges. -
Add detail dots:
The design in the image features small dots between the leaf patterns. Use the wrong end of a paintbrush dipped in black paint to stamp these small, perfect circles into the white space. -
Seal the jar:
To protect your design from scratches, take the jar outside and spray it with a clear matte sealer. Two light coats are better than one heavy coat to avoid drips.
Make it Shine
For a luxe variation, swap the matte carbon black paint for metallic gold or copper. The metallic sheen against the matte white creates a glamorous contrast.
Now you have a beautifully patterned centerpiece that looks professionally designed and handmade.
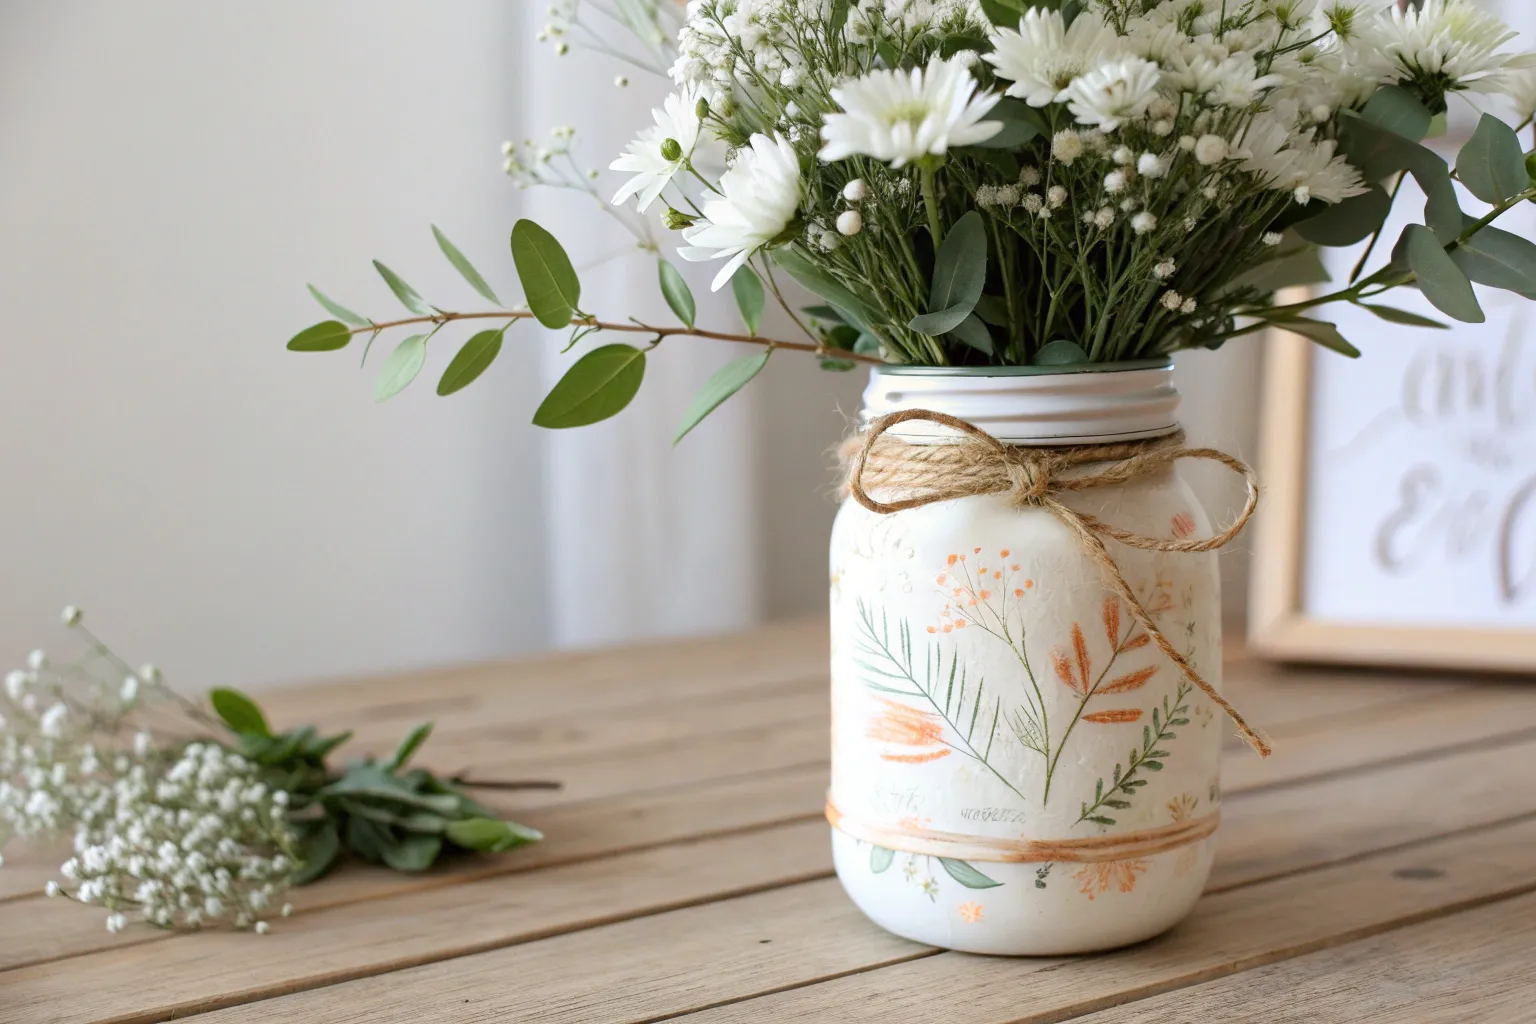
Mixed-Media Painted Mason Jars With Twine, Tags, and Texture
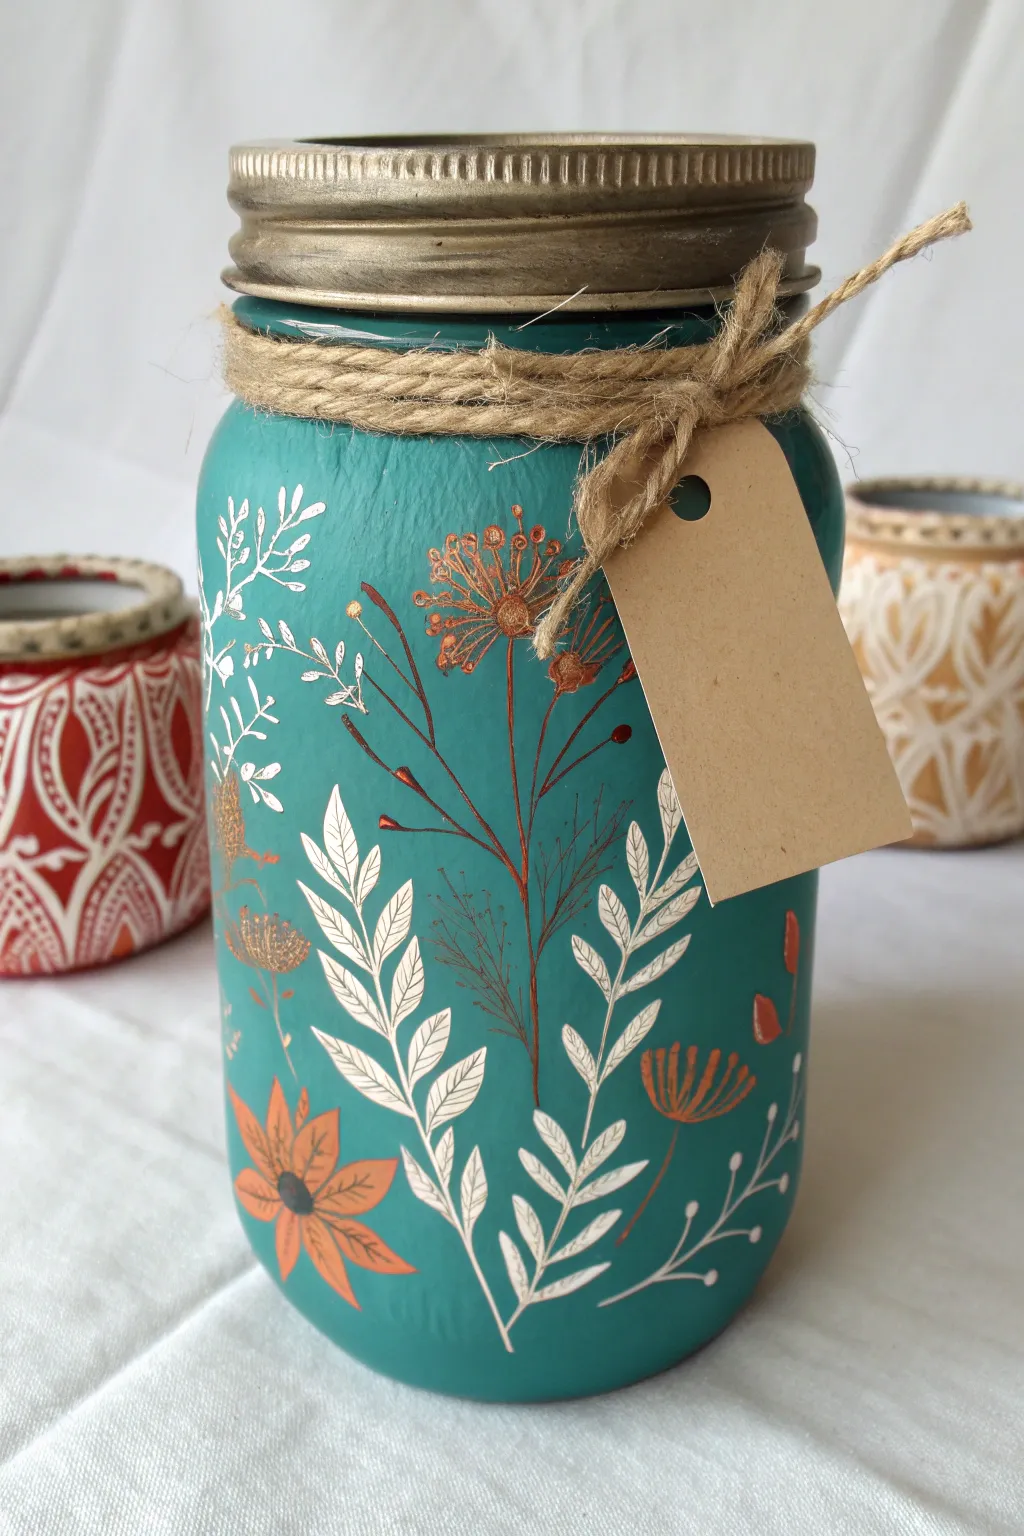
Transform a plain glass jar into a stunning piece of rustic decor featuring intricate botanical illustrations on a smooth teal canvas. This mixed-media project combines matte paint adhesion with delicate brushwork to create a cozy, nature-inspired vessel perfect for gifts or centerpieces.
Detailed Instructions
Materials
- Clean glass mason jar (quart size)
- Rubbing alcohol
- Teal chalk paint or matte acrylic paint
- Flat paintbrush (medium size)
- Fine liner paintbrush (size 0 or 00)
- White acrylic paint
- Burnt orange or terracotta acrylic paint
- Metallic copper or bronze acrylic paint
- Jute twine
- Kraft paper gift tag
- Matte clear sealant spray (optional)
- Sandpaper (fine grit, optional)
Step 1: Base Coat Preparation
-
Clean the surface:
Before painting, wipe down the entire exterior of the mason jar with rubbing alcohol and a paper towel to remove any oils or fingerprints that might prevent adhesion. -
Apply the first coat:
Using a flat paintbrush, apply an even coat of teal chalk paint to the outside of the jar. Chalk paint adheres best to glass, but a multi-surface matte acrylic works too. -
Let it dry:
Allow the first coat to dry completely for about one hour. Painting over wet areas will lift the previous layer, so patience is key. -
Apply the second coat:
Add a second coat of teal paint to ensure full opacity. Brush in vertical strokes from the rim to the base to minimize visible brush marks. -
Final dry:
Let the base color cure for at least 2-3 hours. If you want a smoother finish, you can very lightly sand away any rough bumps with fine-grit sandpaper once fully dry.
Step 2: Floral Illustrations
-
Outline main stems:
Dip your fine liner brush into dilute metallic copper or bronze paint. Paint thin, wispy vertical lines rising from the bottom third of the jar to act as the main stems for your largest floral elements. -
Add leafy ferns:
Switch to white acrylic paint. Paint curving stems that overlay the copper lines slightly. Along these white stems, paint small, teardrop-shaped leaves in pairs, angling them upward to create a fern-like appearance. -
Paint copper seed heads:
Dab the copper paint to create clusters of dots or small fan shapes at the top of your metallic stems. These represent dried seed heads or dandelion puffs. -
Create orange accents:
Using the terracotta or burnt orange paint, add small, simple five-petal flowers near the bottom. I find that keeping these shapes loose and not perfectly geometric adds to the rustic charm. -
Detail the orange flowers:
Once the orange petals are dry, add a tiny dot of dark brown or black in the center of each flower for contrast. -
Add delicate filler:
Use the liner brush with white paint to add very fine, wire-like sprigs and tiny dots around the larger plants to fill empty negative space without overcrowding the design. -
Dry the details:
Allow all the detail painting to dry completely, preferably overnight, to prevent smudging during the final assembly.
Paint Slipping?
If acrylic paint slides off the glass, sponge on a thin layer of specialized glass primer or clear gesso first to give the surface ‘tooth’ for grip.
Step 3: Finishing Touches
-
Seal (Optional):
If you plan to handle the jar frequently, spray it lightly with a matte clear sealant to protect the artwork from chipping. -
Wrap the neck:
Take a length of jute twine and wrap it around the threaded neck of the mason jar three or four times, ensuring the coils sit snugly against each other. -
Attach the tag:
Thread a blank kraft paper tag onto one end of the twine before tying your final knot. -
Tie the bow:
Secure the twine with a simple bow or a rustic double knot, letting the ends fray slightly for texture. -
Position the tag:
Adjust the tag so it hangs naturally to the side, ensuring it doesn’t obscure your beautiful painted floral motifs.
Add Dimension
Mix baking soda into your base teal paint for a textured terracotta-like finish, then dry-brush gold over the raised areas.
Enjoy displaying your beautiful hand-painted jar on a shelf or filling it with dried blooms


Have a question or want to share your own experience? I'd love to hear from you in the comments below!