If you’re craving big, cinematic worlds, matte painting is where you get to build them—one believable detail at a time. Here are my favorite matte painting ideas that start classic and approachable, then ramp up into the weird, wonderful stuff.
Sky Replacement Set Extension
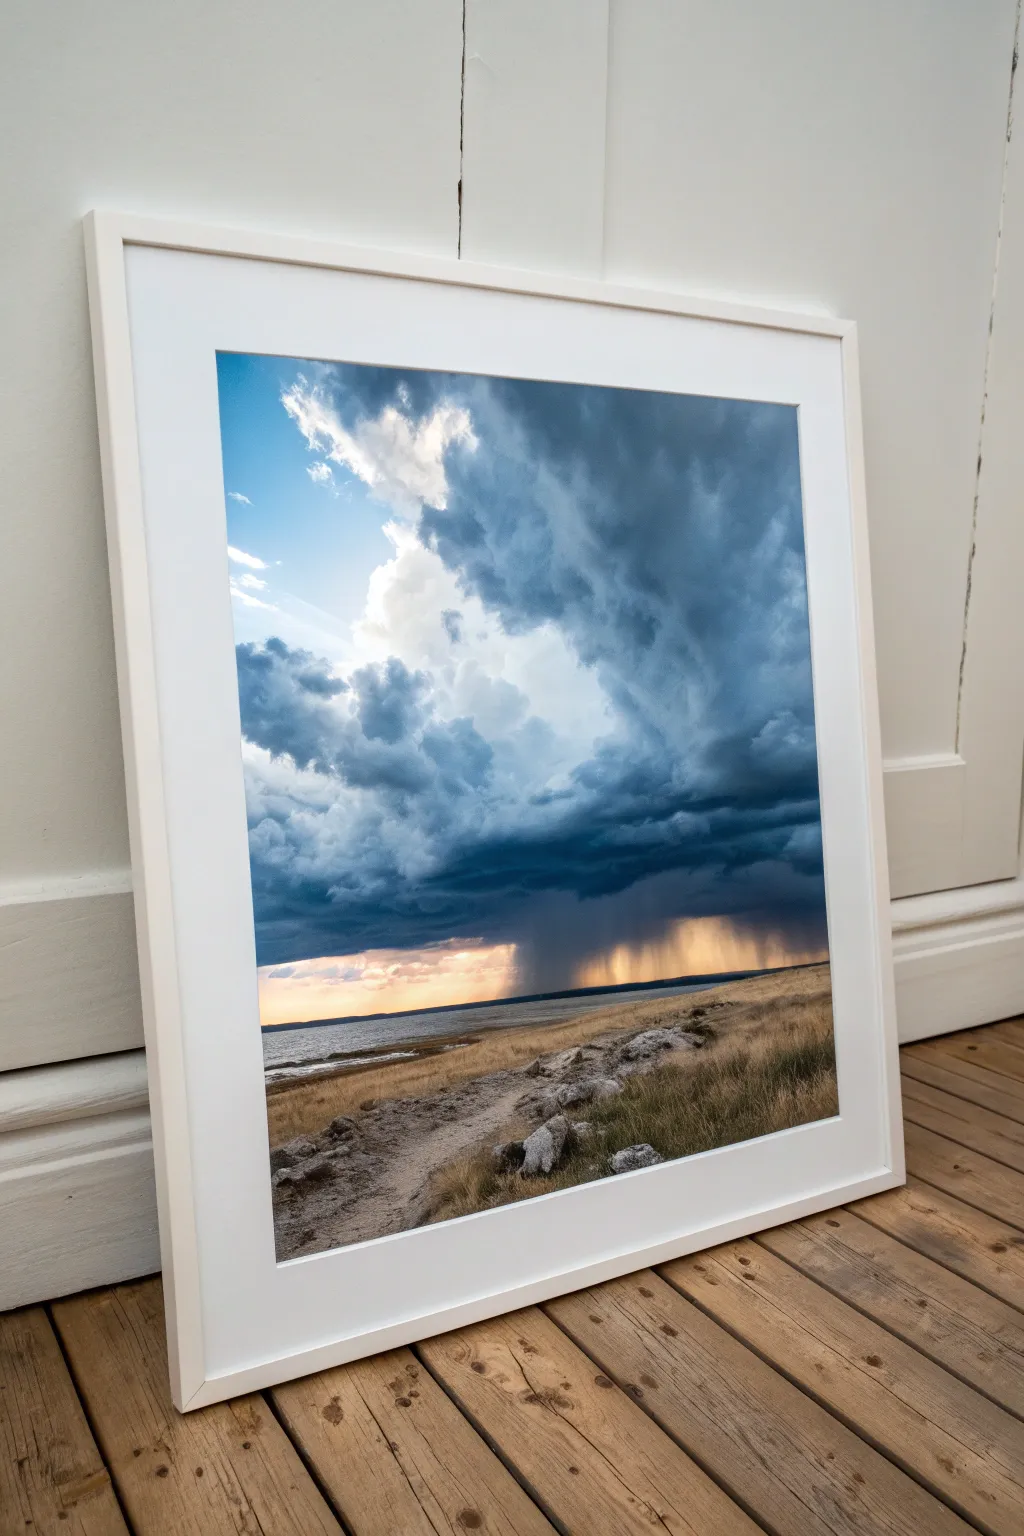
Transform a standard landscape photo into a brewing narrative by seamlessly blending disparate elements. This intermediate matte painting project combines a grounded foreground plate with a digitally manipulated, high-contrast storm sky to create a moody, atmospheric composition.
Step-by-Step Guide
Materials
- Digital painting software (Photoshop, GIMP, or Procreate)
- Graphics tablet
- Source photo: Grassland foreground (base plate)
- Source photo: Dramatic storm clouds
- Source photo: Rain shafts or rain brushes
- Color grading adjustment layers
- High-quality inkjet paper (luster or matte)
- Framing materials (white gallery frame and mount)
Step 1: Preparing the Plates
-
Establish the Canvas:
Open your editing software and set up a vertical canvas at 300 DPI to ensure high-quality printing later. Import your muddy, grassy foreground photo as the bottom layer. -
Mask the Horizon:
Using the Pen Tool or a refine-edge selection brush, carefully cut out the sky from your foreground image. Ensure the transition at the distant water line is sharp, but soften the edges where distant land meets the sky. -
Import the Sky:
Place your dramatic storm cloud image on a layer behind the foreground. Scale and position it so the most intense cloud formations loom large in the upper two-thirds, creating a sense of scale and intimidation.
Step 2: Blending & Lighting
-
Match the Perspective:
If your cloud photo feels too flat, use the Warp or Perspective transform tools to slightly bow the clouds near the edges, mimicking the lens distortion of the foreground plate. -
Color Grading the Sky:
Apply a Curves adjustment layer clipped specifically to the sky. Darken the mid-tones significantly to enhance the brooding blue-grey tones, but keep the highlights bright where the sun will peek through. -
Relight the Foreground:
The foreground must reflect the sky’s mood. Add a Gradient Map adjustment layer (dark blue to transparent) over the foreground, setting the blending mode to ‘Soft Light’ at about 30% opacity to cool down the warm grass. -
Create Atmospheric Depth:
Paint a soft, low-opacity haze between the foreground and sky layers using a large, soft airbrush samples with a light slate-blue color. This pushes the horizon back and helps glue the two images together.
Fixing “Cutout” Looks
If the horizon looks like a sticker, use the Blur Tool lightly along the seam. Real horizons are rarely razor-sharp due to atmospheric distance.
Step 3: Visual Effects & Detail
-
Add Rain Shafts:
On a new layer, paint vertical streaks using a rain brush or a motion-blurred noise layer. Mask these out so they only appear in the distance, connecting the dark cloud bottom to the horizon line. -
Enhance the Sun Break:
In the center where the clouds are lighter, paint a soft, warm glow (orange-yellow) using a ‘Screen’ blend mode. This mimics the sun breaking through the rain, creating that focal point of light. -
Dodge and Burn:
Create a new layer filled with 50% grey set to ‘Overlay’. Gently dodge (lighten) the path in the foreground and the water highlights, and burn (darken) the heavy cloud overhangs to increase contrast. -
Final Color Balance:
Add a global Color Balance adjustment layer. Push the shadows slightly towards cyan and blue, and the highlights towards yellow and magenta to unify the color palette. -
Sharpening:
Apply a high-pass filter on a merged copy of all layers to sharpen the textures in the grass and the hard edges of the clouds, avoiding the soft rain areas.
Level Up: Dynamic Range
Paint subtle rim light on the rocks in the foreground using the color of the sun-break. This ties the foreground lighting directly to the new sky source.
Step 4: Print & Presentation
-
Proofing:
Convert the color profile to your printer’s CMYK profile if necessary, or check soft-proofing view to ensure your dark blues won’t print as muddy black blobs. -
Print the Composite:
Print the final image on high-quality luster paper. I generally prefer luster over glossy for storm scenes as it reduces glare while maintaining deep contrast. -
Matting:
Place a clean, acid-free white mat (mount) over the print. The wide white border acts as a visual ‘breath’ that intensifies the claustrophobic darkness of the storm clouds. -
Framing:
Secure the matted print into a simple white wooden frame. The clean lines of the frame ensure no distraction from the complex textures within the artwork.
Now hang your stormscape and enjoy the dramatic weather from the safety of your home


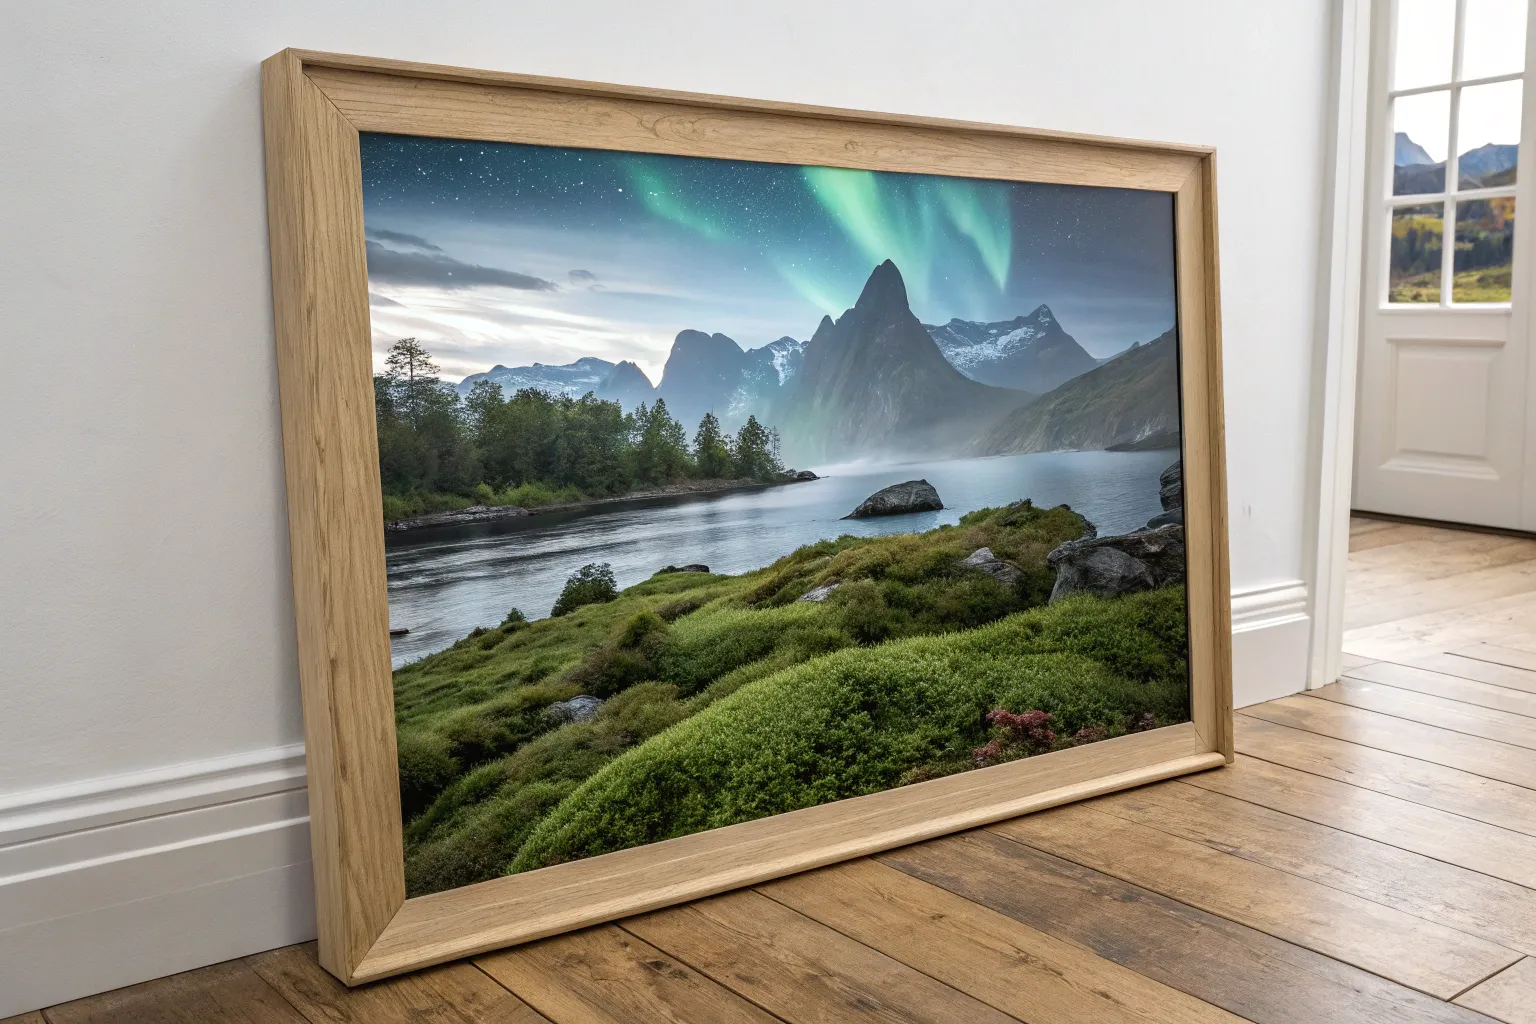
Fog Layers for Atmospheric Depth
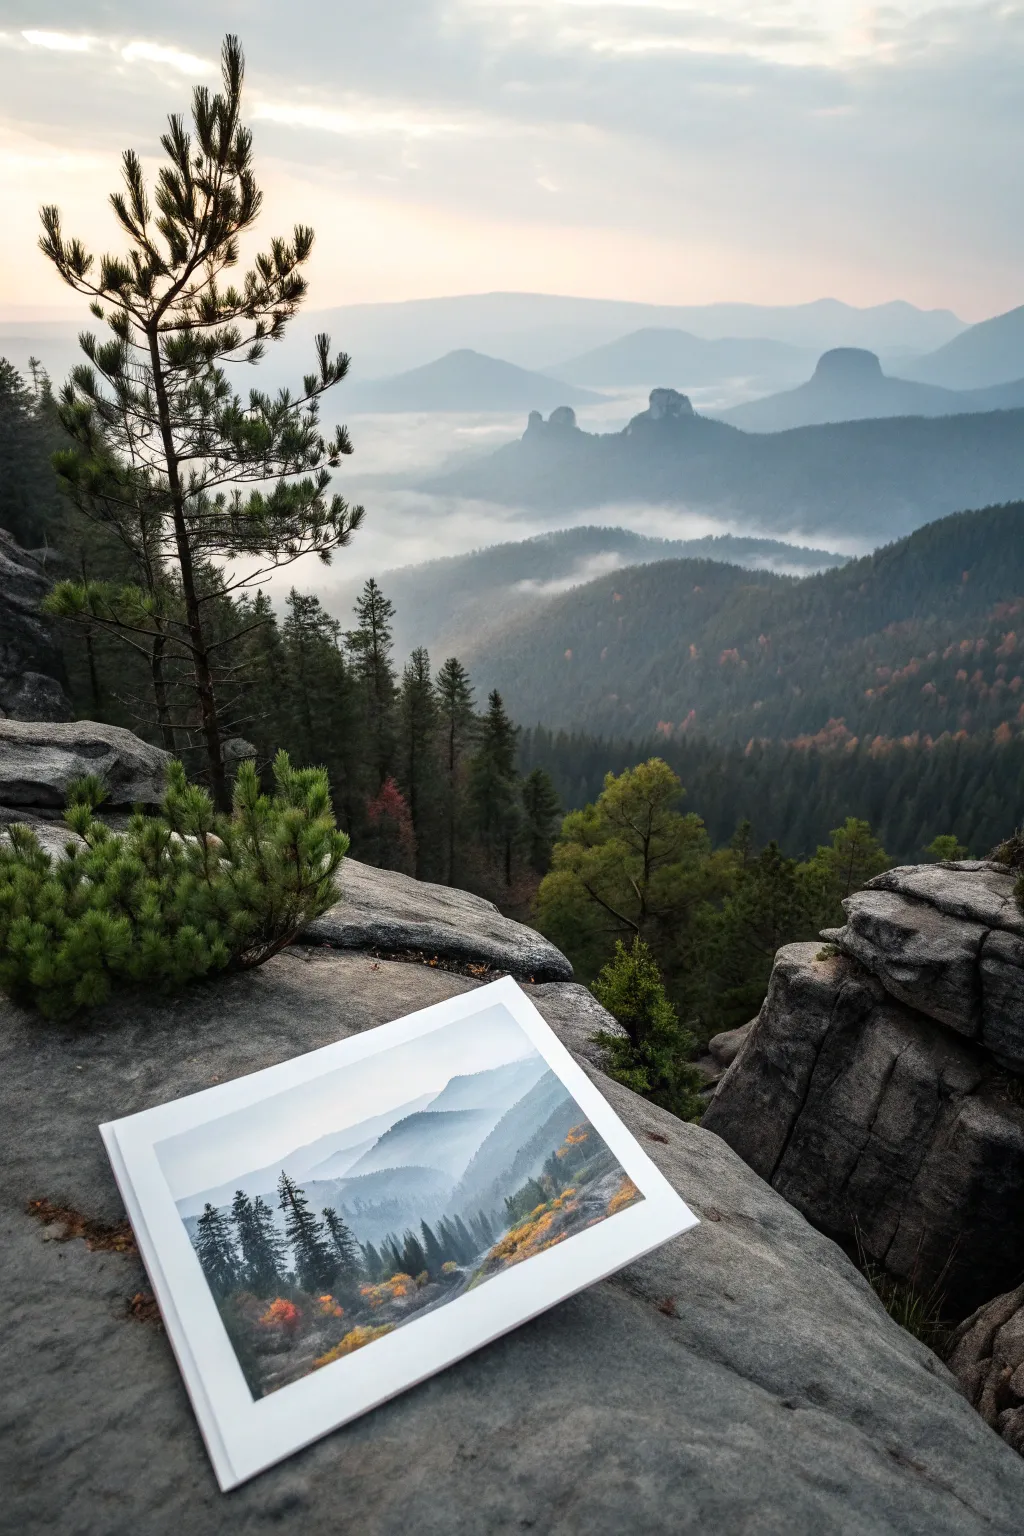
Capture the serene mystery of a mountain range shrouded in mist with this digital matte painting project. You’ll learn to build atmospheric perspective layer by layer, creating a scene that feels vast and endless, just like the print resting on the rock in our inspiration image.
Step-by-Step Tutorial
Materials
- Digital painting software (Photoshop, Procreate, etc.)
- Graphics tablet and stylus
- Textured blending brushes (clouds, smoke, soft splatter)
- Standard round and flat brushes
- Reference photos of mountain ranges
Step 1: Establishing the Horizon
-
Set the sky gradient:
Begin with a blank canvas and establish your light source. Paint a soft gradient for the sky, transitioning from a pale, cool blue at the top to a warm, dusty white near the horizon line to simulate atmospheric haze. -
Block in distant peaks:
Using a large, hard round brush, silhouette the furthest mountain range in a very light, desaturated blue-grey. These shapes should be simple and barely darker than the sky itself to push them far into the distance. -
Layer the mid-ground ranges:
Create a new layer and paint the next range of mountains slightly darker and with a bit more detail. Ensure the edges are somewhat soft, mimicking the way atmosphere blurs distant objects. -
Define the foreground ridge:
Block in the closest large mountain mass on the right side using a darker, cooler grey-blue. This layer will hold the most weight and eventually the most detail, anchoring the composition.
Step 2: Creating Atmosphere
-
Paint the valley floor:
Select a soft airbrush or cloud brush. On a layer behind your foreground ridge but in front of the mid-ground, paint sweeping, horizontal drifts of white mist. Keep the opacity low (around 30%) and build it up slowly. -
Add ‘God rays’ or light bloom:
On a new layer set to ‘Overlay’ or ‘Soft Light’, gently brush in warm light coming from the top left corner. This helps unify the color palette and suggests the sun breaking through the overcast sky. -
Separate planes with haze:
To accentuate depth, I like to sample the sky color and lightly airbrush the bottom edge of each mountain layer. This ‘atmospheric perspective’ trick makes the mountains look like they are receding into thick air. -
Refine the rock formations:
Zoom in on the mid-ground peaks. Use a textured chalk brush to carve out jagged edges and vertical fissures. Keep the contrast low; you want texture, not high-definition sharpness yet.
Depth Perception Tip
Always remember: objects become lighter, bluer, and less detailed the further away they are. Use this rule to instantly create massive scale.
Step 3: Foreground Details
-
Establish the immediate foreground:
In the bottom left and center, paint the closest terrain using dark, rich charcoal tones. This area needs the highest contrast to stand out against the misty background. -
Plant the forest base:
Using a dark, desaturated green-blue, block in the vertical shapes of pine trees along the ridges. Vary their heights and spacing to avoid a picket-fence look. -
Refine tree silhouettes:
Switch to a smaller, detailed brush to paint the distinct jagged tops of the spruce and fir trees. These silhouettes against the glowing mist are crucial for scale. -
Add autumn foliage warmth:
Select a muted orange-brown hue. Gently stipple foliage into the lower sections of the forest and along the rocky slopes to introduce that touch of fall color seen in the artwork. -
Highlight the nearest trees:
With a slightly lighter, desaturated green, paint highlights on the tips of the pine branches that are facing the light source. This adds volume to the flat silhouettes.
Print It Out
Print your finished piece on matte cardstock and place it in a real-world setting to photograph it, blurring the line between digital and reality.
Step 4: Final Polish
-
Enhance the fog integration:
Use a smudge tool or a soft blender to gently push and pull the mist layers over the bases of the trees. The fog should interact with the landscape, wrapping around the trees rather than just sitting behind them. -
Adjust global values:
Add a definition adjustment layer (Curves or Levels). Lift the blacks slightly to wash them out, giving the whole piece a cinematic, matte-finish look. -
Add noise texture:
Create a new layer filled with 50% grey, add monochromatic noise, and set the blending mode to ‘Overlay’ at 3-5% opacity. This unifies the digital strokes and mimics the grain of a physical print. -
Add the photo border:
Expand your canvas size evenly to create a crisp white border around the image, mimicking the look of the physical print shown resting on the rock.
Now you have a breathtaking, atmospheric landscape that draws the viewer deep into the mist-covered mountains

Cinematic Reveal From a Cliff Edge
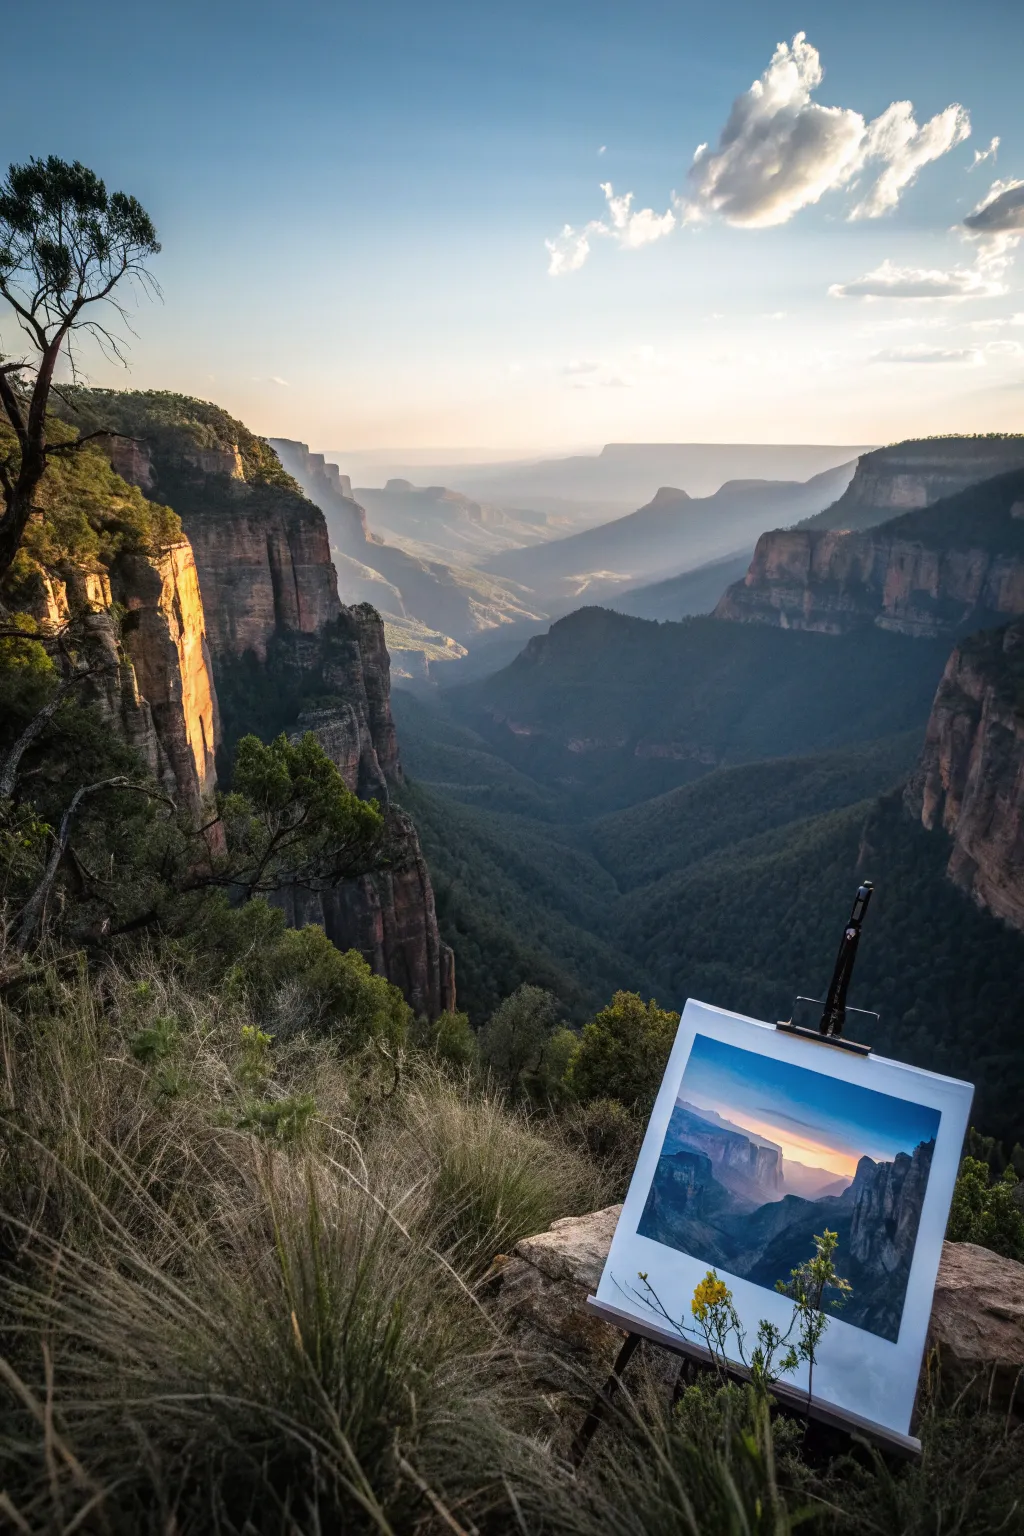
Create a breathtaking meta-landscape where art imitates life with this digital matte painting project brought into the physical world. By compositing a dramatic digital cliffside scene onto a blank canvas photo within the same environment, you’ll achieve a surreal, cinematic reveal perfect for concept art portfolios.
Detailed Instructions
Materials
- Digital painting software (Photoshop, Procreate, or similar)
- Graphics tablet and stylus
- High-resolution reference photo of a canyon drop
- Source photo of an easel in a landscape (or your own photo)
- Texture brushes (cloud, rock, foliage)
- Gesso and rough canvas overlay textures
Step 1: Setting the Scene
-
Establish the Base:
Begin by importing your main background photograph—the dramatic canyon view looking out from the cliff edge—into your software. This serves as the ‘reality’ layer. -
Position the Easel:
Place your secondary image of the easel and blank canvas onto the cliff edge in the foreground. Use layer masks to blend the feet of the easel into the grass and rocks naturally. -
Match the Lighting:
Adjust the color balance and curves of the easel layer so the lighting direction matches the sun’s position in your background canyon shot.
Step 2: Painting the Artwork
-
Create the Canvas Surface:
Select the white area of the canvas on the easel and create a new layer group masked to this shape. This is where your ‘painting’ will live. -
Sketch the Composition:
Using a simple round brush, sketch the main shapes of the canyon view onto the virtual canvas. You want it to look like the painter is capturing the scene before them, but feel free to exaggerate the depth. -
Block in Colors:
Lay down your base colors. For this specific look, I prefer to shift the time of day slightly—use cooler blues and purples in the deep valleys to suggest atmospheric perspective. -
Define the Cliff Faces:
Use a rough, textured brush to paint the vertical striations of the rock faces. Keep the strokes somewhat loose to distinguish the ‘painted’ version from the photo-real background. -
Paint the Sky:
Add a soft gradient for the sky, perhaps introducing a sunrise glow that might be more intense than the actual photo to add artistic flair. -
Deepen the Shadows:
Darken the foreground cliffs in your painting layer. High contrast is key here to make the distant valley look vast and misty.
Match the Focal Point
Ensure the horizon line in the painting on the easel aligns perfectly with the real horizon line behind it to maintain credible perspective.
Step 3: Refining Materiality
-
Add Brush Stroke Texture:
Overlay a ‘thick paint’ or ‘impasto’ texture onto your painting layer. set the blending mode to Overlay or Soft Light to give the digital paint some physical height and ridge detail. -
Apply Canvas Grain:
Import a high-res photo of raw canvas fabric. Place it on top of your painted artwork, set the blending mode to Multiply, and lower the opacity to around 20-30%. -
Create Imperfections:
Manually paint in small imperfections near the edges of the canvas, like places where the paint didn’t quite reach the frame or slight smudges.
Blue Hour Shift
Make the painting depict a different time of day (like dusk) than the surroundings. It implies the artist has been working there for hours.
Step 4: Final Integration
-
Shadows and Occlusion:
Paint a subtle cast shadow from the easel onto the grass in the main photo, ensuring it aligns with the global light source. -
Foreground Foliage:
On a new top layer, paint (or clone stamp) some blades of grass and wild stalks rising up in front of the easel legs and the bottom of the canvas to root the object in the scene. -
Color Grading:
Add a global adjustment layer (like a Color Lookup or Gradient Map) over the entire image to unify the colortones of the ‘real’ world and the ‘painted’ world. -
Final Sharpening:
Merge a copy of all visible layers and apply a High Pass filter on Soft Light mode to sharpen the textures of the rocks and the canvas grain.
With these techniques, you have created a compelling narrative of art existing within nature

Ancient Temple by a Mega Waterfall
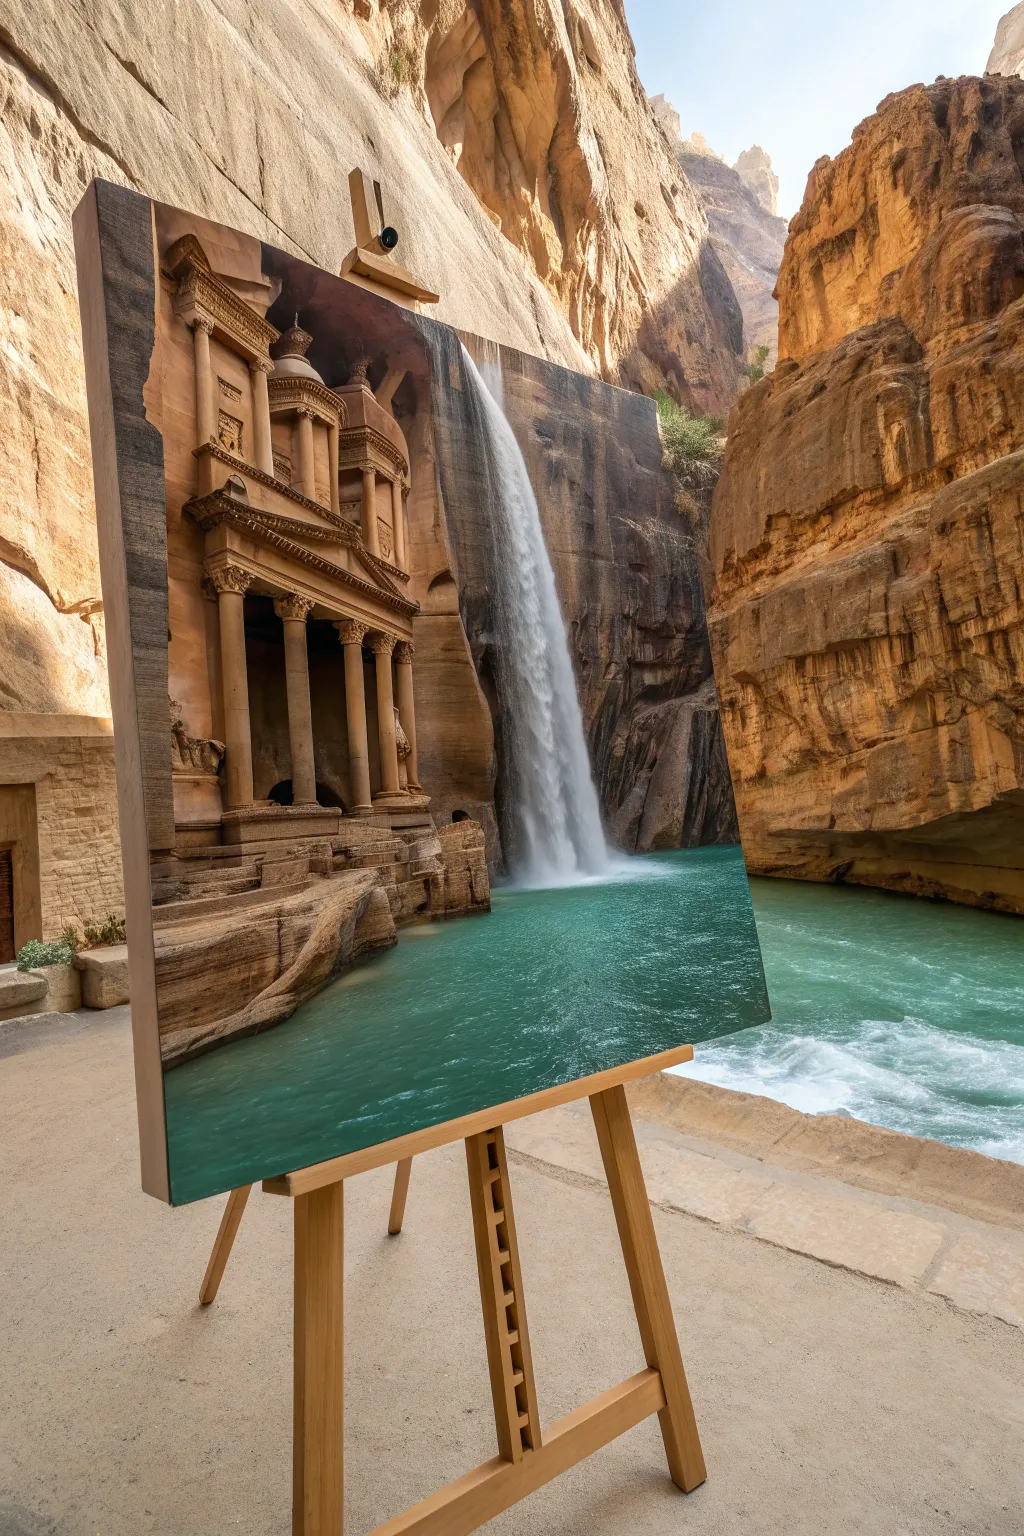
This project creates a seamless surrealist visual where the ancient architecture of Petra merges with a roaring waterfall, all nestled within a real-world canyon environment. By digitally painting over a photo or combining assets on a canvas texture, you’ll achieve a striking trompe-l’œil effect that blurs the line between art and reality.
Step-by-Step Guide
Materials
- Digital tablet (Wacom, iPad, etc.)
- Pressure-sensitive stylus
- Adobe Photoshop or Corel Painter
- High-res reference photo of Petra
- High-res reference photo of a large waterfall
- Canvas texture overlay file
- Textured blending brushes
- Soft round brushes for mist
Step 1: Setting the Scene
-
Establish the canvas:
Open your digital painting software and create a new document. Import a base photo of a canyon landscape similar to the background environment, or start with your chosen canvas texture background to simulate the physical painting surface. -
Rough composition:
Using a large, low-opacity brush, sketch the basic perspective lines. Establish where the cliff face meets the water. The goal is to match the perspective of the ‘real’ canyon behind your easel to make the illusion convincing. -
Import architectural elements:
Place your reference image of the Petra Treasury on the left side of the composition. Use the Transform or Warp tool to align the columns vertically with your established perspective grid. -
Import water elements:
Place the waterfall reference image to the right of the ruins. Distort it slightly so the water appears to be cascading out of the rock face adjacent to the architecture.
Step 2: Blending and Photobashing
-
Masking the architecture:
Create a layer mask on the Petra image. Use a textured brush to mask out the original sky and surrounding rocks, leaving only the columns and facade. I like to keep the edges slightly rough to mimic hewn stone. -
Color grading the stone:
Add a Curves or Levels adjustment layer clipped to the architecture. Shift the tones towards warm sandstone oranges and browns to match the lighting of your background canyon. -
Integrating the waterfall:
Mask the edges of the waterfall layer. Use a soft brush with low flow to feather the edges where the water meets the rock, creating a misty transition rather than a hard cut. -
Painting rock transitions:
Create a new layer between the building and the waterfall. Pick colors directly from the stone facade and paint rocky protrusions that bridge the gap, making the architecture look carved directly into the cliff that holds the waterfall. -
Establishing the water pool:
Paint the pool at the bottom using a teal-green hue. Use horizontal strokes to define the surface tension. Ensure the water color reflects slightly on the base of the columns.
Perspective Drift
If the building looks ‘pasted on,’ check your vanishing points. The horizontal lines of the temple steps and roof must converge at the same horizon line as the water surface.
Step 3: Detailing and Atmosphere
-
Adding texture to the water:
Use a specialized water or splatter brush to add white foam at the base of the falls where it crashes into the pool. This is crucial for selling the scale of the drop. -
Creating depth with shadow:
Create a Multiply layer and paint deep shadows inside the portico and between the columns. This high contrast emphasizes the three-dimensional feel of the structure. -
Atmospheric mist:
On a new layer set to ‘Screen’, lightly paint white mist rising from the bottom of the waterfall. Lower the opacity to around 20-30% so it doesn’t obscure the details behind it. -
Surface reflection:
Duplicate the architecture layer, flip it vertically, and distort it into the water area. Apply a Motion Blur filter vertically and lower the opacity to create a subtle reflection in the turquoise pool.
Digital Impasto
To make it look more like an oil painting, use the Mixer Brush tool on a new layer to smudge pixel details together, mimicking thick paint strokes.
Step 4: Final Polish
-
Applying the canvas texture:
Import your canvas texture image and place it as the topmost layer. Set the blending mode to ‘Overlay’ or ‘Soft Light’. This unifies the different photo elements and gives the entire piece a painted look. -
Edge darkening:
Paint a subtle vignette around the corners of your digital canvas to draw the eye toward the center of the composition. -
Final color balance:
Add a global Color Balance adjustment layer. Push the highlights slightly warm (yellow/red) and the shadows cool (blue/cyan) to create a cinematic color contrast.
Now you have a stunning surrealist landscape that seamlessly blends history with the power of nature.

PENCIL GUIDE
Understanding Pencil Grades from H to B
From first sketch to finished drawing — learn pencil grades, line control, and shading techniques.
Explore the Full Guide
Volcanic Caldera With Ashy Haze
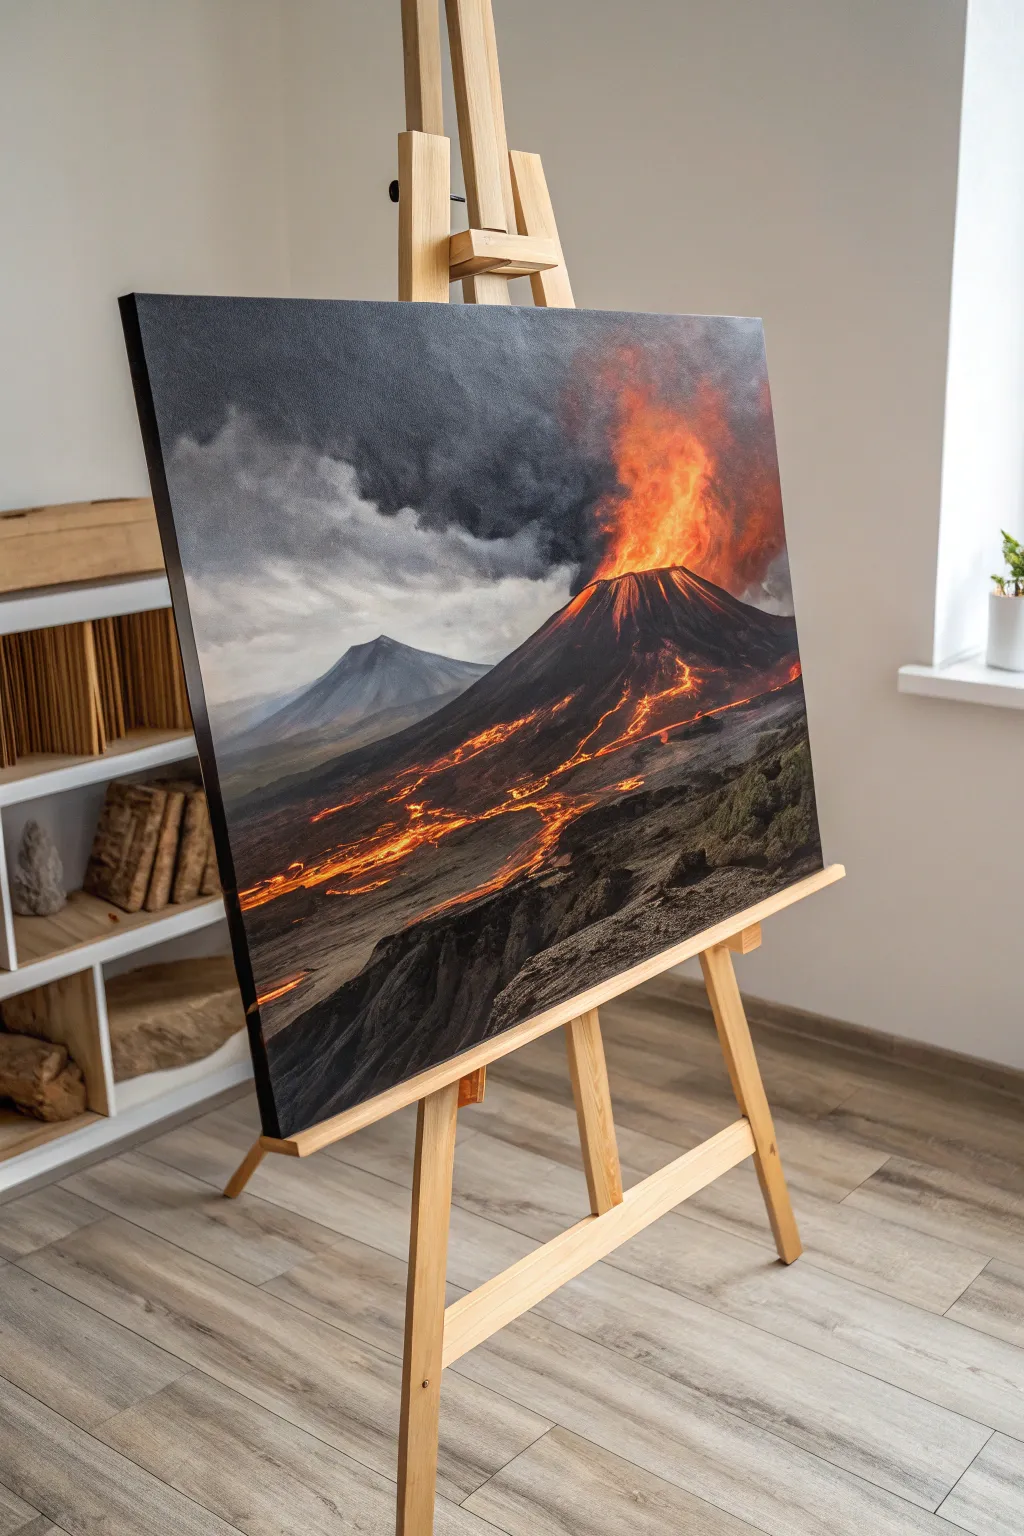
Capture the raw power of nature with this dramatic matte painting project featuring a blazing volcanic eruption against a stormy sky. You’ll layer moody greys and vibrant oranges to create a scene that feels both ominous and beautifully luminous.
How-To Guide
Materials
- Large stretched canvas (at least 18×24 inches)
- Acrylic paints (Mars Black, Titanium White, Burnt Umber, Cadmium Red, Cadmium Orange, Lemon Yellow)
- Matte painting medium (to reduce gloss)
- Filbert brushes (sizes 8 and 12)
- Flat shader brushes (sizes 4 and 6)
- Fine liner brush (size 1)
- Fan brush
- Palette knife
- Easel
- Water container and mixing palette
Step 1: Sky and Atmosphere
-
Prime the canvas:
Begin by applying a neutral grey base coat across the entire canvas using a mix of Mars Black and Titanium White. This kills the harsh white of the canvas and provides a moody undertone. -
Block in the sky gradient:
While the base is tacky, mix a darker charcoal grey and apply it to the top left corner, blending it diagonally down toward the center into a lighter, cloudy grey. -
Create the ash plume:
Load a large filbert brush with a mix of black and a touch of Burnt Umber. Stipple a large, billowing cloud formation emerging from the right-center area, keeping the edges soft and diffusing them into the lighter sky. -
Add smoke volume:
Mix a slightly lighter grey-black and scumble it over the dark plume to create depth and volume within the smoke cloud, suggesting roiling movement. -
Establish the horizon haze:
Paint a faint, horizontal band of pale grey-white across the lower third of the sky to separate the dark clouds from the distant mountains.
Muddy colors?
If your lava looks dull, wait for the dark mountain paint to dry completely. Painting bright yellow over wet black creates green/brown mud. Clean brushes often!
Step 2: Mountain Structure
-
Outline the distant peak:
Using a flat brush and a cool blue-grey mix, paint the triangular shape of the distant, inactive volcano on the left side. Keep the edges slightly blurry to indicate atmospheric perspective. -
Form the main volcano:
Switch to a dark mixture of Black and Burnt Umber. Paint the large, dominant cone shape of the active volcano, extending from the right side and sweeping down toward the bottom left. -
Define the ridges:
Use a palette knife or a flat brush to pull streaks of lighter grey down the sides of the main volcano, mimicking the texture of cooled lava flows and rocky ridges. -
Build the foreground terrain:
In the lower right corner, use thick strokes of black and dark brown to create a rugged, uneven rocky foreground that anchors the composition. -
Texture the rocks:
Dry brush some lighter grey highlights onto the foreground rocks to reveal their jagged edges and craggy texture.
Level Up: Texture
Mix coarse pumice gel into your black paint for the foreground rocks. This creates actual gritty texture that mimics volcanic heavy stone.
Step 3: Fire and Lava
-
Base the eruption:
At the peak of the main volcano, apply a base of pure Cadmium Red where the lava bursts forth, blending it slightly into the dark smoke above. -
Intensify the glow:
Layer Cadmium Orange over the red center, keeping the color brightest near the crater’s mouth. -
Add the hottest core:
Mix Lemon Yellow with a tiny bit of white and paint the absolute center of the eruption to represent blinding heat. -
Map the lava rivers:
Using a small number 4 flat brush and Cadmium Red, paint winding, jagged lines flowing down the mountain side. Let these lines break and reconnect to look like flowing magma. -
Illuminate the flow:
Highlight the center of your lava rivers with thin lines of orange and yellow, leaving the red visible at the edges of the flows. -
Create ambient light:
Glaze a very thin, watery layer of orange over the dark rocks immediately surrounding the lava flows to simulate the reflected glow of the magma. -
Refine smoke highlights:
I like to take a dry brush with a hint of orange and lightly dust the bottom of the smoke plume, making it look lit from below by the fire. -
Final adjustments:
Step back and use your liner brush to add tiny specks of yellow-orange near the crater for airborne debris. -
Matte finish:
Once fully dry, apply a layer of matte medium or varnish to unify the sheen and give it that digital matte-painting aesthetic.
Hang your finished masterpiece in a spot with good lighting to let those fiery oranges truly pop against the dark, stormy background.
Mirror Lake Reflection Shortcut
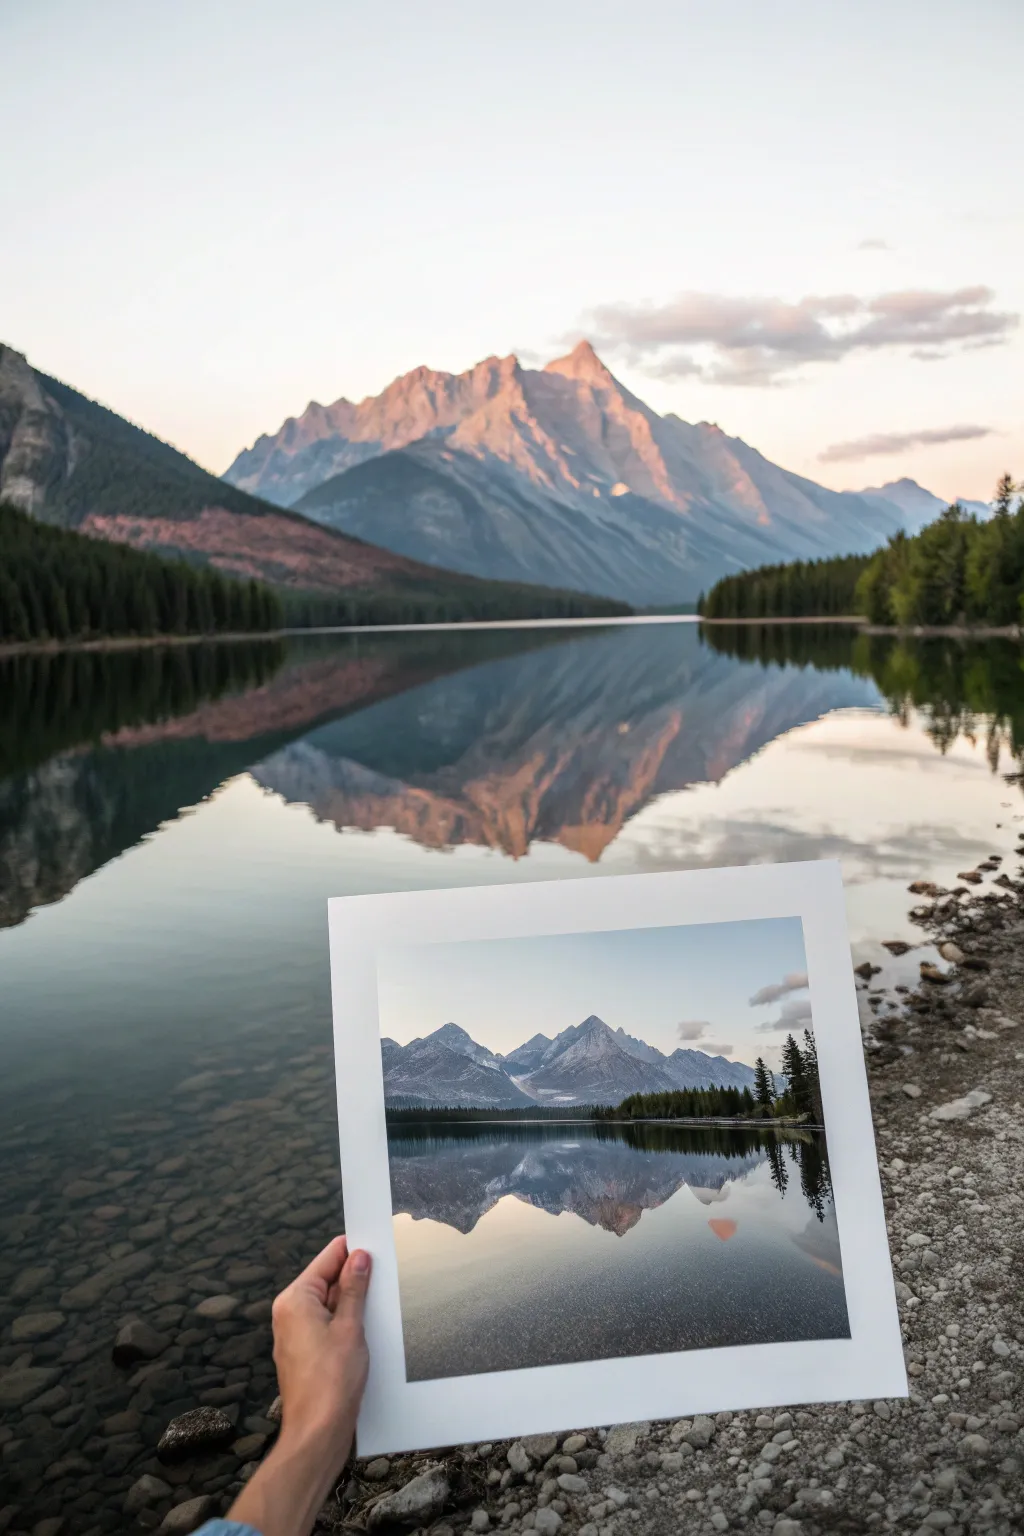
Capture the breathtaking illusion of a matte painting blended with reality by photographing a printed landscape against its real-world counterpart. This project combines digital preparation, high-quality printing, and precise on-location photography to create a surreal, seamless visual narrative.
Step-by-Step
Materials
- High-resolution landscape photo (digital file)
- High-quality matte photo paper or cardstock (8×10 or similar)
- Photo printer (or access to a print shop)
- DSLR or Mirrorless camera with a wide-angle lens (e.g., 24mm or 35mm)
- Tripod (optional but recommended)
- Scizzors or craft knife (for trimming print)
- Weather-appropriate outdoor gear
Step 1: Digital Preparation & Printing
-
Select your source image:
Choose a high-resolution landscape photograph you have previously taken or have the rights to use. Look for an image with strong geographic features like mountain peaks or distinct treelines that will align easily with the real world. -
Adjust the crop:
Crop the digital image to a standard print aspect ratio, such as 4:5 or 1:1, leaving enough white space around the border if you want the ‘Polaroid’ or mounted art look shown in the example. -
Enhance digital contrast:
Boost the contrast and saturation slightly in your editing software. Prints often appear darker and flatter than screens, so I like to overcompensate a tiny bit to ensure the mountain’s glow pops against the real sunset. -
Print the image:
Print the image on heavy matte cardstock or luster photo paper. Avoid glossy paper, as it will catch reflections from the sky and ruin the illusion when you hold it up outside. -
Trim the borders:
Using a craft knife or scissors, trim the paper to leave a clean, wide white border around the image area. This frame is crucial—it visually separates the ‘art’ from reality.
Step 2: On-Location Photography
-
Scout the location:
Travel to the exact location where the original photo was taken. You need to find the specific vantage point that aligns the background mountains with the foreground shoreline. -
Wait for the light:
Timing is everything. Arrive during golden hour or blue hour so the lighting in the real world complements or interestingly contrasts with the lighting in your print. -
Set up your camera:
Set your camera to a relatively wide aperture (around f/4 or f/5.6). You want the hand and print to be sharp, while allowing the real background to soften slightly, creating depth. -
Position the print:
Hold the print out in front of the lens with one hand. Move it forward and backward to gauge the size relationship between the painted/printed mountain and the real mountain. -
Align the horizon lines:
Tilt the print carefully. Your goal is to make the horizon line in the print continuous with the real horizon line in the distance. The mountain peaks in the print should sit just below or align with the real peaks. -
Check reflections:
Look at the water in your viewfinder. Ensure the print isn’t blocking the most beautiful part of the real reflection, or position it so the print’s reflection acts as a continuation of the real water. -
Focus and exposure:
Set your focus point on the print itself. The background mountain should be recognizable but softer. Expose for the highlights in the sky to prevent the sunset colors from blowing out. -
Capture the shot:
Snap the photo. Take multiple variations, slightly adjusting the angle and distance of the print each time to ensure perfect alignment.
Alignment Issues?
If the print perspective feels off, try changing your focal length. A wider lens makes background objects look smaller, while a telephoto lens compresses the scene, making the background loom larger.
Step 3: Post-Processing
-
Import and review:
Load your images onto your computer. Look for the shot where the alignment of the ridgelines is most convincing. -
Color grading:
Edit the final photo to harmonize the color temperatures. If the print looks too cool or blue compared to the real sunset, warm up just the print area using a local adjustment brush. -
Sharpen the print:
Apply a little extra sharpening specifically to the print in the hand to emphasize the texture of the paper and the details of the ‘painting’ illusion.
Creative Twist
Instead of a realistic photo, print a sketch, a historic black and white photo, or a seasonal opposite (snowy print in summer) to tell a story about time passing.
Now you have a stunning image that plays with perspective and celebrates the beauty of the landscape in two mediums at once
BRUSH GUIDE
The Right Brush for Every Stroke
From clean lines to bold texture — master brush choice, stroke control, and essential techniques.
Explore the Full Guide
Impossible Mega-Bridge Across a Canyon
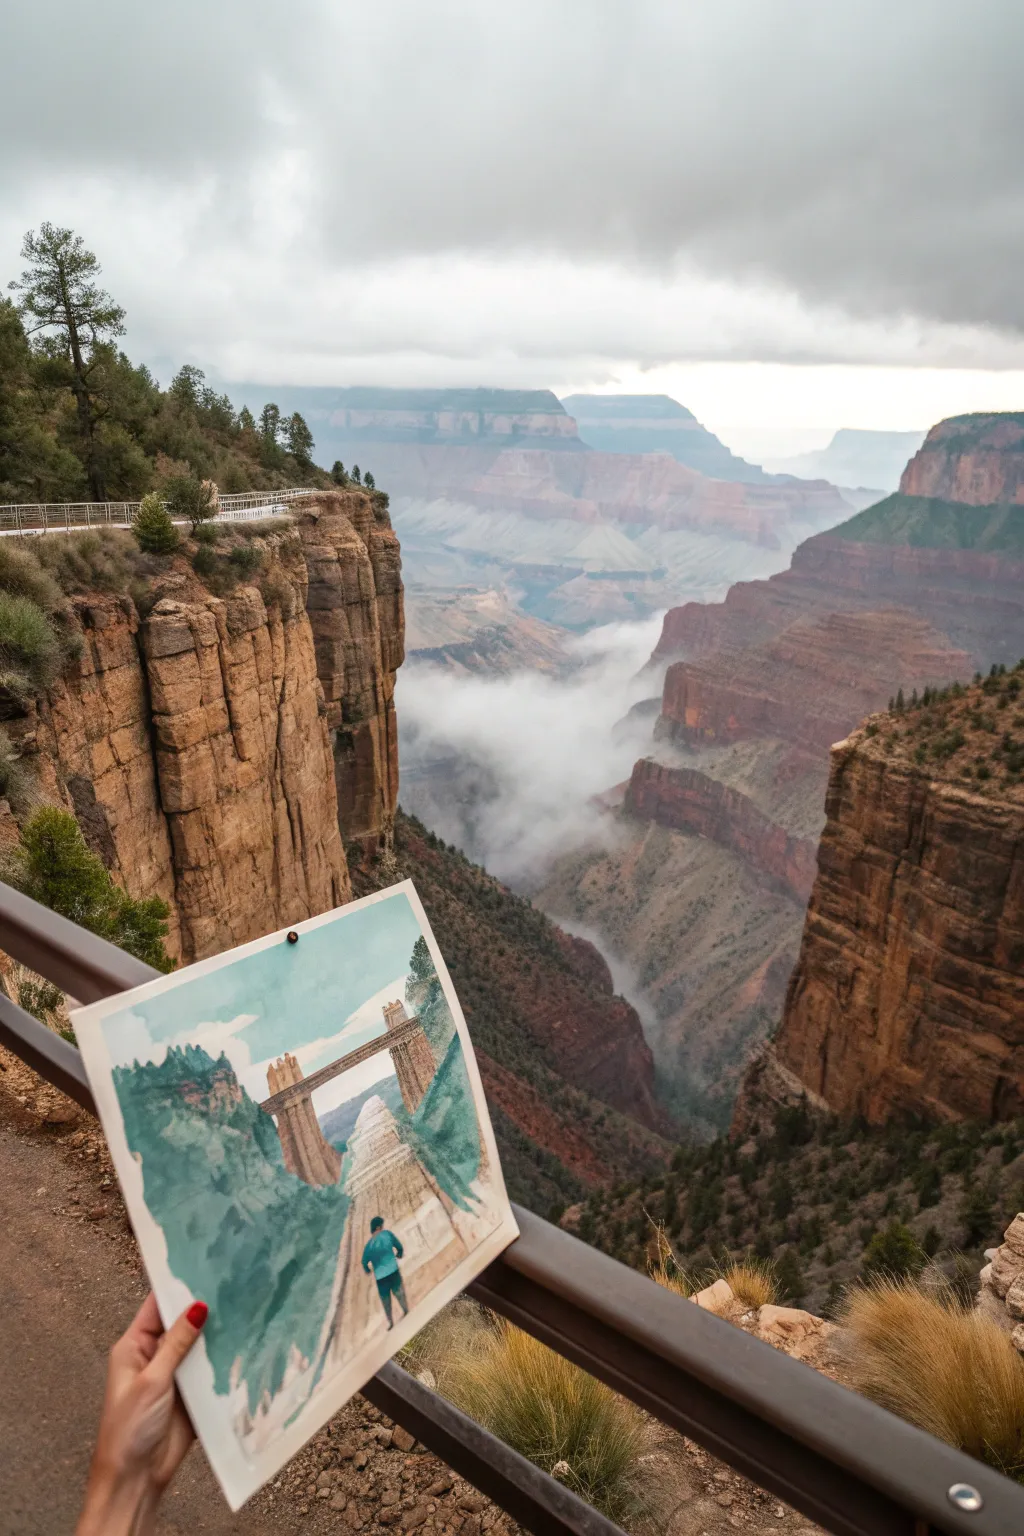
Transform a classic landscape into a fantasy matte painting concept by inserting a monumental stone bridge across a misty canyon. This gouache and watercolor tutorial guides you through capturing the atmospheric depth of the gorge while constructing an ancient, mega-structure that defies physics.
How-To Guide
Materials
- Hot press watercolor block (9×12 inch)
- Gouache paint set (primary colors + black/white)
- Watercolor paints (earth tones: sienna, ochre, umber)
- Flat shader brushes (sizes 6 and 10)
- Round detail brushes (sizes 0 and 2)
- Painter’s tape
- HB Pencil
- Mixing palette
- Paper towels
- Water jar
Step 1: Planning and Sketching
-
Establish the horizon:
Begin by lightly taping the edges of your watercolor block for a clean border. Use your HB pencil to draw a faint horizon line about one-third down from the top of the paper. -
Outline the canyon walls:
Sketch the steep, vertical cliffs on the left and right sides. Keep the lines loose and jagged to mimic natural rock formations, creating a deep V-shape chasm in the center. -
Draft the bridge structure:
Draw the massive bridge spanning the gap. Start with two towering vertical piers rising from the depths, then connect them with a heavy horizontal lintel. Add perspective lines for the walkway leading the eye into the distance. -
Position the figure:
Place a small silhouette of a person in the immediate foreground, standing on a rocky outcrop. This figure is crucial for scale, making the bridge look truly gigantic.
Step 2: Atmospheric Base Layers
-
Wash the sky:
Mix a watery pale blue watercolor wash. Apply it to the sky area, fading it out as you reach the horizon to suggest distance and atmosphere. -
Paint the distant mist:
While the sky is damp, use a very diluted white gouache or pale grey watercolor to paint the bottom of the canyon. Let the colors bleed slightly to create a foggy, misty floor. -
Block in distant cliffs:
Using a mix of burnt sienna and ultramarine blue, paint the furthest rock walls. Keep the value light and the edges soft; atmospheric perspective means distant objects should look hazy. -
Layer the middle ground:
As you move forward, darken your earth tone mix. Apply blocky strokes to shapes closer to the viewer, using more pigment and less water to increase contrast.
Scale Trick
Make the bridge look bigger by painting tiny, almost microscopic birds near the bridge piers. The brain uses them as a reference to realize the structure is massive.
Step 3: Constructing the Mega-Bridge
-
Base coat the stone:
Mix a solid, opaque tan color using gouache (white, yellow ochre, and a touch of brown). Fill in the bridge structure, ensuring the paint is thick enough to cover the background wash. -
Define the shadows:
Once the base is dry, mix a darker cool grey-brown. Paint the undersides of the lintel and the shadowed side of the vertical piers to give the structure 3D form. -
Add texture and weathering:
Using a dry brush technique with a lighter beige, drag the brush vertically down the piers. This suggests weathering streaks and emphasizes the immense height. -
Paint the walkway:
Fill in the bridge’s top surface with a lighter value. Use converging lines to lead the viewer’s eye straight toward the other side of the canyon.
Muddy Colors?
If your gouache layers are mixing and turning brown, let the bottom layer dry completely before adding fresh paint. A light touch prevents reactivating the layer underneath.
Step 4: Foreground and Details
-
Darken the foreground cliffs:
For the closest rocks on the left and right, use your darkest mix of burnt umber and black. Paint decisive, jagged shapes to frame the scene. -
Add vegetation:
Mix a deep mossy green. Stipple small bushes and trees onto the foreground cliffs and the tops of the bridge piers. I find that varied brush pressure helps these look organic rather than uniform. -
Detail the explorer:
Switch to your smallest round brush. Paint the figure with a bright teal or blue jacket to make them pop against the earth tones. Add dark pants and a tiny shadow at their feet. -
Refine the mist:
Use a clean, damp brush to soften the bottom edges of the bridge piers where they disappear into the canyon depths, reinforcing the foggy effect. -
Final highlights:
Add tiny touches of pure white gouache to the edges of the bridge where the light hits, and perhaps a few sparkles on the distant rocks. -
Remove the tape:
Wait for the painting to be completely bone dry. peel the tape away slowly at a 45-degree angle to reveal your crisp white border.
Now you have a stunning concept piece that merges reality with imagination, ready to inspire your next adventure
Surreal Scale Shift With Infinite Architecture
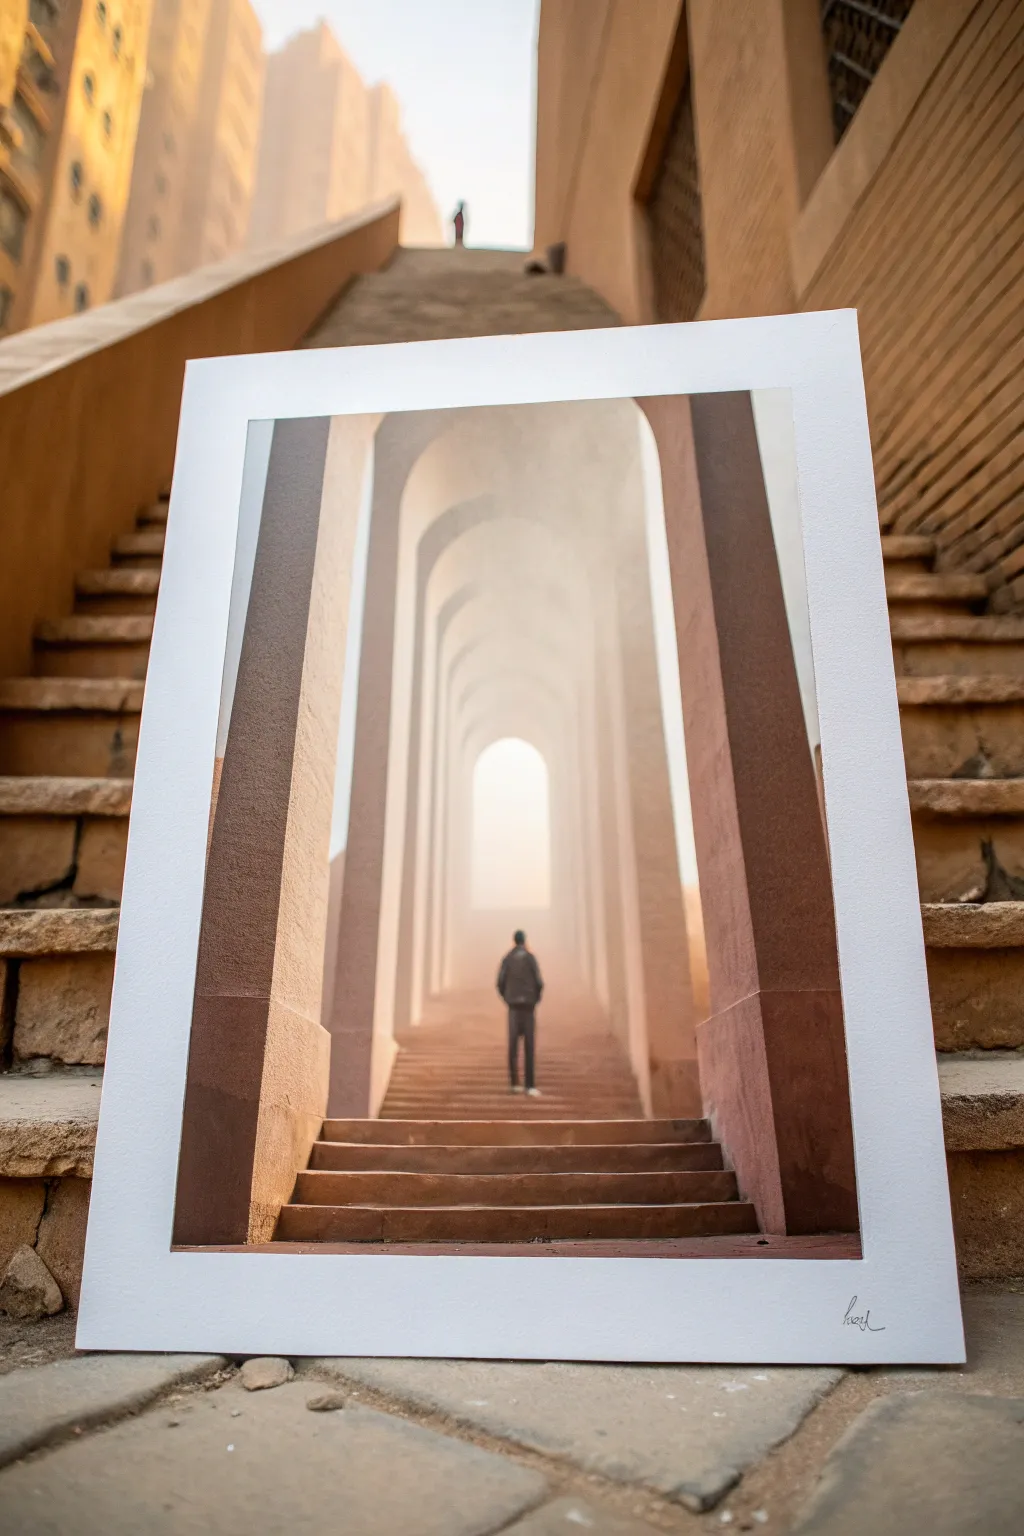
This project combines digital matte painting techniques with physical photography to create a stunning piece of surreal art. By blending the endlessly repeating arches of a digital composition with the real-world texture of stone steps, you’ll produce a print that blurs the line between reality and dream.
How-To Guide
Materials
- Digital painting software (Photoshop, Procreate, or similar)
- High-resolution reference photos of stone arches and steps
- Heavyweight matte fine art paper (min 300gsm)
- Inkjet printer (or access to a print shop)
- Bone folder
- Pencil
- T-square ruler
- White mat board or foam core (for mounting)
Step 1: Digital Composition
-
Establish the perspective:
Begin your digital canvas by setting up a one-point perspective grid. The vanishing point should be dead center to create that infinite, tunnel-like effect. -
Construct the foreground arches:
Block in the first, largest set of arches in the foreground. Use a warm, earthy palette—terracotta, sandstone, and deep browns—to mimic natural stone materials. -
Create the repetition:
Duplicate your arch layer and scale it down towards the vanishing point. Repeat this process multiple times, creating a dense rhythm of columns receding into the distance. -
Atmospheric depth:
I like to gently brush in layers of soft ‘fog’ between each receding archway. Use a low-opacity soft round brush with a pale, warm dazzling white/yellow color to fade the distant geometry into white. -
Add the figure:
Place a silhouette or a detailed figure walking away from the viewer on the steps. Keep their lighting consistent with the environment, ensuring their shadow falls naturally on the stairs. -
Detail the stairs:
Paint horizontal steps leading up and into the distance. Ensure the lines converge perfectly with your perspective grid to maintain the illusion of depth. -
Final texture pass:
Overlay a stone or concrete texture on your painted architectural elements. Set the blending mode to ‘Overlay’ or ‘Soft Light’ and reduce opacity to integrate the grit without overpowering the painting.
Pro Tip: Mist Control
When painting the fog, sample the color directly from your lightest background hue. This ensures the fade looks optically natural rather than just a gray overlay.
Step 2: Printing and Presentation
-
Prepare for print:
Add a wide white border around your digital image to simulate a gallery mat. This negative space is crucial for framing the surreal content. -
Proofing:
Run a small test print first to check your colors. The misty center needs to print smoothly without harsh banding, and the shadows shouldn’t be crushed to pure black. -
Final printing:
Print the final image on heavyweight matte fine art paper. The matte texture is essential here; glossy paper would reflect too much light and ruin the atmospheric painting effect. -
Cutting:
Place your print on a clean cutting mat. Use a sharp craft knife and a T-square ruler to trim the paper edges cleanly, ensuring perfectly square corners. -
Adding the signature:
In the bottom right corner of the white border, sign your name lightly with a pencil or a fine-tip archival ink pen for an authentic gallery touch. -
Mounting (Optional):
For extra rigidity, use spray adhesive to mount the print onto a piece of foam core or mat board cut to same size. Use a bone folder to smooth it down from the center outward to prevent bubbles.
Level Up: Environmental Staging
Photograph your finished print in an environment that matches the art (like stone stairs) to create a ‘picture within a picture’ effect for your portfolio.
Now you have a mesmerizing piece of infinite architecture ready to display or photograph in a creative setting
Have a question or want to share your own experience? I'd love to hear from you in the comments below!