If you love drawing lines that turn into little adventures, maze drawing is such a satisfying way to blend art and puzzle-making. I’m sharing my favorite maze drawing ideas—from classic grids to wild illusion-style paths—so you can pick one and start sketching right away.
Nested Box Maze
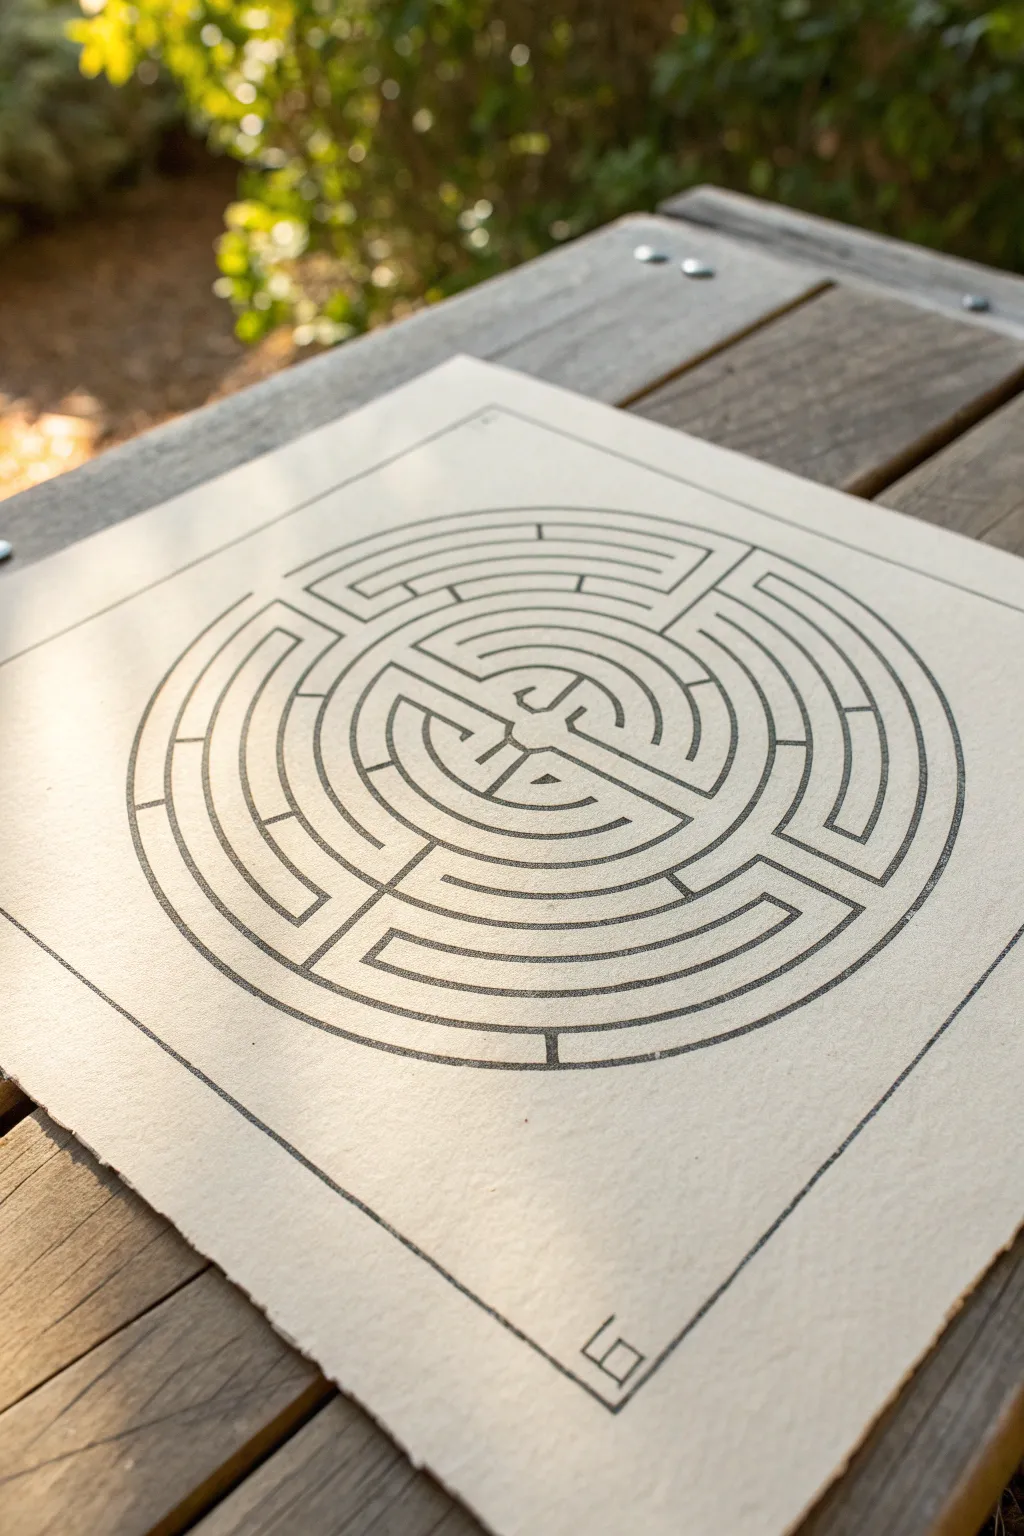
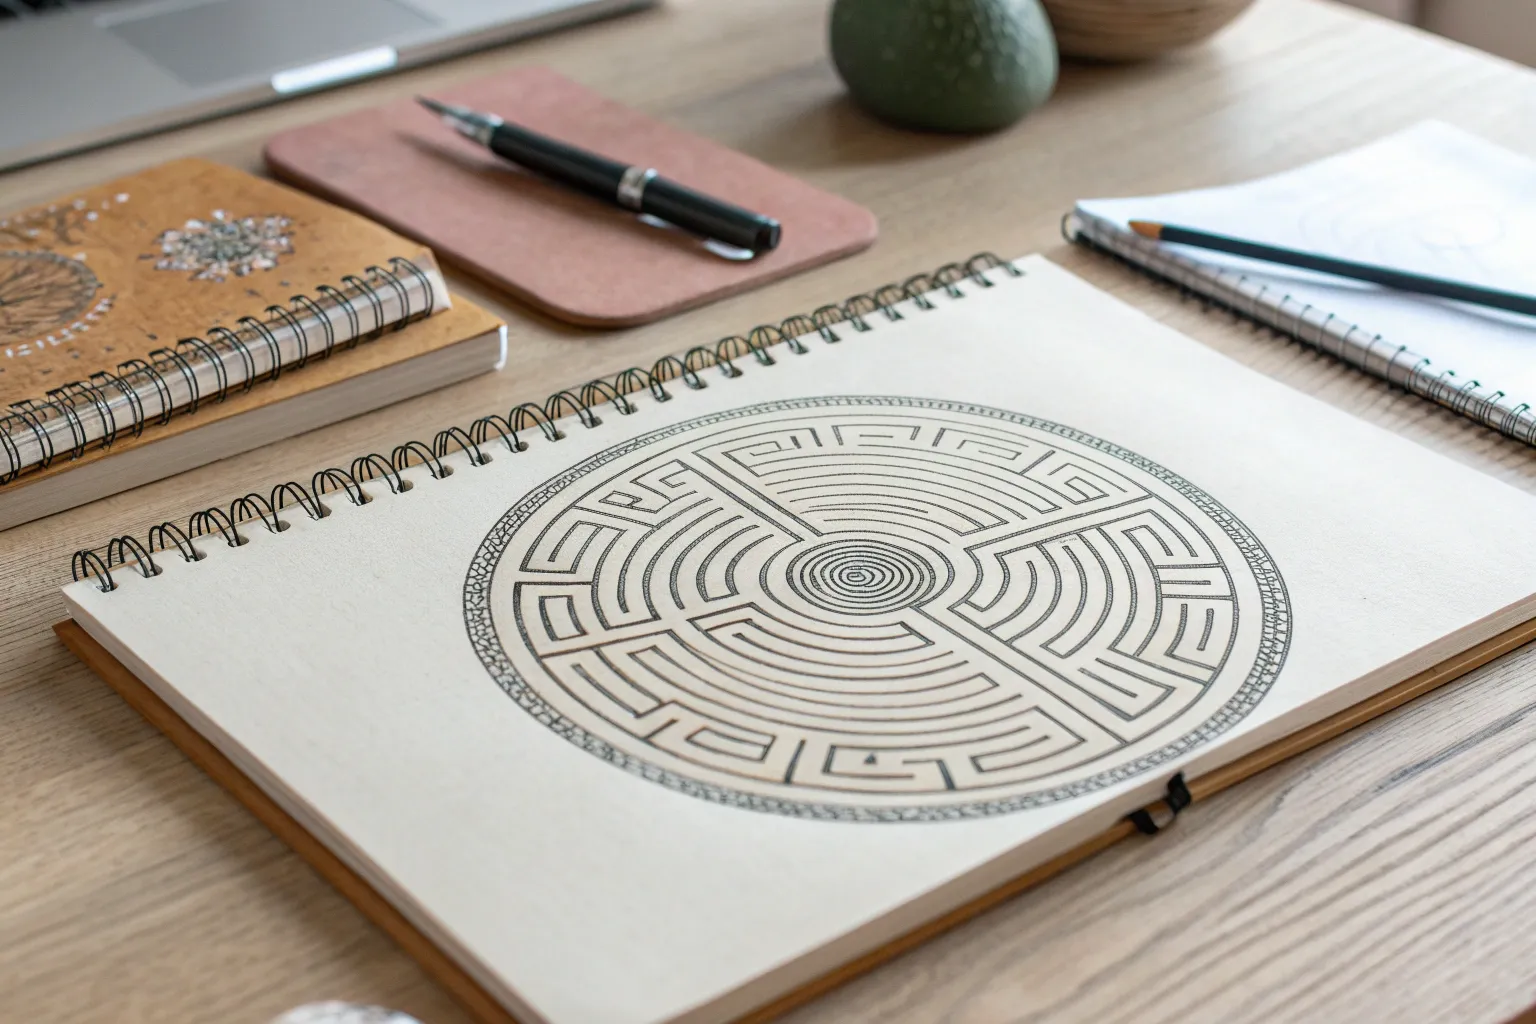
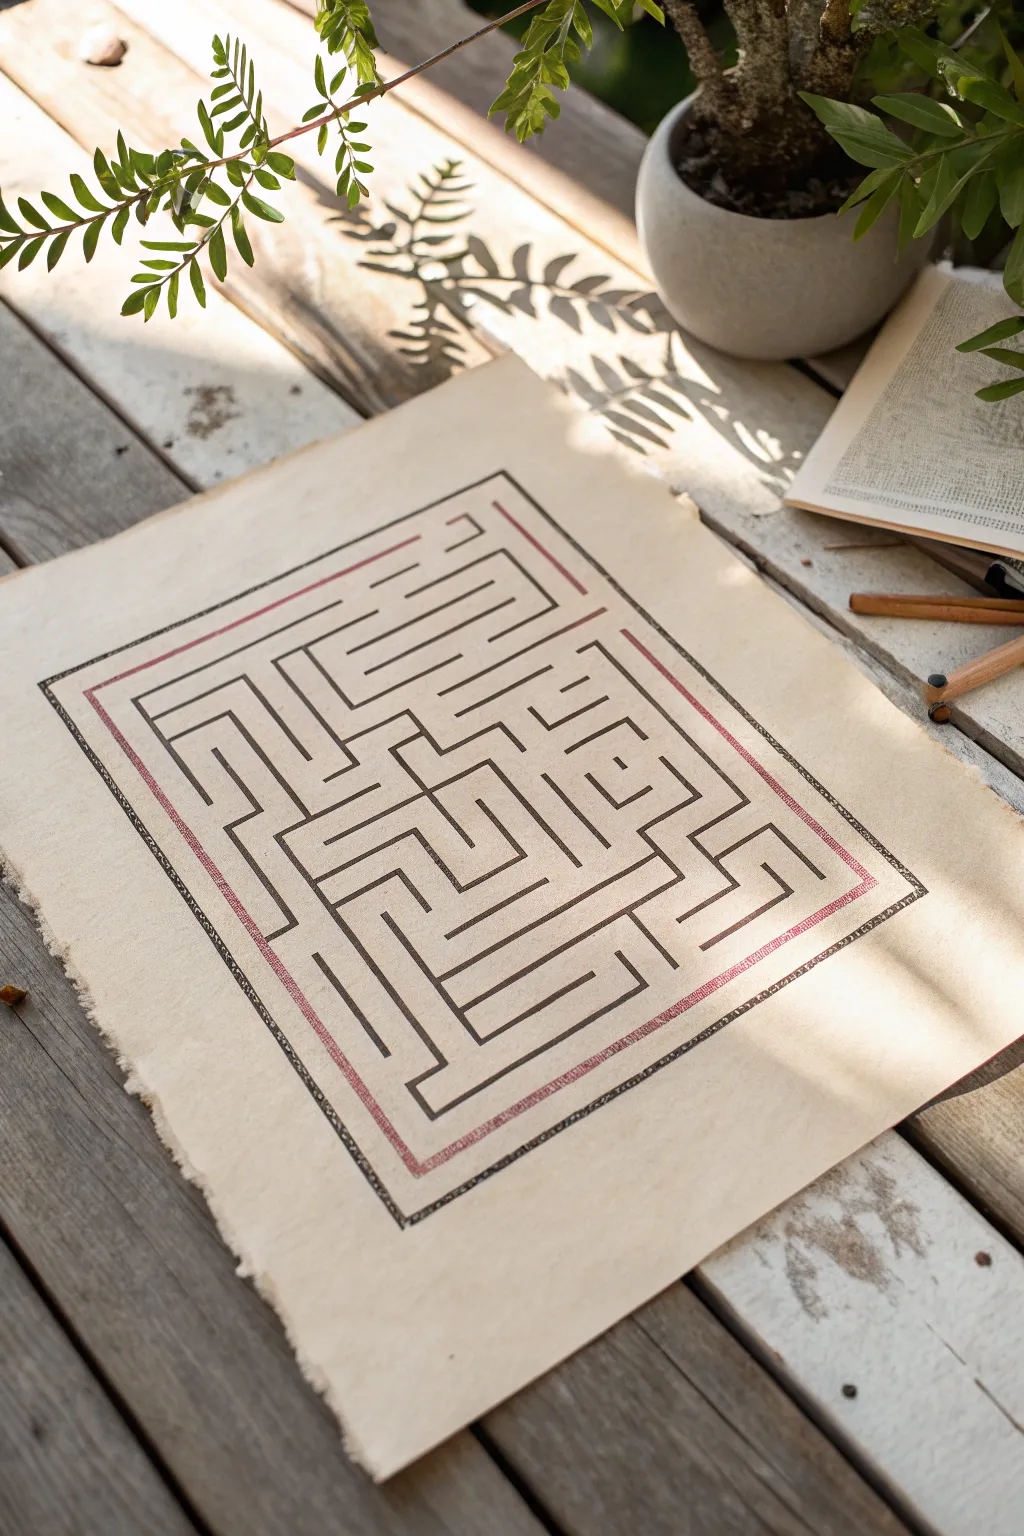
This project creates a stunning, classical-style circular labyrinth on high-quality textured paper. The result is a meditative piece of art that balances clean linework with the organic warmth of the surrounding paper grain.
Step-by-Step
Materials
- High-quality textured paper (like watercolor or printmaking paper, approx. 140lb)
- Fine liner pen (0.5mm or 0.8mm, black archival ink)
- Pencil (HB or 2H)
- Large compass (or string and thumbtack)
- Ruler (preferably clear plastic)
- Eraser (good quality polymer)
- Work surface or drawing board
Step 1: Planning the Structure
-
Paper Preparation:
Begin with a square sheet of textured paper. If your paper has deckled edges, preserve them for a rustic look. Find the exact center by lightly measuring intersecting diagonals with your ruler and pencil. -
Establish the Boundary:
Draw a large square border in pencil first to frame your design. This acts as a visual anchor and ensures your circle will be centered. -
Drafting Concentric Circles:
Using your compass, place the point in the center mark. Draw the outermost circle first to define the labyrinth’s maximum size. -
Creating the Paths:
Decrease the compass radius by consistent increments (about 1cm or 1/2 inch) and draw progressively smaller concentric circles. You will need about 10-12 rings total. -
Defining the Quadrants:
Lightly sketch a vertical and horizontal line through the center, dividing your target into four equal pie slices. This helps organize the complex turns later.
Compass Hack
If your compass isn’t large enough for the outer rings, tie a string to a pencil and a pin. Keep the string taut to draw perfect large circles.
Step 2: Drawing the Labyrinth Layout
-
The Seed Pattern:
In the very center, sketch the distinctive cross or ‘seed’ shape. This central design determines how the paths flow outward. -
Marking the Turns:
This is the trickiest part: identify where walls need to stop to create openings. Reference the reference photo closely. Mark small tick marks in pencil on the rings where a horizontal or vertical barrier will be placed. -
Blocking the Walls:
Start connecting your specific ring segments. Instead of continuous circles, you are now creating ‘C’ shapes and U-turns. Work from the center outward, one quadrant at a time. -
Refining the Pencil Sketch:
Review your pencil web. Trace the path with your finger to ensure it is solvable and actually leads to the center without dead ends (unless you want a puzzle maze rather than a meditative labyrinth). -
Adding Box Details:
In the corners between the outer circle and the square border, lightly sketch any corner details or logo marks you might want, similar to the small geometric signature seen in the bottom right.
Uneven Spacing?
If your paths look wobbly or uneven, create a ‘ruler guide’ on a scrap piece of paper with tick marks for the spacing, and mark the radius on the art paper first.
Step 3: Inking and Finishing
-
Inking the Frame:
Switch to your black fine liner. I prefer to ink the outer square border first to establish the painting’s limit. Use a ruler for a crisp, straight line. -
Inking the Circles:
Carefully trace your pencil lines. For the curved sections, keep your wrist loose and rotate the paper as you draw to maintain a smooth arc. -
Closing the Walls:
Draw the straight perpendicular lines that close off the path segments. Make sure these lines connect cleanly to the curved walls. -
Adding Weight:
Go over your lines a second time if needed to thicken them. The aesthetics of this piece rely on consistent line weight throughout the entire maze. -
The Final Erase:
Allow the ink to dry completely—wait at least 15 minutes to be safe. Then, gently erase all underlying graphite marks. -
Texture Check:
Inspect the drawing. The textured paper might cause slight skips in the ink; fill these significantly to ensure solid black continuity.
Display your finished labyrinth on a flat surface to invite others to trace the path with their finger


Circular Labyrinth Spiral
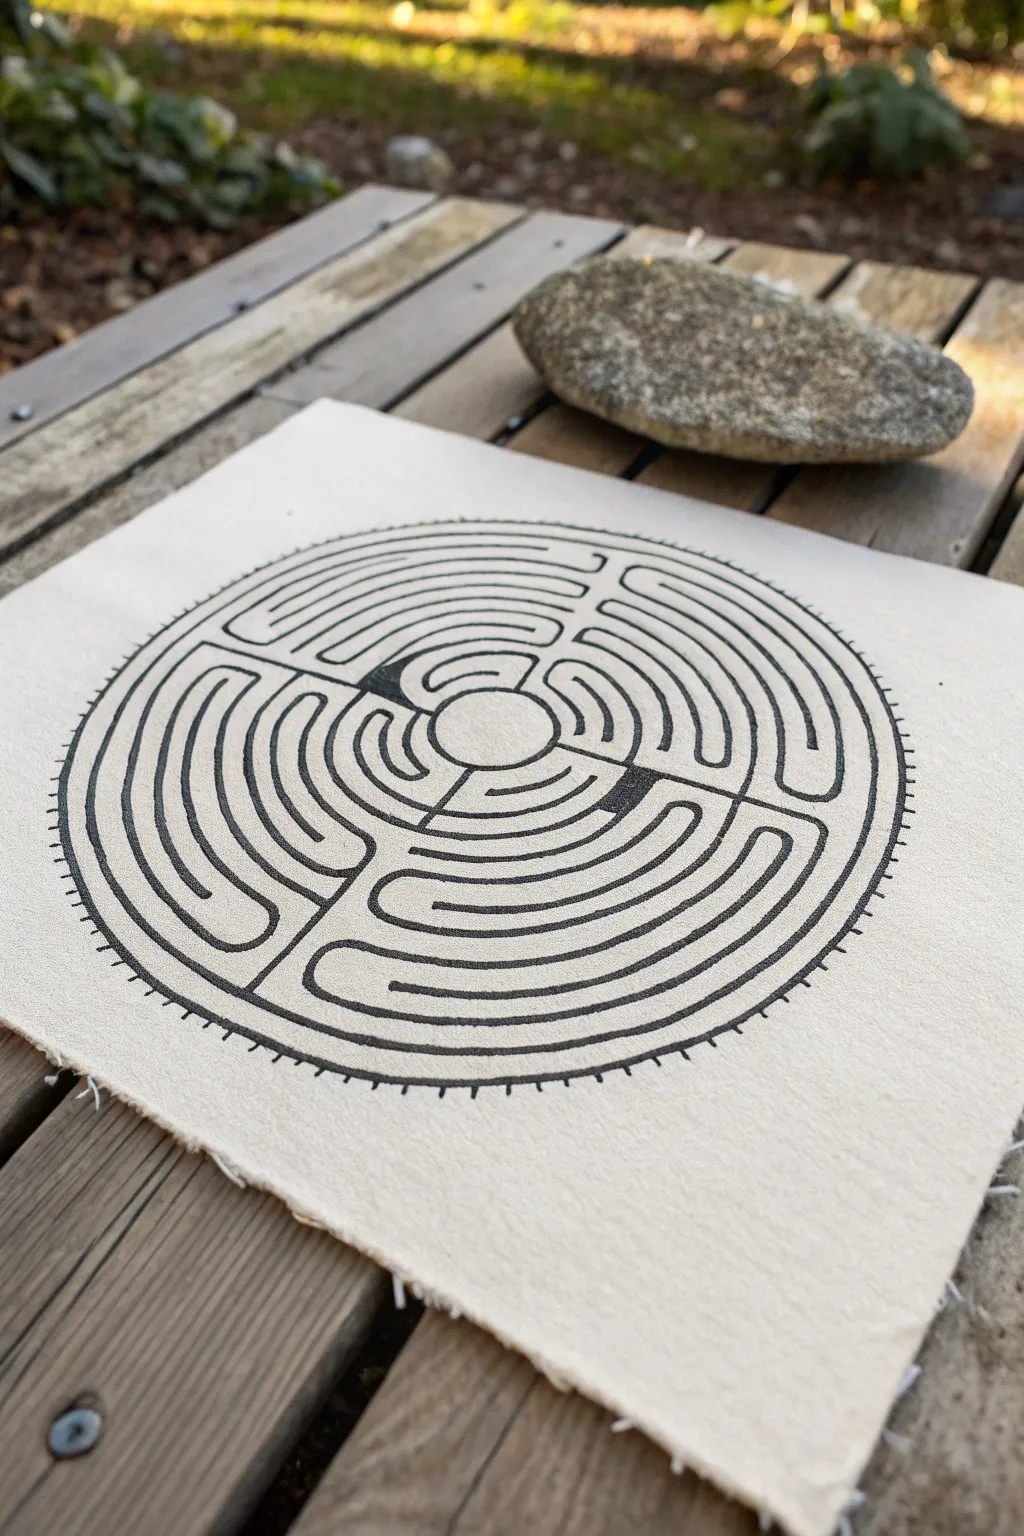
This project features a detailed recreation of the classic Chartres Cathedral labyrinth pattern, drawn in bold black ink on textured, deckle-edged paper. The contrast between the precise geometric lines and the rustic, organic feel of the paper creates a striking piece of meditative art.
Step-by-Step Guide
Materials
- Heavyweight cotton rag paper (handmade or watercolor paper with deckle edge)
- Pencil (HB or 2H)
- Compass with extension bar
- Ruler or straight edge
- Fine liner pen (0.1mm or 0.3mm)
- Thicker geometric pen (0.8mm or 1.0mm) or black calligraphy marker
- Kneaded eraser
Step 1: Planning the Geometry
-
Find the center:
Begin by lightly marking the exact center of your paper. Since the paper has organic edges, measure from the approximate middle of each side to find the most balanced center point. -
Draw the central rosette area:
Using your compass, draw a small central circle about 1.5 inches in diameter. This will be the resting point or ‘rosette’ at the center of the labyrinth. -
Establish the concentric rings:
Without moving the compass needle from the center point, draw 11 additional concentric circles expanding outward. Keep the spacing consistent between each ring, approximately 1/4 to 3/8 of an inch apart. -
Mark the quadrants:
Lightly draw a vertical line and a horizontal line through the center point, dividing your concentric circles into four equal quadrants. These will serve as guides for the turns.
Steady Hands
Work from the center outward when inking to avoid smudging wet ink with your hand. Place a scrap piece of paper under your palm for extra protection.
Step 2: Drafting the Labyrinth Path
-
Identify the entrance:
At the very bottom of the outermost circle, erase a small section to create the opening for the path. This should align with your vertical center line. -
Create the ‘labrys’ turns:
Working quadrant by quadrant, start sketching the U-shaped turns that connect the concentric circles. The Chartres pattern relies on a specific sequence of turns—usually turning back on itself rather than spiraling continuously. -
Sketch the barriers:
Draw the short radial lines that block the path and force a turn. In a classic 11-circuit labyrinth, these barriers form a subtle cross shape across the whole design. -
Detail the central petals:
Inside the central circle, sketch the six-lobed rosette shape. The petals should radiate from the very center, leaving a small circular void in the middle. -
Refine the outer edge:
Around the outermost circle, sketch small tick marks or ‘lunations’ (little teeth) that point outward. In the original design, there are typically 112 or 113 of these, but you can space them visually for this scale.
Make it Ancient
Tea-stain your paper before drawing! Brew strong black tea, brush it over the paper, and let it dry. This creates a parchment-like, aged background.
Step 3: Inking and Finishing
-
Select your pens:
For the main path lines, choose a thicker pen (around 0.8mm) to give the labyrinth visual weight. Use a finer 0.1mm pen for the delicate outer tick marks. -
Ink the concentric paths:
Trace over your pencil lines carefully. I find it helpful to rotate the paper as I draw the curves to keep my hand in a natural, comfortable position. -
Fill the barriers:
Where the lines terminate at the turns, you can add small black triangles or thickened caps to emphasize the geometry, just like the dark accents seen in the reference image. -
Add the outer ring details:
Using the finer pen, ink the outermost circle and then carefully add the small tick marks radiating outward. Keep them short and uniform. -
Erase guidelines:
Let the ink dry completely—wait at least 15 minutes to be safe. Then, gently roll a kneaded eraser over the entire design to lift the pencil graphite without abrading the paper surface. -
Enhance the deckle edge:
If your paper edges look too clean, you can gently roughen them with your fingernail or a dull blade to enhance the rustic, ancient feel of the map.
Now you have a stunning, meditative piece of art that invites the detailed eye to follow its ancient path.


Heart-Shaped Maze Outline
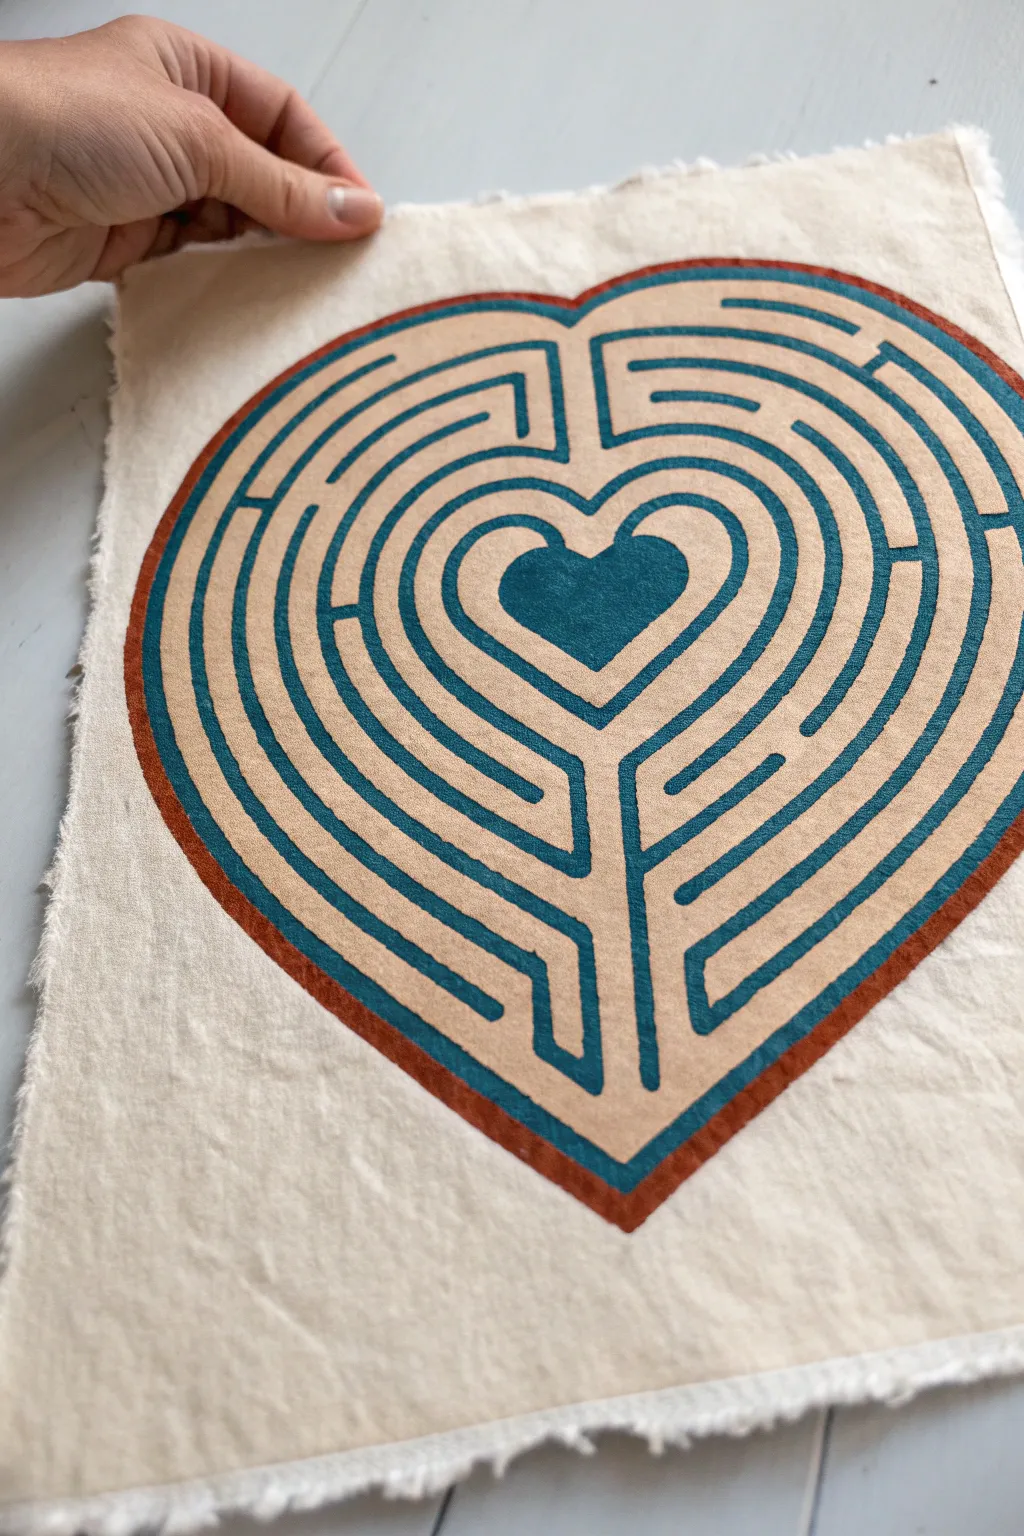
This project transforms a classic labyrinth design into a striking piece of wall art using block printing techniques on textured fabric. The result involves clean teal paths leading to a central heart, framed by a warm rust-colored border on raw-hemmed canvas.
Step-by-Step Tutorial
Materials
- Soft-cut carving block (linoleum or rubber)
- Linoleum carving tools (V-gouge and U-gouge)
- Pencil and eraser
- Tracing paper
- Fabric block printing ink (Teal/Deep Blue and Terracotta/Rust)
- Brayer (rubber roller)
- Inking plate or piece of glass
- Natural cotton canvas fabric or heavy raw muslin
- Baren or wooden spoon
Step 1: Designing the Labyrinth
-
Draft your shape:
Begin by lightly sketching a large heart shape on your paper. This will serve as the outer boundary for your entire design. -
Create the center:
Draw a smaller heart in the very center of your outline. This is the ‘goal’ of the maze and should be solid, as seen in the reference. -
Map the pathways:
Start drawing the maze walls around the center heart. Use a single continuous line technique or concentric heart shapes, erasing small sections to create ‘openings’ or paths. -
Refine the thickness:
Thicken your single lines into double lines to create walls that have weight. Aim for a consistent width for both the walls (the teal part) and the negative space (the fabric color) between them. -
Add the entrance:
Ensure there is a clear start point at the bottom ‘V’ of the heart, with a vertical channel leading upwards into the maze structure.
Clean Lines
Warm up your carving block with a hair dryer before cutting. A slightly warm block slices like butter, giving you much smoother curves.
Step 2: Carving the Block
-
Transfer the design:
Place tracing paper over your drawing, trace it heavily with a soft pencil, then flip it onto your carving block and rub the back to transfer the graphite image. -
Carve the negative space:
Using a V-gouge tool, carefully carve away the lines that represent the fabric color. You are keeping the ‘walls’ of the maze raised. -
Clear large areas:
Switch to a U-gouge to clear away the larger background areas outside the heart shape, leaving the block clean. -
Carve the border groove:
To separate the rust border from the teal maze, carve a consistent channel around the entire perimeter of the heart shape.
Step 3: Printing the Colors
-
Prepare the fabric:
Cut your canvas or muslin to size, leaving roughly an inch of border. I prefer to fray the edges by pulling horizontal and vertical threads for a rustic look. -
Ink the maze:
Squeeze teal ink onto your plate and roll it out until it sounds ‘sticky’ (like velcro). Roll the ink primarily over the inner heart maze area. -
Ink the border:
On a separate part of your palette, roll out the terracotta ink. Use a small brayer or a paintbrush to carefully apply this color just to the outer raised rim of the heart. -
Clean up edges:
If any ink crossed into the wrong channel, quickly wrap a paper towel around your carving tool or a Q-tip to wipe the recessed area clean. -
Make the impression:
Place your fabric piece face down on top of the inked block. Press firmly with your hand to adhere it initially. -
Burnish the print:
Using a baren or the back of a wooden spoon, rub the back of the fabric in small circles. Apply steady pressure to ensure the ink transfers fully into the fabric weave. -
Reveal the art:
Slowly peel back one corner of the fabric to check coverage. If it looks good, peel the rest of the fabric off the block. -
Set the ink:
Allow the print to dry completely (usually 24 hours), then heat set it with an iron according to your fabric ink’s specific instructions.
Double-Tone Effect
Instead of inking the border separately, try a gradient roll! Put teal and rust ink side-by-side and roll so they blend in the middle.
Hang your finished maze with magnetic wooden poster rails or simply pin it up for a charming, rustic touch


Start-and-Finish Arrow Styling
This project transforms a classic rectangular maze into a visually engaging puzzle by incorporating distinct start-and-finish arrow styling. The clean lines and bold directional accents make it both a fun brain teaser and a piece of minimalist graphic art.
How-To Guide
Materials
- Heavyweight white drawing paper or cardstock (A4 size)
- Pencil (HB for sketching)
- Fine-point black marker or micron pen (05 or 08 size)
- Red or orange felt-tip pen (medium tip)
- Ruler (preferably clear plastic)
- Eraser (kneaded or vinyl)
- Graph paper (optional, for planning)
Step 1: Planning the Layout
-
Define the Border:
Start by drawing a large rectangle on your paper using a pencil and ruler. Leave about a 1-inch margin around the edges to frame the maze nicely. -
Outline the Path Structure:
Lightly sketch the internal walls of the maze. Instead of a grid, think in terms of ‘blocks’ and corridors. Create a mix of long, straight paths and tight U-turns. -
Create Dead Ends:
As you sketch, deliberately close off certain paths to create dead ends. This is crucial for the puzzle element; ensure there is only one true continuous route from start to finish. -
Mark Entry and Exit:
Decide on your start and finish points. In the reference image, the start is at the top left corner (indicated by the box with an X) and the finish is implied at the bottom right.
Straight Line Secret
Wipe your ruler’s edge with a tissue between ink strokes. This prevents ink buildup that can smear when you slide the ruler.
Step 2: Inking the Maze Walls
-
Trace Main Lines:
Using your black fine-point marker and ruler, carefully ink over your pencil lines. Keep your hand steady and maintain consistent pressure for a clean, professional look. -
Leave Gaps for Arrows:
Pay attention to where the paths connect. Don’t close every box; leave open corridors where the ‘player’ would travel. I find it helpful to trace the correct path with my finger before inking to avoid accidental blocks. -
Thicken the Walls:
To give the maze walls slightly more weight than the directional arrows we will add later, you might want to go over the black lines a second time or use a marginally thicker pen. -
Erase Guidelines:
Once the black ink is completely dry (give it a few minutes to avoid smudging), gently erase all the underlying pencil sketches.
Fixing Ink Smudges
If you smudge a line, turn it into a thick ‘shadow’ wall or a solid block obstacle to disguise the mistake creatively.
Step 3: Adding Arrow Styling
-
Draw the Starting Icon:
In the top left corner, draw a small square box with an ‘X’ inside using the red/orange pen. This visually anchors the starting point. -
Add Dotted Directionals:
Using the red/orange pen and your ruler, draw dashed lines along the main solution path. These act as ‘hints’ or guiding lights through the puzzle. -
Create Triangle Arrowheads:
At the end of your dashed lines or at key turns, draw small, solid filled triangles pointing in the direction of travel. These add a pop of color and clarity. -
Incorporate Black Arrows:
Switch back to your black pen. Draw simple, thin arrows (lines with open heads) in areas separate from the main solution path, or to indicate general flow in wider corridors. -
Add Dashed Black Lines:
Complement the red dashed lines with occasional black dashed lines leading towards dead ends or alternate routes to make the visual texture more complex. -
Review Balance:
Step back and look at the distribution of red and black elements. You want a balance so neither color overwhelms the page. -
Final Cleanup:
Check for any stray pencil marks one last time and brush away eraser crumbs. Your arrow-styled maze is now ready to be displayed.
Enjoy the satisfaction of guiding your friends through your custom-designed labyrinth

PENCIL GUIDE
Understanding Pencil Grades from H to B
From first sketch to finished drawing — learn pencil grades, line control, and shading techniques.
Explore the Full Guide
Highlight the True Path Subtly
This project transforms a simple puzzle into an artifact by combining precise line work with a subtle pop of color. The result is a maze where the solution – the “true path” – is delicately hinted at through a faint red stroke alongside the traditional black ink.
Step-by-Step Tutorial
Materials
- Textured parchment paper or heavy cream cardstock
- Fine-point black fineliner (0.3mm or 0.5mm)
- Ultra-fine red felt tip pen or gel pen (0.1mm ideally)
- Ruler (clear plastic is best for visibility)
- Pencil (HB or 2H)
- Soft eraser
- Deckle-edge ruler or scissors (optional for edges)
Step 1: Drafting the Labyrinth
-
Prepare the paper:
Start by tearing the edges of your parchment paper against a ruler or simply by hand to create that rustic, deckled look seen in the reference image. The rougher the edge, the more authentic it feels. -
Establish the boundary:
Using your pencil and ruler, lightly sketch a large rectangle centered on the paper. Leave a generous margin of empty space around the outside to frame the puzzle. -
Create the grid structure:
Within your large rectangle, lightly pencil a grid. You don’t need to draw every individual square, but marking 1-inch or 2cm intervals along the perimeter helps keep your internal walls straight. -
Sketch the path:
Draft your maze walls in pencil first. Start with the entrance and exit points, then build winding corridors. I find it easiest to draw the solution path first, then build dead ends around it to fill the remaining space.
Steady Hands
If you struggle with wobbly lines, put a piece of masking tape on the underside of your ruler. This creates a tiny gap and prevents ink from bleeding under the edge.
Step 2: Inking the Structure
-
Ink the outer border:
Take your black fineliner and trace the main rectangular border. To match the style in the image, you can double-draw this line or use a slightly thicker pen to make the frame bold. -
Draw the internal walls:
Carefully ink over your penciled maze walls using the ruler. Keep your pen upright for consistent line width. Remember to leave gaps for the pathways; don’t accidentally close off your routes. -
Add corner details:
For the corners of the maze walls, ensure the lines meet sharply at 90-degree angles. If you overshoot slightly, don’t worry—it adds to the hand-drawn charm. -
Erase guidelines:
Once the black ink is completely dry (give it at least 15 minutes to avoid smudging), gently erase all underlying pencil marks. Ensure the page is clean before adding color.
Step 3: Highlighting the True Path
-
Select the red accent:
Choose a red pen that is very fine. The goal isn’t to fill the path, but to create a thin ‘ghost’ line that runs parallel to the main black structure. -
Trace the inner border:
Draw a thin red line just inside the main black outer border. Leave a tiny gap of paper showing between the red and black lines for a professional, double-matting effect. -
Mark the solution:
Identify the correct route through the maze. Instead of drawing a line down the center of the path, draw a red line that hugs just one side of the corridor walls along the solution route. -
Maintain consistency:
Keep the red line extremely close to the black wall lines, almost like a shadow. This makes the solution visible to the observant eye but not immediately obvious at a glance. -
Final drying time:
Allow the red ink to dry completely. Colored inks can sometimes take longer to set on coated parchment papers. -
Distress (Optional):
To enhance the antique feel, you can very lightly crumple the corners or rub a little tea stain on the torn edges, though the clean parchment look works beautifully on its own.
Invisible Ink Twist
Use UV-reactive invisible ink instead of red for the ‘true path’ line. The maze will look standard in daylight but reveals the secret solution under a blacklight.
Display your finished puzzle flat on a desk or frame it to invite viewers to trace the visual journey with their eyes
Dense Micro-Maze Challenge
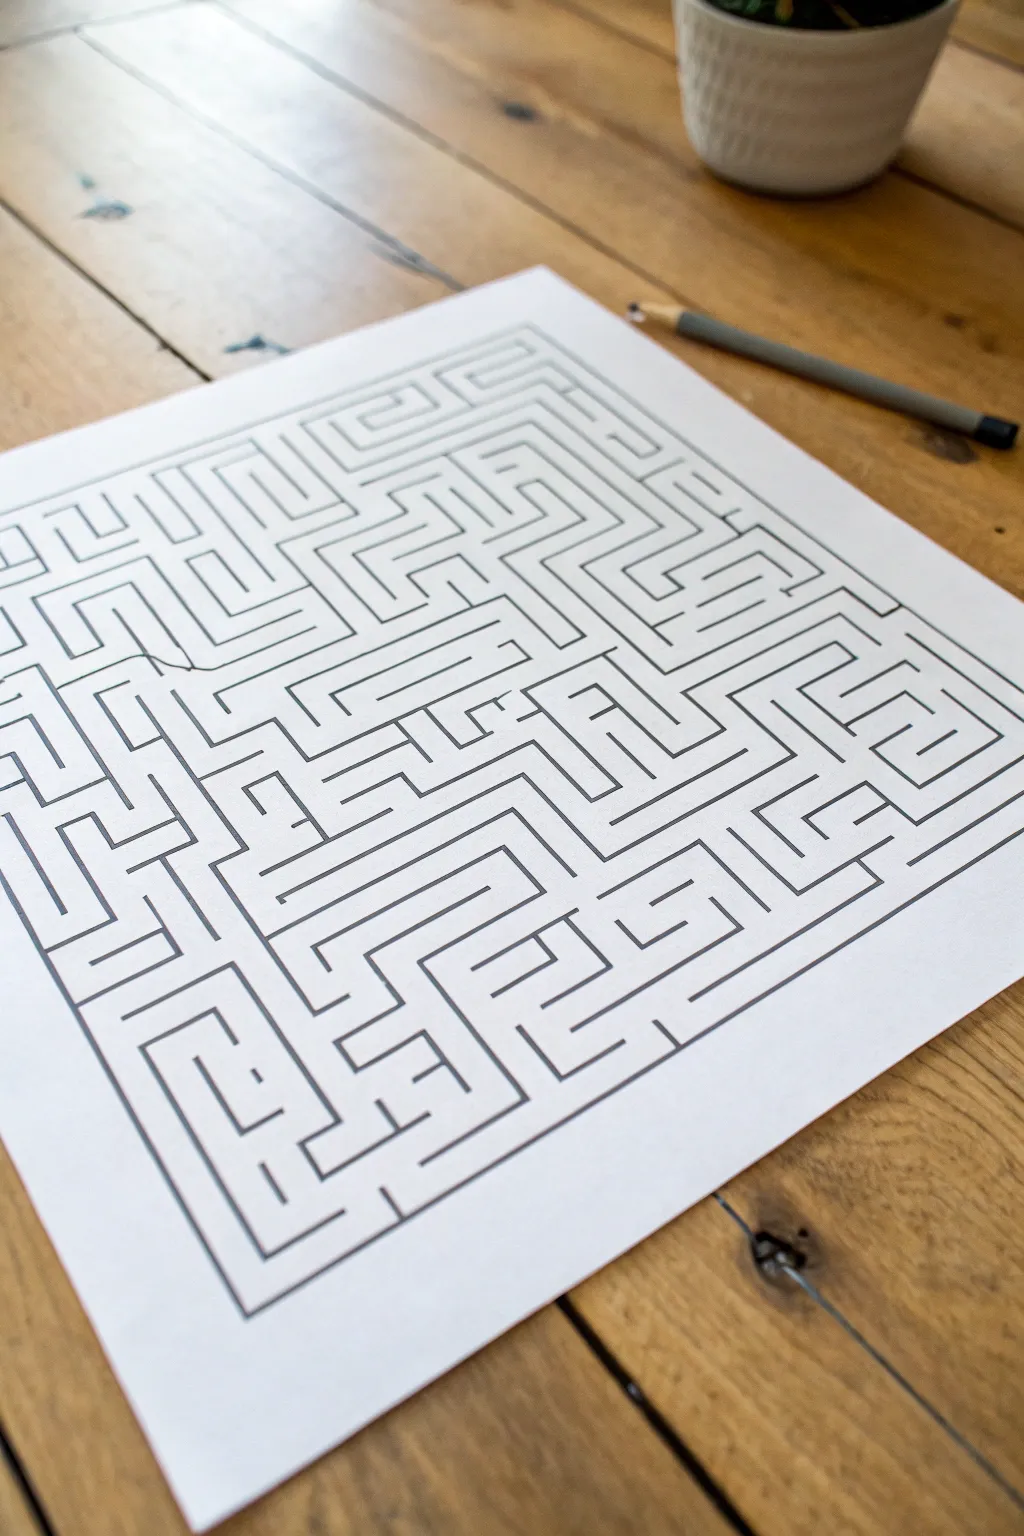
This project involves creating a deceptively complex square maze that emphasizes tight, uniform pathways and sharp turns. The resulting artwork is a satisfying puzzle featuring clean lines that draw the eye into a labyrinthine structure on crisp white paper.
Step-by-Step Guide
Materials
- High-quality white paper (A4 or Letter size)
- Ruler or straight edge
- Fine-point black pen (0.5mm or 0.8mm)
- Pencil (HB or 2B)
- Eraser
Step 1: Setting the Boundaries
-
Define the perimeter:
Start by drawing a large square in the center of your paper using a pencil and ruler. Leave a generous margin of white space around the edges to frame your work nicely. -
Add entrance and exit:
Decide where your maze begins and ends. Erase two small sections of your perimeter line—typically one near the top left and another near the bottom right—to create the opening gaps. -
Sketch the grid:
Lightly pencil a grid inside your square. These guide lines won’t be part of the final drawing, but they ensure your pathways remain a consistent width throughout the puzzle.
Uneven Paths?
If your paths vary wildly in width, cut a small piece of cardboard to the desired width. Use it as a quick spacer tool to check gaps as you sketch.
Step 2: Structuring the Labyrinth
-
Draw the main arteries:
Using your pencil, sketch out a few long, winding paths that cut deeply into the center. These will serve as the backbone of your solution path. -
Create dead ends:
Branch off from your main arteries with paths that deliberately lead nowhere. Create spirals, U-turns, and T-junctions to confuse the potential solver. -
Fill the details:
Work section by section to fill the remaining empty grid spaces. I like to focus on one corner at a time, ensuring every available bit of white space is used by a wall or a path. -
Check consistency:
Step back and look at your pencil sketch. Ensure the gap between lines (the path width) looks roughly the same everywhere. Adjust any areas that look too wide or too cramped.
Level Up: Color Coding
After inking, use a highlighter to trace the true solution path very lightly, turning your drawing into an answer key art piece.
Step 3: Inking the Maze
-
Begin the outline:
Switch to your fine-point black pen. Carefully trace over the outer perimeter square first, skipping the entrance and exit gaps you created earlier. -
Ink the internal walls:
Slowly trace your internal pencil lines. Keep your hand steady and maintain a consistent speed to avoid ink pools or shaky lines. -
Sharpen the corners:
As you ink, pay special attention to the corners. Make them crisp and right-angled rather than rounded to achieve that classic computer-generated maze aesthetic. -
Cap the walls:
Where a wall ends inside the maze, draw a clean, flat line across the tip. This differentiates a wall end from a pathway. -
Review for gaps:
Scan the maze for any unintentional gaps in the walls. Close any breaks that might accidentally let a solver ‘cheat’ their way through a barrier. -
Let it dry:
Wait at least five to ten minutes for the ink to set completely. Smudging intricate line work at this stage is heartbreaking, so patience is key.
Step 4: Final Touches
-
Erase guidelines:
Once the ink is bone dry, gently rub a soft eraser over the entire drawing to remove the underlying pencil sketch and grid lines. -
Clean up debris:
Brush away the eraser shavings carefully with a clean brush or your hand, ensuring you don’t smear any residual graphite across the white paper. -
Reinforce weak lines:
If any black lines look thin or faded after erasing, go over them one last time with your pen to make the maze look bold and definitive.
You now have a complex, crisp maze that looks professionally printed and is ready to challenge a friend
BRUSH GUIDE
The Right Brush for Every Stroke
From clean lines to bold texture — master brush choice, stroke control, and essential techniques.
Explore the Full Guide
Primary-Color Block Maze
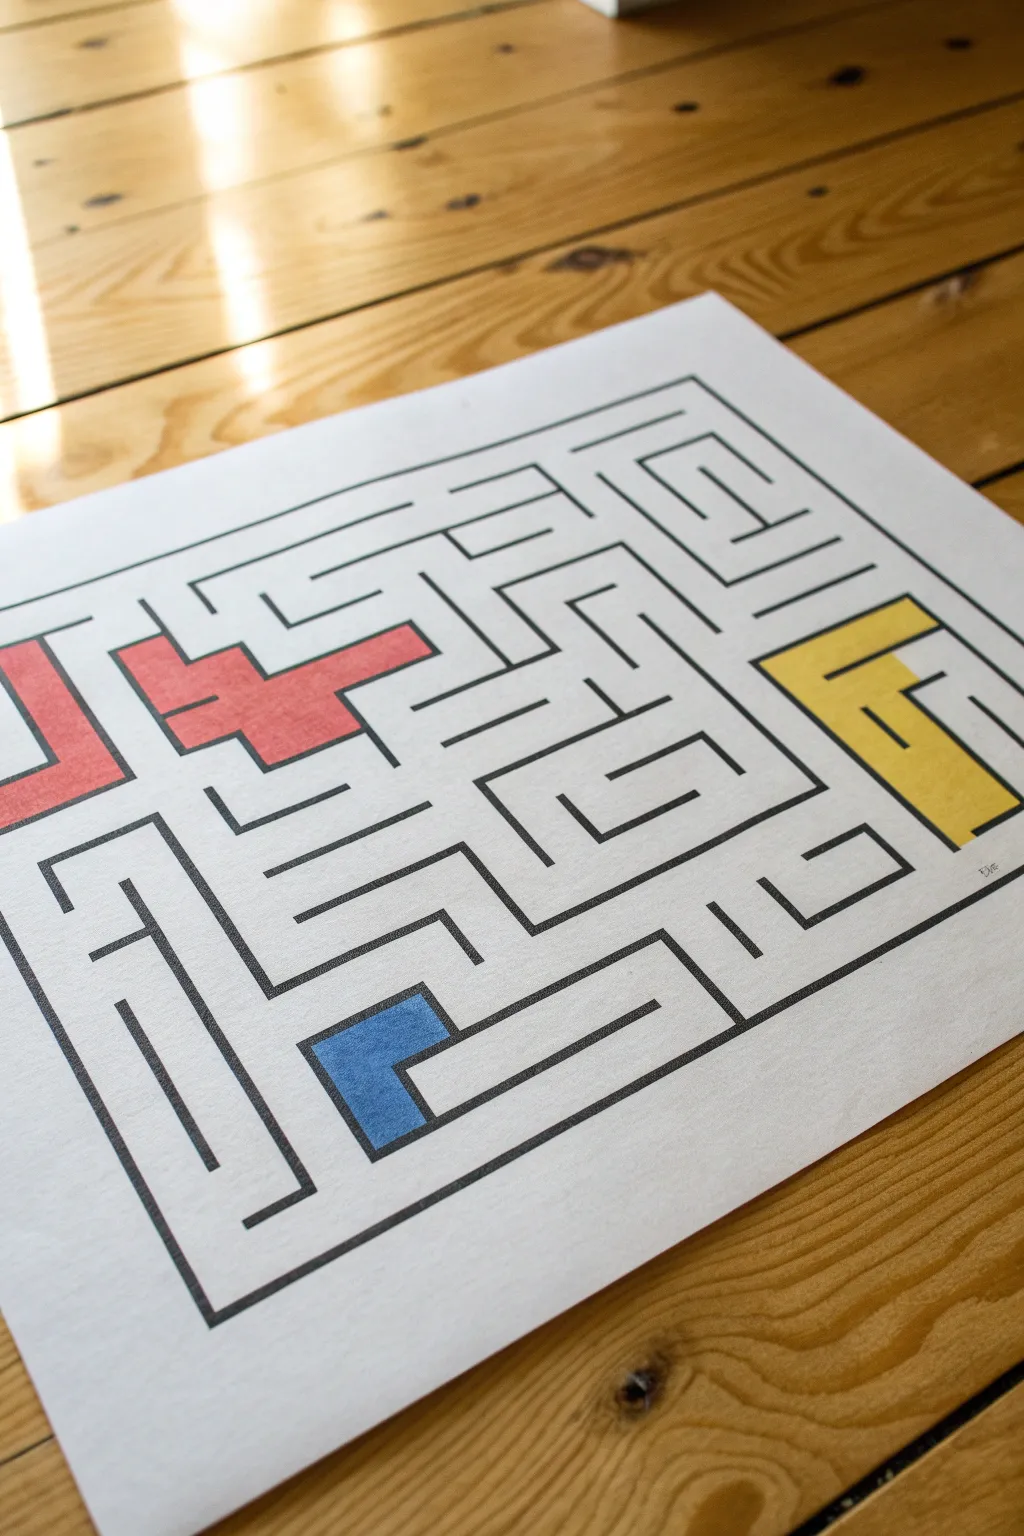
This striking maze combines the clean lines of a classic labyrinth with bold pop-art aesthetics by integrating solid geometric blocks into the pathways. The result is a visually engaging puzzle where obstacles become vibrant splashes of primary color.
How-To Guide
Materials
- White cardstock or heavy drawing paper (A4 size)
- Pencil (HB or lighter)
- Eraser
- Ruler
- Black fine-liner pen (0.5mm)
- Thick black marker or sharpie
- Colored markers or pencils (Red, Blue, Yellow)
Step 1: Planning the Layout
-
Set the boundaries:
Start by drawing a large square in pencil on your paper, leaving a comfortable white margin of about 1-2 inches on all sides to frame the maze. -
Draft the entrance and exit:
Decide where your maze begins and ends. For this design, leave a small gap in the top left corner and bottom right corner of your boundary square. -
Sketch the color blocks:
Before drawing any maze walls, lightly sketch three distinct geometric shapes. Place an L-shape in the top left, a T-shape near the middle-left, a square near the bottom, and an F-like shape on the right side. -
Outline the main corridors:
To ensure there’s a solvable path, I usually sketch the ‘correct’ route first very lightly in pencil, winding it around your geometric obstacles. -
Fill in the dead ends:
Now fill the remaining empty space with branching paths and dead ends. Keep your lines strictly vertical and horizontal to maintain that clean, blocky look. -
Refine the spacing:
Go over your pencil sketch and adjust lines to ensure the pathways are roughly equal in width. Use your ruler to straighten any wobbly sections.
Keep it Straight
Use the width of your ruler as a spacer! Align the edge of the ruler with one wall to draw the parallel line for the next wall perfectly spaced.
Step 2: Inking the Maze
-
Trace the color blocks:
Switch to your thick black marker. Outline the geometric shapes you sketched earlier, giving them a bold, heavy border. -
Ink the outer boundary:
Using the same thick marker and a ruler, trace the large outer square frame of the maze. -
Inking the internal walls:
For the intricate maze walls inside, switch to a slightly thinner black marker or fine-liner. This visual contrast helps the colored blocks stand out more. -
Check connections:
As you ink, be careful not to accidentally close off your main path. Double-check that your lines stop where paths are supposed to intersect. -
Let it set:
Allow the ink to dry completely for at least five minutes to prevent smudging during the next step. -
Clean up:
Gently erase all visible pencil marks. Hold the paper taut with one hand while erasing to keep it from crinkling.
Step 3: Adding Color
-
Select primary colors:
Choose a bright red, a deep blue, and a sunshine yellow marker. The goal is a classic ‘Mondrian’ style palette. -
Fill the L and T shapes:
Color the blocks in the upper left quadrant with the red marker. Use long, even strokes to minimize streak marks. -
Color the square obstacle:
Take the blue marker and fill in the small square block located near the bottom of the maze path. -
Highlight the side block:
Use the yellow marker for the large geometric shape on the right side of the maze. -
Add texture (optional):
If you want a printed look, you can gently cross-hatch a second layer of color over the blocks, or just ensure the saturation is solid and even. -
Final inspection:
Look for any white spots inside your colored blocks and touch them up. Reinforce any black lines that might have been faded by the colored markers.
Ink Smudges?
If you smear wet ink, don’t wipe it. Let it dry fully, then carefully use opaque white gel pen or correction fluid to mask the error before recoloring.
You have now created a visually stimulating puzzle that doubles as a piece of modern pop-art for your wall
Hedge Garden Maze Scene
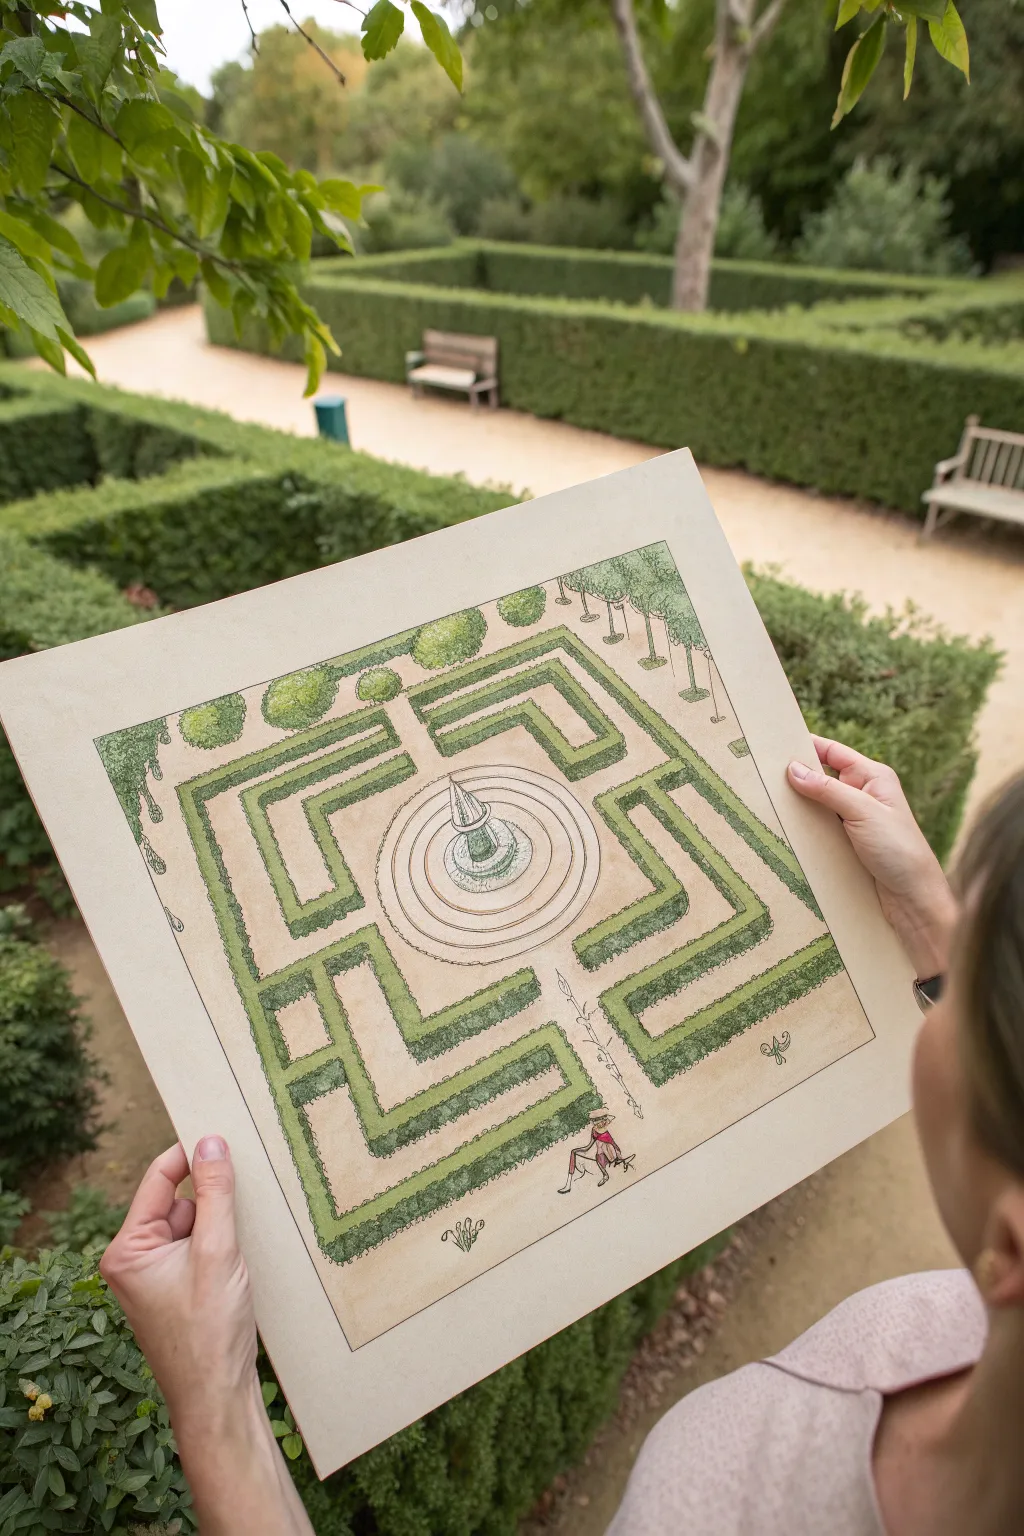
Capture the charm of a manicured garden with this delightful hedge maze illustration. Using fine liners and soft washes of watercolor, you will create a structured yet whimsical top-down view of a classic labyrinth complete with a central fountain.
Step-by-Step Guide
Materials
- Heavyweight watercolor paper (smooth or cold press)
- HB pencil and eraser
- Fine liner pens (0.1mm, 0.3mm, 0.5mm) in black or dark sepia
- Watercolor paints (Sap Green, Olive Green, Yellow Ochre, Burnt Sienna, Phthalo Blue)
- Small round brush (size 2 or 4)
- Ruler
- Compass or circle template
Step 1: Planning the Labyrinth
-
Define the perimeter:
Begin by lightly drawing a large square in the center of your paper using your ruler and HB pencil. This will serve as the outer boundary of your hedge maze. -
Establish the center:
Locate the exact center of your square. Using a compass, draw a series of concentric circles here to represent the central plaza and the fountain tiers. -
Sketch the path grid:
Lightly grid out the interior space between the central circles and the outer square. You don’t need to draw every hedge yet, just faint guidelines to ensure your path widths remain consistent. -
Draft the hedge walls:
Sketch the actual maze walls. I find it easiest to work from the center outward, creating L-shapes and U-turns. Ensure you leave an ‘entrance’ at the bottom and a clear path leading to the center. -
Add landscape details:
Sketch small circles along the back edge for trees and add a few decorative elements like a bench or a small figure walking near the entrance to give the maze scale.
Texture Tip
Don’t fill the hedges solid green. Leave tiny flecks of white paper showing through your watercolor wash to mimic light hitting individual leaves.
Step 2: Inking the Structure
-
Outline the hedges:
Using a 0.3mm fine liner, carefully trace over your pencil lines for the hedge walls. Instead of perfectly straight lines, use a slightly wiggly, textured stroke to mimic the rough surface of leaves. -
Detail the fountain:
Switch to a finer 0.1mm pen to ink the delicate concentric circles of the fountain and the central water feature. Keep these lines smoother than the hedges. -
Draw the surrounding trees:
Ink the trees along the top edge using loose, scribbly loops for the foliage and simple vertical lines for the trunks. -
Enhance texturing:
Add small stippling dots or tiny hatch marks inside the hedge shapes, particularly near the bottom edges, to suggest depth and shadow without filling them in completely. -
Erase pencil guides:
Once the ink is completely dry—wait at least ten minutes to be safe—gently erase all the underlying pencil sketches.
Step 3: Watercolor Washes
-
Paint the paths:
Mix a very watery wash of Yellow Ochre with a tiny touch of Burnt Sienna. Paint the walking paths between the hedges, keeping the color light and uneven to resemble gravel. -
Base layer for foliage:
Apply a light wash of Sap Green to all the hedge shapes and the trees. Don’t worry about perfect evenness; natural variation adds character. -
Deepen the shadows:
While the green is still slightly damp, drop in a darker Olive Green or mix a bit of blue into your green. Apply this to the ‘shadow’ side of the hedges (usually the bottom and right sides) to create a 3D effect. -
Color the fountain:
Use a very pale wash of Phthalo Blue for the water in the fountain. Leave small white highlights on the paper to represent sparkling water. -
Add final touches:
Paint the small figure or bench if you included them. A touch of red or blue on the figure’s clothing creates a nice focal point. -
Add separation lines:
Once the paint is fully dry, you can use your 0.5mm pen to re-emphasize the outer border or add a simple line frame around the entire illustration.
Make It Magical
Turn it into a fantasy map by hiding tiny symbols in the dead ends—like a key, a chest, or a sleeping dragon—for viewers to discover.
Now you have a charming garden plan that looks ready for a leisurely afternoon stroll


Have a question or want to share your own experience? I'd love to hear from you in the comments below!