
Mermaids are basically an artist’s dream subject: flowing hair, glowing water, and endless ways to play with color and texture. Here are my favorite mermaid painting ideas that range from super beginner-friendly silhouettes to more magical, story-filled scenes.
Moonlit Mermaid Silhouette
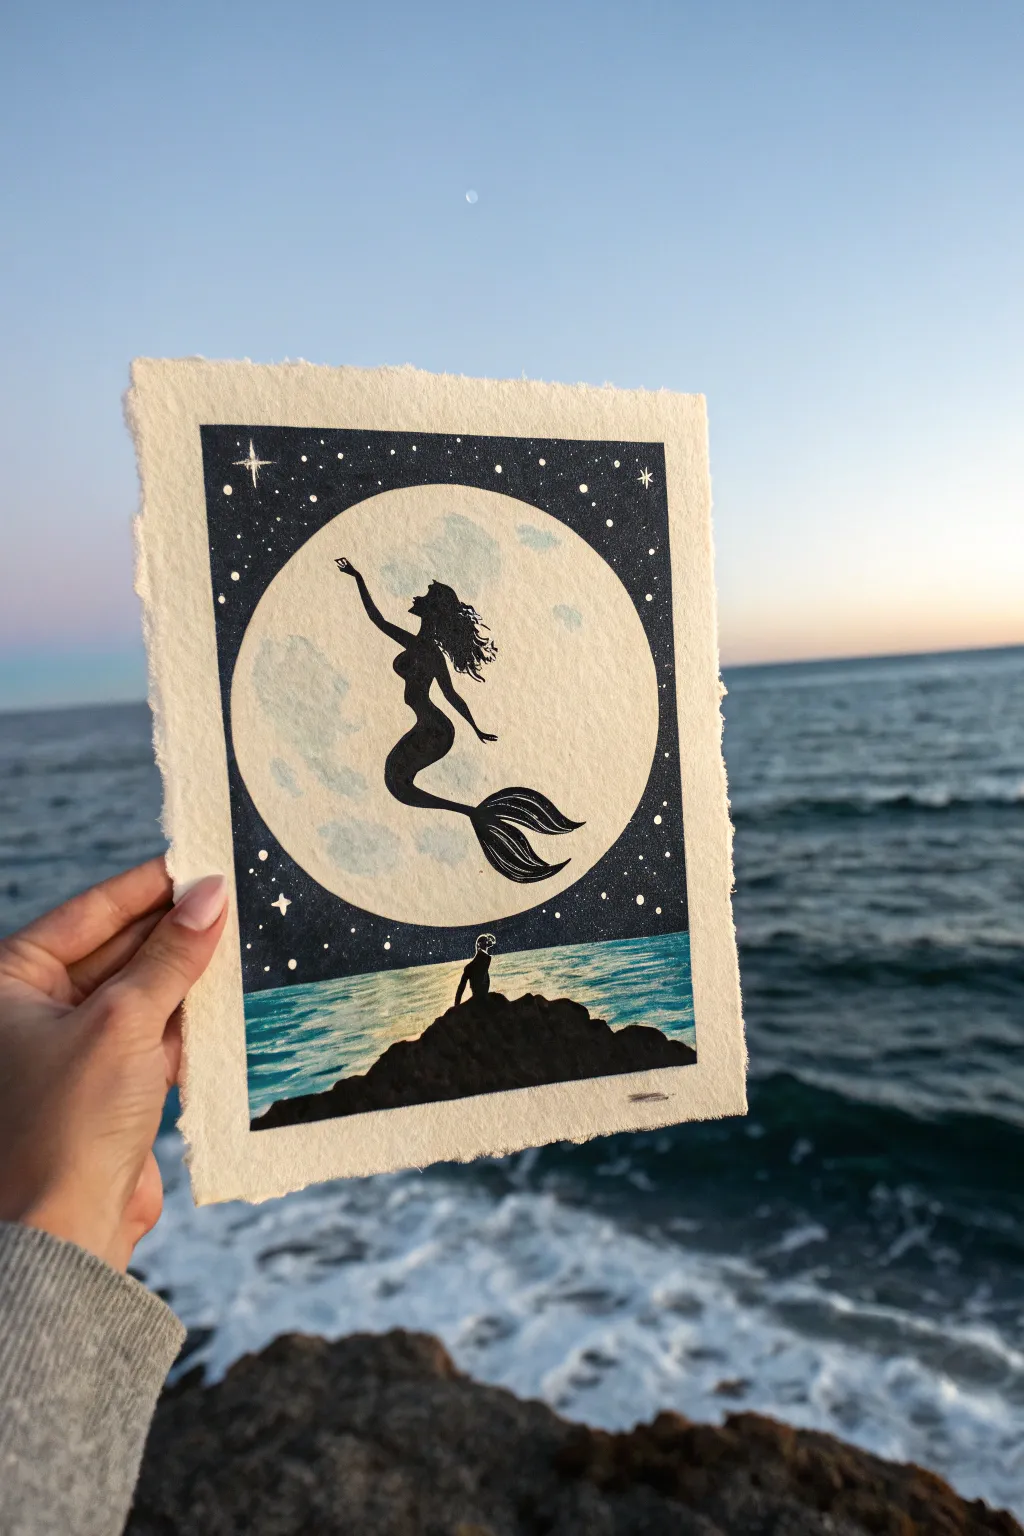
Capture the magic of the ocean under a starry night sky with this striking silhouette art piece. This project combines the textures of handmade paper with the crisp contrast of black ink and a luminous painted moon.
How-To Guide
Materials
- Heavyweight handmade cotton rag paper (with deckled edges)
- Linoleum block (soft-cut or traditional)
- Linocut carving tools (V-gouge and U-gouge)
- Black block printing ink (water-soluble or oil-based)
- Brayer (rubber roller) and inking plate
- Gouache or acrylic paint (titanium white, phthalo blue, seafoam green)
- Small flat paintbrush
- Tracing paper and soft pencil
- Barren or wooden spoon (for pressing)
- White gel pen (optional for stars)
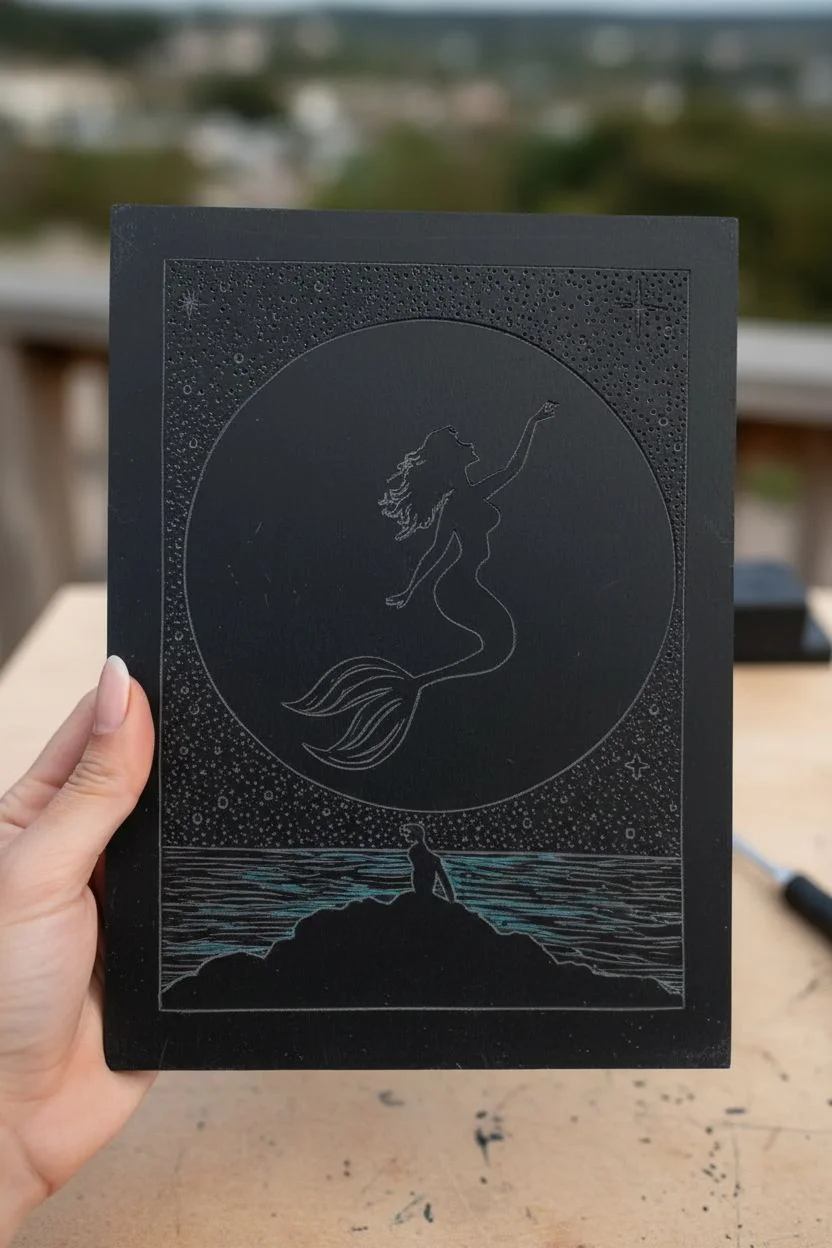
Step 1: Designing and Carving
-
Draft your design:
Sketch your mermaid reaching toward a large circle on a piece of paper the same size as your linoleum block. Include a rocky outcrop at the bottom for balance. -
Transfer to the block:
Use transfer paper or the pencil-rubbing method to transfer your reversed image onto the linoleum surface. Remember, everything you carve away will remain white (or the paper color), and what you leave raised will print black. -
Outline the main shapes:
Using a fine V-gouge, carefully carve along the outline of the mermaid’s silhouette and the circular moon shape. Keep your tool moving away from your body for safety. -
Clear the negative space (Internal):
Carve away the *entire* inside of the moon circle. This needs to be a flat, recessed area so it doesn’t pick up ink. -
Carve the ocean texture:
Below the horizon line, carve wavy, horizontal lines to mimic the ocean surface, leaving enough raised area to create a dark sea. -
Create the starry sky:
In the upper sky area (the negative space surrounding the moon), use a small gauge tool to peck small holes or ‘chatter’ marks. These will remain uninked and look like stars against the night sky. -
Refine the border:
Decide on a border style. You can carve a clean, straight edge or leave a rougher, textured border for a more organic look.
Step 2: Painting the Backdrop
-
Prepare variable moon tones:
Before printing, we need to paint the moon directly on the paper. Mix titanium white gouache with a tiny drop of blue to create a pale, milky lunar color. -
Paint the moon circle:
Lightly mark where the moon will sit on your handmade paper. Paint a solid circle slightly larger than the carved hole in your block to ensure no white gaps appear later. -
Add lunar texture:
While the white paint is still damp, dab in faint grey or pale blue shadows to create craters and texture. Allow this layer to dry completely before printing. -
Paint the water base:
Mix a seafoam green or teal wash. Paint a horizontal band where the ocean will be, blending it slightly. Let this dry fully so the paper fibers stiffen back up.
Registration Trick
Make a simple cardboard ‘jig’ to hold your paper and block in the exact same spot. This ensures your painted moon aligns perfectly with the printed silhouette every time.
Step 3: Printing the Image
-
Charge the ink:
Squeeze a line of black block printing ink onto your inking plate. Roll the brayer back and forth until you hear a sticky ‘velcro’ sound and have an even, satin texture. -
Ink the block:
Roll the ink onto your carved linoleum block. Apply thin, even layers, rolling in multiple directions to ensure the mermaid silhouette is fully coated without filling in the fine details. -
Align the paper:
Carefully hover your paper (painted side down) over the inked block. Align the painted moon on the paper with the carved moon hole on the block. Lower it gently. -
Press the print:
Using a barren or the back of a wooden spoon, rub the back of the paper firmly in circular motions. Focus pressure heavily on the solid black areas like the mermaid and the sky corners. -
The reveal:
Slowly peel back one corner of the paper to check the ink transfer. If it looks patchy, lay it back down and rub more. Once happy, peel the paper entirely off the block. -
Final touches:
Once the ink is dry, use a white gel pen or a fine brush with white gouache to add extra-bright highlights to the stars or a glint on the mermaid’s tail if needed.
Add Metallic Magic
Mix a tiny amount of iridescent medium or silver ink into your black block ink. It gives the night sky a subtle, shimmering quality that catches the light.
Now you have a stunning piece of moonlit art ready to frame or gift to an ocean lover


Sunset Horizon Mermaid Silhouette
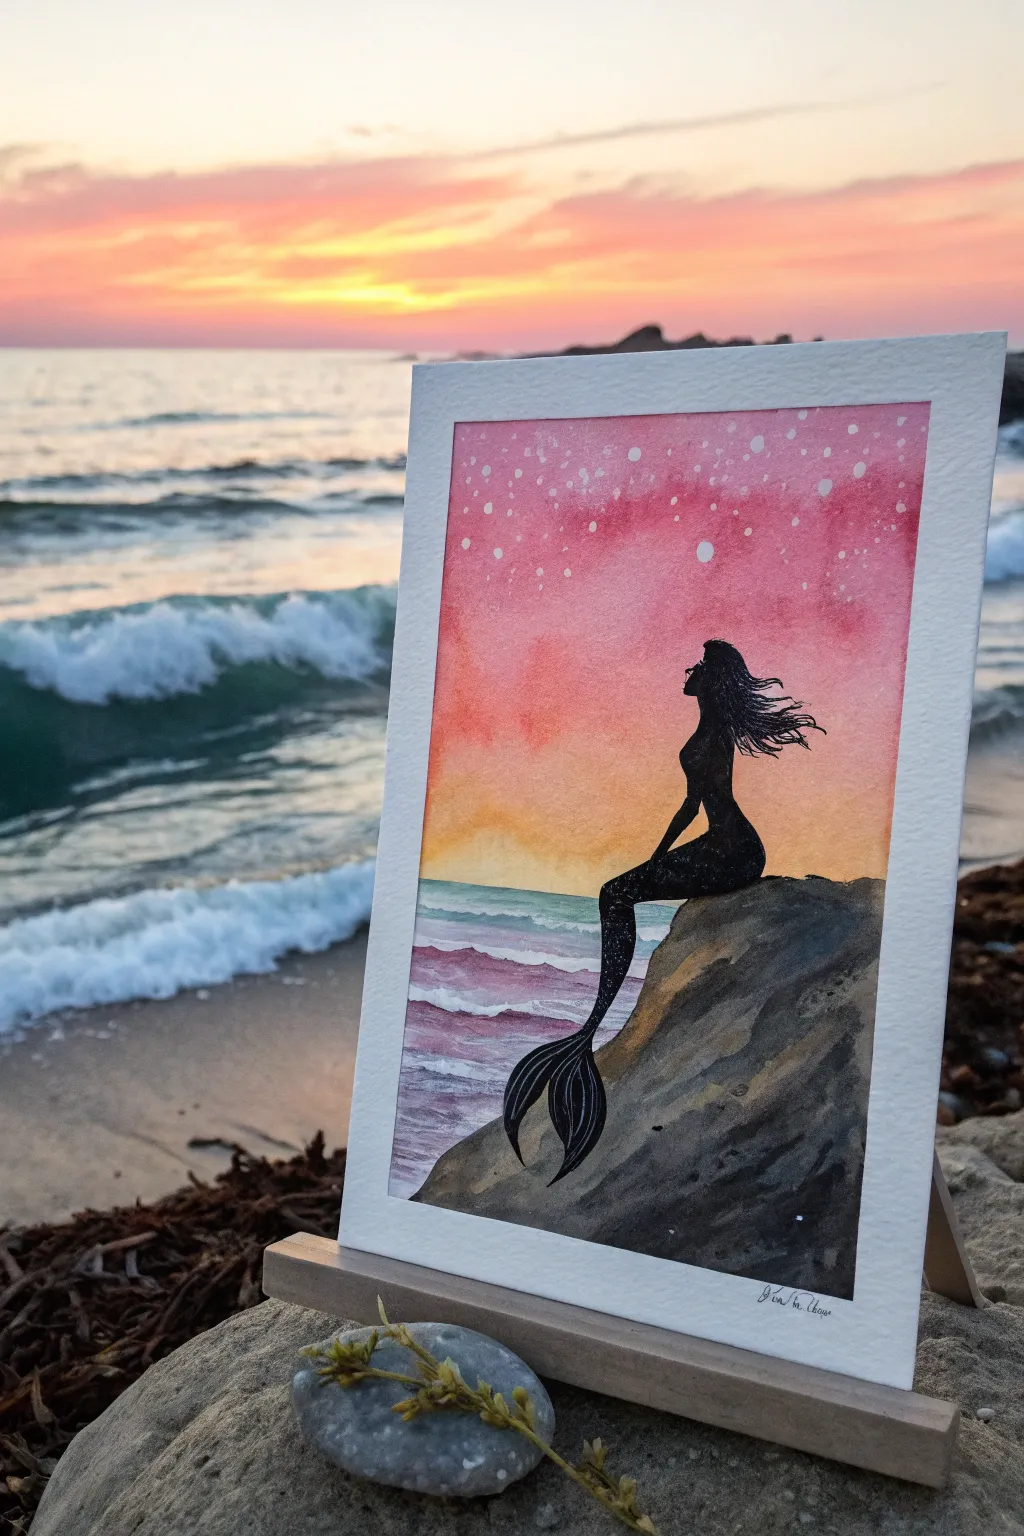

Capture the magic of twilight with this serene watercolor piece featuring a mermaid gazing out at a vibrant pink and orange horizon. The stark black silhouette against a soft, dreamy wash creates a striking contrast that is surprisingly simple to achieve.
Step-by-Step Tutorial
Materials
- Watercolor paper (cold press, 300gsm recommended)
- Watercolor paints (Pink, Orange, Teal/Turquoise, Dark Grey/Black)
- Black waterproof fine liner pen or black acrylic paint
- Masking tape
- Paint brushes (Large wash brush, medium round brush, fine detail brush)
- White gel pen or white gouache
- Pencil and eraser
- Jar of water and paper towels
Step 1: Preparation and Sketching
-
Prepare your canvas:
Tape down all four edges of your watercolor paper to a board or table. This creates that crisp, clean border you see in the final piece and prevents the paper from buckling when wet. -
Sketch the outline:
Lightly sketch the slope of the rock in the bottom right corner. Then, draw the outline of the mermaid sitting atop it. Focus on the curve of the tail and the posture of the back. Don’t worry about filling it in yet; just get the shape right. -
Define the horizon:
Draw a faint, straight horizontal line about one-third of the way up from the bottom of the paper. This will separate your sky from the sea.
Bleeding Colors?
If sky colors bleed into the mermaid area, don’t panic. Since the silhouette will be solid black, you can easily paint over any background errors later.
Step 2: Painting the Background
-
Wet the sky area:
Using a clean wash brush, wet the paper above the horizon line with water. You want it damp and glistening, but not soaking wet with puddles. -
Apply the sunset pink:
Load your brush with a vibrant pink watercolor. Start at the very top of the sky and brush downwards. Let the color fade naturally as it moves toward the middle. -
Blend in the orange:
While the pink is still damp, pick up a warm orange tone. Apply this near the horizon line, blending it upwards into the pink to create a soft, gradient sunset effect. -
Paint the ocean:
Switch to a teal or turquoise color for the water below the horizon line. Paint horizontal strokes, leaving small gaps or using lighter pressure near the shoreline to suggest gentle waves foam. -
Add wave details:
While the ocean layer is drying, you can deepen the color in the troughs of the waves with slightly more concentrated paint to add dimension. -
Create the stars:
Once the sky is completely dry (this is crucial), use a white gel pen or small dots of white gouache to create a scattering of stars across the upper pink section.
Step 3: The Silhouette and Foreground
-
Paint the rock base:
Mix a dark grey or watery black watercolor. Paint the rock formation, keeping the edges rough to simulate texture. I like to let the watercolor create its own natural variations here rather than making it a flat block of color. -
Layer rock shadows:
Once the first layer of the rock is dry, go back with a darker, more saturated black to add jagged cracks and deep shadows, giving the rock volume. -
Fill the silhouette:
Using black acrylic paint or a waterproof black marker/pen, carefully fill in the mermaid shape. Start with the outline to ensure sharp edges, then fill the center. -
Detail the hair:
With your finest brush or pen, draw flowing strands of hair blowing back in the imaginary breeze. These fine lines add movement to the static silhouette. -
Define the tail:
Ensure the curve of the tail fin is sharp and distinct. If using black watercolor, you might need a second coat to make it truly opaque. -
Add highlights:
Use a tiny touch of white gel pen on the mermaid’s shoulder or the curve of the tail to suggest a reflection from the setting sun. -
Reveal the border:
Wait until the painting is 100% bone dry. Carefully peel away the masking tape at a 45-degree angle to reveal your clean white edges.
Level Up: Salt Texture
While the pink sky paint is still wet, sprinkle a pinch of table salt on top. When dry, brush it off to create unique, starry textures in the watercolor.
Now you have a peaceful sunset scene ready to be framed or gifted to a sea-loving friend


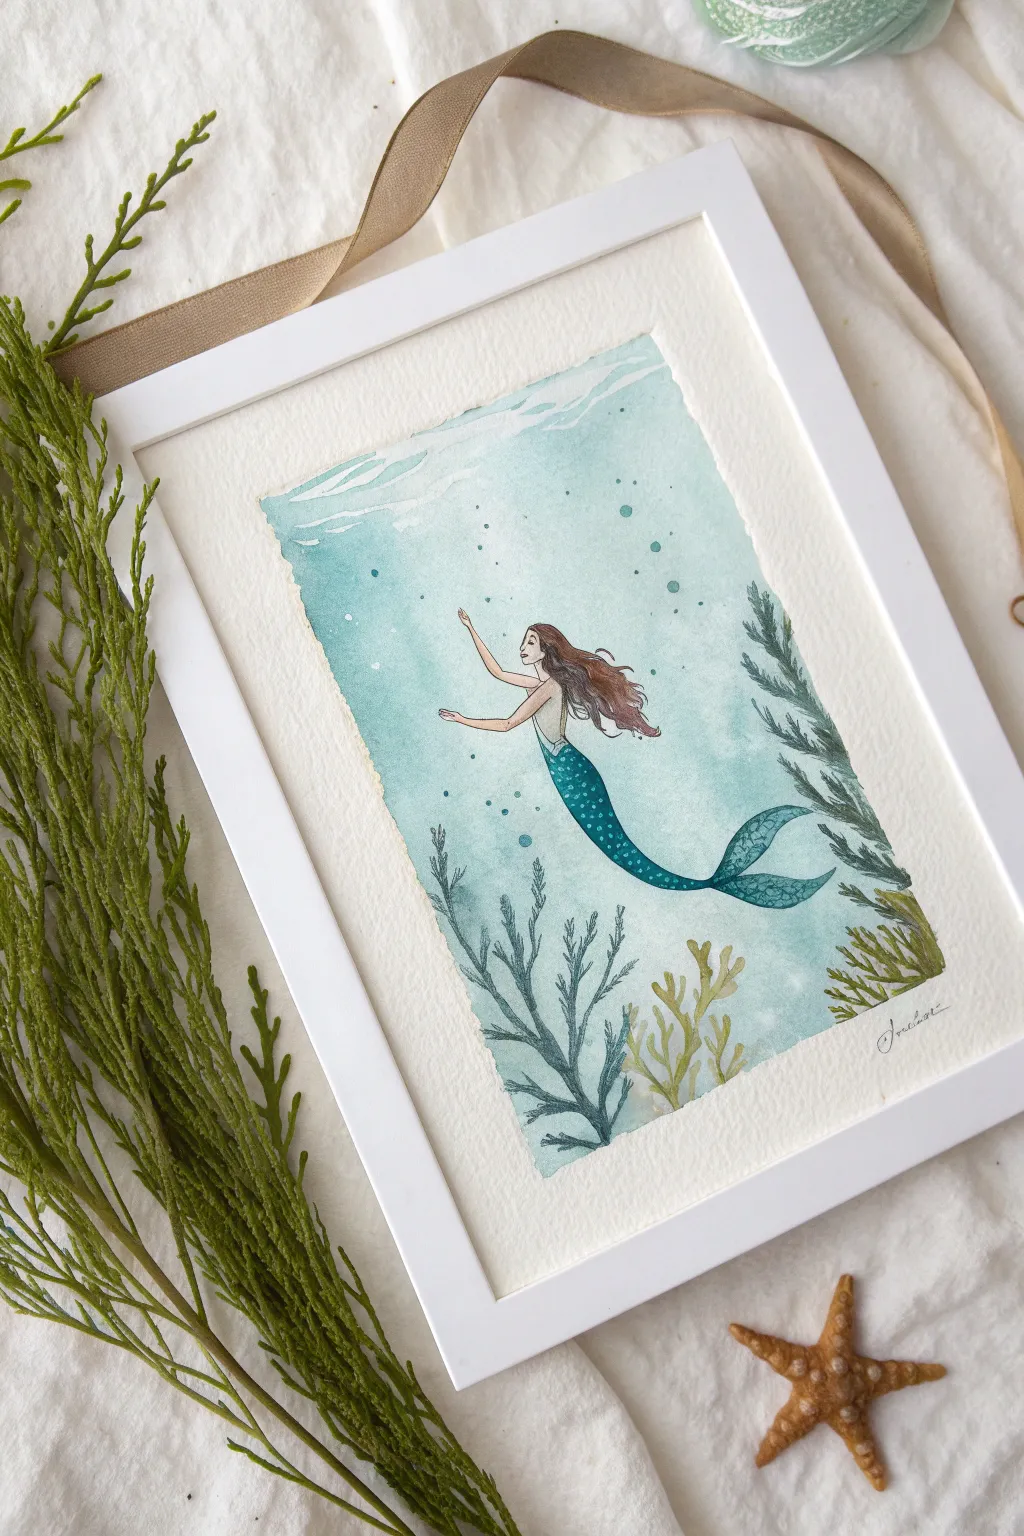
Underwater Mermaid in Blue Gradients
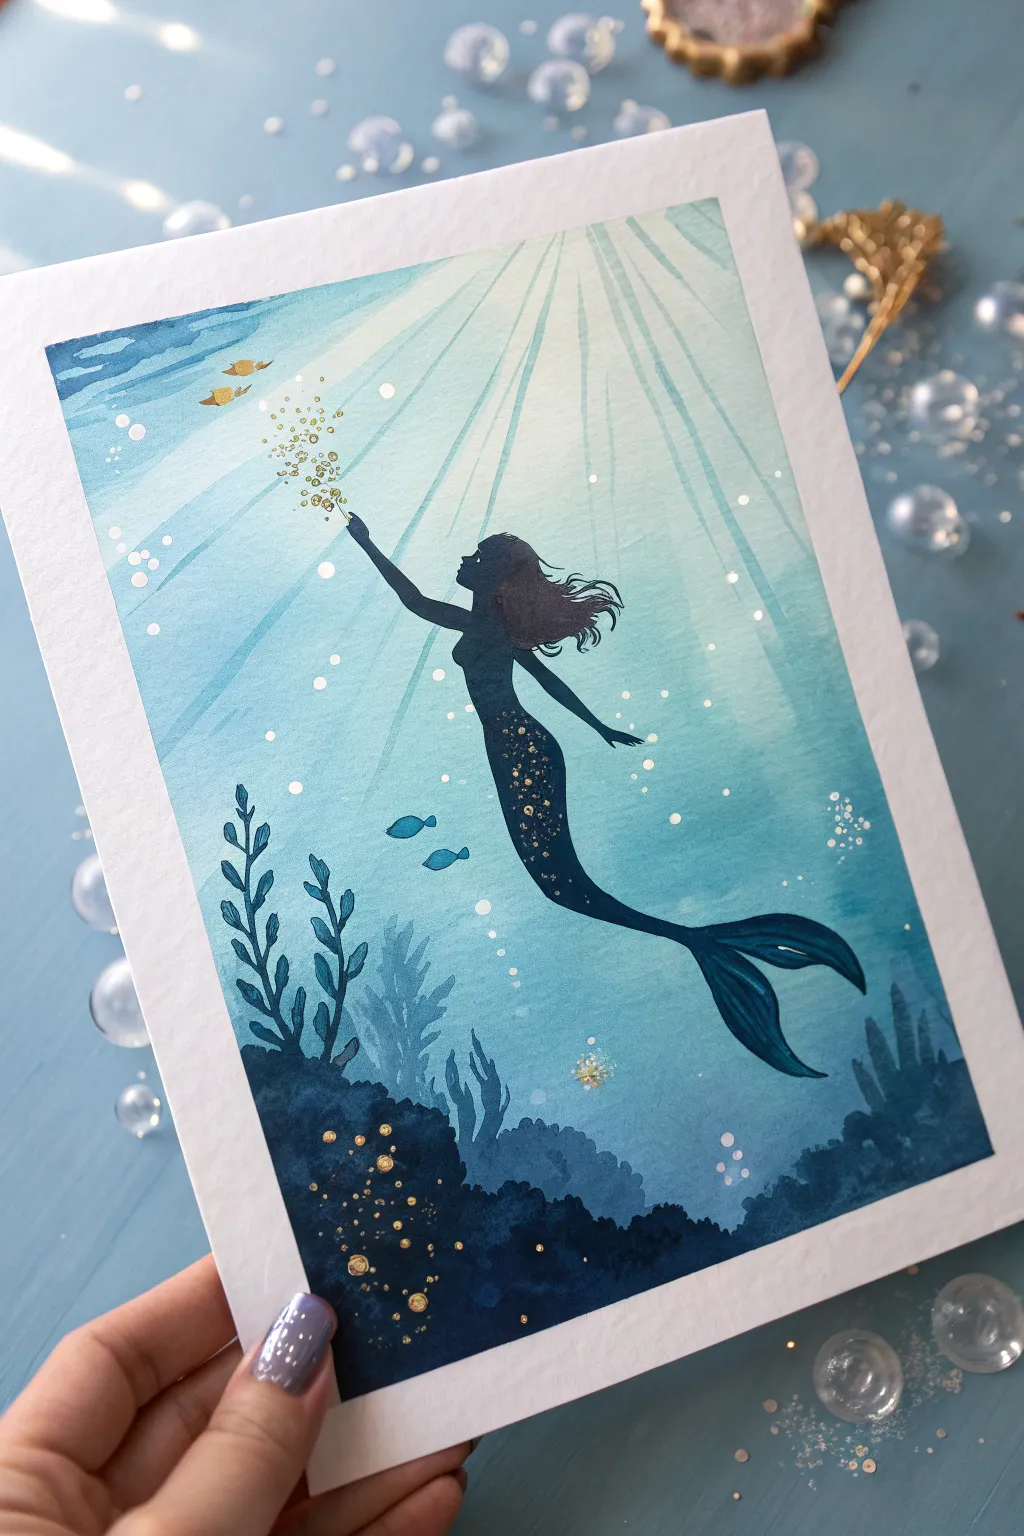
Capture the magic of the deep sea with this enchanting watercolor painting, featuring a delicate mermaid silhouette reaching toward shimmering light. This project focuses on building a monochromatic blue color scheme with subtle gradients to create a sense of depth and luminosity.
Step-by-Step
Materials
- Cold press watercolor paper (300gsm recommended)
- Painter’s tape or masking tape
- Watercolor paints (Phthalo Blue, Indigo, Prussian Blue, Turquoise)
- Black gouache or waterproof black ink
- Metallic gold watercolor or gold ink
- White gouache or white gel pen
- Various round brushes (size 8 for washes, sizes 0 and 2 for details)
- Jar of clean water
- Paper towels
- Pencil and eraser
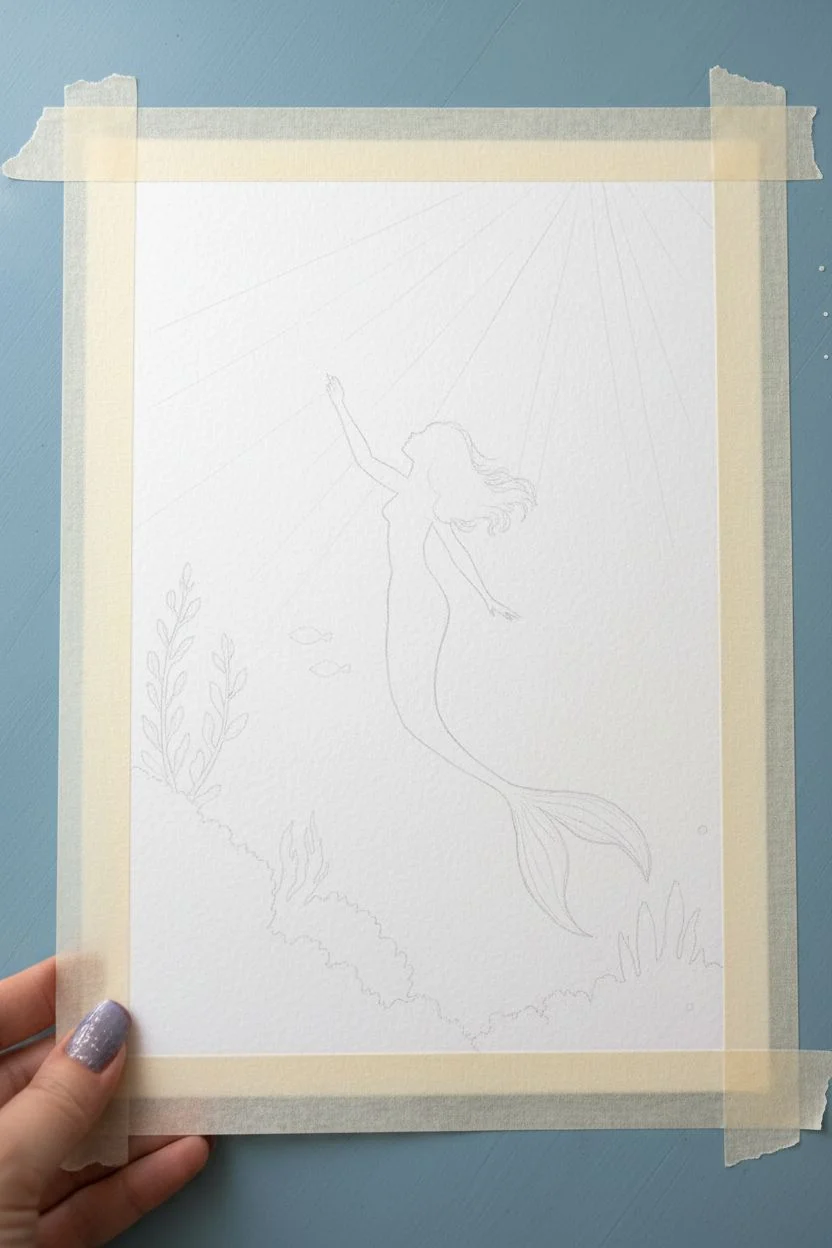
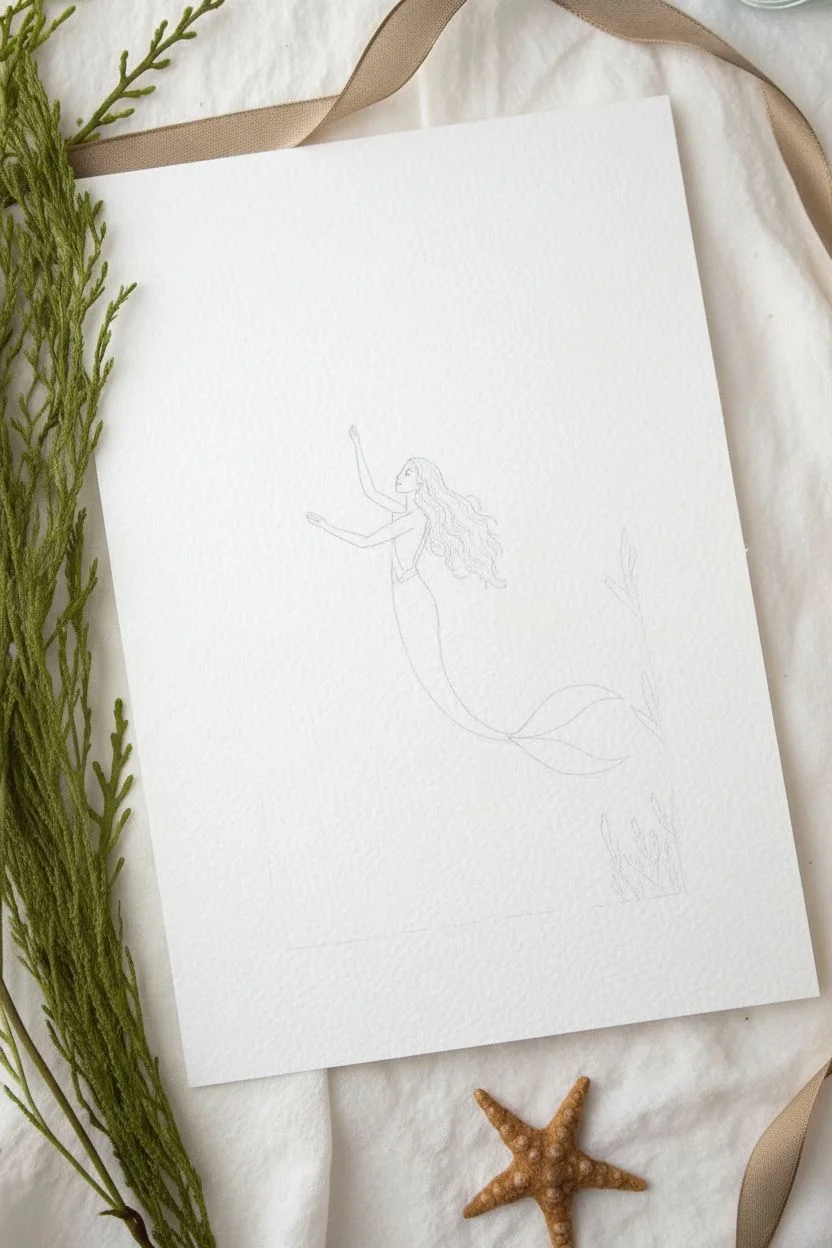
Step 1: Preparation and Sketching
-
Secure the paper:
Begin by taping down all four edges of your watercolor paper to a board or hard surface. This creates a crisp white border and prevents the paper from buckling when we add water. -
Sketch the outline:
Lightly sketch the silhouette of the mermaid in the center. Keep your pencil lines faint so they don’t show through later. Draw the curve of her tail, her flowing hair, and her arm reaching upward. -
Map out the seabed:
Sketch rough, organic shapes at the bottom for the coral reef and seaweed. These don’t need to be detailed, just simple outlines to guide your painting.
Step 2: Creating the Underwater Background
-
Paint the first light wash:
Mix a very watery, pale turquoise or light blue. Paint the entire background area, carefully painting *around* the mermaid silhouette and the bottom seabed area. Leave the mermaid white for now. -
Establish the light source:
While the first layer is still wet, lift out pigment using a clean, damp brush in diagonal streaks radiating from the top center. This creates the initial soft ‘sunrays’ filtering through the water. -
Deepen the blue gradients:
Once the first layer is dry, mix a slightly darker blue (like Phthalo Blue). Paint vertical sections between your lifted light rays, blending the edges softly with water so the transition isn’t harsh. -
Darken the edges:
Add a third layer of even deeper blue (Prussian Blue) to the left and right outer edges of the paper. This vignette effect draws the eye toward the center light. -
Refine the sunrays:
Using a flat brush or the side of a round brush with clean water, scrub gently to lift more pigment in the ray shapes if needed to make the light distinct. Let the background dry completely.
Making Rays Pop
To get sharper light rays, place strips of masking tape diagonally across the paper before painting the blue background washes, then peel them off to reveal white paper.
Step 3: Painting the Silhouette and Seabed
-
Fill in the mermaid:
Using black gouache or a very concentrated mix of Indigo and black watercolor, carefully fill in the mermaid silhouette. Use a size 0 or 2 brush for the delicate fingers and hair strands. -
Paint the seabed base:
Paint the coral and rock formations at the bottom using a deep, dark blue (Indigo). This creates a foreground that frames the scene. -
Add seaweed details:
While the seabed is drying, use a small brush to paint vertical, wavy seaweed stalks rising from the dark rocks. Use a slightly lighter dark blue so they stand out against the deep background. -
Layering the reef:
Once the base layer of the reef is dry, add another layer of dark Indigo or black to the very bottom edge and parts of the coral to create volume and shadows.
Bleeding Silhouette?
If black paint bleeds into the blue background, your paper wasn’t dry enough. Wait for the blue wash to be bone-dry before painting the mermaid.
Step 4: Magical Details and Finishing Touches
-
Add gold scales:
Dip a small brush into metallic gold watercolor. Dab tiny dots onto the mermaid’s tail to suggest shimmering scales. Concentrate them on the curved part of the tail where light would hit. -
Create the magic dust:
Using the same gold paint, add a cluster of tiny dots rising from her hand upward toward the surface, mixing small and medium dots for variety. -
Paint distant bubbles:
Dilute white gouache with water until it’s semi-transparent. Paint various sized circles in the background water to look like bubbles. Some can be solid, others just outlines. -
Add foreground sparkles:
Use concentrated white gouache to add bright, crisp highlights. Dot these near the gold magic dust and sporadically around the mermaid for extra sparkle. -
Add reef details:
Don’t forget the bottom! Add a few gold dots or small white specks to the dark coral reef to tie the painting together. -
Paint the tiny fish:
With a steady hand, paint two tiny silhouette fish near the surface using gold or a warm ochre color. -
The Reveal:
Once every drop of paint is completely dry, slowly peel off the masking tape at a 45-degree angle to reveal your crisp, clean borders.
Frame your underwater masterpiece or gift it to someone who loves the ocean to brighten their day


Easy Scale Pattern With U-Shapes
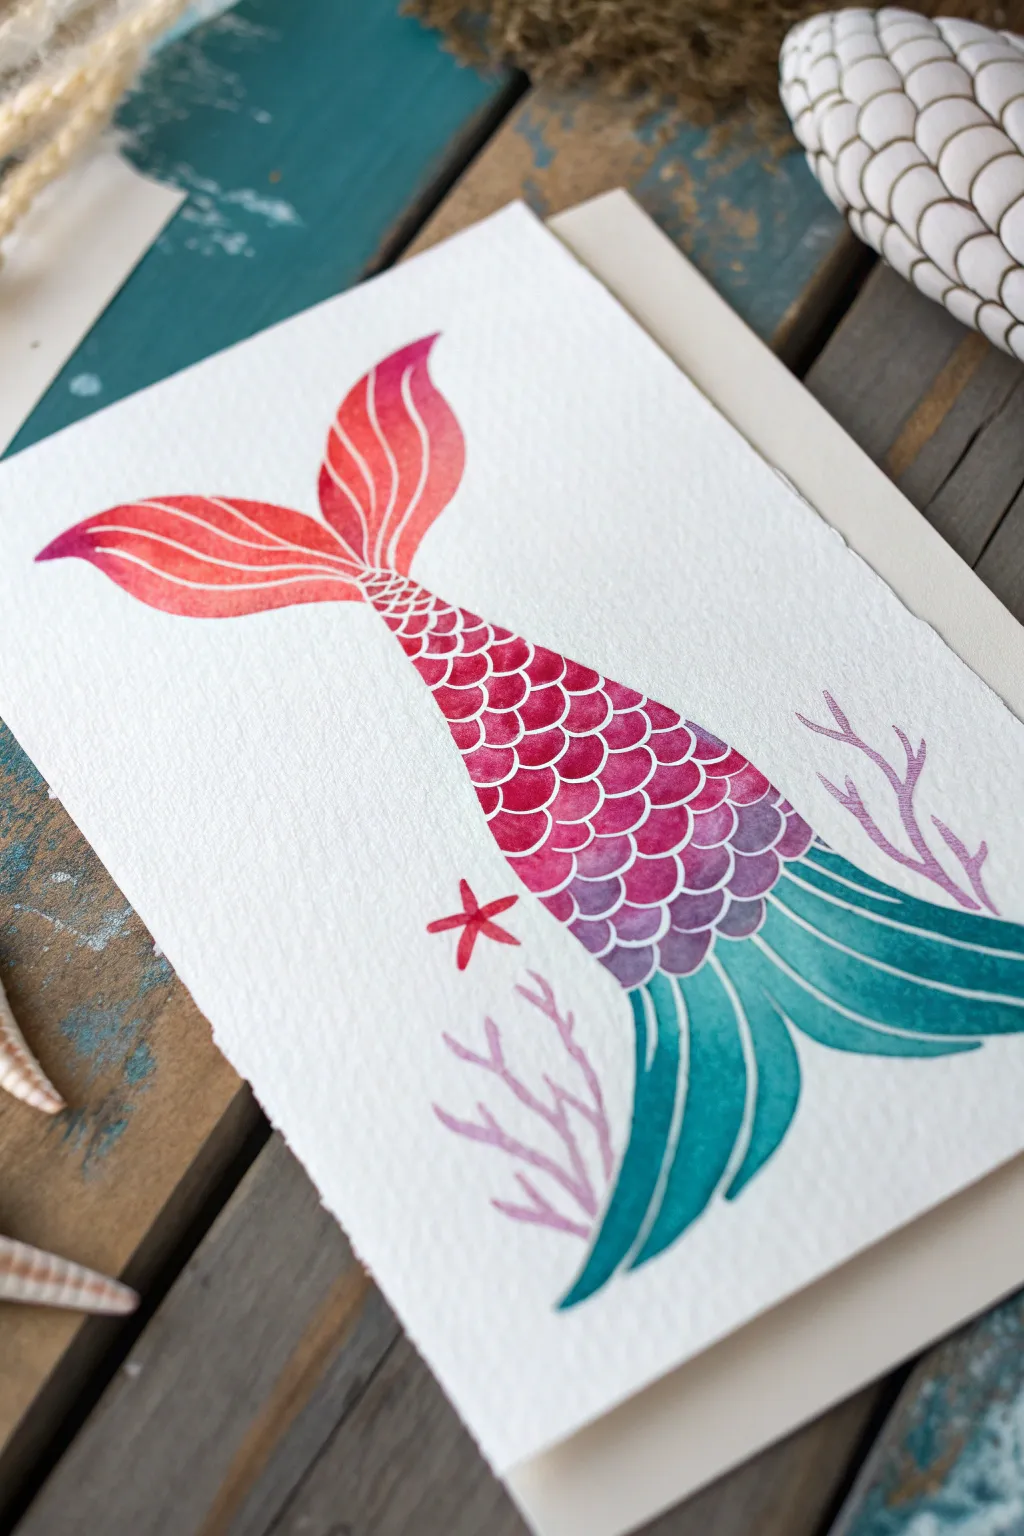
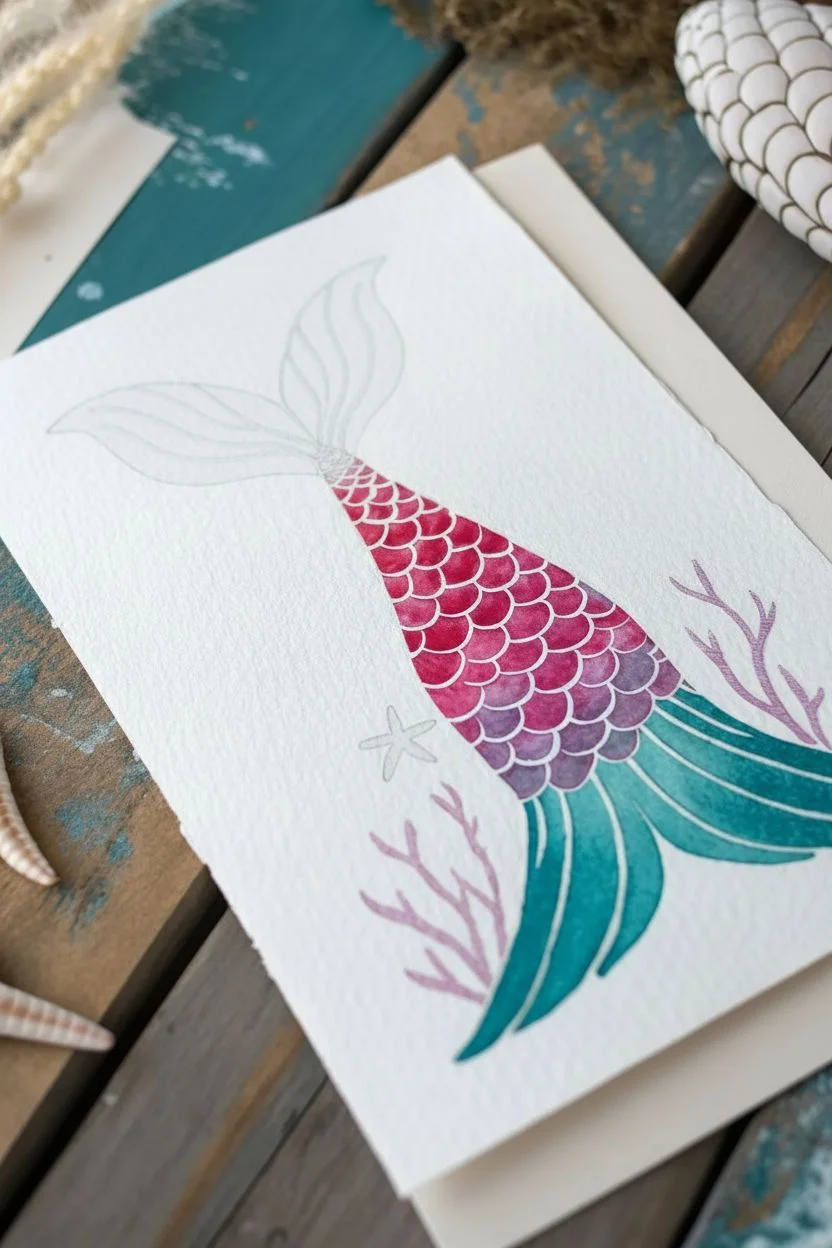
This stunning watercolor card captures the magic of the ocean with a vibrant gradient mermaid tail, transitioning seamlessly from fiery reds to deep ocean teals. Using a clever white-resist technique, you can easily create defined, crisp scales that pop against the colorful washes.
Step-by-Step Tutorial
Materials
- Cold-press watercolor paper (300gsm)
- Watercolor paints (Red, Magenta, Purple, Turquoise/Teal)
- White gel pen (water-resistant) or masking fluid
- Pencil and eraser
- Round watercolor brush (size 4 or 6)
- Clean water and paper towels
- Cardstock for mounting (optional)
Step 1: Sketching and Resisting
-
Outline the Shape:
Begin by lightly sketching the mermaid tail shape in pencil. Draw the bifurcated tail fin at the top, a tapering body in the middle, and a flowing, skirt-like fin at the bottom. -
Add Scale Details:
Fill the middle body section with a pattern of varying U-shapes for scales. Keep them tighter near the tail connection and slightly larger as the body widens. -
Sketch the Flourishes:
Add curved lines inside the top tail fin and the bottom skirt to mimic fin rays. Sketch a small starfish and some simple coral branches on the sides for extra atmosphere. -
Apply the Resist:
Trace over your pencil lines—specifically the scales, fin rays, and coral—using a white gel pen or thin masking fluid. If using a gel pen, make sure it is waterproof once dry. -
Erase Pencil Guidelines:
Once the white ink or masking fluid is completely dry, gently erase the visible pencil marks so you have a clean ‘invisible’ guide on the white paper.
White Pen Trick
If you don’t have masking fluid, a white wax crayon creates a similar resist effect. The watercolor will bead up around the wax lines instantly.
Step 2: Painting the Gradient
-
Start with Red:
Load your brush with a vibrant red paint. Begin filling in the top tail fin, painting right over your white resist lines. -
Begin the Scale Section:
Continue bringing the red paint down into the top narrow section of the scaly body, keeping the paint fairly wet to encourage mixing. -
Transition to Magenta:
Clean your brush slightly and pick up a bright magenta or pink. Blend this into the wet red edge and paint down through the middle of the scale section. -
Shift to Purple:
Introduce a deep purple hue as you move lower on the body. Let the magenta bleed naturally into the purple for a soft, ombre effect. -
Paint the Bottom Fin:
Switch to a rich turquoise or teal color. Paint the bottom flowing fin skirt, starting right where the purple scales end, but don’t blend them too much; a distinct color change here looks striking. -
Intensify the Colors:
While the paint is still damp, drop in slightly more concentrated pigment into the centers of the scales to give them dimension.
Step 3: Finishing Touches
-
Paint the Accessories:
Use a small amount of red paint to fill in the little starfish shape you outlined earlier. -
Add Coral Details:
Paint the coral branches using a very diluted wash of purple or pink so they look soft and distant. -
Let it Dry Completely:
Allow the entire painting to dry fully. If the paper curls, you can press it under a heavy book overnight. -
Optional Highlight Enhancement:
If your paint covered your white lines too heavily, you can re-trace some of the scale outlines with the white gel pen to make them bright again. -
Create the Deckled Edge:
For that rustic, handmade look, carefully tear the edges of the watercolor paper against a ruler instead of cutting them with scissors.
Shimmer Boost
Once the paint is dry, brush a sheer layer of metallic gold or iridescent watercolor over the scales to make your mermaid tail sparkle in the light.
Now you have a beautiful piece of ocean art ready to frame or send as a greeting
BRUSH GUIDE
The Right Brush for Every Stroke
From clean lines to bold texture — master brush choice, stroke control, and essential techniques.
Explore the Full Guide
Mermaid With Kelp Forest Framing
Capture the serene beauty of the deep blue with this delicate watercolor illustration. This project combines soft washes with fine detailing to create a graceful mermaid ascending through a Kelp forest toward the light.
Detailed Instructions
Materials
- Cold press watercolor paper (300 gsm)
- Watercolor paints (Turquoise, Cerulean Blue, Indigo, Sap Green, Burnt Umber, Skin Tone mix)
- White gouache or white gel pen
- Pencil (HB or H) and kneadable eraser
- Round watercolor brushes (sizes 2, 4, and 0 for details)
- Masking fluid (optional)
- Jar of clean water
- Paper towels
- Palette for mixing
Step 1: Sketching and Preparation
-
Light Sketching:
Begin by lightly sketching the mermaid’s pose with your HB pencil. Her body is curved in a gentle ‘S’ shape, swimming upwards. Place her roughly in the center but slightly to the left to leave room for the seaweed. -
Defining Features:
Refine the sketch by adding the flowing hair, the arm reaching up, and the tail fin. Keep the facial features minimal and delicate. Sketch the outlines of the seaweed clumps at the bottom and creeping up the right side. -
Clean Up:
Use a kneadable eraser to lift off excess graphite. You want the lines to be barely visible so they don’t show through the transparent watercolor layers later.
Uneven Washes?
If your ocean backgroud dries with hard edges or ‘blooms’, try re-wetting the whole area gently and lifting pigment with a thirsty brush to smooth it out.
Step 2: Painting the Ocean Background
-
Wet-on-Wet Wash:
Wet the entire ocean area with clean water, carefully painting around the mermaid shape. While the paper is glistening, drop in a very diluted wash of Cerulean Blue. -
Creating Depth:
While the paper is still damp, drop slightly darker Turquoise into the lower sections and around the edges to suggest depth. Leave the top section very pale to indicate sunlight filtering down. -
Surface Texture:
As the wash begins to dry but is still cool to the touch, use a clean, damp brush to lift out horizontal wavy lines near the top surface to represent ripples. -
Drying Time:
Let this background layer dry completely. If the paper feels cold, it’s still wet.
Salt Texture Trick
While the mermaid’s tail paint is still wet, sprinkle a few grains of table salt on it. Brush it off when dry for an effortless, magical scaly texture.
Step 3: The Mermaid
-
Skin Tones:
Mix a pale skin tone using a touch of Burnt Umber and red or orange. Apply a light wash to her face, arms, and torso. Let it dry. -
Hair Base:
Paint the hair with a base of diluted Burnt Umber. While wet, drop in a slightly darker brown near the roots and neck for volume. -
Tail Gradient:
For the tail, start with a vibrant Turquoise near the waist. As you move down towards the fin, blend in Indigo to make it darker. The transition should be seamless. -
Tail Details:
Once the tail is dry, mix a dark Teal. Use your size 0 brush to paint tiny distinct scales on the upper part of the tail and the cross-hatching pattern on the fin.
Step 4: Seaweed and Finishing Touches
-
Base Greenery:
Mix a watery Sap Green and paint the seaweed shapes in the foreground. Vary the height, making the fronds flow upwards like the current is catching them. -
Darker Kelp:
Mix Indigo with your Sap Green to create a deep, shadowy sea-green. Paint the seaweed strands that are further back or in shadow, particularly the tall ones on the right side. -
Adding Bubbles:
Using diluted Turquoise, dab small circles rising from the kelp and around the mermaid. Vary the sizes from tiny dots to recognizable bubbles. -
White Highlights:
I prefer using white gouache or a gel pen for the final sparkles. Add tiny white dots to the mermaid’s tail scales for shimmer and highlight the bubbles. -
Surface Lines:
Use the white medium to reinforce the water ripples at the very top of the painting, giving that distinct water-surface look.
Now you have a framed piece of underwater magic ready to hang on your wall
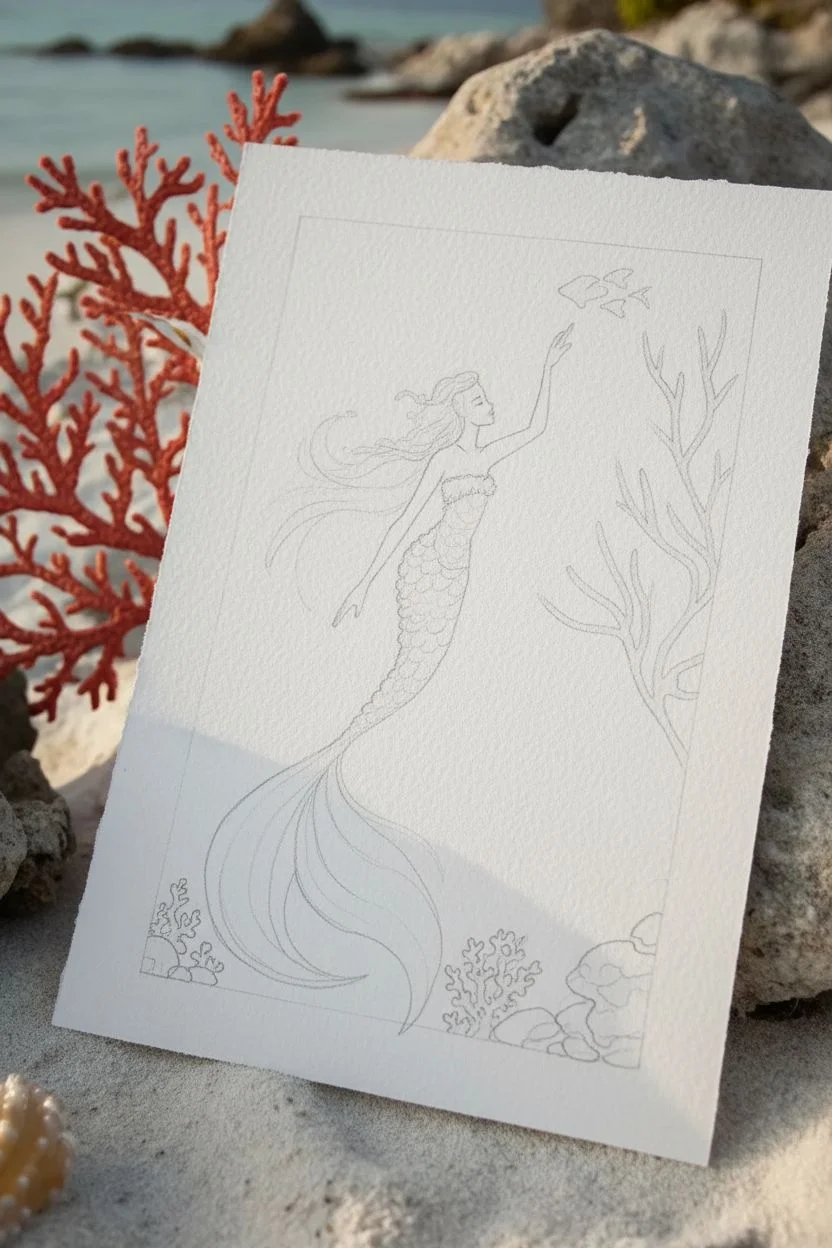
Mermaid and Tiny Fish Companions
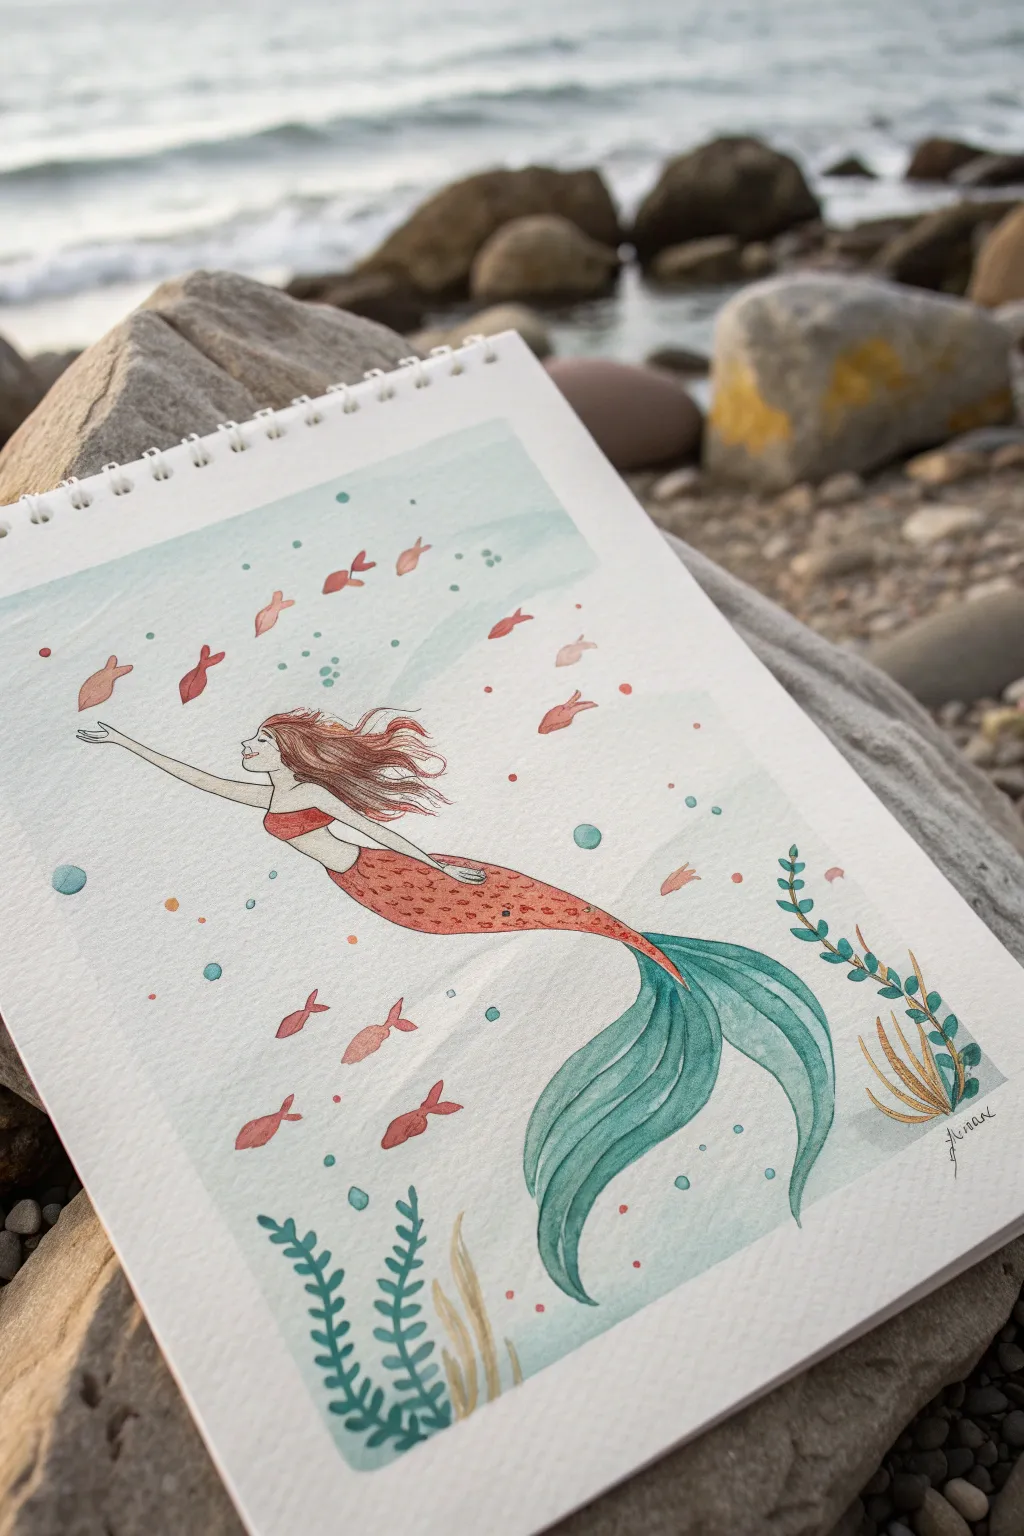
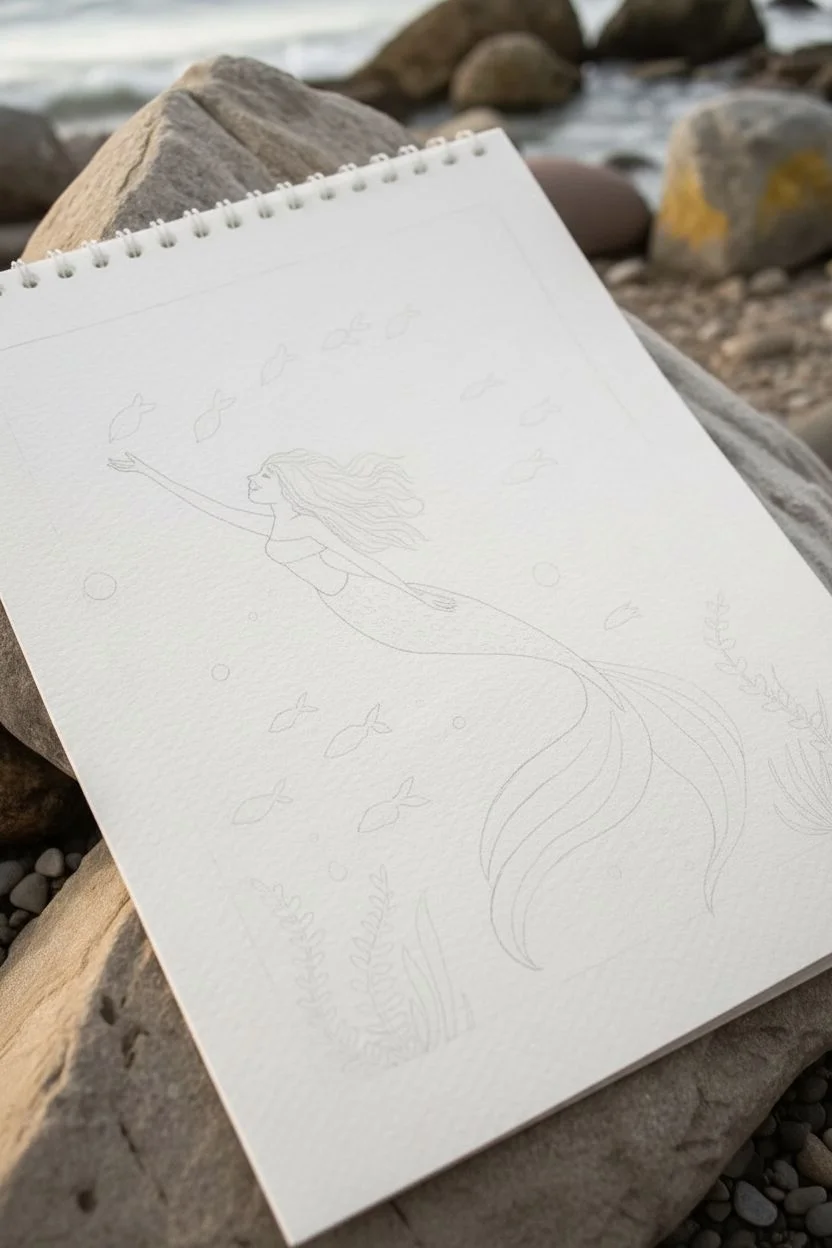
Capture the fluid grace of a mermaid swimming among her tiny companions in this delicate watercolor illustration. The soft washes and crisp details create a serene underwater scene perfect for an art journal or sketchbook.
Step-by-Step Guide
Materials
- Cold press watercolor paper (spiral bound sketchbook preferred)
- Watercolor paints (Emerald Green, Teal, Cadmium Red, Burnt Sienna, Yellow Ochre)
- Small round brushes (size 0, size 2, and size 4)
- Pencil (HB or H)
- Kneaded eraser
- Fine liner pen (brown or sepia, waterproof)
- White gel pen (optional for highlights)
- Paper towels
- Jar of clean water
Step 1: Sketching the Composition
-
Outline the mermaid:
Begin with a very light pencil sketch of the mermaid’s body. Position her diagonally across the page, swimming upward from left to right. Draw her outstretched arm reaching forward and her tail flowing behind her in a gentle curve. -
Add flowing hair:
Sketch long, wavy hair trailing behind her head to emphasize the movement of water. Keep the lines loose and organic. -
Draw the fish companions:
Scatter small, simple fish shapes around the mermaid. Vary their directions slightly but keep a general flow that follows the mermaid’s movement. -
Include seabed details:
At the bottom corners, lightly sketch waving strands of seaweed and kelp to frame the composition without overcrowding it. -
Clean up lines:
Use your kneaded eraser to lift excess graphite, leaving only the faintest guide lines visible before you start painting.
Master the Gradient
To make the tail transition from red to green smoothly, wet the middle area with clean water first, then touch colors to opposite ends and let them meet.
Step 2: Layering the Watercolors
-
Paint the skin tone:
Mix a very dilute wash of Burnt Sienna with plenty of water for a pale skin tone. Carefully fill in the face, arm, and torso, leaving paper white for the eyes. -
Color the tail body:
For the upper part of the tail, use a mix of Cadmium Red and a touch of Burnt Sienna. Apply this color while the paper is dry for a crisp edge, fading it slightly as you reach the fin area. -
Paint the tail fin:
Switch to a Teal or Emerald Green mix for the large tail fin. Use long, sweeping brushstrokes to mimic the fin’s structure. You can blend a little of this green into the red tail section while it’s still damp for a seamless transition. -
Define the hair:
Using a size 2 brush, paint the hair strands with a reddish-brown mix. Leave tiny gaps of white paper between some strands to suggest volume and light hitting the wet hair. -
Fill in the fish:
Paint the small fish using variations of the red and orange hues used for the tail. A single stroke with a round brush often creates a perfect fish shape. -
Paint the seaweed:
Use your green mix for the leafy seaweed and a Yellow Ochre for the grassy strands. Keep the paint somewhat transparent to maintain the watercolor look.
Blooms & Backruns?
If cauliflower-like blooms appear in your wash, you added water to damp paint. Let it dry completely, then gently glaze over it to smooth it out.
Step 3: Adding Details and Background
-
Create the water wash:
Prepare a very watery, pale blue-green wash. Carefully paint around your subject and elements, filling in the background to suggest the ocean. Keep edges soft and irregular for an organic feel. -
Detail the tail scales:
Once the red tail section is completely dry, use a slightly darker, more concentrated red mix and a size 0 brush to draw tiny ‘u’ shapes for scales. -
Outline for definition:
Detailed illustration relies on crisp edges. I prefer using a fine sepia liner or a very fine brush with dark paint to outline the mermaid’s profile, arm, and the individual strands of seaweed. -
Add bubbles:
Dip your brush in a teal or blue mix and dab small dots of varying sizes around the mermaid and fish to represent bubbles rising to the surface. -
Finishing touches:
Add facial features very delicately with your finest brush. A tiny dot for the eye and a small curve for the smile bring her to life. Sign your work in the corner.
Now you have a whimsical underwater scene ready to be admired

PENCIL GUIDE
Understanding Pencil Grades from H to B
From first sketch to finished drawing — learn pencil grades, line control, and shading techniques.
Explore the Full Guide
Mermaid and Sea Turtle Moment
This ethereal artwork captures the grace of an underwater dancer with delicate lines and flowing teal hues. By combining fine liner detailing with soft watercolor washes, you’ll create a dreamlike composition perfect for any ocean lover’s collection.
Step-by-Step Tutorial
Materials
- Cold press watercolor paper (A3 or 11×14 inches recommended)
- Pencil (HB) and eraser
- Waterproof fine liner pens (black, sizes 01 and 03)
- Watercolor paints (phthalo turquoise, sap green, burnt sienna, yellow ochre)
- White gel pen or gouache
- Medium round brush
- Fine detail brush
- Masking tape
- Sea salt (optional for texture)
Step 1: Planning and Sketching
-
Secure the paper:
Begin by taping your watercolor paper to a solid board using masking tape. This creates a clean white border and prevents the paper from buckling when wet. -
Frame the composition:
Lightly sketch the main shapes of the mermaid. Position her torso slightly off-center, with her right arm extended gracefully upward, creating a clean curve from her waist to her fingertips. -
Define the hair:
Sketch the hair as if it’s floating underwater. Instead of heavy blocks, draw long, singular strands that float upwards towards the surface, interacting with the bubbles you’ll add later. -
Add spiral details:
Draw the stylized spiral waves near the bottom left. These should look like gentle whirlpools or shells, anchoring the composition with organic shapes. -
Refine the features:
Carefully draw the facial features. Keep the expression serene with soft eyes and a relaxed mouth. Add the scales on the bodice, drawing them as simple overlapping U-shapes.
Pro Tip: Bubble Depth
Paint the inside of the larger bubbles with a very faint wash of blue, leaving a white crescent shape unpainted. This makes them look transparent and spherical rather than flat circles.
Step 2: Inking the Outline
-
Trace with precision:
Using a 01 waterproof fine liner, go over your pencil lines. Use a confident, unbroken stroke for the long arm and hair lines to maintain fluidity. -
Vary line weight:
Switch to a slightly thicker 03 pen for the main contours of the body and the spiral waves, keeping the facial features delicate with the thinner pen. -
Clean up:
Once the ink is completely dry—give it a few minutes to be safe—gently erase all the underlying pencil sketch marks.
Step 3: Painting the Ocean
-
Mix your skin tone:
Mix a very dilute wash of burnt sienna and a touch of yellow ochre. Apply this gently to the face, neck, and arm, leaving the paper white for highlights on the nose and shoulder. -
Create the teal mix:
Prepare a watery mix of phthalo turquoise and a hint of sap green. This will be the primary color for the water and the mermaid’s tail section. -
Paint the background wash:
Wet the background area around the mermaid with clean water first. Drop in your teal mix, letting it bloom softly. Keep the top area lighter to suggest sunlight filtering down. -
Texturize the water:
While the background is still damp, I like to sprinkle a tiny pinch of sea salt in the corners. As it dries, it creates beautiful, organic patterns that look like sea foam. -
Fill the spirals:
Paint the spiral wave shapes with a more saturated version of your teal mix. Let the brush follow the swirl of the line art to emphasize the movement.
Level Up: Metallic Glint
Once dry, use metallic watercolor or a gold gel pen to trace a few select strands of hair or specific scales on the tail. It adds a magical shimmer when the light hits the artwork.
Step 4: Details and Finishing
-
Paint the scales:
Using the fine detail brush, dab a slightly darker green-blue into the scales on the bodice. Don’t fill them completely; let some of the light paper show through for texture. -
Add hair shadows:
Mix a pale yellow ochre wash for the hair. Add thin strokes of light brown where hair strands overlap to create depth without making it look heavy. -
Create bubbles:
With the 01 pen, draw various circles floating upward. Some can be tiny dots, while others are perfect circles. Mix different sizes for a natural look. -
Add highlights:
Using your white gel pen or opaque white gouache, add tiny highlights to the eyes, lips, and the tops of the bubbles to make them pop. -
Reveal the border:
Wait until the painting is bone dry. Carefully peel away the masking tape at a 45-degree angle to reveal your crisp, white edge.
Step back and admire the serene underwater world you have brought to life on paper
Coral Reef Color Pop Mermaid
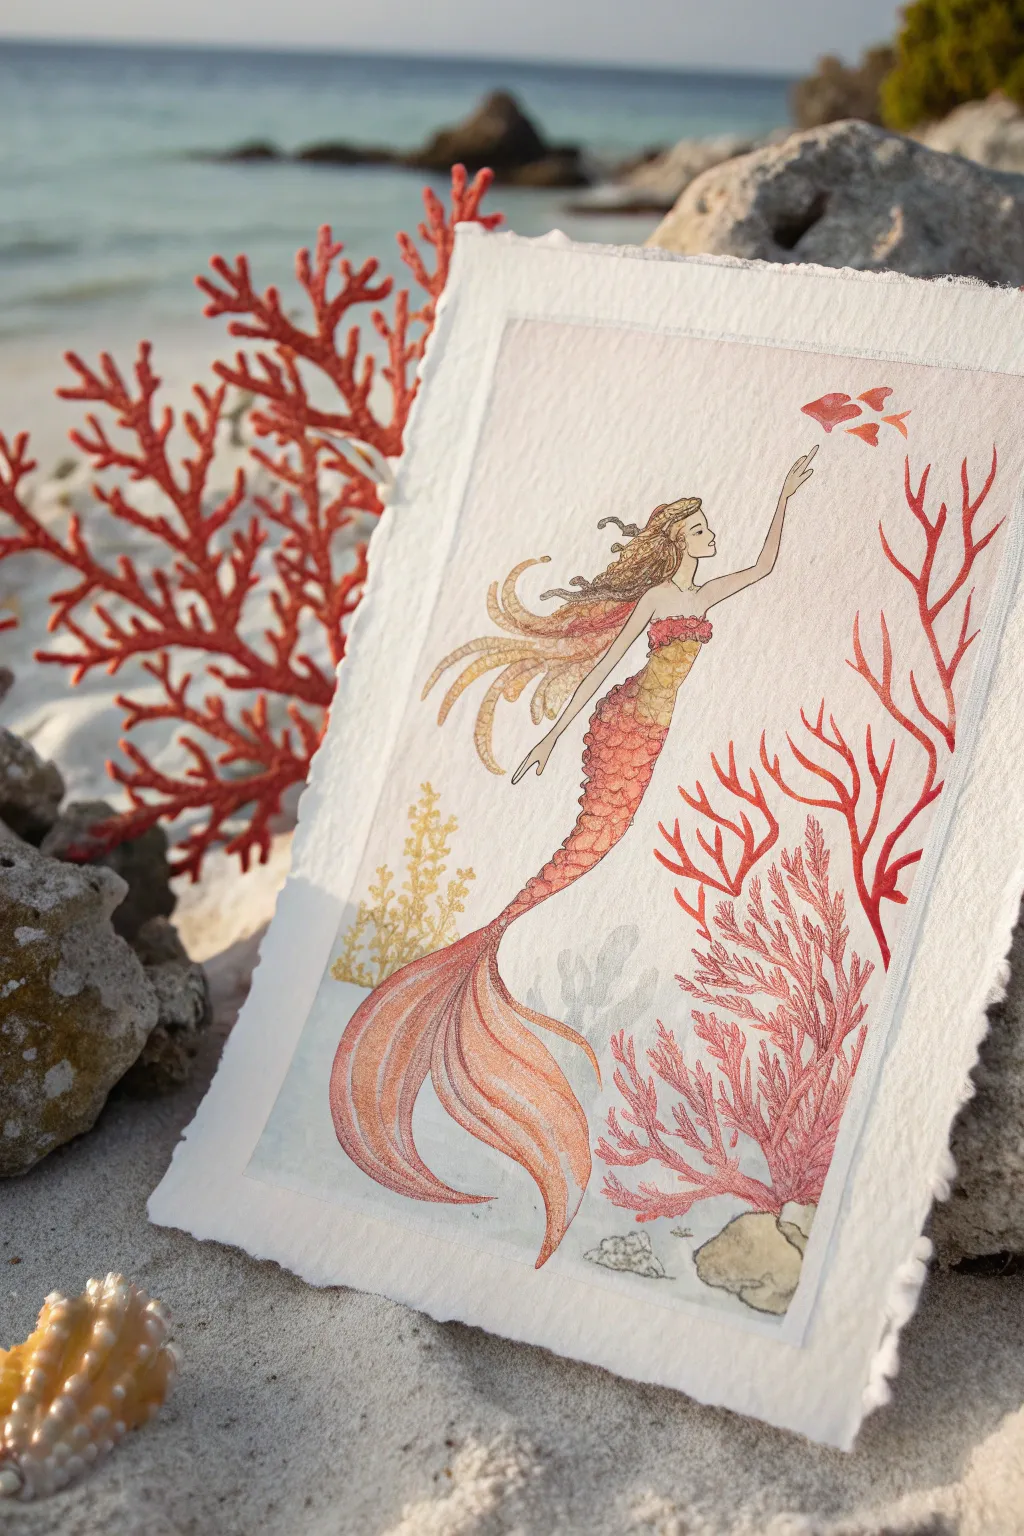
This whimsical project captures the delicate dance of a mermaid amidst a vibrant coral garden, painted on textured paper with deckled edges to evoke an authentic, sea-worn feel. Using soft watercolor washes combined with precise pen work creates a layered, illustrative style that feels both classic and fresh.
How-To Guide
Materials
- Cold press watercolor paper (deckled edge preferred)
- Watercolor paints (coral, orange, gold, yellow ochre, pale blue)
- Fine liner pens (sepia or dark brown, 0.1mm and 0.3mm)
- Round watercolor brushes (size 2 and size 6)
- Pencil (HB or H)
- Kneaded eraser
- Clean water jar
- Paper towels
Step 1: Sketching the Composition
-
Position the figure:
Begin by lightly sketching the mermaid’s pose on the right center of your paper. Draw a gentle S-curve for the spine to capture her upward reaching motion. Her arm should extend toward the upper right corner. -
Outline the tail and corals:
Flesh out the tail, having it curve gracefully toward the bottom left. Sketch the large branching corals on the right side and the smaller, textured coral shapes near the bottom left to frame the figure. -
Add details:
Draw the finer details: her flowing hair trailing behind her, the small scales on the tail, and the tiny fish near her hand. Keep these pencil lines extremely light so they won’t show through the paint later.
Pro Tip: Deckled Edges
Can’t find deckled paper? Tear your watercolor paper against a metal ruler edge instead of cutting it with scissors to create that faux-deckled, vintage look.
Step 2: Watercolor Application
-
Paint the background wash:
Mix a very dilute, watery pale blue or grey. Apply a soft, rectangular wash behind the figure to suggest water, leaving the paper edges white. Let this layer dry completely. -
Base layer for the mermaid:
Using a size 6 brush, paint the mermaid’s skin with a transparent, diluted ochre or peach tone. While wet, you can drop in a tiny hint of pink on the cheek. -
Coloring the tail:
Mix a vibrant coral-orange hue. Paint the tail, starting with a concentrated color at the waist and fading out slightly towards the fluke. I like to drop in touches of gold while the paint is damp for a shimmering effect. -
Painting the hair:
Use a mix of yellow ochre and light brown for the hair, painting in flowing strokes that follow the pencil lines. Allow some strands to be lighter than others. -
Rendering the coral:
Switch to a vivid red-orange for the large branching coral on the right. Paint these strands deliberately, varying the pressure to get thick and thin branches. Use a yellow-green for the smaller coral on the left.
Troubleshooting: Blotchy Washes
If your background wash looks uneven, re-wet the entire area with clean water and gently lift excess pigment with a thirsty brush before it dries fully.
Step 3: Inking and Finishing
-
Wait for dryness:
Ensure the paper is bone dry before picking up your pen. If the paper is cool to the touch, it still holds moisture which will make the ink bleed. -
Outline the figure:
Using the 0.1mm sepia pen, carefully outline the mermaid’s profile and arm. Keep the line weight delicate and broken in places to avoid a cartoonish heavy outline. -
detail the scales:
Draw small, U-shaped scales on her tail over the dried watercolor. Group them closer together near the waist and spread them out as you move down. -
Define the hair:
Add flowing lines within the painted hair mass to suggest individual strands and volume. Add the small fin-like accessories near her ears. -
Texture the coral:
For the red coral, add tiny dots or short dashes with the pen to give it a rough, organic surface texture. Outline the yellow coral with slightly jagged lines. -
Add the fish:
Paint the tiny fish near her hand with a saturated red-orange. Once dry, give them a simple outline and a dot for an eye. -
Ground the scene:
Paint a few rock shapes at the very bottom using a grey-brown mix, and outline them loosely to anchor the coral.
Place your finished piece in a floating frame to show off those beautiful textured paper edges


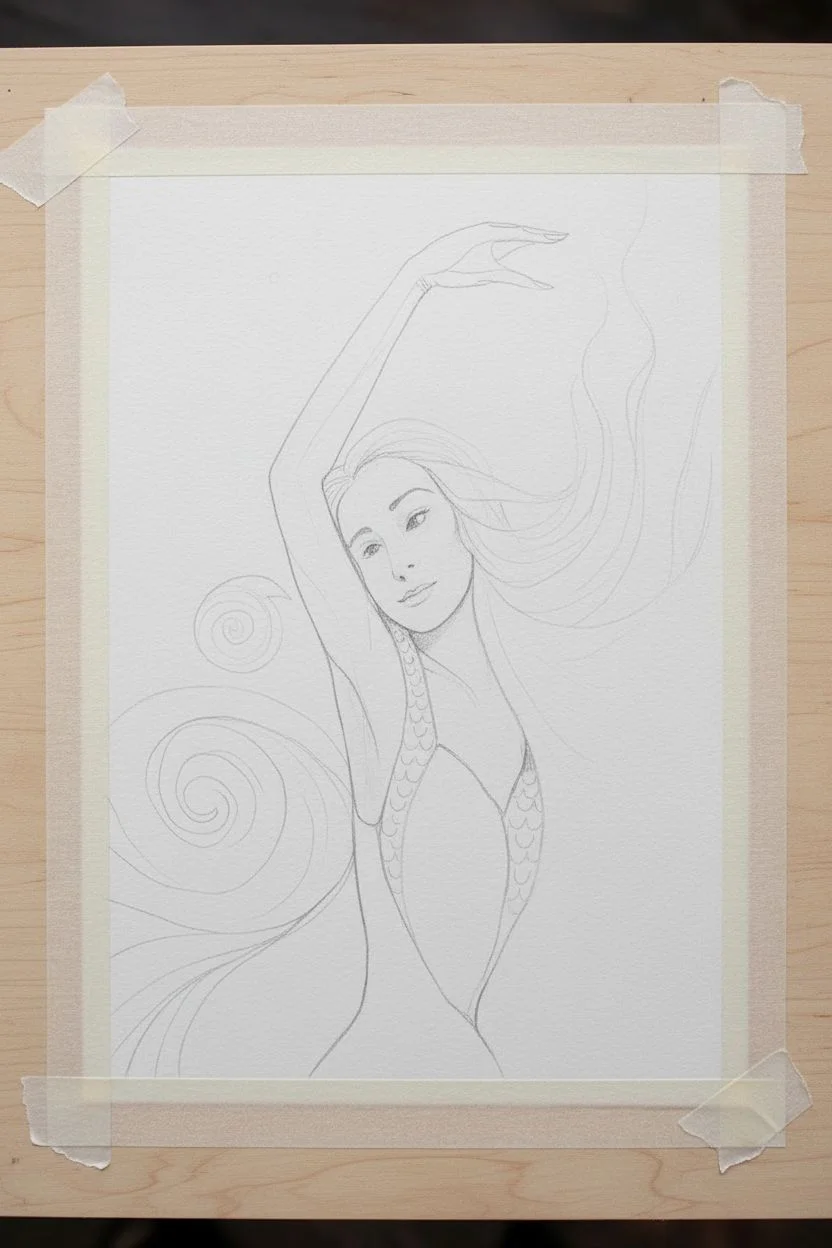
Mermaid Mirror Reflection on Water
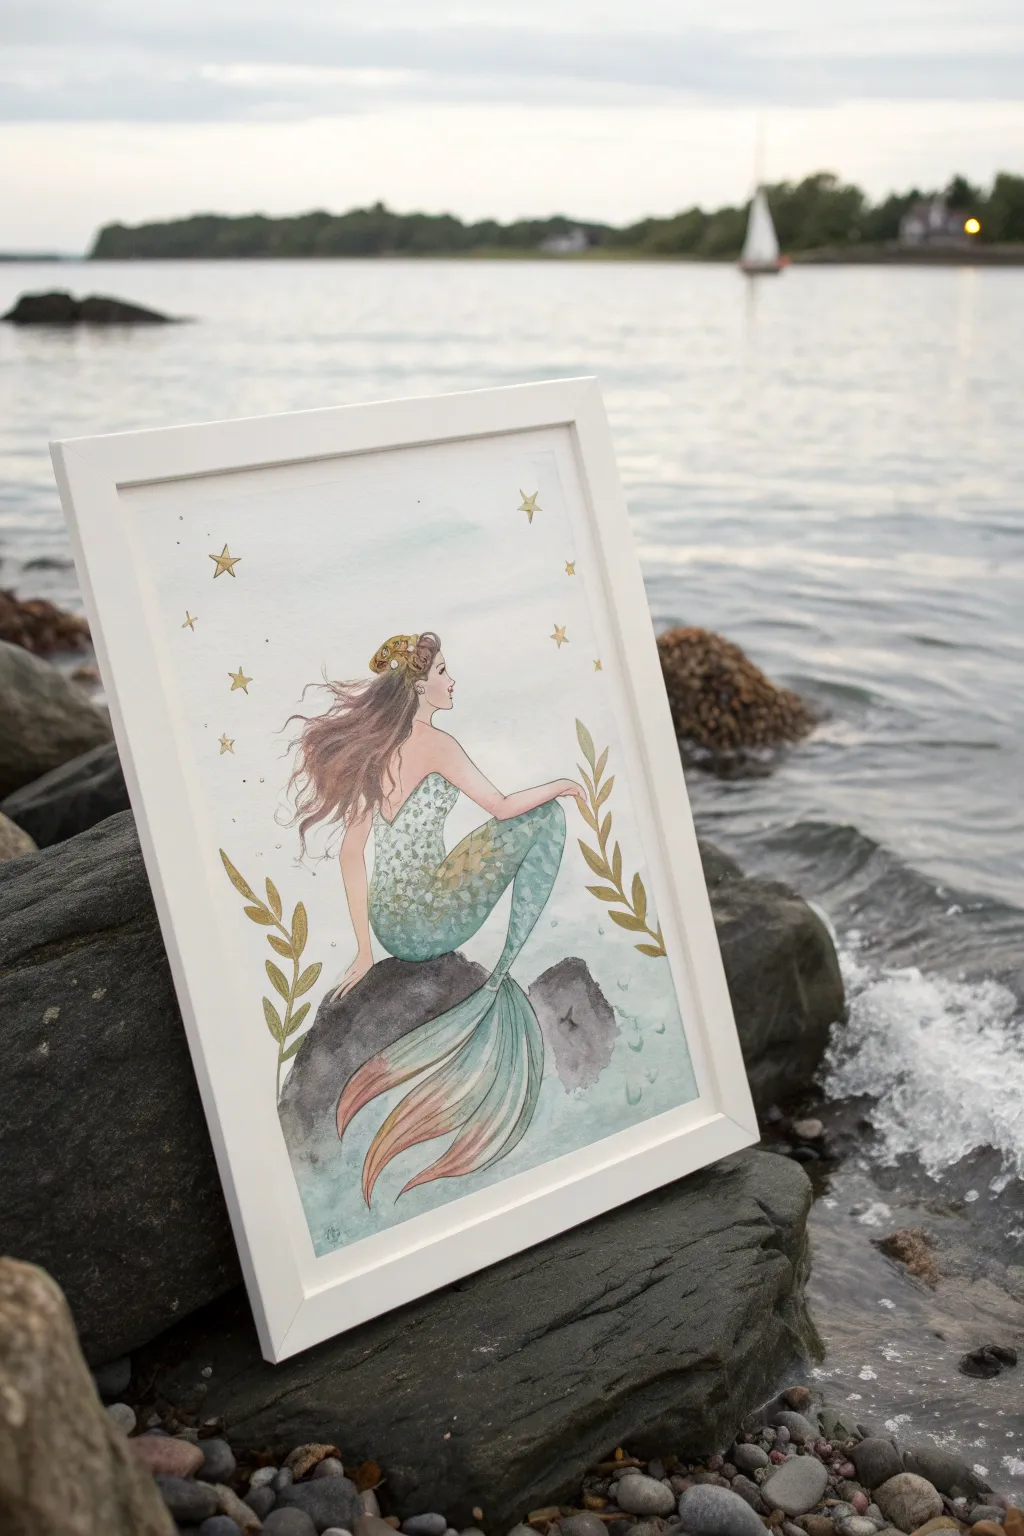
Capture the ethereal beauty of a mermaid gazing out to sea with this delicate watercolor project. The soft washes of aqua and teal combined with gold accents create a dreamy, stardust-speckled composition perfect for coastal decor.
How-To Guide
Materials
- Cold press watercolor paper (300 gsm)
- Watercolor paints (teal, aqua, payne’s gray, burnt sienna, peach/flesh tones)
- Metallic gold watercolor or gold gouache
- Fine liner brush (size 0 or 00)
- Round watercolor brushes (size 4 and 8)
- HB Pencil and kneaded eraser
- White gel pen (optional)
- Masking fluid (optional)
- White wooden frame
Step 1: Sketching the Silhouette
-
Establish the horizon:
Begin by lightly drawing a horizon line about a third of the way down your paper. This separates the sky from the water. -
Form the rock:
Sketch a sturdy, uneven rock shape in the lower center foreground where your mermaid will sit. -
Draw the figure:
Lightly pencil in the mermaid’s anatomy. Start with a curve for the spine, positioning her back towards the viewer. Sketch her head in profile gazing to the right, and extend her arm resting gently on her knee. -
Define the tail:
Sweep a large, curved line down from her waist to create the tail. Fan out the fins at the bottom, giving them an elegant, flowing shape like a long skirt drifting in water.
Step 2: Painting the Mermaid
-
Skin tones:
Mix a watery wash of your flesh tone. Carefully paint the back, arm, and profile. While wet, drop a tiny touch of burnt sienna near the hairline or under the arm for shadow. -
Hair base layer:
Using diluted brown or burnt sienna, paint the hair flowing backwards as if caught in a breeze. Keep the strokes loose and feathery. -
Tail wash:
Load your brush with a soft aqua or seafoam green. Paint the main body of the tail. While it’s still damp, drop in darker teal at the waist and along the bottom edge to create volume. -
Fin details:
For the fanned tail fins, use a blend of peach and diluted burnt sienna to contrast with the green tail. Let the colors bleed slightly where the fins meet the tail body. -
Adding scales:
Once the tail is completely dry, use a slightly darker teal mixture and your fine liner brush to paint delicate ‘U’ shapes for scales. Keep them denser near the waist and more spaced out towards the fins.
Star Placement
Don’t overthink the star placement; randomness looks more natural. Vary the size of your stars, making some tiny dots and others full shapes.
Step 3: Atmosphere and Gold Accents
-
Painting the rock:
Mix gray using Payne’s gray and a touch of brown. Paint the rock with a textured, uneven wash. Let some pigment pool in crevices to create natural darkness. -
Water wash:
Create a very dilute wash of teal blue. Paint the water around the rock and tail, fading it out to white as you move away from the center to keep the vignette look. -
Gold leaf crown:
Using your metallic gold paint, carefully add a floral crown or headdress to the mermaid. Little dabs work best to simulate jewels or flowers. -
Golden stars:
With the fine brush and gold paint, draw varying sizes of four and five-pointed stars scattered in the sky area. -
Seaweed accents:
Paint two curving sprigs of seaweed framing the mermaid on the left and right. Use an olive green tone, then layer gold accents over the leaves once dry for a magical shimmer. -
Final hair details:
Go back into the hair with a darker brown and a rigger or fine liner brush to add individual strands, emphasizing the movement of the wind.
Pearl Effects
After the gold dries, use a tiny dot of white gouache or a white gel pen in the center of the gold crown or on the tail scales to create a pearl effect.
Frame your finished piece in a simple white frame to let the delicate colors truly shine
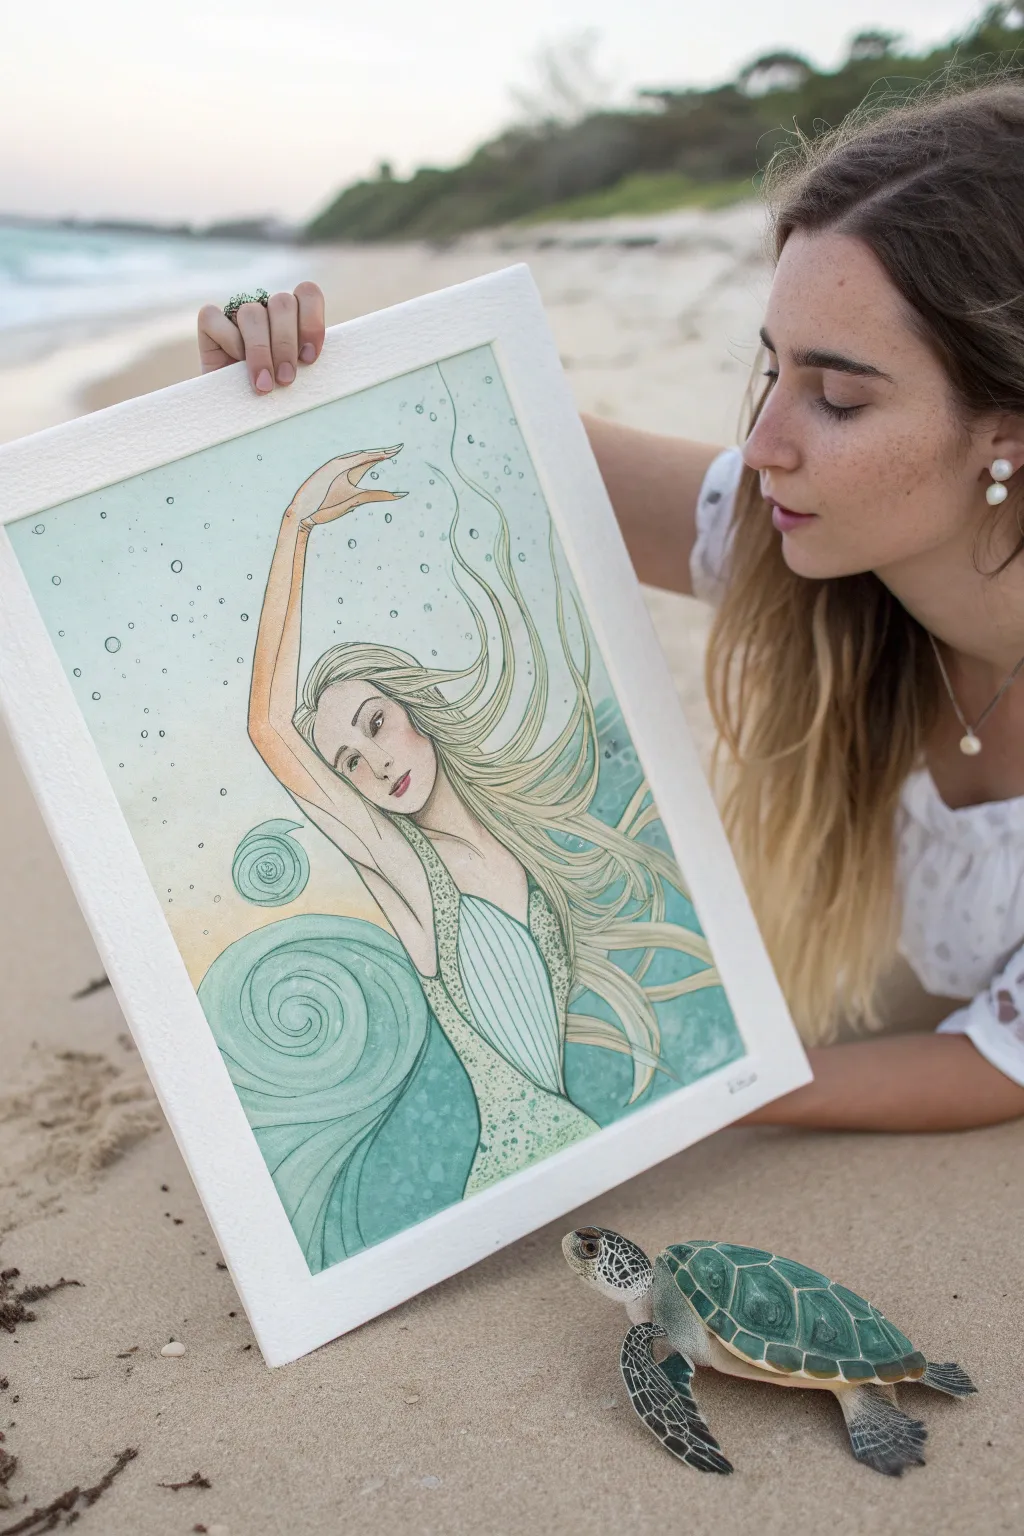
Cosmic Mermaid With Starry Tail
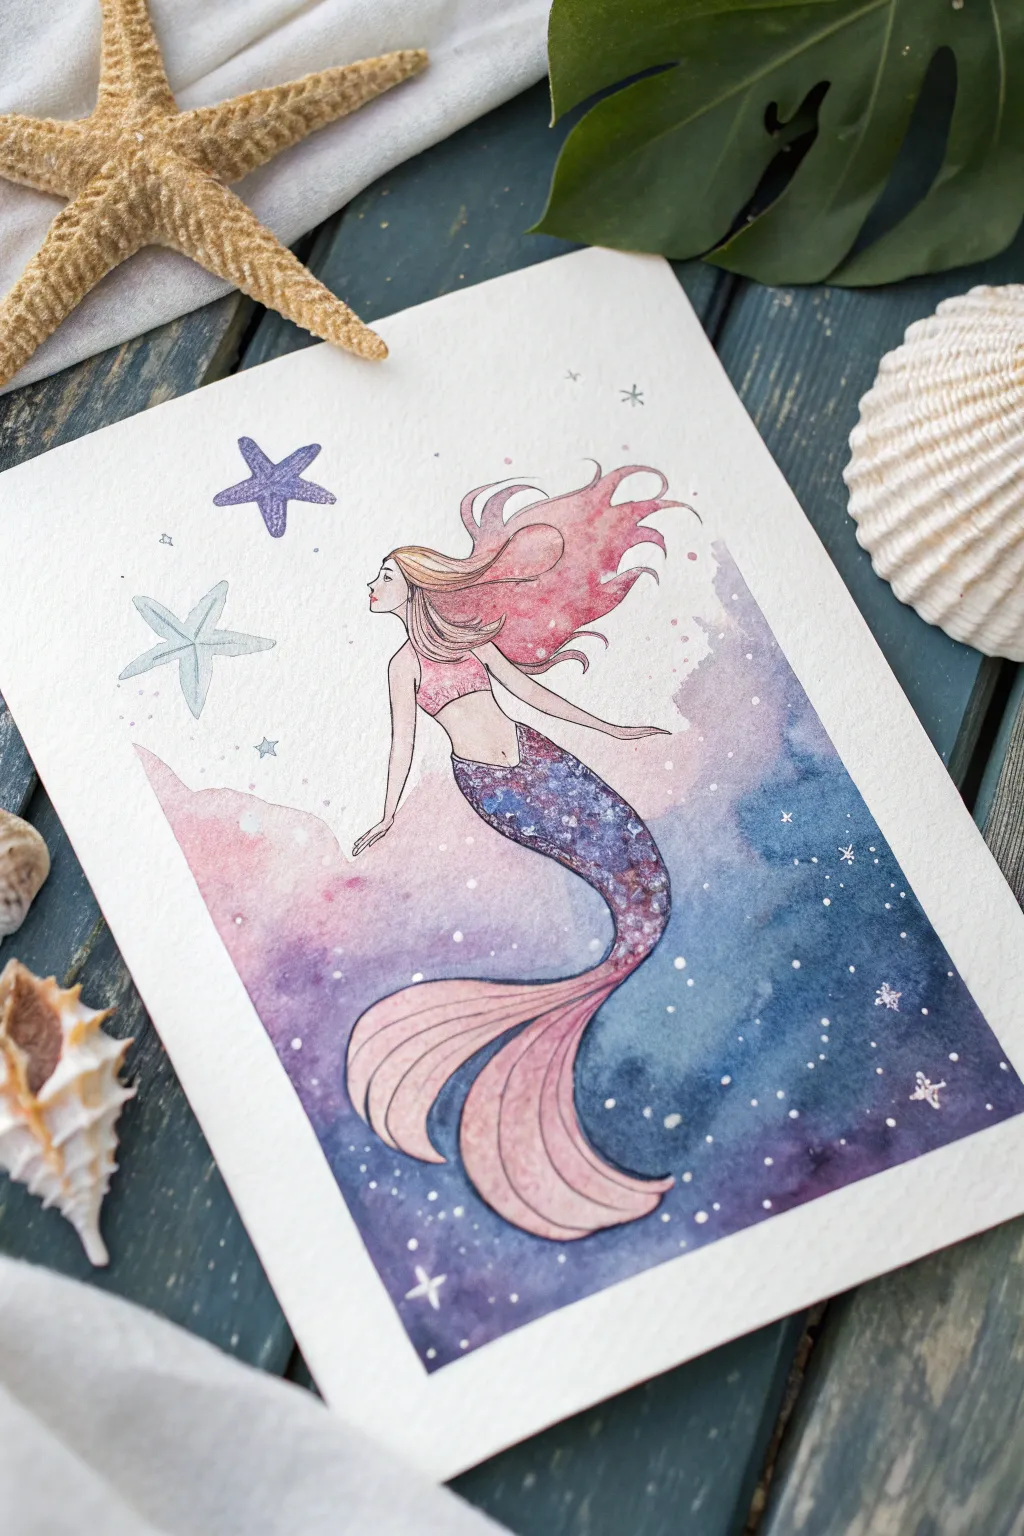
Abstract Mermaid Swirls and Shapes
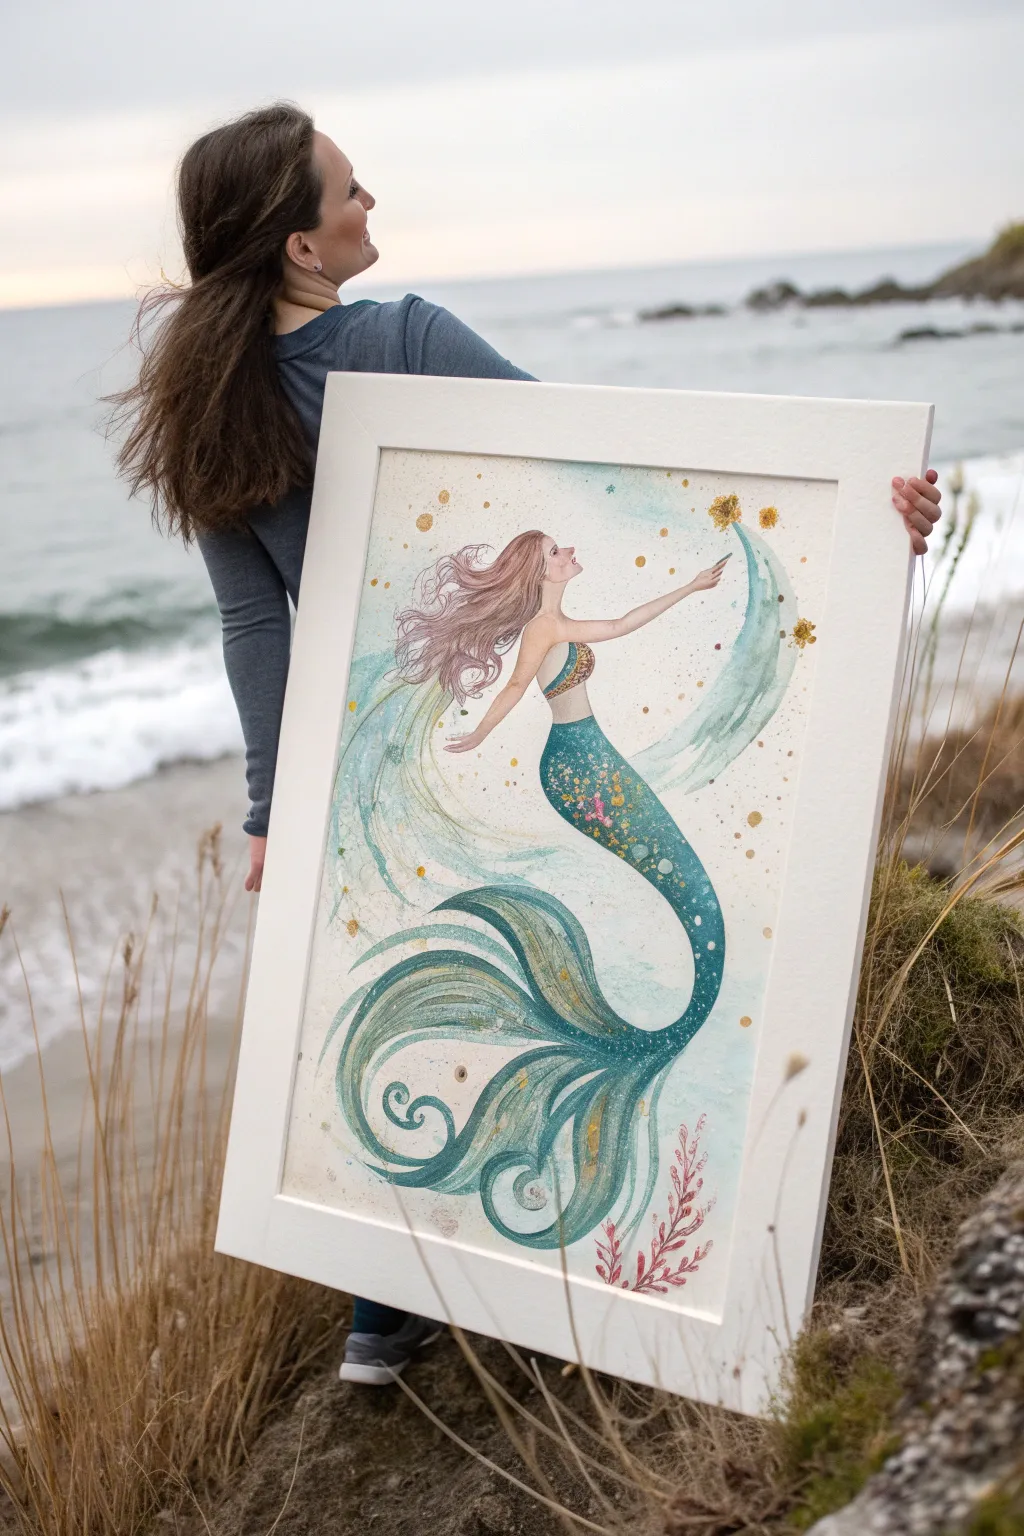
Capture the magic of the sea with this ethereal mermaid painting, featuring flowing lines, soft turquoise hues, and shimmering gold accents. This mixed-media watercolor piece combines delicate figure drawing with abstract, swirling tails to create a dreamy, fantasy-inspired artwork.
Detailed Instructions
Materials
- Large sheet of hot-press watercolor paper (at least 18×24 inches)
- Watercolor paints (Turquoise, Cerulean Blue, Sap Green, Payne’s Gray, Burnt Sienna, Crimson)
- Metallic gold watercolor or gouache
- Pencil (HB or 2H)
- Kneaded eraser
- Round watercolor brushes (sizes 2, 6, and 12)
- Fine liner brush or rigger brush
- Salt (table salt or sea salt)
- Masking fluid (optional)
- Water cups and paper towels
- Large white wooden frame (optional for finishing)
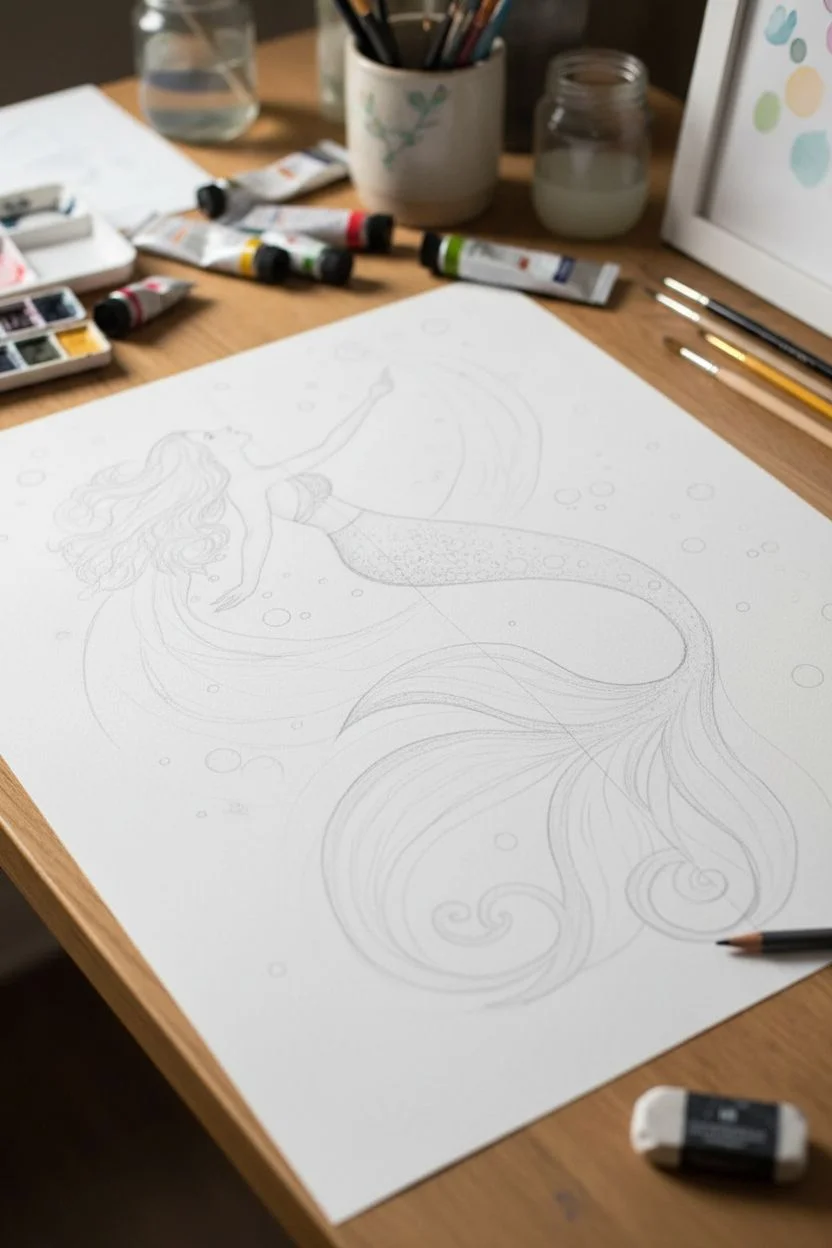
Step 1: Sketching the Silhouette
-
Establish the pose:
Begin by lightly sketching a sweeping ‘S’ curve down the center of your paper. This curve will guide the flow from the mermaid’s head down through her spine and into the tail. -
Draw the figure:
Refine the upper body, drawing a profile view of the face looking upward and an arm reaching out. Keep the anatomy stylised and elongated to match the whimsical feel. Sketch the hair flowing backwards as if caught in a current. -
Outline the tail:
Draw the mermaid’s tail following your initial ‘S’ curve. Instead of a traditional fluke, design a large, ornamental fin that spirals into decorative swirls at the bottom. -
Add floating elements:
Lightly pencil in circles of various sizes around the figure to represent bubbles or magical orbs. Sketch a swooping shape behind her back suggesting a sheer shawl or water current.
Salt Stuck?
If salt sticks to dried paint, gently brush it off with a dry, clean brush. Do not rub with your finger, as oils can cause smudging on the delicate watercolor.
Step 2: Layering the Watercolor
-
Paint the skin tone:
Mix a diluted wash of Burnt Sienna with a tiny touch of Crimson. Apply this gently to the face, torso, and arm. While wet, drop in slightly more saturated pigment at the elbow and shoulder for shadow. -
The first tail wash:
Load your size 12 brush with a watery mix of Turquoise and Cerulean Blue. Paint the entire tail area, starting lighter at the waist and getting darker towards the fluke. -
Create texture with salt:
While the tail wash is still very wet, sprinkle a pinch of salt onto the lower section. As it dries, the salt will push the pigment away, creating a bubbly, underwater texture. -
Detail the hair:
Using a reddish-brown mix, paint the flowing hair. Use the tip of your size 6 brush to flick the ends of the hair strokes, keeping them loose and separate. -
Paint the background swirl:
Wash a very pale teal color over the fabric-like shape behind her back. Use plenty of water here so the edges remain soft and transparent, suggesting movement.
Step 3: Defining Details
-
Deepen the tail colors:
Once the first layer is dry, mix a stronger teal using Turquoise and a touch of Payne’s Gray. Paint detailed scales on the upper thigh area and define the swirling lines of the tail fins. -
Add floral accents:
Using red or coral paint, add small, seaweed-like plant shapes near the bottom right corner to anchor the composition. -
Enhance the flowing lines:
Use a fine liner brush with a darker teal to outline the major curves of the tail and the spirals at the bottom. This gives the piece a graphic, illustrative quality. -
Incorporate gold magic:
Taking your metallic gold paint, fill in the bubbles you sketched earlier. Add tiny gold dots scattered around her hand and tail to simulate glittering magic dust. -
Gild the accessories:
Paint the mermaid’s bikini top with gold and elaborate patterns. I like to add thin gold highlights along the spine of the tail and amidst the hair strands for extra shimmer. -
Final touches:
Review the painting for balance. If the background feels too empty, splatter a few drops of watered-down teal or gold paint for an organic splash effect.
Control the Flow
For the crisp swirls in the tail, switch to a rigger brush. Its long bristles hold more paint but allow for incredibly long, uninterrupted smooth lines.
Frame your masterpiece in a wide white frame to let the delicate colors breathe and bring a splash of ocean magic to your wall


Have a question or want to share your own experience? I'd love to hear from you in the comments below!