I love how metallic acrylics change their mood every time you move the canvas—suddenly your painting feels lit from the inside. If you’re craving that extra pop of glow, contrast, and luxe shimmer, these metallic acrylic painting ideas will keep your brush busy in the best way.
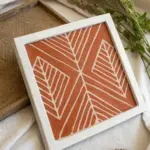
Metallic Acrylic Sunset Silhouettes
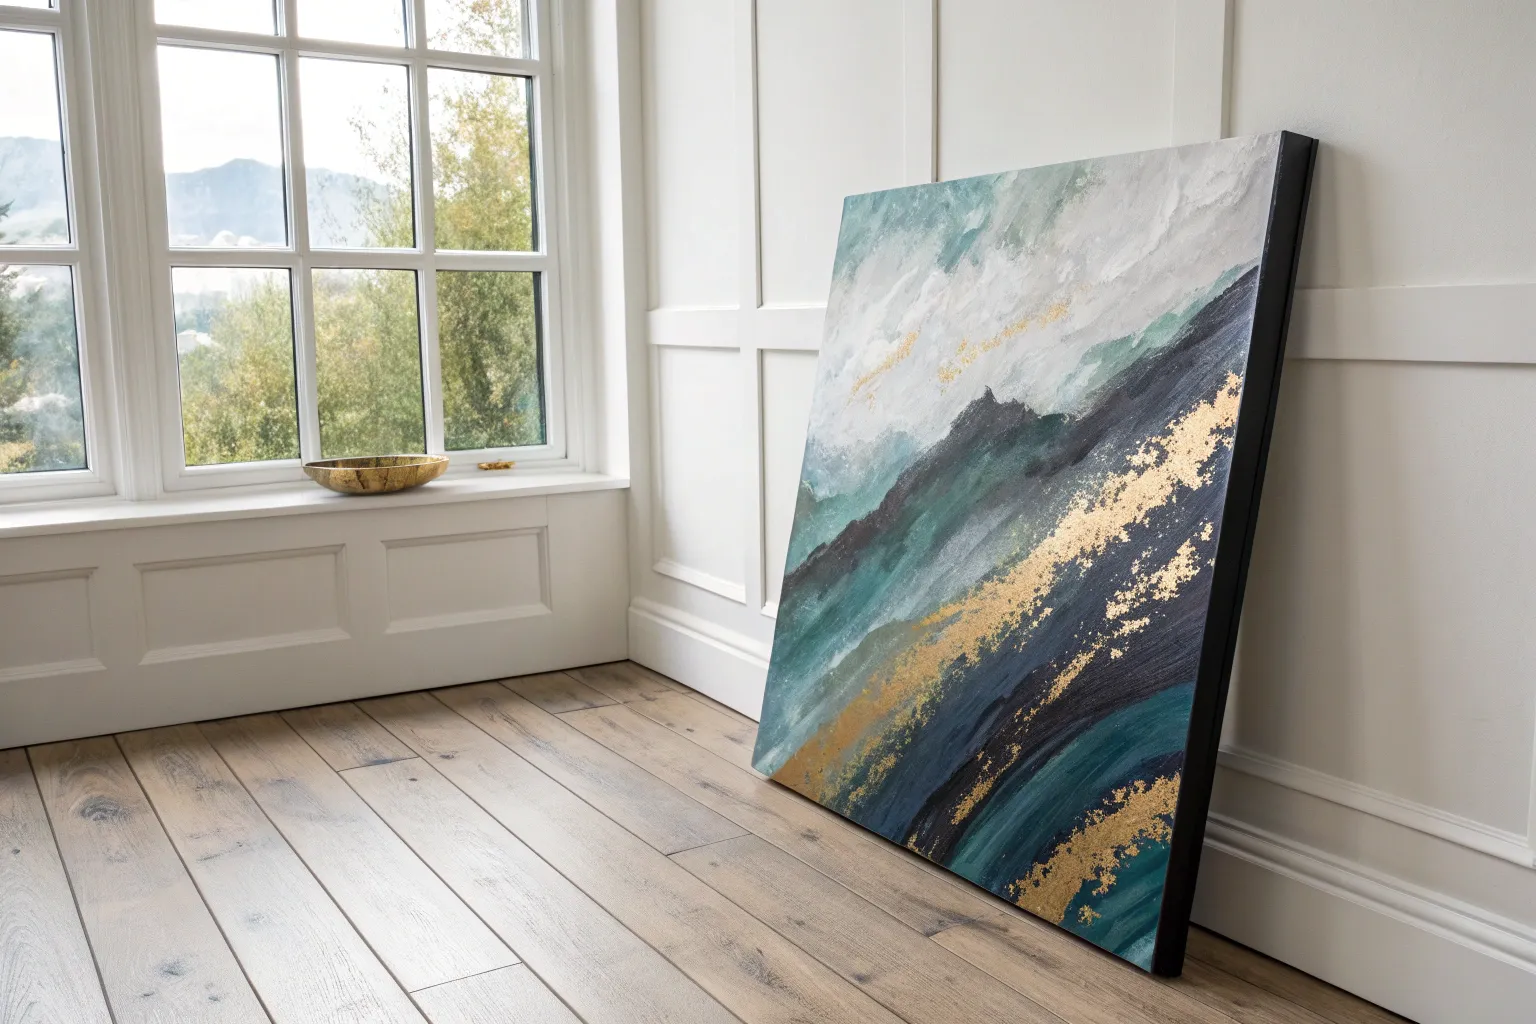
Capture the magic of an alpine sunset with this striking mixed-media piece that combines the lustrous shine of gold leaf with deep, shadowy silhouettes. The textured metallic background creates a dynamic light source that changes as you move around the room.
How-To Guide
Materials
- Stretched canvas (e.g., 16×20 inch)
- Gold leaf sheets (imitation gold leaf works perfectly)
- Gold leaf adhesive (sizing)
- Soft gilding brush or fluffy makeup brush
- Sealant for gold leaf (spray or brush-on)
- Heavy body acrylic paint: Black
- Acrylic paint: Burnt Umber, Burnt Sienna, Unbleached Titanium (or white)
- Glazing medium or water for thinning
- Flat shader brushes (various sizes)
- Small round detail brush (size 0 or 1)
- Fan brush (optional, for texture)
- Palette knife (optional, for mixing)
Step 1: Gilded Foundation
-
Prepare the canvas:
Start with a clean, dry canvas. Apply a thin, even layer of gold leaf adhesive (sizing) over the entire top two-thirds of the canvas where the sky will be. Don’t worry about a perfect straight line solely at the horizon; organic edges are fine. -
Wait for the tack:
Let the adhesive sit for about 15-20 minutes, or until the milky glue turns clear and feels sticky to the touch but doesn’t transfer to your finger. -
Apply the gold leaf:
Gently lay whole sheets of gold leaf onto the sticky surface. Overlap the edges slightly to ensure full coverage. It doesn’t need to be perfectly smooth; wrinkles add beautiful light-refracting texture. -
Buff and burnish:
Use a soft, dry brush to gently rub the gold leaf into the canvas texture. Brush away the excess flakes that break off. This is a messy step, but satisfying. -
Seal the gold:
Apply a dedicated sealant over the gold leaf once you are happy with the texture. This prevents the metal from tarnishing over time and provides a surface that acrylic paint can adhere to without scratching the delicate leaf.
Sticky Situation?
If the gold leaf tears and reveals canvas, just dab a tiny bit more adhesive on the bald spot, wait for it to get tacky, and press a small scrap of excess leaf over the hole.
Step 2: Misty Mountain Range
-
Mix the mountain base colors:
Create a gradient palette for your mountains. You’ll need a dark brownish-purple for the mid-ground and lighter, hazy browns for the distant peaks. Mix Burnt Umber with a touch of Black and Titanium White/Unbleached Titanium. -
Outline the distant peaks:
Using a thinned mixture of your lightest brown-gray, paint the silhouette of the furthest mountain range directly over the lower portion of the gold background. Keep the shapes jagged and triangular. -
Fill and fade:
Fill in the mountain shapes with the same light color. While the paint is wet, drag it downwards, letting it fade out or become more transparent towards the bottom to create a misty atmospheric effect. -
Layer the mid-ground:
Mix a slightly darker, warmer brown tone (Burnt Sienna + Burnt Umber). Paint a second range of mountains below and slightly overlapping the first set. This creates depth. -
Add smoky shadows:
Using a glazing medium mixed with a tiny bit of dark brown, lightly glaze the bottom valleys of the mountains to simulate shadow and fog settling between the ranges.
Pro Tip: Atmospheric Depth
Make distant mountains lighter and bluer/grayer than the foreground. Paint gets darker and warmer as it comes ‘closer’ to the viewer.
Step 3: Foreground Silhouettes
-
Block in the foreground:
Load a flat brush with pure Mars Black (or a very dark mixture of Black and Umber). Paint a solid, undulating horizon line at the very bottom of the canvas, covering the bottom edge completely. -
Establish the main tree:
Decide where your focal point tree will stand—typically off-center looks best. Paint a straight vertical line for the trunk using a medium round brush. Don’t make it too thick at the top. -
Build the pine branches:
Switch to a small detail brush or a small fan brush turned vertically. Start at the top of the tree and dab small, downward-sloping strokes to create branches. As you move down the trunk, make the branches wider and denser. -
Create a forest cluster:
Add smaller trees of varying heights around the main tree and on the opposite side of the painting. Vary the spacing so they don’t look like soldiers in a row. -
Add fine details:
Use your smallest round brush (size 0) to add tiny tips to the tops of the trees and fill in gaps in the foliage. Adding a few very short, thin vertical lines in the dense black foreground suggests undergrowth or smaller saplings. -
Final touches:
Paint the sides of the canvas black to give it a finished, gallery-wrapped look without needing a frame.
Hang your masterpiece in a spot that catches the afternoon sun to see the golden sky truly glow


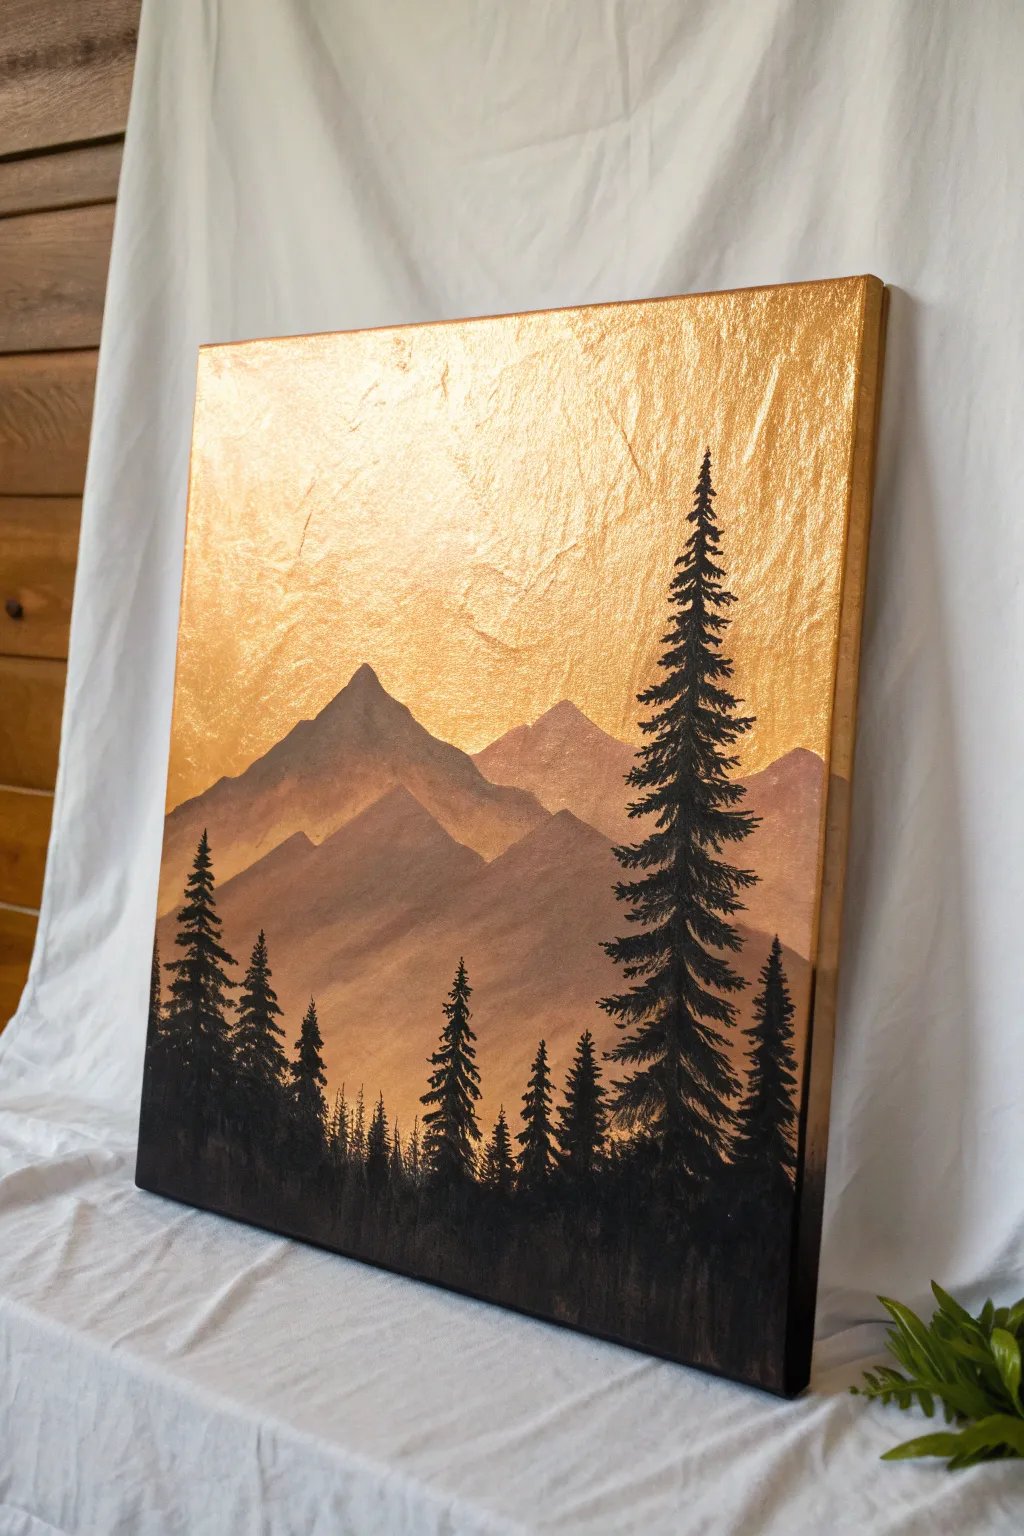
Metallic Acrylic Sunrays Through Trees
Capture the magic of golden hour with this striking metallic acrylic painting. By contrasting deep matte blacks against shimmering gold rays, you’ll create a radiant forest scene that changes beautifully as the light hits it.
Step-by-Step Tutorial
Materials
- Stretched canvas (rectangular format, e.g., 16×20 or 18×24 inches)
- Black gesso or matte black acrylic paint
- Metallic gold acrylic paint (high pigment)
- Wide flat brush (2-3 inch)
- Medium flat brush (1 inch)
- Fine liner brush or rigger brush
- Painter’s tape or masking tape
- Ruler or straight edge
- Pencil
- Palette (or paper plate)
- Cup of water and paper towels
Step 1: Preparation & Background
-
Prime the canvas:
Start by coating your entire canvas with black gesso or matte black acrylic paint. Ensure full coverage, painting the edges as well for a finished look. Let this base layer dry completely. -
Locate the light source:
Decide where your sun will be positioned. In the reference image, it is slightly above the center point. Mark this spot lightly with a pencil; this will be the convergence point for all your rays. -
Tape the rays:
Using painter’s tape, create the sunrays radiating from your marked center point. Place strips of tape extending outward to the edges of the canvas. The gaps between the tape will become your gold rays, so vary the width slightly for a natural effect. -
Seal the edges:
Press down firmly on all tape edges. For crisp lines, apply a very thin layer of black paint over the tape edges first. This seals any gaps and prevents the gold paint from bleeding underneath.
Use Semi-Transparent Tape
Using low-tack or delicate surface painter’s tape prevents peeling up your base layer of black paint when you remove the sunray masking.
Step 2: Painting the Gold Rays
-
Apply the first gold layer:
Using a flat brush, apply your metallic gold paint into the exposed wedge shapes. Brush outward from the sun center toward the canvas edges to maintain the feeling of radiating light. -
Build opacity:
Metallic paints often require multiple coats. Let the first layer dry to the touch, then apply a second layer to ensure the gold is rich and vibrant against the dark background. -
Reveal the pattern:
Once the gold paint is dry, carefully peel away the painter’s tape. Pull the tape at a 45-degree angle away from the painted area to ensure clean, sharp lines. -
Paint the sun:
At the convergence point of your rays, use a small brush to paint a solid gold circle for the sun itself. You can soften the edges slightly if you prefer a glowing look, or keep it crisp.
Bleeding Lines?
If gold paint bleeds under the tape, wait for it to dry fully, then use a small flat brush and black paint to carefully touch up the edges.
Step 3: Creating the Forest Silhouette
-
Sketch tree placement:
Lightly sketch vertical lines where your main trees will stand. Position the tallest, thickest trees in the foreground to create depth, overlapping the sun and rays. -
Paint trunks:
Using black paint and a medium flat brush, paint the vertical trunks. Make them taper slightly as they go up. Don’t worry about being perfectly straight; natural trees have slight curves. -
Start the branches:
Switch to a smaller brush. Start near the top of the tree and dab on downward-sloping branches. Pine trees generally have a triangular overall shape, narrow at the top and wider at the bottom. -
Add foliage texture:
Use a stippling motion (dabbing the brush tip) to create the look of pine needles. Keep the silhouette dark and solid where it overlaps the gold rays to maximize contrast. -
Vary tree heights:
Add smaller, shorter trees in between the large ones. This variation simulates a dense forest and adds interest to the composition. -
Ground the forest:
Paint the bottom section of the canvas solid black to represent the forest floor, blending the base of the tree trunks into this dark mass.
Step 4: Golden Details
-
Highlight the trunks:
To make the trees integrate with the light, use a fine liner brush and gold paint to add thin, scratchy vertical lines on the tree trunks. -
Illuminate branches:
Add subtle touches of gold to the tips of the branches that are closest to the light source. This ‘rim lighting’ effect adds incredible dimension. -
Detail the foreground:
In the dark lower section, paint thin, vertical gold lines to suggest tall grasses or small saplings catching the light. -
Final touches:
Stand back and assess the balance. If any black areas look too flat, I sometimes add tiny flecks of gold to suggest floating dust or pollen in the sunbeams.
Enjoy the way the metallic radiance shifts as you move around your finished piece


Metallic Acrylic Galaxy Mini Series
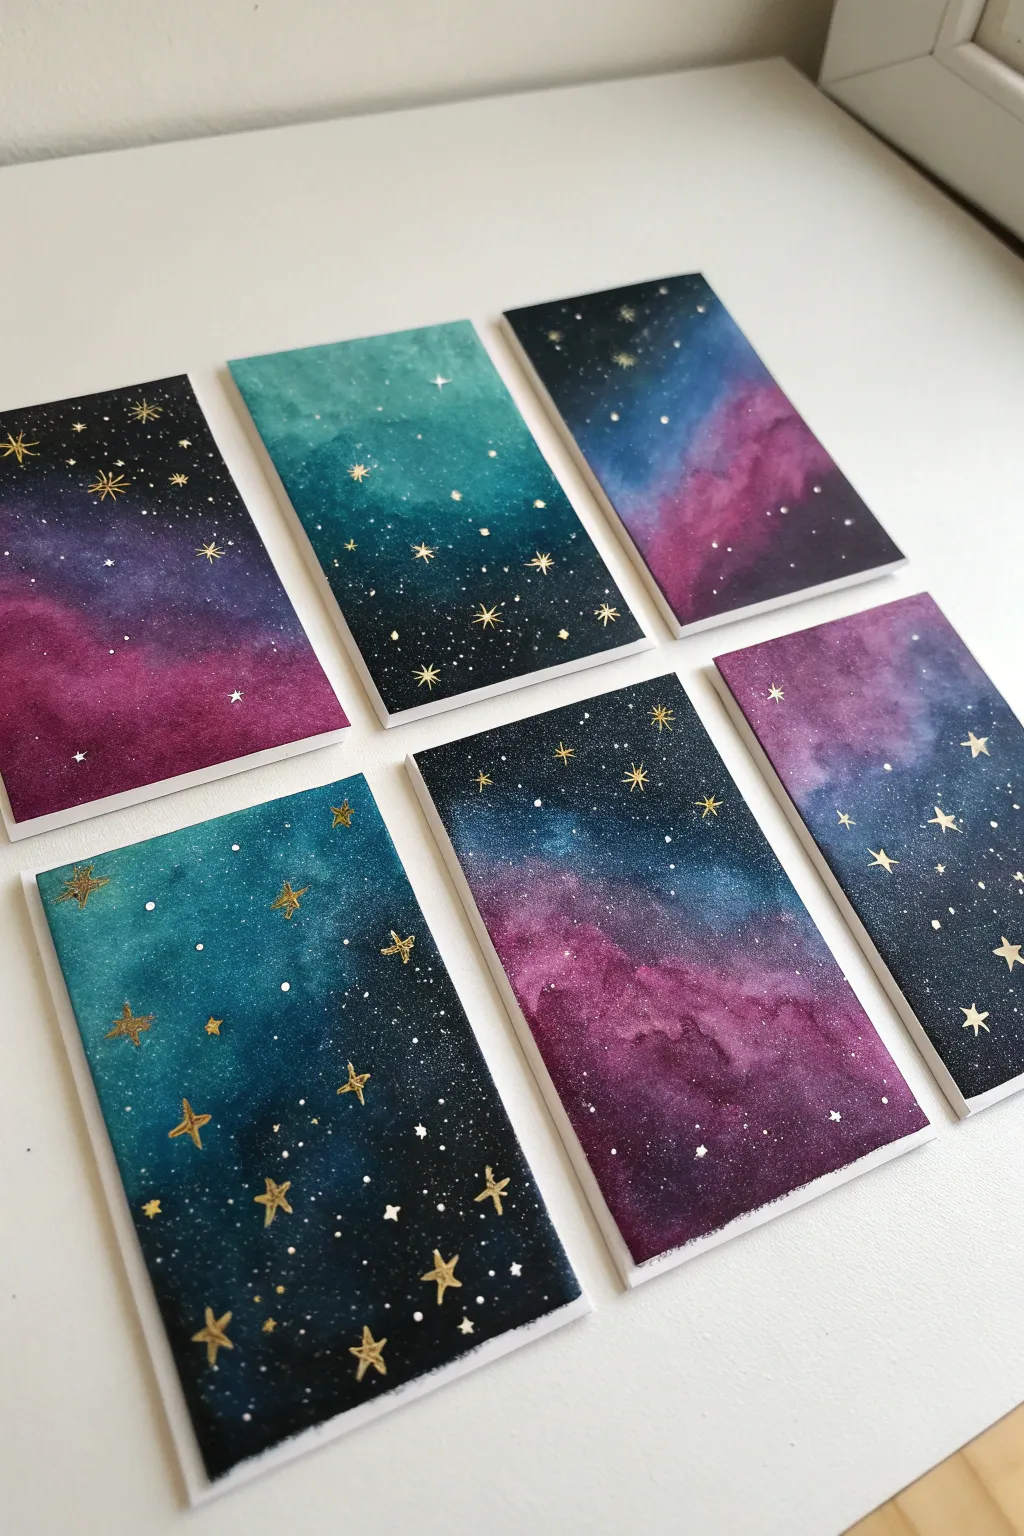
Capture the vastness of the cosmos on a miniature scale with these enchanting galaxy paintings. Using a blend of rich watercolors or acrylics and striking metallic accents, you will create a collection of celestial scenes that shimmer beautifully in the light.
Step-by-Step Tutorial
Materials
- Small watercolor paper blocks or mini canvas panels (approx. A6 or postcard size)
- Watercolor paints or fluid acrylics (Black, Phthalo Blue, Turquoise, Magenta/Crimson, Purple)
- Metallic gold acrylic paint or gold gouache
- White acrylic ink or heavy body white acrylic paint
- Flat wash brush (3/4 inch)
- Small round detail brush (size 0 or 1)
- Old toothbrush (for splattering)
- Painter’s tape or masking tape
- Palette for mixing
- Cup of clean water
- Paper towels
Step 1: Preparing the Backgrounds
-
Secure the paper:
Begin by taping down your paper or panels to a flat surface. Since these are small galaxy studies, keeping the edges clean helps define the space later, although full-bleed painting works too. -
Wet-on-wet technique:
If using watercolor or heavy paper, apply a clear wash of water over the entire surface first. This ensures your colors will bleed and blend naturally into each other. -
Lay down the lightest colors:
Start by applying your vibrant mid-tones. For the teal galaxy, drop in bright turquoise in the center or corners. For the purple ones, start with patches of magenta or bright violet. -
Add depth with darks:
While the first layer is still damp, introduce your darker hues. Paint Payne’s Gray or a deep Phthalo Blue around the edges of your bright patches, letting them merge softly. -
Deepen the void:
To create the illusion of deep space, apply black or very dark indigo to the outermost corners and edges. Blend this inward towards the color, but be careful not to muddy your bright center. -
Create texture:
While the paint is drying, you can blot specific areas with a crumpled paper towel to create cloud-like nebula textures and lift some pigment. -
Let it dry completely:
This is crucial. The background must be 100% dry before adding stars. If the paper is cold to the touch, it’s still wet.
Step 2: Adding the Stars
-
Prepare the splatter mix:
Dilute a small amount of white acrylic paint or ink with water. The consistency should be fluid, like milk, but opaque enough to show up against the dark background. -
Create distant stars:
Dip an old toothbrush into the white mixture. Run your thumb across the bristles to flick a fine mist of spray onto the paintings. Aim for the darker corners to make the stars pop. -
Paint prominent stars:
Using your smallest round brush and undiluted white paint, manually dot a few slightly larger stars in the empty spaces to create variation in distance. -
Allow to set:
Wait for the white speckles to dry completely. Since acrylic dries fast, this should only take a few minutes.
Starry Control
When splattering stars with a toothbrush, test the spray on a scrap paper first. If the drops are too big, your paint is too watery; if nothing comes out, it needs more water.
Step 3: Gilding the Galaxy
-
Mix your metallic gold:
Prepare your gold acrylic or gouache. You want a creamy consistency that flows off the brush easily but holds its shape. -
Paint the first twinkle:
Choose a focal point on your galaxy and paint a small cross shape. Elongate the vertical line slightly for a classic ‘twinkle’ star shape. -
Add diagonal rays:
I like to add very small, shorter diagonal lines between the main cross arms to make the star look like it’s bursting with light. -
Scatter smaller gold accents:
Paint simple five-point stars or small dots using the gold paint randomly around the composition. Don’t overdo it; 3 to 5 distinct gold elements per mini painting is usually perfect. -
Vary the sizes:
Ensure some gold stars are tiny specks while others are larger focal points. This hierarchy makes the composition feel organic and deep. -
Final drying and tape removal:
Once the gold stars are fully set, carefully peel away your masking tape. Pull the tape away from the painting at a 45-degree angle to avoid ripping the paper.
Level Up
Mount these mini paintings onto folded cardstock to create custom greeting cards, or frame them in a floating glass frame for a modern display.
You now have a dazzling set of cosmic artworks ready to be displayed together or gifted individually


Metallic Acrylic Moon Texture Study
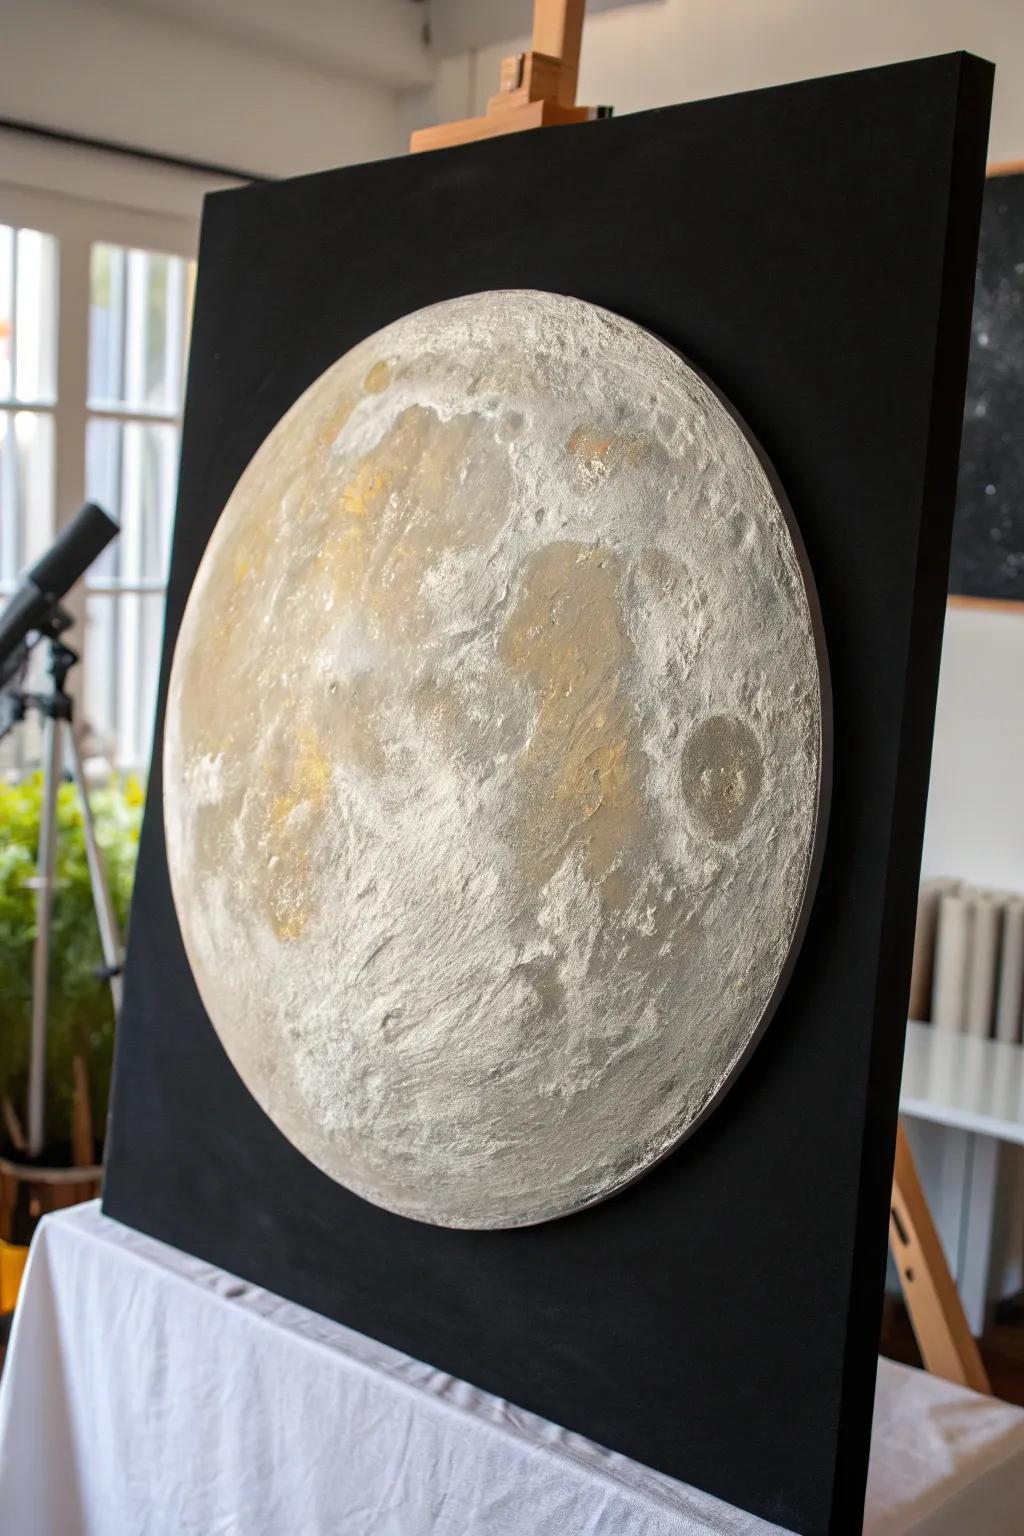
Capture the luminosity of our nearest celestial neighbor with this highly textured, metallic acrylic study. By building heavy layers of paste and integrating gold and silver accents, you’ll create a relief painting that shimmers beautifully under changing light.
Step-by-Step Guide
Materials
- Large square canvas or wood panel (primed black)
- Heavy body black acrylic paint or black gesso
- Modeling paste (coarse or regular)
- Gloss metallic acrylic paints (Silver, Champagne Gold, Pale Bronze)
- Titanium White heavy body acrylic
- Palette knives (large trowel and small diamond shape)
- Large structural compass or round object for tracing
- Chalk or pastel pencil (white)
- Sea sponge or textured rag
- Round bristle brush
Step 1: Preparation and Base
-
Prime the background:
Even if your canvas is black, apply a fresh coat of high-quality black gesso or heavy body black acrylic. This ensures a deep, matte void of space that will make the metallic moon pop. Let this dry completely before moving on. -
Trace the perimeter:
Using a large compass or tracing a large circular object (like a serving platter), draw the moon’s outline in the center of the canvas using a white chalk pencil or pastel. Keep the line faint so it disappears later. -
Base layer of texture:
Scoop out a generous amount of modeling paste. Using a large palette knife, fill the circle with a medium-thick layer of paste. Don’t worry about smoothness—roughness is actually desirable here to mimic the lunar surface.
Cracks happen
If your modeling paste cracks while drying, don’t panic. Simply fill the cracks with a little extra paint or paste, or leave them—they look like rilles on the moon’s surface.
Step 2: Sculpting the Cartography
-
Creating craters:
While the paste is still wet, use the tip of a smaller palette knife or the handle of a brush to gouge out small circular depressions. For the iconic Tycho crater (the large one with rays), press a bottle cap or similar round object into the paste and lift. -
Building lunar maria:
The dark ‘seas’ of the moon are smoother. Use a damp palette knife to flatten specific areas of the paste, contrasting them with the rugged highlands you’ve already established. -
Adding surface noise:
Take a natural sea sponge and dab it randomly across the highland areas to create pitted, organic rock textures. I personally like to twist the sponge slightly as I lift it to create jagged peaks. -
Dry time:
This is crucial: allow the modeling paste to dry completely. Due to the thickness, this may take 24 hours. If you paint too soon, the surface will crack or collapse.
Pro Tip: Ray systems
For realistic crater rays, use a stiff fan brush with watery white paint. Fling or flick the paint outward from the major craters to mimic debris splatter.
Step 3: Painting the Texture
-
Base coloring:
Mix Titanium White with a tiny drop of black to create a very light grey. Paint the entire dried moon surface with this opaque mixture to seal the paste. -
Shadowing:
Create a watery wash of dark grey acrylic. Brush this swiftly over the textured areas and immediately wipe the high points with a rag. The dark paint will settle into the craters and pits, emphasizing depth. -
Applying the silver:
Load a dry brush with silver metallic acrylic. Use a ‘dry brushing’ technique to whisk the paint lightly over the raised textures. The goal is to catch the ridges without filling the low points. -
Adding warmth:
Introduce Champagne Gold or Pale Bronze to specific areas, particularly the ‘seas’ or lower regions. Apply this sparingly with a sponge or rag to create mineral variations on the surface. -
Highlighting ridges:
Switch to pure Titanium White for the brightest highlights. Use a small detail brush to paint the rims of the major craters and the very tops of the highest texture peaks.
Step 4: Finishing Touches
-
Refining the edge:
If your texture spilled over the lines, use black paint to carefully cut back in around the circle’s edge, creating a sharp, crisp boundary against the background. -
Final metallic glaze:
For an ethereal glow, mix a tiny amount of silver into a gloss medium or water. Glaze this over the center of the moon to unify the colors. -
Clean up:
Check the black background for any accidental silver smudges and touch them up with matte black paint to ensure the contrast remains stark.
Hang your artwork in a place where natural light can travel across the surface, animating the phases of your metallic moon throughout the day
BRUSH GUIDE
The Right Brush for Every Stroke
From clean lines to bold texture — master brush choice, stroke control, and essential techniques.
Explore the Full Guide
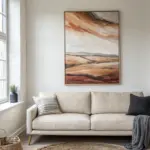
Metallic Acrylic Drip And Pour Highlights
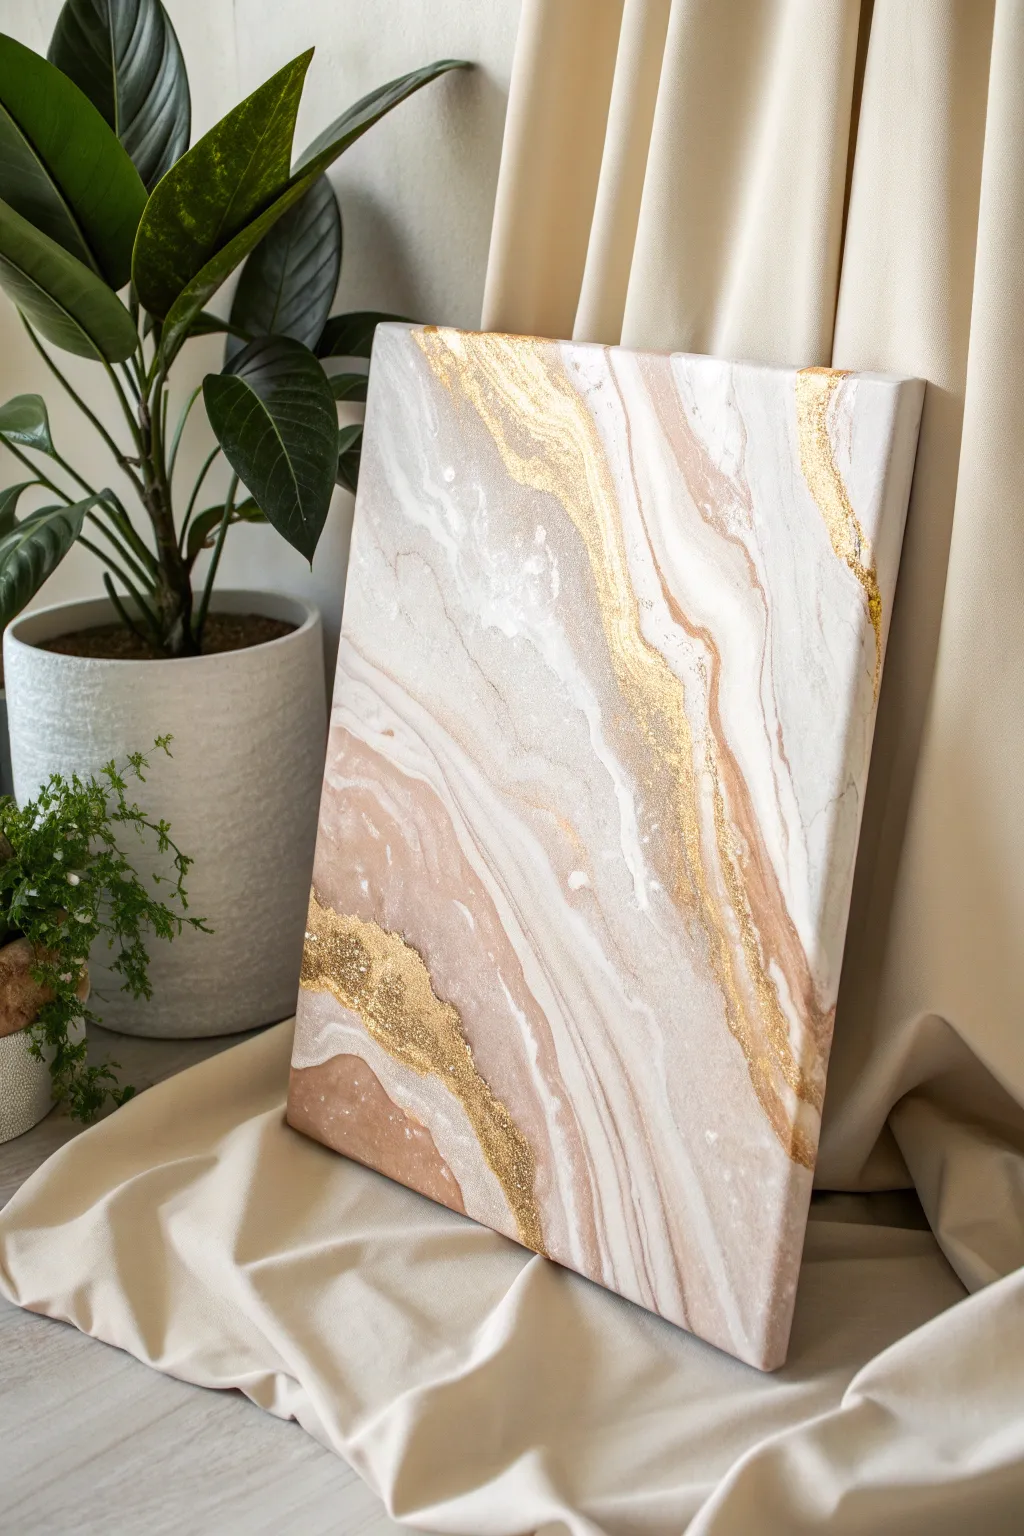
This elegant fluid art piece mimics the luxurious look of natural stone with soft veins of beige, white, and dazzling metallic gold. By combining acrylic pouring techniques with strategic gold embellishments, you can create a sophisticated wall hanging that shimmers beautifully in the light.
Step-by-Step Guide
Materials
- Stretched canvas (e.g., 16×20 inches)
- White acrylic paint (heavy body or soft body)
- Beige or Tan acrylic paint
- Metallic Gold acrylic paint (rich gold)
- Pouring medium (Liquitex or Floetrol)
- Gold glitter or gold leaf flakes (fine)
- Plastic cups for mixing
- Craft sticks for stirring
- Hairdryer (optional for moving paint)
- Varnish (gloss finish)
- Drop cloth or plastic sheet
Step 1: Preparation & Mixing
-
Prepare your workspace:
Cover your entire work surface with a drop cloth or heavy plastic sheet. Use push pins or small cups to elevate your canvas off the table, allowing the paint to flow freely over the edges. -
Mix the base colors:
In separate cups, mix your white and beige paints with the pouring medium. Aim for 1 part paint to 2 parts medium. Stir gently until the consistency resembles warm honey—fluid enough to pour but thick enough to hold color separation. -
Create the metallic gold mix:
Mix the metallic gold acrylic paint with a slightly smaller amount of pouring medium than the other colors. You want the gold to be rich and opaque, so keep it slightly thicker to prevent it from sinking. -
Infuse the glitter:
For that extra texture seen in the reference, stir a pinch of fine gold glitter directly into your gold paint mixture. This adds a physical sparkle that catches the light differently than the paint alone.
Fixing “Muddy” Colors
If your beige and white are blending into a single tan color, your paint is too thin or you tilted too aggressively. Stop tilting and let it settle.
Step 2: The Pouring Process
-
Apply the white base:
Pour a generous amount of the white mixture across the entire canvas. Use a palette knife or a wide stick to spread it to the edges, ensuring the canvas is damp with paint to help the subsequent colors glide. -
Layer the color ribbons:
Pour thin, wandering ribbons of the beige mixture across the canvas diagonally. Don’t cover the white completely; think of these as the primary veins of the marble stone. -
Add gold placement:
Pour the metallic gold mix along the edges of the beige ribbons. I like to let this pool slightly in certain areas to create focal points of intense shimmer rather than a uniform line. -
Tilt the canvas:
Gently lift the canvas and tilt it slowly from side to side. Watch how the paints interact. Your goal is to stretch the ribbons of color into organic, flowing shapes without muddying them together completely. -
Soften the edges:
If the lines look too harsh, you can use a hairdryer on the ‘cool’ and ‘low’ setting to gently push the white paint over the colored veins, creating a misty, submerged look.
Step 3: Refining & Finishing
-
Enhance the gold veins:
While the paint is still wet, inspect your gold lines. If you want more intensity, carefully drizzle a tiny bit more raw gold paint (without medium) into the center of the existing gold rivers. -
Add texture highlights:
Sprinkle a tiny pinch of dry glitter or gold leaf flakes onto the wettest areas of gold paint. They will adhere as the paint dries, creating a tactile crust that mimics mineral deposits. -
Check the edges:
ensure the paint has flowed over the sides of the canvas for a gallery-wrapped look. Use your finger to dab paint onto any bare spots along the corners. -
Let it cure:
Allow the painting to dry on a strictly level surface. Acrylic pours can take 24 to 72 hours to dry completely depending on thickness. Do not touch it during this time. -
Apply varnish:
Once fully cured (wait at least a week for best results), apply two coats of gloss varnish. This will unify the sheen and make the metallic gold elements pop dramatically.
Resin Finish
For the ultimate glass-like stone finish, swap the final varnish for a clear epoxy resin coat. It adds depth that makes the gold look 3D.
Hang your new faux-marble masterpiece near a window to catch the afternoon sun on those gold accents
Metallic Acrylic Geode Veins
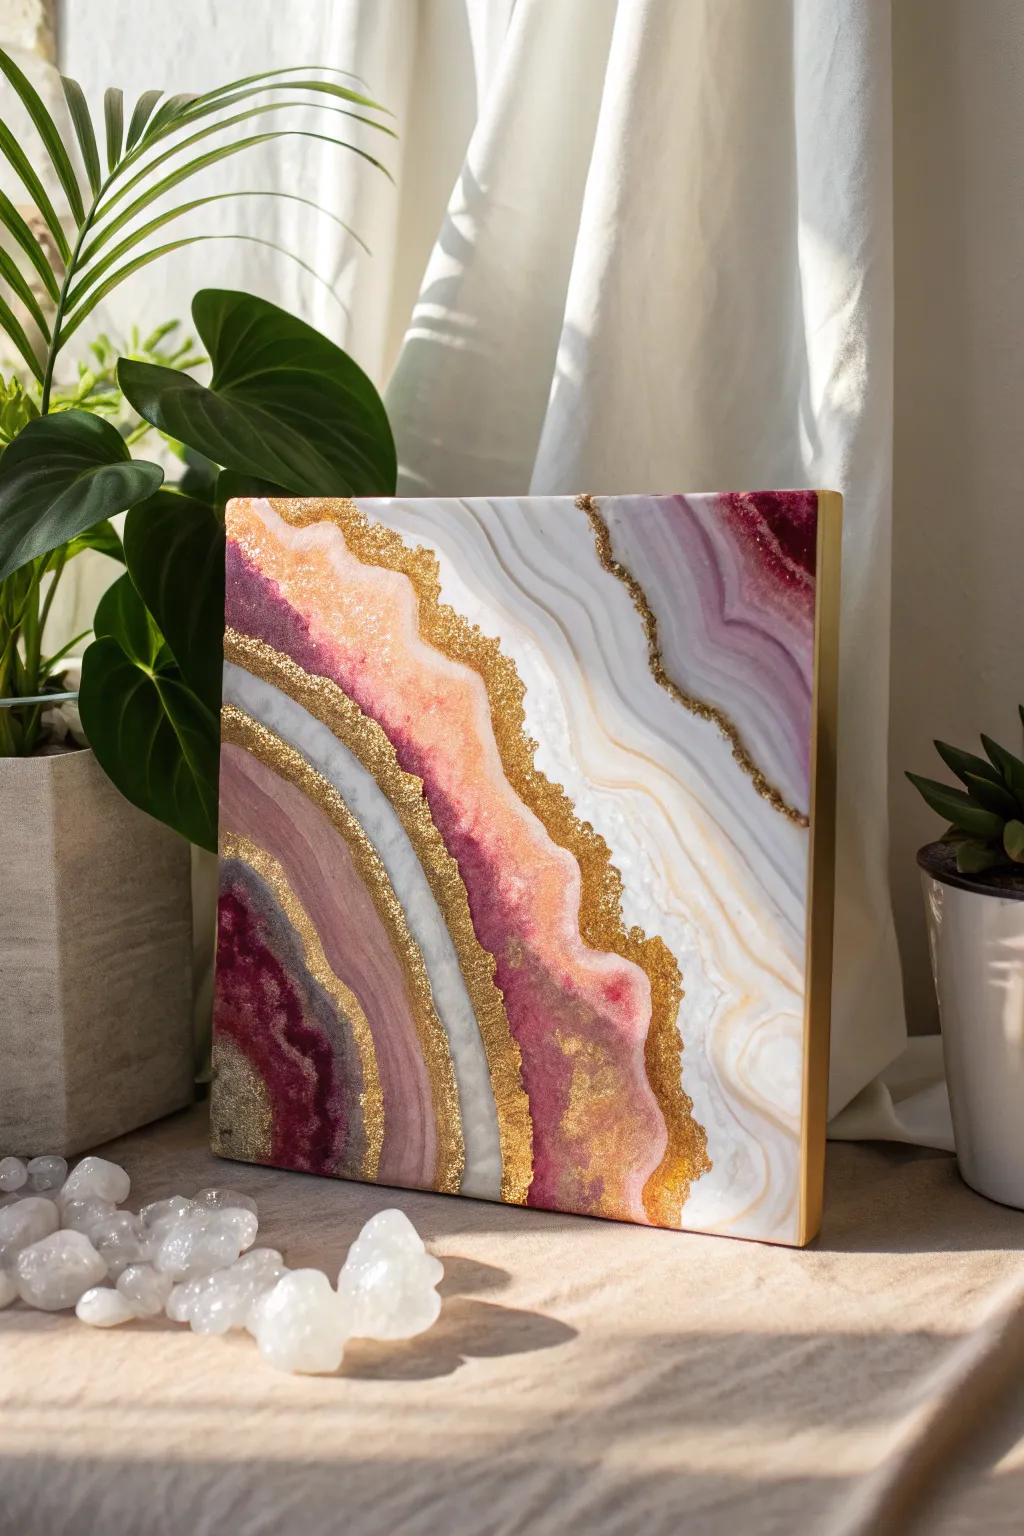
Capture the organic luxury of natural stone with this striking geode-inspired canvas art. Blending soft creams and bold magentas with sparkling gold veins, this piece creates a sophisticated faux-agate effect that glimmers in the light.
Detailed Instructions
Materials
- Square canvas (gallery wrapped, deep edge preferred)
- Acrylic paints: Titanium White, Cream/Off-White, Magenta, Deep Burgundy
- Metallic gold acrylic paint (heavy body)
- Gold glitter (fine and chunky mix)
- Gold leaf or liquid gilding
- Acrylic pouring medium
- Gold paint pen or thin liner brush
- Pale pink pouring paint or diluted acrylic
- Gloss varnish or clear resin (optional for finish)
- Palette knife
- Small cups for mixing
- Painter’s tape
Step 1: Preparation and Planning
-
Map your flow:
Before pouring any paint, visualize your composition. This piece relies on diagonal, wave-like structures flowing from the bottom left corner upward toward the top right, leaving negative space in the upper right. Lightly sketch these main flow lines with a pencil if it helps guide you. -
Protect the edges:
Since we want a clean, gold-finished edge later, apply painter’s tape to the sides of your canvas to catch any drips from the pouring phase. -
Mix your mediums:
Prepare your acrylics for pouring. Mix separate cups of white, cream, pale pink, magenta, and burgundy with pouring medium. Aim for the consistency of warm honey—fluid enough to move but thick enough to hold its shape without muddling together.
Pro Tip: Quartz Effects
Mix a small amount of translucent pearlescent medium into your white paint. It creates a shimmering, semi-transparent depth that mimics real quartz crystal.
Step 2: Creating the Base Layers
-
Pour the white corner:
Start with your white and cream mixtures in the top right corner. Pour distinct bands and use a palette knife or tilt the canvas gently to spread them, creating a soft, marbled white foundation that mimics quartz. -
Establish the dark core:
In the bottom left corner, pour your deepest burgundy and magenta tones. This will act as the ‘interior’ of the geode. Don’t worry about perfection; organic blobs and curves look more natural. -
Bridge the colors:
Fill the middle section with your mid-tones—the pale pinks and lighter magentas. Pour them in striped, wavy formations contouring the distinct bands. -
Marbling check:
Use a straw to gently blow on the wet paint where colors meet, feathering the edges slightly without mixing them into a unified grey. You want distinct strata, like rock layers.
Step 3: Adding the Metallic Veins
-
Define the gold channels:
While the paint is still wet, identify the borders between your major color zones (e.g., between the white quartz area and the pink bands). Carefully pour a thin stream of metallic gold acrylic along these fault lines. -
Add texture with glitter:
Sprinkle your mixed gold glitter directly over the wet gold paint channels. The wet paint acts as an adhesive, and the glitter adds that necessary crystalline texture found in real geodes. -
Let it cure:
Allow the entire painting to dry completely. This is crucial—if you move to the next step too soon, you’ll smear the crisp lines. Wait at least 24 hours.
Troubleshooting: Muddy Colors
If your bands are merging into mud, your paint is too thin. Add more heavy body acrylic to your mixture to thicken it up so the lines stay distinct.
Step 4: Refining and Gilding
-
Reinforce shadows:
Once dry, look at your magenta bands. If they dried flat, mix a tiny bit of burgundy with a glazing medium (or water) and paint thin, translucent shadows along the curves to add depth. -
Detailed vein work:
Using a fine liner brush or a gold paint pen, trace along the edges of your glitter lines to sharpen them. I find adding tiny, branching ‘fractures’ into the white sections makes the stone look more realistic. -
Apply gold leaf:
Brush a thin layer of gilding adhesive along the thickest parts of your gold veins. Apply gold leaf foil, pat it down gently with a dry brush, and sweep away the excess for a brilliant, reflective finish. -
Paint the edges:
Remove the painter’s tape. Paint the sides of the canvas with your heavy body gold acrylic for a framed, high-end gallery look. -
Final seal:
To get that glass-like gemstone finish, apply a coat of high-gloss varnish or a layer of art resin over the entire surface.
Hang your shimmering geode artwork in a well-lit spot to catch the metallic reflections

PENCIL GUIDE
Understanding Pencil Grades from H to B
From first sketch to finished drawing — learn pencil grades, line control, and shading techniques.
Explore the Full Guide
Metallic Acrylic Mountain Ridges
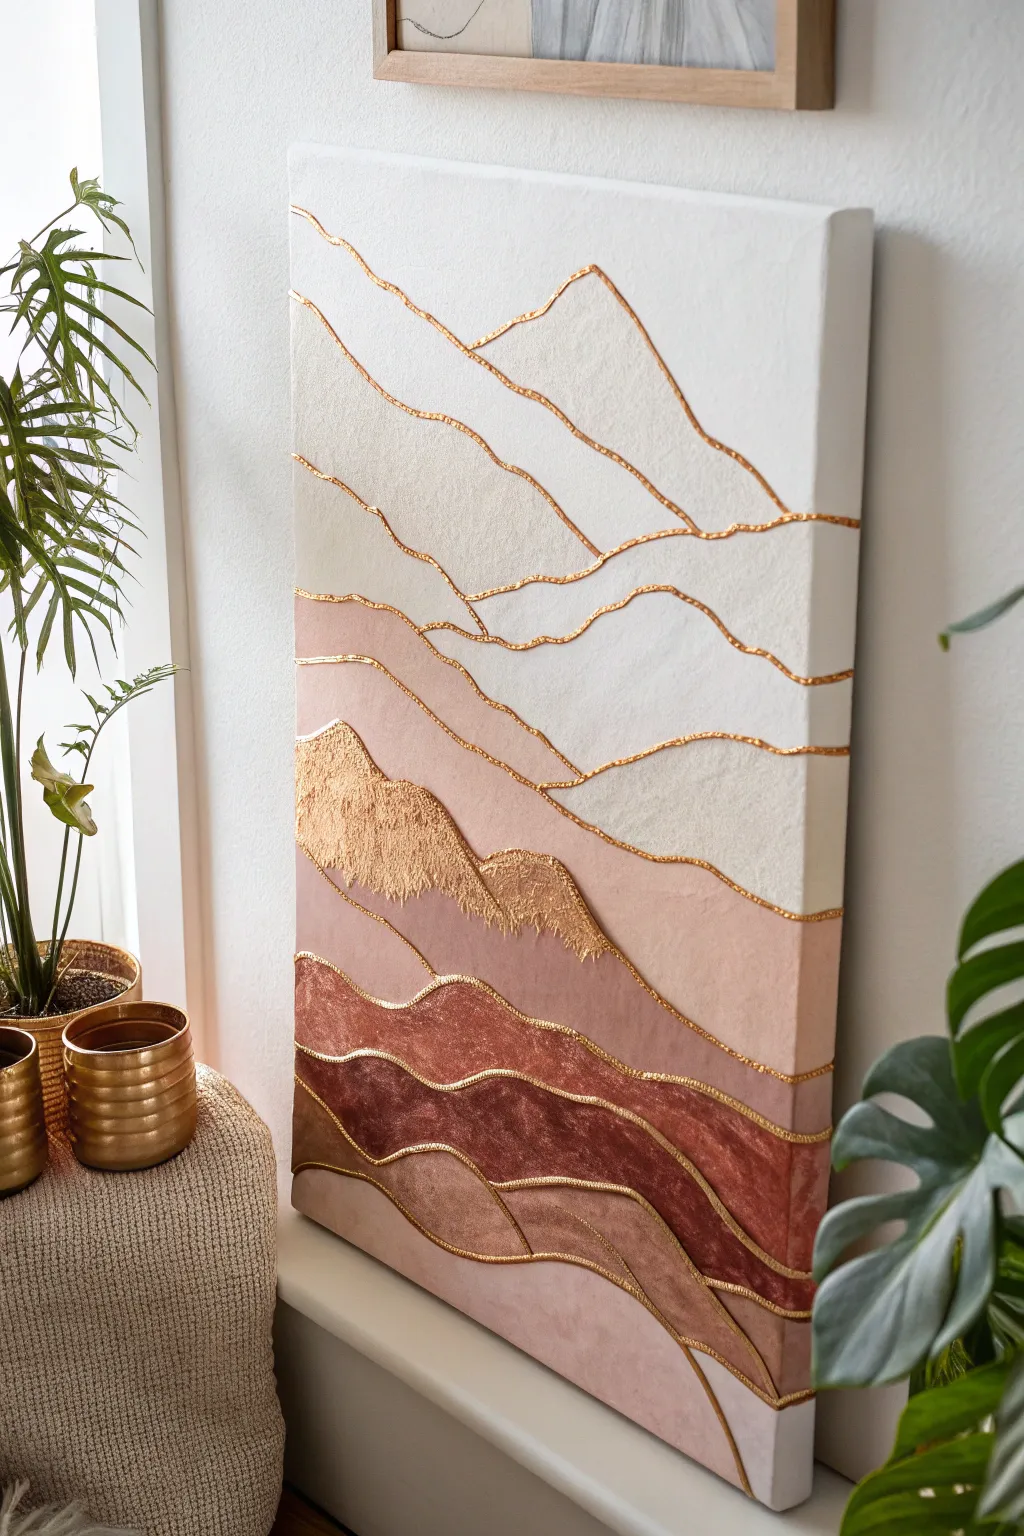
Elevate your space with this stunning dimensional canvas that combines soft, earthen gradients with luxurious gold accents. The raised texture of the mountain ridges catches the light beautifully, creating a sophisticated piece that looks far more expensive than it is to make.
How-To Guide
Materials
- Stretched canvas (e.g., 18×24 inches or similar vertical format)
- Modeling paste or texture medium
- Palette knives (various shapes, including trowel and diamond)
- Acrylic paints (White, Titanium Buff, Dusty Pink, Terracotta, Burnt Sienna/Russet)
- Metallic gold paint (heavy body acrylic or liquid gilding)
- Fine liner brush or gold piping applicator
- Pencil
- Painter’s tape or masking tape (optional)
- Hairdryer (optional, to speed drying)
Step 1: Planning and Base Texture
-
Mock up the landscape:
Begin by sketching your mountain ranges directly onto the clean canvas with a light pencil. Draw wavy, organic lines that span horizontally across the surface, stacking them from top to bottom. Vary the height of the peaks to create visual flow, leaving more negative space at the top for the ‘sky’. -
Choose your palette:
Prepare your acrylic colors. You are aiming for a gradient effect: pure white/cream at the top, transitioning through soft beige, dusty pink, deep rose, and finally a rich russet or burnt umber at the bottom. -
Mix texture medium:
Mix your modeling paste with your acrylic paints on a palette. I usually mix about 50% paint to 50% paste to ensure the color holds while keeping that nice, thick structure. -
Apply the first layer:
Starting at the top section (the sky), apply a mixture of white paint and modeling paste. Use a wide palette knife to spread it relatively flat but leaving slight imperfections for an organic stone look. -
Work your way down:
Move to the next section down, mixing a small amount of beige into your white paste. Apply this to the second ‘mountain’ shape, slightly overlapping the line above if you wish, though distinct separation works best for this specific style.
Step 2: Building Dimensions
-
Create the gradient:
Continue painting downwards, mixing progressively darker and warmer shades for each section. For the middle sections, move into your dusty pinks. Use the flat side of the palette knife to smooth the bulk of the color. -
Add heavy texture:
As you reach the lower, darker sections (terracotta and russet), apply the paste much thicker. Instead of smoothing it out, use the edge of your knife or a dabbing motion to create rough, rocky texture, especially near the ridges. -
Sculpt specific ridges:
Look at the ‘gold’ sections in the reference image—notice how one specific mountain range has a specialized, scratchy texture. Recreate this by applying a thick layer of paste and dragging the teeth of a comb or the tip of a knife vertically through it while wet. -
Clean the edges:
Ensure the paint extends fully around the sides of the wrapped canvas for a professional gallery finish. Smooth out any unwanted globs on the sides before the paste hardens. -
Dry completely:
Allow the canvas to dry fully. Because modeled paste is thick, this stage is crucial. It may take 12-24 hours depending on humidity. Do not rush this, or the gold layer will crack.
Smoother Piping
Instead of a brush, fill a syringe or a fine-tip piping bag with heavy-body gold paint. You can ‘draw’ the gold lines directly onto the canvas for a consistent, raised relief effect.
Step 3: Gilding the Ridges
-
Prepare the gold:
Once dry and hard, shake your metallic gold paint or liquid gilding thoroughly. The goal is a raised effect, so a heavy body metallic acrylic or a dimensional outliner paint in a tube works wonderfully here. -
Outline the top peaks:
Using a fine liner brush loaded generously with gold, trace the very top edge of the highest mountain section. Let the line wobble slightly; nature isn’t perfect, and neither should your line be. -
Define the layers:
Work your way down, painting a thick gold border along the top edge of every color transition. Ensure the gold line is thick enough to cover the gap where two colors meet. -
Highlight the texture:
For that one exceptionally textured mountain section you created earlier, dry-brush gold paint lightly over the raised texture. This catches the high points and emphasizes the rugged depth. -
Final touches:
Inspect your gold lines. If they look too thin or transparent, apply a second coat to ensure they gleam opaquely against the matte background.
Luxe Variation
Press actual gold leaf sheets onto the tacky ridges using sizing glue instead of paint. The irregular flaking of the leaf adds an incredible, authentic vintage texture.
Hang your finished piece in a spot with natural light to watch the metallic ridges shimmer throughout the day
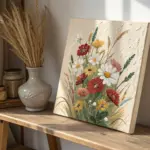
Metallic Acrylic Floral Petal Edges
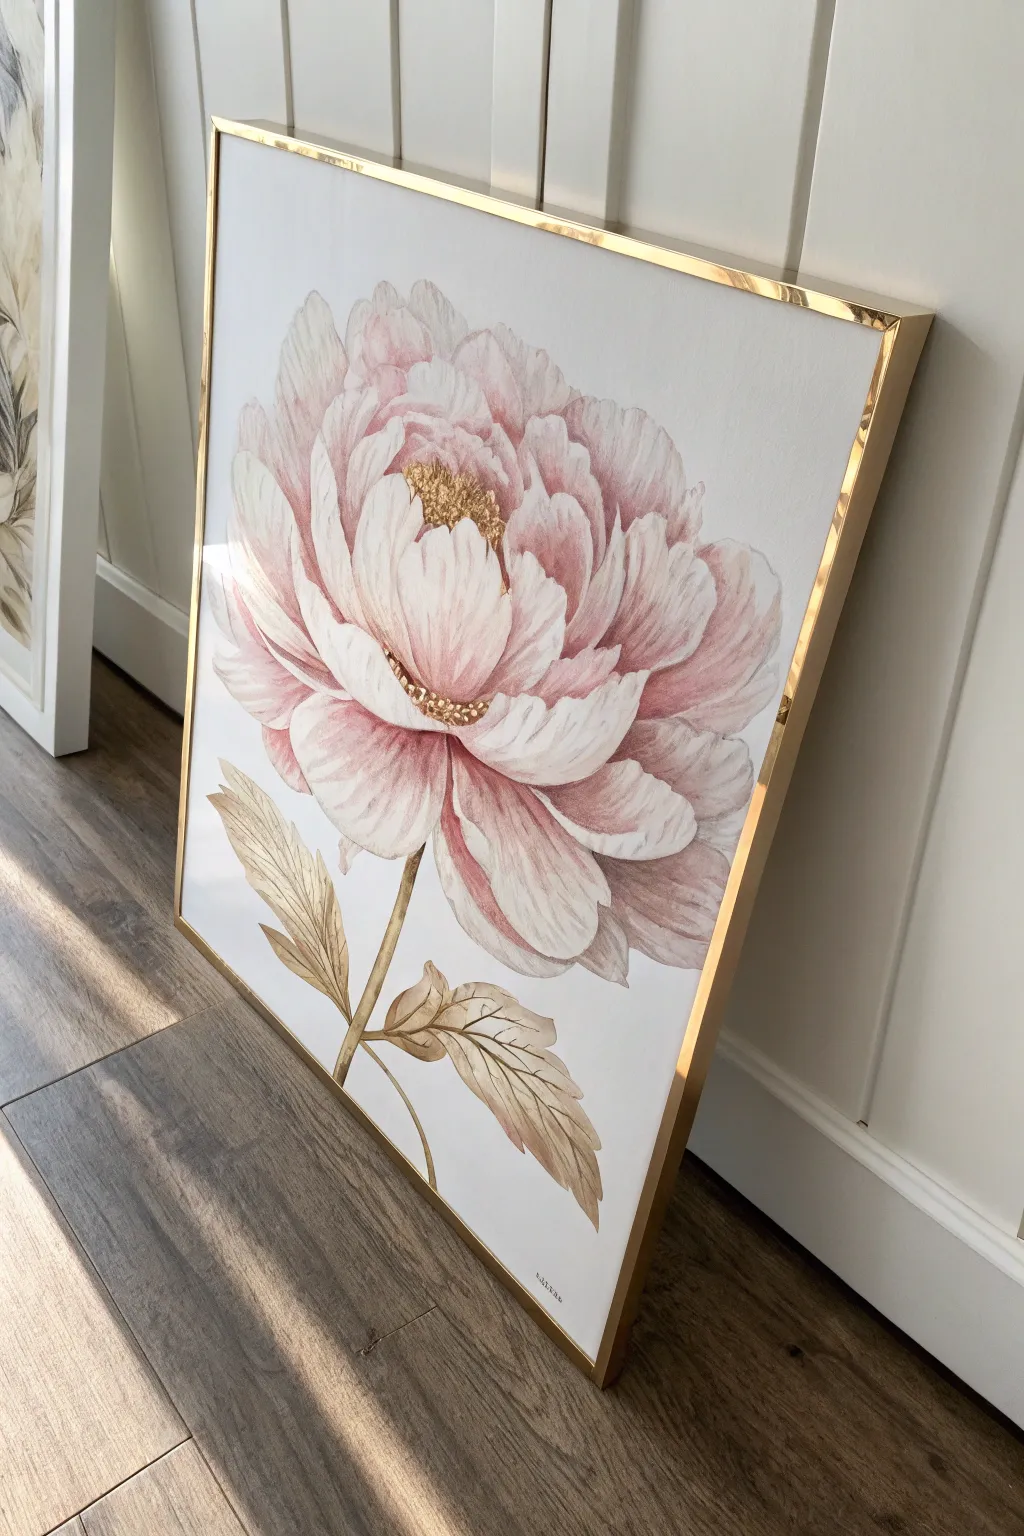
Capture the delicate beauty of a blooming peony with this elegant canvas project that combines soft watercolor-style washes with striking metallic accents. The result is a sophisticated piece where shimmering gold details bring the flower’s center and petal edges to life against a crisp white background.
Step-by-Step Guide
Materials
- Large stretched canvas (at least 16×20 inches recommended)
- White gesso
- Acrylic paints: Titanium White, Alizarin Crimson, Burnt Umber, Yellow Ochre
- Metallic Gold acrylic paint (heavy body or specialty gilding paint)
- Gold leaf adhesive (size) and imitation gold leaf sheets (optional but recommended for center texture)
- Variety of brush sizes: Large flat wash brush, medium filbert, fine liner brush
- Palette knife
- Water cups and paper towels
- Gold floating frame (to finish the look)
- Pencil for sketching
- Matte medium
Step 1: Preparation and Sketching
-
Prime the Surface:
Begin by applying two smooth coats of white gesso to your canvas. Even if the canvas came pre-primed, an extra layer creates a smoother surface that mimics the fine texture of the reference image. Let it dry completely between coats. -
Create a Reference Grid (Optional):
Since peonies have complex petal structures, you might find it helpful to lightly pencil a 2×2 grid on your canvas to help with proportions. Keep these lines very faint so they are easy to erase later. -
Outline the Peony:
Lightly sketch the flower’s main shape using a hard pencil (like an H or HB). Start with the central cluster of stamens, then draw the tightly packed inner petals, and finally the large, billowing outer petals. Don’t worry about perfect symmetry; organic irregularities look more natural. -
Add the Stem and Leaves:
Draw a slender stem extending from the bottom center, slightly curved for elegance. Add two large, serrated leaves branching off near the bottom.
Gold Paint Precision
Does the gold paint look streaky or transparent? Metallic acrylics are often sheer. Paint a base line of Yellow Ochre or Burnt Sienna first, let it dry, then layer the gold on top for opacity.
Step 2: Painting the Base Layers
-
Mix the Pale Pink:
On your palette, mix a large amount of Titanium White with a tiny dot of Alizarin Crimson and a speck of Yellow Ochre. This creates the warm, dusty rose color characteristic of the petals. -
Apply the Initial Wash:
Thicken your paint with a little matte medium or water to create a semi-translucent wash. Paint the petals, starting from the center and working outward. Keep the edges feather-light. I like to leave some areas of white canvas showing through near the tips to simulate light hitting the petals. -
Deepen the Inner Shadows:
Mix a slightly darker version of your pink by adding a touch more crimson and a tiny bit of Burnt Umber. Paint this into the crevices between the inner petals and the base of the outer petals to create depth and dimension. -
Paint the Stem and Leaves:
Mix Yellow Ochre, Burnt Umber, and White to create a muted, golden-brown tan tone. Paint the stem and leaves flatly with this color, ensuring sharp, crisp edges. -
Add Leaf Details:
Once the base leaf color is dry, use a fine liner brush and a slightly darker brown mix to draw delicate veins on the leaves.
Pro Tip: Soften the Pink
To get that ethereal, watercolor look with acrylics, use a glazing medium rather than just water. It increases transparency without breaking the paint binder, allowing for smoother, softer gradients.
Step 3: Adding Metallic Accents
-
Prep the Center for Gold:
For the textured center, apply a thick dab of heavy body gold paint or texture paste mixed with yellow ochre. Use the tip of a palette knife to stipple it, creating a rough, pollen-like texture. -
Gilding the Seed Pods:
If using gold leaf: Apply the adhesive size to the textured center and let it come to tack (usually 15-20 minutes). Carefully press small flakes of gold leaf onto the adhesive, then brush away the excess. If using paint: Use your brightest metallic gold and stipple heavily over the texture. -
Define Petal Edges:
This is the crucial step for the ‘metallic edges’ look. specific to this project. Load a fine liner brush with fluid metallic gold paint. Tracing carefully, paint extremely thin lines along the top ridges of the central petals. -
Highlight the Curve:
Identify the petals that are cupping upwards. Along the ‘lip’ or curl of these petals, apply a slightly thicker line of gold. This catches the light and emphasizes the flower’s volume. -
Accentuate Darker Areas:
Mix a tiny amount of gold into your dark pink shadow color. Glaze this into the deepest shadows near the flower’s center. It adds a subtle glow that ties the metallic elements together.
Step 4: Finishing Touches
-
Refining the Leaves:
Add touches of gold paint to the veins of the leaves you painted earlier. Don’t outline the entire leaf; just highlight the central vein and a few key edges to mimic the style of the flower. -
Clean Up the Background:
Take fresh Titanium White and carefully paint around the outer edges of your flower and stem to cover any stray sketch lines or accidental paint smudges. This ensures the background remains pristine and stark. -
Seal the Artwork:
Once fully dry (give it at least 24 hours), apply a spray varnish. Use a satin or gloss finish to maintain the sheen of the metallic gold; a matte varnish would dull the effect you worked so hard to create. -
Frame and Display:
Place your finished canvas into a gold floating frame. The gap between the canvas and the frame adds a professional gallery feel and complements the metallic accents perfectly.
Hang your shimmering peony in a bright room where natural light can dance across the golden details throughout the day.


Metallic Acrylic Animal Halo Portrait
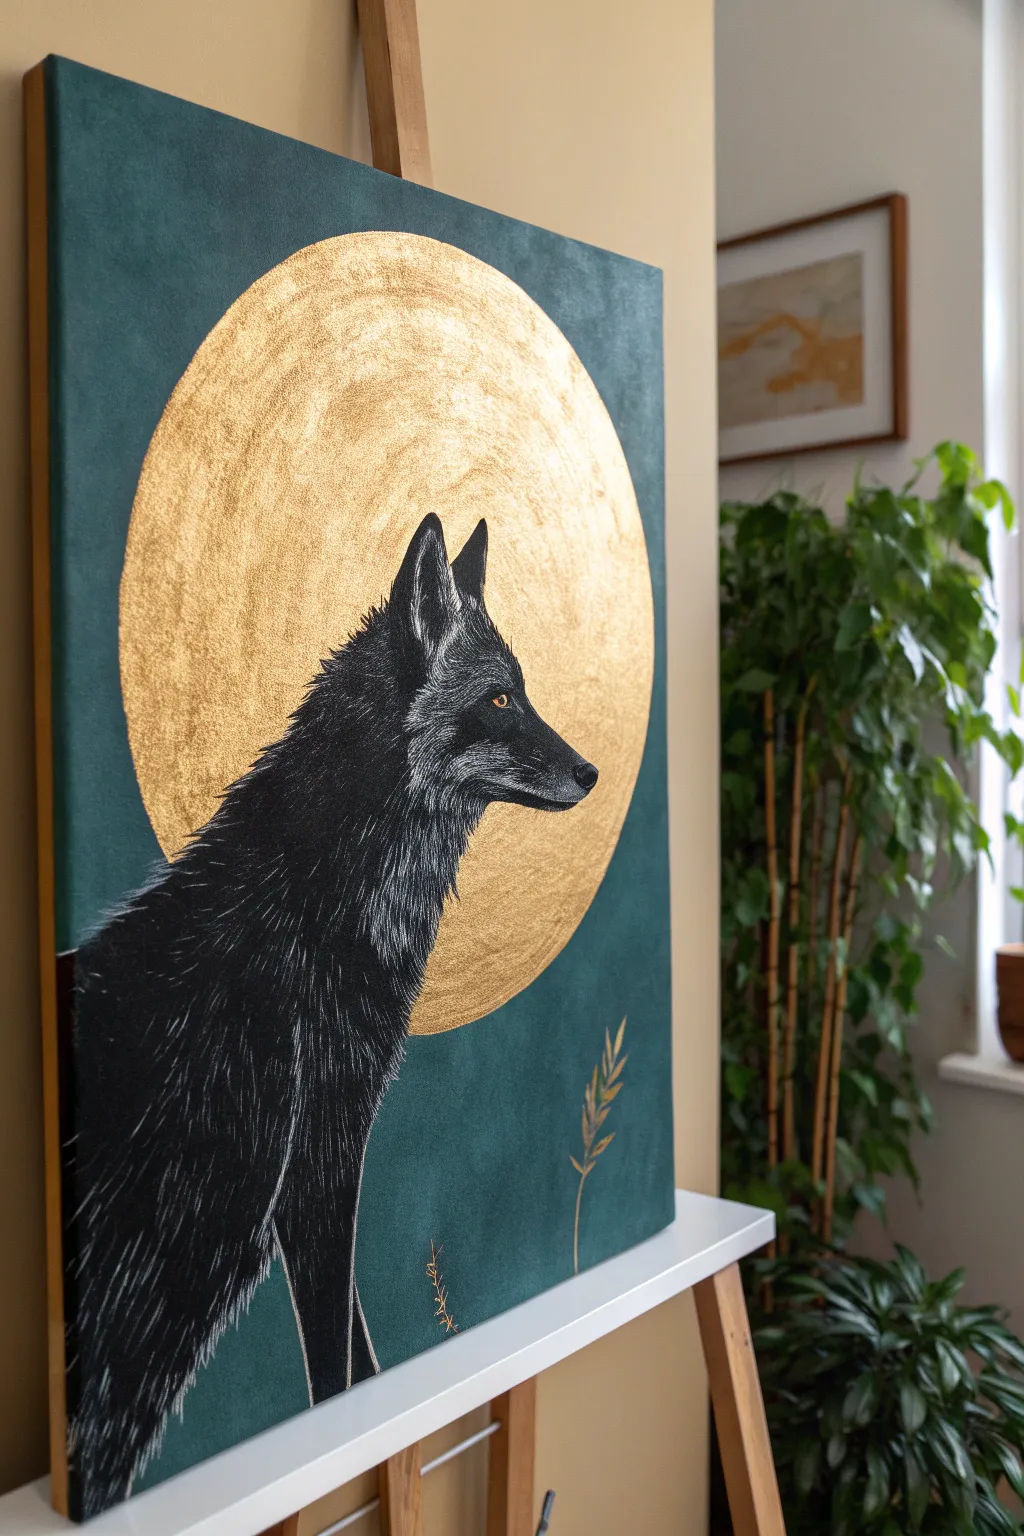
Capture the mystic allure of nature with this striking acrylic portrait, featuring a detailed black wolf silhouette set against a deep teal background and framed by a shimmering gold leaf halo. This project balances precise fur detailing with bold geometric shapes for a truly modern, gallery-worthy piece.
Step-by-Step Tutorial
Materials
- Stretched canvas (approx 16×20 or 18×24 inches)
- Deep teal or forest green acrylic paint (matte finish)
- Black acrylic paint
- White or light grey acrylic paint (for fur highlights)
- Gold leaf sheets and gilding size (adhesive)
- Or: High-quality metallic gold acrylic paint
- Large flat brush (for background)
- Round geometry compass or a large circular object (plate/lid) for tracing
- Fine liner brush (size 00 or 0) for fur details
- Medium round brush (size 4 or 6)
- Chalk or pastel pencil (white or yellow) for sketching
- Soft synthetic brush for gold leaf application
Step 1: Setting the Stage
-
Prepare the background:
Start by coating your entire canvas with the deep teal acrylic paint. I like to mix a tiny bit of black into a forest green to get that rich, moody hue seen in the reference. -
Apply a second coat:
Once the first layer is touch-dry, apply a second coat to ensure an opaque, matte finish. Use long, horizontal strokes to minimize brush marks and let this dry completely—preferably overnight. -
Map the composition:
Using a chalk or pastel pencil, lightly draw a large circle in the upper center of the canvas. You can trace around a large dinner plate or pot lid to get a perfect shape. -
Sketch the subject:
Lightly sketch the outline of the wolf’s head and neck positioned within and below the circle. The snout should break the boundary of the circle on the right side, creating dynamic depth.
Step 2: The Golden Halo
-
Apply gilding size:
Carefully paint the gilding adhesive (size) inside your circle outline. Be precise with the edges. Let the adhesive sit until it becomes tacky, usually about 15-20 minutes depending on the brand. -
Lay the gold leaf:
Gently press sheets of imitation gold leaf over the tacky area. It’s okay if they overlap; this adds texture. Use a soft, dry brush to smooth them down and brush away excess flakes. -
Alternative method: Metallic paint:
If you aren’t using gold leaf, paint the circle with 2-3 layers of high-pigment metallic gold acrylic. Use a sponge brush to dab the paint on for a textured, hammered-metal look instead of flat brushstrokes.
Gold Leaf Help
If gold leaf tears and shows the canvas, don’t panic. Just dab a tiny bit more glue on the hole and apply a small scrap snippet of leaf on top. The texture hides patches.
Step 3: Painting the Wolf
-
Block in the silhouette:
Using your black acrylic and a medium round brush, fill in the entire shape of the wolf. Use opaque black paint to cover any parts of the gold background that the wolf overlaps. -
Refine the edges:
While blocking in, pay attention to the outer edges. Instead of a smooth line, use small flicking motions at the fur boundaries to suggest texture. -
Paint the eye:
Mix a warm amber or yellow-ochre color. Paint the iris of the eye, leaving a small black pupil in the center. Add a tiny dot of white reflection at the top of the pupil to bring it to life.
Pro Tip: Fur Flow
Rotate your canvas while painting the fur details. Pulling the brush toward your body usually creates smoother, more tapered lines than pushing away.
Step 4: Detailed Fur Texture
-
Mix your highlight shade:
Create a dark grey by mixing a little white into your black paint. You want this to be subtle—not bright white. -
Start the under-fur:
Using your finest liner brush, paint thin, consistent strokes following the direction of hair growth. Focus on the cheek, neck, and ear tips. -
Layer the highlights:
Mix a slightly lighter grey. Apply this selectively where the light would hit: the top of the snout, the ridge of the eye, and the chest fur. Keep strokes short and crisp. -
Deepen the shadows:
If you added too many highlights, go back in with a watery black glaze to knock them back. The goal is a high-contrast look that resembles scratchboard art. -
Detail the whiskers:
With a steady hand and watered-down light grey paint, pull quick, long strokes for the whiskers near the nose.
Step 5: Finishing Touches
-
Add nature elements:
At the bottom right, paint slender plant stems using a mix of your background teal and a little gold or yellow ochre. These should be subtle and understated. -
Highlight the stems:
Use the fine liner brush to add touches of pure gold paint or leaf to the tips of these plants, tying them visually to the halo. -
Paint the canvas edges:
Finish the piece by painting the deep sides of the canvas with gold paint. This creates a framed effect without needing an actual frame.
Hang your finished piece in a spot with good lighting to catch that metallic shimmer throughout the day
Metallic Acrylic City Lights At Night
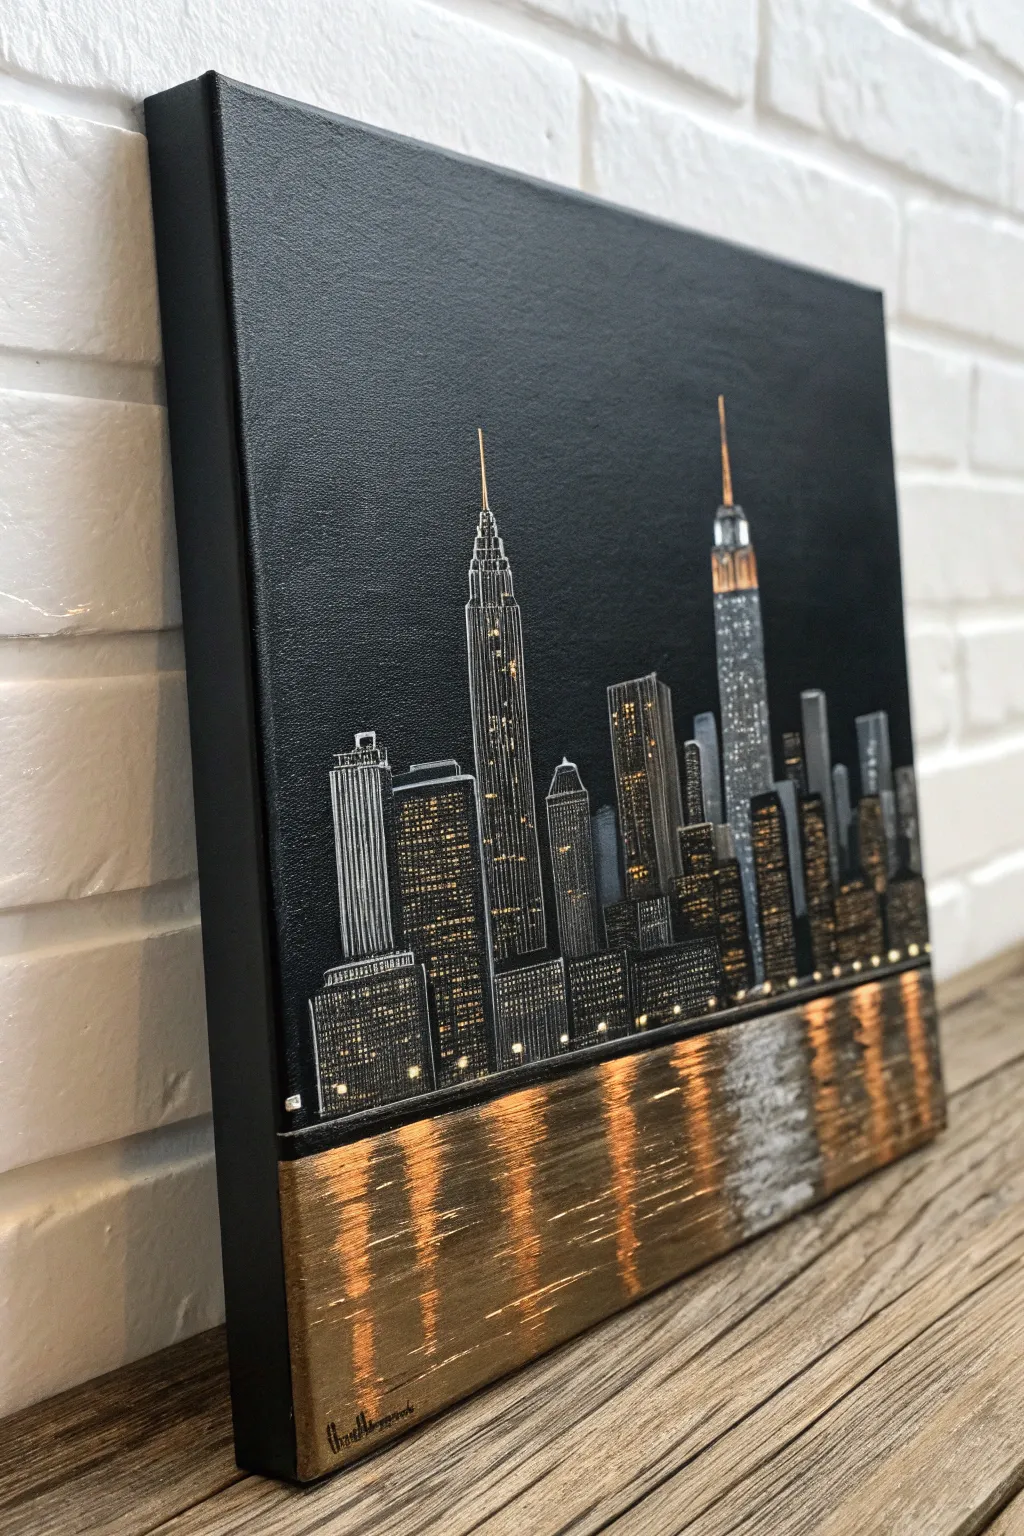
Capture the electric energy of the city that never sleeps with this striking metallic acrylic painting. The contrast between a matte black background and shimmering gold and silver details creates a sophisticated, modern piece that glows under any light.
Detailed Instructions
Materials
- Square stretched canvas (e.g., 12×12 inches)
- Black gesso or heavy body matte black acrylic paint
- Metallic acrylic paints: Bright Gold, Copper, Silver, Champagne
- White acrylic paint or white Posca paint pen (fine tip)
- Wide flat brush (1-2 inch)
- Flat shader brush (small)
- Fine liner brush (00 or 000 size)
- Ruler or T-square
- Chalk or white charcoal pencil
- Palette knife (optional for texture)
Step 1: Preparing the Midnight Canvas
-
Base Coat Application:
Begin by covering your entire canvas with black gesso or matte black acrylic paint. Use the wide flat brush to ensure smooth, even coverage. -
Handling the Edges:
Don’t forget to paint the sides of the canvas black as well. This gallery-wrap style gives the finished piece a polished, professional look without needing a frame. -
Ensuring Opacity:
Let the first coat dry completely. If you can see the canvas weave or any white spots, apply a second coat of black to achieve a deep, void-like darkness. -
Establishing the Horizon:
Once the black base is bone dry, measure about one-quarter of the way up from the bottom of the canvas. Use a ruler and chalk to draw a straight horizontal line across the surface; everything below this line will be the reflective water.
Fixing Wobbly Lines
If your building lines aren’t straight, let the metallic paint dry fully. Then, use black paint and a ruler to ‘cut back’ into the shape, refining the edge to be perfectly crisp again.
Step 2: Drafting and Painting the Architecture
-
Sketching the Skyline:
Lightly sketch the outlines of the skyscrapers using your chalk or white charcoal pencil. Include the iconic stepped shape of the Empire State Building and vary the heights and widths of surrounding buildings for visual interest. -
Adding Silver Structures:
Using a small flat brush or a fine tip silver paint pen, begin filling in the basic structures of the taller buildings. Don’t fill them completely solid; use vertical lines to suggest steel beams and glass. -
Detailing the Iconic Spire:
For the main tower’s spire, switch to a fine liner brush. Mix a tiny bit of copper with silver to give the antenna a distinct metallic glow against the black sky. -
Creating Windows:
Switch to your white paint pen or a liner brush with white paint. Draw fine vertical lines inside the building outlines. Break these lines occasionally to create the illusion of individual lit windows. -
Adding Warm Lights:
Dip your fine brush into the gold paint. Randomly dot or dash small squares of gold into the buildings to simulate office lights still burning late at night. Concentrate more gold near the bottom of the buildings to suggest street-level glow. -
Outline Emphasis:
Go back over the outer edges of the major buildings with a very sharp white line to make them pop against the background. This clean outline is crucial for the graphic style seen in the example.
Make it Pop
Mix a tiny amount of glitter medium into your reflection paint for the water. This adds physical texture and extra sparkle that mimics light dancing on city waves.
Step 3: Creating the Metallic Reflection
-
Base Water Layer:
Below the horizon line, start dragging your flat brush horizontally. Use a mix of dark copper and gold. I find that dry-brushing here works best—load very little paint on the brush so the black background shows through the streaks. -
Mirroring the Towers:
Identify where the tallest buildings sit on the horizon. Directly below them in the water section, paint vertical ‘columns’ of reflection using brighter gold and silver. -
Applying the Shimmer:
Using a palette knife or a coarse stiff brush, drag bright metallic gold paint horizontally across the water area. Apply more pressure to deposit thicker ridges of paint that catch the light. -
The White Reflection:
Add a concentrated area of silver or white reflection directly beneath the brightest skyscraper. Use short, choppy horizontal strokes to mimic ripples on the water’s surface. -
Horizon Definition:
Use a small brush to paint a thin, solid black line right at the water’s edge to separate the buildings from the reflection, then add a tiny ‘shoreline’ of white or silver dots just above the water. -
Final Sign-Off:
Check for any chalk marks and wipe them away with a damp cloth. Sign your name in the bottom corner using a gold pen or thin brush.
Hang your luminous cityscape in a spot where natural light hits it to see the metallic elements truly come to life
Metallic Acrylic Dry Brush Over Texture
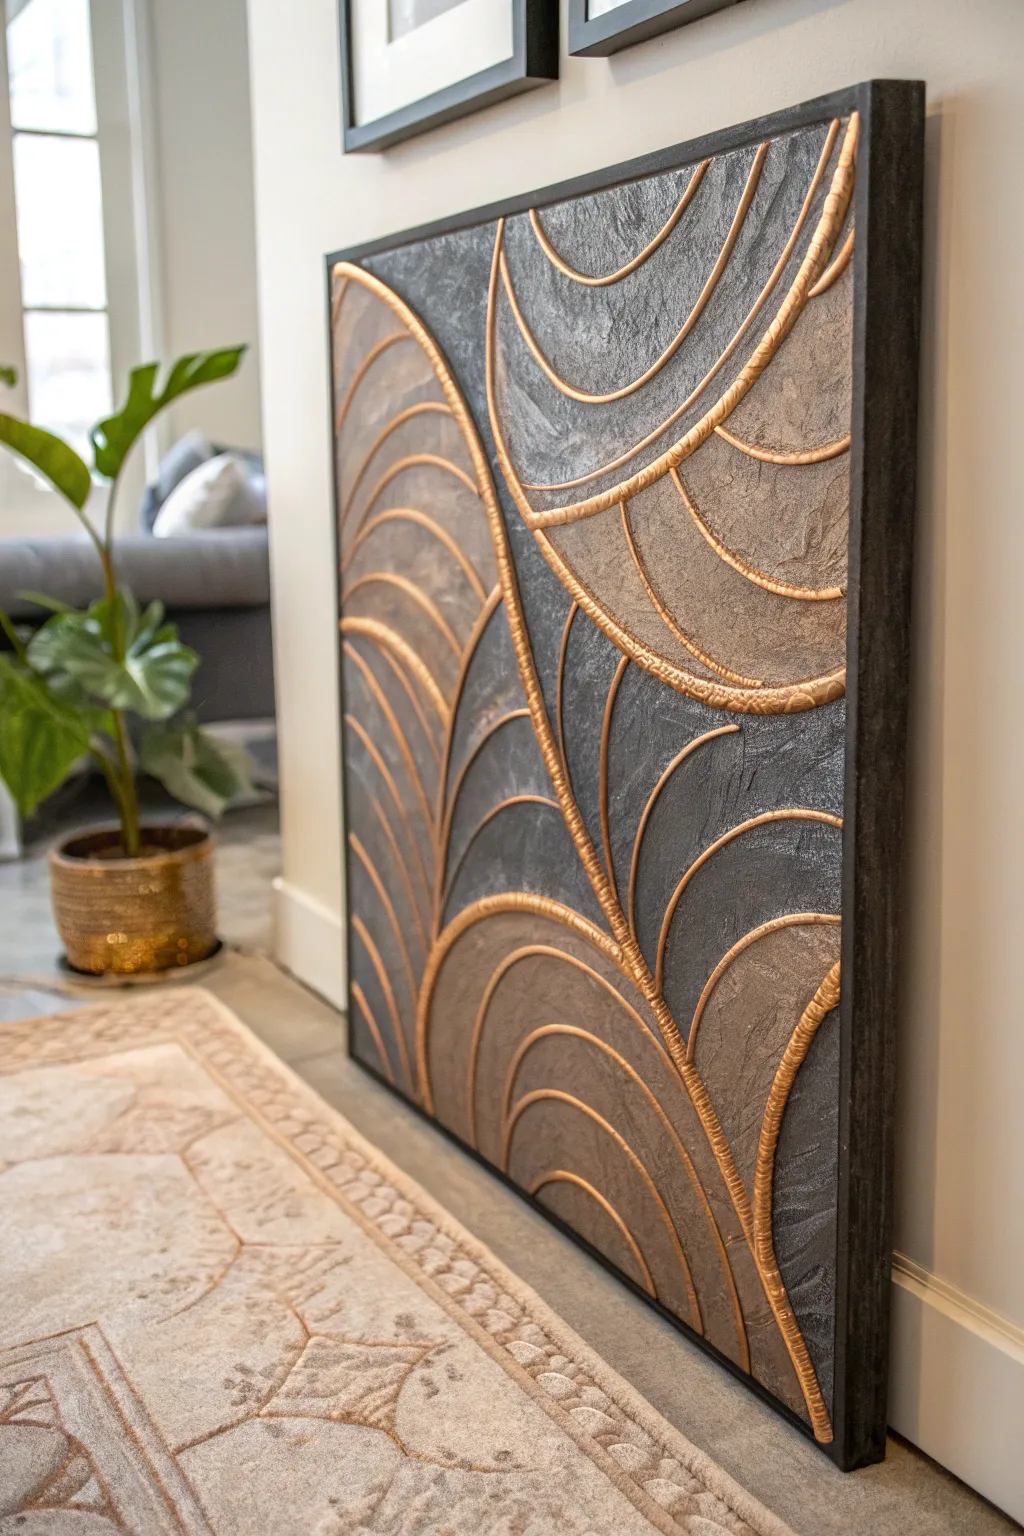
This striking wall art combines bold, geometric texture with the shimmering elegance of metallic acrylics. By building up raised lines and finishing with a dry-brushed metal effect, you’ll create a sophisticated focal point that plays beautifully with light.
Step-by-Step Tutorial
Materials
- Large rectangular canvas (e.g., 24×36 inches)
- Modeling paste or heavy structure gel
- Piping bag or squeeze bottle with a round tip
- Acrylic paints: Charcoal Grey, Taupe/Beige, Metallic Copper or Rose Gold
- Flat synthetic brushes (large area work)
- Stencil or large compass (optional for layout)
- Chalk or pencil
- Palette knife
- Dry blending brush (hog bristle works well)
- Black gesso (optional base)
Step 1: Planning and Texture
-
Prepare the canvas:
Begin by ensuring your canvas surface is clean. If you want a deep undertone, apply a coat of black gesso and let it dry completely, as this helps the metallic colors pop later. -
Sketch the pattern:
Using chalk or a light pencil, lightly sketch your overlapping arc design. Aim for a distinct Art Deco ‘fish scale’ or ‘fan’ pattern, alternating the direction of the sweeping curves to create movement. -
Load the piping tool:
Fill a piping bag or a squeeze bottle with modeling paste. You want a consistency that holds its shape but flows smoothly—think toothpaste texture. -
Pipe the lines:
Carefully trace over your sketched lines with the modeling paste. Apply steady pressure to create a raised, consistent bead. Don’t worry if it’s slightly uneven; that adds to the organic, handcrafted feel. -
Add background texture:
While the lines are drying, use a palette knife or rough dabber to add subtle texture to the negative spaces between the arcs. Avoid touching your fresh pipe-work. -
Allow to cure:
This is the hardest part—waiting. Let the modeling paste dry completely, ideally overnight. It must be rock hard before painting.
Uneven Piping?
If your piped lines look too shaky or blobby, wait for the paste to dry slightly (about 30 mins) and use a damp finger to smooth them out gently.
Step 2: Base Painting
-
Paint the dark zones:
Select specific sections of your design to be the dark focal points. Paint these areas with a matte Charcoal Grey, ensuring you get paint into all the little crevices of the texture. -
Paint the light zones:
For the contrasting sections, apply your Taupe or Beige acrylic. A matte finish works best here too, as it contrasts nicely with the upcoming metallic sheen. -
Cover the raised lines:
Ensure the raised modeling paste lines are also coated with the base colors of their respective sections. At this stage, the painting will look flat, but don’t panic. -
Check for gaps:
Inspect the canvas from different angles to ensure no white canvas is peeking through the texture. Touch up any missed spots.
Pro Tip: Depth Control
Mix a tiny drop of metallic paint into your beige base color. It creates a subtle shimmer that ties the background to the bold gold lines.
Step 3: Metallic Dry Brushing
-
Prepare the metallic paint:
Squeeze a small amount of Metallic Copper or Rose Gold onto a palette or paper plate. You don’t need much. -
Load the dry brush:
Dip just the tip of a dry, stiff-bristled brush into the paint. Wipe almost all of it off onto a paper towel until the brush leaves only a faint, dusty trace. -
Highlight the raised lines:
Gently drag the brush specifically over the raised piping. The paint should catch only on the high points, instantly turning the dull paste into what looks like hammered metal. -
add texture highlights:
Using that same dry brush technique, lightly scumble over the textured background areas. I like to go heavier on the dark grey sections, as the copper creates a stunning contrast there. -
Intensify specific spots:
If you want key focal points to shine brighter, go back over the ‘intersections’ where arcs meet with a second layer of metallic paint for extra luster. -
Protective finish:
Once fully dry, seal the painting with a clear varnish spray. A satin finish strikes a good balance between protecting the work and maintaining the metallic shine.
Hang your masterpiece where it can catch natural light to really show off those metallic dimensions
Metallic Acrylic Negative Space Minimalism
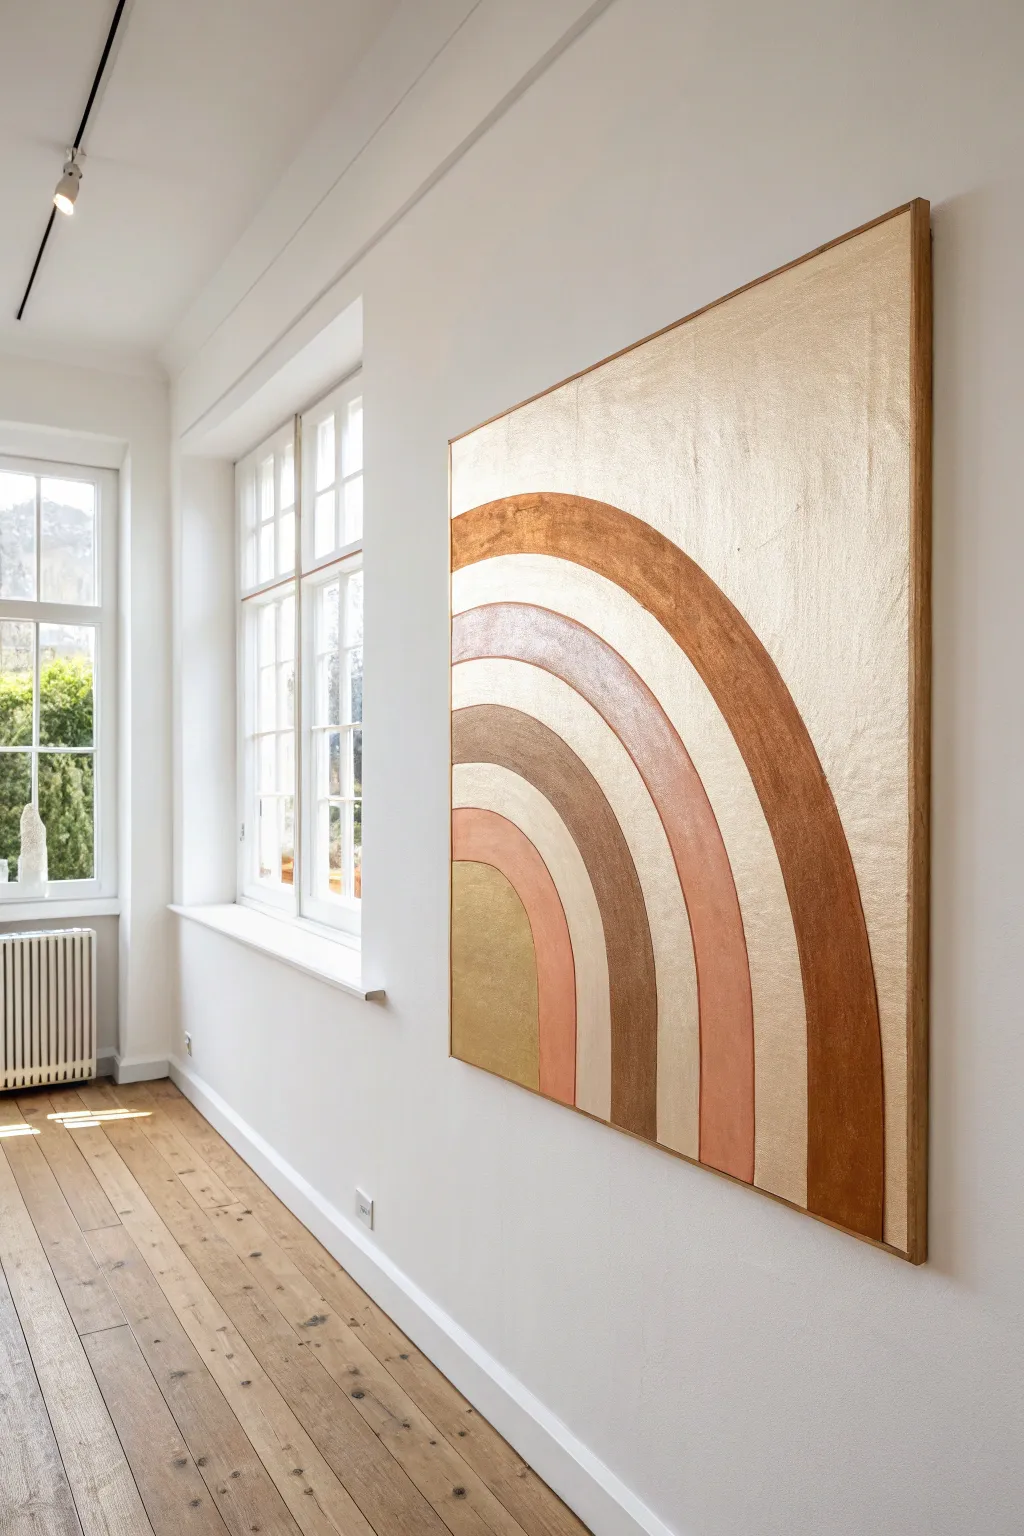
This striking, large-scale piece combines the warmth of earthy metallics with clean, minimalist geometry. By utilizing negative space and highly reflective gold and copper tones, you’ll create a sophisticated focal point that changes beautifully with the natural light of a room.
Step-by-Step
Materials
- Large square gallery-wrapped canvas (approx. 36×36 inches or larger)
- Metallic acrylic paints (Rich Gold, Champagne Gold, Copper, Bronze)
- Matte white acrylic paint or gesso
- Large compass tool (or string, thumbtack, and pencil)
- Painter’s tape (various widths: 1-inch and 2-inch)
- Wide flat synthetic brushes (2-inch and 3-inch)
- High-grit sandpaper (optional, for texture prep)
- Float frame (optional, light oak)
Step 1: Preparation and Base Coat
-
Prepare the canvas:
Start by ensuring your canvas is tight and the surface is clean. If creating a very large piece like the one shown, you may want to place the canvas flat on a protected floor or large table for better stability. -
Apply the base texture:
The background needs a subtle texture to contrast with the smooth metallics. Apply a coat of white acrylic paint or gesso using a large brush in cross-hatch strokes. -
Sand for smoothness:
For the areas where the metallic paint will go, you want a smoother surface so the shine is consistent. Once the base is dry, lightly sand the bottom left quadrant area where the rainbow will sit.
Uneven Edges?
If your curves look shaky, don’t stress. Use a thin ‘lining brush’ with slightly watered-down white paint to cut back into the metallic edges, smoothing out the arc from the outside in.
Step 2: Drafting the Geometry
-
Set the anchor point:
On the bottom left corner of the canvas, measure about 2 inches up from the bottom and 2 inches in from the left edge. Mark this spot lightly with a pencil; this will be the center point for all your rainbow arcs. -
Draw the smallest arc:
Using a large beam compass or the string-and-tack method, draw your first quarter-circle arc. This inner ‘sun’ shape should have a radius of about 6-8 inches. -
Map the bands:
Continuing from the same center point, draw concentric arcs moving outward. Vary the width of the bands to add visual interest; make some thick (4-5 inches) and some thinner (2-3 inches). -
Define the negative space:
Between each metallic band, leave a designated gap of varying width (some narrow, some wide). Lightly mark which bands are ‘paint’ and which are ‘space’ with a pencil code like ‘G’ for gold or ‘X’ for empty.
Step 3: Applying the Metallics
-
Paint the inner core:
Start with the smallest innermost quarter-circle. Mix a ‘Champagne Gold’ by adding a drop of white to your rich gold paint. Apply vertically with strokes moving upward to mimic the curve direction. -
Apply the second band:
Skip the first negative space gap. For the second band, use a ‘Rose Gold’ or copper tone. I find using a flat brush and turning the canvas as I paint helps maintain a clean curve edge without needing tape. -
Deepen the tones:
Move to the third band. Use a darker bronze or antique gold here. This contrast prevents the painting from looking flat. -
Paint the accent band:
For the fourth band, mix a custom light copper by blending your copper and champagne paints. This lighter band acts as a highlight in the middle of the composition. -
Create the outer arch:
The largest, outermost band serves as the visual container. Use your boldest ‘Rich Gold’ here. Ensure the outer edge is crisp; you may want to use painter’s tape along the outside curve if your freehand isn’t steady. -
Layer up:
Metallic paints can be semi-transparent. Let the first layer dry completely (about 1 hour), then apply a second coat to all metallic bands to achieve that solid, foil-like opacity.
Level Up: Texture
Mix gold leaf flakes or modeling paste into your bronze paint for one specific band. This adds 3D texture that catches light differently than the flat paint.
Step 4: Refining and Finish
-
Clean up the negative space:
Once the metallics are fully cured, take a smaller flat brush with your matte white paint. Carefully touch up the negative spaces between the bands to create sharp, crisp edges against the metal tones. -
Paint the background field:
Re-coat the entire large white negative space in the top right quadrant. This ensures the texture and brightness match the newly painted dividers between the rainbow bands. -
Varnish the metallics only:
To make the rainbow pop against the matte background, apply a high-gloss varnish specifically to the colored bands only. Use a steady hand and a clean brush. -
Install the frame:
Finish the look by installing a simple light oak float frame. This natural wood tone complements the bronze and gold hues perfectly.
Hang your masterpiece near a window where the changing daylight will make the metallic arcs dance and shift throughout the day


Have a question or want to share your own experience? I'd love to hear from you in the comments below!