I love how metallic wall paint can turn an ordinary wall into something that moves with the light all day long. Here are my favorite ideas—starting with the classics you probably want first, then sliding into the more artsy, “how did you do that?” finishes.
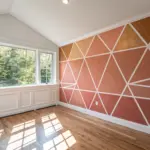
Classic Metallic Accent Wall
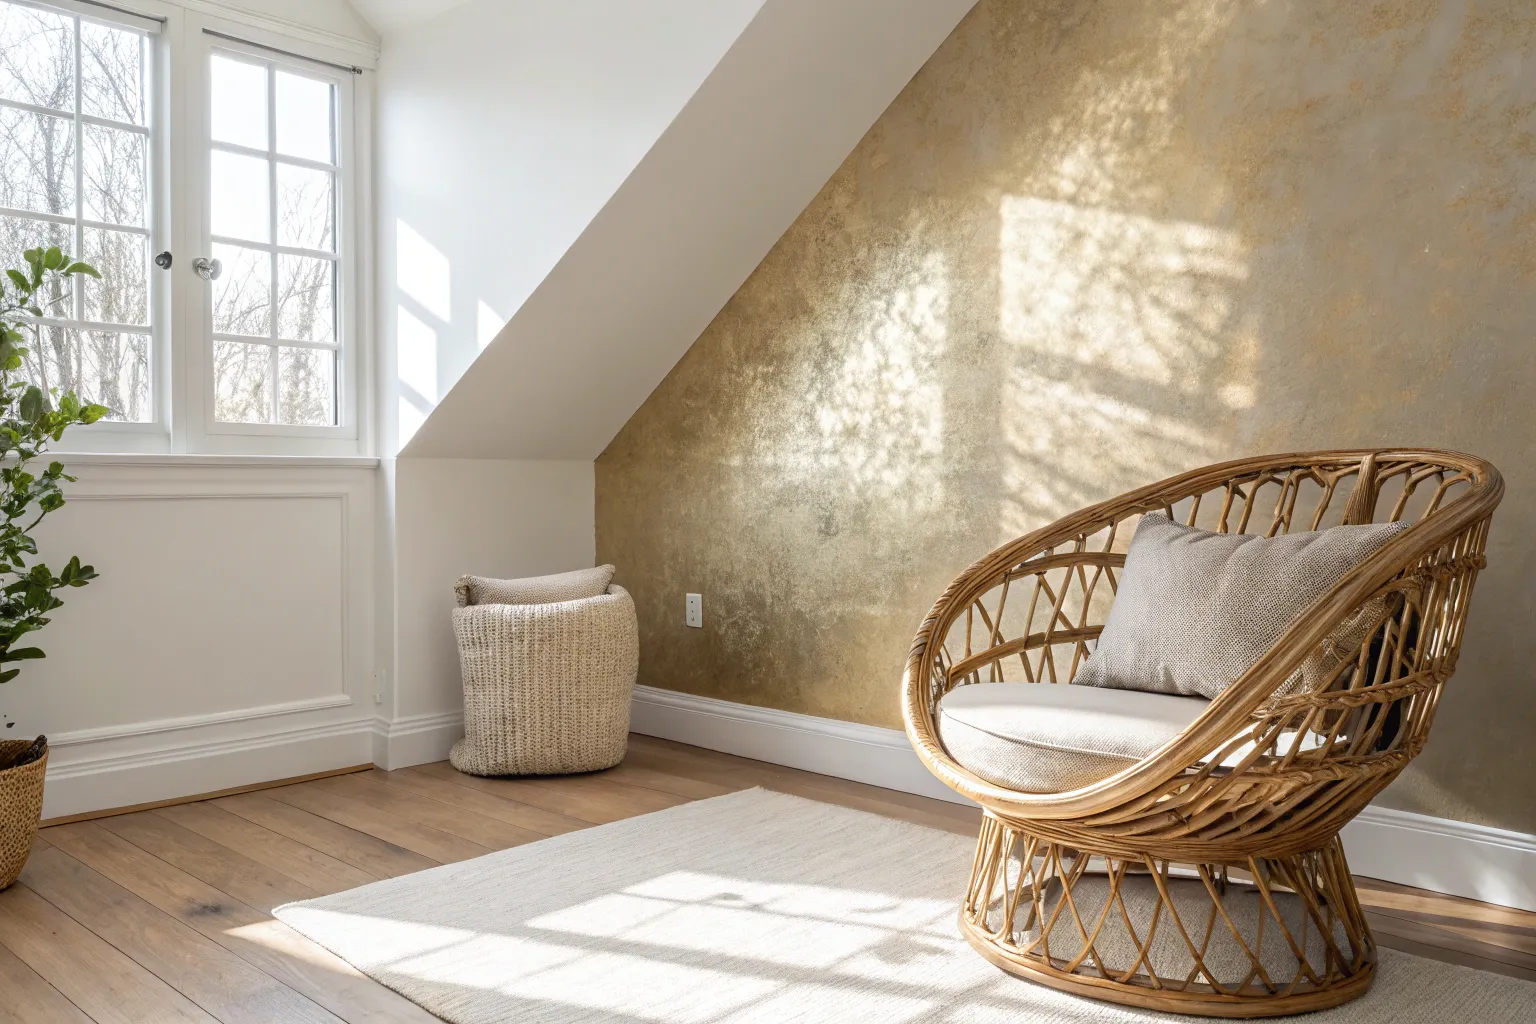
Transform a plain wall into an ethereal masterpiece with this sophisticated metallic finish that mimics sunlight filtering through silver trees. By combining metallic glaze with a natural sea sponge technique, you can create a soft, mottled texture that adds incredible depth and light-reflecting elegance to your living space.
Step-by-Step Guide
Materials
- Light grey satin base coat paint
- Silver metallic wall glaze or paint
- Champagne or warm gold metallic accent paint (optional)
- Clear acrylic glazing medium
- Large natural sea sponge
- Painter’s tape
- Drop cloths
- Paint tray and liners
- Standard paint roller and handle
- 2-inch angled sash brush
- Lint-free rags
- Plastic plate or cardboard palette
Step 1: Preparation & Base Coat
-
Protect the area:
Begin by clearing the wall of any artwork or nails. Lay down drop cloths to protect your flooring and apply painter’s tape to the baseboards, ceiling line, and adjoining walls to ensure crisp edges. -
Clean surface:
Wipe the wall down with a damp cloth to remove dust or grease. A clean surface is crucial for the metallic glaze to adhere properly. -
Apply base coat:
Roll on a coat of light grey satin latex paint. This neutral backdrop provides a solid foundation that will make the silver glaze pop without being too stark. -
Cut in edges:
While rolling, use your angled sash brush to cut in the corners and edges for a seamless finish. Allow this base coat to dry completely, preferably overnight.
Too Much Bling?
If a section looks too heavy or metallic, dampen a clean sponge with water and dab over the wet area to lift excess glaze, revealing more of the matte base coat underneath.
Step 2: Creating the Metallic Mixture
-
Mix the glaze:
In a mixing container, combine your silver metallic paint with the clear glazing medium. I usually aim for a 1:1 ratio, which makes the paint more translucent and extends its working time. -
Prepare your tools:
Dampen your natural sea sponge with water and wring it out thoroughly until it is just barely moist. This softens the sponge fibers and prevents them from soaking up too much paint initially. -
Load the sponge:
Pour a small amount of your metallic mixture onto a plastic plate. Dip the face of the sponge into the glaze, then blot the excess onto a clean part of the plate or a paper towel. You want the sponge loaded but not dripping.
Tree Silhouette
To mimic the tree effect even more, concentrate the metallic dabs into vertical ‘trunk’ shapes and fan them out near the top, leaving more negative space between the ‘branches’.
Step 3: Sponging Technique
-
Begin application:
Start in an upper corner of the wall. Press the sponge gently against the wall and lift it straight off without dragging. This creates the initial organic texture. -
Work in sections:
Work in manageable 3-foot square sections. Rotate your wrist slightly with every few dabs to vary the pattern so it doesn’t look like a repeating stamp. -
Layering the silver:
Continue dabbing across the section, overlapping your sponge marks slightly. Build up density in some areas while leaving the grey base coat peeking through in others to create depth. -
Soften the edges:
Keep the edges of your working section wet and irregular. Never stop in a straight line, or you will create visible seams when you move to the next patch. -
Check your progress:
Step back frequently to view the wall from a distance. Look for any areas that appear too heavy or too sparse and adjust while the glaze is still wet.
Step 4: Adding Dimension & Finishing
-
Mix secondary tone:
For that warm, sunlit glow seen in the photo, mix a small amount of champagne or warm gold metallic paint with glazing medium on a fresh plate. -
Apply high-lights:
Using a clean, damp sponge (or a clean corner of your existing one), lightly dab this warmer tone in scattered clusters. Focus on the center of the wall where light would naturally hit. -
Blend softly:
If a spot looks too harsh, immediately dab it with a clean, dry rag to lift some color and soften the transition into the silver. -
Tackle the corners:
Use a small piece of sponge to dab paint right into the corners and along the tape lines, ensuring the texture runs all the way to the edge. -
Remove tape:
Carefully peel away the painter’s tape while the paint is still slightly tacky to prevent peeling the dried film. -
Final dry:
Allow the entire wall to cure for at least 24 hours before moving furniture back against it, as metallic glazes can remain soft a bit longer than standard latex paint.
Now step back and admire how your new feature wall captures the light and transforms the mood of the room


Metallic Wall Behind the Bed
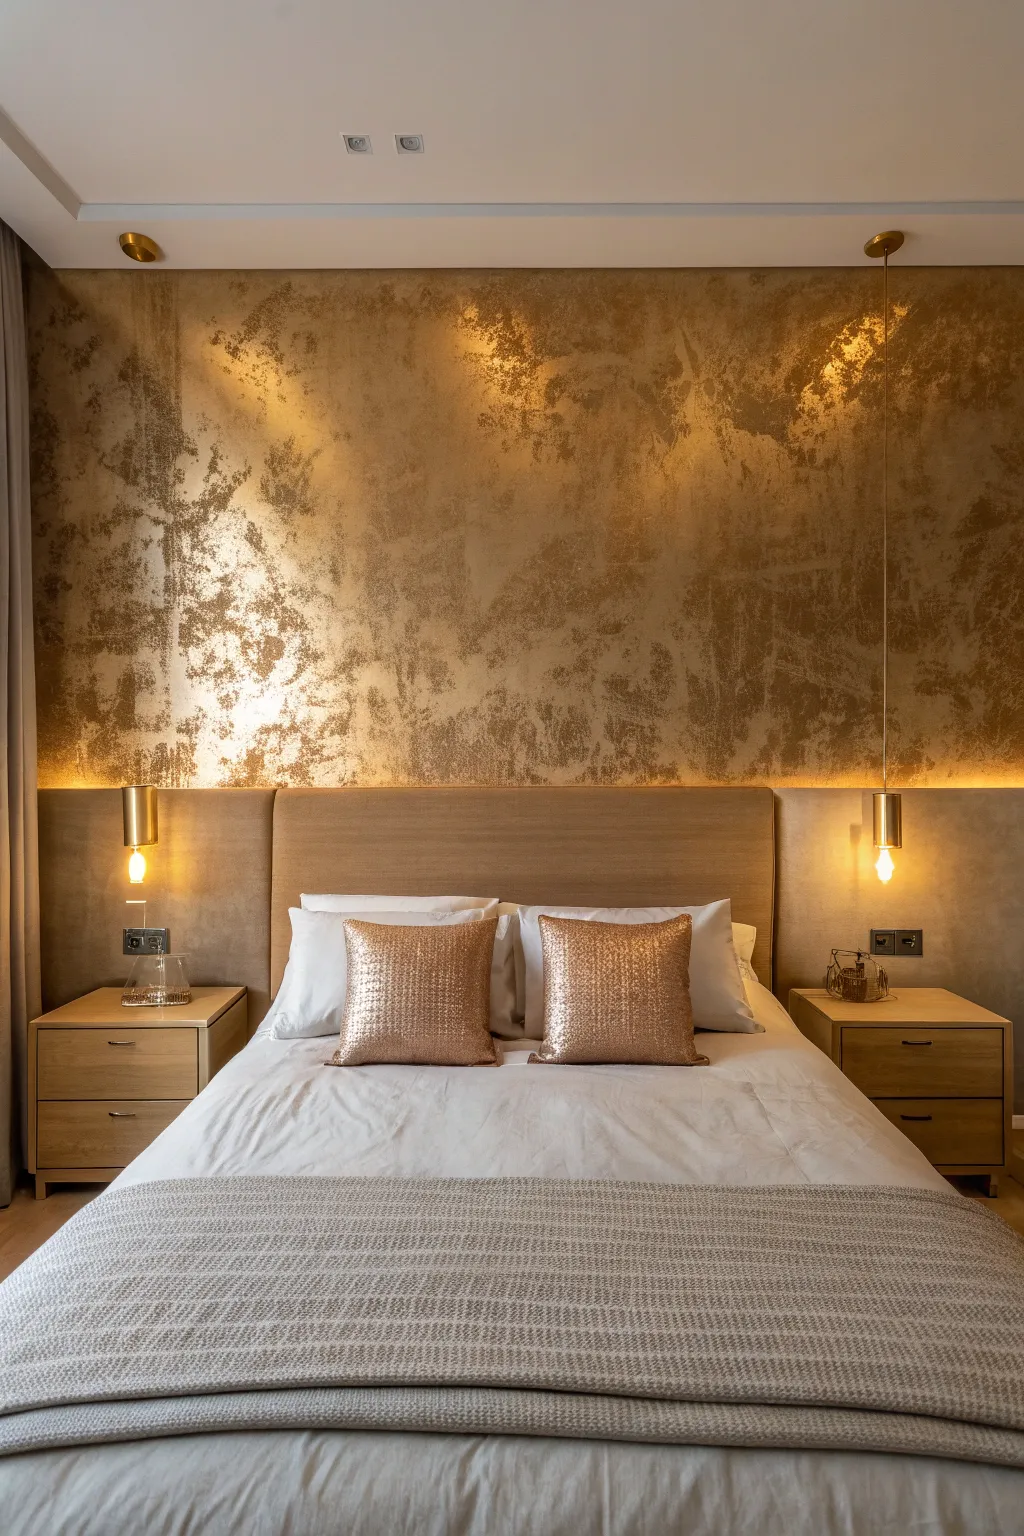
Transform your bedroom into a luxurious suite with this stunning, textured gold accent wall that mimics the look of aged metal leaf. This technique creates a rich, multi-dimensional surface that catches the light beautifully, adding instant warmth and drama behind your headboard.
Step-by-Step
Materials
- Dark beige or light brown latex base coat (eggshell finish)
- Metallic gold glaze or paint (rich gold tone)
- Metallic copper or bronze glaze (for depth)
- Sea sponge or specialized texturing sponge
- Synthetic bristle brush (2-inch)
- Clean, lint-free rags
- Painter’s tape
- Drop cloths
- Paint tray and liners
- Clear acrylic topcoat (satin or matte)
Step 1: Preparation and Base
-
Prepare the area:
Clear the room or move furniture to the center. Remove any wall fixtures like the pendant lights shown in the photo, and cover outlets with tape. Lay down drop cloths to protect your flooring from drips. -
Tape the edges:
Apply painter’s tape precisely along the ceiling line, adjacent walls, and baseboards. Press the edges down firmly with a putty knife or your finger to prevent any paint bleed. -
Clean the surface:
Wipe down the wall with a damp cloth to remove dust and oils. A clean surface is crucial for the metallic finish to adhere properly without peeling later. -
Apply the base coat:
Roll on your dark beige or light brown base paint. This color will peek through the gold texture, so ensure you have solid, even coverage. Let this coat dry completely, ideally overnight.
Wrist Twist Technique
Constantly rotate the sponge in your hand while working. Using the same face of the sponge repeatedly creates a predictable pattern that ruins the organic ‘aged’ effect.
Step 2: Creating the Metallic Textures
-
Prepare your gold glaze:
Pour a small amount of the metallic gold paint or glaze into a tray. If the paint is very thick, I like to thin it slightly with a glazing liquid to make it more workable and translucent. -
Load the sponge:
Dampen your sea sponge with water and wring it out thoroughly until it’s just barely moist. Dip the sponge into the gold paint, then blot the excess onto a clean part of the tray or a rag. -
Apply the first gold layer:
Starting in a top corner, dab the sponge against the wall in a random, organic pattern. twist your wrist slightly with each press to vary the imprint and avoid a repetitive stamp look. -
Work in small sections:
Focus on a 2×2 foot area at a time. Keep the edges of your sections wet and irregular so you can blend the next section seamlessly without visible lines. -
Soften the texture:
While the paint is still wet, take a clean, dry rag and gently dab or “pounce” over the gold you just applied. This softens the sponge marks and creates that cloudy, ethereal gold leaf effect. -
Build coverage:
Continue this sponge-and-dab method across the entire wall. Allow some of the brown base coat to show through—about 20-30% visibility creates the best depth. -
Let it dry:
Allow this first metallic layer to dry for at least 4 to 6 hours. Metallic paints often take longer to cure than standard latex.
Ambient Light Check
Before drying, check your work with the room’s lights ON. Metallic paint looks drastically different under artificial light versus daylight.
Step 3: Adding Depth and Finish
-
Mix the secondary tone:
Pour out a small amount of copper or bronze glaze. This darker metallic tone will add the shadowed, aged look seen in the photo. -
Apply spot accents:
Using a clean sponge, sparingly apply this darker metallic tone to random areas. Focus on creating clusters rather than an even spread to mimic natural weathering. -
Blend the accents:
Immediately use a clean rag to blot and blend these copper spots into the gold layer. You want a subtle shift in tone, not harsh blotches. -
Inspect the wall:
Step back about 6 feet to view the whole wall. Look for any areas that seem too heavy or too bare. You can add more gold to lighten dark spots or base color to tone down bright spots. -
Seal the surface:
Once fully dry (give it 24 hours), apply a clear acrylic topcoat using a roller. A satin or matte finish is best to protect the wall without competing with the metallic drift. -
Remove tape and reinstall:
Carefully peel off the painter’s tape while the topcoat is still slightly tacky to ensure a crisp line. Reinstall your light fixtures and move the bed back into place.
Step back and admire the warm, golden glow your new feature wall brings to the entire room


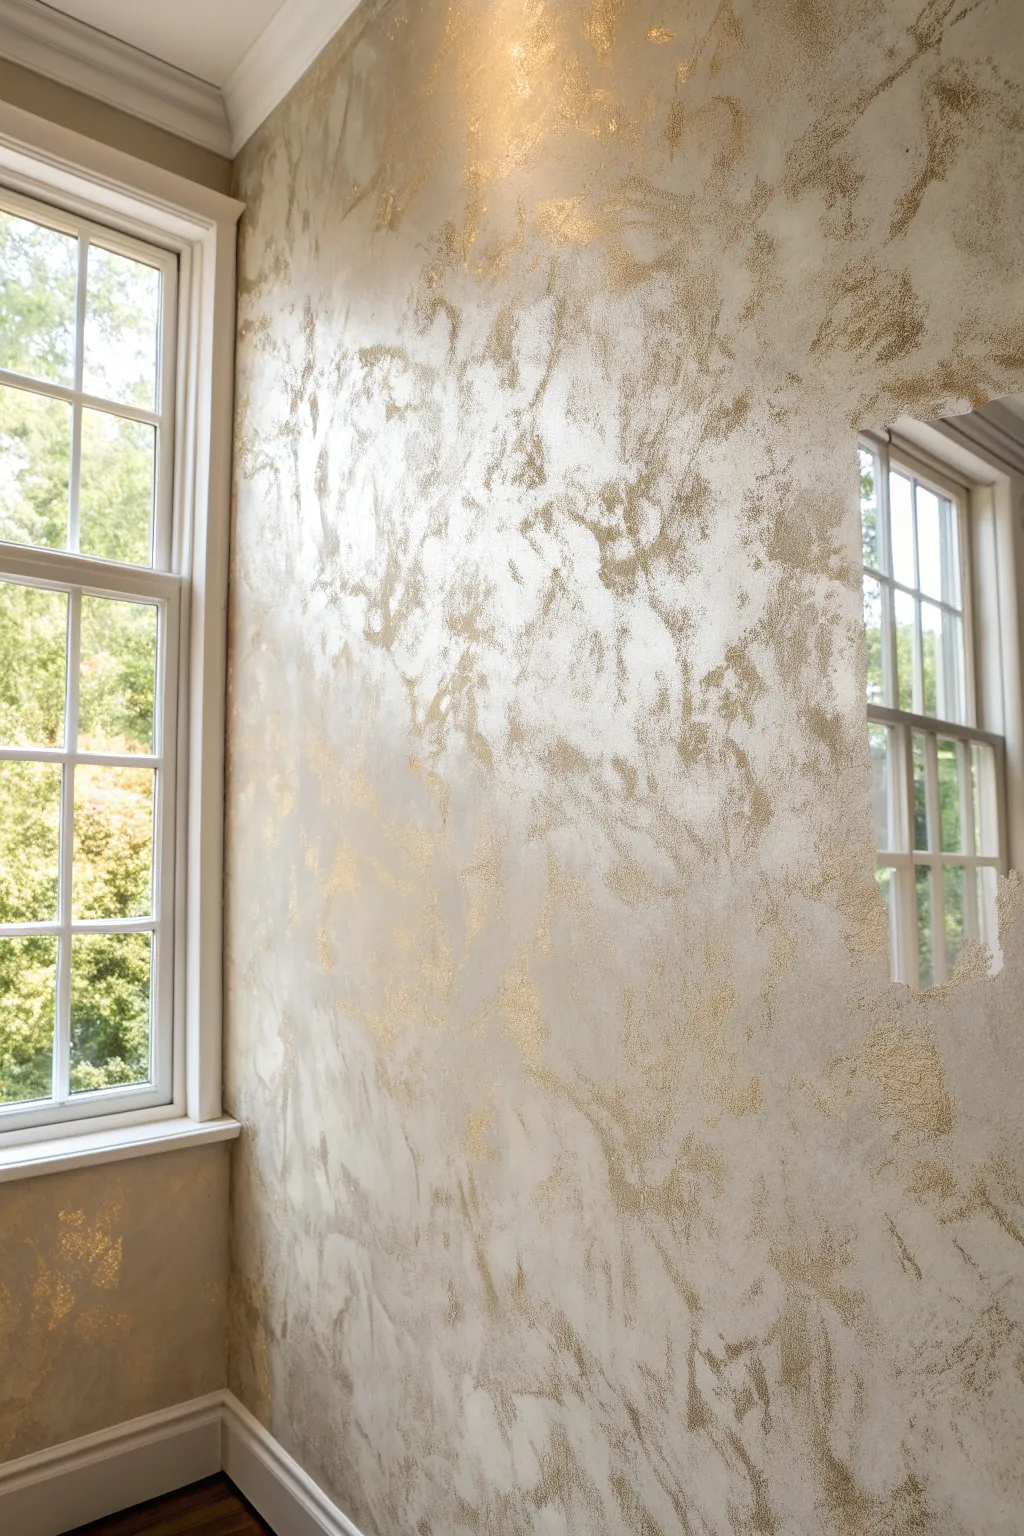
Champagne Sheen in the Entryway
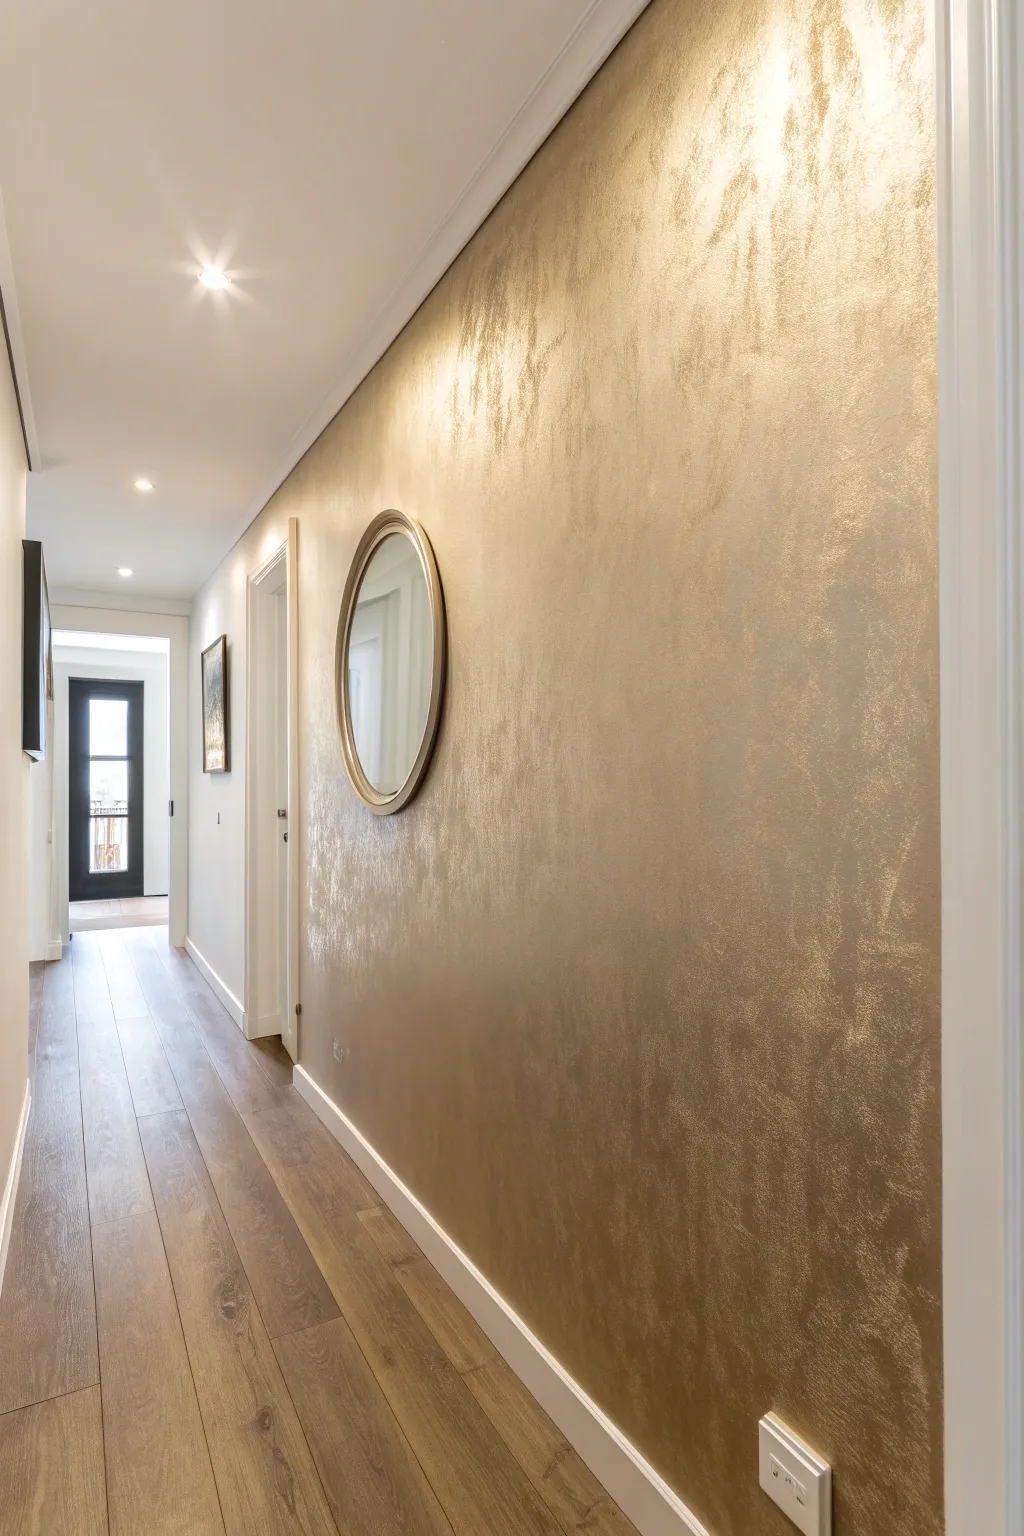
Transform a standard hallway wall into a stunning focal point with this elegant champagne gold metallic finish. The textured application creates a dynamic play of light and shadow, mimicking the look of expensive Venetian plaster or gold leaf.
How-To Guide
Materials
- Metallic interior wall paint (Champagne or Soft Gold color)
- Base coat latex paint (light beige or warm cream)
- Glaze medium (clear or pearl)
- 9-inch paint roller frame and microfiber covers
- Natural sea sponge or specialized texture roller
- Painter’s tape and plastic drop cloths
- Paint tray and liners
- Fine-grit sandpaper (220 grit)
- Damp lint-free rags
- Angled sash brush (2.5 inch)
Step 1: Preparation & Base Coat
-
Protect the perimeter:
Begin by meticulously taping off all baseboards, ceiling molding, and adjacent walls. Since metallic paints are notoriously difficult to clean off unwanted surfaces, take your time pressing the tape edges down firmly to prevent bleed-through. -
Prep the surface:
Ensure the wall is perfectly clean and smooth. Fill any nail holes with spackle and sand them flush. Wipe down the entire wall with a damp cloth to remove dust, as metallics will highlight even the smallest imperfections. -
Apply the base coat:
Roll on a coat of high-quality latex paint in a warm cream or beige tone. This base color doesn’t need to be metallic; it acts as a solid, opaque background that will give depth to the translucent metallic topcoats. -
Let it cure:
Allow the base coat to dry completely, preferably overnight. A fully cured base is crucial so that the subsequent texturing process doesn’t peel up the paint underneath.
Visible Roller Lines?
If you see straight lines, your paint is drying too fast. Mist the wall lightly with water while working or add more glaze to your mix to keep the edge wet longer.
Step 2: Mixing & Application
-
Create the glaze mixture:
In your paint tray, mix your metallic champagne paint with a clear glaze medium. A typical ratio is 4 parts paint to 1 part glaze. The glaze extends the drying time, giving you a longer ‘open time’ to work the texture before it sets. -
Cut in the edges:
Using your angled sash brush, paint a border of the metallic mixture around the ceiling line, baseboards, and corners. Work in small sections so the edges remain wet when you begin rolling. -
Apply the first metallic layer:
Roll the metallic mixture onto the wall using a microfiber roller. Aim for varied, random strokes rather than straight vertical lines. This chaotic base layer helps establish the organic look we are aiming for. -
Texture while wet:
While the paint is still wet, take a dampened natural sea sponge and dab the surface. Rotate your wrist constantly to avoid a repeating pattern. This lifts some paint and deposits texture, creating that cloudy, plastered effect. -
Work in patchy sections:
I usually tackle about a 3×3 foot section at a time. Paint, sponge, and then move to the adjacent area, blending the wet edges together so you don’t get harsh lap lines.
Step 3: Refining the Sheen
-
Inspect the first pass:
Once the first textured layer is dry, step back and view the wall from different angles. You are looking for bald spots or areas where the base coat shows through too clearly. -
Apply the second layer:
For a richer, deeper gold, apply a second coat. This time, use less glaze (or straight metallic paint) on your sponge. Lightly pounce the sponge over the wall to build up opaque highlights on top of the first translucent layer. -
Soften the texture:
If the texture looks too sharp or spiky, lightly knock it down. Wait until the paint is tacky (not fully dry) and gently drag a clean, dry softness brush or wide brush over the surface to blur the sponge marks slightly. -
Detail the edges:
Go back with a small artist’s brush or the tip of your sponge to ensure the texture goes all the way to the tape line. A solid flat line of paint at the ceiling will look unnatural against the textured center. -
Final dry time:
Let this final layer dry for at least 24 hours. Metallic paints often take longer to cure fully than standard latex paints. -
Reveal the edges:
Carefully score the edge of the painter’s tape with a utility knife before peeling it away. This prevents the dried latex film from tearing off the wall along with the tape.
Pro Tip: Lighting Key
Metallic walls rely on lighting. Install warm-toned LED spots aimed at the wall to make the texture shimmer and truly pop.
Step 4: Finishing Touches
-
Re-install fixtures:
Once fully cured, you can re-hang mirrors or artwork. The textured gold surface acts as a stunning backdrop for simple shapes, like the round mirror shown in the example.
Now you have a hallway that glows with sophistication and warmth.


Cool Pewter for a Modern Vibe
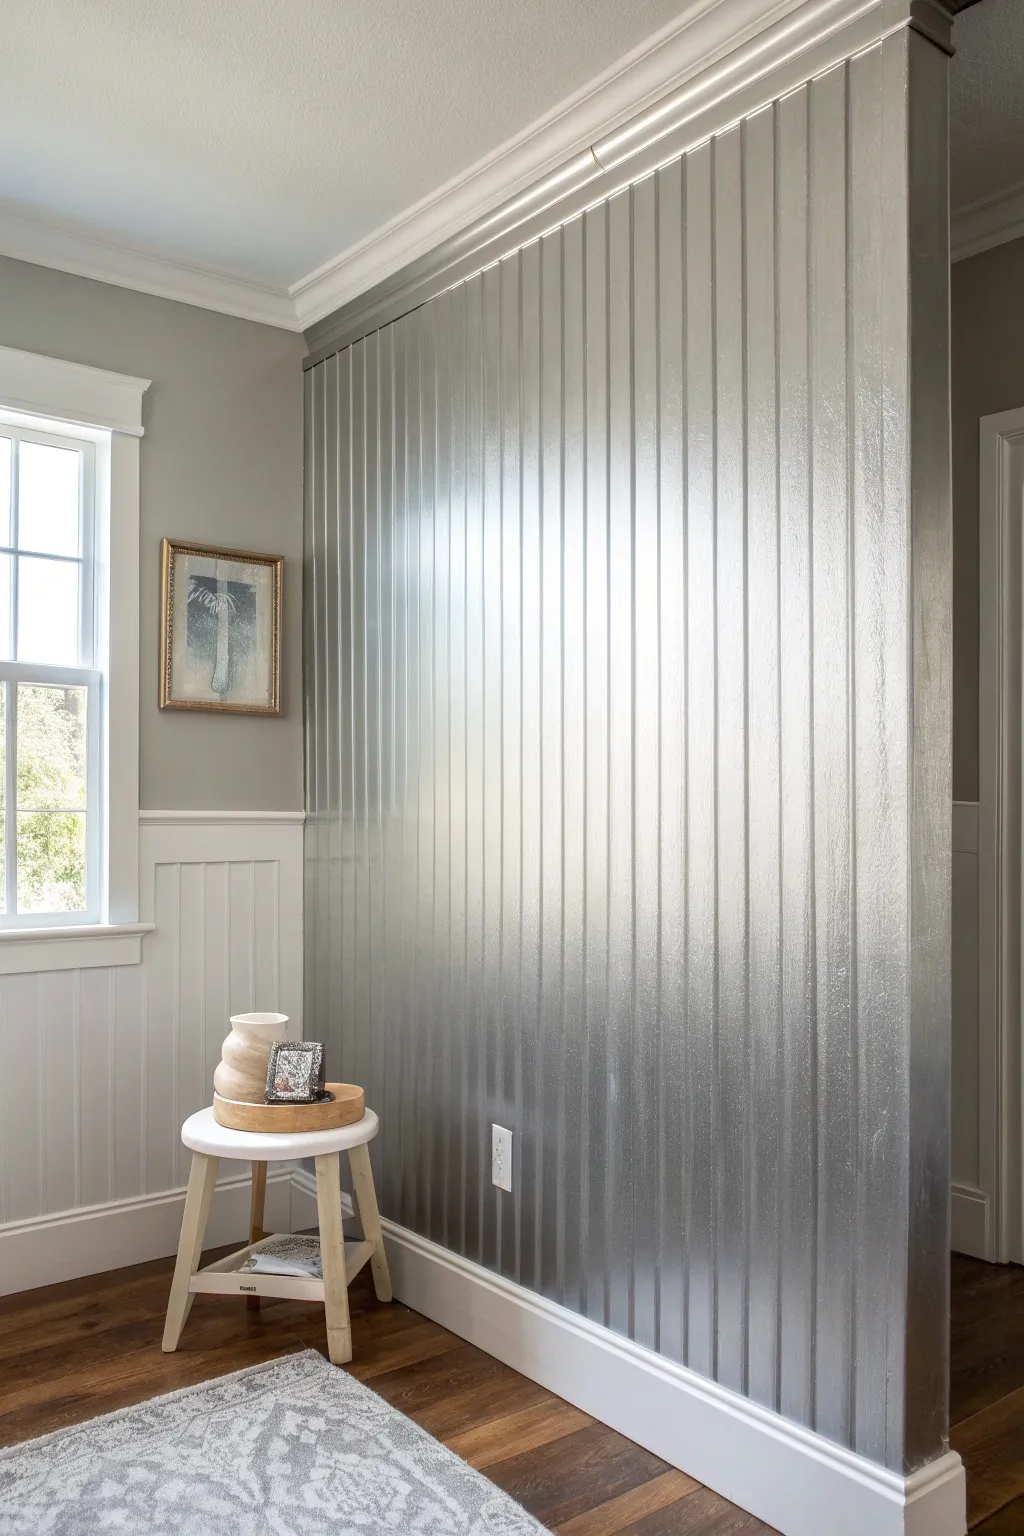
Transform a standard beadboard accent wall into a stunning modern feature with the sleek look of cool pewter. This project combines classic architectural texture with a bold metallic finish that catches the light beautifully throughout the day.
Detailed Instructions
Materials
- Interior paint primer (tinted gray recommended)
- Metallic silver or pewter interior wall paint
- Beadboard paneling (sheets or planks)
- Construction adhesive
- Brad nailer and 1-1/2 inch nails
- Wood filler
- Fine-grit sandpaper (220-grit)
- Tack cloth
- Painter’s tape
- High-quality synthetic angle sash brush (2.5 inch)
- Mini foam roller or microfiber roller (3/8 inch nap)
- Paint tray and liners
- Drop cloths
- Caulk and caulk gun
Step 1: Preparation & Installation
-
Surface Prep:
Begin by removing any existing baseboards or trim on the wall section you intend to cover. Clean the wall surface thoroughly to remove dust and grease, ensuring the adhesive will bond properly. -
Measure and Cut:
Measure the height and width of your wall section carefully. Cut your beadboard panels to size, accounting for ceiling height and any outlets. If using multiple sheets, ensure the beaded grooves align correctly. -
Apply Adhesive:
Flip the panel over and apply a wavy line of construction adhesive across the back. This helps reduce the number of nails needed and prevents the panel from bowing over time. -
Secure the Panels:
Press the panel firmly against the wall. Use a brad nailer to secure the board, placing nails into the grooves where possible to make them less visible. Repeat until the wall section is covered. -
Fill and Sand:
Fill all nail holes and any seams between panels with wood filler. Once dry, lightly sand these areas smooth with fine-grit sandpaper. This step is crucial because metallic paint highlights every imperfection. -
Caulking Edges:
Run a bead of paintable caulk along the edges where the beadboard meets the ceiling, adjacent walls, or baseboards to create a seamless, professional transition.
Step 2: Painting the Metallic Finish
-
Protect Surroundings:
Apply painter’s tape to the ceiling, adjacent walls, and floor trim to protect them from splatters. Lay down a drop cloth to catch any drips. -
Apply Primer:
Roll on a coat of high-quality primer. I strongly suggest using a gray-tinted primer rather than white; this provides a deeper base for the silver topcoat and helps achieve opacity faster. -
Cut In the Edges:
Once the primer is dry, open your metallic pewter paint. Stir it very thoroughly as metallic flakes settle quickly. Use your angled sash brush to cut in around the perimeter and inside the vertical grooves of the beadboard. -
First Roller Coat:
While the cut-in paint is still wet, use a mini roller to apply the first coat of paint to the flat surfaces. Roll in a consistent vertical direction to align the metallic particles for a uniform sheen. -
Check for Drips:
Keep a close eye on the grooves. Metallic paint can sometimes pool in the textured beading, so use your brush to feather out any drips before they start to tack out. -
Drying Time:
Allow the first coat to dry completely according to the manufacturer’s instructions. Metallic finishes often require longer drying times than standard latex paint. -
Second Coat Application:
Apply a second coat using the same method: brush the grooves first, then roll the flats. Two to three thin coats are far superior to one thick coat when working with metallics. -
Final Inspection:
Inspect the wall from different angles to check for roller marks or uneven sheen. If necessary, apply a third light coat to ensure total coverage. -
Cleanup:
Remove the painter’s tape while the final coat is still slightly tacky to prevent peeling the fresh paint film. Let the wall cure fully for at least 24 hours before placing furniture nearby.
Stir, Don’t Shake
Never shake metallic paint cans as this introduces air bubbles that ruin the finish. Stir gently but thoroughly with a wooden stick, reaching the bottom to suspend the metal flakes.
Industrial Edge
For a grittier industrial look, lightly brush a dark glaze into the grooves of the beadboard after the silver paint dries, then wipe the raised surfaces clean.
Now you have a striking, light-reflecting accent wall that adds a sophisticated industrial touch to your space
BRUSH GUIDE
The Right Brush for Every Stroke
From clean lines to bold texture — master brush choice, stroke control, and essential techniques.
Explore the Full Guide
The Metallic “Fifth Wall” Ceiling
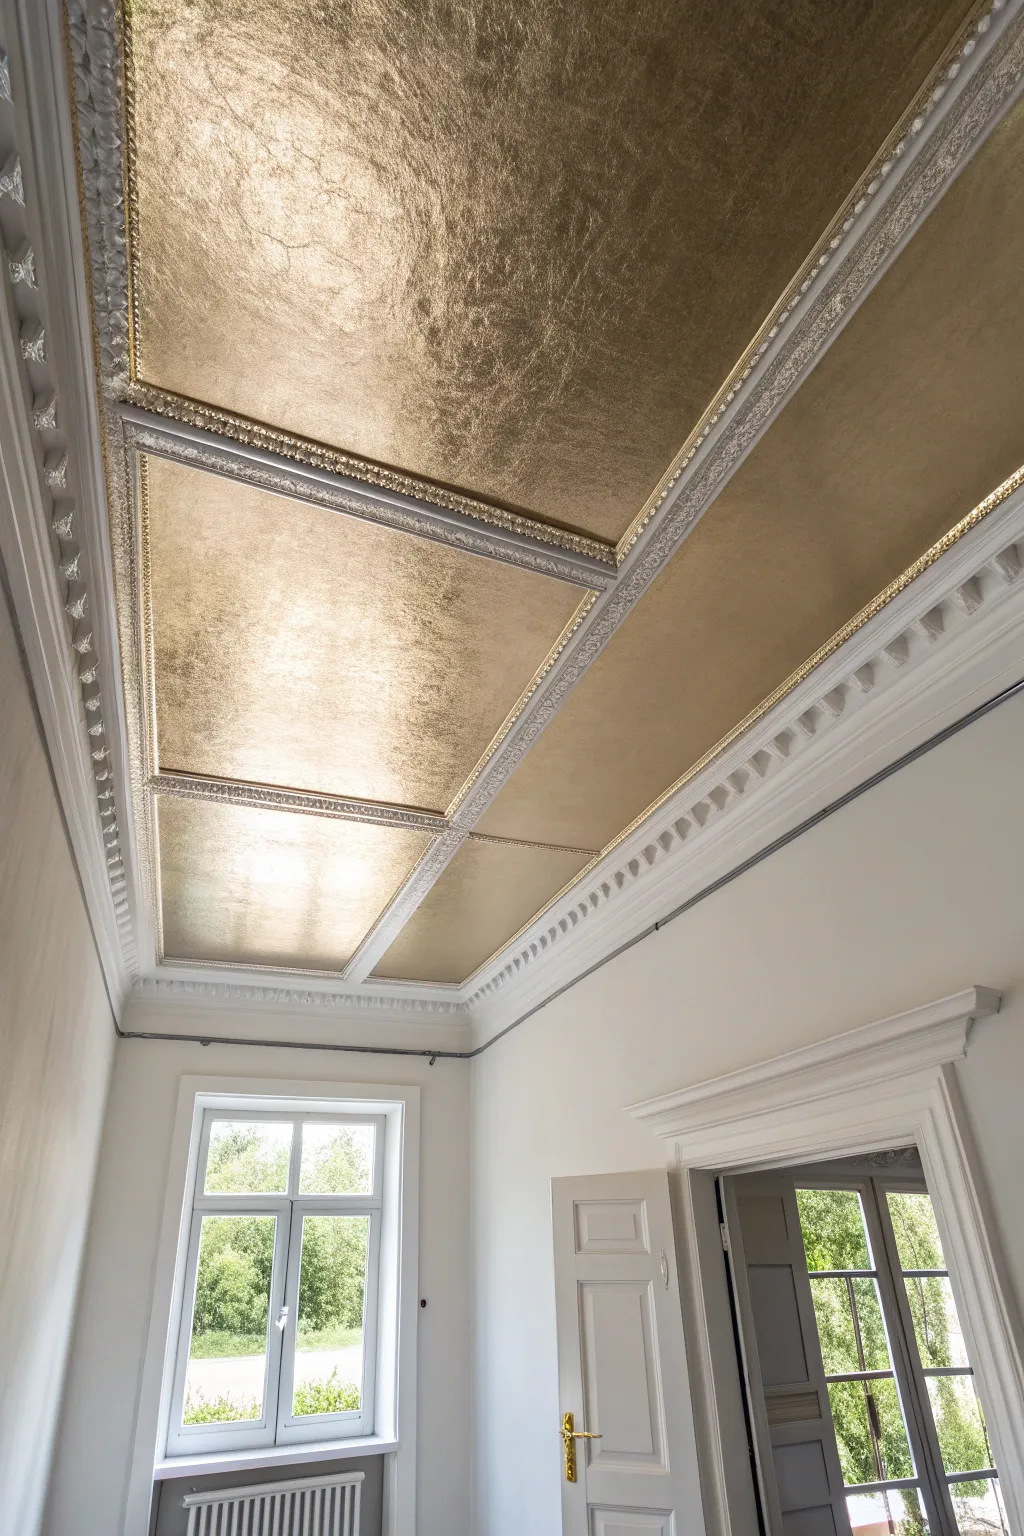
Transform your room’s “fifth wall” into a gilded masterpiece by creating the look of textured gold leaf within classic molding. This high-impact finish catches the light beautifully, adding warmth and regal sophistication to any space.
How-To Guide
Materials
- High-quality gold metallic paint (or liquid gold leaf)
- White semi-gloss trim paint
- Painter’s tape (delicate surface)
- Drop cloths
- Ladder
- Sanding sponge (fine grit)
- Microfiber tack cloth
- Angled sash brush (2 inch)
- Small foam roller
- Sea sponge or clean cotton rag (for texture)
- Decorative crown molding (if not existing)
- Panel molding trim (if not existing)
Step 1: Preparation & Base Coat
-
Assess the surface:
Begin by inspecting your ceiling. If you are extremely lucky to have existing molding, ensure it is clean and caulked. If not, you will need to map out your grid pattern to install crown molding and inner panel trim first. -
Clean and sand:
Wipe down the entire ceiling area to remove dust and cobwebs. Lightly sand the flat ceiling panels where the gold will go to ensure maximum adhesion, then wipe away the dust with a damp tack cloth. -
Prime the surface:
Apply a coat of high-quality primer to the ceiling panels. If your metallic paint is slightly translucent, consider tinting your primer to a mustard yellow or tan color; this creates a rich base that enhances the gold topcoat. -
Tape off the trim:
Once the primer is fully dry, meticulously apply delicate-surface painter’s tape to the inner edges of the white molding. Press the edges of the tape down firmly with your thumbnail or a putty knife to prevent bleed-through.
Prime for Shine
Use a warm yellow or ochre base coat before applying gold paint. It boosts opacity and makes the metallic finish look richer and deeper with fewer coats.
Step 2: Applying the Metallic Finish
-
Cut in the edges:
Open your gold metallic paint and stir well—metallic pigments settle quickly. Using an angled sash brush, carefully paint a 2-3 inch border around the perimeter of the panel where it meets the tape. -
Roll the first layer:
While the cut-in border is still wet (to avoid lap lines), use a small foam roller to fill in the center of the panel. Apply the paint in V-shaped strokes for even coverage. -
Check coverage:
Let this first coat dry according to the manufacturer’s instructions. Metallic paints often look splotchy on the first pass, so don’t panic if it isn’t perfect yet. -
Apply the second coat:
Apply a second coat using the same method: cut in with the brush and roll the center. This layer builds opacity and shimmer. -
Add texture (optional but recommended):
To mimic the organic, slightly crinkled look of real gold leaf seen in the photo, I like to dab the wet second coat gently with a sea sponge or a crumpled cotton rag. This breaks up uniform roller marks and adds depth. -
Touch up texture:
Working quickly before the paint sets, continue sponging across the panel to ensure the texture looks consistent and not patterned.
Add Antique Age
Once the gold is dry, lightly dry-brush a translucent dark brown glaze over the texture to settle into the crevices, giving it an old-world, antiqued bronze look.
Step 3: Finishing the Trim
-
Remove the tape:
Peel the painter’s tape away slowly at a 45-degree angle while the final gold coat is still slightly tacky. This helps ensure a crisp line without pulling up dried paint chips. -
Inspect the edges:
Check for any gold that may have bled onto the white molding. If found, let it dry completely before touching it up with your white trim paint and a small artist’s brush. -
Fresh coat for molding:
For a truly polished look, apply a fresh coat of crisp white semi-gloss paint to the surrounding molding and crown detail. This high contrast makes the gold panels pop even more. -
Clean connection points:
If you have installed new molding for this project, caulk any gaps between the molding and the wall or ceiling for a seamless, built-in appearance. -
Final lighting check:
Open the curtains or turn on the room lights to inspect the ceiling from different angles. The metallic finish often reveals skipped spots under direct light, so perform final touch-ups if needed.
Enjoy the warm, reflective glow of your new ceiling that brings a touch of palace grandeur to your everyday life
Powder Room Glow-Up
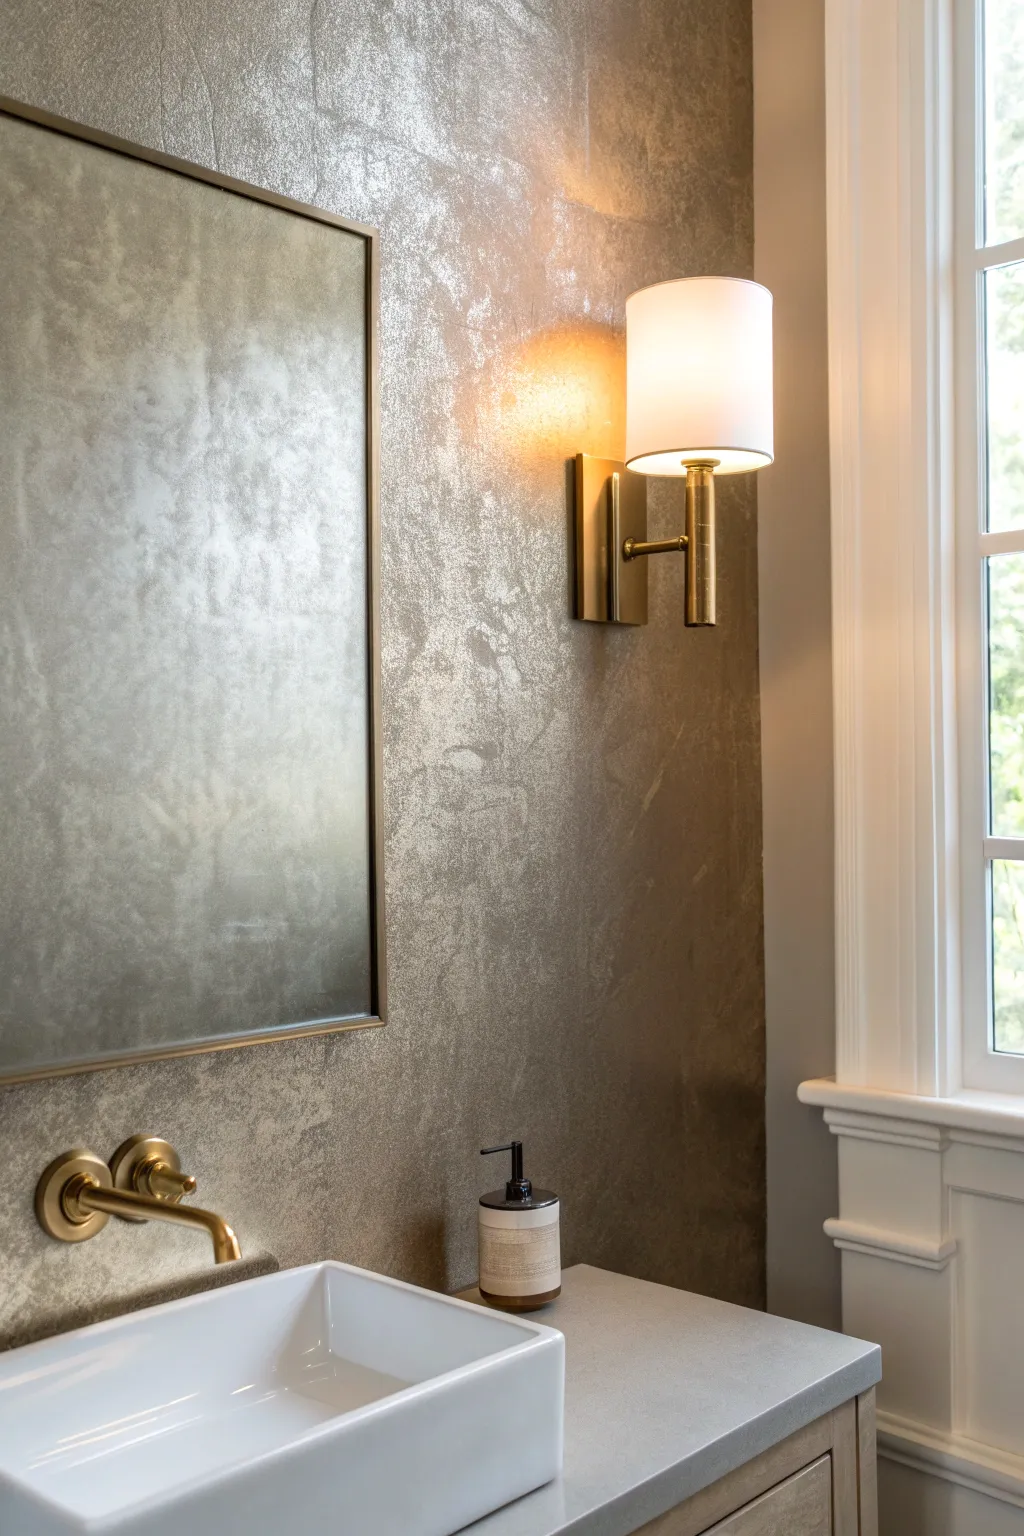
Transform a plain powder room into a jewel-box space with this sophisticated metallic finish that mimics the look of high-end Venetian plaster. The layered technique creates depth and movement, catching the light beautifully to give your walls a soft, glamorous glow.
Detailed Instructions
Materials
- Metallic glaze or paint (champagne or warm silver)
- Base coat paint (matte, light grey or beige)
- Texture medium or joint compound
- Trowel or 4-inch putty knife
- Wide paint roller and tray
- Natural sea sponge
- Clean lint-free rags
- Painter’s tape
- Drop cloths
- Sanding block (fine grit)
- Primer (if starting with bare walls)
Step 1: Preparation and Base
-
Clear and clean:
Remove all fixtures, mirror, and outlet covers from the wall. Clean the surface thoroughly with a mild degreaser to ensure perfect adhesion, especially if it’s a bathroom wall. -
Protect the perimeter:
Apply painter’s tape to the ceiling line, baseboards, and any adjoining walls you aren’t painting. Lay down drop cloths to protect your vanity and flooring. -
Apply the base color:
Roll on a coat of your matte base paint. This should be a similar tone but slightly darker than your metallic topcoat to create depth. A soft greige works wonderfully here. -
Let it cure:
Allow the base coat to dry completely according to the manufacturer’s instructions, usually at least 4-6 hours.
Step 2: Creating Texture
-
Mix the texture:
If using a dedicated texture medium, mix it well. Alternatively, you can mix a small amount of joint compound with your base paint to create a thick, plaster-like consistency. -
Apply texture patches:
Scoop some texture onto your trowel. Apply it to the wall in random, organic strokes, leaving some areas of the base coat flat and creating raised ridges in others. -
Work in sections:
Don’t try to texture the whole wall at once. Work in 3×3 foot sections so the material doesn’t dry out before you finish manipulating it. -
Knock down edges:
Once a section is applied, lightly skim the clean trowel over the wet texture to flatten the highest peaks. This creates broad, flat plateaus that will reflect light later. -
Dry thoroughly:
Allow the texture layer to dry overnight. It must be completely hard before you move to the metallic phase. -
Light sanding:
Gently run a fine-grit sanding block over the wall to remove any sharp burrs or overly rough spots giving the wall a refined, intentional feel. -
Dust off:
Wipe the wall down with a damp cloth or tack cloth to remove all sanding dust.
Uneven Texture?
If your texture looks too spiky or aggressive, wait for it to dry partially (about 20 mins) and firmly drag a wide, clean drywall knife over it to flatten it out.
Step 3: The Metallic Glow
-
Prepare the glaze:
Pour your metallic paint or glaze into a tray. If the paint is very thick, I find thinning it slightly with a clear glazing liquid helps it flow better over the texture. -
Sponge application:
Dip a dampened sea sponge into the metallic mixture. Blot excess onto the tray or a rag—you want it loaded but not dripping. -
Dab and twist:
Press the sponge onto the wall, twisting your wrist slightly with each placement to avoid a uniform stamp pattern. -
Focus on the high points:
Concentrate the metallic finish on the raised texture areas you created earlier. The texture will naturally grab more paint, highlighting the dimension. -
Soften with rags:
While the metallic layer is still wet, gently rub over the area with a clean, dry rag in a circular motion. This blends the edges and pushes the metallic sheen into the crevices. -
Layering for depth:
Once the first metallic pass is dry, assess the look. For a richer glow like the photo, apply a second, lighter pass of metallic glaze, focusing only on the highest textured spots. -
Final clean up:
Remove the tape carefully while the final coat is still slightly tacky to prevent peeling, then reinstall your fixtures once the wall is fully cured.
Two-Tone Effect
Use a warm gold metallic glaze first, then sponge a sheer pearl or silver glaze lightly on top. This mixed-metal look creates incredible complexity.
Enjoy the sophisticated atmosphere your new metallic walls bring to the room

PENCIL GUIDE
Understanding Pencil Grades from H to B
From first sketch to finished drawing — learn pencil grades, line control, and shading techniques.
Explore the Full Guide
Geometric Metallic Color Blocking
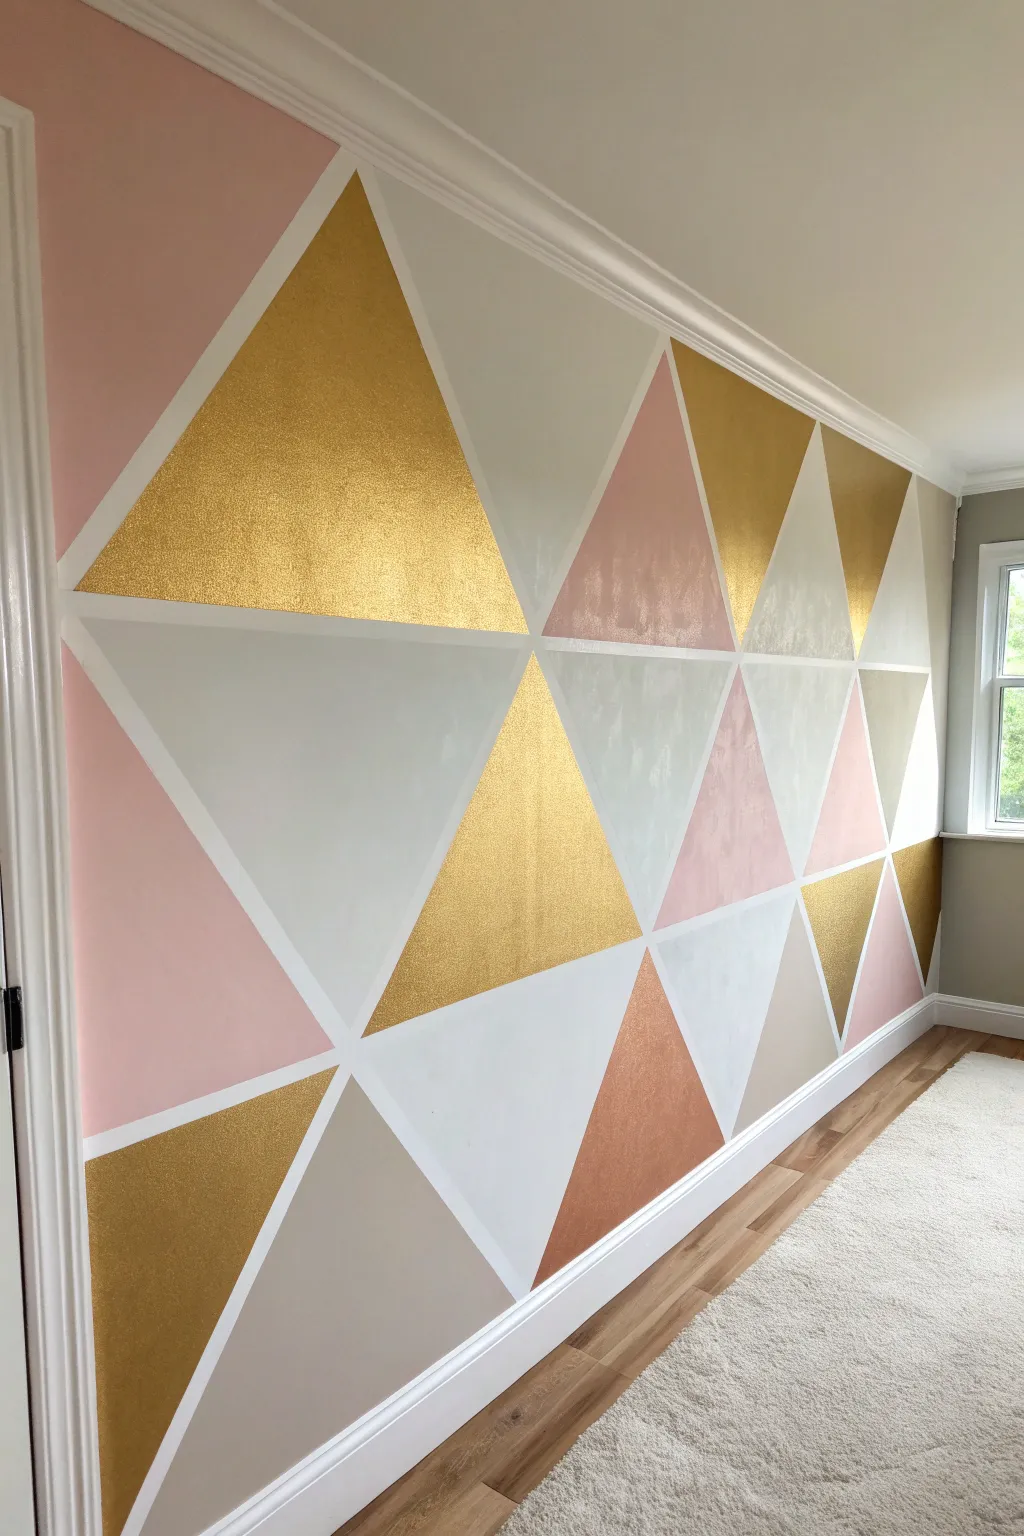
Transform a plain wall into a modern masterpiece with this striking geometric design. Combining soft pastels with bold metallic gold creates a luxurious, light-reflecting focal point that feels expensive and custom-made.
Step-by-Step Tutorial
Materials
- Painter’s tape (1-inch width works best)
- Metallic gold wall paint
- Soft pink latex paint (matte or eggshell)
- Light grey latex paint
- Taupe/Greige latex paint
- White or base color wall paint
- High-density foam rollers (mini size)
- Small angled sash brush
- Paint tray and liners
- Drop cloth
- Level or laser level
- Pencil
- Utility knife or scissors
Step 1: Preparation & Base Coat
-
Prepare the workspace:
Clear furniture away from the wall and lay down a drop cloth to protect your flooring. Remove outlet covers and patch any nail holes or imperfections for a smooth starting surface. -
Clean the wall:
Wipe down the wall with a damp cloth or a mild TSP substitute to remove dust and grease, ensuring the tape adheres perfectly later. -
Apply the base color:
Paint the entire wall with your base color—this will be the color of the lines between your triangles. In the example, this is a crisp white. Let this dry completely for at least 24 hours to prevent tape damage.
Bleeding Lines?
If paint bled under the tape, wait for it to dry fully. Then, place tape perfectly over the colored triangle edge and repaint the white line to clean it up.
Step 2: Designing the Pattern
-
Visualize the layout:
Look at the wall and decide on the scale of your triangles. You can sketch a rough plan on paper first, but random placement often yields the most organic, modern look. -
Create the first diagonal:
Start by applying a long strip of painter’s tape diagonally across a large section of the wall. This anchors your design. Use a straight edge if you are nervous, but eyeballing works well for this abstract style. -
Build the triangles:
Add more strips of tape, intersecting them to form triangles of various sizes. Aim for a mix of large statement triangles and smaller filler shapes. -
Seal the tape edges:
Once your design is taped out, run your finger firmly along all tape edges. I like to paint a thin layer of the *base wall color* (white) over the tape edges first. This seals the tape and ensures crisp lines, as any seepage will just be the base color.
Level Up: Texture
For added dimension, use a sponge to dab the metallic paint on just the final coat. This gives the gold sections a hammered metal look rather than flat sheen.
Step 3: Painting the Colors
-
Plan your palette:
Before dipping your brush, stick small pieces of masking tape with color initials (P for Pink, G for Gold) into each triangle to signify which color goes where. Specifically, space out the metallic gold triangles so they aren’t clumped together. -
Paint the pink sections:
Start with your soft pink paint. Use the small roller for the centers of the triangles and the angled brush for the corners near the tape. Apply two light coats rather than one thick one. -
Apply the neutrals:
Move on to your grey and taupe shades. Paint these sections using the same technique, being careful not to accidentally paint into a neighboring triangle meant for a different color. -
Add the metallic gold:
Stir your metallic paint thoroughly as the shimmer particles settle quickly. Apply the gold to the designated triangles. Metallic paint can be tricky; use a foam roller and finish with unidirectional strokes (all going the same way) to avoid visible roller marks. -
Assess coverage:
Check the metallic sections once dry. Metallic paints often require 3-4 thin coats to achieve that solid, foil-like opacity shown in the image.
Step 4: The Reveal
-
Remove the tape:
This is crucial: remove the tape while the final coat of paint is still slightly tacky, not bone dry. Pull the tape slowly at a 45-degree angle away from the paint edge. -
Touch ups:
Inspect your white lines. If any color bled through, use a tiny artist’s brush and your white base paint to correct the lines.
Step back and enjoy the way the light catches those gold accents throughout the day
Metallic Stencil Statement Pattern
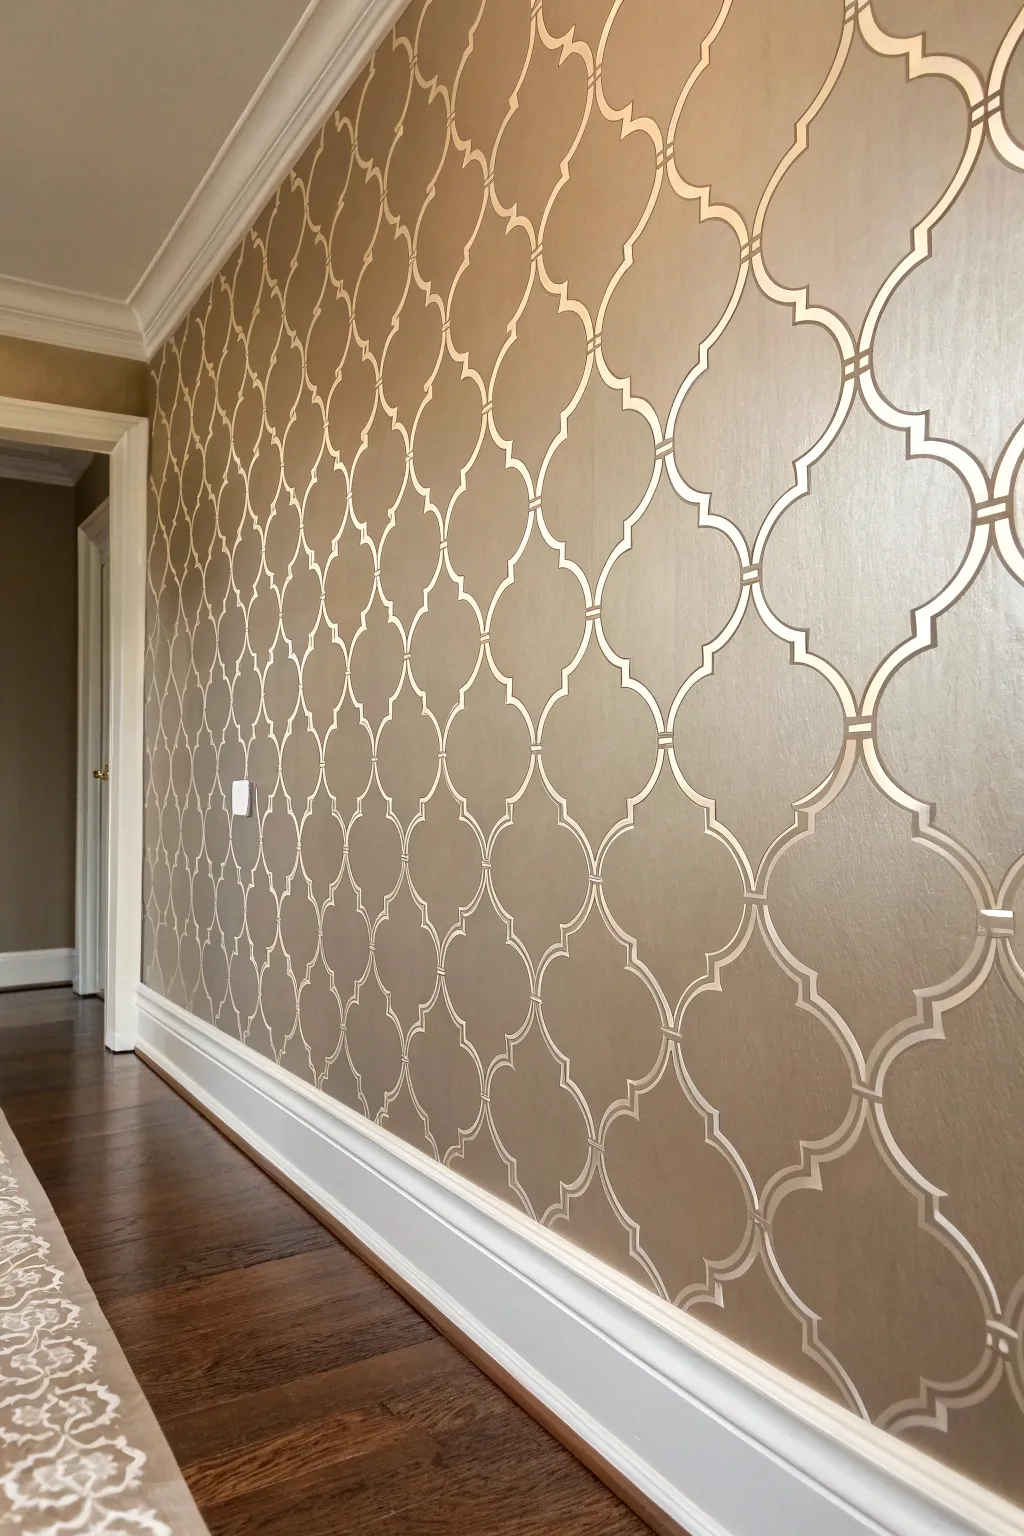
Transform a plain hallway or room into a boutique hotel experience with this sophisticated trellis stencil project. By pairing a warm matte base coat with a shimmering metallic overlay, you achieve a dimensional, high-end look that catches the light beautifully.
How-To Guide
Materials
- Large-scale Moroccan trellis wall stencil (min. 18×24 inches)
- Matte latex wall paint (base color – taupe/warm sand)
- Metallic glaze or metallic paint (champagne or silver)
- Painter’s tape (low tack)
- Clip-on stencil level
- Dense foam roller
- Small stencil brushes
- Paint tray
- Paper towels
- Spray adhesive (repositionable)
- Ladder
Step 1: Preparation & Base Coat
-
Surface Prep:
Begin by cleaning your wall thoroughly with a mild detergent and water solution to remove dust and oils. Fill any nail holes with spackle and sand smooth once dry. -
Tape and Protect:
Apply painter’s tape to the ceiling line, baseboards, and adjoining walls. Lay down a drop cloth to protect your flooring from stray metallic flecks. -
Applying Base Color:
Roll on two even coats of your matte taupe or warm sand latex paint. Allow the first coat to dry for at least 4 hours before applying the second. -
Full Cure:
Let the base coat cure for a full 24 hours. This is crucial—if the paint is fresh, the stencil adhesive might peel it off.
Bleed Control
If paint is bleeding under the stencil edges, your roller is too wet. Offload more paint onto towels until the roller leaves virtually no visible wet marks on the towel before touching the wall.
Step 2: Positioning the Stencil
-
Prep the Stencil:
Lay your stencil flat on the floor. Lightly mist the back with repositionable spray adhesive. Let it get tacky for about 60 seconds before bringing it to the wall. -
First Placement:
Start at the top center of your wall for the most symmetrical look. Place the stencil right up against the ceiling line (or crown molding). -
Level Check:
Clip a small stencil level onto the stencil itself to ensure it is perfectly straight horizontally. Adhere it firmly to the wall, smoothing it out with your hand.
Step 3: Stenciling with Metallic Paint
-
Loading the Roller:
Pour a small amount of metallic paint into your tray. Load your dense foam roller, then offload almost all the paint onto a paper towel. The roller should feel nearly dry to the touch. -
Rolling Technique:
Apply the paint over the stencil using light to medium pressure. Roll in multiple directions to ensure the metallic pigment catches the light from all angles, but avoid pressing too hard to prevent bleed. -
Checking Coverage:
Metallic paints can be translucent. You may need to do a second light pass with the roller immediately to build opacity. -
Peel and reveal:
Gently peel the stencil off the wall while the paint is still wet. Check the underside for any paint buildup and wipe it off if necessary. -
Aligning the Pattern:
Move the stencil to the adjacent spot. Most modern stencils have ‘registration marks’—elements of the previous pattern that overlap to ensure perfect spacing. Use these guides to lock in the next section. -
Repeat Process:
Continue the pattern across the top row first, then work your way down the wall in columns.
Add Depth
For a subtle 3D effect, mix a tiny drop of dark brown acrylic into your metallic paint for the edges of the stencil pattern to create a faux shadow before filling the center with pure metallic.
Step 4: Corners and Finishing Touches
-
Handling Corners:
When you reach a corner, tape off the adjacent wall vertically. Press the stencil into the corner and bend it slightly. Use a small stencil brush here instead of a roller for better control in the crease. -
Bottom Edge:
For the bottom near the baseboard, you usually can’t fit the whole stencil. Bend the stencil so it rests on the floor, or tape it off just above the baseboard and stipple paint into the remaining design. -
Touch Ups:
Once the wall is complete and dry, use a small artist’s brush and your original base paint color to correct any small bleeds where the metallic paint might have slipped under the plastic.
Step back and admire how the subtle shimmer transforms the space from standard to stunning


Two-Tone Wainscoting With Metallic Top
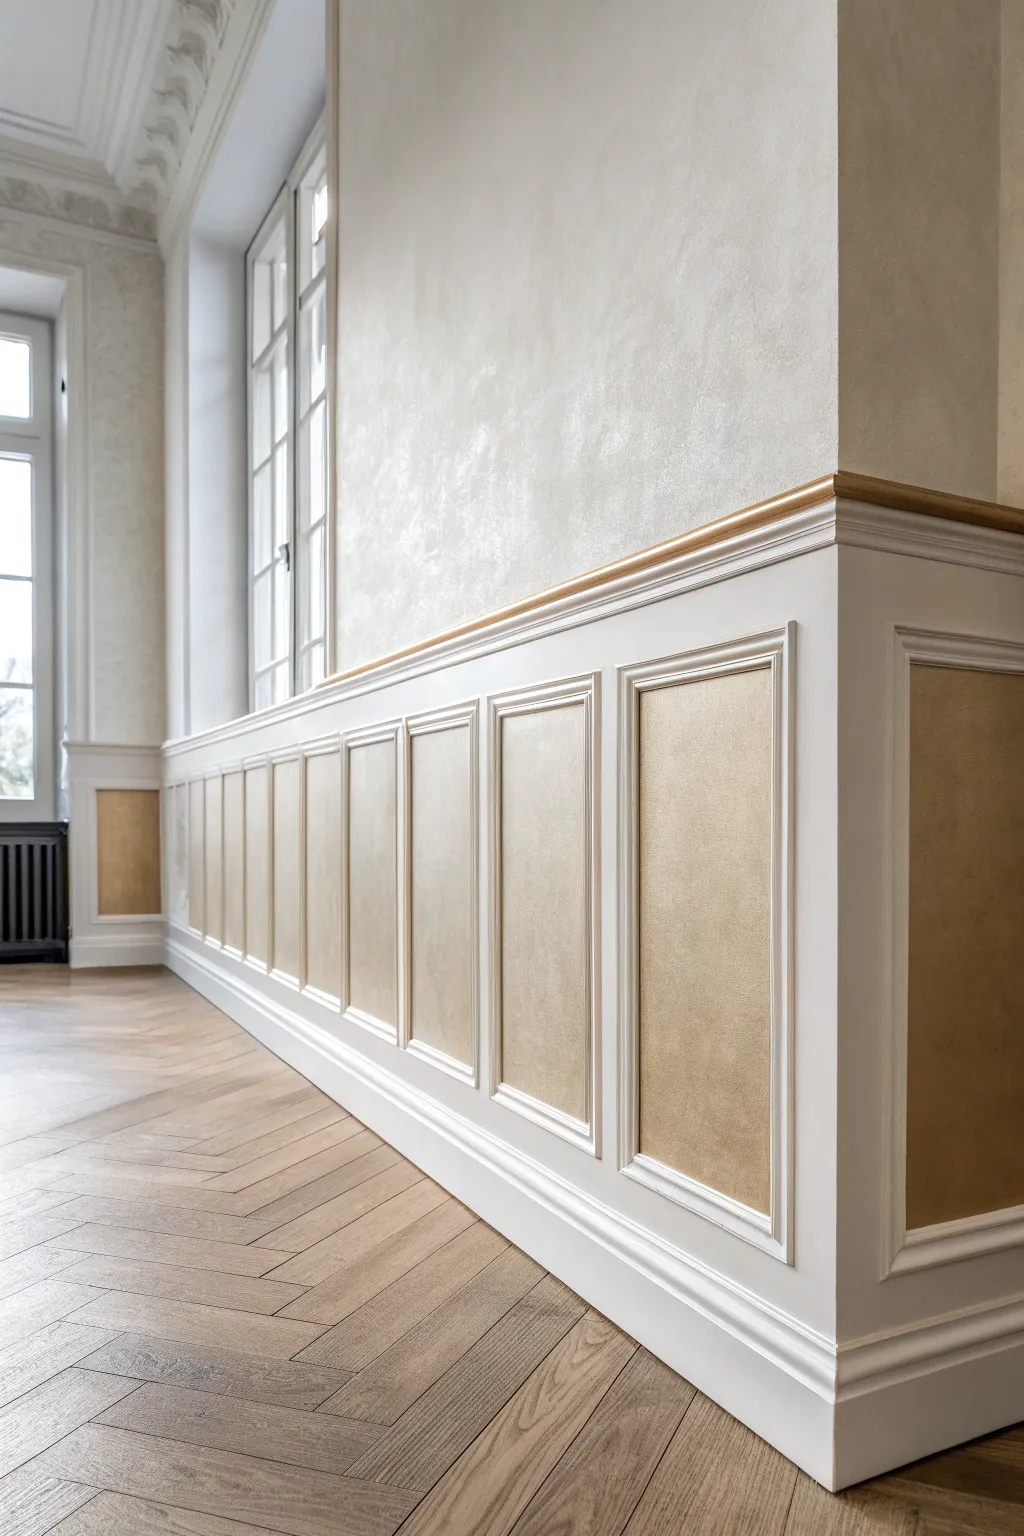
Transform ordinary white wainscoting into a luxurious architectural statement by incorporating rich metallic gold accents into the recessed panels and trim. This project balances classic woodworking with modern metallic finishes to create a sophisticated, light-reflecting feature wall.
Step-by-Step Tutorial
Materials
- Existing wainscoting or panel molding kit
- High-quality painter’s tape (FrogTape recommended for crisp lines)
- Metallic interior wall paint (Gold/Bronze shade)
- Textured metallic plaster (for upper wall)
- White satin or semi-gloss trim paint
- Primer (bonding primer specific for metallic paints)
- 2-inch angled sash brush
- Small artist brush or detail brush
- Mini foam roller and tray
- Trowel or putty knife (for texture)
- Drop cloths
- Sanding sponges (fine grit)
Step 1: Preparation & Base Coat
-
Clean and Sand:
Begin by thoroughly cleaning the entire wainscoting surface to remove dust and oils. Lightly scuff-sand the existing finish with a fine-grit sanding sponge to ensure the new paint adheres properly, then wipe away all dust with a damp tack cloth. -
Protect the Floor:
Lay down heavy-duty drop cloths to protect your flooring, specifically taping the edges if you have intricate parquet like the image, as metallic drips are notoriously difficult to clean. -
Prime the Surface:
Apply a bonding primer to all woodwork. Even if the metallic paint claims to be paint-and-primer in one, a dedicated primer coat ensures an even sheen later. Let this dry completely according to the manufacturer’s instructions. -
Paint the Framework:
Paint the main structural stiles, rails, and baseboards with your white satin or semi-gloss trim paint. Do not worry too much about getting paint inside the panel squares yet, but keep the outer frames clean. Apply two coats for solid coverage.
Stir, Don’t Shake
Never shake metallic paint cans. Shaking creates micro-bubbles that disrupt the metallic finish. Instead, stir gently but thoroughly from the bottom up to suspend the metal flakes evenly.
Step 2: Applying the Metallic Gold
-
Tape the Panel Interiors:
Once the white paint is fully cured (give it at least 24 hours), tape off the inner edges of the recessed rectangles. Press the tape edge firmly with a putty knife to prevent bleed-under. -
Cut-in the Corners:
Using a small angled sash brush, carefully cut in the metallic gold paint around the perimeter of the inner panel rectangle. I find a sweeping motion away from the tape edge helps keep the line sharp. -
Roll the Centers:
Use a mini foam roller to fill in the center of the panels with the metallic gold paint. Foam rollers are superior here as they leave a smooth finish without brush marks, which show up clearly in metallic sheens. -
Apply Second Coat:
Metallic paints are often semi-translucent; a second or even third coat is usually necessary for true opacity. Allow proper drying time between coats to avoid dragging the metallic flakes. -
Gild the Chair Rail:
For the top molding piece (the chair rail), tape off the wall above and the white trim below. Apply the same gold paint to this specific rounded molding strip to tie the lower panels to the upper wall aesthetic. -
Remove Tape:
Peel off the painter’s tape slowly while the final coat of gold is still slightly tacky to ensure a razor-sharp transition between the white frame and gold center.
Step 3: Texturing the Upper Wall
-
Prepare the Upper Wall:
If you are recreating the full look, prepare the wall space above the wainscoting. Ensure it is clean, dry, and primed. -
Apply Base Texture:
Using a trowel, apply texturing compound or a thick Venetian plaster base layer. Work in varying directions to create irregular movement and depth. -
Apply Pearl Glaze:
Once the texture is dry, mix a pearlescent or champagne metallic glaze. Use a wide brush to apply it in a cross-hatch pattern, then wipe it back gently with a clean rag. The glaze will settle into the texture valleys, highlighting the depth. -
Detail Check:
Inspect all edges and corners. Use a tiny artist’s brush to touch up any white paint that may have been smudged, or refine the gold edges for a flawless finish.
Texture Match
For the upper wall, try a ‘suede’ effect paint if plastering feels daunting. These specialized paints contain microspheres that mimic the soft, light-diffusing look of the plaster shown here.
Step back and admire how the light plays across the different metallic textures you have created
Brushed Metallic Crosshatch Texture
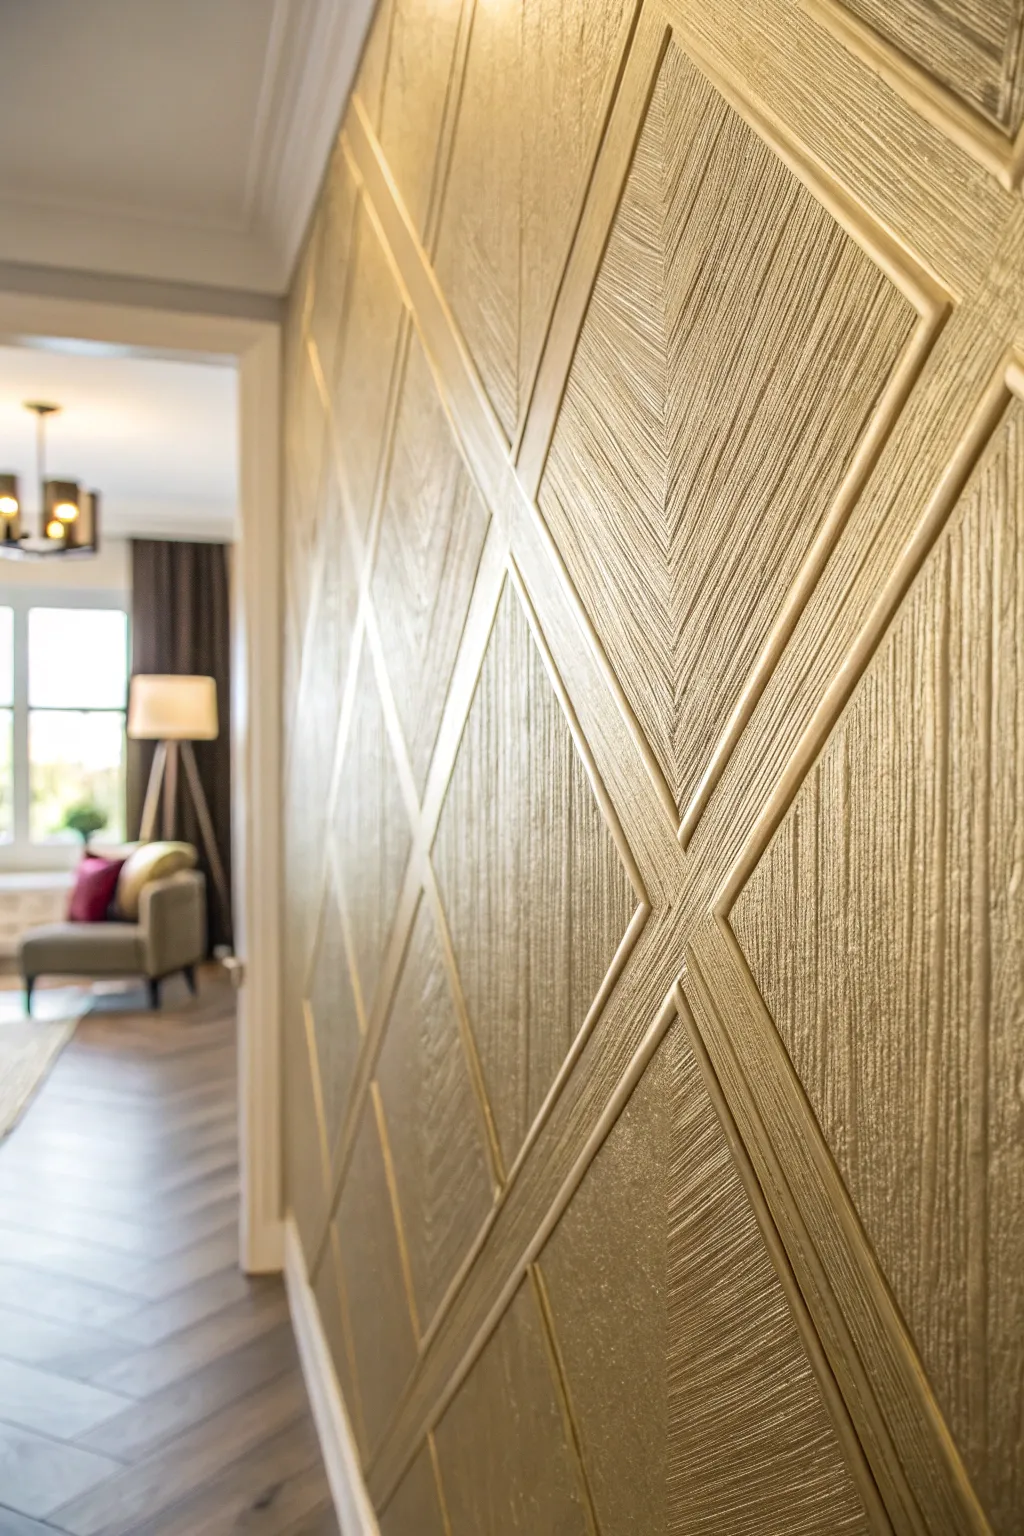
Transform a plain hallway or feature wall into a high-end architectural statement using wood molding and specialized paint techniques. This project combines geometric precision with a rich, brushed metallic finish that catches the light beautifully.
Step-by-Step Guide
Materials
- Wall primer (tinted to a base gold/tan)
- Metallic gold wall paint (high viscosity)
- Textured wall glaze or metallic glaze
- Flat wood molding/battens (1×2 or 1×3 inch)
- Miter saw
- Laser level vs standard spirit level
- Construction adhesive (Liquid Nails)
- Pin nailer or finishing nails
- Wood filler and caulking gun
- Wide stiff-bristled brush (4-inch)
- Sanding block (medium grit)
- Painter’s tape
Step 1: Planning and Grid Layout
-
Measure and scale:
Measure your wall’s total width and height. Sketch a diamond grid pattern on paper first to determine how many ‘diamonds’ will fit comfortably across the space. -
Mark vertical guides:
Using a laser level, mark vertical center lines where the points of your diamonds will meet. This ensures your pattern stays straight across the expanse of the wall. -
Mark horizontal guides:
Snap horizontal chalk lines or use pencil marks to designate the top, middle, and bottom points of your diamonds. -
Tape the layout:
Before cutting any wood, use blue painter’s tape to map out the X-shapes on the wall. This lets you visualize the scale and adjust the angles if the pattern feels too crowded or too sparse.
Step 2: Installing the Molding
-
Cut the first long diagonals:
Set your miter saw to the angle determined by your layout (often around 45 degrees, but this varies based on your diamond width). Cut the longest continuous diagonal pieces first. -
Attach the main pieces:
Apply construction adhesive to the back of the molding and secure it to the wall using a pin nailer. Follow your marked lines precisely. -
Measure the intersecting cuts:
For the cross pieces that intersect the long diagonals, you will need to cut distinct angles to butt them up flush against the installed wood. Measure each gap individually as walls are rarely perfectly square. -
Install the shorter segments:
Glue and nail the shorter intersecting pieces to complete the X shapes. Ensure the joints are tight, but don’t worry about microscopic gaps just yet. -
Fill and seamless joints:
Apply wood filler to all nail holes and the joints where molding pieces meet. Overfill slightly to allow for sanding. -
Caulk the edges:
Run a thin bead of paintable caulk along the edges where the wood meets the drywall to eliminate shadows and create a unified surface. -
Sand smooth:
Once the filler is dry, sand the wood joints completely smooth so the planks look like continuous lines.
Clean Brushing Pro-Tip
Keep a rag handy to wipe your stiff brush off after every few strokes. Removing paint buildup ensures the bristles stay separated, keeping the texture sharp rather than muddy.
Step 3: Applying the Brushed Metallic Finish
-
Prime the surface:
Apply a primer to the entire wall and wood. I strongly recommend having the paint store tint the primer to a dark tan or mustard yellow; this creates a solid base for the gold topcoat. -
Apply the base coat:
Roll on a base coat of your metallic gold paint. Let this layer dry completely; its purpose is color coverage, not texture. -
Prepare the glaze mixture:
Mix your metallic paint with a glazing liquid to extend the drying time. This is critical for achieving the brushed effect without the paint drying too fast. -
Brush the texture – Part 1:
Working in one diamond section at a time, apply the glaze mixture generously. -
Create the directional strie:
Take your wide, stiff-bristled brush and drag it through the wet glaze. For this look, drag the brush diagonally, parallel to the molding on that specific side. -
Maintain consistency:
Ensure the brush strokes inside each diamond section mirror the direction of the framing molding, creating a ‘chevron’ type effect where the texture meets in the center. -
Clean out the corners:
As you brush, glaze might pool in the corners of the molding. Use a small, dry brush to gently pull this excess out so you don’t lose the clean geometric lines. -
Final inspection:
Check for any drips or areas where the metallic pigment has settled unevenly and correct them while the glaze is still tacky.
Level Up: Dual Tone
For added depth, use a slightly darker bronze metallic glaze for the shading near the molding edges, fading into a lighter gold in the center of the diamonds.
Step back and watch how the light dances across your new textured masterpiece as the sun moves through the room.
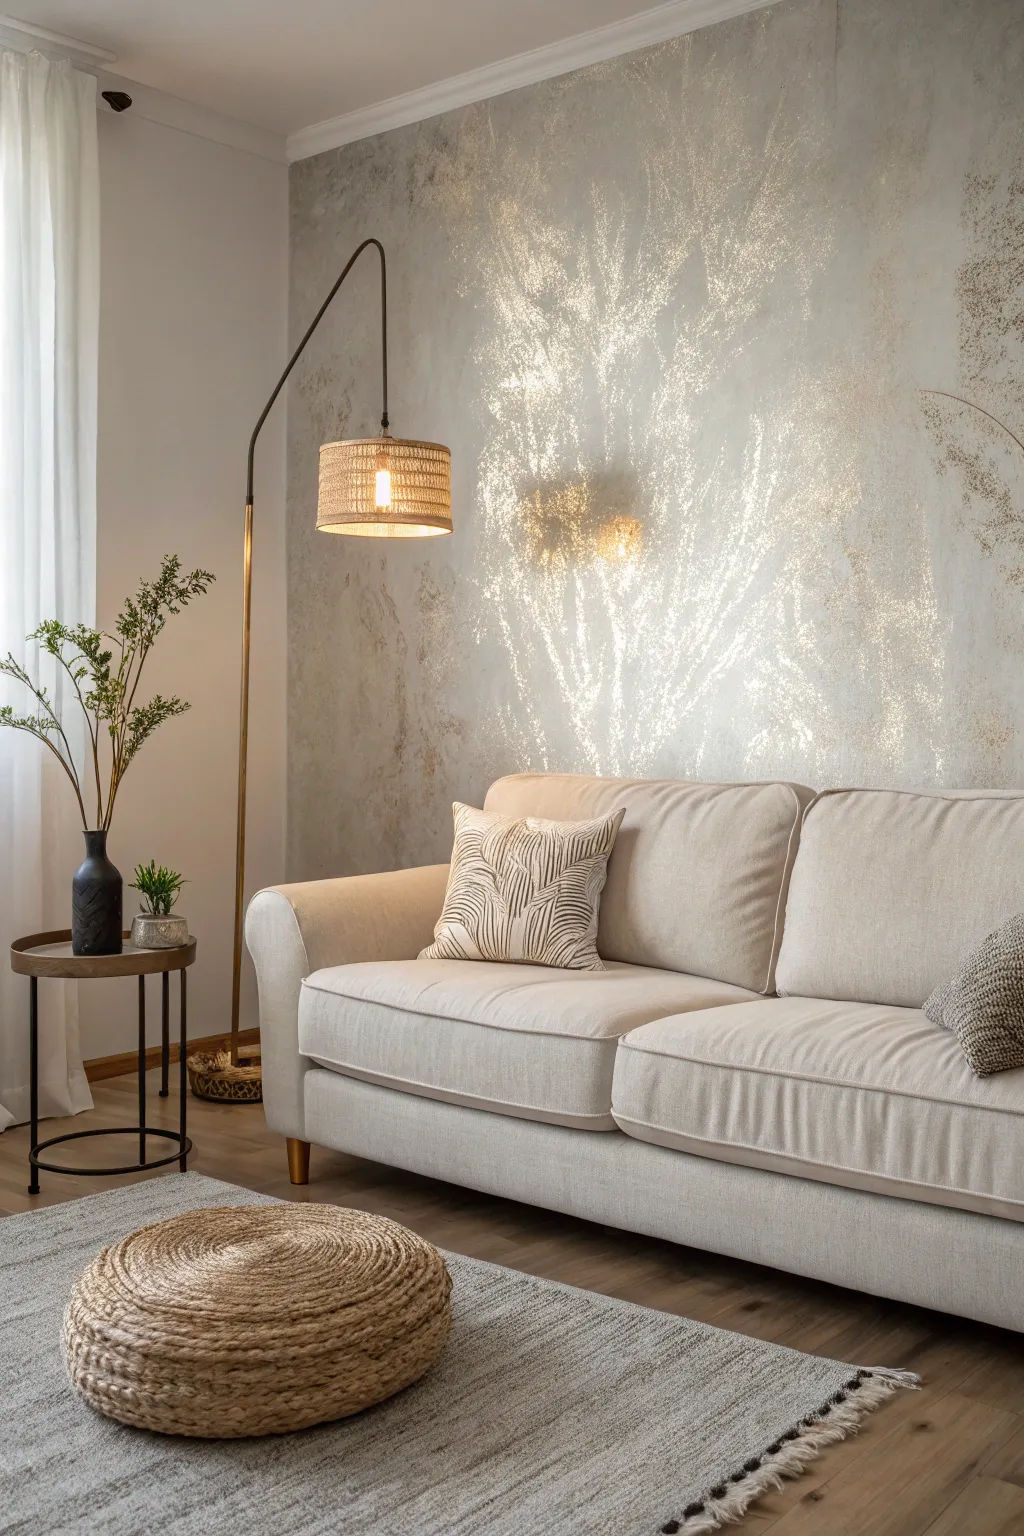
Soft Sponge-Dab Metallic Clouds
Transform a plain white wall into a shimmering canvas of ethereal light and texture with this sophisticated faux-finish. By layering metallic glazes over a solid base using a simple sponge technique, you create a soft, cloud-like depth that catches the light beautifully.
Step-by-Step
Materials
- Interior satin or eggshell latex paint (creamy off-white/beige base)
- Metallic glaze or paint (gold or champagne color)
- Clear acrylic glazing liquid (optional, to extend drying time)
- Natural sea sponges (various sizes)
- Lint-free rags
- Painter’s tape
- Drop cloths
- Paint tray and liners
- Small artist brush (for corners)
- Cardboard scraps (for testing)
Step 1: Preparation and Base Coat
-
Protect the area:
Begin by thoroughly masking off trim, windows, and baseboards with high-quality painter’s tape. Lay down drop cloths to protect your flooring, as sponging can sometimes create minor splatters. -
Clean the surface:
Wipe down the walls with a damp cloth to remove any dust or grease. A clean surface ensures the base coat adheres perfectly and provides a smooth foundation for the metallic texture. -
Apply the base coat:
Roll on your base color—a creamy off-white or soft beige works best to complement the gold. Aim for full, opaque coverage. If you are changing the wall color significantly, apply two coats, allowing at least 4 hours of drying time between them. -
Inspect the base:
Once dry, check for any patchy areas. The metallic glaze is translucent and won’t hide imperfections in the base coat, so ensure this layer is solid and even before proceeding.
Too Much Bling?
If the gold looks too heavy in one spot, use a clean, damp sponge to lift the glaze while it’s still wet, or dab a tiny bit of the original base wall color over it to knock it back.
Step 2: Creating the Metallic Glaze
-
Prepare the sponge:
Soak your natural sea sponge in water until it is fully expanded and soft. Wring it out extremely well; it should be damp but not dripping. A dry sponge will create harsh marks, while a dripping one will cause runs. -
Mix the glaze:
Pour your metallic gold paint into a tray. If the paint is very thick, I like to mix it with a little clear glazing liquid (about a 4:1 ratio of paint to glaze). This makes the metallic finish more translucent and gives you more time to work with it. -
Load the sponge:
Dip the flat face of your damp sea sponge into the metallic mixture. Do not scoop the paint; just dab the surface. -
Offload excess paint:
Blot the sponge repeatedly onto a piece of cardboard or paper towel. You want the sponge to be almost dry, carrying only a dusting of the metallic pigment. This is crucial for avoiding heavy blobs on the wall.
Step 3: Application Technique
-
Start in a corner:
Begin at a top corner of the wall. Press the sponge lightly against the wall and lift it straight off. Do not drag or twist the sponge, as this smears the texture. -
Vary the rotation:
As you move outward, rotate your wrist slightly with every dab. This ensures specific pore patterns on the sponge don’t repeat visibly, keeping the ‘cloud’ look organic and random. -
Build the clouds:
Work in small 3-foot sections. Apply the sponge marks in clusters—some areas dense with gold, and others with more of the base coat showing through. This negative space is what creates the airy, cloud-like dimension. -
Soften the edges:
Keep a clean, slightly damp lint-free rag nearby. If an area looks too heavy or the edges of a sponge mark are too defined, gently dab the wet glaze with the rag to blur the texture into the background. -
Detail the edges:
The large sea sponge might not reach perfectly into tight corners or right up to the window trim. Use a small piece torn from a sponge or a dabbing motion with a small artist brush to carry the metallic texture all the way to the tape line. -
Step back and assess:
stand back about 6 feet from the wall frequently. Up close, it looks like dots; from a distance, the pattern should merge. Use this perspective to spot areas that need a little more gold density to balance the overall look. -
Dry and cure:
Allow the metallic finish to dry completely, typically overnight. Carefully remove the painter’s tape by pulling it away from the paint edge at a 45-degree angle to ensure a crisp line.
Pro Tip: Edge Control
Don’t stop work in the middle of a wall. To avoid visible seam lines where wet glaze meets dry glaze, always maintain a ‘wet edge’ and finish an entire wall section in one session.
The result is a stunning, sun-kissed finish that feels both modern and timelessly elegant
Troweled Metallic Plaster Look
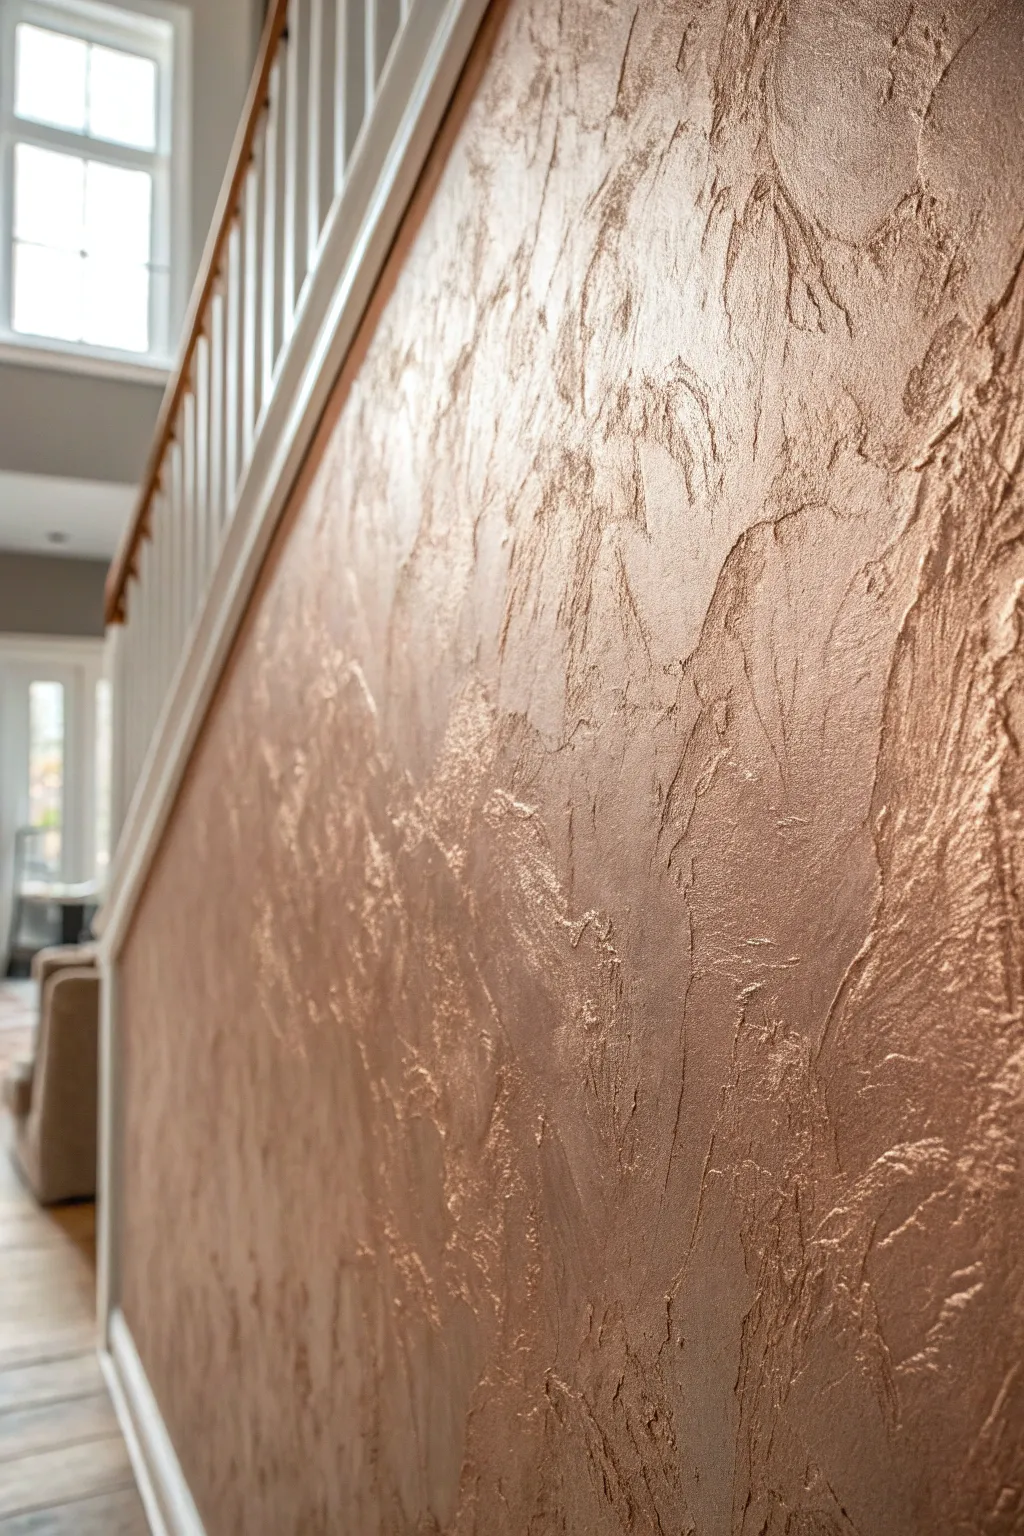
Transform a plain staircase or accent wall into a showstopping architectural feature with this rich, metallic bronze finish. By combining textured plaster with a metallic glaze technique, you can create a surface that catches the light and adds luxurious depth to any space.
Step-by-Step Tutorial
Materials
- Texture medium (e.g., Venetian plaster or heavy-body drywall joint compound)
- Metallic bronze or copper wall glaze
- Satin finish base paint (in a warm beige or tan shade)
- Steel drywall trowel or offset spatula
- Painter’s tape
- Drop cloths
- Medium-grit sanding sponge
- High-density foam roller
- Paint tray and liners
- Clean rags or lint-free cloths
Step 1: Preparation & Base Coat
-
Protect the area:
Begin by masking off all adjacent trim, the ceiling line, and the handrail with painter’s tape. Lay down drop cloths securely on the stairs or floor to catch any falling plaster debris. -
Prep the surface:
Ensure the wall is clean and dust-free. If there are existing holes or cracks, patch and sand them smooth now, though the texture will hide minor imperfections. -
Roll the base color:
Using a standard roller, apply a coat of your warm beige or tan satin base paint. This color acts as the background undertone for any spots where the plaster might be applied thinly. -
Base coat drying:
Allow the base coat to dry completely for at least 4-6 hours. It must be fully cured to handle the weight and moisture of the plaster layer.
Too Much Texture?
If you created ridges that are too aggressive, use a coarser 80-grit sandpaper to really grind down the high spots before painting. It creates a weathered, old-world stucco look.
Step 2: Creating the Texture
-
Load the trowel:
Scoop a generous amount of texture medium or joint compound onto the edge of your steel trowel. -
Apply the first patch:
Start near the top corner of the wall. Press the trowel against the wall and swoop it in a random, arcing motion. Don’t aim for flat coverage; you want peaks and valleys. -
Skip-trowel technique:
Continue applying the material using a ‘skip-trowel’ method. Hold the blade at a shallow angle and skip it across the surface, leaving some low spots smooth and creating high ridges elsewhere. -
Work in small sections:
I find it best to work in 3×3 foot sections to maintain a wet edge. Overlap your strokes unpredictably to avoid creating a discernible pattern. -
Vary the stroke direction:
Ensure you are turning your wrist frequently. Apply some strokes vertically, some horizontally, and plenty of diagonal swoops to mimic natural stone texture. -
Check density:
Step back occasionally to check for balance. You want a consistent level of chaos—not too many smooth spots, but not a solid block of thick plaster either. -
Knock down (optional):
If some ridges look too sharp or pointy, wait about 15 minutes for the plaster to firm up slightly, then gently glide a clean trowel over the high points to flatten them just a bit. -
Full cure time:
Let the textured wall dry completely. This is crucial—thick applications may take 24-48 hours depending on humidity. It will turn opaque white when dry.
Dual-Tone shimmer
Mix a small amount of gold glaze into your bronze for the second coat. Apply it selectively to just the highest peaks of the texture for a complex, multi-dimensional glow.
Step 3: Applying the Metallic Finish
-
Light sanding:
Once fully dry, run a medium-grit sanding sponge quickly over the wall. You aren’t trying to remove texture, just knocking off any sharp burrs that could snag your roller. -
Remove dust:
Vacuum the wall or wipe it down thoroughly with a slightly damp cloth to remove all sanding dust. Dust will prevent the metallic glaze from adhering properly. -
Apply the glaze:
Pour your metallic bronze glaze into a tray. Saturate a high-density foam roller and apply the glaze over the textured surface, working in manageable vertical columns. -
Back-troweling technique:
Immediately after rolling a section, while the glaze is wet, drag a clean trowel or spatula tightly over the surface. This scrapes the metallic glaze off the high points and pushes it deep into the crevices. -
Buffing the highs:
Alternatively, if you want the high points to be the shiniest (as seen in the photo), use a rag to buff the glaze onto the ridges specifically, or dry-brush a lighter metallic shade onto the peaks. -
Final inspection:
Check for any heavy distinct roller marks and smooth them out with a brush or rag. The goal is an organic, fluid transition of light and shadow. -
Remove tape:
Carefully score the edge of your painter’s tape with a craft knife before pulling it off to ensure you don’t peel away any of your new plaster work.
Step back and admire how your new wall captures the light, shifting from deep copper to bright bronze as you move through rest of the day
Metallic “Concrete” Industrial Finish
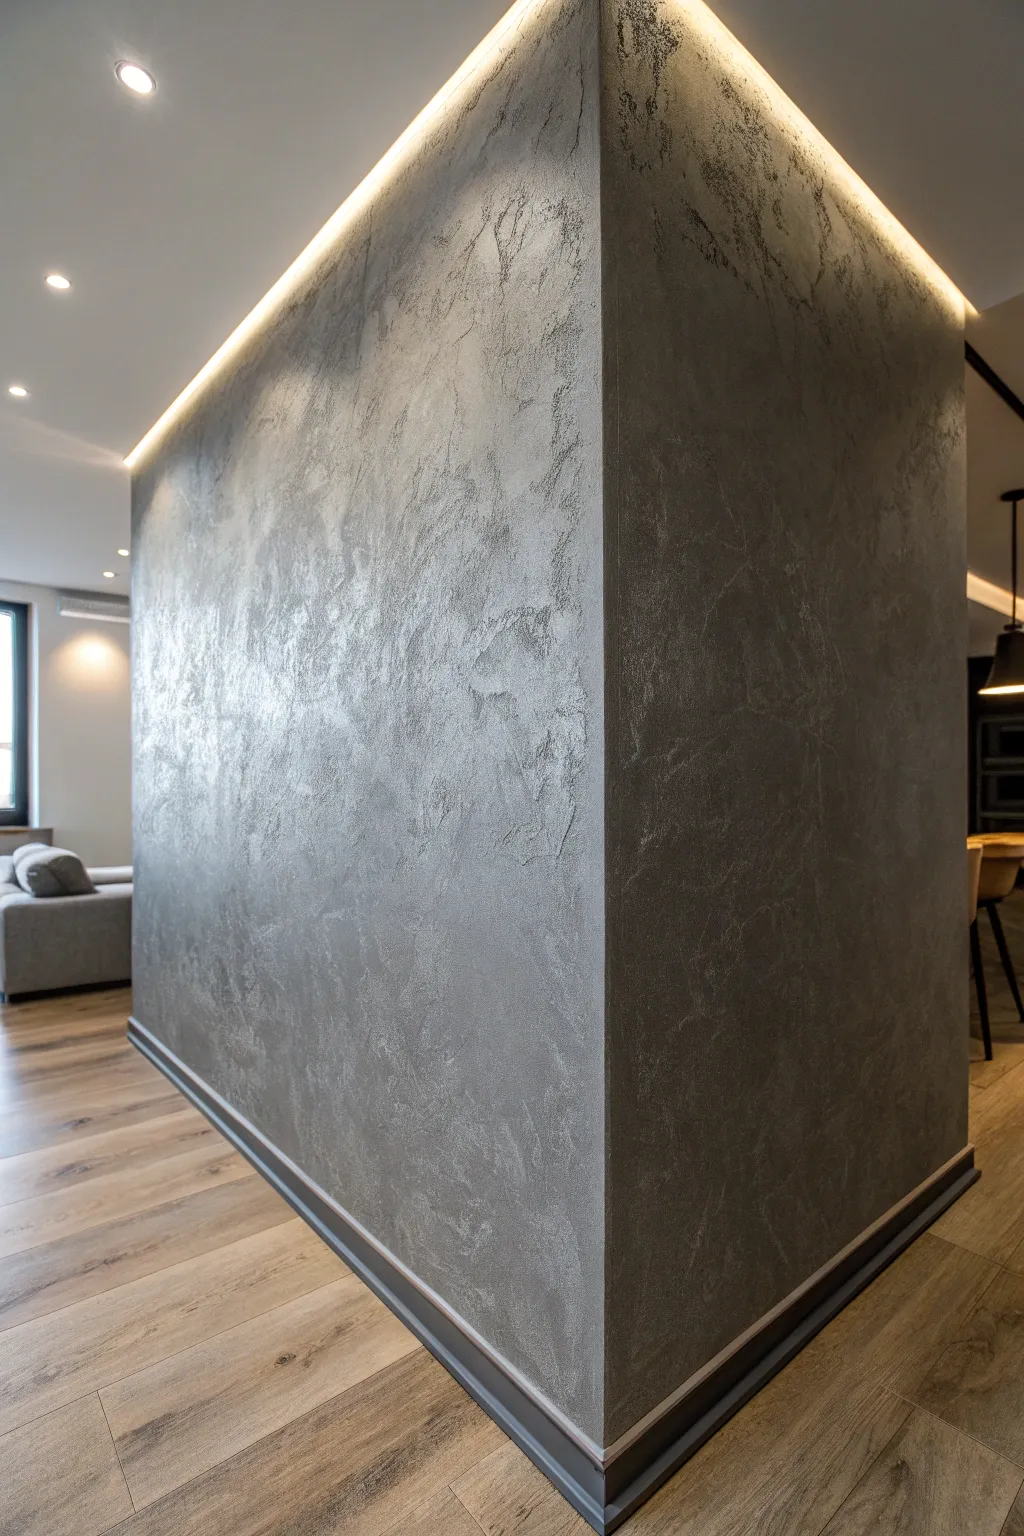
Transform plain drywall into a structural masterpiece with this metallic concrete-effect technique. The finish combines the raw, urban appeal of industrial concrete with a sophisticated, light-reflecting metallic glaze that brings movement and depth to any room.
Step-by-Step
Materials
- High-quality interior primer
- Textured plaster base (gray tinted)
- Metallic silver or steel-colored glaze
- Stainless steel Venetian plaster trowel
- Sea sponge or texturing mitt
- Painter’s tape
- Drop cloths
- Sandpaper (220-grit)
- Wide paintbrush or roller
- Clean lint-free rags
- Polyurethane sealer (satin finish, optional)
Step 1: Preparation and Base
-
Protect the perimeter:
Begin by taping off all adjacent trim, ceilings, and baseboards with high-quality painter’s tape. Lay down drop cloths to protect your flooring, as this textured process can get a bit messy. -
Prime the surface:
Roll on an even coat of interior primer. This ensures your textured plaster adheres properly and provides a neutral background color. -
Mix the base coat:
If your textured plaster isn’t pre-tinted, mix in a dark grey pigment now. You want a base that is slightly darker than your final metallic sheen to create depth. -
Apply the first plaster layer:
Using a stainless steel trowel, apply the plaster to the wall in a thin, erratic layer. Don’t aim for perfection here; leave some areas slightly thicker and others thinner to build the initial topography.
Pro Tip: Light it Up
This texture relies on shadows. Install an LED strip channel along the ceiling edge (grazing light) to dramatically highlight the wall’s topography.
Step 2: Creating Texture
-
Add deliberate imperfections:
While the first coat is still wet, press the flat side of the trowel against the wall and pull it straight off. This creates small peaks and ‘suction’ marks that mimic cast concrete. -
Knock down the peaks:
Wait about 15–20 minutes for the plaster to firm up slightly. Gently glide your clean trowel over the surface at a shallow angle to flatten the highest peaks while leaving the pits and valleys intact. -
Create the signature corner:
For that sharp, architectural edge shown in the image, use a corner trowel or carefully run your flat trowel vertically along the corner bead, smoothing away from the edge on both sides. -
Dry completely:
Let this textured base coat cure for at least 24 hours. It needs to be rock hard before you apply the glaze. -
Light sanding:
Run 220-grit sandpaper lightly over the surface to remove any overly sharp or jagged bits that might snag your tools later. Wipe away all dust with a damp cloth.
Level Up: Rust Accents
For a grittier look, sponge a tiny amount of copper or burnt orange metallic glaze into random low spots to mimic industrial rust.
Step 3: The Metallic Finish
-
Prepare the glaze:
Stir your metallic silver or steel glaze thoroughly. If it feels too thick, similar to pudding, I find that thinning it with a tiny splash of water helps it glide into the crevices better. -
Apply the metallic layer:
Working in 3-foot square sections, brush or roll the metallic glaze onto the textured wall. You want full coverage, getting the liquid into every pit and scratch. -
Trowel burnishing:
Immediately after applying the glaze to a section, take your clean steel trowel and scrape it tightly across the surface in sweeping, cross-hatch arcs. -
Expose the base:
The goal of the scrape is to remove the metallic glaze from the high points (revealing the matte grey plaster) while leaving the shimmering glaze trapped in the low points. -
Sponge blending:
If you see distinct tool lines where sections meet, dab gently with a damp sea sponge to soften the transition before moving to the next patch. -
Repeat and refine:
Continue this apply-and-scrape method across the entire wall. Vary your arm motion to ensure the pattern looks random and organic, not repetitive.
Step 4: Sealing and Final Touches
-
Assess the shine:
Step back and view the wall from different angles. If you want more shimmer, you can spot-apply a second, very thin layer of glaze to specific areas once the first is dry. -
Burnish for smoothness:
Once the glaze is fully dry, take a clean, dry trowel and rub it vigorously over the wall one last time. This friction, called ‘burnishing,’ polishes the surface and heightens the metallic reflection. -
Seal the surface:
If this wall is in a high-traffic area, apply a clear satin polyurethane sealer with a roller. This protects the finish without dulling the metallic effect. -
Remove tape and clean:
Carefully score the edge of your painter’s tape with a utility knife before peeling it off to prevent the thick plaster from chipping.
Enjoy the sophisticated, modern atmosphere your new industrial feature wall brings to the space
Metallic Wash Over a Dark Base

Transform a plain wall into a masterpiece of depth and drama with this metallic wash technique. By layering a shimmering gold glaze over a deep, matte charcoal base, you achieve a sophisticated, aged luster that changes beautifully with the light.
Step-by-Step Tutorial
Materials
- Pre-primed decorative panel molding (rectangular trim)
- Construction adhesive
- Pin nailer and nails
- Wood filler
- Fine-grit sandpaper (220-grit)
- Painter’s tape
- Drop cloths
- High-quality charcoal or soft black interior latex paint (eggshell or satin finish)
- Metallic gold glaze or translucent metallic paint
- Paint rollers (medium nap)
- Clean, lint-free cotton rags
- Sea sponge (natural)
- Angled sash brush
- Glazing liquid (optional, to extend drying time)
Step 1: Wall Prep and Molding
-
Planning the layout:
Measure your wall carefully to determine the spacing for your panel molding. Sketch a layout on paper first, aiming for symmetrical boxes with even gaps between them and the ceiling or floor baseboards. -
Marking the wall:
Transfer your measurements to the wall using a pencil and a long level. Draw the guides lightly so you know exactly where each piece of trim needs to sit. -
Cutting the molding:
Cut your decorative molding strips to size using 45-degree miter cuts at the corners so they fit together perfectly to create rectangles. -
Attaching the trim:
Apply a thin bead of construction adhesive to the back of each trim piece. Press it firmly onto your marked lines and secure it instantly using a pin nailer. -
Filling the gaps:
Dab a small amount of wood filler into the nail holes and the corner miter joints. Smooth it over with your finger or a putty knife and let it dry completely. -
Sanding for smoothness:
Once the filler is dry, gently sand the filled areas with 220-grit sandpaper until the transition is seamless and smooth to the touch. -
Cleaning up dust:
Wipe down the entire wall and the new molding with a tack cloth or slightly damp rag to remove all sanding dust before painting.
Glaze too bright?
If the gold looks too intense against the dark wall, immediately wipe it back aggressively with a damp rag. You can also mix a drop of the charcoal wall paint into the glaze to mute the sparkle.
Step 2: The Dark Base Coat
-
Cutting in the edges:
Using your angled sash brush, paint the charcoal base color around the perimeter of the wall, along the ceiling line, baseboards, and carefully around the inside and outside edges of the molding. -
Rolling the main areas:
Use a medium nap roller to apply the charcoal paint to the flat wall surfaces inside and outside the boxes. Aim for even coverage. -
Applying a second coat:
Allow the first coat to dry according to the can’s instructions, then apply a second coat. A solid, opaque dark base is crucial for the metallic effect to pop later. -
Full cure time:
Let the base coat dry fully, preferably overnight. I find that rushing this step can cause the glaze to drag the base paint, so patience really pays off here.
Rag Management
Change your rubbing rags frequently! Once a rag becomes saturated with glaze, it stops removing product and starts smearing it, which ruins the cloudy ‘wash’ effect.
Step 3: The Metallic Wash
-
Mixing the glaze:
If your metallic paint is very thick, mix it with a clear glazing liquid (usually a 1:1 ratio or 1:2 ratio) to make it translucent and extend the working time. -
Testing the technique:
Test your application method on a piece of cardboard painted with your base color. You want to see how much glaze to apply to get that subtle ‘washed’ look rather than a solid gold stripe. -
Sponging on the gold:
Dampen a natural sea sponge and dip it lightly into the metallic mixture. Blot off excess on a paper plate, then lightly dab the sponge onto the wall inside the panel boxes. -
Working in sections:
Work in small 2×2 foot sections. Apply the glaze with the sponge using a random, twisting motion to avoid creating a recognizable pattern. -
Softening the texture:
Immediately after sponging a section, take a clean, dry lint-free rag and gently rub the wet glaze. This blurs the sponge marks and creates that soft, cloudy, ethereal texture seen in the photo. -
Adding highlights:
For areas where you want more shimmer (like the center of the panels), apply a tiny bit more glaze and utilize less rag-wiping to keep the metallic density higher. -
Highlighting the molding:
Use a dry-brush technique on the molding itself. Dip just the tips of a dry brush in gold, wipe most of it off, and lightly drag it over the raised edges of the trim to catch the light. -
Final inspection:
Step back frequently to ensure the wash looks balanced across the entire wall. If an area looks too heavy, wipe it with a damp rag; if too dark, dab a little more glaze.
Once the glaze cures, install your wall sconces to see how the light dances across your new textured surface
Framed Panel Illusion in Metallic
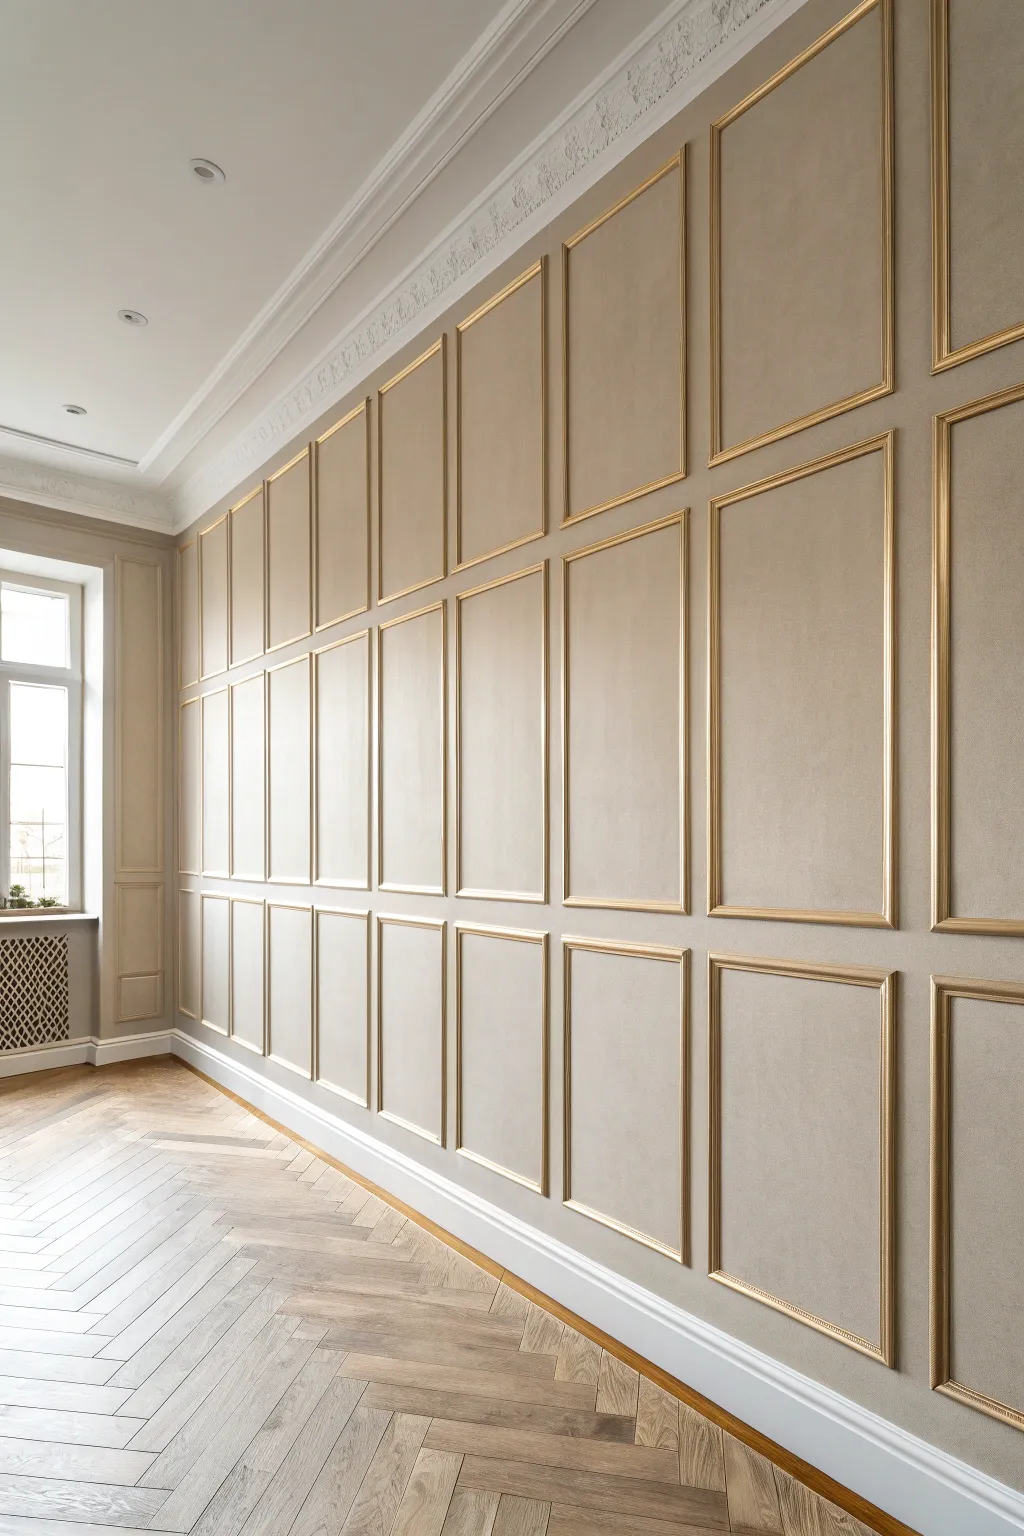
Transform a plain wall into an architectural masterpiece with this elegant paneling illusion. By combining precise trim work with a lustrous metallic finish, you’ll create a sophisticated grid that mimics the grandeur of historic wainscoting without the need for heavy construction.
Step-by-Step
Materials
- High-quality interior latex paint (base wall color, beige/taupe)
- Metallic gold paint suitable for trim
- Half-round molding or thin picture frame molding (composite or wood)
- Miter saw or miter box with hand saw
- Construction adhesive or liquid nails
- Pin nailer or finishing nails and hammer
- Painter’s Caulk
- Wood filler
- Fine-grit sandpaper
- Laser level
- Measuring tape and pencil
- High-density foam roller (for walls)
- Small angled sash brush (for trim)
- Painter’s tape (delicate surface)
Step 1: Planning and Surface Prep
-
Map out your grid:
Measure the total width and height of your wall. Decide on the number of vertical and horizontal panels you want. A classic look, like the one shown, uses three rows of identical rectangles. Calculate the spacing between frames—3 to 4 inches is a standard gap—and sketch your plan on paper first. -
Prepare the wall surface:
Ensure your wall is perfectly smooth. Fill any existing holes with spackle and sand them flush. Clean the wall thoroughly with a mild detergent solution to remove dust and grease, which helps the adhesive bond better later. -
Mark the layout:
Using a laser level for precision, lightly mark the horizontal and vertical lines where your molding will sit. It’s crucial that these lines are perfectly level and plumb, as the grid pattern will highlight any imperfections. -
Apply the base coat:
Before installing any trim, paint the entire wall with your chosen base color. I prefer using a matte or eggshell finish in a warm neutral tone like taupe or mushroom, as this contrasts beautifully with the metallic gold frames later. Apply two coats for full coverage.
Step 2: Installing the Trim
-
Cut the molding:
Set up your miter saw to cut strict 45-degree angles. Cut your half-round molding pieces according to the dimensions from your layout plan. Group them by frame to avoid mixing up slightly different lengths. -
Miter check:
Before gluing, dry-fit the four pieces of one frame on the floor to ensure the corners meet perfectly at 90 degrees. Sand any rough edges gently. -
Attach the molding:
Apply a thin bead of construction adhesive to the back of the first molding piece. Press it firmly onto your marked lines. Secure it in place with a pin nailer or finishing nails. Wipe away any excess adhesive immediately. -
Complete the grid:
Continue installing the frames row by row. Use a spacer block (a piece of wood cut to your gap size) between frames to keep spacing consistent without measuring every single time.
Gaps at the Corners?
If your mitered corners have small gaps, don’t panic. Rub a little wood filler into the gap with your finger and sand it once dry. The metallic paint hides these small fixes surprisingly well.
Step 3: Refining and Painting
-
Fill the gaps:
Fill all nail holes and mitered corner joints with wood filler. Once dry, sand these spots smooth so the frame appears seamless. -
Caulk the edges:
Run a thin bead of painter’s caulk along the inside and outside edges where the molding meets the wall. Smooth it with a wet finger. This step is tedious but essential for that built-in look. -
Protect the wall:
Once the filler and caulk are fully cured, carefully apply delicate surface painter’s tape to the wall right alongside the molding. Usually, I take my time here to ensure crisp lines. -
Apply the metallic gold:
Using a small angled sash brush, paint the molding with your metallic gold paint. Use long, smooth strokes to minimize brush marks. -
Second coat for opacity:
Metallic paints can sometimes be semi-transparent. Allow the first coat to dry completely, then apply a second or third coat until you achieve a rich, solid gold finish. -
Remove the tape:
Peel off the painter’s tape while the final coat of paint is still slightly tacky. Pull the tape away from the molding at a 45-degree angle to ensure a sharp, clean edge. -
Final touch-ups:
Inspect your work closely. Use a tiny artist’s brush to correct any gold bleeds onto the wall color or vice versa. A steady hand here makes all the difference.
Pro Tip: Consistent Sheen
Stir your metallic paint frequently during application. The metallic particles tend to settle at the bottom, which can lead to uneven shimmer if you don’t keep them mixed.
Step back and admire how this sophisticated grid adds immediate depth and luxury to your room.
Abstract Metallic Linework Mural
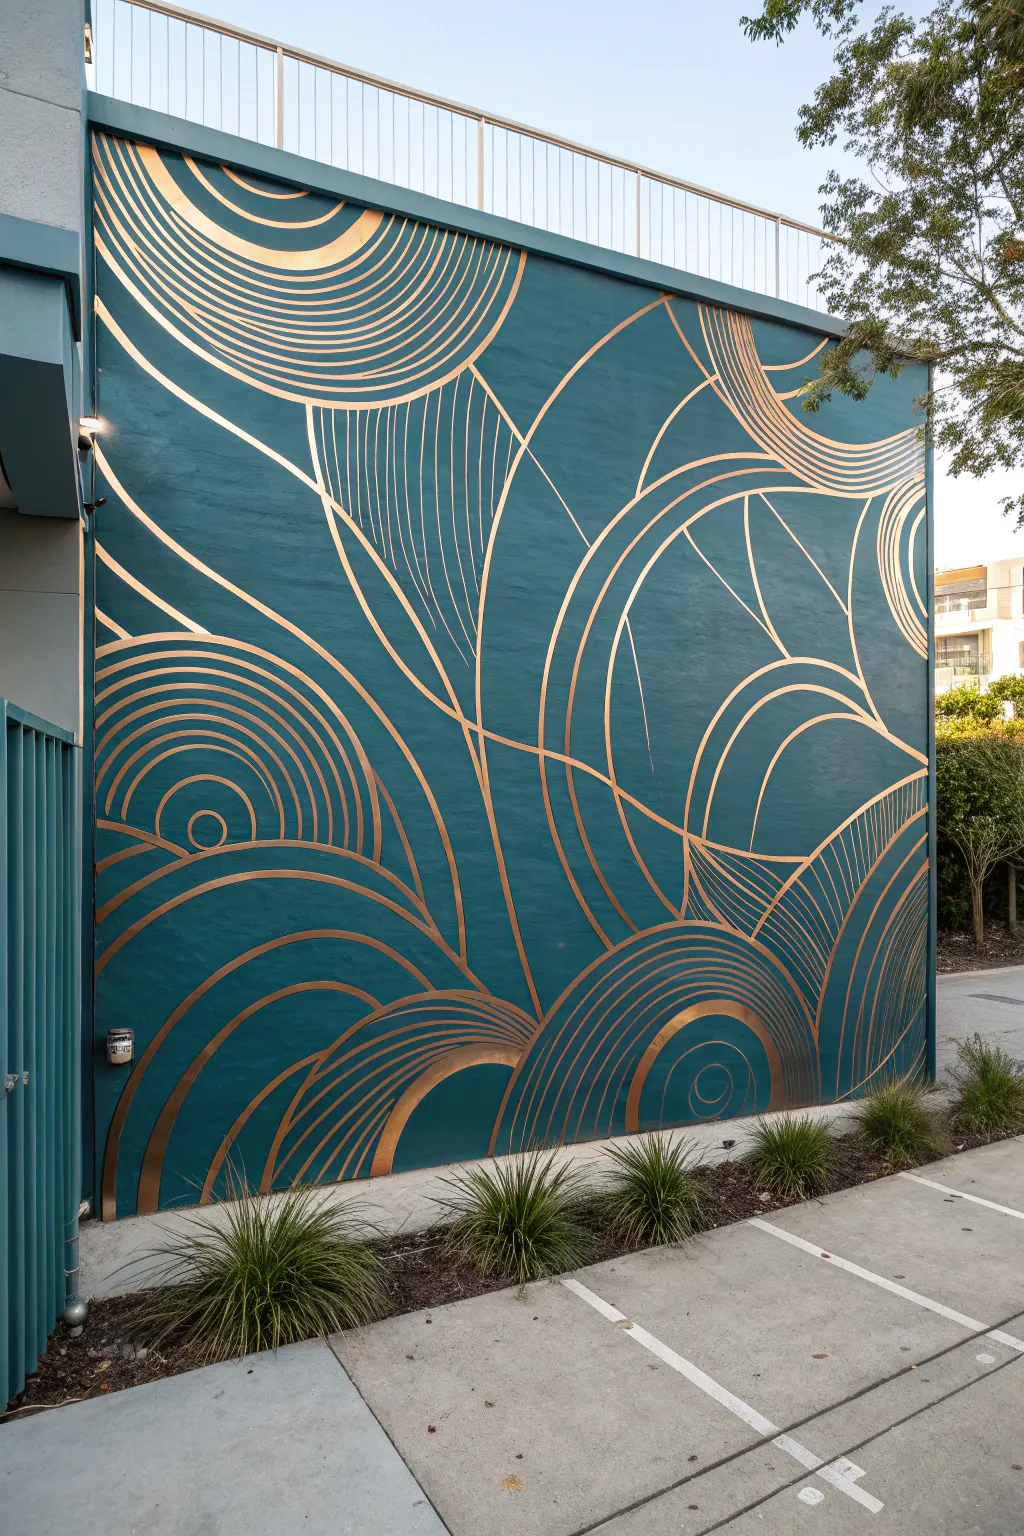
Transform a plain exterior or interior wall into a striking piece of modern art with this abstract linework design. The deep teal backdrop provides a moody canvas for shimmering copper lines that seem to ripple and flow across the surface.
Step-by-Step Tutorial
Materials
- High-quality exterior masonry paint (Deep Teal/Peacock Blue)
- Metallic acrylic latex paint (Copper or Antique Gold)
- Wide paint roller and tray
- Extension pole (optional for height)
- Chalk or soft pastel pencil (white or light yellow)
- Assorted angled sash brushes (1-inch to 2-inch)
- Small round detail brushes (size 4 or 6)
- Long linear or rigger brush
- Painter’s tape
- Ladder
- Drop cloths
- Damp rag for corrections
- Clear exterior sealant (optional)
Step 1: Preparation and Base Coat
-
Clean surface:
Begin by thoroughly cleaning the wall surface to remove dust, dirt, and spiderwebs. If working outdoors, a pressure washer is ideal; otherwise, a stiff brush and soapy water will do the trick. -
Protect area:
Lay down heavy-duty drop cloths along the base of the wall to catch any drips. Mask off adjacent trim, windows, or fences with painter’s tape. -
Cut in edges:
Using your angled brush, ‘cut in’ the perimeter of the wall with your deep teal base color. Careful edging now saves headache later. -
Roll the base:
Fill in the main wall area using the roller. Apply the paint in a ‘W’ pattern for even coverage. -
Apply second coat:
Allow the first coat to dry completely according to the manufacturer’s instructions. Apply a second coat to ensure a rich, opaque, and streak-free teal background. Let this cure fully, ideally overnight.
Use a Steady Stick
Professional sign painters use a ‘mahl stick’ to steady their hand. You can improvise one by wrapping a rag around the end of a dowel rod, resting it against the dry wall to brace your painting arm.
Step 2: Drafting the Design
-
Sketch blocking lines:
Using light colored chalk, lightly sketch the major dividing lines first. These are the long, swooping curves that separate the wall into large, organic sections. -
Draft focal points:
Identify where your main focal points will be—such as the concentric circles in the bottom left or the fan shape in the upper center. Draw the center point or ‘eye’ for each of these shapes. -
Draw radiating lines:
Lightly sketch the flow of the parallel lines within each section. You don’t need to draw every single line perfectly, but create guide marks every few inches to help maintain consistent spacing later. -
Step back and review:
Walk away from the wall to view the composition from a distance. The chalk is forgiving, so wipe away and adjust any curves that look awkward or unbalanced until the flow feels right.
Fixing Wobbly Lines
If a long curve looks shaky, don’t panic. Let it dry, then use the background teal color to ‘cut back’ into the line, trimming the wobble and thinning the line back to a sharp edge.
Step 3: Painting the Linework
-
Prepare metallic paint:
Stir your copper metallic paint thoroughly. Metallic pigments settle quickly, so I like to give it a quick stir every 15 minutes while working to keep the shimmer consistent. -
Start with major curves:
Using a 1-inch angled sash brush, paint the thickest primary dividing lines first. These bold strokes define the structure of the mural. -
Establish thickness variation:
Notice that lines taper. Apply more pressure at the start of a curve and lift off gently as the line narrows or fades out. -
Paint concentric circles:
Switch to a smaller brush for tightness. Start from the center of your circular motifs and work outward, painting rings that follow the curvature of your previous line. -
Fill fan sections:
For the fan-like sections, use long, steady strokes. A rigger brush or long liner brush is excellent here for holding enough paint to make long, uninterrupted lines. -
Maintain spacing:
Keep an eye on the negative space (the teal gaps) between metallic lines. Try to keep this spacing relatively consistent to create that mesmerizing vibration effect. -
Double down for opacity:
Metallic paints can sometimes be semi-transparent. Once a section is dry, go back over pivotal lines with a second pass to make the copper pop against the dark background. -
Tidy up details:
Use a small brush with the original teal paint to “erase” or sharpen up any metallic edges that got too wobbly or thick. -
Clean artwork:
Once the paint is fully dry to the touch, use a damp cloth to gently wipe away any visible chalk guide lines. -
Seal (Optional):
If the wall is exposed to harsh weather, apply a clear, non-yellowing UV-resistant sealer over the entire mural to protect the metallic pigment from oxidizing.
Enjoy the dynamic way the light catches your new copper masterpiece throughout the day
Faux Patina Metallic Wall Finish
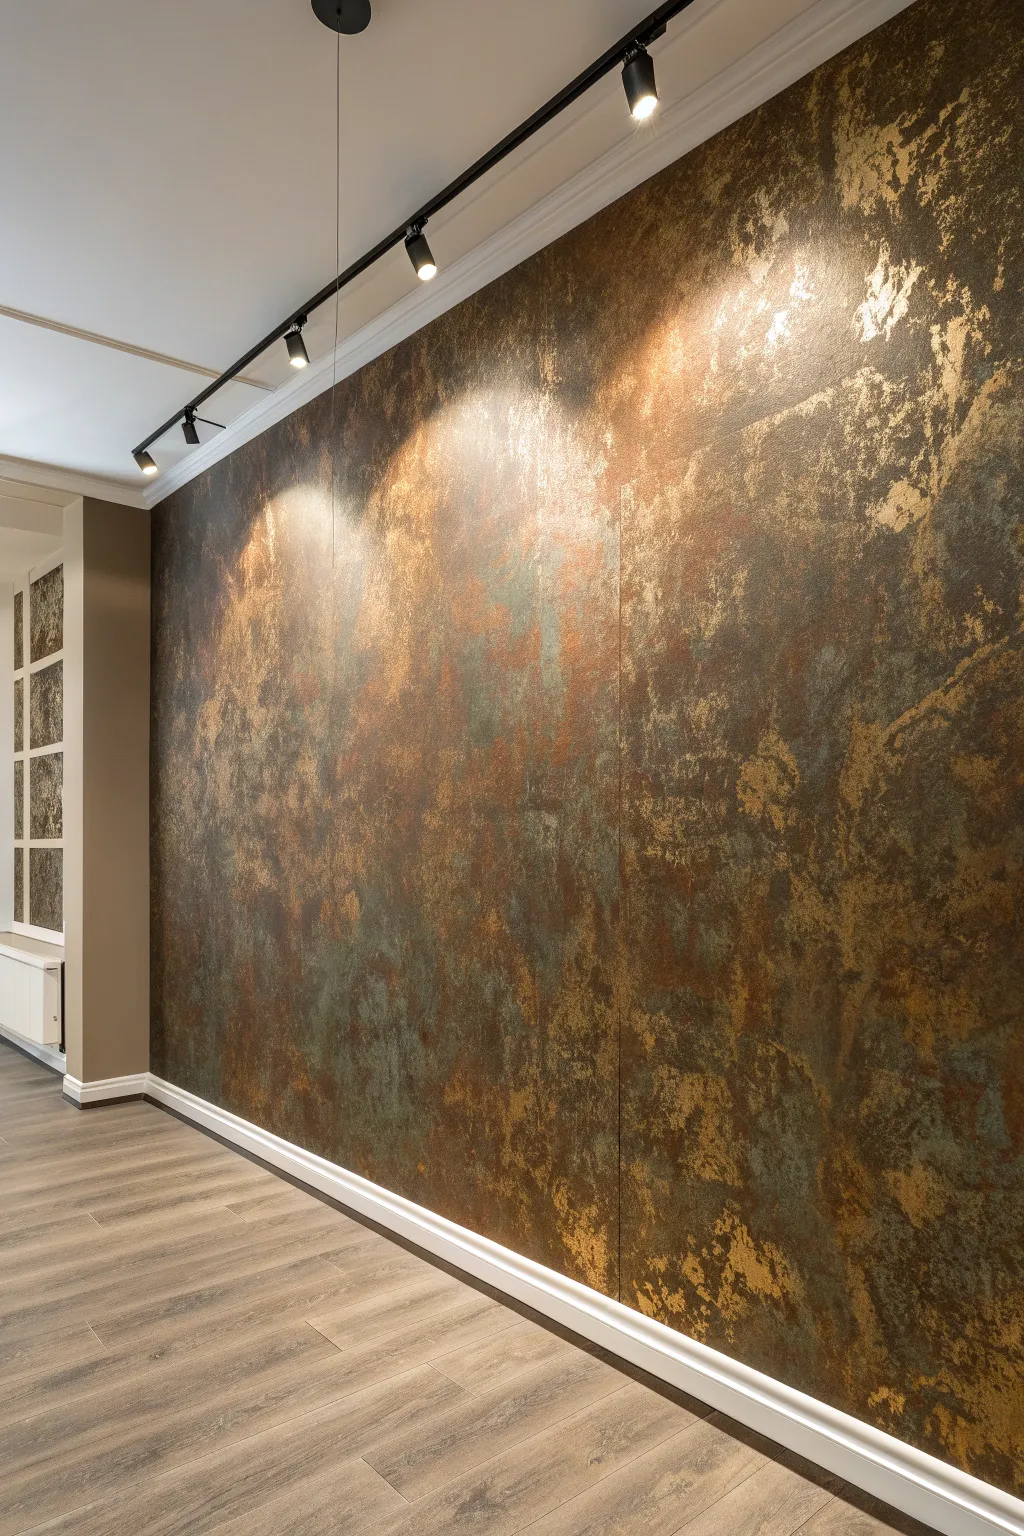
Transform a plain wall into a stunning industrial masterpiece with this faux patina technique that mimicking the natural oxidation of copper and bronze. This layered effect combines rich metallic warm tones with cool, verdigris greens to create a deeply textured, time-worn aesthetic.
Detailed Instructions
Materials
- Dark brown base paint (latex or acrylic, matte finish)
- Metallic copper paint
- Metallic bronze paint
- Faux glaze medium
- Turquoise or verdigris green paint
- Sea sponge or wool sponge
- Various rags and lint-free cloths
- Painters tape
- Paint rollers and tray
- Large blending brush (soft-bristle)
- Spray bottle with water
Step 1: Preparation & Base Coat
-
Prep the surface:
Begin by cleaning the wall thoroughly to remove dust and grease, then tape off the ceiling, baseboards, and any adjoining walls to protect them from the layered finish. -
Apply the dark base:
Roll on a coat of dark brown paint (a color like espresso or dark chocolate works best) to serve as the deep undertone for the metallic layers. -
Add a second coat:
Once dry, apply a second coat of the dark brown to ensure complete, opaque coverage, as any white spots will distract from the final metal effect. -
Full cure:
Allow the base coat to dry completely, preferably overnight, to ensure the subsequent glazing layers don’t lift the base paint.
Natural Oxidation Flow
When applying the verdigris wash, focus heavier applications near the top and bottom of the wall where moisture would naturally collect and oxidize real metal.
Step 2: Applying Metallic Texture
-
Mix the copper glaze:
Mix your metallic copper paint with the faux glaze medium in a 1:1 ratio to increase transparency and extend the working time. -
Sponge on copper:
Dip a dampened sea sponge into the copper mixture and dab it onto the wall in random, organic clusters, leaving plenty of the dark brown base visible. -
Soften the edges:
While the copper is still wet, use a clean rag to gently blot and soften the edges of the sponge marks so they don’t look like distinct stamps. -
Introduce bronze tones:
Repeat the sponging process using the metallic bronze paint (this can be used straight or with a little glaze) to add depth and variety to the metallic sheen. -
Layering strategy:
Apply the bronze in areas where the copper is sparse, allowing the two metals to overlap slightly for a richer, more complex color field. -
Dry blending:
Use a dry, soft blending brush to lightly sweep over the wet metallic areas if you want a softer, more brushed-metal look rather than a purely sponged texture.
Too Much Green?
If the patina looks too intense or uniform, simply sponge a layer of the dark brown base lightly over the green once dry to recede it into the background.
Step 3: Creating the Patina
-
Prepare the verdigris:
Dilute your turquoise or verdigris green paint with water (about 1 part paint to 3 parts water) to create a thin, runny wash. -
Apply the wash:
Working in small sections, dip a rag into the wash and wipe it onto the wall, focusing on areas where ‘rust’ would naturally accumulate. -
Drip technique:
I like to spritz a little water directly onto the applied green wash to encourage natural drips and runs, simulating years of weathering. -
Blotting back:
Immediately blot the green wash with a dry cloth to remove excess paint, leaving a hazy, oxidized residue over the copper and brown areas. -
Detail work:
Use a small artist’s brush to dab concentrated touches of un-thinned teal paint into the texture crevices for brighter pops of oxidation. -
Final metallic highlights:
Once the green is dry, lightly dry-brush a tiny amount of bright copper over the highest points of the texture to make the metal shimmer through the oxidation. -
Review and refine:
Step back to view the whole wall; if any green patches look too heavy, you can sponge a little dark brown or bronze over them to push them back.
Now step back and admire the rugged elegance of your aged metal wall


Have a question or want to share your own experience? I'd love to hear from you in the comments below!