
When I’m craving texture and storytelling, mixed media steampunk art is my go-to because it lets me mash up vintage elegance with gritty machinery. These ideas will help you build that layered, timeworn look—full of gears and cogs, distressed surfaces, and found-object details that feel like they came from an alternate-history workshop.
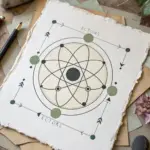
Layered Gears and Cogs Focal Cluster
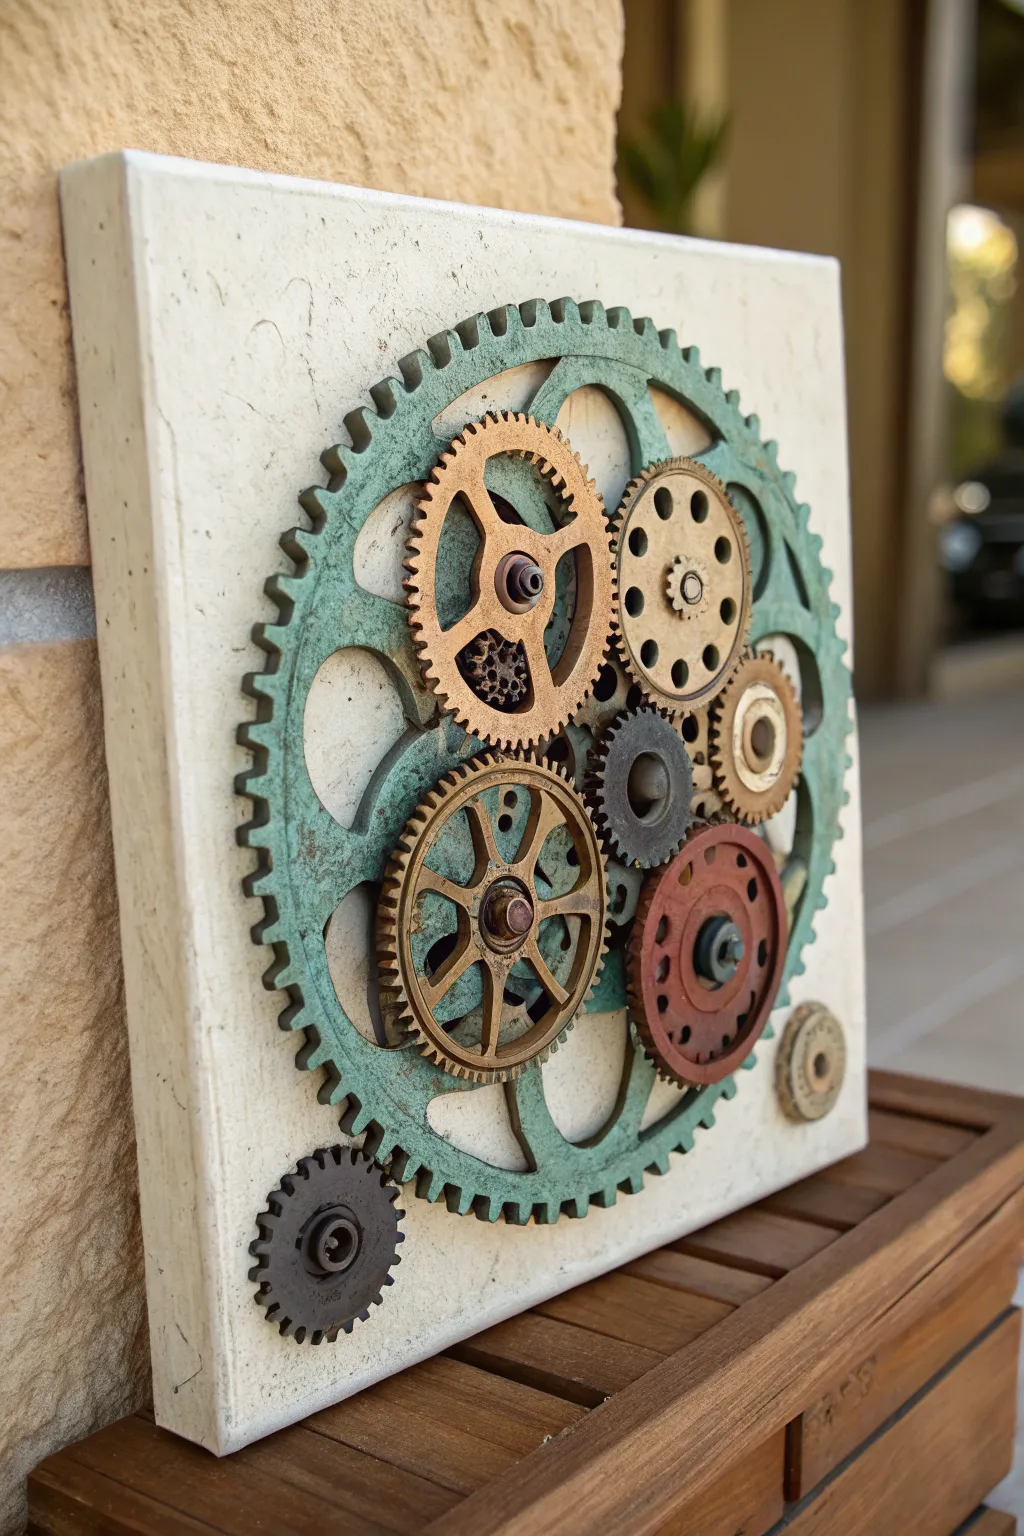
This striking mixed media piece creates a heavy, industrial focal point on a light, textured canvas, playing with the contrast between corroded copper tones and warm brass metallic highlights. It captures the essence of steampunk machinery frozen in time, perfect for adding a mechanical touch to any wall.
How-To Guide
Materials
- Square canvas (approx. 12×12 inches)
- Texture paste or modeling paste
- Palette knife
- Large laser-cut wooden gear (main focal piece)
- Assorted smaller wooden or cardboard gears and cogs
- Acrylic paints: White, Teal/Patina Green, Burnt Umber, Black
- Metallic waxes or paints: Antique Gold, Copper, Bronze, Iron
- Heavy body gel medium or strong craft glue (e.g., E6000)
- Small metal washers or nuts (for center details)
- Sponge dabbers and small stiff paintbrushes
- Sandpaper (fine grit)
Step 1: Preparing the Base
-
Texture the Background:
Begin by spreading texture paste generously over the entire surface of your canvas using a palette knife. Don’t aim for smoothness; create swirls, peaks, and rough patches to simulate an old stucco wall or stone surface. -
Dry and Prime:
Allow the texture paste to dry completely, which may take several hours or overnight. Once hard, paint the entire surface with a coat of creamy white or off-white acrylic paint to seal it. -
Distress the Edges:
Mix a tiny amount of diluted burnt umber paint with water. Lightly brush this wash around the very edges of the canvas and into some of the deeper texture crevices to create a subtle, aged shadow effect.
Rust Effect Tip
Sprinkle cinnamon or baking soda onto wet brown paint. When dry, paint over it with diluted orange. The grainy texture mimics real flaking rust perfectly.
Step 2: Aging the Gears
-
Base Coat the Large Gear:
Take your largest gear cutout and paint it solid black first. This provides a deep shadow base that will make the subsequent colors pop. -
Create the Verdigris Effect:
Sponge a teal or patina green paint over the black base of the large gear. Use a dabbing motion rather than brushing to create an uneven, corroded metal look, letting some black show through in the corners. -
Highlight the Edges:
Once the green is dry, use your finger or a dry brush to lightly rub antique gold wax or paint along the very tips of the gear teeth. This simulates where the ‘corrosion’ has been rubbed off by friction. -
Paint Secondary Gears:
Select your medium-sized gears and paint them in varied metallic tones. Give one a solid bronze coat and another a bright copper finish. I usually do two coats to ensure the wood grain doesn’t show through. -
Add Rust and Grime:
On your metallic gears, stipple small amounts of Burnt Umber or a mixture of brown and orange paint into the recesses and inner holes to mimic accumulated rust. -
Create an Iron Gear:
Identify a small, distinct gear (like the one in the bottom corner) and paint it dark grey or iron. Once dry, dry-brush a tiny amount of black over it to dull the shine.
Step 3: Assembly and Finishing
-
Dry Fit the Layout:
Before gluing, arrange all your painted gears on the textured canvas. Place the large green gear in the center, then layer the smaller metallic gears on top of it, slightly offsetting them off-center for visual interest. -
Add the Outlier:
Place one small, dark gear isolated in a corner (bottom left in the reference). This breaks the symmetry and draws the eye across the negative space. -
Glue the Base Layer:
Lift the top gears carefully, then apply heavy body gel or strong glue to the back of the large green gear. Press if firmly into the textured background and hold for a moment. -
Layer the Metals:
Glue the medium metallics on top of the green gear. Ensure they overlap the spokes of the large gear but act as separate mechanical components. -
Stack the Smallest Cogs:
Glue the smallest cogs on top of the medium gears. Think about depth; building up 3 layers creates a realistic 3D machinery effect. -
Install Center Hubs:
Glue small metal washers, nuts, or tiny circular wood cutouts into the absolute center of the main gears to mimic axles or bolts. -
Final Shadowing:
Dilute a small amount of black or dark brown paint to a watery ink consistency. Carefully paint a thin shadow line on the white canvas right next to where the large gear touches the background to maximize dimension.
Add Realism
Use actual vintage watch parts or broken jewelry bits for the topmost center hubs. The mix of real metal with the painted wood makes the illusion convincing.
Hang your industrial masterpiece where the light can catch those metallic edges and enjoy the mechanical aesthetic.


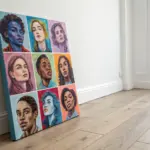
Sepia Victorian Portrait With Mechanical Halo
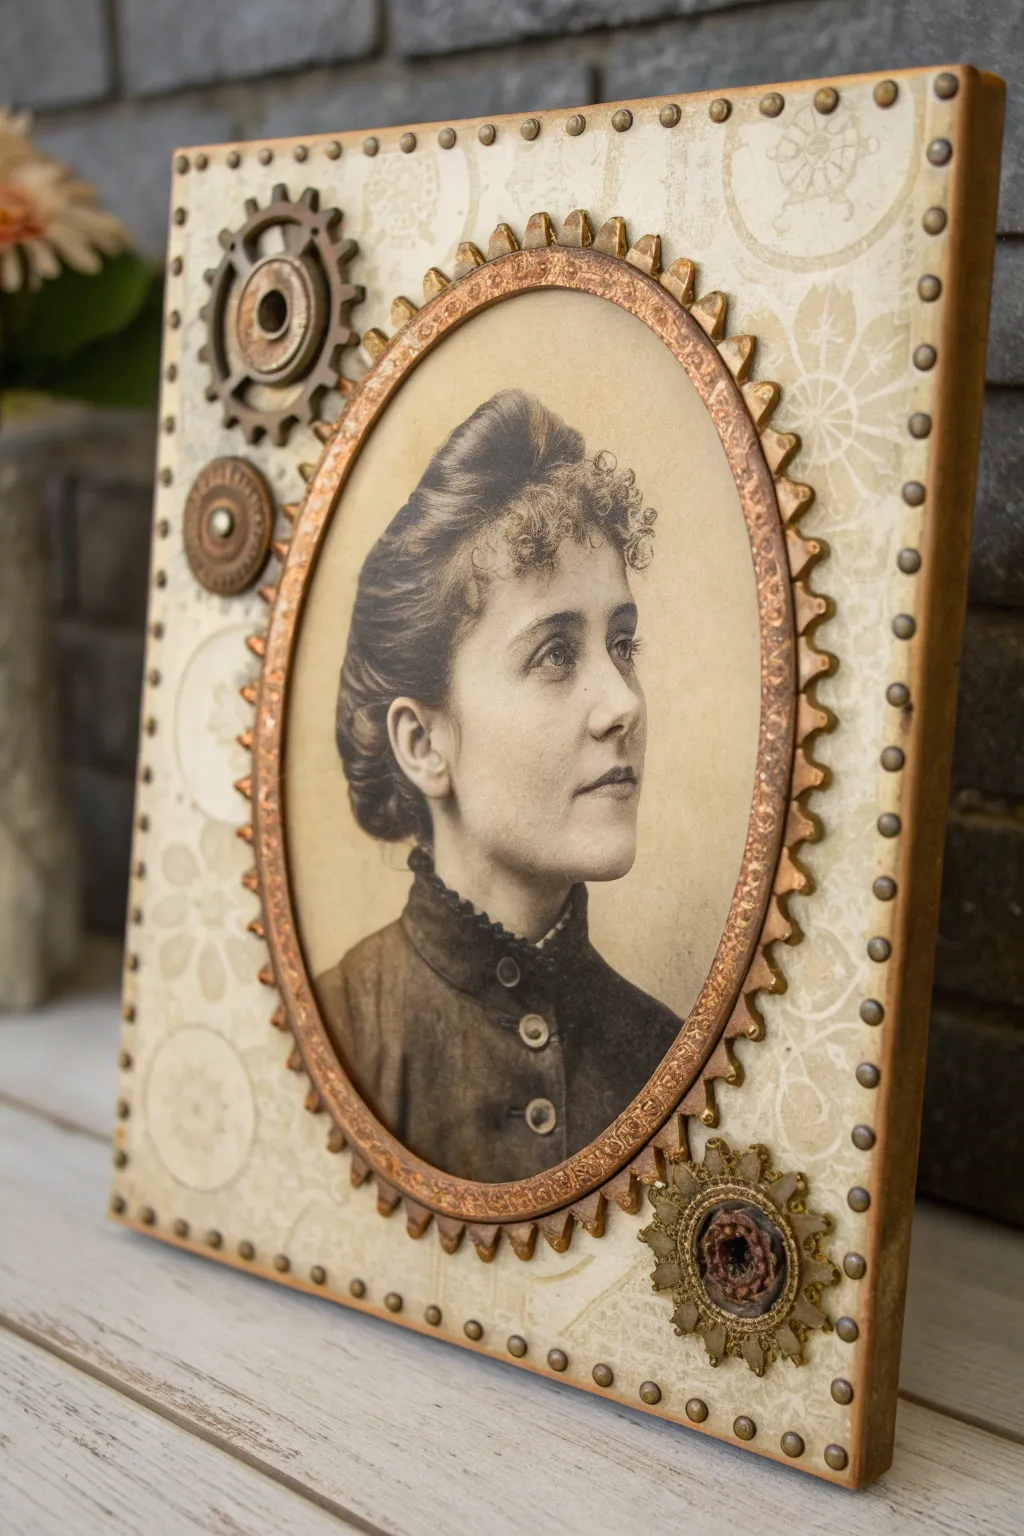
Blend the elegance of the Victorian era with industrial ruggedness in this striking mixed media piece. By layering vintage photography with metallic gears and patterned papers, you’ll create a dimensional portrait that feels like a relic from a steampunk future.
Step-by-Step Tutorial
Materials
- Square wooden panel or canvas (approx. 8×8 or 10×10 inches)
- Vintage Victorian portrait photo (printed on matte cardstock)
- Patterned scrapbooking paper (cream/beige with faint designs)
- Mod Podge or heavy gel medium
- Oval frame or chipboard oval cutout
- Assorted metal gears, cogs, and machinery parts
- Metallic acrylic paints (copper, bronze, gold)
- Antique bronze upholstery tacks or studs
- Distress ink (Vintage Photo or Walnut Stain)
- Sponge daubers or makeup sponges
- Strong craft glue (e.g., E6000 or Tacky Glue)
- X-acto knife and cutting mat
- Fine-grit sandpaper
- Flat paintbrush and small detail brush
Step 1: Preparing the Foundation
-
Surface Preparation:
Begin by sanding the edges of your wooden panel to remove any rough splinters. Wipe it clean with a dry cloth to ensure the adhesive will stick properly. -
Paper Selection:
Choose a light-colored, patterned scrapbook paper. Look for subtle motifs like faint floral outlines, script text, or faded architectural drawings that won’t compete too heavily with the central photo. -
Adhering the Background:
Apply an even coat of Mod Podge to the face of the wooden panel. Lay your paper down, smoothing it from the center outward to push out air bubbles. Let it dry completely. -
Trimming Edges:
Once the paper is dry, flip the panel face down on your cutting mat. Use your X-acto knife to trim the excess paper flush with the wood edges. -
Distressing the Edges:
Dip a sponge dauber into brown distress ink. Gently rub along all four edges of the panel to create an aged, shadowed vignette effect that draws the eye inward.
Aged Photo Tip
If your photo is too new, lightly sand the surface with fine sandpaper to create scratches, then rub a tea bag over it for an instant sepia tone.
Step 2: Creating the Mechanical Halo
-
Preparing the Portrait:
Cut your Victorian portrait into an oval shape. It needs to be slightly smaller than your oval frame or cog mechanism so the edges sit cleanly. -
Painting the Frame base:
Take your oval frame or chipboard cutout. Paint it with a base coat of dark bronze acrylic paint to give it a heavy, metallic weight. -
Adding the Gear Effect:
If you don’t have a pre-made cog frame, glue small triangular chipboard pieces or individual gear teeth around the outer rim of your oval frame to mimic a large machine part. -
Metallic Highlighting:
Using a dry-brush technique, lightly skim copper or gold paint over the raised textures of your frame. This highlights the details and makes the ‘metal’ look worn but polished. -
Mounting the Portrait:
Center your oval portrait on the background panel and glue it down flat. Apply your prepared mechanical halo frame directly over the photo, ensuring the portrait shows through clearly.
Step 3: Industrial Embellishments
-
Corner Gears:
Select a large metal gear and a smaller washer. Glue them in the upper left corner, overlapping them slightly to suggest an interconnected mechanism. -
Additional Details:
Add a standalone gear cluster to the bottom right corner. I usually like to place a small decorative flower or ornate button in the center of this gear to soften the industrial look. -
Studding the Perimeter:
Mark uneven intervals along the very edge of the canvas (about 1 inch apart). Push antique upholstery tacks into these marks to create a riveted boiler-plate border. -
Final Weathering:
Dilute a tiny drop of black or dark brown paint with water. Carefully paint this ‘wash’ into the crevices around the gears and tacks, then wipe away the excess on the high points to simulate accumulated grease and grime. -
Sealing the Work:
Coat the entire paper surface (avoiding the actual metal parts if you want them to remain shiny) with a matte sealer to protect the paper from moisture and fading.
Level Up: Hidden Depth
Use foam adhesive squares behind the central portrait instead of glue to lift it off the background, adding physical depth inside the halo frame.
Display your new steampunk masterpiece on a mantel or shelf where the light can catch those metallic details


Embossed Blueprint Stencil Underlayers
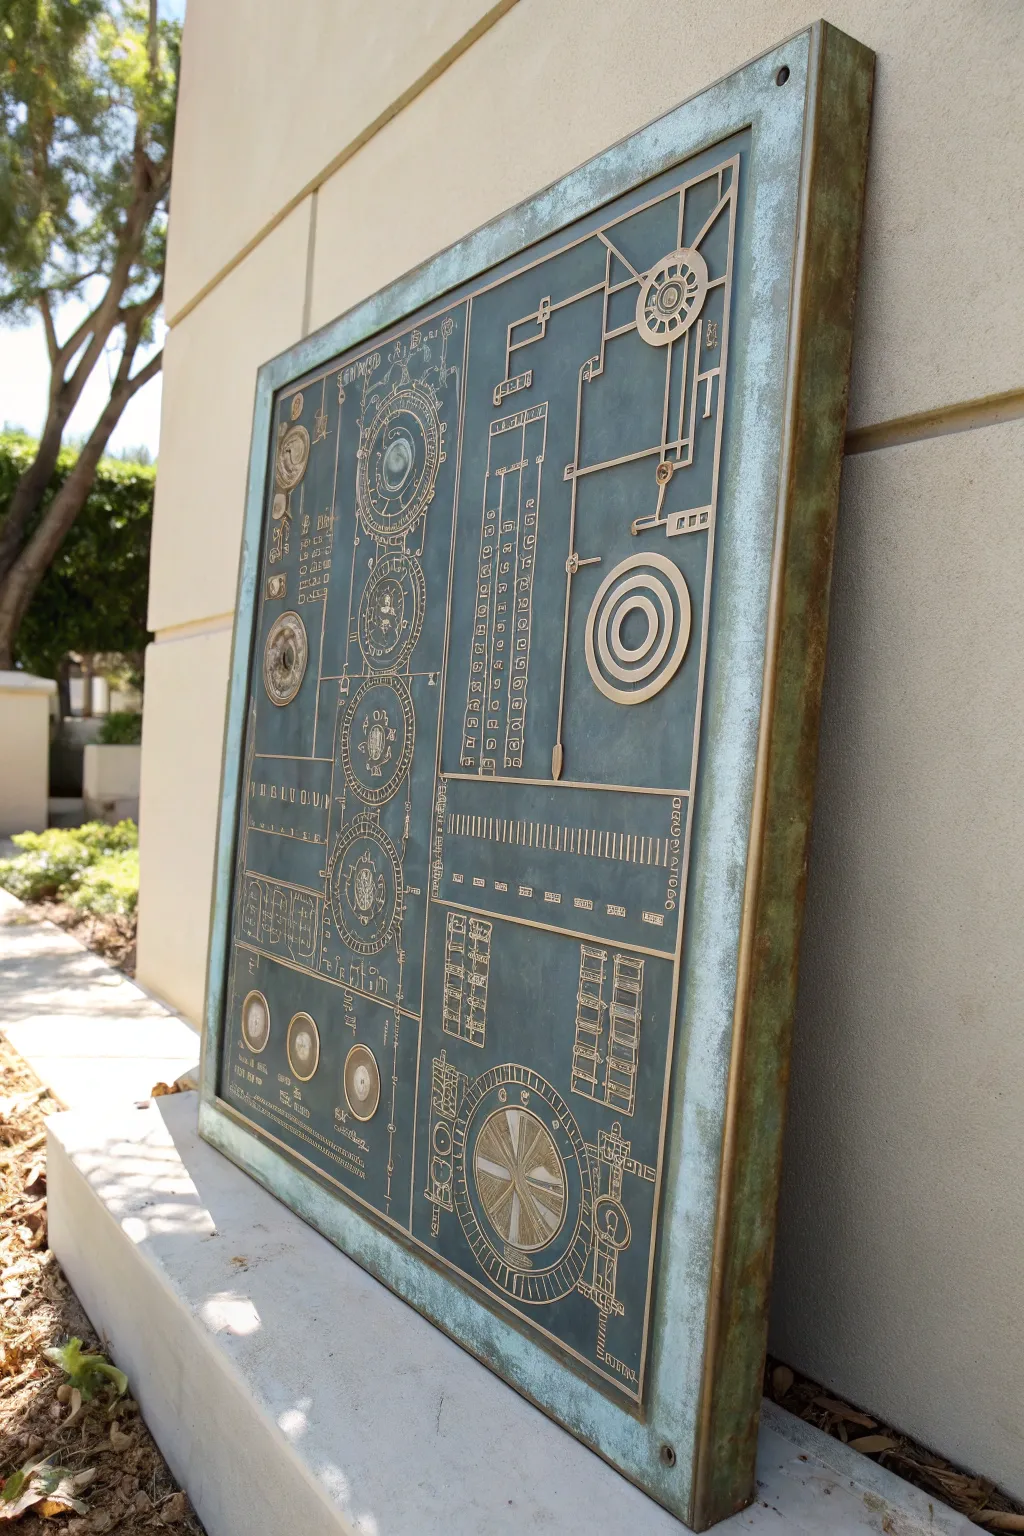
This project mimics the look of an ancient industrial schematic etched into a heavy copper plate. By using laser-cut stencils and careful layering of metallic paints and patinas, you achieve a dimensional, weathered artifact.
Step-by-Step Tutorial
Materials
- Large wooden panel or canvas (approx. 24×36 inches)
- Thick wooden frame trim (2-3 inches wide)
- Laser-cut cardstock or chipboard stencils (blueprint designs)
- Heavy-body acrylic gel medium or modeling paste
- Metallic bronze or copper spray paint
- Metallic acrylic paints (dark bronze, antique gold)
- Verdigris patina kit or acrylics (teal, seafoam green, white)
- Palette knives and blending sponges
- Spray adhesive
- Fine-grit sandpaper
- Matte clear sealant spray
Step 1: Base Construction
-
Prepare the substrate:
Begin with a sturdy wooden panel or heavy-duty canvas. If using wood, sand the surface slightly to help the layers adhere. -
Frame the borders:
Cut your wooden trim to fit the outer edges of the panel, creating a deep, box-like frame. Glue and nail this trim securely to the edges. This gives the piece the heavy look of a cast metal plate. -
Prime the surface:
Coat the entire piece, including the new frame, with a dark grey primer. This hides the wood grain and creates a uniform shadow layer for later.
Step 2: Creating the Blueprint Relief
-
Design your layout:
Arrange your laser-cut schematic stencils on the panel. Overlap circular gears and linear grids to create a complex, machine-like composition. -
Adhere the stencils:
Lightly mist the back of your cardstock shapes with spray adhesive. Press them firmly onto the primed panel. They act as a permanent positive relief, not just temporary masking. -
Building texture:
For added depth, apply modeling paste through select stencil openings or around the edges of your cardstock shapes using a palette knife. Let this dry completely until hard.
Glue Bubbling?
If cardstock bubbles when painted, the adhesive didn’t seal. Prick the bubble with a pin, inject a tiny drop of glue, and press flat until dry before repainting.
Step 3: Metallizing
-
Base metallic coat:
Take the project to a well-ventilated area and spray the entire surface with a dark metallic copper or bronze paint. Apply 2-3 thin coats to avoid drips. -
Ensure coverage:
Check the deep corners of the frame and the sharp edges of the raised schematic lines. The goal is to make the wood and paper look like a single piece of cast metal. -
Highlighting raised areas:
Once dry, use a dry-brush technique with a lighter antique gold acrylic. Brush lightly over the raised stencil lines and the frame edge to make the details pop against the darker background.
Level Up: Real Metal
Use iron-reactive paint for the base layer. Spray with a rust activator solution instead of painting the patina for authentic chemical oxidation.
Step 4: Patina and Aging
-
Mixing the verdigris:
Prepare a glaze by mixing teal and seafoam green acrylic paints with a glazing liquid or water. You want a translucent wash, not opaque paint. -
Apply the wash:
Brush the green wash liberally over the entire surface, letting it pool in the recesses around the stencils and the corners of the frame. -
Wipe back:
Before the wash dries, use a rag to wipe the paint off the high points (the schematic lines and frame edges). This leaves the green ‘oxidized’ look only in the background areas. -
Detailed staining:
I like to use a small sponge to dab concentrated teal paint into the deepest corners and right up against the raised lines for higher contrast. -
Adding grit:
Flick tiny specks of watered-down brown paint onto the surface using an old toothbrush to simulate dirt and pitting on the metal.
Step 5: Finishing Touches
-
Final buffing:
If the verdigris dulled your gold highlights too much, gently re-apply the antique gold to the very tops of the schematic lines using your fingertip or a flat brush. -
Add corner details:
Glue faux screw heads or washers into the four corners of the frame borders to mimic mounting hardware. -
Seal the artwork:
Finish with a matte clear polyurethane spray. This unifies the sheen of the different paints and protects the cardstock elements from moisture.
Now you have a striking industrial artifact ready to lean against a wall or hang as a conversation piece


Riveted Metal Plate Illusion on Canvas
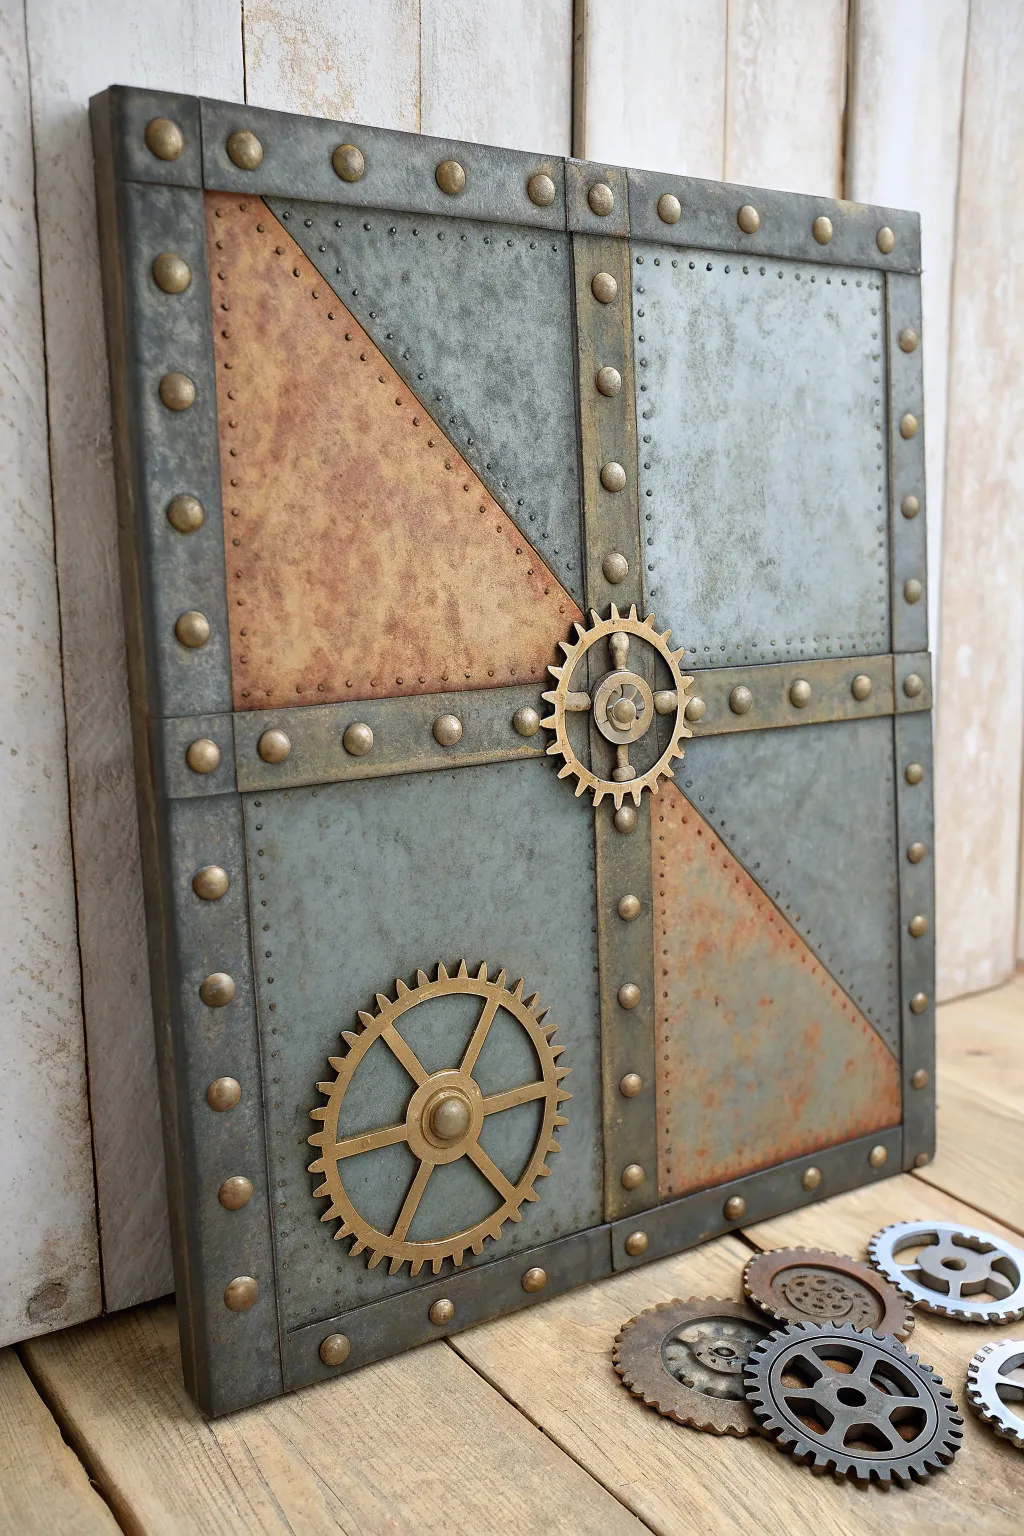
Transform a simple square canvas or wood panel into a heavy, weathered industrial blast shield. Using clever painting techniques and cardstock layering, you’ll create a convincing illusion of rusted iron plates and riveted seams without the weight of actual metal.
Detailed Instructions
Materials
- Square canvas or wood panel (12×12 inch recommended)
- Heavy cardstock or chipboard (cereal box thickness)
- Metallic acrylic paints: Gunmetal Grey, Silver, Copper, Bronze
- Matte acrylic paints: Black, Burnt Umber, Burnt Sienna
- Split peas (dried) or sticky-back pearls
- Steampunk gear embellishments (wood or metal)
- Mod Podge or PVA craft glue
- Ruler and pencil
- Scissors or craft knife
- Texture sponge or stippling brush
- Fine detail paintbrush
Step 1: Building the Framework
-
Measure the grid:
Begin by marking the center of your canvas. Draw a vertical line and a horizontal line through the center to divide the surface into four equal quadrants. -
Cut the bracing strips:
Cut strips of heavy cardstock or chipboard approximately 1 inch wide. You will need two long strips that span the full height and width of the canvas to form a cross, plus four shorter strips to frame the outer edges. -
Create the plate seams:
Glue the cardstock strips onto your pencil lines. Place the outer frame strips first, then layer the vertical center strip, and finally the horizontal center strip. This layering adds subtle physical depth. -
Add diagonal plating:
Cut two right-angled triangles from cardstock to fit into the top-left and bottom-right quadrants. These should act as ‘corner reinforcements.’ Glue them in place. -
Install the rivets:
Using a strong craft glue, attach dried split peas or sticky-back craft pearls along the center of all your cardstock strips. Space them evenly, about 1 to 1.5 inches apart, to mimic industrial bolts.
Uneven Rivets?
If using split peas, inspect them before gluing. Discard any cracked or misshapen ones. If a pea falls off after painting, replace it with a dot of hot glue painted to match.
Step 2: Base Coating & Texture
-
Seal the surface:
Apply a coat of Mod Podge or PVA glue over the entire piece, especially over the split peas and cardstock edges. This seals the organic material and prevents the cardboard from soaking up too much paint. -
Prime in black:
Once the sealant is dry, paint the entire canvas black. Use matte acrylic paint and ensure you get into every nook, cranny, and underside of the ‘rivets.’ -
Base metal layer:
Sponge on a layer of gunmetal grey mixed with a touch of black. Use a dabbing motion to create a mottled texture rather than smooth brush strokes. Do not cover the black completely; let shadows remain in the recesses.
Pro Tip: Texture Trick
Mix a pinch of fine sand or baking soda into your rust-colored paint. When stippled onto the seams, this creates a gritty, corroded texture that looks incredibly realistic.
Step 3: Creating the Rust & Patina
-
Differentiation of panels:
Decide which panels will be ‘steel’ and which will be ‘copper.’ For the steel sections (top-right, bottom-left), sponge on a lighter silver paint, concentrating on the center of the panels. -
Apply copper tones:
For the copper triangle sections (top-left, bottom-right) and the center cross-braces, sponge on metallic bronze and copper paint. Keep the coverage somewhat uneven to simulate age. -
Rust stippling:
Mix Burnt Sienna with a tiny bit of orange. Using a dry brush or sponge, lightly stipple this ‘rust’ color onto the copper sections and sporadically on the steel sections, focusing near the seams and rivets where water would naturally collect. -
Dark wash:
Create a wash by watering down black or dark brown paint. Brush this over the rivets and seams, then quickly wipe away the excess with a rag. This makes the details pop by leaving darkness in the crevices.
Step 4: Detailing & Assembly
-
Highlighting rivets:
Using your finger or a small dry brush, rub a little bright gold or silver paint onto the very tops of the rivets. I find this tiny step makes the biggest difference in convincing the eye that the ‘bolts’ are metal. -
Prepare the gears:
If your gear embellishments are wood or plastic, paint them bronze and gold now. Add a touch of the rust color to them so they match the weathering of the main piece. -
Mount the gears:
Glue a large gear directly over the center intersection where the strips meet. Place a second gear in the bottom-left quadrant for visual balance. -
Faux screw holes:
Use the handle end of a paintbrush, dip it in black paint, and make tiny dots around the inner perimeter of the panels to simulate small screw holes or indentations. -
Final varnish:
Finish with a spray of matte varnish to unify the sheen and protect the paint layers from gathering dust.
Hang your industrial masterpiece on the wall and enjoy the heavy metal aesthetic.
BRUSH GUIDE
The Right Brush for Every Stroke
From clean lines to bold texture — master brush choice, stroke control, and essential techniques.
Explore the Full Guide
Steampunk Shadow Box With Hidden Layers
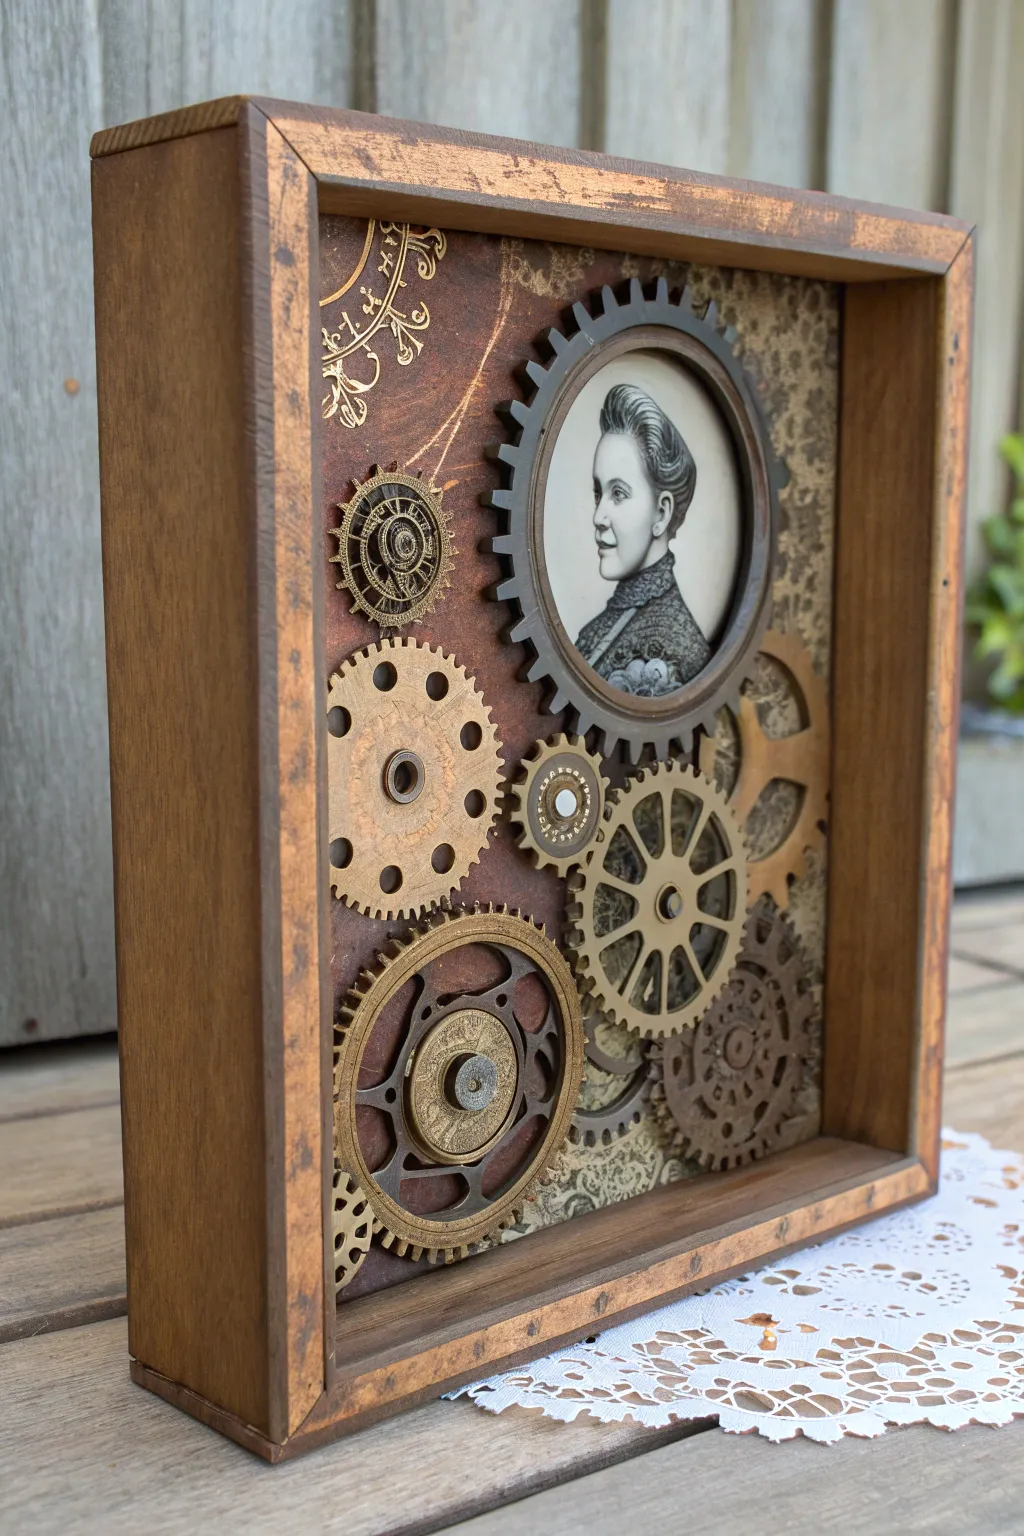
Capture the elegance of a bygone mechanical era with this layered steampunk shadow box. By combining vintage imagery with industrial textures and metallic gears, you’ll create a conversation piece that feels like a treasured artifact from an alternate history.
How-To Guide
Materials
- Deep wooden shadow box frame (approx. 8×10 inches)
- Walnut or dark oak wood stain
- Patterned scrapbook paper (Victorian damask and rusty hues)
- Gold foil rub-on transfers or stencil paste
- Vintage black and white portrait photo
- Assorted gears (laser-cut wood, chipboard, and metal)
- Large circular gear frame (to fit the portrait)
- Metallic acrylic paints (antique bronze, copper, gold, gunmetal)
- Sponge applicators and small detail brushes
- Foam spacers or 3D adhesive dots
- Craft glue or hot glue gun
- Distress ink (brown or vintage photo)
- Scissors and craft knife
Step 1: Preparing the Foundation
-
Stain the frame:
Begin by removing the glass and backing from your shadow box. Apply a coat of walnut or dark oak wood stain to the entire wooden frame, ensuring you get into the corners. Wipe away excess stain with a rag to let the wood grain show through, giving it an aged, antique look. -
Wait for drying:
Allow the stain to dry completely according to the manufacturer’s instructions. A second coat can be applied if you prefer a deeper, richer color. -
Prepare the background:
Cut your scrapbook paper to fit the inner back panel of the shadow box. Choose a darker, distressed pattern for the base layer, perhaps something with a rusted metal or leather look. -
Add texture and shine:
Before gluing the paper down, apply gold foil transfers or use a stencil with gold paste to the upper left corner. This creates a subtle, decorative flourish that catches the light behind the gears. -
Create background depth:
Tear a second piece of contrasting patterned paper—Victorian damask works beautifully here—and layer it on the right side of the backing. I like to ink the torn edges with distress ink to eliminate white paper cores and add age. -
Secure the backdrop:
Adhere the layered papers securely to the backboard of the frame using craft glue, smoothing out any air bubbles.
Pro Tip: Instant Aging
Use a dry brush with a tiny amount of black paint to lightly sweep over the edges of your gold and brass gears. It instantly makes them look grimy and used rather than brand new.
Step 2: Creating the Focal Point
-
Prep the portrait:
Cut your vintage portrait into a circle that fits just inside the inner rim of your large circular gear frame. -
Paint the main gear:
Paint the large circular gear frame with a gunmetal or dark iron metallic paint. While it’s still slightly tacky, dab a little black paint into the teeth recesses to simulate grease and depth. -
Mount the portrait:
Glue the portrait to the back of the gear frame. For added dimensionality, adhere this assembly to the background paper using thick foam spacers so it floats off the surface.
Level Up: Hidden Mechanics
Install a small battery-operated clock movement behind the main portrait gear so the hands actually move, turning your static art piece into a functional steampunk timepiece.
Step 3: Building the Machinery
-
Paint base gears:
Select your largest gears for the bottom layer. Paint these with matte finishes like rusty orange or dull brass. Sponge application works best here to avoid brush strokes. -
Paint accent gears:
Paint the medium and smaller gears in brighter metallics—gold, bronze, and clean copper. This variation in shine helps separate the visual layers. -
Arrange the composition:
Lay out your gears on the table first to find a pleasing arrangement. You want them to look interconnected, as if turning one would turn them all. Cluster them heavily at the bottom and around the central portrait. -
Start gluing layers:
Begin gluing the bottom-most gears directly to the background paper. Overlap the edges slightly with the portrait frame’s perimeter to integrate the scene. -
Add elevated gears:
Use foam tape or multiple layers of chipboard to raise specific gears. Place a large brass-colored gear overlapping the bottom right, and another mid-sized one near the bottom left. -
Detail the centers:
Glue small washers, screw heads, or tiny gears into the centers of the larger wheels. This small detail adds immense realism to the mechanism. -
Final assembly:
Once all glue is dry and the fumes have dissipated, slide the backing board into the frame. Secure the back clips, and your industrial masterpiece is complete.
Hang your new creation on the wall or display it on a shelf to bring a touch of vintage industrial charm to your room
Have a question or want to share your own experience? I'd love to hear from you in the comments below!