If you’re craving a serious mobile home makeover, paint is the fastest way to fake that “custom-built” vibe without changing the footprint. I’m going to share my favorite mobile home paint ideas that boost curb appeal, break up the long “box” shape, and make everything feel intentional.
Warm Greige for a Permanent-Home Look
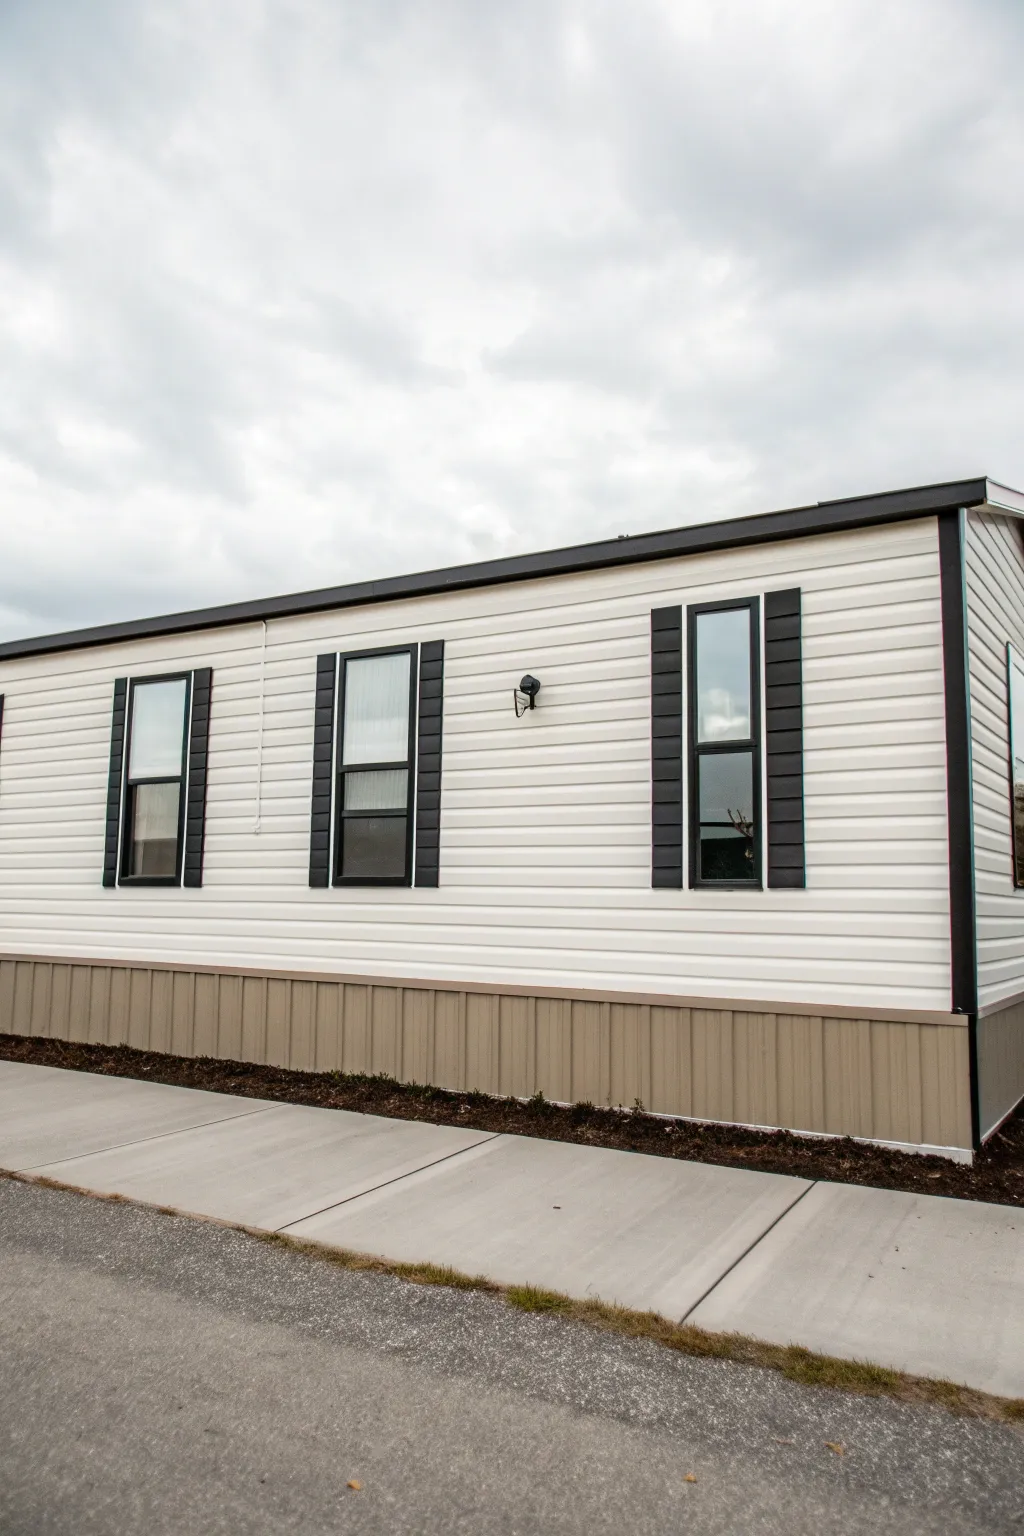
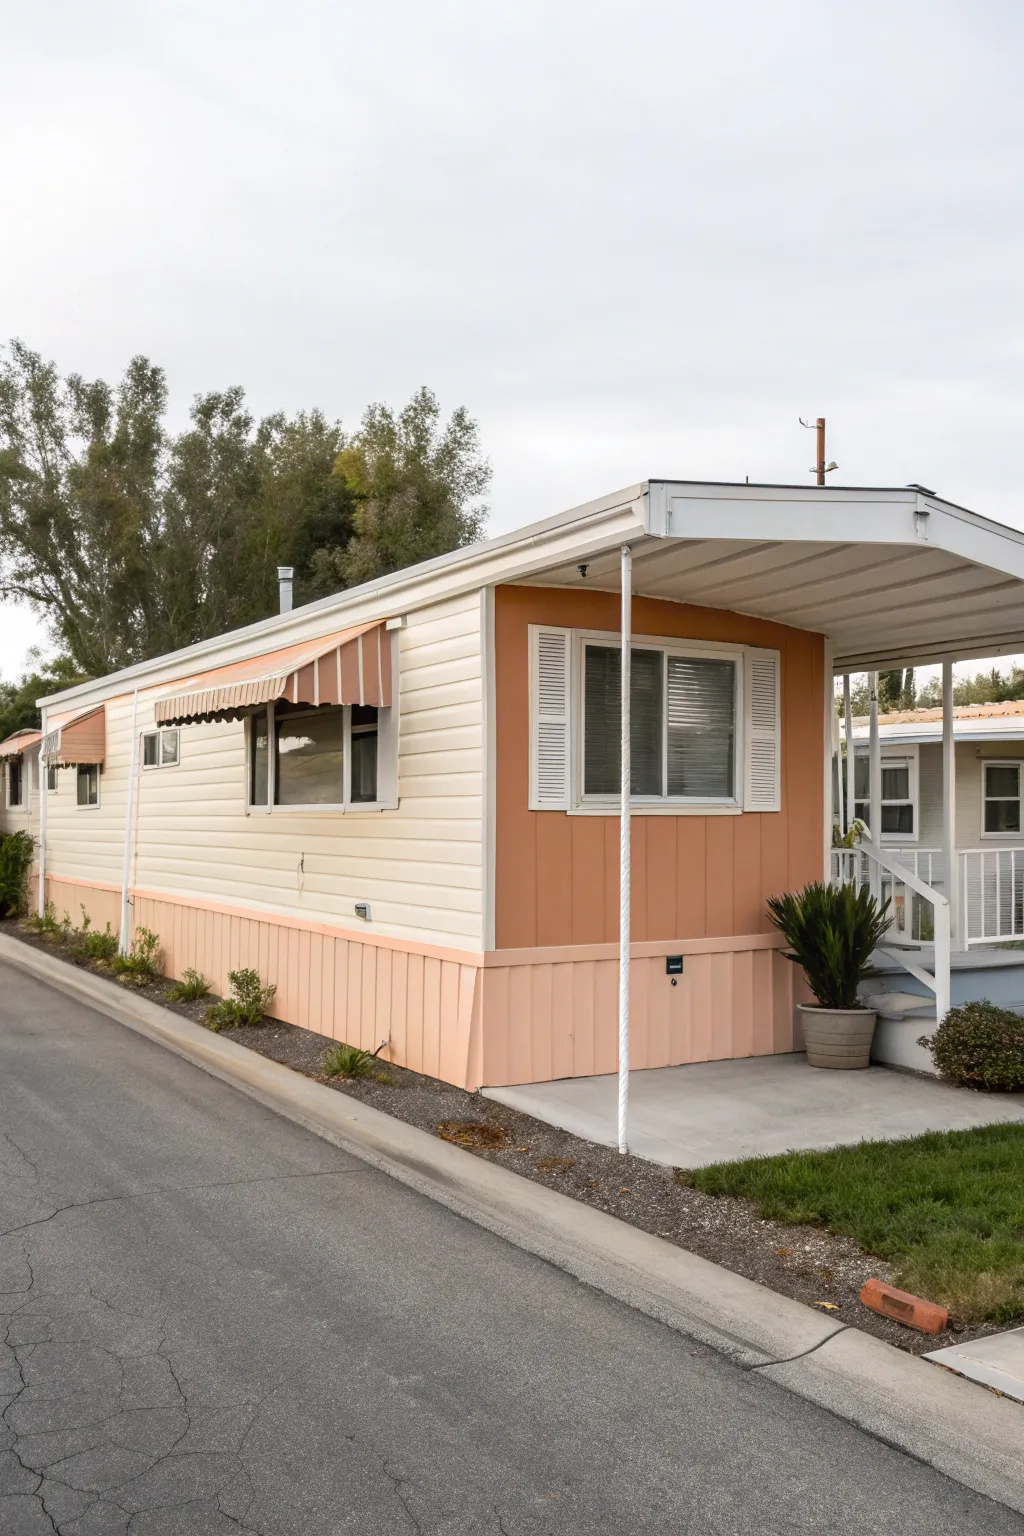
Transform a standard single-wide mobile home into a classic, permanent-looking residence with a warm greige and crisp white color palette. This project focuses on painting vinyl siding and skirting to create a clean, modern exterior that feels grounded and inviting.
Step-by-Step
Materials
- High-quality exterior acrylic latex paint (Warm Greige/Tan)
- Exterior semi-gloss paint (White)
- Exterior paint (Dark Brown/Espresso for shutters)
- Vinyl-safe primer (if needed)
- Pressure washer
- TSP (Trisodium Phosphate) or vinyl siding cleaner
- Scrub brush with extension pole
- Painter’s tape (exterior grade)
- Drop cloths and plastic sheeting
- Paint sprayer (airless recommended for siding)
- 2-inch and 3-inch synthetic angled brushes
- Small roller with 3/8-inch nap
- Caulk and caulk gun (exterior grade)
- Sandpaper (medium grit)
Step 1: Preparation & Cleaning
-
Assess the siding:
Walk around the entire mobile home and inspect the vinyl siding and skirting for any cracks, loose panels, or damage. Repair these issues with exterior caulk or by re-securing panels before you begin cleaning. -
Pressure wash thoroughly:
Connect your pressure washer and start spraying from the top down. Use a moderate setting to avoid forcing water behind the panels. This removes the initial layer of dirt, spiderwebs, and chalky buildup. -
Scrub with cleaning solution:
Mix TSP or a dedicated vinyl siding cleaner with water in a bucket. Use a scrub brush on an extension pole to agitate the surface, paying special attention to areas with mildew or heavy grime. This step is crucial for paint adhesion. -
Rinse and dry:
Rinse the entire home again with fresh water to remove all cleaning residue. Allow the siding to dry completely for at least 24 to 48 hours; painting over damp siding will trap moisture and cause peeling.
Sticky Situation?
If paint peels off the vinyl when untaping, score the edge of the tape with a sharp utility knife before pulling. This breaks the seal and keeps your lines crisp.
Step 2: Masking & Priming
-
Protect the surrounding area:
Lay down drop cloths along the base of the home to catch drips. Cover windows, door hardware, light fixtures, and electrical outlets with plastic sheeting and secure the edges firmly with painter’s tape. -
Mask the trim:
Since we are painting the main siding first, use painter’s tape to protect the window frames, door facings, and corner trim if you plan to brush them separately later. However, many pros spray everything and cut in later—decide which method suits your skill level. -
Prime bare spots:
If your vinyl siding is very old or has lost its color significantly, apply a coat of vinyl-safe primer. While many modern exterior paints are paint-and-primer in one, a separate primer ensures the best bond on weathered vinyl.
Step 3: Painting the Main Body
-
Prepare the sprayer:
Load your airless sprayer with the warm greige/tan exterior paint. Test the spray pattern on a piece of cardboard to ensure an even fan width and proper pressure. -
Spray the siding:
Begin spraying at the top of a section and work your way down in smooth, horizontal strokes. Keep the gun perpendicular to the surface and maintain a consistent distance of about 12 inches. -
Back-roll if necessary:
If the siding has a deep wood-grain texture, have a helper follow immediately behind with a roller to push the paint into the crevices. This ensures full coverage and a uniform finish. -
Apply a second coat:
Once the first coat is dry to the touch (usually 2-4 hours depending on weather), apply a second light coat. This deepens the color and provides better durability against the elements. -
Remove masking early:
Carefully peel off the painter’s tape from the windows and trim while the paint is still slightly tacky to prevent pulling up dried paint chips.
Level Up: Texture
Add faux-stone panels over the white skirting for an upscale foundation look. The texture variation elevates the home’s curb appeal instantly.
Step 4: Painting Trim & Skirting
-
Paint the corner trim and eaves:
Use a 2-inch angled brush and white exterior paint to carefully cut in the corner posts, eaves, and fascia. I like to do two heavy coats here to really make the white pop against the tan. -
Detail the window frames:
Paint the window frames with the same crisp white. Use a steady hand or a small brushing shield to keep the white paint off your freshly painted tan siding. -
Paint the skirting:
Clean the skirting if it got dirty during the siding process. Using a roller or sprayer, apply the white paint to the vertical skirting panels. This grounds the home and creates a finished look. -
Refinish the shutters:
Remove the shutters if possible, or mask around them heavily. Paint them with the dark espresso/brown exterior paint. Clean, dark shutters provide the necessary contrast to the warm neutral body color. -
Final touch-ups:
Walk around the permimeter with a small artist’s brush and your paint cans. fixes any drips, overspray, or missed spots where the siding meets the trim.
Step back and admire how this simple palette swap has completely revitalized the exterior character of the home


Modern Charcoal With Light Accents
Transform a dated mobile home exterior into a modern masterpiece with this striking high-contrast palette. By pairing deep charcoal siding with crisp white trim and natural wood accents, you’ll achieve a contemporary look that feels both sophisticated and welcoming.
Detailed Instructions
Materials
- High-quality exterior latex paint (Charcoal/Dark Gray)
- Exterior trim paint (Bright White)
- Exterior primer (bonding primer recommended)
- Pressure washer
- Painter’s tape and plastic sheeting
- Caulk and caulking gun
- Paint sprayer (optional but recommended for siding)
- Assorted paintbrushes (angled sash brush, flat brush)
- Paint rollers and extension pole
- Sandpaper (medium and fine grit)
- Drop cloths
- Wood stain (for deck/steps)
- Exterior polyurethane sealer
Step 1: Preparation & Cleaning
-
Deep Clean the Exterior:
Start by thoroughly pressure washing the entire exterior of the home. Pay special attention to the siding grooves and eaves to remove accumulated dirt, mildew, and chalky residue. Allow the surface to dry completely for at least 24 hours. -
Inspect and Repair:
Walk around the perimeter and check for any loose siding, cracks, or gaps. Use exterior-grade caulk to seal any cracks around windows, doors, and seams. This ensures a watertight seal and a smooth painting surface. -
Sand Rough Areas:
Lightly sand any peeling paint or rough patches on the siding and trim. If you are painting over a glossy surface, give it a quick scuff sand to help the new primer adhere better. -
Protect Surroundings:
Mask off windows, light fixtures, door handles, and the foundation with painter’s tape and plastic sheeting. Spread drop cloths over the deck and surrounding landscaping to catch any drips or overspray.
Pro Tip: Sheen Choice
Use a satin or eggshell finish for the charcoal siding. It hides imperfections better than semi-gloss while still being easy to clean.
Step 2: Painting the Siding
-
Prime the Surface:
Apply a coat of high-quality bonding primer to the siding. This is crucial for mobile homes, as the siding materials can sometimes be slick. Using a sprayer helps get into all the nooks, but back-rolling ensures good adhesion. -
Paint Siding Edges:
Before tackling the main areas, use an angled brush to cut in the charcoal paint around the trim, under the eaves, and in corners where a roller or sprayer might not reach cleanly. I like to be generous here to ensure full coverage. -
Apply First Siding Coat:
Apply your dark charcoal exterior paint to the siding. If using a sprayer, keep a steady hand and maintain consistent distance. For rolling, use a 3/8-inch nap roller for smooth siding or thicker nap for textured surfaces. -
Allow to Dry:
Let the first coat dry according to the manufacturer’s instructions, typically 2-4 hours. Dark colors often need time to settle to see the true coverage. -
Apply Second Siding Coat:
Apply a second coat of charcoal paint to ensure a rich, opaque finish without streaks. This deepens the color and provides better weather protection.
Step 3: Trim & Accents
-
Prep the Trim:
Once the dark siding is dry, ensure your masking is tight around the trim areas. If you got any charcoal paint on the trim, sand it off or prime over it before painting white. -
Paint Window & Door Frames:
Using a clean angled sash brush, carefully paint the window frames, door casing, and corner boards with bright white exterior trim paint. This high contrast is key to the modern look. -
Refresh the Fascia:
Don’t forget the fascia boards under the roofline. Painting these white visually lifts the roof and creates a crisp border against the dark siding. -
Paint the Front Door:
Paint the front door white to match the trim, utilizing a smaller roller for flat areas and a brush for panels. Ensure the window inserts are taped off or scraped clean later with a razor blade. -
Detail Work:
Go back and touch up any areas where dark paint bled onto white, or vice versa, using a small artist’s brush for precision.
Level Up: Cedar Skirting
Swap standard vinyl skirting for horizontal cedar planks stained to match the deck. It grounds the home and adds a luxury custom feel.
Step 4: Deck & Staging
-
Sand the Decking:
If your wooden deck and stairs are weathered, sand them down to fresh wood. This removes grey fibers and prepares the wood to accept stain evenly. -
Stain the Wood:
Apply a natural or light-toned wood stain to the deck boards and stair treads. This warmth contrasts beautifully with the cool charcoal siding. I prefer doing this last so paint drips don’t ruin the finish. -
Seal the Wood:
Once the stain is dry, apply a clear exterior polyurethane sealer to protect the wood from foot traffic and weather. -
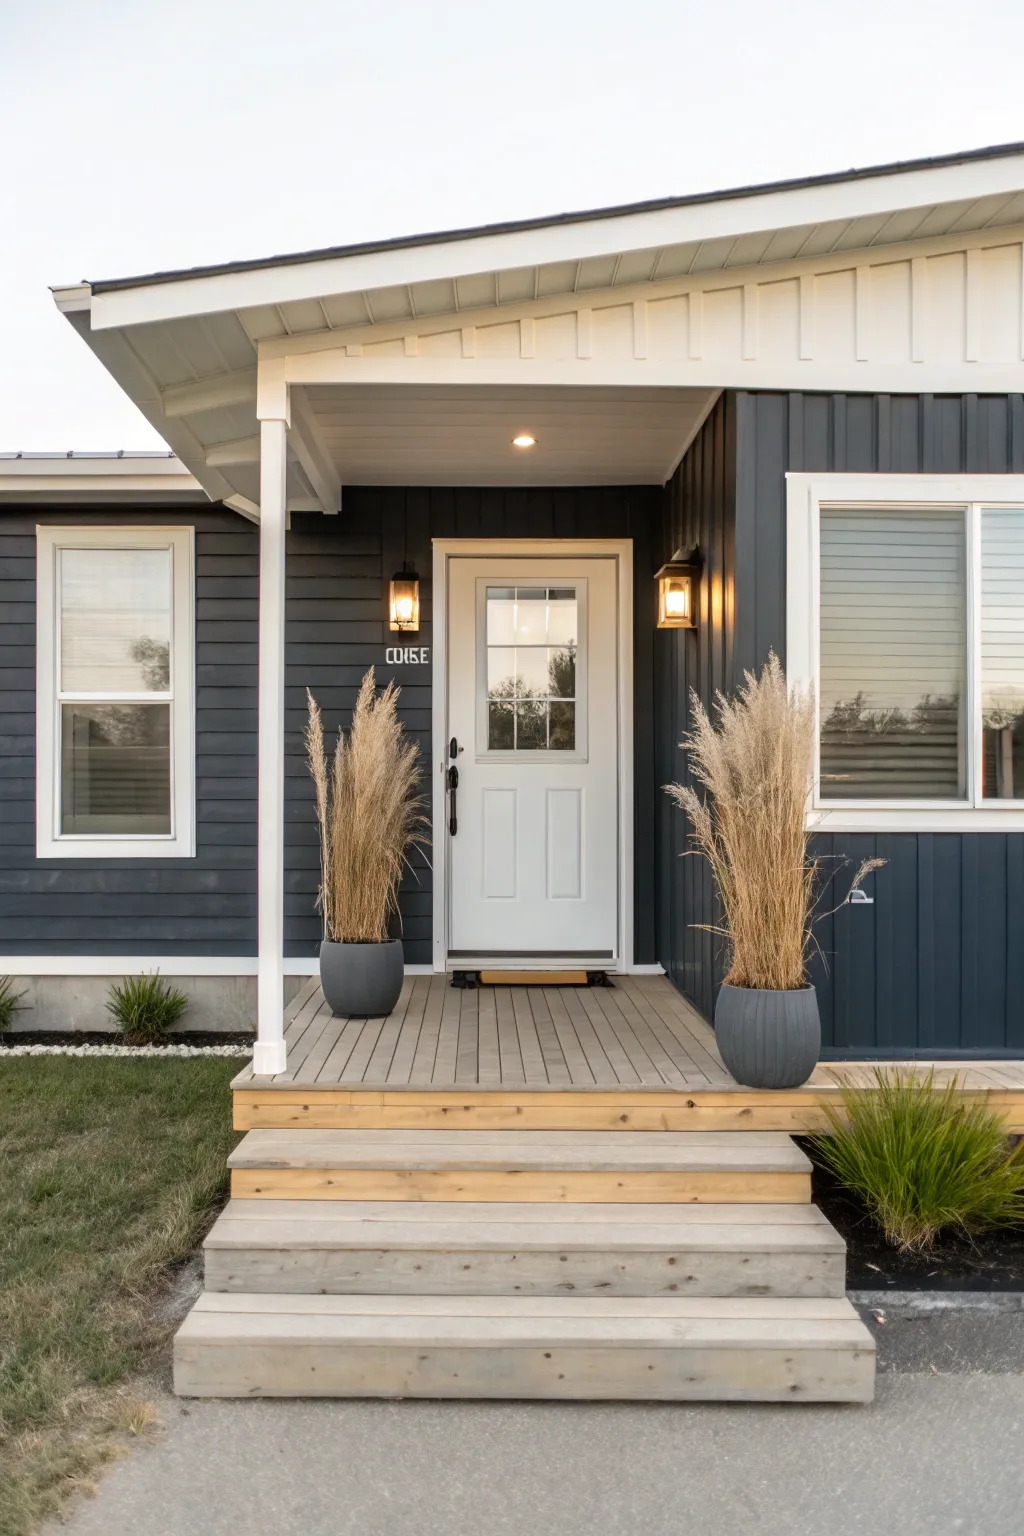
Install Fixtures:
Reattach or install new exterior light fixtures. Modern sconces with warm bulbs, like those in the image, add a cozy glow against the dark walls. -
Style the Entrance:
Place large planters with tall ornamental grasses on either side of the door to frame the entrance and add texture.
Step back and admire how this bold color combination completely reinvents the curb appeal of your home


Dusty Blue With Bright White Trim
Transform your mobile home with a calming, beach-inspired palette that pairs a soft, dusty blue siding with crisp, bright white accents. This classic combination creates an inviting, airy porch space that feels both modern and timeless.
How-To Guide
Materials
- Exterior acrylic latex paint (Dusty Blue/Gray-Blue)
- Exterior acrylic latex paint (Bright White)
- Exterior primer (bonding primer recommended for vinyl/aluminum)
- Pressure washer or hose with scrub brush
- TSP (Trisodium Phosphate) cleaner
- Painter’s tape (exterior grade)
- Drop cloths and plastic sheeting
- Paint sprayer (highly recommended for siding)
- Angled sash brush (2.5 inch)
- Roller frame and exterior nap covers
- Caulk gun and exterior paintable caulk
- Sanding block (medium grit)
- Ladder
Step 1: Preparation
-
Clean everything thoroughly:
Before thinking about paint, the surface needs to be pristine. Use a pressure washer or a stiff brush with a TSP solution to remove all dirt, chalkiness, and mildew from the siding, skirting, and porch posts. -
Address repairs:
Inspect the siding and trim for any gaps or cracks. Apply exterior paintable caulk to seams around windows and trim boards to ensure a weather-tight seal and a smooth painted finish. -
Scuff the surface:
If your mobile home has vinyl or aluminum siding that is glossy, lightly scuff it with a medium-grit sanding block. This helps the primer bite into the material effectively. -
Mask and protect:
Cover the windows, light fixtures, and the ground with plastic sheeting and drop cloths. Use high-quality exterior painter’s tape to mask off the window glass and any hardware you aren’t removing.
Vinyl Siding Tip
When painting vinyl siding, choose a paint color lighter than the original or one specifically formulated ‘vinyl-safe’ to prevent warping from heat absorption.
Step 2: Priming
-
Choose the right primer:
Select a high-quality bonding primer specifically designed for difficult surfaces like vinyl or aluminum. This is the secret to preventing peeling later on. -
Apply the primer coat:
Using a sprayer or roller, apply an even coat of primer to the entire exterior, including the railing and skirting. Let this dry completely according to the manufacturer’s instructions.
Step 3: Painting the Siding
-
Cut in edges:
If you aren’t using a sprayer for everything, start by using a brush to cut in the dusty blue paint along corners and under the eaves where a roller can’t reach. -
Apply the first coat of blue:
Apply your dusty blue exterior paint to the main siding panels. If spraying, move in long, even passes overlapping by about 50% to avoid striping. I find keeping a wet edge is crucial here. -
Let it dry and assess:
Allow the first coat to dry fully. Check for any thin spots or areas where the old color is bleeding through. -
Apply the second coat:
Add a second coat of the dusty blue to ensure rich, consistent coverage and true color depth.
Uneven Coverage?
If the blue looks patchy after drying, you likely stretched the paint too thin. Apply another light coat rather than one heavy, drippy one.
Step 4: The White Accents
-
Paint the porch railings:
Switch to your bright white paint. For intricate spindles and railings, a brush is often best to get into crevices, though a small roller can speed up the flat handrails. -
Whiten the trim and fascia:
Carefully paint the window frames, shutters, fascia boards, and corner trim in bright white. Use an angled sash brush for precise lines against the blue siding. -
Update the porch posts:
Paint the vertical porch support posts in the same crisp white. Smooth vertical brush strokes look best here to mimic the grain of wood. -
Tackle the skirting:
Don’t forget the skirting at the bottom. Painting this element white helps ground the home visually, though painting it the siding color is also an option. In this look, matching the trim makes it pop. -
Paint the steps:
Finish the look by painting the porch stairs. A durable deck and porch paint in a slightly darker blue or grey creates a nice contrast and hides foot traffic wear.
Step 5: Finishing Touches
-
Remove masking:
Carefully peel away all painter’s tape while the final coat is still slightly tacky to prevent pulling up dried paint chips. -
Clean up details:
Use a small artist’s brush to touch up any spots where the blue may have dripped onto the white, or vice versa, ensuring crisp, professional lines. -
Reinstall fixtures:
Once fully cured, screw your exterior lights and house numbers back into place to complete the renovation.
Step back and enjoy the fresh, coastal curb appeal of your newly painted home


Sage Green With Creamy Details
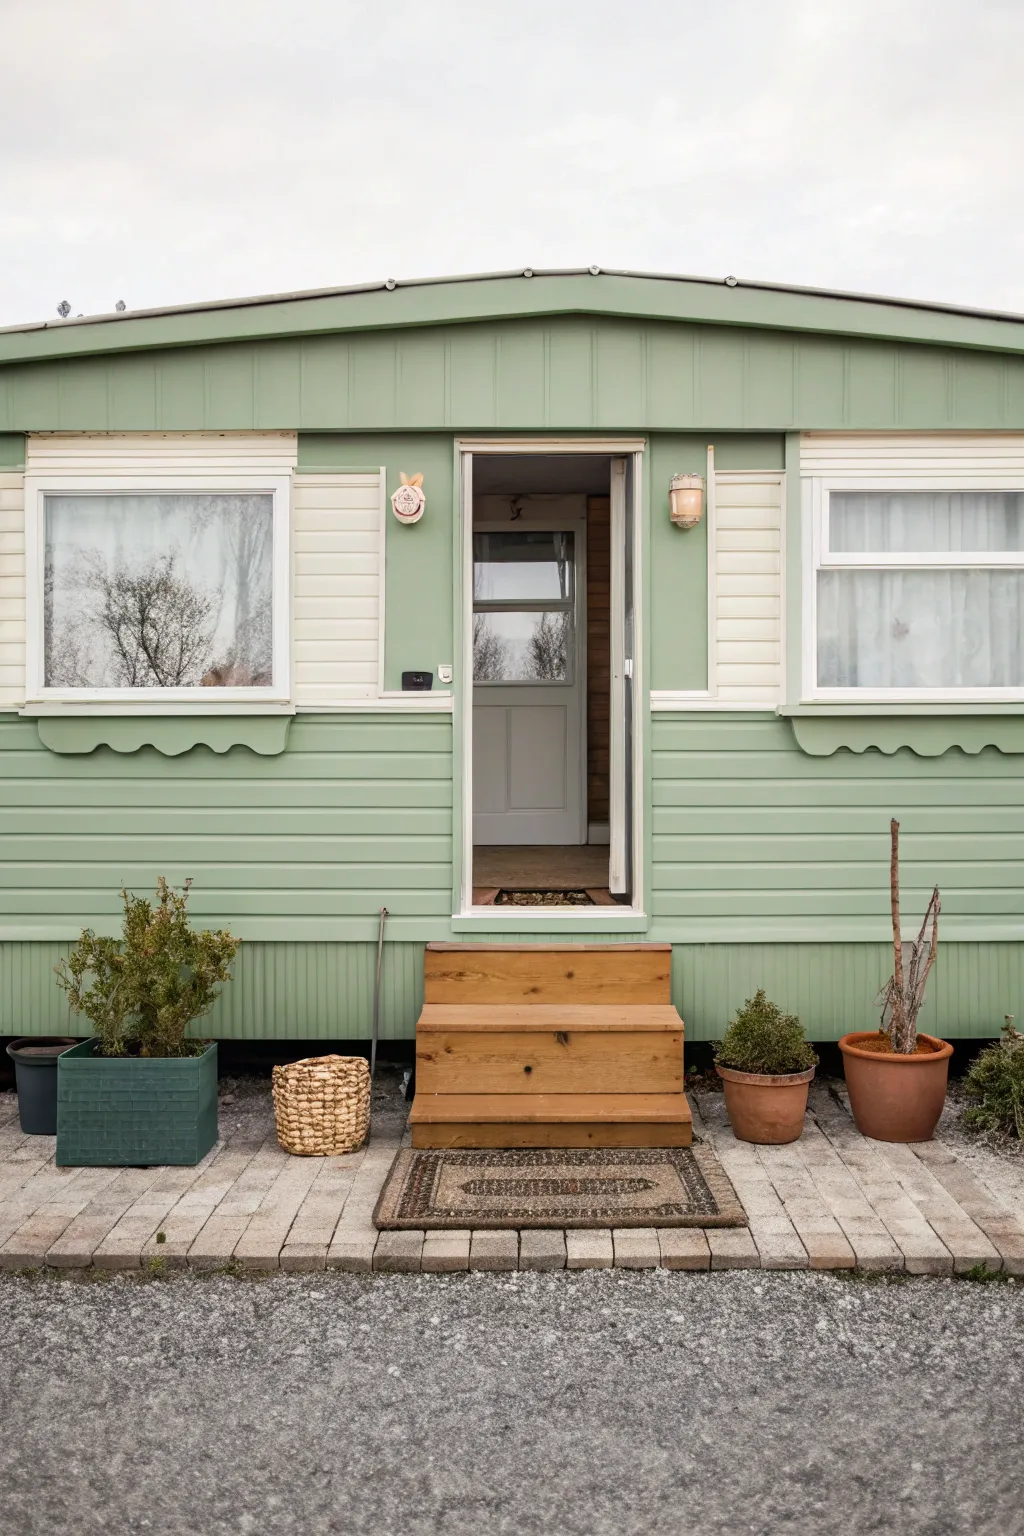
Transform a modest mobile home exterior into a charming cottage-inspired retreat using a classic palette of soft sage green and creamy white. This project focuses on meticulous surface preparation and layering colors to achieve a clean, welcoming finish that instantly boosts curb appeal.
Step-by-Step Guide
Materials
- High-quality exterior primer (oil-based recommended for aluminum)
- Exterior acrylic latex paint (Sage Green)
- Exterior acrylic latex paint (Cream/Off-White)
- Wire brush and scraper
- Sandpaper (80 and 120 grit)
- Painter’s tape and masking film
- Pressure washer or scrubbing brush with TSP substitute
- Paint rollers (medium nap)
- Angled sash brushes (2-inch)
- Drop cloths
- Caulk gun and exterior silicone caulk
Step 1: Preparation & Cleaning
-
Assess the siding condition:
Begin by walking around the mobile home to inspect the aluminum or vinyl siding for any dents, loose panels, or significant peeling paint. -
Deep clean the surface:
Use a pressure washer on a low setting or a stiff brush with a TSP (trisodium phosphate) substitute solution to scrub away years of chalky residue, dirt, and mildew. This step is critical for paint adhesion. -
Scrape and sand:
Once dry, use a wire brush or scraper to remove any loose or flaking paint. Follow up by sanding these rough edges with 80-grit sandpaper to feather them out. -
Scuff sand the entire surface:
Lightly sand the rest of the siding with 120-grit sandpaper. You aren’t trying to remove all the old paint, just creating a ‘tooth’ for the new primer to grab onto. -
Rinse and dry:
Hose down the siding one last time to remove sanding dust. Let the substrate dry completely for at least 24 hours before applying any product. -
Masking off:
Apply painter’s tape around window frames (including the glass), door frames, and any light fixtures you can’t remove. Use masking film to protect the glass panes thoroughly.
Chalky Siding Fix
If siding is powdery to the touch (chalking), use an oil-based primer or a paint conditioner like Emulsa-Bond to ensure the new topcoat sticks permanently.
Step 2: Painting the Base & Trim
-
Prime the surface:
Apply a high-quality exterior primer designed for slick surfaces like aluminum. I prefer to roll this on and back-brush it into the grooves to ensure complete coverage. -
Caulk gaps:
After priming, inspect seams around windows and trim. Fill any gaps with exterior-grade silicone caulk to weatherproof the home and create a seamless look. -
Cut in the Sage Green:
Using an angled sash brush, carefully paint the sage green color along the edges, corners, and under the overhangs where a roller can’t reach. -
Roll on the main color:
Use a medium nap roller to apply the sage green paint to the main siding panels. Work in small sections, maintaining a wet edge to avoid lap marks. -
Second coat application:
Allow the first coat to dry according to the manufacturer’s instructions, then apply a second coat for a rich, uniform color depth. -
Paint the decorative trim:
Switch to your cream or off-white paint. Carefully paint the window shutters, the scalloped detail under the windows, and the vertical trim corners. -
Detailing the door surround:
Paint the door frame in the same creamy white to make the entrance pop against the green siding.
Step 3: Finishing Touches
-
Refinish the steps:
While the siding dries, sand down your wooden steps. Apply a warm-toned exterior wood stain and sealer to complement the new green exterior. -
Clean up masking:
Remove the painter’s tape while the trim paint is still slightly tacky to ensure a crisp, clean line without peeling. -
Style the entrance:
Place terracotta pots with fresh greenery and a woven basket near the steps to echo the natural tones of the new paint job. -
Final inspection:
Walk around with a small brush for touch-ups, checking for any missed spots under the siding laps or around the light fixtures.
Cottage Charm
Install window boxes painted in the same cream trim color beneath the windows. Fill them with trailing ivy or colorful annuals for extra character.
Step back and admire how a fresh coat of paint has completely revitalized the character of your mobile home
BRUSH GUIDE
The Right Brush for Every Stroke
From clean lines to bold texture — master brush choice, stroke control, and essential techniques.
Explore the Full Guide
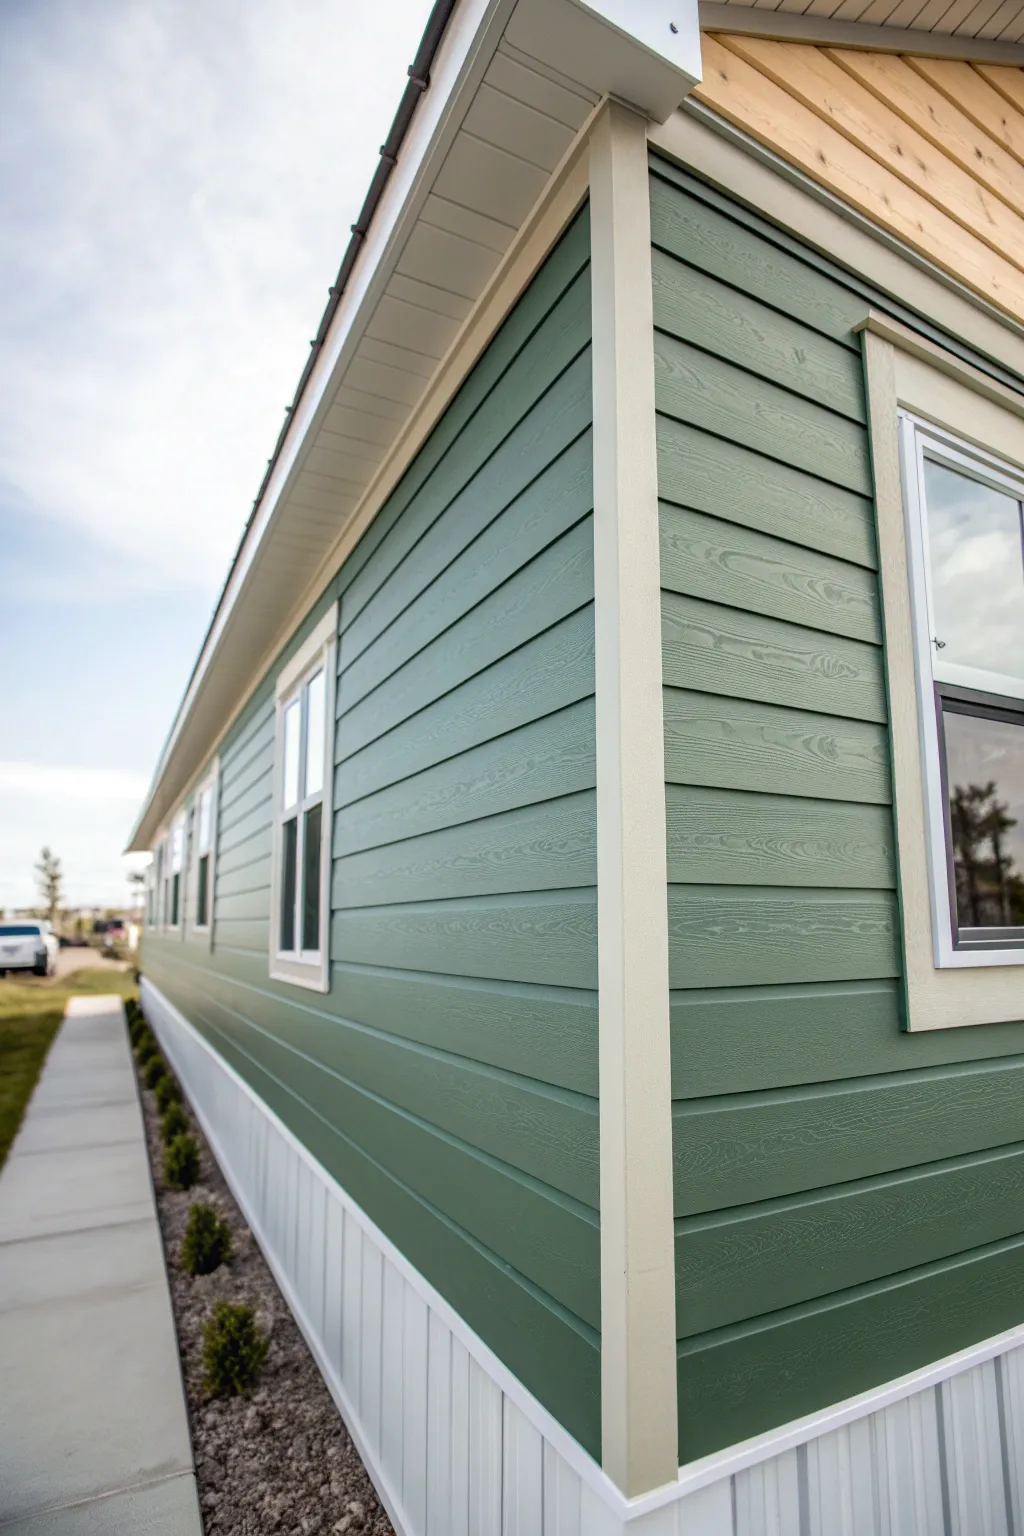
Two-Tone Depth With Dark Skirting
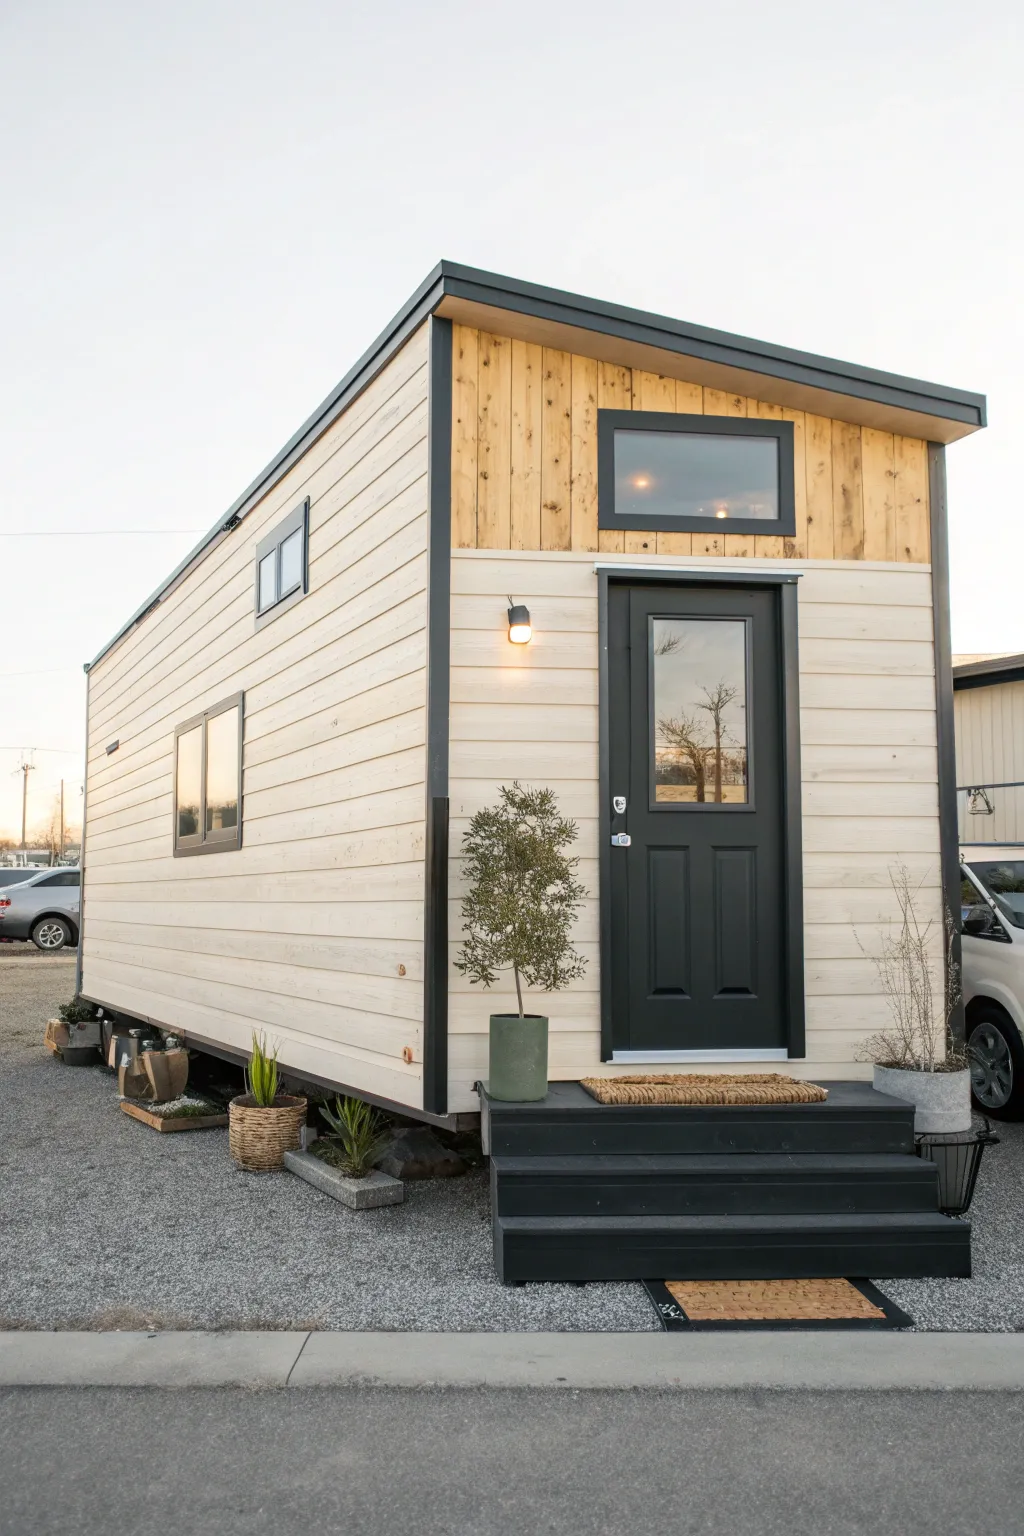
Transform a standard mobile home or tiny house exterior into a sleek, modern statement piece by combining light horizontal siding with bold charcoal accents and warm wood tones. This project focuses on achieving crisp lines and a high-contrast palette that instantly updates the structure’s curb appeal.
Detailed Instructions
Materials
- High-quality exterior primer
- Exterior latex paint (Soft Cream/Off-White)
- Exterior latex paint (Charcoal/Black)
- Exterior solid or semi-transparent stain (Natural Cedar/Pine tone)
- Painter’s tape (various widths)
- Drop cloths
- Sanding block (medium grit)
- Pressure washer or scrubbing brush
- Caulk and caulking gun
- Roller frame and covers (medium nap)
- Angled sash brush (2.5 inch)
- Mini foam roller
- Ladder
Step 1: Preparation & Cleaning
-
Clean the Surface:
Begin by thoroughly cleaning the entire exterior. Use a pressure washer on a low setting or a stiff brush with soapy water to remove dirt, mildew, and chalkiness. Let it dry completely for at least 24 hours. -
Repair and Caulk:
Inspect the siding and trim for any gaps or cracks. Apply fresh exterior-grade caulk around windows, door frames, and siding joints to ensure a watertight seal and professional finish. -
Sand Rough Spots:
Lightly sand any peeling paint or rough patches on the existing siding and trim. Wipe away the dust with a damp cloth to ensure the new paint adheres properly. -
Masking Areas:
Use painter’s tape to protect light fixtures (like the sconce by the door), window glass, and the door hardware. Cover the ground around the foundation with drop cloths to catch drips.
Clean Lines Pro Tip
For ultra-crisp lines on textured siding, run a thin bead of clear caulk over the tape edge before painting your accent color. It seals the tape so no dark paint bleeds under.
Step 2: Painting the Main Siding
-
Prime the Siding:
Apply a coat of high-quality exterior primer to the horizontal siding and the lower skirting area if they haven’t been painted recently. This ensures consistent color coverage. -
Cut In the Main Color:
Using your angled brush, cut in the Soft Cream color around the windows, door frame, and under the roofline where the roller won’t reach. -
Roll the Siding:
Use a roller with a medium nap to paint the horizontal siding. Work in sections, maintaining a wet edge to avoid lap marks. I find two coats usually give the best creamy opacity. -
Paint the Reveal:
Don’t forget the bottom edges of the lap siding. Use the brush to gently push paint up under the laps so no old color shows when looking up from the ground.
Splotchy Wood Stain?
If your upper wood section looks blotchy, the wood might be unevenly porous. Apply a pre-stain wood conditioner first to help the timber absorb the color evenly.
Step 3: Deep Tone Accents & Timber
-
Prepare the Upper Facade:
If your structure has a dedicated upper section or distinct material change near the roofline, this is where the wood tone goes. If it’s raw wood, sand lightly. If it’s painted siding, you’ll need a solid stain or paint that mimics wood. -
Apply Wood Stain:
Using a brush, apply the Natural Cedar stain to the vertical boards on the upper gable. Work with the grain, ensuring the stain penetrates into the grooves. -
Tape for Trim:
Once the main siding is completely dry (wait at least 4-6 hours), tape off the siding right next to the corner posts, window frames, and the door to prepare for the dark accent color. -
Paint Window Frames:
Carefully paint the window sashes and frames with the Charcoal paint. An angled sash brush is critical here for keeping the lines sharp against the glass. -
Corner Posts and Roofline:
Paint the vertical corner trim and the fascia board along the roofline in the same Charcoal color. This frames the house and creates that modern outlined look. -
Paint the Door and Skirting:
Roll the front door and the bottom skirting boards in the Charcoal paint. Use a mini foam roller for the door to achieve a smooth, spray-like finish.
Step 4: Final Touches and Cleanup
-
Remove Tape:
Peel off the painter’s tape while the dark trim paint is still slightly tacky. Pulling it at a 45-degree angle helps prevent the paint from peeling up with the tape. -
Touch Up:
Check for any bleeds or missed spots. Use a small artist’s brush to fix tiny errors where the dark trim meets the light siding. -
Clean Hardware:
Polishing the light fixture and door handle ensures the metal shines against the fresh paint. -
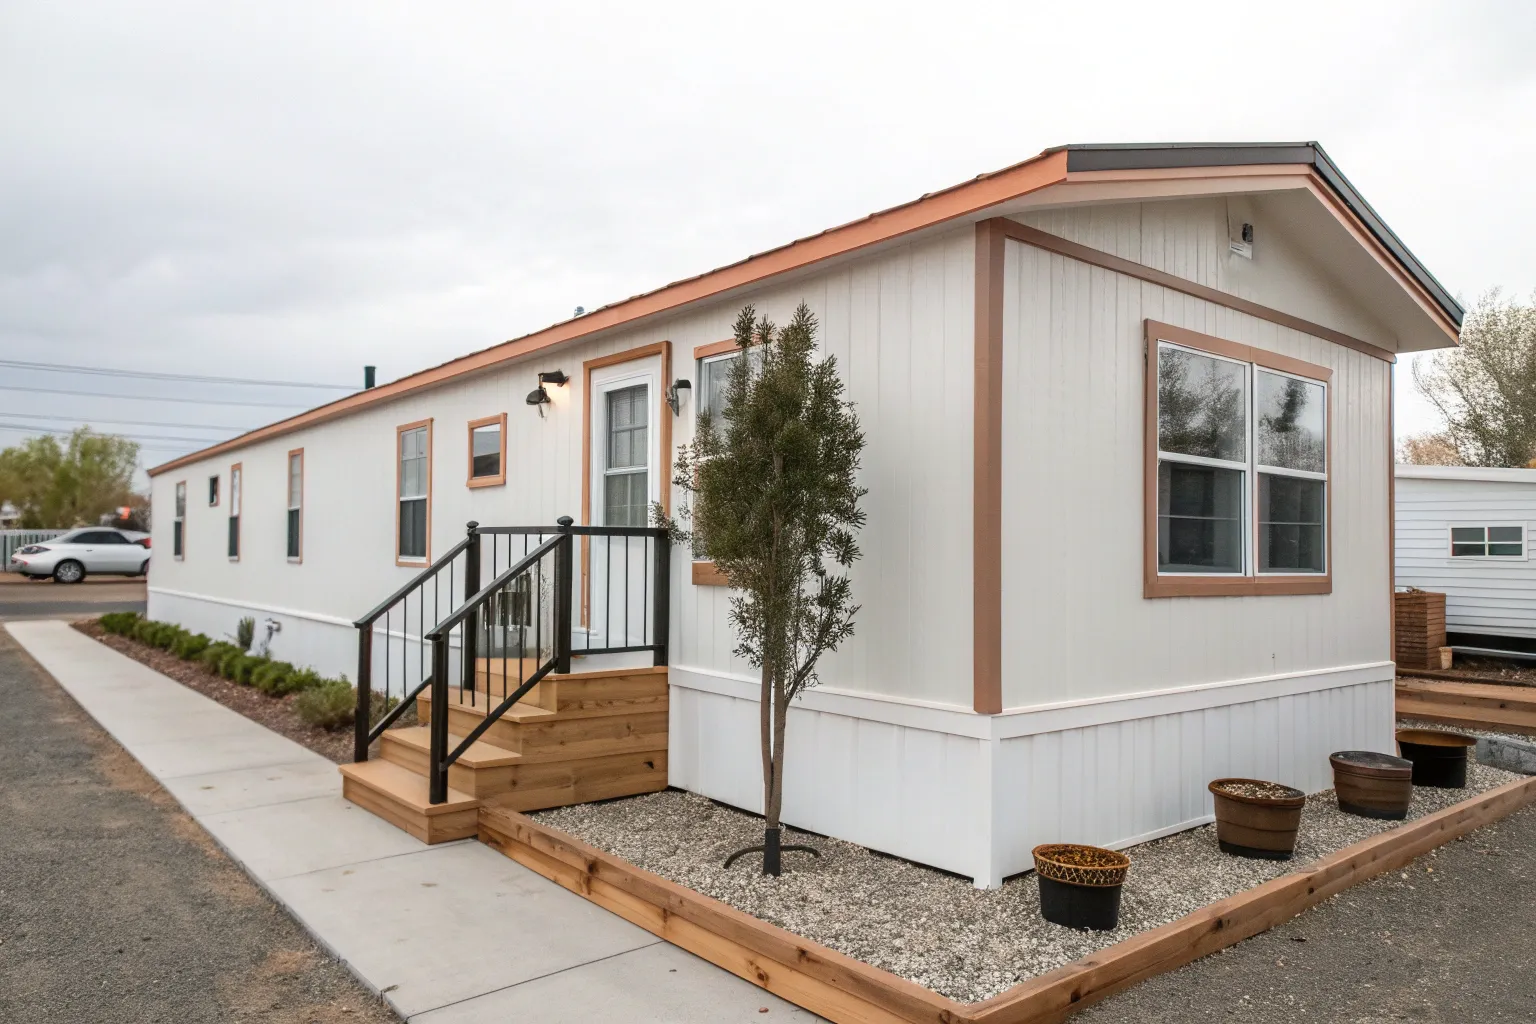
Style the Porch:
Place a woven doormat and a potted olive tree or similar greenery in a dark pot to echo the new color scheme.
Step back and admire how a simple palette change completely redefined the character of your home
High-Contrast Shutters to Break the Box
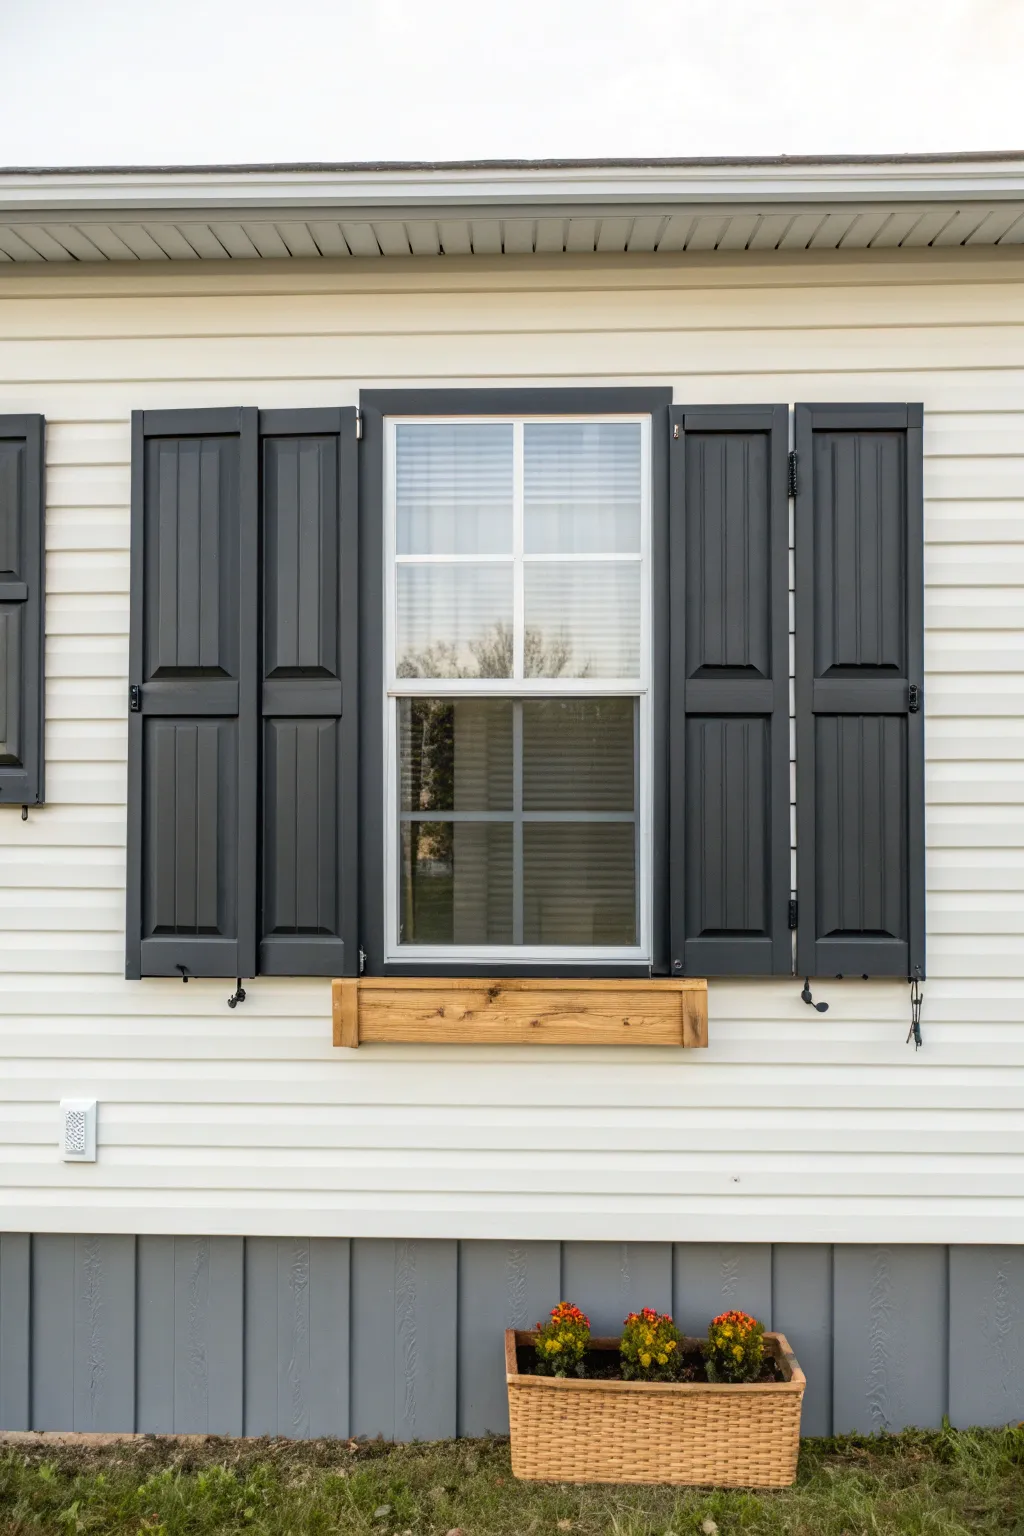
Transform the flat exterior of a standard mobile home by adding bold, architectural interest with high-contrast shutters and accessories. This project combines deep charcoal accents with natural wood tones to create a sophisticated, custom look that breaks up the monotony of vinyl siding.
Step-by-Step Guide
Materials
- External shutter pairs (raised panel, bi-fold style)
- Exterior acrylic latex paint (Dark Charcoal or Iron Ore)
- Painter’s tape (exterior grade)
- Drop cloth or plastic sheeting
- Sandpaper (220-grit)
- Angled sash brush (2.5 inch)
- Small foam roller
- Paint tray
- Drill and exterior screws
- Cedar or pine boards (1×6 or 1×8)
- Clear exterior water sealer or polyurethane
- Window box mounting brackets (L-brackets)
Step 1: Prepping the Surface
-
Clean the Shutters:
Even if your shutters are new, wipe them down thoroughly with a damp cloth to remove manufacturing dust. If reusing old vinyl shutters, scrub them with a mixture of water and TSP substitute to remove oxidation and grime. -
Light Sanding:
Scuff the surface of the shutters lightly with 220-grit sandpaper. You don’t need to strip them, just create a little tooth for the paint to adhere to, which is crucial for vinyl surfaces. -
Protect the Siding:
If painting shutters that are already attached, tape off the surrounding siding meticulously. I prefer to remove the shutters entirely for the best finish, but taping works if you are careful.
Paint Choice Professional Tip
When painting vinyl, choose a paint specifically labelled ‘vinyl safe.’ Standard dark paints can absorb too much heat and cause vinyl shutters to warp in the sun.
Step 2: Painting the Contrast
-
Prime (If Necessary):
Check your exterior paint can; if it isn’t a paint-and-primer in one, or if you are painting bare plastic, apply a coat of bonding primer first. -
Cut in the Details:
Use your angled sash brush to paint the recessed areas, corners, and inside edges of the shutter panels first. It’s much easier to smooth out brush marks on the flat surfaces later. -
Roll the Flats:
While the detailed areas are still wet, use a small foam roller to apply paint to the flat, raised panels and sticking. This ensures a smooth, factory-like finish without brush strokes. -
Paint the Window Frame:
To match the look in the photo, tape off the glass and the siding around the window casing. Paint the vinyl window frame in the same dark charcoal color to create a cohesive, larger visual block. -
Second Coat:
Allow the first coat to dry according to the manufacturer’s instructions (usually 4 hours). Apply a second coat to ensure rich, opaque coverage.
Fixing Sticky Shutters
If you painted the shutters while they were on the house and they stuck to the siding, carefully score the edge with a utility knife before trying to pry them open.
Step 3: Crafting the Natural Wood Box
-
Measure and Cut:
Measure the width of your window frame. Cut a front board, a back board, and a bottom board from your lumber to match this width. Cut two smaller side pieces. -
Assemble the Box:
Using exterior wood screws, assemble the box. Pre-drill pilot holes to prevent the wood from splitting near the edges. -
Seal the Wood:
Instead of staining, apply a clear exterior water sealer. This preserves the light, natural pine or cedar color shown in the image, providing a warm contrast against the dark shutters. -
Install Brackets:
Attach L-brackets to the wall studs below the window. Ensure they are level before securing the wooden box to the brackets.
Step 4: Finishing Touches
-
Reattach Shutters:
Once fully cured, mount the shutters back onto the siding. For the bi-fold look shown, mount them closely together so they appear operational. -
Add Hardware:
Install decorative black hardware hinges and shutter dogs at the bottom. These small details add authenticity to the farmhouse aesthetic. -
Coordinate the Base:
If you have skirting, painting it a matching dark grey anchors the home visually. Use a roller designed for rough surfaces if painting textured skirting material. -
Accessorize:
Place a woven wicker planter with bright flowers (like the marigolds shown) near the base to echo the natural wood tones of the window box.
Now you have a striking, high-contrast exterior that utilizes simple paint hacks to create significant curb appeal

PENCIL GUIDE
Understanding Pencil Grades from H to B
From first sketch to finished drawing — learn pencil grades, line control, and shading techniques.
Explore the Full Guide
A Front Door Color That Pops
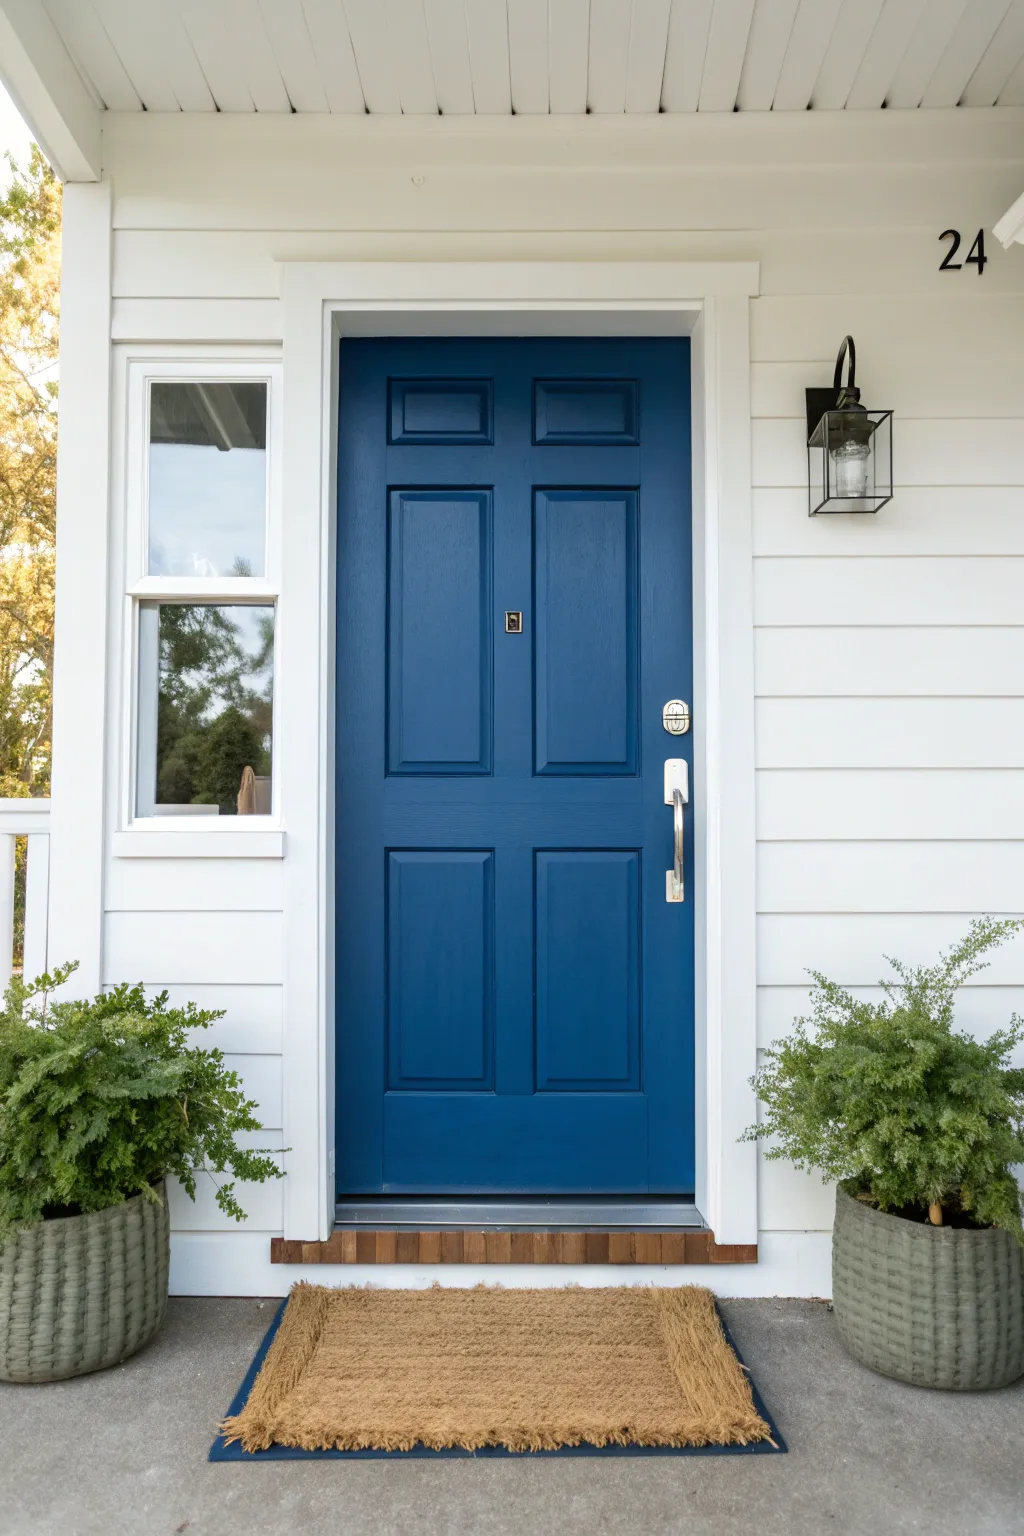
Transforming your mobile home’s entryway is as simple as choosing a bold, vibrant shade for the front door to contrast against neutral siding. This project focuses on achieving a smooth, professional finish with a classic six-panel design in a striking royal blue.
Step-by-Step
Materials
- Exterior semi-gloss paint in Royal Blue
- High-quality angled sash brush (2 inch)
- Mini foam roller and tray
- Painter’s tape
- Sandpaper (120 and 220 grit)
- Tack cloth
- Screwdriver or drill
- Drop cloth
- Primer (bonding primer recommended)
Step 1: Preparation
-
Assess the weather:
Choose a day with mild temperatures (between 50°F and 85°F) and low humidity to ensure the paint dries evenly and cures properly. -
Remove hardware:
Using your screwdriver or drill, take off the handle set, deadbolt, kick plate, and any other mounted hardware. Store screws in a labeled bag so nothing gets lost. -
Clean the surface:
Wash the door thoroughly with a mild detergent and water solution to remove dirt, grease, and grime. Rinse well and let it dry completely. -
Sand the finish:
Scuff the entire door surface with 120-grit sandpaper. You aren’t trying to strip it bare, just creating a rough texture for the new paint to grip. -
Remove dust:
Wipe away all sanding dust with a clean, dry rag followed by a tack cloth to ensure a perfectly smooth base. -
Tape off edges:
Apply painter’s tape carefully around any glass inserts, the peephole if it wasn’t removed, and the hinges if you are painting the door while it is still hanging.
Step 2: Priming and Painting
-
Apply primer:
Roll on a coat of high-quality bonding primer. This is crucial for mobile home doors which often have varied surface materials; let this dry according to the can’s instructions. -
Sand the primer:
Once the primer is dry, lightly sand it with 220-grit sandpaper to knock down any bumps, then wipe clean with a tack cloth. -
Paint the panels:
Dip your angled sash brush into the royal blue paint. Start by painting the recessed areas of the six panels first, feathering out the edges to avoid pooling. -
Paint the center stiles:
Paint the vertical center strip between the panels using a smooth vertical stroke. -
Paint the horizontal rails:
Move to the horizontal rails (the cross-pieces), starting from the top rail and working your way down to the bottom rail. -
Paint the outer stiles:
Finally, paint the long vertical strips on the far left and right edges of the door. I find painting these last helps blend all the brush strokes together seamlessly. -
Check for drips:
Immediately inspect corners and recessed areas for drips or runs and smooth them out gently with the brush tip. -
Apply second coat:
Allow the first coat to dry completely (usually 4-6 hours). Lightly sand with 220-grit paper, wipe clean, and repeat the painting process for full , rich color coverage.
Brushwork Wisdom
Paint with the grain of the door. On a six-panel door, vertical pieces get vertical strokes, and horizontal rails get horizontal strokes.
Step 3: Finishing Touches
-
Remove tape:
Carefully peel away the painter’s tape while the second coat is still slightly tacky to prevent peeling the dry paint film. -
Let it cure:
Keep the door slightly ajar so it doesn’t stick to the weatherstripping. Let it cure for at least 24 hours before heavy use. -
Reinstall hardware:
Once fully dry, screw the handles, locks, and peephole back into place. -
Style the entryway:
Complete the look by placing two potted green shrubs on either side and adding a fresh coir doormat.
Sticky Situation?
If the door sticks to the weatherstripping after drying, rub a little paraffin wax or bar soap along the edges where they meet the frame.
Now you have a stunning, welcoming entryway that makes a great first impression
Painted Skirting That Mimics Masonry
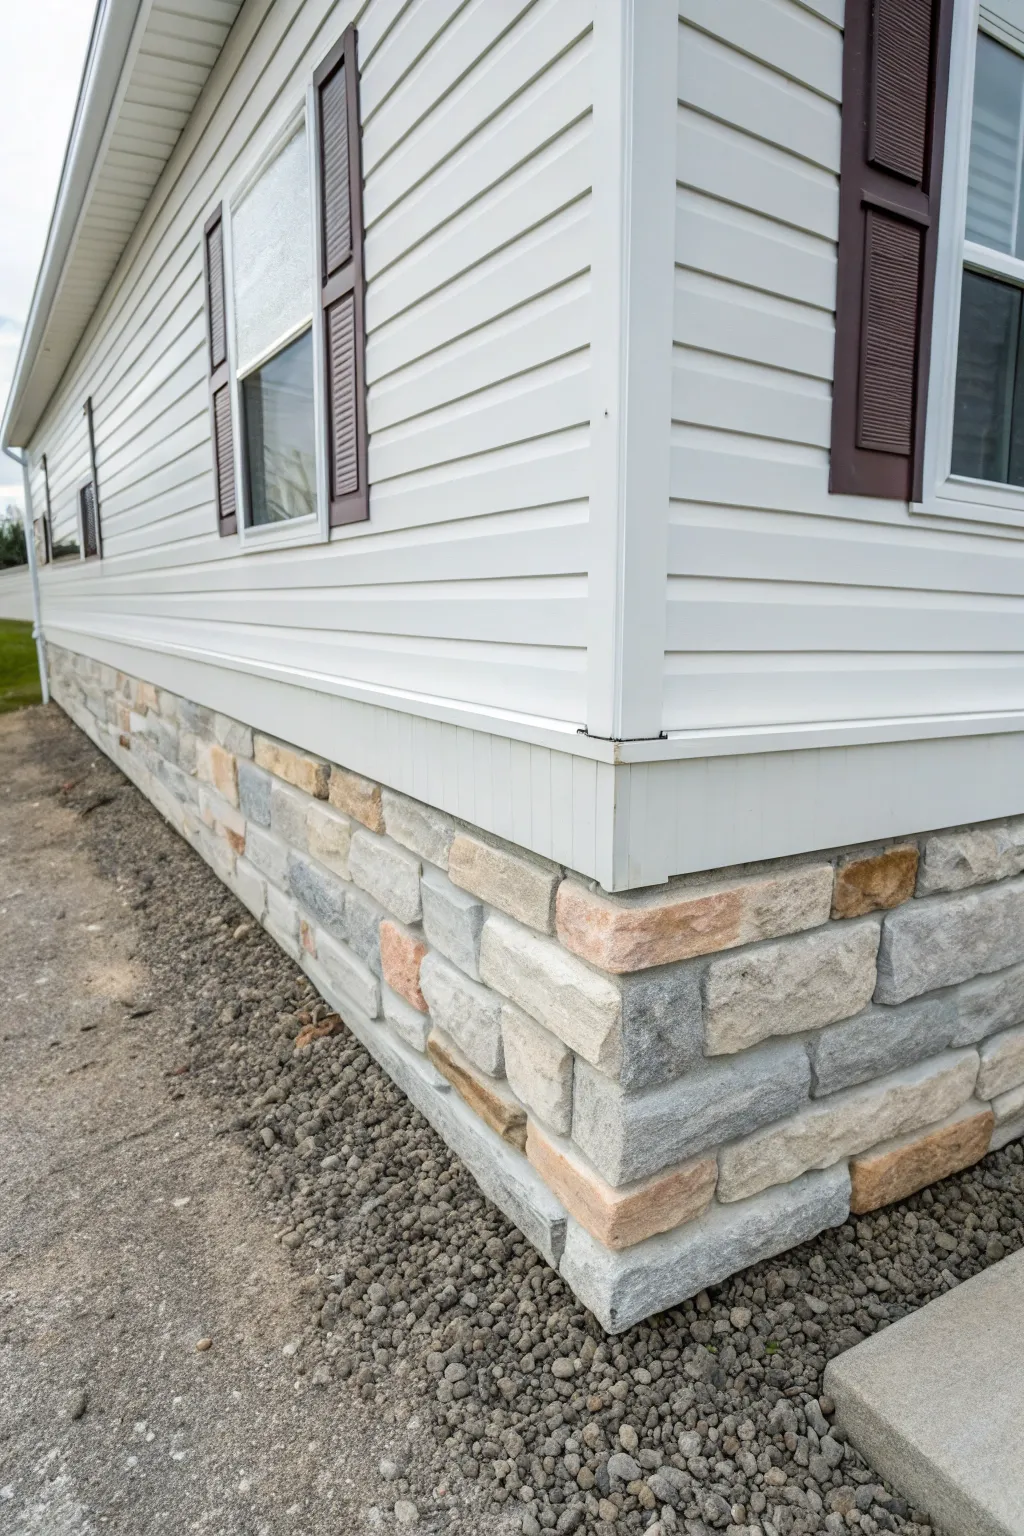
Transform the base of your mobile home with a finish so realistic, neighbors will touch it to believe it. This project uses textured stone veneer panels to create a high-end masonry look that grounds your home and boosts curb appeal instantly.
Detailed Instructions
Materials
- Faux stone veneer panels (interlocking)
- Starter strip (J-channel or specific brand starter)
- Corner stone pieces (matching the panels)
- Construction adhesive (heavy duty)
- Drill and exterior screws
- Circular saw with masonry or fine-tooth blade
- Measuring tape
- Level
- Chalk line
- Caulk gun and exterior caulk (color-matched)
- Pea gravel or landscaping stone
Step 1: Preparation & Framework
-
Assess the foundation:
Begin by inspecting the existing skirting or framing. The surface needs to be flat, rigid, and secure to support the panels. -
Establish a level line:
Using your level and a chalk line, snap a straight reference line around the perimeter of the home. This ensures your stones won’t look like they are sliding downhill, even if the ground is uneven. -
Dig a trench:
Clear away grass or soil about 2-3 inches deep and wide around the base. This prevents the panels from sitting directly in wet dirt and allows for a clean gravel backfill later. -
Install the starter strip:
Screw the starter strip along the bottom edge of your framing, ensuring it is perfectly level. This metal or plastic ledge will support the weight of the first row of panels.
Step 2: Panel Installation
-
Start at the corner:
Always begin your installation at an outside corner. Take a corner piece and dry-fit it to check for height. -
Applying adhesive:
Apply dabs of heavy-duty construction adhesive to the back of the corner piece before securing it. -
Secure the corner:
Screw the corner piece into the framing using the designated screw tabs. Ensure it is plumb vertically. -
Measure the first run:
Measure from the edge of your installed corner piece to the next corner or termination point. I prefer to lay out the panels on the ground first to minimize waste. -
Cut panels to size:
Using a circular saw, cut the flat panels to length. Wear safety glasses and a mask, as cutting faux stone creates fine dust. -
Install the first row:
Slide the first panel into the starter strip and lock it into the corner piece. Secure it with screws through the marked flange at the top. -
Continue the row:
Work your way down the wall, interlocking each panel tightly with the previous one. The tighter the fit, the more convincing the stone effect. -
Stagger the seams:
When you start the second row (if applicable based on height), cut the first panel in half. This offsets vertical seams so they don’t line up, mimicking natural masonry patterns.
Hidden Screws
Paint the heads of your mounting screws with a dab of gray or tan paint that matches the ‘grout’ lines. Even though they are usually hidden by the next row, this ensures they disappear completely.
Step 3: Finishing Touches
-
Install top trim:
Once the stone panels reach the top, install the finishing trim or J-channel just under the siding to hide the screwed flange of the top row. -
Caulk the gaps:
If there are any visible gaps at corners or where panels butt against trim, use color-matched textured caulk to blend them in seamlessly. -
Backfill with gravel:
Fill the shallow trench you dug earlier with pea gravel or river rock. This covers the bottom edge of the starter strip and helps with drainage. -
Clean the surface:
Wipe down any dust from cutting or stray adhesive immediately with a damp cloth to let the stone texture shine.
Uneven Ground?
If your ground slopes significantly, utilize the ‘step-down’ method. Maintain a level starter strip, but step it down at intervals rather than angling the panels, which ruins the illusion.
Step back and admire how a simple weekend project has given your home a solid, permanent foundation look


Porch and Deck Paint That Blends In
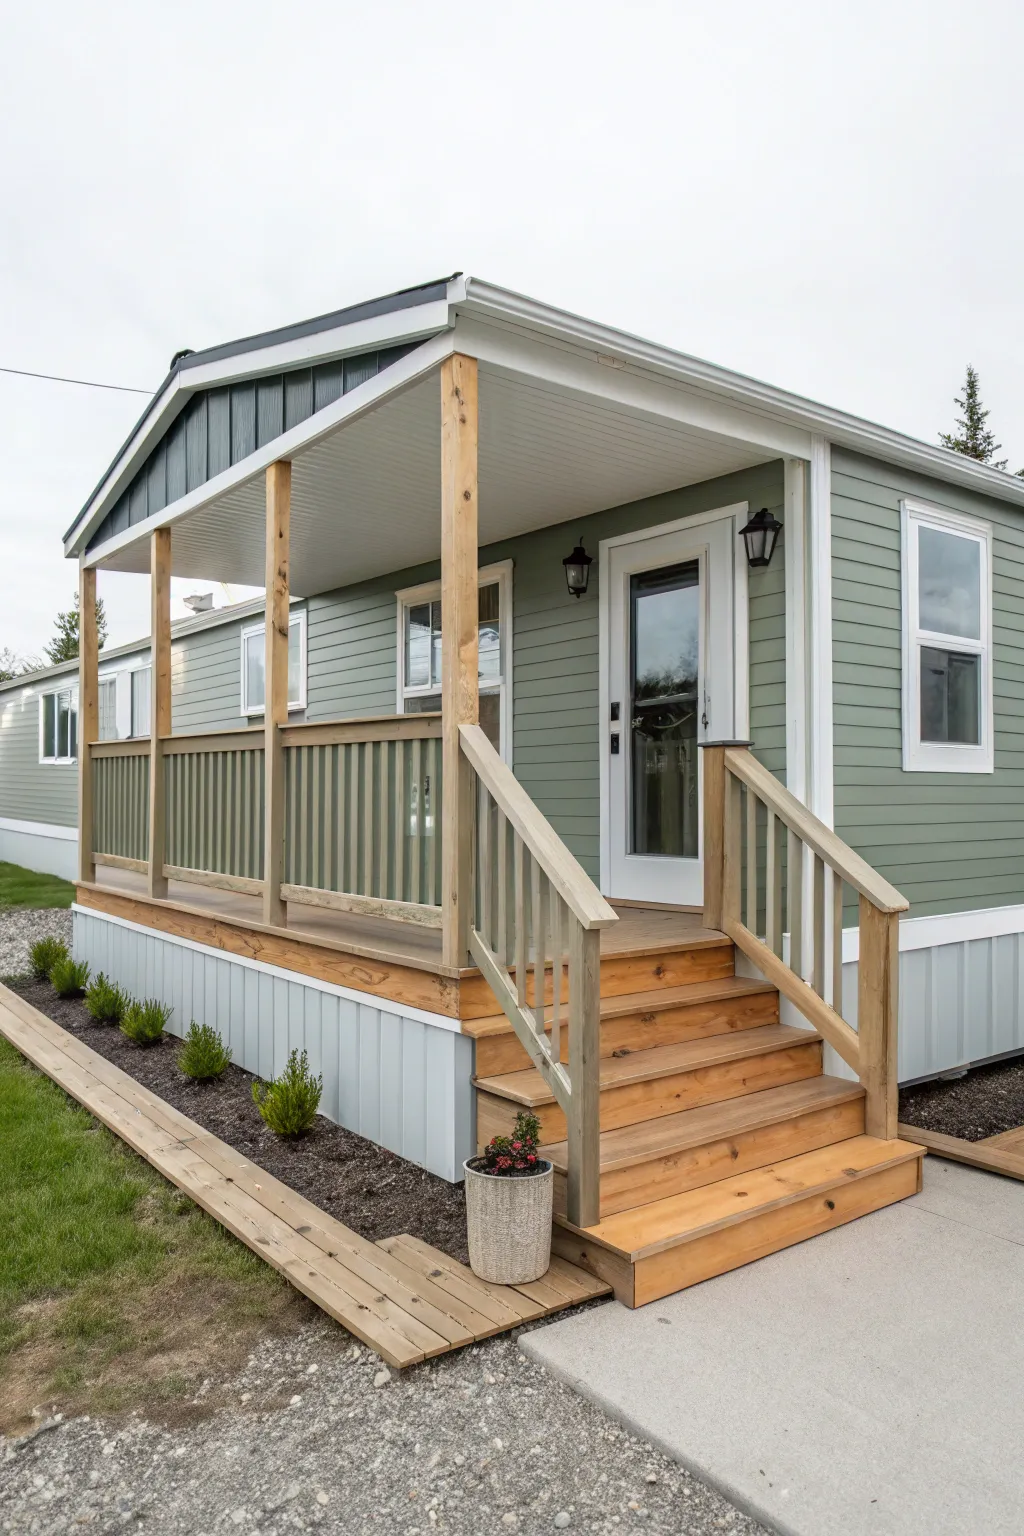
Achieve a seamless transition between your home and outdoor space by carrying the siding color right onto your porch railings. This project uses a calming sage green palette paired with warm, natural wood tones for a cohesive and inviting entryway.
How-To Guide
Materials
- Exterior satin or semi-gloss paint (Sage Green match)
- Exterior solid color stain or paint (White/Off-White for trim)
- Semi-transparent deck stain (Natural Cedar tone)
- Exterior primer
- Pressure washer or deck cleaner
- 80-grit sandpaper or sanding block
- Painter’s tape
- Drop cloths
- Paint scraper
- 2-inch angled sash brush
- 4-inch mini roller with 3/8-inch nap
- Stain brush or applicator pad
- Stir sticks
Step 1: Preparation & Cleaning
-
Protect the area:
Before you begin, lay down drop cloths to protect any landscaping, the concrete walkway, or the skirting of the mobile home from stray drips or overspray. -
Clean the surfaces:
Use a pressure washer on a low setting or a specialized deck cleaner to thoroughly wash the wood railings, posts, deck floor, and stairs. You want to remove all dirt, mildew, and gray wood fibers. -
Let it dry completely:
Allow the wood to dry for at least 48 hours. Painting or staining damp wood is a recipe for peeling later on. -
Scrape and sand:
If there is any old peeling paint, use a scraper to remove it. Afterward, give the railings and floor a light scuff sanding with 80-grit paper to open the wood pores for better adhesion. -
Mask off edges:
Apply painter’s tape carefully where the porch meets the house siding and around the door frame to ensure crisp lines.
Pro Tip: Color Matching
Take a piece of loose siding or a paint chip to the store to get an exact custom match for the railing paint. Close enough isn’t enough for a seamless look.
Step 2: Painting the Railings & Trim
-
Prime bare spots:
If you have new or bare wood on the railings that will be painted solid, spot-prime those areas with a high-quality exterior primer and let dry. -
Paint the balusters:
Using the sage green exterior paint that matches your siding, start painting the vertical balusters. A 2-inch angled sash brush works best here to get into the corners. -
Roll the flat surfaces:
For the top and bottom rails of the balustrade, I find a 4-inch mini roller speeds up the process and leaves a smoother finish than brushing alone. -
Paint the trim posts:
Paint the structural support posts (if you are painting them) or the railing posts. In this look, the vertical railing supports match the sage green, blending them perfectly with the house body. -
Apply a second coat:
Once the first coat is dry (usually 4-6 hours), apply a second coat to the green painted areas for full opacity and weather protection.
Level Up: Lighting
Install solar post caps or small LED stair riser lights. They add safety and highlight your warm wood tones at night.
Step 3: Staining the Deck & Stairs
-
Select the stain:
Choose a semi-transparent stain in a ‘Natural’ or ‘Cedar’ tone. This allows the grain to show through while adding warmth that contrasts beautifully with the cool sage paint. -
Stain the porch floor:
Start at the corner of the porch furthest from the stairs and work your way out. Apply the stain to the long floorboards using an applicator pad or stain brush, maintaining a wet edge to avoid lap marks. -
Stain the stair treads:
Move down to the stairs, applying stain to the tops of the treads. Be mindful of drips running down the risers. -
Detail the structural wood:
Apply the same natural stain to the tall porch roof support posts and the visible support beams under the deck floor to tie the natural wood elements together. -
Let it cure:
Stay off the deck for at least 24-48 hours to allow the stain to fully cure and harden before walking on it or placing furniture.
Step 4: Finishing Touches
-
Check skirting transition:
Ensure the skirting material (the vertical siding below the deck) is clean. You can paint this a crisp white or light gray to differentiate the foundation from the living space. -
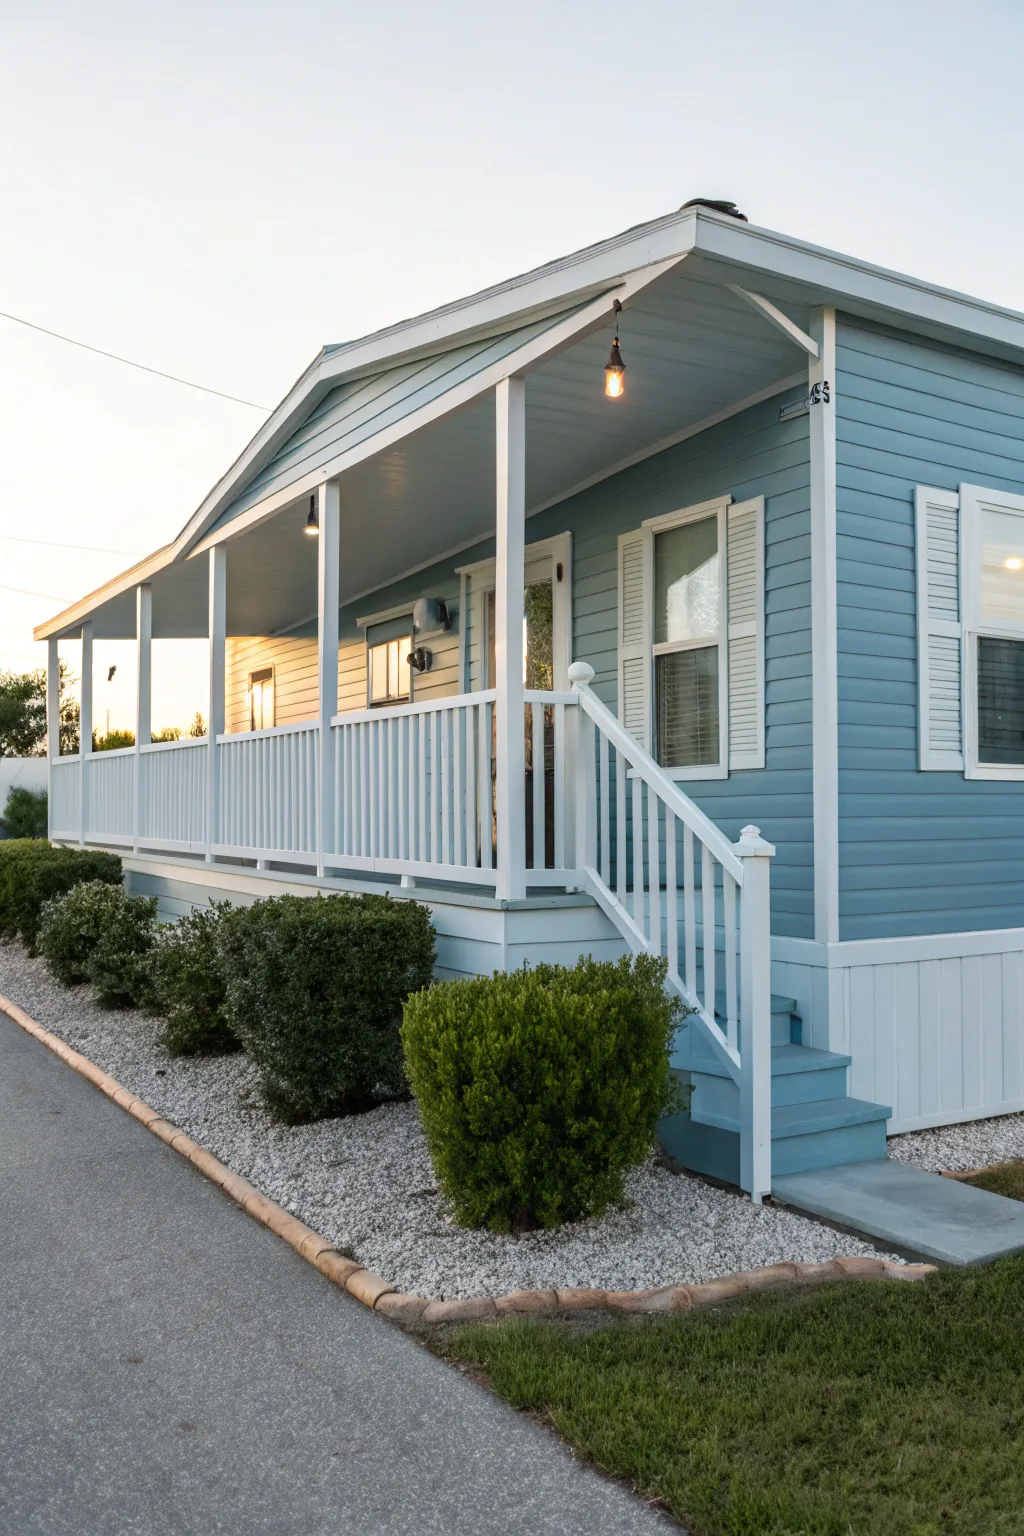
Add landscaping:
Finish the look by refreshing the mulch bed around the base. The dark mulch shown in the image provides a grounding contrast to the light wood and green paint.
Now you have an inviting, cohesive entrance that extends your home’s style effortlessly into the outdoors
Match Steps, Railings, and Posts to Trim
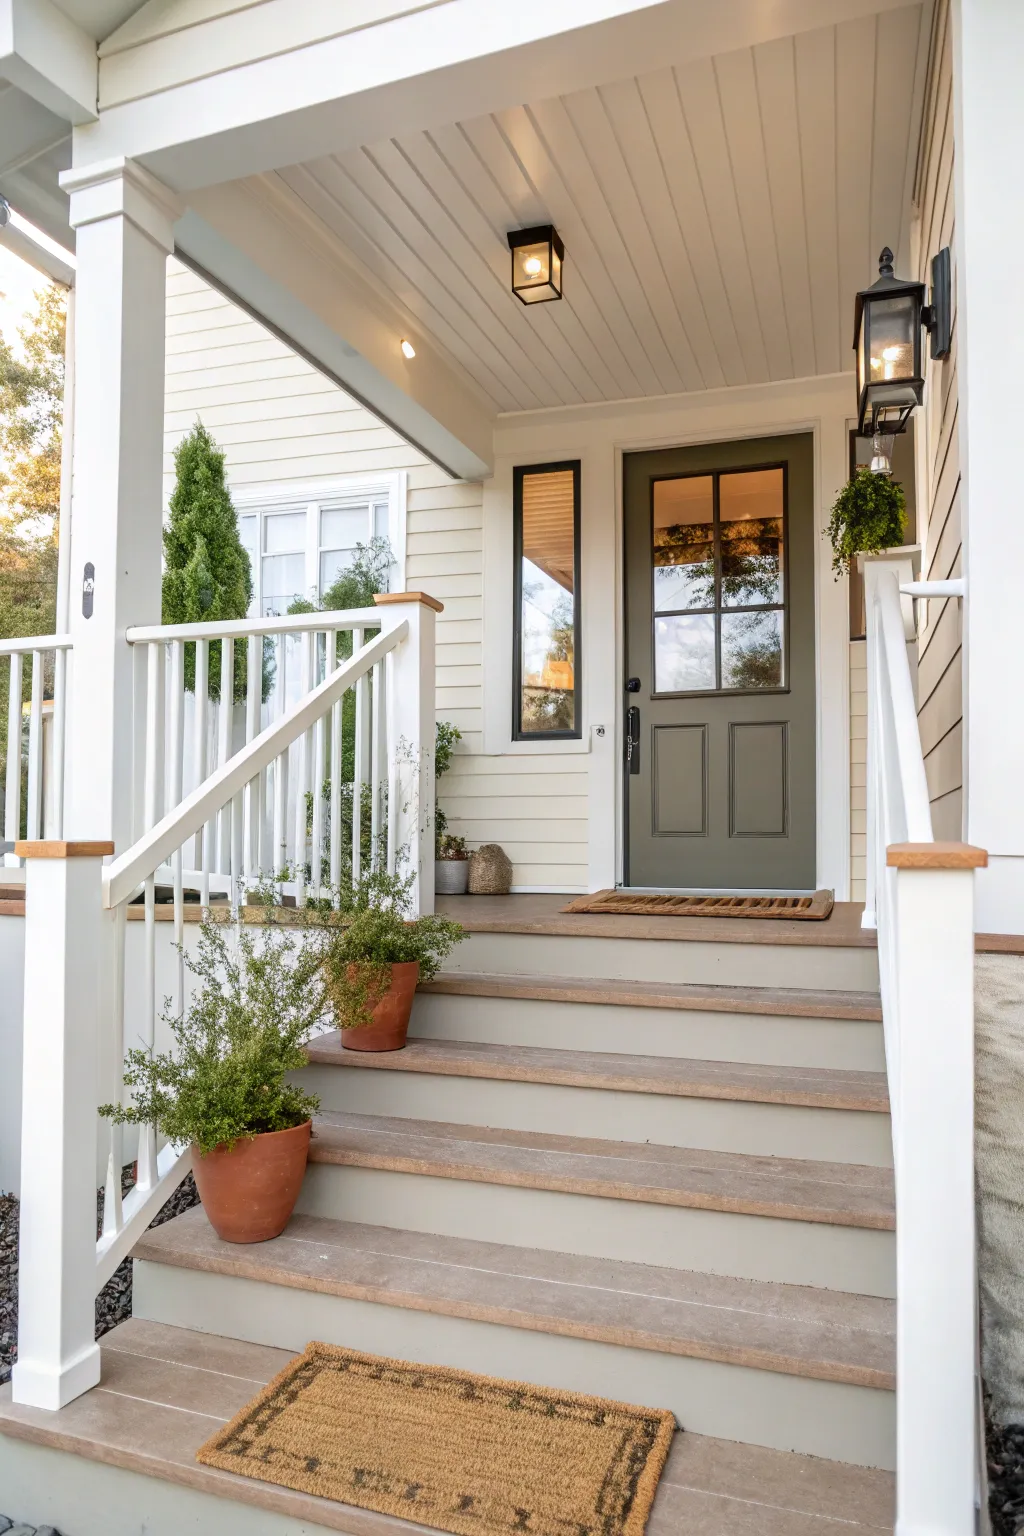
Transform your mobile home’s entrance into a cohesive, inviting space by syncing your steps, railings, and posts with your existing trim. This project focuses on achieving that seamless, clean look using a palette of crisp white, earthy taupe, and a statement olive green door.
Step-by-Step
Materials
- Exterior primer (high-quality bonding formula)
- Exterior semi-gloss paint (Crisp White)
- Exterior porch & floor paint (Warm Taupe/Driftwood)
- Exterior satin or semi-gloss paint (Olive Green)
- Painter’s tape (exterior grade)
- Drop cloths and plastic sheeting
- Sanding block (medium grit)
- Power washer or heavy-duty scrub brush
- Wood filler (exterior grade)
- Angled sash brush (2.5 inch)
- Mini roller with foam covers
- Stiff bristle brush (for cleaning)
- Caulk gun and exterior caulk
Step 1: Preparation
-
Clean surfaces thoroughly:
Before any paint touches the wood, use a power washer or a stiff brush with soapy water to remove all dirt, mildew, and loose paint from the railings, posts, steps, and door. -
Let it dry completely:
Wood holds moisture, so allow at least 24-48 hours of drying time after washing to ensure your paint adheres properly and doesn’t blister later. -
Sand for adhesion:
Run a medium-grit sanding block over the railings, posts, and door surface to scuff up the previous finish. This creates a ‘tooth’ for the new primer to grab onto. -
Repair imperfections:
Inspect the wood for nail holes or cracks. Fill these spots with exterior wood filler, let it dry according to the package instructions, and sand it smooth. -
Mask off areas:
Apply exterior painter’s tape carefully around the glass panes of the door, the door hardware (if not removing it), and where the posts meet the siding or ceiling.
Step 2: The White Trim & Railings
-
Prime the vertical surfaces:
Spot prime any bare wood or repairs on the posts and railings. If you are making a drastic color change, apply a full coat of bonding primer to these areas. -
Cut in the edges:
Using your angled sash brush, paint the crisp white semi-gloss into the corners, joints, and detail work of the railings and posts where a roller can’t reach. -
Roll the flat surfaces:
Switch to a mini roller with a foam cover to apply white paint to the flat sides of the posts and the top rails for a smooth, brush-mark-free finish. -
Apply a second coat:
Once the first coat is dry to the touch, apply a second coat of white to ensure full opacity and solid weather protection. I always find this second pass makes the white truly pop.
Weather Watch
Check the forecast! Aim for a strictly dry window of 3-4 days with temps between 50°F and 85°F. High humidity can ruin the finish.
Step 3: The Statement Door
-
Prep the door jamb:
Open the door and paint the edges first. Ensure you don’t close the door until these are completely dry. -
Paint the recessed panels:
Using the angled brush, paint the inside edges of the door’s recessed panels with the Olive Green paint, working from the inside out. -
Finish the door rails and stiles:
Paint the vertical and horizontal flat sections (stiles and rails) of the door. Long smooth strokes following the wood grain direction produce the best results.
Sticky Situation
If the door sticks after painting, rub a plain candle or wax along the edge where it meets the jamb to provide lubrication without damaging paint.
Step 4: The Steps & Decking
-
Clean the deck again:
Sweep away any dust or debris that may have fallen while painting the railing above. -
Cut in the stair edges:
Use a brush to carefully paint the Warm Taupe floor paint along the edges where the steps meet the risers or side trim. -
Paint the treads:
Use a roller on an extension pole to apply the floor paint to the main walking surfaces of the steps and porch floor. Work your way ‘out’ so you don’t paint yourself into a corner. -
Respect the cure time:
Floor paint takes longer to cure than vertical paint. Avoid walking on the steps for at least 24 hours, or longer if humidity is high. -
Final touches:
Once everything is dry, remove the painter’s tape from the door glass and other masked areas. Replace any hardware you removed, and style with potted plants.
Enjoy the fresh, coordinated curb appeal of your newly updated mobile home entrance
Paint the Under-Window Band as a Design Line
Transform the look of a standard mobile home by adding a bold, grounding stripe of color along the lower skirting. This project creates a deliberate design line that visually anchors the structure and adds a modern, custom touch to plain vinyl siding.
Step-by-Step Tutorial
Materials
- Exterior acrylic latex paint (Teal/Dark Green)
- Exterior primer (bonding primer for vinyl/metal)
- Angled sash brush (2.5 inch)
- Small foam roller (4 inch) and tray
- Painter’s tape (exterior grade)
- Mild detergent or siding cleaner
- Scrub brush
- Rags or microfiber cloths
- Drop cloth or plastic sheeting
- Sandpaper (fine grit, 220)
- Caulk gun and exterior silicone caulk (optional)
Step 1: Preparation & Cleaning
-
Assess the surface:
Begin by inspecting the lower band of siding you intend to paint. Check for any loose panels, cracks, or damage that needs repair before you start altering the color. -
Deep clean the area:
Mix a mild detergent with water and vigorously scrub the lower siding area. This area often accumulates the most dirt and mud splash, so be thorough in removing every speck of grime. -
Rinse and dry:
Rinse the soap away completely with a hose and let the siding dry fully. Moisture trapped under paint will cause bubbling later, so patience here is key. -
Light scuff sanding:
If your siding is glossy vinyl or metal, take your 220-grit sandpaper and lightly scuff the surface. You aren’t trying to remove material, just create a microscopic ‘tooth’ for the primer to grab onto. -
Wipe down dust:
Use a damp rag to wipe away the fine dust created by sanding. I like to do a second pass with a dry tack cloth to ensure it is perfectly clean.
Step 2: Masking & Priming
-
Define the line:
Apply exterior painter’s tape along the horizontal seam where the white upper siding meets the area you want to paint teal. Press the tape edge down firmly with your thumb or a putty knife to prevent bleed-through. -
Protect the ground:
Lay down your drop cloth or plastic sheeting flush against the foundation to protect the gravel or concrete path from drips. -
Cut in the primer:
Using your angled sash brush, apply a high-quality bonding primer into the corners, under the lip of the siding above, and along the vertical corner trim. -
Roll the flat surfaces:
Switch to your 4-inch foam roller to prime the broader, flat sections of the siding panels. This ensures a smooth, texture-free base coat. -
Allow to cure:
Let the primer dry completely according to the manufacturer’s time, usually about 2-4 hours for exterior formulas.
Tape Sealing Trick
To get a razor-sharp line, paint a thin layer of the *base* color (white) over the tape edge first. This seals the gap so line bleed is impossible.
Step 3: Painting the Accent Color
-
Stir the teal paint:
Mix your teal-green exterior paint thoroughly to ensure the pigments are evenly distributed, as darker colors can separate while sitting. -
Brush the edges first:
Just like with the primer, use the angled brush to carefully paint along the taped line, the bottom edge near the ground, and around any vertical trim pieces. -
Apply the first coat:
Roll on the first coat of teal paint using smooth, horizontal strokes that follow the direction of the siding panels. Don’t overwork the paint; just lay it down and move on. -
Dry and assess:
Let the first coat dry for at least 4 hours. Don’t worry if it looks slightly streaky; the second coat will solve that opacity issue. -
Apply the second coat:
Repeat the edging and rolling process for a second coat. This deepens the color saturation and ensures full weather protection. -
Remove tape:
While the second coat is still slightly tacky (not fully cured), carefully peel away the painter’s tape at a 45-degree angle. This prevents the dried paint film from ripping. -
Touch up details:
Inspect the line for any minor bleeds. If you find one, wait for it to dry fully, then carefully touch it up with a small artist’s brush and your original white siding color.
Add Vertical Contrast
Consider continuing the dark teal color up the vertical corner trim pieces to frame the house, or match the window frames for a cohesive look.
Step back and admire how this simple band of color completely redefines the architectural weight of your home
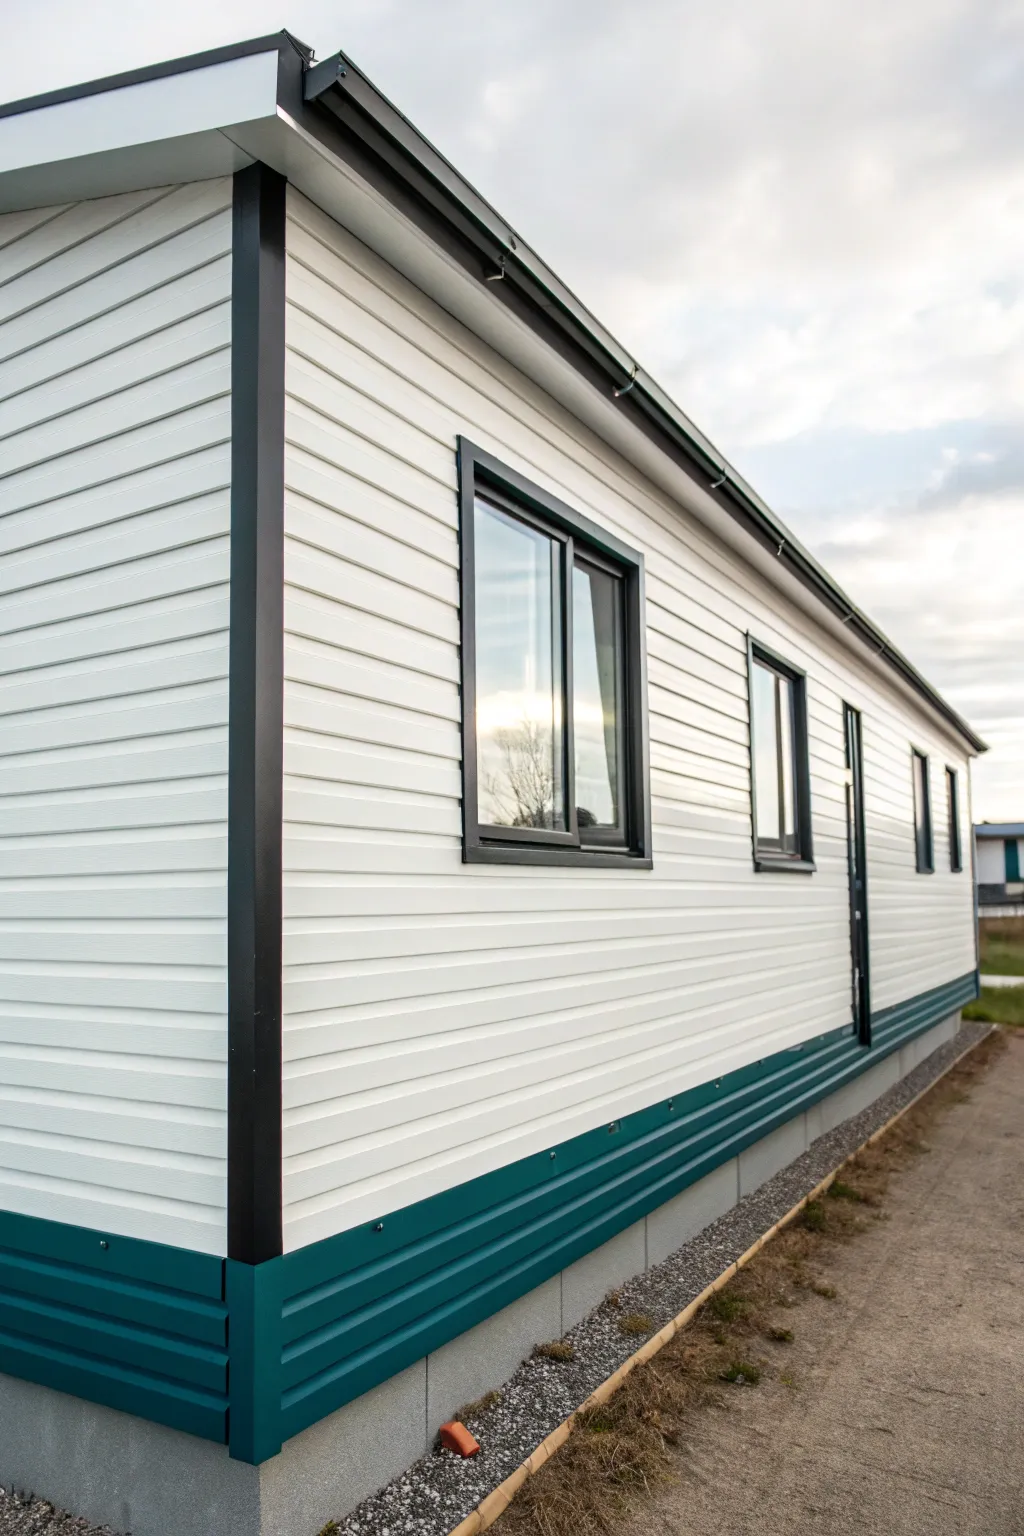
Vertical Accent Panels to Slim the Profile
Transform the flat façade of a mobile home by adding dimension with strategically painted vertical accent panels. This project uses high-contrast colors to create an elegant, slimming effect around windows, mimicking the look of modern shutters while elevating the standard white siding.
Step-by-Step
Materials
- Exterior acrylic latex paint (white/cream for body)
- Exterior acrylic latex paint (black/charcoal for trim)
- Exterior acrylic latex paint (tan/beige for skirting)
- Painter’s tape (heavy-duty exterior grade)
- Drop cloths or plastic sheeting
- Pressure washer or heavy-duty scrub brush
- TSP (Trisodium Phosphate) cleaner
- Exterior primer (bonding primer recommended)
- 2.5-inch angled sash brush
- 4-inch foam roller or mini roller
- Paint sprayer (optional for large siding areas)
- Measuring tape
- Extension pole for roller
Step 1: Preparation & Cleaning
-
Deep clean the exterior:
Begin by thoroughly cleaning the entire siding surface. Use a pressure washer on a low setting or a scrub brush with a TSP solution to remove dirt, mildew, and chalkiness that accumulates on vinyl or aluminum siding. -
Let it dry completely:
Allow the mobile home to dry for at least 24 to 48 hours. Painting over damp siding will trap moisture and cause peeling later. -
Protect the perimeter:
Lay down heavy drop cloths over the concrete sidewalk and garden beds to catch any drips. Cover the light fixtures and window glass with plastic sheeting and painter’s tape.
Step 2: Painting the Body
-
Prime bare spots:
If you have any bare metal or significantly worn vinyl, spot-prime those areas with a bonding exterior primer. For color changes, a full coat of primer is often a good idea. -
Cut in the edges:
Using your 2.5-inch angled brush, paint the edges of the siding where it meets the roofline, corners, and window frames with your main white or cream body color. -
Roll the siding:
Apply the main body color to the horizontal siding panels. Use a sprayer for speed, or a roller for better adhesion. I prefer to back-roll if spraying to work the paint into the texture. -
Apply a second coat:
Once the first coat is dry (check your can for recoat times, usually 4 hours), apply a second coat for a solid, durable finish.
Bleed-Through Blues?
If paint bleeds under tape on textured siding, wait for it to dry fully. Use a small artist brush and the base white color to touch up the line.
Step 3: Creating the Vertical Accents
-
Plan the shutter width:
Measure a consistent width on either side of the windows for your ‘shutter’ effect—typically 12 to 14 inches. Mark these lines lightly with a pencil. -
Tape the vertical lines:
Apply exterior painter’s tape along your measured lines. Press the tape edges down firmly with a putty knife or your thumb to prevent paint bleed under the textured siding ridges. -
Seal the tape edge:
Lightly brush a small amount of the *base* (white) paint over the tape edge first. This seals the tape so any bleed-through matches the base color, keeping your black line crisp. -
Paint the accent panels:
Using the dark charcoal or black paint, carefully fill in the taped vertical areas. Use the angled sash brush to get deep into the grooves of the siding first. -
Roll the flat surfaces:
Use a mini foam roller to smooth out the paint on the flat face of the accent panels. Apply two thin coats rather than one thick one to prevent drips. -
Paint the window frames:
While the black paint is out, carefully paint the window frames themselves to match the shutters, creating a cohesive, modern block of color. -
Remove tape while damp:
Carefully peel back the painter’s tape while the final coat is still slightly tacky. Pull at a 45-degree angle away from the painted area for the sharpest line.
Level Up: Faux Wood
Instead of solid black, use a gel stain over a tan base coat on the shutters to mimic a wood grain look for a rustic, farmhouse vibe.
Step 4: Finishing Touches
-
Paint the roof trim:
Using the dark accent color, paint the fascia board or trim running along the roofline. This ties the vertical accents together visually. -
Prep the skirting:
Ensure the bottom vertical skirting is clean. Tape off the area where the white siding meets the damaged or faded skirting. -
Apply skirting color:
Paint the skirting in a grounding tan or beige tone. Use a roller designed for corrugated surfaces if your skirting has deep ridges. -
Clean up details:
Remove the protection from the light fixture and reinstall it. Check the concrete for any stray drips and wipe them up immediately.
Step back and admire how simple paint lines have completely redefined the architectural profile of your home
Corner Trim in a Deeper Shade for Definition
Transform the look of your manufactured home by adding a sophisticated two-tone effect to your corner trim and siding. This project highlights architectural lines with a calming sage green body and crisp cream accents for a polished, modern finish.
How-To Guide
Materials
- Exterior acrylic latex paint (eggshell or satin finish) – Sage Green
- Exterior acrylic latex paint (semi-gloss finish) – Cream/Off-White
- Exterior primer (bonding primer recommended)
- Painter’s tape (exterior grade)
- Drop cloths or plastic sheeting
- Pressure washer or stiff bristle brush
- TSP substitute cleaner
- Exterior caulk and caulking gun
- Sandpaper (120 and 220 grit)
- Paint scraper
- 4-inch paint roller with 3/8-inch nap
- 2-inch angled sash brush
- Ladder
Step 1: Preparation
-
Clean the Surface:
Before painting, the siding needs to be immaculate. Use a pressure washer on a low setting or a stiff brush with a TSP substitute solution to remove dirt, mildew, and chalkiness from the siding and trim. Rinse thoroughly and let dry for 24-48 hours. -
Scrape and Sand:
Inspect the existing paint for peeling or flaking. Use a scraper to remove any loose paint, then feather out the edges with 120-grit sandpaper so the new coat lays smooth. -
Caulk Gaps:
Check the seams where the siding meets the corner trim and window frames. Apply a bead of exterior caulk to seal any cracks or gaps, ensuring moisture doesn’t get behind the panels. -
Protect Surroundings:
Lay down drop cloths to protect the skirting and landscaping. Use painter’s tape to mask off windows, light fixtures, and the skirting board to ensure clean lines.
Step 2: Painting the Siding
-
Prime Bare Spots:
If you exposed any bare material during sanding, spot prime those areas. If making a drastic color change, apply a full coat of primer to the entire surface for better coverage. -
Cut In Edges:
Using your 2-inch angled sash brush, ‘cut in’ the sage green paint along the edges where the siding meets the trim, roofline, and skirting. I find this creates a nice boundary so I don’t accidentally roll over the trim later. -
Roll the Siding:
Pour the sage green paint into a tray. Use the 4-inch roller to apply paint to the horizontal siding panels. Work in small sections, detailing the overlaps to prevent drips. -
Back-Brush if Needed:
On textured siding like this, the roller might miss deep grooves. Immediately after rolling, run a brush lightly over the surface to push paint into the wood grain texture. -
Apply Second Coat:
Allow the first coat to dry according to the manufacturer’s instructions (usually 4 hours). Apply a second coat for a rich, uniform color depth.
Clean Lines Secret
Press down the edge of your painter’s tape with a putty knife before painting. This seals the edge tight and stops paint bleed.
Step 3: Accenting the Trim
-
Tape the Siding:
Once the green siding paint has cured for at least 24 hours, carefully apply painter’s tape to the siding right up against the corner trim and window frames to protect your fresh work. -
Paint the Vertical Trim:
Stir your cream-colored trim paint thoroughly. Using the angled brush, apply the paint to the vertical corner pieces. Long, vertical strokes help minimize brush marks and follow the length of the trim board. -
Detail Window Frames:
Move on to the window trim, painting the horizontal headers and vertical sides. Keep a wet edge to avoid lap marks, especially on wider trim pieces. -
Verify Coverage:
Lighter colors often need extra coats to hide darker underlying shades. Let the first trim coat dry completely, then evaluate if a second coat is needed for solid opacity. -
Remove Tape:
While the final coat of trim paint is still slightly tacky, carefully peel away the painter’s tape at a 45-degree angle. This prevents the dried paint from peeling off with the tape. -
Touch Up:
Inspect your lines. If any paint bled under the tape, use a small artist’s brush to touch up the line with the appropriate color for a razor-sharp finish.
Uneven Texture?
If the wood grain texture isn’t filling in, switch to a thick-nap roller (1/2 inch or higher) to better penetrate the deep grooves.
Step back and admire how the contrasting trim highlights the structure of your home
Painted “Picture Frames” Around Windows
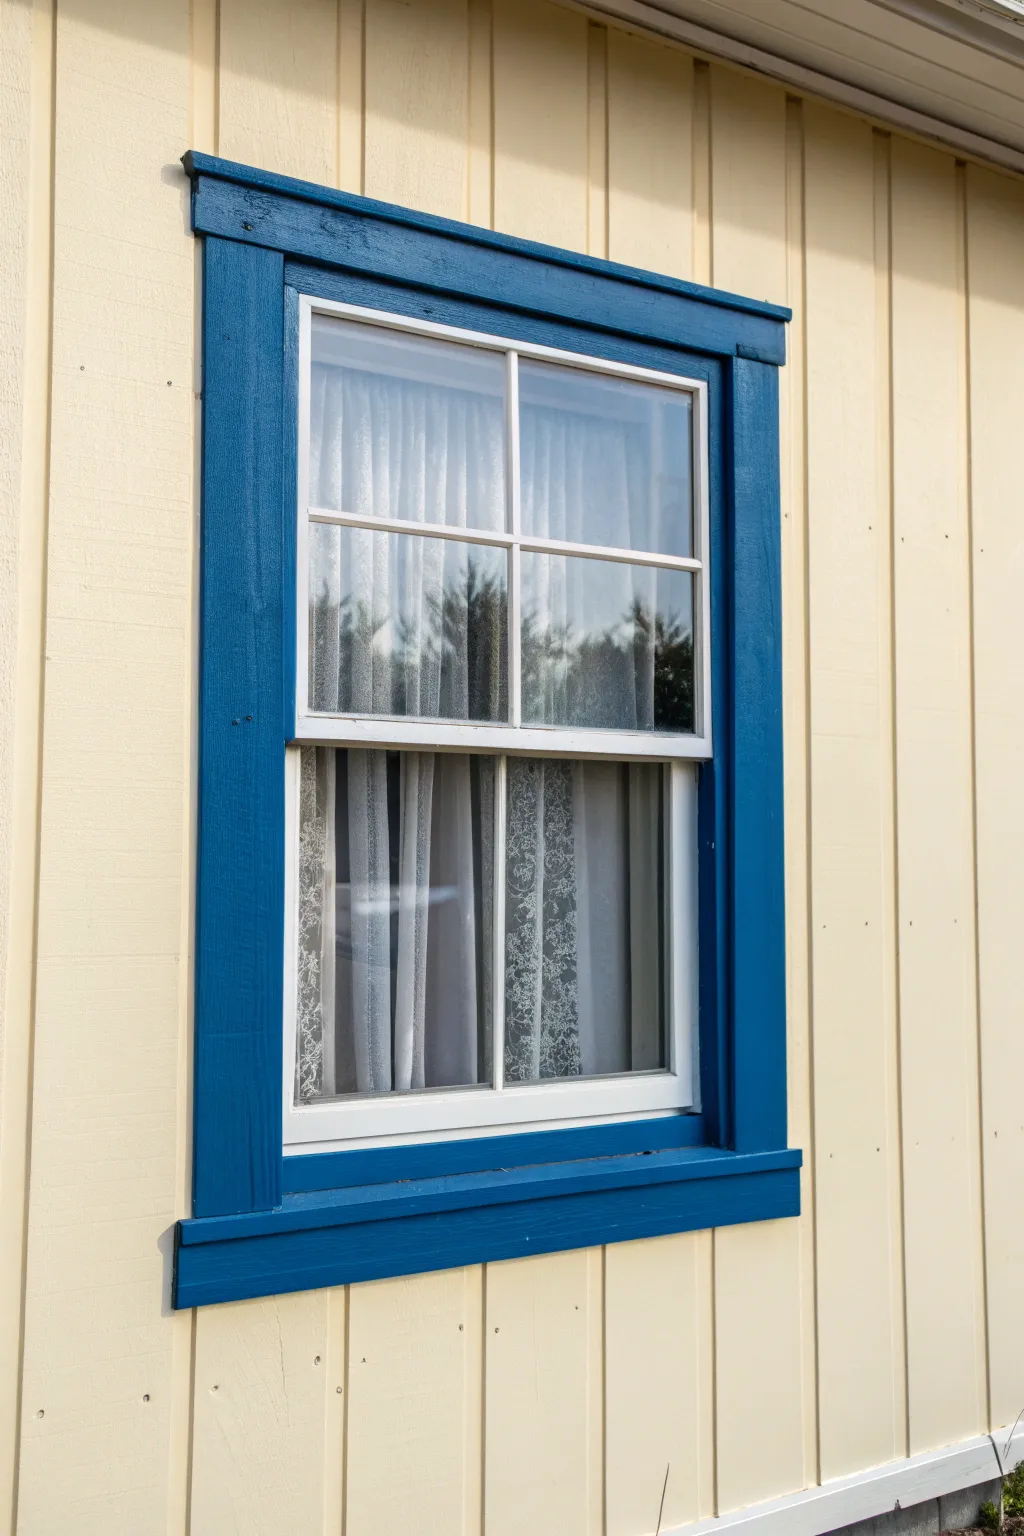
Transform flat mobile home siding by creating a striking architectural feature with just paint and simple lumber. This project creates a bold ‘picture frame’ effect around standard white windows, adding depth and a pop of vibrant blue to a classic cream exterior.
How-To Guide
Materials
- 1×4 pine or primed exterior trim boards (enough for perimeter of window)
- Exterior semi-gloss paint within the ‘Cerulean’ or ‘Cobalt’ blue family
- Exterior wood primer (if using unprimed wood)
- Circular saw or miter saw
- Measuring tape
- Level
- Power drill
- Exterior wood screws (2-inch)
- Exterior-grade wood filler
- Paintable exterior caulk
- Caulk gun
- Sandpaper (120 and 150 grit)
- 2-inch angled sash brush
- Small foam roller (optional for flat surfaces)
- Painter’s tape
Step 1: Preparation & Cutting
-
Measure the window opening:
Measure the width and height of your existing window casing. You want your new frame to sit around the outside of the current window flange or trim. -
Calculate board lengths:
For this Craftsman-style look, plan for the top ‘header’ piece to extend slightly wider than the side pieces. The side pieces will sit flush under the header, and the bottom sill piece can match the header’s width. -
Cut the side pieces:
Cut your 1×4 boards to match the exact vertical height of the window opening. Ensure your cuts are square for a tight fit. -
Cut the top and bottom pieces:
Cut the top header and bottom sill. Add about 1.5 to 2 inches to the total width measurement so the horizontal boards overhang the side vertical boards slightly, creating that classic framed look. -
Sand the wood:
Briefly sand all cut edges and flat surfaces with 120-grit sandpaper to remove any splinters or rough patches from the lumber yard.
Step 2: Installation
-
Dry fit the frame:
Hold the pieces up against the siding to ensure your measurements look correct and the frame sits squarely around the window. -
Install the top header:
Position the top horizontal board first. Use a level to ensure it is perfectly horizontal, then secure it through the exterior siding using your power drill and exterior wood screws. -
Attach vertical sides:
Butt the side pieces snugly up against the bottom of the header. Check them with the level to ensure they are plumb before screwing them into place. -
Install the bottom sill:
Place the bottom horizontal board directly under the side pieces. Secure it with screws, completing the rectangular frame. -
Fill screw holes:
Press a small amount of exterior wood filler into each screw head indentation. Let this overfill slightly to account for shrinkage as it dries. -
Caulk the seams:
Run a bead of paintable exterior caulk along the line where the new wood meets the siding, and where the wood pieces join together. This prevents water from getting behind the trim.
Uneven Siding Gaps?
If the siding ridges cause large gaps behind the trim, don’t just use caulk. Insert small wood shims into the gaps first for stability, then trim them flush and caulk over them.
Step 3: Painting
-
Sand the filler:
Once the wood filler is completely dry, sand it flush with the wood surface using 150-grit sandpaper. -
Mask the area:
Apply painter’s tape to the siding right next to the new wood trim and on the window glass or inner sash to protect them from stray brush strokes. -
Prime the wood:
If your wood wasn’t pre-primed, apply a coat of high-quality exterior primer. I like to focus heavily on the cut ends of the wood, as they absorb the most moisture. -
First coat of color:
Stir your blue exterior paint thoroughly. Using your angled sash brush, cut in the edges first, then paint the flat front surfaces. Brush in the direction of the wood grain. -
Dry and assess:
Allow the first coat to dry according to the manufacturer’s instructions. If the grain is still raising or showing through too much, a quick light sand can help smoothen it. -
Second coat:
Apply a second coat of blue paint for full opacity and weather protection. Ensure you cover the top edge of the framing to protect against rain. -
Remove tape:
carefully peel off the painter’s tape while the paint is still slightly tacky to ensure a crisp, clean line.
Drip Cap Detail
Install a simple metal ‘Z-flashing’ or drip cap on top of the upper header board. This diverts rain away from the top of the window frame and prevents rot.
Step back and admire how a simple wooden outline completely redefines the character of your home’s exterior
A Simple Mural on the End Wall
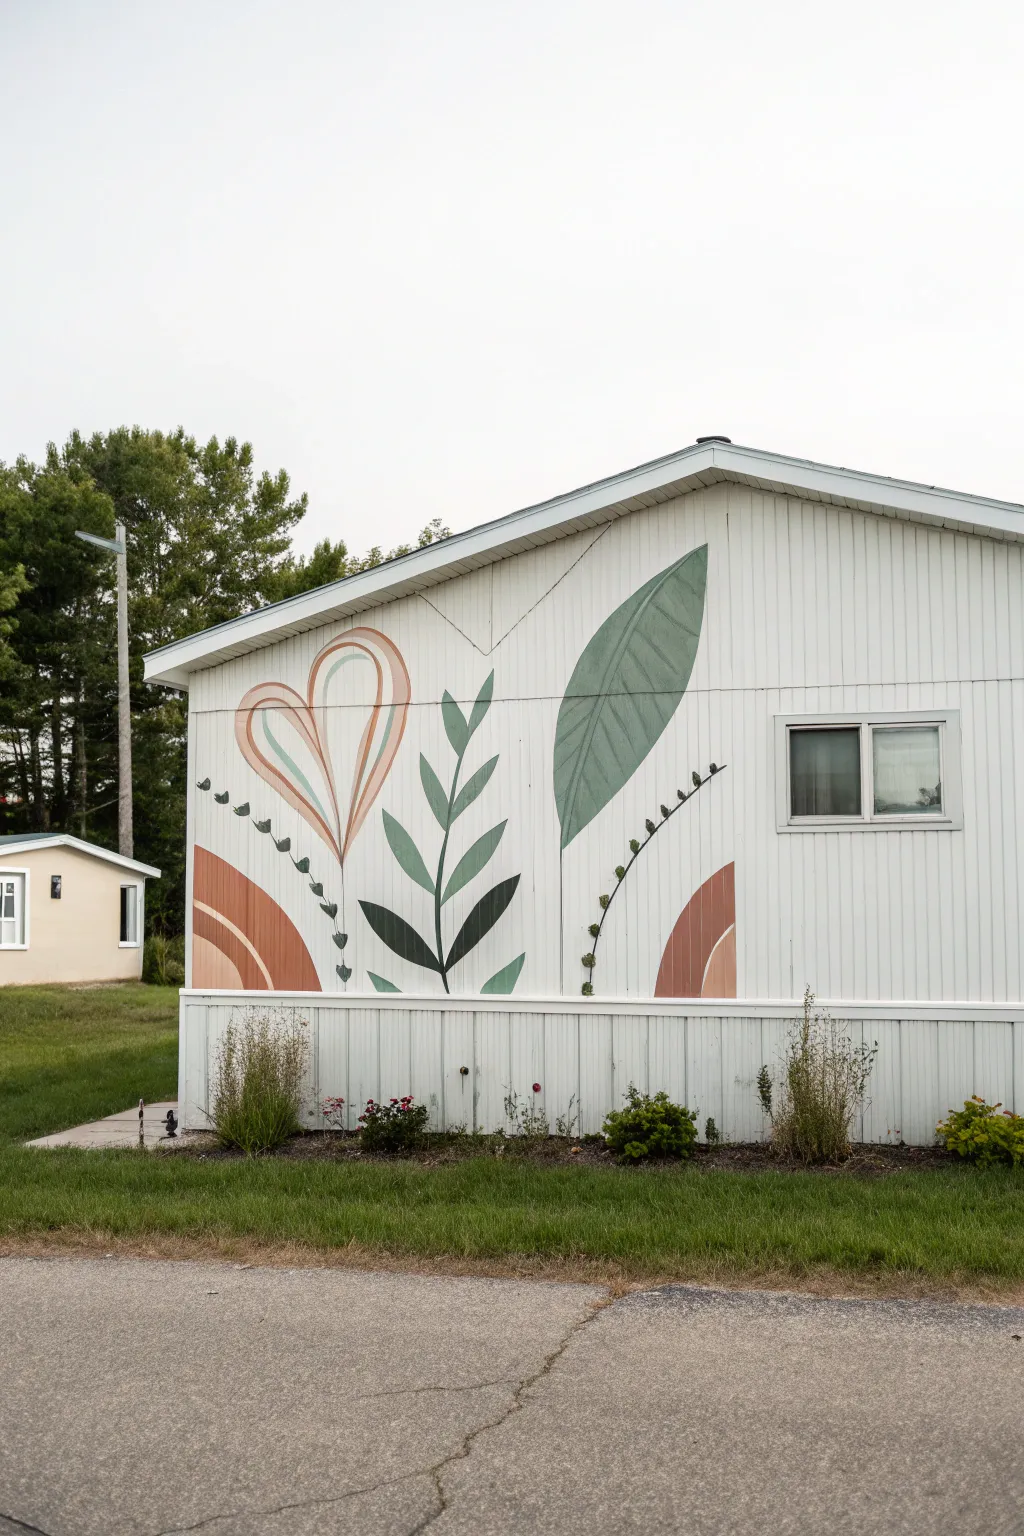
Transform a plain white siding wall into a work of art with this oversized, abstract botanical mural. Featuring soft terracotta arches, sage green leaves, and delicate line work, this design adds a warm, modern touch to your mobile home without overwhelming the space.
Detailed Instructions
Materials
- Exterior acrylic latex paint (White/Base coat)
- Exterior acrylic latex paint (Sage Green)
- Exterior acrylic latex paint (Dark Forest Green)
- Exterior acrylic latex paint (Terracotta/Light Rust)
- Exterior acrylic latex paint (Pale Pink/Peach)
- Graphite pencil or chalk
- Long level or laser level
- Assorted synthetic bristle brushes (2-inch flat, 1-inch angled sash)
- Small round detail brush (size 4 or 6)
- Ladder or step stool
- Painter’s tape
- Drop cloth
- Mild detergent and scrub brush
Step 1: Preparation & Base
-
Clean the Surface:
Before painting slightly textured siding like this, thorough cleaning is crucial. Mix mild detergent with water and scrub the entire wall section to remove dirt, mildew, and chalky residue, then rinse and let it dry completely. -
Prime and Tape:
If your existing paint is peeling or very old, apply a coat of exterior primer. Tape off the trim, the corner edges, and the window frame to protect them from stray brushstrokes. -
Refresh the Background:
To make the colors pop, roll on a fresh coat of crisp white exterior paint over the entire wall panel. Allow this base layer to cure for at least 24 hours so your pencil sketch lines don’t dig into soft paint.
Step 2: Sketching the Design
-
Establish the Center Line:
Using a long level or laser level, lightly mark a vertical centerline. This helps balance the composition, even though the design itself is asymmetrical. -
Outline the Large Leaf:
On the right side, lightly sketch a large, singular oval leaf shape pointing upwards towards the roofline. Add a central vein line down the middle. -
Draw the Central Stem:
Near the center, sketch a vertical stem that branches out with pairs of simple, pointed leaves. Keep the spacing loose and airy. -
Sketch the Heart Motif:
On the left side, draw a large, stylized heart shape that leans slightly inward. Inside this main outline, sketch two smaller, echoing heart shapes to create stripes. -
Add the Arches:
Draw a semi-circle arch in the bottom left corner and another in the bottom right corner. These will ground the design and add weight to the bottom. -
Plan the Delicate Vines:
Finally, sketch two thin, curving lines—one swooping under the heart and one rising next to the large leaf—where you will paint the small bud details later.
Bumpy Surface Blues?
Painting straight lines on vinyl or aluminum siding ridges is tricky. Use a high-quality angle brush and press firmly into the grooves rather than skimming over them to avoid gaps.
Step 3: Painting the Shapes
-
Fill the Large Leaf:
Using the 2-inch flat brush, fill in the large right-side leaf with Sage Green paint. Use smooth, long strokes following the direction of the leaf. -
Paint the Central Foliage:
Switch to Dark Forest Green for the central stem and its leaves. I like to use an angled sash brush here to get crisp points on the leaf tips. -
Color the Arches:
Fill the bottom corner arches with Terracotta paint. Use steady hands or painter’s tape to keep the curved edge clean against the white background. -
Detail the Arches:
Once the Terracotta is dry to the touch, add the inner details: a Pale Pink stripe inside the left arch and a thin Sage Green stripe. -
Paint the Heart:
Paint the outermost outline of the heart in Terracotta. Fill the middle stripe with Pale Pink, and the innermost stripe with Sage Green, leaving thin white gaps between the colors if desired for a lighter look.
Pro Tip: Chalk It Up
Use regular sidewalk chalk to sketch your design instead of pencil. It washes off easily with water if you make a mistake and won’t leave permanent graphite marks under light paint colors.
Step 4: Fine Details
-
Add Leaf Veins:
Return to the large Sage Green leaf. Using the Dark Forest Green and a thin round brush, paint the central vein and delicate angled veins branching off it. -
Paint the Thin Vines:
Using your smallest detail brush and the Dark Forest Green, carefully paint over the thin curving vine lines you sketched earlier. Keep the pressure light to maintain a thin line. -
Add the Buds:
along the thin vines, paint tiny oval ‘buds’ using the Dark Forest Green. Space them out evenly, like beads on a string. -
Clean Up Edges:
Step back and inspect your work. Use a small brush with your white wall paint to touch up any wobbles or drips where the colors meet the background. -
Final Protection:
Once the mural has dried for 48 hours, ensure it’s fully cured. Since you used exterior paint, a sealer isn’t strictly necessary, but you can add a clear matte exterior varnish for extra longevity against UV rays.
Step back and admire how this simple addition brings a bespoke, artistic charm to your home’s exterior that neighbors will love
Unexpected Color Blocking on Awnings and Add-Ons
Transform a standard mobile home exterior into a mid-century modern delight using a clever color-blocking technique. This project combines creamy neutrals with a bold, warm terracotta accent on the skirt and porch wall to create instant curb appeal.
How-To Guide
Materials
- High-quality exterior latex paint (Cream/Off-White)
- High-quality exterior latex paint (Terracotta/Peach)
- Exterior trim paint (Bright White)
- Metal primer (for awning)
- Pressure washer
- Painter’s tape (exterior grade)
- Drop cloths
- Paint rollers (medium nap for siding)
- Angled sash brushes (2-3 sizes)
- Extension pole
- Sandpaper (medium grit)
- Scraper tool
- Ladder
Step 1: Preparation & Cleaning
-
Assess the Surface:
Walk around the mobile home and inspect the siding, skirting, and awning supports for any damage, rust, or peeling paint. Address repairs now so your paint job lasts longer. -
Deep Cleaning:
Use a pressure washer to thoroughly clean the entire exterior. Start from the top and work your way down to remove dirt, chalky residue, and mildew. Let the structure dry completely for at least 24 hours. -
Scrape and Sand:
If there is any flaking paint, gently scrape it away. Lightly sand glossy surfaces, especially on the metal skirting or awning supports, to give the new paint a better grip. -
Masking Off:
Apply exterior painter’s tape around window frames, door frames, and lights. Lay down drop cloths over the concrete driveway and porch area to catch any drips.
Paint Not Sticking?
If paint beads up on metal siding, likely wax or oil remains. Clean the spot with TSP (trisodium phosphate), rinse, sand lightly, and re-prime before painting.
Step 2: The Base Coats
-
Prime the Metal:
Apply a coat of metal primer to the skirting and awning if the original finish is worn or bare metal is exposed. This prevents rust bleeding through your fresh colors. -
Painting the Upper Siding:
Stir your cream/off-white exterior paint. Using a roller on an extension pole, apply the first coat to the main horizontal siding. I find it easiest to work in 4-foot sections to keep a wet edge. -
Cutting In:
While the roller coat dries, use an angled brush to cut in the cream color around the window frames and under the roofline specifically in the siding areas. -
Second Coat (Cream):
Once the first coat is dry to the touch, apply a second coat of the cream paint for full, even coverage.
Step 3: Color Blocking & Accents
-
Define the Skirt Line:
Ensure the cream paint is fully cured. Tape off the bottom edge of the siding where it meets the vertical skirting to get a crisp line. -
Applying the Terracotta:
Using a fresh roller, apply the terracotta/peach paint to the entire skirt perimeter. Vertical metal skirting has deep grooves, so use a thicker nap roller or back-brush to get paint into the crevices. -
The Porch Accent Wall:
Extend that same terracotta color up the wall under the porch awning. This color blocking connects the skirt to the main structure visually. -
Layering the Accent Color:
Apply a second coat of the terracotta paint to both the skirt and the porch wall to ensure the color is rich and opaque. -
Crisp White Trim:
Paint the window shutters, window frames, and the thin vertical corner trim in bright white. This high contrast makes the other colors pop.
Pro Tip: Awning Stripes
Don’t freehand the window awning stripes! Use painters tape to mask off every other slat. It takes extra prep time but guarantees those perfect, factory-finish lines.
Step 4: Awning Details
-
Painting the Columns:
Paint the slender metal support columns for the carport awning in bright white. Use a small brush to get around the decorative scrollwork at the top. -
Awning Underside:
Roll the underside of the large carport awning in white to reflect light and keep the entryway feeling open and airy. -
The Striped Awning Detail:
For the window awnings, paint the stripes to match the house. Paint the alternate metal slats in the terracotta shade, leaving the others cream or white. -
Final Inspection:
Remove all tape slowly at a 45-degree angle while the paint is still slightly tacky to avoid peeling. Touch up any bleed-through with a small artist’s brush.
Step back and admire how this fresh coat of paint completely revitalizes the character of your home


Have a question or want to share your own experience? I'd love to hear from you in the comments below!