I love how a mosaic turns tiny scraps into something that feels like magic under your fingertips. These mosaic project ideas start with the classic, confidence-building projects and then wander into more playful, wow-factor territory.
Classic Garden Stepping Stones
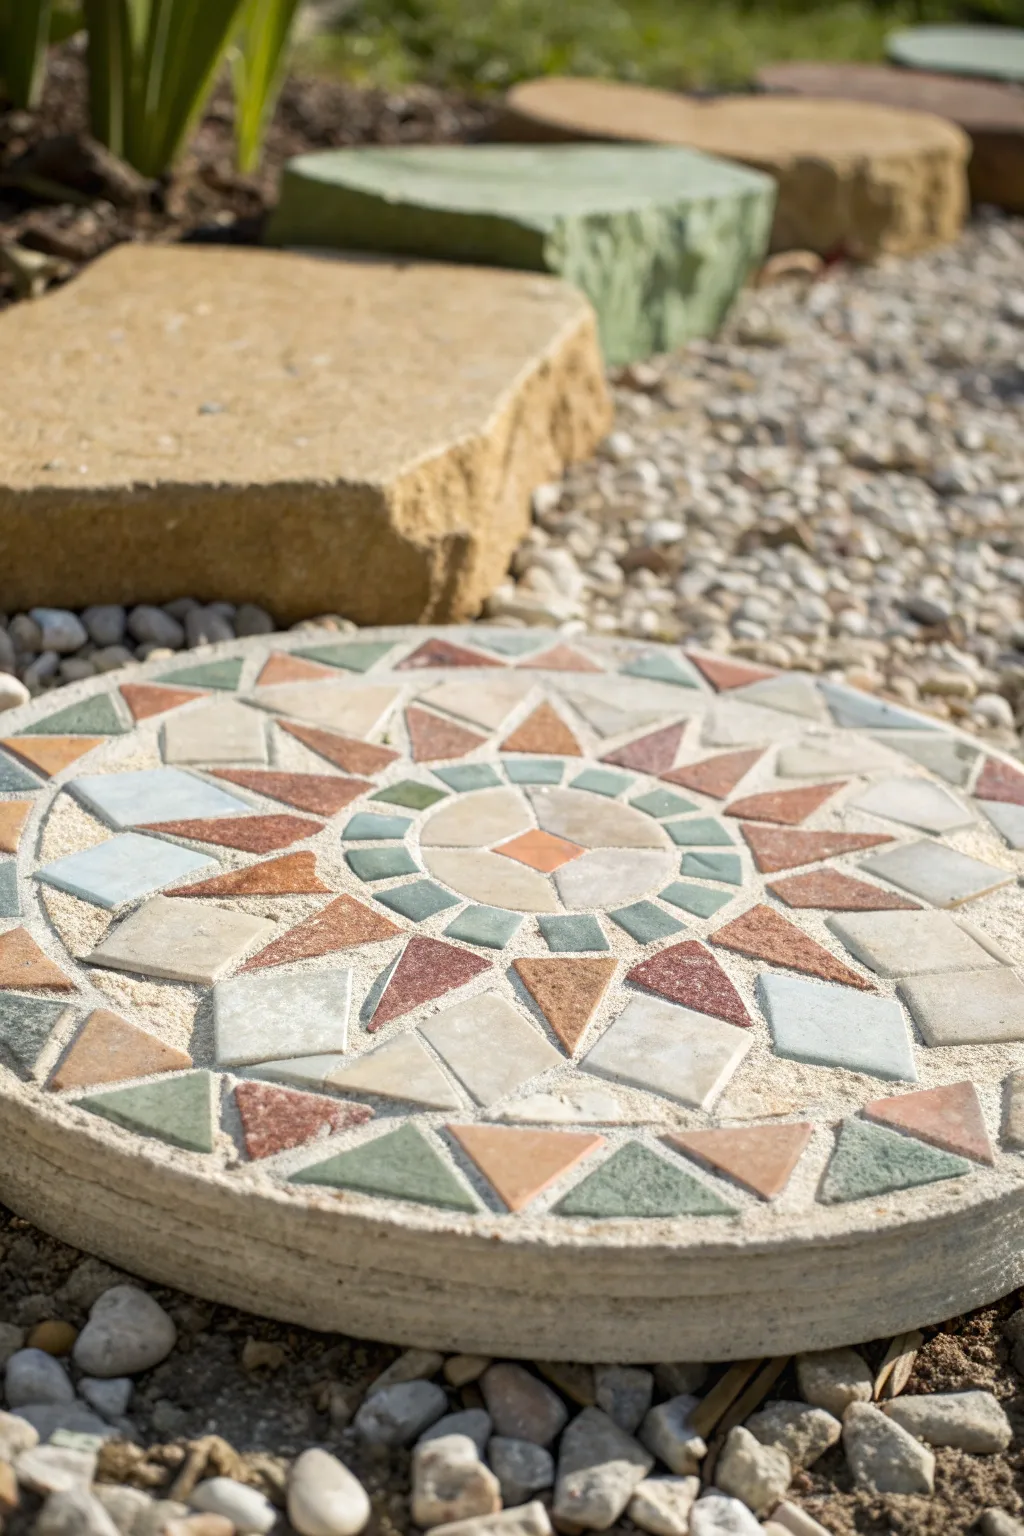
Brighten your garden path with this radiant geometric mosaic stepping stone, featuring earthy tones of terracotta, sage green, and cream. The starburst pattern creates a timeless, classic look that feels right at home among flowers and foliage.
Step-by-Step Tutorial
Materials
- Round concrete stepping stone mold (12-14 inch)
- Quick-setting concrete mix
- Tesserae: Ceramic tiles or stained glass in terracotta, sage green, cream, and beige
- Tile nippers or wheeled glass cutters
- Thick contact paper or clear mosaic mounting film
- Fine-grit sandpaper
- Bucket for mixing concrete
- Trowel or old spoon
- Protective gloves and safety glasses
- Water
- Pencil and large paper (for template)
Step 1: Designing the Pattern
-
Trace and Scale:
Begin by tracing the exact size of your mold onto a large sheet of paper. This circle will serve as your master template to ensure your design fits perfectly inside the finished stone. -
Draft the Geometry:
Mark the center point of your circle. Draw a series of concentric circles radiating outward to guide your bands of color. For this specific sunburst look, lightly sketch a central diamond, surrounded by a ring of small squares, then radiating triangles. -
Plan Your Palette:
Before cutting any tile, lay out your color scheme on paper. Assign terracotta for the star points, sage green or teal for the accents, and creamy white or beige for the larger background shapes.
Step 2: Cutting the Tesserae
-
Safety First:
Put on your safety glasses. Cutting ceramic or glass can send small shards flying, so it’s best to work over a box or tray to catch debris. -
Shape the Center:
Using your tile nippers, cut a small diamond shape for the very center. It doesn’t have to be mathematically perfect; rustic edges add charm. -
Create the Inner Ring:
Cut small, uniform keystones or squares from your beige tile to surround the central diamond. Aim for pieces that are roughly 1/2 inch to 3/4 inch in size. -
Snip the Star Points:
Cut sharp triangles from your reddish-brown or terracotta tiles. These will form the main starburst. Try to keep the angles consistent so they fit snugly in a circle. -
Cut the Outer Elements:
Prepare larger trapezoids and triangles from your blue-green and cream tiles for the outer rings. I find it helpful to cut a few more than I think I need, just in case some break cleanly.
Stone Smoother
Coat the inside of your plastic mold with a very light layer of cooking spray or petroleum jelly before placing the contact paper. This ensures the stone pops out effortlessy once cured.
Step 3: Indirect Method Styling
-
Prepare the Contact Paper:
Cut a piece of clear contact paper slightly larger than your mold. Peel off the backing and tape it to a flat work surface, sticky side up. -
Place the Template:
Slide your paper pattern underneath the clear contact paper. You should be able to see your lines clearly through the sticky film. -
Lay the Tiles:
Press your cut tiles FACE DOWN onto the sticky paper. This is the ‘indirect method.’ Remember, you are working in reverse, so the bottom of the tile is facing you. -
Check the Spacing:
Leave a small gap (about 1/8 to 1/4 inch) between each tile to allow the concrete to flow in and act as grout later. Keep the spacing consistent for a professional look. -
Fit the Mold:
Once your design is fully laid out on the contact paper, lift the paper carefully and place it into the bottom of your mold, with the tiles still sticking to the paper (tile backs facing up).
Cloudy Tiles?
If concrete haze persists on the tiles after scrubbing, use a solution of half water and half white vinegar. The mild acid dissolves the cement film without damaging the ceramic.
Step 4: Casting the Stone
-
Mix the Concrete:
In your bucket, mix the concrete with water according to the package instructions. Aim for a consistency like thick oatmeal or peanut butter—pourable but not runny. -
Pour the Base Layer:
Scoop a small amount of concrete gently onto the tiles. Use your fingers or a small brush to push the concrete into the gaps between the tiles without dislodging them. -
Fill the Mold:
Pour the rest of the concrete into the mold until it reaches your desired thickness (usually 1.5 to 2 inches for a stepping stone). -
Vibrate Air Bubbles Out:
Gently tap the sides of the mold and shake it slightly. This crucial step releases trapped air bubbles that could weaken the stone and helps the concrete settle flat. -
Clean the Edges:
Smooth the back surface of the concrete with a trowel. If any concrete has spilled over the edge of the mold, wipe it away now.
Step 5: The Reveal
-
Let it Cure:
Allow the stone to sit undisturbed for at least 24 to 48 hours. Moving it too soon can cause cracks. -
Invert and Peel:
Once hard, carefully turn the mold over to release the stone. Simply peel off the contact paper to reveal your beautiful mosaic design underneath. -
Clean Up:
There may be a thin film of concrete on the face of your tiles. Use a damp sponge and perhaps a little fine sandpaper to gently scrub the tiles clean and bright.
Place your new stone in a sunny spot in the garden and enjoy the handmade charm it adds to your walkway


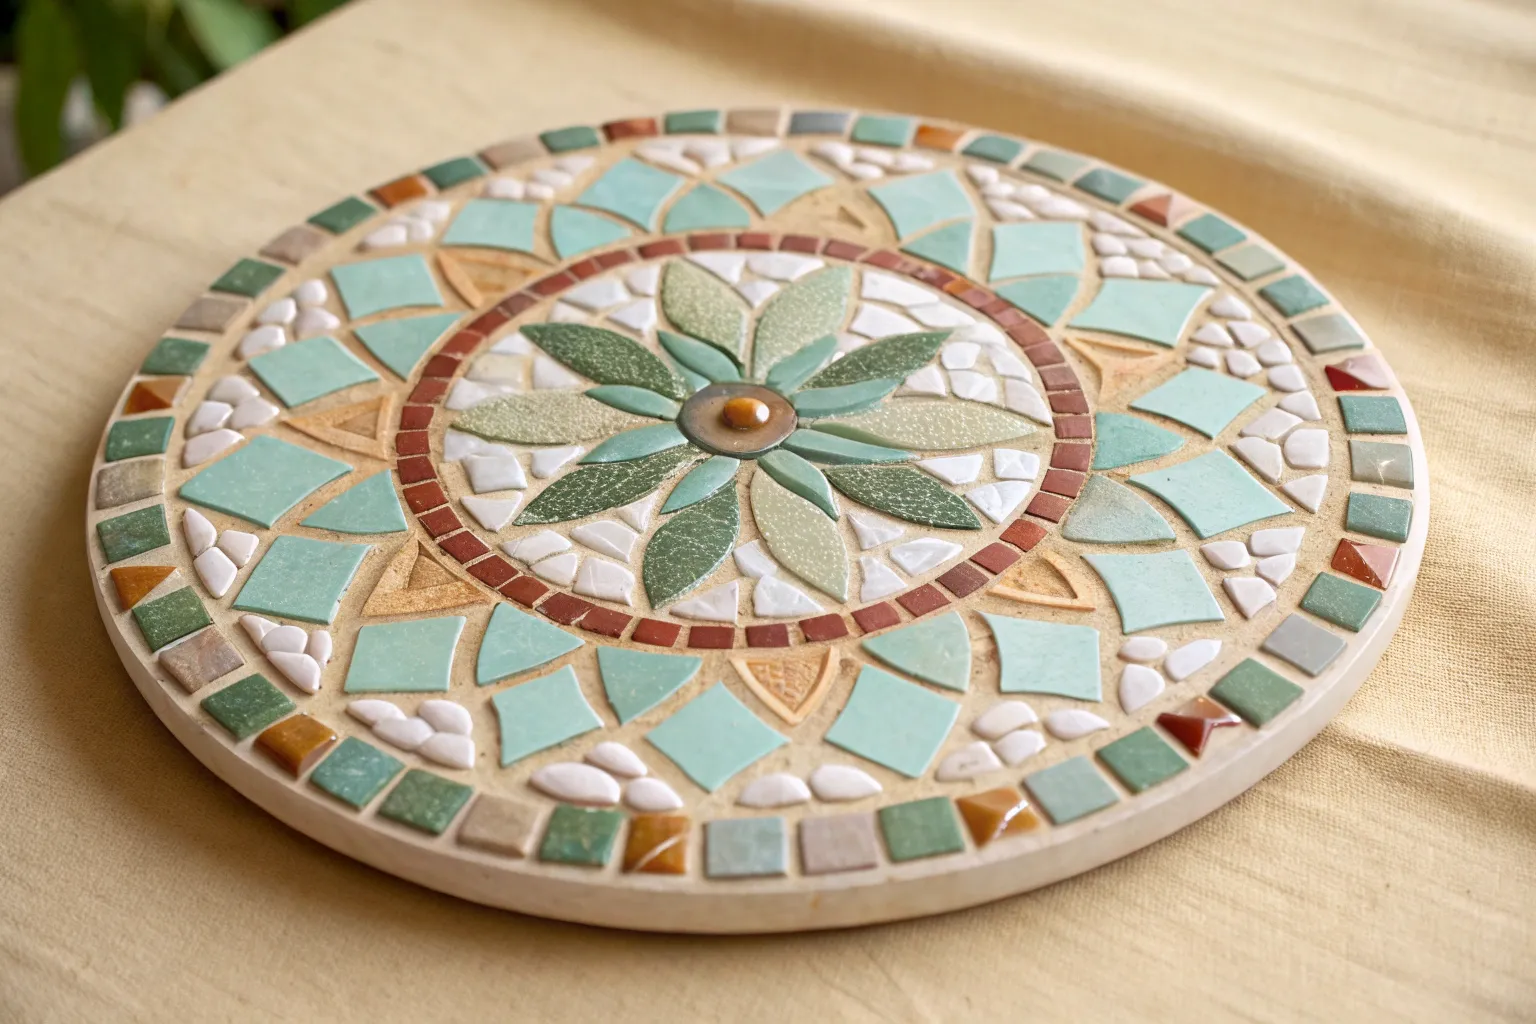
Easy Mosaic Coasters
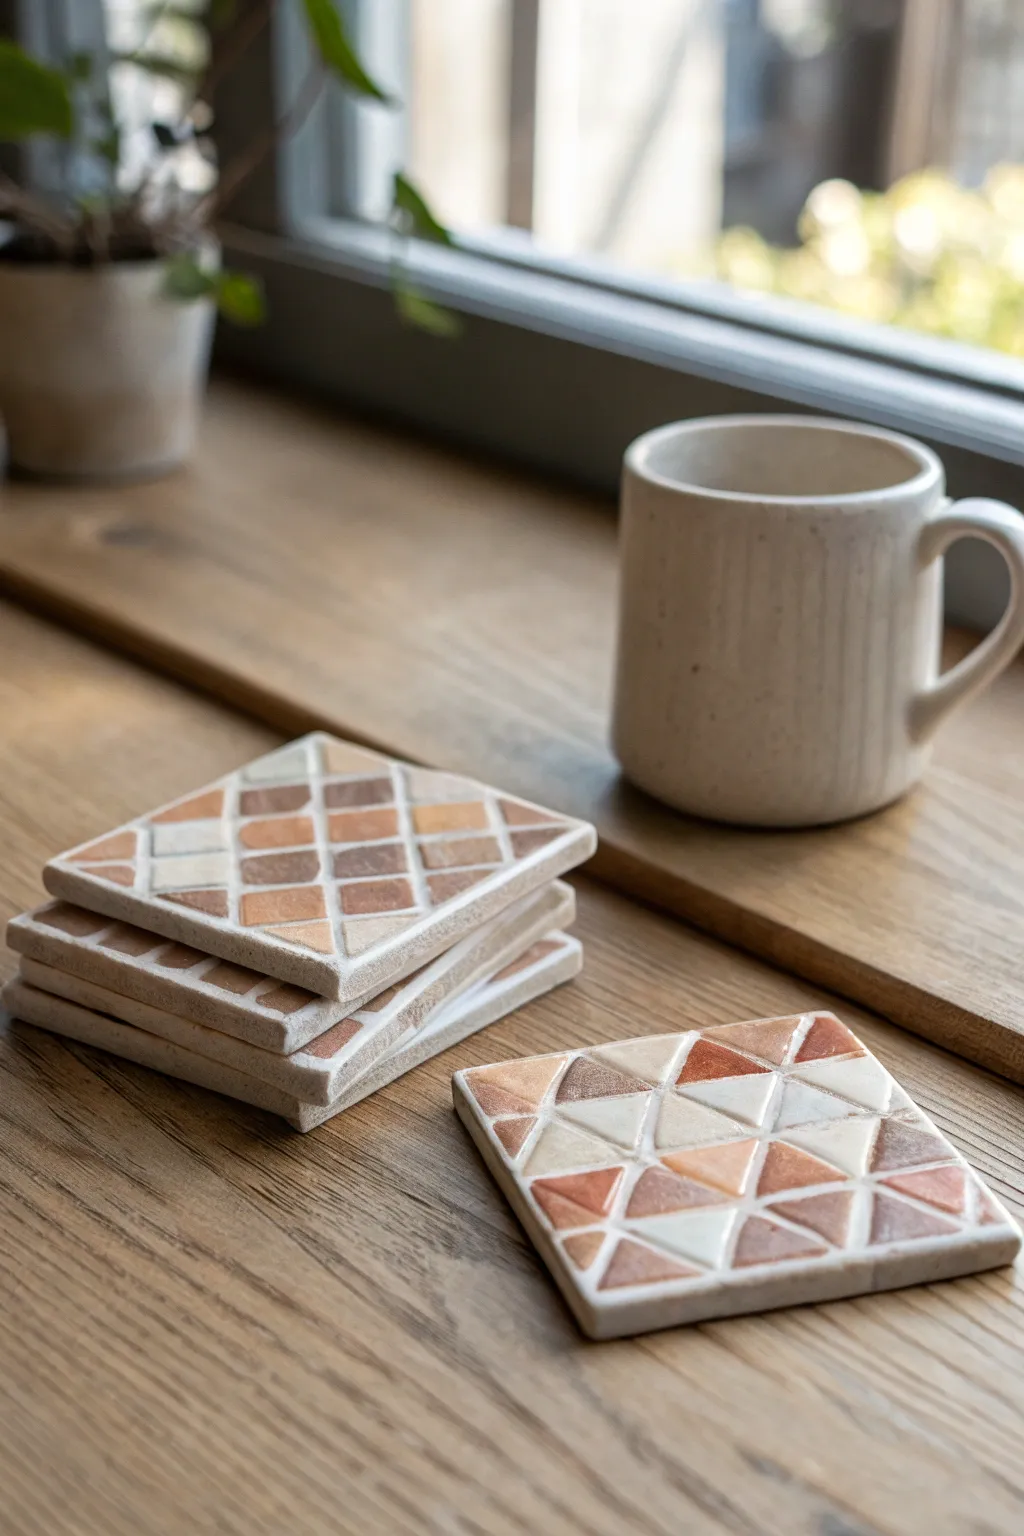
Bring a touch of warm, artisanal charm to your coffee table with these stunning geometric mosaic coasters. Using small ceramic tiles in earthy shades of terracotta, beige, and white, you’ll create intricate patterns that look high-end but are surprisingly simple to assemble.
Step-by-Step
Materials
- 4-inch square ceramic or wooden coaster bases (with a small lip/rim)
- Small ceramic mosaic tiles (assorted shapes: diamonds, triangles, squares)
- Tile adhesive or Weldbond glue
- Pre-mixed grout (sandstone or off-white color)
- Small palette knife or plastic spoon
- Grout sponge
- Soft, clean cloth
- Tweezers (optional but helpful for placement)
- Sealer for grout (optional)
Step 1: Planning the Design
-
Gather your palette:
Begin by sorting your mosaic tiles by color. For this project, you want a warm, cohesive palette featuring reddish-browns, terracottas, creamy whites, and soft beiges. -
Choose your pattern:
Decide on your layout before gluing. The image shows two distinct styles: a classic rotated square (diamond) grid and a more dynamic layout using varying sizes of triangles to create larger geometric forms. -
Dry run your layout:
Place your coaster base on a flat surface and arrange your tiles inside without any glue. This dry fit is crucial to ensure your spacing is even and that the pattern fits perfectly within the rim. -
Adjust spacing:
Aim for consistent gaps between the tiles, roughly 1/8th of an inch wide. If your pattern is tight, slight adjustments now will save a headache later when grouting.
Pro Tip: Consistent Gaps
If you struggle with spacing, cut small strips of cardboard or cardstock to use as temporary spacers between tiles. Remove them right before the glue fully hardens.
Step 2: Adhering the Tiles
-
Prepare the adhesive:
Squeeze a small amount of tile adhesive or Weldbond onto a disposable plate or directly onto the coaster base if you work quickly. -
Apply glue to the base:
I prefer to apply a thin, even layer of adhesive to a small section of the coaster base rather than buttering each tiny tile individually. -
Transfer the pattern:
Carefully move your tiles from the dry layout to the glued base one by one. Using tweezers can help keep your fingers clean and allow for precise placement, especially with the smaller triangle pieces. -
Check alignment:
As you work, frequently step back or look straight down at the coaster to ensure your lines are straight. Nudge tiles gently while the glue is wet to correct any crooked rows. -
Secure the edges:
Pay special attention to the tiles along the perimeter. They should sit flush and neat against the rim of the coaster base, creating a bordered effect. -
Let it cure:
Once all tiles are placed, set the coasters aside. Allow the adhesive to dry completely according to the manufacturer’s instructions, usually at least 24 hours.
Troubleshooting: Haze Won’t Go
If the grout haze has hardened and won’t buff off with a cloth, dampen a rag with a mixture of vinegar and water. The acidity helps dissolve the stubborn residue.
Step 3: Grouting and Finishing
-
Mix the grout:
If using powdered grout, mix it with water until it reaches the consistency of peanut butter. If using pre-mixed grout, give it a good stir. -
Apply the grout:
Scoop a generous amount of grout onto the coaster surface. Use a palette knife or a plastic card to press the grout firmly into all the crevices between the tiles. -
Cover completely:
Ensure every gap is filled and the grout is level with the tile surface. Don’t worry about the mess on top of the tiles right now; just focus on filling the voids. -
Initial wipe down:
Let the grout set for about 10-15 minutes until it becomes slightly firm. Then, take a damp (not soaking wet) sponge and gently wipe across the surface to remove excess grout. -
Clean the tiles:
Continue wiping with the sponge, rinsing it frequently, until the tiles are mostly clean. Be careful not to dig the sponge into the gaps, or you might pull out too much grout. -
Final polish:
Allow the grout to dry for another hour until a haze forms on the tiles. Use a soft, dry cloth to buff the tiles vigorously, removing the haze and making the ceramic shine. -
Seal the grout:
For extra durability against coffee spills, apply a grout sealer over the finished dry surface. This ensures your beautiful earth-toned patterns stay stain-free.
Enjoy your beautifully crafted coasters with your next warm cup of coffee


Mosaic Mirror Frame
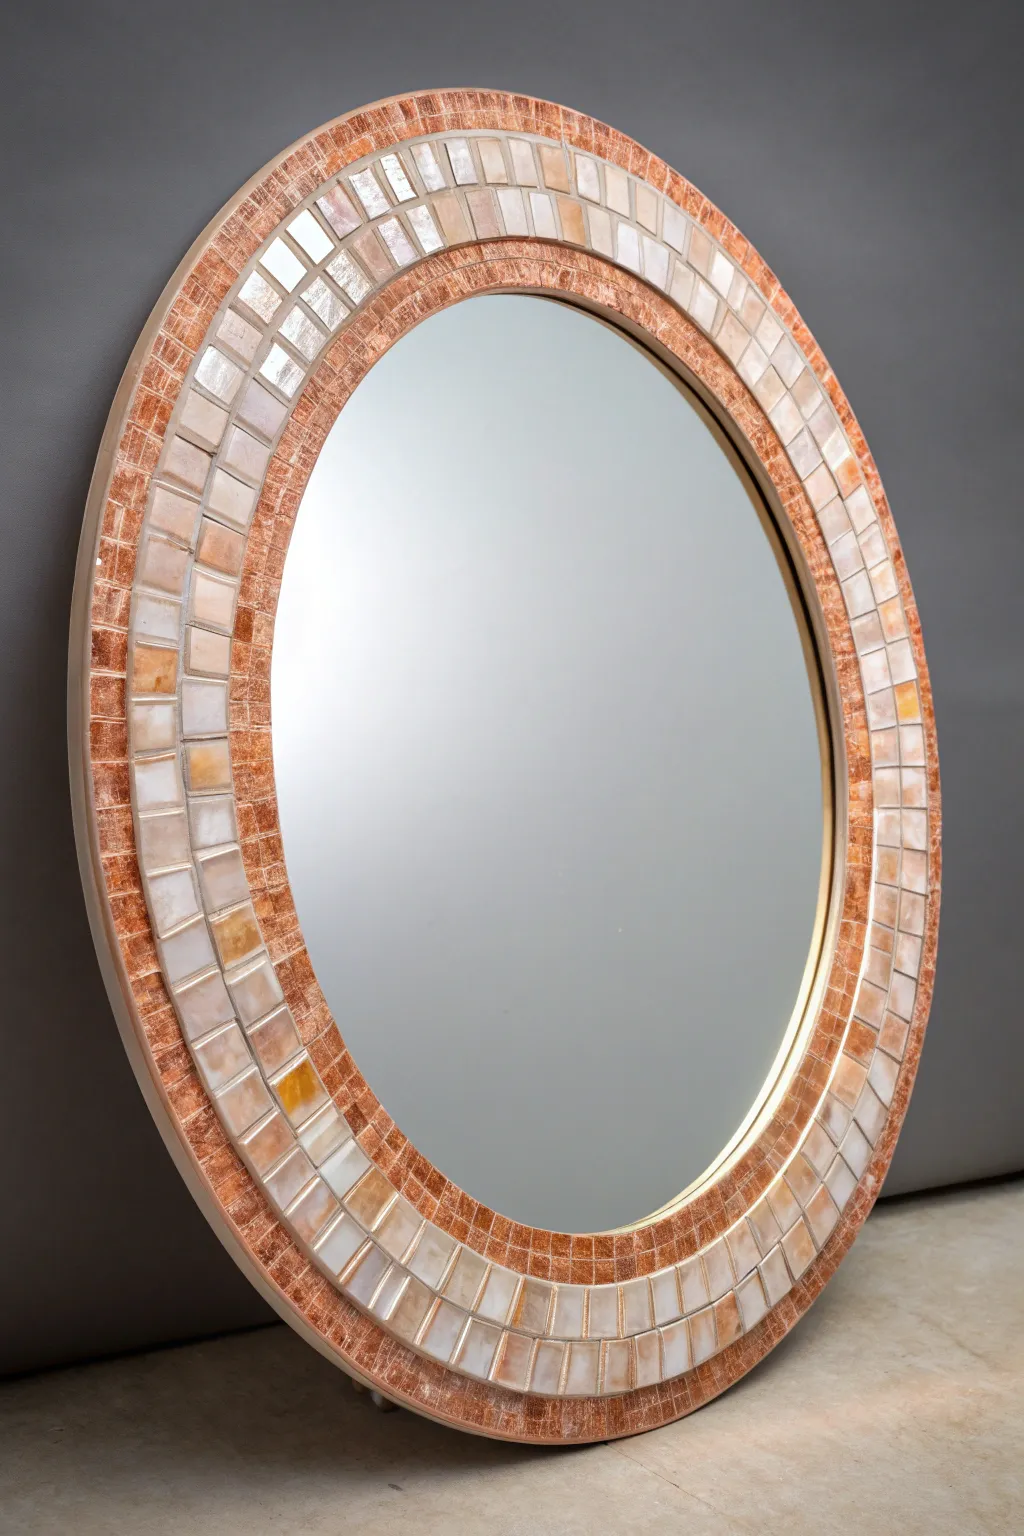
Transform a plain round mirror into a glowing geometric statement piece using textured glass tiles. This project combines warm copper tones with iridescent pearlescent rectangles for a high-end, contemporary look.
Step-by-Step Guide
Materials
- Round MDF or plywood mirror base (approximately 24-30 inches diameter)
- Round mirror glass (to fit the center)
- Small textured copper/amber glass mosaic tiles (approx 3/8 inch square)
- Rectangular pearlescent/off-white glass tiles (approx 1×0.5 inch)
- Heavy-duty mirror adhesive (mastic)
- Weldbond glue or similar mosaic adhesive
- Wheeled glass warm nippers (optional, for trimming)
- Dark grey or charcoal sanded grout
- Sponge and bucket for water
- Rubber grout float
- Soft cloth for polishing
- Acrylic paint (white) for the edge
Step 1: Base Preparation
-
Prep the substrate:
Begin with your round wooden base. Ensure the surface is clean, dry, and free of dust. If the wood is very absorbent, seal it with a mixture of 1 part PVA glue to 4 parts water and let it dry. -
Paint the edge:
Using a small brush, paint the outer rim of the wooden circle with white acrylic paint. This gives a clean, finished look to the side profile often visible when hanging the mirror. -
Mark your guidelines:
Find the exact center of your board. Place your mirror glass in the center and trace lightly around it with a pencil. Remove the mirror glass for now; we will glue it last to keep it pristine.
Sticky Situation?
If you get adhesive on the face of textured tiles, wipe it off immediately with a wet Q-tip. Once dry, it’s very hard to remove from the crevices.
Step 2: Inner & Outer Copper Rings
-
Dry layout:
Before gluing, lay out a small section of your small copper tiles along the pencil line you just drew. This helps check spacing. -
Glue the inner border:
Apply a thin layer of adhesive just outside your pencil circle. Press the small copper tiles into place, side-by-side, creating a solid ring that frames where the mirror will eventually sit. Keep gaps minimal. -
Move to the outer rim:
Repeat this process on the very outer edge of the wooden base. Create a border of 3-4 rows of these small copper tiles. I find it easiest to work in quadrants to ensure the spacing stays even. -
Check the rows:
As you glue multiple rows for the outer border, stagger the joints slightly if possible, or keep them in a grid—whichever look you prefer. The reference image uses a grid alignment.
Level Up
Mix a small amount of copper or gold glitter into your dark grout. It adds a subtle sparkle that complements the warm tones of the glass.
Step 3: The Pearl Center
-
Fill the middle section:
You now have a wide empty channel between your inner copper ring and outer copper rings. This is for the large rectangular pearlescent tiles. -
Arranging the rectangles:
These tiles will be laid radially (pointing toward the center). Depending on the width of your gap, you may fit two distinct concentric rows of these rectangles. -
Gluing the first pearl row:
Glue the first row of rectangles snugly against the inner copper ring. Adjust spacing slightly as you go to ensure you don’t end up with a tiny sliver of tile at the end. -
Gluing the second pearl row:
Place the second row of rectangles against the first. Try to align the grout lines so they look like continuous long strips radiating outward. -
Fill remaining gaps:
If there is still a small gap between your pearl tiles and the outer copper border, fill it with one or two more rows of the small copper squares to make everything tight. -
Let it cure:
Allow the adhesive to dry completely, usually for 24-48 hours. The tiles must be immovable before grouting.
Step 4: Grouting & Finishing
-
Mix the grout:
Mix your dark grey sanded grout with water until it reaches a peanut butter consistency. Let it slake (sit) for 10 minutes, then mix again. -
Apply grout:
Scoop grout onto the mosaic surface. Use your rubber float to spread it across the tiles, holding the float at a 45-degree angle to push the grout deep into the crevices. -
Remove excess:
Once the gaps are filled, scrape off the bulk of the excess grout with the edge of the float moving diagonally across the tiles. -
Initial cleaning:
Wait about 15-20 minutes for the grout to haze over. Dampen your sponge (wring it out very well!) and gently wipe the surface in circular motions to clean the tile faces. -
Final polish:
Once the grout is fully dry (usually the next day), buff the tiles with a soft, dry cloth to remove the remaining haze and make the glass sparkle. -
Attach the mirror:
Finally, apply heavy-duty mirror mastic to the center of the wood and press your round mirror glass into place. Let it cure flat for another 24 hours.
Hang your finished masterpiece in a well-lit area to catch the beautiful reflections in the glass tiles


Mosaic Plant Pot Wrap
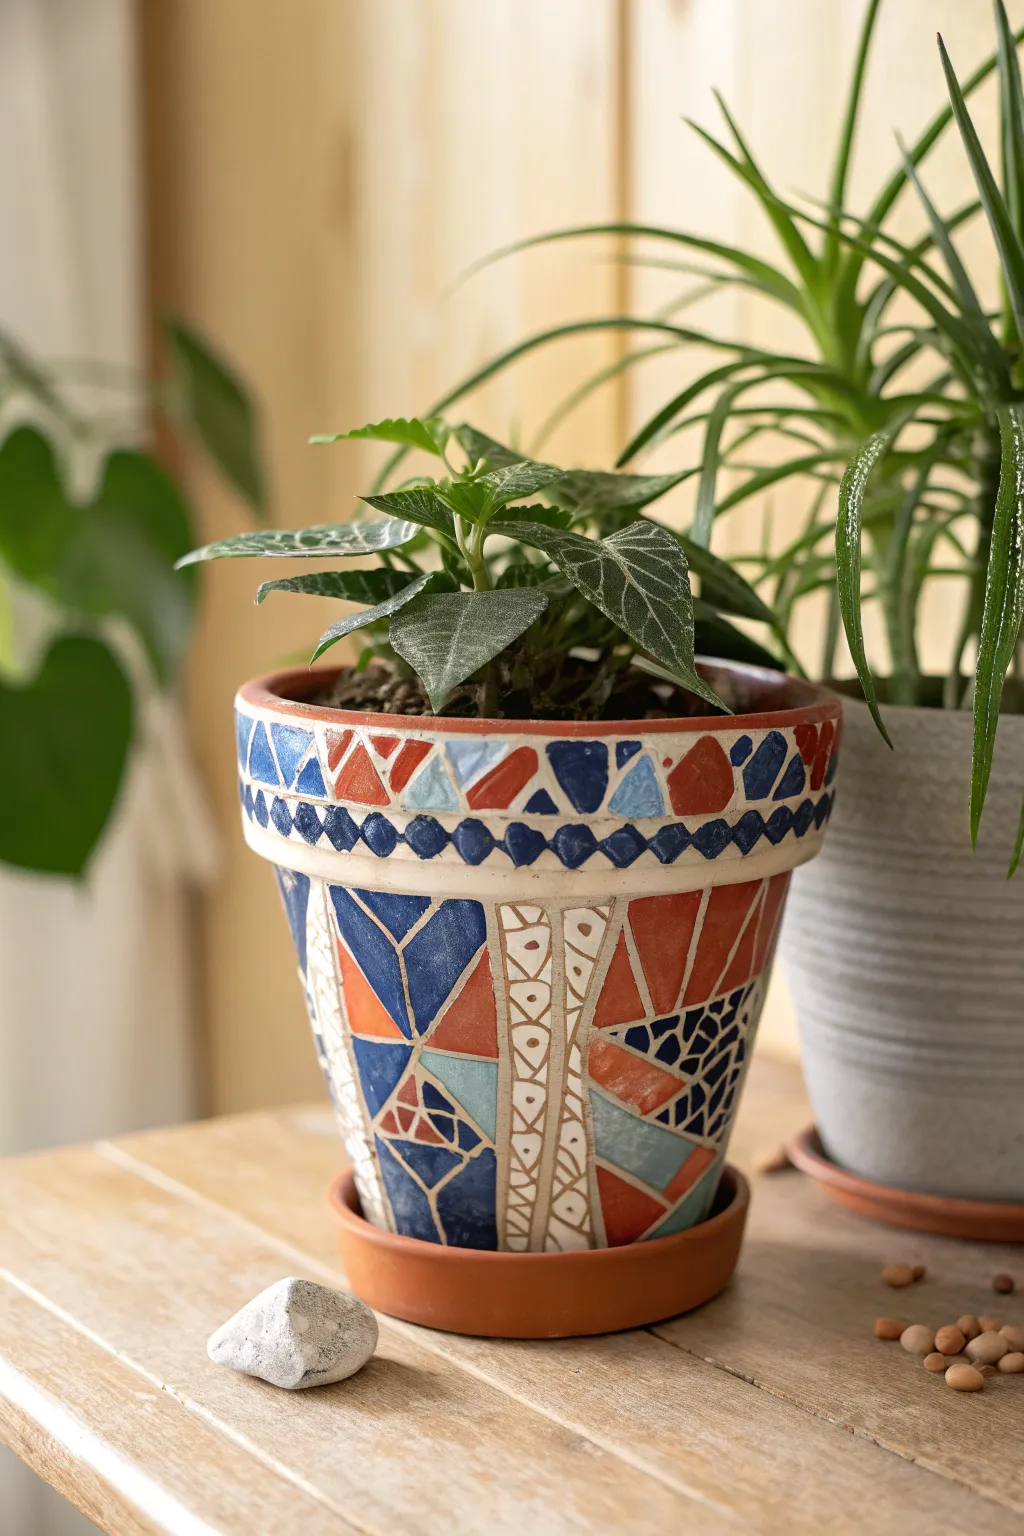
Transform a plain terracotta pot into a vibrant piece of art using cut tiles and a geometric design. The result combines bold primary colors with crisp white grout lines for a modern, slightly rustic aesthetic.
Step-by-Step Tutorial
Materials
- Standard terracotta pot (cleaned and dried)
- Ceramic or glass tiles (navy blue, rust orange, light blue, terracotta red)
- Tile nippers
- Waterproof tile adhesive (thinnest)
- Pre-mixed grout (white or off-white)
- Grout sponge
- Soft cloth
- Pencil
- Sealant (optional, for outdoor use)
- Protective eyewear
Step 1: Preparation & Planning
-
Prepare the surface:
Ensure your terracotta pot is completely clean and dry. If it’s an old pot, scrub away any mineral deposits or dirt that might prevent the adhesive from sticking. -
Map out vertical zones:
Using a pencil, lightly draw vertical lines down the side of the pot to divide it into sections. Create distinct vertical strips about 1 inch wide—these will become your decorative borders. -
Sketch the main fill areas:
Between your vertical strips, sketch large triangular and trapezoidal shapes. These don’t need to be perfect, but they will guide where your larger geometric tiles will go.
Pro Tip: Consistent Gaps
Keep your spacing between tiles roughly 1/8 to 1/4 inch wide. If tiles are too close, the grout creates weak lines; too far, and it looks sparse.
Step 2: Creating the Mosaic Tiles
-
Safety first:
Put on your protective eyewear before cutting any tiles, as shards can fly unpredictably. -
Cut geometric shapes:
Use your tile nippers to cut the colored tiles (blue, red, orange) into triangles and quadrilaterals. Aim for pieces that are roughly 1 to 2 inches in size for the main body sections. -
Create border pieces:
For the vertical strips and the rim, nip smaller, more uniform pieces. You’ll need small triangles for the rim and tiny irregular bits for the vertical strip details. -
Dry fit the design:
Before gluing, lay your pieces out on a flat surface or hold them against the pot to ensure your shapes fit nicely together like a puzzle.
Troubleshooting: Slipping Tiles
If heavy tiles slide down while the glue is wet, use painter’s tape to hold them in place on the vertical surface until the adhesive grabs.
Step 3: Adhering the Design
-
Start with the rim:
Apply a thin layer of adhesive to the back of your small detailed pieces. Place a row of alternating blue and orange triangles around the upper rim, pointing downward. -
Add rim details:
Directly below the rim triangles, place a line of tiny blue diamonds or squares to create a definition line before the main body starts. -
Fill the vertical strips:
Move to the vertical pencil lines you drew earlier. Glue down thin, long slivers of white or light-colored tile here to create the ‘ladder’ effect seen in the design. -
Apply the main geometric shapes:
Butter the back of your larger geometric cuts (the blue and orange triangles) and press them firmly into the large open sections. Leave a consistent gap between them for grout. -
Incorporate varied textures:
I like to mix in a section of smaller, shattered-looking pieces in one of the geometric zones (like the dark blue section shown) to add visual interest and contrast against the solid shapes. -
Let it cure:
Once all tiles are placed, allow the adhesive to dry completely. This usually takes 24 hours depending on your specific product instructions.
Step 4: Grouting & Finishing
-
Mix the grout:
Prepare your white grout according to the package directions until it reaches a peanut-butter consistency. -
Apply the grout:
Scoop the grout onto the pot and spread it firmly into all the crevices. Don’t be afraid to cover the tiles; you want to ensure every gap is filled solidly. -
Wipe away excess:
Wait about 15-20 minutes for the grout to set slightly. Then, using a damp (not soaking wet) sponge, gently wipe across the surface to reveal the tiles. -
Clean and polish:
Rinse your sponge frequently and continue wiping until the tiles are clean. Once completely dry, a haze might appear—buff this off with a soft, dry cloth for a shine. -
Detail the grout (optional):
If you want to mimic the specific look in the photo, you can carefully etch small circles or lines into the grout within the vertical white strips while it’s still slightly damp.
Now you have a stunning, custom planter ready to showcase your favorite greenery
BRUSH GUIDE
The Right Brush for Every Stroke
From clean lines to bold texture — master brush choice, stroke control, and essential techniques.
Explore the Full Guide
Colorful Garden Stake Mosaics
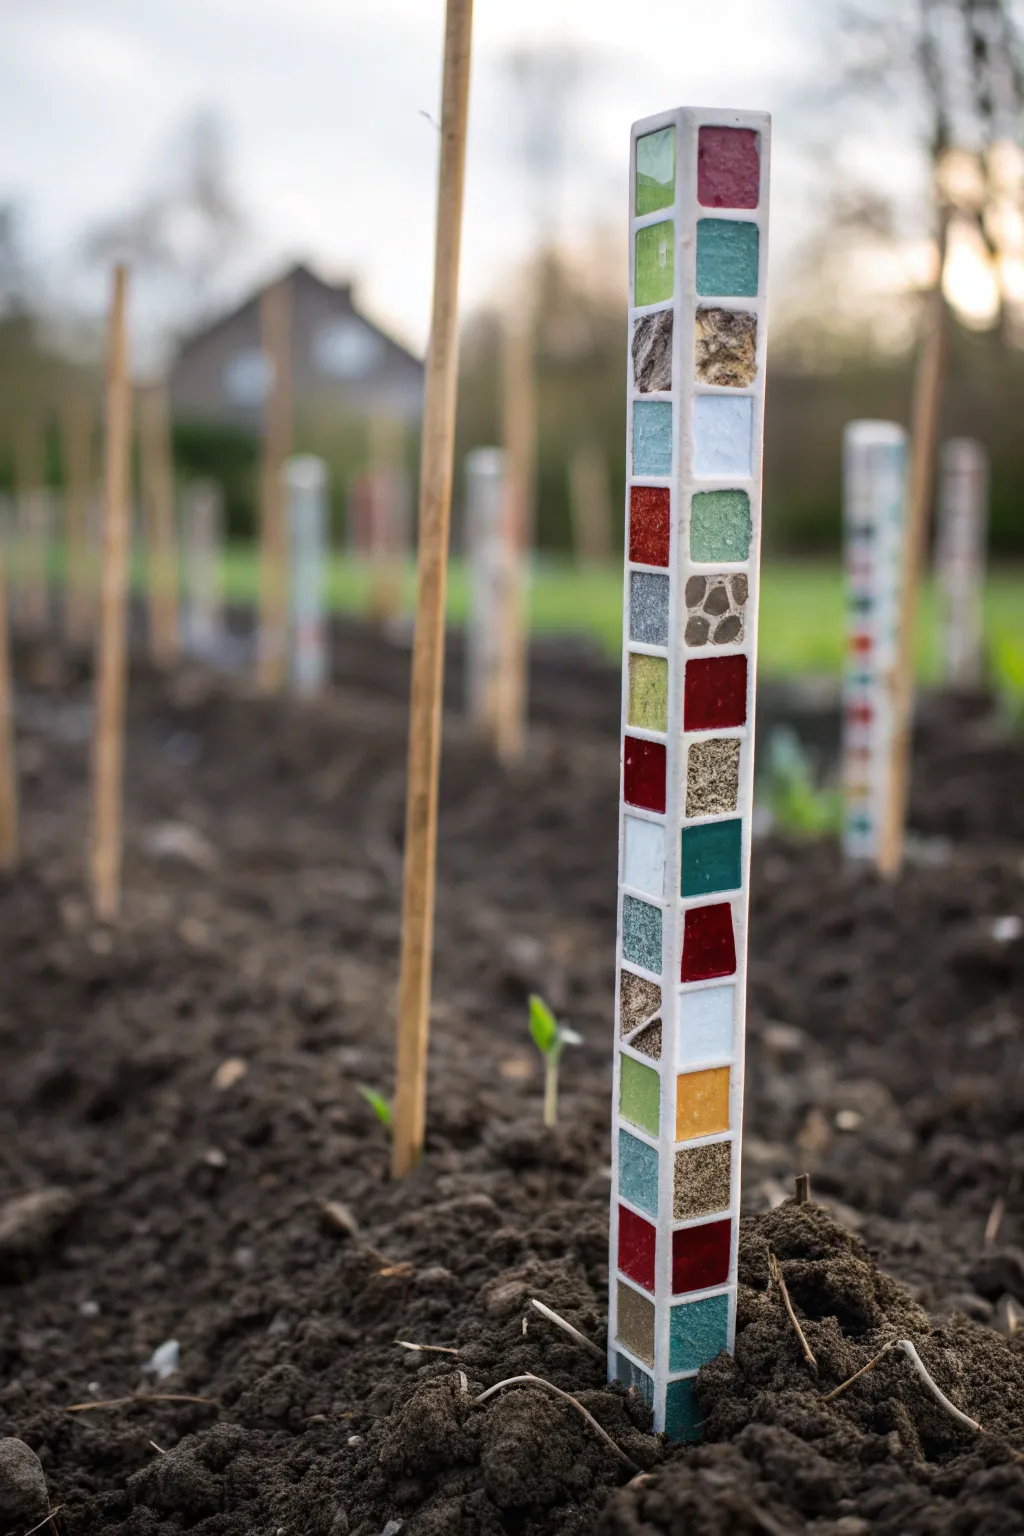
Add a vertical splash of color to your vegetable patch or flower beds with these elegant mosaic stakes. Mixing glass, stone, and ceramic tiles on a simple square post creates a durable, weather-resistant sculpture that sparkles in the sunlight.
How-To Guide
Materials
- Square wooden stake (approx. 1×1 inch or 1.5×1.5 inch thick)
- White exterior primer
- Assorted small mosaic tiles (glass, ceramic, and textured stone)
- Tile adhesive (thinset mortar or Weldbond glue)
- White or light gray sanded grout (exterior grade)
- Tile nippers
- Grout float or rubber spatula
- Sponge and bucket of water
- Clear outdoor sealant
- Clean rags
Step 1: Preparation and Planning
-
Select your lumber:
Choose a sturdy hardwood stake or pressure-treated lumber that is square in profile. Cut it to your desired height, keeping in mind that the bottom 6-8 inches will be buried in the soil. -
Prime the surface:
Apply two coats of white exterior primer to the wood. This seals the wood against moisture and provides a bright, grippy background for your translucent glass tiles. -
Sort your tesserae:
While the primer dries, organize your tiles (tesserae) by color and texture. Aim for a mix of vitreous glass squares, small ceramic bits, and even small polished stones for variety. -
Plan the layout:
Lay your stake flat on a work table and do a dry run of your design. Simple squares stacked vertically work beautifully, or you can alternate colors to create a random patchwork effect.
Pro Tip: Corner Polish
Pay extra attention to the vertical corners where tiles from adjacent sides meet. Smooth the grout here with a wet finger to create a soft, rounded edge.
Step 2: Adhering the Tiles
-
Apply adhesive:
Using a palette knife or small spreading tool, apply a layer of tile adhesive to one side of the stake. You want it thick enough to bed the tile, but not so thick it oozes everywhere. -
Place the first side:
Press your tiles into the adhesive, starting from the top and working down. Leave a uniform gap (about 1/8 inch) between each tile for the grout lines. -
Check alignment:
Use a straight edge to ensure your tiles are staying centered on the stake face. Adjust them gently before the glue begins to set. -
Repeat for all sides:
Once the first side is stable enough that tiles won’t slide, rotate the stake and tile the remaining three sides. Don’t forget to add a single tile to the very top flat surface for a finished look. -
Let it cure:
Allow the adhesive to cure completely. This usually takes 24 hours, but check your specific product’s instructions. The tiles must be rock solid before grouting.
Step 3: Grouting and Finishing
-
Mix the grout:
Mix your sanded grout with water until it reaches the consistency of peanut butter. I find it safest to wear a dust mask during the mixing phase to avoid inhaling powder. -
Apply grout:
Scoop the grout onto the stake and press it firmly into the gaps using a rubber float or your gloved fingers. Ensure every crevice is filled. -
Remove excess:
Scrape off the bulk of the excess grout using the edge of your float. Be careful not to pull the wet grout out of the joints. -
Initial clean:
Wait about 10-15 minutes for the grout to haze over. Dampen a sponge (wring it out very well so it’s barely moist) and gently wipe across the tiles to clean the surface. -
Final polish:
Once the grout is fully dry creating a chalky haze, buff the tiles with a soft, dry cloth until they shine. -
Seal the project:
Apply a clear outdoor sealant over the grout lines to protect the stake from rain and soil moisture.
Level Up: Mirror Magic
Intersperse small pieces of mirror tile into your design. They will catch the sunlight and make your garden stake sparkle brightly from a distance.
Now you have a durable piece of art ready to brighten up your garden beds regardless of the season
House Number Mosaic Plaque
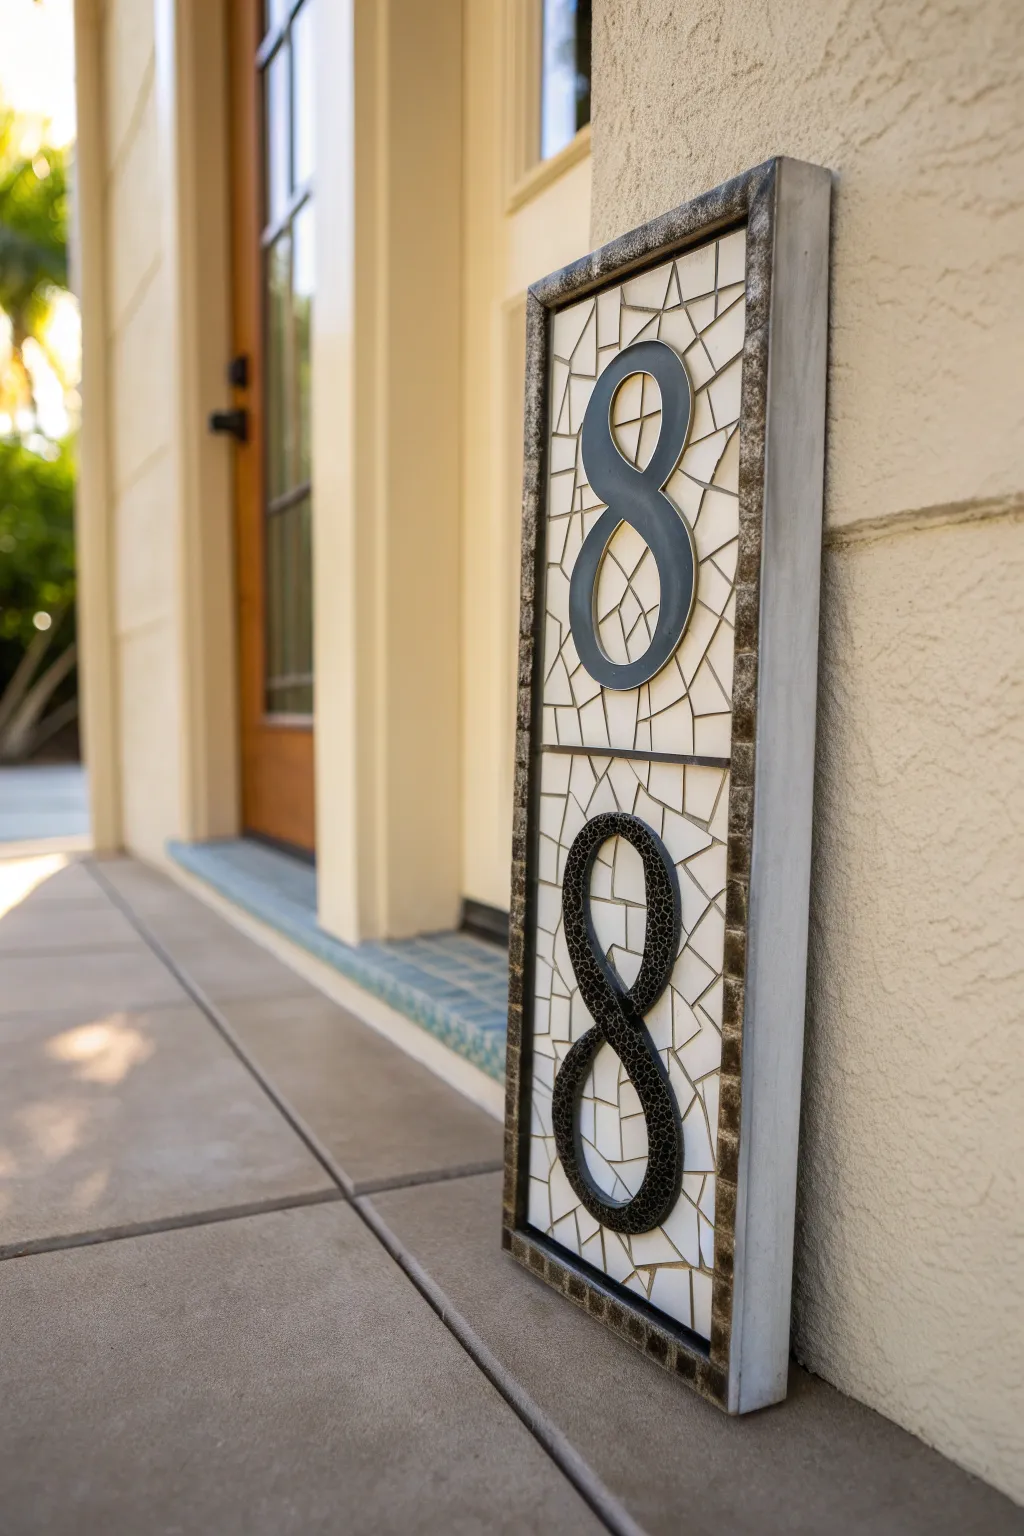
Elevate your home’s curb appeal with this sophisticated vertical house number plaque featuring a shattered ceramic mosaic background. The contrasting dark numbers against the textured white tiles create a timeless, handcrafted look that’s visible from the street.
Step-by-Step Guide
Materials
- Vertical rectangular tray frame (metal or wood with a 1-inch lip)
- White or cream ceramic tiles
- Two large metal or acrylic house numbers (black or dark bronze)
- Tile nippers (wheeled nippers work best)
- Thin-set mortar or appropriate tile adhesive
- Sanded grout (light grey or taupe)
- Rubber grout float
- Sponge and bucket of water
- Strong exterior adhesive (like E6000 or silicone)
- Safety glasses
- Gloves
- Soft cloth for buffing
- Sealant (optional, for outdoor weatherproofing)
Step 1: Preparation & Layout
-
Frame Selection:
Choose a narrow, vertical rectangular tray frame that accommodates your house numbers with at least an inch of space above, below, and between them. If using a wooden tray, seal it first to prevent moisture damage. -
Dry Fitting:
Place your large metal numbers directly into the empty frame to determine their ideal spacing. Use a pencil to lightly mark their approximate positions on the base, but don’t glue them down yet—you need to build the mosaic first. -
Tile Breaking:
Put on your safety glasses. Wrap your white ceramic tiles in an old towel or canvas cloth and strike them gently with a hammer to create large shards. Alternatively, use wheeled nippers to cut more controlled, irregular geometric shapes. -
Sorting Pieces:
Sort through your broken pieces, discarding any dust or tiny crumbs. Look for pieces with at least one flat factory edge to use along the borders of your frame for a cleaner finish.
Pro Tip: Flat Mounting
Before gluing numbers, lay them on the dry tiles. If a tile bump makes them wobble, use a file or coarse sandpaper to grind that high spot down for a flush mount.
Step 2: Creating the Mosaic Field
-
Applying Adhesive:
Spread a layer of thin-set mortar or tile adhesive onto a small section of the frame base, starting at the top. Aim for a thickness of about 1/8 inch. -
Placing Border Tiles:
Start by placing pieces with straight factory edges along the inner walls of the frame. This creates a neat perimeter and makes filling the center easier. -
Filling the Field:
Working inwards from the edges, adhere your irregular white shards. Leave a gap of roughly 1/8 to 1/4 inch between each piece for the grout lines. It’s like a puzzle where pieces don’t need to fit perfectly. -
Navigating the Number Areas:
The image shows the numbers mounting on top of the mosaic, but depending on your hardware, you might need flat spots. I usually ensure I have relatively flat tile pieces where the numbers will rest so they don’t rock. -
Checking for Level:
As you work, periodically run your hand or a flat block of wood over the tiles to ensure they are all at the same height. Press down any pieces that are sticking up too high. -
Drying:
Once the entire background is covered with your mosaic tesserae, let the adhesive cure completely. This typically takes 24 hours, depending on your product instructions.
Level Up: Night Mode
Use solar-powered backlit house numbers or mix glow-in-the-dark powder into your grout for visibility that automatically activates when the sun goes down.
Step 3: Grouting & Finishing
-
Mixing Grout:
Mix your sanded grout with water until it reaches a consistency similar to peanut butter or thick cake frosting. A light grey or taupe color will add subtle contrast without overpowering the white tiles. -
Applying Grout:
Scoop the grout onto the mosaic surface. Use a rubber float to spread it across the tiles, pressing firmly at a 45-degree angle to force the grout into all the crevices and gaps. -
Removing Excess:
Scrape off the bulk of the excess grout with the edge of your float. Let the grout set for about 15-20 minutes until a haze forms on the tile surface. -
Cleaning:
Dampen a sponge (wring it out very well so it’s barely wet) and gently wipe the surface in circular motions to clean the tiles and smooth the grout lines. Rinse the sponge frequently. -
Final Polish:
Once dry, a dusty haze might remain. Buff the tiles with a clean, dry soft cloth to make them shine. If the plaque is going outside, apply a clear grout sealer after it has fully cured (usually 2-3 days). -
Mounting the Numbers:
Now for the main event. Apply a strong exterior-grade adhesive (like silicone or heavy-duty construction adhesive) to the back of your house numbers. -
Securing the Numbers:
Press the numbers firmly onto the finished mosaic surface in the positions you marked earlier. You may need to use painter’s tape to hold them in place while the adhesive cures. -
Sealing the Frame:
If there is any gap between your mosaic and the frame edge, you can run a thin bead of clear silicone caulk to prevent water ingress, ensuring your beautiful new sign lasts for years.
Hang your new handcrafted plaque near your front door and enjoy the classic welcome it provides to every visitor

PENCIL GUIDE
Understanding Pencil Grades from H to B
From first sketch to finished drawing — learn pencil grades, line control, and shading techniques.
Explore the Full Guide
Mosaic Birdbath Rim Accents
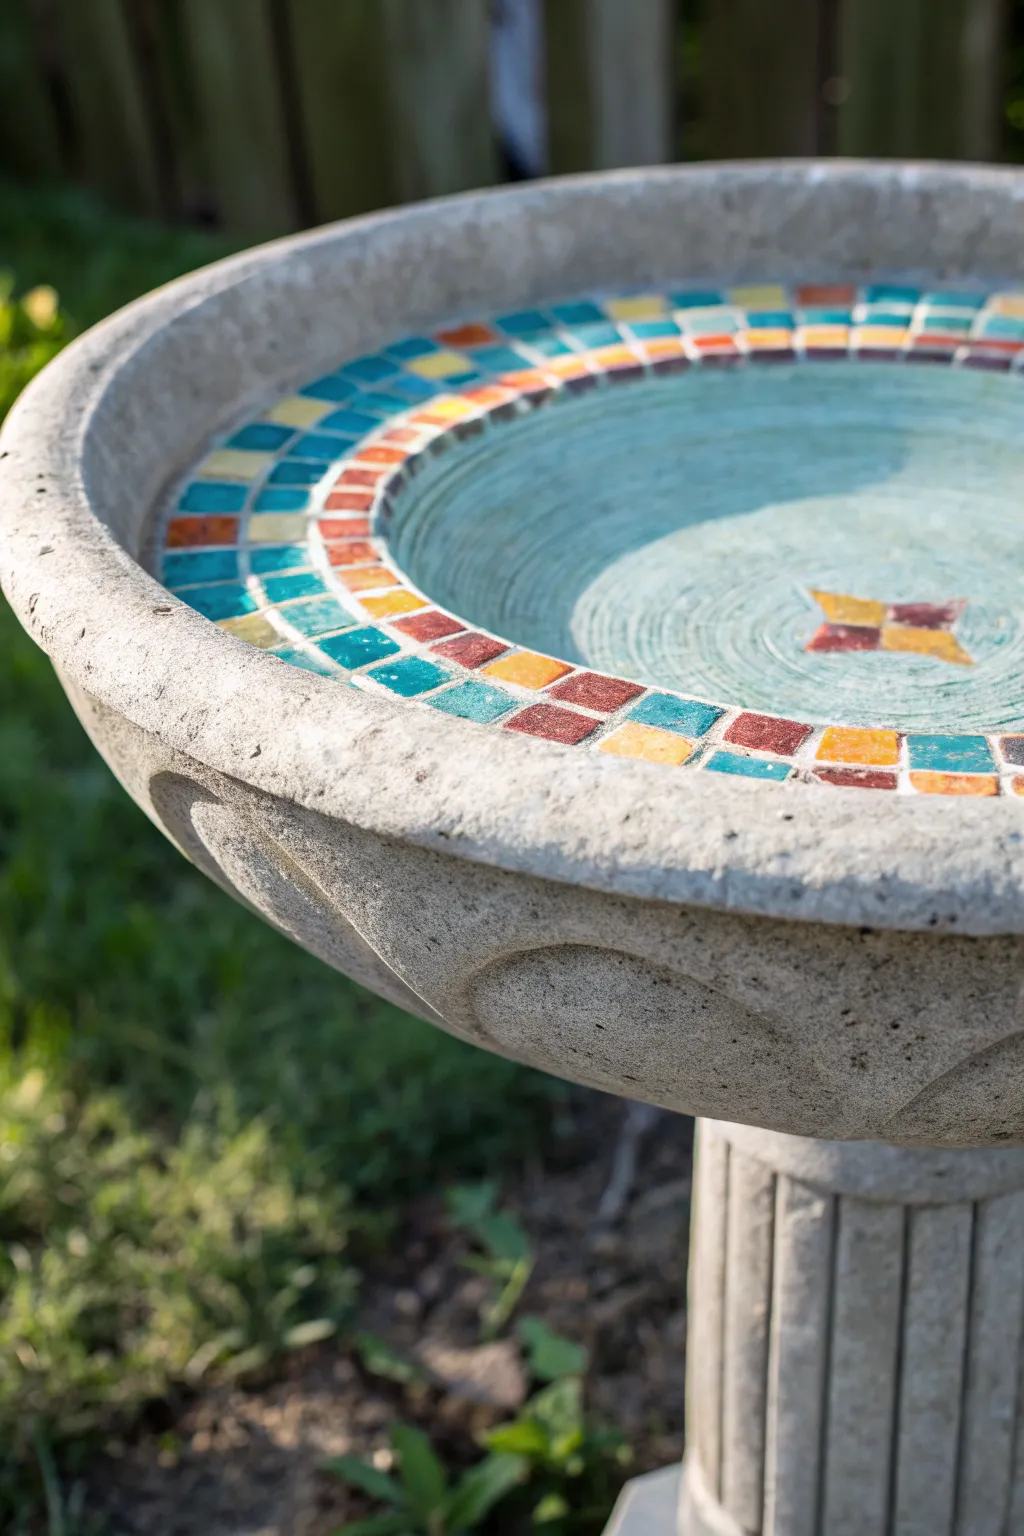
Transform a plain concrete birdbath into a vibrant garden focal point by adding a colorful geometric rim. This project uses small, square glass tiles to create a cheerful, sun-drenched pattern that perfectly frames the water basin.
How-To Guide
Materials
- Concrete birdbath (plain, clean)
- Vitreous glass mosaic tiles (3/4 inch squares): teal, turquoise, yellow, orange, russet red
- Tile nippers (wheeled nippers work best)
- Waterproof silicone adhesive (clear) or thin-set mortar
- Sanded grout (light grey or off-white)
- Grout sealer
- Masking tape or painter’s tape
- Sponge and bucket of water
- Clean rags
- Rubber gloves
- Safety glasses
Step 1: Preparation & Planning
-
Clean surface:
Scrub the birdbath bowl thoroughly with snappy water and a stiff brush to remove any algae, dirt, or moss. Let it dry completely in the sun for at least 24 hours to ensure good adhesion. -
Sort tiles:
Separate your glass tiles by color. For this specific look, you’ll need two shades of blue/teal, a sunny yellow, a bright orange, and a russet red-brown. -
Dry run design:
Before gluing anything, place a few tiles on the rim to check spacing. You want to see how many rows of full tiles will fit comfortably on the flat ledge of your birdbath.
Step 2: Rim Installation
-
Apply outer ring adhesive:
Starting at the very outer edge of the rim, apply a small bead of silicone adhesive or a thin layer of thin-set mortar. Work in short sections of about 6 inches at a time. -
Place outer tiles:
Press square tiles firmly into the adhesive. Create a repeating pattern; for example, alternate between teal, turquoise, and yellow. Keep the spacing tight but leave a small gap for grout. -
Continue the circle:
Work your way around the entire circumference. If the last tile doesn’t fit perfectly, use your nippers to trim a few adjacent tiles slightly smaller to create space without disrupting the pattern visual. -
Start the inner ring:
Move inward to place the second row of tiles. Stagger the joints so they don’t line up perfectly with the outer row, creating a brick-lay effect, or align them for a grid look depending on your preference. -
Color variation:
Shift your color palette slightly for this inner ring. I prefer to introduce more warm tones here, like the orange and russet, to contrast with the cooler outer blues. -
Nip tapered cuts (optional):
Because the inner circle is smaller than the outer one, square tiles might gap awkwardly. Use wheeled nippers to slightly taper the sides of the tiles into subtle keystones for a tighter fit. -
Complete the rim:
Continue placing tiles until the rim is fully covered. Ensure the tiles sit flush with the concrete edge so they don’t create a sharp lip.
Sticky Situation?
If tiles slide down the curved surface while drying, use masking tape to hold them in place until the adhesive sets sufficiently.
Step 3: Central Star Accent
-
Cut diamond shapes:
Select four tiles: alternating colors like yellow and red-brown. Use your nippers to cut them into triangles or diamond shapes. -
Center placement:
Find the absolute center of the basin. Glue the four pieces down with their points meeting in the middle to form a four-pointed star. -
Curing time:
Allow all adhesive to cure for at least 24 hours. Do not disturb the birdbath during this time to prevent tiles from sliding.
Level Up
Add a third ring of tiny mirror tiles between the colored rows. The mirrors will catch the sunlight and water reflections for extra sparkle.
Step 4: Grouting & Finishing
-
Protect the bowl:
Tape off the concrete area below the rim to prevent grout from staining the main basin area unnecessarily. -
Mix grout:
Mix your sanded grout with water until it reaches the consistency of peanut butter. It should hold its shape but be spreadable. -
Apply grout:
Wearing gloves, smear the grout over the tiles, pressing it firmly into all the crevices. Ensure every gap is filled completely. -
Wipe excess:
Wait about 10-15 minutes for the grout to haze over. Use a damp (not dripping) sponge to gently wipe away the excess grout from the tile faces. -
Final buffing:
Once the grout is dry to the touch (another hour or so), buff the tiles with a clean, dry rag to remove the remaining haze and make the glass shine. -
Seal:
After the grout has cured for 2-3 days, apply a penetrating grout sealer to protect the work from water damage and freezing temperatures.
Fill your newly decorated birdbath with fresh water and watch as the birds enjoy their colorful oasis
Geometric Pathway Pavers

Transform a plain garden path into a stunning focal point with this intricate geometric paver design. Evoking the charm of classic quilt patterns, this project uses contrasting colored pavers to create a sophisticated, repeating diamond and star motif that guides the eye down the walkway.
Step-by-Step
Materials
- Concrete pavers (Beige/Tan rectangular border stones)
- Concrete pavers (Red/Terra Cotta square stones)
- Concrete pavers (Dark Green/Slate triangular stones)
- Concrete pavers (Beige/Tan rectangular field stones)
- Crushed gravel base material (Class 5 or similar)
- Bedding sand
- Concrete or plastic edge restraints
- Polymeric joint sand
- Plate compactor
- Masonry saw or angle grinder with diamond blade
- Spirit level
- Rubber mallet
- String line and stakes
Step 1: Site Preparation and Base
-
Mark layout:
Begin by marking the perimeter of your walkway using stakes and string lines. Ensure the width accommodates your specific pattern repetition plus the borders to minimize cuts later. -
Excavate soil:
Dig out the soil to a depth of approximately 7-9 inches. This allows room for a 4-6 inch gravel base, 1 inch of sand, and the height of the pavers themselves. -
Compact the subgrade:
Run a plate compactor over the soil to ensure a solid foundation. If the soil is dry, I like to dampen it slightly to help with compaction. -
Add gravel base:
Spread your crushed gravel base material in 2-inch lifts (layers). Compact each layer thoroughly before adding the next one until you reach the desired base height. -
Screed the sand:
Lay down 1-inch screed rails (like PVC pipe) and pour the bedding sand between them. Drag a straight board across the rails to create a perfectly flat, smooth surface. Do not compact this sand layer yet.
Pattern Planning Pro-Tip
Dry-lay one full ‘quilt square’ of your pattern on a tarp before digging. Measure its exact width to determine your final path width, saving you from making dozens of sliver cuts later.
Step 2: Laying the Pattern
-
Install the gray border:
Start by laying the dark gray soldier course (the outermost border) along the edge restraints. Use a string line to keep this absolutely straight, as it frames the entire artwork. -
Lay the inner cream border:
Just inside the gray border, install the row of beige rectangular pavers in a running bond (end-to-end) orientation. This creates a bright frame for the geometric center. -
Establish the centerline:
Run a string line directly down the center of the path. This is crucial for symmetry. The points of your large central diamonds must align perfectly with this line. -
Place the central diamonds:
Begin the pattern by placing the four beige rectangular stones that form the outline of the large central diamonds. Ensure the corners touch precisely. -
Fill the centers:
Drop the red square pavers into the center of the beige diamond outlines. These specific pavers have a diagonal score line; orient them so the visible lines create dynamism in the pattern. -
Add triangular accents:
Place the dark green triangular pavers at the points where the large beige diamonds meet. These create the ‘star’ effect between the main blocks. -
Form the X motifs:
Between the large diamonds, use four green triangular pavers to create square ‘X’ blocks. These act as spacers and visual connectors between the larger quilt blocks.
Level Up: Night Mode
Install low-voltage LED paver lights replacing a few of the small dark green triangles. This illuminates the geometric pattern at night for a dramatic, glowing pathway effect.
Step 3: Cutting and Finishing
-
Mark cuts:
You will likely need to cut stones where the diagonal pattern meets the straight inner border. Place the stone to be cut over the gap, mark the line with a pencil, and double-check the angle. -
Cut the pavers:
Wear safety gear and use a masonry saw or angle grinder with a diamond blade to make your cuts. Clean cuts are essential for the professional look of this geometric design. -
Set the edges:
Install your edge restraints tightly against the outer gray border pavers and spike them into the ground to prevent lateral shifting. -
Final compaction:
Sweep the surface clean, then run the plate compactor over the pavers. Use a protective pad on the machine to avoid scuffing the colored stones. This seats the pavers into the sand bed. -
Apply joint sand:
Spread polymeric sand over the designated area. Sweep it into the joints at 45-degree angles. Use a blower to remove every speck of dust from the stone surfaces before wetting. -
Activate the sand:
Mist the walkway with water according to the polymeric sand manufacturer’s instructions to harden the joints and lock everything in place.
Enjoy the sophisticated look of your new custom walkway, knowing you’ve built a durable piece of functional art


Beach Scene With Shell Details
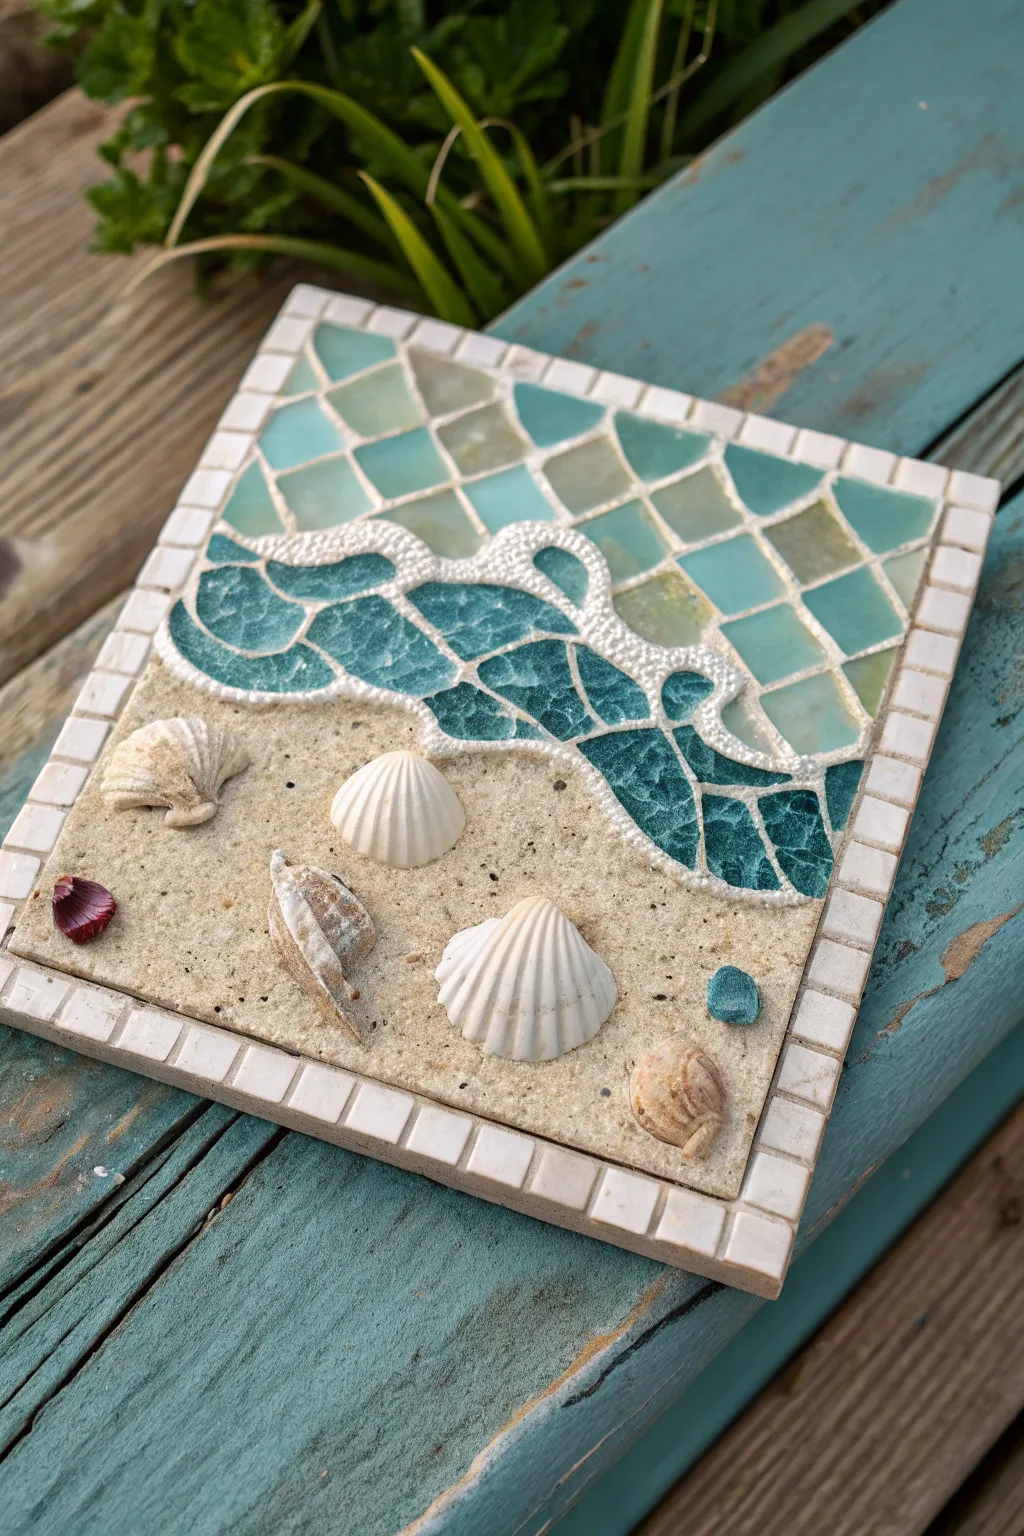
Capture the calming essence of the shore with this mixed-media mosaic that combines traditional glass tiling with natural textures. By blending sandy grout with real seashells and sea glass, you’ll create a tactile 3D snapshot of a perfect beach day.
Step-by-Step
Materials
- Square plywood or MDF base (approx. 8×8 inches)
- Small white ceramic mosaic tiles (for border)
- Stained glass sheets or pre-cut tesserae (dark turquoise, light aqua, pale blue, tan/beige)
- Wheel nippers (glass cutters)
- Weldbond adhesive or mosaic glue
- Real seashells (various sizes)
- Sanded grout (sand color or off-white)
- White sand (optional for texture)
- Palette knife or small trowel
- Sponge and water bucket
- Small stiff-bristled brush
- Protective eyewear
Step 1: Setting the Scene
-
Prepare the base:
Ensure your wooden base is clean and dry. If you are planning to hang this later, attach your hanging hardware to the back now so you don’t have to hammer against the finished mosaic later. -
Create the border:
Begin by gluing the small white square ceramic tiles around the entire perimeter of the board. Keep the spacing consistent, leaving about 1/16th of an inch between each tile for grout. This frames your scene perfectly. -
Sketch the wave line:
Lightly pencil a wavy line across the middle of the board. This separates where your sand section ends and the deep ocean begins. Make it organic and flowing, not a straight line.
Sticky Situation?
If shells keep sliding out of the wet grout, they may be too heavy. Put a dab of glue on the back of the shell before pressing it into the wet grout for an immediate hold.
Step 2: Cutting and Placing Glass
-
Cut the deep water tiles:
Using your wheel nippers, cut the dark turquoise stained glass into irregular shapes. These pieces should be slightly curved or triangular to mimic the movement of chopping waves. -
Place the wave section:
Apply adhesive to the back of the dark turquoise pieces and place them along your pencil line. Follow the curve you drew, creating a band of ‘deep water’ that is about 1.5 to 2 inches thick. -
Cut the sky tiles:
Switch to your lighter aqua and pale blue glass. Cut these into rough squares or diamonds. I like to keep these pieces slightly larger than the wave pieces to create a sense of distance. -
Fill the sky:
Glue the lighter tiles into the top section of the board, filling the space between the dark waves and the top white border. Leave small, irregular gaps between the glass pieces to be filled with grout later. -
Let it cure:
Check that all glass pieces are secure. Allow the adhesive to dry completely according to the manufacturer’s instructions, usually at least 24 hours, before moving to the messy part.
Make It Sparkle
Mix a pinch of iridescent fine glitter into the grout used for the ‘seafoam’ wave line. It will catch the light subtly and mimic wet, glimmering bubbles.
Step 3: Creating the Sand and Texture
-
Mix the sandy base:
Mix a small batch of sanded grout. You want a very thick, peanut-butter consistency. For extra texture, you can mix a little extra white craft sand directly into the grout. -
Apply the beach:
Using a palette knife, spread a thick layer of the sand-colored grout onto the bottom empty section of the board. Apply it thicker than normal grout—about 1/4 inch deep—so it acts like a bed of real sand. -
Embed the shells:
While the bottom grout is still wet and pliable, press your seashells firmly into it. Push them deep enough so the grout hugs the edges, locking them in place. Add a few tiny pebbles or sea glass bits if desired. -
Texture the sand:
Take an old stiff brush or a crumpled piece of plastic wrap and gently dab the wet grout around the shells. This removes the smooth trowel marks and makes it look like natural, grainy beach sand.
Step 4: Grouting the Scene
-
Prepare standard grout:
Mix a fresh batch of grout for the glass sections. You can stick with the sand color for continuity, or use a plain white grout if you want the blue glass to pop more brightly. -
Grout the sky and waves:
Spread the grout over the glass sections and the white border. Press it firmly into the crevices between the tiles using a rubber float or your gloved fingers. -
Create the seafoam:
This is the signature detail: where the dark waves meet the sky, build up a slightly thicker line of white or very pale grout. Stipple it with a brush to create a 3D ‘foamy’ crest effect along the wave line. -
Initial cleaning:
Wait about 15-20 minutes for the grout to haze over. Gently wipe the glass tiles clean with a damp (not soaking) sponge. Be extremely careful near the ‘foam’ line and the bottom sandy section so you don’t flatten the textures. -
Final polish:
Once dry, use a soft cloth to buff any remaining haze off the glass tiles, making them shine like sun on water.
Now you have a permanent slice of summer to display on your shelf all year round
Abstract Pixel Landscape Mosaic
Capture the serene beauty of rolling hills and layered horizons with this charming micro-mosaic project. Using tiny, square tiles in soothing earth tones and blues, you will build a textured, abstract landscape that feels both modern and timeless.
Step-by-Step Tutorial
Materials
- Small square mosaic tiles (approx. 5-8mm) in: dark green, sage green, mint green, teal, navy blue, light blue, rust/brown, beige, and cream
- Square substrate base (wood or sturdy MDF, approx. 6×6 inches)
- Mosaic adhesive (Weldbond or similar PVA glue)
- Tweezers (angled or precision)
- Small paintbrush (for glue application)
- Green acrylic paint (matching the border tiles)
- Tile nippers (optional, mostly for fitting edges if needed)
- Clear sealant or varnish (matte finish)
Step 1: Preparation and Border
-
Prepare the Substrate:
Begin by painting the edges of your wooden substrate with dark green acrylic paint. This ensures that if any gaps show through on the finished sides, they blend seamlessly with the border. -
Sort Your Palette:
Organize your micro-tiles by color families. You’ll need dark forest greens for the frame, sage and mint for the hills, blues for the water or shadows, and creams/beiges for the sky and foreground. -
Create the Frame:
Start gluing a border of dark green tiles around the entire perimeter of the square face. Place them flush with the edge, ensuring the corners meet neatly. I find laying this boundary first helps contain the rest of the design.
Step 2: Building the Sky and Hills
-
Establish the Horizon:
Visualizing the top horizontal section (the sky), apply a thin line of adhesive and place a row of mixed beige, cream, and apricot-colored tiles just inside the top border. -
Second Sky Row:
Directly beneath the first sky row, place another horizontal line of similar warm neutrals. Keep the grout lines tight but not touching. -
Transition to Hills:
Switch to your pale sage green tiles. Create a horizontal band across the width of the piece, introducing a slight ‘step’ down on the right side to begin hinting at a slope. -
Sage Green Layer:
Add another full row of sage green and grey-green tiles below the previous one. These tiles should start to stagger slightly rather than being in a perfect grid, creating a more organic brick-lay pattern. -
Introduction of Teal:
Begin the next section with mint and teal tiles. Instead of a straight line, angle this row slightly upward from left to right, creating the first distinct hill shape. -
The Rolling Slope:
Fill the area below the teal line with darker forest green tiles. Arrange them in a diagonal sweep that moves from the middle-left down toward the bottom-right.
Tweezer Technique
Hold tiles by their sides, not the top/bottom faces. This gives you a clear view of exactly where you are placing the square, ensuring tight, straight lines.
Step 3: Adding Depth and Foreground
-
The Blue Band:
Underneath the dark green slope, introduce a striking band of blue tiles. Use light blue at the top of this band and transition into deep navy blue tiles as you move lower, mimicking shadow or water. -
Earthy Accents:
Create a thin, sharply angled line of rust or brown tiles cutting diagonally across the bottom third. This adds a nice pop of contrasting warmth. -
Foreground Layers:
Fill the remaining bottom right corner with cream and beige tiles to represent the sandy foreground. Angle these rows to follow the slope of the brown line. -
Fitting the Edges:
If your rows have created triangular gaps against the straight side borders, use your nippers to trim tiles into small triangles to fill these spaces flush against the frame.
Uneven Lines?
If a row starts drifting crooked, don’t panic. Insert a slightly smaller or larger tile from your pile to correct the alignment without restarting the whole row.
Step 4: Finishing Touches
-
Tightening Gaps:
Before the glue sets completely, use your tweezers to gently nudge tiles closer together if any gaps look too wide. The aesthetic relies on tight spacing without grout. -
Cleaning Up:
Check for any excess glue that may have squeezed up between tiles. Use a toothpick or clean brush to wipe it away while it’s still tacky. -
Final Seal:
Once the adhesive is fully cured (usually 24 hours), brush a coat of matte varnish over the entire surface. This seals the un-grouted cracks and deepens the tile colors slightly.
Display your miniature landscape on a small easel or shelf to bring a moment of calm to your space
Mosaic Lettering and Monograms
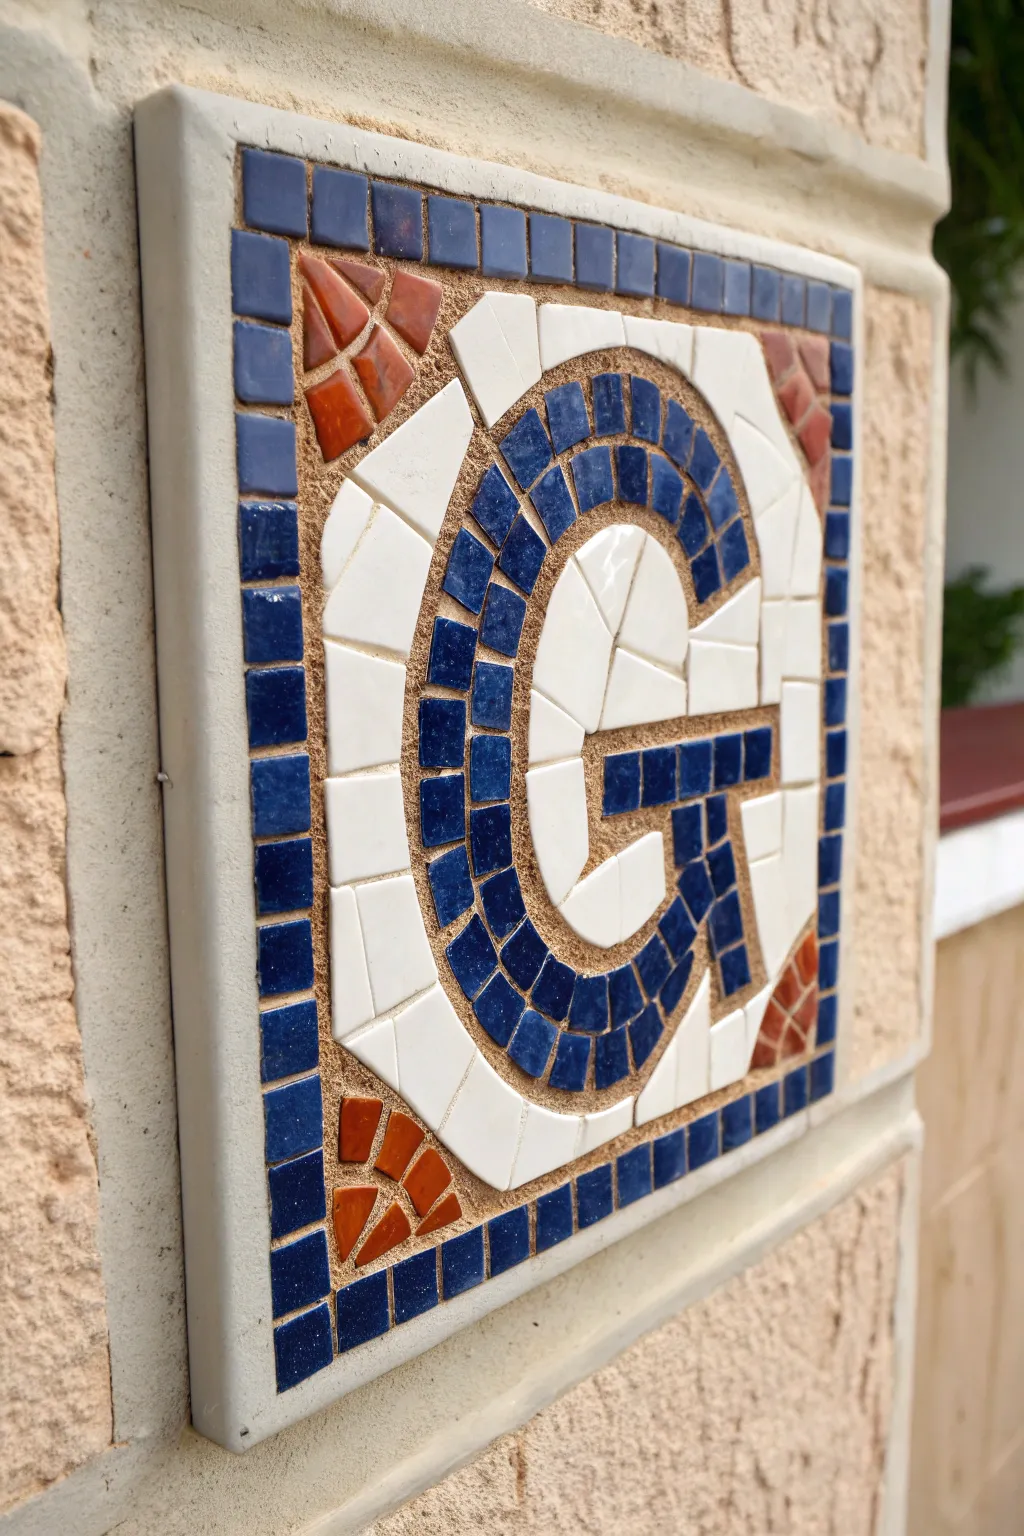
Bring an era of timeless elegance to your garden or entryway with this striking letter ‘G’ mosaic plaque. Composed of deep blue, terra cotta, and creamy white tesserae, this project mimics the sophisticated look of ancient Roman tiled floors.
How-To Guide
Materials
- Pre-cast concrete or cement paver base (square)
- Small vitreous glass tiles (Dark Blue) – approx. 1x1cm
- Ceramic or unglazed porcelain tiles (Cream/White) – varying shapes
- Ceramic or stained glass tiles (Terra Cotta/Rust Orange) – triangular shapes
- Thinset mortar (white or grey)
- Sanded grout (Sandy Beige/Tan color)
- Wheeled tile nippers
- Pencil and ruler
- Stencil or printed template of your chosen letter
- Notched trowel or palette knife
- Grout float or rubber spatula
- Sponge and bucket of water
- Clean rags
- Safety glasses
Step 1: Planning and Preparation
-
Prepare the Substrate:
Ensure your concrete paver is clean, dry, and free of dust. If the surface is very smooth, rough it up slightly with sandpaper to help the mortar adhere better. -
Mark the Border:
Using a ruler and pencil, draw a square border about 1/2 inch in from the edge of the paver. This will be the outer limit for your blue tile frame. -
Draft the Letter:
Place your stencil in the center of the framed area or sketch the letter ‘G’ freehand. Focus on creating a thick, blocky serif font that allows room for tile placement.
Uneven Surfaces?
If your tiles are different thicknesses (like glass vs. ceramic), ‘butter’ the back of the thinner tiles with extra mortar to raise them level with the thicker ones.
Step 2: Setting the Tiles (Tesserae)
-
Frame the Border:
Mix a small amount of thinset mortar. Apply it to the outer border lines and press the dark blue square tiles into place, creating a continuous single-row perimeter. -
Define the Letter Outline:
I usually start inside the letter itself to establish the shape. Use your nippers to cut the dark blue tiles into smaller rectangles or slightly tapered shapes to follow the curve of the ‘G’. -
Fill the Letter Interior:
Once the blue outline of the ‘G’ is set, continue filling the interior line with blue tiles. Notice how the tiles in the curve are set perpendicular to the flow, creating a specific directional movement called ‘andamento’. -
Add Decorative Corners:
In the four corners between the letter and the border, place your terra cotta pieces. Nip these into triangles or fan shapes to create a quadrant motif. -
Background Infill – Cutting:
The white background tiles need to fit specifically around your letter. Use wheeled nippers to shape the cream tiles into trapezoids and irregular quadrilaterals. -
Background Infill – Placement:
Apply mortar to the open background spaces. Press the cream tiles in, ensuring you leave consistent gaps between them for the grout. Don’t worry if the shapes are irregular; this adds to the ancient aesthetic. -
Check for Height:
Run your hand or a flat board gently over the surface to ensure all tiles are level. Press down any that remain sticking up too high before the mortar sets. -
Let it Cure:
Allow the adhesive to dry completely, following the manufacturer’s instructions—usually 24 to 48 hours.
Ancient Patina
To make the piece look like a recovered artifact, dab a diluted wash of dark brown acrylic paint into the beige grout lines after they are fully cured to simulate age.
Step 3: Grouting and Finishing
-
Choose the Right Grout:
For this textured look, select a sanded grout in a sandy beige or tan color. This mimics the limestone mortar seen in historical mosaics. -
Mix the Grout:
Combine the grout powder with water until it reaches the consistency of peanut butter. Let it slake (rest) for about 10 minutes, then mix again. -
Apply the Grout:
Spread the grout over the entire surface using a grout float or rubber spatula. Push firmly to ensure the grout fills every crevice between the irregular tiles. -
Clear Excess Grout:
Hold the float at a 45-degree angle and swipe diagonally across the mosaic to remove the bulk of the excess grout from the tile surfaces. -
First Sponge Wipe:
Wait about 20 minutes for the grout to haze over slightly. Dampen a sponge (wring it out well!) and gently wipe the surface in circular motions to shape the grout lines. -
Reveal the Texture:
Because the cream tiles have texture, some grout might get stuck in the pits. Use a stiff-bristled brush or toothbrush to gently scrub the face of the tiles while the grout is still semi-soft. -
Final Polish:
Once completely dry (another 24 hours), buff the tiles with a soft, clean cloth to remove any remaining haze and make the glass shine.
Mount your finished monogram on a garden wall or by your front door to greet guests with classic artistry
Pet Silhouette Mosaic Portrait
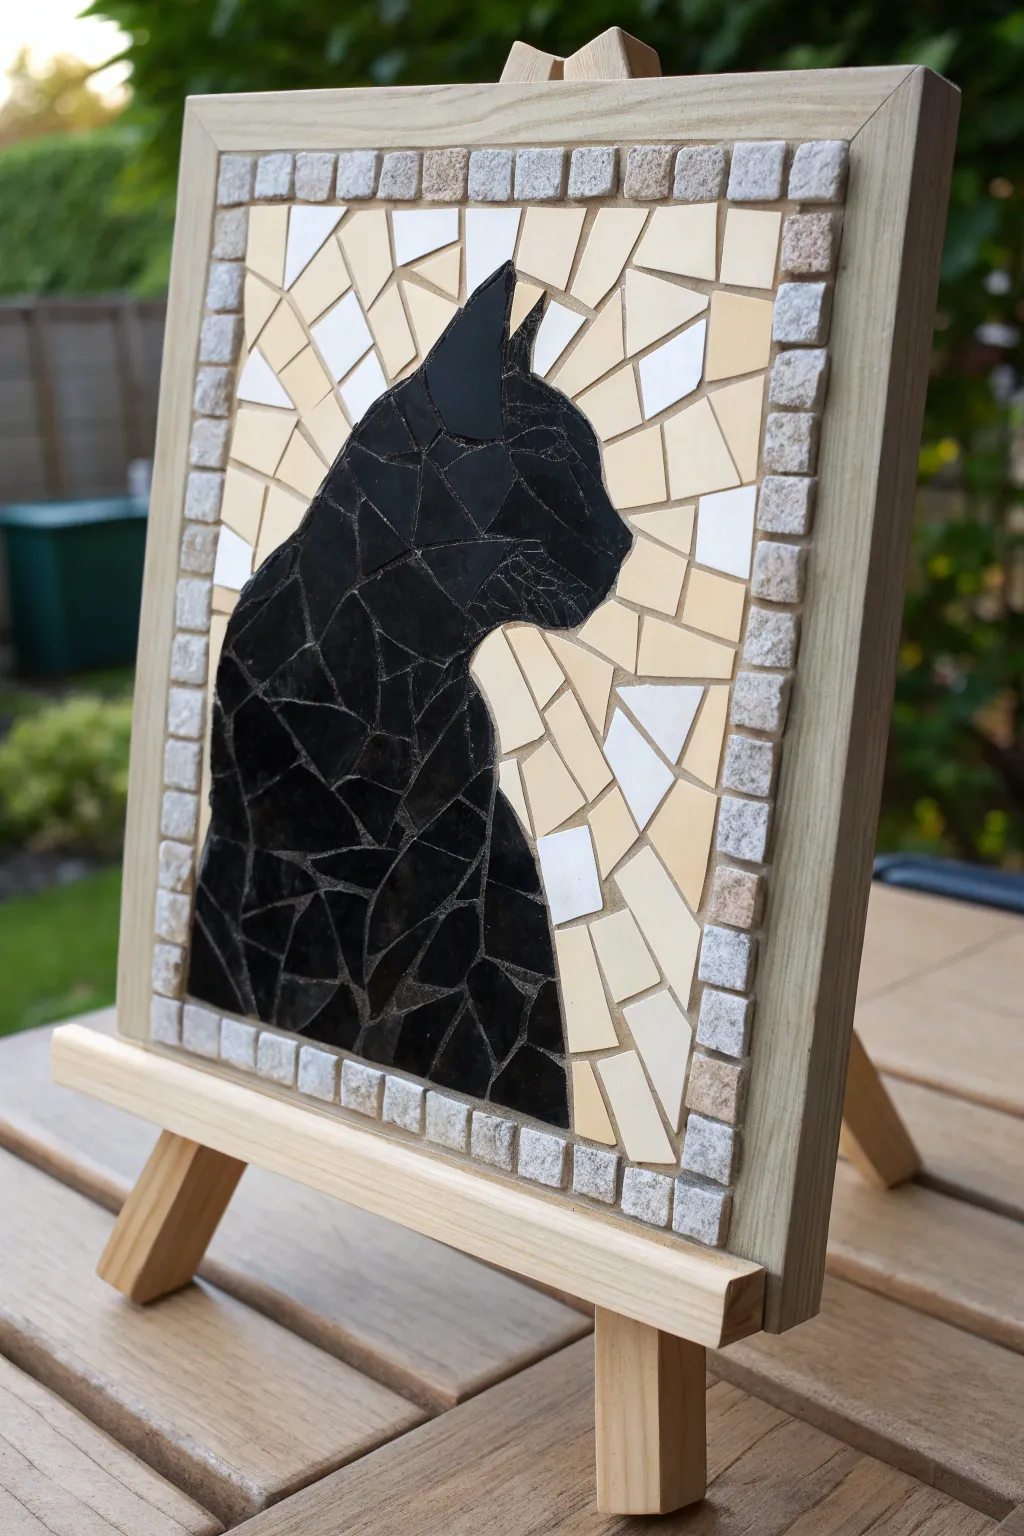
Immortalize your furry friend with this striking black cat mosaic, featuring a sleek silhouette against a radiating geometric background. Using simple ceramic or glass tiles, this project captures the elegance of a cat in profile with lovely contrasting textures.
Step-by-Step Tutorial
Materials
- Wooden frame (approx. 8×10 inches)
- Plywood backing board (cut to fit inside frame)
- Black ceramic tiles (glossy and matte mix)
- Cream and off-white ceramic tiles
- Small grey square stone tiles (for border)
- Tile nippers (wheeled nippers work best)
- PVA glue or Weldbond adhesive
- Black grout (sanded)
- Grout sponge & bucket
- Black acrylic paint (for touching up edges)
- Pencil and paper for template
Step 1: Preparation & Template
-
Secure the base:
Begin by firmly gluing your plywood backing board inside the wooden frame. Ensure there is a small lip or recess if you want the tiles to sit flush, though in this project, we are building directly onto a flat backing inserted into a frame rim. -
Create the border:
Arrange the small grey square stone tiles around the entire perimeter of the inner board. Glue them down one by one to establish a neat, rugged frame-within-a-frame. -
Draft the silhouette:
Sketch your cat’s profile on a piece of paper the same size as the interior space. Focus on the ears, the curve of the neck, and the shoulder line. -
Transfer the design:
Cut out your paper cat silhouette and trace the outline directly onto the wooden backing using a pencil. This guide is crucial for perfect placement.
Step 2: Creating the Cat
-
Nip the black tiles:
Using your tile nippers, cut the black ceramic tiles into random, sharp shards. Aim for a variety of triangles and irregular quadrilaterals. -
Define the outline:
Select pieces with at least one straight edge to line up along the pencil mark you drew. This creates a crisp, recognizable profile. -
Detail the ear:
For the ear, look for a sharp triangular piece. I find it helpful to use a single, larger shard here to keep the point distinct rather than using many tiny bits. -
Fill the body:
Glue the black shards into the interior of the cat shape. Leave very narrow gaps between them—much tighter than usual—to make the cat appear solid and dark. -
Check the fit:
Ensure the bottom edge of the cat sits flush against the bottom border of grey stones.
Cutting Clean Curves
For the curve of the cat’s head, use wheeled nippers to take tiny ‘bites’ off a tile piece. This creates a softer, rounded edge that fits the organic profile better than straight cuts.
Step 3: The Background
-
Prepare background tiles:
Nip your cream and off-white tiles into larger, chunkier trapezoids and triangles than you used for the cat. -
Radiate outwards:
Start placing these light tiles right next to the black cat outline. Angle them so they seem to radiate or ‘starburst’ away from the silhouette. -
Maintain spacing:
Leave slightly wider gaps between the background tiles compared to the cat’s body. This difference in spacing adds visual interest. -
Fill to the border:
Continue gluing pieces until you reach the grey stone border. You may need to nip specific shapes to fit the final gaps snugly against the grey squares. -
Dry time:
Allow the adhesive to cure completely. For most PVA glues, 24 hours is best to ensure pieces don’t shift during grouting.
Grout Haze on Rough Stone
The rough grey border stones hold onto grout. Tape them off with painter’s tape before grouting, or use a stiff toothbrush to scrub them clean immediately while the grout is wet.
Step 4: Grouting & Finishing
-
Mix the grout:
Prepare a small amount of black sanded grout. Since the cat is black, dark grout is essential to unify the silhouette and make the background pop. -
Apply the grout:
Spread the grout over the entire mosaic, pressing it firmly into the crevices. Don’t worry about getting it on the grey stones; it will wipe off. -
Clean surface:
After the grout sets for about 10-15 minutes, wipe the surface gently with a damp (not soaking) sponge to reveal the tiles. -
Final polish:
Once dry, use a soft cloth to buff away the remaining haze from the black and cream tiles. -
Paint touch-ups:
If necessary, create thin white whisker lines with a fine brush or specific ceramic paint, though the texture alone often implies them enough.
Place your finished piece on a display easel to catch the light and admire the sharp contrast of your work
Light-Catching Window Mosaic Panel
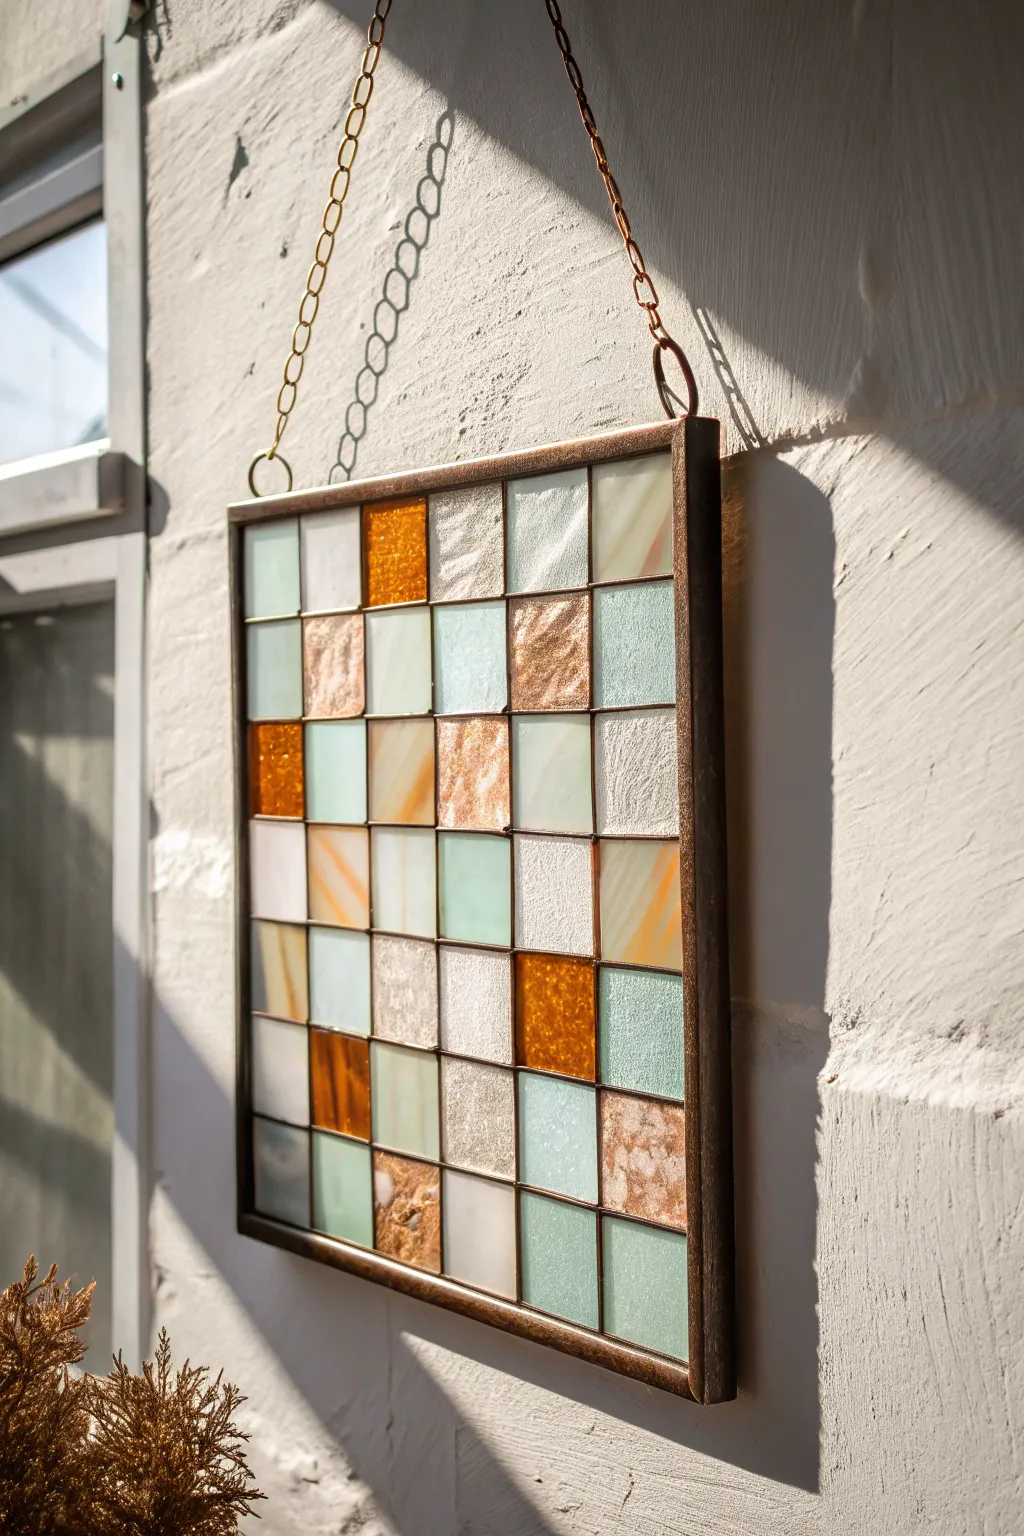
Capture the ethereal beauty of sunlight with this modern, grid-style mosaic panel. By combining semi-opaque frosted glass with textured amber and peach tones, you create a stunning interplay of light and shadow.
Detailed Instructions
Materials
- Square metal frame (e.g., bronze or copper finish, approx 12×12 inches)
- Sheet glass (colors: frosted white, seafoam green, textured amber, peach)
- Glass cutter and running pliers
- Metal grid insert or copper foil tape (depending on method)
- Clear silicone adhesive
- Grout (charcoal or dark grey, non-sanded)
- Sponge and soft cloths
- Metal eyelets or jump rings
- Metal hanging chain
- Pliers
- Protective gloves and eyewear
Step 1: Planning and Cutting
-
Measure the frame:
Begin by measuring the precise interior dimensions of your metal frame to determine the size of your grid. -
Calculate tile size:
If you are aiming for the 7×7 layout shown, divide your interior dimension by 7. Subtract about 1/16th of an inch from each tile to account for grout lines or the metal spacers. -
Score the glass:
Using your glass cutter, firmly score your glass sheets into strips according to your calculated width. Keep the pressure consistent for a clean break. -
Break into strips:
Use running pliers to snap the glass along the score lines, creating long rectangular strips. -
Cut squares:
Score these strips crosswise to create your individual square tiles. Group them by color to make layout easier.
Grid Precision
For perfectly straight lines without measuring every gap, draw your grid on a piece of graph paper and tape it under your clear glass base as a guide while gluing.
Step 2: Assembly and Arrangement
-
Dry fit the design:
Lay out your squares on a flat surface or template. Distribute the darker amber and peach tiles randomly to create balance, ensuring no two identical colors touch if possible. -
Prepare the frame:
Clean the inside of your metal frame with rubbing alcohol to ensure a strong bond. -
Secure the backing (if applicable):
If your frame has a glass backing, clean it thoroughly. If it’s an open frame, you will need to secure a clear glass substrate into the frame first to glue the tiles onto. -
Glue the tiles:
Apply a small dab of clear silicone adhesive to the back of each glass square. Press them firmly onto the glass backing, following your planned grid pattern. -
Mind the gaps:
Use tile spacers or simply eyeball equal spacing between the squares to ensure straight, uniform lines for grouting later. -
Let it cure:
Allow the silicone adhesive to cure fully, which usually takes 24 hours. I prefer to leave it in a warm, dry spot to ensure nothing shifts.
Step 3: Grouting and Finishing
-
Mix the grout:
Mix your non-sanded dark grey grout according to the package instructions until it reaches a peanut butter consistency. -
Apply grout:
Spread the grout over the entire surface, pressing it deeply into the gaps between the glass squares using a rubber float or gloved fingers. -
Clean the excess:
Wait about 10-15 minutes for the grout to set slightly, then wipe the surface gently with a damp sponge to remove excess grout from the glass faces. -
Final polish:
Once the grout is dry (another 24 hours), buff the glass tiles with a soft, dry cloth to remove any remaining haze. -
Attach hardware:
Using pliers, open the jump rings and attach them to the top corners of the metal frame. -
Add the chain:
Connect your decorative chain to the jump rings, ensuring the length is suitable for where you plan to hang the piece.
Variant Visuals
Experiment with different textures by using reeded or water-glass variations for the clear pieces. This changes how the background distorts when viewed through the panel.
Hang your finished panel in a sunny window and enjoy the shifting colors throughout the day

Have a question or want to share your own experience? I'd love to hear from you in the comments below!