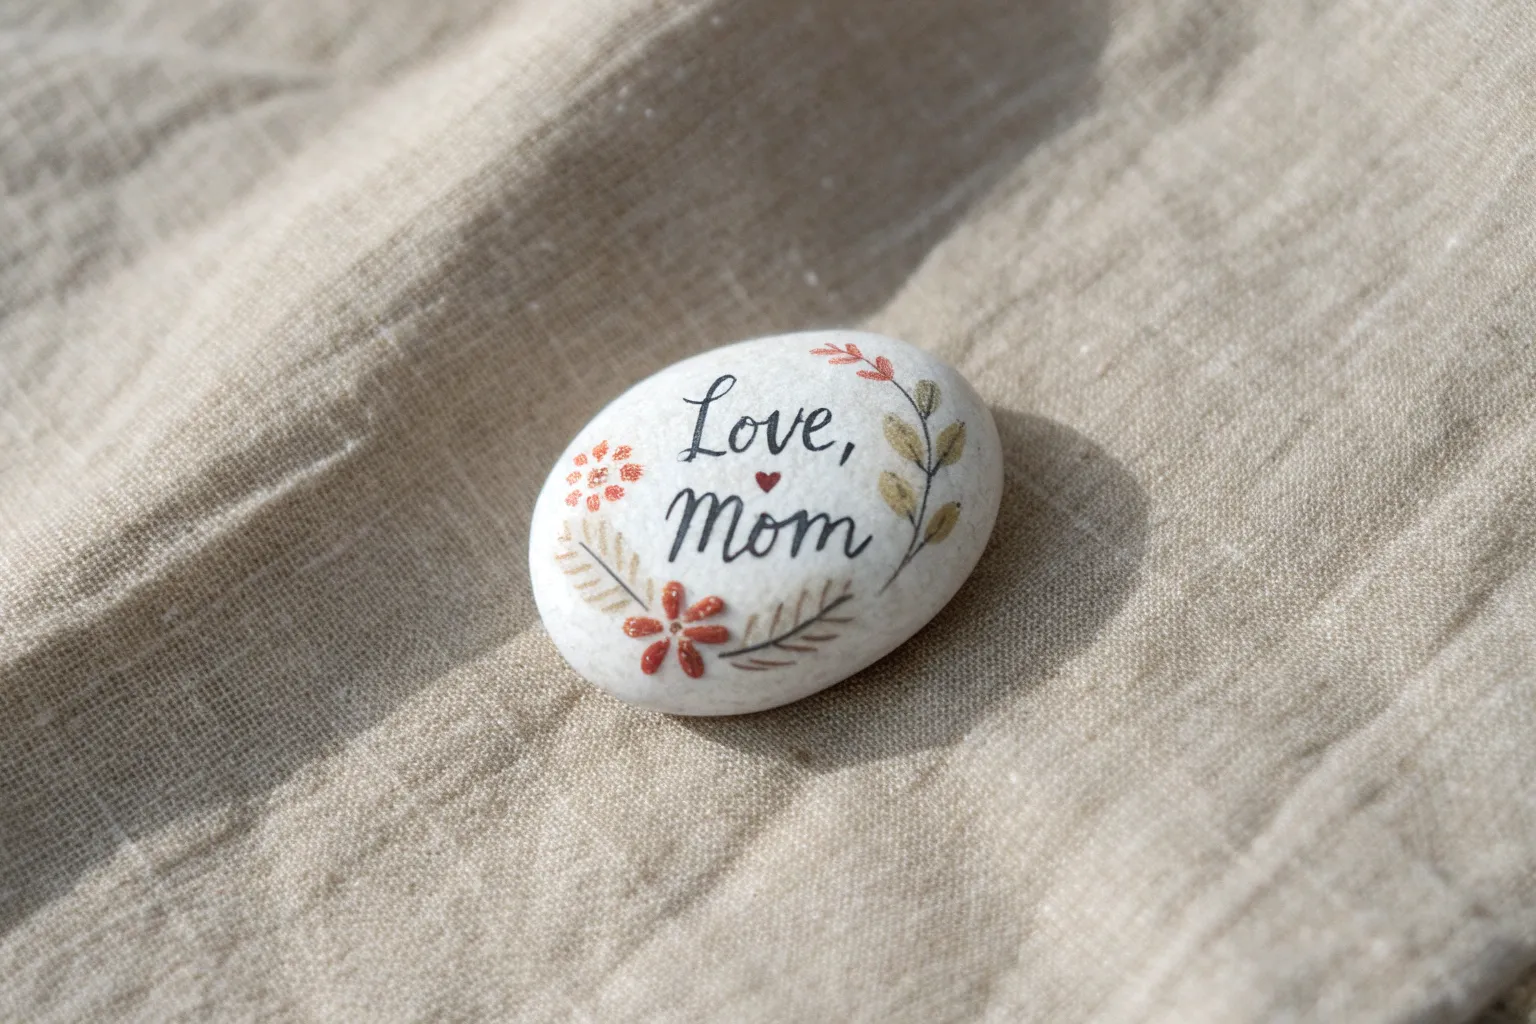
Mother’s Day rock painting is one of my favorite ways to turn a simple stone into a tiny keepsake that feels genuinely personal. These ideas are designed to be sweet, giftable, and totally doable—whether you’re painting solo or crafting with kids at the table.
Classic “Happy Mother’s Day” Lettered Rock
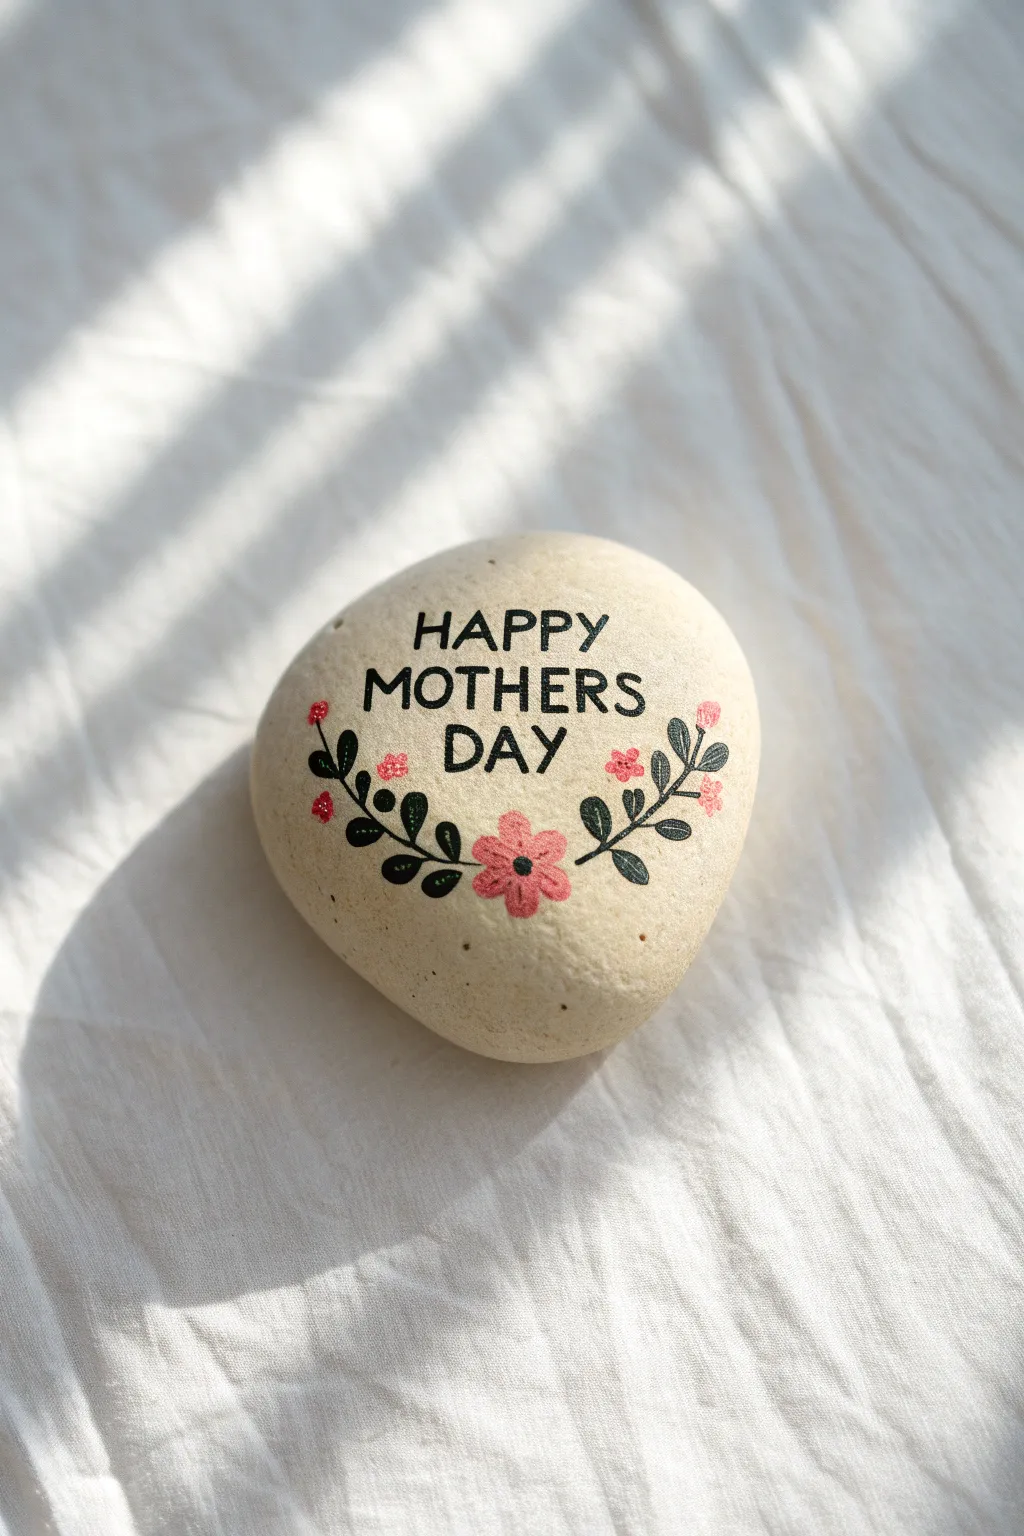
This elegant rock painting project combines crisp lettering with delicate floral touches for a sophisticated and heartfelt gift. The smooth, cream-colored surface of the stone serves as perfectly neutral canvas, allowing the black text and pink blossoms to pop beautifully.
Detailed Instructions
Materials
- Smooth river rock (flat surface preferred)
- Sandpaper (fine grit)
- Cream or beige acrylic paint (matte finish)
- Wide flat brush
- Pencil
- Fine-point black paint pen (0.5mm or 0.7mm)
- Medium-point black paint pen
- Pink acrylic paint (or pink paint pen)
- Red or dark pink acrylic paint (for flower centers)
- Small round detail brush (size 0 or 1)
- Matte spray sealer
Step 1: Preparation & Base Coat
-
Clean the stone:
Begin by washing your river rock with warm, soapy water to remove any dirt or oils. Use a stiff brush if needed to get into any crevices. -
Dry completely:
Allow the rock to dry fully. You can set it in the sun or use a hairdryer to speed up this process, as moisture trapped inside can ruin the paint later. -
Sand the surface:
If your rock has rough patches, lightly sand the top surface with fine-grit sandpaper. This creates a smoother canvas for your lettering. -
Apply base color:
Using a wide flat brush, paint the entire top surface with cream or beige acrylic paint. I usually apply two to three thin coats rather than one thick one to avoid brush strokes. -
Let it cure:
Ensure the base coat is completely dry to the touch before moving on to sketching.
Step 2: Lettering & Layout
-
Sketch the text:
Lightly sketch ‘HAPPY MOTHERS DAY’ in the center of the rock using a pencil. Arrange the words in three stacked lines, keeping the font simple and sans-serif. -
Outline the letters:
Trace over your pencil lines with a fine-point black paint pen. Go slowly to keep the lines steady and crisp. -
Thicken the strokes:
Go back over the letters with a medium-point black paint pen or slightly thicken the strokes with the fine point to give them more visual weight. -
Erase guidelines:
Once the black ink is totally dry, very gently erase any visible pencil marks remaining around the letters.
Pro Tip: Pencil Prep
Before painting, rub white chalk over the back of a printed design and trace it onto the rock. This transfers a faint guide without distinct graphite lines.
Step 3: Painting the Foliage
-
Draw the main stems:
Using the fine-point black pen, draw two curved lines stemming from the bottom center, curving upwards around the text like a laurel wreath. -
Add leave outlines:
Along these stems, draw small, oval-shaped leaves. Place them in pairs or alternating along the vine. -
Fill the leaves:
Color in the leaves with the black paint pen. For a solid look, you might need a second pass once the first layer of ink dries. -
Add detail stems:
Draw tiny, short stems or branching lines coming off the main vines where the flowers will sit.
Troubleshooting: Blobby Paint
If your paint pen releases a blob of ink, don’t wipe it! Let it dry completely, then paint over it with your cream base color and try again.
Step 4: Floral Details & Finishing
-
Paint main flowers:
Using pink paint and a small detail brush (or a pink paint pen), create a five-petaled flower right in the bottom center where the two vines meet. -
Add side blossoms:
Paint smaller pink flower clusters or buds near the ends of the vines and scattered sparingly along the stem. -
Add flower centers:
Dip the very tip of your brush (or use a toothpick) into darker pink or red paint. Dot the center of the main flower and add tiny dots to the smaller buds for depth. -
Wait for drying:
Let the floral details dry completely. If the pink looks too sheer against the cream background, carefully dab a second layer of pink on top. -
Seal the artwork:
Finish by spraying the rock with a matte sealer. Hold the can about 12 inches away and apply light, even mists to prevent the ink from running.
Place this charming stone on a desk or garden table as a lasting reminder of appreciation


“Mom, You’re My Rock” Pun Stone
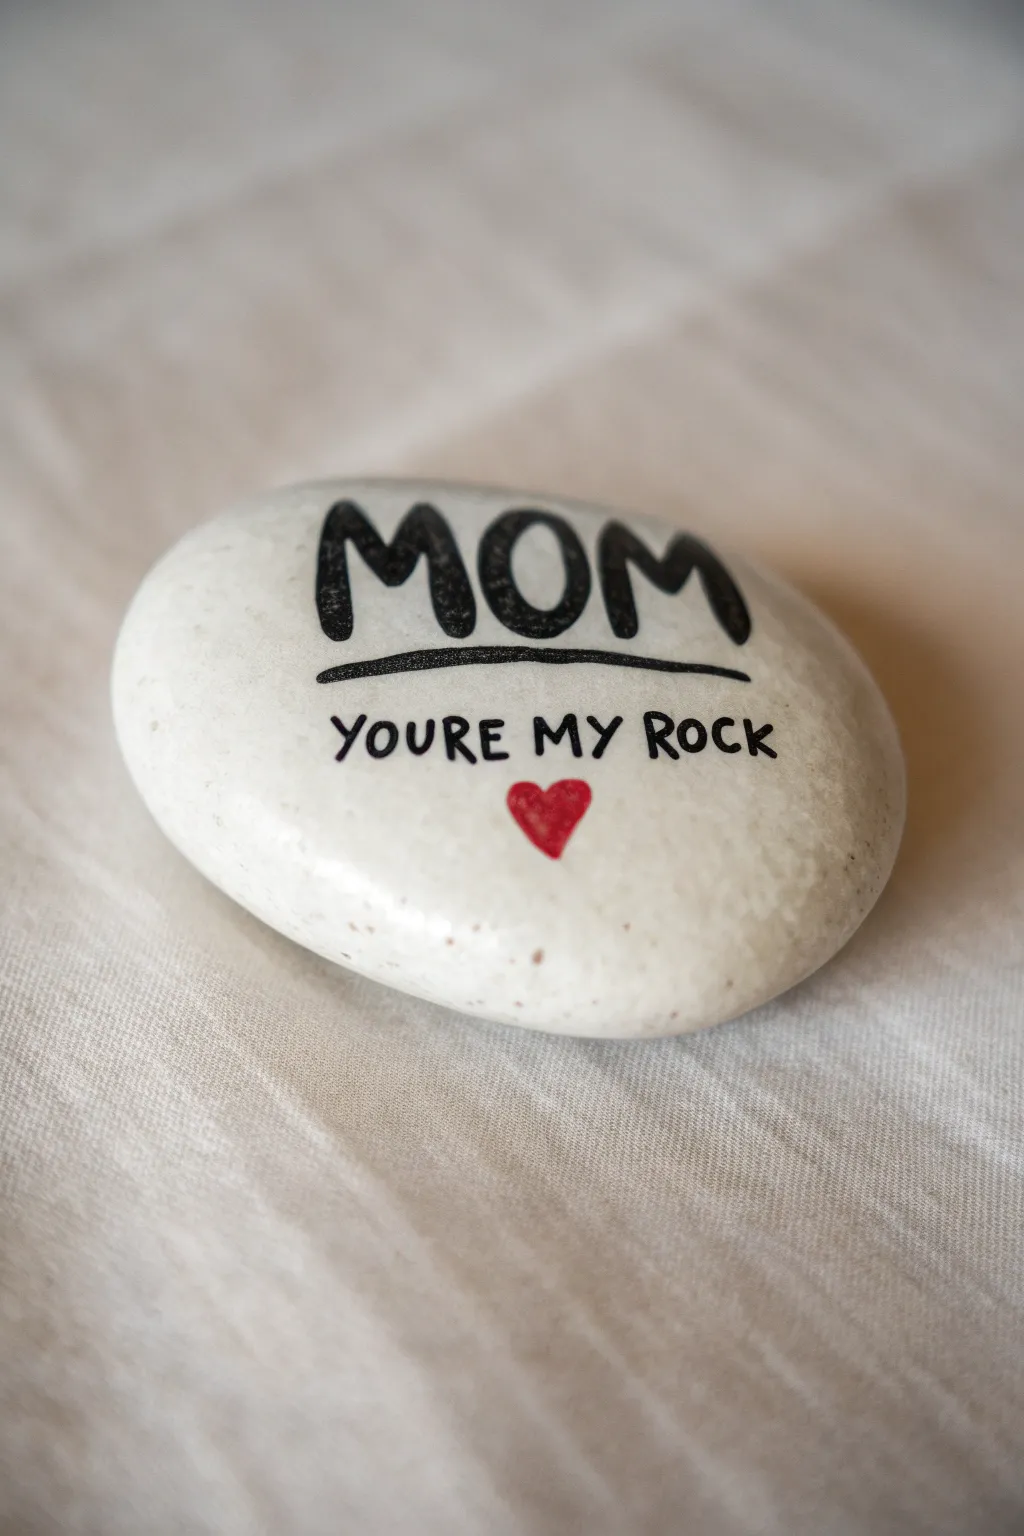
This clever and heartfelt gift combines a classic pun with a clean, modern aesthetic that any mom will cherish. Using a smooth white stone as your canvas makes the black lettering pop, creating a sophisticated little keepsake perfect for her desk or bedside table.
Step-by-Step
Materials
- Smooth, oval river rock (white or very light grey)
- Black acrylic paint pen (medium tip)
- Black acrylic paint pen (fine tip/extra fine tip)
- Red acrylic paint pen (fine tip) or small brush with red acrylic paint
- Pencil (HB or lighter)
- White eraser
- Paper towel or rag
- Mild soap and water
- matte sealant spray (optional)
Step 1: Preparation
-
Clean surface:
Begin by thoroughly washing your rock with mild soap and warm water. Remove any dirt or grit that could interfere with your pen tip, then let the stone dry completely. -
Test the stone texture:
Run your finger over the surface. For this specific lettering style, you want the smoothest side of the rock facing up to prevent your lines from becoming shaky or uneven.
Ink Bleeding?
If the ink ‘spiders’ into the rock’s pores, your paint is too thin. Switch to a thicker acrylic paint or apply a thin layer of clear matte medium first to seal the porous surface.
Step 2: Drafting the Design
-
Pencil placement:
Lightly sketch the word ‘MOM’ in the upper third of the stone. Aim for a loose, rounded sans-serif style where the letters are slightly bouncy rather than rigidly straight. -
Underline sketch:
Draw a slight, gentle curve directly underneath ‘MOM’. This line acts as a divider and anchors the larger text. -
Lower text alignment:
Below the curved line, pencil in ‘YOURE MY ROCK’. Space the letters evenly, keeping them much smaller than the top text. Note that the apostrophe is intentionally omitted for a casual, rustic look. -
Heart placeholder:
Sketch a small, simple heart shape centered beneath the phrase ‘MY ROCK’ to complete the layout. -
Refine the sketch:
Step back and look at the spacing. If the text looks off-center, gently erase and adjust the pencil lines now before committing to ink.
Pro Lettering Tip
To center text perfectly, write the middle letter first! For ‘MOM’, write the ‘O’, then add the ‘M’ on either side. It keeps spacing symmetrical without measuring.
Step 3: Inking the Lettering
-
Prime the medium pen:
Shake your medium-tip black paint pen well and depress the nib on a scrap piece of paper until the ink flows smoothly and evenly. -
Outline ‘MOM’:
Carefully trace over your pencil lines for the word ‘MOM’. Use confident, steady strokes rather than short, scratchy ones to get clean edges. -
Thicken the strokes:
Go back over the ‘MOM’ letters to add weight. I like to thicken the downstrokes slightly more to give it a hand-lettered feel, making sure the ends of the letters are rounded, not sharp. -
Draw the divider:
Using the same medium tip, draw the horizontal line underneath ‘MOM’. Start with slightly less pressure, press down in the middle, and lift off closely at the end to create a tapered look. -
Switch pens:
Cap your medium pen and switch to the fine or extra-fine tip black pen for the smaller text. -
Letter the quote:
Trace ‘YOURE MY ROCK’. Since the rock surface can be bumpy, go slowly. Keep these letters purely monoline—meaning don’t thicken them like you did the title text. -
Lettering check:
Examine the small text. If any parts look faint due to the rock’s texture, carefully retouch them with the fine point tip.
Step 4: Adding the Heart & Finishing
-
Paint the heart:
Using your red paint pen or a small brush, fill in the heart shape. You may need two thin coats to ensure the red looks vibrant against the stone. -
Dry time:
Allow the paint to dry completely. Black acrylic markers usually dry fast, but wait at least 15 minutes to be safe so you don’t smudge anything. -
Erase guidelines:
Once the paint is bone dry, take your white eraser and very gently remove any visible pencil marks remaining around the letters. -
Seal the deal:
For longevity, especially if this will be used as a paperweight, spray a light coat of matte sealant over the stone.
This charming stone is now ready to serve as a permanent reminder of your appreciation


Simple Heart Rock With “Mom”
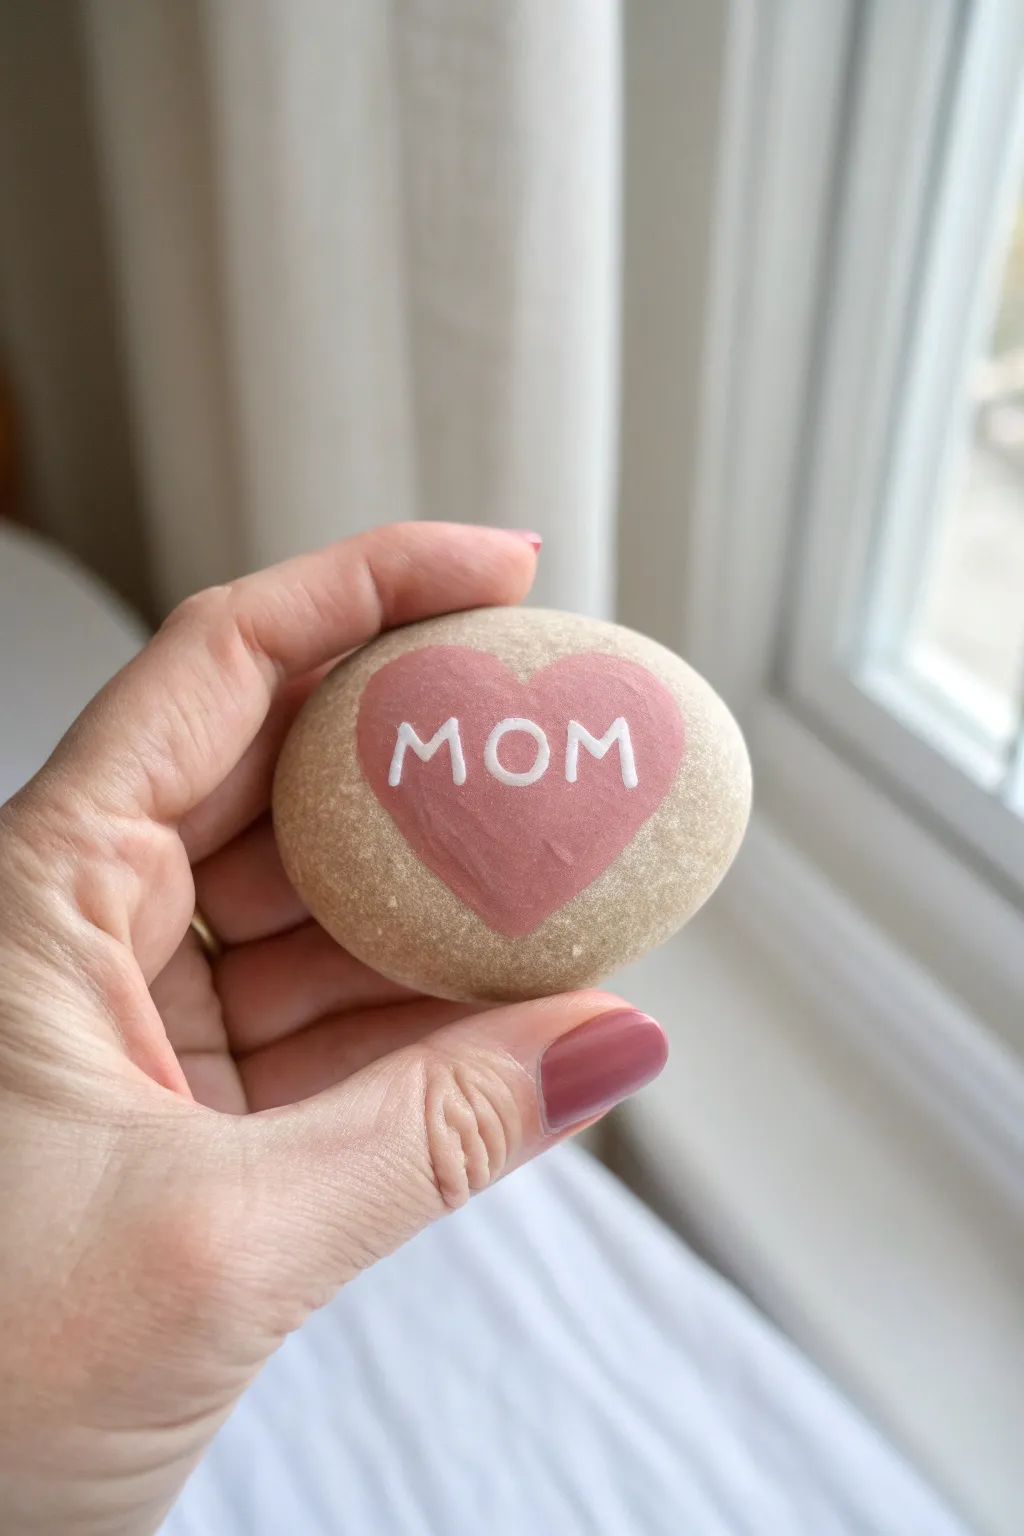
Sometimes the simplest designs carry the biggest message, like this sweet and classic heart rock. This beginner-friendly project features a smooth, light-toned stone with a soft dusty-pink heart and crisp white lettering, making it a perfect handmade token of appreciation.
How-To Guide
Materials
- Smooth, light-colored river rock (flat surface preferred)
- Dusty pink acrylic paint or paint pen (Posca pens work great)
- White acrylic paint or fine-tip paint pen
- Small flat paintbrush (if using bottle paint)
- Very fine liner brush (if using bottle paint for letters)
- Pencil
- Clear sealant spray or brush-on varnish (matte or satin finish)
Step 1: Preparation and Base Shape
-
Select and clean your rock:
Choose a rock that fits comfortably in the palm of your hand and has a smooth, relatively flat surface. Wash it thoroughly with soap and water to remove any dirt or oils, then let it dry completely before starting. -
Position the design:
Hold the rock to find its most natural orientation. You want the flattest face facing up, acting as your canvas. -
Sketch the heart outline:
Using a pencil, lightly sketch a heart shape in the center of the rock. Aim for a plump, rounded heart rather than a sharp, narrow one to match the cozy feel of the stone. -
Refine the symmetry:
Step back and look at your sketch. If one side looks larger than the other, gently erase and adjust the curve until the heart looks balanced. -
Fill in the heart:
Using your dusty pink paint (or paint pen), carefully outline the pencil mark first to establish a clean edge. -
Complete the fill:
Fill in the rest of the heart shape with the pink paint. Use smooth strokes to avoid ridges in the paint texture. If you are using a brush, I sometimes like to dampen it slightly to help the paint flow over the stone’s texture. -
Apply a second coat:
Let the first layer dry to the touch. If the rock’s color is showing through the pink, apply a second coat for solid, opaque coverage. -
Allow thorough drying:
This is crucial—wait until the pink heart is completely dry before attempting to write on top of it. Wet-on-wet will cause the colors to smear and turn muddy.
Paint Pen Troubleshooting
If your paint pen tip gets clogged or dirty from painting over the pink, scribble on a scrap piece of paper until the white ink flows purely again.
Step 2: Adding the Lettering
-
Sketch the letters:
Once dry, very lightly use your pencil to write ‘MOM’ across the center of the heart. The letters should follow the horizontal center line of the heart shape. -
Keep fonts simple:
Stick to a simple, sans-serif print style for the letters. The lines should be straight and clean. The ‘M’s should have straight vertical legs. -
Paint the first stroke:
Using a white fine-tip paint pen or a liner brush with white acrylics, carefully trace over your pencil lines. Start with the vertical lines of the ‘M’s to set up your spacing. -
Complete the word:
Fill in the rest of the letters. Work slowly; pulling the brush or pen towards you usually offers more control than pushing it away. -
Thicken the lines (optional):
If your lines look too thin against the pink background, carefully go over them a second time to add just a tiny bit of weight, making the text pop. -
Clean up edges:
If you accidentally went outside the heart or made a letter wobbly, you can use a tiny bit of the pink paint to ‘erase’ the mistake once the white is dry. -
Final drying time:
Let the white paint dry completely. This usually takes about 15-20 minutes depending on how thick the paint was applied. -
Seal the artwork:
To protect your design from chipping or fading, apply a clear sealant. A spray sealant is easiest to apply lightly without smudging your fresh paint work.
Make It Sparkle
Add a coat of glitter glaze over just the pink heart before sealing to give it a subtle shimmer that catches the sunlight.
This charming little keepsake is now ready to brighten Mom’s desk or garden


Floral Wreath Around “Mom”
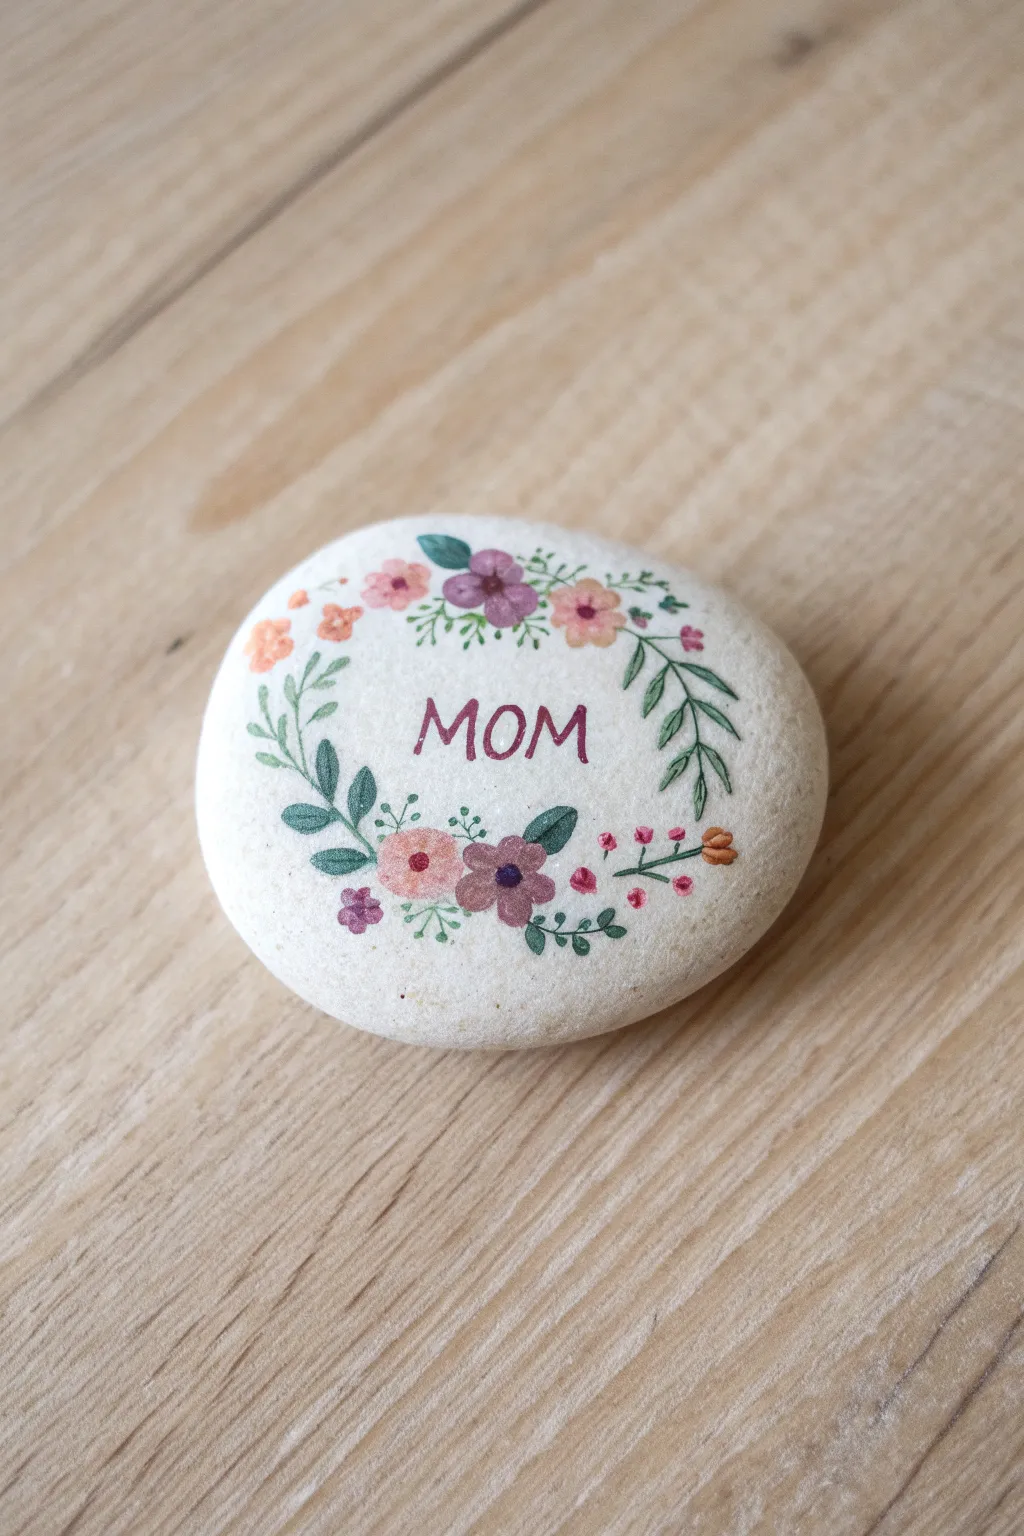
This elegant rock painting features a soft, pastel floral wreath encircling the word “MOM” on a smooth white stone. It’s a minimalist yet heartwarming design that mimics the look of watercolor on a natural canvas.
Step-by-Step Tutorial
Materials
- Smooth, flat white river rock (approx. 3-4 inches wide)
- Acrylic paints (Burgundy, sage green, forest green, light pink, peach, violet, white)
- Fine detail brushes (size 000, 00, and 1)
- Pencil for sketching
- Eraser
- Gloss or matte varnish spray
- Palette for mixing paint
- Water cup and paper towel
Step 1: Preparation & Sketching
-
Clean the surface:
Begin by washing your stone with warm soapy water to remove any dirt or oils. Let it dry completely before starting; painting on damp stone causes the paint to bleed. -
Outline the center:
Using a very light pencil touch, lightly sketch the word “MOM” in the center of the rock. Choose a simple, serif font style to match the delicacy of the flowers. -
Map out the wreath:
Sketch a faint circular guide around the text where the wreath will sit. Mark small circles where the main flowers will go to ensure the wreath stays balanced and doesn’t become lopsided.
Step 2: Painting the Text
-
Mix the text color:
Create a deep burgundy-purple shade by mixing violet with a tiny touch of burgundy. Add a drop of water to improve the flow for fluid lettering. -
Lettering:
With your finest liner brush (size 000), carefully paint over your pencil letters. Keep your hand steady and apply even pressure. If the paint drags, wet your brush slightly.
Fixing Wobbly Lines
If your text lines get too thick or wobbly, wait for the paint to dry fully. Use a toothpick to gently scrape away the excess paint and refine the edge.
Step 3: Creating the Blooms
-
Paint base flowers:
Using a clean detail brush, paint the largest flowers first. Use light pink, peach, and a soft violet. Apply these as simple five-petal shapes in the positions you marked earlier. -
Add center details:
Once the flower bases are dry, use a contrasting color for the centers. A dot of dark purple works well for the peach flowers, while a rusty orange looks lovely in the violet ones. -
Layering petals:
To give the flowers depth without making them bulky, mix a slightly lighter version of your base colors (add white) and dab a tiny highlight on the tip of the petals. -
Tiny accent buds:
Fill in some gaps with clusters of tiny dots using the tip of your brush or a toothpick. Use bright pink or orange to create the look of small berry clusters.
Add Dimension
Mix your paint with a glazing medium instead of water. This creates semi-transparent layers that look exactly like watercolor painting.
Step 4: Adding Greenery
-
Main stems:
Load a size 00 brush with sage green paint. Connect your flowers with thin, curving stems that follow the circular shape of your wreath guide. -
Soft leaves:
Paint small, almond-shaped leaves branching off the stems. Keep these fairly transparent or mix in plenty of water to achieve that watercolor aesthetic. -
Darker foliage accents:
Switch to forest green. Add a few distinct leaves, particularly framing the bottom center flower and the upper right curve. This contrast makes the soft colors pop. -
Fern details:
Using extremely light pressure, paint delicate fern-like fronds filling the white space on the sides. These should just be whisper-thin lines branching from a main vein. -
Final touches:
Inspect the wreath for empty spots. Add tiny green sprigs or single dots of color to balance the circle, ensuring the wreath frames the word “MOM” perfectly.
Step 5: Finishing
-
Erase guidelines:
Wait until the paint is 100% dry to the touch—I usually give it at least an hour. Gently erase any visible pencil marks around the text or flowers. -
Seal the artwork:
Take the rock strictly outside or to a ventilated area. Spray lightly with a matte or satin varnish to protect the design from chipping without making it too shiny.
This lovely keepsake stone is now ready to be gifted or displayed in a garden pot
BRUSH GUIDE
The Right Brush for Every Stroke
From clean lines to bold texture — master brush choice, stroke control, and essential techniques.
Explore the Full Guide
Daisy Border “Best Mom Ever” Rock
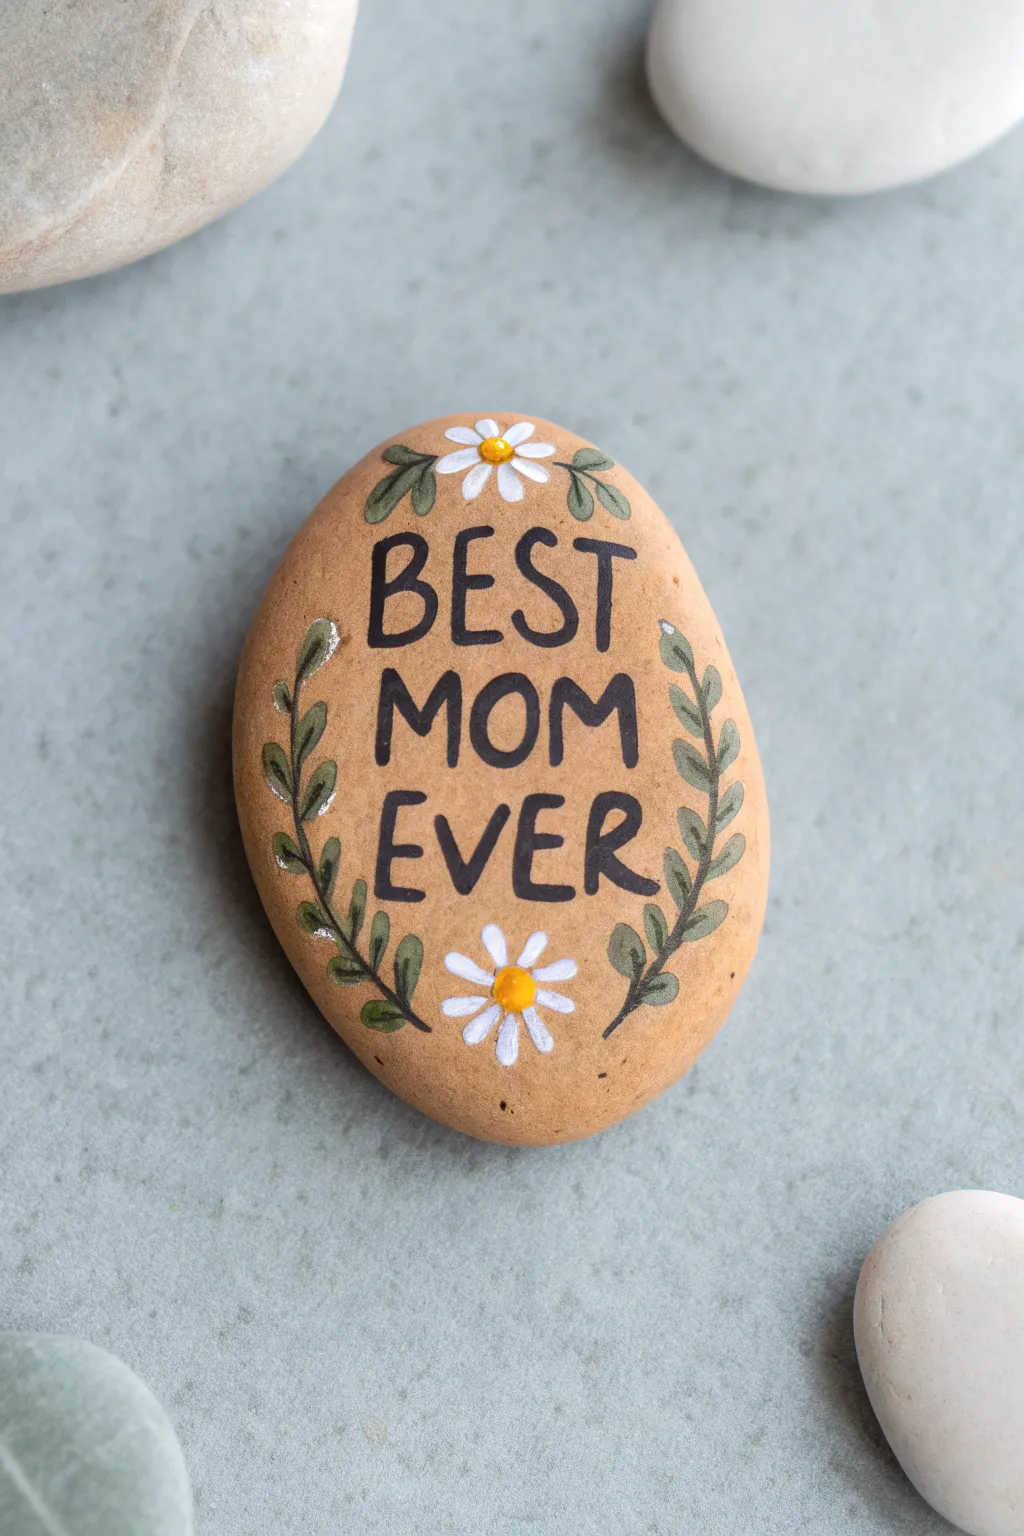
This simple yet elegant rock design frames a sweet Mother’s Day message with delicate greenery and cheerful daisies. The natural tan background of the stone gives it a rustic charm that highlights the crisp black lettering beautifully.
Step-by-Step Guide
Materials
- Smooth river rock (tan or light brown color)
- Black acrylic paint pen (fine tip)
- White acrylic paint pen (medium tip)
- Yellow acrylic paint or paint pen
- Sage green acrylic paint
- Darker olive green acrylic paint
- Detail paintbrush (0 or 00 size)
- Pencil and eraser
- Matte or satin sealant spray
Step 1: Preparation & Lettering
-
Clean surface:
Begin by washing your rock with soap and water to remove any dirt or oils, then let it dry completely. -
Sketch the text:
Use a pencil to lightly sketch “BEST MOM EVER” in the center of the rock. Stack the words vertically, keeping them centered. -
Refining the font:
Aim for a simple, slightly playful sans-serif style. I usually make the middle word “MOM” just a little wider than the others for emphasis. -
Ink the letters:
Trace over your pencil lines with a fine-tip black paint pen. Go slowly to ensure the lines are crisp. -
Thicken the strokes:
Go back over each letter to thicken the lines slightly, adding weight so the text stands out clearly against the stone.
Paint Pen Flow
If your paint pen tip feels dry or scratchy on the rock, press the nib down on a scrap piece of cardboard a few times to get the ink flowing smoothly again.
Step 2: Painting the Vines
-
Sketch the stems:
Lightly pencil two curved lines flanking the text on the left and right, curving inward slightly to hug the words. -
Paint the main stems:
Using a detail brush and darker olive green paint, carefully paint thin lines over your pencil guides to create the main vine stems. -
Add leaf shapes:
Mix a small amount of water with your sage green paint to improve flow. Paint small, almond-shaped leaves extending outward from the stems. -
Vary direction:
Ensure the leaves point generally upward and outward, alternating sides along the stem for a natural look. -
Add depth:
Once the sage green is dry, add tiny strokes of the darker olive green near the base of each leaf to create a shadow effect.
Add Some Shimmer
For a subtle sparkle, use a metallic gold paint pen for the daisy centers instead of yellow, or add tiny gold dots scattered around the vines.
Step 3: Adding Daisies & Finishing
-
Position the flowers:
Plan for one daisy centered at the very top and one centered at the very bottom of the rock. -
Paint the petals:
Using a white paint pen or a small brush, create 7-8 small, teardrop-shaped petals radiating from a center point. -
Layering petals:
If the white looks translucent against the tan rock, let the first layer dry and add a second coat for opacity. -
Add flower centers:
Dip the end of a paintbrush handle or a dotting tool into yellow paint and place a neat dot in the center of each daisy. -
Top leaves:
Paint two small sage green leaves tucked behind the top daisy, curving outward to frame the top of the rock. -
Bottom leaves:
Repeat this for the bottom daisy, adding two small leaves that curve upward to meet the bottom of the text. -
Cleanup:
Once all paint is 100% dry, gently erase any visible pencil marks from your initial sketch. -
Seal the art:
Apply a coat of matte or satin sealant spray to protect the paint from chipping and to weatherproof it for the garden.
This charming nature-inspired rock is a keepsake she can tuck into a flower pot or keep on her desk
Mama Script With Pastel Ombre Base
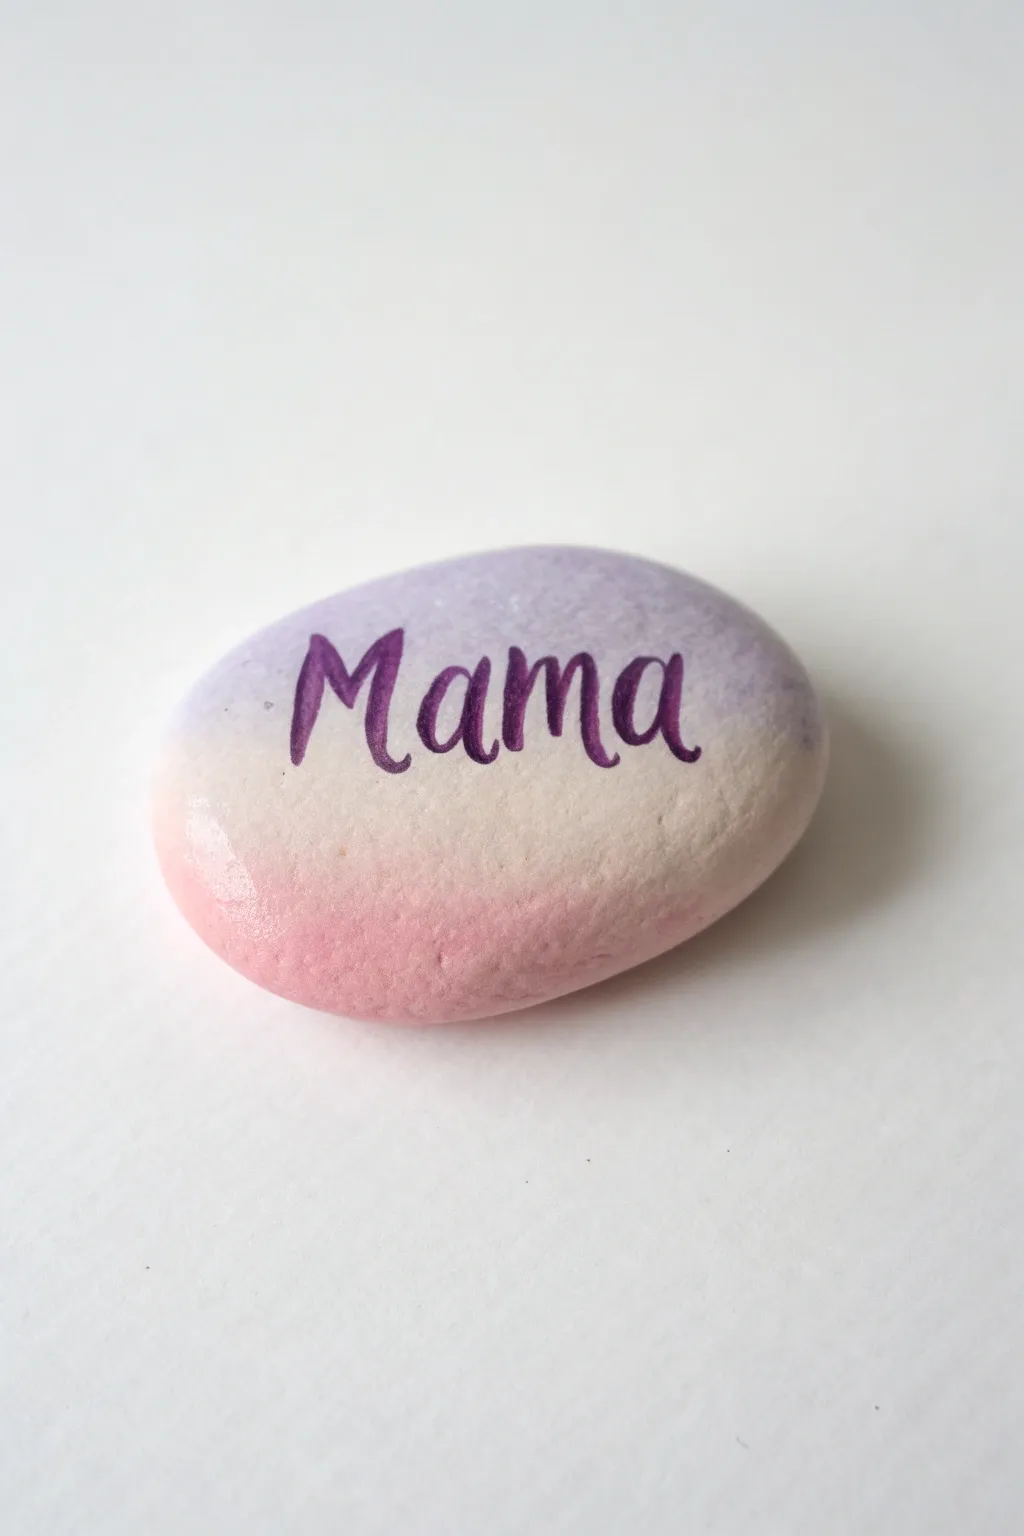
This elegant rock features a soft, dreamy gradient fading from lavender to cream to sweet pink. Topped with beautiful hand-lettered calligraphy, it makes a sophisticated yet simple gift that any mother would cherish.
Detailed Instructions
Materials
- Smooth river rock (oval shape works best)
- White acrylic paint (for priming)
- Lavender or light purple acrylic paint
- Soft pink acrylic paint
- Cream or off-white acrylic paint
- Makeup sponges or small sponge dabbers
- Fine liner brush or purple paint pen (extra fine tip)
- Dark purple acrylic paint or ink
- Gloss varnish or clear sealant spray
- Palette or wax paper for mixing
Step 1: Preparing the Canvas
-
Clean the stone:
Begin by washing your rock thoroughly with warm soapy water to remove any dirt or oils. Scrub it gently and let it dry completely before starting. -
Prime the surface:
Apply a base coat of white acrylic paint to the top surface of the rock. This ensures your pastel colors will pop and look true to tone rather than muddy against the gray stone. -
Smooth the base:
If the white paint looks streaky, allow it to dry and add a second thin coat. A smooth base is crucial for a seamless ombre effect later.
Sponge Wisdom
Dampen your makeup sponge slightly before dipping it in paint. A bone-dry sponge absorbs too much product, but a slightly damp one releases paint smoothly for a better gradient.
Step 2: Creating the Ombre Gradient
-
Layout your colors:
Squeeze a small amount of lavender, cream, and pink paint onto your palette. Position them in the order you want them on the rock to visualize the transition. -
Apply the top color:
Using a makeup sponge, dab the lavender paint onto the top third of the rock. Don’t create a hard line at the bottom; fade it out gently. -
Apply the bottom color:
Take a fresh side of the sponge (or a new one) and dab the pink paint onto the bottom third, again fading it out as you move upward. -
Fill the center:
Dab the cream color into the middle section. Gently tap over the edges where it meets the purple and pink to start blending them. -
Blend the transitions:
This is the key step. While the paint is still tacky, lightly tap the sponge over the transition lines. The colors should mix slightly on the rock surface to create a soft blur. -
Build opacity:
Let the first layer dry. Sponging puts down thin layers, so I usually find it needs a second round of sponging to get that solid, creamy coverage shown in the photo. -
Final smooth coat:
Repeat the sponge blending process until you are happy with the gradient. Allow the background to dry completely—at least 30 minutes—before attempting any lettering.
Step 3: Lettering & Finishing
-
Practice the script:
Before painting on the rock, practice writing ‘Mama’ on a piece of paper. Aim for a bouncy, modern calligraphy style where the downstrokes are thicker than the upstrokes. -
Pencil sketch (optional):
If you are nervous about freehanding, very lightly sketch the word onto the dry ombre surface with a soft pencil. Keep the lines faint so they don’t show through. -
Letter the word:
Using your dark purple paint pen or a fine liner brush loaded with dark purple paint, carefully trace your letters. A paint pen offers great control for beginners. -
Thicken the downstrokes:
To get the calligraphy look, go back over the ‘down’ parts of the letters (where your pen moved downward) and make those lines slightly thicker. -
Let the ink cure:
Allow the lettering to dry completely. If you used a paint pen, giving it an hour ensures it won’t smear during the sealing process. -
Seal the artwork:
Finish by applying a coat of gloss varnish or clear sealant spray. This protects the paint from chipping and gives the rock that polished, ceramic-like shine.
Messy Blends?
If your gradient looks patchy, you likely overworked the paint while it was drying. Let it dry fully, then add another thin layer, tapping quickly without dragging.
Now you have a beautifully blended keepsake ready for gifting

PENCIL GUIDE
Understanding Pencil Grades from H to B
From first sketch to finished drawing — learn pencil grades, line control, and shading techniques.
Explore the Full Guide
Mother’s Day Bouquet Rock With Layered Petals
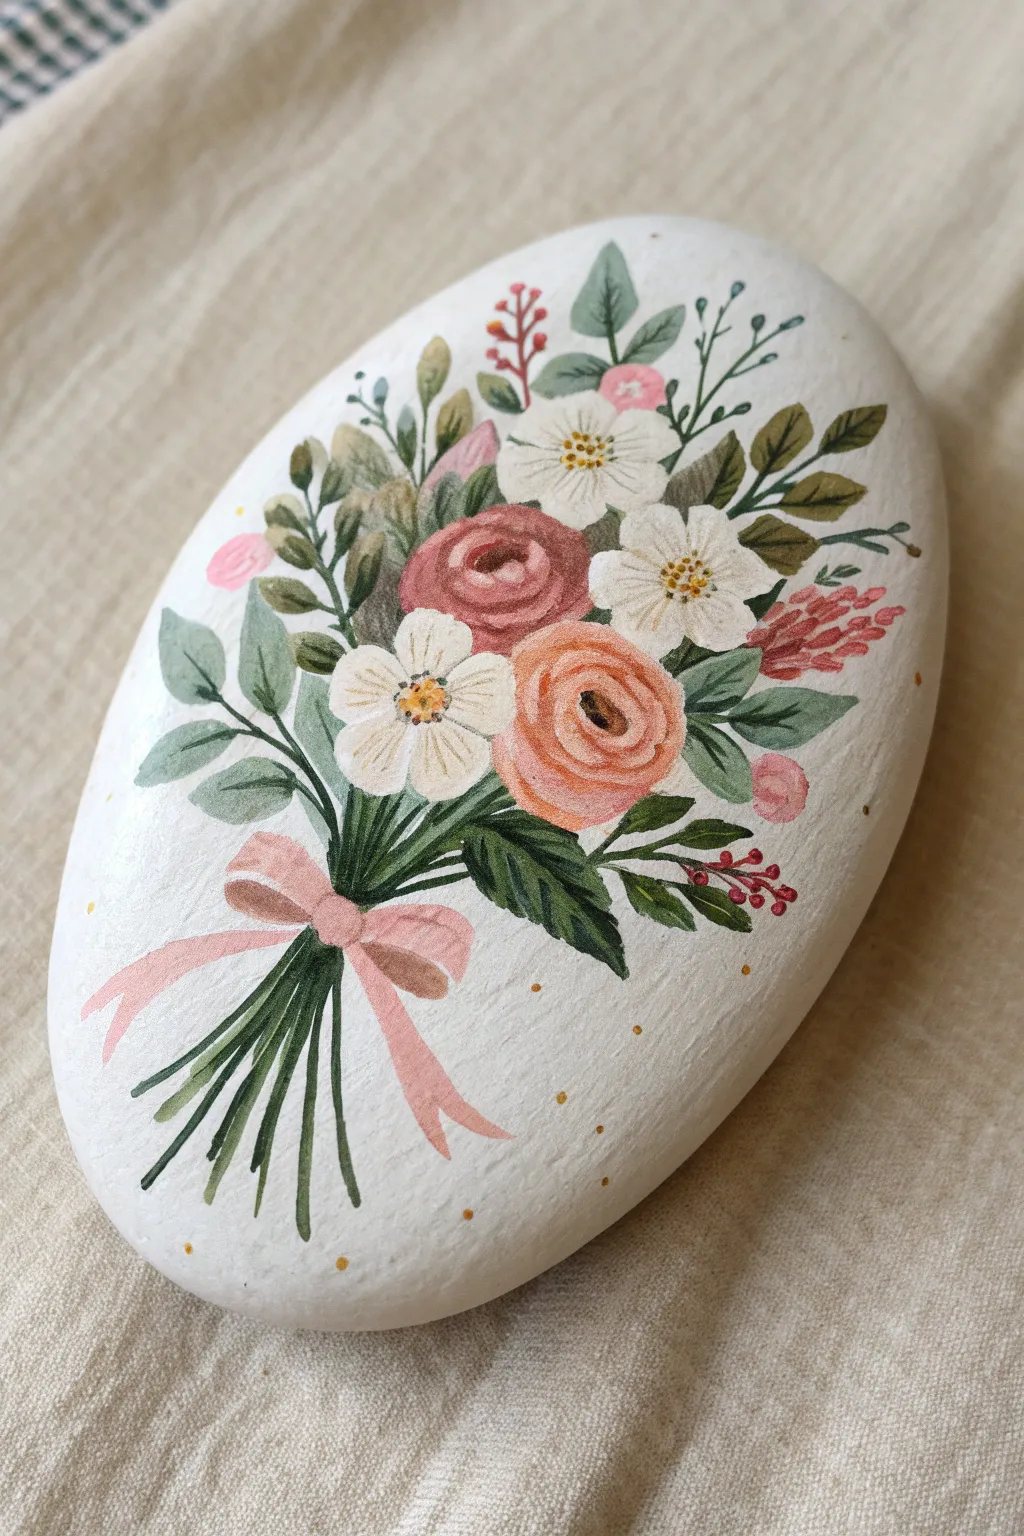
Capture the beauty of fresh blooms with this sophisticated painted rock design, featuring a classic bouquet tied with a pink ribbon. The soft, layered petals and delicate foliage create a timeless look that makes a perfect heartfelt gift for Mom.
How-To Guide
Materials
- Smooth oval river rock (approx. 4-5 inches)
- White acrylic paint or gesso (for base)
- Acrylic paints: Dusty rose, peach, olive green, sap green, creamy white, soft pink, golden yellow
- Fine detail brushes (sizes 0, 00, and 1)
- Small flat brush (size 4)
- Pencil for sketching
- Matte spray varnish
Step 1: Preparation & Base Coat
-
Priming the surface:
Begin by cleaning your rock thoroughly to remove any dust or oils. Apply 2-3 coats of white acrylic paint or gesso to the entire top surface, allowing each layer to dry completely until you have a smooth, opaque canvas. -
Sketching the layout:
Using a light pencil lead, sketch the basic oval shape of the bouquet in the center of the rock. Draw two circles for the main roses—one slightly higher and to the left, and one lower to the right. Add rough positions for the smaller white flowers and the flowing ribbon at the bottom.
Uneven Petals?
If your rose layering looks messy, let it dry completely. Re-paint the base circle color over the mess, and start the C-strokes again with a smaller brush.
Step 2: Painting the Main Blooms
-
Base for the roses:
Mix a dusty rose color and paint a solid circle for the upper central flower. For the lower flower, mix a warm peach tone and fill in its circular shape. -
Layering rose petals:
Once the base circles are dry, mix a slightly darker shade of your rose and peach colors. Using a small round brush, paint curved, C-shaped strokes starting from the center and spiraling outward to create the illusion of tightly packed petals. -
Highlighting the roses:
Mix a lighter version of your petal colors (add white). carefully paint thin highlights on the top edges of the outer petals to give them dimension and a soft, cupped appearance. -
Adding white blossoms:
Paint three or four simple 5-petal flower shapes using creamy white paint. Place these around the roses to fill gaps. You may need two coats to ensure the white stands out against any background. -
Flower centers:
For the white flowers, dab a small dot of golden yellow in the center. Use a size 00 brush to add tiny brown or black specks around the yellow center for realistic detail.
Make It Pop
Add tiny white dots to the center of the berries and the glistening points of the leaves to make the bouquet look fresh and dewy.
Step 3: Foliage & Filler
-
Dark leaves:
Load a size 1 brush with sap green. Paint simplistic leaf shapes tucked behind the flowers, ensuring pointier leaves extend outwards. Add a few darker leaves near the bottom center where the stems will converge. -
Soft greenery:
Mix olive green with a touch of white for a sage color. Paint softer, more rounded eucalyptus-style leaves drifting out to the sides of the bouquet. -
Adding stems:
Using your thinnest liner brush and dark green paint, draw fine lines extending downwards from the flowers, gathering them at a single pinch point before fanning them out slightly at the bottom. -
Berries and accents:
Using a soft pink or coral shade, dot small clusters of berries on delicate branches sticking out from the top right and bottom right of the bouquet.
Step 4: Finishing Touches
-
Drawing the ribbon:
With soft pink paint, create the bow right where the stems gather. Paint two loops for the bow and two flowing tails that drape down over the stems. -
Defining the bow:
Once the pink is dry, use a slightly darker pink or diluted brown to paint the crease lines in the knot and the folds in the ribbon tails to give it fabric-like movement. -
Golden specks:
I like to add a bit of magic here by dipping a toothbrush or stiff brush into diluted gold paint and gently flicking it over the rock to create tiny, subtle speckles around the bouquet. -
Sealing:
Allow the artwork to cure for at least 24 hours. Finish with a matte spray varnish to protect the delicate details without adding too much glare.
This blooming masterpiece is now ready to brighten Mom’s garden or serve as a lovely paperweight on her desk
Family Rock Portrait Gift Set for Mom

Turn smooth river stones into a charming collection of family caricatures that Mom keeps forever. Using flat colors and simple illustrative line work, you will create a custom set of skipping stones representing each beloved member of the family.
How-To Guide
Materials
- Smooth, oval river rocks (approx. 2-3 inches long)
- Acrylic paints (teal, peach/tan tones, coral, yellow, light blue, white, red)
- Fine point black paint pen or archival ink marker (0.5mm and 0.1mm)
- Small flat paintbrushes (size 4 or 6)
- Fine detail paintbrush (size 0 or 00)
- Matte spray varnish or sealant
- Pencil and eraser
- Palette for mixing skin tones
Step 1: Base Coating & Skin Tones
-
Surface Prep:
Begin by washing your rocks with soapy water and drying them completely to ensure the paint adheres properly. -
Background Blocking:
For rocks that will feature a colored background (like the teal and light orange ones), paint the entire upper surface of the stone with two coats of your chosen base color, letting each coat dry for about 15 minutes. -
Mixing Skin Tones:
Mix a pale peach or light tan color using white, a tiny dot of yellow, and a speck of red or brown acrylic paint to get a natural skin tone base. -
Painting the Faces:
Paint a simple oval or round shape in the center of your colored rocks for the face; for rocks without a painted background, simply paint the face shape directly onto the raw stone. -
Adding Necklines:
Extend a small neck shape downward from the chin area of each face oval using the same skin tone mixture.
Smudge Prevention
Wait at least 24 hours before sealing. Ink pens can sometimes smear under varnish even when dry to the touch, so patience is key for crisp lines.
Step 2: Clothing & Hair
-
Designing Shirts:
Block in the clothing shapes at the bottom of the rock using contrasting colors like mustard yellow, polka-dot red, or striped shirts. -
Hair Foundations:
Paint the solid shapes for hair using dark browns, blacks, or grays, framing the face oval you created earlier. -
Detailing Clothes:
Once the shirt base colors are dry, use a fine brush or a toothpick to add patterns like small white polka dots, stripes, or collars. -
Floral Accents:
If your background is solid (like the teal rock), add tiny white flower shapes or dots around the portrait to fill the negative space. -
Full Dry:
Allow all paint layers to dry completely for at least an hour before attempting any line work.
Step 3: Illustration & Sealing
-
Pencil Sketching:
Lightly sketch the facial features over the dry paint with a pencil to ensure you like the placement of the eyes and smile. -
Inking the Outline:
Using your fine point black paint pen, carefully outline the face shape, hair, and clothing borders with a steady hand. -
Drawing Facial Features:
Draw simple, expressive eyes (curved lines for sleeping or closed eyes work great), simple nose lines, and small smiles. -
Hair Texture:
I like to add texture to the hair by drawing fine lines within the painted hair shape to suggest strands or partings. -
Adding Blush:
Dilute a tiny amount of pink or red paint with water to create a glaze, then gently dab small circles on the cheeks for a rosy blush effect. -
Final Touches:
Add specific accessories like glasses on the dad figure or jewelry on the mom figure using the black pen. -
Sealant Application:
Finish by spraying the rocks with a matte varnish to protect the artwork from chipping without making them strangely glossy.
Make It A Puzzle
Paint the shirt of one person to match the side edge of another rock, so the family members can be arranged like a puzzle or a specific lineup.
Arrange these lovely stones in a small bowl or shadow box to gift a truly enduring family portrait


“Reasons I Love You, Mom” Mini Rock Set
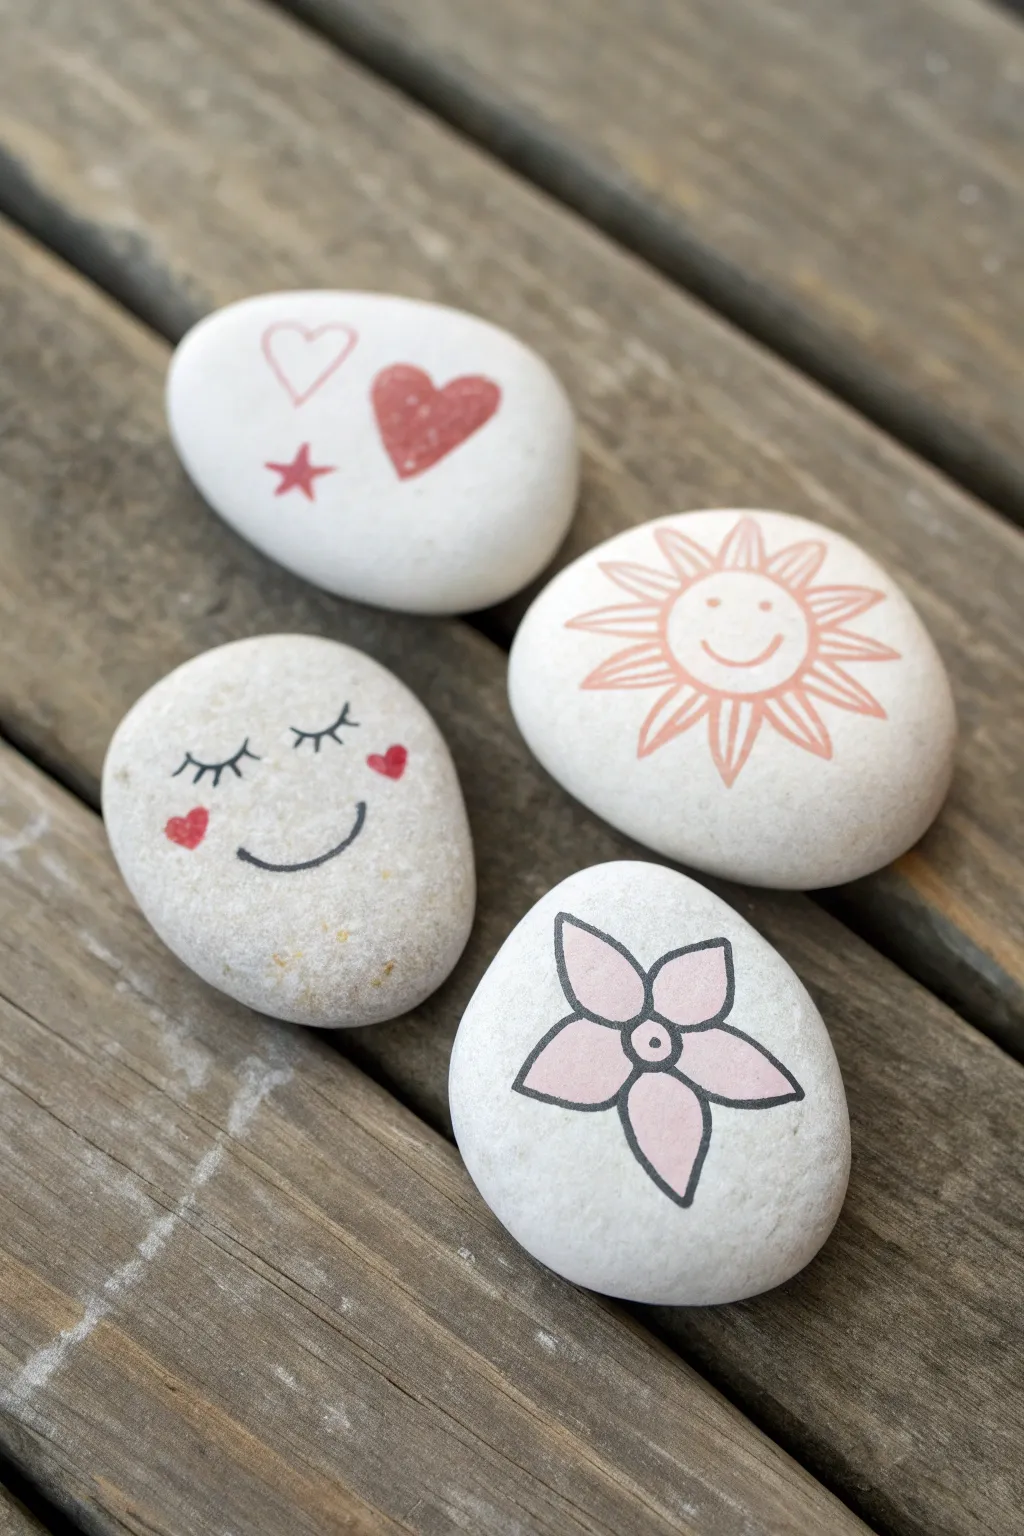
These four adorable mini stones capture the essence of a warm hug with simple, iconic symbols like hearts, a smiling sun, and a flower. Using clean lines and soft colors on natural canvas, they make a perfect heartfelt gift set for Mother’s Day.
Step-by-Step Tutorial
Materials
- 4 smooth, light-colored river rocks or heavy cardstock cutouts
- Acrylic paint markers (fine tip: black, red, light pink, peach/orange)
- Pencil and eraser
- Matte clear sealant spray or brush-on varnish
Step 1: Preparation & Planning
-
Prepare your canvas:
Begin by washing your stones with soap and water to remove any dust or oils that might prevent the paint from sticking. Let them dry completely, preferably in the sun. -
Draft the love stone:
On your first stone, use a pencil to lightly sketch two hearts near the center—one slightly larger than the other. Add a small star shape to the left side. -
Draft the happy face:
For the second stone, sketch a simple curved smile line in the lower third. Mark two small heart locations for the cheeks and draw two closed eyelids with eyelashes above. -
Draft the sun:
On the third stone, draw a circle in the center. Sketch triangular rays radiating outward, and add a simple smiley face inside the circle. -
Draft the flower:
For the final stone, sketch a small circle for the flower center. Draw five teardrop-shaped petals radiating outward from the center point.
Step 2: Painting the Designs
-
Outline the flower:
Using a fine-tip black paint marker, carefully trace over your pencil lines for the flower petals and center circle. Keep your hand steady for clean lines. -
Fill the flower petals:
Once the black outline is dry, use a light pink marker to color inside the petals. I usually leave a tiny gap between the fill color and the black outline to keep it crisp. -
Detail the flower center:
Add a tiny black dot in the very center of the flower for a finished look. -
Draw the sleeping face:
Switch to the second stone. Use the black marker to trace the curved smile and the sleeping eyelids with lashes. -
Add rosy cheeks:
Using a red marker, fill in the small heart shapes on the cheeks of the sleeping face. -
Color the hearts stone:
On the first stone, use the red marker to color in the larger heart and outline the smaller heart and star. You can leave the smaller heart as just an outline for visual variety. -
Outline the sun:
For the sun stone, use a peach or light orange marker to trace the central circle and the triangular rays. -
Draw the sun’s face:
Inside the sun, use the same peach/orange color to draw two small dots for eyes and a simple curved smile. -
Erase guidelines:
Once all ink is fully dry—wait about 15 minutes to be safe—gently erase any visible pencil marks.
Master the Line Work
Rest your wrist on the table or a spare block of wood while drawing. This anchor point stabilizes your hand for much steadier black outlines.
Step 3: Finishing Touches
-
Final inspection:
Check your designs for any uneven opacity. If the pink or red looks streaky, add a second coat now. -
Seal the stones:
Apply a thin coat of matte clear sealant. This protects the designs from scratches and gives the stones a professional, unified finish without making them too glossy.
Ink Bleeding Help
If the marker ink bleeds into the stone’s texture, your stone might be too porous. Prime it first with a clear matte medium or white acrylic paint.
Place these sweet tokens in a small bag or box for a gift that says ‘I love you’ in four different ways
Negative Space “Mom” With Painted Wildflowers
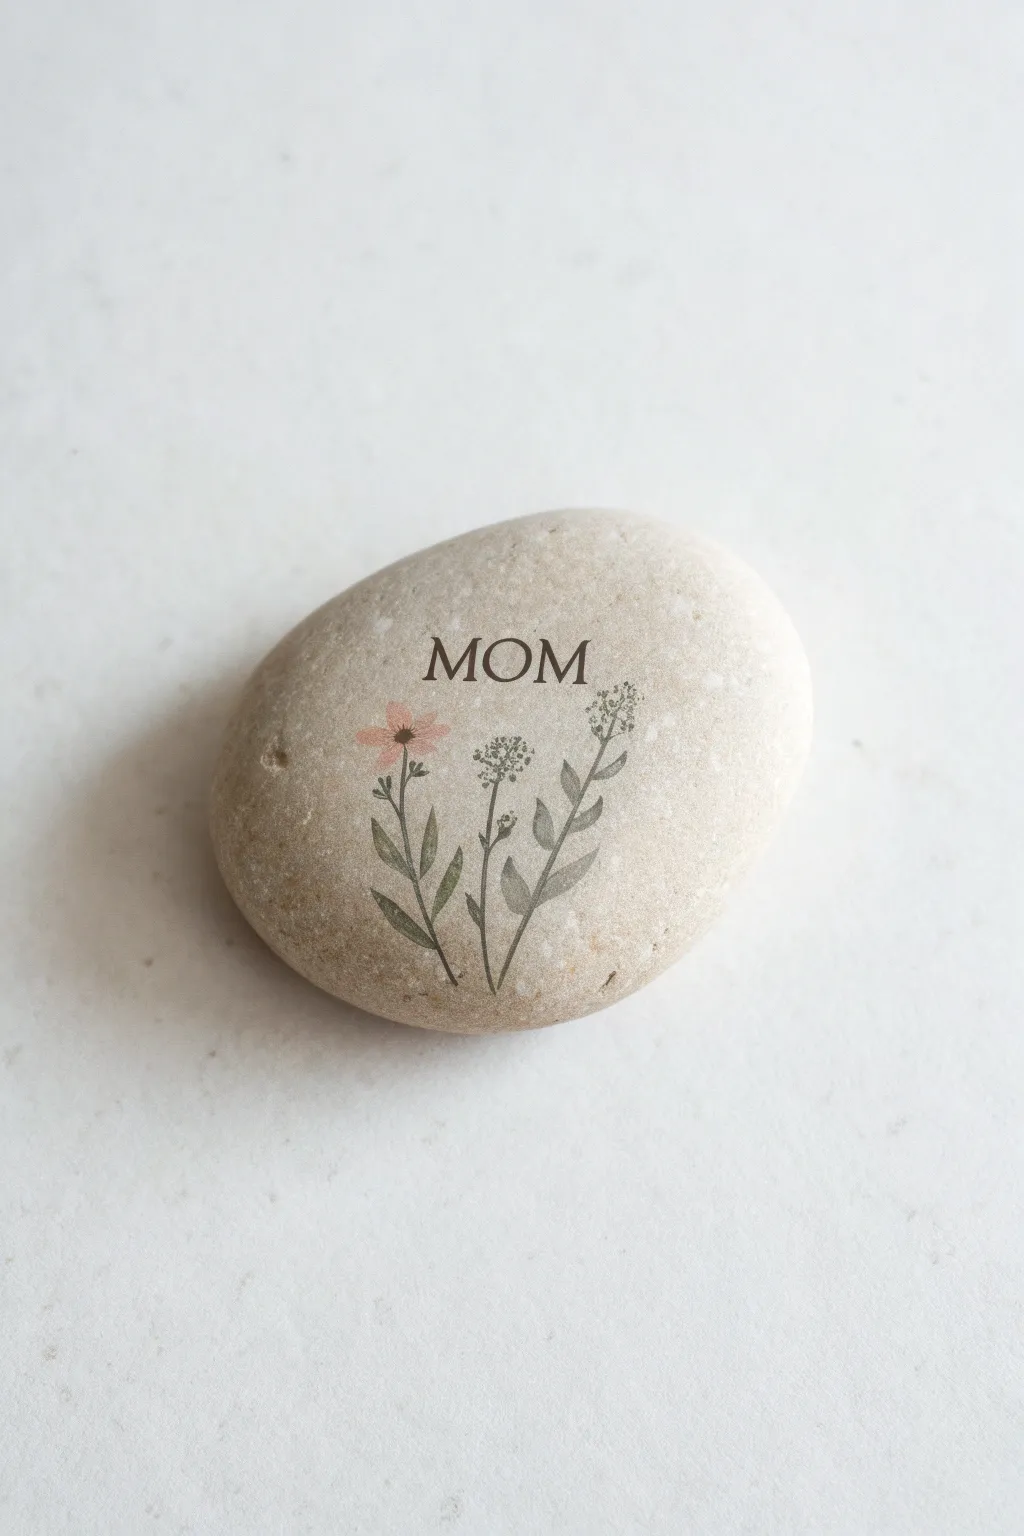
This elegant project combines the simplicity of negative space with the charm of dainty wildflowers to create a sophisticated keepsake. The result is a smooth, professional-looking stone that features crisp serif lettering surrounded by soft, muted botanical illustrations.
Step-by-Step Tutorial
Materials
- Smooth, beige or light gray river rock (approx. 3-4 inches wide)
- Rub-on transfer paper or decoupage paper (botanical/floral theme)
- Rub-on letters or fine-point brown acrylic paint marker
- Mod Podge or decoupage glue (matte finish)
- Small soft bristle brush
- Scissors
- Damp cloth
- Matte acrylic sealer spray
Step 1: Preparation & Planning
-
Clean the surface:
Before you begin, scrub your river rock thoroughly with mild soap and water to remove any dirt or oils. Let it dry completely in the sun or use a hairdryer to speed up the process. -
Select your design elements:
Since this design has a very specific printed look, the easiest way to achieve it is with rub-on transfers or decoupage elements. Choose a small wildflower cluster that includes sage green leaves and a soft pink blossom. -
Arrange the layout:
Dry fit your design by holding the uncut transfer sheet or paper against the rock. You want the word ‘MOM’ to sit centered in the upper third, with the stems of the flowers rising up from the bottom edge to frame it.
Transfer Trouble?
If the rub-on transfer tears, don’t panic. Use a fine-point brown pen to connect the broken lines. The tiny correction will blend seamlessly once sealed.
Step 2: Applying the Lettering
-
Choose your method:
To get that crisp serif font, I recommend using rub-on letter transfers. If you have a very steady hand, you can pencil in the letters first and trace with a fine-point brown paint pen. -
Position the ‘O’:
Start by placing the letter ‘O’ in the exact horizontal center of the stone. This ensures the word remains balanced. -
Add remaining letters:
Place the ‘M’ on either side of the ‘O’. Ensure the spacing is even and the baseline of the letters follows the natural curve of the stone slightly. -
Secure the letters:
If using rub-ons, use a popsicle stick or the provided tool to rub vigorously over the backing sheet until the letter adheres. Peel back slowly.
Step 3: Adding the Botanical Elements
-
Prepare the floral image:
Cut out your wildflower transfer or decoupage paper. Trim as close to the design as possible to minimize visible edges. -
Placement:
Position the flowers so the tallest stems reach up towards the ‘MOM’ text without overlapping it. The stems should look like they are growing from the bottom of the rock. -
Apply the transfer:
If using a rub-on transfer, place it sticky-side down. Rub firmly over the entire design, paying special attention to the thin stems and delicate petals. -
Alternative decoupage method:
If using decoupage paper, apply a thin layer of Mod Podge to the rock where the flower will go. Place the paper down and gently smooth it from the center outward to remove air bubbles. -
Remove backing:
For transfers, slowly peel up the plastic sheet. If a piece of the stem doesn’t stick, lay the sheet back down instantly and rub that specific spot again.
Seamless Finish
To make decoupage paper edges invisible, dampen your finger and gently rub the paper edges to feather them before gluing. This helps them melt into the stone.
Step 4: Finishing Touches
-
Check for imperfections:
Inspect the design closely. If there are tiny gaps in the letters or stems, you can fill them in carefully with a fine-point marker or a tiny detail brush and diluted paint. -
Clean up edges:
If you used the decoupage method and have visible glue residue, use a slightly damp cloth to wipe the bare stone around the image carefully. -
Allow to set:
Let the rock sit for at least an hour to ensure all transfers or glues are fully cured and dry. -
First seal coat:
Apply a very light mist of matte acrylic sealer spray. Do not spray heavily or the ink might run. -
Final protection:
Once the first mist is dry, apply a second, heavier coat of sealer to protect the rock from the elements and give it a finished, professional sheen.
This sophisticated rock makes a timeless gift that captures the natural beauty of a spring garden
Gold-Accent Galaxy “Mom” Gratitude Rock
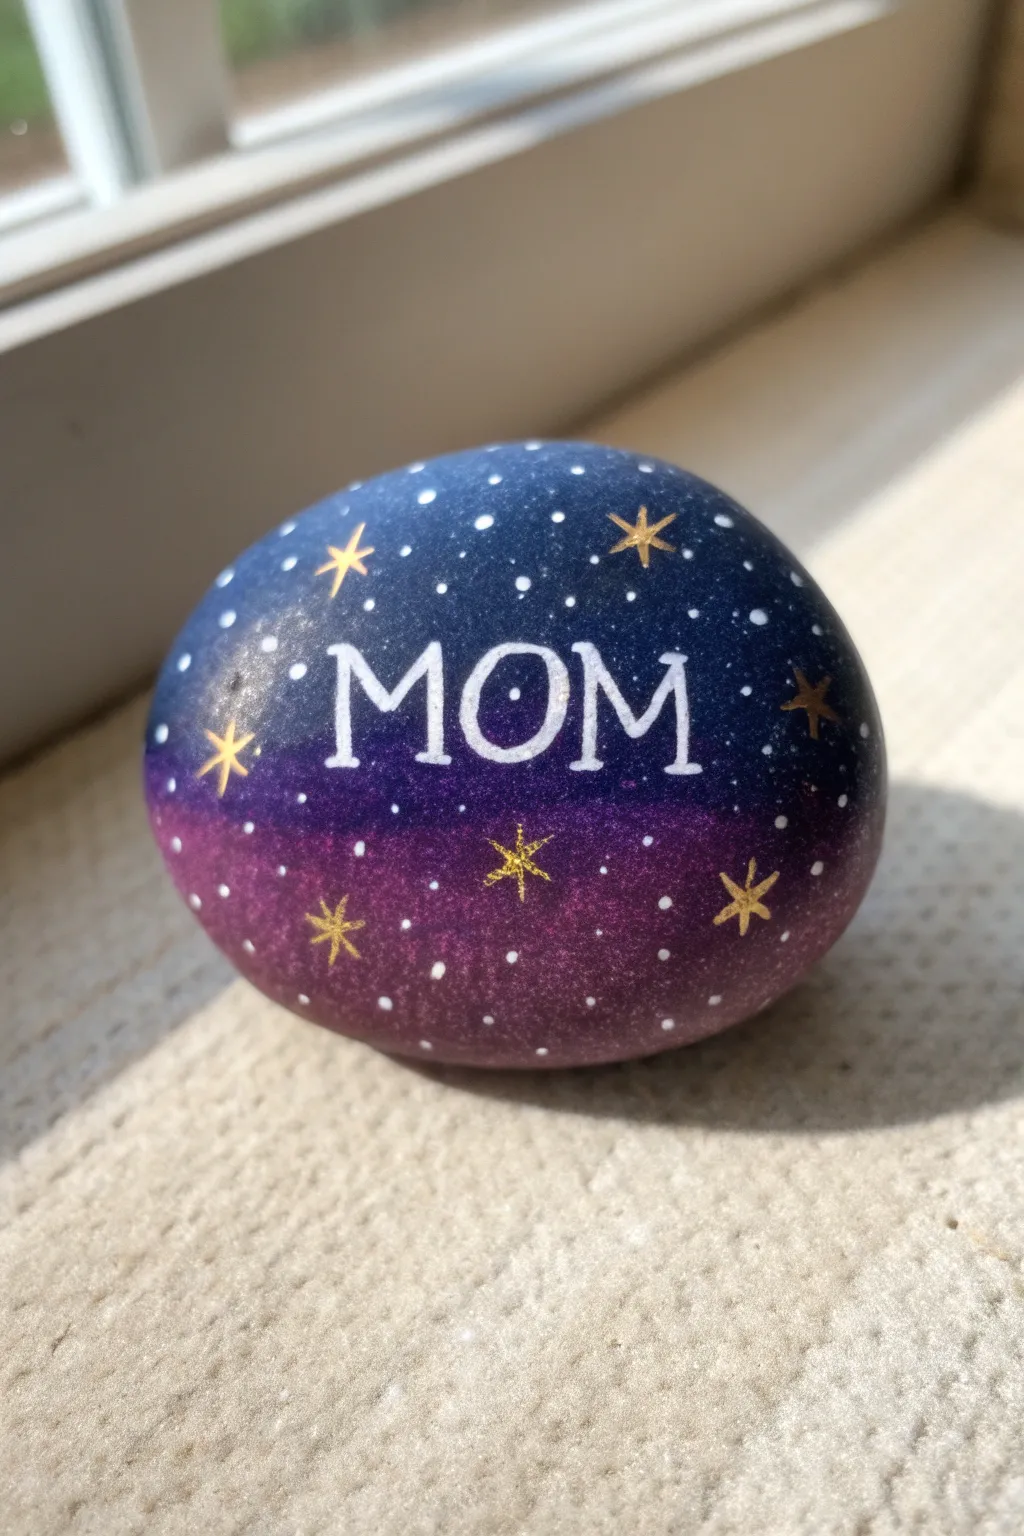
Capture the magic of the night sky with this dazzling galaxy-themed rock featuring gold star accents and crisp lettering. The smooth gradient from deep navy to vibrant purple creates the perfect backdrop for a heartfelt message Mom will treasure.
Step-by-Step
Materials
- Smooth, oval-shaped river rock (cleaned and dried)
- Acrylic paints: Black, Navy Blue, Purple (Violet), Magenta, White
- Gold metallic paint pen (fine tip) or metallic acrylic paint
- White paint pen (fine or extra-fine tip)
- Small makeup sponge or dense foam applicator
- Fine detail paintbrush (size 0 or 00)
- Flat shader paintbrush
- Gloss varnish or clear sealant spray
- Paper plate or palette
- Pencil (optional)
Step 1: Creating the Galaxy Gradient
-
Prepare the base:
Start by ensuring your rock is completely clean and dry. Apply a base coat of solid black acrylic paint over the entire front surface. This provides depth for the galaxy effect. Let it dry completely. -
Load the sponge:
Squeeze a small amount of navy blue and purple paint onto your palette. Dampen your makeup sponge slightly, squeezing out excess water, and dab it into the navy blue paint. -
Apply the upper sky:
Gently sponge the navy blue onto the top two-thirds of the rock. Use a dabbing motion rather than wiping to create texture. Gradually fade the pressure as you move downward. -
Add the lower horizon:
Using a clean section of the sponge (or a new one), load up the purple or magenta paint. Dab this onto the bottom third of the rock. -
Blend the transition:
While the paints are still tacky, lightly dab over the line where the blue and purple meet. This blends the colors together for a seamless Ombré effect. If I need a smoother transition, I sometimes dab a tiny bit of black back in near the very top edge. -
Let it cure:
Allow this gradient layer to dry fully before moving on. The sponge technique dries relatively quickly, but patience here prevents muddy colors later.
Starry Splatter Tip
Make a ‘test splatter’ on a piece of paper first. This helps you gauge how wet the paint is so you don’t accidentally drop big blobs of white onto your perfect gradient.
Step 2: Adding the Stars
-
Create distant stars:
Load a toothbrush or a stiff bristle brush with slightly watered-down white acrylic paint. Run your thumb over the bristles to flick a fine mist of tiny white speckles across the entire rock. -
Review the splatter:
Check your splatter density. You want a dusty, distinct look, not large blobs. Wipe away any accidents immediately with a damp Q-tip. -
Paint prominent stars:
Using a fine paintbrush or white paint pen, add varying sizes of individual white dots by hand. Place them randomly, clustering a few together to mimic constellations. -
Draw the main gold stars:
Take your gold metallic paint pen. Draw several larger, twinkling stars scattered across the surface. A simple way to do this is to draw a cross, then add an ‘X’ through the center. -
Refine the gold accents:
Go over the gold stars a second time if the first layer looks translucent. Ensure the points of the stars are sharp and crisp.
Level Up: Hidden Detail
Before sealing, arrange specific white dots to form your mom’s zodiac constellation in the background sky for a deeply personal hidden touch.
Step 3: Lettering and Finishing
-
Sketch the text:
Lightly pencil the word ‘MOM’ across the center of the rock. Use block letters with slight serifs to match the photo’s style. -
Outline the letters:
Using your white paint pen, carefully trace over your pencil lines. Keep a steady hand and pull the pen towards you for better control. -
Thicken the strokes:
Go back over the vertical lines of each letter to add weight, creating a faux-calligraphy look. The styling in the image features slightly serifed feet on the ‘M’s. -
Clean up edges:
If any background paint shows through the white letters, apply a second coat of white once the first is dry for bright, opaque coverage. -
Seal the artwork:
Once the lettering is 100% dry (give it at least an hour), apply a coat of gloss varnish or spray sealant. This creates that shiny, polished look and protects the paint from chipping.
Now you have a gorgeous piece of painted nature that serves as a permanent reminder of your love for Mom


Have a question or want to share your own experience? I'd love to hear from you in the comments below!