When you’re looking for Native American painting ideas, it helps to start with subjects that carry strong symbolism—then slow down and really study the shapes, colors, and meaning behind them. I’m sharing a mix of classic, expected themes and a few more creative spins you can try in your own sketchbook or on canvas.
Dignified Profile Portrait With Braids
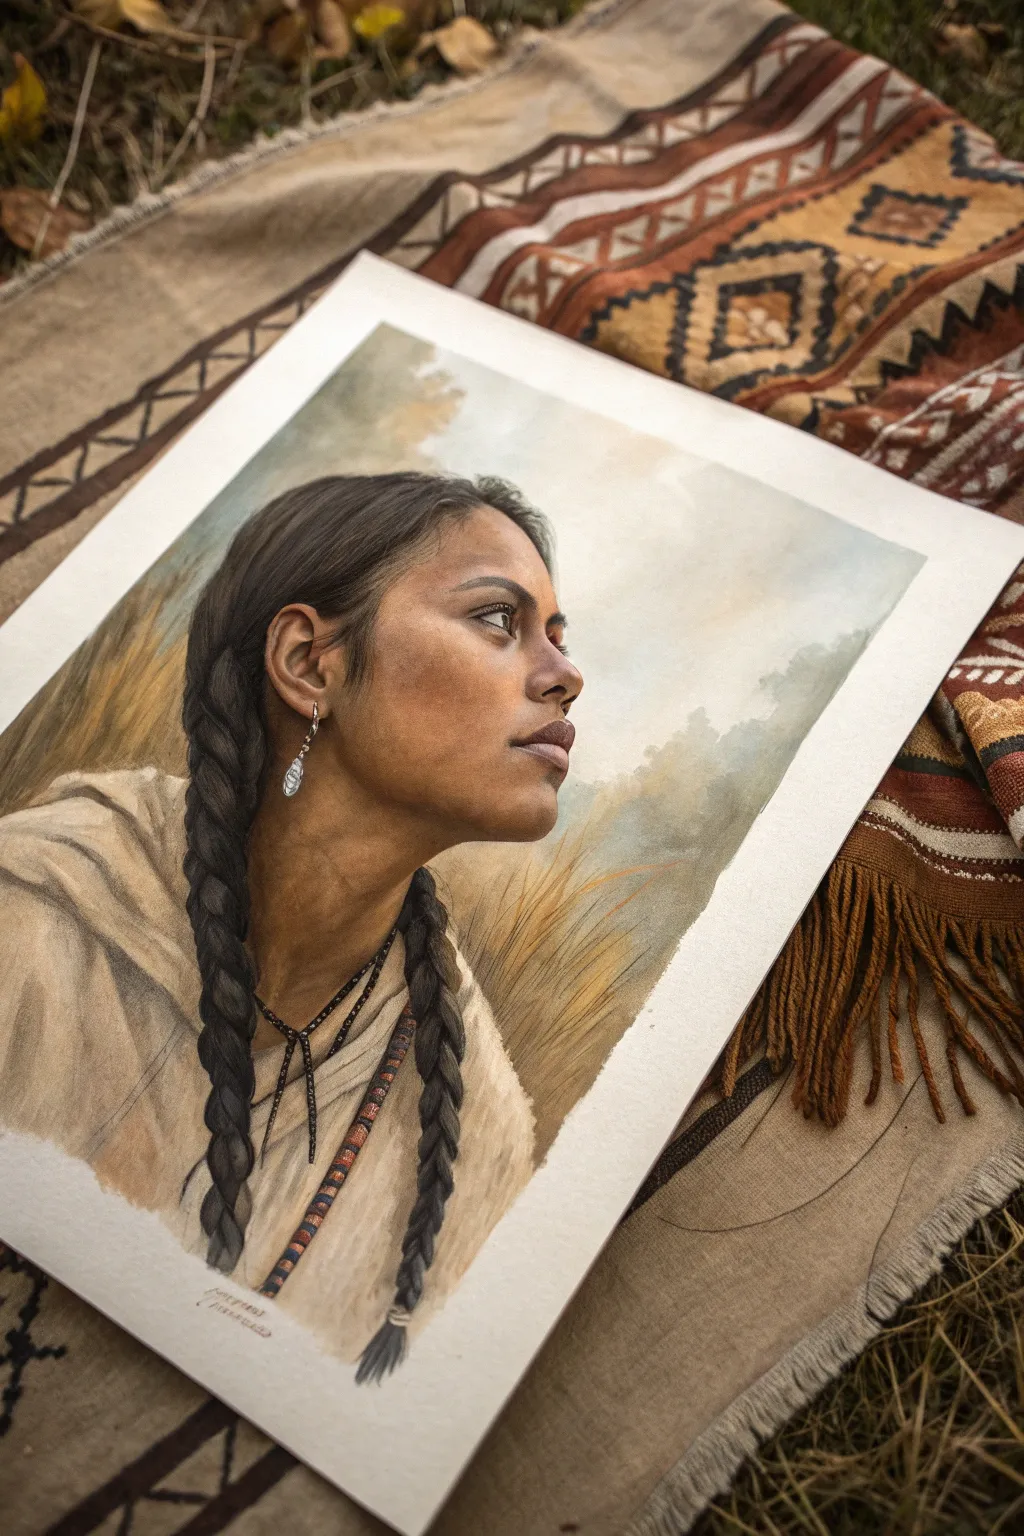
Capture the quiet strength and contemplative beauty of a profile portrait using distinct watercolor layering techniques. This project focuses on building realistic skin tones, rendering the texture of dark hair, and creating an atmospheric background that frames the subject perfectly.
Step-by-Step Tutorial
Materials
- Cold-pressed watercolor paper (300 gsm or heavier)
- Watercolor paints (Burnt Sienna, Yellow Ochre, Alizarin Crimson, Ultramarine Blue, Burnt Umber, Lamp Black)
- Round brushes (sizes 2, 6, and 10)
- Detail liner brush (size 0 or 00)
- Masking fluid (optional)
- Pencil and eraser
- Mixing palette
- Paper towels and two water jars
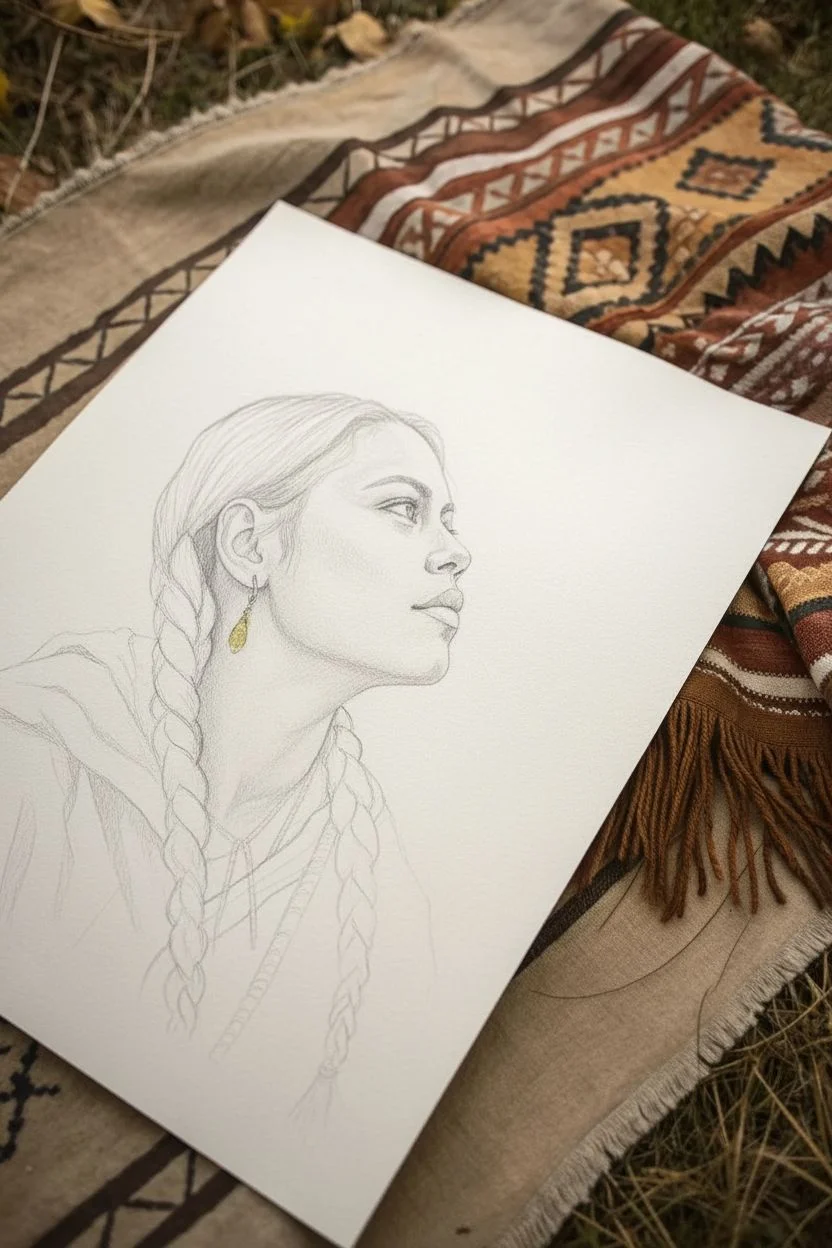
Step 1: Sketching and Masking
-
Establish the profile:
Begin with a light pencil sketch. Focus heavily on the proportions of the profile, ensuring the distance from the ear to the nose bridge is accurate and the jawline is defined but soft. -
Map the features:
Draw the braids carefully, noting the interlocking ‘Y’ shapes that make up the plait pattern. Sketch the loose clothing folds and the beaded necklace details lightly. -
Protect highlights:
If you struggle with preserving white space, use a small amount of masking fluid on the earring highlight and the brightest reflection in the eye. Let this dry completely.
Step 2: The Atmospheric Background
-
Wet-in-wet wash:
With your size 10 brush, wet the background area around the figure with clean water. The paper should be glisten, not puddle. -
Drop in soft color:
Touch in a diluted mix of Yellow Ochre and a hint of Burnt Sienna to suggest distant golden grasses. Keep the edges nearest the face soft and diffused. -
Add misty depth:
While still damp, add faint touches of dilute Ultramarine Blue mixed with Burnt Umber near the horizon line to create a sense of misty atmosphere. Allow the background to dry fully before touching the figure.
Pro Tip: Avoiding Mud
Wait for each layer to be bone-dry before glazing shadows over the skin tone. Creating shadows on damp paper often results in muddy, overworked colors.
Step 3: Building Skin Tones and Form
-
Base flesh tone:
Mix a watery wash of Yellow Ochre and a tiny touch of Alizarin Crimson. Apply this over the entire face and neck, avoiding the eye and earring. -
Developing shadows:
Once the base is dry, mix Burnt Sienna with a little Burnt Umber. Glaze this shadow color under the jawline, inside the ear, and in the hollow of the cheek to sculpt the facial structure. -
Deepening contrast:
I like to add a cooler shadow tone (a mix of Alizarin Crimson and Ultramarine Blue) to the darkest areas, like the nostril and the deep corner of the eye socket, to prevent the face from looking too orange. -
Refining the eye:
Use a size 2 brush to paint the iris with Burnt Umber and Lamp Black. Leave the tiny highlight unpainted (or remove masking later). Add a fine line for the upper lashes. -
Painting the lips:
Mix Alizarin Crimson with Burnt Sienna for a muted dusty rose color. Paint the lips, keeping the upper lip slightly darker than the lower lip.
Level Up: Texture Trick
Sprinkle a tiny pinch of salt into the wet background wash while it’s drying. This creates natural, organic blooms that mimic the texture of distant foliage or clouds.
Step 4: Hair and Clothing
-
Base hair wash:
Apply a medium-strength wash of Burnt Umber over the hair and braid area. Let it follow the direction of hair growth. -
Defining the braid:
Once the base is dry, use a concentrated mix of Lamp Black and Burnt Umber. Paint the negative spaces between the plaits to make the braid pattern pop. -
Adding texture:
With a damp, clean brush, ‘lift’ a little pigment from the top of each braid loop to create a shine. Then, use a liner brush to flick in loose stray hairs for realism. -
Clothing foundation:
Wash a very pale, dirty beige (lots of water with a speck of Burnt Umber) over the clothing area. -
Fabric folds:
Use a slightly darker version of the beige mix to paint hard edges where the fabric folds, softening the other side of the stroke with water to create a rounded fold effect.
Step 5: Details and Final Touches
-
Jewelry accents:
Paint the necklace beads with precise dabs of Burnt Sienna and Ultramarine. Add a touch of grey-blue to the silver earring to simulate metal. -
Foreground grasses:
Use a rigger or liner brush with a dry-brush technique to sweep in a few sharp, golden-brown grass stalks in the foreground, overlapping the clothes slightly. -
Final assessment:
Step back and check your values. Deepen the hair shadows or the shadow under the chin if the portrait feels too flat.
Remove any masking fluid and sign your work gently in the corner to complete this serene portrait


Indigenous Woman Wrapped in a Blanket
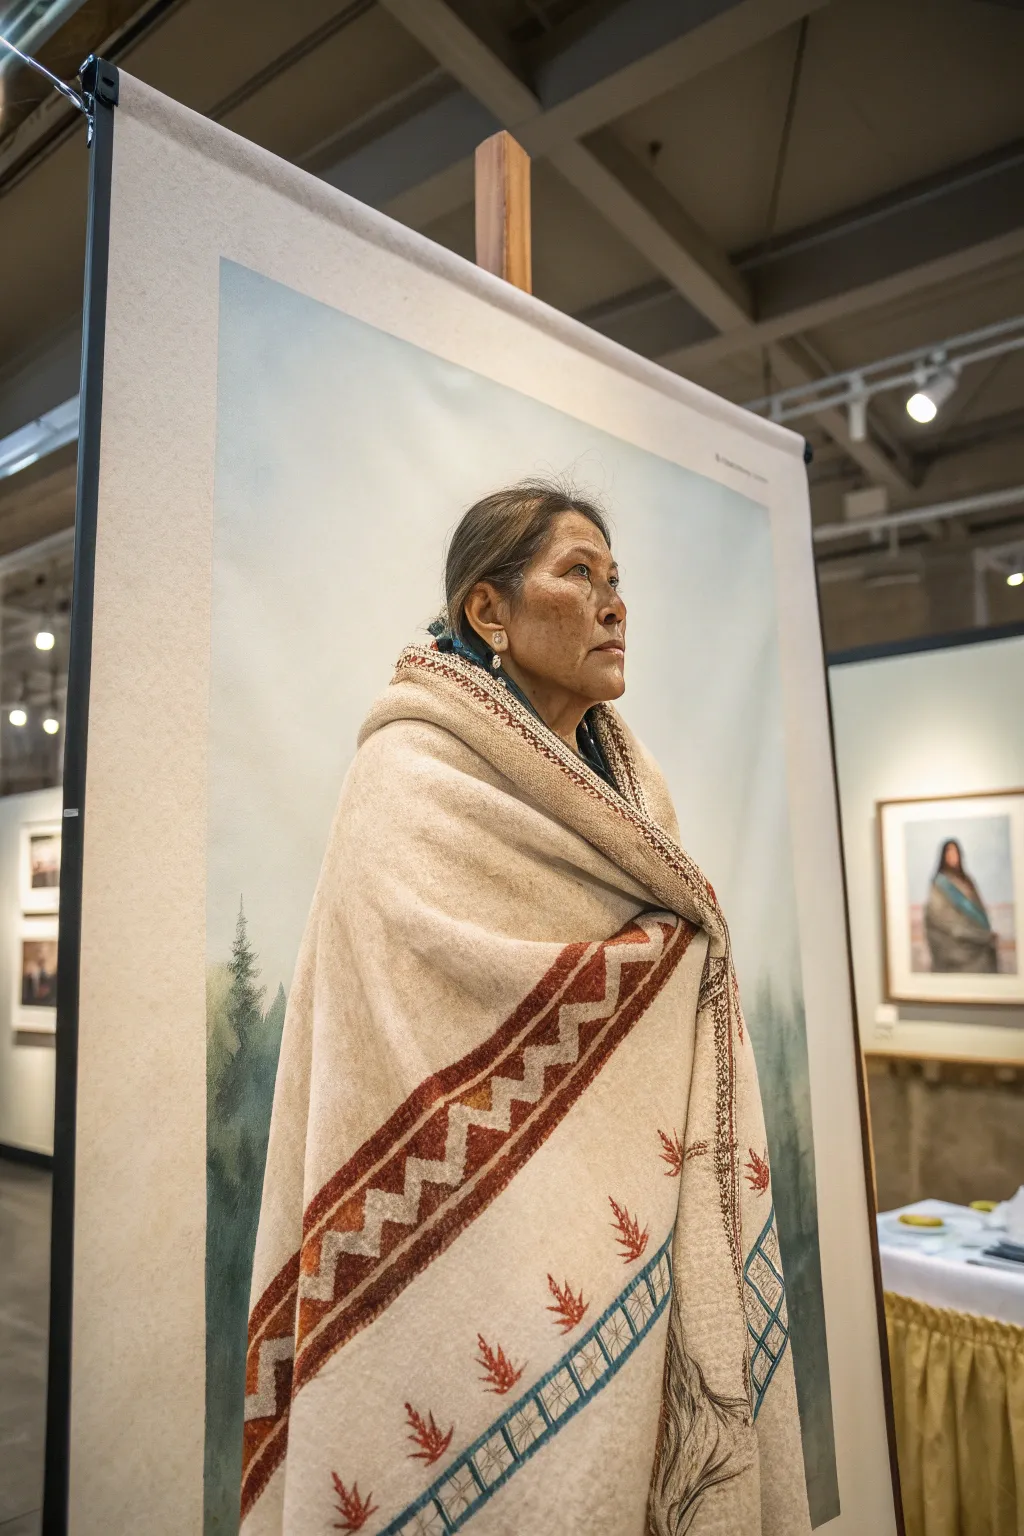
Capture the solemn dignity and textured beauty of this portrait featuring an Indigenous woman wrapped in a patterned blanket. By layering soft glazes to build skin tones and using dry-brush techniques for the wool textile, you’ll create a piece rich in history and atmosphere.
Step-by-Step
Materials
- Large stretched canvas (24×36 inches or similar)
- Acrylic or Oil paints (Burnt Sienna, Yellow Ochre, Raw Umber, Titanium White, Ultramarine Blue, Alizarin Crimson, Cadmium Red)
- Assorted flat and filbert brushes (Sizes 2 to 12)
- Fine liner brush (Score 00)
- Old, scruffy brush for stippling
- Gesso and large brush for priming
- Palette knife
- Slow-drying medium (if using acrylics)
- Reference photo
Step 1: Preparation and Underpainting
-
Prime the Surface:
Begin by applying two coats of gesso to your canvas to create a smooth, workable surface. Sand lightly between coats if you prefer a very sleek finish for the face, though a little tooth helps grip the paint for the blanket texture. -
Sketch the Composition:
Using thin Raw Umber paint or a charcoal pencil, lightly sketch the outline of the woman’s profile. Pay careful attention to the proportions of the nose, the jawline, and how the blanket drapes over her shoulder. -
Block in the Background:
Mix a very pale, misty blue using Titanium White, a touch of Ultramarine Blue, and a tiny hint of Raw Umber to desaturate it. Paint the entire background, keeping the strokes loose and vertical to suggest a calm, hazy sky. -
Establish the Forest Layer:
At the bottom third of the canvas behind the figure, wash in faint tree shapes. Use a mix of Raw Umber and a touch of Phthalo Green or Blue, thinned down significantly so they appear distant and ghostly against the pale sky.
Pro Tip: Softening Textile Edges
To make the blanket look soft rather than stiff, blur the outer edges slightly into the background while the paint is wet. This ‘lost edge’ technique mimics the fuzziness of wool.
Step 2: Face and Features
-
Base Skin Tone:
Mix a mid-tone complexion colour using Burnt Sienna, Yellow Ochre, and White. Apply this to the entire face area as a base layer, ensuring you cover your sketch lines but can still see the faint guide. -
Shadows and Depth:
While the base is tacky (or dry, depending on your medium), mix Burnt Sienna with a little Alizarin Crimson and Raw Umber. Paint in the shadow areas: under the chin, the hollow of the cheek, the eye socket, and the side of the nose. -
Adding Highlights:
Mix Titanium White with a tiny amount of Yellow Ochre. Apply highlights to the top of the cheekbone, the bridge of the nose, the forehead, and the chin to bring the form forward. -
Refining the Profile:
Use a smaller filbert brush to blend the transitions between your highlights and shadows. I find that smoothing these edges creates that realistic, soft skin texture seen in the reference. -
Detailed Features:
Switch to your fine liner brush. With a dark brown mix, carefully define the eye, the nostril, and the line of the mouth. Remember, the eye is in profile, so focus on the shape of the lid and the lashes. -
Hair Texture:
Paint the hair mass with a dark brown/black mix. Once dry, drag a few thin strokes of grey and lighter brown over the top to suggest strands pulling back, revealing the ear and earring if visible.
Step 3: The Blanket and Textile
-
Base Blanket Color:
Mix a warm, creamy beige using Titanium White and a very small amount of Yellow Ochre and Raw Umber. Block in the entire shape of the blanket, following the flow of the fabric over the shoulder. -
Modeling the Folds:
Using a slightly darker version of your beige mix (add more Raw Umber), paint the shadowed areas where the fabric folds and overlaps. This gives the blanket weight and volume. -
Creating Wool Texture:
Take an old, dry scruffy brush with very little paint on it (a technique called scumbling). Lightly tap and drag Titanium White over the limitless areas of the blanket to simulate the fuzzy texture of thick wool. -
Geometric Pattern Base:
Map out the zigzag pattern and the borders using a thin wash of Burnt Sienna. Ensure the pattern follows the undulating folds of the fabric—if the fold goes in, the pattern should curve with it. -
Painting the Red Motifs:
Fill in the zigzag patterns with a deep, earthy red (Burnt Sienna mixed with Cadmium Red). Don’t make it too solid; let some of the canvas texture show through to maintain the woven look. -
Adding Blue Accents:
Paint the thin blue grid lines near the bottom edge using a mix of Ultramarine Blue and a touch of white. Keep these lines delicate. -
Leaf details:
With a fine round brush, paint the small red leaf or feather motifs on the lighter part of the blanket. Keep the brushstrokes distinct to mimic embroidery. -
Fringe Details:
At the bottom edge or wherever the blanket ends, use a liner brush to flick paint downwards, creating loose, uneven fringe strands in varying shades of beige and brown.
Level Up: Impasto Texture
Mix a thickening gel medium or modeling paste into your white and beige paint for the blanket highlights. Use a pallet knife to apply it for real, 3D texture you can feel.
Step 4: Final Touches
-
Atmospheric Edges:
If the edges of the figure look too cut-out against the background, glaze a tiny bit of the background color over the very edge of the shoulder to push it back into the space. -
Final Highlights:
Add the brightest specks of white to the eye, the earring, and perhaps the very top edge of the blanket where the light hits the wool.
Step back and admire the quiet strength and cultural beauty portrayed in your finished painting.


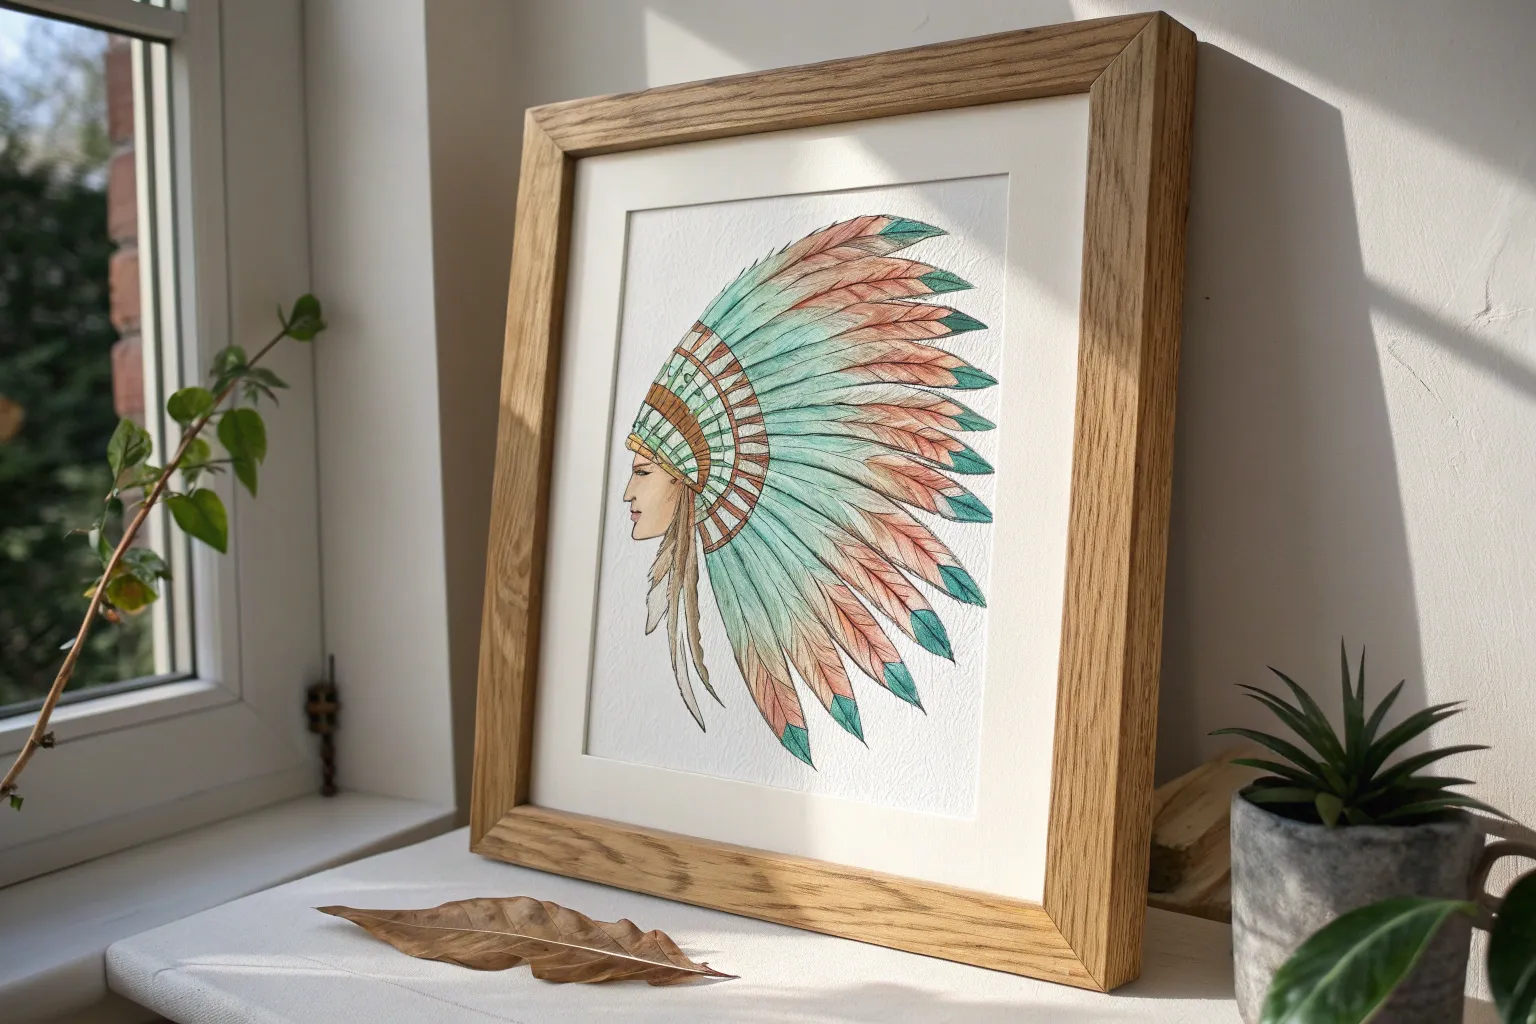
Headdress Still Life Floating on Black
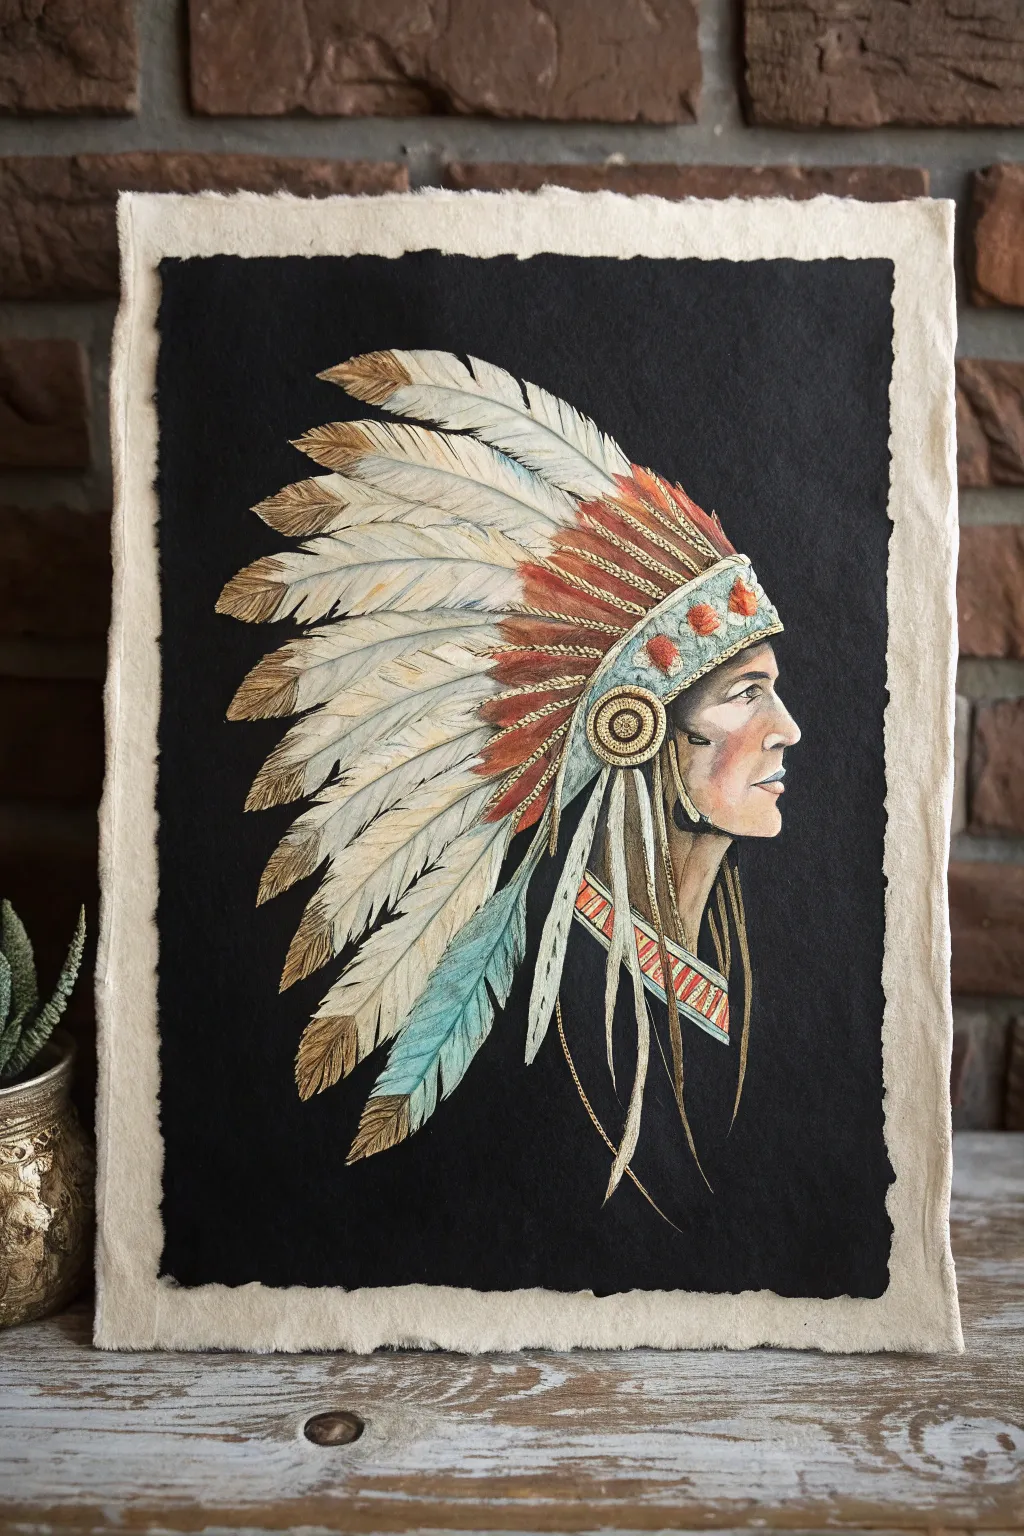
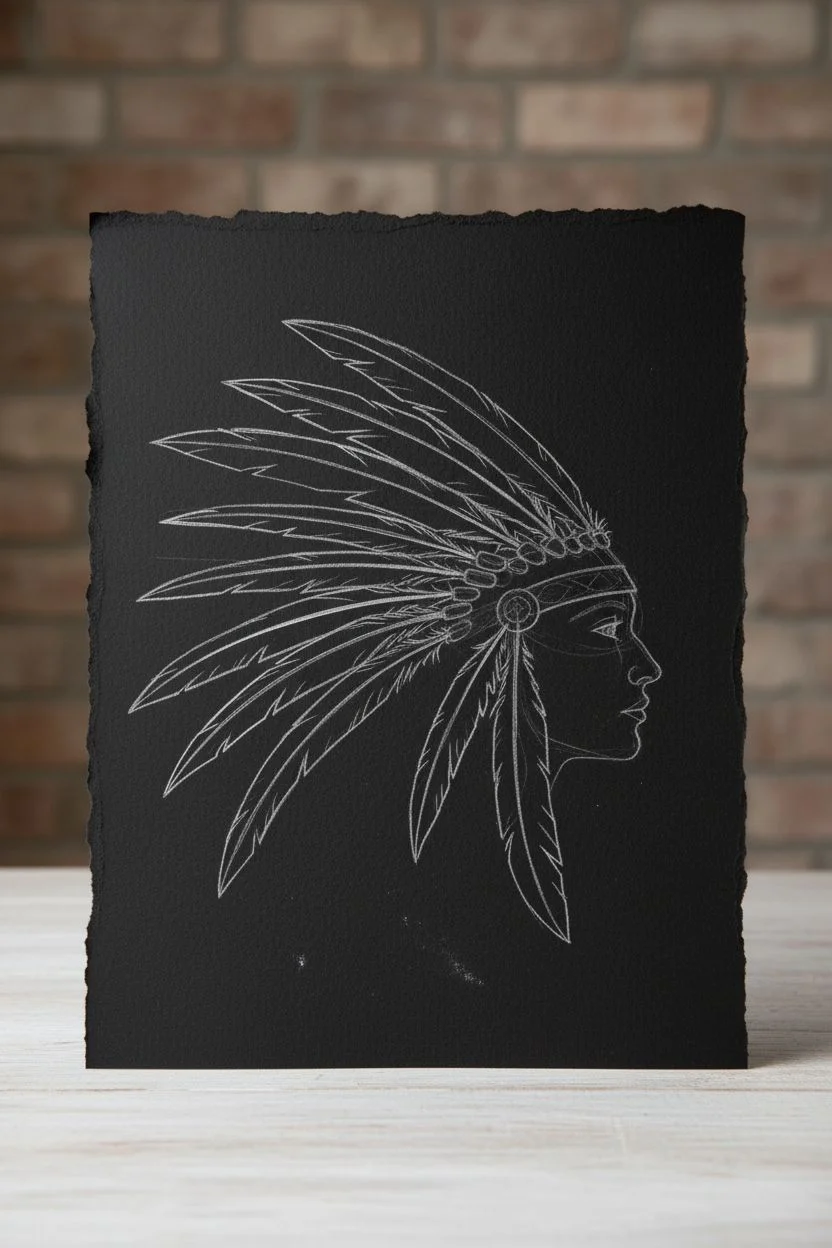
Capture the dignity and intricate detail of a traditional headdress with this striking mixed-media project. By working on a deep black background, the white feathers and warm skin tones pop with dramatic contrast, creating a piece that feels both historical and modern.
Step-by-Step
Materials
- High-quality black watercolor paper or mixed media paper (heavyweight)
- handmade deckle-edge paper (cream or white) for mounting
- Gouache paints (opaque watercolor)
- Gold metallic paint or ink
- Pencil (white or metallic for sketching)
- Fine detail brushes (sizes 00, 0, and 1)
- Flat brush (size 4 or 6)
- Mixing palette
- Masking tape
- Glue stick or archival mounting adhesive
Step 1: Preparation & Sketching
-
Prepare the substrate:
Begin by tearing the edges of your black paper to create a soft, deckled look. This doesn’t need to be perfect; irregular edges add character to the final piece. -
Map out the composition:
Using a white or silver pencil, lightly sketch the profile of the face. Place it on the right side of the paper to leave ample room for the expansive headdress flowing to the left. -
Outline the headdress:
Sketch the main shape of the headdress. Start with the headband across the forehead, then draw long, sweeping curves to indicate the direction of the feathers. Don’t draw individual barbs yet, just the general quill lines.
Step 2: Painting the Portrait
-
Base skin tones:
Mix a warm, mid-tone skin color using ochre, burnt sienna, and white gouache. Apply this to the face, keeping the layer smooth but opaque enough to cover the black background. -
Build facial structure:
Once the base is dry, mix a slightly darker shade for shadows under the cheekbone, jawline, and eye socket. Use a lighter mix to highlight the nose bridge, forehead, and cheekbone. -
Define the features:
With a fine brush and dark brown or black paint, carefully define the eye, nostril, and mouth. I like to add a tiny dot of white in the eye to bring the portrait to life.
Chalky Paint?
If your gouache dries too chalky against the black, mix in a tiny drop of gum arabic. It increases transparency slightly but significantly boosts the richness and sheen of the colors.
Step 3: Rendering the Headdress
-
Feather base layers:
For the feathers, start with a base of cream or off-white gouache. Paint the main shape of each feather, leaving small black gaps between them to separate the forms. -
Adding feather texture:
Mix a diluted grey or light brown. Using your finest brush, paint quick, diagonal strokes outward from the center quill of each feather to mimic the barbs. -
Painting the distinct tips:
Many of the feathers have dark, dipped tips. Use a warm brown or burnt umber to paint the ends of the feathers, blending slightly into the white section for a natural transition. -
Accent feathers:
Add the specialized feathers, such as the red fluff near the headband and the turquoise-blue accent feathers at the bottom. These distinct colors break up the white mass and guide the eye. -
Headband detailing:
Paint the headband strip across the forehead. Use turquoise or light blue as a base, then add small geometric patterns or beadwork suggestions with red and white dots. -
The rosette:
Paint the circular ear ornament (rosette). Start with concentric circles of color, then use tiny vertical dashes to simulate beading texture.
Sharper Feathers
For ultra-fine feather barbs, use a rigger brush (liner brush). Its long hairs hold more paint and allow for long, uninterrupted strokes that taper beautifully at the ends.
Step 4: Finishing Touches & Mounting
-
Metallic accents:
Take your gold metallic paint or ink and carefully trace the quills of the feathers and add highlights to the beadwork on the headband. This subtle shimmer adds a regal quality. -
Refining edges:
Check the silhouette of the face against the black background. If needed, use black paint to neaten the profile line or sharpen the tip of the nose. -
Review contrast:
Step back and look at the whole piece. If the white feathers look too flat, add a glaze of very watery burnt sienna in the shadowed areas where feathers overlap. -
Prepare the mount:
Take your larger sheet of handmade cream deckle-edge paper. Ensure it is clean and flat. -
Mount the artwork:
Apply adhesive to the back of your painted black paper. Center it on the cream paper, leaving an even border all around. Press firmly to secure it.
Now you have a stunning, high-contrast portrait that honors the beauty of traditional regalia


Silhouette Figure With a Color-Wash Sky
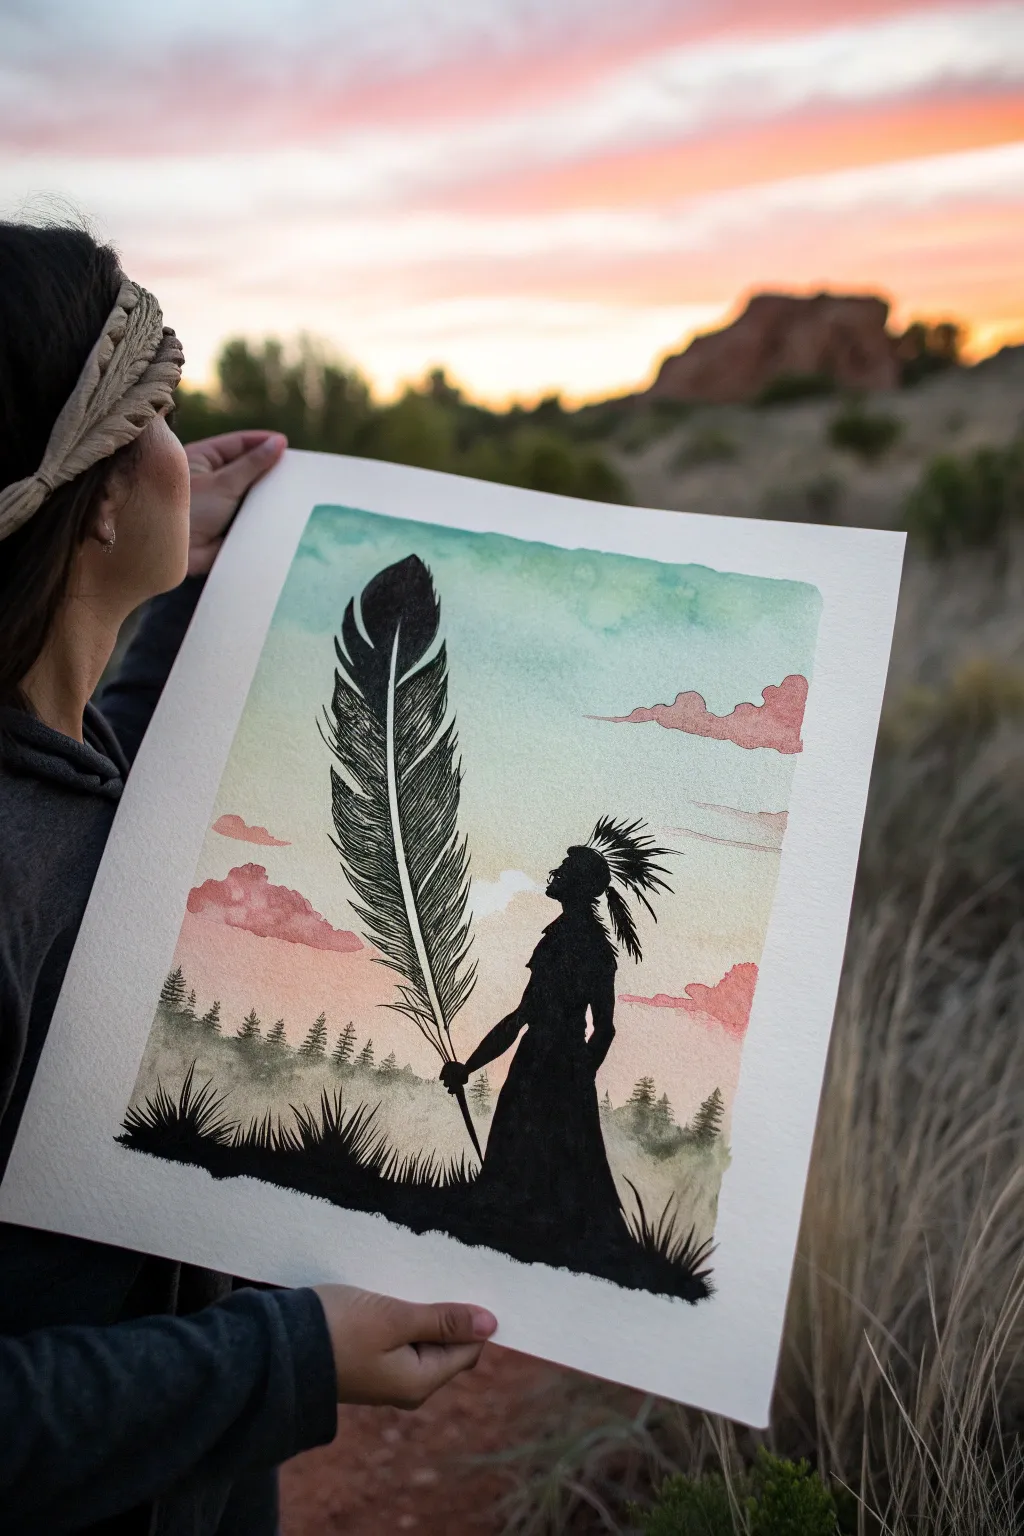
Capture the solemn beauty of a sunset landscape with this striking mixed-media piece that combines soft watercolor washes with bold, opaque silhouettes. The contrast between the delicate, dreamy sky and the stark black figure creates a powerful and symbolic image perfect for honoring Native American themes.
How-To Guide
Materials
- High-quality watercolor paper (140lb/300gsm cold press recommended)
- Watercolor paints (teal, pale blue, pink, muted orange/vermilion)
- Black acrylic paint or black India ink
- Large flat wash brush
- Medium round brush
- Fine liner brush (size 0 or 00)
- Pencil and eraser
- Masking tape
- Palette for mixing
- Paper towels and water cup
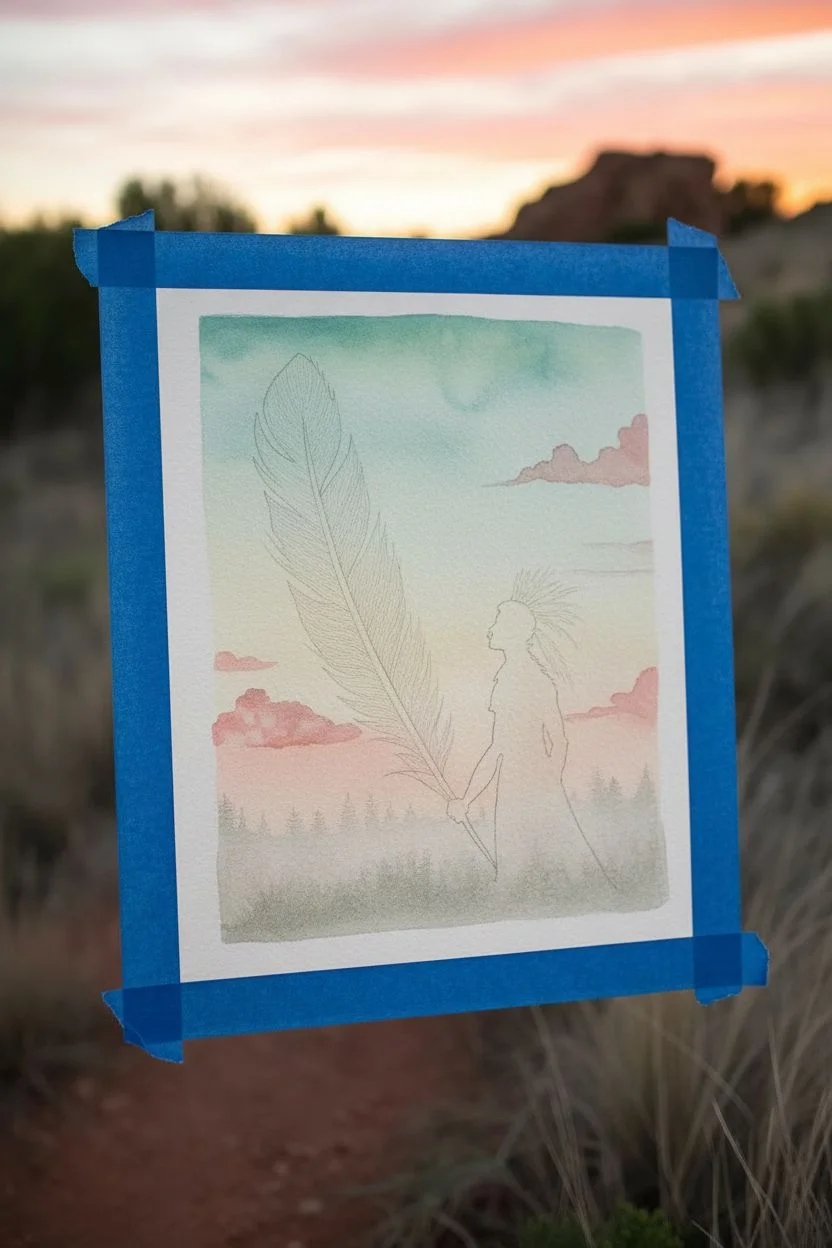
Step 1: Setting the Scene: The Sky Wash
-
Prepare the surface:
Begin by taping down all four edges of your watercolor paper to a board. This prevents the paper from buckling when we apply the wet wash and creates a crisp white border for your finished piece. -
Sketch the layout:
Lightly sketch the horizon line near the bottom third of the paper. Gently outline the position of the figure and the large feather to guide your painting, but keep these lines faint so they don’t show through the sky. -
Wet the sky area:
Using your large flat brush and clean water, dampen the entire sky area above your horizon line. The paper should be glisten but not look like a puddle. -
Apply the upper sky:
Load your brush with a watered-down teal or pale blue. Start at the very top of the paper and sweep across using broad horizontal strokes, letting the color fade naturally as you move downward. -
Blend the transition:
While the blue is still damp, rinse your brush and pick up a very pale, diluted yellow or unpainted white space in the middle to act as a transition zone. -
Paint the sunset clouds:
Mix a soft pink with a touch of vermilion. While the paper is still slightly damp, drop in cloud shapes near the horizon and a few floating higher up. The wet-on-wet technique will give them soft, fluffy edges. -
Ground the horizon:
Using a very diluted grey-green mix, paint a faint, misty treeline just above where your solid black ground will be. Keep this extremely subtle to create a sense of atmospheric depth. -
Let it dry completely:
This is crucial. The paper must be bone dry before we add the crisp silhouette layers. You can use a hairdryer on a low setting if you need to speed this up.
Sharpen Your Edges
For the finest details in the feather and grass, slightly dilute your black acrylic with a drop of water. This improves the flow and helps create razor-sharp tips.
Step 2: The Bold Silhouette
-
Outline the figure:
Switch to your medium round brush and black acrylic paint (or ink). Carefully trace the outline of the Native American figure you sketched earlier, paying attention to the profile of the face and the flow of the clothing. -
Fill the figure:
Fill in the body of the figure with solid black. Ensure the paint is opaque; you may need a second coat if the watercolor paper texture shows through. -
Detail the headdress:
Using your fine liner brush, paint the individual feathers of the headdress. Use quick, flicking motions to make the tips of the feathers sharp and tapered. -
Paint the ground:
Extend the black paint from the figure’s feet to create the sloping hill. Use uneven, jagged strokes along the top edge of the hill to simulate grass and wild vegetation. -
Add grassy texture:
With the detail brush, flick upward from the black ground to create individual blades of grass and small plants, particularly in the foreground corners.
Step 3: The Feather & Final Touches
-
Stem the feather:
Draw the central quill of the large feather using the fine liner brush. I like to start from the figure’s hand and pull the line upward in a gentle curve to ensure it looks balanced. -
Create the vanes:
Starting from the quill, paint the vanes of the feather outward. Instead of a solid block, use many closely spaced lines that curve upward. Leave small, intentional gaps between clumps of lines to show the natural splits in a feather. -
Refine the edges:
Go back over the outer edge of the feather. Make the tips of the vanes sharp and slightly irregular to mimic the texture of a real bird feather. -
Review contrast:
Check the opacity of your black areas against the dried sky. If any areas look patchy or grey, apply a final layer of black for maximum impact. -
Reveal the border:
Once the black paint is fully dry, slowly peel away the masking tape at a 45-degree angle to reveal your clean, crisp edges.
Did the paint bleed?
If black paint bleeds into the sky, wait for it to dry perfectly. Then, use a white gel pen or opaque white gouache to tidy up the edge and cover the mistake.
Now you have a serene and powerful piece of art that beautifully balances color and form
BRUSH GUIDE
The Right Brush for Every Stroke
From clean lines to bold texture — master brush choice, stroke control, and essential techniques.
Explore the Full Guide
Modern Indigenous Portrait With Contemporary Color Blocking
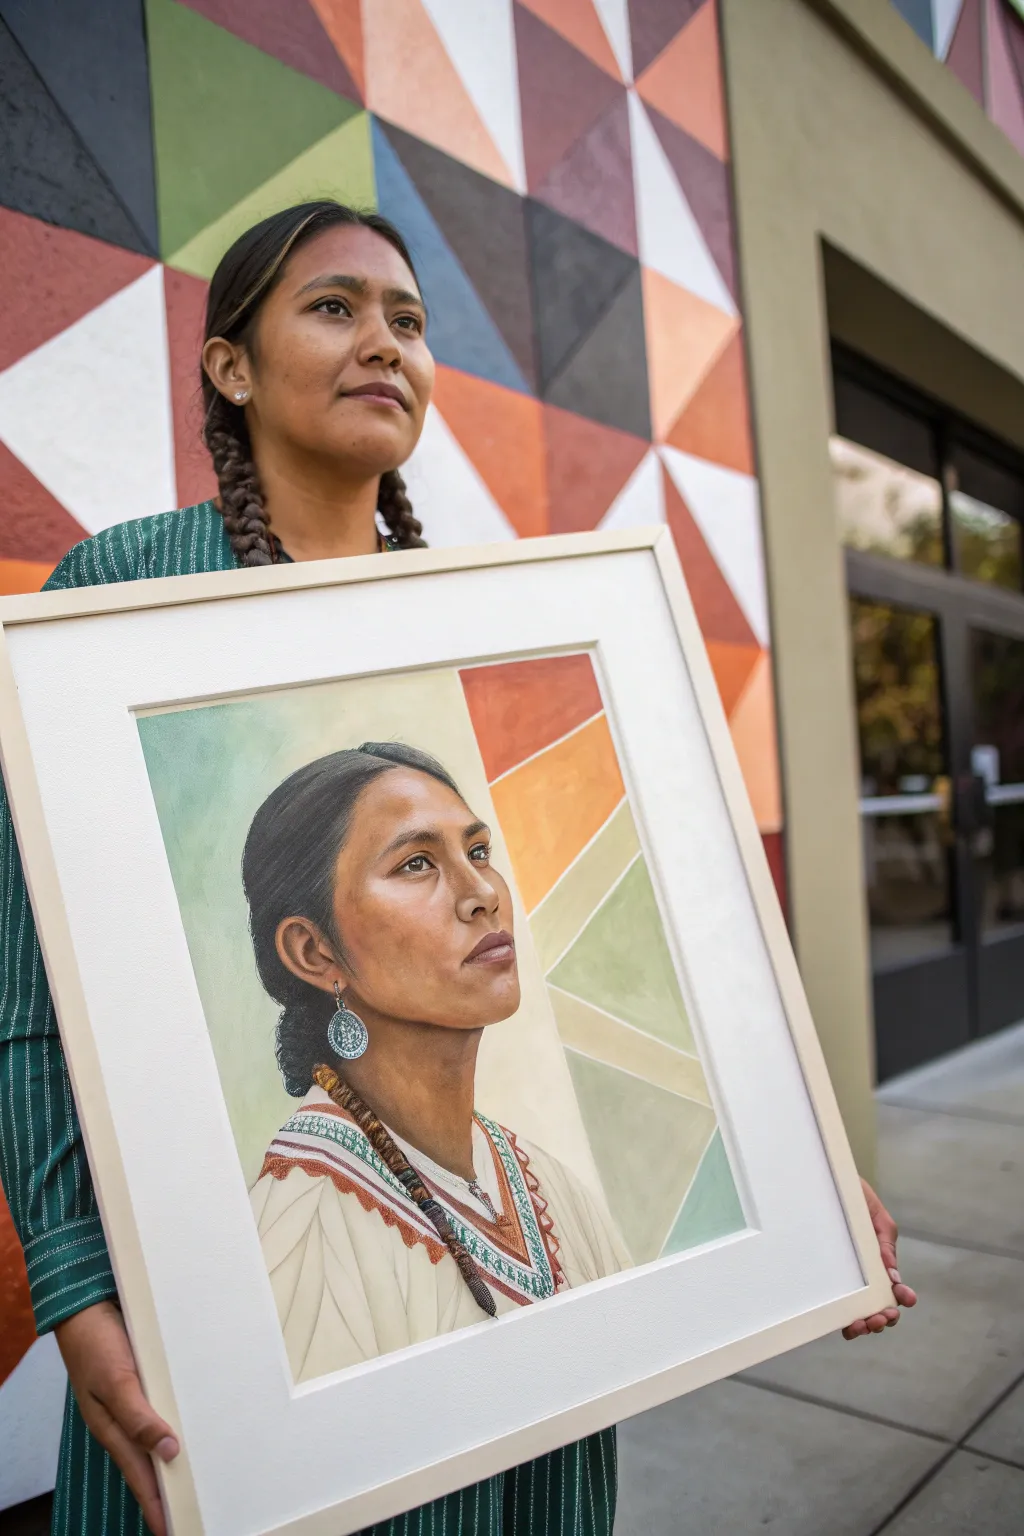
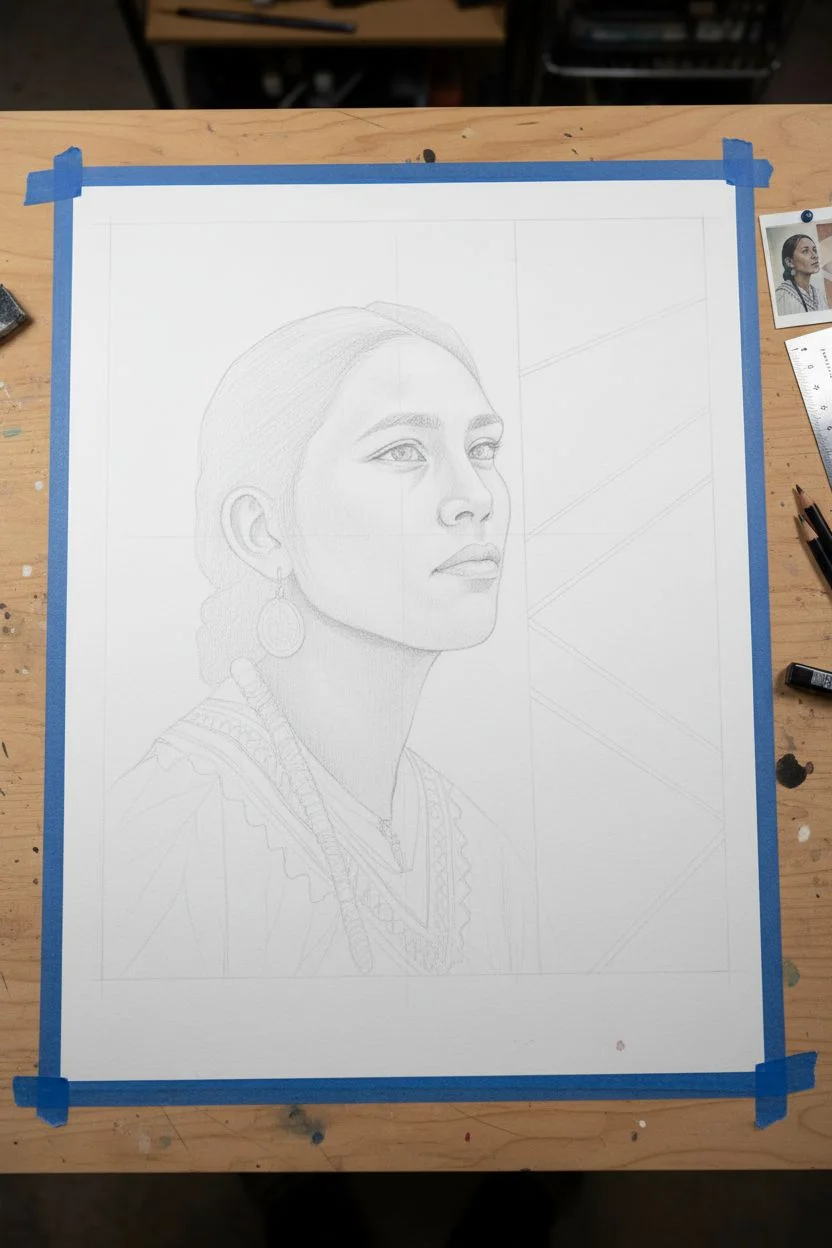
This striking project blends realistic portraiture with modern, hard-edge geometric abstraction. By combining a sensitive, detailed study of a subject’s face with bold, angled color blocking, you’ll create a piece that feels both deeply personal and stylishly contemporary.
Step-by-Step Tutorial
Materials
- Heavyweight watercolor paper or hot-press illustration board (16×20 inches)
- Acrylic gouache or matte acrylic paints (skin tones, teal, terracotta, cream, olive)
- Graphite pencils (HB and 2B) and kneaded eraser
- Synthetic brushes: fine rounds (sizes 0, 2) and flat shaders (sizes 4, 8)
- Low-tack masking tape or drafting tape
- Ruler or triangles
- Mixing palette and water container
- Reference photo of your subject
Step 1: Planning and Sketching
-
Select your reference:
Choose a reference photo with strong lighting that highlights facial structure. A 3/4 profile pose works beautifully for this composition as it draws the eye across the canvas. -
Map the geometry:
Before drawing the face, lightly mark out your background geometry. Use a ruler to create the distinctive diagonal rays and triangles. Ensure these lines don’t intersect awkward points on the face, like the tip of the nose or eye. -
Draft the portrait:
Sketch the portrait lightly with an HB pencil. Focus on accurate proportions and the tilt of the head. Keep your lines faint so they won’t show through lighter paint layers later. -
Refine the details:
Go back in with a slightly sharper pencil to define the eyes, nostrils, and mouth. Sketch the clothing details, paying attention to the embroidered patterns on the collar, but keep the hair shapes simple for now.
Clean Lines Secret
Burnish down your masking tape edges with the back of a spoon or a bone folder. Paint a thin layer of clear matte medium over the tape edge first to seal it completely against leaks.
Step 2: Painting the Background
-
Mask the edges:
Apply low-tack tape along the exterior edges of your paper to create a crisp white border. Then, use the tape to mask off the first set of geometric shapes in the background. -
Mix your palette:
Prepare your background colors: a soft sage green, a muted terracotta, and a pale cream. Acrylic gouache is perfect here because it dries opaque and matte. -
Apply the first blocks:
Paint the exposed geometric sections. Paint away from the tape edge to prevent bleeding. Let this layer dry completely before moving the tape to adjacent shapes. -
Complete the geometry:
Continue masking and painting until the background abstraction is finished. I like to peel the tape while the paint is still slightly damp to get the cleanest possible line.
Make It Symbolic
Choose background colors that hold personal meaning. Use earth tones to represent land, blues for water, or specific tribal colors to add a layer of heritage to the abstract design.
Step 3: Rendering the Portrait
-
Block in skin tones:
Mix a mid-tone base color for the skin using burnt sienna, ochre, and white. Apply this as a thin wash over the face and neck to establish the overall warmth. -
Build facial structure:
Using a smaller flat brush, lay in the shadows under the cheekbone, jawline, and nose using a slightly darker, cooler mix. Keep your edges soft by blending while the paint is wet. -
Add highlights:
Mix a lighter tint of your flesh tone. Apply this to the forehead, bridge of the nose, and cheekbones to bring the face forward. -
Detail the features:
Switch to a size 0 round brush for the eyes and lips. Use dark browns rather than pure black for the lash line and pupils to maintain realism without harshness. -
Paint the hair:
Use a dark charcoal or soft black for the hair. Paint in the direction of hair growth, leaving the blocked-out shape fairly solid but adding wispy strands at the temple and nape of the neck for texture.
Step 4: Clothing and Final Touches
-
Render the shirt:
Paint the blouse using a creamy off-white. Use pale gray-browns to suggest folds and shadows in the fabric, giving the garment weight and form. -
Add textile patterns:
Carefully paint the embroidered details on the collar. Use the terracotta and teal from your background palette to tie the subject into the abstract surroundings. -
Paint the jewelry:
Add the earring and necklace details. For silver jewelry, use grey tones with a stark white highlight to simulate metallic shine. -
Clean up edges:
Check the intersection where the portrait meets the geometric background. If needed, use a fine brush to sharpen the outline of the head against the color blocks. -
Seal:
Once fully dry (give it at least 24 hours), apply a matte spray varnish to protect the surface and unify the sheen of the different paint layers.
Frame your finished piece in a simple light wood frame to let the powerful composition speak for itself


Have a question or want to share your own experience? I'd love to hear from you in the comments below!