There’s something magical about laying down neon paint on a black canvas—it’s like watching light appear out of a dark void. In my studio, these are my go-to ideas when I want high contrast, bold color, and that juicy, believable glow effect.
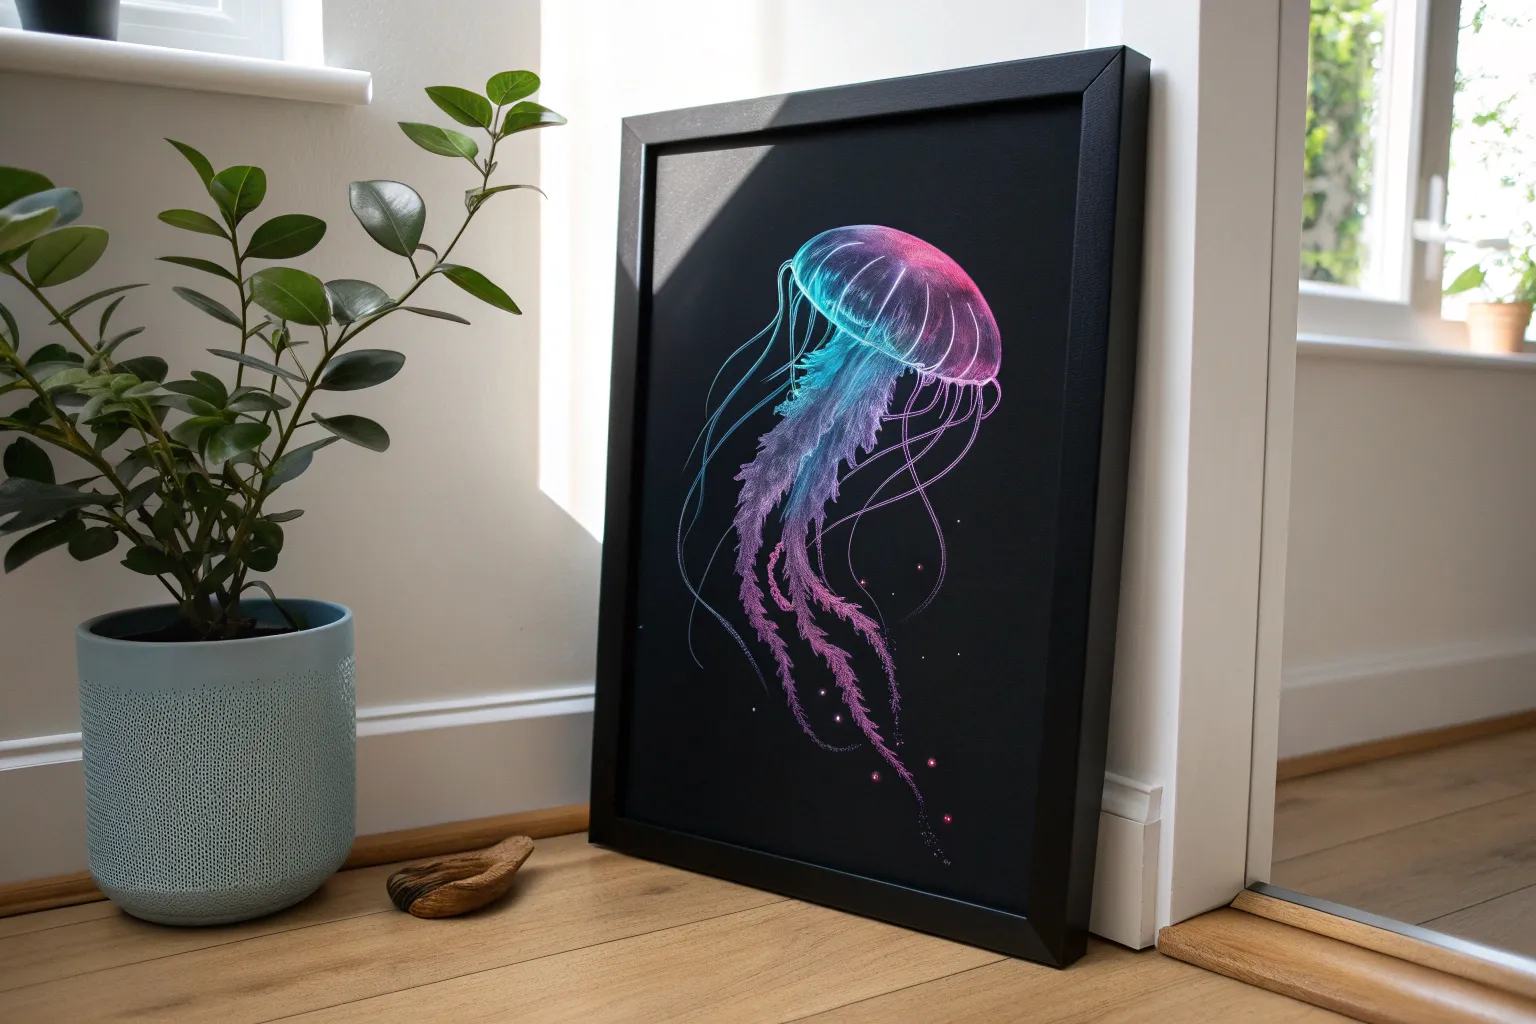
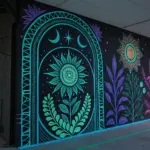
Floating Neon Jellyfish
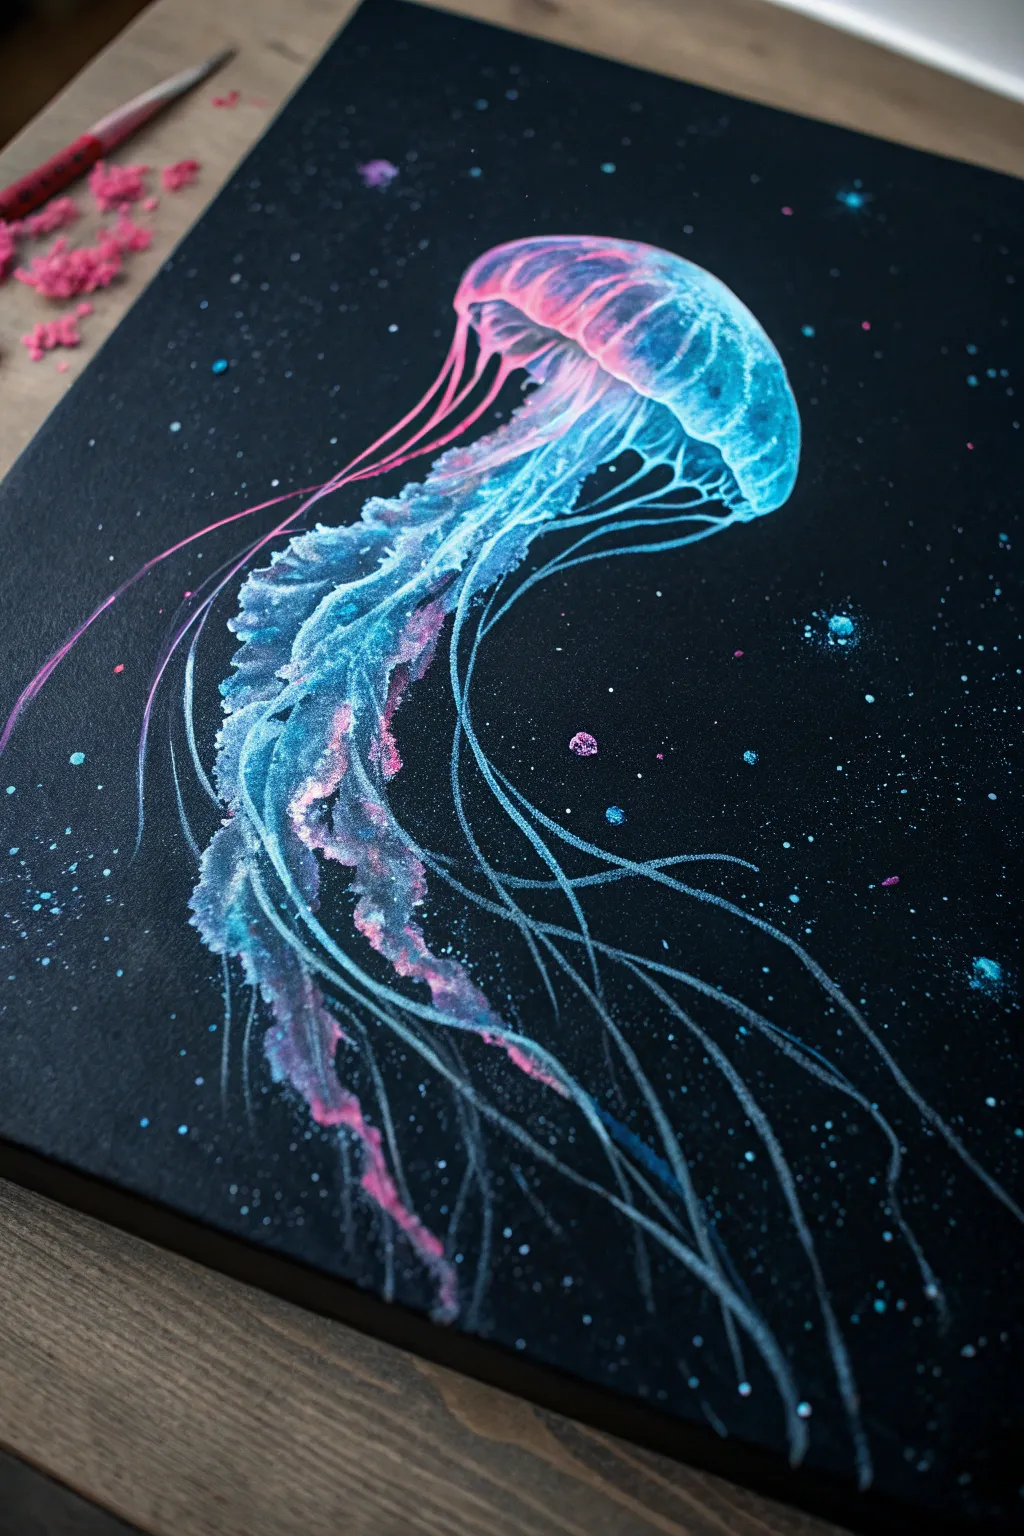
Illuminate your black canvas with this ethereal jellyfish that seems to float between the deep ocean and outer space. By layering translucent neon acrylics over white highlights, you’ll create a striking bioluminescent effect that practically glows in the dark.
Step-by-Step
Materials
- Black stretched canvas (11×14 or similar)
- White colored pencil or chalk pencil
- Acrylic paints: Titanium White, Neon Pink/Magenta, Cyan/Electric Blue, Phthalo Blue
- Round brushes (sizes 2, 4, and 6)
- Fine liner brush (size 0 or 00)
- Old toothbrush or stiff bristle brush
- Cup of water and paper towels
- Mixing palette
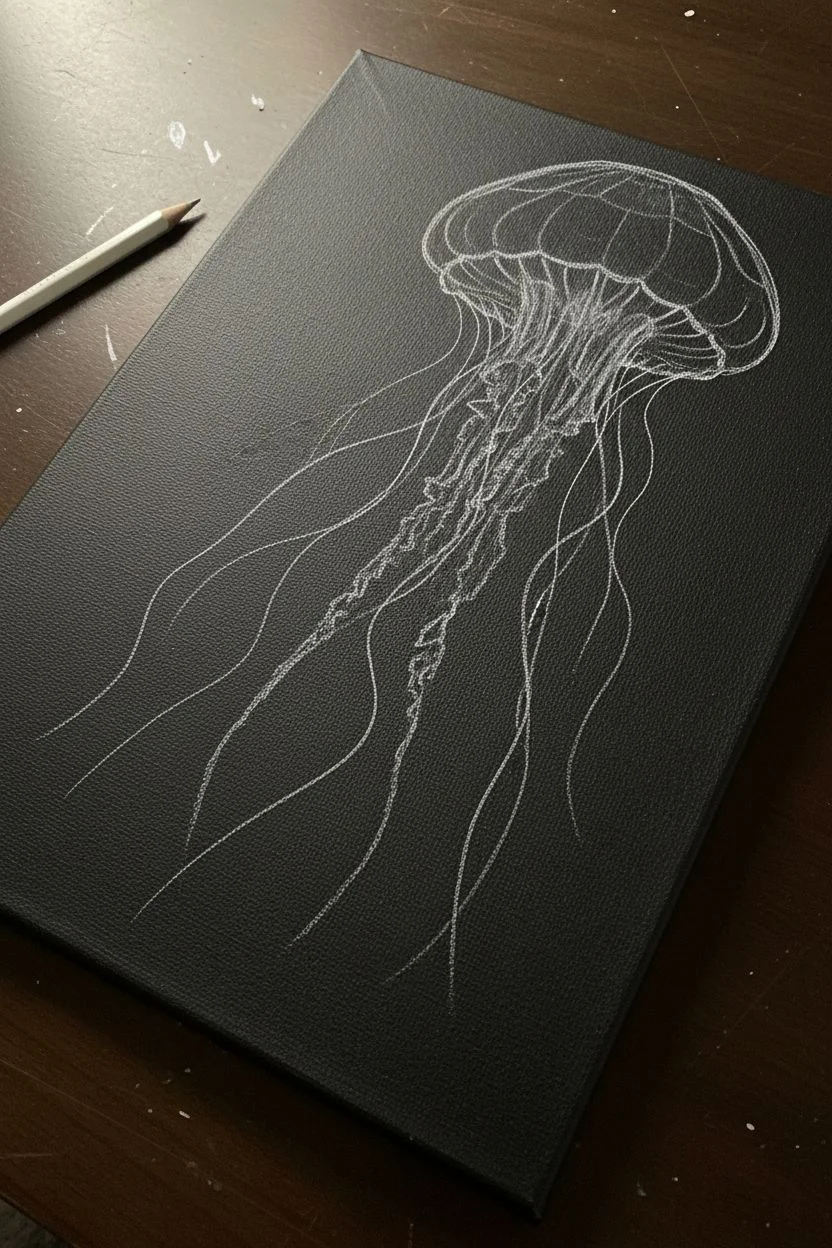
Step 1: Drafting the Shape
-
Sketch the bell:
Begin by lightly sketching the mushroom-shaped cap (the bell) of the jellyfish near the top right of your canvas using a white colored pencil. Keep the lines very faint so they don’t show through later. -
Map the tentacles:
Draw loose, wavy guidelines flowing diagonally downward from the bell to the bottom left. Don’t worry about perfect details yet; just establish the general flow and length of the tentacles.
Step 2: Underpainting for Luminosity
-
Create the base white layer:
Load a size 4 round brush with Titanium White watered down slightly to a milky consistency. Paint the main body of the jellyfish, focusing the brightest white on the top curve of the bell where the ‘light’ hits. -
Add translucent texture:
While the white is still wet, use a surprisingly dry brush to drag the paint downward inside the bell, creating streaks that look like ribbed textures. The black canvas showing through creates natural shadows. -
Paint the ruffled arms:
Switch to a smaller brush to paint the thick, frilly oral arms in the center. Use a stippling or dabbing motion with white paint to create that crinkly, organic texture. -
Detail the fine tentacles:
Using your fine liner brush and thinned white paint (inky consistency), trace over your long tentacle guidelines. Vary the pressure—press down for thicker lines and lift up for hairline cracks—to make them look fluid.
Paint Looking Dull?
Neons are naturally transparent. If they look muddy on black, ensure your white base layer is completely dry and very bright before glazing colors over it.
Step 3: Applying Neon Glazes
-
Mix your glazes:
Prepare your neon colors. Mix Neon Pink and Cyan separately with a tiny bit of water or glazing medium. They should be transparent enough to see the white underneath. -
Glaze the pink areas:
Gently wash the Neon Pink over the left side of the bell and the tips of the ruffled arms. The white underpainting will make this color pop instantly. -
Apply the blue gradients:
Wash the Cyan over the right side of the bell and into the center tentacles. Where the pink and blue meet, blend them slightly to create a soft violet transition. -
Deepen the shadows:
Mix a tiny drop of Phthalo Blue with water and carefully paint along the bottom rim of the bell and the shadowed undersides of the tentacles to add volume and 3D form.
Pro Tip: Fluid Lines
For ultra-smooth, long tentacles, add a drop of flow improver or water to your paint. It should feel like ink, allowing the liner brush to glide without stopping.
Step 4: Highlights and Atmosphere
-
Reinforce the highlights:
Once the color glazes are dry, go back in with pure Titanium White on your liner brush. Add tiny, crisp highlights to the very top edge of the bell and the brightest ridges of the tentacles. -
Create the starry background:
Cover your jellyfish with a scrap piece of paper to protect it. Dip an old toothbrush into watered-down white paint or neon blue, point it at the canvas, and run your thumb over the bristles to spray fine mist. -
Add distinct glowing orbs:
Use the back end of a paintbrush handle dipped in Cyan or Pink to dot a few larger ‘stars’ or bubbles around the jellyfish. -
Final glow touches:
I like to dry brush a very faint haze of neon blue around the immediate outside of the jellyfish bell on the black background, giving it a soft atmospheric glow.
Step back and dim the lights to admire your glowing deep-sea creation

Neon Galaxy and Starfield
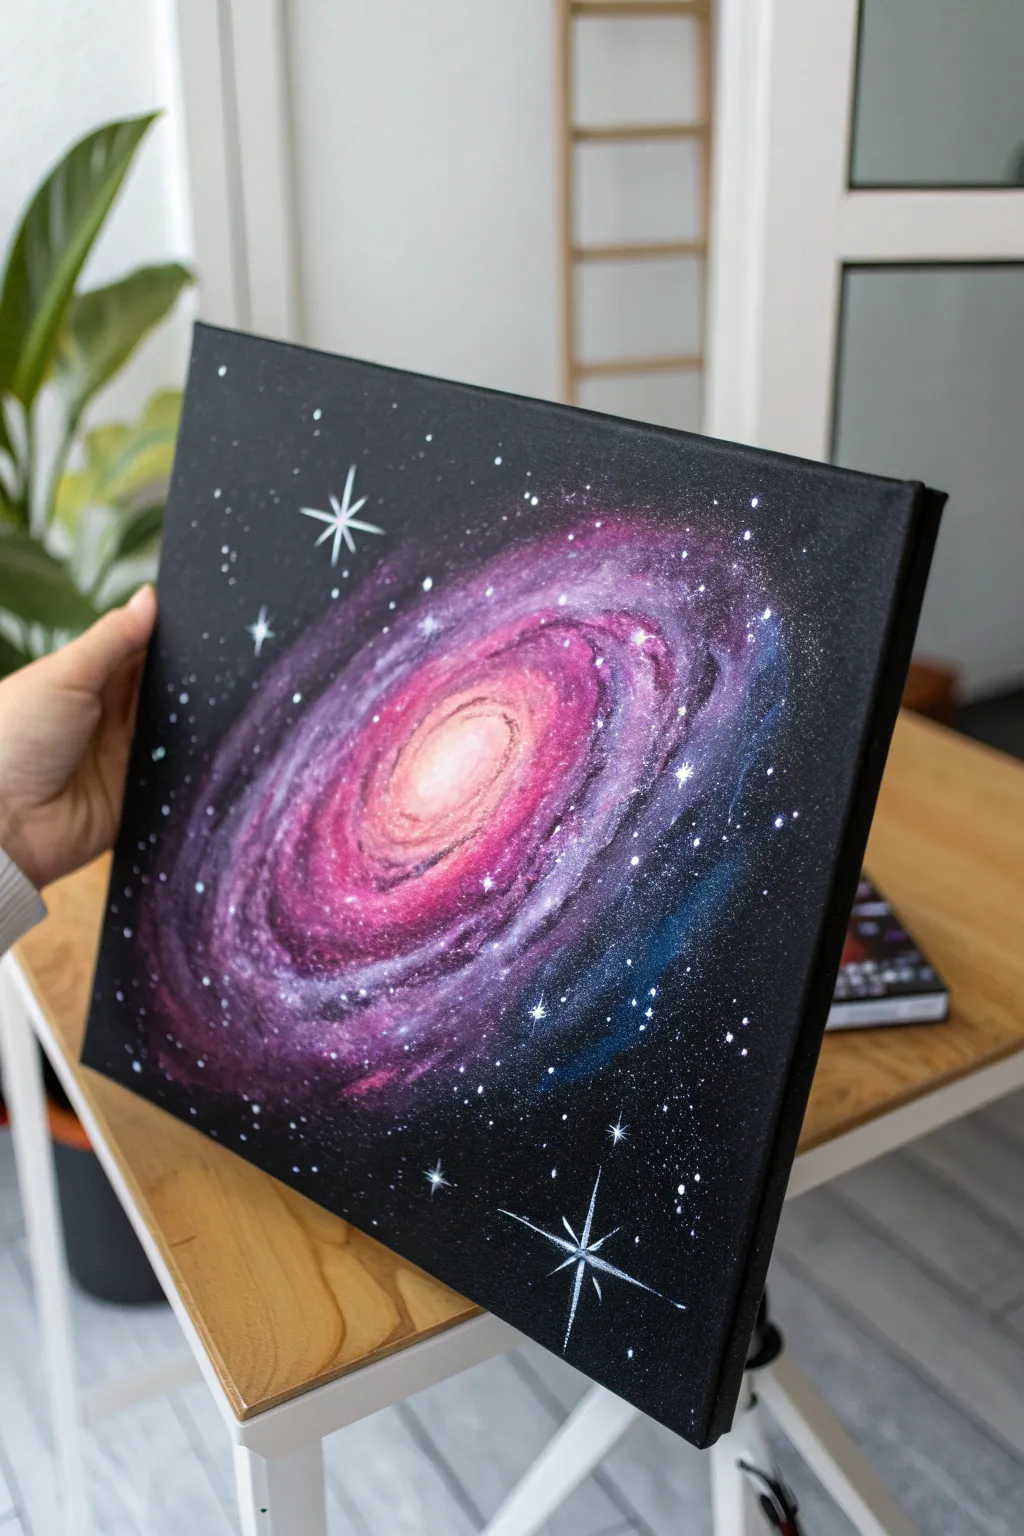
Capture the ethereal beauty of deep space with this radiant spiral galaxy painting on a black canvas. The intense contrast of neon pinks and purples against the dark void creates a stunning, glowing effect that feels like it’s illuminating the room.
Step-by-Step Guide
Materials
- Square stretched black canvas (or white canvas painted black)
- Acrylic paints: Titanium White, Neon Pink, Magenta, Purple/Violet, Phthalo Blue
- Medium flat brush (approx. 1 inch)
- Small round brushes (sizes 2 and 4)
- Fine liner brush or old toothbrush (for stars)
- Sponge or paper towel
- Cup of water and palette
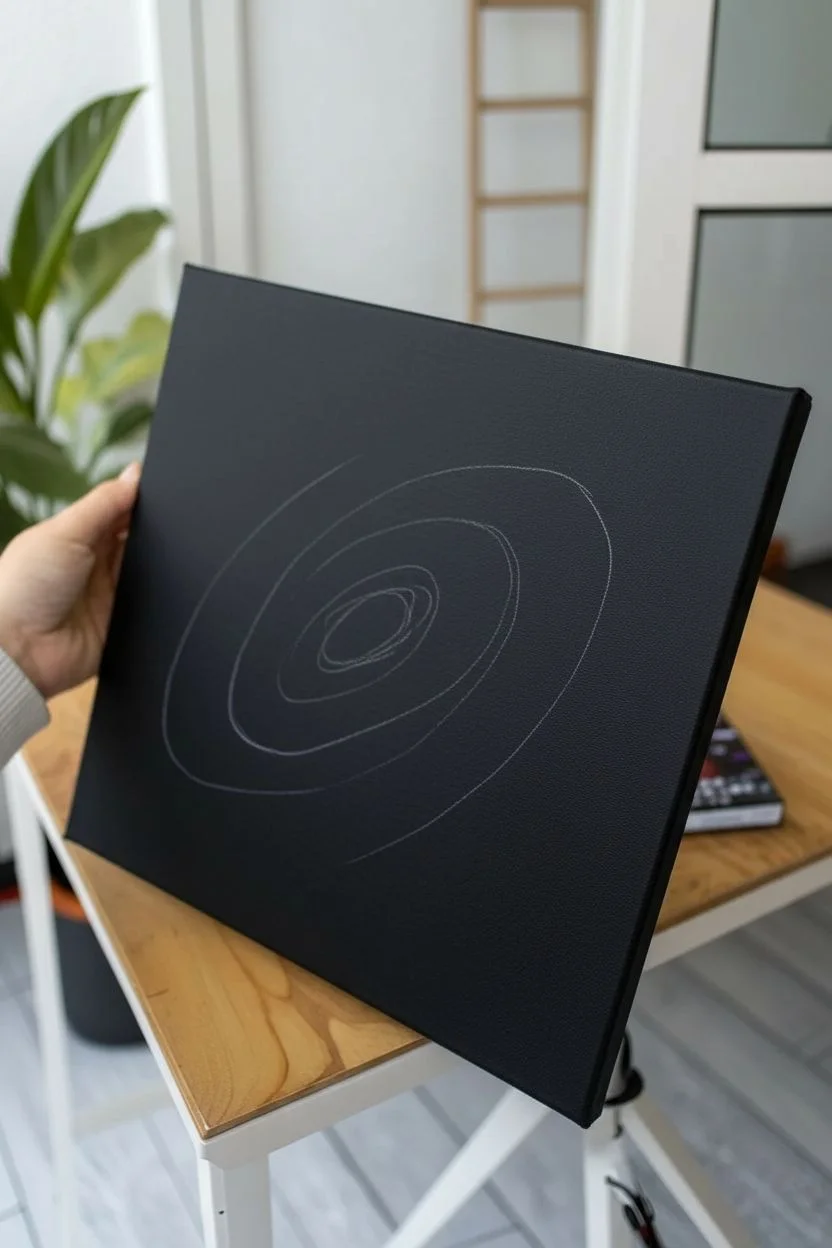
Step 1: Setting the Background
-
Prep the Void:
If you aren’t starting with a pre-primed black canvas, coat a standard white canvas with two layers of black acrylic heavily. Let it dry completely until the surface is matte and solid. -
Sketch the Spiral:
Using a very generic, faint touch with a white charcoal pencil or a thin brush dipped in watered-down purple, lightly outline the oval shape of your galaxy. Just mark the central oval and the general direction of the two main spiral arms to guide your painting.
Step 2: Building the Galaxy
-
The Glowing Core:
Start at the very center with a mix of Titanium White and a tiny drop of Neon Pink. Paint a solid, bright oval in the middle. While the paint is still wet, soften the edges outward. -
First Layer of Color:
Surround the white core with pure Neon Pink. Blend this into the still-wet white center to create a seamless, glowing transition. Use a soft, dry brush to feather these edges so there are no harsh lines. -
Extending the Arms:
Switch to your Magenta paint. Begin pulling curved strokes outward from the pink ring, following your initial spiral sketch. Use a scrubbing motion to create a texture that looks like distant dust clouds. -
Deepening the Sprawl:
As you move further out to the galaxy’s edges, mix Purple with a little Phthalo Blue. Apply this darker mix for the outer edges of the spiral arms, letting it fade gradually into the black background. -
Adding Texture with Sponging:
I like to take a small piece of sponge or a crumpled paper towel here, dip it lightly into the Magenta and Purple mix, and dab it over the spiral arms. This creates that mottled, gaseous nebula texture that brushes sometimes miss. -
Reinforcing the Center:
Once the first layers are tacky, go back to the absolute center with pure Titanium White. Dab it right in the middle to maximize the ‘light source’ effect, making sure it glows intensely against the surrounding pinks.
Keep it fluid
Keep a misting spray bottle handy. A light mist over the canvas keeps acrylics wet longer, allowing for smoother, softer blends between the pinks and purples.
Step 3: Details and Stars
-
Defining the Dust Lanes:
Mix a dark purple (Purple + tiny bit of Black). Using a smaller round brush, paint thin, broken lines in between the bright spiral arms. These ‘negative spaces’ create the separation and depth seen in real galaxy photos. -
Highlighting the Arms:
Take a mix of White and Neon Pink again. With a mostly dry brush, lightly scumble (brush lightly over the surface texture) along the top ridges of the spiral arms to suggest clusters of bright stars within the gas. -
Blue Accents:
On the very outer fringes of the galaxy, add faint whispers of Phthalo Blue mixed with a lot of water or glazing medium. This creates a cool temperature contrast against the hot pink center. -
Creating the Starfield:
Dilute Titanium White paint with water until it has an ink-like consistency. Loading a stiff brush or toothbrush, flick the bristles to spray fine white specks across the entire black background and over the galaxy itself. -
Painting Major Stars:
Choose 3 or 4 spots in the black space around the galaxy for brighter stars. Use a liner brush to paint a small white dot, then carefully drag long, thin lines outward from the center to create a cross (lens flare) shape. -
Final Sparkles:
Add smaller ‘cross’ stars within the galaxy’s arms using a very fine detail brush. These should be tiny twinkling points of light that sit on top of the colorful nebula clouds. -
The Final Glaze:
Optional: If you have glitter paint or a shimmer medium, add a very thin, translucent coat over the pinkest parts of the spiral for an extra magical finish once everything is dry.
Level Up: Hidden Depth
Before painting the galaxy, sponge a faint layer of metallic silver or interference violet on the black background. It will only show when the light hits it at an angle.
Step back and admire how your personal galaxy seems to spin right off the canvas


Electric Aurora Over Dark Pines
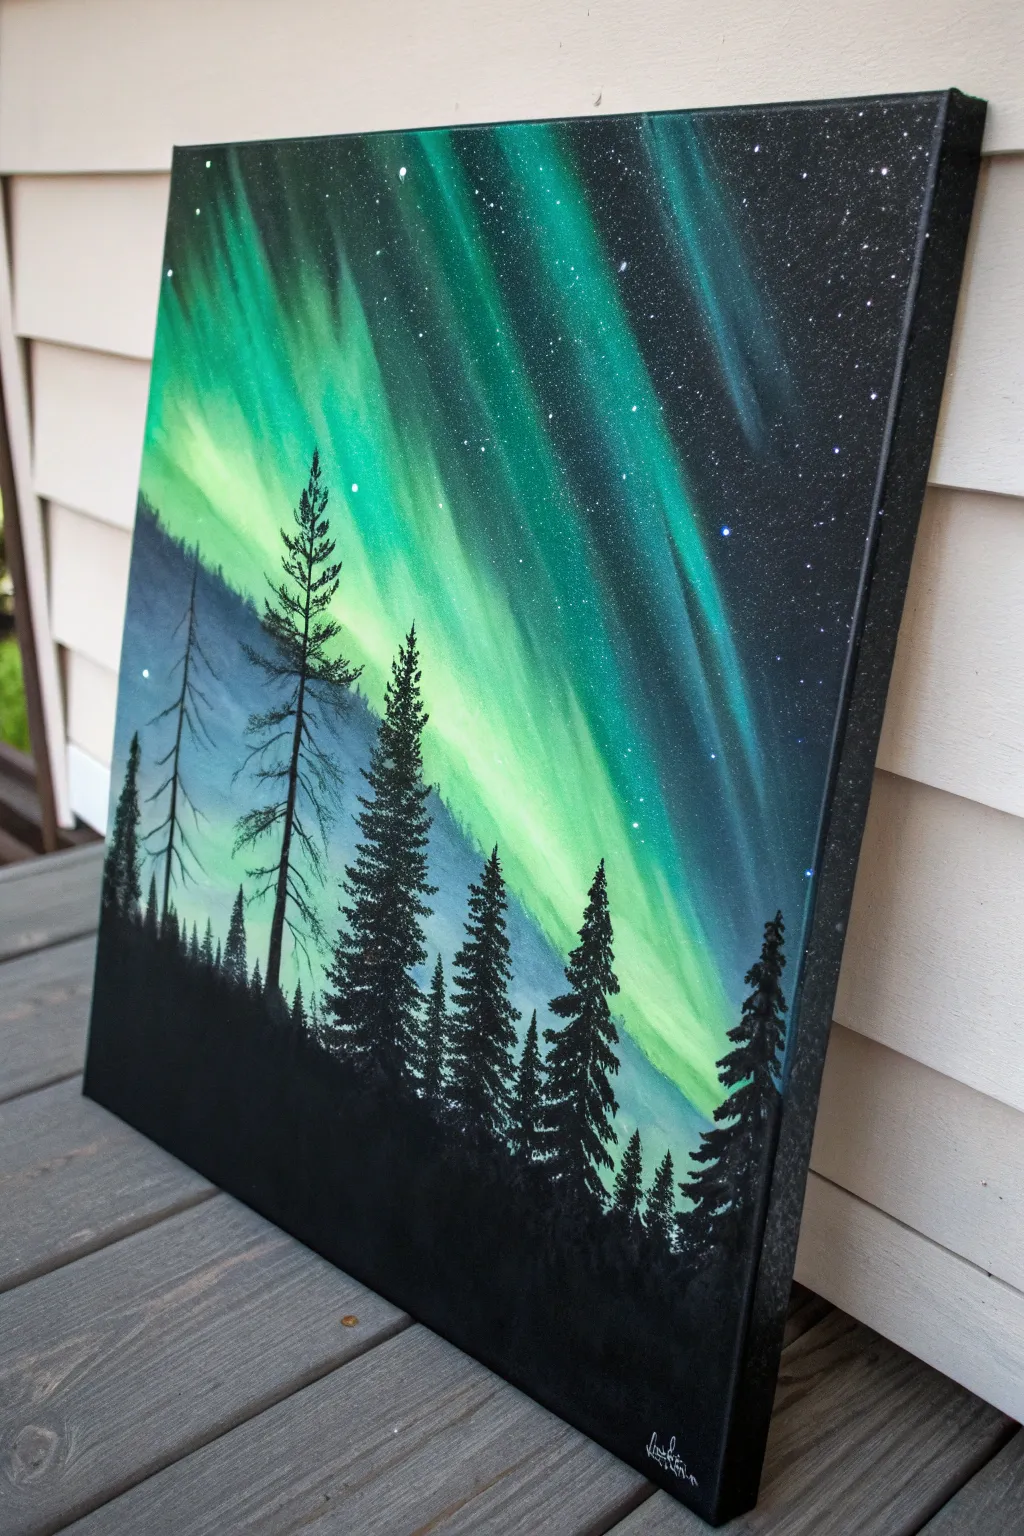
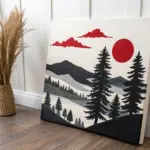
Capture the magic of the polar night with this vibrant acrylic painting, where neon green light cascades across a deep, starry sky. The sheer contrast between the glowing aurora and the stark black pine silhouettes creates a dramatic, eye-catching piece perfect for any wall.
Step-by-Step Tutorial
Materials
- Stretched canvas (11×14 or similar)
- Black gesso or black acrylic paint
- Acrylic paints: Titanium White, Phthalo Green, Phthalo Blue, Neon Green (or bright Lime Green)
- Glazing medium or water (for thinning)
- Large flat brush or sponge brush
- Fan brush (optional, for stars)
- Small round liner brush
- Old toothbrush (for stars)
- Medium angle brush or flat brush
Step 1: Setting the Stage
-
Prepare the canvas:
Start by coating your entire canvas with black gesso or black acrylic paint. Cover the sides as well for a finished gallery look. Let this base layer dry completely until it is matte and distinctively dark. -
Map the light source:
Visualize where your aurora will flow. Using a very diluted mixture of white paint and water, lightly sketch broad, diagonal swoops starting from the top left corner down toward the bottom right. This invisible guide will help structure your glow.
Paint Looking Chalky?
If your black dries looking grey or milky, apply a layer of gloss varnish over the dried painting. This restores the deep, richness of the black and makes the neon colors pop.
Step 2: Painting the Aurora
-
Base glow layer:
Mix a small amount of Phthalo Green with Titanium White to create a soft, minty green. Using a dry flat brush, gently scumble this color onto your canvas following the diagonal path you visualized. -
Keep it hazy:
When applying this first layer of green, don’t worry about hard edges. Use a dry, clean brush to feather the edges out into the black background so the color seems to fade into nothingness. -
Deepen the hues:
Mix Phthalo Blue with a touch of Phthalo Green. Apply this darker teal shade to the outer edges of your green glow, blending it smoothly into the black void of space to create depth. -
Intensify the light:
Now, load your brush with Neon Green or bright Lime Green mixed with a little white. Apply this concentrated color to the center of your aurora streaks. This is the ‘core’ of the light and should be the brightest part. -
Create vertical streaks:
To mimic the curtain-like effect of the aurora, use a clean, slightly damp flat brush. Pull the wet paint gently upward in straight vertical strokes. This technique drags the color slightly, creating those iconic pillars of light. -
Final highlights:
Add pure Titanium White to the very brightest center points of the aurora bands. Blend it softly outward. This extreme contrast is what gives the painting its ‘neon’ appearance.
Add a Lake Reflection
Mirror the aurora colors on the bottom third of the canvas before painting the trees. Using horizontal strokes creates the illusion of a calm lake reflecting the sky.
Step 3: The Starry Sky
-
Prepare spatter paint:
Mix Titanium White with enough water to create an ink-like consistency. It should be fluid but not dripping uncontrollably. -
Create the stars:
Dip an old toothbrush or a stiff fan brush into the watery white paint. Hold it over the canvas and flick the bristles with your thumb to spray tiny droplets across the black areas of the sky. -
Add larger stars:
Use the tip of a small round brush or a toothpick to manually dot a few slightly larger, brighter stars in the empty black spaces for variety.
Step 4: The Silhouette Forest
-
Establish the ground:
Using pure black acrylic paint, block in a solid, uneven horizon line along the bottom third of the canvas. This forms the dark forest floor. -
Outline the trees:
Switch to a liner brush or a small round brush. Paint thin, vertical lines extending upward from the ground to serve as the trunks for your pine trees. Vary the heights to make the forest look natural. -
Start the foliage:
Starting at the top of a tree trunk, use the tip of your brush to tap small, horizontal dashes. As you move down the trunk, make the dashes wider and denser. -
Shape the pines:
I find it helpful to wiggle the brush slightly as I tap to create irregular, organic shapes for the branches. Remember, pine trees are rarely perfect triangles; give them some character with uneven spacing. -
Layer the forest:
Paint the tallest trees first, then fill in the gaps at the bottom with smaller, shorter trees. This creates a dense, impenetrable forest look. -
Detail the dead trees:
Include one or two ‘snag’ trees—trunks with only a few barren branches near the top. Use very fine lines for these to contrast against the full pines. -
Final touch-ups:
Check your black values. If the black looks patchy over the bright green background, apply a second coat to the tree silhouettes to ensure they are solid and opaque.
Step back and admire how the stillness of the dark forest amplifies the movement in your bright northern sky

Radiant Neon Mandala Burst
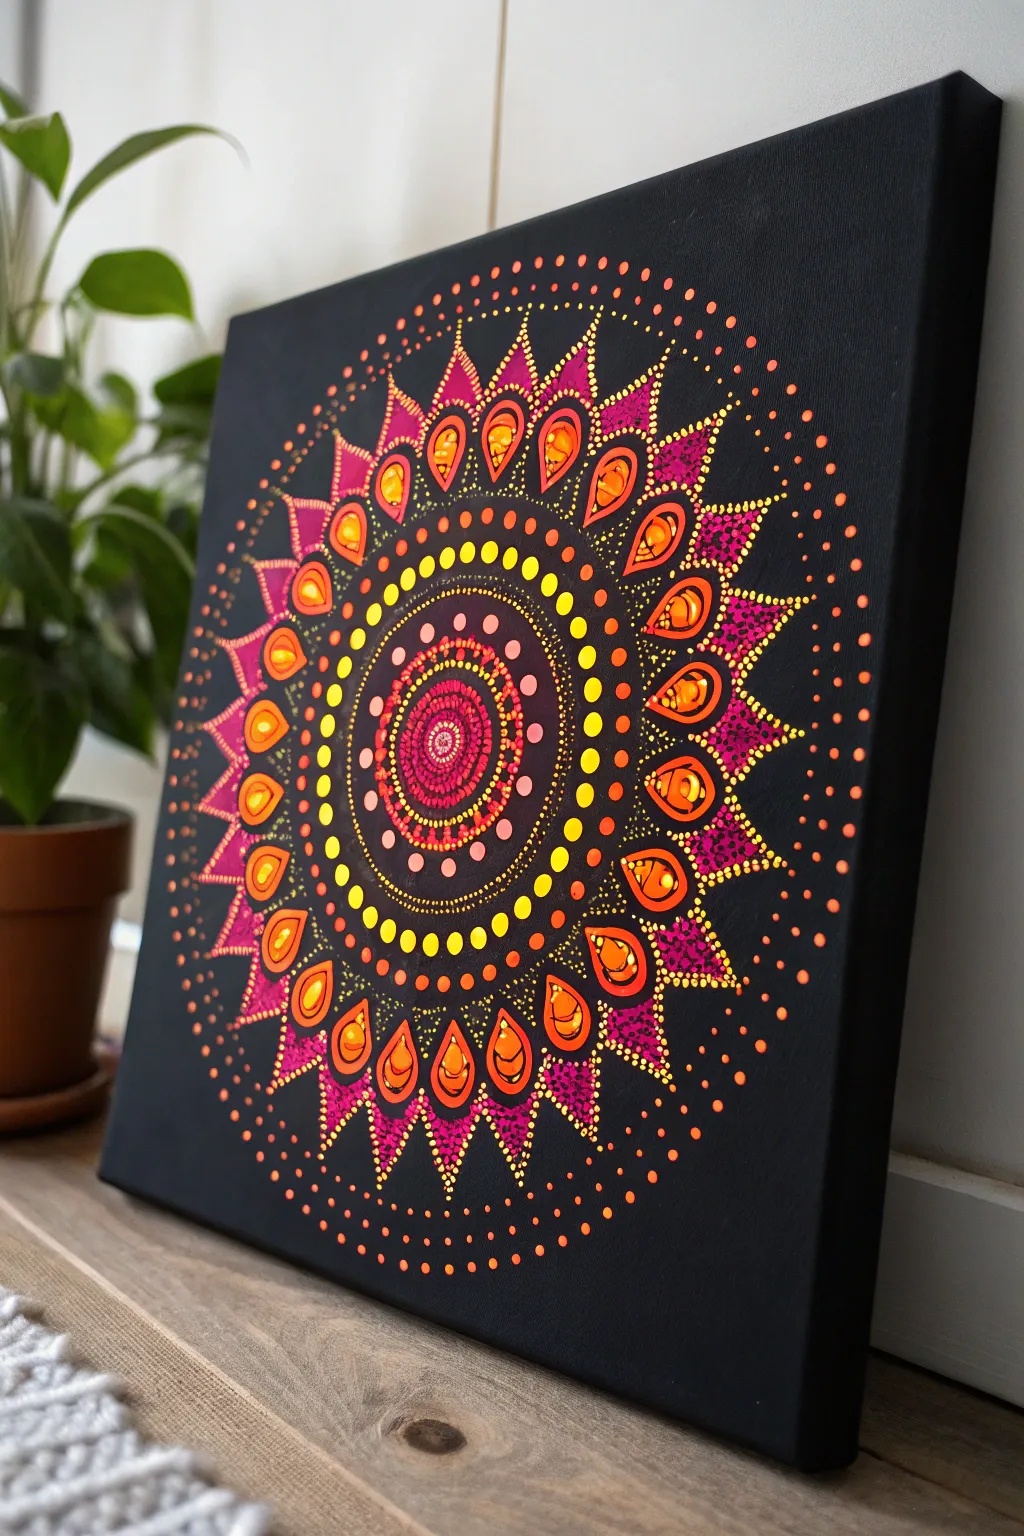
This striking dot mandala uses the high contrast of neon acrylics against a deep black background to create a hypnotic, glowing effect. The radiant design features concentric circles of fiery oranges, pinks, and yellows that seem to pulse with energy.
Detailed Instructions
Materials
- Square black stretched canvas (12×12 inches or similar)
- Neon acrylic paints (Pink, Orange, Yellow, Coral)
- White acrylic paint (for mixing/base)
- Dotting tools (various sizes from stylus to large rods)
- Fine liner brush (size 0 or 00)
- White charcoal pencil or chalk pencil
- Ruler
- Protractor or compass
- Palette for mixing
- Damp paper towel
Step 1: Grid & Center
-
Prep the surface:
Ensure your black canvas is clean and dust-free. If you are painting a white canvas black, give it two solid coats of lamp black acrylic and let it dry completely. -
Map the grid:
Find the exact center of your canvas using a ruler. Draw a vertical and horizontal line crossing at the center. Use a compass to draw about 6-8 concentric guide circles radiating outward, focusing on the initial 2-inch center area and the outer 5-inch rim area. -
Mark radial lines:
Use a protractor to mark radial lines every 15 or 20 degrees. These ‘pie slices’ are crucial for keeping your teardrops and outer spikes symmetrical. -
Paint the central seed:
Place a medium-sized neon pink dot directly in the center of the canvas. Let this dry slightly so it doesn’t smear during the next delicate steps.
Wobbly Dots?
If a dot isn’t perfectly round, let it dry completely. Then, use a small brush with black paint to carefully reshape the edges, ‘erasing’ the mistake.
Step 2: The Core Burst
-
First ring of micro-dots:
Using your smallest stylus tool, place a tight ring of tiny white or pale pink dots immediately around the central seed dot. -
Building outward:
Move to the next guide circle. Create a dense ring of small neon orange dots. They should be close together but not touching. -
Layering the gradients:
Continue expanding outward with three more concentric rings of dots, gradually increasing your tool size slightly with each ring. Transition colors from pink to coral to orange. -
Adding the halo:
Leave a small gap about 1/4 inch wide of negative space (black background). Then, create a distinct ring of larger, bright yellow dots. This acts as a glowing halo separating the core from the outer designs.
UV Glow Up
Use true fluorescent acrylics specifically labeled ‘UV reactive.’ Hang the finished piece near a blacklight bulb to make the mandala actually glow in the dark.
Step 3: Teardrops and Spikes
-
Outline the teardrops:
In the open space beyond your yellow halo, lightly sketch large teardrop shapes using your chalk pencil. These should fit within your radial grid lines to ensure they are even. -
Paint the teardrop interiors:
Using a liner brush or a small round brush, fill these teardrop shapes with a solid coat of neon orange. You may need two coats for full opacity on the black canvas. -
Detail the teardrops:
Once the orange base is dry, add a ‘swoosh’ or comma stroke inside each teardrop using a lighter orange or yellow paint to give it dimension. -
Dotted outlines:
Using a small dotting tool, walk a line of tiny pink dots around the perimeter of each painted teardrop. This crisp outline makes the shapes pop. -
Creating the spiked border:
Moving to the outer edge of the design, sketch triangular ‘spike’ shapes that sit between the peaks of the teardrops. Outline these triangles with lines of tiny pink dots. -
Filling the spikes:
Fill the interior of these dotted triangles with a darker pink or magenta wash, stippling it with very fine dots to create texture rather than a solid fill.
Step 4: Finishing Touches
-
Outer rim dots:
I like to finish the perimeter with a scattering of large and small orange dots that fade out into the black corners, creating a dissolving effect. -
Top dots (highlights):
Go back to your largest central dots and the teardrops. Add a smaller, lighter-colored dot on top of the dry base dots. For example, place a tiny light yellow dot on top of an orange dot to create a 3D convex look. -
Clean up:
Once the paint is 100% dry, gently erase any visible chalk grid lines with a damp cotton swab or a soft eraser.
Step back and admire how the neon colors vibrate against the dark background, creating a mesmerizing focal point
BRUSH GUIDE
The Right Brush for Every Stroke
From clean lines to bold texture — master brush choice, stroke control, and essential techniques.
Explore the Full Guide
Single-Line Neon Human Silhouette
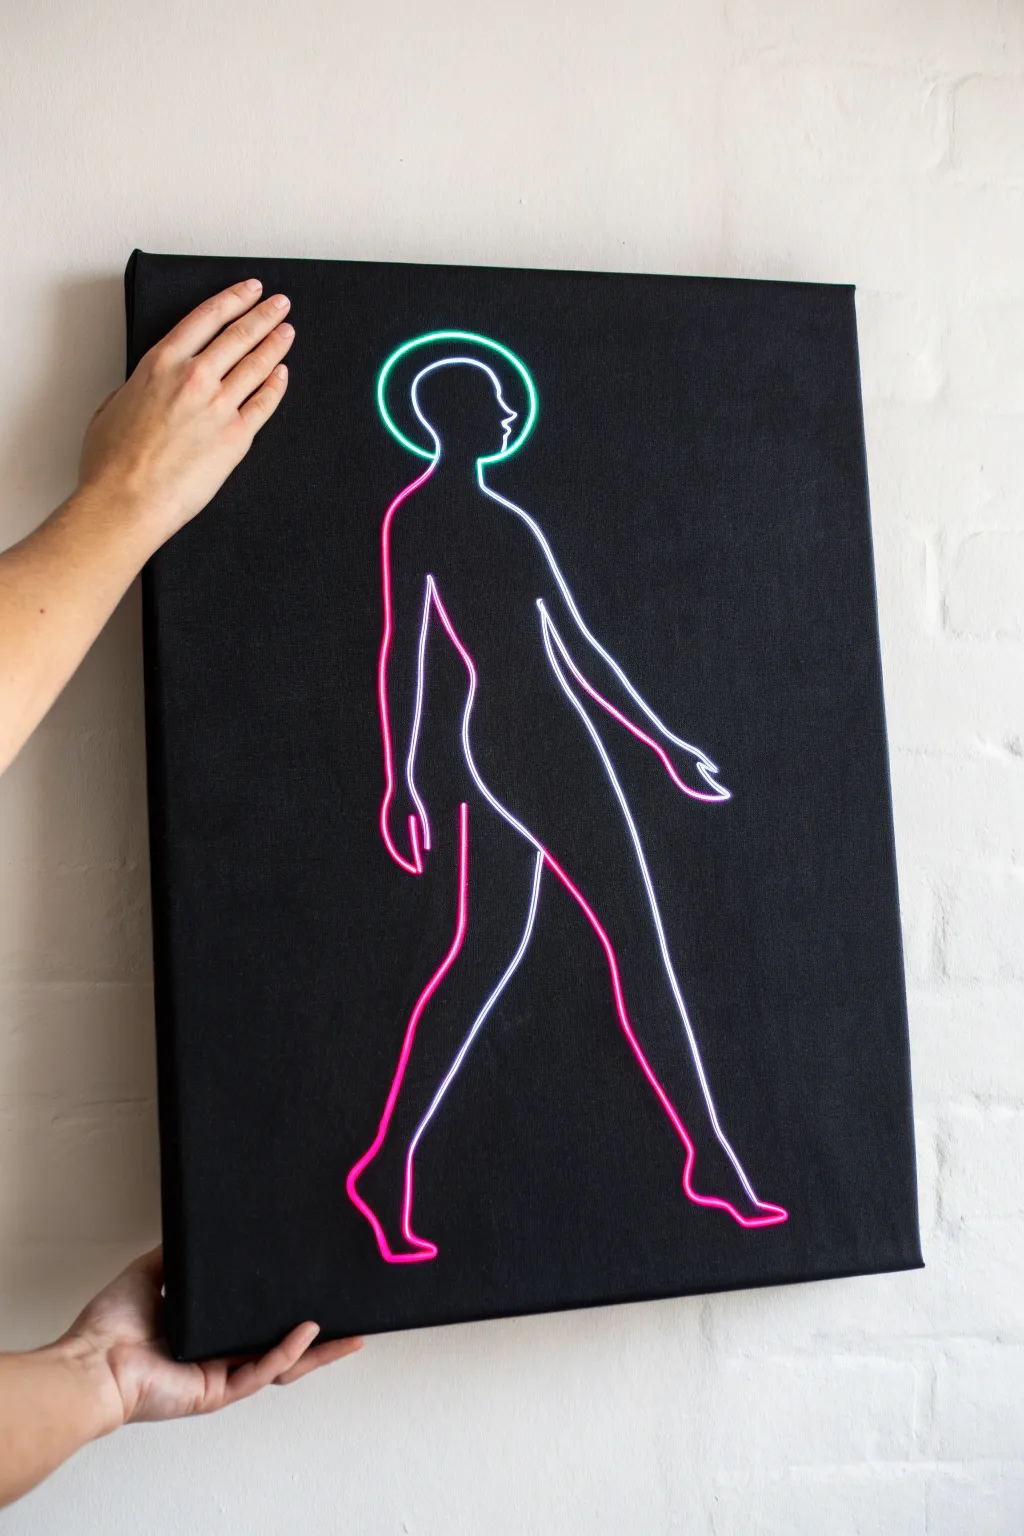
Capture the electric glow of neon signs without the glass tubing in this striking canvas project. Using high-contrast acrylics on a stark black background, you’ll create a walking figure that appears to vibrate with light.
Step-by-Step Tutorial
Materials
- Stretched canvas (e.g., 16×20 inches)
- Black gesso or matte black acrylic paint
- Pencil and eraser
- Printable template of a walking silhouette (optional)
- White transfer paper (graphite paper)
- White acrylic paint (heavy body is best)
- Neon pink fluid acrylic paint
- Neon green fluid acrylic paint (for the halo)
- Fine liner brush (size 0 or 00, long bristles)
- Round synthetic brush (size 2)
- Glazing medium (optional)
- Palette for mixing
Step 1: Preparing the Darkness
-
Base coat application:
Begin by coating your entire canvas with matte black acrylic paint or black gesso. Even if you bought a pre-primed black canvas, I like to add a fresh coat to ensure a velvety, non-reflective surface. -
Painting the edges:
Don’t forget to paint the sides of the canvas. This gallery-wrap style makes the finished piece look professional even without a frame. -
Full drying time:
Allow this base layer to cure completely. It must be bone dry, or your sketch lines will dig into the wet paint and ruin the texture.
Step 2: Designing the Figure
-
Drafting the pose:
Sketch a walking figure in profile directly onto the canvas using a light pencil touch. Focus on a fluid, continuous motion rather than anatomical perfection. -
Using a reference:
If freehand sketching feels daunting, print a silhouette reference image. Place white transfer paper between the printout and the canvas, then trace the outline firmly. -
Adding the halo:
Draw an oval or circle around the head area. This floating halo adds a sci-fi or angelic element that contrasts nicely with the body shape. -
Refining the lines:
Clean up your sketch with an eraser. You want a distinct double-line effect in some areas to mimic the glass tubing of a neon sign, but a single line works well for the limbs.
Fixing Shaky Lines
Line wobble? Don’t panic. Widen the line slightly to smooth it out, or wait for it to dry and ‘cut in’ with black paint to reshape the edge.
Step 3: The White Underpainting
-
Mixing the primer:
Squeeze out some heavy body white acrylic. You need a paint that is opaque enough to cover the black in one or two passes. -
Laying the foundation:
Using your size 2 round brush, paint over your pencil lines with pure white. This step is crucial because neon colors are naturally transparent and won’t show up against black without this white base. -
Smoothing the strokes:
Try to keep steady, fluid movements to simulate continuous tubing. If the line breaks, pick it up again smoothly. -
Double-checking opacity:
Once the white is dry, check for any grey spots where the black shows through. Add a second coat of white if necessary to get a bright, solid foundation.
Level Up: Airbrush Effect
Dry brush a very faint layer of the neon color around the lines on the black canvas. This mimics the ambient light casting onto a wall.
Step 4: Electrifying the Lines
-
Planning the gradient:
Decide where your colors will flow. In the example, the back and rear leg are hot pink, fading into white/blue on the front leg and chest. -
Applying the pink glow:
Load a liner brush with neon pink paint thinned slightly with water or glazing medium. Paint over the white lines on the back, heel, and arm, letting the color slightly overlap onto the black canvas to create a ‘glow’ effect. -
Creating the bright center:
Here is the trick: Use a finer brush to repaint a very thin line of pure white right down the center of your pink lines. This makes the ‘tube’ look like it’s lit from the inside. -
The blue-white transition:
For the front leg and chest, use a very pale blue or just keep it bright white with a hint of blue glaze at the edges. This color shift adds dimension to the movement. -
Painting the halo:
Use neon green paint for the halo circle. Apply it over the white base, feathering the edges outward slightly for that hazy neon look. -
Highlighting the halo:
Just like the body, add a crisp, thin white line through the center of the green circle to intensify the brightness.
Step 5: Final Details
-
Cleaning up edges:
If your ‘glow’ got too messy, use a small flat brush with black paint to tidy up the outer edges of the neon lines. -
Final assessment:
Step back and look at the painting from a distance. The white centers should make the colors pop significantly against the dark background.
Hang your new artwork in a dimly lit corner to fully appreciate the optical illusion of the neon glow
Psychedelic Neon Sunset Rings
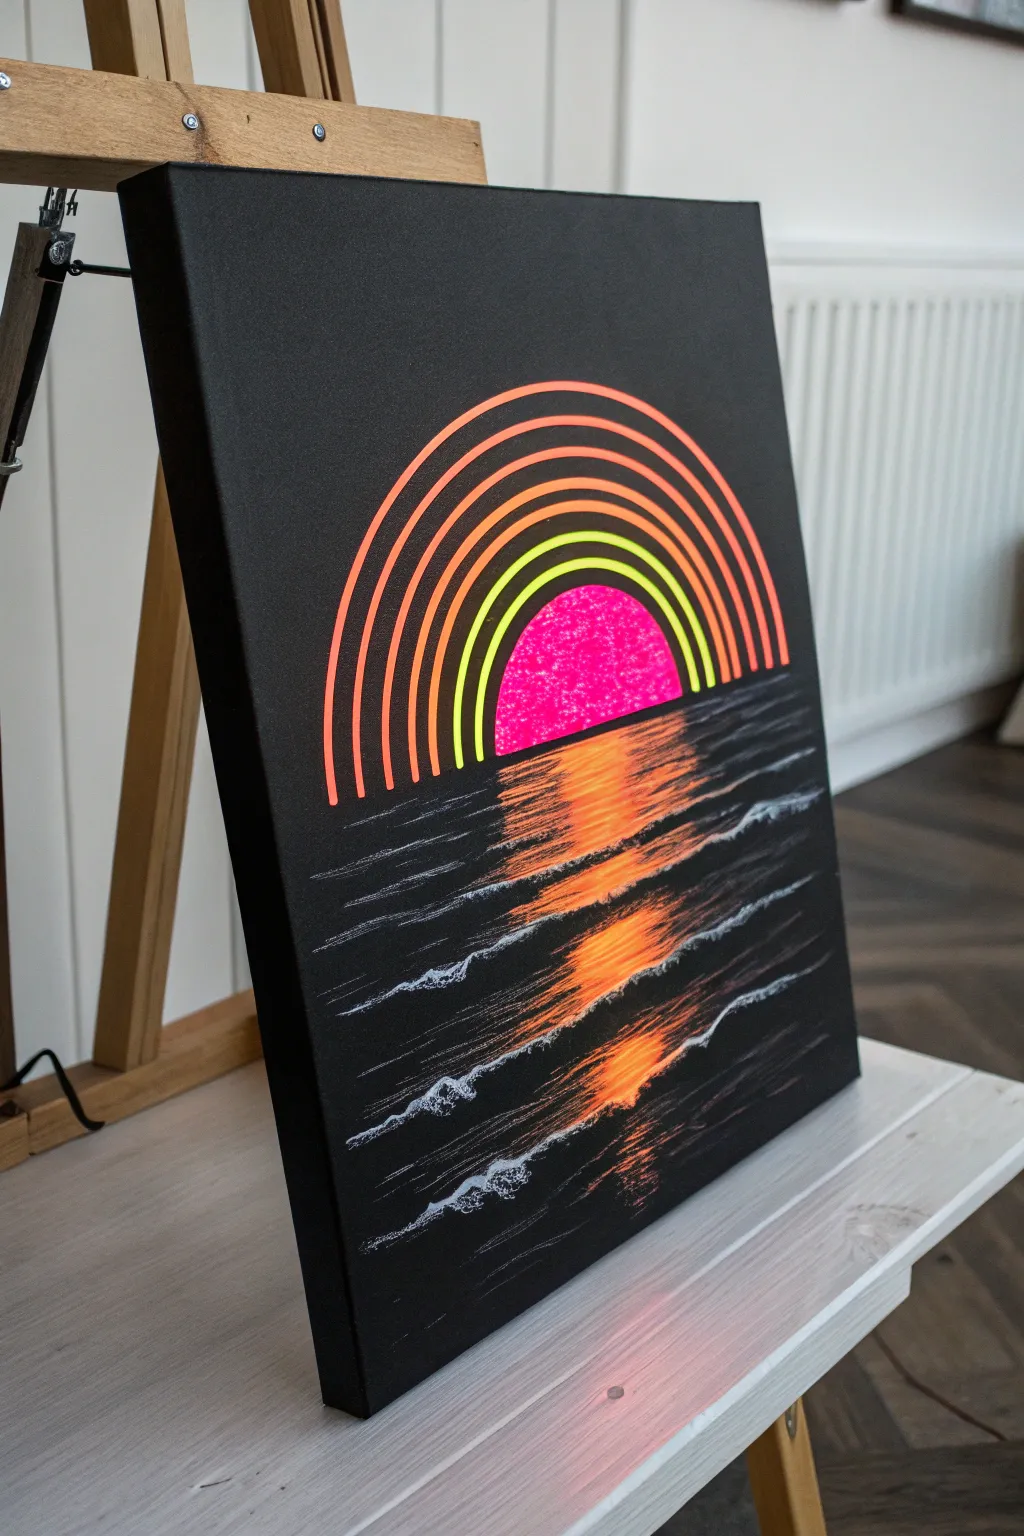
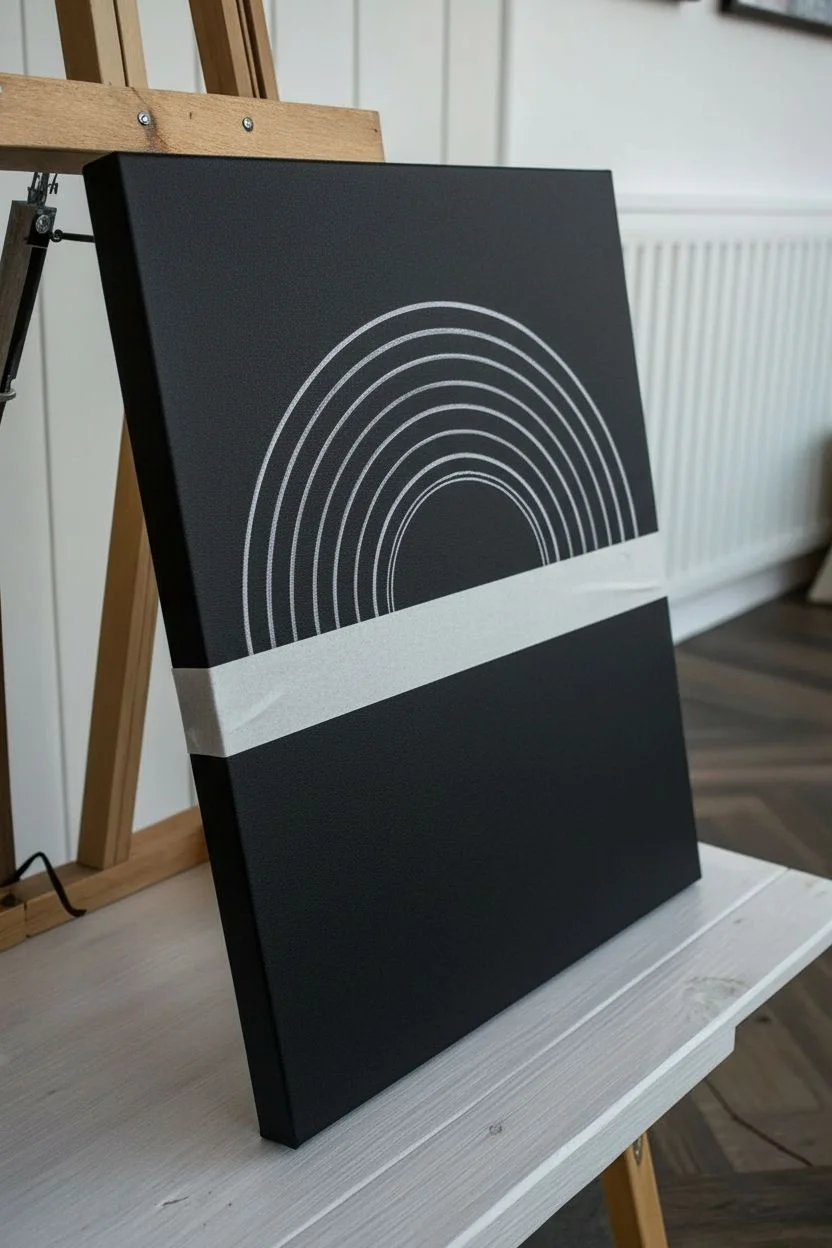
Transport yourself to a retro-futuristic dreamscape with this vibrant neon landscape. The stark contrast between the black canvas and the glowing gradient rings creates a hypnotic visual that is surprisingly simple to achieve.
Detailed Instructions
Materials
- Black stretched canvas (16×20 or similar)
- Neon acrylic paints (Pink, Orange, Yellow)
- Titanium White acrylic paint
- Compass or round objects for tracing
- White or light chalk pencil
- Flat shader brushes (medium and small)
- Fine liner brush
- Fan brush (optional, for water)
- Masking tape or painter’s tape
- Palette for mixing
Step 1: Planning and Structure
-
Establish the horizon:
Place a strip of masking tape horizontally across the canvas, slightly below the center point. This will create a crisp division between the sky and the water, ensuring your horizon line is perfectly straight. -
Outline the sun:
Using a compass or a small round object (like a bowl or lid), trace a half-circle resting directly on top of your masking tape in the center using a chalk pencil. This forms the main sun body. -
Draw guide rings:
Using the same center point, lightly sketch concentric arches radiating outward from the sun. Space them evenly; you’ll need about 6-8 distinct lines. Don’t worry about perfection, as the chalk wipes off easily.
Neon Pop Secret
Neon paints can be transparent. Paint your design in white first, let it dry, then layer the neon on top for maximum brightness.
Step 2: Painting the Neon Sky
-
Block in the sun:
Fill the central half-circle with neon pink paint. Use a flat brush and a dabbing or stippling motion rather than smooth strokes. This creates the textured, almost glittery appearance seen in the center. -
Overlay the yellow rings:
Load a small flat brush or a thick liner brush with neon yellow. Carefully paint the two arches closest to the sun. The key here is consistent line width, so maintain steady pressure as you curve around the center. -
Transition to orange:
Paint the next set of outer rings using neon orange. For a smooth gradient effect, I like to mix a tiny bit of the yellow into the orange for the first orange ring, then use pure orange for the furthest ones. -
Clean up edges:
Once the sky elements are painted, gently peel off the masking tape. You might see a small ridge of paint; smooth it down with a damp brush if necessary to keep the horizon flat.
Step 3: Creating the Reflection
-
Establish the reflection base:
Beneath the sun, use a flat brush to paint horizontal dashes of neon orange and pink. Start wider directly under the sun and taper them as you go down, mimicking the sun’s reflection on the water surface. -
Layering the glow:
While the base color is still slightly tacky, streak in some neon yellow highlights right down the prominent center line of the reflection. Keep your strokes strictly horizontal to sell the illusion of water. -
Darkening the water:
The background remains the raw black canvas, but to blend the reflection, lightly dry-brush some black paint over the edges of your colored reflection if the lines look too harsh or solid.
Grid Lines
Draw a perspective grid on the bottom half fading into the horizon instead of water for a classic 80s ‘vaporwave’ computer aesthetic.
Step 4: Waves and Highlights
-
painting the ripples:
Using a fine liner brush loaded with slightly watered-down white paint, create thin, wiggly lines horizontally across the water area. These represent the crests of small waves catching the light. -
Adding sea foam:
Focus on the left and right sides of the canvas, away from the central reflection. Use a small, scruffy brush to tap in clusters of white foam. Keep these irregular and organic. -
Connecting foam to waves:
Drag small tails from your foam clusters inward toward the reflection using a very light touch. This connects the choppy water to the illuminated center. -
Final highlights:
Add a few concentrated dabs of pure white right in the center of the neon reflection column to show the most intense sparkle of the setting sun. -
Review and refine:
Step back and look at the composition. If the black canvas shows through the neon rings too much, apply a second coat to make the colors pop against the dark background.
Hang this glowing piece in a dim room and watch how the colors seem to vibrate against the darkness

PENCIL GUIDE
Understanding Pencil Grades from H to B
From first sketch to finished drawing — learn pencil grades, line control, and shading techniques.
Explore the Full Guide
Neon Betta Fish With Flowing Fins
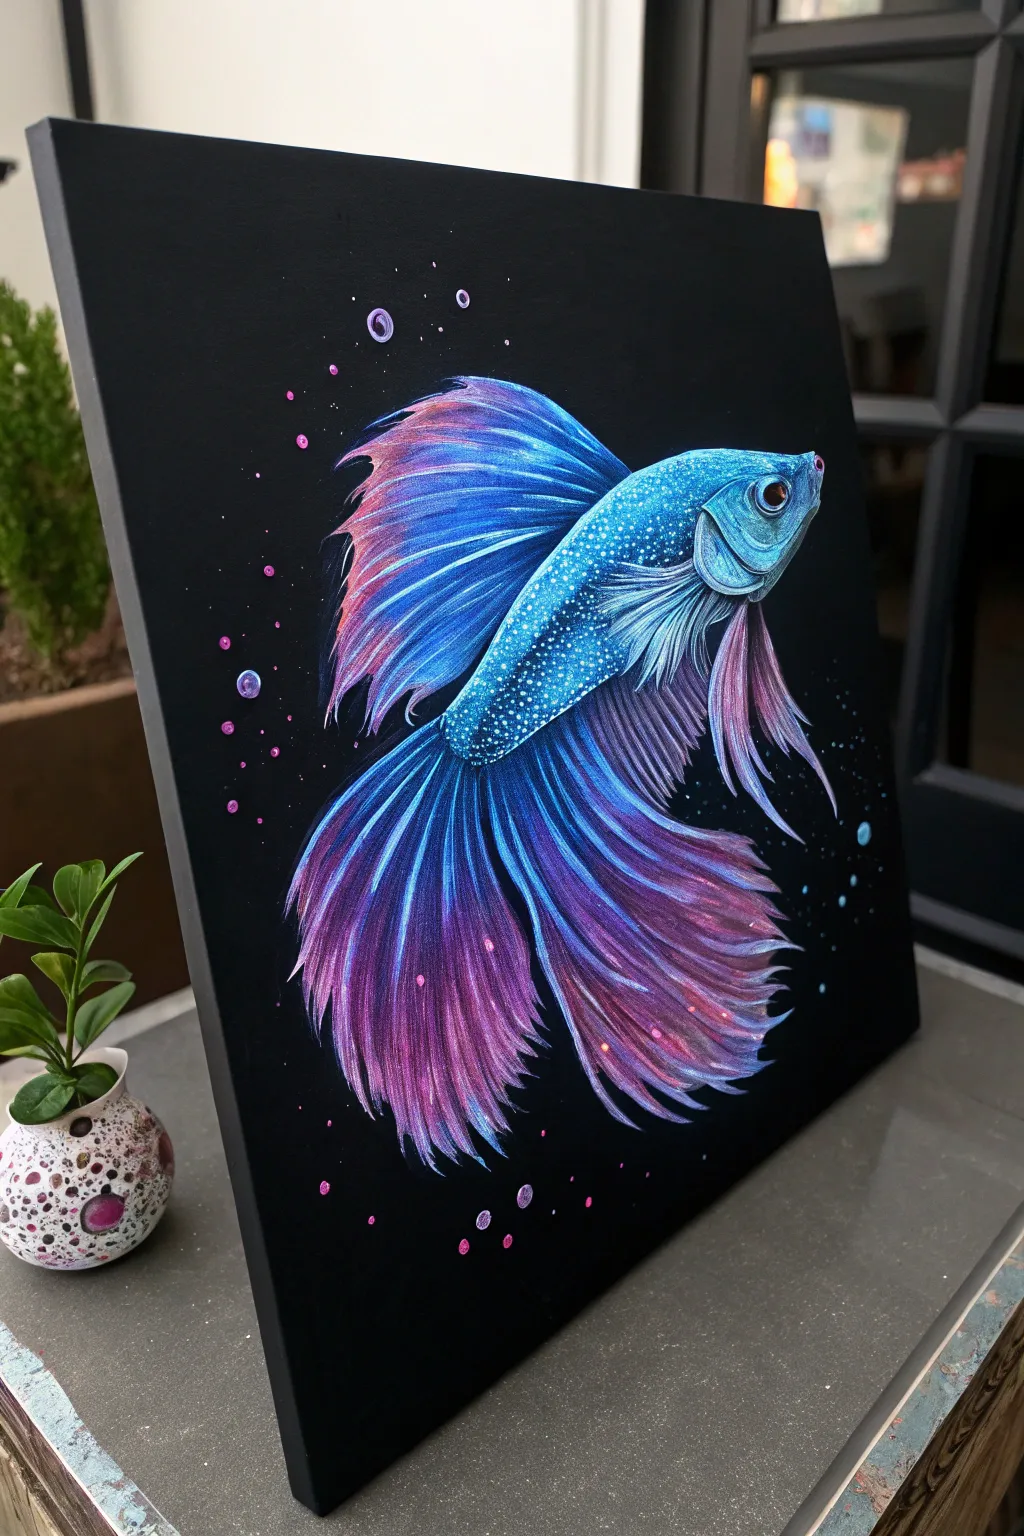
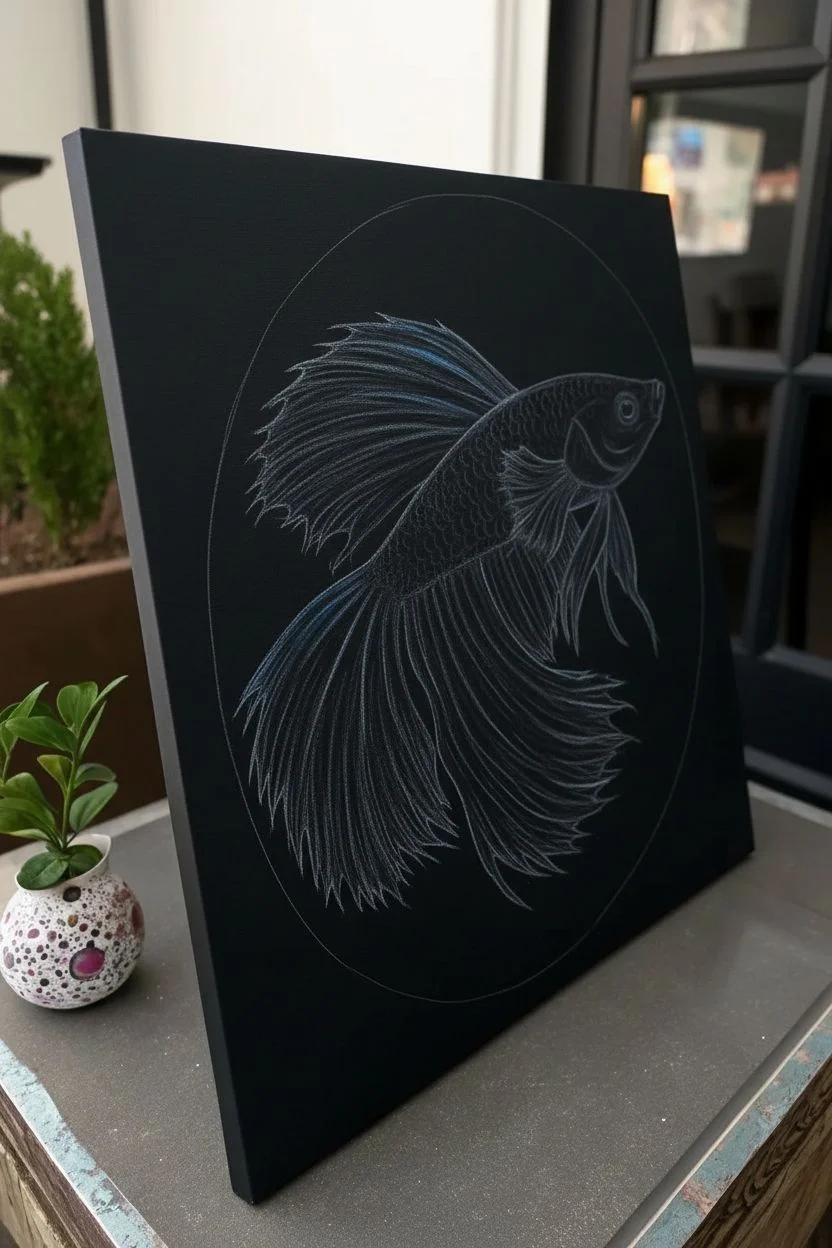
Capture the ethereal beauty of a Betta fish swimming through the deep with this striking project. Using bright neon acrylics against a Stark black background creates a luminescent effect that makes the fins appear to ripple with light.
Step-by-Step Guide
Materials
- Black stretched canvas (square format recommended)
- White colored pencil or chalk pencil (for sketching)
- Neon/Fluorescent acrylic paints (Blue, Purple, Pink)
- Standard heavy body acrylic paints (Titanium White, Phthalo Blue, Dioxazine Purple)
- Round synthetic brushes (sizes #0, #2, #4)
- Small flat brush (size #4 or #6)
- Palette and water cup
- Paper towels
Step 1: Sketching the Form
-
Establish the curve:
Begin by drawing a faint ‘S’ curve with your white pencil in the center of the black canvas. This line will guide the flow of the fish’s body and its long, dragging tail. -
Outline the body:
Sketch an elongated teardrop shape along the top half of your curve for the fish’s main body. Make the head slightly pointed and the back arched. -
Map the fins:
Draw the sweeping top fin (dorsal) and the long, flowing bottom fins (anal and caudal). Let the pencil lines fray at the ends to indicate where the fins will split and feather out.
Neon Pop Secret
Cheap neon paints can be transparent. Painting a solid white layer first is non-negotiable if you want that true electric glow on black.
Step 2: Base Layers & Body
-
Undercoat the focus areas:
Mix a small amount of Titanium White with water to create a milky wash. Paint this inside the body shape and the main sections of the fins. This white base is crucial—it makes the neon colors pop against the black canvas. -
Base the body color:
Once the white wash is dry, paint the body using Phthalo Blue mixed with a touch of neon blue. Use a #4 round brush and stipple the paint (tap straight down) to create a scaly texture. -
Add dimension:
While the blue is wet, blend a tiny bit of Dioxazine Purple near the bottom edge of the belly for shadow, and pure neon cyan along the top ridge for a highlight. -
Detail the face:
Switch to your #0 brush. Paint the gill cover with a sharp crescent shape in light blue. Add the eye as a dark circle with an orange/gold ring and a tiny white reflection dot.
Level Up: UV Surprise
Use actual UV-reactive acrylics for the highlights. When you hang this under a blacklight, the fish will literally light up the room.
Step 3: Fins and Flow
-
Start the fin gradient:
On your palette, mix your neon blue into your neon purple. Paint the base of the fins (where they attach to the body) with the solid blue, transitioning into purple as you move outward. -
Create fin striations:
Using the #2 brush, paint long, confident strokes from the body outward to the tips of the fins. Leave tiny gaps of the black background showing between some strokes to mimic the separation of fin rays. -
Infuse the neon tips:
Dip your clean brush into neon pink. Glaze this color over the very tips of the purple tail fins. Feather the pink backward into the purple so there is no hard line. -
Define the rays:
Mix Titanium White with a drop of neon blue to make a very pale tint. With your smallest liner brush (#0), paint very thin lines following the curve of the fins to represent the skeletal rays holding the fin membrane.
Step 4: Luminescence and Magic
-
Highlight the scales:
Return to the fish’s body with the pale blue tint. Dot tiny points along the upper back and flank to create individual shimmering scales. -
Enhance the glow:
I like to dry brush a little pure neon blue right where the fins meet the body. This creates an internal glow effect. -
Add floating orbs:
Dip the handle end of a brush into purple and pink paint. Stamp circles of varying sizes around the fish to create magical bubbles. -
Highlight the bubbles:
Add a tiny crescent of white to the top-left of each bubble and a smaller dot on the bottom-right to give them a spherical, glossy look. -
Final speckle:
Flick some watered-down neon pink or white paint off a toothbrush or stiff brush around the edges of the canvas for a cosmic dust effect.
Step back and admire how your vibrant Betta seems to be swimming right out of the darkness
Glowing Butterfly Wings in Neon Gradients
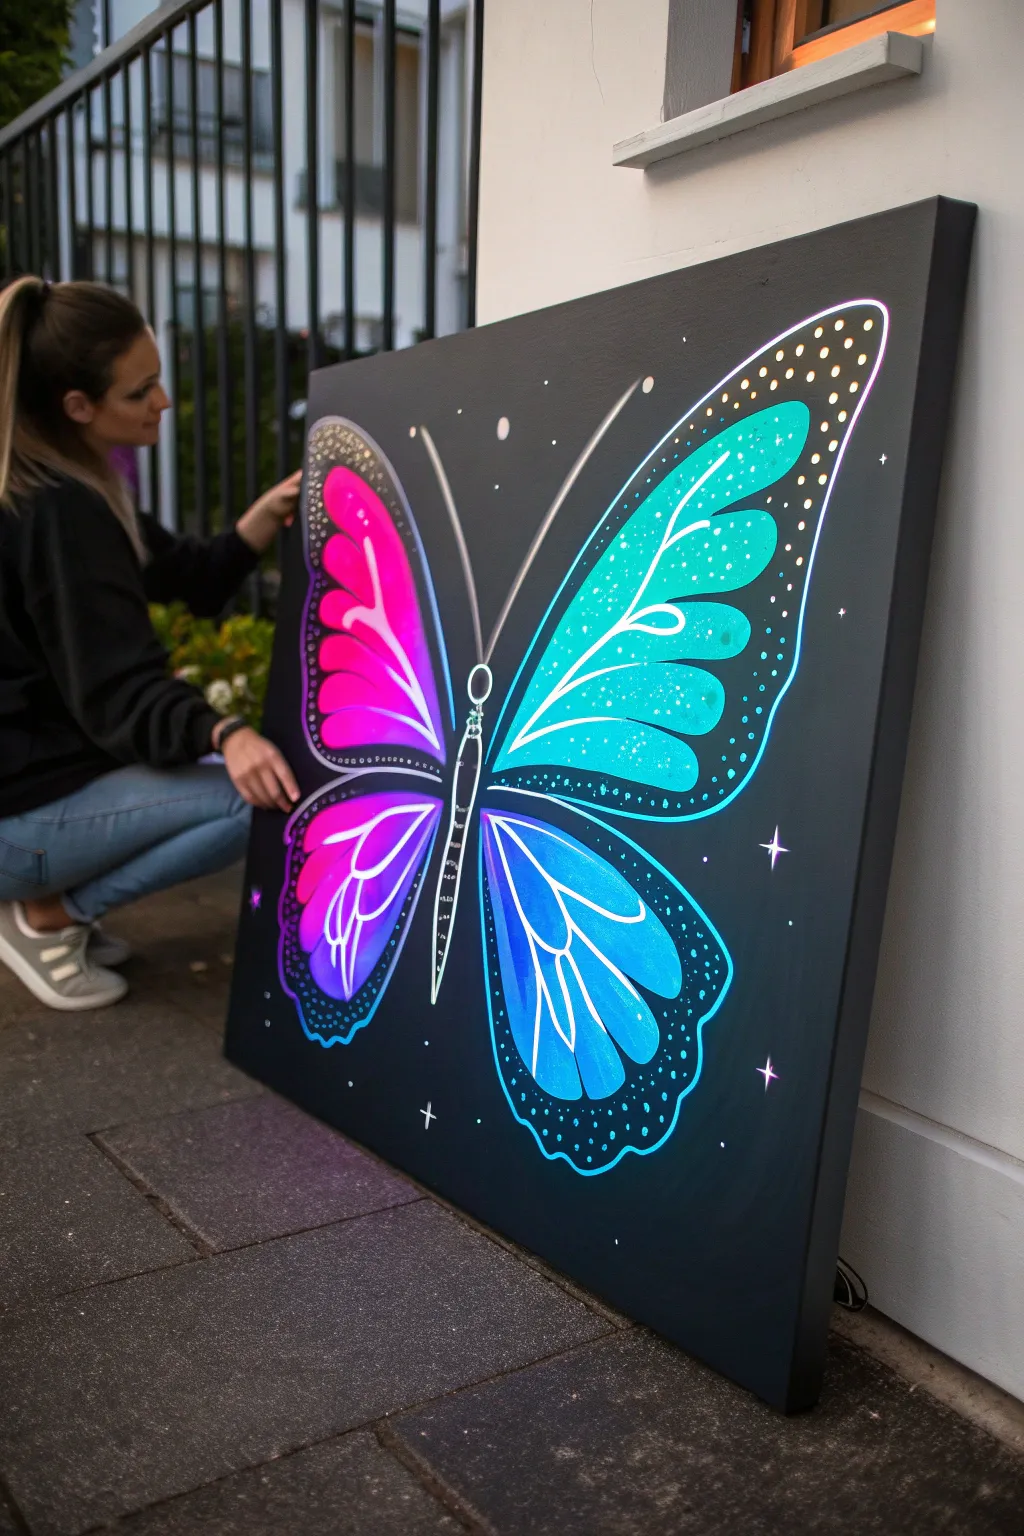
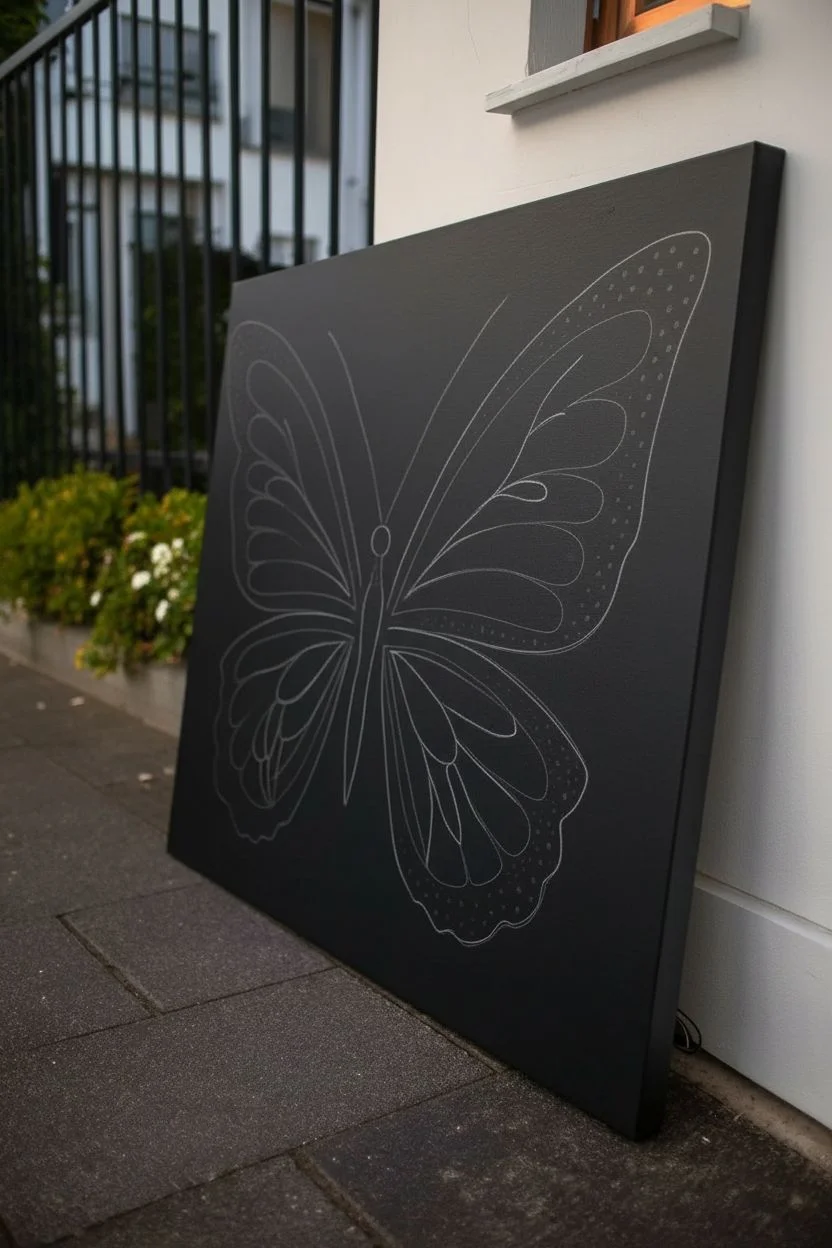
Transform a plain black canvas into a luminous spectacle with this neon galaxy butterfly. Using vibrant gradients and crisp white detailing, you’ll create an artwork that appears to glow from within against a starry night sky.
Step-by-Step Tutorial
Materials
- Large stretched canvas (square or portrait)
- Black acrylic paint (matte or satin)
- Wide flat paintbrush (for background)
- Neon pink acrylic paint
- Neon teal or cyan acrylic paint
- Neon purple acrylic paint
- Neon blue acrylic paint
- White acrylic paint (high opacity)
- Set of round brushes (small and medium)
- Fine liner brush
- Chalk or white watercolor pencil
- Palette
- Water cup and paper towels
Step 1: Setting the Stage
-
Prepare the canvas:
Start by coating your entire canvas with black acrylic paint. Use a wide flat brush and apply two even coats if necessary to ensure a solid, opaque dark background without streaks. Let it dry completely. -
Sketch the outline:
Using a piece of chalk or a white watercolor pencil, lightly sketch the large butterfly shape. Draw the central body first, then extend the large upper wings and smaller lower wings. Don’t worry about perfection; this is just a guide you can wipe away later.
Step 2: Creating the Neon Gradient
-
Paint the left upper wing base:
Load a medium round brush with neon pink paint. Fill in the top left wing shape, starting solid near the body and fading slightly as you move outward. -
Blend the left gradient:
While the pink is still slightly wet, introduce neon purple to the bottom edge of that upper wing and blend it upwards into the pink for a seamless transition. -
Paint the right upper wing base:
Switch to your teal or cyan paint. Fill in the large upper right wing, ensuring the color is vibrant and opaque. -
Paint the lower wings:
For the lower wings, use a mix of blue and purple. On the left lower wing, blend purple into blue. On the right lower wing, use blue transitioning into a deeper purple at the tips. -
Layer for vibrancy:
Neon paints can be translucent. Once the first layer is touch-dry, apply a second coat to the brightest parts of the wings to really make the color pop against the black.
Boost the Brightness
For neon colors that truly scream, paint a layer of white silhouette first where the wings will go. Let it dry, then paint the neon colors on top of the white base.
Step 3: The Glowing Details
-
Outline the wings:
Load your fine liner brush with bright white paint. Just inside the colored edge of the wings, paint a smooth, continuous line to define the shape. Leave a small gap of color between this white line and the black background. -
Add internal veins:
Using the same fine liner, draw the veins inside the wings. Start thick near the body and taper them into thin wisps as they curve outward toward the wing edges. -
Detail the body:
Paint the butterfly’s body with a thin white outline. Add small horizontal dashes across the abdomen to give it texture, and draw two long, curved antennae extending from the head. -
Create the outer wing spots:
Dip the handle end of a small brush into white paint to create perfect dots. Stamp a row of dots along the outer black edges of the wings, following the curve of your previous painting.
UV Magic
Use actual UV-reactive acrylic paints or glow-in-the-dark medium mixed with your colors. Under a blacklight, your butterfly will literally light up the room.
Step 4: Cosmic Atmosphere
-
Enhance the glow:
Mix a tiny amount of your neon color with water to make a glaze. Lightly brush this over the white veins in the corresponding wing sections to make the white lines look like they are faintly glowing with color. -
Add stardust:
Using the tip of your smallest brush or a toothpick, dot tiny white stars scattered across the black background. Vary the spacing to make it look random. -
Paint feature stars:
Select a few spots on the background to add larger stars. Paint a small cross shape with a bright center to create a twinkling star effect. -
Final touches:
Check your white lines. If any background blackness shows through the neon areas where it shouldn’t, touch it up now. I like to add a final bright white highlight to the thickest part of the veins for extra dimension.
Hang your luminous masterpiece in a dimly lit corner to fully appreciate the glowing effect


Bioluminescent Deep-Sea Anglerfish
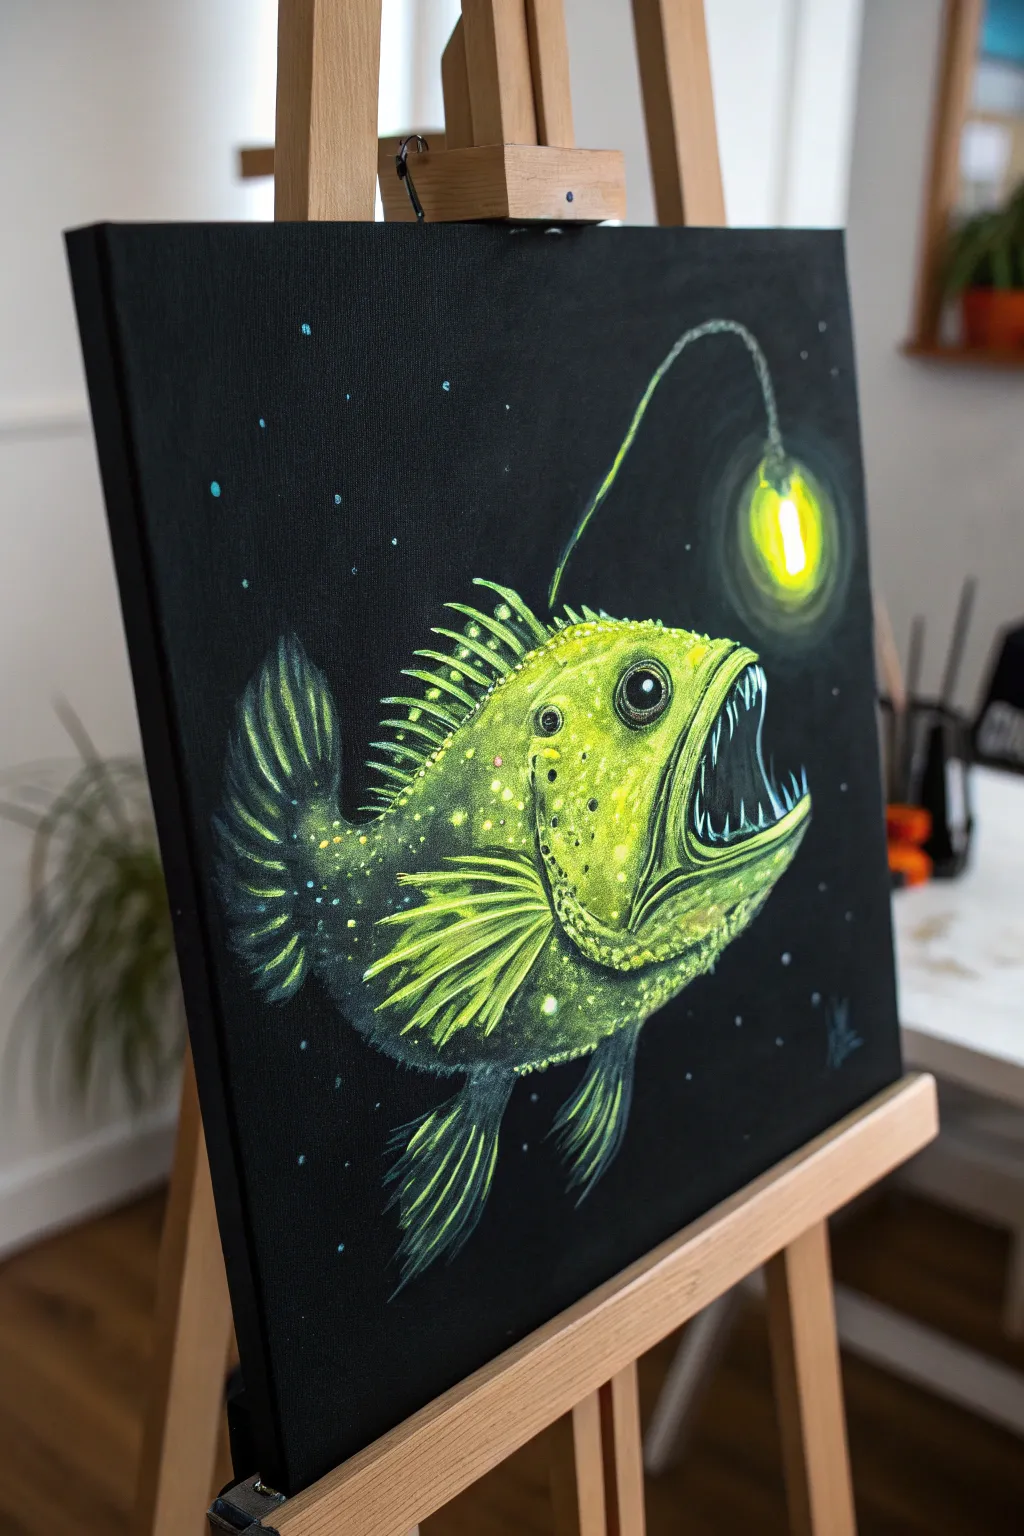
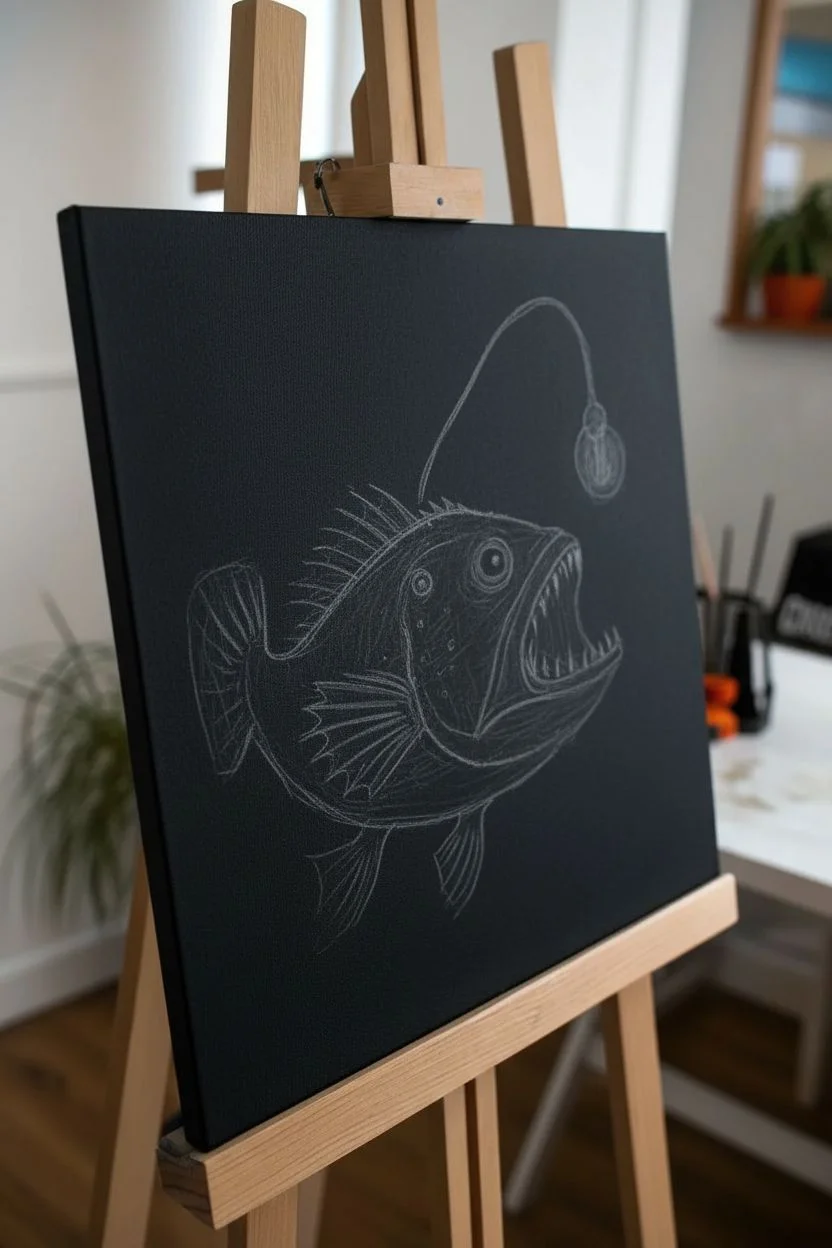
Bring the mysteries of the deep sea to life with this radiant neon painting. Using a stark black background makes the electric greens and yellows of the bioluminescent lure pop with incredible intensity.
Step-by-Step Guide
Materials
- Black stretched canvas (square format, e.g., 12×12 inches)
- Neon acrylic paints (fluorescent green, yellow)
- Standard acrylic paints (white, black, teal/dark blue)
- White or light grey chalk pencil for sketching
- Assorted brushes (fine liner, small filbert, medium flat)
- Palette and water cup
- Paper towels
Step 1: Sketching the Beast
-
Outline the body:
Using a light grey chalk pencil, lightly sketch the main oval shape of the fish’s body in the center of the canvas. -
Define the jaw:
Add the large, gaping mouth. Sketch the lower jaw extending slightly past the upper jaw to give it that classic underbite look. -
Sketch the features:
Draw the large circular eye socket, the dorsal fin spines, and the pectoral and tail fins. Keep the lines faint so they don’t show through the paint later. -
Add the lure:
Curve a long line from the top of the head arching forward, ending in a bulb shape for the iconic bioluminescent lure.
Neon Not Bright?
Neons are naturally transparent. If your green looks dull against the black canvas, paint the area with white first, let it dry completely, and then apply the neon color on top.
Step 2: Laying the Base Colors
-
Mix a dark base:
Mix a small amount of neon green with a touch of dark teal or black to create a murky, dark green. Use a filbert brush to fill in the body shape, staying away from the very edges of the fins. -
Establish the shadows:
While the base is wet, blend a bit more black into the lower belly and tail area to create depth and shadow. -
Brighten the top:
Apply pure neon green to the top ridge of the fish’s back and the forehead area, blending it downwards into the darker body color. -
Paint the fins:
Use a liner brush and the dark teal-green mix to paint the spines of the fins. Use short, flicking strokes to suggest the webbing between the spines.
Step 3: Adding the Glow
-
Highlight the skin:
Mix neon yellow with neon green. Use a small brush to stipple (tap repeatedly) texture onto the skin, focusing on the upper body and face to simulate bumpy scales. -
Define the eye:
Paint a solid black circle for the eye. Once dry, add a thin ring of white or pale yellow around it, and a tiny white reflection dot inside the black pupil. -
Create the lure glow:
Paint the bulb of the lure solid white first. This is crucial for neon colors to pop. Once the white is dry, paint over it with pure neon yellow. -
Dry brush the halo:
Take a dry brush with very little neon green paint and lightly scrub around the lure bulb in a circular motion to create a hazy glow effect on the black background. -
Paint the teeth:
Use a fine liner brush and thinned white paint to create the needle-like teeth. Curve them slightly inward.
UV Surprise
Use actual UV-reactive acrylic paints or invisible UV ink for the final highlights. When you turn on a blacklight, the lure and eyes will actually glow in the dark.
Step 4: Final Details
-
Intensify highlights:
I like to go back with pure neon yellow and add tiny dots along the spine and on the brightest parts of the fins for extra punch. -
Define the fin rays:
Use your sharpest liner brush with a mix of neon green and white to draw crisp lines along the edges of the tail and pectoral fins. -
Add background particles:
Dip a toothbrush or stiff brush in thinned blue-white paint and gently flick it to splatter tiny stars or ‘marine snow’ across the black background. -
Paint distinct stars:
Manually paint a few larger blue or teal dots around the fish to represent distant bioluminescence or bubbles.
Step back and admire your glowing deep-sea creature as it emerges from the darkness
Neon City Skyline With Reflections

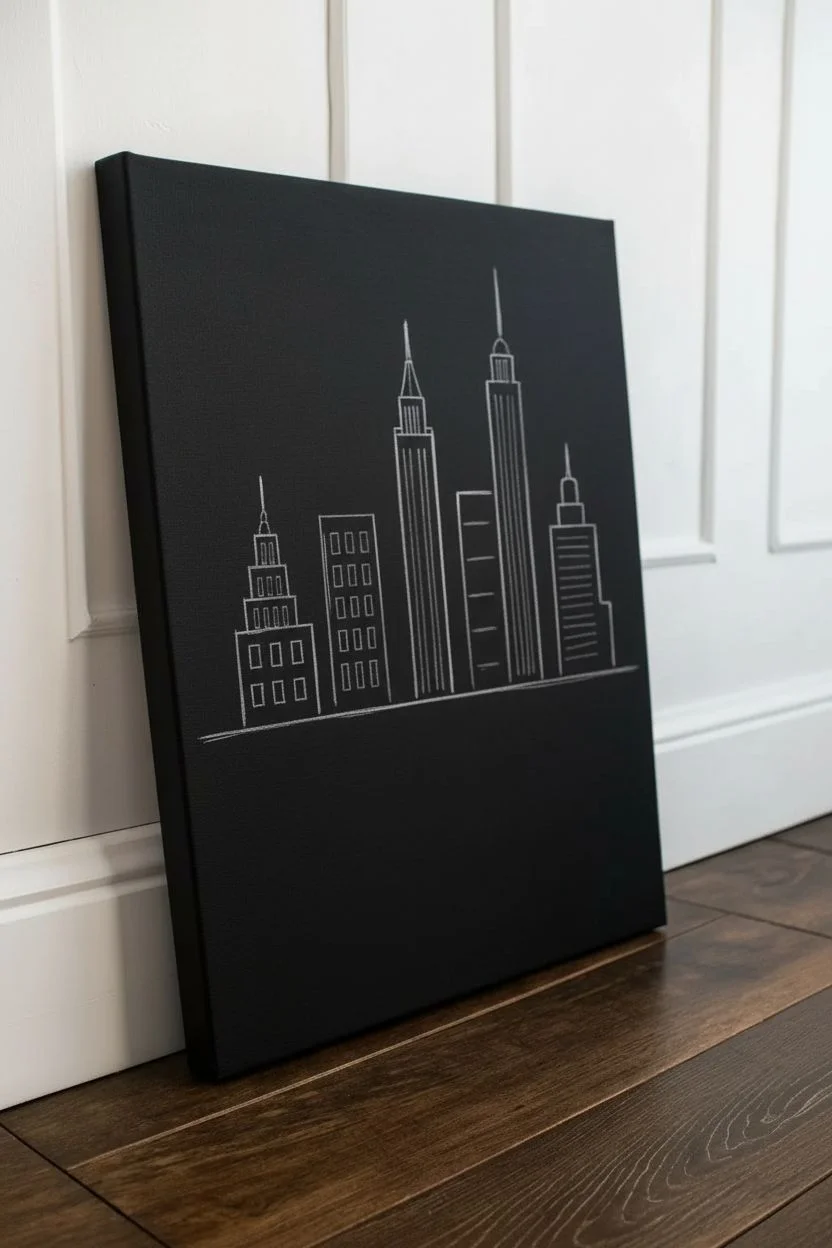
Capture the electric buzz of a stylized metropolis at night with this striking neon art project. By combining crisp architectural lines with loose, wavy strokes on a dark background, you’ll create a vibrant illusion of a glowing city reflecting over water.
Step-by-Step
Materials
- Black stretched canvas (16×20 inches recommended)
- Neon acrylic paint markers (fine point)
- White colored pencil or chalk (for sketching)
- Ruler or straight edge
- Damp cloth (for erasing sketch lines)
- Clear acrylic sealer (glossy spray)
Step 1: Planning the Cityscape
-
Prep the Surface:
Begin with a clean, deep black canvas. If your canvas looks a bit faded or grey, give it a quick coat of black acrylic paint and let it dry completely to ensure the neon colors pop. -
Establish the Horizon:
Using a ruler and a white colored pencil, lightly draw a straight horizontal line across the canvas, positioning it slightly below the vertical center point. -
Outline Building Shapes:
Lightly sketch the basic rectangles and spires of your skyline above the horizon line. Vary the heights and widths—include some tall needle-like skyscrapers, some stepped buildings, and some shorter blocks for variety. -
Add Window Details:
still using your pencil, map out the internal lines for windows and architectural details. Keep it simple: vertical stripes for modern towers, grids for office blocks, and horizontal bands for others.
Step 2: Drawing the Neon Structures
-
Select Your Colors:
Choose a specific neon color for each building to keep the look organized. In the example, we have distinct pink, green, yellow, orange, and blue structures. -
Line the First Building:
Starting from the left, trace over your pencil sketch with a pink neon paint marker. Use the ruler to keep the vertical structural lines perfectly straight. -
Fill the Windows:
Color in the window grid for this first building. For solid filled windows, press the nib down slightly to release more paint, ensuring opaque coverage against the black background. -
Continue Across the Skyline:
Move to the next building, switching to a neon green marker. Outline the shape and add internal vertical stripes, keeping your hand steady. -
Complete the Buildings:
Proceed through the rest of the skyline, alternating colors (yellow, another pink/orange, blue). Make sure lines don’t smudge by working from left to right if you are right-handed. -
Draw the Water Line:
Trace the main horizon line with a silver or white paint pen to separate the sky from the water, but stop the line where it intersects with the buildings if you prefer a continuous look, or draw it straight through as a base.
Neon Brightness Hack
If your neon markers look transparent on the black canvas, draw the lines in white paint first. Let it dry, then trace over the white with the neon color for maximum vibrancy.
Step 3: Creating the Reflections
-
Understand the Technique:
The reflections are not mirror images; they are abstract representations. You will use the same color as the building directly above, but instead of straight lines, you will use horizontal zig-zags. -
Start the Pink Reflection:
Directly under the pink building, begin making horizontal back-and-forth strokes with the pink marker. Start wide near the horizon line and taper them slightly as you move down. -
Vary the Stroke Width:
I find it helps to vary the pressure here. Make some lines thick and opaque, and others thinner or slightly broken, to mimic the shimmering distortion of water. -
Create the Orange/Green Ripples:
Switch to green and draw the reflection for the second building. Leave a tiny gap of black space between the pink and green reflections so the colors don’t bleed into a muddy mess. -
Elongate the Reflections:
Ensure the length of the reflection roughly matches the height of the building above it. Tall skyscrapers should have long, deep reflections. -
Finish with Blue and Yellow:
Complete the remaining reflections for the yellow and blue towers. For the blue tower on the far right, keep the squiggles tight and narrow to match its slender profile.
Shaky Hands?
If you struggle with straight lines, don’t rely only on the ruler. Place the canvas flat on a table and rest your wrist on the table surface to stabilize your movement.
Step 4: Final Touches
-
Clean Up:
Once the paint marker ink is 100% dry, gently wipe away any visible white pencil sketch lines with a barely damp cloth. -
Seal the Artwork:
To protect the neon pigments from fading and give the black canvas a uniform sheen, spray the entire piece with a glossy acrylic sealer in a well-ventilated area.
Hang this piece in a dimly lit room to see those neon colors truly shine
Neon Palm Trees Against a Black Sky
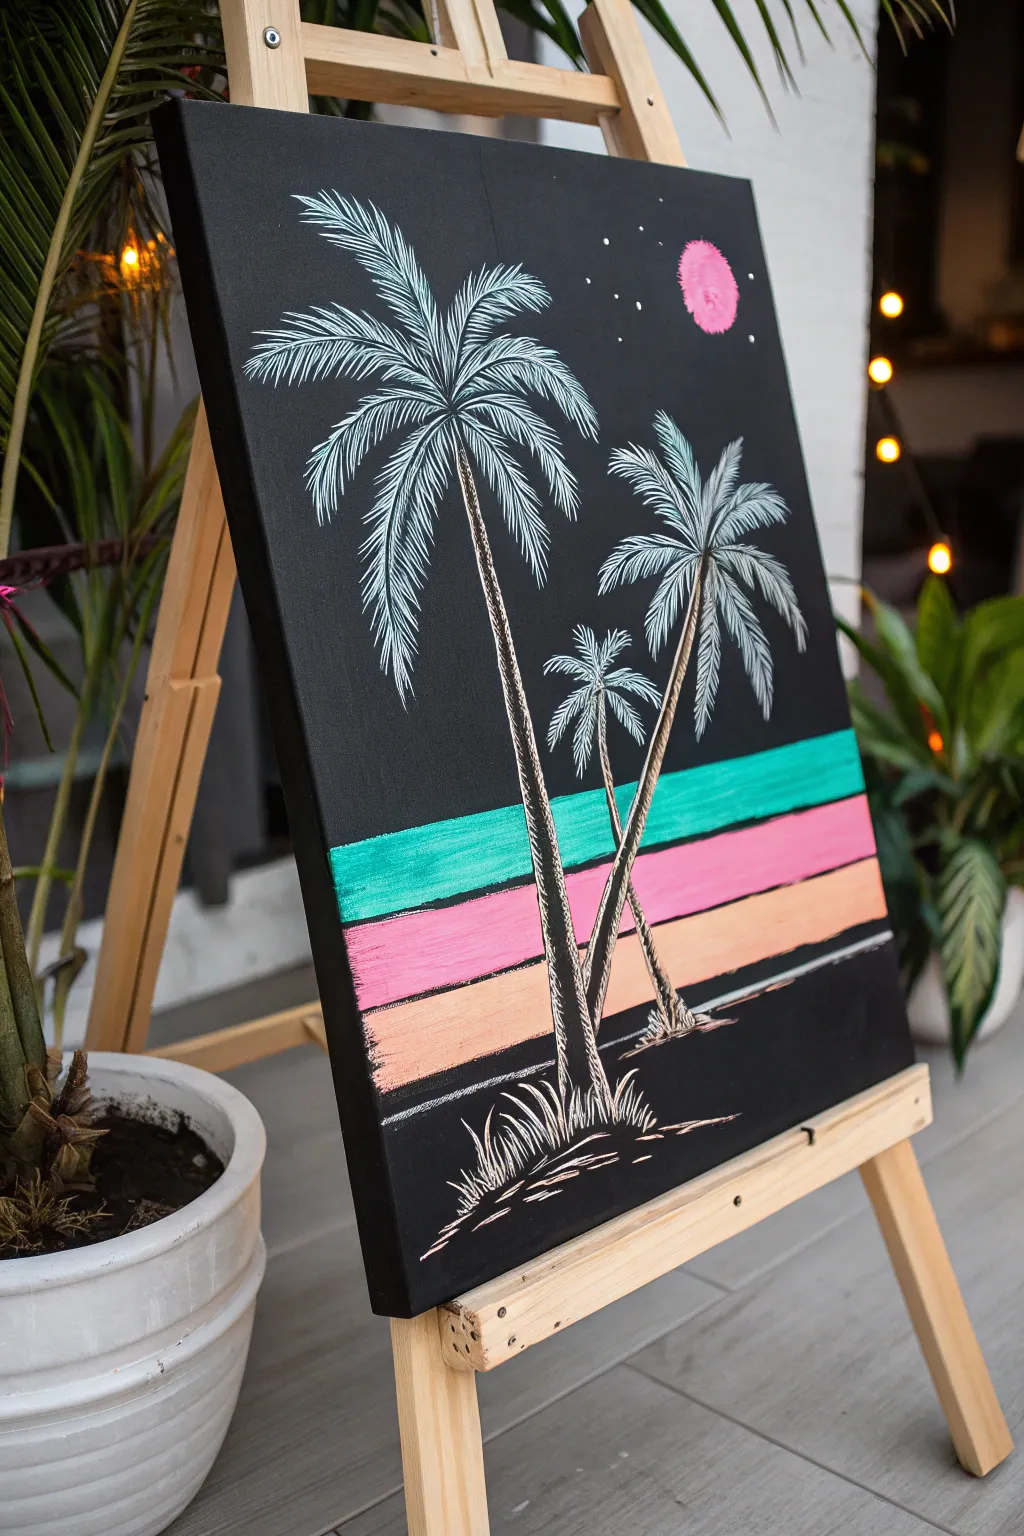
Transport your space to a retro-futuristic paradise with this striking painting that pops against a deep black background. The contrast between the stark white palm sketches and the vibrant horizontal neon bands creates a captivating 80s synthwave asthetic.
Step-by-Step Tutorial
Materials
- Stretched black canvas (16×20 or similar)
- White acrylic paint or white paint marker (fine tip)
- Neon acrylic paints (Teal, Hot Pink, Bright Orange)
- Flat brush (1 inch)
- Round liner brush (size 0 or 1)
- Ruler or painter’s tape
- Chalk or pastel pencil (for sketching)
- Cup of water and paper towels
Step 1: Setting the Horizon
-
Prepare the canvas:
Ensure your black canvas is clean and dust-free. If you only have a white canvas, paint it entirely black with matte acrylic and let it dry completely before starting. -
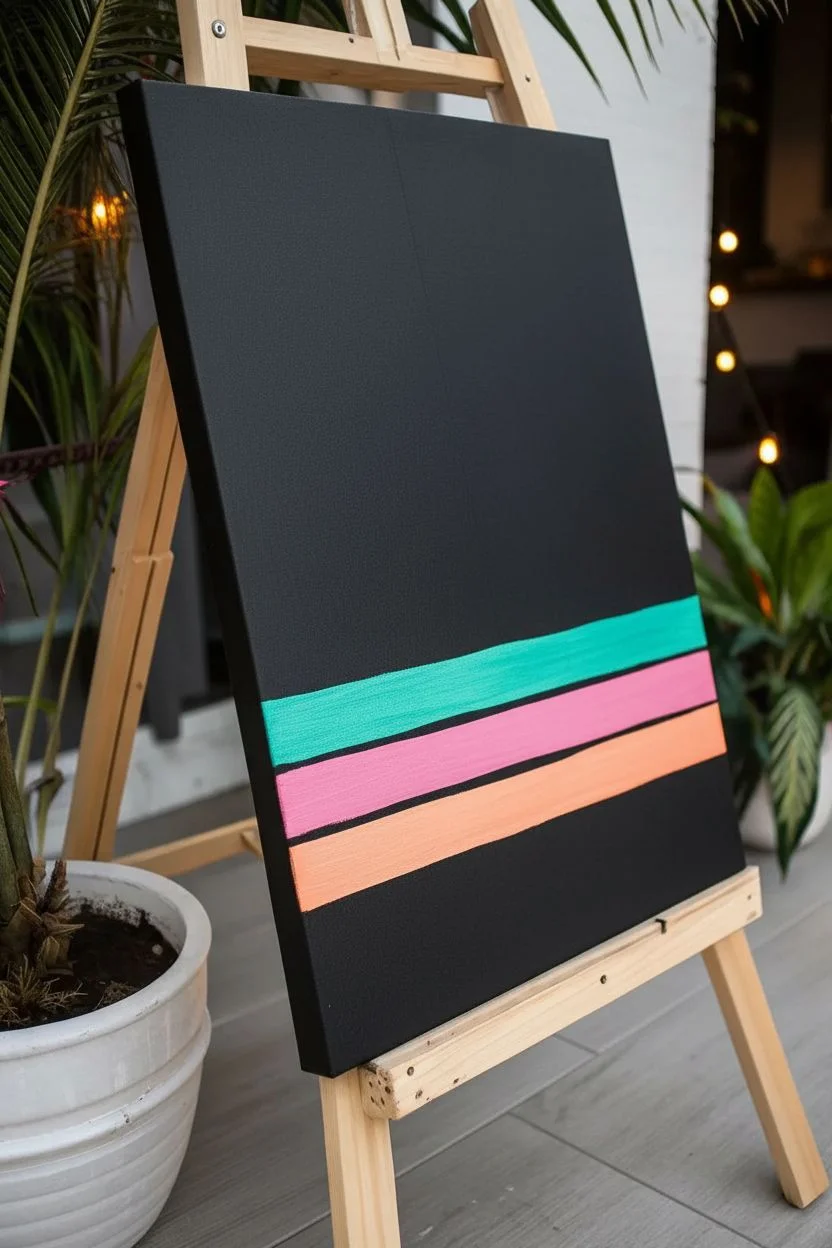
Mark the neon bands:
About one-third of the way up from the bottom, use a ruler and chalk to lightly mark three horizontal bands. These will become your vibrant sunset stripes. -
Enhance precision (optional):
If you struggle with straight lines, apply painter’s tape across the canvas to mask off the areas between the stripes. This ensures crisp, clean edges for your neon colors. -
Paint the teal stripe:
Using your flat brush, fill in the top band with neon teal acrylic paint. You may need two coats to get solid coverage over the black background. -
Paint the pink stripe:
Rinse your brush thoroughly and fill in the middle band with neon hot pink paint. Let the colors meet directly or leave a hairline fracture of black between them for separation. -
Paint the orange stripe:
Fill the lowest band with bright orange paint. I like to apply this layer fairly thick so the neon pigment really stands out against the dark canvas. -
Dry completely:
Allow the colorful bands to dry fully. If you used tape, peel it off gently now to reveal your stripes.
Step 2: Sketching the Palms
-
Outline the trunks:
Using a white chalk pencil, lightly sketch the curved lines of three palm tree trunks. Place the largest one in the foreground and two smaller ones slightly behind. -
Paint the main trunks:
Switch to your fine liner brush and white paint (or a white paint pen). Trace over your chalk lines, painting the trunks directly over the neon stripes in the foreground. -
Add trunk texture:
Don’t just paint solid white lines; use short, scratchy strokes to simulate the rough texture of palm bark. Leave small gaps of black showing through for dimension. -
Create the frond spines:
From the top of each trunk, paint several curved lines arching outward to serve as the central spines for the palm leaves. -
Feather the leaves:
Using quick, flicking motions with your liner brush, paint the individual leaflets coming off the central spines. Keep these strokes loose and intentionally sketchy. -
Building density:
Go back over the palm crowns, adding more white flicks to make the foliage look fuller. Let some fronds overlap others for a natural look.
Paint opacity issues?
Neon paint is often translucent. If colors look dull on black canvas, paint the stripes white first. Once dry, paint the neon color on top for maximum brightness.
Step 3: Celestial Details
-
Paint the neon moon:
In the upper right corner, paint a small circle using the hot pink paint. Dab the paint on with a dry brush to give it a slightly textured, cratered appearance. -
Highlight the moon:
While the pink is still tacky, mix a tiny dot of white into the center to create a glowing effect. -
Ground the trees:
At the base of the trees, use your white liner brush or pen to sketch some grassy textures and uneven ground lines, anchoring the scene. -
Add starlight:
Dip the tip of your liner brush into white paint and dot tiny stars into the black sky area. cluster a few near the moon for balance. -
Final touches:
Check your white lines. If the neon stripes show through the tree trunks too much, add a second layer of white texture to make them opaque.
Level Up: Glow Effect
Mix a tiny amount of neon pigment with glazing liquid. Lightly brush this transparent mix around the moon and stars to create a hazy, glowing aura effect.
Hang this retro masterpiece in a room with low lighting to let those neon hues really shine
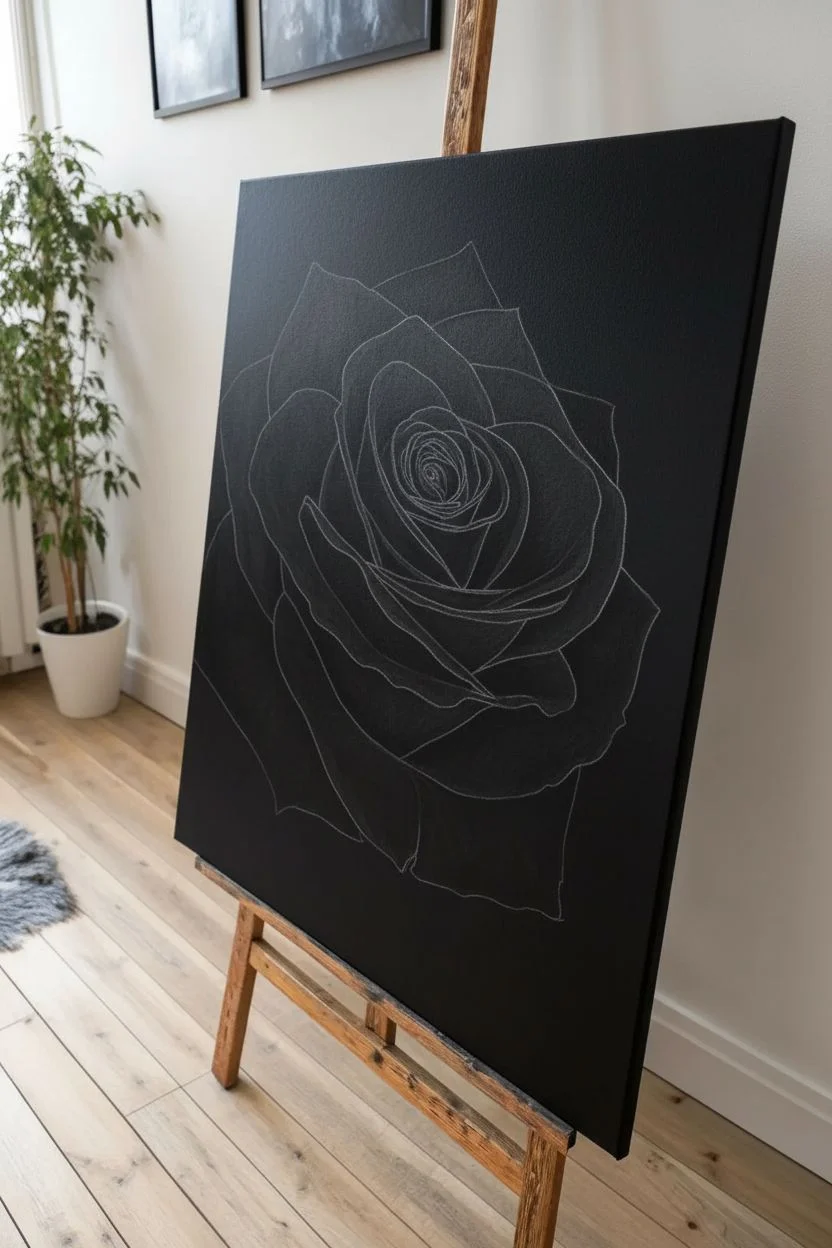
Luminous Neon Roses on Black
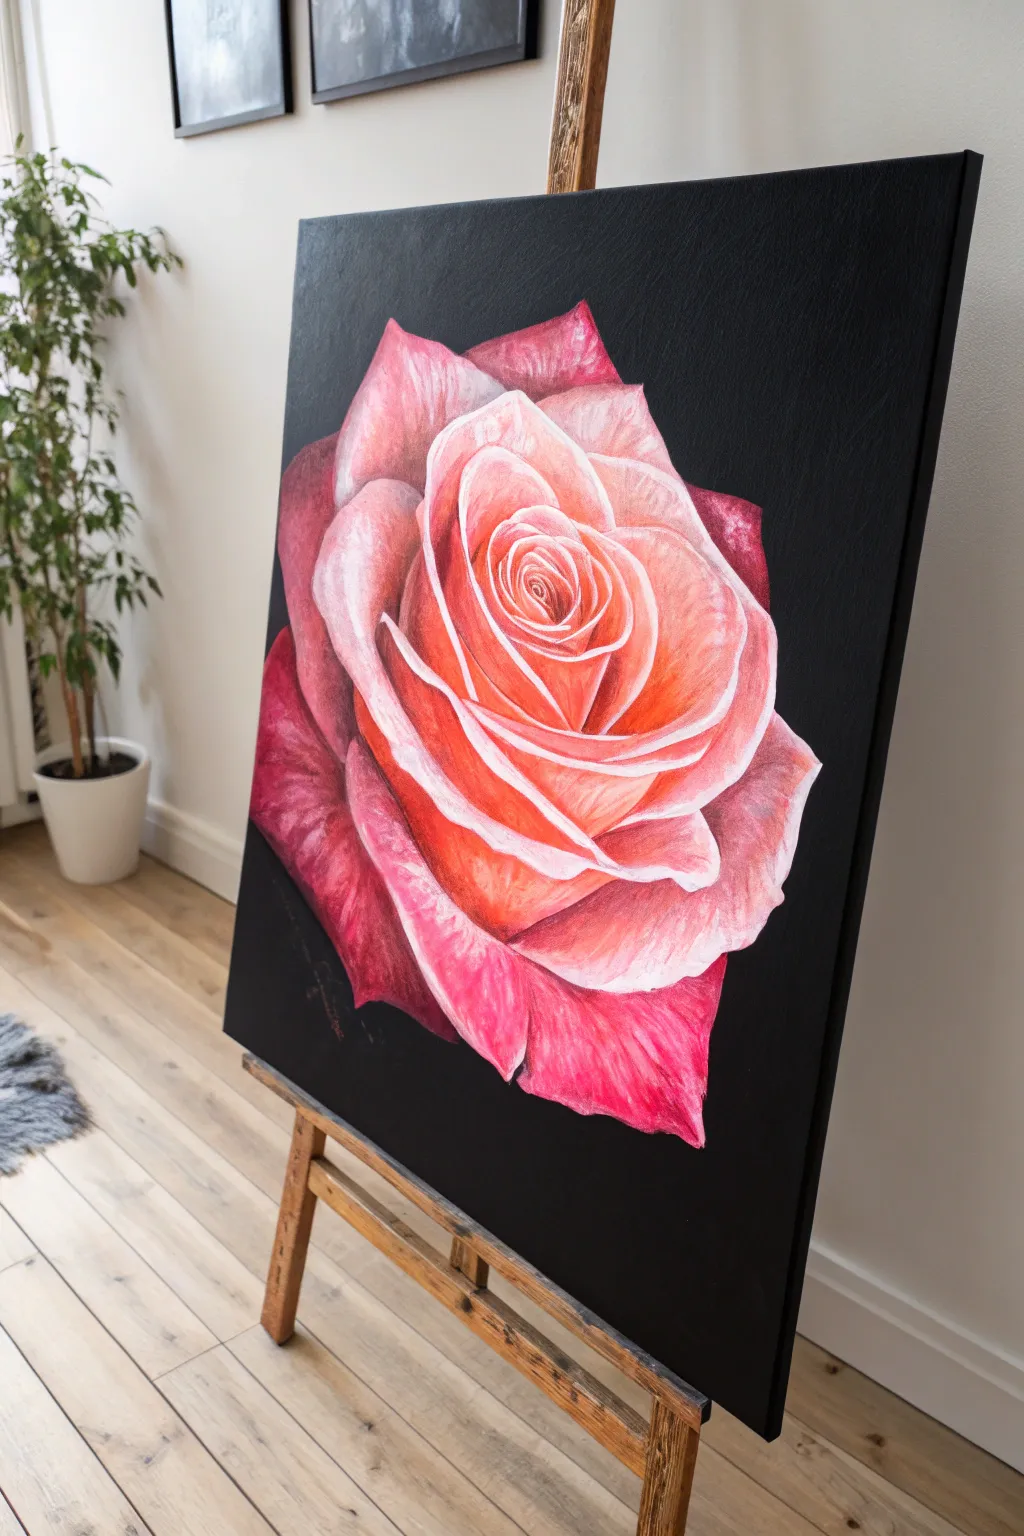
This project creates a stunning, high-contrast floral portrait where a delicate rose seems to emerge from the darkness. By layering translucent glazes over a black background, you’ll achieve a luminous, almost neon quality that makes the petals pop.
Step-by-Step
Materials
- Stretched black canvas (or white canvas painted black)
- Heavy body acrylic paints (Titanium White, Neon Pink/Magenta, Cadmium Red, Cadmium Orange, Yellow)
- Glazing medium or slow-drying medium
- Chalk or a white pastel pencil
- Assorted synthetic brushes (filbert, round, and fine liner)
- Palette knife (for mixing)
- Water container and paper towels
Step 1: Preparation and Sketching
-
Prime the canvas:
Even if you bought a pre-primed black canvas, I find applying a fresh coat of Mars Black acrylic ensures a velvety, matte finish. Let this dry completely before starting. -
Map the center spiral:
Using a white pastel pencil or a piece of chalk, lightly sketch the tight spiral at the very center of the rose. Keep your pressure extremely light so the lines can be easily wiped away later. -
Draft the outer petals:
Work outward from the center, drawing overlapping, curved shapes for the larger petals. Don’t worry about perfect symmetry; natural irregularities make the rose look more realistic. -
Refine the composition:
Step back to check the scale. The rose should dominate the canvas with significant negative space around the edges to enhance the glowing effect.
Chalky Residue?
If white sketch lines remain visible, use a damp Q-tip to gently lift the chalk. Do this before varnishing, or the lines will be sealed in forever.
Step 2: Underpainting the Light
-
Mix a translucent white:
Mix Titanium White with a generous amount of glazing medium. You want a milky consistency, not opaque paint. -
Establish the highlights:
Paint the edges of the petals where the light hits the strongest using your white glaze. This creates the ‘map’ for your luminosity. -
Fade into the shadows:
Using a dry brush technique, feather the white glaze inward towards the base of each petal, letting it fade into the black background. The black of the canvas will serve as your deepest shadows.
Step 3: Building Color Layers
-
First color wash:
Mix your Neon Pink or Magenta with glazing medium. Apply this sheer wash over the dried white underpainting. The white areas will instantly turn bright pink, while the black areas remain dark. -
Deepen the mid-tones:
Mix a slightly more opaque Cadmium Red. Paint this into the crevices and shadow areas where petals overlap, blending it softly into the pinks. -
Add warmth to the center:
Mix Orange and a touch of Yellow with glazing medium. Apply this specifically to the tight center spiral and the inner bowl of the rose to create a glowing, warm heart. -
Strengthen the outer petals:
On the large, drooping outer petals, use a mix of Magenta and Red. Apply the paint with directional strokes that follow the curve of the petal to suggest texture.
Dew Drops
Add realism by painting tiny water droplets on a few petals. Use pure white for the highlight reflection and black for the drop’s cast shadow.
Step 4: Creating Luminosity
-
Enhance petal edges:
Take pure Titanium White (with very little medium this time) and a fine liner brush. Carefully trace the very tips of the petals that are catching the ‘light.’ This stark white against the color creates the neon illusion. -
Blend the highlights:
Immediately after applying the white edge, use a clean, slightly damp filbert brush to pull that white paint slightly into the colored part of the petal, softening the transition. -
Glaze over highlights:
Once the white edges are dry, apply a very thin layer of Neon Pink or Orange over them. This tints the highlight so it looks like glowing light rather than just white paint. -
Darken the contrast:
If you’ve accidentally painted over any deep shadow areas, re-apply Mars Black carefully to reclaim the depth. High contrast is key to the glowing look.
Step 5: Final Details
-
Add texture veining:
Using a watered-down crimson or dark red, paint very faint, branching veins on the larger outer petals. Keep these subtle so they don’t overpower the glow. -
Clean up edges:
Inspect the outer silhouette of the rose. Use black paint to sharpen any fuzzy edges where the rose meets the background. -
Final varnish:
Allow the painting to cure for several days. Apply a gloss varnish to unify the sheen of the paints and deepen the black background even further.
Step back and admire how the dark background makes those petals radiate with color
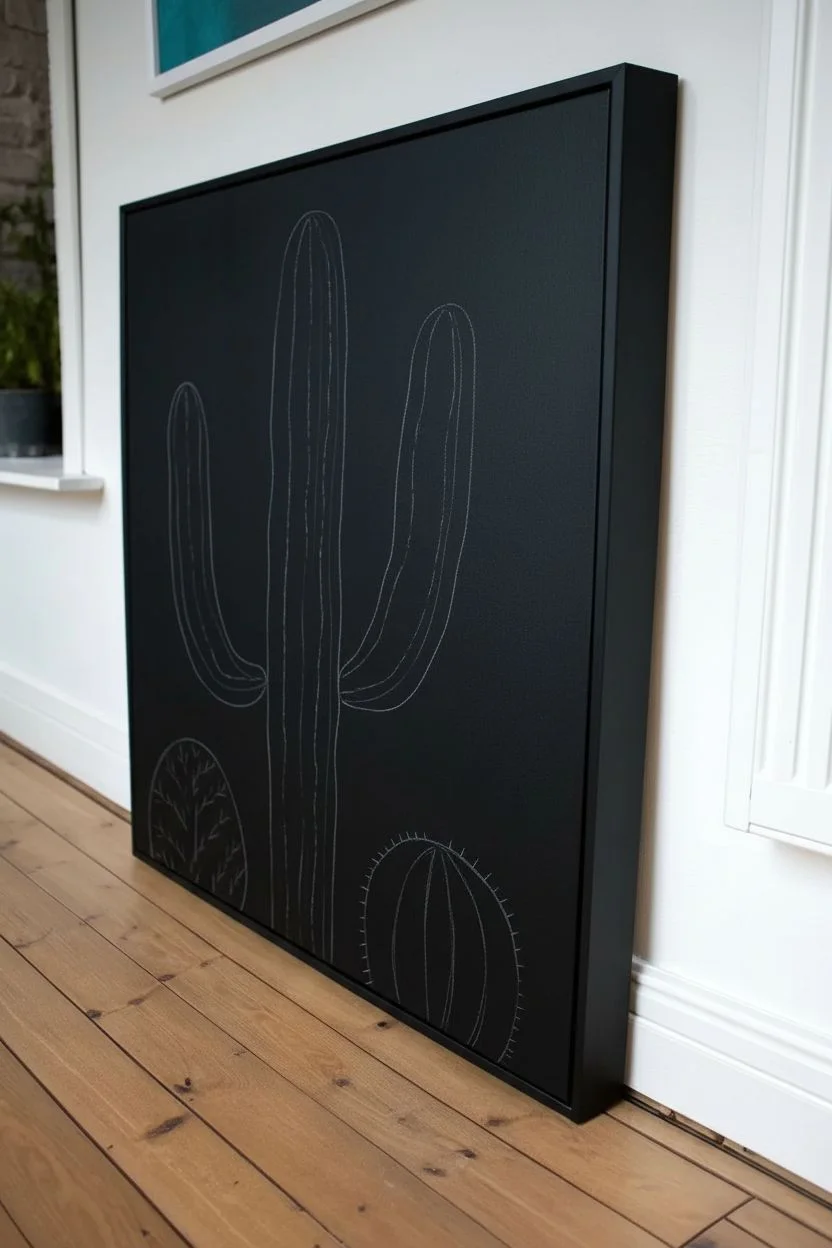
Neon Cacti With Glowing Edges
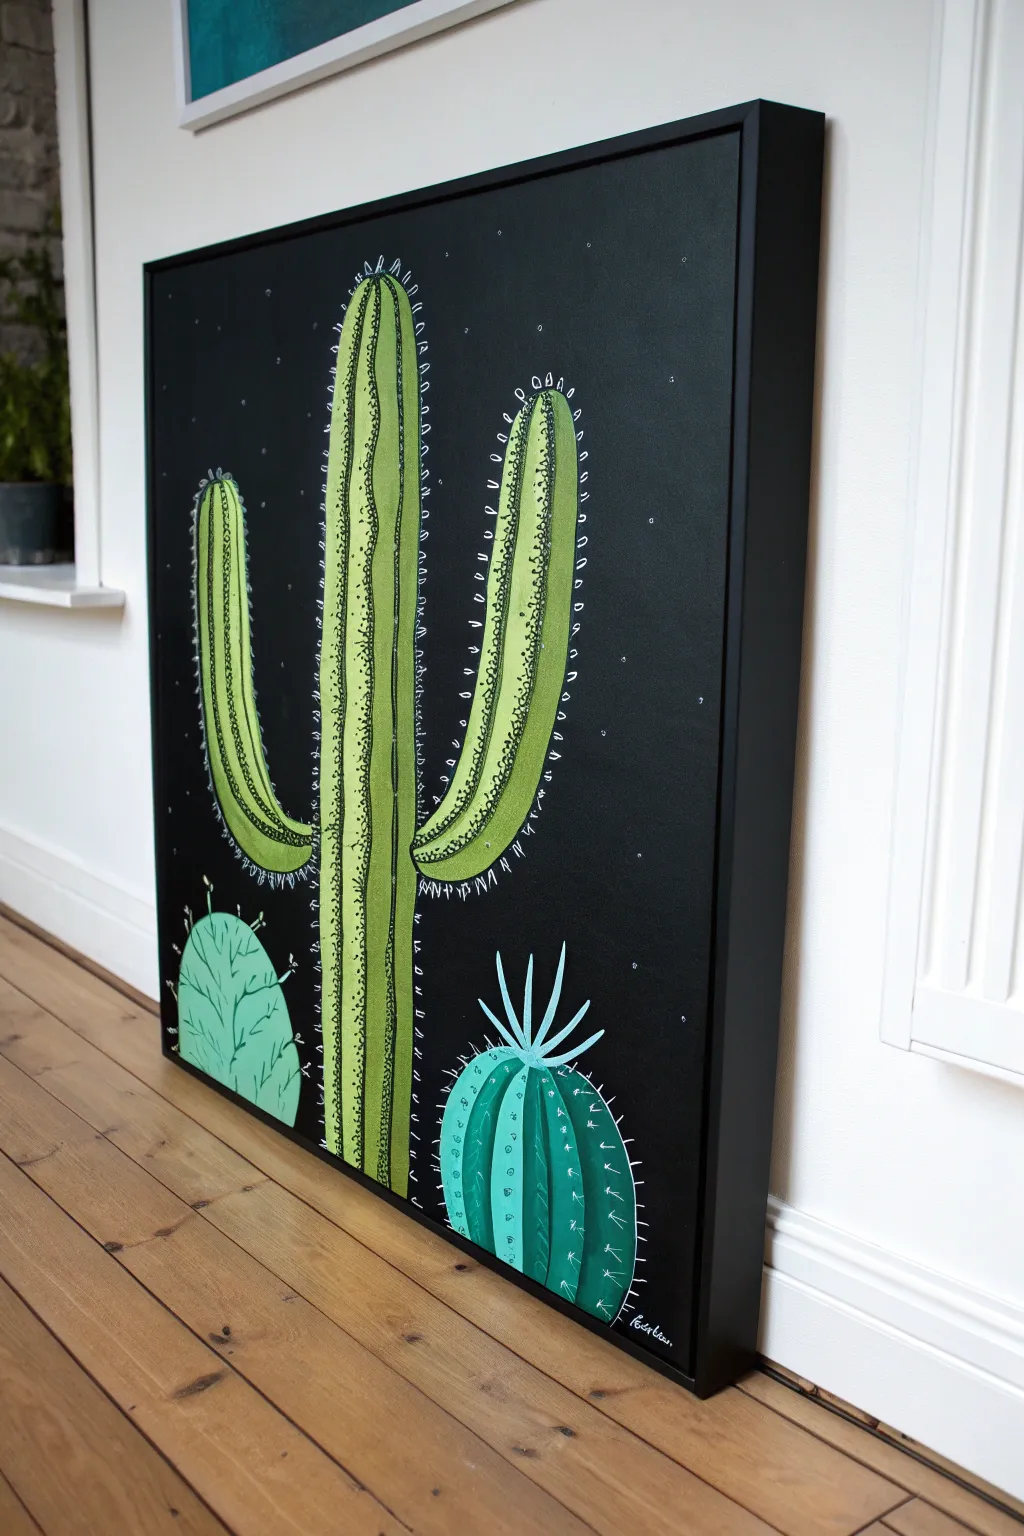
Bring the vibrancy of the desert night into your home with this striking oversized canvas art. The high-contrast combination of a matte black background and luminous neon greens creates a modern, illustrative look that pops off the wall.
Detailed Instructions
Materials
- Large square gallery-wrapped canvas (approx. 30×30 or 36×36 inches)
- Black acrylic gesso or matte black acrylic paint
- Wide flat paintbrush (2-3 inch)
- White charcoal pencil or chalk
- Acrylic paints: Lime Green, Olive Green, Teal/Turquoise, Mint Green, White
- Fine liner brush (size 0 or 00)
- Round brush (size 4 or 6)
- Black floater frame (optional)
Step 1: Setting the Stage
-
Prime the canvas:
Start by coating your entire canvas with black acrylic gesso or matte black paint. Use a wide flat brush and apply two coats to ensure a solid, opaque background without any white canvas showing through. Don’t forget to paint the edges. -
Let it cure:
Allow the black background to dry completely. This is crucial—if the black is even slightly wet, it will muddy your bright neon colors later. I usually suggest leaving it overnight or for at least 3-4 hours. -
Sketch the composition:
Using a white charcoal pencil or chalk, lightly sketch your three cacti. Draw a tall, central saguaro-style cactus with two arms. At the bottom left, draw an oval prickly pear pad, and at the bottom right, a round barrel cactus shape.
Chalk Marks?
If visible white sketch lines remain after painting, don’t erase them until the paint is 100% cure-dry. Use a damp Q-tip to gently wipe away the chalk without damaging the black matte finish.
Step 2: Painting the Greens
-
Block in the main cactus:
Mix a bright Lime Green with a tiny touch of white to increase opacity. Using a round brush, paint vertical stripes to fill in the main body and arms of the central cactus, leaving thin black gaps between the stripes to act as shadow lines. -
Paint the barrel cactus:
For the bottom right round cactus, switch to a Teal or Turquoise shade. Paint curved vertical segments that follow the round form, again leaving small gaps of black background showing between the segments to define the ribs. -
Fill the prickly pear:
Use a Mint Green or pale green for the bottom left cactus. Paint this as a solid shape or with very subtle internal contour lines, keeping the edges slightly rough to suggest texture. -
Add visual depth:
Once the first layer is dry, distinct darker green stripes can be added down the center of the lime green sections on the main cactus. This creates a ribbed, three-dimensional effect without complex shading.
Step 3: Detailing and Glowing Edges
-
Outline the ribs:
With your fine liner brush and black paint, tidy up the gaps between your color segments. It helps to make these lines crisp to separate the ‘ribs’ of the cacti clearly. -
Create the spines:
Load your fine liner brush with pure White paint. On the central cactus, paint small ‘U’ shapes or tiny clusters of dashes along the ridges of the green stripes to represent spines. -
Add the glowing halo:
This is the ‘neon’ secret: outline the outer edges of the main cactus with a thin, broken line of white or very pale lime. This high-contrast edge against the black background simulates a glowing effect. -
Detail the teal cactus:
On the teal barrel cactus, paint small white arrows or ‘V’ shapes along the vertical ribs. Ensure they point upwards and are spaced evenly. -
Crown the barrel cactus:
Paint long, thin spikes shooting out from the very top center of the teal cactus using a mix of light blue and white. These should look like distinct, long needles. -
Texture the mint cactus:
On the mint green cactus, use a very shaky, loose hand to draw thin, vein-like lines in a darker green. Add small white spikes protruding from the outer silhouette. -
Pop the background:
Dip the handle end of a paintbrush into white paint. Dot tiny ‘stars’ randomly across the black background. Cluster a few together and leave large open spaces elsewhere for an atmospheric night sky look. -
Final touches:
Step back and check for opacity. If any green areas look streaks, apply a careful second coat. Ensure your white highlights are crisp and bright.
Level Up
Mix a clear fluorescent medium or glow-in-the-dark pigment into your white highlight paint. Under a blacklight, the spines will actually glow for a true neon effect.
Hang your desert masterpiece in a spot with good lighting to let those high-contrast colors truly shine
Neon Bubbles and Light Orbs

Transform a simple black canvas into a floating dreamscape with these vibrant, translucent bubbles. This project uses the stunning contrast of neon acrylics against a dark background to create convincing spheres that seem to glow from within.
Step-by-Step
Materials
- Large stretched canvas (pre-primed black or primed yourself)
- Black gesso or black acrylic paint (if canvas isn’t black)
- Wide flat brush (for background)
- Set of round brushes (sizes 2, 6, and 10)
- Fine liner brush (size 0 or 00)
- Neon acrylic paints (pink, blue, yellow, green)
- Titanium white acrylic paint
- Mixing palette
- Compass or various circular objects for tracing
- White or grey chalk pencil
- Water cup and paper towels
Step 1: Preparation and Layout
-
Prepare the Void:
If your canvas isn’t already black, cover the entire surface with an even coat of black gesso or black acrylic paint. Use a wide flat brush and ensure full coverage so no white peeks through. -
Dry Completely:
Allow the base coat to dry thoroughly. This is crucial because any wet black paint will muddy your neon colors later. -
Trace the Orbs:
Using a white chalk pencil, lightly trace circles of various sizes all over the canvas. You can use a compass, or just trace bowls, cups, and lids for variety. -
Composition Check:
Arrange the circles so some are clustered together while others float alone. Include a mix of very large spotlight bubbles and tiny background specks. -
Overlap Planning:
Draw a few circles overlapping each other. Decide which one is ‘in front’ and erase the chalk line of the back bubble where they intersect.
Transparency Tip
To make bubbles look truly hollow, keep the centers mostly black. Concentrate color only on the rims and fade it inward.
Step 2: Defining the Shape
-
Base Outline:
Load a size 6 round brush with your first neon color (e.g., bright blue). Paint over the chalk line, but vary the pressure. Make some parts of the ring thick and others very thin. -
Broken Lines:
Don’t close the circle completely with one solid heavy line. Leave gaps or areas where the paint is very faint to suggest transparency. -
Second Color Accent:
Before the first color dries, wash your brush and grab a second neon color (like pink). Paint along the inner edge of the blue line, letting them blend slightly on the canvas. -
Create Depth:
Repeat this outlining process for all bubbles, changing up the color combinations. Try blue/green, pink/yellow, and blue/pink pairings.
Level Up: UV Magic
Use specifically labeled ‘UV reactive’ or fluorescent acrylics. If you hang this under a blacklight, the bubbles will actually glow in the dark!
Step 3: Creating Transparency
-
Dry Brushing:
Dip a dry brush into a tiny amount of paint and wipe most of it off on a paper towel. Gently scumble (rub) this dry paint inside the bubble near the edges to create a foggy, glass-like texture. -
The Inner Glow:
Mix a little white with your neon color to create a pastel tint. Apply this softly to the bottom curve of the bubble to simulate light catching the spherical weight. -
Ghost Bubbles:
For the bubbles in the background, use very watered-down paint or purely dry-brush techniques so they look fainter and further away.
Step 4: Highlights and Details
-
Primary Reflections:
Using pure Titanium White and a fine liner brush, paint a sharp, curved highlight on the upper left or right side of each bubble. This indicates the light source. -
Secondary Reflections:
Add a smaller, fainter white dot or small curve on the opposite side of the main highlight to show light passing through the sphere. -
Surface Tension:
Add tiny, crisp lines of white or very pale neon on top of the original colored outlines to make the edges pop. -
Floating Particles:
Dip the end of a brush handle or a dotting tool into white or neon paint. Dot tiny specks around the empty black spaces to look like dust motes caught in the light. -
Final Clean Up:
Once the paint is 100% dry, take a damp cloth or sponge and gently wipe away any visible chalkboard tracing lines.
Step back and admire how your simple circles have transformed into glowing, floating spheres
Fireworks Exploding in Neon Trails
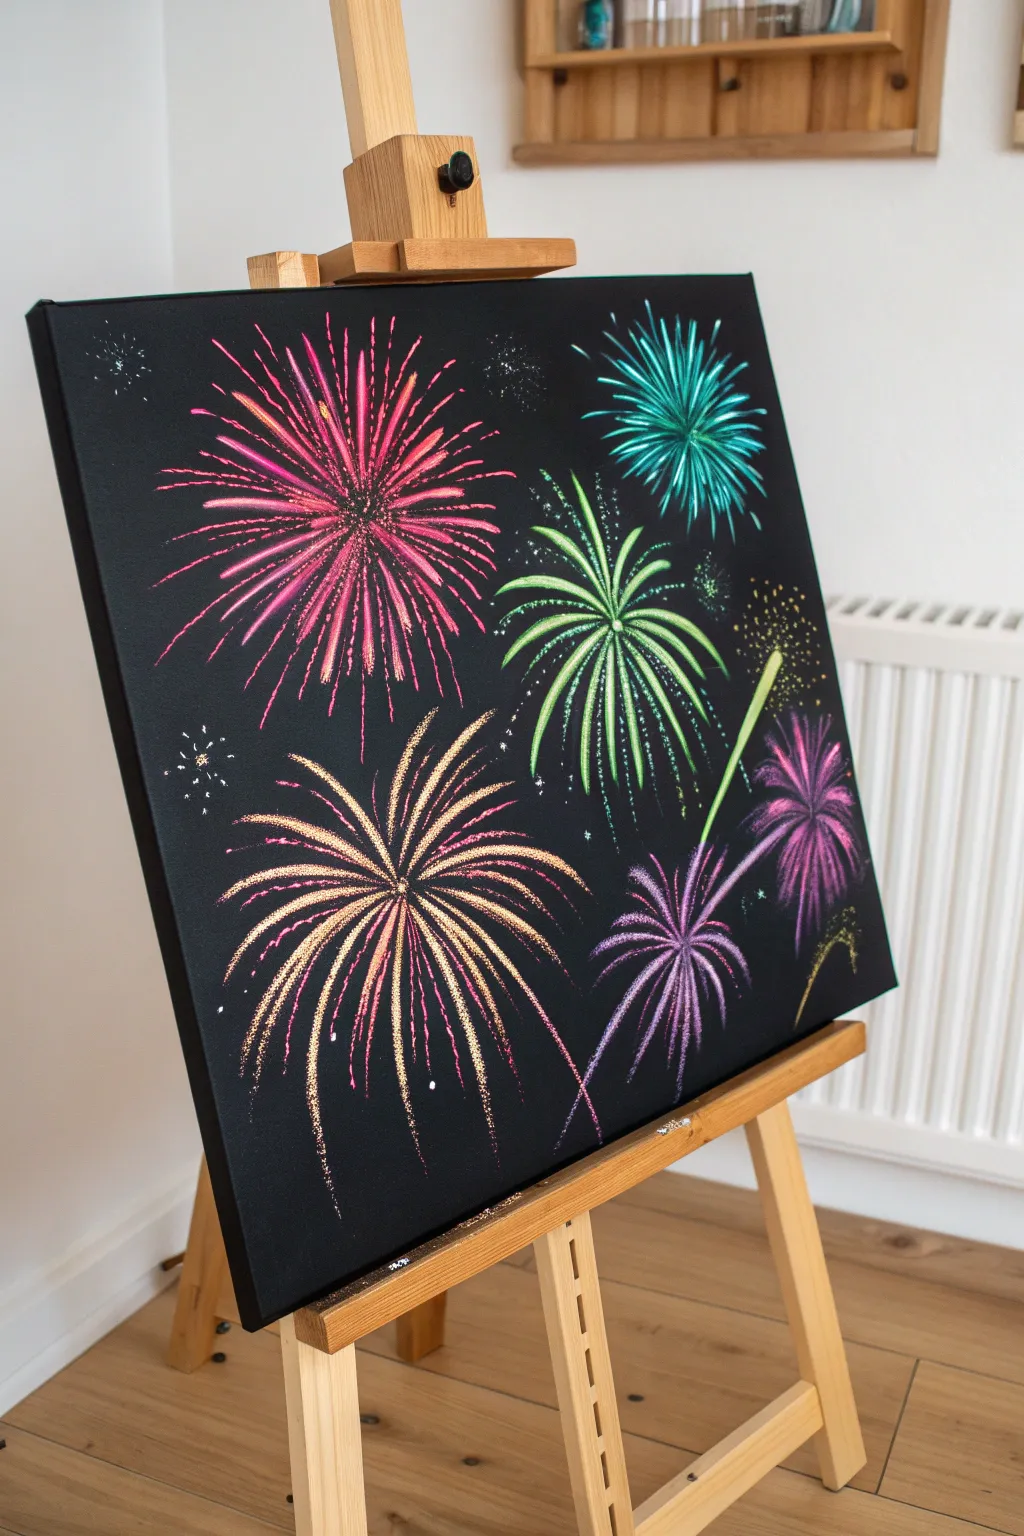
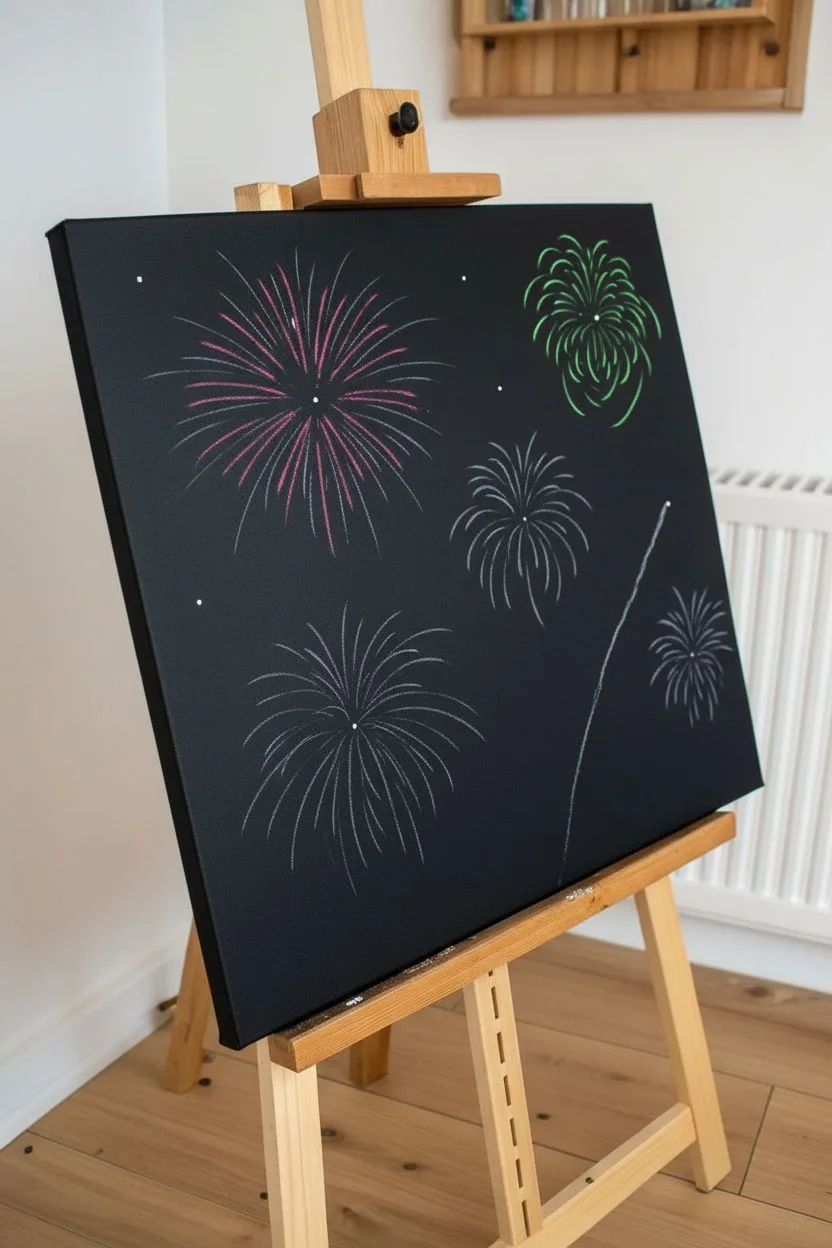
Capture the explosive joy of a celebration with this striking neon fireworks display on a deep black canvas. Using simple stroke techniques and high-contrast colors, you’ll create a glowing effect that truly pops against the dark background.
Step-by-Step Tutorial
Materials
- Black stretched canvas (square format recommended)
- Neon acrylic paints (Pink, Green, Purple, Yellow, Orange)
- White acrylic paint (for mixing highlights)
- Set of round brushes (sizes 2, 4, and 6)
- Fine liner brush (size 0 or 00 for details)
- Palette or mixing plate
- Cup of water
- Paper towels
- Chalk or white pencil (optional, for sketching)
Step 1: Planning the Composition
-
Prepare your canvas:
Ensure your black canvas is clean and dust-free. If you only have a white canvas, paint it entirely with black acrylic or gesso and let it dry completely before starting. -
Mark focal points:
Visualize where your main fireworks will explode. Use a tiny dot of chalk or a white pencil to mark the center point for about 5-6 different fireworks bursts. Stagger them at different heights and sizes for a natural look. -
Sketch directional guides:
From each center point, lightly sketch faint radiating lines outward like the spokes of a wheel. These don’t need to be perfect circles; varying the length of the lines makes the explosion look more dynamic.
Glow Up Technique
To make colors truly neon, paint a line of white first, let it dry, and then glaze your neon color over it. The white base amplifies the brightness.
Step 2: Painting the Large Bursts
-
Start the main pink burst:
Load a size 4 round brush with neon pink paint. Starting from the center point of your largest firework, flick the brush outward quickly. Lift the brush as you reach the end of the stroke to create a tapered, feathery tip. -
Layer the strokes:
Continue adding pink strokes around the center, varying their lengths. Some should be short and close to the core, while others stretch out further. Leave small gaps of black space between strokes to maintain definition. -
Add a secondary color:
While the pink is still slightly wet or just tacky, mix a tiny bit of orange or a lighter pink. Add a few overlapping strokes in the center of the burst to create a glowing core effect. -
Create the green burst:
Clean your brush thoroughly. Move to the upper right section and create a smaller burst using neon green. Use the same flicking motion, but make these strokes slightly more curved, like a palm frond, to simulate gravity pulling the sparks down. -
Paint the gold/yellow burst:
In the lower left, create a large burst using a metallic gold or neon yellow mixed with a touch of orange. I like to make the strokes on the bottom half of this firework slightly longer, mimicking a ‘weeping willow’ style explosion. -
Add the purple trails:
For the purple firework on the lower right, paint fewer, thicker strokes. Add a long, curved trail leading up to the center of the burst using a mix of green and purple, suggesting the rocket’s path before explosion.
Fixing Stray Splatters
If you accidentally splatter paint where you don’t want it, quickly dab it with a wet Q-tip. If it’s dried, just paint over it with black paint.
Step 3: Adding Details and Sparkle
-
Highlight for neon effect:
Mix a small amount of white paint with each of your neon colors to create a pastel version (e.g., very light pink, mint green). using a fine liner brush, paint thin lines down the center of your existing fireworks strokes. This creates the ‘hot’ white center of a light streak. -
Apply dry brush texture:
Wipe most of the paint off a dry brush. Lightly dab the outer tips of the fireworks with the original neon color to create a fuzzy, glowing halo effect around the sharp lines. -
Create distant sparks:
Dip a toothbrush or a stiff bristle brush into watered-down white or yellow paint. Run your thumb over the bristles to gently splatter tiny dots across the background. These represent distant stars or fading embers. -
Paint isolated sparkles:
Use your smallest liner brush to paint tiny clusters of dots or small asterisks (*) in empty black spaces. These act as smaller, distant fireworks or twinkling stars. -
Add falling embers:
At the ends of the longest strokes on the bottom of the canvas, add tiny, separated dots of paint drifting downward. This simulates the dying embers falling from the sky. -
Intensify the centers:
Go back to the very center of each explosion with a dot of pure white or very pale yellow. This high contrast point creates the illusion of intense light at the source of the blast. -
Final review:
Step back from the canvas to view the composition as a whole. If any area looks too dark, add a small, simple starburst or a few trailing sparks to balance the heavy black space.
Hang your masterpiece in a spot with good lighting to watch those neon colors truly shine in the dark
Neon Feather With Soft Highlight Blends
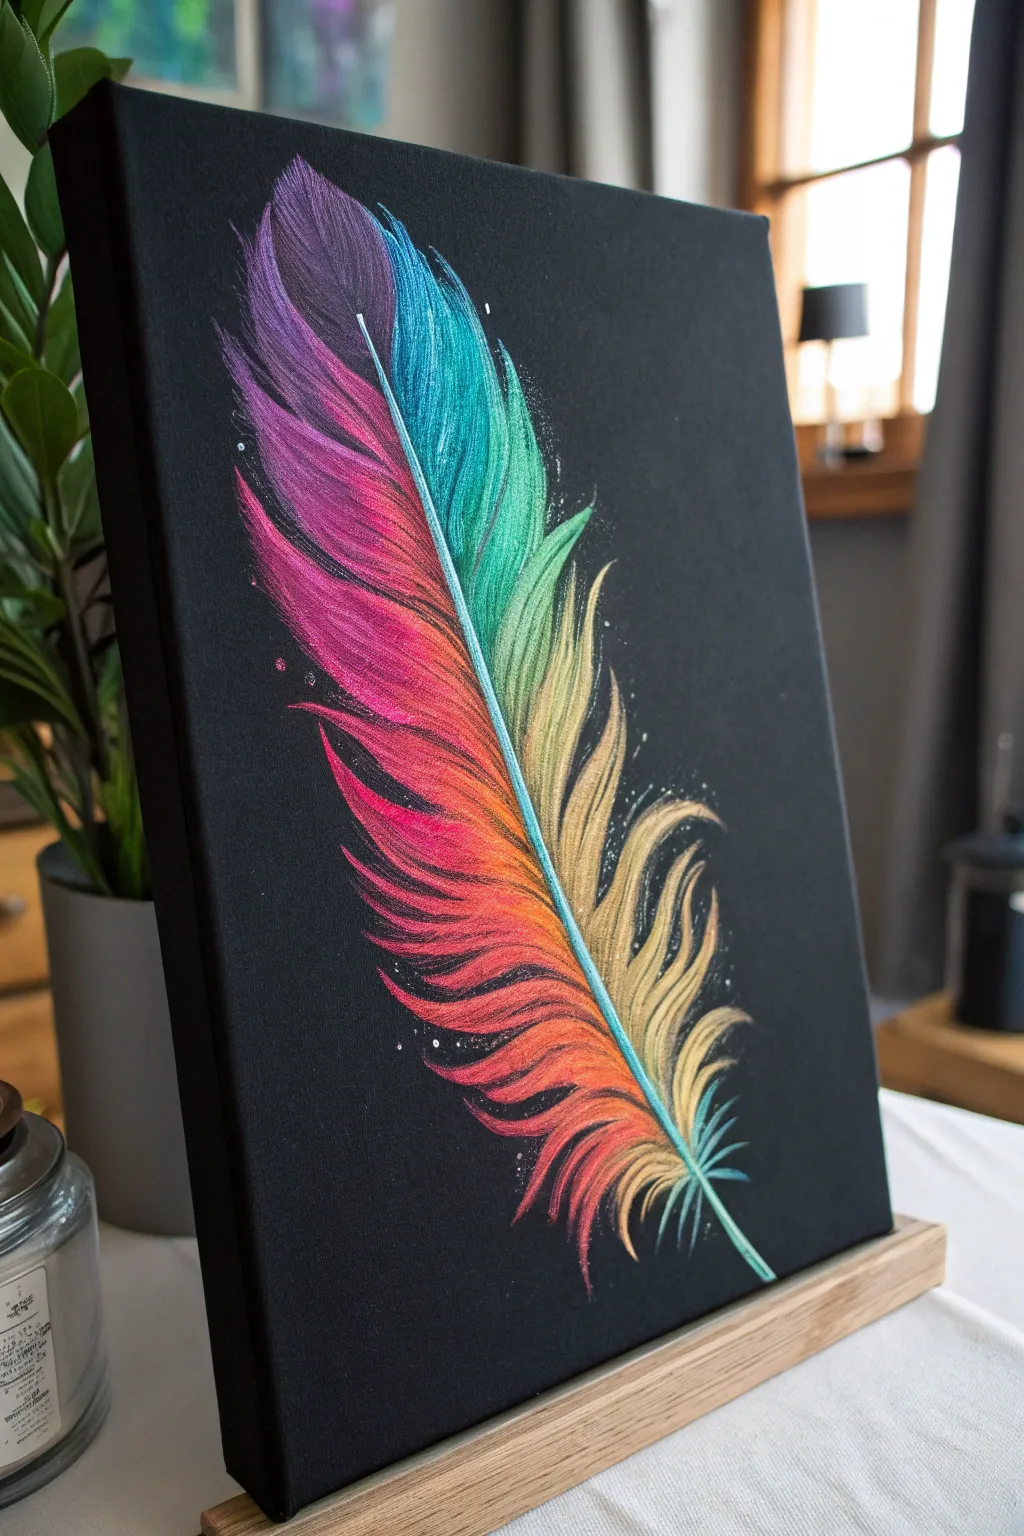
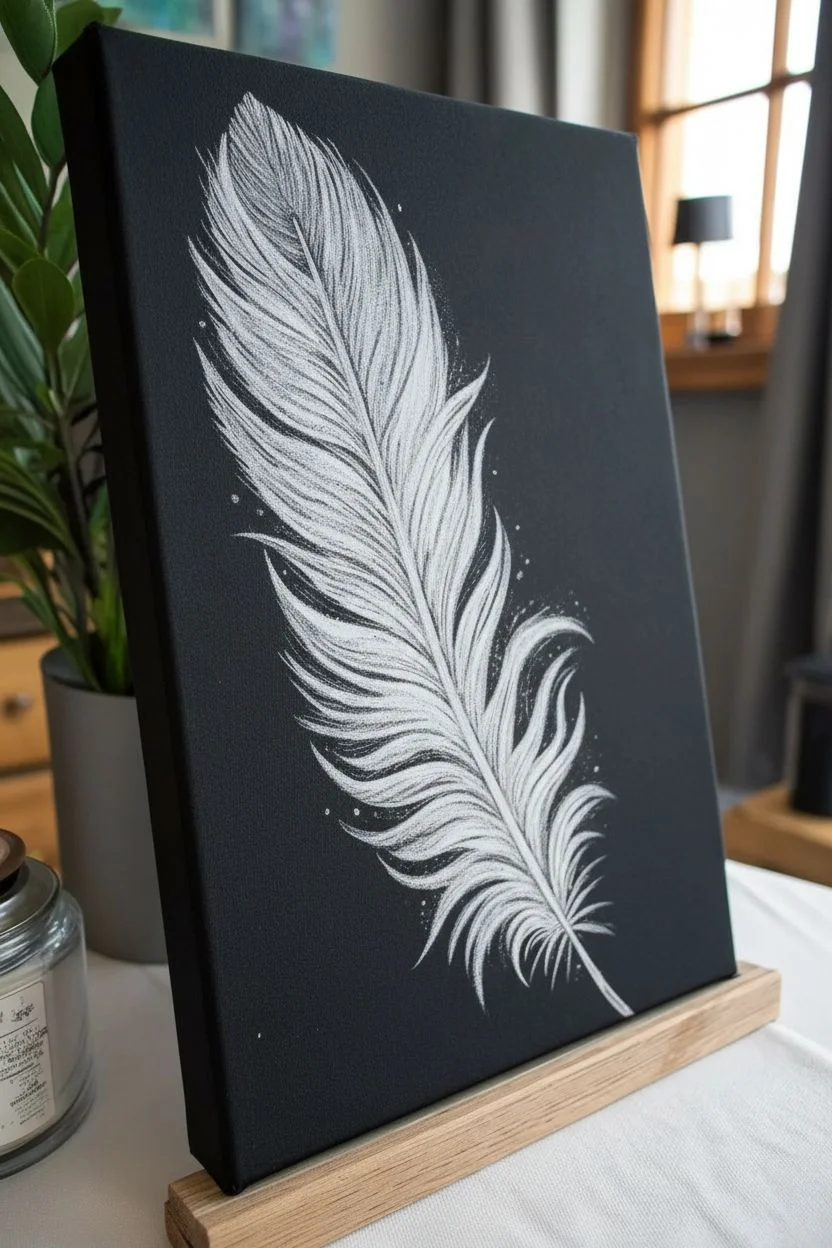
Capture the ethereal beauty of a glowing feather with this striking black canvas project. By layering vivid neon hues over a dark background, you’ll create a luminous effect where the colors seem to visually pop off the surface.
Step-by-Step
Materials
- Black stretched canvas (11×14 or similar)
- White colored pencil or chalk pencil (for sketching)
- Acrylic paints (primary cyan, magenta, yellow, plus neon variants of purple, green, orange, pink)
- Titanium white acrylic paint
- Fine liner brush (size 0 or 00)
- Small flat brush (size 2 or 4)
- Fan brush (optional, for texture)
- Palette and water cup
- Paper towels
Step 1: Sketching the Structure
-
Draw the Spine:
Begin by lightly sketching the central spine of the feather using a white colored pencil. Start from the bottom right corner and curve it gently upward toward the top left center, creating a graceful, flowing arc. -
Outline the Shape:
Lightly sketch the outer boundaries of the feather’s vanes. Don’t make the edges perfect; keep them wispy and jagged to mimic the natural separation of feather barbs. -
Map the Base White:
To make neon colors truly pop on black canvas, you need a white underlayer. Using your fine liner brush and thinned white paint, fill in the sketched spine and the individual barb lines. -
Feather the Edges:
Flick the brush outward from the spine to create the texture of individual strands. Ensure the white paint isn’t too thick, as you want the texture of the canvas to help diffuse the light later. -
Dry Completely:
Let this white base layer dry entirely. This step is crucial because wet white paint will turn your neons into pastels, losing that electric glow.
Step 2: Applying the Neon Gradient
-
Purple Top:
Start at the very top left of the feather. Load your small flat brush with neon purple and gently glaze over the white base coat in that section, following the direction of the barbs. -
Transition to Blue:
While the purple is still slightly workable, introduce a bright teal or cyan blue just below it. Blend the meeting point softly so the transition looks seamless. -
Green and Yellow Midsection:
Moving down the right side of the feather, apply neon green, fading it into a bright, warm yellow. I find that cleaning the brush thoroughly before switching to yellow prevents the color from looking muddy. -
Orange and Pink Lower Section:
On the lower left and bottom sections, paint vivid orange transitioning into hot pink. Allow these warm tones to overlap slightly with the yellow area above for a fiery blend. -
Deepening Shadows:
Mix a tiny drop of black into your original colors (or use non-neon versions) to paint the areas closest to the spine. This creates depth and makes the outer edges appear to glow brighter.
Brush Control Tip
For the finest feather strands, thin your paint to an ink-like consistency. Roll the brush tip in the paint to sharpen it before touching the canvas.
Step 3: Defining Highlights and Details
-
Highlight the Spine:
Using a clean fine liner brush, paint a crisp line of bright teal or white down the center of the quill (spine). This anchors the feather and adds a sharp focal point. -
Intensify the Tips:
Go back over the very tips of the feather barbs with your purest neon pigments. You can even mix a tiny bit of white into the neon paint for the absolute brightest points to simulate light hitting the edges. -
Add Stray Barbs:
Use the liner brush to add a few loose, flying strands detaching from the main feather body. Paint these in lighter tints to make them look delicate and airy. -
Micro-Splatter Effect:
Dip a stiff brush or toothbrush into watered-down white acrylic. Tap off the excess, then flick a very fine mist of ‘stars’ or dust around the feather to enhance the magical atmosphere. -
Final Contrast Check:
Step back and assess your blends. If any area looks too flat, add a thin glaze of the neon color to boost saturation, or re-establish dark gaps between barbs with a touch of black paint.
Metallic Magic
Once the paint is dry, gently dry-brush a tiny amount of iridescent or metallic pearl medium over the brightest curves to give the feather a shimmering finish.
Hang your luminous creation in a spot with good lighting to watch those neon colors truly shine
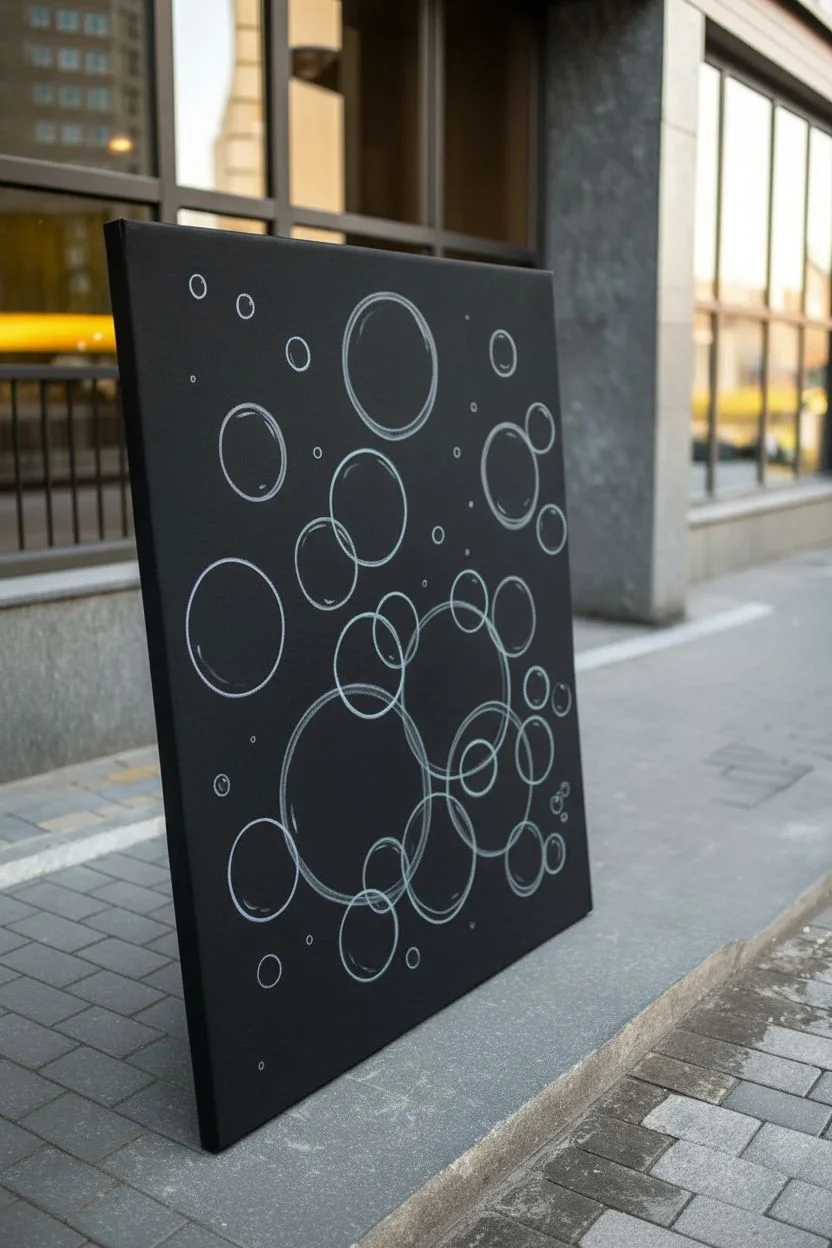
Negative-Space Circles With Neon Pour
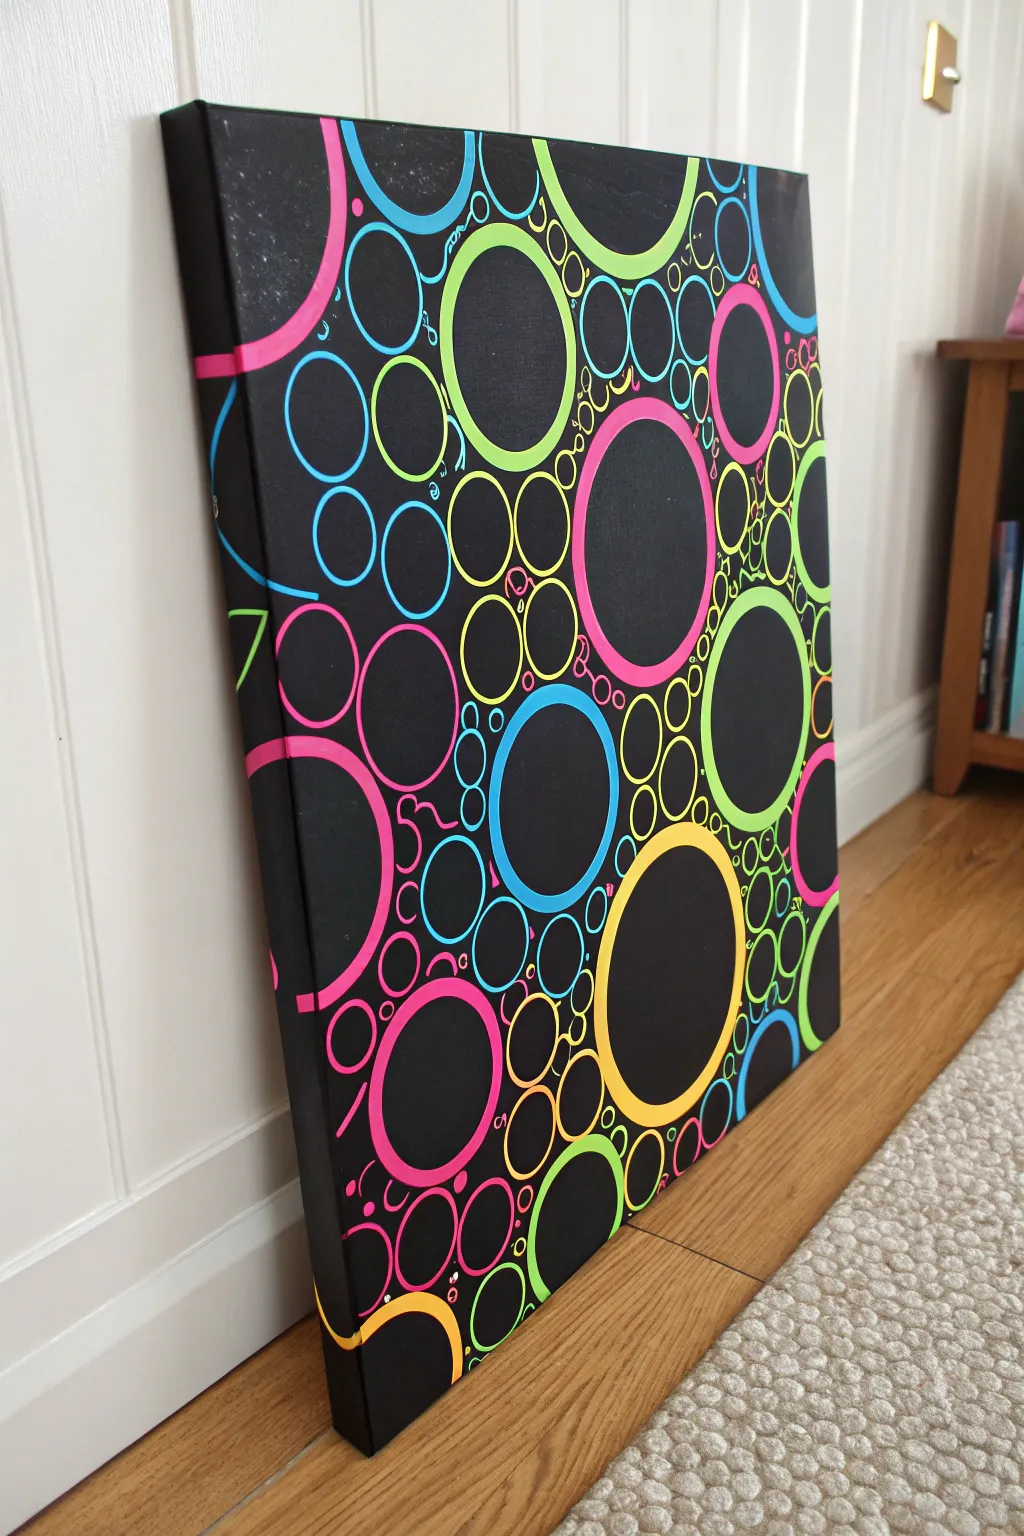
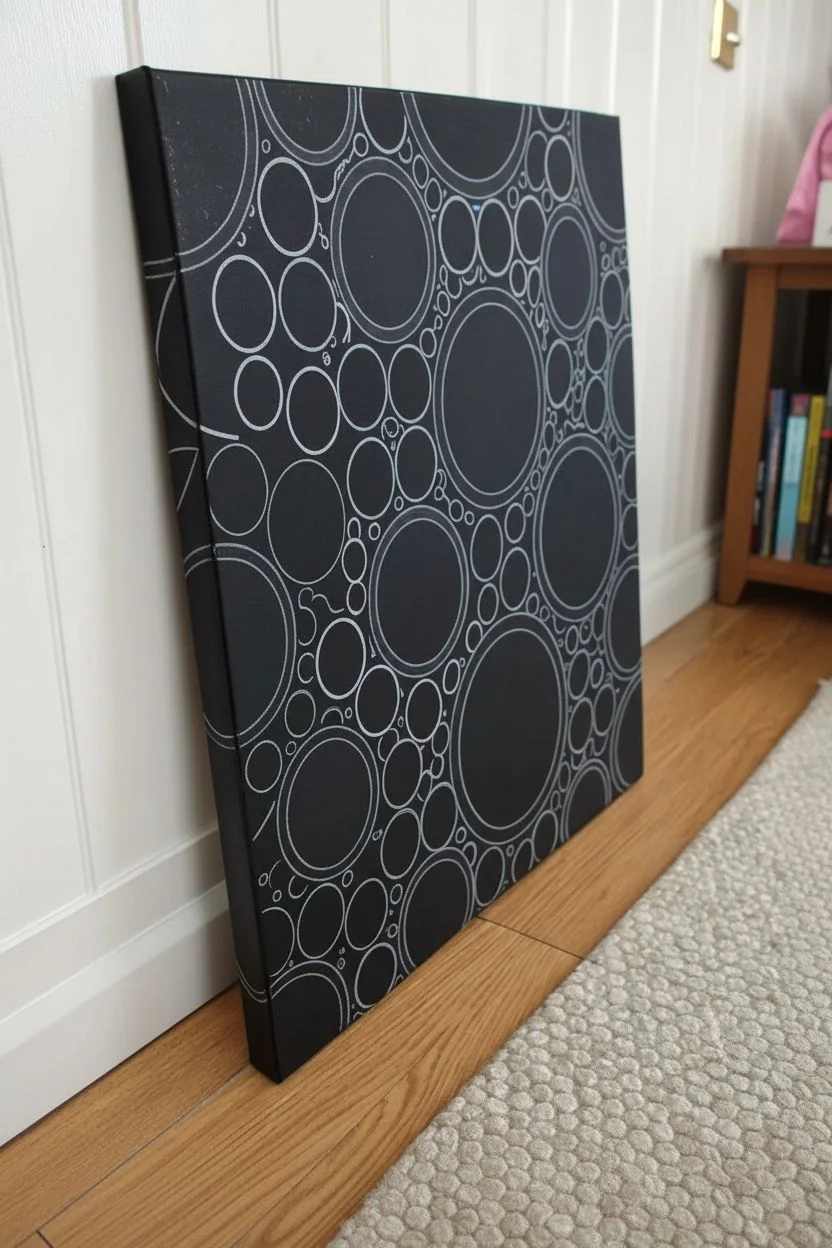
This vibrant project transforms a simple black background into a mesmerizing bubble-like display using bright neon paints. By focusing on outlines rather than filled shapes, you create a stunning negative space effect that looks complex but is surprisingly approachable.
Step-by-Step Tutorial
Materials
- Black stretched canvas (square or rectangular)
- Neon acrylic paints (Pink, Blue, Green, Yellow, Orange)
- Assorted circular objects for tracing (cups, lids, rolls of tape)
- White slate pencil or chalk pencil
- Small round paintbrushes (sizes 2-4)
- Black acrylic paint (for touch-ups)
- Palette or paper plate
- Water cup for rinsing
- Paper towels
Step 1: Planning and Layout
-
Gather tracing objects:
Collect a variety of round household items to use as templates. Look for different diameters, ranging from small bottle caps to large jar lids or duct tape rolls. -
Prepare the canvas:
Ensure your black canvas is clean and dust-free. If you only have a white canvas, paint it thoroughly with two coats of black acrylic and let it dry completely before starting. -
Trace large circles:
Place your largest circular objects onto the canvas first. Using a white slate pencil or chalk pencil, lightly trace roughly 5–7 large circles scattered across the surface. Let some go off the edge of the canvas to create a dynamic composition. -
Add medium circles:
Fill in the gaps between the large shapes with your medium-sized tracing objects. Try to cluster them slightly rather than spacing them perfectly evenly. -
Fill with small circles:
Use your smallest objects (like bottle caps) to fill the remaining negative spaces. The canvas should be fairly crowded with circles, but make sure none of them overlap. -
Review the composition:
Step back and look at your layout. If there are large empty voids, hand-draw a few tiny bubble-like circles to balance the density.
Paint Transparency?
Neon paints can be thin. If 2 coats aren’t enough, paint a thin white line first as a primer, let it dry, then layer your neon color on top for maximum brightness.
Step 2: Painting the Neon Rings
-
Prepare your palette:
Squeeze out small amounts of your neon acrylic paints onto your palette. It’s best to work with one color at a time to keep your brush clean. -
Start with pink:
Dip a small round brush into the neon pink paint. Carefully paint over your chalk outlines for a random selection of the circles. Aim for a smooth, consistent line width—not too thick, but distinct. -
Add the green rings:
Switch to neon green. Select another set of circles to paint, trying to distribute the color evenly across the canvas so no area is too heavy with one shade. -
Paint the blue circles:
Clean your brush well and move to neon blue. Outline another group of circles. I find that placing cool colors like blue next to warm pinks makes the design pop. -
Finish with yellow and orange:
Fill in the remaining traced circles with your neon yellow and orange paints. Ensure every chalk outline is covered with paint. -
Paint the edges:
For circles that run off the side of the canvas, continue the painted line right around the edge of the frame. This gives the artwork a professional, finished look from all angles. -
Let the first coat dry:
Allow the paint to dry for about 15–20 minutes. Neon paints are often semi-transparent, so don’t worry if the black shows through slightly right now. -
Apply a second coat:
Go over every circle again with a second layer of the corresponding paint. This is crucial for making the colors truly opaque and vibrant against the dark background.
Step 3: Details and Cleanup
-
Add decorative squiggles:
Using a very fine detail brush, add tiny squiggles, dots, or ‘C’ shapes in the empty black spaces between circles. Use whatever color is nearby to tie the elements together. -
Remove chalk marks:
Once the paint is 100% dry, take a slightly damp cloth or cotton swab and gently wipe away any visible white chalk lines that peek out from under the paint. -
Touch up the background:
If you accidentally smudged any neon paint onto the negative space, use a small brush and black paint to cover the mistake seamlessly.
Glow In The Dark
Swap standard neons for UV-reactive or phosphorescent acrylics. Your rings will look cool in daylight but completely transform under blacklight.
Hang your new geometric masterpiece in a well-lit area to let those colors really shine
Neon Drip Paint Light Leaks
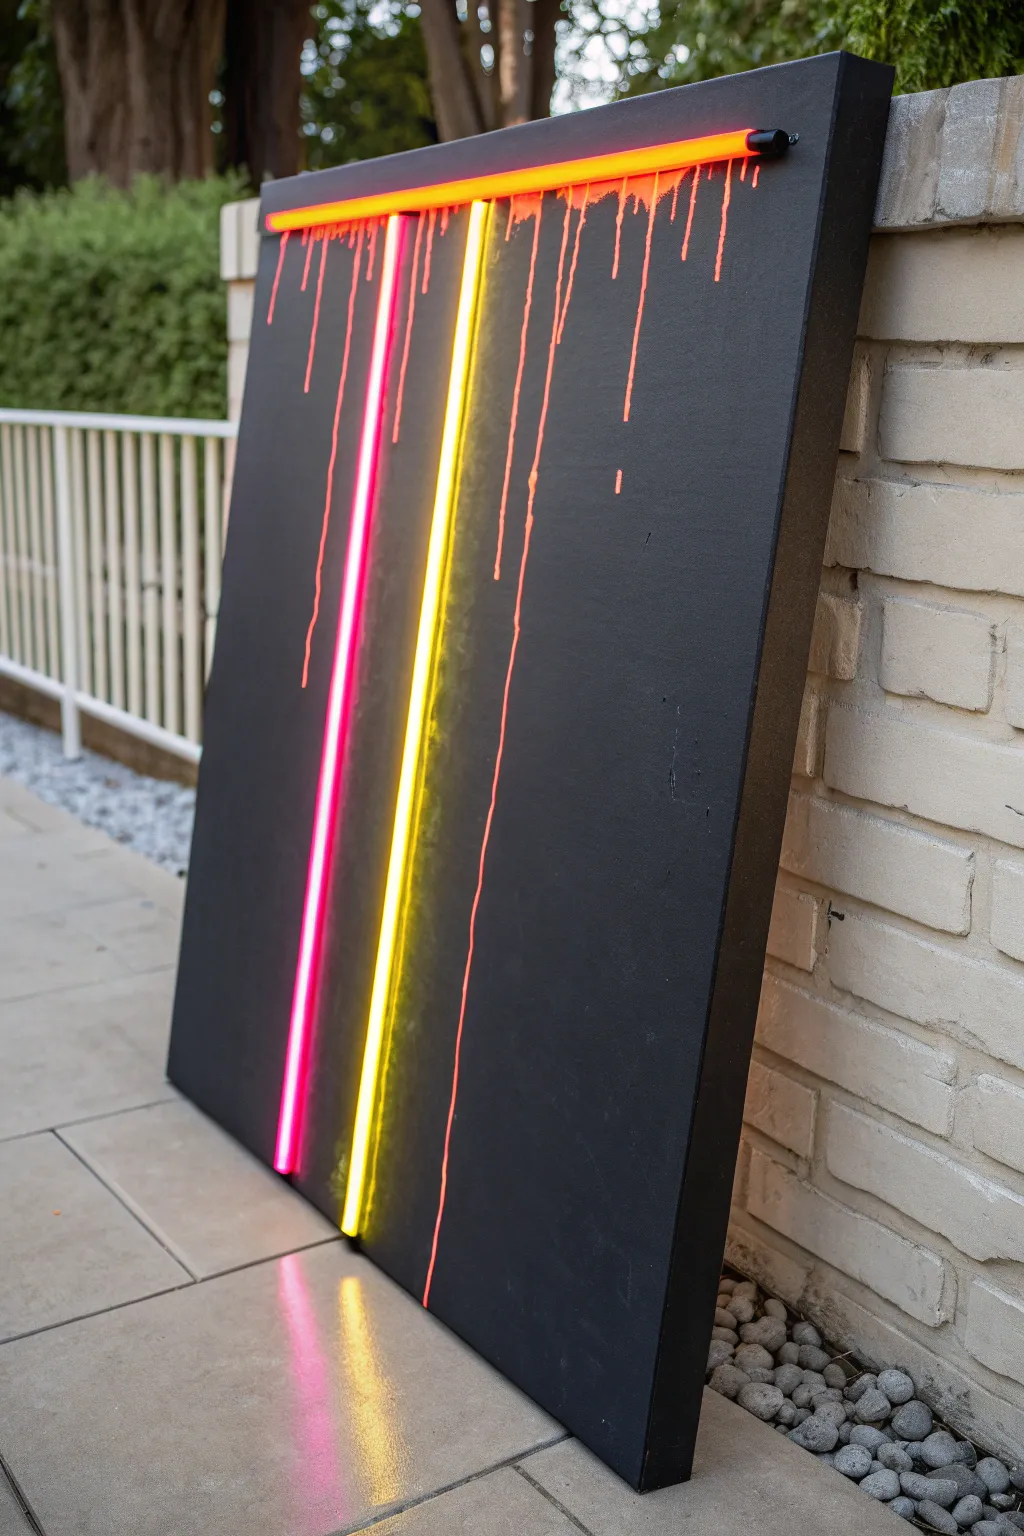
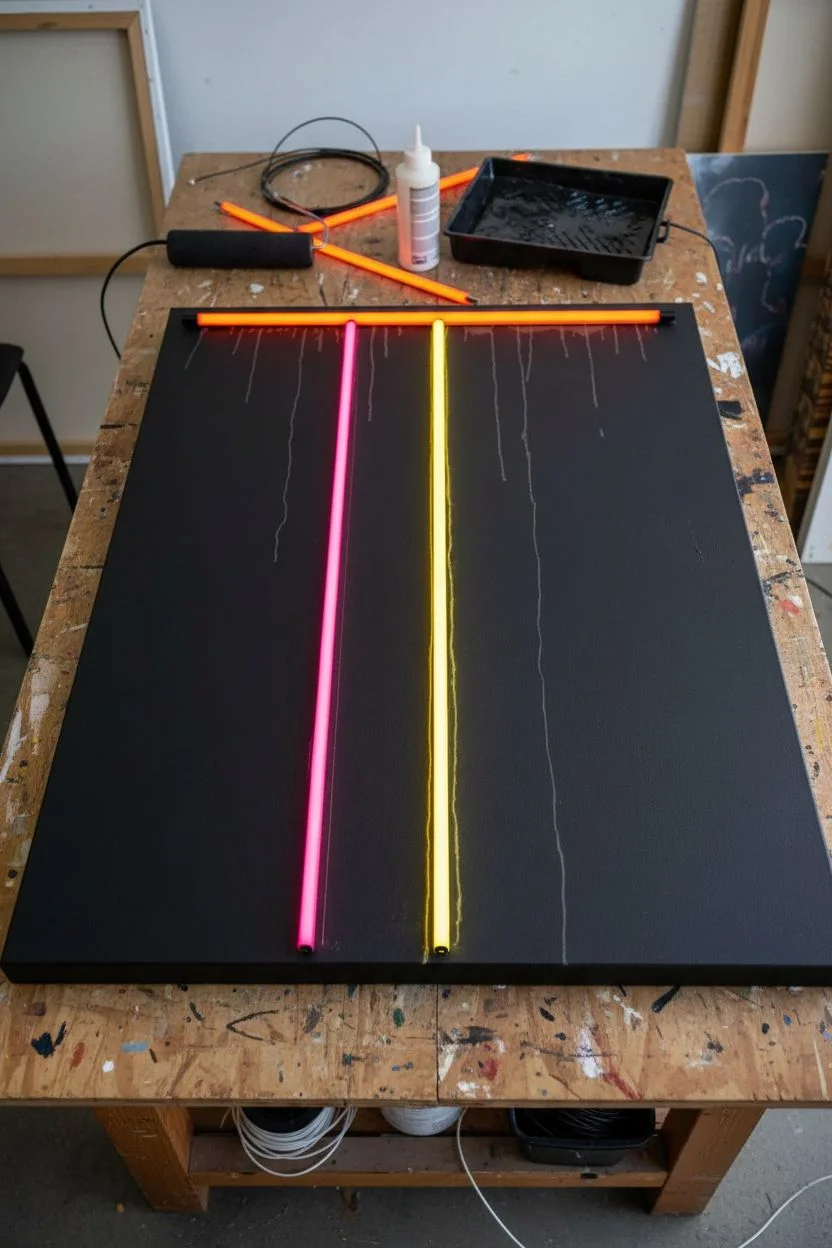
This striking mixed-media piece combines the sleek brightness of LED neon tubes with the raw, chaotic energy of drip painting. By mounting real lights onto a deeply matte black canvas, you create a glowing sculpture that looks like the light itself is melting down the surface.
Step-by-Step Guide
Materials
- Large stretched canvas (e.g., 36”x48” or custom size)
- Matte black acrylic paint or gesso
- Foam roller and paint tray
- Neon orange or fluorescent red acrylic paint
- Pouring medium
- Small squeeze bottle or pipette
- LED neon flex tube lights (warm orange and hot pink)
- Aluminum U-channel or mounting clips for neon flex
- Power drill with small bits
- Super glue or heavy-duty clear adhesive
- Soldering iron and wire (or pre-wired connectors)
- 12V power supply
- Masking tape
- Pencil
Step 1: Canvas Preparation
-
Prime the Surface:
Begin by coating your large canvas with matte black acrylic paint or black gesso. Using a foam roller helps achieve a smooth, texture-free finish that absorbs light, making the neon pop more intensely. -
Apply Second Coat:
Once the first layer is dry to the touch, apply a second coat. Ensure the coverage is solid and opaque; any white specs showing through will distract from the final glowing effect. -
Plan the Layout:
Lay the canvas flat on a table. Place your neon flex tubes on top to test the composition. For this look, arrange one short horizontal bar at the top, and two long vertical bars dropping down—one pink, one yellow/orange. -
Mark the Positions:
Lightly mark the exact placement of your LED strips with a pencil. Mark where the wires will need to pass through the canvas to the back.
Flickering Lights?
If a section flickers, check your connection points on the back. A loose wire nut or a cold solder joint is usually the culprit. Re-strip the wire end and re-secure tightly.
Step 2: Creating the Drips
-
Mix the Neon Paint:
Mix your neon orange acrylic paint with a pouring medium. You want a consistency similar to warm honey—runny enough to drip, but thick enough to hold its shape and color intensity. -
Load the Applicator:
Pour your mixture into a squeeze bottle or use a pipette. This gives you much more control than simply pouring from a cup. -
Start the Top Drips:
Focus on the top horizontal line where your horizontal light will sit. Apply a generous bead of paint right along that line. -
Encourage Gravity:
Tilt the canvas upright. Squeeze more paint at specific intervals along that top line to force long, dramatic drips to run down the vertical length of the canvas. -
Add Random Splatters:
Create a few shorter, rogue drips slightly away from the main lines to add organic imperfection. Let the paint dry completely overnight.
Step 3: Installing the Lights
-
Drill Access Holes:
Drill small holes through the canvas where your pencil marks indicated the wire entry points (usually at the ends of your LED strips). -
Attach Mounting Channels:
If using aluminum channels, glue or screw them lightly into the frame supports where possible. Alternatively, apply a strong heavy-duty adhesive directly to the back of the neon flex. -
Mount the Horizontal Light:
Feed the wires of the horizontal orange strip through the drilled hole. Press the light firmly onto the canvas, aligning it perfectly over the source of your painted drips. -
Mount the Vertical Lights:
Repeat the process for the vertical pink and yellow strips. They should run parallel to the painted drips, enhancing the illusion that the light is liquid. -
Secure Behind Canvas:
Flip the canvas over carefully. Use duct tape or gaffer tape to secure the wires against the back of the canvas so they don’t dangle or cast shadows.
Level Up: Paint Reflectivity
Mix phosphorescent powder into your drip paint. When the LEDs are off, the ‘drips’ will glow in the dark, maintaining the artwork’s visibility even without power.
Step 4: Wiring and Finish
-
Connect the Wires:
Wire your positive and negative leads together to a single outcome (parallel connection). I find twisting caps or Wago connectors easiest here if you aren’t comfortable soldering. -
Test the Power:
Connect your wiring to the 12V power supply adapter. Plug it in to ensure all strips light up evenly without flickering. -
Clean Up:
Wipe away any pencil marks with a damp cloth or a tiny bit of black paint. Check the painting for any scuffs that need a quick black touch-up.
Hang your new luminous artwork near an outlet and enjoy the ambient, modern glow it brings to your space
Palette-Knife Neon Shards Abstract
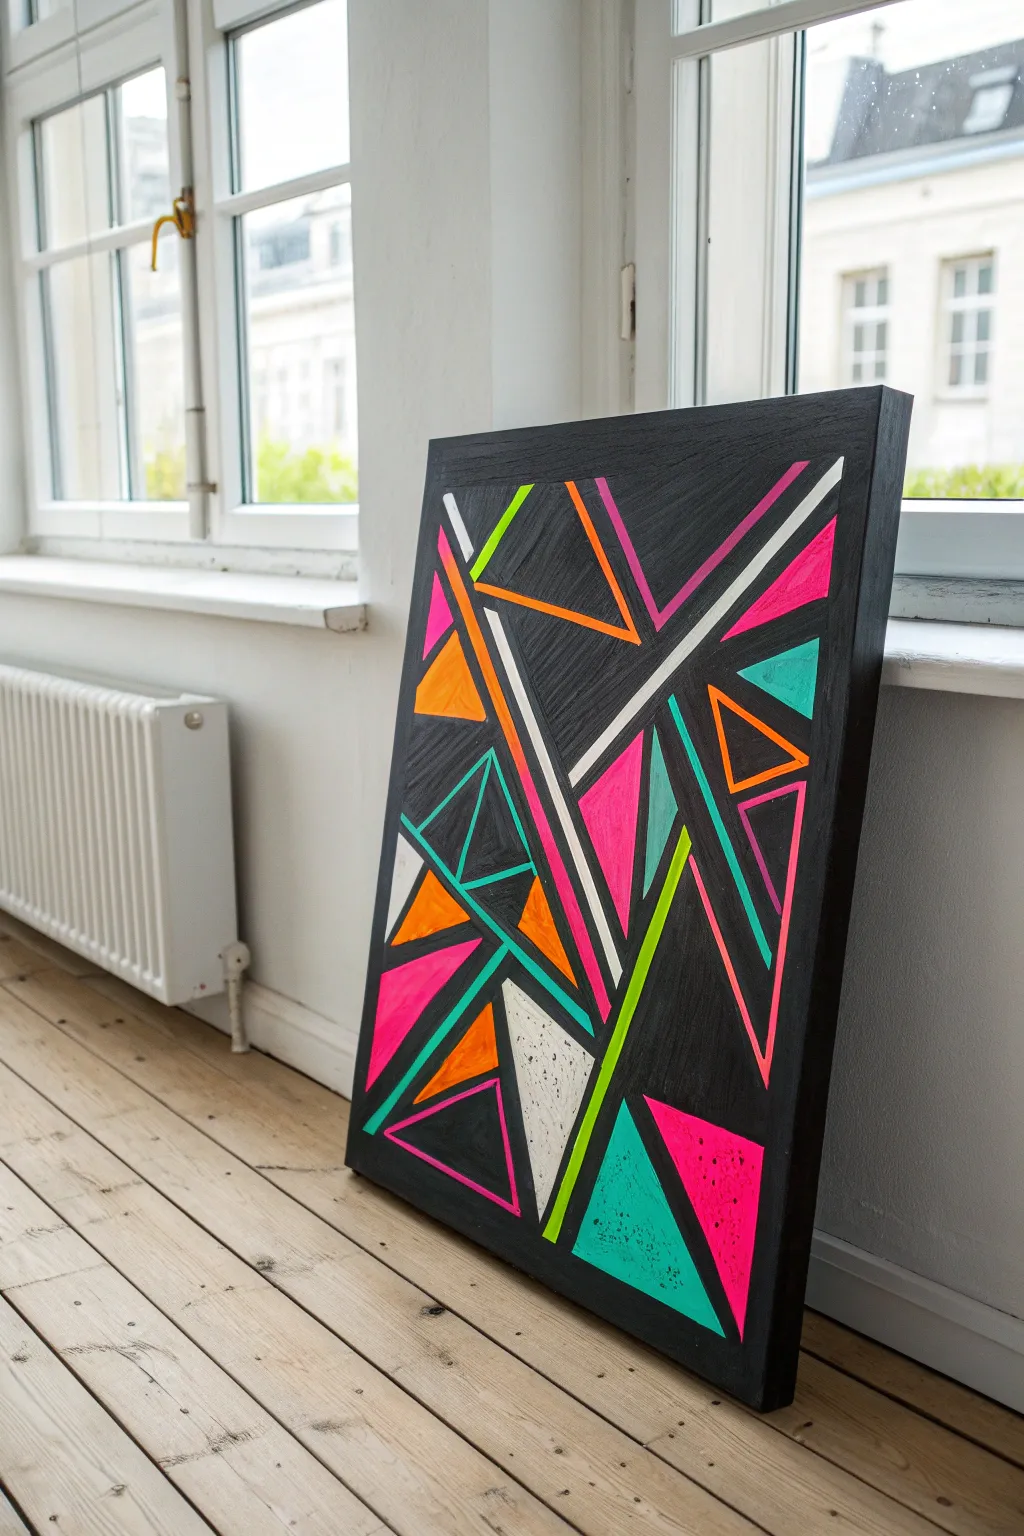
This striking abstract piece uses high-contrast neon acrylics against a deep black background to create a shattered, geometric effect. The sharp, clean lines and brilliant pops of color make it a modern statement piece that is surprisingly simple to achieve with proper taping techniques.
Step-by-Step Tutorial
Materials
- Large stretched canvas or wood panel (approx. 24×36 inches)
- Black gesso or matte black acrylic paint
- Neon acrylic paints (Pink, Orange, Lime Green, Teal/Blue)
- Titanium White acrylic paint
- Painter’s tape (various widths: 1/4 inch, 1/2 inch, and 1 inch)
- Palette knife or flat credit card
- Flat synthetic brushes (various sizes)
- Ruler or straight edge
- Pencil
- Matte varnish (optional)
Step 1: Base Preparation
-
Prime the surface:
Begin by coating your entire canvas or wood panel with black gesso. If you are using standard black acrylic paint, you may need two coats to ensure a rich, opaque finish that hides the original white of the canvas. -
Ensure complete dryness:
Let the black base coat dry completely. This is crucial because if the paint is even slightly tacky, the painter’s tape will peel it up later. I usually let this sit overnight just to be safe.
Crisp Line Secret
Painting a thin layer of the *background color* (black) over the tape edges first seals the tape. This prevents neon bleeding completely.
Step 2: Geometric Taping
-
Plan your shards:
Lightly sketch a few intersecting lines with a pencil and ruler to guide your composition. Aim for a mix of large triangles and smaller, sharp slivers. -
Apply the tape:
Use your painter’s tape to lay out the geometric design. Create intersecting lines that form triangles and trapezoids. Don’t be afraid to cross lines over each other; the tape represents the black negative space that will remain between your colors. -
Vary line thickness:
To mimic the dynamic look of the example, use different widths of tape. Use the 1/4 inch tape for delicate interior lines and wider tape for major structural separations. -
Seal the edges:
Once taped, press down firmly along every edge of the tape. For perfect crisp lines, paint a very thin layer of your black base color over the tape edges. This seals any gaps so neon paint won’t bleed underneath.
Glow Up
Mix a tiny amount of phosphorescent (glow-in-the-dark) medium into your white underlayer. Your shards will faintly glow when the lights go out.
Step 3: Painting the Neon
-
Select your color zones:
Decide which shapes will be which color. Distribute the colors so no two adjacent shapes are the same shade, creating a balanced visual rhythm. -
Prime with white:
Neon paints are naturally translucent and will look dull on black. Paint a layer of Titanium White inside the shapes you plan to be neon. Let this white underlayer dry completely. -
Apply the first neon coat:
Fill in the white shapes with your neon acrylics. Use a flat brush to keep the application smooth. -
Layer for vibrancy:
Neon often needs multiple coats. Apply 2-3 layers of color, allowing each to dry in between, until the color is punchy and solid. -
Add texture (optional):
For the textured effect seen in some sections of the example, you can use a palette knife to scrape a thicker layer of paint across specific triangles, leaving a slightly rough surface. -
Create fine lines:
Some shards in the reference image are just thin outlines. To achieve this, paint a triangle a solid color, let it dry, and then carefully apply a smaller triangle of tape inside it before painting over with black or a contrasting color. -
Incorporate white shards:
Leave some triangles purely white or light grey. These neutralized zones help the neon colors pop even more by providing visual rest.
Step 4: The Reveal
-
Remove the tape:
Wait until the paint is dry to the touch but not fully cured. Slowly peel the tape back at a 45-degree angle. This is the most satisfying part, revealing the crisp black lines underneath. -
Touch up:
If any paint bled through, use a small detail brush and black paint to neaten up the edges. -
Final varnish:
Once the entire piece is cured (give it 24 hours), apply a clear matte varnish. This will unify the sheen of the different paints and protect that deep black background.
Hang your new masterpiece in a well-lit area or near a window to let those neon hues really catch the light
Neon Topographic Lines Map
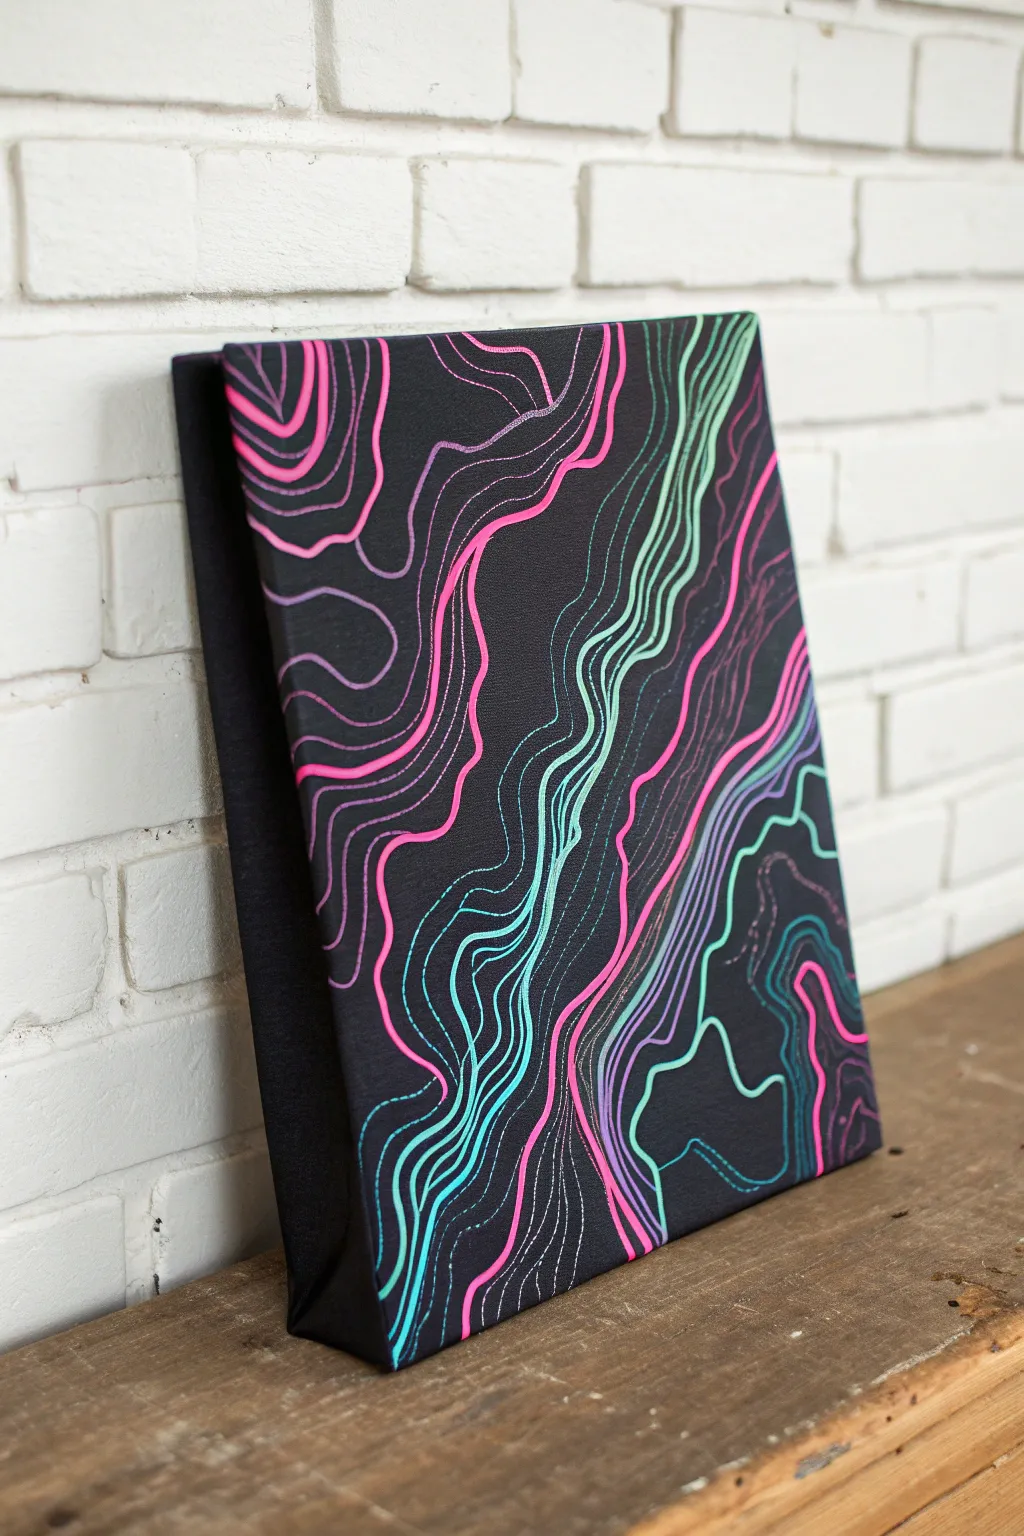
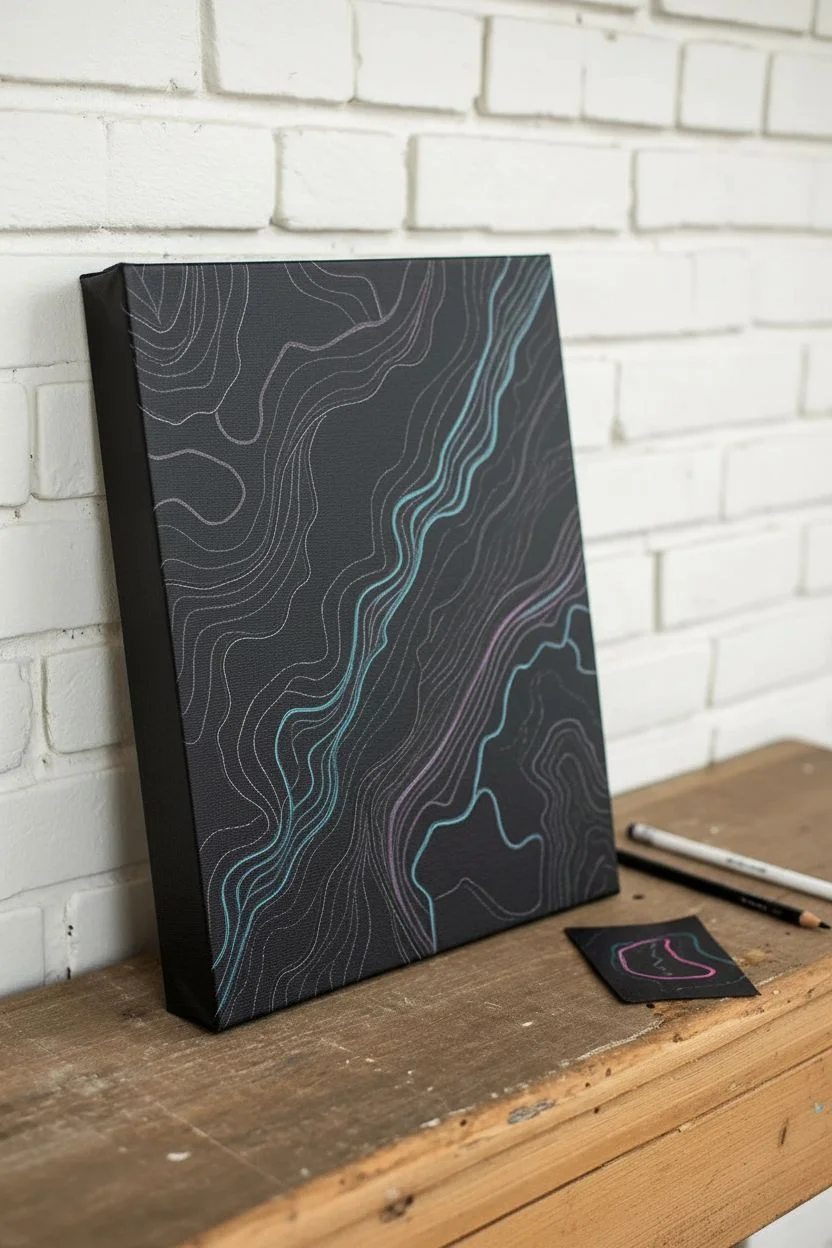
Transform a simple black canvas into a vibrant topographical landscape that pulses with neon energy. This project uses flowing, organic lines to mimic elevation maps, creating a mesmerizing abstract piece that looks complex but is surprisingly meditative to create.
How-To Guide
Materials
- Black stretched canvas (or white canvas painted black)
- Neon acrylic paint pens (fine and medium tip) or liner brushes
- High-flow neon acrylic paints (pink, teal, purple)
- White colored pencil or chalk pencil
- Ruler (optional, for spacing reference)
- Matte or satin varnish (spray or brush-on)
- Paper towels
- Cup of water
Step 1: Preparation & Planning
-
Prepare the base:
If you are starting with a white canvas, paint the entire surface with two coats of matte black acrylic paint. Ensure full coverage on the sides as well so the artwork wraps around the edges. Let it dry completely for at least an hour. -
Map the flow:
Using a white charcoal pencil or chalk pencil, sketch out a few ‘anchor lines’ very lightly. These will be the primary curves that dictate the movement of your map. Think of river currents or mountain ridges when drawing these organic shapes. -
Test your colors:
Before committing to the canvas, scribble your chosen neon markers or paints on a piece of scrap black paper. This ensures the opacity is strong enough to pop against the dark background.
Step 2: Creating the Lines
-
Establish the first color:
Pick your first color, perhaps the neon pink. Start drawing a continuous line that follows one of your sketched anchor curves. I like to start from the top edge and work my way down to prevent smudging. -
Echo the shape:
Draw a second line parallel to the first, maintaining a relatively consistent distance. The beauty of topographic maps is that the lines get closer together (representing steep terrain) and further apart (flat terrain) naturally. -
Vary the line weight:
If you have different marker tips or brush sizes, switch between a medium width and a fine width occasionally. This subtle variation adds depth to the visual texture. -
Introduce the second color:
Switch to your teal or cyan color. Start a new cluster of lines adjacent to the pink ones. You can have them run alongside the pink section or start a new ‘elevation’ point elsewhere on the canvas. -
Blend the transitions:
Where two color zones meet, allow the lines to interlock slightly without touching. For example, a teal line might curve into a bay created by a pink line. -
Add the third tone:
Bring in the purple hue to bridge the gap between pink and teal, or to add deep shadows. Purple works excellently as a transition color in this neon palette. -
Extend to the edges:
Don’t stop your lines at the front face of the canvas. Continue painting the lines over the sides and wrap them around to the back. This gives the artwork a finished, sculptural object quality.
Uneven Lines?
Don’t worry if your hand shakes. Smooth out wobbly lines by simply thickening them slightly at the shaky points. Varying line thickness actually makes the map look more organic and natural.
Step 3: Refining & Detailing
-
Create tight clusters:
Find areas that look too empty and add very fine, closely spaced lines. These tight clusters create focal points of intensity. -
Add dotted lines:
To break up the solid lines, convert a few contours into dotted or dashed lines. This mimics trail markers often found on real hiking maps. -
Check for opacity:
Neon paint can sometimes dry semi-transparent. Step back and identify any lines that look dull. Go over them a second time to ensure vibrant, solid coverage. -
Clean up sketches:
Once the paint is fully dry to the touch, use a damp cloth or cotton swab to gently wipe away any visible white charcoal or chalk guidelines.
Level Up: UV Glow
Use specifically labeled ‘UV reactive’ or ‘blacklight’ acrylics. Hang the finished piece near a blacklight bulb, and your topographic map will literally glow in the dark for a futuristic effect.
Step 4: Finishing Touches
-
Fix mistakes:
If two lines accidentally touched or you made a wobble you dislike, use a small brush with black paint to ‘erase’ the error and reshape the line. -
Seal the work:
Apply a coat of spray varnish. A matte finish will keep the background velvety black, while a gloss finish will make the neon colors appear wet and even brighter.
Hang your modern neon map and enjoy the electric pop of color it brings to your space
Hidden Message With Neon Glaze Reveal

Create an intriguing conversation starter with this sleek black canvas that hides a colorful secret until the light hits just right. By combining matte black backgrounds with vibrant neon lettering and subtle glazed accents, you achieve a modern, minimalist look with a surprising pop of color.
Step-by-Step Guide
Materials
- Stretched canvas (11×14 or similar)
- Black acrylic paint (matte finish)
- Wide flat paintbrush
- Neon pink acrylic paint
- Neon green acrylic paint
- White acrylic paint
- Fine detail paintbrush (round #0 or #1)
- Adhesive vinyl letter stencils (optional but recommended)
- Ruler or painter’s tape
- Glazing medium or clear gloss medium
- Palette or mixing plate
Step 1: Setting the Stage
-
Prime the canvas:
Start by coating your entire canvas with black acrylic paint. While many canvases come white-primed, a solid coat of black paint ensures a deeper, richer background. -
Check for coverage:
Inspect the canvas under a light to ensure no white speckles are showing through the weave. Apply a second coat if necessary for a completely opaque finish. -
Let it cure:
Allow the base coat to dry completely. This is crucial because any moisture will mess up your stencil work or lettering in the next phase. -
Mark your baseline:
Using a ruler, lightly mark a straight horizontal line where you want your text to sit. Alternatively, use a strip of painter’s tape to create a temporary guide edge.
Neon Looking Dull?
Neon paints are naturally transparent. If they look muddy on black, always paint a pure white silhouette of the shape first as a primer.
Step 2: The Neon Typography
-
Plan the text:
Decide on your spacing. The phrase ‘BLACK CANVAS ARTWORK’ is used here, but any short phrase works. Lay out your stencils first to ensure they fit the width. -
Paint the white base:
For the word ‘BLACK’, carefully paint the letters using white acrylic paint. You may need two thin layers to get a crisp, bright white against the dark background. -
Paint the pink accents:
For the word ‘CANVAS’, switch to your neon pink. Neon paints can be translucent, so paint a layer of white first, let it dry, and then apply the pink on top for maximum vibrancy. -
Paint the green accents:
Repeat the process for ‘ARTWORK’ using neon green. Start with a white underpainting if needed, then layer the green on top until it pops. -
Clean up edges:
Once the letters are touch-dry, use a very fine brush with a tiny bit of black paint to tidy up any ragged edges or smudges around the letters.
Step 3: The Glazed Reveal Effect
-
Mix the green glaze:
On your palette, mix a small drop of neon green paint with a generous amount of glazing medium. The ratio should be about 1 part paint to 10 parts medium; you want it very transparent. -
Apply green glaze:
Using a dry, clean brush, sweep the green glaze mixture diagonally from the top left corner down toward the text. Use a light, feathery touch to mimic a beam of light. -
Mix the pink glaze:
Clean your brush thoroughly. Create a similar glaze mixture using the neon pink paint and glazing medium. -
Apply pink glaze:
Brush the pink glaze diagonally near the green section, allowing them to slightly overlap or fade into the black. I like to keep this very subtle so it looks like a reflection. -
Dry brush texture:
If the glaze looks too uniform, take a nearly dry brush and lightly drag it across the glaze while it’s wet to create streaks that catch the light. -
Final cure:
Let the artwork dry undisturbed for at least 24 hours. The glazing medium often stays tacky longer than standard acrylics.
Add UV Magic
Use actual UV-reactive or blacklight paints for the letters and glaze. Your artwork will look subtle in daylight but glow intensely under a blacklight.
Place your canvas where room lighting can glimmer off the glazed sections for the best effect


Have a question or want to share your own experience? I'd love to hear from you in the comments below!