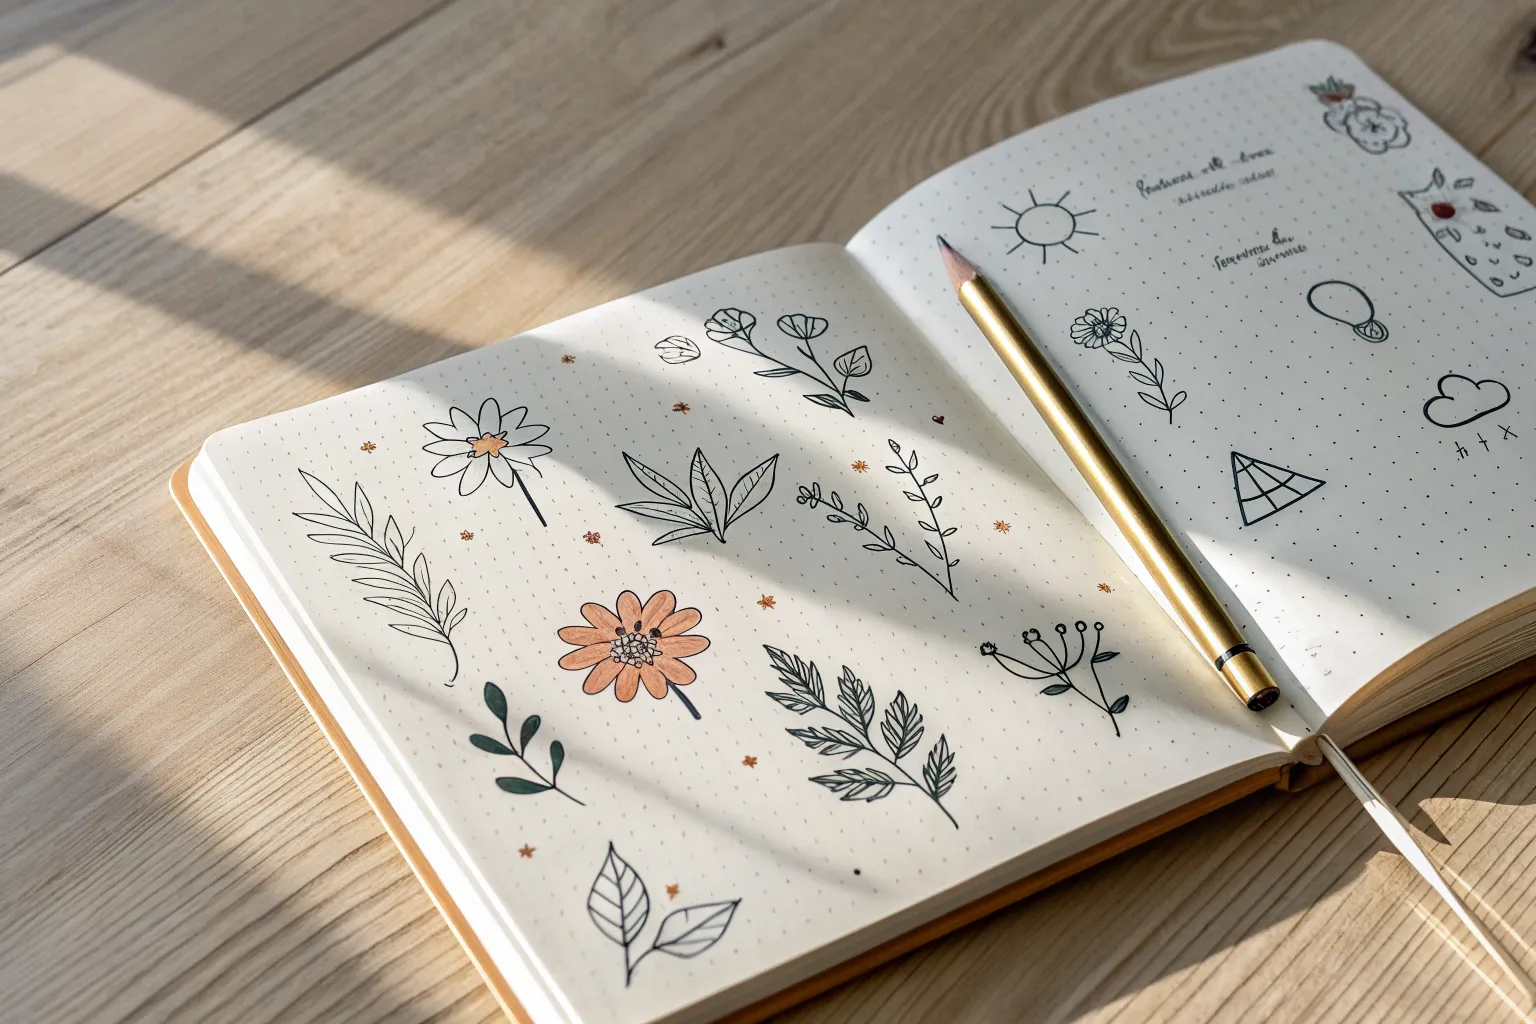
Blank notebook pages can feel weirdly intimidating, but the trick is to think small, repeatable, and totally doable. Here are my favorite notebook drawing ideas that look adorable in a sketchbook and still fit into real life.
Icon Grid Doodle Library
Capture small sparks of inspiration by building a structured library of minimalist icons on a single page. This project uses the natural constraints of grid paper to create a satisfyingly organized collection of everyday symbols and nature motifs.
Step-by-Step Tutorial
Materials
- Grid paper notebook or bullet journal
- Fine liner pen (0.3mm or 0.5mm)
- Pencil (optional for sketching)
- Eraser (optional)
- Ruler (optional for alignment check)
Step 1: Planning the Layout
-
Review grid spacing:
Examine your grid paper. In this layout, the icons are spaced out to breathe, rather than crammed into every single square. Mentally visualize a 4×4 or 3×5 arrangement depending on your page size. -
Mark anchor points:
If you’re worried about spacing, lightly mark a small dot in pencil where the center of each icon will go. Aim for roughly 4-6 grid squares of empty space between each doodle.
Step 2: Drawing Top Row Icons
-
Sketch the twig:
Starting at the top left, draw a simple diagonal line for a stem. Add small, tear-drop shaped leaves on alternating sides of the stem. -
Create the preservation jar:
Moving to the right, draw a small rectangle for the lid with vertical hatch marks. Below it, draw a rounded square for the jar body. Inside, add a square label with a simple ‘X’ or crosshatch pattern to suggest contents. -
Add a simple shape:
To complete the top visual line, you can add a simple geometric shape or leave blank space if you prefer an asymmetrical look, but try to keep alignment with the row below.
Uniformity Trick
Count the grid boxes! If your first icon is 2 boxes high, try to keep every subsequent icon roughly 2 boxes high for a cohesive look.
Step 3: Drawing the Second Row
-
Doodle the mug:
On the far left, draw a short cylinder. Add a ‘C’ shape for the handle on the right. Draw a horizontal line near the bottom and cross-hatch the body to create a plaid pattern. -
Draw a single leaf:
In the next column, draw a simple, slender leaf shape pointing diagonally upwards. Make it sleek and minimal with a single central vein. -
Outline the star:
Draw a classic five-point star. I find it easiest to draw the outline in one continuous line without lifting the pen, keeping the points somewhat rounded for a softer look. -
Add the helmet icon:
On the far right, draw a semicircle. Add a small rectangle at the bottom right edge to create a visor or opening, resembling a stylized space or bike helmet.
Color Pop
Choose one accent color, like a mild highlighter or pastel marker, and color in just one small detail on each doodle to tie them together.
Step 4: Drawing the Third Row
-
Sketch the sparkle:
Draw a four-pointed star shape (diamond style) on the left side to represent a glimmer or sparkle. Keep the lines slightly curved inward. -
Create a burst:
Next, draw a central point or small circle. RADIATE several straight lines outward from the center, varying their lengths to create an explosion or ‘idea’ spark. -
Draw the apple heart:
Draw a standard heart shape. Inside the top cleavage of the heart, add a small stem and two curved lines to turn the top of the heart into an apple silhouette. -
Detail the broad leaf:
On the right, draw a spade-shaped leaf outline. Draw a straight line down the center, then add parallel diagonal veins extending from the center to the edges.
Step 5: Drawing the Bottom Row
-
Draw the sack:
On the left, draw a trapezoid shape for the bag’s body. Top it with a gathered, cinched neck and a small star shape sticking out, suggesting a gift bag or money sack. -
Outline the heart:
Draw a simple open heart outline. Keep the line weight consistent with the other icons to maintain unity. -
Sketch the fern:
Towards the right, draw a slightly curved central stem. Add long, thin oval leaves on both sides, arranged opposite each other, getting smaller near the tip. -
Add the final sprig:
At the bottom right, draw a small, diagonal twig. Add tiny, darker oval leaves to this one to differentiate it from the fern and the first twig.
Step 6: Finishing Touches
-
Erase guidelines:
Wait at least five minutes to ensure the ink is completely dry. Gently erase any pencil dots or spacing marks you made earlier. -
Review contrast:
Check if any lines look too thin. Go over key outlines (like the jar or the broad leaf) a second time to darken them against the grid lines.
Now you have a charming reference page to inspire future journal entries and decorative margins


Botanical Corner Frames
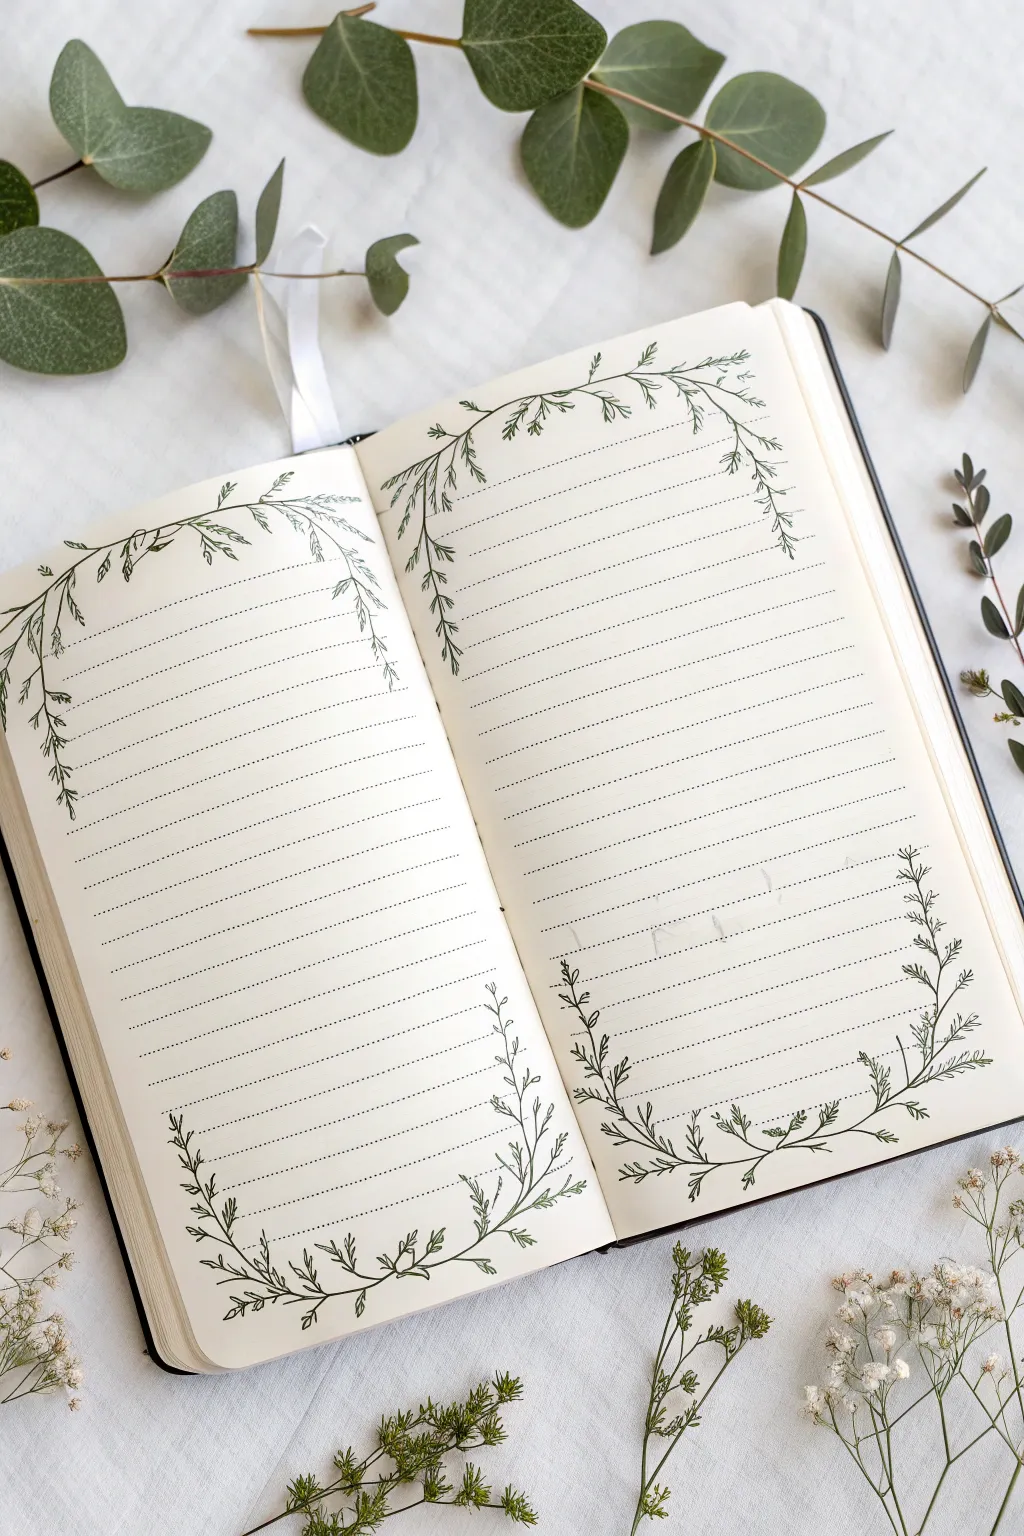

Transform a plain lined notebook spread into an inviting nature-themed journal with these delicate botanical corner frames. Using simple vine-like structures and consistent leaf patterns, you will create an elegant border that guides the eye without overwhelming your writing space.
Step-by-Step Tutorial
Materials
- Lined A5 notebook or journal
- Fine liner pen (0.1mm or 0.3mm, black or dark green)
- Pencil (HB or H for light sketching)
- Soft eraser
- Ruler (optional)
Step 1: Planning the Layout
-
Define the boundaries:
Visualize an invisible rectangle in the center of your page where you want your text to eventually go. The drawing will occupy the negative space around the corners of this imaginary box. -
Sketch the primary stems:
Using a pencil, lightly draw the main ‘spine’ of the vines. Start at the top left corner of the left page, curving a line inward and down along the margin. Repeat this mirroring effect on the top right corner of the right page. -
Add lower stems:
Sketch the bottom corner stems. For the bottom left, draw a sweeping curve starting near the gutter and extending out towards the bottom edge. Mirror this on the bottom right page to create symmetry across the spread. -
Refine the flow:
Check the balance of your four corner curves. They don’t need to be perfectly identical, but they should have a similar visual weight and curvature.
Ink Flow Secret
Use a light touch with your pen. Pressing too hard creates consistent line width; varying pressure creates tapered lines that make leaves look more natural.
Step 2: Inking the Vines
-
Trace the main lines:
Take your fine liner pen and carefully trace over your pencil stem lines. Keep your hand relaxed to ensure the curves look organic rather than stiff. -
Add secondary branches:
Draw small, short offshoot lines branching out from the main stems. Alternate them left and right along the vine, spacing them about 1-2 centimeters apart. -
Vary the branch length:
Make the branches slightly longer near the corner apex and shorter as the vine tapers off at the ends. This helps create a tapered, natural look.
Step 3: Drawing the Leaves
-
Start the leaf shapes:
Begin drawing small clusters of leaves at the tip of each offshoot branch. Aim for a narrow, needle-like shape, similar to rosemary or willow leaves. -
Cluster formation:
Instead of drawing single leaves, try drawing them in bunches of three or four sprouting from a single point. This adds density and texture to the illustration. -
Directionality:
Ensure the leaves generally point in the direction the vine is growing. I find it helpful to rotate the notebook physically as I work around the curves to keep my hand angle comfortable. -
Fill the main stem:
Go back along the main spine of the vine and add tiny single leaves in the gaps between the larger branches. This prevents the vine from looking too bare. -
Mirror the design:
Repeat this leaf-drawing process for all four corners. Remember, slight variations between the left and right pages add to the hand-drawn charm.
Seasonal Twist
Adapt this for seasons by changing the leaf shape! Use holly shapes for winter, rounded petals for spring, or maple leaf outlines for an autumn theme.
Step 4: Final Touches
-
Extend the tips:
At the very ends of your main vines, draw a few trailing, single lines with tiny leaves to make the foliage appear as if it is gently fading out. -
Review density:
Step back and look at the spread. If any corner looks too thin, add a few extra leaf clusters to bulk it up. -
Dry and erase:
Wait at least 5-10 minutes for the ink to dry completely. Once safe, gently erase all visible pencil marks, being careful not to crumple the paper. -
Optional texture:
If you want more depth, add tiny dots or very short hatching lines at the base of the leaf clusters to simulate shadow.
Now your notebook is beautifully framed and ready for your daily thoughts or lists


Easy Notebook Page Borders and Dividers
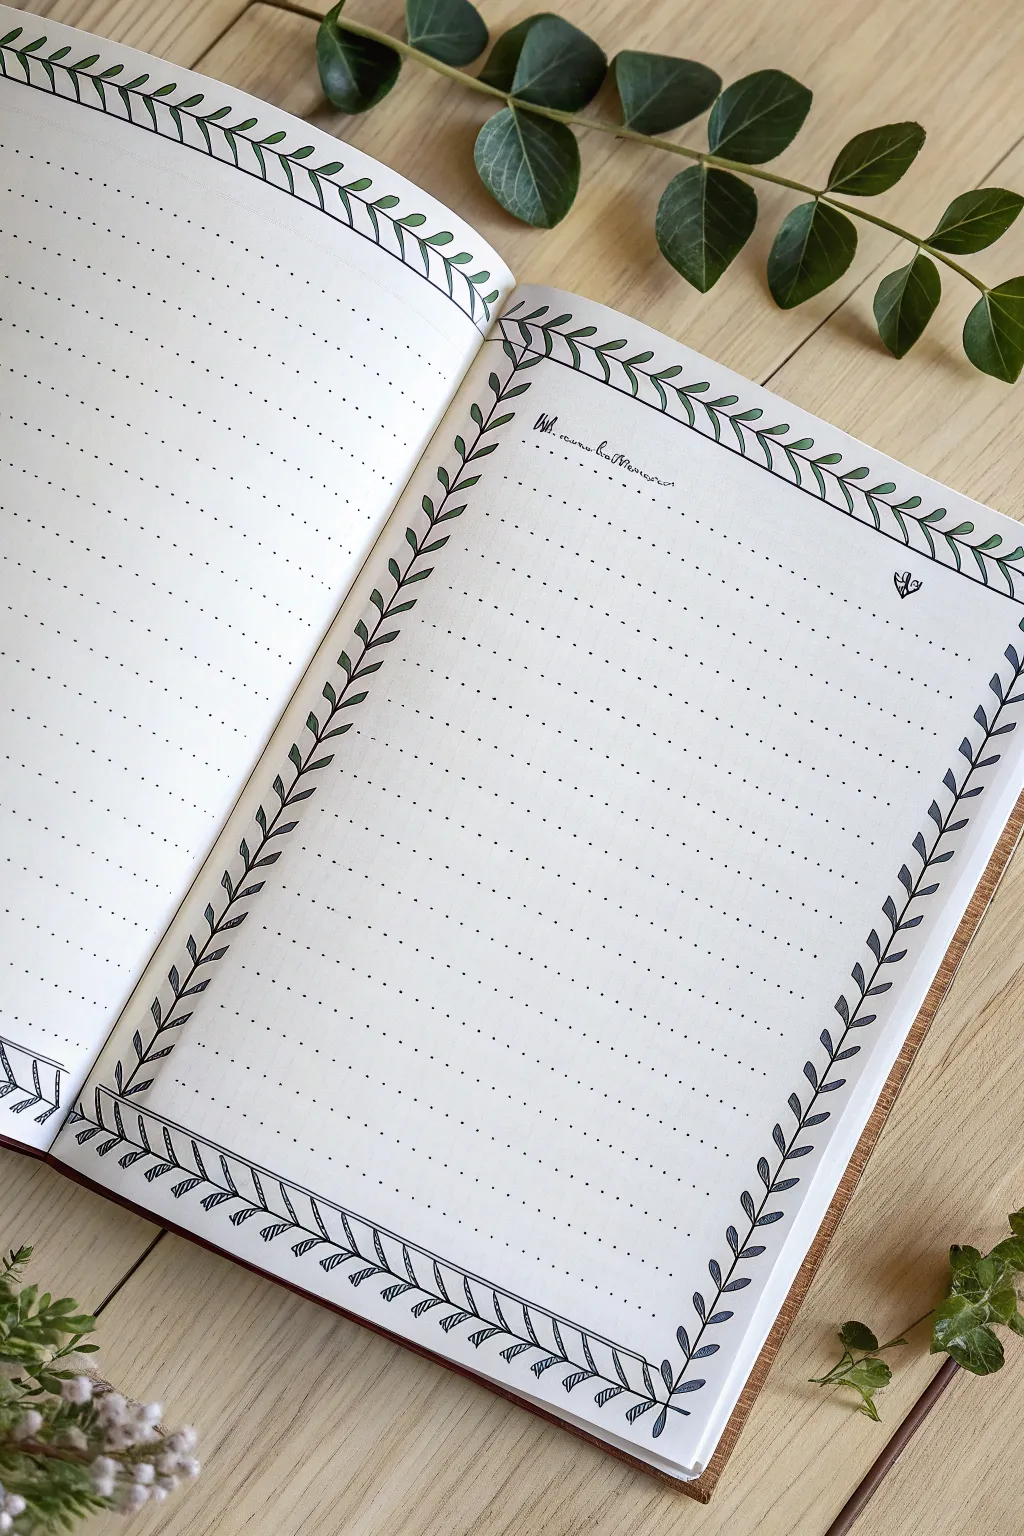
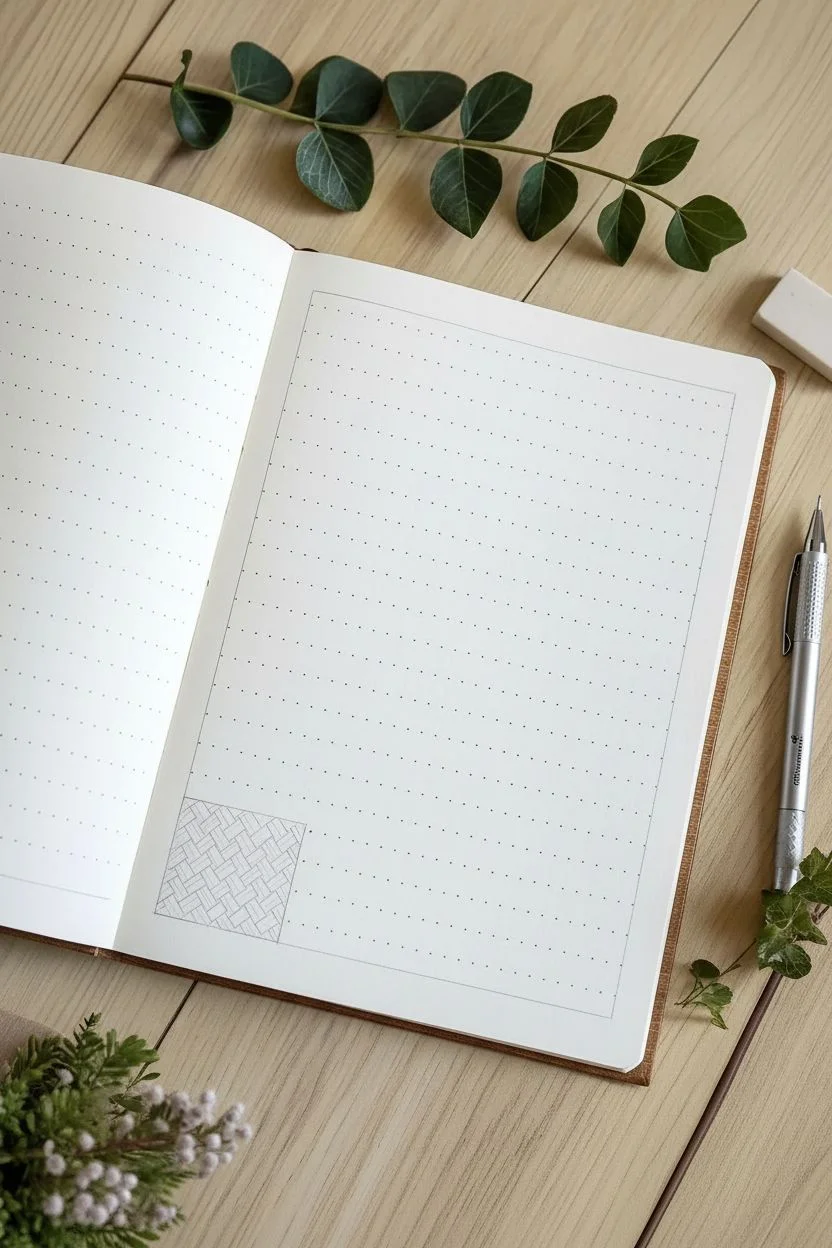
Transform a plain dot grid page into a structured, nature-inspired layout with this continuous vine border. The combination of delicate leaves and a geometric woven base creates a frame that is both elegant and easy to customize.
Step-by-Step
Materials
- A5 Dot Grid Notebook
- Fine liner pen (0.3mm or 0.5mm, black)
- Fine liner pen (0.1mm, black, optional for details)
- Pencil
- Eraser
- Ruler
Step 1: Planning the Layout
-
Define the frame:
Start by lightly sketching a large rectangle using your pencil and ruler. Leave a margin of about 3-4 dot grid squares from the edge of the paper to ensure the border doesn’t get cut off. -
Mark the corners:
Decide which corners will be rounded with vines and which will be square. In this design, the bottom left corner features a woven geometric pattern, so mark off a square section there.
Consistent Spacing
Use the dot grid as a measuring tool. Draw one leaf every 2 vertical dots to keep your pattern uniform without needing a ruler.
Step 2: Drawing the Base Vine
-
Sketch the main stems:
Using your pencil, draw a single continuous line for the vine stem starting from the top of your bottom-left geometric section. Carry it up the left side, across the top, and down the right side. -
Inking the stem:
Trace over your pencil line with the 0.3mm fine liner. Keep your hand steady but allow for slight natural wobbles to make it look organic. -
Corner transition:
When you reach the top corners, gently curve the line rather than making a sharp 90-degree angle. This softens the look of the frame.
Add Pop of Color
Use a light green mildliner or watercolor marker to fill in just the leaves, or shade only one half of each leaf for a dimensional look.
Step 3: Adding the Leaves
-
Leaf placement strategy:
Begin drawing leaves along the stem. I find it easiest to work on one side of the stem at a time to maintain a rhythm. -
Drawing individual leaves:
Draw simple, elongated oval shapes (lanceolate leaves). Each leaf should attach directly to the main stem or have a tiny petiole (stemlet). -
Alternating pattern:
Place the leaves in an alternating pattern—left, right, left, right—rather than having them perfectly opposite each other. This looks more natural. -
Detailing the leaves:
Draw a central vein line down the middle of each leaf. You can curv the line slightly to follow the shape of the leaf giving it movement. -
Rounding the corner leaves:
As you approach the rounded top corners, angle the leaves outward like rays of sun to help guide the eye around the bend.
Step 4: Creating the Geometric Base
-
Outline the rectangle:
Move to the bottom of the page. Draw a long, thin horizontal rectangle along the bottom edge using your ruler and pen. -
Add diagonal divisions:
Inside this rectangle, draw diagonal lines spaced about two dot-grid squares apart. Slant them forward, like forward slashes. -
Create the woven effect:
Between every other diagonal line, draw a series of tight, parallel hatching lines. This creates a texture that looks like wrapped ribbon or shading. -
Connecting the elements:
Ensure the vine on the right side comes down and neatly meets the right end of this geometric bar. On the left side, extend the bar slightly up to meet the start of your vine.
Step 5: Final Touches
-
Add a header:
Near the top center of your new frame, use your favorite cursive handwriting to write a small header or date. -
Tiny embellishments:
Draw a tiny heart or star symbol in the upper right quadrant of the writing space to balance the composition. -
Erase guidelines:
Wait for the ink to be completely dry—give it a full minute just to be safe. Then, gently erase all your underlying pencil sketches.
Now you have a beautifully framed page ready for your daily tasks or journaling thoughts


Cozy Drink Cup Variations

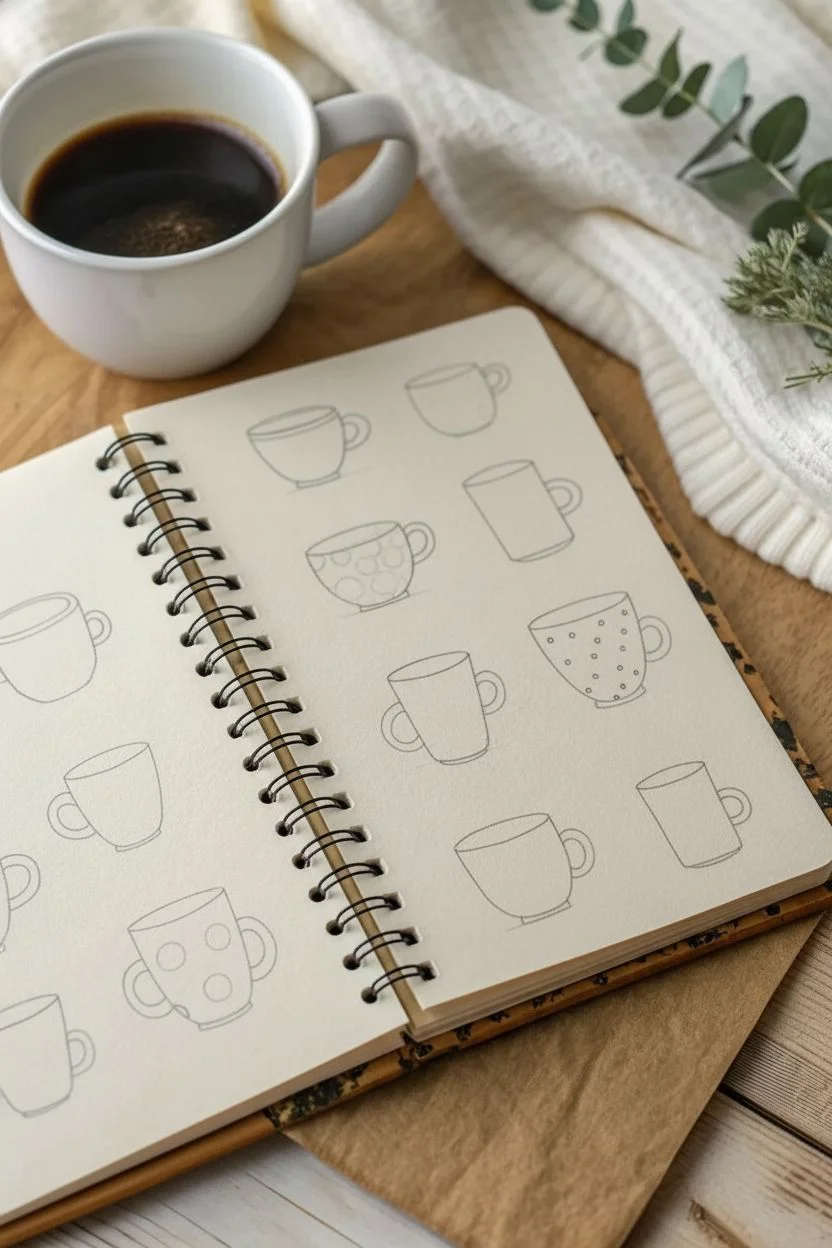
Capture the warmth of your favorite hot beverages with this collection of charming, hand-drawn mug variations. This sketchbook page features a grid of whimsical cup designs, each boasting unique patterns and steam wisps that evoke a cozy, relaxed atmosphere.
Step-by-Step Tutorial
Materials
- Sketchbook with cream or off-white paper (spiral bound preferred for laying flat)
- Fine liner pen (0.3mm or 0.5mm, black ink)
- Pencil (HB or 2B for sketching)
- Eraser (kneaded eraser works best)
- Ruler (optional, but helpful for alignment)
Step 1: Planning the Layout
-
Define the grid:
Visualize a grid on your sketchbook page. For this design, aim for roughly three columns and four or five rows. You can lightly mark the center points of each imagined square with your pencil to keep the spacing consistent. -
Sketch the basic shapes:
Using your pencil, lightly draw the basic outline for twelve unique cups. Vary the shapes: try some that are short and wide, others tall and tapered, some like bowls, and others like standard cylinders. -
Add handles:
Attach handles to your shapes. Mix it up by placing some on the left and some on the right. Experiment with C-shapes, D-shapes, and tiny loops for variety.
Use Variety
Don’t just change the patterns; change the steam! Try straight lines, curly-cues, or little hearts to give each drink a different ‘temperature’ or personality.
Step 2: Inking the First Row
-
The striped mug:
Start with a rounded, bowl-like mug. Draw horizontal lines following the curve of the cup’s bottom edge. Fill in every other stripe with your black pen to create bold bands. -
Botanical accent:
Instead of a cup, fill one grid space with a simple leafy spray. Draw a central stem and add almond-shaped leaves branching off it. Fill them in solid black for contrast. -
Polka dot cylinder:
Draw a straight-sided mug. Inside, add rows of small, solid black dots. Top it off with a double-line rim to give it some dimension.
Step 3: Adding Patterns & Details
-
Dark floral cup:
Create a dark-themed mug by outlining a rounded cup shape. Draw small circles inside for flowers, then carefully color the rest of the cup black, leaving the circles white (negative space). -
Vertical stripes:
For the next mug, draw a tapered shape that is wider at the top. Add vertical lines that curve slightly with the mug’s form to emphasize its roundness. Add three wavy lines above for steam. -
Line-pattern bowl:
Draw a wide, soup-bowl style mug without a handle. Decorate the rim with tiny circles and use vertical hatching lines for the body. Add two sprigs of herbs sticking out the top. -
Confetti texture:
Outline a tall, rectangular mug. Fill the interior with random dashes and dots to mimic a terrazzo or confetti pattern. -
Swirls and doodles:
Create a short, stout mug. Decorate it with rows of small spirals and circles. I like to keep the lines loose here for a hand-drawn feel.
Uneven Lines?
Wobbly lines actually add to the charm of this doodle style. If a line goes astray, just thicken it slightly or turn it into a deliberate pattern choice.
Step 4: Final Touches
-
Steam elements:
Go back to selected mugs and add steam. Use simple wavy lines for some, and for others, distinct ‘S’ shapes or tiny leaf-like wisps rising from the rim. -
Saucers and coasters:
Ground a few of your designs by drawing simple straight lines or thin ovals underneath them to represent saucers or tabletops. -
Refine the lines:
Go over your final pen lines to ensure they are crisp. Thickening the outer contour of each mug slightly can help them pop off the page. -
Erase guidelines:
Once the ink is completely dry (give it a few minutes to avoid smudges), gently erase all your pencil sketches.
Now you have a full page of comforting designs ready to add character to your journals or greeting cards

PENCIL GUIDE
Understanding Pencil Grades from H to B
From first sketch to finished drawing — learn pencil grades, line control, and shading techniques.
Explore the Full Guide
Simple Animal Faces in a Row
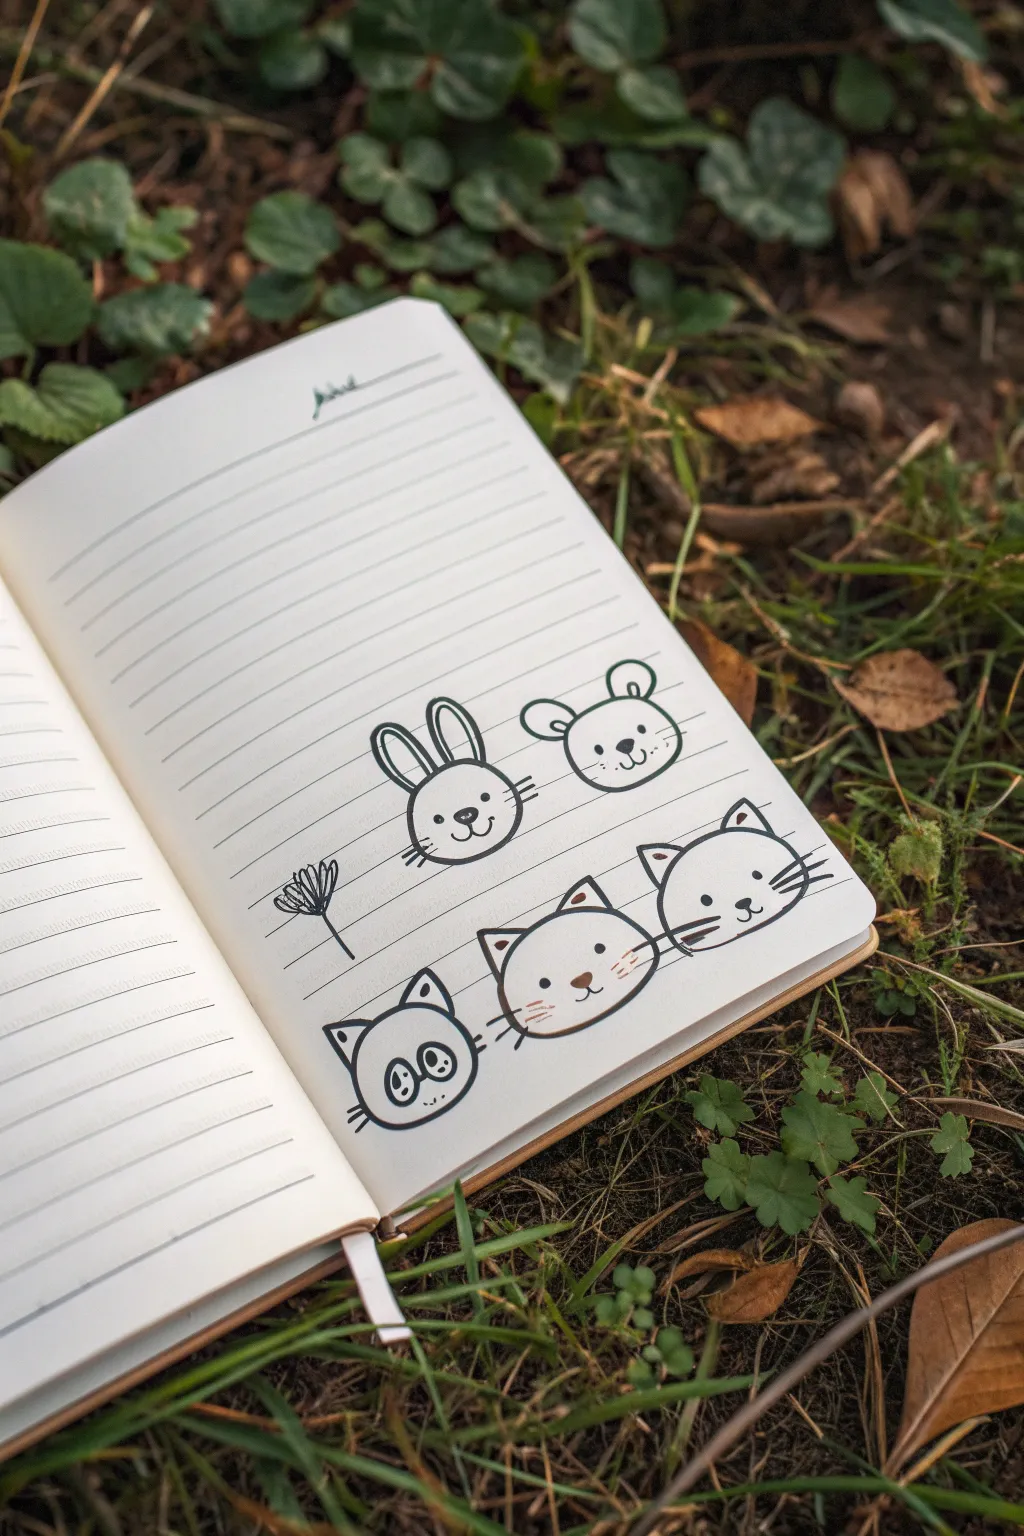

Brighten up your journaling pages with this adorable lineup of simple animal faces. The clean lines and minimalistic style make these characters perfect for beginners looking to add a touch of personality to their notes.
Step-by-Step
Materials
- Lined notebook or journal
- Fine-point black pen (0.5mm or 0.7mm)
- Pencil (optional, for sketching)
- Eraser
Step 1: Setting the Scene: Rabbit & Bear
-
Anchor the rabbit:
Start on the right-hand page, about halfway down. Draw a simple circle or slightly flattened oval resting on one of the notebook lines. This will be the rabbit’s head. -
Add the ears:
Draw two tall, narrow loops extending upward from the top of the circle. Inside each ear, draw a smaller, matching loop to create the inner ear detail. -
Define the rabbit’s face:
Place two small dots wide apart for the eyes. Below them, draw a small inverted triangle for the nose and a ‘W’ shape for the mouth. Add three short whiskers on each cheek. -
Sketch the bear:
To the right of the rabbit, draw a slightly wider, flatter oval for the bear’s head. Imagine it sitting on the same line as the rabbit. -
Create round ears:
Add two small semi-circles on the top corners of the bear’s head. Draw smaller semi-circles inside them for depth. -
Finish the bear’s expression:
Draw the eyes similar to the rabbit’s but perhaps slightly larger. Add a rounded triangular nose and a simple curved mouth. Finish with three whiskers on each side.
Fixing Wobbly Circles
If your head shapes aren’t perfect ovals, don’t erase! Simply thicken the outline slightly in the uneven areas to smooth out the curve visually.
Step 2: The Flower & The Cat Trio
-
Plant a doodle flower:
To the left of the rabbit, draw a thin stem extending down two lines. At the top, scribble a small, messy oval or burst shape to represent a dandelion or abstract bloom. -
Start the bottom row:
Move down a few lines. We start the cat trio from the right side this time. Draw a wide oval for the first cat’s head. -
Add pointy ears:
Draw two triangles on top of the head. Add a tiny triangle inside the left ear for detail. -
Draw the classic cat face:
Place the eyes wide apart. Add a tiny nose and a simple mouth. Draw three long, sweeping whiskers extending from each cheek. -
Draw the middle cat:
To the left of the first cat, draw another oval head. Give this one slightly softer, curved triangle ears. Add a little speckle or patch on the top of the head. -
Give it personality:
Draw the eyes and nose. For this one, I like to use very light strokes to add a hint of blush on the cheeks near the whiskers. -
Outline the spectacle cat:
Finally, draw the third cat’s head to the far left. Make the ears slightly more pointed. -
Add the glasses:
Draw two large circles where the eyes usually go, connecting them with a small bridge in the middle. Inside the circles, draw vertical oval pupils for a studious look. -
Final details:
Add the nose, mouth, and whiskers to your bespectacled friend. Check all your lines and thicken any strokes that look too thin.
Add Color Accents
Use a pink highlighter or colored pencil to fill in the inner ears and add rosy cheeks to make the characters pop off the page.
Now you have a charming row of companions to keep you company while you write
Clouds, Moons, and Weather Minis
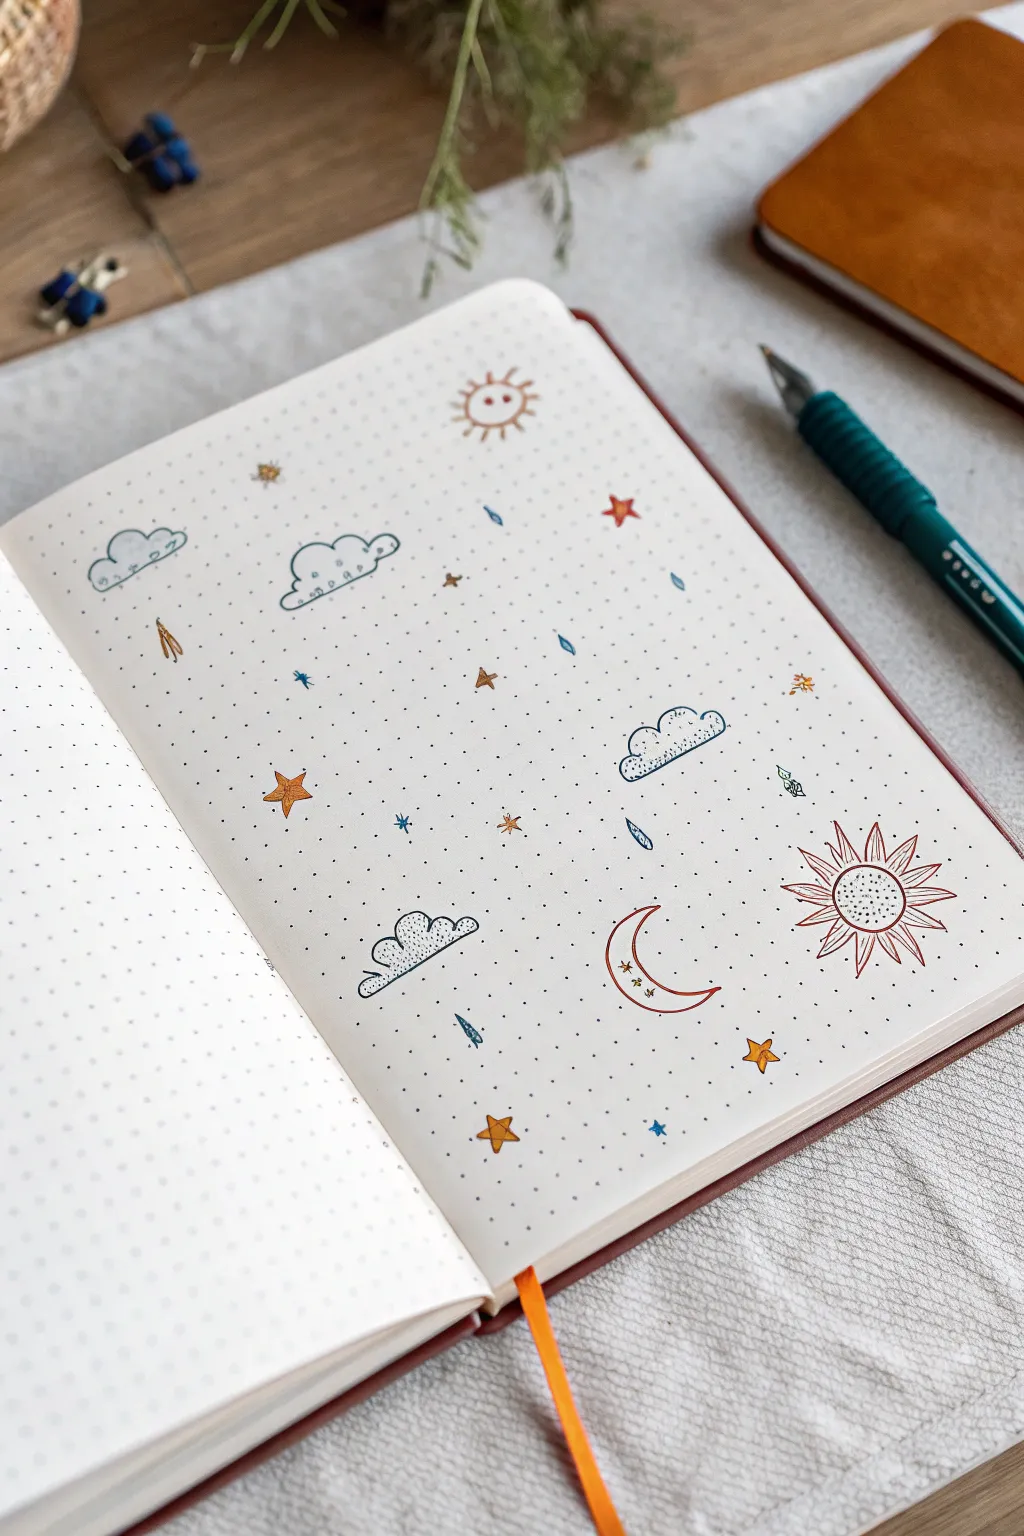
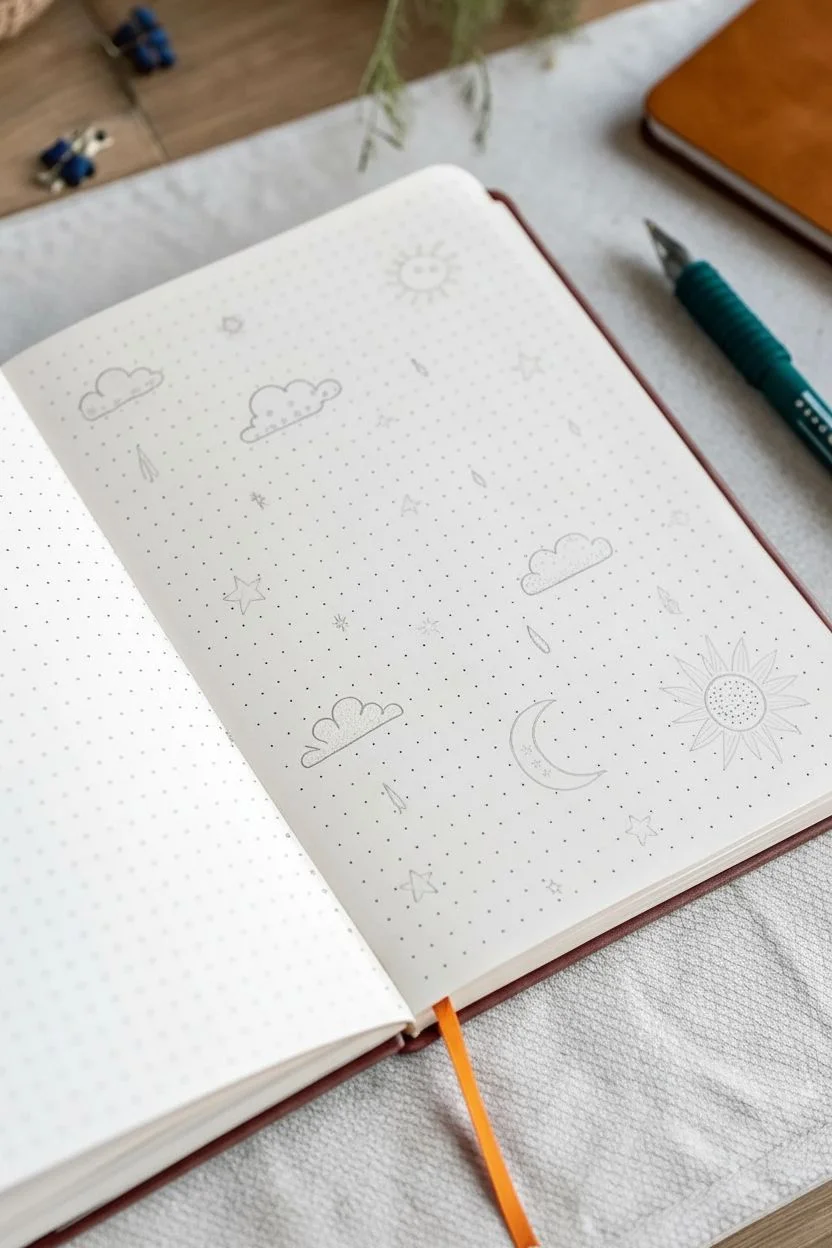
Fill a blank page with this delightful scatter pattern of celestial and weather-themed doodles. This dotted grid layout uses simple lines and primary colors to create a playful, dreamy aesthetic perfect for bullet journals.
Detailed Instructions
Materials
- Dotted grid notebook or journal (A5 size recommended)
- Fine liner pen (black, 0.3mm or 0.5mm)
- Colored pencils or fine markers (orange, blue, yellow)
- Pencil (HB for sketching)
- Eraser
Step 1: Planning the Layout
-
Lightly pencil the placements:
Before committing to ink, take your pencil and very lightly sketch small circles or ovals where you want your main icons to go. Stagger them irregularly so no two large elements are right next to each other. -
Balance the big elements:
Ensure you have a mix of the larger icons spread out: place the large sunburst in the bottom right, a couple of clouds in the middle and top, and the crescent moon near the bottom center.
Grid Guide
Use the dots on your paper to keep spacing consistent. Count 2-3 dots between smaller doodles so the page looks full but not cluttered.
Step 2: Drawing the Suns & Moon
-
Draw the detailed sun:
In the lower right area, draw a medium-sized circle in black ink. Inside, create a textured center by adding many tiny stippled dots. -
Add sun rays:
Draw triangular rays pointing outward from the circle. I like to double them up, drawing a slightly larger triangle around a smaller inner one for extra definition. -
Create the simple sun:
Near the top center, draw a smaller, simple circle. Add short, straight lines radiating outward for rays. Draw a simple smiley face inside for a touch of character. -
Sketch the crescent moon:
Draw a large ‘C’ shape in the lower middle section to form a crescent moon. Close the shape by connecting the points with an inner curve. -
Decorate the moon:
Inside the crescent, draw three tiny stars spaced evenly apart to add detail.
Step 3: Adding Clouds & Rain
-
Outline the fluffy clouds:
Draw three to four cloud shapes scattered across the page (top left, middle right, lower left). Use bumpy, curved lines for the top and a flatter, slightly curved line for the bottom. -
Detail the cloud interiors:
Give the clouds dimension by adding small, stippled dots along the bottom edges and faint internal curved lines to suggest volume. -
Add falling rain:
Underneath the clouds or floating freely, draw small teardrop shapes pointing upward to represent raindrops. -
Draw a shooting star:
Find an empty spot (like near the bottom center) and draw a small star with a long, thin tail trailing behind it to create movement.
Metallic Magic
Trace over the yellow stars or the moon details with a metallic gold or silver gel pen for a drawing that shimmers when you turn the page.
Step 4: Filling the Gaps
-
Scatter the stars:
Fill the empty white spaces with various sizes of five-pointed stars. Draw some as simple outlines and others as solid shapes. -
Add tiny sparkles:
For the tiniest gaps, draw simple asterisks or cross shapes. These act as distant twinkling stars and tie the whole composition together. -
Include mini elements:
If there are still awkward gaps, toss in a tiny leaf sprig, a small diamond shape, or a miniature lightning bolt.
Step 5: Coloring
-
Color the sun elements:
Use a burnt orange or warm red pencil to color the rays of the large sun and the outline of the simple sun. Fill in the five-pointed stars with a bright yellow or gold. -
Shade the clouds:
Take a muted blue pencil and lightly shade just the bottom edges of the clouds. This ombre effect makes them look fluffy without being heavy. -
Enhance the details:
Use a teal or darker blue to color the raindrops and the handle of the shooting star. Outline the crescent moon in rust-red to match the sun. -
Erase pencil marks:
Once all ink and color is applied (and the ink is fully dry!), gently erase your initial pencil planning marks for a clean finish.
Your finished page is now a charming snapshot of the sky that can serve as a cover page or just a relaxing creative exercise
BRUSH GUIDE
The Right Brush for Every Stroke
From clean lines to bold texture — master brush choice, stroke control, and essential techniques.
Explore the Full Guide
Stars and Space Page Scatter
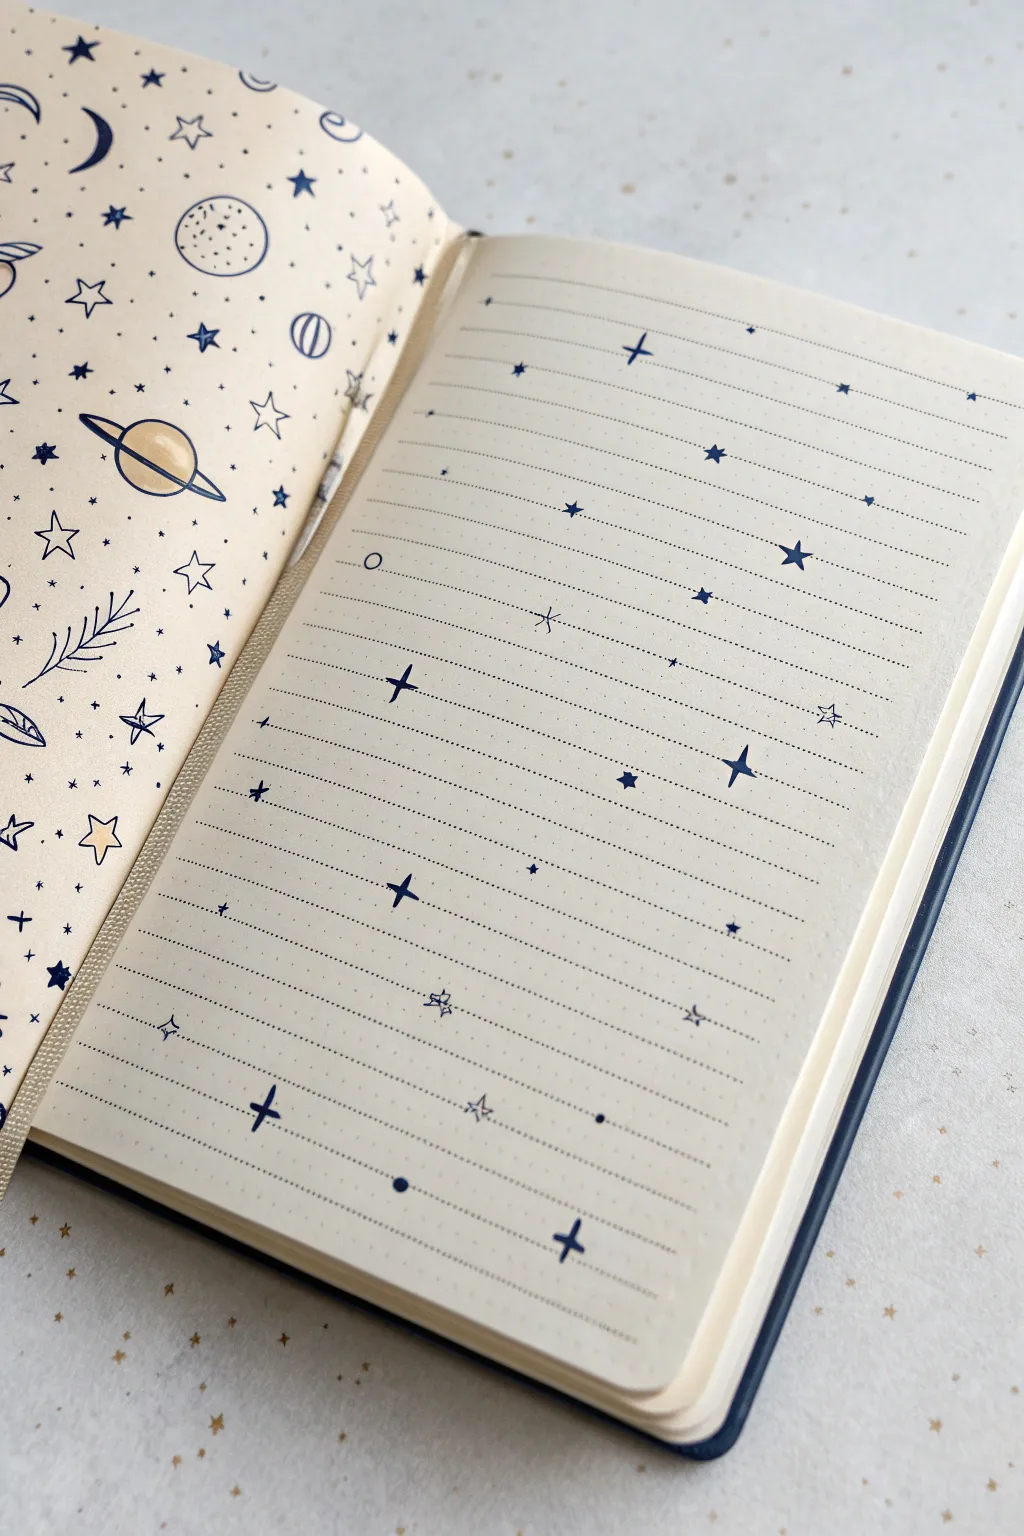

Transform a plain journal spread into a dreamy night sky with this simple yet effective heavy-versus-light composition. By filling one page completely with doodles and keeping the writing side airy, you create a beautiful balance perfect for bullet journaling or diary entries.
How-To Guide
Materials
- A5 Notebook or Journal (blank or dotted preferred)
- Fine-liner pen (0.3mm or 0.5mm) in dark blue or black
- Ruler (clear acrylic is helpful)
- Pencil and eraser
- Gold or yellow gel pen/marker (optional for accents)
Step 1: The Left Page: Dense Patterning
-
Establish the Anchors:
Start on the left-hand page by drawing your largest elements first to space things out evenly. Draw a few crescent moons facing different directions and perhaps one larger ringed planet near the center-left. -
Add Botanical Elements:
Sketch in a few simple leafy olive branches. These add organic movement to the celestial theme. Draw a curved line for the stem and add small V-shaped leaves extending outward. -
Draw Large Stars:
Fill the medium-sized gaps with varying star shapes. Try standard five-pointed outline stars and some solid four-pointed diamond stars (North Stars) to add visual weight. -
Cluster the Small Details:
This is the most crucial step for the ‘pattern’ look. Fill every remaining open space with tiny dots, miniature circles, and little ‘x’ stars. The goal is to minimize white space without distinct shapes touching each other. -
Add Color accents:
If you are using a secondary color like yellow or beige, carefully fill in the planets and larger stars now to make them pop against the cream paper.
Uneven Spacing?
If your pattern feels clumpy, draw your three biggest shapes first in a triangle formation across the page, then work smaller shapes around them.
Step 2: The Right Page: Functional Stardust
-
Set Up Your Spacing:
On the right page, you want to create writing lines that look like constellations. Use a ruler and a pencil to very lightly mark out horizontal lines spaced about 7-8mm apart. -
Draw Dotted Lines:
Using your fine-liner, trace over your pencil guides with a dotted or dashed line. Keep the dashes small and consistent for a delicate look. -
Intersperse Large Sparkles:
As you draw the dotted lines, occasionally stop to draw a four-pointed ‘sparkle’ star right on the line. I like to place these randomly—maybe one or two per line—so they don’t form vertical columns. -
Add Floating Elements:
Break up the monotony of the lines by drawing tiny solid stars or open circles floating just above or below the dotted lines in random spots. -
Create a Constellation Effect:
If you mistakenly make a gap in your dotted line too wide, simply fill it with a tiny plus sign (+) or a small solid dot to maintain the celestial rhythm. -
Erase Guide Lines:
Once the ink is completely dry (wait at least 5 minutes to avoid smearing), gently erase your pencil guidelines.
Use Color Wisely
Keep the drawing elegant by limiting your palette. Stick to just dark blue ink, or add only one metallic accent color like gold or silver.
Step 3: Finishing Touches
-
Review the Balance:
Open the book flat and look at both pages together. The left should feel heavy and the right light. -
Fill the Gaps:
If the left page has awkward empty spots near the spine or corners, add a few more micro-dots to maintain the density all the way to the edge. -
Clean Up:
Check for any stray pencil marks or unfinished star points and neaten them up.
You now have a magically themed spread ready for your daily thoughts and observations
Ocean-Themed Notebook Mini Scene


Capture the spirit of the beach with this charmingly simple pen-and-ink doodle that transforms a standard notebook page into a mini ocean scene. The clean lines and minimal shading create a whimsical, relaxed vibe perfect for journaling or scrapbooking.
Step-by-Step Guide
Materials
- Small spiral-bound lined notebook (cream or white paper)
- Black fineliner pen (0.4mm or 0.5mm)
- Blue gel pen or ballpoint pen
- Pencil (optional for sketching)
- Eraser
Step 1: Setting the Scene
-
Top Border Waves:
Begin at the very top left of the right-hand page. Draw a single, smooth wavy line that stretches about a third of the way across the page. Keep the curves gentle and irregular. -
Adding Bubbles:
Nestle small circles into the valleys of your upper wave line. I like to vary their distance slightly—some touching the line, some floating just beneath it—to mimic foam. -
Seabed Foundation:
Move to the bottom third of the page. Draw a second wavy line, this time slightly more jagged, to represent the sandy bottom. Let this line span about half the width of the page.
Ink Confidence
Don’t worry about shaky lines; they add to the organic, watery feel. Let your hand flow naturally rather than trying to make perfect geometric shapes.
Step 2: Bringing the Ocean to Life
-
Sketching the Seaweed:
On the left side of your bottom wave line, sprout a cluster of seaweed. Draw three or four long, blade-like leaves curving upward. -
Leaf Detailing:
Add a central spine line to each seaweed blade for definition, but keep it loose and sketch-like. -
Drawing the Fish Body:
In the open space above the seaweed, draw a simple oval shape for the fish’s body. Orient it swimming toward the left. -
Tail and Fins:
Attach a triangle to the right side of the oval for a tail. Add a small triangular dorsal fin on top and a pectoral fin on the side. -
Fish Features:
Give the fish personality by drawing a large circle for the eye with a small dot pupil. Add a curved line for the gill slit and a tiny smile. -
Adding a Shell:
To the right of the fish, resting on your sand line, draw a fan shape. Connect the top points to the base with straight radiating lines to create a scallop shell.
Step 3: Texture and Background
-
Sand Texture:
Beneath your main sand line, draw a secondary line made of tiny, continuous loops or scallops. This squiggly texture suggests the grainy surface of the ocean floor. -
Middle Ground Waves:
Between the seaweed and the shell, draw another rolling wave line to add depth to the scene. -
Bubbles and Details:
Scatter a few tiny circles rising from the fish’s mouth and around the seaweed to fill empty spaces. -
Left Page Starfish:
Switch to your blue pen for the left page. Draw simple five-pointed star shapes near the bottom corner. -
Soft Outlines:
Go over the blue star shapes gently, possibly doubling the line in some spots to make them look hand-sketched and casual. -
Final Touches:
Wait a moment for the ink to fully set, then gently erase any pencil guidelines if you used them.
Creative Splash
Use a light watercolor wash or colored pencils to fill in the fish and shell for a pop of color, or glue a tiny bit of real sand at the bottom edge.
Now you have a breezy seaside sketch to remind you of sunny days on the beach


School Supply Doodles That Match Your Notebook Vibe
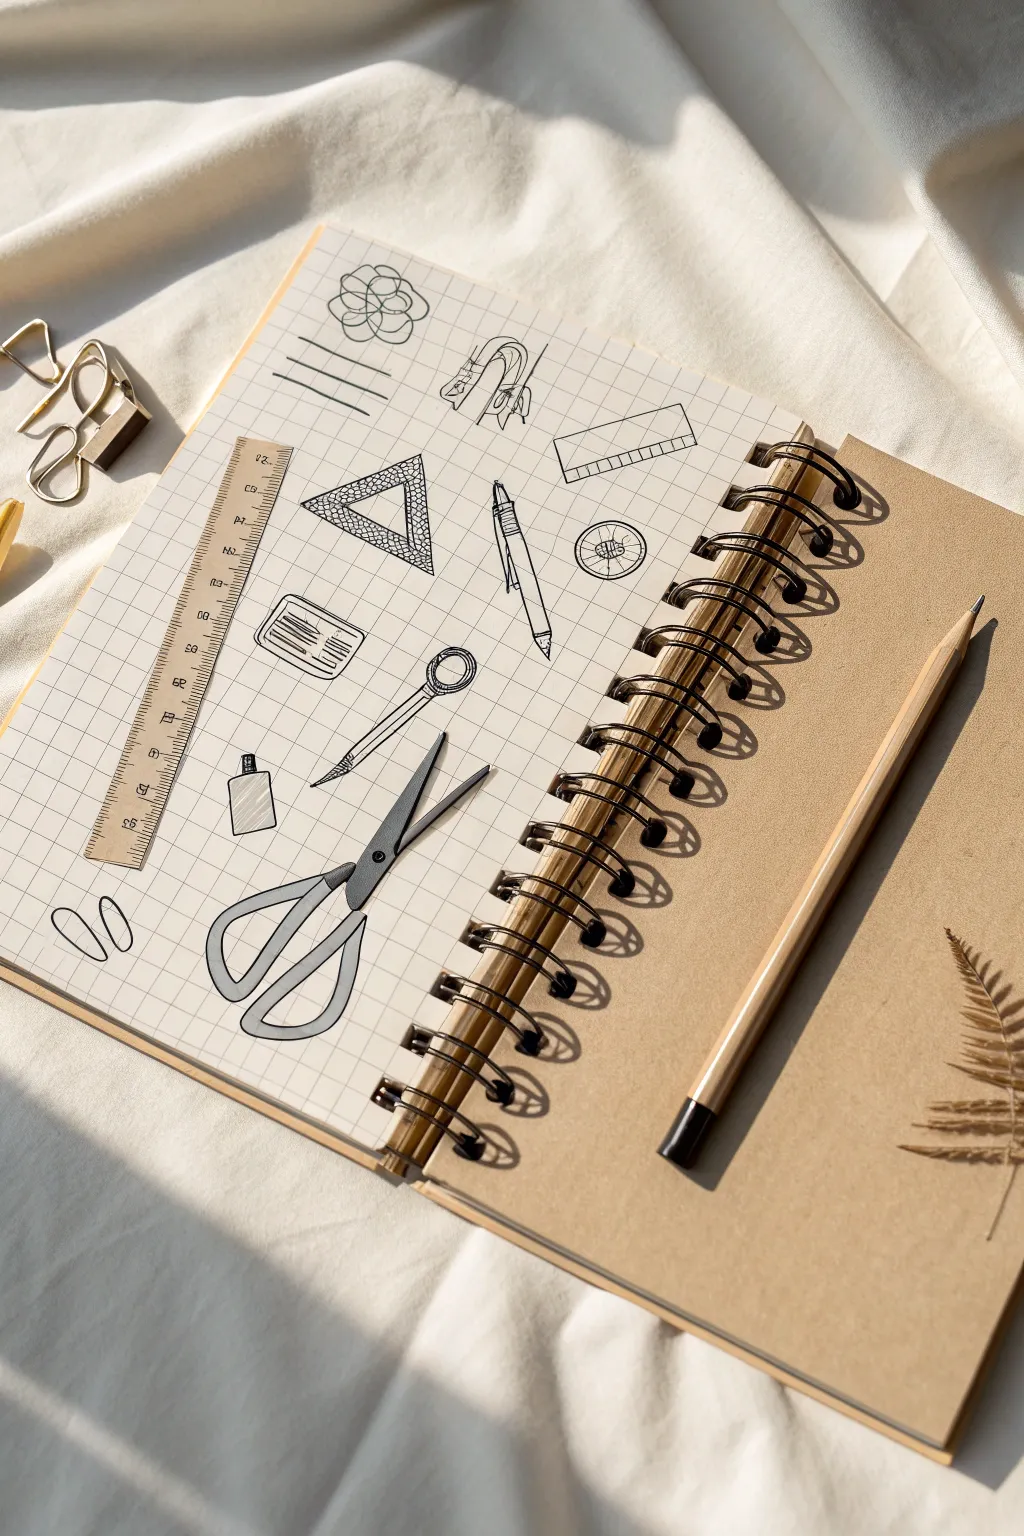
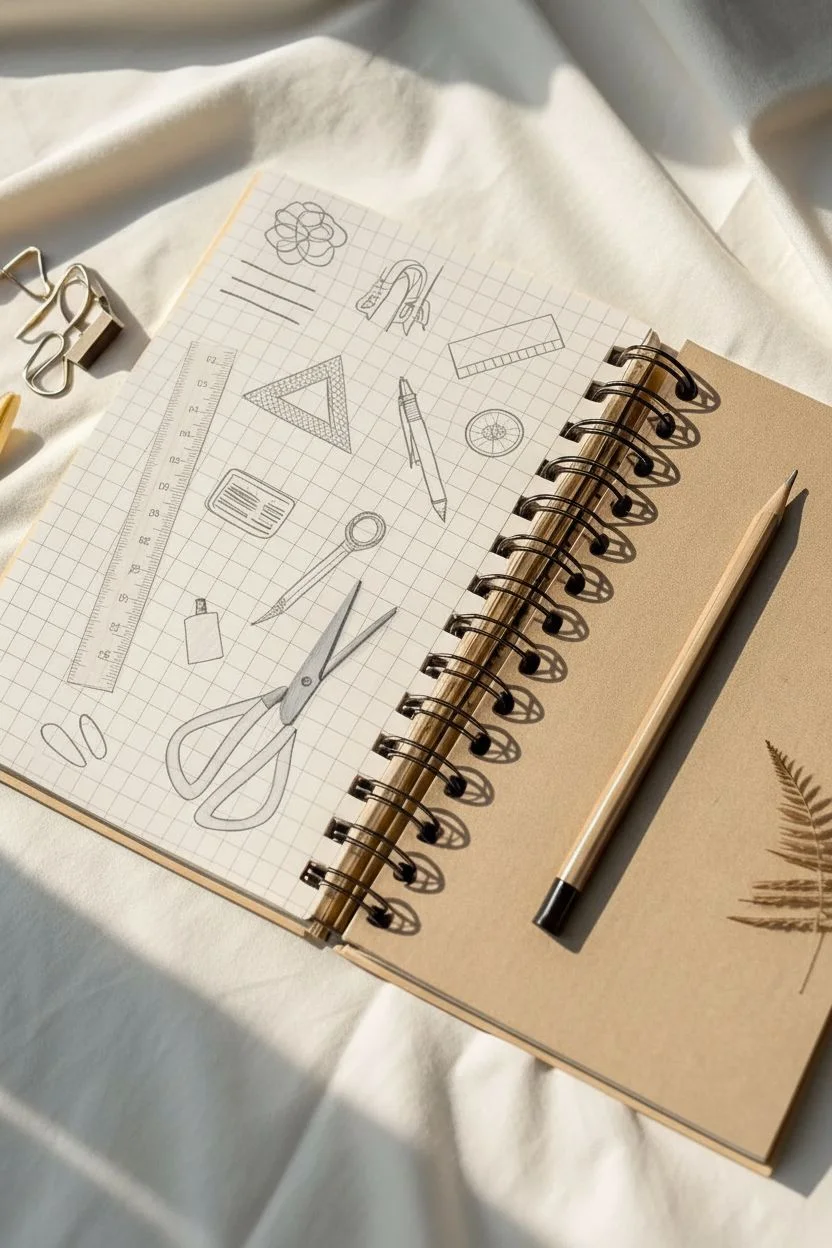
Transform a simple grid notebook page into a charming collection of school-themed illustrations. This project mixes flat, linear doodles with semi-realistic drawings of stationery items like scissors and rulers for a playful, organized aesthetic.
Step-by-Step Tutorial
Materials
- Grid paper notebook (spiral bound)
- Fine liner pen (black, 0.3mm or 0.5mm)
- Pencil (HB for sketching)
- Eraser
- Ruler (real one for guidelines)
- Optional: Grey marker or colored pencils for shading
Step 1: Planning the Layout
-
Lightly sketch positions:
Begin by lightly planning where each item will go using a pencil. Aim for a scattered but balanced composition, leaving equal negative space between objects. -
Map out the large items:
Mark the spot for the ruler on the left side and the scissors near the bottom center. These are your largest elements and will anchor the design.
Step 2: Drawing the Semi-Realistic Tools
-
Outline the ruler:
Draw a long, thin rectangle for the ruler. Use your real ruler to keep these lines perfectly straight along the grid lines. -
Add measurement marks:
Carefully draw the tick marks on the ruler. Make the centimeter marks slightly longer than the millimeter marks. Adding small numbers (12, 13, 14, etc.) gives it authenticity. -
Sketch the scissor blades:
Draw the open blades of the scissors. One blade should overlap the other slightly at the pivot point. Draw the sharp edges as straight lines. -
Draw the scissor handles:
Create the looped handles. Notice how they curve organically. I like to double the line here to show the thickness of the plastic handles. -
Shade the realistic items:
Using a very light touch with your pen or a grey marker, add subtle shading to the scissors’ handles and the ruler’s wood grain to make them pop against the grid.
Grid Power
Use the grid lines of your paper as a built-in guide for proportions. Count squares to keep objects symmetric without measuring.
Step 3: Doodling the Stationery Items
-
Draw the triangle ruler:
Sketch a right-angled triangle. Fill the inner edge with a textured, cross-hatched pattern to mimic the grip area often found on drafting triangles. -
Create the compass:
Draw a V-shape for the legs of a compass. Add a small circle at the top hinge and a tiny point at one end. A simple rectangle on the other leg represents the pencil holder. -
Add the protractor:
Draw a semi-circle shape. Add an inner semi-circle and draw a few key angle lines radiating from the center point. -
Sketch the mechanical pencil:
Draw a slender cylinder with a tapered tip. Add details like a clip near the top and horizontal lines for the grip section. -
Doodle the eraser:
Draw a simple rectangular box. Add a wrapper sleeve around the bottom two-thirds by drawing a horizontal line across it. -
Draw the tape dispenser:
Sketch a snail-shell shape or a rounded form with a flat bottom. Add a serrated edge at one end for the tape cutter. -
Add abstract lines:
In an empty corner, draw three parallel horizontal lines of varying lengths. This acts as a minimalist filler element. -
Create the flower doodle:
Near the top, draw a simple geometric flower using overlapping loops. Keep it loose and wire-like to match the technical vibe.
Wobbly Lines?
If your straight lines aren’t perfect, re-trace them once more for a sketchy, deliberate look rather than trying to fix them with a single correction.
Step 4: Final Touches
-
Ink the outlines:
Go over all your pencil sketches with the fine liner pen. Use confident, smooth strokes. Don’t worry if lines aren’t machin-perfect; the slight wobble adds charm. -
Erase guidelines:
Wait for the ink to dry completely to avoid smudging. Then, gently erase all underlying pencil marks. -
Add paper clips:
Finally, draw a couple of stray paper clips in the corners. Use a continuous looping line to form the classic oval spiral shape.
Now you have a creatively filled page that celebrates the tools of the trade
Pattern Swatch Page for Mindless Practice
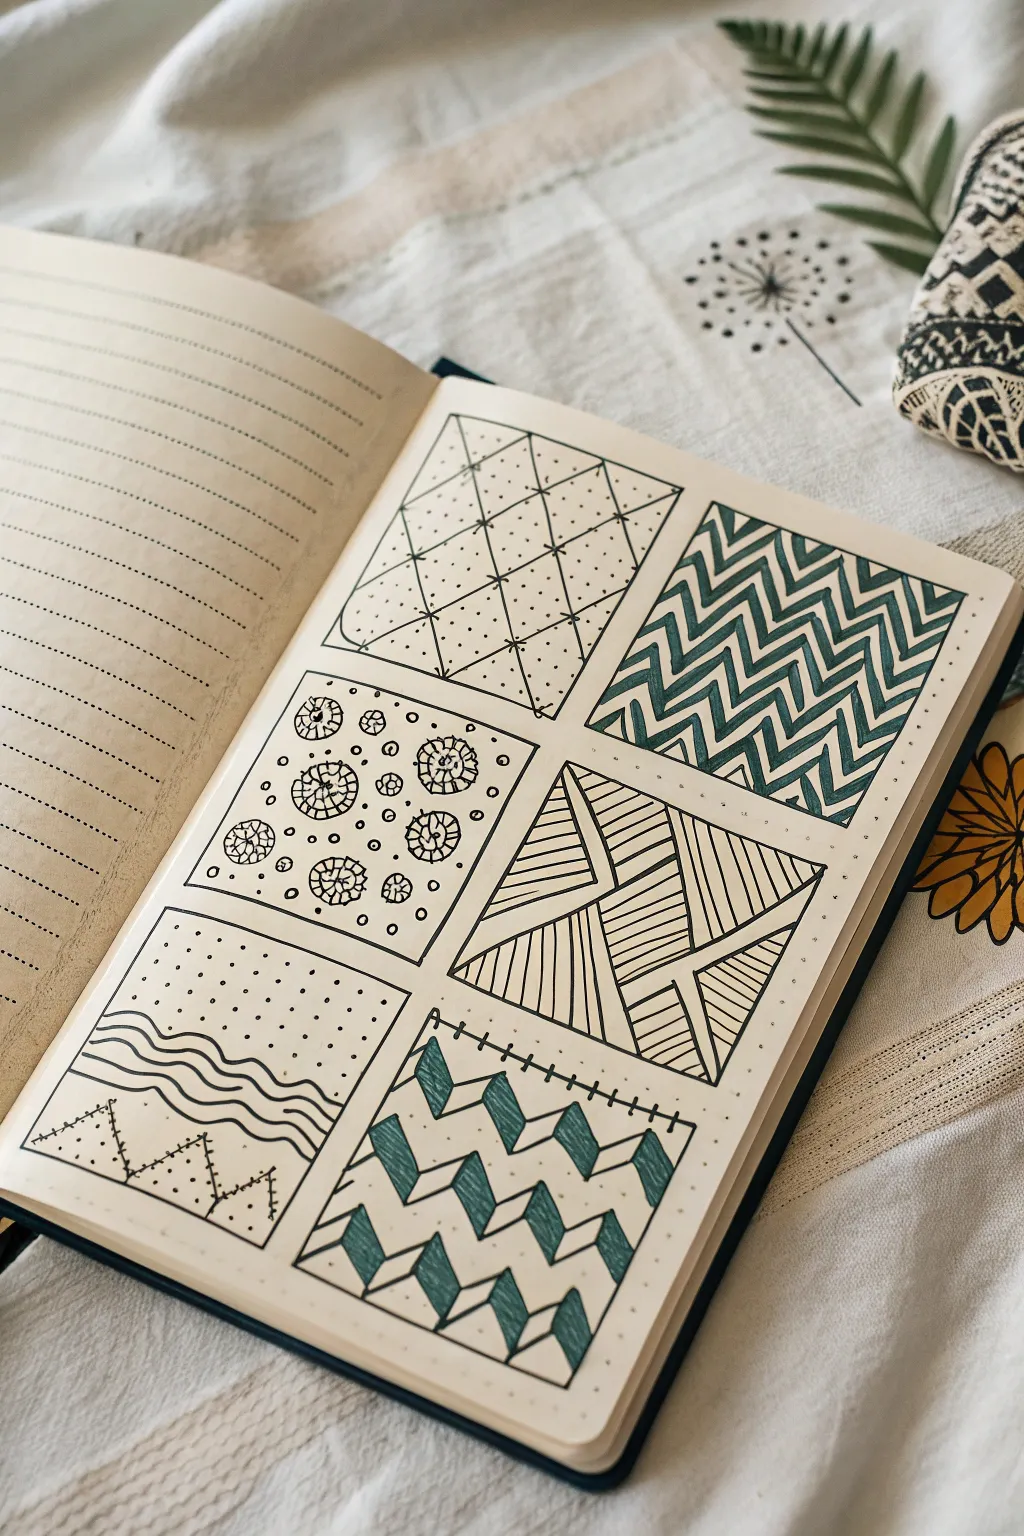
This soothing exercise involves creating a six-panel swatch page filled with repeating geometric and organic motifs. Perfect for testing new pens or simply unwinding, the combination of crisp black lines and deep teal accents creates a polished, cohesive collection.
Detailed Instructions
Materials
- Dotted or blank journal (A5 size recommended)
- Fine liner pen (Black, 0.3mm or 0.5mm)
- Teal or dark green felt-tip marker or gel pen
- Ruler
- Pencil
- Eraser
Step 1: Setting up the Grid
-
Draft the frame:
Begin by using your pencil and ruler to draw a large rectangular frame on a fresh page. Leave a comfortable margin of whitespace around the edges to frame your work. -
Divide into squares:
Measure the total width and height of your rectangle. Divide it into six equal boxes—two columns wide and three rows high. Use light pencil lines so they can be erased later or traced over. -
Ink the outlines:
Go over your six boxes with a black fine liner. Using a ruler here ensures crisp, professional edges that will contrast nicely with the hand-drawn patterns inside.
Step 2: Creating the Linear Patterns
-
Top Left: Diamond Grid:
In the first box, draw diagonal lines in one direction, then cross them in the opposite direction to create a diamond lattice. Add a small dot in the center of every diamond. -
Top Right: Chevron Waves:
Draw zig-zag lines horizontally across the entire box. Instead of single lines, duplicate each zig-zag to create thick bands. Use your teal marker to fill in every other band, leaving the alternates white. -
Middle Left: Orbital Circles:
Draw scattered circles in varying sizes. Inside the larger circles, draw small radiating lines like wheel spokes. Fill the empty background space with tiny dots to add texture. -
Middle Right: Shattered Glass:
Start by drawing a few random straight lines that intersect across the box. Inside the resulting shapes, fill them with parallel lines. Change the angle of the hatching for each adjacent section patterns clash directionally.
Smudge Prevention
If you are left-handed or working quickly, place a scrap piece of paper under your drawing hand. This prevents skin oils and friction from smearing your fresh ink lines.
Step 3: The Final Organic & 3D Patterns
-
Bottom Left: Mixed Landscapes:
Divide this box into three horizontal zones. In the top zone, add simple stippling (dots). In the middle, draw wavy, flowing parallel lines. In the bottom section, draw jagged triangles like mountains and fill them with small dashes. -
Bottom Right: 3D Staircase:
Draw a zig-zag line similar to the chevron pattern. From each downward point, draw a short vertical line down. Connect the bottom of that vertical line back to the zig-zag to create a ‘step’ face. -
Fill the shadows:
identify the left-facing side of each 3D step you just drew. Use the teal marker to color these panels in, creating a strong shadow effect that makes the pattern pop. -
Add detail element:
Across the very top edge of this final box, draw a small perpendicular line crossing the border at regular intervals, resembling stitches. -
Cleanup:
Wait at least five minutes for all ink to dry completely. Gently erase any visible pencil guidelines to reveal your clean, sharp swatch page.
Consistent Spacing
For the geometric patterns, don’t worry about measuring every single line. Slightly imperfect, hand-balled spacing often looks more charming and artistic than clinically perfect grids.
You now have a beautiful reference page for future doodling sessions
Monoline Mini Illustrations
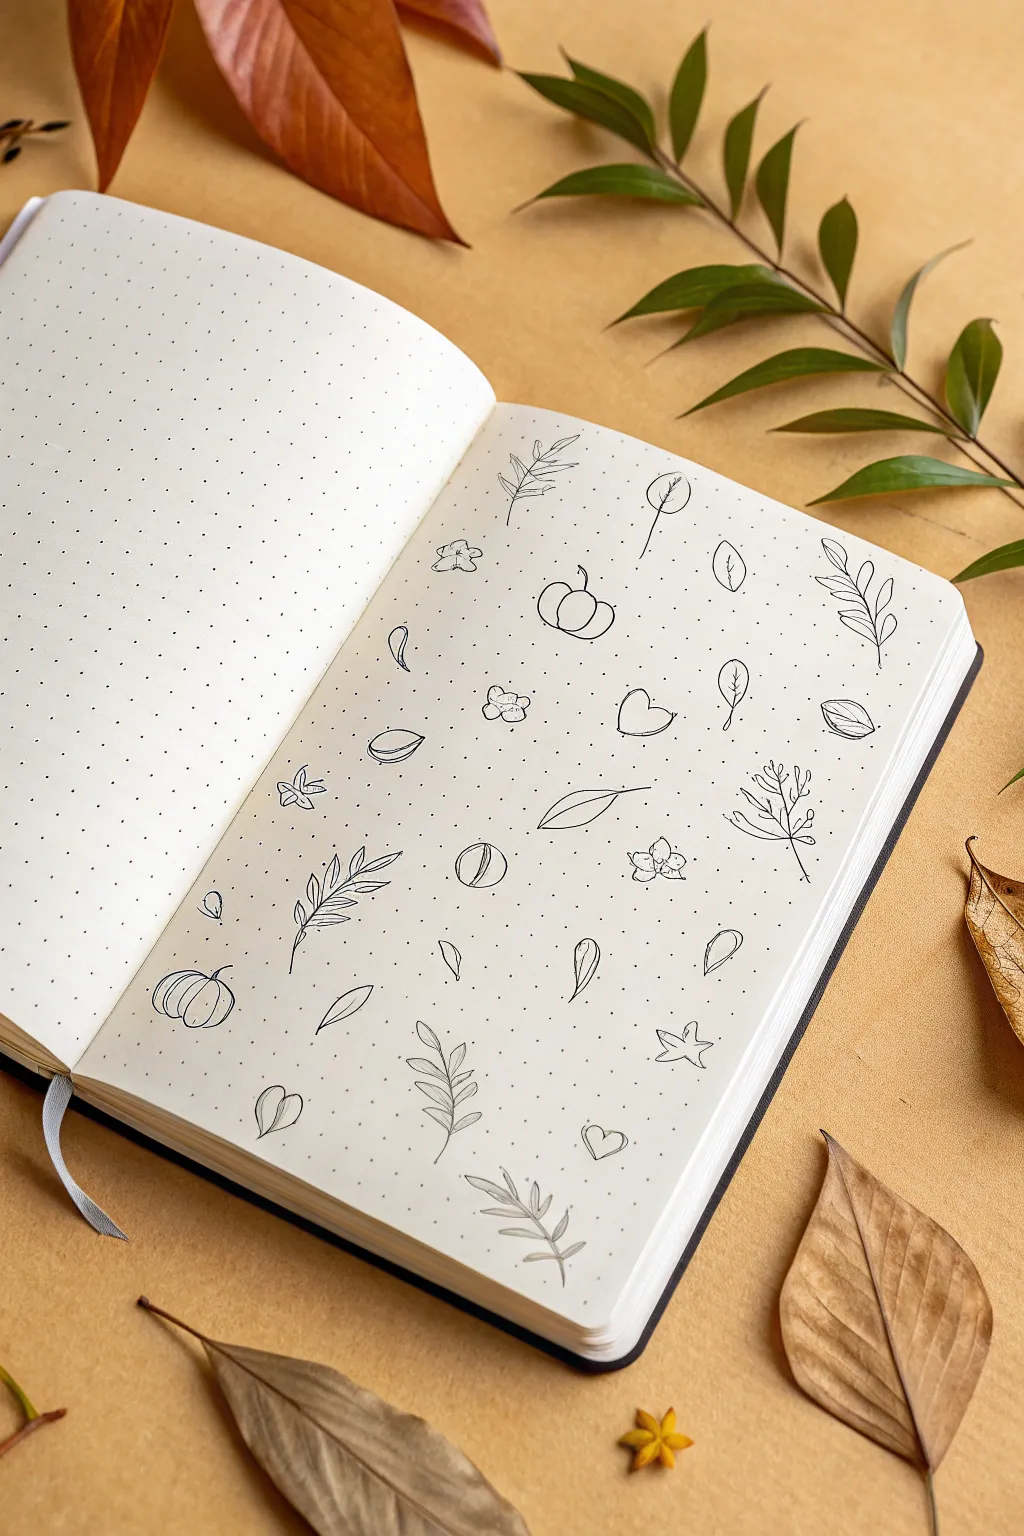
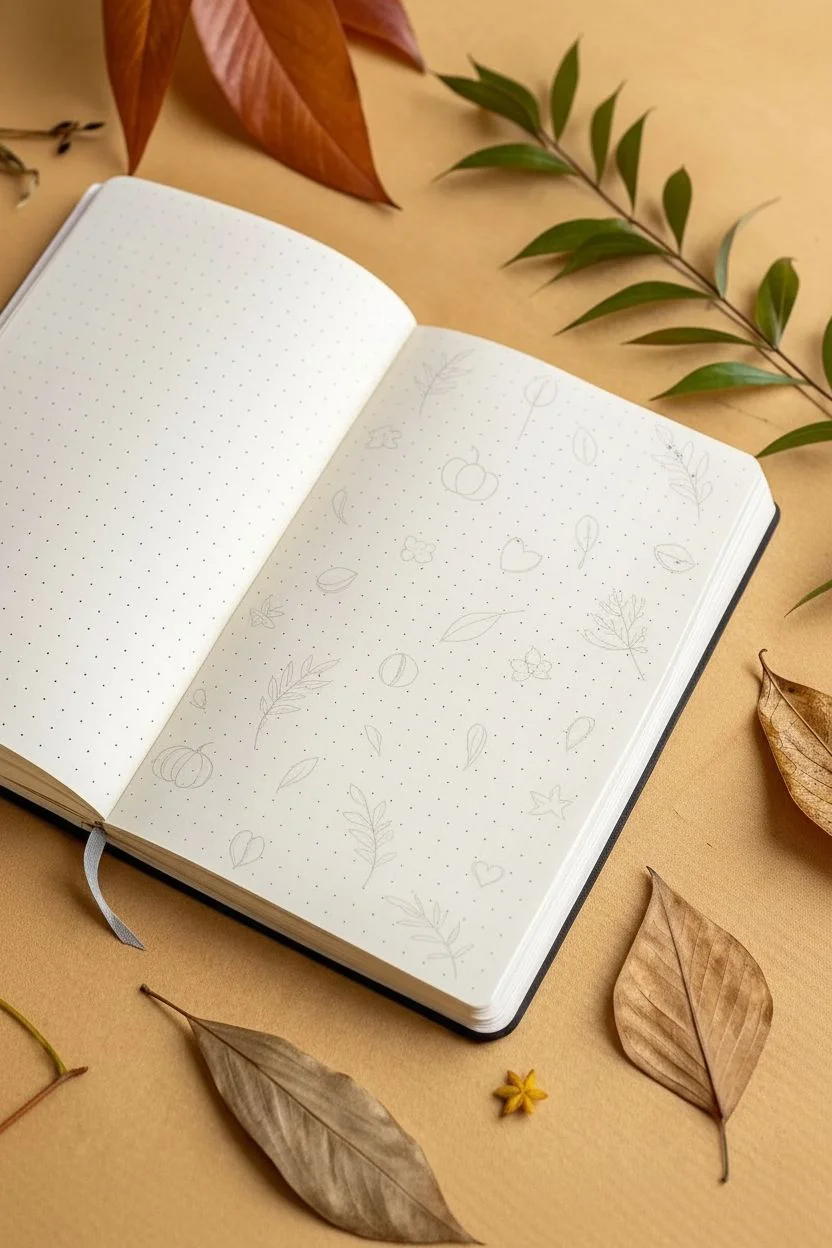
Capture the essence of fall with this scattered collection of minimalist, monoline drawings. Using a simple dot grid notebook as your guide, you’ll fill a page with charming botanical elements, tiny pumpkins, and seasonal motifs.
Step-by-Step Tutorial
Materials
- A5 Dot Grid Journal
- Fine liner pen (0.3mm or 0.5mm black)
- Pencil (HB or 2B)
- Kneadable eraser
- Ruler (optional for spacing)
Step 1: Planning the Layout
-
Visualize the spacing:
Before putting pen to paper, look at the blank dot grid page. Imagine a loose, invisible grid where each small doodle will live. The goal is to have them evenly spaced but not rigid, creating a pleasing ‘confetti’ effect rather than strict rows. -
Lightly sketch positions:
Using your pencil very lightly, mark small circles or crosses where you want each main element to go. Aim for roughly 2-3 grid squares of distance between each planned doodle to keep the layout breathable.
Grid Guide Trick
Use the dots! Count grid squares (e.g., ‘3 up, 2 over’) to ensure your symmetrical items, like leaves or pumpkin segments, stay perfectly balanced.
Step 2: Drawing Botanical Elements
-
Start with simple leaves:
Choose a spot near the top right. Draw a simple stem line spanning about 3-4 dots in height. Add paired leaves branching off the sides, keeping the shapes simple and pointed like willow leaves. -
Add a skeletal fern:
In the lower section, draw a vertical stem. Instead of full leaf shapes, draw simple upward-curving lines branching out from the spine to mimic a fern frond or dry twig. -
Draw a broad leaf:
Find an empty space in the middle. Draw a single, larger leaf shape that is wide at the base and pointed at the tip, somewhat like a beech leaf. Add a center vein line that doesn’t quite touch the tip. -
Create a twig sprig:
Near the bottom, draw a y-shaped branch. At the end of each little twig, draw a tiny oval or teardrop shape to represent buds or small leaves.
Step 3: Adding Seasonal Motifs
-
Draw the center pumpkin:
Locate a spot near the upper middle. Draw a flattened oval for the center of the pumpkin. Add a C-curve on the left and a backward C-curve on the right to create the segments. Top it off with a cute, curly stem. -
Sketch a side pumpkin:
In the lower left corner, draw another pumpkin, perhaps slightly taller or angled differently. Varying the shapes makes the page look more organic. -
Add a simple acorns:
Draw small oval shapes with a ‘cap’ on top. For the cap, draw a curved line across the top third of the oval and add a tiny stem. Use cross-hatching or dots on the cap for texture if you like, but simple outlines work best here. -
Insert floating hearts:
Scatter 2-3 simple outline hearts in the gaps between larger drawings. These act as filler elements to balance the composition. -
Draw scattered petals:
Draw small, single tear-drop shapes or tiny three-petaled flowers in any remaining large gaps. These tiny details make the page feel full and abundant.
Wobbly Lines?
If your long lines aren’t straight, pivot from your elbow rather than your wrist. This creates smoother, more confident strokes for stems.
Step 4: Inking and Refining
-
Begin inking:
Take your fine liner pen. I prefer starting from the top left and working down to avoid smudging the ink with my hand. Trace over your pencil references with confident, smooth strokes. -
Focus on line consistency:
Try to keep your pressure even. The beauty of monoline art is that every line is the same weight, so resist the urge to thicken shadows or double-back over lines. -
Close the gaps:
Ensure distinct shapes like the pumpkins or hearts are fully closed. This gives the doodles a clean, polished sticker-like appearance. -
Let the ink set:
Allow the page to dry completely for at least 5-10 minutes. Fineliner ink can smudge easily on smooth dot grid paper if erased too soon. -
Erase guidelines:
Gently embrace the page with your kneadable eraser to lift off the graphite sketches. A kneadable eraser is gentler on the paper texture than a hard rubber eraser. -
Final assessment:
Step back and look at the whole page. If there is an awkward empty space, add a tiny dot, a small circle, or a single line to balance the visual weight.
Enjoy flipping through your journal and seeing this cozy collection of autumn art
Simple Shading Sampler Using Basic Shapes


Master the fundamentals of form and light with these essential geometric studies. This practice page helps you understand how simple shapes can gain three-dimensional volume through careful shading and perspective.
How-To Guide
Materials
- Sketchbook with smooth paper
- Graphite pencil (HB or 2B)
- Black colored pencil or charcoal pencil (for deep shadows)
- Ruler or straight edge
- Eraser
- Blending stump (optional)
Step 1: Setting the Layout
-
Define the grid:
Visualize your page as a grid of six roughly equal sections—two columns and three rows. This will keep your geometric studies organized and spaced evenly, just like the reference photo. -
Light sketch frames:
Using your ruler and a very light touch with your HB pencil, draw faint square boundary boxes for the bottom right and middle right figures. These squares act as guides for the shapes you’ll draw inside them.
Smooth Shading Secret
Hold your pencil near the end of the shaft and tilt it low to use the broad side of the lead. This builds soft layers without scratching the paper texture.
Step 2: Drawing the Linear Forms
-
Top right: Wireframe pyramid:
In the top right area, draw a square in perspective (a diamond shape). Find the center point and draw a vertical line up. Connect the corners to the top of this line to form a pyramid within a rectangular box structure. -
Middle right: Geometric pattern:
Inside your middle-right guide square, draw diagonals connecting opposite corners. Divide the square horizontally and vertically through the center. Connect the midpoints of the sides to create a diamond inside the square. -
Middle left: Triangular prism:
Draw a triangle for the front face. Extend parallel diagonal lines back from the top and bottom right corners, then connect them with a vertical line to create the side plane of the prism. -
Bottom right: The cube:
Draw a Y-shape securely inside the bottom-right frame. Connect the outer tips of the Y to form a hexagonal outline, creating a classic isometric cube view showing the top, front, and side faces.
Step 3: Adding Spheres & Shading
-
Top left: The outline sphere:
Draw a perfect circle in the top left space. You can trace a small round object if needed. Underneath it, add a tiny, flat ellipse to suggest a floating shadow or base. -
Bottom left: The volume sphere:
Draw another circle in the bottom left area. Lightly sketch a curved line across the ‘equator’ and a vertical axis line to help visualize the 3D form before shading. -
Shading the pyramid:
Return to the middle-left prism. Using the side of your pencil lead, shade the side plane a uniform medium grey. Leave the front triangular face white to represent the light source hitting it. -
Shading the cube:
For the bottom-right cube, identify your light source (coming from the top right). Shade the left face very dark (this is the core shadow). Shade the top face very lightly or leave white. Shade the right face a medium grey.
Level Up: Light Angles
Draw the exact same shapes on the next page, but move your imaginary light source to the opposite side to see how the shadows completely interpret the form.
Step 4: Rendering the Main Sphere
-
Core shadow placement:
On the bottom-left sphere, identify a crescent-shaped area on the bottom left side. This will be your darkest area (core shadow). -
Applying gradient:
Start filling in the core shadow with dark strokes, gradually lightening your pressure as you move toward the top right highlight. I find circular pencil motions help avoid harsh lines here. -
Reflected light:
Leave a very thin, lighter strip right at the bottom edge of the sphere, just before the cast shadow begins. This represents light bouncing off the table back onto the object. -
Cast shadow:
Draw a horizontal, elongated ellipse directly under the sphere spreading to the left. Fill this in with your darkest black pencil tones closest to the object, fading out slightly at the edges.
Step 5: Final Touches
-
Clean up:
Take your eraser and clean up any guide lines or smudges outside your geometric boxes. Crisp edges make these studies look much more professional. -
Darkening accents:
Use your black pencil to re-trace the outlines of shapes that are in shadow, like the bottom edge of the prism and the dark side of the cube, to make them pop.
Now you have a reference page of basic forms to refer back to whenever you start a complex drawing
Color Palette Stripe Page With Mini Doodles
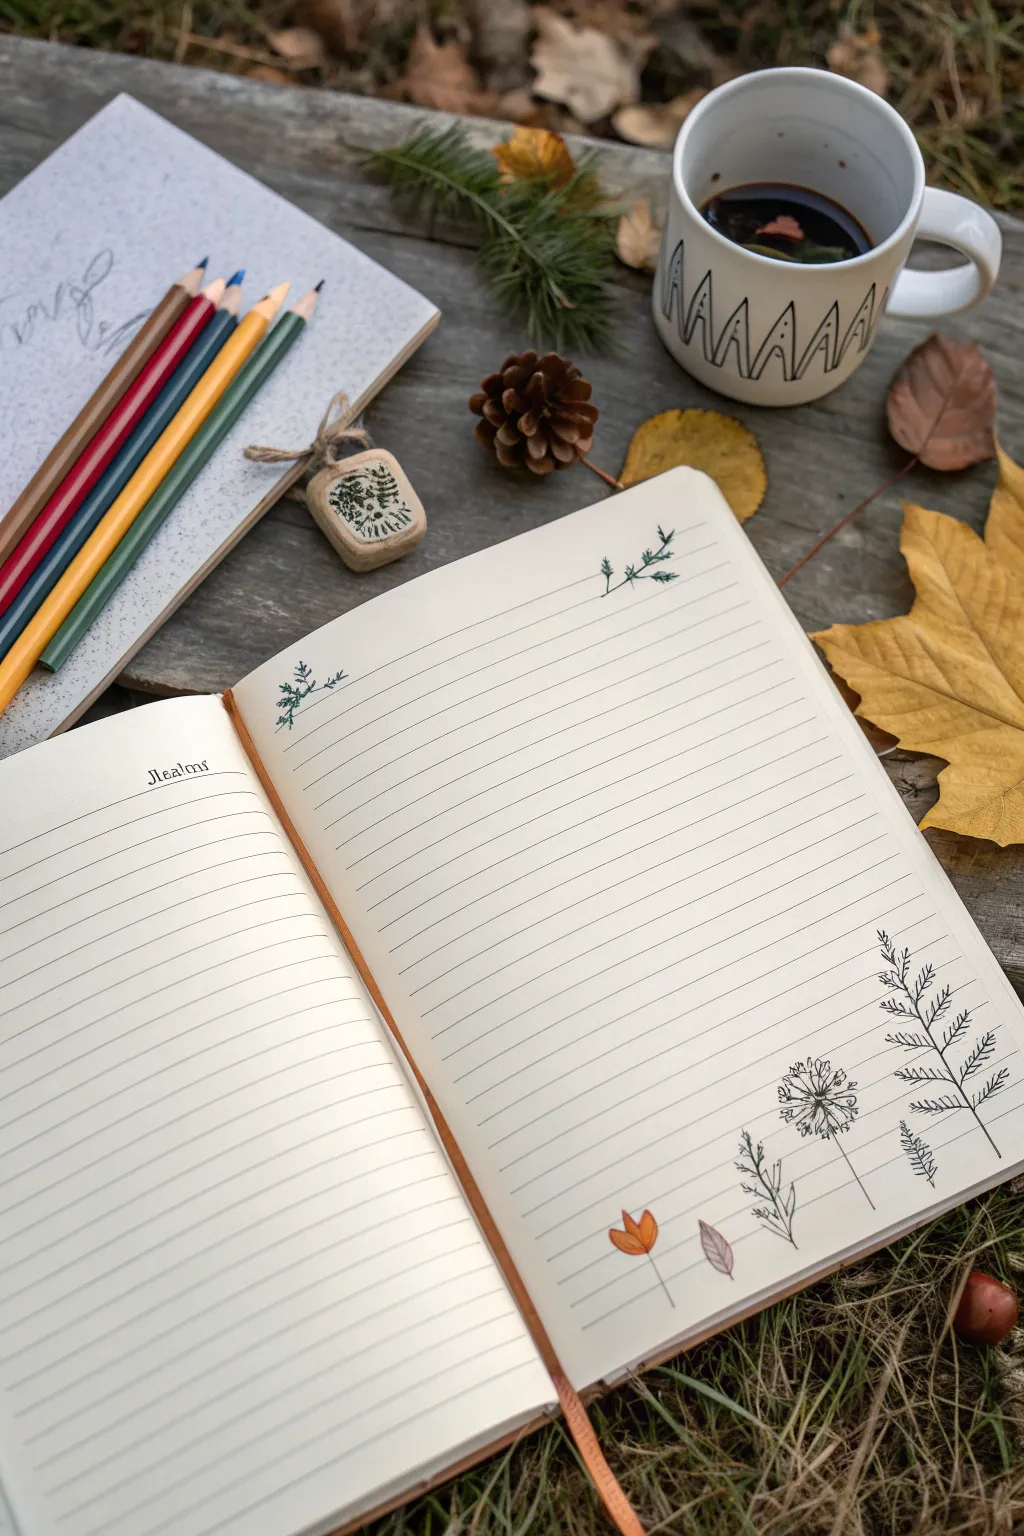
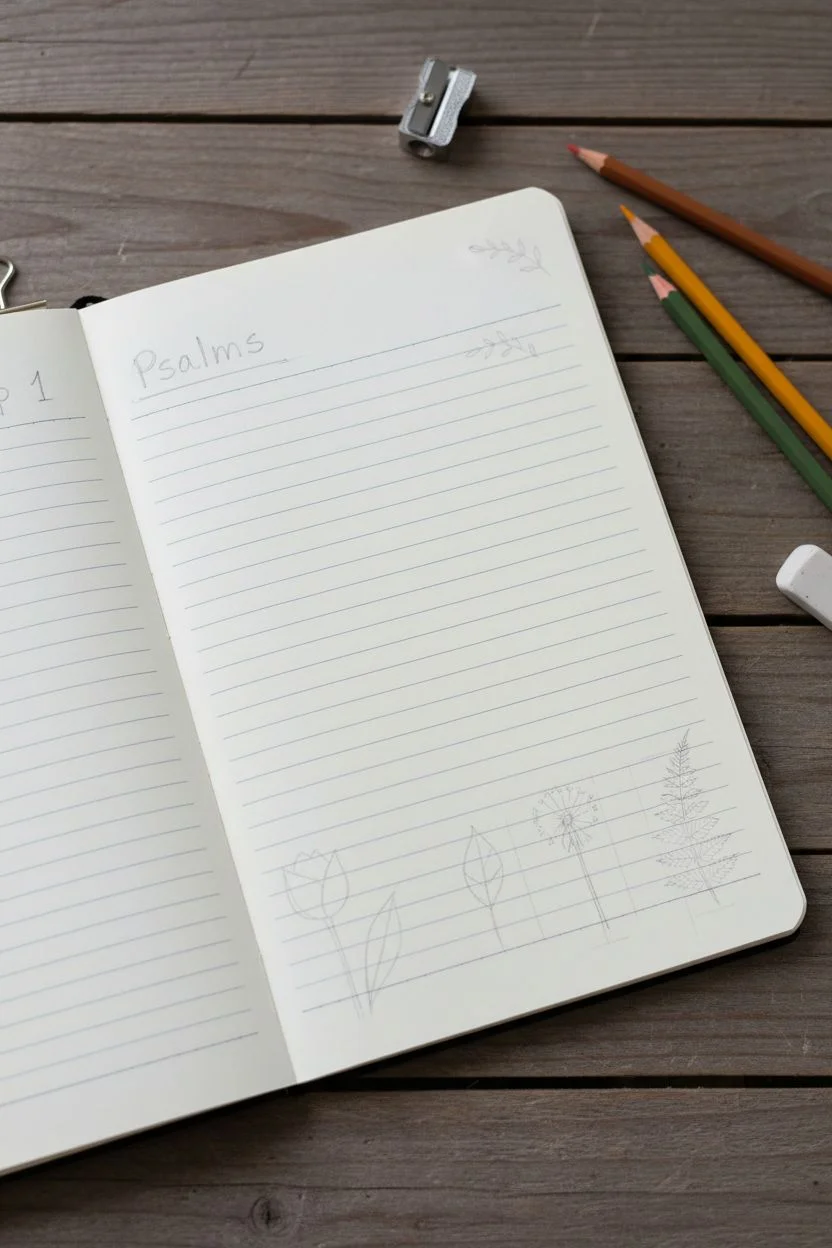
Transform a plain ruled notebook into a charming nature journal with delicate line drawings and simple headers. This project focuses on minimalist botanical sketches and a personalized title to create a serene space for your thoughts.
Step-by-Step Guide
Materials
- Ruled notebook or journal (cream paper works beautifully)
- Fine liner pen (black, 0.1mm or 0.3mm)
- Colored pencils (muted orange, yellow, and brown tones)
- Pencil and eraser (for sketching)
Step 1: Setting the Composition
-
Choose your page:
Open your notebook to a fresh spread. Ensure the paper lies relatively flat, using a clip if necessary to hold the pages down. -
Plan the layout:
Visualize a header in the top left corner. Plan for two small corner embellishments at the top of the right page, and a ‘garden row’ of plants along the bottom right edge. -
Draft lightly:
Using a pencil with a light touch, sketch the position of your title on the top left line. Mark the general height and placement of the bottom flowers so they don’t look cramped.
Ink Confidence
Work steadily. If a line is wobbly, don’t overwrit it immediately. Natural variations often add to the organic, sketched charm of botanical art.
Step 2: The Header & Top Details
-
Lettering the title:
On the first line of the left page, write your chosen title (like ‘Psalms’) in a neat serif font. Add small horizontal serifs to the tops and bottoms of your vertical strokes for a classic look. -
Underlining:
Draw a fine, straight line directly underneath your title to anchor it to the page ruling. -
Top corner accents:
Moving to the right page, locate the top two lines. Draw two small sprigs of greenery facing inward from the left and right margins. -
Drawing the needles:
For these corner sprigs, draw a central stem and add tiny, short dashes branching off on both sides to mimic pine or rosemary needles. Keep the ink flowing lightly for a delicate texture.
Step 3: The Bottom Botanical Garden
-
First flower stem:
At the bottom right of the page, start your first doodle: a small tulip-like bulb. Draw a simple cup shape with a ‘v’ notch at the top. -
Adding color accents:
Before outlining the tulip fully in ink, I like to color the petals with an orange colored pencil, shading slightly darker at the base. -
Defining the tulip:
Outline the colored petals with your fine liner. Draw a thin, straight stem extending down about two lines, and a single, simple leaf near the bottom. -
The floating leaf:
Next to the tulip, draw a single detached leaf. Color it lightly with brown pencil, then outline it with a central vein and diagonal veins. -
Dandelion puff:
Draw a tall, straight stem next. At the top, create a circle of small radiating lines. Add ‘seeds’ by drawing tiny V-shapes or dots at the end of several radiating lines to create a fluffy texture. -
Fern frond:
For the largest plant on the far right, draw a tall, slightly curved central stem that spans about 6-7 lines of height. -
Frond details:
Starting from the bottom of the stem, draw pairs of branches curving upward. On each branch, add tiny, rapid zig-zag or dashed lines to create the look of fern leaves. -
Grounding details:
Add a tiny sprout or smaller weed between the dandelion and the fern to fill the gap, using simple vertical lines with small oval leaves.
Seasonal Switch
Change the vibe by swapping the tulip for a holly berry sprig or an acorn to match the current season or month of your journal entry.
Step 4: Final Touches
-
Erase guidelines:
Wait a few minutes to ensure the ink is completely dry, then gently erase any visible pencil marks. -
Review contrast:
Check if any lines in your botanical drawings need thickening to stand out against the notebook’s ruled lines. Re-trace carefully if needed.
Your page is now ready to be filled with thoughts, surrounded by a peaceful garden border
Mood Tracker Made of Little Icons
Transform a simple bullet journal page into a charming galaxy of doodles with this freeform mood tracker layout. Featuring scattered stars, earthy rainbows, and simple hearts, this design allows you to fill floating space with daily emotions in a style that feels organic rather than grid-locked.
How-To Guide
Materials
- Dotted notebook or bullet journal
- Fine liner pen (black, 0.3mm or 0.5mm)
- Set of dual-tip brush pens or markers (mustard yellow, teal/slate blue, dusty pink, rust orange)
- Pencil and eraser (optional for sketching)
Step 1: Setting the Sky
-
Start with the moon:
Begin in the upper left quadrant of your page. Using your slate blue or dark teal marker, draw a small, solid crescent moon shape. Keep the curves clean and fill it in completely. -
Scatter the large stars:
Switch to your mustard yellow marker. Draw several five-pointed stars across the upper two-thirds of the page. Space them out randomly—don’t try to align them with the grid perfectly. Aim for about 5-7 large yellow stars. -
Add medium stars:
Using a dusty pink marker, draw slightly smaller five-pointed stars in the gaps between the yellow ones. Let them float naturally. -
Fill with tiny stars:
Take your teal marker again. Draw tiny four-pointed stars (just two crossed lines or a tiny diamond shape) or very small five-pointed stars to fill the remaining negative space in the upper section. -
Incorporate micro-details:
For texture, use all three colors to add very small dots or asterisks around the stars. This makes the ‘sky’ look fuller without feeling cluttered.
Grid Guide
Use the dot grid to guide the height of your stars. For example, make large stars 2 dots high and small stars 1 dot high for consistency.
Step 2: Drawing the Focal Doodles
-
Create the swirl divider:
Roughly halfway down the page, draw a horizontal Loopy line using a dark blue or black fine liner. This acts as a soft separation between the ‘sky’ area and the larger icons below. -
Draw the striped planet:
On the right side below the stars, draw a circle with your rust-colored marker. Leave thin negative space lines running horizontally through it to create stripes, or draw the circle solid and add white gel pen stripes later. -
Add the rainbow arcs:
In the middle section, draw a simple rainbow. Start with a rust-colored outer arch, then add a teal inner arch. Leave a small gap between the colors to keep the look airy. -
Sketch the outline hearts:
Using your black fine liner, draw a loose, open heart shape near the bottom center. The charm here is in the imperfection, so don’t worry if lines overlap slightly at the bottom point. -
Add solid hearts:
Draw a solid teal heart near the rainbow. Color it in completely for a bold pop of color that contrasts with the outlined doodles. -
Create the flower icons:
Near the bottom, draw a flower by making a small center dot. Radiate simple, elongated oval petals outward. Try one in teal and another in mustard yellow for variety. -
Include the patterned planet:
In the bottom right corner, draw a dark circle. Before the ink dries, or using a white gel pen afterwards, add small specks or stars inside to make it look like a view of deep space. -
Final tiny hearts:
Scatter a few tiny, solid hearts (in rust or pink) around the larger icons to tie the top and bottom sections together.
Use it as a Tracker
Assign a mood to each icon shape! Color in a star for ‘happy’ days or a heart for ‘calm’ days to slowly fill a blank page over the month.
Step 3: Finishing Touches
-
Review vertical balance:
Step back and look at the page. If the top looks too heavy compared to the bottom, add one or two more small stars near the large heart outlines. -
Add defining lines:
I like to take the black fine liner and add very subtle outlining to just one side of the rainbow or flower petals to give them a slight pop, though this is optional.
Now you have a playful, celestial spread ready to track your month.
Cut-and-Layer Notebook Collage Characters
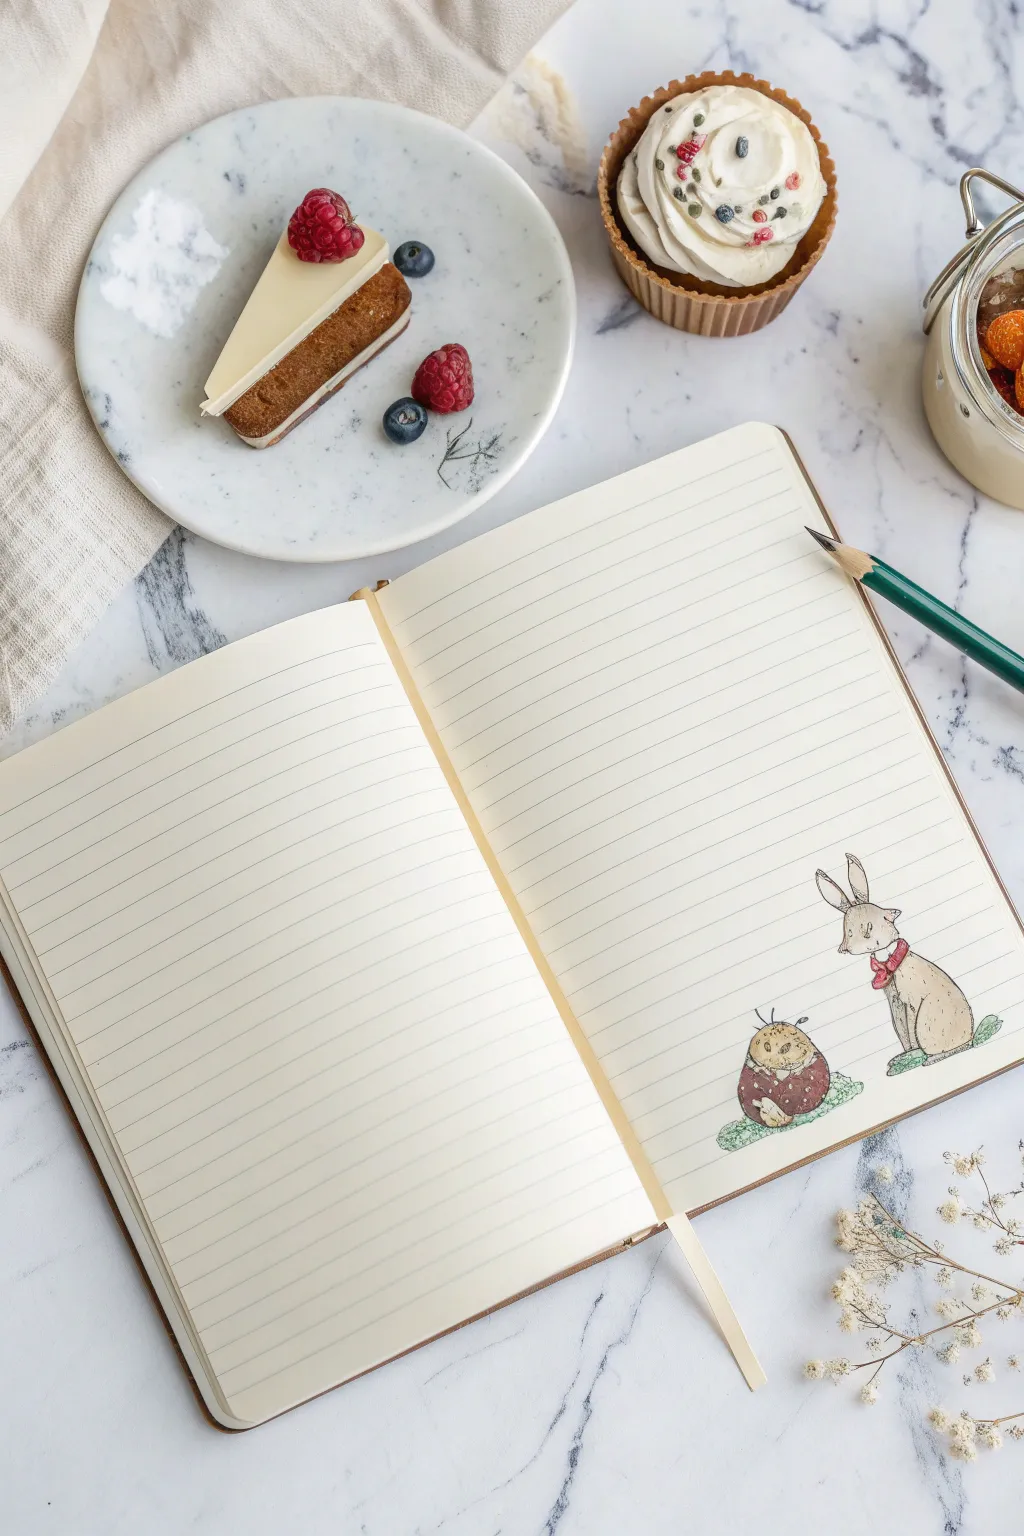
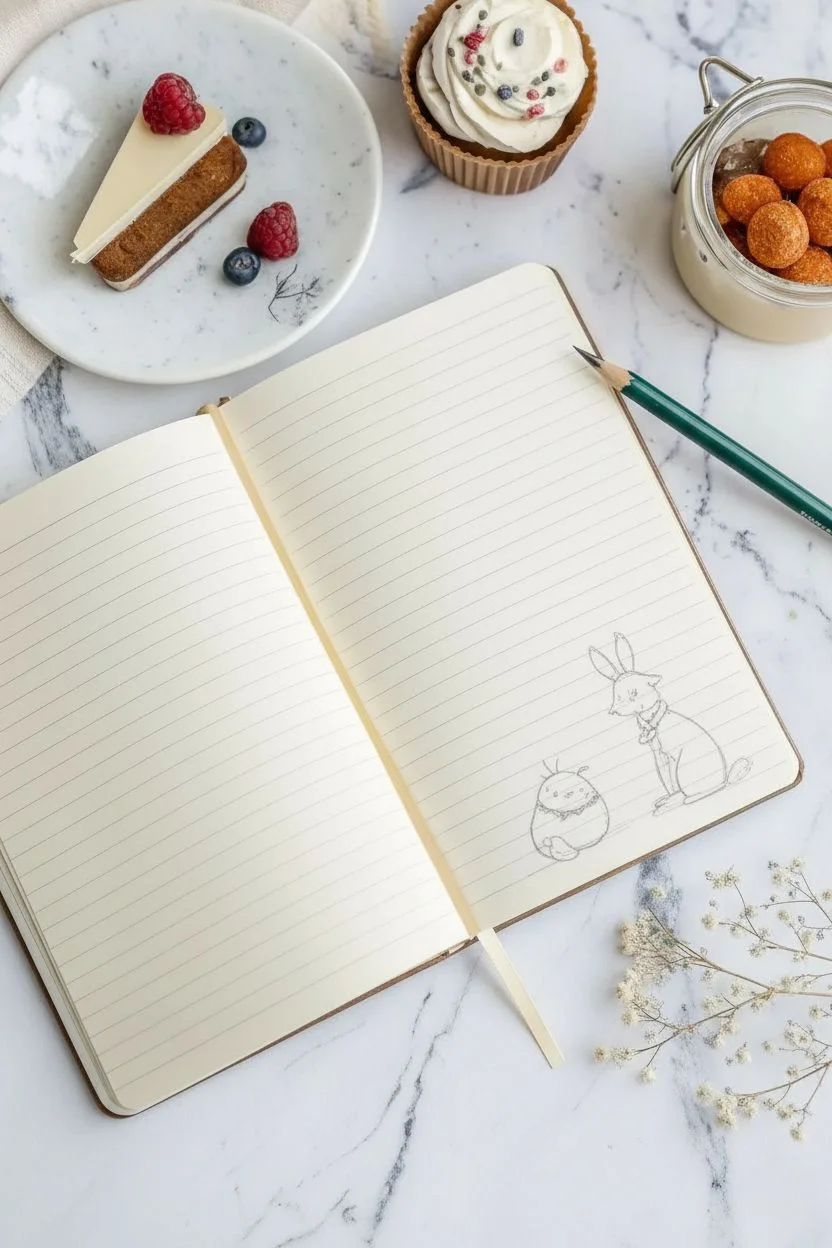
Transform a plain lined notebook page into a storybook scene with this charming illustration of a rabbit and its round little companion. This project uses soft colored pencil shading and fine ink details to create a gentle, nostalgic aesthetic perfect for journaling.
Detailed Instructions
Materials
- Lined notebook (cream paper preferred)
- HB graphite pencil
- Kneaded eraser
- Fine liner pen (0.1mm or 0.3mm, dark brown or black)
- Colored pencils (brown, tan, cream, red, green, grey)
- Sharpener
Step 1: Drafting the Shapes
-
Position the characters:
Begin on the bottom right corner of the right-hand page. Visualize where your two characters will sit—the rabbit on the right and the round creature on the left—ensuring they rest ‘on top’ of one of the printed notebook lines. -
Sketch the rabbit’s body:
Pencil in a pear-shaped oval for the rabbit’s body, leaning slightly forward. Add a smaller circle on top for the head. -
Add rabbit details:
Draw two long, upright ears extending from the head. Sketch a small, fluffy tail at the base and indicate the paws resting on the imagined ground. -
Sketch the companion:
To the left of the rabbit, draw a simple, stout egg shape for the companion creature. This character is shorter than the rabbit. -
Refine the companion:
Add tiny stick-like lines for arms and legs, and sketch a dividing line horizontally across the ‘egg’ to suggest clothes or a shell pattern.
Soft Lines Pro-Tip
Avoid purely black outlines. Using a dark brown or sepia fine liner makes the drawing feel warmer and blends better with the vintage vibe of cream paper.
Step 2: Adding Color
-
Base coat for the rabbit:
Using a light tan or cream colored pencil, gently shade the entire rabbit. Keep the pressure light to let the paper texture show through. -
Rabbit fur texture:
Take a medium brown pencil and add short, directional strokes to mimic fur, concentrating on the back, ears, and paws. -
Coloring the companion:
Color the bottom half of the round creature with a deep reddish-brown or maroon pencil. Use a lighter cream or yellow ochre for the top half. -
Adding the scarf:
Draw a small red scarf around the rabbit’s neck. Fill it in solidly with red pencil to make it pop against the neutral fur tones. -
Grounding the scene:
Use a soft green pencil to scribble small patches of grass underneath both figures. Don’t create a solid line; just scuff in some green texture to suggest turf.
Step 3: Inking and Details
-
Outline the rabbit:
Using your fine liner, carefully trace the pencil lines of the rabbit. Use broken, sketchy lines rather than one continuous stroke to keep the furry look soft. -
Define the face:
Place a small dot for the eye and a tiny ‘Y’ shape for the nose and mouth. Add three delicate whiskers on the visible cheek. -
Outline the companion:
Ink the round creature with steady lines. Add two tiny dots for eyes and little antennae or hair sprigs on top of its head. -
Enhance texturing:
I like to add tiny stippling dots with the pen on the companion’s darker ‘pants’ to give it a fabric texture. -
Final shading touches:
Go back in with a grey colored pencil and add very faint shadows on the ground directly beneath the characters to ground them. -
Clean up:
Once the ink is fully dry, gently erase any visible graphite guidelines with your kneaded eraser.
Level Up: Interactive Elements
Draw tiny speech bubbles coming from the characters. You can use these spots to write the date, the weather, or a quick mood rating for your journal entry.
Now you have a sweet little corner illustration to keep you company while you write


Have a question or want to share your own experience? I'd love to hear from you in the comments below!