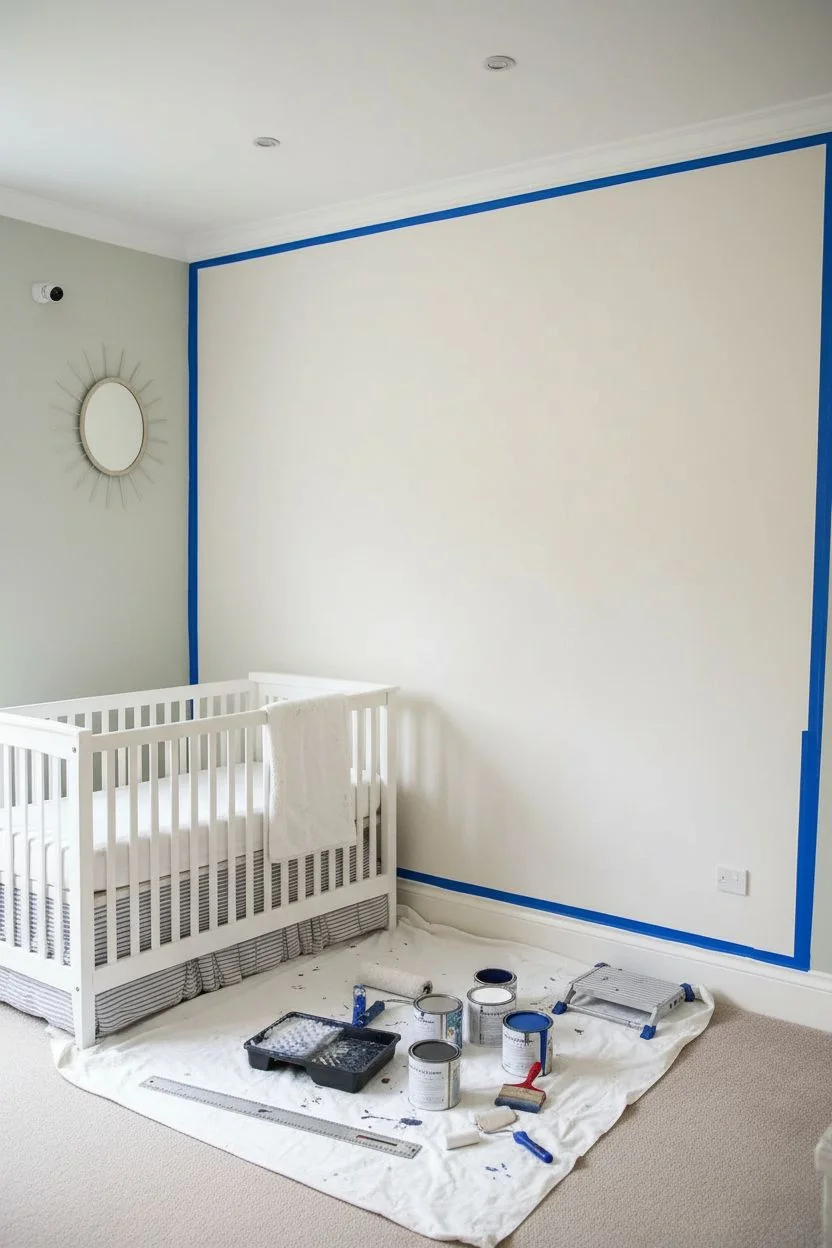
A nursery mural is basically an instant atmosphere-maker—one wall can turn the whole room into a tiny world your kiddo gets to grow up inside. I’m sharing my favorite mural themes (from classic and calming to a little more magical) so you can pick a vibe that feels just right.
Woodland Forest Feature Wall
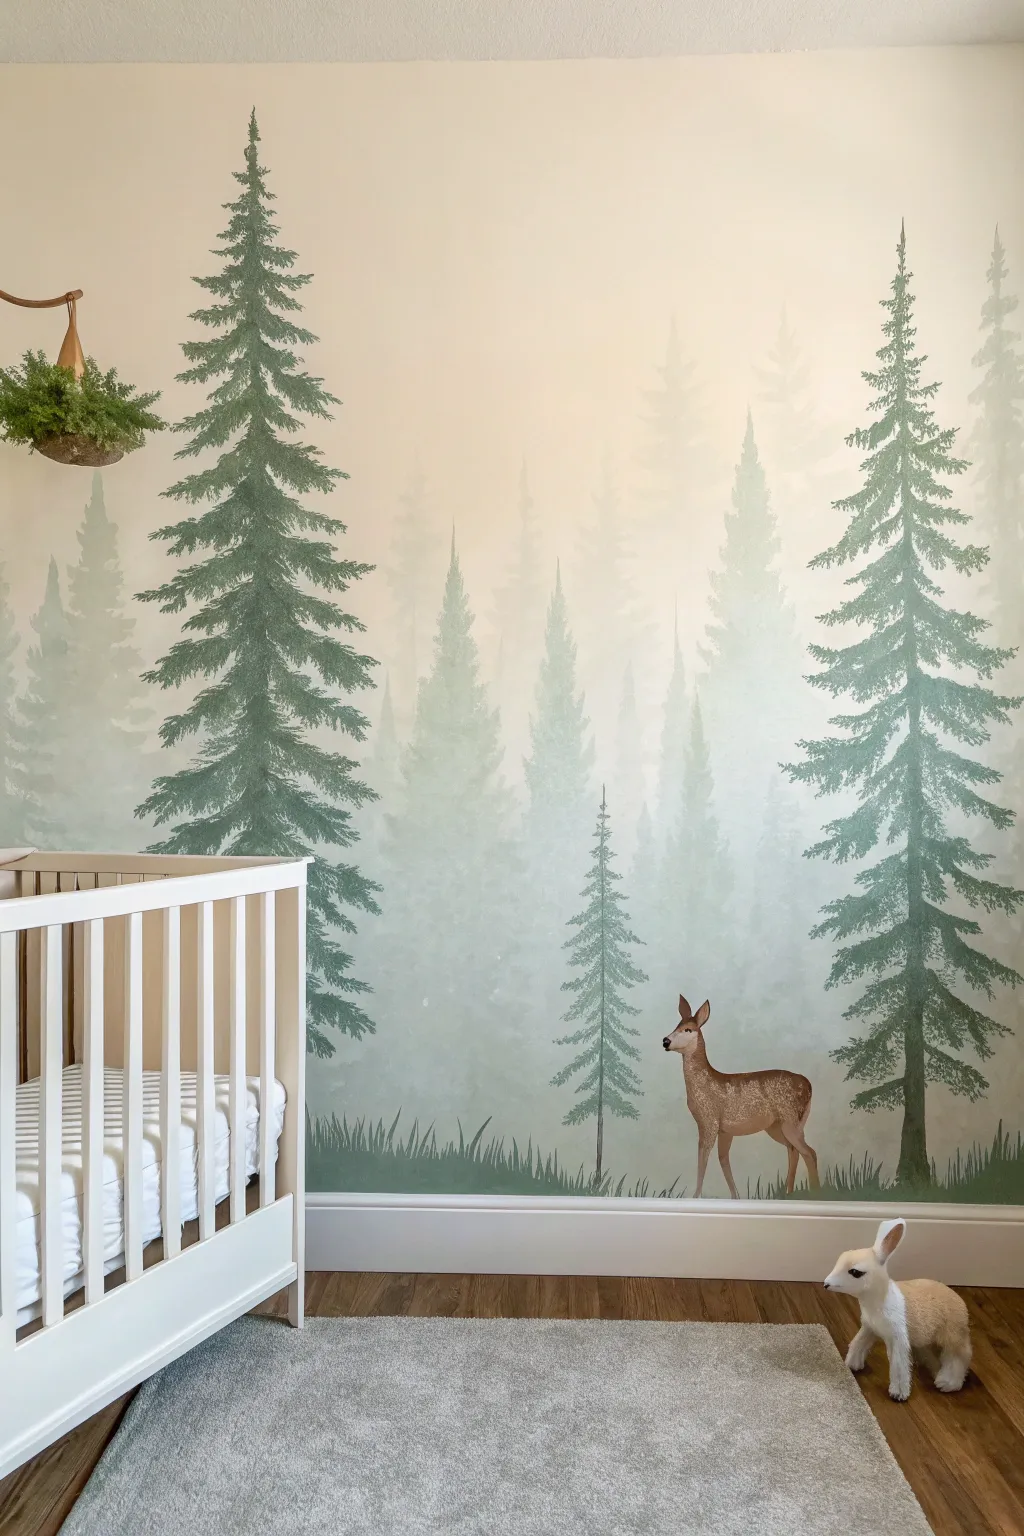
Transform a plain nursery wall into a serene forest retreat with this layered, atmospheric mural. Using a gradient technique to create depth, soft mist, and towering pines, this feature wall brings the calmness of nature indoors.
Step-by-Step Tutorial
Materials
- Interior latex wall paint (white base)
- Interior latex wall paint (dark forest green)
- Glaze medium or flow improver
- Large painter’s drop cloth
- Painter’s tape
- Paint rollers (large and mini)
- Wide paintbrush (2-3 inch)
- Fan brushes (various sizes)
- Small detail brushes
- Pencil and eraser
- Mixing cups or trays
- Sponge (optional for misting)
- Deer decal (optional) or acrylic paints for the deer (brown, tan, white, black)
Step 1: Preparation & Background
-
Prepare the space:
Clear the room of furniture or move it to the center. Cover the floor completely with a drop cloth and tape off the baseboards, ceiling line, and adjoining walls with painter’s tape to ensure crisp edges. -
Mix the mist gradient:
Create 4-5 shades of green ranging from very pale (almost white) to a medium sage. Mix your dark forest green with increasing amounts of white paint to achieve these gradations. I like to keep my darkest green pure for the final foreground trees. -
Paint the background sky:
Start with your lightest, almost-white shade. Using a roller, cover the top third of the wall. This will serve as the foggy sky and the backdrop for the most distant trees.
Uneven Fog?
If your mist looks patchy, mix 1 part white paint with 4 parts glazing liquid. Roll a very thin, translucent layer over the problematic area to soften harsh transitions.
Step 2: Creating the Misty Layers
-
Mark horizon lines:
Lightly sketch wavy, uneven horizontal lines across the wall with a pencil to mark where each layer of trees will sit. The highest line is the furthest away; the lowest line is the foreground. -
Paint the furthest tree line:
Using the second lightest green mixture and a diluted glaze, paint the first row of distant trees. Use a dry brush technique or a sponge to dab vertical shapes that taper at the top. Don’t worry about detail here; these should look like ghostly silhouettes. -
Blend the fog:
While the tree paint is still slightly wet, use a clean, dry brush to feather the bottom of the trees into the lighter background color, creating a seamless misty transition. -
Paint the middle ground:
Move down to the next horizon line. Use the medium sage mix to paint the next layer of trees. These should be larger and slightly more defined than the background layer. Use a fan brush held vertically to tap in pine branch textures. -
Add separation:
Ensure the bottom of this middle layer is lighter than the top of the next layer. If it gets too dark, glaze over the bottom third of the trees with a translucent white wash to push them back into the ‘fog’.
Pro Tip: Depth Illusion
Always paint background trees smaller and paler. As you move forward, make trees larger, darker, and more detailed. This simple size and color logic creates huge depth.
Step 3: Detailed Foreground Trees
-
Sketch the hero trees:
For the largest, darkest trees in the foreground, sketch vertical lines for the trunks to ensure they are straight. Space them out irregularly for a natural look. -
Paint the trunks:
Using your darkest forest green and a standard brush, paint the thin vertical trunks. Make them wider at the base and taper them to a fine point near the ceiling. -
Form the branches:
Switch to a fan brush or a small flat brush. Starting from the top of the tree, use downward dabbing motions to create hanging pine boughs. Keep the top branches short and widen the span as you move down the trunk. -
Add branch texture:
Reload your brush frequently to get a crisp texture on the jagged edges of the branches. Leave some gaps between branches so the lighter background layers peek through, which enhances realism. -
Ground the scene:
At the very bottom of the wall, paint a strip of grass using the dark green. Use a small brush to flick paint upward to mimic blades of grass, covering the base of the tree trunks.
Step 4: Finishing Touches
-
Position the deer:
Decide where your woodland creature will stand. If you are not confident painting animals, apply a high-quality matte vinyl decal now. If painting, lightly sketch the outline of the deer standing in the grass. -
Underpaint the deer:
Block in the deer’s shape with a solid coat of tan or light brown acrylic paint. Let this dry completely before adding shadows. -
Detail the animal:
Use a darker brown for the back and legs, and white for the underbelly and inner ears. Use a fine liner brush for the eye and nose details. -
Final inspection:
Step back to view the whole wall. If any areas look too sparse, add a small sapling or extra grass blades. Remove tape carefully while the paint is barely tacky to avoid peeling.
Enjoy the peaceful atmosphere your new forest mural brings to the room.


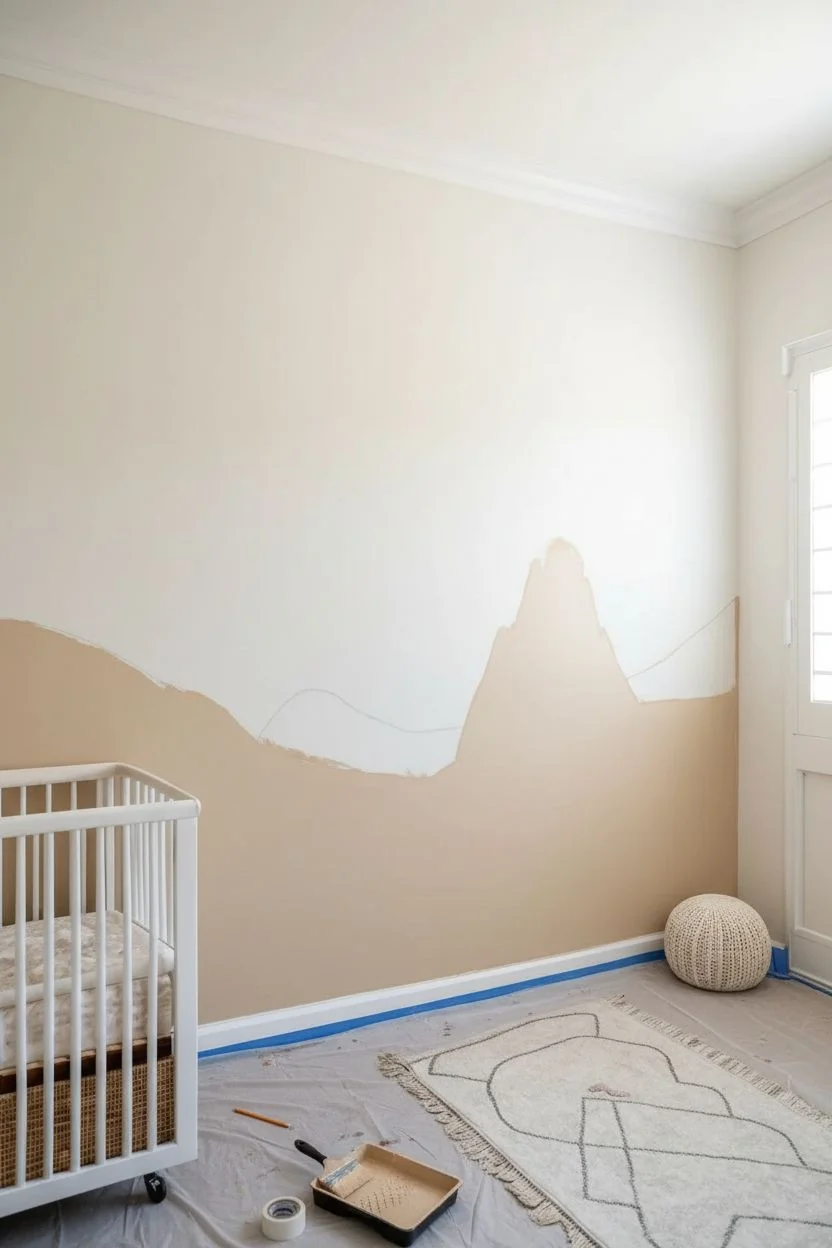
Misty Mountain Landscape in Soft Neutrals
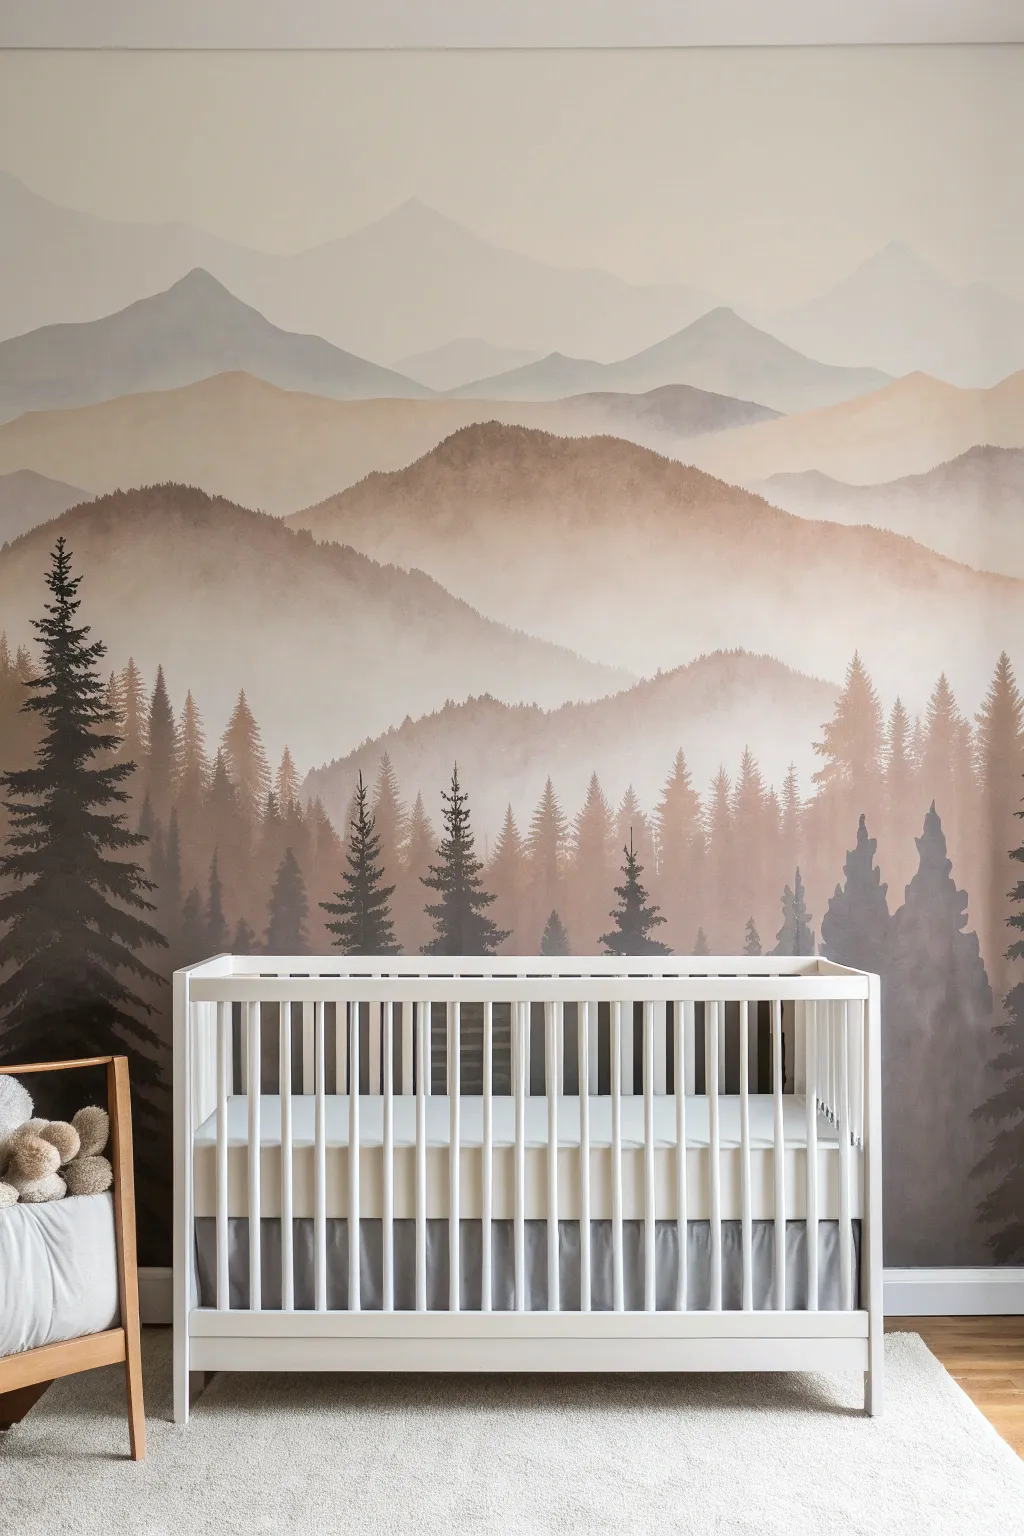
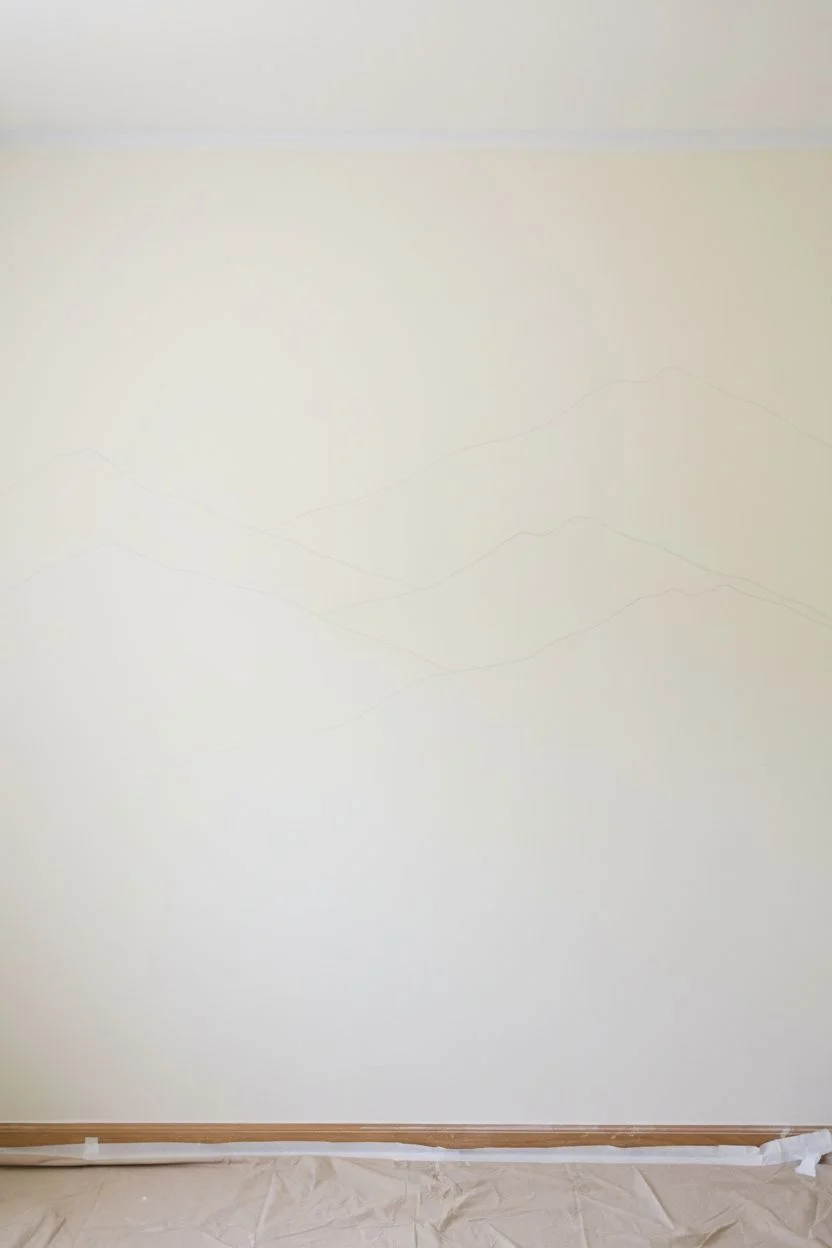
Transform a blank nursery wall into a serene escape with this watercolor-inspired mountain landscape. By layering soft neutrals from light to dark, you can create a stunning depth that feels both modern and peaceful.
How-To Guide
Materials
- Latex wall paint in 5 shades (cream, light beige, taupe, warm grey, dark charcoal)
- Glaze medium or water for thinning paint
- Large watercolor brush (synthetic blend)
- 4-inch flat paintbrush
- 2-inch angled sash brush
- Painter’s tape
- Drop cloth
- Pencil
- Spray bottle with water
- Clean rags
- Step ladder
Step 1: Planning & Preparation
-
Prepare the canvas:
Begin by clearing the wall completely. Patch any holes, sand them smooth, and wipe the wall down with a damp cloth to remove dust. Tape off your baseboards, ceiling line, and adjacent walls. -
Establish the base layer:
Paint the entire wall with your lightest color—the cream or off-white shade. This will serve as the sky and the glowing mist between the mountain ranges. Let this base coat dry completely. -
Sketch the horizon lines:
Using a pencil very lightly, draw the rolling outlines of your mountain ranges. Start about 1/3 down from the ceiling for the most distant peak. Draw 3-4 distinct layers, ensuring they overlap naturally without being perfectly symmetrical.
Wet-Edge Wonder
Work quickly in sections! Keeping a ‘wet edge’ is crucial for smooth gradients. If paint dries mid-section, you’ll get hard lines instead of mist.
Step 2: Painting the Distant Peaks
-
Mix the first glaze:
For the furthest mountains (the ones highest on the wall), mix your light beige paint with a generous amount of glaze medium or water (about 50/50 mix). You want this layer to be translucent and ethereal. -
Paint the top ridge:
Use the angled sash brush to cut in the top edge of your highest mountain range. Work in sections of about 2-3 feet at a time so the paint stays wet. -
Create the misty fade:
While the paint is still wet, use a damp rag or a clean, wet brush to drag the color downward, fading it out into the cream background before you reach the pencil line of the next mountain layer below. -
Soften the edges:
Before the paint dries, mist it lightly with your spray bottle if needed, and use a large, dry brush to gently feather out the bottom edge, creating that foggy, indistinct look.
Metallic Magic
Mix a tiny drop of gold metallic paint into your glaze for just the sun-facing slopes of the mountains to catch the light beautifully.
Step 3: Adding Mid-Ground Layers
-
Darken the mixture:
Move to the next mountain range down. Mix your taupe paint with slightly less glaze (about 70/30 paint-to-glaze ratio). These mountains should be a bit more defined and opaque than the top layer. -
Paint the mid-range peaks:
Follow your pencil guide to paint the top edge of this second layer. I find that overlapping the faded bottom of the previous layer slightly helps build that sense of distance. -
Blend downward again:
Just like before, pull the paint downward, feathering it out as you go lower. The color should be strongest at the peak and almost invisible at the base of this section. -
Add texture detail:
While the mid-layer is drying but still tacky, use a dry brush to lightly stipple or dabbing motion in a few areas to suggest rugged terrain or distant trees without painting distinct shapes.
Step 4: Foreground & Trees
-
Prepare the darkest shade:
For the closest mountain layer and the trees, use your dark charcoal or deepest warm grey. Use this paint full strength or with very little water for maximum contrast. -
Paint the foreground ridge:
Paint the lowest rolling hills first, keeping the top edge crisp against the misty mid-ground. Fill in the area solidly down to the baseboard. -
Practice tree shapes:
Before hitting the wall, practice your pine trees on cardboard. Start with a vertical line for the trunk, then use quick, horizontal dabs that get wider as you move down. -
Paint the large anchor trees:
Start with the largest trees on the far left or right. Use a smaller artist’s brush or the tip of your angled brush to create the detailed pine branches. Vary the height and width to keep it organic. -
Fill in the forest:
Add smaller, fainter trees in the background of this dark layer by mixing a little of your mid-tone taupe with the charcoal. This creates a dense forest effect. -
Refine the mist:
Once the trees are dry, if they look too stark, create a very watery wash of your cream wall color and lightly glaze over the bottom third of the trees to ‘sink’ them into the fog. -
Final touches:
Step back and look for any hard lines in the sky or mid-ground. Use a damp sponge to gently soften any areas that distract from the dreamy atmosphere.
Now step back and admire the calm, majestic view you’ve brought indoors


Undersea Scene With Whales, Coral, and Bubbles
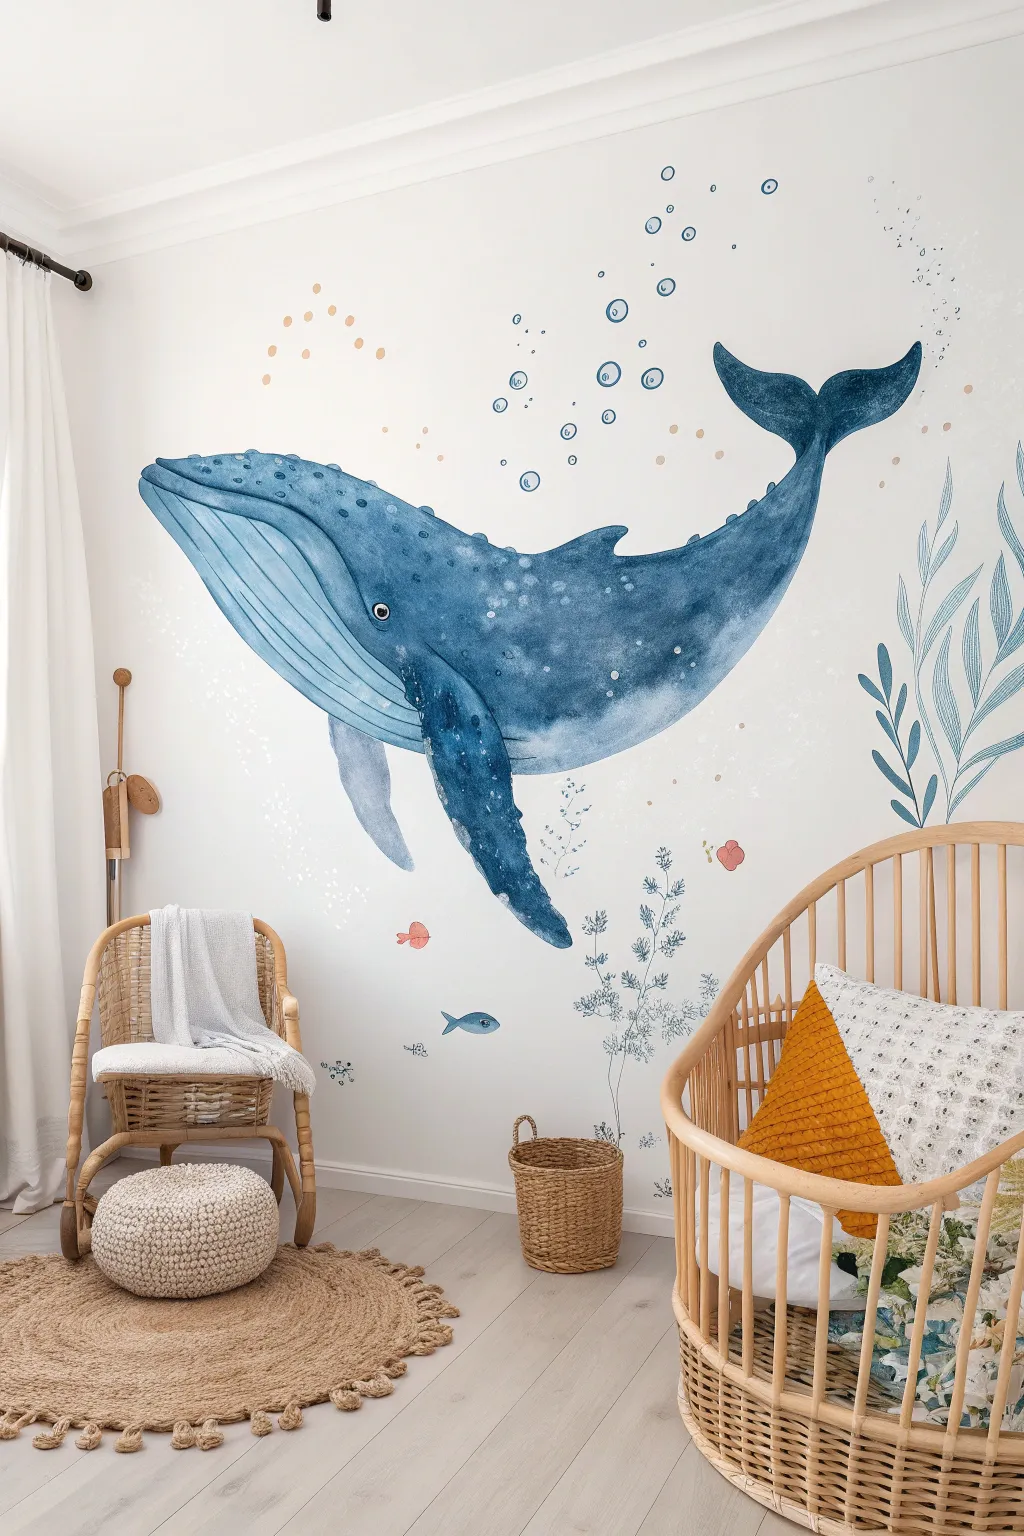
Transform your nursery into a serene underwater escape with this breathtaking whale mural. The soft blues and watercolor textures create a calming atmosphere perfect for lulling little ones to sleep.
How-To Guide
Materials
- Interior wall paint (white or off-white base)
- Pencil and large eraser
- Watercolor-effect wall decals (whale, bubbles, seaweed) OR acrylic paints and glazing medium
- Clear matte varnish (optional)
- Painter’s tape
- Drop cloths
- Soft synthetic brushes (various sizes: large wash, medium round, fine liner)
- Sea sponge (natural texture)
- Water containers and mixing palette
- Ladder or step stool
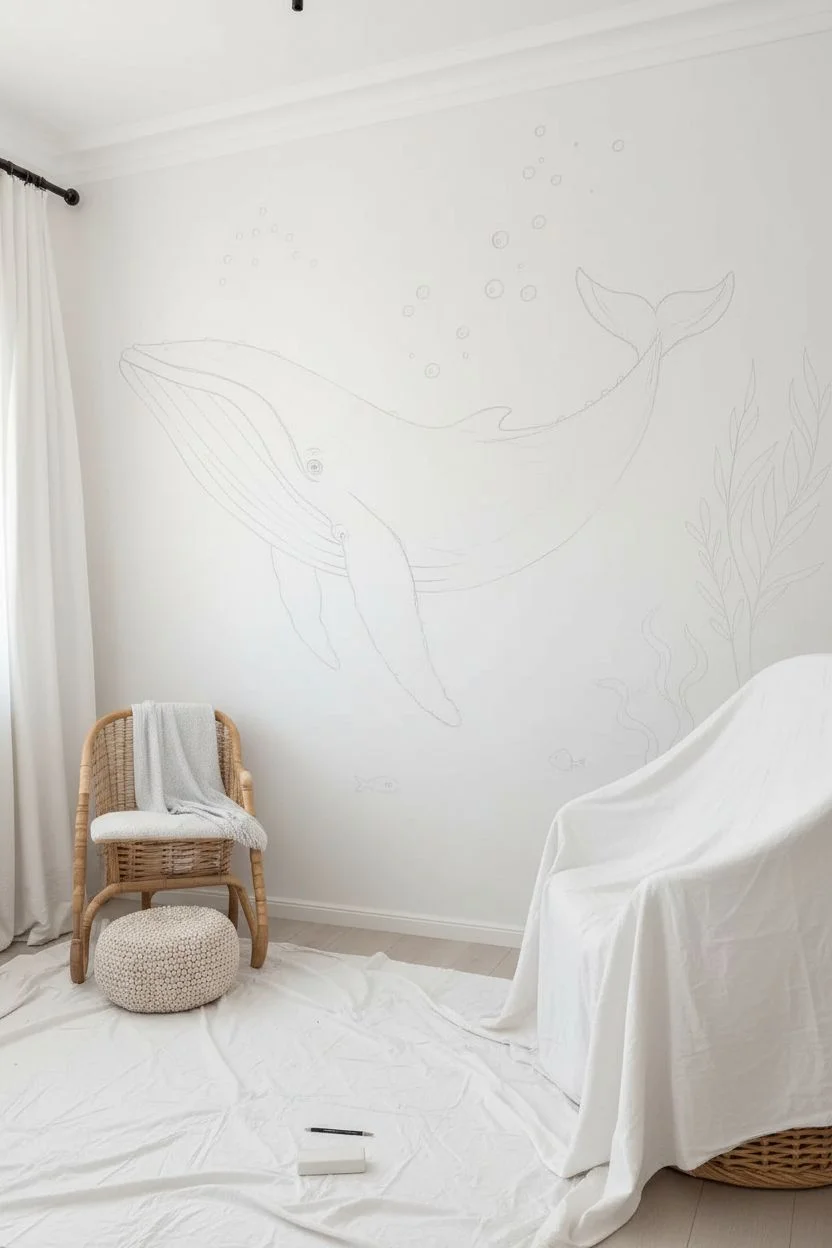
Step 1: Preparation and Planning
-
Clear the space:
Begin by removing all furniture, like the crib and chairs, away from the wall to give yourself ample working room. Lay down drop cloths to protect your flooring. -
Clean the surface:
Wipe down the wall with a damp cloth and mild soap to remove any dust or oils. A clean surface ensures your paint or decals adhere perfectly. -
Sketch the layout:
Lightly sketch the position of your whale using a pencil. Since the whale is the focal point, place it centrally but slightly angled upwards to create a sense of movement. Mark rough spots for bubbles and plant life.
Decal Shortcut
Not confident painting? Buy a high-quality, large-scale watercolor wall decal set. They often come in pieces, allowing you to customize the layout without a single drop of paint.
Step 2: Creating the Whale (Painting Option)
-
Mix your base color:
If painting by hand, mix a deep cobalt blue acrylic paint with a generous amount of glazing medium. This is crucial for achieving that translucent, watercolor look on a solid wall. -
Paint the body outline:
Using a medium round brush, carefully outline the whale’s shape. Keep the lines fluid and organic rather than rigid. -
Fill with a wash:
Use a large wash brush to fill in the body. Don’t aim for solid coverage; vary the pressure to leave lighter areas, mimicking the natural variation of watercolor pigment on paper. -
Add texture while wet:
While the blue glaze is still tacky, blot areas with a damp sea sponge. This lifts some pigment and adds a beautiful, uneven texture resembling skin or water refraction. -
Detail the underbelly:
Switch to a lighter blue-grey mix for the whale’s pleated underbelly. Paint long, sweeping lines that follow the curve of the body from the ‘chin’ toward the tail. -
Paint the fins:
Fill in the side fin and tail flukes. For the side fin, make the leading edge darker and fade out significantly towards the rear edge to suggest transparency. -
Add speckles:
Mix a slightly darker indigo shade. Use a small brush to dab tiny irregular spots along the top of the head and back, creating that classic humpback texture. -
Define the eye:
With a fine liner brush and black paint, add the small eye just above the corner of the mouth. A tiny dot of white in the center brings it to life.
Step 3: Adding Underwater Elements
-
Paint the bubbles:
Dip a circular object (like a bottle cap or spool) into diluted white or pale blue paint and stamp circles rising from the whale. Hand-paint a few uneven ones for variety. -
Create the seaweed:
Using a diluted teal or grey-blue glaze, paint tall, wavy vertical stalks rising from the bottom right corner. Press down and lift up with your brush to create leaf shapes. -
Add accent fish:
Paint tiny silhouettes of fish in coral or soft terra cotta tones. Keep these simple—just basic shapes—to ensure they don’t distract from the main whale. -
Splatter effect:
Load a toothbrush with watery white or pale grey paint and gently flick the bristles to create a spray of fine mist around the whale’s movement path.
Add Dimension
Glue small polished wooden half-spheres or clear glass gems over the painted bubbles to make them pop off the wall and catch the light.
Step 4: Finishing Touches
-
Review and refine:
Step back to the far side of the room. Look for any areas that feel too heavy or empty. You can soften harsh edges by rubbing them gently with a damp cloth. -
Seal the work:
Once the paint is fully cured (usually over 24 hours), apply a clear matte varnish over the painted areas if the mural is in a high-traffic zone, though this is optional for higher wall sections. -
Reassemble the room:
Move your crib and furniture back into place, arranging them so they frame the mural without blocking the whale’s face.
Now you have a stunning, peaceful backdrop ready for years of bedtime stories and sweet dreams.


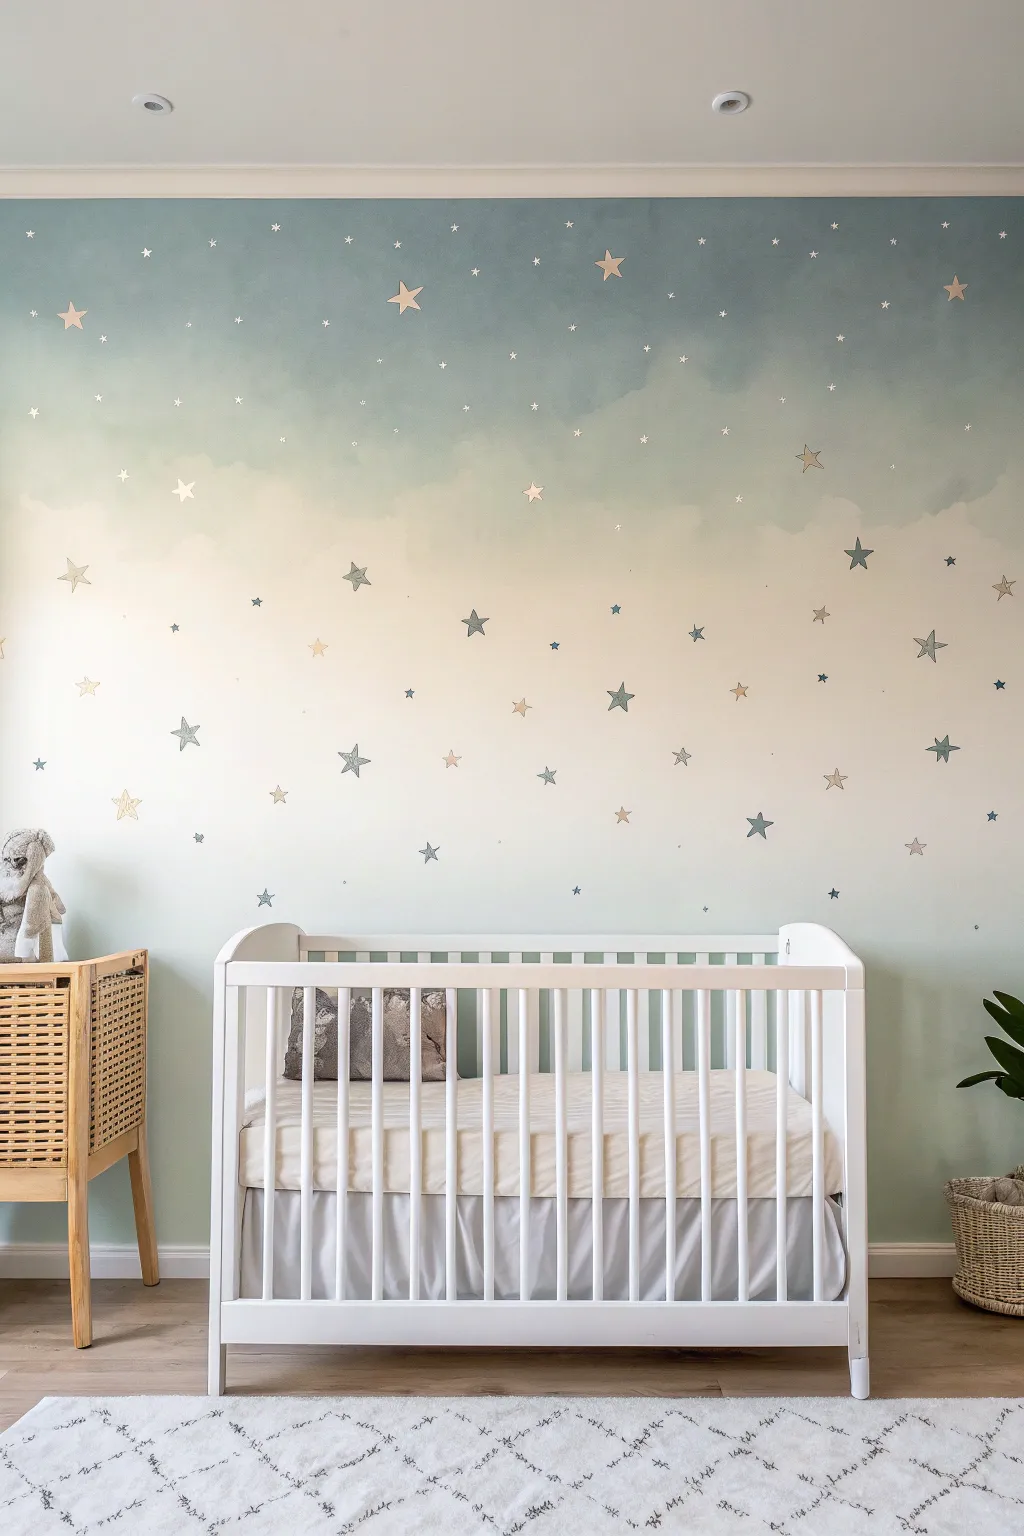
Starry Night Sky With Moon and Constellations
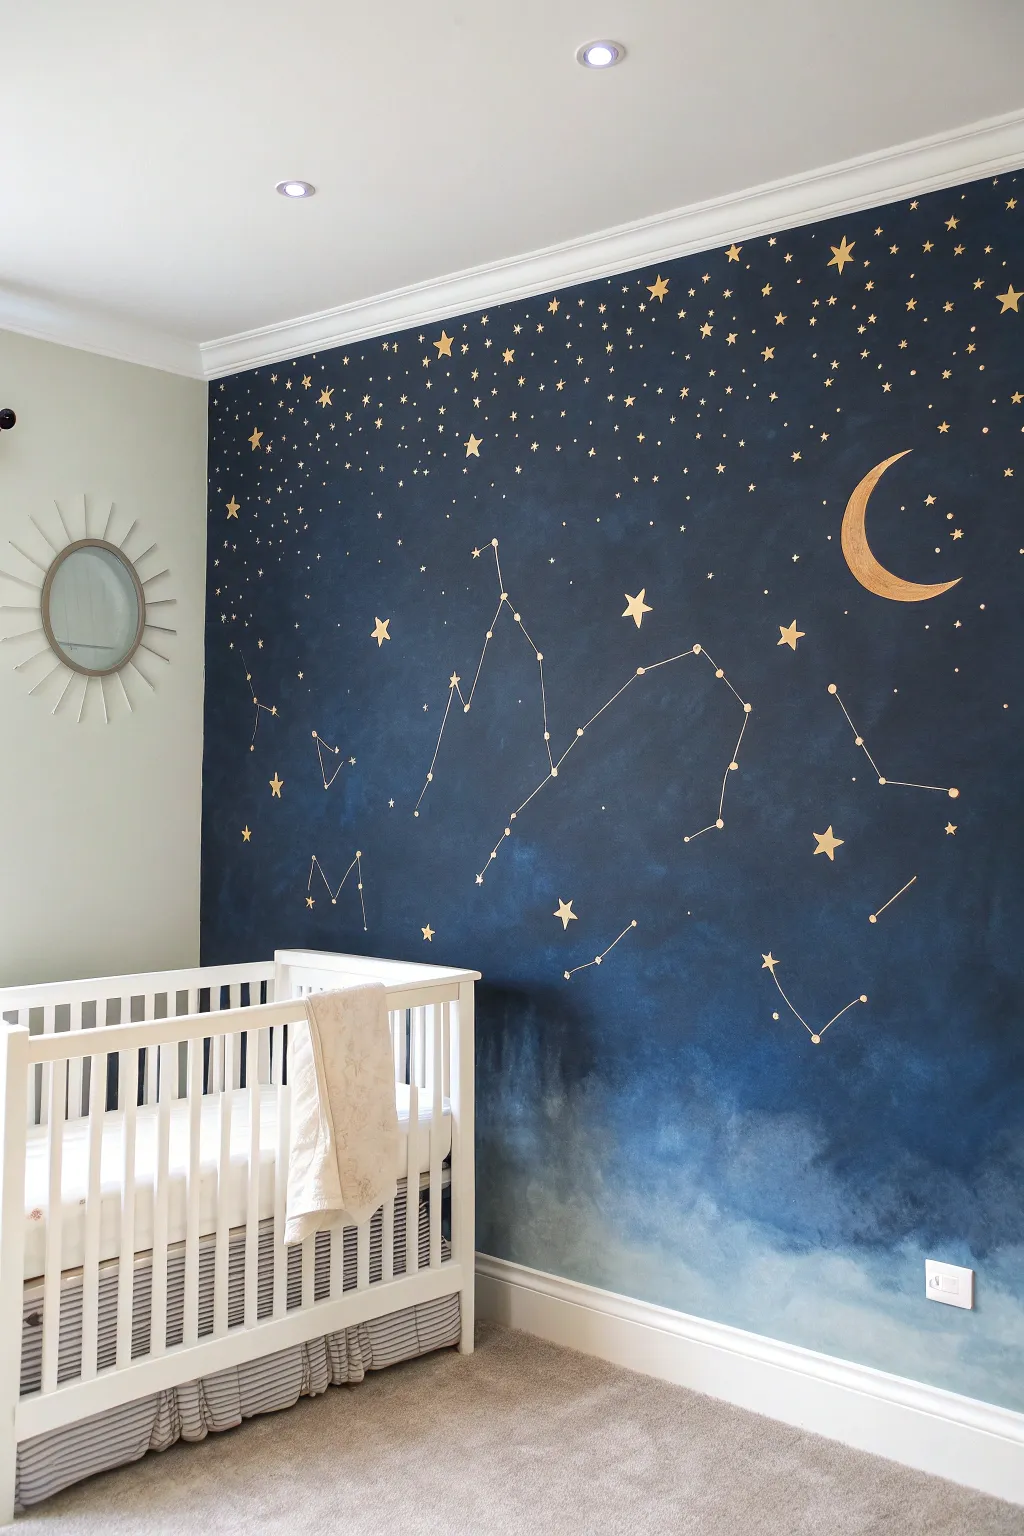
Transform a nursery wall into a magical gateway to the cosmos with this stunning celestial mural. Featuring a deep, ombre-style night sky that fades into cloudy mists, this project uses gold accents to bring the stars and moon to life right in your own home.
Detailed Instructions
Materials
- Interior wall paint (Navy Blue, Deep Royal Blue, Light Steel Blue, White)
- Metallic gold paint
- Painter’s tape
- Drop cloth
- Paint rollers (large and small)
- Wide blending brush or large sponge
- Detail brushes (fine tip and small round)
- Chalk or pencil
- Ruler or straight edge
- Star stencil (optional)
- Ladder
Step 1: Preparing the Canvas
-
Room Prep:
Clear the area of furniture, including cribs and changing tables, to give yourself ample working space. Lay down a drop cloth to protect your carpet or flooring from any potential drips. -
Tape Edges:
Apply painter’s tape along the ceiling line, skirting boards, and adjacent walls. Ensure a tight seal by running your finger or a plastic card firmly along the tape edge to prevent bleed-through. -
Base cleaning:
Wipe down the wall with a damp cloth to remove dust or oils, ensuring the paint adheres perfectly. Let it dry completely before starting any painting.
Watercolor Wisdom
Mix a clear glaze medium into your latex paint for the blending phase. It keeps the paint wet longer, giving you more time to create that perfect smoky ombre transition.
Step 2: Creating the Ombre Sky
-
Mapping the Gradient:
Visualize the wall in horizontal thirds. The top third will be your darkest navy, the middle a royal blue transition, and the bottom a lighter steel blue fading into white mist. -
Applying the Darkest Blue:
Using a roller, apply the darkest Navy Blue paint to the top third of the wall. Don’t worry about a perfect bottom edge; an uneven line helps with blending later. -
Applying the Mid-Tone:
While the top is still slightly wet (if possible), or just after, roll the Deep Royal Blue across the middle section of the wall. Overlap slightly with the Navy Blue section above. -
Blending the Upper Transition:
Take a clean, dry brush or a damp sponge. Work the area where the Navy and Royal Blue meet, using crisscross strokes or a stippling motion to blur the hard line into a soft gradient. -
Applying the Lightest Tones:
Roll the Light Steel Blue onto the bottom third. Immediately mix in some white paint directly on the wall or on your tray for the very bottom area near the skirting board. -
Creating the Cloudy Effect:
Use a large sponge or soft blending brush to swirl the white and light blue paints together at the bottom. Use circular, cloud-like motions to create that ethereal, misty look seen in the photo. -
Final Blending Check:
Step back to view the gradient as a whole. If any lines look too harsh, use a slightly damp brush to soften the transitions while the paint is tacky. Let the entire wall dry completely, preferably overnight.
Glow Up
Mix glow-in-the-dark additive into your white paint for the tiniest stars. During the day it looks normal, but at night the galaxy will softly glow for the little one.
Step 3: Adding Celestial Details
-
Sketching the Constellations:
Using a piece of chalk, lightly sketch out your desired constellation patterns. You can copy real ones like Ursa Major or Cassiopeia, or create whimsical shapes. Use a ruler to help visualize the connecting lines. -
Positioning the Moon:
Sketch a large crescent moon shape on the upper right side of the wall. I find drawing a full circle first and then erasing the inner curve helps get the crescent shape proportionate. -
Painting the Moon:
Fill in your moon sketch with metallic gold paint using a small flat brush. You may need two coats for a solid, shimmering opacity. -
Connecting the Stars:
With a fine liner brush and slightly thinned metallic gold paint (or a gold paint pen), carefully trace over your chalk lines to connect the constellation stars. -
Adding Main Stars:
At the points where your lines connect, paint larger accent stars. You can do simple five-point stars or diamond shapes. Make these slightly bigger than the surrounding background stars. -
Sprinkling the Background Stars:
Dip a small round brush into the gold paint and dot random stars throughout the upper dark sections. Vary the pressure to create different sized dots for a sense of depth. -
Tiny Star Clusters:
Dip an old toothbrush or stiff bristle brush into thinned gold or white paint. Run your thumb over the bristles to flick tiny specks of ‘stardust’ onto the darkest parts of the wall. -
Adding Dimension:
For a magical touch, add tiny white highlights to the center of your largest gold stars. This makes them appear to twinkle. -
Final Cleanup:
Once all paint is fully dry, gently wipe away any remaining visible chalk lines with a damp cloth and peel off the painter’s tape carefully.
Now you have a serene, custom-painted galaxy ready to inspire sweet dreams and starry adventures
BRUSH GUIDE
The Right Brush for Every Stroke
From clean lines to bold texture — master brush choice, stroke control, and essential techniques.
Explore the Full Guide
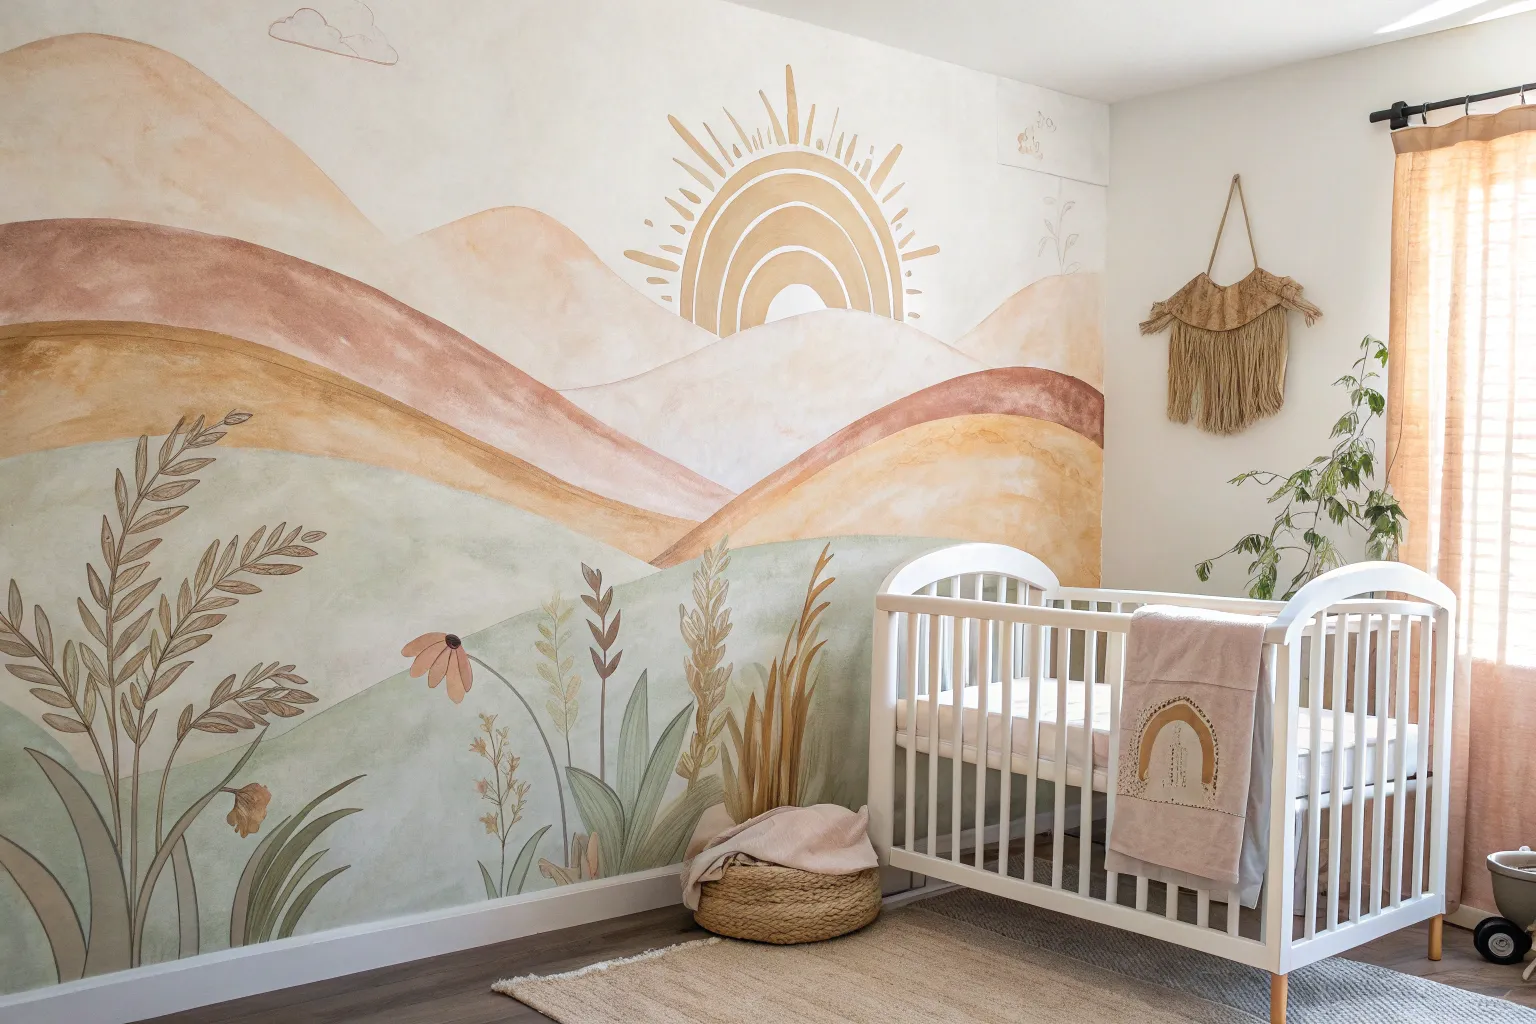
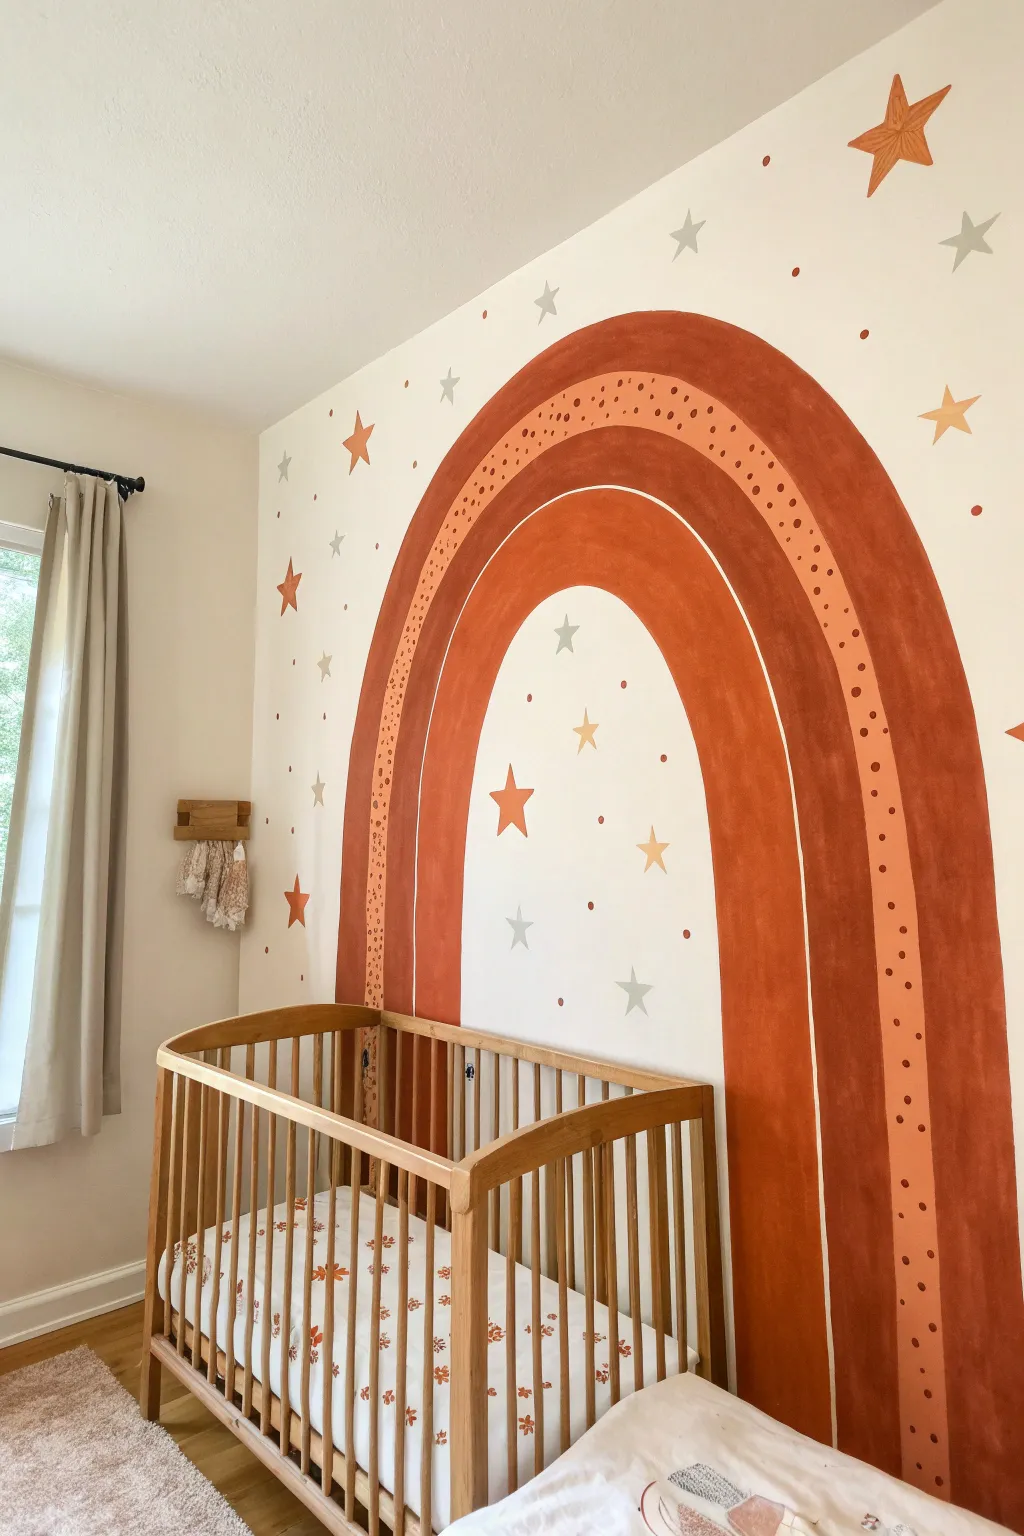
Soft Rainbow Arches in a Minimal Palette
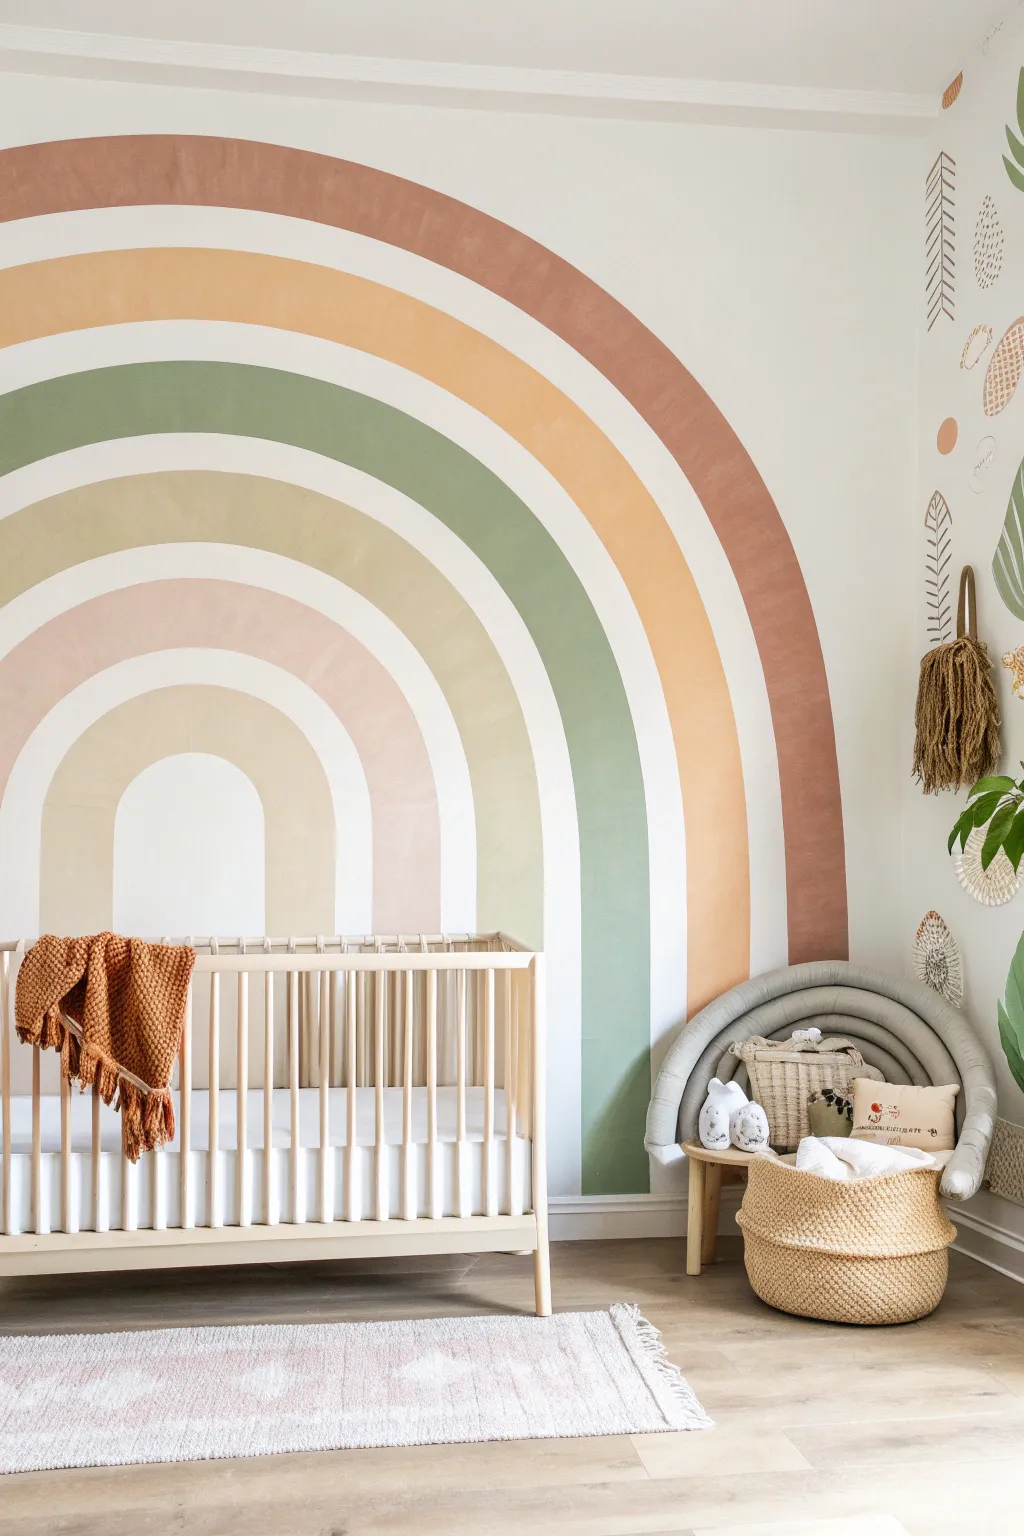

Transform a blank nursery wall into a stunning focal point with this large-scale arched rainbow mural. Featuring a soothing palette of terracotta, mustard, sage, and blush, these soft, organic shapes bring a calm and modern warmth to the room.
Step-by-Step
Materials
- Latex interior wall paint (terracotta, mustard yellow, sage green, beige, soft blush)
- White latex wall paint (for base color)
- Pencil
- String or twine
- Push pin or tack
- Level (optional but helpful)
- Painter’s tape
- 1.5-inch angled sash brush
- 2-inch flat brush
- Small artist brush (for touch-ups)
- Drop cloth
- Eraser
Step 1: Setting the Foundation
-
Prepare the workspace:
Clear the area against the wall where you plan to paint. Lay down a drop cloth to protect your flooring from any accidental drips. -
Establish the center point:
Decide how wide and tall you want your largest arch to be. The center point should be at the very bottom, right against the baseboard. Mark this spot with a pencil; this will be your anchor for all the arches. -
Create a compass tool:
Cut a piece of non-stretchy string slightly longer than the height of your largest desired arch. Tie one end securely around a pencil. -
Anchor the compass:
Place a push pin or have a helper hold the free end of the string firmly at your center mark on the floor (or just above the baseboard).
Step 2: Drafting the Arches
-
Draw the outer line:
Pull the string taut and lightly trace the largest semicircle on the wall, moving from one side of the floor to the other. Keep your hand steady and the tension consistent. -
Measure the stripe width:
Decide on the thickness of your colored bands. For this look, roughly 5-6 inches works well. Shorten your string by that amount to draw the inner line of the first arch. -
Draw the gap:
Shorten the string again by about 2-3 inches to create the negative white space between the colored arches. Draw this third line. -
Complete the sketching:
Continue this alternating pattern—shortening the string for a colored band, then a gap, then another band—until you have outlined all five nested arches. -
Extend vertical lines:
Since the semicircle won’t likely hit the floor perfectly straight on the sides, use a level or a straight edge to extend the ends of your arches vertically down to the baseboard.
Wobbly Lines?
Don’t panic if your curves aren’t perfect! Use a small angled brush dipped in your white wall paint to ‘cut in’ and reshape the edges. It acts like an eraser for paint.
Step 3: Painting the Colors
-
Start with the outer ring:
Dip your 2-inch flat brush into the terracotta paint. I find it easiest to outline the edges carefully first, creating a crisp line along your pencil marks. -
Fill in the first band:
Once the edges are defined, fill in the rest of the outermost arch. Use smooth, long strokes to follow the curve of the rainbow. -
Move to the second color:
Skip the gap (leave it white) and move to the second arch for the mustard yellow tone. Use the angled sash brush here if you need more control on the tighter curves. -
Paint the middle arch:
Apply the sage green paint to the third band. Be patient with the curves; rotating your wrist as you follow the arc helps maintain a smooth edge. -
Apply the smaller arches:
Paint the fourth band in beige and the smallest, final center arch in the soft blush pink. The innermost arch is often the trickiest, so take your time. -
Second coats:
Allow the first layer of paint to dry completely according to the can’s instructions. Apply a second coat to ensure rich, opaque color coverage.
Add Texture
For a trendier, tactile finish, mix a texture additive like suede paint or a bit of baking soda into your colored paints before applying to give the rainbow a plaster-like look.
Step 4: Refining Details
-
Clean up the edges:
Once the colored paint is fully dry, inspect your lines. Use a small artist brush and white paint to tidy up any wobbles or spots where the color bled into the negative space. -
Erase visible marks:
Gently erase any remaining pencil marks that weren’t covered by paint, particularly in the white gaps between the arches. -
Remove tape and finish:
If you used any painter’s tape at the baseboards, peel it off slowly at a 45-degree angle to reveal a clean bottom edge.
Step back and admire how this simple geometric design completely softens the atmosphere of the nursery
Wildflower Meadow With Oversized Blooms
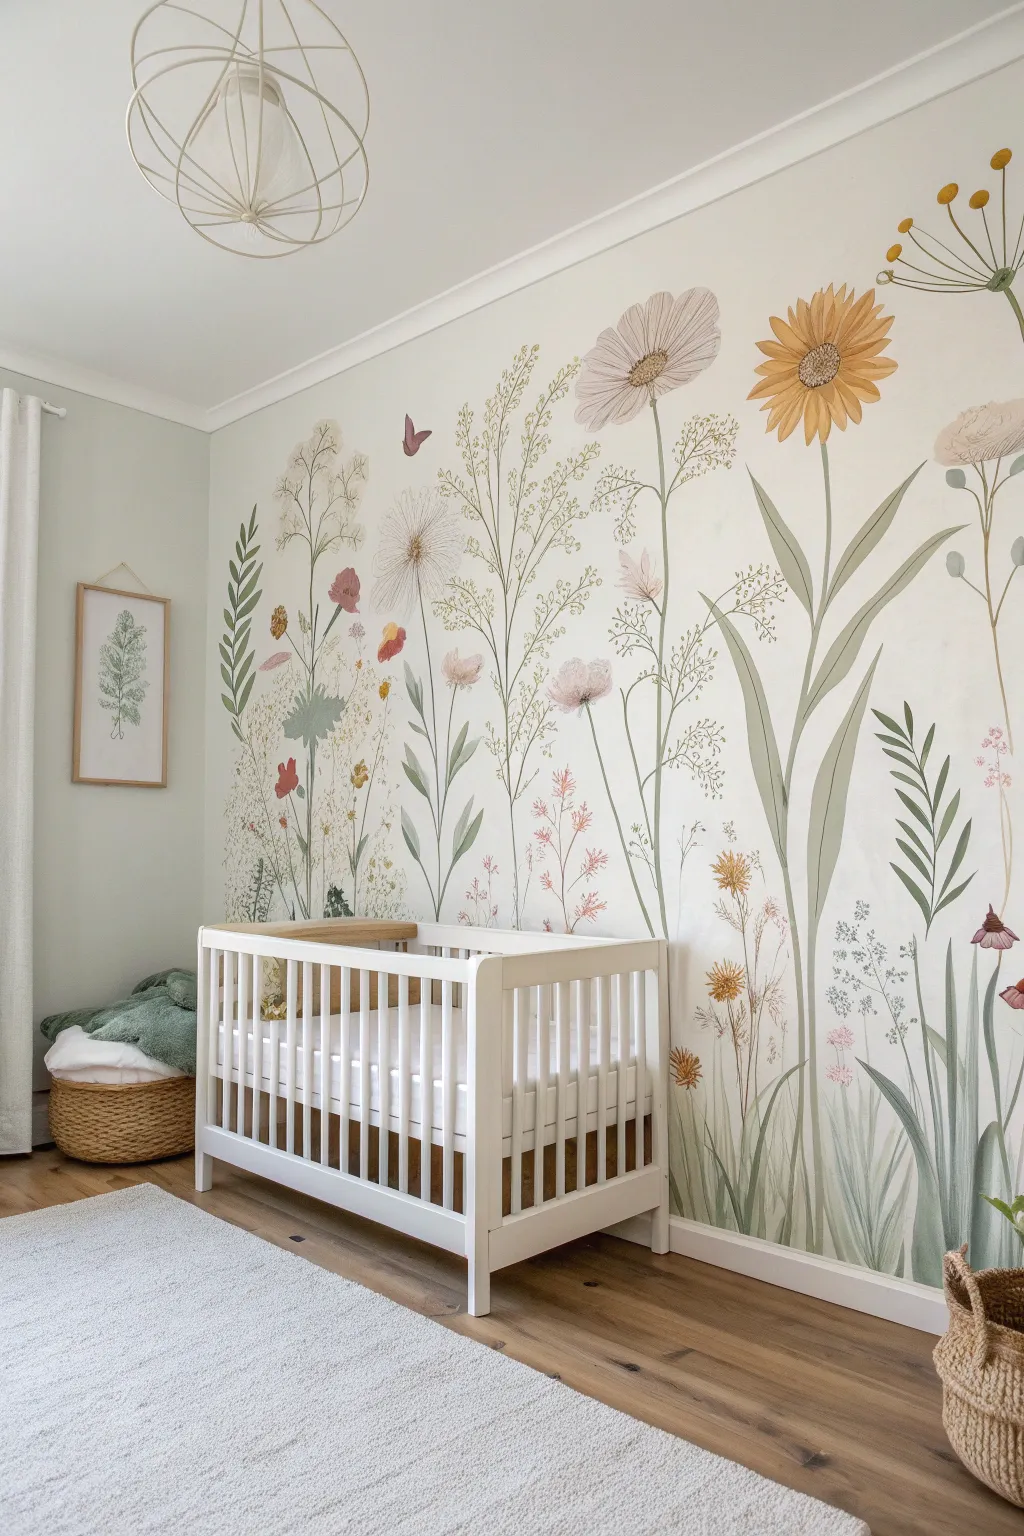
Bring the serene beauty of the outdoors inside with this breathtaking wildflower mural, featuring oversized blooms and delicate grasses. The soft, watercolor-inspired technique creates an airy, organic atmosphere perfect for a peaceful nursery setting.
Step-by-Step Tutorial
Materials
- Interior latex paint (Eggshell finish: White/Off-white for base)
- Acrylic paints (Soft Sage Green, Olive Green, Pale Pink, Mustard Yellow, Cream, Dusty Rose)
- Glaze medium (clear)
- Pencil (HB or similar light graphite)
- Eraser
- Assorted synthetic brushes (1-inch flat, #6 round, #2 liner)
- Water cups and paper towels
- Painter’s tape
- Drop cloth
- Step ladder
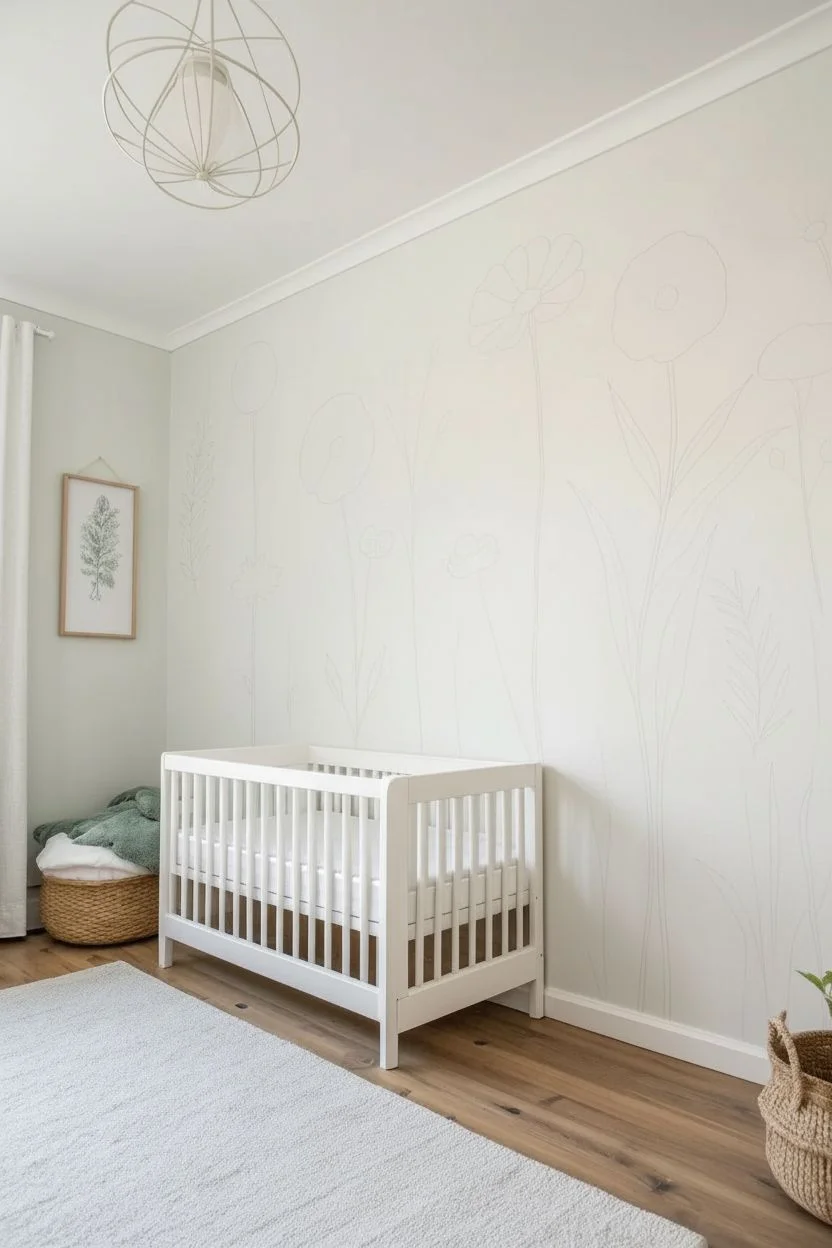
Step 1: Preparation and Sketching
-
Prepare the canvas:
Begin by clearing the wall and laying down a drop cloth. Apply a fresh coat of soft white or off-white eggshell interior paint to create a clean, luminous background that mimics watercolor paper. -
Draft the composition:
Once the base is fully dry, lightly sketch the layout of your flower stems using a pencil. Aim for varied heights—some reaching almost to the ceiling, others staying low—to create a natural meadow rhythm. Don’t worry about perfect straight lines; organic curves look best. -
Outline the blooms:
Sketch basic circles and oval shapes at the tops of your stems where the flower heads will go. Include a mix of shapes: wide daisies, fluffy dandelions, and bell-shaped droopers.
Fixing Heavy Hands
If a paint stroke looks too solid or dark, quickly dab it with a damp paper towel while wet. This lifts pigment and restores the translucent, airy watercolor look instantly.
Step 2: Painting the Greenery
-
Mix the stem color:
Combine your olive green acrylic paint with a generous amount of glaze medium (about a 1:1 ratio). This transparency is crucial for achieving that soft, watercolor effect rather than a solid sticker look. -
Paint main stems:
Using a #6 round brush, trace your pencil lines for the main stems. Apply slightly more pressure at the bottom and lift off as you move upward to taper the stroke naturally. -
Add leafy details:
Switch to a sage green mixture. Along the lower portions of the stems, paint long, slender leaves. Think of them like blades of grass arching away from the stem. -
Create background textures:
Mix a very watery, pale green wash. Use the liner brush to add faint, wispy grasses in the background layer between the main flowers. These should look almost like shadows or distant foliage.
Adding 3D Texture
Glue small faux silk flowers or fabric butterflies directly onto a few painted blossoms for a subtle mixed-media pop that adds enchanting depth to the room.
Step 3: Blooming the Flowers
-
Paint the yellow centers:
For the daisy-like flowers, mix mustard yellow with a touch of cream. Paint the center disks first using a stippling motion (dabbing the brush tip) to create a seeded texture. -
Add petals:
Working with a pale pink and glaze mixture, paint long, loose petals radiating from the centers. Don’t fill them in solidly; leave streaks of the white wall showing through to mimic light hitting delicate petals. -
Create the large sunflower:
For the focal yellow flower, use a diluted mustard yellow for the petals. I like to paint these with a flat brush, twisting it slightly at the end of the stroke to create the pointed tip. -
Detail the Queen Anne’s Lace:
For the fluffy, umbrella-shaped flowers, use a cream or pale grey color. Instead of painting lines, maintain a ‘dotting’ rhythm to create the clusters of tiny blooms at the top of the stems. -
Layering colors:
Once the first layer of petals is dry, go back in with a slightly less diluted version of the same color to add depth near the center of the flowers, leaving the tips diaphanous.
Step 4: Final Details
-
Add fine details:
Using your smallest liner brush and un-thinned paint, add crisp details like the veins in the leaves or the very center points of the flower disks. -
Incorporate whimsy:
Paint a few tiny butterflies or floating seeds using a dark mauve or brown to add movement to the scene, making it feel alive. -
Erase guidelines:
Wait at least 24 hours for the paint to cure completely. Gently erase any visible pencil marks that weren’t covered by paint, being careful not to scrub the artwork. -
Step back and assess:
View the mural from the doorway. If any area feels too sparse, add a few more ghostly, watered-down grass blades to fill the gaps without overpowering the main blooms.
Now you have a serene, everlasting garden that will grow with your little one for years to come

PENCIL GUIDE
Understanding Pencil Grades from H to B
From first sketch to finished drawing — learn pencil grades, line control, and shading techniques.
Explore the Full Guide
Clouds and Sky Gradient for a Daydreamy Backdrop
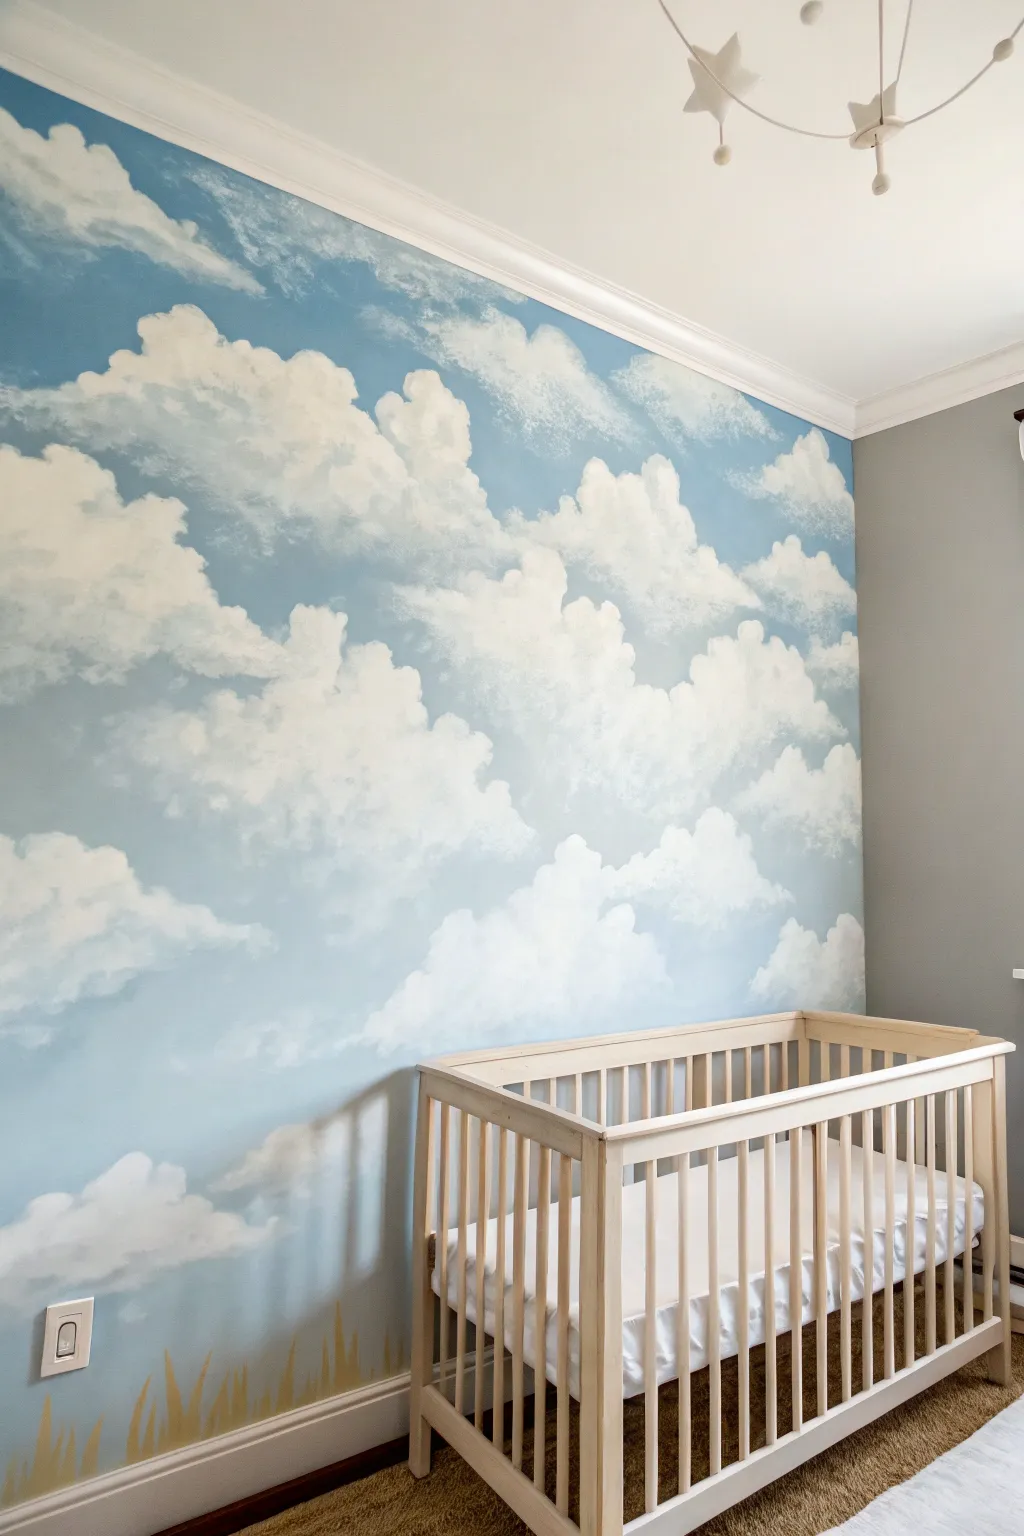

Transform a plain nursery wall into a serene, limitless sky with this hand-painted mural. Featuring fluffy, realistic clouds drifting across a gradient blue backdrop and grounded by gentle golden grass, this project creates a calming atmosphere perfect for little dreamers.
Step-by-Step
Materials
- Interior latex paint (Sky Blue)
- Interior latex paint (White)
- Interior latex paint (Light Grey)
- Interior latex paint (Golden Yellow/Ochre)
- Glazing medium (optional but recommended)
- Large roller and tray
- 2-inch angled sash brush
- Large round brush or stencil brush (for clouds)
- Sea sponge or rag
- Painter’s tape
- Drop cloths
- Small liner brush (for grass details)
Step 1: Preparation and Sky Base
-
Prepare the workspace:
Clear the area around the wall, removing the crib and any furniture. Lay down drop cloths to protect the flooring and apply painter’s tape to the baseboards, ceiling line, and adjacent walls. -
Mix your sky color:
Pour your chosen sky blue paint into a tray. If you want a gradient look like the inspiration image, you might want to mix a second, slightly lighter version of this blue by adding a touch of white. -
Roll the base coat:
Using a roller, apply the sky blue paint to the entire wall. Work in -
Create a subtle gradient (optional):
While the paint is still wet, roll the lighter blue mixture towards the bottom half of the wall, blending it upward into the darker blue to mimic the natural way the sky lightens near the horizon. -
Let it cure:
Allow the base coat to dry completely, ideally overnight, before starting the cloud work. A dry surface ensures your cloud edges stay crisp where you want them and blended where you don’t.
Step 2: Painting the Clouds
-
Mix the cloud glaze:
Mix your white paint with a bit of glazing medium. This extends the drying time and makes the paint semi-translucent, which is crucial for achieving that fluffy, airy texture rather than a solid sticker-like look. -
Map out cloud shapes:
Dip a large round brush or a sea sponge lightly into the white mixture. Dab the basic organic shapes of your clouds onto the wall, focusing on large formations near the middle and top, and smaller, wispy ones near the bottom. -
Create the dense centers:
Go back into the center of your cloud shapes with more opaque white paint (less glaze). Stipple—changing the angle of your brush constantly—to build up the brightness in the ‘meat’ of the cloud. -
Soften the edges:
Using a dry, clean brush or a rag, gently feather out the edges of the white paint while it is still wet. I like to use a circular scrubbing motion to blur the line between the cloud and the blue sky. -
Add shadows for depth:
Mix a tiny amount of light grey paint with your glazing medium. Lightly dab this into the undersides and lower crevices of the larger clouds to give them volume and dimension. -
Blend the shadows:
Immediately use a dry brush to blend the grey upwards into the white. Avoid hard lines; the shadow should look like a soft bruise on the cloud, not a distinct stripe. -
Highlight the tops:
Add a final touch of pure, unthinned white paint to the very tops of the clouds where the imaginary sun would hit them. This high contrast makes the clouds pop. -
Step back and assess:
Frequently step back to the far side of the room to view the composition. Fill in any awkward gaps with small, wispy ‘scud’ clouds using a dry brush technique.
Trouble: Muddy Skies?
If your grey shadows turn the clouds muddy, let the layer dry completely. Then, dry-brush a thin layer of pure white over the muddy area to reset the brightness.
Step 3: Adding the Golden Grass
-
Mix the grass color:
Prepare your golden yellow or ochre paint. You want a warm, earthy tone that contrasts nicely with the cool blue sky. -
Paint the base blades:
Using a 2-inch angled sash brush, start at the baseboard tape and flick your wrist upward to create varying lengths of grass blades. Keep the strokes loose and varying in direction. -
Layer in details:
Switch to a smaller liner brush for finer strands. Paint thinner, taller blades interspersed comfortably among the thicker ones to create a natural, unkempt meadow look. -
Add color variation:
Mix a slightly lighter yellow (mix in some white) and add a few highlighted blades to the foreground. This adds depth so the grass doesn’t look like a flat silhouette. -
Clean up:
Once everything is dry, carefully peel away the painter’s tape. Touch up any blue spots near the ceiling or baseboards if paint bled through.
Level Up: Mobile Magic
Install a 3D element like the star mobile shown in the reference photo. Hanging white stars or a moon from the ceiling adds kinetic energy and enhances the sky theme.
With your mural complete, arrange the crib and step back to enjoy the peaceful, sky-high sanctuary you have created.
Storybook Castle on a Distant Hill
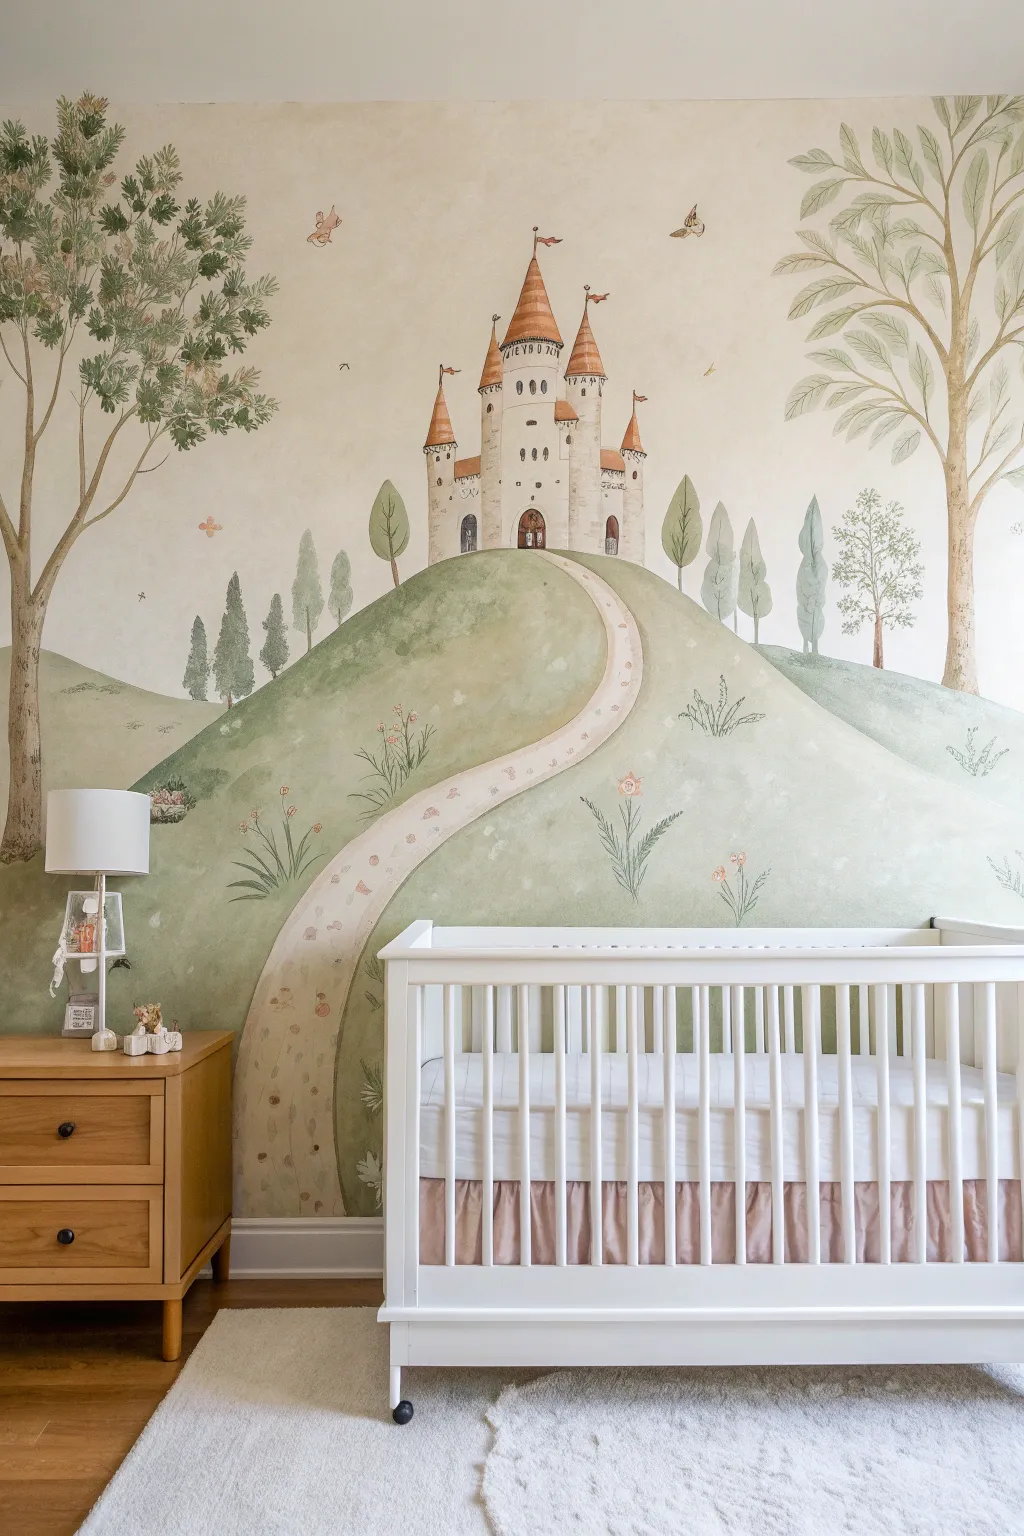
Transform a blank nursery wall into a gateway to a fairytale land with this soft, storybook-style mural. Featuring a charming castle perched atop rolling green hills, the design uses a gentle watercolor wash technique to create a dreamy, atmospheric backdrop for your little one.
Detailed Instructions
Materials
- Interior latex wall paint (white base)
- Acrylic paints (Soft sage green, olive green, warm beige, terracotta, cream, charcoal grey)
- Glazing medium or water (for thinning paint)
- Large painter’s drop cloth and masking tape
- Pencil and large eraser
- Assorted brushes: 2-inch angular sash brush, 1-inch flat brush, various round detail brushes (sizes 2, 6, and 10)
- Sea sponge or clean cotton rag (for texture)
- Projector (optional but recommended for the castle outline)
- Paper plates or palette for mixing
- Ladder or step stool
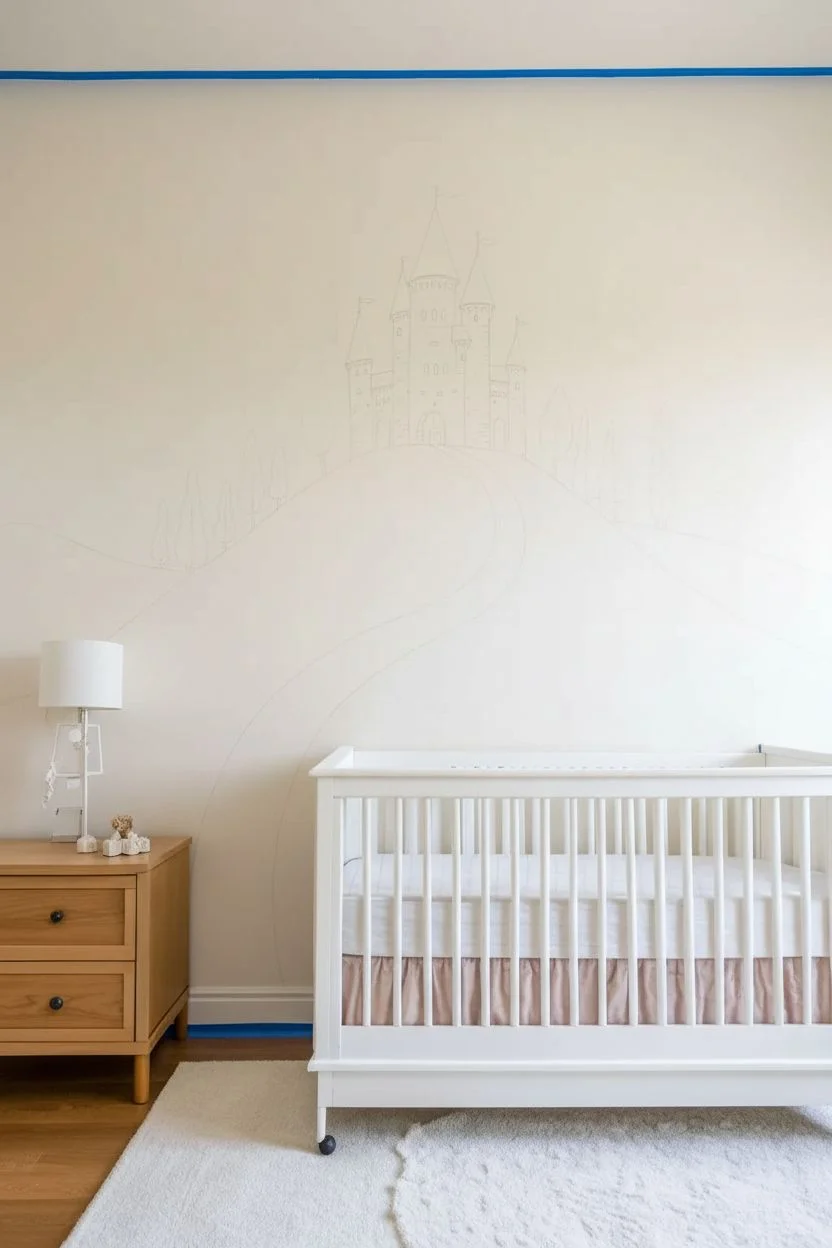
Step 1: Planning and Sketching
-
Prepare the Canvas:
Begin by ensuring your wall is clean, dry, and primed with a neutral base color, preferably a warm off-white or cream to mimic the look of paper. Tape off baseboards, ceiling edges, and adjacent walls to protect them from stray brushstrokes. -
Draft the Hills:
Using a pencil, lightly sketch the rolling hills. Start with the large central hill that will anchor the castle, then add two lower, gently sloping hills on either side. Keep the lines fluid and organic rather than perfectly symmetrical. -
Outline the Castle and Path:
Sketch the castle structure at the apex of the central hill. If you aren’t confident in your freehand drawing, project a castle silhouette onto the wall and trace it. Draw a winding path that starts wide at the bottom of the hill and tapers narrowly as it reaches the castle gates.
Step 2: Painting the Landscape
-
Mix the Hill Colors:
Mix a soft sage green with a generous amount of glazing medium or water. You want the paint to be translucent, like watercolor, rather than opaque. Create a second, slightly darker olive green mix for shadows. -
Wash the Hills:
Using the 2-inch brush and irregular, sweeping strokes, fill in the hills. Start with the lighter sage mix. Don’t aim for perfect solidity; let some of the background wall show through to create that textured, storybook feel. -
Add Depth and Shadow:
While the first layer is still slightly damp, blend in the darker olive mix near the bottom of the hills and along the edges of the path. This creates volume. Use a damp rag or sponge to soften any harsh lines where the green meets the sky. -
Detailed Tree Silhouettes:
Once the hills are dry, use a size 6 round brush and darker grey-green paint to add the distant trees. Paint vertical, tapered strokes for firs and cypress-style trees along the ridge line. Keep them simple and slightly varied in height. -
Paint the Foreground Trees:
For the large trees flanking the mural, use a light brown wash for the trunks. Paint the branches reaching upward and outward. Use a stippling motion with a sponge or old brush and varying shades of green to create the leafy canopy, keeping it airy and light.
Uneven Coverage?
Since this is a watercolor style, blotchiness is good! If a spot looks too heavy with paint, immediately dab it with a damp paper towel to lift the color back to a wash.
Step 3: Constructing the Castle
-
Block in the Walls:
Mix a warm cream or beige color for the castle walls. Using a flat brush, fill in the towers and main keep. I like to keep this layer slightly uneven to mimic the texture of old stone. -
Roof Turrets:
Use a terracotta or muted orange shade for the cone-shaped roofs. Paint these carefully with a smaller flat brush. Add tiny strokes of a darker orange on one side of each cone to suggest roundness and shadow. -
Architectural Details:
Switch to a fine liner brush and thinned charcoal grey paint. Outline the windows, arched doorways, and battlements. Keep the lines delicate; a shaky hand actually adds charm here, making it look like a hand-drawn illustration. -
Flags and Flourishes:
Add tiny triangular flags atop the turrets using the terracotta paint. Ensure they all point in the same direction to simulate a gentle breeze.
Level Up: Magic Dust
Mix a tiny amount of iridescent or pearl medium into the final clear glaze coat over the castle roofs to make them subtly sparkle in the nursery lighting.
Step 4: Final Touches
-
Define the Path:
Fill in the winding path with a very pale beige wash. It should be lighter than the surrounding hills but distinct from the background wall. Add tiny, darker pebbles or specks along the edges for texture. -
Floral Accents:
Using your smallest brush, dot tiny flowers in the foreground along the path and bottom of the hills. Use simple dabs of pink, blue, or yellow with thin green stems to suggest wildflowers without needing botanical precision. -
Whimsical Elements:
Paint a few simple birds or butterflies in the sky area using charcoal grey or soft brown. Keep them small and distant to maintain the sense of scale. -
Erase and Clean:
Once the paint is fully cured (give it at least 24 hours), gently erase any visible pencil sketch lines. Remove the painter’s tape slowly at a 45-degree angle to reveal crisp edges.
Step back and admire the peaceful storybook world you have created for your nursery


Dinosaur Landscape in Warm Earth Tones
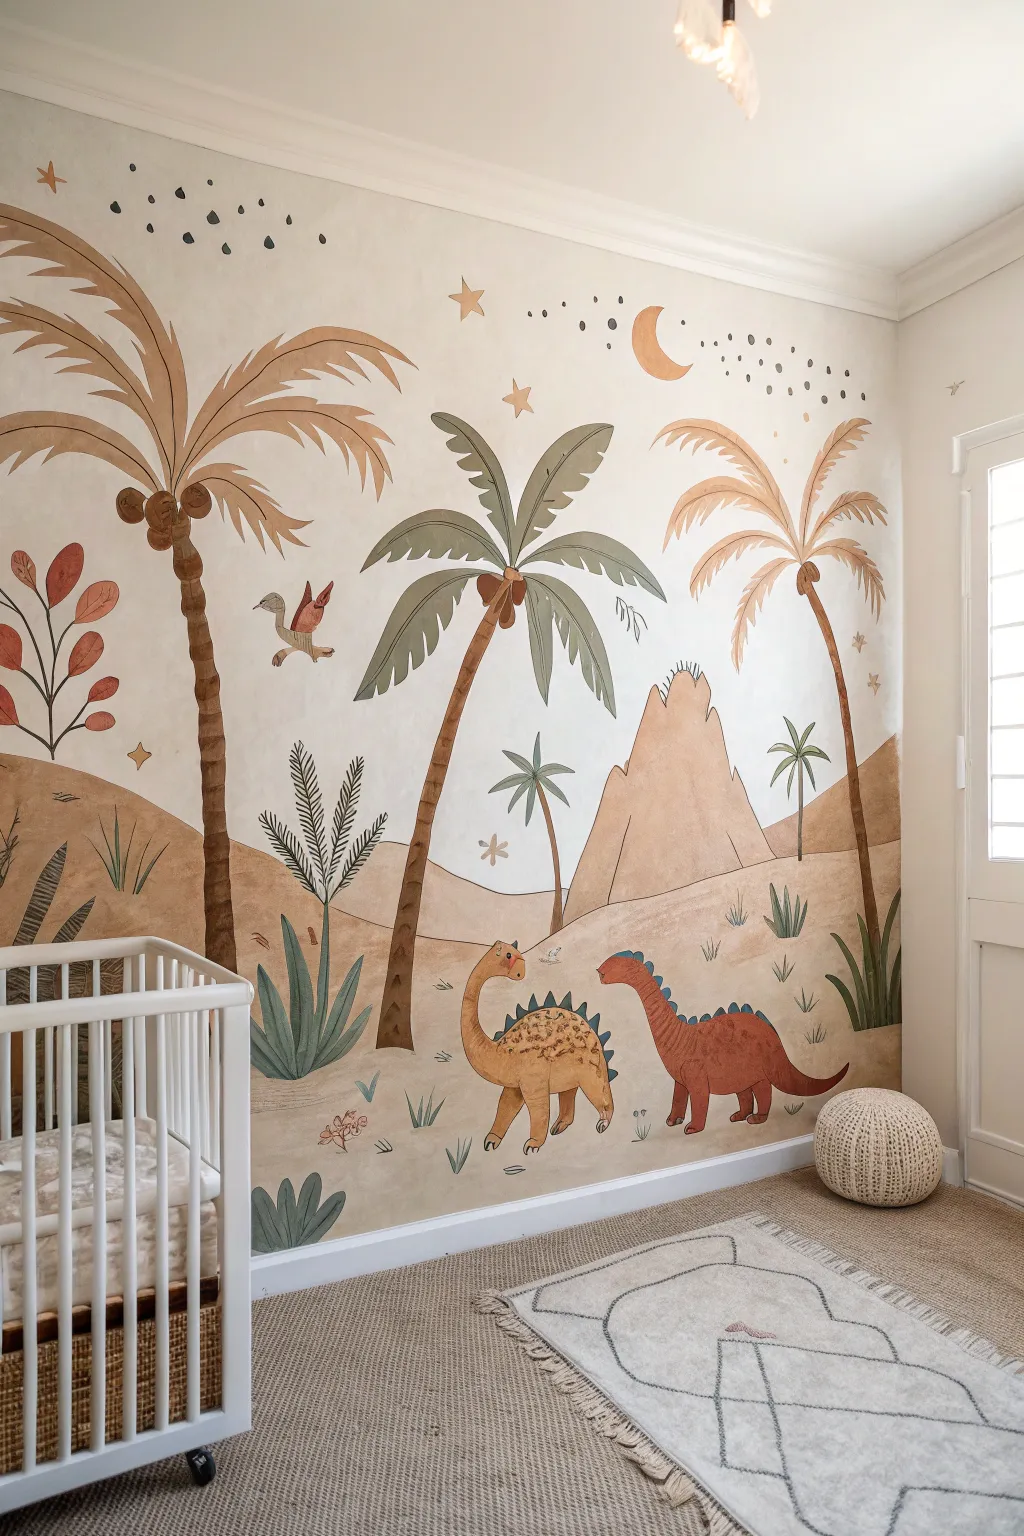
Transform a blank nursery wall into a charming prehistoric landscape featuring warm earth tones and friendly dinosaurs. This mural uses soft desert hues and playful palms to create a calming yet imaginative backdrop for your little one’s room.
How-To Guide
Materials
- Interior latex paint (eggshell or satin finish): Cream/off-white (base), Light Tan (sand), Terracotta (features), Sage Green (leaves), Dark Brown (trunks)
- Pencil and large eraser
- Painter’s tape
- Synthetic angled sash brush (2-inch) for large shapes
- Round artist brushes (sizes 4, 8, and 12) for details
- Small foam roller and tray
- Drop cloths
- Chalk or a projector (optional for sketching)
- Step ladder
Step 1: Preparation and Background
-
Prepare the workspace:
Clear the room or move furniture to the center and cover distinct areas with drop cloths. Tape off the baseboards, ceiling line, and adjacent walls to ensure crisp edges. -
Apply the base color:
Roll on two coats of your creamy off-white base color across the entire wall. Allow the first coat to dry fully—usually about 4 hours—before applying the second to ensure a smooth, opaque canvas for your artwork. -
Sketch the horizon:
Using a pencil, lightly sketch the rolling hills of the landscape. Aim for gentle, overlapping curves about one-third of the way up the wall to establish the ground level. -
Paint the sand dunes:
Fill in the sketched ground area with your light tan paint using the angled sash brush for the edges and a roller for the larger sections. Two coats may be necessary for solid coverage.
Make It Easier
Don’t trust your freehand drawing? Use an overhead projector to cast the image of the dinosaurs and trees onto the wall, then simply trace the outlines with pencil.
Step 2: Painting the Landscape Elements
-
Outline the large trees:
Sketch three large palm trees. Place the tallest one on the left, a medium one in the center, and one on the right. Give the trunks a slight curve to make them feel organic and lively. -
Fill the tree trunks:
Paint the trunks using the dark brown shade and a medium-sized artist brush. creating segmented, bumpy edges to mimic the texture of palm bark rather than painting straight lines. -
Add the palm fronds:
Using the terracotta color for the left and right trees, and the sage green for the center tree, paint long, arching leaves radiating from the trunk tops. Use swift, sweeping strokes that taper at the ends. -
Paint the mountains:
Behind the sand dunes but in front of the sky, sketch and paint a jagged mountain peak using a shade slightly darker than your sand color (or mix a little brown into the tan) to create depth. -
Detail the coconuts:
Once the fronds are dry, dab small circles of dark brown at the center point where the leaves meet the trunk to represent coconuts.
Step 3: Adding the Dinosaurs
-
Sketch the dinosaurs:
Lightly draw your dinosaurs near the bottom. Include a long-necked sauropod on the right looking left, and a smaller, spiked ankylosaurus on the left looking right. Adding a small flying pterodactyl near the left tree adds great movement. -
Block in dinosaur bodies:
Paint the ankylosaurus in a golden-yellow ochre and the sauropod in a reddish-terracotta. Use your size 8 round brush to carefully fill the outlines to keep edges sharp. -
Add texture and features:
Once the base coats are dry, use a fine brush to add details: dark brown for the ankylosaurus’s spikes and eye, and blue-grey spots on the sauropod’s back. Don’t forget a tiny smile on each. -
Paint the flying friend:
Fill in the pterodactyl with a soft mauve or brown, highlighting the wings with a lighter shade to show dimension.
Level Up: 3D Texture
Mix a texture additive or a bit of sand into the paint used for the dunes and mountains. This adds a subtle, tactile quality that looks amazing when light hits the wall.
Step 4: Final Flourishes
-
Add ground vegetation:
Pepper the ground with small clusters of grass and spiky agave plants. Use the sage green and dark blue-grey paints, varying the height and direction of the leaves for variety. -
Paint the celestial sky:
In the upper open spaces, paint a crescent moon in soft orange. Scatter small stars and simple dots across the sky using grey and gold paint to create a magical atmosphere. -
Refine the lines:
Step back to view the whole wall. If any pencil lines are still visible, gently erase them. Use a small brush to touch up any uneven edges where the paint colors meet. -
Seal (optional):
If the mural is in a high-traffic zone, you might apply a clear, matte water-based sculptural varnish over the lower half of the wall to protect your work from little hands.
This playful prehistoric scene creates a warm and inviting space for imagination to grow
Modern Geometric Mountains With Color Blocking
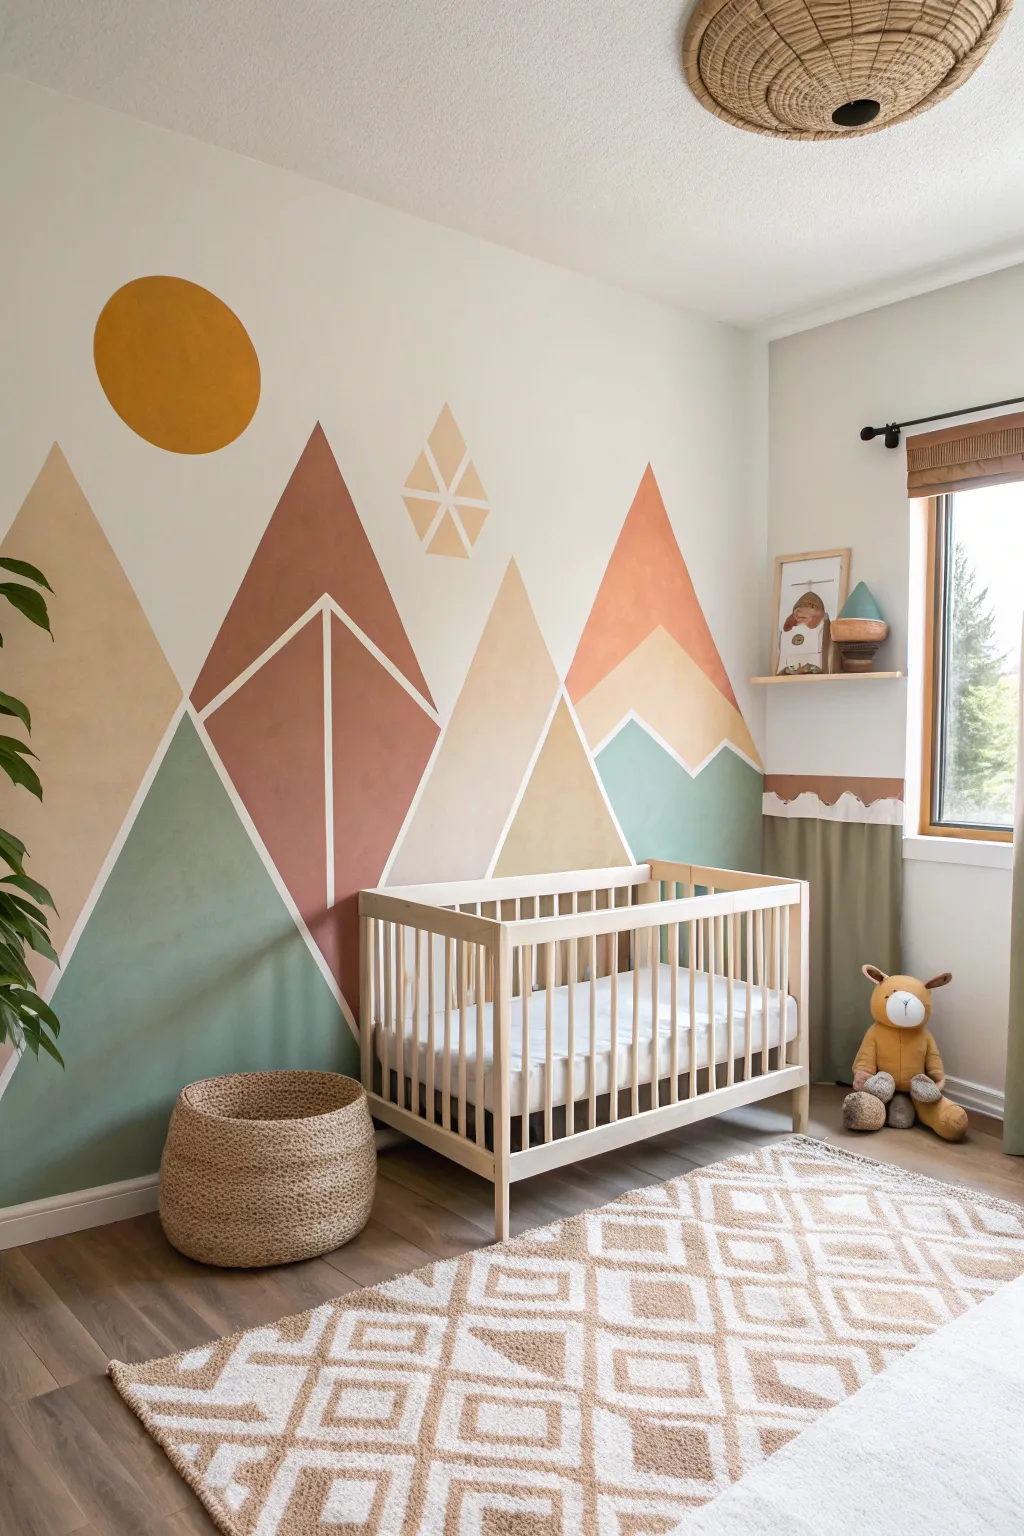

Transform a plain nursery wall into a calming modern landscape with this color-blocked mountain mural. Featuring earthy tones like terracotta, sage, and mustard, this design uses sharp lines and simple shapes to create a sophisticated yet playful backdrop for your little one.
Step-by-Step
Materials
- Interior latex paint (Eggshell finish)
- Painter’s tape (multiple widths: 1-inch and 0.5-inch)
- Laser level or long straight edge
- Pencil
- Small foam roller (4-inch)
- Angled sash brush (2-inch)
- White paint (for sealing tape)
- Drop cloth
- Ladder
- Measuring tape
Step 1: Planning and Taping
-
Prep the canvas:
Clear the room and wipe down the wall with a damp cloth to remove dust. Ensure the base wall color is a fresh, clean white, as this will act as the ‘grout lines’ between your shapes. -
Sketch the layout:
Using the reference image, lightly pencil the main mountain peaks onto the wall. Draw a large central peak, flanked by two medium peaks, and lower undulating hills in the foreground. -
Mark the sun and diamonds:
Trace a large circle near the top left for the sun (a dinner plate makes a great template) and sketch the floating diamond cluster above the central peak. -
Tape the main mountain lines:
Apply 0.5-inch painter’s tape over your penciled lines for the mountain slopes. These strips will create the thin white separation lines, so place them precisely where you want the gaps to be. -
Tape the internal geometric details:
Add the internal details, like the vertical line splitting the large terracotta mountain and the smaller triangle caps on the side mountains. Ensure the tape intersects cleanly. -
Tape the accent shapes:
Outline the sun circle and the diamond shapes carefully. For the circle, use small overlapping pieces of tape to form a curve, or use specialized flexible tape if available. -
Seal the edges:
Paint a thin layer of your base wall color (white) over the edges of all the tape. This crucial step prevents colored paint from bleeding under the tape and ensures crisp, sharp lines later.
Bleeding Lines?
If paint bleeds under the tape, wait for it to dry fully. Then, place a new piece of tape over the colored area and tough up the white line with a small artist brush.
Step 2: Painting the Shapes
-
Mix your palette:
Prepare your paint trays with the four main colors: a deep terracotta/rust, a soft sage green, a muted mustard yellow, and a pale sandy beige. -
Paint the background peaks:
Start with the palest sandy beige color. Use the foam roller to fill in the tall, skinny peaks in the background and the upper sections of the side mountains. -
Fill the large focal mountain:
Switch to the deep terracotta color. Paint the large central mountain shape, being careful around the taped internal white lines. I find using a brush for the corners and a roller for the center gives the smoothest finish. -
Add the greenery:
Apply the sage green paint to the lower foreground hills on the far left and right. This grounds the mural and adds a nice cool-toned contrast to the warm peaks. -
Paint the sun:
Fill in the circular sun shape with the mustard yellow paint. Use a small brush to ensure you stay strictly within the taped boundary. -
Detail the diamonds:
Paint the diamond cluster. You can alternate colors here or stick to a single shade like the pale beige to keep it subtle. -
Apply a second coat:
Allow the first coat to dry for at least 2 hours. Once dry to the touch, apply a second coat to all shapes to ensure rich, opaque color coverage.
Step 3: The Big Reveal
-
Remove tape while slightly damp:
Once the final coat is tacky but not fully dry (usually about 45 minutes after painting), begin peeling the tape. Pull it slowly at a 45-degree angle away from the painted edge. -
Touch up imperfections:
Inspect the lines closely. If any paint bled through, use a tiny artist’s brush and the white base paint to cover the mistake and sharpen the line. -
Erase pencil marks:
Check for any visible pencil lines that weren’t covered by paint or tape and gently erase them with a clean white eraser. -
Final cure:
Let the wall cure for a full 24 hours before moving furniture, like the crib, back against the wall to prevent scuffing the fresh paint.
Add Texture
Instead of flat latex paint, mix a texture additive or ‘limewash’ style glaze into the terracotta sections for an old-world, earthy plaster look.
Step back and admire your clean, modern mountain range that brings warmth to the room without overwhelming the space
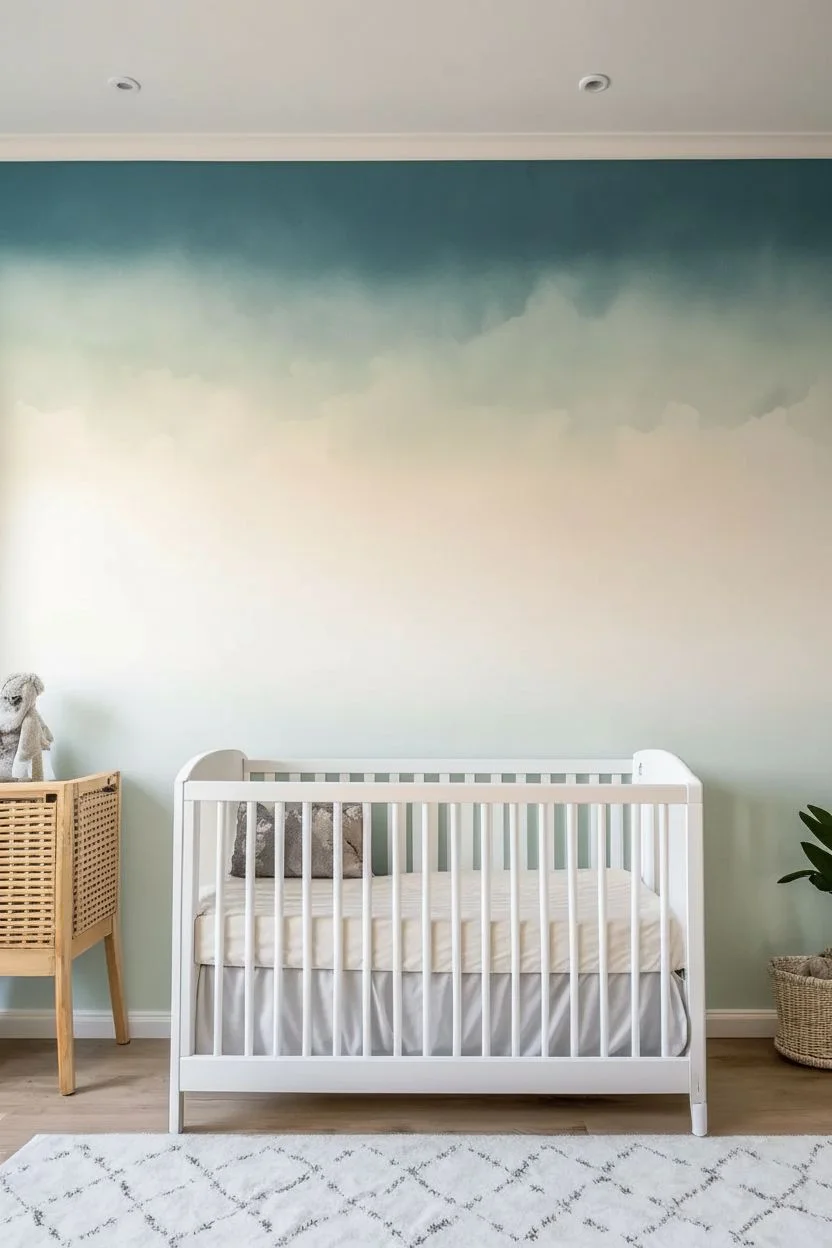
Ombre Wash Wall That Feels Like Watercolor
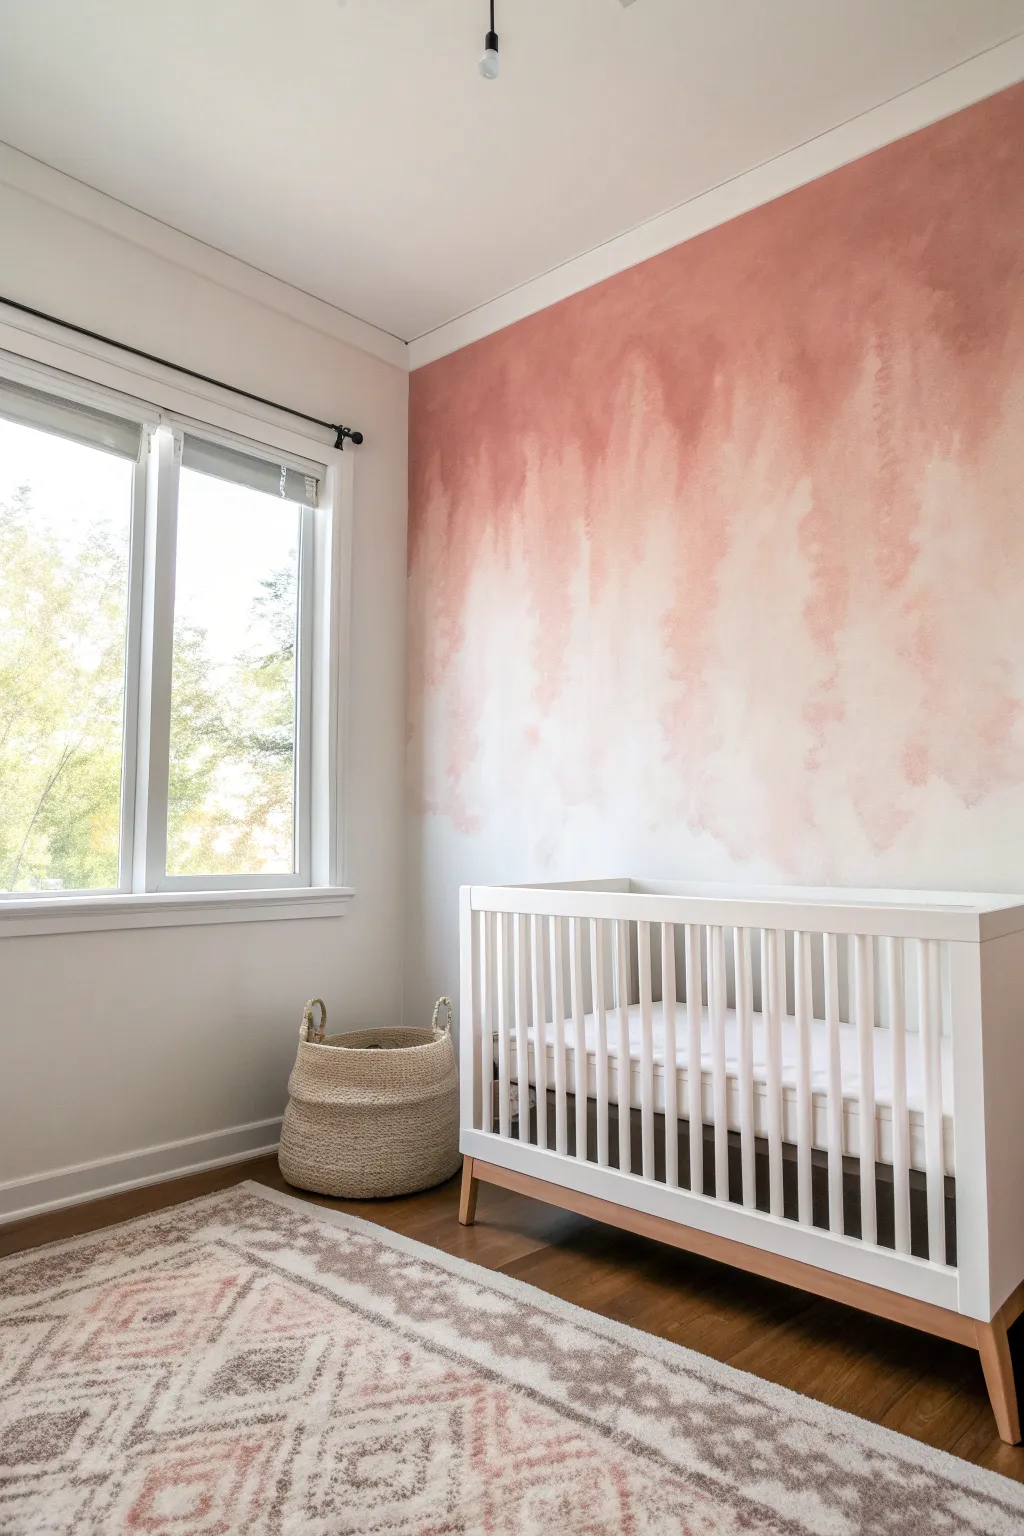

Transform a plain nursery wall into a soft, ethereal masterpiece with this watercolor wash technique. By layering diluted paint and allowing gravity to do some of the work, you’ll create a gentle, organic gradient that feels like a sunset cloud.
How-To Guide
Materials
- Latex interior paint (your chosen accent color, e.g., dusty rose)
- White latex interior wall paint (matching existing wall sheen)
- Clear glaze medium (latex/acrylic based)
- Painter’s tape
- Drop cloths
- Small plastic buckets or mixing containers (at least 3)
- Spray bottle filled with water
- Large sponge or sea sponge
- 4-inch paintbrush suitable for cutting in
- Wide softening brush (like a large chip brush or specialized blending brush)
- Stir sticks
- Microfiber rags
Step 1: Preparation and Mixing
-
Protect the space:
Clear the area against the wall completely. Lay down drop cloths, ensuring they are flush against the baseboards, and secure them with tape if necessary to prevent slipping. -
Tape the edges:
Apply painter’s tape to the adjacent walls, ceiling line, and baseboards to protect them. Press the edges of the tape firmly to prevent any watery paint from bleeding through. -
Base coat check:
Ensure the wall is currently painted with the white base color you want for the bottom. If not, paint the entire wall white and let it cure for at least 24 hours before starting the effect. -
Mix the glaze:
In a mixing bucket, combine your colored paint with the clear glaze medium. A 1:4 ratio (paint to glaze) is a good starting point for translucency, but check the glaze manufacturer’s instructions. -
Create gradients:
Divide your glaze mixture into three separate containers. Keep one as is (darkest), add a splash of white paint to the second (medium), and more white to the third (lightest). This helps achieve a natural fade.
Wet Edge Wonder
Work in small sections and maintain a ‘wet edge.’ Never let a section dry completely before blending the next one into it, or you’ll get a visible vertical seam.
Step 2: Applying the Wash
-
Wet the wall:
Starting at the top of the wall where the color will be strongest, lightly mist a 3-foot wide section with your spray bottle. The surface should be damp but not dripping wet. -
Apply the darkest shade:
Dip your 4-inch brush into the darkest glaze mixture. Apply it along the ceiling line in disjointed, organic strokes, bringing it down about 12-18 inches. -
Encourage the drip:
While the paint is wet, spray more water directly onto the applied paint. Use a wet sponge to drag the color downwards in vertical motions, breaking up any hard horizontal lines. -
Introduce the medium tone:
Below the dark section, brush on the medium glaze mixture. Just like before, mist with water and use your sponge to blend the bottom of the dark section into the top of the medium section. -
Fade into the light:
Apply the lightest glaze mixture below the medium tone. Use the sponge and ample water spray to pull this color down further, letting it feather out into the white wall. -
Mist for organic texture:
Stand back and look at the section. Spray water at the bottom edge of the color to create natural-looking drips and runs. Let gravity pull these trails down into the white space. -
Soften the transition:
Take a clean, dry softening brush and very lightly whisk over areas that look too heavy or brush-marked. I find this creates that misty, cloud-like appearance essential for this look. -
Blat excess water:
Keep a rag handy to dab (not wipe) the bottom of any drips that run too far down the wall closer to the floor than you intend.
Metallic Magic
Once the wall is fully dry, mix a tiny amount of gold metallic paint with water and flick it onto the wall with a toothbrush for subtle, starry shimmer.
Step 3: Finishing Up
-
Continue across the wall:
Move laterally to the next 3-foot section. Repeat the process—wet wall, dark paint, medium paint, light paint—making sure to overlap the wet edges of the previous section to avoid vertical seams. -
Review and refine:
Once the entire wall has the first layer, stand back. If you see spots that are too light near the ceiling, you can carefully dab more distinct dark glaze onto those areas while they are still slightly tacky. -
Clean edges immediately:
Carefully peel off the painter’s tape while the wall is still slightly damp. This prevents the dried glaze, which can be rubbery, from peeling off with the tape. -
Let it dry completely:
Allow the wall to dry undisturbed for at least 24 hours. The glaze extends drying time significantly compared to regular paint.
Step back and admire the soft, soothing atmosphere you have created for the room
Sloped Ceiling Tree Branch Canopy
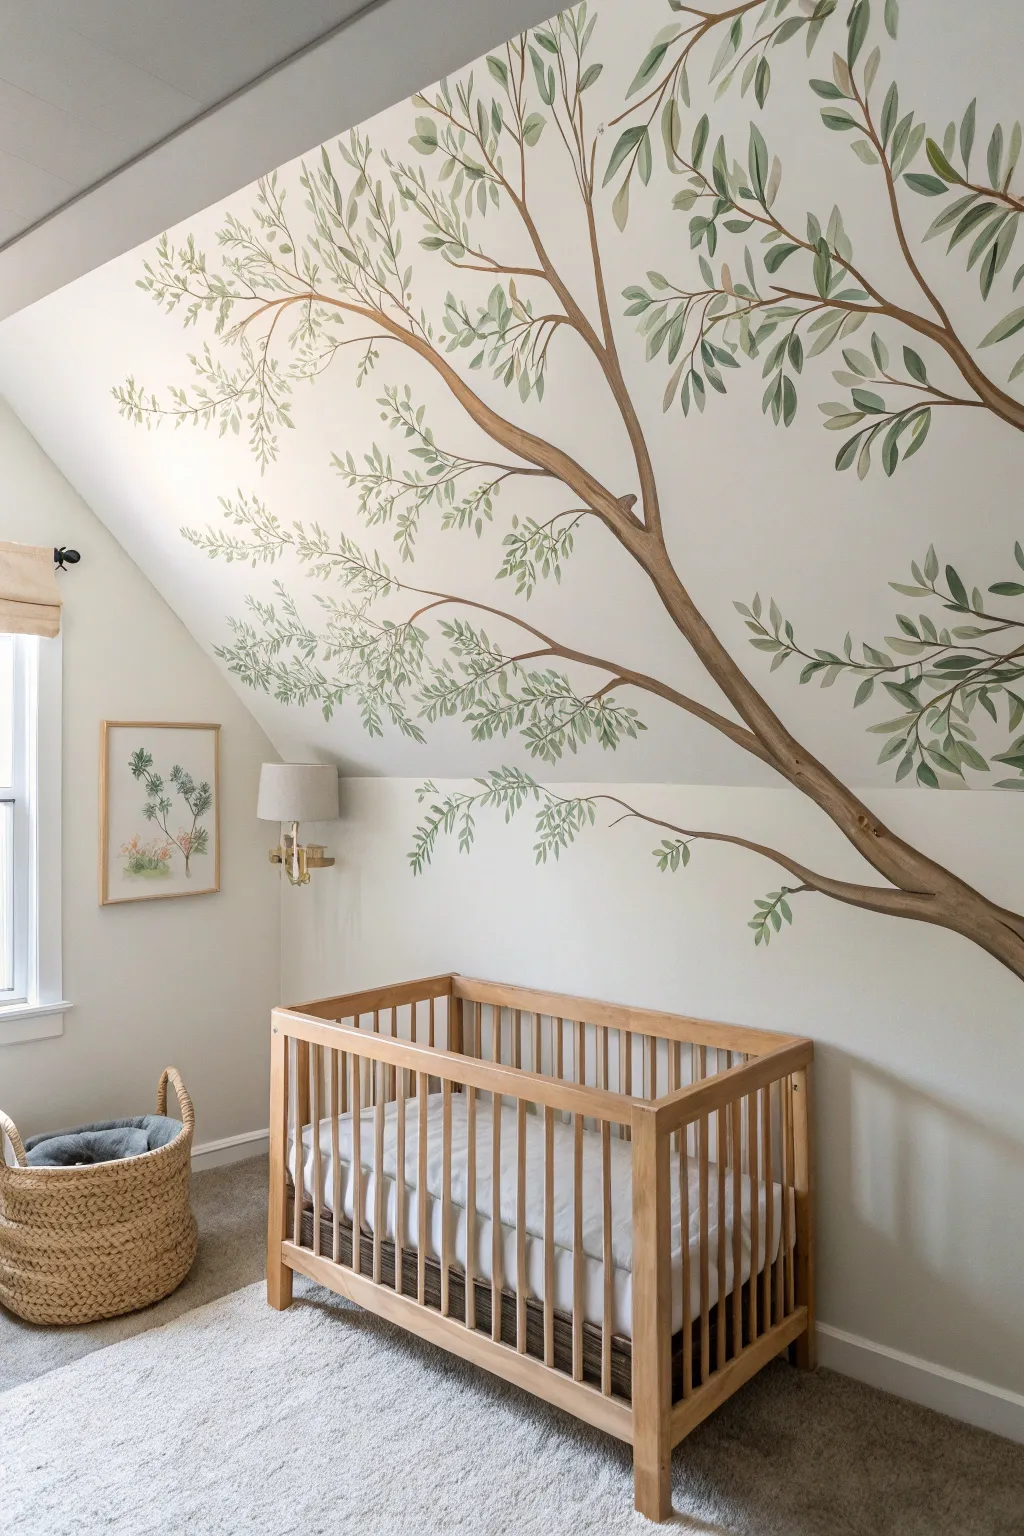
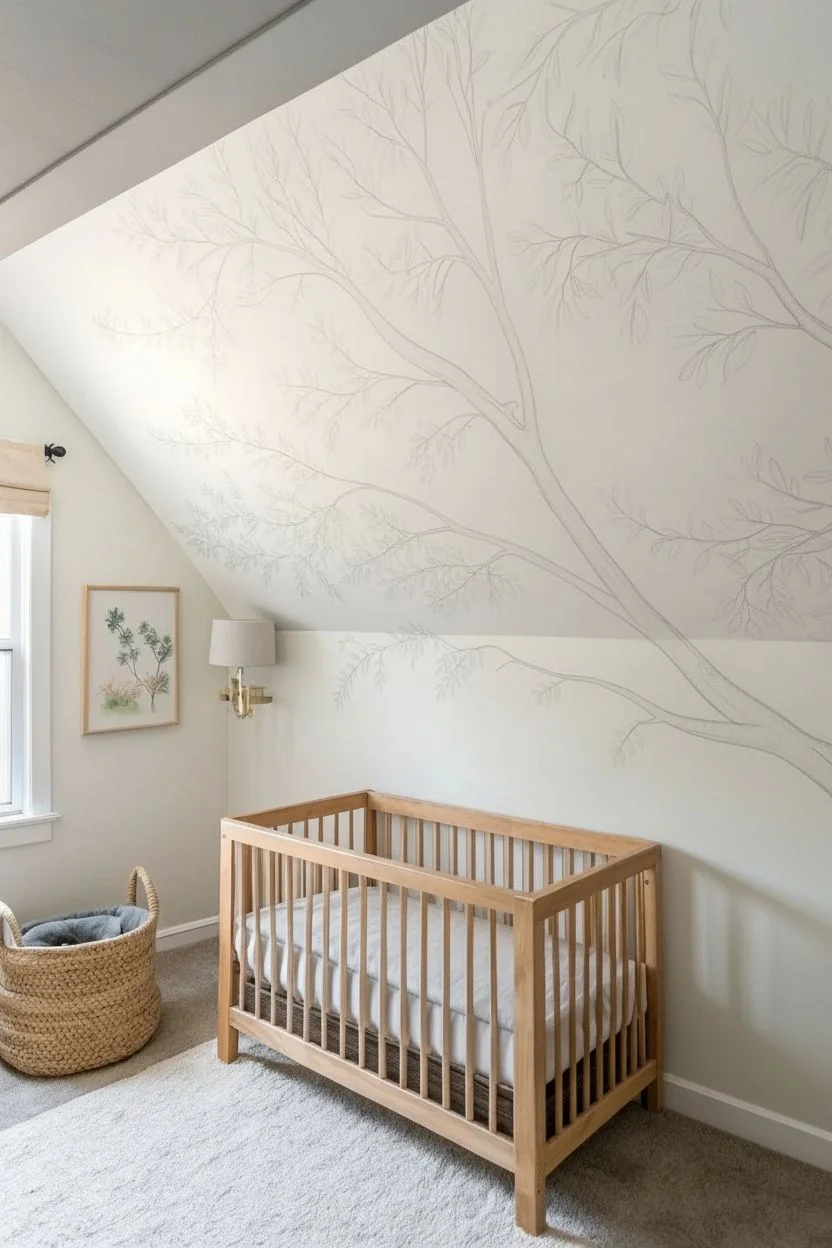
Transform awkward angles into a cozy forest emcrace with this sweeping branch mural that utilizes slope lines to create depth. By painting the tree structure across the ceiling slant, you create an immersive canopy effect perfect for a tranquil nursery space.
Detailed Instructions
Materials
- Interior latex paint (soft white/cream for base wall)
- Acrylic mural paints (burnt umber, raw sienna, olive green, sage green, white)
- Pencil and large eraser
- Painter’s tape
- Drop cloth
- Ladder or step stool
- Assorted brushes: 2-inch angled sash brush, #8 round brush, #4 filbert brush
- Mixing palette or paper plates
- Water cup and rags
Step 1: Planning and Sketching
-
Prepare the canvas:
Ensure your wall and ceiling slope are clean and primed. If you want a fresh background color like the creamy off-white shown, apply two coats of latex wall paint and let it cure for at least 24 hours before starting the mural art. -
Map the main artery:
Using a light pencil, sketch the main trunk starting from the lower right side of the wall. Draw it moving diagonally upward, crossing the seam where the wall meets the sloped ceiling. This crossover is crucial for the immersive effect. -
Branch out logically:
Sketch major primary branches extending from the main trunk. Let them flow naturally across the ceiling space, mimicking how a real tree reaches for light. Keep the lines fluid and slightly irregular; nature rarely makes perfect straight lines. -
Add secondary twigs:
From your main branches, pencil in thinner stems and twigs. Pay attention to the negative space—ensure the branches aren’t too crowded, leaving plenty of open ‘sky’ background.
Pro Tip: Perspective Trick
Paint leaves slightly smaller as they move higher up the sloped ceiling. This trick forces the perspective, making the ceiling feel much higher and the room more spacious.
Step 2: Painting the Structure
-
Mix your wood tones:
On your palette, create three wood shades: a dark shadow tone (burnt umber), a mid-tone (burnt umber mixed with raw sienna), and a highlight tone (raw sienna mixed with a touch of white/cream). -
Block in the trunk:
Using the 2-inch angled brush and your mid-tone brown, fill in the main trunk and the largest branches. Don’t worry about perfect coverage yet; varied opacity can actually look like bark texture. -
Establish the light source:
Decide where your light is coming from (usually the window). Paint the shadow tone along the underside of the branches and the side of the trunk facing away from the light. -
Add dimension with highlights:
While the base is tacky but not fully dry, blend your highlight color along the top edges of the branches. I find using a dry-brushing technique here creates a lovely, realistic bark texture without needing intricate detail. -
Paint the finer twigs:
Switch to your #8 round brush to paint the thinner twigs connecting to the foliage areas. Use a lighter hand here so the tips taper off naturally.
Step 3: Creating the Foliage
-
Prepare leafy greens:
Mix a variety of green shades. You’ll want a deep olive for older leaves, a fresh sage for the mid-tones, and a pale, milky green for distant or highlighted leaves. Transparency is your friend here, so you can dilute these slightly with water. -
Start with the cluster base:
Using the #4 filbert brush, paint the leaves closest to the branches first using your darkest olive green. Group them in small clusters rather than evenly spacing them out. -
Layering mid-tones:
Apply the sage green leaves, overlapping some of the darker ones. Vary the angle of your brush strokes to make the leaves look like they are fluttering in different directions. -
Adding delicate tips:
For the outermost leaves and the very tips of the branches (especially those high up on the slope), use your lightest, palest green mix. This creates atmospheric perspective, making the top of the tree feel higher and more airy. -
Refining the connections:
Step back and look at the composition. If any leaf clusters look like they are floating, use a fine liner brush and brown paint to connect them back to the main branch system with tiny stems. -
Final softening:
If any leaves look too harsh or heavy, gently glaze over them with a very watery wash of the wall color (cream) to push them back into the distance and soften the overall look.
Level Up: Hidden Friends
Hide tiny woodland creatures like a distinct bird silhouette or a small squirrel on a high branch. Keep it subtle and monochrome so it’s a fun discovery rather than a focal point.
Step back and enjoy the peaceful atmosphere your new indoor grove brings to the nursery
Painted Arch Frame Around the Crib Area
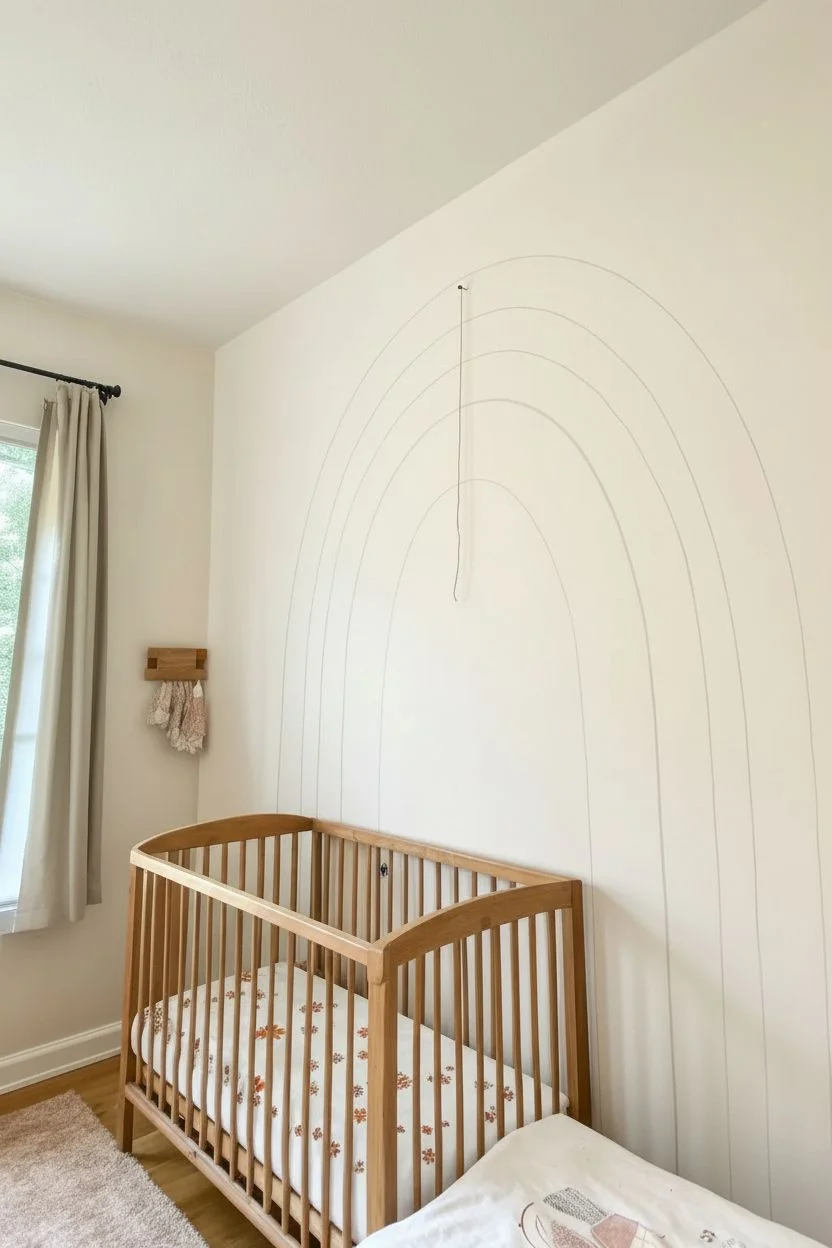
Transform a blank nursery wall into a cozy focal point with this earthy, bohemian-inspired arch mural. Using warm terracotta tones and celestial accents, this project frames the crib area perfectly and adds a touch of hand-painted charm without needing professional artistic skills.
How-To Guide
Materials
- Interior latex paint (Cream/Off-white for base)
- Interior latex paint (Deep Burnt Orange/Terracotta)
- Interior latex paint (Lighter Clay/Peach)
- Interior latex paint (Grey/Silver for stars)
- Pencil
- String or twine
- Measuring tape
- Painter’s tape
- Push pin or small nail
- Level
- 2-inch angled sash brush
- Small round artist brush (Size 4 or 6)
- Medium flat artist brush
- Drop cloth
Step 1: Planning & Outline
-
Measure the center:
Begin by determining exactly where the crib will sit. Measure the width of the crib and find the center point on the wall roughly 3 feet up from the floor (or just above the crib mattress height). -
Set the pivot point:
Mark your center point with a pencil. Insert a push pin or small nail securely into this mark; this will act as the anchor for drawing your perfect arches. -
Prepare the string compass:
Tie a piece of non-stretchy string to the pencil. Tie the other end to the push pin. Adjust the length so the pencil tip touches the wall where you want the top of the innermost arch to be. -
Draw the first arch:
Keeping the string taut, carefully guide the pencil in a semi-circle from the left side of the crib area, up over the top, and down to the right side to create your first outline. -
Draw the subsequent arches:
Lengthen the string by about 6-8 inches and draw a second arc for the top of the inner band. Repeat this process two more times to create the outlines for the middle pattern band and the outer solid band. -
Extend lines to floor:
Use a long level or a straight edge to draw straight vertical lines from the bottom of your semi-circles down to the baseboard, completing the arch shape.
Step 2: Painting the Rainbow
-
Paint the inner band:
Dip your angled sash brush into the deep burnt orange paint. Carefully cut in along the pencil lines of the innermost arch band. Fill in the center of the band with even strokes, moving in the direction of the arch. -
Paint the outer band:
Using the same deep burnt orange color, paint the outermost arch band. Take your time with the outer edge to ensure a crisp curve against the wall color. -
Apply the middle base:
Switch to the lighter clay or peach paint color. Fill in the middle band completely. This lighter color usually needs two coats to be opaque enough for the pattern layer. -
Let dry:
Allow all bands to dry for at least 4 hours. If the dark orange looks streaky, apply a second coat now. -
Add the dots:
Once the middle band is fully dry, dip the handle end of a medium paintbrush or a small round foam dobber into the deep terracotta paint. Stamp irregular dots along the peach band to create a playful texture.
Wobbly Lines?
If your arch edges aren’t perfect, use a small angled artist brush with your wall base color to ‘cut back’ into the arch shape, straightening the line.
Step 3: Adding Galaxy Details
-
Sketch the stars:
I find it helpful to lightly sketch star placements first. Draw simple five-point stars of varying sizes scattered around the rainbow and inside the arch. -
Paint large stars:
Using a small flat artist brush, fill in the larger stars with the terracotta and grey paints. A flat brush helps keep the points sharp. -
Paint small stars:
Switch to your smallest round brush to fill in the tiny stars. Don’t worry about perfection; a slightly hand-drawn look adds character. -
Add stardust dots:
Dip the very tip of your small brush (or use the brush handle trick again) into the terracotta and grey paints. Dot the wall randomly between the stars to create ‘stardust’ clusters. -
Clean up:
Once everything is dry, gently erase any visible pencil marks. Use a small brush with your original wall color to touch up any wobbly edges on the main rainbow.
Make it Metallic
For a magical touch, use metallic gold or copper paint for the smallest stars and the dots inside the middle rainbow band to catch the light.
Step back and admire how this simple geometric design completely transforms the room’s atmosphere
Interactive Growth Chart Integrated Into the Mural
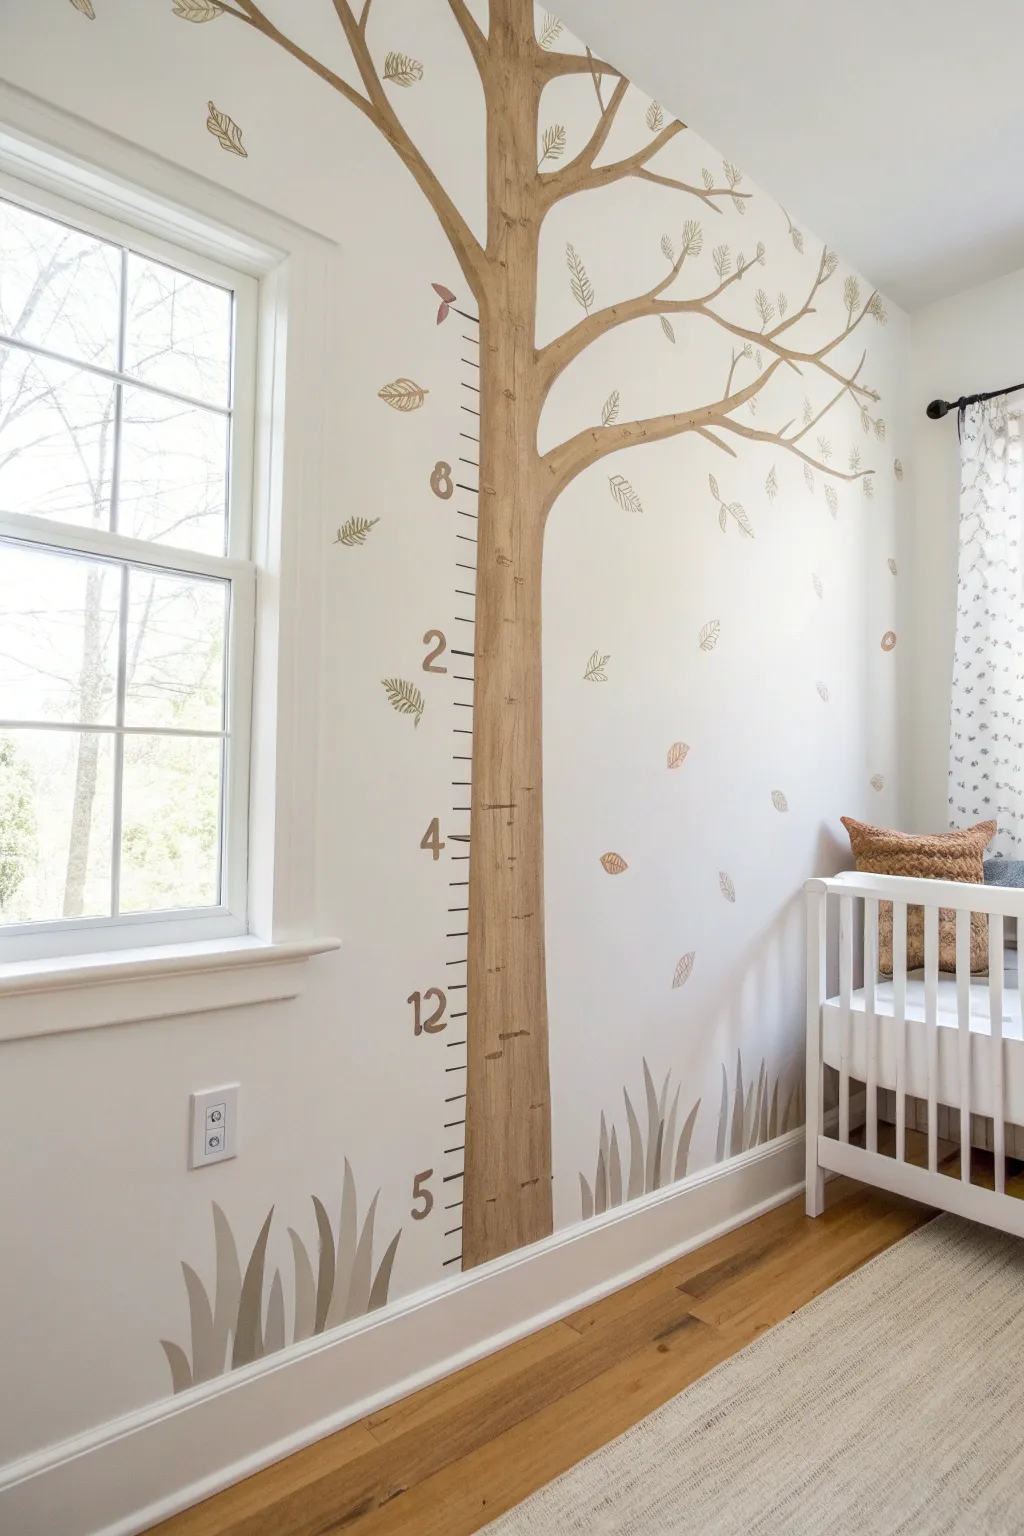
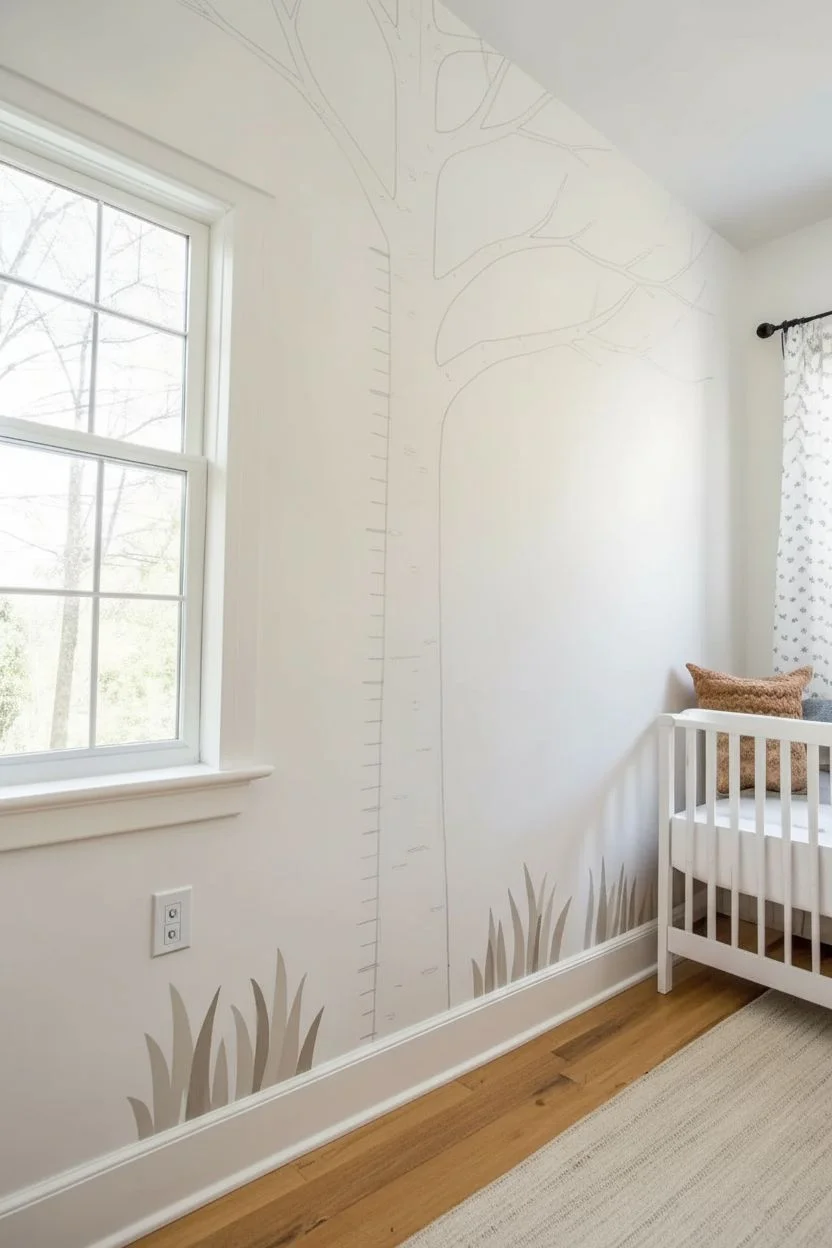
Bring the outdoors in with this whimsical tree mural that doubles as a functional growth chart to track your little one’s height. This charming project combines a hand-painted trunk with playful decals or stenciled leaves, creating a soft, nature-inspired focal point for any nursery.
Step-by-Step
Materials
- Light brown wall paint (water-based latex or acrylic)
- Dark brown or charcoal acrylic paint (for details)
- Sage green and olive green acrylic paints (for grass)
- Pencil and large eraser
- Measuring tape (crucial for accuracy)
- Painter’s tape or a long straight edge (level recommended)
- Small angled brush (1-inch)
- Fine liner brush (size 0 or 1)
- Medium flat brush
- Leaf wall decals (optional) or stencil plastic and X-acto knife
- Drop cloth
Step 1: Planning and Sketching
-
Prepare the canvas:
Begin by cleaning the wall surface with a mild soap and water solution to remove any dust or oils that might prevent paint adhesion. Lay down your drop cloth to protect the flooring. -
Map out the trunk:
Using a pencil, lightly sketch the vertical trunk of the tree. Let it curve slightly at the top as it branches out, but keep the main trunk relatively straight to serve as the measuring stick. -
Draw the branches:
Extend 3-4 main branches from the top right of the trunk, allowing them to stretch towards the ceiling and corner. Keep the lines fluid and organic rather than perfectly straight. -
Add the grass base:
At the bottom of the wall, lightly sketch clusters of tall grass blades varying in height and bending slightly to the left and right for a natural look. -
Measure the tick marks:
This is the most critical step for functionality. Use your measuring tape to mark accurate height measurements along the left side of the trunk. Start measuring from the floor up, accounting for baseboards if necessary.
Fixing Wobbly Lines
Did your hand shake while painting the measurement lines? Don’t stress. Wait for the paint to dry fully, then use a small brush with the wall’s background color to ‘erase’ and straighten the edges.
Step 2: Painting the Tree
-
Block in the trunk color:
Using your light brown paint and the medium flat brush, fill in the sketched outline of the tree trunk and branches. Apply two coats if necessary for solid coverage. -
Add wood grain texture:
Mix a small amount of darker brown into your base color. While the base coat is dry, use a contrasting technique to paint vertical streaks and knots to simulate bark texture. -
Paint the measurement lines:
Using the fine liner brush and dark brown or charcoal paint, carefully go over your pencil tick marks. Make the foot markers (like the 4 and 5) slightly longer and bolder than the inch markers. -
Add the numbers:
Paint the numbers next to their corresponding foot markers. You can freehand these for a rustic look or use a small number stencil for uniformity. -
Detail the bark:
I like to add tiny horizontal dashes across the trunk with my thinnest brush to mimic birch or aspen bark markings.
Step 3: Adding Greenery and Details
-
Paint the grass background:
Start with the lighter sage green to paint the grass blades in the background. Use quick, upward strokes with your angled brush, lifting pressure at the tip to create a sharp point. -
Layer the grass foreground:
Once the first layer dries, use the darker olive green to paint foreground grass blades. Overlap them slightly with the lighter ones to create depth. -
Create falling leaves:
If you are painting the leaves, use a simple leaf stencil. Position them as if they are gently falling from the branches—some attached, some floating in ‘mid-air’. -
Paint leaf details:
Use a fine brush to add central veins to your painted leaves. If you are using decals instead, simply peel and stick them in a scattering pattern around the branches. -
Review and touch up:
Step back to look at the overall composition. Use your eraser to remove any visible pencil lines, particularly around the numbers and the edges of the grass.
Custom Stencils
For unique leaf shapes, trace a real leaf onto cardstock and cut it out. Use this custom stencil to trace faint outlines on the wall before filling them in with paint.
Now you have a beautiful piece of art that will capture memories as your child grows tall
Glow-Style Star Accents for a Subtle Nighttime Surprise
Transform a plain nursery wall into a soothing celestial escape with this soft, cloud-like gradient mural. The gentle transition from deep teal to warm cream creates the perfect backdrop for scattered stars that twinkle without overwhelming the space.
Step-by-Step Guide
Materials
- Interior latex paint (Deep Teal/Slate Blue for top)
- Interior latex paint (Warm Cream/Off-White for middle)
- Interior latex paint (Pale Mint/Blue-Grey for bottom)
- Glazing medium (clear)
- Large blending brush or high-quality sea sponge
- Paint rollers and trays
- Painter’s tape
- Star stencils (assorted sizes: 2-inch to 6-inch)
- Stencil brushes (small round bristles)
- Acrylic craft paints (Metallic Gold, Slate Blue, Soft Grey, White)
- Small fine-liner brush (for touch-ups and hand-drawn stars)
- Glow-in-the-dark paint (optional topcoat for stars)
Step 1: Creating the Ombre Backdrop
-
Prep the canvas:
Begin by clearing the wall space and taping off your baseboards, ceiling line, and adjacent walls. Ensure the wall is clean and dry. If you are painting over a dark color, apply a coat of white primer first to ensure your gradient colors stay true. -
Map your zones:
Mentally divide the wall into three horizontal horizontal sections. The top third will be your darkest teal, the middle section the warm cream, and the bottom section the pale mint or blue-grey. These don’t need to be perfect lines; organic is better. -
Apply the middle shade:
Start by rolling the Warm Cream paint across the entire middle section of the wall. Extend this color slightly up into the top zone and down into the bottom zone to provide a wet edge for blending later. -
Apply the top shade:
While the middle section is still tacky, paint the top section with your Deep Teal. Stop about 6-10 inches away from where the cream paint begins. -
Mix the transition glaze:
In a small tray, mix equal parts of your Deep Teal and Warm Cream with a generous splash of glazing medium. The glaze extends dragging time, which is crucial for a soft look. -
Blend the upper horizon:
Use a large blending brush to apply the glazed mixture between the teal and cream zones. Use crisscross ‘X’ strokes to feather the wet paints together, blurring out any hard lines until it looks like a soft cloud bank. -
Paint the bottom zone:
Repeat the process for the bottom third. Apply the Pale Mint paint at the bottom, stopping just short of the cream middle section. -
Blend the lower horizon:
Mix a glaze using the Pale Mint and Warm Cream. Blend the transition area using the same crisscross motion. I find stepping back every few minutes helps ensure the fade looks natural from a distance.
Step 2: Adding the Celestial Details
-
Plan your constellations:
Once the wall is completely dry (wait at least 24 hours), plan your star placement. Use small pieces of painter’s tape to mark where the largest stars should go to ensure a balanced composition. -
Stencil the large stars:
Secure your largest star stencil over a marked spot. Dip a stencil brush into Slate Blue or Metallic Gold paint, offload most of the paint onto a paper towel until the brush is ‘dry’, and use a pouncing motion to fill the shape. Repeat randomly. -
Add medium clusters:
Switch to medium-sized stencils. Cluster a few around the larger stars but leave plenty of open space. Use Soft Grey and Metallic Gold here to create depth. -
Create hand-drawn details:
Use a fine-liner brush to add tiny, hand-drawn stars or dots. These shouldn’t be perfect; a quick cross shape or a simple 5-point doodle adds whimsical charm. -
Layer overlapping stars:
For a dimensional look, let a few stars overlap. Once a grey star is dry, stencil a slightly smaller golden outline or offset star on top of it. -
Apply the glow (optional):
For the subtle nighttime surprise mentioned in the intro, paint a thin layer of glow-in-the-dark medium over the white and light grey stars. It will be invisible during the day but magical at night. -
Clean up edges:
Remove the painter’s tape from the ceiling and trim. Use a small angled brush to touch up any spots where the gradient might have bled under the tape.
Patchy Blending?
If the blending dries too fast and looks streaky, lightly mist the wall with water from a spray bottle. This reactivates the latex slightly, allowing you another minute or two to smooth out brush strokes.
Level Up: 3D Texture
Mix a pinch of fine glitter into the Metallic Gold paint for the stars, or adhere tiny wooden craft stars painted to match the mural for a tactile, 3D element that pops off the wall.
Step back and admire how this serene sky creates a peaceful atmosphere for your little one to drift off to sleep


Have a question or want to share your own experience? I'd love to hear from you in the comments below!