I never get tired of drawing a nutcracker—it’s the perfect mix of simple shapes and fancy little details that make your sketch feel instantly festive. Here are my favorite nutcracker drawing ideas, starting with the classic looks and sliding into more playful, unexpected twists.
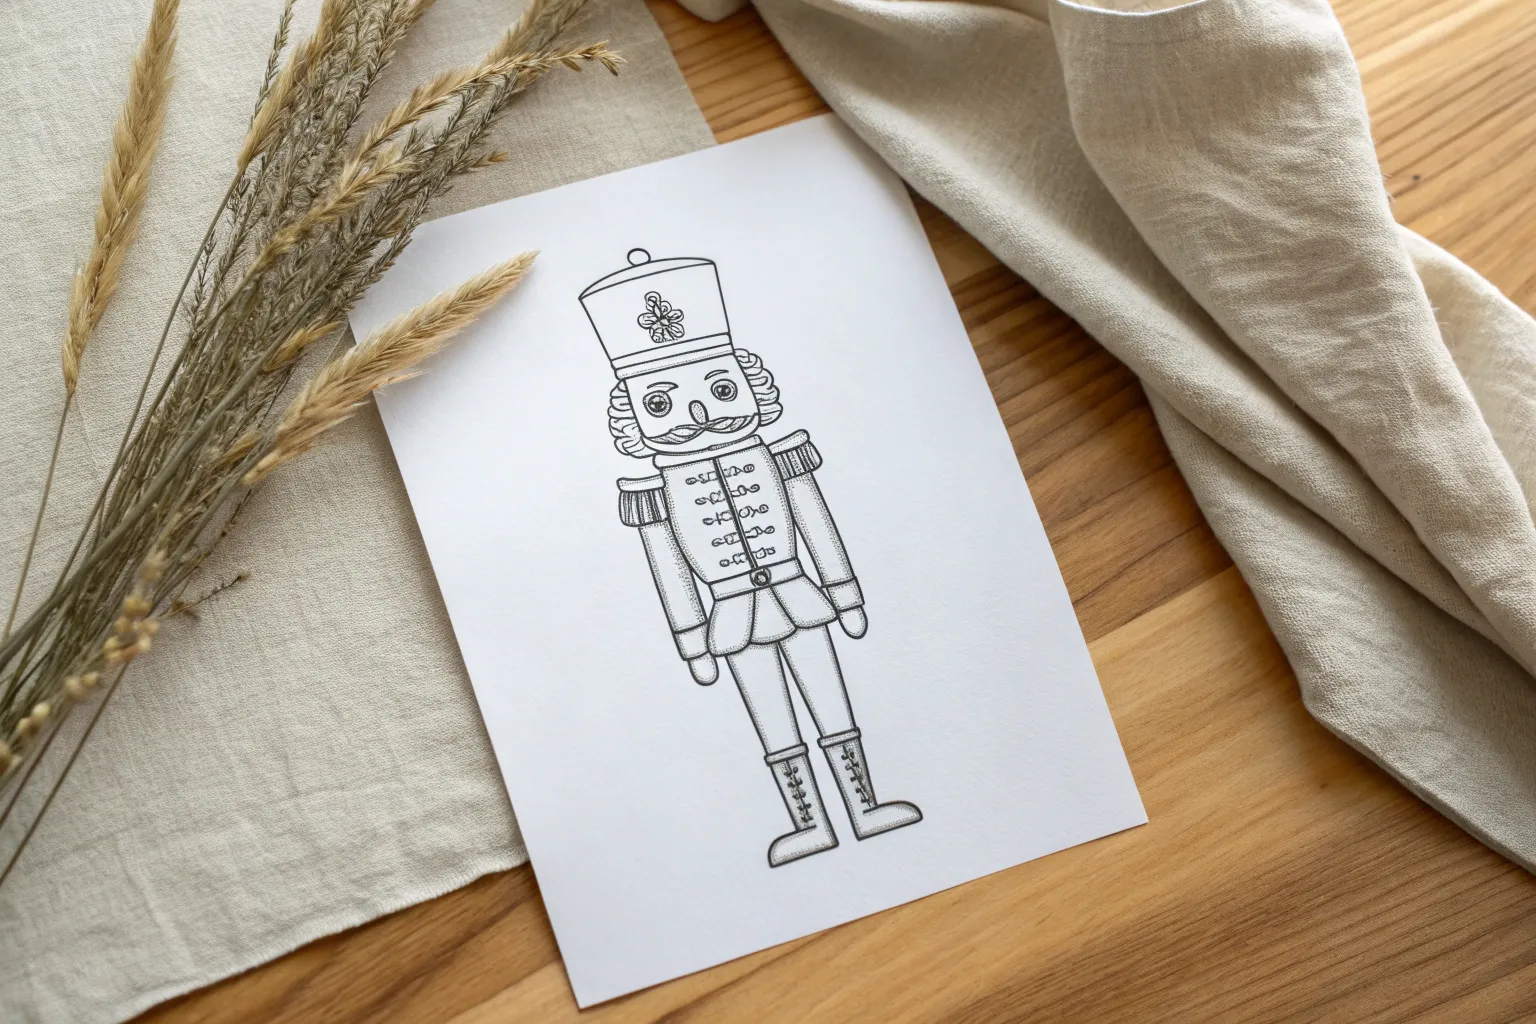
Classic Nutcracker Soldier Front View
Capture the charm of a classic holiday tale with this stylized Nutcracker soldier illustration. Using simple geometric shapes and a muted, vintage-inspired color palette, you can create a character that feels both modern and timeless.
Step-by-Step Tutorial
Materials
- Heavyweight drawing paper (off-white or cream)
- Pencil (HB for sketching)
- Fine-point black drawing pen (archival ink)
- Alcohol-based markers or colored pencils (sage green, salmon/rust, grey, black)
- Ruler
- Eraser
Step 1: Basic Structure
-
Create the head and hat:
Start near the top of your paper by drawing a vertical rectangle for the hat. Directly below it, draw a slightly smaller square shape for the face. Keep your pencil lines light so they are easy to erase later. -
Outline the torso:
Below the face, sketch a wider rectangle for the chest. Underneath that, draw a slightly narrower square for the waist/belt area, followed by a flared trapezoid shape for the bottom of the coat. -
Add the limbs:
Draw two long, thin rectangles hanging from the shoulders for arms. For the legs, draw two vertical rectangles extending from the coat to the bottom, ending in rectangular boot shapes. -
Refine the shapes:
Using your ruler, tidy up the edges of the uniform to ensure they are crisp. Add rectangular epaulets on the shoulders.
Uneven Ink Lines?
If your pen slips, don’t panic. Thicken the line slightly to hide the wobble, giving the drawing a bolder, more illustrative look.
Step 2: Details & Inking
-
Sketch the face:
Draw two large oval eyes with pupils looking forward. Add a prominent, wide mustache that curls up at the ends, and a straight nose bridge connecting to eyebrows. -
Decorate the uniform:
Draw horizontal bands across the chest for the jacket frogging. Add small circles at the ends of these bands for buttons. Sketch a belt buckle rectangle and a central vertical stripe down the coat skirt. -
Add hat details:
Draw a decorative ‘star’ or emblem in the center of the hat. Add vertical lines to texture the top rim of the hat. -
Detail the boots:
Draw laces or buttons up the front of the boots using small circles or x-shapes, and define the boot cuffs just below the knees. -
Ink the main lines:
Go over your final pencil lines with a fine-point black pen. Use a fairly consistent line weight for the outer edges. -
Add texture lines:
Sketch vertical hatch lines on the shoulder epaulets to mimic fringe. Add distinct stitching lines (small dashes) along the inseams of the pants and the pockets. -
Erase guidelines:
Once the ink is completely dry, gently erase all underlying pencil sketches to clean up the drawing.
Make It 3D
Cut the finished drawing out carefully and attach a small cardboard stand to the back to turn your artwork into a standing paper doll.
Step 3: Coloring
-
Apply the green coat:
Color the main body of the hat, the jacket torso, and the coat skirt with a sage green marker or pencil. Leave the decorative bands and belt uncolored for now. -
Add rust accents:
Use a salmon or rust-colored shade for the horizontal chest straps, the central coat stripe, the collar, and the top rim of the hat. I also like to use this same shade for the pants/trousers. -
Color the boots and details:
Fill in the boots with a dark grey or soft black, leaving the laces visible. Color the belt a very dark green or black. -
Shading the face:
Leave the face mostly the color of the paper, perhaps adding a tiny touch of rosy color to the cheeks if desired. Color the mustache and hair black. -
Final texture touches:
If using colored pencils, lightly layer a bit of grey over the white areas (eyes, hands) to give them depth, avoiding a stark white look.
Display your soldier proudly on a mantel or shelf to watch over your holiday festivities


Build a Nutcracker With Geometric Shapes
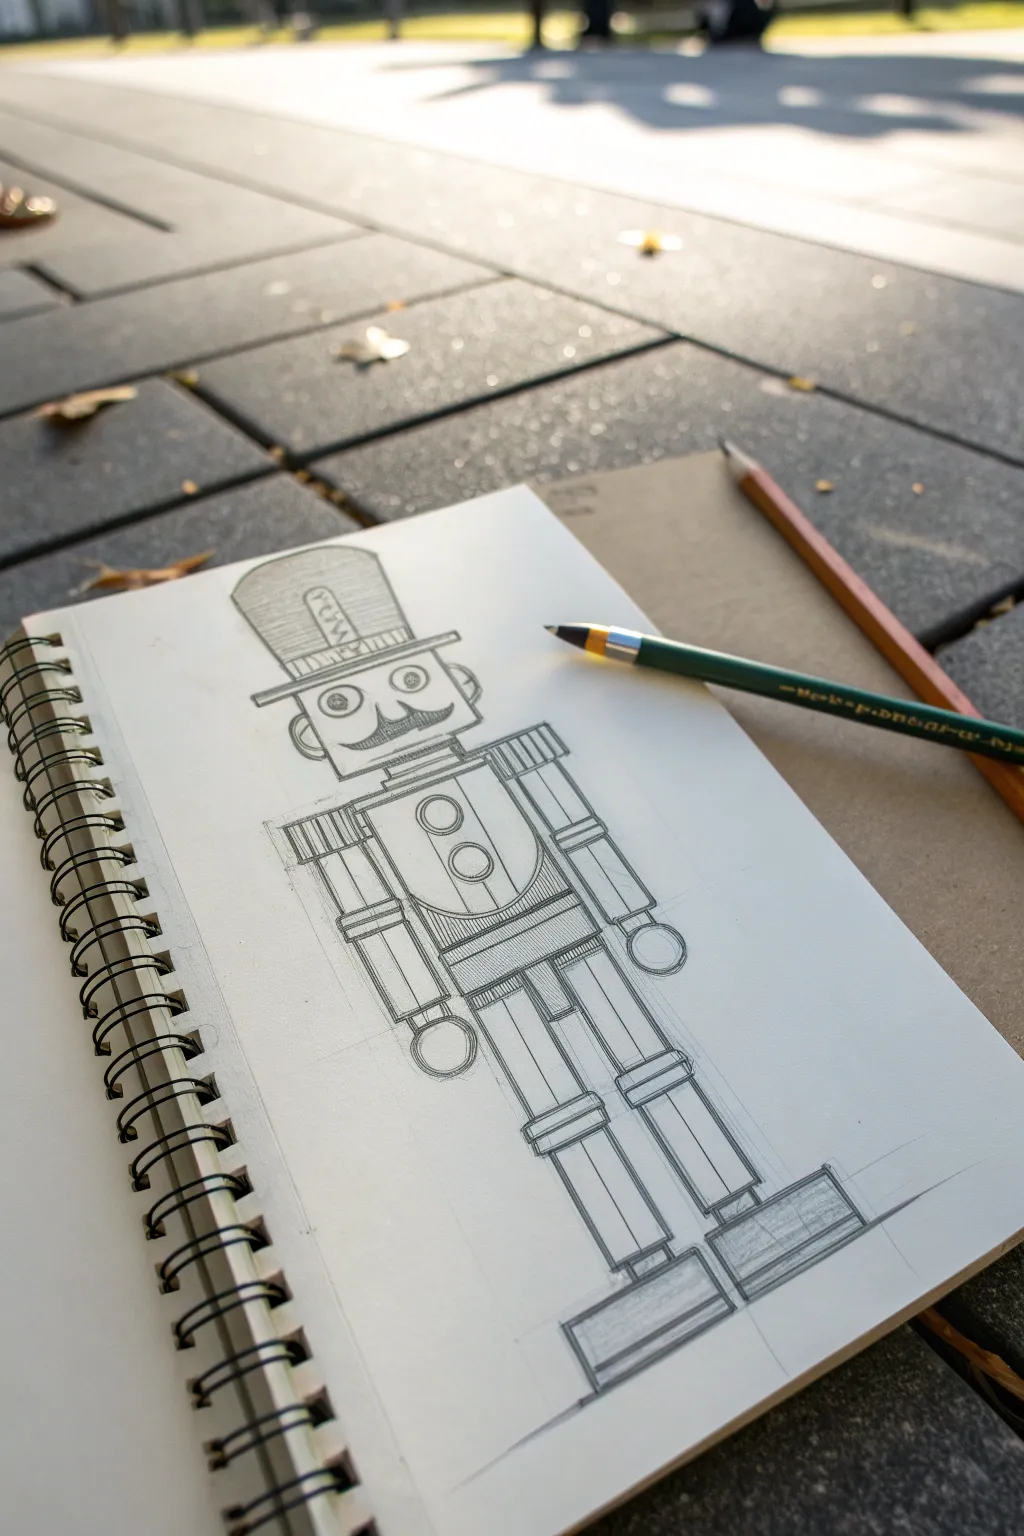
This tutorial guides you through constructing a classic nutcracker using simple, fundamental shapes. By breaking down a complex figure into rectangles, circles, and cylinders, you’ll create a structured and charming character sketch perfect for holiday cards or decorations.
Step-by-Step
Materials
- Sketchbook with smooth white paper
- HB or 2B graphite pencil (for initial sketch)
- Fine-point mechanical pencil (optional, for details)
- Eraser
- Ruler (optional, but helpful for straight lines)
Step 1: Setting the Foundation
-
Draw the head:
Start near the top of your page by drawing a square for the head. Leave plenty of room above it for the tall hat. -
Add the torso:
Directly beneath the head square, draw a vertical rectangle for the body. This should be slightly wider than the head and about twice as tall. -
Attach the legs:
Below the torso, draw a long, narrow rectangle split down the middle to form two legs. These should be roughly the same length as the torso, keeping the proportions balanced. -
Block in the feet:
At the bottom of the legs, sketch two wide, flat rectangles for the base of the boots. They should be wider than the legs to provide stability.
Wonky Lines?
Don’t stress if your freehand shapes aren’t perfect squares. A slightly uneven line adds character and suggests a hand-carved wooden texture rather than a perfect factory toy.
Step 2: Adding Geometric Details
-
Create the hat:
Draw a tall, slightly flared rectangle on top of the head. Add a brim by drawing a narrow horizontal rectangle that extends slightly past the head’s width. -
Define the arms:
On either side of the torso, sketch the arms using segmented rectangles. Draw a rectangle for the shoulder/upper arm and another for the forearm, keeping them stick-straight and vertical. -
Add hands and joints:
Draw simple circles at the ends of the arms for hands. Add small horizontal bands at the elbows and knees to suggest mechanical joints. -
Detail the uniform:
Inside the main torso rectangle, draw a large ‘U’ shape or semi-circle to define the jacket front. Add two circles in the center for buttons. -
Sketch the epaulets:
Add small rectangular blocks on the shoulders for epaulets. Draw vertical lines inside them to simulate the fringe texture.
Step 3: Refining the Face and Features
-
Draw the main facial features:
Place two small circles for eyes in the upper half of the head square. Add dots in the center for pupils. -
Add the mustache:
Draw a wide, curling mustache just below the eyes. Use curved triangles that taper up at the ends like handlebars. -
create the mouth mechanism:
For the classic nutcracker jaw, draw a rectangle below the mustache. Add a horizontal line and short vertical lines to suggest teeth. -
Refine the hat details:
Add a decorative band across the front of the tall hat. You can sketch a simple emblem or oval shape in the center of the hat for extra flair. -
Add vertical definitions:
Draw vertical lines down the center of each leg to give the trousers a pressed, cylindrical look. Do the same for the arm segments to make them look dimensional. -
Darken the contour lines:
Go over your main construction lines with firmer pressure to finalize the shape. I like to keep the pencil sharp here for crisp, clean edges on the geometric forms. -
Add subtle shading:
Using the side of your pencil, add light hatching lines on the sides of the cylindrical shapes (legs, arms, hat) to give the figure volume.
Add Color
Use colored pencils to fill in the sections. Classic red for the jacket, blue for the pants, and gold for the buttons and epaulets will instantly bring him to life.
Now you have a structured nutcracker ready to guard your sketchbook page


Cute Nutcracker Face With Big Eyes
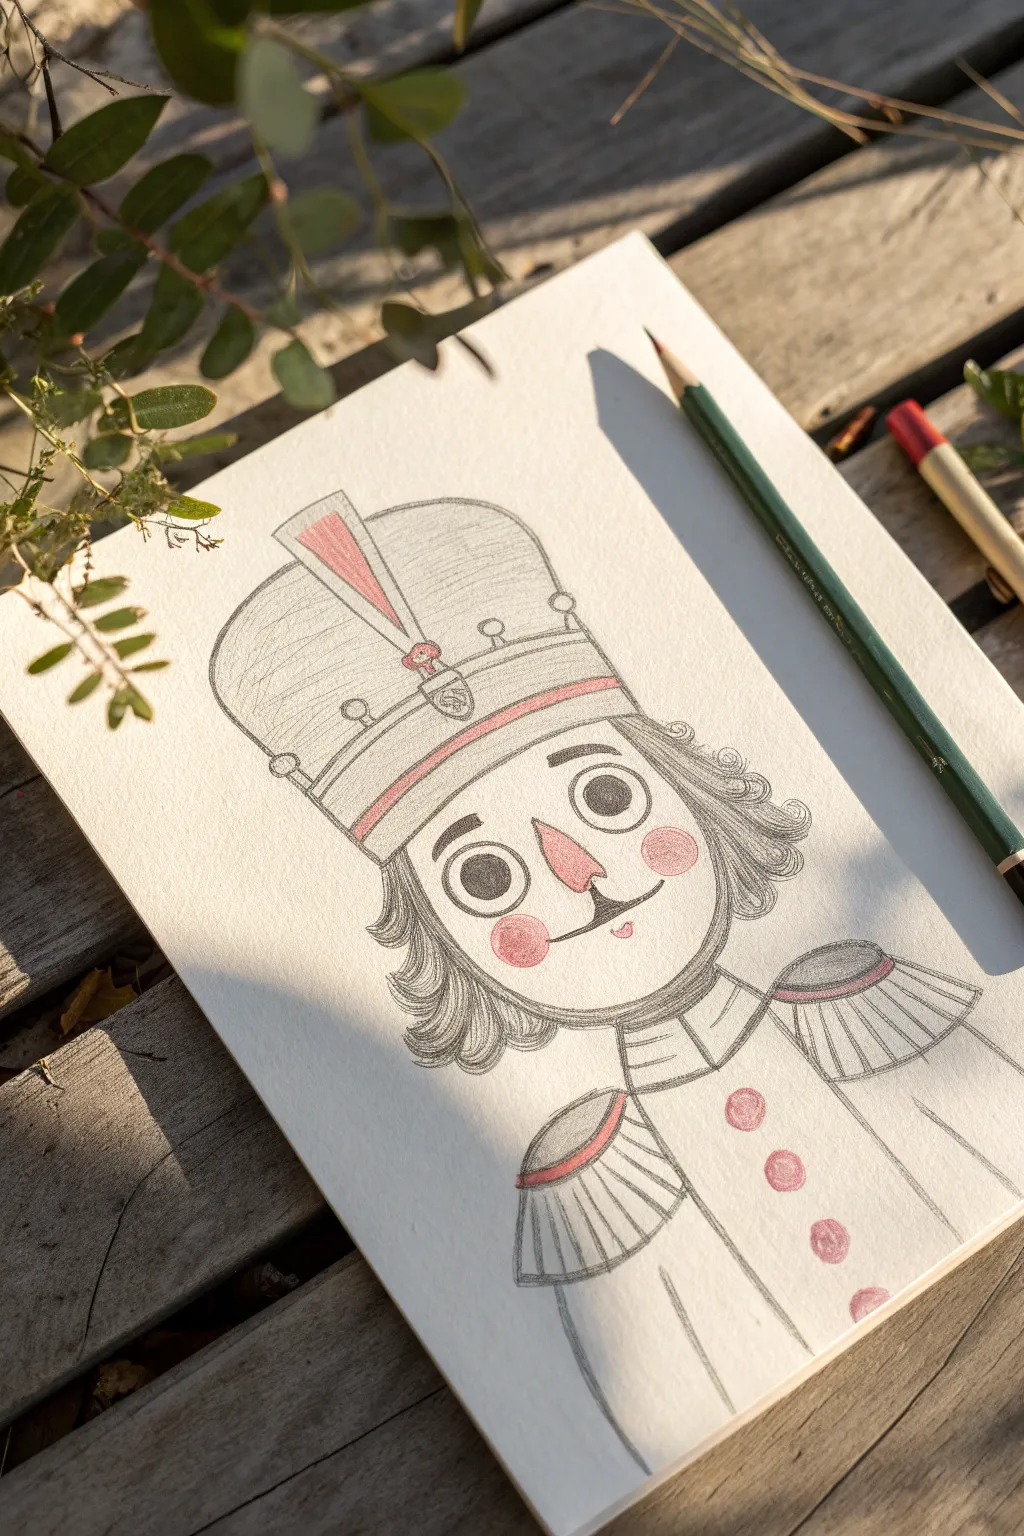
Capture the holiday spirit with this endearing sketch of a nutcracker soldier, featuring oversized eyes and soft, rosy details. The simple line work combined with gentle shading creates a charming, storybook character perfect for greeting cards or festive art journals.
Detailed Instructions
Materials
- Heavyweight sketch paper or mixed media paper
- HB or 2B graphite pencil (for initial sketching)
- 4B or 6B graphite pencil (for darker shading)
- Red colored pencil
- Pink colored pencil
- Fine-tip black liner pen (optional)
- Clean eraser
- Pencil sharpener
Step 1: Drafting the Head and Hat
-
Outline the face shape:
Begin by lightly sketching a wide U-shape for the nutcracker’s face. Keep the bottom curve broad and rounded to give him a friendly, youthful appearance. -
Position the hat base:
Draw a curved line connecting the top points of your U-shape. Add a second parallel line slightly above it to create the brim of his tall hat. -
Build the tall hat:
Extend lines upward from the brim, flaring them out slightly as you go up. Connect them at the top with a soft, downward curve to form the crown of the iconic shako hat. -
Add hat details:
Sketch a decorative band across the middle of the hat. Draw a small vertical rectangle shape sticking up from the center of the brim for the plume or ornament base. -
Create the plume:
Draw a tall, slender feather shape extending from the ornament base, angling it slightly to the left for a dynamic look.
Step 2: Drawing the Facial Features
-
Sketch the nose:
Place a triangular nose right in the center of the face. Round off the corners slightly so it doesn’t look too sharp. -
Draw the big eyes:
On either side of the nose, draw two large circles. Inside, draw smaller circles for the pupils, leaving a tiny white spot in each for a highlight. -
Add eyebrows:
Draw thick, rectangular eyebrows above the eyes, angling them slightly to give him an alert, friendly expression. -
Create the mustache:
From the bottom of the nose, draw a classic handlebar mustache. Keep the curls tight and neat, extending just past the width of the nose. -
Complete the mouth:
Draw a simple curved line under the mustache for the mouth, adding a tiny U-shape below it to suggest an open, smiling lip. -
Add the hair:
On the sides of the face, sketch fluffy hair rolls. Use varied loop strokes to create the texture of curled hair peeking out from under the hat.
Keeping it Symmetrical
Draw a faint vertical line down the center of the face before starting. This guides the placement of the nose, hat center, and buttons so everything aligns perfectly.
Step 3: Adding the Uniform and Shading
-
Sketch the shoulders:
Draw the collar area below the chin, then extend sloping lines for the shoulders. Add epaulets (shoulder decorations) with curved shapes and fringe lines hanging down. -
Detail the uniform:
Running down the center of the chest, draw a vertical line and add three round buttons evenly spaced. -
Fill in the eyes:
Using your graphite pencil, color in the pupils solidly black, being careful to preserve the white highlights. -
Apply graphite shading:
Use the side of your pencil to add soft gray shading to the hat, the hair, the mustache, and the epaulet fringe. Use distinct, directional strokes on the hat to mimic fabric texture. -
Add color accents:
Take your red colored pencil and fill in the hat band, the center of the plume ornament, part of the shoulder pads, and the buttons. -
Rosy cheeks and nose:
Switch to the pink pencil. Create soft circular blush spots on the cheeks and gently color the nose. I like to keep the pressure light here to maintain that soft, illustrative feel. -
Final touches:
Review your sketch and darken any main outlines that look too faint. Add a streak of pink inside the white plume feather for a final pop of color.
Pencil Smudging?
If your graphite is smearing while you colour the red details, place a scrap piece of paper under your drawing hand to protect the work underneath while you add finishing touches.
Now you have a charming holiday character ready to guard your sketchbook pages


Easy Line Art Coloring-Page Style
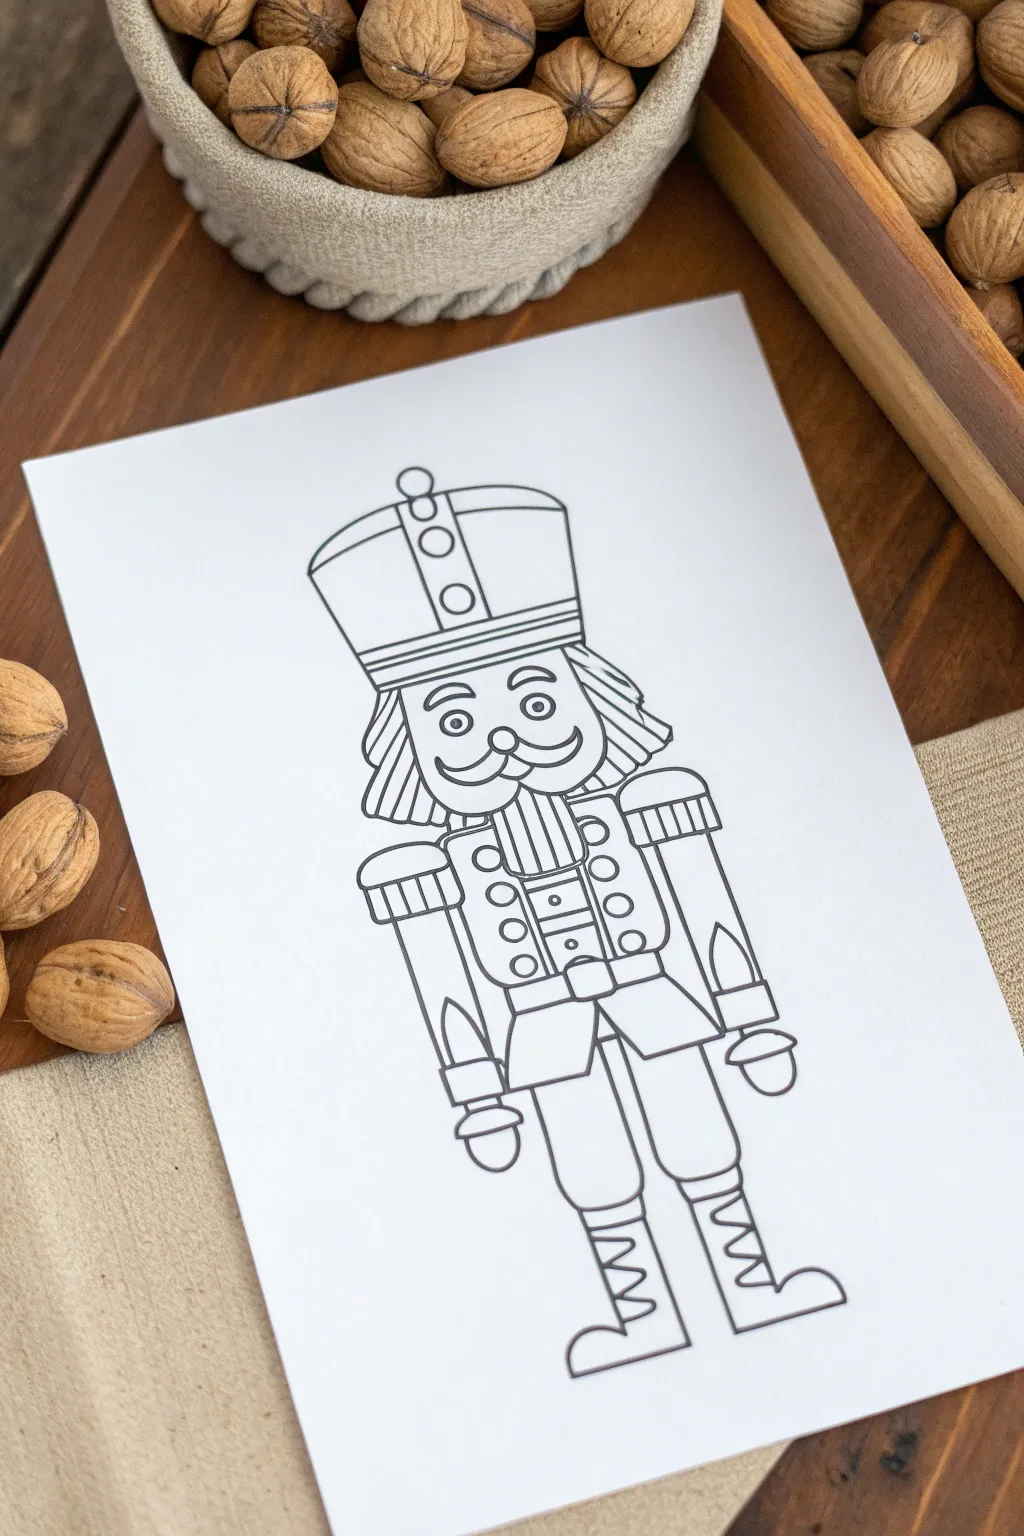
This project features a clean, charming line drawing of a traditional nutcracker soldier, perfect for creating your own holiday coloring pages or greeting cards. The style focuses on bold, even outlines and symmetrical details that capture the classic wooden toy aesthetic without needing complex shading.
Step-by-Step Tutorial
Materials
- White cardstock or heavy drawing paper
- Pencil (HB or 2H for initial sketching)
- Fine-point black marker or technical pen (0.5mm or 0.8mm)
- Eraser
- Ruler
Step 1: Setting the Foundation
-
Map out the proportions:
Start by lightly sketching a central vertical line down your page with a ruler; this guide is crucial for keeping your nutcracker symmetrical. Divide the line into three main sections: one for the head and hat, one for the torso, and one for the legs and boots. -
Sketch the hat shape:
At the top, draw a tall, slightly trapezoidal shape for the hat. It should be wider at the top than at the brim. Add a curved band across the bottom of this shape to define the rim of the hat. -
Define the head:
Directly below the hat brim, sketch a rounded rectangle for the face. Keep the lines soft to suggest the painted wooden texture of a toy.
Step 2: Drawing the Face & Hair
-
Create the stiff beard and hair:
On either side of the face, draw the hair by creating a series of angled, blocky tufts that fan outwards. Do the same for the beard later, but for now, focus on the side hair, using zig-zag lines to mimic stiff wooden carvings. -
Draft the facial features:
Sketch two wide circles for eyes with smaller dots inside for pupils. Add a curved mustache that curls up at the ends, centering it below the eyes. Draw a simple triangular nose right above the mustache. -
Add the mouth and teeth:
Draw the signature nutcracker mouth—a wide, rectangular shape filled with a grid of vertical lines to represent the big, blocky teeth.
Wobbly Lines?
If your long straight lines are shaky, try moving your entire arm rather than just your wrist, or use a ruler for the uniform’s edges.
Step 3: Constructing the Uniform
-
Outline the torso:
Draw the main body shape below the head. It should be slightly narrower than the shoulders. Add rounded rectangles on either side for the shoulder epaulets. -
Draft the arms:
Extend two long, rectangular shapes down from the epaulets for the arms. They should hang straight down. At the bottom of each arm, add a cuff detail and a simple semi-circle or mitten shape for the hands. -
Detail the jacket:
Draw two vertical lines down the center of the chest to create the placket. Add circles on either side for buttons, ensuring they are evenly spaced. -
Add the belt and tunic bottom:
Draw a horizontal band for the belt across the waist. Below that, add the bottom of the tunic or coat, which flares out slightly like a stiff skirt.
Customize It
Turn this into a mixed-media project by gluing on gold glitter for buttons or using real yarn for the hair and beard.
Step 4: Designing Legs & Accessories
-
Sketch the legs:
Draw two straight legs extending down from the tunic. Keep them simple and tubular. -
Form the boots:
At the bottom of the legs, sketch the boot shapes. They should have a distinct cuff at the top and finish with a curved foot shape. Add the laces by drawing zig-zag lines up the front of each boot. -
Finalize decorative touches:
Add small circles to the hat’s vertical strap and vertical lines to the epaulets for texture.
Step 5: Inking & Refining
-
Ink the main outlines:
Take your black fine-point marker and trace over your pencil lines. I prefer to use confident, continuous strokes for long lines like the legs and hat to minimize wobbles. -
Refine the details:
Carefully ink the smaller details like the eyes, mustache, and buttons. Ensure the lines close completely to give it a polished coloring-book feel. -
Erase guidelines:
Once the ink is completely dry (wait at least 5 minutes to avoid smudges), gently erase all the pencil sketches and the central guide line. -
Check line weight:
If any outer lines feel too thin, go over them a second time to thicken the silhouette, making the character pop off the page.
Now you have a crisp, classic nutcracker illustration ready to be colored in with your favorite markers or pencils.

PENCIL GUIDE
Understanding Pencil Grades from H to B
From first sketch to finished drawing — learn pencil grades, line control, and shading techniques.
Explore the Full Guide
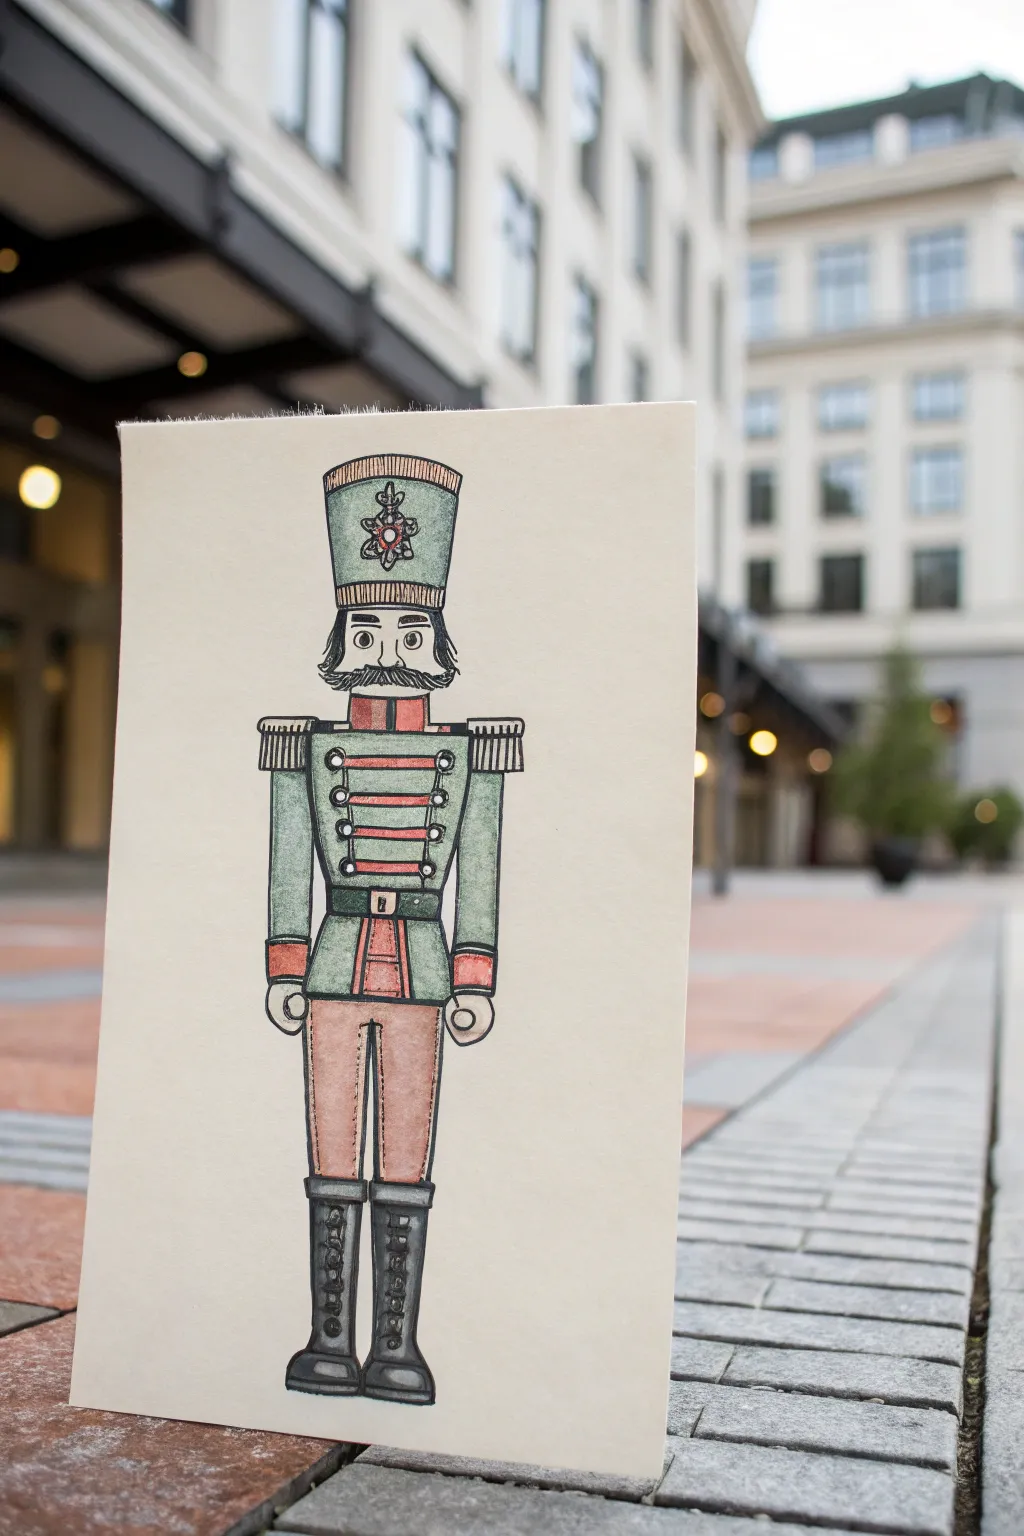
Holiday Color Palette Swatches for a Nutcracker
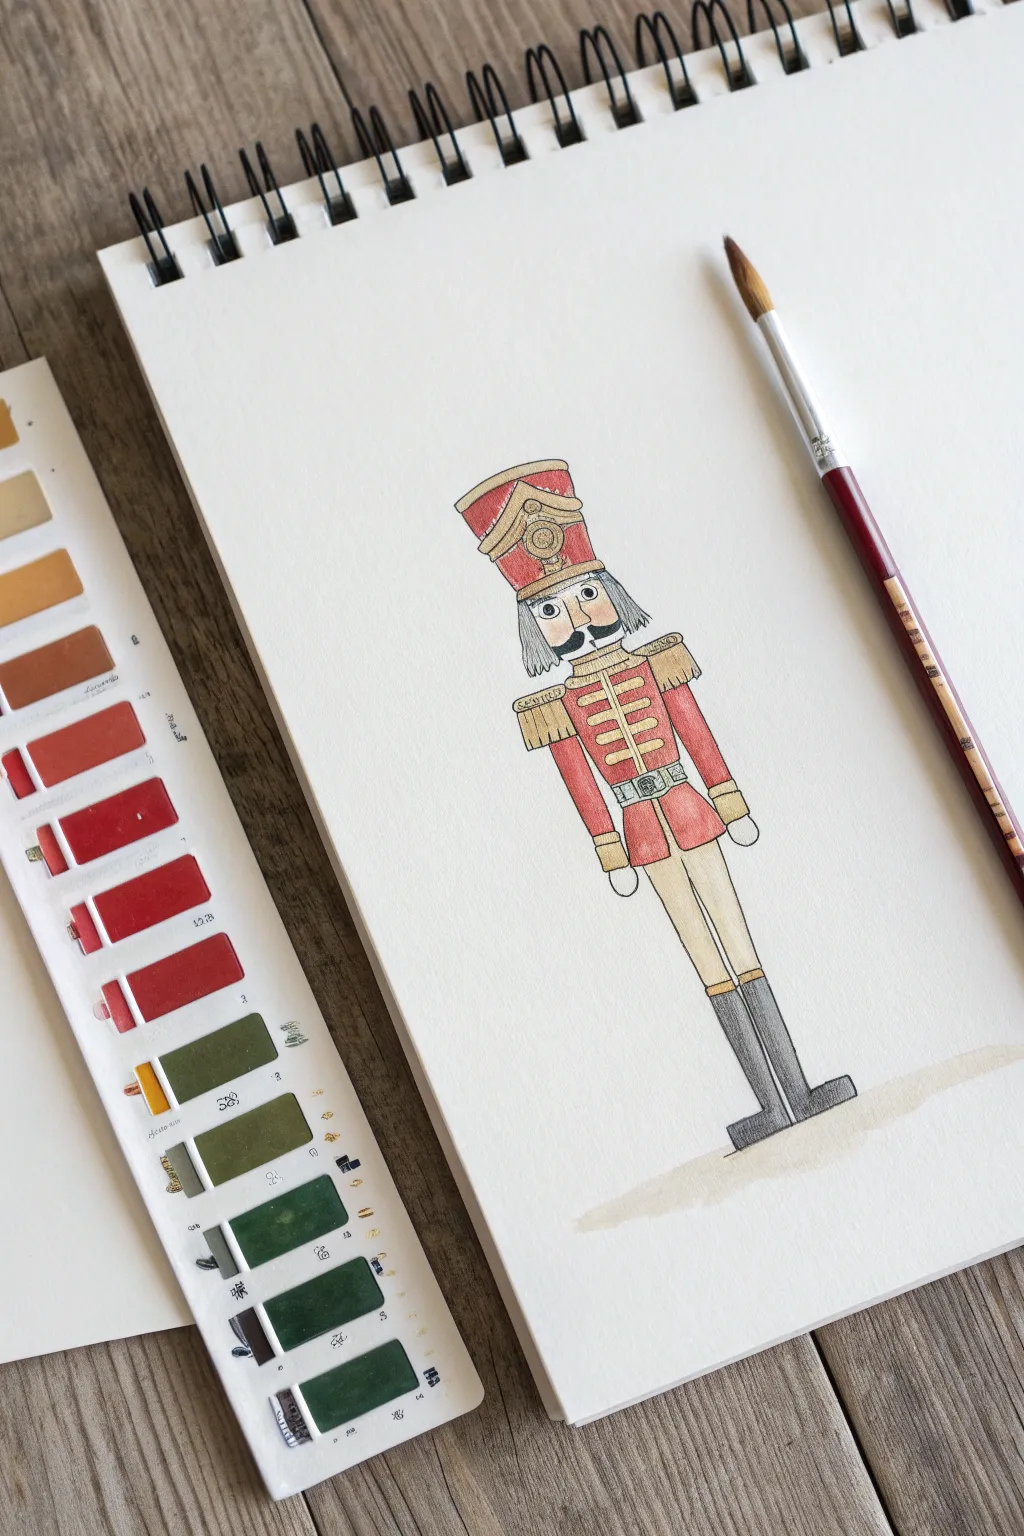
Capture the classic charm of a wooden toy soldier with this delicate watercolor illustration. Using a limited holiday palette of warm reds and antique golds creates a vintage feel perfect for seasonal cards or sketchbook practice.
Step-by-Step Guide
Materials
- Hot press watercolor paper (smooth texture)
- Watercolor paint set (featuring reds, ochres, and blacks)
- Small round brushes (size 2 and 4)
- Pencil (HB or lighter)
- Fine liner pen (black, waterproof, 0.1mm or 0.3mm)
- Jar of water
- Paper towel
Step 1: Sketching the Soldier
-
Basic Shapes:
Start by lightly sketching a tall, thin rectangle for the body and legs. Add a smaller, slightly wider rectangle on top for the head and hat area. -
Defining the Hat:
Draw the tall shako hat. Make the top slightly wider than the base where it meets the forehead. Curve the top edge to give it volume. -
Face and Hair:
Sketch a U-shape for the face area below the hat. Add two boxy shapes on either side for the stiff, wooden hair. Draw a simple defined nose and the iconic curved mustache. -
Torso Details:
Define the jacket by drawing shoulder epaulets (little rectangles with fringe). Add crossed belt straps across the chest and a waist belt with a square buckle. -
Legs and Boots:
Extend the legs down as two long, thin cylinders. At the bottom, draw tall boots that flair slightly at the top and have solid block feet at the base. -
Final Pencil Refinement:
Go back over your sketch to add details like buttons, the decorative plate on the hat, and the cuff details on the sleeves. Keep lines light so they don’t show through the paint.
Step 2: Inking the Outline
-
Tracing:
Using a waterproof fine liner, carefully trace over your pencil lines. A shaky or imperfect line actually adds character to this illustrative style. -
Texture Lines:
Add vertical lines inside the hair blocks to simulate strands. Draw small vertical dashes for the fringe on the epaulets. -
Erase:
Once the ink is completely dry, gently erase all pencil marks to leave a clean black outline.
Keep it Steady
Rest your painting hand on a clean sheet of scrap paper while working. This prevents oils from your hand transferring to the paper and smudging the ink.
Step 3: Adding Color
-
Skin Tone:
Mix a very watery beige or pale peach. Paint the face and hands, keeping the wash flat and even. -
Uniform Red:
For the jacket and hat stripes, mix a muted holiday red. Apply this to the main body of the coat and the top/bottom bands of the hat. Be careful to paint around the straps. -
Golden Accents:
Use yellow ochre or a metallic gold paint for the epaulets, buttons, belt buckle, hat decor, and the horizontal straps across the chest. -
Pants and Hair:
Paint the pants in a soft cream or very light tan color. For the hair and beard, use a diluted grey wash, letting the paper show through for highlights. -
Boots:
Fill in the boots with a dark charcoal or black. I often dilute the black slightly so it isn’t too heavy compared to the rest of the figure. -
Grounding Shadow:
Mix a very watery grey-brown. Paint a loose, organic puddle at the feet to ground the figure so he isn’t floating in space. -
Second Layer:
Once the first layer is dry, add a tiny bit of darker red to the edges of the jacket for subtle shading.
Vintage Patina
For an aged look, lightly wash the entire finished painting with a very diluted tea stain or warm beige watercolor once the other layers are bone dry.
Now you have a charming holiday character ready to frame or turn into a greeting card
Fake Metallic Shine With Simple Highlights
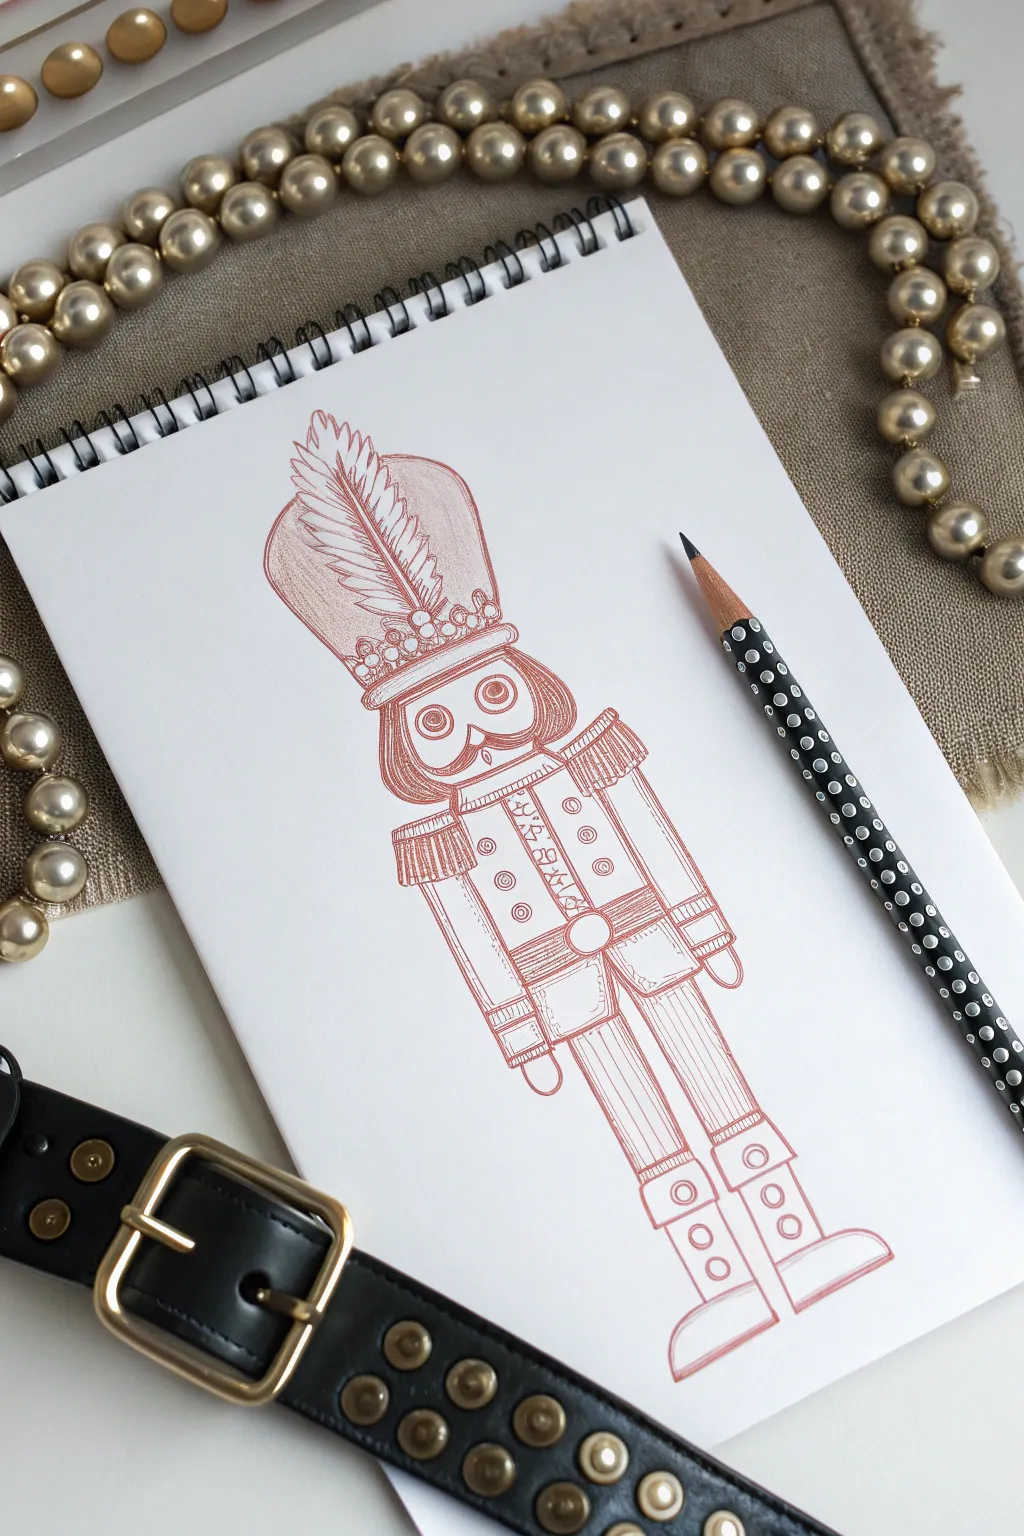
Capture the gleam of polished metal using nothing but a single colored pencil and clever line work. This project focuses on drawing a classic Nutcracker soldier with a unique monochromatic style that mimics the look of copper or rose gold wire.
How-To Guide
Materials
- White sketchbook (spiral bound)
- Metallic or standard colored pencil (Copper, Rust, or Rose Gold)
- Standard HB graphite pencil (for initial sketch)
- Kneaded eraser
- Pencil sharpener
Step 1: Planning the Structure
-
Establish the centerline:
Begin by lightly drawing a vertical line down the center of your page with your graphite pencil. This will ensure your Nutcracker stands up straight and his uniform remains symmetrical. -
Block in the shapes:
Sketch the basic geometric forms: a tall rectangle for the hat, a circle for the head, a rectangular torso, and long, thin rectangles for the legs. Keep these lines extremely faint, as you’ll erase them later. -
Define the features:
Map out the face within the circle. Draw large round eyes, a triangular nose, and the distinctive wide, curved moustache and beard shape. Add the horizontal bands for the hat brim and the belt.
Step 2: Inking the Outline
-
Start the final lines:
Switch to your metallic or rust-colored pencil. Ensure it is sharpened to a fine point. Begin tracing over your graphite sketch, starting with the tall hat. Use firm, confident strokes. -
Draw the feather:
Add the plume on the front of the hat. Instead of a solid outline, use short, flicking strokes that pull outward from a central stem to mimic the texture of a feather. -
Detail the face:
Outline the large eyes and pupils. For the hair and beard, draw distinct, curved lines that bunch together, creating volume without coloring it in fully. -
Construct the uniform:
Draw the jacket details including the shoulder epaulets and the crossed belts. Notice how the epaulets use vertical ticking lines to suggest fringe. -
refine the lower body:
Outline the trousers, boots, and base. Use simple geometric shapes for the boot cuffs to keep the style consistent with the rest of the drawing.
Sharpness is Key
Keep a sharpener handy! A dull decorative pencil creates fuzzy lines that ruin the metallic effect. You want distinct, crisp strokes.
Step 3: Creating the Metallic Textures
-
Shade the hat:
Using the side of your pencil tip slightly, apply extremely light, vertical shading to the main body of the hat, leaving a vertical strip of white paper untouched on the left side to act as a harsh highlight. -
Add hair volume:
Go back to the hair and beard. Darken the areas where the curls meet the face, and leave the rounded outer edges lighter to suggest a 3D form. -
Decorate the jacket:
Draw small circles for buttons and intricate little shapes down the center placket of the jacket. Keep these small details distinct so they don’t blur together. -
Detail the trousers:
Fill the pant legs with closely spaced vertical lines. This pinstripe effect adds texture and differentiates the fabric of the pants from the smooth leather of the boots. -
Emphasize the boots:
Outline the circular details on the boots. Double up your lines on the soles to give them thickness.
Try Gold or Silver
Swap the copper pencil for a metallic gold or silver gel pen on black paper. The negative space technique works beautifully in reverse.
Step 4: Finishing Touches
-
Deepen the shadows:
Identify areas where shadows would naturally fall, like under the hat brim, under the chin, and beneath the belt. Press harder with your colored pencil here to create a rich, dark tone. -
Clean up:
Once you are satisfied with your colored lines, gently use your kneaded eraser to lift away any remaining graphite guidelines from the first step. -
Review highlights:
Check your ‘metallic’ shine. The illusion relies on contrast, so if your mid-tones are too dark, carefully lift some pigment with the eraser to reclaim the white paper highlights.
Now you have a charming, vintage-style illustration that looks ready to march off the page
BRUSH GUIDE
The Right Brush for Every Stroke
From clean lines to bold texture — master brush choice, stroke control, and essential techniques.
Explore the Full Guide
Fold-Out Nutcracker With a Moving Jaw
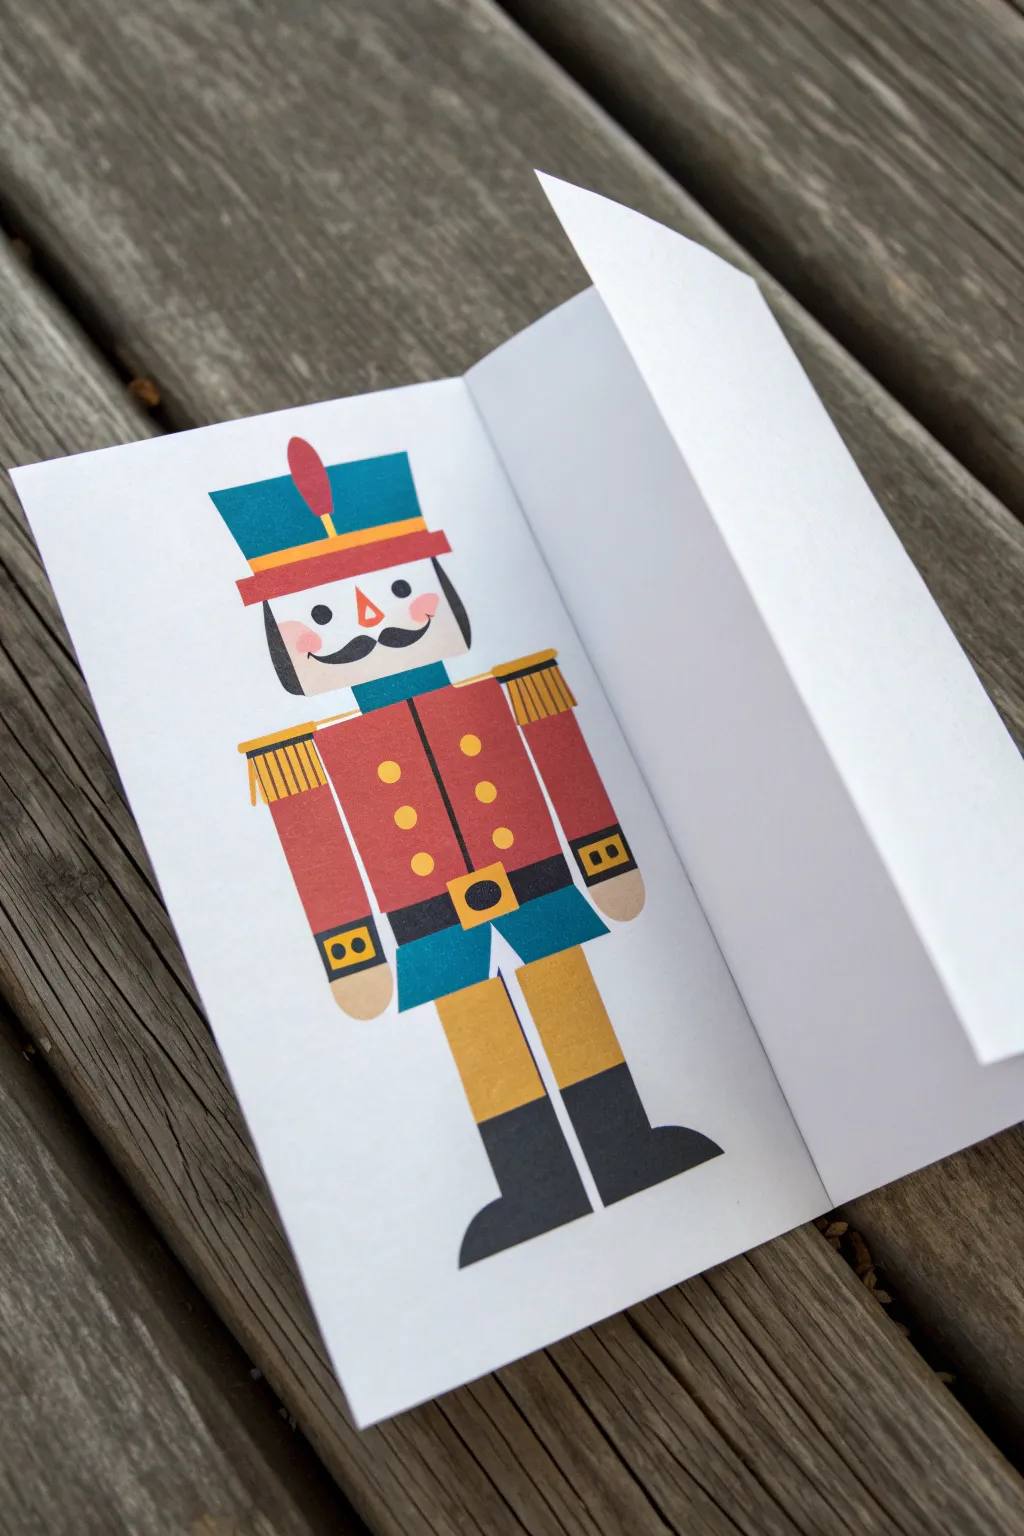
This clever paper project features a stylized geometric nutcracker that reveals a secret when unfolded. By strategically placing the fold across the character’s jawline, you create a fun, interactive element that brings this classic holiday figure to life.
How-To Guide
Materials
- Heavyweight white cardstock (8.5 x 11 inches)
- Ruler
- Pencil
- Eraser
- Fine-point black marker or pen
- Colored markers or paint pens (red, blue, gold/yellow, skin tone, black)
- Bone folder (optional but helpful)
Step 1: Preparing the Card Base
-
Measure and mark:
Start with your sheet of white cardstock in a portrait orientation. Decide on the width of your card—roughly 4 to 5 inches works best. Lightly mark the vertical lines for cutting if you are trimming a larger sheet down. -
Create the fold lines:
This mechanism relies on a specific accordion-style fold. Find the vertical center of your paper. Make two horizontal score lines near the middle, spaced about 1.5 to 2 inches apart. -
Execute the fold:
Fold the top section down creating a mountain fold, and the bottom of that flap up creating a valley fold. Essentially, you are pleating the paper so that a hidden section is tucked away, bringing the top and bottom halves of the paper together. -
Flatten the crease:
Use a bone folder or the back of a spoon to press these creases strictly flat. It is crucial that the paper lays completely flat so you can draw across the seam.
Ink Bleeding Issues?
If using alcohol markers, place a scrap sheet of paper inside the fold while coloring. This prevents the ink from soaking through to the inner layers of the card.
Step 2: Sketching the Outline
-
Position the head:
Keep the card folded shut. Lightly sketch a square shape for the nutcracker’s head directly over the seam where the paper overlaps. The seam should run right through where the mouth will be. -
Add the hat:
Draw a tall rectangle on top of the head for the hat. Add a horizontal band near the bottom of the hat and a small oval shape for the feather or decoration on top. -
Draw the body:
Sketch a rectangular torso below the head. Add simple rectangular shapes for the arms hanging at the sides. Keep the shapes very geometric and blocky for this modern style. -
Legs and boots:
Extend two vertical rectangles down for legs. At the bottom, draw curved boot shapes pointing outward. -
Detail the face:
Draw two circle cheeks, two small dot eyes, and a triangular nose. For the mustache, draw a curly handlebar shape right on the fold line. -
Connect the hidden area:
Gently open the card. You will now see a blank gap between the top of the head and the bottom of the Jaw. Use your ruler to connect the side lines of the face across this gap, elongating the head. This is the ‘mouth’ area.
Step 3: Adding Color and Definition
-
Color the jacket:
Use a deep red marker to fill in the main torso rectangle and the sleeves. Leave small strips at the wrists for cuffs. -
Fill in the hat and pants:
I like to use a teal or slate blue for the hat and the pants (the area just below the belt). This provides a nice contrast to the red jacket. -
Apply gold accents:
Use a yellow or gold marker to color the shoulder epaulets (little rectangles on the shoulders), the buttons on the jacket, the belt buckle, and the cuffs on the sleeves blocks. -
Color the face and legs:
Fill in the face shape with a light skin-tone marker. Color the legs in a mustard yellow or tan to represent trousers. -
Darken boots and details:
Use solid black for the boots, the back of the hair framing the face, and the belt. Careful coloring against the lighter legs keeps the edges crisp. -
Add fringes:
With a fine-tip yellow or gold pen, draw vertical lines hanging down from the shoulder epaulets to create fringe texture. -
Drawing the mouth:
Open the card again. In that hidden middle section, draw a large open mouth shape or simply continue the skin tone for a ‘long face’ look. You can add teeth here if you want extra detail when it opens. -
Final outlines:
Once the ink is dry, erase any visible pencil marks. If your style allows, layout crisp black lines around the major shapes to make the character pop against the white background.
Level Up: Hidden Message
Write a holiday greeting like ‘Merry Christmas!’ inside the hidden mouth fold area so it only appears when the recipient pulls the card open.
Fold it back up and you are ready to surprise someone with this charming interactive card
Story Scene: Nutcracker Guarding a Gift Stack
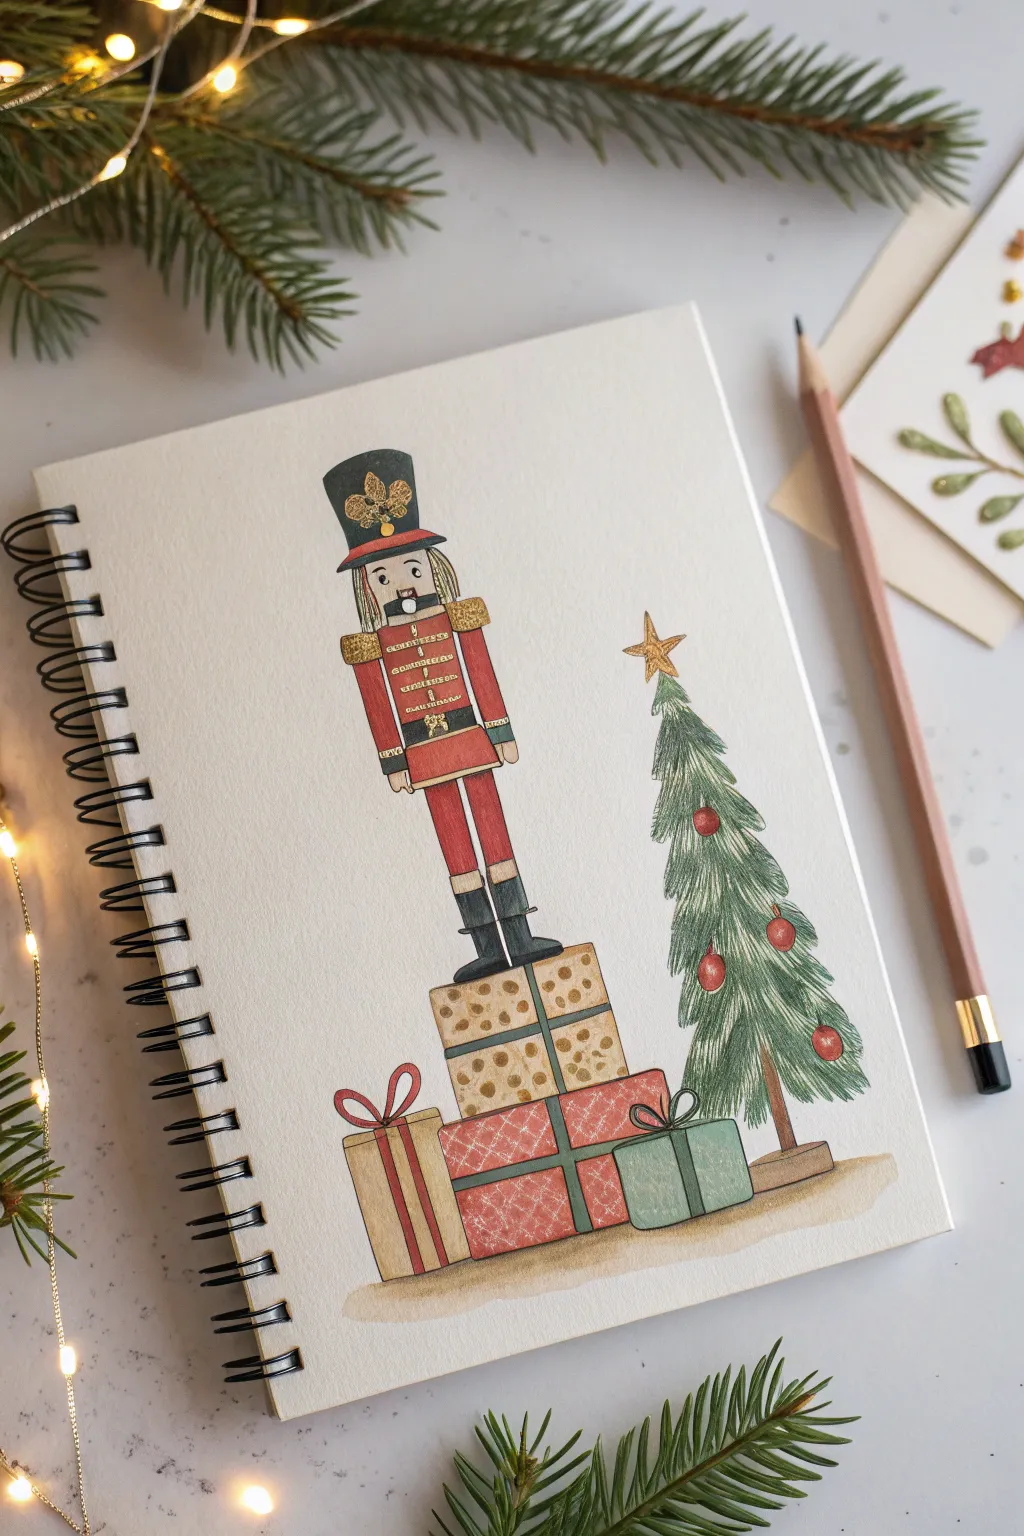
This charming holiday illustration features a classic uniformed Nutcracker standing tall atop a precarious stack of wrapped presents. The soft, textured finish suggests colored pencils or watercolor pencils, creating a nostalgic and festive scene perfect for a sketchbook or greeting card.
Step-by-Step
Materials
- Spiral-bound sketchbook (heavyweight paper)
- H or HB graphite pencil for sketching
- Kneaded eraser
- Colored pencils (red, forest green, black, gold/mustard, peach, grey)
- Fine-liner pen (black, 0.1mm or 0.3mm)
- Gold gel pen or metallic paint marker (optional)
- Ruler (optional)
Step 1: Sketching the Composition
-
Establish the vertical line:
Start by drawing a faint vertical guideline down the center of your page to help balance the Nutcracker on the gifts. -
Block in the gift stack:
Draw three rectangular shapes at the bottom, stacked somewhat unevenly. The bottom two can be side-by-side or slightly overlapping, with a third smaller box perched on top. Keep the lines light so they can be erased later. -
Draft the Nutcracker’s basic shapes:
On top of the highest gift box, lightly sketch a vertical rectangle for the body and legs. Add a circle for the head and a taller cylinder shape on top for the hat. He should look stiff and upright, like a toy soldier. -
Add the tree outline:
To the right of the stack, sketch a simple triangular shape for the Christmas tree. Add a small star at the tip and a rectangular trunk base.
Pro Tip: Hair Texture
For the Nutcracker’s white hair and beard, don’t just leave the paper blank. Use a very light grey pencil to draw thin, vertical lines to suggest strands of hair.
Step 2: Detailing the Figure
-
Define the face and hat:
flesh out the Nutcracker’s face. Draw the prominent jaw (the nut-cracking mechanism), a mustache, and wide eyes. Refine the hat shape, adding a brim and a decorative emblem on the front. -
Dress the soldier:
Draw the uniform details. Add shoulder epaulets, crossed belts on the chest, and distinct cuffs. Separate the legs and add tall boots that reach up to the knees. -
Refine the tree texture:
Instead of a straight triangle, draw jagged, downward-pointing zigzag lines to simulate pine boughs hanging down. Add small circles for ornaments scattered throughout the branches. -
Decorate the gifts:
Add ribbons to the boxes. Draw bows on top with loops that drape naturally. Add patterns to the wrapping paper—try creating one with polka dots and one with a cross-hatch pattern for variety.
Step 3: Inking and Coloring
-
Apply the outline:
Using a fine-liner pen, carefully trace over your pencil lines. Keep the lines thin for the internal details like the face and uniform buttons. Let the ink dry completely before erasing the pencil sketch. -
Color the uniform:
Start with a bright red pencil for the coat and trousers. Apply the color evenly, pressing harder in shadowed areas (like under the belt) to create depth. -
Fill in the darks:
Use black pencil for the hat and boots. Leave tiny slivers of white paper showing on the curves of the boots to act as highlights, making them look shiny. -
Color the tree:
Use a forest green pencil for the tree. Use vertical strokes that follow the direction of the needles. Layer a darker green or grey near the center of the tree to suggest volume. -
Wrap the presents:
Color the gift boxes. I like to alternate colors so they don’t blend together—try a beige box with gold dots, a red box with green ribbon, and a blue-green box. Keep the shading light on the top surfaces. -
Add metallic accents:
Use a gold/mustard yellow pencil for the epaulets, buttons, and belt buckle. If you have a gold gel pen, add tiny dots of sparkle to the hat emblem and the star on the tree. -
Create the ground:
Lightly shade a horizontal patch under the gifts and tree using a light brown or beige pencil to ground the scene so the objects aren’t floating.
Level Up: Watercolor Wash
Use watercolor pencils for the base coloring. Once sketched, run a damp brush over the areas to blend the pigment into a paint-like finish, then add details back on top with dry pencil once completely dry.
You now have a festive guardian ready to watch over your holiday season sketch collection


Have a question or want to share your own experience? I'd love to hear from you in the comments below!