If you’ve been craving a room that feels like a deep breath by the sea, an ocean mural can do that in one big, beautiful sweep. Here are my favorite ocean mural ideas—from classic underwater scenes to more unexpected, artsy takes—so you can pick a vibe that fits your space and your style.
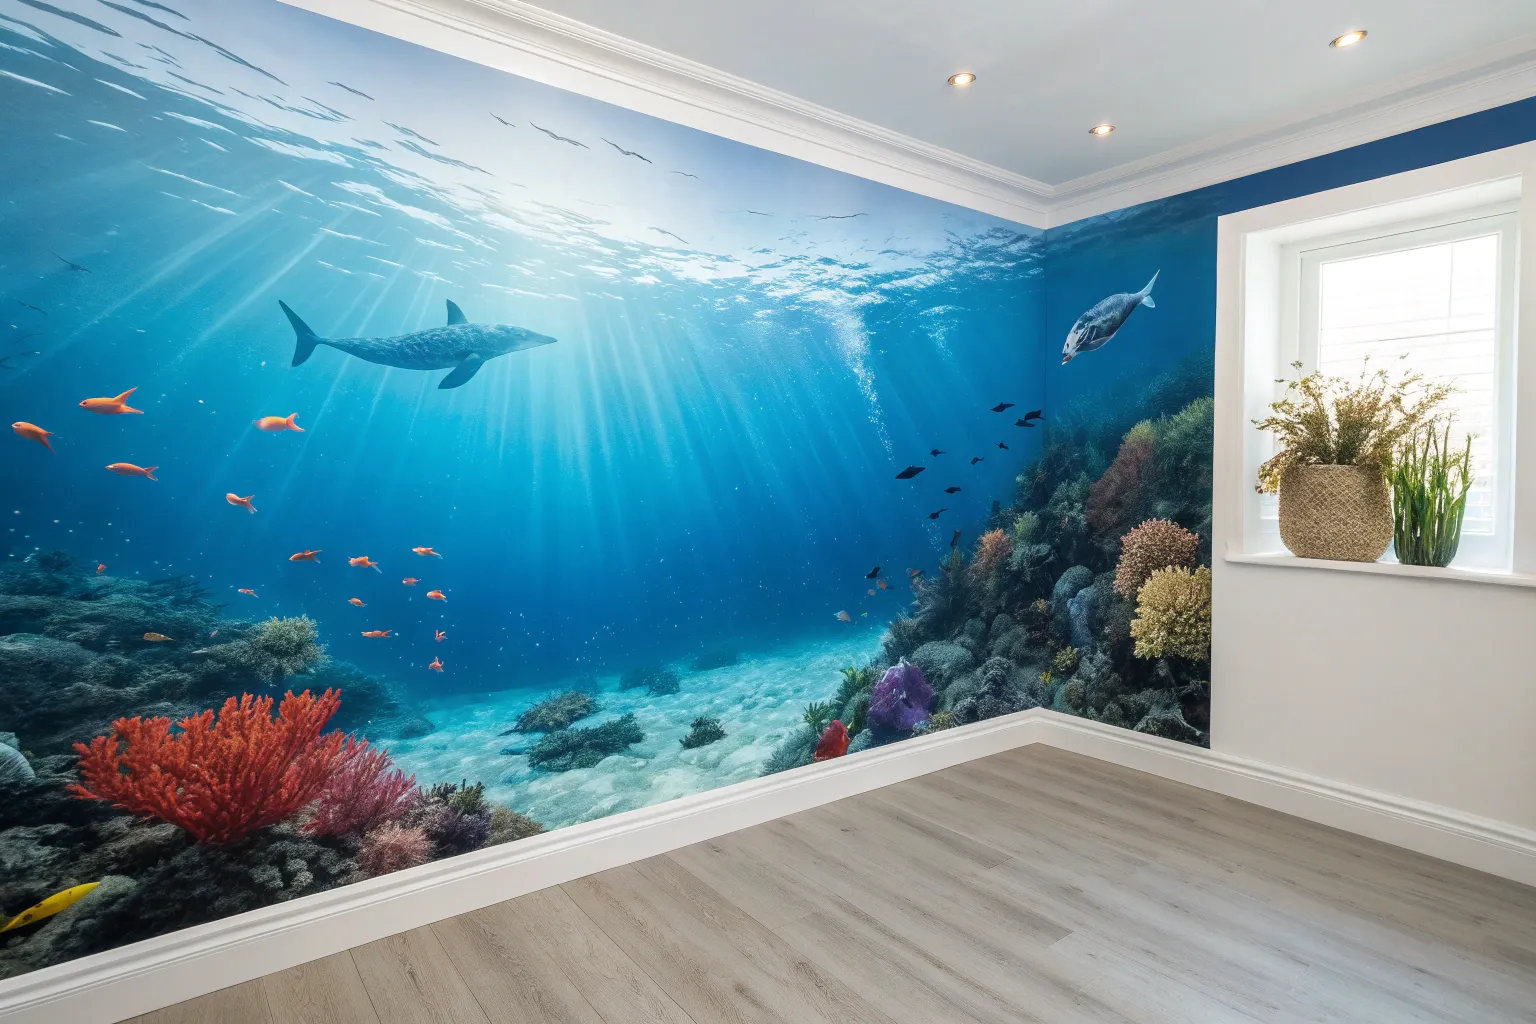
Classic Coral Reef Panorama
Transform a blank hallway wall into a breathtaking underwater window with this large-scale mural project. By combining deep sea gradients with detailed foreground coral elements, you’ll create a deceivingly realistic aquarium effect that adds depth and serenity to any room.
Detailed Instructions
Materials
- High-quality interior latex paint (White primer, Deep Navy, Royal Blue, Teal, Cyan)
- Acrylic paints for details (Orange, Yellow, Pink, Purple, various Greens, Black, White)
- Wide paint rollers and tray
- Large blending brushes (soft bristle)
- Assorted detail brushes (rounds, liners, flats)
- Sea sponge
- Painter’s tape
- Chalk or pastel pencil for sketching
- Clear acrylic glazing medium
- Ladder or step stool
- Drop cloths
Step 1: Setting the Scene
-
Prep the Surface:
Begin by cleaning the wall surface thoroughly to remove dust and grease. Apply a coat of high-quality white primer to ensure your blue tones will be vibrant and true to color. -
Mask the Frame:
Use painter’s tape to create a crisp, rectangular border around your mural area. This hard edge is crucial for simulating the ‘glass’ of an aquarium tank. -
Base Gradient Application:
Start painting the water from bottom to top. apply the Deep Navy at the bottom left, transitioning into Royal Blue as you move up and to the right. The goal is to create depth, so keep the deepest water darkest. -
Upper Water Transition:
Mix the Cyan and Teal with a clear glazing medium to keep it translucent. Apply this to the top third of the wall, blending it downward into the darker blues while the paint is still wet to avoid hard lines. -
Creating Surface Light:
At the very top edge, blend in almost pure white mixed with a tiny drop of Cyan. Use a dry, soft brush to pull simulate shimmering light rays filtering down through the water.
Pro Tip: Perspective Trick
Make distant fish smaller, paler, and bluer than foreground fish. This ‘atmospheric perspective’ mimics how water absorbs light and creates massive depth.
Step 2: Building the Reef
-
Sketch the Composition:
Once the blue background is fully dry, lightly sketch the outlines of your rock formations and coral clusters using a white chalk pencil. Focus on the bottom right corner for the main reef structure. -
Block in Rock Shapes:
Paint the base shapes of the rocks using a mix of grey, brown, and mossy green. Don’t worry about texture yet; just establish the silhouette against the blue water. -
Sponge Texture:
Dip a sea sponge into lighter grey and beige tones. Lightly dab this over your rock shapes to create a porous, organic stone texture. I find dabbing off excess paint on a paper towel first gives the best control. -
Painting Brain Coral:
For the large, rounded coral heads, use a pale yellow or cream base. Once dry, use a thin liner brush with a slightly darker ochre to paint the squiggly, maze-like patterns. -
Adding Soft Coral Fans:
Using a bright orange paint, create the large fan coral. Start with the main thick stems and branch out into finer and finer lines. These should look delicate and lace-like. -
Layering Tube Sponges:
Paint clusters of tubular shapes in pinks and purples. Add a dark center to each tube to show openings, and highlight the rims with a lighter shade of the base color to give them volume.
Step 3: Bringing it to Life
-
School of Fish Silhouette:
Mix a translucent grey-blue wash. Toward the upper left, paint hundreds of small, simple fish shapes. They don’t need detail—just the suggestion of a massive shoal swimming in the distance. -
Foreground Fish Details:
Paint the larger, hero fish (like the orange Anthias) closer to the ‘glass’. Use opaque bright oranges and yellows. Add tiny white highlights to their eyes and scales to make them look wet and shiny. -
Shadows and Depth:
Use a watered-down dark blue or black to glaze shadows underneath the coral branches and rocks. This grounding step is what separates the foreground from the background. -
Final Light Rays:
With a very wide, dry brush and white paint extended with glaze, sweep faint diagonal beams of light coming from the top surface down across the fish and reef. -
Refine and Reveal:
Check for any small touch-ups needed on your fish or coral. Once completely 100% dry, carefully peel away the painter’s tape to reveal the sharp edges that create the window illusion.
Troubleshooting: Hard Blends
If your water gradient dries with stripes, mix a glaze of the two meeting colors. Brush this semi-transparent mix over the transition line to soften it.
Step back and enjoy the peaceful view of your personal, maintenance-free indoor ocean reef


Sun-Dappled Surface Light Rays
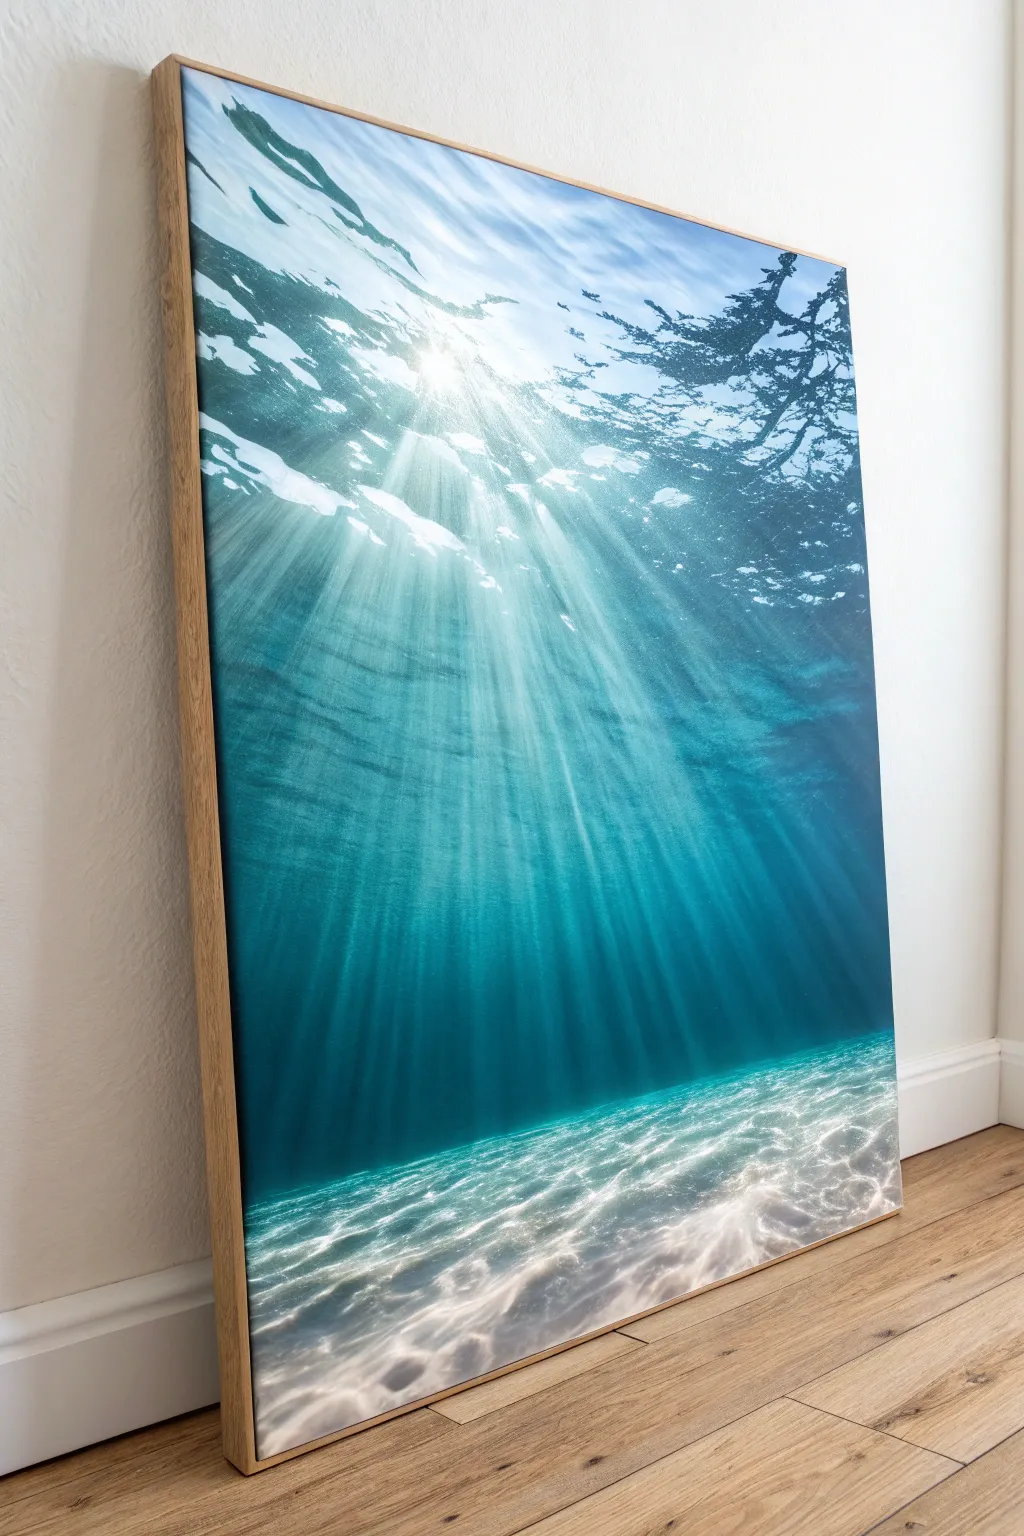
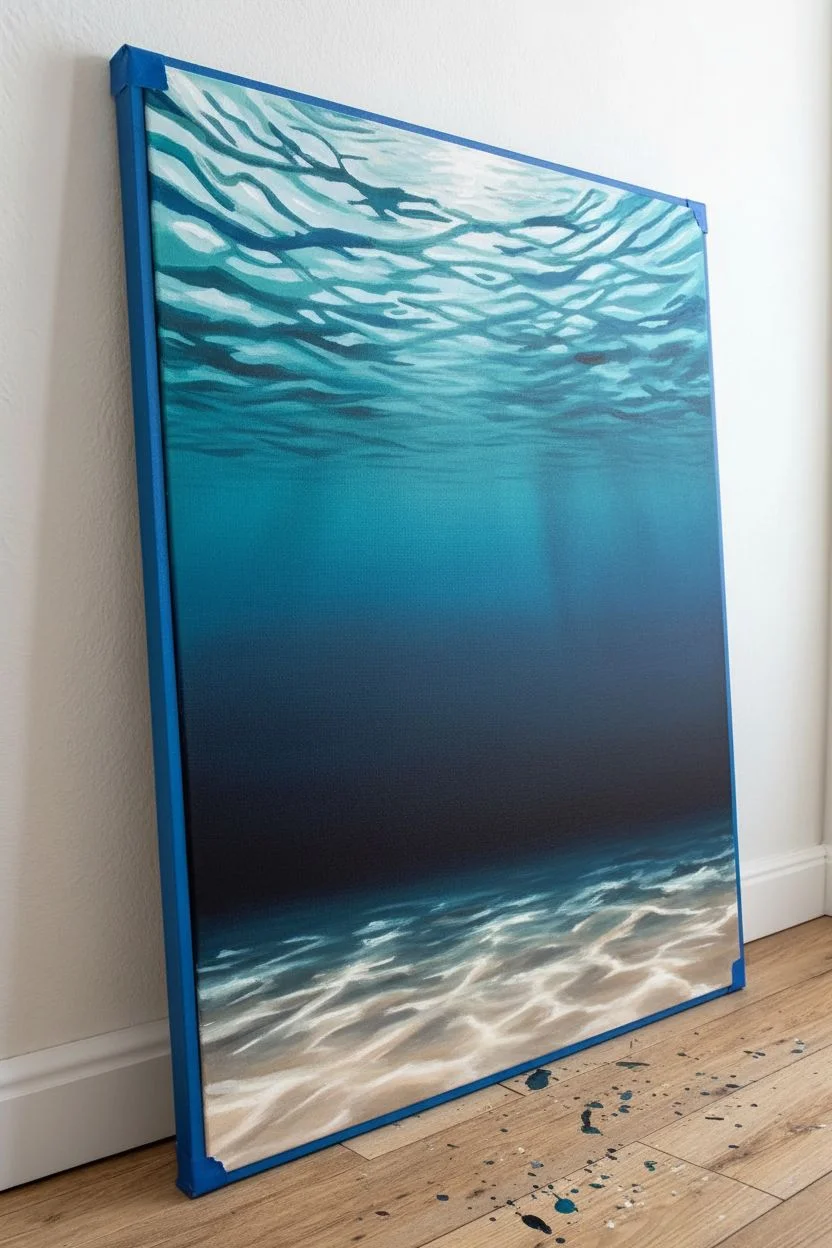
Capture the serene beauty of the deep blue with this large-scale canvas project that brings the ocean’s calming light into your home. The striking contrast between the dark depths and the ethereal sunbeams creates a mesmerizing focal point for any room.
Step-by-Step Tutorial
Materials
- Large floating frame canvas (24×36 or larger)
- Acrylic paints (Phthalo Blue, Prussian Blue, Titanium White, Teal, Burnt Umber)
- Glazing medium or slow-drying medium
- Large flat brush (2-3 inch)
- Medium filbert brush
- Soft blending brush or mop brush
- Fan brush
- Spray bottle with water
- Palette knife
- Masking tape (for frame protection)
Step 1: Setting the Scene
-
Prepare the canvas:
Begin by taping off the wooden frame edges with masking tape to keep them pristine. If your canvas isn’t pre-primed, apply a coat of gesso and let it dry completely. -
Create the gradient base:
Mix Prussian Blue with a touch of Burnt Umber to create a deep, almost black navy. Apply this to the middle section of the canvas, blending it upwards into pure Prussian Blue. -
Transition to teal:
As you move towards the top third, start mixing Phthalo Blue and Teal into your brush. Blend this wet-into-wet with the darker blue below to create a seamless transition towards the surface. -
Establish the surface:
At the very top, mix Titanium White with Teal and a tiny dot of blue. Paint the water’s surface using horizontal, wavy strokes to suggest the movement of waves from underneath. -
Paint the sandy bottom:
For the bottom fifth of the canvas, mix Titanium White with a small amount of Burnt Umber and a tiny touch of blue. Paint this area with loose, sweeping strokes to mimic the sandy ocean floor.
Glazing Magic
For the most realistic underwater beams, use 80% glazing medium to 20% paint. It needs to be very transparent to look like light rather than white stripes.
Step 2: Creating Depth and Light
-
Enhance the darkness:
Once the base layer is dry, mix a glazing medium with your darkest blue. Apply a thin wash over the middle section to deepen the abyss effect without losing the color vibrancy. -
Texture the surface water:
Using a smaller filbert brush and white paint mixed with a little water, dab in the chaotic, frothy patterns of the underside of the waves at the top. Keep these shapes organic and random. -
Draft the light rays:
Identify where your main light source is entering (top center-left). Use a dry brush with a very small amount of white paint to faintly map out the direction of the rays fanning downward. -
Paint the primary beams:
Mix white with plenty of glazing medium. Using a wide flat brush, pull long, straight strokes from the surface light source down into the deep blue. The glaze makes them transparent. -
Intensify the brightness:
I like to go back over the center of the strongest rays with slightly more opaque white paint. This creates a ‘core’ to the light beam that fades out at the edges.
Streaky Rays?
If your light rays look too solid or ‘painted on,’ use a damp sponge to gently wipe and blur the edges while the paint is still wet to effect softness.
Step 3: Refractions and Details
-
Detail the seabed:
The light rays create a caustic network on the sand. Use a small round brush with bright white to paint connecting, net-like patterns on the sandy floor where the light hits. -
Soften the seabed shadows:
Between the bright white caustic lines, glaze a slightly darker sandy color to show the ridges and troughs of the sand. -
Add floating particles:
Flick a stiff bristle brush loaded with watered-down white paint to create tiny specks of marine snow and bubbles caught in the light beams. -
Deepen surface shadows:
Paint dark, jagged shapes near the top surface area using dark blue. These represent the shadows of waves or floating debris seen from below. -
Final blending pass:
Use a clean, dry mop brush to very gently sweep over the edges of your light rays if they look too harsh. This softens the transition into the dark water. -
Highlight the source:
Add a heavily pigmented spot of pure Titanium White at the very top convergence point of the rays to simulate the blinding sun. -
Remove tape and seal:
Peel off the masking tape carefully. Finish the piece with a satin varnish to protect the paint and unify the sheen across the dark and light areas.
Step back and admire how the light seems to physically glow from within the depths of your new artwork


Big Hero Sea Turtle
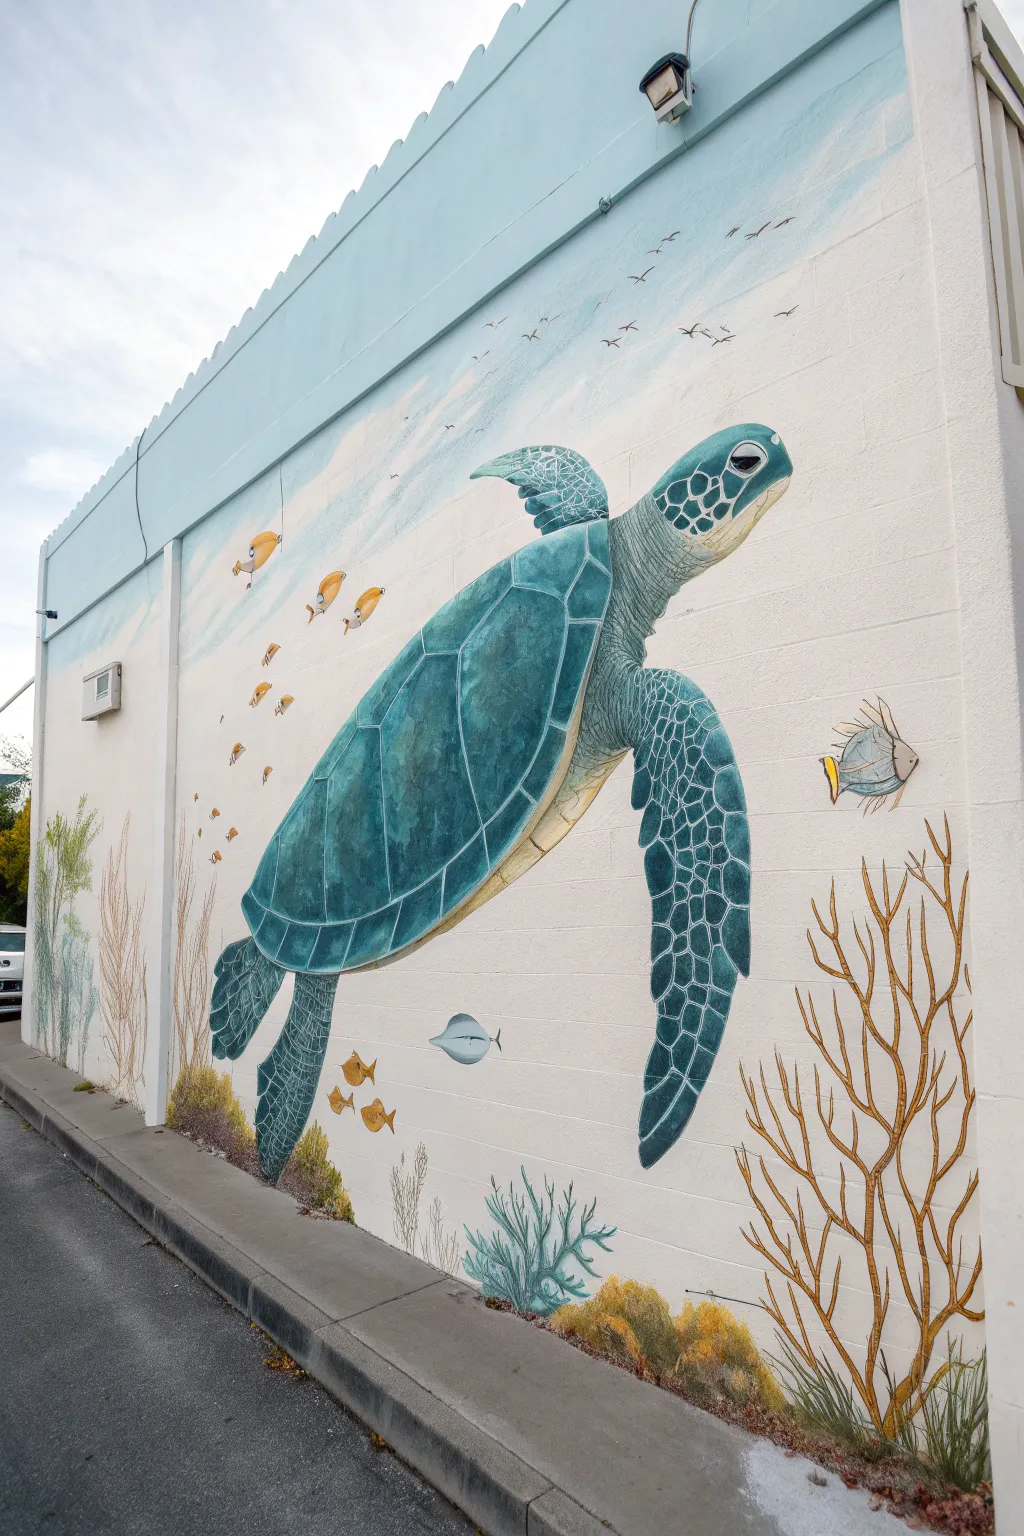
Transform a plain exterior wall into an underwater paradise with this impressive large-scale mural. Featuring a majestic sea turtle surrounded by coral and schooling fish, this project uses layered acrylics to create depth and movement on stucco or brick surfaces.
Step-by-Step
Materials
- Exterior acrylic latex primer (white)
- Exterior acrylic mural paints (blue, teal, green, yellow, orange, brown, black, white)
- Chalk or charcoal sticks for sketching
- Assorted paintbrushes (large rollers, 2-inch angled sash brushes, detail rounds)
- Painter’s tape
- Drop cloths
- Ladder or scaffolding
- Clear UV-resistant topcoat (matte or satin)
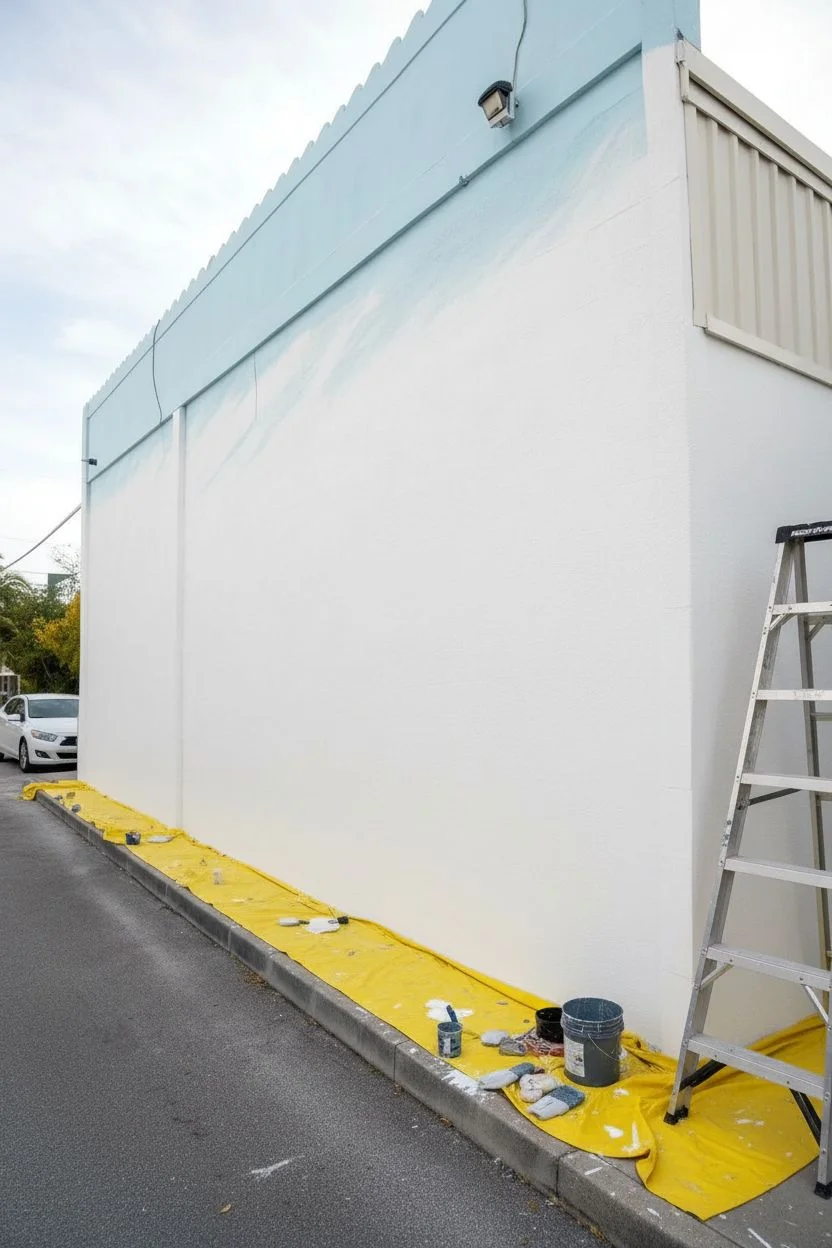
Step 1: Preparation and Background
-
Clean the Surface:
Begin by thoroughly cleaning the wall surface with a pressure washer or stiff bristle brush and soapy water to remove dirt, moss, or loose paint. Let the wall dry completely before proceeding. -
Prime the Area:
Roll on a coat of high-quality white exterior primer over the entire area where the mural will be located to ensure bright colors and good adhesion. -
Create the Sky and Horizon:
Using a roller, paint the upper third of the wall a soft, pale blue to represent the sky, fading it into white near the top edge for an atmospheric effect. -
Establish the Water Line:
Paint a gentle diagonal transition using a slightly darker, cooler blue to suggest the water’s surface, keeping the line soft and blended rather than harsh.
Step 2: Drafting the Main Subject
-
Sketch the Turtle Outline:
Using chalk or charcoal, sketch the large oval shape of the turtle’s shell diagonally across the center of the wall to create a sense of upward swimming motion. -
Add Limbs and Head:
Draw the large front flippers extended outward, the smaller rear flippers tucking back, and the head stretching forward and slightly upward. -
Map Out the Shell Pattern:
Lightly sketch the hexagonal scutes on the shell and the smaller scale patterns on the flippers and head to guide your painting later. -
Position Secondary Elements:
Sketch vertical coral structures at the bottom corners, small schools of fish near the turtle’s tail, and tiny bird silhouettes in the upper sky area.
Grid Transfer Method
For accurate proportions on a huge wall, draw a grid over your reference photo and a matching chalk grid on the wall, copying one square at a time.
Step 3: Painting the Sea Turtle
-
Base Coat the Shell:
Fill in the shell area with a deep teal or turquoise color, ensuring full coverage over the texture of the wall. -
Detail the Scutes:
Use a smaller brush and a lighter aqua shade to outline the individual scutes on the shell; blend darker blues into the center of each shape to create a convex, 3D appearance. -
Paint the Flippers:
Apply a base of hunter green to the flippers. Once dry, use a detail brush to paint the distinct mosaic-like scales in a pale mint or light grey color. -
Define the Underbelly:
Paint the plastron (underbelly) and the underside of the neck with a creamy yellow-white, blending it softly into the green of the skin. -
Add Facial Features:
Paint the eye using black with a small white refection dot. Add the mouth line and nostril, giving the turtle a gentle expression.
Add Hidden Details
Personalize the mural by hiding tiny elements in the coral reef—like a small crab, a seashell, or initials carved into a rock for viewers to find.
Step 4: Supporting Details & Finish
-
Paint the Coral:
Use burnt sienna, ochre, and brown paints to fill in the branching coral structures at the bottom right. Keep these lines organic and somewhat loose. -
Add Vegetation Texture:
Stipple greens and yellows at the very base of the wall to represent mossy rocks or seabed vegetation, grounding the composition. -
Create the Fish:
Paint the small schooling fish in bright yellow and orange. I like to keep these simple—just basic teardrop shapes with tiny fins—so they don’t distract from the turtle. -
Paint the Birds:
Using a fine liner brush and black paint, add simple ‘V’ shapes in the sky area to represent distant seabirds. -
Final Touches and Sealing:
Step back to check for any missed spots or messy edges. Once the entire mural is cured (usually 24-48 hours), apply a clear UV-resistant topcoat to protect your work from sun and weather.
Now you have a breathtaking piece of public art that brings the calm of the ocean to your neighborhood


Playful Dolphin Family Scene
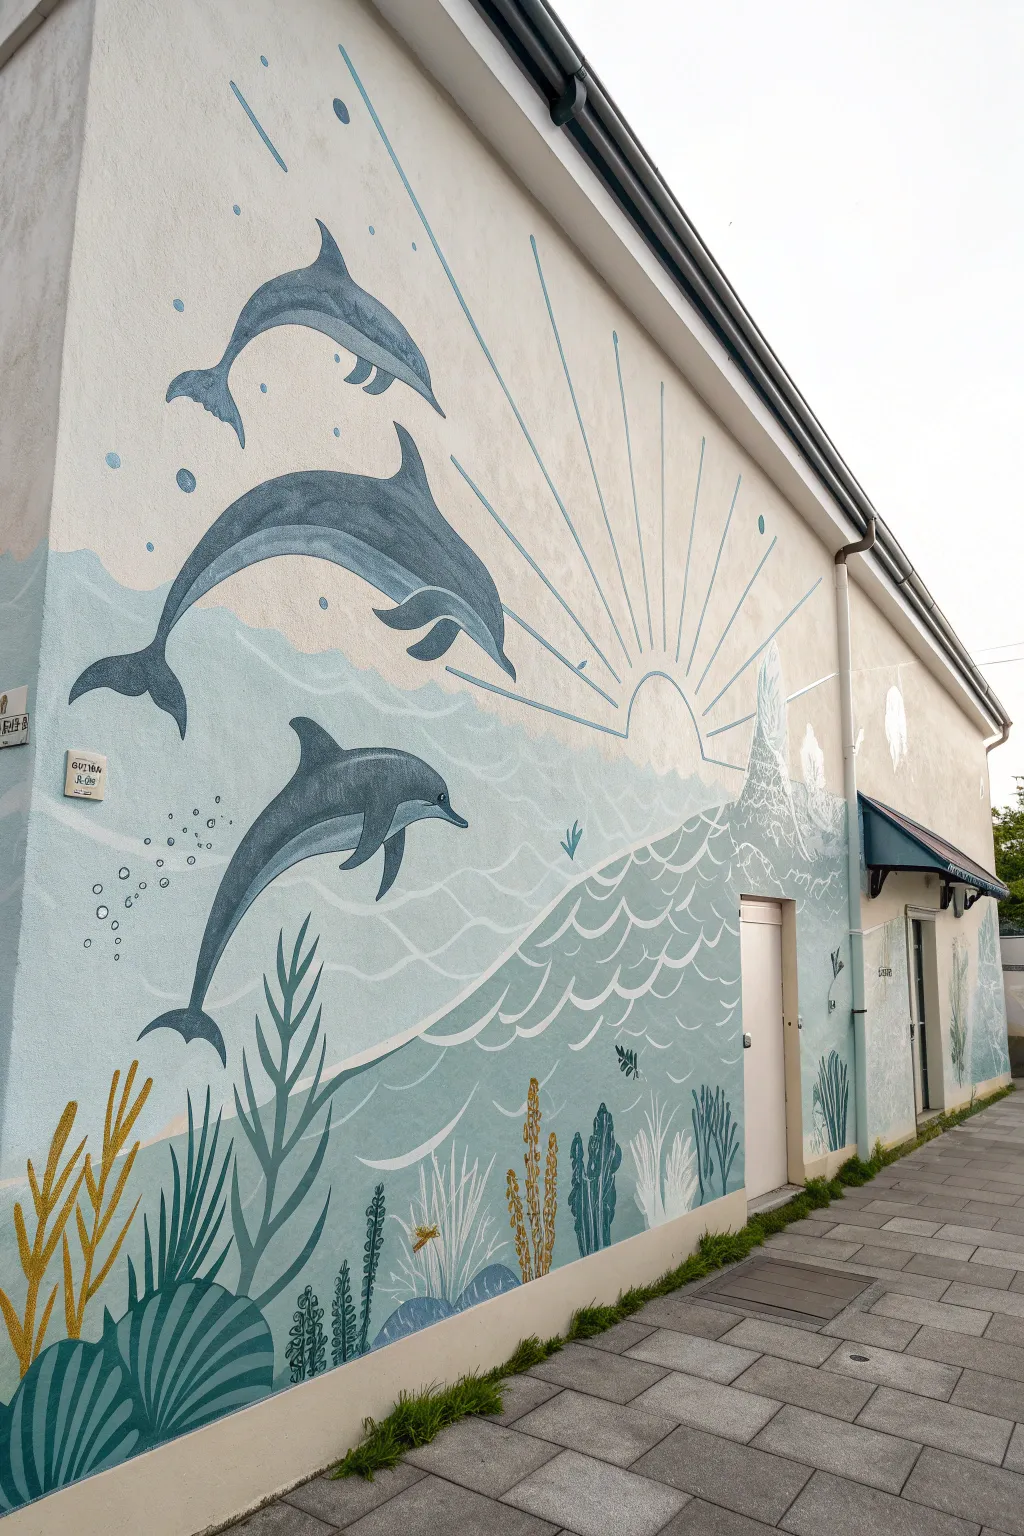
Transform a plain exterior wall into a coastal paradise with this large-scale mural featuring leaping dolphins, radiating sun rays, and a lush underwater garden. The design combines stylized, illustrative waves with realistic dolphin silhouettes for a joyful and welcoming scene.
Step-by-Step Guide
Materials
- Exterior masonry primer (white)
- Exterior acrylic latex paints (Navy Blue, Teal, Sky Blue, White, Golden Ochre)
- Assorted paintbrushes (large rollers, 2-inch angled sash brush, small detail brushes)
- Chalk snap line
- Painter’s tape
- Projector (optional, but recommended for dolphins)
- Ladder or scaffolding
- Pencil or chalk for sketching
- Drop cloths
Step 1: Preparation and Background
-
Clean and Prime:
Before painting, power wash the wall to remove dirt and loose debris so your mural adheres properly. Once dry, roll on a coat of high-quality white masonry primer to create a blank canvas. -
Plan the Horizon:
Visualize a diagonal line sloping downward from left to right, separating the sky from the ocean. Use a chalk line or pencil to lightly mark this wave crest line. -
Block in the Ocean:
Paint the area below your diagonal line with a base coat of light teal or seafoam blue. This doesn’t need to be perfectly opaque yet, as you will layer details over it later. -
Create the Sky:
Leave the upper section white or paint it a very pale cream to contrast with the blue ocean.
Clean Lines Pro Tip
For the long sun rays, don’t rely on a freehand brush. Use long strips of blue painter’s tape to mask off the lines. This guarantees sharp, professional edges.
Step 2: Sun and Waves
-
Mark the Sun:
Find a focal point on your horizon line and trace a semicircle to represent the rising sun. I find using a string attached to a center point helps create a perfect arc. -
Snap the Sun Rays:
Using your chalk snap line, create long, straight lines radiating outward from the sun’s center point across the upper wall to verify the spacing before painting. -
Paint the Rays:
Using a steadier hand or painter’s tape, paint the sun rays using a thin brush and a medium blue-grey tone. Keep the lines consistent in width. -
Stylize the Water Surface:
Along the main diagonal horizon line, paint a series of scalloped, white foam curves. Below this, add smaller, disconnected white scallops throughout the blue area to suggest gentle movement in the water.
Step 3: The Dolphins
-
Outline the Trio:
Project the dolphin shapes onto the wall at night for accuracy, or freehand sketch them with chalk. Arrange them in an arching composition: one jumping high, one mid-dive, and one lower in the water. -
Fill the Silhouettes:
Paint the dolphin bodies using a slate blue or dark grey. Ensure the edges are crisp and clean against the lighter background. -
Add Dimension:
Once the base color is dry, mix a slightly lighter shade of your slate blue. Paint the bellies and add subtle highlights along the top dorsal ridges to give the dolphins form and volume. -
Detail the faces:
Use your smallest brush to carefully define the beaks, eyes, and fins. A tiny dot of white in the eye brings the character to life. -
Bubbles and Splashes:
Paint clusters of small circles near the dolphin tails and faces to represent bubbles and splashes.
Level Up: Texture
Mix a fine sand additive into the paint used for the seabed coral. This adds a subtle, tactile texture that mimics the rough surface of real coral reefs.
Step 4: The Seabed Garden
-
Paint Tall Seagrass:
At the bottom of the wall, paint long, flowing ribbons of seagrass using teal and dark green. Vary the heights, making some reach up towards the dolphins. -
Add Coral Shapes:
Intersperse the green grass with rounded coral shapes in darker teal or blue tones. Use broad, curved strokes to create the fan-like structures. -
Introduce Contrast:
Using the Golden Ochre paint, add upright, branch-like plants. This warm color contrasts beautifully with the cool blues and adds visual interest to the bottom section. -
White Plant Accents:
Paint delicate, feathery white plants among the darker foliage. This helps tie the seabed to the white waves and sun rays above. -
Final Touches:
Step back to review the entire mural. Touch up any wobbly lines, especially on the sun rays, and add extra white highlights to the sea plants if they need to pop more.
Now you have a serene, permanent window to the ocean right on your own wall
BRUSH GUIDE
The Right Brush for Every Stroke
From clean lines to bold texture — master brush choice, stroke control, and essential techniques.
Explore the Full Guide
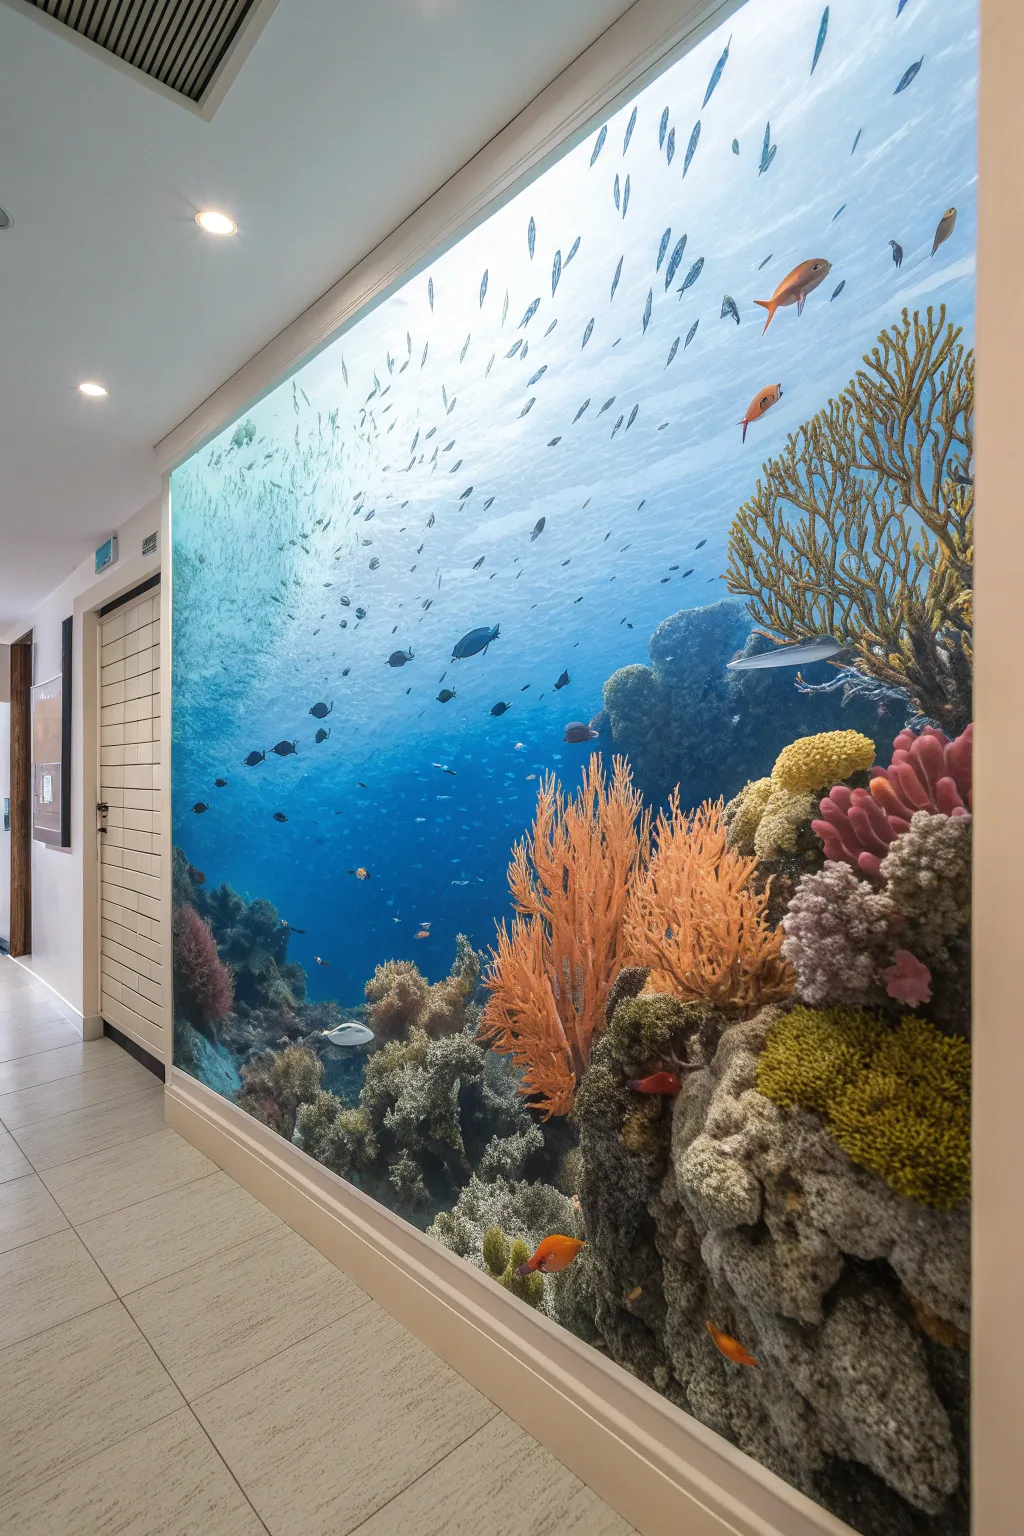
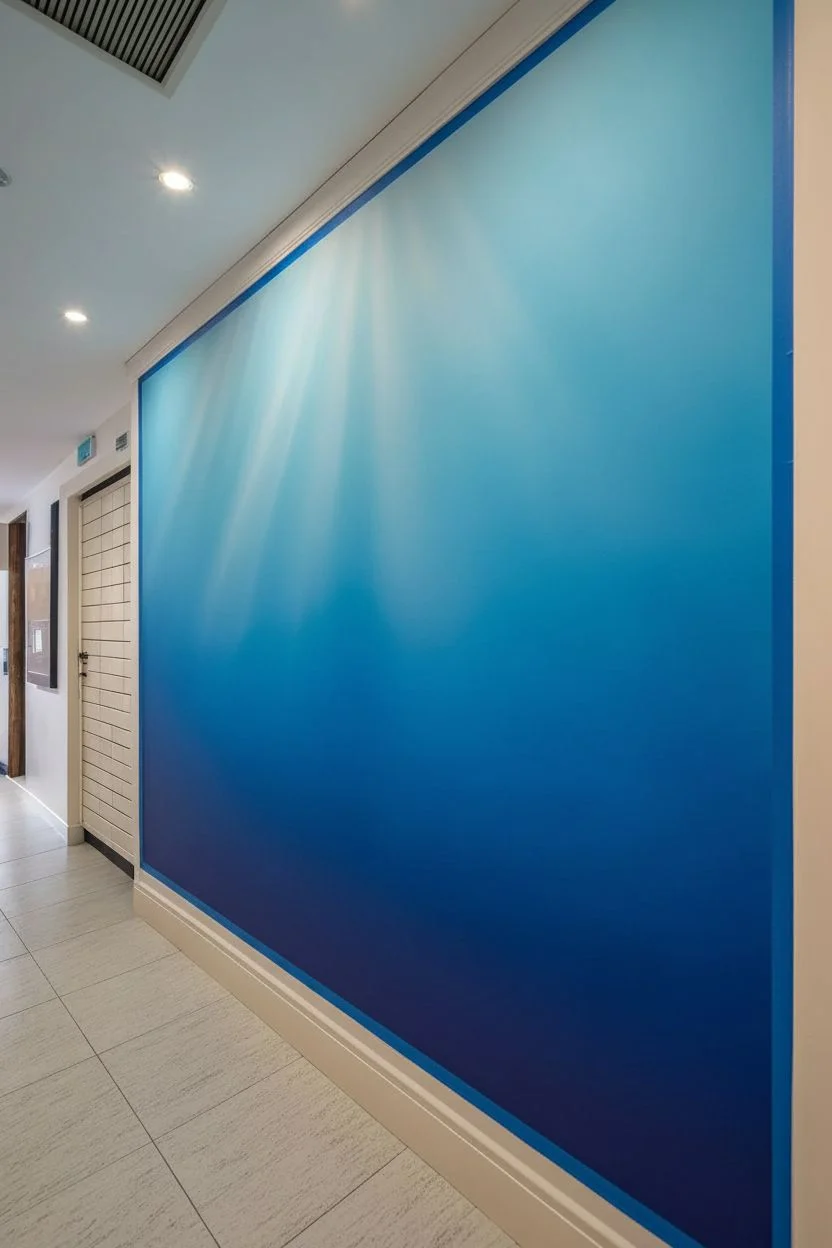
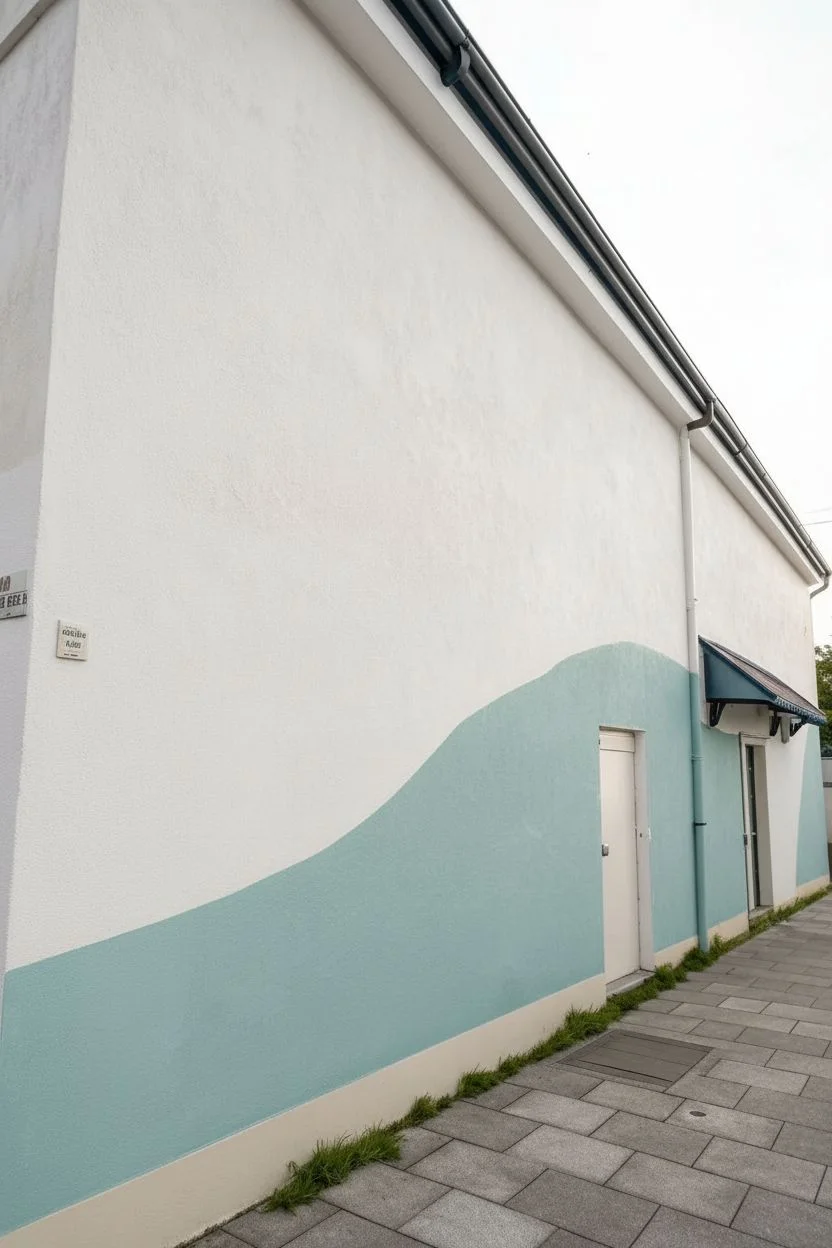
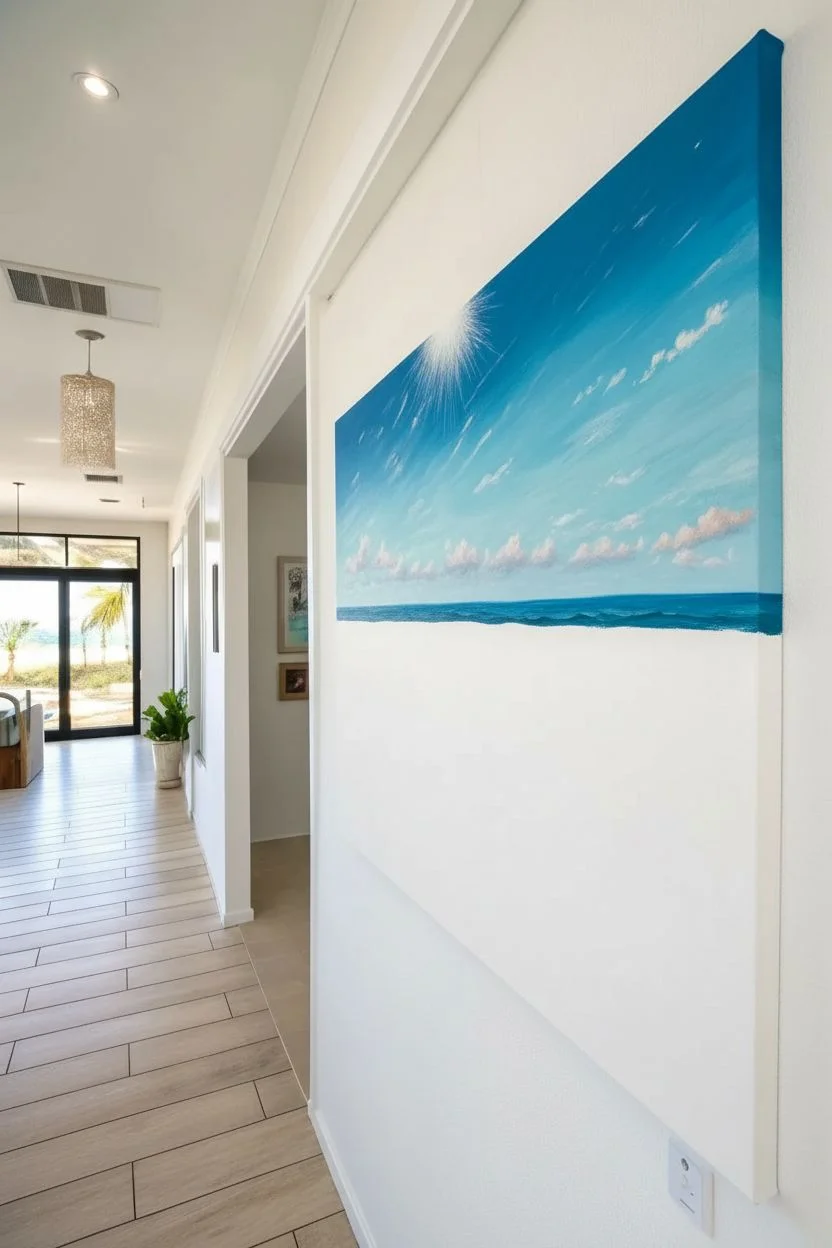
Ocean Wave Feature Wall
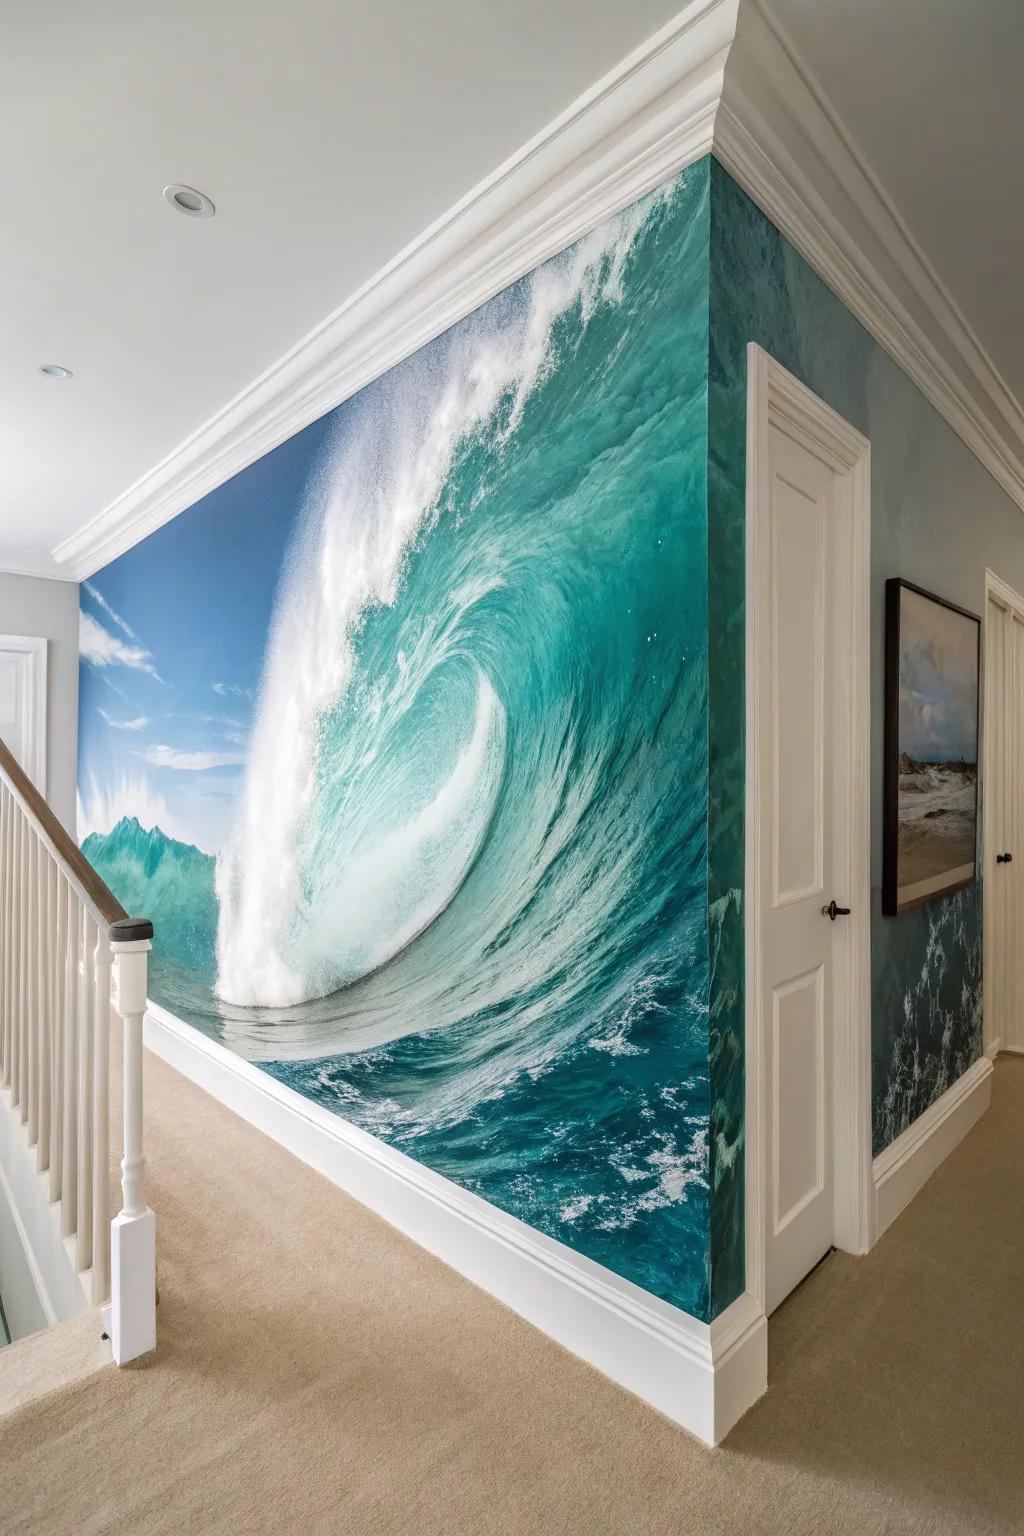
Transform a plain hallway corner into an immersive coastal experience with this dramatic wrap-around wave mural. By carefully aligning high-definition wallpaper panels, you create a seamless illusion of a crashing ocean wave that dominates the space with refreshing energy.
Detailed Instructions
Materials
- Custom-sized photo mural wallpaper (non-woven or vinyl)
- Wallpaper paste (heavy-duty for murals)
- Paste brush or roller
- Smoothing tool (plastic sweep or felt-edged squeegee)
- Seam roller
- Sharp craft knife with snap-off blades
- Metal straight edge or trim guide
- Laser level or plumb bob
- Measuring tape
- Sponge and bucket of clean water
- Latter or step stool
- Drop cloth
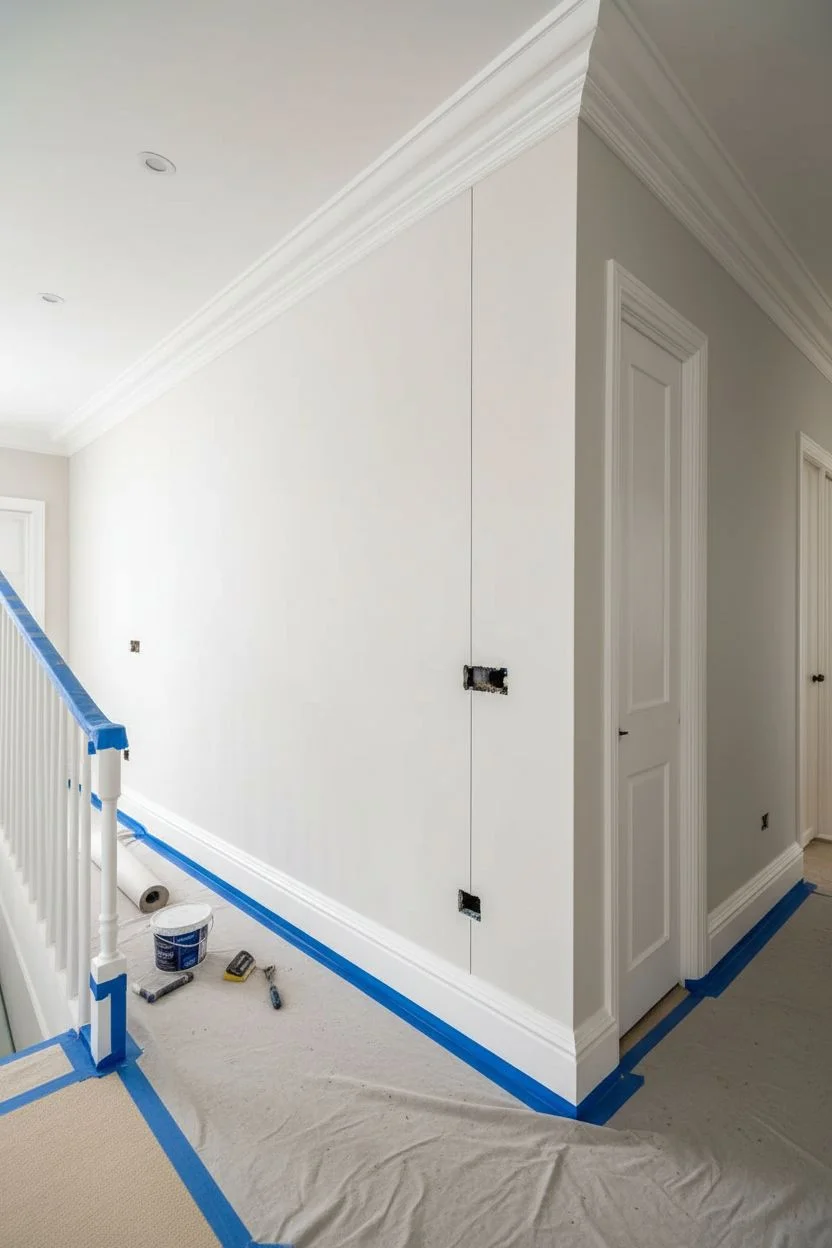
Step 1: Preparation & Planning
-
Measure the canvas:
Measure the total width and height of the wall space, including the corner return. Add at least 2-3 inches of excess to both height and width dimensions when ordering your mural to account for uneven walls. -
Prepare the surface:
Ensure your walls are completely smooth, clean, and dry. Fill any holes or cracks with spackle and sand them flat. If your walls are freshly painted, wait at least 3-4 weeks for the paint to cure fully before applying wallpaper. -
Remove hardware:
Take off any outlet covers, light switch plates, or venture grilles that sit within the mural area. It’s much easier to cut around these openings than to try and paper seamlessly over them. -
Protect the perimeter:
Lay down a drop cloth to protect your carpet or flooring. It’s wise to tape off the baseboards and crown molding with painter’s tape to keep paste off the trim.
Step 2: Mapping & Pasting
-
Layout the panels:
Unroll your mural panels on a clean floor to check the sequence. Ensure the image aligns perfectly from panel to panel and number them lightly on the back with a pencil if they aren’t already marked. -
Set the plumb line:
This is crucial for the first panel. Measure out from the corner the width of your first panel minus about one inch (to allow for corner wrapping). Use a laser level or plumb line to draw a strict vertical guide on the wall. -
Paste the wall:
Using a roller, apply a generous, even coat of wallpaper paste directly to the wall section where the first panel will go. Extend the paste slightly beyond the width of the panel to ensure edges stick well.
Double Cut Trick
If you struggle with the corner wrap, overlap the two panels at the corner by 2-3 inches. Then, slice through both layers vertically with a sharp new blade and peel away the excess strips for a perfect match.
Step 3: Installation & Cornering
-
Hang the first panel:
Align the edge of your first panel with your plumb line. Leave about an inch of excess paper at the top (ceiling) and bottom (baseboard) for trimming later. Smooth it down gently with your hands first. -
Smooth out bubbles:
Use your smoothing tool to work from the center of the panel outwards. Press firmly but evenly to push out any trapped air bubbles and ensure strong adhesion. -
Wrap the corner:
When you reach the outside corner, the paper needs to wrap around it tightly. Smooth the paper right up to the corner edge, then gently fold it around to the next wall face. If the corner isn’t perfectly straight, you may need to make small relief cuts at the top and bottom excess areas to prevent tension tears. -
Align the second panel:
Apply paste for the second panel. Carefully match the pattern or image details of the wave perfectly with the edge of the first panel. This is often a ‘butt join’ where edges touch but don’t overlap, though check your specific manufacturer instructions. -
Secure the seam:
Once aligned, use a seam roller to press the edges of the two panels together firmly. This prevents the seams from lifting later and makes the joint nearly invisible. -
Continue the sequence:
Repeat the pasting and hanging process for the remaining panels, constantly checking alignment and smoothing out air bubbles as you go.
Coastal Immersion
Enhance the theme by replacing standard baseboards or door trim with weathered wood or a sandy-beige tone to complement the beach aesthetic of the mural.
Step 4: Trimming & Finishing
-
Trim the excess:
Once all panels are up, use your metal straight edge and a very sharp craft knife to trim the excess paper at the ceiling and baseboard. Change your blade frequently—a dull blade will tear wet paper. -
Cut around obstacles:
For door frames (like the one shown in the image), smooth the paper over the opening, then make a diagonal cut from the corner into the waste paper. Press the paper firmly into the crevice between the wall and door frame, then trim away the excess. -
Wipe down:
Ideally, you shouldn’t get paste on the front of the mural, but accidents happen. Use a clean, damp sponge to gently wipe away any paste residue from surface immediately. Don’t scrub. -
Reinstall hardware:
Wait for the wallpaper to dry completely (usually 24 hours) before cutting out the small holes for outlets and screwing the covers back on.
Enjoy the dramatic transformation of your hallway into a breathtaking ocean view
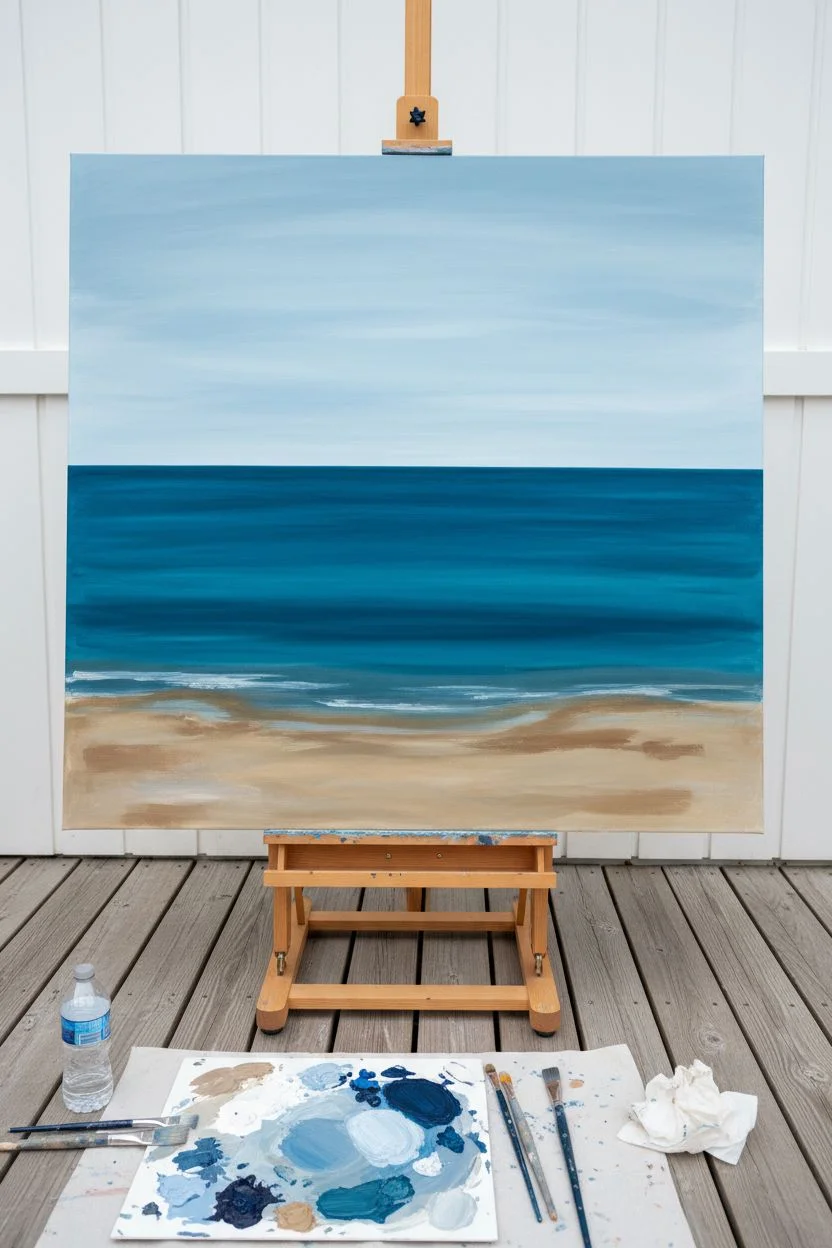
Calm Beach Horizon Gradient
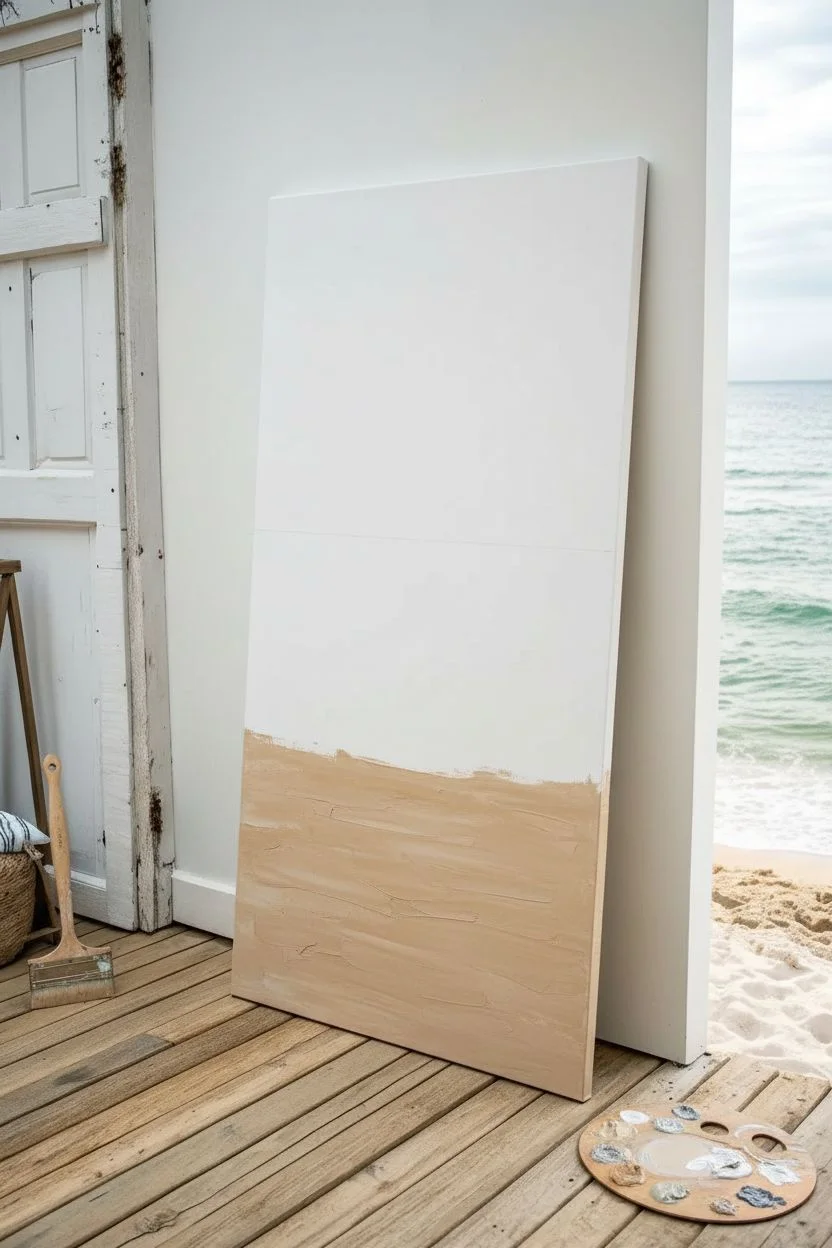
Capture the ethereal beauty of a calm shoreline with this large-scale acrylic gradient painting. This project focuses on soft blending techniques to create a seamless transition from sandy beige to soothing turquoise and pastel skies.
How-To Guide
Materials
- Large stretched canvas (24×36 inches or larger)
- Acrylic paints: Titanium White, Unbleached Titanium (sand), Turquoise Blue, Phthalo Green, Light Rose, Sky Blue
- Large flat brush (2-3 inch width)
- Medium filbert brush
- Fan brush
- Palette knife
- Water spray bottle or misting bottle
- Mixing palette or paper plates
- Paper towels
- Easel or drop cloth
Step 1: Setting the Scene
-
Prepare the canvas:
Begin by wiping down your large canvas with a dry cloth to remove any dust. Set it up vertically on an easel or leaning against a protected wall. Ensure you have plenty of space to move your arm for wide brushstrokes. -
Map the horizon:
Using a very light wash of blue paint or a pencil, lightly mark your horizon line. For this composition, place the horizon about two-thirds of the way up the canvas, giving dominance to the water and sand. -
Mix the sand tones:
On your palette, mix Unbleached Titanium with a tiny touch of Light Rose to warm it up. You want a soft, neutral beige that mimics wet and dry sand.
Mastering the Blur
Keep a separate, dry ‘blending brush’ nearby that never touches wet paint. Use it solely to feather edges between colors for that airy, photographic look.
Step 2: Painting the Gradient Base
-
Paint the sand:
Using your large flat brush, apply the sand mixture to the bottom third of the canvas. Use horizontal strokes, but don’t worry about being perfectly smooth yet; letting some brush texture show mimics the grain of sand. -
Create the shallow water:
Mix a large amount of Titanium White with a small dot of Turquoise Blue and Phthalo Green. Paint this directly above the sand section, blending slightly downwards into the wet sand color to create a transparent shoreline effect. -
Deepen the ocean:
Gradually add more Turquoise Blue to your mixture as you work your way up toward the horizon line. Keep your strokes long and horizontal to represent calm water. -
Mist and blend:
I like to keep a misting bottle handy for this stage. Lightly spray the transition area between the shallow and deep water, then gently brush back and forth to create a seamless, dreamy gradient. -
Define the horizon:
At the horizon line, use your deepest mix of Turquoise. Ensure this line is perfectly straight—use painter’s tape if you don’t have a steady hand.
Sky Colors Looking Muddy?
If the pink and blue mix into purple/grey, let the pink layer dry completely first. Then, apply a thin glaze of blue over the top for a cleaner transition.
Step 3: The Sky and Atmosphere
-
Apply the sunset glow:
Clean your large brush thoroughly. Mix Titanium White with a very small amount of Light Rose. Start painting immediately above the horizon line, blending upward. -
Transition to blue sky:
As you move to the top of the canvas, gradually introduce Sky Blue into your pink mixture. The goal is a soft ombre effect where the pink fades into a pale, airy blue at the very top. -
Smooth the sky:
Use a dry, clean brush to sweep across the sky area while the paint is still tacky. This dry-brushing technique removes harsh lines and creates that soft-focus look seen in the photo.
Step 4: Details and Highlights
-
Form gentle waves:
Switch to a medium filbert brush. Using pure Titanium White slightly thinned with water, paint thin, wavy lines in the turquoise water area to suggest rolling movement. -
Create sea foam:
I prefer using a fan brush for the shore break. Dip the tips in white paint and gently tap it along the line where the water meets the sand. -
Soften the foam:
While the white ‘foam’ is wet, use a clean finger or a dry soft brush to smudge the bottom edge of the foam into the sand, making it look like retreating water. -
Add texture to sand:
Mix a slightly darker beige (add a tiny bit of brown to your original mix). Spatter this lightly on the bottom-most section of the canvas using an old toothbrush or stiff brush to create the texture of sand grains. -
Highlight the water:
Add a few horizontal streaks of pure white in the deeper water area to represent light reflecting off the surface. -
Final assessment:
Step back about five feet to view the gradient. If any transitions look too harsh, mist lightly with water and soften with a dry brush before the paint fully cures. -
Seal the artwork:
Once completely dry (wait at least 24 hours), apply a satin or matte varnish to protect the painting and unify the sheen of the colors.
Hang your finished masterpiece in a well-lit area to bring a permanent vacation vibe to your space

PENCIL GUIDE
Understanding Pencil Grades from H to B
From first sketch to finished drawing — learn pencil grades, line control, and shading techniques.
Explore the Full Guide
Whimsical Nursery Sea Creatures

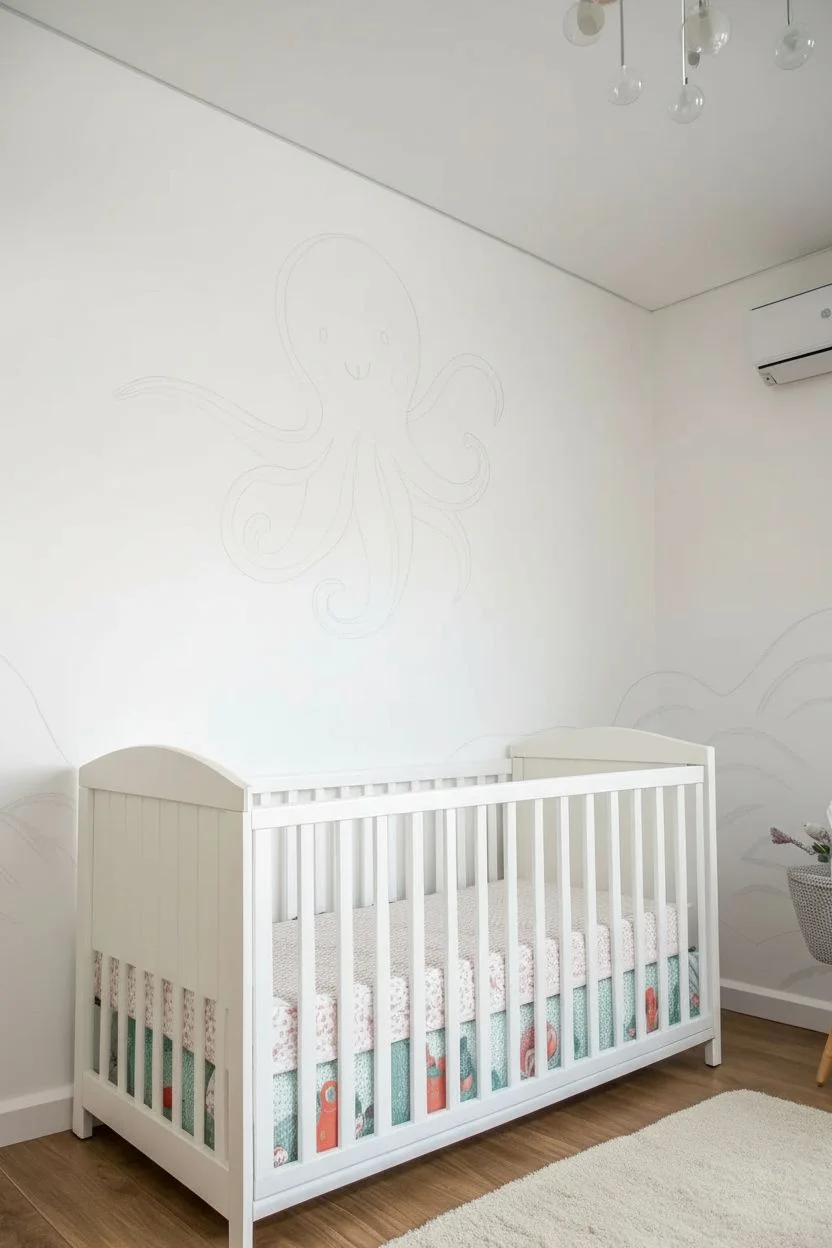
Transform a nursery wall into a gentle underwater world with this charming mural featuring a friendly pink octopus. The soft color palette and illustrative style create a soothing yet playful environment perfect for little ones.
Detailed Instructions
Materials
- Interior latex paint (white for base)
- Acrylic mural paints or sample pots (soft pink, teal, sage green, coral orange, white)
- Pencil and eraser
- Painter’s tape
- Assorted paintbrushes (1-inch flat brush, #4 round brush, fine liner brush)
- Small foam roller and tray
- Level and measuring tape
- Projector (optional but recommended for the octopus)
- Drop cloth
Step 1: Preparation and Background
-
Prep the surface:
Begin by cleaning the wall thoroughly with a damp cloth to remove any dust or oils. Fill any nail holes with spackle and sand smooth once dry. Lay down your drop cloth to protect the flooring. -
Roll the base coat:
Apply a fresh coat of white or off-white interior latex paint to the entire wall using a roller. This provides a clean, bright canvas that helps the pastel mural colors pop. Let this dry completely, ideally overnight. -
Sketch the layout:
Lightly sketch the horizon of the ‘ocean floor’ using sweeping, curved lines about one-third of the way up the wall. If you aren’t confident freehanding, use a projector to cast the octopus image onto the center of the wall and trace the outline lightly with a pencil.
Step 2: Painting the Ocean Floor
-
Block in the sand dunes:
Mix a muted teal-green color for the rolling hills at the bottom. Using a 1-inch flat brush or a small roller, fill in the wavy shapes you sketched along the bottom perimeter. Don’t worry about perfect opacity yet; two thin coats are better than one thick one. -
Add texture to the hills:
Once the base green is dry, maintain visual interest by adding subtle texture. Mix a slightly lighter version of your teal and use a dry-brushing technique to create faint, sweeping curves that mimic the movement of water over sand.
Uneven Edges?
If your curved lines look shaky, use a ‘dagger striper’ brush. Its unique slanted shape makes pulling long, consistent curved lines significantly easier than standard round brushes.
Step 3: The Centerpiece Octopus
-
Base coat the octopus:
Mix a soft, dusty pink color. Using a medium flat brush, fill in the main body and tentacles of the octopus. Keep your edges smooth and round. You will likely need two coats here to ensure the pink is solid and streak-free. -
Define the tentacles:
While the pink dries, I like to mix a slightly darker shade of pink or coral. Use this to paint the underside of the tentacles where the suckers will go, creating a sense of dimension without harsh shading. -
Paint the suckers:
Switch to a #4 round brush. Dip it in white paint mixed with a tiny drop of pink. Paint small circles along the darker undersides of the tentacles to create the suckers. Vary their sizes, making them smaller as the tentacles taper. -
Add facial features:
Using a fine liner brush and dark grey or black paint, carefully add the two small oval eyes and the curved smile. Add two soft pink circles for cheeks using a predominantly dry brush to keep the edges soft. -
Detail work:
Use a liner brush with a darker pink to add small dots and texture to the top of the octopus head for a speckled, illustrative look.
Make it Sparkle
Mix a clear glitter glaze or iridescent medium into the paint for the bubbles and the octopus suckers. This adds a subtle, magical shimmer that is only visible when the light hits it just right.
Step 4: Seaweed and Coral
-
Paint tall seaweed:
Mix a sage green color. Paint long, flowing stems rising from behind the teal hills. Along these stems, paint tear-drop shaped leaves in alternating patterns. Keep your wrist loose to mimic the swaying motion of plants underwater. -
Add framing foliage:
Create a visual frame by painting taller, darker teal vine-like plants curving inward from the left and right edges of the wall. These should curve toward the octopus, drawing the eye to the center. -
Create coral accents:
Using a coral or soft orange paint, add small fan-shaped coral structures near the bottom hills. Use short, upward strokes that branch out like fingers.
Step 5: Final Touches
-
Paint the fish:
Scatter a few small fish around the scene using orange and deep pink paints. Keep the shapes simple—basically ovals with triangular tails. Make sure they are facing different directions for a natural look. -
Add bubbles and dots:
Dip the handle end of a paintbrush into varying shades of pastel paint (dusty pink, beige, light teal). Dot these around the empty white space to represent bubbles or floating particles, balancing the composition. -
Outline work (Optional):
If you want a more distinct illustrative style, use a very fine liner brush with watered-down dark grey paint to loosely outline the seaweed and fish, though the soft borderless look works beautifully too. -
Erase and Clean:
Once the paint is fully cured (give it 24 hours), gently erase any visible pencil sketch lines. distinct marks.
Step back and admire the peaceful underwater sanctuary you have painted for the little one to enjoy
Underwater Kelp Forest Depth
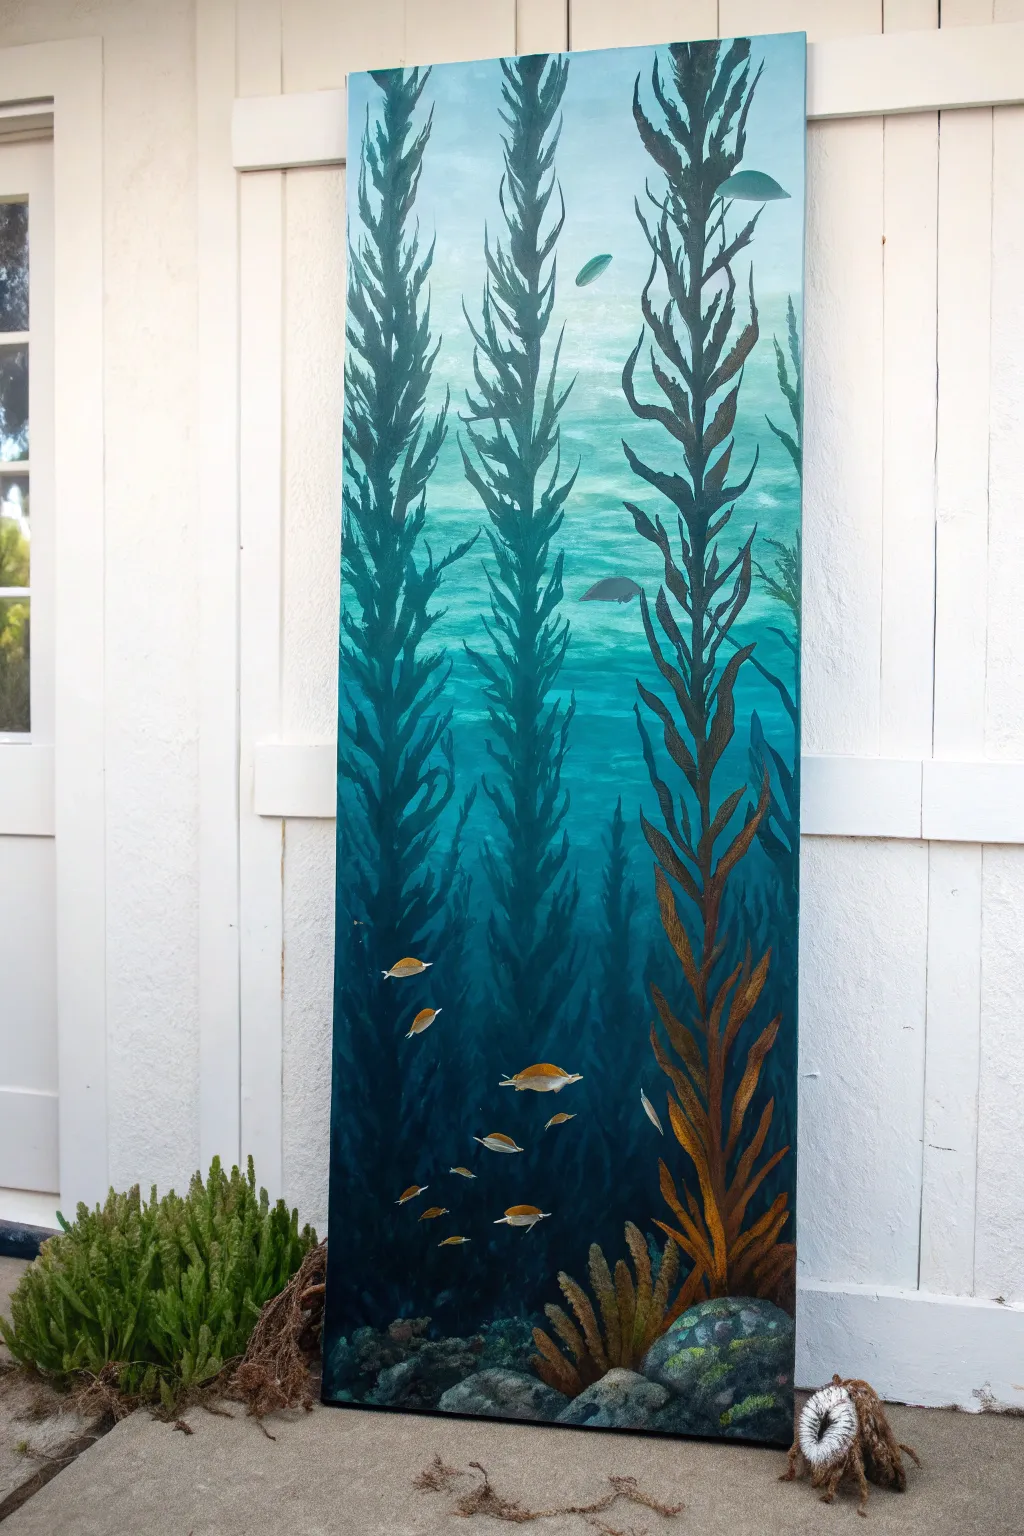
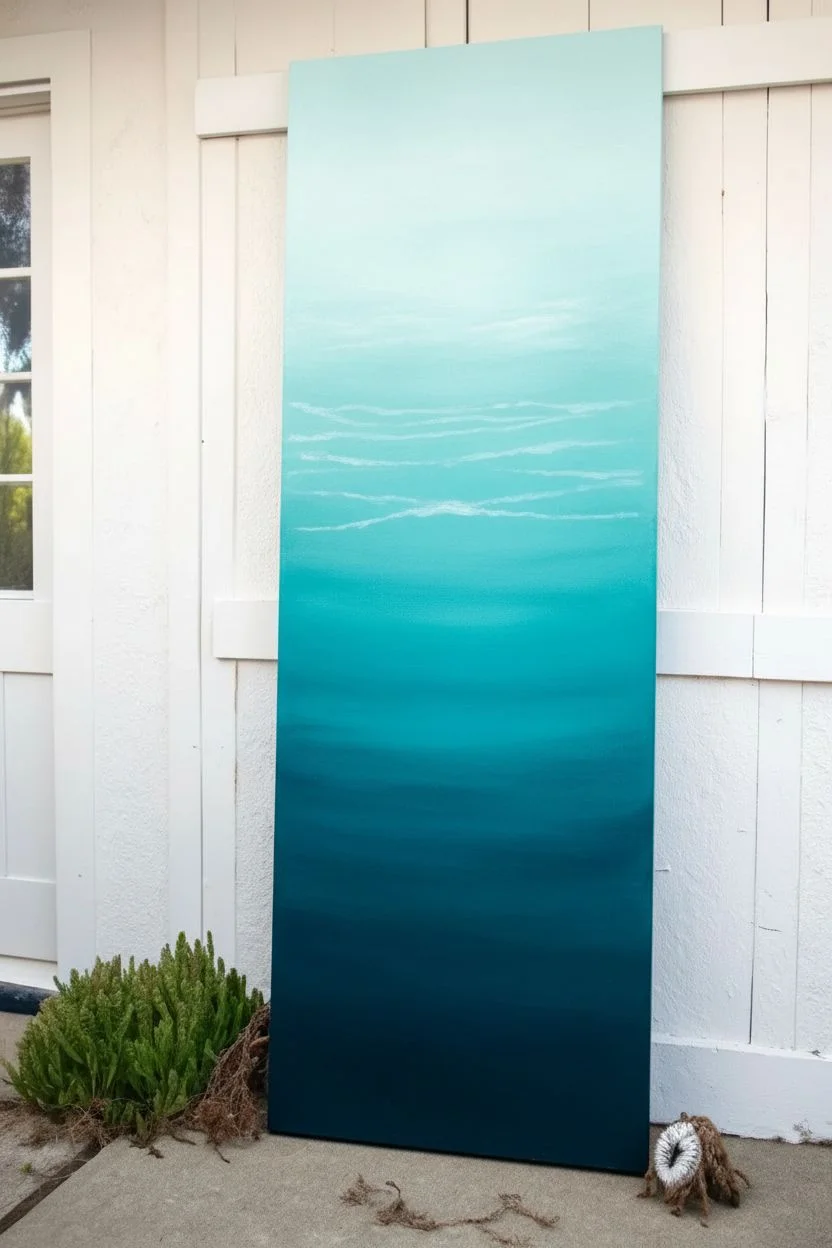
Capture the serene majesty of the ocean depths with this striking vertical mural panel. This project uses gradients and layering to create a convincing sense of underwater distance, featuring towering kelp stalks and schooling fish.
Step-by-Step
Materials
- Tall, narrow wooden panel or canvas (approx. 2ft x 5ft)
- Gesso primer
- Acrylic paints (Phthalo Blue, Phthalo Green, Burnt Umber, Titanium White, Yellow Ochre, Cadmium Orange, Black)
- Large flat brush (2-3 inch)
- Medium filbert brush
- Small round detail brush
- Glazing medium
- Mixing palette
- Water container and rags
- Natural sea sponge (optional for rocks)
Step 1: Preparation and Gradient Background
-
Prime surface:
Begin by coating your wooden panel or canvas with a layer of gesso. Let it dry completely to ensure a smooth painting surface. -
Mix base colors:
Prepare three shades of teal: a very pale, almost white aqua for the surface; a medium turquoise for the middle; and a deep, dark teal (blue-green mixed with a touch of black) for the ocean floor. -
Apply top layer:
Using your large flat brush, paint the top quarter of the canvas with the palest aqua mixture to represent sunlight filtering through the water. -
Apply bottom layer:
Focusing on the bottom third, apply the darkest teal color. Ensure full coverage on the bottom edge. -
Create the gradient:
Fill the middle section with your medium turquoise. While the paint is still wet, use horizontal sweeping motions to blend the sections where they meet, creating a seamless transition from light top to dark bottom. -
Add water texture:
Mix a small amount of glazing medium with white paint. Use horizontal, wavy strokes near the top half to simulate subtle ripples and light refraction. Let the background dry fully.
Depth Perception Trick
Make background kelp blurry and blue-tinted. Cooler colors recede visually, while warmer, sharper browns bring the foreground forward.
Step 2: Painting the Kelp Forests
-
Sketch stalks:
Lightly pencil in three main vertical lines for your primary kelp stalks. They should be wavy and organic, not perfectly straight ladders. -
Background kelp layers:
Mix a watery, transparent teal-green. Paint faint, shadowy kelp shapes in the background essentially just wavy lines to add depth without detail. -
Paint main stalks:
Mix Burnt Umber with Phthalo Green. Using a medium filbert brush, paint the central stems of the main foreground kelp, starting thick at the bottom and tapering slightly as you go up. -
Add kelp leaves:
Using the same dark mixture, paint the leaves (blades). Use a twisting motion with your brush: press down to widen the leaf, then lift and twist to create a sharp point. Leaves should point upward. -
Highlight the kelp:
Add a touch of Yellow Ochre to your dark green mix. Paint subtle highlights on the right side of the kelp blades and stems where the light hits them, giving them volume. -
Warm foreground kelp:
For the kelp strand closest to the viewer (usually on the right), mix more Burnt Umber and Orange into the green for a warmer, browner tone. Paint this stalk more clearly and distinctively.
Step 3: Details and Sea Life
-
Paint the seafloor:
At the very bottom, paint rounded rock shapes using dark greys and greens. A sea sponge can add excellent texture here. -
Add sea plants:
Using an ochre and brown mix, paint small, fern-like sea fans or smaller grassy plants at the base of the rocks to anchor the scene. -
Paint the fish bodies:
Mix Cadmium Orange with a little White. Use a small round brush to paint simple almond shapes for the school of fish swimming through the lower stalks. -
Add fish details:
Once dry, use a tiny brush with white to add a stripe along the fish flanks and a dot for the eye. Add tiny transparent fins using a wash of grey. -
Final highlights:
Add sharp white highlights to the top edges of the rocks and the tips of the sea fans to show where the light catches. -
Protective coat:
Allow the painting to cure for at least 24 hours, then apply a satin varnish to protect the surface and unify the sheen.
Gradient Not Blending?
If the acrylic dries too fast to blend smooth gradients, mist the canvas lightly with water or add a slow-drying retarder medium to your paint.
Step back and admire how the height of the panel emphasizes the incredible depth of your new underwater scene


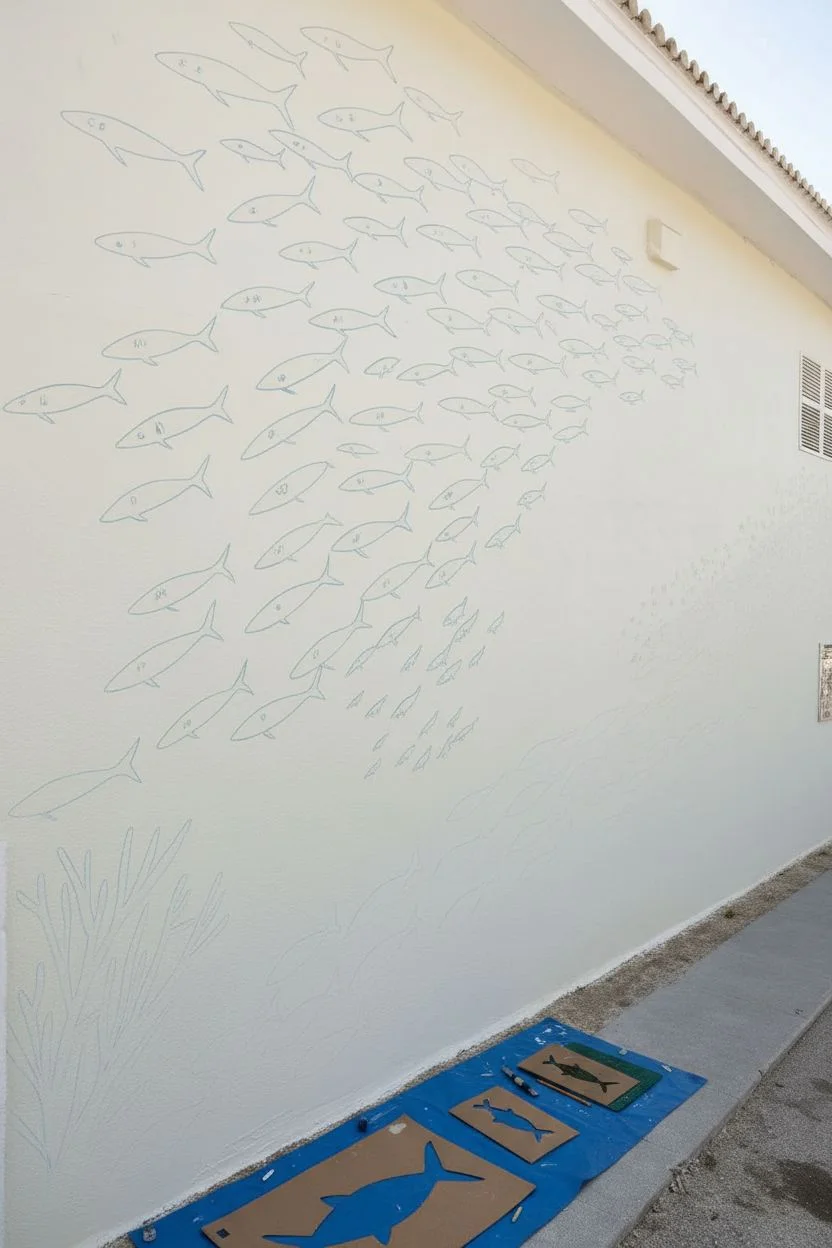
Schooling Fish Pattern Drift
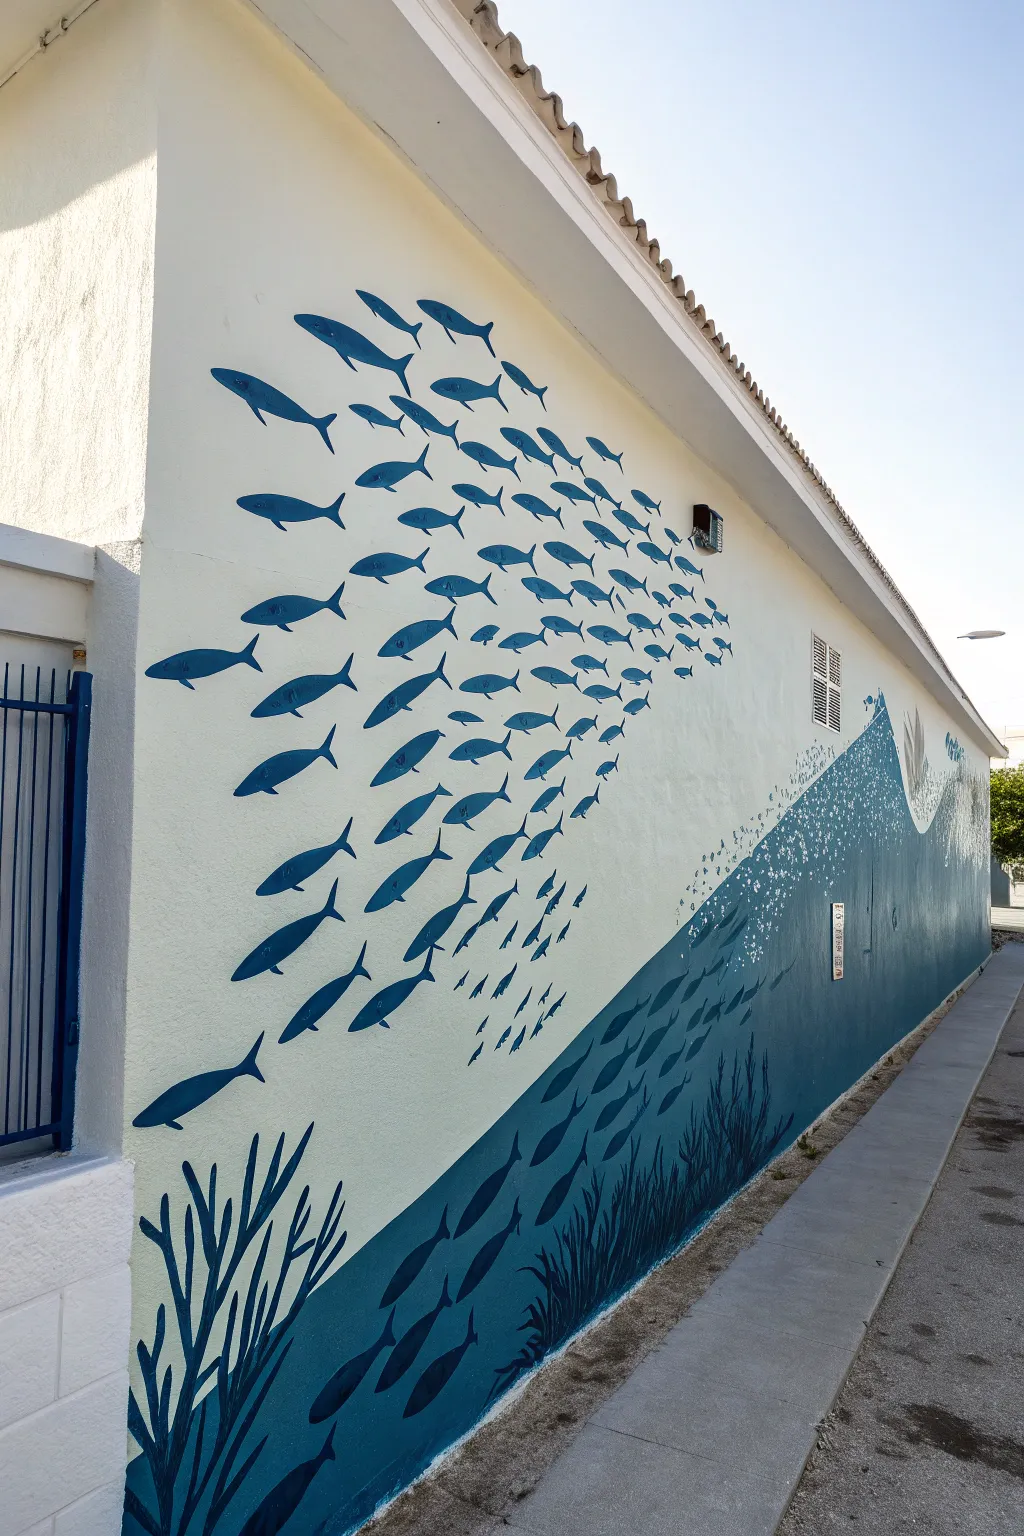
Transform a plain exterior or interior wall into a dynamic seascape with this sweeping mural of schooling fish. By playing with scale, density, and a monochromatic blue palette, you can create a stunning sense of movement that guides the eye across the entire surface.
How-To Guide
Materials
- Exterior masonry paint (White/Cream base)
- Exterior masonry paint (Deep Navy Blue)
- Exterior masonry paint (Medium Cerulean Blue)
- Assorted angled sash brushes (1-inch to 2.5-inch)
- Small round detail brushes (sizes 4-8) for fins
- Cardboard or stencil mylar sheets
- Craft knife and cutting mat
- Painter’s tape
- Chalk or a light watercolor pencil
- Extension pole (if wall is high)
- Drop cloths
Step 1: Planning and Base Work
-
Prepare the surface:
Ensure your wall is clean, dry, and free of loose debris. If the existing paint is old or flaking, scrape and sand it down before applying a fresh coat of your base cream or white masonry paint. Let this base cure completely for at least 24 hours. -
Map the flow:
Stand back and visualize the movement of the school. Using chalk or a very light watercolor pencil, sketch a large, sweeping diagonal curve starting high on the left and swooping down towards the bottom right corner. This line will represent the upper boundary of your fish school. -
Create fish stencils:
To keep the school cohesive, cut 3-4 templates out of cardboard or mylar. Create a ‘Large’ (approx. 12-14 inches), ‘Medium’ (8-10 inches), and ‘Small’ (4-6 inches) version of a simple, streamlined fish silhouette. I like to keep the shape stylized—football-shaped bodies with forked tails.
Step 2: Painting the Foreground Fish
-
Start with the leaders:
Begin on the far left of the wall, where the fish are most sparse. Use your ‘Large’ stencil to trace outlines of the biggest fish. Position them swimming upwards and towards the right, following your chalk guide. -
Block in the lead fish:
Fill in these traced outlines with your Medium Cerulean Blue paint. Use an angled sash brush for crisp edges, but don’t worry about perfection yet—schooling fish look better with slight organic variations. -
Add defining details:
Once the blue bodies are tacky-dry, use a smaller round brush to pull out the tail fins and dorsal fins. Keep the strokes sharp and pointed to emphasize speed and direction. -
Vary the density:
As you move slightly to the right, introduce your ‘Medium’ stencils. Mix them in with the larger fish, gradually increasing how close the fish are to one another. The goal is to make the school look like it’s tightening up.
Natural Movement Tip
Don’t align fish perfectly parallel. Tilt a few slightly up or down. Real schools shift constantly, and slight angle variations make the movement feel alive.
Step 3: Creating the Deep Ocean Wave
-
Mark the deep water zone:
On the bottom right third of the wall, mark out a steep, triangular wave shape that rises from the ground up to about waist height (or higher, depending on wall scale). This will be your deep-sea section. -
Fill the deep blue:
Paint this entire bottom-right section with your solid Deep Navy Blue. Use a larger brush or roller here for efficiency, but maintain a sharp, angled edge where the navy meets the white wall. -
Blend the school:
Along the top edge of this navy wave, paint medium and small fish silhouettes in the Deep Navy color, swimming ‘out’ of the solid block and into the white space. This creates the illusion that the solid block is actually millions of fish densely packed together. -
Add white ‘negative’ fish:
While the navy paint is fresh, or after it dries using your base wall color, paint tiny fish silhouettes *inside* the navy block. These should look like they are catching light in the deep water. -
Create the spatter effect:
At the very top crest of the navy wave, dip a stiff bristle brush in white paint and flick it to create a spray of dots. This mimics bubbles and sea foam rising from the dense school.
Drip Control
Painting on vertical masonry can cause drips. Keep a damp rag in your pocket to instantly wipe drips, and overload your brush less—it’s better to dip often than to drip once.
Step 4: Varying Tone and Depth
-
Mix a transitional color:
Create a blend of 50% Cerulean and 50% Navy. Use this new mid-tone color to paint fish in the middle section of the wall, bridging the gap between the light solo swimmers on the left and the dark mass on the right. -
Layering for depth:
Go back to your main cluster of fish. Paint a few smaller, darker fish slightly overlapping the lighter blue ones. This simple overlap instantly pushes the lighter fish into the background and brings the dark ones forward.
Step 5: Seaweed and Final Touches
-
Sketch the seaweed:
In the bottom left corner, pencil in organic, wavy vertical lines to represent seagrass or coral. Let these shapes overlap the bottom of your Deep Navy wave section. -
Paint the vegetation:
Using the Deep Navy paint and a long liner brush or a thin angled brush, paint the seaweed. Start from the ground and pull your brush swiftly upward, lifting pressure at the end to create tapered, pointed tips. -
Connect the elements:
Ensure the dark seaweed at the bottom left visually connects with the dark wave on the right, anchoring the entire mural to the ground. -
Review from distance:
Step back about 20 feet. Look for any ‘holes’ in the schooling pattern that feel unnatural. Fill these distinct gaps with tiny, simple fish shapes using your smallest brush. -
Clean and seal:
Erase any remaining chalk lines with a damp cloth. If this is an exterior wall exposed to harsh weather, apply a clear matte UV-resistant masonry sealer over the painted areas once fully cured.
Now you have a dynamic aquatic feature that brings life and movement to your space
Lighthouse and Sea Spray Scene

Bring the dramatic beauty of the seaside into your home with this stunning full-wall mural project. Featuring a classic white lighthouse perched atop rugged cliffs and crashing waves, this large-scale artwork transforms an ordinary room into a window overlooking the ocean.
Step-by-Step Guide
Materials
- High-resolution lighthouse reference image
- Wall primer (white)
- Acrylic interior latex paints (White, Phthalo Blue, Burnt Umber, Yellow Ochre, Raw Sienna, Grey, Red)
- Wide painter’s tape
- Drop cloths
- Large foam rollers and tray
- Assorted synthetic brushes (2-inch flat, 1-inch angle, round detail brushes)
- Sea sponge
- Chalk or watercolor pencil for sketching
- Step ladder
- Mixing buckets and glaze medium
Step 1: Preparation and Sky Layer
-
Prep the surface:
Clear the room and lay down drop cloths to protect your flooring. Tape off the ceiling, baseboards, and window trim with wide painter’s tape. Apply a fresh coat of white primer to the entire wall to ensure your colors pop and adhere properly. -
Sketch the composition:
Using a light blue watercolor pencil or chalk, sketch the main horizon line about one-third up from the floor. Outline the large cliff mass on the right side and position the lighthouse vertical roughly at the rule of thirds intersection. -
Mix sky gradients:
In mixing buckets, prepare three shades for the sky: a pale blue-grey for the top, a soft white-cream for the middle clouds, and a warm peach-yellow tone for the horizon sunrise. Use a glaze medium to extend drying time for better blending. -
Paint the sky:
Starting at the top with the blue-grey, roll paint downwards. Quickly switch to the white-cream in the middle and the warm peach at the bottom. Use a large, clean dry brush to blend the transition areas while the paint is still wet, creating a soft, misty look. -
Form the clouds:
Dip a sea sponge into white paint mixed with a tiny drop of grey. Lightly dab diagonal cloud formations across the sky, softening the edges with a dry rag to make them look windswept.
Misty Horizon Hack
To get perfectly hazy distance, run a very lightly damp, clean sponge horizontally across the horizon line while the paint is still tacky.
Step 2: Painting the Ocean and Cliffs
-
Block in the water:
Mix a deep teal using Phthalo Blue and a touch of Burnt Umber. Paint the ocean area below the horizon, keeping the strokes horizontal. As you get closer to the foreground wave, lighten the mix with white and a hint of green. -
Create the wave curl:
With a 2-inch flat brush, paint the large crashing wave in a sweeping curve. Use a translucent teal-green for the translucent part of the wave where the light hits it, blending into deep blue at the base. -
Base coat the cliffs:
Mix a dark brownish-grey and block in the cliff shapes on the right. Don’t worry about texture yet; just establish the silhouette against the sky and water. -
Add cliff texture:
Once the base is dry, use a palette knife or a rough bristle brush with lighter grey and tan paints. Drag the tool downward to mimic vertical rock striations and craggy surfaces. -
Paint the distant land:
Mix a hazy purple-grey color for the far island on the horizon. Paint this shape flatly and with less detail to push it into the background, creating atmospheric perspective.
Step 3: Lighthouse and Details
-
Construct the lighthouse:
Paint the body of the lighthouse with clean white paint. Use a ruler or straight edge to keep the sides perfectly vertical. Add a soft grey shadow on the left side to give the tower cylindrical volume. -
Add architectural features:
Switch to a fine detail brush. Use dark grey for the railing and window frames, and a bright barn red for the lantern room roof. Don’t forget the small keeper’s house attached to the base using white for walls and red for the roof. -
Highlights on the rocks:
Mix a warm Yellow Ochre with white. Dry-brush this highlight color onto the top edges of the cliff rocks where the ‘sun’ would catch them, specifically on the right side. -
Create sea spray:
I prefer to use a stiff old toothbrush for this step. Dip it in watered-down white paint and flick the bristles to create a fine mist of spray at the base of the lighthouse and where the wave crashes. -
Refine the foam:
Use a small round brush and pure white paint to add the thick, roiling foam patterns on top of the water surface. Paint squiggly, organic lines that follow the contour of the waves. -
Foreground grass:
At the very bottom right, paint tufts of coastal grass using greens and browns. Use choppy, upward brush strokes to simulate texture and anchor the bottom corner. -
Protect the mural:
Allow the entire wall to cure for at least 48 hours. Once fully dry, apply a clear, matte water-based varnish to protect your artwork from dust and UV fading.
Adding Realism
Install a warm-toned picture light above the lighthouse area to simulate the glow of the sunset and draw the eye to the focal point at night.
Step back and enjoy the calming view of your personal seaside escape.
Half-Above, Half-Underwater Split View
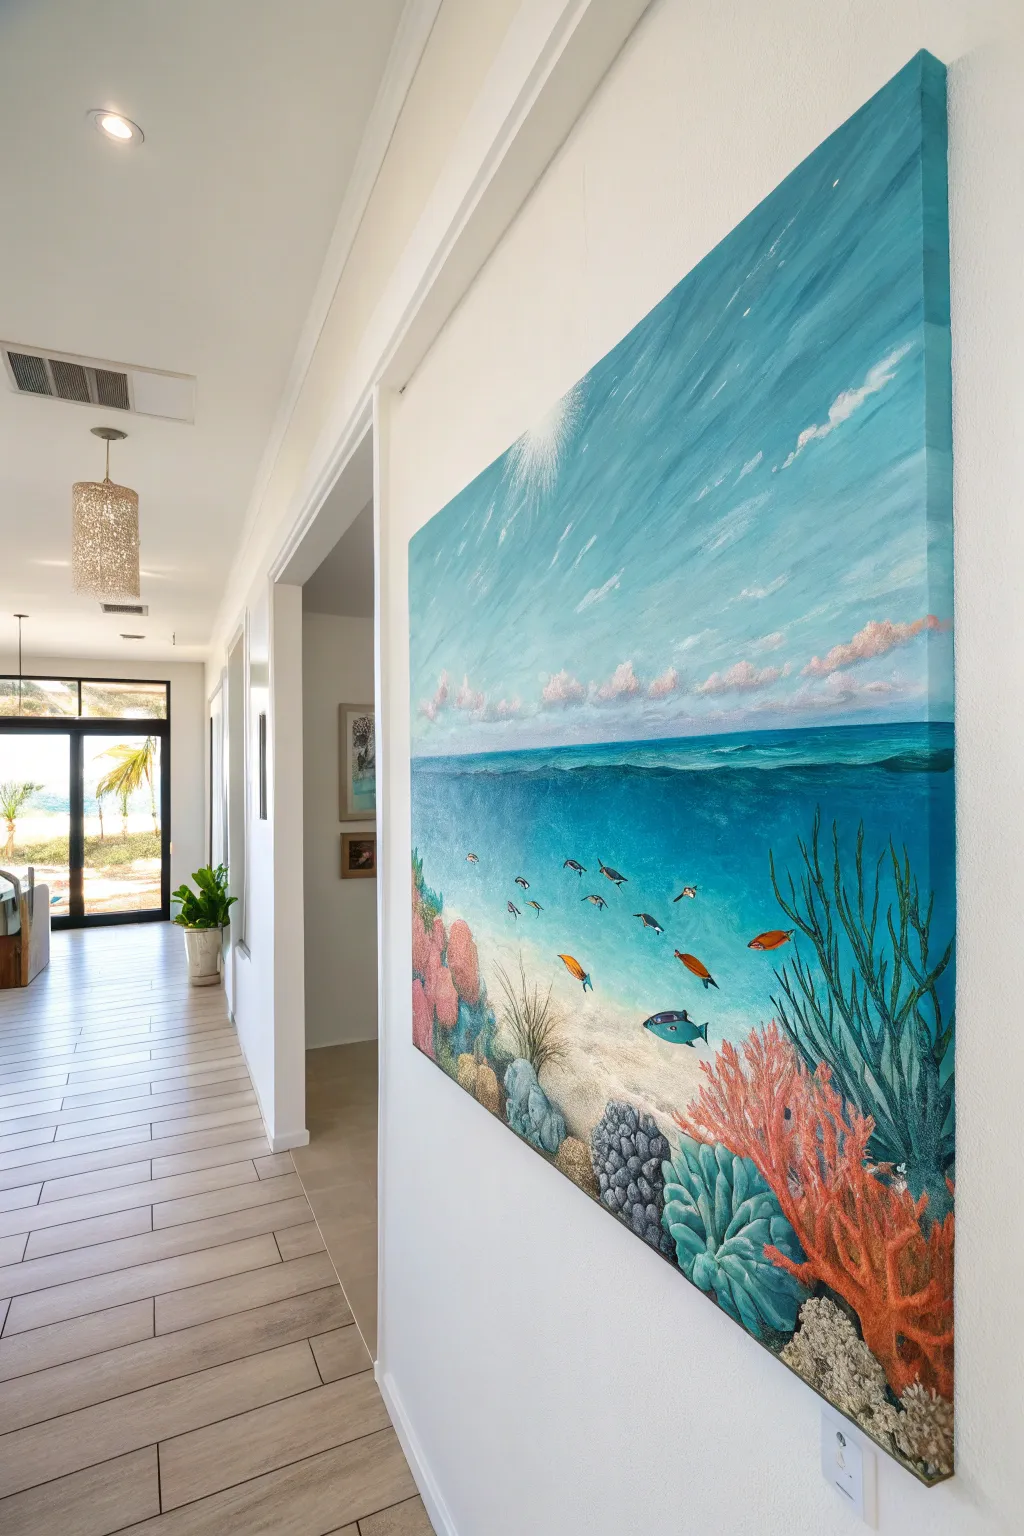
Bring the dual beauty of the ocean into your home with this large-scale acrylic painting that captures both the sunlit surface and the vibrant reef below. This split-view composition creates a dynamic window into an underwater world, perfect for brightening a hallway or living space.
Detailed Instructions
Materials
- Large rectangle canvas (e.g., 36×48 inches)
- Acrylic paints (Phthalo Blue, Ultramarine Blue, Titanium White, Raw Sienna, Burnt Umber, Cadmium Orange, Sap Green, Coral Pink)
- Wide flat brushes (2-3 inch) for background blending
- Medium filbert brushes for clouds and sand
- Fine round detail brushes (sizes 0-2) for fish and coral
- Gesso (optional, for priming)
- Mixing palette and water container
- Rags or paper towels
- Sea sponge (natural)
- Painter’s tape or a straight edge
Step 1: Setting the Horizon
-
Prime the Surface:
Begin by applying a coat of white gesso to your large canvas if it isn’t pre-primed. This ensures your blue gradients will glide smoothly and stay vibrant. -
Establish the Waterline:
Decide where your split view will occur; slightly above the middle works best for composition. Lightly sketch a horizontal line across the canvas to separate the sky from the underwater section. -
Paint the Deep Sky:
Start at the very top of the canvas with a mix of Phthalo Blue and white. Paint horizontally, adding more white as you move downward toward the horizon line to create a natural atmospheric gradient. -
Define the Surface Water:
Use a darker, pure Phthalo Blue right at the horizon line to represent the distant ocean surface. Gently blend this upward into the paler sky color while the paint is still wet. -
Add Cloud Textures:
While the sky is drying, use a dry filbert brush or a small sponge with Titanium White to dab in soft, drifting clouds. Keep them wispy and focused near the horizon line to add depth. -
Paint the Upper Sunlight:
In the upper left corner, create a burst of sunlight using thinned white paint. Dry-brush distinct rays shooting downward diagonally through the sky and into the water section.
Keep it Transparent
To make water look ‘wet’ and deep, use glazing liquid instead of water to thin your acrylics. This maintains the paint binder’s strength while allowing layers to shine through.
Step 2: Going Underwater
-
Create the Underwater Gradient:
For the bottom half, start just below the horizon line with a deep Ultramarine Blue, blending it gradually into a lighter turquoise (Phthalo Blue + White + tiny touch of Yellow) as you move down towards the seabed. -
Paint the Sandy Bottom:
Mix Raw Sienna, White, and a dot of Burnt Umber. Paint the bottom section of the canvas, curving the sand dune slightly upward on the right side. Using a scumbling motion (circular scrubbing) creates a sandy texture. -
Blend Sea and Sand:
Where the blue water meets the sandy bottom, glaze a very thin wash of turquoise over the top edge of the sand. This makes the water look transparent and shallow near the floor. -
Add Surface Texture:
Return to the water’s surface line. Use a lighter blue-white mix to paint small, choppy horizontal strokes, simulating waves catching the light just above the underwater view.
Step 3: Cultivating the Coral Reef
-
Block in Coral Shapes:
In the foreground corners (mostly bottom right), block in the basic silhouettes of your coral structures. Use dark grays or deep greens first to establish shadows and volume. -
Detail the Fan Coral:
Using a vibrant orange-red mix, paint the branching fan coral structures. Use a liner brush to pull thin, twig-like strokes upward from the base, overlapping them for density. -
Create Sea Grass:
On the right edge, use Sap Green mixed with a little blue to paint tall, swaying sea grass. Use long, fluid strokes that taper at the top, varying the direction slightly to simulate movement. -
Texture the Brain Coral:
For the rounder rocks or brain coral shapes at the bottom, use a small round brush to stipulate little dots or ridges in lighter pastel blues and purples to mimic rough textures. -
Add Sun Rays Underwater:
Extend the sun rays from the sky section down into the water. Use a very watery white glaze to paint faint diagonal beams piercing through the blue depths, creating the ‘god ray’ effect.
Horizon Line Trouble?
If your split line between sky and water looks too sharp or unnatural, dry-brush a tiny amount of white paint horizontally across the seam to create a sense of surface foam or distance.
Step 4: Bringing it to Life
-
Populate with Fish:
Using your smallest detail brush, paint schools of small fish. Start with simple teardrop shapes in silver, dark blue, or orange. Remember, fish further away should be smaller and less detailed. -
Detail the Tropical Fish:
Select a few larger focal fish—like the blue triggerfish or orange anthias seen here—and add specifics like fins, eyes, and stripe patterns. High precision isn’t necessary; suggest the shapes with confident strokes. -
Enhance Highlights:
Add final highlights of pure white to the tips of the coral, the crests of the surface waves, and the scales of the nearest fish to catch the imaginary light. -
Final Glaze:
I like to finish with a very thin, watery wash of bright turquoise over the distant underwater background to push it back visually and unify the colors.
Step back and admire your personal window to the ocean, ready to transport you to the tropics every time you walk by.
Sunken Treasure Story Corner
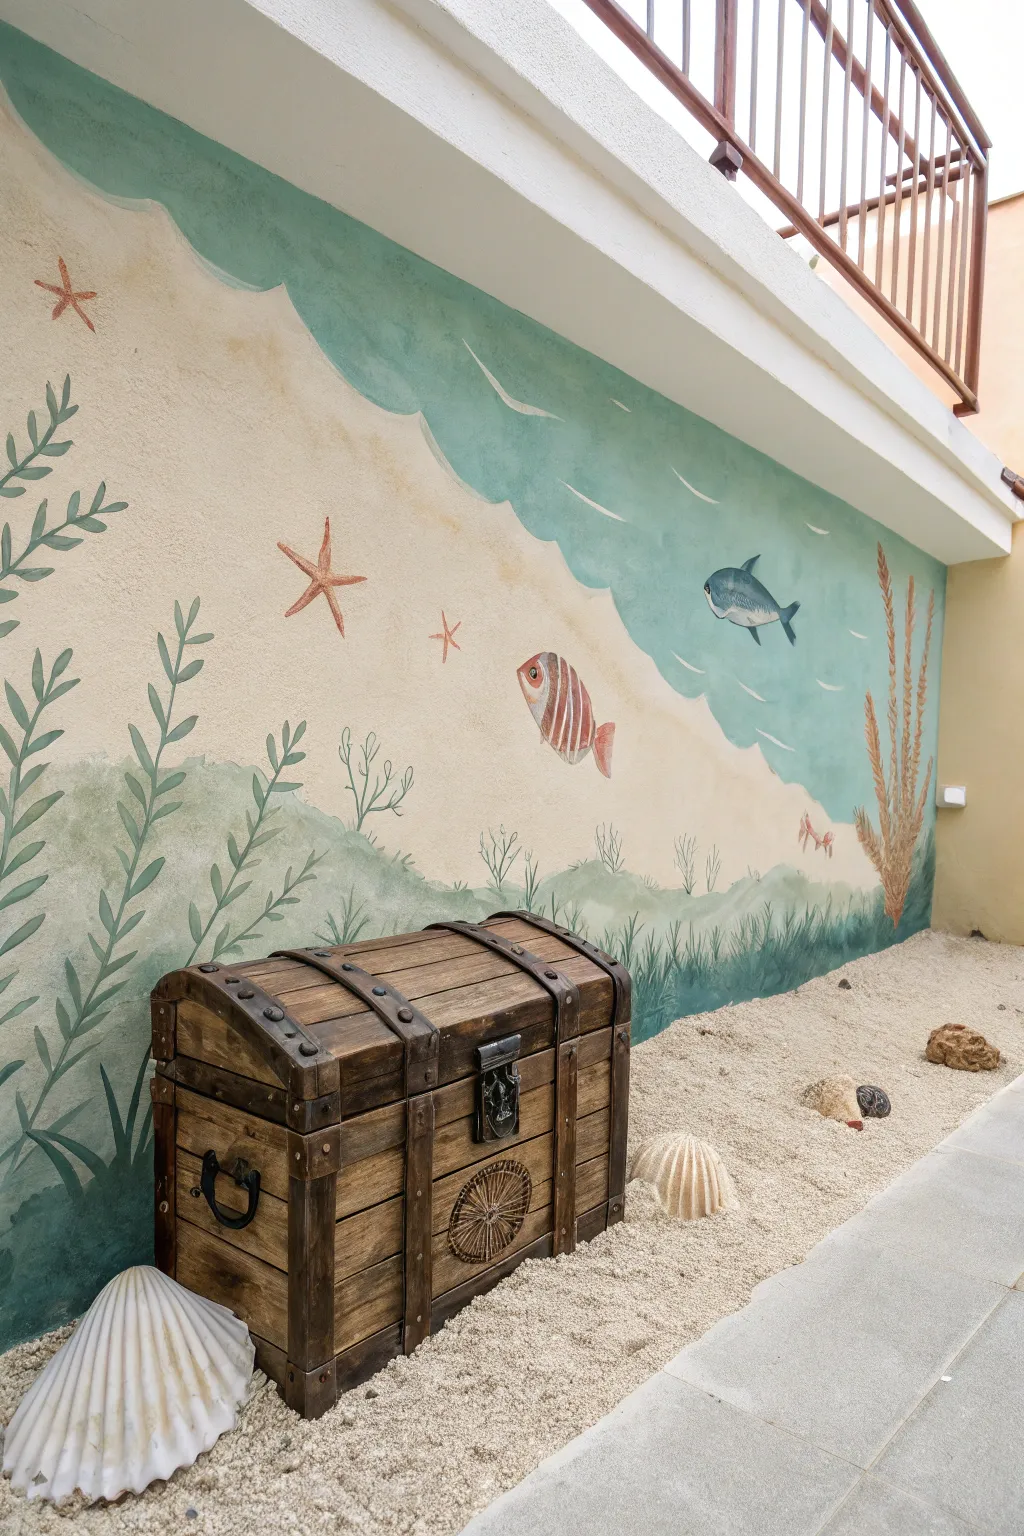

Transform a blank corner into an immersive underwater narrative with this blended mural and prop installation. By combining soft, illustrative wall art with tactile elements like sand and a wooden chest, you create a magical 3D vignette perfect for sparking imagination.
Step-by-Step
Materials
- Exterior acrylic latex paint (white, beige/sand, teal/aqua, olive green, coral red, orange, dark grey)
- Wide painter’s tape
- Assorted paintbrushes (2-inch sash brush for cutting in, medium rounds for details, liner brush for stems)
- Sea sponge (optional, for texture)
- Chalk or pencil for sketching
- Wooden treasure chest (vintage or decorative reproduction)
- Play sand (approx. 2-3 bags depending on area)
- Large decorative seashells (clam, conch)
- Exterior clear coat sealant (matte or satin finish)
Step 1: Planning and Background
-
Prepare variable surfaces:
Since this project involves both a wall and the ground, ensure the wall is clean and dry. If painting on stucco like the image, use a sturdy brush to get into the crevices. Sweep the patio floor thoroughly where the sand will eventually sit. -
Draft the horizon line:
Using chalk, sketch a wavy, diagonal line across the wall. This will separate your sandy ocean floor from the water above. It doesn’t need to be perfect; a gentle, organic slope looks best. -
Paint the sandy bottom:
Fill the lower section with a warm beige or sand-colored exterior paint. Apply two coats if necessary to cover the existing wall texture. -
Establish the water layer:
Paint the upper section with a soft teal or aqua blue. If you want the subtle gradient seen in the photo, mix a little white into your teal as you near the sandy border to simulate shallow water. -
Create the shoreline transition:
Where the beige meets the teal, use a dry brush technique with white paint to create a soft, scalloped edge, mimicking the foamy break of a wave on the shore.
Stucco Success
Painting on textured stucco? Use a “stippling” motion (dabbing the brush straight on) rather than sweeping strokes to force paint into the deep pits without leaving gaps.
Step 2: Painting the Motifs
-
Sketch the underwater flora:
Lightly chalk in positions for seaweed and kelp. Focus on the bottom corners and edges to frame the scene. -
Paint tall seaweed stalks:
Using an olive green shade and a medium round brush, paint long, flowing vertical lines that curve gently. Add small, leaf-like ovals along the stems. -
Add leafy ground cover:
Near the bottom of the wall, dab in clusters of shorter, grassy strokes in a slightly darker green to create depth at the ‘ocean floor’. -
Position the fish:
Decide where your fish will swim. Sketch a few simple oval shapes in the teal water area. A medium-sized fish swimming diagonally adds dynamism. -
Detail the red fish:
Fill a fish outline with a mixture of white and light red. Once dry, use a liner brush with darker red or maroon to paint vertical stripes and outline the fins. -
Paint the darker fish:
For the blue/grey fish, use a dark grey-blue paint. Keep the belly lighter (white or pale grey) and use a fine brush to define the eye and tail fork. -
Add starfish accents:
Paint five-pointed stars in a coral or orange hue scattered across the beige sandy section. Don’t make them too uniform; varying sizes look more natural. -
Enhance water movement:
With watered-down white paint and a thin brush, add very subtle, short curved lines in the blue water area to suggest ripples or currents.
Interactive Gold
Hide waterproof faux gold coins or plastic gems half-buried in the sand around the chest. It creates a fun discovery activity for kids exploring the corner.
Step 3: Installation and Staging
-
Seal the mural:
Once the paint is fully cured (usually 24 hours), apply a clear exterior sealant to protect your artwork from the elements. -
Prepare the prop area:
Pour play sand onto the patio floor directly in front of the mural. Create a mound that slopes up slightly against the wall to blur the line between the painted floor and the real ground. -
Weather the chest:
If your wooden chest looks too new, I like to lightly sand the edges or dilute some dark brown paint to use as a wash, giving it an aged, sunken look. -
Place the treasure:
Nestle the wooden chest into the sand pile. Angle it slightly so it looks like it has been resting there for years. -
Arrange the large shells:
Place large decorative shells (like giant clams or conchs) around the chest and near the wall. Half-burying them in the sand helps integrate the props with the scene. -
Final touches:
Step back and check the perspective. If the mural feels disconnected, brush a tiny bit of real sand or beige paint onto the bottom of the chest to visually ‘sink’ it further.
Now you have a charming seaside nook where stories of pirates and mermaids can come to life
Abstract Ocean Color Bands
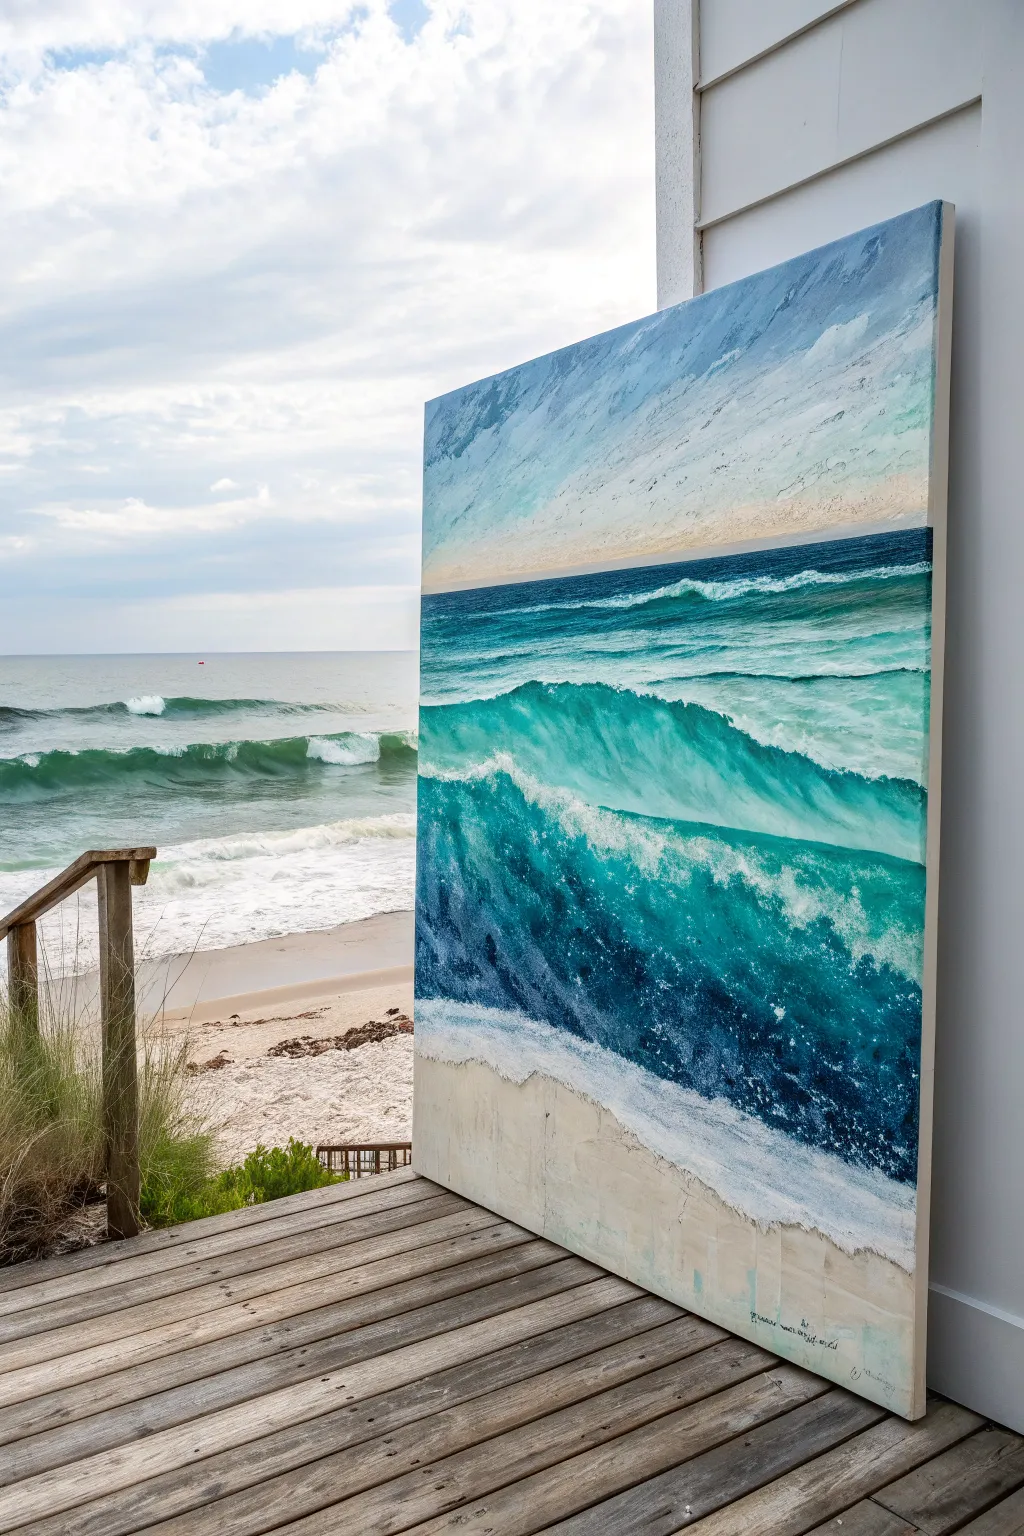
Capture the raw power and serene beauty of the ocean with this large-scale acrylic painting, featuring a crashing wave full of depth and movement. By layering teals, deep blues, and crisp whites, you’ll create a photorealistic seascape that transforms any wall into a window to the beach.
How-To Guide
Materials
- Large stretched canvas (at least 36×48 inches)
- Acrylic paints (Phthalo Blue, Ultramarine Blue, Teal, Titanium White, Raw Sienna, Burnt Umber)
- Wide flat synthetic brushes (2-3 inches)
- Medium round brushes
- Fan brush
- Sea sponge or crumpled paper towel
- Palette knife
- Water spray bottle
- Large painter’s palette or plastic plate
- Easel or drop cloth for floor painting
Step 1: Setting the Scene
-
Prime the Surface:
Even if your canvas is pre-primed, apply a coat of white gesso mixed with a tiny drop of blue to create a cool, consistent undertone. Let this dry completely before starting. -
Establish the Horizon:
Using a light blue-grey mix (Ultramarine Blue + Titanium White), paint the sky area in the top quarter of the canvas. Keep the strokes horizontal and smooth, blending lighter as you move closer to the horizon line. -
Paint the Deep Water:
Below the horizon, block in a dark, solid band of Phthalo Blue and Teal. This represents the deep ocean before the wave breaks. Ensure a sharp, straight line where the water meets the sky. -
Underpaint the Sand:
At the very bottom of the canvas, mix Titanium White with a touch of Raw Sienna and Burnt Umber. Apply this beige mixture loosely to create the wet sand area where the wave recedes.
Muddy Waters?
If your blues and whites turn grey, stop blending wet-on-wet. Let the blue layer dry completely before adding white foam on top to keep colors crisp.
Step 2: Building the Wave Form
-
Draft the Wave Shape:
Using a diluted wash of Teal, sketch the large curve of the crashing wave in the center. Don’t worry about details yet; just focus on the flow and the diagonal direction of the water. -
Add Shadow Depth:
Mix Phthalo Blue with a tiny bit of Burnt Umber to create a deep, shadowy teal. Apply this to the underside of the wave curl and the trough behind the foam. This dark contrast is crucial for making the wave pop. -
Layer Mid-Tones:
Blend pure Teal and a lighter Phthalo Green into the middle section of the wave face. Use a wide brush and follow the curve of the water—painting in the direction the water is moving helps create realistic flow. -
Highlight the Translucency:
At the very top of the wave, just before it breaks, the sun shines through the water. Mix a bright, translucent aqua using Teal and lots of Titanium White (or a glazing medium) and apply it right at the crest.
Step 3: Creating Texture and Movement
-
Start the Foam:
Dip a fan brush into slightly thinned Titanium White. Lightly skim the surface of the dark trough area to create the look of sea foam stretching and pulling back. -
Build the Crash:
Load a round brush with thick, heavy body Titanium White. Dab and stipple the paint where the wave hits the surface to create that explosion of whitewash. Don’t smooth this out—let the texture stand up. -
Splatter Effect:
I like to use an old toothbrush or a stiff bristle brush here. Flick tiny speckles of white paint over the crashing area to mimic ocean spray and mist. -
Sea Sponge Texture:
Take a damp sea sponge dipped in white and gently press it into the foreground foam area. This creates an organic, bubbly texture that looks like receding tide suds. -
Detailing the Surface:
Use a small liner brush to paint delicate veins of foam climbing up the face of the wave. Keep these lines broken and irregular for a natural look.
Level Up: Texture Gel
Mix heavy gel medium into your white paint for the crashing foam. It holds peaks like real frosting, adding 3D tactile texture to the wave.
Step 4: Final Adjustments
-
Refine the Horizon:
Go back to your horizon line with a steady hand or ruler edge. Ensure the separation between sky and deep sea is crisp, adding a faint touch of pale orange or pink just above the water if you want a hint of sunset. -
Deepen Contrasts:
Look for areas where the white foam meets the teal water. If it looks flat, add a thin line of your darkest blue shadow mix right next to the white to make the foam lift off the canvas. -
Glazing Unifiers:
Once the main layers are dry, mix a transparent glaze of Phthalo Blue and glazing medium. Brightly brush this over the deep water sections to unify the colors and add a wet, glassy sheen. -
Signature and Protective Coat:
Sign your masterpiece in the bottom corner using a color that blends slightly, like a dark grey. Finish with a satin varnish to protect the paint and give the water a uniform, realistic gloss.
Step back and admire how the layers of blue and white come together to bring the rhythm of the ocean into your space
Textured 3D Coral and Shell Details
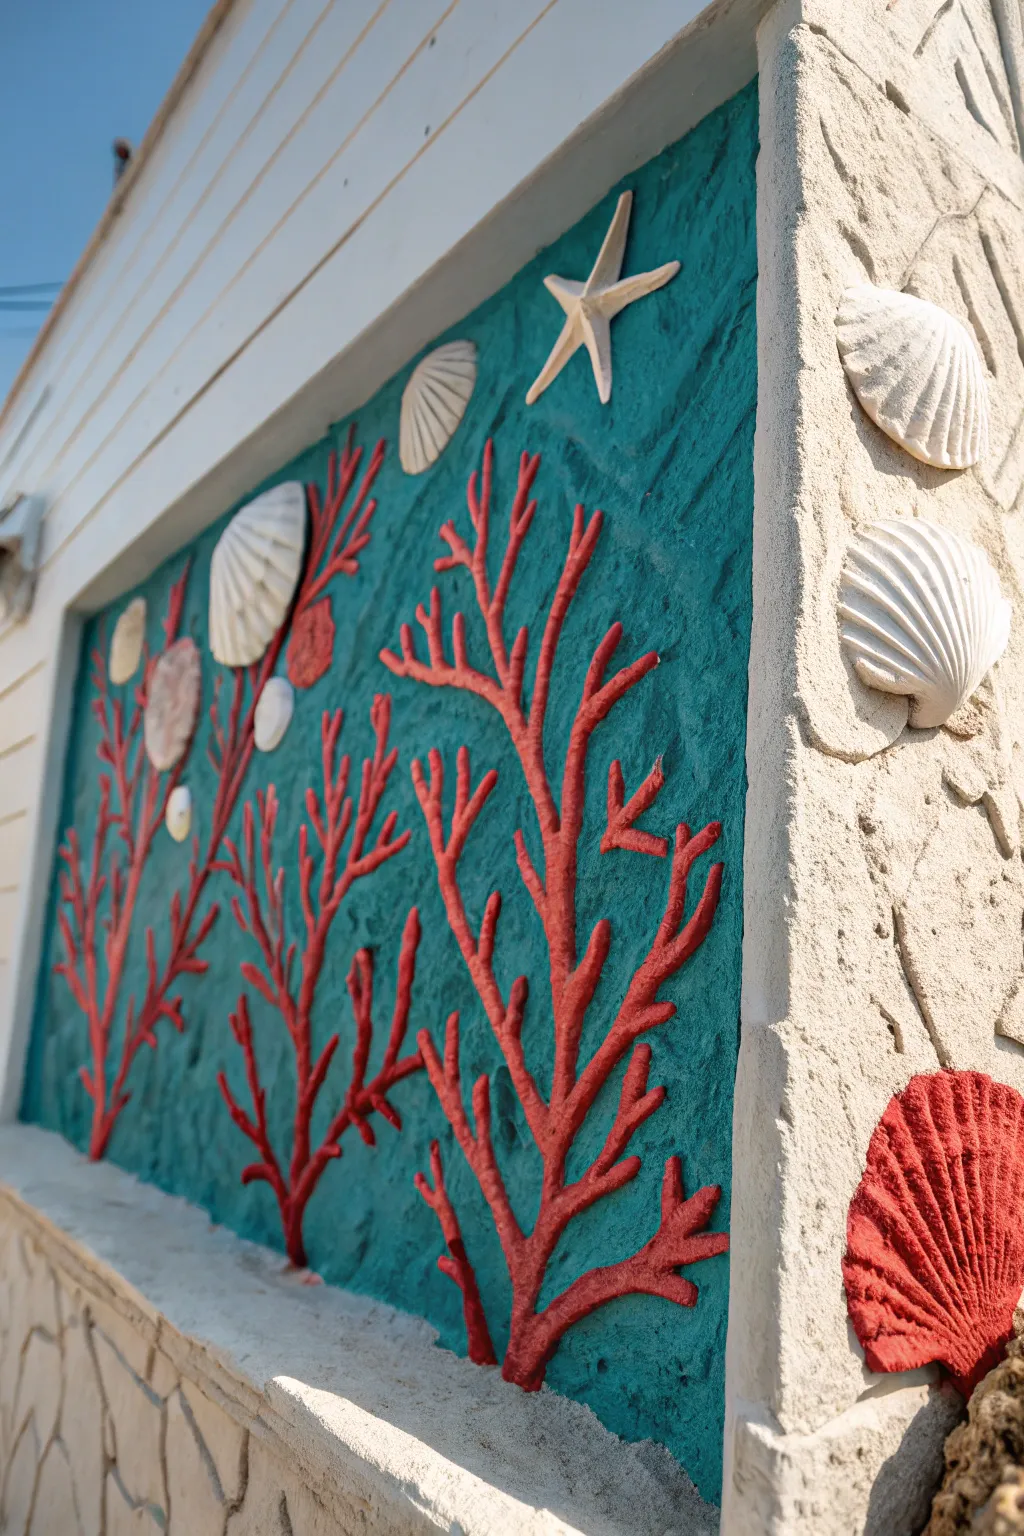
Transform a plain wall into a vibrant underwater scene with this highly textured 3D mural technique. By combining relief sculpting with embedded natural elements, you’ll achieve a tactile finish where coral branches seem to grow right off the surface.
Step-by-Step Tutorial
Materials
- Exterior stucco mix or joint compound (depending on location)
- White cement or tinted stucco base
- Real seashells (scallop shells, starfish)
- Concrete bonding adhesive
- Teal/Turquoise exterior acrylic paint
- Bright red exterior acrylic paint
- Trowel and putty knife
- Piping bag or heavy-duty ziplock bag
- Small paintbrush (detail work)
- Medium paintbrush (background)
- Sandpaper (medium grit)
- Painter’s tape
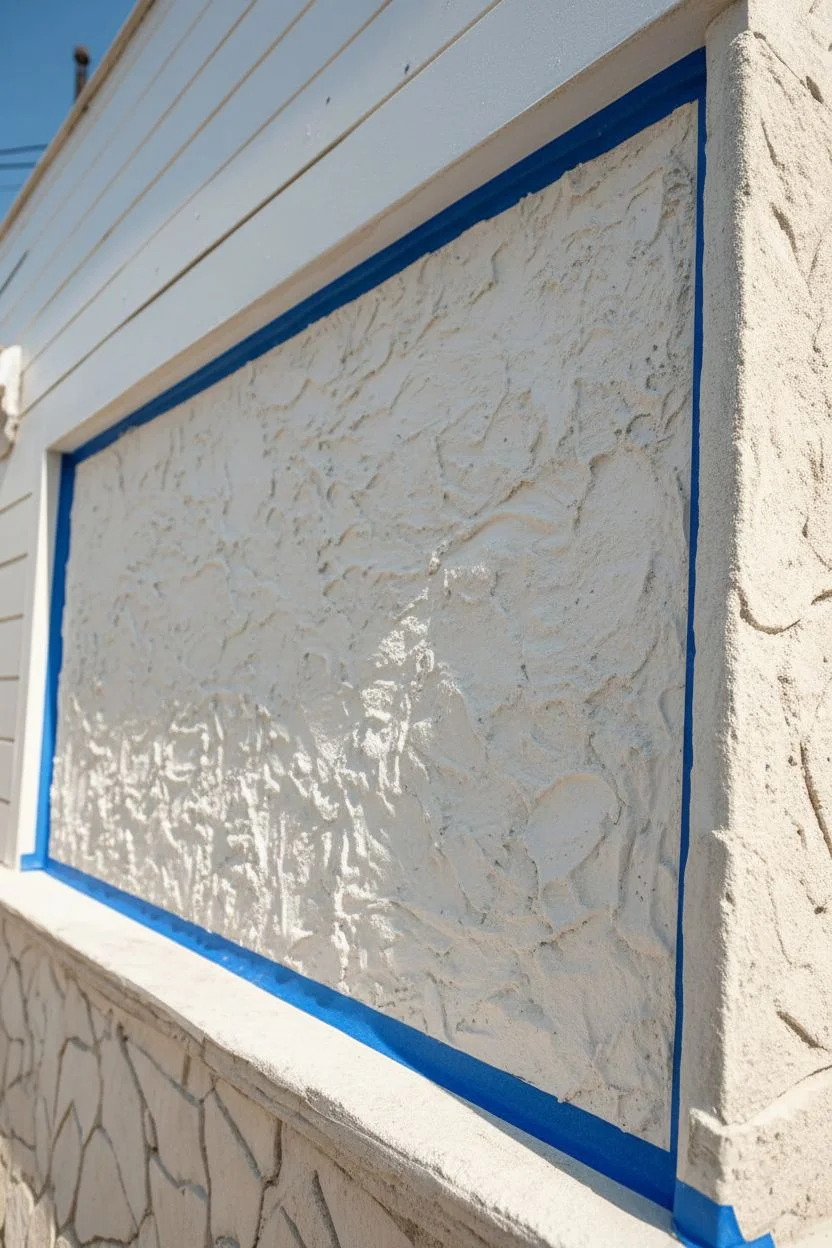
Step 1: Preparation and Background Texture
-
Surface Prep:
Clean the target wall area thoroughly to remove dust and grease. If you are working on smooth drywall, lightly sand it to help the stucco adhere better. -
Frame the Area:
Define the boundaries of your mural using painter’s tape. This creates clean, crisp edges for your recessed or framed look. -
Apply Bonding Agent:
Brush a layer of concrete bonding adhesive onto the area. This is crucial for ensuring the heavy textured material sticks vertically. -
Create the Base Texture:
Mix your stucco or joint compound. Apply a roughly 1/4-inch thick layer across the entire background using a trowel. -
Distress the Surface:
Before the base layer dries, tap the flat side of your trowel against the wet compound and pull away to create a rough, watery texture. Let this cure completely, usually for 24 hours.
Step 2: Painting the Backdrop
-
Base Color Application:
Once the textured base is rock hard, paint the entire surface with your teal or turquoise exterior paint. -
Ensure Coverage:
Use a medium brush to dab paint into all the deep crevices of the texture so no white material shows through. -
Dry Time:
Allow the paint to dry fully. I usually give it at least 4-6 hours so I don’t smudge the background while adding the 3D elements.
Uneven Piping?
If your piped coral looks too lumpy, dip a small artist’s brush in water and gently glide it over the wet compound to smooth out the bumps.
Step 3: Sculpting the Coral
-
Prepare the Relief Mix:
Mix a fresh batch of stucco or thick compound. It should be stiffer than the base layer—think peanut butter consistency so it holds its shape. -
Load the Bag:
Fill a heavy-duty piping bag with the thick mixture. Cut a hole about the size of a dime at the tip. -
Pipe the Branches:
Squeeze the bag to draw the coral branches directly onto the teal wall. Start with thicker main stems at the bottom and branch out into thinner twigs as you move upward. -
Build Height:
For more dimension, let the first layer of piping firm up slightly, then pipe a second layer directly on top of the main branches to make them protrude further. -
Refine the Shape:
Use a damp small brush or your finger to gently smooth down any sharp peaks on the coral piping while it’s still wet, giving it an organic, rounded look.
Add Sparkle
Mix a tiny amount of fine iridescent glitter into the teal paint or the final clear sealant coat to mimic sunlight hitting the ocean floor.
Step 4: Embedding and Finishing
-
Positioning Shells:
Decide where you want your seashells and starfish. Apply a generous dollop of the thick stucco mix to the back of each shell. -
Press and Hold:
Press the shells firmly onto the wall. If they are heavy, use a piece of painter’s tape to hold them in place until the adhesive mix sets. -
Blend the Edges:
Use a small tool to smooth any adhesive that squishes out from behind the shells so they look naturally embedded rather than pasted on. -
Paint the Coral:
After the coral piping is fully hardened, carefully paint the raised branches with bright red acrylic paint. A steady hand is key here to avoid getting red on the teal background. -
Highlight the Shells:
Leave most shells natural white for contrast. However, you can paint a few specific large shells red to tie the color palette together, just like in the inspiration photo. -
Final Clean Up:
Remove the painter’s tape from the perimeter and touch up any edges for a crisp, finished appearance.
Step back and admire your durable, tactile ocean scene that brings coastal charm to any space


Have a question or want to share your own experience? I'd love to hear from you in the comments below!