If you’ve been craving that calm, deep-breath feeling of the sea, an ocean wall painting can change the whole mood of a room. Here are my favorite ocean wall painting ideas—from classic beach views to artsy, unexpected underwater moments.
Classic Beach Horizon Accent Wall
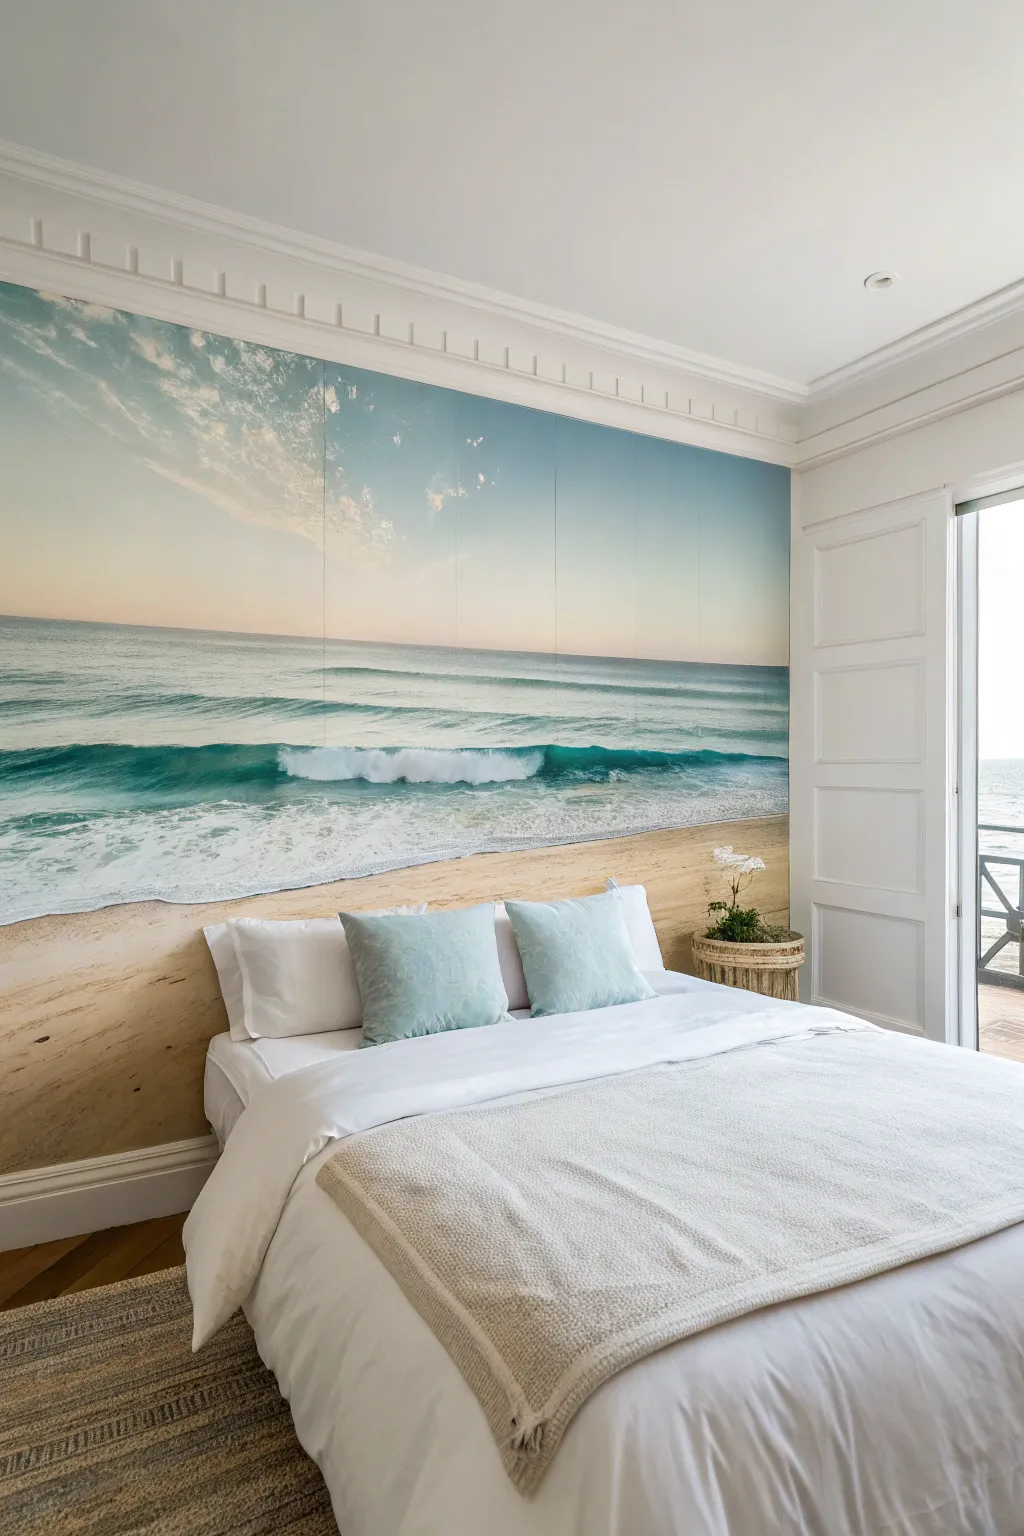
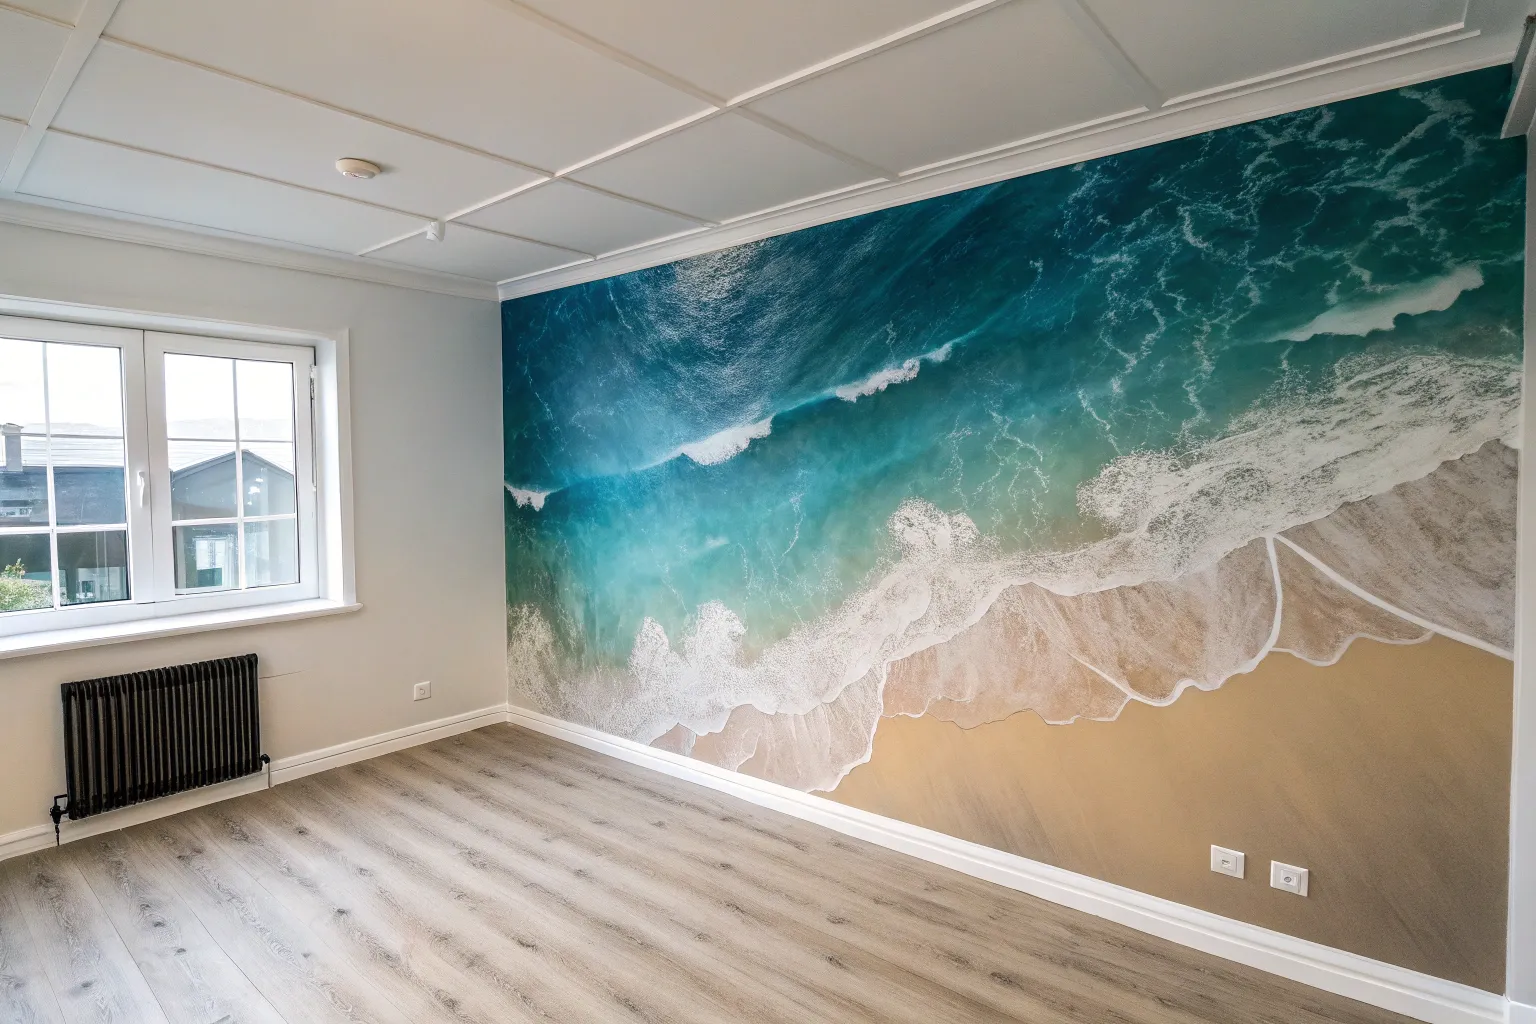
Transform an entire room with the soothing presence of a photorealistic beach horizon that stretches from corner to corner. This immersive mural installation uses large-scale wallpaper panels to create a window onto a calm, crashing shoreline, instantly making any bedroom feel like a seaside retreat.
Step-by-Step Tutorial
Materials
- Custom-sized beach mural wallpaper (pre-pasted or unpasted)
- Wallpaper paste (if required by your mural type)
- Clean bucket and water sponge
- Plumb line or laser level
- Smoothing tool or wallpaper brush
- Seam roller
- Sharp utility knife (with extra blades)
- Metal straight edge or trim guide
- Drop cloth
- Stepladder
- Sandpaper (fine grit)
- Wall primer (optional but recommended)
Step 1: Wall Preparation
-
Assess the Surface:
Start by clearing the wall completely, removing any outlet covers, nails, or existing artwork. Run your hand over the surface to check for bumps or imperfections. -
Smooth and Patch:
Fill any holes with spackle and sand down any bumps. A smooth surface is critical for a photorealistic mural, as textures will distort the horizon line. -
Prime the Wall:
Apply a coat of high-quality primer to the wall. This ensures the wallpaper adhesive bonds correctly and makes it easier to slide panels into position during installation.
Air Bubble Trouble
If you find a stubborn bubble after the paper dries, don’t peel it back. Prick it with a fine sewing needle and utilize a glue syringe to inject a tiny amount of paste, then smooth flat.
Step 2: Setting the Guideline
-
Measure the Width:
Unroll your mural panels on a clean floor to double-check their order. I prefer to number the back of each panel faintly with a pencil just to be safe. -
Establish the Plumb Line:
Most people start from the left, but for a centered image like this, measure the width of your first panel. Mark that distance on the wall minus one inch (to allow for trimming at the corner) and use a laser level or plumb bob to draw a perfectly vertical line.
Crown Molding Trick
To make the view look like a real window, install white crown molding or a simple wood trim frame around the entire perimeter of the mural wall after the wallpaper dries.
Step 3: Mural Application
-
Apply Adhesive:
If using unpasted paper, roll the paste directly onto the wall for the first section, going slightly wider than the panel width. If using pre-pasted, activate the adhesive with water according to the manufacturer’s instructions. -
Hang First Panel:
Align the right edge of your first panel with your vertical plumb line. Let approximately two inches of excess paper overhang at the ceiling and floor. -
Smooth the Surface:
Using your smoothing tool, work from the center of the panel outward to push out air bubbles. Be gentle to avoid stretching the paper. -
Align the Second Panel:
This is the most crucial step. Bring the second panel to the wall and match the horizon line and wave details exactly. You may need to overlap the seam slightly depending on the brand, or butt them edge-to-edge. -
Check the Horizon:
Step back and verify the horizon line is perfectly straight before smoothing down the second panel. Even a millimeter difference can break the illusion. -
Continue Installation:
Repeat the process for the remaining panels, always wiping away excess glue from the face of the paper immediately with a damp sponge. -
Seal the Seams:
Once panels are placed, use a seam roller gently along the vertical joins. This ensures the edges don’t lift later.
Step 4: Finishing Trims
-
Trim Excess Paper:
Once the adhesive has tacked up slightly (wait about 15-20 minutes), use your straight edge and a fresh razor blade to trim the excess paper at the ceiling and baseboard. -
Trim Around Obstacles:
Carefully cut around any outlets or switches. Replace covers once the paper is dry. -
Final Wipe Down:
Give the entire mural one last gentle wipe with clean water to remove any residual paste haze.
Now stepping into your room will feel like walking onto a private beach every single day


Sunlit Shallow-Water Shoreline
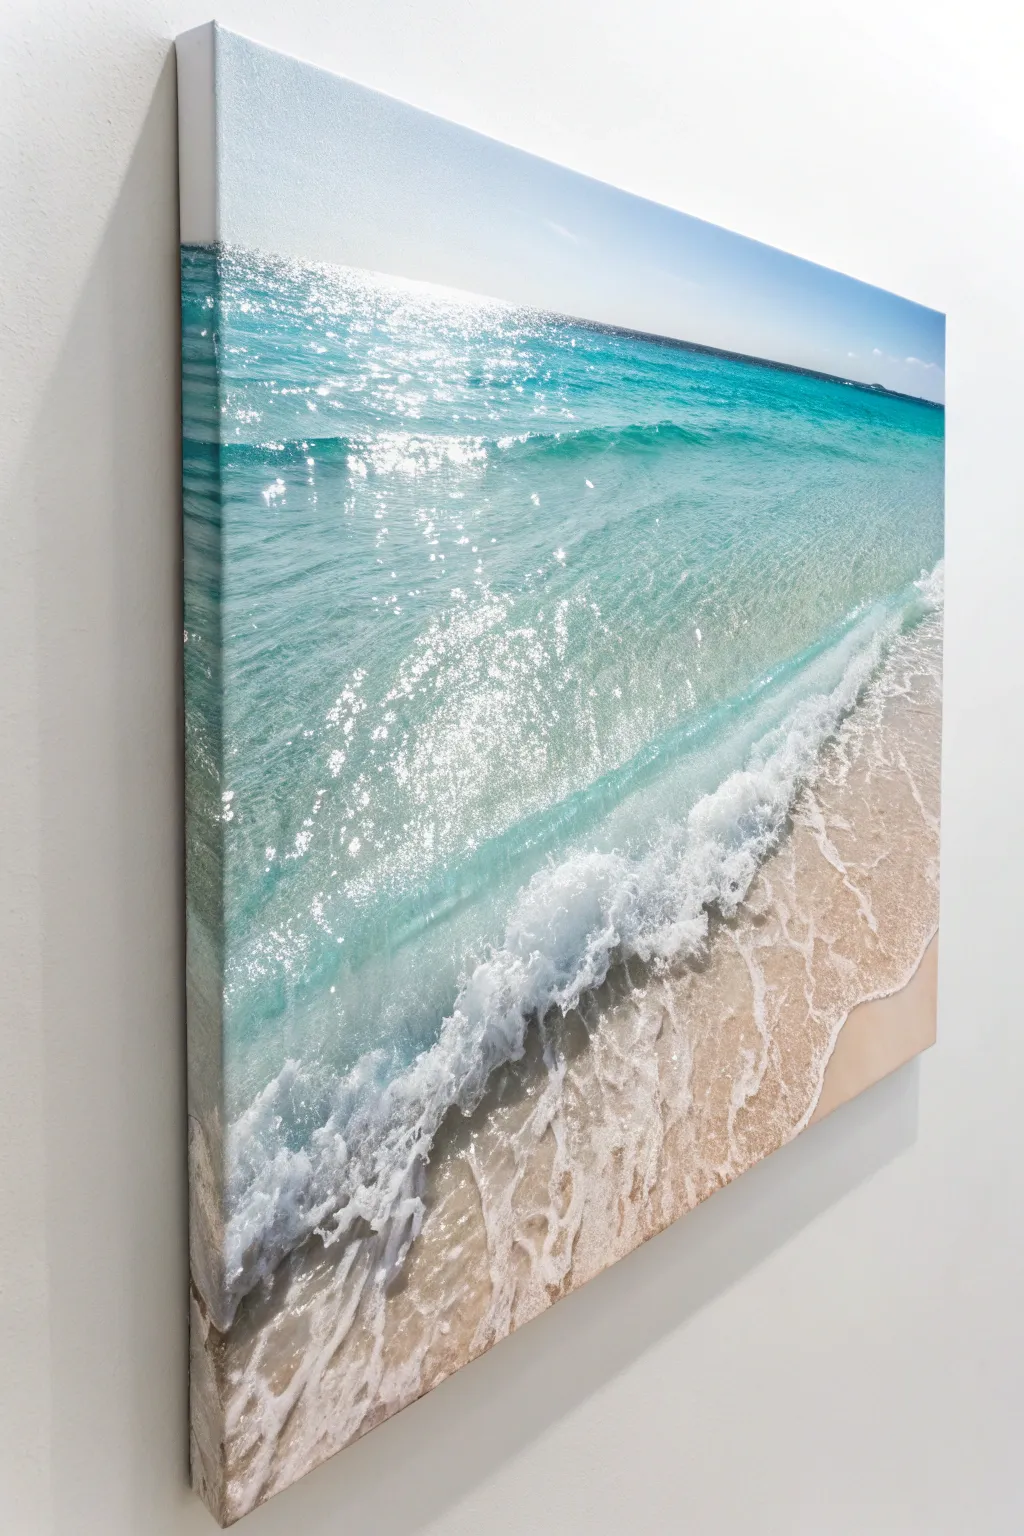
Capture the breathtaking luminescence of shallow tropical waters with this vibrant acrylic painting on a gallery-wrapped canvas. This piece focuses on the interplay of sunlight, crystal-clear turquoise waves, and the soft textures of wet sand.
Step-by-Step Tutorial
Materials
- Large rectangular gallery-wrapped canvas (e.g., 24×36 inches)
- Acrylic paints: Phthalo Blue, Turquoise, Titanium White, Raw Sienna, Burnt Umber, Naples Yellow
- Large flat brush (2-inch)
- Medium filbert brush
- Small round detail brush
- Fan brush (optional)
- Glazing medium
- Sea sponge
- Old toothbrush (for spatter)
- Palette knife
- Water container and paper towels
Step 1: Blocking the Composition
-
Establish the horizon:
Begin by lightly sketching a horizontal line near the top third of your canvas. The focus here is the water, so keep the sky area relatively small, just a strip at the top. -
Paint the sky gradient:
Mix a very pale blue using Titanium White and a tiny dot of Phthalo Blue. Apply this to the sky section, blending it to be nearly white at the horizon line and slightly deeper blue at the very top edge. -
Map the sand:
Mix Raw Sienna, Naples Yellow, and plenty of Titanium White to create a warm, pale sand color. Paint the bottom right corner in a diagonal sweeping motion, extending up towards the middle left. -
Base coat the water:
For the deep water near the horizon, mix Phthalo Blue with a touch of Turquoise. As you move down towards the sand, gradually add more Turquoise and White to create that iconic aquamarine gradient.
Step 2: Creating Depth and Transparency
-
Blend the transitions:
While the paint is still slightly tacky, use a soft, dry brush to blur the line where the deep blue water meets the lighter turquoise. This creates the illusion of depth. -
Suggest the sea floor:
In the shallowest teal areas, mix a glazing medium with a transparent wash of Raw Sienna. Lightly glaze this over the lower turquoise sections to show the sand reflecting through the water. -
Darken the horizon line:
To make the water pop, run a thin, very dark blue line (Phthalo Blue mixed with a tiny bit of Burnt Umber) right at the horizon. This separates the sea from the sky cleanly.
Sunlight Secret
For blindingly bright sparkles, use a high-gloss gel medium mixed with your white paint. It physically catches the room’s light, making the painting shimmer.
Step 3: Painting the Waves and Foam
-
Form the main wave:
Using a filbert brush and pure Titanium White, paint the rolling foamy edge of the water. Follow the diagonal line where the water meets the sand, using a scalloped or irregular motion. -
Add wave transparency:
Behind the white foam, mix a slightly darker teal green. Paint a thin shadow line right behind the white crest to show the curve of the wave before it breaks. -
Create sea foam texture:
Dip a sea sponge into thinned white paint. Dab it gently along the wave break and receding water lines on the sand to create airy, bubbly textures. -
Refine the wet sand:
I like to darken the sand immediately next to the white foam using Raw Sienna and a touch of Burnt Umber. Wet sand is darker than dry sand, and this contrast makes the foam look brighter.
Foam Too Heavy?
If your sea foam looks like solid white shapes rather than airy bubbles, wait for it to dry, then glaze over it with a very thin wash of the sand color to push it back.
Step 4: The Sunlit Sparkle Effect
-
Map the light path:
Identify where the sunlight is hitting the water—in this piece, it’s a broad vertical column in the center-left. This area needs to remain lighter than the rest. -
Stipple the glints:
Using a small round brush and thick Titanium White, dab tiny geometric dots and dashes in the sunlit path. Keep them dense near the horizon and spread them out as you move down. -
Add ‘star’ highlights:
Select a few larger white dots and pull tiny points outward in a cross or star shape. This mimics the camera lens flare effect on bright water. -
Enhance surface movement:
Use a palette knife or a rigger brush to add very thin, squiggly lines of white and pale turquoise throughout the water. These represent the small ripples catching the light. -
Spatter for mist:
Load an old toothbrush with watery white paint. Flick the bristles with your thumb to spray a fine mist of dots near the crashing wave, creating the effect of sea spray. -
Wrap the edges:
Don’t forget the sides of your canvas to mimic the gallery-wrap look shown in the photo. Extend your horizon line, sand color, and water gradients around the corners.
Step back and enjoy the calming, tropical atmosphere you have brought into your space


Dramatic Crashing Wave Close-Up
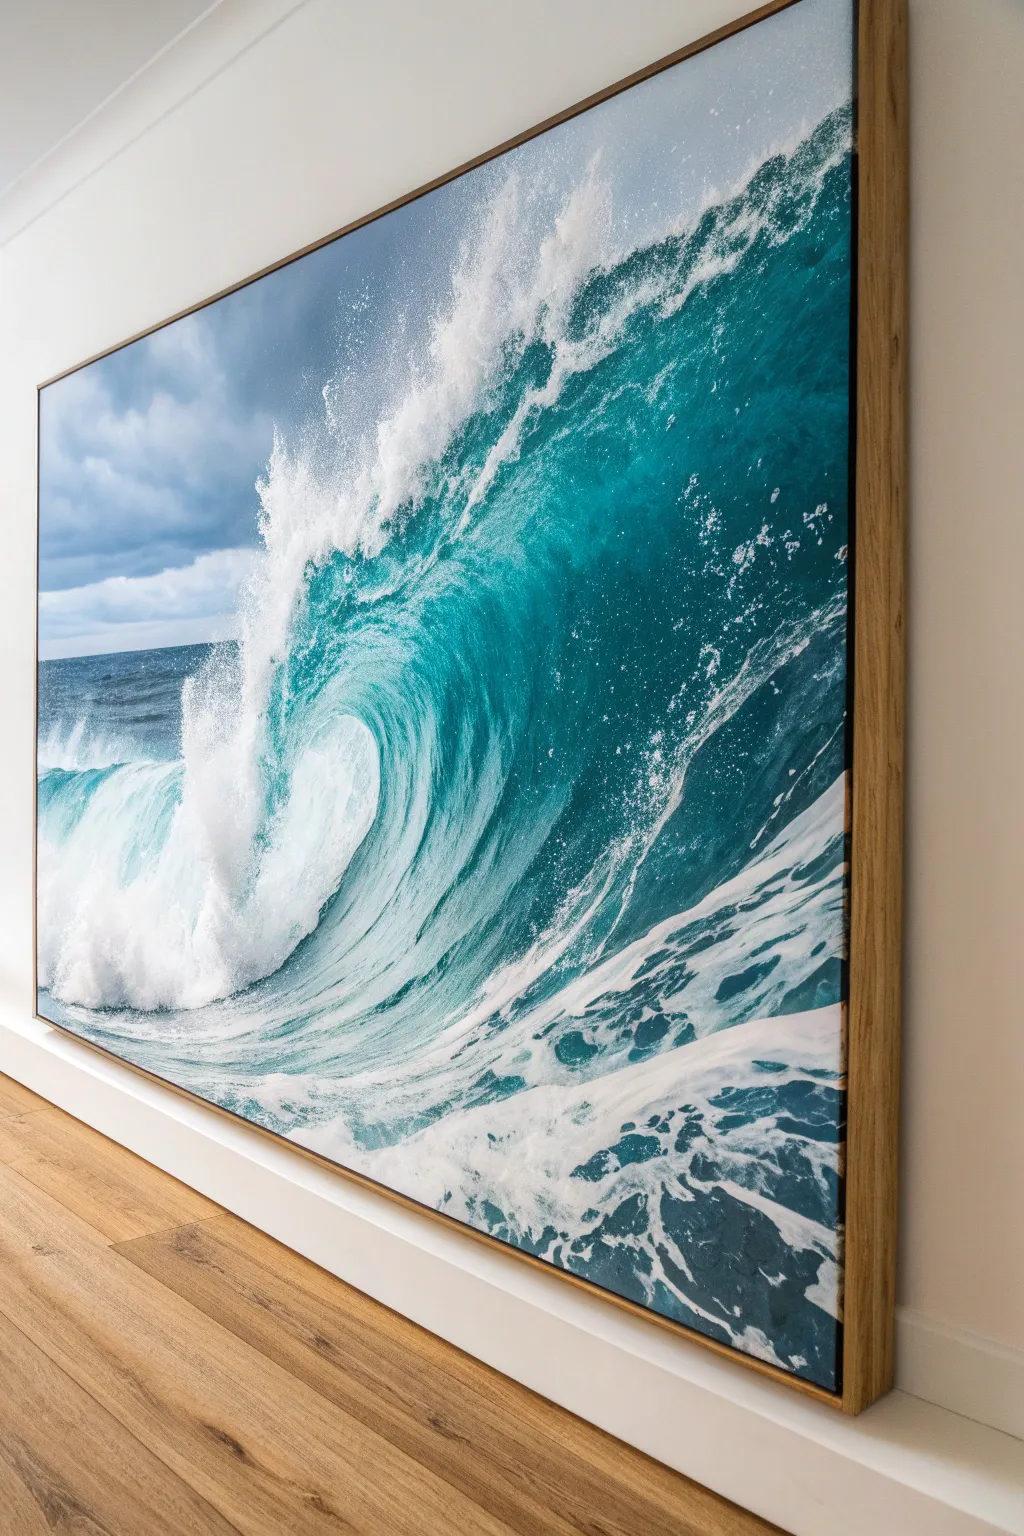
Capture the raw power of the ocean with this massive, immersive painting that freezes a crashing wave in time. By layering translucent glazes of teal and deep blue against bright white foam, you create a sense of movement and depth that transforms an entire room.
Detailed Instructions
Materials
- Large deep-edge canvas (ideally 36×48 inches or larger)
- Light wood floating frame (custom or pre-sized)
- Heavy body acrylic paints (Phthalo Blue, Phthalo Green, Titanium White, Prussian Blue, Payne’s Grey)
- Acrylic glazing medium
- Large flat brushes (2-3 inch)
- Fan brushes and bristle brushes for texture
- Sea sponge
- Spray bottle with water
- Palette knives
- Gesso
Step 1: Setting the Composition
-
Prime and Plan:
Begin by applying two coats of gesso to your large canvas to ensure a smooth surface. Once dry, lightly sketch the main wave shape using a diluted wash of Payne’s Grey—focusing on the large C-curve of the barrel and the horizon line about one-third up from the bottom. -
Underpainting the Deep Water:
Mix Prussian Blue with a touch of Payne’s Grey to block in the darkest areas: the deep ocean on the left horizon and the shadowed underside of the wave barrel. Apply this broadly with your largest flat brush. -
Establishing the Mid-Tones:
Create a rich teal by mixing Phthalo Blue and Phthalo Green. Paint the main body of the wave wall, blending it slightly into the wet edge of your darker underpainting. Don’t worry about perfect smoothness; the brushstrokes simulate water movement. -
Mapping the Light:
While the paint is still workable, use a clean brush to lift out some pigment or add pure white to the top crest area where the sunlight hits, establishing your main light source immediately.
Foam looking flat?
Don’t just use pure white. Mix a tiny drop of blue or grey into your white for the ‘shadow’ parts of the foam, then use pure white only for the sun-hit tips to add volume.
Step 2: Building Translucency and Depth
-
Glazing the Barrel:
Once the underlayer is fully dry, mix a glaze using Phthalo Green, a tiny bit of yellow, and lots of glazing medium. Apply this over the ‘eye’ of the wave to recreate that glowing, stained-glass effect where the water is thinnest. -
Strengthening the Shadows:
Go back into the deepest curve of the wave with a dark navy mix. Feather the edges out toward the lighter center to enhance the cylindrical 3D form of the water. -
Creating Water Texture:
Using a smaller flat brush, paint directional streaks following the curve of the wave. I like to use a slightly lighter teal here to show the surface tension and ripples before the wave breaks. -
Horizon and Sky:
Paint the sky in the upper left corner using a soft grey-blue mix. Keep this area soft and slightly out of focus to ensure the sharp details of the wave pop forward.
Step 3: Creating the Crash and Spray
-
Block in the Foam Base:
Using Titanium White and a palette knife, lay down thick, textured white paint at the base where the wave hits the water. Don’t smooth it out; the physical texture creates the bubbly look of sea foam. -
Detailing the Lip:
Switch to a fan brush loaded with thin white paint. Flick the brush upward along the breaking lip of the wave to create the delicate spray flying off the top edge. -
Sponging the Chaos:
Dampen a natural sea sponge and dip it in white paint. Lightly dab the transition area between the solid blue water and the white foam to create a misty, aerated look. -
Adding Veins of Foam:
With a fine liner brush, paint the web-like patterns of foam that are being pulled up the face of the wave. These lines should stretch and break apart as they move higher. -
Final Highlights:
Mix a tiny amount of neon blue or pure white and add the brightest highlights on the very tip of the crashing lip and the bubbles in the foreground water.
Add sparkle
For a magical touch, spatter very diluted white paint off a toothbrush onto the breaking crest. This creates microscopic droplets that mimic real ocean spray perfectly.
Step 4: Framing and Finishing
-
Sealing the Work:
Allow the painting to cure for at least 48 hours. Apply a high-gloss varnish to simulate the wet look of water and deepen the dark blue tones. -
Prepare the Float Frame:
Measure your canvas and the inner dimensions of your light wood floating frame. There should be a roughly 1/4-inch gap between the canvas and the frame edge. -
Mounting the Canvas:
Place the canvas face up inside the frame. Use spacers (like pieces of cardboard) to ensure the gap is even on all sides. -
Securing the Back:
Flip the assembly over carefully. Screw through the pre-drilled holes in the frame directly into the stretcher bars of the canvas to secure it in place.
Hang your masterpiece where it can catch natural light and enjoy the refreshing energy it brings to your space


Ceiling Ripples and Ocean Light Rays
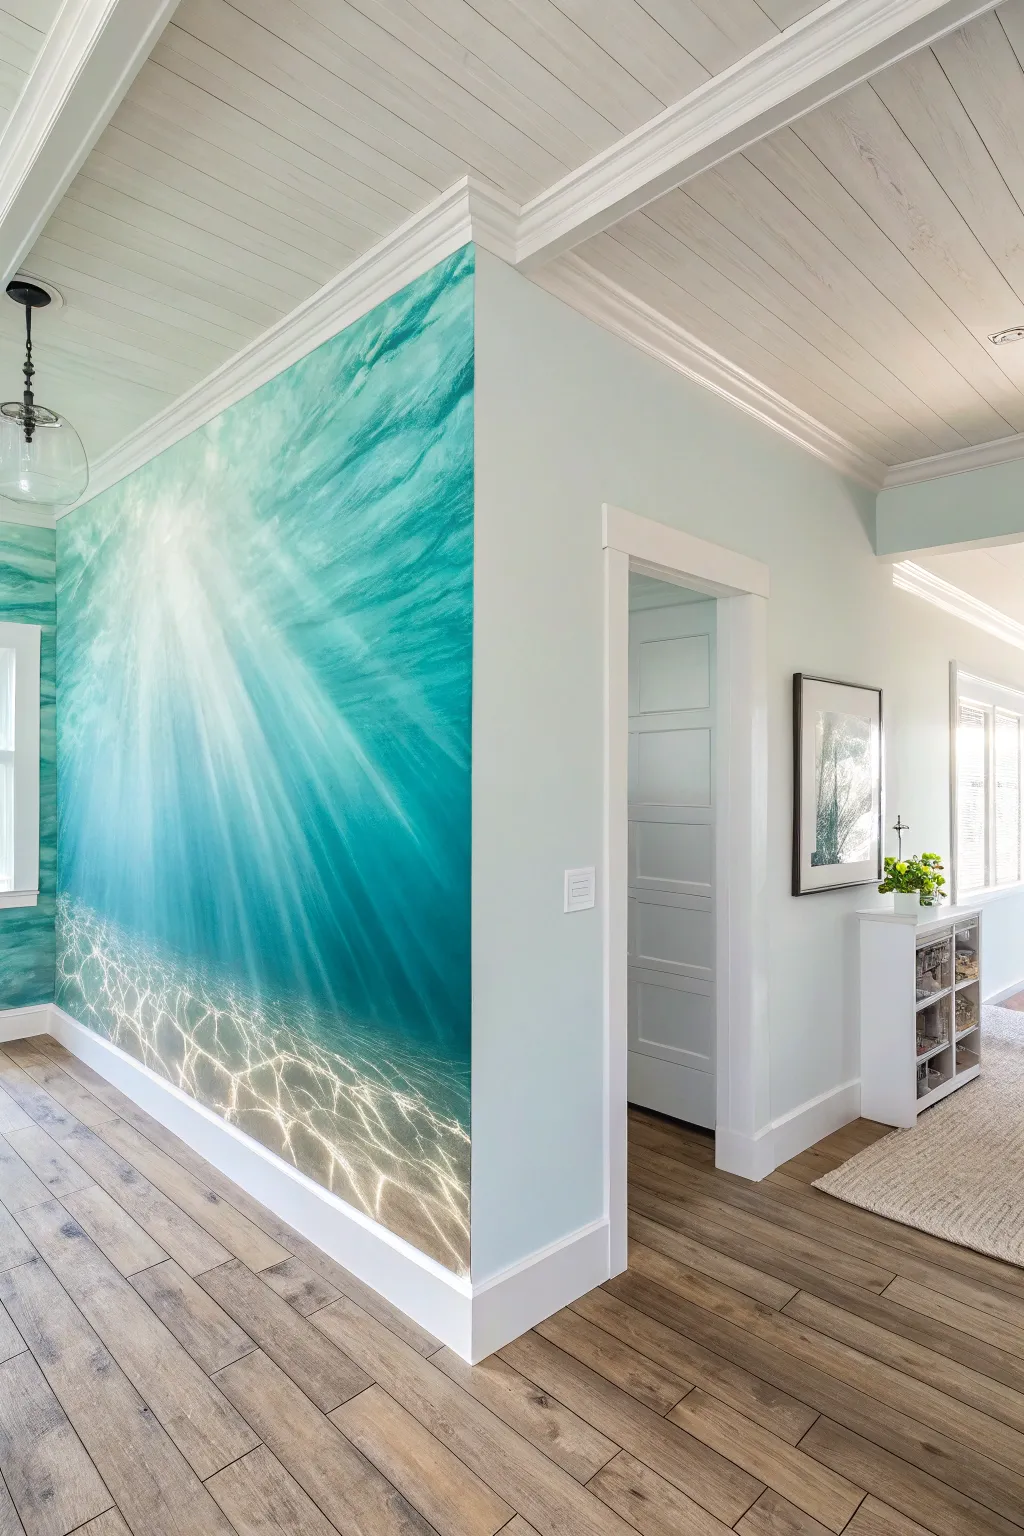
Transform a plain hallway corner into a submerged sanctuary with this immersive underwater mural. Featuring piercing light rays filtering through turquoise depths and dancing caustic patterns on a sandy floor, this project brings the calming motion of the ocean right into your home.
Step-by-Step Guide
Materials
- Interior latex paint (White, Pale Turquoise, Deep Teal, Navy Blue, Sandy Beige)
- Glaze medium (acrylic or latex compatible)
- Large blending brush or softening brush
- 2-inch and 4-inch standard paint brushes
- Natural sea sponge
- Painter’s tape
- Drop cloths
- Small fine-liner brush
- Bucket of water and rags
- Step ladder
Step 1: Preparing the Canvas
-
Protect the space:
Begin by laying down drop cloths to protect that beautiful wood flooring, and tape off the white trim, crown molding, and the adjacent wall edge to ensure crisp lines. -
Base coat application:
Paint the entire wall area with your palest turquoise shade. This will serve as the light source color and the underlying glow of the water. -
Establish the light source:
Identify where your ‘sun’ is coming from—in this design, it’s the upper left corner. Keep this area almost pure white or very pale turquoise.
Pro Tip: The Wet Edge
Work in sections and keep a ‘wet edge’ when blending the large blue gradient. Use a spray bottle to lightly mist the wall if the paint dries too fast.
Step 2: Creating the Deep Blue
-
Mixing the gradient:
Mix a glaze with your Deep Teal and Navy Blue paints. The glaze extends the drying time, which is crucial for achieving that smooth, seamless underwater fade. -
Applying the deep water:
Start painting from the bottom right corner (the deepest part) and work your way diagonally upwards toward the light source. -
Blending the transition:
While the paint is still wet, use a large, dry blending brush to feather the dark blue into the pale background. Use long, sweeping diagonal strokes that mimic the direction of sunbeams.
Step 3: Painting the Sunbeams
-
Drafting the rays:
Dilute some white paint with water or glaze until it’s milky and translucent. Using a 2-inch brush, paint broad, straight diagonal lines radiating from your light source. -
Softening the edges:
Immediately soften one side of each ray with a clean, dry brush. This creates the ethereal ‘volumetric light’ effect where beams seem to fade into the water. -
Layering intensity:
Add a second, slightly more opaque layer of white to the center of the strongest rays near the top. I find this helps them look like they are truly piercing through the surface.
Troubleshooting: Harsh Beams
If your light rays look too stiff or stripey, wait for them to dry, then apply a very thin, watery wash of your base blue color over them to push them back.
Step 4: The Sandy Floor & Caustics
-
Laying the sandbed:
Paint the bottom 12-18 inches of the wall with a mix of Sandy Beige and a touch of the Deep Teal to shadow it. It doesn’t need to be a hard line; let it blur into the blue water above. -
Mapping the caustics:
Caustics are the net-like patterns of light on the ocean floor. Take a fine liner brush with thinned white paint and draw a connected, irregular web pattern over the sand area. -
Thickening the web:
Go back over the intersections of your web lines and thicken them slightly. Light focuses at these points, so they should be brighter. -
Adding motion:
Dry brush the edges of your caustic web slightly to make them look soft and moving, rather than like a rigid net. -
Highlighting the floor:
Add pure white highlights inside the shapes of the web on the sandy bottom to represent the most intense refracted light hitting the sand.
Step 5: Final Details
-
Surface texture:
Use a natural sea sponge with very dilute teal glaze to dab lightly near the top ‘surface’ area, suggesting surface ripples without drawing hard lines. -
Step back and assess:
View the mural from the hallway entrance. If the transition from light to dark looks too harsh, apply a very thin wash of the pale turquoise over the mid-section to unify it. -
Remove tape:
carefully peel away the painter’s tape while the paint is still slightly tacky to avoid pulling up any dried film.
Enjoy the peaceful atmosphere your new underwater view brings to the hallway


Have a question or want to share your own experience? I'd love to hear from you in the comments below!