If your office walls feel a little blah, a fresh paint color can instantly shift your focus and your mood. I’m sharing my favorite office painting ideas—from classic neutrals to bolder statement techniques—so you can build a workspace that feels productive and totally you.
Classic Warm White With Crisp Trim
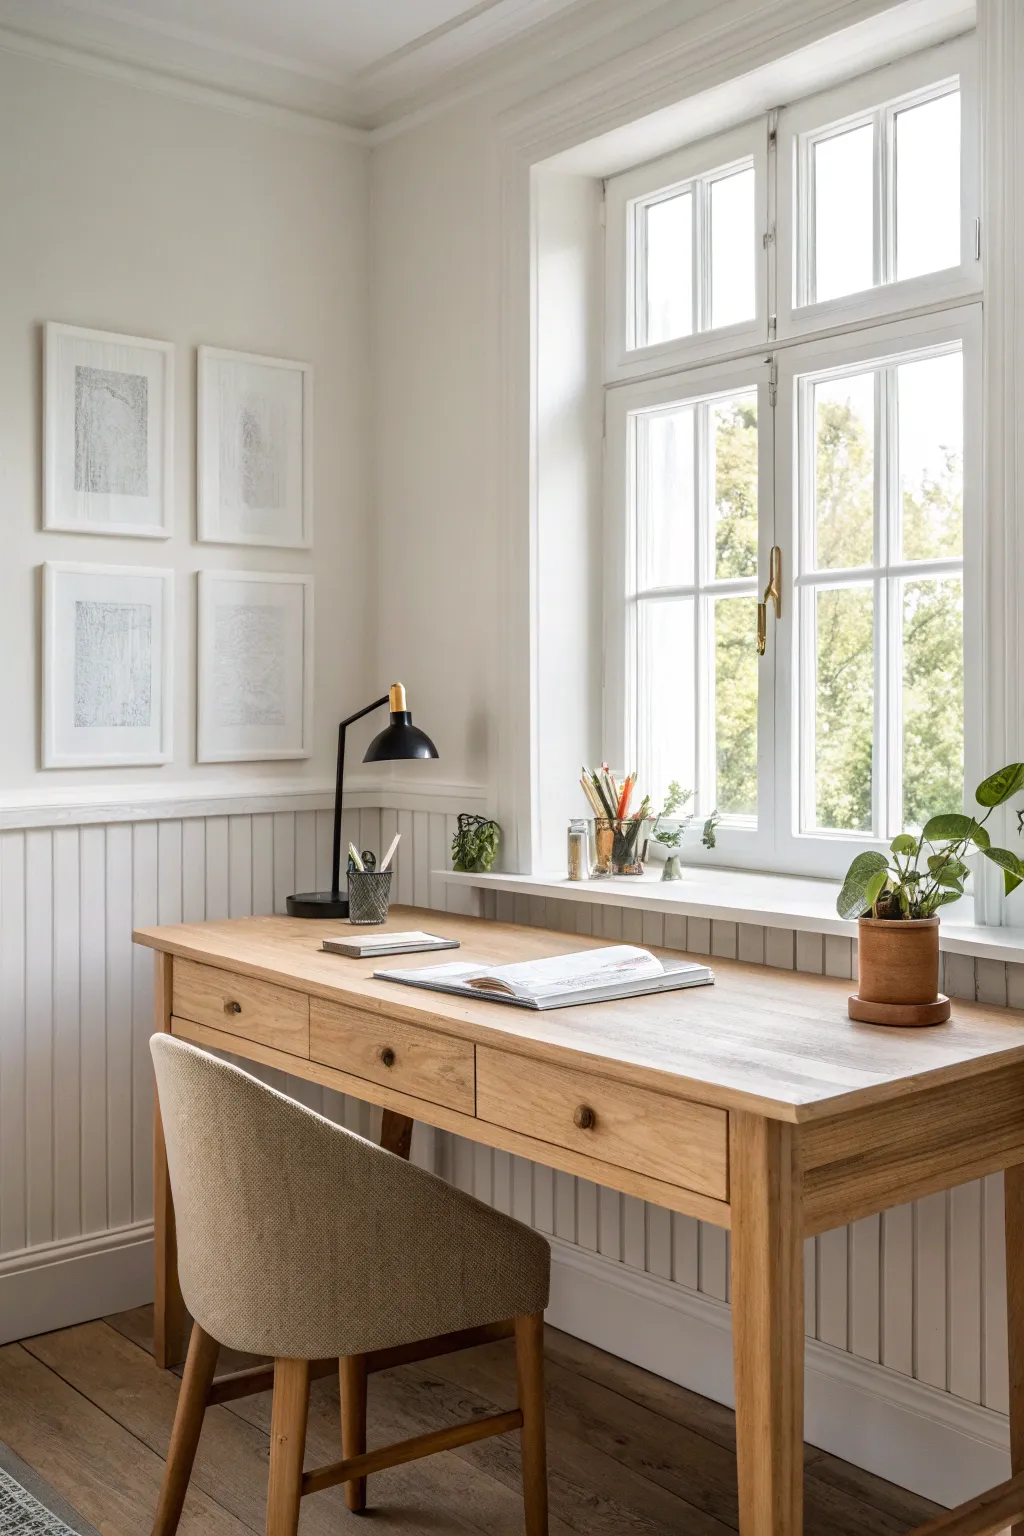
Transform a plain wall into a classic focal point by adding vertically paneled wainscoting coupled with a fresh, warm white paint job. This project combines simple carpentry with precise painting to create a texture-rich backdrop perfect for a calm home office.
Step-by-Step Tutorial
Materials
- Warm white interior wall paint (satin or eggshell finish)
- Beadboard or V-groove wainscoting panels (MDF or wood)
- Chair rail molding
- Baseboard molding
- Construction adhesive
- Finishing nails & nail gun
- Wood filler
- Paintable caulk & caulk gun
- Fine-grit sandpaper (220-grit)
- Painter’s tape
- Angled sash brush (2-inch)
- Microfiber paint roller (3/8-inch nap)
- Primer (if using bare wood)
Step 1: Preparation & Paneling
-
Clear and clean:
Remove all furniture, outlet covers, and existing baseboards from the wall. Wipe down the surface to ensure it is dust-free. -
Measure your height:
Decide on the height for your wainscoting. A standard height is often around 32-36 inches from the floor, or roughly one-third of the wall height. -
Mark a level line:
Use a laser level or a long spirit level to mark a horizontal line across the entire wall at your chosen height; this will guide the top edge of your panels. -
Cut panels to size:
Cut your beadboard or V-groove panels to fit vertically between the floor and your level line, accounting for any outlets you need to cut out with a jigsaw. -
Apply adhesive:
Apply a zigzag pattern of construction adhesive to the back of the first panel. -
Install the first panel:
Press the panel firmly against the wall, starting in one corner. Use a level to ensure it is perfectly plumb before securing. -
Nail it in place:
Secure the panel using a nail gun with finishing nails, placing them into the grooves where possible to hide the holes later. -
Continue the run:
Repeat the process across the wall, butting the edges of the panels tightly together for a seamless look.
Seamless Seams
When caulking the top of the chair rail, dip your finger in water and smooth the bead in one long, continuous swipe for a perfect invisible transition.
Step 2: Trim Installation
-
Add baseboards:
Install your new baseboard molding along the bottom of the paneled wall to cover the gap at the floor. -
Top with chair rail:
Measure and cut the chair rail molding to fit the length of the wall. Install it directly on top of the wainscoting panels to cap off the raw edge. -
Fill the holes:
Use wood filler to cover all nail heads. I find using a putty knife specifically for this helps minimize the amount of sanding needed later. -
Caulk the seams:
Run a thin bead of paintable caulk along the top of the chair rail (where it meets the wall) and all corners to ensure a professional, airtight seal.
Two-Tone Twist
Instead of all-white, try painting the wainscoting a soft “greige” or pale sage while keeping the upper wall white for subtle depth and contrast.
Step 3: Painting & Finishing
-
Sand smooth:
Once the filler is dry, lightly sand the patches with 220-grit sandpaper until flush with the surface, then wipe away dust with a tack cloth. -
Prime bare wood:
If your materials are unprimed, apply a coat of high-quality primer to seal the wood and ensure even paint absorption. -
Cut in edges:
Using your angled sash brush and the warm white paint, careful ‘cut in’ along the corners, the top of the chair rail, and around the baseboards. -
Paint the grooves:
Brush paint vertically into the grooves of the wainscoting first, as rollers often miss these deep recesses. -
Roll the flat surfaces:
Use a microfiber roller to apply paint to the flat faces of the panels and the wall above. Work in ‘W’ shapes for even coverage. -
Apply second coat:
Allow the first coat to dry completely according to the can’s instructions, then apply a second coat for a rich, true color. -
Final touches:
Remove any painter’s tape while the paint is still slightly tacky to prevent peeling, then reinstall your outlet covers.
Enjoy the calm and sophisticated atmosphere your new wainscoting brings to your workspace


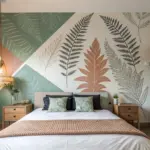
Serene Blue Focus Wall Behind the Desk
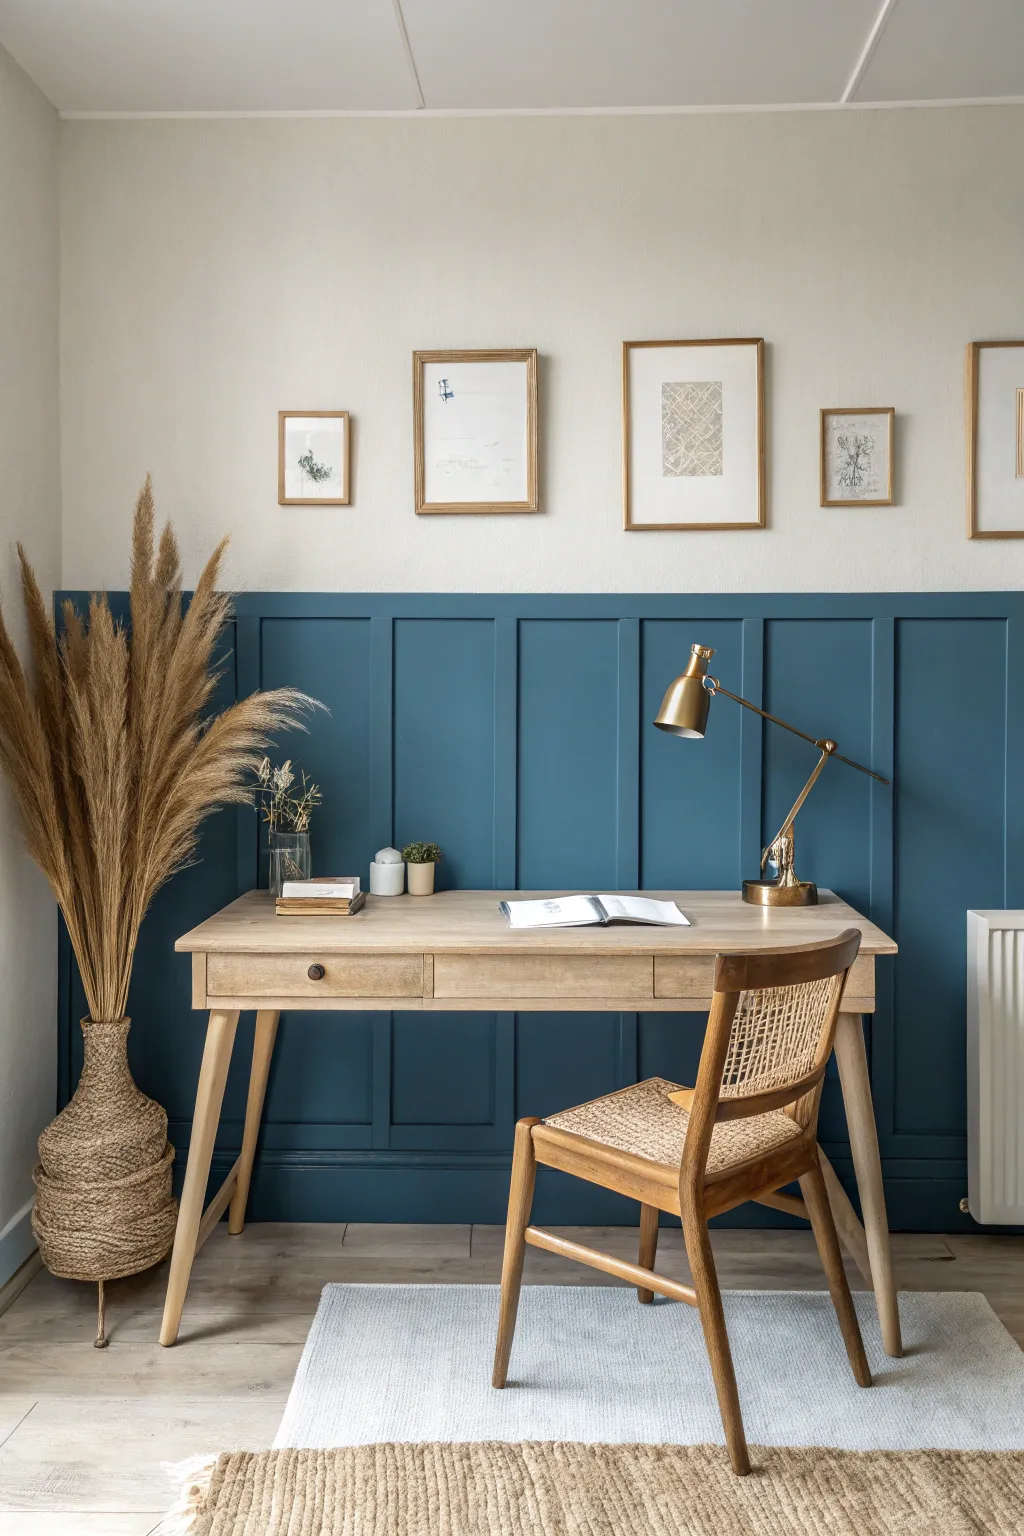
Transform your home office into a sanctuary of focus with this elegant board and batten wall treatment. The deep, serene blue wainscoting adds architectural interest and depth, creating a sophisticated backdrop for your creative work.
Step-by-Step Tutorial
Materials
- MDF or wood strips (1×2 or 1×3 inch)
- Top cap moulding
- Construction adhesive
- Brad nailer and 1.5-inch brad nails
- Wood filler
- Sandpaper (120 and 220 grit)
- Caulk and caulk gun
- Primer (if using bare wood)
- Blue interior paint (satin finish)
- Paint roller and tray
- Angled sash brush
- Tape measure
- Level
- Pencil
- Miter saw or hand saw
Step 1: Planning and Layout
-
Measure your wall:
Start by measuring the total width of your wall to determine spacing. A good target height for wainscoting like this is about two-thirds up the wall, often around 60 to 72 inches. -
Mark the top line:
Using your tape measure and a long level, draw a horizontal line across the wall at your desired height. This will guide the placement of your top horizontal rail. -
Calculate batten spacing:
Decide on the spacing between your vertical battens. For this look, aim for squares or tall rectangles approximately 16 to 20 inches apart. Mark these vertical positions on the wall with a pencil.
Step 2: Installation
-
Install the top rail:
Cut your horizontal top rail to the full width of the wall. Apply construction adhesive to the back, press it against your marked line, and secure it into studs using your brad nailer. -
Add the bottom baseboard:
If you don’t already have a flat baseboard, install a horizontal board at the floor level to match the thickness of your battens. This grounds the structure. -
Cut vertical battens:
Measure the distance between your top rail and bottom baseboard for each vertical mark. I find it safest to measure each spot individually since floors aren’t always perfectly level. -
Attach the battens:
Apply adhesive to the back of each vertical strip. Position them on your pencil marks, check for plumb with your level, and nail them into place. Don’t worry if you miss a stud here; the adhesive helps hold the lighter vertical pieces. -
Install the top cap:
For a finished look, place a small projecting ledge or cap moulding on top of the horizontal rail. Nail it down from the top into the rail.
Seamless Joints
Use a ‘scarf joint’ (cutting ends at 45-degree angles) to join two pieces of wood. It hides the seam much better than a blunt butt joint.
Step 3: Preparation for Paint
-
Fill nail holes:
Go over every nail hole with wood filler. Leave it slightly proud of the surface to account for shrinkage as it dries. -
Sand smooth:
Once the filler is dry, sand the filled areas flush with 120-grit sandpaper. Follow up with a quick pass of 220-grit over all the wood surfaces to ensure a professional finish. -
Caulk the seams:
Run a thin bead of finish caulk along every edge where wood meets wall and where wood meets wood. Smoothing this with a wet finger creates that seamless, built-in appearance.
Level Up: Picture Ledge
Extend the depth of the top cap moulding to 3-4 inches to create a functional picture ledge for displaying framed art without nails.
Step 4: Painting
-
Cut in the edges:
Using your angled sash brush, paint along the top edge, the bottom baseboard, and inside all the corners of the battens with your chosen deep blue shade. -
Roll the panels:
Use a small foam or microfiber roller to paint the flat wall sections between the battens. This texture will match the wood better than a brush. -
Paint the battens:
Roll the front faces of the vertical and horizontal boards. I recommend doing a light, even coat first and letting it dry completely before assessing coverage. -
Apply the second coat:
Apply a second full coat to the entire wainscoting area. This deeper color often needs two or even three coats to achieve true richness and opacity. -
Final touches:
Inspect the wall for any drips or missed spots while the paint is still slightly tacky, correcting them gently with your brush.
Step back and admire how this simple architectural addition completely redefines the atmosphere of your workspace.


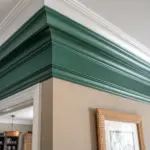
Deep Green for a Study-Style Office
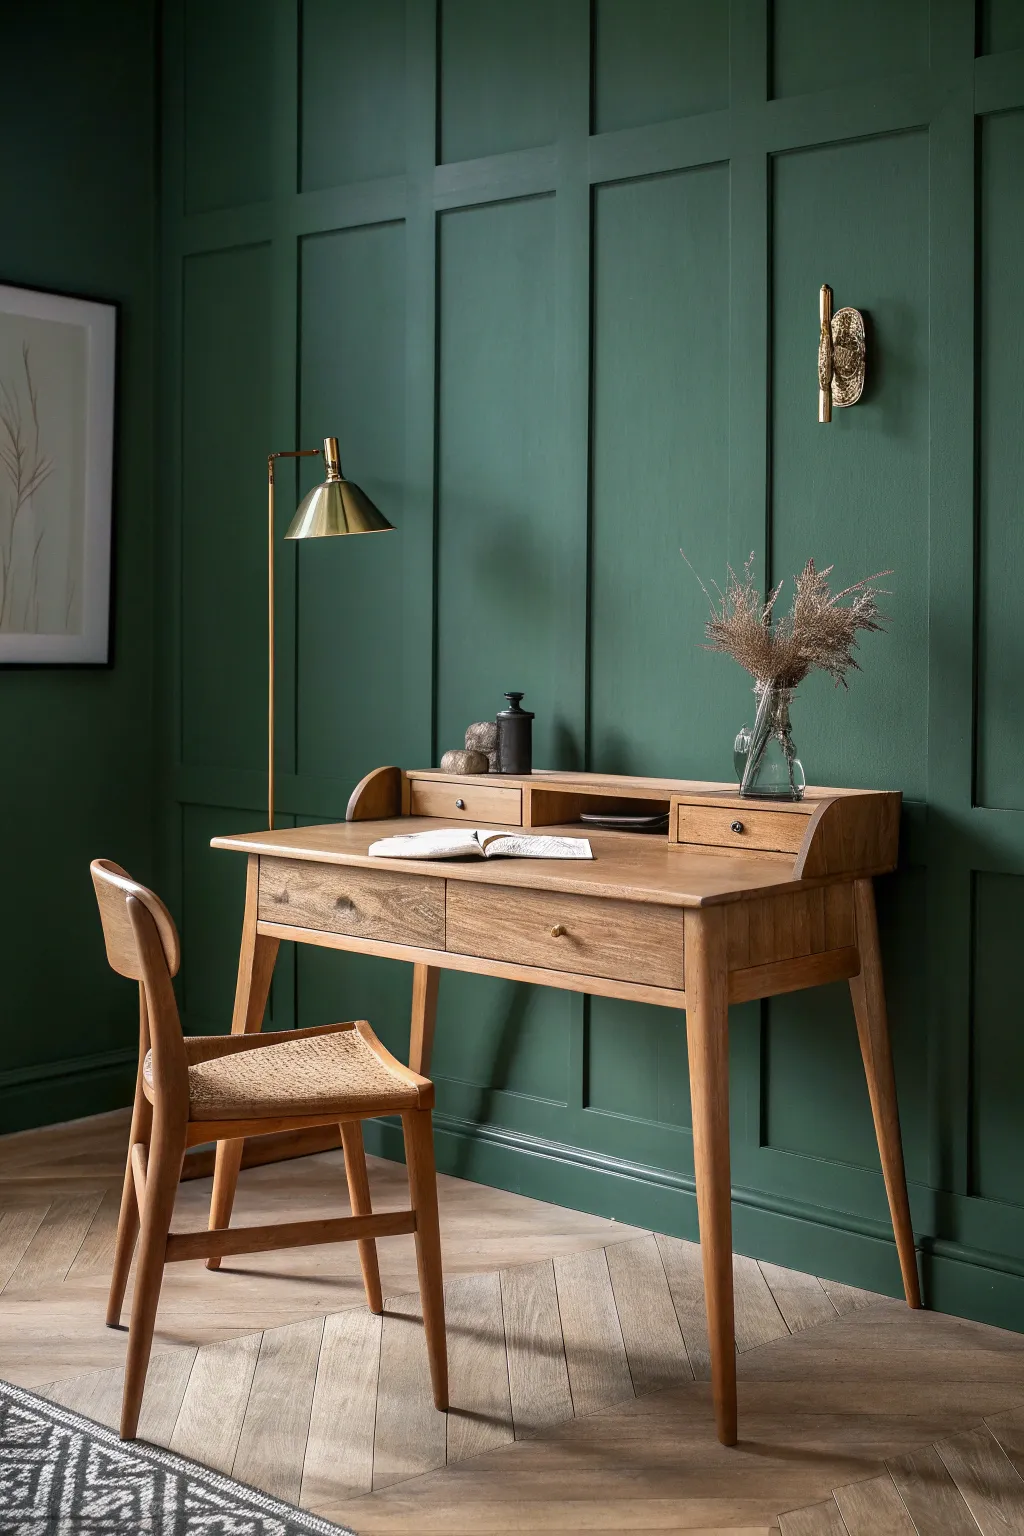
Transform a plain wall into a sophisticated, library-inspired focal point with this DIY board-and-batten project painted in a rich, velvety deep green. The architectural paneling adds instant character and depth, creating the perfect backdrop for a focused workspace.
Detailed Instructions
Materials
- Deep forest green interior paint (matte or eggshell finish)
- Primer (tinted gray recommended)
- MDF or wood battens (1×3 inch strips)
- Top molding/dado rail (optional)
- Construction adhesive
- Brad nailer and 1.5-inch brad nails
- Bubble level or laser level
- Tape measure and pencil
- Miter saw or hand saw
- Wood filler and putty knife
- Paintable caulk and caulk gun
- Sandpaper (120 and 220 grit)
- Paint rollers (foam and medium nap)
- Angled sash brush (2 inch)
- Painter’s tape
- Drop cloths
Step 1: Planning and Preparation
-
Measure twice, cut once:
Start by measuring the total width and height of your wall. Decide on your grid spacing; for this look, large rectangular panels work best. Map out your design on paper first to ensure even spacing between the vertical battens. -
Clear and clean:
Remove any existing baseboards if you plan to replace them, or decide to rest your battens on top of the current skirting. Clean the wall thoroughly with a mild detergent solution to remove dust and grease, ensuring rigorous adhesion later. -
Protect the space:
Lay down heavy-duty drop cloths to protect your beautiful herringbone floors. Apply painter’s tape to the ceiling edge and adjacent walls to keep your lines crisp.
Uneven Walls?
If your wall is bowed, the wood battens might not sit flush. Use a ‘scribe’ technique to trim the wood back, or use extra caulk for gaps less than 1/4 inch.
Step 2: Installing the Grid
-
Mark vertical lines:
Using your level and pencil, draw the vertical locations for your battens directly onto the wall. This visual guide effectively prevents mistakes before you start gluing. -
Install vertical battens:
Cut your 1×3 vertical strips to length. Apply a wavy line of construction adhesive to the back of the first strip, press it onto your mark, and secure it with brad nails every 10-12 inches. -
Add horizontal rails:
Measure the distance between your installed vertical battens individually—walls are rarely perfectly straight. Cut your horizontal pieces to fit snugly between the verticals. -
Secure the cross pieces:
Install the horizontal rails using the same glue-and-nail method. Use a small level on each piece to ensure your grid doesn’t drift crooked as you work your way up the wall. -
Check for gaps:
Once all wood is installed, inspect the joints. If any horizontal pieces are slightly loose, add an extra nail at an angle (toenailing) to pull them tight against the vertical pieces.
Step 3: Finishing and Painting
-
Fill nail holes:
Apply wood filler to all nail holes and the joints where horizontal and vertical pieces meet. Overfill slightly, as the filler will shrink when it dries. -
Sand until smooth:
Once dry, sand the filled areas flush with 120-grit paper. I find running my hand over the joints locates rough spots better than my eyes can. Follow up with 220-grit for a furniture-grade finish. -
Caulk the seams:
Run a thin bead of paintable caulk along every edge where the wood creates a seam with the wall. Smooth it with a wet finger or caulk tool for a seamless, built-in look. -
Prime the wall:
Apply a coat of primer over the entire wall, including the new wood. A gray-tinted primer helps deeply saturated colors like forest green achieve true opacity with fewer topcoats. -
Cut in the edges:
Using your angled sash brush, paint the deep green into the corners, around the elaborate molding, and along the ceiling line. Work in small sections to keep a wet edge. -
Roll the first coat:
Use a medium nap roller for the flat wall sections and a small foam roller for the face of the battens. Apply the green paint in ‘W’ patterns for even coverage. -
Evaluate and recoat:
Let the first coat dry for at least 4 hours. Dark colors often look patchy initially. Apply a second coat, and possibly a third, to achieve that rich, light-absorbing depth seen in the photo. -
Remove tape:
Carefully score the edge of the painter’s tape with a utility knife before pulling it off while the paint is still slightly tacky. This prevents peeling your new green paint off with the tape.
Brass Accent
To truly match the image, swap your outlet covers and light switch plates for brushed brass hardware. It pops beautifully against fresh dark green paint.
Step back and admire how the dark green tones instantly make your study feel warmer and more contemplative


Charcoal Statement Wall With Light Neutrals
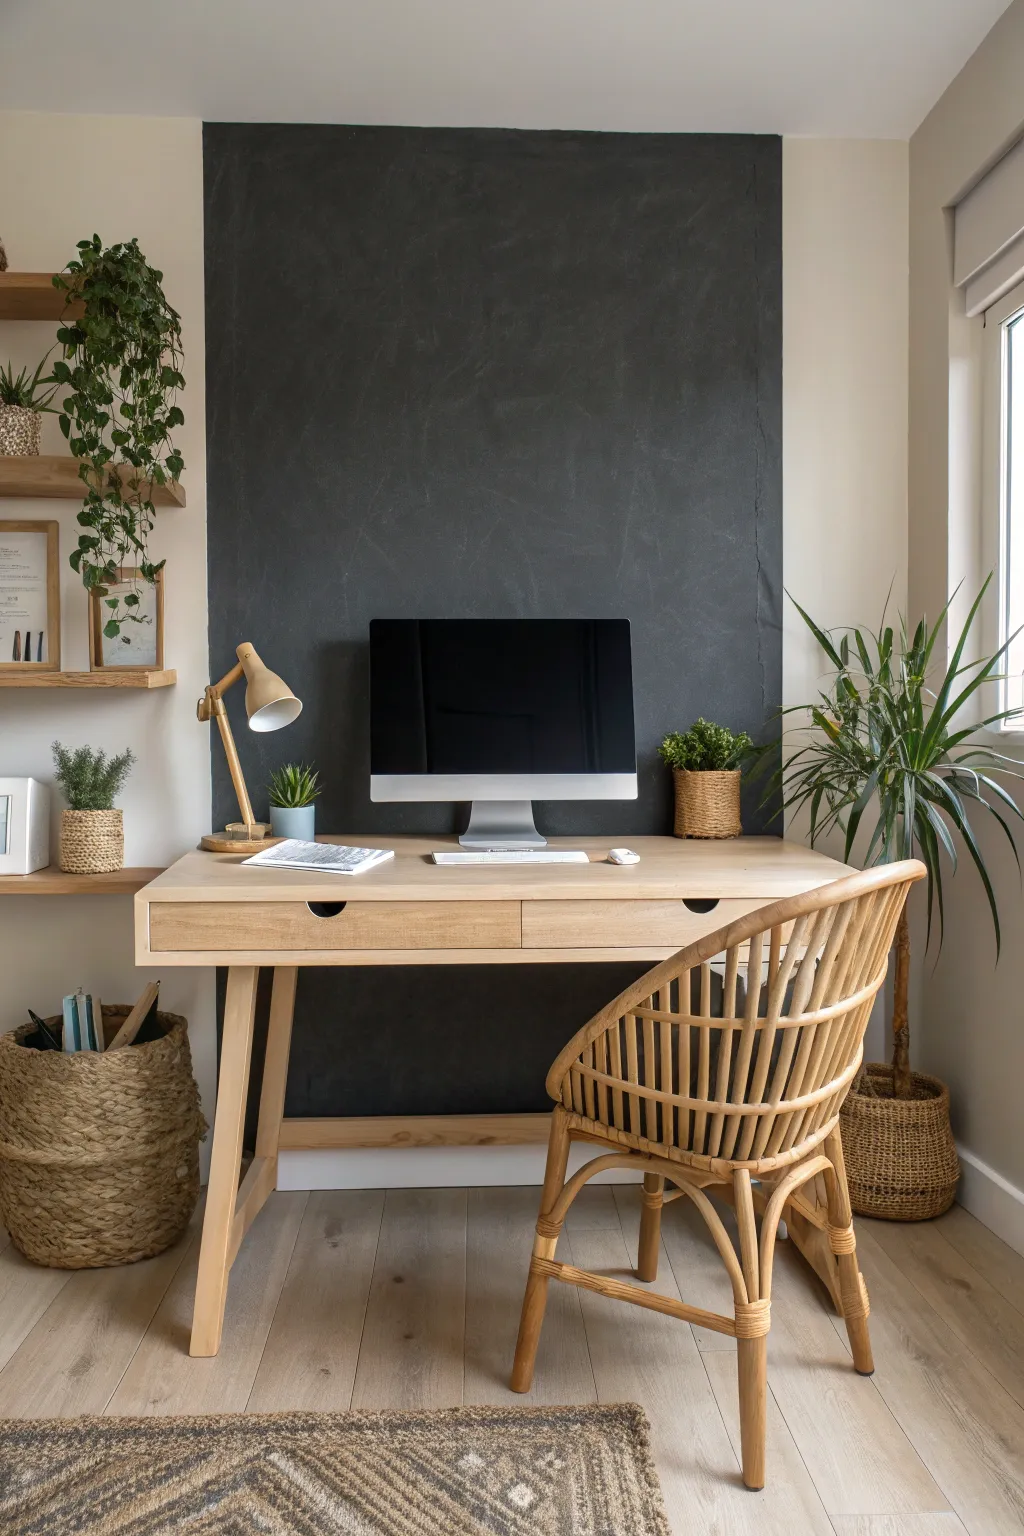
Transform a plain white office corner into a focused productivity zone with this bold, geometric statement feature. The deep charcoal paint creates a striking contrast against light wood furniture and greenery, effectively defining your workspace without needing architectural changes.
Step-by-Step Tutorial
Materials
- Matte charcoal or soft black interior latex paint
- Painter’s tape (high quality, sharp lines)
- Measuring tape
- Pencil
- Level (2-foot or longer recommended)
- Small foam roller and tray
- Angled sash brush (2-inch)
- Drop cloth
- Damp rag for cleanup
- Spackle and sandpaper (optional for wall prep)
Step 1: Planning and Preparation
-
Clear the area:
Begin by removing all furniture, shelving, and decor from the wall. You need a completely blank canvas to measure accurately and paint freely. Lay down your drop cloth to protect the flooring. -
Inspect the surface:
Check the wall for any nail holes or bumps. Fill holes with a tiny bit of spackle, let dry, and sand smooth. A smooth substrate is crucial because dark paint tends to highlight texture imperfections. -
Determine the width:
Measure the width of your desk. Ideally, the painted block should be slightly wider than the desk itself—about 2 to 3 inches on each side—to frame the furniture perfectly. -
Mark the boundaries:
Using your measuring tape and pencil, make small tick marks on the wall to indicate the left and right edges of your desired block. Measure from the adjacent corner to ensure the placement is centered or positioned exactly where you want the desk.
Step 2: Taping the Perimeter
-
Draw vertical guides:
Use your level to draw faint vertical pencil lines connecting your tick marks from the floor all the way to the ceiling. Don’t trust the floor or ceiling to be perfectly straight; the level is your best friend here. -
Apply the tape:
Run your painter’s tape along the *outside* edge of your pencil lines. This ensures your paint covers the pencil marks. Press the tape down firmly, especially at the edges. -
Seal the edges:
To prevent paint bleed, I like to run a fingernail or a putty knife along the tape edge to ensure a tight seal against the wall texture. -
Tape the trim:
Apply tape along the baseboard at the bottom and the ceiling line at the top (or crown molding if you have it) within the vertical boundaries you’ve just created.
Bleed-Through Fix
If your walls are heavily textured, paint the edge of the tape with the *original wall color* first. This seals the tape gaps so the charcoal paint sits perfectly on top.
Step 3: Painting the Feature
-
Cut in the edges:
Open your charcoal paint and use the angled sash brush to carefully paint along the inside edges of the tape. Brush away from the tape slightly to avoid pushing paint underneath it. -
Feather the brushwork:
Feather the wet edge of your brushwork inward toward the center of the block so it will blend seamlessly when you start rolling. -
Load the roller:
Pour paint into your tray and load the foam roller evenly. Foam rollers are great for this project as they leave a smooth, matte finish without heavy stippling texture. -
Apply the first coat:
Roll the paint onto the wall in W-shaped motions, filling in the large center area. Work from top to bottom, maintaining a wet edge to avoid varying sheens. -
Let it dry:
Allow the first coat to dry completely according to the can’s instructions, usually about 2-4 hours. Dark colors often look patchy on the first coat, so don’t worry if it’s not perfect yet. -
Apply the second coat:
Repeat the cutting-in and rolling process. A second coat is essential for charcoal and black tones to achieve that deep, velvety opacity shown in the inspiration image.
Chalkboard Option
Swap standard matte latex for high-quality chalkboard paint. Follow the manufacturer’s conditioning steps to turn this visual feature into a functional note-taking surface.
Step 4: Finishing Touches
-
Remove tape while damp:
This is the critical moment. Carefully peel off the painter’s tape while the second coat is still slightly tacky—not soaking wet, but not fully cured. Pull the tape at a 45-degree angle away from the painted area. -
Touch up lines:
If any paint bled through, let it dry fully. Then, use a tiny artist’s brush and your original wall color to carefully touch up the line for a razor-sharp finish. -
Cure time:
Let the wall cure for at least 24 hours before pushing your desk back against it to prevent the furniture from sticking to or scuffing the fresh paint.
Once the paint has fully cured, slide your desk into place and enjoy the instant visual anchor this simple project adds to your room
BRUSH GUIDE
The Right Brush for Every Stroke
From clean lines to bold texture — master brush choice, stroke control, and essential techniques.
Explore the Full Guide
Two-Tone Wainscoting for Polished Structure
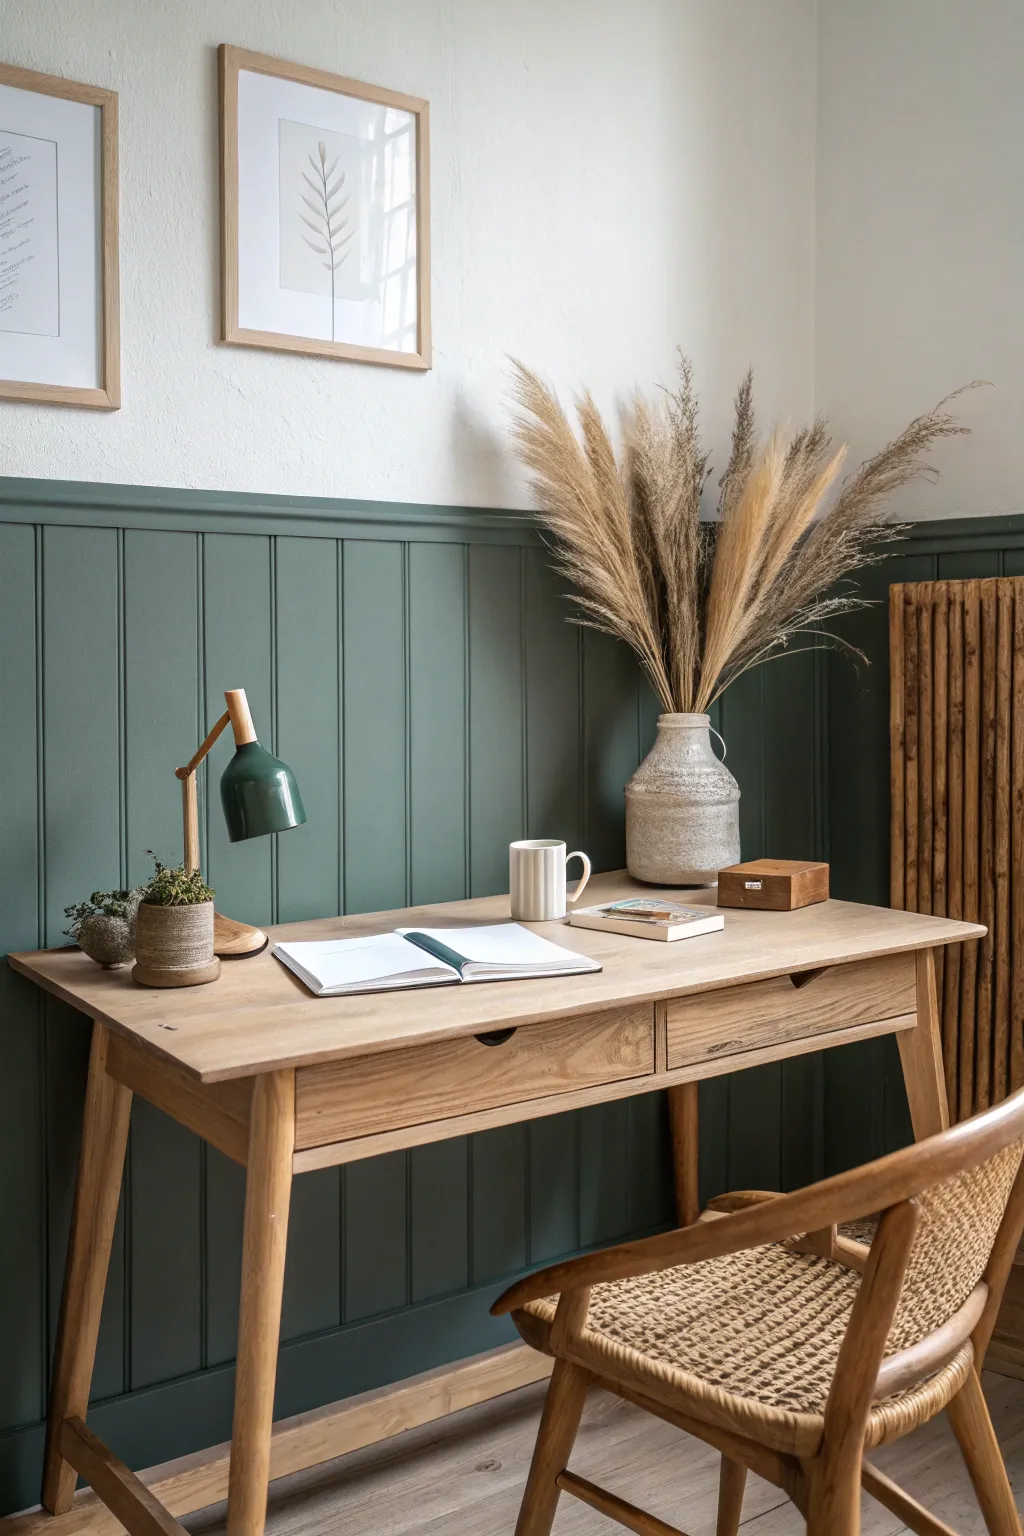
Transform a plain wall into a sophisticated backdrop with this two-tone wainscoting project. The combination of vertical paneling in a deep sage green with crisp white upper walls adds architectural interest and a calming atmosphere to any workspace.
How-To Guide
Materials
- Vertical tongue-and-groove paneling or beadboard sheets
- Chair rail molding of your choice
- High-quality baseboard trim
- Construction adhesive (e.g., Liquid Nails)
- Finishing nails or brad nailer
- Wood filler and sandpaper
- Painter’s caulk
- Primer (if using bare wood)
- Interior paint: Deep sage green (satin or eggshell finish)
- Interior paint: Warm white (flat or matte finish)
- Paint rollers, brushes, and trays
- Level and measuring tape
- Miter saw or hand saw with miter block
Step 1: Preparation and Planning
-
Measure and mark:
Begin by determining the desired height for your wainscoting. A standard height is often around 32-36 inches, or roughly one-third of the wall height. Use your measuring tape to mark this height at several points along the wall. -
Draw a level line:
Using a long carpenter’s level or a laser level, connect your height marks to create a continuous horizontal guideline across the entire wall. This line represents where the top of your paneling will sit. -
Remove existing trim:
Carefully pry off the existing baseboards using a pry bar and a block of wood to protect the drywall. Remove any electrical outlet covers that fall within the paneled area.
Step 2: Panel Installation
-
Cut panels to size:
Measure and cut your beadboard sheets or tongue-and-groove planks to the specific height determined by your level line. If your floor is uneven, you may need to scribe the bottom of the boards for a flush fit. -
Locate studs:
Use a stud finder to locate and mark the wall studs above your horizontal line. This ensures you know where to nail for maximum holding power. -
Apply adhesive:
Apply a zigzag bead of construction adhesive to the back of your first panel. Position it in the corner, ensuring it is perfectly plumb using your level. -
Secure the panel:
Nail the panel into place using a brad nailer or hammer and finishing nails. Aim for the studs where possible, and place nails near the top and bottom where trim will eventually cover them. -
Continue installation:
Repeat the process across the wall, sliding the tongue-and-groove edges together tightly or butting beadboard sheets against one another. Check for level every few feet to prevent the pattern from slanting. -
Cut for outlets:
When you encounter an electrical outlet, measure its position carefully and cut a corresponding hole in the panel using a jigsaw before installation. You may need box extenders so the outlet sits flush with the new surface depth.
Secret Weapon: Caulk
Caulking is the pro secret. Don’t skip caulking the gap between the chair rail and the wall. It eliminates dark shadow lines and makes the trim look built-in rather than just stuck on.
Step 3: Trim and Finishing
-
Install baseboards:
Measure, cut, and install your new baseboards over the bottom of the paneling. Secure them with nails into the studs. -
Install chair rail:
Cut the chair rail molding to length. Place it along the top edge of the paneling so it caps the wainscoting. Nail it securely into the studs, ensuring a tight fit against the wall. -
Fill and sand:
Use wood filler to cover all nail holes and any gaps in the seams. Once dry, sand these areas smooth until they are undetectable to the touch. -
Caulk the seams:
Run a thin bead of painter’s caulk along the top of the chair rail (where it meets the drywall) and at corners or joints. Smooth it with a wet finger for a seamless look.
Style Upgrade
For a more modern, monochromatic look, paint the baseboards and chair rail the exact same color as the paneling. This creates a cohesive block of color that feels very contemporary.
Step 4: Painting
-
Prime the wood:
If your paneling or trim is unprimed wood, apply a coat of high-quality primer to seal the surface and ensure even paint absorption. I prefer to let this cure fully before moving on. -
Paint the upper wall:
Start by painting the drywall above the chair rail with your warm white paint. Don’t worry about being too precise at the bottom edge, as the green paint will cover any overlap later. -
Cut in the trim:
Once the white paint is dry, use painter’s tape to mask off the wall just above the chair rail. Use an angled sash brush to carefully paint the chair rail, baseboards, and the edges of the paneling with your deep sage green paint. -
Paint the panels:
Use a small foam roller or a short-nap roller to paint the flat surfaces of the vertical paneling in the same sage green. Use a brush to work paint into the grooves if the roller misses them. -
Apply second coat:
Allow the first coat of green to dry completely according to the can’s instructions. Apply a second coat for a rich, opaque finish that stands up to daily use. -
Remove tape:
Carefully remove the painter’s tape while the final coat is still slightly tacky to ensure a crisp, clean line between colors.
Step back and admire how this structured color blocking instantly grounds your office space
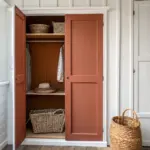
Monochrome Built-Ins That Blend In
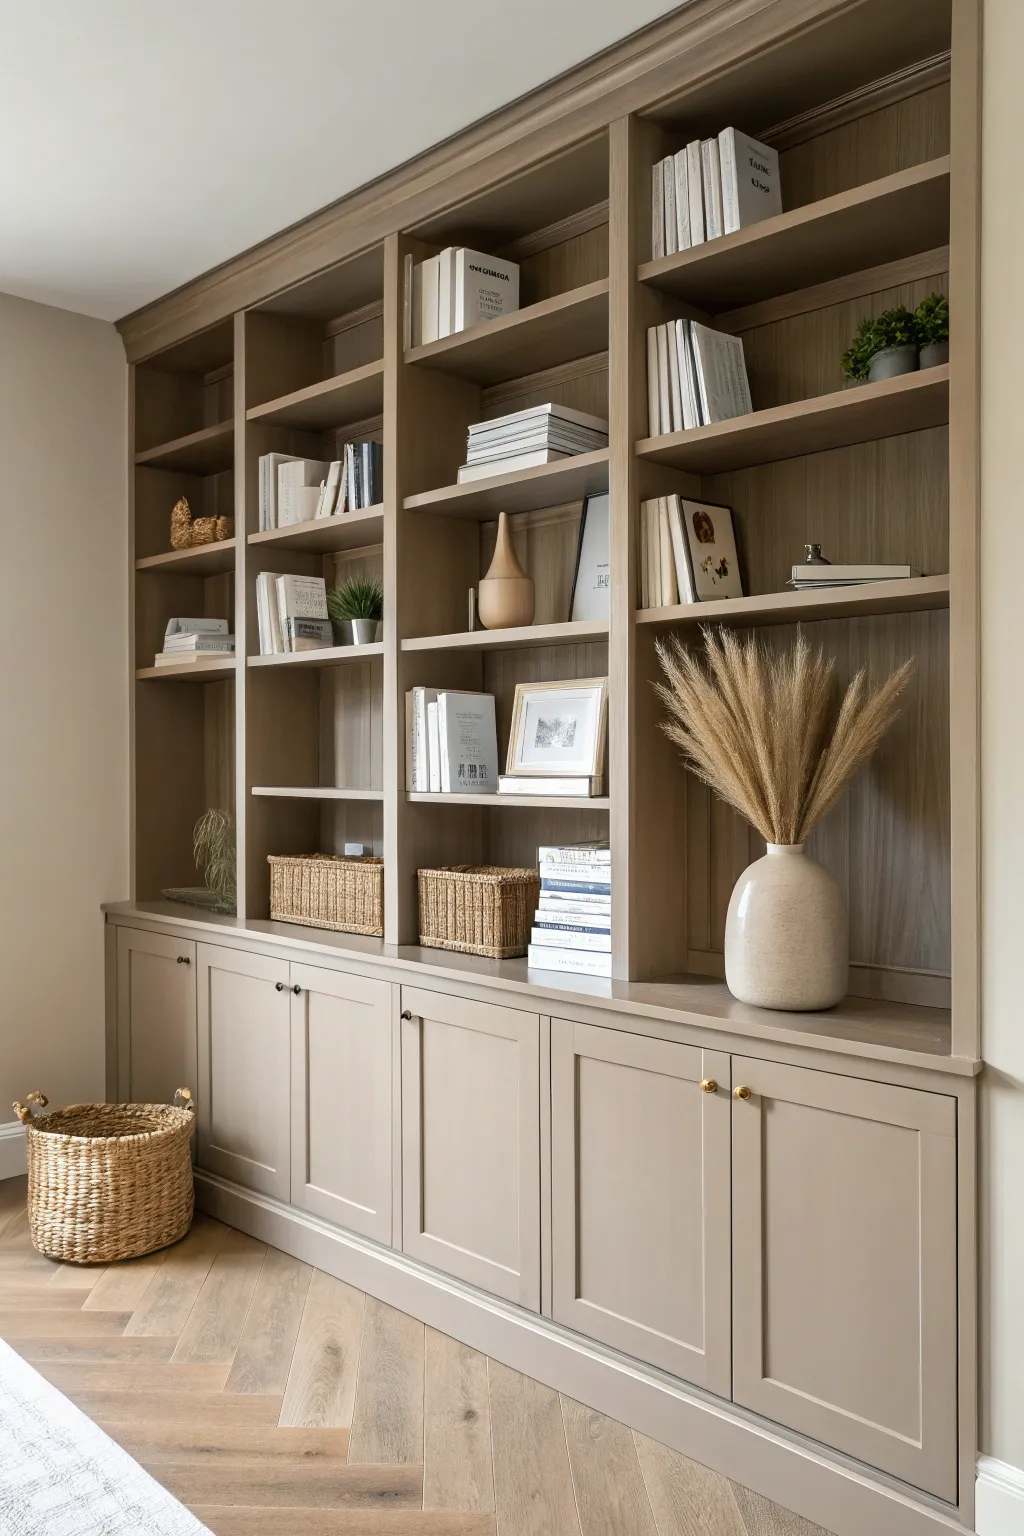
Transform a standard wall into a custom-looking architectural feature using this monochromatic painting technique to blend built-ins seamlessly into the room. This project creates a sophisticated, high-end look where the storage feels like a natural extension of the space rather than separate furniture.
Step-by-Step Guide
Materials
- High-quality satin or semi-gloss cabinet enamel paint (taupe/mushroom shade)
- Bonding primer (specifically for glossy surfaces or laminates)
- Painter’s tape (delicate surface)
- Sanding sponges (120-grit and 220-grit)
- Tack cloth
- High-density foam roller covers (4-inch)
- Mini roller frame
- Angled sash brush (2-inch, synthetic bristle)
- Wood filler or spackling paste
- Caulk and caulk gun
- Drop cloths
- Degreasing cleaner (like TSP substitute)
- Screwdriver or drill (for hardware removal)
Step 1: Preparation & Disassembly
-
Clear and Clean:
Begin by removing all books, decor, and adjustable shelves from the unit. Wipe down every surface thoroughly with a degreasing cleaner to remove oils and dust that could inhibit paint adhesion. -
Remove Hardware:
Unscrew and remove all cabinet doors and drawers. Take off the knobs and hinges, placing them in labeled bags so you don’t lose any small screws. -
Fill Imperfections:
Inspect the surfaces for scratches or old handle holes you want to move. Fill these spots with wood filler. If there are gaps where the unit meets the wall or ceiling, apply a bead of paintable caulk for a seamless built-in look. -
Sand Surfaces:
Once the filler is dry, lightly scuff-sand all surfaces—including the doors and drawers—using 120-grit sanding sponges. The goal isn’t to remove the old finish entirely, but to create a ‘tooth’ for the primer to grip. -
Dust Removal:
Vacuum up the sanding dust, then wipe everything down with a tack cloth to ensure a perfectly smooth surface before priming. -
Protect Surroundings:
Lay down drop cloths to protect the flooring. Use painter’s tape to mask off the adjacent walls, ceiling, and floor trim where the built-ins meet the room.
Step 2: Priming & Painting
-
Apply Primer:
Using the foam roller for flat areas and the angled brush for corners, apply a coat of high-quality bonding primer. This step is crucial if your built-ins are pre-finished or laminate. Let it dry completely according to the can’s instructions. -
Light Sanding:
After the primer is dry, I like to do a very light pass with 220-grit sandpaper to knock down any bumps. Wipe away the dust again with a tack cloth. -
Cut In Edges:
Start applying your taupe enamel paint. Use the angled sash brush to ‘cut in’ the corners, edges, and detailed trim areas where the roller can’t reach. -
Roll Flat Surfaces:
Immediately follow the brush work with the foam roller on the larger flat surfaces and shelves. Maintain a ‘wet edge’ to blend the brush marks and roller texture seamlessly. -
Paint Doors Separately:
Paint the removed cabinet doors on a flat work surface. Paint the backs first, let them dry, flip them over, and then paint the fronts. This prevents drips and ensures the front finish is pristine. -
Second Coat:
Allow the first coat to cure fully (usually 4-6 hours for enamels). Apply a second coat using the same method: cut in with the brush, then roll the flat areas. This ensures deep, opaque color coverage.
Pro Tip: Floetrol Magic
Add a paint conditioner like Floetrol to your water-based enamel. It slows drying time, helping brush strokes level out for a silky, sprayed-on finish.
Step 3: Reassembly & Styling
-
Cure Time:
Let the paint cure for at least 24 to 48 hours before reattaching anything. Cabinet paint takes time to harden, and rushing this can lead to sticky doors or chipped paint. -
Reinstall Doors:
Carefully reattach the hinges and hang the cabinet doors. Check alignment to ensure the gaps between doors remain consistent, adjusting the hinge screws if necessary. -
Install Hardware:
Attach your knobs or pulls. For this monochrome look, simple brass or matte black hardware adds a nice contrast without overwhelming the muted color scheme. -
Touch Up:
Inspect the unit for any nicks that might have happened during reinstallation. Use a small artist’s brush to touch up these tiny spots. -
Style Shelves:
Reinsert your adjustable shelves. Arrange your books (spines turned inward for a neutral look) and decor items, keeping the color palette restricted to naturals and whites to complement the paint.
Level Up: Metallic Accent
Paint the back panel of the open shelving in a metallic gold or a slightly darker shade of taupe to add depth and subtle luxury behind your decor.
Enjoy the calm and organized atmosphere your new streamlined office feature brings to your workday

PENCIL GUIDE
Understanding Pencil Grades from H to B
From first sketch to finished drawing — learn pencil grades, line control, and shading techniques.
Explore the Full Guide
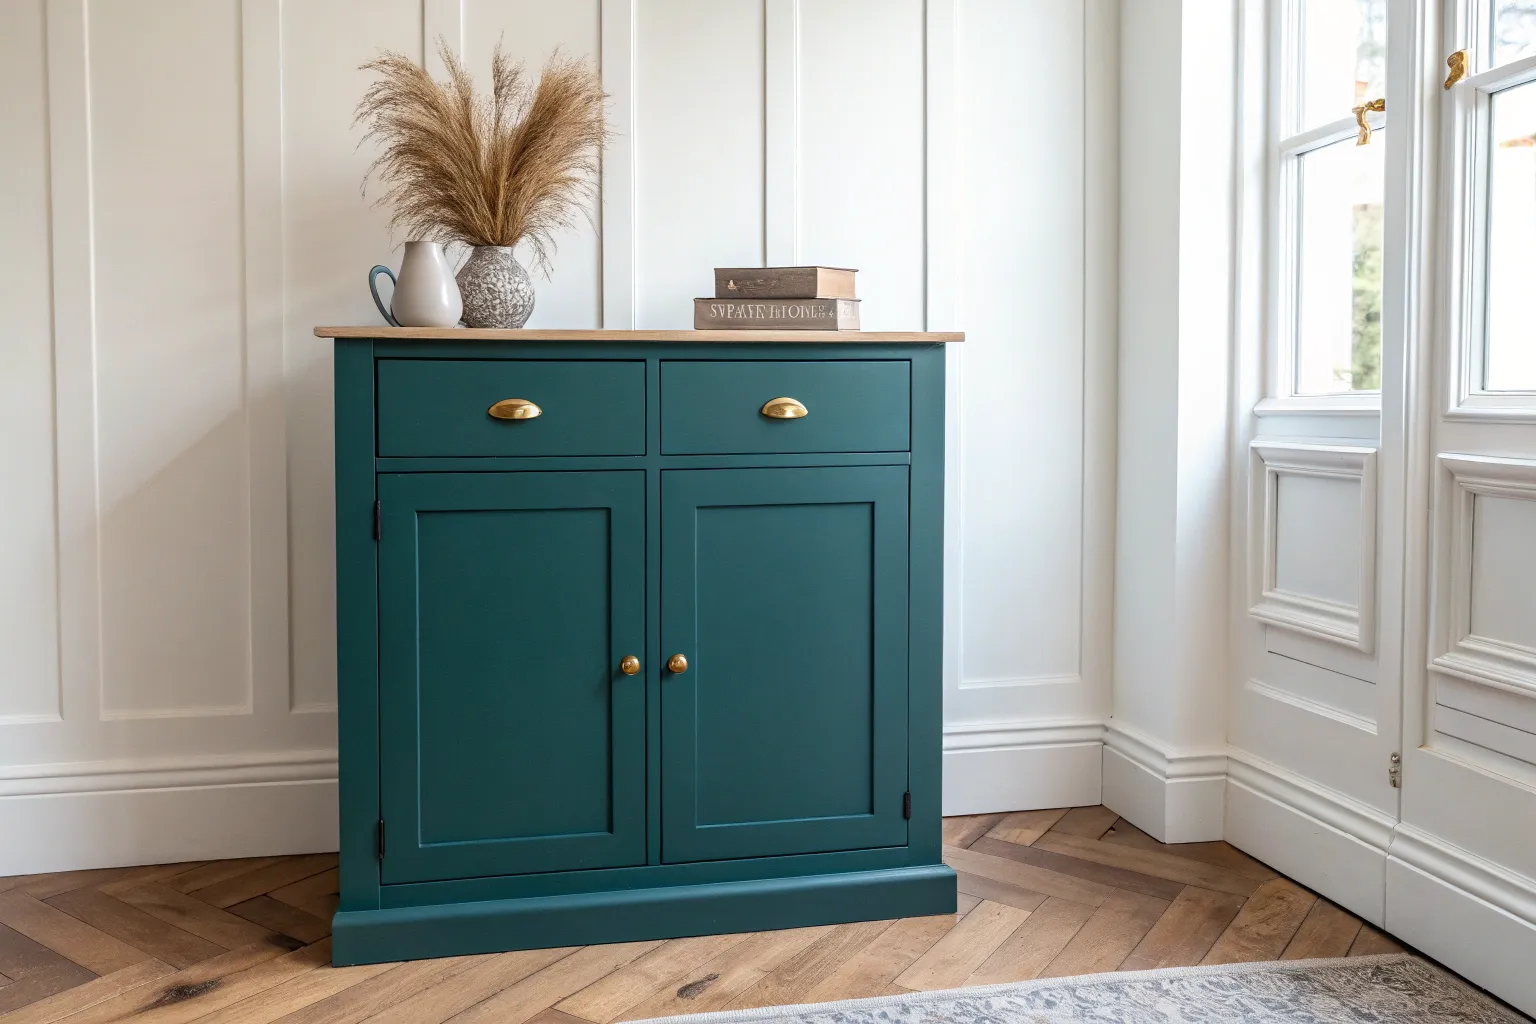
Contrasting Shelves to Add Definition
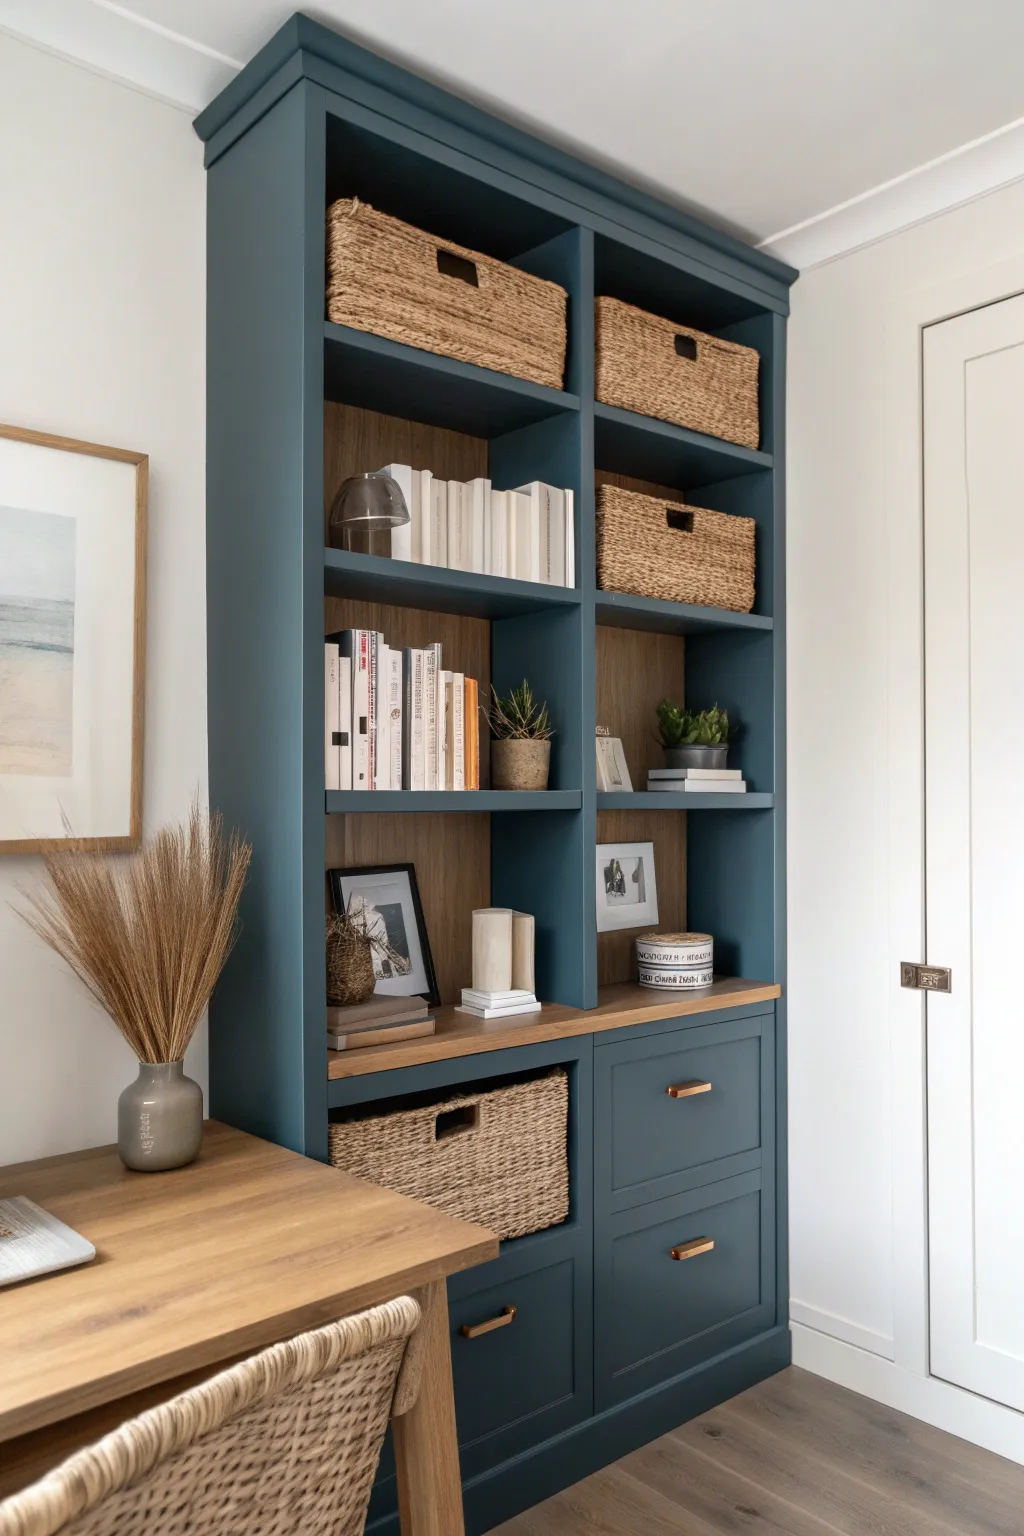
Transform a standard built-in or bookcase into a statement piece by pairing a deep, moody teal with warm, exposed wood backing. This two-tone approach adds incredible depth and sophistication to any home office space while highlighting your favorite decor items.
Detailed Instructions
Materials
- Existing bookcase or built-in unit
- Deep teal interior satin or semi-gloss paint
- Stain-blocking primer
- Sanding sponges (120 and 220 grit)
- Painter’s tape (high quality)
- Wood veneer sheets or 1/4″ plywood (if backing needs replacing)
- Wood stain (warm oak tone)
- Matte or satin polyurethane finish
- Mini foam roller and tray
- 2-inch angled sash brush
- Drop cloths
- Screwdriver or drill
Step 1: Preparation & Disassembly
-
Clear the shelves:
Remove all books, baskets, and decor items from the unit. Take out any adjustable shelves and set them aside on a flat work surface. -
Remove hardware:
Unscrew and remove any cabinet handles, pulls, or hinges. Place them in labeled bags so you don’t lose the screws during the painting process. -
Assess the backing:
Decide if you will paint the existing back panel or cover it. For the look in the photo, we want a wood-tone back. If your current back is not stainable wood, measure the back dimensions inside each shelf section to prepare for installing wood veneer or thin plywood later. -
Clean surfaces:
Wipe down the entire unit with a degreaser or mild soap and water solution to remove dust, oils, and grime. Let it dry completely.
Step 2: Sanding & Priming
-
Scuff sand:
Lightly sand all surfaces you intend to paint using 120-grit sandpaper. This roughs up the existing finish so the primer adheres better. Wipe away the dust with a tack cloth. -
Protect the wood accents:
If you have a wood countertop surface like the one in the photo that you want to keep natural, tape it off meticulously with painter’s tape. Press the edges down firmly to prevent bleed-through. -
Apply primer:
Roll or brush a coat of stain-blocking primer onto the frame, the sides, and the shelves. I find a mini foam roller gives the smoothest finish on these flat surfaces.
Uneven Paint Coverage?
If the dark paint looks patchy after drying, don’t overload the brush. Instead, apply a third thin coat. Thin layers dry harder and look smoother than thick ones.
Step 3: Painting the Teal
-
Cut in edges:
Using your angled sash brush, paint the corners, edges, and tight spots of the bookshelf frame with your deep teal paint. -
Roll the flat surfaces:
While the cut-in paint is still wet, use the foam roller to apply paint to the larger flat areas of the frame and shelf faces. This technique, called ‘keeping a wet edge’, prevents brush marks. -
Paint the adjustable shelves:
Paint the adjustable shelves separately on your drop cloth. Remember to paint the front, top, and bottom, but leave the sides unpainted if they fit tightly into the unit to prevent sticking. -
Second coat:
Allow the first coat to dry according to the can’s instructions, then apply a second coat for full, rich color coverage. A light sanding with 220-grit paper between coats can ensure an ultra-smooth finish.
Level Up: Lighting
Install battery-operated LED puck lights or LED strips under the front lip of each shelf to illuminate the wood backing and highlight your decor.
Step 4: The Wood Contrast
-
Prepare the backing inserts:
If you are adding new wood backing, cut your veneer or 1/4″ plywood to the exact dimensions of the shelf openings. Test fit them to ensure they slide in snugly. -
Stain the wood:
Apply your chosen warm oak stain to the backing pieces (and the countertop if you are refinishing it). Apply with a rag, wipe off excess, and let dry. -
Seal the wood:
Protect the stained wood with two coats of matte or satin polyurethane. This step is crucial for durability, especially if you move books around frequently. -
Install the backing:
Once dry, install the wood panels into the back of the shelf sections. You can secure them with construction adhesive or small brad nails that will be hidden by books.
Step 5: Finishing Touches
-
Reassemble:
Carefully remove the painter’s tape from the countertop. Re-insert the painted adjustable shelves into the unit at your desired heights. -
Add hardware:
Reattach your cabinet pulls or handles. For a modern update matching the photo, consider swapping old hardware for sleek brass or copper pulls. -
Style the shelves:
Arrange your books, baskets, and plants. Try grouping books by color or size, and use the baskets to hide clutter while adding texture.
Step back and enjoy the striking contrast of your newly refreshed, custom-looking office storage
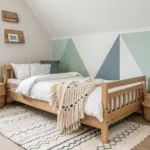
Color Blocking to Zone Your Office
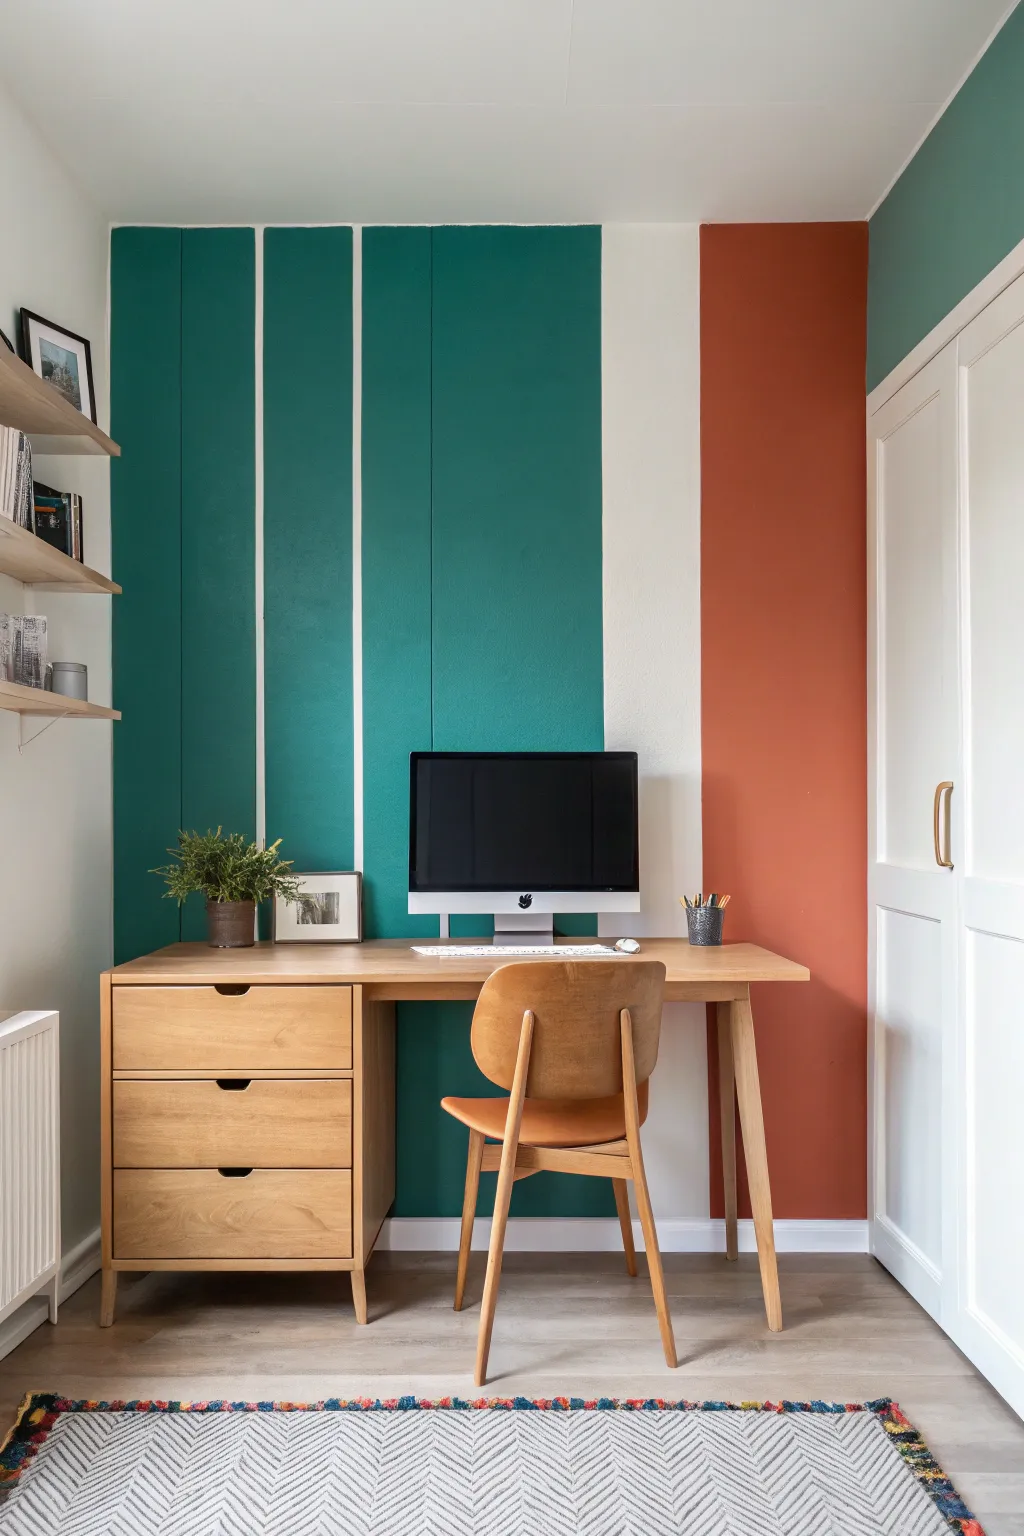
Transform a plain white wall into a dynamic focal point with this bold, vertical color-blocking technique. The combination of deep teal and warm terracotta creates a sophisticated balance that perfectly zones a workspace.
Step-by-Step
Materials
- High-quality painter’s tape (frog tape recommended)
- Laser level (or spirit level and pencil)
- Teal interior wall paint (matte or eggshell)
- Terracotta/Rust interior wall paint (matte or eggshell)
- White interior wall paint (matching existing wall color)
- 9-inch paint roller and tray
- Small foam roller
- 2-inch angled sash brush
- Drop cloths
- Measuring tape
- Spackle and sandpaper (for wall prep)
Step 1: Preparation & Planning
-
Clear and clean:
Begin by removing all furniture, including the desk and shelving, away from the wall. Wipe the wall down with a damp cloth to remove dust and let it dry completely. -
Patch imperfections:
Inspect the wall for any nail holes or dings. Fill them with spackle, let dry, and sand smooth so your color blocks will look professional and crisp. -
Measure the layout:
Measure the total width of your wall. This design features three equal teal stripes on the left (approx. 12-16 inches each), separated by 2-inch white gaps, followed by a wide white negative space, and a final terracotta block on the right. -
Mark vertical guides:
Using a laser level is a game-changer here; project your vertical lines onto the wall. If you don’t have one, measure carefully from the corner and use a spirit level to draw light pencil lines from ceiling to floor.
Clean Lines Secret
Always peel tape toward the wet paint, not away from it. This simple motion helps cut the paint film cleanly rather than stretching it.
Step 2: Taping the Design
-
Apply the tape:
Apply painter’s tape along the *outside* of your pencil lines for the painted areas. For the white gaps between the teal stripes, place the tape so it covers the area you want to remain white. -
Seal the edges:
Run your finger or a plastic putty knife firmly along the edge of the tape to ensure a tight seal. This prevents paint from bleeding underneath. -
The ‘lock-in’ trick:
I like to brush a light coat of the *existing* wall color (white) over the tape edges first. This seals the tape relative to the wall texture, ensuring crispest possible lines for the colored paint.
Step 3: Painting the Teal Section
-
Cut in the edges:
Dip your angled sash brush into the teal paint. Carefully paint along the ceiling line, the baseboard, and the corners within your taped-off teal zones. -
Roll the first coat:
Using the roller, apply the teal paint to the three defined vertical panels. Use a ‘W’ motion to distribute paint evenly, then smooth it out with vertical strokes. -
Apply second coat:
Allow the first coat to dry according to the can’s instructions (usually 2-4 hours). Apply a second coat to ensure rich, opaque coverage without streaks.
Add Texture
For a rustic ‘limewash’ look on the terracotta block, mix a little glaze into your paint and apply it with a cross-hatch brush motion.
Step 4: Painting the Terracotta Section
-
Start the accent block:
Move to the right side of the wall for the single terracotta panel. Use a fresh liner or clean your brush thoroughly before switching colors. -
Cut in and roll:
Just as with the teal, cut in the top, bottom, and side edges with your brush, then use a roller to fill in the large vertical rectangle. -
Assess coverage:
Reds and oranges can sometimes be translucent. Check if you need a third coat for full saturation after the second coat dries.
Step 5: The Reveal
-
Remove tape:
This is the satisfying part. Remove the tape while the final coat of paint is still slightly tacky (not fully cured) to avoid peeling up chips of paint. Pull the tape slowly at a 45-degree angle. -
Touch ups:
Inspect your lines. If any bleed-through occurred, use a tiny artist’s brush and your white paint to carefully correct the edges. -
Reassemble:
Once the paint is fully cured (give it at least 24 hours), move your desk and shelves back into place, aligning the desk centered on the white gap for visual balance.
Enjoy your organized, vibrant new workspace that looks professionally designed and sparks creativity


Painted “Zoom Wall” Backdrop Panel
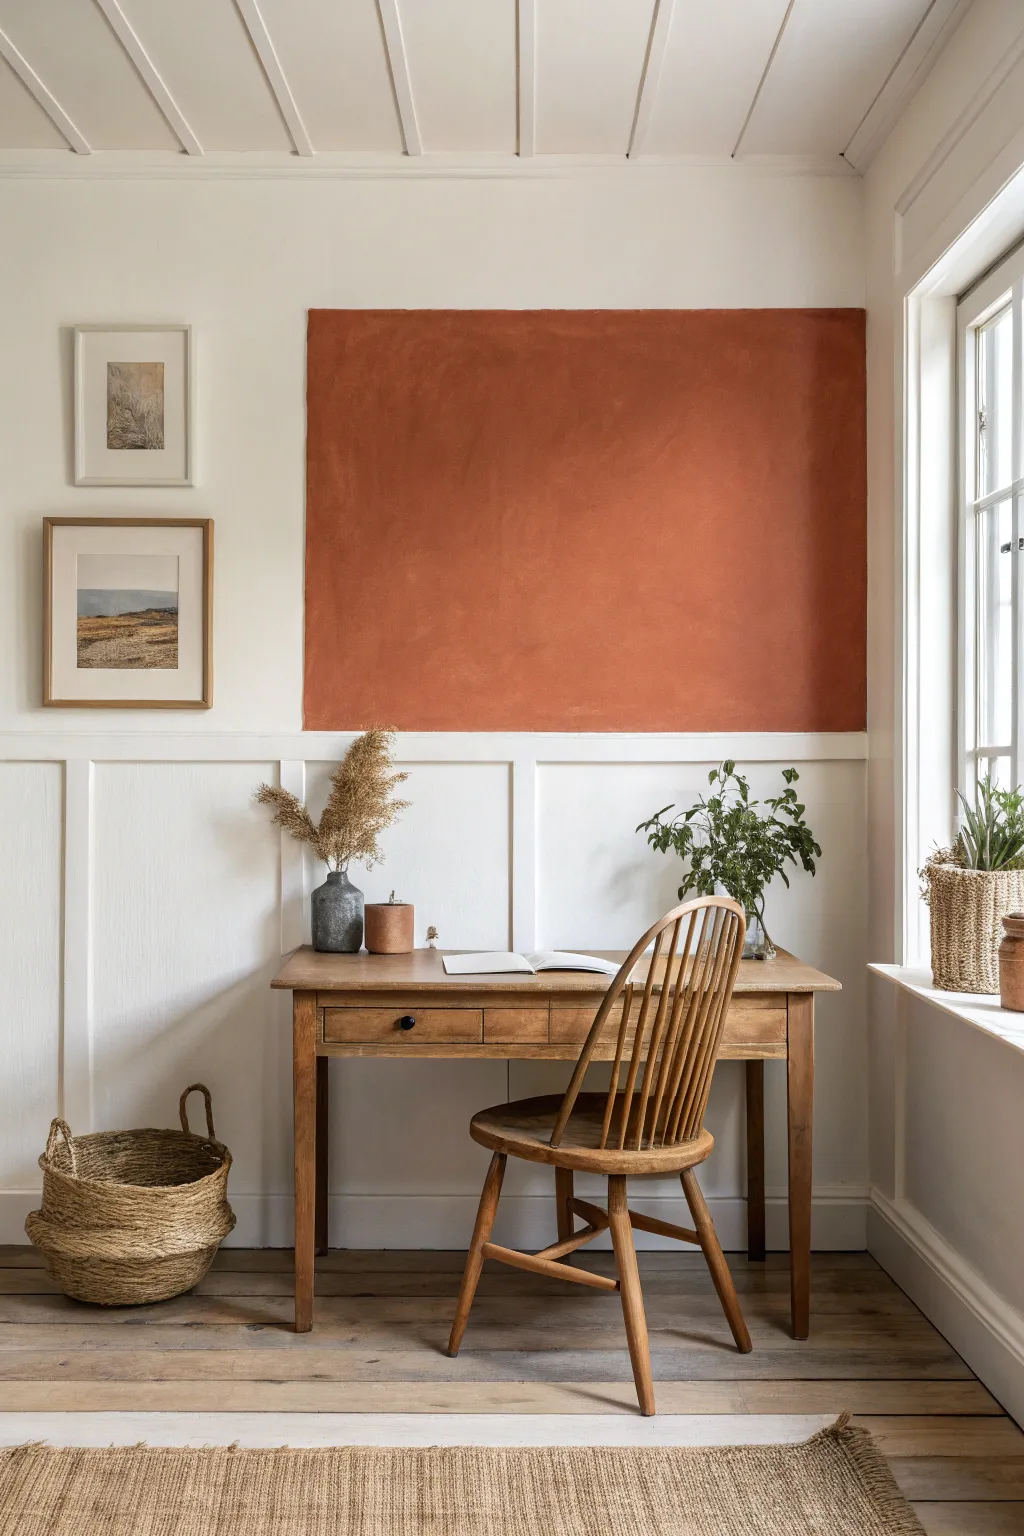
Transform a blank office wall into a sophisticated focal point by painting a textured, geometric color block directly above your wainscoting. This warm, terracotta-toned backdrop adds instant depth and character, creating a perfect frame for video calls or quiet study.
Step-by-Step Guide
Materials
- Painter’s tape (high quality)
- Measuring tape
- Level (spirit level or laser level)
- Pencil
- Primer (if painting over dark colors)
- Terracotta or burnt orange interior paint (chalk paint or limewash recommended for texture)
- Medium-sized paint roller and tray
- Angled sash brush (2 inch)
- Clean rag or sponge
- Drop cloth
Step 1: Preparation & Mapping
-
Clear and clean:
Begin by moving your desk and any wall art away from the area. Wipe down the wall surface above the wainscoting with a damp cloth to remove any dust or oils that might prevent adhesion. -
Determine dimensions:
Decide on the size of your rectangle. In the example, the block is roughly 4-5 feet wide and 3-4 feet high, centered comfortably on the wall section. -
Mark the corners:
Using your measuring tape and pencil, lightly mark the four corners of your desired rectangle. Ensure the bottom edge aligns perfectly with the top rail of your wainscoting or dado rail. -
Draw the perimeter:
Use a long level to connect your corner marks with light pencil lines. This step is crucial; if the box is even slightly crooked, it will be very noticeable against the straight lines of the ceiling and paneling. -
Apply painter’s tape:
Run your painter’s tape along the *outside* edge of your pencil lines. Press the edges of the tape down firmly with your fingertip or a credit card to create a seal that prevents paint bleed. -
Protect the wainscoting:
Place a strip of tape along the top edge of the wainscoting where it meets your planned block to protect the white trim.
Seal the Deal
To get perfectly crisp lines on textured walls, run a thin bead of clear paintable caulk along the tape edge and smooth it with your finger before painting.
Step 2: Painting & Texturing
-
Seal the tape edge:
For razor-sharp lines, I like to brush a very thin layer of the existing wall color (white) over the edge of the tape first. This seals any gaps so the terracotta paint won’t seep under. -
Cut in the edges:
Once the seal remains dry, dip your angled sash brush into the terracotta paint. carefully paint the perimeter of the rectangle, brushing inward from the tape. -
First coat application:
Use your roller to fill in the center of the rectangle. If you are using standard latex paint, aim for smooth, even coverage. If using limewash or chalk paint, random multi-directional strokes create better texture. -
Assess drying:
Allow the first coat to dry completely according to the manufacturer’s instructions. This usually takes 2-4 hours depending on humidity. -
Build depth (Second coat):
Apply a second coat. To replicate the cloudy, soft look in the photo, try ‘cross-hatching’ with your brush or roller—applying paint in ‘X’ shapes rather than straight vertical lines. -
Optional: Ragging technique:
If your paint looks too flat and uniform, lightly dab a damp rag over the wet paint in random areas to lift a tiny bit of pigment, adding that subtle, old-world plaster vibe. -
Remove tape:
While the final coat is still slightly tacky (not fully cured), slowly peel back the painter’s tape at a 45-degree angle. Pulling while wet helps prevent the paint skin from ripping. -
Touch ups:
Inspect your edges. If any paint bled through, wait for the terracotta to dry fully, then use a small artist’s brush and your original wall color to tidy up the lines. -
Styling:
Once fully cured (wait at least 24 hours), move your desk back into position. Center it under the block and accessorize with neutral ceramics and dried botanicals to complement the earthy tones.
Faux Plaster Finish
Mix baking soda into your paint (1 part soda to 4 parts paint) for a gritty, authentic plaster texture without buying expensive specialty paints.
Enjoy the warmth and defined structure this simple painted feature brings to your workspace
Desk-Anchoring Paint Halo or Arch
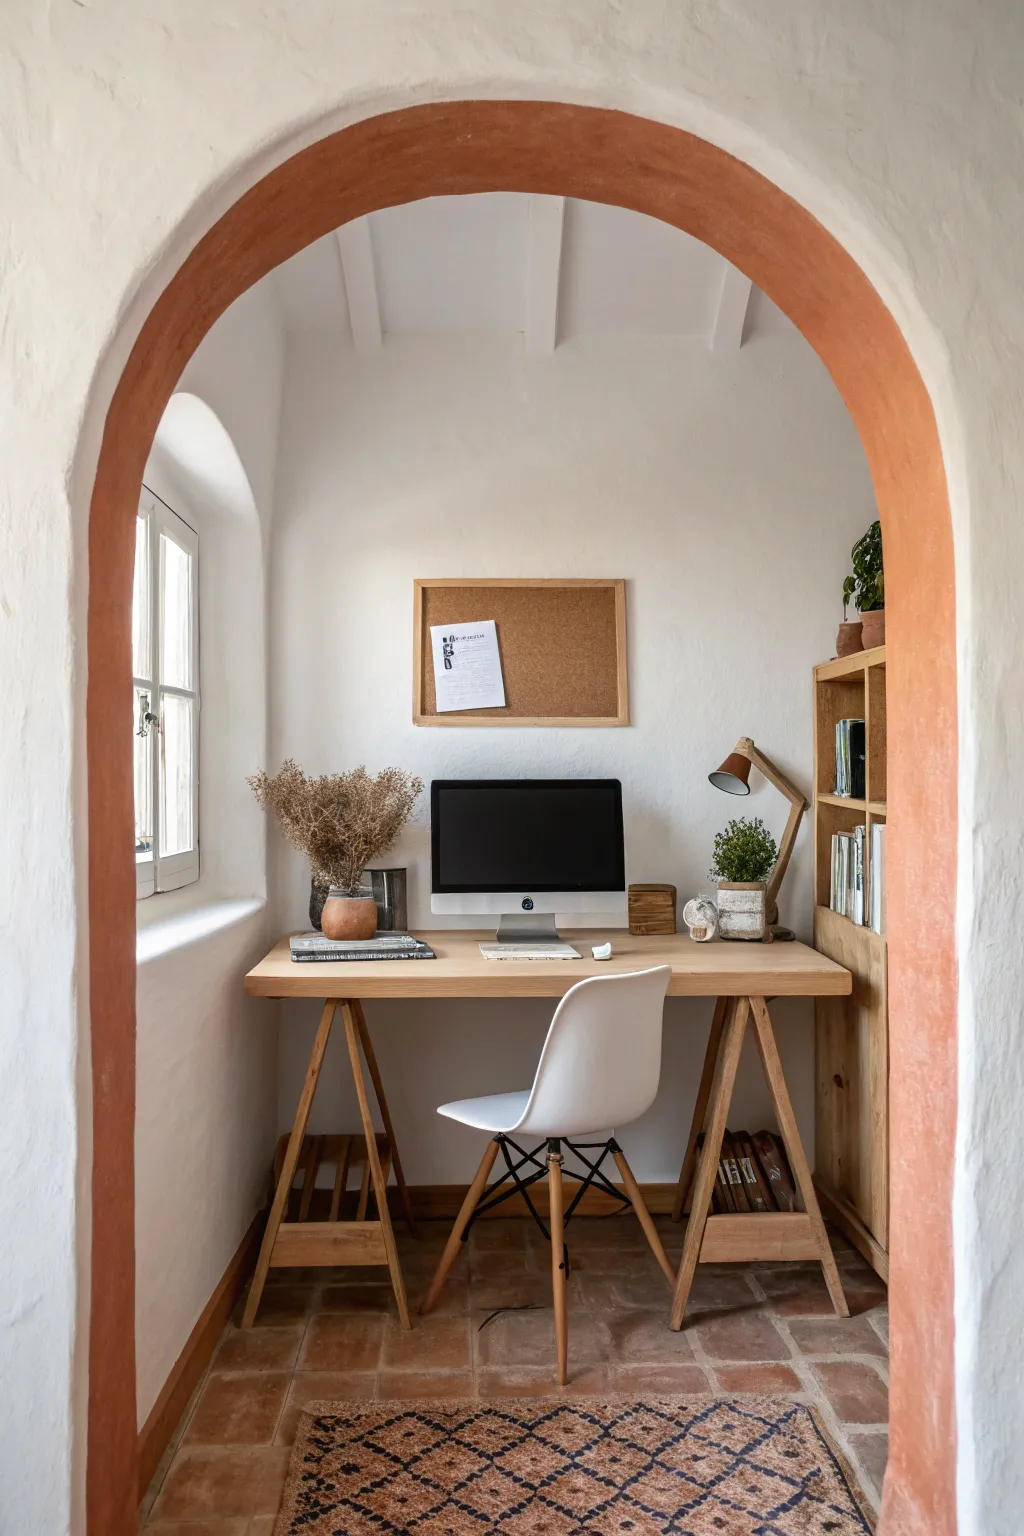
Transform a simple alcove into a focused workspace sanctuary by highlighting architectural details with warm color. This project uses a rich, earthy tone on the inner jamb of an archway to add depth and frame your view without overwhelming the room.
How-To Guide
Materials
- Terracotta or rust-colored interior latex paint (matte or eggshell finish)
- White paint (matching existing walls) for touch-ups
- 2-inch angled sash brush
- 4-inch mini foam roller and handle
- Painter’s tape (high-adhesion for textured walls)
- Drop cloth or plastic sheeting
- Fine-grit sandpaper (220-grit)
- Damp rag or tack cloth
- Small artist brush
Step 1: Preparation
-
Clear the area:
Remove all furniture, decor, and rugs from the immediate vicinity of the archway to ensure you have plenty of room to move freely. -
Protect the floor:
Lay down your drop cloth directly under the arch, securing it with tape if necessary to prevent it from sliding as you work on the upper sections. -
Clean the surface:
Wipe down the inside jamb of the archway with a damp rag to remove dust and cobwebs. If the surface is glossy, give it a quick scuff with 220-grit sandpaper to help the new paint adhere.
Don’t Fight the Wobble
For organic, hand-troweled plaster walls like this, skip the tape entirely. Use an angled brush and a steady hand to follow the natural, imperfect curve for an authentic old-world look.
Step 2: Taping and Edging
-
Apply tape to the outer face:
Carefully apply painter’s tape along the outer edge of the arch face, where the flat wall meets the curve. Press the tape edge firmly with your fingernail or a putty knife to seal it tight. -
Tape the inner room side:
Move to the inside of the room (the office side) and apply a second line of tape along that edge, effectively isolating the strip of wall that forms the arch thickness. -
Seal the tape edges:
To get a crisp line on textured walls like these, paint a very thin layer of your existing *white* wall paint over the edge of the tape first. This seals any gaps so the terracotta color won’t bleed under.
Dual-Tone Method
Add dimension by painting the inner office walls a shade of cream just slightly darker than the outer room. This subtle shift makes the terracotta arch pop even more.
Step 3: Painting the Arch
-
Cut in the edges:
Once the white sealing layer is dry, dip your angled sash brush into the terracotta paint. Carefully paint along the taped edges on both sides of the jamb. -
Feather the brush strokes:
Work in small sections, feathering the paint inward toward the center of the jamb to avoid creating thick ridges near the tape line. -
Roll the center:
Use the 4-inch mini foam roller to fill in the space between your brush work. The foam roller helps achieve a smooth finish that blends well with the brush strokes. -
Check for consistency:
Inspect the curve for drips, especially near the apex of the arch. Smooth them out immediately with a dry brush before they tack up. -
Let the first coat dry:
Allow the paint to dry completely according to the manufacturer’s instructions, usually about 2-4 hours.
Step 4: Second Coat and Finish
-
Apply the second coat:
Repeat the cutting and rolling process for a second coat. This deeper color often needs two layers to achieve the full, rich opacity seen in the photo. -
Remove tape while wet:
I prefer to peel the tape off slowly at a 45-degree angle while the second coat is still slightly damp. This prevents the dried paint skin from ripping. -
Touch up irregularities:
Inspect your lines. If the textured plaster caused any bleed-through, use a small artist brush and white paint to crisp up the line from the wall side. -
Final cure:
Let the paint cure for at least 24 hours before moving furniture back or leaning items against the wall. -
Style the space:
Reassemble your workspace, using natural wood tones and white accents to complement your new architectural feature.
Enjoy the new depth and warmth this simple accent brings to your workspace view
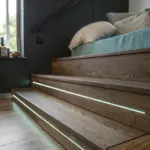
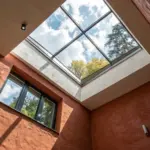
Ceiling Painted a Shade Deeper for Cozy Focus
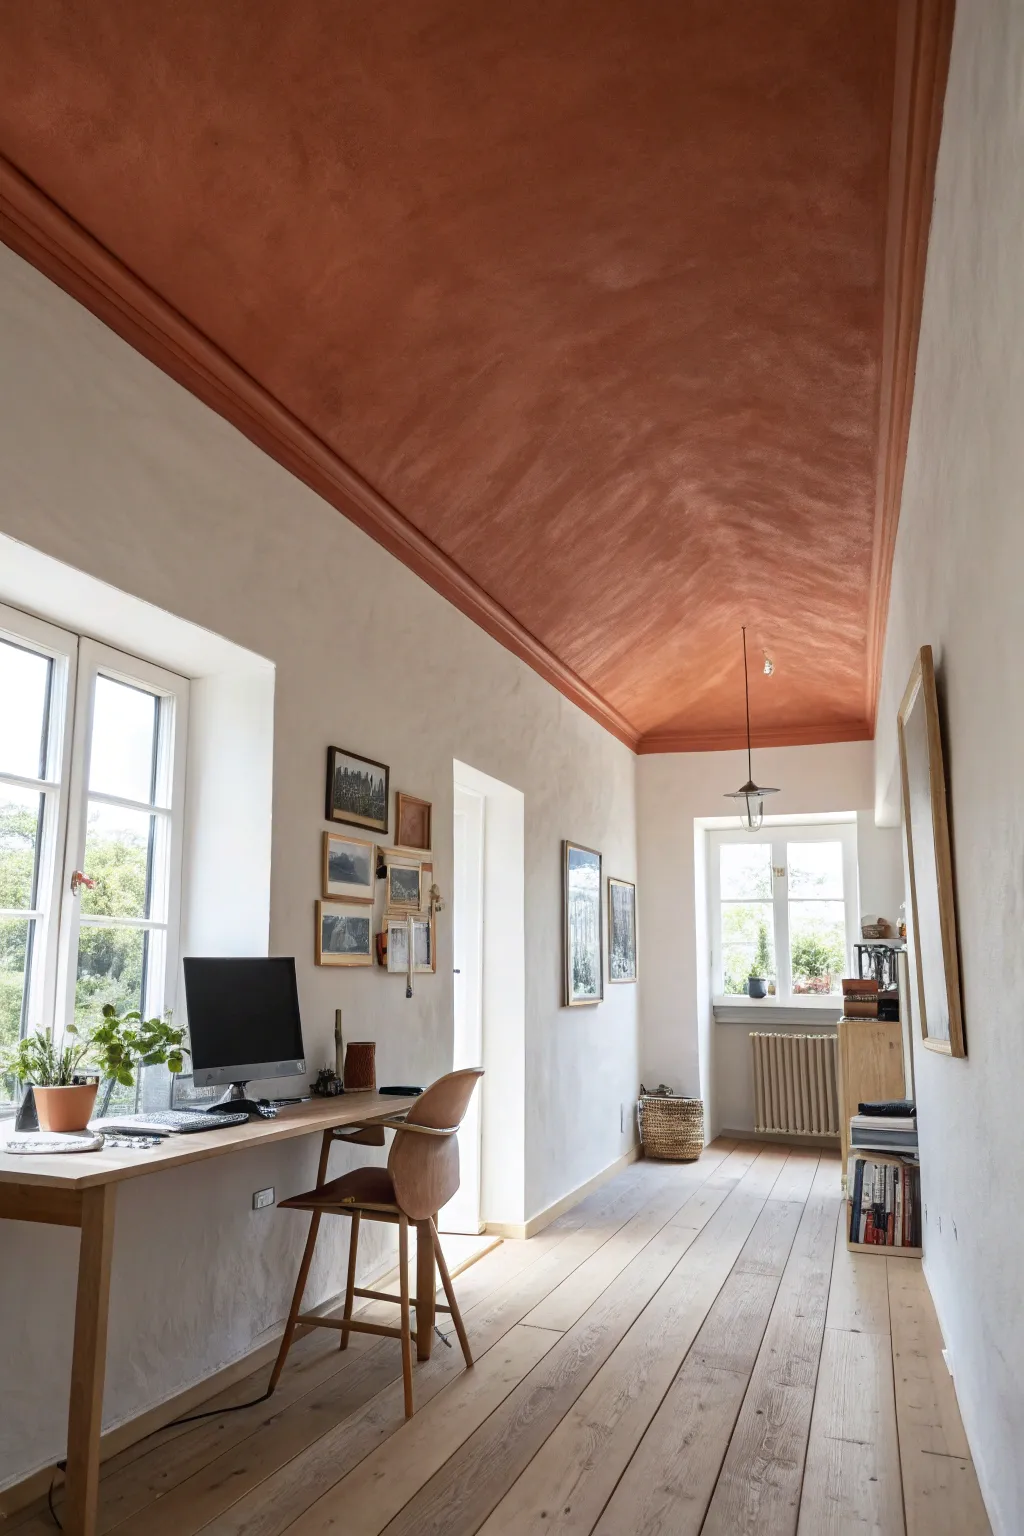
Transform a standard office into a warm, contemplative sanctuary by applying a textured limewash finish to both the walls and ceiling. This project focuses on highlighting architectural features with a bold, earthy terra cotta ceiling contrasted against soft, cloud-white walls.
Step-by-Step
Materials
- Limewash paint (Terra Cotta or Rust shade) for ceiling/molding
- Limewash paint (Warm Off-White or Cream shade) for walls
- Large block brush (masonry brush)
- Small block brush or sash brush for cutting in
- Painter’s tape (high quality)
- Drop cloths and plastic sheeting
- Primer (specifically formulated for limewash)
- Spackle and sanding block (if repairs are needed)
- Extension pole for roller (for primer)
- Paint roller and tray (microfiber nap)
- Sturdy ladder
Step 1: Preparation & Priming
-
Clear and protect:
Remove all furniture, like the desk and seating, from the room or push it to the center and cover completely. Lay down drop cloths to protect wooden flooring from splashes. -
Patch and repair:
Inspect the walls and the vaulted ceiling for any cracks or nail holes. Fill them with spackle, let dry, and sand smooth so the surface is uniform. -
Apply specialized primer:
Since limewash requires a specific mineral bond, roll on a coat of primer designated for limewash use over the walls, ceiling, and molding. Do not skip this, as standard primer won’t allow the limewash to bloom correctly. -
Let it cure:
Allow the primer to dry fully according to the manufacturer’s instructions, usually overnight. A proper base ensures the texture develops beautifully later.
Don’t Overwork It
Resist the urge to go back and fix “imperfect” spots while the paint is drying. Limewash changes color drastically as it dries; overworking wet spots can ruin the texture.
Step 2: Painting the Walls
-
Tape off the trim:
Apply painter’s tape carefully along the floor baseboards and around the window frames. For now, leave the crown molding un-taped as we will painting up to it carefully. -
First coat: cloud white:
Dip your large block brush into the off-white limewash. Apply it to the walls using a cross-hatch motion (X-strokes). This technique creates that signature cloudy, mottled depth. -
Work in sections:
Maintain a wet edge by working in manageable 3×3 foot sections. Don’t let a hard line dry in the middle of a wall. -
Cut in around windows:
Use the smaller sash brush to push the white limewash carefully around the window casings, maintaining the textured stroke even in tight spaces. -
Second coat application:
Once the first coat is dry (limewash dries much lighter than it looks wet), apply a second coat using the same random X-strokes to build up opacity and texture.
Make It Moody
For an even cozier vibe, mix a tiny bit of grey pigment into the terra cotta wash for the second coat. This dulls the brightness and adds an aged, historic feel.
Step 3: The Ceiling & Molding
-
Protect the new wall paint:
After the walls are fully dry (give it 24 hours to be safe), run a strip of delicate-surface painter’s tape along the wall right underneath the crown molding. -
Start with the molding:
Using your smaller brush and the terra cotta limewash, paint the crown molding first. Ensure you get the paint into every groove and curve of the profile. -
Begin the ceiling corners:
Cut in around the perimeter of the ceiling where it meets the molding. I like to feather this edge out slightly so it blends easily when you switch to the larger brush. -
Apply the ceiling wash:
Using the large block brush on an extension pole (or from the ladder), apply the terra cotta paint to the vaulted ceiling. Use those big, sweeping cross-hatch strokes again. -
Manage the overhead drips:
Limewash is water-thin. Keep your brush damp but not dripping wet to prevent splatter on your face or the floor below. -
Second ceiling coat:
Apply the second coat of terra cotta once the first is dry. This second layer creates the rich, velvety variations in color seen in the photo. -
Remove tape:
Slowly peel away the tape while the paint is still slightly tacky to ensure a crisp line between the rusty red molding and the white walls.
Step 4: Styling & Final Touches
-
Reinstall lighting:
Once the ceiling is fully cured, reinstall your pendant light. A simple fixture ensures it doesn’t compete with the dramatic ceiling color. -
Curate the wall art:
Hang vintage frames and artwork low on the walls, as shown. This keeps the visual weight grounded and emphasizes the height of the vaulted ceiling.
The result is a workspace that feels both expansive and intimately grounded by rich color
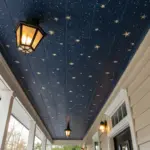
Subtle Ceiling Stripes for Extra Height
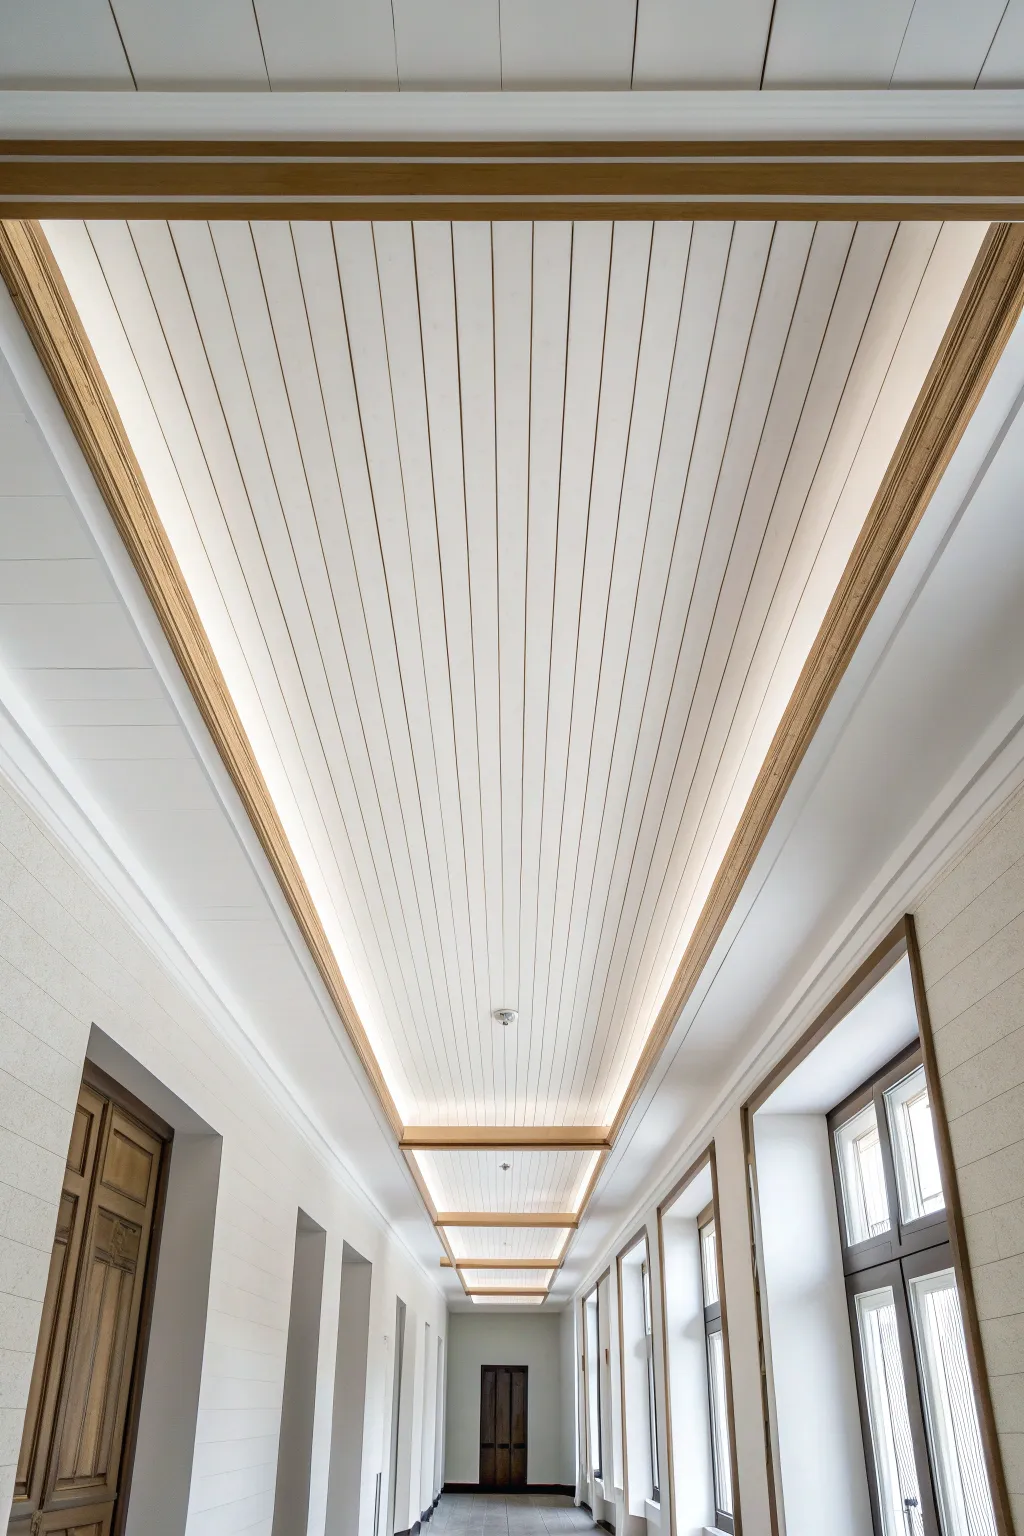
Transform a plain corridor into an architectural statement by adding faux shiplap stripes and framing them with elegant wood trim. This technique draws the eye upward and elongates the room, creating a sophisticated, airy atmosphere perfect for a modern office.
How-To Guide
Materials
- Painter’s tape (multi-width pack)
- High-quality interior latex paint (White, semi-gloss)
- Light gray interior paint (satin finish)
- Wooden trim moulding (simple rectangular profile)
- Wood stain (Golden Oak or similar)
- Clear polyurethane finish
- Pin nailer or construction adhesive
- Paint rollers and extension pole
- Angle sash brush (2-inch)
- Measuring tape
- Laser level
- Pencil
- Drop cloths
- Ladder
Step 1: Preparation & Base Coat
-
Clear and protect:
Begin by removing any existing light fixtures or obstacles from the ceiling area you plan to paint. Lay down drop cloths to protect the entire floor surface below. -
Surface prep:
Clean the ceiling thoroughly to remove dust and cobwebs. Patch any holes or cracks with spackle, sand smooth, and wipe clean with a damp cloth. -
Apply base white:
Roll on two coats of high-quality white semi-gloss paint across the entire central ceiling panel. Allow full drying time between coats according to the manufacturer’s instructions.
Bleed-Through Blues?
If paint bleeds under tape lines, let it dry fully, then use a tiny artist brush and the base color to carefully ‘erase’ the mistake with a steady hand.
Step 2: Creating the Faux Shiplap Stripes
-
Measure and mark:
Determine the width of your ‘planks’. A standard 4-6 inch width works well. Use a measuring tape to mark intervals across the width of the ceiling at both ends. -
Snap lines:
Using a laser level as a guide, lightly draw pencil lines connecting your marks from one end of the corridor to the other. These will be your guides for the painted gaps. -
Tape the gaps:
Apply thin painter’s tape (approx. 1/8 inch or 1/4 inch width) directly over your pencil lines. Press the edges down firnly to prevent bleed-under. -
Paint the gaps:
Using a small brush or mini-roller, paint over the taped lines with your light gray paint. You don’t need to cover the whole ceiling, just over the tape and slightly onto the white. -
Peel and reveal:
While the gray paint is still slightly tacky, carefully peel back the thin tape. This reveals the original white base below, creating a perfect thin ‘gap’ line between your gray ‘planks’. -
Reverse the effect (Optional):
Alternatively, if you want white planks with shadow lines (like the photo), paint the ceiling gray first, apply thin tape for the gap lines, then paint the whole ceiling white. When you peel the tape, you reveal gray shadow lines.
Hidden Glow
Create a cove lighting effect by installing the wood trim slightly lower than the ceiling plane, leaving a lip to hide an LED strip facing upwards.
Step 3: Woodwork & Framing
-
Prepare the trim:
Cut your wooden moulding to fit the length of your ceiling recess. You will likely need to seam pieces together for a long hallway. -
Stain application:
Apply your golden oak wood stain to the trim pieces before installation. It’s much easier to stain on sawhorses than over your head. -
Seal the wood:
Once dry, apply a coat of clear polyurethane to protect the wood and give it a slight sheen that catches the light beautifully. -
Install perimeter trim:
Attach the long trim pieces along the outer edges of your striped ceiling section. Use a pin nailer to secure them into the framing or joists above. -
Add cross beams:
Measure and cut shorter pieces of trim to create the horizontal cross-beam accents. Space them evenly down the hallway to break up the long expanse. -
Install cross beams:
Secure these cross beams perpendicular to your long trim. Ensure they are perfectly straight using your laser level before nailing them in place.
Step 4: Finishing Touches
-
Touch-ups:
I like to take a small artist’s brush with the white paint to tidy up any edges where the ceiling ‘planks’ meet the new wood trim. -
Lighting installation:
If you plan to add LED strip lighting (as seen in the inspiration), install the adhesive strips along the inner upper edge of the wood trim now. -
Final clean:
Remove all drop cloths and sweep the area. Reinstall any necessary fixtures like smoke detectors or central lights within the defined spaces.
Enjoy the incredible depth and sophistication this new ceiling brings to your corridor work
Half-Painted Wall With a Floating Ledge
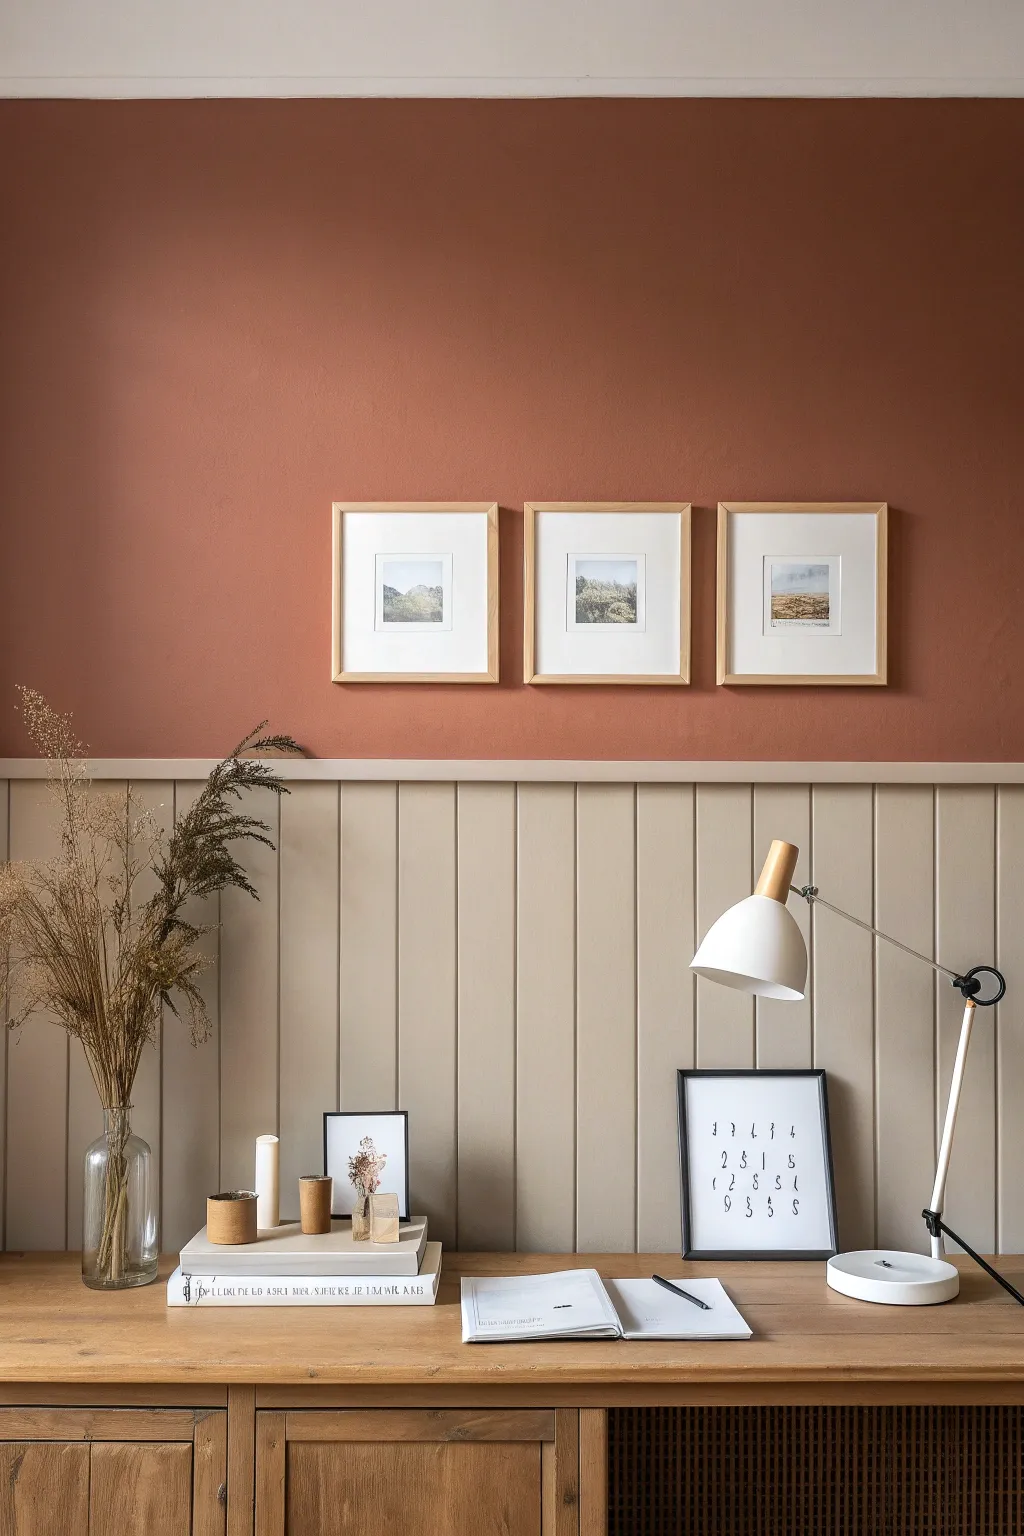
Transform a plain office wall into a structured focal point by combining classic beadboard texture with a warm, earthy color block. This project uses a simple ledge trim to bridge the gap between styles, creating a functional display shelf that adds depth and character to your workspace.
Step-by-Step
Materials
- Beadboard panel sheets or individual tongue-and-groove planks
- 1×2 or 1×3 inch wood trim (for the ledge)
- Small molding trim (optional, to support the ledge)
- Construction adhesive (e.g., Liquid Nails)
- Finishing nails
- Hammer or nail gun
- Jigsaw (if cutting around outlets)
- Circular saw (to cut panels to height)
- Spackle or wood filler
- Fine-grit sandpaper (120 and 220 grit)
- Painter’s tape
- Caulk and caulk gun
- Primer (if using raw wood panels)
- Paint: Warm terracotta (top wall)
- Paint: Creamy beige or warm taupe (bottom paneling)
- Paint brushes and rollers
- Level
- Stud finder
Step 1: Planning and Preparation
-
Measure the wall height:
Decide on the height of your wainscoting. A standard chair rail height is around 32-36 inches, but for a modern office look like this, going slightly higher (around 40-48 inches) often balances better with desks. -
Clear and clean:
Remove any existing baseboards carefully if you plan to reuse them, or purchase new baseboards that are thick enough to cover the bottom edge of the beadboard. Clean the wall surface to ensure adhesive sticks well. -
Mark the level line:
Use a level and a pencil to draw a straight horizontal line across the entire wall at your chosen height. This will guide the top of your beadboard panels. -
Locate wall studs:
Use a stud finder to mark the location of studs along your horizontal line. You will need these anchor points to securely fasten the ledge shelf later.
Uneven Wall Woes?
If gaps appear between the ledge and a wavy wall, don’t force the wood back. Instead, fill the gap with paintable caulk for a seamless look.
Step 2: Installing the Beadboard
-
Cut panels to size:
Measure and cut your beadboard sheets or planks to the exact height determined by your level line. If using sheets, double-check that the grooves run vertically. -
Dry fit the first piece:
Place your first panel in the corner. Check for plumb using your level. If your corner isn’t perfectly square, scribe the edge and trim it for a tight fit. -
Apply adhesive:
Apply a zigzag pattern of construction adhesive to the back of the panel. I like to keep the glue about an inch away from the edges to prevent messy squeeze-out. -
Secure the panel:
Press the panel firmly against the wall. Secure it with finishing nails at the top, bottom, and into any studs you cross. Repeat this process across the wall, butting edges tightly together. -
Cut for obstacles:
For electrical outlets, measure their position carefully on the panel before installation. Drill starter holes in the corners of your marked area and use a jigsaw to cut out the opening.
Level Up: Gallery Lighting
Install wireless puck lights or a dedicated picture light above the frames on your new wall to highlight the art and warm color.
Step 3: Adding the Ledge and Trim
-
Install baseboards:
Reinstall your old baseboards or attach new ones at the bottom of the beadboard to cover the gap at the floor. Nail into the studs for a secure hold. -
Prepare the ledge piece:
Cut your 1×2 or 1×3 lumber to the full length of the wall. Sand it smooth, paying special attention to the front-facing edge. -
Attach the ledge:
Place the ledge on top of the beadboard edge. It should overhang slightly. Nail down through the ledge into the tops of the beadboard and, more importantly, toe-nail it into the wall studs. -
Caulk the gaps:
Run a thin bead of painters caulk along the top of the ledge where it meets the drywall, and along all seams in the beadboard or corners. Smooth it with a wet finger and let it cure. -
Fill nail holes:
Use wood filler or spackle to cover all nail heads on the beadboard and the ledge. Once dry, sand these spots flush with fine-grit sandpaper.
Step 4: Painting and Styling
-
Prime the wood:
If your beadboard or ledge is raw wood or MDF, apply a coat of primer to ensure an even finish. If it came pre-primed, you can skip this step. -
Paint the top wall:
Cut in along the ceiling and corners with your terracotta paint. Use a roller for the main wall surface. I prefer doing this top section first so any drips on the ledge can be easily sanded off before finishing the bottom. -
Tape off the wall:
Once the top coat is fully dry (give it at least 24 hours to be safe), run a strip of delicate-surface painter’s tape along the wall just above the ledge to protect your new terracotta paint. -
Paint the paneling:
Paint the beadboard, baseboards, and the ledge itself in your creamy beige color. Use a brush to get into the vertical grooves first, then smooth out the flats with a foam roller for a factory-like finish. -
Remove tape:
Peel off the painter’s tape slowly at a 45-degree angle while the paint is still slightly tacky to ensure a crisp, clean line.
Step back and admire how this architectural detail instantly makes your office feel custom-designed and perfectly organized
Bold Door and Trim for Instant Personality
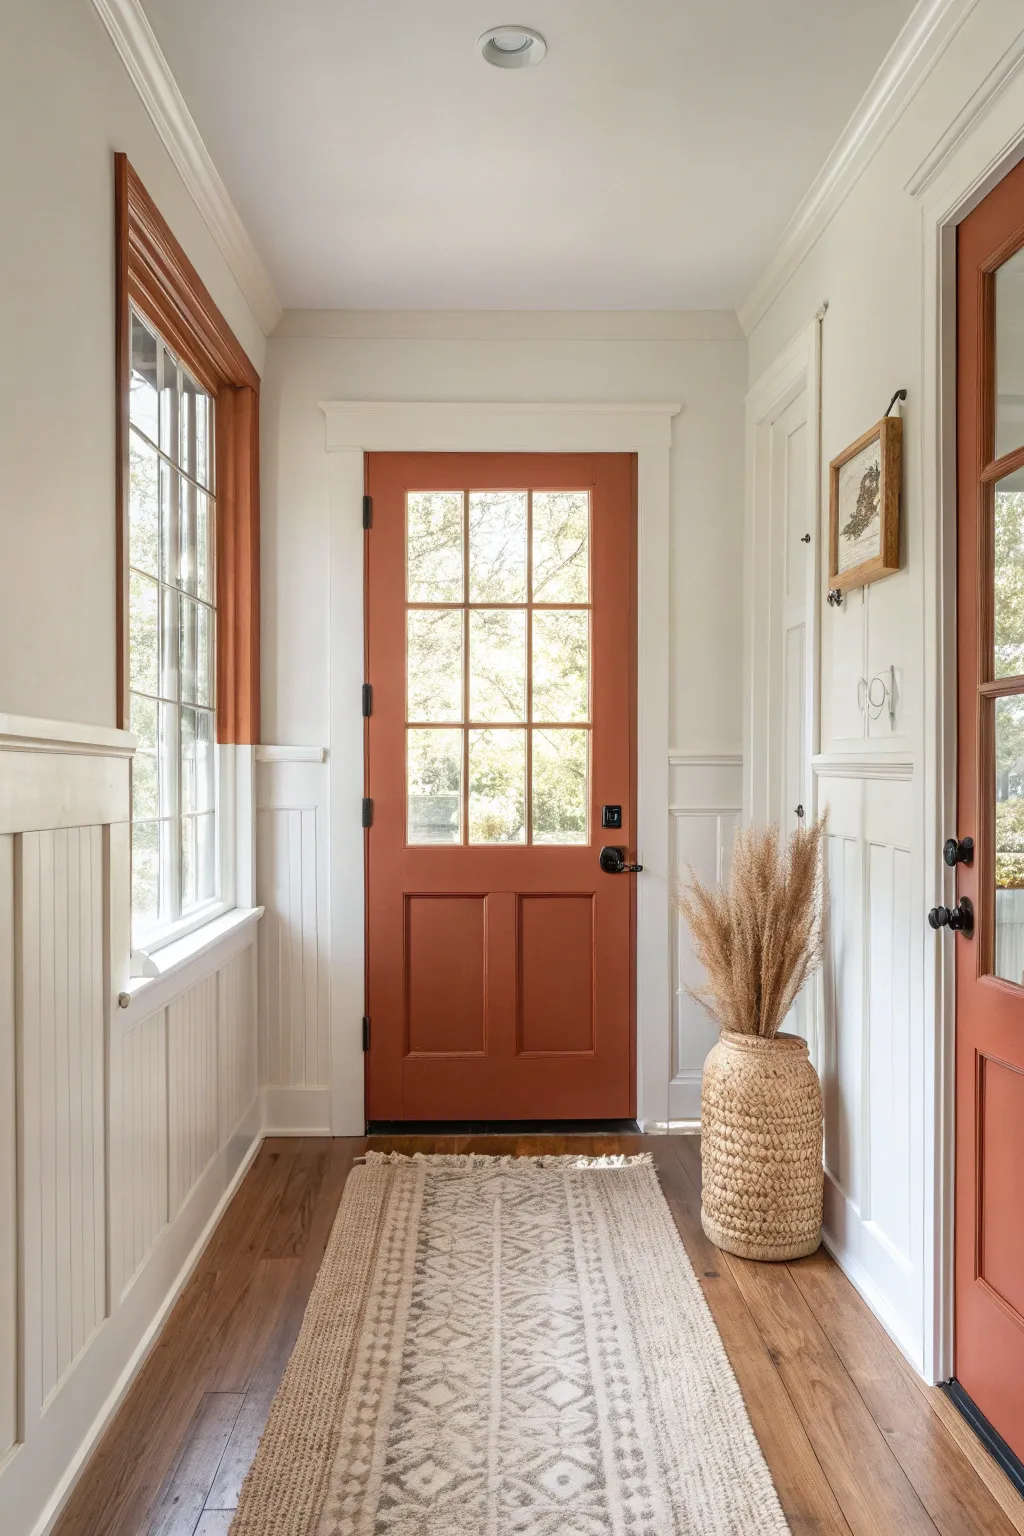
Enhance a neutral hallway by adding a bold, warm accent color to the architecture itself. This project focuses on painting the interior door and window casings in a rich, earthy terracotta tone to create immediate visual interest and framing.
Step-by-Step Guide
Materials
- High-quality interior paint (Satin or Semi-Gloss finish, Terracotta/Rust color)
- White semi-gloss paint (for wainscoting/trim touch-ups)
- Painter’s tape (1.5-inch and 2-inch width)
- Angled sash brush (2-inch)
- Angled sash brush (1.5-inch for details)
- Mini foam roller and tray
- Sandpaper (220-grit)
- Tack cloth
- Drop cloths
- Screwdriver (for hardware removal)
- Cleaning solution (TSP or degreaser)
Step 1: Preparation & Cleaning
-
Protect the area:
Begin by laying down drop cloths over the hardwood floors to catch any drips or splatters. Secure the cloths with tape if necessary to prevent slipping. -
Remove hardware:
Using a screwdriver, carefully remove the door knob, deadbolt, and latch plates. Place all screws and pieces in a sealed bag so nothing gets lost. -
Clean surfaces:
Wipe down the door, door frame, window sash, and window casings with a cleaning solution like TSP or a mild degreaser. Removing oils and dust is crucial for proper adhesion. -
Sanding:
Lightly sand all surfaces you intend to paint using 220-grit sandpaper. You aren’t trying to strip the old paint, just scuffing it up to create a ‘tooth’ for the new coat. -
Dust removal:
Wipe away all sanding dust with a tack cloth. Even a small amount of dust can create a gritty texture in your final finish.
Step 2: Taping & Priming
-
Tape the glass sets:
On the door and window, carefully apply painter’s tape to the glass panes, leaving a tiny gap (about 1/16th inch) between the tape and the wood. This ensures the paint seals the glass-to-wood joint. -
Protect surrounding walls:
Apply tape along the edges where the trim meets the white wainscoting and the wall. Press the tape edges down firmly with a putty knife or your fingernail to prevent bleed-through. -
Spot prime:
If there are any bare wood spots or areas where the old finish is compromised, apply a thin coat of primer. I like to let this spot-priming dry completely before moving on.
Paint Bleeding?
If paint bled under the tape onto the glass, wait for it to fully dry. Then, gently score the edge with a razor blade and scrape the excess off the glass.
Step 3: Painting the Trim & Casings
-
Cut in the window:
Start with the window sash. Using the 1.5-inch angled brush, paint the muntins (the grid pieces) first, working from the center outward. -
Paint window casing:
Move to the outer frame of the window. Use long, smooth strokes with the larger brush to coat the casing in your terracotta color. -
Door frame application:
Paint the door jambs and the casing around the door opening. Watch for drips in the corners where the vertical and horizontal pieces meet. -
Check for consistency:
Ensure the coverage is even on your first coat. It will likely look streaky, but don’t overwork the paint; let it dry according to the can’s instructions.
Add Depth
For a vintage look, apply a subtle dark glaze into the crevices of the door moulding and wipe it back. This accentuates the architectural details.
Step 4: Painting the Door
-
Paint the muntins:
Just like the window, start the door by painting the grid-work around the glass panes using your smaller brush. -
Panels and rails:
Paint the recessed panels at the bottom of the door, then move to the horizontal rails. -
Vertical stiles:
Finish the door by painting the long vertical stiles on the sides. Where the rails and stiles meet, lightly feather the brush strokes to blend them. -
Second coat:
Once the first coat is fully dry, apply a second coat to the window, trim, and door following the same order. This coat provides the true richness of the color.
Step 5: Finishing Touches
-
Remove tape:
While the paint is still slightly tacky (or immediately after it dries), carefully peel away the painter’s tape at a 45-degree angle. Pulling it slowly helps keep lines crisp. -
Clean glass:
Use a razor blade to gently scrape off any paint that seeped onto the glass, creating a perfect edge. -
Reinstall hardware:
Once the paint has cured (usually 24 hours), screw the door knob and plates back into place.
Step back and admire how a simple color shift has completely redefined the character of your entryway


Have a question or want to share your own experience? I'd love to hear from you in the comments below!