
If you’ve ever wanted your drawings to feel like you can step right into them, one-point perspective is the magic trick. I’m sharing a bunch of sketch-friendly ideas that make the vanishing point and converging lines super clear, so you can practice without overthinking it.
Classic Hallway With Lockers and Doors
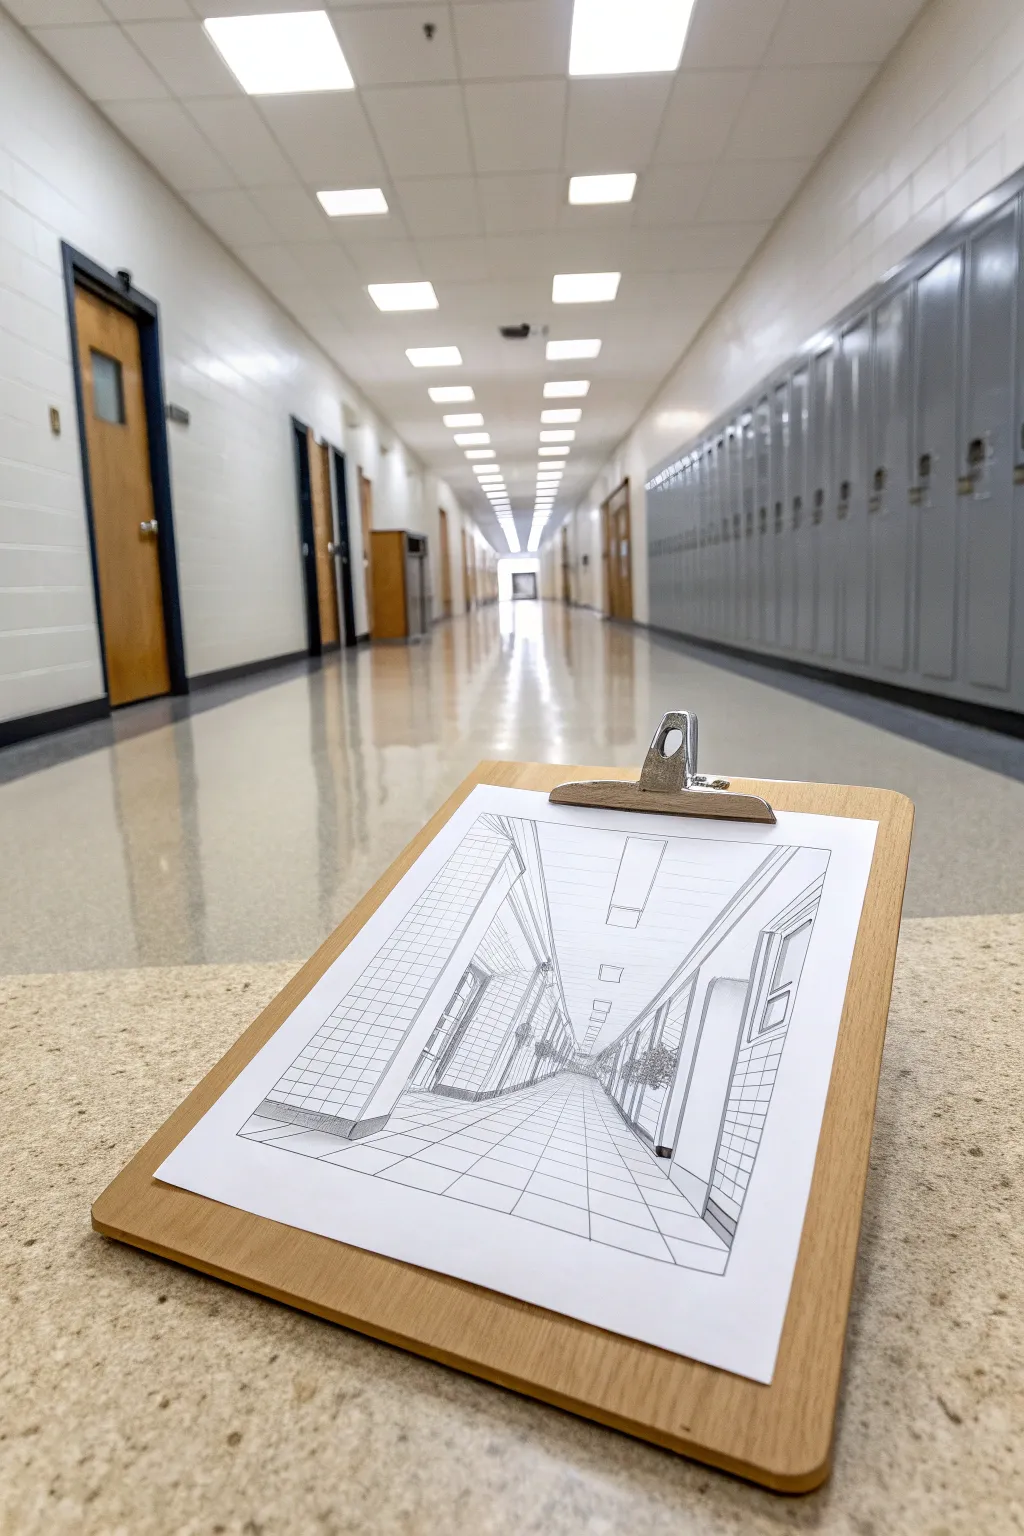

Master the art of depth with this crisp one-point perspective drawing of a tiled corridor. This project focuses on clean linework and establishing a single vanishing point to create a convincing illusion of endless space.
How-To Guide
Materials
- White drawing paper (A4 or similar)
- HB or 2B graphite pencil
- Fine-point black pen or liner (0.3mm & 0.5mm)
- Ruler or straight edge
- Eraser (kneaded preferred)
- Clipboard (optional, for effect)
Step 1: Setting the Perspective Framework
-
Define the Horizon:
Begin by lightly drawing a horizontal line across the middle of your paper using your ruler. This is your horizon line or eye level. In the exact center of this line, mark a small dot—this will be your single vanishing point. -
Establish the Corridor Shape:
Draw a large rectangle centered around your vanishing point. This rectangle represents the back wall of your hallway. Keep your lines light, as much of this will be inked over later. -
Connect the Corners:
Place your ruler on the vanishing point and align it with each of the four corners of your rectangle. Draw straight diagonal lines extending from the vanishing point, through the corners of the rectangle, all the way to the edges of your paper. These are your orthogonal lines that form the ceiling, floor, and side walls. -
Draw the Back Wall Details:
Inside the central rectangle, sketch a simple door frame or arched opening. Keep these lines vertical and horizontal, parallel to the edges of your paper, to anchor the scene.
Step 2: Creating the Tiled Floor
-
Mark Tile Intervals:
Along the very bottom edge of your paper, make small tick marks spaced evenly apart. These will determine the width of your floor tiles. -
Draw Floor Orthogonals:
Connect each tick mark at the bottom edge directly to the central vanishing point with your ruler. Stop these lines when they hit the bottom of your back wall rectangle. -
Add Horizontal Tile Lines:
Draw horizontal lines across the floor section. I find it crucial to space these lines closer together as you get nearer to the vanishing point to simulate distance. The gap between lines should be largest at the bottom of the page.
Straight Edge Secret
Use a clear plastic ruler if possible. Being able to see through the ruler helps immensely when aligning your orthogonals with previous lines.
Step 3: Adding Architectural Features
-
Constructing Side Pillars:
On the left wall, draw vertical lines to represent protruding pillars or wall sections. Use the vanishing point to determine the top and bottom angles of these features so they appear to recede into the distance. -
Sketching the Grid Wall:
For the tiled section on the left wall, replicate the grid method you used for the floor. Draw lines radiating from the vanishing point for the horizontal grout lines, and vertical lines that get closer together as they move away from the viewer. -
Drafting the Right Windows:
On the right wall, sketch rectangular window shapes. Remember: vertical lines stay vertical, but the top and bottom edges of the window frames must align with the vanishing point. -
Adding Ceiling Lights:
Draw rectangular light fixtures on the ceiling. Start with a centerline from the vanishing point to keep them aligned, then draw the boxes, ensuring their sides follow the perspective rules.
Add Life to the Hall
Draw a silhouetted figure walking in the distance or add posters to the walls. Just remember: the top of heads should align roughly with the horizon line.
Step 4: Refining and Inking
-
Detailing Planters:
Sketch rough, organic shapes near the base of the walls to suggest indoor planters or bushes. These softer lines break up the rigid geometry of the hallway. -
First Pass with Ink:
Switch to your 0.5mm pen. Carefully trace over your main structural lines—the walls, ceiling edges, and floor grid. Use the ruler to keep everything sharp. -
Finer Details:
Use the thinner 0.3mm pen for details further away in the distance, like the grout lines near the back wall or the window pane details. This line weight hierarchy helps create depth. -
Adding Texture:
Add subtle scribbles or stippling to the planter areas to look like leaves. Add small tick marks or double lines on the windows to suggest frames. -
Clean Up:
Once the ink is completely dry, gently erase all your pencil guides. Be thorough but careful not to crinkle the paper. -
Final Shading:
If desired, use your pencil or hatch marks with the pen to add light shading under the planters and in the corners of the ceiling to enhance the 3D effect.
Step back and admire how simple lines can construct an entire world of depth and space


Simple Room Interior Facing the Back Wall

Learn to master the fundamentals of depth with this simple yet effective one-point perspective study of a hallway interior. This sketch captures the cozy geometry of a room facing a back window, utilizing clean lines and vertical shading to create a convincing sense of space.
How-To Guide
Materials
- Sketchbook with smooth paper
- HB or 2B graphite pencil (for initial layout)
- Fine liner pen (0.3mm or 0.5mm, black)
- Ruler or straight edge
- Eraser (kneaded preferred)
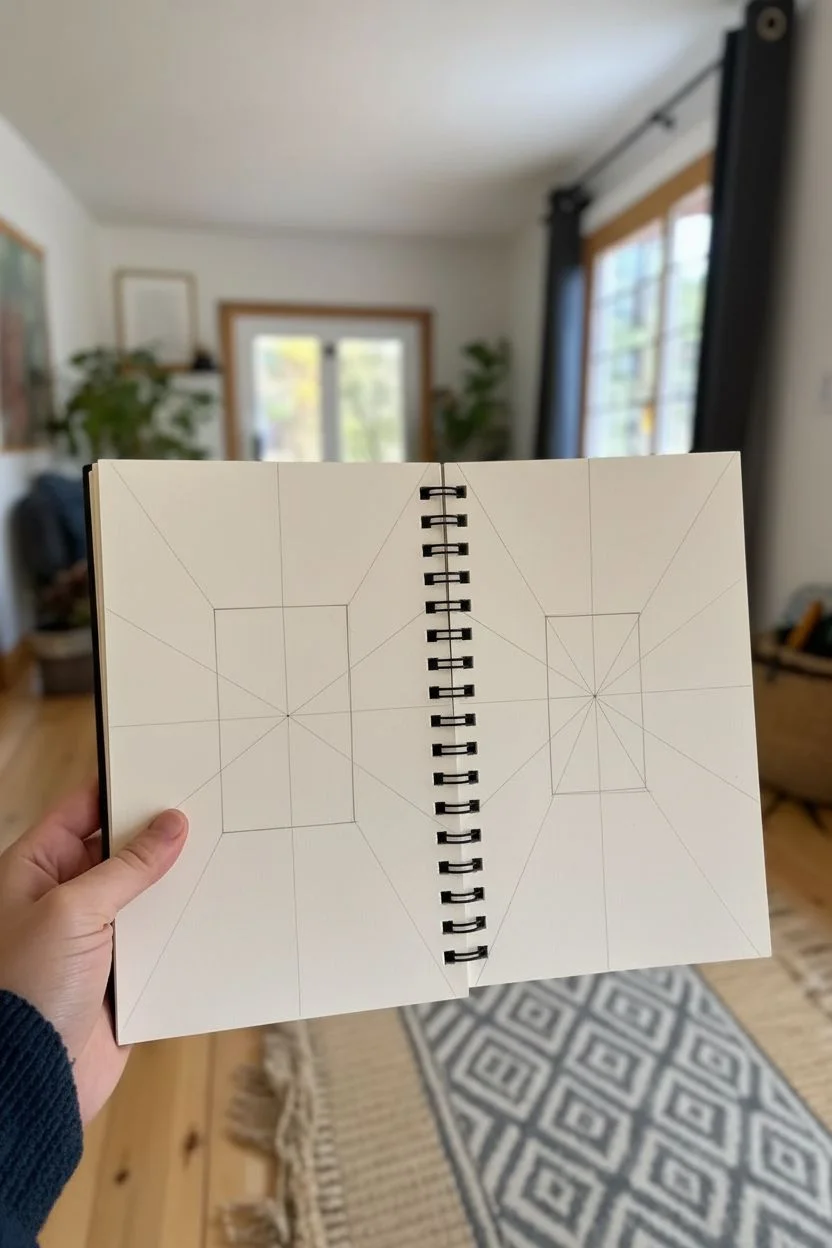
Step 1: Setting the Perspective Framework
-
Establish the horizon line:
Start by drawing a light horizontal line across the middle of your page. This is your horizon line, representing eye level. -
Locate the vanishing point:
Place a small dot right in the center of your horizon line. This single vanishing point is the anchor for the entire drawing. -
Define the back wall:
Draw a rectangle centered around your vanishing point. This rectangle represents the back wall of the room. Keep your lines light so they can be inked later. -
Connect corners to the vanishing point:
Using your ruler, lightly draw diagonal lines extending from the vanishing point through each corner of the back wall rectangle, continuing outward to the edges of the page. These form the ceiling, floor, and side walls.
Wonky Lines?
If your room looks warped, check that all vertical lines (walls, door sides) are perfectly parallel to the paper’s edge. Only depth lines should angle.
Step 2: Adding Room Details
-
Draft the back window:
Inside the back wall rectangle, draw a slightly smaller rectangle for the window frame. Add a horizontal line and a vertical line inside it to create the window panes. -
Outline the side door:
On the right wall, draw vertical lines to indicate a door frame. Remember, the top and bottom horizontal lines of the door must angle back toward the vanishing point. -
Sketch the side artwork:
Further down the right wall, closer to the viewer, sketch a rectangular frame for artwork. Like the door, the top and bottom edges should align with the vanishing point perspective lines. -
Add ceiling planks:
For the ceiling, draw a series of lines radiating from the vanishing point outward. These represent wooden planks or beams running the length of the hallway. -
Create the floorboards:
Similar to the ceiling, draw radiating lines on the floor section extending from the vanishing point toward the bottom of the page to mimic floorboards. -
Detail the trim:
Add thickness to the baseboards and ceiling trim by drawing parallel lines along the floor and ceiling edges, giving the room a more finished construction.
Add Atmosphere
To make the room feel lived-in, try sketching a simple rug or a hanging plant. Use the floor grid to help place the object correctly in space.
Step 3: Inking and Shading
-
Ink the main structural lines:
Take your fine liner pen and carefully trace over your graphite lines. Start with the geometric structure—the back wall, the radiating corners, and the door frames. -
Ink the floor and ceiling details:
Go over the radiating lines for the floorboards and ceiling planks. Keep a steady hand to maintain the straightness of the ruler-guided lines. -
Erase pencil guides:
Once the ink is completely dry, gently erase all the underlying graphite sketch lines and the vanishing point dot. -
Add vertical grain texture:
To give the floorboards texture, use your pen to add very fine, broken vertical lines within the floor sections. This mimics wood grain without needing heavy shading. -
Shade the window:
Add very light hatching lines inside the window panes if you want to suggest glass, or leave them blank for a bright, blown-out daylight look. -
Detail the side door:
Add interior rectangles to the side door to suggest panels. Ensure the horizontal lines of these panels also angle slightly toward the vanishing point. -
Final touches:
Review your sketch for any gaps in the line work. Add a small signature in the bottom corner of the floor area to complete your architectural study.
Now you have a clean, precise architectural sketch that perfectly demonstrates the illusion of depth on a flat page


City Street “Urban Canyon” With Repeating Windows
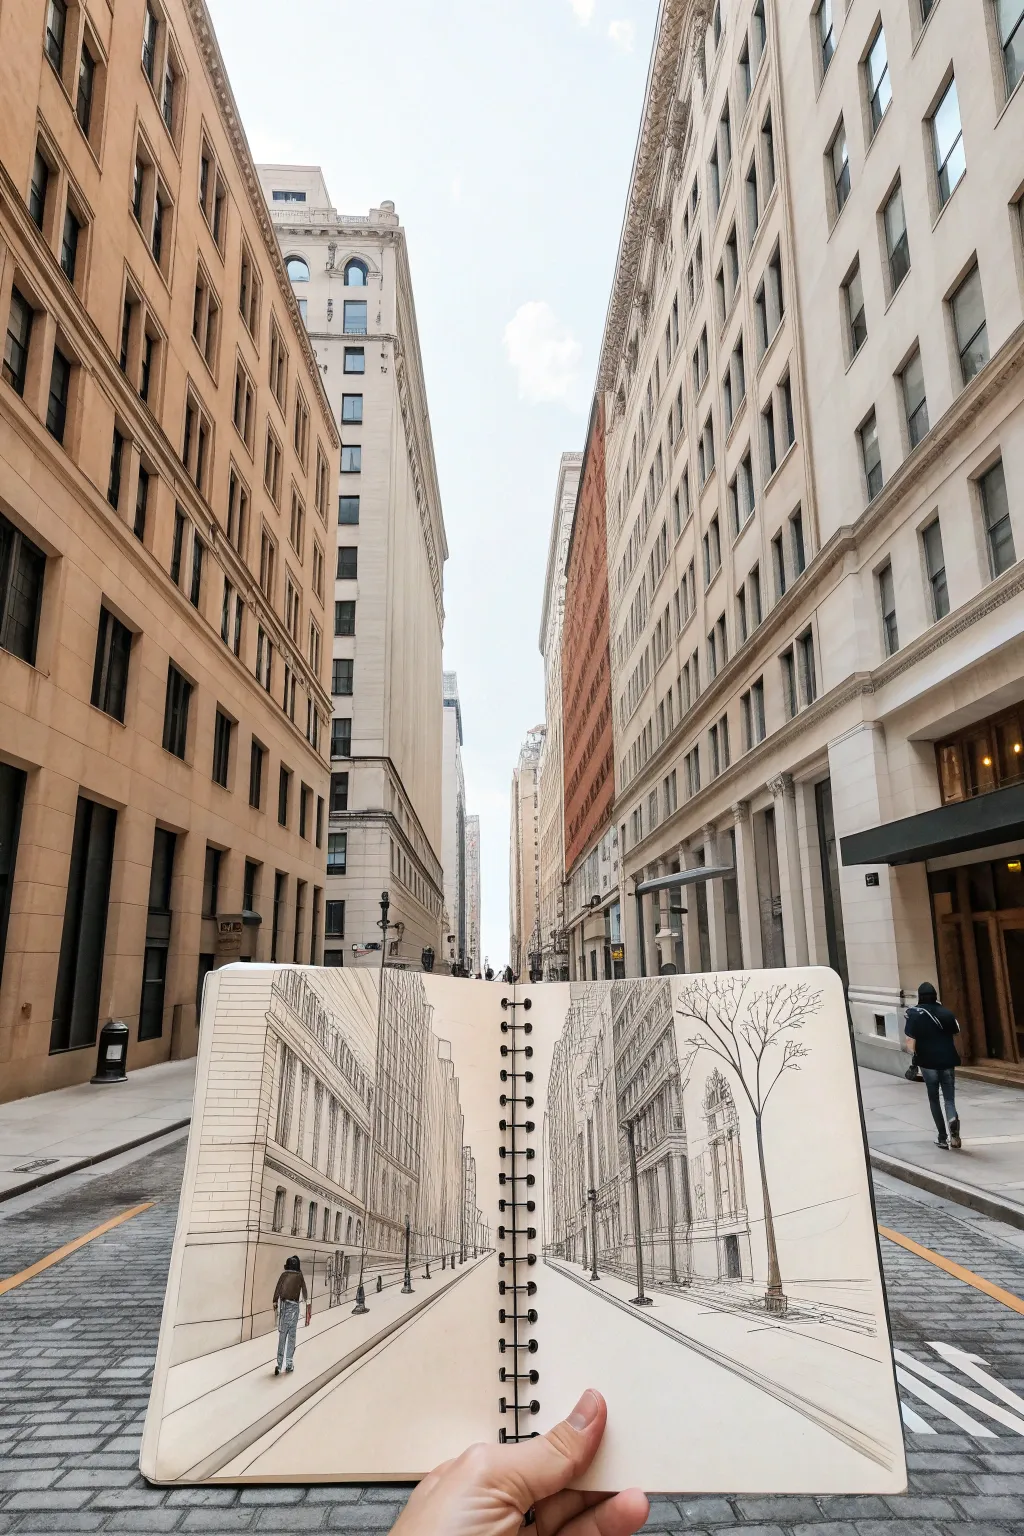
Capture the towering grandeur of a city street with this classic one-point perspective study. By focusing on repeating architectural elements like windows and cornices, you will create a convincing sense of depth that draws the viewer straight down the avenue.
Detailed Instructions
Materials
- Wire-bound sketchbook (A4 or similar size)
- HB graphite pencil (for initial layout)
- Mechanical pencil (0.5mm or 0.3mm) for fine details
- Fine liner pens (0.1mm, 0.3mm, 0.5mm – black)
- Clear plastic ruler (at least 12 inches)
- Kneaded eraser
- Portable stool (optional, for on-location sketching)
Step 1: Setting the Perspective Framework
-
Establish the horizon line:
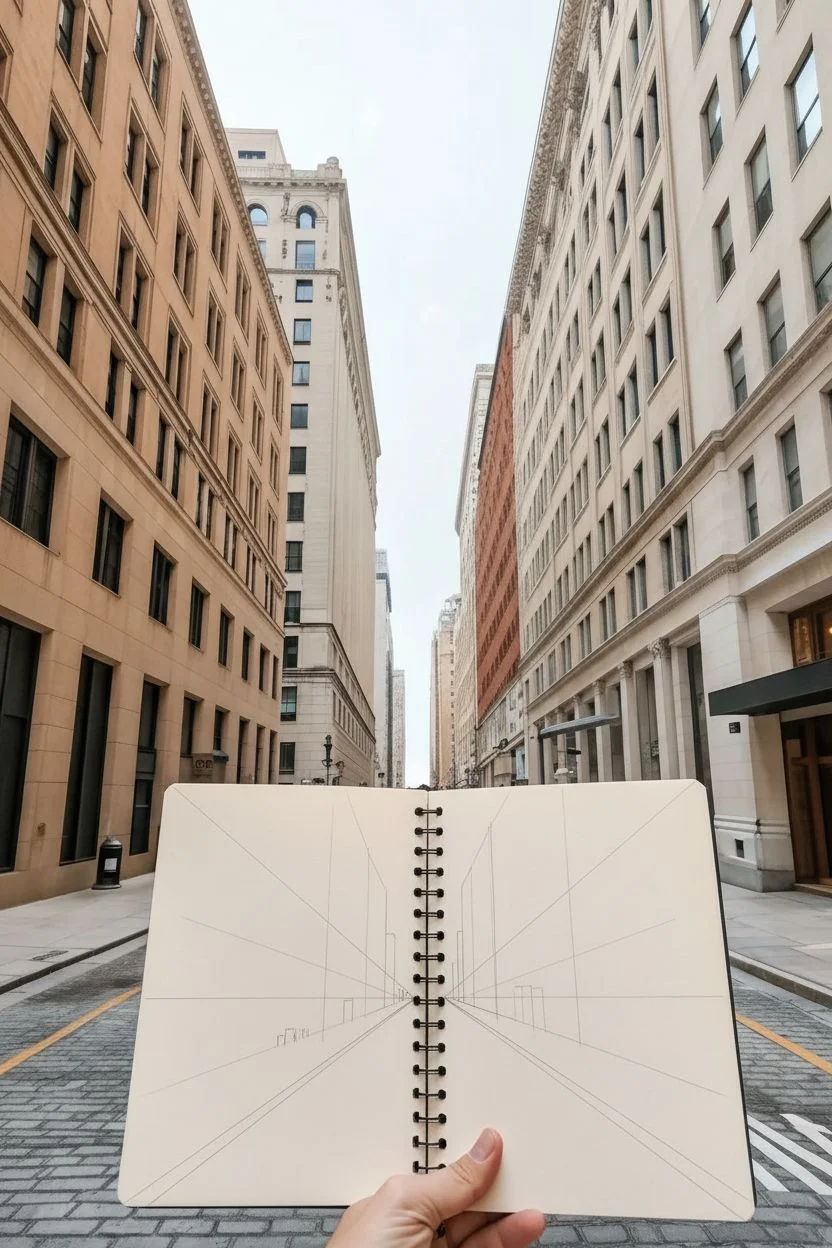
Open your sketchbook partially so the spiral binding is vertical in the center. Lightly draw a horizontal line across both pages, positioning it roughly in the lower third of the paper. This represents your eye level. -
Place the vanishing point:
Mark a single small dot on the horizon line, right near the center binding (or slightly offset if you prefer an asymmetrical view). All diagonal lines representing building sides will converge here. -
Block in the street canyon:
Using your ruler and HB pencil, draw two diagonal lines radiating from the vanishing point downward to the bottom corners to define the curbs of the street. Draw two more diagonal lines radiating upward to define the rooflines of the buildings on either side. -
Define the vertical boundaries:
Draw vertical lines perpendicular to the horizon to mark the nearest corners of the buildings on the far left and far right. These will serve as the anchor points for your architectural details. -
Sketch the distant end:
Near the vanishing point, sketch tiny vertical rectangles to represent the faint, distant buildings that close off the street view. Keep these shapes simple and indistinct to enhance the feeling of atmospheric depth.
Spacing Trick
To space receding windows accurately, draw an ‘X’ across a rectangular section. The center of the ‘X’ is the perspective midpoint, helping you divide space realistically as it shrinks.
Step 2: Measuring and Subdividing Facades
-
Divide the facades vertically:
On the large building to your left, lightly mark vertical sections to separate the main structural columns from the window bays. Remember that as objects recede toward the vanishing point, the space between vertical lines should get progressively narrower. -
Establish horizontal story lines:
From the vanishing point, draw light guide lines that cut across the building faces to mark the top and bottom of each floor’s windows. This ensures every window lines up perfectly in perspective. -
Refine the window shapes:
Within the grid you’ve created, draw the inset rectangles for the windows. On the nearest parts of the building, draw the thickness of the window sills to show depth; as the windows get further away, simplify them into single lines or dark slivers. -
Mirror the process on the right:
Repeat the subdivision process for the buildings on the right page. Try varying the architecture slightly—perhaps taller, thinner windows or a different cornice style—to add visual interest to the street composition.
Step 3: Inking and Detailing
-
Start with the main structural lines:
Switch to your 0.5mm fine liner. Carefully ink the main vertical edges of the buildings and the primary perspective lines of the curbs and rooflines. Use a ruler if you want a crisp architectural look, or freehand it for a looser vibe. -
Ink the repeated windows:
Use a 0.3mm pen for the windows. I find it helpful to draw all the vertical sides of the windows first, then connect them with the horizontals, following your pencil guidelines back to the vanishing point. -
Add architectural textures:
With the 0.1mm pen, add hatching or subtle lines to suggest brickwork, stone textures, or decorative molding under the rooflines. Keep the texture denser on the shadowed sides of the street to enhance the 3D effect. -
Detail the street level:
Sketch in the sidewalk details, street lamps, and perhaps a few tiny figures walking in the distance. Draw a lone figure in the foreground on the left sidewalk to give the scene a sense of scale. -
Include organic contrast:
On the right page, sketch a bare winter tree near the foreground. Use the 0.3mm pen to draw jagged, reaching branches that overlap the rigid grid of the building behind it, breaking up the straight lines.
Slanted Windows?
If your windows look tilted or like they are falling over, check your vertical lines. In 1-point perspective, all vertical lines must be perfectly perpendicular to the horizon line.
Step 4: Final Touches
-
Erase guidelines:
Wait for the ink to dry completely to avoid smudging. Then, gently use the kneaded eraser to lift off all the remaining graphite pencil lines, leaving only the crisp ink drawing. -
Strengthen contrast:
Use the 0.5mm pen to re-line closer objects or deepen the shadows inside the nearest windows. This atmospheric perspective trick makes the foreground pop while the background recedes. -
Add street markings:
Lightly draw road markings or crosswalk lines on the street surface, ensuring they also obey the rules of perspective by converging toward the vanishing point.
Now you have a dynamic urban landscape that pulls the viewer’s eye deep into the city scene


Classroom Rows of Desks Facing the Front Wall
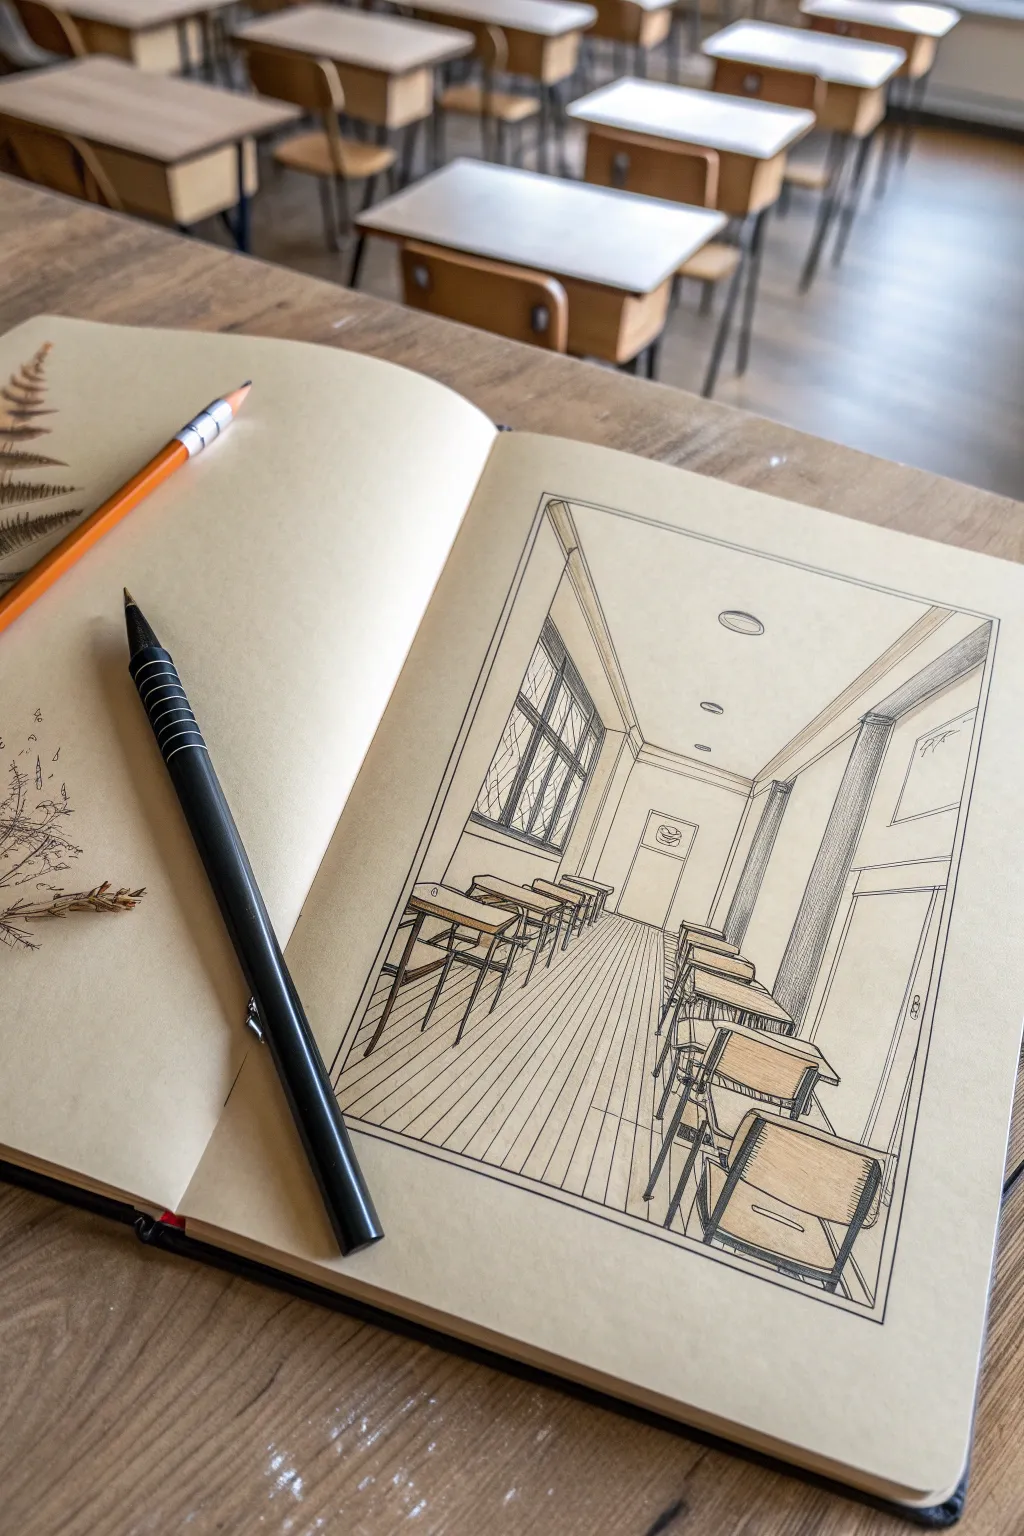

Master the fundamentals of one-point perspective with this clean and architectural classroom study. Using simple linework and strategic shading, you’ll create a convincing illusion of depth that draws the viewer straight down the center aisle.
Step-by-Step
Materials
- Smooth sketchbook paper (cream or toned)
- Black technical pens (0.1mm, 0.3mm, 0.5mm)
- Orange colored pencil
- Ruler or straight edge
- HB Graphite pencil
- Eraser
Step 1: Setting the Perspective Framework
-
Establish the horizon:
Begin by drawing a faint horizontal line with your HB pencil across the middle of your page. This is your eye level. -
Mark the vanishing point:
Place a small dot exactly in the center of your horizon line. Every diagonal line in this drawing will converge to this single point. -
Define the back wall:
Draw a small rectangle centered around your vanishing point. This represents the far wall of the classroom and dictates the room’s scale. -
Create the structural rays:
From the vanishing point, draw faint guide lines extending outwards through the four corners of your back wall rectangle all the way to the paper’s edge. These form the ceiling, floor, and side walls. -
Block in major elements:
Lightly sketch the vertical lines for the windows on the left and the door frame on the back wall. Keep your vertical lines perfectly straight up and down to maintain the illusion.
Keep it Vertical
The golden rule of one-point interior sketching: all vertical lines (walls, table legs, door frames) must be perfectly perpendicular to the bottom of the page, never tilted.
Step 2: Constructing the Furniture
-
Align the desk rows:
Draw faint orthogonals (diagonal guide lines) directly from the vanishing point along the floor. These will mark the tops and bottoms of the desks to ensure they shrink correctly as they recede. -
Sketch the nearest desk:
Start with the closest desk in the foreground. Draw it largely, focusing on the rectangular desktop and tubular metal legs. -
Recede the rows:
Using your guide lines, sketch the subsequent desks behind the first one. Remember, the gaps between desks should get smaller as they move away from you. -
Add construction details:
Square off the chair backs and seats. I find it easiest to draw them as simple boxes first, then refine the curves later. -
Detail the windows and door:
Flesh out the window panes on the left wall. The horizontal bars on the windows must angle downwards toward the vanishing point.
Warm it Up
Use the orange pencil from the materials list to lightly shade just the wooden tops of the desks. This pop of warm color contrasts beautifully against the stark black ink lines.
Step 3: Inking and Refining
-
Outline the main structure:
Switch to a 0.5mm technical pen. Go over the main structural lines of the room—the corners, ceiling, and floor edges—creating a crisp border. -
Define the furniture:
Use a 0.3mm pen for the desks and chairs. Be careful not to ink your guide lines; only ink the visible edges of the furniture. -
Texturing the floor:
With a 0.1mm pen or very light touch, draw the floorboards. These must radiate from the vanishing point. Don’t draw every single line all the way; broken lines suggest texture without overcrowding. -
Shading for depth:
Use hatching (parallel lines) to add shadow. Darken the side of the cabinets on the right and underneath the desk surfaces to ground them. -
Adding atmospheric details:
Draw the circular ceiling lights. Since they are perspective circles, render them as thin ovals that get wider as they get closer to the top of the page. -
Final clean up:
Wait for the ink to dry completely to avoid smudging. Then, gently erase all your graphite pencil guide lines to reveal the stark, clean architectural finish.
With your guide lines erased, you now have a professional architectural study that perfectly captures the depth of the room
BRUSH GUIDE
The Right Brush for Every Stroke
From clean lines to bold texture — master brush choice, stroke control, and essential techniques.
Explore the Full Guide
Warehouse Aisle of Stacked Boxes and Pallets

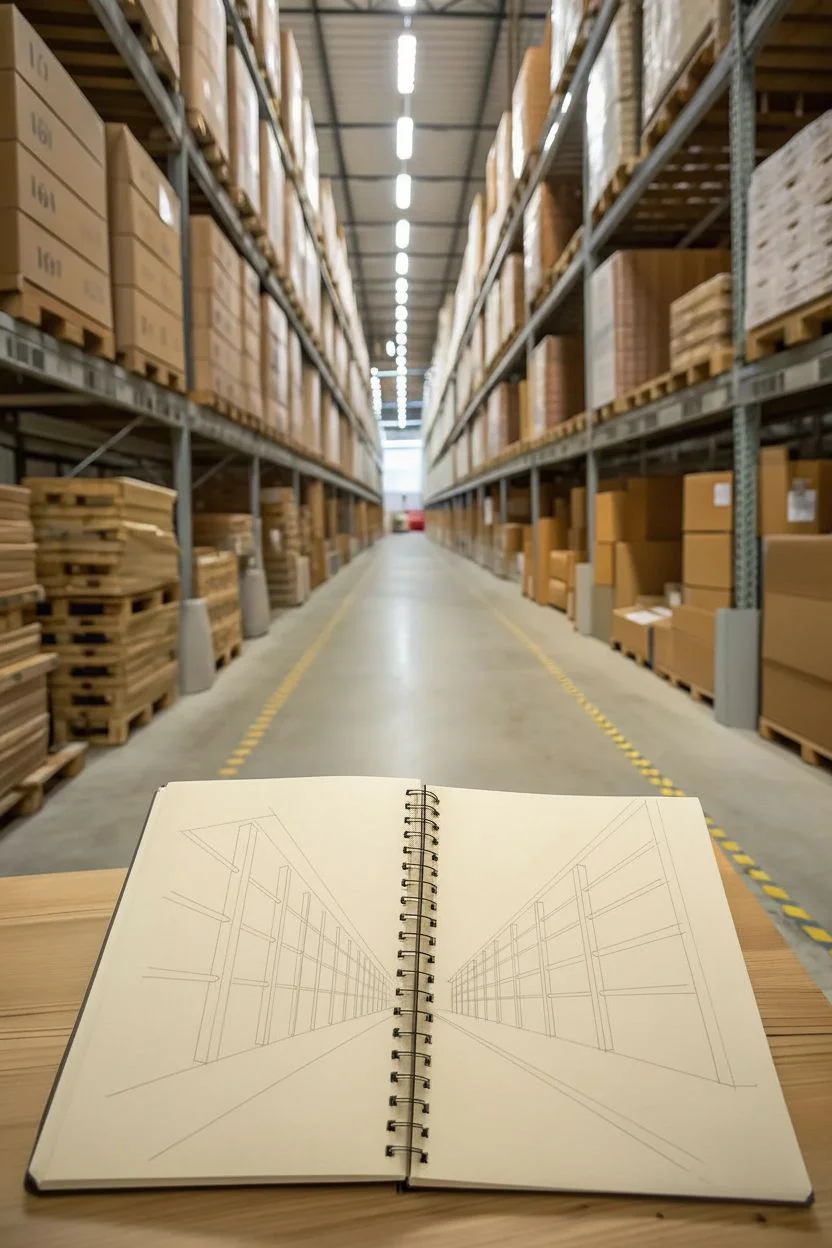
Learn to capture the immense scale and depth of a warehouse aisle using classic one-point perspective techniques. This project focuses on turning rigid architectural lines into a dynamic sketch that draws the viewer’s eye straight down the center.
How-To Guide
Materials
- A4 sketchbook (smooth or medium tooth paper)
- HB graphite pencil for initial guidelines
- 0.3mm fine liner pen (black)
- 0.5mm or 0.8mm fine liner pen (black)
- Clear plastic ruler (at least 30cm)
- Kneaded eraser
Step 1: Setting the Perspective Framework
-
Establish the horizon:
Begin by lightly drawing a horizontal line across the middle of your page with your HB pencil. This represents the viewer’s eye level. -
Place the vanishing point:
Mark a small X exactly in the center of your horizon line. Every diagonal line in this drawing will eventually converge at this single spot. -
Define the aisle corridor:
Use your ruler to draw two diagonal lines extending from the vanishing point downward to the bottom left and right corners of the page. These mark the base of the shelves. -
Set the ceiling limits:
Draw two more diagonal lines from the vanishing point upwards towards the top corners. These will define the tops of the massive shelving units. -
Sketch vertical supports:
Along your floor diagonals, draw vertical lines spaced out to represent the metal uprights. Remember to space them closer together as they get nearer to the vanishing point to create the illusion of depth.
Step 2: Constructing the Shelves
-
Draw horizontal beams:
Connect your vertical posts with horizontal lines. These lines should remain perfectly parallel to your horizon line, not angled. -
Add diagonals for depth:
For the side supports of the shelves (the parts facing the aisle), draw lines going back toward the vanishing point from the tops and bottoms of your vertical posts. -
Block in pallets:
Sketch rough rectangular prism shapes on the floor and shelves. Keep the lines loose; these represent boxes and pallets. -
Detail the ceiling structure:
Above the shelves, lightly sketch diagonal lines radiating from the vanishing point to represent the roof trusses and lighting fixtures.
Wobbly Lines?
If your shelves look uneven, double-check that your vertical lines are perfectly perpendicular to the bottom edge of the paper, not slanted.
Step 3: Inking and Detailing
-
Outline main structures:
Switch to your 0.5mm fine liner. Go over the main vertical beams and horizontal shelf supports, making these lines confident and straight. -
Line the perspective edges:
Trace the diagonal lines of the shelves leading to the vanishing point. I usually stop these lines just short of the center to keep the background from getting too cluttered. -
Add structural details:
Use the 0.3mm pen to add internal cross-bracing (small X shapes) within the vertical metal posts for realism. -
Sketch the goods:
In the foreground on the left, use wiggly, organic lines to suggest a forklift or stack of loosely wrapped pallets. This contrasts nicely with the rigid shelves. -
Refine the floor:
Draw the aisle markings (like yellow safety lines) by extending two more diagonals from the vanishing point along the floor. -
Finalize ceiling elements:
Ink the overhead lights as simple rectangles or ovals that get smaller as they recede into the distance.
Depth Trick
Make distant objects less detailed and lighter in line weight. Heavy details draw the eye, so save those for the foreground elements.
Step 4: Cleanup
-
Erase guidelines:
Once the ink is completely dry (give it a few minutes), gently rub your kneaded eraser over the whole sketch to lift the graphite. -
Strengthen the foreground:
Take your thicker 0.8mm pen and re-line the closest shelf posts and the foreground pallet details. This line weight hierarchy pulls them forward visually.
You now have a structured technical sketch that perfectly captures industrial depth


Have a question or want to share your own experience? I'd love to hear from you in the comments below!