
Whenever I feel stuck, I reach for opposite drawing ideas because a good contrast instantly gives me a story to draw. Think visual juxtapositions—two clearly different vibes sharing one page, like they’re arguing and harmonizing at the same time.
Sun vs. Moon Face Profile Duo
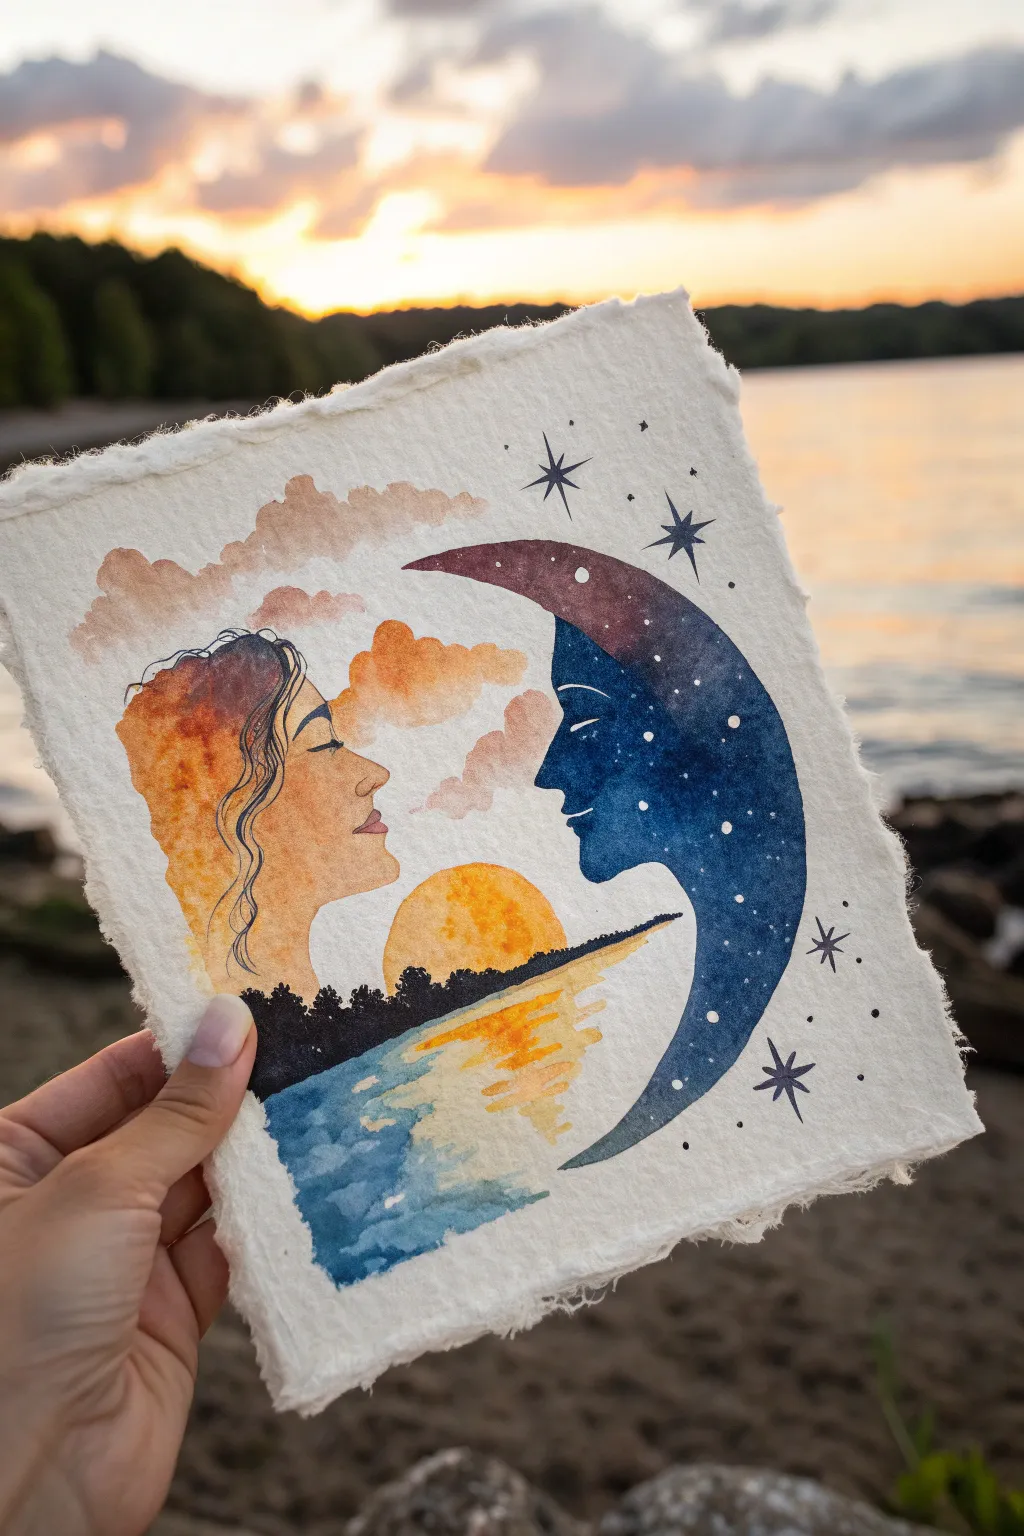
Capture the eternal dance between day and night with this romantic watercolor illustration. Using negative space for the sun goddess and bold washes for the moon face creates a striking visual balance on textured paper.
Step-by-Step
Materials
- Cold press watercolor paper (deckle edge preferred)
- Pencil (HB or lighter)
- Kneaded eraser
- Watercolor paints (Indigo, Paynes Gray, Alizarin Crimson, Cadmium Yellow, Orange, Burnt Sienna)
- Round watercolor brushes (sizes 2 and 6)
- Black fine liner pen (01 or 03 size)
- White gel pen or gouache
- Masking fluid (optional)
- Water jars and paper towels
Step 1: Sketching the Silhouettes
-
Establish the composition:
Lightly draw a central horizon line across the lower third of your paper. This will separate the sky from the water. -
Outline the profiles:
Draw two profiles facing each other in the center. On the left, sketch a feminine profile with flowing hair—this will be the ‘Sun’ figure. On the right, sketch a masculine profile that curves into a crescent moon shape. -
Protect the sun face:
The face on the left will remain unpainted (white paper), so keep your pencil lines very light here. You are essentially drawing the boundary where the background sky will stop. -
Define the moon:
For the moon on the right, sketch the eye closed and a slight smile. The shape should taper at the top and bottom like a classic crescent.
Fixing Muddy Water
If the blue water and yellow reflection create an ugly green where they mix, let the yellow layer dry completely before painting the blue strokes around it.
Step 2: Painting the Sun Side (Left)
-
Paint the sunset sky:
Inside the hair shape of the left profile, wet the paper slightly. Drop in orange and burnt sienna near the face’s edge, blending outward into softer peach tones towards the back of the head. -
Create the clouds:
While the wash is still damp but not soaking, dab in darker brownish-orange pillowy shapes to form clouds roughly following the curve of the hair. -
Form the sun:
Paint a semi-circle of bright yellow-orange rising from your horizon line, positioned right between the two figures. -
Add the reflection:
Beneath the horizon line, paint horizontal strokes of yellow and orange into the ‘water’ area, mirroring the colors of the sunset above. -
Define the water:
Fill the rest of the bottom left corner with blue watercolor washes, carefully painting around the yellow reflection strokes. Let the blue bleed slightly into the yellow for a natural look.
Add Metallic Magic
Use gold metallic watercolor for the sun and the reflection in the water to make the piece shimmer beautifully when it catches the light.
Step 3: Painting the Moon Side (Right)
-
Base wash for the moon:
Mix a deep indigo with a touch of purple. Paint the entire crescent moon shape, starting lighter at the top and getting darker and more saturated towards the bottom point. -
Adding gradients:
While the moon is wet, drop in concentrated Paynes Gray or black along the back curve to giving it roundness and volume. -
Lift the facial features:
Use a thirsty, clean brush to gently lift a small line of paint where the moon’s eye and eyebrow are located, creating a subtle highlight. -
Paint the tree line:
Once the sky and water layers are totally dry, use solid black ink or very concentrated dark paint to create a silhouette of trees along the horizon line, connecting the two profiles.
Step 4: Finishing Details
-
Define hair strands:
Using a fine liner pen or a very small brush with dark paint, draw loose, wavy strands of hair on the sun profile. Let them overlap the painted sky area to integrate the shape. -
Add facial details:
Use the fine liner to gently ink the closed eye, eyebrow, and lips of the sun profile. Keep the lines delicate. -
Create stars:
Using a white gel pen or white gouache, dot small stars onto the dark blue moon. Add a few larger, four-pointed shiny stars around the moon’s exterior. -
Final touches:
Draw thin black starburst shapes in the white space around the moon to balance the composition. -
Refine the edges:
If you want that rustic look but didn’t buy deckle-edge paper, you can dampen the edges of your finished painting and carefully tear strips away.
Now you have a poetic piece of art that beautifully balances the warmth of day with the cool mystery of night


Summer vs. Winter One Tree

This stunning double-page spread captures the passage of time by depicting the same solitary tree in two starkly different seasons. You’ll work across a sketchbook fold to create a vibrant summer scene on the left and a crisp, snowy winter landscape on the right.
Detailed Instructions
Materials
- Watercolor sketchbook (cold press paper, minimum 140lb/300gsm)
- Watercolor paint set (greens, blues, browns, yellow ochre, cadmium orange, alizarin crimson)
- Round watercolor brushes (sizes 2, 6, and 8)
- Fine liner pen (waterproof, brown or dark grey, size 0.1 or 0.3)
- Pencil (HB) and eraser
- Masking tape or painter’s tape
- White gouache or white gel pen
- Paper towels and two jars of water
Step 1: Planning and Sketching
-
Prepare the spread:
Begin by isolating your painting area. Use masking tape to create a clean rectangular border on both pages of your open sketchbook. Leave a small gap in the center fold if you want the two paintings to feel like distinct panels rather than one continuous image. -
Establish the horizon line:
With your HB pencil, lightly draw a horizon line. It should be at roughly the same height on both pages, positioned about one-third of the way up from the bottom of the taped area. -
The summer tree skeleton:
On the left page, sketch the trunk and main branches of the tree. Focus on a sturdy trunk that leans slightly, branching out towards the top. Don’t worry about tiny twigs yet; the leaves will cover them. -
The winter tree skeleton:
On the right page, replicate the same trunk structure in the same position. Since this tree is bare, you need to draw the branch system in much greater detail. Sketch main boughs splitting into smaller branches, reaching upwards and outwards.
Uneven Watercolors?
If your sky dries with hard edges (blooms), soften them with a clean, damp brush before they fully set, or embrace the texture as clouds.
Step 2: Painting the Summer Scene (Left)
-
Summer sky wash:
Wet the sky area on the left page with clean water. Drop in a very pale wash of cerulean or sky blue, keeping it lighter near the horizon. Let it dry completely. -
Leafy base layer:
Mix a fresh sap green. Using a size 6 brush, damp (not soaking), stipple irregular cloud-like shapes around the branches to form the foliage masses. Leave gaps of white paper showing through for airiness. -
Building tree volume:
While the green is still slightly damp, drop in a darker, cool green (mix sap green with a touch of blue or brown) into the bottom-right sections of the foliage clumps to suggest shadow. -
Summer trunk texture:
Paint the trunk using burnt umber or sepia. Keep one side lighter for a highlight. While wet, dropping in a darker brown at the base grounds the tree. -
Grassy foreground:
Use broad, horizontal strokes of yellow-green and ochre for the field. As you get closer to the bottom edge, use upward flicking motions to suggest tall blades of grass. -
Wildflower details:
Once the grass is dry, use your smallest brush to dab tiny dots of red, orange, and white gouache in the foreground corner for the wildflowers.
Step 3: Painting the Winter Scene (Right)
-
Winter sunset gradient:
Wet the sky area on the right. Start with a pale blue at the top, fading into clear water, then blend in a soft warm peach or watery orange near the horizon to mimic a cold winter sunset. -
Snowy ground shadows:
The snow remains mostly the white of the paper. Mix a very watery, pale blue-grey shade. Paint soft, horizontal shadows across the foreground and slightly darker patches near the tree roots to show undulating snow. -
Winter trunk definition:
Paint the trunk on the right using similar browns as the summer tree, but emphasize the texture more. Use a dry-brush technique to drag color down the trunk, creating a rough bark effect that catches the ‘sunset’ light. -
Detailed branch work:
Using your finest brush (size 2) or a waterproof fine liner, trace over your pencil branch sketches. Ensure the branches taper to very fine points and overlap each other for complexity. -
Distant tree line:
On both pages, paint a soft, muted undulating shape along the horizon line. On the winter side, make it a cool blue-grey; on the summer side, a muted dark green. This adds depth. -
Final winter textures:
Add dried weeds poking through the snow using quick, sharp strokes of ochre and dark brown with your smallest brush or pen. Add subtle shadows extending from the tree base across the snow.
Level Up: Birds in Flight
Paint a few tiny V-shaped birds in the distance on the summer side, and perhaps a single perched bird or owl on the bare winter branches.
Peel off your masking tape carefully to reveal the crisp edges that frame your beautiful study of seasonal change


Order vs. Chaos Split Pattern Page
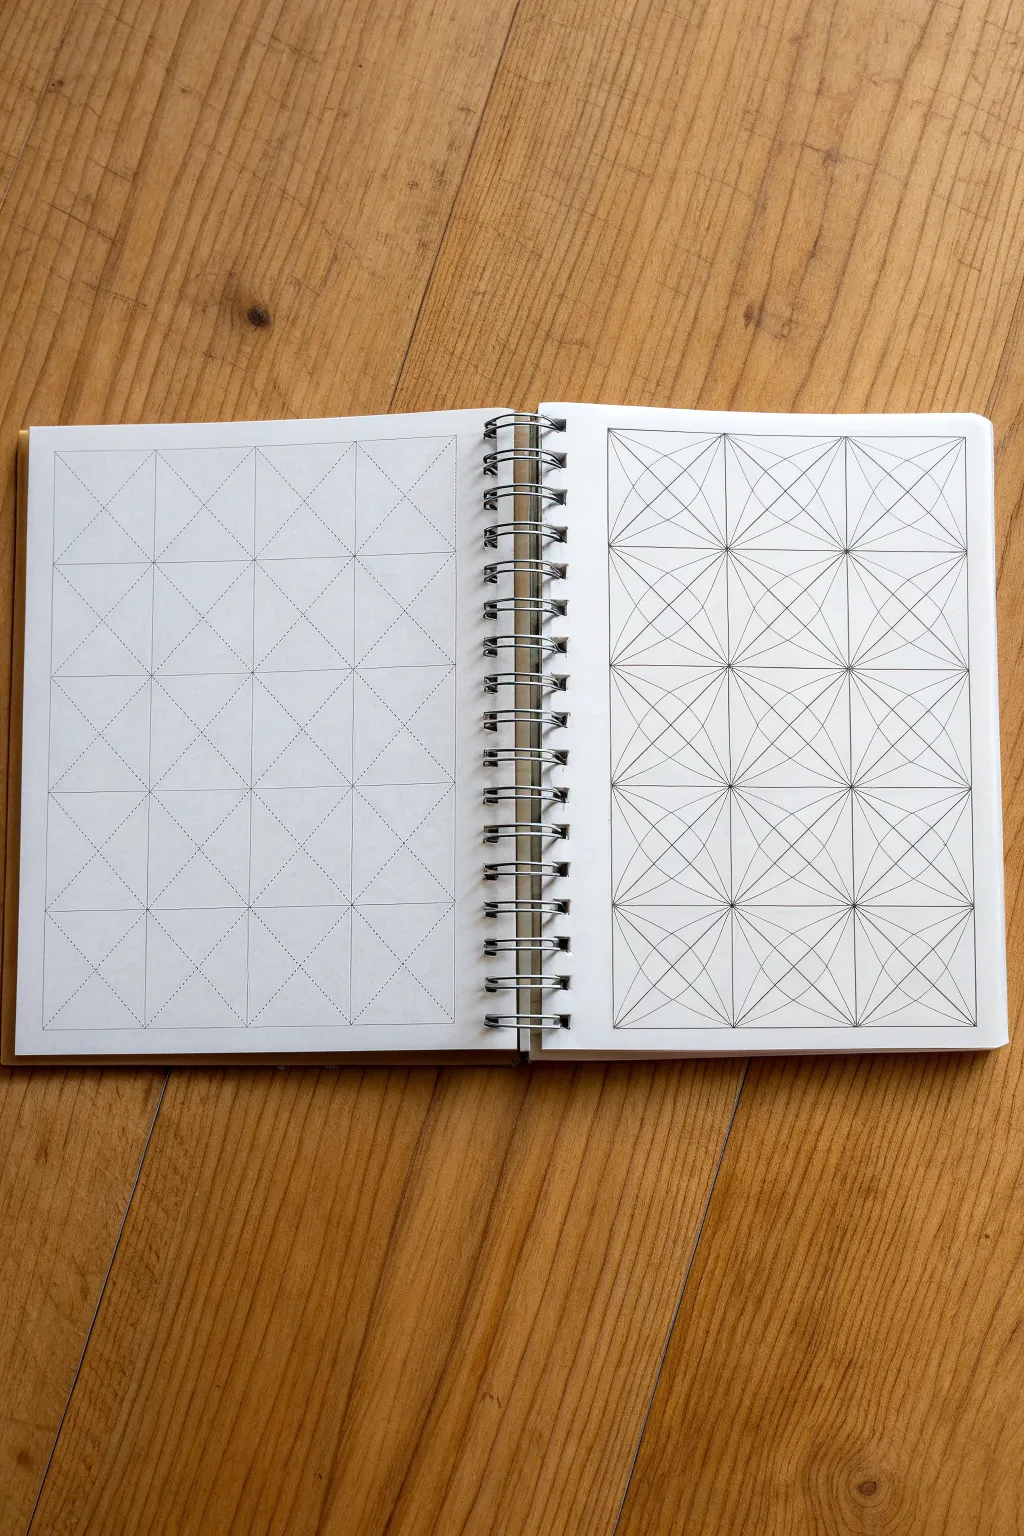
This captivating spread explores the beautiful tension between structure and freedom, using simple geometry as a foundation. By setting up identical grids on facing pages and completing only one, you create a striking visual dialogue about potential and realization.
How-To Guide
Materials
- Spiral-bound sketchbook (A4 or similar size)
- Ruler (preferably clear acrylic)
- Mechanical pencil (0.5mm HB)
- Fine liner pen (0.3mm or 0.5mm, black)
- Eraser (kneaded or high-quality vinyl)
Step 1: Setting the Foundations
-
Define the Grid Area:
Begin by measuring a large rectangle on the left page. Leave a consistent margin of about 1 inch from the edges. Lightly mark the corners with your pencil. -
Create the Vertical Columns:
Divide the width of your rectangle into four equal sections. Draw light vertical lines from top to bottom to create four tall columns. -
Create the Horizontal Rows:
Divide the height of the rectangle into five equal sections. Draw light horizontal lines across to form a grid of 20 squares total (4 wide by 5 high). -
Add the Diagonals:
Inside each square, draw faint diagonal lines from corner to corner. You should now have an ‘X’ inside every square box on this page. -
Mirror the Grid:
Repeat this exact process on the right-hand page. Ensure the dimensions match the left side perfectly so the books feels balanced when open.
Step 2: Developing the Patterns
-
Left Page: The Ghost Grid:
On the left page, take your fine liner pen and carefully trace *only* the vertical lines of the grid columns. -
Completing the Frame:
Trace the horizontal lines next. Do not ink the diagonal lines on this page; leave them in pencil to represent the ‘Order’ or the blueprint phase. -
Right Page: Inking the Base:
On the right page, ink the entire grid structure first: all vertical and horizontal lines creating the squares. -
Inking Structural Diagonals:
Ink the main diagonal lines (the ‘X’ shapes) inside every square on this page. Use a ruler to keep these crisp. -
Adding the Mid-Points:
Mark the center point of every vertical and horizontal grid line. You will connect these new points to create diamonds. -
Drawing the Diamond Layer:
Draw lines connecting the top-center of a square to the side-center, then to the bottom-center, and finally the other side-center. This creates a diamond shape inside the square. -
Repeating the Diamond:
Repeat this diamond pattern for all 20 squares on the right page.
Smudge Alert
If using a plastic ruler with fine liner pens, tape pennies to the underside of the ruler. This lifts the edge slightly off the paper to prevent ink smearing.
Step 3: The Chaos Detail
-
Adding Organic curves:
Now for the intricate part. Inside each triangular section formed by your lines, draw a curved line that bows slightly inward toward the center of the square. -
Connecting the Curves:
Continue these curved lines so they meet at the grid intersections. This creates the optical illusion of circular petals or concave stars. -
Developing the Starburst:
Focus on where four squares meet. Your curved lines should create a four-pointed star shape centered on that intersection. -
Detailed Inking:
Go over these curved lines with your fine liner. I find it helpful to rotate the sketchbook physically to get the best angle for my hand’s natural curve. -
Final Cleanup:
Once the ink is completely dry (give it a good 5-10 minutes just to be safe), gently erase all pencil marks from the right page. -
Preserving the Concept:
Leave the left page exactly as it is—inked straights and penciled diagonals—to show the ‘before’ state of the geometry.
Level Up: Depth
Use a thicker pen (0.8mm) for the main grid lines and a super fine pen (0.1mm) for the inner curved details to add instant visual depth.
Step back and appreciate how a simple grid can transform into complex art with just a few extra lines


Have a question or want to share your own experience? I'd love to hear from you in the comments below!