An orange pumpkin is already doing half the work for you—it’s bright, nostalgic, and basically begging for paint. Here are my favorite orange pumpkin painting ideas that keep things fun and approachable, from classic fall looks to the artsy “how did you do that?” designs.
Classic Jack-o’-Lantern Face (No Carve)
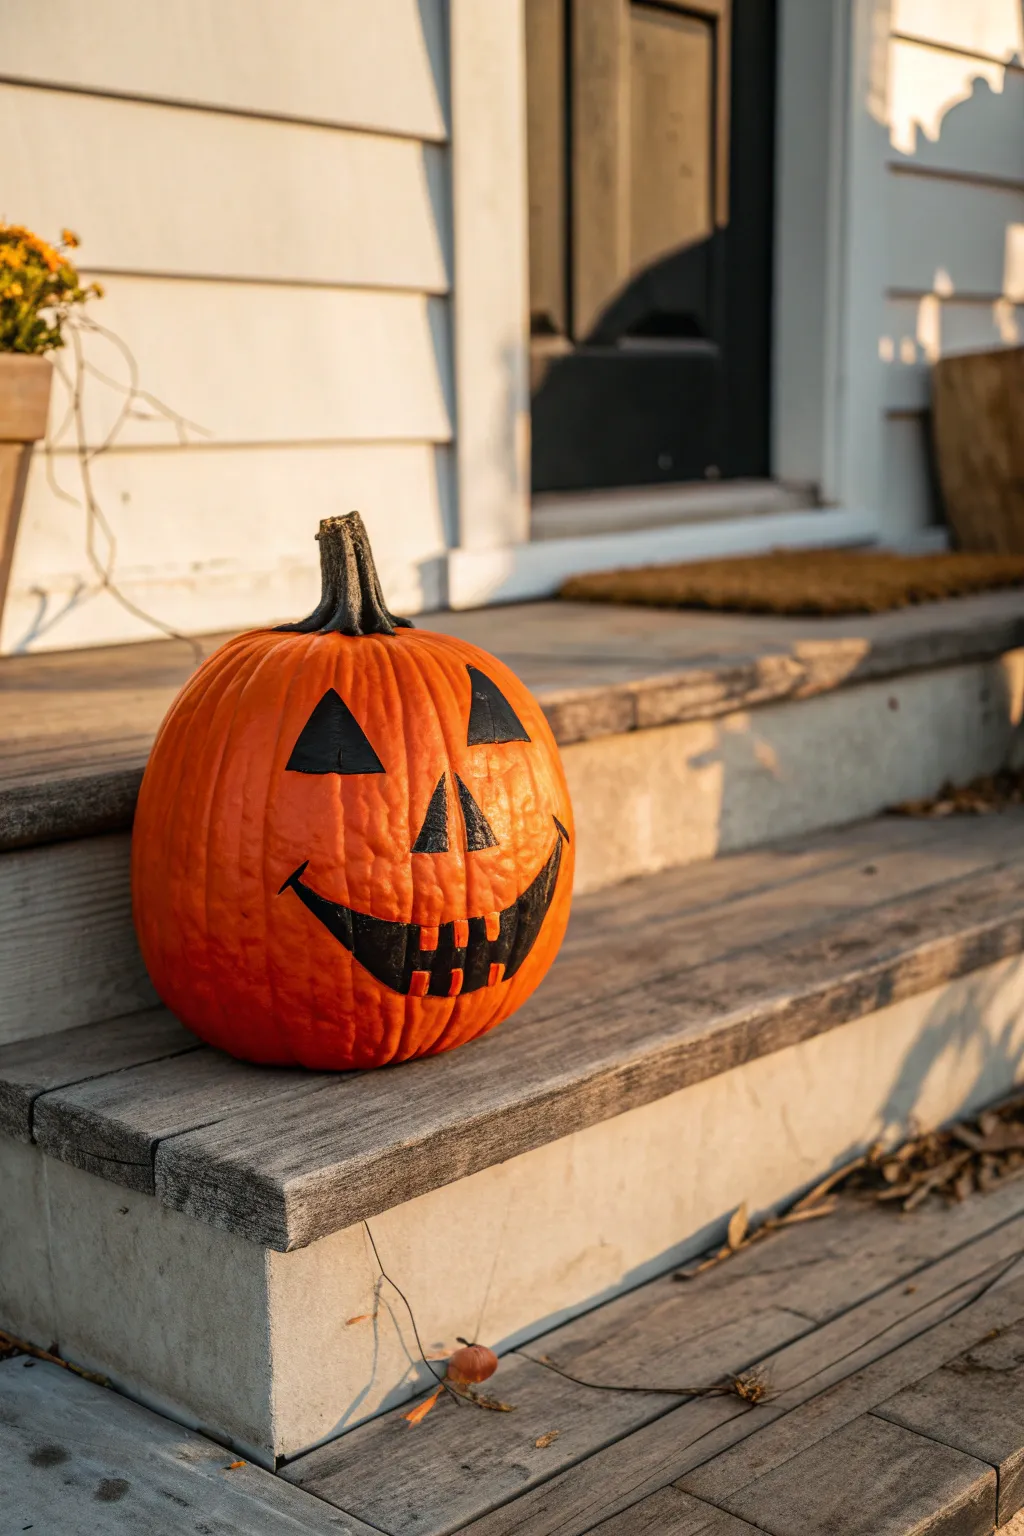
Capture the nostalgic charm of a traditional Jack-o’-lantern without the mess of scooping out seeds. This no-carve project uses bold black paint to create that iconic smiling face, making it a perfect decoration that lasts much longer than its carved counterparts.
Detailed Instructions
Materials
- Medium to large orange pumpkin (smooth surface preferred)
- Black acrylic craft paint (outdoor rated if possible)
- Pencil or dry-erase marker
- Wide flat paintbrush (approx. 1 inch)
- Small round detail brush
- Paper towels
- Cup of water
- Mild dish soap and cloth (for cleaning)
Step 1: Preparation & Planning
-
Clean the Surface:
Before putting any paint down, wipe the entire pumpkin with a damp cloth and a drop of mild dish soap to remove dirt and oils. This ensures the paint adheres properly. -
Dry Completely:
Use a clean towel to dry the surface thoroughly, paying special attention to the deep grooves of the pumpkin ribs. -
Sketch the Eyes:
Using a pencil or a dry-erase marker, lightly draw two large equilateral triangles for the eyes about a third of the way down the pumpkin face. -
Add the Nose:
Draw a slightly smaller triangle directly between and below the eyes for the nose. -
Outline the Grin:
Sketch a wide, U-shaped mouth curve starting below the nose, extending outwards towards the sides of the pumpkin. -
Detail the Teeth:
Within the mouth shape, mark out square blocked teeth—two on the top row and three on the bottom row—leaving gaps between them. -
Review the Face:
Take a step back to check the symmetry and expression. Since you used pencil or dry-erase, now is the time to wipe away and adjust any lines.
Use a Sealant
To make your pumpkin weather-resistant, spray the finished painted face with a clear acrylic sealer or matte fixative after the black paint is 100% dry.
Step 2: Painting the Design
-
Outline the Eyes:
Using your small round detail brush dipped in black acrylic paint, carefully trace over the pencil lines for the left eye triangle. -
Fill the Left Eye:
Switch to your wider flat brush to fill in the center of the triangle with smooth strokes. -
Repeat for Right Eye:
Outline and fill the right eye just like the first one, ensuring the black paint is opaque. -
Paint the Nose:
Use the small brush again to outline the nose triangle, then fill it in solid black. -
Outline the Mouth:
Carefully trace the entire outer perimeter of the smiling mouth shape using the small detail brush for crisp edges. -
Define the Teeth:
Paint the vertical lines and blocks that define the teeth, being very careful to keep your lines straight. -
Fill the Mouth Background:
Use the larger brush to fill in the black areas of the mouth around the teeth blocks. I find it helpful to work from the outside corners inward to avoid smudging. -
Check for Gaps:
Look closely at the pumpkin’s ribs; paint often skips these dips. Dab extra paint into the deep grooves to ensure solid coverage. -
Let it Dry:
Allow the first coat to dry completely for about 15-20 minutes. -
Apply Second Coat:
If the orange shows through, apply a second layer of black paint over all the shapes to get that deep, solid black look.
Wobbly Lines?
If your edges look shaky, wait for the paint to dry fully. Then, use a black permanent marker to trace the outline again, sharpening up any rough edges.
Set your cheerful pumpkin on the porch steps to welcome visitors with a classic Halloween smile


Simple White Ghost Faces
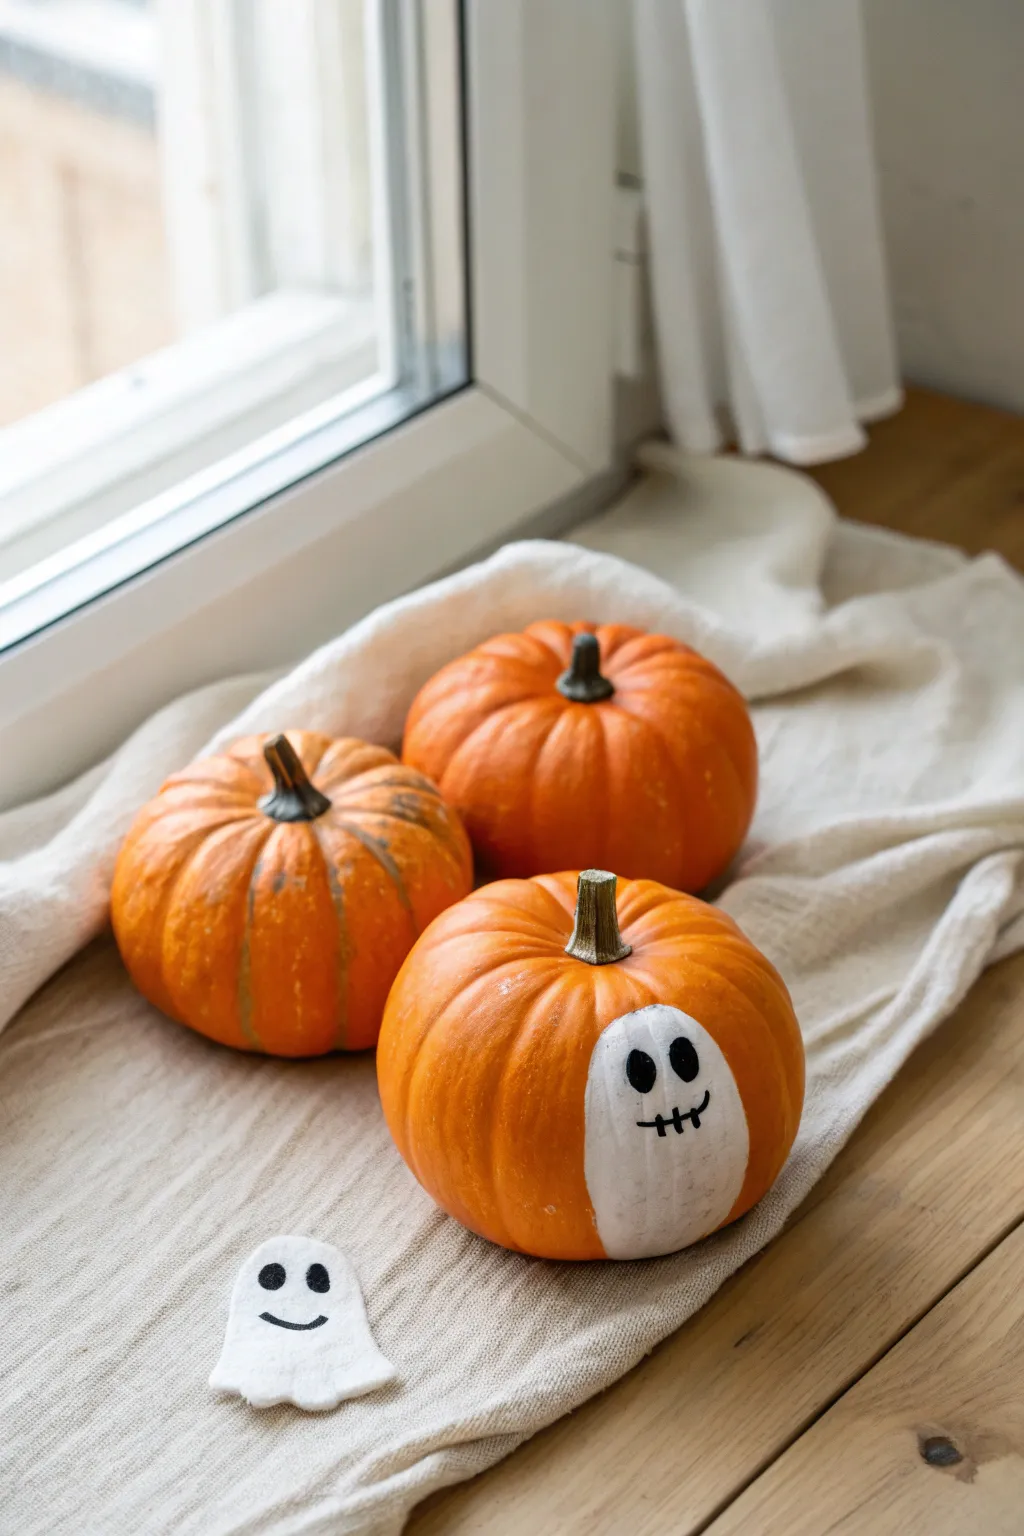
Embrace the charm of simplicity with this adorable ghost-faced pumpkin project, perfect for a cozy windowsill display. By painting a sleek, rounded ghost silhouette directly onto the orange rind, you create a striking contrast that is both modern and playful.
How-To Guide
Materials
- Small orange pumpkin (sugar pie or mini variety)
- White acrylic craft paint
- Black acrylic craft paint or a black paint pen
- Medium flat paintbrush
- Small round detail brush
- White felt sheet
- Fabric scissors
- Clean cloth for wiping
- Pencil (optional)
Step 1: Painting the Pumpkin Ghost
-
Clean the Surface:
Begin by wiping down your pumpkin with a damp cloth to remove any dirt or waxy residue. A clean, dry surface ensures the paint adheres smoothly and lasts longer. -
Outline the Shape:
Visualize an elongated oval shape on the smoothest side of your pumpkin. If you’re nervous about freehanding, I like to lightly sketch the outline with a pencil first to get the placement just right. -
Fill in the Base:
Dip your medium flat brush into the white acrylic paint. Carefully fill in your oval shape, using long, vertical strokes to mimic the curve of the pumpkin. -
Refine the Edges:
While the paint is wet, smooth out the edges of your oval to create a clean, rounded silhouette. The bottom should be slightly wider than the top for a classic ghost shape. -
Apply a Second Coat:
Allow the first layer to dry completely for about 15-20 minutes. Apply a second coat of white paint to ensure it is opaque and the bright orange rind doesn’t show through. -
Paint the Eyes:
Once the white base is fully dry, take your small detail brush with black paint (or a paint pen). Paint two vertical ovals for the eyes near the top third of the white shape. -
Add the Mouth:
Below the eyes, paint a simple curved line for a smile. Keep the line thin and delicate for a friendly expression. -
Stitch Detail:
To give it a whimsical, stitched look, draw three or four small vertical hash marks across the smile line. This small detail adds a lot of character.
Pro Tip: Sealed to Last
Apply a clear matte varnish over the painted area once dry. This prevents chipping and keeps the white bright.
Step 2: Creating the Felt Companion
-
Draft the Felt Ghost:
Take your piece of white felt and lightly sketch a small ghost shape, about 1-2 inches tall. Make the bottom edge wavy for a floating effect. -
Cut Out the Shape:
Using fabric scissors, carefully cut along your sketched line. Felt can be tricky, so make slow, deliberate cuts to keep the curves smooth. -
Paint the Face:
Using the very tip of your detail brush or a fine-point paint pen, add two small black dots for eyes onto the felt. -
Finish with a Smile:
Paint a tiny curved smile beneath the eyes on the felt ghost. Let the paint dry completely before handling or placing it next to your pumpkin.
Troubleshooting: splotchy paint?
If the white paint looks streaky, don’t overwork it while wet. Let it fully dry, then dab—don’t drag—the next layer on.
Arranging your painted pumpkin with plain ones creates a lovely, balanced autumn vignette


Spiderweb Radiating From the Stem
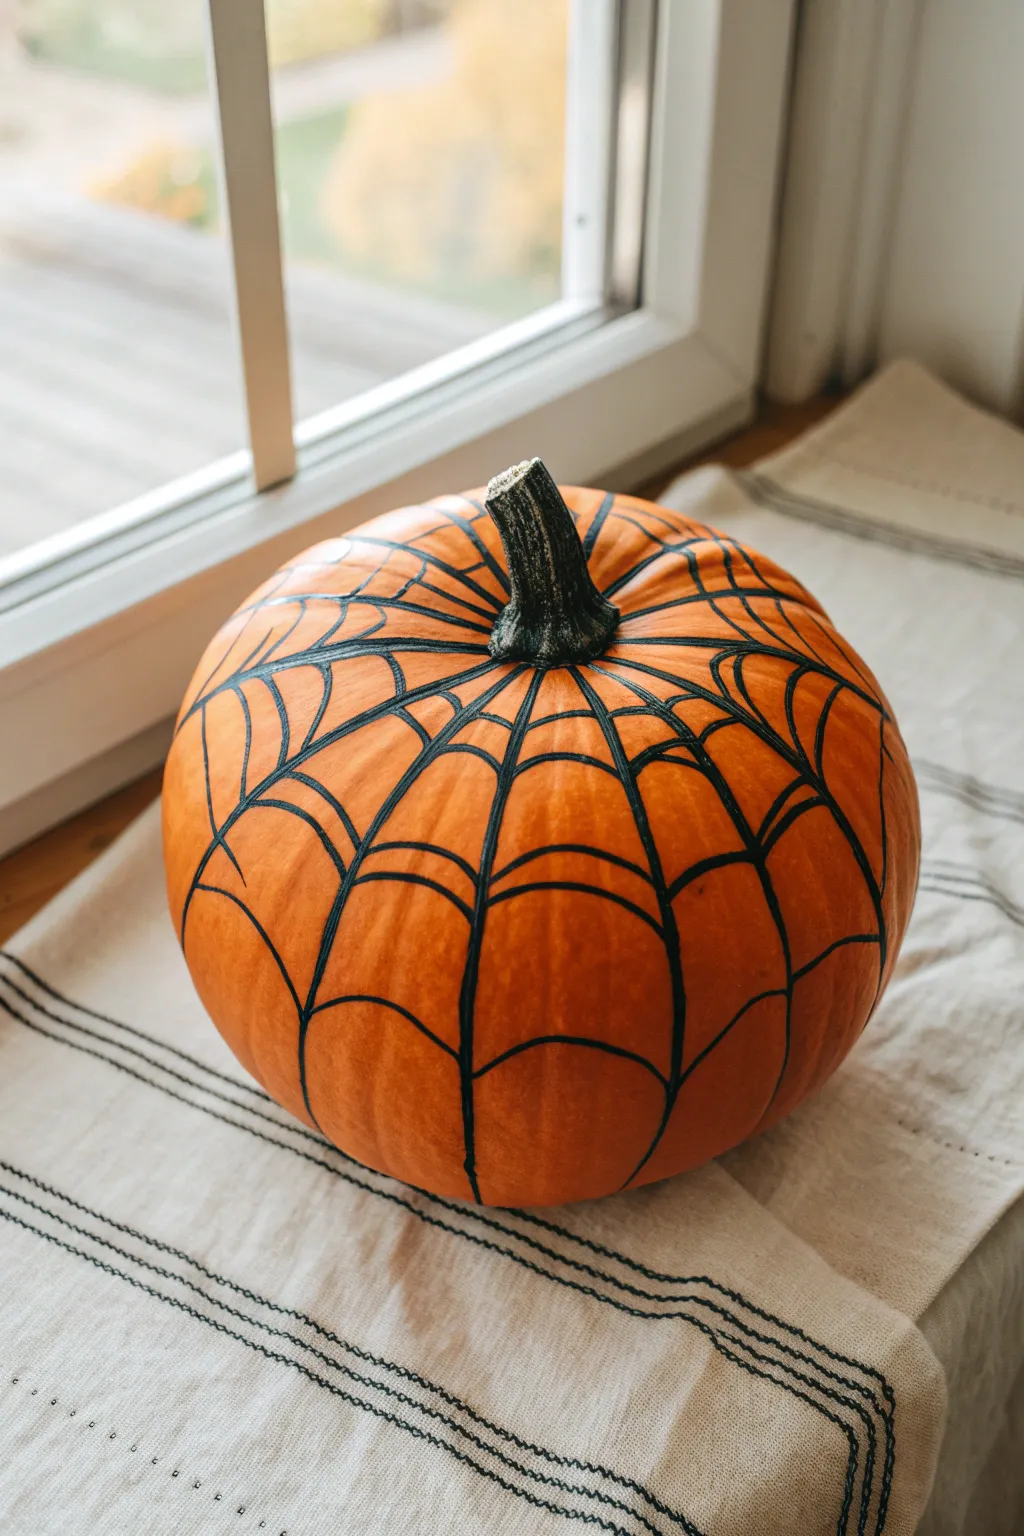
This striking no-carve design uses the natural shape of the pumpkin to create a mesmerizing spiderweb effect. By centering the web on the stem, you let the pumpkin’s ribs guide your lines for a beautifully symmetrical, spooky look.
Step-by-Step Tutorial
Materials
- Medium-sized orange pumpkin
- Black acrylic paint
- Medium round paintbrush (size 4 or 6)
- Small liner paintbrush (size 0 or 1)
- Damp cloth or paper towels
- Water cup
- Optional: Black permanent marker (chisel or broad tip)
- Matte or satin clear sealant spray
Step 1: Preparation
-
Clean surface:
Begin by wiping down your pumpkin thoroughly with a damp cloth to remove any dirt or field dust. -
Dry completely:
Ensure the surface is bone dry before determining where your lines will go; moisture will prevent the paint from adhering properly. -
Study the ribs:
Take a moment to look at the natural vertical grooves (ribs) of your pumpkin. These indentations will serve as the perfect guides for your main radial lines.
Use a Marker Assist
If you are nervous about using a brush for long lines, draw the initial design with a thick black permanent marker first, then paint over it for richness.
Step 2: Painting the Radial Lines
-
Load the brush:
Load your medium round brush with black acrylic paint, ensuring the bristles are coated but not dripping. -
Start at the stem:
Identify the base of the stem where it connects to the pumpkin skin. This will be the central anchor point for every vertical line. -
Follow the grooves:
Starting right against the stem, paint a confident line down the deepest part of a natural groove. -
Extend down:
Continue that line down the side of the pumpkin until it reaches the bottom curve where the pumpkin sits. -
Repeat vertically:
Move to the next major groove and paint another vertical line. I find it easiest to work on opposite sides first to keep things balanced. -
Fill gaps:
Continue painting radial lines until you have a ‘spoke’ pattern covering the entire pumpkin. Aim for roughly equal spacing, though following the natural ribs is more important than perfect geometry.
Step 3: Creating the Webbing
-
Switch brushes:
Switch to your smaller liner brush or continue with the round brush if it has a fine tip. You want slightly clearer control for these curved connectors. -
Start near the top:
Begin about one inch away from the base of the stem. Paint a small, curved line connecting two adjacent vertical spokes. -
Complete the first ring:
Continue connecting all the spokes in a circle at this same height, creating a scalloped ring around the stem. -
Move outward:
Move down another two inches or so. Paint a second, larger ring of scalloped lines connecting the vertical spokes. -
Create the droop:
Make sure your horizontal web lines dip downward in the middle (like a smiley face) rather than going straight across. This emphasizes the ‘sticky’ look of a real web. -
Widen spacing:
As you move down the widest part of the pumpkin, increase the distance between your web rings to accommodate the larger surface area. -
Thicken lines:
Go back over your main lines with a second coat if the orange is showing through. The black should be opaque and bold. -
Clean stem base:
If your brushstrokes got messy near the stem, use a small amount of black paint to create a solid ring right at the base of the stem to hide the start points.
Make It 3D
Before the paint dries, sprinkle fine black glitter onto the wet web lines. This catches the light and adds a shimmering, textural effect.
Step 4: Finishing Touches
-
Check for gaps:
Inspect the web from all angles. If a specific section looks too empty, add an intermediate web ring just in that segment. -
Let it cure:
Allow the paint to dry completely for at least an hour. Thick acrylic can be deceptive and may still be wet underneath the skin. -
Seal result:
Lightly mist the pumpkin with a clear matte sealant spray to prevent the paint from flaking off in humid weather.
Place your webbed creation in a window or on a porch step to welcome visitors to your spooky display


Bold Polka Dots That Pop
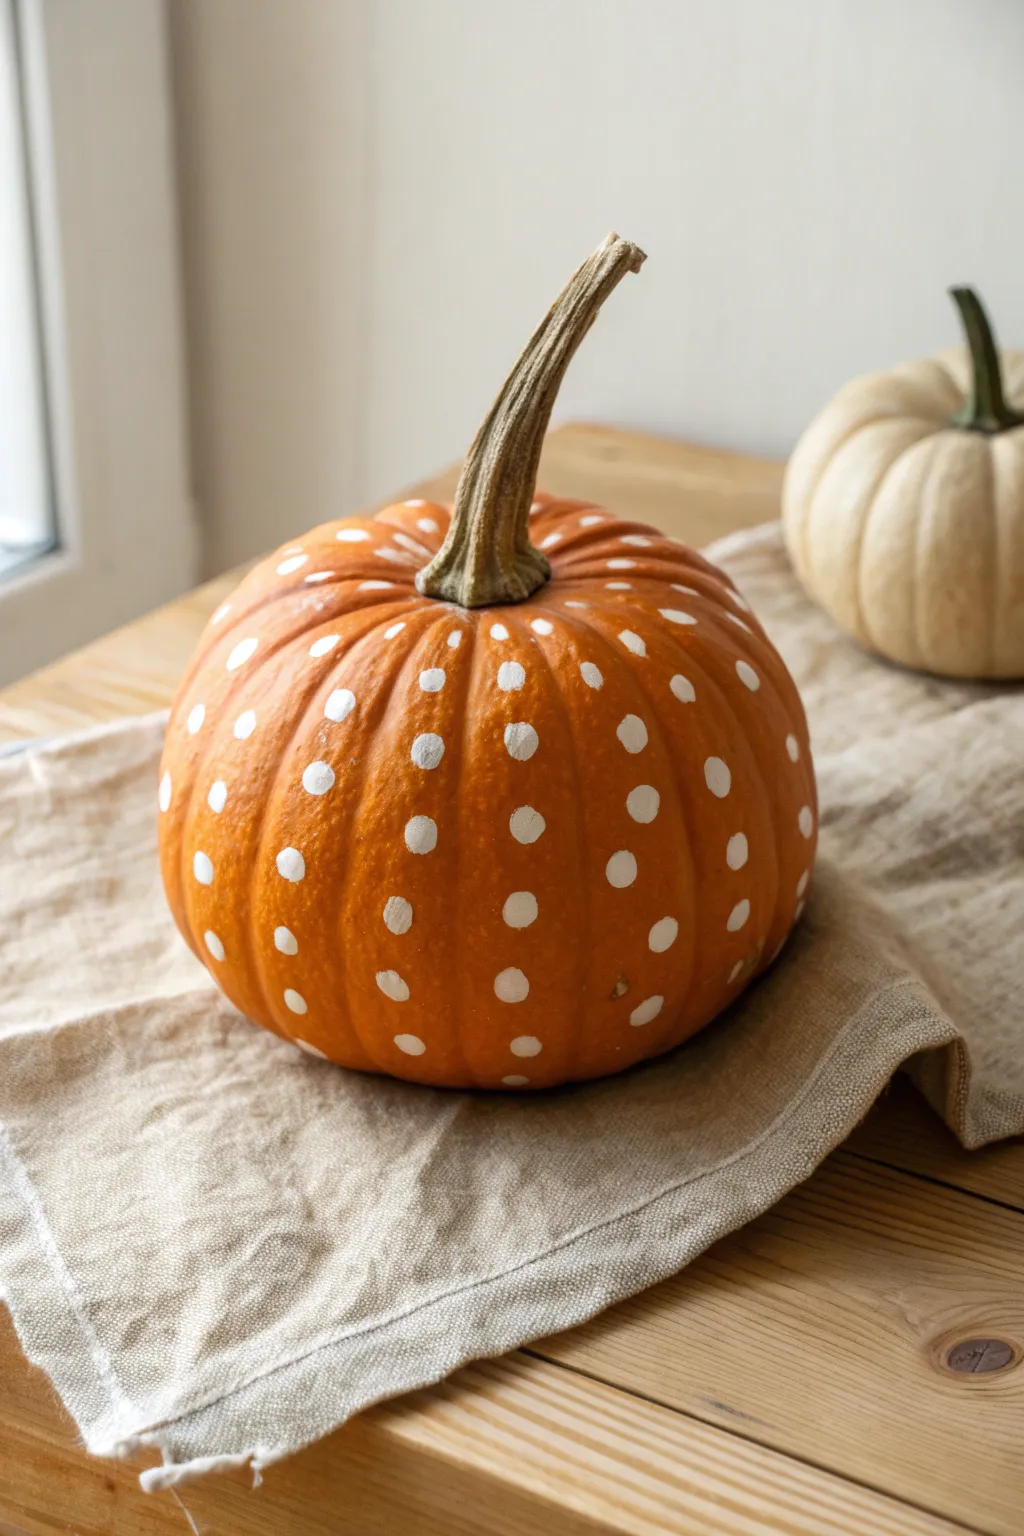
Embrace the playful charm of this rustic yet modern design that pairs the natural warmth of a classic orange pumpkin with the crisp contrast of white dots. This no-carve project is perfect for adding a touch of whimsy to your autumn table setting without the mess of gutting a gourd.
Step-by-Step
Materials
- Medium-sized orange pumpkin (real or faux)
- White acrylic craft paint
- Round sponge pouncers (varying sizes)
- Small round paintbrush
- Damp cloth or baby wipes
- Paper plate or paint palette
- Clear matte sealer (spray or brush-on, optional)
Step 1: Preparation
-
Clean the surface:
Before startting with any paint, it is crucial to ensure your pumpkin is free of dirt and oils. Wipe the entire surface down with a damp cloth or a baby wipe. -
Dry thoroughly:
Allow the pumpkin to air dry completely. If the surface is damp, the paint won’t adhere properly and might peel later. -
Set up your workspace:
Lay down newspaper or a drop cloth to protect your table. Squeeze a generous amount of white acrylic paint onto your paper plate or palette.
Step 2: Creating the Dots
-
Load the pouncer:
Dip a round sponge pouncer into the white paint. Tap it lightly on a clean part of the palette to ensure the sponge is evenly coated but not dripping with excess paint. -
First application:
Press the pouncer straight down onto the pumpkin surface. Do not rock the sponge or twist it, as this can cause smearing. Lift it straight up to reveal a clean circle. -
Consider placement:
Start applying dots randomly around the pumpkin. I find it helpful to vary the spacing slightly to keep the look organic rather than perfectly geometric. -
Work in sections:
Paint one side of the pumpkin first and let the dots tack up slightly before rotating it to reach the other side. This prevents accidental smudges from your hand holding the pumpkin. -
Add variety:
If you want a more dynamic look, switch to a slightly smaller pouncer or brush to add smaller dots in the gaps between the larger ones. -
Touch up edges:
Pumpkin surfaces are bumpy and ribbed, so your sponge might miss some crevices. Use a small round paintbrush to fill in any gaps in the circles or smooth out rough edges.
Uneven Circles?
If the ribs of the pumpkin are distorting your circles, use a q-tip dipped in paint to gently round out the shape, following the natural curve of the gourd.
Step 3: Finishing Touches
-
Second coat:
Once the first layer is dry to the touch (usually 15-20 minutes), you may notice the orange showing through. Go back over each dot with a second coat of white paint for a solid, opaque look. -
Review the pattern:
Step back and look at the pumpkin from a distance. If there are large empty spaces that look awkward, add a few more dots to balance the composition. -
Clean the stem:
If you accidentally got any white paint on the stem, wipe it off quickly with a wet cloth or paint over it with a bit of brown or green paint to tidy it up. -
Let it cure:
Allow the pumpkin to dry completely for at least an hour. Thick dots of acrylic paint can take a little longer to dry in the center. -
Seal the deal (optional):
If this pumpkin will be sitting outside on a porch, spray it with a clear matte sealer to protect the design from rain and humidity.
Pro Tip: Stick to It
For perfectly uniform dots without slippage, use circular adhesive stickers as stencils. Stick them on, paint over the pumpkin, then peel them off to reveal negative-space dots.
Now you have a stylishly spotted centerpiece ready to brighten up your home for the season
BRUSH GUIDE
The Right Brush for Every Stroke
From clean lines to bold texture — master brush choice, stroke control, and essential techniques.
Explore the Full Guide
Buffalo Check Corner Panel
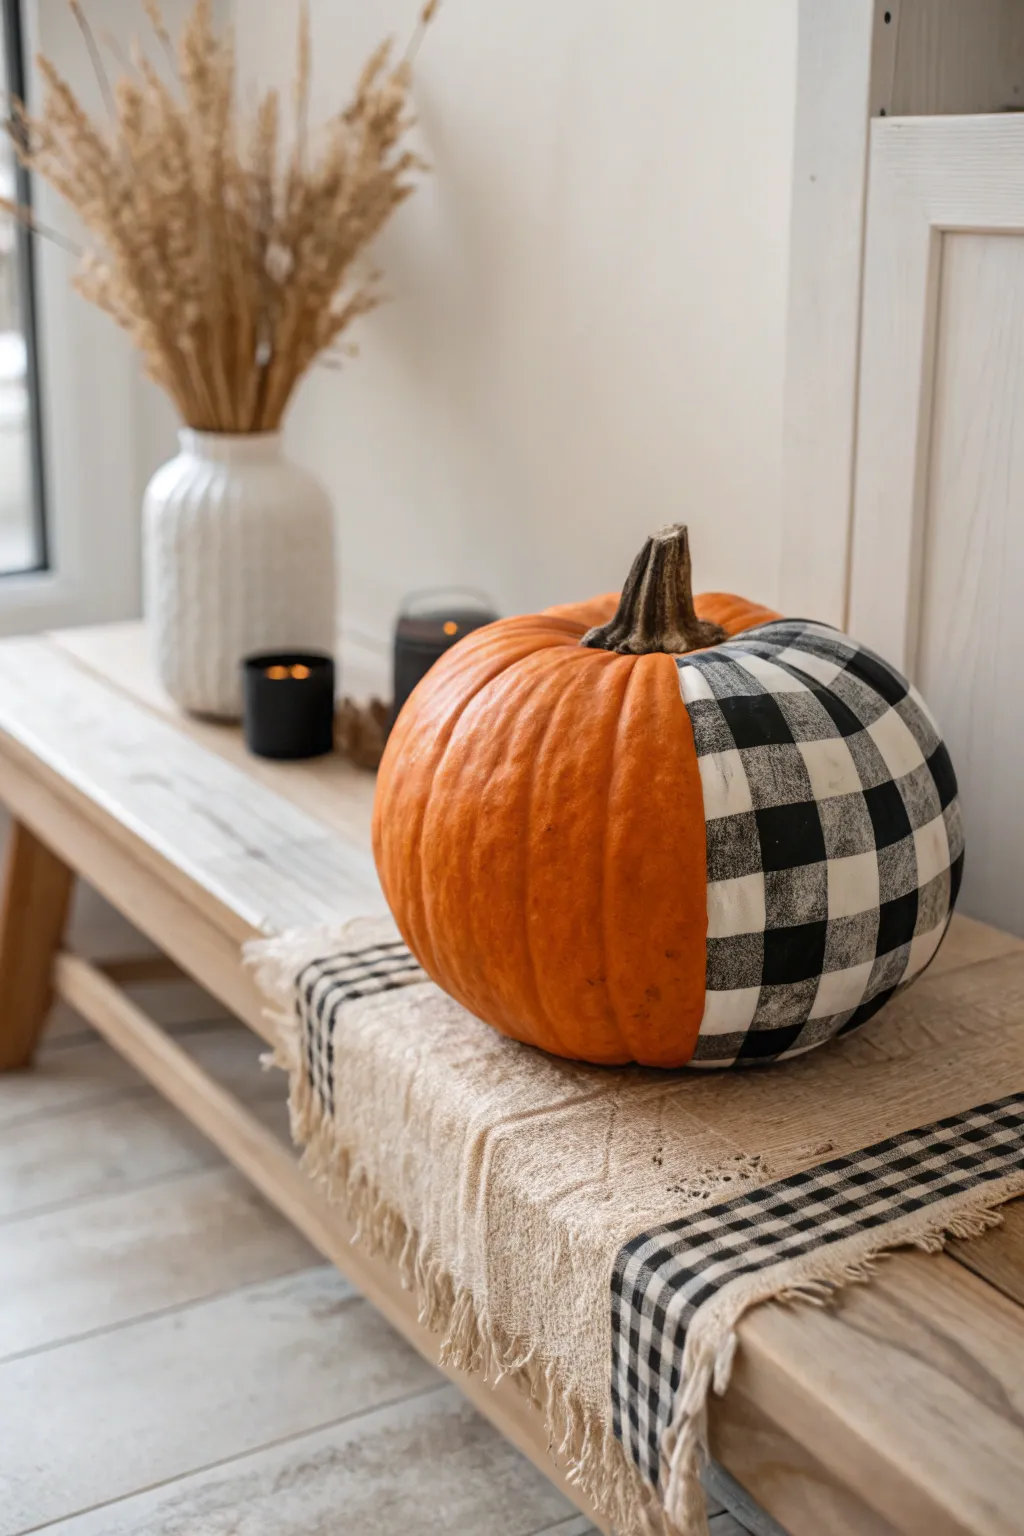
This project offers a stylish spin on the classic plaid pumpkin by highlighting just one segment with a crisp buffalo check pattern. The contrast between the bold black-and-white grid and the natural orange skin creates a sophisticated, rustic farmhouse look that is perfect for autumn decor.
Step-by-Step
Materials
- Medium-sized orange pumpkin (real or faux)
- White acrylic paint (matte finish)
- Black acrylic paint (matte finish)
- Grey acrylic paint (or mix black and white)
- Flat shader brush (approx. 1/2 inch width)
- Fine detail liner brush
- Painter’s tape or masking tape (optional)
- Pencil
- Palette or paper plate
- Water cup for rinsing
- Paper towels
- Clear matte sealant spray (optional)
Step 1: Preparation & Base Coat
-
Clean surface:
Begin by wiping down your pumpkin with a damp cloth to remove any dirt or oils. If you are using a real pumpkin, ensure the skin is completely dry before applying paint to prevent peeling. -
Select the panel:
Choose a single vertical segment or ‘rib’ of the pumpkin that has fairly defined grooves on either side. This natural boundary will act as a frame for your painted design. -
Paint the background:
Using your flat shader brush, apply a smooth coat of white acrylic paint to fill the chosen segment from the top stem down to the base. -
Apply second coat:
Allow the first layer to dry completely, usually about 15-20 minutes. Apply a second coat of white to ensure full opacity so no orange shows through the background.
Step 2: Creating the Grid
-
Sketch the grid:
Once the white base is bone dry, lightly sketch a grid pattern onto the white panel using a pencil. Draw horizontal lines spaced evenly apart, followed by vertical lines to create a series of squares. -
Mix grey paint:
If you don’t have pre-mixed grey paint, create a medium grey tone on your palette by mixing equal parts black and white. You want a distinct contrast from both the stark white and the deep black. -
Paint vertical stripes:
Using the flat brush, paint every other vertical column with your grey paint. The width of your brush can be a helpful guide for consistency here. -
Paint horizontal stripes:
Next, paint every other horizontal row with the same grey mixtures. You will now see a grid forming where the white squares remain untouched.
Wobbly Lines?
If freehand painting is difficult, use thin strips of painter’s tape or washi tape to mask off your grid lines before painting for crisp, straight edges.
Step 3: Adding Depth & Detail
-
Identify intersections:
Locate the squares where your vertical grey stripes and horizontal grey stripes overlap. These intersection points are where the ‘fabric’ would be darkest. -
Paint black squares:
Carefully fill in these intersection squares with pure black acrylic paint. I find that using the edge of the flat brush helps keep the corners sharp and square. -
Refine edges:
Switch to your fine liner brush. Dip it in a small amount of white or black paint to touch up any wobbly lines or uneven edges within your grid. -
Clean up boundaries:
If any paint strayed onto the orange sections of the pumpkin during the process, gently scrape it away with a damp fingernail or Q-tip before it fully cures.
Texture Twist
For a rustic finish, lightly sand the painted area with fine-grit sandpaper after it dries. This distresses the pattern for a vintage, worn-fabric look.
Step 4: Finishing Touches
-
Dry check:
Inspect the pumpkin to ensure the black squares are fully opaque. If they look streaky, add a second thin layer of black paint just to those areas. -
Seal (Optional):
For longevity, especially if placing outdoors, spray the painted section lightly with a clear matte sealant. Cover the unpainted orange sections with paper to keep them natural. -
Style and display:
Place your finished pumpkin on a runner or wooden bench, turning it so the painted panel is prominently displayed at a slight angle for the best visual impact.
Now you have a charming, custom piece that adds a modern farmhouse touch to your seasonal display
Black Cat Silhouette With Bright Eyes
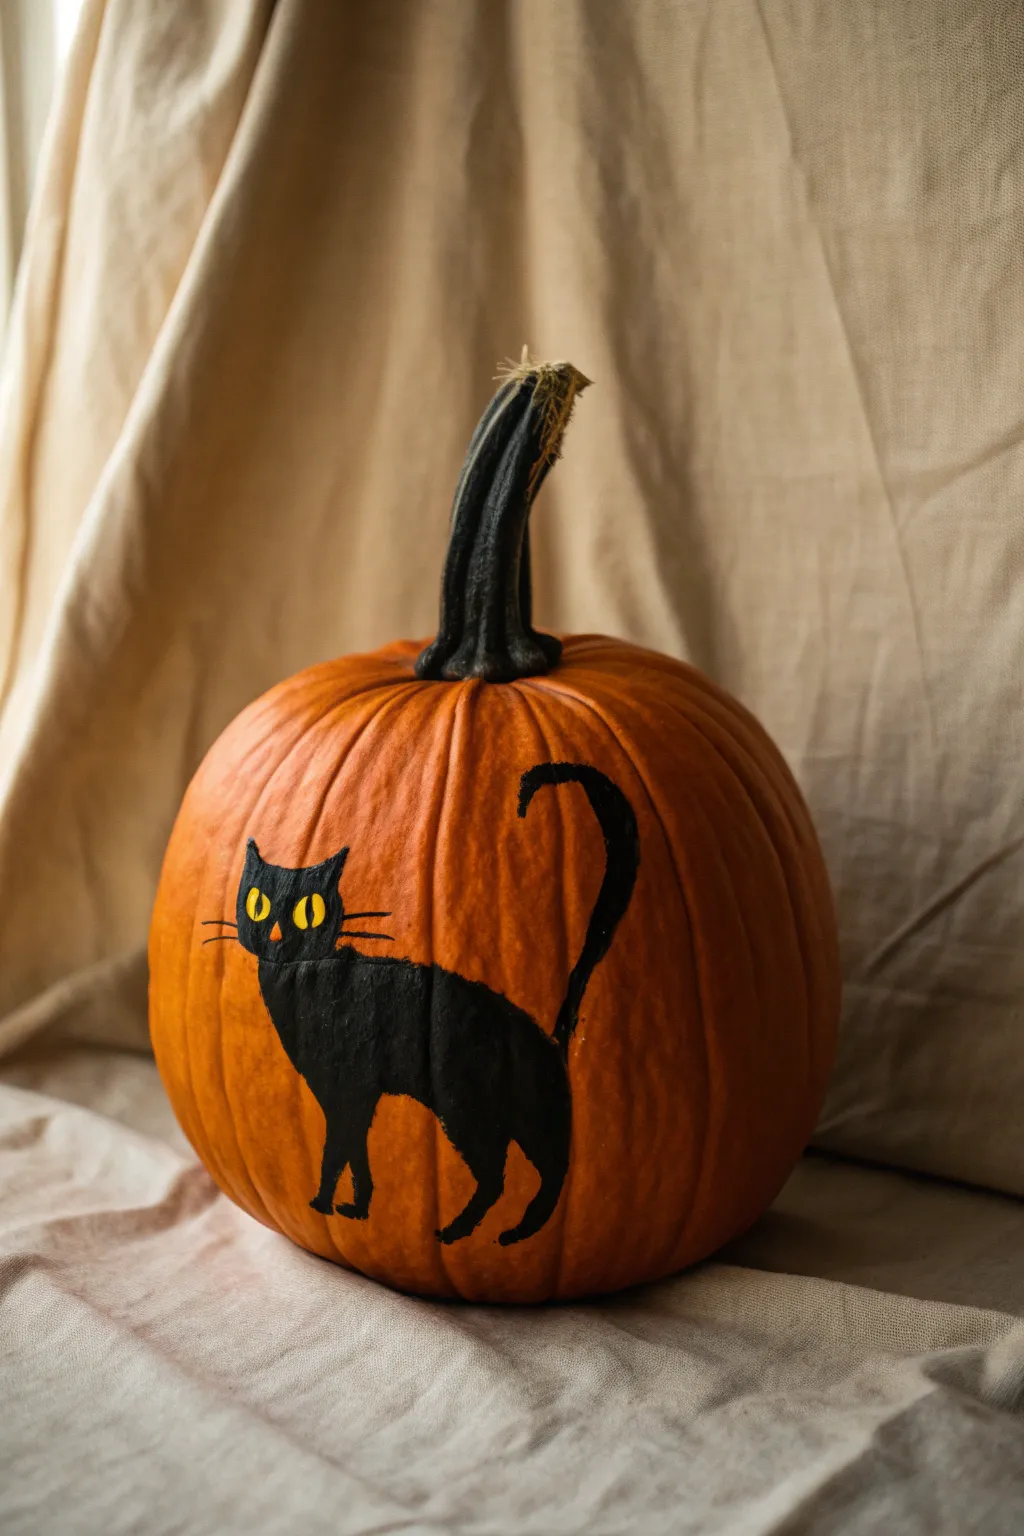
Transform a classic orange pumpkin into a bewitching decoration with this black cat silhouette design. The striking contrast between the matte black paint and the bright orange rind, coupled with piercing yellow eyes, makes for a simple yet engaging Halloween project.
Step-by-Step Guide
Materials
- Medium-sized orange pumpkin (cleaned and dried)
- Black acrylic paint
- Yellow acrylic paint
- Small round paintbrushes (sizes 2 and 4)
- Fine liner brush (size 0 or 00)
- Pencil or white chalk pencil
- Cup of water
- Paper towels
- Matte sealant spray (optional)
Step 1: Drafting the Design
-
Clean surface:
Begin by wiping down your pumpkin with a damp cloth to remove any dirt or oils, then dry it completely with a paper towel. A clean surface ensures the acrylic paint adheres properly without peeling later. -
Visualizing placement:
Look for the flattest or smoothest side of your pumpkin to serve as your canvas. Avoid deep ridges if possible, as they can distort the cat’s shape. -
Sketch the body:
Using a pencil or a white chalk pencil, lightly unnecessary sketch the outline of the cat’s body. Start with an elongated oval shape that leans slightly to the left to mimic the cat’s walking posture. -
Add the head:
Draw a smaller circle overlapping the top left of the body oval for the head. Add two small triangles on top for ears. -
Outline the legs:
Sketch four simple legs extending from the body. The front two legs should be close together, while the back legs are spaced out to suggest movement. -
Draw the tail:
Sketch a long, sinuous tail rising from the back end. Create a distinctive ‘S’ curve or question mark shape that reaches high up the pumpkin’s side for dramatic flair.
Step 2: Painting the Silhouette
-
Outline in black:
Load a size 2 round brush with black acrylic paint. carefully trace over your pencil or chalk lines to establish a crisp border for the silhouette. -
Fill the body:
Switch to a slightly larger size 4 brush to fill in the main body area. Use smooth, even strokes to avoid leaving heavy texture marks. -
Fill the details:
Go back to your smaller brush to fill in the legs and the tail. Take your time on the tail to keep the width consistent as it curves upward. -
Second coat:
Acrylic black can sometimes look translucent on orange skin. Let the first layer dry for about 10-15 minutes, then apply a second coat for a solid, opaque black finish. -
Refine edges:
While the black paint is still workable, check your edges. Smooth out any bumps or wobbles with the fine tip of your brush to get that sharp silhouette look.
Chalk It Up
Use a white chalk pencil instead of graphite for sketching. The white shows up clearly on orange skin and wipes away easily with a damp Q-tip if you make a mistake.
Step 3: Adding the Details
-
Paint the eyes:
Once the black head area is completely dry, mix a bright yellow acrylic. Using your smallest detail brush, paint two small, slanted oval shapes for the eyes. -
Intensify the yellow:
Yellow paint is notoriously sheer. I like to let this dry briefly and apply 2-3 coats until the yellow is vibrant and stands out against the black background. -
Add pupils:
Using a fine liner brush and black paint, add a tiny vertical slit in the center of each yellow eye to create a feline gaze. -
Add whiskers:
With the liner brush and clean black paint, flick three very thin lines outward from each side of the face for whiskers. Use a light hand so the lines taper off at the ends. -
Add the nose:
Place a tiny dot of yellow or orange paint just below the eyes for a subtle nose suggestion. -
Optional sealing:
If you plan to display your pumpkin outdoors, wait for all paint to cure fully (at least an hour) and lightly mist with a matte sealant spray.
Glow in the Dark
For a spooky nighttime effect, paint the yellow eyes with phosphorescent acrylic paint. They will charge up during the day and glow eerily after the sun goes down.
Place your pumpkin on a porch or mantle to let this charming black cat keep watch over your Halloween festivities

PENCIL GUIDE
Understanding Pencil Grades from H to B
From first sketch to finished drawing — learn pencil grades, line control, and shading techniques.
Explore the Full Guide
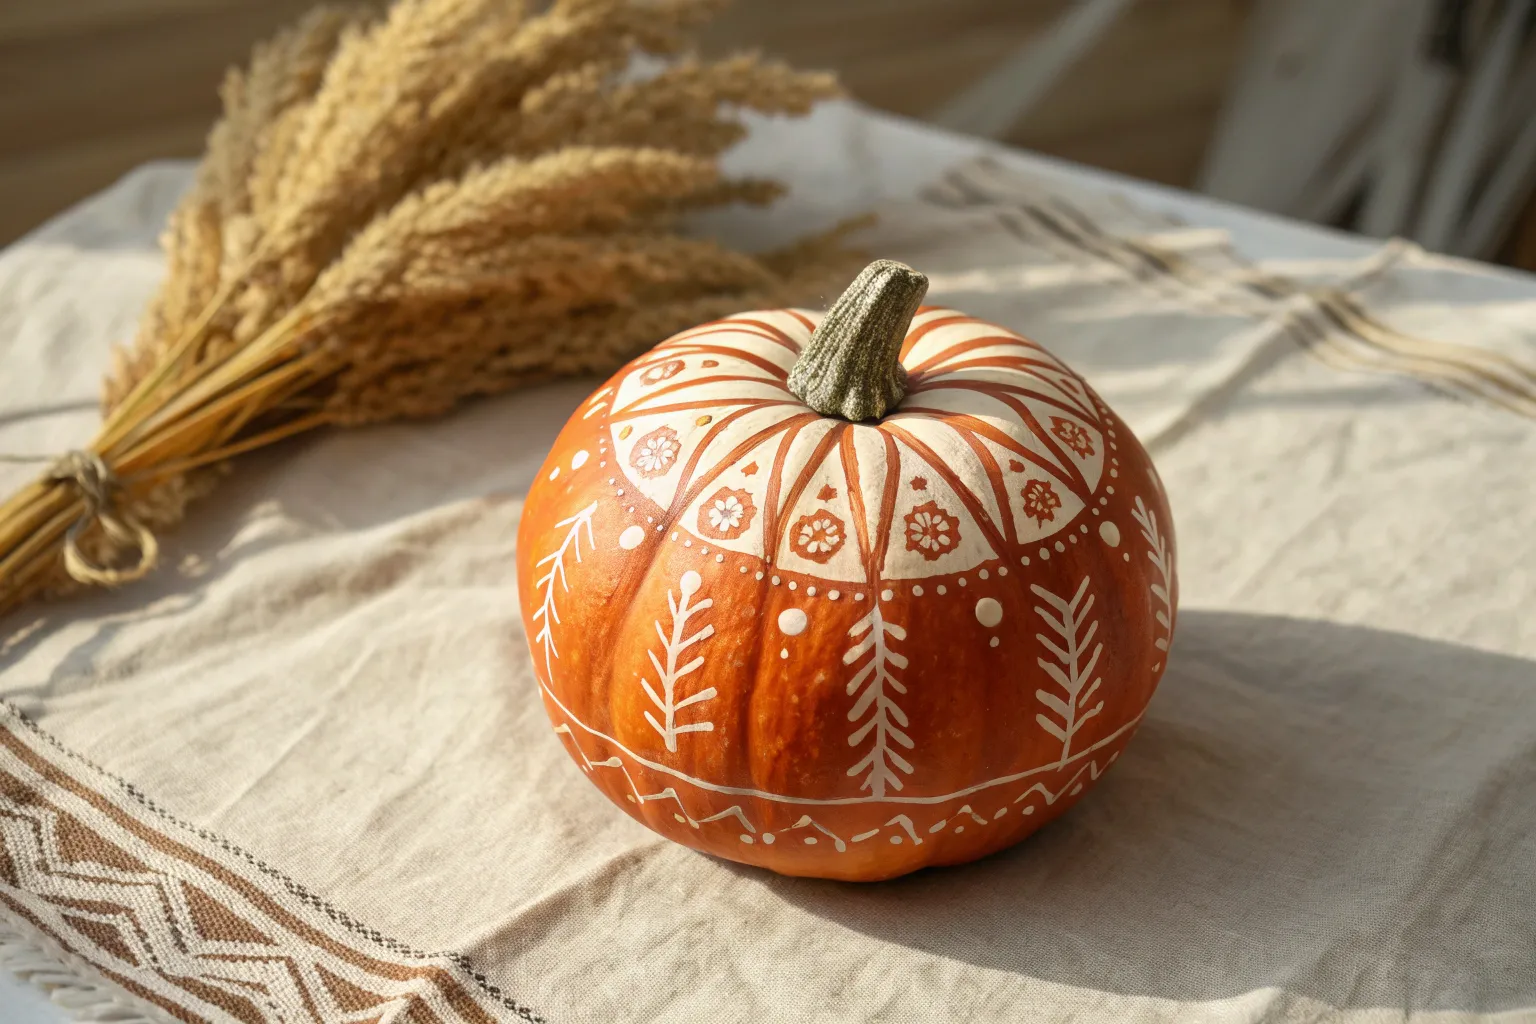
Leafy Vines Around the Ribs

This elegant pumpkin design highlights natural contours by painting alternate ribs in a soft cream color, creating the perfect canvas for delicate botanical vines. The contrast between the bright orange skin and the hand-painted foliage offers a sophisticated autumn look that feels both rustic and refined.
How-To Guide
Materials
- Medium-sized orange pumpkin (real or faux)
- Cream or off-white acrylic craft paint
- Dark olive green acrylic paint
- Dark chocolate brown acrylic paint
- Flat shader brush (medium size)
- Fine liner brush (size 0 or 00)
- Small round brush (size 2)
- Palette or paper plate
- Cup of water and paper towels
- Pencil (optional)
Step 1: Creating the Cream Canvas
-
Clean surface:
Begin by wiping down your pumpkin with a damp cloth to remove any dirt or oils, ensuring the paint adheres properly. Dry it completely before starting. -
Select the ribs:
Identify the natural ribs of the pumpkin. You will be painting every other rib section, leaving alternating stripes of natural orange skin exposed. -
Paint base layer:
Using your flat shader brush, paint the selected rib sections with the cream or off-white acrylic paint. Follow the vertical curve of the pumpkin from the stem down to the base. -
Refine edges:
Don’t worry about perfectly straight lines; a slightly wavy or organic edge where the cream meets the orange looks more natural. I find this forgiving style much less stressful to paint. -
Apply second coat:
Acrylic paint can be semi-transparent on orange skin. Once the first layer is dry to the touch, apply a second coat of cream to ensure solid, opaque coverage. -
Dry completely:
Allow the base coats to dry fully before moving on to the detailed work. If the paint is wet, your green lines will muddy the cream background.
Smooth Flow Trick
If your fine lines look shaky or dry, mix a tiny drop of water into your acrylic paint. The consistency should be like heavy cream for perfect, long strokes.
Step 2: Painting the Botanical Vines
-
Plan the vines:
Visualize a central vertical line running down the middle of each cream section. This will be the main stem for your botanical designs. You can lightly sketch this with a pencil if you need a guide. -
Paint central stems:
Load your fine liner brush with dark olive green paint mixed with a tiny drop of water to help it flow. Paint a thin, continuous vertical line down the center of one cream section. -
Add swooping branches:
On the first type of vine, paint curved branches extending outward and upward from the main stem. Keep these strokes fluid and light. -
Paint serrated leaves:
Switch to the small round brush. On these branches, dab and pull the brush to create elongated, serrated leaves in dark green. These should look somewhat like fern fronds. -
Create berry vines:
On the next cream panel, try a different design. Paint a main stem using the dark chocolate brown paint instead of green for variety. -
Add simple leaves:
Along this brown stem, paint pairs of small, simple oval leaves using the dark green paint. Space them out evenly as you move down the vine. -
Detail with dots:
Dip the non-brush end (the handle) of your liner brush into the brown paint. Dot the ends of the small green leaves or add tiny berries along the stem for texture. -
Add decorative flourishes:
At the top of the cream sections near the stem, use the fine liner brush to add small swirls or curlicues in black or dark green to frame the design. -
Fill accent dots:
In any empty white space around the leaves, use the brush handle technique again to add small decorative dots in groups of three or single accents. -
Seal the work:
Once all paint is completely dry (give it at least an hour), you can optionally apply a clear matte sealer to protect your design, especially if the pumpkin will sit near a window.
Metallic Accent
For a glamorous twist, use metallic gold paint for the decorative dots or trace existing green vines with a super-fine gold line for extra shimmer.
Your sophisticated botanical pumpkin is now ready to add a touch of artistic flair to your autumn display
Whitewashed Highlights for Soft Glow
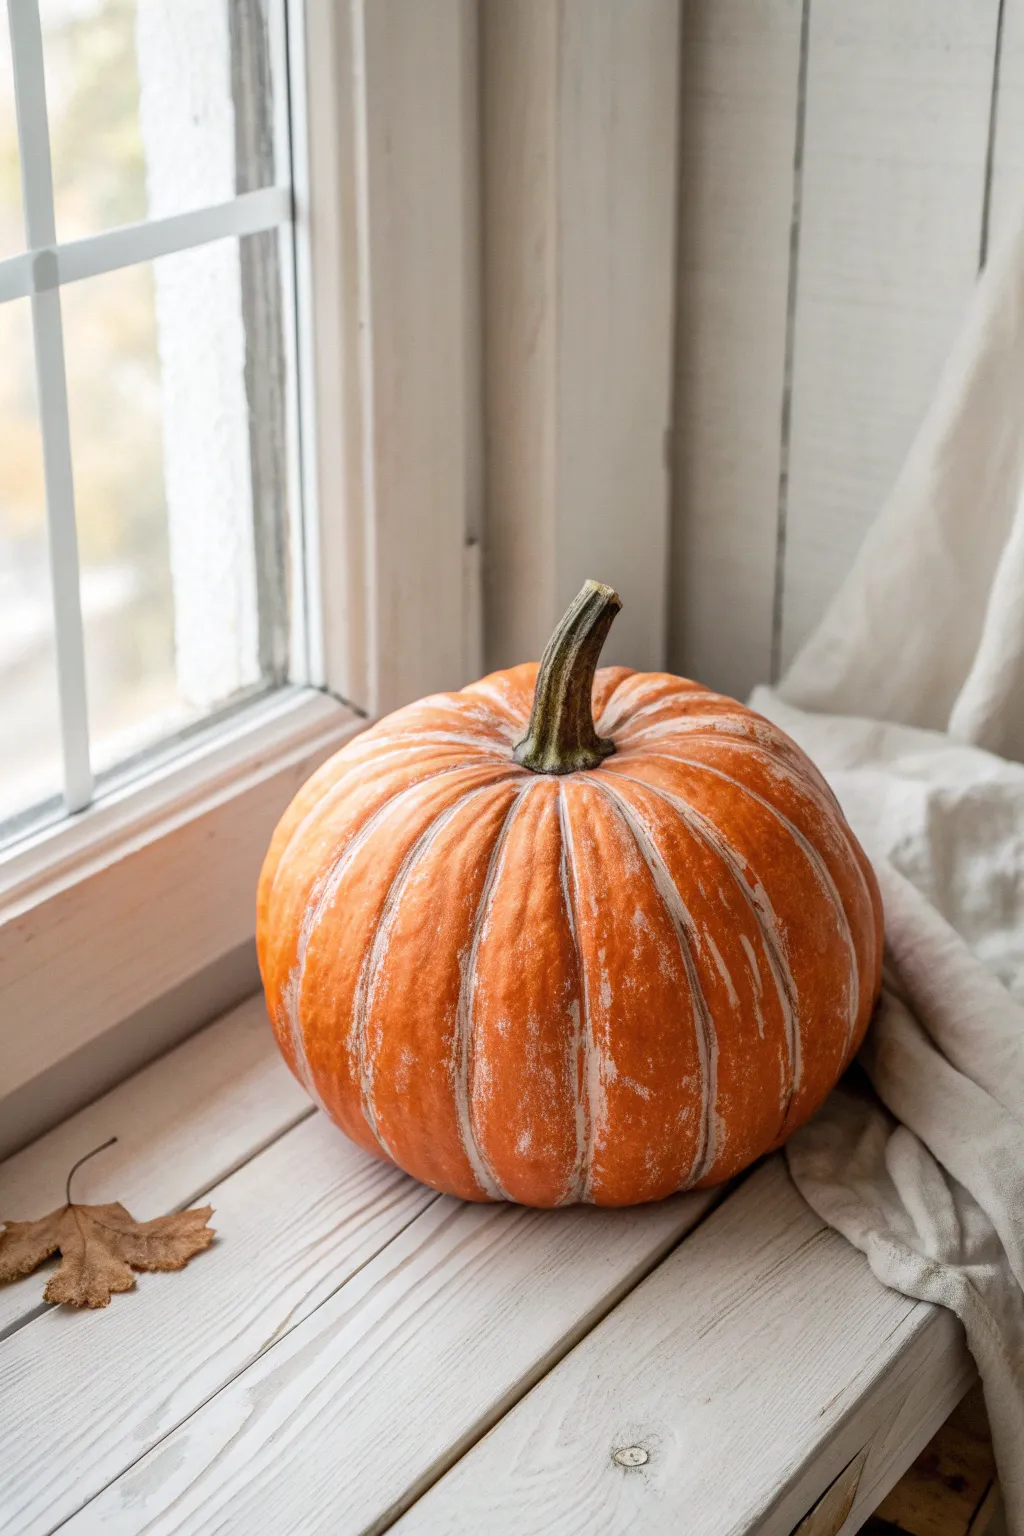
Give a standard orange pumpkin a rustic, farmhouse makeover with this subtle dry-brushing technique. The whitewashed highlights catch the light beautifully, emphasizing the natural ridges for a soft, glowing effect that feels cozy and elegant.
Detailed Instructions
Materials
- Medium-sized orange pumpkin (real or high-quality faux)
- White acrylic craft paint or chalk paint
- Small flat brush (1/2 inch or smaller)
- Paper towels or a rag
- Clean water for rinsing
- Matte clear sealer spray (optional)
- Drop cloth or newspapers
Step 1: Preparation
-
Clean surface:
Begin by thoroughly wiping down your pumpkin with a damp cloth to remove any dirt or dust from the garden. If using a real pumpkin, dry it completely; moisture will prevent the paint from adhering properly. -
Prepare palette:
Squeeze a small amount of white acrylic or chalk paint onto a palette or paper plate. You won’t need much, as this technique uses very little pigment. -
Offload paint:
Dip just the very tip of your dry brush into the paint. Immediately brush it back and forth on a paper towel until the brush looks almost completely dry and only a faint amount of white remains. -
Test stroke:
Flip the pumpkin over and do a quick test stroke on the bottom. If the line is solid white, scrub the brush on the paper towel more. You want a dusty, translucent scratchy look, not a solid stroke.
Too Heavy Handed?
If paint goes on too thick, don’t panic. While wet, wipe it away with a damp rag. If dry, use fine-grit sandpaper to gently scuff it back.
Step 2: Applying Highlights
-
Identify ridges:
Look at the natural vertical ribs of the pumpkin. These raised areas are where light naturally hits, and where we will focus our painting efforts. -
Start at the top:
Starting near the stem (but not touching it), gently drag your brush down one of the raised ribs. Use a very light hand, barely grazing the surface. -
Feather downwards:
Continue the stroke down the rib, letting the paint fade out naturally as you move toward the bottom. The goal is to catch the texture of the pumpkin skin. -
Build slowly:
Go over the same rib again if you want more definition. I find it’s always better to do three faint layers than one heavy layer to maintain that natural look. -
Work around:
Rotate the pumpkin and repeat this process on every raised rib. Keep the indented valleys between the ribs clean and orange to create depth and contrast. -
Blend edges:
If you accidentally apply a blob of paint, immediately use a clean, slightly damp rag to wipe it back or smudge it out before it dries. -
Top detailing:
Add a few smaller, horizontal cross-hatches near the shoulder of the pumpkin (the top curve) to simulate wear and texture variation.
Step 3: Finishing Touches
-
Stem maintenance:
Ensure the stem remains unpainted to keep the grounded, organic look. If any white paint got on the stem, wipe it off carefully with a wet cotton swab. -
Check balance:
Step back and look at the pumpkin from a distance. Add a touch more white to any ribs that look too dark compared to the others. -
Deepen valleys:
If you lost some contrast, you can use a clean, damp cloth to wipe the recessed valleys between the ribs again, ensuring the orange pops through. -
Let dry:
Allow the paint to dry completely. Since the layers are so thin, this usually only takes about 10 to 15 minutes. -
Seal (Optional):
If you plan to put this pumpkin outside, give it a light coat of matte clear sealer spray to protect your work from moisture.
Level Up: Antique Look
Mix a tiny drop of brown paint into your white before dry brushing. This ‘dirty white’ creates a vintage, aged parchment aesthetic.
Place your newly highlighted pumpkin near a window to let the natural light play off your beautiful handiwork


Modern Color-Block Geometry
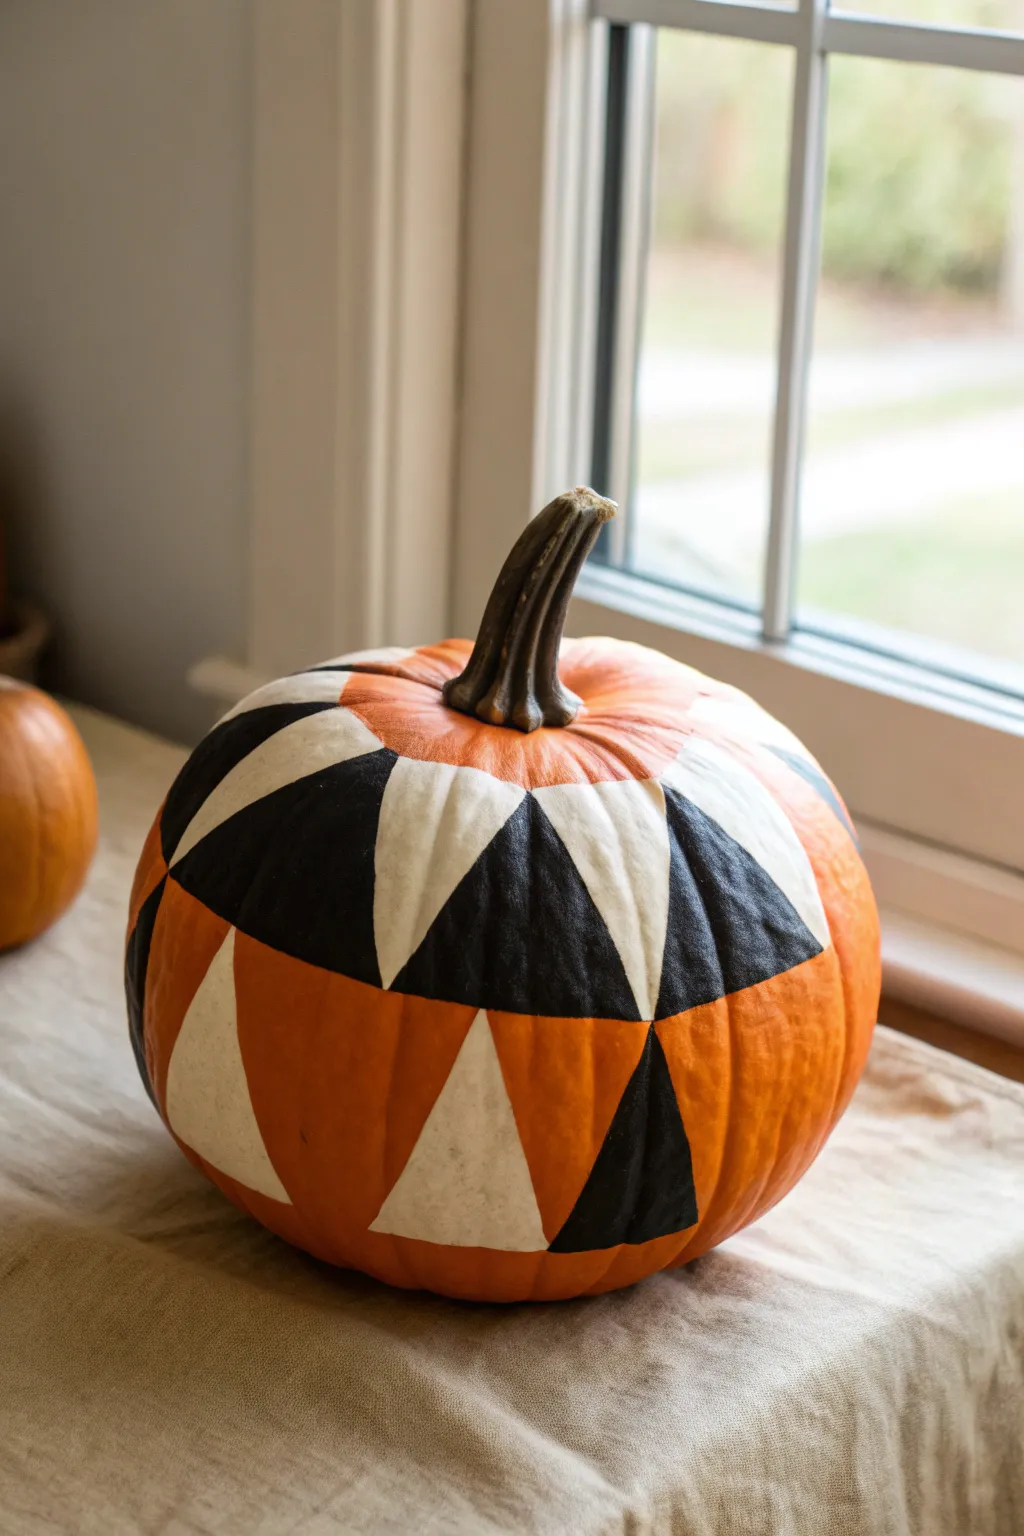
Embrace the crisp lines of modern design with this striking geometric painted pumpkin. By utilizing the pumpkin’s natural orange hue alongside bold black and white triangles, you can achieve a sophisticated, color-blocked look that stands out on any porch.
Step-by-Step
Materials
- Medium-sized orange pumpkin, clean and dry
- Painter’s tape or masking tape (1-inch width)
- Black acrylic craft paint
- White acrylic craft paint
- Flat paintbrush (medium size)
- Small angled brush (for edges)
- Pencil
- Ruler or flexible measuring tape
- Damp cloth (for mistakes)
Step 1: Preparation & Planning
-
Clean surface:
Begin by wiping down your pumpkin with a damp cloth to remove any dirt or oils, then dry it completely with a towel. Paint adheres much better to a clean, dry surface. -
Visualize the grid:
Examine the natural vertical grooves of your pumpkin. These ribs act as perfect guides for your columns of triangles. You will essentially be creating two or three horizontal bands of triangles around the pumpkin. -
Define the midline:
Using a flexible measuring tape and a pencil, lightly mark a horizontal line around the circumference of the pumpkin, roughly halfway down. This will be the meeting point for the points of your triangles.
Straight Edge Secret
If you have a shaky hand, use thin painter’s tape or washi tape to mask off the triangles before painting. Press edges firmly to prevent bleeding.
Step 2: Drafting the Design
-
Mark the top references:
Measure about 2-3 inches up from your center line and make small marks on the ribs to define the top edge of your upper row of triangles. -
Mark the bottom references:
Repeat this process below the center line, measuring 2-3 inches down to define the bottom edge of your lower row. -
Connect the dots:
Using a ruler or straight edge, use your pencil to draw zigzag lines connecting your top marks, center line, and bottom marks. You should see a pattern of diamonds or hourglass shapes emerging. -
Refine the triangles:
Go over your pencil lines to ensure you have clear, distinct triangles. Some will point up, and some will point down.
Metallic Upgrade
Swap the white or black paint for gold leaf or metallic gold paint to add a glamorous, distinctive shimmer to the geometric design.
Step 3: Applying the Paint
-
Start with white:
Select specific triangles to be white. I generally like to space them out so no two white triangles touch. Use your flat brush to fill these in. -
Clean edges:
For the sharpest points, use the small angled brush to carefully paint the corners of the white triangles. -
Apply second coat:
White paint can be translucent on bright orange skin. Let the first coat dry for about 15 minutes, then apply a second coat for opacity. -
Begin the black:
Once the white is fully dry, identify the triangles adjacent to the white ones or the unpainted orange ones that you want to be black. The goal is a random but balanced mix. -
Fill in black shapes:
Using a clean flat brush, carefully fill in the chosen black triangles. Be very steady near the edges where they meet the white paint or the orange skin. -
Refine black borders:
Use the angled brush again to nudge the black paint right up to the line. The contrast is key, so straight lines are important here. -
Leave negative space:
Crucially, leave about one-third of the triangles unpainted. This allows the natural orange pumpkin skin to act as the third color in your palette.
Step 4: The Final Touches
-
Check for gaps:
Inspect the pumpkin from all angles. Look for any orange showing through the paint where it shouldn’t be. -
Clean up lines:
If any paint overlapped unintended areas, you can carefully scratch it off with a fingernail (if dry) or use a tiny bit of orange paint to correct the line. -
Extend slightly:
If the pumpkin curves sharply at the top, extend the top points of the upper triangles slightly toward the stem to maintain visual balance. -
Final dry:
Allow the entire pumpkin to dry undisturbed for at least an hour before moving it.
Place your masterpiece near a window or on the doorstep to show off its modern angles
Painted Pumpkin Spider (Dots + Legs)
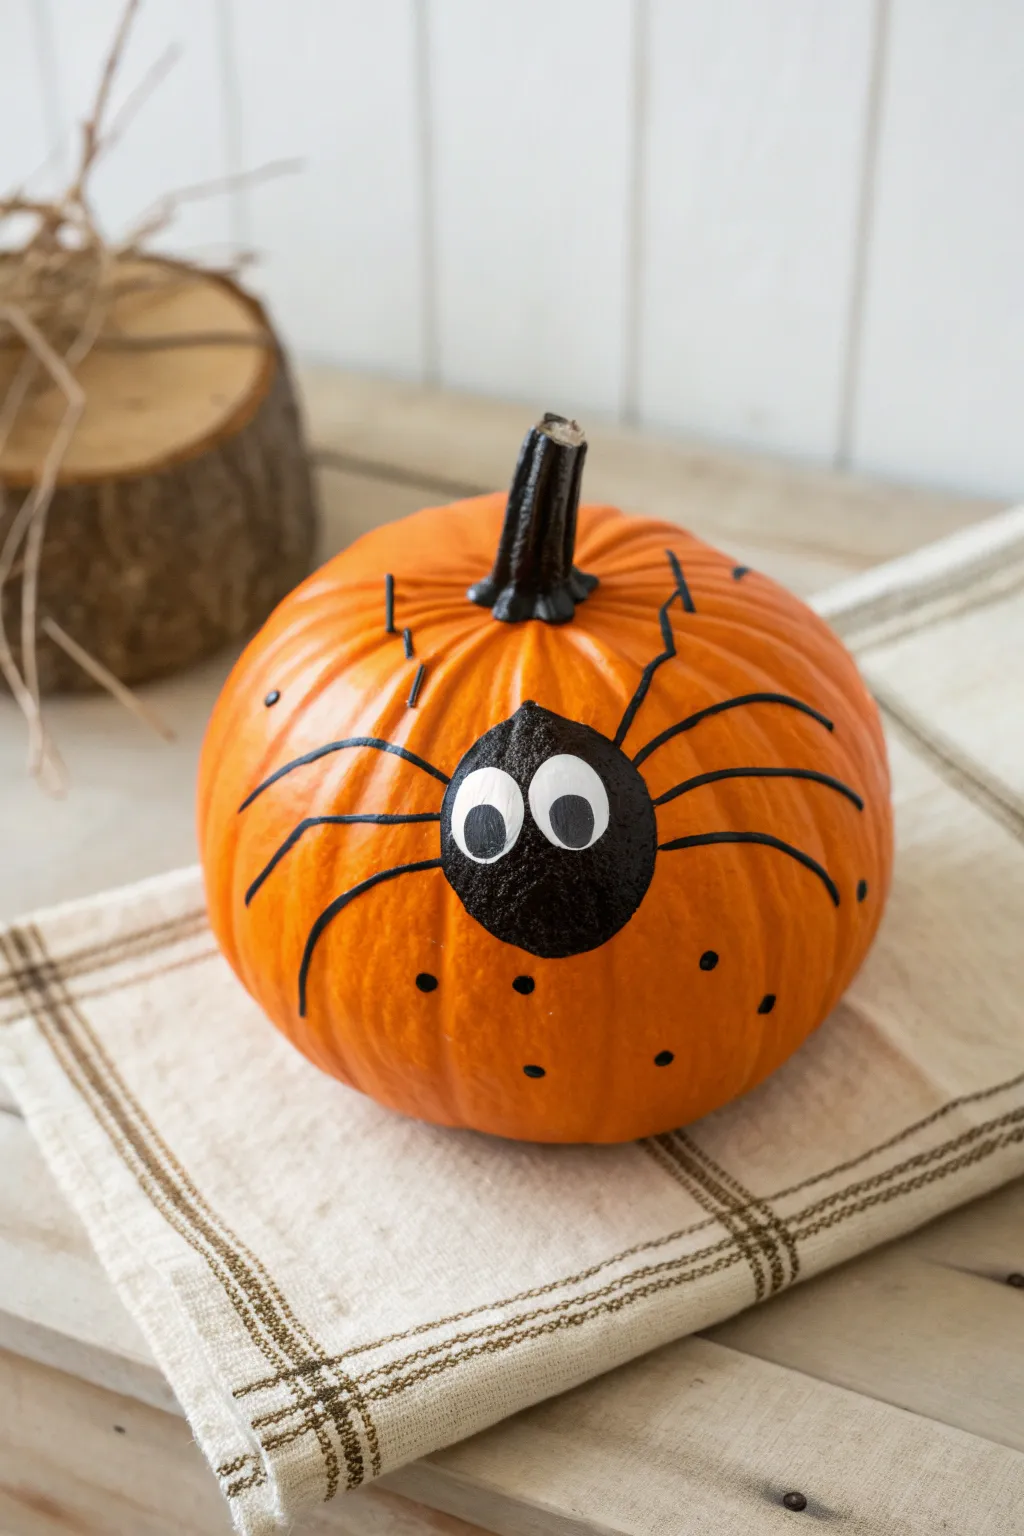
Transform a classic orange pumpkin into a friendly arachnid with just a bit of black paint and a steady hand. This playful design features a chunky spider body, spindly legs, and simple dots that add texture and whimsy without being spooky.
How-To Guide
Materials
- Medium-sized orange pumpkin (real or faux)
- Black acrylic paint
- White acrylic paint
- Round paint brush (medium size)
- Fine liner brush or detail brush
- Pencil for sketching (optional)
- Small cup of water
- Paper towels
Step 1: Preparation and Stem
-
Clean surface:
Begin by wiping down your pumpkin with a damp cloth or paper towel to remove any dirt or dust. Let it dry completely so the paint adheres properly. -
Paint the stem:
Using your medium round brush and black acrylic paint, carefully coat the entire stem of the pumpkin. Get into the crevices where the stem meets the fruit, but try to keep a clean line at the base. -
Stem touch-ups:
You might need a second coat on the stem depending on how porous it is. Allow the first coat to dry to the touch before adding a second layer for solid black coverage.
Paint Pen Alternative
Struggling with brush control on the slippery pumpkin skin? Use a black Posca paint marker for the legs and dots. It offers better precision for beginners.
Step 2: Painting the Spider
-
Position the body:
Choose the smoothest side of your pumpkin to be the front. Visualize where the center of your spider will be—aim for the middle or slightly lower third of the pumpkin face. -
Outline the body shape:
With the medium brush and black paint, draw a circle roughly 2-3 inches in diameter. Ideally, it should serve as both the head and abdomen combined. -
Fill the body:
Fill in the circle completely with black paint. I like to use a dabbing motion near the edges if the pumpkin surface is bumpy, ensuring the paint gets into the textured skin. -
Dry the body base:
Let this large black circle dry completely. This is crucial because you will be painting white eyes on top later, and wet black paint will turn them gray.
Uneven Coverage?
If the orange shows through your black paint, resist painting over wet layers. Let it dry completely, then apply a second coat for a solid, opaque finish.
Step 3: Adding the Legs
-
Switch brushes:
Change to your fine liner or detail brush. This will give you the control needed for thin, spider-like lines. -
Start top legs:
Paint the first leg starting from the top-left of the body, curving upward and then bending sharply down. Repeat on the right side. -
Add middle legs:
Paint two more legs on each side, spacing them out slightly. These should extend horizontally before curving downward. -
Paint bottom legs:
Add the final set of legs near the bottom of the body. These can curve downward almost immediately to frame the spider. -
Leg thickness check:
If the legs look too wispy, go over them once more to thicken the line slightly, especially where they connect to the body.
Step 4: Details and Dots
-
Create the white eyes:
Once the black body is totally dry, dip a clean medium brush into white paint. Paint two large ovals side-by-side in the upper center of the black circle. -
Refine eye shape:
You may need 2-3 coats of white to make it opaque against the black background. Let each layer dry in between. -
Add pupils:
Using the detail brush and a tiny dot of black paint, add the pupils inside the white ovals. I prefer placing them slightly cross-eyed or looking in different directions for a goofy look. -
Paint scattered dots:
Dip the back end of your paintbrush handle into black paint. Press it gently onto the orange skin around the spider to create perfect, uniform polka dots. -
Vary dot placement:
Scatter the black dots randomly across the rest of the pumpkin, leaving some space around the legs so the design doesn’t get too cluttered. -
Final cure:
Allow the entire project to dry undisturbed for at least an hour before moving or displaying it.
Now you have a charming, crawling creature ready to greet guests on your porch or table
Silhouette Scene on Orange “Sunset”
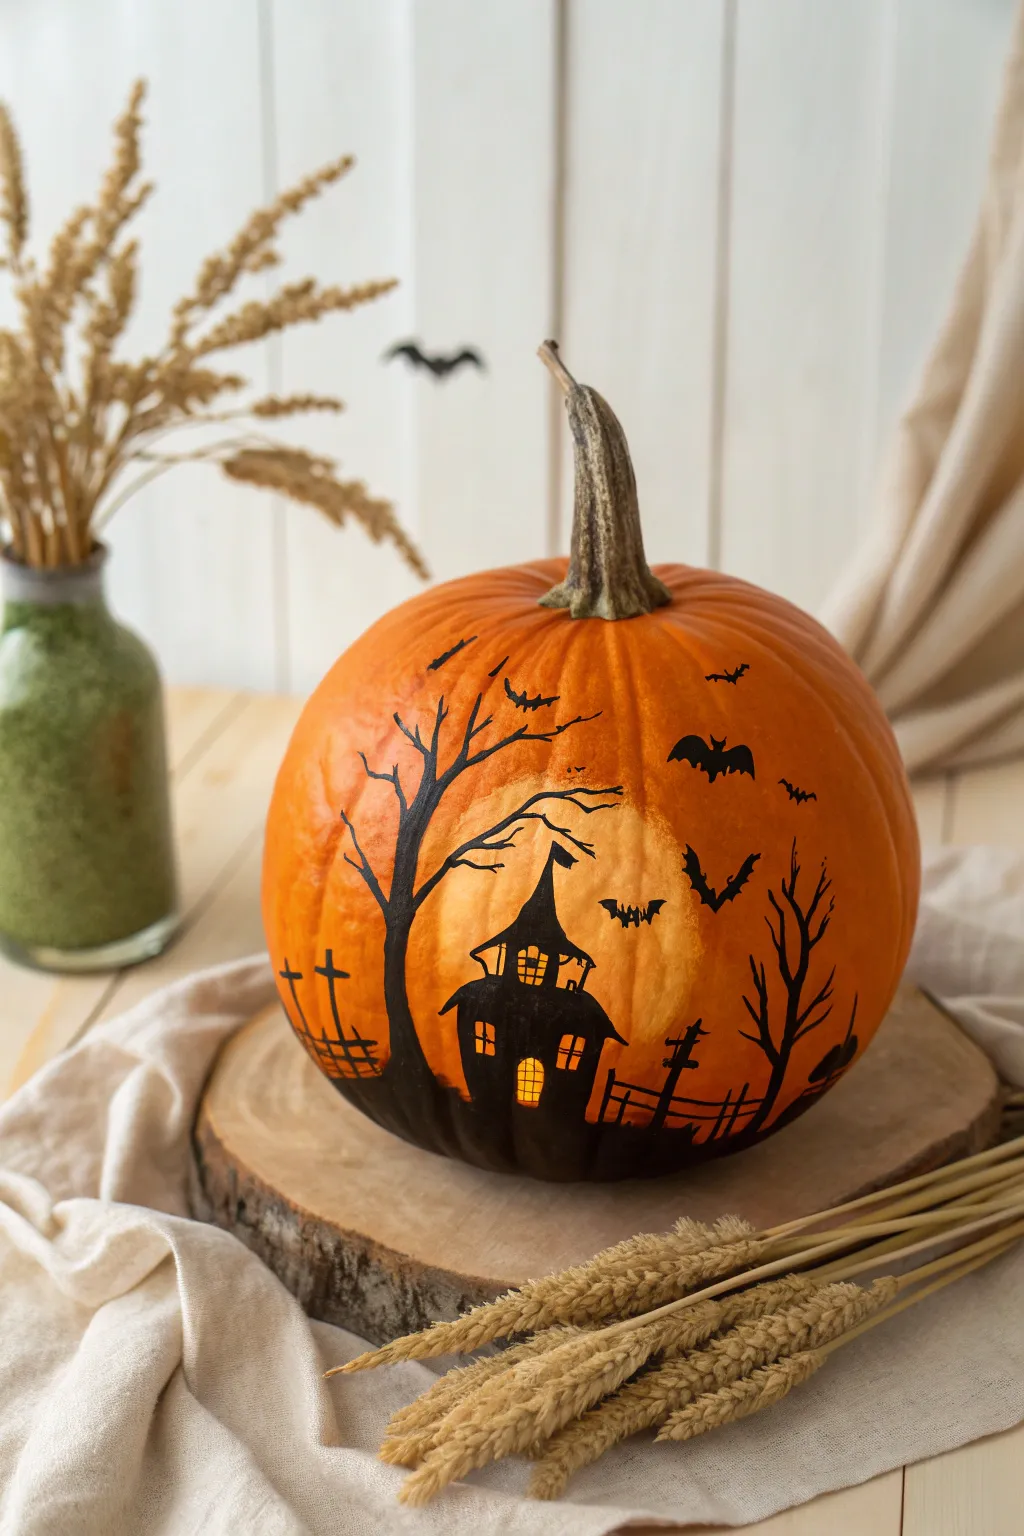
Capture the eerie beauty of a haunted twilight by painting a detailed silhouette scene directly onto your pumpkin. The natural orange rind acts as the perfect sunset backdrop for a spooky black manor, gnarled trees, and fluttering bats.
Step-by-Step
Materials
- Medium or large orange pumpkin (smooth surface is best)
- Black acrylic paint
- Yellow or pale cream acrylic paint (for the moon)
- Fine detail paintbrush (size 0 or 00)
- Small flat paintbrush (size 4 or 6)
- Pencil or dry erase marker
- Water cup and paper towels
- Matte finish spray sealant (optional)
Step 1: Setting the Scene
-
Clean surface:
Begin by wiping down your pumpkin with a damp cloth to remove any dirt or oils. Let it dry completely to ensure the paint adheres properly. -
Draft the moon:
Choose the smoothest side of your pumpkin. Using a pencil, lightly sketch a large circle in the center-right area to represent the full moon. Don’t worry if it’s not a perfect circle; a slightly organic shape looks more natural. -
Paint the moon glow:
Dip your flat brush into the yellow or cream paint. Use a ‘dry brush’ technique—wipe most of the paint off on a paper towel—and lightly scumble the paint inside your circle. -
Create a halo effect:
Soften the edges of the moon by lightly brushing outward, letting the paint fade into the orange skin. This creates a hazy, glowing atmospheric effect rather than a harsh sticker-like circle. -
Sketch the horizon:
Once the moon is dry, use your pencil to draw a low, rolling horizon line near the bottom quarter of the pumpkin. This will be the ground for your silhouette.
Paint Consistency Tip
Add a single drop of water to your black acrylic paint. This improves flow for spindly tree branches and prevents the brush from dragging.
Step 2: Building the Architecture
-
Outline the house:
In the center, sketch the outline of a crooked haunted house. Include a pointed witch-hat roof, a small turret, and crooked walls. Let the house overlap the bottom portion of your painted moon slightly. -
Fill the silhouette:
Using black acrylic paint and a small brush, fill in the main body of the house and the ground below it. Ensure the black is opaque; distinct brushstrokes shouldn’t be visible. -
Add windows:
While painting the black house, carefully leave small squares or rectangles unpainted to represent lit windows. The orange pumpkin skin showing through will look like warm candlelight. -
Refine the windows:
If you accidentally paint over a window spot, wait for the black to dry, then dot a tiny bit of yellow paint back in. -
Add window panes:
Use your finest detail brush with black paint to draw tiny crosses or grid lines inside the lit windows for panes.
Step 3: Adding Atmosphere
-
Paint the main tree:
To the left of the house, paint a tall, gnarled tree. Start with a thick trunk at the base and taper off into thin, spindly branches that reach up and over the house. -
Detail the branches:
I find it helpful to roll the brush slightly as I pull it away to create natural-looking, twiggy ends. Let some branches cross in front of the moon for dramatic contrast. -
Create the graveyard:
On the far left, paint two simple cross shapes sticking out of the ground to suggest a distant cemetery. Add a small jagged fence line connecting them. -
Add the right-side foliage:
On the right side of the pumpkin, paint a smaller, bare tree or large bush. Keep the lines sharp and jagged. -
Paint the fence:
Connect the house to the right-side tree with a crooked picket fence. Use quick, short vertical strokes for the posts and a thin horizontal line to join them. -
Release the bats:
Using your finest brush, paint several small ‘M’ or ‘V’ shapes in the sky to represent distant bats. Paint one or two larger, more detailed bat silhouettes closer to the moon.
Glow in the Dark
Paint the window squares with glow-in-the-dark acrylic paint instead of leaving them bare. At night, the house will look inhabited!
Let your masterpiece dry completely before displaying it, and enjoy the spooky elegance it brings to your decor
Ombré Fade That Keeps Orange Center
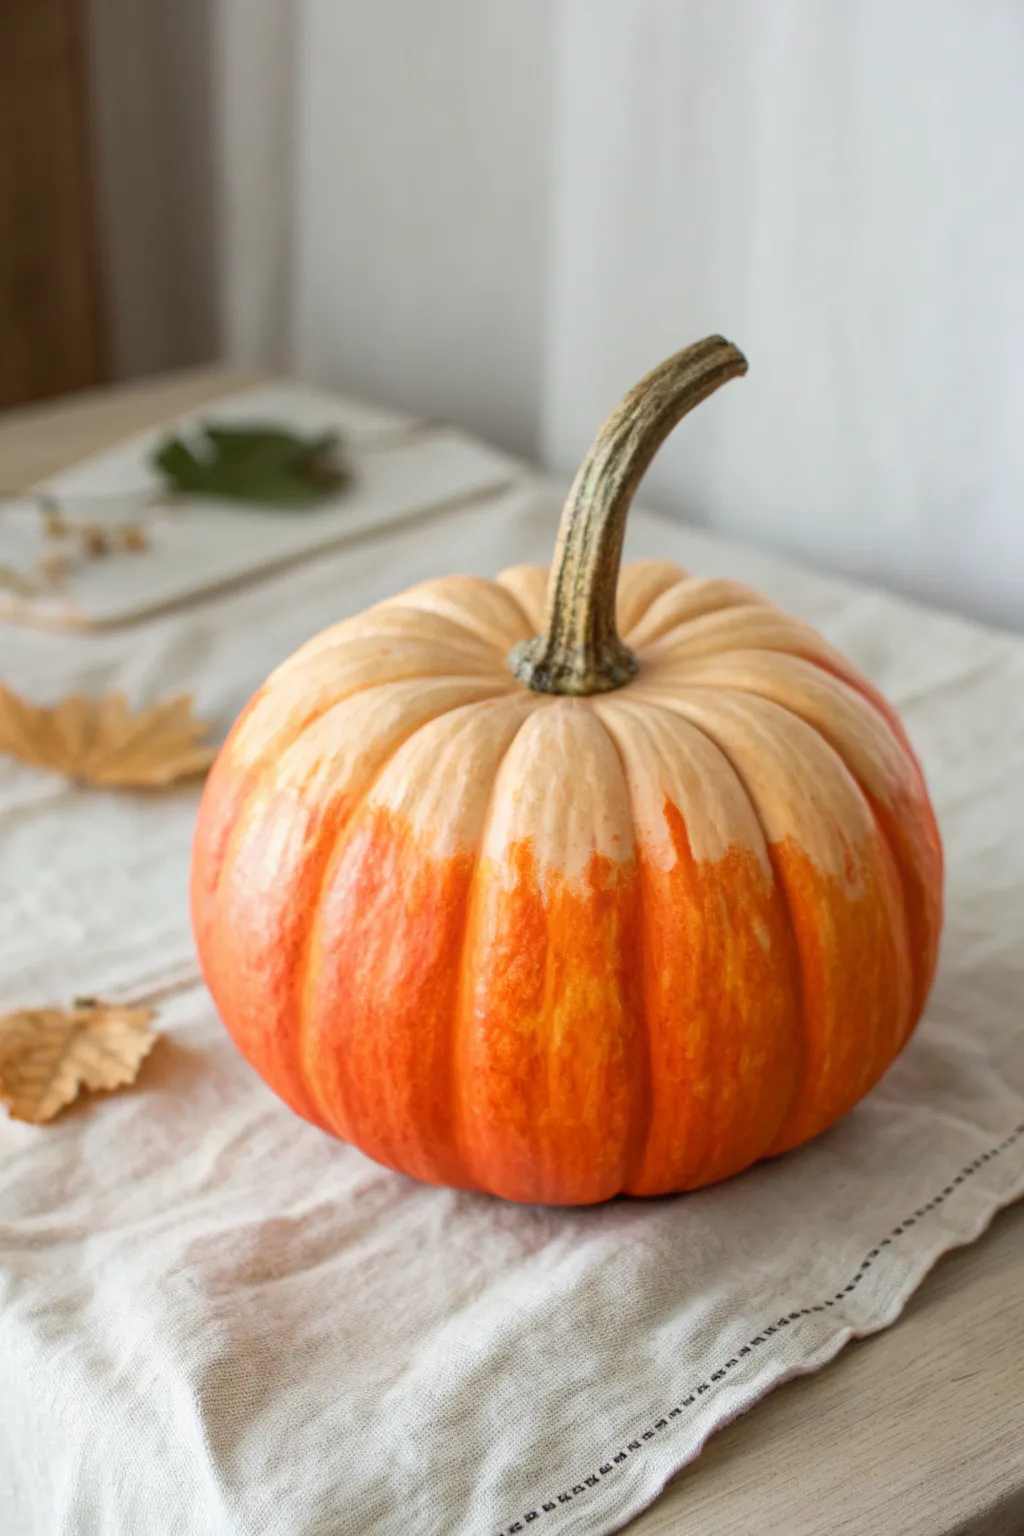
This elegant pumpkin project uses a subtle gradient technique to blend vibrant orange into a soft, creamy beige. The result is a sophisticated, half-dipped look that transitions seamlessly, perfect for a modern autumn centerpiece.
Step-by-Step Tutorial
Materials
- Medium-sized orange pumpkin (real or faux)
- Cream or pale beige acrylic paint
- Burnt orange or terracotta acrylic paint (optional, for enhancing the base)
- Medium flat synthetic brush
- Dry blending brush or makeup sponge
- Paper plate or palette
- Damp paper towel
- Water cup
- Painter’s tape (optional)
Step 1: Preparation
-
Clean surface:
Begin by wiping down your pumpkin with a damp cloth to remove any dirt or oils. If you are using a real pumpkin, ensure it is completely dry before starting. -
Protect the stem:
Carefully wrap the stem with painter’s tape to keep it paint-free. Since the top section will be painted right up to the base of the stem, this step is crucial for a clean finish.
Step 2: Painting the Base
-
Base inspection:
Check the natural color of your pumpkin. If it’s already a vibrant, uniform orange, you can skip painting the bottom half. If it’s patchy or you’re using a craft pumpkin, apply a coat of burnt orange paint to the bottom two-thirds. -
Cream application:
Squeeze a generous amount of cream or pale beige acrylic paint onto your palette. Using your flat brush, start painting the top third of the pumpkin, working from the stem downwards. -
Fill the crevices:
Ensure you push the cream paint deep into the ribs and grooves near the stem. The coverage needs to be opaque and solid at the very top. -
Create the mid-line:
Bring the cream paint down to roughly the halfway mark of the pumpkin. Don’t worry about a perfect straight line; an organic, slightly uneven edge looks more natural for an ombré effect.
Pro Tip: Sponge Blending
For the smoothest gradient without brush strokes, use a slightly damp makeup sponge to blot the area where the cream and orange meet.
Step 3: Blending the Ombré
-
Prepare the transition:
While the cream paint at the midway point is still wet, dip your brush lightly into the orange paint (or use the pumpkin’s natural skin if you didn’t paint the base). -
Mix on the surface:
Apply the orange paint right below the cream line, slightly overlapping the wet cream paint. The goal is to have the two colors meet while both are still workable. -
Feathering technique:
Using a clean, dry blending brush or a makeup sponge, gently tap or ‘stipple’ along the line where the colors meet. This breaks up the hard edge. -
Drag and blend:
Lightly drag the brush upwards from the orange section into the cream section, lifting the brush off the surface at the end of the stroke. Here I prefer to use a very light hand to avoid dragging too much dark color up. -
Clean brush often:
Wipe your blending brush on a paper towel frequently. If the brush gets overloaded with paint, it will just smear color around rather than creating a gradient. -
Work in sections:
Move around the circumference of the pumpkin, blending one or two ribs at a time so the paint doesn’t dry before you can smooth it out. -
Refine the fade:
Step back and look at the gradient. If the transition looks too abrupt, add a tiny amount of diluted cream paint to the transition zone and stipple it again.
Troubleshooting: Dried Too Fast?
If the paint dries before you blend it, mist the surface lightly with water or add a retarder medium to the acrylics to keep them wet longer.
Step 4: Finishing Touches
-
Remove tape:
Once you are happy with the blend, carefully peel off the painter’s tape from the stem while the paint is still slightly tacky to prevent peeling. -
Dry time:
Let the pumpkin sit undisturbed for at least an hour. Acrylics dry fast, but thicker layers in the grooves might take longer. -
Clean edges:
If any paint got onto the stem, use a damp Q-tip or a small stiff brush dipped in water to gently scrub it away. -
Seal (Optional):
If you plan to place this pumpkin outdoors, apply a clear matte spray sealer over the entire surface to protect your work from moisture.
Now you have a beautifully blended decoration that captures the soft light of the season
Metallic Drips for Glam Contrast
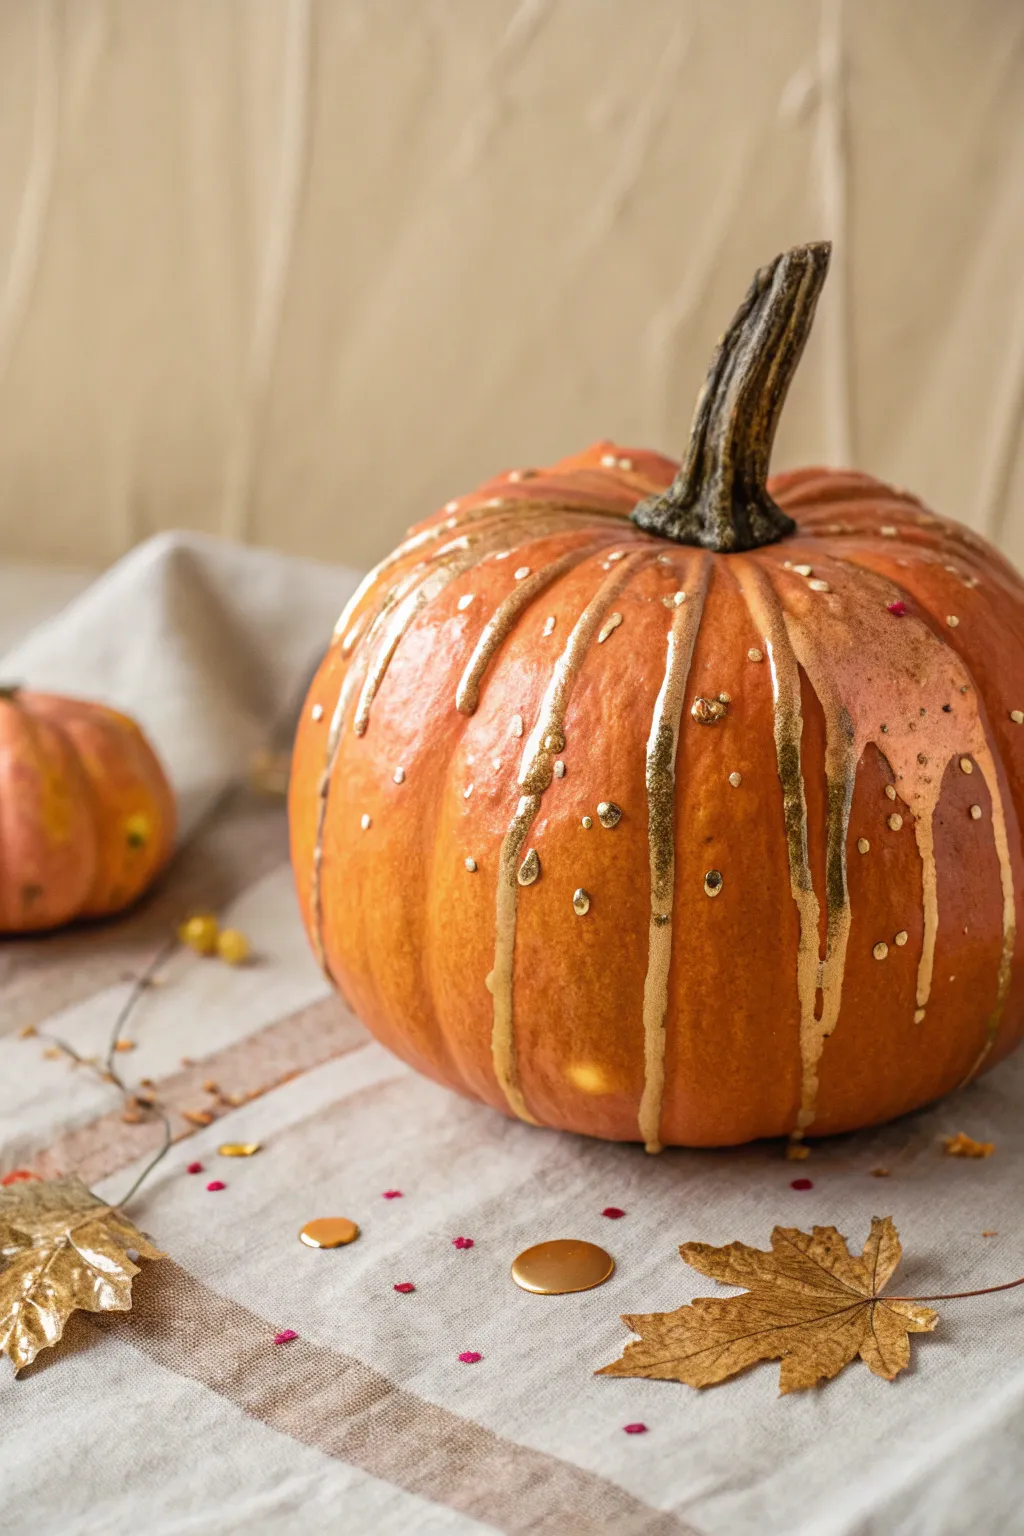
Transform a standard orange pumpkin into a glam centerpiece with cascading metallic accents. This design uses controlled drips of gold paint to create an elegant, high-contrast look that mimics melting metal against the organic pumpkin skin.
Detailed Instructions
Materials
- Medium-sized orange pumpkin (real or faux)
- Metallic liquid gold leaf or high-flow gold acrylic paint
- Soft synthetic brush (round or flat, size 6-8)
- Small detail brush (size 0-2)
- Gold sequins or confetti (optional)
- Disposable cup for paint
- Drop cloth or old newspaper
- Paper towels for cleanup
Step 1: Preparation
-
Clean the Surface:
Wipe your pumpkin down thoroughly with a damp cloth to remove any dirt or dust. Allow it to dry completely so the paint adheres properly. -
Protect Your Workspace:
Lay down newspaper or a drop cloth. Liquid gold leaf and fluid acrylics can be runny, so you’ll want to protect your table. -
Prepare the Paint:
Shake your metallic gold paint or liquid leaf vigorously. Pour a small amount into a disposable cup. If using fluid acrylics, ensure the consistency is pourable but not watery.
Step 2: Creating the Drips
-
Start at the Top:
Load your medium-sized brush generously with gold paint. Place the tip of the brush right against the base of the stem. -
Create the Initial Pool:
Paint a thick band of gold around the stem’s base, allowing the paint to pool slightly. This reservoir is essential for creating natural-looking drips. -
Guide the First Drip:
Choose a natural groove or rib of the pumpkin. Push a bead of paint from your top pool downwards into this groove. -
Let Gravity Work:
Allow gravity to pull the paint down the side. If the paint is thick, you may need to gently drag the brush tip down to encourage the flow, but try to let the bottom edge form naturally. -
Vary the lengths:
Repeat this process around the pumpkin. Make some drips long, reaching near the bottom, and keep others short near the top shoulder for visual interest. -
Refine the Edges:
Use your brush to smooth out the connection points near the stem so it looks like one cohesive spill rather than separate stripes.
Paint Too Thick?
If your paint won’t drip naturally, mix in a few drops of pouring medium or water (for acrylics) to thin it. Test the viscosity on a piece of paper first.
Step 3: Adding Details
-
Mix Glitter or Sequins:
While the larger drips are still wet, you can press a few small gold sequins or heavy glitter flakes into the thickest parts of the paint for extra texture. -
Add Scatter Dots:
Switch to your small detail brush. Dip it lightly in gold paint. -
Placement of Dots:
Paint tiny, random dots or ‘splatters’ on the orange skin between the main drip lines. This mimics the look of splashing metal. -
Create Stray Droplets:
Add a few larger, isolated teardrop shapes distinct from the main drips to create a dynamic, messy-chic effect. -
Stem Detailing:
If desired, dry-brush a tiny amount of gold onto the ridges of the stem to tie the whole look together. -
Check for Runs:
Scan the bottom of the pumpkin. If any drips have reached the table, wipe them away quickly with a paper towel to keep the bottom edge clean. -
Final Drying:
Let the pumpkin sit undisturbed for at least 24 hours. Metallic paints and liquid leaf often require longer drying times to fully cure and harden.
Level Up: Mixed Metals
Alternate drips of copper and gold for a warm, multi-dimensional metallic finish that catches the light differently.
Place your finished masterpiece on a neutral linen runner to let those gold accents truly shine
Marbled Swirls on Orange Base
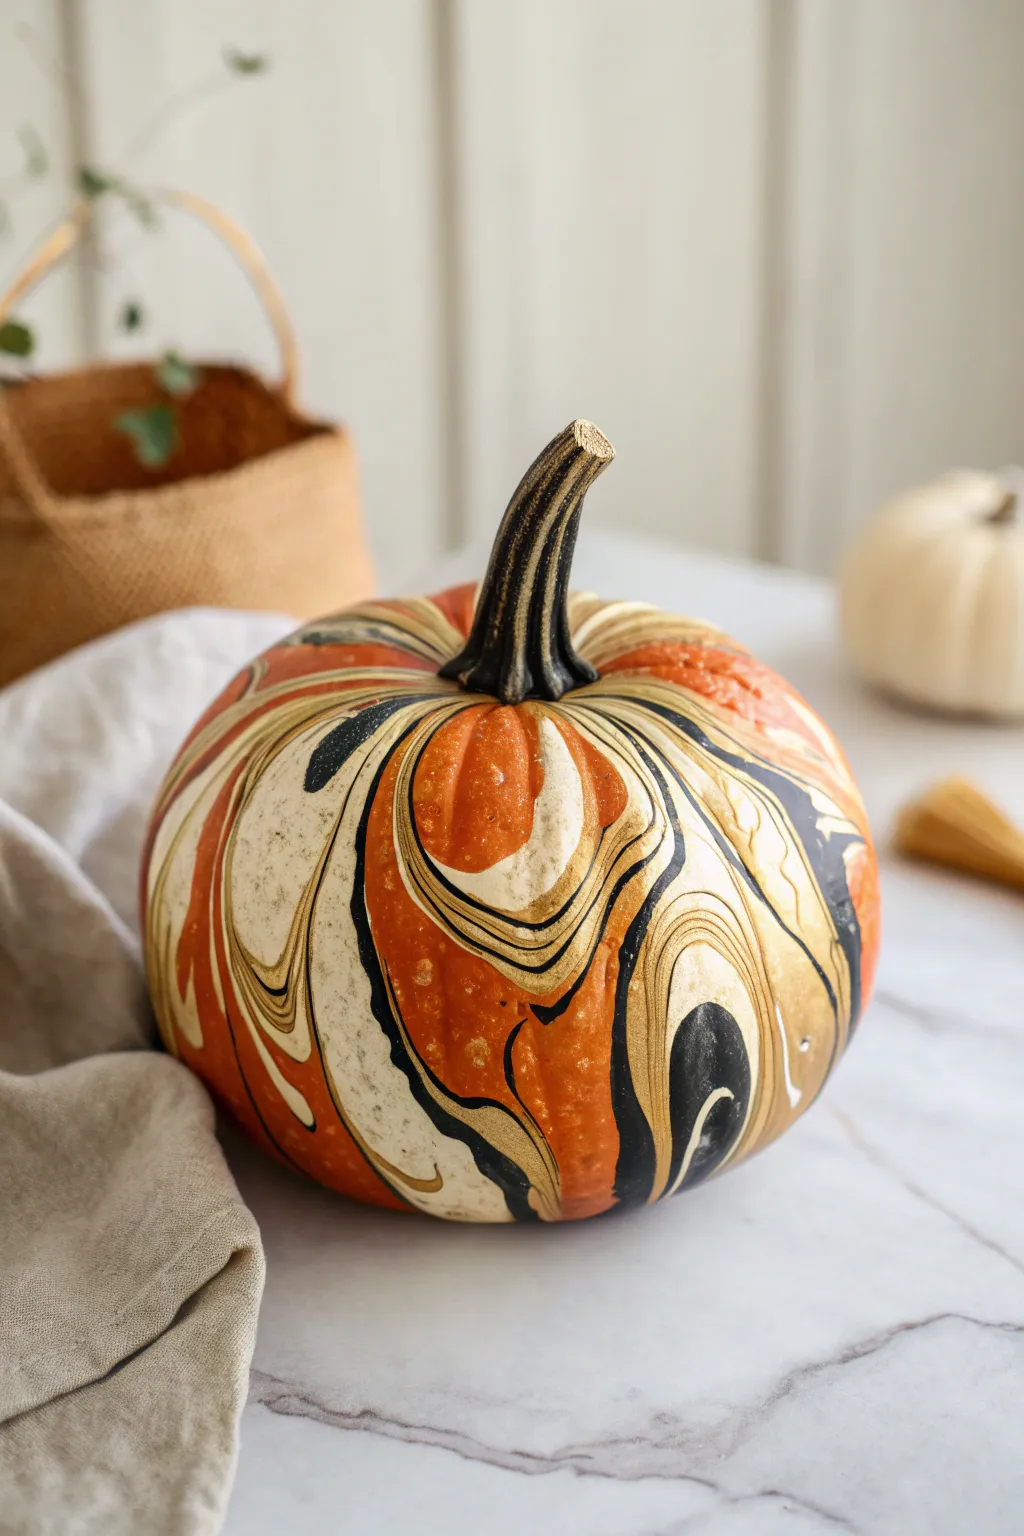
Transform a classic orange pumpkin into a piece of modern art with this mesmerizing hydro-dip technique. The high-contrast swirls of black, cream, and metallic gold create a sophisticated finish that looks like expensive marble but takes only minutes to achieve.
Step-by-Step Guide
Materials
- Medium-sized orange pumpkin (real or faux)
- Large plastic tub or bucket (deep enough to submerge half the pumpkin)
- Spray paints: Matte Black, Cream/Off-White, and Metallic Gold
- Water
- Painter’s tape
- Wooden skewer or toothpick
- Disposable gloves
- Drop cloth or newspapers
- Clear acrylic sealant spray (glossy or matte)
- Small paintbrush (optional)
Step 1: Preparation & Setup
-
Clean the Surface:
Begin by washing your pumpkin thoroughly with mild soap and water to remove dirt or waxy residue. Dry it completely with a lint-free cloth. -
Protect the Stem:
Wrap the pumpkin’s stem tightly with painter’s tape. We want to keep this area clean for a special treatment later, so ensure the tape seals well at the base of the stem. -
Prepare the Tub:
Fill your plastic tub with lukewarm water. The temperature matters—if it’s too cold, the paint might clump. Leave about 4-6 inches of space at the top to account for water displacement when you dip the pumpkin. -
Safety First:
Set up your workspace outdoors or in a very well-ventilated area, covering the ground with your drop cloth. Put on your disposable gloves now, as this process can get messy.
Paint Clumping?
If the paint sinks or clumps immediately, your water is likely too cold. Replace it with tepid tap water. Also, spray closer to the water surface to avoid ‘dusting’ it.
Step 2: Creating the Marble Effect
-
Spray the Base Layer:
Shake your spray paint cans vigorously. Start by spraying the Matte Black directly onto the center of the water’s surface. Hold the can about 8-10 inches away and spray for just 2-3 seconds. -
Add Secondary Colors:
Immediately spray the Cream/Off-White into the center of the black circle you just created. Follow this quickly with the Metallic Gold. -
Repeat the Rings:
Continue alternating colors—Black, Cream, Gold—spraying into the center bullseye each time until the water’s surface is mostly covered with concentric rings of floating paint. -
Create the Swirls:
Take your wooden skewer and gently drag it through the paint on the water’s surface. Move slowly to create swirling marble patterns, but don’t over-mix or the colors will become muddy. -
The Dip:
Hold the pumpkin by the taped stem and the bottom. Slowly but steadily submerge it into the water at a slight angle. The paint will adhere to the pumpkin skin as it breaks the surface. -
Submerge and Clear:
Push the pumpkin down until it is fully submerged (or as much as you want covered). While it is underwater, quickly wave your hand or a piece of cardboard across the water surface to clear away the remaining paint film. -
Remove and Drain:
Pull the pumpkin out of the cleaned water. If you pull it up through paint, you’ll add a second, messy layer. Let the excess water drip off and set it on the drop cloth to dry. -
Touch Ups (Optional):
If there are large gaps where the orange shows through too much for your liking, you can repeat the dipping process on just that specific side once the first coat is dry to the touch.
Step 3: Finishing Details
-
Remove Tape:
Once the marbled paint is completely dry (usually 1-2 hours), carefully peel off the painter’s tape from the stem. -
Paint the Stem Base:
Spray a small amount of Matte Black paint into a cap or on a paper plate. Use a small brush to paint the entire stem black. -
Add Gold Highlights:
While the black stem paint is still slightly tacky, or after it dries, spray a tiny bit of Metallic Gold onto your palette. Using a dry-brush technique, lightly whisk gold over the ridges of the stem to add dimension. -
Seal the Work:
To protect your design and give it a unified sheen, spray the entire pumpkin with a clear acrylic sealant. A glossy finish really makes the gold pop. -
Final Cure:
Allow the sealant to cure fully overnight before moving the pumpkin to your porch or display table.
Make it Metallic
For an even more luxe look, use liquid gold leaf on the stem instead of spray paint. It catches the light better and creates a richer contrast against the black.
Place your hydro-dipped masterpiece in a well-lit spot to watch those metallic swirls catch the autumn light
Mix-and-Match Pumpkin Set in One Palette
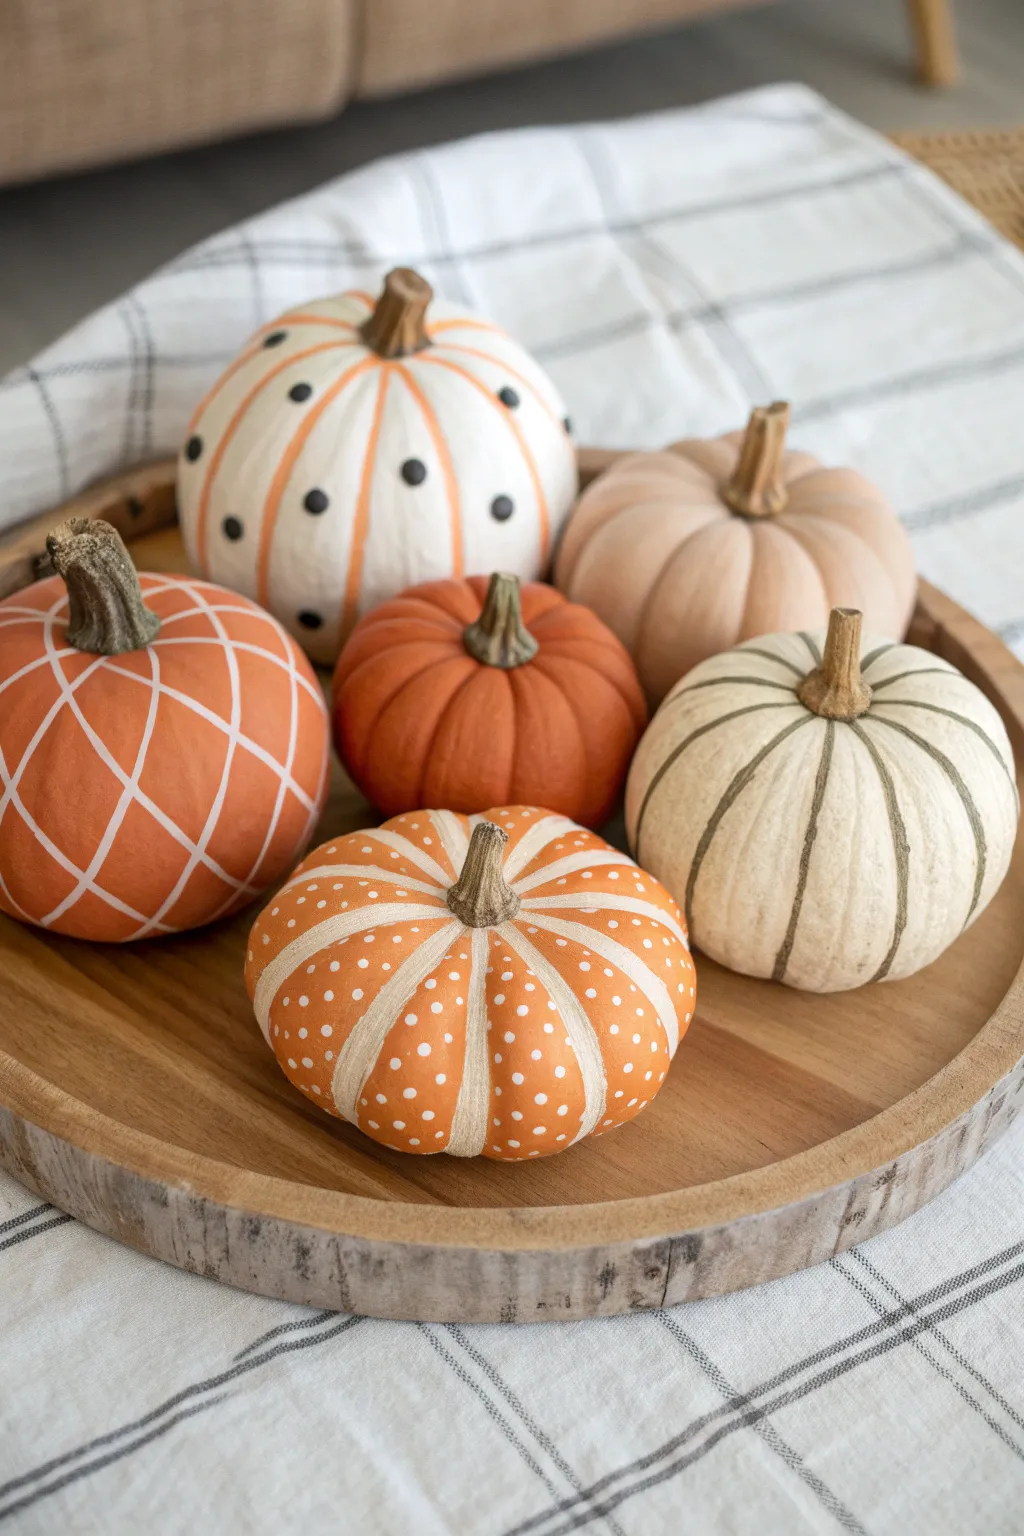
Create a sophisticated autumnal display by unifying diverse patterns within a single color palette of burnt orange, cream, and beige. This project transforms a mix of plain craft pumpkins into a curated collection featuring stripes, polka dots, and grids for visual interest.
Step-by-Step Tutorial
Materials
- 6 small faux pumpkins (diverse shapes)
- Acrylic craft paint (burnt orange, warm cream/off-white, beige/tan, black)
- Set of small paintbrushes (fine liner, small flat brush)
- Pencil
- Painter’s tape or thin washi tape (optional)
- Matte finish sealer spray
- Wooden tray for display
Step 1: Base Coating
-
Prep the surface:
Wipe down all your pumpkins with a damp cloth to remove dust or manufacturing residue. If your faux pumpkins have a glossy finish, lightly sand them with fine-grit sandpaper to help the paint adhere better. -
Plan your palette:
Divide your six pumpkins into color groups to ensure balance. For this look, aim for two predominantly orange, two cream/white, one beige, and one natural orange accent. -
Apply base colors:
Paint the solid base coats according to your plan. Paint one pumpkin solid beige and one solid white. For the patterned pumpkins, apply their dominant background color first: orange for the grid pumpkin, and white for the striped pumpkin. -
Second coats:
Let the first layer dry completely, usually about 20 minutes. Apply a second coat to ensure opaque, rich coverage, especially for the light cream colors covering bright orange faux pumpkins. -
Protect the stems:
I like to carefully paint around the stems, but if you have a shaky hand, wrap a small piece of painter’s tape around the base of each stem to keep them clean and natural-looking.
Step 2: Detailing the Grid Pumpkin
-
Mark the lines:
Take one of the dried orange pumpkins. lightly sketch diagonal lines crisscrossing the surface with a pencil to create a diamond lattice pattern. Follow the natural curve of the pumpkin rather than drawing perfectly straight lines. -
Paint the lattice:
Using a fine liner brush and cream paint, carefully trace over your pencil lines. Keep the paint fluid but not watery to get crisp lines.
Clean Lines Hack
For the grid or stripe patterns, you can use a white paint pen instead of a brush. It offers much more control and keeps the lines consistent width.
Step 3: Creating the Polka Dot & Stripe Pumpkin
-
Paint vertical stripes:
On a white pumpkin, paint thin vertical orange stripes following the natural indentations (ribs) of the pumpkin. Use a steady hand and a small flat brush. -
Add the dots:
Dip the non-brush end of a paintbrush or a dedicated dotting tool into black paint. Firmly press dots into the white spaces between the orange stripes, spacing them randomly but evenly.
Fixing Wobbly Lines
If your painted lines look uneven, don’t panic. Gently distress the pumpkin with sandpaper after it dries. This creates a rustic look that hides imperfections.
Step 4: Designing the Dotted Ribs Pumpkin
-
Define the sections:
On another orange pumpkin, paint the indented ribs with a creamy beige color. This highlights the natural segments of the fruit. -
Micro-dotting:
Using your smallest detail brush or a toothpick, apply tiny white dots all over the orange sections. Keep the beige rib lines clean and free of dots for contrast.
Step 5: Finishing Touches
-
Enhance the white pumpkin:
Take your final white pumpkin and add very subtle, thin vertical lines in a dark grey or olive tone within the crevices to add depth and make it look more realistic. -
Clean up:
Check all your pumpkins for smudges or uneven lines. Use a small brush dipped in the base color to ‘erase’ any mistakes. -
Seal the work:
Once fully dry, take the pumpkins to a well-ventilated area and spray them with a matte clear coat. This removes any artificial acrylic shine and protects your designs. -
Arrange the display:
Place the pumpkins on a round wooden tray. Nestle them close together, tilting some slightly so the stems point in different directions for a casual, organic feel.
Group your newly painted pumpkins on a coffee table or sideboard to bring a touch of autumn warmth to your home


Have a question or want to share your own experience? I'd love to hear from you in the comments below!