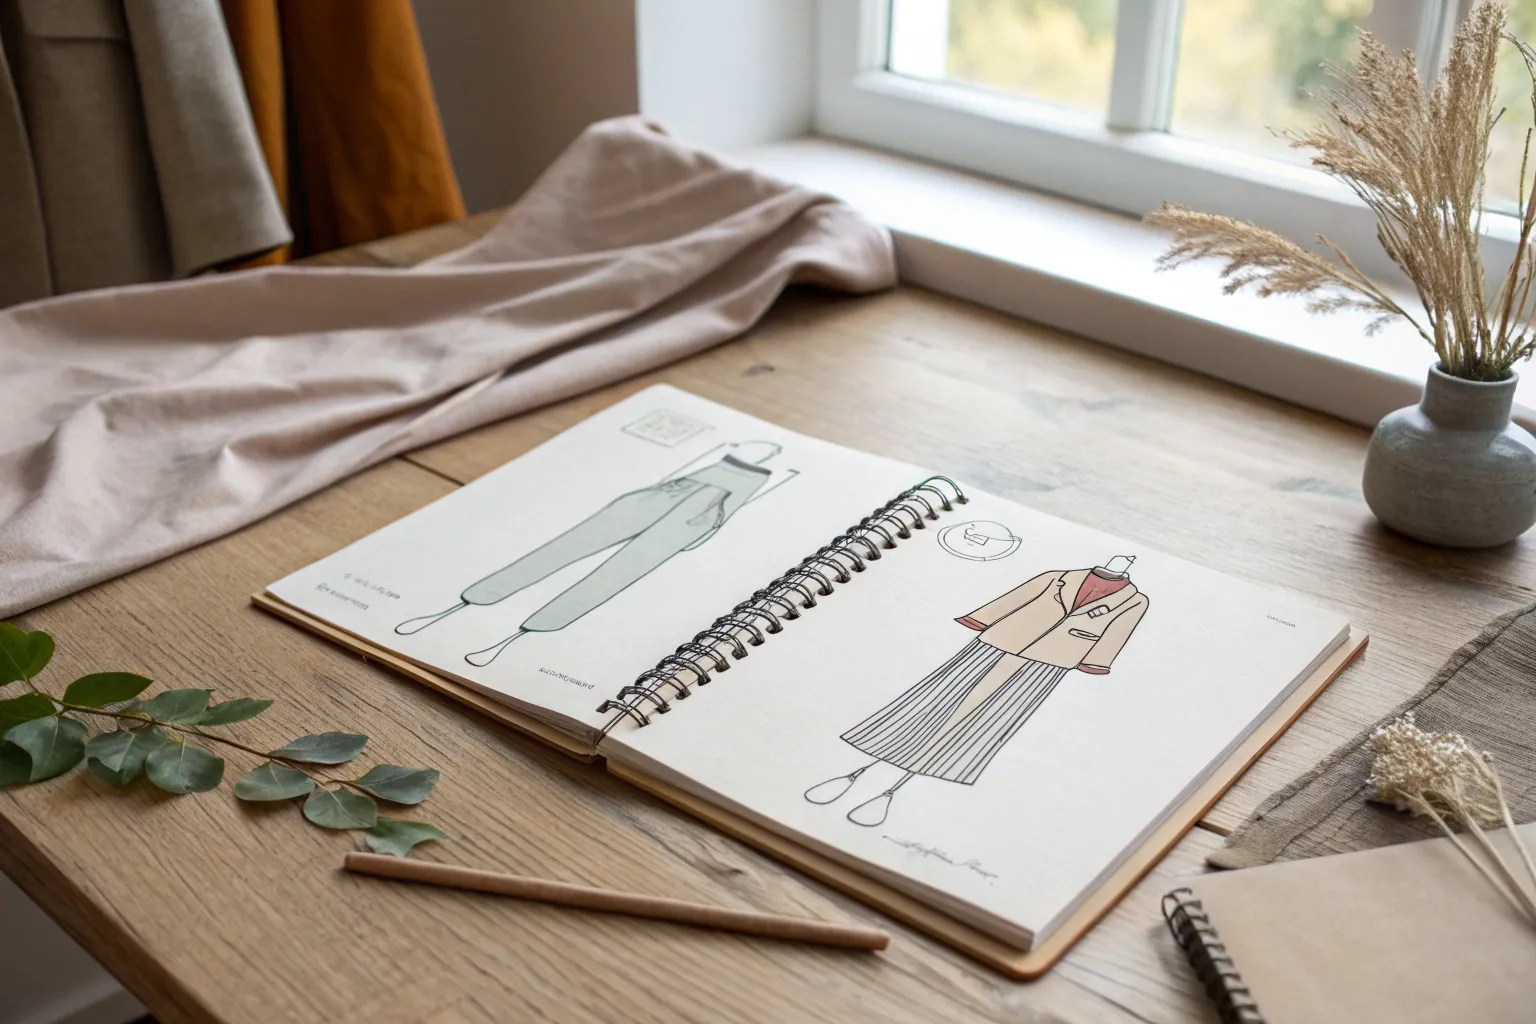
When I’m stuck on what to draw, I love sketching outfits because you get instant character and storytelling without needing a complicated scene. Here are my favorite outfit ideas drawing prompts—starting with the classics and drifting into the weirder, more playful stuff.
Classic Tee and Jeans Combo
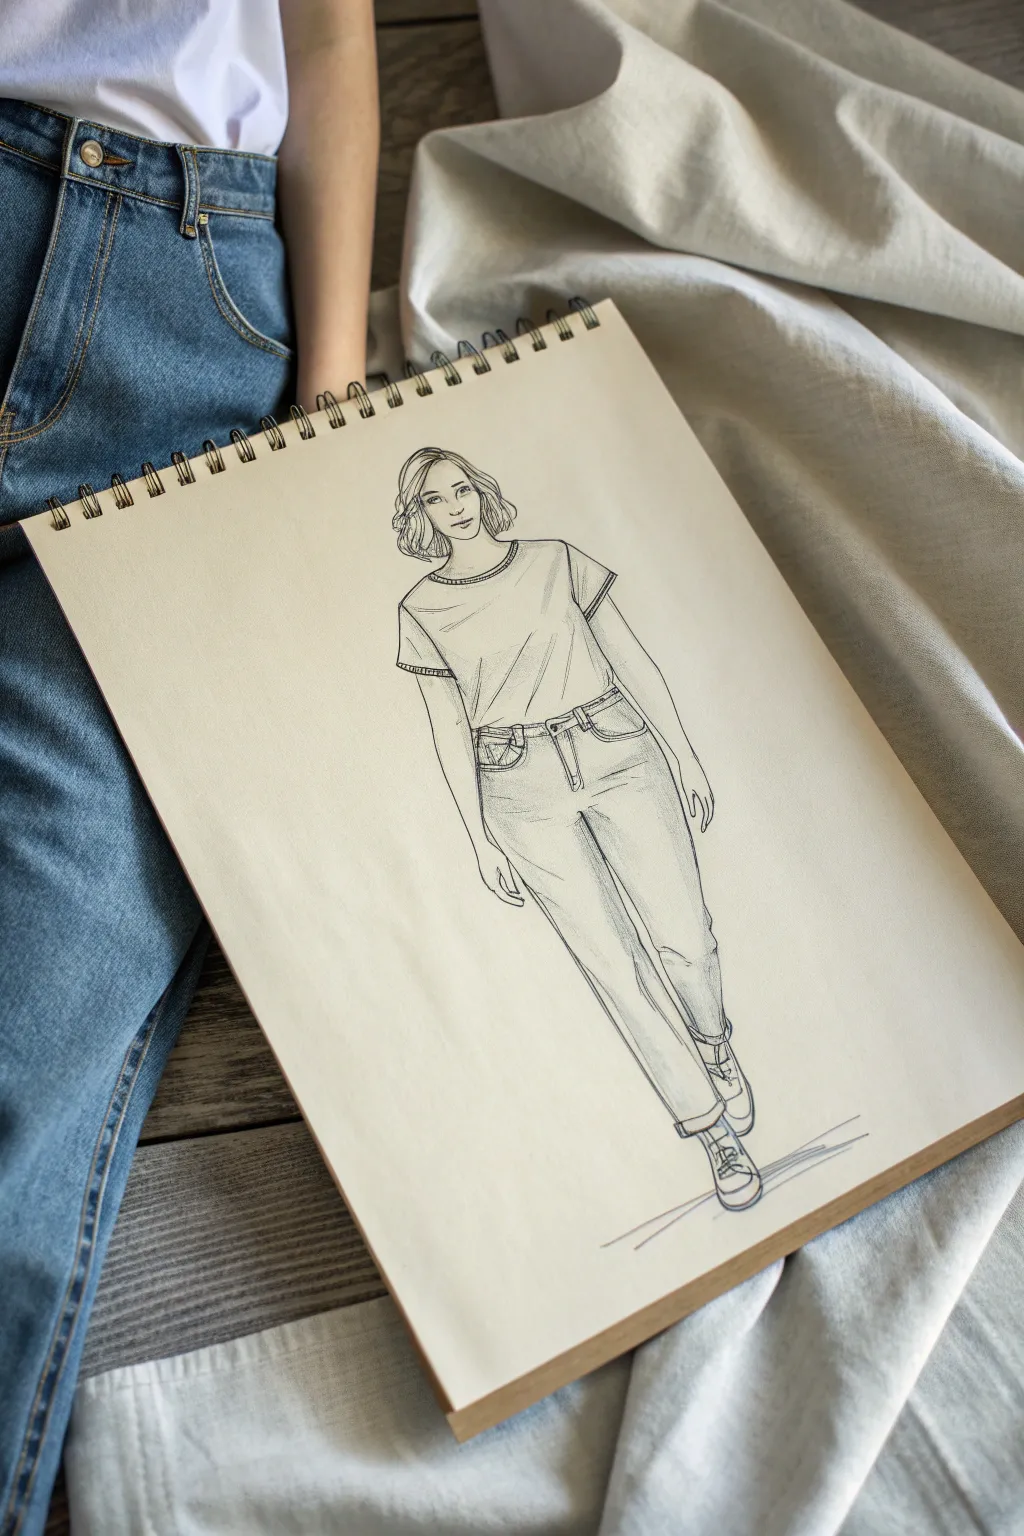
Capture the effortless vibe of everyday fashion with this clean, linear illustration of a timeless outfit. This tutorial guides you through sketching a relaxed figure pose and detailing denim textures using simple ink techniques.
Step-by-Step Guide
Materials
- Spiral-bound sketchbook (cream or off-white paper)
- HB or 2B pencil for initial sketching
- Kneaded eraser
- Fine liner pen (0.1mm or 0.3mm, black)
- Thicker marker or brush pen (optional for outlines)
Step 1: Laying the Foundation
-
Establish the pose:
Begin by lightly sketching a vertical line to mark the center of balance. Draw a simplified stick figure or ‘croquis’ with the weight shifted slightly to one leg, creating a gentle S-curve through the torso. -
Outline the body blocks:
Flesh out the stick figure with geometric shapes. Use a trapzoid for the chest, an oval for the hips, and cylinders for the arms and legs. Keep the lines faint so they are easy to erase later. -
Define the face shape:
Sketch a soft oval for the head. Add guidelines for the eyes, nose, and mouth. The model in the example has a relaxed expression, so keep the jawline soft and the head slightly tilted.
Fabric Weight Tip
Make tee-shirt folds softer and curved, while denim folds should be more angular and rigid to reflect the heavier material.
Step 2: Draping the Clothing
-
Sketch the t-shirt silhouette:
Draw the outline of the t-shirt over the torso. Since it’s a loose tee, leave some space between the fabric line and the body line. Drop the shoulders slightly for a relaxed fit. -
Mark the neckline and sleeves:
Add a simple crew neckline. Sketch the short sleeves, making sure they angle out slightly to show the structure of the fabric rather than clinging to the arm. -
Draw the jeans waist:
Locate the natural waistline and draw the waistband of the jeans. The example shows a mid-to-high rise fit, so place it just below the narrowest part of the torso. -
Shape the pant legs:
Extend lines down from the hips for the jeans. They should be somewhat straight-leg or ‘mom jean’ style, tapering slightly at the ankle but remaining loose around the thighs and calves. -
Add the shoes:
Sketch simple outlines for sneakers at the feet. Focus on the general shape of the shoe upper and the sole rather than intricate shoelace details at this stage.
Level Up: Pattern Play
Try adding a striped pattern to the t-shirt or small distressing rips on the jeans knees for a more grunge-inspired look.
Step 3: Refining with Ink
-
Ink the face and hair:
Switch to your fine liner. carefully trace the facial features and draw the hair in sections. Use loose, wavy lines for the bob haircut to suggest movement and texture. -
Detail the t-shirt:
Ink the neckline with a double line to show the ribbing. Add fold lines radiating from the armpits and tuck-in point to suggest the fabric’s drape. -
Define the denim:
Outline the jeans, adding details like belt loops, the front button, and pockets. I like to add small stress lines near the crotch and knees to show where stiff denim naturally creases. -
Complete the outline:
Go over the arms, hands, and shoes with confident strokes. Try not to lift your pen too often to maintain smooth, continuous lines.
Step 4: Adding Texture and Depth
-
Add seam details:
Draw double stitching lines on the jeans pockets and down the side seams. This is crucial for making the pants look like denim. -
Create shading:
Use light hatching (parallel diagonal lines) to indicate shadows. Focus on the areas under the chin, the inside of the sleeves, and the inner thighs. -
Ground the figure:
Sketch a few quick, horizontal scribble lines under the feet. This simple shadow anchors the figure so she doesn’t look like she’s floating. -
Clean up:
Wait for the ink to dry completely to avoid smudging. Then, gently erase all your underlying pencil sketches to reveal the crisp ink work.
Now you have a stylish fashion illustration ready to inspire your next outfit choice


Cozy Hoodie and Leggings Look
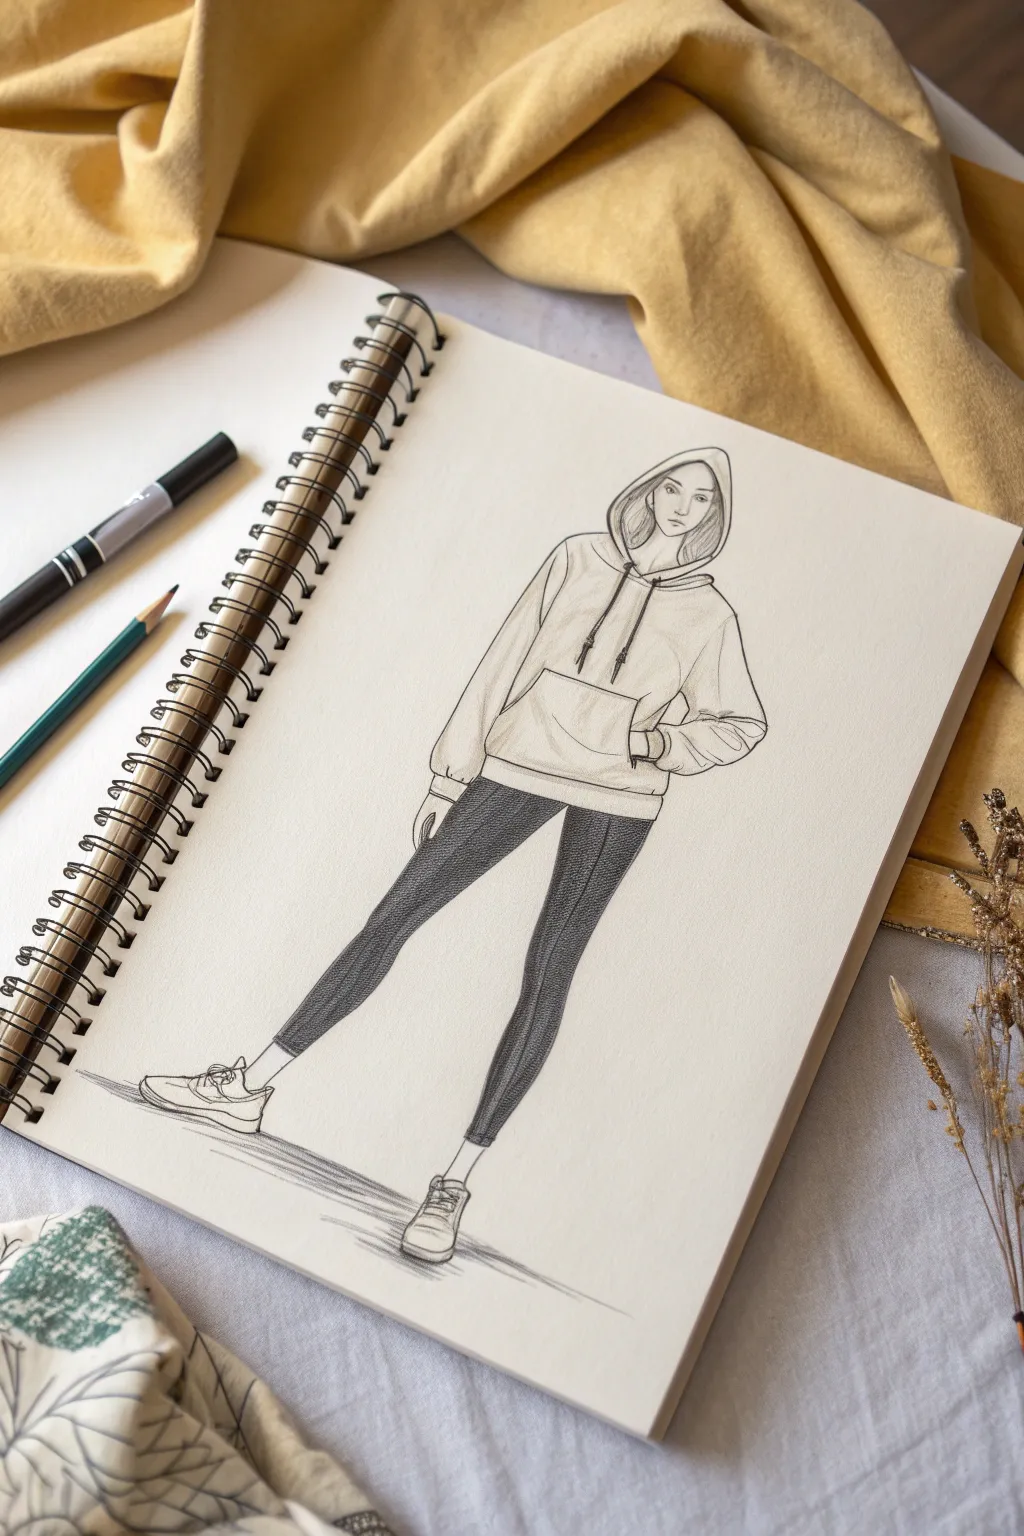
Master the art of casual fashion illustration with this drawing of a classic hoodie and leggings combo. This sketch focuses on capturing drape, fold details, and fabric texture using simple graphite and fine-liner techniques on sketchbook paper.
How-To Guide
Materials
- Spiral-bound sketchbook (smooth or mixed media paper, approx. A4)
- H or HB pencil for initial sketching
- 2B or 4B pencil for shading
- Fine-liner pen (black, 0.3mm or 0.5mm)
- Kneaded eraser
- Blending stump (paper tortillon)
Step 1: Constructing the Figure
-
Establish the pose:
Begin by lightly sketching a stick figure to define the pose. Draw a vertical line for the spine, tilting the hips slightly for a natural stance. Position the legs so the weight is shifted onto the left leg, while the right leg extends outward. -
Map out volumes:
Flesh out the stick figure with basic geometric shapes. Use ovals for the shoulders and hips, cylinders for the arms and legs, and a soft oval for the head. Keep these lines very faint, as they serve only as guides. -
Define the head and hood:
Draw the contours of the face inside the head oval. Sketch a larger, loose shape around the head to represent the hood. It should not sit tight against the skull; leave ample space to suggest the fabric’s thickness.
Step 2: Drafting the Outfit
-
Outline the hoodie silhouette:
Sketch the oversized shape of the hoodie over the torso references. Drop the shoulder seams lower than the actual shoulders to emphasize the slouchy fit. Draw the bottom hem resting just below the hip line. -
Add the kangaroo pocket:
Place a trapezoid shape on the lower abdomen area for the central pocket. Ensure the lines curve slightly around the form of the body rather than looking perfectly flat. -
Sketch the leggings:
Outline the legs, following the muscles’ natural curves but keeping the lines relatively sleek to mimic tight fabric. Stop the hem just above the ankle bone. -
Draw the shoes:
Box in the basic shapes of the sneakers. Indicate the sole thickness and the tongue of the shoe, keeping the details minimal at this stage.
Keep it Clean
Graphite creates dust. Place a clean sheet of scrap paper under your drawing hand while shading the leggings to prevent smudging the white paper background.
Step 3: Inking and Refining
-
Ink the hoodie contours:
Switch to your fine-liner pen. Go over the hoodie lines, adding wrinkles where the fabric bunches—specifically at the elbows, armpits, and where the sleeves meet the cuffs. Draw the drawstrings hanging from the hood neck. -
Ink the leggings and shoes:
Trace the leg outlines with smooth, confident strokes. For the shoes, define the laces and the separation between the upper shoe and the rubber sole. -
Erase guide lines:
Once the ink is completely dry, gently run your kneaded eraser over the entire drawing to lift the initial pencil structure marks, leaving only the clean ink lines.
Fabric Weight Tip
To make the hoodie look heavy and cozy, concentrate your wrinkle lines at the bottom hem and cuffs where gravity pulls the fabric down and causes bunching.
Step 4: Shading and Texture
-
Shade the leggings:
Using a 2B or 4B pencil, fill in the leggings. Use tight, diagonal hatching lines to create a dark, textured look that mimics knit fabric. Press harder near the inner thighs and outer edges to create roundness. -
Shade the hoodie folds:
Add subtle graphite shading to the hoodie. Focus on the areas where fabric overlaps—under the hood, inside the pocket opening, and beneath the bust. Applying a light touch here keeps the hoodie looking like a lighter color than the pants. -
Detail the face and hair:
Lightly shade the hair framing the face inside the hood. Add tiny shadows under the chin and nose to give the face dimension without overworking it. -
Ground the figure:
Sketch loose, horizontal scribbles directly under the shoes. This cast shadow anchors the figure to the page so she doesn’t appear to be floating. -
Final blending:
Take a blending stump and soften the graphite on the leggings to make the texture more uniform. You can also lightly smudge the shadow beneath the feet for a softer effect.
Now you have a stylish, relaxed fashion illustration ready to inspire your next outfit choice


Easy Sundress With Movement
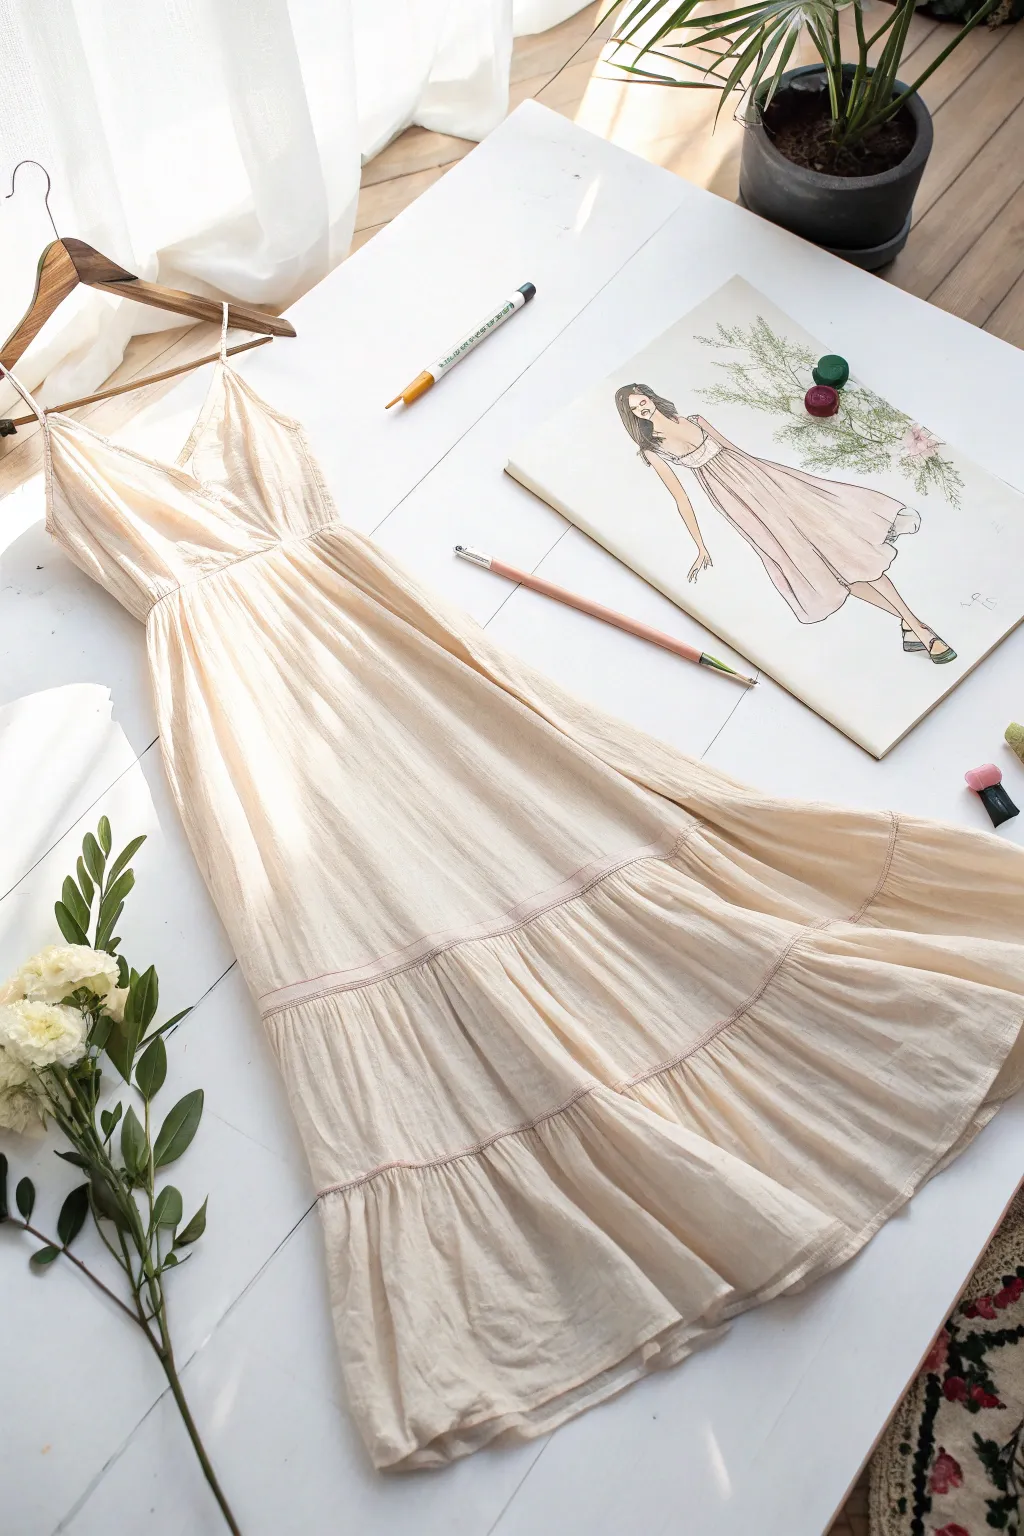
Capture the effortless flow of a summer maxi dress with this mixed-media fashion illustration tutorial. You will learn to draft a light, airy tiered silhouette and tint it with soft washes of color to mimic fabric texture.
Step-by-Step
Materials
- Hot press watercolor paper (A3 or A4)
- H or HB pencil for initial sketching
- Fine liner pen (black or dark brown, 0.1mm)
- Watercolor paints (Light Ochre, Sepia, and a touch of Rose)
- Round watercolor brush (size 4 or 6)
- Skin tone marker or watercolor
- Eraser
- Two small mixing wells or caps
Step 1: Sketching the Figure & Silhouette
-
Establish the pose:
Begin by lightly sketching a fashion croquis in a relaxed, walking pose. This movement is crucial for showing off the swing of a long dress. Keep the lines faint so they don’t show through the final color. -
Draft the bodice:
Draw the V-neck bodice of the dress. The straps should be thin spaghetti straps, leading into a wrapped or surplus neckline. Add small gathers just under the bust line where the fabric would pinch together. -
Define the waistline:
Mark the waist slightly high, giving it an empire-waist feel. This allows the skirt to flow loosely from the ribcage down. -
Sketch the first tier:
From the waist, draw the first section of the skirt. Instead of straight lines, use slightly wavy vertical strokes to suggest the gathering and folds of the fabric. -
Add the lower tiers:
Draw two more horizontal seams to create the tiered effect. Widen the skirt as you go down, making sure the hemline swings slightly to one side to match the walking pose of your figure.
Loose Lines
Don’t connect every single line when drawing the skirt folds. Leaving gaps allows the viewer’s eye to fill in the rest, creating a sense of movement.
Step 2: Refining Lines & Adding Details
-
Ink the outline:
Using your fine liner, carefully trace over your pencil lines. I prefer to use broken, varied lines for the fabric folds to keep the drawing looking soft rather than rigid. -
Detail the gathers:
At each horizontal seam (the waist and the tiers), add small, quick ticking marks or tiny ‘v’ shapes. These represent the gathered stitching that gives the dress its volume. -
Draw the figure:
Ink the model’s arms, legs, and face. Keep the hair simple and flowing to match the mood of the dress. Don’t forget the shoes—a simple wedge sandal works perfectly here. -
Clean up:
Once the ink is completely dry, gently erase all the underlying pencil marks to prepare the paper for painting.
Pattern Play
Once dry, use a white gel pen to add a subtle micro-floral print or polka dots over the watercolor for a completely different textile vibe.
Step 3: Color & Texture
-
Mix the dress color:
Create a very dilute wash of Light Ochre mixed with a tiny drop of Rose. You want a creamy, almost-beige tone, not a bright yellow. Test it on a scrap piece of paper first. -
Apply the first wash:
Paint the entire dress with this pale wash. Work quickly so the color remains even, but leave tiny Slivers of white paper at the highlights (the tops of folds) to show sheen. -
Add shadows:
While the first layer is still slightly damp, mix a bit of Sepia into your cream color. Paint this darker shade into the deep folds of the skirt and directly under the tier seams. -
Paint the skin:
Use your skin tone marker or a watercolor mix to color the model’s exposed skin. Keep the shading minimal to maintain a fresh look. -
Enhance the tiers:
Once the paint is dry, use a slightly more concentrated mix of the shadow color to paint a thin line along the stitching of the tiers. This separates the sections clearly. -
Add background context:
To frame the drawing without overwhelming it, sketch some very loose, abstract greenery behind the figure using pale greens and browns. This mimics the natural vibe of the photo.
Now you have a charming fashion sketch that perfectly captures the breezy elegance of a summer day


Monochrome Outfit for Value Practice

This chic fashion sketch captures a relaxed, utilitarian jumpsuit in warm rust tones, perfect for practicing fabric folds and monochromatic shading. By focusing on a single color family, you’ll learn how to build volume and texture through marker layering and fine liner details.
Step-by-Step Guide
Materials
- Spiral-bound sketchbook (heavyweight paper suitable for markers)
- alcohol-based Art Markers (Rust/Burnt Orange set: light, medium, dark)
- Fine liner pen (Black, 0.1mm to 0.3mm)
- Pencil (HB for sketching)
- Kneadable eraser
- White gel pen (optional for highlights)
Step 1: The Foundation Sketch
-
Establish the pose:
Begin with a faint pencil gesture line to determine the stance. The figure is standing straight with one leg slightly forward. Draw the basic underlying body shapes—shoulders, torso, and hips—to ensure the clothing will hang correctly. -
Draft the jumpsuit outline:
Sketch the garment over your body form. Start with the collared neckline, moving down to the belted waist. Note how the fabric bunched at the waist creates volume. -
Add sleeves and legs:
Draw the loose, slight balloon sleeves, cuffing them at the wrists. For the legs, extend straight, wide lines down to the ankles, adding a defined cuff at the bottom. -
Detailing pockets and belt:
Add the utilitarian details: a patch pocket on the leg, diagonal hand pockets at the hips, and the belt loops. Keep your pencil pressure very light so it doesn’t show through the marker later. -
Refine the folds:
Beforeinking, clarify where the fabric folds. Look for tension points at the waist, elbows, and crotch area. The folds should radiator outward from these tension points.
Fabric Texture Pro-Tip
For a linen look, let the marker dry slightly between layers. The subtle streakiness mimics the weave of natural rough fabrics perfectly.
Step 2: Adding Color
-
Base layer application:
Take your lightest rust or terra-cotta alcohol marker. Fill in the entire jumpsuit, working quickly to saturate the paper evenly. Leave the hands and neck uncolored for now. -
Building mid-tones:
Using a medium rust shade, add shadows to create depth. Focus on the inside of the legs, underneath the collar, and the areas where the fabric gathers at the waist belt. -
Deepening the shadows:
Switch to your darkest rust marker. Apply this sparringly to the deepest crevices: directly under the belt, the armpits, and the sharpest creases in the pants legs. This high contrast makes the drawing pop. -
Skin tone basics:
Color the neck, hands, and the small visible portion of the face with a basic skin tone marker. Keep it simple as the focus is on the outfit. -
Shoes and socks:
Fill in the sneakers with a neutral grey or keep them white, adding just a touch of shading to stamp them to the ground.
Step 3: Inking and Definition
-
Outline the silhouette:
Once the marker ink is completely dry, use a 0.3mm fine liner to trace the main outer lines of the garment. Use a confident, fluid stroke. -
Detail the seams:
Switch to a finer tip (like 0.1mm) or use lighter pressure for internal details. Draw the stitching lines on the pockets, the collar lapels, and the cuffs of the pants. -
Emphasize drapery:
Go back over your marker shadows with the pen to define the folds. Add short, tapered lines radiating from the belt to show the fabric tension. -
Texture the hair:
Ink the bob haircut with simple, sweeping strokes that follow the hair’s shape. I prefer to leave a few gaps in the ink lines to suggest shine. -
Grounding shadow:
Draw a few quick, horizontal lines beneath the shoes. This ‘ground’ prevents the figure from looking like it’s floating in space.
Level Up: Pattern Play
Once the base color is dry, use a fine tip pen or colored pencil to overlay a pinstripe or polka dot pattern that follows the curve of the folds.
Step 4: Final Touches
-
Erase pencil marks:
Gently rub a kneadable eraser over the entire drawing to lift any remaining graphite lines. -
Add buttons and hardware:
Draw small circles for the buttons down the front placket. You can fill these in with black or a dark brown dot. -
Optional highlights:
If you have a white gel pen, add tiny dots to the buttons or a thin line on the crest of the shoulder folds to suggest a smooth fabric texture.
Now you have a stylish fashion illustration that captures both the structure and softness of the garment

PENCIL GUIDE
Understanding Pencil Grades from H to B
From first sketch to finished drawing — learn pencil grades, line control, and shading techniques.
Explore the Full Guide
Pastel Outfit With Soft Layering

Capture the essence of relaxed fashion with this delicate ink and watercolor illustration, featuring soft hues and clean lines. This project focuses on building a gentle, harmonious color palette perfect for fashion sketching.
Step-by-Step Tutorial
Materials
- Heavyweight sketchbook paper (min 160gsm) or watercolor paper
- HB or 2H graphite pencil
- Fine liner pen (0.1 or 0.3mm, waterproof ink)
- Black ink or diluted black watercolor
- Watercolor set (focus on peach/pink, sage green, cool grey, and skin tones)
- Round watercolor brushes (sizes 2 and 4)
- Eraser
- Jar of water & paper towel
Step 1: Pencil Structure
-
Map the proportions:
Begin by lightly sketching a vertical line for the center balance of the figure. Mark the head size, then measure down about 7-8 head lengths to find the feet placement, keeping the pose relaxed and upright. -
Rough out the body:
Sketch the basic shapes of the body underneath the clothes first. Draw a simple oval for the head, a trapezoid for the torso, and stick-figure lines for the limbs to ensure the anatomy feels natural before dressing the figure. -
Draft the sweater:
Outline the oversized sweater. Drop the shoulder seams slightly down the arm to suggest a loose fit, and sketch the balloon sleeves bunching up near the wrists. Add the ribbed collar high on the neck. -
Add the pleated skirt:
Draw the skirt starting from the natural waist. Sketch the hemline significantly wider than the waist, then add light vertical lines to indicate the pleats. Keep the lines soft so the fabric looks fluid. -
Legs and accessories:
Refine the legs, adding the slightly curved lines for the calves. Above the ankles, sketch the ribbing for knee-high socks. Finally, draft the basic shape of the sneakers, focusing on the sole and laces.
Muddy water?
If your pastel colors look dirty, you likely need fresh water. Pastels require pristine water; changing your jar frequently ensures your pinks stay bright and your greens stay minty.
Step 2: Inking the Lines
-
Trace the main contours:
Using your waterproof fine liner, carefully go over your pencil lines. Keep the pressure light for delicate areas like the face and hair. For the clothing folds, use broken lines occasionally to prevent the drawing from looking too stiff. -
Refine clothing details:
Add smaller vertical tick marks for the ribbing on the sweater cuffs, hem, and collar. Ink the shoelaces carefully. Once the ink is completely dry—wait at least five minutes—erase all your pencil marks thoroughly.
Level Up: Pattern Play
Once dry, use a white gel pen or colored pencil to add a subtle pattern to the sweater, like polka dots or stripes. This adds texture without overpowering the soft watercolor.
Step 3: Watercolor Washes
-
Skin tone base:
Mix a very watery, pale skin tone. Apply a light wash to the face, neck, and legs. While the paint is still damp, I like to drop in a tiny hint of pink on the cheeks and knees for a natural flush. -
Sweater wash:
Dilute a peach or warm pink watercolor. Paint the entire sweater area with a consistent wash. Let the pigment pool slightly at the bottom of the sleeves to create a natural shadow effect. -
Skirt color:
Mix a soft sage or mint green. Carefully paint the skirt sections. To emphasize the pleats, you can paint every other section first, let them dry, and then paint the remaining ones to keep crisp edges. -
Shadows and depth:
Once the base layers are dry, mix a slightly darker version of your pink and green. Paint thin lines along the seams, under the armpits, and inside the pleats to give the clothes volume. -
Hair and socks:
Paint the hair with a light sandy brown or blonde mix, leaving tiny white gaps for highlights. For the socks, use a very diluted cool grey to give them form without making them look dark. -
Finishing the shoes:
Add touches of grey to the sneakers for shadow, keeping the main areas white or very pale. Draw a faint wash of blue-grey under the feet to ground the figure so she doesn’t look like she is floating.
Now you have a charming fashion illustration ready to inspire your next wardrobe choice
Outerwear Spotlight: Coats and Jackets
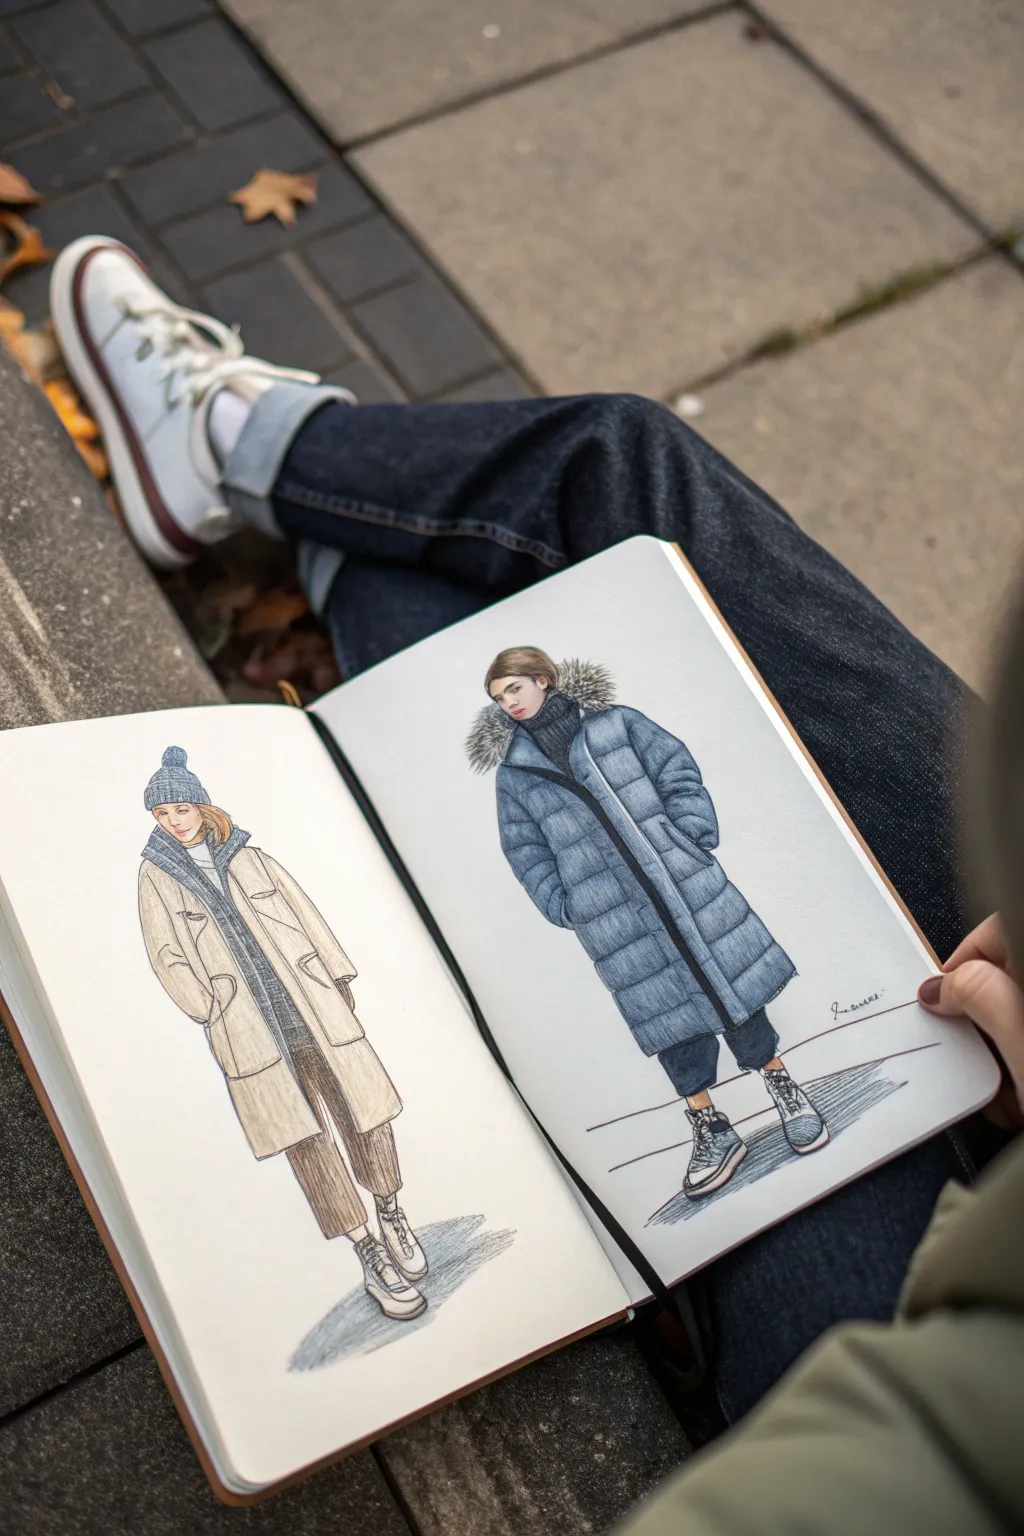
Capture the cozy sophistication of cold-weather fashion with this dual-spread sketchbook study. This project focuses on rendering textures like puffer quilting and wool blends using a combination of marker base layers and colored pencil detailing.
Step-by-Step Guide
Materials
- Heavyweight sketchbook or mixed media paper
- HB or 2B graphite pencil
- Kneaded eraser
- Fine liner pens (black, 0.1mm and 0.3mm)
- Alcohol-based markers (Cool Greys, Beige/Sand, Denim Blue, Navy)
- Colored pencils (White, Dark Blue, Dark Brown, Cream)
- White gel pen
Step 1: The Framework
-
Establish the poses:
Begin by lightly sketching two ‘croquis’ or fashion figures. For the left figure, aim for a relaxed walking stance with hands in pockets. For the right, draw a standard standing pose with a slight lean. Keep the lines very faint so they don’t show through later. -
Draft the garment shapes:
Sketch the outline of the coats over the figures. For the left coat, draw a mid-length parka silhouette with an open front. On the right, outline a long, cylindrical puffer coat shape that extends past the knees. -
Add structural details:
Refine the pencil sketches by adding collars, hoods, and hemlines. Don’t forget the accessories—sketch the beanie hat on the left figure and the fur trim on the hood of the right figure. -
Draft the legs and shoes:
Draw the trousers extending from the coats. The left figure wears cropped trousers showing ankles, while the right has slightly wider legs. Sketch simple sneaker shapes for both figures.
Muddy colors?
If your marker layers look muddy or bleed too much, let the first layer dry completely (about 5-10 minutes) before adding shadows. This creates sharper edges.
Step 2: Inking and Base Color
-
Fine line outline:
Using a 0.1mm fine liner, go over your pencil lines. Use a broken, sketchy line quality rather than a solid hard line to keep the drawing feeling organic. Erase the pencil marks once the ink is dry. -
Base layer: Beige coat:
Apply a layer of beige or sand-colored alcohol marker to the left coat. Leave small slivers of white paper showing at the high points of folds to suggest light hitting the fabric. -
Base layer: Blue puffer:
Color the right coat with a medium denim blue marker. I like to work in horizontal bands for this one to mimic the baffled stitching of a puffer jacket. -
Underlayers and skin:
Fill in the skin tones with a pale marker. Use a cool grey marker for the sweater under the beige coat, and a dark navy for the turtleneck worn under the blue puffer.
Fabric Swath
Tape small scraps of actual fabric or yarn next to your sketches. It adds a tactile element and helps you reference the exact texture you are trying to draw.
Step 3: Texturing and Depth
-
Shadowing the parka:
Using a slightly darker beige marker or colored pencil, add shadows inside the open flaps of the coat, under the collar, and where the sleeves crease. -
Creating the puffer quilt:
On the blue coat, use a dark blue colored pencil to draw horizontal curved lines across the body and sleeves. Shade heavily directly below each line to create the 3D ‘puff’ effect of the down filling. -
Texturing the fur:
For the fur hood trim, use short, quick flicks of a brown fine liner and a grey colored pencil. Radiate the strokes outward to make it look fluffy. -
Knitwear details:
Add texture to the beanie and sweaters using a sharp colored pencil. Draw tiny ‘V’ shapes or vertical ribs to simulate the knit patterns. -
Refining the denim:
Color the trousers with markers—brown for the left, dark navy for the right. Use a colored pencil to scumble (lightly scribble) texture over the top to make them look like fabric.
Step 4: Final Polish
-
Deepen the blacks:
Use a black marker or pen to fill in the darkest areas, like the deep shadows inside the puffer jacket’s collar or the soles of the shoes. -
Highlights:
With a white gel pen or a very sharp white colored pencil, add highlights to the top of the puffer coat sections to emphasize the shiny nylon material. -
Grounding shadows:
Using a cool grey marker, swipe a quick horizontal shadow under the feet of both figures to ground them so they aren’t floating on the page.
Start your own fashion journal by documenting your daily outfits or dream winter looks
BRUSH GUIDE
The Right Brush for Every Stroke
From clean lines to bold texture — master brush choice, stroke control, and essential techniques.
Explore the Full Guide
Uniform-Inspired Outfit Variations
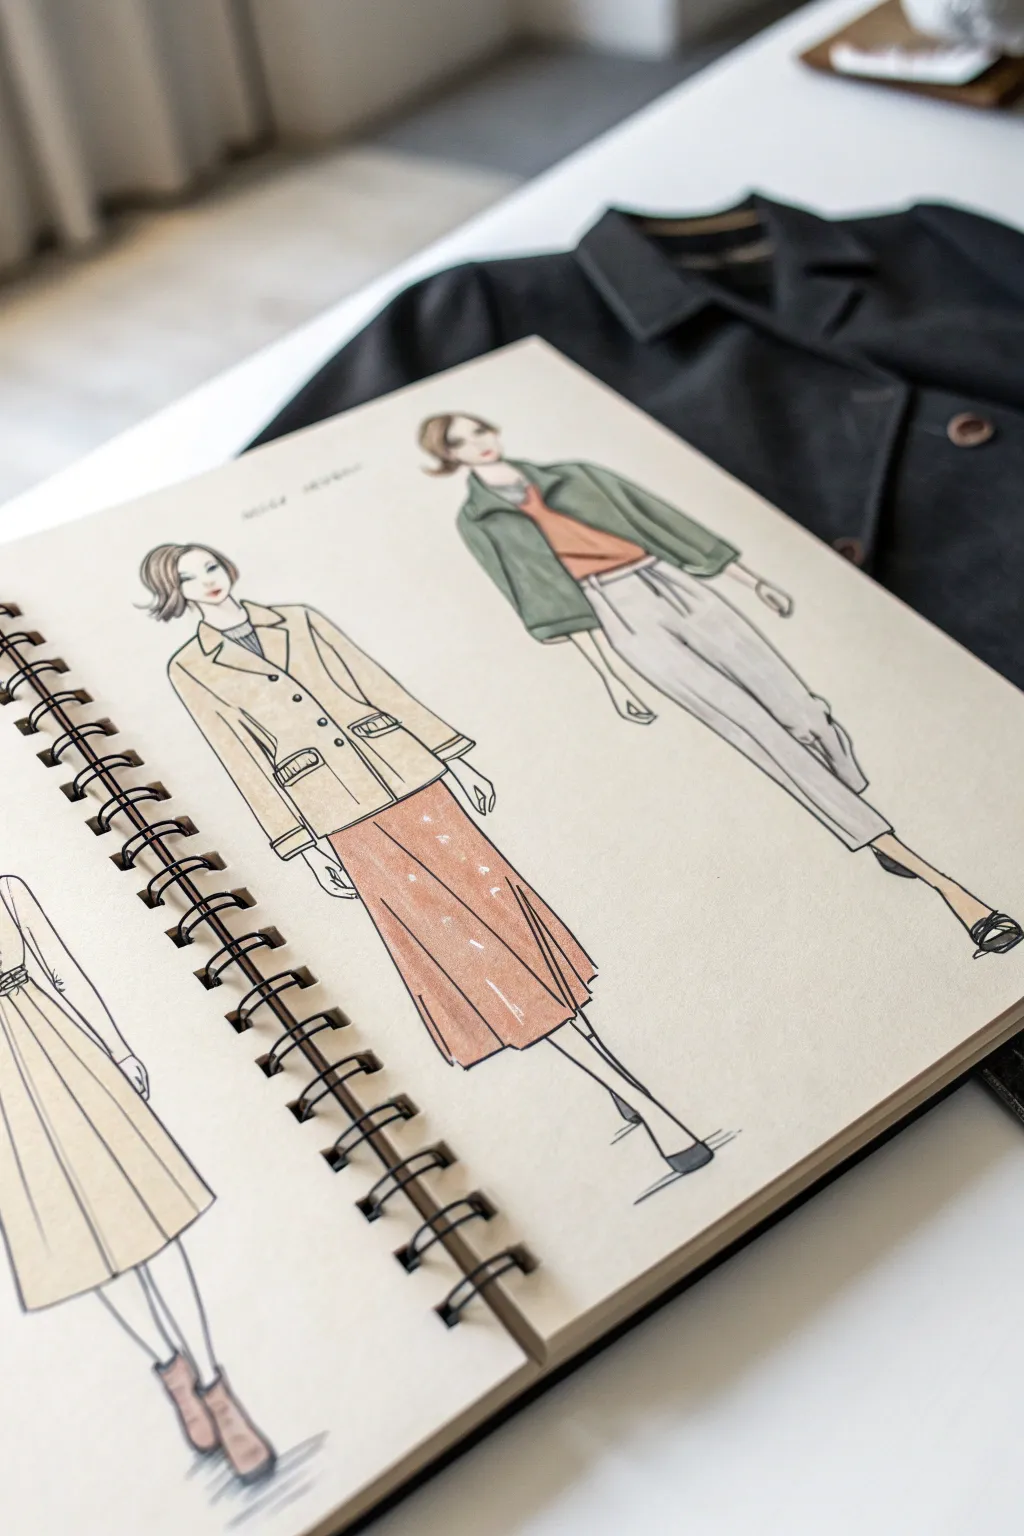
Capture the effortless elegance of fashion design with this mixed-media illustration tutorial. Using a blend of fine liners and alcohol markers, you’ll create stylized figures wearing structured coats and relaxed trousers, perfectly mimicking the look of professional design flats.
How-To Guide
Materials
- Spiral-bound sketchbook (heavyweight paper recommended)
- HB pencil for sketching
- Kneaded eraser
- Fine liner pens (0.1mm, 0.3mm, and 0.5mm in black)
- Alcohol-based markers (beige/tan, olive green, warm grey, terracotta/rust)
- White gel pen (optional for highlights)
- Ruler (optional)
Step 1: Planning and Basic Shapes
-
Establish the croquis:
Begin lightly with your HB pencil to draw the ‘croquis’ or figure templates. Since these act as hangers for the clothes, focus on a standard 9-head fashion proportion. Draw two main figures side-by-side: one facing forward-left, the other slightly more angled. -
Draft the garment outlines:
On the left figure, sketch a structured blazer that hits mid-hip. Keep the lines loose but define the lapels clearly. On the right figure, draft an open, casual jacket that sits effortlessly on the shoulders. -
Add lower body garments:
For the left figure, sketch a flowing A-line midi skirt. For the right figure, draw high-waisted, pleated trousers that taper at the ankle. Keep the pencil strokes faint so they don’t show through the marker later. -
Refine details and faces:
Sketch minimal facial features—a simple jawline, a suggestion of a nose, and short, stylish bob haircuts on both figures. Add details like pocket flaps on the blazer and a drawstring waist on the trousers.
Step 2: Inking the Lines
-
Outline the main garments:
Switch to your 0.3mm fine liner. Trace over your pencil lines for the clothing, using confident, continuous strokes. Don’t worry if the lines aren’t perfectly straight; a little waiver adds organic character to the fabric. -
Define the silhouettes:
Use a slightly thicker 0.5mm pen for the outer edges of the coats to give them visual weight. Use a thinner 0.1mm pen for interior details like buttons, seams, and fabric folds. -
Inking the figures:
In the legs and hands, use delicate, broken lines with the 0.1mm pen. Fashion illustration often implies the body rather than outlining it heavily. Ink the shoes—simple heels for the left, sleek flats for the right. -
Erase preliminary sketches:
Once the ink is completely dry (wait at least 5 minutes to avoid smudging), gently use the kneaded eraser to lift all visible graphite pencil lines.
Bleeding Lines?
If your marker bleeds through the outlines, switch to pigment liners (like Microns) which are waterproof. Also, ensure your paper is heavyweight enough for markers.
Step 3: Adding Color and Texture
-
Color the left blazer:
Take a beige or warm sand-colored marker. Fill in the blazer on the left figure using broad, vertical strokes. Leave small slivers of white paper near the shoulders or lapels to suggest light reflecting off the fabric. -
Paint the midi skirt:
Use a terracotta or rust-colored marker for the skirt. Apply the color in sweeping downward motions to mimic the flow of the fabric pleats. You can go over the shadowed areas (between pleats) twice to deepen the tone. -
Color the right outfit:
For the right figure’s jacket, choose a muted olive green. Color it in, focusing on the draped areas. For the trousers underneath, use a very pale warm grey. This contrast helps separate the layers visually. -
Add skin tones and hair:
Swipe a pale skin-tone marker quickly over the face, neck, and exposed legs. Be fast to avoid streakiness. For the hair, use a medium brown, following the curve of the hairstyle. -
Detailing the patterns:
Once the skirt ink is dry, use a white gel pen or a fine liner to add tiny dots or a subtle floral print to the terracotta skirt. This adds texture without overwhelming the drawing.
Pro Tip: Fabric Weight
Use “broken lines” for softer fabrics (like the flowy pants) and solid, continuous lines for stiff fabrics (like the structured blazer) to visually communicate texture.
Step 4: Final Touches
-
Deepen shadows:
I like to go back in with a cool grey marker to add drop shadows on the floor near the feet. This grounds the figures so they don’t look like they are floating. -
Enhance contrast:
Use the black 0.5mm pen to darken the buttons on the blazer. If any outlines were lost during coloring, carefully re-trace them to bring the crispness back. -
Sketch the partial figure:
If you have space on the far left (like the original image), sketch a partial third figure showing just the skirt pleats in pencil and pen, leaving it uncolored or lightly tinted to frame the composition.
Now you have a stylish sketchbook page ready to inspire your next wardrobe update
Fantasy Outfit With Capes and Trims
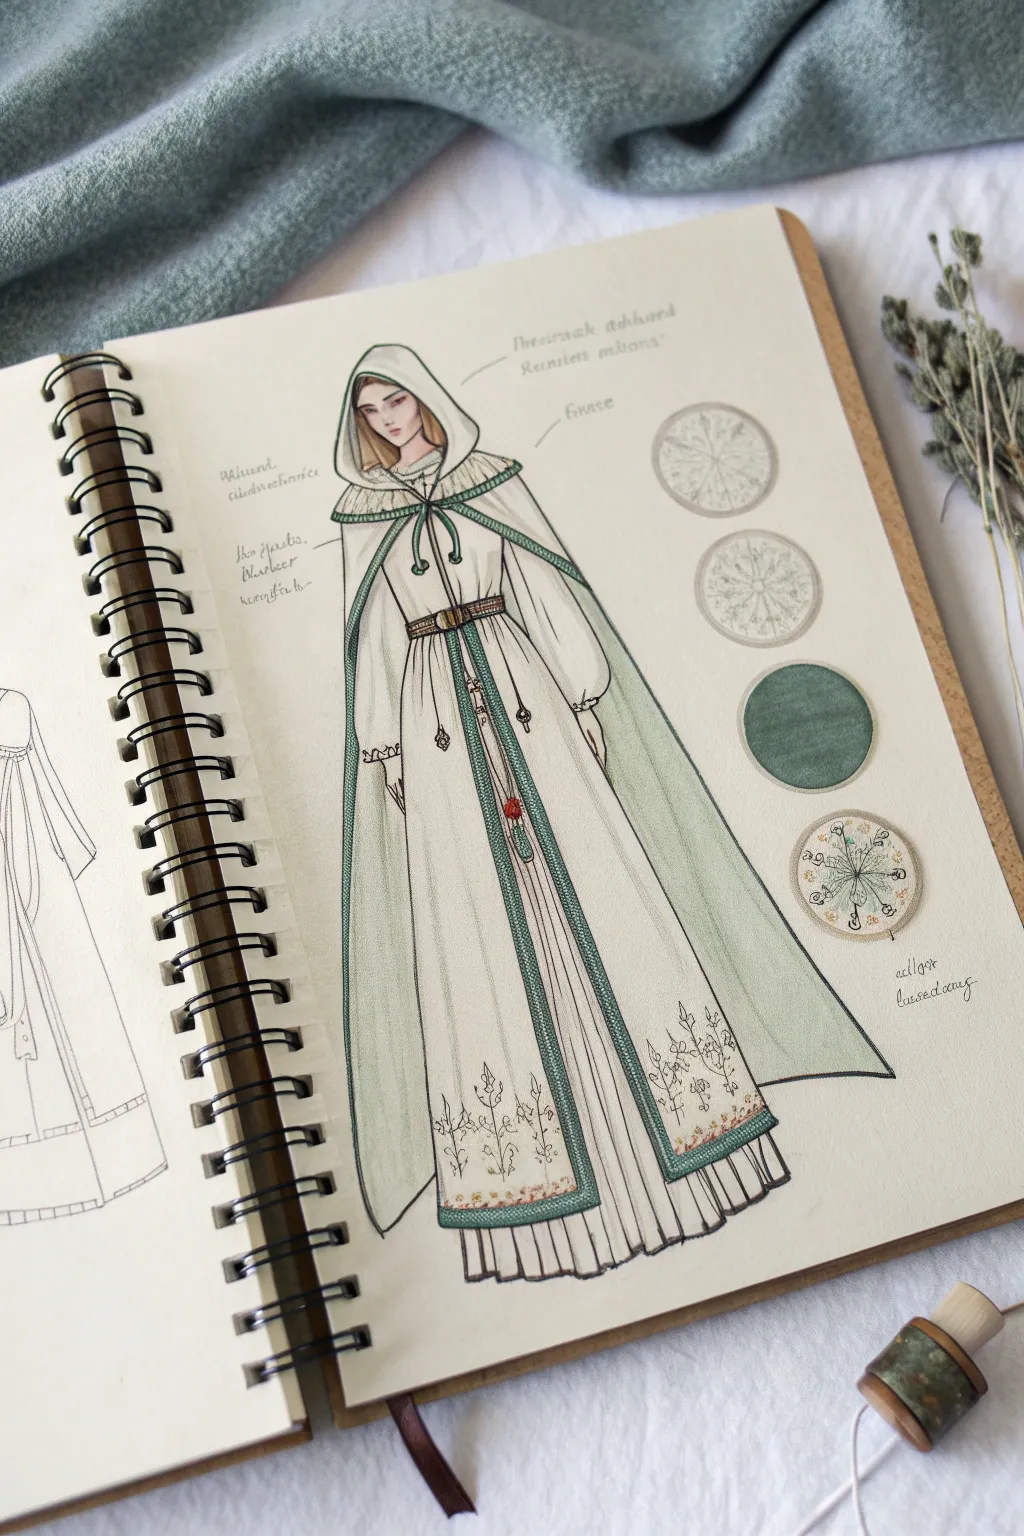
This elegant character design captures the essence of fantasy fashion with a hooded cape layered over a flowing gown. Using fineliners and soft markers, you will create a detailed costume sketch complete with color swatches and annotation notes.
Detailed Instructions
Materials
- Spiral-bound sketchbook (mixed media paper preferred) or high-quality drawing paper
- HB pencil and eraser
- Waterproof fineliner pens (sizes 0.1, 0.3, and 0.5)
- Alcohol-based markers or watercolor paints (Sage Green, Forest Green, Ivory/Cream, Pale Skin Tone, Warm Brown, Red for gem accent)
- White gel pen (optional for highlights)
- Ruler (optional)
Step 1: Sketching the Figure
-
Establish the pose:
Begin with a very light pencil sketch of a standing female figure. Draw a simple oval for the head and a gentle S-curve for the spine to give the posture a relaxed but noble stance. Sketch long lines downward to indicate the floor-length skirt. -
Map out the garments:
On top of your stick figure, lightly outline the inner dress first. Draw a fitted bodice that flares out slightly at the waist. Add long, slightly puffed sleeves that gather at the wrists. -
Add the cape:
Draw the hooded cape over the dress. Start the hood shape around the head, ensuring it looks draped rather than tight. Let the cape fall from the shoulders, creating an opening at the front that reveals the dress underneath. Sketch the hem of the cape shorter than the dress. -
Refine the details:
Add the belt cinched at the waist. Sketch the vertical trim lines running down the front of the cape and the bottom hem. Briefly sketch the facial features—eyes, nose, and mouth—keeping them simple and delicate.
Step 2: Inking the Drawing
-
Outline the main shapes:
Using a 0.3 fineliner, go over your pencil lines for the main silhouette of the cloak and dress. Use confident, smooth strokes. For the fabric folds at the bottom, use broken or tapered lines to suggest softness. -
Detail the face and hair:
Switch to a 0.1 fineliner for the face. Carefully ink the eyes and lips. Draw the hair strands flowing out from under the hood with quick, sweeping flicks. -
Add trim texture:
Use the 0.1 pen to create the texture on the green borders of the cape. You can use tiny cross-hatching or stippling to make these areas look like embroidered fabric. -
Draw the floral motifs:
Near the hem of the cape, delicately draw the small plant stems and leaves. Keep these very light and airy; they don’t need to be perfect botanical illustrations, just suggestive patterns. -
Erase pencil lines:
Once the ink is completely dry (wait at least a few minutes to prevent smudging), gently erase all underlying pencil sketches.
Fabric Texture Tip
When coloring the green cape, let your marker strokes follow the direction of gravity. This naturally mimics how heavy fabric drapes and creates realistic folds without complex shading.
Step 3: Adding Color
-
Skin and hair base:
Apply a pale skin tone marker to the face and visible neck area. Use a warm brown for the hair sections peeking out from the hood. -
Coloring the dress:
Use an ivory or very light cream marker for the main dress. Leave some areas white to represent highlights on the fabric folds. I like to keep the center of the dress lightest to give it volume. -
Painting the cape:
Take a sage green or pale mint marker and fill in the main body of the cape. Use broad strokes to ensure even coverage. For the inside lining visible near the bottom, use a slightly darker or cooler grey-green shade. -
Darkening the trims:
Use a deep forest green marker for the borders of the hood, the front opening, and the hem. This contrast frames the outfit beautifully. -
Accents and gems:
Color the belt brown. Add a tiny dot of red for the gem hanging from the belt cord. Add subtle touches of yellow or orange to the floral embroidery at the hem.
Uneven Ink Lines?
If your long lines for the dress feel shaky, try drawing from your shoulder rather than your wrist. You can also embrace the wobble; it often adds a lovely organic textile feel to the drawing.
Step 4: Final Touches & Layout
-
Create the swatches:
On the right side of the page, draw three circles. Fill the bottom one with a solid circle of the deep green used for the trim. For the top two, sketch faint patterns resembling snowflakes or embroidery wheels to show fabric detail references. -
Add handwritten notes:
To give it that authentic ‘designer’s sketchbook’ feel, use a 0.1 pen to write small notes around the figure. You can use scribble-text (lorem ipsum) to mimic the look of design specifications, pointing to the hood, sleeve, and hem. -
Partial croquis:
On the far left, draw just the partial outline of the skirt and sleeve of the dress without the cape. This adds to the ‘work in progress’ aesthetic of a fashion spread. -
Highlighting:
Finally, use a white gel pen to add tiny glints to the belt buckle, the red gem, and the highest points of the green trim to make them pop.
Now you have a beautiful fantasy fashion plate that looks like it came straight from a costume designer’s portfolio


Have a question or want to share your own experience? I'd love to hear from you in the comments below!