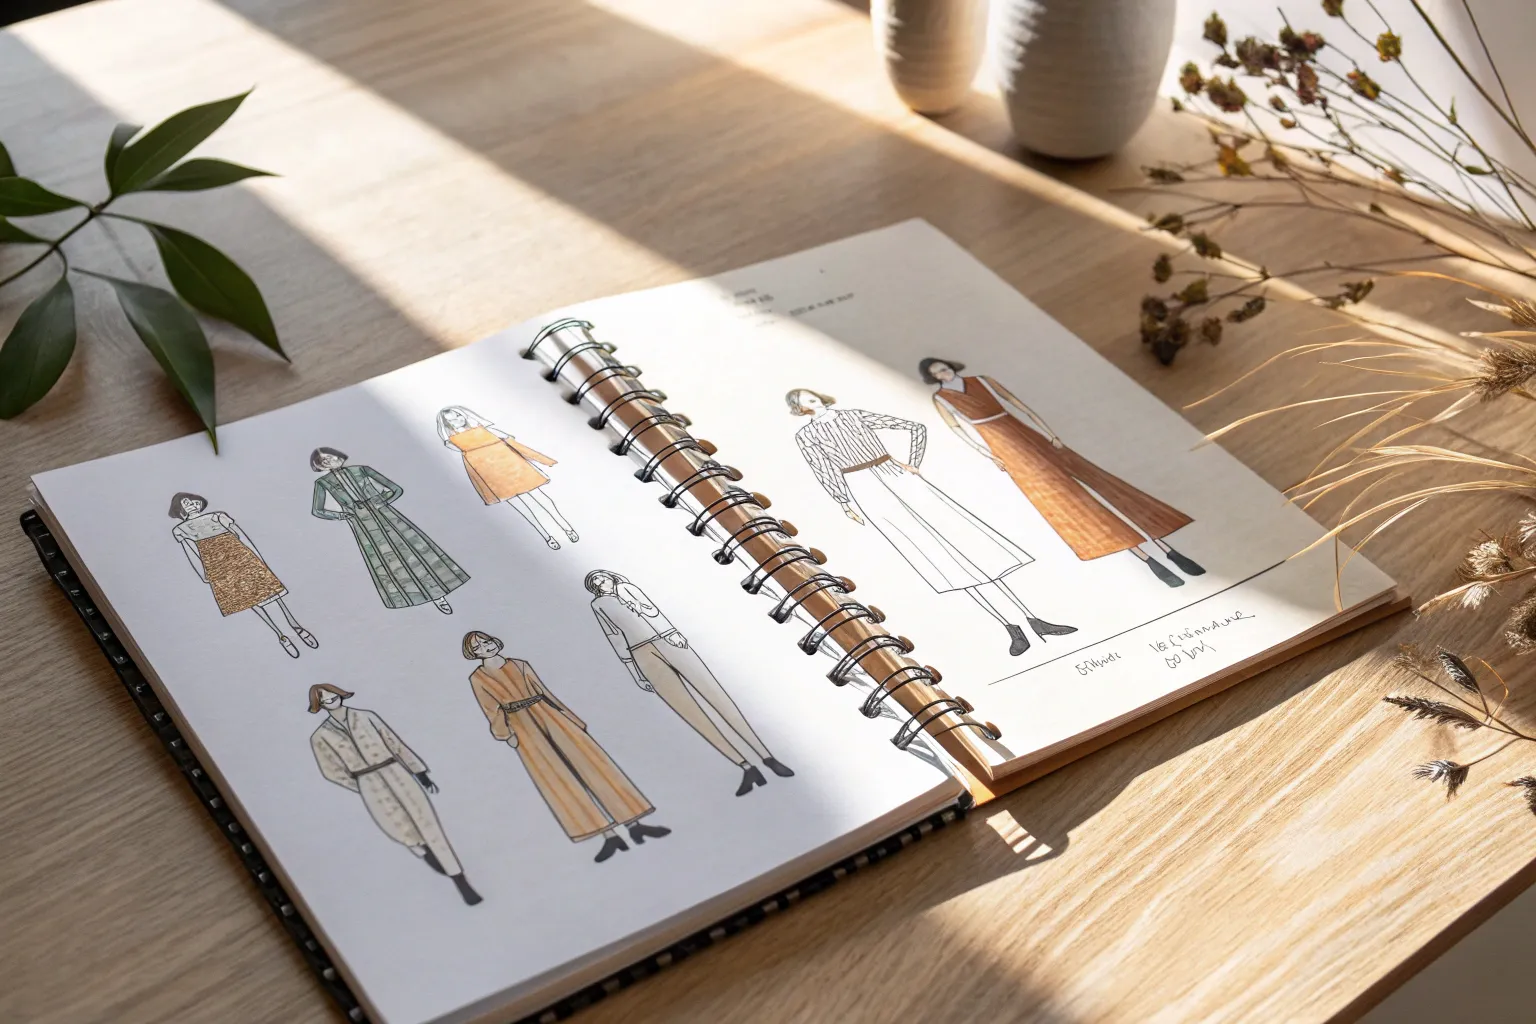
When I’m sketching female outfit ideas, I’m really sketching personality—how a character moves, what she loves, and what kind of day she’s having. Here are my go-to looks to draw, starting with classic staples and drifting into more stylized, world-building outfits as we go.
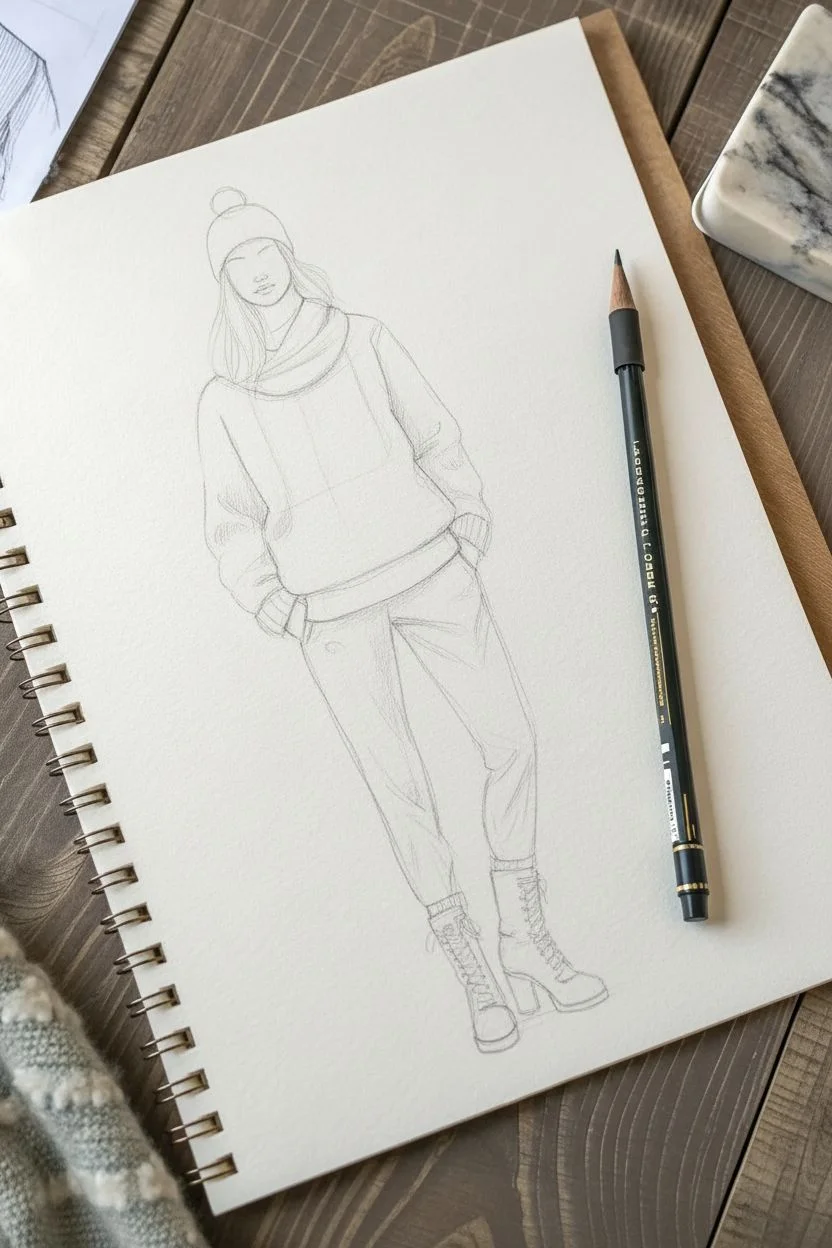
Casual Hoodie and Leggings
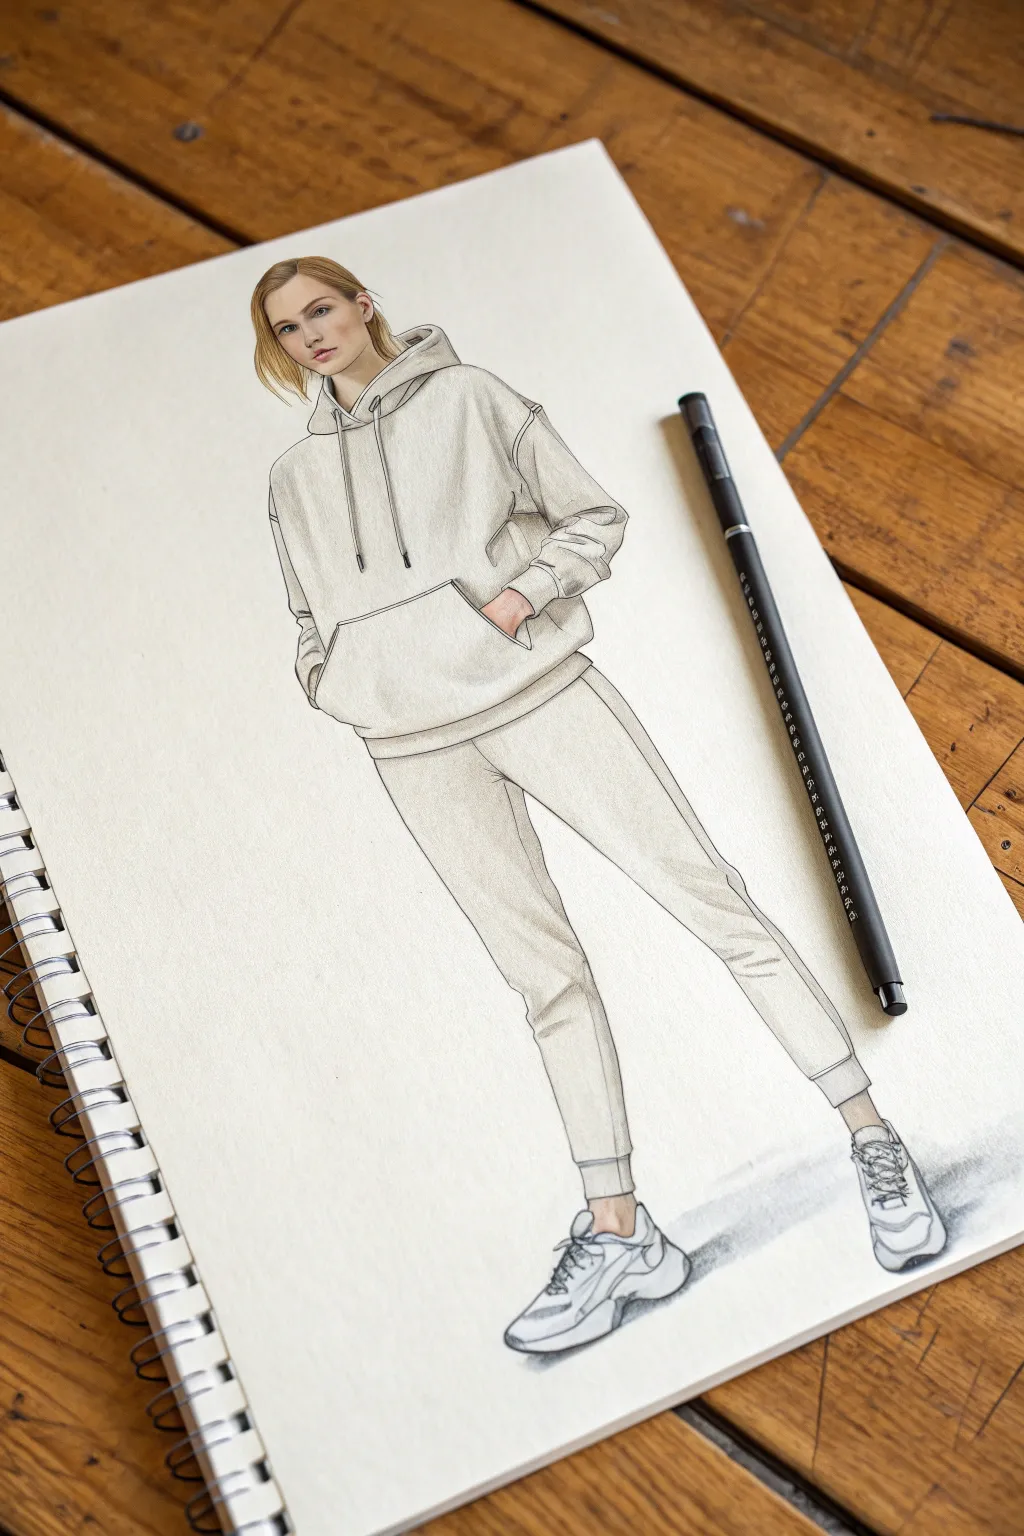
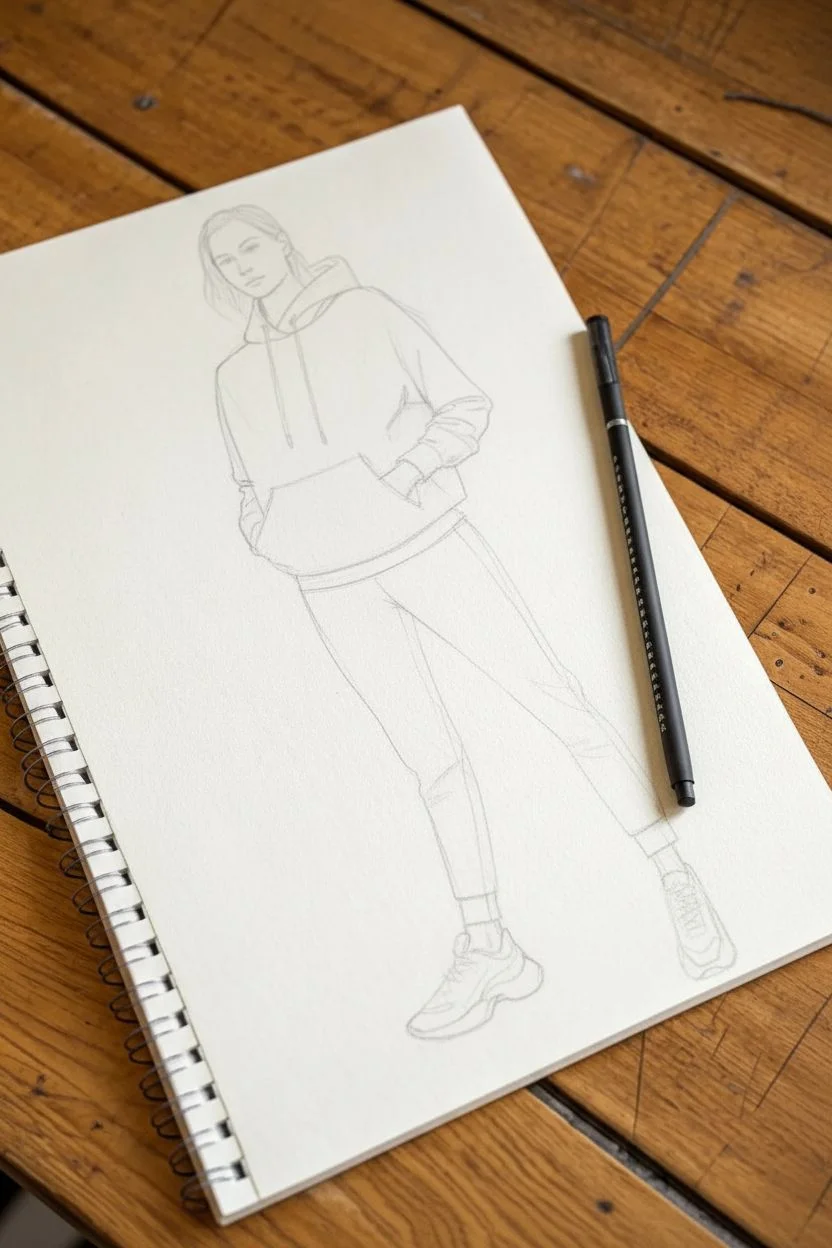
Master the art of athleisure illustration with this guide to drawing a relaxed hoodie and jogger outfit. You will learn to render soft fabric folds and realistic textures to bring this cozy, stylish look to life on paper.
Step-by-Step
Materials
- Heavyweight sketch paper or mixed media paper
- HB and 2B graphite pencils
- Kneadable eraser
- Fine liner pen (0.1mm, black or dark grey)
- Alcohol-based markers (Light warm grey, pale flesh tone)
- White gel pen or white gouache
- Colored pencils (dark grey, warm grey, white)
Step 1: The Foundation
-
Establish the pose:
Begin by lightly sketching a standard 9-head croquis or fashion figure. The pose is casual, with weight shifted to the right leg and the left leg slightly extended. Keep the lines faint so they can be easily erased later. -
Map the torso:
Sketch the silhouette of the hoodie over the torso. It should be oversized, so draw the shoulder seams dropping below the natural shoulder line. Indicating the volume early prevents the clothing from looking too tight. -
Define the legs:
Outline the legs for the joggers. These should taper toward the ankle but remain loose at the thighs. Add the gathered cuffs at the ankles to define the jogger style. -
Position the hands:
Place the hands inside the front kangaroo pocket of the hoodie. This critical detail helps define the slouchy posture and pulls the fabric taut across the lower abdomen. -
Sketch the shoes:
Block out the shape of chunky sneakers on the feet. Focus on the large, curved sole and the general bulk of the shoe to match the oversized feel of the outfit.
Step 2: Refining the Lines
-
Detail the hoodie features:
Draw the hood structure around the neck, making sure it looks bunched and soft. Add the two drawstrings hanging down from the eyelets, ensuring they follow gravity. -
Add fabric folds:
This is where the realism happens. Add creases at the elbows where the arms bend and horizontal stress lines across the stomach where the hands pull the pocket. Remember, sweatshirt material is thick, so the folds should be soft and rounded, not sharp. -
Detail the pants:
Draw gentle drape lines from the crotch area and around the knees. Joggers tend to bunch up slightly above the ankle cuffs, so add a few small, horizontal wrinkles there. -
Refine the face and hair:
Fill in the facial features with delicate lines. Sketch a short, bobbed hairstyle, keeping the strands loose to match the casual vibe. -
Finalize outlines:
Use a fine liner or a sharpened darker pencil to confirm your final lines. I prefer to keep the outline slightly broken in areas to maintain a sketchy, artistic feel.
Fixing Flat Fabric
If the sweatshirt looks too flat, your shading might be too uniform. Enhance contrast by darkening the deepest creases significantly with a dark grey pencil.
Step 3: Adding Color and Depth
-
Base skin tone:
Apply a pale flesh-toned marker to the face, neck, and exposed ankle area. Let it dry completely before adding any shadows. -
Base clothing layer:
Use a very light warm grey marker to color the entire outfit. Apply broad, quick strokes to avoid streaks and create a smooth, fabric-like base. -
Shading the folds:
Once the base is dry, go back in with a slightly darker grey marker or colored pencil. deeply shade the areas inside the folds—under the arms, beneath the pocket, and inside the creases of the pants. -
Defining the seams:
Use a dark grey colored pencil to trace over the main seam lines, such as the dropped shoulders, the pocket outline, and the side seams of the legs. -
Shadowing the shoes:
Add grey shadows to the recesses of the sneakers to give them dimension. Leave the highlighted areas of the shoe pure white for contrast. -
Finishing touches:
Use a white gel pen to add subtle highlights on the highest points of the folds and the drawstrings. Finally, add a light cast shadow on the ground beneath the sneakers to ground the figure.
Make It Pop
Try rendering this outfit in a pastel tone like sage green or lavender instead of grey. Use a color wheel to pick a complementary shadow color.
Step back and admire your stylish and cozy fashion illustration


Jeans, Tee, and Light Jacket
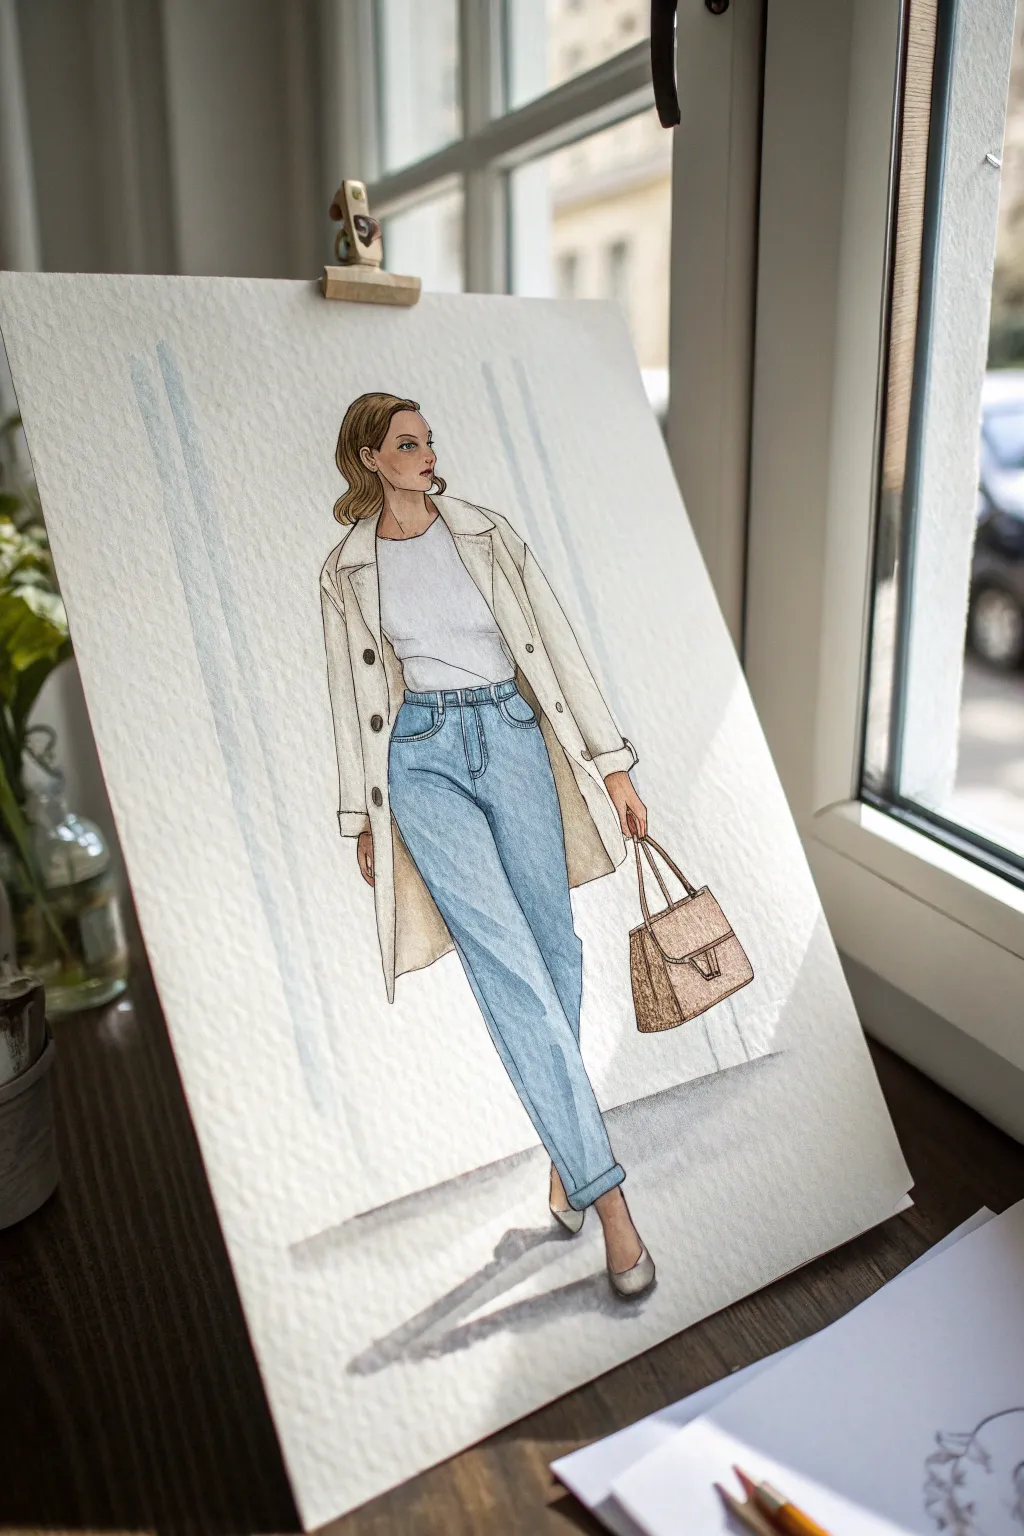
Capture the effortless elegance of street style with this fashion illustration featuring a classic jeans, tee, and trench coat ensemble. Using a blend of pencil sketching and watercolor washes, you’ll learn to render fabric textures like denim softness and crisp cotton.
How-To Guide
Materials
- Cold press watercolor paper (300 gsm)
- HB or 2B graphite pencil
- Kneaded eraser
- Watercolor paint set (Ultramarine Blue, Burnt Sienna, Yellow Ochre, Paynes Grey, White gouache)
- Round brushes (sizes 2, 4, and 6)
- Fine liner pen (brown or sepia, water-resistant)
- Clean water and paper towels
- Drawing board and masking tape
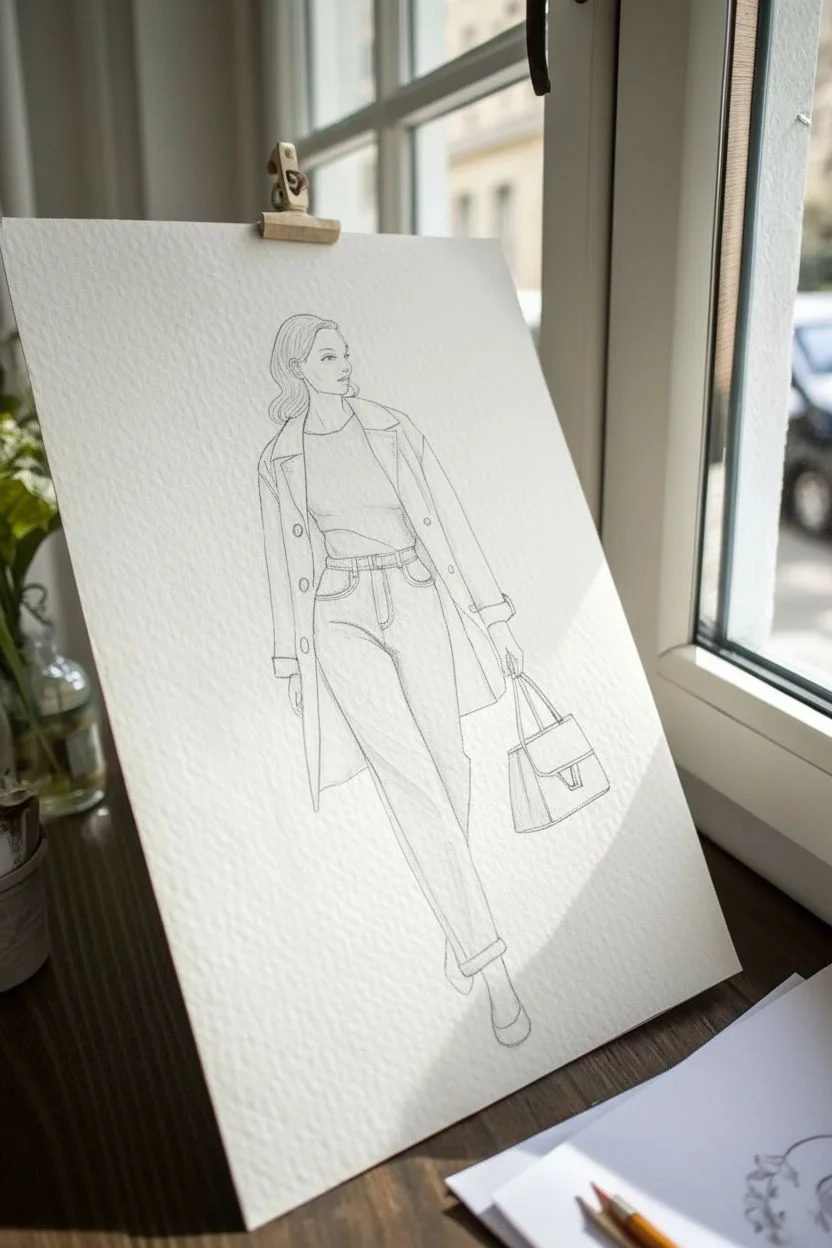
Step 1: Sketching the Silhouette
-
Establish the pose:
Start with a light gesture line to capture the walking motion. Draw a distinct ‘S’ curve for the spine and angle the hips slightly to suggest a mid-stride movement. -
Construct the body forms:
Using simple geometric shapes, block in the torso, legs, and head. Keep the legs elongated—a common fashion illustration technique to make the figure look more elegant. -
Outline the garments:
Sketch the clothes over the body form. Draw the high-waisted jeans first, followed by the tucked-in t-shirt. Add the coat draped over the shoulders, keeping the lines loose to suggest movement. -
Detail the accessories:
Sketch the rectangular structured handbag in the hand farthest from the viewer. Indicate the shoes (pointy flats) and refine the facial features and hair. -
Clean up the drawing:
Use your kneaded eraser to lift away the construction lines, leaving only the clean outline of the outfit and figure ready for painting.
Fabric Texture Tip
For a true denim look, dab the wet blue paint with a dry paper towel or coarse salt. This lifts pigment unevenly, mimicking the weave of jeans.
Step 2: Layering Watercolor Washes
-
Paint the skin tones:
Mix a diluted wash of Burnt Sienna and a touch of Yellow Ochre. Apply this to the face, neck, hands, and ankles. Let it dry completely before moving next to it. -
Wash the jeans:
Create a watery mix of Ultramarine Blue with a tiny drop of Paynes Grey. Apply an even wash to the jeans, but leave the center of the thighs slightly lighter to represent highlighting and wear. -
Render the trench coat:
Mix a very pale wash of Yellow Ochre and a hint of brown for a cream/beige tone. Paint the coat, allowing the paint to pool slightly in the folds for natural shading. -
Shadow the t-shirt:
Since the shirt is white, use a very diluted grey-blue mix to paint just the shadows: under the bust, inside the armpits, and along the tuck of the jeans. -
Color the accessories:
Paint the bag and hair using a stronger concentration of brown. I like to add darker brown streaks to the hair while it’s still damp to create volume.
Level Up: Pattern Play
Make the look distinct by adding a pattern to the coat lining or bag. Tiny painted polka dots or stripes can add huge personality.
Step 3: Refining and Contouring
-
Deepen the denim:
Once the first layer is dry, use a slightly darker blue mix to paint the seams, the waistband, and the zipper area. Glaze over the outer edges of the legs to simulate roundness. -
Define the coat details:
Use a size 2 brush and a darker beige mix to paint the buttons, lapel edges, and deep creases in the sleeves. -
Add line work:
Using a fine sepia liner or a very fine brush with concentrated paint, outline only the key edges. Don’t outline everything equally; keep lines broken and variable in thickness. -
Create the cast shadow:
Mix a cool grey (Paynes Grey diluted significantly). Paint a diagonal shadow extending from the feet to the left to ground the figure. -
Add highlights:
Use a touch of white gouache or a gel pen to add small highlights to the eyes, the metal buckle on the bag, and the top of the hair.
Now you have a stylish, professionally illustrated fashion figure ready to be framed or added to your portfolio


Sweater and Pleated Skirt
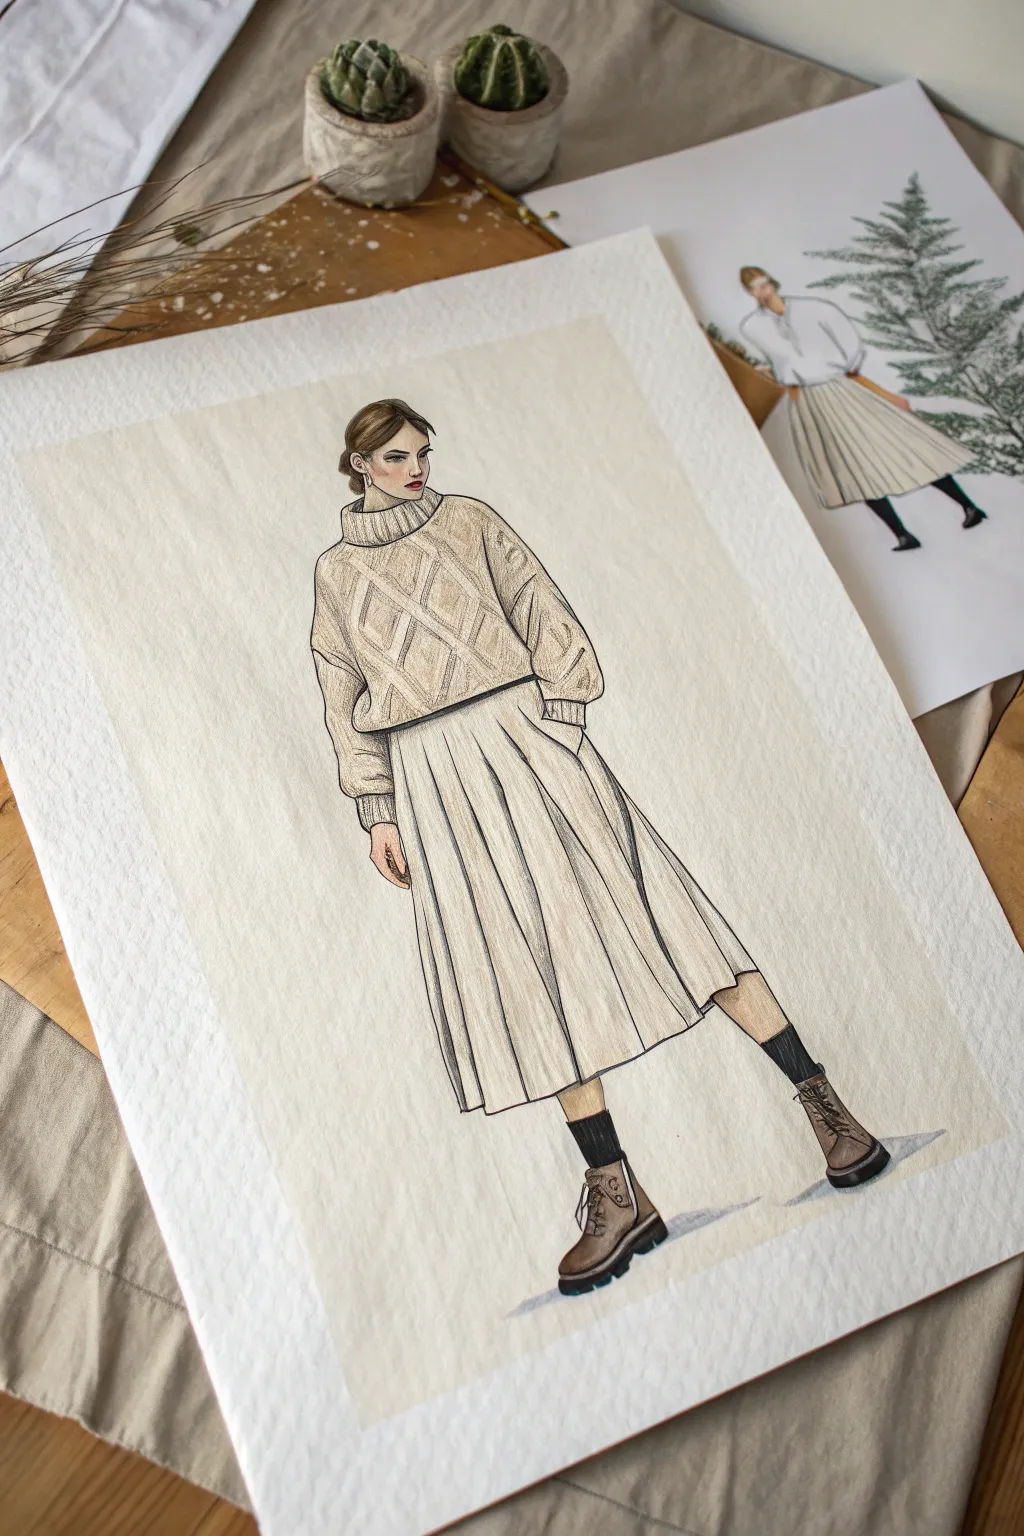
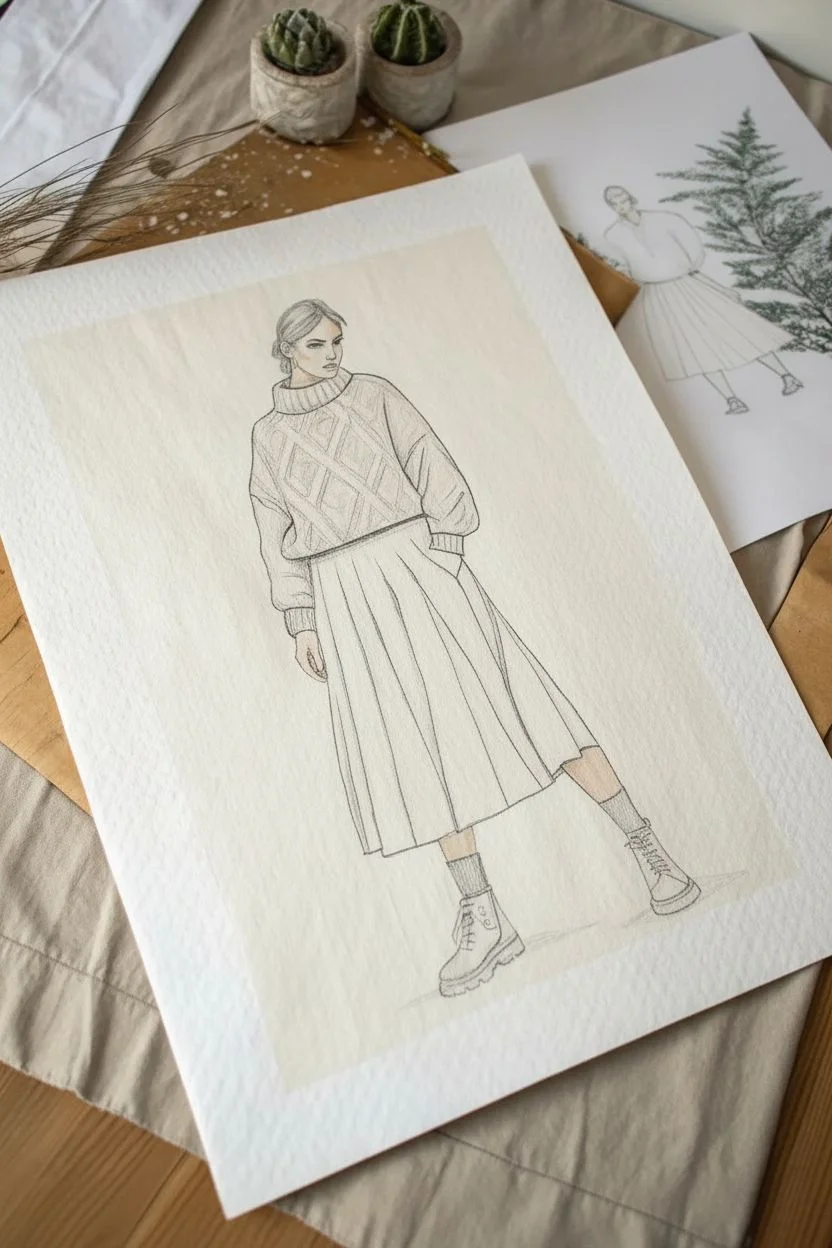
Capture the warmth of winter style with this detailed fashion illustration featuring a classic cable-knit sweater and pleated skirt combination. Using a mix of colored pencils and fine liners on textured paper creates a soft, realistic fabric finish.
Step-by-Step Tutorial
Materials
- Heavyweight textured drawing paper (cold press or mixed media)
- HB pencil for sketching
- Kneaded eraser
- Fine liner pens (sizes 0.1, 0.3, and 0.5, black)
- Alcohol-based markers (beige, sand, warm grey tones)
- Colored pencils (cream, ochre, dark brown, indigo, white)
- White gel pen
Step 1: Basic Structure & Sketching
-
Establish the pose:
Begin by lightly sketching a gestural line for the spine and stance. Draw an oval for the head and simple geometric shapes to block out the torso and leg placement. The figure is standing with legs slightly apart for a confident, grounded pose. -
Draft the garment outlines:
Sketch the oversized shape of the sweater over the torso, letting the shoulders drop slightly. Define the high turtleneck and the balloon sleeves. For the skirt, draw an A-line shape extending from under the sweater hem down to mid-calf. -
Add facial features and accessories:
Refine the face shape, adding eyebrows, eyes, nose, and lips. Draw the hair pulled back into a low bun. Sketch the boots at the feet, ensuring they align with the leg angles, and add the visible sock cuffs. -
Detail the cable knit:
Lightly pencil in a diamond pattern across the front of the sweater. Inside each diamond, indicate the twisted texture of the cable knit. Add ribbing lines on the collar, cuffs, and bottom hem. -
Define the pleats:
Draw vertical lines down the skirt to create the pleats. Ensure the lines fan out slightly as they reach the bottom hem to show movement and volume.
Step 2: Inking & Base Colors
-
Clean up the sketch:
Use your kneaded eraser to roll over the drawing, lifting the graphite until the lines are faint guides. This prevents pencil smudging in the coloring phase. -
Apply marker base tones:
Fill in the skin areas with a pale beige marker. For the sweater and skirt, lay down a base of light sand or cream marker. This provides a solid undertone for the pencils later. -
Outline with fineliners:
Use a 0.1 or 0.3 fine liner to trace the main contours of the outfit. Keep the lines somewhat loose on the sweater to suggest softness, but use firmer, straighter lines for the skirt pleats. -
Ink the cable details:
Switch to your finest pen (0.05 or 0.1) to trace the intricate cable knit patterns. Use broken lines or small dashes to keep the texture looking woven rather than rigid.
Fabric Texture Pro Tip
Use the side of your colored pencil rather than the tip when shading the sweater. The paper’s grain will show through, mimicking the fuzzy texture of wool.
Step 3: Shading & Texture
-
Shadow the sweater:
Using an ochre or light brown colored pencil, shade the recessed areas of the cable knit pattern to create depth. Add shading under the arms and where the sleeves bunch at the elbows. -
Enhance the skirt folds:
Take a warm grey or darker beige pencil and shade the inner folds of the pleats. Gradient the color from dark in the crease to light on the ridge of the pleat to make them look three-dimensional. -
Color limits and boots:
Fill in the boots with a brown marker or pencil. Use a dark brown pencil to shadow the edges and laces. Color the socks a dark charcoal or indigo. -
Refine the face:
Add a touch of pink pencil to the cheeks and lips. Define the eyes with a sharp dark brown or black pencil. I prefer to keep facial features crisp against the softer clothing textures. -
Add final highlights:
Use a white colored pencil to highlight the tops of the cable knit ridges and the high points of the skirt pleats. Use a white gel pen for tiny accents on the boot eyelets and earrings. -
Ground the figure:
Using a light grey marker or watered-down paint, add a subtle cast shadow beneath the boots to anchor the figure to the page.
Pleat Troubleshooting
If your pleats look flat, deepen the contrast. Make the deepest part of the fold significantly darker than the outer ridge to force the 3D pop.
Step back and admire how the simple lines and shading come together to create a stylish, textured winter look


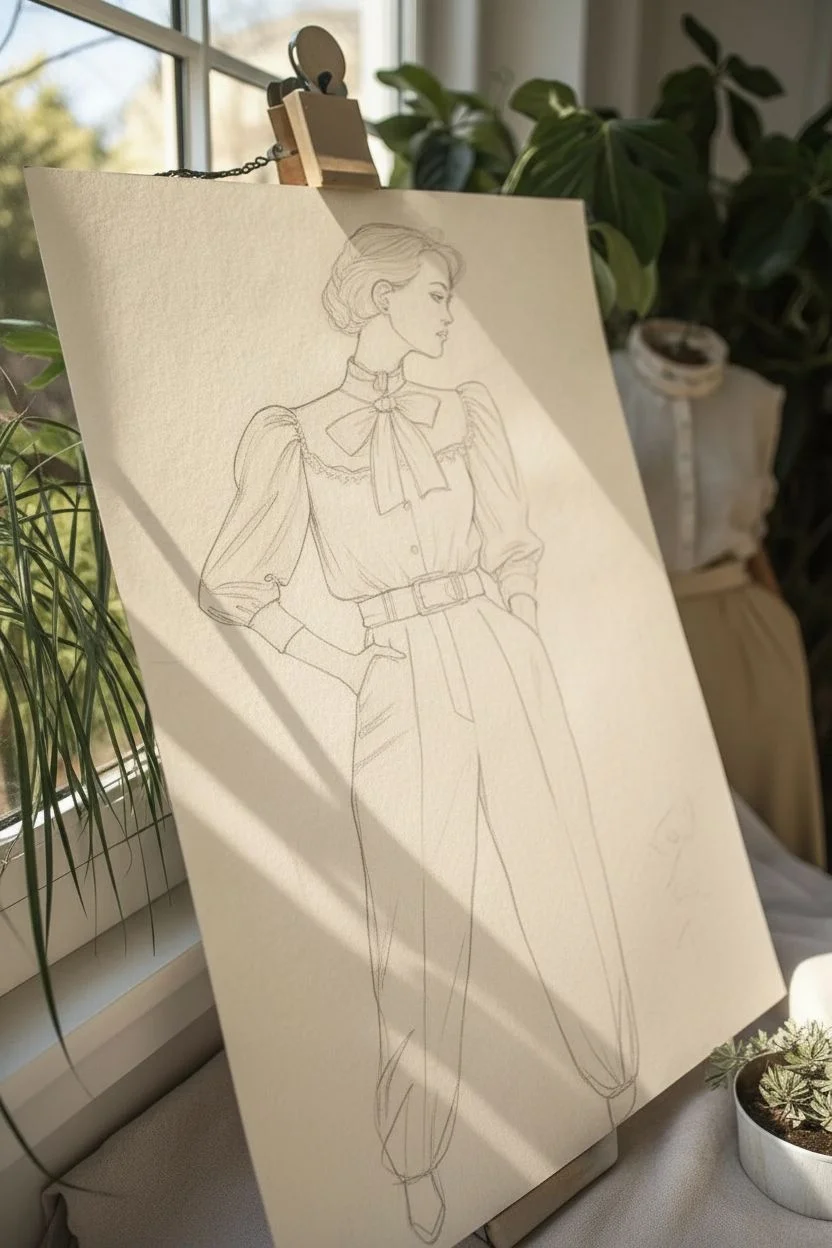
Vintage Blouse and High-Waisted Trousers
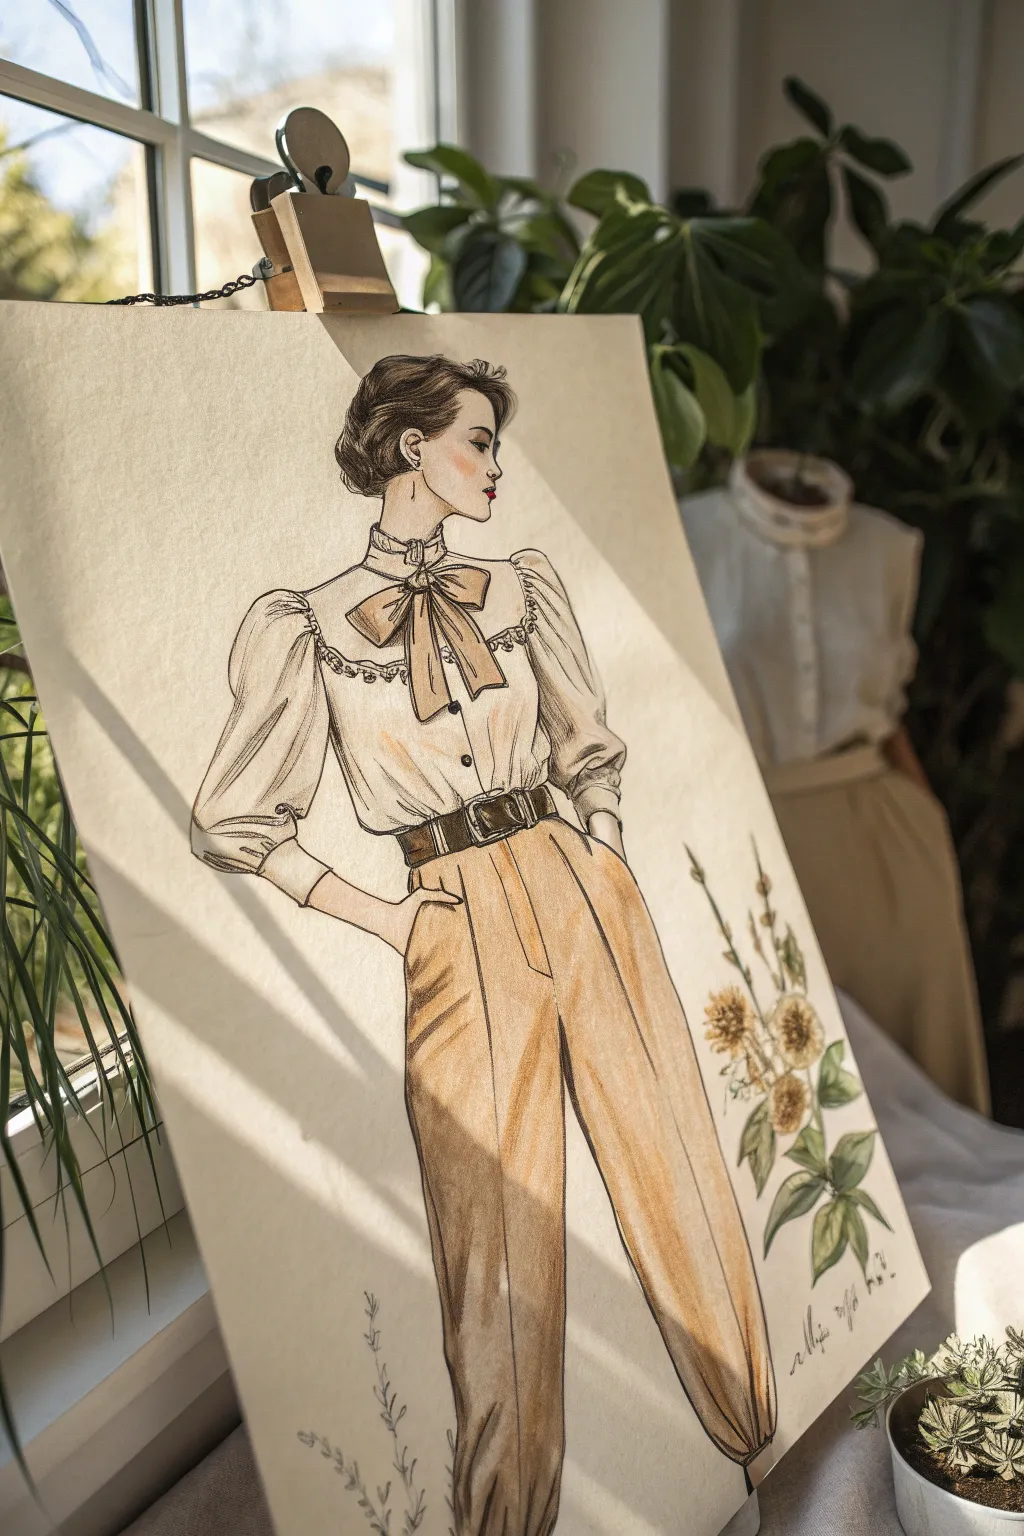
This elegant fashion sketch captures the charm of a bygone era with a high-neck blouse and tailored trousers rendered in warm, sepia tones. Using a mix of fine liners for crisp details and watercolors or markers for soft shading, you’ll create a timeless piece that looks lovely on any studio wall.
Step-by-Step Guide
Materials
- Heavyweight mixed media paper or hot-press watercolor paper (A3 or similar large format)
- HB or 2H graphite pencil for sketching
- Kneaded eraser
- Fine liner pens (Black or Sepia, sizes 0.1, 0.3, and 0.5)
- Alcohol-based markers (Skin tones, Cream/Beige, Tan/Sand, Warm Grey)
- Watercolor paints (Burnt Sienna, Yellow Ochre, Raw Umber)
- White gel pen or gouache for highlights
- Soft synthetic watercolor brushes (sizes 4 and 8)
Step 1: Constructing the Figure
-
Establish the pose:
Begin with a loose gesture drawing using your HB pencil. Focus on the ‘S’ curve of the spine to create a relaxed, confident stance. The figure is leaning slightly back with hands in pockets, so ensure the hips are pushed slightly forward. -
Block in the shapes:
Refine the anatomy. Sketch the oval for the head, looking over the shoulder. Draw the cylinders for the arms and the long, flowing shapes for the legs. Don’t worry about clothing details yet; just get the mannequin proportions right. -
Draft the blouse outcome:
Lightly sketch the blouse over the torso. Mark the high collar and the large bow at the neck. Outline the puffy fullness of the sleeves, ensuring the fabric billows out at the shoulder and tapers at the cuff. -
Define the trousers:
Draw the high waistline, adding the belt loops and belt. Extend the trouser legs downwards, keeping them wide and loose. Indicate the deep pleats at the waist which give the pants their volume.
Uneven Marker Streaks?
If your large color areas look streaky, work faster while the ink is still wet to blend edges, or switch to watercolor for broad areas like the trousers for a smoother wash.
Step 2: Inking the Outline
-
Outline the face and hair:
Switch to your 0.1 fine liner. Carefully ink the profile of the face, keeping the line work delicate. Draw the hair in sweeping clusters rather than individual strands, capturing the volume of the updo. -
Ink the blouse details:
Use a 0.3 pen for the clothing. Draw the ruffles on the blouse collar and shoulders with small, wavy lines. Ink the bow, emphasizing the knot and the way the ribbons drape. -
Refine the trousers:
Ink the belt and the trousers. Use confident, long strokes for the leg lines. Pay close attention to the fabric folds near the pocket where the hand is inserted—these folds show tension. -
Add floral elements:
Sketch the botanical elements in the bottom right corner using a 0.1 pen. These should look like scientific illustrations—delicate stems and detailed petals. -
Erase pencil lines:
Once the ink is completely dry, gently erase the graphite guidelines with your kneaded eraser to reveal a clean line drawing.
Pro Tip: Shadow Placement
Imagine a single light source coming from the top left (like the window in the photo). Place all your deepest clothing shadows on the right side of the folds for instant 3D volume.
Step 3: Adding Color and Tone
-
Base skin tones:
Use an alcohol marker in a light skin tone to fill in the face, neck, and hands. Leave small white areas on the nose and cheekbones for natural highlights. -
Coloring the blouse:
Apply a very light cream or warm grey marker to the blouse. Keep the application sheer. Add a second layer of the same color under the arms and inside the folds of the bow to create shadow depth. -
Painting the trousers:
Mix a diluted wash of Yellow Ochre and Burnt Sienna watercolor. Apply this to the trousers. I find working wet-on-dry gives more control here. Let the color pool slightly in the shadow areas of the legs. -
Deepening shadows:
Once the base wash is dry, use a translucent brown marker or a darker watercolor mix (Raw Umber) to define the deep creases in the pants, the belt leather, and the hair. -
Adding lip color:
Carefully dab a spot of red marker or paint onto the lips. Keep it precise to maintain the elegant look.
Step 4: Finishing Touches
-
Intensify the blacks:
Go back in with your 0.5 pen or a dark grey marker to darken the deepest shadows—specifically under the collar, the belt buckle, and the darkest parts of the hair. -
Enhance the botanicals:
Lightly wash the floral illustration with muted greens and yellows. Keep this much fainter than the fashion figure so it doesn’t compete for attention. -
Apply highlights:
Use a white gel pen to add sharp highlights. Place small dots on the eyes and lips, a glint on the belt buckle, and thin lines on the upper ridges of the blouse folds. -
Final assessment:
Step back and look at the overall balance. If the trousers look too flat, add a little cross-hatching with a sepia pen to suggest texture.
Now you have a sophisticated fashion illustration ready to display or add to your portfolio

PENCIL GUIDE
Understanding Pencil Grades from H to B
From first sketch to finished drawing — learn pencil grades, line control, and shading techniques.
Explore the Full Guide
Winter Layers With Beanie and Boots
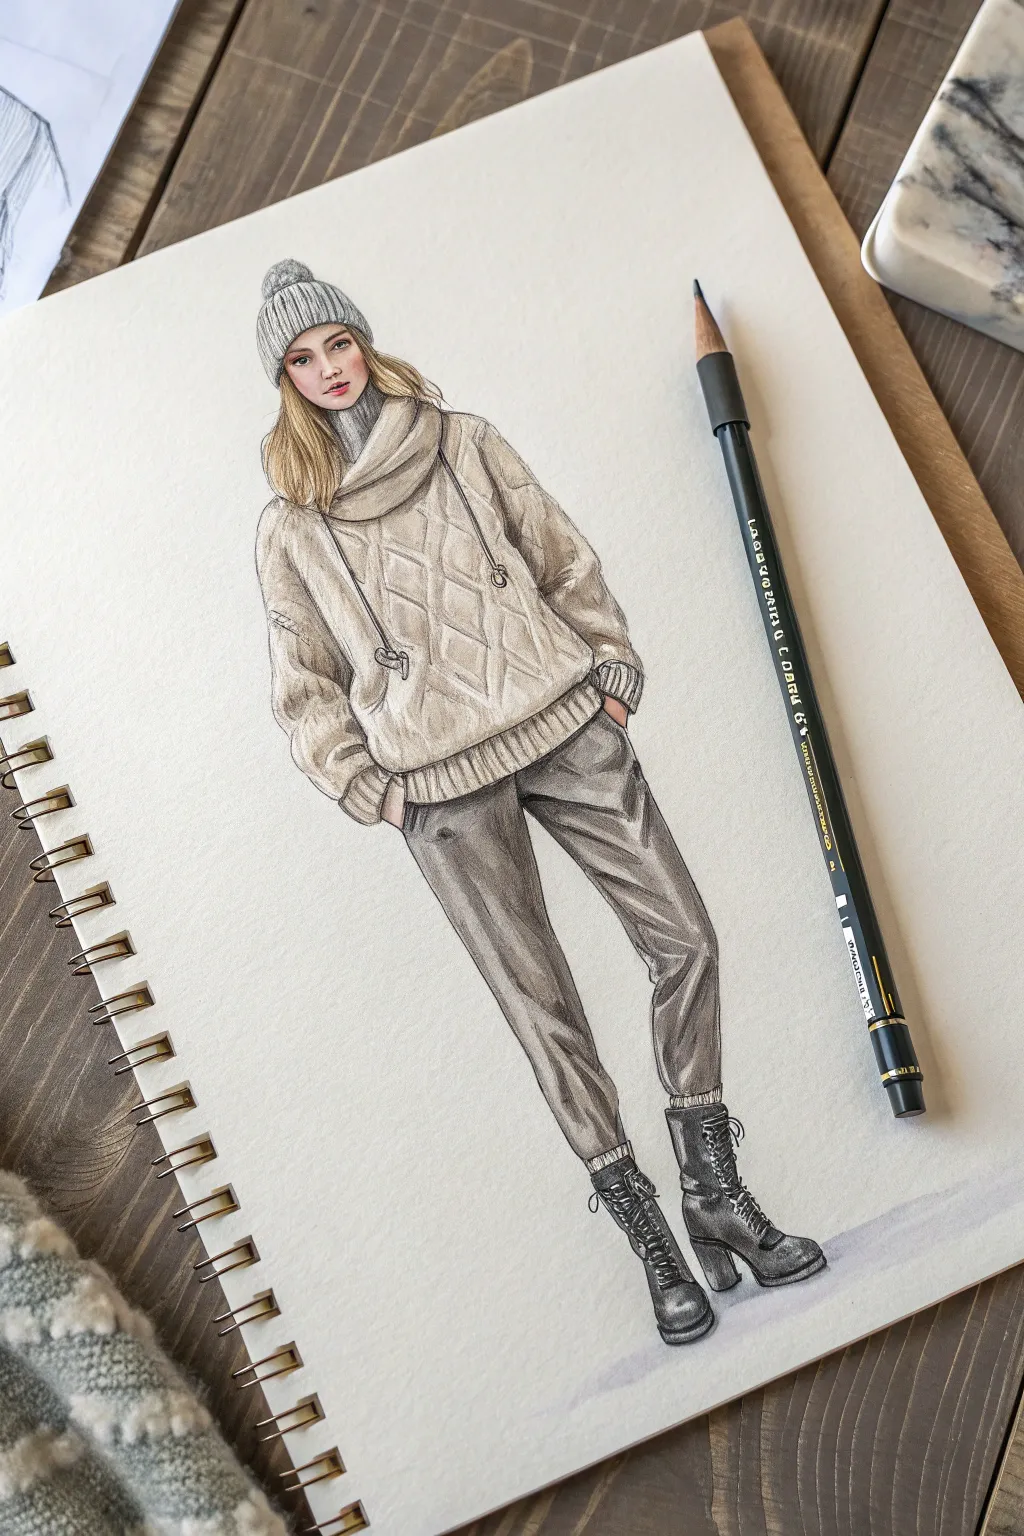
Capture the warmth of winter fashion with this detailed illustration featuring a chunky cable-knit sweater and sleek combat boots. Using a blend of markers and colored pencils, you’ll learn to render soft textures against structured accessories for a stylish, finished look.
Step-by-Step
Materials
- Heavyweight smooth drawing paper or Bristol board
- HB and 2B graphite pencils
- Kneaded eraser
- Alcohol-based markers (Warm Greys, Cool Greys, Skin Tones)
- Colored pencils (White, Black, Dark Grey, Beige, Cream)
- Fine liner pen (Black or Dark Grey, 0.1mm)
- White gel pen
Step 1: Sketching the Framework
-
Establish the pose:
Begin with a faint HB pencil line to capture the figure’s vertical axis. Draw an elongated croquis, positioning the hips slightly tilted to give a relaxed, casual stance with hands in pockets. -
Outline the head and accessories:
Sketch a soft oval for the face and immediately place the beanie shape on top. Keep the beanie slightly oversized so it doesn’t look like it’s squeezing the head, adding a small pom-pom circle at the apex. -
Draft the sweater volume:
Draw the oversized shape of the sweater. Let the shoulders drop significantly to emphasize the chunky knit style. Sketch the large cowl neck collar wrapping loosely around the neck. -
Define the trousers:
Map out the legs with loose, gathering lines around the ankles where they meet the boots. The trousers should look slightly baggy but tapered, suggesting a cargo or jogger style. -
Detail the boots:
distinctive combat boot shape. Block in a chunky heel and the rounded toe, ensuring the feet feel grounded and proportionate to the long legs.
Fixing Flat Knits
If your cable knit looks flat, deepen the shadows directly *under* each cable twist with a darker beige pencil. This high contrast pops the texture instantly.
Step 2: Adding Color with Markers
-
Base skin tones:
Apply a light wash of skin-tone marker to the face. Leave the paper white for the eyes to keep them bright. Add a tiny blush of pink to the cheeks and nose for a cold-weather flush. -
Undershading the sweater:
Use a very pale warm grey or cream marker to fill in the sweater. Don’t worry about the knit pattern yet; just establish a solid base color. -
Rendering the trousers:
Color the trousers with a medium cool grey marker. While the ink is wet, go over the shadow areas (inner thighs, beneath the sweater hem) with a second layer to build depth quickly. -
Depicting the boots:
Fill the boots with a dark cool grey or black marker. Leave a small strip of white or lighter grey on the toe and heel to represent the shine of leather. -
Base for the hair:
Lay down a base of blonde or light brown marker for the hair peeking out from the hat. Stroke downwards to follow the natural fall of the strands.
Level Up: Texture Mix
Try using textured paper specifically for the sweater area. Place the paper under your drawing sheet and rub with pencil to grab a rough texture.
Step 3: Refining Texture with Pencils
-
Creating the knit pattern:
With a beige colored pencil, draw the diamond cable-knit pattern on the sweater. Use light pressure to keep it subtle. Shade the bottom right of each diamond shape to make the pattern look raised and puffy. -
Texturing the beanie:
Use a grey colored pencil to draw vertical ribbed lines on the beanie. Add short, curved strokes to the pom-pom to simulate fuzziness. -
Defining hair strands:
Sharpen a darker brown pencil and add individual strands to the hair sections. Focus on the areas near the neck and under the hat brim to create depth. -
Shading trouser folds:
Take a dark grey pencil and deepen the folds in the trousers, specifically around the knees and ankles. This emphasizes the fabric’s weight and drape. -
Polishing the boots:
Use a black pencil to firmly outline the boots and draw the laces. I like to press harder here to make the leather look heavy and rugged compared to the soft knitwear.
Step 4: Highligts & Final Touches
-
Ribbing details:
Use a fine liner or sharp grey pencil to draw vertical lines on the sweater’s cuffs and hem. This differentiates the ribbing from the main cable pattern. -
Adding highlights:
With a white gel pen or opaque white pencil, add crisp highlights to the boots’ toes and heels. You can also add a few stray white hairs on the beanie for texture. -
Facial features:
Carefully define the eyes and lips with your finest pencil point. Keep the features delicate to contrast with the heavy winter clothing. -
Cast shadow:
Lightly sketch a soft grey shadow on the ground beneath the boots to anchor the figure so she doesn’t look like she is floating.
Enjoy the process of layering textures to bring this chic winter outfit to life on your page
Fantasy Mage Outfit With Flowing Layers

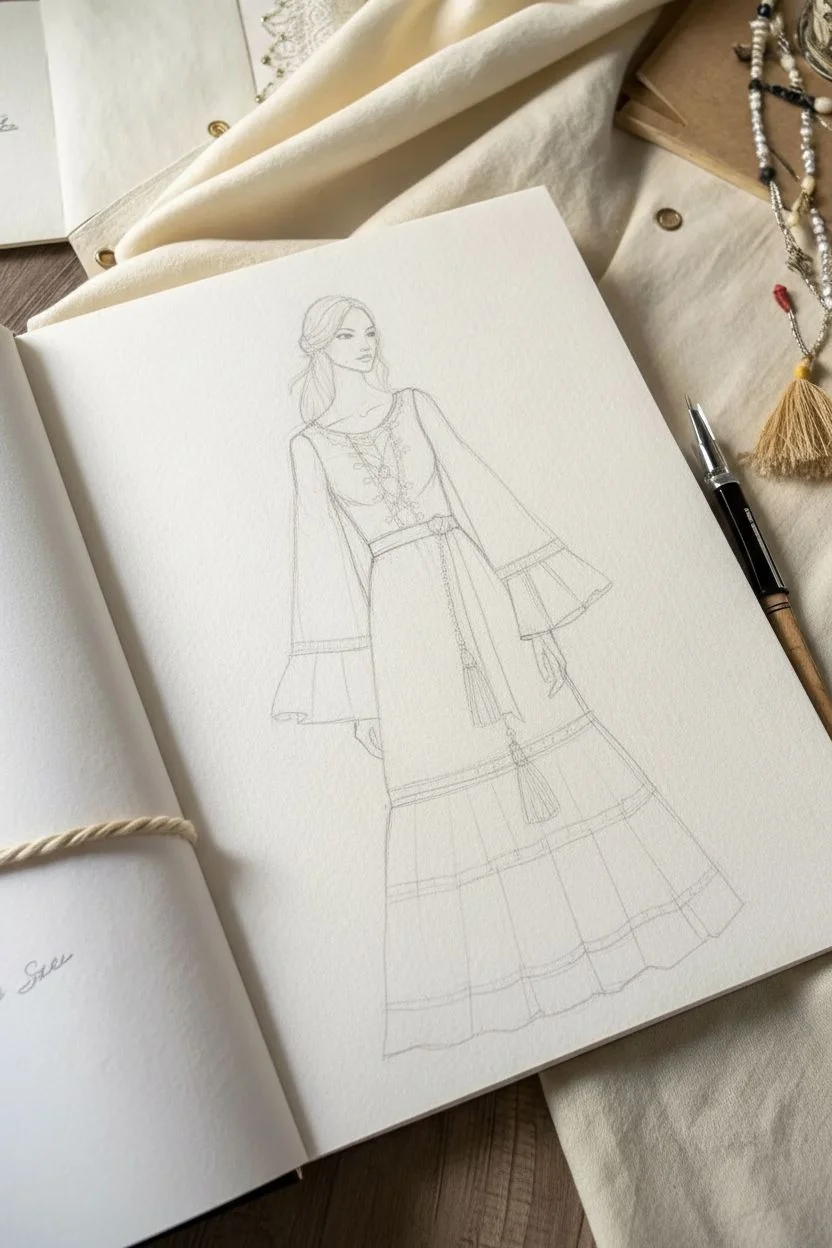
Learn to sketch a classic fantasy mage outfit featuring soft, flowing bell sleeves and layered textures. This tutorial captures the delicate balance between crisp ink lines and subtle shading to bring a historical-inspired costume to life.
Step-by-Step Guide
Materials
- Hot press watercolor paper or smooth Bristol board
- HB graphite pencil
- Kneaded eraser
- Fine liner pens (sizes 0.1, 0.3, and 0.5)
- Alcohol-based markers (colors: skin tone, pale beige, warm grey, dark brown)
- Colored pencils (brown, grey-green, gold/ochre)
- White gel pen
Step 1: Sketching the Foundations
-
Establish the pose:
Begin by lightly sketching a standard fashion croquis. The figure stands with weight on one leg, letting the hips tilt slightly. The arms should hang naturally, but keep them slightly away from the body to make room for the sleeves. -
Draft the garment shape:
Over your figure, outline the shape of the dress. Start with a fitted bodice that loosens at the waist. Draw the skirt as an A-line shape that reaches the floor, adding horizontal lines near the bottom to indicate the tiered layers. -
Add the bell sleeves:
Sketch large, dramatic bell sleeves starting from the elbow. Let the cuff flare out widely. Ensure the lines curve slightly to suggest fabric draping rather than stiff cardboard. -
Place the details:
Mark the position of the belt at the natural waist. Sketch the hanging belt straps and the large tassels that act as focal points. Add the intricate lace-up detail at the neckline.
Step 2: Inking the Lines
-
Define the face and hair:
Using a 0.1 fine liner, carefully trace the facial features. For the hair, use long, smooth strokes to create the soft waves, keeping the lines loose to suggest movement. -
Ink the main garment:
Switch to a 0.3 pen for the dress outlines. When inking the skirt tiers and sleeve hems, add slight wobbles or breaks in the line to simulate fabric texture. Don’t make the lines perfectly straight. -
Detail the embroidery:
Use the 0.1 pen again for the delicate details. Draw the stitching along the tiered skirt seams and the embroidery on the sleeve cuffs. Add small circles and cross-hatching for the chest lacing. -
Create the tassels:
Draw the tassels on the belt with quick, vertical strokes to mimic individual threads. Inking the top ‘cap’ of the tassel darker helps give it dimension. -
Erase pencil guides:
Once the ink is completely dry—give it a few minutes so it doesn’t smudge—gently erase all the underlying graphite sketch marks.
Fabric Flow Tip
When drawing bell sleeves, make the bottom hemline curve upward slightly in the center. This reveals the inside of the sleeve and shows that the fabric has volume.
Step 3: Coloring and Shading
-
Base skin tones:
Apply a base layer of skin tone marker to the face, neck, and hands. Add a second layer under the chin and hairline for shadow. -
Shadow the white dress:
Since the dress is white/cream, you won’t color the whole thing. Instead, use a very pale warm grey marker to add shadows where the fabric folds—specifically under the belt, inside the bell sleeves, and along the skirt pleats. -
Color hair and accessories:
Fill in the hair with a medium brown marker. Use a golden-ochre color for the belt, tassels, and embroidery details to create a warm contrast against the pale dress. -
Deepen the shadows:
For deeper contrast, use a dark brown colored pencil to shade the darkest areas of the belt and hair. I find this gives more textual depth than markers alone.
Ink Bleeding fix
If your fine liner bleeds when you add marker on top, switch the order. Do all your marker coloring first, let it dry completely, and then add your ink linework last.
Step 4: Background and Final Touches
-
Add organic elements:
Sketch a few simple fern leaves or grass blades at the bottom right corner using a 0.1 pen. This grounds the figure so she isn’t floating in space. -
Color the foliage:
Lightly wash over the plant sketch with a desaturated green watercolor or marker. Keep it abstract and loose so it doesn’t distract from the outfit. -
Enhance highlights:
Use a white gel pen to add tiny highlights to the eyes, the shine on the hair, and the metallic parts of the belt buckle. -
Final assessment:
Check the balance of the drawing. If the skirt feels too light, add a few more vertical ink lines to suggest gathers and folds in the fabric.
With your final details in place, you have created a stunningly elegant character design ready for any fantasy setting


Have a question or want to share your own experience? I'd love to hear from you in the comments below!