Oysters are such a fun subject because you get both rugged texture on the outside and that dreamy, pearly glow on the inside. Here are my favorite oyster painting ideas for decorating real oyster shells and creating oyster-inspired art on paper or canvas.
Gilded-Edge Oyster Shell Trinket Dish
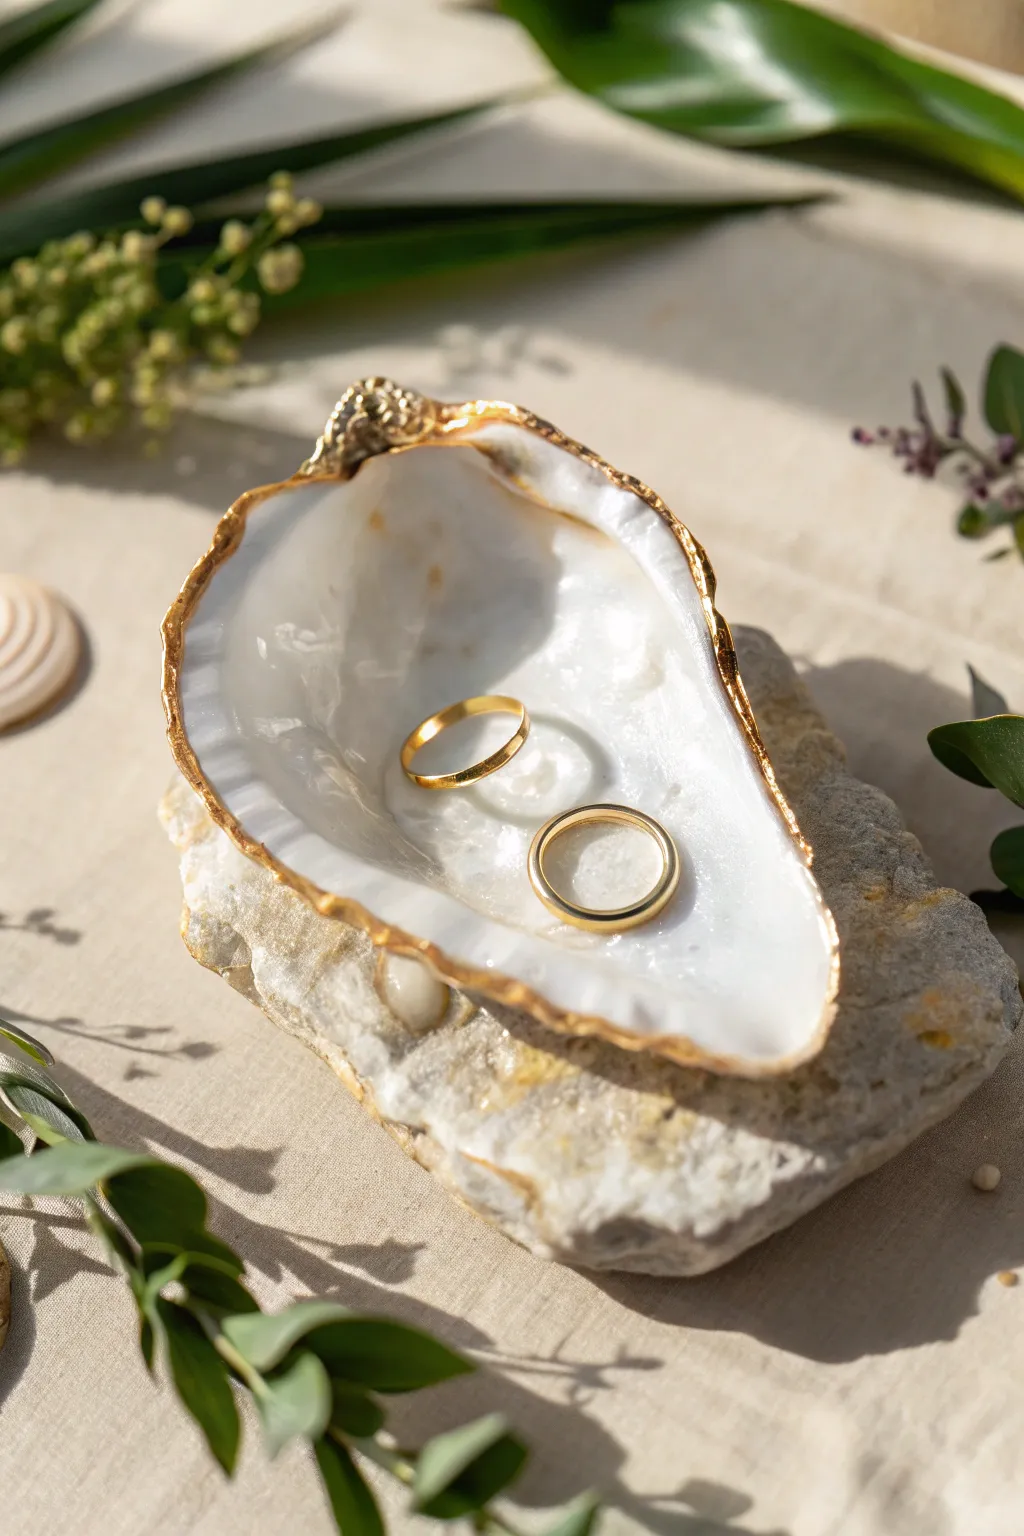
Transform a natural treasure into a luxurious catch-all for your jewelry with this simple yet elegant project. By refining the interior and adding a touch of gold leaf paint to the rim, you create a sophisticated piece that highlights the shell’s organic beauty.
Step-by-Step
Materials
- Large, concave oyster shell (cleaned)
- Mild dish soap and scrub brush
- Bleach (optional)
- Sandpaper (fine grit)
- High-gloss white pearl acrylic paint
- Liquid gold leaf or metallic gold enamel paint
- Small flat paintbrush (for interior)
- Fine detail paintbrush (for rim)
- Mod Podge or clear gloss varnish
- Small stone or wooden beads (for feet, optional)
- Hot glue gun (optional)
Step 1: Preparation & Cleaning
-
Clean the shell thoroughly:
Begin by scrubbing your oyster shell with warm water and mild dish soap to remove any sand, salt, or organic debris. If the shell has a strong odor, soak it in a solution of water and bleach for an hour, then rinse well and let it dry completely in the sun. -
Sand the interior:
Once dry, use fine-grit sandpaper to gently smooth the inside of the cup. You don’t need to remove all texture, but focus on knocking down any sharp ridges or rough patches where jewelry might sit. -
Wipe away dust:
Use a slightly damp cloth or tack cloth to remove all sanding dust from the interior. A clean surface is crucial for a smooth paint application.
Step 2: Painting the Interior
-
Apply the first coat of white:
Using a small flat brush, apply a thin layer of high-gloss white pearl acrylic paint to the inside of the shell. Follow the natural contours of the shell with your brushstrokes for an organic look. -
Let it dry:
Allow this base coat to dry completely. Acrylics dry fast, but give it about 15-20 minutes to be safe. -
Build up the opacity:
Apply a second and possibly third coat of the pearl paint. The goal is a milky, lustrous finish that still allows the hints of the shell’s natural texture to peek through. I personally love seeing just a bit of the original discoloration underneath for character. -
Seal the interior:
Once the paint is fully cured, brush on a layer of Mod Podge or clear gloss varnish. This protects the paint from scratching when you toss your rings in.
Fixing Gloopy Gold
If liquid gold leaf gets sticky or thick, don’t force it. Clean your brush immediately with thinner or turpentine, as water won’t work. Keep the bottle cap tight to prevent evaporation.
Step 3: Gilding the Edge
-
Load the detail brush:
Shake your liquid gold leaf or metallic enamel thoroughly. Dip a fine detail brush into the gold, removing excess on the rim of the jar so it doesn’t drip. -
Paint the rim:
Carefully trace the ragged edge of the oyster shell with the gold paint. Allow the line to vary slightly in thickness, embracing the waviness of the shell’s lip. -
Extend to the back:
Wrap the gold paint just barely over the edge to the backside of the shell. This creates a finished look from every angle. -
Refine the inner line:
Go back over the interior edge of the gold line to ensure it is crisp against the white pearl background. If you make a mistake, you can gently scrape it away with a fingernail before it fully hardens.
Decoupage Pattern
Instead of plain pearl paint, level up by decoupaging a piece of patterned floral napkin into the center before gilding the edges. It adds a vintage, chinoiserie vibe.
Step 4: Finishing Touches
-
Create a stable base:
Test how your shell sits on a flat surface. If it wobbles unpredictably, flip it over and identify the contact points. -
Attach stabilizing feet:
Using a hot glue gun, attach three small wooden beads or even tiny dabs of hardened hot glue to the bottom to create a tripod. This ensures your rings won’t spill out. -
Final cure:
Let the gold leaf cure according to the manufacturer’s instructions—usually at least 24 hours—before placing any jewelry inside.
Place your new gilded shell on a nightstand or vanity for a coastal chic accent that keeps your treasures safe

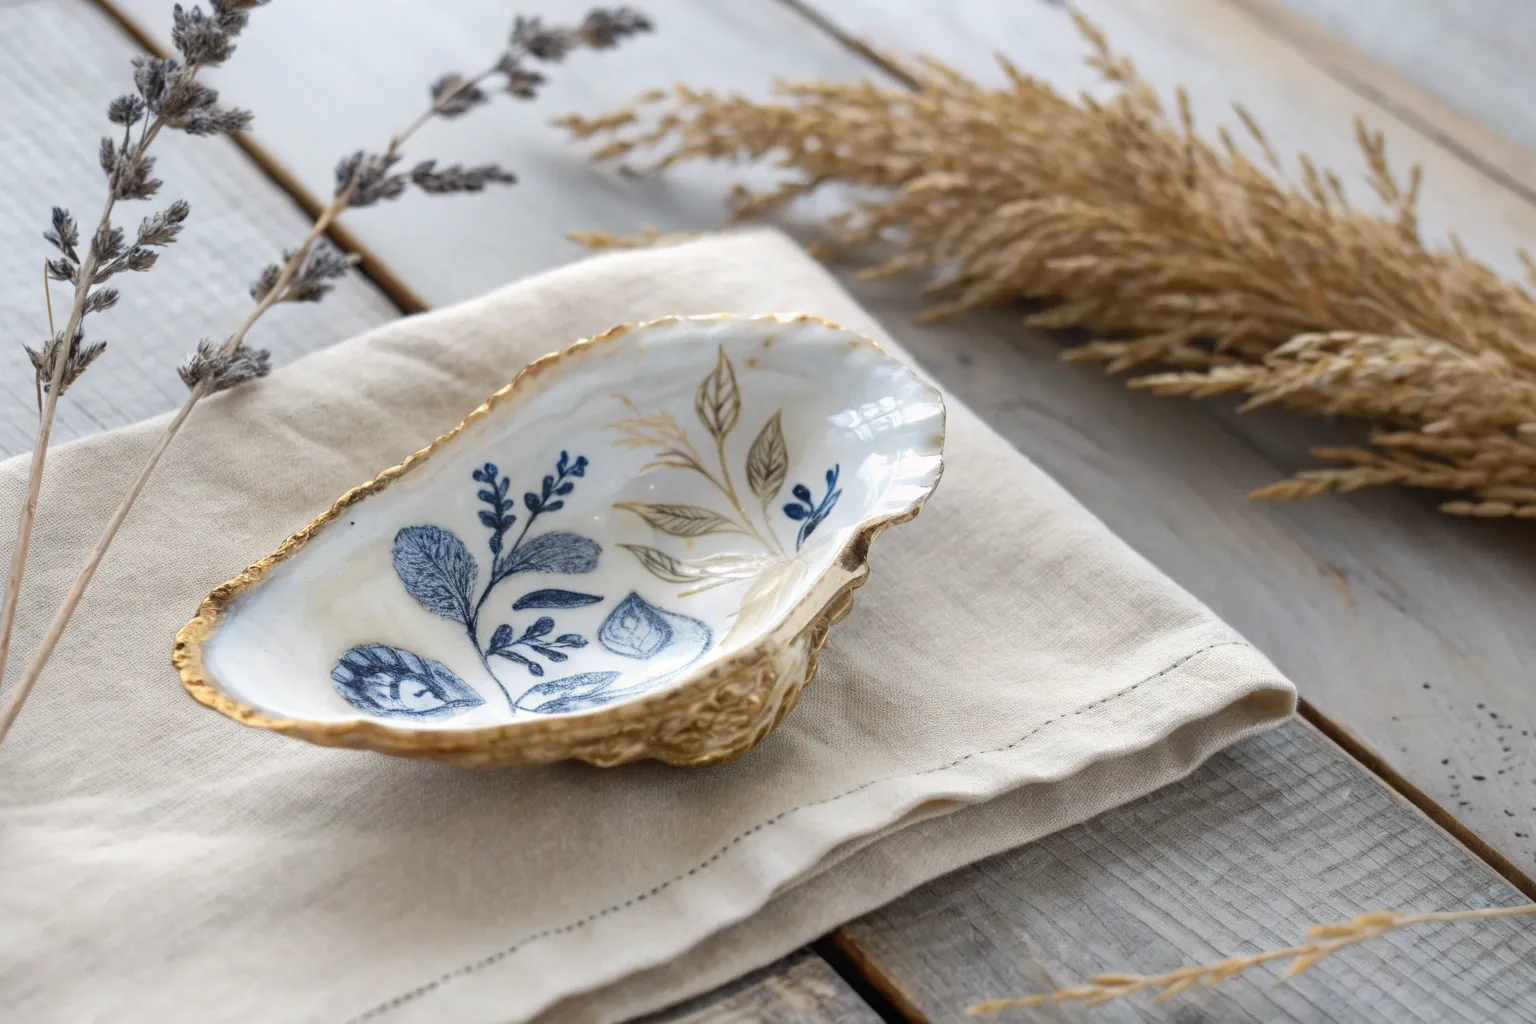
Blue-and-White Oyster Shell Pattern
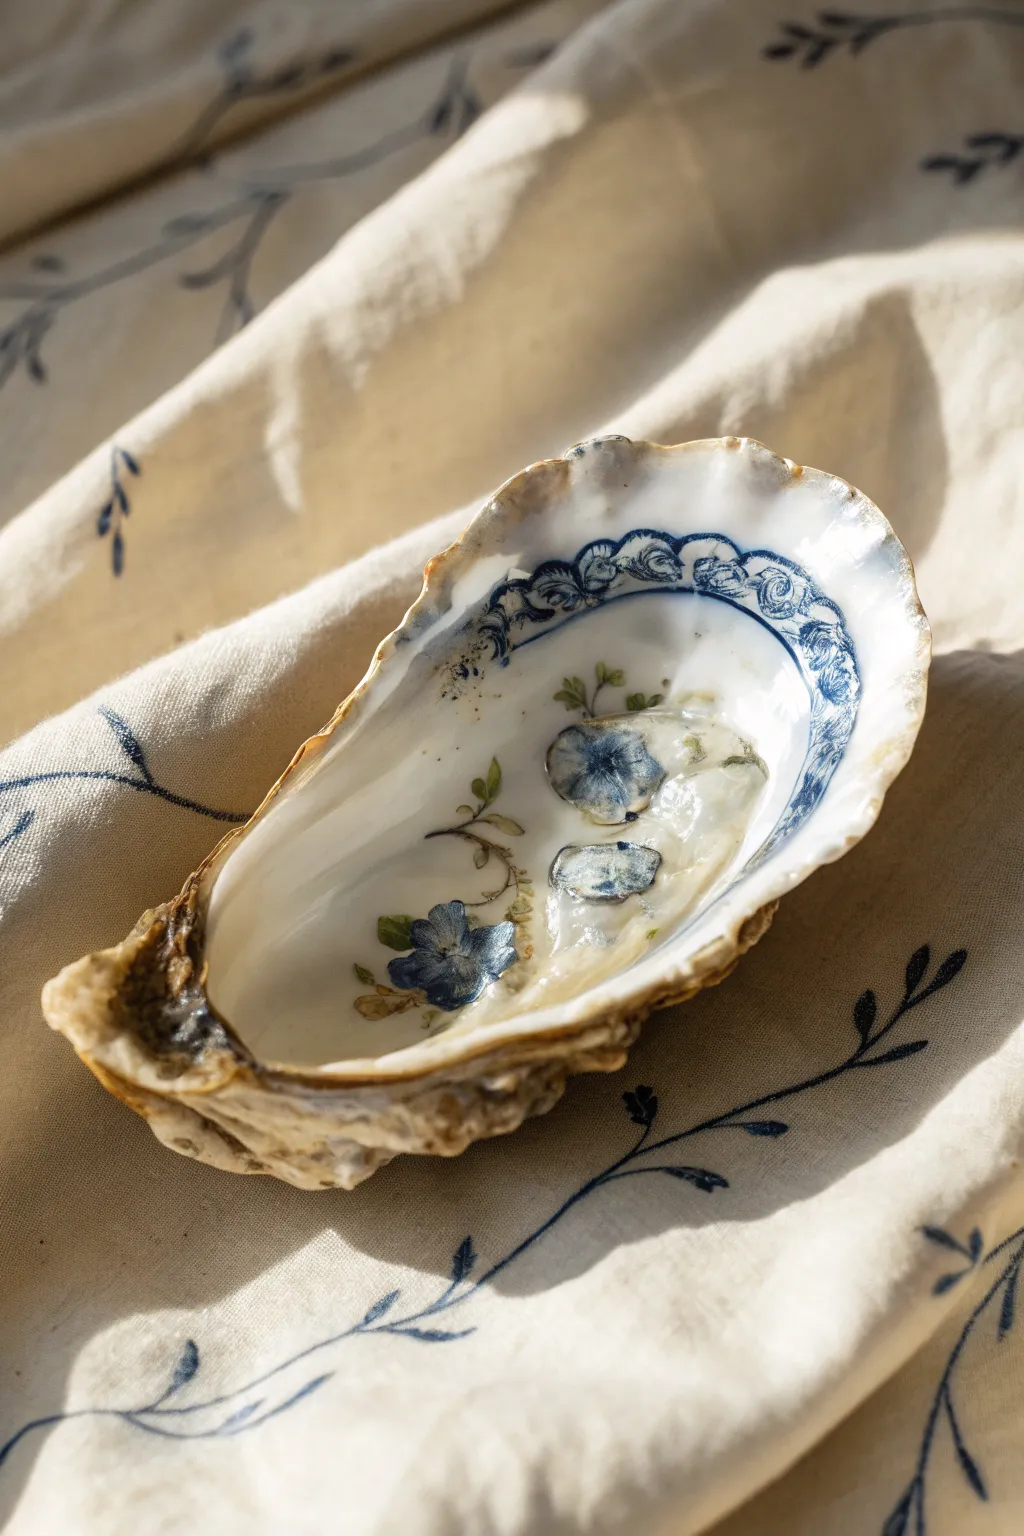
Transform a humble oyster shell into a piece of faux fine china with this elegant decoupage project. Using the classic blue-and-white aesthetic of Delftware or Chinoiserie, you’ll create a sophisticated trinket dish that looks hand-painted but uses a clever paper napkin technique.
Step-by-Step Guide
Materials
- Large, clean oyster shell (approx. 4-5 inches)
- Blue and white patterned paper napkin (floral or Chinoiserie style)
- White acrylic paint
- Gold leaf paint or metallic gilding wax (optional)
- Mod Podge (Gloss finish)
- Gloss varnish or clear resin (UV or 2-part epoxy)
- Soft flat paintbrush
- Small detail brush
- Scissors
Step 1: Shell Preparation
-
Clean and Scrub:
Before you begin, ensure your shell is impeccably clean. Scrub it thoroughly with warm soapy water and a stiff brush to remove any grit or sea residue, then let it dry completely in the sun or overnight. -
Apply Varied Base Coat:
Paint the inside of the shell with white acrylic paint. You don’t need a perfectly opaque layer everywhere; apply it somewhat heavily but unevenly to mimic the natural variation of porcelain, ensuring the dark spots of the shell are mostly covered. -
Dry and Assess:
Let the white paint dry fully. If the dark parts of the shell are still showing through too much, apply a second coat, focusing on the deepest part of the cup.
Step 2: Design Composition
-
Separate Napkin Layers:
Take your patterned paper napkin and carefully peel away the back white layers. You only want the very top, single printed ply; this translucency is key for the painted effect. -
Isolate Motifs:
Using small scissors, cut out specific floral elements and border designs. For this look, you need a curved border piece for the rim and individual floral sprays for the center. -
Rough Layout:
Place your dry cutouts into the shell without glue first. Arrange the border piece along the smoother, wider side of the shell’s interior and place the flowers in the deep cup to check the spacing. -
Apply First Design:
Lift the floral cutout. Apply a thin layer of Mod Podge to the center of the shell where the design will sit. -
Seat the Design:
Gently place the floral napkin piece onto the wet Mod Podge. Starting from the center of the flower, tap gently with your brush to smooth it down, working outward. -
Seal the Center:
Immediately apply another thin layer of Mod Podge over the top of the floral design to seal it, being careful not to tear the fragile wet paper.
Wrinkle Rescue
If the napkin wrinkles excessively, use a piece of plastic wrap over your finger to smooth it out while the glue is wet. The plastic allows you to press down without tearing the delicate paper.
Step 3: Detailed Bordering
-
Prepare the Rim:
Apply Mod Podge along the upper inner curve of the shell where you planned your border pattern. -
Apply the Border:
Lay your curved decorative strip onto the glue. Since the shell is curved, you may need to make tiny relief cuts (slits) in the napkin strip so it overlaps slightly rather than wrinkling. -
Blend Edges:
Use your brush with a little extra Mod Podge to feather out the edges of the napkin pieces. The wet paper should become translucent, making the design look like it’s painted directly onto the white background. -
Dry Completely:
Allow the Mod Podge to dry until it is clear and hard to the touch. I usually wait about 20 minutes between these application steps.
Pro Tip: seamless look
Tear the edges of your napkin cutouts instead of cutting with scissors. The frayed fibers blend invisible into the white paint, eliminating harsh outline marks.
Step 4: Gilding and Finishing
-
Paint the Edge:
Dip a small detail brush into gold leaf paint or use your finger with gilding wax. Run this along the very rough outer rim of the shell to create a luxurious frame. -
Clean Up:
If any gold paint smudged onto the white interior where you don’t want it, quickly wipe it away with a damp cloth before it sets. -
Final Glaze application:
To achieve the high-gloss look shown in the image, apply a coat of high-gloss varnish or clear resin. If using resin, pour a small amount into the center and tilt the shell to coat the interior walls. -
Cure:
Let the final topcoat cure completely (24-48 hours for resin, less for varnish) in a dust-free area.
Display your new porcelain-style shell on a coffee table or use it to hold your favorite rings


Realistic Open Oyster Watercolor Study
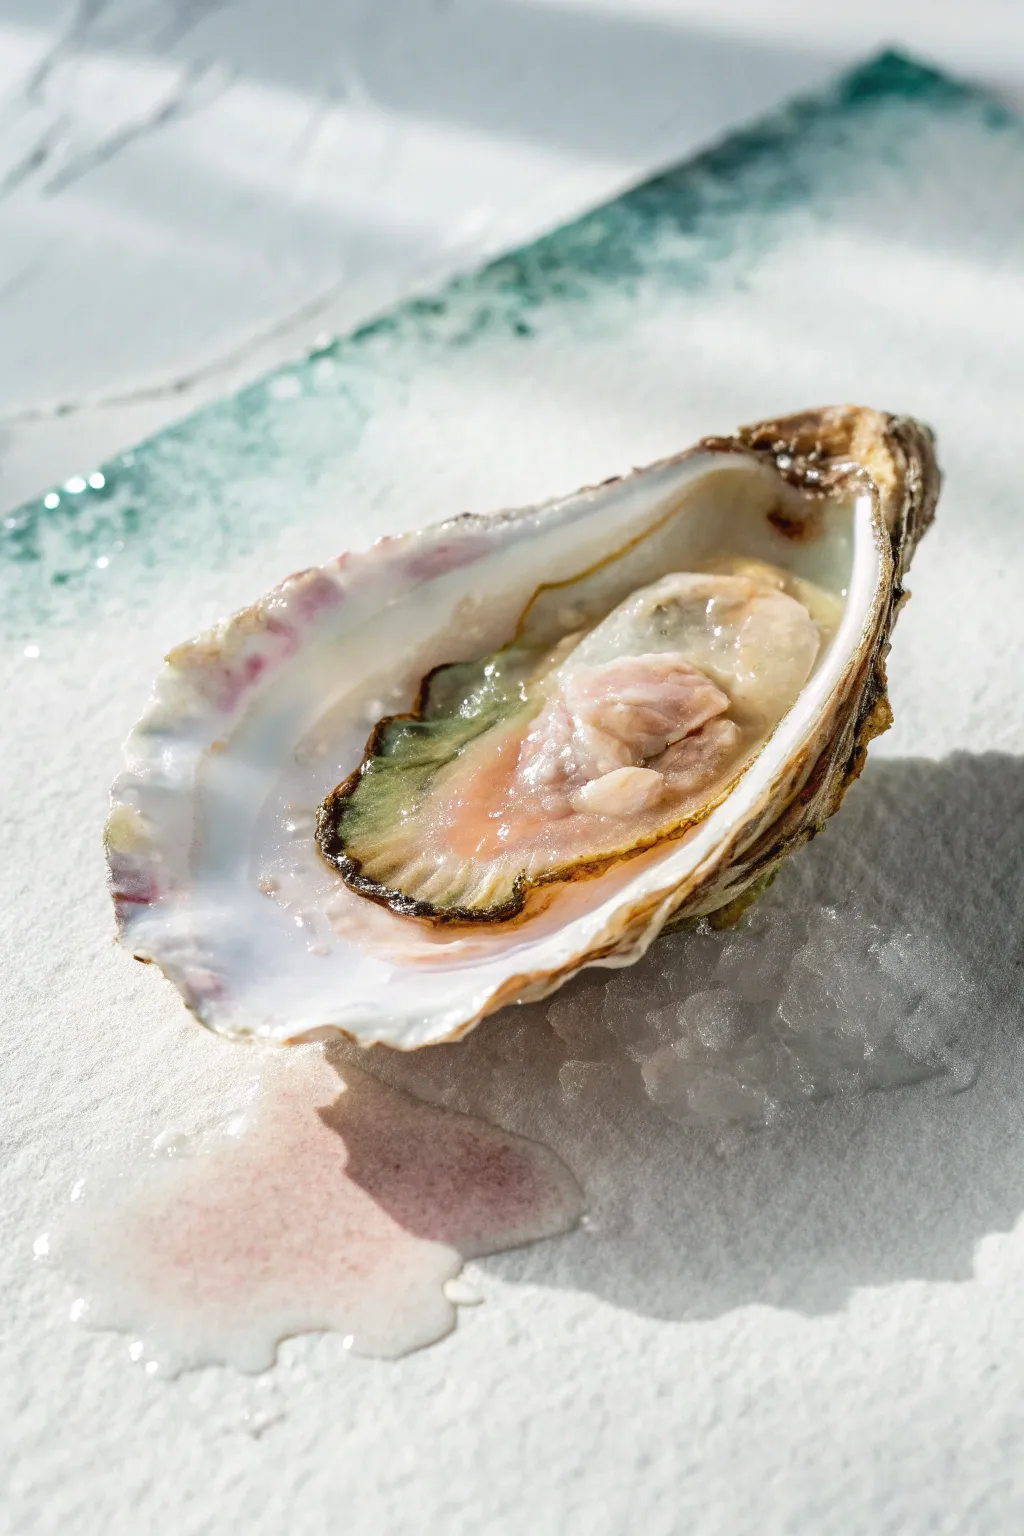
Capture the delicate translucency and briny freshness of this realistic open oyster study, bathed in bright, dappled light. This tutorial focuses on mastering glistening textures and the subtle interplay of pearlescent pinks, greens, and ochres within the shell.
Step-by-Step Tutorial
Materials
- Cold press watercolor paper (300 gsm)
- Watercolor paints (Alizarin Crimson, Sap Green, Yellow Ochre, Burnt Umber, Payne’s Grey, Cerulean Blue)
- Round brushes (sizes 2, 6, and 10)
- Masking fluid applied with an old brush or silicone tool
- Clean water and mixing palette
- Paper towels
- Pencil (HB) and kneaded eraser
- White gouache (optional, for highlights)
Step 1: Drawing & Masking
-
Outline the form:
Begin with a very light pencil sketch of the oyster shell’s elongated oval shape. Mark the inner rim where the shell curves up and the central muscle scar where the meat sits. -
Texture the edges:
Sketch the jagged, ruffled edges of the shell. Don’t make this a smooth line; keep it irregular to mimic the calcium build-up of a real oyster. -
Map the shadows:
Lightly outline the shadow shape cast by the shell onto the surface below, paying attention to the specific angle of light shown in the reference. -
Preserve the highlights:
Use masking fluid to spot the brightest white highlights on the wet meat of the oyster and the shiny inner rim of the shell. Let this dry completely before painting.
Step 2: The Shell Interior
-
First wash:
Wet the interior of the shell with clean water. Drop in a very dilute wash of Yellow Ochre near the hinge and a faint touch of Alizarin Crimson along the left rim. -
Deepen the meat:
While the paper is still damp, mix Alizarin Crimson with a tiny bit of Burnt Umber to create a fleshy pink. Paint the central meat area, letting the color bloom softly. -
Add greenish tones:
Introduce a watery mix of Sap Green and Payne’s Grey to the left side of the meat and the deep recess of the shell to suggest depth and organic matter. -
Define the mantle:
Using a size 2 brush and a mix of Burnt Umber and Payne’s Grey, carefully paint the dark, ruffled edge (the mantle) of the oyster meat. Allow the paint to bleed slightly inward for a soft transition, but keep the outer edge sharp. -
Enhance the pinks:
Glaze a vibrant, clean pink (dilute Alizarin Crimson) over the central fleshy part to boost the saturation, making it look raw and fresh.
Muddy Colors?
If the pinks and greens inside the shell are turning brown, wait for the first color to dry completely before glazing the second color over it.
Step 3: The Outer Shell & Shadows
-
Paint the shell rim:
Use a mix of Yellow Ochre and Burnt Umber to paint the rough outer crust of the shell. Use a dry-brush technique here to replicate the chalky texture. -
Cast shadow base:
Mix a cool shadow color using Cerulean Blue and a touch of Alizarin Crimson (leaning purple-grey). Paint the cast shadow on the right side of the shell. -
Texture the ice:
Use very pale washes of the shadow color to suggest the uneven surface of the crushed ice or textured paper beneath the shell. Keep this extremely subtle. -
The spilled liquor:
Paint the puddle of liquid in the foreground using a transparent wash of Alizarin Crimson. Keep the edges soft and watery to show it has absorbed into the surface.
Salt Texture
Sprinkle a tiny pinch of table salt onto the wet paint of the outer shell or the background wash. As it dries, it creates a bloom texture perfect for minerals.
Step 4: Finishing Touches
-
Remove masking:
Once the paint is bone dry, gently rub off the masking fluid to reveal the crisp white paper underneath. -
Refine highlights:
Soften the edges of your revealed white highlights with a damp brush if they look too harsh. I like to leave the sharpest ones on the meat to make it look wet. -
Deepen contrast:
Add touches of undiluted Payne’s Grey into the deepest crevices of the shell hinge and under the meat to maximize the 3D effect. -
Final glisten:
If you need even brighter highlights, use a tiny dot of white gouache on the most reflective point of the oyster meat.
Step back and admire the fresh, luminous quality of your finished oyster study


Mother-of-Pearl Color Layering in an Oyster
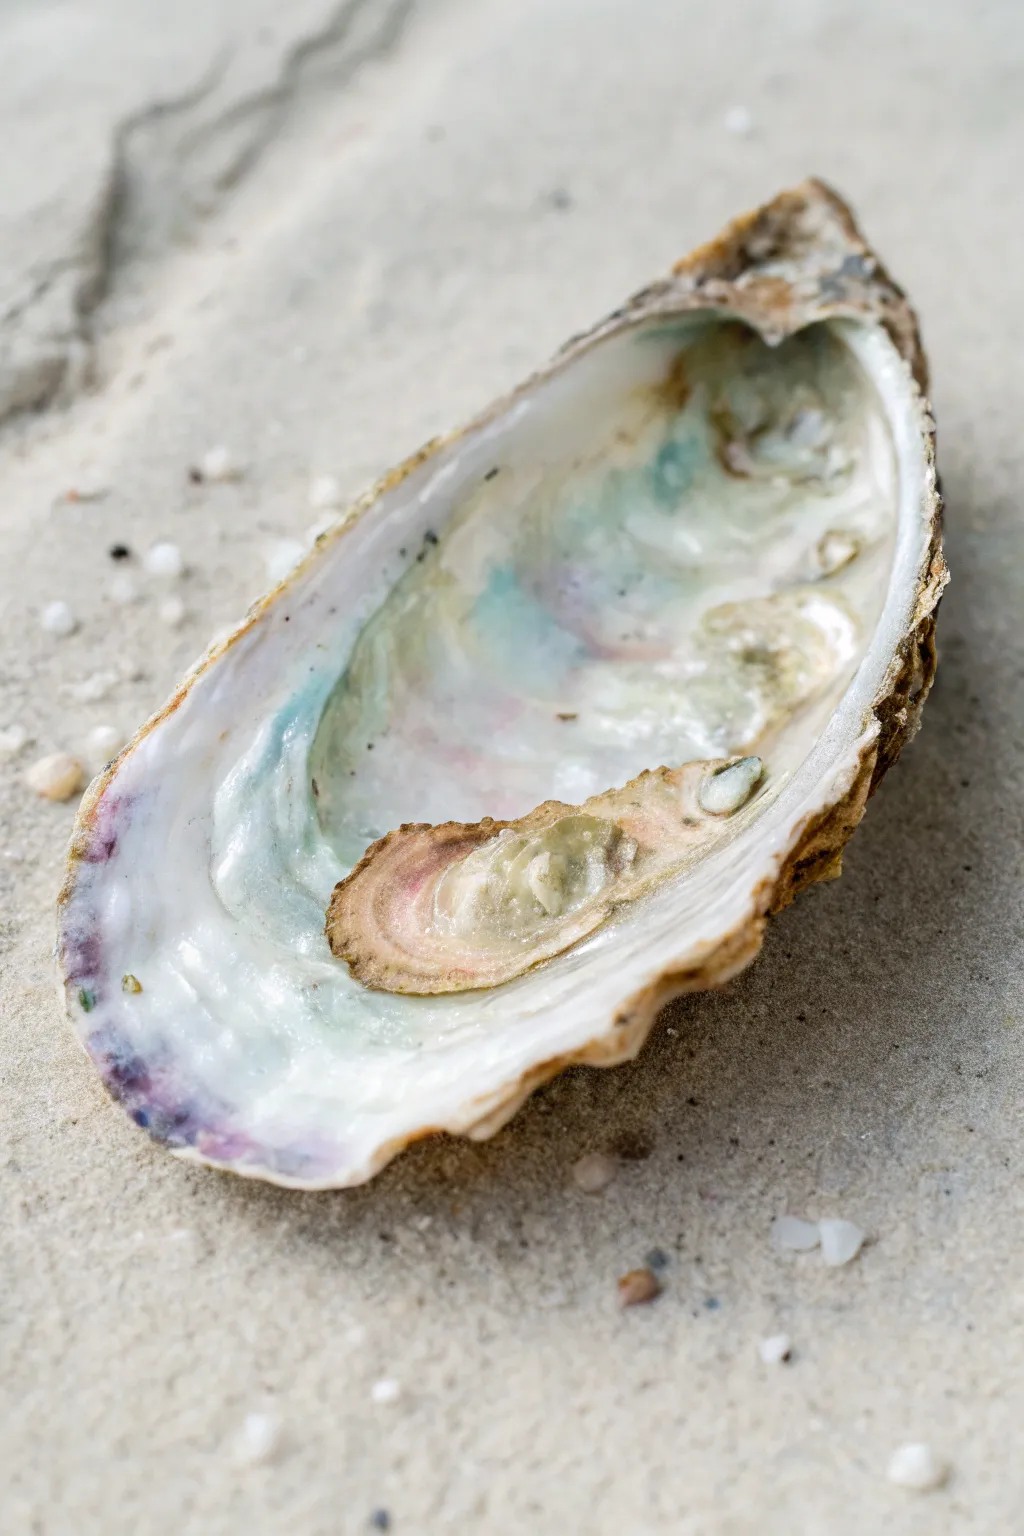
Capture the breathtaking iridescence of a natural oyster shell with this dedicated mother-of-pearl painting study. By layering sheer washes of metallic and interference watercolors, you’ll recreate the delicate shimmers of blue, pink, and gold found in nature.
Step-by-Step Tutorial
Materials
- Watercolor paper (140lb cold press)
- Pencil (HB or H)
- Kneaded eraser
- Watercolor paints: Indigo, Burnt Umber, Yellow Ochre, Alizarin Crimson, Phthalo Blue
- Iridescent or Interference Medium (or metallic watercolor set)
- Round brushes (sizes 2, 4, and 8)
- Masking fluid (optional)
- Two water containers
- White gouache
Step 1: Sketching the Form
-
Outline the Contour:
Begin by lightly sketching the elongated oval shape of the oyster shell on your paper, making the top slightly narrower than the bottom. -
Define the Rim:
Draw the jagged, irregular rim of the shell. Keep your pencil lines loose and organic, as no two oysters are perfectly smooth. -
Mark the Interior Depth:
Sketch the inner boundary where the smooth nacre (mother-of-pearl) meets the rougher outer edge. -
Locate the Muscle Scar:
Draw the teardrop-shaped muscle scar slightly off-center in the lower half of the shell.
Pro Tip: Clean Water
Change your rinse water religiously when painting mother-of-pearl. Any muddy brown residue in your water will dull the delicate pastels and ruin the iridescent effect immediately.
Step 2: The Pearlescent Interior
-
Wet-on-Wet Base:
With your size 8 brush, wet the entire interior area of the shell with clean water until it glistens but doesn’t puddle. -
First Cool Glaze:
Drop in a very diluted wash of Phthalo Blue mixed with a touch of Indigo near the left rim and the deep cup of the shell. -
Adding Warmth:
While the paper is still damp, introduce localized spots of pale Alizarin Crimson and Yellow Ochre, letting them bleed softly into the blue areas. -
Creating the Nacre Sheen:
Once the color layer is dry, mix your iridescent medium with a tiny amount of water (or use metallic pearl paint) and glaze over the colored sections to unify them with a shimmer. -
Deepening Shadows:
Mix a stronger grey-purple using Alizarin Crimson and Indigo. Apply this to the deepest recesses of the shell interior to create the illusion of curvature. -
Highlight Preservation:
I find it best to leave the brightest white areas of the paper untouched for the strongest highlights, but you can also lift color out with a clean, damp brush if it gets too dark.
Level Up: Resin Finish
Once the watercolor is fully dry, paint a thin layer of high-gloss varnish or UV resin just inside the cup of the shell. It mimics the wet, slick look of a fresh oyster perfectly.
Step 3: The Rough Exterior & Scar
-
Painting the Rim:
Switch to a size 4 brush and mix Burnt Umber with a little Indigo. Paint the jagged outer rim using a dry-brush technique to mimic the flaky texture. -
Texturing the Edge:
Add small dabs of pure Yellow Ochre along the rim for variations in the calcium deposits. -
The Muscle Scar Base:
Paint the muscle scar area with a mix of Yellow Ochre and a tiny dot of Burnt Umber. -
Scar Details:
While the scar base is damp, drop darker brown edges around it to make it look slightly recessed. -
Adding Contrast:
Use your smallest brush to deepen the shadow right under the rim on the right side, giving the shell dimension.
Step 4: Refining and Finishing
-
Enhancing Iridescence:
Let the painting dry completely. Add a second layer of interference blue or gold specifically to the high points of the interior ridges. -
Crisp White Highlights:
Use opaque white gouache to add sharp, tiny bright spots on the wettest-looking parts of the nacre. -
The Sand Effect:
Mix a very watery wash of Burnt Umber and spatter it lightly around the outside of the shell to suggest a sandy surface. -
Final Assessment:
Step back and check your values; darken the outer jagged edge if the contrast against the pearly center isn’t strong enough.
Now you have a shimmering coastal study that captures the hidden beauty of the sea
BRUSH GUIDE
The Right Brush for Every Stroke
From clean lines to bold texture — master brush choice, stroke control, and essential techniques.
Explore the Full Guide
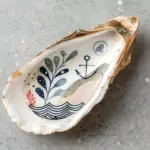
Simple Coastal Motifs Inside Oyster Shells
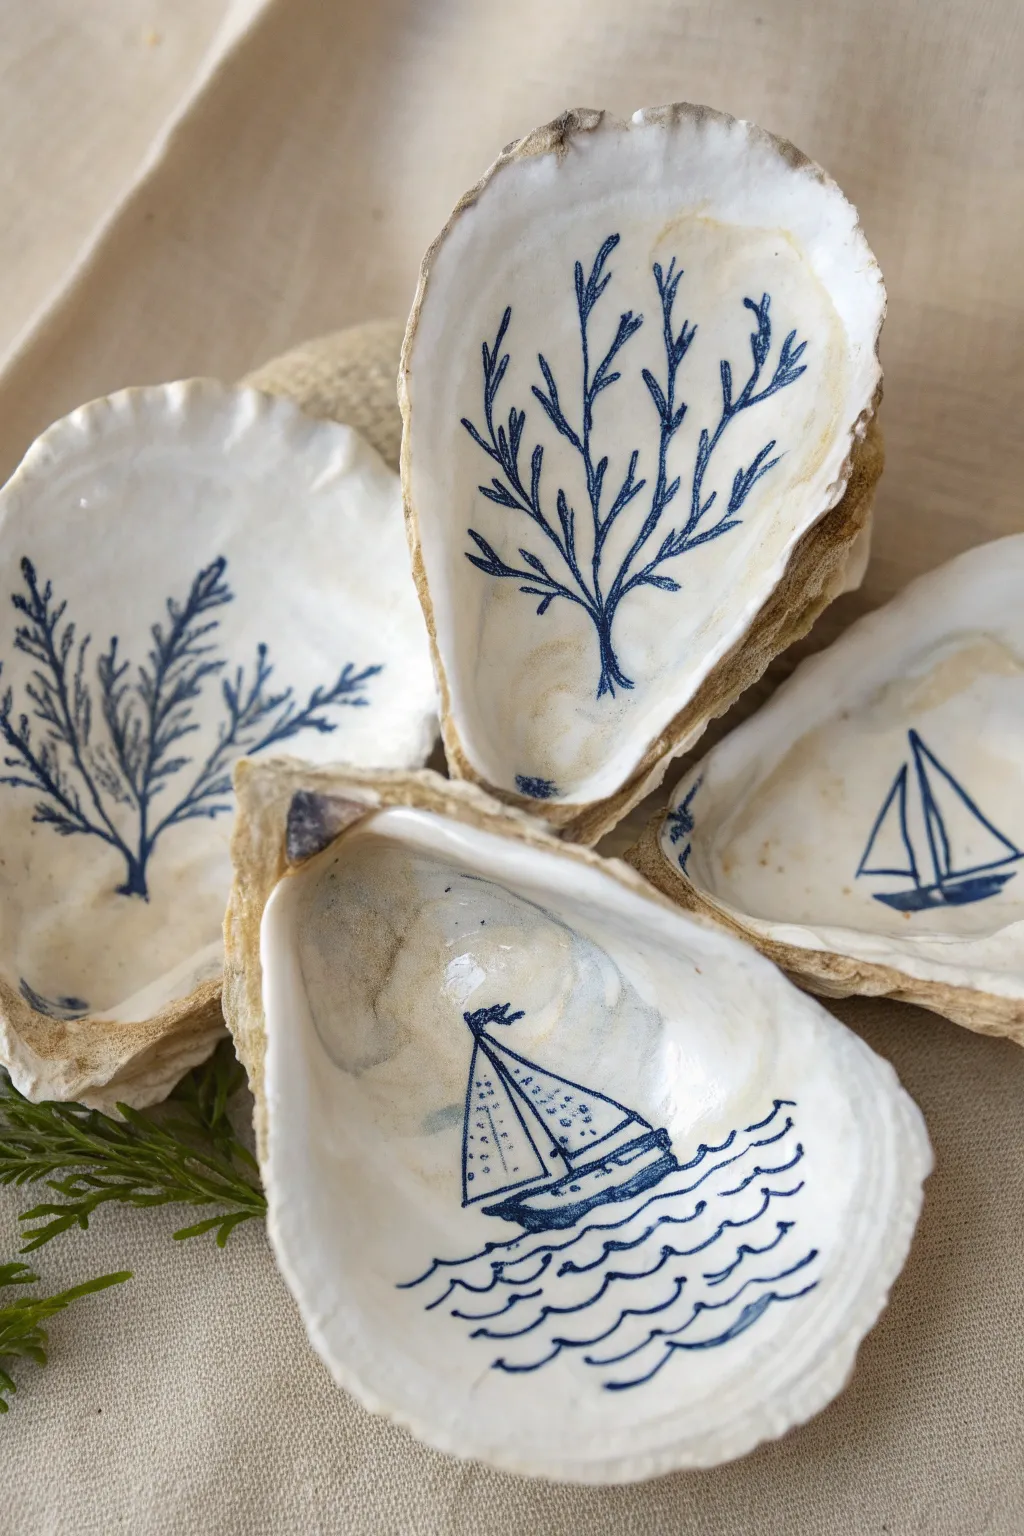
Transform humble oyster shells into elegant trinket dishes reminiscent of classic blue and white porcelain. This project combines natural textures with delicate maritime illustrations for a sophisticated coastal accent.
How-To Guide
Materials
- Large oyster shells (cleaned and dried)
- White acrylic paint or gesso
- High-gloss varnish or decoupage medium (like Mod Podge Gloss)
- Fine-point permanent marker (navy blue) or 000 liner brush with navy fluid acrylics
- Soft flat brush (for base coating)
- Pencil (optional for sketching)
- Gold leaf or gold paint (optional for sizing rims)
- Sandpaper (medium grit)
Step 1: Preparation & Base Coat
-
Clean the canvas:
Ensure your shells are thoroughly scrubbed, boiled if necessary to remove organic matter, and completely dry before beginning. -
Smooth the interior:
If the inside of the shell is particularly rough or flaky, gently sand the pearlescent surface with medium grit sandpaper to create a smoother painting ground. -
Prime the surface:
Using a soft flat brush, apply a thin, even layer of white acrylic paint or gesso to the interior of the shell. You don’t need opaque coverage; a semi-sheer wash allows some natural pearl luster to shine through. -
Dry completely:
Let the white base coat dry fully. If you want a brighter white background, apply a second coat and let it dry.
Ink Bleeding issues?
If your marker blurs when varnish is applied, spray the design with a clear matte sealant first. Let that dry, then brush on the liquid gloss.
Step 2: Painting the Motifs
-
Choose your subject:
Decide on your design. For the coral motif, you will be drawing branching organic lines. For the boat, you’ll need simple geometric triangles and sweeping curves for waves. -
Light sketch:
If you are nervous about free-handing, lightly sketch your design with a pencil directly on the dried white paint. -
Start the coral anchor:
For the coral shell, take your navy marker or fine brush and draw a single vertical line starting from the bottom ‘hinge’ of the shell, extending about halfway up. -
Branch outward:
From that central stem, draw Y-shaped branches extending outward and upward. Keep the lines thin and delicate. -
Add intricate details:
Add smaller twigs coming off the main branches. Vary the lengths and angles to make the sea fan look organic and natural. -
Draw the sailboat hull:
For the boat design, start by drawing a simple, small boat shape—a flattened semi-circle or trapezoid—near the lower third of the shell. -
Raise the mast:
Draw a vertical line rising from the center of the boat hull. -
Set the sails:
Add two triangles attached to the mast for sails. To add visual interest, you can add tiny dotted details inside the sails. -
Add the pennant:
Draw a tiny triangular flag fluttering at the very top of the mast. -
Create the ocean:
Beneath the boat, draw series of wavy lines to represent the sea. Vary the length of the waves, stacking them about four or five rows deep to ground the illustration.
Decoupage cheat
Can’t draw? Print blue clipart boating motifs deeply onto tissue paper. Cut them out and decoupage them onto the white shell base.
Step 3: Sealing & Finishing
-
Let the ink cure:
Allow your drawing to dry completely. If using a paint pen or marker, wait at least an hour to ensure it won’t smear during sealing. -
First seal coat:
Dip a clean brush into your high-gloss varnish. Apply a very thin layer over the entire inside of the shell, moving quickly to avoid dragging the ink. -
Gloss it up:
Once the first coat is tacky or dry, apply a second, more generous coat of gloss. This mimics the look of fired ceramic glaze. -
Clean the rim (Optional):
If paint got on the rough exterior edge during the process, you can carefully wipe it away or paint the rim with liquid gold leaf for a luxurious finish. -
Final cure:
Let the shells sit undisturbed for 24 hours to let the varnish harden completely before using them as jewelry dishes.
Place these charming little dishes on a nightstand or coffee table to bring a touch of the seaside into your home
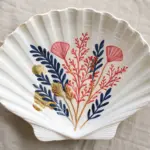
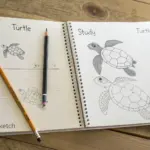
Minimal Oyster Line Drawing on Toned Paper
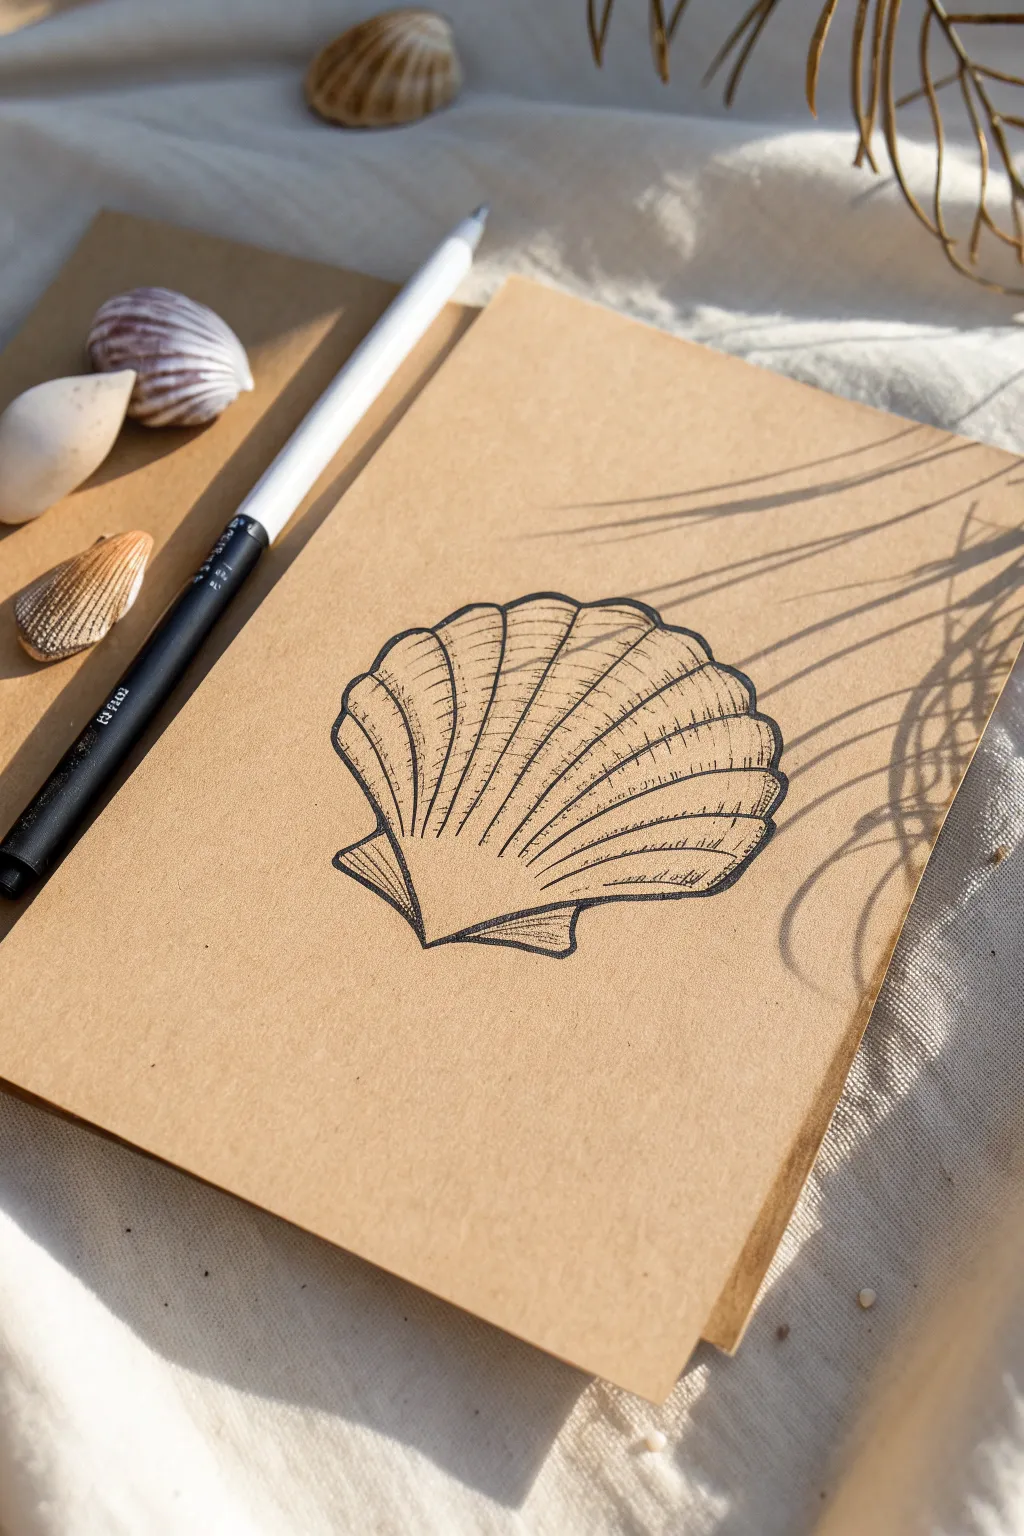
Capture the delicate ridges and texture of a scallop shell using stark black ink against warm, toned tan paper. This project focuses on clean lines and careful hatching to create a dimensional, vintage-style illustration perfect for framing or handmade cards.
Step-by-Step
Materials
- Tan/Kraft paper sketchbook or cardstock
- Fine-tipped black drawing pen (size 01 or 03)
- Thicker black drawing pen (size 05 or 08)
- Pencil (HB or H)
- Soft white eraser
- Reference shell (optional, but helpful)
Step 1: Planning the Shape
-
Establish the anchor point:
Begin by lightly marking a small point near the bottom center of your page with your pencil. This will be the hinge (umbo) of the shell from which all the fan lines will radiate outward. -
Map the outer curve:
Sketch a wide, gentle arc above your anchor point to define the top edge of the shell. Keep this line light and loose, imagining a fan shape opening up. -
Connect the sides:
Draw two diagonal lines connecting the hinge point to the far left and far right edges of your top arc. The shape should now look roughly like a rounded triangle or a fan. -
Add the wings:
At the very bottom hinge, sketch two small triangular ‘wings’ or ears protruding slightly from the sides. These are distinct features of scallop-style shells. -
Divide into segments:
Lightly draw radiating lines from the hinge to the top arc. Imagine cutting a pizza slice; these lines will become the valleys between the shell’s ridges. Aim for about 7-9 main sections. -
Refine the scalloped edge:
Using your guide lines, pencil in the actual scalloped curves along the top edge. Each radiation line should meet a predominantly inward curve, while the space between them bows outward.
Wobbly Lines?
Don’t stress if your long vertical lines aren’t perfectly straight. Organic shells have bumps and imperfections. A little shake in your hand actually adds realistic character to the texture.
Step 2: Inking the Outlines
-
Trace the perimeter:
Switch to your thicker black pen (size 05 or 08). Carefully trace the outer silhouette of the shell. I like to make the bottom hinge lines slightly bolder to ground the drawing. -
Draw the ridges:
Switch to the finer pen (size 01 or 03). Draw the radiating lines from the hinge to the dips in the top edge. These lines shouldn’t be perfectly straight; give them a slight wobble to mimic organic growth. -
Create the heavy shadow band:
Look at the visual reference: there is a distinct band across the shell where the ridges are darker. Use your thicker pen to re-trace the ridge lines just in that middle section to emphasize the shell’s curvature. -
Erase pencil guides:
Wait a moment for the ink to fully set, then gently erase all your pencil sketches so you have a clean base for texturing.
Pro Tip: Volume Control
To make the shell look rounder, curve your horizontal hatching lines more dramatically. The more they curve like a rainbow, the more ‘puffed up’ the shell segment will appear.
Step 3: Adding Texture and Depth
-
Start the hatching:
Using your finest pen, begin adding horizontal hatching lines across individual shell segments. These lines should follow the subtle curve of the shell’s surface, arching slightly upward. -
Build darker values:
Concentrate your hatching marks on the sides of each ridge segment. By leaving the center of each segment with fewer lines, you create a highlight effect that makes the ridge look rounded and 3D. -
Detail the growth rings:
Draw occasional concentric curved lines that span across the entire width of the shell. These represent growth rings and help break up the vertical flow of the ridges. -
Deepen the valleys:
Go back into the ‘dips’ between the ridges. Add very short, dense diagonal hatch marks right along the vertical dividing lines to create deep shadows where the shell folds inward. -
Texture the wings:
Add simple vertical shading lines to the small triangular ears at the bottom hinge, making them slightly darker than the main body of the shell to show they sit further back. -
Final contrast check:
Step back and look at your drawing. Use the thicker pen to darken any outer edges that feel too flimsy. Stronger contrast between the ink and the tan paper creates that crisp, illustrative look.
Now you have a striking piece of coastal art that emphasizes simple beauty through line work

PENCIL GUIDE
Understanding Pencil Grades from H to B
From first sketch to finished drawing — learn pencil grades, line control, and shading techniques.
Explore the Full Guide
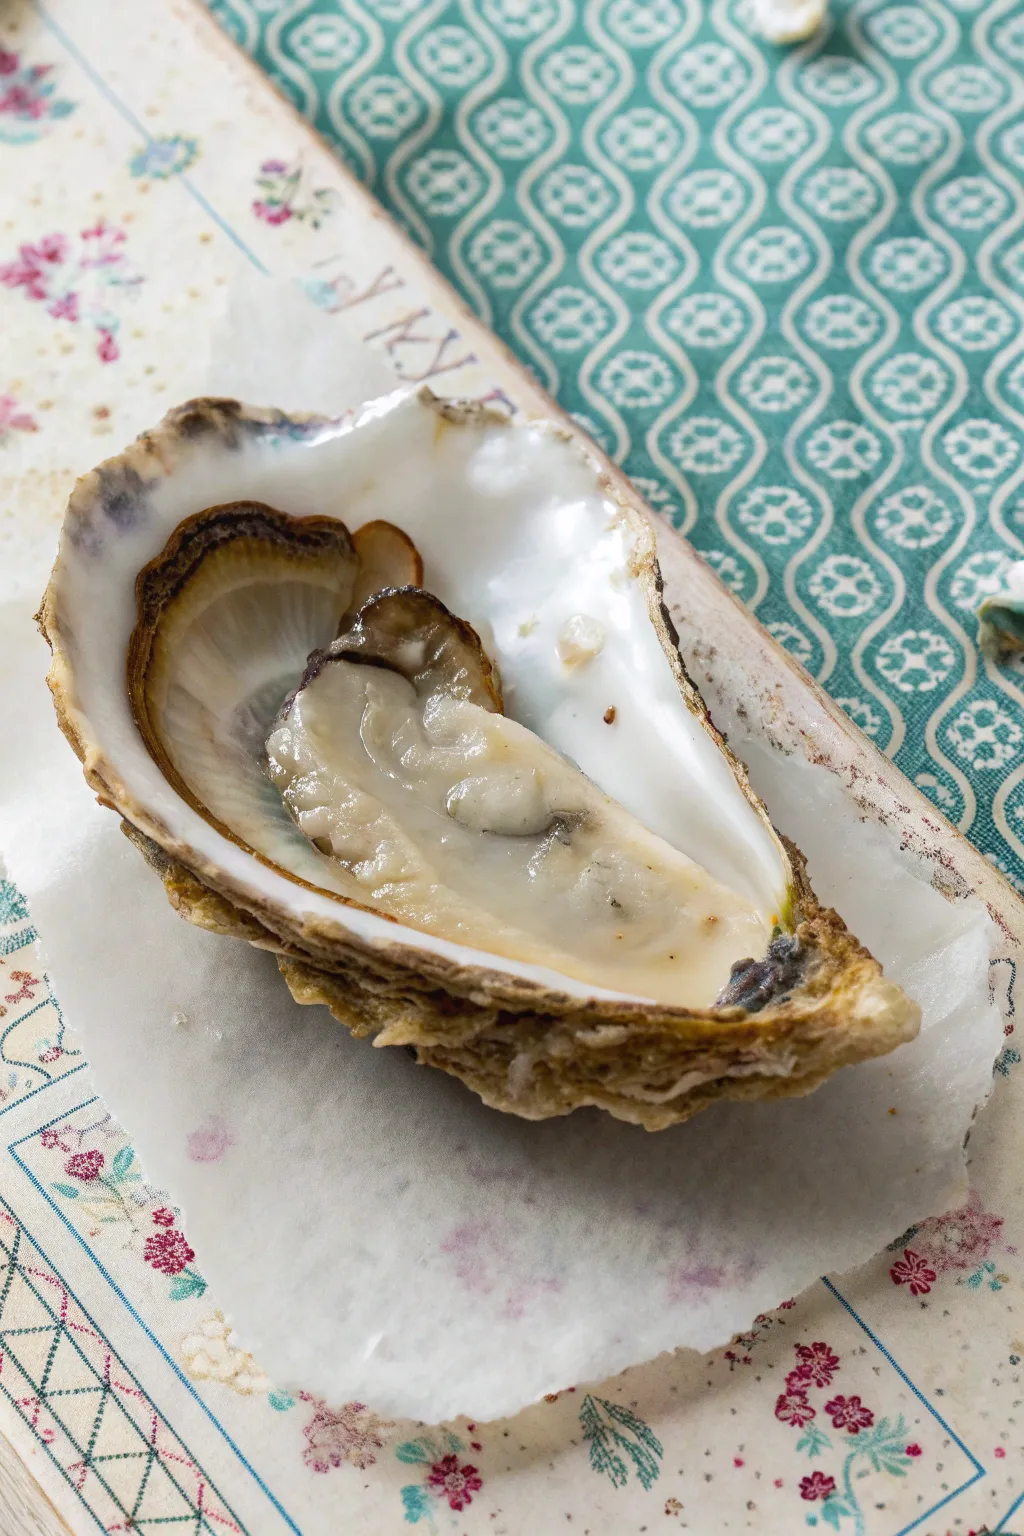
Vintage-Style Oyster Market Illustration
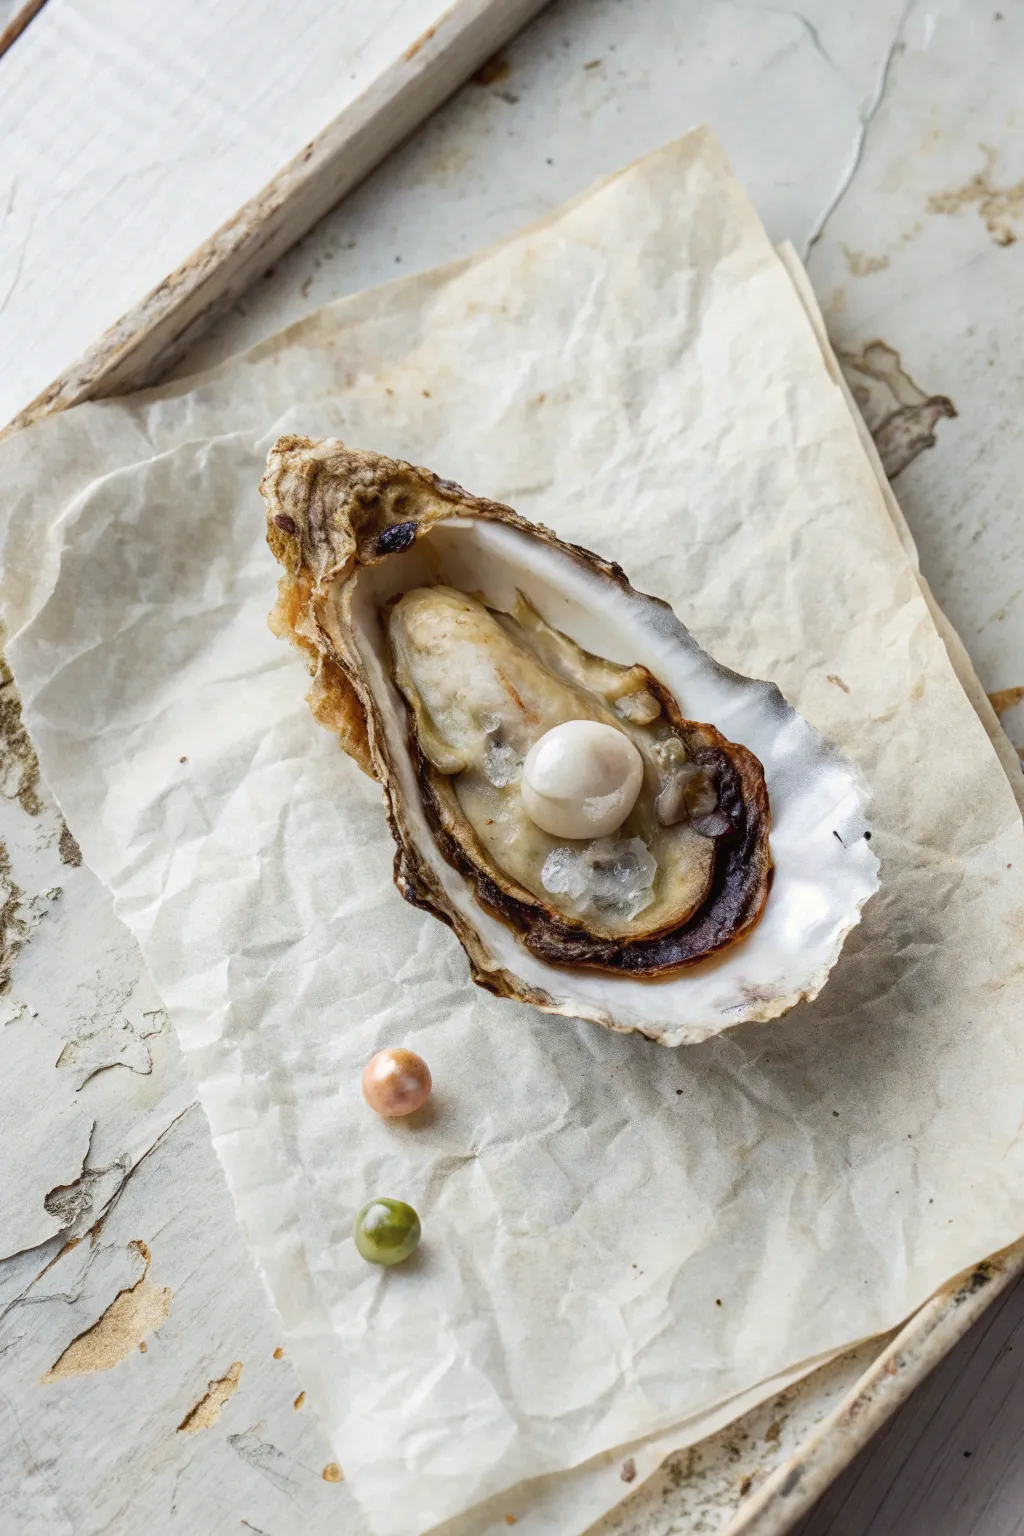
This project captures the delicate textures of a freshly shucked oyster resting on crumpled parchment, evoking the charm of a vintage seafood market illustration. You’ll layer acrylics or gouache to achieve the realistic sheen of the inner shell and the soft translucency of the pearls.
Detailed Instructions
Materials
- Heavyweight watercolor paper or illustration board
- Gouache or matte acrylic paints (White, Raw Umber, Yellow Ochre, Burnt Sienna, Payne’s Grey, Alizarin Crimson, Sap Green)
- Round synthetic brushes (sizes 2, 4, and 0 for details)
- Pencil (HB) for sketching
- Kneaded eraser
- Palette for mixing
- Two water containers
- Paper towels
Step 1: Sketching and Background
-
Lay the Foundation:
Begin by lightly sketching the outline of the oyster shell on your paper. Don’t worry about perfect symmetry; organic shapes look more natural. Draw the wavy outer edge and define the inner cup where the oyster meat sits. -
Map the Elements:
Lightly sketch the circle for the main pearl inside the shell, and the two smaller pearls (one pink, one green) resting on the paper below. Add faint, angular lines around the shell to indicate the crumpled texture of the parchment paper. -
Create the Parchment Base:
Mix a very dilute wash of Yellow Ochre and a tiny touch of Raw Umber with plenty of white. Paint the entire background area, leaving the oyster and pearls white. While the paint is wet, lift a few spots with a dry brush to create uneven highlights. -
Define the Crinkles:
Using a slightly darker mix of the background color (add a speck more Umber), paint thin, jagged lines to represent the folds and creases of the parchment paper. Soften one edge of each line with a clean, damp brush to create a shadow side.
Step 2: Painting the Shell
-
Outer Shell Texture:
Mix Burnt Sienna, Yellow Ochre, and a touch of Payne’s Grey. Stipple this earthy mix onto the rough, outer rim of the oyster shell. Use the tip of your brush to create a jagged, crusty texture. -
Inner Shell Values:
For the smooth inner rim, mix a cool grey using White and Payne’s Grey. Apply this in a sweeping motion along the right side of the interior, letting it fade into white as you move toward the center. -
The Oyster Meat Base:
Paint the fleshy body of the oyster using a mix of Yellow Ochre and White, kept quite watery. While wet, drop in tiny amounts of Raw Umber to suggest the contours and uneven surface of the meat. -
Dark Accents:
Mix Alizarin Crimson with Payne’s Grey to create a deep, purplish black. Carefully paint the dark, ruffled edges of the oyster mantle (the skirt-like part) that curls against the shell. Keep the edges irregular. -
Adding Gloss:
Once the meat layer is dry, mix a glaze of White with a tiny bit of water. Paint subtle highlights on the high points of the oyster meat to make it look wet and glistening. I find this step really brings the freshness to life.
Tip: Get Glossy
For an ultra-realistic wet look on the oyster meat, apply a layer of clear acrylic gloss medium over just that area after the paint dries completely.
Step 3: The Pearls and Details
-
Main Pearl Volume:
Paint the large center pearl with a base of pure White. While wet, blend a tiny amount of pale grey (White + dot of Payne’s Grey) onto the creamy bottom curve to create roundness and shadow. -
Pearl Luster:
Add a crisp, pure white dot near the top of the pearl for the specular highlight. This simulate the reflection of light. -
The Pink Pearl:
Mix White with a whisper of Alizarin Crimson and Yellow Ochre for a peachy tone. Paint the small sphere below the shell. Add a darker peach shadow on the bottom right and a bright white highlight on the top left. -
The Green Pearl:
Mix White with Sap Green and a touch of Yellow Ochre. Paint the second small sphere, using the same shading technique: darker green shadow on the bottom, bright highlight on top. -
Cast Shadows:
Mix a transparent grey wash. glaze a soft shadow directly underneath the oyster shell and under each of the three pearls. This anchors them to the parchment paper so they don’t look like they are floating. -
Weathered Wood Texture:
If you are including the table surface at the edges, paint irregular patches of grey-blue scumbled over a beige base to simulate chipped, vintage painted wood.
Troubleshooting: Muddy Colors?
If your shadows look muddy, you’re likely over-mixing wet paint on the paper. Let layers dry fully before glazing darker shadow tones over them.
Now you have a stunning, pearlescent study that captures the elegance of the sea
Bold Floral Oyster Shell Interiors
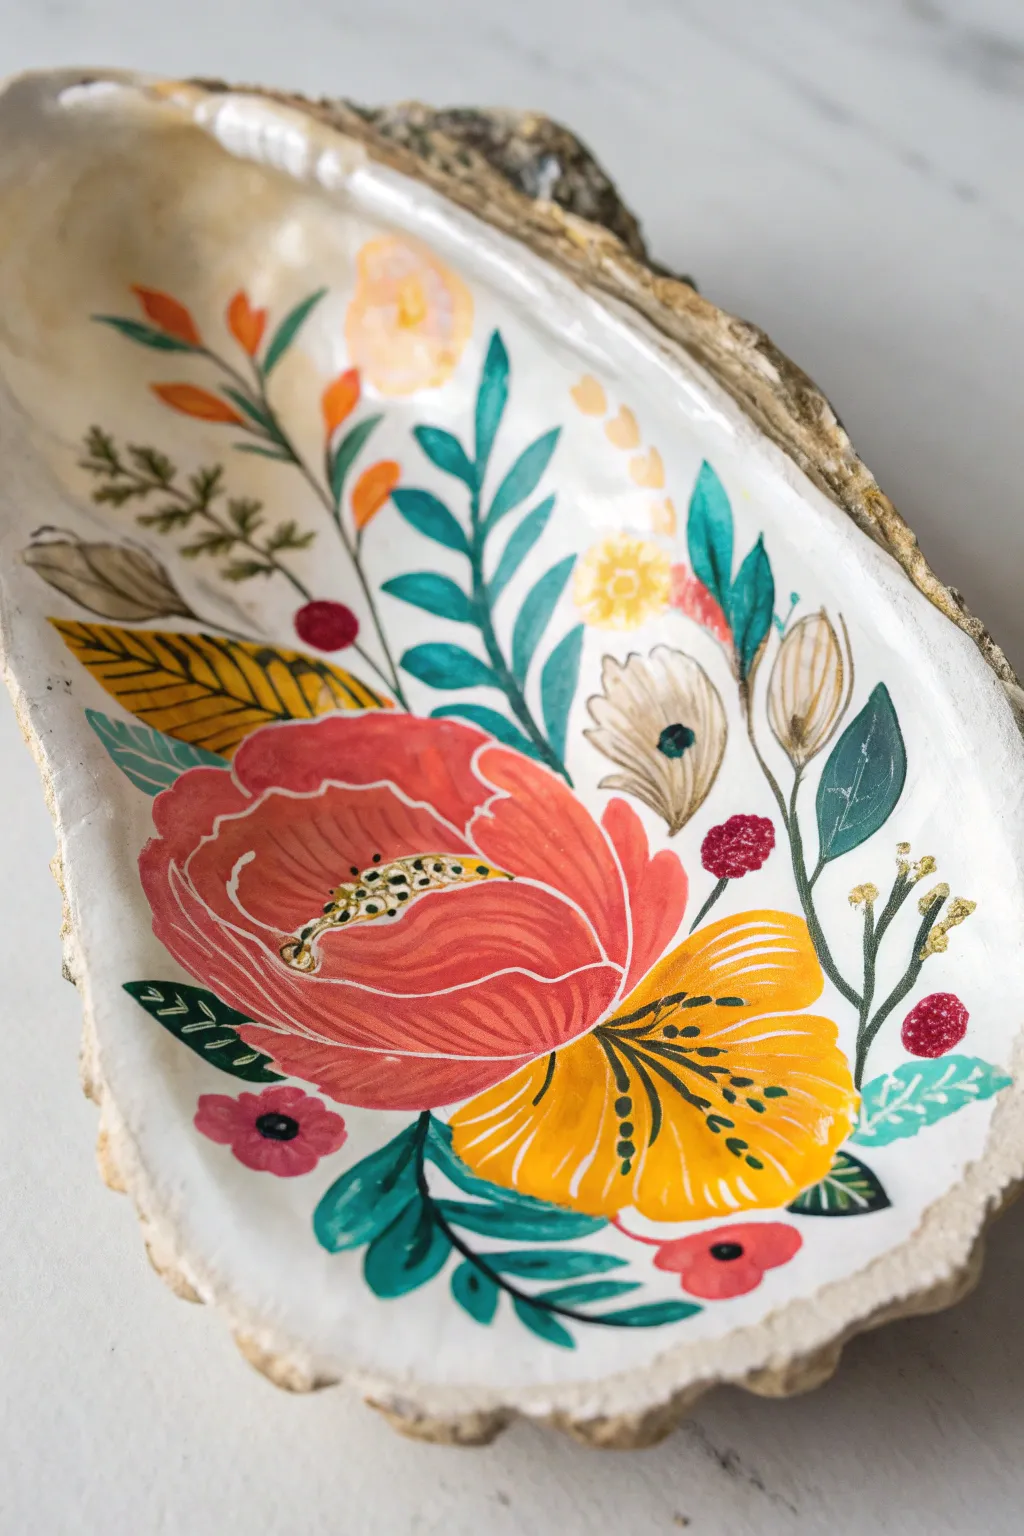
Transform a humble oyster shell into a striking piece of decor with this vibrant botanical design. Featuring bold coral blooms, mustard yellow accents, and teal foliage against a crisp white background, this project captures the charm of modern folk art.
Step-by-Step Tutorial
Materials
- Large, clean oyster shell (at least 4-5 inches)
- White acrylic paint or gesso
- Acrylic paints: Coral red, mustard yellow, deep teal, forest green, light pink, white, and metallic gold
- Detail brushes (sizes 00, 0, and 1)
- Flat shader brush (size 4 or 6)
- Gloss varnish or decoupage medium (optional)
- Small cup of water
- Paper towels
- Palette
Step 1: Preparation & Base Coat
-
Clean and dry:
Before you begin, ensure your oyster shell has been thoroughly scrubbed with soap and water to remove any grit or salt. Let it dry completely in the sun or overnight so the surface creates a strong bond with the paint. -
Prime the surface:
Using your flat shader brush, apply a generous coat of white acrylic paint or gesso to the inside bowl of the shell. You want a solid, opaque background, so let the first coat dry and apply a second coat if the shell’s natural coloration peeks through. -
Define the painting area:
Cleanly feather the white paint toward the edges but stop just before the rough rim. Leaving the natural textured edge unpainted creates a beautiful contrast that frames your artwork effortlessly.
Brush Control Pro-Tip
Add a drop of water to your acrylics for the fine line work. Ink-consistency paint flows much smoother from a liner brush than thick paint, giving you crisp, confident stems.
Step 2: Blocking in Blooms
-
Paint the main coral flower:
Start with the focal point: paint a large coral-red, uneven circle slightly off-center in the lower left quadrant. Don’t worry about petals yet; just paint a solid color shape that mimics the silhouette of a wide, open bloom. -
Add the secondary yellow flower:
To the right of the coral bloom, paint a mustard yellow shape. This one should look like a flattened semi-circle or fan shape, tucked partially behind or beside the red flower. -
Place filler flowers:
Using a smaller brush, dab a small pale pink circle in the bottom left corner and a few tiny red berry-like dots scattered on the right side. Include a pale beige tulip-like bud shape pointing upwards on the right. -
Create the upper buds:
Near the top of the shell, add smaller floral elements. Paint a small peach-colored circle and a few tiny yellow dots that will become smaller blossoms later.
Step 3: Foliage & Stems
-
Connect the composition:
Switch to your size 0 liner brush and deep teal paint. Draw thin, flowing stems connecting your floral shapes. Allow the lines to curve naturally, following the concave shape of the shell. -
Paint the main leaves:
Using the same teal color, add leaves extending from the center. Paint long, slender leaves reaching toward the top of the shell, pressing down on the brush to widen the leaf belly and lifting up for a sharp point. -
Add variation:
Mix a darker forest green or olive shade. Paint a few distinct leaves, like the large serrated leaf shape on the left side and some smaller leaves near the bottom right to create depth and variety in the greenery. -
Add the fern details:
With the very tip of your smallest brush and dark green paint, add a delicate fern-like sprig near the upper left, using tiny, quick hatching strokes.
Level Up: Functional Dish
To make this a usable jewelry dish, use a food-safe resin instead of standard varnish. It creates a thick, glass-like layer that is much more durable against scratching from rings or keys.
Step 4: Details & Highlights
-
Detail the coral flower:
Once the red base is dry, use a thin brush with white paint to outline the individual petals. Add curved lines inside the bloom to suggest cupping petals. In the center, paint a small dark oval, then dot it with white and gold to create stamen texture. -
Detail the yellow flower:
Paint fine white lines radiating from the base of the yellow flower to define its petals. Add a cluster of black or dark green stamens bursting from the center for contrast. -
Refine the leaves:
I prefer to go back into the teal leaves with a lighter mint green or white to add a central vein line. This simple step instantly makes the foliage look more illustrative and finished. -
Final decorative touches:
Look for empty spaces and fill them with tiny whimsical details. Add small gold dots on the ends of stems, or paint subtle veins on the beige bud. These tiny marks bring the ‘folk art’ style to life. -
Gild the rim:
Take your metallic gold paint and carefully brush it along the rough, natural edge of the shell. Let it be purely organic, catching the high points of the shell’s texture. -
Seal the artwork:
Allow the paint to cure for at least 24 hours. Finish by applying a high-gloss varnish over the painted area to protect it and give it a porcelain-like shine.
This charming painted shell is now ready to hold your trinkets or simply be admired on a shelf


Decoupage Oyster Shell Pattern Play
Transform a humble oyster shell into a striking piece of decor by using the natural texture of the shell against a backdrop of bold pattern. While this look appears to be a raw oyster, the decoupage technique allows you to preserve that fresh-from-the-ocean aesthetic permanently using paper and gloss mediums.
Detailed Instructions
Materials
- Large, clean oyster shell (sanitized and dried)
- Patterned napkin or tissue paper (floral or geometric)
- Mod Podge (Gloss finish)
- White acrylic paint
- High-gloss varnish or clear resin
- Soft flat brush
- Small detail brush
- Raw Umber acrylic paint
- Cream or Titanium Buff acrylic paint
- Grey acrylic paint
- Scissors
Step 1: Preparing the Base
-
Clean and Prime:
Begin by scrubbing your oyster shell thoroughly with soap and water to remove any debris or salt. Once bone dry, paint the entire interior of the shell with a coat of white acrylic paint. This creates a bright, neutral base that will make your subsequent layers pop. -
Background Application:
Select your patterned paper. If using a napkin, separate the plies so you are left with only the single, top printed layer. Cut a piece slightly larger than the shell. -
Adhering the Pattern:
Apply a thin layer of Mod Podge to the back (exterior) or the very outer rim of the shell if you want the pattern to frame the ‘meat’ inside. Gently press the paper onto the surface, smoothing out wrinkles with your finger or a soft brush.
Pro Tip: Paper Edges
Tear the edges of your decoupage paper instead of cutting them with scissors. The feathery, torn edge blends significantly better into the shell surface.
Step 2: Painting the Oyster Meat
-
Base Color:
Inside the shell cup, where the oyster meat would sit, paint a base shape using a mix of Cream and a tiny drop of Grey. It should look organic and slightly irregular, not a perfect circle. -
Adding Depth:
While the base is still slightly tacky, mix a darker watery wash using Raw Umber. Apply this to the edges of your cream shape to create the ‘gills’ or ruffled edges of the oyster. -
Creating the Muscle:
Paint the central muscle scar—the ‘heart’ of the oyster—using a solid dab of Cream or Titanium Buff near the center of the meat shape. -
Wet-on-Wet Blending:
Soften the transition between the dark brown edges and the creamy center using a damp brush. You want a murky, natural gradient rather than harsh lines.
Troubleshooting: Cloudy Finish
If your resin or varnish looks cloudy, it may be due to humidity or mixing bubbles. Use a heat gun or straw to gently pop bubbles immediately after pouring.
Step 3: Detailing and Texture
-
Highlighting:
Add tiny touches of pure White paint to the highest points of the ‘meat’ to simulate wetness and light reflection. -
Rim Definition:
Use a detail brush and the Raw Umber paint to darken the very rim of the shell where the paper meets the painted interior, adding contrast and framing the artwork. -
Drying Time:
Allow all paint layers to dry completely. This step is crucial before adding the final finish to prevent smearing your work.
Step 4: The High-Gloss Finish
-
Resin Preparation:
Mix a small amount of clear resin or use a dedicated high-gloss varnish. The goal is to mimic the natural slime and moisture of a fresh oyster. -
Pouring the Glaze:
Carefully pour or brush the gloss medium into the well of the shell, covering the painted ‘meat’ entirely. I usually like to let it pool slightly in the dip of the shell for realism. -
Final Cure:
Let the shell sit undisturbed on a level surface until the finish is hard and glass-like, creating that perpetually wet look. -
Back Finishing:
If you decoupaged the exterior, seal the back with a final coat of Mod Podge to protect the paper.
Now you have a stunning faux-specimen that brings a touch of coastal elegance to any table setting
Abstract Color Swirl Oyster Shell Painting
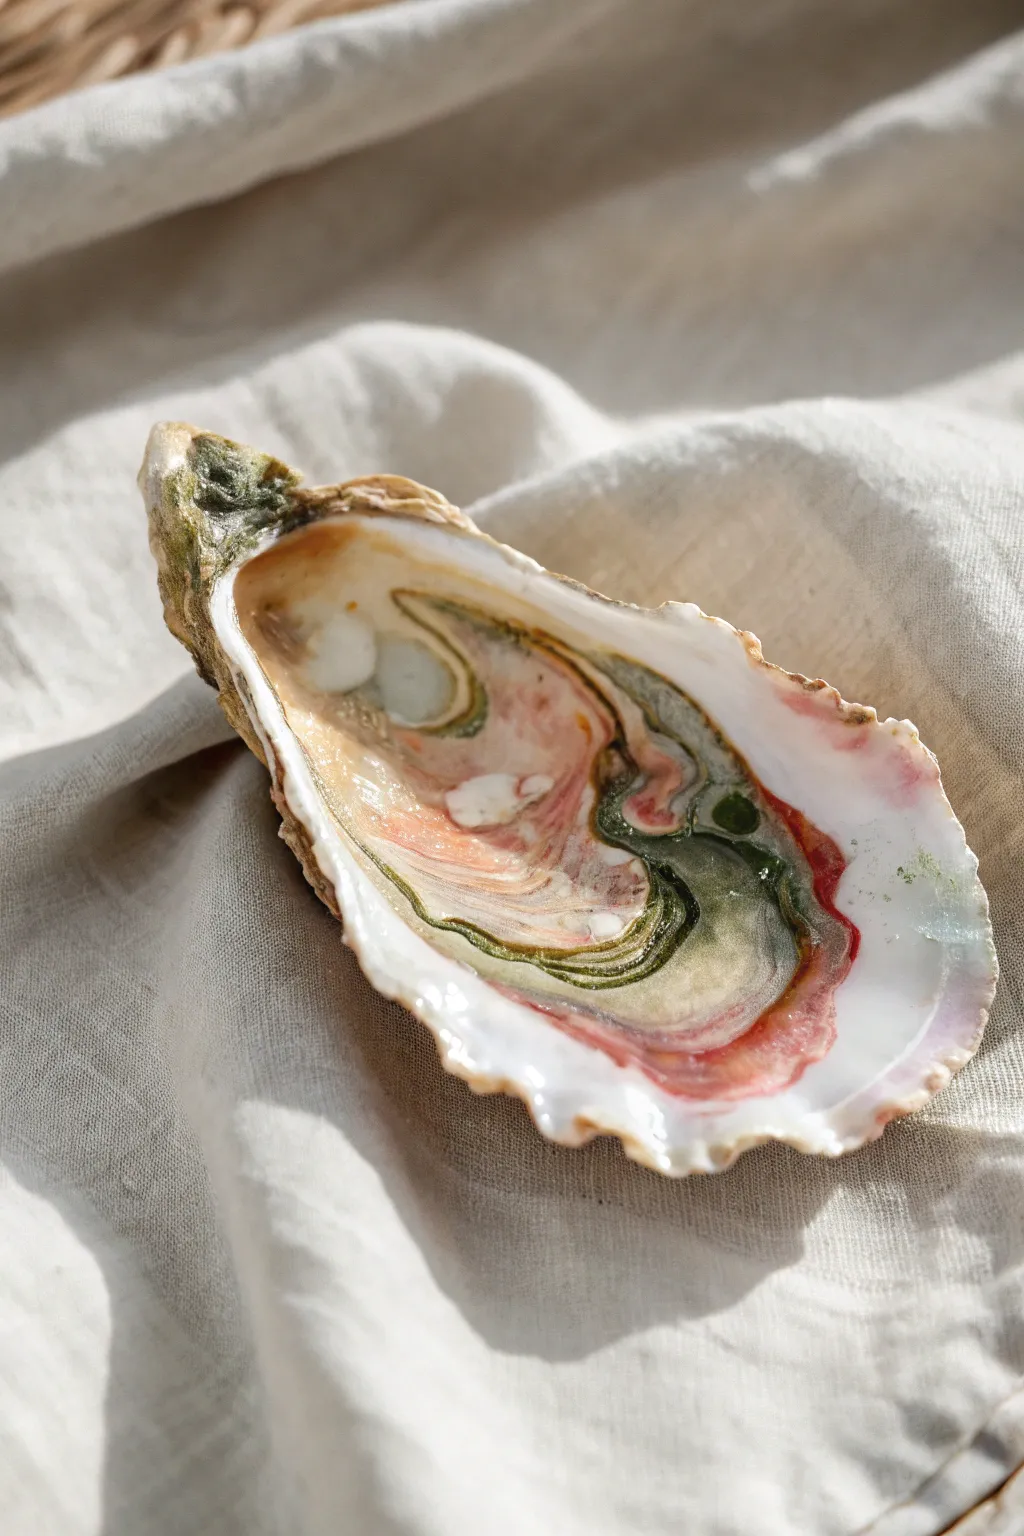
Transform a humble oyster shell into a striking piece of decor by mimicking the fluid beauty of a coastal tide pool. This project uses swirling techniques to blend creams, muted reds, and mossy greens directly inside the shell’s natural pearl interior.
Step-by-Step Guide
Materials
- Clean, dry oyster shell (large size preferred)
- Acrylic paints: Cream, Titanium White, Muted Dusty Rose/Pink, Deep Moss Green, Olive Green
- Pouring medium or Flow Improver
- Small cups or palette wells for mixing
- Fine detail paintbrush (size 0 or 1)
- Toothpick or sewing needle
- High-gloss varnish or resin
- Water cup and paper towels
Step 1: Preparation and Base Layer
-
Clean the Canvas:
Ensure your oyster shell is thoroughly scrubbed and completely dry. Any residual salt or sand will prevent the paint from adhering properly to the nacre. -
Mix the Medium:
Mix a small amount of each acrylic paint color with pouring medium in separate wells. You want a consistency similar to warm honey—fluid enough to flow but thick enough to hold distinct bands of color. -
Prime the Interior:
Apply a very thin, wet coat of the Titanium White mixed with pouring medium over the entire inner cup of the shell to help the subsequent colors glide.
Natural Texture
Don’t over-mix! Stop swirling the toothpick while you still see distinct separation between the pink, cream, and green for the best marble look.
Step 2: Creating the Swirls
-
Map the Design:
Visualize the oval shape inside the shell. We will be working in concentric, uneven rings, mimicking the natural growth lines of an oyster. -
Apply the Cream Tone:
Using your brush or by carefully pouring from a small cup, lay down a curved band of the Cream mixture along one side of the shell’s deep cup. -
Introduce the Red:
Directly next to the cream, add a streak of the Muted Dusty Rose. Don’t worry about perfect lines; natural waviness is desired. -
Add Depth with Green:
Drop small pools of Deep Moss Green into the center and along the edges of the pink section. This provides that deep, oceanic contrast. -
Swirl the Colors:
Take your toothpick or a clean needle and gently drag it through the wet paint boundaries. Move in slow, s-shaped curves to marble the colors without muddying them into a single brown hue. -
Detailed Veining:
Dip just the tip of your fine detail brush into the Olive Green. Carefully paint thin, wiggly lines following the contours of your marble effect to emulate algae veins. -
Adding the ‘Pearl’:
Place two small dots of white paint near the top (hinge) end of the painted area to represent the muscle scar often seen in shells. -
Softening Edges:
If any lines look too harsh, I like to gently tilt the shell back and forth to let gravity soften the transitions slightly before the paint sets.
Step 3: Refining and Sealing
-
Define the Rim:
While the center dries, use a dry brush with a tiny amount of white paint to highlight the rough, jagged outer rim of the shell, enhancing its texture. -
Darken the Hinge:
Paint the very tip of the shell hinge with a wash of Deep Moss Green mixed with a drop of water to make it look aged and authentic. -
Drying Time:
Allow the paint to dry completely. Because we used pouring medium, this might take 24 hours depending on humidity. Do not touch the center. -
First Varnish Coat:
Apply a coat of high-gloss varnish over the painted area. This mimics the natural wet look of a fresh oyster. -
Final Gloss Layer:
For a glass-like finish, apply a second thick coat of varnish or a thin layer of resin once the first coat is tacky.
Gilded Edges
Once dry, paint the very rim of the shell with liquid gold leaf or metallic gold paint to turn this into a chic jewelry dish.
Now you have a stunning piece of coastal art that captures the essence of the ocean in the palm of your hand
Monochrome Ink Wash Oyster Cluster

This elegant tutorial captures the raw, organic beauty of oysters using a sophisticated monochrome palette. By focusing on values rather than vibrant colors, you’ll create a striking, minimalist cluster that feels both modern and timeless.
Detailed Instructions
Materials
- Cold press watercolor paper (300 gsm)
- Black India ink or concentrated black watercolor
- Sepia or Burnt Umber watercolor (for subtle warmth)
- Round brushes (Size 2, 4, and 8)
- Pencil (HB or 2H)
- Kneaded eraser
- Paper towels
- Palette for mixing washes
- Clean water jar
- Square white frame with mount
Step 1: Sketching the Composition
-
Analyze the shapes:
Begin by observing the general shapes of the four oysters. They aren’t perfect circles; they are irregular tear-drop or oval shapes with wavy edges. Notice how they are clustered, almost touching in the center. -
Light pencil outline:
Using your HB pencil, lightly sketch the outer contours of the four shells. Keep your wrist loose to mimic the organic, rugged edges of an oyster shell. Don’t worry about perfect symmetry. -
Define the inner wells:
Draw the inner rim of the shell where the oyster meat sits. This creates a distinct ‘cup’ shape within each outline. Leave a gap between the outer edge and this inner rim to represent the thick shell wall. -
Refine the details:
Sketch the muscle scar (the small circular indentation inside the shell) and the wavy ridges on the exterior part of the shell. Use your kneaded eraser to lighten these lines until they act just as faint guides.
Muddy Washes?
If your grays look dull or muddy, you may be reworking the paper while it’s damp. Wait for layers to dry fully, or restart with fresh water.
Step 2: Layering the Washes
-
Mix your base grays:
On your palette, create three puddles of diluted black ink or watercolor: a very pale tea-wash gray, a medium gray, and a dark, near-black tone. Add a tiny dot of Sepia to the medium gray for warmth. -
First wet-on-wet layer:
Wet the interior of one oyster shape with clean water using your size 8 brush. Drop in the palest gray wash, allowing it to bloom naturally. Keep the paper white in the very center for the highlight. -
Building the exterior rim:
While the center is drying, paint the outer shell ridges. Use the size 4 brush and the medium gray mix. Paint short, curved strokes that follow the contour of the shell, leaving thin slivers of white paper between strokes to show texture. -
Repeat for all shells:
Work your way around the cluster, repeating this base layer process for all four oysters. I like to rotate the paper as I work to keep my hand from smudging wet areas. -
Let it dry complete:
It is crucial to let this initial layer bone-dry before moving on. If the paper is cool to the touch, it’s still wet.
Step 3: Defining Contrast and Detail
-
Deepening the ‘cup’:
Switch to your size 4 brush and the dark gray mix. Paint the shadowed side of the inner cup. The deepest blacks should be tucked under the rim where the shell curves downward. -
Adding the muscle scar:
Paint the muscle scar shape inside the shell. Usually, this has a dark outline and a slightly lighter center. Soften one edge of this mark with a damp brush so it blends into the shell’s pearlescent interior. -
Darkening external ridges:
Using the darkest black ink and a size 2 brush, add distinct, jagged lines to the outer shell edges. Emphasis the ‘frilly’ texture where the layers of shell have built up over time. -
Creating the shine:
The contrast is what makes the oyster look wet. Ensure you have very dark darks right next to your preserved white highlights. If you lost your highlights, you can use a tiny bit of white gouache later, but preserving paper white is best. -
Connecting the cluster:
Add a very faint, watery shadow beneath the shells where they touch the ‘ground.’ This grounds the composition so the oysters don’t look like they are floating in space.
Level Up: Pearl Effect
Mix a tiny amount of iridescent medium or pearl watercolor into your final light gray wash for a subtle shimmer in the shell’s interior.
Step 4: Finishing and Framing
-
Final ink touches:
Using almost undiluted ink and your finest brush, add tiny specks and scratches to the rough exterior parts of the shell to mimic sediment and texture. -
Evaluate the values:
Step back and look at the whole piece. Do the centers look deep? Does the rim look rough? Add final dark glazing layers if the image looks too washed out. -
Sign and dry:
Sign your name small and discreetly near the bottom right. Allow the painting to dry for at least an hour to ensure the paper lies flat. -
Positioning in the mount:
Place your painting behind the mount (mat board). Center the cluster so there is ample white space breathing room on all sides. -
Framing:
Clean the glass of your square frame, insert the mounted artwork, and secure the back. The stark white frame enhances the high-contrast, modern look of the ink wash.
Hang your finished monochrome study in a well-lit spot to admire the subtle textures and dramatic contrast.
Textured Palette-Knife Oyster on Canvas
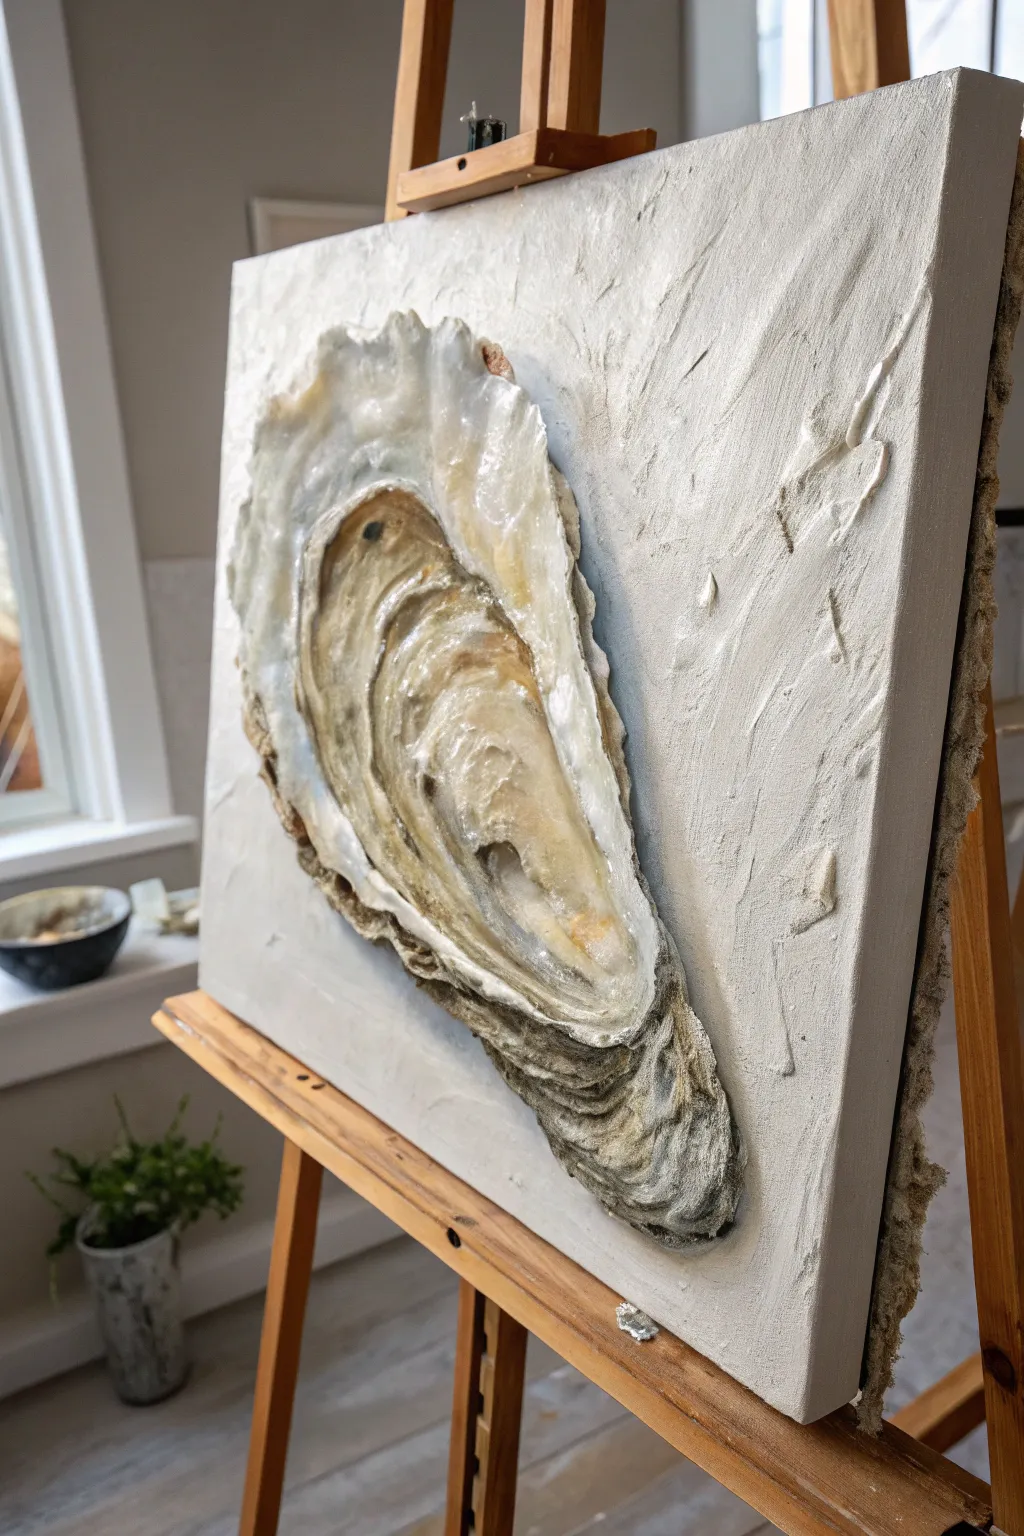
Capture the raw beauty of the ocean with this high-relief oyster art that bridges the gap between painting and sculpture. Using heavy texture paste and subtle glazing, you’ll create a striking, three-dimensional centerpiece that looks like it was plucked straight from the sand.
How-To Guide
Materials
- Stretched canvas (vertical orientation)
- Heavy modeling paste or texture gel
- Gesso (white)
- Palette knives (variety of sizes, including a large trowel shape and a small pointed one)
- Acrylic paints (Titanium White, Raw Umber, Yellow Ochre, Paynes Grey, Burnt Sienna)
- High-gloss varnish or pouring medium
- Pencil for sketching
- Small synthetic brushes for detail
- Mixing palette
- Paper towels
Step 1: Prepping the Foundation
-
Prime the Surface:
Start by applying a fresh coat of white gesso to your canvas to ensure a smooth, uniform surface. Let this dry completely before moving on. -
Texture the Background:
Using a wide palette knife, spread a thin, uneven layer of modeling paste across the entire background. create vertical, sweeping motions to mimic the movement of sand or water, keeping the center relatively flat where the oyster will sit. -
Outline the Shape:
Once the background is dry to the touch, lightly sketch a large, organic tear-drop shape in the center of the canvas using a pencil. Oysters are naturally irregular, so don’t worry about perfect symmetry.
Sculpting Secret
Mix a little coarse sand or pumice gel into your modeling paste for the bottom “hinge” of the oyster. This creates a gritty, realistic texture distinct from the smooth interior.
Step 2: Building the Relief
-
Build the Base Layer:
Load a large palette knife with a generous amount of heavy modeling paste. Apply this thick blob into the center of your sketched outline to form the main body of the oyster shell. -
Sculpt the Outer Rim:
Add more paste along the pencil outline to create the shell’s edge. Use the edge of your knife to pull the paste outward slightly, creating the ruffled, jagged texture characteristic of oyster shells. -
Carve the Interior:
While the paste is still wet, use a smaller knife or a spoon to press into the center, carving out the concave ‘cup’ of the shell. Leave the edges high and thick to emphasize depth. -
Refine the Ridges:
Use a small, pointed palette knife to score lines and ridges into the wet paste, following the curve of the shell from the hinge at the bottom to the fluted top edge. -
Dry Completely:
This is the most critical step. Because the paste is thick, you must let the canvas dry for at least 24-48 hours. The sculpture must be rock hard before painting.
Add a Pearl
For a luxe touch, press a faux pearl bead or a ball of metallic gold leaf into the wet gloss medium inside the shell before it sets to create a hidden treasure.
Step 3: Painting and Glazing
-
Base Coat:
Paint the entire sculpted shell with Titanium White mixed with a tiny drop of Yellow Ochre. This warms up the base so it isn’t stark white. -
Deepen the Shadows:
Mix a wash of Raw Umber and water. With a small brush, run this fluid paint into the deepest crevices and the ‘hinge’ area at the bottom of the shell. The water will help the pigment settle naturally into the textures. -
Add Ocean Tones:
Create a soft grey using White and a speck of Paynes Grey. I like to lightly dry-brush this color on the outer left edge of the shell to give it that weathered, external shell appearance. -
Highlight the Interior:
Mix Burnt Sienna with White to create a soft pearl tone. Apply this to the smooth inner cup of the oyster, blending it gently into the darker shadow areas. -
Accentuate the Ruffles:
Using pure Titanium White on a dry brush, hit the very tops of the ridges and the ruffled outer edges. This highlights the texture you sculpted earlier. -
Refine the Background:
Paint the textured background with a mix of White and a tiny touch of Raw Umber (an off-white stone color). Use a dry brush technique so the paint catches the texture of the background paste without filling it in.
Step 4: Finishing Touches
-
The Wet Look:
Once the acrylic paint is fully dry, mix a high-gloss varnish or pouring medium. Carefully apply a thick coat only to the *inside* of the oyster shell. -
Create the Pearl:
While the gloss medium is wet, add a tiny extra drop of white paint or pearl medium into the deepest part of the cup and swirl it slightly to mimic the nacreous shine. -
Final Inspection:
Check the contrast between the shiny interior and the matte, rough exterior. If needed, dab a little matte varnish on the outer ruffled edges to enhance this contrast.
Your textured masterpiece is now ready to bring a touch of coastal calm to your walls
Oyster Diptych With Matching Wash Backgrounds
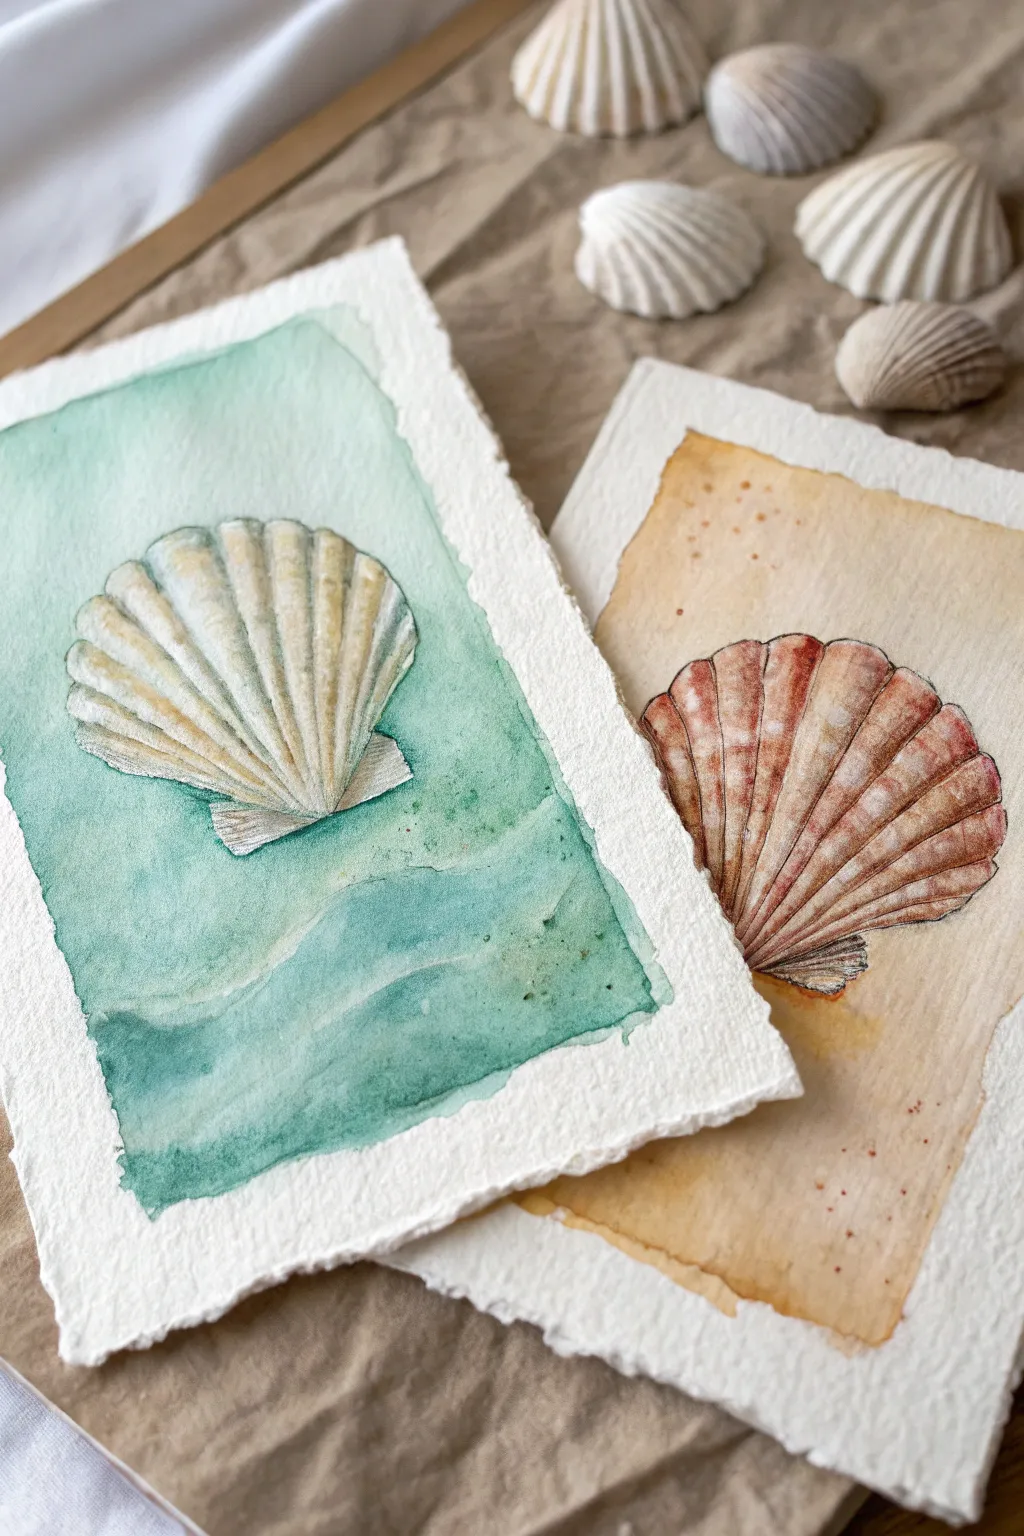
Capture the delicate beauty of the shore with this pair of watercolor shell studies on textured paper. Featuring soft teal and sand-colored washes, these paintings balance loose, organic backgrounds with detailed, realistic shell illustrations.
Step-by-Step
Materials
- Hot press watercolor paper (deckle edge heavily preferred)
- Watercolor paints (Teal/Seafoam Green, Yellow Ochre, Burnt Sienna, Sepia)
- Pencil (HB or 2H)
- Fine liner pen (brown or sepia, waterproof)
- Round brushes (size 4 and 8)
- Clean water and paper towels
- Masking tape (optional)
Step 1: Preparation & Sketching
-
Prepare the paper:
If you are using a large sheet, tear it down to size using a ruler to create a soft, torn edge rather than a sharp cut. If you have pre-cut deckle edge paper, simply tape it down gently to your work surface to prevent buckling. -
Outline the shell shape:
Lightly sketch a fan shape in the center of your first page. It doesn’t need to be perfectly symmetrical; nature is rarely perfect. Imagine an upside-down teardrop that flares out wide at the top. -
Draw the ribs:
Starting from the bottom hinge point (the umbo), draw radiating lines outward to the top edge of the fan. These lines represent the ribs of the scallop shell. -
Add dimension:
Review your sketch and add slight curves to the top edge of the shell where each rib ends, creating that classic scalloped silhouette. Repeat the sketching process for the second paper, angling the shell slightly differently for variety.
Fixing Water Blooms
If your background dries with unwanted hard edges (cauliflowers), gently scrub the edge with a damp stiff brush to soften it, or embrace the texture as ‘sea foam’.
Step 2: Painting the Teal Background
-
Mix the seafoam wash:
Dilute a teal or seafoam green watercolor paint with plenty of water. You want a translucent, airy color, not an opaque block of paint. -
Apply the uneven border:
Using your larger size 8 brush, paint a rectangular background behind the shell sketch. Intentionally leave the edges rough and uneven, stopping about an inch inside the paper’s actual edge. -
Create water textures:
While the wash is still wet, drop in slightly more concentrated pigment at the bottom or near the shell to create a ‘bloom’ effect that mimics underwater currents. Let this dry completely before touching the shell area.
Add Metallic Shimmer
Once fully dry, glaze a very thin layer of iridescent medium or pearlescent watercolor over just the high points of the shell ribs for a realistic nacre shine.
Step 3: Painting the Sandy Background
-
Mix the sand wash:
For the second painting, mix Yellow Ochre with a tiny touch of Burnt Sienna and lots of water to create a warm, sandy beige. -
Paint the warm wash:
Apply this wash around the second shell sketch just like the first, keeping those edges loose and organic. It should look like a vintage parchment stain. -
Splatter texture:
Load your brush with a slightly darker brown mixture and gently tap the handle against your finger to splatter tiny speckles over the wet background. This mimics sand grains. Allow to dry fully.
Step 4: Detailing the Shells
-
Base layer for shells:
On the teal painting, paint the shell with a very faint, watery wash of yellow ochre or cream. On the sandy painting, use a light reddish-brown wash. -
Shading the ribs:
Once the base is dry, use your smaller size 4 brush to paint stripes of darker color between the ribs. Use a damp brush to soften one side of these stripes to make the ribs look rounded and 3D. -
Deepen the contrast:
Mix a darker sepia or brown. Carefully paint thin shadow lines deep in the grooves of the shell and right at the bottom hinge area. -
Ink outlining:
For the crisp look seen in the photo, use a waterproof sepia or brown fine liner pen. Trace over your original pencil lines, but keep the lines broken and sketchy rather than solid. -
Cross-hatching details:
Add tiny hatching lines with the pen near the bottom hinge and along the shadowed sides of the ribs to enhance the texture. -
Final highlights:
If you lost your highlights, you can use a tiny distinct amount of white gouache or a white gel pen on the highest points of the ribs to make them pop.
Display these framed together or propped on a shelf for an instant coastal update to your room
Tiny Seascape Inside an Oyster Shell
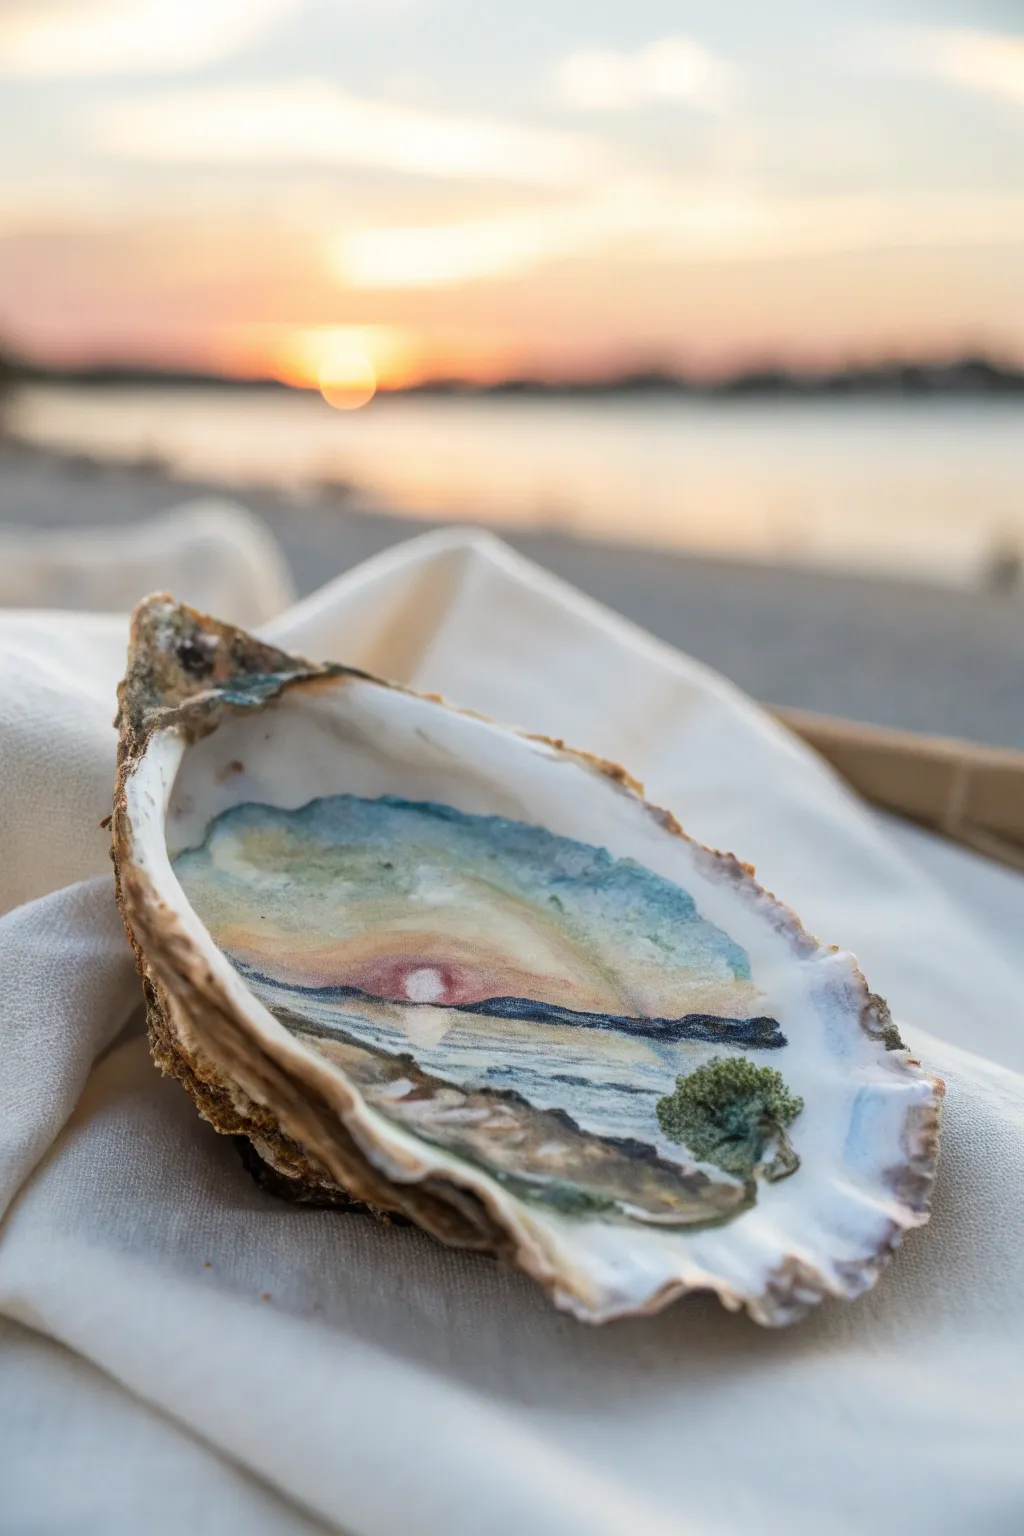
Capture the magic of golden hour by creating a miniature world inside a discarded oyster shell. This delicate painting project uses the shell’s natural curve and pearlescence to enhance a soft, dreamy watercolor-style sunset.
Detailed Instructions
Materials
- Large, clean oyster shell (flatter shells are easier)
- Acrylic paints (White, Phthalo Blue, Yellow Ochre, Burnt Sienna, Alizarin Crimson, Sap Green)
- Pencil for sketching
- Gesso or white acrylic primer
- Small round paintbrushes (sizes 0, 00, and 2)
- Water cup and paper towels
- Clear acrylic sealer or varnish (glossy)
Step 1: Preparation & Base
-
Clean the canvas:
Begin by scrubbing your oyster shell thoroughly with soap and water to remove any debris or salt. Let it dry completely in the sun. -
Observe the shape:
Hold the shell and look at its natural cup. Identify the smoothest area inside, which will serve as your primary painting surface. -
Prime the surface:
Apply a thin layer of white gesso or white acrylic paint to the inside area where you intend to paint. This gives the colors something to grip onto, as the natural shell can be too slick. -
Feather the edges:
While the primer is wet, feather the edges outward so the white fades gently into the natural pearl of the shell rather than leaving a hard line.
Natural Border Trick
Don’t paint all the way to the shell’s edge. Leaving a rim of raw, pearlescent shell creates a natural frame that makes the artwork pop.
Step 2: Sky & Horizon
-
Mix the sky colors:
Prepare a pale blue wash by mixing a tiny dot of Phthalo Blue with plenty of white and a touch of water. You want it translucent. -
Paint the upper sky:
Sweep this pale blue across the top third of your primed area, following the curve of the shell. -
Add the sunset glow:
Mix a soft peach color using White, Yellow Ochre, and a speck of Alizarin Crimson. Blend this directly below the blue while the paint is still damp to create a gradient. -
Define the sun:
Using pure white paint on your smallest brush, dab a small circle right at the horizon line where the peach color is strongest. This anchors your light source. -
Paint the distant hills:
Mix Phthalo Blue with a little Burnt Sienna to create a muted, dark slate blue. Paint a thin, uneven organic line across the horizon, overlapping the sun slightly to push it into the distance.
Paint Stripping?
If paint peels off the slick shell surface, your primer layer wasn’t dry enough. Let the base layer cure for at least an hour before painting details.
Step 3: Water & Foreground
-
Reflect the sky:
Mirror your sky colors in the water section. Start with a wash of the peach tone under the horizon line. -
Add water texture:
Use horizontal strokes of very pale blue and white to suggest ripples on the reflected water. Keep these strokes loose. -
Create the shoreline:
Mix Burnt Sienna, Yellow Ochre, and White to make a sandy beige. Paint the foreground area, curving it upward on the right side to create a sense of perspective. -
Add rocky details:
I like to use a nearly dry brush with dark brown paint to stipple texture onto the sand, suggesting small rocks or debris on the beach. -
Paint the vegetation:
Mix Sap Green with a little Yellow Ochre. Using a stippling motion (tapping the brush tip), create a small cluster of bushes or moss on the right side of the foreground. -
Highlights on greenery:
Add tiny dots of lighter green/yellow to the tops of your mossy bush to show where the sunset light hits it. -
Final blending:
Use a damp, clean brush to soften any edges that look too harsh, especially where the water meets the sand.
Step 4: Finishing Touches
-
Dry completely:
Let the paint dry fully. Acrylics on a non-porous surface like this might take a little longer than on paper. -
Seal the artwork:
Apply a coat of clear gloss varnish over the painted area. This protects the paint from chipping and mimics the wet look of the ocean. -
Clean the rim:
If you got any stray paint on the rough outer rim of the oyster, carefully scrape it off with a fingernail or damp cloth for a clean finish.
Place your finished shell on a small stand or fill a bowl with sand to display your miniature coastal escape
Galaxy Oyster Shell With Metallic Specks
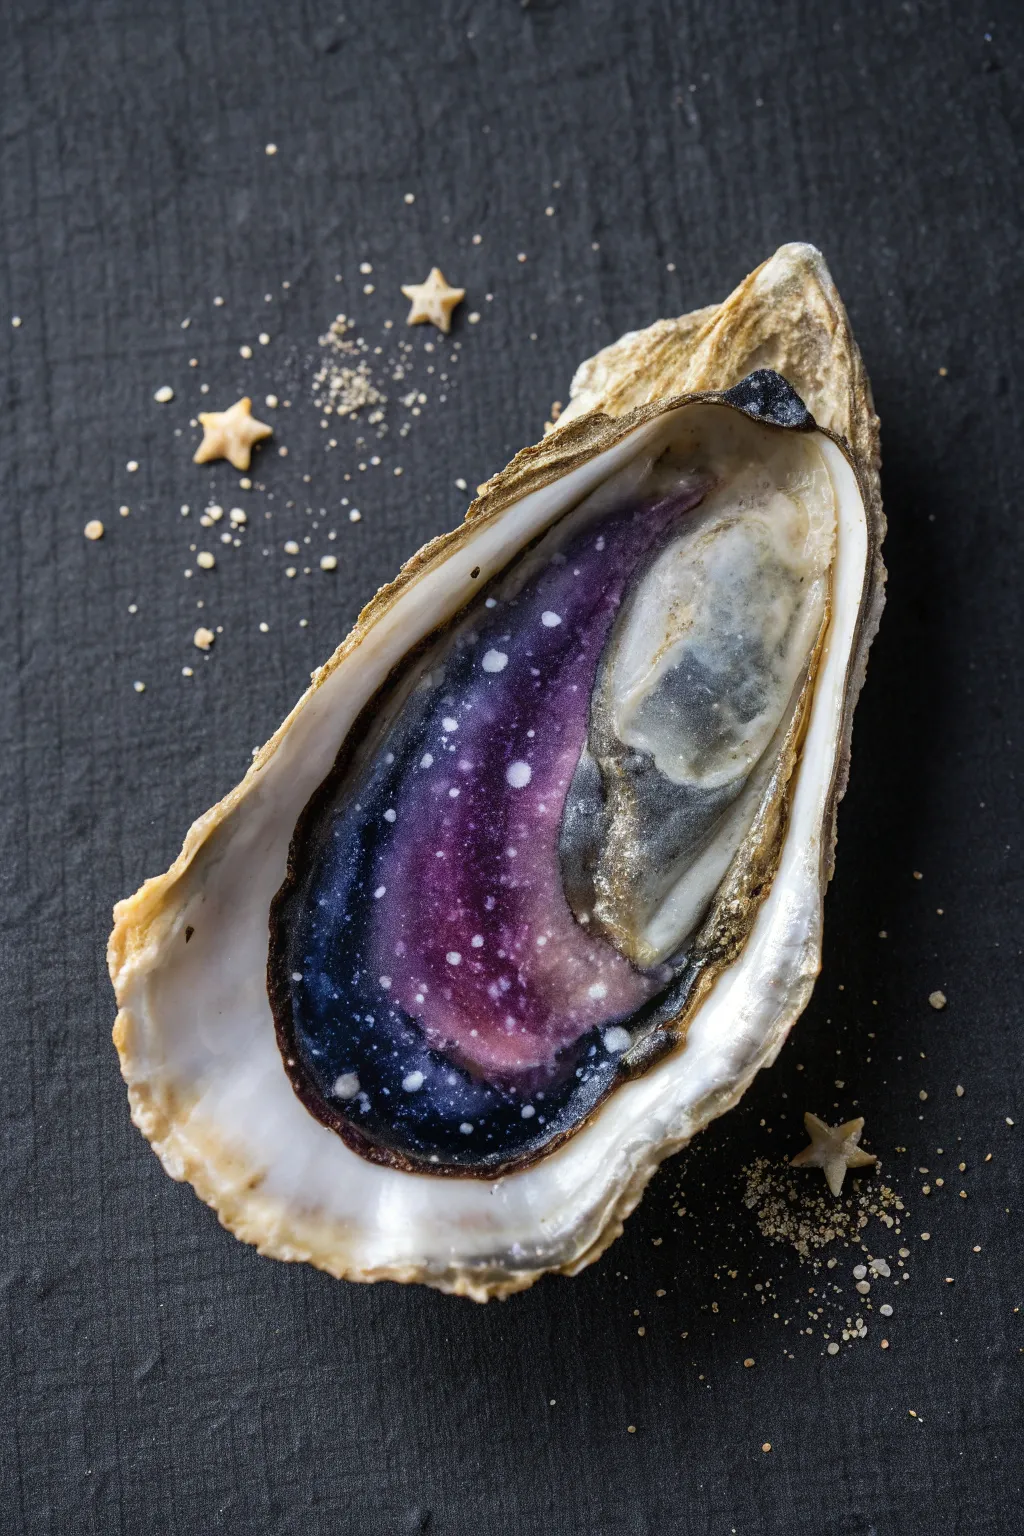
Transform a simple found shell into a window to deep space with this mesmerizing galaxy painting technique. The rich purples and shimmering stars create a stunning contrast against the rough, natural texture of the oyster shell.
Step-by-Step Guide
Materials
- Large, clean oyster shell (dried)
- Acrylic paints: Black, Deep Purple, Indigo, Magenta, Metallic Gold, Titanium White
- High-gloss varnish or resin
- Small flat shader brush
- Fine detail brush (0 or 00 size)
- Old toothbrush (optional)
- Small gold star confetti (for styling)
- Palette for mixing paint
- Cup of water and paper towels
Step 1: Preparation & Base Coat
-
Clean the canvas:
Begin by thoroughly scrubbing your oyster shell with warm soapy water to remove any ocean debris or sand. Let it dry completely, preferably in the sun for several hours, to ensure the surface is ready for paint. -
Prime the interior:
Using your flat brush, apply a thin layer of white acrylic paint to the smooth inner cup of the shell. This acts as a primer and helps the dark galaxy colors appear more vibrant later on. Let this dry fully.
Wet-on-Wet Blending
Work quickly while the acrylics are still damp to get that smoky nebula look. If the paint dries too fast, mist it lightly with water.
Step 2: Painting the Nebula
-
Lay the darkness:
Mix a small amount of black with deep indigo. Paint the outer edges of the shell’s deep cup, visualizing where the oyster meat would naturally sit. Keep this dark layer concentration on what would be the ‘bottom’ or deepest part of the nebula. -
Introduce the purple:
While the dark edge is still slightly tacky, load your brush with deep purple. Blend this inwards from the black edges, creating a gradient. Don’t cover the entire center; leave the middle area open. -
Add magenta highlights:
Mix a touch of magenta with the purple. Apply this to the center of your dark gradient, dabbing the paint on to create a cloud-like texture rather than smooth strokes. This creates the glowing heart of the nebula. -
Highlight the muscle scar:
Oysters have a distinct ‘scar’ where the muscle attaches. Leave this area mostly unpainted or lightly washed with a mix of white and a tiny dot of black to create a pearly gray. This anchors the realistic anatomy against the fantasy galaxy. -
Blend the transitions:
Use a clean, slightly damp brush to soften the edges between your black, purple, magenta, and the pearly muscle scar area. The goal is a seamless, smoky transition. -
Deepen the contrast:
Once the first layer dries, adding a second coat of pure black to the very deepest edges adds incredible depth. I find this extra step makes the colors pop significantly.
Step 3: Creating the Stars
-
Mix the star paint:
Water down a small amount of titanium white acrylic paint until it has the consistency of heavy cream or ink. -
Splatter texture:
Dip an old toothbrush or stiff bristle brush into the watered-down white. Use your thumb to flick the bristles over the shell, creating a spray of tiny white dots like distant stars. -
Add major stars:
Dip the handle end of your fine detail brush into pure white paint. Dot a few larger, deliberate stars into the darkest purple areas to create focal points. -
Gold accents:
Using metallic gold paint, carefully line the very edge where the ‘meat’ meets the shell wall. You can also add tiny gold specks near the muscle scar for extra shimmer.
Add a Pearl
Glue a small faux pearl or a bead of iridescent hot glue onto the ‘muscle scar’ area for a 3D treasure hidden in your galaxy.
Step 4: Finishing Touches
-
Gloss coat:
Once all paint is perfectly dry, apply a thick coat of high-gloss varnish or a thin layer of UV resin over the painted area. This mimics the wet, slimy look of a fresh oyster while protecting the artwork. -
Styling:
Create the final look by placing the finished shell on a dark surface and arranging gold star confetti around it to extend the celestial theme outward.
Now you have a captured piece of the cosmos resting in a shell, ready to display or gift
Kintsugi-Inspired Oyster Shell Cracks and Gold Lines
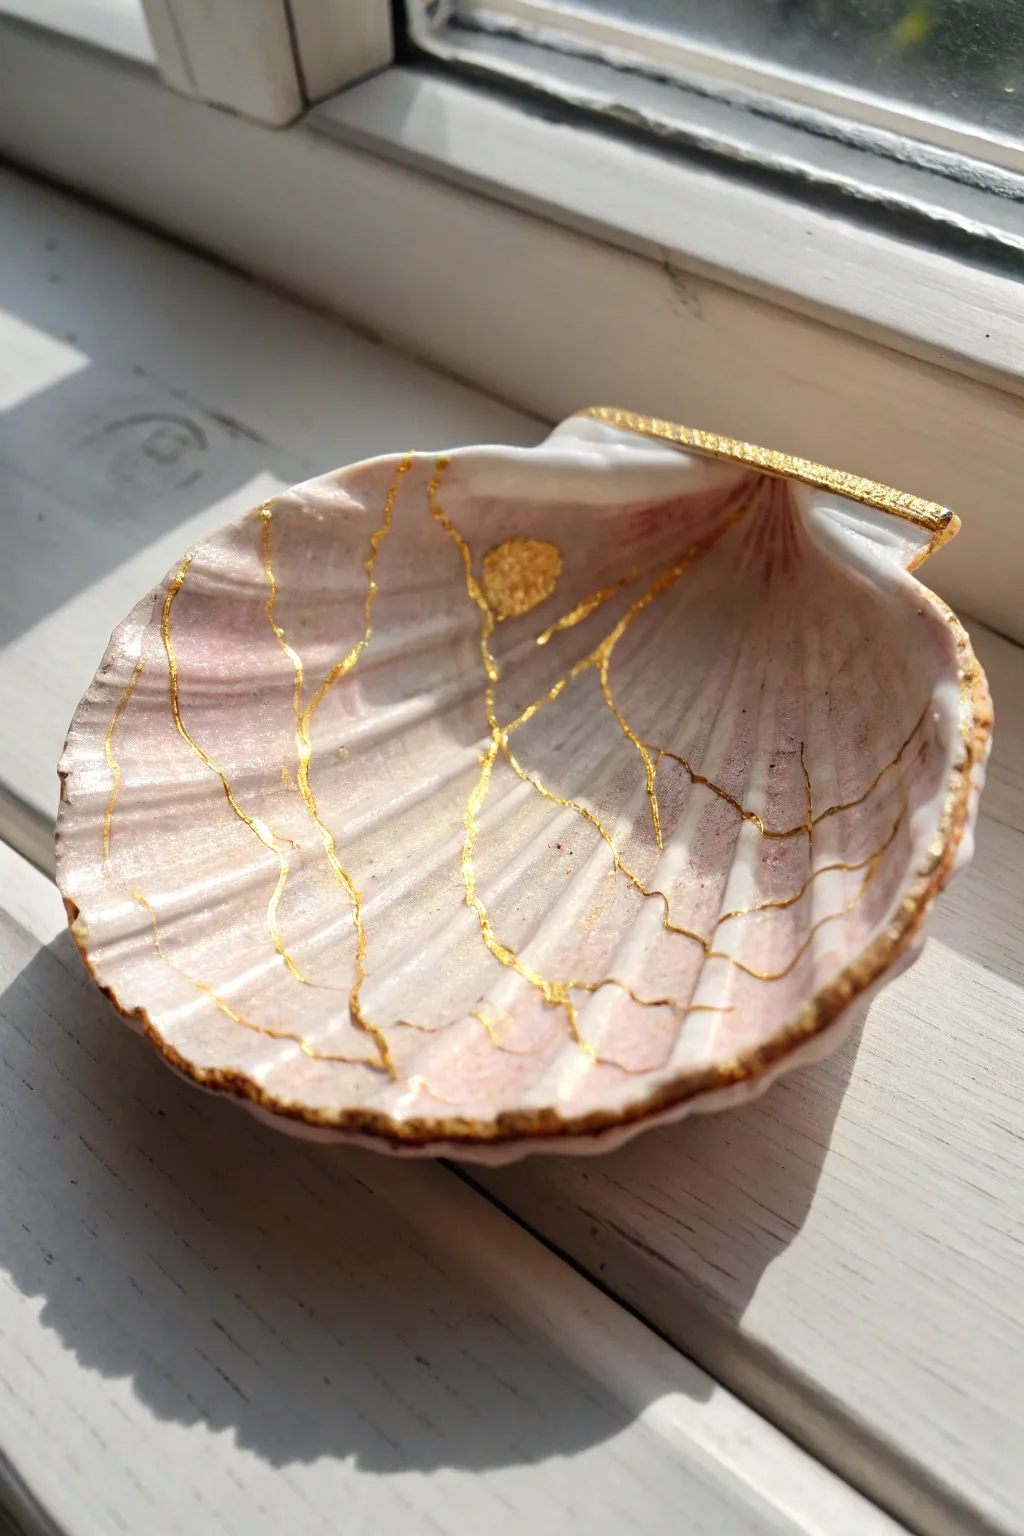
Transform a natural scallop or oyster shell into a piece of art that celebrates finding beauty in imperfection. By mimicking the Japanese art of Kintsugi with shimmering gold leaf, you create delicate veins that contrast beautifully against the pearlescent interior.
Step-by-Step Tutorial
Materials
- Clean scallop or oyster shell (medium to large size)
- Gold leaf sheets (imitation or real)
- Gold leaf adhesive size (water-based)
- Two soft paintbrushes (one for glue, one for leaf)
- Sealer (gloss varnish or clear acrylic spray)
- Fine-point paintbrush (for glue lines)
- Cotton gloves (optional)
- Gold paint or gold gilding wax (for the rim)
Step 1: Preparation & Gilded Rim
-
Clean the canvas:
Begin by thoroughly washing your shell with warm, soapy water and scrubbing it gently to remove any ocean debris or sand. Let it dry completely in the sun or with a paper towel. -
Inspect the surface:
Check the interior for any rough spots. The smoother the interior, the better the gold lines will adhere, so you can lightly sand any particularly jagged areas if needed. -
Edge preparation:
Dip your medium brush into the gold adhesive size. Carefully paint the very top edge of the shell’s rim. -
Waiting period:
Allow the adhesive to sit until it becomes tacky. It shouldn’t be wet, but sticky to the touch. This usually takes about 15-20 minutes depending on the brand. -
Applying the rim gold:
Gently press a sheet of gold leaf over the tacky rim. Use a soft, dry brush to tap it down into the ridges of the edge. -
Clean the edge:
Once adhered, brush away the excess gold leaf flakes with a dry brush until you have a smooth, solid gold line running along the shell’s perimeter.
Step 2: Creating the Kintsugi Effect
-
Plan your fractures:
Visualize where you want your ‘cracks’ to be. Kintsugi celebrates brokenness, so imagine how the shell might naturally shatter—usually in branching lines radiating from the hinge or crossing the ridges. -
Painting the adhesive lines:
Using your finest-point paintbrush, dip into the adhesive size. Paint thin, wandering lines across the interior of the shell. I like to let my hand shake slightly here to create organic, non-uniform lines. -
Adding the focal point:
In the image, there is a small, solid gold patch near the center. Paint a small, irregular blotch of adhesive where two or three lines intersect to create this pooled gold effect. -
Tack time:
Again, wait for the adhesive to turn from milky white to clear and tacky. Do not rush this step, or the gold leaf will slide around. -
Applying leaf to lines:
Lay a fresh sheet of gold leaf over the entire interior of the shell where you painted your lines. Do not worry about placement precision; cover the whole area. -
Pressing it home:
Use a clean, soft brush to firmly dab the gold leaf down onto the invisible glue lines. Ensure it enters the deep grooves of the shell’s natural ridges. -
The reveal:
This is the satisfying part. Take a stiffer dry brush and vigorously sweep it across the shell’s surface. The gold leaf on the un-glued areas will flake away as dust, leaving behind only the crisp gold veins. -
Refining the details:
Inspect your lines. If there are gaps, you can dab a tiny dot of glue, wait, and patch it with a flake of leftover gold leaf.
Clean Lines Pro Tip
For ultra-fine ‘cracks,’ use a liner brush or even a toothpick dipped in adhesive. The thinner the glue application, the more delicate and realistic the final gold vein will look.
Step 3: Sealing and Finishing
-
Dust removal:
Blow away any remaining loose gold dust or use a soft camera lens brush to ensure the white parts of the shell are clean. -
Sealing the work:
Apply a coat of gloss varnish or clear acrylic sealer over the entire interior. This prevents the gold leaf from tarnishing (oxidizing) over time. -
Final drying:
Let the varnish cure completely according to the manufacturer’s instructions before using the shell as a jewelry dish or display piece.
Troubleshooting: Sticky Mess
If gold leaf is sticking where you don’t want it, your shell wasn’t fully dry or clean. Wait for it to dry completely, then use a slightly damp Q-tip to gently rub away the unwanted gold spots.
Your elegant, gold-veined shell is now ready to hold your favorite rings or simply catch the sunlight on a windowsill


Have a question or want to share your own experience? I'd love to hear from you in the comments below!