If you’ve been craving a fresh look at home, I’m telling you—paint is the fastest way to make a space feel brand new. These paint ideas are all about bold choices, clever placement, and fun techniques that go way beyond a basic single-color wall.
Accent Wall With a Bold Color Pairing
Bring warmth and depth to your living space by creating a textured terracotta accent wall that mimics the organic look of traditional limewash. This project transforms a flat surface into a rich, cloudy backdrop that perfectly complements natural wood and neutral textiles.
How-To Guide
Materials
- Matte latex paint (terracotta/burnt orange base)
- Glaze medium or extender
- Water
- Large block brush (4-5 inch, natural bristle)
- Painter’s tape
- Drop cloths
- Mixing bucket
- Paint tray and roller (for base coat)
- Clean lint-free rags
- Stir sticks
Step 1: Preparation & Base Coat
-
Clear and Clean:
Remove all furniture, including that comfy white sofa, away from the wall to give yourself plenty of working room. Wipe down the wall with a damp cloth to remove dust and grease, ensuring a clean canvas for your paint. -
Protect Surfaces:
Apply painter’s tape along the ceiling line, baseboards, and any adjoining walls or window frames. Lay down drop cloths to protect your beautiful wood floors from potential splatters. -
Roll the Base:
Pour your terracotta latex paint into a tray. Using a standard roller, apply a solid, even coat of the paint over the entire wall. This doesn’t need to be perfect, but it establishes the primary color undertone. -
Dry Completely:
Allow this base coat to dry fully according to the manufacturer’s instructions. I usually let it sit overnight to ensure it’s perfectly cured before starting the texture work.
Step 2: Mixing the Haze
-
Create the Wash Mixture:
In your mixing bucket, combine one part of your original terracotta paint with one part glaze medium and roughly half a part of water. You want a consistency that is thinner than standard paint but not quite watery. -
Lighten the Mix (Optional):
If you want meaningful depth, pour a small amount of this mixture into a separate container and add a splash of white paint or a lighter beige to create a subtle variation tone.
Brush Technique
Don’t overthink your brushstrokes. The more chaotic and random your wrist movement, the more authentic the limewash effect will look. Imperfection is the goal.
Step 3: Creating the Texture
-
Load the Block Brush:
Dip just the tips of your large block brush into the primary glaze mixture. Offload excess paint onto a piece of cardboard or the side of the bucket; a ‘dry brush’ approach prevents drips. -
X-Motion Application:
Start at a top corner and apply the glaze using large, random X-shaped strokes. The goal is to create cloud-like formations rather than straight lines. -
Work in Sections:
Focus on a 3×3 foot section at a time. Paint quickly and keep a wet edge to avoid harsh lap lines where sections meet. -
Introduce Variation:
While the first glaze layer is still tacky, dip a clean corner of your brush into the slightly lighter mixture you set aside. Dab it randomly into the wet glaze on the wall. -
Blend the Tones:
Use the dry block brush to cross-hatch over the lighter spots, blending them softly into the darker terracotta background to create that classic plaster bloom effect. -
Check for Pools:
scan the section for any heavy accumulation of paint. If you see pooling, lightly stipple it with a dry rag to absorb the excess and soften the texture. -
Continue Across:
Move to the adjacent section, overlapping your strokes slightly with the previous area to ensure a seamless transition. -
Step Back and Assess:
Frequently step back to the quiet side of the room to view the wall as a whole. Look for areas that seem too uniform and add a few extra wispy strokes to break them up.
Earthy Styling
Enhance the wall’s warmth by styling with dried pampas grass, warm wood furniture, and linen textiles in oatmeal or rust tones.
Step 4: Finishing Touches
-
Edge Work:
Use a smaller brush to gently stipple the glaze right up to the tape line, ensuring the texture doesn’t abruptly stop an inch from the ceiling. -
Remove Tape:
Carefully peel off the painter’s tape while the glaze is still slightly damp. This helps prevent the dried film from peeling off with the tape. -
Final Cure:
Let the wall dry undisturbed for at least 24 hours. The texture often looks different when fully dry, settling into a matte, velvety finish.
Enjoy the cozy, Mediterranean atmosphere your new textured artwork brings to the room


Half-Painted Wall (Dipped Wall) for Instant Contrast

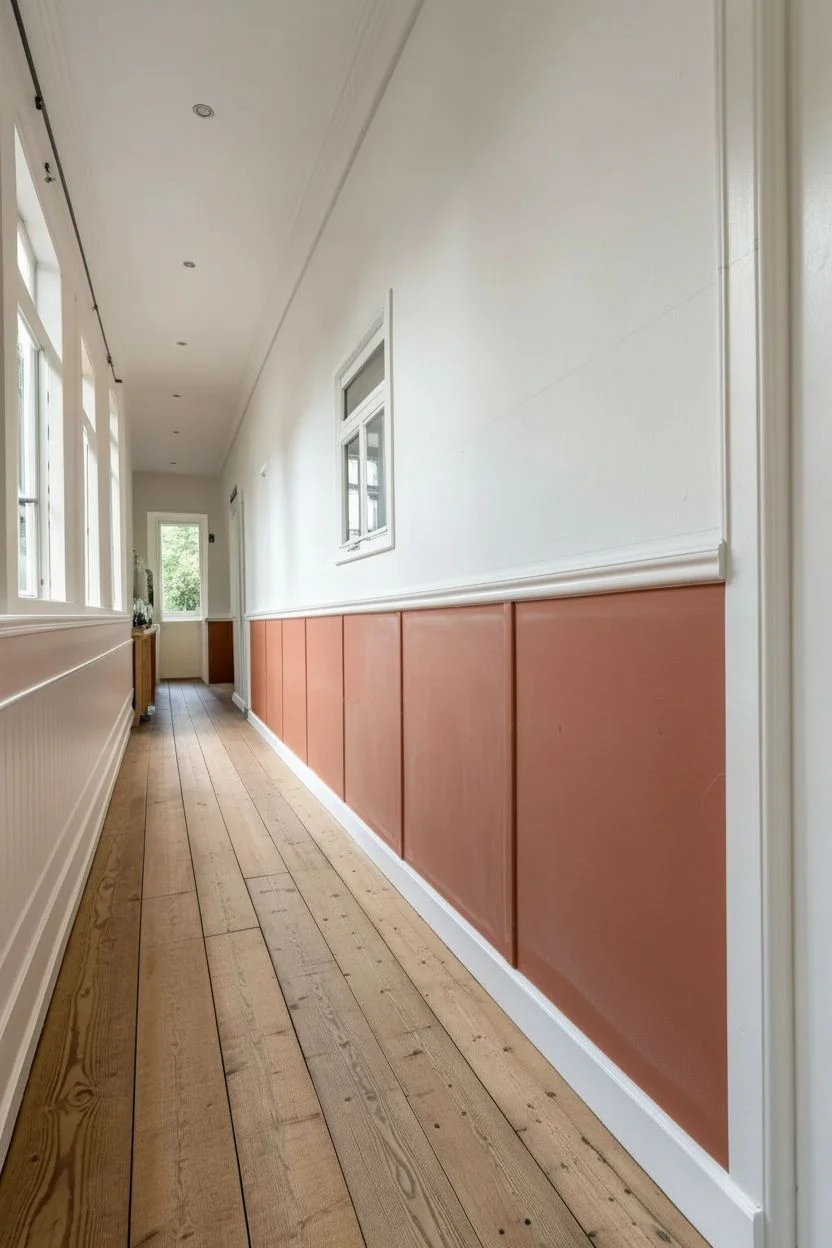
Transform a plain hallway into a sophisticated corridor with this warm and structured take on the half-painted wall trend. By combining simple batten strips with a rich terracotta hue, you create architectural interest that grounds the space while keeping things bright and airy above.
Step-by-Step Guide
Materials
- Terracotta/burnt orange interior wall paint (satin or eggshell finish)
- White trim paint (semi-gloss)
- White wall paint (eggshell or matte)
- 1×4 pine boards or MDF strips (for battens and top rail)
- Small dado rail molding (optional cap)
- Construction adhesive
- Brad nailer and brad nails
- Wood filler
- Sandpaper (120 and 220 grit)
- Caulk and caulk gun
- Paint rollers (microfiber)
- Angled sash brush (2 inch)
- Painter’s tape
- Level (long spirit level or laser level)
- Tape measure
Step 1: Preparation & Planning
-
Measure and mark:
Begin by determining the height of your wainscoting. A good rule of thumb is about one-third of the wall’s height, or roughly 36 to 40 inches from the floor. Mark this height at several points along the wall. -
Snap a level line:
Using a long spirit level or a laser level, trace a horizontal pencil line across the entire length of the hallway connecting your marks. This will be the guide for the top edge of your paneling. -
Prep the surface:
Ideally, remove existing baseboards if you want a seamless look, though you can rest the battens on top of existing flat skirting if it’s square enough. Lightly sand the wall area below your line to ensure better adhesion for the glue.
Step 2: Installing the Woodwork
-
Install the top rail:
Apply construction adhesive to the back of your horizontal top rail board. Position it so the top edge aligns perfectly with your pencil line. Nail it into the studs using a brad nailer for a secure hold. -
Calculate batten spacing:
Measure the total length of the wall and decide on the spacing for your vertical ‘battens’ (the vertical strips). A spacing of 16 to 24 inches usually looks balanced. Mark these vertical positions on the wall. -
Cut and attach battens:
Measure the distance from the top of your baseboard (or floor) to the bottom of the top rail for each vertical position. Cut your vertical strips to size. Glue and nail them into place at your marked intervals, checking for plumb with your level as you go. -
Add the cap molding:
For a refined finish, install a small piece of molding or a protruding ‘cap’ piece on the very top edge of your horizontal rail. This creates a small shelf-like detail typical of traditional wainscoting.
Seamless Seams
For a truly built-in look, use caulk freely between the vertical battens and the wall surface. This hides any gaps caused by uneven drywall and makes the wood and wall look like one unified piece.
Step 3: Finishing the Surface
-
Fill the holes:
Take a dime-sized amount of wood filler and press it into every nail hole. Overfill slightly as the filler will shrink when drying. Don’t forget the joints where boards meet. -
Sand smooth:
Once the filler is completely dry, sand the filled spots flush with the wood using 220-grit sandpaper. I like to run my hand over the joints to ensure they feel perfectly seamless. -
Caulk the seams:
Apply a thin bead of paintable caulk along every edge where the wood meets the wall, inside the panel squares, and along the top of the rail. Smooth it out with a wet finger for a professional transition.
Level Up: Picture Ledge
Use a deeper 1×2 or 1×3 board for the top cap of your wainscoting. This creates a functional picture ledge where you can lean frames or small art pieces without hanging them.
Step 4: Painting
-
Prime the wood:
If you are using raw wood or reliable MDF, apply a coat of primer to the new paneling elements to seal them. This ensures your topcoat color will be even and rich. -
Paint the upper wall:
Before tackling the color, paint the upper section of the wall white. It’s easier to be messy now and cut in that crisp line later. Let this dry completely. -
Tape the separation:
Carefully apply painter’s tape along the top edge of your wainscoting cap to protect the white wall you just painted. Press the edge of the tape down firmly. -
Cut in the color:
Using your angled sash brush, paint the terracotta color into the corners, around the battens, and along the floor or baseboard. Get into all the nooks and crannies the roller can’t reach. -
Roll the panels:
Use a small microfiber roller to apply the terracotta paint to the flat sections of the wall and the face of the boards. Apply two coats, allowing proper drying time in between for the deepest, most opaque color. -
Remove tape:
Pull the painter’s tape off slowly while the final coat is still slightly tacky to prevent peeling dry paint. Step back and check for any small touch-ups needed.
Enjoy the dramatic warmth this classic yet colorful architectural detail brings to your home


Painted Arch Headboard Behind the Bed
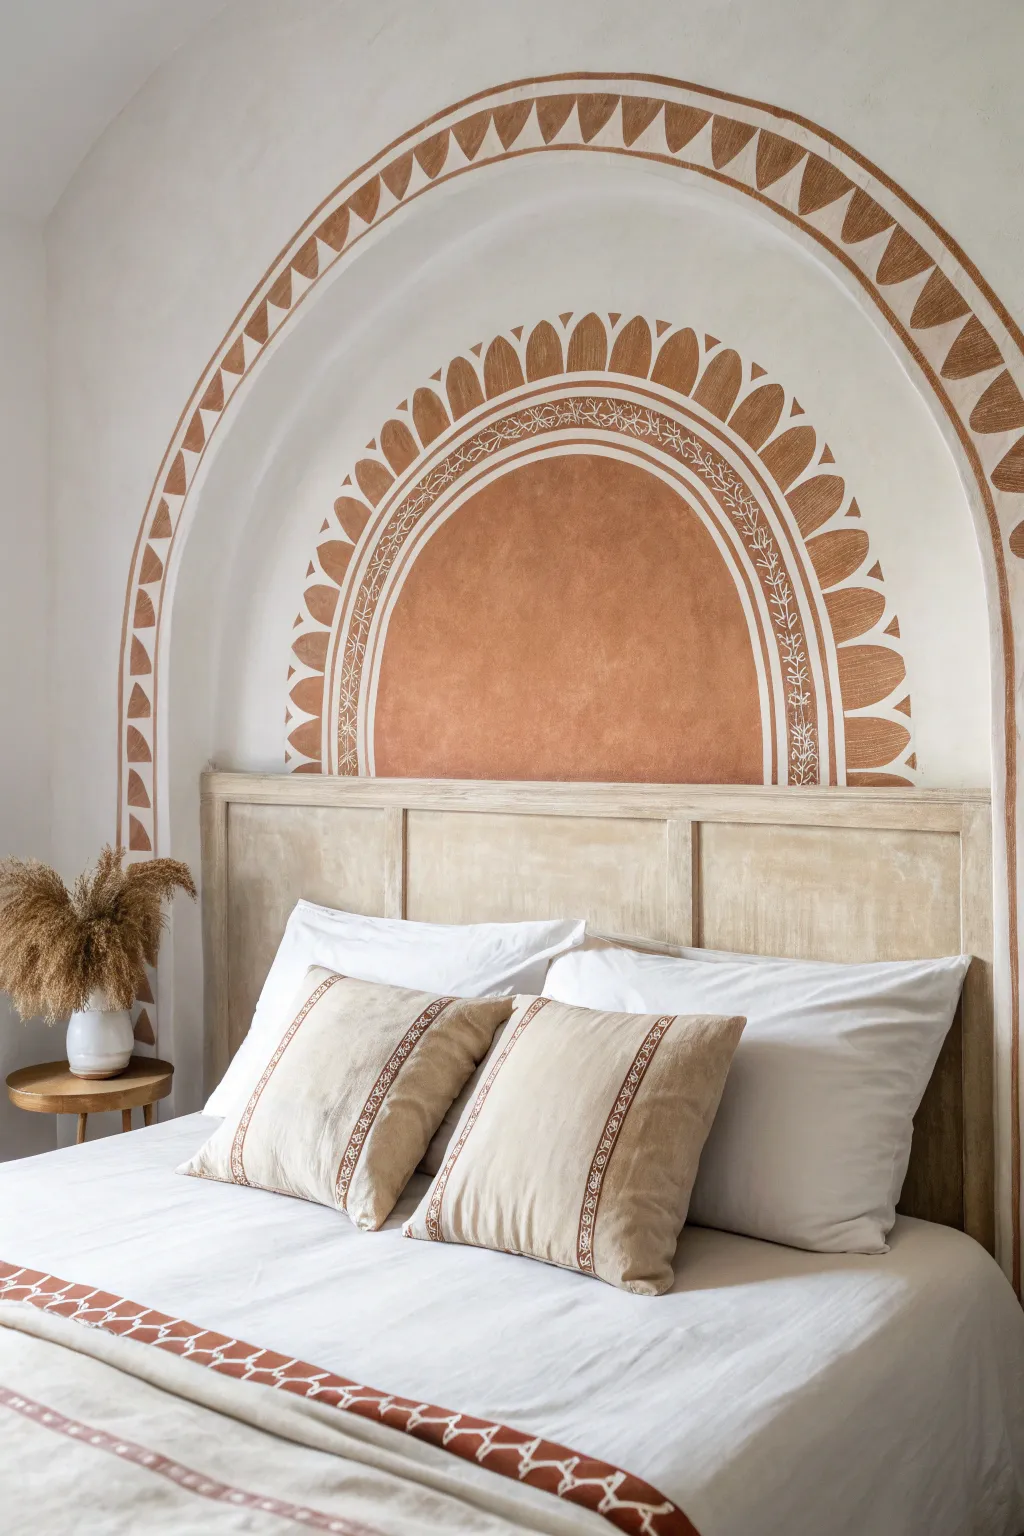
Transform your bedroom by painting a stunning, multi-layered arch headboard directly onto the wall. This warm terracotta design mimics the look of inlaid tile or plasterwork, adding architectural interest and cozy vibes without any construction.
How-To Guide
Materials
- Terracotta or rust-colored interior latex paint (matte finish)
- White or cream interior latex paint (for the base wall color)
- Pencil
- String
- Push pin or tape
- Measuring tape
- Small angled paintbrush (1-inch)
- Fine detail brush (round tip, size 2 or 4)
- Medium flat brush (for filling)
- Level
- Eraser
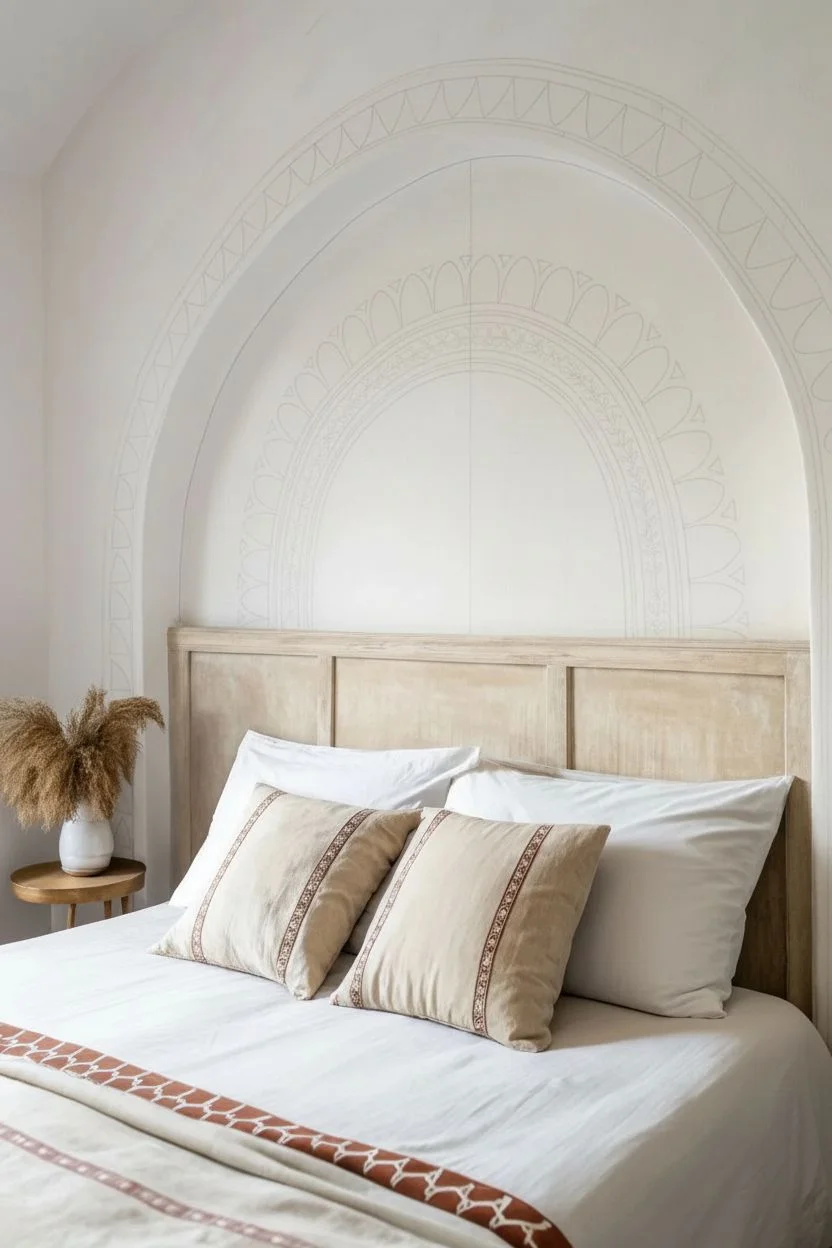
Step 1: Planning and Outlining
-
Measure and mark center:
Find the center point of where your bed will sit and mark it low on the wall, just below where the top of your mattress will be. This will be the anchor point for your arches. -
Create a string compass:
Tie a piece of non-stretchy string to a pencil. Secure the other end to your center mark using a push pin or strong tape. The length of the string determines the radius of your arch. -
Draw the outer guideline:
Extend the string to define the outermost edge of your mural—it should be wide enough to frame your headboard comfortably. Keeping the string taut, draw a large semi-circle lightly on the wall. -
Draw the inner layers:
Shorten the string by about 4-5 inches and draw a second arc inside the first. Repeat this process until you have four distinct concentric semi-circles, creating the zones for the different patterns. -
Mark vertical guides:
Use a level to lightly draw a vertical line straight up from your center point. This helps ensure your petal patterns remain symmetrical as they curve over the top.
Wobbly Lines?
If your hand isn’t steady, use a ‘mahl stick’ technique. Rest your painting hand on a clean, dry stick or ruler held against the wall to stabilize your wrist while doing detail work.
Step 2: Painting the Base Forms
-
Paint the solid center:
Using your medium flat brush, fill in the innermost semi-circle completely with the terracotta paint. Use the angled brush to get a crisp, clean edge along the pencil line. -
Create the sunray petals:
In the band directly outside the solid center, sketch petal shapes that radiate outward. Think of them like elongated tombstone vibes. Paint these carefully with your smaller brush, leaving negative space between them. -
Sketch the outer triangles:
Move to the outermost band (the largest arch). Sketch a series of triangles or ‘tooth’ shapes pointing inward towards the center. Spacing is key here, so sketch lightly first. -
Fill the outer band:
Fill in these outer triangles with the terracotta paint. I like to use the 1-inch angled brush here for the sharp corners and straight lines of the triangles. -
Define the spacer rings:
Between your pattern bands, paint thin, solid terracotta rings to act as borders. This separates the floral/petal layer from the outer geometric layer, giving the mural structure.
Step 3: Adding Fine Details
-
Draft the white inlay:
Once the central solid arch is fully dry, visualize a decorative band inside its upper edge. Lightly sketch a floral vine pattern directly over the dried terracotta paint using a white chalk pencil if you have one, or just regular pencil. -
Paint the vine details:
Load your fine detail brush with the white/cream wall color (or a slightly lighter tint). Carefully paint the vine and leaf details over the terracotta background. -
Paint the borders:
Using that same fine brush and cream paint, outline the vine section with thin lines to encase the pattern, mimicking a decorative tile border. -
Clean up edges:
Step back and inspect your work. Use the wall’s base color to touch up any terracotta drips or wobbly lines, essentially ‘erasing’ mistakes with paint. -
Let it cure:
Allow the paint to cure for at least 24 hours before pushing furniture back against the wall to prevent scuffs.
Add Texture
Mix a small amount of baking soda or plaster of Paris into your terracotta paint. This creates a gritty, plaster-like texture that makes the mural look like authentic masonry.
This warm accent feature will anchor your room beautifully and creates a permanent headboard that saves floor space


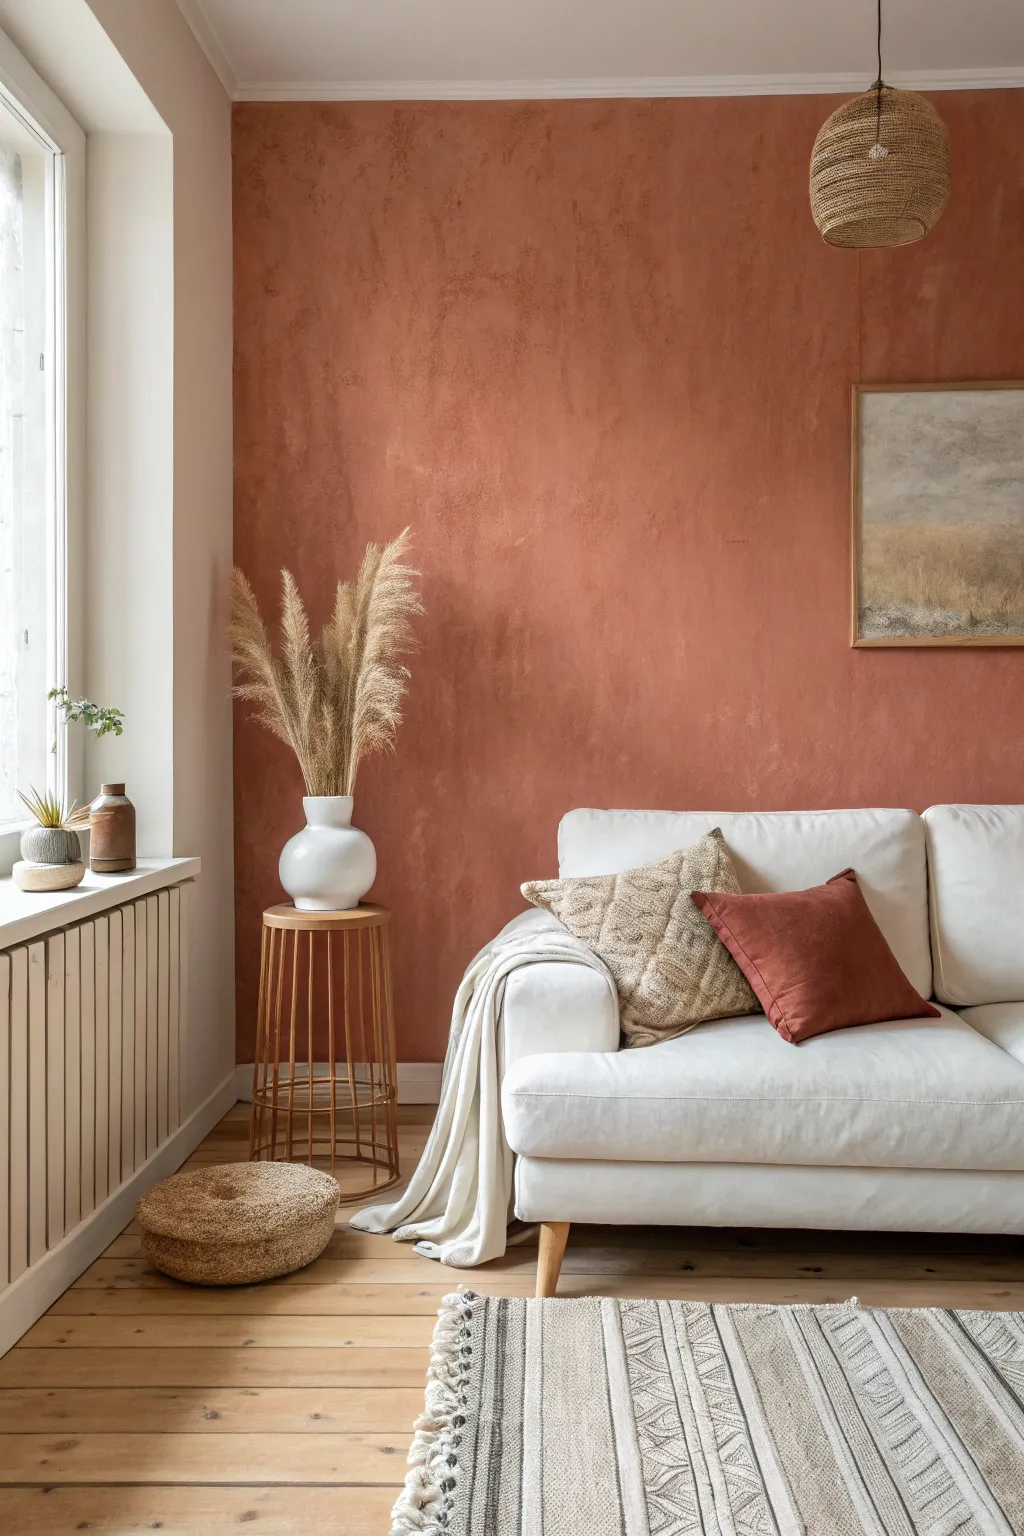
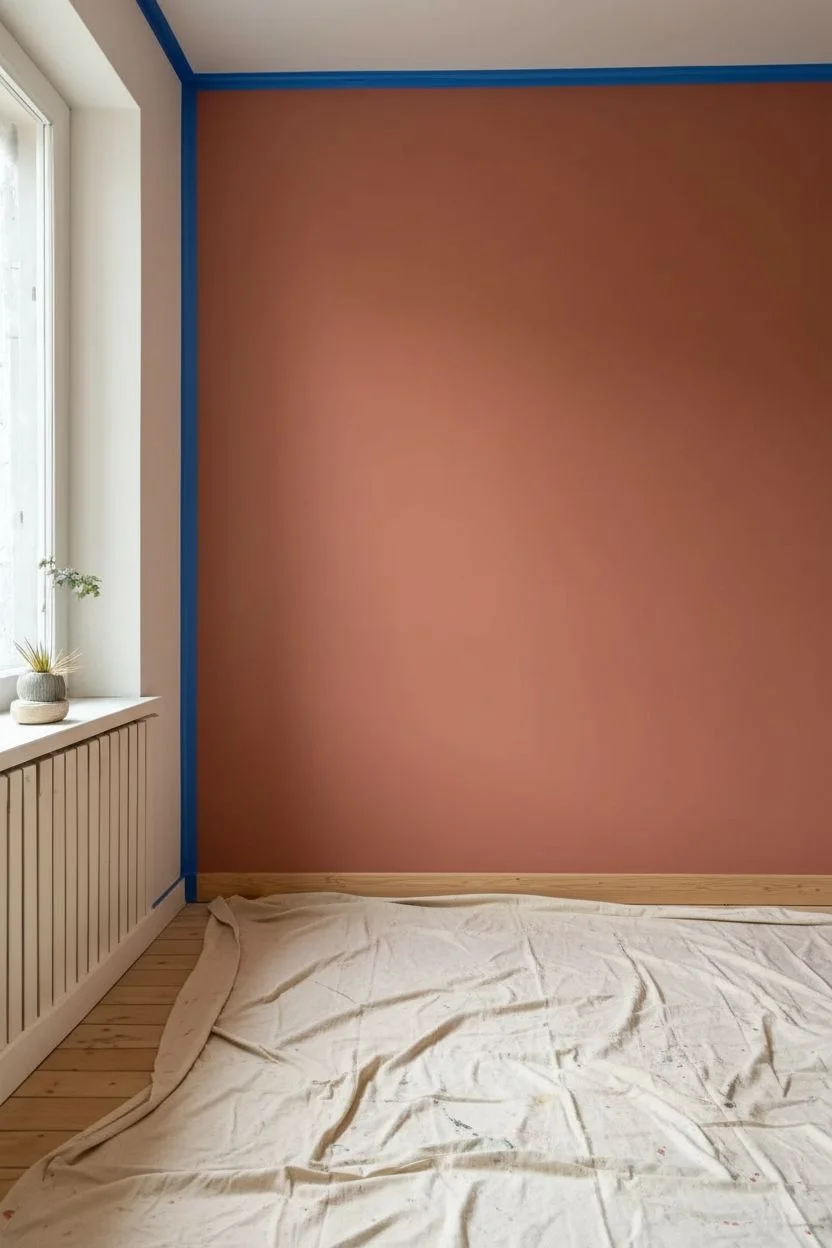
Color Blocking to Zone a Dining Nook
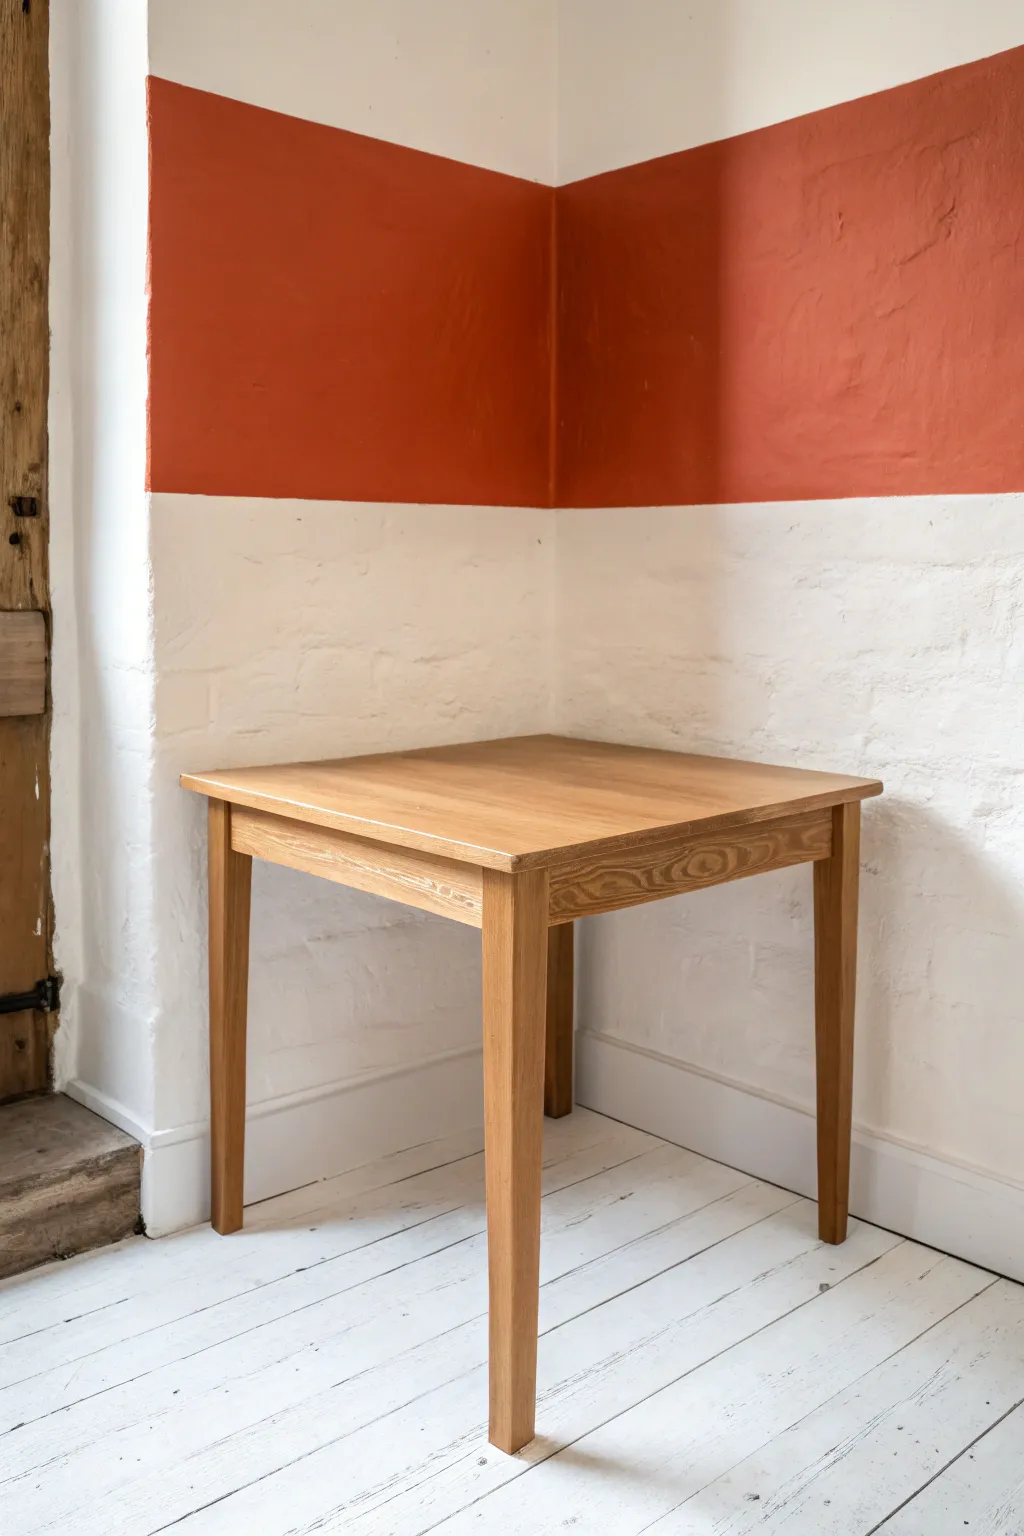
Transform a plain corner into a cozy, dedicated dining zone with this simple yet striking color-blocking technique. The horizontal band of warm terracotta creates an instant visual anchor, adding architectural interest to even the most basic white walls.
Detailed Instructions
Materials
- White emulsion paint (base coat)
- Terracotta or warm burnt orange matte emulsion paint
- Painter’s tape (high-quality, low-tack for delicate surfaces)
- Spirit level or laser level
- Pencil
- Tape measure
- Small paint roller (4-inch) with smooth nap
- Roller tray
- Angled sash brush (2-inch)
- Dust sheets or drop cloths
- Damp cloth for cleanup
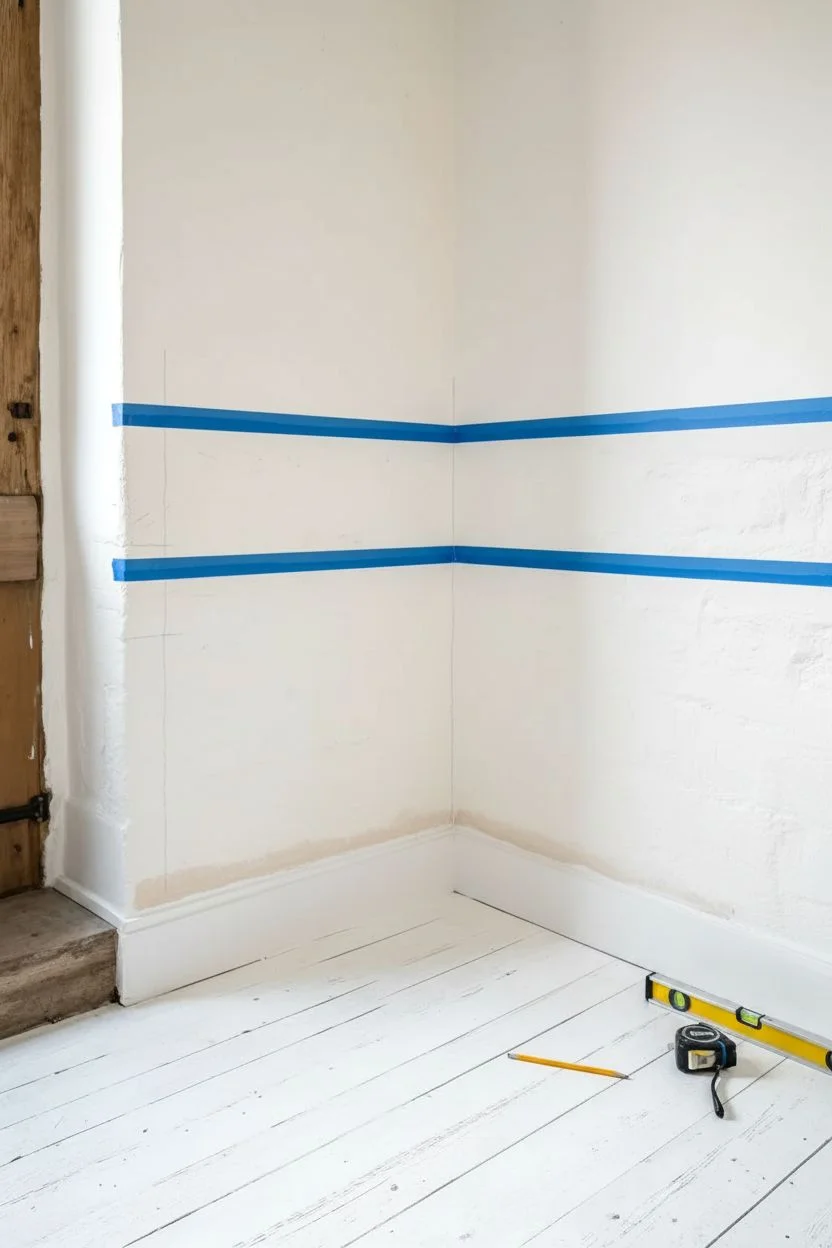
Step 1: Preparation & Planning
-
Clear and Clean:
Begin by removing all furniture from the corner to give yourself ample working space. Wipe the walls down with a damp cloth to remove any dust or cobwebs, ensuring a clean surface for the tape to adhere to. -
Refresh the Base:
If your existing white walls are looking tired or scuffed, apply a fresh coat of white emulsion first. Let this base coat dry completely—I usually wait at least 24 hours to ensure the tape won’t peel it off later. -
Determine Height:
Decide on the height and width of your color block band. For a dining nook, aim for the band to sit just above table height, or centered at eye level when seated. -
Mark the Level Line:
Using your tape measure, mark your starting point height on the wall with a pencil. Use a laser level specifically for this step if you have one; it makes projecting a perfectly straight line across a corner much easier. -
Manual Leveling:
If you don’t have a laser level, use a long spirit level. Draw faint pencil dashes along the top and bottom boundaries of where your terracotta stripe will go, checking frequently to ensure the line stays perfectly horizontal as it wraps around the corner.
Tape Sealing Trick
Painting over the tape edge with your base wall color first is vital on textured walls like brick. It creates a barrier that guarantees a crispy line every time.
Step 2: Taping for Precision
-
Apply Top Tape:
Carefully apply a strip of painter’s tape along the top pencil line. Place the tape *above* the pencil mark so you paint over the mark, covering it with color. -
Apply Bottom Tape:
Repeat the process for the bottom boundary, placing the tape just *below* your lower pencil mark. Press the edges of the tape down firmly with your thumb or a putty knife to prevent bleed-through. -
Seal the Edge:
Here is a crucial trick: brush a very thin layer of your *base* wall color (white) along the edge of the tape where the terracotta will go. This seals the tape edge so if any paint bleeds under, it’s white-on-white and invisible. -
Let Seal Dry:
Allow that thin sealing coat to dry for about 30-45 minutes. It must be dry to the touch before you introduce the color.
Step 3: Painting the Color Block
-
Cut In the Edges:
Open your terracotta paint and stir thoroughly. Dip your angled sash brush and carefully ‘cut in’ along the tape lines and the vertical corner crease, ensuring full coverage in the uneven texture if you have brick walls. -
Roll the Middle:
Load your small roller with paint. Roll the section between your cut-in edges, using smooth, overlapping strokes. Don’t press too hard; let the roller do the work. -
Texture Management:
If you are painting over painted brick or textured plaster like in the example, use a dabbing motion with the brush to push paint into deep crevices that the roller might miss. -
First Coat Dry:
Wait for the first coat to dry according to the manufacturer’s instructions (usually 2-4 hours). -
Apply Second Coat:
Apply a second coat to ensure a rich, opaque finish. Bold colors like terracotta often need two or even three thin coats for true depth.
Try a Vertical Stripe
Instead of a horizontal band, flip the concept! Paint a vertical floor-to-ceiling stripe slightly wider than your table to visually heighten the room.
Step 4: The Big Reveal
-
Timing the Removal:
Remove the painter’s tape while the final coat is still slightly tacky—don’t let it cure completely hard, or it might chip the paint line. -
Peel Back:
Peel the tape away slowly at a 45-degree angle, pulling it back onto itself. This angle helps cut through the paint film cleanly for a razor-sharp edge. -
Touch Up:
Inspect your lines. If any tiny bleeds occurred despite your best efforts, wait for the paint to fully dry, then use a tiny artist’s brush and a bit of white paint to correct them. -
Styling:
Once fully cured (give it a day or two), replace your furniture. The warm band should now nicely frame your table.
Enjoy your customized dining nook that brings warmth and modern structure to your space
BRUSH GUIDE
The Right Brush for Every Stroke
From clean lines to bold texture — master brush choice, stroke control, and essential techniques.
Explore the Full Guide
Soft Geometric Shapes for a Modern Feature Wall
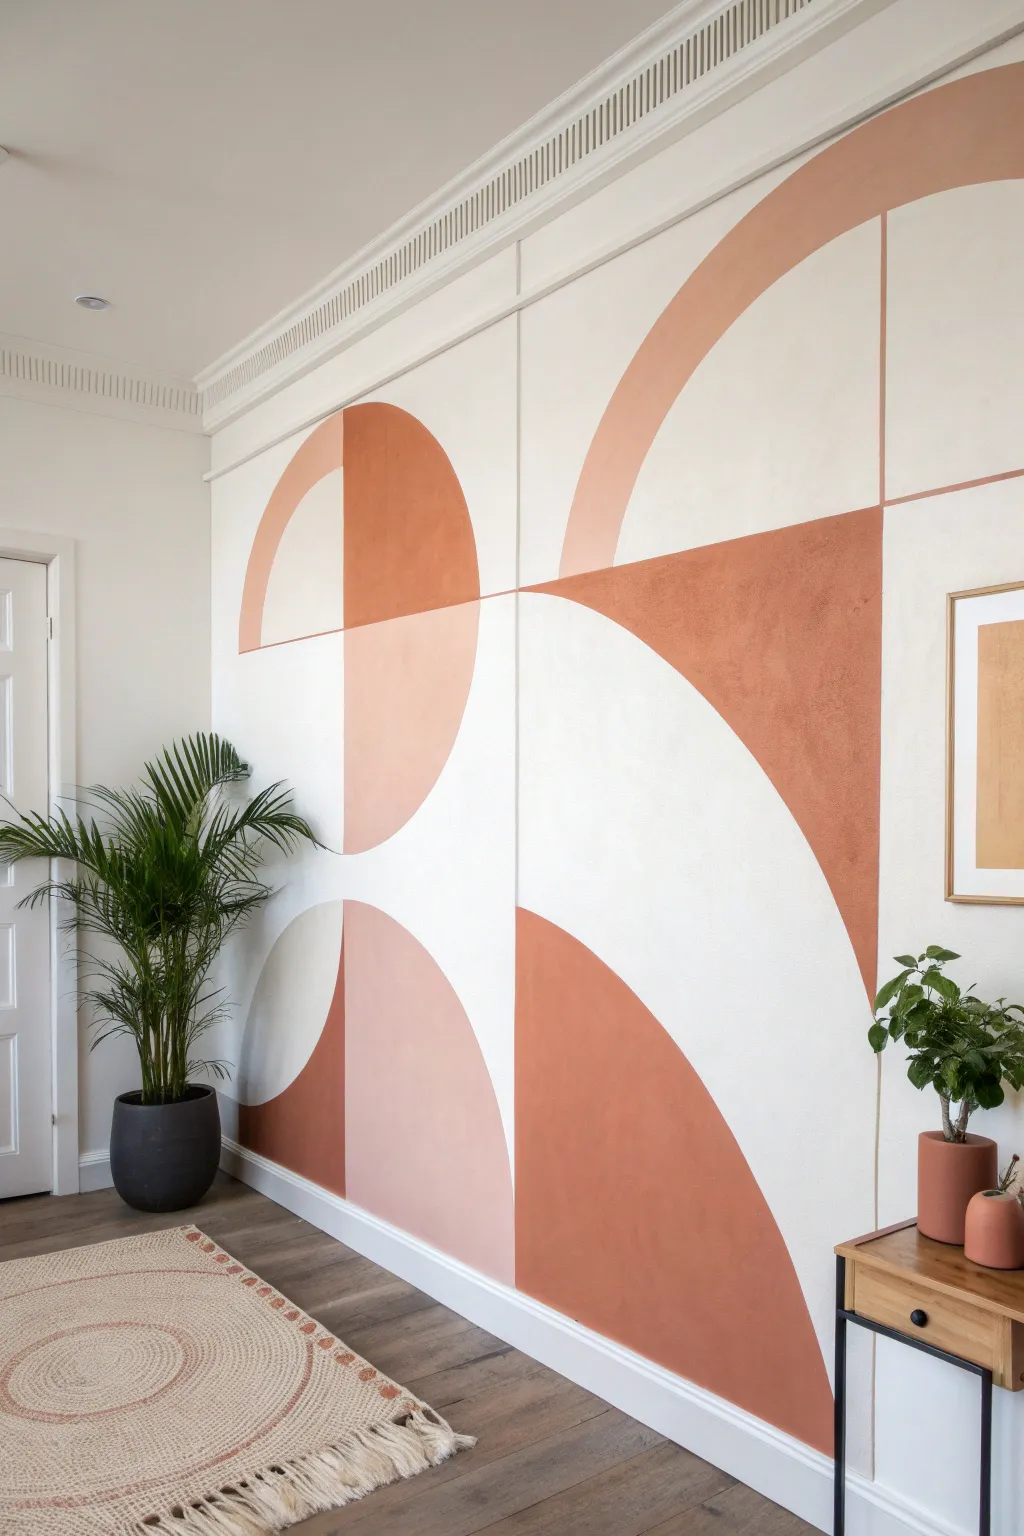
Transform a plain white wall into a stunning focal point with this modern abstract mural featuring intersecting arches and bold geometric forms. Using a warm palette of burnt sienna, dusty rose, and creamy beige, this design adds architectural interest and a trendy bohemian vibe to any room.
Step-by-Step Tutorial
Materials
- Interior latex paint (White base coat)
- Interior latex paint (Burnt Sienna/Terracotta)
- Interior latex paint (Dusty Rose/Peach)
- Painter’s tape (multi-surface, 1-inch width)
- Pencil
- String or twine (and a push pin or nail)
- Measuring tape
- Long spirit level (2-4 ft) or laser level
- Small paint roller (4-inch width)
- Medium paint roller (9-inch width)
- Angled sash brush (2-inch)
- Small artist brush for touch-ups
- Drop cloth
- Paint tray and liners
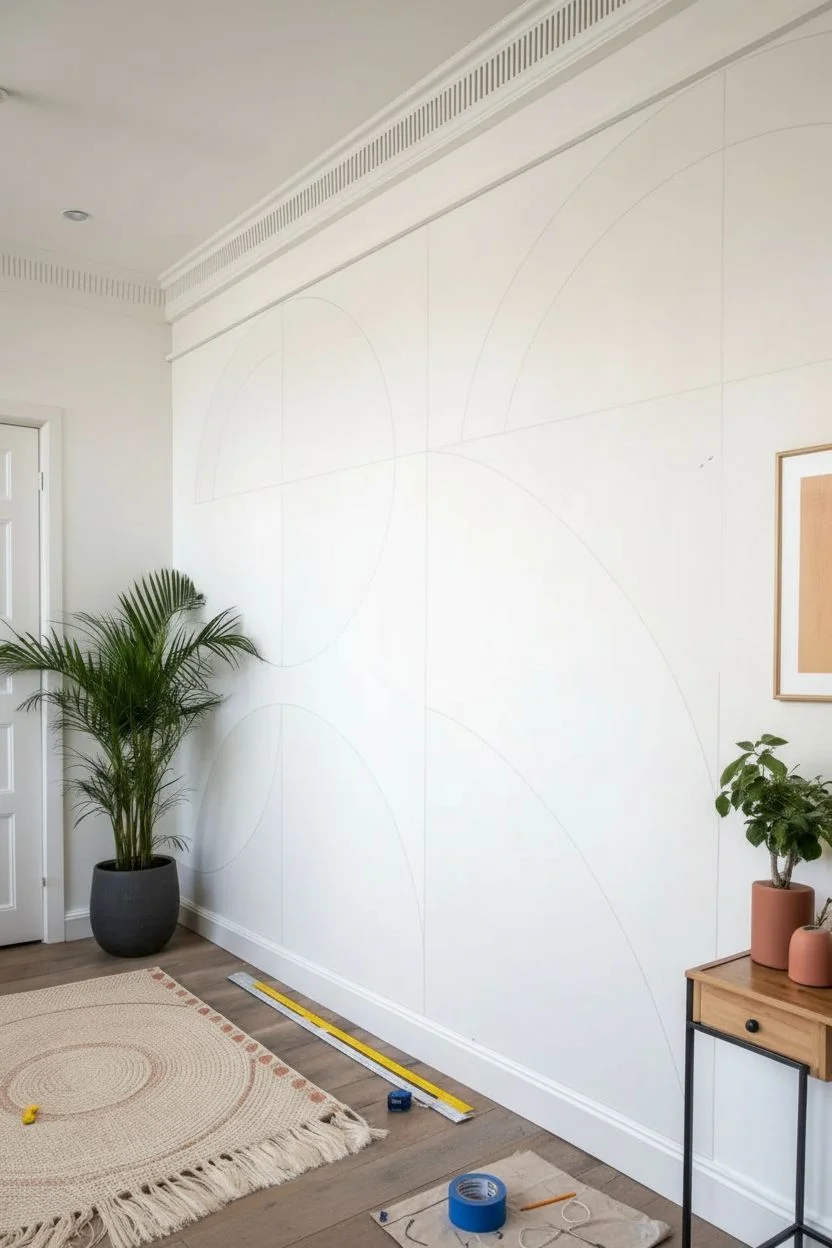
Step 1: Planning and Mapping
-
Prep the surface:
Begin by ensuring your wall is clean, dry, and free of dust. If your current wall color isn’t a crisp white or cream, apply a fresh base coat now; this mural relies on the negative space acting as part of the design. -
Measure the grid:
The design is based on a structured grid. Measure the total width and height of the wall area you want to paint. Divide this space into large rectangular quadrants using a pencil and a long level (or laser level) to draw faint vertical and horizontal guides. -
Visualize the shapes:
Look closely at the reference image. Notice how the large quadrant lines act as the ‘spines’ for the arches and semi-circles. Sketch these primary intersections lightly on the wall to map out where the major curves will go.
Bleed-Proof Lines
Before painting your color, brush a thin layer of your base wall color (white) over the edge of the tape to seal it. This guarantees razor-sharp lines.
Step 2: Drawing the Geometry
-
Create a compass:
To draw perfect curves, tie a piece of non-stretchy string to a pencil. Determine the radius for your large arches—for the biggest shapes, this will likely be half the width of your grid sections. -
Anchor the pivot point:
Press a push pin or nail gently into the wall at the center point where a curve should originate (often on one of your grid lines). Loop the string end around this anchor. -
Draw the main arches:
Keeping the string taut, swing the pencil to draw your large semi-circles and quarter-circles. I find it helpful to double-check the radius length occasionally to ensure the string hasn’t slipped. -
Add inner curves:
For the rainbow-like arches or segmented circles, shorten your string length and draw a smaller, concentric arc inside the larger ones using the same pivot point. -
Define straight edges:
Use your level and a straight edge to connect the ends of your curves to the grid lines, finalizing the enclosed shapes.
Steady Hands
For smoother curves, lock your wrist and move your entire arm from the shoulder. Exhale slowly as you pull the brush along the curved line.
Step 3: Painting the Design
-
Tape straight lines:
Apply painter’s tape along the straight grid lines and the straight edges of your geometric shapes. Press the tape edges down firmly to prevent bleed-through. -
Hand-paint the curves:
Taping perfect curves is notoriously difficult. Instead, use a high-quality 2-inch angled sash brush to carefully ‘cut in’ the curved edges by hand. Load the brush moderately and use long, confident strokes. -
Fill the large terracotta shapes:
Start with your darkest color (the burnt sienna). After cutting in the edges, use a small 4-inch roller to fill in the main body of the shapes. Apply two thin coats rather than one thick one for a smooth finish. -
Switch to Peach/Rose:
Once the dark distinct shapes are dry to the touch, move on to the lighter dusty rose sections. Be careful where shapes touch; let adjacent colors dry completely before painting next to them. -
Paint grid lines (Optional):
The reference image shows faint grid lines separating the panels. To achieve this, leave a thin gap of white wall between shapes, or tape off a 1/4 inch line and paint over it with the shapes, revealing the white line when peeled. -
Second coat application:
Solid geometric shapes need opacity to look sharp. Apply a second coat to all colored sections, ensuring the texture is consistent with the rest of the wall.
Step 4: Finishing Touches
-
Remove tape:
Ideally, peel off the painter’s tape while the final coat is still slightly tacky. Pull the tape away from the paint edge at a 45-degree angle to get a crisp line. -
Fix imperfections:
Inspect your curves and edges. If paint bled under the tape or your hand was unsteady on a curve, use a small artist’s brush and your white base color to ‘erase’ and sharpen the lines. -
Erase pencil marks:
Gently erase any visible pencil guidelines that weren’t covered by paint. If the eraser leaves a smudge, lightly dab a tiny bit of white paint over it. -
Clean pivot holes:
Refill the tiny pinholes from your string compass with a dab of spackle or a thick drop of paint.
Step back and admire how simple geometry has completely changed the energy of your space
Vertical Stripes to Make Ceilings Feel Taller
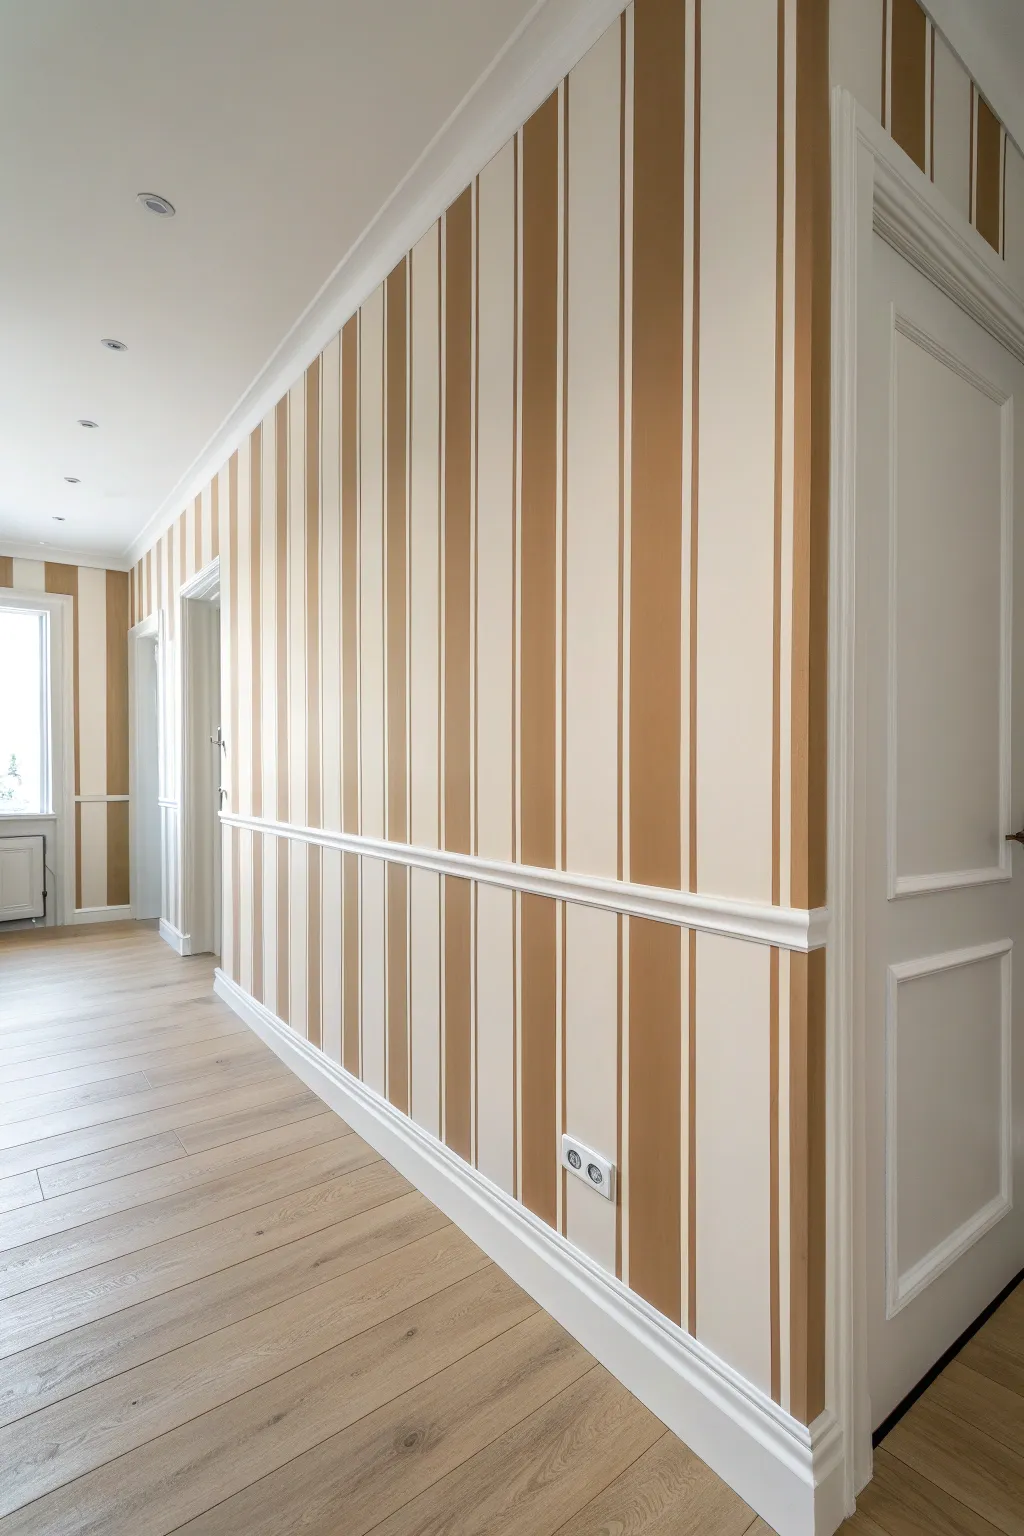
Transform a standard hallway into a grand corridor using the optical illusion of vertical stripes. This project combines crisp off-white tones with warm caramel accents to draw the eye upward, instantly adding perceived height and architectural elegance to your home.
Step-by-Step
Materials
- High-quality painter’s tape (choose a gentle release for freshly painted base coats)
- Laser level or long spirit level
- Pencil
- Tape measure
- Base coat paint (creamy off-white/eggshell finish)
- Accent paint (warm caramel/bronze)
- Paint roller and tray
- Small angled sash brush (1.5 – 2 inch)
- Mini foam roller (4-inch size)
- Drop cloths
- Putty knife or credit card (for sealing tape)
- Damp cloth for clean-up
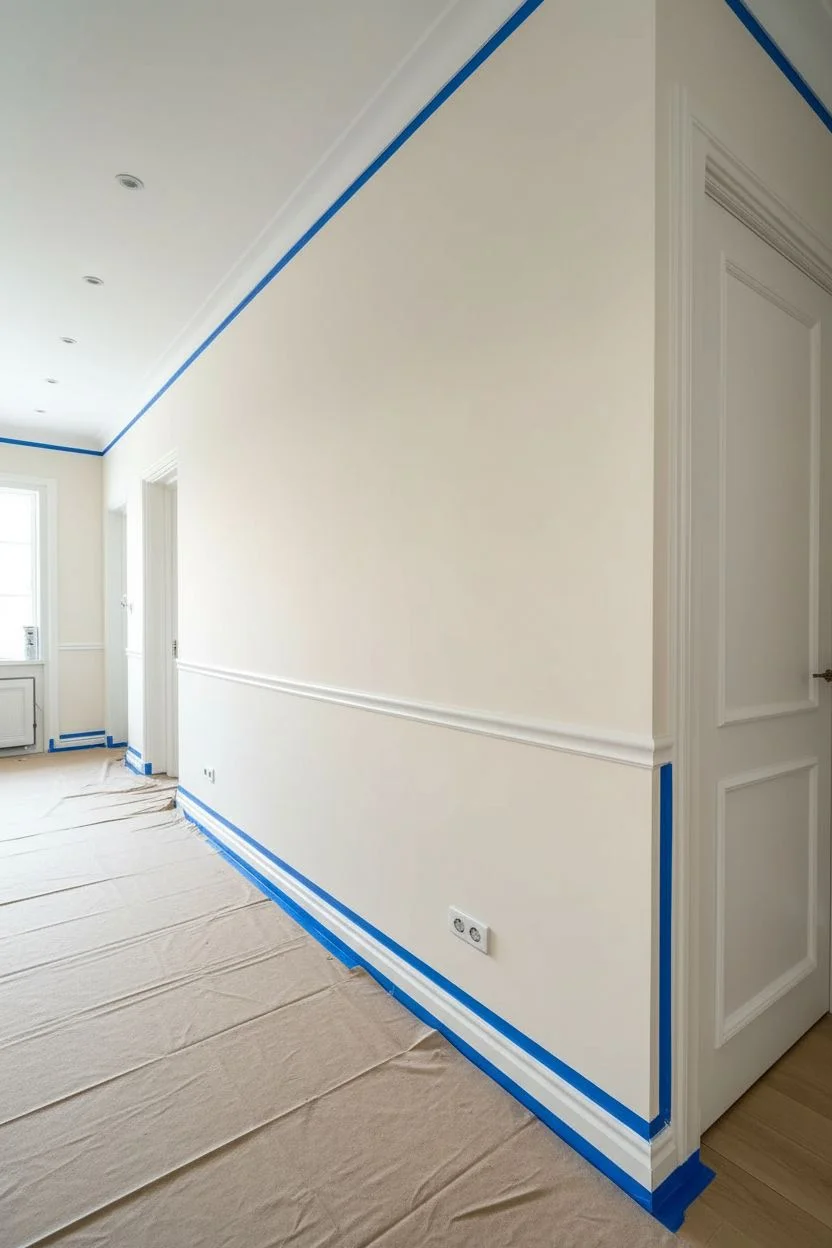
Step 1: Preparation & Base Coat
-
Clear and Clean:
Begin by removing all furniture, switch plates, and outlet covers from the wall. Wipe down the walls with a damp cloth to remove any dust or grease. -
Protect the Area:
Lay down heavy-duty drop cloths to protect your beautiful flooring. Use painter’s tape to mask off the ceiling line, baseboards, and any door frames or chair rails. -
Apply the Base Coat:
Roll on two coats of your creamy off-white base color. This lighter color will serve as the background for your stripes. -
Dry Time is Crucial:
Allow the base coat to cure fully for at least 24 to 48 hours. If you tape too soon, you risk peeling off your fresh base layer.
Step 2: Measuring & Taping Pattern
-
Plan Your Pattern:
Measure the total width of your wall. Decide on a repeating pattern—for this look, we are doing a wide stripe (around 6 inches) followed by a thin white gap, then a medium stripe. -
Mark the Wall:
Using a pencil and tape measure, make small tick marks along the top of the wall (near the ceiling) to indicate where each stripe starts and ends. -
Set the Level:
Set up your laser level to align vertically with your first tick mark. If you don’t have a laser, use a long spirit level to draw faint vertical plumb lines down the wall. -
Tape the Lines:
Apply your painter’s tape along the pencil lines. Remember to place the tape on the *outside* of the area you intend to paint, so the stripe maintains the correct width. -
Varying Stripe Widths:
For the specific look in the photo, ensure you are taping off the ‘white’ negative space stripes to preserve the background color. -
Seal the Edges:
Run a putty knife or a clean credit card firmly over the edge of every piece of tape. This is critical for preventing paint bleed. -
The Sealing Trick:
I like to lightly brush a small amount of the *base coat* color over the edge of the tape first. This seals any tiny gaps with the background color, ensuring your accent lines are razor-sharp.
Seal the Deal
Brush a layer of the BASE color over the tape edge before applying the stripe color. This fills any tape gaps with white paint, guaranteeing a crisp line.
Step 3: Painting the Stripes
-
Cut In First:
Using the angled sash brush, carefully paint the accent color at the very top (ceiling line) and very bottom (baseboard/chair rail) of your taped-off stripe areas. -
Roll the Accent Color:
Use the 4-inch mini foam roller to fill in the vertical stripes with your warm caramel paint. -
Apply Second Coat:
Wait for the first coat to be dry to the touch (usually 1 hour), then apply a second coat for rich, opaque coverage. -
Remove Tape Promptly:
Don’t wait for the paint to fully dry. Carefully peel the tape off slowly at a 45-degree angle while the paint is still slightly tacky to prevent chipping. -
Chair Rail Detail:
If you have molding separating the wall sections like in the image, ensure the stripes align perfectly above and below the chair rail for continuity. -
Touch Ups:
Inspect your lines once dry. Use a tiny artist’s brush to correct any small bleeds with the appropriate color. -
Reinstall Hardware:
Once the walls are fully cured, screw your outlet covers and switch plates back into place.
Metallic Luxe
Mix a metallic glaze into your caramel accent paint. The vertical stripes will catch the light differently throughout the day, adding dynamic shimmer.
Step back and enjoy how your new vertical lines draw the eye upward and make the room feel instantly more spacious

PENCIL GUIDE
Understanding Pencil Grades from H to B
From first sketch to finished drawing — learn pencil grades, line control, and shading techniques.
Explore the Full Guide
A Running Stripe That Wraps Around the Whole Room
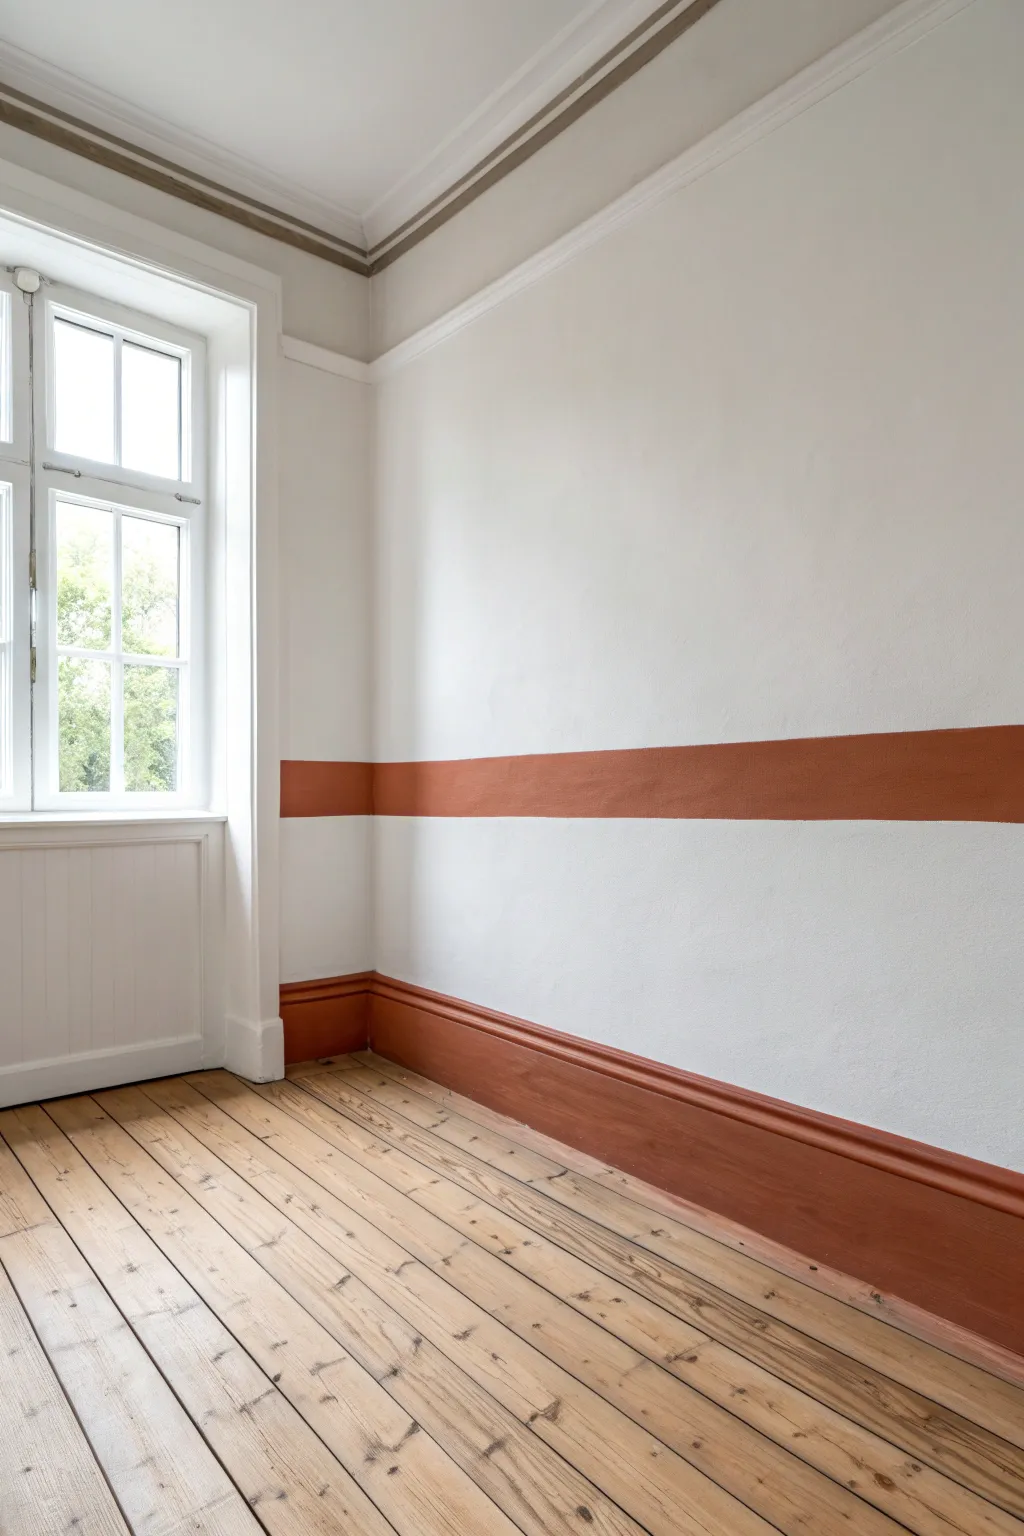
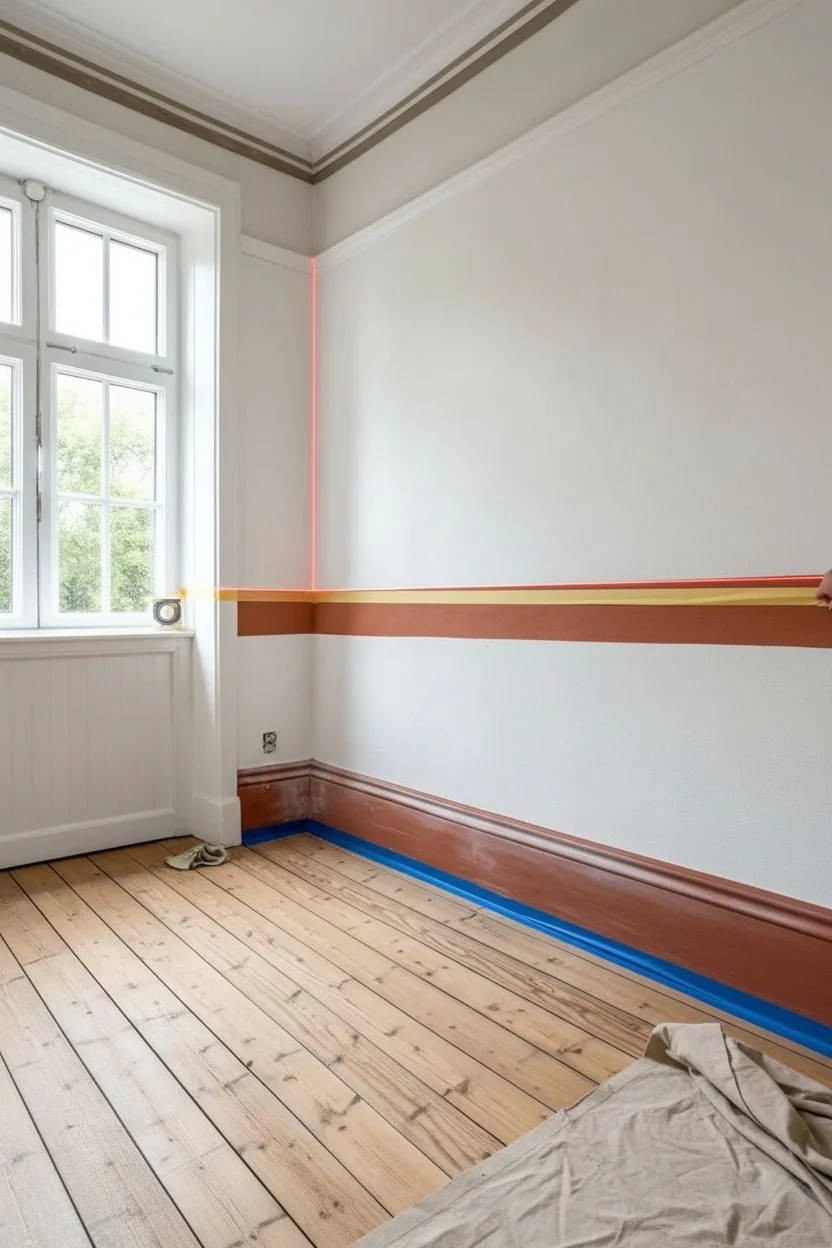
Bring continuity and a modern touch to your space with a single, bold stripe that travels seamlessly across walls and baseboards. This project uses a warm terracotta hue to ground the room while keeping the upper walls airy and open.
Step-by-Step Guide
Materials
- High-quality painter’s tape (multi-surface)
- Laser level or traditional spirit level
- Pencil
- Tape measure
- Terracotta shade interior latex paint (e.g., satin or eggshell finish)
- White wall paint (for touch-ups and sealing)
- Angled sash brush (2.5 inch)
- Mini foam roller and tray
- Drop cloths
- Sandpaper (120-grit and 180-grit)
- Tack cloth
- Screwdriver (for removing outlet covers if needed)
Step 1: Preparation & Mapping
-
Clear and Clean:
Begin by removing any furniture from the walls and taking off outlet covers. Wipe down the walls and baseboards with a damp cloth to remove dust and oils, ensuring the paint adheres properly. -
Sand the Baseboards:
Since the bottom stripe includes the baseboards, scuff sand them lightly with 120-grit sandpaper to remove any glossy finish. Wipe away the dust with a tack cloth. -
Measure the Height:
Decide on the height of your stripe. A common rule of thumb is to place it at chair rail height, about 32-36 inches from the floor, but measure to see what feels right for your ceilings. -
Set the Laser Level:
Position your laser level on a tripod or stable surface. Adjust it until the beam hits your desired top height for the stripe. This tool is invaluable for getting a perfectly straight line around corners. -
Establish the Bottom Line:
If your stripe is floating above the floor, you’ll need a bottom line too. However, for this specific look, the color extends all the way down to the floor, covering the baseboard, so you only need to mark the top edge.
Step 2: Taping & Sealing
-
Apply the Tape:
Carefully run a long strip of painter’s tape along the laser line you marked. Press the edge down firm to prevent bleeding. -
Protect the Floor:
Run a strip of tape along the floor right against the baseboard, and lay down your drop cloths to catch any stray drips. -
The Sealing Trick:
Here sits the secret to crisp lines: paint a very thin layer of your *existing* white wall color over the edge of the painter’s tape. This seals the tape, meaning any bleed-through matches the wall, not the new color. -
Let it Dry:
Allow this sealing layer to dry completely—usually about 30 to 60 minutes—before introducing your new color.
Bleeding Lines?
If paint bleeds under the tape, wait for it to dry fully. Then, re-tape the good side and lightly touch up the bleed with the correct color using a tiny artist brush.
Step 3: Painting the Stripe
-
Cut In the Edges:
Dip your angled sash brush into the terracotta paint. Carefully paint along the tape line and into the corners where the roller won’t reach. -
Paint the Baseboard Detail:
Use the brush to get into the grooves and curves of the baseboard facing. Be generous enough to cover, but watch out for drips pooling in the crevices. -
Roll the Flat Areas:
Load your mini foam roller. Roll the paint onto the wall section between the tape line and the baseboard. I prefer a foam roller here for a super smooth finish that mimics the texture of the plaster. -
Apply the Second Coat:
Let the first coat dry for at least 2 hours. Apply a second coat to ensure rich, opaque coverage, especially over the white baseboards. -
Check for Unevenness:
Inspect the wall from an angle to check for patchy spots or roller marks. If the terracotta color looks sheer, a third light coat might be necessary.
Level Up: Gloss Contrast
Use a matte finish for the wall stripe but a semi-gloss finish in the exact same shade for the baseboard. The subtle sheen difference adds incredible depth.
Step 4: The Reveal
-
Score the Tape:
If the paint layers are thick, lightly score the edge of the tape with a utility knife before pulling to prevent peeling the new paint. -
Remove Tape While Damp:
Slowly peel the tape off at a 45-degree angle while the final coat is still slightly tacky to the touch. This typically yields the cleanest edge. -
Clean Up Edges:
If any tiny bits of paint bled through, use a small artist’s brush and your original wall color to touch them up once everything is fully dry. -
Reinstall Hardware:
Once the paint has cured for 24 hours (or according to manufacturer instructions), screw your outlet covers back in place.
Step back and admire how this simple band of color completely transforms the architecture of your room
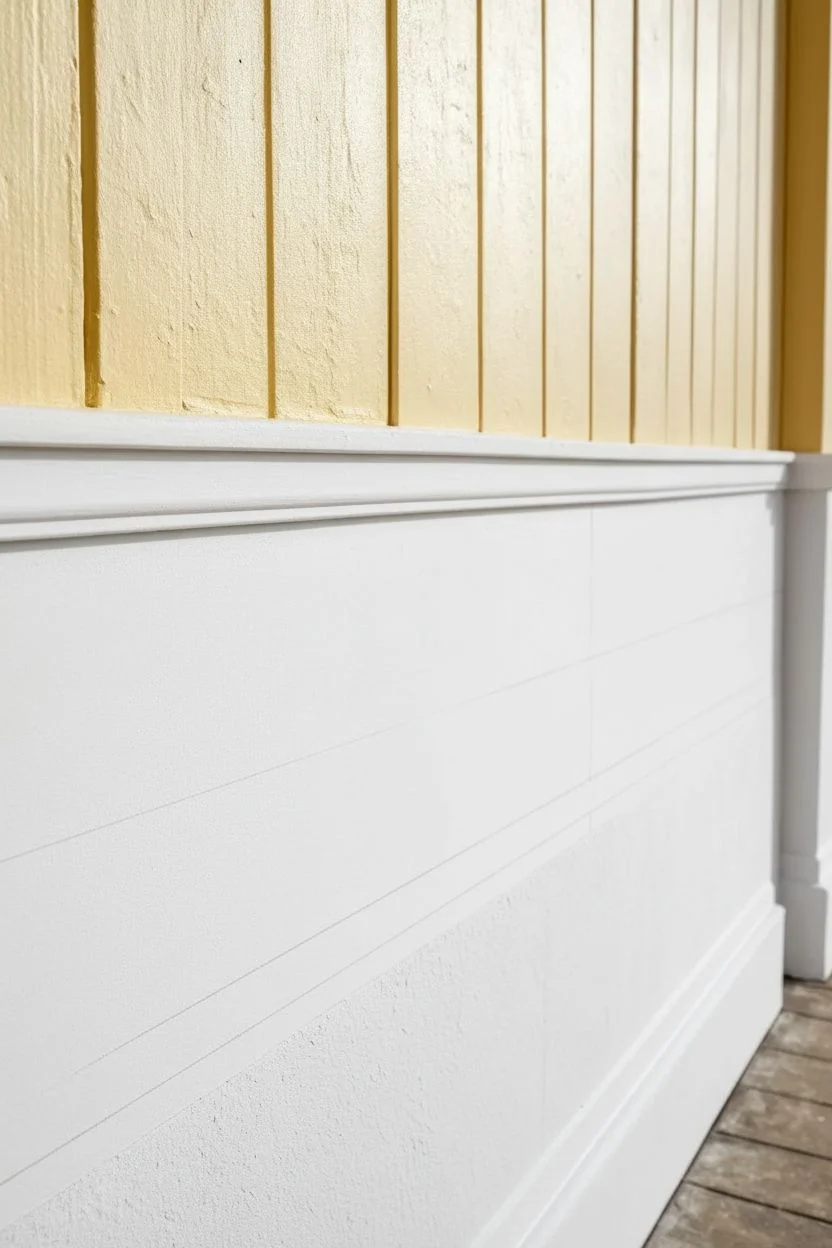
Painted Faux Wainscoting With Tape and Patience
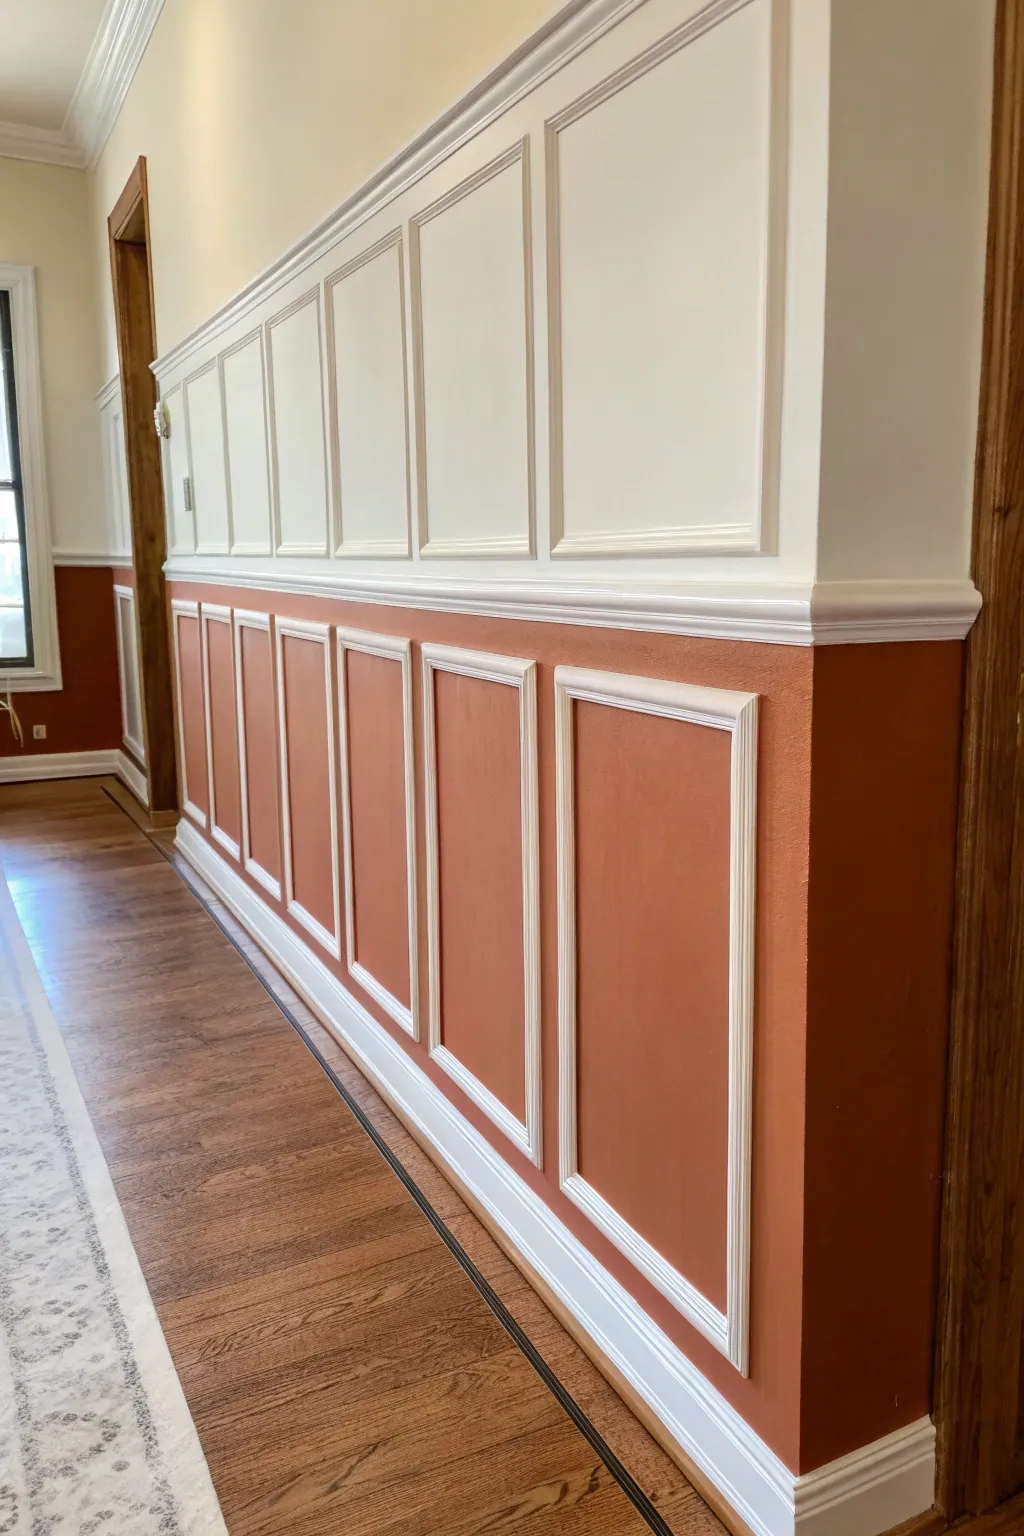
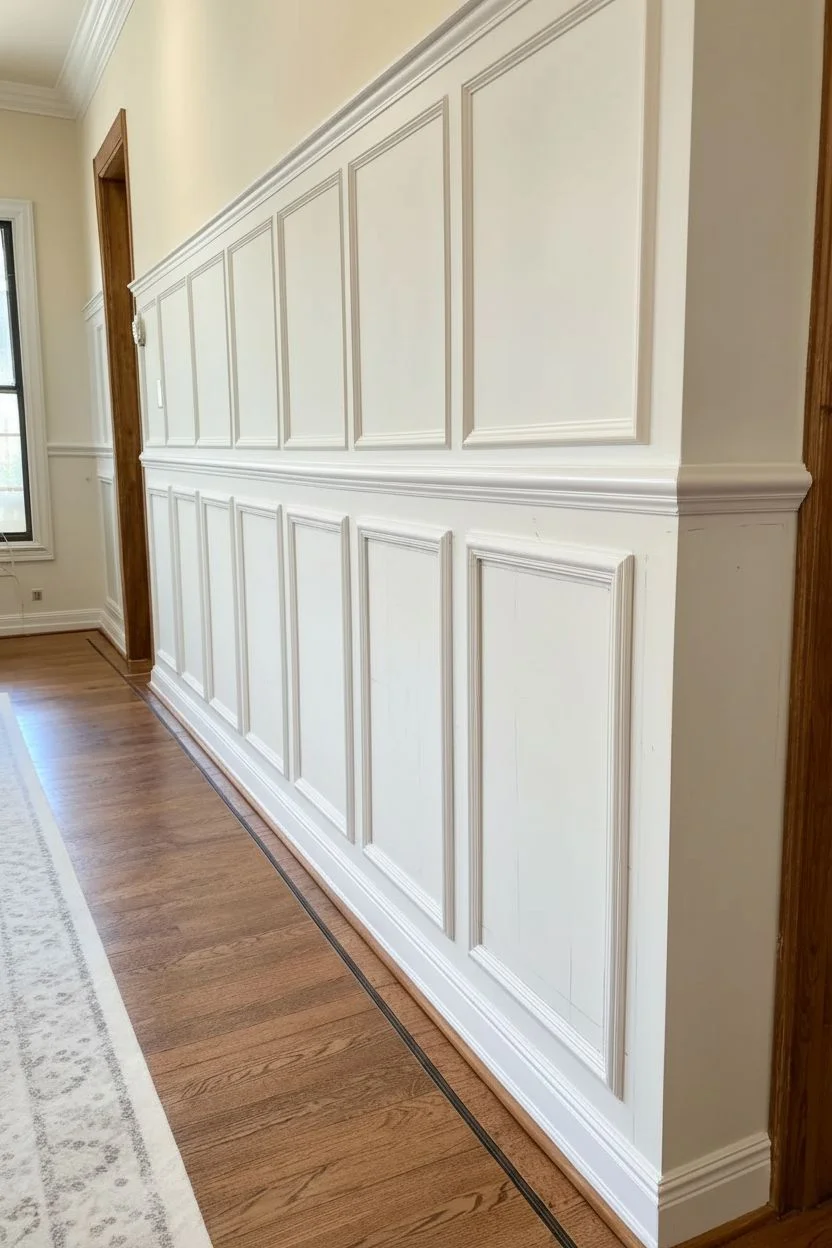
Achieve the classic elegance of wood molding without the expense or carpentry skills by using clever painting and trim placement. This project focuses on the lower wall section, creating a rich, terracotta-hued backdrop with bright white accented framing.
Detailed Instructions
Materials
- Terracotta colored interior wall paint (satin finish)
- White semi-gloss trim paint
- Pre-primed decorative panel molding (thin profile)
- Chair rail molding
- Baseboard molding
- Construction adhesive (Loctite or similar)
- Finishing nails
- Hammer or nail gun
- Miter box and hand saw (or miter saw)
- Wood filler
- Caulk and caulking gun
- Painter’s tape
- Measuring tape
- Level (long spirit level)
- Pencil
- Sandpaper (220 grit)
- Paint brushes (angled sash brush)
Step 1: Preparation & Layout
-
Prepare the Surface:
Begin by ensuring the lower wall area is clean, smooth, and free of dust. If you are starting on a fresh wall, apply a coat of primer to the lower half. If existing baseboards are in poor shape, remove them now; otherwise, you can build on top of or above them. -
Establish the Chair Rail Height:
Determine the height of your wainscoting. A standard height is often around 32-36 inches from the floor, roughly one-third of the wall’s height. Use your long level to mark a straight horizontal line across the entire wall at this height. -
Calculate Box Spacing:
Measure the total length of the wall. Decide how many ‘boxes’ you want. I find that leaving about 3 to 4 inches of space between boxes creates a balanced look. Use your pencil to lightly mark the vertical center lines for each future box on the wall. -
Draft the Dimensions:
Using your spacing calculations, draw the actual rectangles on the wall where the molding will go. Ensure the top and bottom of the boxes are equidistant from the chair rail line and the baseboard line.
Tape Trick
To get razor-sharp lines on textured walls, seal the edge of your painter’s tape with a tiny amount of the base color before applying the accent color. This blocks bleed-under.
Step 2: Cutting & Installation
-
Install the Chair Rail:
Measure, cut, and install your chair rail molding along the top horizontal line you marked. Apply a wavy bead of construction adhesive to the back, press it firmly to the wall, and secure it with finishing nails into the studs. -
Cut the Panel Molding:
Using your miter box or saw, cut the decorative panel molding strips to form your rectangles. Each corner needs to be cut at a 45-degree angle so they fit together perfectly like a picture frame. -
Test Fit the Frames:
Before gluing, hold the four pieces of a box against the wall within your pencil marks to ensure the corners meet tightly. Make small adjustments with sandpaper if the angles aren’t quite sharp. -
Attach the Frames:
Apply construction adhesive to the back of the molding strips. Press them onto your pencil outlines. Use a level on each piece as you go—don’t trust the floor or ceiling to be perfectly straight. Secure with a few finishing nails. -
Fill and Sand:
Once the adhesive is set, fill all nail holes and corner joints with wood filler. Let it dry completely, then sand these spots smooth with 220-grit sandpaper so the joints become invisible. -
Caulk the Seams:
Run a thin bead of paintable caulk along the inside and outside edges of every molding strip, as well as along the chair rail and baseboard. Smooth this with a wet finger to eliminate gaps between the trim and the wall.
Double Frame Depth
For a truly high-end ‘library’ look, install a second, smaller rectangle of molding inside the first one. Paint the space between them white to simulate a solid wood recessed panel.
Step 3: Painting the Finish
-
Base Color Application:
Because this project features a high-contrast look, you have a choice. I prefer painting the ‘inside’ of the boxes and the wall spaces first. Apply your terracotta paint to the wall surface, carefully cutting in around the trim. -
Second Coat Depth:
Apply a second coat of the terracotta paint to ensure full opacity. This rich color is the key to making the white trim pop. -
Protect the Wall Color:
Once the terracotta paint is fully cured (give it at least 24 hours), apply painter’s tape to the wall right next to the molding edges to protect your fresh color. -
Painting the Trim:
Using an angled sash brush, paint the chair rail, baseboards, and the picture frame molding in bright semi-gloss white. Use long, smooth strokes to minimize brush marks. -
Detail Work:
Check the sides of the molding. You want the white to cover the moulding itself but stop cleanly at the wall. Apply a second coat of white if the wood grain or primer is showing through. -
The Reveal:
Remove the painter’s tape slowly while the paint is still slightly tacky to ensure a crisp line. If any terracotta paint bled onto the white, or vice versa, use a small artist’s brush for final touch-ups.
Step back and admire how a simple grid of molding and paint has completely transformed the architectural character of your room


Scalloped Border for a Sweet, Handmade Finish
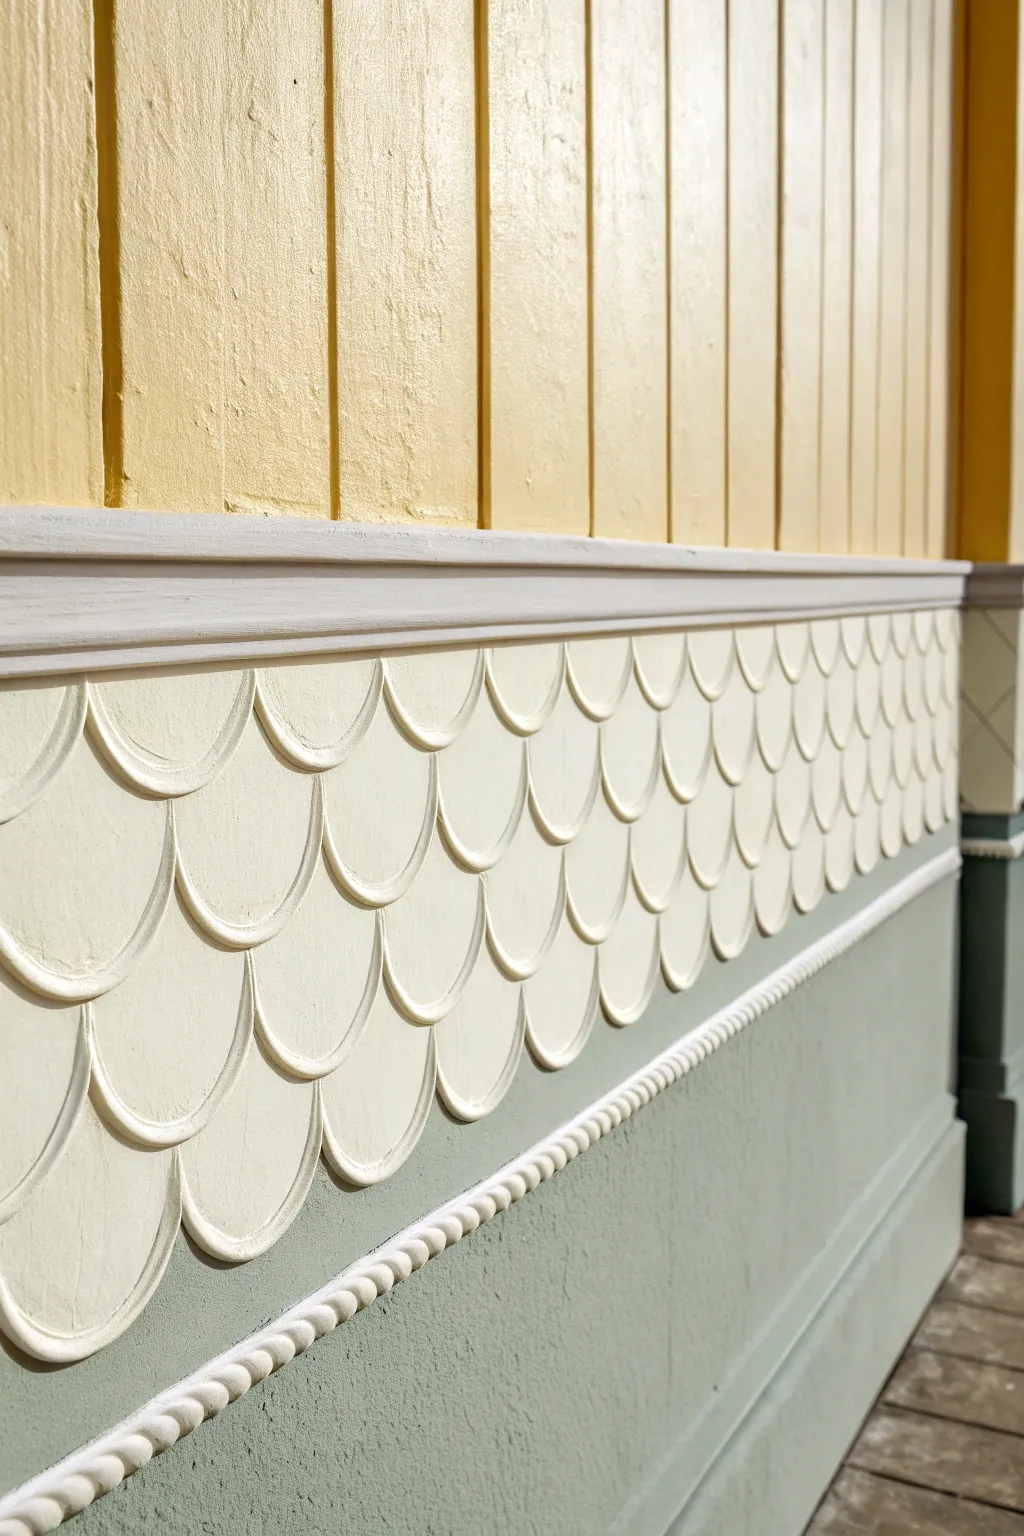
Transform a plain wall into a charming architectural feature with this multi-textured scalloped paneling technique. By combining vertical shiplap, raised fish-scale molding, and subtle color blocking, you create a tactile, vintage-inspired finish that feels both sweet and sophisticated.
Step-by-Step Tutorial
Materials
- Vertical shiplap or beadboard paneling
- Medium-density fiberboard (MDF) or thin plywood sheets
- Jigsaw or laser cutter
- Sandpaper (120 and 220 grit)
- Decorative chair rail molding
- Rope trim molding
- Construction adhesive
- Brad nailer and 1-inch nails
- Wood filler
- Caulk and caulk gun
- Primer
- Pale yellow satin paint
- Creamy white eggshell paint
- Sage green matte paint
- Paintbrushes and foam rollers
- Compass or round template
Step 1: Preparation and Top Board Installation
-
Install the Top Siding:
Begin by installing your vertical shiplap or beadboard on the upper portion of the wall. Ensure the boards are plumb and securely attached to studs or wall anchors. -
Define the Scallop Zone:
Determine the height of your scalloped middle section. Measure and mark horizontal level lines where the top chair rail and the bottom rope trim will eventually sit. -
Prime the Surface:
Before attaching any trim, apply a coat of primer to the area below the shiplap to ensure good adhesion for the adhesive you’ll be using later.
Step 2: Creating the Scallops
-
Draft the Pattern:
On your MDF or thin plywood, use a compass or a sturdy circular object to draw rows of identical semi-circles. The radius should match the scale you want for your ‘fish scales.’ -
Cut the Shapes:
Carefully cut out your scalloped shapes. For the most 3D effect shown in the image, you aren’t just cutting a flat edge; you are cutting individual overlapping scales or creating deep grooves with a router on a panel. -
Alternative: Use Pre-made Molding:
If cutting individual scales feels daunting, source scalloped architectural panels or fish-scale siding shingles which can be glued directly to the wall surface. -
Attach the First Row:
Apply construction adhesive to the back of your first row of scallops. Press them firmly onto the wall, starting from the top line immediately under where your chair rail will go. -
Layering Downward:
Install subsequent rows, offsetting them so the center of a scallop in the new row aligns with the gap between the two scallops above it, mimicking fish scales. -
Secure with Nails:
Use a brad nailer to tack the scales in place while the adhesive cures. Keep nails near the top of each scale so the overlapping row creates a seamless look.
Depth Perception
To enhance the 3D effect of the scallops, lightly sand the curved bottom edge of each scale to round it over before painting. This softens the shadow line.
Step 3: Adding Trim and Details
-
Install the Chair Rail:
Measure and cut your decorative chair rail molding. Install it horizontally, covering the seam between the yellow vertical boards and the top of your scalloped section. -
Add the Bottom Trim:
Install the twisted rope trim molding at the bottom of the scallop section. This acts as a visual divider between the cream scallops and the green base wall. -
Fill and Caulk:
Fill all nail holes with wood filler. Run a bead of caulk along the top and bottom of the chair rail and rope trim to eliminate gaps and create a professional, built-in appearance. -
Sand Smooth:
Once the filler is dry, gently sand any rough spots on the scallops and trim with 220-grit sandpaper to prepare for the final paint finish.
Level Up: Glazing
Apply a translucent antique glaze over the dried cream paint on the scallops. Wipe it back immediately to leave subtle darkness in the crevices for an aged look.
Step 4: Painting the Finish
-
Paint the Upper Wall:
Paint the vertical shiplap in a cheerful pale yellow satin paint. Use a brush to get into the grooves first, then roll the flat surfaces. -
Paint the Scallops:
Apply a creamy white eggshell paint to the scalloped section and the top chair rail. I find angled sash brushes work best here to get under the curves without dripping. -
Paint the Base:
Paint the wall section below the rope trim in a sage green matte finish. Painting the rope trim white first creates a crisp contrast against this darker green connection point. -
Detail the Rope Trim:
Carefully paint the rope trim in the same creamy white as the scallops. Take your time here to ensure a clean line where it meets the green wall. -
Final Inspect:
Check for any drips or missed spots in the crevices of the scallops or rope texture and touch up as needed with a small artist’s brush.
Step back and enjoy the delightful texture and soft color palette of your profound new wall feature
Checkerboard Paint Pattern for a Statement Corner
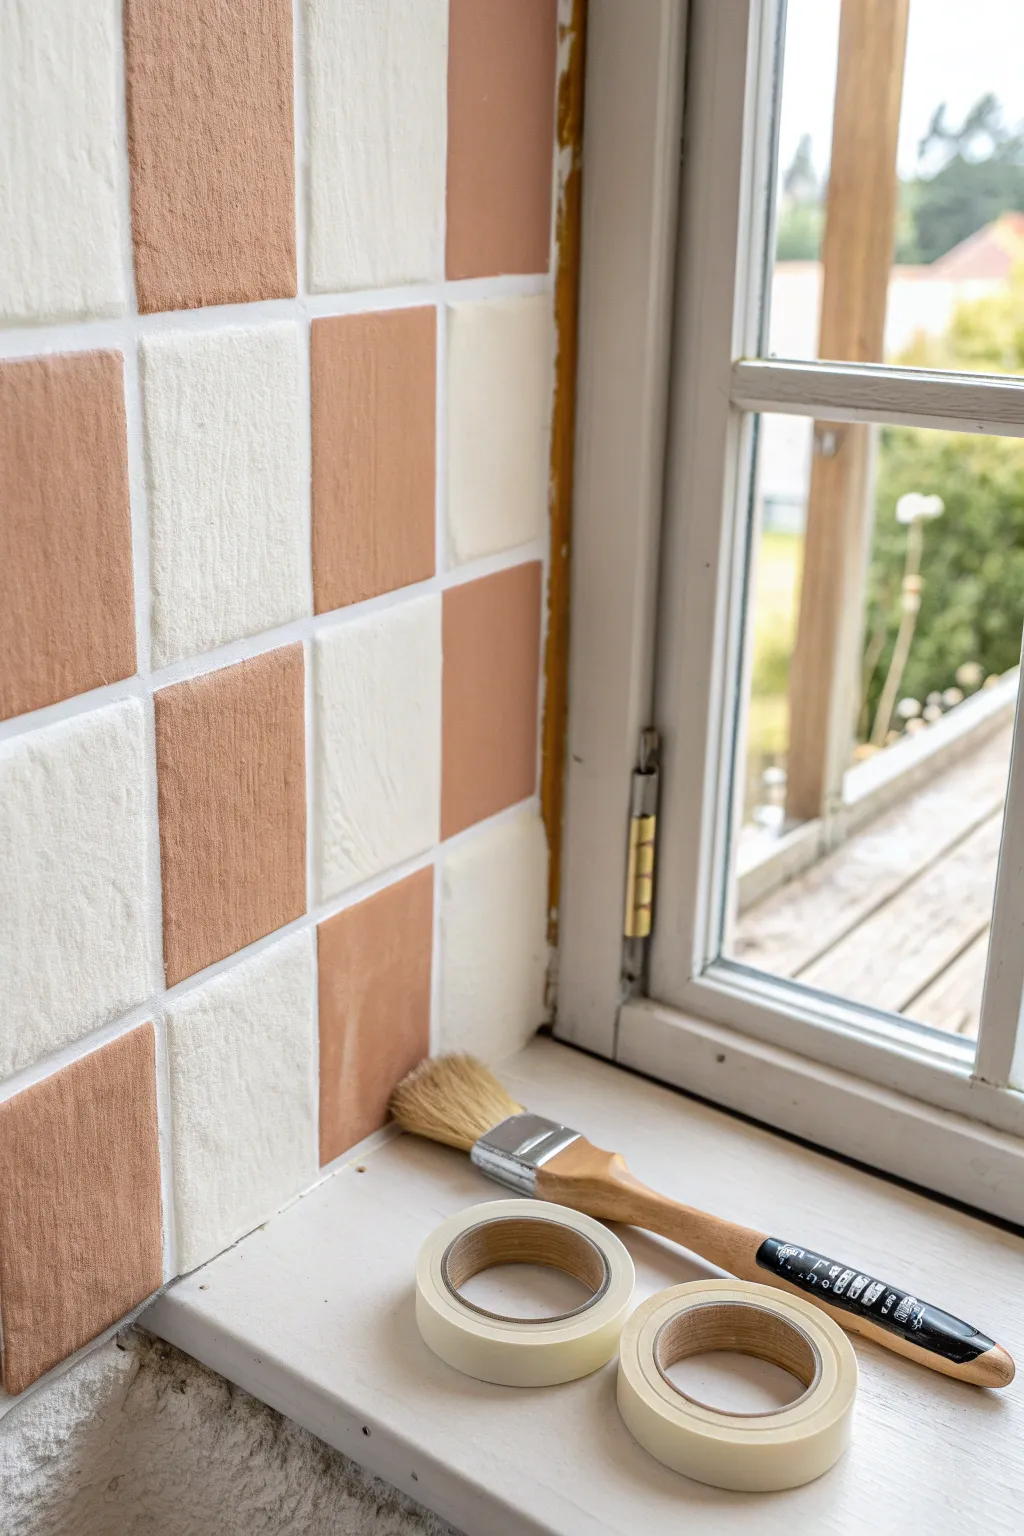
Transform a plain wall corner into a charming, faux-tiled accent using nothing but paint and tape. This checkerboard pattern mimics the rustic texture of terracotta stones, adding warmth and visual interest next to a window or in a cozy nook.
Step-by-Step Guide
Materials
- High-quality painter’s tape (1-inch width to simulate grout lines)
- Measuring tape
- Pencil
- Bubble level or laser level
- Off-white latex wall paint (base coat and ‘grout’)
- Terracotta or rust-colored matte paint
- Cream or broken-white colored matte paint
- Small angled sash brush (1.5 to 2 inch)
- Small foam roller
- Dry rag or stiff bristle brush (for texture)
- Drop cloth
Step 1: Preparation & Base Coat
-
Clean and prep:
Start by wiping down the wall surface with a damp cloth to remove dust and grease, ensuring the tape will adhere perfectly. -
Protect the area:
Lay down your drop cloth and tape off the trim, window frame, and adjacent ceiling to protect them from stray brushstrokes. -
Apply the ‘grout’ color:
Paint the entire section with your off-white base color. This will serve as the background for potential gaps and, most importantly, the visible lines between your painted tiles. Let this dry completely, preferably overnight.
Texturing Tip
To get that authentic stone look, mix a tablespoon of baking soda into your paint cup. It adds a subtle grit that mimics real matte tiles beautifully.
Step 2: Mapping the Grid
-
Measure the tiles:
Decide on the size of your squares. For a realistic tile look like the image, 4×4 or 5×5 inches works well. -
Mark vertical guides:
Using your level and pencil, lightly draw vertical lines spaced apart by your tile width plus the width of your painter’s tape (representing the grout). -
Mark horizontal guides:
Repeat the process horizontally, drawing level lines across the wall to create a large grid system. -
Apply the tape grid:
Place your painter’s tape exactly over your pencil lines. Press the edges of the tape down firmly with your fingertip or a credit card to prevent paint bleed.
Step 3: Painting the Tiles
-
Seal the tape:
I like to quickly brush a thin layer of the *base* color over the tape edges first. This seals the tape so any bleed is just the base color, keeping your final lines crisp. -
Plan your pattern:
Mark every other square lightly with a piece of tape or a pencil ‘X’ so you know which ones will be terracotta and which will be cream. -
Paint the darker squares:
Using a small brush, fill in the terracotta squares. Don’t aim for perfect, flat coverage; dab the brush slightly to build up texture. -
Add texture:
While the terracotta paint is still tacky, stipple it gently with a dry rag or a stiff dry brush to simulate the porous look of real stone. -
Paint the lighter squares:
Rinse your brush or grab a fresh one, then fill in the remaining squares with the cream paint, using the same texturing technique.
Bleeding Lines?
If you peel the tape and see fuzzy edges, don’t panic. Wait for it to fully dry, then use a straight edge and a fine-tip brush to re-establish the line.
Step 4: Finishing Touches
-
Second coat (optional):
If the colors look too translucent, apply a second coat once the first is dry to the touch, maintaining that textured finish. -
Remove tape:
Here is the satisfying part: slowly peel off the tape while the paint is still slightly damp to avoid chipping the edges. -
Touch ups:
Inspect your ‘grout’ lines. If any paint bled through, use a tiny artist’s brush and your base color to tidy up the lines. -
Erase pencil marks:
Once the paint is fully cured (give it 24 hours), gently erase any visible pencil marks from the grid planning stage.
Step back and admire how a simple grid of color has added architectural character to your room without installing a single ceramic tile
Contrasting Trim and Doors for Crisp Transitions
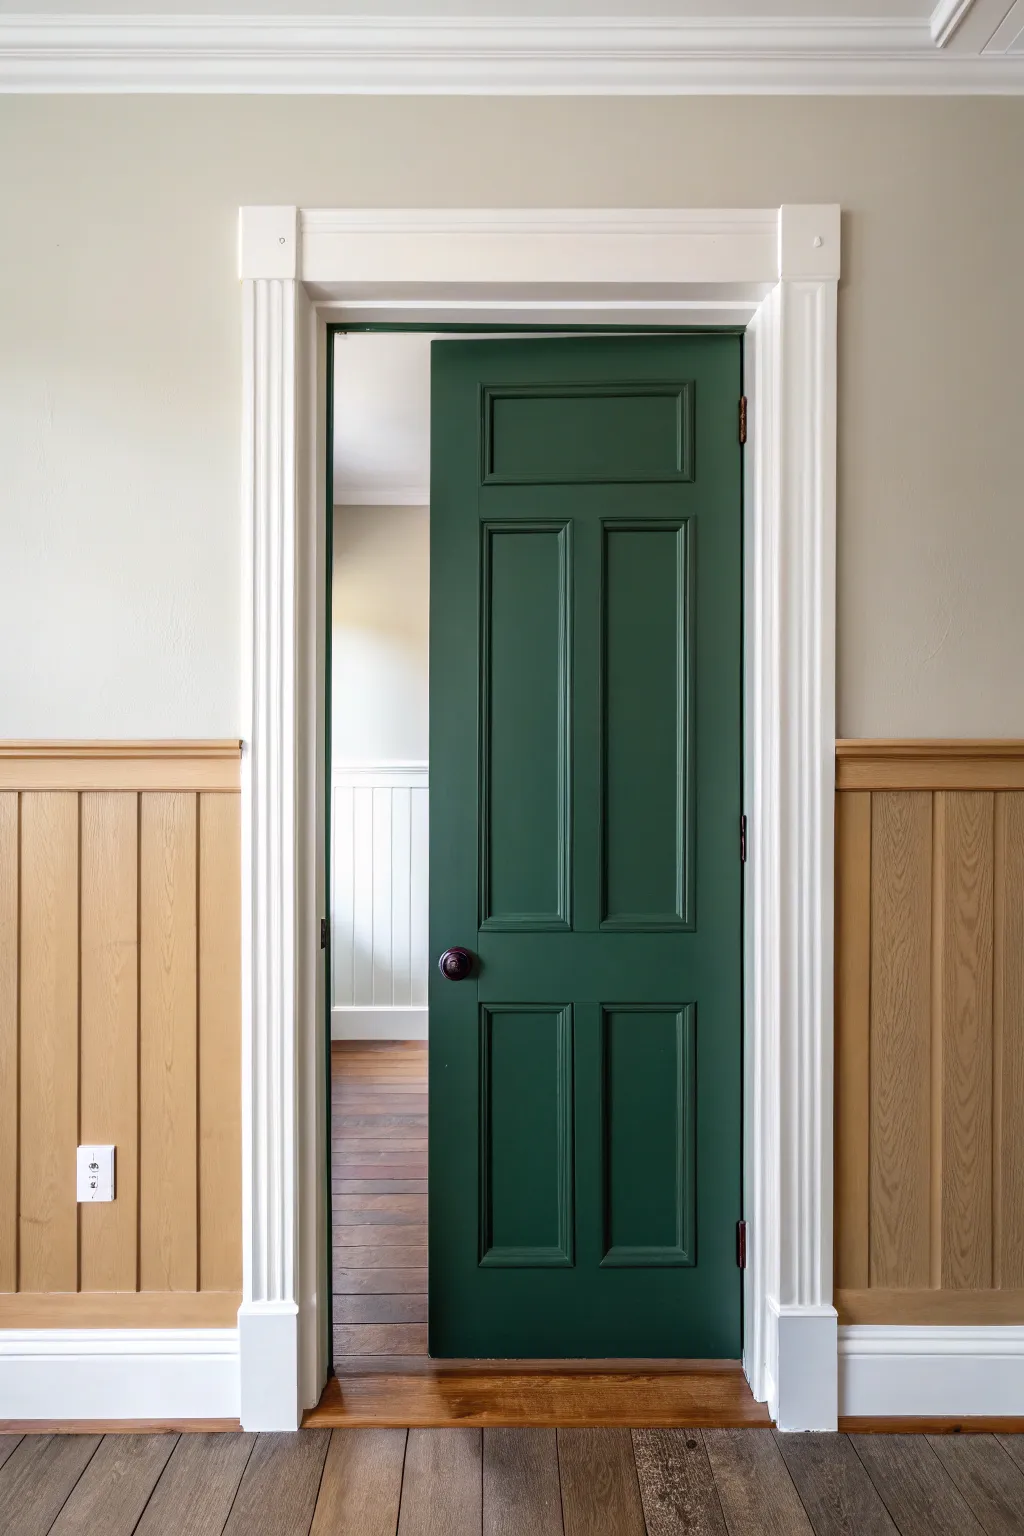
Transform a standard interior doorway into a striking architectural feature by pairing crisp white trim with a deep, sophisticated green door. This high-contrast look provides an elegant transition between rooms while highlighting traditional millwork details.
Detailed Instructions
Materials
- Interior semi-gloss or satin paint (Deep Hunter Green)
- Interior semi-gloss paint (Bright White)
- High-quality angled sash brush (2-2.5 inch)
- 4-inch foam roller and tray
- Painter’s tape (delicate surface)
- Sandpaper (120 and 220 grit)
- Tack cloth
- Clean rags
- Screwdriver (for hardware removal)
- Drop cloths
- Wood filler (if needed)
- Primer (bonding primer highly recommended)
Step 1: Preparation & Hardware
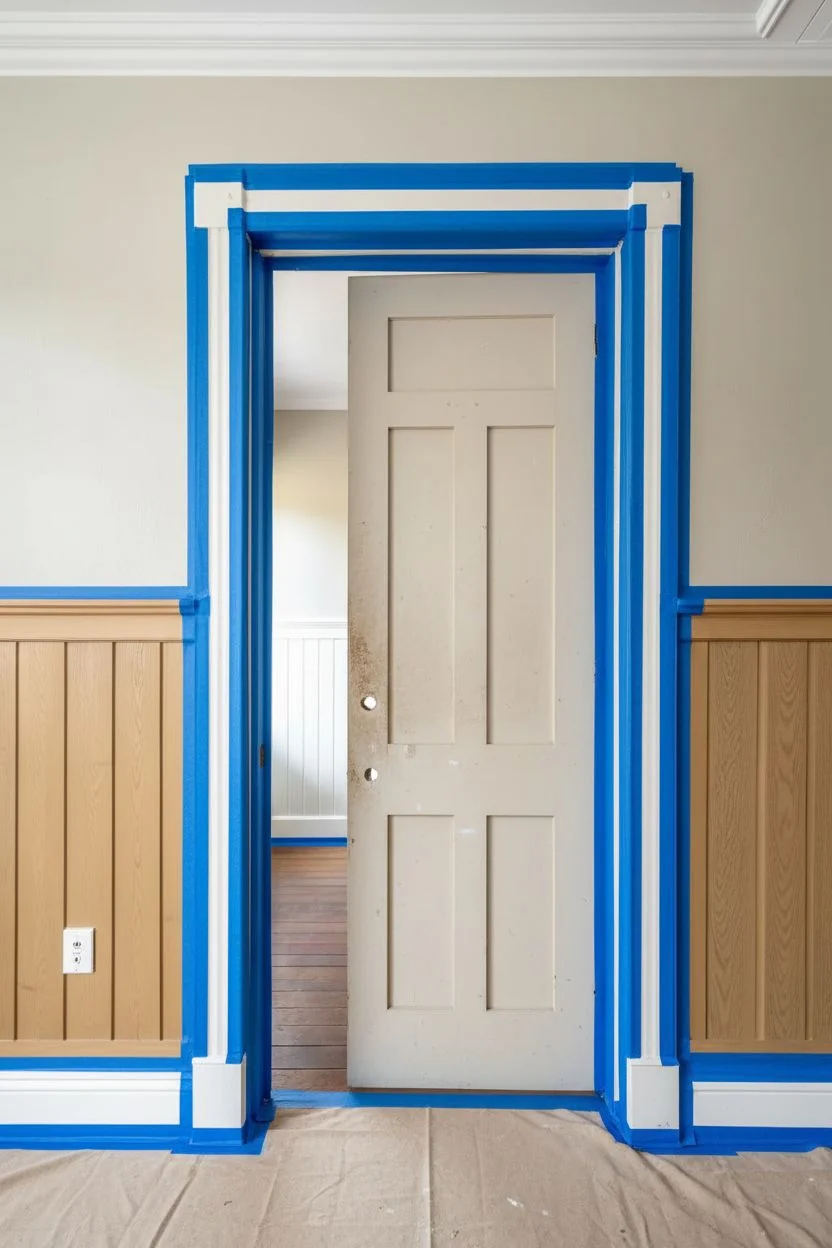
-
Remove hardware:
Begin by removing the doorknob, strike plates, and hinges if you plan to paint the door off the frame. If leaving the door hung, tape off the hinges meticulously with blue painter’s tape. -
Clean surfaces:
Wipe down both the door and the trim using a mild degreaser or soapy water to remove oils and fingerprints. Let everything dry completely before proceeding. -
Fill imperfections:
Inspect the wood for dings or nail holes. Apply wood filler, let it dry, and sand flush. This ensures your final high-contrast finish looks professional. -
Protect the area:
Lay down drop cloths to protect the floor. Apply painter’s tape to the walls adjoining the trim and the floor baseboards to ensure crisp lines.
Sticky Door Syndrome?
If the door sticks after painting, dust the edges with talcum powder or rub with paraffin wax. Ensure paint has cured for at least 48 hours before closing fully.
Step 2: Sanding & Priming
-
Light sanding:
Scuff sand the door and the white trim areas with 120-grit sandpaper. You aren’t trying to remove all old paint, just creating a ‘tooth’ for the new coat to grip. -
Remove dust:
Vacuum up the sanding dust, then wipe everything down with a tack cloth. Any remaining dust will show through semi-gloss paint. -
Apply primer:
Paint a coat of bonding primer over the door, especially if making a drastic color change or painting over oil-based gloss. Let the primer cure according to the can’s instructions.
Elevate the Look
Swap standard brass hinges for matte black or oil-rubbed bronze to complement the deep green tone. It adds a modern, custom feel to the entryway.
Step 3: Painting the Trim
-
Start with trim:
While the primer dries on the door, paint the door casing and plinth blocks with your bright white semi-gloss. I find doing the trim first allows for easier taping later. -
Brush technique:
Use your angled sash brush for the fluted details of the trim. Keep a wet edge to avoid brush marks. -
Second trim coat:
Once the first coat is dry, lightly sand with 220-grit paper, wipe clean, and apply a second coat of white for full opacity.
Step 4: Painting the Door
-
Tape the trim:
Once the trim is fully dry (give it at least 24 hours to be safe), mask off the inner edge of the doorstop where the door meets the frame. -
Paint panels first:
Using the angled brush, paint the recessed areas of the door panels first within the green paint. Don’t let paint pool in the corners. -
Roll the flats:
Use the foam roller for the flat vertical stiles and horizontal rails. This helps achieve a smooth, sprayed-on look without brush strokes. -
Order of operations:
Follow the wood grain: panels first, then the center vertical stile, then horizontal rails, and finally the two outer vertical stiles. -
Check for drips:
Inspect corners and edges immediately after painting a section to catch any runs before they dry. -
Second coat:
Wait for the recommended drying time, lightly sand with 220-grit paper, wipe with a tack cloth, and apply your second coat of green. -
Remove tape:
While the final coat is still slightly tacky, carefully peel away the painter’s tape at a 45-degree angle to ensure a sharp line. -
Reinstall hardware:
Once the door has cured for a couple of days (to prevent sticking), reinstall your knobs and hardware to complete the transformation.
Enjoy the dramatic and sophisticated entrance you have created for your home
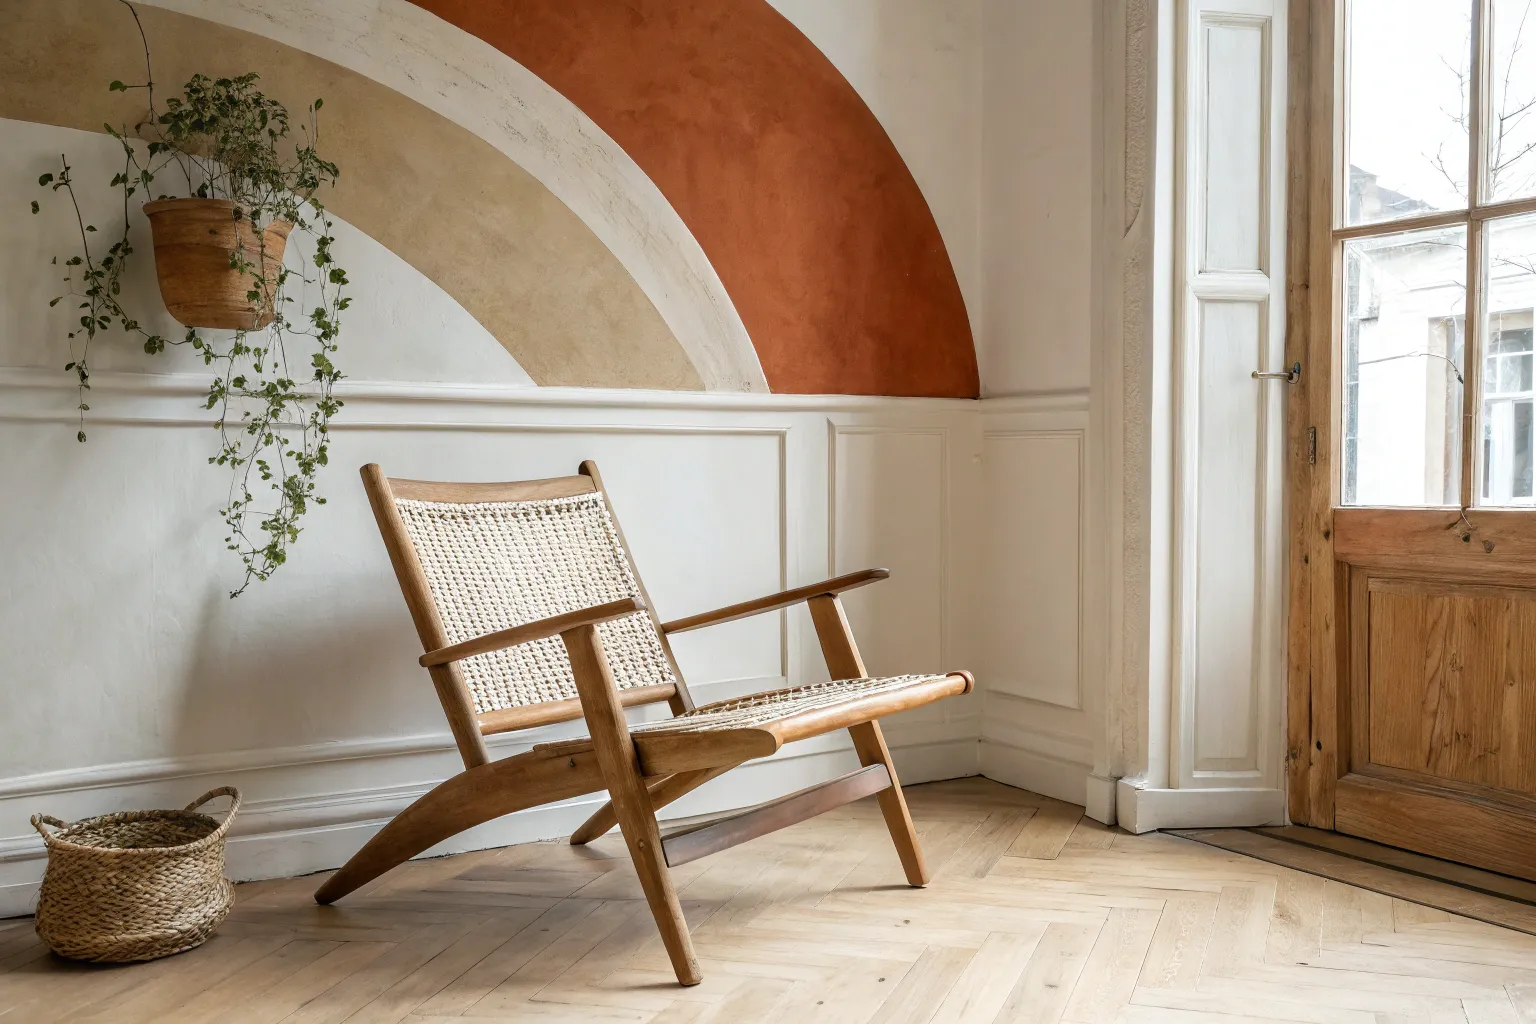
Monochrome Paint Wrap: Walls and Trim in One Shade

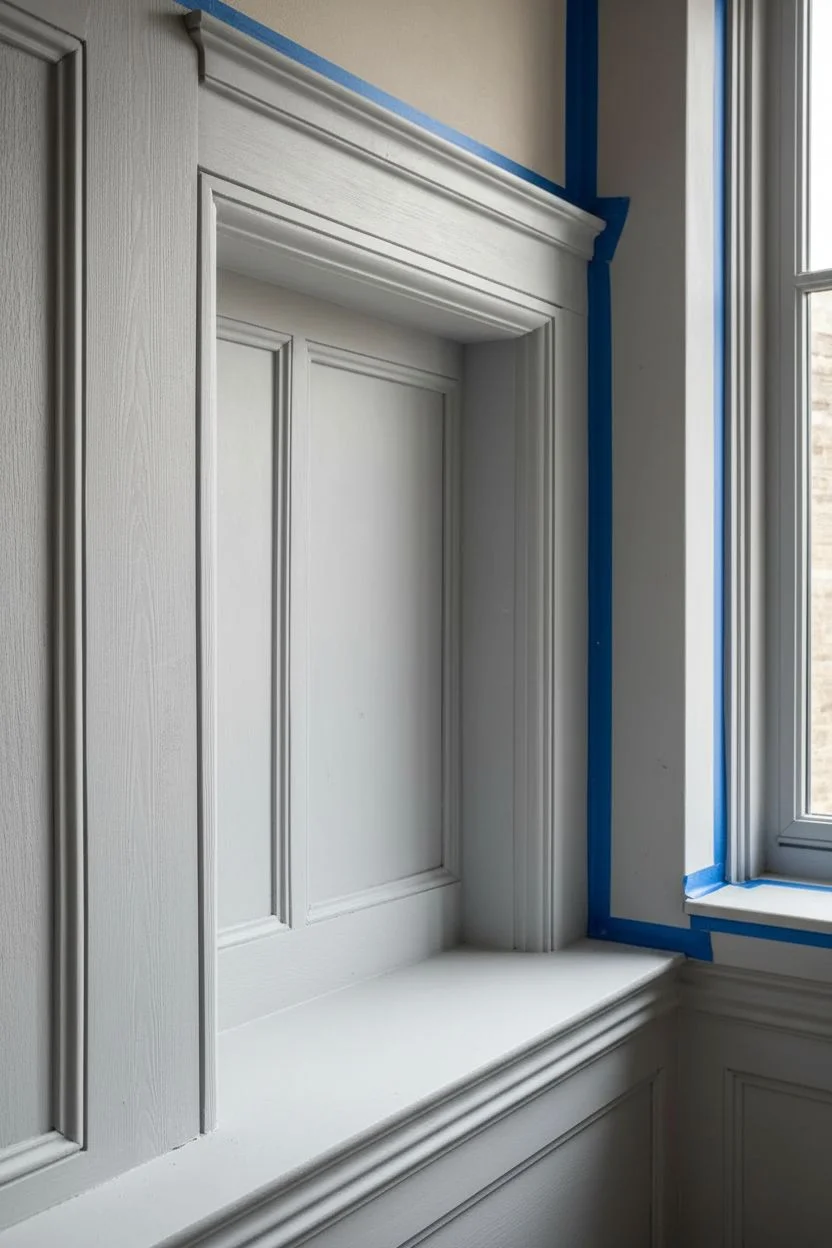
Transform a room with the sophisticated technique of monochrome color washing, where walls, trim, and woodwork are bathed in a single, rich hue. This project creates a moody, textural depth using a striking matte blue paint that highlights the natural grain of the wood paneling.
Step-by-Step Guide
Materials
- High-quality matte or eggshell interior paint (deep slate blue)
- Primer suitable for wood and previous finishes
- Medium-grit sanding sponge (120-150 grit)
- Fine-grit sandpaper (220 grit)
- High-quality angled sash brush (1.5-2 inch)
- Microfiber roller cover (short nap, 1/4 or 3/8 inch)
- Small roller frame and tray
- Painter’s tape
- Drop cloths
- Tack cloth
- Wood filler (if repairing holes)
Step 1: Preparation & Surface Care
-
Assess the surface:
Begin by inspecting your wood paneling and trim. If there are any nail holes or deep scratches, fill them with wood filler and let it dry completely according to the manufacturer’s instructions. -
Detailed sanding:
Use your medium-grit sanding sponge to scuff-sand all surfaces. This is crucial for adhesion, especially if the current finish is glossy. Get into the grooves of the molding, but be careful not to round over crisp edges. -
Clean the dust:
Vacuum the area thoroughly, using a brush attachment to clear dust from corners and crevices. Finish by wiping everything down with a tack cloth to ensure a perfectly clean base. -
Protect adjacent areas:
Apply painter’s tape carefully along the floor, ceiling line (if you aren’t painting it), and window glass. Press the tape down firmly with a putty knife or your fingernail to prevent bleed-through. -
Prime the wood:
Apply a coat of high-quality primer. If you are making a drastic color change to a dark blue, ask your paint store to tint the primer gray to help with coverage. Let this dry fully. -
Light sand between coats:
Once the primer is dry, I like to do a very quick pass with fine-grit sandpaper (220) to knock down any raised grain or brush marks, creating a glass-smooth surface for the topcoat.
Sticky Paint Fix
If your painted surfaces stick together (blocking) after drying, the paint hasn’t fully cured. Dust a tiny amount of talcum powder on contact points until the paint hardens completely.
Step 2: Painting the Monochrome Look
-
Cut in the edges:
Dip your angled sash brush about an inch into the paint. carefully ‘cut in’ around the edges of the panels, inside the recessed niche corners, and along the trim where a roller can’t reach. -
Work in sections:
Don’t cut in the entire room at once. Work on one wall or section at a time so the brushed paint stays wet when you roll into it, preventing ‘picture framing’ marks. -
Rolling the flats:
Use the small roller with a short nap cover for the flat recessed panels and wider stiles. The short nap ensures a smooth finish without too much texture. -
Feathering the brushwork:
Immediately smooth out any drips or heavy ridges in the corners with your brush. For deep grooves in the paneling, you may need to use the brush to ensure full coverage before lightly rolling over adjacent flat areas. -
Dry and assess:
Allow the first coat to dry completely. Dark colors often look patchy after one coat, so don’t panic if the coverage isn’t perfect yet. -
Second coat application:
Repeat the cutting and rolling process for the second coat. This layer provides the true depth and richness of the color. Ensure you maintain a wet edge to avoid lap marks. -
Check for holidays:
Inspect the intricate molding details from different angles. Use a small artist’s brush to touch up any ‘holidays’ (missed spots) deep in the crevices where the roller missed. -
Remove tape:
While the final coat is still slightly tacky (not fully cured), carefully peel away the painter’s tape at a 45-degree angle to ensure a crisp clean line.
Step 3: Styling the Niche
-
Refine the shelf:
If your niche has a wooden shelf base like the image, decide whether to paint it or leave it natural as a contrast. If leaving it natural, ensure it was well-taped during painting; simply clean it with a wood polish now. -
Final cure:
Allow the paint to cure for at least 24 hours before placing any objects, like the terracotta vase, onto the painted surfaces or the shelf to prevent sticking.
Texture Contrast
For a subtle twist, use a satin finish on the trim pieces and a matte finish on the flat recessed panels. It keeps the monochrome color but adds light-catching dimension.
Now you can step back and admire the calm, enveloping atmosphere your new monochrome room provides
Statement Ceiling in a Color That Changes the Whole Room
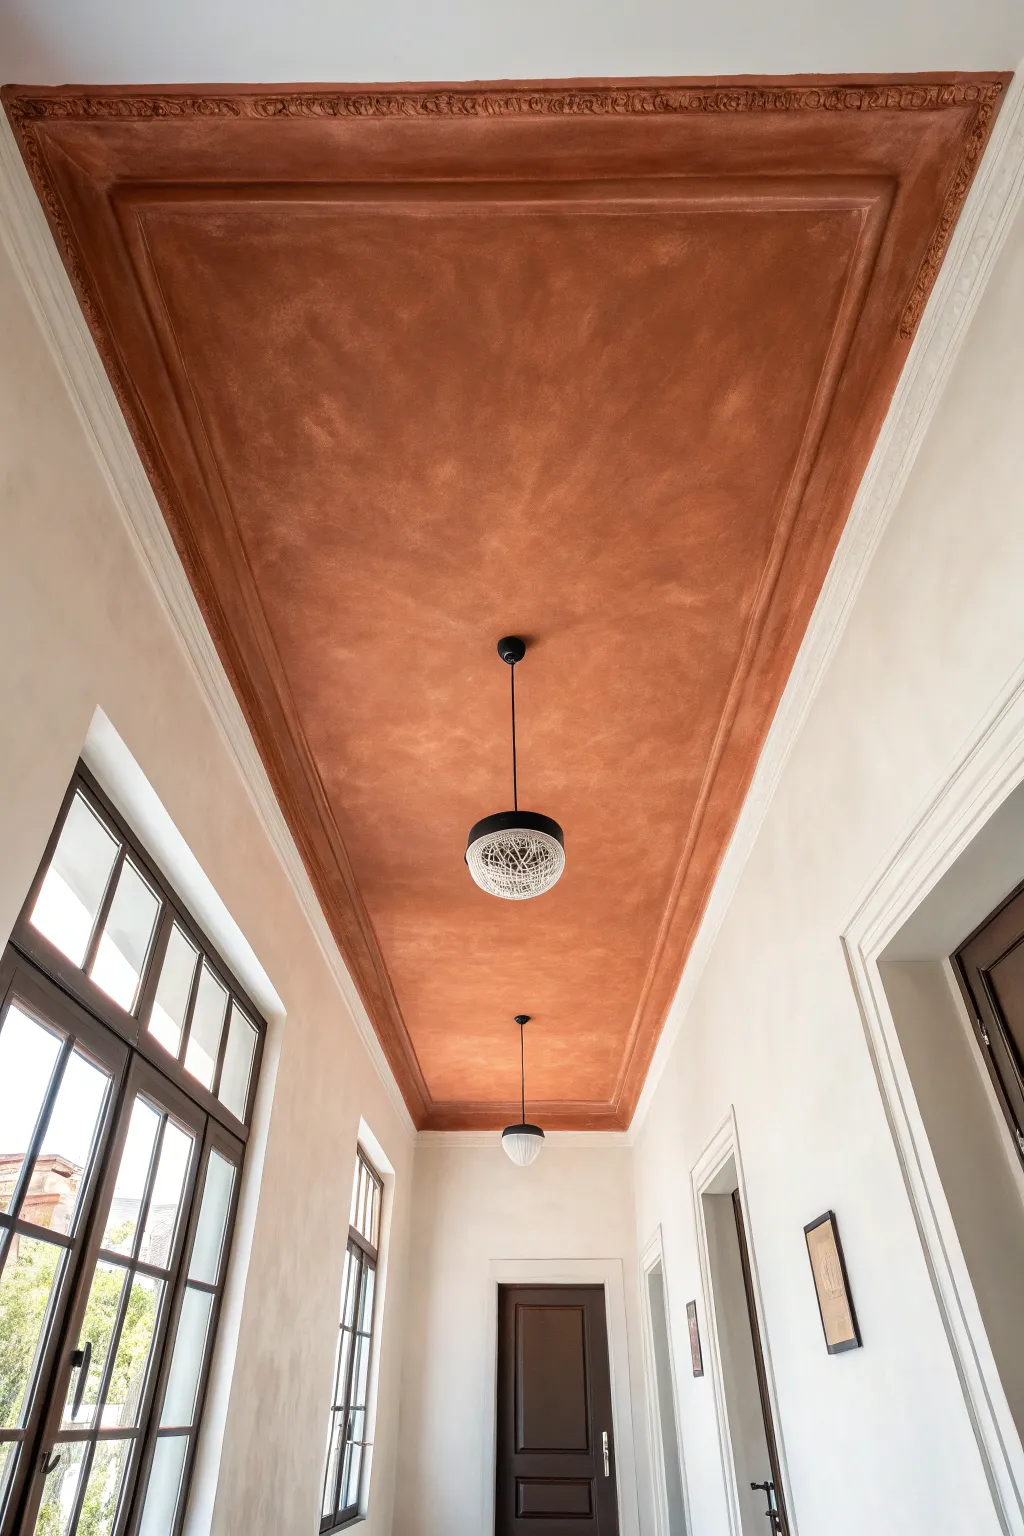
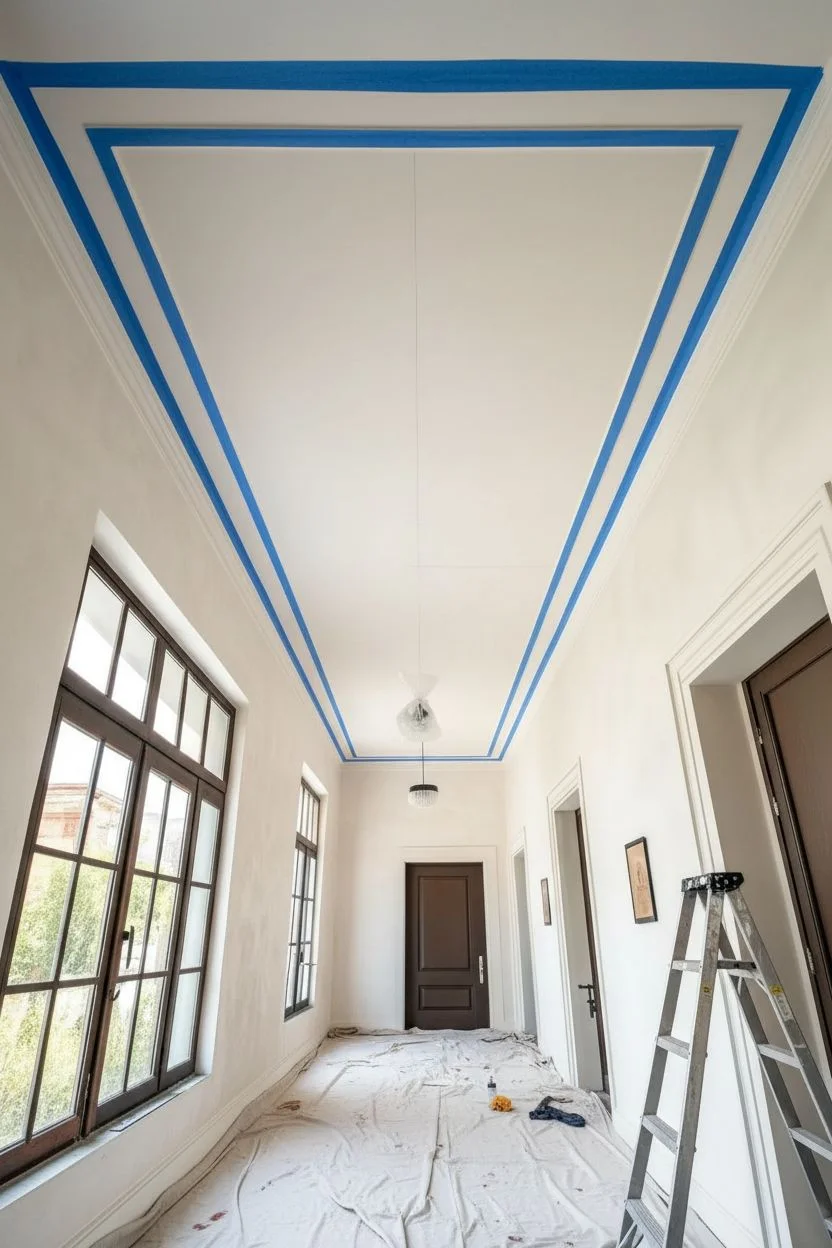
Transform a plain hallway into a sophisticated architectural feature by creating a faux-recessed tray ceiling effect using warm, earthy tones. This project uses color blocking and limewash-style texture to add depth and historical charm to any corridor.
How-To Guide
Materials
- Painter’s tape (high quality)
- Laser level (optional but recommended)
- Terracotta or burnt orange interior latex paint (matte finish)
- Cream or off-white interior latex paint (eggshell finish)
- Tintable glaze medium
- Large paint roller and extension pole
- Angled sash brush (2.5 inch)
- Sea sponge or ragging cloth
- Drop cloths
- Ladder
- Measuring tape
- Pencil
Step 1: Preparation & Layout
-
Clear the space:
Remove any existing light fixtures or cover them completely with plastic bags and tape. Lay down drop cloths to protect the entire floor span. -
Measure the recess:
If you don’t have existing molding, you’ll need to create the illusion of a tray ceiling. Measure equal distances from the walls inward (e.g., 12 inches) to define the central colored rectangle. -
Mark the lines:
Use a pencil to mark your measurements at intervals along the ceiling length. Connect these marks using a laser level or a long straight edge to ensure crisp, straight lines. -
Clean the surface:
Wipe down the ceiling area with a damp cloth to remove dust or cobwebs, ensuring the tape will adhere properly. -
Tape the perimeter:
Apply painter’s tape along the outer edge of your pencil lines. Press the edges down firmly with a putty knife or your fingernail to prevent bleed-through.
Step 2: Creating the Border
-
Paint the surround:
Paint the outer perimeter of the ceiling (the area between the wall and your tape) with the cream/off-white paint. This creates the contrast that makes the dark center pop. -
Add faux molding depth:
To mimic the stepped look in the photo, paint a secondary, thinner line (about 2 inches wide) just inside your main taped area in a slightly darker shade of cream or a very light taupe. This acts as a shadow line.
Keep it Cloudy
When sponging the texture, avoid pressing too hard or creating repetitive stamp patterns. Rotate your wrist constantly to keep the ‘clouds’ organic and random.
Step 3: The Terracotta Center
-
Seal the tape:
I like to brush a tiny amount of the *cream* base color over the tape edge first. This seals the tape so any paint that bleeds underneath matches the border, keeping your terracotta line razor-sharp. -
Apply the base coat:
Roll the entire central rectangle with your solid terracotta paint. Don’t worry about texture yet; just aim for full, opaque coverage. Let this dry completely. -
Mix the glaze:
Mix one part terracotta paint with three parts glaze medium. If you want a more weathered look, add a drop of dark brown to this mixture. -
Start the texture technique:
Dip a sea sponge or a bunched-up rag into the glaze mixture. Offload excess paint onto a piece of cardboard so it isn’t dripping. -
Apply the wash:
Work in small 3-foot sections. lightly dab and swirl the sponge over the dried base coat. The goal is to create a cloudy, plaster-like effect rather than a distinct pattern. -
Soften edges:
While the glaze is still wet, use a clean, dry brush to feather out any harsh sponge marks, blending the clouds of color together for a soft, aged appearance. -
Repeat until finished:
Continue this process down the length of the hallway, maintaining a wet edge so the sections blend seamlessly.
Add Real Trim
Install actual picture frame molding along the border of the terracotta paint. Paint the molding a metallic bronze or dark wood tone for an ultra-luxe finish.
Step 4: Finishing Touches
-
Remove the tape:
Carefully peel back the painter’s tape while the final glaze coat is still slightly tacky. Pull at a 45-degree angle away from the painted edge. -
Inspect and touch up:
Check your lines. If any terracotta bled onto the cream border, use a small artist’s brush and the cream paint to erase mistakes once everything is dry. -
Reinstall lighting:
Once the ceiling has cured for at least 24 hours, reinstall your pendant lights or chandeliers to illuminate your new masterpiece.
Now step back and admire how a simple change in ceiling color adds dramatic height and warmth to your hallway
Painted “Halo” Around a Ceiling Light Fixture
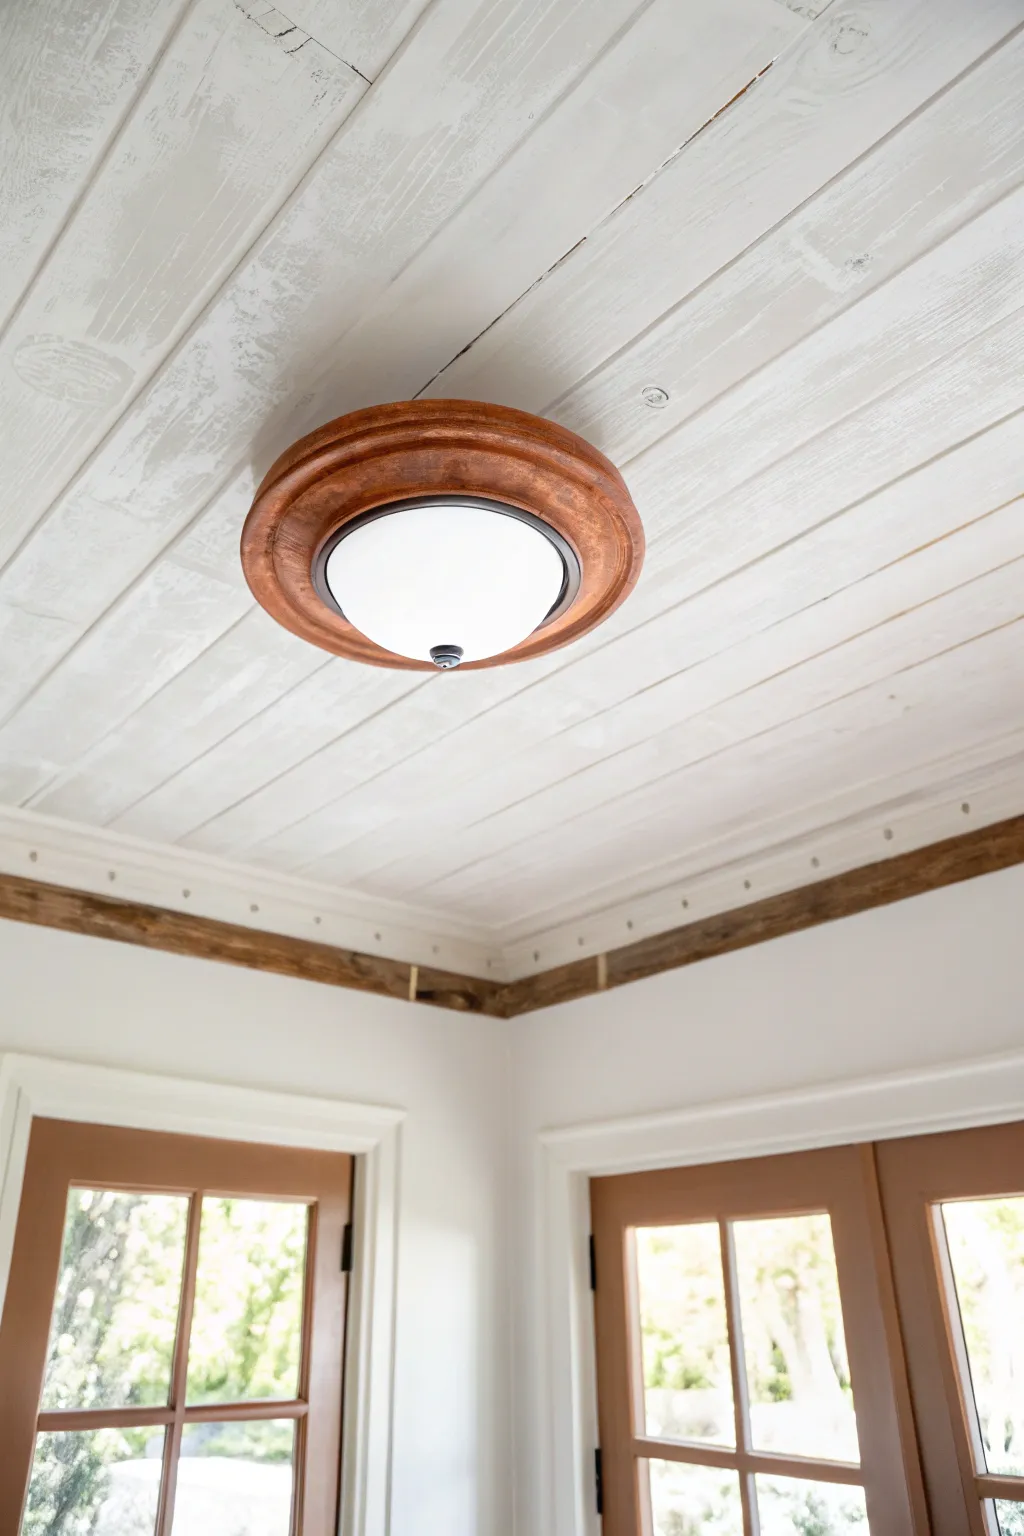
Transform a basic flush-mount light fixture by painting a realistic faux wood halo onto the ceiling around its base. This clever trompe-l’œil technique adds architectural interest and warmth to a room without the need for actual woodworking or heavy installation.
Detailed Instructions
Materials
- Pencil
- String or twine
- Thumbtack or tape
- Painter’s tape (delicate surface)
- Small angled sash brush (1.5 inch)
- Small artist detail brush
- Base paint (warm tan or beige latex)
- Glaze medium
- Dark brown acrylic paint or latex sample
- Rags or lint-free cloth
- Stepladder
Step 1: Preparation and Layout
-
Prepare the surface:
Turn off the light at the switch. If possible, loosen the light fixture slightly to paint underneath the edge later, or simply clean the ceiling area around the fixture thoroughly to remove dust and oils. -
Determine the width:
Decide how wide you want your halo to be. A width of 4 to 6 inches usually creates a substantial, realistic molding look. Measure outward from the fixture’s base. -
Create a compass:
Tie a piece of string around a pencil. Determine the radius of your outer circle (distance from center of light to outer edge of halo). Measure this length on your string and make a loop or knot. -
Draw the outer circle:
Hold the free end of the string at the exact center of the light fixture (taping it temporarily can help). Pull the string taut and lightly trace a circle around the fixture with the pencil. -
Draw inner details:
To mimic the look of routed wood molding, draw two or three additional concentric circles inside your outer ring. These will define the ‘ridges’ and ‘valleys’ of your faux wood trim.
Natural Grain Trick
Rotate your wrist slightly while dragging the rag through the glaze to create natural ‘knots’ and waves in the wood grain pattern.
Step 2: Creating the Base Layer
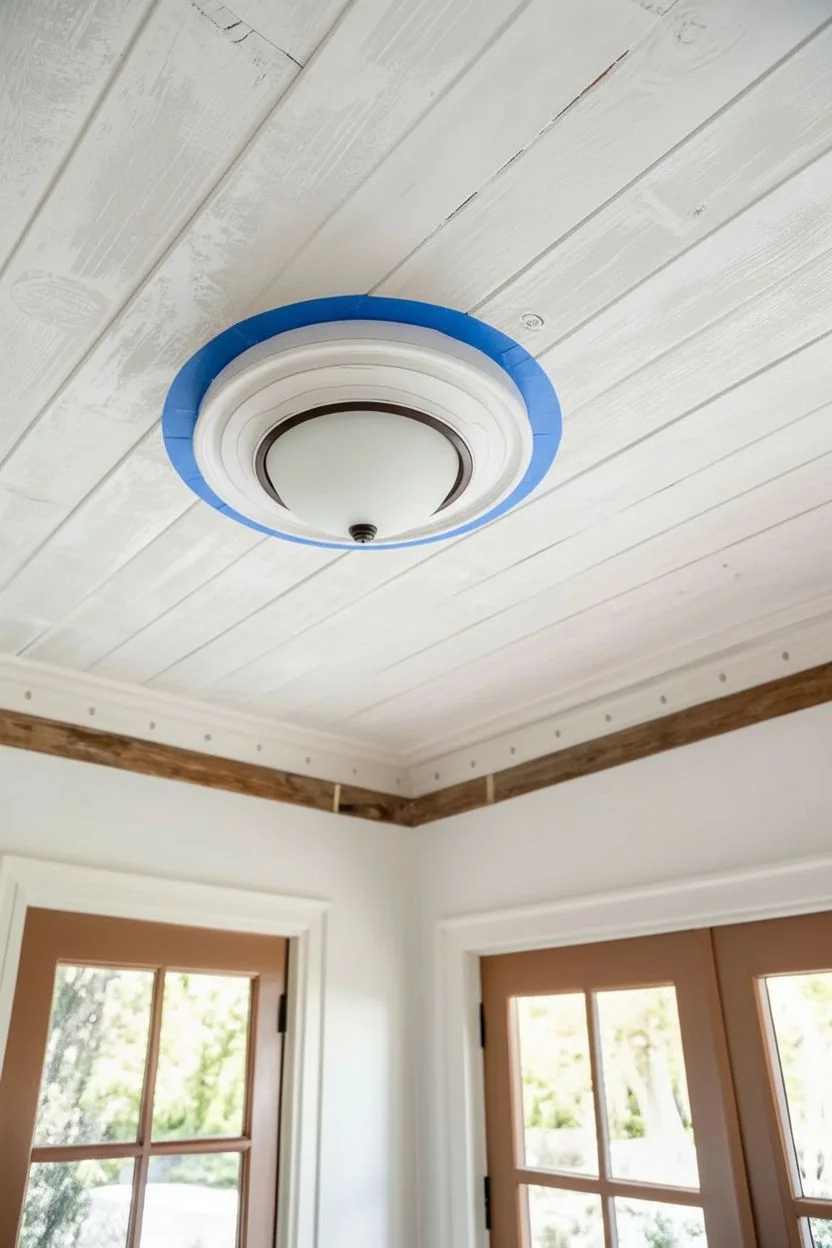
-
Mask the ceiling:
Carefully apply painter’s tape along the outside edge of your outermost pencil line to protect the rest of the ceiling. Press the edges firmly to prevent bleed-through. -
Apply the base coat:
Using your sash brush, fill in the entire ring area with your warm tan base paint. This opaque layer will act as the raw wood tone. -
Solidify the coverage:
Allow the first coat to dry completely, then apply a second coat if necessary to ensure a solid, even color without streaks.
Step 3: Faux Wood Graining
-
Mix the glaze:
Mix one part dark brown paint with four parts clear glaze medium. The mixture should be translucent, allowing the tan base to show through. -
Apply the glaze:
Working in sections, brush the glaze mixture over the tan base coat. Don’t worry about perfection here; you just need wet material to work with. -
Create grain texture:
While the glaze is wet, drag a dry brush or a folded rag through the paint in a circular motion, following the curve of the halo. This creates the striated look of wood grain. -
Add detail lines:
Dip your fine artist brush into slightly un-thinned dark brown paint. Carefully trace the inner concentric pencil circles you drew earlier to create shadows that simulate depth and carved ridges. -
Soften the shadows:
I like to use a clean, dry brush to gently feather these dark lines before they dry. This blurs the hard edges, making the ‘carving’ look worn and natural rather than painted on. -
Add highlights:
Mix a tiny bit of white into your tan base color. Use the artist brush to paint very thin highlights right next to your dark shadow lines, enhancing the 3D relief effect. -
Detail the perimeter:
Paint a thin, darker shadow line along the very outer edge of the halo (just inside the tape) and the very inner edge touching the fixture. This simulates the shadow hanging wood would cast.
Level Up: Metallic Sheen
Once fully dry, dry-brush a tiny amount of antique bronze or gold paint on the ‘raised’ ridges to give the wood a polished, high-end finish.
Step 4: Finishing Touches
-
Review and refine:
Step down from the ladder to view your work from the floor. Add a little more dark glaze to any areas that look too flat or light compared to the rest. -
Remove the tape:
While the final touches are still slightly tacky or just dry, slowly peel away the painter’s tape at a sharp angle to reveal a crisp outer edge. -
Clean up edges:
If any paint bled under the tape, use a small brush with your ceiling color to touch up the outside perimeter for a flawless finish.
Step back and admire how a simple paint job has added a sophisticated, custom architectural detail to your ceiling
Ombre Stair Risers for a Subtle Gradient Wow
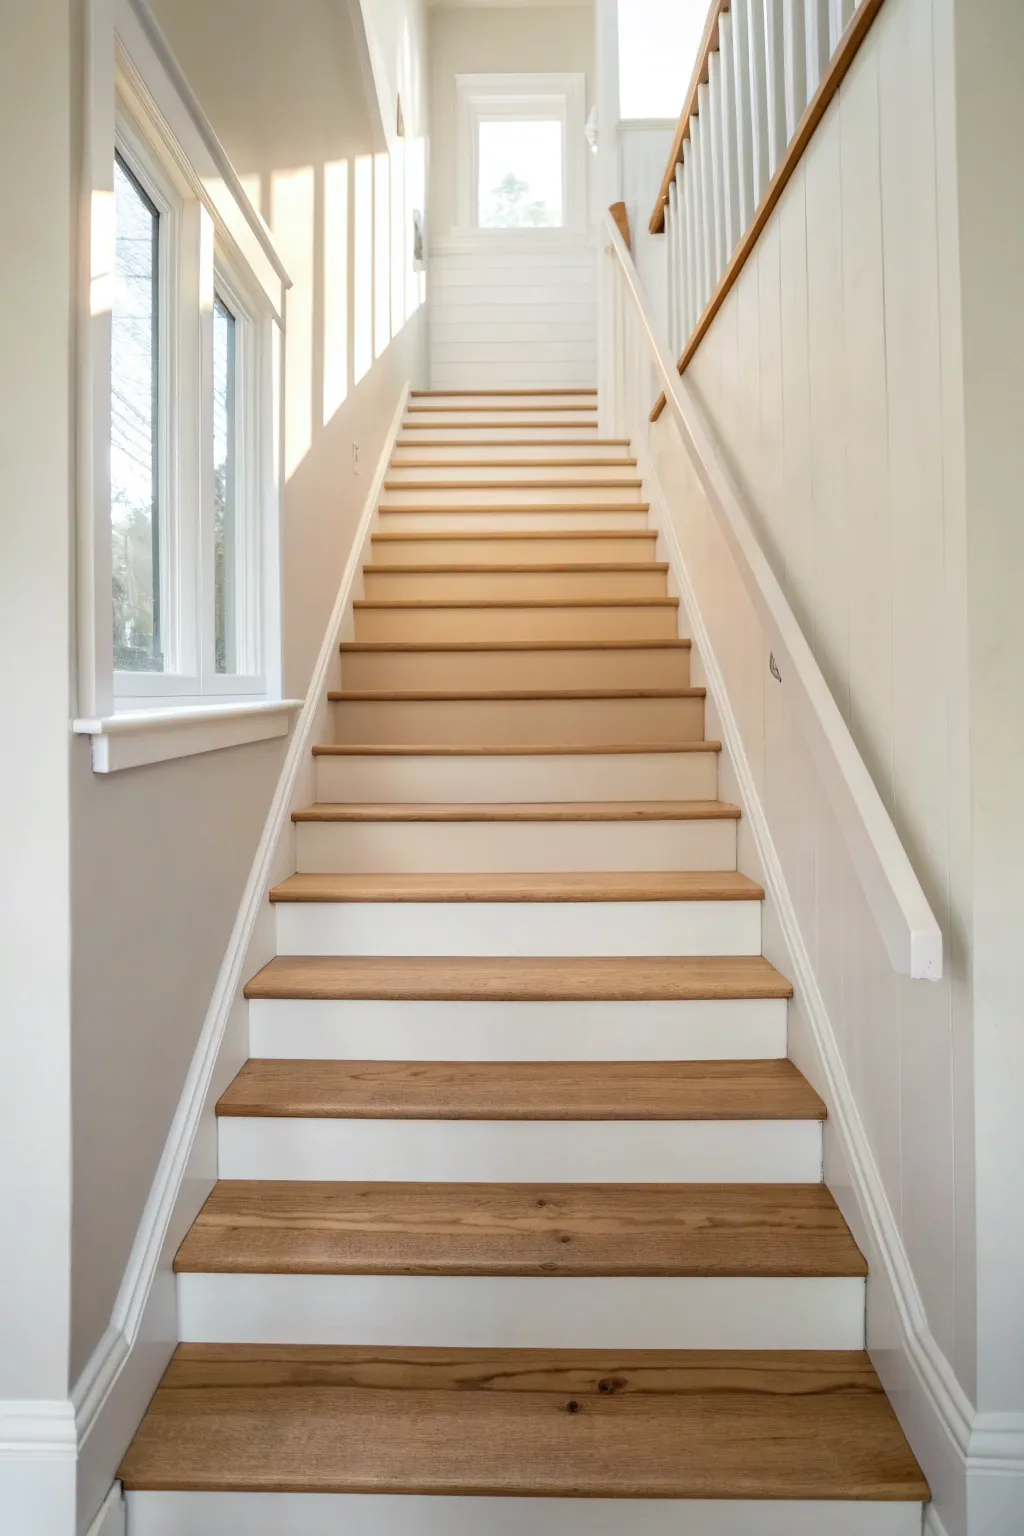
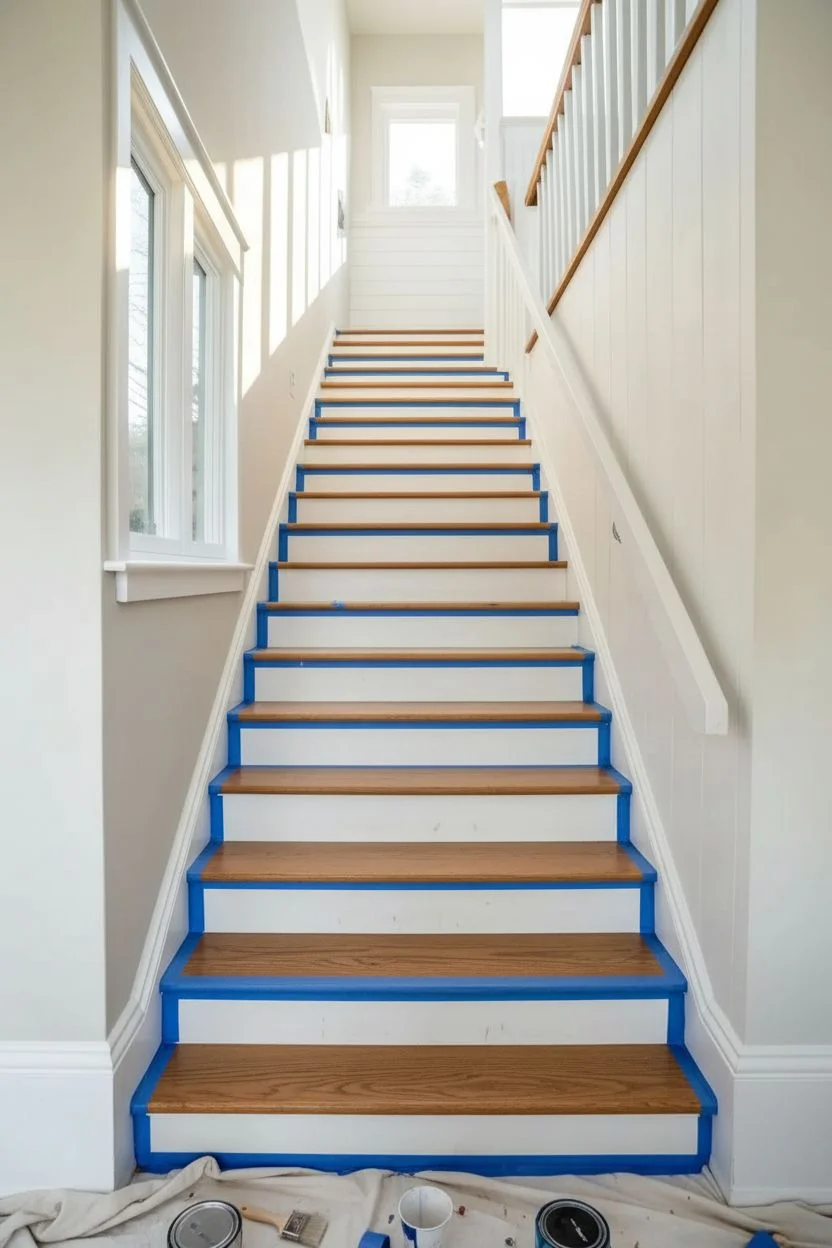
Transform a standard staircase into a stunning design feature with this subtle ombre effect. By painting the risers in a gradually shifting spectrum from white to warm beige, you create a sophisticated vertical gradient that draws the eye upward.
Step-by-Step Guide
Materials
- High-quality trim paint (eggshell or satin)
- White base paint (quart or gallon depending on stair count)
- Darker beige/taupe mix-in paint (sample pot size is usually sufficient)
- Painter’s tape (multi-surface)
- Sanding sponge (fine grit 120-150)
- Tack cloth
- Clean mixing cups (one per riser)
- Measuring spoons or syringe
- Stir sticks
- 2-inch angled sash brush
- Pre-stain wood conditioner (for treads)
- Wood stain (medium oak tone)
- Polyurethane sealer (satin finish)
- Natural bristle brush (for stain)
- Drop cloths
Step 1: Preparation and Treads
-
Clear and Clean:
Begin by removing any existing runner or carpet staples if necessary. Thoroughly vacuum the stairs and wipe them down with a damp cloth to remove all dust and debris. -
Sand the Surfaces:
Lightly sand both the treads and risers. You want to scuff the surface to help adhesion, not necessarily strip it down to raw wood unless there is significant damage. Wipe away sanding dust with a tack cloth. -
Protect the Surroundings:
Apply painter’s tape along the wall edges (stringers) and the underside of the nosing. Lay drop cloths at the base of the stairs to catch any drips. -
Condition the Treads:
If your treads are bare wood, apply a pre-stain wood conditioner. This ensures the stain absorbs evenly without blotching. Allow it to penetrate according to the manufacturer’s time, usually about 15 minutes. -
Stain Application:
Using a natural bristle brush or rag, apply your medium oak stain to the treads. Work with the grain, wiping off excess stain as you go to achieve a rich, natural wood tone that contrasts beautifully with the painted risers. -
Seal the Wood:
Once the stain is fully dry (check the can, usually 24 hours), apply two to three light coats of satin polyurethane to protect the treads from foot traffic. Lightly sand between coats for a smooth finish.
Swatch Test
Before painting, dab a small amount of each mixed shade onto index cards. Tape them to the risers to visualize the transition and ensure the gradient isn’t too abrupt.
Step 2: Creating the Ombre Risers
-
Tape the Treads:
Once the tread finish is completely cured (give it a few days to be safe), apply fresh delicate-surface painter’s tape to the back of each tread where it meets the riser to ensure crisp paint lines. -
Calculate the Gradient:
Count your risers. To achieve the ombre look, you will mix a slightly different shade for every riser or every two risers. Dedicate one mixing cup for each step. -
Establish the Base:
Pour your pure white base paint into the first cup (for the bottom riser). This riser will be the brightest point of the gradient. -
Mix the Darkest Shade:
In the cup designated for the top stair, create your darkest intended color by mixing the white base with your beige mix-in paint until satisfied. -
Prepare Intermediate Shades:
For the steps in between, I find it easiest to add incrementally more beige mix-in to the white base for each subsequent cup. Use a syringe or measuring spoon to increase the dosage by a specific amount (e.g., 1ml, then 2ml, then 3ml) for consistent progression. -
Start Painting from the Top:
Begin distinct painting at the top of the staircase with your darkest mixture. Use the 2-inch angled sash brush to cut in the edges first, then fill the center. -
Work Your Way Down:
Move down one step at a time, switching to the corresponding lighter paint mixture for each riser. Keeping the cups lined up in order on a nearby table prevents confusion. -
Check Coverage:
Allow the first coat to dry completely. Because risers take abuse, a second coat is mandatory. Re-mix your colors if necessary or simply cover the cups with plastic wrap between coats to keep paint wet. -
Apply Second Coat:
Apply the second decorative coat in the same order. Ensure brush strokes are smooth and horizontal to minimize texture. -
Remove Tape:
Carefully peel off the painter’s tape while the final coat is still slightly tacky—this helps prevent peeling the paint film. Pull the tape away at a 45-degree angle. -
Final Touch-Ups:
inspect the edges where the riser meets the stringer (the side trim). Use the white base paint and a small artist’s brush to correct any bleed-through or uneven lines.
Number Stencils
Add a whimsical touch by stenciling the step number in the corner of each riser using the paint color from three steps above for subtle contrast.
Step back and admire how a simple shift in color brings a whole new dimension of height and light to your hallway.
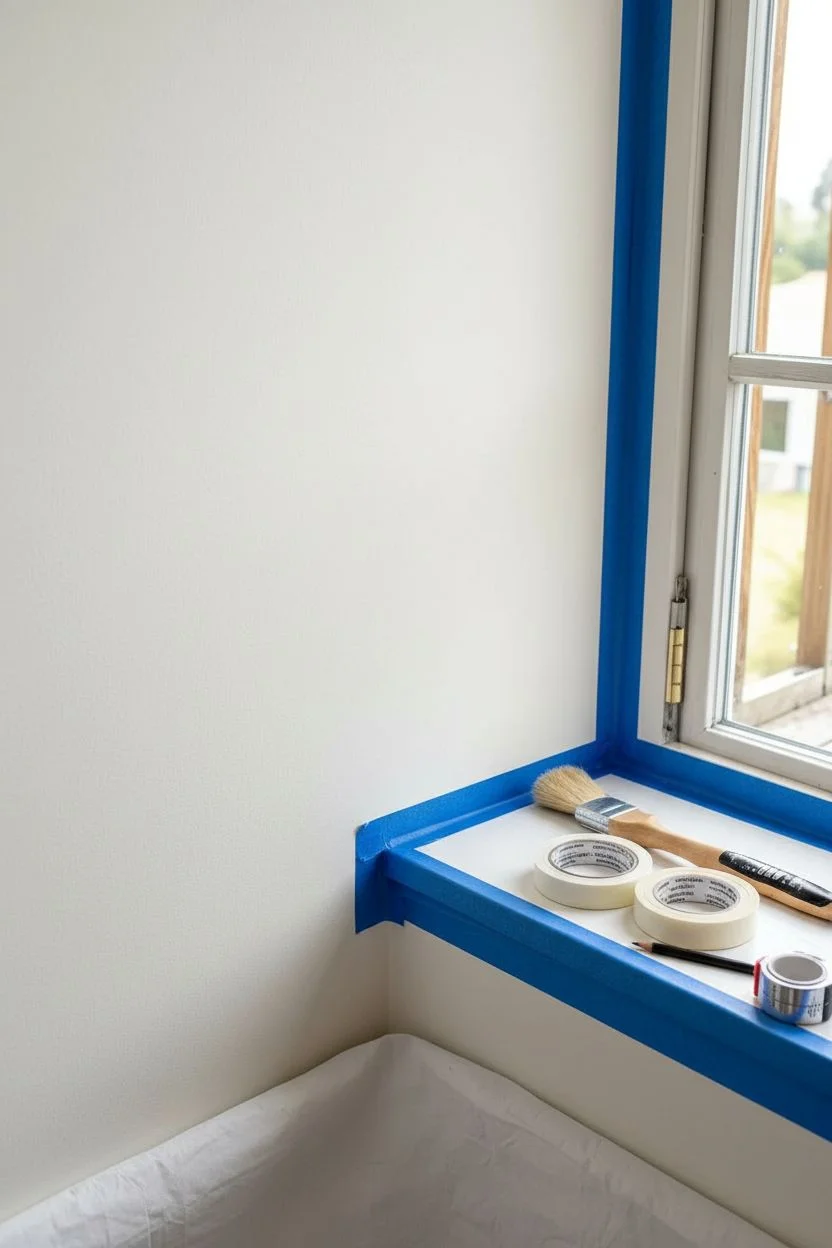
Painted Window Frame Outline to Fake Extra Molding
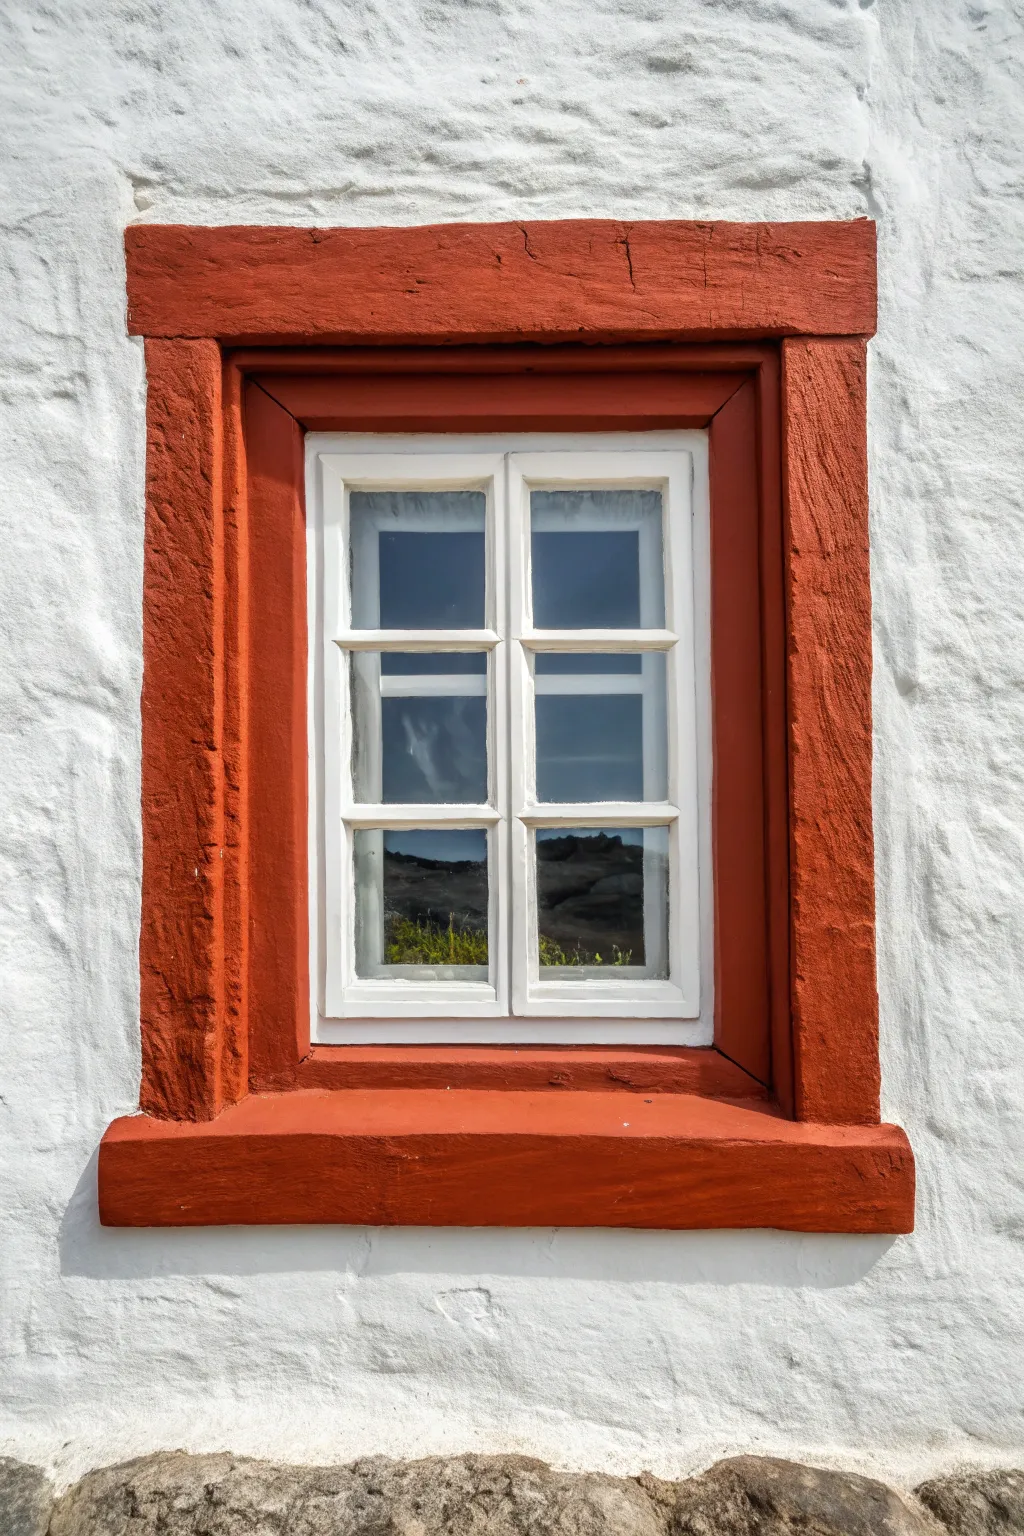
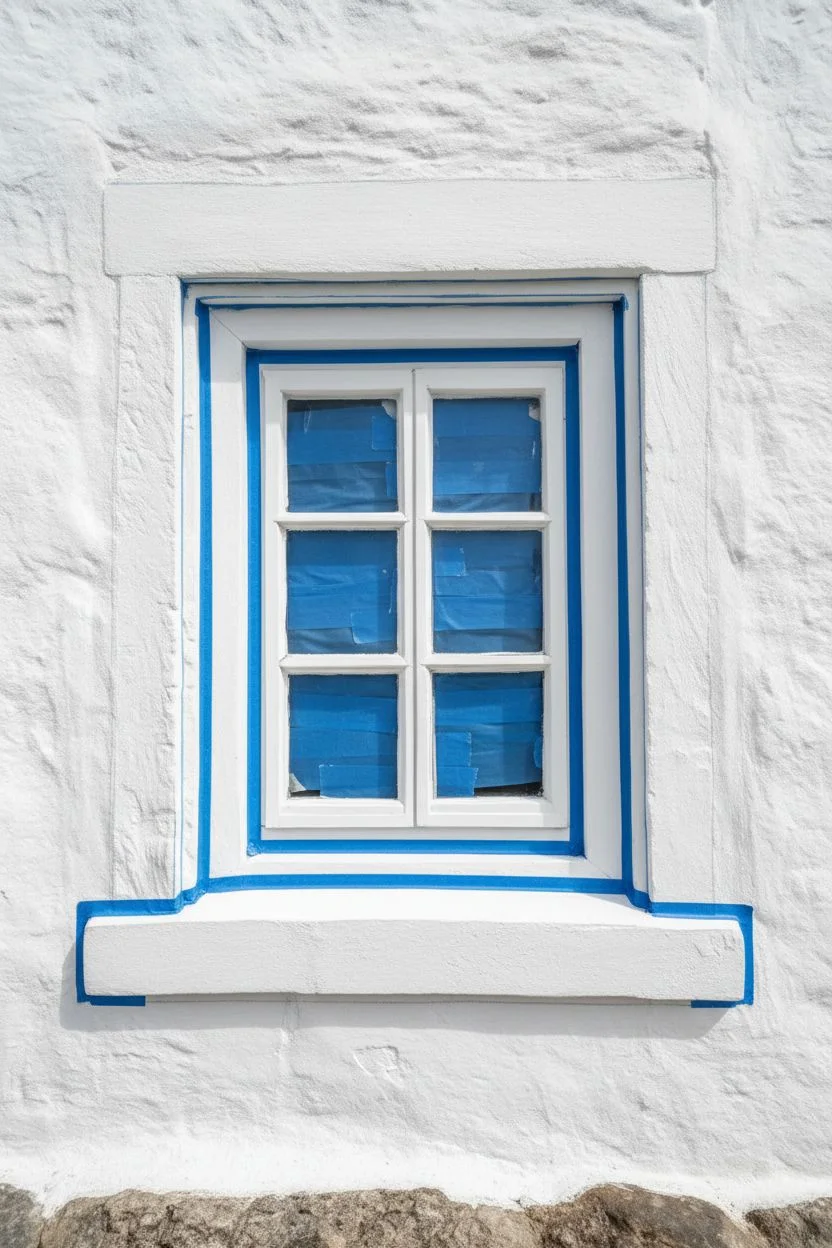
Transform a plain window into a rustic architectural feature using only paint. This clever trompe-l’œil technique mimics the look of heavy timber framing on rough plaster, adding instant character to any flat facade.
Detailed Instructions
Materials
- Exterior masonry paint (White)
- Exterior masonry paint (Terracotta or Rust Red)
- Painter’s tape (multi-surface)
- Wide flat paintbrush (2-3 inch)
- Small angled sash brush
- Medium grit sandpaper
- Small roller (optional for wall)
- Measuring tape
- Pencil
- Drop cloth
Step 1: Preparation and Base Layer
-
Clean the surface:
Begin by thoroughly cleaning the exterior wall and window area to remove dust, cobwebs, and loose debris. A stiff bristle brush works well for textured stucco walls. -
Mask the glass:
Apply painter’s tape carefully to the window panes to protect the glass. Ensure edges are pressed down firmly to prevent bleed-through. -
Establish the white base:
Paint the surrounding wall with your white exterior masonry paint. This high-contrast white background is crucial for making the red frame pop. -
Paint the inner sash:
While you have the white paint out, coat the actual wooden sash of the window. Use an angled sash brush to get into the corners and muntins. -
Allow to dry:
Let the white base coat dry completely according to the manufacturer’s instructions before measuring your new frame.
Bleeding Lines?
On rough stucco, tape often leaks. Seal the tape edge first with a thin layer of the *base* wall color (white) to block holes before applying the red.
Step 2: Drafting the ‘Timber’ Frame
-
Measure the width:
Decide how wide you want your faux molding to be. For the sturdy look in the photo, measure about 4 to 6 inches outward from the window opening on all sides. -
Mark the perimeter:
Use a pencil to lightly mark this outer perimeter on the wall. Since we want a rustic, hand-hewn look, these lines don’t need to be surgically straight. -
Tape the outline:
Apply painter’s tape along your pencil marks to define the outer edge of the red frame. Press the tape firmly into the stucco texture. -
Define the sill:
For the bottom sill, extend the width slightly past the vertical side frames (about an inch on each side) to mimic a heavy wooden beam resting underneath.
Step 3: Painting the Faux Frame
-
Load the brush:
Dip your wide flat brush into the terracotta or rust red paint. Don’t overload it; a slightly drier brush helps maintain control on textured surfaces. -
Paint the reveal:
Start by painting the inner reveal (the depth of the wall leading to the window). This connects your new outer frame to the actual window. -
Fill the frame area:
Paint the area between the window opening and your outer tape line. Use vertical strokes for the side jambs to simulate wood grain direction. -
Paint the header:
Paint the top horizontal section (the header) using horizontal brush strokes. I find that following the natural grain direction of real wood makes the illusion much more convincing. -
Paint the sill:
Finish by painting the bottom sill area with horizontal strokes. Ensure the paint gets into the deep crevices of the stucco for a solid, heavy look. -
Check for gaps:
Inspect the textured surface from different angles. Stucco hides white spots easily, so dab extra paint into any deep pits within the red zone.
Add Wood Texture
Mix a tiny drop of dark brown or black into your red paint and dry-brush subtle streaks to mimic wood grain and weathering.
Step 4: Finishing Touches
-
Remove tape immediately:
Pull the painter’s tape off while the red paint is still slightly tacky. This prevents the dried paint form bridging and peeling off in chunks. -
Touch up edges:
If the paint bled under the tape due to the rough texture, use your small brush and white paint to tidy up the outer line. -
Clear the glass:
Remove the tape from the window panes. Use a razor scraper if any paint managed to sneak onto the glass. -
Inspect the corners:
Look at where the vertical and horizontal red create ‘joints.’ Ensure the paint is solid there to mimic joined lumber.
Step back and admire how a simple band of color adds architectural weight and charm to your home
Two-Tone Cabinets With Painted Panel Accents
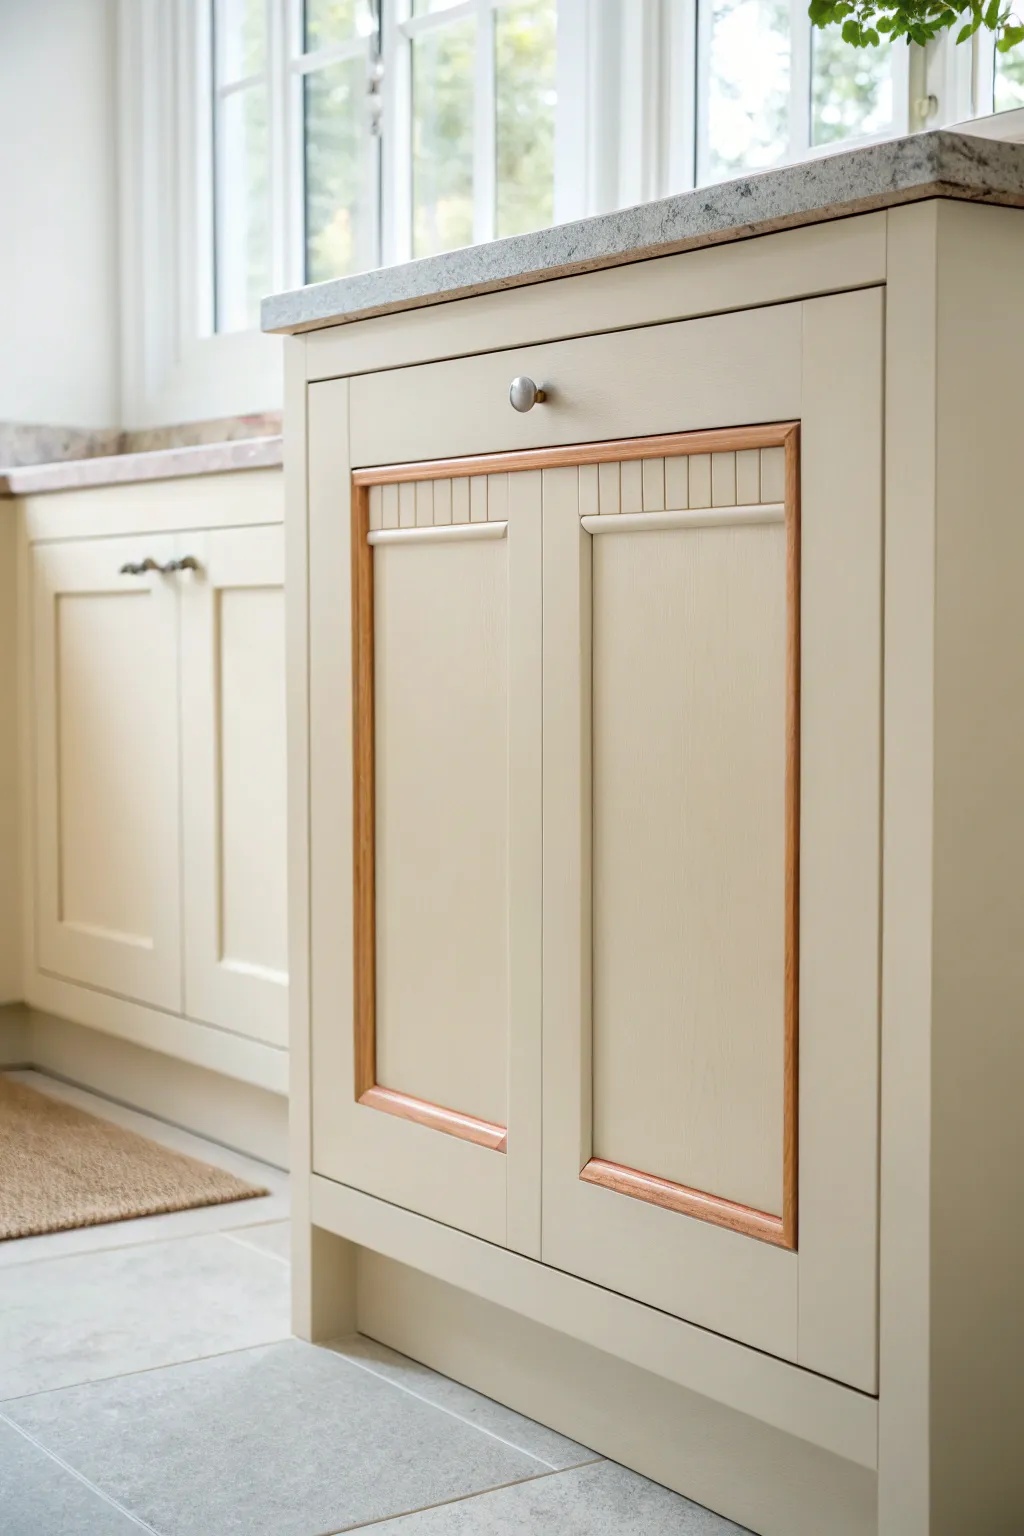
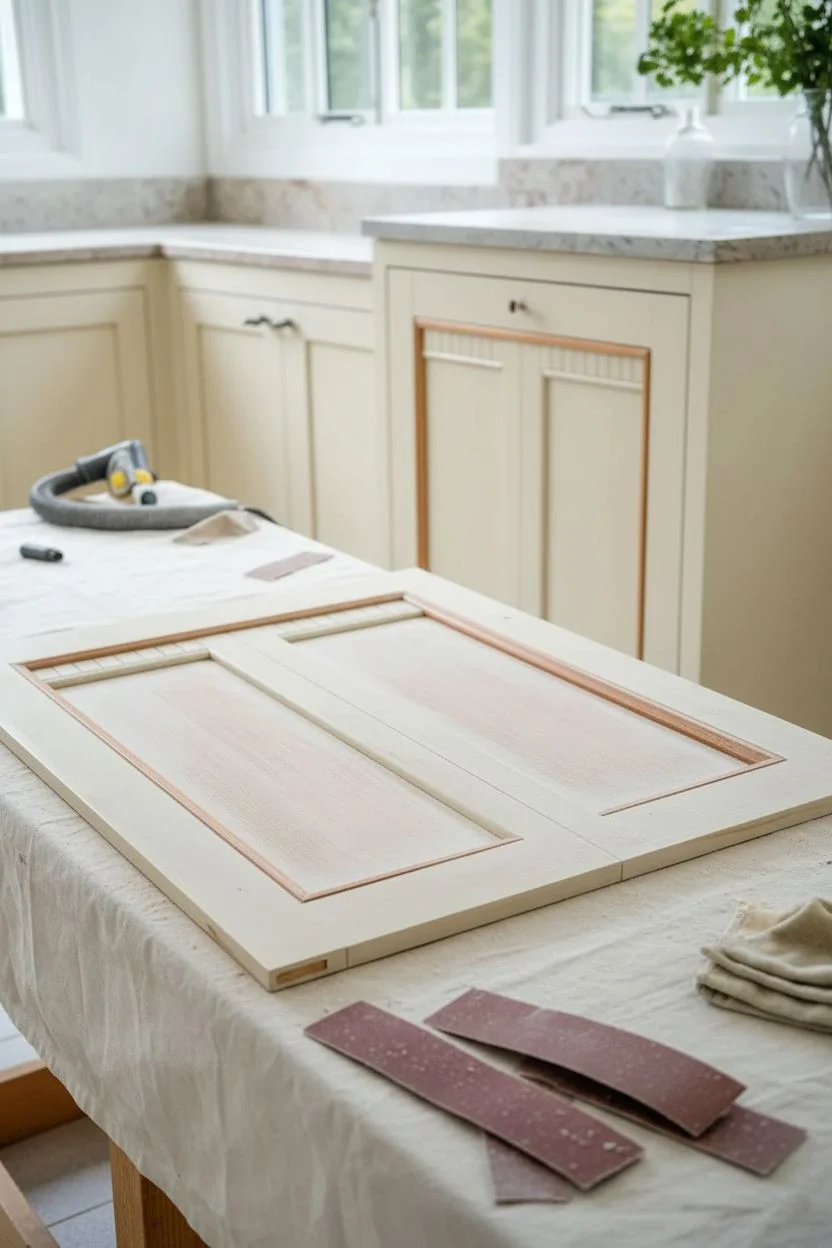
Transform standard kitchen cabinetry into a bespoke masterpiece by combining soft, creamy paint with natural wood accents. This project creates a sophisticated two-tone effect that highlights the architectural details of your doors, adding warmth and depth to a bright kitchen space.
Step-by-Step
Materials
- Cabinet door with recessed panel
- High-quality wood primer
- Satin or semi-gloss cabinet paint (Cream/Off-White)
- Small foam roller
- High grit sandpaper (220 and 400 grit)
- Painter’s tape (automotive grade or delicate surface)
- Gel stain (Warm Oak or Cherry)
- Small angled artist brush
- Clean lint-free rags
- Polyurethane topcoat (Matte or Satin)
- Tack cloth
- Degreaser/Cleaner
Step 1: Preparation & Cleaning
-
Remove Hardware:
Start by taking the cabinet door off its hinges and removing the knob or handle. Place the hardware in a labeled bag so nothing gets lost. -
Deep Clean:
Kitchen cabinets accumulate grease. Scrub the entire door thoroughly with a heavy-duty degreaser or TSP substitute to ensure the paint adheres properly. -
Sand Surfaces:
Lightly scuff sand the entire door with 220-grit sandpaper. You aren’t trying to remove all previous finish, just creating a ‘tooth’ for the primer to grip. -
Dust Removal:
Vacuum away the sanding dust and follow up with a tack cloth to pick up every last microscopic particle.
Razor Sharp Edges
Before painting, run a slightly damp rag over the tape edge to activate its adhesive fully. This simple trick creates a perfect seal and prevents paint bleed.
Step 2: Painting the Base Color
-
Tape the Accents:
This is the critical step. Carefully apply painter’s tape over the molding trim that surrounds the inner panel—the part you want to remain wood-toned. Press the edges down firmly with a credit card to prevent bleed. -
Prime the Door:
Apply a coat of high-quality wood primer to all exposed surfaces. Use a brush for corners and grooves, and a foam roller for the flat areas to keep it smooth. -
Sand the Primer:
Once the primer is fully dry, very lightly sand it with 400-grit sandpaper to knock down any raised grain or brush strokes. -
First Coat of Paint:
Apply your cream-colored cabinet paint. Work in long, even strokes with the grain. Don’t overload the brush, as thick paint leads to drips. -
Assess and Repeat:
Allow the first coat to dry according to the can’s instructions. Keep in mind that lighter colors often need coverage help, so apply a second coat for a flawless, solid finish. -
Remove Tape:
While the second coat is still slightly tacky (not wet, but not fully cured), carefully peel back the tape at a 45-degree angle to reveal the unpainted trim.
Step 3: Creating the Wood Accent
-
Sand the Reveal:
If the exposed trim has old finish on it, carefully sand it down to bare wood using a folded piece of sandpaper or a sanding sponge. Be extremely careful not to scratch your fresh paint work. -
Apply Tape Barriers:
To protect your new cream paint, reverse the taping process. Apply delicate surface tape on the painted areas right up against the wood trim line. -
Apply Gel Stain:
Using a small artist brush, apply a gel stain to the wood trim. Gel stain is thicker and less likely to run than liquid stain. I find this gives me much more control on vertical surfaces. -
Wipe Excess:
After letting the stain sit for a minute or two, gently wipe off the excess with a lint-free rag wrapped around your finger. This reveals the wood grain while leaving the rich color behind. -
Seal the Trim:
Once the stain is completely dry (check the manufacturer’s time), apply a thin layer of clear polyurethane to the wood accents using a clean artist brush.
Faux Wood Hack
If your cabinets are MDF and have no grain, use a glaze mixed with brown paint instead of stain. Drag a stiff bristle brush through the wet glaze to mimic wood grain texture.
Step 4: Final Assembly
-
Final Tape Removal:
Remove the delicate surface tape. If any stain bled onto the paint, use a tiny touch-up brush with the cream paint to correct it. -
Cure Time:
Let the door cure for at least 24-48 hours before reattaching it. Cabinets take a lot of abuse, so a hard cure is essential. -
Reinstall Hardware:
Screw the knob back into place and hang the door back on the cabinet box to admire your custom look.
Enjoy the refined elegance this custom paint job brings to your kitchen renovation
A Color Block That Wraps Over a Corner for a 3D Effect
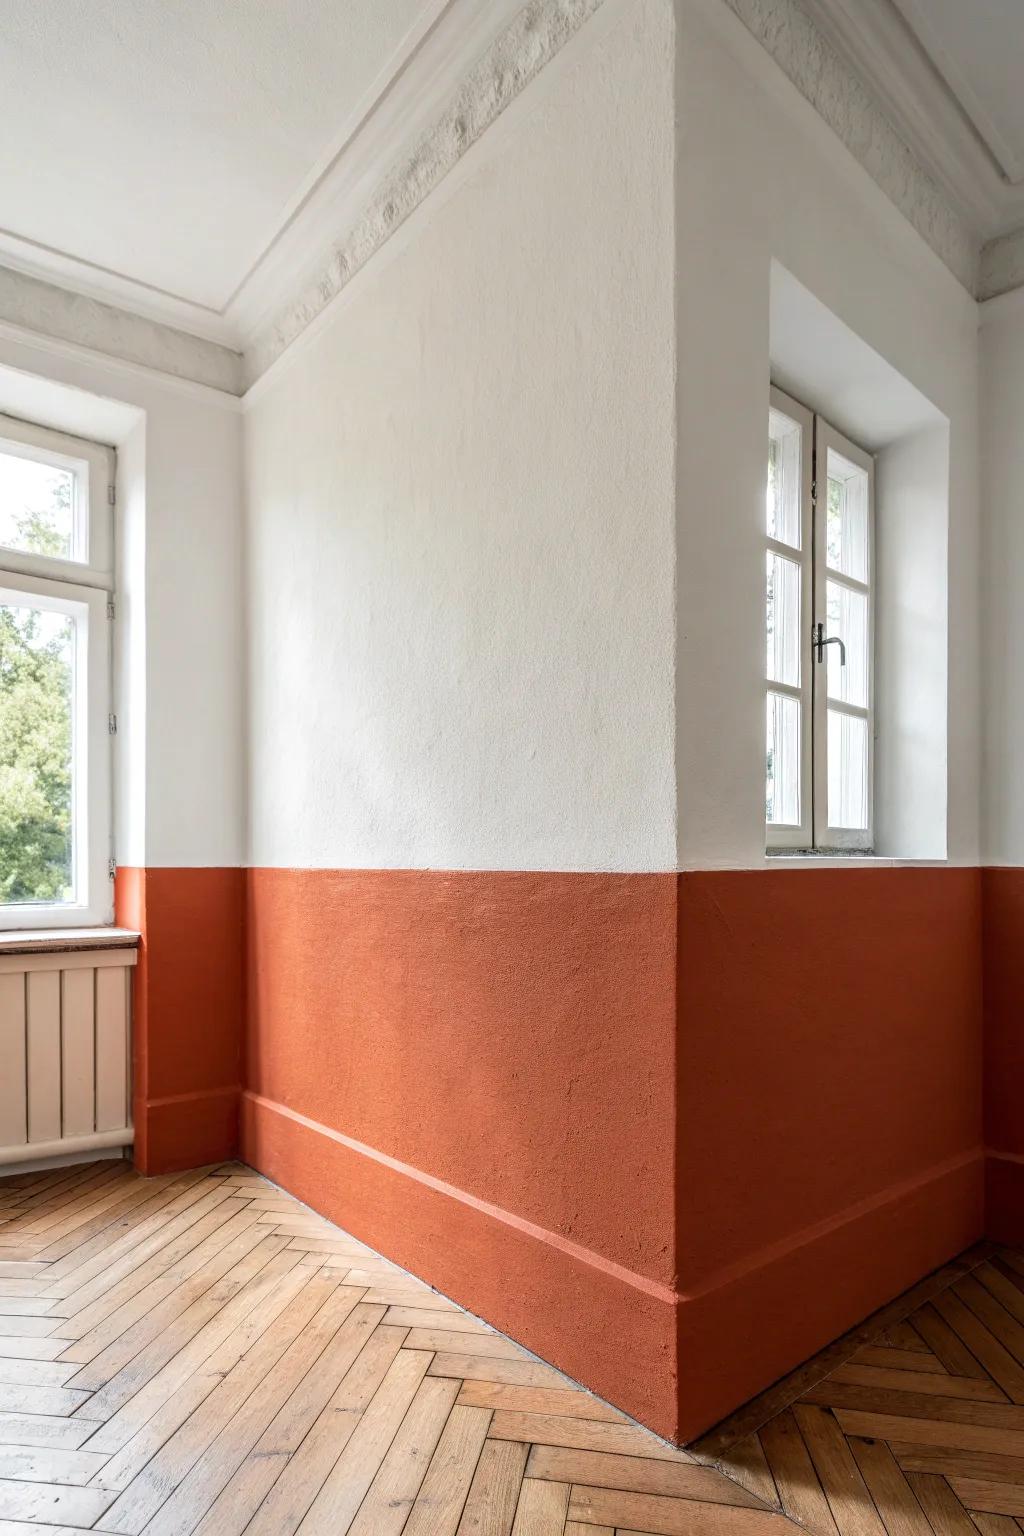
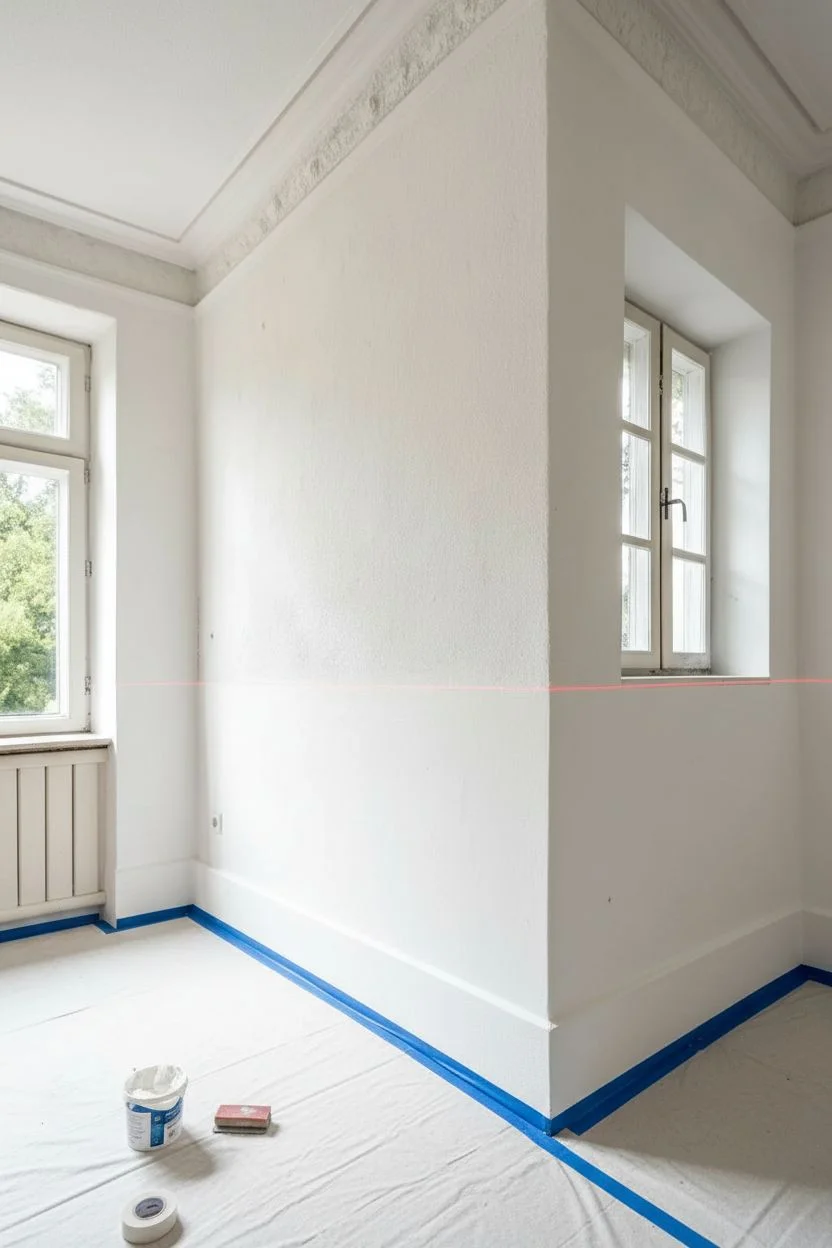
Transform a plain corner into an architectural statement with this bold two-tone color blocking technique. By grounding the lower third of your walls in a warm terracotta hue while keeping the upper portion bright white, you create a sophisticated 3D effect that highlights the room’s geometry.
Step-by-Step Guide
Materials
- High-quality painter’s tape (frog tape recommended)
- Laser level or spirit level
- Measuring tape
- Pencil
- Terracotta or burnt orange interior wall paint (matte or eggshell finish)
- White interior wall paint (to match existing upper wall)
- Angled sash brush (2.5 inch)
- Medium pile roller and tray
- Small foam roller (optional for trim)
- Drop cloths
- Sanding block (fine grit)
- Damp cloth
- Caulk gun and paintable caulk (optional for gaps)
Step 1: Preparation & Mapping
-
Clear and clean:
Begin by removing any furniture or obstacles from the corner area. Wipe down the walls and baseboards with a damp cloth to remove dust and grime, ensuring a clean surface for the tape to adhere to. -
Assess the surface:
Check the walls for any nail holes or imperfections. Fill small holes with spackle and sand them flush once dry. If your baseboards are rough, give them a light sanding as well. -
Measure the height:
Decide on the height of your color block. A common rule of thumb is roughly one-third of the wall height, or alignment with a window sill as seen in the inspiration photo. Measure from the floor up and mark this height lightly with a pencil at several intervals along both walls. -
Set the level line:
This is the most critical step for a crisp look. Set up a laser level at your marked height to project a beam across the corner. If you don’t have a laser, use a long spirit level to connect your pencil marks, drawing a faint, continuous horizontal line.
Crisp Line Guarantee
Use the ‘white paint trick’ in step 7. Painting the tape edge with the upper wall color first fills voids, ensuring the bold color creates a razor-sharp line.
Step 2: Taping for Precision
-
Apply the tape:
Carefully run your painter’s tape along the top edge of your pencil line or laser beam. To ensure the painted color block is the exact height you want, place the tape *above* the line so you paint up to it, not over it. -
Seal the tape edge:
Run your finger or a plastic putty knife firmly along the bottom edge of the tape to secure it. This prevents paint from bleeding under the tape and ruining that sharp line. -
The ‘seal’ coat trick:
I like to take a small amount of the *base wall color* (the white) and lightly brush it over the bottom edge of the tape. This seals the tape with the existing wall color, so if any bleed occurs, it matches the top wall and remains invisible. -
Protect the floors:
Lay down drop cloths and tape off the floor where it meets the baseboards to catch any stray drips or splatter.
Add Texture
For an old-world plaster look, mix a texture additive into your paint or use a lime wash paint for the bottom section to impart a velvety, suede-like finish.
Step 3: Painting the Color Block
-
Cut in the edges:
Open your terracotta paint and stir thoroughly. Using the angled sash brush, carefully ‘cut in’ along the baseboards, the inner corners, and just below the tape line. Don’t worry about filling the middle yet. -
Paint the baseboards:
For a seamless, modern look, paint the baseboards the same color as the wall. Use your brush to get into the grooves of the molding. -
Roll the first coat:
Pour some paint into your tray. Load your medium pile roller and apply paint to the main wall sections, rolling in ‘W’ or ‘M’ patterns to distribute it evenly. Overlap with your cut-in areas while they are still wet to blend the textures. -
Let it dry:
Allow the first coat to dry completely according to the manufacturer’s instructions. This usually takes 2-4 hours depending on humidity. -
Apply the second coat:
Repeat the cutting-in and rolling process. A second coat is essential for deep colors like terracotta to achieve a rich, opaque finish without streakiness. -
Check for coverage:
Inspect the corner and baseboards closely. If the lighter color is still peeking through, apply a light third coat to those specific areas.
Step 4: The Reveal
-
Remove tape while damp:
Don’t wait for the paint to cure fully. When the final coat is tacky but not soaking wet (usually about an hour after painting), slowly peel the tape off. Pull it back against itself at a 45-degree angle for the sharpest line. -
Clean up edges:
If you notice any tiny jagged spots or bleeds, use a small artist’s brush with the white paint to touch up the line carefully. -
Final inspection:
Remove the floor tape and drop cloths. Once completely dry, wipe away any pencil marks that might still be visible (though the paint should have covered them).
Enjoy the dramatic architectural depth this simple color block adds to your space


Have a question or want to share your own experience? I'd love to hear from you in the comments below!